KAONMEDIA KCF-E220MCO Digital Cable Receiver User Manual
KAONMEDIA Co., Ltd. Digital Cable Receiver
User manual
Connection
Menu Application
Press the MENU button on the remote control unit. You will see the Main Menu on the screen.
1.Pressthe▲/▼/◄/►buttonstomovetosubmenu.
2. Press the OK button to select or confirm menu.
3. Press the MENUbuttontoreturntopreviousmenu.
4. Press the EXIT button to quit the menu.
Easy Installation
→ Whensearchingisstarted,thenameofchannelssearchedwillbedisplayedonthescreen.
→ Whensearchingisfinished,the“Search finished”messagewillbedisplayedonthecenterof
the screen.
→ PresstheOKbuttontosavethechannellistandwatchthechannelsearched.
• Automatic Search
→ InputaproperStartFrequencyofthecablesignalusingNUMERIC buttons.
→ InputaproperEndFrequencyofthecablesignalusingNUMERIC buttons.
→ InputaproperSymbolRateofthecablesignalusingNUMERIC buttons.
→ SelecttheConstellation(AUTO,16,32,64,128or256QAM)using◄/►buttons.
→ PressOK button.
→ Whensearchingisstarted,thenameofchannelssearchedwillbedisplayedonthescreen.
→ Whensearchingisfinished,the“Search finished”messagewillbedisplayedonthecenterof
the screen.
→ PresstheOKbuttontosavethechannellistandwatchthechannelsearched.
Note
The design of the Rear Panel may be changed without any notice
in advance. Menu Guide
Basic Function
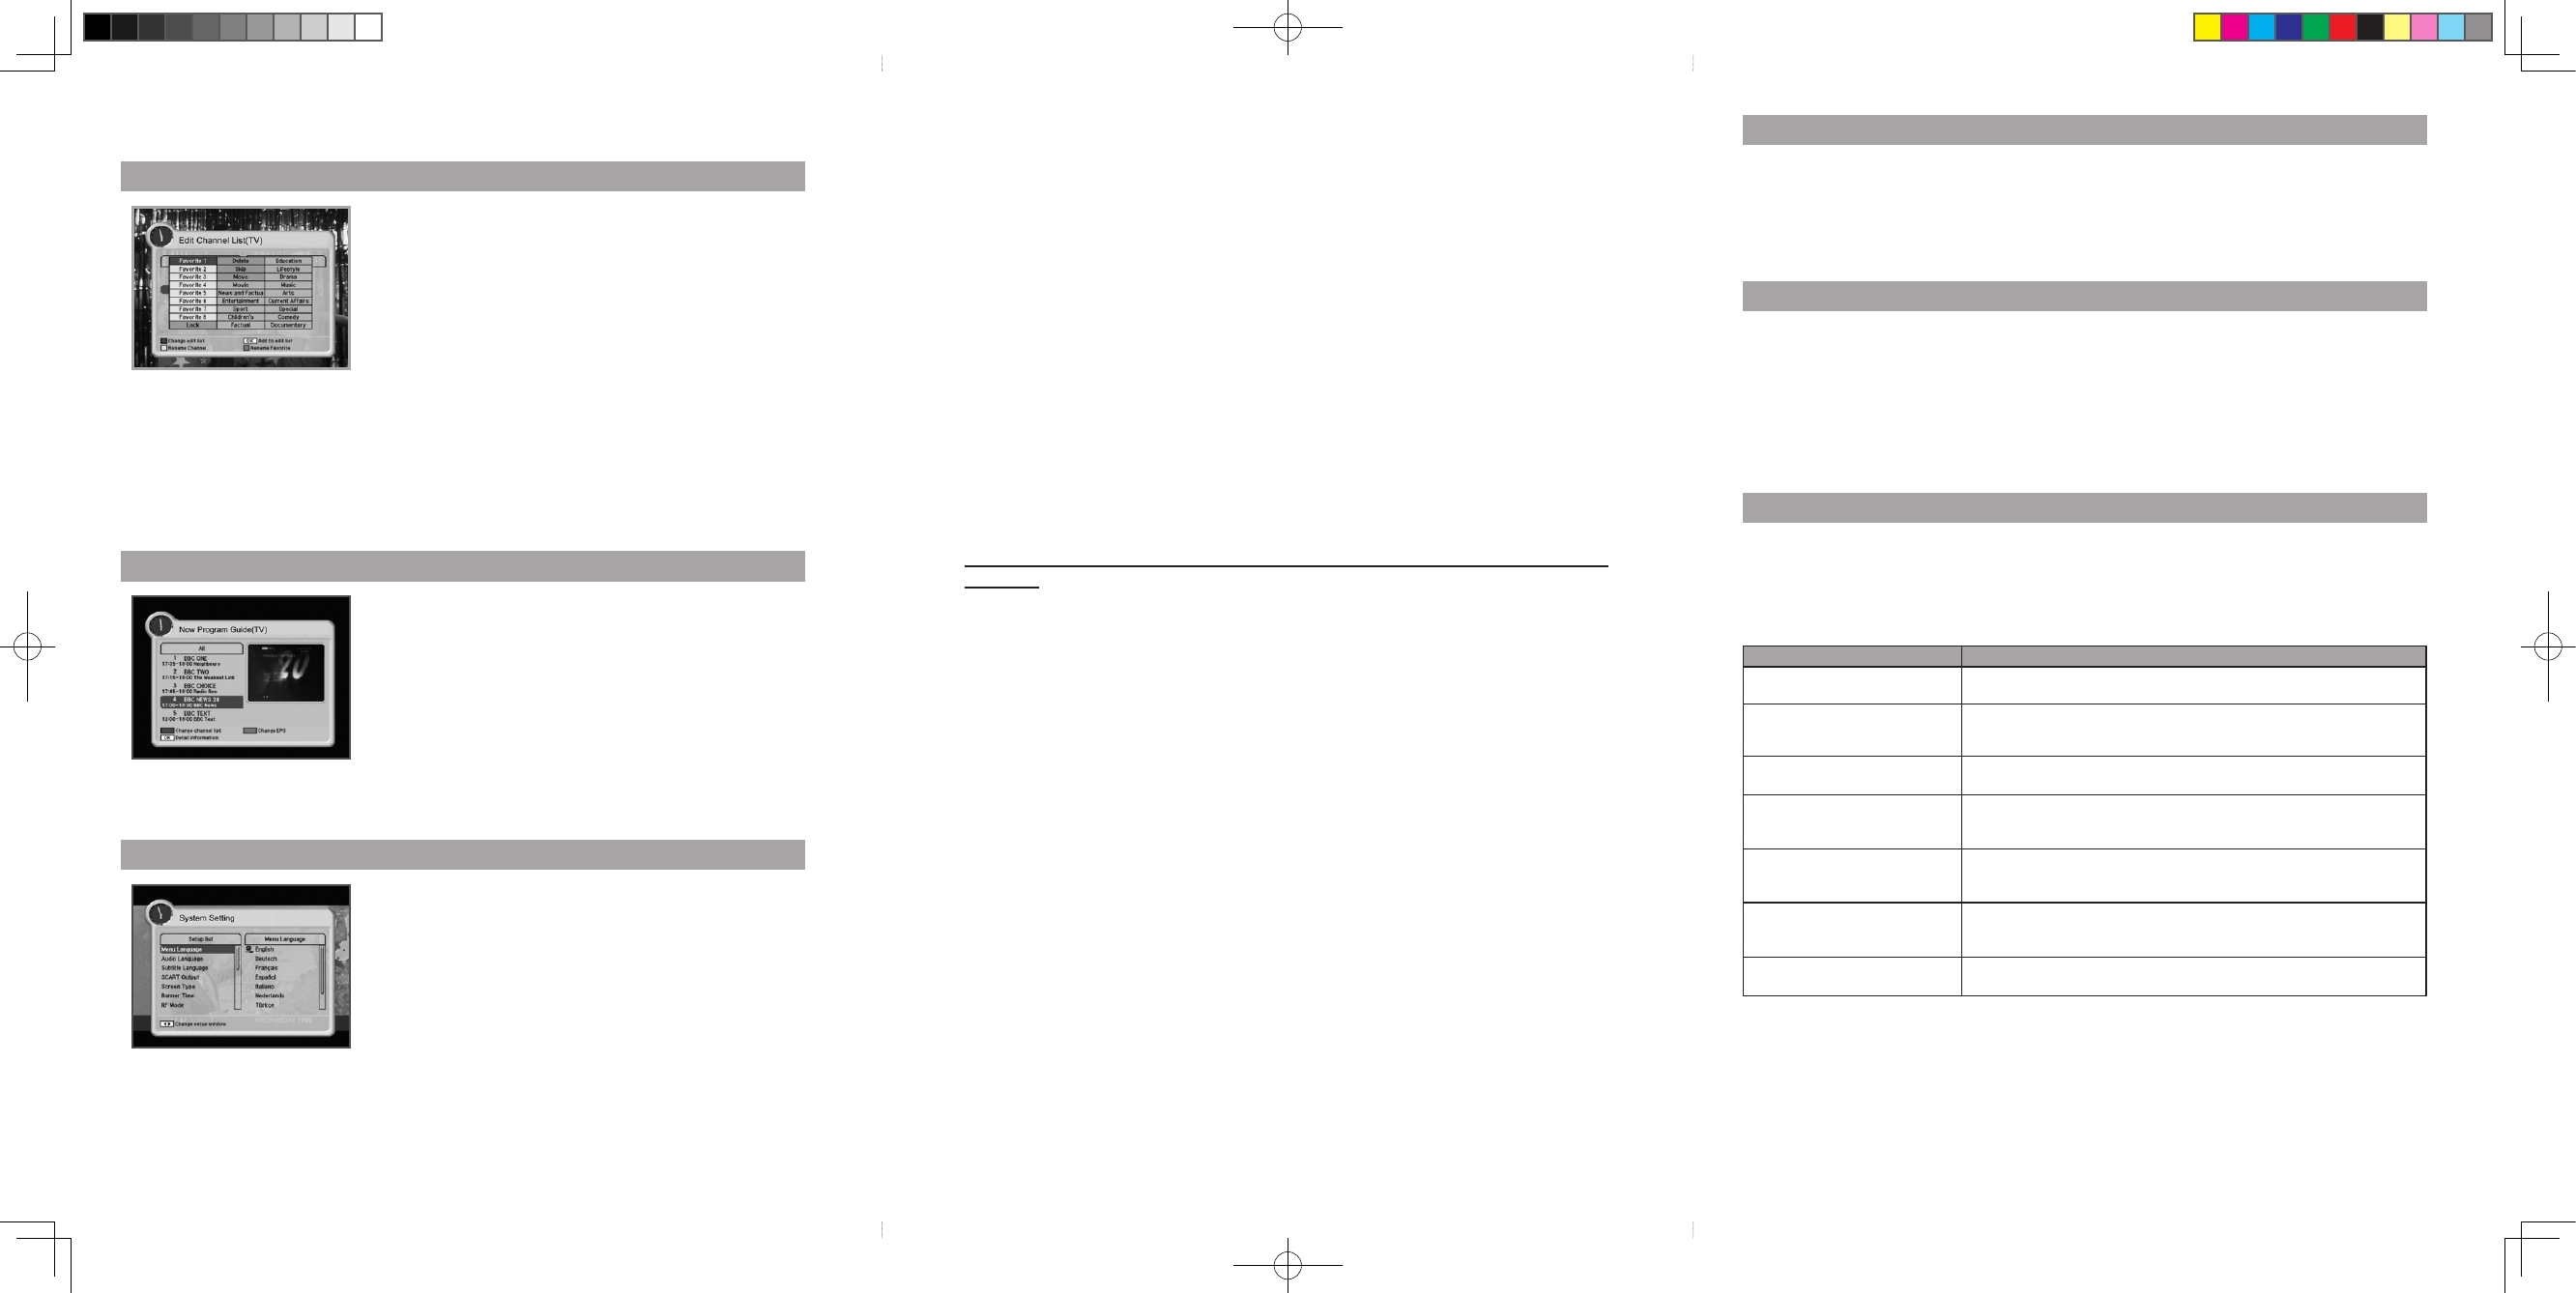
1. Program Information Banner
Afterthetelevisionchannelshavebeenprogrammed,youwillseetheinformationboxeachtime
youchangethechannels.
Note
If you press the button below, the banner will be displayed like the
following.
1. GREEN button → Now information banner.
2. YELLOW button → Next information banner.
3. INFO button → Channel information banner.
2. Teletext / Subtitle
Press the RED button to select the Subtitle or Teletext,thenyoucanseethesubtitlelanguage.
3. Once, Daily, Weekly Reservation
The user can reserve a desired program at a desired time by using the Timer function.
PressingtheYELLOWbuttontousethe▲/▼/◄/►buttonsintheTimer Setting screen to select the
dateandtime.
4. Simple Channel List
1. WhenyoupressOKbuttonduringreceivingservicestream,youcangetChannel Listview.
2.Using▲/▼buttonsinChannel Listview,youcanchooseanotherchannel.
Pleasereadtheentiremanualthoroughlyandretainitforfuturereference.
User's Manual
Digital Cable Receiver
K_GB_104340
CAUTION
RISKOFELECTRICSHOCK
DONOTOPEN
CAUTION : Toreducetheriskofelectricalshock,
donotremovethecover.Nouserserviceablepartsinside.
ReferanyservicingtoqualiedServicepersonnel.
Warning
General Safety
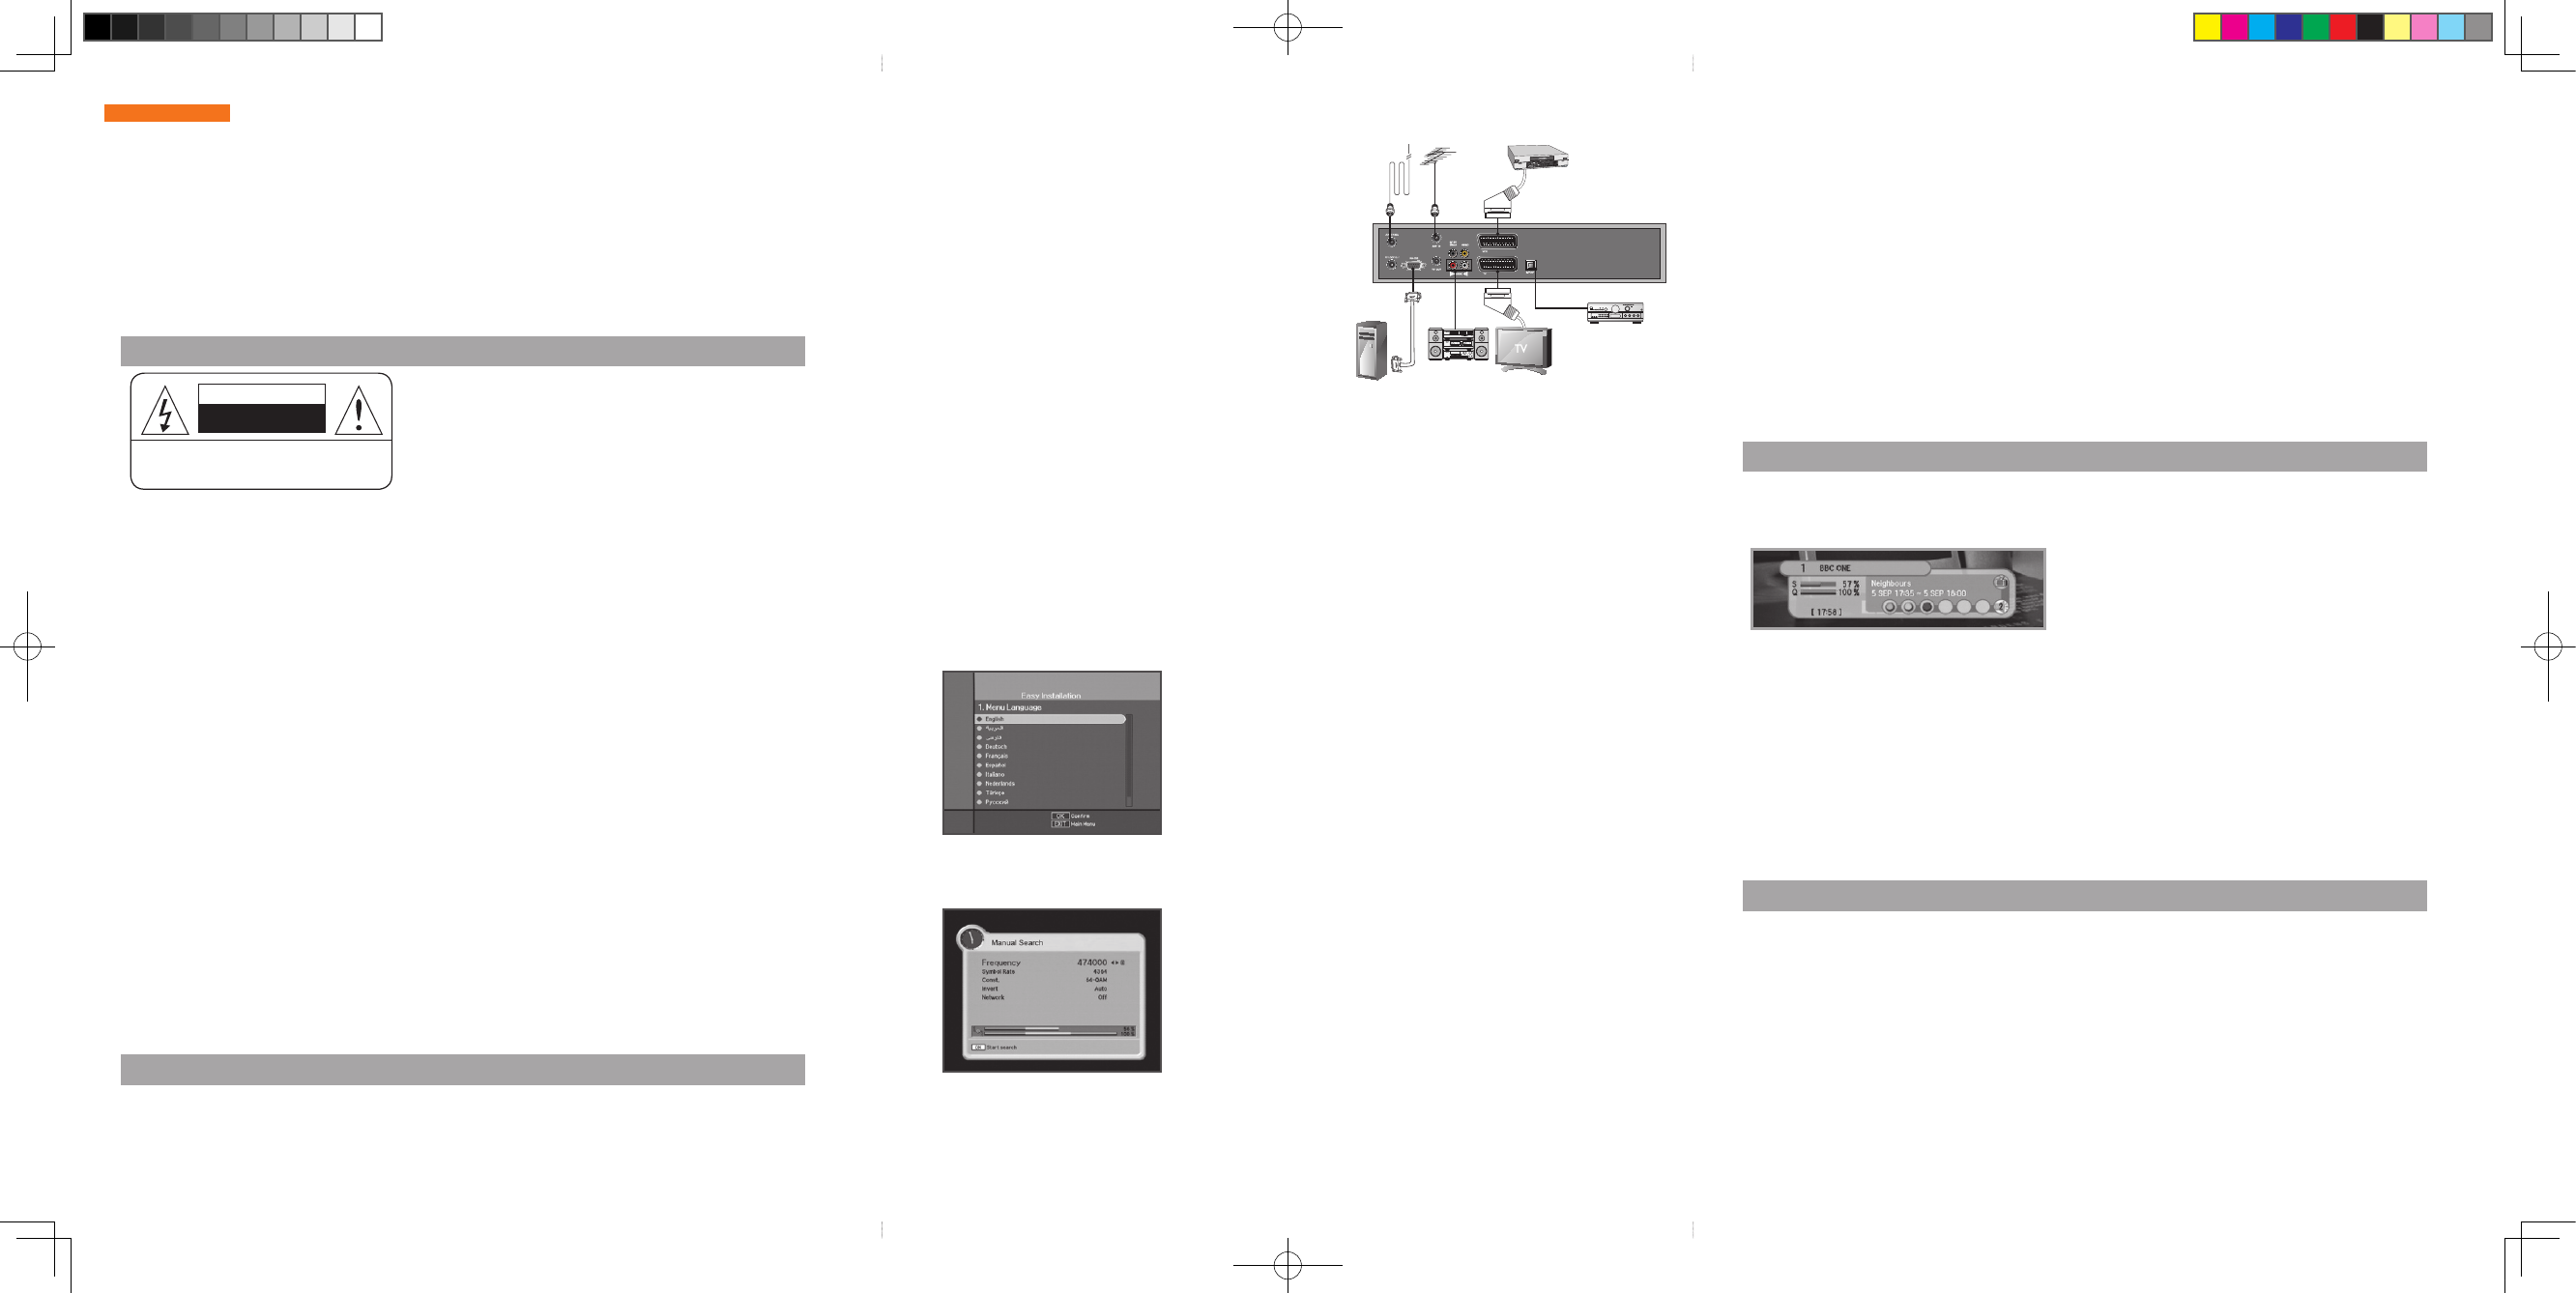
1. To connect Cable Antenna
ConnecttheantennacabletoANTENNA.
2. To connect Terrestrial Antenna
ConnecttheterrestrialantennacabletoANTIN.
3. To connect TV / VCR
ConnectRCA,SCART,orS-VIDEOcabletothereceiver.
4. To connect Digital Audio System
ConnectS/PDIFcoaxialcabletoadigitalamplifier.
5. Loop Through
ConnectcoaxialcabletotheLoopThroughontheSTB
andconnecttheotherSTB.
YouwillseeonlyEasy Installation menuatfirstwhenyouplugin
yoursystem.
TheEasyInstallationgivesyoutheconvenienceofselectingvarious
languages,adjustingthetimeandchannelsearch.
1. Language
TheLanguageofMenu,Audio,orSubtitlewillbechangedtothe
selectedlanguage.
2. Local Time
Youcansetyourlocaltimeaccordingtoyourlocation.
3. Channel Search
YoucansearchthechannelsaccordingtotheAutomatic
orManualmode.
4. Channel Search
• Manual Search
→InputaproperFrequencyofthecablesignalusing
NUMERIC buttons.
→InputaproperSymbolRateofthecablesignalusing
NUMERIC buttons.
→SelecttheConstellation(AUTO,16,32,64,128or256QAM)
using◄/►buttons.
→SelectthespectralInvert(Auto,OfforOn)
→SelectfortheNetworkSearch(OfforOn).
Whenyouselect“On”,youcanfindmoreservicesusing
thehomenetwork.
→PressOK button.
Thismenuhelpsyoutoeasilyselectthechannelthatyouwanttowatch.
Youcanseethechannellistwhenyouhadsearchedbefore.
Tousethismenu,youshouldsetchannelgroupyouwantintheEdit Channel List menu.
1.Toseetheavailablechannellist,usetheSUB-T(Red)button.
Thechannellistmovesinthefollowingsequence:
ALL→Favorite from 1 to 4→Lock
Channel List
• Alwaysfollowtheseinstructionstoavoidtheriskofinjurytoyourselfordamagetoyourequipment.
• UnplugthereceiverfromtheACpoweroutletbeforecleaning.
• Useonlyadampclothforcleaningtheexteriorofthereceiver.
• Donotuseaccessoriesorattachmentsnotrecommendedbythereceivermanufacturerasthey
maycauseproblemstotheequipmentandwillvoidthewarranty.
• Donotplacethereceiveronanunstablecart,stand,tripod,bracket,ortable.
• Thereceivermayfall,causingseriouspersonalinjuryanddamagetothereceiver.
• Donotblockorcovertheslotopeninginthereceiver.
• Theseareprovidedforventilationandprotectionfromoverheating.
• Neverplacethereceivernearoroveraradiatororanyheatsource.
• Donotplacethereceiverinanenclosuresuchasacabinetwithoutproperventilation.
• Donotstackthereceiverontopoforbelowotherelectronicdevices.
• Theapparatusshallnotbeexposedtodrippingorsplashingandwithnoobjectfilledwithliquids,
suchasvases,shallbeplacedontheapparatus.
• Operatethereceiverusingonlythetypeofpowersourceindicatedonthemarkinglabel.
• Unplugthereceiverpowercordbygrippingthepowerplug,notthecord.
• Routepowersupplycordsothatarenotlikelytobewalkedonorpinchedbyitemsplaceduponor
againstthem.Payparticularattentiontothecordsthatplugsintheconveniencereceptacles,
andthepointwheretheyexitfromtheunit.
• Useanoutletthatcontainssurgesuppressionorgroundfaultprotection.
• Foraddedprotectionduringalightningstorm,orwhenthereceiverisleftunattachedandunused
forlongperiodsoftime,unplugitfromthewalloutletanddisconnectthelinesbetweenthe
receiverandtheantenna.Thiswillprovidesomeprotectionagainstelectricaldamagecaused
bylightningorpowerlinesurges.
• Themainsplugisusedasthedisconnectdevice.Thedisconnectdeviceshallremainreadilyoperable.
Servicing
• Donotattempttoservicethereceiveryourself,asopeningorremovingcoversmayexposeyouto
dangerousvoltage,andwillvoidwarranty.
Referallservicingtoauthorizedservicepersonnel.
@@__Cab_K_104340_Kaon_Eng.indd 1 2007-05-04 오후 5:11:56
Information to the user
NOTE: This equipment has been tested and found to comply with
the limits for a Class B digital device, pursuant to part 15 of the
FCC Rules. These limits are designed to provide reasonable
protection against harmful interference in a residential installation.
This equipment generates, uses and can radiate radio frequency
energy and, if not installed and used in accordance with the
instructions, may cause harmful interference to radio
communications. However, there is no guarantee that interference
will not occur in a particular installation. If this equipment does
cause harmful interference to radio or television reception, which
can be determined by turning the equipment off and on, the user is
encouraged to try to correct the interference by one or more of the
following measures:
- Reorient or relocate the receiving antenna.
- Increase the separation between the equipment and receiver.
- Connect the equipment into an outlet on a circuit different from
that to which the receiver is connected.
- Consult the dealer or an experienced radio/TV technician for help.
CAUTION : Changes or modifications not expressly approved by the
party responsible for compliance could void the user's authority to
operate the equipment.
Menu Guide
Program Guide
The program guide supplies information such as program listings
and ending times for all available programs.
1. Now/Next Program Guide
ShowstheinformationofPresent/Followingprogramon
differentchannels.
2. Weekly Program Guide
Shows the information of program that will be played for a week.
Note
The Program Guide information may not be supplied by service
providers.
From these menus, You can edit favorite lists, lock, skip, delete, or
move channel.
1. Favorite Channel
YoucaneditfavoriteTVandRadiolist.
2. Lock Channel
Fromhereyoucanlockchannelsinanyofthelistinorderto
prevent(e.g.yourchildrenfromwatching.)
3. Delete / Skip Channel
Youcandelete/skipTVorRadiochannelfromthecurrentlist.
Edit Channel List
You will be asked to enter your PIN code before you can enter this
menu. The PIN code preset to 0000 from the factory.
The code can be changed from the Change PIN Code menu .
Ifyouwanttocustomizethesystemtosuityoubetter,youcan
specifysomesettingsfromthesubmenusintheSystem Setting
menu.
System Setting
1. Menu Language / Audio Language / Subtitle Language
In this menu You can change default language for menus, audio, and subtitle when changing
services.
2. SCART Output (option)
If your SCART supports RGB control, select RGB. Otherwise select CVBS.
3. Screen Type
If you have a TV set with the 4:3 picture format and the transmission is in 16:9, you can select
4:3 letterbox, 4:3 full screen, and 16:9 full screen.
4. Banner Time
You can select for how long the banner will be shown.
5. RF Mode
If you get picture but no sound, the RF Mode selecting might be wrong.
6. RF Channel
Select this alternative if you have to change the RF channel.
7. Local Time
You can set your local time according to your location.
8. Menu Transparency
Give the variable transparency on Video and OSD screen.
9. Change PIN Code
From here you can change the PIN code from the standard 0000.
DO NOT FORGET IT! Without it, you are not able to access to any of the functions where the code
is required.
Note
If you forget the PIN code, press the RGYB(Color) button in sequence.
(i.e. Red → Green → Yellow → Blue button) The PIN code will be changed to 0000.
10. Parental Lock
IfyouselectOn,youmayneedPINcodeeverytimeyouselectthelockchannelprogramas
yousetinthechannelcontrol.
11. Receiver Lock
IfyouselectOn,youwillhavetoenterthePINcodeeverytimeyoustartthereceiver
fromstandby.
12. Menu Lock
IfyouselectOn,youwillhavetoenterthePINcodeeverytimewhenyouentertheMenu.
13. Auto Power
IftheAutoPowerissettoOnandpowerisoff,theSetturnsonautomaticallyandturnsinto
thechannelmodewhichyouwerewatchingbeforepowerbreakdown.
14. Factory Reset
Usethisoptiononlyifyouhavetostartthecompleteinstallationprocedurefromscratch.
Ifyoucontinuefromhere,allyourprevioussettingsandallchannelswillbecleared.
Thedefaultdatawillbeloaded.
15. OTA Upgrade
To set up OTA Upgrade. It is possible to set up OTA upgrade manually or automatically.
16. System Information
Displays the system information
4. Move Channel
YoucanchangethepositionofthechannelyouwantontheTV/Radio/Allchannellists.
5. Genre Channel
YoucaneditTVandRadiolistofthegenrewhichisvarious.(Movie,NewsandFactual,Entertainment,
Sport,Children’s,Factual,Education,Lifestyle,Drama,Music,Arts,CurrentAffairs,Special,Comedy,
Documentary.)
YoucanuseUtilty menu
whichisvarious.(Game,Demonstration,Calendar,Zoom,Calculator)
CA System
The menus are provided by Smartcard.
YourreceiverisequippedwithoneSmartcardslot,PlugintheappropriateavalidSmartcard.
YouwillthenhaveaccesstotherespectivescrambledandPay-Per-Viewservices.
InserttheSmartcardintotheSlotonthefrontpanel.
IfyouinserttheSmartcardintotheSmartcardslotthenyoucanwatchyouselectedchannel.
Utility
Problem Solution
NodisplayLEDonthefrontpanel.
Nopowersupply
Powercordplugincorrectly.
NoPicture EnsurethattheSTBisswitchedon.
Checkconnectionandcorrect.
Checkchannelandvideooutputandcorrect
Poorpicturequality Checkthesignallevel,ifthisislowthentryadjustingthealignmentofyourdish.
NoSound CheckthevolumeleveloftheTVandSTB.
CheckthemutestatusoftheTVandSTB.
Checktheconnectionofaudiocord.
RemoteControldoesnotoperate Pointremotecontroldirectlytowardsthereceiver.
Checkandreplacebatteries.
Checkthatnothingblocksthefrontpanel.
Serviceisnotrunningorscrambled CheckthewhethertheCommonInterfacemoduleandsmartcardiscorrectly
inserted.
Checkthatthesmartcardisappropriatefortheselectedservice.
YouhaveforgottenyoursecretPIN
code
RefertoChangePINcodeofthisowner'smanual.
Troubleshooting
Common Interface (option)
The menus are provided by the CA module and its smart card.
YourreceiverisequippedwithtwoslotsofCommonInterface(CI),acceptingbothType1andType2
PCMCIAmodules(seediagrambelow.).PlugintheappropriateCImoduletogetherwithavalidsmart
card.YouwillthenhaveaccesstotherespectivescrambledandPay-Per-Viewservices.
InsertthesmartcardintotheCImodule,andtheCImoduleintotheslotbehindtheflaponthefront
panel.TheCIandsmartcardmodulesdeterminetheprogramsthatcanbede-scrambled.Thisreceiver
supportstwoCIslotssoyoucanplugintwodifferentmodules,automaticallyprovideaccesstoboth
services.
@@__Cab_K_104340_Kaon_Eng.indd 2 2007-05-04 오후 5:11:58