KAPSCH TRAFFICCOM CANADA 801660A Janus Interior OBU User Manual Users manual
KAPSCH TRAFFICCOM CANADA INC. Janus Interior OBU Users manual
Users manual

Sheet 1 of 5
MARK IV Industries Corp., I.V.H.S. Division
JANUS Interior OBUs Mounting Instructions Sheet
WARNING: For proper operation the vehicle must be equipped with one and only one properly mounted and presented
E-ZPass® IAG Capture Compatible OBU for the duration of passage through an E-ZPass facility. Other E-ZPass IAG
Capture Compatible OBUs or transponders present in the vehicle must be enclosed in an RF shield.
The JANUS interior OBU is the primary OBU recommended for all vehicles with the exception of the following:
• Vehicles fitted with metal oxide or equivalent RF blocking material coated windshields
• Vehicles with overhangs obscuring the windshield such as a metallic sun visor
• Vehicles with a metallic center divider post on the windshield
• Vehicles with concave windshields
• Vehicles where the OBU cannot be located within 2 inches on either side of the center of the windshield
• Vehicles with non-metallic roofs or soft-tops such as certain types of Convertibles and Jeeps
• Vehicles without a windshield center mounted rear-view mirror
• Vehicles where the OBU cannot be located within 2 inches from the metal roofline
• Vehicles where DMV (state or province equivalent) requirements prevent the use of windshield mount locations
An alternate OBU is recommended for these cases. Please contact your nearest Customer Service Center for information on
obtaining an alternate OBU and applicable mounting instructions.
The following limitations apply to the placement of the JANUS Interior OBU:
• For proper operation it is imperative to select the correct OBU mounting location. The selected location must
provide for direct line of sight communication between the OBU and the overhead antenna.
• In-vehicle or externally mounted Radio Frequency (RF) transmitter antennas operating in the 900 MHz band may
interfere with the operation of the OBU. The associated RF transmitters must be switched off for the duration of
passage through a toll facility.
• Cellular phones, pagers, two-way radios and other mobile handheld communication devices must not be located
within 12 inches of the JANUS interior OBU
• Metal objects must not be located within 6 inches of the JANUS interior OBU with the exception of the vehicle
roof and rear-view mirror
• The OBU when mounted must not impact the driver’s visibility of the roadway or otherwise interfere with safe
operation of the vehicle.
Sheet 2 of 5
JANUS Interior/JANUS Feedback OBU Mounting Instructions
for Passenger Vehicles
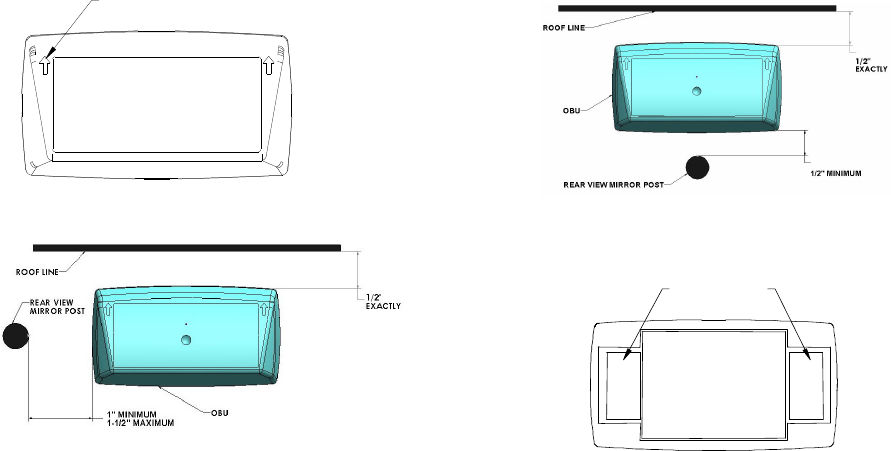
1. Identify the front face of the OBU. It displays your agency label and two upward-pointing arrows (Fig.-1). This side
faces the driver with the arrows pointing toward the roof of your vehicle.
2. Identify the position in your vehicle in which the OBU will be mounted. The preferred location is between the exposed
edge of the windshield (roofline) and the rear view mirror post as long as the clearances in Fig.-2 can be maintained. If
there is insufficient room, the alternate location shown in Fig.-3 must be used.
3. Having determined the mounting position in your vehicle, clean the inside surface of that section of the windshield if
necessary. Now carefully remove the protective backing from the Dual Lock® mounting strips on the rear of the OBU
as shown in Fig. 4 and firmly press the rear of the OBU against the glass. Maintain the pressure for about 15 seconds to
achieve a good bond.
Fig-1: OBU Front Face Fig-2: Preferred Mounting Location
Fig-3: Alternate Mounting Location Fig-4: OBU Rear Face
The OBU may be removed by lifting any one corner with sufficient pressure to separate the Dual Lock® strips. Do not
remove the Dual Lock® from the windshield and reuse it; obtain new strips from your nearest Customer Service Center.
ARROWS POINT UP
M ARK I V
FC C I D : JQ U 801630
Thi s device c omplies with par t 15 of the FC C r ul es.
Oper ation is subjec t to the con ditio n that thi s d evice
does not c ause harmf ul interfer ence.
IC : 2 665A
-
801630
UN ITED ST AT ES PAT ENT Nos .
4,870,419 ; 4,937,581 ; 5,1 32,687; 5,1 64,732
5,192,954; 5,196,846
C ANAD A PA TEN T N os.
1,165,427; 1,248,613
DUAL LOC K® STRIPS
PEEL OFF BACK ING
Sheet 3 of 5
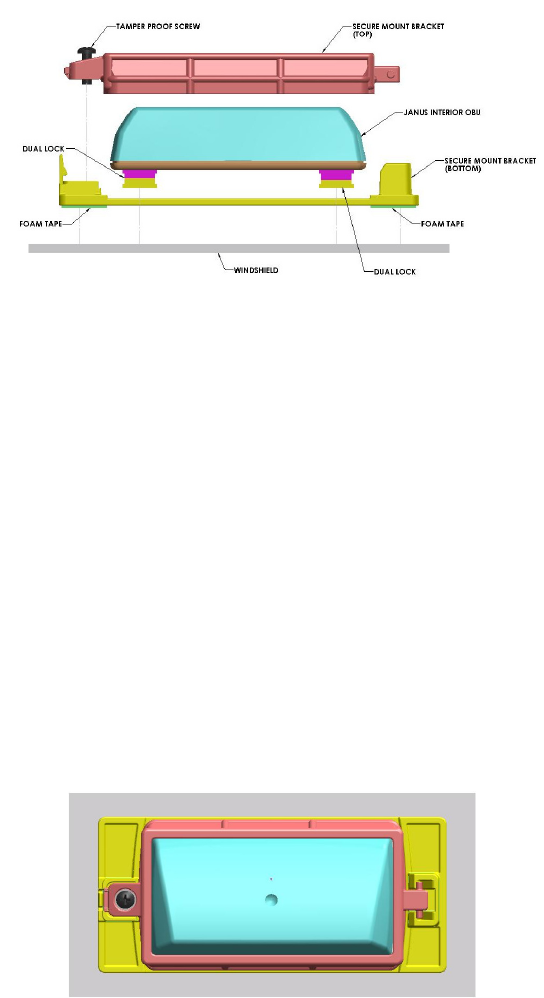
JANUS Interior Secure OBU/JANUS Feedback Secure OBU
Mounting Instructions for Passenger Vehicles
These mounting instructions are identical to the instructions for a standard JANUS Interior or JANUS Feedback OBU. The
main difference is the application of the Secure Mount bracket on the windshield glass (Fig-5).
Fig-5: Securing a JANUS Interior or JANUS Feedback OBU
1. Identify the front face of the OBU. It displays your agency label and two upward-pointing arrows (Fig.-1). This side
faces the driver with the arrows pointing toward the roof of your vehicle.
2. Identify the position in your vehicle in which the OBU will be securely mounted. The preferred location is between the
exposed edge of the windshield (roofline) and the rear view mirror post as long as the clearances in Fig.-2 can be
maintained. If there is insufficient room, the alternate location shown in Fig.-3 must be used.
3. Having determined the mounting position in your vehicle, clean the inside surface of that section of the windshield if
necessary. Now carefully remove the protective backing from the Dual Lock® mounting strips on the rear of the OBU
as shown in Fig. 4 and firmly press the rear of the OBU against the glass. Maintain the pressure for about 15 seconds to
achieve a good bond.
4. Prepare the surface of the windshield for application of the 3M™ VHB™ acrylic foam tape adhesive per the
instructions supplied on the last sheet of this document. Next carefully remove the protective backing from the 3M™
VHB™ acrylic foam tape strips on the rear of the secure mount bracket (Fig-5), place the bracket over the OBU and
firmly press the rear of the bracket against the glass (Fig-6). Maintain the pressure for about 15 seconds to achieve a
good bond.
Fig-6: JANUS Interior Secure OBU Assembly
The OBU may be removed by:
1. Opening the tamper proof screw with a special tool and freeing the top half of the secure mount bracket from the OBU
2. Lifting any one corner of the OBU with sufficient pressure to separate the Dual Lock® strips.
Do not remove the Dual Lock® or 3M™ VHB™ acrylic foam tape from the windshield and reuse it; obtain new strips from
your nearest Customer Service Center.
Sheet 4 of 5
JANUS Permanent OBU Mounting Instructions
for Passenger Vehicles
WARNING: The user is recommend to follow these instructions carefully and mount the JANUS Permanent OBU correctly
on the first attempt. Once mounted removal from the windshield will result in permanent disablement of the OBU.
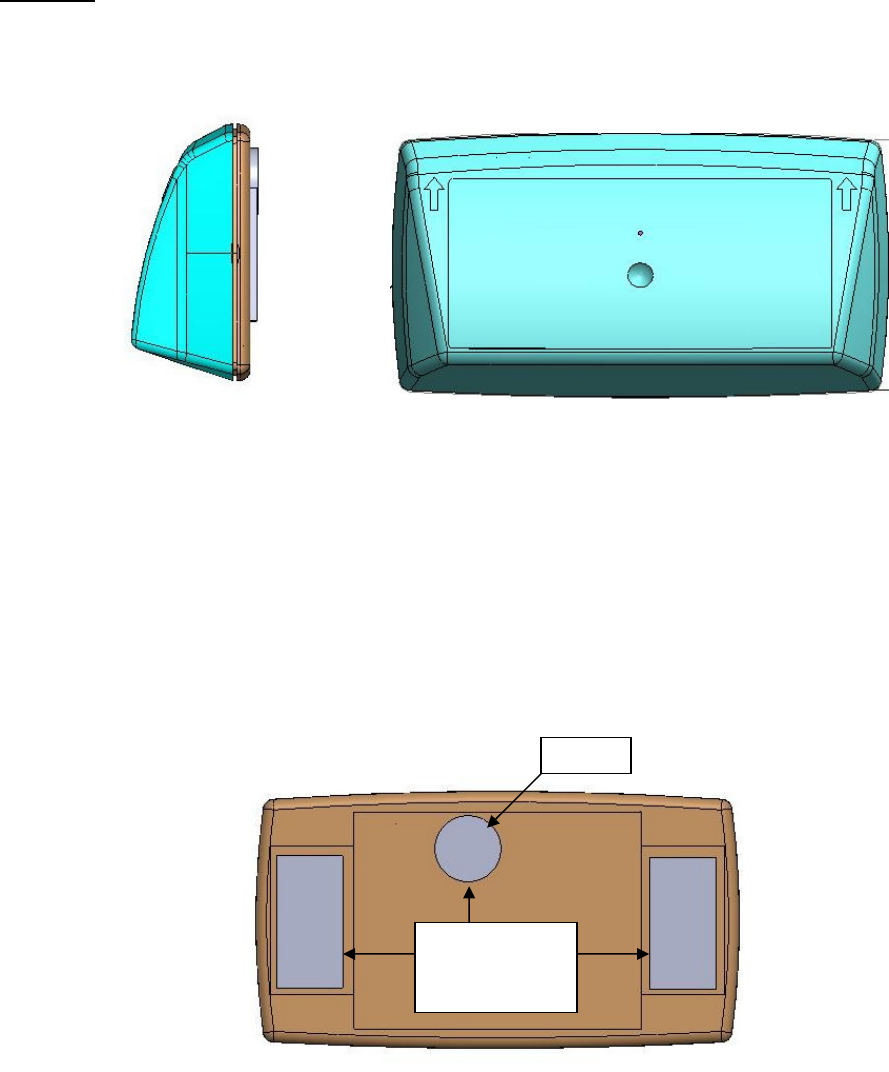
The JANUS Permanent OBU (Fig-7) is sensor equipped for detection of removal from the windshield.
Fig-7: JANUS Permanent OBU Front and Side Views
1. Identify the front face of the OBU. It displays your agency label and two upward-pointing arrows (Fig.-7). This side
faces the driver with the arrows pointing toward the roof of your vehicle.
2. Identify the position in your vehicle in which the OBU will be mounted. The preferred location is between the exposed
edge of the windshield (roofline) and the rear view mirror post as long as the clearances in Fig.-2 can be maintained. If
there is insufficient room, the alternate location shown in Fig.-3 must be used.
3. Prepare the surface of the windshield for application of the 3M™ VHB™ acrylic foam tape adhesive per the
instructions supplied on the last sheet of this document. Next carefully remove the protective backing from the 3M™
VHB™ acrylic foam tape strips on the rear of the JANUS Permanent OBU (Fig-8) and firmly press the rear of the
OBU against the glass. Maintain the pressure for about 15 seconds to achieve a good bond.
Fig-8: JANUS Permanent OBU Rear Face
Sensor
3M™ VHB™
Tape Strips
Peel off backing
Sheet 5 of 5
General Procedure for Application of Dual Lock® and/or 3M™ VHB™ Tape
• Minimum adhesive application temperature to bonding surface shall be 15°C or higher. Initial tape application
temperature below the suggested minimum is not recommended because the adhesive becomes too firm to adhere
readily.
• Clean bonding surface with rubbing alcohol and dry. Surface must be free of moisture and any surface contaminants.
• Carefully remove the protective backing paper from the adhesive strips on the rear side of the OBU or secure bracket
and firmly press it against the glass. Maintain the pressure for about 15 seconds to achieve a good bond.
• Once the adhesive is applied to the windshield, do not remove the item from the windshield and reuse it. Obtain new
strips from your nearest Customer Service Center.
• Allow the adhesive to cure on the windshield for 20 minutes prior to any removal of the OBU.