KBX GROUP QD3GME-710-SL MID User Manual
KBX GROUP MID
User manual
mobility.com
User Manual
3G
BLAZ
E
7
e
23
User Manual
3G
BLAZ
E
7
e
Introduction
a. Package contents
b. Safe handling of the product
c. Battery instructions I.D.
d. Disposal information
1. CHAPTER 1 • Basic conguration and setup
1.1. Charging your tablet
1.2. Switching your tablet on/o
2. CHAPTER 2 • Getting started
2.1. Home screen
2.2. Managing icons and several screens
3. CHAPTER 3 • Main applications
3.1. Internet access
3.2. Web browser
3.3. Email
4. CHAPTER 4 • Data transfer modes
4.1. Connection to a PC
4.2. Micro-SD card
5. CHAPTER 5 • Productivity applications
5.1. File manager
5.2. Search
5.3. Manage downloads
5.4. Clock
5.5. Calendar
6. CHAPTER 6 • Entertainment applications
6.1. Sound recorder
6.2. Music player
6.3. Camera
6.4. Camera and camcorder settings
6.5. Social applications
6.6. FM radio
6.7. FM receiving
7. CHAPTER 7 • Settings
7.1. Wireless and networks
7.2. 3G internet
7.3. GPS navigation
7.4. Device settings
7.5. Personal settings
7.6. System settings
7.7. About Tablet
8. CHAPTER 8 • Security
9. CHAPTER 9 • Backup and reset
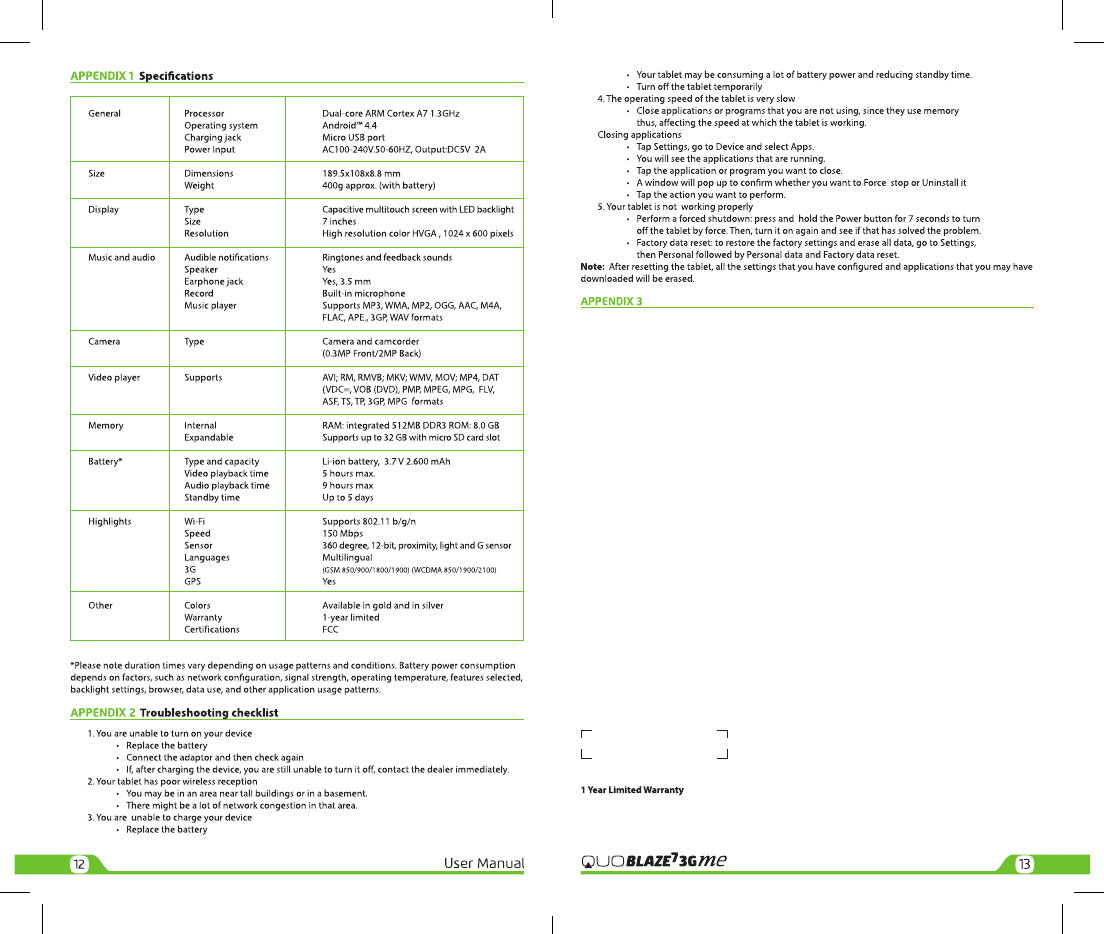
Appendix 1 Specications
Appendix 2 Troubleshooting checklist
Appendix 3 FCC statement
Thank you for purchasing the QUO BLAZE7 3Gme Tablet. This manual guide will show you how to set up your
device and use its functions. Once your tablet is up and running, you can visit www.quomobility.com to nd
out more about all the great features your new device has.
a. Package contents
• QUO BLAZE7 3Gme Tablet with rechargeable lithium-ion battery
• AC charger/USB sync data cable
• OTG adapter
• User manual
Note: If any of the listed items is missing, mismatched, damaged or broken, contact your local dealer
immediately for replacement.
b. Safe handling of the product
• Never expose your tablet to direct sunlight or excessive heat. Avoid leaving the product inside a
car with the windows closed.
• Keep your tablet in a dry place. Never expose this product to rain or water.
• Do not use or store your tablet in dusty, dirty areas.
• Do not use harsh chemicals, soaps or detergents to clean your tablet.
• Do not modify, disassemble, open, drop, crush, or puncture this product.
• Never disconnect your tablet while a download or upload is in progress.
• Switch o the device in restricted areas or where the use of electronic devices is prohibited.
• To protect your hearing, make sure the volume level is not set too high when plugging
the earbuds.
c. Battery instructions
• Use only the battery and battery charger specied by the manufacturer.
• The battery has a limited service life so it will need replacing when it no longer holds enough charge.
• Dispose of old batteries at directed places.
• Do not throw batteries into a re.
• Do not force the battery when installing it.
• If the battery overheats or changes color while charging it or storing it, stop using it.
• Do not expose batteries to high temperatures.
• Do not charge the battery for more than 24 hours.
d. Disposal information
Electrical and electronic products as well as batteries must not be discarded as regular household waste. As part of
the company’s eco-friendly approach, we encourage you to recycle and follow all applicable local waste
regulations to dispose of your used devices properly. Never dispose of batteries in a re.
CHAPTER 1 Basic setup
1.1. Charging your tablet
• Fully charge the battery prior to using the tablet for the rst time. Firmly insert the Micro-USB end
of the supplied charger into the I/O port on the tablet, and the other end to a standard AC wall
outlet or to an available USB port on your computer.
• The battery must be initially charged for 5 hours and for 3 hours or so thereafter.
• Let the battery drain completely, before recharging it to full capacity for a second time. From then
on, allow the battery to charge until the icon on the screen becomes solid green.
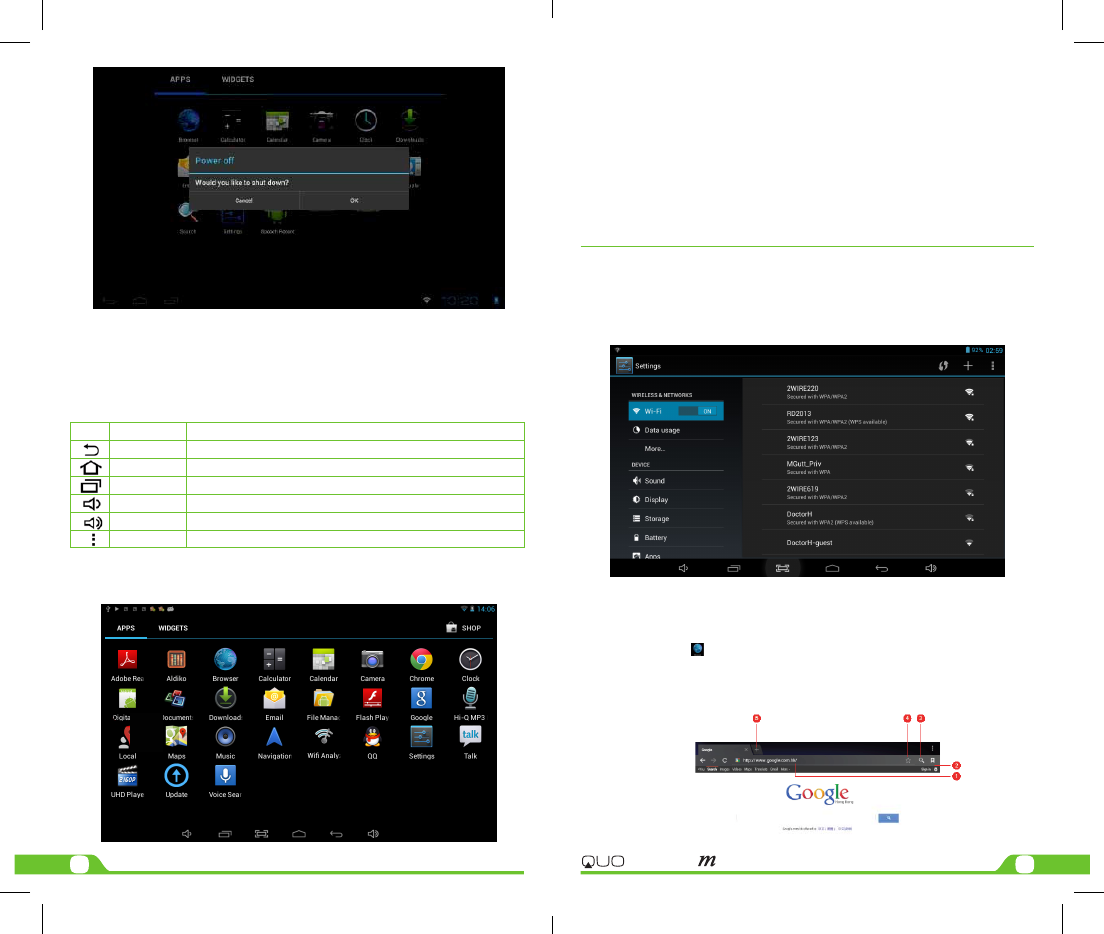
1.2. Switching your tablet on/o
• To turn on the tablet, press and hold the Power button for several seconds. The welcome screen
will appear.
• To switch o the tablet, press and hold down the Power button again. When the “Power o” options
menu comes up, select OK. The device will shut o completely.
Note: make sure to follow the on-screen prompts for the initial setup of the tablet.
CHAPTER 2 Getting started
45
User Manual
3G
BLAZ
E
7
e
2. Application view.
A. In Desktop view, six default shortcuts will be displayed, which you can later
customize based on your own particular needs and lifestyle.
B. The Application view allows access to all the application available in your device.
To open the main All Apps screen, touch the icon on any Home screen.
Note: on the locked screen the most recent application icons will be displayed when accessing the system
from either visualization mode.
2.2. Managing icons and dierent screens
In order to see the dierent screens, slide your nger to the left or to the right. You may customize the home
screen or any of the other screens by moving icons to another location. Just tap on the icon, drag it and drop it
at the location where you want to place it.
CHAPTER 3 Main applications
3.1. Internet access
Congure the internet connection using your new tablet.
• Go to Settings and click on Wi-Fi ON/OFF switch in order to enable the wireless
Conguration on the tablet.
• Choose a wireless access point, and enter your login and password
• Select the Connect option on this menu to activate access to the internet.
3.2. Web browser
The browser allows you to enjoy a seamless surng experience using your new tablet.
• Once you have successfully established an internet connection, you just need to tap on
the Browser icon on the apps screen or the shortcut icon on a Home screen to
launch this application.
• At this stage, the following window will be displayed.
• The user can then configure all related navigation settings based on his/her
individual preferences.
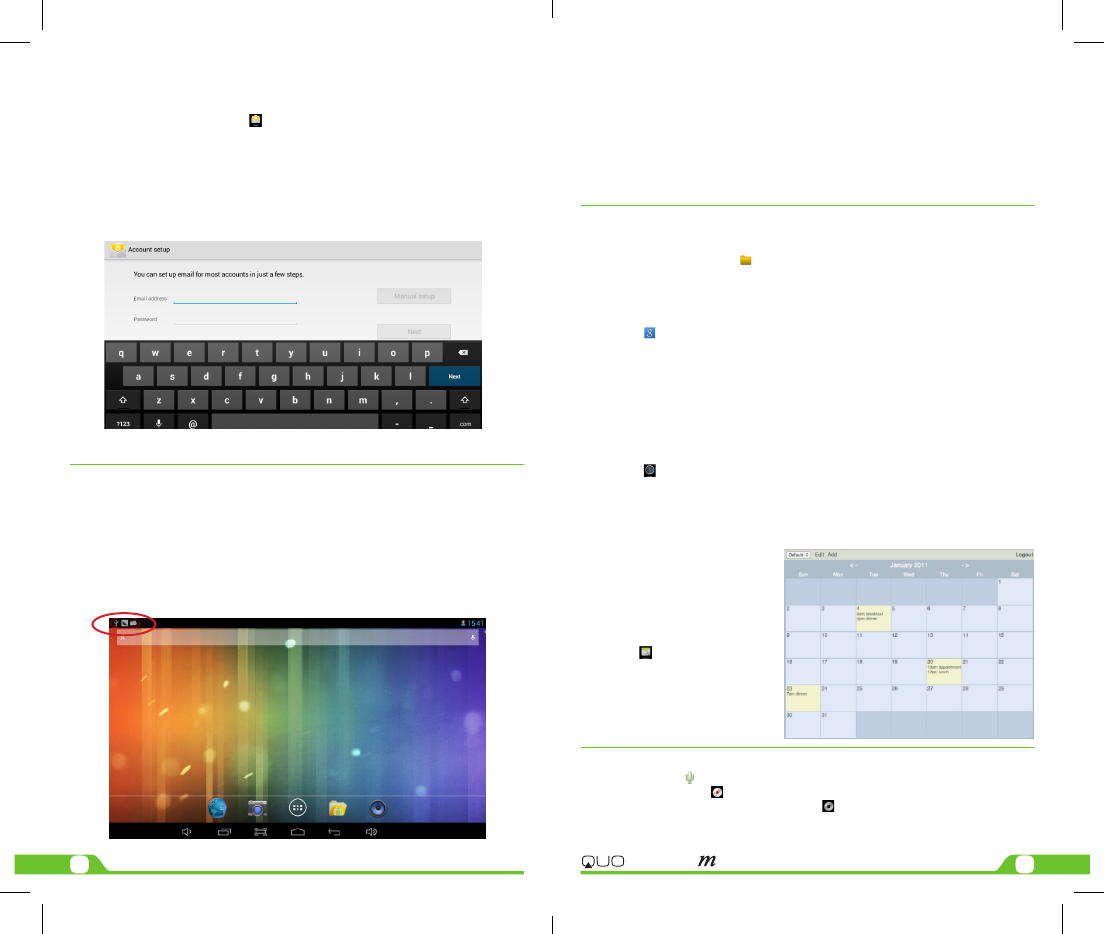
2.1. Home screen
As soon as you power-on your tablet, you will see the Locked screen interface Slide your nger to the right to
access the Home screen. This screen provides quick access to the things you need most. The home screen
contains a System bar, located in the bottom left corner of the display, which includes six default navigation
buttons accessible by touching the screen:
Icon Name Description
Back Opens the previous screen you were working in
Home Opens the Home screen
Recent apps Opens a list of thumbnail images of apps recently used
Volume down Tap on this icon if you want to decrease the volume level
Volume up Tap on this icon if you want to increase the volume level
Shortcut Opens the options menu for frequently used applications
In addition the user can choose between two home screen visualization modes:
1. Desktop
67
User Manual
3G
BLAZ
E
7
e
3.3. Email
Stay in touch with friends, family and your business associates via email wherever you are.
Follow this quick and easy setup process.
• Select the Email application icon from the apps menu.
• You will be prompted to enter your full email address and password.
• Once you are done, tap the Next button and the system will automatically search for
the incoming and outgoing server settings. If unable to congure automatically, you
have the option to manually set these parameters.
• The Account settings menu will be displayed, allowing you to set certain emails
parameters. When done, select Next to nish the setup.
• If setup is successful, you will have instant access to all your emails using your
wireless connection.
• If you also want to set up a Gmail account, look for the icon in the applications menu.
CHAPTER 4 Data transfer modes
You can transfer data to and from your tablet PC using the micro-USB connection or the micro-SD card slot.
4.1. Connection to a PC
• On main desktop, connect the device with the PC,
touch right side of the status bar on the top of desktop.
• Press “USB connected”, select “Turn on USB storage”.
The device is recognized at Explorer of the computer.
Now you can use it as an external storage.The Android icon will turn orange.
• On your computer, the tablet will be displayed as a hard drive.
• Now, you are able to copy, delete or share les between your computer and the tablet.
Important note: to safely disconnect your tablet from the computer, you must touch the Turn o USB storage
button on the tablet screen.
4.2. Micro-SD card
• Insert the micro-SD card into the slot located on the side of the tablet.
• Open the File manager application on your tablet. The SD-card tab will become
illuminated, and you will be able to visualize the folders and les stored in the external
memory attached to the device.
CHAPTER 5 Productivity applications
5.1. File manager
In addition to creating, deleting or sharing les, the le manager allows you to keep all your data properly
organized and conveniently stored in your memory.
• Select the File manager icon on your main screen.
• After opening the le browser interface, users will be able to copy, paste or delete les
stored in the local memory, SD card, or USB external storage device.
5.2. Search
Select the icon to open Google search in order to nd content matching the key words
you entered.
5.3. Manage downloads
The les, apps or other items that the user downloads are saved in the tablet´s internal storage.
• In order to see those items, select the icon from the All Apps screen.
• From the download directory of your tablet, select the item you want to view, reopen
or delete.
5.4. Clock
Select the icon on the applications menu to open the clock interface. It allows the user to enable or
disable the alarm, set up the time, select the alert tone (Ringtone option), and other related functions of this
feature.
5.5. Calendar
Keep track of your meetings, appointments, places you want to visit, or schedules that you need to follow.
• It is required to have a network
connection active the rst time
you use this application, in order
to be able to congure it using
an existing Google Account, or
by creating a new account.
• Once you have an email account
set up, you need to select the
icon on the application
screen to open this feature.
• Click on the day, week, month or
agenda tab to view, add or delete
an event.
CHAPTER 6 Enter-
tainment applications
6.1. Sound recorder
• Select the icon to enter the sound recorder interface
• Next, tap on the icon to start recording.
• When you are nished recording, tap on the icon to stop.
• A dialog box will popup. Click on Done if you want to save your recording, or Discard if you prefer to
permanently delete that le.

89
User Manual
3G
BLAZ
E
7
e
• Click on the icon to listen to the recording you just saved or go to Applications view, tap the File manager
icon to see the recordings. To perform other le operations, tap and hold your nger on the
recording; a menu will pop and you will be able to delete, rename, copy, move or email your le.
6.2. Music player
• Select the icon to enter the music player interface.
• Three dierent sorting schemes will be displayed at this stage: by Artists, Albums and Songs.
• The user can also choose Playlists to replay his/her customized tracks, or tap on the Now playing tab
to either access the music or movie currently being played or to resume playback after being
stopped or paused.
• Tap the icon to enable or disable the random playback mode.
• Tap the icon to switch between continuous repeat mode or single song playback.
6.3. Camera
This interface provides an integrated camera, camcorder, and gallery experience.
• Select the icon to enter the camera interface.
• Then touch the proper icon to toggle between still and video capture modes.
• Tap the blue button in the center to take a snapshot or the red one to start recording.
• After capturing a snapshot or recording a video, your le will appear above the blue button. Tap the
image once to choose options such as see your media le in the gallery send it by email, post it on
Facebook or in Twitter.
• To delete your media le, just tap on the center of the image followed by the Garbage icon on the
upper right corner of the screen.
• To view les, you can tap on the media application icon for instant visualization of your recorded les,
or go to your le manager and retrieve your images from the default location of the camera folder.
6.4. Camera and camcorder settings
Both the still mode and the video capture mode have additional settings. Still and video capture modes:
slide the dot towards the plus (+) sign to zoom in or towards the minus (-) sign to zoom out. You may also tap
the menu icon next to the minus sign to open options such as White balance, Exposure, Store location and Time
lapse interval, only for video capture mode.
6.5. Social network applications
Your tablet comes with other popular and exciting social applications such as Facebook and Twitter. In order
to access to them, you should set your own username and password.
6.6. FM radio
Click on in the main interface or desktop to enter the FM radio interface:
• Radio button operation instruction as in the following image.
• RDS setting: click Menu key in interface, click button, enter into RDS setting as image below, and
choose the selection you want to add.
• Search channel: Click “Menu” in the main interface, click search button, it will start to auto search
channels, the searched channels will be saved in the channels list
• Save channels: Click button in the main interface to save the channel, and the channel will be
saved in channels list.
6.7. FM Receiving
1. Click Setting application procedure.
2.
Click FM receiver.
3. Operate as below picture.
Play/Pause
Previous
Channel
Next Channel
Save Button
Open Speaker
Channel List
Current
Frequency
Manual Setting
Frequency
Auto Search
Vacant
Channels
10 11
User Manual
3G
BLAZ
E
7
e
CHAPTER 7 Settings
The icon gives you access to a host of customizable features that each user can congure based on his/
her own individual preferences. The most frequently used features will be explained below. Please refer to the
manual in our website for a complete description of all settings.
7.1. Wireless and networks
• Wi-Fi: turn on Wi-Fi so you can see a list of available wireless networks to connect to.
• Data usage: measure the data used in a certain period of time.
• Airplane mode: enable or disable this mode if you are in an area where no electronic devices
are allowed.
• VPN (Virtual Private Network): connect to a VPN to access resources inside a secure local network,
from outside that network. To select this option, you should rst choose a lock screen PIN or password.
• Portable hotspot: congure a portable Wi-Fi spot in order to share your tablet’s network
data connections.
• Wi-Fi direct: see a list of available networks to set up a peer-to-peer connectivity.
• Mobile network: tap to enable access to data access, roaming data, use of 3G networks to save battery
or to select network operators.
7.2. 3G Internet
1. Turn o the device and plug in 3G card.
2. Turn on the device.
3. Unlock to enter into system, make sure the MID can search signal.
(Note: 3G internet can’t be used with wi internet at the same time, the system is defaulted to use Wi
internet. If you wish to use 3G internet, please turn o wi internet.)
7.3. GPS Navigation
Map of the third parties is required for MID internal GPS satellite signal receiver positioning, after installation
the device can accurately implement trac real-time navigation, meet the needs of outdoor navigation.
7.4. Device settings
• Sound: select the volume for music, video, games and other media, ringtones, notications and alarms
• Display: select brightness, wallpaper, the autorotate option, sleep, font size, screen adaption.
• Storage: monitor the used and available space on your tablet’s internal storage and on the card.
• Battery: monitor the battery used when the tablet is idle, by the display and backlight and by
the app.
• Apps: see all the applications that have been downloaded, that are located on the SD card, the
applications that are currently running or to view all of them.
7.5. Personal settings
• Accounts and synchronization: add, remove and manage your Google and other accounts.
• Location and services: enable Google’s location service or Location and Google search to let apps use data
from sources such as Wi-Fi and mobile networks to determine your approximate location or to let Google
use your location to improve search and other services.
• Security: manage screen security, passwords, device administrators and credential storage.
(See Chapter 8)
Language and input: • Use the Language & Input settings to select the language you want to work with
on your tablet.
• From this menu, the user can congure the onscreen keyboard and other input
methods. It is also possible to add or remove words that have been stored in the
Personal dictionary.
Backup and reset: • enable or disable this setting to restore and backup data, passwords. (See 8.1)
7.6. System settings
Set the date and time, accessibility plug-ins, developer options and view information about your Tablet such
as system updates, Status, Legal information, Android version and more.
• Date and time: check this option to allow the network to provide the time and date.
• Accessibility: adjust font size, enable auto-rotate screen, and speak passwords and other settings.
• Developer options: tap to enable the debug mode when the USB is connected, to enable the Stay
awake mode, to allow mock locations and other options.
• User interface: tap to select options such as Flash screen when applications do long operations, to
show visual feedback for touches, to ash areas of the screen when they update.
• Applications: enable the option to destroy every activity as soon as the user leaves it, to limit
background processes or to show that Apps not responding dialog for background apps.
7.7. About Tablet
Information about the tablet: tap for system updates, to see the status of the battery, to access legal information
about the Tablet, to the model number, the Android version, the kernel version, the baseband version and the
build number.
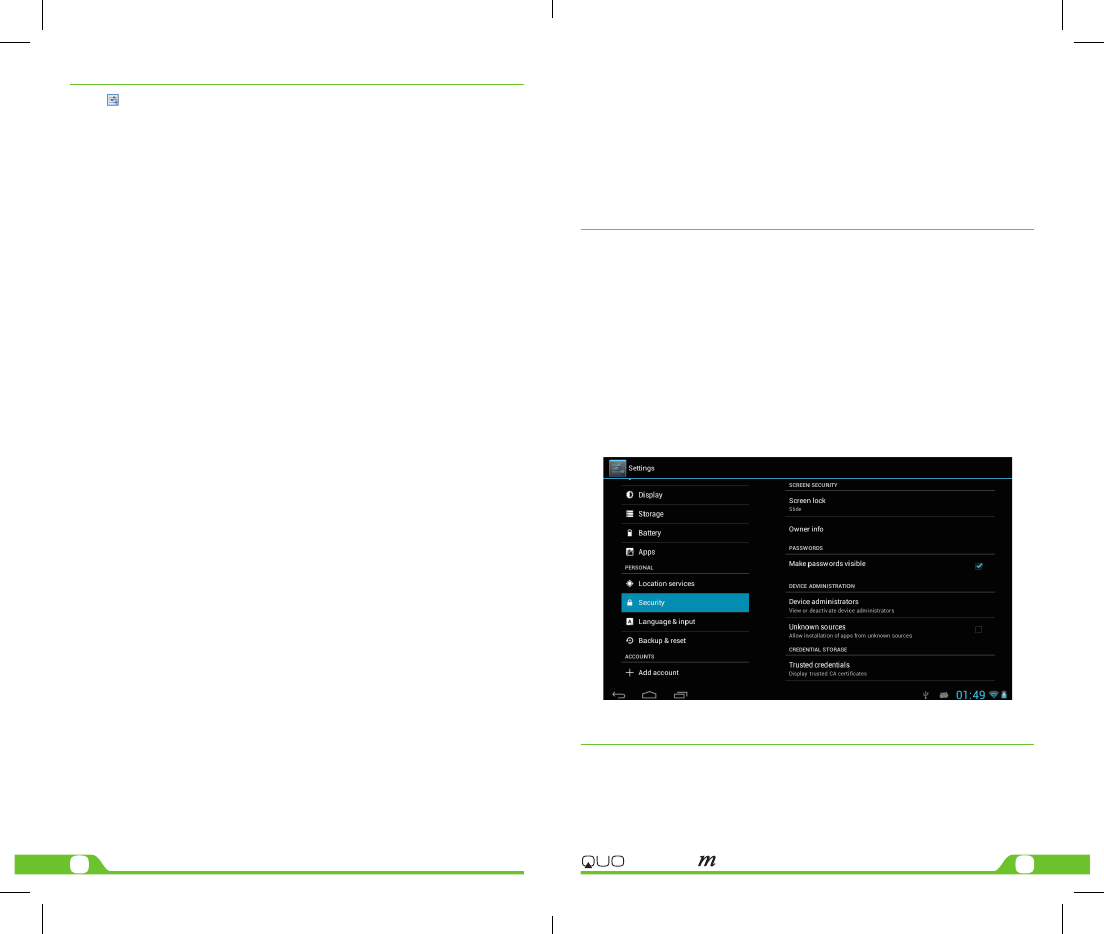
CHAPTER 8 Security settings
Protect your tablet and the privacy of your personal information by locking the screen or using data encryption
methods.
1. To secure the screen go to Applications, select Security, followed by Screen security.
Pick any of the ve locking options included in the menu to unlock the screen:
• None: slide the lock interface and slide your nger to the right
• Slide: tap the lock interface and slide it to the
• Pattern: draw a pattern to lock the screen
• PIN: set up a personal identication number to unlock the screen
• Password: enter a passphrase to unlock the screen
2. Encrypt tablet: to further secure your device, choose this option and follow the on-screen instructions
to complete the process.
3. Make passwords visible: tap to see the passwords as you set them.
4. Device administration: tap to view or deactivate device administrators or to allow installation of apps from
unknown sources
5. Credential storage: credentials are used to establish some kinds of VPN and Wi-Fi connections. If you
require a certicate to log on to certain networks, you should rst obtain it and store it in your tablet’s
secure location or memory card before you can congure access to those networks.
CHAPTER 9 Back-up and reset
You can backup settings and other data associated with one or more of your Google accounts. If you need to
replace or factory reset your device, you can restore your data for any accounts that were previously backed up.
To view these settings:
1. From a Home or All Apps screen, touch the Settings icon
2. Under that, you will see several options such as Backup my data, Automatic restore, Factory data
reset or System upgrade, touch Backup & reset.
*
This device complies with part 15 of the FCC Rules. Operation is subject to the following two conditions: (1) This
device may not cause harmful interference, and (2) this device must accept any interference received, including
interference that may cause undesired operation.
Changes or modifications not expressly approved by the party responsible for compliance could void the user‘s
authority to operate the equipment.
This device has been tested and found to comply with the limits for a Class B digital , pursuant to Part 15 of the
FCC Rules. These limits are designed to provide reasonable protection against harmful interference in a
residential installation. This equipment generates, uses and can radiated radio frequency energy and, if not
installed and used in accordance with the instructions, may cause harmful interference to radio communications.
However, there is no guarantee that interference will not occur in a particular installation If this equipment does
cause harmful interference to radio or television reception, which can be determined by turning the equipment
off and on, the user is encouraged to try to correct the interference by one or more of the following measures:
- Reorient or relocate the receiving antenna.
- Increase the separation between the equipment and receiver.
- Connect the equipment into an outlet on a circuit different from that to which the receiver is connected.
- Consult the dealer or an experienced radio/TV technician for help.
FCC RF Exposure Information (SAR):
This device is designed and manufactured not to exceed the emission limits for exposure to radio frequency (RF)
energy set by the Federal Communications Commission of the United States.
During SAR testing, this is set to transmit at its highest certified power level in all tested frequency bands, and
placed in positions that simulate RF exposure in usage near the body with the separation of 0 cm. Although the
SAR is determined at the highest certified power level, the actual SAR level of the device while operating can be
well below the maximum value. This is because the device is designed to operate at multiple power levels so as
to use only the power required to reach the network. In general, the closer you are to a wireless base station
antenna, the lower the power output.
The exposure standard for wireless s employs a unit of measurement known as the Specific Absorption Rate, or
SAR. The SAR limit set by the FCC is 1.6W/kg. Tests for SAR are conducted using standard operating positions
accepted by the FCC with the device transmitting at its highest certified power level in all tested frequency
bands. The FCC has granted an Equipment Authorization for this model device with all reported SAR levels
evaluated as in compliance with the FCC RF exposure guidelines. SAR information on this model device is on file
with the FCC and canbe found under the Display Grant section of HYPERLINK "http://www.fcc.gov/oet/ea/fccid"
www.fcc.gov/oet/ea/fcc searching on: FCC ID: 2AAPW-QD3GME‐710‐SL
FCC Warning Statement