KBX GROUP QSP-502QM WCDMA/GSM MOBILE PHONE User Manual
KBX GROUP WCDMA/GSM MOBILE PHONE
User manual
mobility.com
User Manual
Infinity PQ5h

23
User Manual
Infinity PQ5h
Introduction
a. Package contents
b. Safe handling of the product
c. Battery instructions I.D.
d. Disposal information
1. CHAPTER 1 • Basic conguration and setup
1.1. Charging your smartphone
1.2. Switching your smartphone on/o
2. CHAPTER 2 • Getting started
2.1. Home screen
2.2. Managing icons and several screens
3. CHAPTER 3 • Main applications
3.1. Internet access
3.2. Web browser
3.3. Email
4. CHAPTER 4 • Data transfer modes
4.1. Connection to a PC
4.2. Micro-SD card
5. CHAPTER 5 • Productivity applications
5.1. File manager
5.2. Search
5.3. Manage downloads
5.4. Clock
5.5. Calendar
6. CHAPTER 6 • Entertainment applications
6.1. Sound recorder
6.2. Music player
6.3. Camera
6.4. Camera and camcorder settings
6.5. Social applications
6.6. FM radio
6.7. FM transmission
7. CHAPTER 7 • Settings
7.1. Wireless and networks
7.2. 3G internet
7.3. GPS navigation
7.4. Device settings
7.5. Personal settings
7.6. System settings
7.7. About Smartphone
8. CHAPTER 8 • Security
9. CHAPTER 9 • Backup and reset
10. CHAPTER 10 • Make and answer calls
11. CHAPTER 11 • Contacts
12. CHAPTER 12 • Messaging
Appendix 1 Specications
Appendix 2 Troubleshooting checklist
Appendix 3 FCC statement
Thank you for purchasing the
Infinity PQ5h
Smartphone. This manual guide will show you how to set up
your device and use its functions. Once your smartphone is up and running, you can visit www.quomobility.
com to nd out more about all the great features your new device has.
a. Package contents
•
Infinity PQ5h
smartphone with rechargeable lithium-ion battery
• AC charger/USB sync data cable
• Earbuds
• User manual
Note: If any of the listed items is missing, mismatched, damaged or broken, contact your local dealer
immediately for replacement.
b. Safe handling of the product
• Never expose your smartphone to direct sunlight or excessive heat. Avoid leaving the product
inside a car with the windows closed.
• Keep your smartphone in a dry place. Never expose this product to rain or water.
• Do not use or store your smartphone in dusty, dirty areas.
• Do not use harsh chemicals, soaps or detergents to clean your smartphone.
• Do not modify, disassemble, open, drop, crush, or puncture this product.
• Never disconnect your smartphone while a download or upload is in progress.
• Switch o the device in restricted areas or where the use of electronic devices is prohibited.
• To protect your hearing, make sure the volume level is not set too high when plugging
the earbuds.
c. Battery instructions
• Use only the battery and battery charger specied by the manufacturer.
• The battery has a limited service life so it will need replacing when it no longer holds enough charge.
• Dispose of old batteries at directed places.
• Do not throw batteries into a re.
• Do not force the battery when installing it.
• If the battery overheats or changes color while charging it or storing it, stop using it.
• Do not expose batteries to high temperatures.
• Do not charge the battery for more than 24 hours.
d. Disposal information
Electrical and electronic products as well as batteries must not be discarded as regular household waste. As part of
the company’s eco-friendly approach, we encourage you to recycle and follow all applicable local waste
regulations to dispose of your used devices properly. Never dispose of batteries in a re.
CHAPTER 1 Basic setup
1.1. Charging your smartphone
• Fully charge the battery prior to using the smartphone for the rst time. Firmly insert the Micro-USB
end of the supplied charger into the I/O port on the smartphone, and the other end to a standard
AC wall outlet or to an available USB port on your computer.
• The battery must be initially charged for 5 hours and for 3 hours or so thereafter.
• Let the battery drain completely, before recharging it to full capacity for a second time. From then
on, allow the battery to charge until the icon on the screen becomes solid green.
1.2. Switching your smartphone on/o
• To turn on the smartphone, press and hold the Power button for several seconds. The welcome screen
will appear.
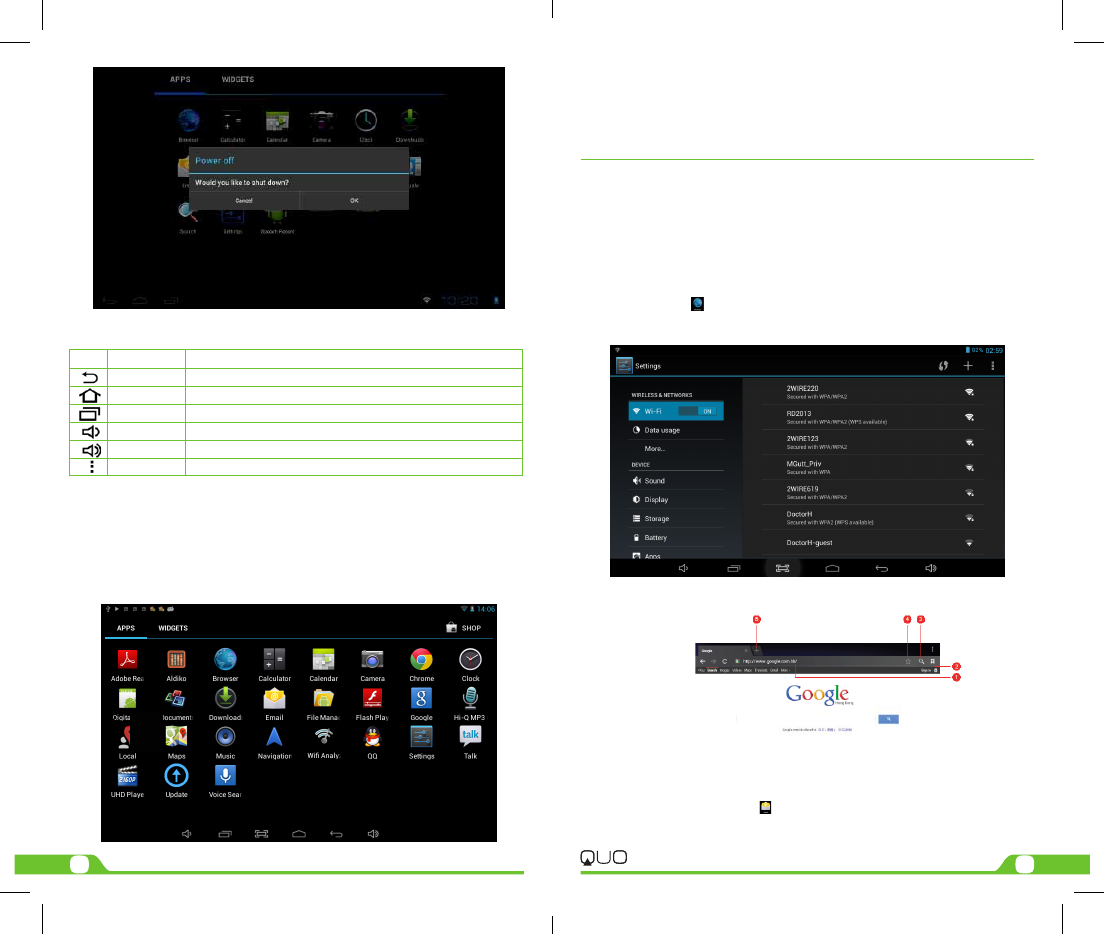
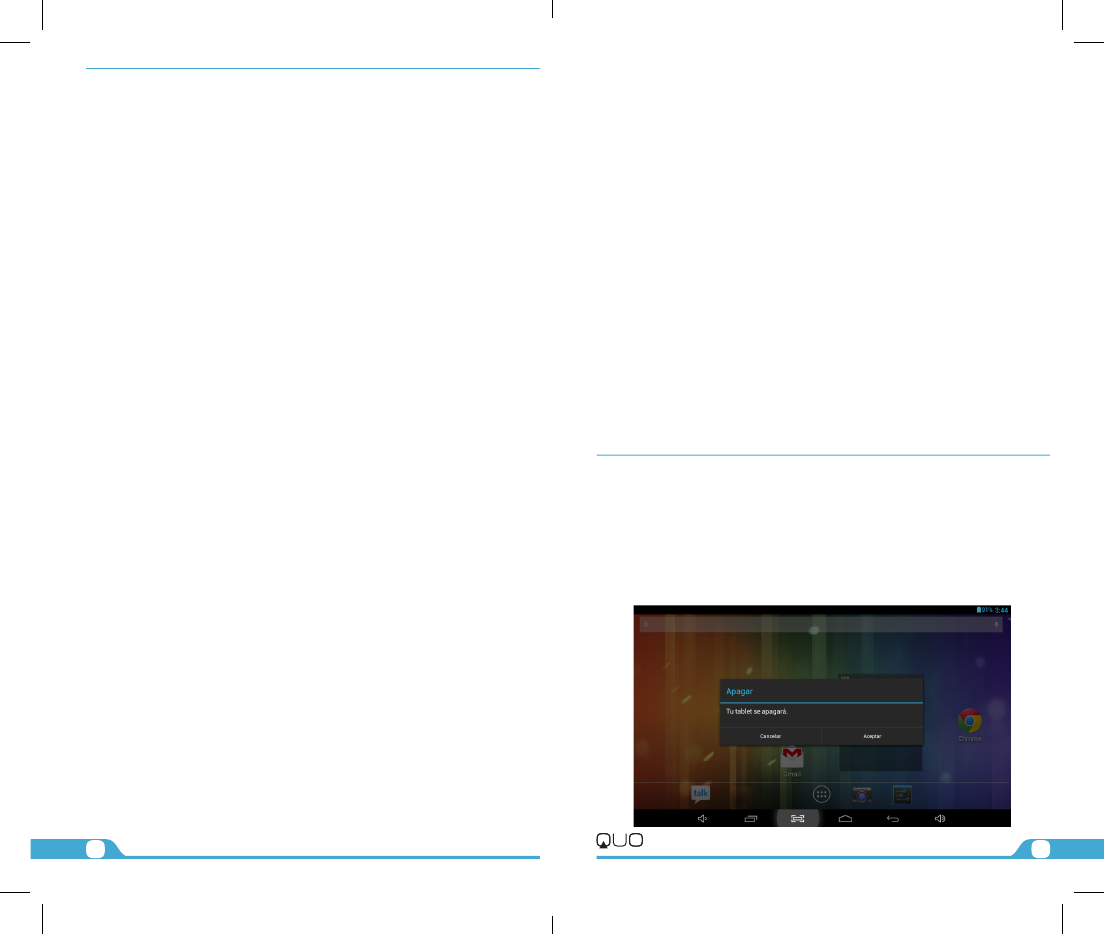
• To switch o the smartphone, press and hold down the Power button again. When the “Power o”
options menu comes up, select OK. The device will shut o completely.
Note: make sure to follow the on-screen prompts for the initial setup of the smartphone.
CHAPTER 2 Getting started
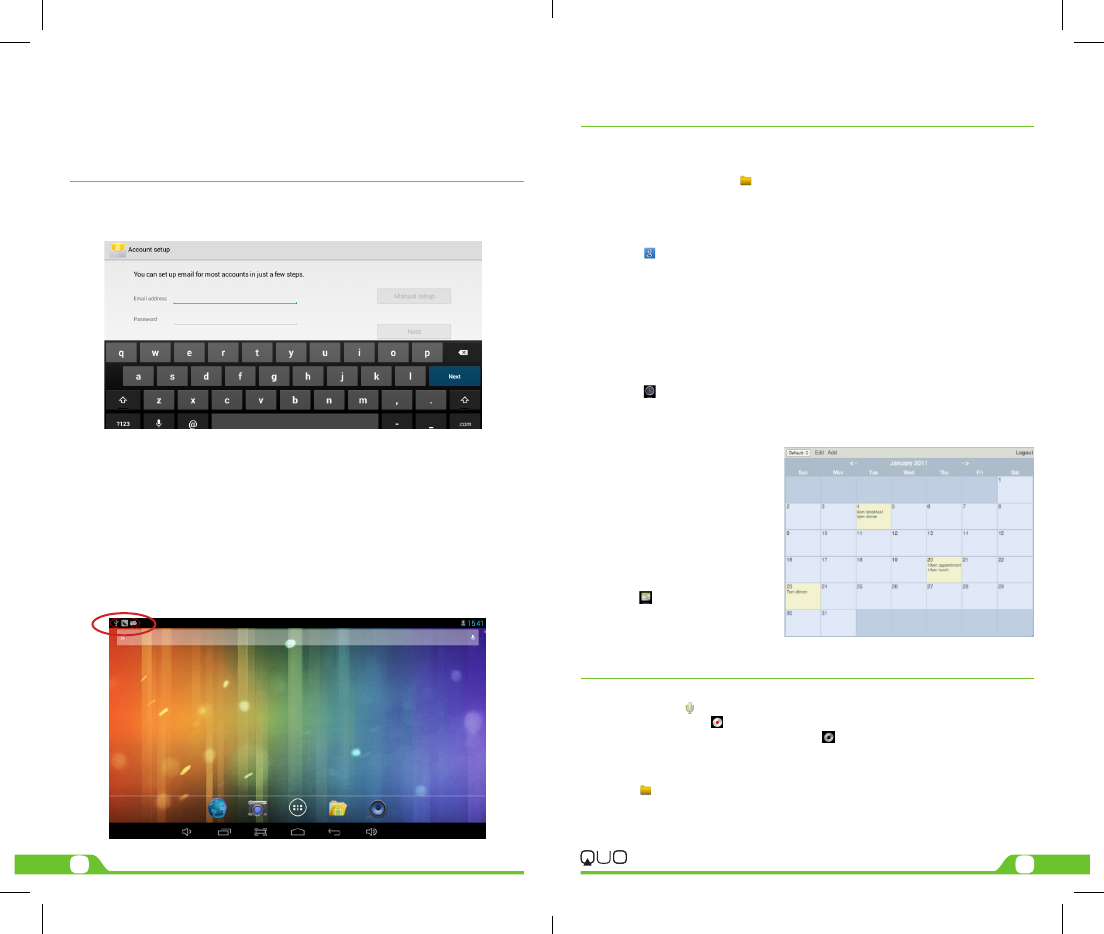
2.1. Home screen
As soon as you power-on your smartphone, you will see the Locked screen interface Slide your nger to the right
45
User Manual
Infinity PQ5h
2.2. Managing icons and dierent screens
In order to see the dierent screens, slide your nger to the left or to the right. You may customize the home
screen or any of the other screens by moving icons to another location. Just tap on the icon, drag it and drop it
at the location where you want to place it.
CHAPTER 3 Main applications
3.1. Internet access
Congure the internet connection using your new smartphone.
• Go to Settings and click on Wi-Fi ON/OFF switch in order to enable the wireless
Conguration on the smartphone.
• Choose a wireless access point, and enter your login and password
• Select the Connect option on this menu to activate access to the internet.
3.2. Web browser
The browser allows you to enjoy a seamless surng experience using your new smartphone.
• Once you have successfully established an internet connection, you just need to tap on
the Browser icon on the apps screen or the shortcut icon on a Home screen to
launch this application.
• At this stage, the following window will be displayed.
• The user can then configure all related navigation settings based on his/her
individual preferences.
3.3. Email
Stay in touch with friends, family and your business associates via email wherever you are.
Follow this quick and easy setup process.
• Select the Email application icon from the apps menu.
• You will be prompted to enter your full email address and password.
• Once you are done, tap the Next button and the system will automatically search for
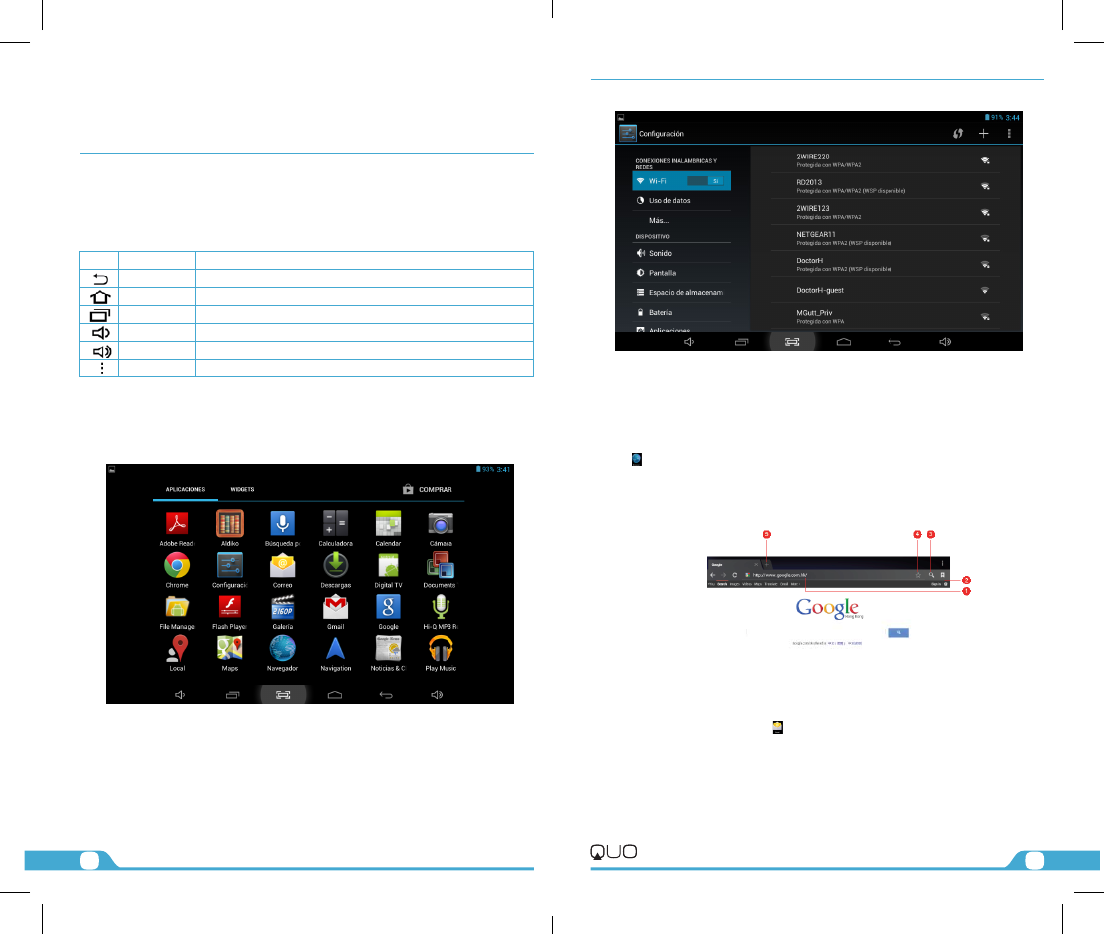
to access the Home screen. This screen provides quick access to the things you need most. The home
screen contains a System bar, located in the bottom left corner of the display, which includes six default
navigation buttons accessible by touching the screen:
Icon Name Description
Back Opens the previous screen you were working in
Home Opens the Home screen
Recent apps Opens a list of thumbnail images of apps recently used
Volume down Tap on this icon if you want to decrease the volume level
Volume up Tap on this icon if you want to increase the volume level
Shortcut Opens the options menu for frequently used applications
In addition the user can choose between two home screen visualization modes:
1. Desktop
2. Application view.
A. In Desktop view, six default shortcuts will be displayed, which you can later
customize based on your own particular needs and lifestyle.
B. The Application view allows access to all the application available in your device.
To open the main All Apps screen, touch the icon on any Home screen.
Note: on the locked screen the most recent application icons will be displayed when accessing the system
from either visualization mode.
67
User Manual
Infinity PQ5h
the incoming and outgoing server settings. If unable to congure automatically, you
have the option to manually set these parameters.
• The Account settings menu will be displayed, allowing you to set certain emails
parameters. When done, select Next to nish the setup.
• If setup is successful, you will have instant access to all your emails using your
wireless connection.
• If you also want to set up a Gmail account, look for the icon in the applications menu.
CHAPTER 4 Data transfer modes
You can transfer data to and from your smartphone PC using the micro-USB connection or the micro-SD card slot.
4.1. Connection to a PC
• On main desktop, connect the device with the PC,
touch right side of the status bar on the top of desktop.
• Press “USB connected”, select “Turn on USB storage”.
The device is recognized at Explorer of the computer.
Now you can use it as an external storage.The Android icon will turn orange.
• On your computer, the smartphone will be displayed as a hard drive.
• Now, you are able to copy, delete or share les between your computer and the smartphone.
Important note: to safely disconnect your smartphone from the computer, you must touch the Turn o USB
storage button on the smartphone screen.
4.2. Micro-SD card
• Insert the micro-SD card into the slot located on the side of the smartphone.
• Open the File manager application on your smartphone. The SD-card tab will become
illuminated, and you will be able to visualize the folders and les stored in the external
memory attached to the device.
CHAPTER 5 Productivity applications
5.1. File manager
In addition to creating, deleting or sharing les, the le manager allows you to keep all your data properly
organized and conveniently stored in your memory.
• Select the File manager icon on your main screen.
• After opening the le browser interface, users will be able to copy, paste or delete les
stored in the local memory, SD card, or USB external storage device.
5.2. Search
Select the icon to open Google search in order to nd content matching the key words
you entered.
5.3. Manage downloads
The les, apps or other items that the user downloads are saved in the smartphone´s internal storage.
• In order to see those items, select the icon from the All Apps screen.
• From the download directory of your smartphone, select the item you want to view, reopen
or delete.
5.4. Clock
Select the icon on the applications menu to open the clock interface. It allows the user to enable or
disable the alarm, set up the time, select the alert tone (Ringtone option), and other related functions of this
feature.
5.5. Calendar
Keep track of your meetings, appointments,
places you want to visit, or schedules that you
need to follow.
• It is required to have a network
connection active the rst time
you use this application, in order
to be able to congure it using
an existing Google Account, or
by creating a new account.
• Once you have an email account
set up, you need to select the
icon on the application
screen to open this feature.
• Click on the day, week, month or
agenda tab to view, add or delete
an event.
CHAPTER 6 Entertainment applications
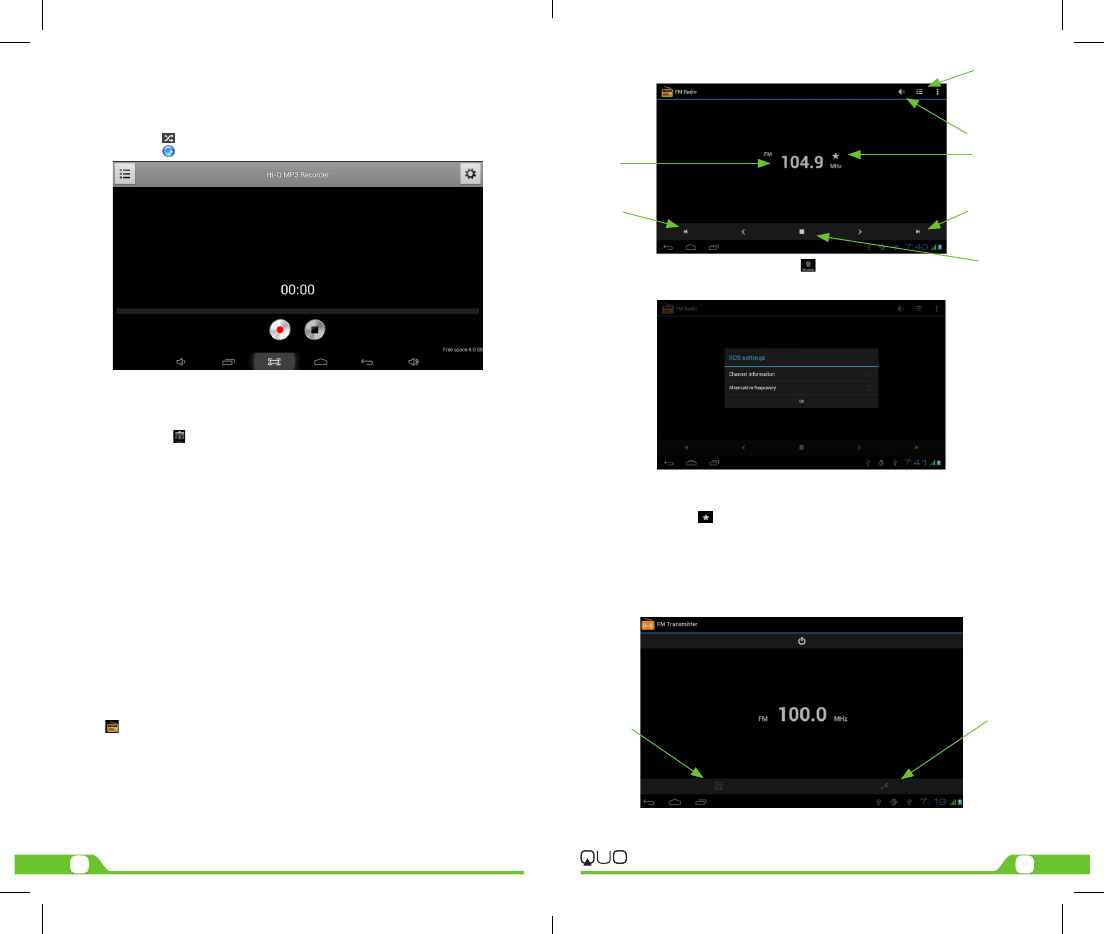
6.1. Sound recorder
• Select the icon to enter the sound recorder interface
• Next, tap on the icon to start recording.
• When you are nished recording, tap on the icon to stop.
• A dialog box will popup. Click on Done if you want to save your recording, or Discard if you prefer to
permanently delete that le.
• Click on the icon to listen to the recording you just saved or go to Applications view, tap the File manager
icon to see the recordings. To perform other le operations, tap and hold your nger on the
recording; a menu will pop and you will be able to delete, rename, copy, move or email your le.
6.2. Music player
89
User Manual
Infinity PQ5h
• Select the icon to enter the music player interface.
• Three dierent sorting schemes will be displayed at this stage: by Artists, Albums and Songs.
• The user can also choose Playlists to replay his/her customized tracks, or tap on the Now playing tab
to either access the music or movie currently being played or to resume playback after being
stopped or paused.
• Tap the icon to enable or disable the random playback mode.
• Tap the icon to switch between continuous repeat mode or single song playback.
6.3. Camera
This interface provides an integrated camera, camcorder, and gallery experience.
• Select the icon to enter the camera interface.
• Then touch the proper icon to toggle between still and video capture modes.
• Tap the blue button in the center to take a snapshot or the red one to start recording.
• After capturing a snapshot or recording a video, your le will appear above the blue button. Tap the
image once to choose options such as see your media le in the gallery send it by email, post it on
Facebook or in Twitter.
• To delete your media le, just tap on the center of the image followed by the Garbage icon on the
upper right corner of the screen.
• To view les, you can tap on the media application icon for instant visualization of your recorded les,
or go to your le manager and retrieve your images from the default location of the camera folder.
6.4. Camera and camcorder settings
Both the still mode and the video capture mode have additional settings. Still and video capture modes:
slide the dot towards the plus (+) sign to zoom in or towards the minus (-) sign to zoom out. You may also tap
the menu icon next to the minus sign to open options such as White balance, Exposure, Store location and Time
lapse interval, only for video capture mode.
6.5. Social network applications
Your smartphone comes with other popular and exciting social applications such as Facebook and Twitter. In
order to access to them, you should set your own username and password.
6.6. FM radio
Click on in the main interface or desktop to enter the FM radio interface:
• Radio button operation instruction as in the following image.
• RDS setting: click Menu key in interface, click button, enter into RDS setting as image below, and
choose the selection you want to add.
• Search channel: Click “Menu” in the main interface, click search button, it will start to auto search
channels, the searched channels will be saved in the channels list
• Save channels: Click button in the main interface to save the channel, and the channel will be
saved in channels list.
6.7. FM transmission
1. Click Setting application procedure.
2. Click FM transmitter.
3. Operate as below picture.
Play/Pause
Previous
Channel
Next Channel
Save Button
Open Speaker
Channel List
Current
Frequency
Manual Setting
Frequency
Auto Search
Vacant
Channels

10 11
User Manual
Infinity PQ5h
CHAPTER 7 Settings
The icon gives you access to a host of customizable features that each user can congure based on his/
her own individual preferences. The most frequently used features will be explained below. Please refer to the
manual in our website for a complete description of all settings.
7.1. Wireless and networks
• Wi-Fi: turn on Wi-Fi so you can see a list of available wireless networks to connect to.
• Data usage: measure the data used in a certain period of time.
• Airplane mode: enable or disable this mode if you are in an area where no electronic devices
are allowed.
• VPN (Virtual Private Network): connect to a VPN to access resources inside a secure local network,
from outside that network. To select this option, you should rst choose a lock screen PIN or password.
• Portable hotspot: congure a portable Wi-Fi spot in order to share your smartphone’s network
data connections.
• Wi-Fi direct: see a list of available networks to set up a peer-to-peer connectivity.
• Mobile network: tap to enable access to data access, roaming data, use of 3G networks to save battery
or to select network operators.
7.2. 3G Internet
1. Turn o the device and plug in 3G card.
2. Turn on the device.
3. Unlock to enter into system, make sure the MID can search signal.
(Note: 3G internet can’t be used with wi internet at the same time, the system is defaulted to use Wi
internet. If you wish to use 3G internet, please turn o wi internet.)
7.3. GPS Navigation
Map of the third parties is required for MID internal GPS satellite signal receiver positioning, after installation
the device can accurately implement trac real-time navigation, meet the needs of outdoor navigation.
7.4. Device settings
• Sound: select the volume for music, video, games and other media, ringtones, notications and alarms
• Display: select brightness, wallpaper, the autorotate option, sleep, font size, screen adaption.
• Storage: monitor the used and available space on your smartphone’s internal storage and on the
card.
• Battery: monitor the battery used when the smartphone is idle, by the display and backlight and by
the app.
• Apps: see all the applications that have been downloaded, that are located on the SD card, the
applications that are currently running or to view all of them.
7.5. Personal settings
• Accounts and synchronization: add, remove and manage your Google and other accounts.
• Location and services: enable Google’s location service or Location and Google search to let apps use data
from sources such as Wi-Fi and mobile networks to determine your approximate location or to let Google
use your location to improve search and other services.
• Security: manage screen security, passwords, device administrators and credential storage.
(See Chapter 8)
Language and input: • Use the Language & Input settings to select the language you want to work with
on your smartphone.
• From this menu, the user can congure the onscreen keyboard and other input
methods. It is also possible to add or remove words that have been stored in the
Personal dictionary.
Backup and reset: • enable or disable this setting to restore and backup data, passwords. (See 8.1)
7.6. System settings
Set the date and time, accessibility plug-ins, developer options and view information about your Smartphone
such as system updates, Status, Legal information, Android version and more.
• Date and time: check this option to allow the network to provide the time and date.
• Accessibility: adjust font size, enable auto-rotate screen, and speak passwords and other settings.
• Developer options: tap to enable the debug mode when the USB is connected, to enable the Stay
awake mode, to allow mock locations and other options.
• User interface: tap to select options such as Flash screen when applications do long operations, to
show visual feedback for touches, to ash areas of the screen when they update.
• Applications: enable the option to destroy every activity as soon as the user leaves it, to limit
background processes or to show that Apps not responding dialog for background apps.
7.7. About Smartphone
Information about the smartphone: tap for system updates, to see the status of the battery, to access legal
information about the Smartphone, to the model number, the Android version, the kernel version, the baseband
version and the build number.
CHAPTER 8 Security settings
Protect your smartphone and the privacy of your personal information by locking the screen or using data
encryption methods.
1. To secure the screen go to Applications, select Security, followed by Screen security.
Pick any of the ve locking options included in the menu to unlock the screen:
• None: slide the lock interface and slide your nger to the right
• Slide: tap the lock interface and slide it to the
• Pattern: draw a pattern to lock the screen
• PIN: set up a personal identication number to unlock the screen
• Password: enter a passphrase to unlock the screen
2. Encrypt smartphone: to further secure your device, choose this option and follow the on-screen
instructions to complete the process.
3. Make passwords visible: tap to see the passwords as you set them.
4. Device administration: tap to view or deactivate device administrators or to allow installation of apps from
unknown sources
5. Credential storage: credentials are used to establish some kinds of VPN and Wi-Fi connections. If you
require a certicate to log on to certain networks, you should rst obtain it and store it in your smart-
phone’s secure location or memory card before you can congure access to those networks.
CHAPTER 9 Back-up and reset
You can backup settings and other data associated with one or more of your Google accounts. If you need
to replace or factory reset your device, you can restore your data for any accounts that were previously backed up.
To view these settings:
1. From a Home or All Apps screen, touch the Settings icon
2. Under that, you will see several options such as Backup my data, Automatic restore, Factory data
reset or System upgrade, touch Backup & reset.
CHAPTER 10 Make and Answer Calls
Directly make a call: On the home screen or in the All Apps screen, touch the button to display the dialing
keypad. Touch the numeric buttons to input the telephone number and touch the button to make the call.
Make the call from Contacts: On the home screen or in the All Apps screen, touch the icon, touch the
desired contact and touch the phone number to dial it.
Make the call from Call log: On the home screen or in the All Apps screen,touch the button, notice the
three tabs at the top of the phone, the call log tab shows recent calls. Touch the phone icon in a call log
to return it.

12 13
User Manual
Infinity PQ5h
Dial from Messaging:
1. On the home screen or in the All Apps screen, touch the Messaging icon
2. Select and open one message or conversation.
3. Touch the icon at the top of the phone to dial.
Answer a call: Phone will ring or vibrate (depends on the current mode and settings) upon an incoming call
• Slide the icon from middle to right to answer the call.
• If the earphone is inserted, press the key on the earphone to answer the call.
Reject a call: Slide the icon from middle to left to reject the call.
End a call: Touch the button to hang up the call.
Adjust the volume: In a call, you can raise or lower the volume by using the volume keys.
Turn the speaker on or o: In a call, touch the button to turn on the speaker, and touch it again to turn
o speaker.
Add one call: In a call, touch the button then dial a number and touch the phone icon to add one call and
put the current caller on hold. This function requires the support of the network operator.
Open the dialing keypad: In a call, you can touch the button to open the dialing keypad to input ad-
ditional numbers.
CHAPTER 11 Contacts
You can place calls from the Phone app , the People app , or other apps or widgets that display contact
information. Wherever you see a phone number, you can usually touch it to dial.
The contacts interface can be divided into the following tab pages:
• Caller groups: Groups of callers you have created.
• Contacts: View the list of contacts.
• Favorites: Display the numbers you usually call.
All of your contacts are displayed alphabetically in a scrollable list. You can slide your nger up or down to
scroll quickly.
Add new contact:
1. In People, touch the add contacts icon at the bottom right hand corner of the screen.
2. Select a memory location.
3. Input all contact information. Slide up to move to the next eld or touch Next.
4. Touch the icon to save your contact.
Delete contacts:
1. In People, touch the Menu keyand then select Delete contact.
2. Touch the contacts you want to delete, then select OK.
Edit contact details:
1. In People, touch the contact whose details you want to edit.
2. Touch the Menu key and then select Edit.
3. Edit the contact information.
Search contacts:
1. In People, touch the icon.
2. Type a key word of a contact name. The phone will automatically list all matched contacts.
Add a contact to Favorites: You can tap the contact you want to add to favorites in the contact interface, and
then touch in the upper right corner to add it to Favorites directly.You can only add the contacts stored
on the phone to the Favorites.
Create a group of contacts: By creating groups of contacts, you can manage multiple contacts and send a
message to an entire group.
1. In People, touch the tab.
2. Touch the icon at the bottom of the screen.
3. Select a memory location.
4. Enter the group’s name and type the person’s name or touch icon to select the contacts you want to
add to the group, then touch .
5. Press the Menu key then touch Edit to add members to the group.
6. Touch .
Accounts
You can synchronize contacts information to your phone from multiple GoogleTM Accounts, Microsoft
Exchange ActiveSync accounts or other kinds of accounts, depending on the applications installed on your
phone.
In People, touch the Menu key and then select Accounts.
Import/Export contacts:
1. In People, touch the Menukey to select Import/export.
2. You can select your Google account, your SIM Card, Phone contact, Phone storage and SD Card.
Share a contact: You can share a contact with someone.
1. In People, tap the contact you want to share.
2. Touch the Menukey and then touch Share.
3. Select application with which to share (Bluetooth®, Email, Gmail, MMS, SMS and SD Card).
CHAPTER 12 Messaging
In Messaging, you can send or receive text messages and multimedia messages.
On the home screen or in the All Apps screen, touch the Messaging icon to open.
Send messages:
1. In Messaging, touch the icon.
2. Input your desired telephone number in Type name or number.
You can also touch the button to select contacts you want to send message from the People and then
touch OK.
3. You can touch the icon attach pictures, videos or audio le and the phone will convert the message to
a multimedia message.
4. Input some text in Typetext message. You can touch the Menu key to select:
• Addsubject: Add a message subject.
• Insertquick text: Insert a quick text.
• Insert contact: Insert contact information.
5. After that, touch the icon to send the message.
APPENDIX 1 Specications
General Processor Quad Core Cortex A53 1.3 GHZ
(MT6582 Mediatek)
Operating system Android™ 4.4
Charging jack Micro USB port
Power Input AC100-240V.50-60HZ
Size Dimensions 145x71.5X9.3mm
Weight 155gr approx. (with battery)
Display Type Capacitive multitouch screen with IPS
Size 5 inches
Resolution HD 1280 x 720 pixeles
Music and audio Audible notications Ringtones and feedback sounds
Speaker Yes
Earphone jack Yes, 3.5 mm
Record Built-in microphone
Music player Supports MP3, WMA, MP2, OGG, AAC, M4A,
FLAC, APE., 3GP, WAV formats
Camera Type Camera and camcorder
(5MP rear and 2MP front)
Video player Supports AVI; MKV; MP4, FLV, others
Memory Internal RAM: integrated 1GB DDR3 ROM: 8.0 GB
Expandable Supports up to 32 GB with micro SD card slot
Battery* Type and capacity Li-ion battery, 3.7 V 1900 mAh
Video playback time 5 hours max.
Audio playback time 9 hours max
Standby time Up to 5 days
Highlights Wi-Fi Supports 802.11 b/g/n
Speed 150 Mbps
Sensor G sensor, proximity and light sensor
Languages Multilingual
4G/3G (GSM 850/1900/1800/1900) (HSPA+ 850/1900)
GPS Yes
Other Colors Available white/gold
Warranty 1-year limited (Venezuela 6 months)
Certifications FCC
*Please note duration times vary depending on usage patterns and conditions. Battery power consumption
depends on factors, such as network conguration, signal strength, operating temperature, features selected,
backlight settings, browser, data use, and other application usage patterns.

Manual del Usuario
14 User Manual
14
APPENDIX 2 Troubleshooting checklist
1. You are unable to turn on your device
• Replace the battery
• Connect the adaptor and then check again
• If, after charging the device, you are still unable to turn it o, contact the dealer immediately.
2. Your smartphone has poor wireless reception
• You may be in an area near tall buildings or in a basement.
• There might be a lot of network congestion in that area.
3. You are unable to charge your device
• Replace the battery
• Your smartphone may be consuming a lot of battery power and reducing standby time.
• Turn o the smartphone temporarily
4. The operating speed of the smartphone is very slow
• Close applications or programs that you are not using, since they use memory
thus, aecting the speed at which the smartphone is working.
Closing applications
• Tap Settings, go to Device and select Apps.
• You will see the applications that are running.
• Tap the application or program you want to close.
• A window will pop up to conrm whether you want to Force stop or Uninstall it
• Tap the action you want to perform.
5. Your smartphone is not working properly
• Perform a forced shutdown: press and hold the Power button for 7 seconds to turn
o the smartphone by force. Then, turn it on again and see if that has solved the problem.
• Factory data reset: to restore the factory settings and erase all data, go to Settings,
then Personal followed by Personal data and Factory data reset.
Note: After resetting the smartphone, all the settings that you have congured and applications that you may
have downloaded will be erased.
APPENDIX 3 FCC Statement
This equipment has been tested and found to comply with the limits for a Class B digital device, pursuant to part
15 of the FCC Rules. These limits are designed to provide reasonable protection against harmful interference
in a residential installation. This equipment generates, uses and can radiate radio frequency energy and, if not
installed and used in accordance with the instructions, may cause harmful interference to radio communications.
However, there is no guarantee that interference will not occur in a particular installation. If this equipment does
cause harmful interference to radio or television reception, which can be determined by turning the equipment
o and on, the user is encouraged to try to correct the interference by one or more of the following measures:
• Reorient or relocate the receiving antenna.
• Increase the separation between the equipment and receiver.
• Connect the equipment into an outlet on a circuit dierent from that to which the
receiver is connected.
• Consult the dealer or an experienced radio/TV technician for help.
2. La señal del smartphone es débil
a. Es posible que esté en una zona cerca de edicios altos o en un sótano.
b. Es posible que la red esté muy congestionada.
3. No puede cargar el dispositivo
a. Cambie la batería.
b. Es posible que el smartphone esté consumiendo mucha batería y reduciendo el tiempo de
carga completa.
c. Apague el smartphone provisoriamente.
4. La velocidad del smartphone es muy lenta
a. Cierre las aplicaciones o los programas que no esté usando debido a que utilizan memoria
y por lo tanto, afectan la velocidad a la que funciona el smartphone.
Cerrar aplicaciones
• Pulse el ícono Ajustes, vaya a Dispositivo y seleccione Aplicaciones.
• Aparecerá una pantalla con todas las aplicaciones que están abiertas.
• Pulse la aplicación o el programa que quiera cerrar.
• Se abrirá una ventana pidiéndole que conrme si quiere Forzar detención o Desinstalar
• la aplicación o el programa.
• Pulse la acción que desee ejecutar.
5. El smartphone no funciona bien
• Efectúe una desconexión forzada del smartphone: mantenga oprimido el botón de
Encendido durante 7 segundos para apagar el smartphone. Luego, proceda a encenderla y
verique si el problema está solucionado.
• Restablecer datos de fábrica: para restablecer los ajustes predeterminados y borrar toda la
información, vaya a Ajustes, luego Personal seguido de Datos personales y Restablecer
datos de fábrica.
Nota: Después de restablecer los datos de fábrica del smartphone, se borran todas las conguraciones que usted
haya ingresado al igual que las aplicaciones que se hayan descargado.
APÉNDICE 3 Declaración de la Comisión Federal de Comunicaciones (FCC)
Tras haber sido sometido a todas las pruebas pertinentes, se ha comprobado que este equipo cumple con los límites
establecidos para dispositivos digitales Clase B, conforme a la Sección 15 del Reglamento de la FCC. Tales límites
denen los niveles máximos permisibles a las interferencias nocivas de la energía radioeléctrica en instalaciones
residenciales. Puesto que el actual equipo genera, utiliza y puede radiar energía radioeléctrica, si no observa las
instrucciones relativas a la instalación y operación del dispositivo, puede provocar interferen- cias nocivas a las
comunicaciones por radio. Sin embargo, no es posible garantizar que no se producirá interferencia alguna en una
instalación determinada. Dado el caso de que el equipo interriera en a recepción de aparatos de radio o televisión,
lo cual se puede determinar al apagar y volver a encender dispositivo, le recomendamos al usuario que intente una
de las siguientes medidas con el objeto de corregir la situación:
• Vuelva a orientar o cambie la ubicación de la antena receptora.
• Aumente la distancia que separa el equipo y el aparato receptor.
• Conecte el equipo en una toma de corriente situada en un circuito distinto al cual está
enlazado el receptor.
• Solicite asistencia al distribuidor o a un técnico experimentado en radio o aparatos de TV.
Declaración de derechos de autor
La reproducción total o parcial de este manual está estrictamente prohibida sin la expresa autorización de QUO.
1 Año de Garantia Limitada (Venezuela 6 meses)
Any changes or modifications not expressly approved by the party responsible for compliance could void
the user's authority to operate this equipment.
This device complies with part 15 of the FCC Rules. Operation is subject to the condition that this device
does not cause harmful interference
FCC RF Exposure Information and Statement
The SAR limit of USA (FCC) is 1.6 W/kg averaged over one gram of tissue. Device types: QSP-502QM-GD
(FCC ID: 2AAPW-QSP-502QM) has also been tested against this SAR limit. The highest SAR value
the handset kept1.0cm from the body. To maintain compliance with FCC RF exposure requirements, use
accessories that maintain a 1.0cmseparation distance between the user's body and the back of the handset.
The use of belt clips, holsters and similar accessories should not contain metallic components in its assembly.
The use of accessories that do not satisfy these requirements may not comply with FCC RF exposure
requirements, and should be avoided.
reported under this standard during product certification for use at the ear is W/kg and when properly
0.610
worn on the body is W/kg. This device was tested for typical body-worn operations with the back of
1.022
This device was tested for typical body-worn operations. To comply with RF exposure requirements,
a minimum separation distance of 1.0 cm must be maintained between the user.s body and the handset,
including the antenna. Third-party belt-clips, holsters, and similar accessories used by this device should not
contain any metallic components. Body-worn accessories that do not meet these requirements may not comply
with RF exposure requirements and should be avoided. Use only the supplied or an approved antenna.
Manual del Usuario
Infinity PQ5h
7
guardada de la manera más conveniente en la memoria.
• Seleccione el ícono Administrar archivos en la pantalla principal.
• Después de abrir la interfaz del explorador de archivos, los usuarios podrán copiar, pegar o borrar archivos
guardados en la memoria local, tarjeta SD o dispositivo USB de almacenamiento externo.
5.2. Como realizar una búsqueda en Google
Seleccione el ícono para abrir el buscador de Google y encontrar información que contenga las palabras claves
ingresadas por usted.
5.3. Administrar descargas
Los archivos, las aplicaciones y otros elementos que el usuario descarga se guardan en el almacenamiento interno
del smartphone.
• Para ver dichos elementos, seleccione el ícono de Todas las aplicaciones.
• Desde el directorio de descargas de su smartphone, seleccione el archivo que desea ver,
volver a abrir o borrar.
5.4. Reloj
Seleccione el ícono en el menú de aplicaciones para abrir la interfaz del reloj. Ésta le permite al usuario habilitar o
inhabilitar la alarma, poner la hora, seleccionar el tono de alerta (opción de tonos) y otras funciones relacionadas.
5.5. Calendario
Manténgase al día con sus reuniones, citas,
lugares que desea visitar u horarios que
deba seguir.
• Deberá haber una conexión
activa a la red la primera vez que se
use esta aplicación, para poder
congurarla usando una cuenta
existente de Google, o creando una
cuenta nueva.
• Una vez que tenga una cuenta
de correo congurada, deberá
seleccionar el ícono en la
pantalla de aplicaciones para
abrir esta función.
• Haga clic en la pestaña día, semana,
mes o agenda para ver, agregar o
borrar un evento.
CAPÍTULO 6 Aplicaciones de entretenimiento
6.1. Archivos de sonido
• Seleccione el ícono para ingresar a la interface de la grabadora de sonido
• Toque a continuación el ícono para comenzar a grabar.
• Cuando termine, toque el ícono para detener la grabación.
• Emergerá un cuadro de diálogo. Haga clic en Listo si desea guardar la grabación, o en Descartar si preere
borrar el archivo de manera permanente.
6
CAPÍTULO 4 Modalidades de transferencia de datos
Usted puede transferir datos desde y hacia su smartphone usando la conexión micro USB o la ranura para micro-
tarjeta SD.
4.1. Como conectarse a una computadora
• Inserte el Micro USB externo en el puerto ubicado en el costado del smartphone y una vez detectado el
dispositivo, emergerá el botón Activar almacenamiento USB en el borde superior izquierdo de la pantalla,
para habilitar la conexión a la computadora.
• Toque este botón para continuar. El ícono de Android se pondrá naranja.
• En su computadora, el smartphone aparece indicada como un disco rígido.
• Desde ahora, usted podrá copiar, borrar o compartir archivos entre su computadora y el smartphone.
Nota importante: para desconectar su smartphone de la computadora de forma segura, debe tocar el botón
Desactivar almacenamiento USB en la pantalla del smartphone.
4.2 Tarjeta Micro SD
• Inserte la microtarjeta SD en la ranura ubicada al costado del smartphone.
• Abra la aplicación Administrador de archivos en su smartphone. Se iluminará la pestaña Tarjeta,
y podrá visualizar las carpetas y archivos almacenados en la memoria externa conectada al dispositivo.
CAPÍTULO 5 Aplicaciones de productividad
5.1. Administrador de archivos
Además de crear, borrar o compartir archivos, el administrador le permite mantener toda su información organizada y
Manual del Usuario
Infinity PQ5h
5
CAPÍTULO 3 Aplicaciones principales
3.1. Acceso a Internet
El navegador le permite disfrutar sin problemas a la hora de explorar la web con su nueva smartphone.
• Primero, vaya a Ajustes y pulse el interruptor de Encendido/Apagado de Wi-Fi para habilitar la configuración
del smartphone.
• Seleccione el punto de acceso inalámbrico e ingrese sus credenciales.
• Finalmente, seleccione la opción Conectar de este menú para activar el acceso a Internet.
3.2. Navegador
• Una vez que haya establecido la conexión a Internet con éxito, sólo tiene que tocar el ícono del Navegador
en la pantalla de aplicaciones o el ícono de acceso directo en una pantalla principal para activar
dicha aplicación.
• En esta instancia, aparecerá la siguiente pantalla.
• Luego el usuario podrá congurar todo lo relacionado con la navegación, conforme a sus
preferencias personales.
3.3. Correo electrónico
Ahora puede mantenerse en contacto por correo electrónico con amigos, familiares y colegas dondequiera que se
encuentre. El proceso de conguración es rápido y fácil.
• Seleccione el ícono de la aplicación Correo electrónico en el menú de aplicaciones.
• Deberá ingresar su dirección de correo y contraseña.
• Cuando termine, toque el botón Siguiente y el sistema buscará automáticamente los parámetros entrantes
y salientes del servidor. Si no puede congurarlo automáticamente, tiene la opción de establecer dichos
parámetros de forma manual.
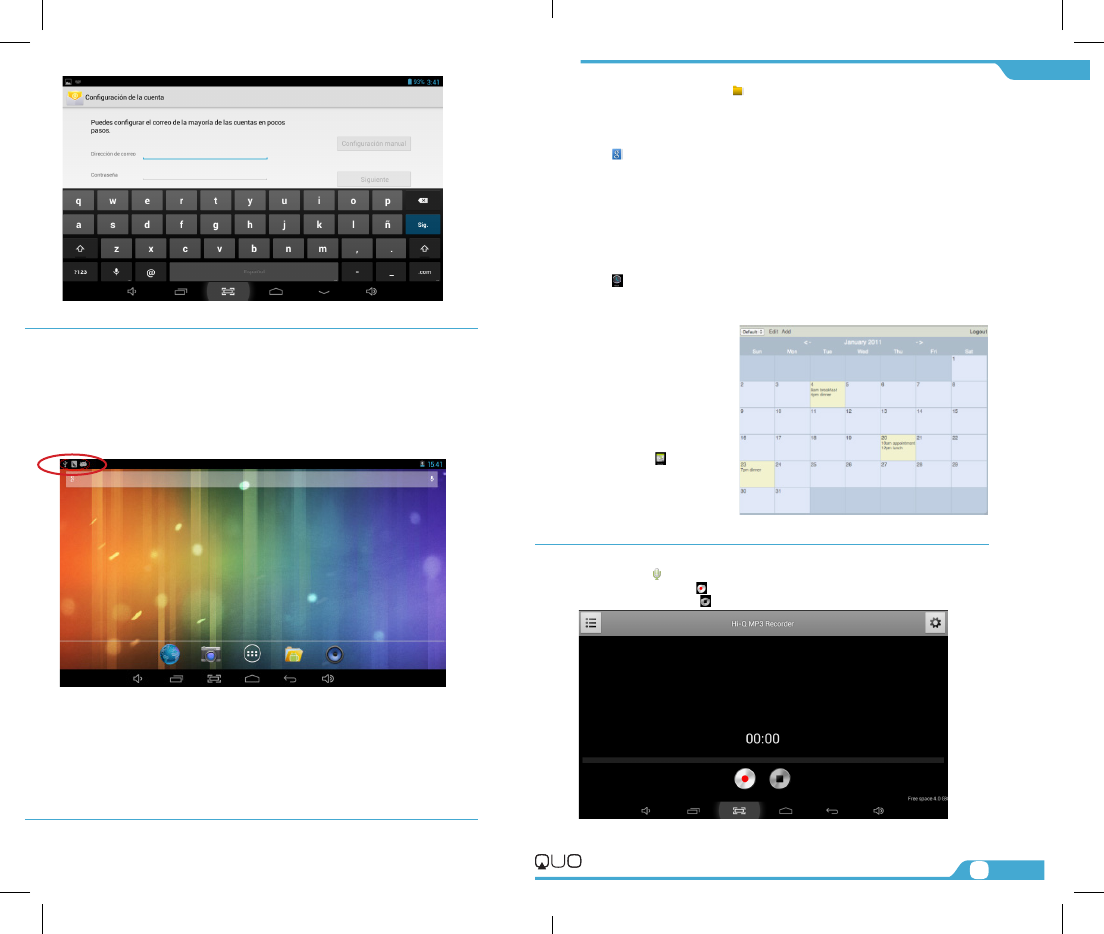
• Se mostrará el menú de Conguración de la cuenta, que le permitirá establecer ciertos parámetros del
correo electrónico. Cuando termine, seleccione Siguiente para nalizar la conguración.
• Si la conguración se realizó correctamente, tendrá acceso inmediato a su correo electrónico usando la
conexión inalámbrica.
• Si también quiere abrir una cuenta de Gmail, busque el ícono en el menú de aplicaciones.
4
• Para encender el smartphone, mantenga oprimido el botón de Encendido durante varios segundos.
La pantalla de bienvenida aparece desplegada en esta etapa.
• Para apagar el smartphone, vuelva a mantener oprimido el botón de Encendido. Cuando aparezca el
menú de opciones de “Apagado”, seleccione OK. Lo anterior ocasionará la desconexión del dispositivo.
Nota: procure seguir las indicaciones en pantalla para la conguración inicial del smartphone.
CAPÍTULO 2 Pasos preliminares
2.1. Pantalla de inicio
Apenas encienda su smartphone, se activa la interfaz de bloqueo. Deslice el dedo hacia la derecha para acceder a
la Pantalla de inicio. Esta pantalla le brinda acceso rápido a las aplicaciones que usted más necesita, así como a la
información clave respecto al estado actual de su smartphone. La pantalla de inicio contiene una barra del Sistema,
ubicada en la esquina inferior izquierda, la cual incluye seis botones de navegación predeterminados. Puede acceder
a ellos pulsando la pantalla:
Ícono Nombre Descripción
Retorno Abre la pantalla anterior en la que usted estaba trabajando
Inicio Abre la pantalla de inicio
Aplic. recientes Abre una lista de imágenes en miniatura de las aplicaciones utilizadas recientemente
Bajar volumen Pulse el ícono para disminuir la intensidad del sonido
Subir volumen Pulse el ícono para incrementar la intensidad del sonido
Atajo Abre el menú de opciones para las aplicaciones que se usan con frecuencia
Además, el usuario puede elegir entre dos modos de visualización de la pantalla de inicio: Visualización del Escritorio
y de las Aplicaciones.
A. El Escritorio exhibe seis accesos directos predeterminados, los cuales más adelante podrá
personalizar de acuerdo a sus propias necesidades y estilo de vida.
B. El visualizador de Aplicaciones permite acceder a todas los programas disponibles en su dispositivo.
Para abrir la ventana principal de Todas las aplicaciones, toque el ícono en cualquiera de las pantallas principales.
Nota: en la pantalla de bloqueo, los íconos de las aplicaciones más recientes aparecen desplegados cuando se
ingresa al sistema utilizando cualquiera de los modos de visualización.
2.2. Administrar íconos y varias pantallas
Para ver varias pantallas, deslice el dedo hacia la izquierda o la derecha. Se puede personalizar la pantalla de inicio o
cualquiera de las otras pantallas trasladando los íconos a otra ubicación. Simplemente, mantenga pulsado cualquier
ícono y arrástrelo hacia el lugar donde quiera reubicarlo.
Manual del Usuario
Infinity PQ5h
3
a. Contenido del empaque
• Smartphone
QUO Innity Q4e con batería de iones de litio recargable
• Cargador de CA/cable USB para sincronización de datos
• Audífonos
• Manual del usuario
Nota: si se hubiera dañado o extraviado cualquiera de las piezas de la lista anterior, comuníquese de inmediato con el
vendedor para efectuar el cambio del producto.
b. Manipulación correcta del producto
• Nunca exponga el smartphone a los rayos directos del sol o al calor excesivo. Evite dejar el producto
en el interior de un vehículo con las ventanas cerradas.
• Mantenga el smartphone en un ambiente seco. Nunca exponga el producto al agua o la lluvia.
• No utilice o guardel smartphone en un ambiente donde exista polvo o suciedad.
• Jamás utilice químicos, limpiadores o detergentes abrasivos para limpiar el smartphone.
• Nunca intente alterar, desarmar ni abrir el producto, y evite aplastarlo, dejarlo caer o perforarlo.
• Nunca desconecte el smartphone durante la carga o descarga de programas o archivos.
• Apague el dispositivo en áreas restringidas o en donde el uso de electrónicos esté prohibido.
• Para proteger su audición, evite ajustar el volumen en el nivel más alto cuando utilice audífonos.
c. Instrucciones para la batería
• Use únicamente la batería y el cargador que especique el fabricante.
• La batería tiene una vida útil limitada, por este motivo, hay que cambiarla cuando ya no pueda almacenar
suciente carga.
• Elimine las baterías viejas en los lugares indicados.
• Jamás incinere las baterías.
• No inserte la batería por la fuerza cuando la instale.
• Deje de usar la batería, si ésta se recalienta o cambia de color mientras se recarga o mientras está guardada.
• No exponga la batería a altas temperaturas.
• No cargue la batería durante más de 24 horas.
d. Información de eliminación
Los aparatos eléctricos y electrónicos así como las baterías no se deben desechar junto con la basura al nal
de su vida útil. Atendiendo al compromiso de la empresa por proteger el medio ambiente, le recomendamos
observar todas las disposiciones regionales pertinentes para eliminar los componentes electrónicos en la forma
adecuada. Jamás incinere las baterías.
CAPÍTULO 1 Conguración básica
1.1. Cargar la batería del smartphone
• Deberá cargar la batería por completo antes de usar el smartphone por primera vez. Inserte el extremo del
cargador (incluido) con el microconector USB en el puerto de entrada-salida ubicado en el smartphone, y el otro
extremo en un tomacorriente de alterna o bien, en un puerto USB disponible en su computadora.
• La batería nueva debe cargarse inicialmente durante al menos 5 horas y en lo sucesivo, por alrededor
de 3 horas.
• Deje que la batería se consuma por completo antes de volver a cargarla a plena capacidad por segunda
vez. A contar de ese momento, cargue la batería hasta que el ícono en pantalla se ilumine de color verde.
1.2. Encender y apagar el smartphone
2
Introducción
a. Contenido del empaque
b. Manipulación correcta del producto
c. Instrucciones para la batería I.D
d. Información de eliminación
1. CAPÍTULO 1 • Conguración Básica del sistema
1.1. Cargar la batería del smartphone
1.2. Encender/apagar el smartphone
2. CAPÍTULO 2 • Pasos preliminares
2.1. Pantalla de inicio
2.2. Administracion de íconos y varias pantallas
3. CAPÍTULO 3 • Aplicaciones principales
3.1. Acceso al Internet
3.2. Navegador
3.3. Correo electrónico
4. CAPÍTULO 4 • Transferencia de datos
4.1. Como conectarse a una computadora
4.2. Tarjeta Micro SD
5. CAPÍTULO 5 • Aplicaciones de productividad
5.1. Administrar archivos
5.2. Como realizar una búsqueda en Google
5.3. Administrador de descargas
5.4. Reloj
5.5. Calendario
6. CAPÍTULO 6 • Aplicaciones de entretenimiento
6.1. Archivos de sonido
6.2. Reproductor de música
6.3. Cámara
6.4. Conguraciones de la cámara y de la videocámara
6.5. Redes sociales
6.6. Radio FM
6.7. Transmisión FM
7. CAPÍTULO 7 • Conguraciones varias
7.1. Conexiones inalámbricas y a la red
7.2. Internet 3G
7.3. Navegacion GPS
7.4. Conguraciones del dispositivo
7.5. Conguraciones personales
7.6. Conguraciones del sistema
7.7. Información del smartphone
8. Seguridad
9. Copia de seguridad y restablecimiento
10. CAPÍTULO 10 • Realizar Y Recibir Llamadas
11. CAPÍTULO 11 • Contacots
12. CAPÍTULO 12 • Mensajes
Apéndice 1 Especicaciones
Apéndice 2 Guía de solución de problemas
Apéndice 3 Declaración de la Comisión Federal de Comunicaciones
Gracias por preferir el smartphone QUO Innity Q4e. La presente guía le enseñará a congurar su dispositivo y a
utilizar las funciones esenciales del producto. Una vez que comience a utilizar el smartphone, puede visitar
www.quomobility.com para conocer más acerca de las magnícas funciones que posee este dispositivo.
Manual del Usuario
mobility.com
Q069.MA.01
Infinity PQ5h