KCMobile GM819 Quad-Band GSM 850/900/1800/1900 MHz Mobile Phone User Manual
KCMobile Co., Ltd. Quad-Band GSM 850/900/1800/1900 MHz Mobile Phone
KCMobile >
User Manual

Quad-band GSM/GPRS handset
GM819
User Guide
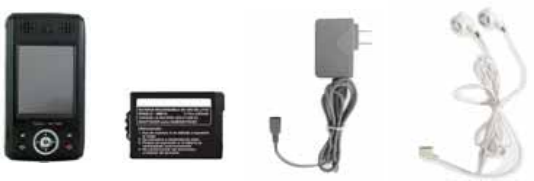
UNPACKING
Thank you for purchasing GM819. Check whether your phone comes equipped with all the nec
essary components, as shown in the figure below. If the product is defective or there is a comp
onent missing, immediately contact the office where you bought our phone.
9 Phone
9 Li-ion Battery
9 USB type Travel Charger & USB Cable
9 Earphone
9 User Guide
9 Quick Reference Card
CONTENTS
0…SAFETY INFORMATION
0…BEFORE YOU START
0…PHONE ICONS
0…DESCRIPTION OF KEYS
0…BACKLIGHT
0…BATTERY
0…NETWORK LINKING
0…INSERT & REMOVE
THE T-FLASH CARD
0…THE IDLE PROFILE
0…CALL FUNCTIONS
0…DISPLAY SCREEN
0…KEY OPERATION
0…SILENT MODE
0…CALL LOG
0…CALL MENU
0…FUNCTION MENU
0…AUDIO PLAYER
0…VIDEO PLAYER
0…VIDEO RECORDER
0…CAMERA
0…PHONEBOOK
0…Quick Search
0…Search Entry
0…Add New Entry
0…Copy All
0…Delete
0…Caller Group
0…Extra Number
0…Settings
0…Caller Picture
0…Caller Ring Tone
0…Caller Video
0…Search by Location
0…Options
0…MESSAGE CENTER
0…Message
0…Chat
0…Voice Mail Server
0…Broadcast Message
0…CALL HISTORY
0…Missed Calls
0…Dialed Calls
0…Received Calls
0…Delete Call Log
0…Call Time
0…Call Cost
0…SMS Counter
0…GPRS Counter
0…ORGANIZER
0…Calendar
0…To Do List
0…Alarm
0…World Clock
0…FUN & GAME
0…Games
0…Themes
0…Stopwatch
0…SERVICES
0…SIM Tool Kit
0…WAP
0…Data Account
0…MULTIMEDIA
0…Image Viewer
0…Webcam
0…Photo Editor
0…Sound Recorder
0…Melody Compose
0…EXTRA
0…Calculator
0…Unit Converter
0…Currency Converter
0…Health
0…E-Book Reader
0…SETTINGS
0…Display Setup
0…Phone Setup
0…Call Setup
0…Network Setup
0…Security Setup
0…Sound Effect
0…Restore Factory Settings
0…Software Version
0…USER PROFILES
0…SHORTCUTS
0…FILE MANAGER
0…TEXT INPUT MODE
0…SPANISH/ENGLISH IUPUT MODE
0…Touch Screen Write Input Mode
(Pen Editor)
0… Virtual Keyboard Input Mode
0… Input Mode Change
0...Symbols
0…MP3 AND MP4 INSTRUCTION
0…TROUBLESHOOTING
0…GLOSSARY
0…LIMITED
WARRANTY STATEMENT
SAFETY INFORMATION
PERSONAL USE
Operation of any radio equipment including mobile phones may interfere with the function of in
adequately shielded medical devices such as hearing aids and pacemakers. You must consult t
he manufacturer of these devices or your physician before use.
In oil depots and chemical factories where explosive gas or other products are stored, the user
should pay close attention to the restriction on the use of mobile phone. Even if your phone is i
n the idle mode, it will still transmit radio frequency signals. Therefore, you must switch off wh
en requested to do so.
Note traffic safety. When you are driving, please do no use your mobile phone. Stop on the sid
e of the road when you do need to use it. Avoid making calls with your cellular phone in storm
y weather.
Safety Information related with children:
9 Be cautious of children swallowing the small parts such as the SIM card
9 Prevent children from playing with your cell phone as toys. For example, behaviors l
ike throwing, biting the phone, or immersing it into water should be avoided.
9 Do not let children less than 14 years old hang the phone around the neck.
MOBILE PHONE USE

Please use only the accessories or parts offered by the manufacturer or those authorized by th
e manufacturer. Use of unauthorized accessories might influence the performance of the phone.
What’s worse, your phone might get damaged and harm will be caused to your body. It might
even violate the national regulations on the telecommunication terminal products.
Do not use chemical products like cleaning solvents or detergents to clean your phone. It is rec
ommended that you use slightly damp and static electricity proof cloth instead of cloth that is d
ry and easy to catch static electricity. Before cleaning, you should switch off your phone.
Your mobile phone produces magnetic fields. Do not place it next to magnetic storage media s
uch as computer diskettes. Operating your mobile phone close to other electrical equipment su
ch as televisions, phones, radios and personal computers may cause interference and therefore
influence the performance of your phone.
Do not expose your mobile phone to strong sunlight, direct heat or any liquids in case of any d
amage.
Harsh handling behaviors such as throwing; beating which might damage the internal integrate
d circuit of the phone should be avoided.
Please do not link it to other unnecessary equipments.
Note! Non-professionals must not try to dissemble the phone.
Phone Precautions!
9 Use your phone battery only for its intended purpose, and never use any battery
charger which is damaged or worn out.
9 When you unplug your phone from its charger, grasp and pull the plug, not the
power cord.
9 Do not use harsh chemicals, cleaning solvents, or strong detergents to clean your
phone. Wipe it with a soft cloth slightly dampened in a mild soap-and-water
solution.
9 Do not attempt to open the casing on your phone or its battery.
9 Always keep SIM card out of children’s reach.
BATTERY USE
Do not short-circuit the battery terminals. This is dangerous and will damage the battery, produ
ce heat and may cause a fire.
Never dispose of batteries in a fire as it can cause explosion. Return waste batteries to your su
pplier or an approved recycling center. Do Not dispose along with household wastes.
Warning! If the battery case is broken, avoid contact with the contents. Wash contaminated s
kin with lots of water and seek medical attention.
Battery Precautions!
9 Avoid dropping the cell phone. Dropping it, especially on a hard surface, can potenti
ally cause damage to the phone and battery. If you suspect damage to the phone o
r battery, take it to a service center for inspection.
9 Never use any charger or battery that is damaged in any way.
9 Use the battery only for its intended purpose.
9 If you use the phone near the network’s base station, it uses less power; talk and st
andby time are greatly affected by the signal strength on the cellular network and t
he parameters set by the network operator.
9 Battery charging time depends on the remaining battery charge and the type of bat
tery and charger used. The battery can be charged and discharged hundreds of tim
es, but it will gradually wear out. When the operation time (talk time and standby ti
me) is noticeably shorter than normal, consider purchasing a new battery.
9 If left unused, a fully charged battery will fully discharge itself over time.
9 Extreme temperatures will affect the charging capacity of your battery : it may requ
ire cooling or warming first.
9 Do not leave the battery in hot or cold places, such as in a car in summer or winter
conditions, as it will reduce the capacity and life of the battery. Always try to keep t
he battery at room temperature. A phone with a hot or cold battery may temporaril
y not work, even when the battery is fully charged. Batteries are particularly affecte
d by temperatures below 32°F.
9 Do not place the phone in areas that may get very hot, such as on or near a cookin
g surface, cooking appliance, iron, or radiator.
9 Prevent your phone or battery from getting wet. Even though they will dry and app
ear to operate normally, the circuitry could slowly corrode and pose a safety hazard.
9 Avoid a battery out of the phone in coming contact with metal objects, such as coin
s, keys or jewelry.
ON THE ROAD

Before making or receiving calls acquaint yourself thoroughly with the applicable local laws and
guidelines regarding the use of mobile radio telephones and always abide by these laws.
Air bags, anti-lock brakes, cruise control and fuel injection systems are normally immune to rad
io transmissions but if you come across problems, please consult you vehicle dealer.
Turn off your mobile phone when refueling or where there are signs restricting the use of two-
way radio equipment. Do not store or carry flammable or explosive materials in the same comp
artment as your mobile phone because internal sparks could cause ignition.
Safety comes first, and is the ultimate responsibility of the driver. Please:
9 Give full attention to driving – driving safely is your first responsibility.
9 Use a Hands-free Kit, if available.
9 If you have a Hands-free Kit make sure to pre-program numbers when possible, an
d keep calls brief and to a minimum.
9 If you don’t have a handsfree kit, pull off the road and park your vehicle before ma
king or answering a call in driving conditions so require.
ON AN AIRCRAFT
Switch off your mobile phone before boarding an aircraft. Use of mobile phone is strictly forbid
den on an aircraft because of the potential interference with the telecommunication system. If
the plane has not taken off yet, you should ask the flight crew for permission before you use y
our phone.
Note! If you have set your phone to Auto Switch ON, please check the Alarm Clock setting stat
us and the Schedule menu to see the reminding time setting so that your phone will not power
on automatically during the flight.
EXPLOSIVE ATMOSPHERES AND MATERIALS
Turn your phone off and do not remove the battery when in any area with a potential explosive
atmosphere and obey all signs and instructions. You must observe restrictions on the use of
radio equipment in fuel depots; below deck on boats; fuel or chemical transfer or storage
facilities; areas where the air contains chemicals or particles, such as grain, dust, or metal
powders; areas with signs about explosive atmospheres or where blasting operations are in
progress; any other areas where you would normally be advised to turn off your vehicle
engines.
WIRELESS PHONE POSE A HEALTH HARZARD
The available scientific evidence does not show that any health problems are associated with
using wireless phones. There is no proof, however, that wireless phones are absolutely safe.
Wireless phones emit low levels of radio frequency energy (RF) in the microwave range while
being used. They also emit very low levels of RF when in the stand-by mode. Whereas high
levels of RF can produce health effects(by heating tissue), exposure to low level RF that does
not produce heating effects causes no known adverse health effects. Many studies of low level
RF exposures have not found any biological effects may occur, but such findings have not been
confirmed by additional research. In some cases, other researchers have had difficulty in
reproducing those studies, or in determining the reasons for inconsistent results.

NON-IONIZING RADIATION(Exposure to Radio Frequency Signals)
Your phone is a low power radio transmitter and receiver. When it is on, it receives and also
sends radio frequency (RF) signals. Most modern electronic equipment is shielded from RF
signals. However, certain electronic equipment may not be shielded against the RF signals from
your mobile phone. RF signals may affect improperly installed or inadequately shielded
electronic systems in motor vehicles. Consult your vehicle manufacturer and the manufacturer
of any equipment that has been added to the vehicle.
CAUTION! Read this information carefully before using your phone
In August 1996 the Federal Communications Commission (FCC) of the United States with its
action in Report and Order FCC 96-326 adopted an updated safety standards for human
exposure to radio frequency electromagnetic energy emitted by FCC regulated transmitters.
Those guidelines are consistent with the safety standards previously set by both U.S and
international standards parties. The design of this phone complies with the FCC guidelines ad
these international standards.
BODY-WORN OPERATION
This device has been tested for body-worn operation and meets FCC RF exposure guidelines, a
nd positions the handset at a minimum of 1.5Cm from the body. Use of any body-worn accesso
ries may not compliance with FCC RF exposure guidelines.
For more information about RF exposure, please visit the FCC website an www.fcc.gov
BEFORE YOU START

PHONE ICONS
Shows the received signal strength. The more the bars, the better the sign
al strength.
Appears when a new text message has been received
Appears when you have messages waiting in voice mail
Appears when the vibrator mode is selected as ring tone type.
Appears when the alarm clock function is enabled.
Shows the level of battery status. The more bars you see, the more power
battery has left.
Indicates that your phone is on quick silence mode.
If your phone is on quick silence mode, all audible key tones are muted an
d all audible alerts are changed to vibrator alert.
Appears when a PUSH message has been received
Appears when your phone is registered to a GPRS network.
Appears when there is an active GPRS connection.
Appears when your phone is connected to a GPRS modem.
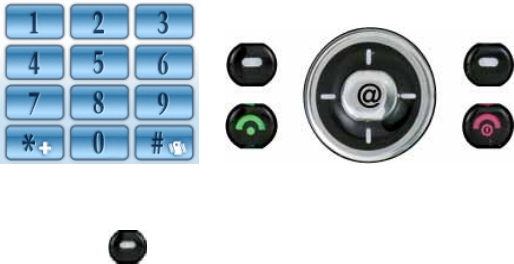
DESCRIPTION OF KEYS
Left Soft Key
9 Performs the functions indicated by the text in the left bottom line of the display scr
een above it.
9 On standby mode, enables you to enter into the menu.
9 When in the Game Mode, enables you to quit the program.
9 In the menu mode, selects menu function or stores information that you have enter
ed in the phone or SIM memory.

Right Soft Key
9 Performs the functions indicated by the text in the right bottom line of the display s
creen above it.
9 On standby mode, enables you to enter into the Phonebook.
9 In the menu mode, press the right soft key function, to go back to previous screen.
Send Key
9 Press to dial a Number.
9 Press to answer an incoming Call.
End Key
9 Press to end a call or reject an incoming call. The phone will switch ON or OFF if it i
s pressed and held.
9 Also In the menu mode, enables you to return to the idle mode (screen) or cancel
your input.
Navigation Key
9 In the editing mode, moves the cursor.

9 In the menu mode, moves the menu cursor.
9 In the idle mode, each key has the following function.
- Up-Navigation Key: Enter into the Audio Player. Long pressing leads you to enter
into the User Profiles.
- Down-Navigation Key: Enter into the Shortcuts. Long pressing leads you to enter
into the General/Silent mode.
- Left-Navigation Key: Enter into the Write Message. Lon
g
pressin
g
leads you to
the SIM Toolkit.
- Right-Navigation Key: Enter into the Alarm. Long pressing leads you to the
Multimedia menu.
9 Center-Navigation : Enter into the WAP menu directly. Long Pressing leads the Hom
e Page.
Press to take a picture or record/pause a video cliff.
-
0~9 Numeric Keys
9 If you want enter numbers and characters, touch the phone icon( ) on screen. B
y touching the keys, you can enter numbers and characters. You can make use of
the Speed Dial function by long touching the number keys ([2]~[9] key) select opti
ons of menus quickly.
9 In key screen, Enter into the “Voice Mail Server” by long touching the [1] key.
[* ] Key and [#] Key
9 In key screen mode, switch between the Mute Mode and the Normal Mode by long
touching the [#] key.

9 In number dialing screen, you can enter characters such as “P” , “+”, “ * ” and
“W” , of which “P” shows it’s a extension call, “+” indicates it’s an international call
and “W” indicates “Waiting” to check to user if the phone may send DTMF before s
ending.
Left Side Volume Key
9 When the phone is in the idle mode, you can adjust the volume of the keys.
Also in the same mode, you can switch to adjust the volume of the ring tone by pre
ssing Right- Navigation key.
9 During a call, when the MP3 player is working, you can regulate the volume of the
voice or music.
9 When there is an incoming call, you can stop the alert ring by short pressing the
Up or Down-side key.
Right Side Function Key

9 When your phone is in the idle mode, you can adjust change the keypad lock and
unlock by long pressing the side function up key.
9 When your phone is in the idle mode and phone is unlocked, you can go into the
Camera preview simply by pressing the side function down key.
Long pressing leads you to the Video recorder directly
Hook Button on the earphone
9 If you insert the earphone to the jack on the bottom side of your phone, you can us
e it in the same way as your phone’s earpiece.
9 You can answer or end a call by pressing the hook button on the earphone.
9 When a new call comes in while you are on a call, you can answer the waiting call b
y pressing the hook button on the earphone. (The first call will be held automaticall
y).
9 You can call the last number dialed in the idle screen by pressing the hook button o
n the earphone. The last number dialed is launched by pressing the hook button, a
nd then the call will be made by pressing the hook button again.
9 If you press the hook button shortly
In idle mode : MP3 player is background played.
MP3 is playing : pause and play
9 If you press and hold the hook button ;
In idle mode : make a call the last number dialed
MP3/video/camera/video recording : stop all action and go to the idle mode
9 During a call, you can adjust the earpiece volume.
To increase the volume, press VOLUME-UP key.
To decrease the volume, press VOLUME-DOWN key.
BACKLIGHT
A backlight illuminates the display and the keypad. When you press any key, the backlight
comes on. It goes off when no keys are pressed within a given period of time.
BATTERY
The phone comes with Li-ion battery which is only half charged but can be put into use immedi
ately after the package is opened. However, the battery should be thoroughly discharged and f
ully recharged for at least 3 recycling times successively to achieve optimum performance.
Insert and Remove Battery
9 Remove the battery from the phone by two steps:
- Push up the release batch.
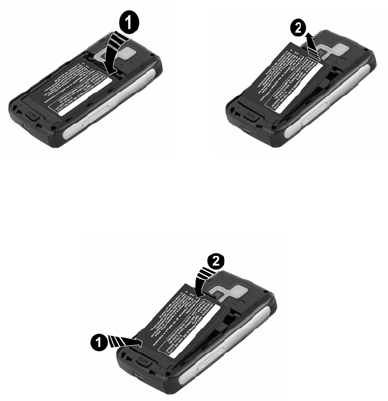
- Slightly lift the battery out of the back of the phone.
9 Insert the battery into the phone by following two steps:
- Align the bottom of the battery down into the holes in the bottom of the phone.
- Then sit the battery on the back of the phone until it clicks into place.
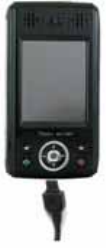
How to Charge the Battery
9 Plug your charger into the main socket first.
9 Connect the lead from the charger to the bottom of the phone.
9 When the battery is charging, the icon on the upper right corner which indicates th
e battery charge level will flash in cycle. If the phone has powered off, a charging s
creen will show that the battery is charging now. You have to wait for some time be
fore the charging icon appears on the screen if your phone is overused.
9 When the bars in the icon are fully filled and has stopped flashing, it tells you that t
he battery has been fully charged. If the phone has powered off, the screen will tell
you verbally that the charging has finished. Generally, it takes 2—3 hours to fully c

harge the battery. Normally, the battery, the phone and the charger might get heat
ed in the process.
9 Release the charger from the power socket and the phone.
9 Warning! Charge the battery in a well-ventilated area between -40℃ ~ +55℃. Yo
u must only use the supplied charger. Unauthorized charger might result in danger
and any malfunction or damage caused by the use of unapproved charger will void
the product warranty and it will not be acknowledged by the manufacturer.
Battery Use
9 It is highly recommended that you recharge your battery when your phone powers
off automatically or when the screen says “Inadequate Battery”. If you recharge the
battery before it is fully discharged, the phone will make some adjustment automati
cally and complete the charging in less time.
9 The talk time and standby time suggested by the supplier is measured in an ideal o
perating environment. Practically, the time may vary with the state of the network,
operating environment and the way it is used.
NETWORK LINKING
SIM Card
9 Your network service provider will offer you a SIM (subscriber identity module) card,
which is inserted into your phone. It is the key to the digital GSM network. You sho
uld install a valid SIM card in place before you start to use your phone. Information
about network linking and your call record together with your phonebook and SMS i
s all saved in SIM card. It can be applicable to all GSM linking phones. A new phone
will read the data stored automatically.
9 Do not touch the gold contacts of SIM card in case the data might get lost or dama
ged. Avoid placing it near areas where there is a magnetic or electric field. Once th
e card is damaged, you will not be able to link to the GSM network by it.
9 Warning! Switch the phone off before you remove the SIM card from the phone. Y
ou may damage the card if you try to insert it into the phone or remove it from the
phone when your phone is connected to external power.
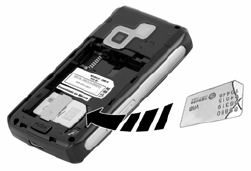
Insert and Remove the SIM Card
9 The SIM card is usually embedded in a sheet card. You should first take it off the ca
rd before you assemble it to the phone.
9 Switch the phone off. Then remove the battery and pull it away from external powe
r socket.
9 Insert the SIM card under the SIM card holder.
9 When you need to remove the SIM card, you should first switch off the phone, rem
ove the battery and take it away from under the SIM card holder.
9 Note!: About the SIM card
The SIM card is a computer chip containing information about your subscription,
security, phonebook etc.
When you register as a subscriber with GSM or GPRS network operator, you are
provided with the SIM card.
Always handle the SIM card with care and insert with the gold contacts facing d
own.
Power ON/OFF
9 Make sure that the battery is attached. You can switch your phone On/Off by long p
ressing the [end] key.
9 If you switch the phone on without a SIM card :
The phone will promote “Insert SIM” ― In this case, you can make emergency c
all 171
The phone will promote“Network Emergency”― which means it is searching for
network but has failed to link.
9 When the SIM card is in the due place, the phone will check the validity of the card
automatically. Then the screen will promote in sequence:
“Enter PIN”-- prerequisite: SIM card security code is enabled.
“Enter Lock Code ”-- Prerequisite: Phone Lock Code is enabled.
“No Service”-- Network registration failure. In this case, you can not make a call.
“Emergency Call Only”-- You phone has registered the other network and only
171 emergency call is allowed.
“Searching for Network”-- The phone will search for proper network to log on.
“Digitel ” -- Successful network registration. You may make a call and send or re
ceive SMS.
PIN Code
9 A PIN code is adopted to prevent your SIM card from any illegal use. If a PIN code i
s activated, you are requested to input the PIN code to unlock the SIM card every ti
me your phone is switched on. Only in this way can you make or receive a call. The
user can also disable the PIN code. In this case, your phone will be open to illegal u
se.
9 When the PIN code is enabled, you can erase the wrong input by pressing the Right
soft key and confirm the code by pressing [#] or [OK] key.

9 For example: If the PIN code is set to be 1234, you can enter the code as follow : 1
234#.
9 If the PIN code is entered incorrectly more than 3 times in succession, PIN will be b
locked and your SIM card will automatically lock-up. Once your SIM card is blocked,
you will be asked for the PUK1 password.
9 Note! A regular PIN code consisting of 4~8 digits will be offered to you by your net
work service provider. You are advised to change it into your private code set by yo
urself as soon as possible.
Phone Lock
9 A Phone lock code can be set to prevent your SIM card from any illegal use. If a PI
N code is activated, you are requested to input the phone lock code to unlock the p
hone every time your phone is switched on. Only in this way can you make or recei
ve a call. The user can also disable the phone lock code. In this case, your phone w
ill be open to illegal use.
9 When you enter a wrong phone lock code, you can clear it by pressing [END/POWE
R] key. Confirm your operation by pressing [#] key or [OK] key.
9 For example : If the phone lock code is set to be 0000, you can enter the code as f
ollow : 0000#.
9 Provided that you forget the phone lock code, you must contact your dealer or the l
ocal authorized maintenance center.
Link the Network
9 If the SIM lock code is acknowledged, your phone will search for the registration ne
twork automatically or log on to other applicable networks. “Searching …” appears o
n the screen. In the end, you will find the name of the network service provider, ap
pearing in the middle of the screen, to show successful connection and your phone
will turn to the idle mode.
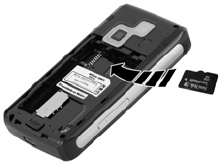
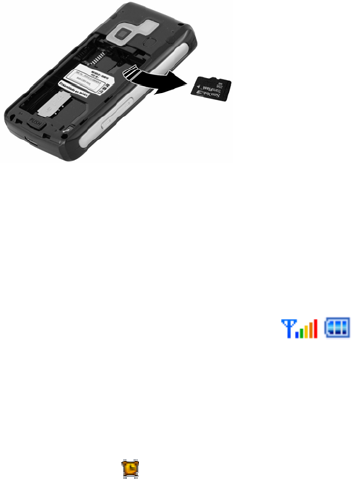
INSERT & REMOVE THE T-FLASH CARD
9 The T-Flash card is embedded in a sheet card. You should first take it off the card b
efore you assemble it to the phone.
9 Switch the phone off. Then remove the battery and pull it away from external powe
r socket.
9 Insert the T-Flash card under the T-Flash card holder.
9 When you need to remove the T-Flash card, you should first switch off the phone, r
emove the battery and take it away from under the T-Flash card holder.
THE IDLE PROFILE
Link Icons on the idle main screen
9 Signal strength indicator and battery power level indicator:
9 The fully filled bars on both icons only suggest abundance and not necessary 100%
in power.
9 Wallpaper ( Still or Animated Image)
9 There are built-in still or animated wallpapers for your choice. You can also downloa
d pictures from the PC by connecting your phone to the computer.
9 When your phone is in the idle mode, you can also see the following icons:
Alarm Setting has been enabled.

New text message and full inbox indicator:
Mute Setting has been enabled.
CALL FUNCTIONS
Making a call
9 You can receive or make a call when the sign of the network service provider appea
rs on the display screen. The number of the bars on the upper left corner indicates
the network signal strength.
9 Since barriers could greatly influence the talk quality on the telephone line, it is advi
sable to move within a limited area to receive stronger signal.
Dialing mode
9 Whenever you touch and input a numeric key in key screen, your phone will go to t
he dialing mode. The Signal indicator icon and the Battery level indicator and other
icons remain on the screen.
9 Function keys:
Save a number to Phonebook by pressing Left soft key.
Return to the idle mode by pressing right soft key or the [END/POWER] key.
Dial the number entered by pressing [SEND] key.
Erase the digit before the cursor by short pressing the Right soft key.
Clear all the digits entered by long pressing the Right soft key.
Navigation Key: Use to move the cursor.

Connecting a Number
9 In the idle mode, you will enter the key screen by touching the phone icon( ). By
pressing the [SEND] key, your phone will try to connect to the entered number.
The connecting animation, signal indicator, and the battery level icon will display on
the screen. If the number you are dialing is stored in your phonebook in advance, t
he name will be displayed on the screen. Otherwise, the called number appears on
the screen.
9 Key operation : You can end a call by pressing Right soft key, [END/POWER] key, th
e hook button on the earphone.
Adjusting the Call Volume
9 During a call, if you want to adjust the earpiece volume, use the Up/Down Side
Volume key. Press the Up-Side Volume key to increase the volume level, press the
Down- Side Volume key decrease the volume level.
Domestic Call
9 The most convenient way to make a domestic call is to enter telephone numbers by
touching the numeric keys in key screen. (Please add area code before the numbe
r.) Press [SEND] key to connect the called number. You can change the entered nu
mber by pressing the Right soft key to clear the digit before the cursor. A connectin
g animation appears on the screen. When the other part ends the call, you can che
ck the call related information.
9 Press [END] to end a call.
9 The input sequence is: Area code + number + [SEND].
Call an Extension of fixed Phone sets
9 Extensions of fixed phone sets cannot be connected directly to your phone. You nee
d to first connect to the telephone exchange and then dial the extension number. H
owever, this can also be achieved by inserting a pause character “P” to indicate the
extension number. Your phone will finish the entire dialing automatically.
9 You can enter “P” by short touching [*] three times successively, the symbol “P” will
appear on the screen.
9 The steps to dial an extension number:
Area code + main number + “P” + extension number + [SEND] key
9 For example:
If you want to dial 1234567 to call the tele-banking system with the balance inq
uiry number 7777 and password 0000, the dialing sequence will be: 1234567 +
P +7777+ P + 0000. The first part is to call the banking system. When the call i
s answered, the phone will transmit 7777 to enquire the balance.
International Call
9 You should touch [*] key for a couple of times until the symbol “+” appear on the s
creen. By doing so, you can make an international call in whatever country without
having to input the country code. After the prefix symbol is entered, you should inp
ut the country code and the telephone number. Country code is customarily fixed. F
or instance, in Germany, it is 49. In UK, it is 44. In Sweden, it is 46, etc. When you
are dialing an international call, you should omit the digit “0” before the city code.
9 To dial a fixed number: +”Country code + complete number + [SEND] key

Call from the List
9 Your phone automatically stores each number dialed or answered in its memory. In
the call list, you can view recently called and answered numbers. The latest call will
be listed in the very beginning. All the records are categorized into Missed Calls, Dia
led Calls, and Received Calls. The list may be updated continually as new numbers
are added to the beginning of the list and the oldest entries are removed from the
bottom of the list. You can view the Dialed Call numbers by pressing [Send] key. Yo
u can also dial the numbers in the list by pressing [SEND] key.
9 You can launch the call options mode by pressing left soft key so that you can save
the number into the Phonebook by pressing “Save to Phonebook”.
Emergency Call
9 In whichever countries covered by the digital GSM network, you can make an emer
gency call if you are within the coverage of the network. The network signal strengt
h indictor will tell you whether you can make it or not. If no service is available, the
screen will say “EMERGENCY CALLS ONLY”. Therefore, you can make an emergenc
y call even without the SIM card in place.
1) Enter 171 to call the emergency services. 2) Press [SEND].
9 Note! : Some network may not allow the emergency call(171) and may request to
insert SIM card.
Answer a call
9 Press the [SEND] key to answer a call as a default setting. To change the answering
mode, press Menu> User Profiles> General (or select other option)> Customize>
Answer Mode.
9 When there is an incoming call, the phone icon on the display screen will be

displayed, and the melody will sound or the vibrator will work according to the
setting.
9 If the caller is identified, the caller photograph, phone number/name (if stored in
the Phonebook), and caller group name is displayed on the screen.
DISPLAY SCREEN
Incoming call animation
9 The number of the caller will be displayed on the screen if it is not saved in the Pho
nebook. Otherwise, caller’s name will be displayed.
KEY OPERATION
Function Key
9 You can answer or divert an incoming call by pressing the left soft key and reject it
by pressing right soft key.
9 You can answer a call by pressing [SEND] key and reject it by [End] key.
9 Note! If the earphone is plugged into the jack on the phone, you can answer a cal
l by pressing the hook button. If you have set “Auto Answer” ON with the earphone
plugged, the call will be connected automatically in 5 seconds.

SILENT MODE
Silent mode is convenient, for example in a theater, when you wish to stop the phone from ma
king noise.
In the key screen mode, touch and hole the key (or long press Down-Navigation key)
until the “Silent Activated” message and the Silent mode icon display.
In Silent mode, your phone will vibrate instead of ringing.
CALL LOG
Your phone saves the recent call record and all the call times. In “Call Time” sub-menu, you ha
ve the following options:
Last Call Time : You can see the last call time of your call.
Total Sent : You can see the total sent call time of your call.
Total Received : You can see the total received call time of your call.
Reset All Time : When you want to reset call time, selects the Reset All Time.
CALL MENU
During a Call
9 When the call is confirmed by the caller and connected, the main-screen displays th
e following information when the conversation begins: “Number or Name”, “Call Tim
e”, “Status (Hand-free On/Off)”.

Key Function
9 Function Key:Right soft key for switching between Hand and Hand-free mode;
[END/POWER] key for hanging up the phone.
9 Adjust the volume by pressing the left side volume key.
9 Hook Button to end a call.
Call Options
9 These options are visible only when you are during the process of a call. The multi-
part call function should get support by the network. Please contact you network se
rvice provider for further information.
9 The following options are available: “Hold”, “End”, “New Call”, “Phonebook”,
9 “Message Center”, “Sound Record”, “Mute (Local voice will not be transmitted to
the other part)”, “DTMF (You can set it ON or OFF)”.
9 Note! Some options appear only in some particular situations. Or they may need th
e support from the network. For example: “New Call” should be supported by the n
etwork.
Auto DTMF
9 In cases when the “P” symbol is placed in between numbers, the phone will first
attempt to connect the call and then automatically send out the numbers after the
“p”.
Auto Answer
9 If the earphone has been plugged into the jack on the phone and the Auto Answer
function is set ON, the incoming call will be answered automatically in 5 seconds.

To set the Auto Answer function, follow the steps ; Menu > User Profiles > Headset
> Customize > Answer Mode.
Auto Redial
If the Auto Redial mode is set ON, the call will be redialed automatically following a failed
attempt. To set the Auto Redial function, follow the steps ; Menu > Settings > Call Setup
> Auto Redial.
Sound Management
9 Generally, the key sound and the sound of the ring are heard from the earpiece of t
he phone during a call. If the preset time of the alarm comes during a call, the
alarm will be delayed from ringing until after the call has ended. With the earphone
plugged in the jack of the phone, the sound will be from the headphone and the ale
rt ring will still work.
FUNCTION MENU
AV ZONE
AUDIO PLAYER
9 Move the cursor to the option of “Audio Player” and press the left soft key to view t
he file list.
9 Each audio has the following options ;
Play : Play the selected file.
Detail : Check the details of the selected music.

Add to Ring : Add the selected music to the ring list.
Refresh List : Update intentionally the list of Audio.
Settings : The following options are available ; Play List/ List Auto Generate/ Rep
eat/ Shuffle/ Background Play/ Backlight Mode/ Equalizer/ Spectrum Display/
Lyrics Display.
9 Operational key instructions ;
Go to the idle mode : press [END] key
Play/Pause : press the Up Navigation key
Stop : press the Down Navigation key
Move to the previous : press the Left Navigation key
Move to the next : press the Right Navigation key
Volume up/down : press the left side volume key.
9 You can also press the hook button on the earphone to Play or Pause the music.
9 Note! It is suggested that the volume be turned down before the earphone is plug
ged in to the jack on the phone for loud sound can do harm to your ears.
VIDEO PLAYER
9 You can see the saved movies in the album. The options :
Play: To play the saved movies.
Forward : Forward the saved video clip “To PhoneBook”, “To Screen Saver”, “To
Power On Display”, “To Power Off Display” and “To MMS”.
Rename: Change the name of the selected movie.
Delete: Delete the selected movie.
Delete All Files: Delete all the saved movies.
Sort : Rearrange the saved photos by selected means. The following options are

available.
By Name : The saved photos are sorted by name.
By Type : The saved photos are sorted by type.
By Time : The saved photos are sorted by time.
By Size : The saved photos are sorted by size.
None : The saved photos are not sorted
Storage : Select the target storage. The following options are available.
Phone : The saved photos are stored to phone.
Memory Card : The saved photos are stored to Memory Card.
VIDEO RECORDER
9 In the video recorder main screen, you can make a video clip (MPEG4) or play the s
aved video clip.
9 To record a video or to pause the recording, press [Center Navigation] key.
9 You can set the corresponding options and enter the video player menu to see the s
aved video clip.
To Player
9 You can see the saved movies in the album. The options ;
Play: To play the saved movies.
Forward : Forward the saved video clip to “To Phonebook”, “To Screen Saver”,
“To Power on Display”, “To Power off Display” and “To MMS”.
Rename: Change the name of the selected movie.
Delete: Delete the selected movie.

Delete All Files: Delete all the saved movies.
Sort: Rearrange the saved photos by selected means. The following options are
available.
By Name : The saved photos are sorted by name.
By Type : The saved photos are sorted by type.
By Time : The saved photos are sorted by time.
By Size : The saved photos are sorted by size.
None : The saved photos are not sorted
Storage: Select the target storage. The following options are available.
Phone : The saved photos are stored to phone.
Memory Card : The saved photos are stored to memory card
Camcorder Setting
9 You can select the following camcorder setting value.
9 White Balance
Options : Auto/Daylight/Tungsten/Fluorescent/Cloud/Incandescence
9 EV Select the effect of exposure. Use Navigation Left/Right key
Options : EV-4 ~ EV+4
9 Night Mode : On/Off
9 Banding
Select the frequency (50Hz/ 60Hz)
Video Setting
9 Video Quality
Setting the quality level of movie.

Options : Normal / Low / Fine / High
9 File Size Limit
Setting the limit of movie size.
Options : No Limit / 95K / 195K / 295K
9 Record Time Limit
Setting the limit of recording time.
Options : No Limit / 15 sec / 30 sec / 60 sec
9 Record Audio : On/Off
9 Encode Format
Setting the encoding format.
Options : H.263 / Mpeg4
Effect Setting
9 You can set special photo effect.
9 Options : Normal/ Gray Scale/ Sepia/ Sepia Green/ Sepia Blue/ Color Invert/ Gray In
vert
Storage
9 You can select the target storage.
9 Options : Phone / Memory Card
Restore Default
9 You can restore all setting value of video recorder to Factory default value.

CAMERA
9 In the camera main screen, you can take photos, set camera options or view the sa
ved pictures.
9 To take a photo, press [Center Navigation] or [Right Side Down] key.
9 If there is not enough memory to save a new photo, you need to create free space
by deleting old pictures or other files in the menu.
9 Option (Press the left key) : You can set the corresponding options and enter the
album to see saved photos.
Album
9 You can see the saved pictures in the album.
9 The following options are available.
View : To see the saved photos.
Browse style : Select the list type of saved photos. The following options are
available.
List Style : You can see the list type.
Matrix Style : You can see the matrix type.
Forward : Send the picture to the target place. The following options are
available.
To Wallpaper : Send the picture to wallpaper.
To Screen Saver : Send the picture to screen saver.
To Power On Display : Send the picture to power on display.
To Power Off Display : Send the picture to power off display.
To PhoneBook : Send the picture to phonebook.
To MMS : Send the picture to MMS

Rename : Change the name of the selected photo.
Delete : Delete the selected photo.
Delete All Files : Delete all the saved photos.
Sort : Rearrange the saved photos by selected means. The following options are
available.
By Name : The saved photos are sorted by name.
By Type : The saved photos are sorted by type.
By Time : The saved photos are sorted by time.
By Size : The saved photos are sorted by size.
None : The saved photos are not sorted.
Storage : Select where the photo will be stored. The following options are
available.
Phone : The saved photos are stored to phone.
Memory Card : The saved photos are stored to memory card.
Camera Setting
9 You can select the following camera setting value. All the shortcut keys are valid onl
y in the camera preview mode.
9 Shutter Sound :
Select shutter sound when you take a photo.
The following options are available ; Off , Sound 1, Sound 2, Sound 3.
9 EV :
Select the effect of exposure. Use Navi Left/Right.
Options : EV-4 ~ EV+4
9 Night Mode : On/Off
9 Banding : Select the frequency (50Hz/ 60Hz)

9 Delay Timer :
Options : Off, 5 Sec, 10 Sec and 15 Sec.
9 Continuous Shot :
Options : Off, 1 Shot, 3 Shot, 5 Shot.
Image Setting
9 Image Size :
Setting the size of photo.
Options : 176x220/ 320x240/ 640x480/ 1024x768/ 1280x1024
9 Image Quality :
Setting the quality level of photo
Options : High/ Low/ Normal
White Balance
9 Options : Auto/Daylight/Tungsten/Fluorescent/Cloud/Incandescence
Effect Setting
9 You can set special photo effect.
9 Options : Normal/ GrayScale/ Sepia/ Sepia Green/ Sepia Blue/ Color Invert/ GrayInv
ert.
Add Frame
9 You can select a frame for a certain photo.
9 Options : Off/ Frame 1 ~ Frame 10
Storage
9 You can select the target storage medium, Phone/ Memory Card

Restore Default
9 You can restore all the setting value of camera to Factory default value.
PIM
PHONEBOOK
Note!: If the SIM card is changed, you may lose the information of the phonebook data in the
previous SIM card. If you do so, the type of the number, text memo and group type may be los
t. Only the name and telephone number will remain in previous SIM card.
The SIM card memory and phone memory is physically separated but they are searched as a si
ngle entity.
You can protect your phonebook information against other persons.
Phonebook of name-card style is designed in your phone. Each item stored in it consists of 3 n
umbers (mobile , home, office), company , E-mail address, Fax, Image, Ring type, caller group
( None, Family, Friend, VIP, Business and others). You can also save names and numbers in the
SIM memory. Your phone is capable of storing and retrieving up to 300 numbers. Speed Dial is
also supported and you can make a call by pressing the numeric key directly in the idle mode.
Quick Search
9 In “Phonebook” menu, you can find a number conveniently and quickly in the
“Quick Search” sub-menu.
9 Input the initial letter of the Name in the place where the cursor is located, and the
phone will begin to search for the most possible record.
9 For example, In the case of searching for “James”, input the letter J in the “es Input
Mode”. Then the number corresponding to the surname “James” will show.
Search Entry
9 You can find phonebook lists conveniently and quickly.
Add New Entry
9 You can store the phone number in your phone.
Select the storage location (To SIM/To Phone).
Enter the name, number and caller group.
Storage location : To SIM : stores 200 entries, to Phone : stores 300 entries.
9 If you want to store the number at the idle screen.
Enter the number at the idle screen and press “save”(left soft key).
Select the storage location (To SIM/To Phone).
Enter the name of the person and caller group.
Copy All
9 Copy all the records stored in the memory of SIM card and the phone memory resp
ectively.
- From SIM : copy all of the entries from SIM to Phone.
- From Phone : copy all of the entries from Phone to SIM.
Delete
9 Delete the records stored in SIM card and Phone memory respectively. The records
can be deleted instantly or one at a time.
From SIM : You can delete all of the entries from SIM.
From Phone : You can delete all of the entries from Phone.
One By One : You can delete an entry.
Caller Group
9 You can set different alert ring types, images, members to each of the five groups.
Each of the five groups is Friends, Family, VIP, Business, Others. Navigation key is f
or you to choose specific objects.
Extra Number
9 In this category, you can set Owner Number, Service Dial Number and SOS Number.
Settings
9 Shows the current setting status of the phonebook. You can select the Memory
status, Preferred storage, Fields, My vCard.
Memory status : You can see the memory status of the phonebook list.
Preferred storage : You can select the priority of the phonebook list.
Fields : You can select the field On/Off.
My vCard : You can edit or send your vCard.
Caller Picture
9 If you set a specified picture for a phone number in Phonebook, when you received
a call from that phone number, the specified picture is displayed.
Caller Ring Tone
9 If you set a specified ring tone for a phone number in Phonebook, when you receiv
ed a call from that phone number, the specified ring tone rings.
Caller Video
9 If you set a specified video clip for a phone number in Phonebook, when you
received a call from that phone number, the specified video clip is activated.
Search by Location
9 In the idle mode, you can enter “Location number + # ” to search for a number
directly. For example, input “1#” to retrieve the first number in SIM memory. If
there is no such number, “No Record” or “Un-identifiable Location” appears on the
screen.
9 Choose the option of “Search” in the menu + Input the name + Go through the
record for the one matched your target the most.
Options
9 If you press option soft key after locating the menu cursor to the name you wish to
do an action, the following options are available.
Prefix dial:The Prefix number is automatically attached to the number dialed.
Send SMS:Send SMS to a number selected from the phonebook.
Send MMS:Send MMS to a number selected from the phonebook.
View:You can go through the list of telephone numbers stored in the phonebook.
Edit:Edit names and numbers etc.
Delete:Delete the selected information/record.
Copy:You can copy the selected information either from Phone memory to SIM card
memory or vice versa.
Move:You can move the selected information either from Phone memory to SIM card
memory or vice versa.

Duplicate:Duplicate the selected information either from Phone memory to SIM
card memory or vice versa.
Send vCard:You can send name cards out or save them to archives by means of SMS,
MMS.
MESSAGE CENTER
Messages
Write Message
Text Message
Your phone has 10 preset messages. You can also create your own text messages. You can ad
d the message module to the new message you are editing.
You can input the number to which you wish to send your message by either touching the num
eric keys in the key screen or retrieve it from the phonebook. The finished message can be sen
t immediately or saved for later editing. During the process of sending, you can see animation
on the screen. If the message is successfully delivered, the screen will display “Successful Deliv
ery”. Otherwise, “Failure!” will appear instead. The user should make a confirmation. The mess
age could be saved automatically. That is, after the message is sent and return to the editing s
creen, the message will still be there. You can activate this function by setting “Auto Memory”
ON in the Message Setting menu.

“Save and Send” option enables you to send the message successfully and save it in the Outbo
x. The capacity of out-box is 50.Users can delete the messages one by one manually or Delete
All.
When there is new message, your phone will remind you with both animation and alert
ring. (Menu> User profile> Customize> Tone Setup> Message Tone) If the inbox is full, corres
ponding icon will appear on the top of the screen. You can return to the idle screen by pressing
the [END/POWER] key.
9 Following options are available in the “Write Message” menu: Done, Use Template,
I n s e r t Object, Format Text, Insert PHB (Phonebook) Number, Insert PHB
(Phonebook) Name and Input Method. Each message may be composed of up to
1224 English characters. But in some cities or areas, messages should not be longer
than 160 English characters. In the editing mode, you can select the text input mod
e by touching [EC] [ec] [ABC] [abc] [123] icon in screen. Touch the [>>] icon to in
put symbols. Short press the right soft key to erase the character before the cursor.
If you long press the right soft key, all the characters on the screen will be erased.
You can go back to the idle mode by pressing the [END/POWER] key. Select charact
ers by the right and left soft key. Quit the Text Input Mode by pressing the right
soft key and continue your operation according to the text above the left soft key.
9 Note! Please refer to the Text Input Mode part for further information.
Multimedia Message
A multimedia message can contain text, images, and/or sound clips.

The phone has 5 preset MMS, which serve as samples when you want to create new MMS.
When a message is readily finished, you can choose to send it at once or save it for later use.
During the process of sending, you can see animation on the screen. If the message is success
fully delivered, the screen will display “Successful Delivery”. Otherwise, “Failure!” will appear ins
tead. The user should make a confirmation. The message could be saved automatically. That is,
after the message is sent and return to the editing screen, the message will still be there.
“Save and send” option enables you to send the message successfully and save it in the Outbo
x. The capacity of out-box is 50. Users can delete the messages one by one manually or Delete
All.
When there is a new message, your phone will remind you with both animation and ale
rt ring. (Menu> User profile> Customize> Tone Setup> Message Tone) If the inbox is full, corr
esponding icon will appear on the top of the screen.
You can return to the idle screen by pressing the [END/POWER] key.
9 Edit Name : You can edit ‘To’, ‘CC’, and ‘Bcc’ by pressing Up/Down Navigation key. I
n the editing mode, you can select from the phonebook or edit it. Choose Text Inpu
t Mode by touching the [EC] [ec] [ABC] [abc] [123] icon in screen. Touch the [>>]
icon to input symbols. Short press the right soft key to erase the character before t
he cursor. If you long press the right soft key, all the characters on the screen will b
e cleared. You can go back to the idle mode by pressing the [END/POWER] key. Pre
ss the left soft key for [OK] to confirm your input and you can continue number ope

ration or quit.
9 Edit Subject : The same as the editing of SMS.
9 Edit Content : Press Down-Navigation key to choose the item to be edited. Press th
e right soft key to the edit screen. You may insert images, sounds etc. When you ha
ve finished editing, press left soft key to continue or quit.
9 Note! Refer to the Text Input Mode, introduced below, for further information abou
t the input of characters. Limitation on the number of characters appears on the rig
ht upper corner of the screen.
Inbox
9 With this menu, you can view the new text messages or the read messages. Sender
number or name (if stored in the Phonebook) are displayed on the list.
9 In the inbox, the scrolling cursor indicates the date when the new message arrives.
Read the message by pressing the left soft key. You can preview the message by pr
essing Left/Right Navigation key. You can also Reply, Forward, Edit the received me
ssage. Delete All is also allowed. Call back to the message sender through “Messag
e List> Option> Use Number”. Press the right soft key to the previous menu and pr
ess the [END/POWER] to the Idle screen.
Outbox
9 If you choose “Save and Send”, the message will be saved to the outbox after the
message is successfully sent. The unsent messages are also saved to the outbox an
d “ No Number” is displayed, which indicates that there is no destination.
9 In delivering a stored message, you can send to a person, many people or group.
Sent

9 With this menu, you can view a list of the sent message.
Drafts
9 With this menu, you can view a list of any draft messages that have been created in
the ‘create message mode’ and you can save the draft messages here.
The following options are available for each message in “Inbox”, “Outbox”, “Sent” and “Draft” ;
Reply:You can reply to the sender.
Forward:You can forward the message to any other person.
Edit:You can edit the message.
Delete:You can delete the message.
Delete All:You can delete all the messages in “Inbox”.
Use Number:You can make a call to the sender or save the phone number.
Use URL:You can write the web address.
Chat:You can ask chat to the sender.
Advanced:You can copy or move the message to the phone or SIM card.
Delete Folder
9 Delete the records stored in the Inbox/Outbox/Send/Drafts/Delete All folders.
Template
9 Users can insert a preset phrase into a text message which is being composed.
9 When you are sending a message, you can quickly use a preset phrase.
Message Settings

Text Message
9 Profile Setting : Profile Name, SMS Center Address, Valid Period, Message Type.
9 Common Setting:
Delivery Report : Option that allows you to check if the message has been
successfully delivered through the network to the other person.
Reply Path : Transmit the reply path to the network terminals. The support of th
e SMS center is needed for this function.
9 Memory Status : To examine the status of the SIM card and Phone memory. (The st
orage can be Up to 50)
9 Preferred Storage : Allows you to select the default storage between phone and SI
M card.
9 Preferred Bearer: Prefer GPRS, Prefer GSM, GSM only.
Multimedia Message
9 Compose : You can make your own signature.
Creation Mode : You can set it to “Free”, “Restricted”.
Image Resizing : You can set it to “Off”, “160x120”, “320x240”, “640x480”
Auto Signature : You can set it to “ON”, “OFF”.
9 Send
Validity Period : The period of time the MMS kept in the SMS center.
Delivery Report : You can set it to ON/OFF.
Read Report
: Requests notification from the service provider whether the receiv
er has read the MMS. You can set it ON/OFF.
Priority
: You can set to priority.: Low , Normal , High
Slide Timing : You can set the MMS slide timing.
Delivery Time : You can set the MMS delivery Time. The following options are av

ailable ; Immediate, in one hour, in 12 hours, in 24 hours.
9 Retrieve
Home Network : You can set the Home Network. The following options are
available ; immediate, restricted, delayed.
Roaming : You can set the Roaming Network. The following options are
available ; as home, delayed, restricted.
Read Report : Requests notification from the service provider whether the receiv
er has read the MMS. Options : “Send”, “Never Send”, “On request”.
Delivery Report : Whether the delivery report is allowed or not.
9 Filter
Anonymous : You can set to allow or reject the anonymous MMS.
Max Size : You can set to max size of MMS up to 300K Bytes.
Advertisement : You can set to allow or reject advertising messages.
9 Server Profile : Edit the network service provider of MMS.
9 Memory Status: Indicate the used memory size for MMS.
Chat
9 The phone support up to 2 “Chat Room”.
9 Select chat room and enter into “Chat Room Info”.
9 Type your nickname and destination phone number.
Voice Mail Server
9 To use this menu, you have to ask to your service provider to activate this function.
9 The phone support up to 2 phone numbers of voice message center.
9 Select a phone number of voice message center, then you can have 2 options ;
Edit : You can edit the phone number of voice message center.

Connect to Voice : You can call to the current voice message center.
9 You can call to the voice message center that is saved in 1st directory simply by hold
ing down [1] more than 2 seconds on idle mode.
Broadcast Message
9 Receive Mode : You can set activation “ON” or “OFF”.
9 Read Message : You can read the message.
9 Languages ; You can set the language type you want.
9 Channel Settings
Select : You can select the channel you want.
Add : You can add the channel you want. Type “Channel Title” and “Channel ID”.
Edit : You can edit the existing channel.
Delete : You can delete the channel you want.
9 Note! : The voicemail service may not be available on all networks. For more detail,
please contact your network service provider.
CALL HISTORY
In the call history menu screen, you can see the number of Missed Calls, Dialed Calls, and Rece
ived Calls.
Missed Calls
9 This menu lets you view the latest missed calls. In the missed calls list, you can

view the details of the record by pressing the left soft key. Then select view option.
In the view screen you can make a call to the number by pressing the [SEND] key.
Dialed Calls
9 This menu lets you view the last some dialed calls.
9 In the dialed calls list, you can view the details of the record by pressing the left
soft key. Then select view option. In the view screen you can make a call to the
number by pressing the [SEND] key.
Received Calls
9 This menu lets you view the received calls. In the received calls list, you can view
the details of the record by pressing the left soft key then select view option. In the
view screen you can make a call to the number by pressing the [SEND] key.
Delete Call Log
9 You can delete the records of missed calls, dialed calls and received calls respectivel
y without clearing the call time record. In order to avoid unnecessary deleting opera
tion, the user should confirm his action before the record is deleted.
9 The following options are available.
Missed Calls : You can see the missed calls information and missed call lists.
Dialed Calls : You can see the dialed calls information and dialed call lists.
Received Calls : You can see the received calls information and lists.
Delete All : If you want to delete all calls, selects the Delete All.
Call Time
9 In this menu, you can view the last call time, total sent and total received. You can

clear the all call time.
9 The following options are available.
Last Call Time : You can see the last call time of your call.
Total Sent : You can see the total sent call time of your call.
Total Received : You can see the total received call time of your call.
Reset All Time : When you want to reset call time, select the Reset All Time.
Call Cost
9 This menu is dependant to SIM card. Please contact your service provider for detail.
Last Call Cost : Used to show the cost of the last call.
Total Cost : Used to show the cost of total call.
Reset Cost : Used to reset all the cost items.
Max Cost : Used to show and set the credit of cost.
Price per Unit : Used to show and set the price per unit of cost of a call.
SMS Counter
9 In this menu, you can view the sent and received messages. It can be reset.
GPRS Counter
9 This menu is used to view the data call counter through GPRS network.
9 It has following options ;
Last Sent : Used to show the last sent GPRS data call.
Last Received : Used to show the last received GPRS data call.
All Sent : Used to show the all sent GPRS data calls..

All Received : Used to show the all received GPRS data calls.
Reset Counter : Used to reset all counter items.
9 Note! You can only store 10 records of the Missed calls, Dialed Calls or Received C
alls respectively. You make a call directly from the record list.
Following options are available in the sub-menu of Call History:
Delete : Delete the selected record.
Save to Phone book : Save the selected number to the Phonebook.
Dial : Call back the caller.
Edit : Edit the number so that it can be saved to the phonebook together with the city cod
e.
ORGANIZER
Calendar
9 With this menu, you can use the calendar function.
9 If you enter this menu, the date cursor will be on today’s date. If the date on the
cursor has schedule list, you can selected by pressing option soft key. And then you
may write your schedule.
9 The scheduler function helps you keep track of reminders, calls, meetings, birthdays,
travels or weddings that you need to remember. Your phone sounds an adequate
melody alarm when the set date/time for the schedule is reached.
9 This calendar helps to keep track of memos by alarming clock.
9 Press left soft key “Option” and the following are available:
View Tasks : You can view the current schedule. In the menu, you can edit Time,

Task, Alarm and the Due Time. You can choose the due date by pr
essing left/right navigation key. You can Delete the Schedule and A
dd a New Schedule.
Jump to Date : View the designated date.
To Do List
9 You can check the schedule arranged on the current date. To edit Schedule, please
refer to the above “Schedule”.
Alarm
9 This menu allows you to set the alarm to ring at a specific time. Three options are a
vailable. The default mode is OFF. You may set one or all ON if necessary. The time
and due date of each alarm can be set separately.
World Clock
9 You can view the current time for GMT and the other cities around the world by pre
ssing the navigation key.
ENTERTAINMENT
FUN & GAME
Games
9 This phone has five games for your enjoyment : Copter, Puzzle, Panda, Magicsushi,
and UFO
9 Each game has Best Grades, Game Help (and the Game Level ) function.
9 Use [Up Navigation] and [Down Navigation] key for move up and down in Copter G
ame.
9 Use [Up], [Down], [Left] and [Right] Navigation key as navigation key in Puzzle, Ma
gicsushi , UFO, and Panda Game.
9 During a game, you can pause the game by pressing left or right soft keys.
9 Continue the game by pressing the left soft key.
9 Quit the game and go back to the idle screen by pressing the [END/POWER] key.
9 You can configure of game setting with “Game Setting” menu
Themes
9 You can set the color theme of the game screen and define your own favorite phon
e profile.
9 The color theme of the game screen offers three options :
Theme1/Theme2/Theme3
Stopwatch
9 Your phone can be used as a typical stopwatch or multi-direction stopwatch. There a
re Split Timing and Lap Timing stopwatch functions in this typical stopwatch menu. Y
ou can view the record in this menu.
SERVICES
SIM Tool Kit
9 This menu is activated only by service provider.

WAP
9 WAP is a standard application protocol specially created for mobile communications
devices and gives fast and easy access to Internet information and service. You can
obtain rich information by the WAP browser instead of a PC. Multi-services are avail
able such as Reservation, News, Sports and Weather Broadcast.
9 Home Page : Once the connection is built, you will link to the home page defined b
y yourself.
9 Bookmarks : Once you choose the menu Bookmarks, you can connect to your favori
te site much more conveniently.
9 Recent Pages : The phone keeps track of the recent pages you log in. When you ch
oose ‘Recent Pages’, your WAP browser will open the latest page at any time.
9 Enter Address : If you know the URL of a website, you can go to the site directly by
inputting the URL.
9 Settings : You can utilize the various WAP settings with the following options.
Edit Profile : Choose from the network setting options.
Browser Option : Choose the time span you wait while opening the pages and s
et whether display the pictures.
Wap Push Message: You can set whether to receive the server push messages o
r not.
Clear Cache : Clear the pages saved in the cache to make more room for new o
nes.
Clear Cookies : Clear personal information such as User ID, password stored in t
he cache of the phone.
Trusted Certificates : View or delete Certificate.
Data Account

9 This menu allows you to change and edit the settings for the GSM and GPRS netwo
rk services. For further details, contact your service provider.
9 GSM Data : This menu allows you to manage and edit the settings required by the
CSD connection.
9 GPRS : This menu allows you to manage and edit the settings required by the GPRS
connection.
MULTIMEDIA
ImageViewer
9 You can view the saved photos in the album menu.
View : To see the saved photos.
Browse Style : Select the list type of saved photos ; List Style/ Matrix Style.
Forward : Forward the saved photos to the following options ; to wallpaper, to
screen saver, to power on display, to power off display, to phonebook,
and to MMS.
Rename : Change the name of the selected photo.
Delete : Delete the selected photo.
Delete All Files : Delete all the saved photos.
Sort : Rearrange the saved photos by selected means.
The following options are available.
By Name : The saved photos are sorted by name.

By Type : The saved photos are sorted by type.
By Time : The saved photos are sorted by time.
By Size : The saved photos are sorted by size.
None : The saved photos are not sorted
Storage : Select the target storage medium.
The following options are available.
Phone : The saved photos are stored to phone.
Memory Card : The saved photos are stored to memory card
Webcam
9 You can use the camera of the phone as web camera. To activate this ;
- Connect your phone to the PC by using USB cable.
- You can find POP up message showing 3 options to you ; “Mass Storage”,
“WebCam” and “COM Port”, then select “WebCam”.
- Or you can enter into Menu > Multimedia > WebCam.
- You can see the image by using the program of PC.
Note! This function is available only with Microsoft Windows XP Service Pack 2.
Photo Editor
Photo Artist
9 With this menu, you can edit the saved photos.
9 Open the photo from the phone, DRM Right or memory card.

9 The submenus are ;
Auto Resize : Resize the saved photo automatically.
Main LCD clip : Clip the photo as main LCD size.
9 Each photo has the following options ;
Save As : To save the selected photo.
Add Effect : To add effect on the selected photo. The options are ; “Grayscale”,
“Sepia”, “Sepia Green”, “Sepia Blue”, “Color Invert”, “Gray Invert”,
“Water Color”, “Blur”, “Strong Blur”, “More Sharpen”, “Median”,
“Dilation” and “Erosion”.
Add Frame : To add frame on the selected photo (Frame 1~10).
Add Icon : To add icon on the selected photo.
Add Text : To add text on the selected photo.
Adjustment :
Adjust Image : Select the effect ; “Brightness”, “Contrast” and
“Saturation” and “Hue”.
Adjust Color : Select the effect ; “Color R”, “Color G” and “Color B”.
Flip : To select the photo flip ; “Horizontal Flip” and “Vertical Flip”.
Extend Canvas : To extend the size of canvas.
Image Tile
9 With this menu, you can have many photos in one screen.
9 Options : 2 Image Tile/ 4 Image Tile/ 9 Image Tile.
Slide Show

9 With this menu, you can take slide show with all photos in specified folder.
Sound Recorder
9 You can record a sound and play the saved sound.
9 If there is no saved sound, press the left soft key to bring options ;
New Record : Start recording.
9 If there is saved sound already, you can have the following additional options ;
Play : Play the recorded sound file.
Append : Add extra sound to the previous selected sound file.
Rename : You can change the file name.
Delete : You can delete the sound file.
Delete All : You can delete all of the sound files.
Settings: Allows you to set the preferred storage and file format.
Forward : Forward the selected sound file to ; “To User Profile”, “To MMS”.
Melody compose
9 You can compose ring tone with this menu.
9 On “Melody Composer” screen, you can find the list of composed melody.
9 Select and touch item for edit
9 Press the left soft key for “Add” to compose a new ring tone – 1st time of compositi
on only.
9 Press the left soft key for “Option” to bring the following more options ;
Play : Play the selected record.
Play Speed : Set the play speed.

Select Instrument : Select the instrument with 10 options.
Save : Save the composed ring tone.
9 On the list of composed ring tone, press the left soft key for “Option” to bring the f
ollow menus;
Play : Play the selected composed ring tone.
Edit : Edit the selected composed ring tone.
Add : Compose a new ring tone. Refer to #3 above in this menu.
Rename : Change the file name of composed ring tone.
Delete : Delete the selected composed ring tone.
Delete All : Delete all composed ring tone in “Melody Composer” list.
Forward : Forward the selected composed ring tone “To User Profile”, ”To MMS”
and ”To EMS”.
EXTRA
Calculator
9 Enter numbers by touching [0]~[9] icon and symbols.
9 Press the right soft key or touch [Clear] text to clear your input
9 Note! The precision of the calculator is limited for the round off error.
Unit Converter
9 You can convert one type of unit to another by this function. Such as weight , lengt
h, volume, temperature, velocity, and surface.

Currency Converter
9 You can convert the currency at a given exchange rate.
Health
9 You can make a note of your current health such as BMI and Menstrual cycles.
9 BMI(Body Mass Index)
BMI, also known as the Body Mass Index, indirectly shows the amount of body
fatin the body.
Select BMI in the menu and input your weight and height.
Then the phone will automatically calculate your BMI.
9 Menstrual.
Female users can predict pregnancy from sex by calculating your menstrual
cycles.
E-Book Reader
9 You can read E-Book with this menu.
9 E-Book refers to “eLibro” folder from phone or memory card in File Manager.
9 You can have the following options ;
Open E-Book : Open to read.
CleanUp Bookshelf : Refresh the file list.
Global Settings : Enables to set the following items ;
Font Style/ Font Size/ Scroll By/ Auto Scroll/ Scroll Speed/ F
ull Screen/ Encoding.
Book Info : Provides the information of E-Book for title, size, format etc.,
Delete : Delete the current E-Book file.
Delete All Files : Delete all E-Book files in the folder.

Sort : Enables to sort the E-Book files with the following options ; By Name/ By
Type/ By Time/ By Size/ None.
Apply Global Settings : Enables to set the Global Settings On or Off.
Help : Informs you how to use the shortcut keys.
SYSTEM
SETTINGS
Many different features of your phone can be customized to suit your preferences. All of these
features are accessed via the Setting menu.
Display Setup
9 In this menu, you can change various settings for the display.
9 The following options are available ;
Wallpaper : Allows you to set the wallpaper from the “System” or “User Define”.
Screen Saver : Allows you to set the screen saver.
Power On Display : Allows you to set the power on animation from the “System”
or “User Define”.
Power Off Display : Allows you to set the power off animation from the “System”
or “User Define”.
Show Date and Time : Allows you to set the showing date and time in idle mode.
Show Network Name : Allows you to set showing the operator name on or off in
idle mode.

Phone Setup
Time and Date
9 This menu allows you to change the current time and date displayed.
9 You can choose the city by pressing the Up/Down navigation key. The time and dat
e format could be set by using left/right navigation key.
Set Home city : You can set the city.
Set Time/Date : You can set the time and date.
Set Format : You can select the format such as time, date.
Schedule Power On/Off
9 In this menu, you can set the schedule to the Power On/Off time and action.
Language
9 You can set the language with this menu.
9 The available option are : “English”, “Espanol”.
Preferred Input Methods
9 You can set the text input method with this menu.
9 The available options are ; “Multitap ABC”, “Multitap abc”, “Numeric”, “Multitap ES”,
“Multitap es”.
Pen Calibration
9 This menu allows you to reinitialize to screen touch points.
Greeting Text

9 Greeting is an alternative to the switch-on animation.
Speed Dial
9 You can set it On or Off. You also need to edit the speed dial number 2~9.
Dedicated Key
9 You can set the key function of the Navigation key (up/down/right/left)
Auto Update of date and time
You can set the auto update of date and time(On/Off).
Flight Mode
9 You can set this function when you are boarded in airplane.
9 You cannot make or receive any call but only use MP3/MP4/camera function.
Handwriting
9 You can set write-pen option(pen speed, pen color).
Font Size
9 You can set the font size of the phone. Options : “Theme Default”, “Small”,
“Medium” and “Large”.
LCD Backlight
9 You can set the brightness (1~5 level) and backlighting time (5~60 seconds) of the
phone.

Call Setup
Caller ID
9 Set whether to display your number on the other party’s phone. It can also depend
on the network.
Call Waiting
9 Three options are available: Activate, Disable, Query Status.
Call Divert
9 You can divert the coming calls on your own setting.
Call Barring
9 You can bar the “Outgoing Calls”, “Incoming Calls” and cancel all settings. Also, you
can change the barring password.
Line Switching
9 You can switch between two network lines available on the phone. This is a networ
k feature.
Call Time Reminder
9 You can set a tone to sound every minute or user specific period during a call as a
reminder of the time.
Call Time Display

9 You can set whether to calculate and display the call time of the conversation.
Auto Redial
9 With this function activated on, your phone will redial your unconnected call automa
tically.
Closed User Group
9 All calls listed in the group alert in the same way as your current setting.
Prefix Number
9 You can edit at most 3 Prefix dial number and use one of them.
9 Note! Some setting should be supported by the network. The Call Barring function
is applicable only when you subscribe to the network and be activated in SIM card.
Network Setup
Network Selection
9 Select Network selection between Automatic or Manual.
Preferred Networks
9 Select your favorite network manually.
GPRS Connection
9 Select your GPRS setting for MMS and WAP.
Security Setup
9 You can set security pattern with this menu so that your phone and SIM card will be

guarded against any illegal use.
PIN Code
9 When you want to activate the PIN code function, enter your Personal Identification
Number.
9 Personal Identification Number is needed to establish authorization for access to cer
tain functions or information in your SIM card. The PIN code comes with your subsc
ription. It may be a four to eight digit number and can be change as required.
Phone Lock
9 When the Phone lock feature is enabled, the phone is locked and you must enter
the 4 to 8 digit phone password each time the phone is switched on.
9 The password is preset to “0000”. Once the correct password has been entered,
you can use the phone until you switch it off.
Auto Keypad Lock
9 Without any key touch for a set period, the keypad will be locked. There are 6
values (None, 5 secs, 30 secs, 1 minute, 5 minutes, LCD Light Off).
9 Default value is LCD Light Off. If you don’t want use this keypad lock option, you
have to set to “None” value.
Fixed Dial
9 You can set the mode and fixed dial list.
Barred Dial
9 Note! : The Barred Dial service may not be available on all cellular phones.

Change Password
9 You can change the password such as PIN, PIN2, Phone Lock Password.
9 Note! The default Phone Lock code is 0000. It is highly recommended for you to c
hange it.
Sound Effect
9 You can choose from Normal, Base, Dance, Classical, Treble, Party, Pop. Rock
9 Also you can edit the frequency areas of equalizer.
Restore Factory Settings
9 To use this option, first enter your phone password. All the settings will be restored
to the factory setting. Please operate carefully. If you want, you have to input
Phone lock code.
Software Version
9 You can see the S/W version.
USER PROFILES
You can use the sound setting features to customize various settings such as ring type, vibrator,
volume depending on environments:
General 、
Meeting 、
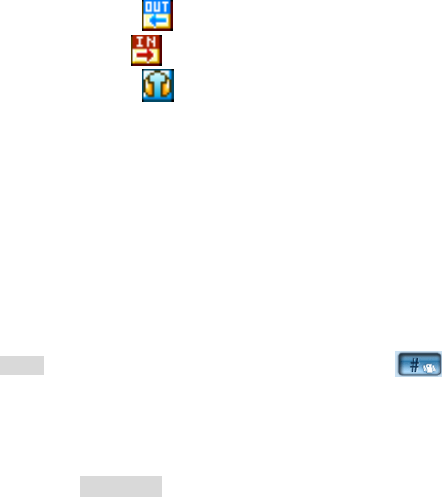
Outdoor 、
Indoor 、
Headset
You do not have to change every setting every time you arrive at a new setting. Instead, you
just switch to the readily set mode that fits the setting.
In each profile, you can set the following items:
9 Tone Setup : Yon can set alert ring to the following operation: Incoming Call, Alarm,
Power On, Power Off, Message Tone and Keypad Tone.
9 Volume : Set the volume of ring tone and key tone.
9 Alert Type : Ring, Vibration Only, Vibration and Ring and Vibration then Ring, Light
Only
9 Ring Type : Single, Repeat and Ascending.
9 Extra Tone : Warning, Error, Camp On and Connect.
9 Answer Mode : Any Key (On/Off).
Note! Switch back to silent mode by long pressing the key. Pressing and holding again
will go back to the previous mode.
SHORTSCUTS
9 Edit the order of numbers dedicated to some shortcut function.
9 Procedure: In the idle mode, you can enter the Shortcut menu by pressing the

Navigation Down key. Then you can edit relevant functions to set shortcuts by pres
sing corresponding numbers.
FILE MANAGER
The total memory of your phone is 60MB. You can realize the management of images,
video clips, sounds, MP3, folder, etc. through this function menu.
It is to manage your files of audio, eBook, photos, images, my music, received and video as
default. It works as “My Document” in Window O/S.
Select drive between phone and memory card (only in case that you are using T-Flash). You ca
n have the following options ;
9 Open : Open the folder. If you create a folder, it will be generated in here.
9 Create Folder : Create a folder as you want.
9 Format : Format all folders and its properties.
TEXT INPUT MODE
SPANISH/ENGLISH IUPUT MODE

Touch Screen Write Input Mode (Pen Editor)
9 Write a character in the screen using write-pen and select one or wait a second.
Virtual Keyboard Input Mode
9 Touch the virtual keyboard icon( ) on right bottom screen and select characters
Input Mode Change
9 If you want change input mode to English or Spanish mode, touch the mode
change icon([ES],[es] [ABC], [abc], [123]) on center bottom screen.
Symbols
9 Touch the symbol keyboard icon( ) on right bottom screen and select characters.
MP3 AND MP4 INSTRUCTION
Connect your phone to the computer using the USB cable.
If the phone is connected, the computer will show a sign that an external memory device is co
nnected. Select an mp3 file of your choice from the computer and copy it to the My Music fol
der in the USB memory. For mp4 files, you can copy it to the Video Folder.
After canceling the connection of the external memory device through the computer,
disconnect the USB Cable from the computer.
Use the Navigation up key or follow the sequence “Menu> Multimedia> Audio Player” to
activate the music player. Press the play button or short press the ear button connected to the
earphone to play the mp3 file copied from the computer. If you long press the ear button, the
phone will dial the last call made.
TROUBLESHOOTING
If you meet a trouble on your phone operation, please check the followings. These checks ena
ble you to save time and expense due to unnecessary after-service.
When Enter PIN appears at the power-up…
☞The PIN check is currently enabled. You must enter the PIN supplied together with your SIM
card. You can disable the PIN check if you want, please see Security Setting menu.
When Enter PUK appears at the power-up…
☞ PUK(Personal Unblocking Key) is used to unblock the blocked SIM card due to incorrectly
entered PIN. PUK code is composed of 8 digits, and usually provided with your SIM card. If the
PUK code is entered incorrectly several times in succession, PUK will be blocked and your SIM
card will be automatically lock-up and the SIM Blocked message will be displayed. Once you
see the message, you need to contact your network service provider for a new SIM card.
When Insert SIM screen appears at the power-up…
☞ Please check that your SIM card is inserted properly.

When Enter Lock Code appears at the power-up…
☞ Your phone is phone locked. You must enter the Lock Code supplied together with your pho
ne.
When No Service appears…
☞ You probably are in the area out of the coverage of a GSM/ GPRS network.
When Emergency Only appears even though a number of the signal bar are indicated…
☞ You probably are in the area out of the coverage of your home GSM/ GPRS network. You pr
obably are in the coverage of another GSM/ GPRS network but you are not allowed to be regist
ered to the network.
If any tone is not generated when you press a keypad…
☞ You need to check the quick silence mode setting. If you can find icon on the top of the
main display screen it is the quick silence mode. By pressing and holding [VOL-UP] on the idle
screen, you can switch it off. You need to check the Key Tone Type of Sound Setting menu. You
need to check Key Tone Volume of the profile option that you have set on Profiles menu.
If an audible alert is not made when a call is received…
☞ You need to check the quick silence mode setting. If you can find icon on top of the mai
n display screen it is the quick silence mode. By pressing and holding [VOL-UP] on the idle scre
en, you can switch it off. You need to check Ring Type and Ring Volume of the profile option th
at you have set on Profiles menu.
If an audible alert is not made when an alarm is expired…

☞ You need to check the quick silence mode setting. If you can find icon on top of the mai
n display screen it is quick silence mode. By pressing and holding [VOL-UP] on the idle screen,
you can switch it off.
If an outgoing call is not made…
☞ You have probably set an outgoing calls barring option. You need to check Call Barring men
u. Otherwise, you have probably set to Hide Number in Caller Number menu of Call Setting me
nu. In some network, when you make a call with hiding the telephone number, the network do
es not allow to make the call.
If an incoming call is not made…
☞ You have probably set an incoming calls barring option. You need to check Call Barring men
u.
If an outgoing SMS message is not sent…
☞ You need to check the Message Center option in SMS Setting menu.
If all audible key tones are muted and all audible alerts are changed to vibrator alert…
☞ You need to check the quick silence mode setting. If you can find icon on top of the mai
n display screen it is the quick silence mode. By pressing and holding [VOL-UP] on the idle scre
en, you can switch it off.
If some audible action is not prompted on a menu of Sound Setting menu…
☞ You need to check the quick silence mode setting. If you can find icon on top of the mai
n display screen it is the quick silence mode. By pressing and holding [VOL-UP] on the idle scre
en, you can switch it off.
If the image on the screen is blurred when you try to take a picture…
☞ You need to check that the protection film is detached or the lens is clean. To remove finger
prints or other stains, wipe the lens with soft cloth.
GLOSSARY
Cell Broadcast
This network service allows you to receive the broadcasted text messages on various topics suc
h as weather, traffic, local district code, local hospitals, taxis or pharmacy in the area where yo
u are.
CUG (Closed User Group)
This network service allows the restriction of calls to and from a selected user group.
DTMF (Dial Tone Multi Frequency)
Codes sent as tone signals. Used for telephone banking, for accessing an answering machine,
etc.
GPRS (General Packet Radio Service)
New packet service that allows information to be sent and received across a mobile network. T
he GPRS promises data rates from 56 up to 114 Kbps and continuous packet connection to the
Internet for mobile phone and computer users. It is based on existing GSM such as circuit-swit
ched cellular phone connections and complements that.
Network Service Operator
To be able to use your phone, you need a subscription to a network. You get this subscription f
rom a network operator, together with a SIM card that you need to use with your phone.
PIN (Personal Identification Number)
The code is to establish authorization for access to certain functions or information in your SIM
card. The PIN code comes with your subscription. It may be a four to eight digit number and c
an be changed as required.
PIN2 (Personal Identification Number 2)
The code is an authorization code to access certain special field in your SIM card. The PIN2 co
de does not come with your subscription in some country.
PPUK (Personal Unblocking Key Code)
Used to unlock a blocked SIM card. This comes with your subscription
Roaming
Use of your phone when you are outside your subscription network area.
SIM (Subscriber Identity Module)
It contains subscriber details, security information and memory for a personal directory of num
bers.
SMS (Short Message Service)
Messages to be sent and received between the network service operator’s message center to y
our mobile phone. To use this service, it must be supported by your network.
WAP (Wireless Application Protocol)
A standard specifically created for mobile communication devices which give fast and easy acc
ess to Internet information and services.
LIMITED WARRANTY STATEMENT
1. WHAT THIS WARRANTY COVERS :
KCM offers you a limited warranty that the enclosed subscriber unit will be free from defects in
material and workmanship, according to the following terms and conditions:
The limited warranty for the product extends for ONE (1) year beginning on the date of purcha
sing of the product.
The limited warranty extends only to the original purchaser of the product and is not assignabl
e or transferable to any subsequent purchaser/end user.
This warranty is good only to the original purchaser of the product during the warranty period
as long as it is in the purchased local area.
The external housing and cosmetic parts shall be free of defects at the same time of shipment
and, therefore, shall not be covered under these limited warranty terms.
Upon request from KCM, the customer must provide information reasonably prove the date of
purchasing.
The customer shall bear the cost of shipping the product to the Customer Service Center of KC
M. KCM shall bear the cost of shipping the product back to the customer after the completion o
f service under this limited warranty.
2. WHAT THIS WARRANTY DOES NOT COVER :
Defects or damages resulting from use of the product in other than its normal and customary
manner.
Defects or damages from abnormal use, abnormal conditions, improper storage, exposure to m
oisture or dampness, unauthorized modifications, unauthorized connections, unauthorized repa
ir, misuse, neglect, abuse, accident, alteration, improper installation, or other acts which are no
t the fault of KCM, including damage caused by shipping, blown fuses, spills of food or liquid.
Breakage or damage to antennas unless caused directly by defects in material or workmanship.
That the Customer Service Department at KCM was not notified by consumer of the alleged de
fect or malfunction of the product during the applicable limited warranty period.
Products which have had the serial no. removed or made illegible.
This limited warranty is in lieu of all other warranties, express or implied either in fact or by op
erations of law, statutory or fitness for a particular use.
Damage resulting from use of non-KCM approved accessories.
All plastic surfaces and all other externally exposed parts that are scratched or damaged due to
normal customer use.
Products operated outside published maximum ratings.
Products used or obtained in a rental program.
Consumables (such as fuses).
3. STATE LAW RIGHT :
No other express warranty is applicable to this product. THE DURATION OF ANY IMPLIED WAR
RANTIES, INCLUDING THE IMPLIED WARRANTY OF MARKETABILITY, IS LIMITED TO THE DUR
ATION OF THE EXPRESS WARRANTY HEREIN. KCM SHALL NOT BE LIABLE FOR THE LOSS OF
THE USE OF THE PRODUCT, INCONVENIENCE, LOSS OR ANY OTHER DAMAGES, DIRECT OR C
ONSEQUENTIAL, ARISING OUT OF THE USE OF, OR INABILITY TO USE, THIS PRODUCT OR F
OR ANY BREACH OF ANY EXPRESS OR IMPLIED WARRANTY, INCLUDING THE IMPLIED WARRA
NTY OF MARKETABILITY APPLICABLE TO THIS PRODUCT.
Some states do not allow the exclusive of limitation of incidental or consequential damages or l
imitations on how long an implied warranty lasts; so these limitations or exclusives may not ap
ply to you. This warranty gives you specific legal rights and you may also have other rights whi
ch vary from state to state.
4. HOW TO GET WARRANTY SERVICE :
To obtain warranty service, please call the following telephone number.
Safety Information
1 . SAFETY INFORMATION FOR FIXED WIRELESS TERMINALS
.POTE NTIALLY EXPLOSIVE ATMOSPHERES
Turn your phone OFF when in any area with a potentially explosive atmosphere and
obey all signs and instructions. Sparks in such areas could cauls e an explosion or fire
resulting in bodily injury or even death.
INTERFERENCE TO MEDICAL DIVICES
Certain electronic equipment may be shielded against RF signal from you wireless
phone. (pacemakers, Hearing Aids, and so on) Turn your phone OFF in health c are
facilities when any regulations posted in these areas instruct you to do so. RF signals
may affect improperly installed or inadequately shielded electronic system in motor
vehicles.
.EXPOSURE TO RF ENERGY
Use only the supplied or an approved replacement antenna. Do not touch the antenna
unnecessarily when the phone is in use. Do not move the antenna close to, or
couching any exposed part of the body when making a call.
SAFETY INFORMATION FOR RF EXPOSURE
Body worn operation
This device was tested for typical body-worn operations with the back of the phone
kept 15 mm. from the body. To maintain compliance with FCC RF exposure
requirements, use only belt-clips, holsters or similar accessories that maintain a 15
mm. separation distance between the user’s body and the back of the phone, including
the antenna. The use of belt-clips, holsters and similar accessories should not contain
metallic components in its assembly. The use of accessories that do not satisfy these
requirements may not comply with FCC RF exposure requirements, and should be
avoided.

SAR INFORMATION
THIS MODEL PHONE MEETS THE GOVERNMENT’S
REQUIREMENTS FOR EXPOSURE TO RADIO WAVES.
Your wireless phone is a radio transmitter and receiver. It is designed and manufactured not to
exceed the emission limits for exposure to radiofrequency (RF) energy set by the Federal
Communications Commission of the U.S. Government. These limits are part of comprehensive
guidelines and establish permitted levels of RF energy for the general population. The guidelines
are based on standards that were developed by independent scientific organizations through
periodic and thorough evaluation of scientific studies. The standards include a substantial safety
margin designed to assure the safety of all persons, regardless of age and health. The exposure
standard for wireless mobile phones employs a unit of measurement known as the Specific
Absorption Rate, or SAR. The SAR limit set by the FCC is 1.6 W/kg. *
Tests for SAR are conducted with the phone transmitting at its highest certified power level in all
tested frequency bands. Although the SAR is determined at the highest certified power level, the
actual SAR level of the phone while operating can be well below the maximum value. This is
because the phone is designed to operate at multiple power levels so as to use only the power
required to reach the network. In general, the closer you are to a wireless base station antenna, the
lower the power output. Before a phone model is available for sale to the public, it must be tested
and certified to the FCC that it does not exceed the limit established by the government adopted
requirement for safe exposure. The tests are performed in positions and locations (e.g., at the ear
and worn on the body) as required by the FCC for each model. The highest SAR value for this
model phone when tested for use at the ear is 0.963 W/Kg and when worn on the body , as
described in this user guide, is 0.648 W/Kg . (Body-worn measurements differ among phone
models, depending upon available accessories and FCC requirements). While there may be
differences between the SAR levels of various phones and at various positions, they all meet the
government requirement for safe exposure. The FCC has granted an Equipment Authorization for
this model phone with all reported SAR levels evaluated as in compliance with the FCC RF
exposure guidelines. SAR information on this model phone is on file with the FCC and can be found
under the Display Grant section of http://www.fcc.gov/ oet/fccid after searching on FCC ID:
T6QGM819.
Additional information on Specific Absorption Rates (SAR) can be found on the Cellular
Telecommunications Industry Asso-ciation (CTIA) web-site at http://www.wow-com.com. * In the
United States and Canada, the SAR limit for mobile phones used by the public is 1.6 watts/kg
(W/kg) averaged over one gram of tissue. The standard incorporates a sub-stantial margin of safety
to give additional protection for the public and to account for any variations in measurements.
U.S.A.
U.S.FEDERAL COMMUNICATIONS COMMISSION
RADIO FREQUENCY INTERFERENCE STATEMENT
INFORMATION TO THE USER
NOTE : This equipment has been tested and found to comply with the limits for a Class B
digital device pursuant to Part 15 of the FCC Rules. These limits are designed to provide
reasonable protection against harmful Interference in a residential installation This equipment
generates, uses, and can radiate radio frequency energy and, if Not installed and used in
accordance with the instructions, may cause harmful Interference to radio communications.
However, there is no guarantee that interference will not occur in a particular Installation. If this
equipment does cause harmful interference to radio or television reception, which can be
determined by turning the equipment off and on, the user is encouraged to try to correct the
interference by one or more of the following measures:
*- Reorient or relocate the receiving antenna.
Increase the separation between the equipment and receiver.
*- Connect the equipment into an outlet of a circuit different from that to which the receiver is
connected.
*- Consult the dealer or an experienced radio/TV technician for assistance.
Changes or modification not expressly approved by the party responsible for Compliance
could void the user’s authority to operate the equipment. Connecting of peripherals requires
the use of grounded shielded signal cables.
FCC Compliance Information
This device complies with Part 15 of FCC Rules.
Operation is subject to the following two conditions:
(1) This device may not cause harmful interference, and
(2) This device must accept any interference received.
Including interference that may cause undesired operation.