KCodes KCODES-901 KCodes 9 Series USB AirPrint Server User Manual 9 Manual1007
KCodes Corporation KCodes 9 Series USB AirPrint Server 9 Manual1007
KCodes >
user manual

©2014KCodesCorporation.Allrightsreserved.6Seriesv2User’sManualV1.0
KCodes 9 Series Print Server
User’s Manual
Chapter1 Introduction
Thankyouforpurchasing901n/901iPrintServer(inthefollowingreferredtoas“Server”).ThisServeris
designedtoconnectyourPrinter,MultifunctionPrinter,iPhone,iPodtoyournetwork,allowingallnetwork
users’accesstothesesharedUSBdevices.
1.1 About2ModelsDescribedinthisManual
Thismanualprovidesintroductoryinformationaswellasdetailedinstructionsonhowtosetupand
manage9Seriesinvariousnetworkenvironments.Thefollowingtableshowsthedifferencesamongthe
2models.All2modelshaveoneUSBport,a10/100Mbit/secLanportandanadditionalwirelessmodule
(802.11b/g/n).However,901nisexternalantennawhile901iisinternalantenna.Exceptfortheantenna
type,mostconfigurationandoperationsarethesamefor901nand901i.Unlessexplicitlyspecified,all
instructionsinthemanualapplyto9Series.
ModelNameLANWirelessAntennaUSBPort(s)
901nYesYes external 1
901iYesYes internal 1
Tofullybenefitfromthisdocument,youshouldbefamiliarwithbasicnetworkingprinciples.The
instructionsdescribedinthismanualarebasedonthesettingsinanewServer.ToreloadtheFactory
Parameters,youcanresetthisServerbacktoFactoryDefault,whichwillrestoremostofthesettings.For
details,pleaserefertothechapter“RestoreFactoryDefaults”.
1.2 CustomerSupport
Shouldyourequireanytechnicalassistance,pleasecontactyourproductreseller.Oryoucanvisitour
websiteforlatestproductinformation.Thisdocumentissubjecttochangeswithoutpriornotice.

©2014KCodesCorporation.Allrightsreserved.6Seriesv2User’sManualV1.0
Chapter2 ProductOverview
2.1 PackageContents
Verifythatnothingismissingfromthepackagebyusingthecheckinglistbelow.Pleasecontactyour
dealerifanythingismissingordamaged.Allpackingmaterialsarerecyclable.Pleaseconfirmtheitemsin
thepackagebelow:
ThisServer(901n/901i)
CD(ControlCenterandUser’sManualandQuickInstallationGuide)
PowerAdaptor(5V1A)
2.2 ProductCD
ThisCDprovideseasy‐to‐useControlCentersoftware,andtheUser’sManualandQuickInstallation
Guide.
2.2.1. Start-upProcedures
IfyourcomputerisconfiguredtoautostartCDs,thisCDwillstartautomaticallywheninserted.Youcan
alsonavigatetotheCDandstarttheautorun.exefilefromwithintheWindowsfilemanager.
2.3 PhysicalDescription
1. PowerAdaptorConnector:5V/1A
2. InitButton:forrestoringtheconfigurableparameterstothedefaultvalues
3. WirelessStation:IEEE802.11b/g/nwirelessstationwithexternalantennafor901norinternal
antennafor901i
4. EthernetConnector:connectedtoatwistedpaircategory5cable
5. USBHostPorts:USB1.1/2.0low,full,andHi‐Speedcompliant
6. Indicators
PowerIndicatorislitwhilepowerisapplied.Ifitisnotlit,orifitblinks,thereisaproblemwiththe
PrintserverorPowerAdapter.
WLANIndicatorblinkswhetheruserconnectswirelessornot.
LANIndicatorblinkstoindicatewirednetworkactivity.Ifitislit,itindicatesthewirednetworkis
applied.Ifitisnotlit,itindicatesthattheserverdoesnotconnecttothewirednetwork.
USBIndicatorislitwhileaUSBdeviceconnectstoaUSBPortoftheUSBdeviceserver.Ifitisnotlit,
orifitblinks,thereisaproblemwiththeUSBdeviceortheUSBdeviceserver.

©2014KCodesCorporation.Allrightsreserved.6Seriesv2User’sManualV1.0
2.4 SupportedUSBDevices
TheUSBdeviceserversupportsthefollowingtypesofUSBdevices.
USBPrinter
USBmultifunctionprinter(MFP/AIO)
iPad
iPhone

©2014KCodesCorporation.Allrightsreserved.6Seriesv2User’sManualV1.0
Chapter3 BasicInstallation
3.1. ConnectingtheHardware
1. MakesurethatyourUSBdevicesareswitchedoffandthattheServer’sPowerAdapteris
disconnected.
2. ConnecttheUSBdevicestotheUSBportswiththeUSBcables.
3. ConnecttheServertothenetworkwithatwisted‐paircategory5cable,10baseTor100baseTX.
4. TurnontheUSBdevicesandmakesureitisreadyforuse.
5. ConnectthePowerAdaptertotheServer.ThePOWERindicator,WLANindicator,LANindicator,
USBindicatorwilllightup.WhentheLANindicatorlightsup,theServeriscorrectlyconnectedto
thenetwork.WhenWLANandUSBindicatorsstoplitting,theServerstartstoworknormally.
3.2. Preliminary
Beforeyoucanaccesswirelessnetwork,wirelessparametersshouldbesetcorrectly.You
havetosetupthefirstwirelessparametersetthroughLAN(wired)connectionorconnectto
serverdirectly.
Wirelessaccesscanbesetasinfrastructure(station)mode,whichneedanaccesspointto
routenetworkmessageswiththesameSSID.
WirelessaccesscanbesecuredbyWEP(64/128),WPA‐PSA(TKIP/AES),andWPA2‐PSK(AES).
Ininfrastructuremode,themaximaltransferrateis150MBitsdependingonaccesspoint’s
capability.
3.2.1. SetWirelessConfigurationUsingControlCenter
1. InstallUSBDeviceServerControlCenter.Itisavailableinthe901n/901iPrintServerProductCD.
2. StartUSBDeviceServerControlCenterandAuto‐searchingUSBDeviceserverwindowwillappear.

©2014KCodesCorporation.Allrightsreserved.6Seriesv2User’sManualV1.0
3. Ifthetoolfindsserversinyourlocalareanetwork,thenyouhavetoselectaserverfromthe
serverlist.
4. Doubleclickthehighlightedserver(orclickthe“ConfigureServer”button)togettheserver’sweb
pages.ThenloginwithadministratorID(default:admin)anditspassword(default:admin).
5. ClickConnecttoAnotherAPandchooseoneofexistingwirelessnetworks.

©2014KCodesCorporation.Allrightsreserved.6Seriesv2User’sManualV1.0
6. ClickselecttochooseyourAPandentertheAP’spassword.Pleasewait60secondstoallow
devicereboot.
7. Youhavenowfinishedtheprocedureofsettingthewirelessparameters.
Afterproperlyconfiguringthewirelessparameters,youcanremovethenetworkcableandrebootthe
server.901n/901iwillthenconnecttoyourwirelessnetwork.Oryoucanconnecttheserverdirectlyas
below.
1. SetupPCwirelesstoconnecttheserver.(DefaultSSID:myPrintXX)
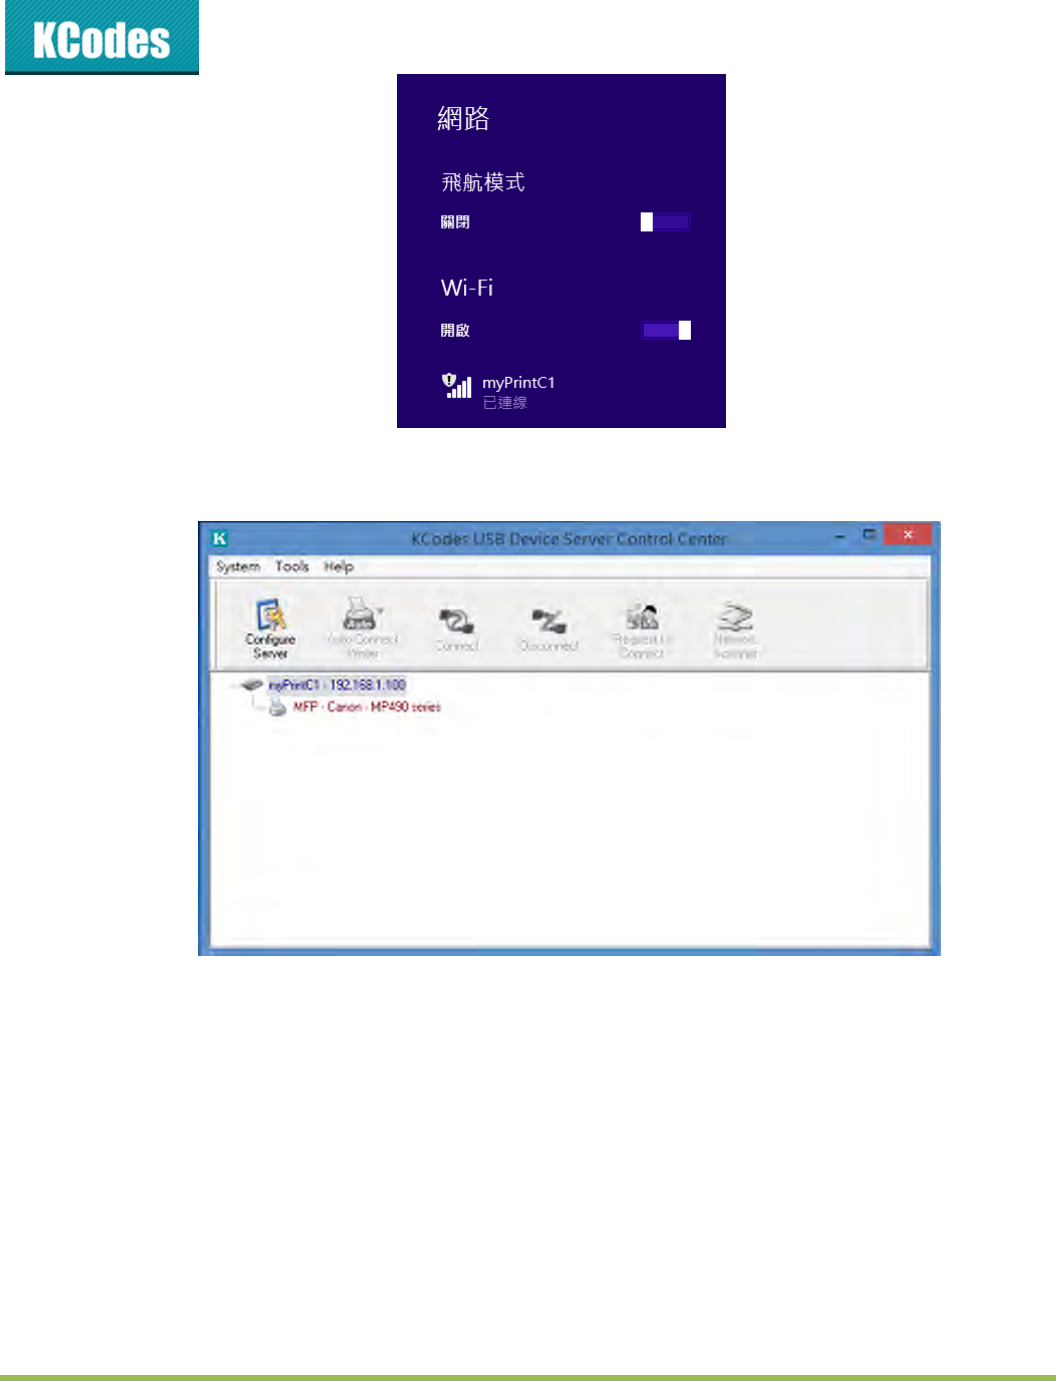
©2014KCodesCorporation.Allrightsreserved.6Seriesv2User’sManualV1.0
2. Thenyoucanentertheserver’swebpagesthroughusingcontrolcenterorenteringtheserver’IP
onthewebbrowser.(Default:192.168.1.100)
3. SoyoucanConnectanotherAPonthewebpageas3.2.1
901n/901iwilldetectifanetworkcableisplugged‐inornot.Ifanetworkcableisplugged‐in,901n/901i
willalwaysconnecttothenetworkthroughthenetworkcable.Otherwiseitwillalwaysconnecttothe
networkthroughwirelessmodule.
Once901n/901iconnectstothenetwork,eitherbynetworkcableorbywirelessmodule,alloperations
touseUSBdeviceserverareexactlythesame.

©2014KCodesCorporation.Allrightsreserved.6Seriesv2User’sManualV1.0
3.3. AssigninganIPAddresstotheServer
3.3.1. Preliminary
IfyouhaveaDHCPserveronyournetwork,yourServerwillreceiveanIPaddress
automatically.TheIPaddresswillthenappearontheControlCenteroronthepageof
configurationreportthatyouprintedearlier.IfyourDHCPserverdoesnotgiveanIPaddress
totheServer,theServerwillusetheautomaticprivateIPaddressingIP:169.254.0.0.~
169.254.255.255
IfyouarenotworkinginaDHCPnetwork,youneedtomanuallysettheServer’sIPaddress.
3.3.2. IPAddress
UnlessyouareassigninganIPaddressusingDHCP,youmustobtainanunusedIPaddress
fromyournetworkadministrator.
3.3.3. MethodsforSettingtheIPAddress
YoucansettheIPaddressofyourServerusingoneofthefollowingmethods,dependingonyournetwork
operatingenvironment:
AutomaticIPAddressAssignment
ManualIPAddressAssignment
3.3.4. ServerNamesandServerNameRules
ThedefaultServernameoftheServeris“myPrintXX”.Everyserverhasdifferentservername.
3.3.5. SettingtheIPAddressUsingDHCP
FollowtheinstructionsbelowtogetanIPaddressusingDHCP:
1. EditorcreateascopeintheDHCPmanageroftheDHCPdaemon.Theentriesincludedinthisscope
shouldcontainthefollowingparameters:
rangeofIPaddresses
subnetmask
defaultrouterIPaddress
DNSserverIPaddress
leaseduration
©2014KCodesCorporation.Allrightsreserved.6Seriesv2User’sManualV1.0
2. Activatethescope.TheServerautomaticallygetstheDHCPparameters.IfyouareusingDNS,you
mayincludeatleastoneDNSserverIPaddressintheDHCPscopeormanuallysettheDNSserverIP
addressusingServer’swebpagesortheControlCenter.
3.3.6. SettingtheIPAddressUsingtheControlCenter
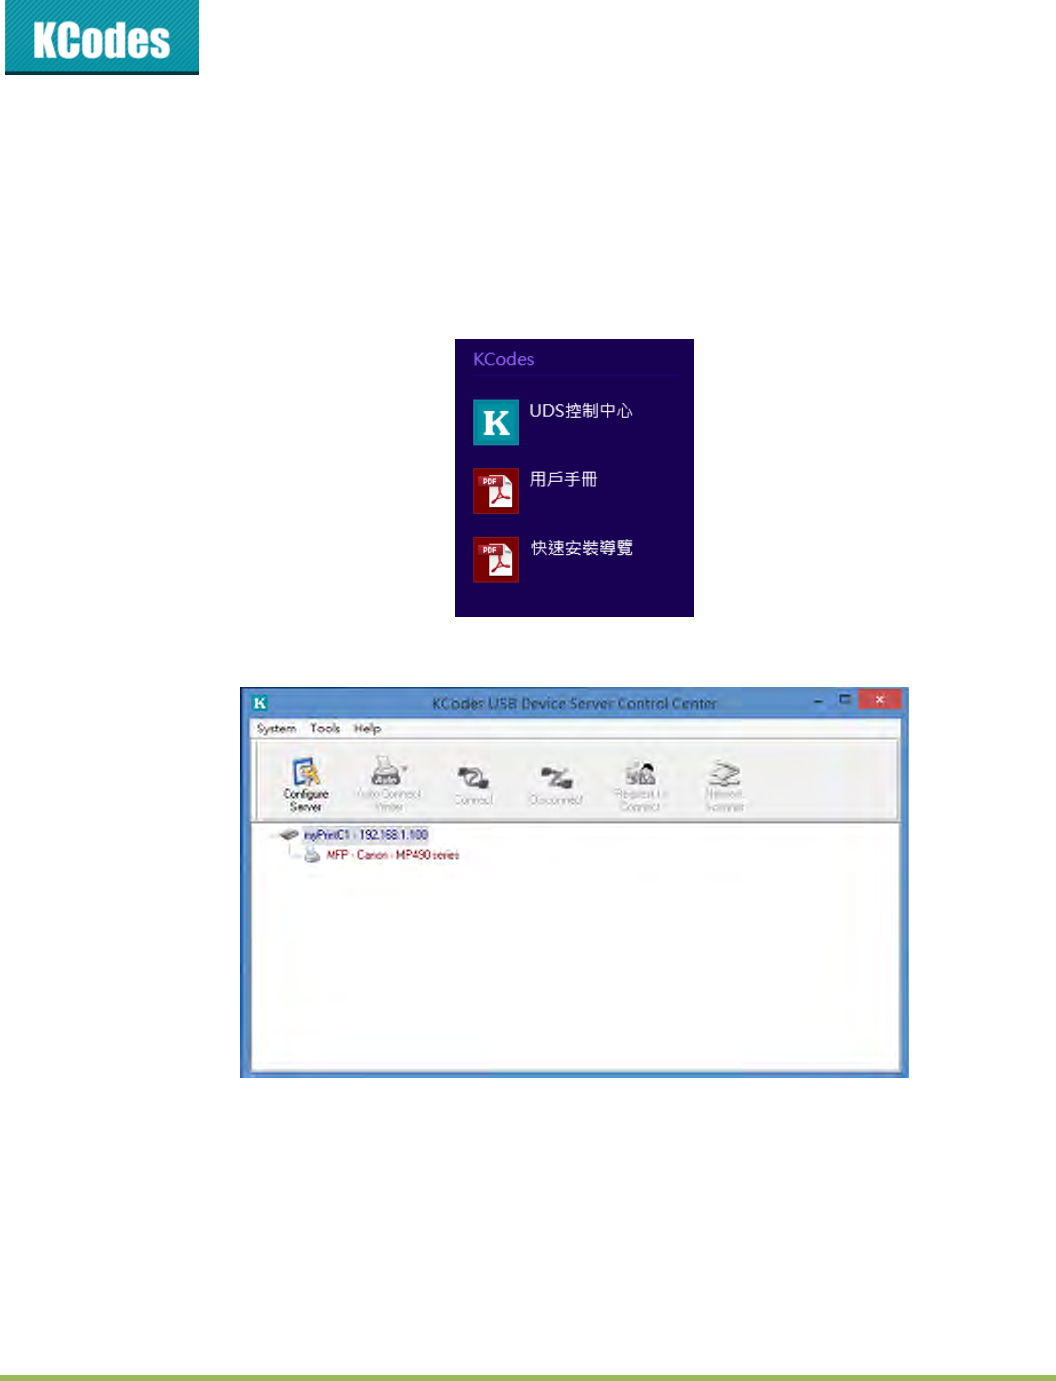
1. InstalltheControlCenter.TheControlCenterisavailableontheProductCD.
2. StarttheControlCenterandAuto‐searchingServerwindowwillappear.
3. IfthetoolfindsmultipleServersinyourlocalareanetwork,thenyouhavetoselectoneServerfrom
theServerList.
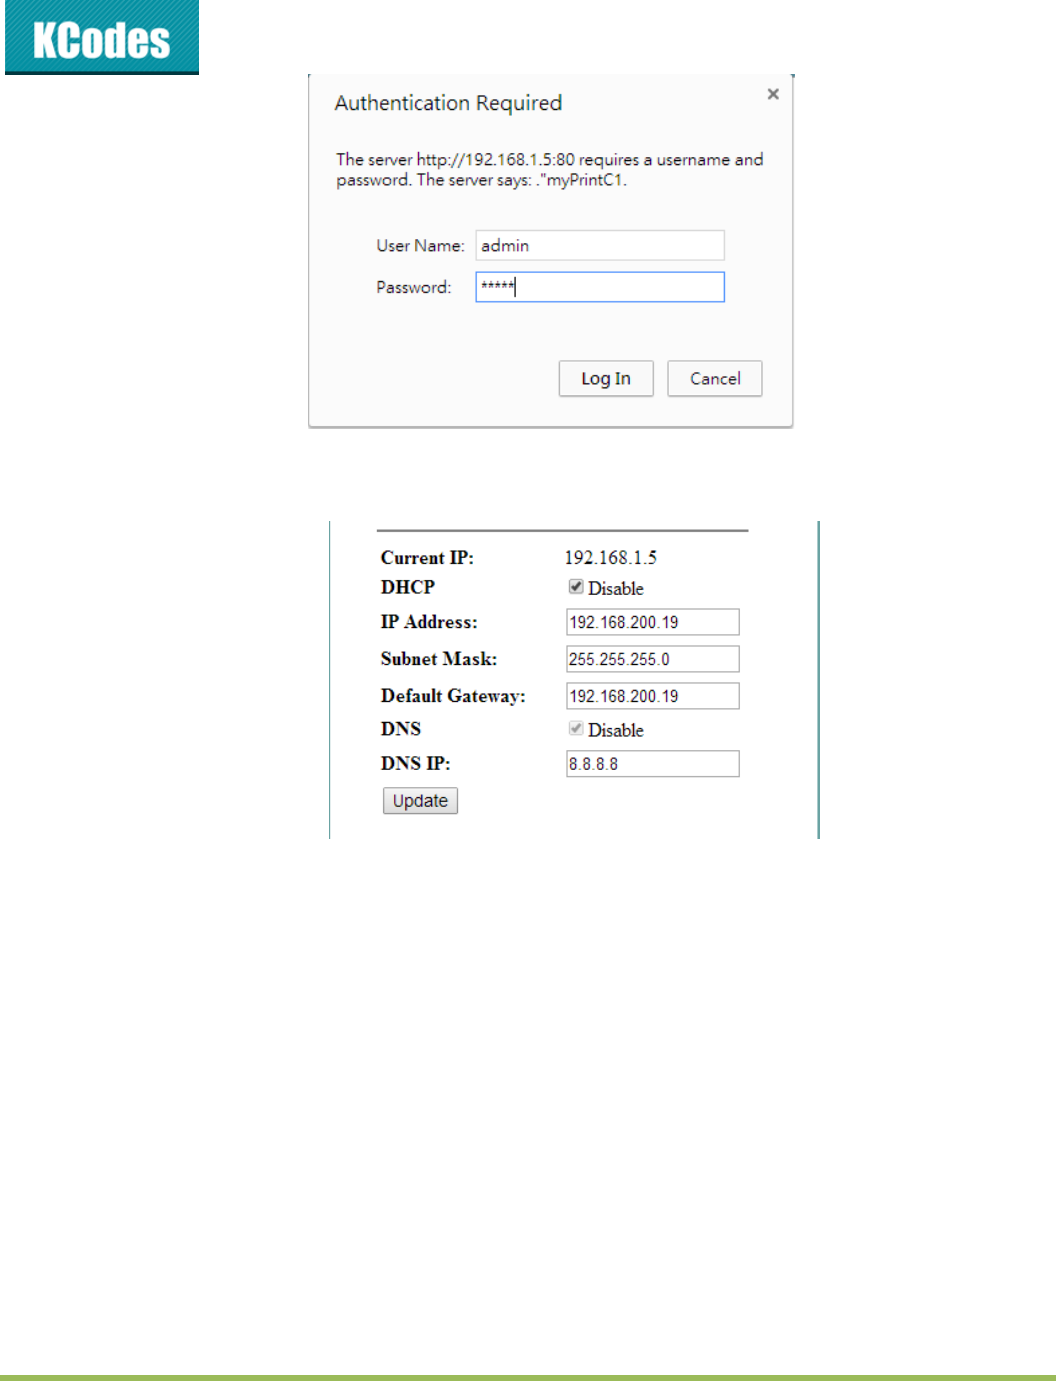
4. Doubleclickthehighlightedserver(orclickthe“ConfigureServer”button)togettheserver’sweb
pages.ThenloginwithadministratorID(default:admin)anditspassword(default:admin).
©2014KCodesCorporation.Allrightsreserved.6Seriesv2User’sManualV1.0
5. SetupIPAddress,DefaultGatewayandDNSIP.DefaultGatewayandIPAddressshouldbethesame
subnet.Thenclicktheupdatebutton.
6. ClickthebuttoncorrespondingtoyourchoiceofIPsettingmethods(staticordynamicusingDHCP).
WhenassigningastaticIPaddressyoualsohavetodefineSubnetMask.
7. ClickSubmittosaveyoursettings.AndtheServerwillreboot.Youhavenowfinishedtheprocedure
ofsettingtheIPaddress.
Chapter4 UsingthePrintServer
4.1. Introduction
Thegoalofthisproduceistoprovidetheprintserverinasingleproduct.Wedevelopednewtechnology
called“NetUSB”and“AirPrint”toachievethisgoal.Basically,the“NetUSB”isa“USBoverIP”technology
thattransparentlyredirectsallUSBpacketstoTCP/IPnetworkchannel.“NetUSB”allowsyoutouseprint
devicesasiftheywereconnecteddirectlytoyourPCalthoughtheyareactuallyremotelyconnectedto
the901n/901iUSBdeviceserver.And“AirPrint”isatechnologythatallowyoutoprintphotosor
documentsonyouriPhoneoriPadwithoutanycable.
©2014KCodesCorporation.Allrightsreserved.6Seriesv2User’sManualV1.0
4.2. NetUSBfuntion
4.2.1. Connect&Disconnect
“NetUSB”allowsyoutouseUSBdevicesasiftheywereconnecteddirectlytoyourPCalthoughtheyare
actuallyremotelyconnectedtothe901n/901iprintserver.The“connect”operationisasoftware
operationthatsimulatesanactualUSBdeviceplug‐in.Thatistosay,whenyoudoa“connect”operation
intheControlCenter,PCcanthendetectaprintdevice’splug‐in,althoughactuallyyoudonotpluginany
USBdevice.Similarly,the“disconnect”operationisasoftwareoperationthatsimulatesthe
disconnectionoftheUSBdevice.Oncetheconnectoperationissuccessful,theoperationstousethat
USBdevicearejustthesameasiftheUSBdeviceisdirectlyconnectedtothePC.
IfaUSBdeviceis“connected”byaPC,wesaythatPChastheownershipoftheprintdevice.OnlyonePC
cangettheownershipofaUSBdeviceatthesametime.Therefore,ifaUSBdeviceisconnectedbyone
PC,nootherPCcanconnectthisUSBdeviceuntilthisUSBdeviceisdisconnected.
4.2.2. SubnetIssue
BeforeusingtheNetUSBtechnology,youmustfirstmakesurethatyourPCcanaccessUSBdeviceserver
viaTCP/IP.Thesimplestwaytodothisisusing“ControlCenter”tosearchfortheUSBdeviceserveron
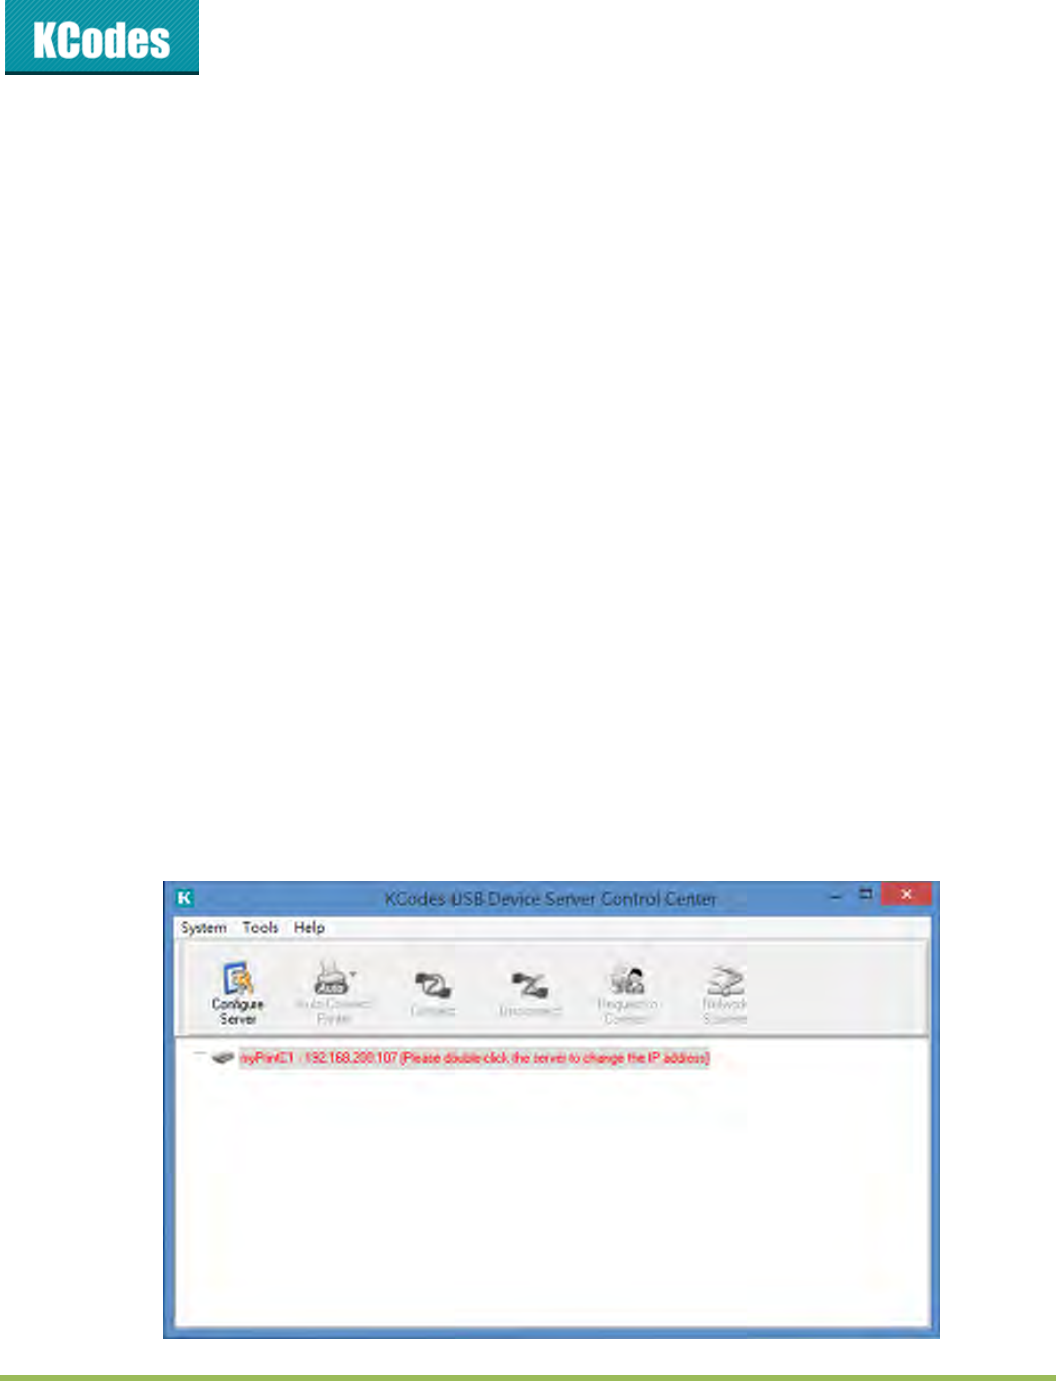
thenetworkandchangeitsIPaddresstobethesamesubnetasyourPC.IftheserverandyourPCarenot
inthesameTCP/IPsubnet,ControlCenterwillshowtheserverinred,asthefollowingfigure.Youmust
changetheIPaddress(orusingDHCP)oftheserversothattheserverandyourPCareinthesamesubnet.
ControlCenterwillshowtheseserversinblue,meaningyoucanaccesstheseserversbytheNetUSB
technology.
©2014KCodesCorporation.Allrightsreserved.6Seriesv2User’sManualV1.0
4.2.3. InstallationofUSBDeviceDriver
SomeUSBdevices,likeprintersorMFPs(multifunctionprinters),requiretoinstallvendor‐supplieddriver
(usuallyonCDROM).ForthoseUSBdevicesthatdonotneedtoinstalldriver,pleaseskipthissection.
1. InserttheCDROMintotheCDdriveandrunthe“autorun”program.
2. Followtheinstructionsoftheinstallationprogramtoinstalldriver.
3. Whentheinstallationprogramasksyoutoplug‐intheUSBdevice,runthe“ControlCenter”.
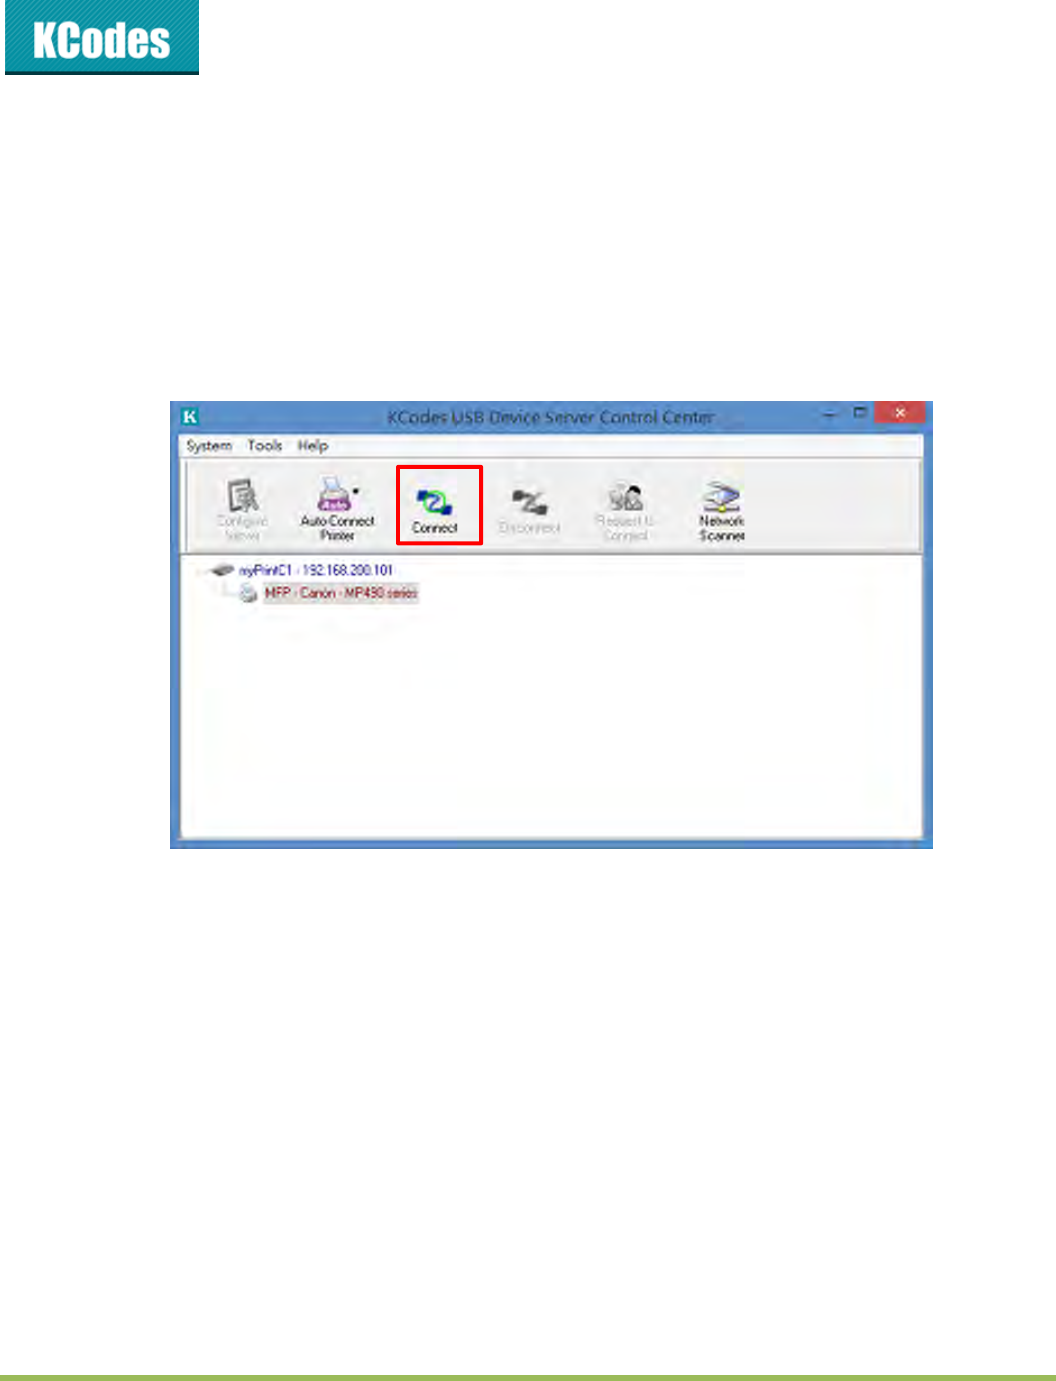
4. IntheControlCenter,clicktheUSBdeviceserverthathasthedesiredUSBdeviceattached.
5. ClickthedesiredUSBdeviceasthefollowingfigure.
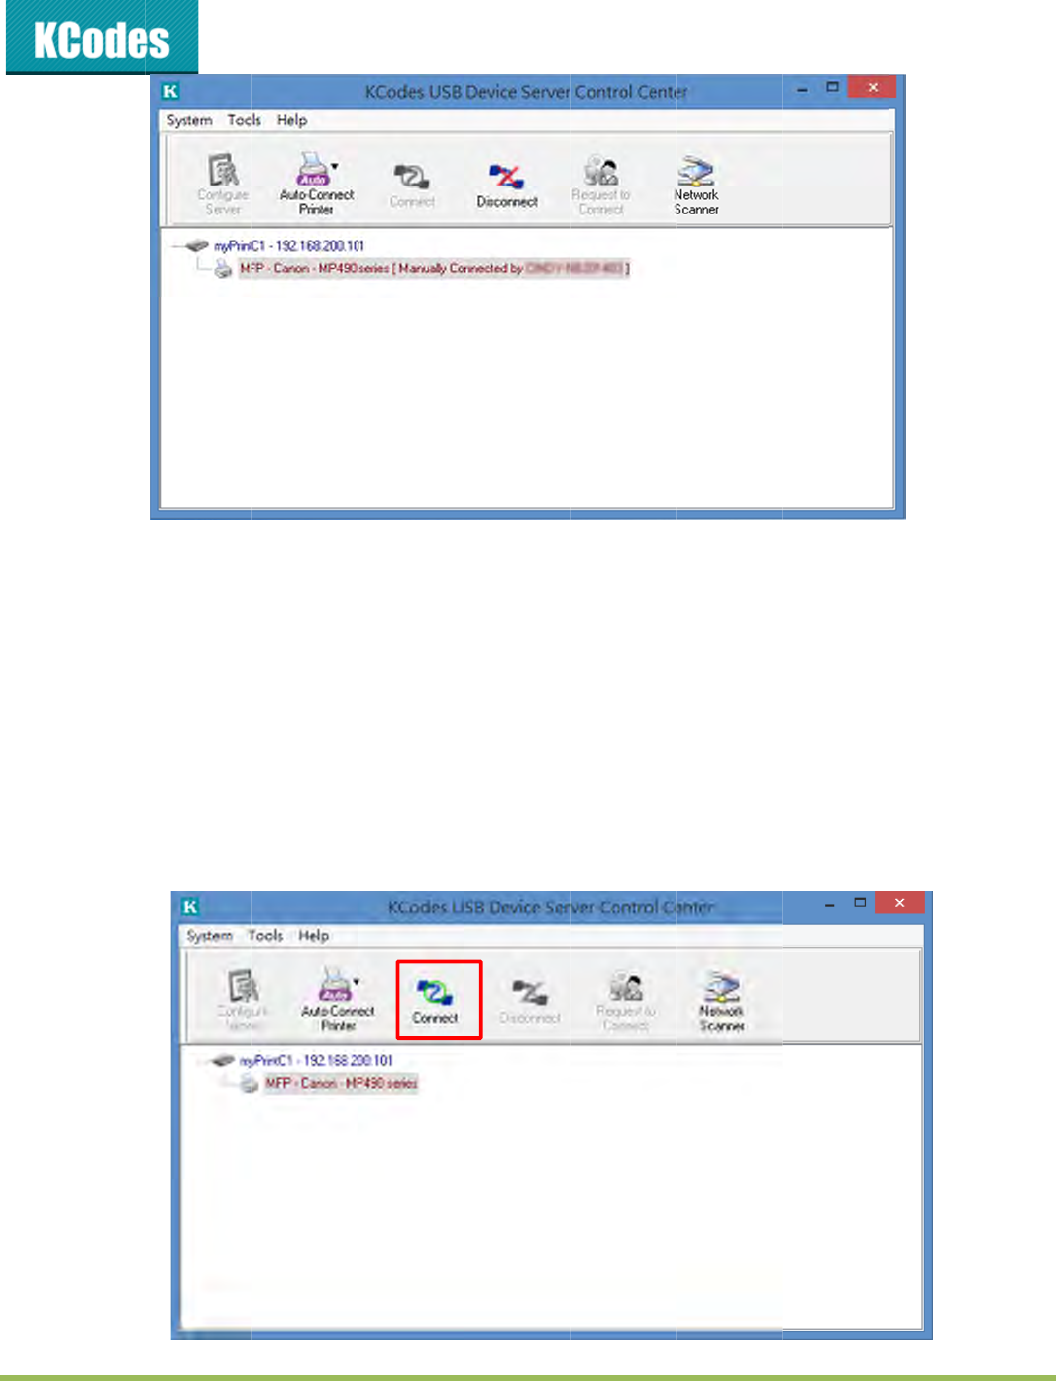
6. Clickthe“Connect”button.Thenthemessage“ManuallyConnectbyyour_computer_name”will
beshown,asthefollowingfigure.
4
7. N
o
8. Af
t
“D
i
Nowthe
d
4
.2.4.
U
1. In
t
2. Cli
c
o
w,theinst
a
t
ertheinst
a
isconnect”
b
d
riverofyo
u
U
singt
h
t
heControl
c
kthedesi
r
a
llationpro
g
a
llationisc
o
b
uttontod
u
rUSBdevi
c
h
eUSB
D
Center,cli
c
r
edUSBde
v
©2014KC
o
g
ramwilld
e
o
mpleted,c
isconnectt
h
c
eisinstall
e
D
eviceS
e
c
ktheUSB
d
v
ice.
o
desCorpor
a
e
tecttheU
S
licktheUS
B
h
eUSBdev
i
e
d.
e
rver
d
eviceserv
e
a
tion.Allrig
h
S
Bdevicea
n
B
devicein
t
i
ce.
e
rthathas
t
h
tsreserved.
n
dcontinu
e
t
heControl
t
hedesired
6Seriesv2
U
e
toinstalld
Centerand
USBdevice
U
ser’sManu
a
river.
thenclick
t
attached.
al
V1.0
t
he
3. Cli
c
be
4. N
o
th
a
th
e
an
y
5. Th
e
6. Af
t
“D
i
un
t
de
v
c
kthe“Con
shown.
o
w,PCwill
d
a
tsimulate
s
e
ControlC
e
y
USBdevic
e
n,justuse
t
eryoufini
s
isconnect”
b
t
ilyou“Dis
c
v
iceatthe
s
nect”butt
o
d
etectthep
s
anactual
U
e
nter,PCca
c
e.
theUSBd
e
s
husingthe
b
uttontod
c
onnect”th
s
ametime.
©2014KC
o
o
n.Thenth
e
lug‐inofth
e
U
SBdevice
p
nthendet
e
e
viceasifit
USBdevic
e
isconnectt
h
atUSBdev
i
o
desCorpor
a
e
message
“
e
USBdevi
c
p
lug‐in.Th
a
e
ctaUSBd
e
isconnect
e
e
,clickthe
U
h
eUSBdev
i
i
ce.Thatis
t
a
tion.Allrig
h
“
Manually
C
c
e.The“co
n
a
tistosay,
w
e
vice’splug
‐
e
ddirectlyt
o
U
SBdevicei
i
ce.Other
P
t
osay,only
h
tsreserved.
C
onnectby
y
n
nect”oper
a
w
henyoud
‐
in,althoug
o
yourPC’s
ntheCont
r
P
Cscannot
onePCisa
6Seriesv2
U
y
our_comp
u
a
tionisas
o
oa“conne
c
hactuallyy
USBport.
r
olCentera
“Connect”
t
llowedtoc
o
U
ser’sManu
a
u
ter_name
”
o
ftwareope
c
t”operati
o
oudonot
p
ndthencli
c
t
heUSBde
v
o
nnectthe
al
V1.0
”
will
ration
o
nin
p
lugin
c
kthe
v
ice
USB

©2014KCodesCorporation.Allrightsreserved.6Seriesv2User’sManualV1.0
4.2.5. Auto-ConnectPrinter
Themethoddescribedinsection4.2.4isso‐calledmanual‐connect,whichmeansusersmustmanually
connecttheUSBdevicebeforeusingthatdevice,andmustmanuallydisconnecttheUSBdeviceafter
usingthedevice,otherwisenobodyelsecanconnectthisdevice.However,forprintersandscanners(and
MFPs),theUSBdeviceserversupportsauto‐connectsousersdon’tneedtomanuallyconnect/disconnect.
Thisandthenextsectionsshowyouhowtodothis.
Afterthedriverisinstalledasdescribedinsection4.2.3,youcanseeanewlycreatedprinterinthe
ControlPanel’s“PrintersandFaxes”.FollowthestepsbelowtodoaNetUSBauto‐connectprinting.
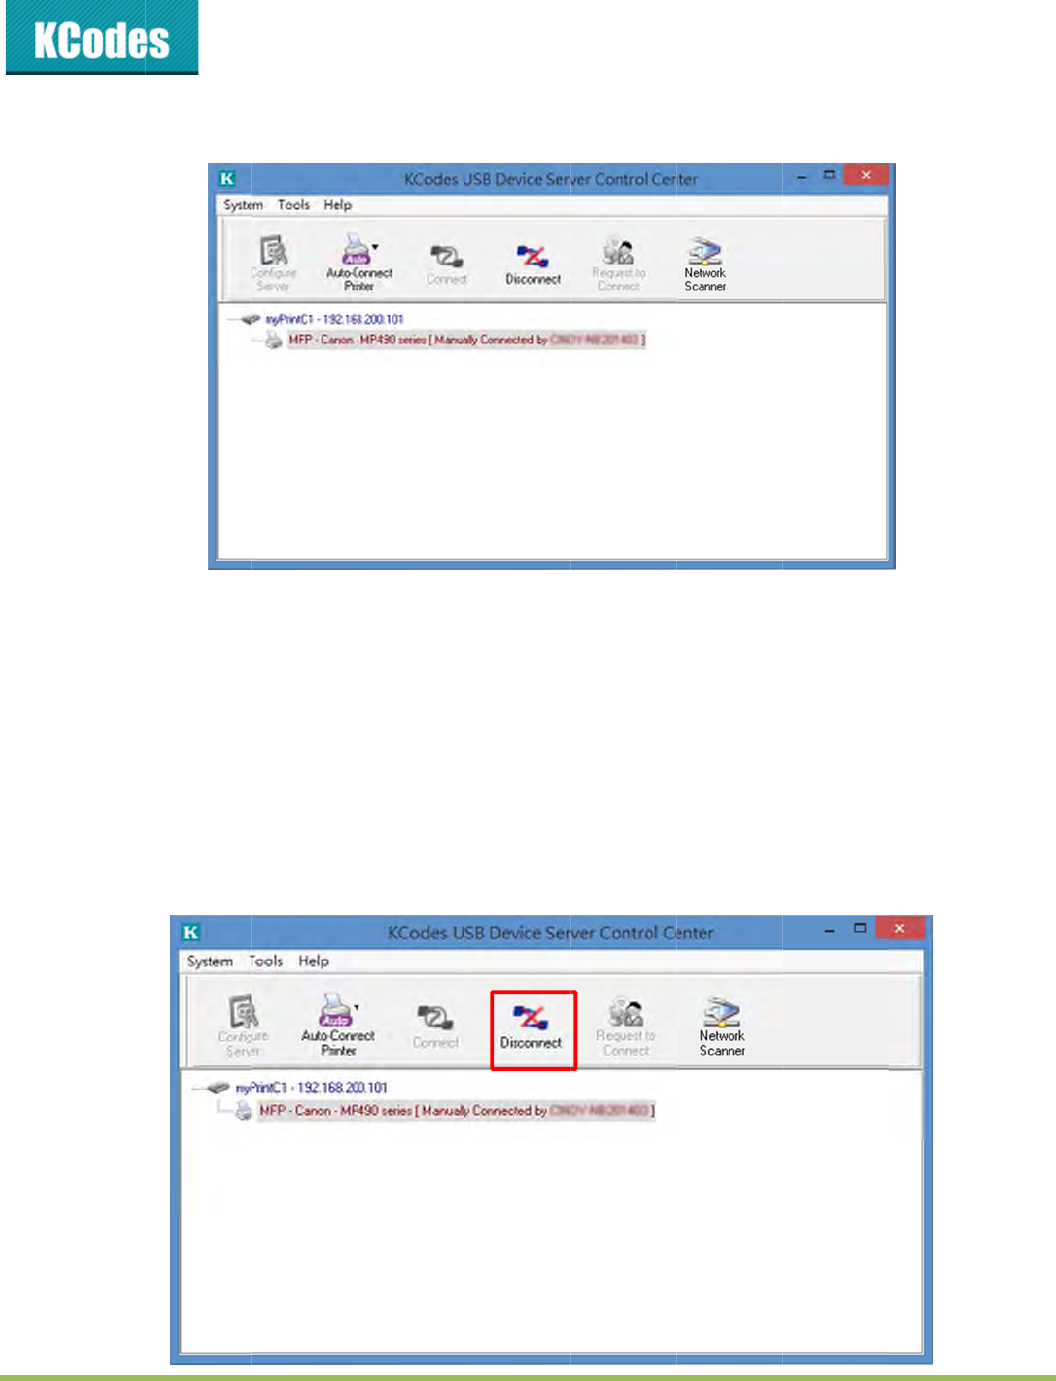
1. IntheControlCenter,clicktheUSBdeviceserverthathasthedesiredprinter(orMFP)attached.
2. Clickthedesiredprinter(orMFP).
3. Clickthe“AutoConnectPrinter”buttonandchoose“SetAuto‐ConnectPrinter”.
Thefollowingfigurewillappear.
©2014KCodesCorporation.Allrightsreserved.6Seriesv2User’sManualV1.0
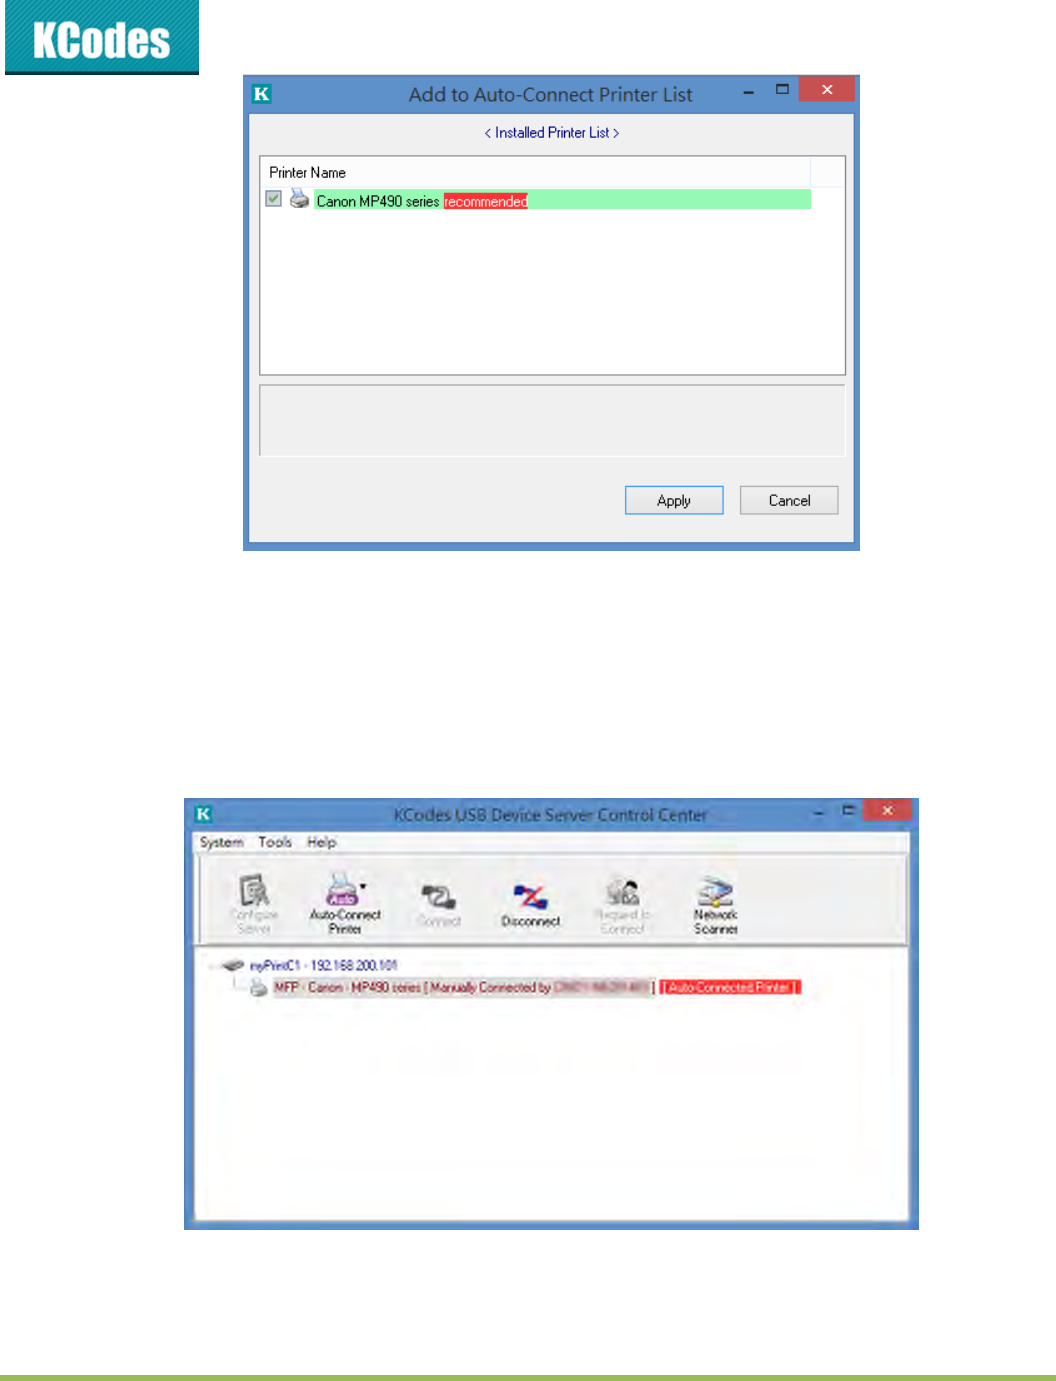
4. Choosethedesiredprinter.ThedesiredprintermustbetheWindowsprinter(thisisalogical
printer)thatmatchestheprinterattachedontheUSBdeviceserver(thisisaphysicalprinter).
Thenclickthe“Apply”button.
5. Then,theprinterwillbemarkedasan“Auto‐ConnectedPrinter”inred.Ifyouchoose“Auto‐
ConnectedPrinterList”inthe“Tools”menu,youcanseeanewlycreateditemthatdescribesthe
associationbetweentheWindowsprinterandthephysicalprinterontheserver.

©2014KCodesCorporation.Allrightsreserved.6Seriesv2User’sManualV1.0
6. Thentrytoissueaprintjobtothedesiredprinter.YouwillseetheControlCenterwill
automaticallydoaconnectoperation.Then,theprintjobwillbeissuedtothatprinter.
7. Evenyoualreadyproperlysetupanauto‐connectedprinter,theControlCentermustberunning
(inthebackground)whileaprintjobisissued.Thismeansyou’dbetterruntheControlCenter
everytimeafteryouloginWindows.Inordertoskipthismanualoperation,youcanmakethe
ControlCenterberunautomaticallyafteryouloginWindows.Todothis,choosethe
“Configuration”iteminthe“Tools”menu.Thefollowingwindowwillappear.Clickonthecheck
boxandthenonthe“OK”button.Thisfeatureisenabledbydefault.
IfyouwouldliketobreaktheassociationbetweentheWindowsprinterandthephysicalprinter,justclick
ontheassociationandclickthe“Delete”buttoninthe“Auto‐ConnectedPrinterList”.

4
4
.2.6.
IfaUSBd
e
However,
example,
t
Then,the
“Request
t
Atthism
o
computer
Theuser
w
disconnec
t
Reques
t
e
viceisma
n
weoffera
n
t
herearet
w
TESTESco
m
t
oConnect
”
o
ment,the
u
–TESTESis
w
illchoose
t
t
thedevic
e
t
toCon
n
n
uallyconn
e
n
othermec
h
w
ocomput
e
m
puterwan
t
”
buttonin
t
u
seronthe
requestin
g
t
oaccepto
r
e
andtheC
o
©2014KC
o
n
ect
e
ctedbyan
y
h
anismcall
e
e
rs–TESTE
S
t
stouseth
i
t
heControl
TESTcomp
u
g
tousethe
r
reject.Ifa
c
o
ntrolCent
e
o
desCorpor
a
y
otheruse
e
d“Reques
t
S
andTEST.
i
sHPprinte
Center.Th
e
u
terwillse
e
HPprinter.
c
cepted,th
e
e
ronTESTE
a
tion.Allrig
h
r,basically
y
t
toConnec
Nowtheo
w
r.Theuser
e
following
w
e
thefollo
w
e
ControlC
e
Swillauto
m
h
tsreserved.
y
oucanno
t
t”tosolve
t
w
nerof“H
P
ontheTES
T
windowap
p
w
ingwindo
w
e
nteronTE
m
aticallyco
n
6Seriesv2
U
t
connectt
h
t
hisinconv
e
P
Photosma
r
T
EScomput
p
ears.
w
,indicatin
g
STwillaut
o
nnectthat
d
U
ser’sManu
a
h
atdevice.
e
nience.Fo
r
r
t2600”is
T
t
ercanclick
g
thatanot
h
o
matically
d
evice.
al
V1.0
r
T
EST.
the
h
er
©2014KCodesCorporation.Allrightsreserved.6Seriesv2User’sManualV1.0
4.2.7. QuittingtheControlCenter
TheControlCenterdoesn’treallyquitifyouclickthe“X”box(closebox)atthetoprightcornerofthe
window.Instead,itjustminimizesitselftothesystemtray.TherearetwowaystoreallyclosetheControl
Center.Thefirstwayischoosing“Exit”iteminthe“File”menuintheControlCenter.Thesecondwayis
right‐clickingtheiconoftheControlCenterinthesystemtrayandchoosingthe“Exit”item
4.2.8. Limitations
TherearesomelimitationstousetheNetUSBtechnology.
1. OnlysupportsWindowsXP/2003/Vista/7/8.Windows98/MEisnotsupported.
2. SupportsMacOSX10.6SnowLeopard/10.7Lion/10.8MountainLion/10.9Mavericks.
3. OnlyonePCcangettheownershipofthesameUSBdeviceatthesametime.
4.3. AirprintFunction
“Airprint”allowsyoutouseUSBdevicesdirectlybyyouriPhoneoriPadthoughtheyareactuallyremotely
connectedtothe901n/901iprintserver.
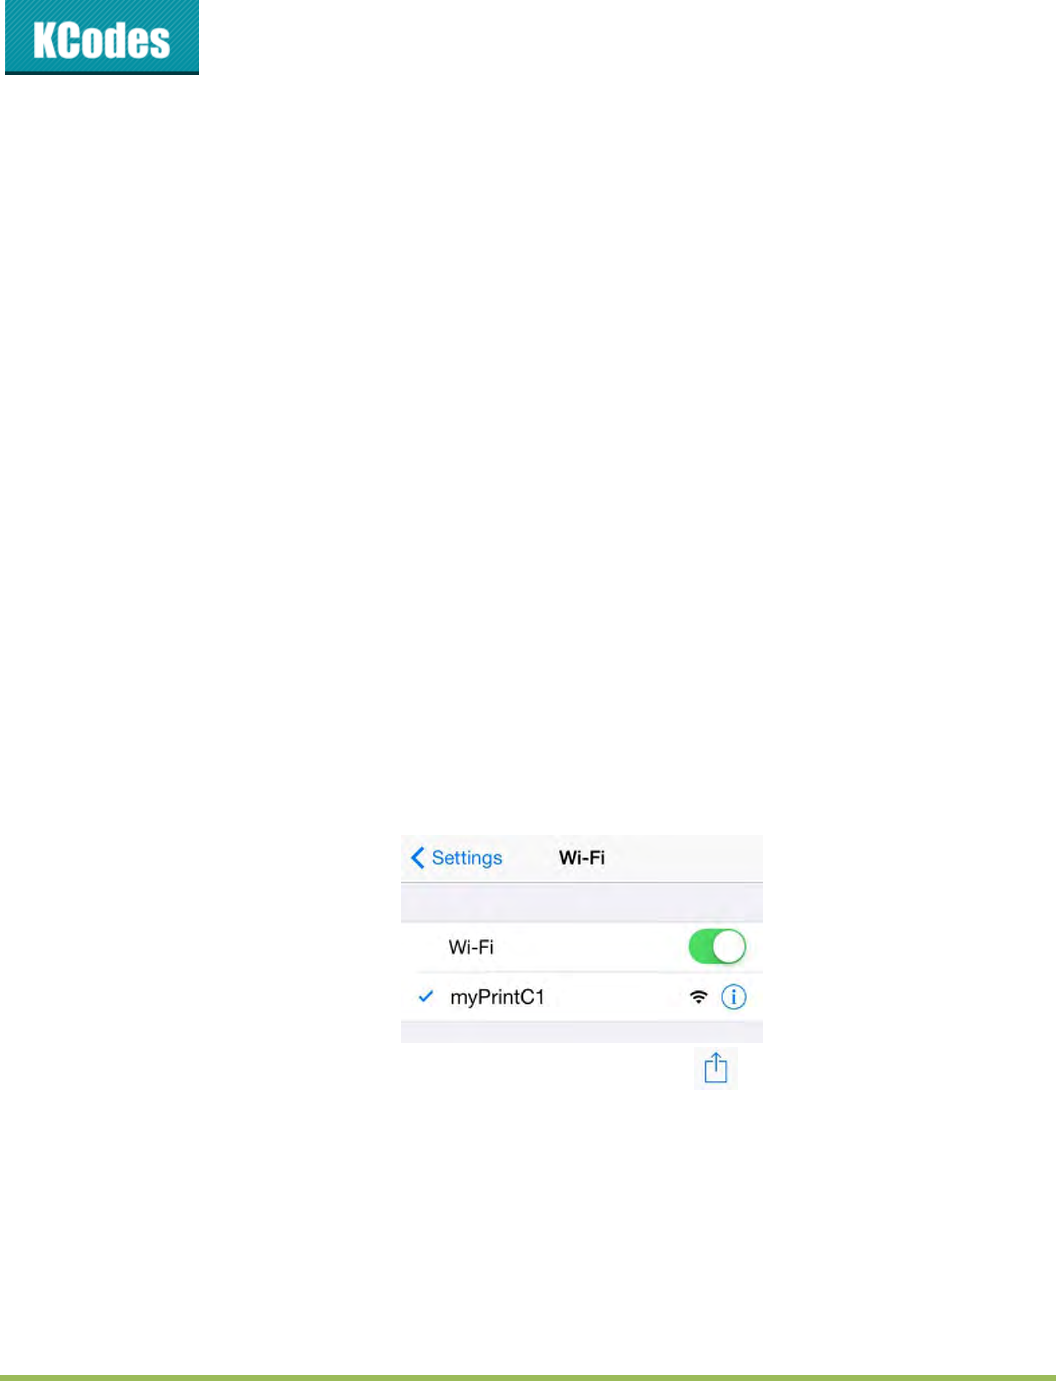
4.3.1. UsingAirprint
1. OpeniPhonesettingandsetupthewifitoconnecttheserver.
2. Chooseoneofpicturesordocumentsyouwanttoprint,clickandprint.
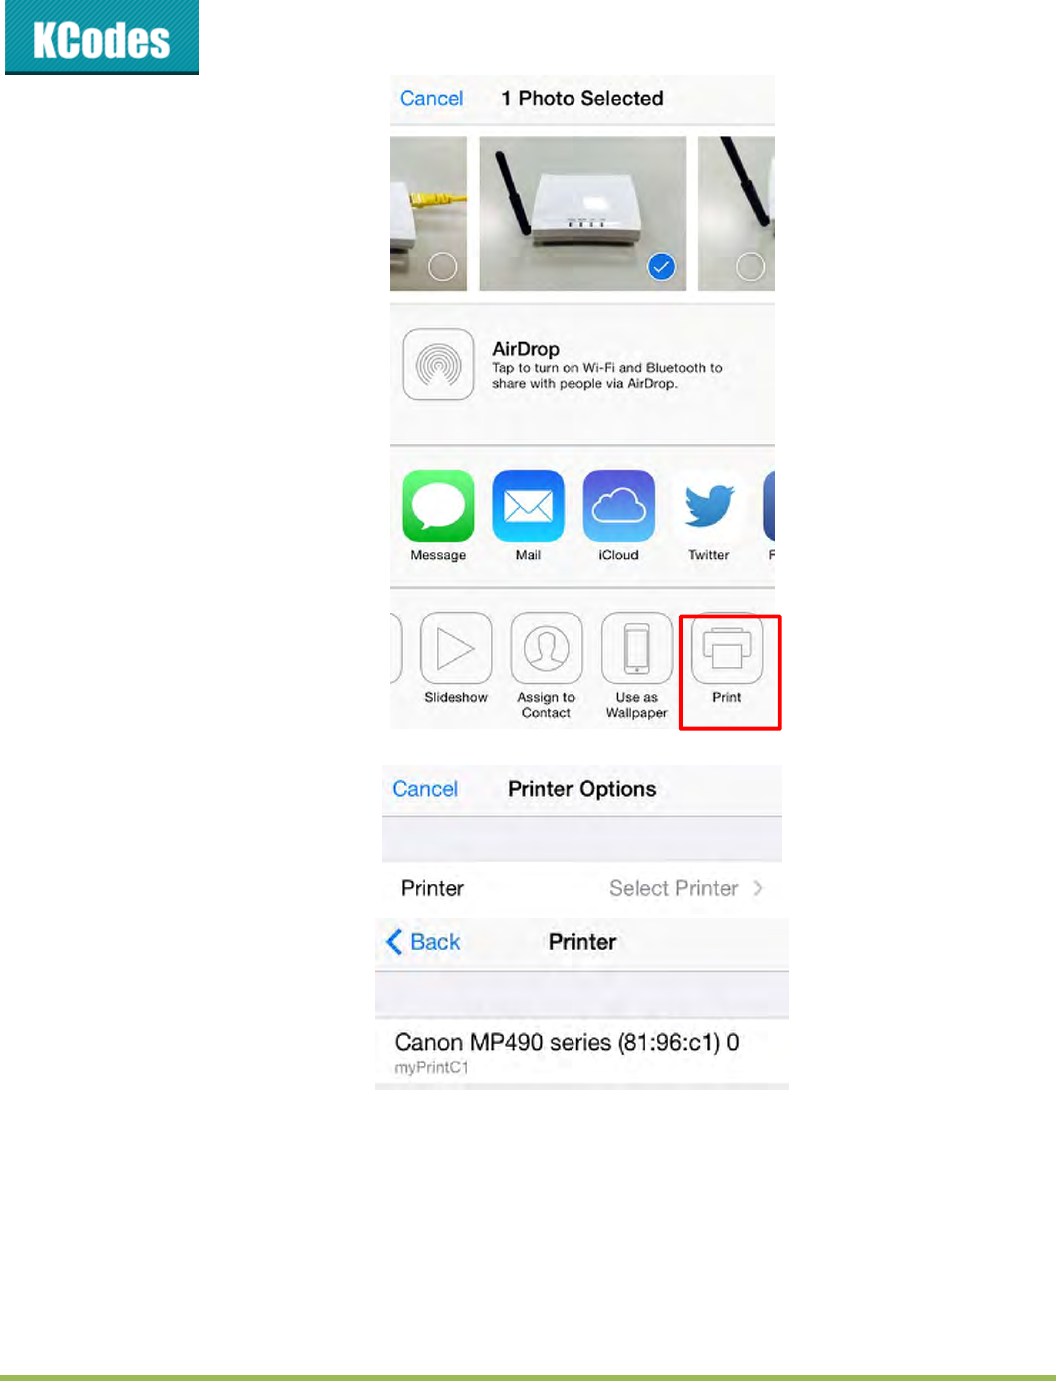
©2014KCodesCorporation.Allrightsreserved.6Seriesv2User’sManualV1.0
3. Thenyoucanselectprinter.
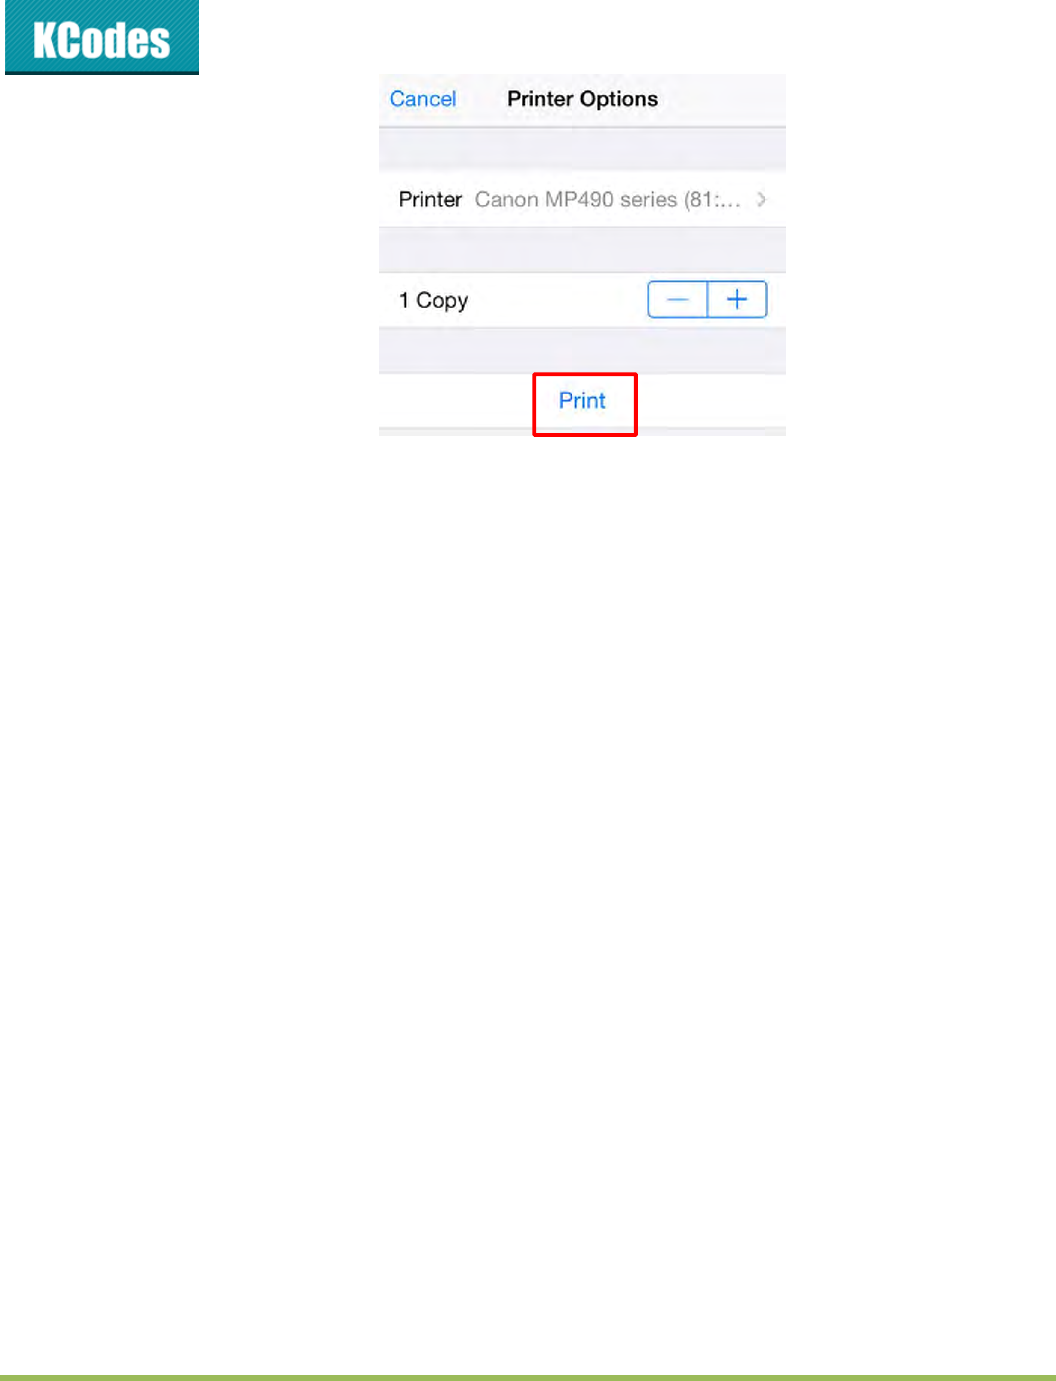
4. Afteryouselecttheprinteryoucanprintanythingyouwant.
©2014KCodesCorporation.Allrightsreserved.6Seriesv2User’sManualV1.0
©2014KCodesCorporation.Allrightsreserved.6Seriesv2User’sManualV1.0
Chapter5 TheServer’sWebPages
5.1. Introduction
TheServerrunsthehttpserver,httponTCPport:80.UsersmayusethewebpagestoseetheServer’s
systemstatusandconfiguretheServer.
5.2. UsingtheServer’sWebPages
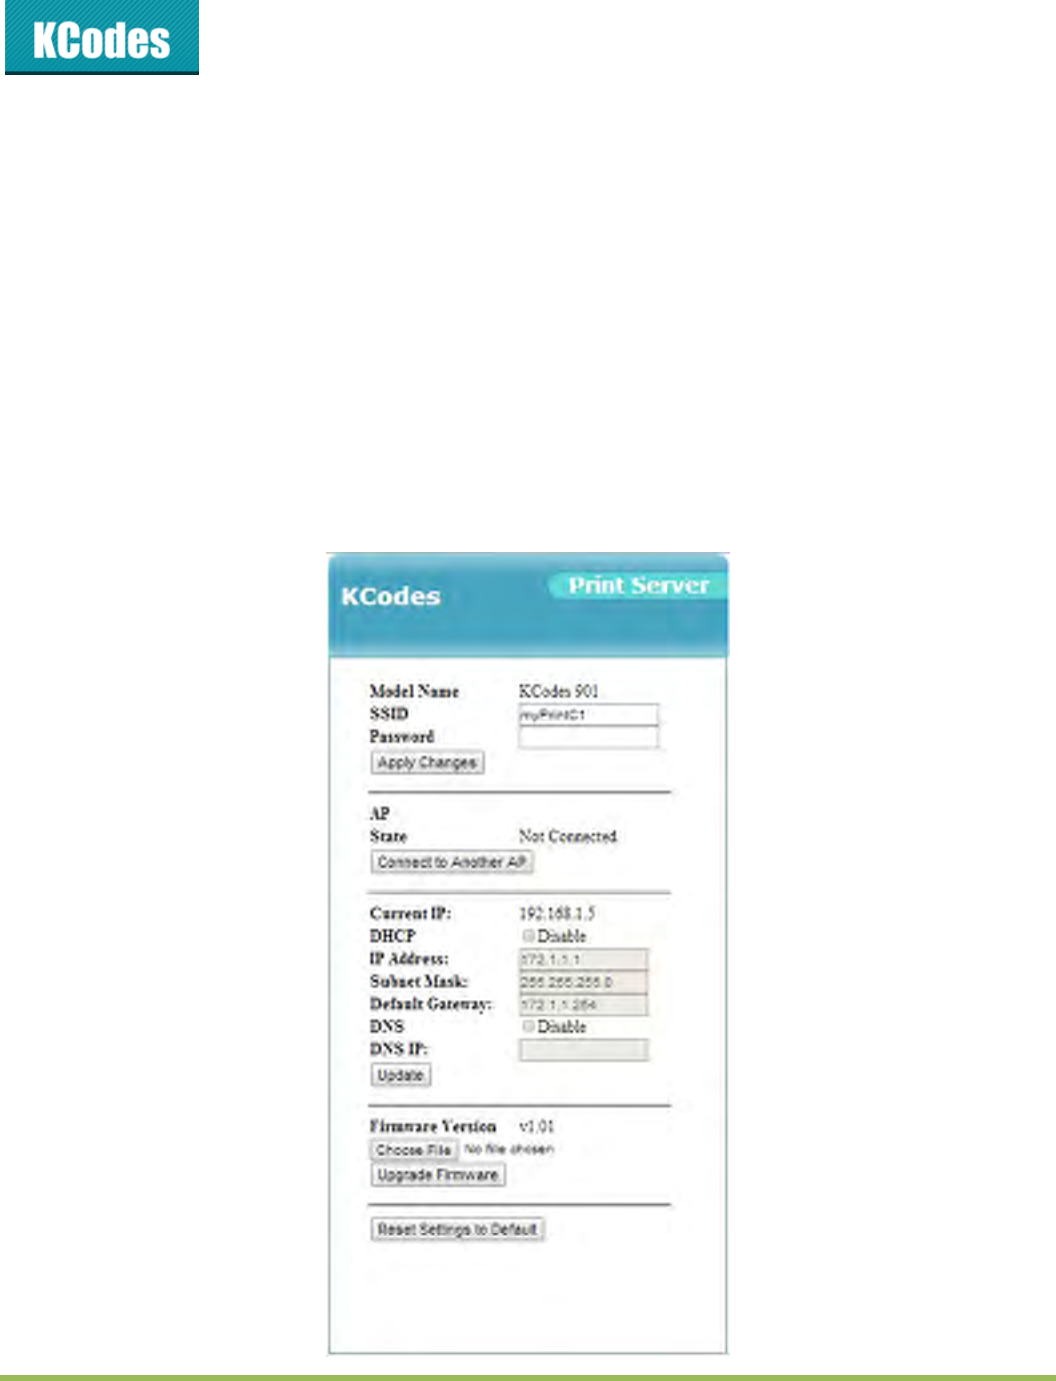
5.2.1. DisplayingServerStatus
Whenyouopentheserver’swebpages(thesystemwillrequestusertoenteradministrator(default:
admin)andpassword(default:admin)tologin.),youcanseeallthestatusoftheserver.

©2014KCodesCorporation.Allrightsreserved.6Seriesv2User’sManualV1.0
5.2.2. SettingupServerConfiguration
YoucanalsosetuptheServerconfigurationhere..
GeneralConfiguration
ServerInformation:YouhavetosettheSSIDandPassword,whichisthenametorepresentthe
Server.
TCP/IP:YouhavetosettheServer’sTCP/IPconfigurationtoconnectTCP/IPnetwork.Pleasesee
Chapter3BasicInstallationformoredetails.
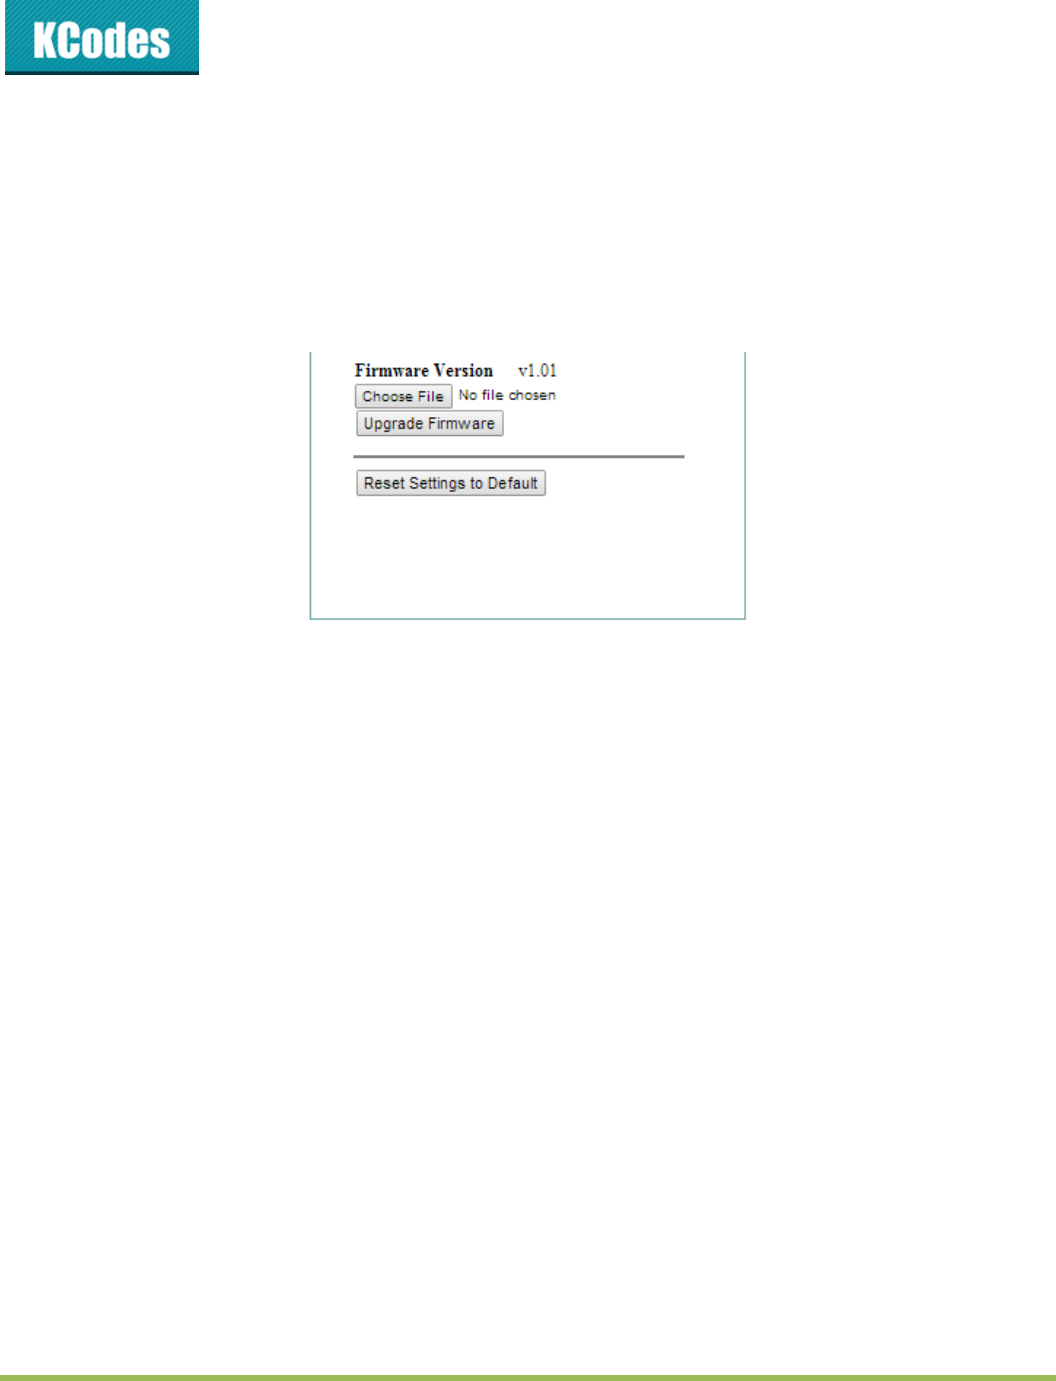
MaintenanceIfyouwanttorestorefactorydefaultvaluesoftheServerorupgradenew
firmware,youcanusetheMaintenancetool.
ResetSettingstoDefault:clickthisbutton,theServerwillrestorefactorydefault
values.
UpgradeFirmware:clickChoosefiletofindthefirmwarefiletobeupgraded.
ClickUpgradeFirmwaretouploadthefirmwareintotheServer.

©2014KCodesCorporation.Allrightsreserved.6Seriesv2User’sManualV1.0
Chapter6 Troubleshooting
Thischapterprovidesusefulinformationtohelpyouresolvedifficultiesthatyoumayexperiencewithyour
Server.Faultsymptoms,possiblecauses,andremedialactionsareprovidedwithinaquickreferencetable.
ThisServer’sUSBportsonlysupportMFPs,printers.
6.1. LEDIndicators
Indicators Behavior Descri
p
tion
POWER On Power On
Off Power off/System error
WLAN Blinking Activity on wireless
LAN Blinking Activity on network
Off No activity on network
USB On USB device connected
Off No physical connection to USB device
6.2. Firewall
IfafirewallsoftwarehasbeeninstalledonyourPC,itmayblockthecommunicationbetweenthePCand
theUSBdeviceserversothattheUSBdeviceservercannotworkproperly.Tosolvethisproblem,either
disablethefirewallorconfigurethefirewalltoallowthefollowingTCPandUDPports:
7303,7305,7411,20005
©2014KCodesCorporation.Allrightsreserved.6Seriesv2User’sManualV1.0
Chapter7 RestoreFactoryDefaults
YoumayrestoretheServer’sdefaultparametersbyoneofthefollowingmethods.
7.1. UsingtheServer’sWebPages
GototheServer’swebpageandclickResetSettingtoDefault
1. ClickYestoconfirm
2. Waitfor60seconds
7.2. UsingInitButton
Turnonserverandwaituntilyoucanseeitoncontrolcenter,presstheinitialbuttonover10sec.Server’s
WLANandUSBLEDindicatorswillautomaticallyblinkandrestart,thisprocesswilltakeabout1min,after
restartserverwillbacktofactorydefault.
7.3. DefaultParametersList
GeneralInformation
ServerName:myPrintXX
TCP/IP
AutomaticallygetIPbyDHCP:Enabled
StaticIP:Disabled
‐IPAddress:192.168.1.100
‐SubnetMask:255.255.255.0
UserAccounts
Administrator:admin
Password:admin
©2014KCodesCorporation.Allrightsreserved.6Seriesv2User’sManualV1.0
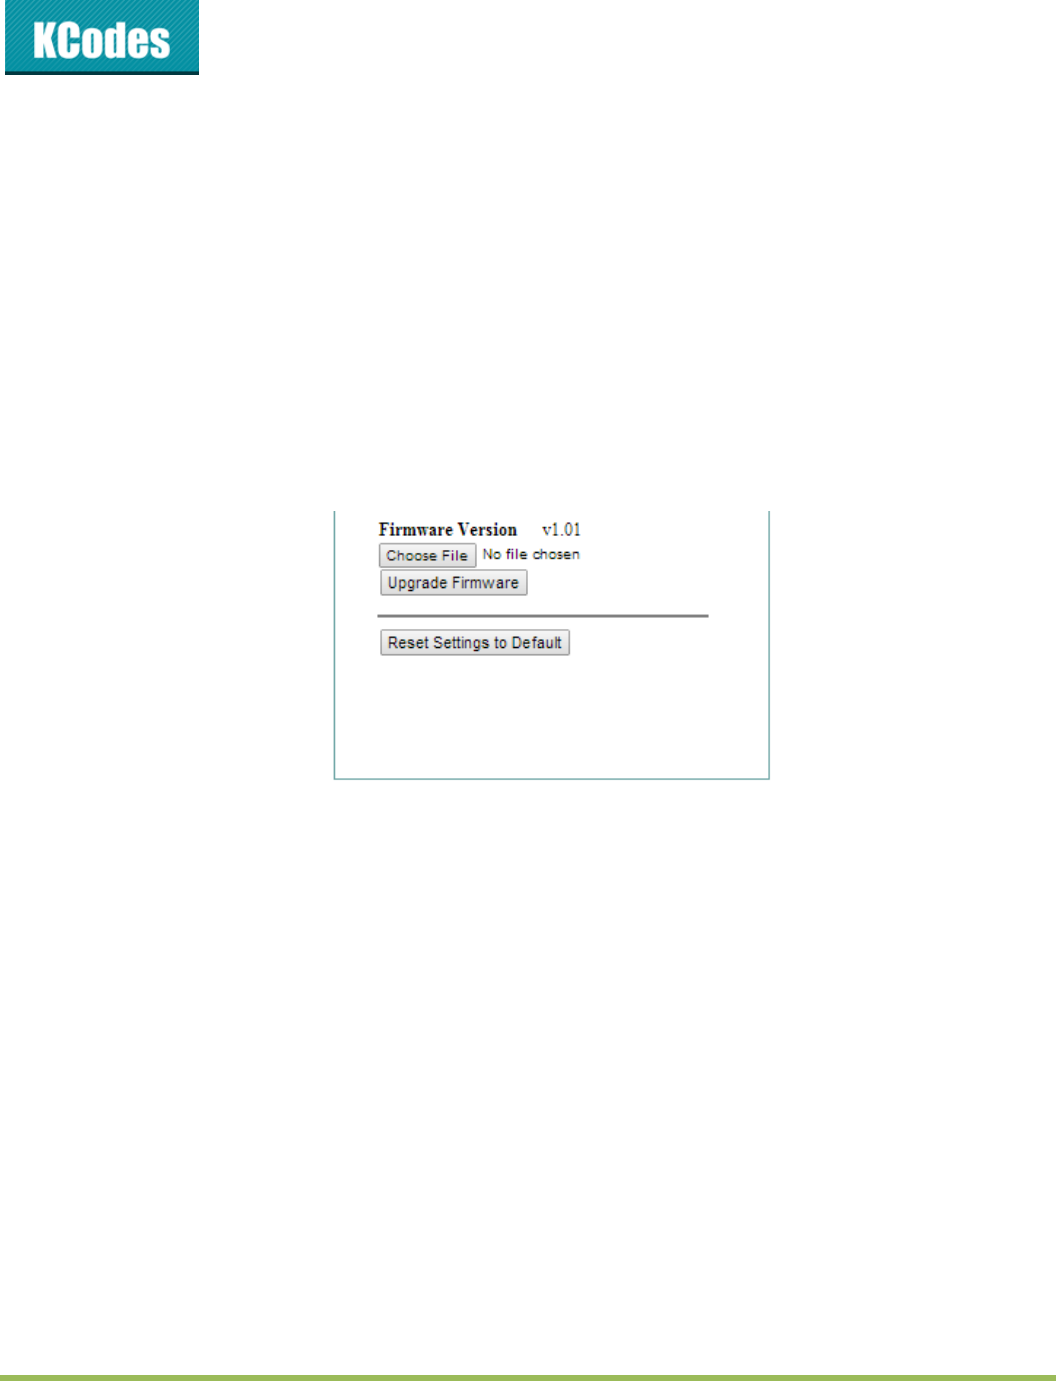
Chapter8 UpgradeFirmware
Thischapterdescribeshowtoupgradefirmware.PleasefollowthefollowingProcedures:
8.1. UsingtheControlCenter
1. OpenControlCenter.ItwillautomaticallysearchtheexistingServersanddisplaytheirstatuses.
2. SelecttheServerthatyouwanttoupgradethefirmware.DoubleclicktheselectedServertogetthe
serve’smainwebpage.
3. LogintheServerwithAdministrator(default:admin)andPassword(default:admin).
4. ClickChooseFiletochoosethefileofnewfirmware.
5. ClickUpgradeFirmwaretostartfirmwareupgrade.
6. Waitfor20secondsforsystemreboot.

©2014KCodesCorporation.Allrightsreserved.6Seriesv2User’sManualV1.0
Chapter9 TheInitButton
TheInitbuttonisusedformaintenance:SimultaneouslypressInitbuttonandturnon(byplugginginthe
poweradaptor)theServeruntilWLANandUSBLEDindicatorssimultaneouslyblink.Afterthat,theServer
willdothefollowingtasks:
PerformaFactoryDefaultrestorationoftheserver,whichwillrestoremostofthe
parametersandsettingstofactorydefaultvalues.
PerformaTFTPserver.YoucanupgradenewfirmwareusinganyTFTPclienttool.
Note:Afterperformingthetasksmentionedabove,youhavetoplugoffthepoweradaptorandthenplug
inthepoweradaptortorestarttheServer.

©2014KCodesCorporation.Allrightsreserved.6Seriesv2User’sManualV1.0
Federal Communication Commission Interference Statement
This equipment has been tested and found to comply with the limits for a Class B digital device,
pursuant to Part 15 of the FCC Rules. These limits are designed to provide reasonable protection
against harmful interference in a residential installation. This equipment generates, uses and can
radiate radio frequency energy and, if not installed and used in accordance with the instructions, may
cause harmful interference to radio communications. However, there is no guarantee that interference
will not occur in a particular installation. If this equipment does cause harmful interference to radio or
television reception, which can be determined by turning the equipment off and on, the user is
encouraged to try to correct the interference by one of the following measures:
● Reorient or relocate the receiving antenna.
● Increase the separation between the equipment and receiver.
● Connect the equipment into an outlet on a circuit different from that to which the receiver is
connected.
● Consult the dealer or an experienced radio/TV technician for help.
FCC Caution: Any changes or modifications not expressly approved by the party responsible for
compliance could void the user’s authority to operate this equipment.
This device complies with Part 15 of the FCC Rules. Operation is subject to the following two
conditions: (1) This device may not cause harmful interference, and (2) this device must accept any
interference received, including interference that may cause undesired operation.
For product available in the USA/Canada market, only channel 1~11 can be operated. Selection of
other channels is not possible.
This device and it's antennas(s) must not be co-located or operating in conjunction with any other
antenna or transmitter except in accordance with FCC multi-transmitter product procedures.
For MPE Statement – Mobile device
IMPORTANT NOTE:
FCC Radiation Exposure Statement:
This equipment complies with FCC radiation exposure limits set forth for an uncontrolled
environment. This equipment should be installed and operated with minimum distance 20cm between
the radiator & your body.

©2014KCodesCorporation.Allrightsreserved.6Seriesv2User’sManualV1.0
IC
This device complies with Industry Canada license-exempt RSS standard(s). Operation is subject to
the following two conditions: (1) this device may not cause interference, and (2) this device must
accept any interference, including interference that may cause undesired operation of the device.
Le présent appareil est conforme aux CNR d'Industrie Canada applicables aux appareils radio exempts de licence.
L'exploitation est autorisée aux deux conditions suivantes : (1) l'appareil ne doit pas produire de brouillage, et (2)
l'utilisateur de l'appareil doit accepter tout brouillage radioélectrique subi, même si le brouillage est susceptible d'en
compromettre le fonctionnement.
For product available in the USA/Canada market, only channel 1~11 can be operated. Selection of
other channels is not possible.
Pour les produits disponibles aux États-Unis / Canada du marché, seul le canal 1 à 11 peuvent être exploités. Sélection
d'autres canaux n'est pas possible.
This device and it's antennas(s) must not be co-located or operating in conjunction with any other
antenna or transmitter except in accordance with IC multi-transmitter product procedures.
Cet appareil et son antenne (s) ne doit pas être co-localisés ou fonctionnement en association avec une autre antenne ou
transmetteur.
IMPORTANT NOTE:
IC Radiation Exposure Statement:
This equipment complies with IC RSS-102 radiation exposure limits set forth for an uncontrolled
environment. This equipment should be installed and operated with minimum distance 20cm between
the radiator & your body.
Cet équipement est conforme aux limites d'exposition aux rayonnements IC établies pour un environnement non contrôlé.
Cet équipement doit être installé et utilisé avec un minimum de 20 cm de distance entre la source de rayonnement et votre
corps.