KEEN HIGH HOLDING MT791 Mobile Internet Device User Manual MT791 Manual For FCC
KEEN HIGH HOLDING(HK) LIMITED Mobile Internet Device MT791 Manual For FCC
UserManual.wiki
>
KEEN HIGH HOLDING
>
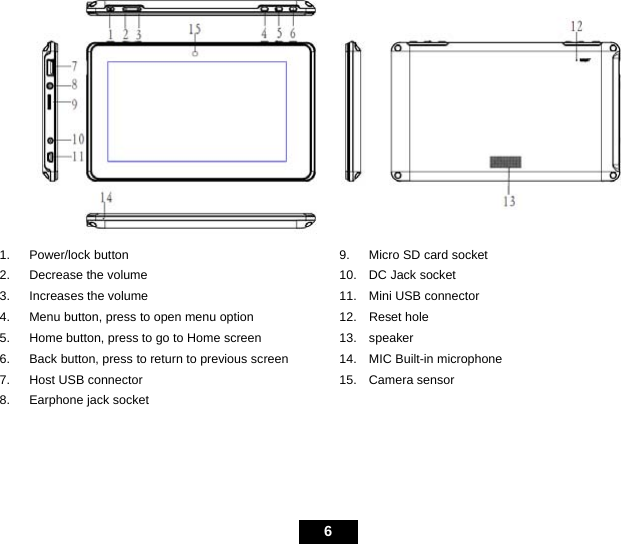
MT791 User Manual
Users Manual
Navigation menu
Upload a User Manual
Namespaces
Wiki Guide
HTML
PDF
Info
Views
User Manual
Discussion / Help
Navigation


![17 y When entering texts or numbers, each letter or number appear above the key you have pressed. y Tap ABC (character),⇑(Capitalized or not), ?123 (number), or ALT (symbols) on the onscreen keyboard to switch between different input modes. y Tap and hold the word you have typed to activate the following edit text options: Select Word, Select all, Input method. Add“ ” to dictionary y Press Back key or tap to exit. Sleep/Wake button When you are not actively using tablet, you can short press [ ] button to turn off the display and save the battery. When you turn off the display, nothing happens if you touch the screen. You just need to short press [ ] button to turn on the display. Making a Wireless Connection Before you can surf the Internet, send and receive emails, download content and applications etc, you must join a Wi-Fi network that is connected to the Internet. For Wi-Fi networks that are not secured with a PIN code, you can easily connect to them and access the Internet freely. However, for Wi-Fi networks that are secured with password, you need to have the password to access the Internet. y From the home screen or Application menu, tap Settings to enter setting interface. Or on the home screen, press Menu key or tap ,then select Settings on the menu bar. y Tap Settings > Wireless & networks. y Tap Wi-Fi to turn on wireless connection. ✓ appears in the Wi-Fi checkbox. y Tap Wi-Fi settings. Your device will start to scan for the networks within range and display a list of available Wi-Fi networks. y Tap the Wi-Fi network that you want your device to be connected with. If the network is not secured with a password, your device will start](https://usermanual.wiki/KEEN-HIGH-HOLDING/MT791/User-Guide-1593968-Page-20.png)