KENWOOD Furnace/Heater, Oil Manual L0712588
BCG300 L0712588
User Manual: KENWOOD KENWOOD Furnace/Heater, Oil Manual KENWOOD Furnace/Heater, Oil Owner's Manual, KENWOOD Furnace/Heater, Oil installation guides
Open the PDF directly: View PDF ![]() .
.
Page Count: 6
IMPORTANT INSTRUCTIONS
SAVETHESEINSTRUCTIONS
INSTRUCIONES PARAELUSO
REPASEY GUARDEESTASINSTRUCCIONES
The Kenwood electricoil filled radiators are thefinestand mostversatileportable heatersavai-
lable.
Pleasereview the following to ensurethe fullestbenefitfrom their features.
Losradiadoresel_ctricosde aceite Kenwood sonlosmejoresy m6svers_tilescalentadores
port, tilesen el mercado.
Favor de repasar la informaci6na confinuaci6npara asegurarel beneficiocompletode sus
caracteristicas.
IMPORTANTSAFEGUARDS
When using electrical appliances, basic precautions should always be followed to reduce risk of
fire, electric shock, and injury to persons, including the following:
1. Read all instructions before using this heater.
2. Never for any reason coverthe appliance during operationas thiscould lead to dangerous
overheating.
3. This heater is hot when in use. To avoid burns, do not let bare skin touchhot surfaces. Use
handle when moving this heater. Keep combustible materials, such as furniture, pillows, bed-
ding, papers, clothes, and curtains at least3 feet (0,9 m) from the front and top of the heater
and keep themaway from the sidesand rear.
4. Extremecaution is necessarywhen any heater is usedby or near children or invalids and whe-
never the heater is left operating and unattended.
5. Always unplug heater when not in use.
6. Do notoperateany heaterwilh a damagedcordor plugor afterIhe heatermalfunclians,hasbeen
droppedor damagedin any manner.If heaterhasleakedany oil,discontinueusingIhe healerand
contactthe servicecenlerasindicatedinthisinslrudionsleaflet.Relumheaterto authorizedservicefoci-
lilyforexamination,electricalormechanicalacljuslnm_,ormL0air.
7. Do not useoutdoors.
8. Thisheater is not intended for usein bathrooms,laundry areas ana similar indoor locations.
Never locate heater where it may fall into a bathtub or other water container.
9. Do not run cord under carpeting. Do not cover cordwith throw rugs, runners,or the like.
Arrange cord away from trafficarea and where it will not be tripped over.
10. To disconnectheater, turn controls to off, thenremove plug from outlet.
11. Connect to properly polarized outlets only.
12. Do not insert or allow foreign objects to enter any ventilation or exhaust opening as this may
eausean electric shock,fire, or damage the heater.
13. To prevent e possible fire, do not block air intakes or exhaust in any manner. Do not use on
soft surfaces, like a bed, where openings may become blocked.
14. Aheater has hot or arcing or sparking parts inside. Do not use it in areas where gasoline,
paint, or flammable liquids are usedor stored.
15. Use this heater only as described in this manual Any other use not recommended by the
manufacturer may cause fire, electric shock,or injuryto persons.
16. To prevent overload and blown fuses, be sure that no other appliance is plugged into the
sameoutlet (receptacle) or into another outlet (receptacle)wired into the same circuit.
17. It is normal for the heater'splug and cord to feel warm to the touch. A plug or cord which becomes
hot to the touch or becomesdistorted in shape may be a resultof a worn electricaloutlet. Worn
outletsor receptaclesshould be replaced prior to furtheruse of the heater. Pluggingheater into _a
worn outlet/receptacle/may resuffin overheatingof thepower cord or fire.
18. Donotuseonex_nsk_ cordbecauseit may overfleatandoausea riskoffire._, __ _to _
an _cord,ihecordshallbeNo. 14AWG minimumsizeandralednotle_ '_nan1875wags,and
bestobeusedonlyforsupplyi_powerto_isheater.
19. Besurethat the plug isfullyinsertedinto an appropriate receptaclein order to preventany dangerof
overheatingor arcing.Pleaserememberthat recep_desalso de_riorate dueto aging and continuous
use:checkperiodicallyif signsof overhec_ngor deformationsare evidencedby the plug. Do natusethe
receptacleand CALLyour electrician.
20. Check that neither the appliance nor the power cable have been damaged in any way during
transportation.
21. Make sure that no pieces of polystyrene or other packaging material have been left between
one element of the appliance and another. It may be necessaryto passover the appliance with
a vacuum cleaner.
22. When switchingon the appliancefor the firsttime, allow it to runat full power for about two
hoursto get rid of the unpleasantsmell. Make sure that the room in which the applianceis
located is well ventilatedduring this operation, it is normal for the appliance to emit small
crackingsoundswhenyou turn it onfar the firsttime.
SAVETHESEINSTRUCTIONS
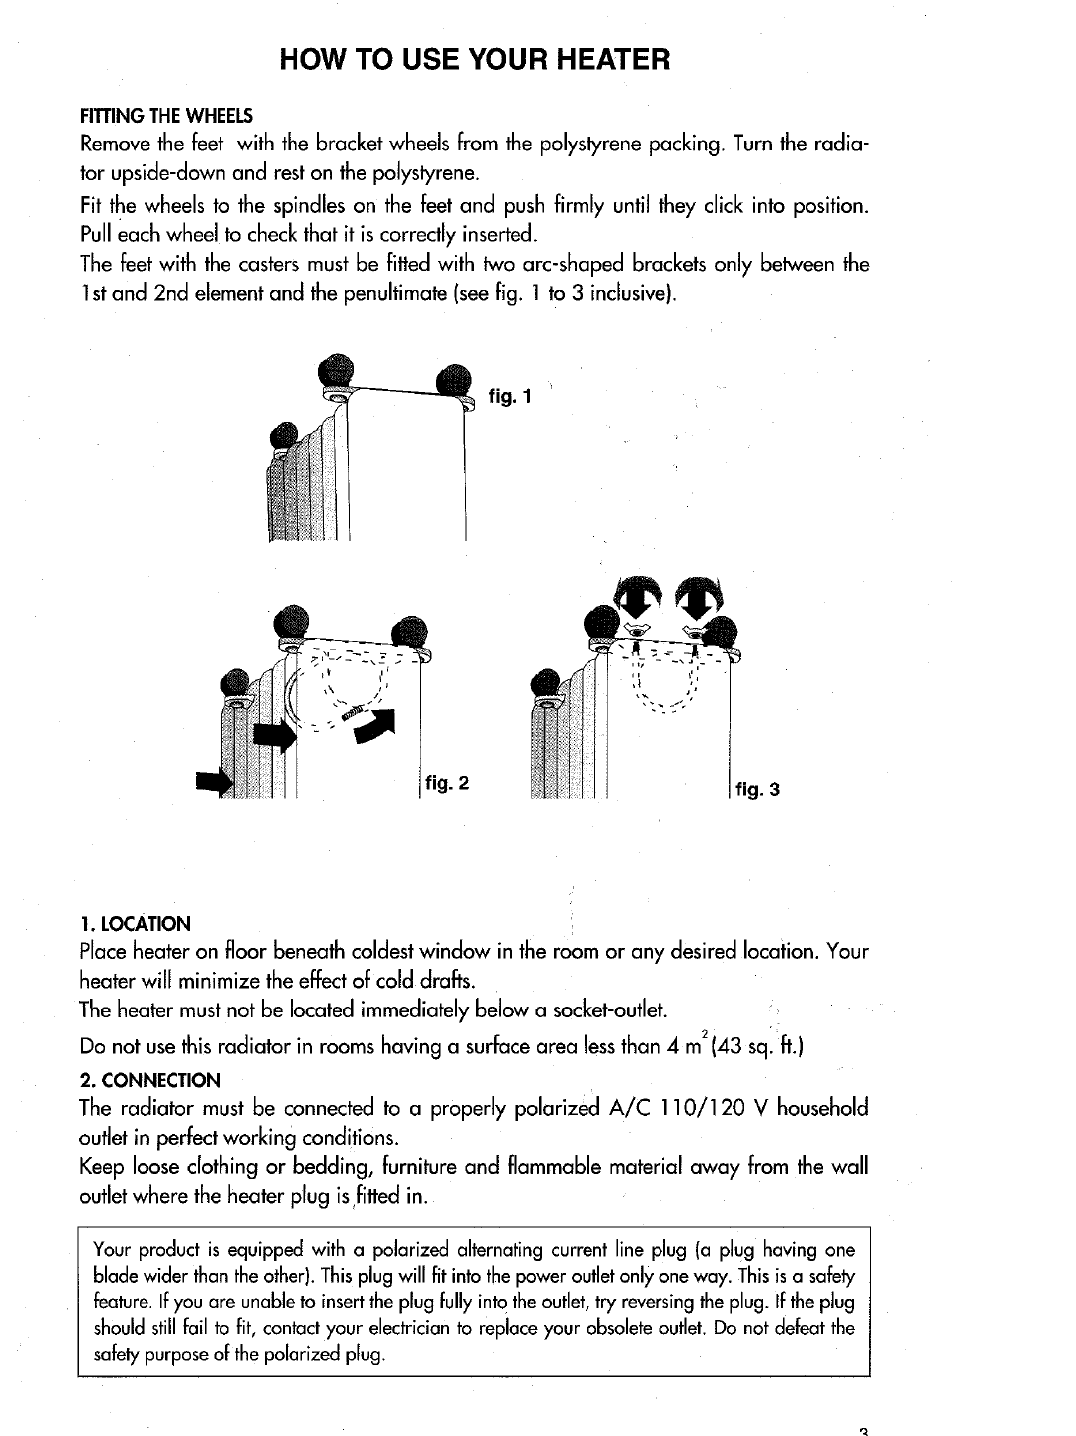
HOW TO USE YOUR HEATER
FITTINGTHEWHEELS
Remove the feet with the bracket wheels from the polystyrene packing. Turn the radia-
tor upside-down and rest on the polystyrene.
Fit the wheels to the spindles on the feet and push firmly until they click into position.
Pull each wheel to check that it is correctly inserted.
The feet with the casters must be fitted with two arc-shaped brackets only between the
1st and 2nd element and the penultimate (see fig. 1 to 3 inclusive).
fig. 1
ig. 2 ig. 3
1. LOCATION
Placeheateron floor beneath coldest window in the room or any desiredlocation.Your
heater will minimize the effect of cold drafts.
The heater mustnot be located immediately below a socket-outlet.
Do not usethis radiator in rooms having a surface area lessthan 4 m2(43 sq. ft.)
2. CONNECTION
The radiator must be connectedto a properly polarized A/C 110/120 V household
outlet in perfect working conditions.
Keep loose clothing or bedding, furniture and flammable material away from the wall
outlet where the heater plug is fitted in.
Your product is equipped with a polarized alternating current line plug (a plug having one
blade wider than the other). This plug will fit into the power outlet only one way. Thisis a safety
feature. If you are unable to insert the plug fully into the outlet, try reversingthe plug. If the plug
should still fail to fit, contact your electrician to replace your obsolete outlet. Do not defeat the
safety purpose of the polarized plug.
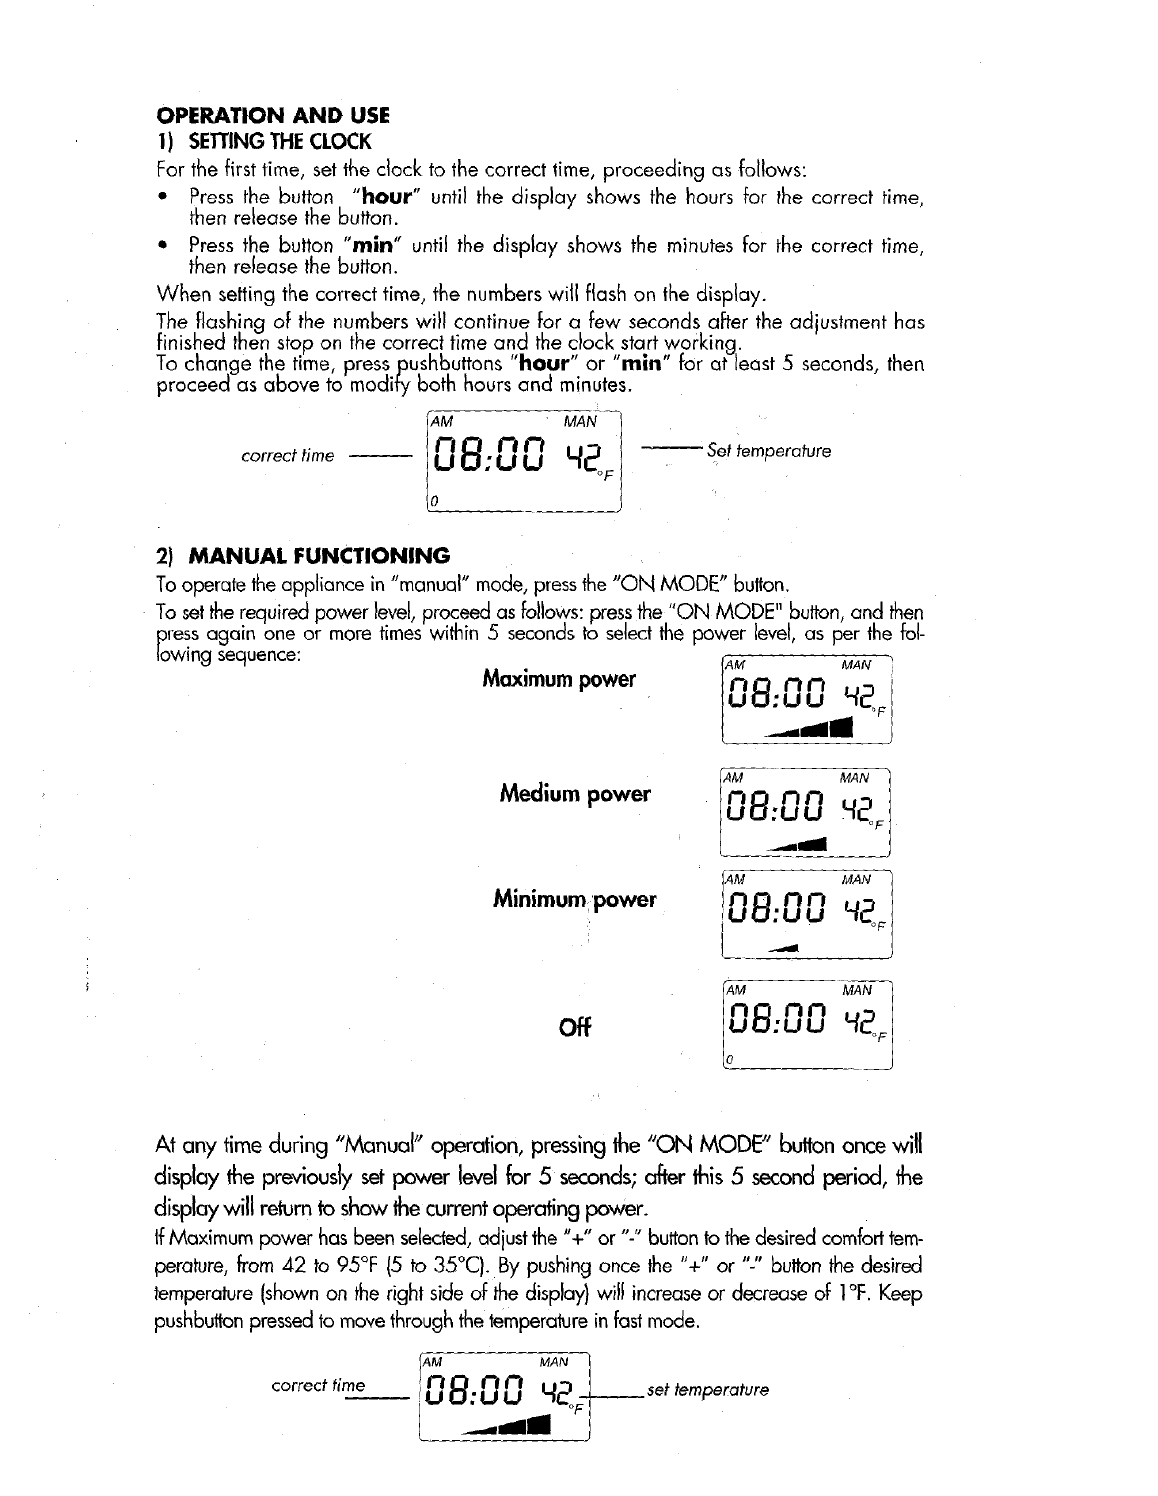
OPERATION AND USE
i) SETrlNG THE CLOCK
For the first time, set the clock to the correct time, proceeding as follows:
• Press the button "hour" until the display shows the hours for the correct mime,
then release the button.
•Press the button "min" until the display shows the minutes for the correct time,
then release the button.
When setting the correct time, the numbers will flash on the display.
The flashing of the numbers will continue for a few seconds after the ad ustment has
finished then stop on the correct time and the clock start working.
To change the time, press pushbuttons "hour" or "mm" for at least 5 seconds, then
proceed as above to modify both hours and minutes.
_ _ Set temperature
correct time - Q;LIU L_
2) MANUAL FUNCTIONING
To operate the appliance in "manual" mode, press the "ON MODE" buiton.
To setthe required power level, proceed as follows: press the "ON MODE" button, and then
pressagain one or more times within 5 seconds to select the power level, as per the fol-
lowing sequence: ,_ MAN "
Maximum power no m_ , ,-_ i
UO;UU _F
Medium power _'l O_ _ MAN "
A-M
Minimumpower fn_ n MAN /
lua:un
off ,rl rl L_'_
At any time during "Manual" operation, pressing the "ON MODE" button once will
display the previously set power level for 5 seconds; after this 5 second period, the
display will return to show the current operating power.
If Maximum power has been selected, adjust the "+" or "-" button to the desired comfort tem-
perature, from 42 to 95°F (5 to 35°C). By pushing once the "+" or "-" button the desired
temperature (shown on the right side of the display) will increase or decrease of I°F. Keep
pushbutton pressed to move throughthe temperature in fast mode.
correct time AM MAN 1
--_IN__IS:I._L_ L_ ____ set temperature
This heater has Electronic Climate Control which automatically monitors and selects
the ideal power setting to maintain your chosen temperature.
If the selected temperature is higher than the actual room temperature, the appliance
will start automatically and rapidly heat the room until it reaches the selected tempe-
rature. The unit will automatically maintain the temperature at a constant level, by
switching between maximum, medium, minimum power and OFF.
If medium power level has been selected using the "ON MODE" button, the
appliance will modulate between medium, minimum power and OFF to maintain a
selected temperature.
ANTI-FREEZE SETI'ING
Press the "ON MODE" button and it is recommended to select the maximum power
level. Set the temperature to 42°F with the' "-" button. When setin this way, the
appliance will switch on automatically only/iF the room temperature falls below 42°F,
to prevent freezing, at minimum energy consumption.
N.B.This function is not guaranteed in the event of power faiMes, lasting more than
2 minutes.
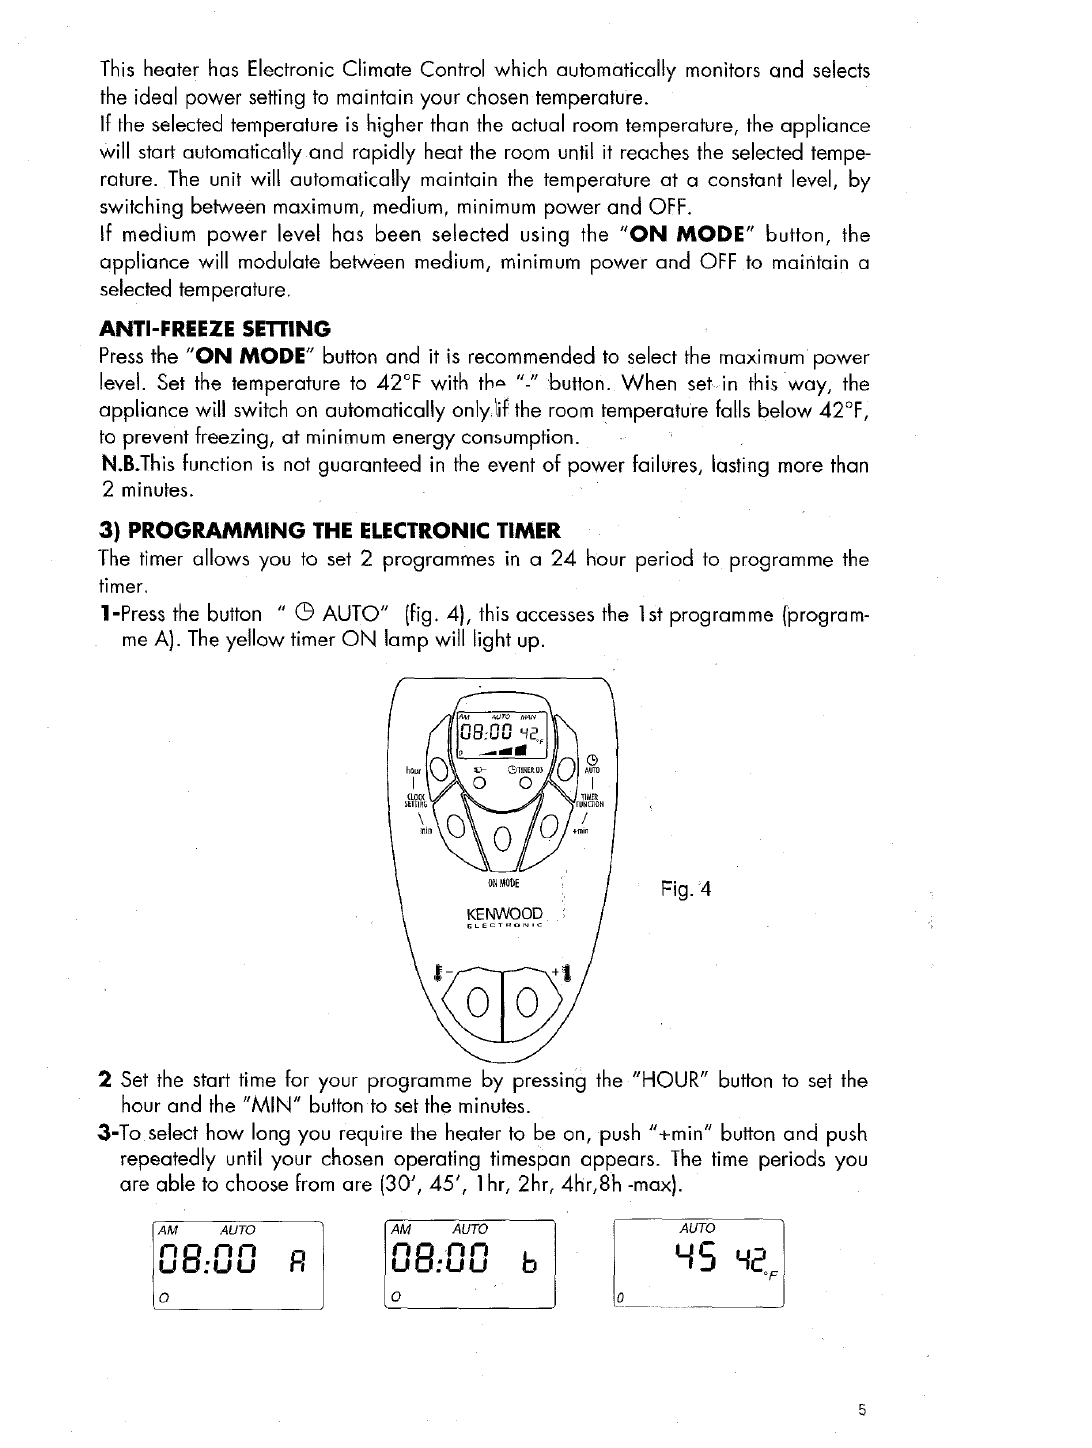
3) PROGRAMMING THE ELECTRONIC TIMER
The timer allows you to set 2 programmes in a 24 hour period to programme the
timer.
1-Press the button " G AUTO" (fig. 4), this accesses the 1st programme (program-
me A). The yellow timer ON lamp will light up.
#"
CL0_ TIMER
2 Set the start time for your programme by pressing the "HOUR" button to set the
hour and the "MIN" button to set the minutes.
3-To select how long you require the heater to be on, push "+rain" button and push
repeatedly until your chosen operating timespan appears. The time periods you
are able to choose from are (30', 45', 1hr, 2hr, 4hr,8h -max).
AM AUTO
1"10 NN
uo:uu R
AM AUTO
NO t'I¢1
uo:uu b
I0 AUTO ]
4- To set programme B, press the " Q AUTO" button again and then proceed as
above to select the start hours and minutes. The set time will be the same as for
the first programme. When the operating time is changed, the time of both pro-
grammes is updated
S-- Use the "÷" or "_" buttons to set the desired comfort temperature, as described
above.
6-When set in this way the appliance will automatically switch on at the set time and
automatically maintain the preset comfort temperature. To cancel a programme,
press the "GAUTO" button and then the "hour" and "min" buttons until the
display shows (see Fig.l
TIMER OVERRIDE
To operate the appliance without using the programmes (timer), press the "ON
MODE" button (Fig.4). The yellow lamp will go off.
IMPORTANT:
If the heater looses its electricity supply for more than 2 minutes the appliance does
not switch on. The display shows the blinking numbers.
To switch it on, repeat the above described operations.
WARNINGS
You must leave the heater plugged in at the mains socket to keep the heaters memory
programmed.
If the heater looses its electricity supply for more than 2 minutes, e.g. switched off at
the mains socket or in the event of a power failure, the heater's programmes will be
lost, and the heater will not work until reset.
Asafety device switches the heater off in the event of overheating. To restart the
heater, call the nearest Service Center to change tee safety device.
Note: when the safety device intervenes, the heater doesn't heat but the display
regularly works.
4. MAINTENANCE AND SERVICE
Always remove the plug from the power socket and allow the radiator to cool. Wipe
radiator with a soft damp cloth, do not use detergents and abrasives.
Should the radiator not be in use over a certain length of time, wind the cable round
the holder and store it in a dry place.
This appliance has been built to give many Years of trouble free service.
In case of malfunction or doubt, do not try to repair the heater by your_self: it may
result in fire hazard or electric shock.
Call the nearest Service Center (see attached list of Service Centers).
