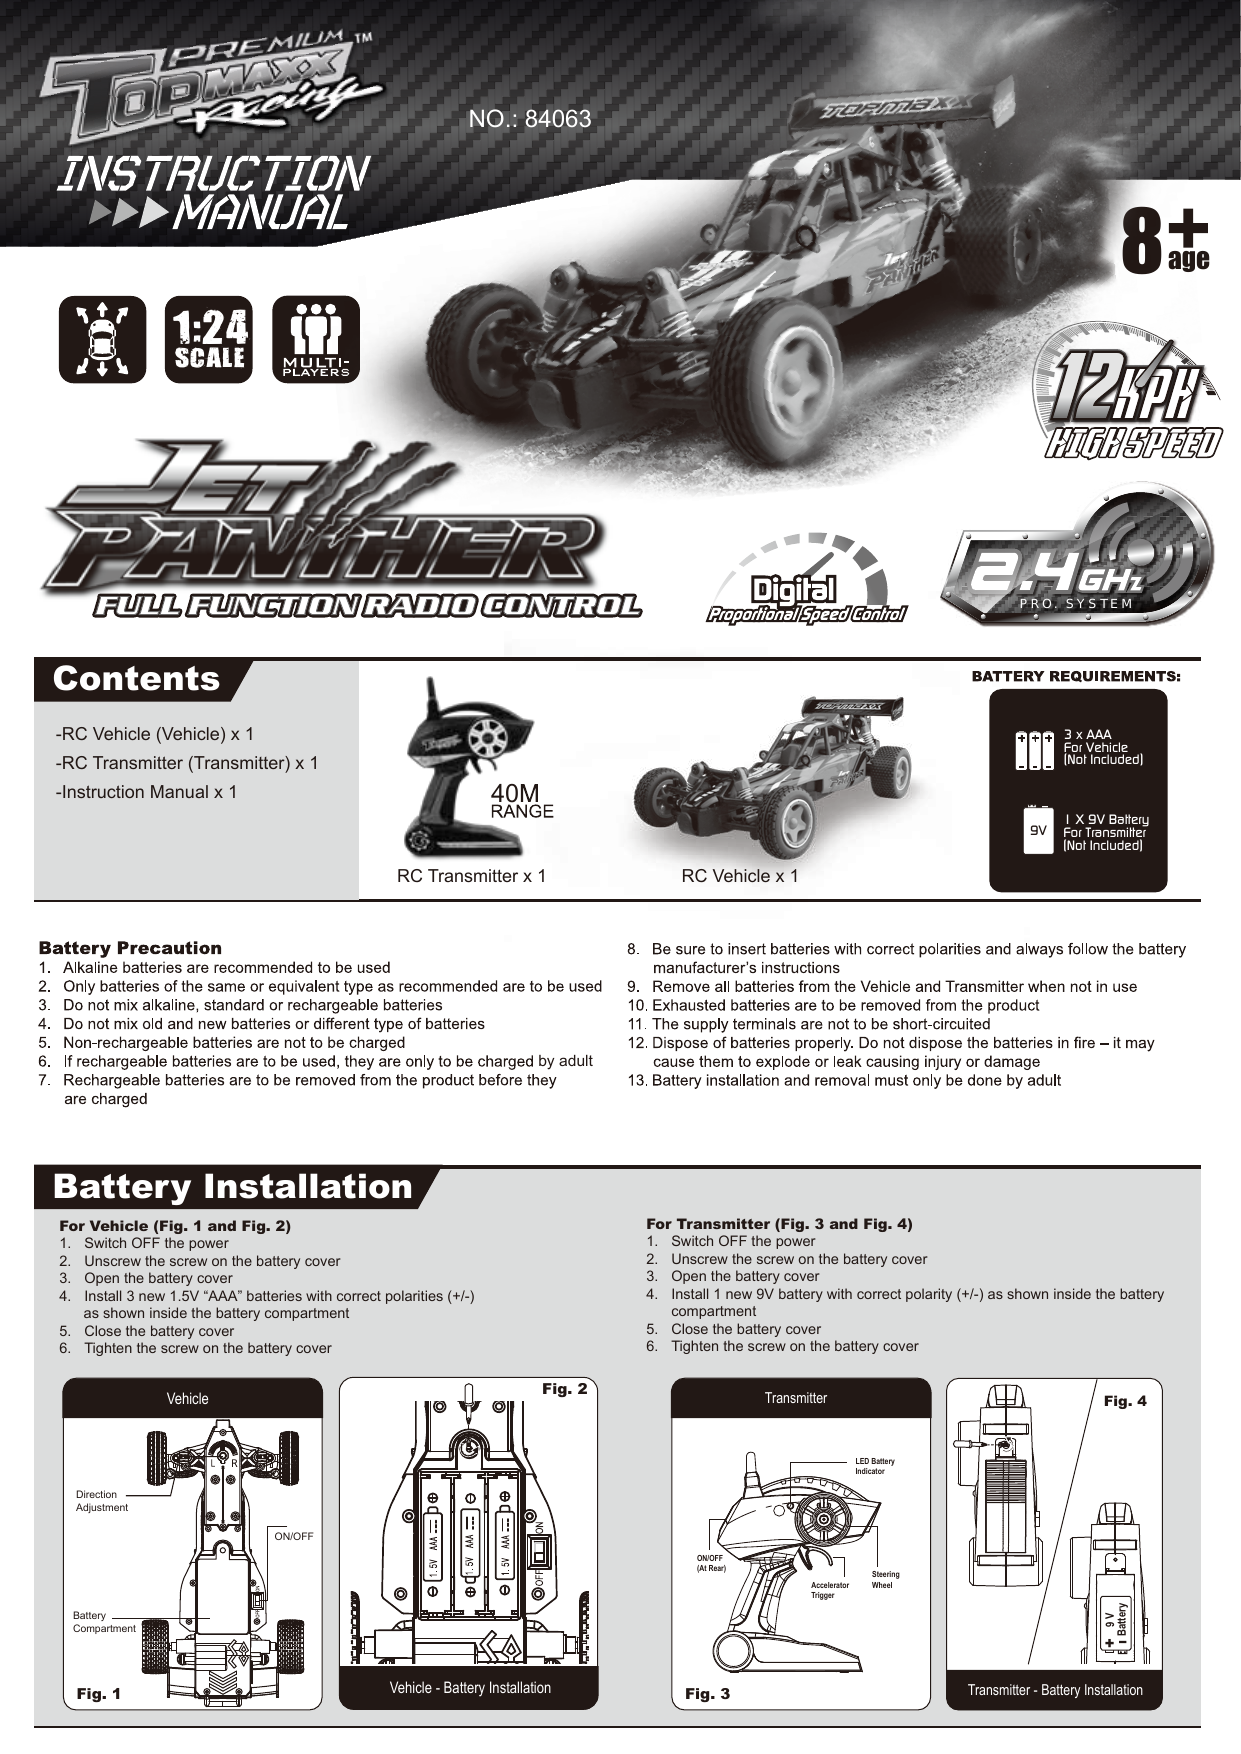
KIDZTECH TOYS 8406315-24GTX 1/24 RC Jet Panther / 1/10 RC Jet Panther User Manual KT84063 2 4G 1 24 RC Jet Panther IM 20150507 A03

KIDZTECH TOYS MANUFACTURING LTD 1/24 RC Jet Panther / 1/10 RC Jet Panther KT84063 2 4G 1 24 RC Jet Panther IM 20150507 A03

User Manual

1:24SCALEPRO. SYSTEMBattery InstallationNO.: 84063age8For Transmitter (Fig. 3 and Fig. 4)1.  Switch OFF the power2.  Unscrew the screw on the battery cover3.  Open the battery cover4.  Install 1 new 9V battery with correct polarity (+/-) as shown inside the battery  compartment5.  Close the battery cover6.  Tighten the screw on the battery coverFor Vehicle (Fig. 1 and Fig. 2)1.  Switch OFF the power2.  Unscrew the screw on the battery cover3.  Open the battery cover4.  Install 3 new 1.5V “AAA” batteries with correct polarities (+/-)       as shown inside the battery compartment5.  Close the battery cover6.  Tighten the screw on the battery coverVehicle - Battery InstallationFig. 1  Fig. 3 Vehicle Fig. 2  TransmitterLED Battery IndicatorSteeringWheelON/OFF(At Rear)AcceleratorTriggerTransmitter - Battery InstallationFig. 4 I+9 VBatteryDirection AdjustmentBatteryCompartmentON/OFF-RC Vehicle (Vehicle) x 1-RC Transmitter (Transmitter) x 1-Instruction Manual x 11 X 9V BatteryFor Transmitter(Not Included)9VContentsRC Vehicle x 1RC Transmitter x 1403 x AAA For Vehicle(Not Included)by adult
84063The packaging and instruction manual contain important information. Please keep them for future reference.Warning! Choking Hazard. Not suitable for children under the age of 3 years due to small parts.We reserve the right to improve/amend specifications and colors without notice.KIDZTECH TOYS MANUFACTURING LTD. Room 1201,12/F, Inter-Continental Plaza,94 Granville Road, TST East, Hong Kong.Tel: (852) 27218868      info@kidztech.netMade in China     http://www.kidztech.net3.  Use the Accelerator Trigger to drive the Vehicle Forward, Stop and Backward4.  If the vehicle does not run in straight line, adjust the              Direction Adjustment on the Vehicle chassis (Fig.1)5.  Play on smooth surface to have the optimum performance6.  Remember to switch OFF the power of the Vehicle and            Transmitter after playing7.  The optimum control range is up to 40m outdoorBraking ActionKeep driving forward rapidly then switch to backward for the braking action. When the trigger of the Transmitter returns to the center position, push it again for the backward action.1.  Switch ON the Vehicle and Transmitter. Turn Left Turn Right2.  Use the Steering Wheel to control the Vehicle turning left or rightFCC label compliance statement:This device complies with part 15 of the FCC rules. Operation is subject to the following two conditions:1.  This device may not cause harmful interference, and 2.  This device must accept any interference received, including interference that may cause undesired operation.  Note: This equipment has been tested and found to   comply with the limits for a Class B digital device, pursuant to Part 15 of the FCC Rules.  These limits are designed to provide reasonable protection against harmful   interference in a residential installation.  This equipment generates, uses and can radiate radio frequency energy and, if not installed and used in accordance with the   instructions, may cause harmful interference to radio communications.  However, there is no guarantee that interference will not occur in a particular installation.  If this   equipment does cause harmful interference to radio or television reception, which can be determined by turning the equipment off and on, the user is encouraged to try   to correct the interference by one or more of the following measures:  -  Reorient or relocate the receiving antenna  -  Increase the separation between the equipment and receiver  -  Connect the equipment into an outlet on a circuit different from that to which the receiver is connected  -  Consult the dealer or an experienced radio/TV technician for helpWarning: Changes or modifications to this unit not expressly approved by the party responsible for compliance could void the user’s authority to operate the equipment.RSS-310 Compliance Statement:This device complies with Industry Canada Licence-exempt RSS-310.  Operation is subject to the following two conditions: (1) this device may not cause interference, and (2) this device must accept any interference, including interference that may cause undesired operation of the device.Declaration of ConformityThe product is in conformity with the requirement of EU Directive 1999/5/ECEnvironmental notes:  The whole product also does not belong to household waste at the end of the product life.  You can return it at collection points for the recycling of electronic and electronical instruments  The symbol on the item, instruction manual, hangtag or packing is showing this clearly.  Materials should be recycled according to their respective markings.  Recycling of old devices or other re-use of materials contained therein represents an important    contribution to environmental protection.  Please ask at your local community for the correct collection point.Disposal of batteries  Batteries should not be disposed of in the household waste.  As the consumer you are legally obliged to return batteries containing harmful substances and all other used batteries.  You can hand in your old batteries at public collection points in your area or wherever batteries are sold.  You will find these chemical abbreviations along with a crossed-out refuse bin on batteries containing harmful substances:  Pb=Battery contains lead  Cd=Battery contains cadmium  Hg=Battery contains mercuryPerformance Tips1.  Do not drive on grass, dirt, sand, dusts, carpet or go through water2.  Do not drive in windy or rainy weather3.  Avoid direct impact the Vehicle with obstacles4.  Switch OFF the power when not in use to prevent damage of Vehicle and Transmitter due to leakage of electrolyte from batteries5.  Remove all batteries from the Vehicle and Transmitter when not in use for long period6.  Keep fingers, hair and loose clothing away from wheels7.  The operating range can be affected by a variety of factors  a)  Low Voltage of batteries in Transmitter or Vehicle  b)  Interference from other items that emit radio frequency signals8.  Outdoor usage is recommended in order to get optimum control range9.  Recommend to play the vehicle on a clean and smooth surface10. Clean the battery compartment to make sure it is free from dust to prevent poor contact of batteriesCautions1.  Do not attempt to disassemble the Vehicle or Transmitter2.  Make sure the batteries are installed with correct polarities (+/-) as shown inside the battery compartment3.  Remove the package and take out all accessories before giving the Vehicle and Transmitter to child to playConforms to the safety requirements of ASTM F9631. Turn on the Vehicle.2. Keep pulling the trigger of the Transmitter forward then turn the Transmitter on. Do not release the trigger until the binding process completed.3. The LED light of the Transmitter will keep flashing for the binding process, which is within 8 seconds. Do not turn off any buttons while in progress, otherwise,     the process will be terminated.4. After the wheels of the Vehicle turn left and right and the LED light of the Transmitter stops flashing, the binding process completed for playing.5. If it cannot complete within 8 seconds, please turn off both Vehicle and Transmitter and re-start the binding process.6. When the binding process is done, whenever switching the Vehicle and Transmitter on and off, it searches for the code that it memorized, and will only lock on to the Transmitter signal containing that code.7. Please turn off both Vehicle and Transmitter and re-start all binding process if changing to another 2.4GHz Transmitter for playing.How To BindHow To PlayVehicleForward Stop BackwardTransmitter

Navigation menu