KIDZTECH TOYS 84181-27MTX R/C Vortex User Manual 84181 IM P 1
KIDZTECH TOYS MANUFACTURING LTD R/C Vortex 84181 IM P 1
User Manual
ADAPTER
(Included)
1 X 9V Battery
For Transmitter
(Included)
9V
11.1V Lithium
1100mAh
For Vehicle
(Included)
11.1V
BATTERY REQUIREMENTS:
11.1V11.1V
CAUTION
1. Do not drive on grass, dirt, sand, dusts, carpet or go through water.
2. Do not drive in windy or rainy weather.
3. Avoid direct impact the Vehicle with obstacles.
4. Switch OFF the power when not in use to prevent damage of Vehicle and
Transmitter due to leakage of electrolyte from batteries.
5. Remove all batteries from the Vehicle and Transmitter when not in use for
long period.
Voltage of batteries in Transmitter or Vehicle b) Interference from other
items that emit radio frequency signals.
8. Outdoor usage is recommended in order to get optimum control range.
9. Recommend to play the vehicle on a clean and smooth surface.
10. Clean the battery compartment to make sure it is free from dust to
prevent poor contact of batteries
You can operate your Vortex indoors or outdoors. The Vortex is designed to operate in most
rugged conditions and terrains. Do not operate your Vortex on roads or any areas where there are cars. Operating your Vortex
on roads or any areas with cars is extremely dangerous and most likely illegal! The Vortex is not water resistant. Do not operate
your Vortex in any wet conditions, mud, puddles, rain or any other form of precipitation or harsh weather. The Vortex has open
Cooling Vents in some strategic locations. If water gets into these Cooling Vents, the Vortex could sustain damage which would
not be covered under warranty. If operating your Vortex indoors, be careful to avoid contact with any objects such as furniture,
plants, electronics, and any other items which can break easily. The Vortex is capable of some relatively high speed stunts and
could easily damage some household objects. Avoid operating your Vortex around pets or people, and especially crowds. If the
Vortex is stepped on or otherwise crushed, it will sustain damage that would not be covered under warranty. Ensure that people
around you are aware that you are playing with your Vortex. Be aware of changes in your operational environment and play safe!
The radio control range of your Vortex is up to 80’ (24 M), and varies depending on interference within the operational
environment. WARNING: The relatively high speed stunts of the Vortex are capable of damaging or injuring plants, furniture,
pets or people so play carefully.
Performance Tips
NO. 84181
age
8
Environmental notes:
The whole product also does not belong to household waste at the end of the product life.
You can return it at collection points for the recycling of electronic and electronical instruments
The symbol on the item, instruction manual, hangtag or packing is showing this clearly.
Materials should be recycled according to their respective markings.
Recycling of old devices or other re-use of materials contained therein represents an important contribution to environmental protection.
Please ask at your local community for the correct collection point.
Disposal of batteries
Batteries should not be disposed of in the household waste. As the consumer you are legally obliged to return batteries containing harmful substances and all
other used batteries. You can hand in your old batteries at public collection points in your area or wherever batteries are sold.
You will find these chemical abbreviations along with a crossed-out refuse bin on batteries containing harmful substances:
Pb=Battery contains lead
Cd=Battery contains cadmium
Hg=Battery contains mercury
Cautions
1. Do not attempt to disassemble the Vehicle or Transmitter.
2. Do not operate the Vehicle with same frequency with other player(s)
in same location that will interfere and make the Vehicle out of control.
3. Make sure the batteries are installed with correct polarities (+/-) as
shown inside the battery compartment.
4. Remove the package and take out all accessories before giving the
Vehicle and Transmitter to child to play.
The packaging and instruction manual contain important
information. Please keep them for future reference.
Warning! Choking Hazard. Not suitable for children under
the age of 3 years due to small parts.
We reserve the right to improve/amend specifications and
colors without notice.
Warning! The Antenna of vehicle is not to be inserted into
socket outlets.
FCC label compliance statement:
This device complies with part 15 of the FCC rules. Operation is subject to the following two conditions:
1. This device may not cause harmful interference, and
2. This device must accept any interference received, including interference that may cause undesired operation.
Note: This equipment has been tested and found to comply with the limits for a Class B digital device, pursuant to Part 15 of the FCC
Rules. These limits are designed to provide reasonable protection against harmful interference in a residential installation. This
equipment generates, uses and can radiate radio frequency energy and, if not installed and used in accordance with the instructions,
may cause harmful interference to radio communications. However, there is no guarantee that interference will not occur in a
particular installation. If this equipment does cause harmful interference to radio or television reception, which can be determined
by turning the equipment off and on, the user is encouraged to try to correct the interference by one or more of the following
measures:
- Reorient or relocate the receiving antenna
- Increase the separation between the equipment and receiver
- Connect the equipment into an outlet on a circuit different from that to which the receiver is connected
- Consult the dealer or an experienced radio/TV technician for help
Warning: Changes or modifications to this unit not expressly approved by the party responsible for compliance could void the user’s authority to operate the
equipment.
RSS-310 Compliance Statement:
This device complies with Industry Canada Licence-exempt RSS-310. Operation is subject to the following two conditions:
(1) this device may not cause interference, and (2) this device must accept any interference, including interference that may cause undesired operation of the
device.
Declaration of Conformity
The product is in conformity with the requirement of EU Directive 1999/5/EC
Charging the Rechargeable Battery Pack for the Vehicle
CHOOSING YOUR PLAYING LOCATION
CONTENTS
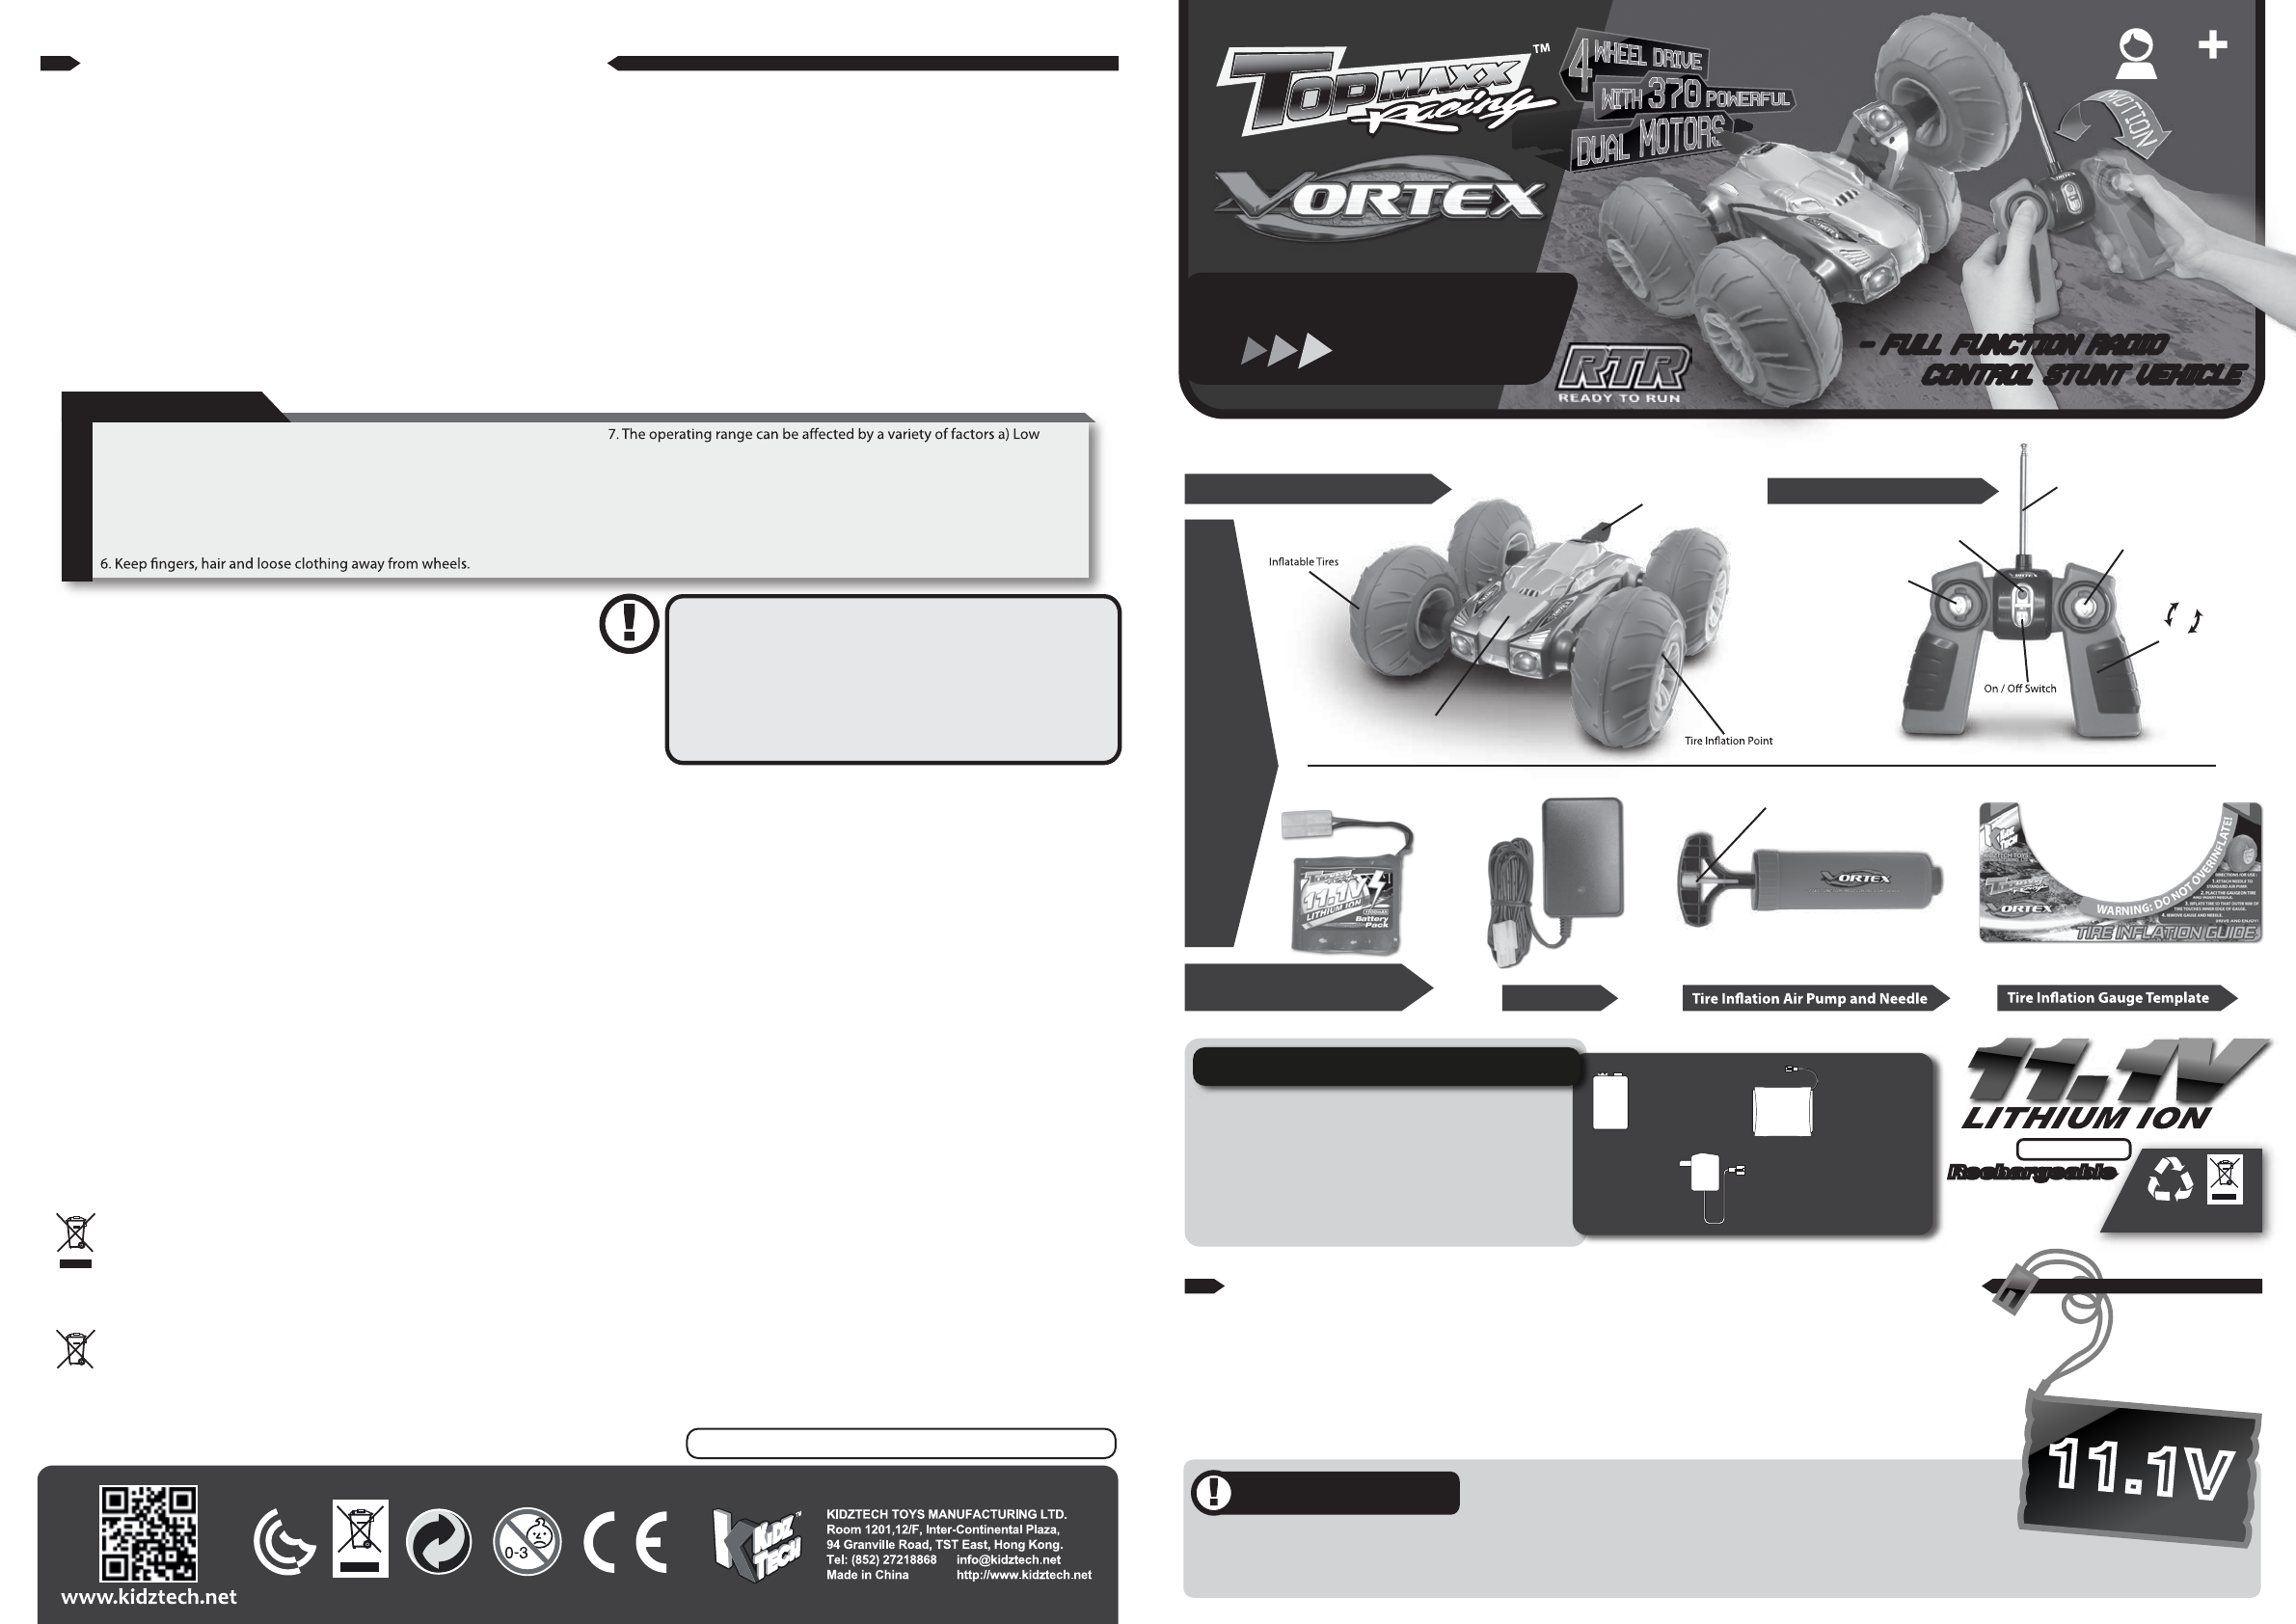
Vortex 360° Stunt RC Vehicle Radio Controller & Antenna
11.1V Lithium Ion
Rechargeable Battery Pack AC Charger
Main body
Rear Spoiler
Left Stick
- Controls Forward /
Reverse speed on
left side wheels of
Vortex
Right Stick
- Controls Forward /
Reverse speed on
right side wheels of
Vortex
Antenna
Twist Control
- Controls twisting
of Vortex
Power On LED
Needle
1. Vehicle:
1 x 11.1V Lithium Ion (1100mAH)
rechargeable battery pack
(Included)
2. Transmitter:
1 x 9V battery(Included)
11.1V
Rechargeable Battery Must Be
Recycled Or Disposed Of Properly.
Battery
Pack
1100mAh
Rechargeable Rechargeable
- Full function radio
control stunt vehicle
- Full function radio
control stunt vehicle
INSTRUCTION
MANUAL
Conforms to the safety requirements of ASTM F963
• Be Sure To Charge Battery Pack Before Using.
• If Battery Pack Is Hot After Use, Allow To Cool Before Recharging.
• Do Not Dispose Of Battery Pack In Fire.
• Do Not Recharge Battery Pack That Shows Leakage Or Corrosion,
or Attempt To Open Battery Pack.
1. Connect the 11.1V rechargeable battery pack to the battery charger.
2. Plug the charger into the standard AC socket.
3. The charging time for a full charge is about 2 hours.
4. When charging is completed, unplug the charger from the AC socket.
5. Disconnect the rechargeable battery pack form the battery charger.
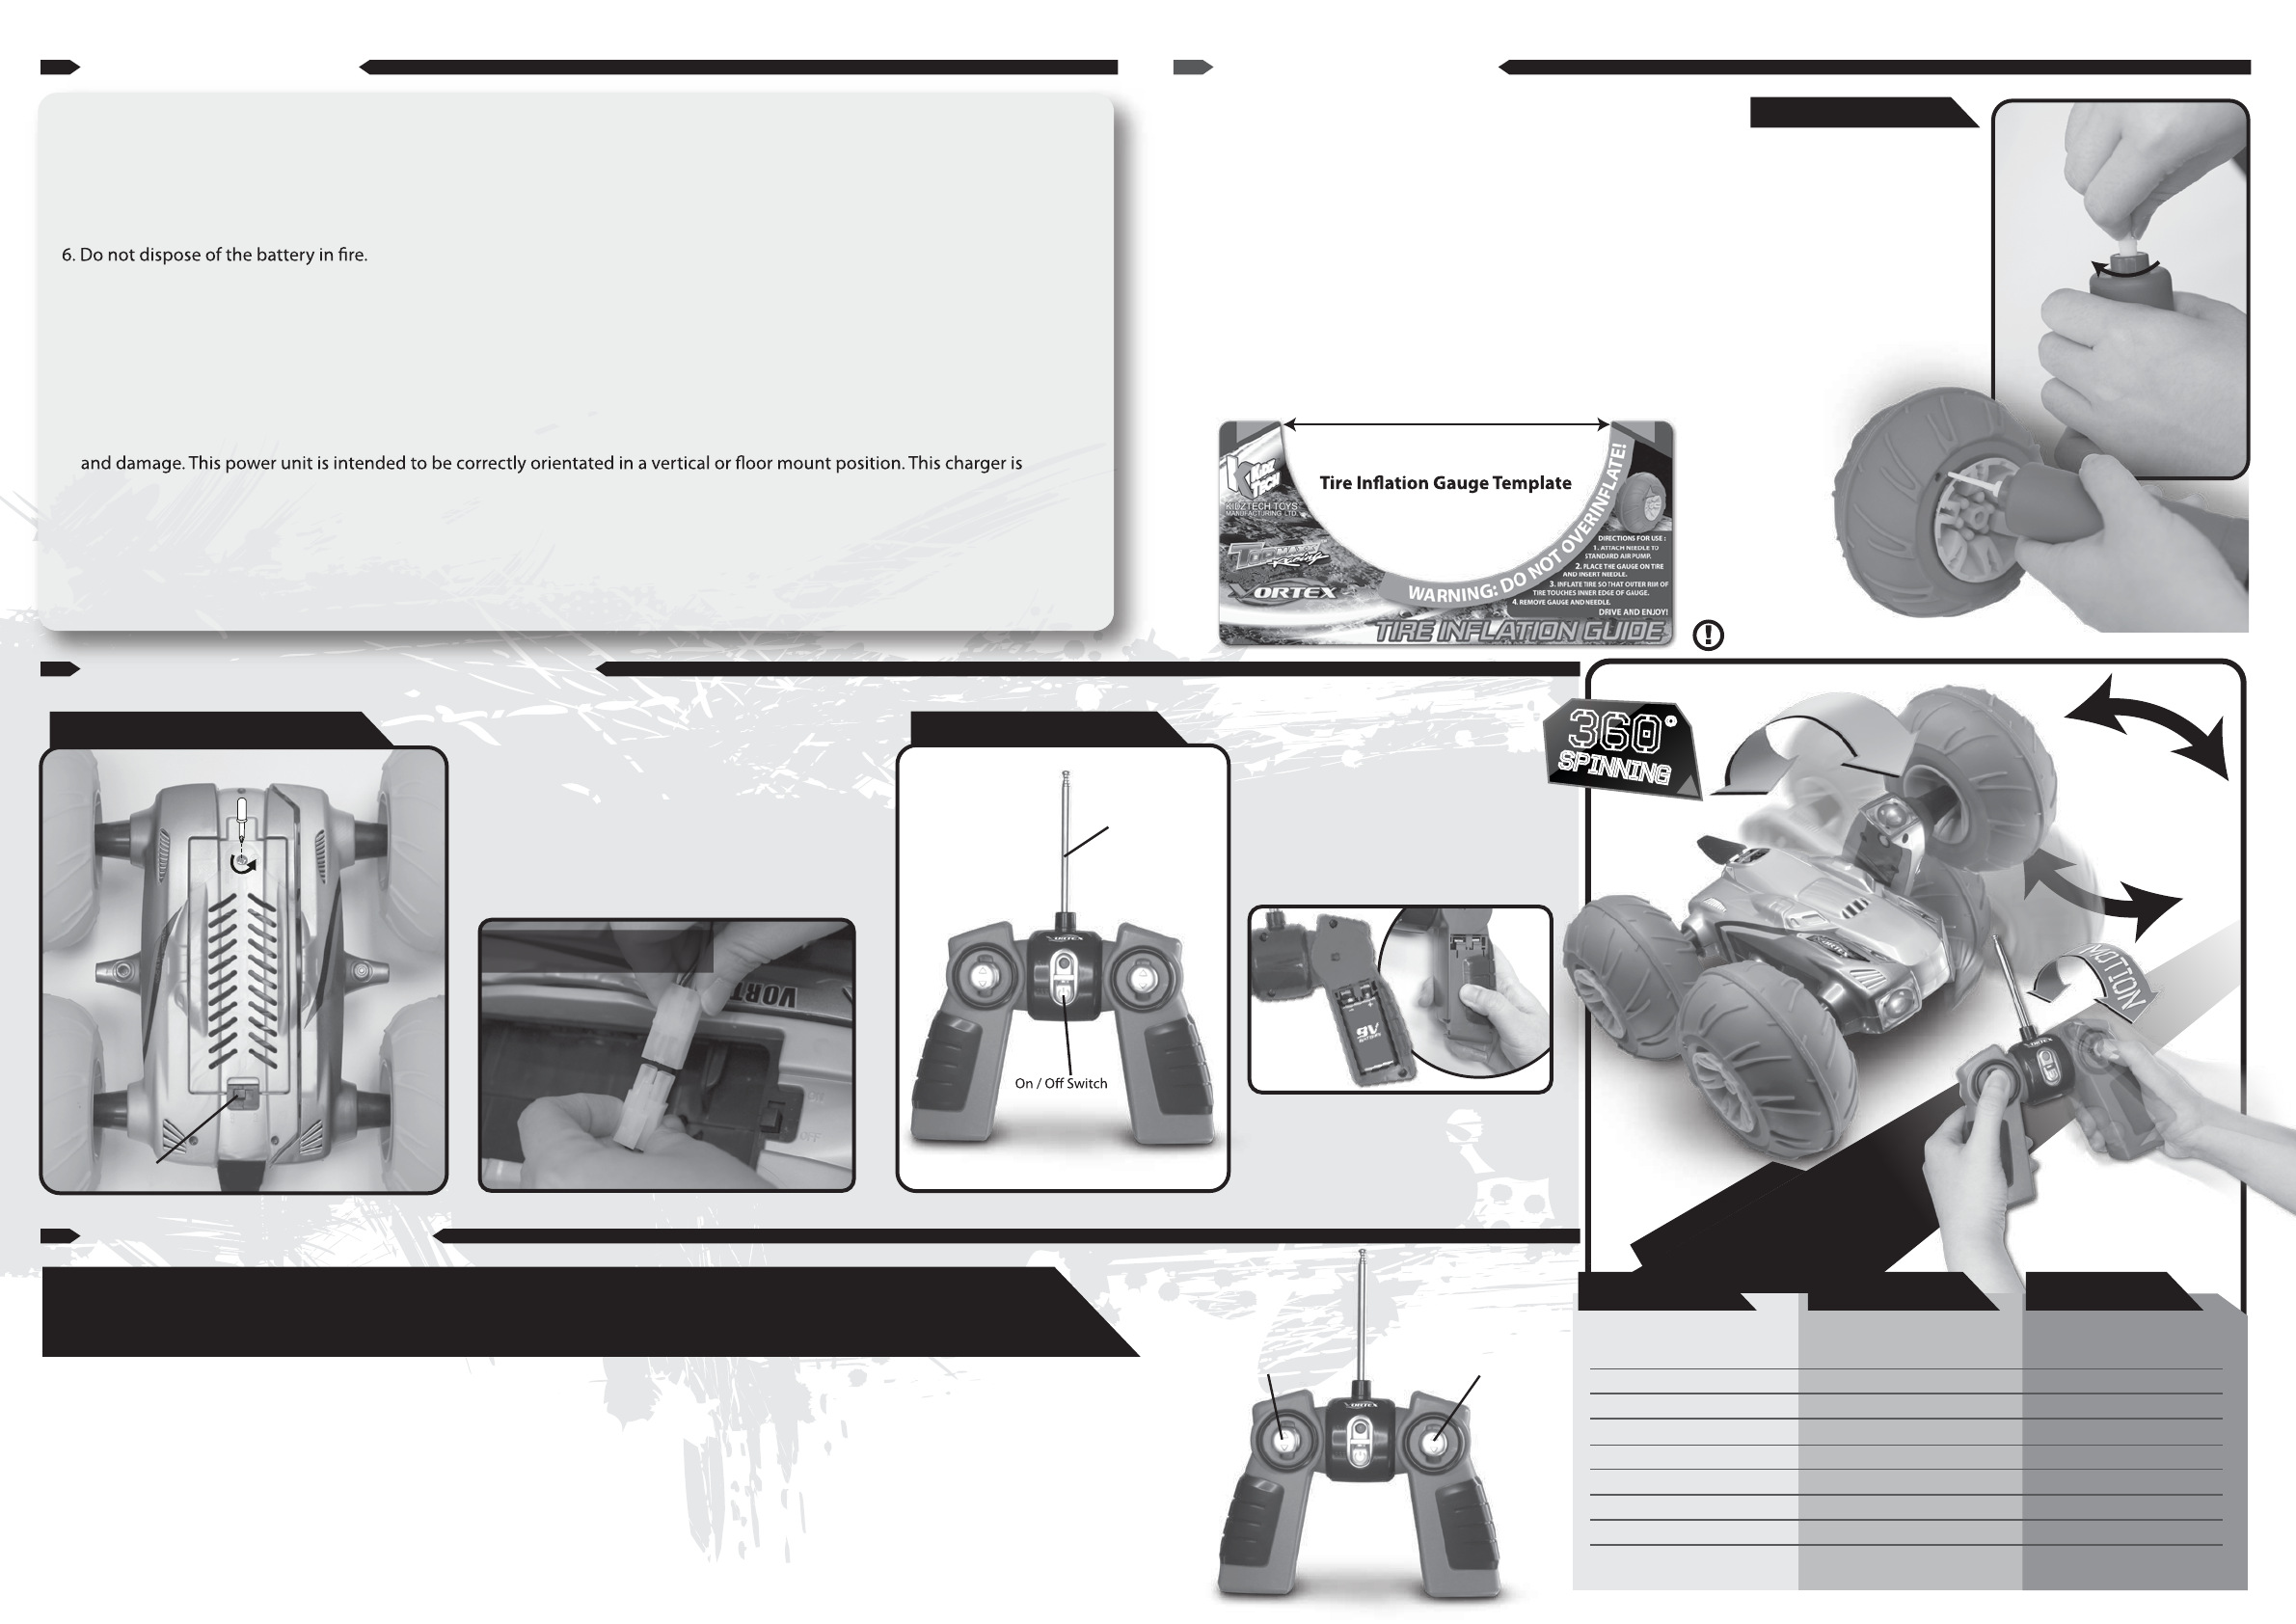
Fig. 1 Fig. 2 Fig. 3
Fig. 4
For Vehicle (Fig. 1 and Fig. 2)
1. Switch OFF the power.
2. Unscrew the screw on the battery cover.
3. Open the battery cover.
4. Install a new 11.1V battery pack with
correct polarities (+/-) as shown inside the
battery compartment.
5. Close the battery cover.
6. Tighten the screw on the battery cover.
For Transmitter
(Fig. 3 and Fig. 4)
1. Switch OFF the power.
2. Slide to open the battery cover.
3. Install 1 new 9V battery with correct
polarity (+/-) as shown inside the
battery compartment.
4. Close the battery cover.
5. Tighten the screw on the battery cover.
1. Attach the Tire Inflation Needle (included) to any standard
air pump (included).
2. Gently insert the Tire Inflation Needle into the Tire Inflation
Point on one of theTires (as shown).
3. Position the cardboard Tire Inflation Gauge Template
(Included with the Vortex) on the tire to ensure that the Tire
is fully inflated to the proper size. Inflate the Tire so that
the outer rim of the Tire touches the inner edge of the Tire
Inflation Gauge Template.
4. Once the Tire is fully inflated, disconnect the Tire Inflation
Needle from the Tire by pulling it out, and remove the Tire
Inflation Gauge Template. Repeat these steps on the other
3 Tires until all 4 Tires are inflated to the exact same size.
The Vortex is designed to operate
properly when the tires are fully
inflated and have the same diameter.
The Tire Inflation Gauge Template is
a handy tool to ensure that your tires
are properly inflated. For the
Squeeler to operate properly, the
Tires need to have a maximum
diameter of 6.1" (155 MM).
Underinflated tires may cause the
body of the Squeeler to contact the
ground and the body may become
scratched or damaged. Overinflated
tires may cause the Squeeler to
bounce uncontrollably or
for the Tires to
physically conflict
with the body.
Inflating the
tires is fun
and easy so
inflate the
tires fully as
specified to
avoid
damage!
6. Insert the antenna into the top of
Transmitter, tighten it by rotating
clockwise (viewing from top of
Transmitter)
spinning
360 ˚
spinning
360 ˚
1. The 11.1V rechargeable battery pack must be charged before use by utilizing the battery charger which included.
2. Do not overcharge the battery pack. Do not charge for more than 6 hours.
3. Do not charge the battery pack if it shows leakage, corrosion, or has loose or exposed wires or other damage.
4. Do not cover the battery pack with any sort of materials while charging.
5. Do not touch the battery pack when it is hot. Wait until the battery pack cools before installing it in the Vehicle and before
recharging.
7. Do not dismantle the battery or charger, and do not cut the battery or charger cables.
8. The battery pack will be warm after charging, and hot after use in a vehicle.
9. The supply terminals are not to be short-circuited.
10. Rechargeable batteries are to be removed from the toy before being charged.
11. Rechargeable batteries are only to be charged under adult supervision.
12. Battery replacement must be only made by adults.
13. The transformer (charger) is not a toy.
14. Charge only type (1100mAh Max.) rechargeable battery packs. Other types of batteries may burst causing injury to persons
intended to be used for charging 11.1V rechargeable battery pack with capacity 1100mAH Max. It cannot be used for charging
non-rechargeable batteries. Regular examination of battery charger for any damage to their cord, plug, enclosure and other
parts, and that, in the event of such damage, it must not be used with the charger or battery pack charge until such damage
has been repaired. Note that the 9V battery is non-rechargeable and is not to be recharged. Only batteries of the same or
equivalent type as recommended are to be used. It will need replacement when transmission is poor.
15. Exhausted batteries are to be removed from the product.
Vehicle -
Battery Installation
Vehicle Transmitter
155mm
Once the fully charged Battery Pack is inserted into the Vortex and the Controller is likewise prepared you
are ready to play with your Vortex! Operation of the Vortex is simple as described below. See what sorts of
stunts you can come up with!
1. Ensure that the On / Off Switches on the Vortex and the Controller are in the On position.
2. Move the Left and Right Sticks on the Controller and also twist the Controller to drive the Vortex. Twisting the Controller
will twist the Squeeler under certain circumstances. It is recommended to experiment with this feature and develop your
own stunts. Let the off-road stunt driving begin! The following is a table of Vortex Controller Stick inputs and their
functional results:
3. If your Vortex’s Battery Pack becomes depleted, you will need to recharge your Battery Pack as outlined in the section:
"INSTALLING BATTERIES", sub-section: "Charging the 11.1V Rechargeable Battery Pack and Installing it into the Vortex".
4. When you are finished playing with your Vortex or if the Battery Pack is depleted, turn off the Controller and the Vortex.
Left Stick
Neutral
Up
Down
Up
Down
Up
Down
Neutral
Neutral
Right Stick
Neutral
Up
Down
Down
Up
Neutral
Neutral
Up
Down
Function
Nothing
Forward
Reverse
Spin Right
Spin Left
Forward & Turn Right
Reverse & Turn Left
Forward & Turn Left
Reverse & Turn Right
Battery Precaution Inflating The Tire
Battery and Antenna Installation
Operating The Vortex
Twist Control
Controls twisting
of Vortex
Right Stick
- Controls Forward /
Reverse speed on
right side wheels of
Vortex
Antenna
ON / OFF Switch
WARNING: DO NOT OVERINFLATE!
Left Stick
- Controls Forward /
Reverse speed on
left side wheels of
Vortex
MOTION CONTROL
TIP!
Inflating Tip