KIDZTECH TOYS 8902118-49MTX 1/26 RC Cars User Manual 1 26 GM new remote BO IM EN 20170502 A02
KIDZTECH TOYS MANUFACTURING LTD 1/26 RC Cars 1 26 GM new remote BO IM EN 20170502 A02
User Manual
Contents
RC Vehicle (Vehicle) x 1
RC Transmitter (Transmitter) x 1
Antenna for RC Transmitter x 1
Instruction Manual x 1
Battery Precaution
1. Alkaline batteries are recommended to be used
2. Only batteries of the same or equivalent type as recommended are to be used
3. Do not mix alkaline, standard or rechargeable batteries
4. Do not mix old and new batteries or different type of batteries
5. Non-rechargeable batteries are not to be charged
6. If rechargeable batteries are to be used, they are only to be charged by adult
7. Rechargeable batteries are to be removed from the product before they are charged
How to Play
1. Switch ON the Vehicle.
2. Use the Forward / Backward joystick (Fig.3) to drive the Vehicle forward and backward.
3. Use the Left / Right joystick (Fig.3) to control the Vehicle turning left or right.
4. If the vehicle does not run in straight line, adjust the direction adjustment on the Vehicle chassis (Fig. 1).
5. Play on smooth surface to have the optimum performance.
6. Remember to switch OFF the power of the Vehicle and Transmitter after playing.
7. The optimum control range is up to 10m outdoor.
Performance Tips
1. Do not drive on grass, dirt, sand, dusts, carpet or go through water.
2. Do not drive in windy or rainy weather.
3. Avoid direct impact the Vehicle with obstacles.
4. Switch OFF the power when not in use to prevent damage of Vehicle and Transmitter due to leakage of electrolyte from batteries.
5. Remove all batteries from the Vehicle and Transmitter when not in use for long period.
6. Keep fingers, hair and loose clothing away from wheels.
7. The operating range can be affected by a variety of factors.
a) Low Voltage of batteries in Transmitter or Vehicle.
b) Interference from other items that emit radio frequency signals.
8. Outdoor usage is recommended in order to get optimum control range.
9. Recommend to play the vehicle on a clean and smooth surface.
10. Clean the battery compartment to make sure it is free from dust to prevent poor contact of batteries.
Cautions
1. Do not attempt to disassemble the Vehicle or Transmitter.
2. Do not operate the Vehicle with same frequency with other player(s) in same location that will interfere and make the Vehicle out of control.
3. Make sure the batteries are installed with correct polarities (+/-) as shown inside the battery compartment.
4. Remove the package and take out all accessories before giving the Vehicle and Transmitter to child to play.
FCC label compliance statement:
This device complies with part 15 of the FCC rules. Operation is subject to the following two conditions:
1. This device may not cause harmful interference, and
2. This device must accept any interference received, including interference that may cause undesired operation. Note: This equipment has been tested and found to
comply with the limits for a Class B digital device, pursuant to Part 15 of the FCC Rules. These limits are designed to provide reasonable protection against harmful
interference in a residential installation. This equipment generates, uses and can radiate radio frequency energy and, if not installed and used in accordance with the
instructions, may cause harmful interference to radio communications. However, there is no guarantee that interference will not occur in a particular installation. If this
equipment does cause harmful interference to radio or television reception, which can be determined by turning the equipment off and on, the user is encouraged to try
to correct the interference by one or more of the following measures:
- Reorient or relocate the receiving antenna
- Increase the separation between the equipment and receiver
- Connect the equipment into an outlet on a circuit different from that to which the receiver is connected
- Consult the dealer or an experienced radio/TV technician for help
Warning: Changes or modifications to this unit not expressly approved by the party responsible for compliance could void the user’s authority to operate the equipment.
RSS-310 Compliance Statement:
This device complies with Industry Canada Licence-exempt RSS-310. Operation is subject to the following two conditions: (1) this device may not cause interference, and
(2) this device must accept any interference, including interference that may cause undesired operation of the device.
Declaration of Conformity
The product is in conformity with the requirement of EU Directive 2014/53/EU
Environmental notes:
The whole product also does not belong to household waste at the end of the product life.
You can return it at collection points for the recycling of electronic and electronical instruments
The symbol on the item, instruction manual, hangtag or packing is showing this clearly.
Materials should be recycled according to their respective markings.
Recycling of old devices or other re-use of materials contained therein represents an important contribution to environmental protection.
Please ask at your local community for the correct collection point.
Disposal of batteries
Batteries should not be disposed of in the household waste. As the consumer you are legally obliged to return batteries containing harmful substances and all
other used batteries. You can hand in your old batteries at public collection points in your area or wherever batteries are sold.
You will find these chemical abbreviations along with a crossed-out refuse bin on batteries containing harmful substances:
Pb=Battery contains lead
Cd=Battery contains cadmium
Hg=Battery contains mercury
3 x AA
For Vehicle
( Not Included )
1 x 9V
For Transmitter
( Not Included )
Battery Requirement
1. Vehicle: 3 x 1.5V ”AA” batteries
2. Transmitter: 1 x 9V battery
The packaging and instruction manual contain important information. Please keep them for future reference.
Warning! Choking Hazard. Not suitable for children under the age of 3 years due to small parts.
We reserve the right to improve/amend specifications and colors without notice.
Warning! The Antenna of vehicle and/or transmitter is/are not to be inserted into socket outlets.
KT02/05/17-02EN
RADIO CONTROL
VEHICLE
1:26
Conforms to the safety requirements of ASTM F963
Fig. 2
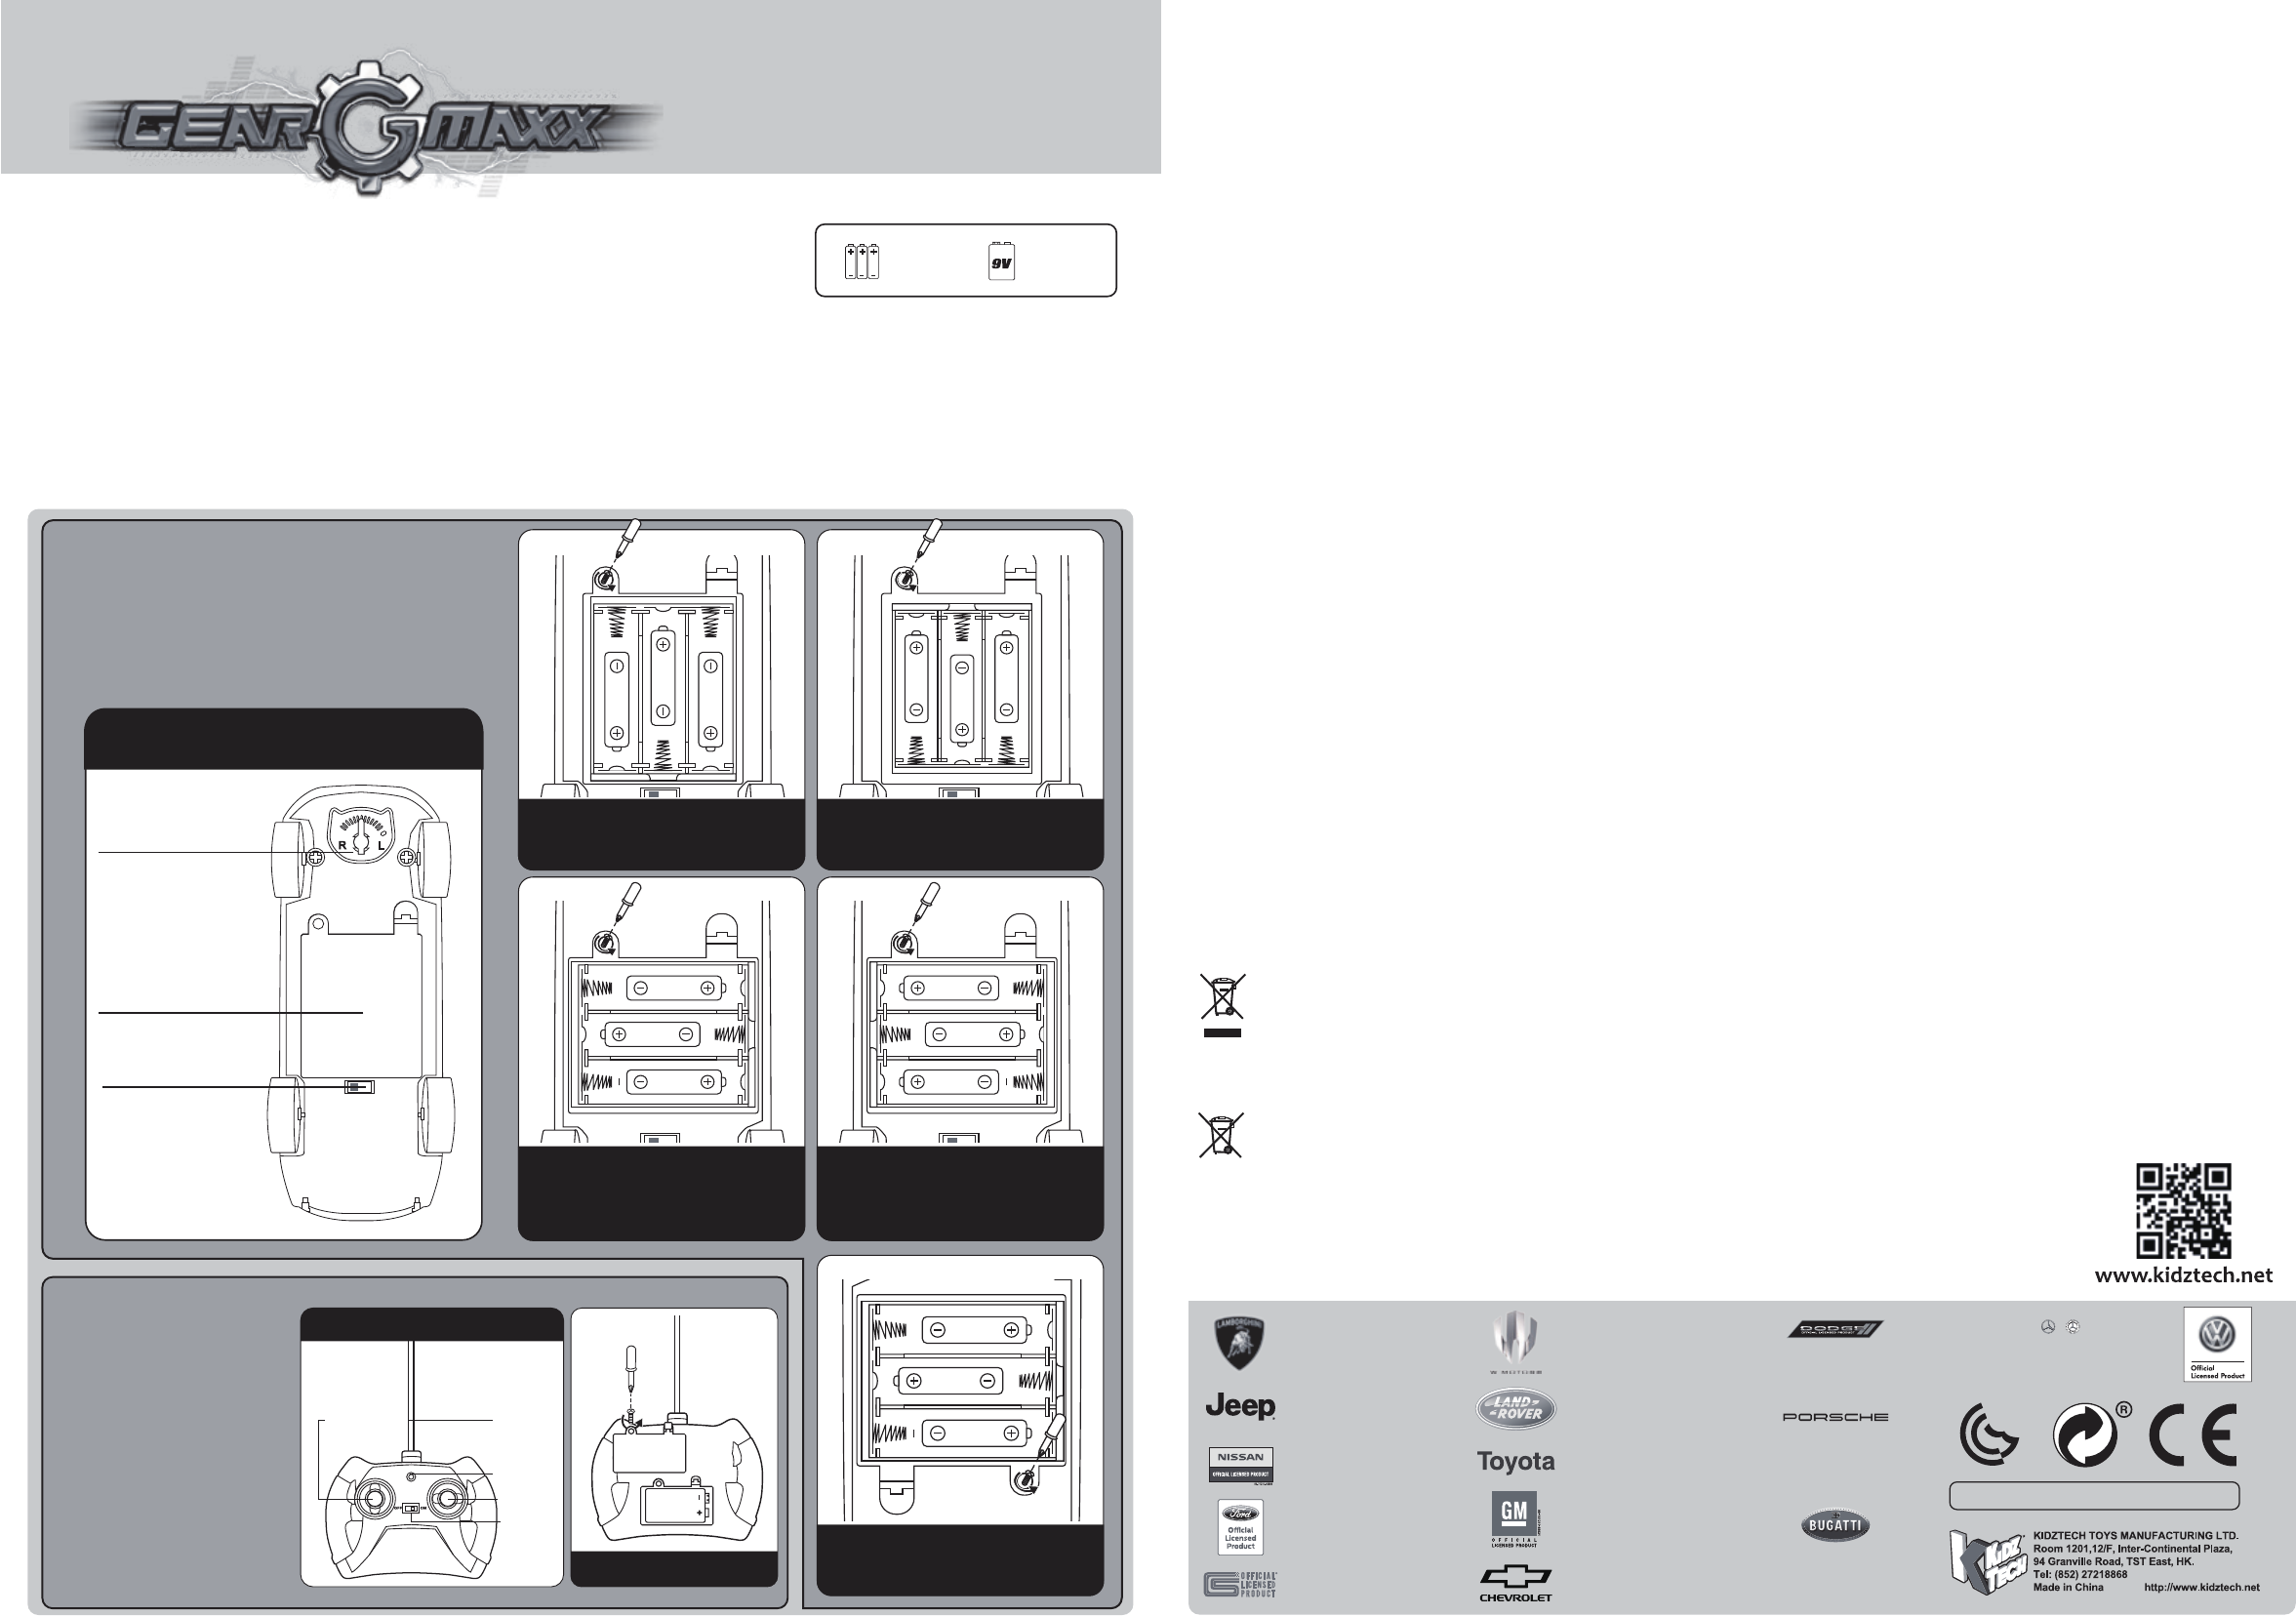
RL
Fig. 1
Vehicle
RL
Direction
Adjustment
ON/OFF Switch
Battery
Compartment
(The position of ON/OFF
switch on the chassis of
Vehicle varies from each
model.)
info@kidztech.net
8. Be sure to insert batteries with correct polarities and always follow the
battery manufacturer’s instructions
9. Remove all batteries from the Vehicle and Transmitter when not in use
10. Exhausted batteries are to be removed from the product
11. The supply terminals are not to be short-circuited
12. Dispose of batteries properly. Do not dispose the batteries in fire – it may
cause them to explode or leak causing injury or damage
13. Battery installation and removal must only be done by adult
Battery and Antenna Installation
For Vehicle (Fig. 1 and Fig. 2)
1. Switch OFF the power.
2. Unscrew the screw on the battery cover.
3. Open the battery cover.
4. Install 3 new 1.5V “AA” batteries with correct polarities (+/-)
as shown inside the battery compartment.
5. Close the battery cover.
6. Tighten the screw on the battery cover.
Vehicle - Battery Installation Vehicle - Battery Installation
Fig. 2
Fig. 2
RL
Vehicle - Battery Installation
Mercedes-Benz G 500 (4 x 4)²
Volkswagen Golf24 “GTI 35”
Fig. 2
RL
RL
Fig. 2
Porsche Panamera GTS
Bugatti Veyron 16.4
GM Hummer H2
Toyota FJ Cruiser
Land Rover Evoque
VW T1 Van
Ford Shelby GT350R
Vehicle - Battery Installation
Ford Shelby F-150
Lamborghini Aventador LP700-4
Bugatti Vision GT
Bugatti Chiron
Vehicle - Battery Installation
Lamborghini Veneno LP750-4
Lamborghini Murcièlago LP670-4
Lykan Hyper Sport
Chevrolet Silverado Z71
Porsche 911 GT3 RS 4.0
Porsche Cayenne Turbo
Bugatti Super Sport
Lamborghini Gallardo LP 560-4
Chevrolet Camero ZL1
Nissan GT-R R35
Nissan 370Z
Dodge Challenger
Dodge Charger
VW Beetle
For Transmitter (Fig. 3 and Fig. 4)
1. Switch OFF the power.
2. Unscrew the screw on the
battery cover.
3. Open the battery cover.
4. Install 1 new 9V battery with
correct polarity (+/-) as shown
inside the battery compartment.
5. Close the battery cover.
6. Tighten the screw on the battery
cover.
7. Insert the antenna into the top of
Transmitter, tighten it by rotating
clockwise. (viewing from top of
Transmitter)
Transmitter
Transmitter - Battery installation
Fig. 3
Fig. 4
9 V
Battery
LED Battery
Indicator
Left / Right
OFF / ON
Transmitter
Antenna
Forward /
Backward
RL
"Mercedes-Benz” , , and the
design of the enclosed product are subject
to intellectual property protection owned by
Daimler AG. They are used by Kidztech
Toys Manufacturing Limited under license.
W Motors Trademarks used
under license to KidzTech Toys
2016 CHEVROLET USED UNDR LICENSE
General Motors Trademarks used under
license to Kidztech Toys Manufacturing Ltd.
Ford Motor Company vTrademarks
and Trade Dress used under license
to KidzTech Toys Manufacturing Ltd.
SHELBY® and GT350R™ and F-150 ARE
REGISTERED TRADEMARKS OF
CARROLL SHELBY AND CARROLL
SHELBY LICENSING, INC. (SHELBY).
The trademarks, copyrights and design
rights in and associated with Lamborghini,
Lamborghini with Bull and Shield Device,
are used under license from Automobili
Lamborghini S.p.A., Italy.
Licensed Manufacturer:
Kidztech Toys Manufacturing Ltd.
Porsche, the Porsche shield and the distinctive
design of Porsche cars are trademarks and
trade dress of Porsche AG. Permission granted.
Licensed Manufacturer:
Kidztech Toys Manufacturing Ltd.
Dodge, HEMI and related logos,
vehicle model names and trade dress are
trademarks of FCA US LLC and used under license by
Kidztech Toys Manufacturing Ltd. © 2015 FCA US LLC.
Nissan Motor Co., Ltd. trademarks, designs,
copyrights and/or other intellectual property
rights are used under license.
Land Rover and the Land Rover Logo
are trademarks owned and licensed by
Jaguar Land Rover Limited.
TOYOTA, FJ Cruiser and all other
associated marks, emblems and designs are
intellectual property rights of Toyota Motor
Corporation and used with permission.
Jeep, the Jeep grille and related logos,
vehicle model names and trade dress
are trademarks of FCA US LLC and
used under license by Kidztech Toys
Manufacturing Ltd. © 2017 FCA US LLC.
THE BUGATTI LOGO AND BUGATTI WORDMARK
ARE TRADEMARKS OF BUGATTI INTERNATIONAL
S.A. AND ARE USED UNDER LICENSE.
KIDZTECH TOYS MANUFACTURING LIMITED.
89021 / 89031 / 89051 / 89061 / 89071 / 89081 / 89091 / 89101 / 89111 / 89121 / 89131 / 89141 /
89151 / 89161 / 89171 / 89181 / 89221 / 89231 / 89241 / 89281 / 89291 / 89301 / 89311 / 89321 /
89331 / 89341 / 89351 / 89391 / 89401 / 89022 / 89032 / 89052 / 89062 / 89072 / 89082 / 89092 /
89102 / 89112 / 89122 / 89132 / 89142 / 89152 / 89162 / 89172 / 89182 / 89222 / 89232 / 89242 /
89282 / 89292 / 89302 / 89312 / 89322 / 89332 / 89342 / 89352 / 89392 / 89402 / 89251 / 89261 /
89321 / 5F633F9 / 5F60A88
Frequency band: 26.957 - 27.283 MHz
or 40.66 - 40.70 MHz
Maximum radio frequency power
transmi�ed: 0 dBm