KING PROFIT 626T PORTABLE SOUND SYSTEM User Manual STEREO RADIO
KING PROFIT TRADING LTD. PORTABLE SOUND SYSTEM STEREO RADIO
15_KP626T UserMan
User Manual
PORTABLE SOUND SYSTEM
Model:TY-ASC50
Read this booklet thoroughly before using and save it for future reference
Unit must be fully charged before use

1
Safety information and Warnings
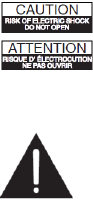
CAUTION
Symbol Definitions
DANGER- Indicates an imminently hazardous situation, which, if not avoided, will result in
death or serious injury. This symbol appears only in the most extreme situations.
WARNING - Indicates a potentially hazardous situation which could result in death or
serious injury.
CAUTION- Indicates a potentially hazardous situation, which, if not avoided, may result in
minor/moderate injury or product/property/damage. It also warns against unsafe practices
The lightning flash with arrowhead symbol, within an equilateral triangle is intended to
alert the user to the presence of insulated „dangerous voltage‟ within the product‟s
enclosure that may be of sufficient magnitude to constitute a risk of electric shock to
persons.
WARNING: TO REDUCE THE RISK OF ELECTRIC SHOCK DO NOT
REMOVE COVER (OR BACK), NO USER SERVICEABLE PARTS INSIDE
REFER SERVICING TO QUALIFIED SERVICE PERSONNEL
The exclamation point within an equilateral triangle is intended to alert the user to the
presence of important operating and maintenance (servicing) instructions in the
literature accompanying the appliance.
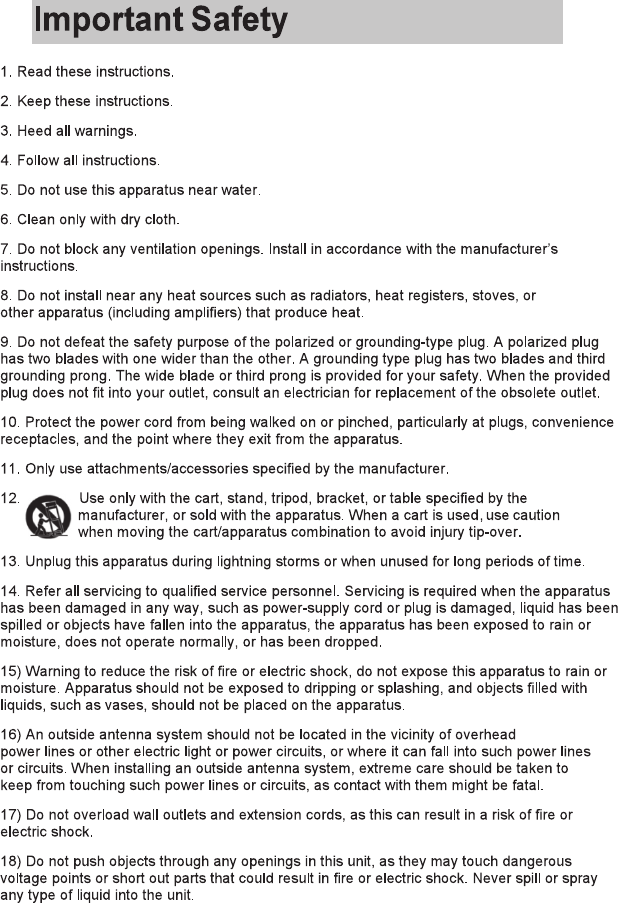
READ ALL INSTRUCTIONS BEFORE USE
Always follow basic safety precautions when using this Bluetooth speaker
system with Microphone, especially when children are present.
SAFETY INSTRUCTIONS
1) Read this Instruction Manual before you attempt to connect or operate the appliance.
2) Keep these instructions in good condition. Heed all warnings. Follow all instructions.
3) Save this Instruction Manual for future reference.
4) The apparatus shall not be exposed to dripping or splashing and no objects filled with
liquids, such as vases, shall be placed on the product. Dry location use only.
5) No naked flame source, such as candles, should be placed on the product.
6) Children should be supervised to ensure that they do not play with the appliance.
7) Ventilation should not be impeded by covering the ventilation openings.
8) Ensure that the unit is plugged into an AC 100-240V~60/50Hz power outlet. Using higher
voltage may cause the unit to malfunction or even fire catching. Turn off the unit before
2
unplugging it from power source to completely switch it off.
9) Do not plug/ unplug the power plug into/from an electrical outlet with wet hands.
10) If the power plug does not fit into your outlet, do not force the plug into an electrical
socket if it does not fit.
11) Use replacement parts, which are specified by the manufacturer.
12) Install the unit in accordance with the manufacturer‟s instructions.
13) Place the unit where there is good ventilation. Place the system on a flat, hard and stable
surface. Do not expose to temperatures above 35°C. Allow at least 30 cm clearance from
the rear and the top of the unit and 5 cm from each side.
14) Press the buttons of the unit gently. Pressing them too hard can damage the unit.
15) Dispose of used batteries in an environmental-responsible manner.
16) Always ensure that the product is unplugged from the electrical outlet before moving or
cleaning. Clean it with dry cloth only.
17) Unplug the product during lightning, storms or when it will not be used for long periods of
time.
18) This product has no user-serviceable parts. Do not attempt to repair this product yourself.
Only qualified service personnel should perform servicing. Take the product to the
electronics repair shop of your choice for inspection and repair.
19) NEVER let anyone, especially children, push anything into holes, slots or any other
openings in the unit‟s casing as this could result in a fatal electric shock.
20) Don‟t mount this product on a wall or ceiling.
21) Do not place the unit near TVs, speakers and other objects that generate strong
magnetic fields.
22) Do not leave the unit unattended when it is in use.
NOTE: To disconnect the system completely if it not to be used for a long time, remove the AC
power plug from the wall outlet.
FCC/IC Warnings
Warning: Changes or modifications to this unit not expressly approved by the party responsible
for compliance could void the user‟s authority to operate the equipment.
NOTE: This equipment has been tested and found to comply with the limits for a Class b digital
device, pursuant to Part 15 of the FCC rules. These limits are designed to provide reasonable
protection against harmful interference in a residential installation. This equipment generates,
uses, and can radiate radio
may cause harmful interference to radio communications. HOWEVER, there is no guarantee
that interference will not occur in a particular installation. If this equipment does cause harmful
interference to radio or television reception, which can be determined by turning the equipment
off and on, the user is encouraged to try to correct the interference by one or more of the
following measures:
3
• reorient or relocate the receiving antenna.
• Increase the separation between the equipment and receiver.
• Connect the equipment into an outlet on a circuit different from that to which the receiver is
connected.
• Consult the dealer or an experienced radio/TV technician for help.
additional Warnings and Precautions
• CAUTON: To PREVENT ELECTRIC SHOCK, MATCH WIDE NLADE OF PLUG TO WIDE
SLOT, FULLY INSERT.
• mains plug is used as disconnect device and it should remain readily operable during intended
use. In order to disconnect the apparatus from the mains completely, the mains plug should be
disconnected from the mains socket outlet completely.
• Warning: shock hazard - Do not open.
• Warning: To reduce the risk of fire or electric shock, do not expose this apparatus to rain,
moisture, dripping, or splashing.
• Objects filled with liquids, such as vases, shall not be placed on the apparatus.
• CAUTION: use of controls or adjustments or performance of procedures other than those
specified may result in hazardous radiation exposure.
• Warning: Changes or modifications to this unit not expressly approved by the party
responsible for compliance could void the user‟s authority to operate the equipment.
• Warning: Do not place this unit directly onto furniture surfaces with any type of soft, porous, or
sensitive finish. As with any rubber compound made with oils, the feet could cause marks or
staining where the feet reside. We recommend using a protective barrier such as a cloth or a
piece of glass between the unit and the surface to reduce the risk of damage and/or staining.
•Caution: Danger of explosion if battery is incorrectly replaced. Replace only with the same or
equivalent type.
• Warning: There is a danger of explosion if you attempt to charge standard alkaline batteries in
the unit. only use rechargeable NIMH batteries.
4
• Battery shall not be exposed to excessive heat such as sunshine, fire or the like.
• Caution marking is located at the rear or bottom of the apparatus.
• The marking information is located at the rear or bottom of the apparatus.
• Keep new and used batteries away from children. If the battery compartment does not close
securely, stop using the product and keep it away from children.
• If you think batteries might have been swallowed or placed inside any part of the body, seek
immediate medical attention.
• Do not mix old and new batteries.
• Completely replace all old batteries with new ones.
• Do not mix alkaline, standard (carbon-zinc), or rechargeable (ni-cad, ni-mh, etc) batteries.
•Batteries should be recycled or disposed of per state and local guidelines.
• WARNING: This product may contain chemicals known to the state of California to cause birth
defects, or other reproductive harm (California Prop 65). Wash hands after handling.
• This product meets and complies with all Federal regulations.
Warning: Do NOT INGEST BSTTERY,
Warning: To reduce the risk of electric shock, do not remove cover (or back).
NO user-serviceable parts inside. Refer RISK servicing to qualified service personnel
The exclamation point within an equilateral triangle is intended to alert the user to
the presence of important operating and maintenance (servicing) instructions in the literature
accompanying the appliance.

5
The lightning flash with arrowhead symbol, within an equilateral triangle, is
intended to alert the user to the presence of uninsulated “dangerous voltage” within the
product‟s enclosure that may be of sufficient magnitude to constitute a risk of electric shock to
persons.
This symbol indicates that this product incorporates double insulation between
hazardous mains voltage and user accessible parts.
WARNING:
- Remove batteries if exhausted or if they will not be used for a long period.
- The incorrect use of batteries can cause electrolyte leakage and will corrode the
compartment or cause the batteries to burst. Therefore:
- Do not mix battery types, e.g. alkaline with zinc carbonate.
- When inserting new batteries, replace all batteries at the same time.
IC Notice:
- This device complies with Canada Industry licence-exempt RSS standard(s). Operation is
subject to the following two conditions:
- (1) this device may not cause interference; and
- (2) this device must accept any interference. Including interference that may cause
undesired operation of the device.
-
- CAN ICES-3 (B)
Avis d’Industrie Canada
Le présent appareil est conforme aux CNR d'industrie Canada applicables aux appareils radio
exem pts de licence L'exploitation est autorisée aux deux conditions suivantes:
1) I'appareil ne doit pas produire de brouillage; et
6
2) I'utillsateur de I'appareil doit accepter brouillage radio électrique subi meme si le brouillage
est susceptible d'enc ompromettre le fonctionnement. mauvais fonctionnement de I'appareil.
Cet appareil numériquie de la classe B est conforme à la norme NMB-003 du Canada.
CAN NMB-3 (B)
FCC/IC RF Exposure
Radiation Exposure Statement:
Déclaration d'exposition aux radiations:
The device has been evaluated to meet general RF exposure requirement.
The device can be used in portable exposure condition without restriction.
L'appareil a été évalué pour répondre aux exigences générales en matière d'exposition aux RF.
L'appareil peut être utilisé en condition d'exposition portable sans restriction.
5
Ins tructions

6
1. Lisez ces instructions.
2. Conservez ces instructions.
3. Respectez tous les avertissements.
4. Suivez toutes les instructions.
5. Ne pas utiliser cet appareil à proximité de l’eau.
6. Nettoyez uniquement avec un chiffon sec.
7. Ne jamais boucher les ouvertures de la ventilation. Installez l’unité conformément aux instructions
du fabriquant.
8 . Ne pas installer près d’une source de chaleur telle que des radiateurs, des registres de chaleur,
ULVpHRXGHPLVHjODWHUUH8QH¿FKH
HGHWHUUHDGHX[ODPHVHWXQH
broche de terre. La lame large ou la troisième broche sont fournies pour votre sécurité. Lorsque
pOHFWULFLHQSRXUUHPSODFHUODSULVH
1. Lisez ces instructions.
2. Conservez ces instructions.
3. Respectez tous les avertissements.
4. Suivez toutes les instructions.
5. Ne pas utiliser cet appareil à proximité de l’eau.
6. Nettoyez uniquement avec un chiffon sec.
7. Ne jamais boucher les ouvertures de la ventilation. Installez l’unité conformément aux instructions
du fabriquant.
8 . Ne pas installer près d’une source de chaleur telle que des radiateurs, des registres de chaleur,
GHVSRrOHVRXG¶DXWUHVDSSDUHLOV\FRPSULVGHVDPSOL¿FDWHXUVTXLSURGXLVHQWGHODFKDOHXU
1HSDVFRQWRXUQHUOHGLVSRVLWLIGHVpFXULWpGHOD¿FKHSRODULVpHRXGHPLVHjODWHUUH8QH¿FKH
SRODULVpHDGHX[ODPHVGRQWXQHSOXVODUJHTXHO¶DXWUH8QH¿FKHGHWHUUHDGHX[ODPHVHWXQH
broche de terre. La lame large ou la troisième broche sont fournies pour votre sécurité. Lorsque
OD¿FKHIRXUQLHQHV¶LQVqUHSDVGDQVYRWUHSULVHFRQVXOWH]XQpOHFWULFLHQSRXUUHPSODFHUODSULVH
obsolète.
10. Évitez que le cordon d’alimentation ne soit piétiné ou pincé, en particulier sur les prises, les
multiprises et au niveau de la sortie de l’appareil.
1¶XWLOLVH]TXHGHV¿[DWLRQVDFFHVVRLUHVLQGLTXpVSDUOHIDEULFDQW
12. Utilisez uniquement avec le chariot, le stand, le trépied, le support ou la table
recommandée par le fabricant, ou vendu avec l’appareil. Lorsqu’un chariot est utilisé,
faites attention lors du déplacement de la combinaison du chariot/appareil pour éviter
de vous blesser en cas de chute.
13. Débranchez cet appareil pendant les orages ou lorsqu’il n’est pas utilisé pendant une longue
période.
&RQ¿H]WRXWHUpSDUDWLRQjGXSHUVRQQHOTXDOL¿p8QHUpSDUDWLRQHVWQpFHVVDLUHORUVTXHO¶DSSDUHLO
DpWpHQGRPPDJpGHTXHOTXHIDoRQTXHFHVRLWSDUH[HPSOHVLOHFRUGRQG¶DOLPHQWDWLRQRXOD¿FKH
sont endommagés, du liquide a été renversé ou des objets sont tombés dans l’appareil, l’appareil a
été exposé à la pluie ou à l’humidité, s’il ne fonctionne pas normalement, ou s’il est tombé.
15. Avertissement pour réduire le risque d’incendie ou de décharge électrique : ne pas exposer
cet appareil à la pluie ou à l’humidité. L’appareil doit être gardé à l’abri des gouttes ou des
éclaboussements d’eau ; ne posez jamais un objet contenant de l’eau sur cet appareil, par exemple
un vase.
16. Le système d’antenne extérieure ne devrait pas être situé à proximité de lignes électriques
aériennes ou d’autres circuits d’éclairage ou d’alimentation électrique, ou à un endroit où il
peut tomber sur ces lignes ou circuits électriques. Lors de l’installation d’un système d’ antenne
extérieure, prenez extrêmement soin de ne pas toucher ces lignes ou circuits électriques, car tout
contact peut être fatal.
17. Ne pas surcharger les prises murales et les câbles de rallonge, car cela peut entraîner des
risques d’incendie ou d’électrocution.
18. Ne pas introduire d’objets par les ouvertures de cet appareil, car ils pourraient entrer en contact
avec des points de tension dangereux ou court-circuiter des pièces qui pourraient provoquer des
incendies ou une décharge électrique. Ne jamais verser ou pulvériser de liquide quel qu’il soit sur
l’unité.
Instructions de sécurité importantes
7
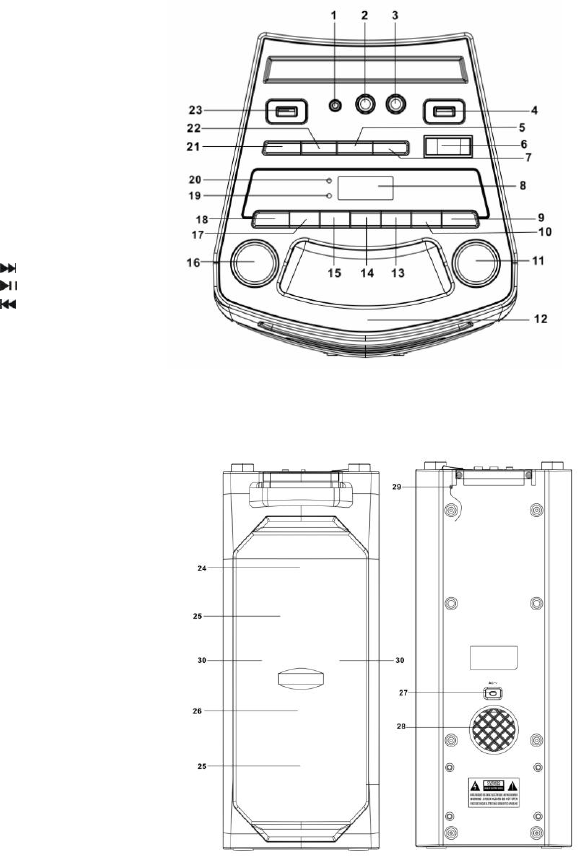
Guide to the Appliance
Top View
1. 3.5mmAUX IN JACK
2. 6.3mm MIC JACK1
3. 6.3mm MIC JACK2
4. USB PORT
5. ECHO BUTTON
6. POWER ON/OFF BUTTON
7. LIGHT BUTTON
8. LCD DISPLAY
9. FUNCTION BUTTON
10. 10/M./FOLD.+ BUTTON
11. VOLUME CONTROL
12. HANDLE
13. /TUN.+ BUTTON
14. /PAIR/AUTO BUTTON
15. /TUN.- BUTTON
16. MIC VOL. CONTROL
17. 10/M./FOLD.- BUTTON
18.P-MODE/M. BUTTON
19. CHARGE INDICATOR
20. PAIR INDICATOR
21. BASS BUTTON
22. EQ BUTTON
23. USB CHARGE PORT
Front and Back view
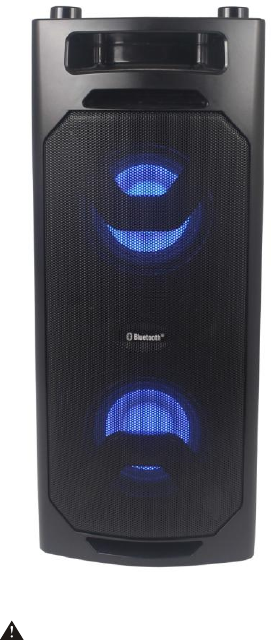
24. SPEAKERS
25. LED DISCO LIGHT
26. SPEAKER GRILL
27. AC SOCKET
28. VENTILATION HOLES
29. FM ANTENNA
30. TWEETER
8
Getting Started
POWER SOURCE
This unit works with rechargeable lead-acid battery (the battery capacity 4000mAh). Fully
charge the unit (around 7 hours) before using the product for the first time. The playback time
has about 2hours after full charging. Unplug the AC Power cord from the AC socket to work on
the battery pack after fully charged. Plugging the AC Power cord while the battery pack is
attached initiates the charging of this battery, the charge LED indicator lights red during
charging, when the battery is fully charged the indicator will turn to green. When the unit is with
low battery, the LED indicator will flash in red.
Warning: Do not change the battery, only high-qualified personnel can perform this operation.
OPERATION INSTRUCTION
BASIC FUNCTION
TURNING THE UNIT ON/OFF
Press the power ON/OFF button to switch the unit on/off.
Electrostatic Discharge hints – The unit may reset or may not reset to normal operation mode
due to electrostatic discharge, just switch it off and reconnect again.
SETTING THE FUNCTION MODE
To change the function modes, press the FUNCTION button repeatedly to choose
USB/Bluetooth/AUX/Radio function.
ADJUSTING THE VOLUME
1. Rotate the VOLUME knob on the unit to increase or decrease the music volume.
2. Rotate the MIC VOL. knob on the unit to increase or decrease the microphone volume.
BASS ADJUSTMENT
Press the BASS button on unit to increase the bass effect.
EQUALIZER (EQ) FUNCTION
This unit has a built-in equalizer system, Press the EQ button on unit to select a setting that best
matches the music style: FLAT, CLASSIC, ROCK, POP and JAZZ.
USB CHARGING
This unit provides a 5V 1A USB charging port for charging your smart phone. Connect the USB
cable of your smart phone to the USB CHARGE port for charging.
MICROPHONE ECHO ADJUSTMENT
Press the ECHO button on unit turn on or off the microphone echo effect.
FLASHING LIGHT
There are 5 modes for the DISCO LED lighting. Press the LIGHT button to choose
the light modes. To inactivate the light, press the LIGHT button until “OFF” showed
on the display.
9
L-1: Blue LED will be on constantly when it is selected.
L-2: Blue LED will be on flashing mode.
L-3: Red LED will be on constantly.
L-4: Red LED will be on flashing mode.
L-5: 7 colors LED will be on flashing mode.
RADIO OPERATION
Listen to FM radio broadcasts. Press the FUNCTION button on the unit, the display reads FM
and the radio frequency.
Note: in order to get the best reception, extend the FM ANT. on the rear of the unit before use to
its full length.
TUNING TO A RADIO STATION
If you know the station frequency that you want to tune to directly:
Tune to a station by press the /TUN.+ or /TUN.- button repeatedly. The station frequency
is shown on the display.
AUTOMATIC TUNING STOP
Press and hold the /TUN.-BUTTON or /TUN.+ BUTTON to start tuning, Tuning stop
automatically when a station is received.
AUTO PRESET MEMORY / SCAN
To scan for stations within reception range and save them to preset memory
automatically, press and hold the /PAIR/AUTO button. After the unit is finished
scanning, the unit will automatically tune to preset number 1 (P01). To tune to a
preset station:
To tune to the next preset station, press the 10/M./FOLD.+ button.
To tune to the previous preset, press the 10/M./FOLD.- button.
MANUAL PRESET MEMORY OPERATION
Choose which stations to save in preset memory instead of scanning automatically.
1. Use the /TUN.+ or /TUN.- button to tune to the station that you want to save
as a preset (e.g., 93.1).
2. Press the P-MODE/M. button. “ ” will flash on the display to indicate that you
are saving the station as Preset Memory 01. (To change the preset memory
number, press the 10/M./FOLD.+ or 10/M./FOLD.-buttons.)
3. Press the P-MODE/M. button to finish saving the station (e.g., P01 is now set to
93.1).
4. To save another station, repeat steps 1 to 3. You may save up to 30 FM stations.
USB OPERATION
This unit provides two USB ports for music playback.
1. Press the FUNCTION button on unit to select “USB” mode.
10
2. Plug the USB memory stick to the USB port on top of the unit(The unit can support up to 32G
USB device). Playback will start automatically from Track 1.
3. To pause playback, press the /PAIR/AUTO button on unit. The playing time will flash on
the display.
4. To resume playback, press the /PAIR/AUTO button again.
5. To select a desired track, press the or button respectively during playing until the
desired track appears on the display. The unit will start play automatically.
6. To search for a particular passage during playback, press and hold the or button to
scan the current playing track at high speed until desired point (passage) appears, then
release the button for normal playback mode.
7. To select a song which track number exceeds 10,press the 10/M./FOLD.+ or 10/M./FOLD.-
button each time to skip forward/backward 10 tracks, then press the or button to
select desired track.
8. To select a desired folder (if the USB contains more than one folder), press and hold the
10/M./FOLD.+ or 10/M./FOLD.- button each time to skip forward/backward a folder, then
press the or button to select desired track.
Important: The USB port is intended for data transfer only, other devices cannot be used
with this USB connection. The use of USB extension cords is not recommended. Don’t
plug the USB from the unit when playing or reading the USB device.
REPEAT PLAY
You can play one track or all tracks on the USB repeatedly.
To Repeat a Single Track
1. Press P-MODE/M. button on unit during play, the display will show “ ” and the current
track will be played over and over again.
2. To cancel repeat play, press P-MODE/M. button on unit until “ ” disappears from the
display.
To repeat all the Tracks
1. Press P-MODE/M. button on unit until the “ ” shows steadily on the display, all tracks on
the USB will be played over and over again.
2. To cancel repeat play, press the P-MODE/M. button on unit until “ ” disappears from the
display.
To repeat the folder (only for USB which contains more than one folder)
1. Press the P-MODE/M. button on unit until “ FOLDER ” shows steadily on the display,
the current folder will be repeated over and over again.
2. To cancel repeat play, press the P-MODE/M. button on unit until “ FOLDER”
disappears from the display.
RANDOM PLAY
Press the P-MODE/M. button on unit in play mode till the “RAND” shows steadily on the display,
the random play will start from next track automatically. Press the P-MODE/M. button on unit
again until the “RAND” disappears from the display to cancel.

11
BLUETOOTH OPERATION
1. Press the FUNCTION button on unit to switch to BLUETOOTH function, the LCD will display
“” and the pair indicator will flash at high speed.
2. Turn on the Bluetooth function on the device, scan the unit “KP626T” and connect, then
input the password 0000 if required, the pair indicator keep light up to indicate connection
done, and the display will show “ ” steadily. Press Play to start playback.
3. Rotate the VOLUME knob on the unit or adjust the volume on the external device to
increase or decrease the music volume to your desired level.
4. Press and hold the /PAIR/AUTO button to disconnect Bluetooth.
Note: The Bluetooth works best within 10 meters in open air.
AUX-IN OPERATION
1. Press the FUNCTION button on unit to select the “AUX” mode.
2. Connect your audio device to the AUX IN jack on the top panel of the unit with an AUX IN
cable.(audio cable is not included)
3. Rotate the VOLUME knob on the unit or adjust the volume on the external device to increase
or decrease the music volume to your desired level.
4. Control the playback with your audio device.
MIC JACK OPERATION
Microphone input is available in all modes.
1. Connect your microphone to the 6.3mm MIC JACK found on the top panel of the unit.
2. Rotate the MIC VOL. knob on the unit to increase or decrease the microphone volume.
3. Press the ECHO Button to turn on or off the echo effect of the microphone.
12
Technical Specifications
GENERAL
Power Requirements AC100-240V~60/50Hz
Battery type Built-in rechargeable battery,
4000mAh/12V, lead-acid
Power consumption 40W
Power output 25W X 2
FM frequency FM 87.5-108 MHz
AUX in jack 3.5mm
Microphone jack 6.3mm
Work temperature 5°C - +35°C
USB memory section
Playback format WMA/MP3
Memory 32MB to 32GB
Bluetooth
Communication system Bluetooth Standard version 2.1+EDR
Reception Range 10 meter (line-of-sight distance)
Compatible Bluetooth profiles Advanced Audio Distribution Profile (A2DP)
ACCESSORIES
Instruction Manual x 1pc
AC Cord x 1pc
Microphone x 1pc
Note: Specifications are subject to change for continuous improvement without prior notice.