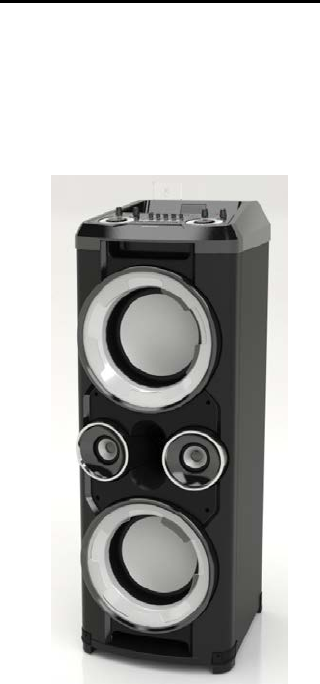
KING PROFIT 633A BLUETOOTH ENTERTAINMENT SYSTEM User Manual STEREO RADIO
KING PROFIT TRADING LTD. BLUETOOTH ENTERTAINMENT SYSTEM STEREO RADIO
15_KP633ABT UserMan

INSTRUCTION MANUAL
BLUETOOTH ENTERTAINMENT SYSTEM
MODEL: KP633ABT
IMPORTANT: Please read before using and keep for future reference.
IMPORTANT NOTES
PARTY SYSTEM 3100
PARTY SYSTEM 3100
:
INTRODUCTION
Thank you for buying this product.
Please read through these operating instructions, so you will know how to operate your
equipment properly. After you finished reading the instructions manual, put it in a safe place
for future reference.
CAUTION
TO REDUCE THE RISK OF ELECTRIC SHOCK, DO DOT REMOVE THE COVER (OR BACK).
DO NOT OPEN THE UNIT. FOR SERVICE, PLEASE REFER TO QUALIFIED SERVICE
PERSONNEL.
• The apparatus shall not be exposed to dripping or splashing and that no objects filled with
liquids, such as vases, shall be placed on the apparatus.
• Minimum distances 30 cm around the apparatus for sufficient ventilation.
• The ventilation should not be impeded by covering the ventilation openings with items, such as
newspapers, table-cloths, curtains, etc.
• No naked flame sources, such as lighted candles, should be placed on the apparatus.
• When the mains plug or an appliance coupler is used as the disconnect device, the disconnect
device shall remain readily operable.
To be completely disconnected the power input, the mains plug of apparatus shall be
disconnected from the mains completely.
• The main plug of apparatus should not be obstructed or should be easily accessed during
intended use.
FCC Notice:
NOTE: This equipment has been tested and found to comply with the limits for a Class B digital
device, pursuant to Part 15 of the FCC Rules. These limits are designed to provide
reasonable protection against harmful interference in a residential installation. This
equipment generates uses and can radiate radio frequency energy and, if not installed and
used in accordance with the instructions, may cause harmful interference to radio
communications. However, there is no guarantee that interference will not occur in a
particular installation. If this equipment does cause harmful interference to radio or television
reception, which can be determined by turning the equipment off and on, the user is
encouraged to try to correct the interference by one or more of the following measures:
---Reorient or relocate the receiving antenna.
---Increase the separation between the equipment and receiver.
---Connect the equipment into an outlet on a circuit different from that to which the receiver is
connected.
---Consult the dealer or an experienced radio/TV technician for help.
WARNING: Changes or modifications not expressly approved by the party responsible for
compliance could void the user's authority to operate the equipment.
This equipment complied with FCC radiation exposure limits set forth for an uncontrolled
environment. This equipment should be installed and operated with minimum distance 20cm
between the radiator & your body.
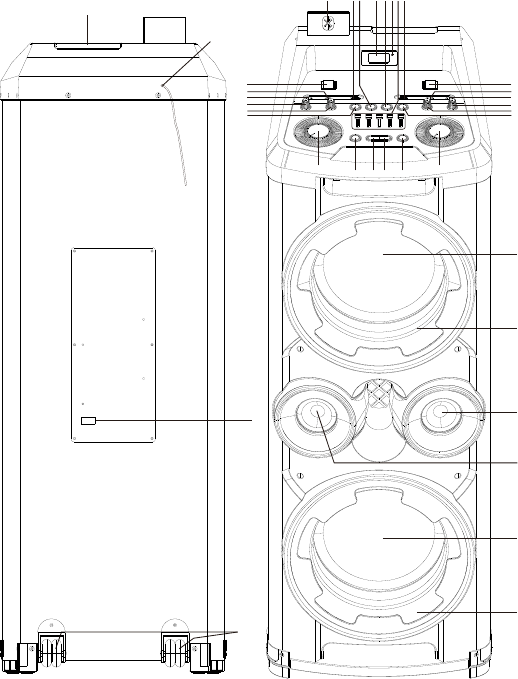
NAMES OF CONTROLS
1. USB Port-1
2. Previous/Fast Backward/TUN.- Button
3. Display
4. Play/Pause/Pair/Scan Button
5. Power Indicator
6. EQ Controls
7. USB Port-2
8. On/Off Switch
9. 3.5 mm AUX IN Jack
10. 6.3mm GUITAR Jack
11. TREBLE Knob
12. BASS Knob
13. P-MODE/MEM. Button
14. BASS On/Off Switch
15. 6.3mm MIC Jack 1
16. 6.3mm MIC Jack 2
17. MIC. VOLUME Knob
18. ECHO MIC. Knob
19. Next/Fast Forward/TUN.+ Button
20. VOLUME Knob
21. Function Button
22. FOLD./10/MEM. + Button
23. FOLD./10/MEM. - Button
24. Disco/Light Button
25. GUITAR Volume Knob
26. Bluetooth Indicator
27. Speakers
28. LED Light Cover
29. Tweeters
30. AC Socket
31. Wheels
32. FM wire Antenna
33. Disco light

LOCATION OF CONTROLS
POWER SOURCE
This unit works with direct AC.
BASIC FUNCTION
TURNING THE UNIT ON/OFF
30
32
31
33
27
28
27
28
29
29
26 1 2 3 4 5 6 7
8
9
10
11
12
13
14
15
16
17
18
19
20
21222324
25
After connecting the power, switch the power ON/OFF button on the top cabinet to turn the unit
ON/OFF.
Note: If you don’t use the unit for a long time, switch the power ON/OFF button on the top
cabinet to cut off the AC power supply or disconnect the AC power cord from the household wall
outlets.
SETTING THE FUNCTION MODE
To change the function modes, press the FUNCTION button to choose
USB1/USB2/BLUETOOTH/AUX/RADIO function.
ADJUSTING THE VOLUME
1. Rotate the VOLUME knob on the unit to increase or decrease the music volume.
2. Rotate the GUITAR VOL. knob on the unit to increase or decrease the guitar volume.
3. Rotate the MIC VOL. knob on the unit to increase or decrease the microphone volume.
EQUALIZER (EQ) FUNCTION
This unit has a built-in equalizer system, adjust the EQ bar by five frequencies (100Hz, 330Hz,
1KHz, 3.3KHz, 10KHz) on unit to select a setting that best matches the music style.
BASS ADJUSTMENT
Rotate the BASS knob on unit to increase or decrease the bass effect that best matches the
music style.
SUPER BASS: switch the BASS button on to increase to double bass effect.
TREBLE ADJUSTMENT
Rotate the TREBLE knob on unit to increase or decrease the treble effect that best matches the
music style.
MICROPHONE ECHO ADJUSTMENT
Rotate the ECHO MIC knob on unit to increase or decrease the microphone echo effect that
best matches the style.
Disco Light
There’s a disco light on top of the unit with multi-color flashing to the music beat for party time.
To disable the disco light, press and hold the DISCO/LIGHT button on unit. To activate the
disco light, press and hold the DISCO/LIGHT button again.
Blue LED Light
There’s blue LED light around the speakers with different modes selection. Default mode is blue
light turn on steadily, press the DISCO/LIGHT button once to change to flashing mode, press
the DISCO/LIGHT button twice to turn off the blue light.
USB OPERATION
This unit provides two USB port for music playback.
1. Press the FUNCTION button on unit to select “USB1” or “USB2” mode.
2. Connect the USB memory stick to the USB port found on the front of the unit. Playback will
start automatically from Track 1.
3. To pause playback, press the PLAY/PAUSE/PAIR/SCAN button on unit. The current track
No. and play time will show on the display.
4. To resume playback, press the PLAY/PAUSE/PAIR/SCAN button again.

5. To select a desired track, press the /TUN+ or /TUN- button respectively during playing
until the desired track appears on the display. The unit will start play automatically.
6. To search for a particular passage during playback, press and hold the /TUN+ or
/TUN- button to scan the current playing track at high speed until desired point (passage)
appears, then release the button for normal playback mode.
7. To select a song which track number exceeds 10, press the FOLD./10/MEM+ or
FOLD./10/MEM- button each time to skip forward/backward 10 tracks, then press the
/TUN+ or /TUN- button to select desired track.
8. To select a desired folder (if the USB contains more than one folder), press and hold the
FOLD./10/MEM+ or FOLD./10/MEM- button each time to skip forward/backward a folder, then
press the /TUN+ or /TUN- button to select desired track.
Important: The USB port is intended for data transfer only, other devices cannot be used
with this USB connection. The use of USB extension cords is not recommended.
REPEAT PLAY
You can play one track or all tracks on the USB repeatedly.
To repeat a Single Track
1. Press P-MODE/MEM. button on unit during play, the display will show a “” logo and the
current track will be played over an over again till you press the PALY/PAUSE/PAIR/SCAN
button on unit.
2. To cancel repeat play, press P-MODE/MEM. button on unit until “” logo disappears from
the display.
To repeat all the Tracks
1. Press P-MODE/MEM. button on unit until the “ ALL” logo shows steadily on the display, all
tracks on the USB will be played over and over again till you press the
PALY/PAUSE/PAIR/SCAN button on unit.
2. To cancel repeat play, press the P-MODE/MEM. button on unit until “ ALL” logo disappears
from the display.
To repeat the folder (only for USB which contains more than one folder)
1. Press the P-MODE/MEM. button on unit until “ DIR” logo show steadily on the display,
the current folder will be repeated over and over again till you press the
PALY/PAUSE/PAIR/SCAN button on unit.
2. To cancel repeat play, press the P-MODE/MEM. button on unit until “DIR” logo
disappears from the display.
RANDOM PLAY
Press the P-MODE/MEM. button on unit in play mode till the “RAND” shows steadily on the
display, the random play will start from next track automatically, until all tracks are played over
and then it will stop. Press the P-MODE/MEM. button on unit again until the “RAND” disappears
from the display to cancel.
RADIO OPERATION
TUNING RADIO STATIONS
1. Press the FUNCTION button on unit to select the radio mode: FM mode.
2. Tune to desired station by pressing /TUN+ or /TUN- button, the display will show the
band frequency. Example: FM 97.10 MHz.
3. Rotate the VOLUME knob on unit to increase or decrease volume.
4. Extend Pig Tail Antenna to its full length and gently move the unit back and forth to get the
best reception, or place the unit in an open location.

5. To turn off the radio, press the FUNCTION button to switch to other functions or switch off
the unit.
AUTO PRESET MEMORY / SCAN
To search for and automatically save stations to preset memory, press and hold the
PLAY/PAUSE/PAIR/SCAN button. Any station with a strong enough signal will be saved to
preset memory. After the unit finishes scanning, the unit will automatically tune to preset station
number 1 (P01). To tune to the next or previous preset station, press FOLD/10/MEM +/- button.
MANUAL PRESET MEMORY OPERATION
You may pre-store 30 radio stations in memory for your preference.
1. Press /TUN+ or /TUN- button to select the desired station that you want to save as a
preset.
2. Press the P-MODE/MEM. button on unit, “P01” will flash on the display to indicate that you
are saving the station as preset memory 01, to change the preset memory sequence, press
the FOLD/10/MEM +/- button on unit, then press P-MODE/MEM. button again to enter.
3. Search another station, repeat steps (1) & (2) until all desired stations stored. Up to 30 FM
stations can be programmed.
4. Press the FOLD/10/MEM +/- button to switch between the stored stations.
BLUETOOTH OPERATION
1. Press the FUNCTION button on unit to switch to BLUETOOTH function, the LCD will
display “BLUETOOTH” and the acrylic transparent Bluetooth logo will flash at high speed.
2. Turn on the Bluetooth function on the device, scan the unit KP633A and connect, then
input the password 0000 if required, the acrylic transparent Bluetooth logo keeps light up
and the display will show “CONNECT” to indicate connection done. Press Play to start
playback.
3. Rotate the VOLUME knob on the unit or adjust the volume on the external device to
increase or decrease the music volume to your desired level.
4. Press and hold the PLAY/PAUE/PAIR/SCAN button to disconnect Bluetooth.
Note: The Bluetooth works best within 10 meters.
AUX-IN OPERATION
1. Press the FUNCTION button on unit to select “AUX” mode.
2. Connect your audio device to the AUX IN jack found on the front of the unit with an AUX IN
cable.
3. Rotate the VOLUME knob on the unit or adjust the volume on the external device to increase
or decrease the music volume to your desired level.
4. Control playback with your audio device.
MIC JACK OPERATION
Microphone input is available in all modes.
1. Connect your microphone to the 6.3mm MIC jack found on the front of the unit.
2. Rotate the MIC VOL. knob on the unit to increase or decrease the microphone volume.
GUITAR JACK OPERATION
Guitar input is available in all modes.
1. Connect your guitar to the 6.3mm Guitar jack found on the front of the unit.
2. Rotate the GUITAR VOL. knob on the unit to increase or decrease the guitar volume.
SPECIFICATIONS
GENERAL
Power Requirement ............................. ……… AC 100-240V~60/50Hz
Power consumption ............... ……. ………………………………600 W
Weight-------------------------------------------------------------------------- 28.5kg
Dimensions………………………………………………466(L) x 402(D) x 1165 (H) mm
Operation temperature……………………………………………… + 5°C – + 35° C
AUDIO SECTION
Power output………………………………………………………………………200W X 2
ACCESSORIES
Instruction Booklet………………………………………………………………………… 1
AC Cord…………………………………………………………………………………… 1
Note: Specifications are subject to change for continuous improvement without prior notice.