KINGTEL 611D6 US DECT Portable Unit User Manual 611D6 2008
KINGTEL Corporation US DECT Portable Unit 611D6 2008
UserManual.wiki
>
KINGTEL
>
611D6 User Manual
Users Manual
Navigation menu
Upload a User Manual
Namespaces
Wiki Guide
HTML
PDF
Info
Views
User Manual
Discussion / Help
Navigation
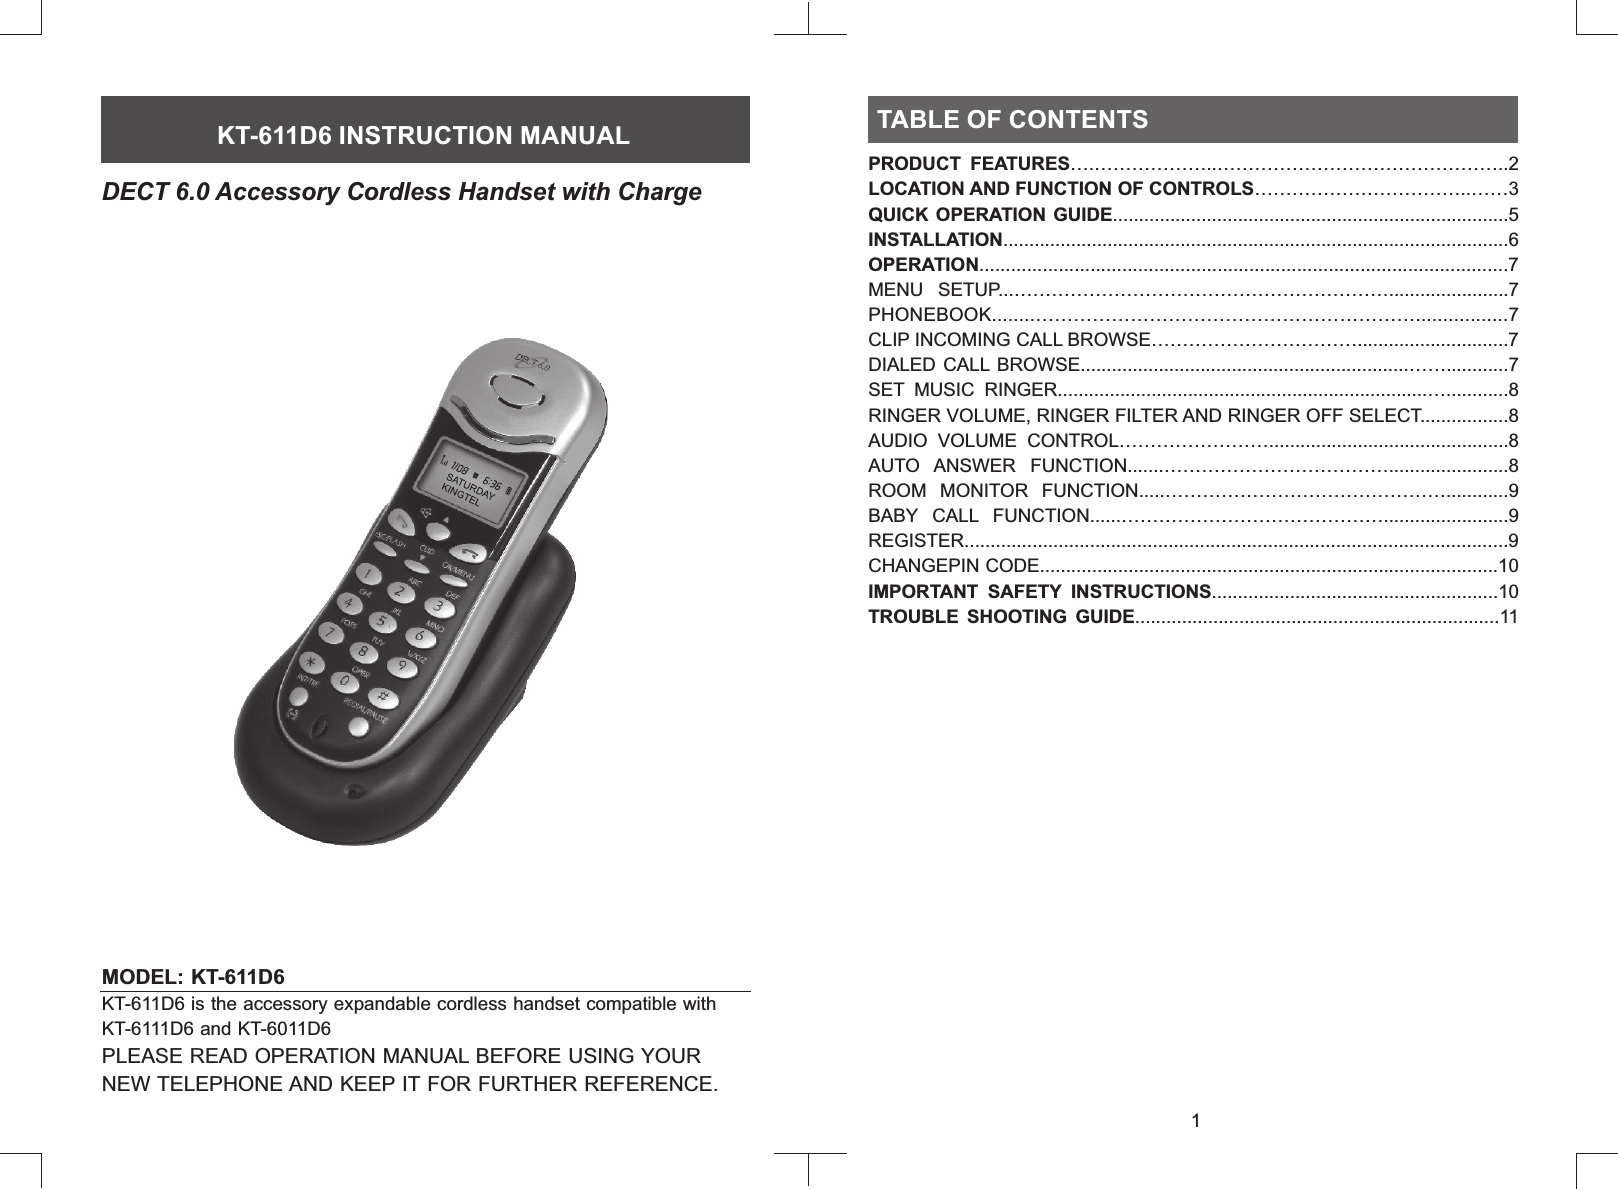
![Please charge the handset rechargeable batteries for at least 8 to 12 hours before using the new cordless telephone for the first time.1. Open the battery compartment cover and load the rechargeable batteries (Fig.1)2. Plug one end of the phone line to the line jack on the bottom of the base unit and connect the other end to the wall jack (Fig.2)3. Plug the AC adaptor cord to the DC IN 6V on the bottom of the base unit and plug the other end into the wall outlet (Fig.2) Note: The maximum standby time is 100 hours, talking time 8 hours when the batteries are new and fully charged. The battery capacity will gradually degrade depending on the usage.INSTALLATION1. Menu setup At standby mode, press [ OK/MENU ] key to enter menu mode ‧Press [ ] or [ ] to move page backward or forward Press [ OK/MENU ] key to go to selected page Press [ ] key to return to standby mode2. Phonebook To press [ OK/MENU ] and select phonebook mode, Or, press [ OK/MENU ] key to enter phonebook. Press [ ▲ ] or [ ▼ ] to browse name list backward or forward To search record, press digit key for character entry or press [ ] key to change language, press [ OK/MENU ] key to search Press [ ] or [ ] to dial out Press [ OK/MENU ]to select option, function include new entry, show record, edit record, delete, select ring group, assign speed dial and check memory status ‧Press [ ] key to return to standby mode3. CLIP Incoming call browse To enter incoming call browse mode, go to menu mode, select call log menu then select missed call sub-menu for missed call browse or select received call sub-menu for answered call browse. User can press shortcut key at standby mode to enter. Press [ ▲ ] key to enter answered call browse or press [ ▼ ] key to enter missed call browse. Press [ ▲ ] or [ ▼ ] to browse call list backward or forward To edit number, press digit key to add prefix number or press [ ESC ] key to delete number from left hand side Press [ OK/MENU ] to select option, function include number edit, transfer to phonebook and delete record Press [ ] key to return to standby mode4. Dialed call browse To enter outgoing call browse mode, go to menu mode, select call log menu then select dialed call browse. User can press [ REDIAL ] key at standby mode to enter. ‧Press [ ▲ ] or [ ▼ ] to browse call list backward or forward▲ ▼OPERATION76AdaptorDC 6V 200mALoad the rechargeable batteries(Fig.1)(Fig.2)](https://usermanual.wiki/KINGTEL/611D6/User-Guide-1033072-Page-4.png)
![Press to select option, function include number edit, transfer to phonebook and delete record Press [ ] key to return to standby mode5. Set music ringer To select external call music ringer, enter setup mode, go to profile menu, select set handset ringer. Then select music group of default, VIP, family, friend or colleague, browse music melody by pressing [ ▲ ] or [ ▼ ] key. Press [ OK/MENU ] to confirm selection and return to music group menu. Total number of song for selection can be define at EEPROM parameter, maximum selectable song is 32. Song number 1~20 are NS's royalty, song 21~30 are classical music for which will have royalty issue that customer should take care. To select internal call music ringer, enter setup mode, go to profile menu, select set page tone. Then browse music tone (1-4) by pressing [ ▲ ] or [ ▼ ] key, press [ OK/MENU ] to confirm selection.6. Ringer volume, Ringer filter and Ringer off select 1. To set external or internal call ringer volume, enter setup mode, go to profile menu, select set handset ringer, then select volume. User can set ringer volume level from 1 to 6, or set ringer off. 2. To temporary turn off ringer at sleep time, enter setup mode, go to function menu, select set non-disturb. User can set temporary ringer off period from 1 to 16 hours. After this period, ringer will resume to normal. A shortcut key for 8 hours non-disturb is provided by hold [ ] key for 2 second at standby mode, or hold [ ] key again to release non-disturb function. 3. To active ring filter for external call, user should assign external call number in phonebook music group. Then enter setup mode, go to profile menu, select music group for ringer filter, set ringer off for assigned group.7. Audio volume control To change speakerphone volume, press [ ▲ ] , [ ▼ ] key at speakerphone mode. To change receiver volume, press [ ▲ ] , [ ▼ ] key at earpieces mode. To change headset volume, press [ ▲ ] , [ ▼ ] key at headset mode. 8. Auto answer function To answer an external or internal call by lifting from charge cradle, user can enable auto-answer function. At standby mode, enter menu mode, go to setup menu, select auto answer to function on.[ OK/MENU ] 9 To run room monitor function, two units are used : detector unit (listen) and monitor unit (play). To setup a detector, enter menu mode, go to function menu, select room monitor function on. The unit will lock at detector mode and wait for monitor unit to connect. Press [ESC] key to function off menu. Press [ ] to return to standby mode. To setup a monitor, press [INT] + detector unit number to connect to detector. Handset : Press [ ] key to quit room monitor function. In case of external ring in during room monitor mode, detector will keep silent and monitor will be ring. To answer call, press [ ] key at monitor and detector will keep state at detector mode and wait for next connection. After phone call is finished, press [INT] + detector unit number to reconnect detector again.10. Baby call function Baby call is a function to provide a quick dial out a predefine number by pressing any key. This is used for child or baby to call their parent just simple press any key on the keypad.To turn on the function, enter menu mode, go to function menu, select baby call function on. A telephone number (up to 24 digit) should be input, this is for quick dial access.. Room monitor function11. REGISTER Register or deregister a handset to or from selected base unit. Enter menu, select [SETUP], press [OK/Menu] to bring up sub-menus, select [REGISTER] and press [OK/Menu] to enter registration page and then select one of the following functions, press [OK/Menu] to enter each setting page. a. NEW REGISTER Having cordless base set on registering mode and then in registration page of the cordless handset, select [BASE UNIT 1] or [BASE UNIT 2] to register and press [OK/Menu] to confirm and start registering. b. DEREGISTER Enter the [PIN NUMBER], press [OK/Menu], select the handset that is to be deregistered and then press [OK/Menu] to confirm. c. SELECT BASE Select [BASE UNIT 1] or [BASE UNIT 2] to link, or select [AUTO SELECT] to link automatically if the handset is previously registered to 2 base units, pressing [OK/Menu] to confirm.89](https://usermanual.wiki/KINGTEL/611D6/User-Guide-1033072-Page-5.png)
![When using your telephone equipment, basic safety precautions should always be followed to reduce the risk of fire, electric shock and injury to individuals.1. Read and understand all directions.2. Follow all warnings and instructions.3. Unplug this product from the wall outlet before cleaning. Do not use liquid cleaners or aerosol cleaners. Use a damp cloth for cleaning.4. Do not use this product near water.(i.e. Near a bathtub, kitchen sink, washing machine, in a wet basement, or near a swimming pool.) Avoid spilling liquid on the product.5. Do not place this product on an unstable cart, stand, or table. Serious Damage may occur to the product if it falls.6. Do not allow anything to rest on the telephone cord. Do not locate this product where the cord might be damaged by persons walking on it.7. Never put foreign objects of any kind into the product as they may touch dangerous voltage points or short out parts that could result in a risk of fire or electrical shock.8. To reduce the risk of electric shock, do not disassemble this product, take it to a qualified service person if service or repair work is required. Opening or removing cover may expose you to dangerous voltages or other risks. Operate after Incorrect reassembly can cause electric shock.9. Adjust only the controls that are covered by the operating instructions. Improper adjustment of controls may result in malfunction that could require extensive work by a qualified technician.10. Refer servicing to qualified service personnel if the following should occur: If the phone line or plug is damaged or frayed. If liquid has been spilled into the product. If the product has been exposed to rain or water. If the product does not operate normally by following operating instructions. If the product has been dropped or the cabinet has been damaged. If the product exhibits a distinct change in performance.IMPORTANT SAFETY INSTRUCTIONS1112. CHANGE PIN CODE The default pin code is 1234. Enter menu, select [SETUP], press [OK/Menu] to bring up sub-menus, select [CHANGE PIN CODE] and press [OK/Menu] to access pin code setting page, enter 4 digits old pin code, press [OK/Menu] and then enter 4 digits new pin code, press [OK/Menu] to confirm.11. Avoid using a telephone during an electrical storm. There may be risks of electric shock from lightning.12. Do not use the telephone in the vicinity of a gas leak.13. The handset receiver may retain dangerous materials such as metallic pins and staples because the receiver is magnetic. TROUBLE SHOOTING GUIDE PROBLEM SOLUTION Phone does not ring Make sure phone line cord is connected to base unit and wall jack Ringer volume is too low Check if ringer volume set on low (see page 11 for HS Ringer Vol adjustment) Phone receives but cannot Is the dial mode in accordance with the make calls local telephone company10FCC Interference InformationThis device complies with Part 15 of the FCC Rules. Operation is subject to the following two conditions: (1) This device may not cause harmful interference; and (2) This device must accept any interference received, including interference that may cause undesired operation.This equipment has been tested and found to comply with the limits for a Class B digital device, pursuant to Part 15 of the FCC Rules. These limits are designed to provide reasonable protection against harmful interference in a residential installation. This equipment generates, uses, and can radiate radio frequency energy and, if not installed and used in accordance with the instructions, may cause harmful interference to radio communications. However, there is no guarantee that interference will not occur in a particular installation.If this equipment does cause harmful interference to radio or television reception, which can be determined by turning the equipment off and on, the user is encouraged to try to correct the interference by one or more of the following measures:• Reorient or relocate the receiving antenna (that is, the antenna for radio or television that is “receiving” the interference).• Reorient or relocate and increase the separation between the elecommunications equipment and receiving antenna.• Connect the telecommunications equipment into an outlet on a circuit different from that to which the receiving antenna is connectedFCC RF Radiation Exposure StatementThe installation of the base unit should allow at least 20 centimeter between the base and persons to be in compliance with FCC RF exposure guidelines. For body worn operation, the portable part (handset) has been tested and meets FCC RF exposure guidelines.This device must not be co-located or operating in conjunction with any other antenna or transmitter. The changes or modifications not expressly approved by the party responsible for compliance could void the user’s authority to operate the equipment.](https://usermanual.wiki/KINGTEL/611D6/User-Guide-1033072-Page-6.png)