KODAK Cameras, All Manual L0406062
User Manual: KODAK KODAK Cameras, All Manual KODAK Cameras, All Owner's Manual, KODAK Cameras, All installation guides
Open the PDF directly: View PDF ![]() .
.
Page Count: 125 [warning: Documents this large are best viewed by clicking the View PDF Link!]
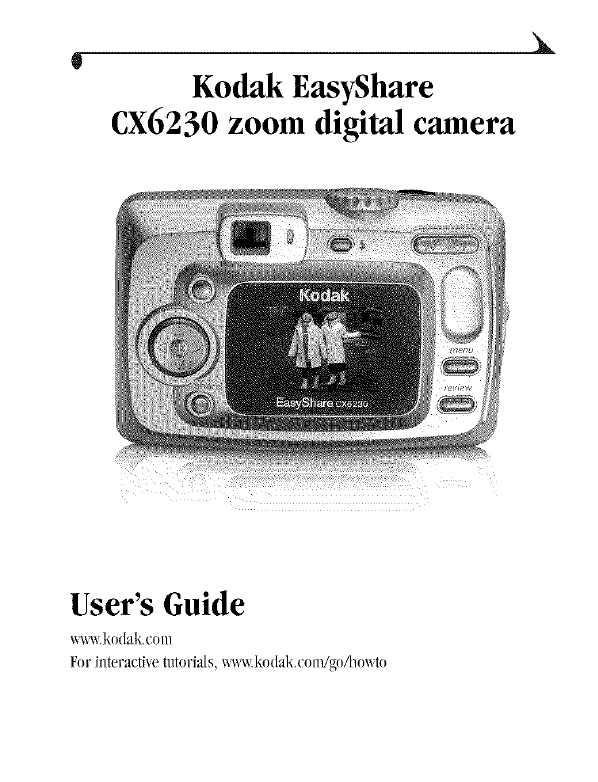
WKodak EasyShare
CX6230 zoom digital camera
User's Guide
_.kodak.com
Forinteractivetutorials,x_x kodak.co_VgoAmx_to
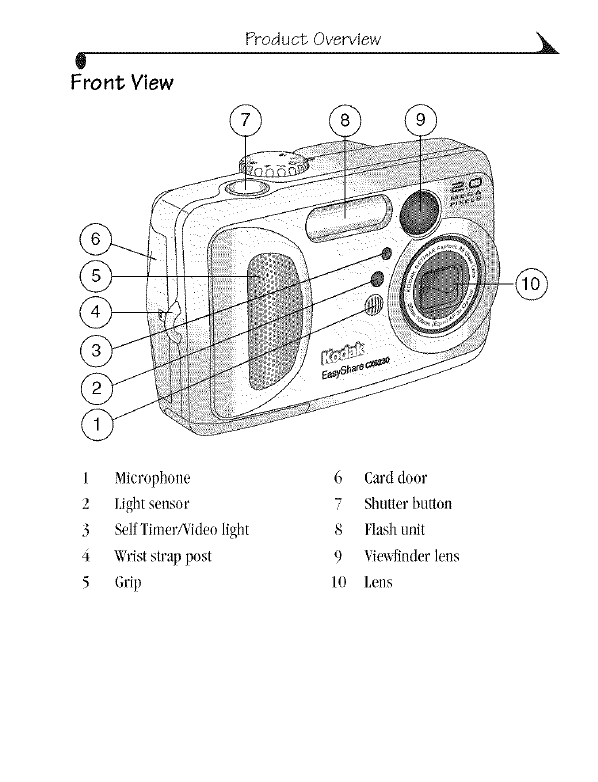
Product Overview ,_
W
Front View
1 ._licrophone
2Lightsensor
3 SelfTimer/Vkleolight
4Wriststrap post
5 Grip
6 Card door
7 Shutterbutton
8 Flashunit
9 Vim_finderlens
10 Lens
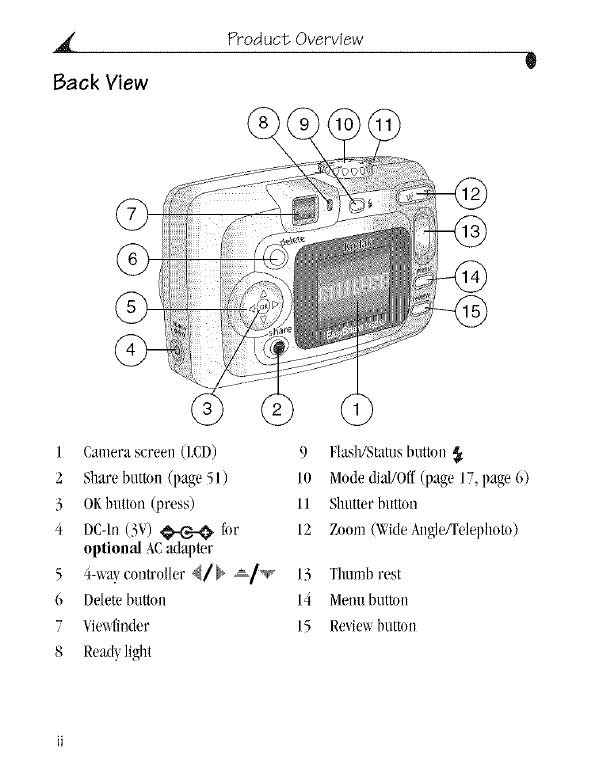
Product Overview
Back View
1 Camerascreen (I£D) 9 Flas/#Statusbutto_l
2 Share button (page 51) 10 Modedial/Off(page 17, page 6)
3 ORMtton (press) 11 Shmterbutton
4 De-In (3V) _C:.,-'@,for 12 Zoom(Widekugh:,/Telephom)
optio_lal _,Cadapter
5 4-_a},controller _/b =/_ 13 Tlmmbrest
6 Ddete button 14 Memlbutto_l
7 Vie_finder 15 Reviewbutton
8 Read},light
Product Overview ,_
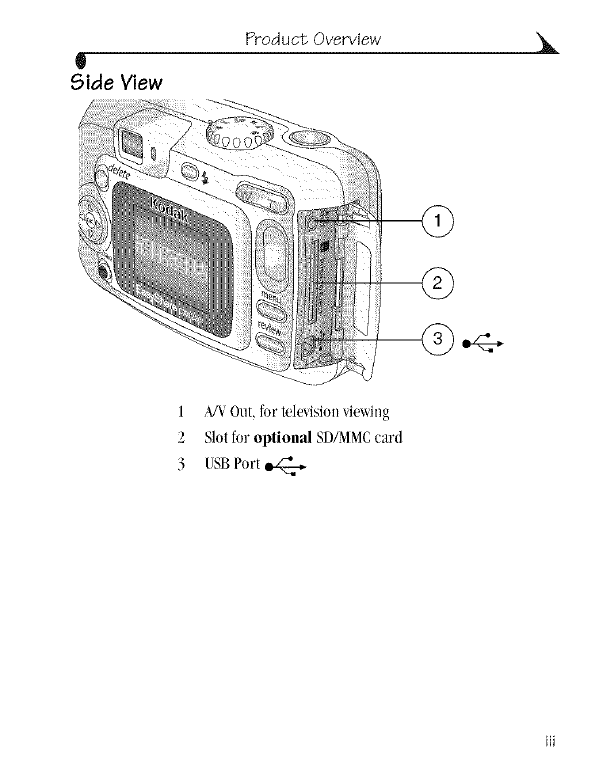
Side View
1 A/VOut, for television viewing
2 Slot for optional SD/MMCcard
3 USB Port
Prod uct Overview
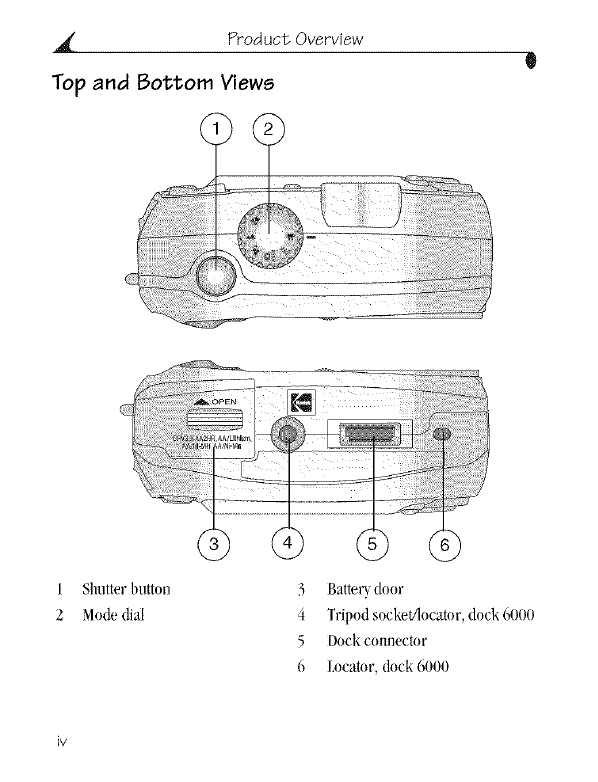
Top and Bottom Views
5Batter_ door
4Tripod socket/locator, dock 6000
5 Dock cow,hector
6Locator, dock 6000
Table of Contents
1 Getting Started ................................................................... 1
install Software First ................................................................1
Need This User Guide in Larger Print? .................................1
What Can i Do With My Camera? ...........................................2
What Can i Do With My Pictures and Videos? ...................2
Package Contents .....................................................................3
Loading the Batteries .............................................................4
Attaching the Wrist Strap ....................................................5
Turning the Camera Qn and Off ............................................6
Using the QK Button and 4-way Controller ......................6
Adjusting the Display ...............................................................7
Setting the Date and Time....................................................8
Checking Camera Status ........................................................9
Camera Screen icons ..............................................................10
inserting an MMC!SD Card ....................................................11
Choosing internal Memory or SD!MMC Card ...................12
important Battery information ...........................................14
2 Taking Pictures ................................................................. 17
Take a Picture ...........................................................................17
Picture-Taking Modes .............................................................18
Liveview_Framing with the Camera Screen ....................19
Quickview--Reviewing the Picture Just Taken ...............20
Using the Digital Zoom ...........................................................21
UsingtheFlash........................................................................22
ChangingPicture-TakingOptions.......................................24
ChangingOptionalSettings................................................25
PuttingYoursdfinthePicture...........................................27
SettingExposureCompensation.......................................28
SettingPictureQuality.........................................................29
TakingaBurstSeriesofPictures.....................................30
SettingColorMode.................................................................31
Pre-taggingforAlbumNames............................................32
PlacingtheDateonPictures..............................................33
SettingtheOrientationSensor.........................................34
3 TakingVideos...................................................................35
TakingaVideo...........................................................................35
Quickview--ReviewingtheVideoJustTaken..................36
UsingtheOpticalZoom.........................................................37
ChangingOptionalVideoSettings.....................................37
Pre-taggingforAlbumNames............................................38
PuttingYourselfintheVideo..............................................39
4 ReviewingPicturesandVideos.....................................41
ViewingSinglePicturesandVideos....................................41
ViewingMultiplePicturesandVideos................................42
PlayingaVideo.........................................................................42
DeletingPicturesandVideos..............................................43
ChangingOptionalReviewSettings...................................44
WMagnifyingPictures...............................................................44
ProtectingPicturesandVideosFromDeletion.............45
TaggingPictures!VideosforAlbums.................................46
RunningaSlideShow.............................................................47
DisplayingPictures!VideosonaTelevision.....................48
CopyingPicturesandVideos...............................................49
DisplayingVideoDate............................................................5Q
ViewingPicture!Videoinformation.....................................50
5 SharingPicturesandVideos.......................................51
WhenCaniTagMyPicturesandVideos?..........................51
TaggingPicturesforPrinting..............................................52
TaggingPicturesandVideosforEmailing.......................53
TaggingPicturesandVideosasFavorites.....................54
NeedHelp?................................................................................54
6 CustomizingYourCameraSettings.........................55
ToAccessSetupMode!Menus..........................................55
SetupMenus............................................................................55
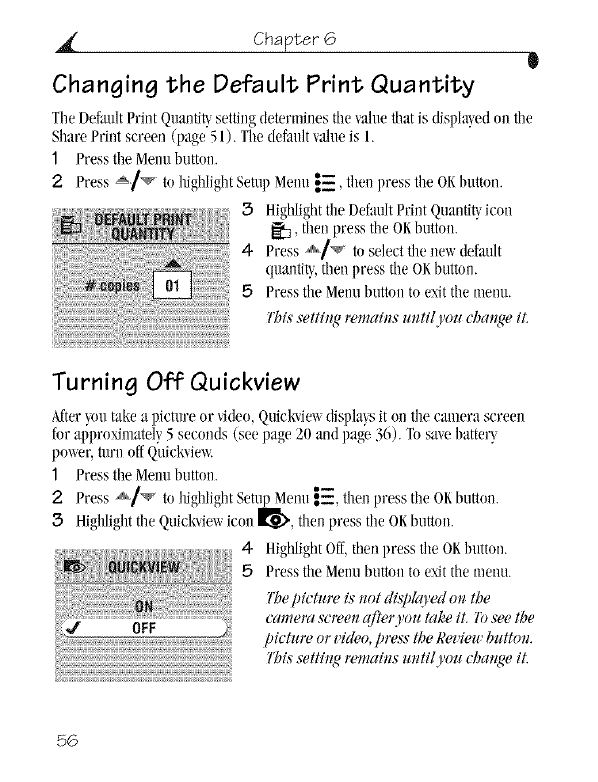
ChangingtheDefaultPrintQuantity...............................56
TurningOffQuickview.............................................................56
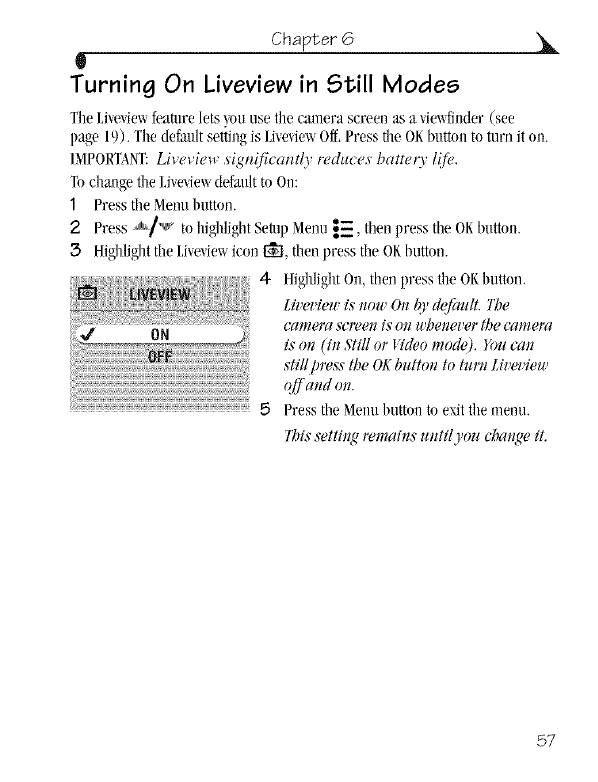
TurningQnLiveviewinStillModes......................................57
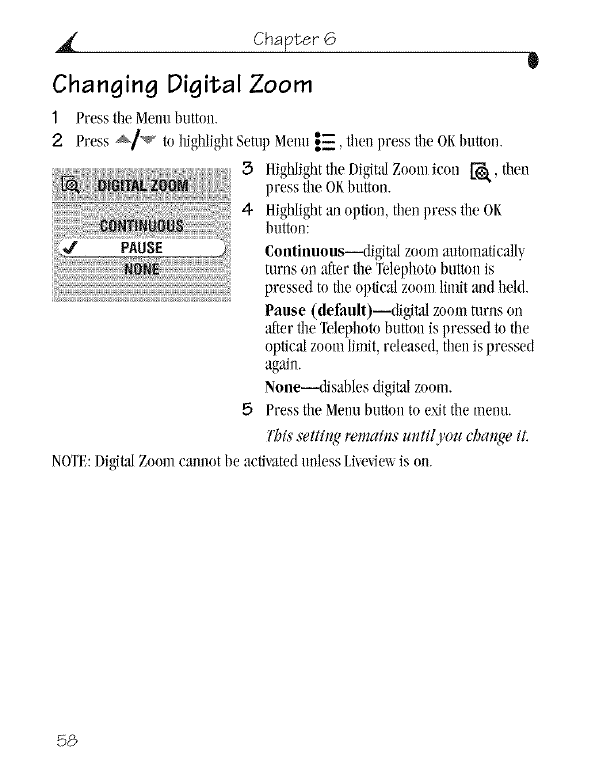
ChangingDigitalZoom..........................................................58
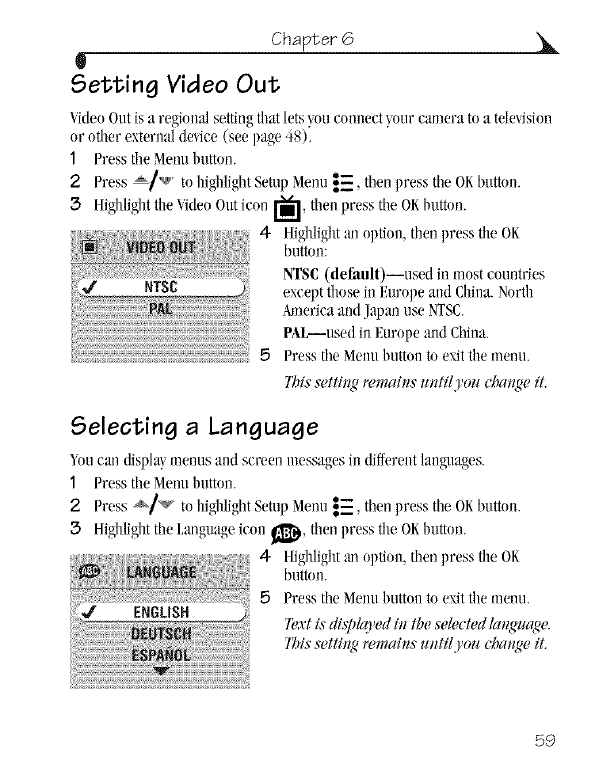
SettingVideoOut...................................................................59
SelectingaLanguage............................................................59
FormattinginternalMemoryorSD!MMCCard............60
ViewingCamerainformation................................................60
vJJ
7Installing the Software .................................................. 61
Windows System Requirements ..........................................61
Mac QS X System Requirements .......................................62
Mac OS 8.6 and 9.x System Requirements ..................62
install the Software ..............................................................63
8 Connecting Camera to Computer .............................. 65
Transferring Pictures With the USB Carte .....................65
Printing Pictures From Your Computer ..........................66
Printing From an Optional SD!MMC Card ......................66
Print With or Without a Computer ....................................66
9 Using the Camera Dock 6QQQ ................................... 67
Camera Dock 60QO Package Contents ..........................67
installing the Custom Camera insert ..............................68
Connecting the Camera Dock 6000 ................................69
installing the RechargeaHe Battery .................................70
Docking the Camera .................................................................71
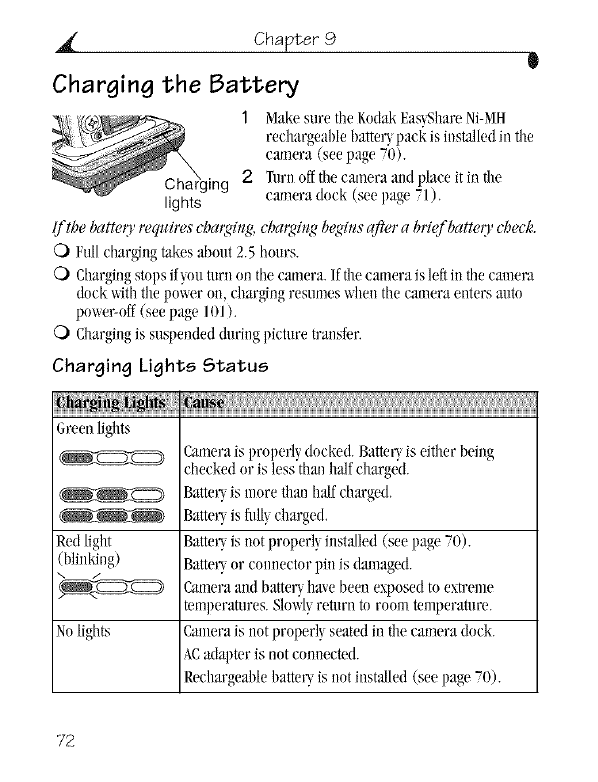
Charging the Battery ............................................................72
Transferring Pictures With the Dock ................................73
Reviewing Pictures and Videos ............................................74
Camera Dock 6000 Specifications ..................................74
Troubleshooting--Camera Dock 6000 ...........................75
Earlier Cameras and Docks .................................................75
viii
W
1Q Troubleshooting .............................................................. 77
Camera Problems .....................................................................77
Camera!Computer Communications ..................................81
SD!MMC Cards and internal Memory ..............................82
Camera Screen Messages ...................................................83
Camera Ready Light Status ...............................................88
11 Getting Heip ..................................................................... 91
Helpful Web Links .....................................................................91
Help in this Manual .................................................................91
Software Help ...........................................................................91
Telephone Customer Support .............................................92
12 Appendix ........................................................................... 95
Camera Specifications ..........................................................95
Original Factory Settings .....................................................97
Shutter Speeds ......................................................................98
Upgrading Your Software and Firmware .........................98
Tips, Safety, Maintenance ...................................................98
Storage Capacities ................................................................99
Locating Pictures and Videos on a Card .......................100
Picture Naming Conventions ...............................................101
Power-Saving Features .........................................................101
Optional AC Adapter ............................................................102
FCC Compliance and Advisory ...........................................103
1Getting Sta rted
Install Software First
Install the soft_are fromfileRodakEas)Sharesoft\_areCDbefore conneeting
thecamera (or canlem dock) to the computer.Failureto do soma) causethe
so_are to load incorrectly.
Seetlle StartHere! guide or Installingthe Snflware,page 61.
Need This User Guide in Larger Print?
1 Goto ww_.kndak.ennl/gn/cx6230snppnrt.
2 Navigateto the .Manualssection.
3ClickD'eu as tJDFto open the User's Guide.
4 On a Wind(msOS-basedcomputer or MacOS8.6 or 9.x:
C) Fronlthe Filemenu, select Print.
O /n thePrintx_indm_,sdect Fitto Page.
On MacOSX:
0 Fromthe Filemenu, selectPage Setup.
OChangeScaleto 200%.
5Print as usual.
Chapter1 0
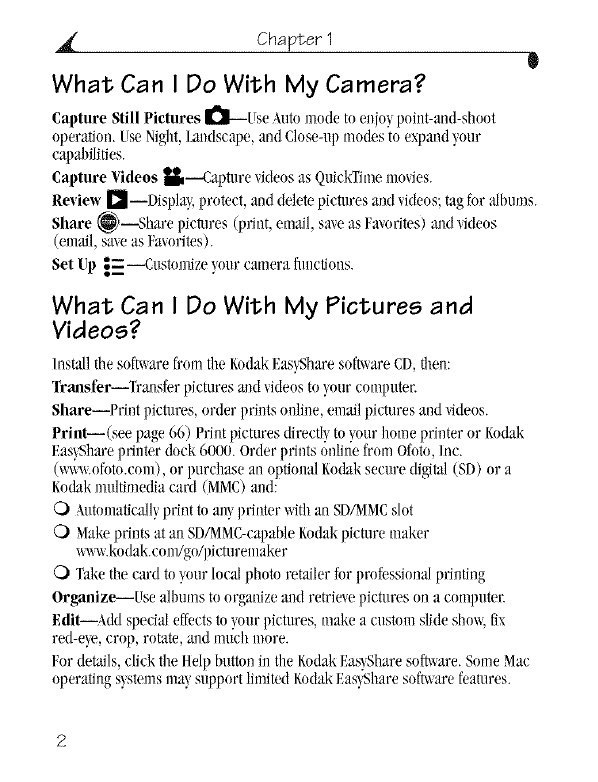
What Can I Do With My Camera?
Capture Still Pictures [_-Use _,utomode to enjo)point-aud-shuut
operation. UseNight,La_ldscape,and Close-upmodes to expandyour
capallilities.
Capture Videos _--Capture videosas QuickTimemovies.
Review rlI--Displa L protect, and deletepictures and videos;tag for albums.
Share _---Share pictures (print, ematl, sale as Favorites)midvideos
(email,saxeas Fa/orites).
Set Up .'------Customizeyour cameraflmctious.
What Can 1Do With My Pictures and
Videos?
Install the softwarefromthe KodakEas_Sharesoft_are CD,titan:
Transfer TraJlsferpictures aJld videostoyour computer.
Share--Prhlt pictures, order prints ouline, email pictures and _deos.
Priut--(see page 66) Print pictures directly to}uur hmue printer or Kudak
Eas}Shareprinter duck 6000. Order prints onlinefrom Ofoto, Inc.
(ww_.ofoto.coul),or purchase an optionalKodaksecure digital(SD) or a
Kodakmultimediacard (MMC)and:
O _,utonlaticallyprint tuallyprinter withan SDAMMCslot
O Makeprints at all SDA_lMC-capableKodakpicture maker
,,_,,v_.kodak.eom/gcq)ieturemaker
O Takethe card tuyour local photu retailer for pmfession_flpriuting
Organize---Use albumsto organizea*ldretrievepictures on a computer.
Edit Addspedal effectsto )our pictures, make a custumslide shm_,fix
red-eD, crop, rotate, a_d much more.
For de_ls, click tile Helpbutton in the KodakEas)Sharesub, are. StoneMac
operatilg s)stemsmW support limited KudakEas)Sharesoft_are features.
Chapter 1
W
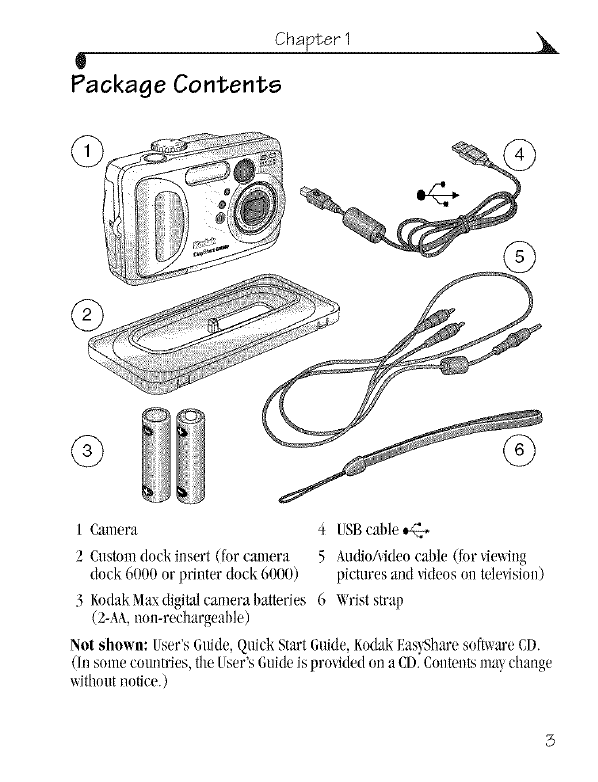
Package Contents
ICamera 4 [SBcable
2 Cnstoln dock insert (for caJnera 5 AudioAideo cable (for yielding
dock 6000 or printer dock 6000) pictures and _qdeos on television)
3 Kodak Max digital camera batteries 6 Wriststrap
(2-AA,non-rechargeable)
Not shown: User's Gltide, Quick Start Guide, Kodak Eas_Share soft_are CD.
(In sonle comltries, the User's Guide is prosided on a CD.Content_ lna_ change
without notice.)
Chapter 1
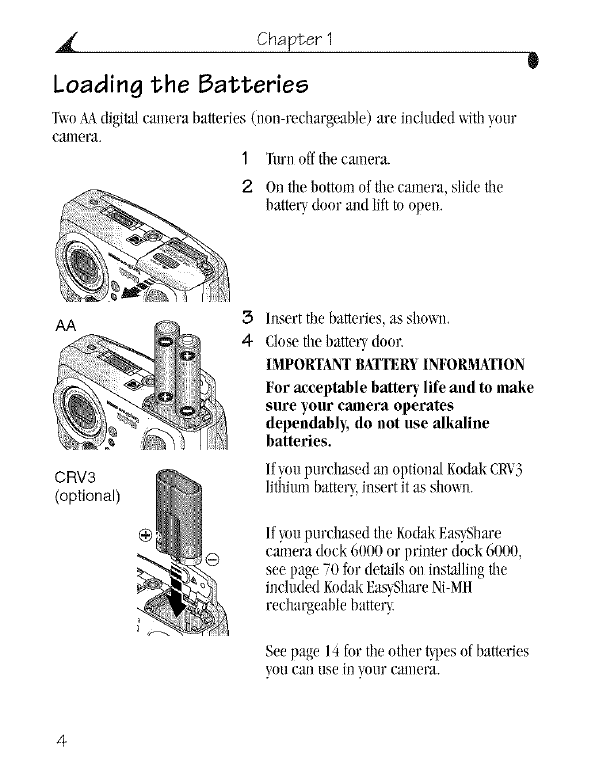
Loading the Batteries
T_o AAdigi_ camera Mtteries (non-rechargeable) are inchlded withyour
camera.
1 Turnoffthe camera.
2 On tilebottom of tile camera, slidetile
batteU door and liftm open.
AA
CRV3
(optional)
3
4
/llsert the batteries, as shm_n.
Close tile IlatteUdoor.
IMPORTANT BA1TER¥ INFORMATION
For acceptable battery life and to make
sure your camera operates
dependably, do not use alkaline
batteries.
/f_,oupurchased an optionalKodakCRY3
lithiumbatter},insert it as shox_n.
If }ou purchased file Kodak Eas}Share
cmnera dock 6000 or printer (lock 6000.
see page 70 for details on installing tile
included Kodak Eas}Share Ni-MH
rechargeable batter}.
Seepage 14 for tileother _.pes of batteries
youcan use in }our camera.
Chapter 1
g
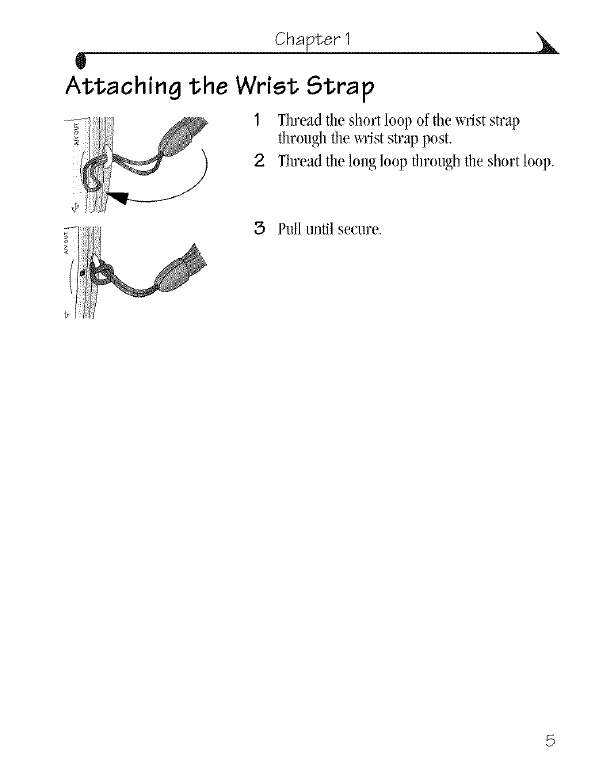
Attaching the Wrist Strap
1Threadthe short loop of the _rist strap
fllroughfile wrist strap post.
2 Thread filelong loop through file shortloop.
3Pull until secure.

Chapter 1
Turning the Camera On and Off
1Rotatethe Modedial:
Counterclockwise forStillcapture
modes
Clockwise for }_deomode
Theready light blinks greel_wb#e the
camerapelfinvns a self-check, tbel_glows
green u'bet_the camera is tea@ to tc_e
pichtres &r videos, if the mode dial is set
to _t_ ).
h_ Still aHd Wdeomodes, status A_ms
appear o1_the camera scwe_. &,e
6'heckil(_,*6'amera Status, pqq,e 9.
Toturn oft'the camera, rotate the Modedial
to the Oft"position.
The{v_meracomldetes operations that am
i_process.
Using the OK Button and 4-way Controller
Navigating--use and {/1_,to
_crollthrouthpicturesandmenus.
OK--use OF,tomakea selection,
Chapter 1
l
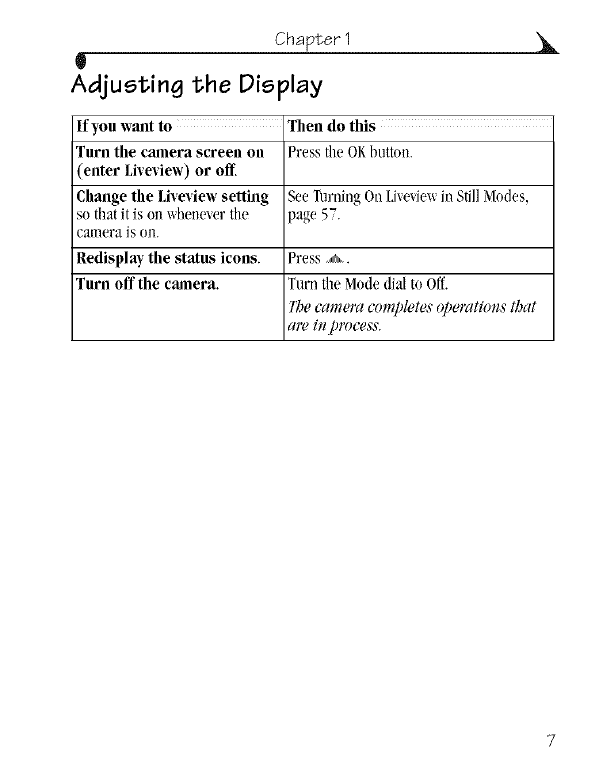
Adjusting the Display
If you want to Then do this
Turn tile camera screen on Press file OKbutton.
(enter Li_e_iew) or off.
Change tile Li_e_iew setting See Tumi_g Or_I,i_e_ie_ ir_Still Modes,
so that it is o_lwhe_le_er the page 57.
camera is o_.
Redisplay the status icons. Press _,¢_,.
Turn off tile camera. Turnthe Mode dial to Off.
7_e camera completes operations that
are in process.
Chapter 1
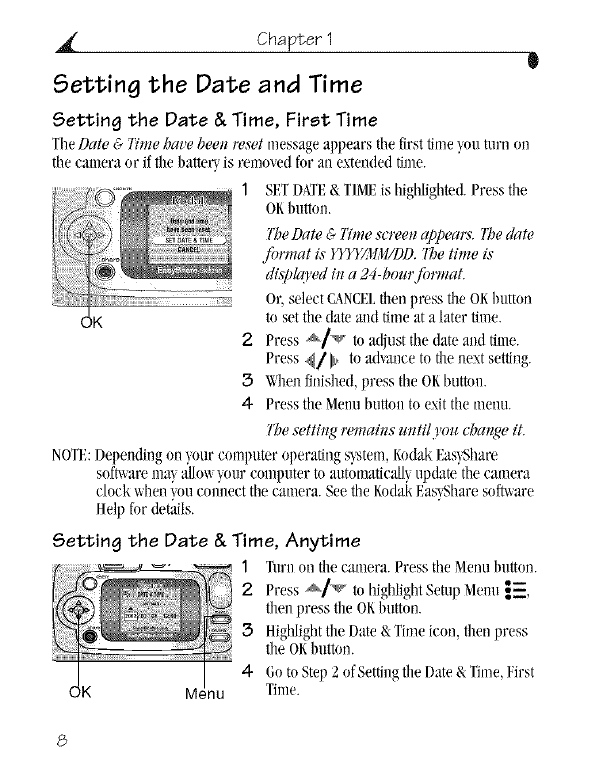
Setting the Date and Time
Setting the Date & Time, First Time
TileDate &l:ime hare beelt reset messageappears tilefirst timeyou mm nu
tilecamera or ifthe batteU is removedforan extended time.
1 SETDATE&T/VIEis highlighted.Press the
OKbutton.
2
3
4
l'beDate 5 lime sc_ve_l_'_peaxY.Y/redate
fi_lvnat is )TYJZ}Lll/DD._lbetime is
dt:sl#co'edi1_a 24-bour fi*Jwtat.
Or,select CANCELthen press the OKIlntton
to settile dateand time ata later time.
Press ._/_ madjnst tiledate and time.
Press 4/]11_ to advanceto the next setting.
_qmn finished,press the OKbutton.
Pressthe Menubutton to exittile menu.
Thesettit_gremains utd#.)'ou cha_{wit.
NOTE:Dependingon_,nurcomputer operatings_,stem,KndakEas_,Share
soft_are ma_,allow_,nurcomputerto amomaticall_,update tile camera
clock when_,oucmmectthe camera. Seetile KodakEas'_Shareso_are
Helpfor details.
M_nu
Setting the Date & Time, Anytime
1Turn on the camera. Press the Menu button.
2 Press _]v to ....
h ghl gilt Setup Me u {--,
then press the OKbutton.
3 Highlight the Date & Time icon, then press
the OKbutton.
4 Go to Step 2 of Setting the Date & Time, First
Tiule.
Chapter 1
l
Checking Camera Status
Tileieons thatappear on the camera screen indicate theactivecamera and
pictnre settings.Seepage I0 for a list of tile icons.
Tocheck tilecurrent camera setth/gs:
Q) Turn theMode dialfrom the Offposition.
"Status /f 10t is displa_,edin tile statasarea, press
area tileFlash/Statusbuttonto display,additional
settings.
Press _,_ to redispla_,the staresinformation
Mode at any time.
icon
0 Press tile Fla_slWStatusbutton.
_l_ecllrfellt C(l]llel*gl5"[atllS [COILS are
dispko'ed ft_ the bottom ba((f tbe
flash/Status stween.
Chapter1 0
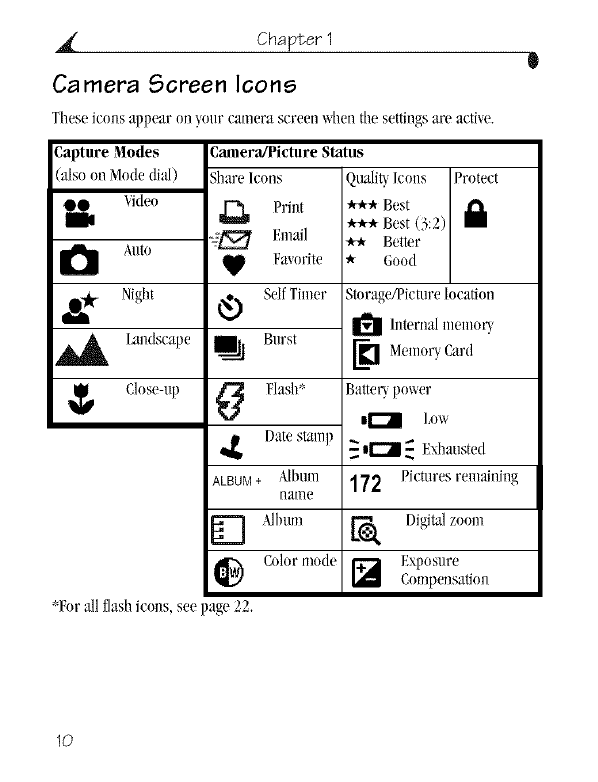
Camera Screen Icons
These icons appear onyour camera screen \qlen tilesettingsare active.
Capture Modes
also on Mode dial)
Video
Auto
&*ik Night
Laldscape
Close_ul)
gamera/Picture Status
_,hareIcons
Print
gj_ Email
Favorite
SelfTimer
Burst
Datestamp
ALBUM + A[bulI]
[]all]e
_=1 Mbum
l_) Colormode
QualityIcons Protect
.,k, Best
*** Best(3:2)
Better
* Good
Storage/Picturelocation
_1_ Internalmemor_
E_ Meulor}Card
Batter_power
tr"-J Low
II1 _ F.xhausted
172 Pictures remaining
Digitalzoom
_ Exposure
Compensation
*Forallflashicons, see page 22.
10
Chapter 1
t
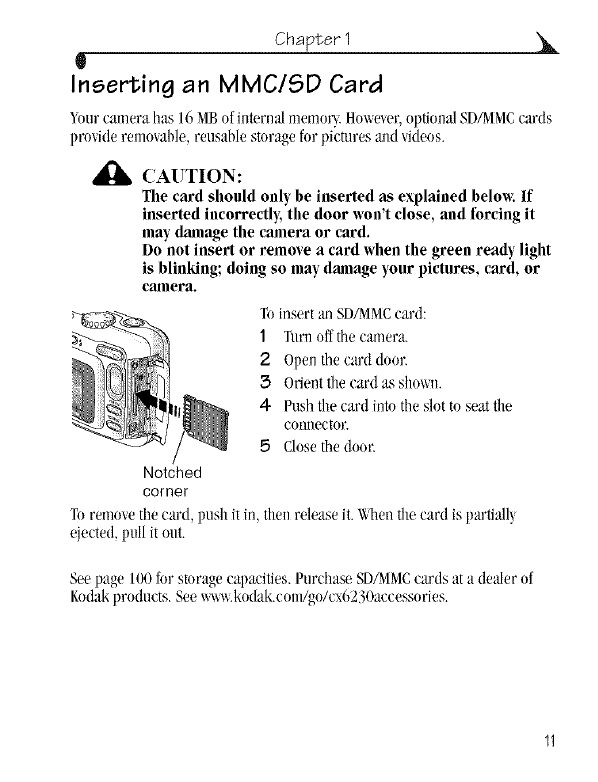
Inserting an MMC/SD Card
_our camera has 16 MB of internal memory. Hm_ewr, optional SDAfVlVlCcards
provkle removable, reusable storage for pictures a11d\ideos.
CAUTION:
The card should only be inserted as explained below. If
inserted incorrectly, the door won't close, and forcing it
may damage the camera or card.
Do not insert or remove a card when the green ready light
is blinking; doing so may damage your pictures, card, or
camera.
Toinsert an SDA'clMCcard:
1 Turu offthe camera.
20peu the card door.
3Orientthe card as sllm_U.
4 Pushthe card into the slot to seat the
connector.
5 Closethe door.
Notched
comer
To remme the card, push it in, then release it. When tile card is partiall'_
ejected, i)1111it out.
Seepage 100for storagecapacities.Purchase SDA_IMCcards ata dealer of
Kodakproducts. See_.kodak.conl/go/cx6230accessories.
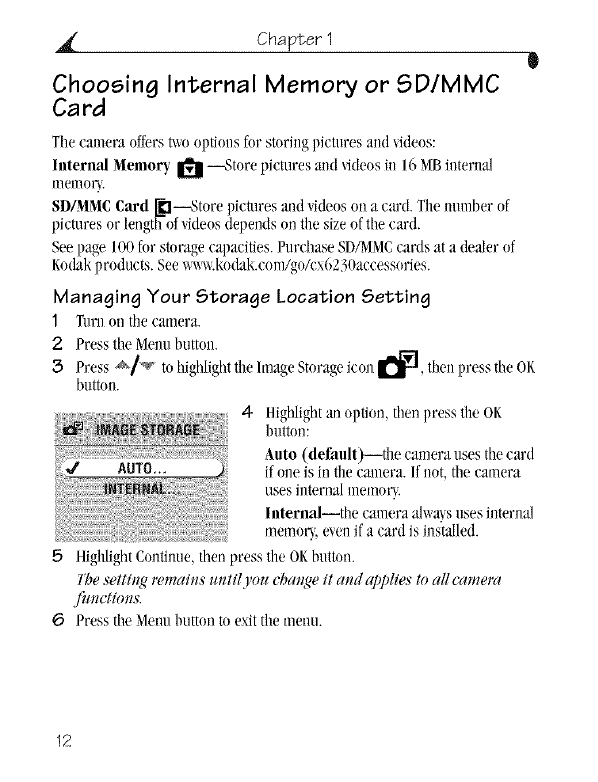
Chapter 1
Choosing Internal Memory or SD/MMC
Card
Thecamera offers t_o optionsfor storingpictures and videos:
Internal Memory _ --Store pictures and _ideosill 16MBinterua.I
memo_.
SD/MMCCard I_--Store pic_lres and videosoll a card. Tile number of
pictures or length of_ideosdepends on tile sizeof thecard.
Seepage 100 for storagecapaeities.Purchase SD/MMCcards at a dealer of
Kodakproducts. See ww_.kodak.eonl/go/e\6230aeeessories.
Managing Your Storage Location Setting
1Turnon the camera.
2Press the Menu button.
3 Press _/_ to highlightthe Image Storageicon _1_, thenpress tileOK
button.
4Highlightan option, then press tile OK
Ilutton:
Auto (default)--the camera uses the card
ifone isin tilecamera./f not, the camera
uses internalmemory.
Internal--the camera alw:gs uses internal
memorLe/en ifa card is installed.
5HighlightContinue,tilenpress tile OKbutton.
The.w,tth_g mmah_s *mtilj ou &at_ge it arm(q)plies to all camera
fimctlm*s.
6 Presstile Menuhutton to exittilemenu.
12
Chapter 1
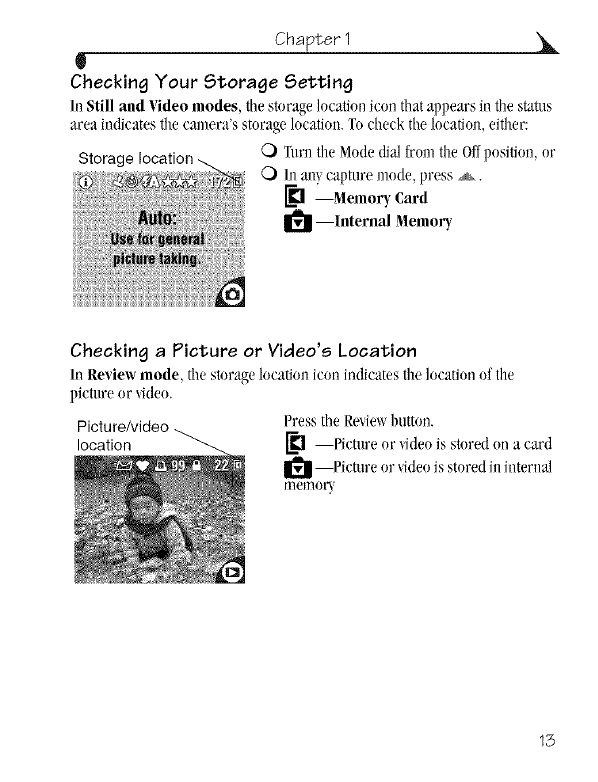
i
Checking Your Storage Setting
/n Still and Videomodes, tile storageloeatJonleon thatappears in tile status
area indicates tilecamera's storagelocation. To check the location, either:
0 Turn the Modedial from tile Offposition, or
0Illml_capture mode, press _.
_l --Memory Card
II_ --Internal Memory
Checking a Picture or Video's Location
/n Review mode, tile storage location icon indicates the locationof the
picture or/ideo,
Press the Reviewbutton.
location _] --Picture or/ideo is stored oll a card
--Picture or/ideo is storedill internal
memoU
13
Chapter1 0
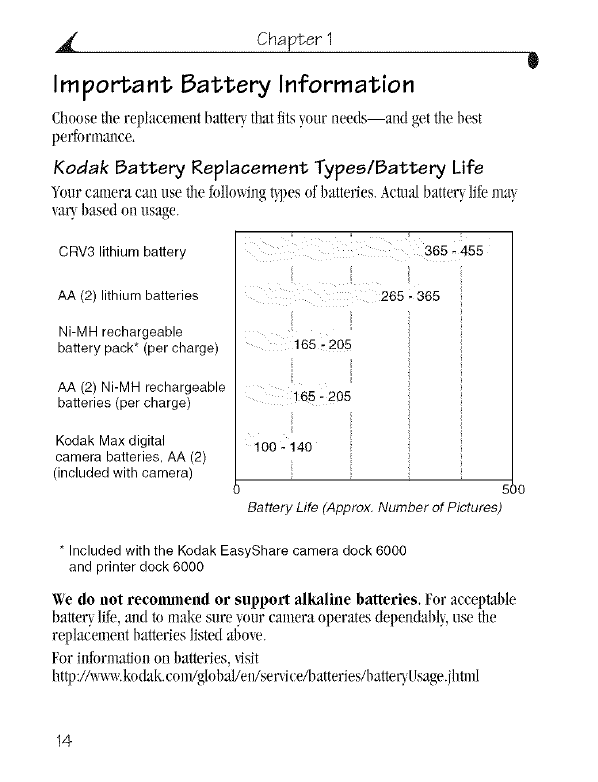
Im porta nt Battery Information
Choosethe replacemeut batter_that fitsyour needs--and get tilt,best
performance.
Kodak Battery Replacement Types/Battery Life
"_ourcamera can list, the follmqng t_pesof I)atteries.Actualbatter}lift,ma}
/ar_ based oll usage.
CRV3 lithium battery
AA (2) lithium batteries
Ni-MH rechargeable
battery pack* (per charge)
AA (2) Ni-MH rechargeable
batteries (per charge)
Kodak Max digital
camera batteries, AA (2)
(included with camera)
165- 205 {
165-2o6 il
,oo:14oil il
Battery Life (Approx, Number of Pictures
* Included with the Kodak EasyShare camera dock 6000
and printer dock 6000
We do not recommend or support alkaline batteries, For acceptable
batter}lift,,a11dto make sure}our camera operates dependal)l},use file
replacementI)atterieslistedabme.
For i_}formatJoilon batteries,_isit
http:/A_.kodak.com/g/obal!en/serqceA)atteries/batteuI;sage.jhtlll/
14
Chapter 1
l
Extending Battery Life
O Limitthe follnx_ingactivitiesthatquicMydepletebatteWpnxwr:
- Reviewing}nut pictures on the cmnera screen (see page41)
- IIsingtivevie_ (see page 19)
- IIsingQnickview(see page 20 and page 36).
- Excessiveuse of tile flash
O Purchase an optional Kodak3-/olt ACadapter to power your camera (see
page 102).
O Purchase an optional KodakEas_,Sharecmneradock 6000 (see page 67).
Thecanlera dock 600(}powers}nnr camera, transfers pictures,mid is _tiso
ahatteU charger fur its induded RodakEas}ShareNi-MHrechargeahle
hatteU pack.
O Purchase an optional KodakEas_,Shareprinter (lock6000 (see page66).
Theprinter dock 6(}00powers}nut cmnera, makes 4 x 6 prints withor
\_ithouta computer,transfers pictnms, aud is alsoa batteUcharger furits
included I_odakEas}ShareNi-_ rechargeablebatteUpack
(_ Dirt ou tilehatteU contacts can affecthatteU life.Wipethe contacts with a
cleml,dr} cloth hefnreloading batteriesin the canlera.
O BatteUperfnrmmlceis reduced at temperatures below41° F (5 ° ¢).
CarUspare batterieswhen using_,nurcamera in cold _emher,and keep
themwarm. Do uot discardcold batteriesthat do not x_nrk;whenthU
return to room temperature, thUmW be usable.
Battery Safety and Handling
0 Do uot allm_batteries totouch metal nhjects, inchldingChinS.Otherwise,a
hatteU mWshort circuit, discharge energ> become I/of,or leak.
O For rechargeable batmUdisposa.Iinfnrmation,/isit tile Rechargeable
BatteURecyding CorporationWebsite at ww_vrhrc.coul.
15

2 Taking Pictures
Tilecamera is reMy to take pictures uhen youtun] it on--even if!,ouare in
Resie_,Share, or Setup. (In Videomode, tilecamera captures ddeo.) Before
you take a pk:ture, make sure tilestorage location is set the _a_,ym _ant it
(seepage 12).
Take a Picture
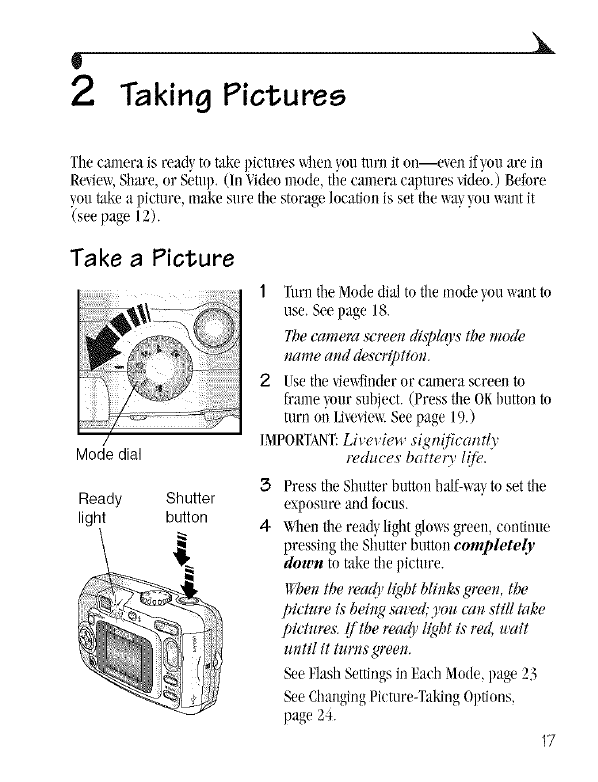
i
Mode dial
Ready Shutter
light button
1Turn tile Modedial to the mode you want to
use. See page 18.
l_e camera screen diqdq]sthe mode
name and description.
2 Usethe _iewfinderor cmnera screen to
flameymr subject. (Press tile ORbutton to
turn on Li_evie_a.See page 19.)
IMPORTANT:Live_ iew sigu{_icaut!\
iv,duces batte 0hfi'.
3 Press tileShutter bnttonhalf-wayto settile
exposureand focus.
4 Whentile read_light g/m_sgreen, continue
pressing the Shutter button completely
dou,n to take tilepicture.
l_be_lthewalO_li_# blinks (,¢ee_, the
pictztw is behrgsa_'ed;you ca_ still take
pictrtres. If the rea({l lig_t is red, u'ait
unt# it turns green.
SeeFlashSettingsinEach Mode,page 23
SeeChangingPk:ture-TaMngOptions,
page 24.
17

Chapter 2
Picture-Taking Modes
For the best possible pictures, choose
tile mode that suits your collditio_ls.
I_l Auto Generalpicnlre-taking.Automaticall}setsexposure,
focus,and flash.
&-,)!_ Night Nightscenesor low-lightconditions.Place tilecameraon a flat, stead}'surfaceor use a tripod. Due to slow
shutter speeds, a&_sepeople to staystillfur a few
seconds a_er flashfires.
Landscape Distil subjects. Flashdoes not fire unlessyou set it
(seepage 22).
Close-up Closesubjects4-24 in. (10-60 cm) from the lens in
g&le_.ngle;8-24 in. (20-60 cm) in Telephoto.Use
asailablelight insteadof flash if possible.Usethe
camera screen to frame tile subject.
¥ideo Capture_kleowithsound. See page 35,
18
Chapter 2
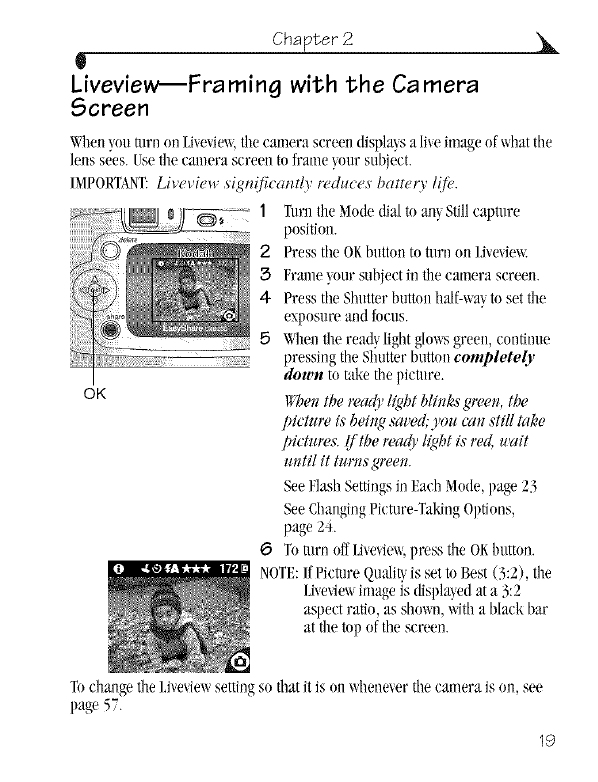
Liveview_Fra ruing with the Ca mera
Screen
Wheuyouturn on lJ_eqex_,tilecamera screen displaysali_e imageof whattile
lenssees. I_setile camera screen to frame"_oursubject.
I._IPORT,__NT:Livevie*_ .vign{lic(mtlyrech_ces'battery lift<
Q_ 1 Turn the Mode dial to all'_Stillcapture
position.
2Presstile OKbutton toturn (mIJ*e_iew:
3Dane "_oursubject in the camera screen.
4 Press the Shutter buttonhalf-wa'_to set the
exposureand focus.
,5 1_bellthe read}light _o_s green, continue
pressing tileShutterbutton completely
dou,n to take tilepicture.
OK g'hel_the read)'light blh_kl'gree_, the
pictttre is behzgsat,ed;.)'ouca_ qti#take
pictures. If the rea{{!'light is red, wait
u_til it tm'tzsgreetz.
SeeFlashSettingsinEach Mode,page 23
SeeChangingPieture-TakhlgOptions,
page 24.
6Tomrn offD_e_iew,press tile OKbutton.
NOTE:If Pictnre Qua/i_ is set to Best (3:2), tile
Live_iewimage is displa_edat a 3:2
aspectratio, as sbm_n,_qtha black bar
at the top of the screen.
TochaugetileIJ*e_ewsettingsothatitis onwbene_ertilecameraisou,see
page57.
19
Chapter 2
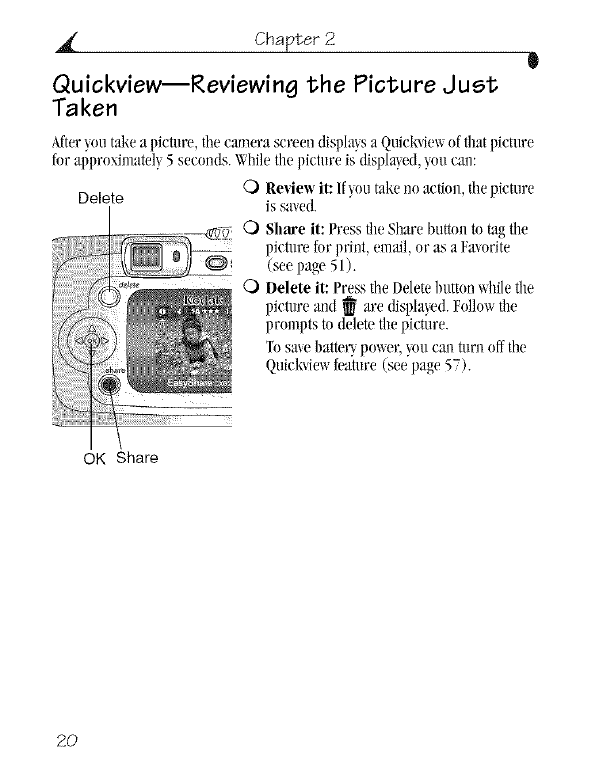
Quickview--Reviewing the Picture Just
Ta ken
After_outakea picture, the camera screen displws a Quickviewof fllatpicture
for approximately5 seconds.Whilefilepicture is displa_ed,_ou caJl:
O Rmiew it: If'_outake noaction, tilepicture
Delete is sa_ed.
O Share it: Press tileSharebutton to tag file
llictumfor print, email,or as a Favorite
(see page 51).
O Delete it: Press tileDeletebuttonxqlilefile
pictureand _ are displaDd. Followthe
promptsto deletefilepicture.
Tosale batteUpm_er,Wu caalturn offtile
Quiekviewfeature (see page 57).
OK Share
2O
Chapter2
W
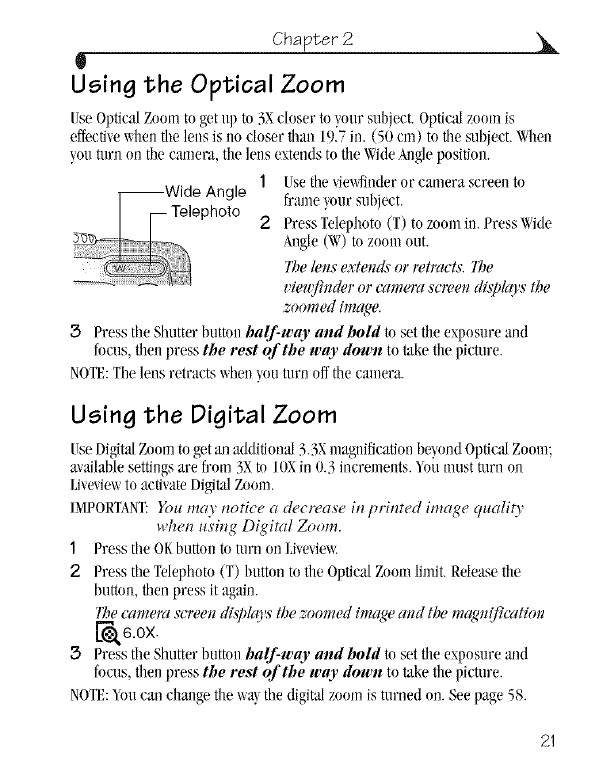
Using the Optical Zoom
I_se Optical Zoom to get up to 3":.closer to your subject. Optical zoom is
effective _dlen the leus is uo closer thau 19.7 in. (50 cm) to tile subject. _heu
you turn oil the camera, tile lens extends to tile Wkle &ngle position.
1 Use tile _imffinder or camera screen to
frame "ffmr subject.
2Press Telephoto (T) to zoom in. Press',_ide
Angle(\_,)to zoomout.
l_e leJ_sextemLs' or retracts, l_e
viedf!llder or cal_wra screel_ di.s]#q1'sthe
zoomed image
3 PresstheShutterbuttouhalf-wayandholdtosettileexposureaud
focus, tilen press the rest of the way down to take tile picture.
NOTF.:The lens retracts when you turn off the camera.
Using the Digital Zoom
Use Digital Zoom to get an Mditiona[ 3.3X magllification beyond Optical Zoom;
available settiugs are from 3X to IOXin 0.3 increments. _nu must turn on
Livevie_ to activate Digital Zoom.
IMPORTANT: You ma 3 _*otice a decrease i_*printed image quali 0
whet* Hsing Digital Zoom.
1 Press tile OF,buttou to turn on Livevie_v
2 Press the Telephoto (T) button to the Optical Zoom limit. Release the
button, then press it again.
_lhe_wmem screeH dLsplq)'s the _oomed imq_e arm the magMficat/on
['_(_6. OX.
3 I_resstheShutterbuttonhalf-wayandheldtosettileexposureand
focus, tllen press the rest of the way down to take tile pidure.
NOTF.:_nu cau change the wal, tile digital zoom is turned on. See page 58.
21
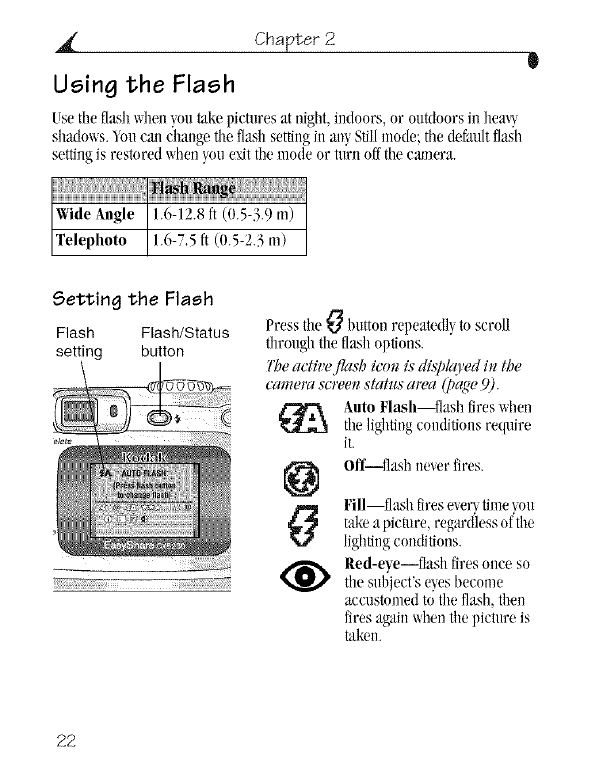
Chapter 2 0
Using the Flash
Usethe flashxqle_ _,outake pictures at night,indoors, or outdoors i_ hea_,
shadows./ou can change the flash settingin an_,Stillmode; the defaultflash
settingis restored when you e,(itthe mode or turn oft'the camera.
Wide Augle _ (0.5-3.9 _/)
Telephoto 11.6-7.5ft (0.5-2.3 m)
Setting the Flash
Flash Flash/Status
setting button
Pressthe _ button repeatedl'_to scroll
throughthe flashoptions.
l'he adit'e fla.vbicoll is diq#co ed i_ the
camera .vcmenstam,varea (pq¢,e9).
Auto Flash--flash fireswhen
the lightingconditions require
it.
Off flash_ever fires.
Fill--flash firese'_er_,time),ou
takea picture, regardlessof the
lightingconditions.
Red-eyeiflash firesonce so
the subject'se._esbecome
aecustomed to the flash, then
fires agais whenthe picture is
taken.
22
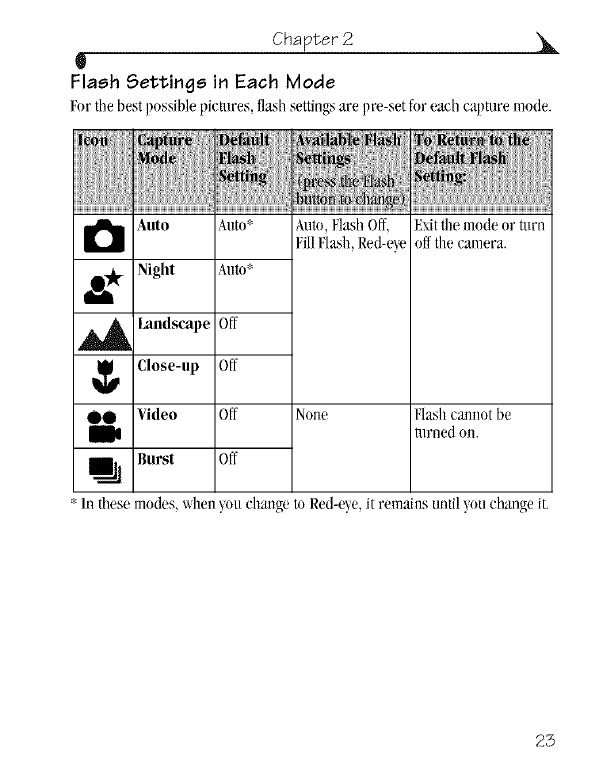
Chapter 2
U
Flash Settings in Each Mode
Fortilebest possiblepictllres, flash settingsare pre-set for each capture mode.
oetault
FlasB
_ettln_t
_.lltO*
_lltO*
)ff
)ff
)ff
)ff
Auto,FlashOff,
FillFlash,Red-e}e
Exitthe mode or turn
offthe camera.
Flashcannot be
tllrlled oIL
*In these modes,xqlen._oucha_ge to Red-eye,it remains untilyou change it.
23
Chapter 2 0
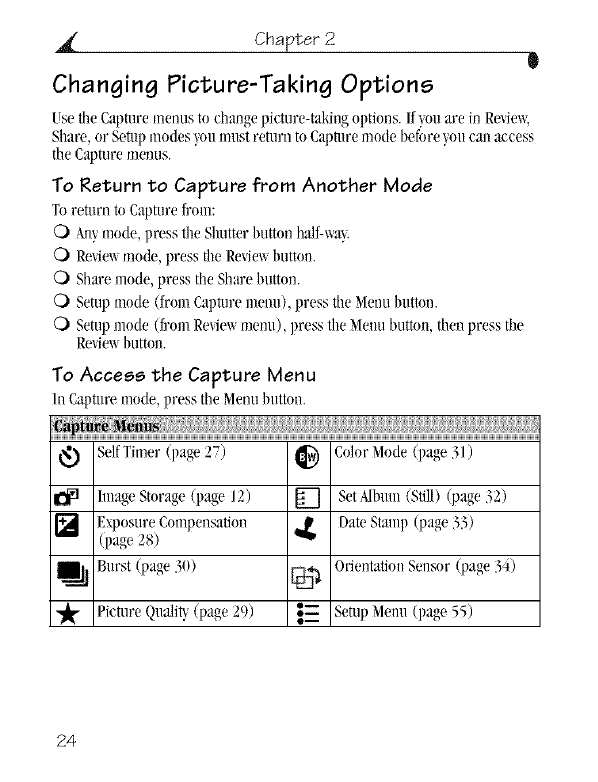
Changing Picture-Taking Options
Usethe Capturemenus to changepicture-takingoptions. If_,ouare in Re_ie_,
SMm, or Setupmodes youmust return to Capnlremode beforeyoucan access
the Capturemenus.
To Return to Capture from Another Mode
Toreturn to Capturefrom:
C) 4uy mode, press the Slmtterbutton half-war
(_ Reviewmode, press the Reviewbutton.
C) Share mode, press the Sharebutton.
C) Setnpmode (frmu Capturemetal), press the .Menubutton.
C) Setupmode (from Revie_menu), press the Meuubutton, then press the
Reviewbuttou.
To Access the Capture Menu
In Capturemode, press the Menubutton.
.,{_ : {{{{{{{{{{{{{{{{{{{
SelfTimer (page 27) _ ColorMode (page 31)
hnage Storage (page 12) [] SetA/bum(Still) (page 32)
] ExposureCompensation DateStanlp (p lge _,)
(page 28)
Burst (page 30) _E]_ OrientationSensor (page 34)
-_ Picture Q1]ali_(page 29) }_- SetupMem](page 55)
24
Chapter 2
l
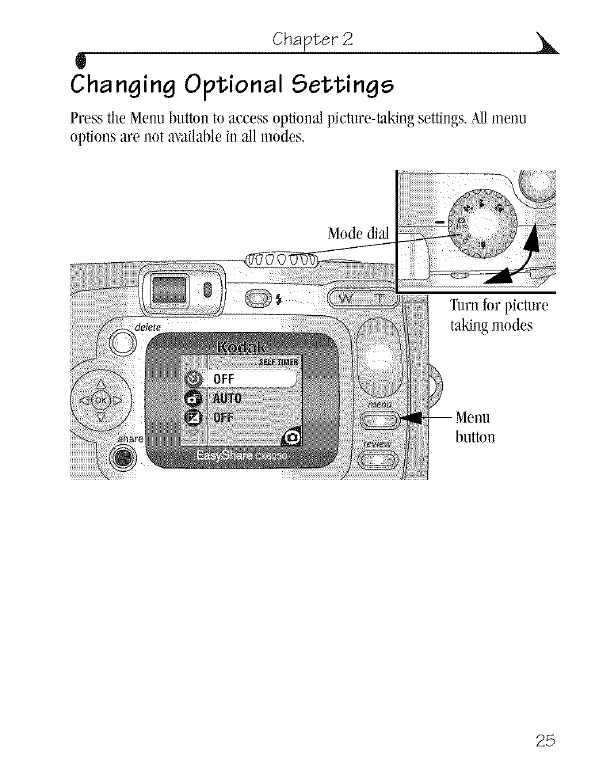
Changing Optional Settings
Press the Menu button to access optional picture-taking settings. NI menu
options are not available in all modes.
,X
\_lode dial
Turn for picture
taking modes
button
25
Chapter 2 0
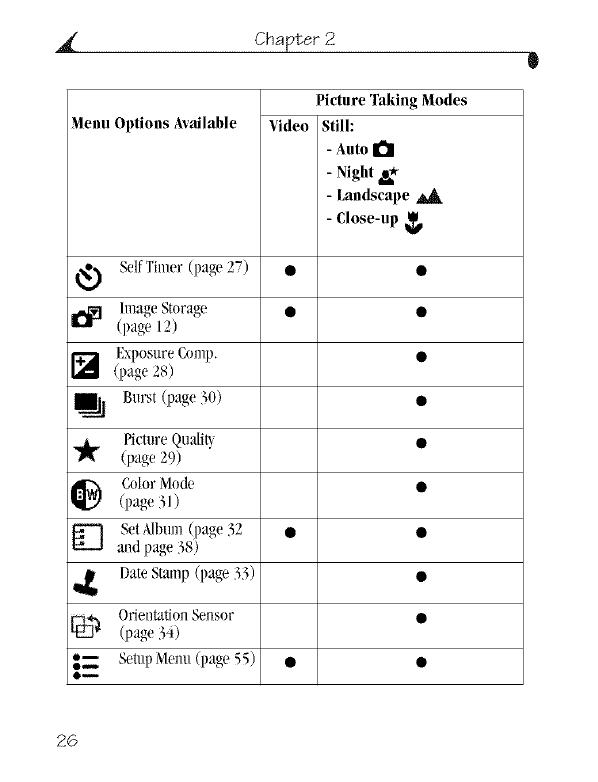
Menu Options Available Video
Picture Taking Modes
Still:
-Autoa
-Night II_
- Landscape _k
-Close-up
_t_ SelfTimer (page 27)
ImageStorage
(page 12)
ExposureComp,
] (page 28)
Burst (page 30)
Picture Qu:dit)
"_ (page 29)
_) olor Mode
(page 31)
] SetMbum (page 32 •
and page i:;8)
Date Stamp (page 33)
Onenta_on Sensor
_ (p_ge:;4)
_. Setup Menu (page 55) •
O_
26
Chapter 2
W
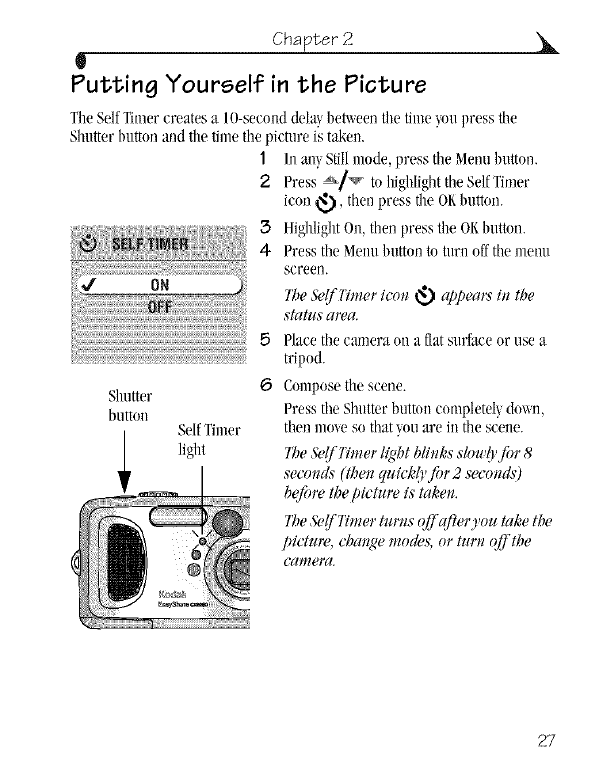
Putting Yourself in the Picture
TileSelfTimercreates a lO-secnnddelayhet_een the tinle_,nupress tile
SMtter hutton and tiletime tilepicture is taken.
SMtter
hutton
X
Self Tflner
light
1 Illa_} Stillmode, press tile Menuhutton.
2 Press a,_/_ tohighlighttheSelfTimer
icon _.), then press tile ORMttm/.
3HighlightOn, then press the OKbuttnn.
4- Press the Menu button to turn offtilememl
screen.
7Z_e&,lflTmer icoll _ cq)pecu:_h_the
status area.
5 Place the camera on a flat surfaceor use a
tripod.
6 Cmnposetile scene.
Press tileSMtter hnttnu completel_,down,
then mole so that?,nuare in tile scene.
7t_e&,lflTmer light blh_ksslowlrfi*r 8
set_md,Y(t/)ell ql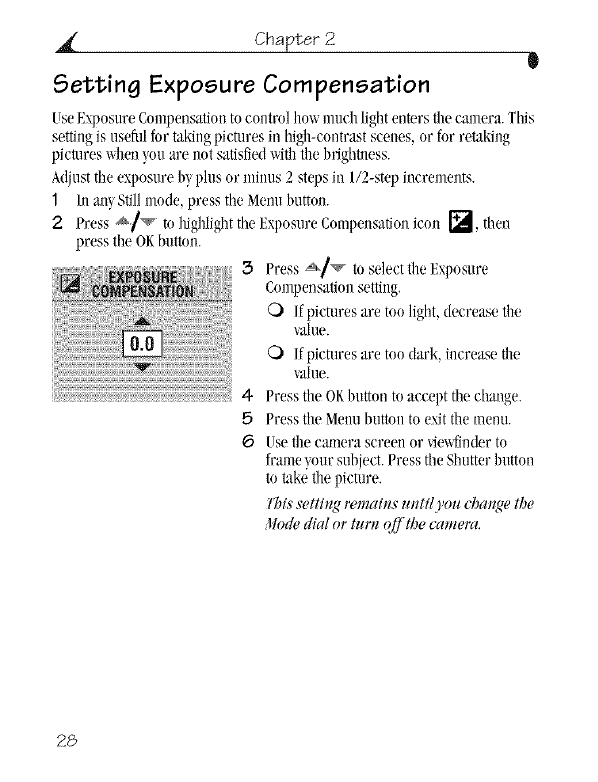
Chapter 2 0
Setting Exposure Compensation
UseExposure Compensatioutocontrol hm_mueh lightentersthe camera. This
settingis usefulfor takingpictures in high-contrastscenes, or for remkiug
pica.ires_qmnyouare not satisfiedwiththe brightness.
Adjusttileexposure I)7plus or mimls 2 stepsin l/2-step increments.
1hi mr_Stillmode, press the Menu Iluttou.
2Press _/_ to highlightthe ExposureCompensationicon [_, then
press tile OKbutton.
3 Press a,_/v to selectIll(!Exposure
Compensationsetting.
Q) Ifpictures are too light, decrease the
"_a[ue.
C) Ifpictures are too clark,increase tile
"_alue.
4- Press the OKbutton to accept the change.
5 Pressthe Menubutton to exitthe menu.
6 ITsetilecamera screen or_ewfinder to
frame}our subject. Press the Shutterbutton
to take tilepicture.
This setting remah_s m_til)'ou chaJ_pethe
llode dial or turn off'the camera.
28
i!!ii!i!iiiiii_ii!_!_!i!,i_i!ifiiii_i¢i_!i¢ii_i_!ii_i_iii_i_ili_i_ii_iii!_!_!_i_!i!;_i_!i_i_;_i_ii_i:i_i_i_i_!i_:_!_i_i_!_!i_ii_i_i_
Chapter 2
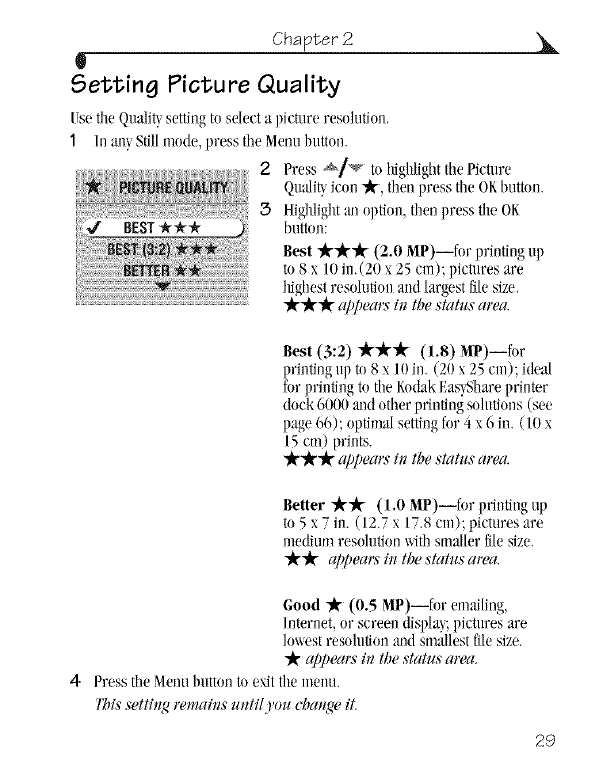
Setting Picture Quality
IJsetileQnaliWsettingto selecta picture resolution.
1 In an_,Stillmode, press the Menubutton.
,_t i 2 Press _ to highlightthePkttnre
Quail%icon "Jr",then press the OKbuttoo.
Highlightan option, then press the OK
button:
Best "_'It7 (2.0 MP)--for printing up
to 8 x 10 in.(20 x 25cm); pictnres are
highestresolution and largest filesize.
$€$€_t_ appears h_the status area.
Best (3:2) "RJr'lk (1.8) MP)--for
printingup to 8 x 10in. (20 x 25 cm); idea[
for printing to the KodakEas_,Shareprinter
dock 6000 and other printingsolutions (see
page 66); optimal settingfor 4x 6 in. (10 x
15cm) prints.
_appeal:_"in the status alva.
Better "A'"_ (1.0 MP)--for printiog up
_ " S
to 5x 7 ill. (12.7 X1, .8 cm), p*cture,are
medium resolution\_ithsmaller file size.
"R4t appears'in the status area.
Good "_ (0.5 MP)--for emai/ing,
Internet, or screen displat pictnres are
Imwst resolutionand smallestfilesize.
appealw#l tl_estatus a_wa.
4- Press the Menubutton to e_t the menu.
Ibis sett/Hgmmah_s mff/l you _aHge it.
29
Chapter 2 0
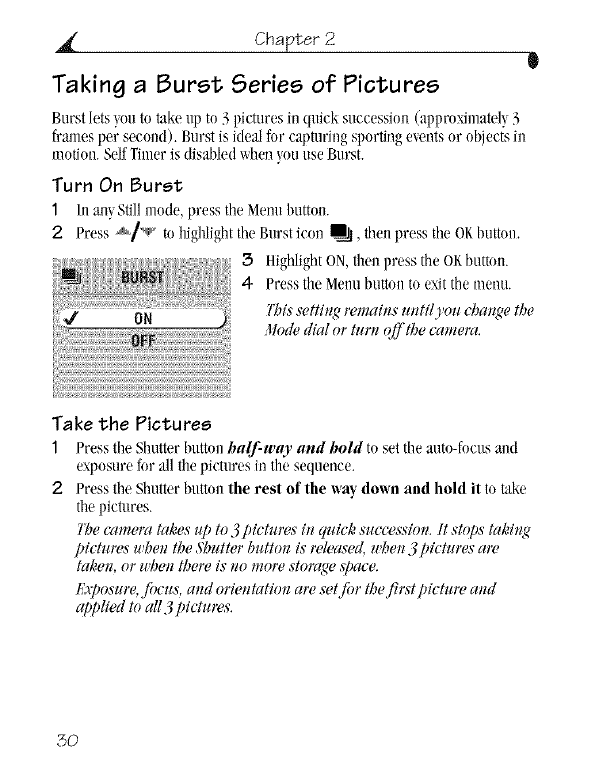
Taking a Burst Series of Pictures
Burstk,ts_nuto takeupto 3pieturesin quick successhm(al_prn_mately3
framesper second). Burstis ideal for captnringsporting eu,nts or objectsin
motion. SelfTimeris disal)ledwhenyouuse Burst.
Turn On Burst
1 /n an},Stillmode, press the Metal button.
2 Press _/_' to highlightthe Burst icnn mJ_l,then press the OKbntton.
3 HighlightON,then press tile OKbutton.
4 Pressthe Menubuttnn to e\it the menu.
lWs .wttit_gwmait_s m## you cbat_gethe
llode dial or turn off tbe camera.
Take the Pictures
1 Pressthe Shntterbuttnnhalf-way and hold to set the antn-fncusand
e\posure for allthe piemres in the sequence.
2Pressthe Shutterbuttnn the rest of the way down and hold it to take
the pictures.
l'he camera takes _q_to 3 pictz_res Dzquick succes:_'iolz.It st@s tak/tzg
pi(¢z_resuhetz the Shz#ter bz#ton is released,*l't_ett3pictmws aw
taken, or *1"bet*tl,ew i.s"no mow storq_e,#)ace.
I_h'posmw,fiJcus, armorietttation am set f)r tbefirst pict*_rearm
applied to all3 pictm'_,s.
3O
Chapter 2
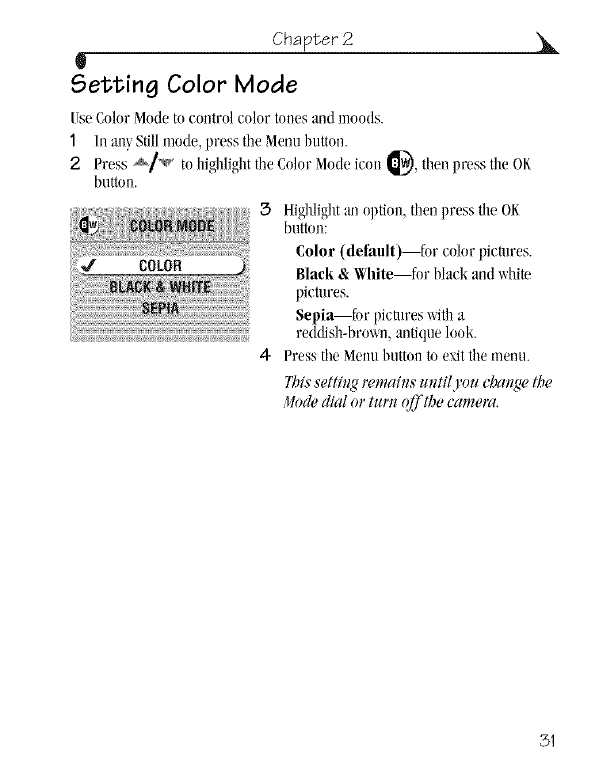
Setting Color Mode
tse ColorModeto comrol color tones and moods.
1/n m}_,Stillmode, press the Menubutton.
2 Press _]_ to highlighttileColor .Modeicm__, thenpress tileOK
button.
3 Highlightan option, then press the OK
button:
Color (default)--for color pictures.
Black &White--for black and white
pictures.
Sepia--for pictllres witha
reddish-brox_u, antiquelook.
4- Press tileMenu hutton to eMtthe menu.
Ibis setth_g remah_s u_til 'ou chal_Wthe
Mode dial or tun_ (_'the camera.
31
Chapter 2
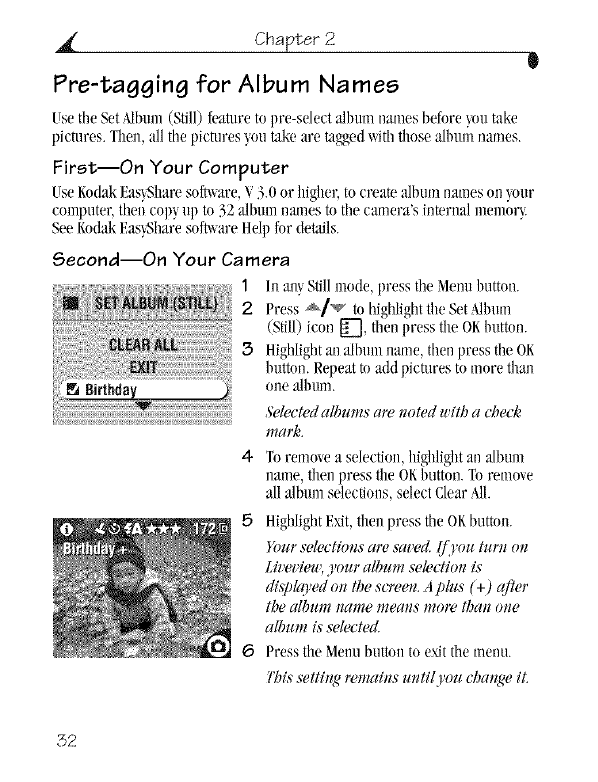
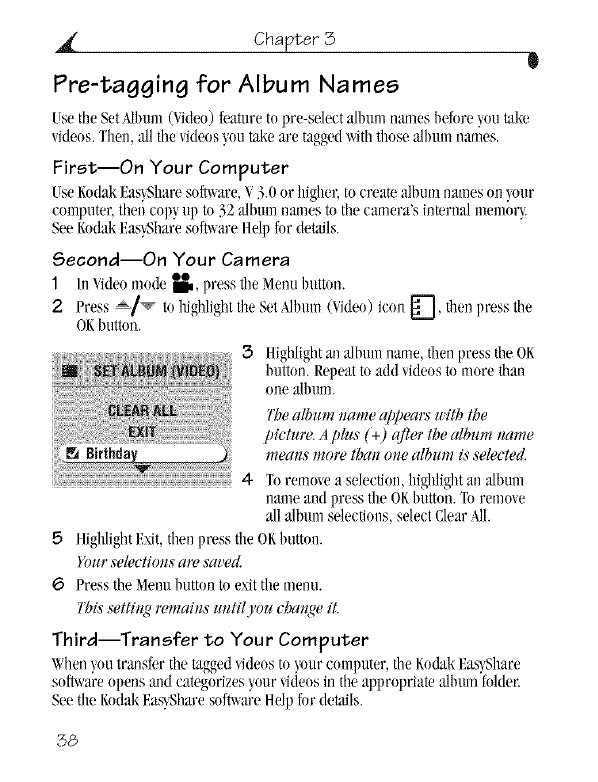
Pre-tagging for Album Names
Usethe Set Mbum (Still)feature to pre-seleetalbum names before_ou take
pictures. Then,all tilepictures .'you"takeare taK*gedwiththose album ramies.
First--On Your Computer
UseKodakF.as}Sharesoft',_are,V3.0 or higher, to ereatealbum ramieson }our
computer,then copy up to 32 albumnmnesto the camera's internal memor}.
SeeKodakEas_Sharesoft_are BelI)for details.
Second--On Your Camera
1 /l_aW Stillmode, press the Melmbutton.
2 Press _1_ to highlightthe Set Mbum
(Still) icml {_], then press the OKbutton.
3 Highlightanalbum _mme,then press the OK
button.Repeat madd pictures to more tha_
one albmn.
&,letted a#mms are noted with a check
mark.
4 Toremovea selection,highlightan album
name, then press the OKbutton. Toremuve
allalbum selections,selectClearMI.
5 HighlightE_t, then press the OKbutmlL
Dur selections atz,saved. If l,ou turn on
Lh'ev/eu',your album selection is
df,_ldqvedon the screen, a plus (+) (_ter
the album name means more than one
album is selected.
6 Pressthe Menubutton to exitthe menu.
This setting remains until y(m change it.
32
Chapter 2
U
Third--Transfer to Your Computer
When}outraslsfertile taggedpictures to}our computer, tileKodakEas}Share
so_are opens mid categorizes}our pietures in tileappropriate albumfolder.
Seetile KodakEas}Sharesofix_areHelp for details.
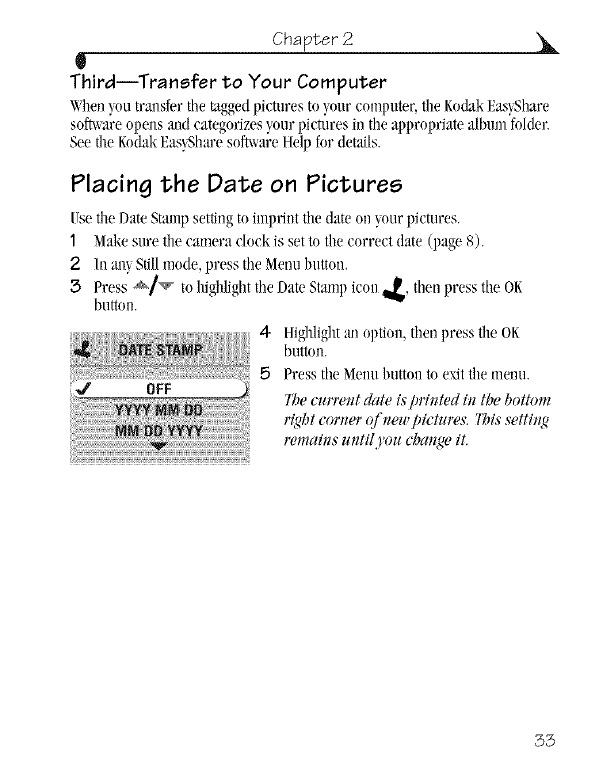
Placing the Date on Pictures
I!setileDateStampsettingto imprh}tthe dateon ymr pictures.
1.Makesure the camera clock is set to the correct (late (page 8).
2 In au.'yStillmode, press tile Menubutton.
3 Press ._/_ to highlighttileDateStampicon _, then press tile OK
button.
4Highlightan option, then press the OK
button.
D Press tileMenu button to eMtthe menu.
l_e c_rreJzt date is pri_ted hz the bot&m
right comer (f _wwpictures. 1Ws ,vettlJ_g
remai_s z_til yoz_ chaJ_ge it.
33
Chapter 2 e
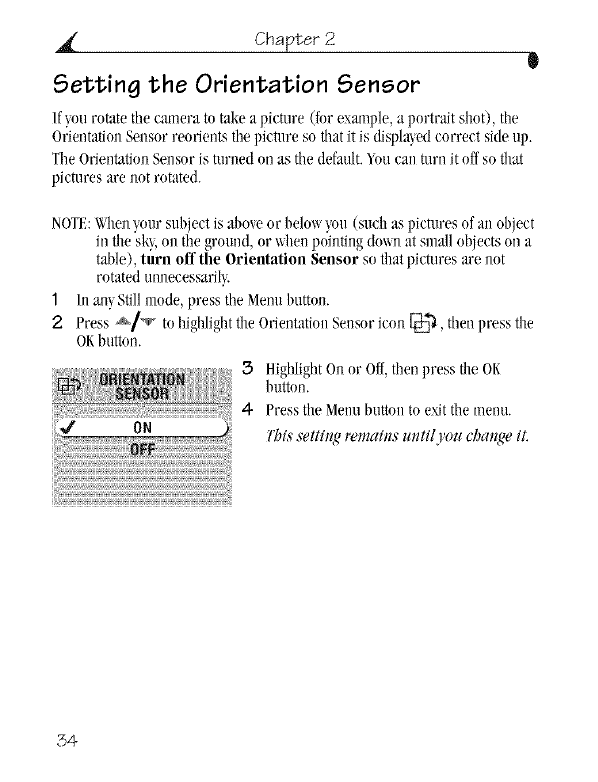
Setting the Orientation Sensor
/f _,ourotate the camera to take a picture (for example, a portrait shot), the
Orientation Sensor reorients tile picture so Nat it is displav,d correct side up.
Tile Orientation Sensor is turned on as tile default. 'Youcan turn it off so that
pictures are not rotated.
NOTE: When _,nur subject is abme or below you (such as pictures of all object
in tile sk?,,on tile ground, or _qleu p(;inting dm_n at small objects oll a
table), turn off the Orientation Sensor so that pictures are not
rotated u_/llecessarJl}.
1hi an_, Still mode, press the Menu buttol}.
2 Press _/1_ to highlight the Orientation Seusor icou _, then press tile
OKbutton.
3 Highlight On or Off, then press the OK
button.
4 Press the Menu button to exit the menu.
This settiJ_gremaiJzsuntil rou chaJ_geit.
34
W
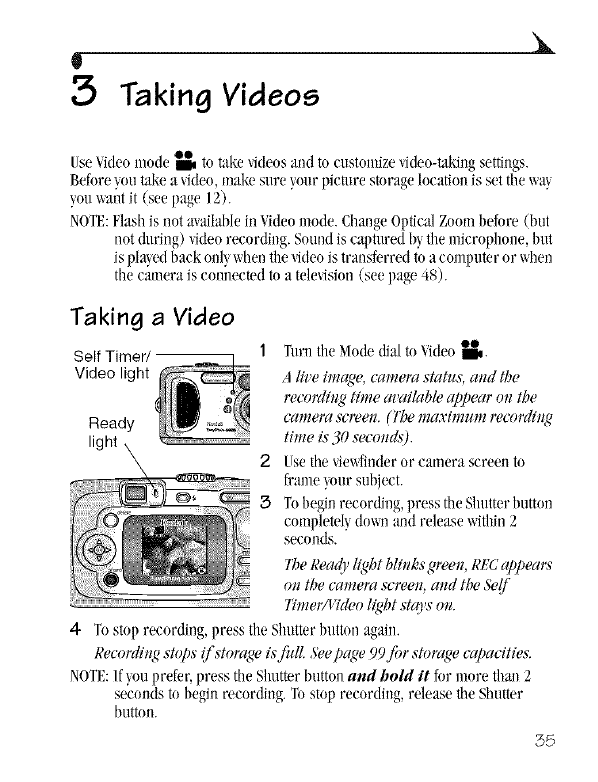
3 Taking Videos
,. O0 .... or •
Use_qdeomodeI_ to take_deosandto custounze_ldeo-takiu_,settings.
Befnre_nutakea_ideo,makesureyourpicturestnragelocationis settilewa_
you_aut it (seepage12).
NOTE:Flashis notavailablein Videomode.ChangeOpticalZoombefore(but
not during) video recording. Soundis c@tured b} tilemicrophone, but
ispla}edback olflywhentile_deo istransferred toa computer or when
the camera is connected to a television(see page 48).
Taking a Video
1 TurutileModedial tn Video[1_.
A live imqw, eamera status, and the
meording time available appear on the
eamera selz,en. (7"hemaximum iz,eording
time is30 seeonds).
2 Usetile_iewfinderor camera screen to
frame)our subject.
3 Tnbeginrecording, press theShutterbutton
compleml}down and releasewithin 2
seconds.
7be Readyl{@tblinks green, RI%'@pears
on the (*_merasereen, and the &,(
D'merAq<leolight stars on.
4- Tn stop recording, press the Shutter Imttnn:gain.
ReeordingstoDs[f stor¢(Wisfidl. 5g,e page 09 fi)r storage(*qmcities.
NOTE:/f_ou prefer,press tile S/mtterbuttonand hold It fnr more than 2
secouds tn I)eginrecording. Tn stop recording, release tileShutter
buttnn.
35
Chapter 3
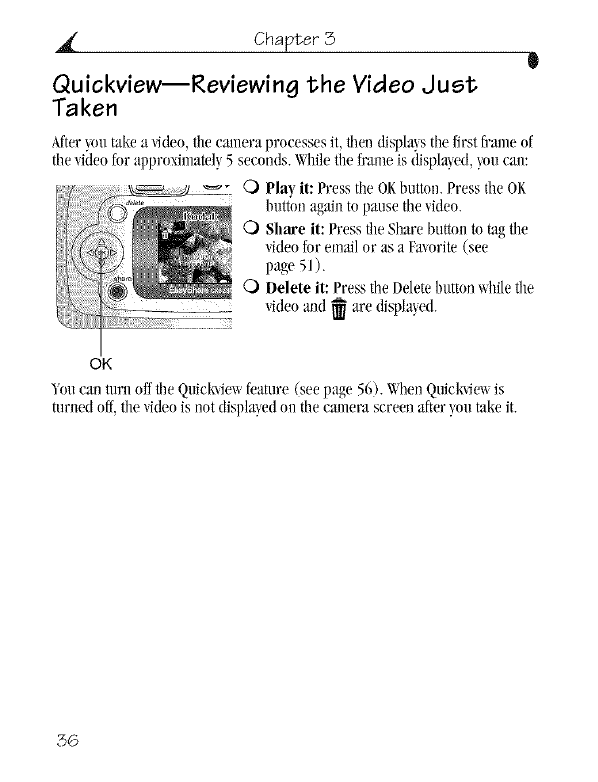
Quickview--Reviewing the Video Just
Ta ken
After)ou take a _ideo, tilecamera processes it, then displws the first frameof
the videofor approximately5 secouds.Whilefileframe is (lispla_ed,youceal:
OPIW it: Press the OKbutton.Press the OK
button againto pause the video.
OShare it: Press the SharebuttCmto tag file
video for email or as a Favorite(see
page 51).
O Delete it: Press tileDeletebuttonxq_ilefile
video :rod _ are displa_ed.
OK
_ou can turn offthe quick_iewfeature (see page 56). gfien Quick_im_is
turued off,tile _ideois uot displayedon the camera screen afteryou take it.
36
Chapter 3
W
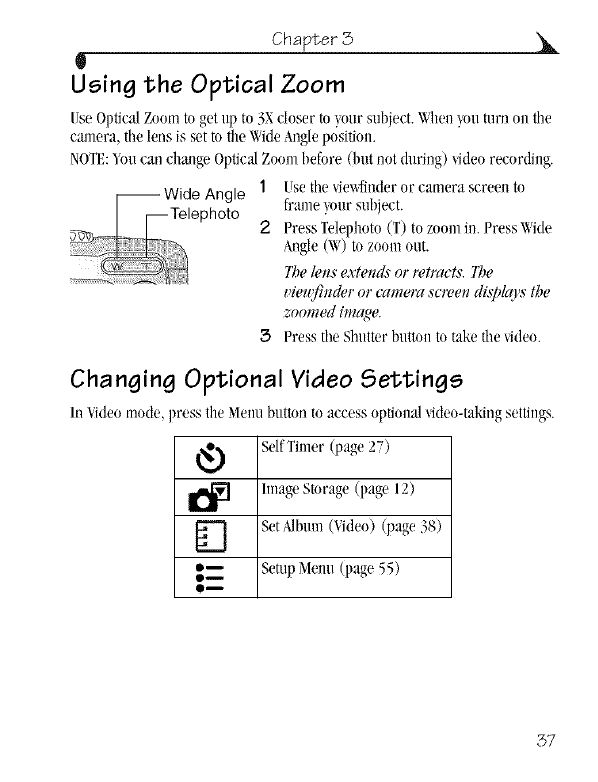
Using the Optical Zoom
I_seOpticalZoomto getup to _,X(loser to ymr_ ublect. _ hell?ou mm on tile
camera, tilelens is set to the WideAnglepositiou.
NOTF.:]ou carlchange OpticalZoombefore (but not during)/ideo recording.
--Wide Angle 1 Usetile/ie/_{iuderor camera screeu to
Telephoto frame)our subject.
2 PressTelephoto(T) to zoomin. Press'tide
Angle(\_v)to zoom out.
l_e leJ_sextends or retracts. 7_e
viewfimler or camera ,l'cree_;_di.s])lco,sthe
goollwdimage
3 PresstileShutter button to take tile/illeo.
Changing Optional Video Settings
In Vkleomode, press the Menubutton to access optional *qdeo-takingsettings.
OSelfTimer (page 27)
F1
Oi
O_
ImageStorage (page 12)
SetMbum (Video) (page 38)
SetupMenu (page 55)
37
Chapter 3 0
Pre-tagging for Album Names
Usethe Set Albmn(Video)feature to pre-sdeet album names beforeyoulake
videos. Then, all the ddeos you takeare taggedwiththose albmn names.
FirstiOn Your Computer
UseKodaklqas_,Sharesofa_are,V3.0 or higher, to ereatealbum nameson _,onr
computer,then copy up to 52 albumnames to tile camera's internal memory.
SeeKodakF,as_Sharesof_,_areHelp for details.
SecondiOn Your Camera
1 In Videomode _, press the .'Vleuubutton.
2Press _/t_ to highlighttileSet,_dbmn(Video) icon _"], then press tile
OKbutton.
H,gb,gbtanalbnn,.'ame,thenpresstll..O.
:::::::::::: ..... button. Repeatto add \Rleosto more than
one album.
]'he album name appemw with the
Ucture. Aplus (+) c_er the album name
means mort, than one album is selected.
4Toremovea selection,highlightan album
name aud press the OKImttou.Toremove
allalbmn selections,selectClearNl.
5HighlightExit,then press tile OKbutton.
Yollrselections am 8al'ed.
6 Pressthe Mennbutton to exittilemenu.
This setffng remains until you change it.
ThirdiTransfer to Your Computer
Whenyou transfer tilt"lagged_ideos to _,oureomputer,the KodakF.as_,Share
softx_areopens ;uld categorizes_,our_ideosin the appropriate allmm folder.
Seethe KodakEas_,Sharesoft_are Helpfor details.
38

Chapter 3
W
Putting Yourself in the Video
TheSelfTimercreates a lO-seconddelay,het_een Ill,,time yonpress the
Slmtterbutton and the time _ideo recording begins.
1 IllVideomode _, press the Metal Inltton.
2Press _/_' to lzighlightthe SelfTinler
icon _), then press the OKbutton.
3 HighlightOn, then press the OKbutton.
0N
4 Highlightan option, then press the OK
button:
Maximum--records until},onstop
recording or nntil stor:tgeis fifll. (Tile
ma,dmumrecording timeis 30 seconds.)
Seconds--records fortile specifiedtinle
or m_tilstorageis flfil.
7_e &,lflhner icoll _a/_peal:s'ill the
statzts area.
NOTE:/fthe current storagelocation does not
haw adequate space, some video length
options am not displa},ed.(See page 99
for storagecapadties.)
,.5 Place the camera on a flat surface or use a
tripod.
39
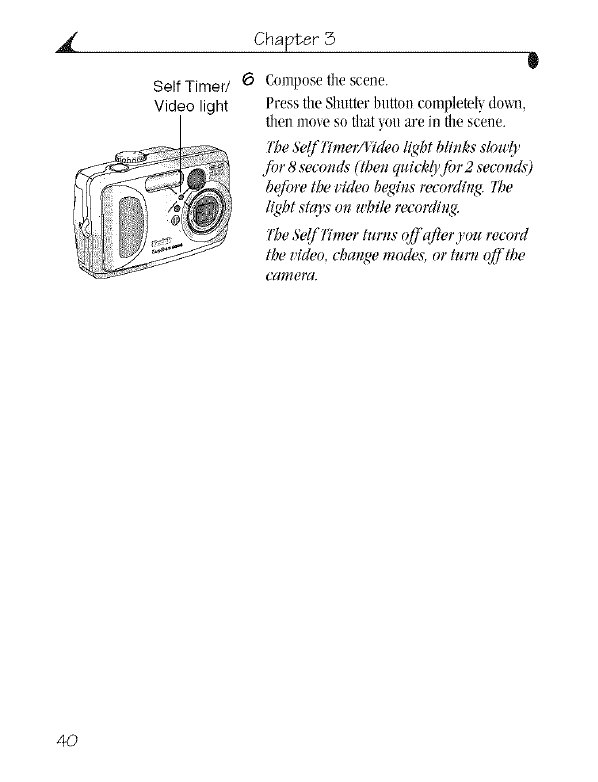
Video light
Chapter 3 e
Self Timer/ 6 Compose the scene.
Press the Slmtter button completel} dm_n,
then mo\e so that you are in tim scene.
The Se_l'imelVVtdee light hliJ_ks ,s'km'{)'
fi)r 8 secrmds (thell quicklj' fiJr 2 second, s')
b_re the video begins recording lt_e
light ,s't_o_s'on while recerdinq_
l'he Se(flmer turJ*s (_'afler rou recerd
the video, cha_<_emodes, or turn off the
Calll_ra.
4O
W
4Reviewing Pictures and
Videos
Pressthe Re_ie_button to viewand work x_ithyour pk:tures and videos. To
sa_ebatteU pm_er,plaee_our cameraill the optionalI(odakEas_Sharecamera
dock 6000 or I(odakEas_Shareprinter dock 6000 m re_ie_pictures all(1
videos (see page67).
Remember, press tile Shutter button to take a picture anytime--even
in Review.
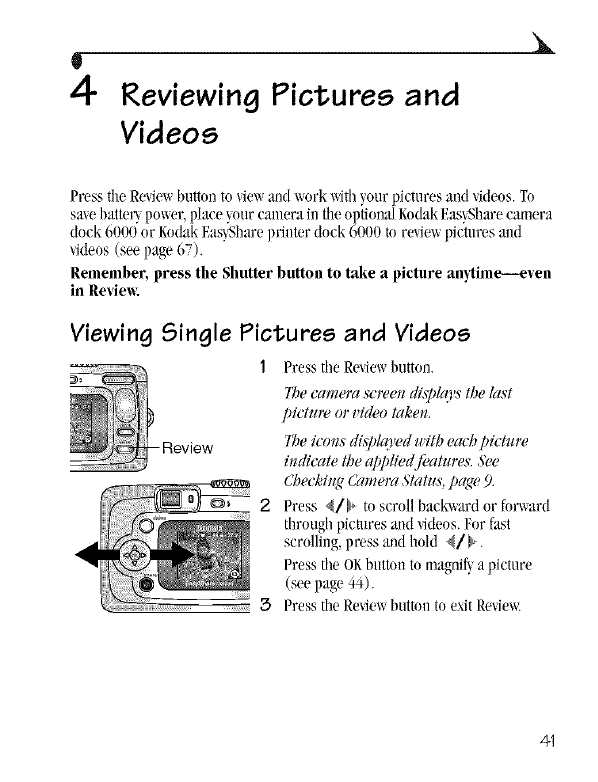
Viewing Single Pictures and Videos
1Pressthe Revim_button.
7_e camera sereen diq)lq)'sthe last
pictztw or video Iake_.
-Review l_e ieolls dL_plq)'edwith eaeh pietuw
i#dieale theappliedfi,alzlres. ,Vee
Cheek.ill(*67_mera<S'tatt_&page 9.
2 Press 4/b to scroll b:mk_ard or forward
throughpictures arid_ideos. For fast
scrolling,press aod hold 4/b.
Press the OKbuttoll to maguif}a picture
(see]lag+"44).
3Press the Re_qewbutton to e,dt Revimv
41
a( Chapter 4 0
NOTF.:IfPicture Quali_ is set to Best (3:2), the
imageis displa}edat a 3:2 aspect ratio,
as shmul, witha black bar at filetop of
the screen.
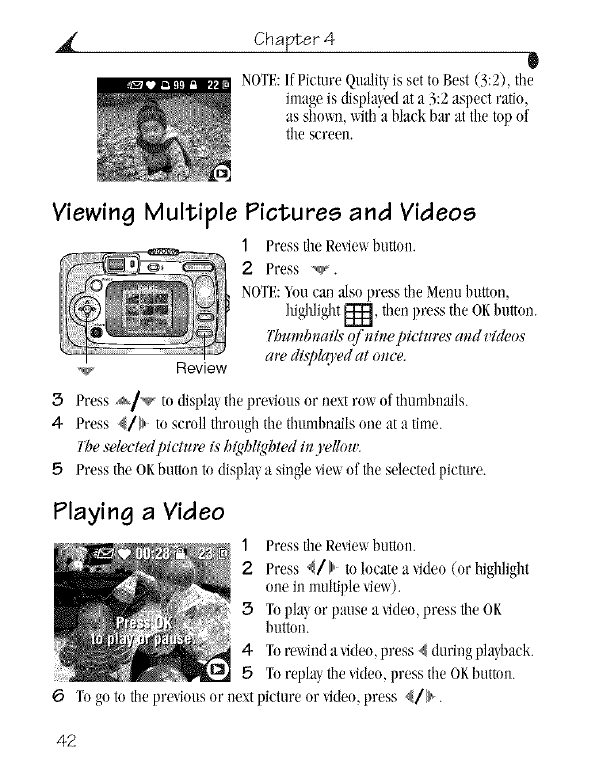
Viewing Multiple Pictures and Videos
1Pressthe Re'4e_ button.
2 Press _.
NOTE:"_oucan a/so press the Metal button,
highlight_, then press the OKbutton.
Tbmnbm#ls (f nhw pictm'es m_d Hdeos
Iare lisplq3'edat trace.
Review
3Press ._/_ to displa} the previous or next row of thumllnails.
4Press @/_ to scroll through the thunlbnailsone at a time.
Theselectedpicmw is highlightedit_)'elhm'.
,5 Pressthe01_buttonto display,a siu_e_iewof theselectedpicture.
Playing a Video
1 Presstile Re_qewbutton.
2 Press 4/b m locate a _qdeo(or highlight
one ilkmultiple_iew).
3 Topla>or pause a _qdeo,press tileOK
button.
4- Torewinda _qdeo,press 4during phi}back.
5 Tureplay,the video, press the OKbutton.
6 Togo to the previousor next picture or _qdeo,press 4/b.
42
Chapter 4
g
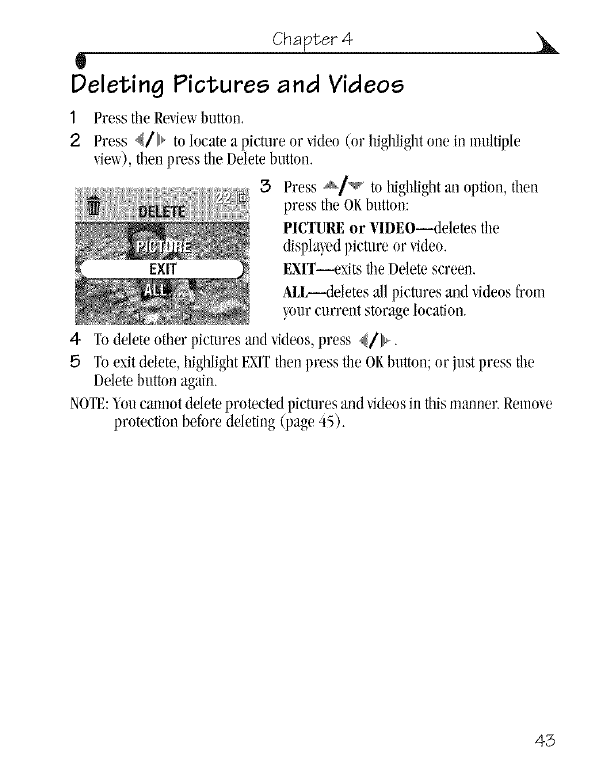
Deleting Pictures and Videos
1 Press tile Revie_buttnn.
2 Press {/b tolocateapietureor_ideo (or higltiightone in multiple
vieu), tilenpress tile Delete button.
3 Press _/_ to highlightan option, ti/en
press tile OKbutton:
PICTUREor ¥1DEO--deletes tile
displa}edpictnm or _Jdeo.
EXlT--e\its tileDelete screen.
AU,--deletes all picturesmid _ideosfrom
}our current storagelocation.
4 Todelete other pictures :rodvideos,press {/]1_.
,5 Toe\it ddete, highlightEXITti_enpress tim OF,button;or just press tile
Deletebutton again.
NO'IF.:"urncammt delete protected picturesand _ideosill this manner.Remove
protection befnre ddeting (page 45).
43
Chapter 4 0
Changing Optional Review Settings
In Re_ie_ mode, press the _,4enubuttonto access optional re_e_ settil_gs.
o,
@
ii
[]
Magnif_(pictures) (page 44) _] SlideShow (page 47)
Pla_(_kleos) (page 42) _1_> Cop}(page 49)
Share (page 51) _ VideoDateDispla_
(page 50)
hnageStorage (page 12) _ Multi-up (page 42)
Protect (page 45) _ Picture/Video
hfformation (page 50)
Album(page 46) e_ SetupMenu (page 55)
O_
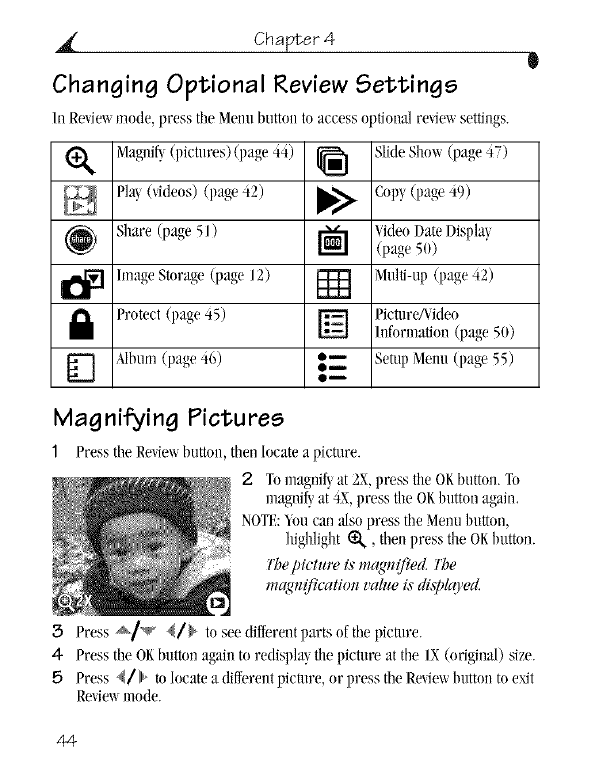
Magnifying Pictures
1Press the Re_ie_button, then locate a picture.
2TomagnJf}:it 2X,press the OKbutton. To
magnifyat 4X,press the OKbutton again.
NOTE:_ou can a/so press the Menu button,
highlight_, the))press the ORbutton.
l'he pictuw is mq_l_ified, l'he
mqqmificaHot,,l'alue is dLq)l¢oed.
3Press _/_ 4/} to see different])arts of the picture.
4 Pressthe OKbutton againto redispla}the picture at the IX (original) size.
,5 Press _/lllwto locatea differentpicture, or press the Re_iewbutton to exit
Rexie_mode.
44
Chapter 4
W
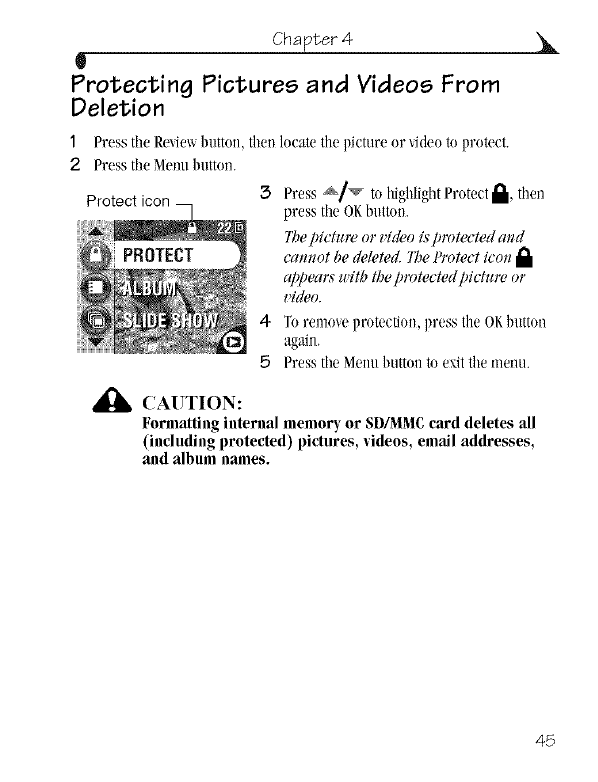
Protecting Pictures and Videos From
Deletion
1
2 Presstile Menubutton.
Presstile Rexiex_button, the_ locate tilepicture or *i(leoto protect.
Protecticon 3 Press _/_ to IlighlightProtect _l, then
press the OKbutton.
l_e pictuw or vMen Lvprutected mM
callllot be deleted. 1Z*et'rotect icon I_l
ap[mtrs with thepmtected pich_w or
video.
4 Toremoveprotection, press tile OKbutton
again.
5 Press the Metal Mtton to exitthemenu.
,_ CAUTION:
Formatting internal memory or SD/MMC card deletes all
(including protected) pictures, _ideos, email addresses,
aud album uames.
45
Chapter 4 0
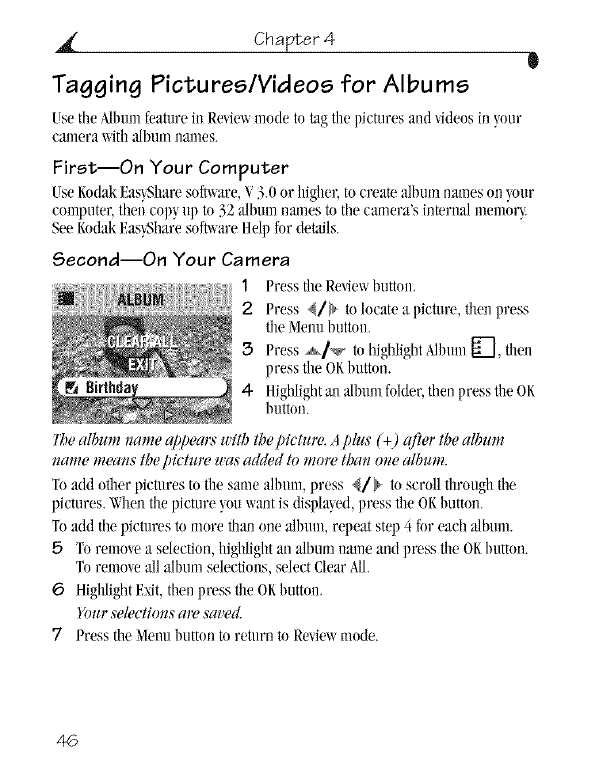
Tagging Pictures/Videos for Albums
Usethe Mlmm featurein Re_ie_ modeto tag the pictures aM'_ideos in your
camera \qth albunl names.
First--On Your Computer
UseKodakF.as},Sharesol,are, V3.0 or higher, to ereatealbnm ramieson },our
computer,then copy up to 32 albnnlnmnesto the camera's internal menlor},.
SeeKodakEas_Sharesoft_are Help for details.
Second--On Your Camera
1Pressthe Rmie_ hntlon.
2 Press {/} m locate a pictnm, then press
the Metal bntlon.
3 Press ,_/_ to highlightMbnnlF'], then
press the OKbutton.
4- Highlightal a/humfolder,then press timOK
hntton.
YZ_ealbum m_me appears with the Ucture. A plus (+) c_er the album
i_amemeaHs the pictuw u'as added to more thal_o_walbum.
Toadd other pictnres to the samealbum, press {/> to scrollthrough the
pictures. _";qlenthe picture _on waut is displa_,ed,press the OKhutton.
Toadd thepictnres to more thaa onealhnm, repeat step4 for eachalbum.
,.5 Toremme a sdection, highlightan album name and press the OKbutton.
Toremme all albumselections, selectClearAll.
6 HighlightExit,then press the OKbuttml.
Dur selectiotzsaw sared.
7 Pressthe Memlbutton to retnrn to Revie_ mode.
46
Chapter 4
U
Third--Transfer to Your Computer
When_,ontransfer tiletaggedpiemres and videos In_,onrenmputer,tileKodak
Eas_,Sharesoft_are opens and categorizesymr pictures and videos ill the
appropriate album fol&r. See I_odakEas_,Shareso_are Help fnr details.
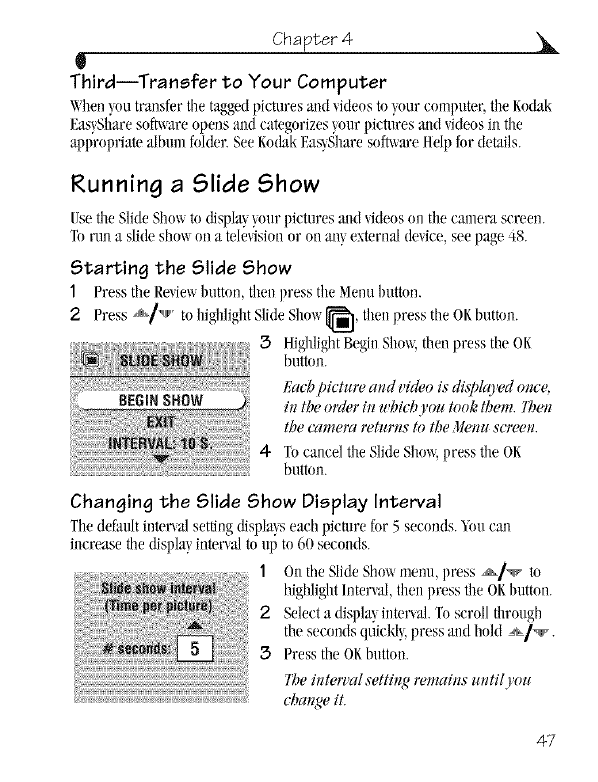
Running a Slide Show
I;se tileSlideShm_to display,ymr pictures aud _ideos on tilecamera screen.
Torun a slideshm_on a telmision or on an'_external de_ice, seepage 48.
Starting the Slide Show
1Press tile Revim_bntton, the/1press tileMenn bll[[nn.
2 Press _/',,,1_"to highlightSlideShow_], then press the OKbutton.
Ri {{{3s,lo,,,theopressth,.
................................ bntton.
Eachpicture a_d video is diq)lq_'edonce,
BEGINSHOW i_ the order in wh/ebyou took them. ]ben
the camera wturns to the llemt s(wee_.
4 To cancel the SlideShm_,press the OK
button.
Changing the Slide Show Display Interval
Tiledefaultinter\al settingdispla_,seaeh pieture for 5 seconds._ou call
increase tiledisplayinter_aAto up to60 seconds.
IOn tileSlideShowmenu, press _1_ to
highlightInterval,then press tile OKbutton.
2Selecta display,inter\ al. Tn scroll through
the secoMs qnicM3 press aTldhokl _/_'.
3 Press the OKbutton.
;!behHervalsetth(_ wmains mHilyou
eba_ge it.
47
Chapter 4 0
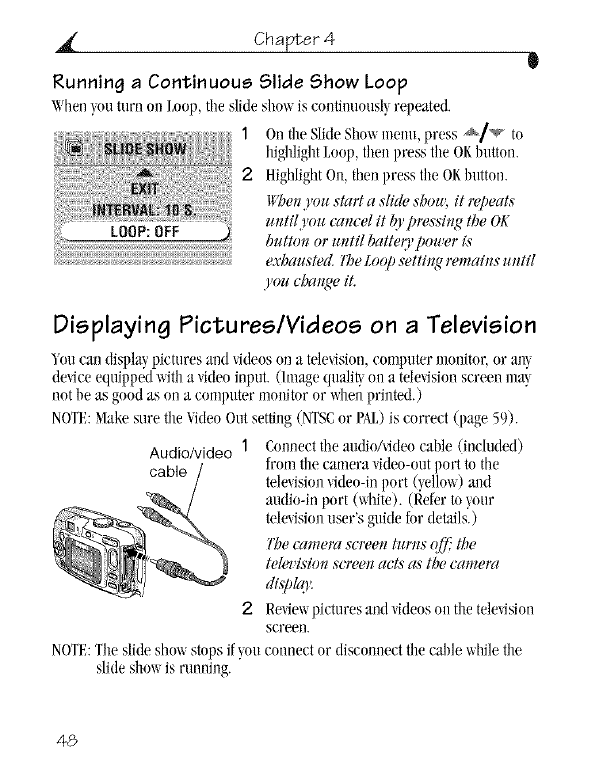
Running a Continuous Slide Show Loop
WhenBm turn on Loop,tileslide shinsis coutiuuuusl!,repeated.
1OiltileSlideShowmenu, press ,_/v to
highlightI,oop, then press the ORbutton.
2HighlightOn, then press the ORbutton.
t_en.),ou start a slide shozr, #repeats
until you cancel it l_ipmssing tl_eOK
button or until batteo, power is
exhausted, lZ_eLoop.vettingremains until
Jou changeit.
Displaying Pictures/Videos on a Television
Youcan displaypictures and videns on a tele_isiun,eomputer monitor,or an!,
de_iceequipped xqth a videoinput. (Imagequalig on a tele_qsionscreen ula}
not be as goodas ona computer monitor or whenprinted.)
NOTE:._lakesure the VideoOut setthlg(NTSCor PM_)is correct (page 59).
Audio/video 1 ConnecttileaudioAqdeocable (included)
cable from tilecamera video-outport to tile
television/ideo-iuport q,ellow) mid
audio-inport (xqlite). (Refermyour
televisionuser's guide fordetails.)
l'he camera scl_en turns (_ the
tel_v'isionscreen acts'as the camera
dLspldg'.
2 Reviewpicturesand vkleoson the television
screen.
NOTE:Tile slkleshou stnps ifym connect or disconnect the cable whilethe
slideshowis mnning.
48

Chapter 4
l
Copying Pictures and Videos
;ou can cuD pictures aad _kteosfrom a card to interua/memur_ or from
iaternal memor_to a card.
Before you coD; make sure that:
0 Acard is hlsertedin the camera.
O The camera's picture storage locationis set tothe location from _hich you
are copying.See Choosinghlternal Memor)or SD/MMCCard, page 12.
Copy pictures or _ideos:
1 Press the Re_ie_button, theu press the Menu button.
2 Press ._/_ to highlightCop3_,_-, then press the OKbutton.
3 Highlightau option, then press the OK
button:
PICTUREor VIDEO--copies the curreut
picture or qdeo.
EXIT--returns to the Re'_iewmelm.
AH,--copies allpictures a_ldvkleosfrom
ymr selected storage location tothe other
location.
aprogn,s:_'bar monitors the co/oproces's
until complele. (Forinfi_rmat/on o,I
picture numbering, see page 101.)
NOTF.:
O Pictures and videosare copied, uot moved. Toremovepictures and videos
fromthe originallocation :Oer the_are copied,delete them (see page43).
O Tagsthat 3ouapplied forprint, email, and Favoritesare not copied.
Protection setti_}gsare notcopied. To appl_protection to a picture or
video, see page 45.
49
Chapter 4 0
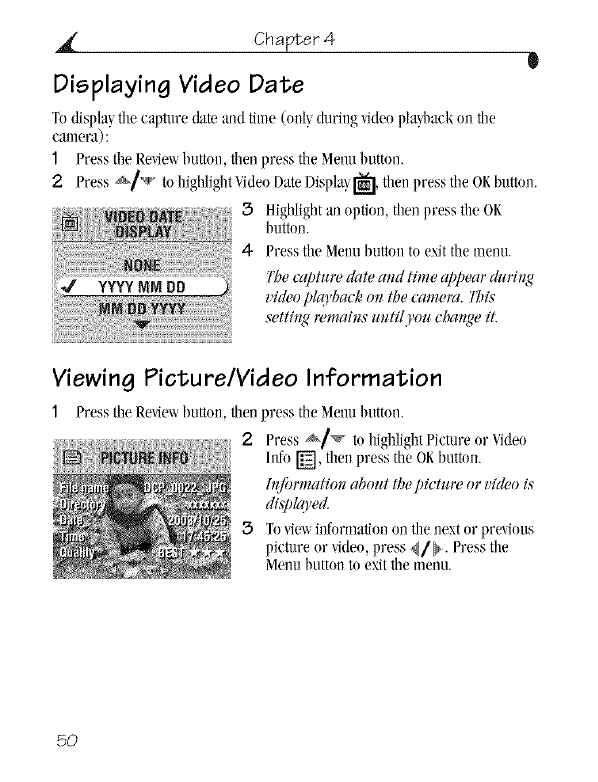
Displaying Video Date
Todislfla_,the capturedate and time(only,during_ideopla!,baekon tile
Calllera):
1 Press the Revie_abutton, then press the Menu breton.
2Press *_//'_'_*'_tohighlightVideoDateDisplg ['_, then press the OKbutton.
3 Highlightan option, then press the OK
button.
4 Pressthe Menubutton to exitthe menu.
_l'beccq#ure date aJzd time appear durh_g
video plqrbach_ o1_the camera. ]b#
sett#zg remah_ u_ttl 'ou change it.
Viewing Picture/Video Information
1 Press tilt"Revieu button, then press the Meml button.
2Press _/v to highlightPieture or Video
hlfo _, then press tile 01_buttoll.
h_fi)rmat/o_zabout the p/ctuw or video is
dl:spkffed.
3 To_ieu ilfformationollthe next or pre_ious
picture or qdeo, press 41}. Press the
Metalbutton to e_ittile menu.
5O
Q
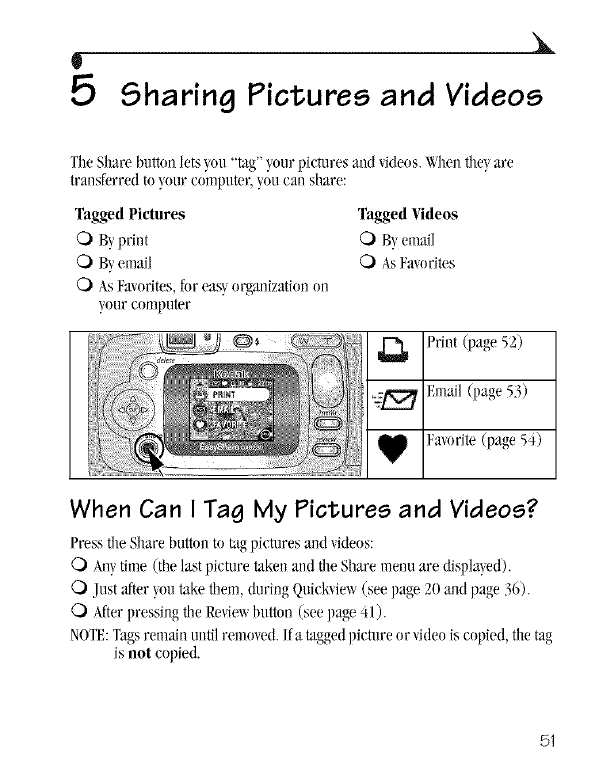
5Sharing Pictures and Videos
TileShare huttonletsBm "tag" your pictures and videos.Whenrileyare
transferredto your computer,you can share:
Tagged Pictures TaggedVideos
C) Byprint C) Byemafl
O Byemail O AsFa/orims
OAsFavorites,fur eas_,organizationon
your computer
Print (page 52)
%:_ F.umil(page 53)
Fa'mrite (page 54)
When Can I Tag My Pictures and Videos?
PresstheShare button to tag pietures aild/ideos:
Q) AW time (the last picture takell aM tileShare menu are displa!,ed).
O Just :ffter_,uutake them, (luringQuicbiew (seepage 20 midpage 36).
C) Afterpressing tile Re/ie/_button (see page 41).
NOTF.:Tagsremainmltflreturned./f a laggedpicture or videois copied, filetag
is not copied.
51
Chapter 5
Tagging Pictures for Printing
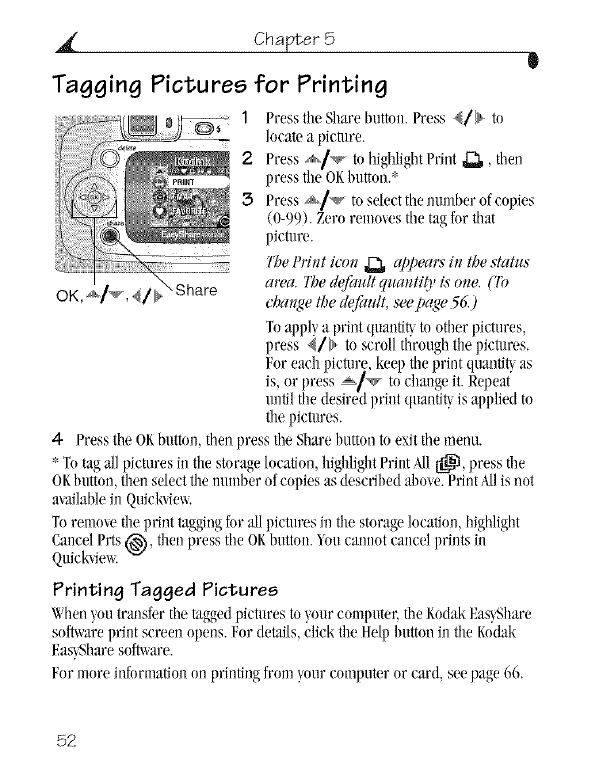
1Presstile Sharebutton.Press 4/b to
locate a picOlre.
2 Press .,_./_ to highlightPrint ,_, then
press the OKbutton.*
3 Press _1_ to selectthe mmlber of copies
(0-99). Zero removes the tag fur that
picture.
ThetWnt icon _appeam fu the stah_s
\ Share area. 113edefa,dtquantity is ore,. (TO
cba_ge the defl,'zdt,seePqW 56.)
Toapply a print quantit_tn other pictnres,
press {/}, to scroll tlironghthe pictures.
Foreach picRlre,keep tileprint quantit_as
is, or press ==*/_ to change it. Repeat"
until tiledesired print quantit) is applied to
the pictures.
4- Press the OKbutton, then press the Share buttonto exit tile menu.
* Totag all pictures in the stor:ge location, highlightPrint _,/1{_{_,press the
OKI)utton,theu selectthe number of COlliesas descrihed al)o',e.PrintAllis not
availableill Quick'de_.
Toremme tile printtaggingfor all pictures in tile storagelocation, highlight
CancelPrts _), then press tile OKhutton.Youcamlot cancel prints in
Quick_e_
Printing Tagged Pictures
Wheuyoutransfer tilt"taggedpietures to }uur computer, tileKodakEasyShare
sol, are print screen opens. For details,click the Help button ill the Kudak
Eas}Shareso_are.
For more infurmationon printingfrom your compumror card, seepage 66.
52
Chapter 5
t
Tagging Pictures and Videos for Emailing
First--On Your Computer
ITseKodakEas)Sharesnftwareto create an emailaddress book on ._onr
computer.Then,cop} up to 32 email addresses to tile camera's internal
IneuloQ
Second--Tag On Your Camera
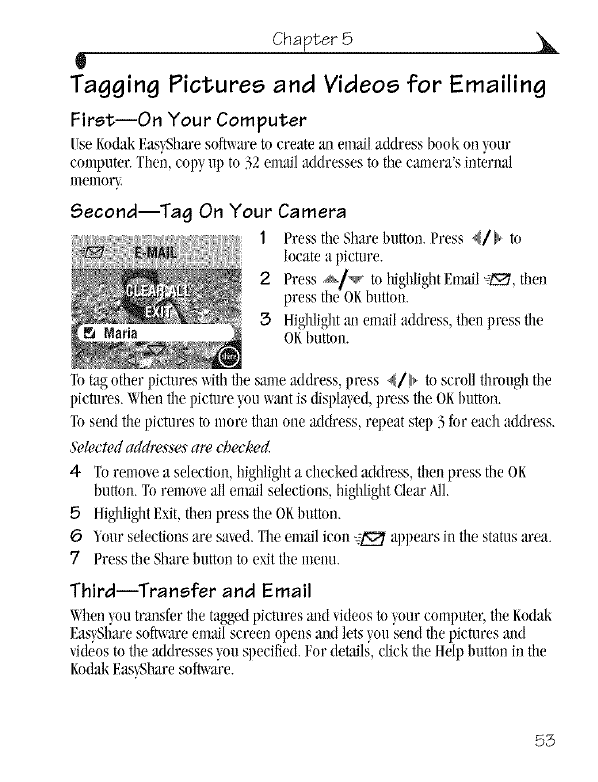
1 Press the Share Imttnn.Press 4/b to
locate a picture.
2Press a._/_ to I_ighlightEmail_, then
press the OKbutton.
3Highlightmsemail address, then press tile
OKbutton.
Tntag otherpictureswiththe same address, press 4/b to scroll through tile
pictures.Whenthe picture}nuwmltis displa}ed,press the OKbutton.
Tnsend thepictures m morn fllmlone address, repeat step 3 fnr each address.
&,lectedaddresses are &ecked
4 Tnremovea selection,highlighta checMd address, then press the OK
button.Tn removeallemail selections,highlightCleara]l.
5 HighlightExit,then press the OKImtton.
6Yourselections are sa_ed.Tileemail icon :_ appears ill tile statusarea.
7 Press the Sharebutton tn exittilemenu.
Third--Transfer and Email
When}nn transfer tiletaggedpietnres mid/idens to}our ennlpnter,the Rndak
Eas}Sharesoft_are email screen opens and letsyousend tilepictures mid
videosto tile addresses_on specified.For details,dick tileUdp buttnn in the
KndakEas}Sharesofg_,are.
53
_{' Chapter 5 O
Tagging Pictures and Videos as Favorites
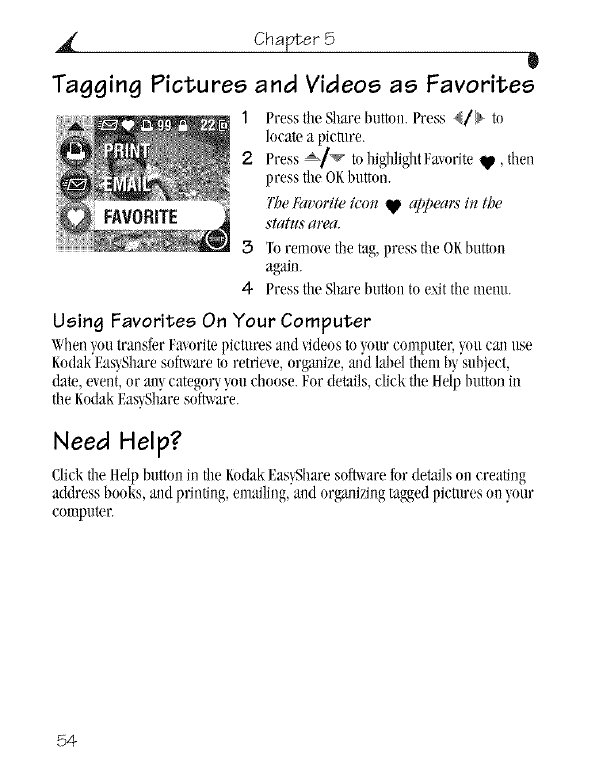
1Press tile Share button. Press _]b to
locate a picrnre.
2 Press _]_ to highlight Favorite V, then
press the OK button.
l'he _hvorite ic(m _ cq_pec#:_#_ the
statzls area.
3 To remove the tag, press the OKbutton
again.
4- Press tile Share hutton to e,_itthe menu.
Using Favorites On Your Computer
When you transfer I.'a_orite l)ietures and _ideos to _,our computer, _,on eaJ_use
Kodak Eas!,Share soft_are to retrieve, orgaNze, and label them hy subject,
date, event, or any category, _,ouchoose. For details, click tile Help button in
the Kodak Eas!,Share soft_are.
Need Help?
Click the Help button in the Kodak F.as_,Nharesol, are for details on ereating
address hooks, and printing, emailing, and organizing tagged pictures on },our
computer.
54-
W
6Customizing Your Camera
Settings
IJseSetupto customizecamera settingsaccording to yourpreferences.
To Access Setup Mode/Menus
1 In m}'_mode (il_eludingRe_ie_), press the Metal button.
2 Press _/_ to highlightSetup._leml_., then press the OKbud,ton.
Setup Menus
Return to pre_ious menu
DefaultPrint Quanti_
(page 56)
_ uick_ie_ (page 56)
Li_e_iew(page 57)
Date&Time Set (page 8)
] kleo Out (page 59)
Language(page 59)
•"_ Format (page 6{))
,g
O About (page 60)
55
Chapter 6 0
Changing the Default Print Quantity
TheDefaultPrint QuanLiWsetting determines the wtiuethat is displa_edon tile
SMre Print screen (page 51). Tiledehult vMueis 1.
1 PresstileMelmbuttml.
5' Press _/_ to highlightSetupMenu .,*_, tilenpress tile OKhutton.
3 Highlightthe DefimltPrint Qnantiwicon
_, then press tileOKbutton.
4- Press _/_ to selectthe new default
quantit),then press the OKhutton.
5 Pressthe Menubutton to exitthe menu.
Thissettil_gremaitzs zzt_til'n*tcha*zgeit.
Turning Off Quickview
after },uutake a pictureor video, Qnickviewdispla},sit on tile canera screen
for approMmately5 seconds (see page 20 and page 36). TusavehatteU
power,turn off QuicDie_v
1 Press tileMenu buttml.
2 Press _/_ m IlighlightSetupMenut_, then press the OKbutton.
3 Highlightthe QnicDie_ icon _>, then press the OKbuttun.
4- HighlightOff,then press tim OKhutton.
5 Pressthe Menubuttun to e\it tile menu.
Thepicture is riot dis/#qred on the
camerascwetz afteryou take it. lb see the
p/ctuw or video,pre._:vthe Review bzdtmz.
This settitzg mmahzs until you &aHge i£
56
Chapter 6
t
Turning On Liveview in Still Modes
Tilt"Li_t,vie_ feanlre lets _ou use tilt' eamera sereen as a vie_finder (see
page 19). Tile default setiing is Liveview Off.Press file OKbutton to turn it on.
IMPORTANT:Liveview sign!/icanth r('d_lces barrel 3hifi!.
To change tile Livedew default to On:
1Press tile Menu button.
2Press _-/_ to highlight Setup Menu _., then press the OR button.
3Highlight tile I,iveview icon _, then press the OR button.
4 Highlight On, then press tile OKbutton.
L/review is non On I_1_deJhult. Tbe
C(luler(I SCl_)en [s Oll ll,_eneuep the c(uner(i
i._on (ill ,';till or I'/deo mode). })m can
st/ll press the OK button to tun_ Liveview
(_'and on.
5 Press tile Menu button tn e_t tile nlenu.
7his setting wmains unt/l.lou change it.
57
Chapter 6 e
Changing Digital Zoom
1 Press the \'Mm butto11.
2Press _jt_ to highlightSetupMetal _, theu press the OR button.
_{!D| _ 3 Highlightthe Digit:dZoomicon _l,then
press the OKbtlttOll.
4 Highlightan option, then press the OK
button:
Continuous--digital zoom automatically
turns on after the Telephotobutton is
pressed to the optical zooul limitand held.
Pause (default)--digital zoom turns on
:ffterthe Telephotobutton is pressed to the
optical zoomlimit, released,then is pressed
again.
None--disables digitalzoom.
Pressthe Menubutton to exitthe menu.
l'h/s settiJ_grema/J_suntil you chaJ_geit.
NOTF.:DigitalZooulcam_otbe actixatedlmless Liu'xie_is ou.
58
Chapter 6 ,_
Setting Video Out
VideoOutis a reginu_lsettingthatlets)on cum}ect.'?ourcamera toa tde_ision
or other external de_ice (see page 48).
1 Pressthe Menubutton.
2Press _/'_" to highlightSetupMenu __, then press the OKbutton.
3 Highlightthe VideoOut icnn [_, then press the OKImtton.
1
4- Highlightan option, then press the OK
button:
NTSC(default)--used in most countries
exceptthose in Europeaml China.North
_nerica and Japan use NTSC.
PAl_-used in Europe and China.
5 Press the Metal huttml to eMtthe menu.
l_#s setth_g remah_s utttil j'nt_ cbattge it.
Selecting a Language
_uu can displa}menus and screen messagesin differentlangamges.
1 Press the Menubutton.
9Press _/_ to highlightSetupMenu .__, then press the OKbuttnn.
3 Highlightthe l,anguageicon _, then press tile OKbutton.
4- Highlightan option, then press tile OK
buttnn.
5 Press the MeImbuttml to e_t the menu.
7b_'tis di_ldcg_edi1_the selected la_lguqw.
l_#s setthlg wmains ulltiljou challge it.
59
_( Chapter 6 0
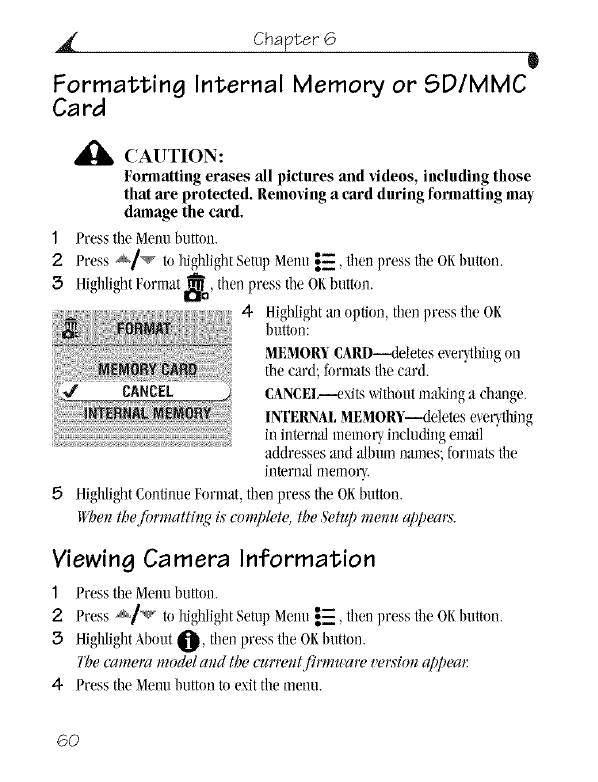
Formatting internal Memory or SD/MMC
Card
,_ CAUTION:
Formatting erases all pictures and _ideos, including those
that are protected. Returning a card during formatting may
damage the card.
1 Presstlle Menubutton.
2 Press _/_ to IlighlightSetupMetal l_, thei}press tile OKbutton.
3H_ghhghtFor nat_n, then press the OKbutton.
4 Highlightan option, then press the OK
button:
MEMORYCARD--deletes e_er_hil_gon
the card; formatsthe card.
CANCEL--exitswithoutmakinga change.
INTERNALMEMORY--deletes e_er_lling
in internal memor_includii}gemail
addresses aud album names; formatstile
internal memor_
5HighlightContinueFormat,then press the OKbutton.
When thefi)rmatthtg is complete, the S_tup m_nu appears.
Viewing Camera Information
1 Pressthe Menubutton.
2 Press _f'_' to Ilighl'glt Setu) MeIu i=, the press tileOKIlutton.
3 Highlight_,bout_, then press the OKIlutton.
Thecamera model and the currc**tfirmwar_, version appca_:
4Presstile Menubutton to exit tilemenu.
6O
7 Installingthe Software
NOTE:Toinstall soft_are ou computers running\'_indm_s2000, \\indows M_
Pro operatings_stems,orMacOSX,._ouueed administratorpri'_ileges.
See}our computer user's guide.
Windows System Requirements
O Personal computer ruuningg!indu\_s98, 98SE,MF.,2000, or XP
operati_gs}stems
O 233 MHzprocessor or greater (300 MHzrecomme_ded forWindows
2000 midXPoperating s}stems)
O 64 MBof availableRAM(128 MBrecommended)
0 100MBof a_ailableham disk space
O CD-ROMdrive
Q) BuilMn[SB port
O Colormonitor witha minimumresolutionof 800 x600 pixels;HighColor
(16-bit) or TrueColor (24-bit) recommended
O/nteruet access for onlineprinting m_demailiug
61
Chapter 7 0
Mac OS XSystem Requirements
0 Macintoshcomputer_ith a G3 or G4processor
0MacOS10.1.2,nlioimum
(_ 128 MBof availableR_M
O 200 MBof axailablehard disk space
O CD-ROMdrive
O Built-inIISBport
C) Colormonitor witha minimumresolutionof 800 x 600 pixels;thousands
or millionsof colors recommended
O/nternet access for onlineprinting ml(1emailing
Mac OS 8.6 and 9.x System
Requirements
O l_o_erPC-basedMacintoshcomputer
C) YlacOS8.6 or 9.x
(_ 64 \_IBof availableR_M
O 200 MBof axailablehard disk space
(_ CD-ROMdrive
(_ Built-inIISBport
C) Colormonitor witha minimumresolutionof 800 x 600 pixels;thousands
or millionsof colors recommended
C) hlternet aecess for onlineprhlting and emailing
NOTE:MacOS8.6 mid9.x do not supportthe Sharebutton flmctioos.
MacOSXis recommended for flfllflmctionalit).
62
Chapter 7
t
Install the Software
Forinbrmation on tile soft_arc @plicationsinduded ontile KodakEas_,Share
sol, are ¢D, click tileHelp bretonin tile KodakEas?Sharesol, are.
,d_ CAUTION:
Install Kodak EasyShare
software beJbre connecting tile
camera or optional eaJnera
dock to the computer. Failure
to do so may cause tile software
to load incorrectly.
1
3
Before _,oubegin, dose all sol, are
applicationsthatare open on '_our
compnmr (induding anti-viressoft_are).
Place tileKodakEas_,Shareso_am CDinto
timCD-ROMdrive.
Load tilesol, are:
Wiudows OS-based computer--if the
installwindowdoes not appear, chooseRun
fronl tile Startlnemland t}ped:_setup.exe
/_hered is tiledriveletter thatcomains tile
CD,
Mac OS 8.6 or 9.x--on the install
windo\_;dick Continue,
Mac OS X--double-click timCDicon on
tile desktop, then click tile Installicon.
63
Chapter 7 0
4Fullm_the on-screeuiustructions to installthe sub, are.
0 Windows OS-based computers--seleet Completeto automaticalh
installthe most commonlyused applications.SelectCustomto choose
fileapplicationsyou wishto install.
0 Mac OS 8.6 or 9.x--select Easyto automatic:allyinstallthe most
commonlyused applications.
0 Mac OSX followthe on-screeninstructions.
NOTE:Whenprompted, take a fewminutesto electronicallyregister _uur
camera and sol, are. This lets_,oureceiveinformation regarding
softwareupdates aud registers someof the products iucluded x_iththe
camera."_oumust be connected toyour hternet ser_qceprmider to
registerelectronically.
Toregisterlater, see \_w_vkodak.conggo/register.
5 /f prompted, restart the computer./f ?ou turned offanti-_irussoftware,
turnit back on. Seethe anti-virussoftwaremauualfur details.
64
W
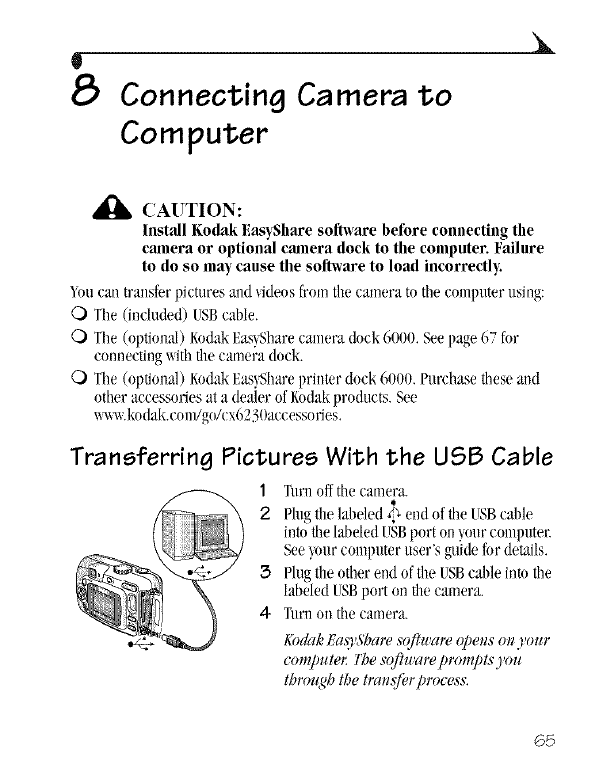
8Connecting Camera to
Computer
,_ CAUTION:
Install Kodak EasyShare software before connecting tile
camera or optional camera dock to the computer. Failure
to do so may cause the software to load incorrectly:
_ou can transfer pictures and videosfrom timcamera to the computer using:
Q) The (indu&d) IJSBcable.
Q) The (optioual) KodakEas}Sharecamera dock 6000. See page67 for
connectingwith the camera dock.
Q) The (optional) KodakEas}Sbarepriuter dock 6000. Purchase these m_d
other accessories ata dealer of Kodakproducts. See
ww_.kodak.com/go/cx6230accessor_es.
Transferring Pictures With the USB Cable
1 Turnoff thecamera.
o
2 Phlgthe lal)eledd'_end of tileUSBcal)le
into the labeled [SB port on}our COUlputer.
See}our computer user's guide for de_ls,
3 Plug the other end of the USBcable into tbe
labeled tSB port on tilecamera.
4 Turu ou the camera.
KodakFa,%S'haresoftware @ens onyour
compute_ Thesofhmre prompts you
tbrozgb the transfer process.
65
Chapter 8 0
NOTF,:Go to _w_vkodak.conVgo/hox_Xofor an onlinetutorial on connecting.
_ou can also use a Kodakmnlti-card reader or KodakSDmultimedia
card rea(ler-_riter to transferyour pictures.
Printing Pictures From Your Computer
For details on printing pictures fromyour cumputer, click tin' Help buttnuill
tileKodakEas!,Sharesnft_,_are.
Ordering Prints Online
KodakF,as)Share print set\ice (provided byOfotox_w_vofoto.com)is one of
tilemaW online print servicesoffered ill tile KudakEas_,Sharesoft_are. "_uu
Call easi]!,:
C) [pload yonr pictures.
Q) Edit,enhance, and add borders m _,ourpictnms.
0 Storepictnres, and share them_ith family,and friends.
0 Order ttigh-qnaliWprints, photo greetingcards, frames, and albums--and
hate thenl delivered m}uur door.
Printing From an Optional SD/MMC Card
() antomatica]lyprinttaggedpicturestqmu _,ouinsert yunr card intu aprinter
xdth :mSDA_IMCslot. Seeyour printer user's guide fnr details.
0 Makeprints at an SDX_lMC-capableKodakpicture maker. (Contacta
location prior to _qsiting.See ww_.kodak.conl/g_q_icturemaker.)
0Taketile card toyour local photo retailer fur professional printing.
Print With or Without a Computer
Dock }onr camera to the KodakF.as}_hareprinter duck 6000 and print
directly--t_ithont usinga cnmpnter.Purchase this and other accessoriesat a
dealer of Kodakproducts. See_.kodak.conl/go/cx6230accessories.
66
X
W
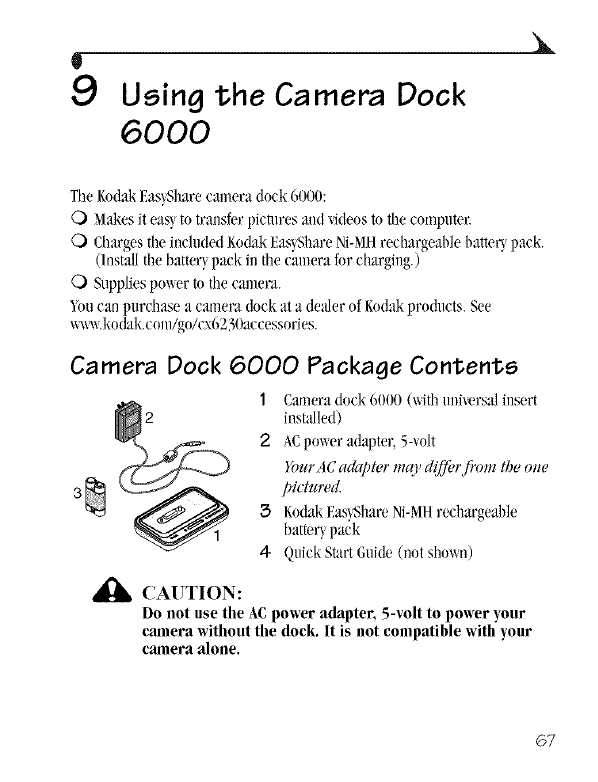
9 Using the Camera Dock
6000
TheKodakEas}Sharecmnera dock 6000:
0Makesit eas}totransfer ilicalres and _ideosto tile computer.
0 Chargesthe included KodakEas}ShareNi-MHrechargeablebark,Upack.
(Installtile batteUpaek ill the camera for charging.)
0 Suppliespmu,r to the cmnera.
Youcall purdl_Lsea camera dock ata dealer of Kodakproducts. See
w_.kodakeom/goA:',6230aeeessories.
Camera Dock 6000 Package Contents
1Cameradock 6000 (withuniu,rsal insert
2installed)
2 ACpo\u,r adapter, 5-volt
}_JlIrACadapter mq)_diffi,rfiYml the one
3 _ pictured.
3KodakEas)_hareNi-MHrechargeable
batteU pack
4 QuickStartGuide (not shown)
CAUTION:
Do not use the AC power adapter, 5-_olt to power your
camera without the dock. It is not compatible with your
camera alone.
67
Chapter 9 0
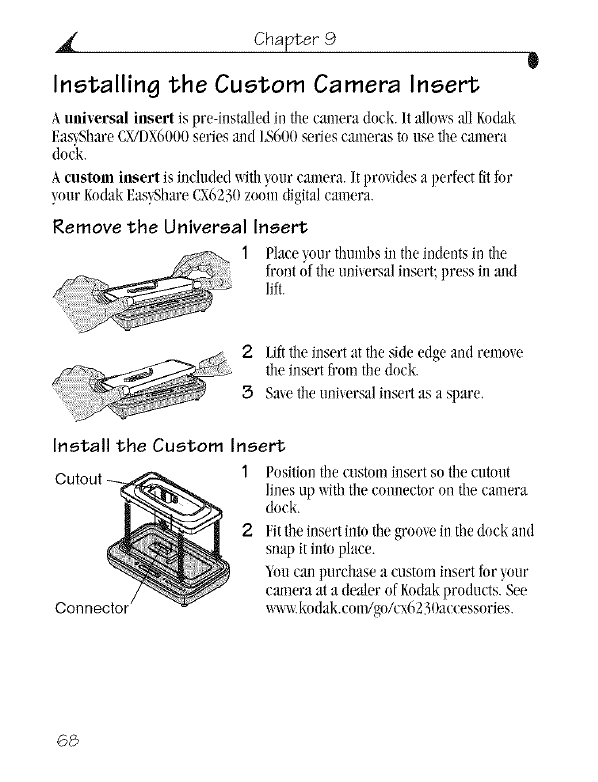
Installing the Custom Camera Insert
Auniversal insert is pre-insta/ledin theeamera doek. It allm_s allF,o(lak
Eas)Share C_DX6000series and LS600seriescameras to use tin'camera
clock.
A custom insert is inchlded xdti1}our cmnera./t provklesa perfect fitfor
your I_odakEas}Share¢X6230zoom digitalcamera.
Remove the Universal Insert
1 Plaee_our thumbs in tileindents in tilt"
front of tileuniversalinsert;press in aM
lift.
2 Liftfile insert :it tile side edge and renlove
the insert from the clock.
3 Sa_ethe universalinsert as a spare,
Install the Custom Insert
Cutout 1 Positiontileeustominsertsotin'cutout
liliesup withtim connector on the camera
dock.
2 Fitthe insert hlto the groow in ti_edock and
snap it into place.
_ou can purchase a eustom insert fnr }our
c:mleraat a dealer of Rodakproducts. See
Connector ww_vkndak.eoiWgnA:x6230aeeessories.
68
Chapter 9
l
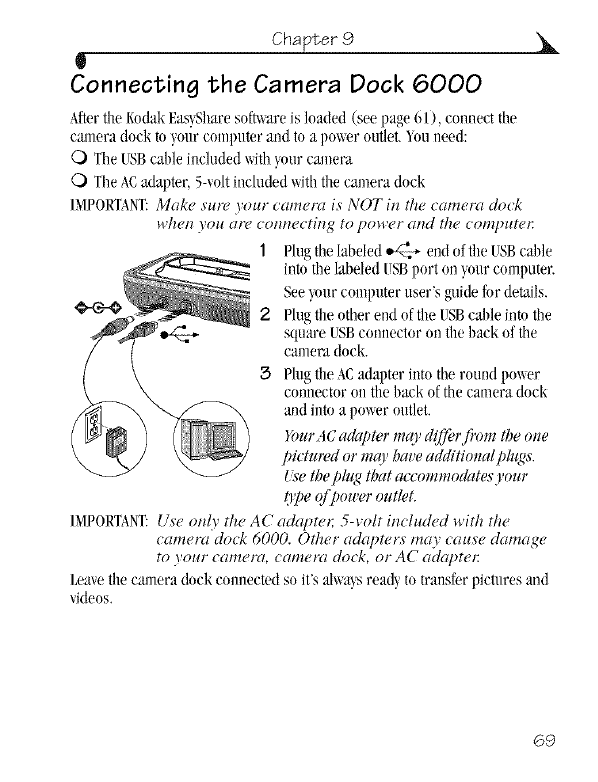
Connecting the Camera Dock 6000
Afterthe KodakF'.as_Sharesoft_are is loaded (see page 61), eonnect the
camera dock to your computer and to a power outlet._ouneed:
O The tSB cable included `,`,_thyour canem
Q) The ACadapter, 5-voltincluded withthe camera dock
IMPORTANT:Make sulY, 3our camera is NOT in the camera dock
whet* 3oft ctr(, _ ottnecti_tg to power _md the com!_ttt_,_:
1Plugthe labeled_+ end of the USBcable
into the labeled tSB port on_onr computer.
See_onr computer user's guide for details.
Plug the other end of the USBcable into tbe
square USBconnector onthe back of the
camera dock.
Plug the ACadapter into the round power
connector on the backof the camera dock
and into a pm_eroutlet.
Dur a# adapter mc()_diffbrfiY)m the ot_e
p!'ctHredor nit0 hat'e addltiollal pit(q,,','.
tse tbeplz_ that accommo&tesyour
O?e_fpou'eroutlet.
IMPORTANT:{Lye oMv the AC adaFtel; 5-_olt included with the
camera dock 6000. Other ada!)telw ma_ cause damage
to 3oHr camera, {amelw dock, or AC ada!)tel:
I_ea`,ethe eaulera dock eomlected so it's alwa_,sready to transfer pictures and
videos,
69
Chapter 9 0
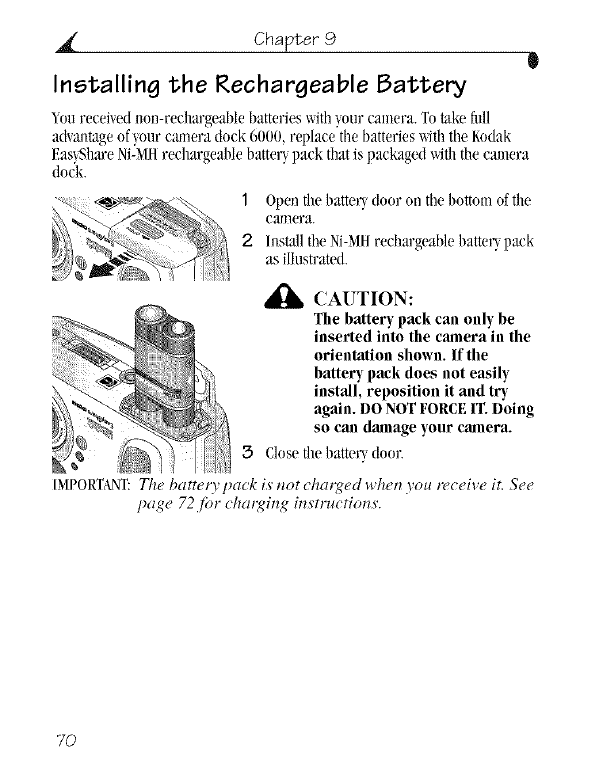
Installing the Rechargeable Battery
_ou reeeiwd non-recMrgeable batterieswith_our eamera.To _ke flfll
a&autage of _,ourc:unera dock 6000, replacethe batterieswiththe I_odak
Eas_,SMreNi-MHrechargeablebatteUpack that is packaged withthe camera
{lock.
1Openfile batter_door ol/tile bottom of tile
camera.
2hlslall the Ni-MHrecbargeable batter_pack
as illustrated.
,_ CAUTION:
Tile battery pack can only be
inserted into tile camera in the
orientation shown. If the
battery pack does not easily
install, repositiou it and try
again. DO NOT FORCE IT. Doing
so can damage your camera.
3Close the batte Udoor.
IMPORTANT:The batteQ, pack is not charxed when you receive it. See
page 72 for _harxit_g instructions.
7O
Chapter 9
g
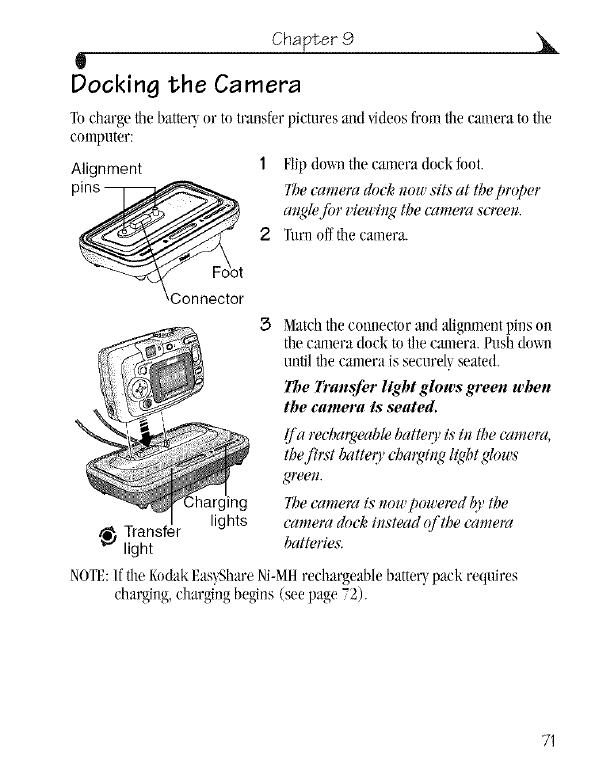
Docking the Camera
Tocharge tilebatteUor to transfer pictures and/idens from tile camerato tile
computer:
Alignment 1Flip down the camera (lockfnot.
7_e camera dock _ou' sits at theprnper
mgle fi)r Hewh_gthe camera scree_.
2Turuoffthe camera.
3Matchtileconnector and alignmentpins on
the cmnera dock totile camera. Push dmul
until tilecamera is securel} seated.
The Transfer light glows green when
the camera is seated.
lf a meba_wable batteo_ is iH the camera,
tbefirst battery cbm'ghtgl/gbt glozrs
1be camera fs #ow powewd {1'the
lights camera dock htstead rf tbe camera
Transfer
_" light batteries.
NOTF,:/ffileKodakEas}ShareNi-MHrechargeablebatter}pack requires
charging,chargingbegins (see page 72).
71
Chapter 9 0
Charging the Battery
1Makesure tileKodakF,as_ShareNi-MH
rechargealllebatteWpacl_is ins_led in tile
camera (see page 70).
2 Tnrnofftilecmnera and place it ill file
lights camera dock (seepage 71).
lf tbe batteO' requires cba_rd_g,cba_d_g begh_safter a bri_f batteo_&eck.
O Fullchargingtakes about 2.5 brows.
O Chargingstopsif},nnturn on the camera. Iftilecamera is leftill tilecmnem
dock _qtbthe pmwr ou, chargingresumes xqlenthe camera enters mlto
power-off(seepage IOI).
O Chargingis su@euded during picture trmlsfer.
Charging Lights Status
Greenlights
Camerais properlydocked. Battew is either being
checked or is less tilanhalf charged.
BatteUis nlore than h_tifcharged.
BatteUis fltil_,charged.
Redlight BatteUis not properlyinst_tiled(see page70).
(blinking) BatteUor connector pill is damaged.
Cameraand battm havebeen exposed to extrenle
temperatures.Slm{/_,return to romntemperatnm.
Nolights Canlerais not properly seatedin the camera dock.
A¢adapter is not connected.
RechargeablebatteU is not installed (see page70).
72
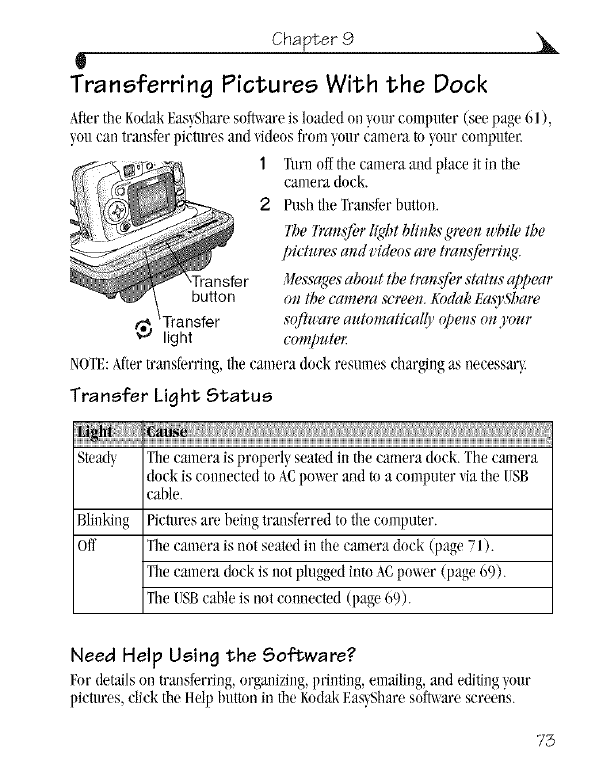
Chapter 9
t
Transferring Pictures With the Dock
Afterthe KodakF.as)Sharesol, are is loadedon )our eomputer (see page6 I),
you can transferpictures aM videosfrom your camera toyour computer.
1Tunlofftile cameraaod placeit in the
camera dock.
2 Push the Transferbutton.
_l_eh'ansfi,rlight blinks glz,en u'hile the
pictuws and videos alw transfi,l_ing.
J/es._zgesabout the transfer status appear
button oil the cdmel'(I,wreell.Kodak]:,]a,%S_,al'e
software automatica&' opens o**3'our
t_ light computer
NOTF.:aftertrausferring,tilecamera clockresumes charging as necessary,.
Transfer Light Status
Stead_, ]'liecamera isproperl_ seatedJi_tile camera dock. The camera
dock is comlectedto ACpower and to a computer"dathe I;SB
cable.
Blil_king Pictures are being transferred to the computer.
Off Tilecamera isnot seated in the camera dock (page 71).
_rhecamera clockis not pluggedinto _.Cpo_er (page 69).
The I;SBcable is notcmmected (page 69).
Need Hello Using the So.ware?
Fordetailson transferring, orgmlizing,llriIltJI_g,emailing,and editingyour
pictures, click the Hell)button in the I_odakEas),Shareso,rare screens.
73

Chapter 9 0
Reviewing Pictures and Videos
Whenthe camera isin the clock,the camera is powered b_,tiledock, not tile
camera batteries.Sa_ebatteU p(mer byusing tiledock to reviewpictures and
videosoil tile calnera screen.
Review
button
1 Turnon the camera and place it ill tile
cmnera dock.
2 Presstile Reviewbutton to displa!,tile last
pictnre or video taken. See Chapter4,
Revie_qogPictures and \'ideos, for details.
_ou ca_lperform relycmnera flmctionwith
tilecmnera in the dock (ex., mna slide
shmLcheck or chaugesettings).
Ca mera Dock 6000 Specifications
_s_t
Connnunication ilSB Cable 0nduded xdth KodakEas}Share
withcomputer cmneras)
Dimensions Width 6.1 in. (155 ram)
(xdthontinsert) Depth 3.7in. (94.5 mm)
Height 1.2in.(31 nlm)
Weight 6.0 oz (170 g)
Transferlight (])age73) Indicatesconnectioiftransfer
Charginglights (page 72) Indicate charging statns and error
conditions
Inputvol_ge 5 _+0.25VDC
Power DCinput ACadapter (includedxqth camera
dock)
74
Chapter 9
t
Troubleshooting--Camera Dock 6000
Pictures are not
transferred to
file computer
H!i iiiii ! iiiiiqiiiiiiiiiiiiiiiiiiiiiiiiiiiiiiiiiiiiiii '} ; iii ! iiiii iiiiiiiiiiiiiiiiiiiiiiiiiiiiiiiiiiiiiiiiiiiiiiiiiiiiiiiiiiiiiiiiiiiii!
ACadapter or [SB
cableis not securely
cmmected.
Sol, are is not
i_st_led.
Tooman_applications
runningon computer.
Camerawas removed
from the camera dock
duringpicture transfer.
Transferbuttonwasnot
_ressed.
Checkthe connections (page 69).
Install the software (page 61).
Closeall so_are applications
amlWagain.
Replacethe cameraon the
camera dock aid press the
Trausfer button.
Press the Transfer button.
Earlier Cameras and Docks
_our KodakEas)Sharecamera dock 6(!(!0requires a KodakEas_Share
CUDX6000or 1£600series digitalcamera.
Earlier cameramodels (KodakEas}Sham4000 series a_ldprevious) require
the origi_alKodakEas_Sharecamera {lockor camera dock//.
75

!)
0Troubleshootin0
When_,ouha_e questionsabout _,ourcamera or cameraclock6000, s"tarthere.
Additiollaltechnicalinformationis availablein the ReadMefilelocated on tile
g,odak Eas_,Sharesoft_are ¢D. Forupdatesto Troubleshootinginformation,see
w_.kodak.eom/goA:x6230support.
Camera Problems
Cmneradoes not Batter?is not properl'_ Reinstallthe hatter_,(page 4).
turn on. installed.
Batter?is 1)orcharged. Recharge the batter? (page 72).
Camera does not a non-appro',ed batter? I_sethe hatter? that came _ith
turn off. ma_,he in the camera, your camera,or an appro',ed
replacementhatter? (page 14).
Pictures The picture does not Thecamerais operatingnormall'>
remaining take up enough space Continue_Mi)gpictures.
lUllllherdoes not to decrease tile
decrease after number.
taking a picture. "_ou(lidnot (ake a I!seRe'_iew(page 41) or
picture. Quick_im_(page 20) to make
sure a picture was taken.
77
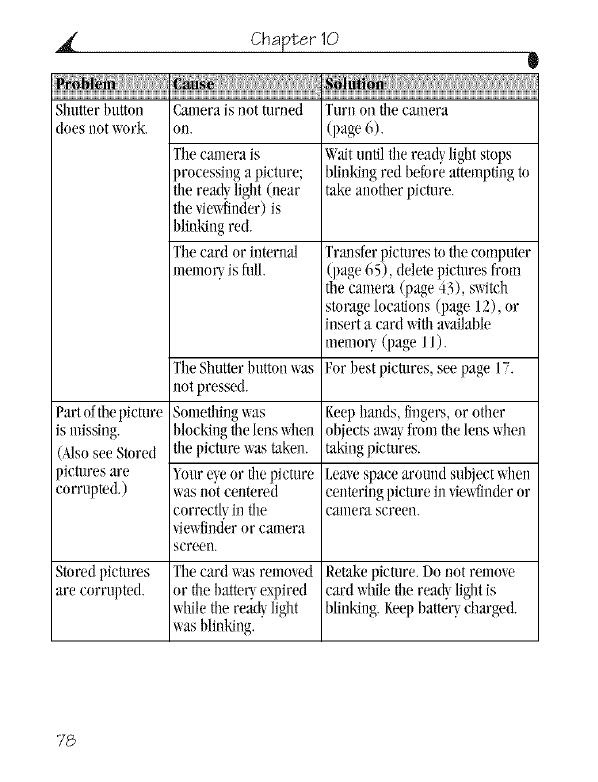
Chapter 10 0
Shutter button Camerais m_tturned Turnon fl*ecamera
does *lotwork on. (page 6).
Tilecamerais Waituntil the ready light stops
processing a picture; blinkingred beforeattemptingto
the read_,light (near takeanother picture.
tile vimffinder)is
blinking red.
'file card or internal Trmlsferpictures totileemnputer
memou is fifll. (page 65), deletepictures ffmn
the camera (page 43), switeh
storagelocations (page 12), or
insert a card \_ithavailable
memoU(page I I).
TheShutter buttonwas For hest pictures, see page 17.
not pressed.
Partofthepicture Somethingwas KeephaMs, fingers,or other
is missing, blockingthe lens xqmn objectsa\_a!,from the lensxqmn
(Msosee Stnred the picture wastaken, takingpictures.
_icturesare _our q,e or the picture Leaxespace around subjectwhen
corrupted,) w_tsnnt centered centeringpicture in"_iewfinderor
correctly,in tile camera screen.
_ie_,_finderor camera
screen.
Stored pictures The card wasreturned Retakepicture. Do not remove
are corrupted, or the batteU expired card while the rea¢, light is
while tileread_,light blinking.KeephatteUcharged.
was blinking.
78
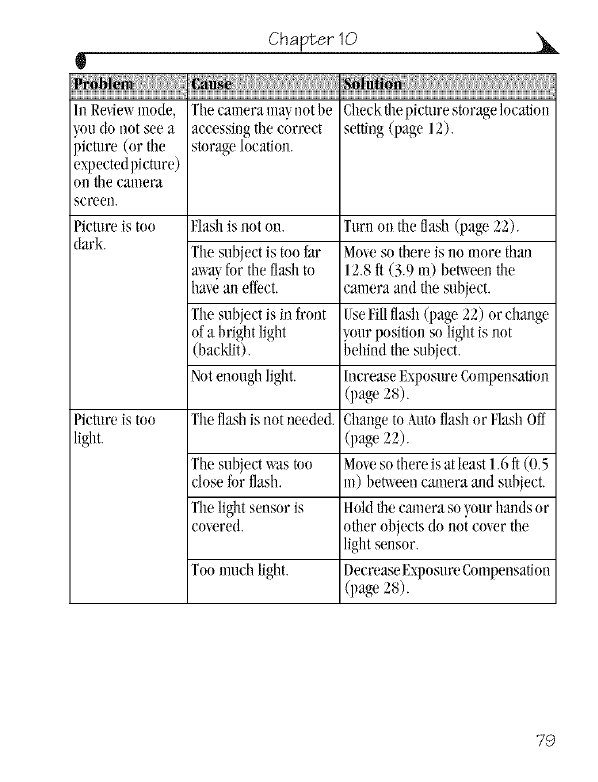
Chapter 1Q _k,
t
/n Re_ie_ mode, Theeamerama},notbe Cheekfllepicturestoragehmatin_
'ou do not see a accessing the correct setting (page !2).
_icture (or the storage location.
expectedpicmre)
Oil the calllera
scr{_eIL
Picture is too Flash is not on. Turn on the flash (page 22).
dark. The subject is too far Mine so there is no more than
a_a_ for the flash to 12.8 fl (3.9 m) bet_u,e_l the
ha_e au effect, camera and the subject.
The subject is in front Itlse],'illflash (page 22) or change
of a bright light your positiml so light is not
(backht). behind the subject.
Not enough light. Increase Exposure Compensation
(page 28).
Picture is too The flash is not needed. ¢ha_ge to Auto flash or Flash Off
light. (page 22).
The subject was mo Move so there is atleast 1.6 ft (0.5
dose fur flash, m) bet_wen camera mid subject.
The light sensor is Hold the camera so },ourhands or
cou, red. oilier objects do uot cmer the
light sensor.
Too umch light. Decrease Exposure Compensation
(page 28).
79
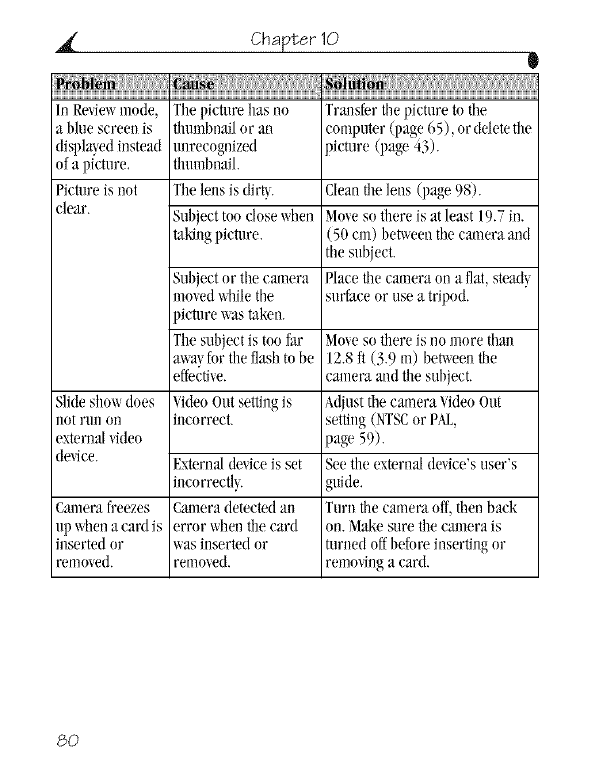
Chapter 10 0
In Re'_im_mode, The pieture has no Transferthe picture to tilt"
a blue scree_ is flnnnbnailor an computer(page 65), or deletethe
displwed instead unrecognized picture (page 43).
of a picture, thumbnail.
Pictureis not The lens is dirt). Cleantile lens (page 98).
clear. Subjecttooclose when Mineso there is at least 19.7 in.
ml_ugpicture. (50 cm) bet_een tilecamera and
tilesubject.
Subject or the camera Placetilecamera on a flat, stead}
mo'_edxqliletile surfaceor use a tripod.
picture _as taken.
The subject is too far Mole so there is no more thal_
a_a'_for the flashto be 12.8ft (3.9 Ill) bemeen the
effecti/e, camera and tile subject.
Slideshou does VideoOut settingis Adiustthe camera VideoOut
not rimon il_correct, setting(NTSCor PAI_,
external/ideo page 59).
de'_qce. External de/ice is set Seetileexternal de/ice's user's
il_correctl'> guide.
Camera freezes Camera detected an Turn the camera off,then back
up whena card is error whenthe card oil.Make sure the camera is
il_sertedor was inserted or turlledoffbefore insertingor
remmed, remmed, remo'_inga card.
8O
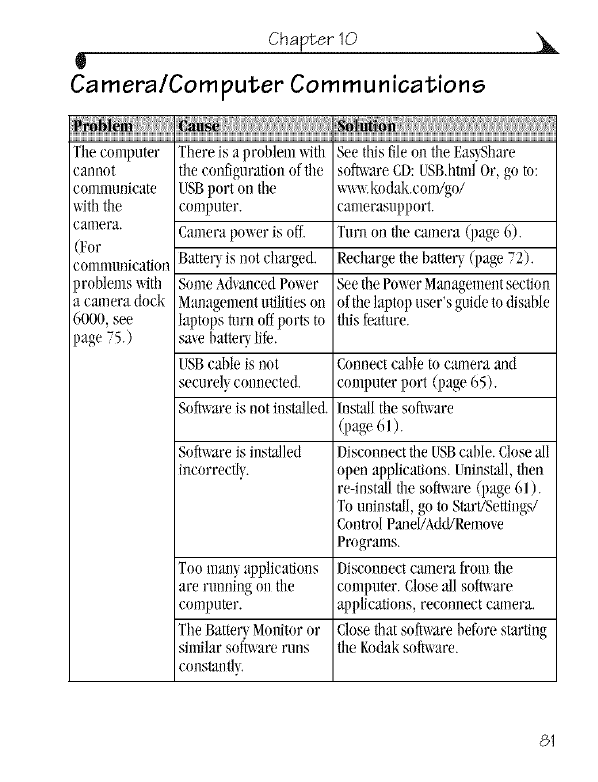
Chapter 1Q ,_
l
Camera/Computer Communications
Theeomputer There is a prol)lemx_ith See this fileon the F.as}_hare
cannot the configurationof the so,rare CD:USB.htmlOr, go to:
communicate USBport on tile t_kodak.com/go/
withthe computer, eanlerasupport.
camera. Camerapower is off. Turn on the camera (page 6).
(For
communication Batter_,is notcharged. Rechargethe batter_,(page 72).
_roblemst_ith SomeA&ancedPower Seethe Pm_erManagementsectim]
a camera dock Mal]agementutilitieso_]ofthelaptopuser'sguidetodisable
6000, see laptops turn offports to this feature.
page 75.) sa_ebatter_life.
USBcable is not Connectcable to camera and
securel'_comlected, computer port (page 65).
Sol, are isnot il]slalled. Installthe sofmare
(page 61).
Soft_are isinstalled Disconnectthe USBcable. Closeall
incorrectl}, open applications.UninstaJl,then
re-installthe sol,rare (page61).
Tounillstall, goto Start/Settil]gs/
ControlPane//Add/Remo'_e
Programs.
Toommr_applicatious Disconnect camera from the
are running onthe computer. Closeallsoft_are
computer, applications, reconnect camera.
TheBatter_Monitoror Closethatsoft_are before starting
similar so0_are runs the Kodaksol, are.
coustal]tl},
81
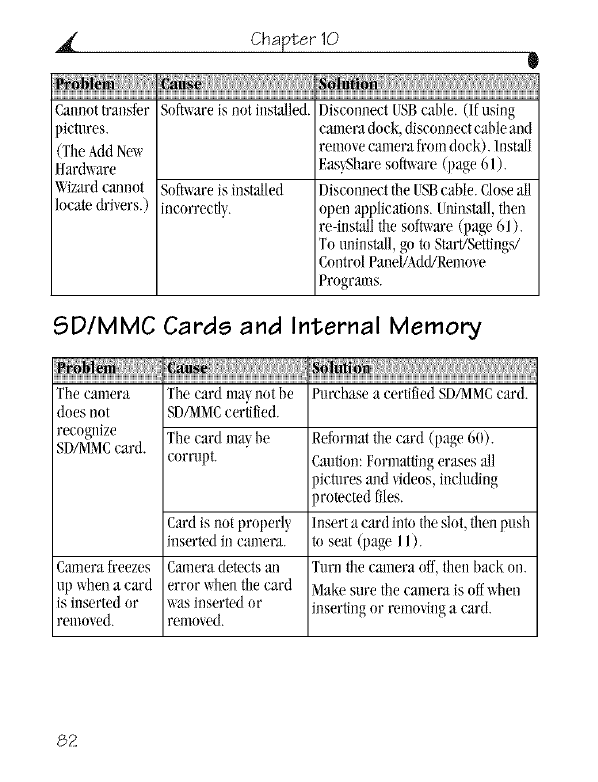
Chapter 10 0
Canuottr:msfer Soft_are is notinstalled. DisconnectI;SBeallle. (Ifusing
_ictures. camera dock,disconnectcallleand
(TheMd New remme camerafromdock). Install
Hardx_are Eas_Sharesof_are (page 6 I).
_izard cannot Sofmareis installed Disconuectthe IOSBcal)le.Closeall
locate dri*ers.) incorrectl'> open applications.Uninstall,then
re-install tile soft_are (page 61 ).
TotmJnslall,goto StaWSettJngs/
ControlPanel/Add/Remo_e
Programs.
SD/MMC Cards and Internal Memory
Thecamera The card ma) not be Purchase a certifiedSDL_I\4Ccard.
does not SDAMMCcertified.
recogllize The card ma_be Reformatthe card (page 60).
SD/MMCcard. corrupt. Caution:Formattingerases all
pictures and xideos, including
protected files.
Cardis Ilotproperly lusert a card intotileslot, then push
inserted in camera, to seat (page I I).
Camerafreezes Cameradetectsan Turuthe caaneraoff,then back oil.
up whena card error x_henthe card Makesure the camera is offwhen
is iilserted or x_asinsertedor insertingor returninga card.
relno'_ed, remo\ed.
82
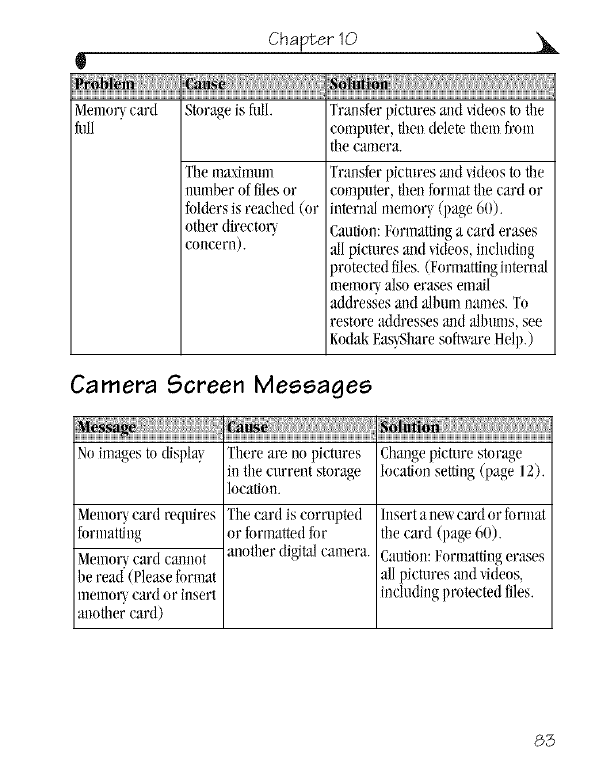
The ma.,_imum
number of filesor
foldersis reaehed (or
other directoU
conceru).
Chapter 1Q
t
Memory,card Storageis flfll. Tr_)sferpietures aud _qdeostotile
full computer, then delete thenl from
tilecamera.
Transferpictllres _ld videosto the
computer, then fnrmat the card or
internal memoU(page 60).
Cautioll:Fornlattinga card erases
allpictures midvideos,including
proteeted files.(Formattinginterna/
memoUalso erases email
addresses alld album names. To
restore addresses and albums,see
KodakEas_,Sharesoft_are Help.)
Camera Screen Messages
Noimagesto display, There are nopictures Changepicture storage
ill the current storage location setting (page 12).
location.
MemoUcard requires
fornlatting
Melnor_,card Callnot
be read"(Pleaseformat
ulelno_. _card or insert
mlothercard)
The card is corrupted
or formattedfor
another digitalcamera.
Inserta ile/_card or format
the card (page 60).
Caution:Formattingerases
allpictures and videos,
includingprotected files.
83
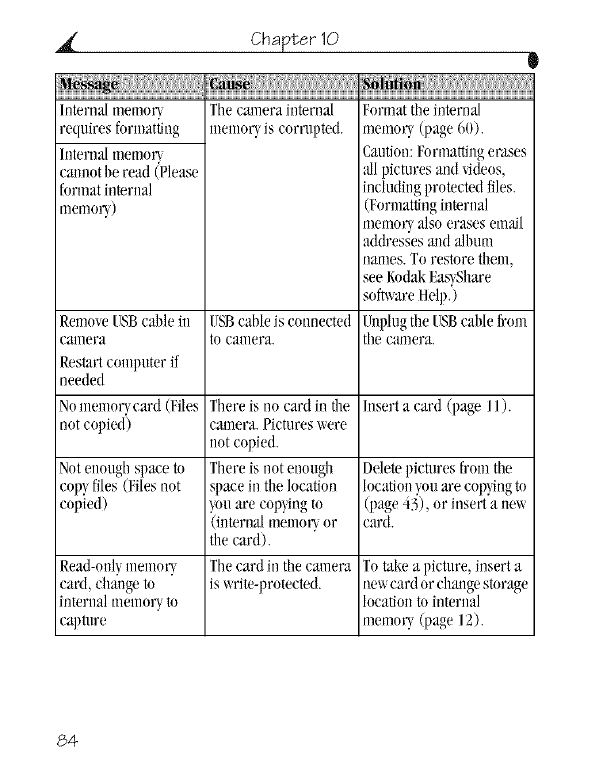
a(
]nterml] memory
requiresfnrmatting
Internalmemo_
c_mnotberead(Please
fnrmat iuternal
melnoU)
Remove[SBcable ill
camera
Restart computer if
needed
Nomenloucard (Files There is no cardin the
not copied) cmnera. Pictures were
not copied.
Not enough spaee to There is not enough
copy files (Files not spaee in the location
copied) vnn are coding to
(iuternal memoUor
the card).
Read-onlymenloUThe card in the cmnera
card, chauge to is write-protected.
internal memoUtn
captnre
Chapter 10 B
:C_u q' Soiuti q ;
Thecalm,ra internal Format the hlternal
memor) is corrnpted, memou (page 60).
Caution:Fnrmattingerases
allpictures and videos,
includingprotected files.
(Formattinginternal
memoUalsoerases email
addresses and album
names. Torestore tllem,
see KodakEas)Share
soft_are Help,)
USBcable is connected [ nplugthe [SB cable from
to canlera, tile camera.
hlsert a card (page I I ).
Deletepictures frmntile
locatiouy/n are cop_,ingtn
(page 43), or insert a net_
card.
Totake a pictnre, insert a
newcard or chmge stnrage
locatiou tn internal
memoU(page 12).
84

Chapter 1Q
t
MemoUcard is Sxqtchon card is in Reset the s_qtchas shm_n
_rolected(Reset write-protectposition, on camera screen.
s\qtdl on lllemoU
card)
Memor_cardislocked The card is To take a picture, insert a
Insert'ue_ memor_ write-protected, nm_card or change storage
card) location to imernal
memoU(page 12).
The card is slow, Insert a new card
corrupted, or (page I I).
unreadable.
Card cmmotbe used to
lad _ideos.
There is no space
remaining.
Memo_card is
unusabie (Insert new
memoUcard)
Recordingslopped.
Recordin internal
memoU(Cardspeedis
slow)
Memor_card is MI
Cmlnotsavealbum
tagging)
internalmemouis fifll
Cmlnotsae album
tagging)
Memor_card is fifll
(Cmlnotsau, share
ta%ing)
internalmemowis fifll
(Cmlnotsau, sMre
lagging)
Changesluragelocation to
internal memoU
(page 12). Usethis card to
take pictures raft}.
/llsert a llew card
(page 1I), transfer
pictures (page 65), or
ddete pictures (page 43).
85
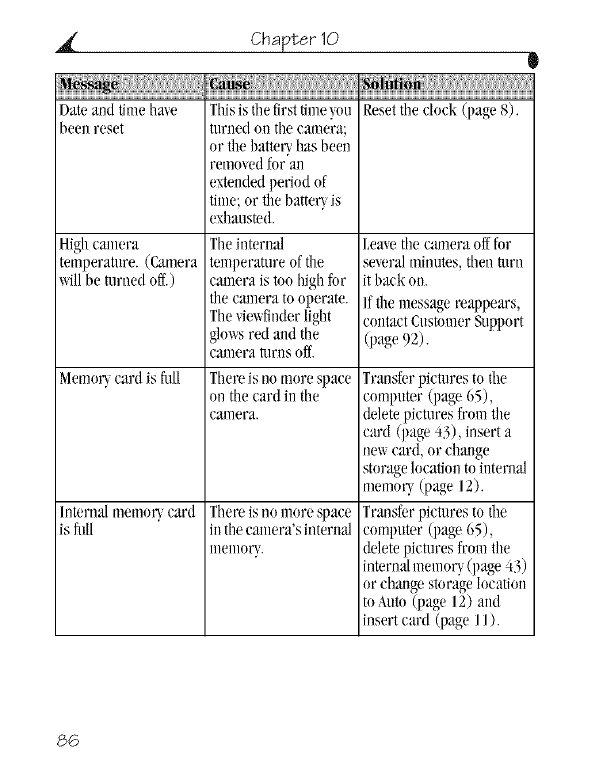
Dateand timeha_e
been reset
Highcamera
temperature.(Camera
x_Jllbe turnedoff.)
MemoUcard is fifll
Internal memoUcard
is MI
Chapter 10 0
:C_u q' Soiuti q ;
Thisisthe first time!,ou
turned on tilecamera;
or the batteUhas been
removedfor an
extendedperiod of
time; or the batteUis
exhausted.
Tileinternal
temperatureof file
camera is too high for
the cmnera to operate.
The _ie_finder light
glowsred and tile
camera t11rns off.
There is no more space
on tile card ill the
canlera.
There is no more space
in tilecamera's internal
lnenlor!,.
Reset the clock (page 8).
Lea_etile camera offfor
several minutes,then turn
it baek on.
If the message reappears,
contactCustomerSupport
(page 92).
Transferpictures to tile
compmer (page 65),
deletepictures frmn tile
card (page 43), insert a
new card, or chatlge
storagelocation tointerual
memoU(page 12).
Transferpictures to tile
compmer q)age 65),
deletepictures from the
in>rna/memo U(page 43)
or change storage location
toAutn (page 12) and
insert card (page I I).
86
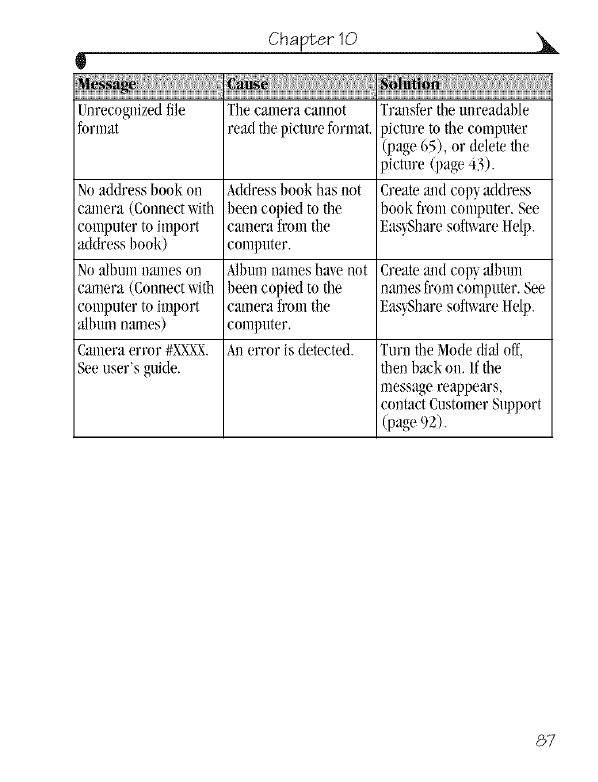
Chapter 1Q
t
tnrecoguized file Tilecanera eamot Tralsfer themlreadable
format read tilepicture format, picture to tile computer
(page 65), or delete tile
picture (page 43).
Noaddress book on Addressbook has not Createaid copyaldress
canera (Cmmectwith beencopied to the book fronl computer. See
computerto import camera from tlle Eas_Shareso_are Hdp.
address book) computer.
Noalbum names on Mbum names ha_enot Createaid coD album
camera (Cmmeetwith beencopied to the umnesfrom computer. See
computerto import camera from tile Eas'_Sbareso_are Hdp.
albumnames) computer.
¢anera error #£ggX. Allerror is detected. Turnthe Modedia3off,
Seeuser's guide, then backon, Iftile
messagereappears,
contactCustomerSupport
(page 92).
87
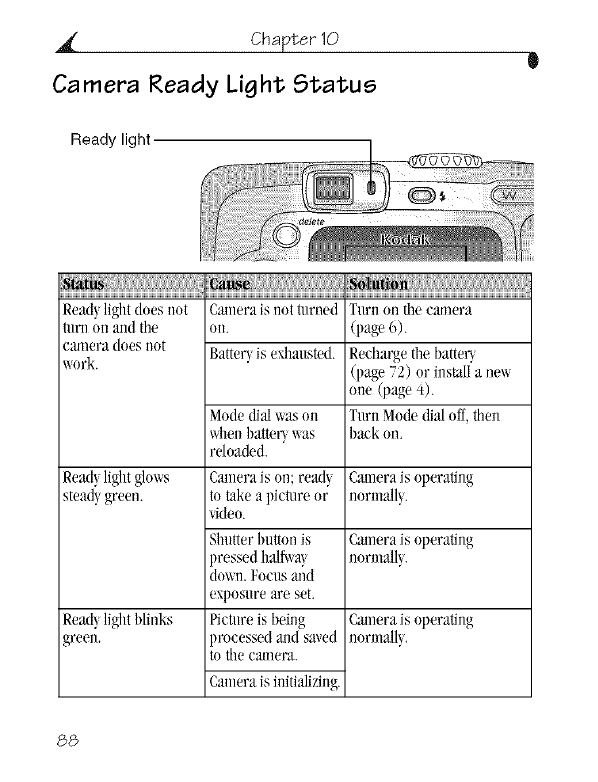
Chapter 10
Camera Ready Light Status
Ready light
Read}light does not Cameraisnotturned Turnon the can/era
tunl on and the
camera does lint
work.
Read}light glows
steadygreen.
Read}light blinks
green.
on. (page 6).
Batteu is exhausted. Rechargethe batteU
(page 72) or installa new
one (page 4).
Turn ,Modedialoff,then
backon.
Mode dial x_as on
_¢en batte Uwas
reloaded.
Camerais on; read!,
to takea picture or
video.
SMtter buttonis
pressed llalfx_a}
down. FocllS and
exposllre are set.
Pictureis being
processed and saved
to tile call/ei_.
Camerais initializing.
Camerais operating
normally.
Camerais operating
normally.
Camerais operating
normally.
88
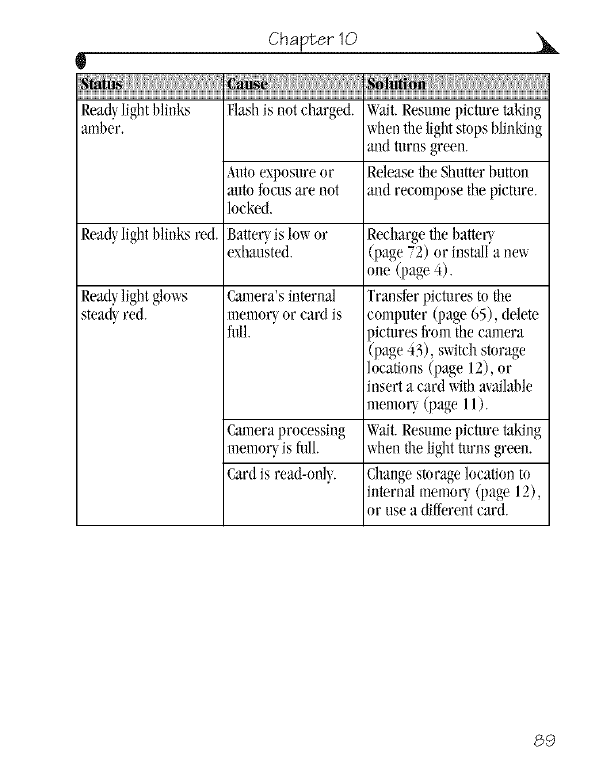
Chapter 1Q
t
Rea(lylight blinks Flashis not charged. Wait.Resmnepicture taking
amber, whentile lightstopsblinking
AlltOexposure or
mlto focus are not
locked.
Camera's internal
lnemor} or c_l.rd1S
fllll.
Readylight blinks red. BatteUis lowor
exhausted.
Read}light glows
stead}red.
Cameraprocessing
memoUis fllll.
Card is read-only.
and turns green.
Release the Shutterbntton
aml recompose the picture.
Rechargethe batteU
(page 72) or installa new
one (paNe4).
Transferpictures to the
computer (page 65), delete
pictures from the camera
(page 43), switchstorage
locations (page 12), or
insert a card x_Jthmailable
memoU(page I I).
Wait.Resumepicture taking
when the light turns green.
Changestor_gelocation to
internal memory (page 12),
or use a differentcard.
89

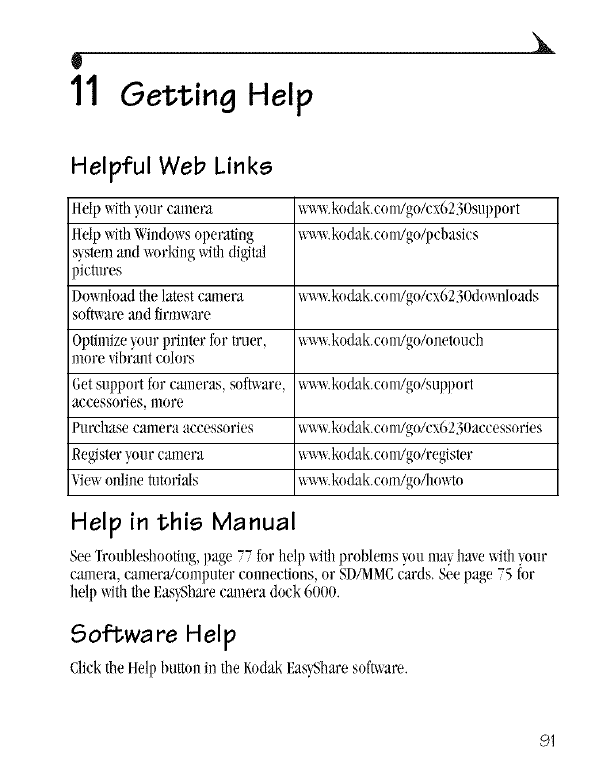
11 Getting Help
X
Helpful Web Links
Help with your camera wwx_.kodak.eom/goA:x6230support
Help with Windows operating ww_.kodak.eom/go/pebasies
s_,stema_ld worMng with digital
pictures
Dm_uload the latest camera wwx_.kodak.eoul/goA:x6230dowu/oads
soft_are and firmware
Optimize _,uur printer fur truer, ww_.kodak.eoul/go/onetoueh
more vibrant colors
Getsupport fur cameras, sol, are, wwx_.kod'ak.eoul/go/support
accessories, more
Purchase camera accessories ww_.kodak.eoul/go/ex6230aeeessories
Register your camera wwx_.kodak.eoul/go/register
Vie_ online tutorials wwx_.kodak.eom/go/howto
Help in this Manual
SeeTroubleshooting,page 77 for help xqth problems youma}ha_ewith'tour
camera, camera!comlmtercmmectious,or SD/MMCcards.See page 75for
help withthe Eas'_Sharecamera clock6000.
Software Help
Clickthe Helpbuttimin the KodakEas3_haresoft_are.
91
Chapter 11 0
Telephone Customer Support
/f _,ouMve questionseoneerning the operatio_ of the soft_are or camera,you
ma_,speak _qtha customer supportrepresentative.
Before You Call
0 Haw the camera or eamera dock connectedto your computer.
0 Be at !,ourcomputer.
0 Haw the follo\_inginformation available:
Operatings_,stem
Processor speed (._lHz)
Computermodel
Amountof memow (MB)
Exacterror message_,oureceived
Versionof KodakEas!,Sharesoft_are CD
Cameraserial llllmber
92

Chapter 11
U
Telephone Numbers
Australia
AustrWOsterreich
Belgiut]VBelgique
Brazil
Cmmda
China
Denmark/Danmark
/relan{gF,ire
Finlalld/Suomi
France
German}/Deutschland
Greece
Hong Kong
India
/ta/)/Italia
Japan
Korea
Netheflands/Nededand
New Zealmld
Nor_a}/Norge
P/_lippines
Pornlgal
Singapore
1800 147 701
0179 567 357
02 713 14 45
0800 150000
1 800 465 6325
800 820 6027
3 848 71 30
01 407 3054
0800 1 17056
Ol 55 1740 77
069 5007 0035
00800 441 25605
800 901 514
91 22 617 5823
02 696 33452
03 5644 5050
00798 631 0024
020 346 9372
0800 440 786
23 16 21 33
1 800 1 888 9600
021 415 4125
800 6363 036
93
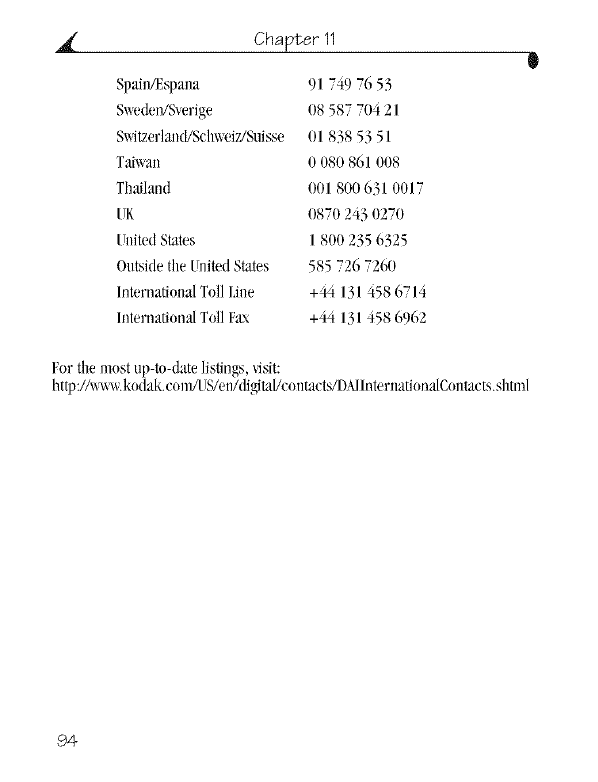
Chapter 11 0
Spain_spana 91 749 76 53
SwedeiVSverige 08 587 704 21
S_itzerlan{VSchweiz/Suisse 01 838 53 51
Tai\_an 0 080 861 008
Thailand 001 800 631 0017
UK 0870 243 0270
[nitedStates 1800 235 6325
Outsidethe [uited States 585 726 7260
InternationalTollLine +44 131458 6714
/nternatiomdTollFax +44 131458 6962
For file most up-to-datelistings,_sit:
http://x__x_.kodak.eonlA S/en/dJ_tal/eontaets/DAIInternationa/Contaets.shtm/
94
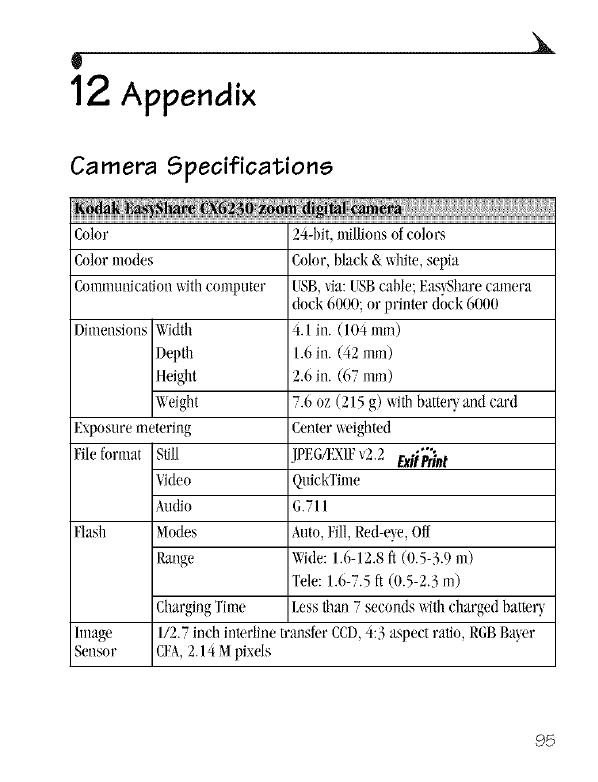
12 Appendix
X
Ca mera Specifications
Color 24-bit, millionsof colors
Colormodes Color,black &x_hite,sepia
Communicationwithcomputer USB,_ia:USBcable;Eas3_harecamera
dock 6000; or printer (lock6000
Dimensions Width 4.1 in. (104 ram)
Depth 1.6in. (42 ram)
Height 2.6 in. (67 ram)
_ eight 7.6 oz (215 g) \_ithbatter_and card
Exposuremetering Centerweighted
Fileformat Still JPEG_IXIF_2.2 ExitPrint
Video QuickTime
Audio G.711
Flash Modes Auto,Fill,Red-e}e,Off
Range Wide:1.6-12.8 ft (0.5-3.9 m)
Tele: 1.6-7.5ft (0.5-23 m)
ChargingTime Lessthan 7seconds withcharged batter}
Image 1/2.7inch interline transfer CCD,4:3 aspect ratio, RGBBa}er
Sensor CFA,2.14Mpixels
95
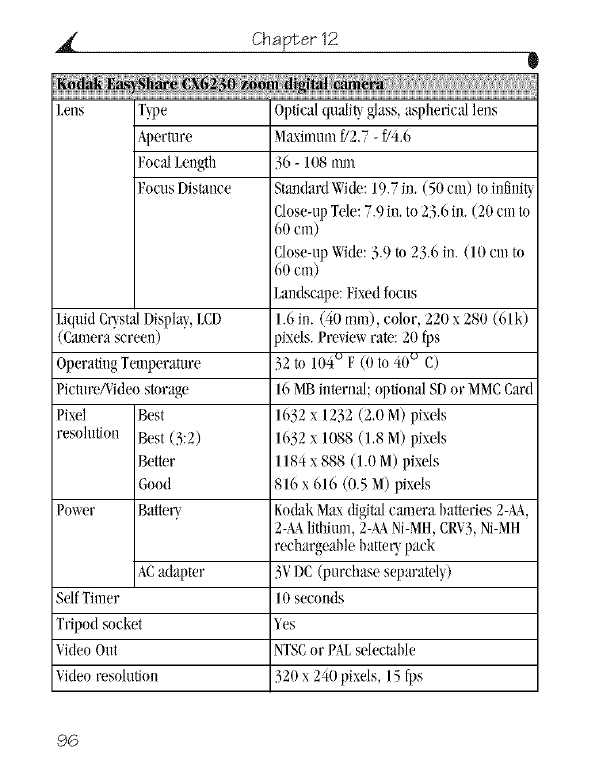
a(
Leus T}pe
aperture
FocalLength
FocusDistance
LiquidCustalDisplay,LCD
(Cmnerascreen)
OperatingTemperature
Picture/Videostorage
Pixel Best
resolution Best(3:2)
Better
Good
Pmwr BatteU
ACadapter
Sdf Timer
Tripodsocket
VideoOut
Video resolution
Chapter 12 e
OpticalqualiWglass, aspherica[lens
.Maximumf/2.7 - f/4.6
36 - 108 mm
Stat]dardWi(le:19.7 in. (50 cm) toinfJniW
Close-upTele:7.9 in. to23.6 i_].(20 cm to
60 cm)
Close-upWide: 3.9to 23.6 in. (10 cm to
60 cm)
Landscape:Fixedfocus
1.6in. (40 ram), color, 220 x 280 (61k)
pixels.Previewrate: 20 fps
32 m 104_'F (0 to 40_' O
16VIBhlterua/; optional SDor MMCCard
1632x 1232 (2.0 M)pixels
1632x 1088 (1.8 M)pixels
1184 x888 (1.0 M) pixels
816 x616 (0.5 ._1)pixels
KodakMax(ligi_/cmnera batteries2-M,
2-AA.lithium, 2-&_.Ni-MH,CRV3,Ni-MH
rechargeable batteUpack
3VDC(purchase separat@)
10seconds
Yes
NTSCor PALselectal)le
320 x240 pixds, 15fps
96
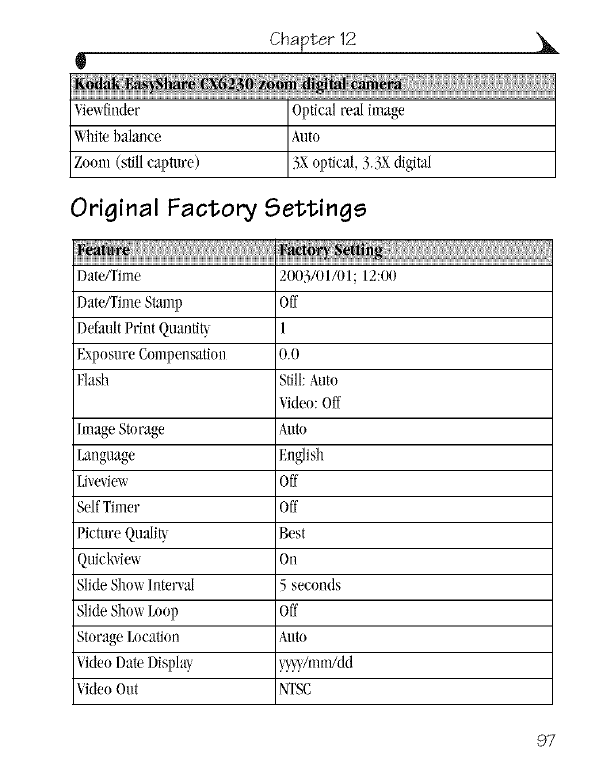
Chapter 12
t
Viewfinder Opticalreal image
Ime I_alance" Auto
Zoom (stillcapture) 5X optical, 3. SXdigital
Original Factory Settings
DateMime 2003/01/01; 12:00
Date/TimeStamp Off
DefaultPrint Quantdt_ 1
ExposureCompensation 0.0
Flash Still:Auto
Video:Off
hnage Storage Auto
Language English
Li',miew Oft"
SelfTimer Off
Picture Qua/ig Best
QuicMie_ On
SlideShowInter_a[ 5 seconds
SlideShowLoop Off
StorageLocation Auto
VideoDate Displa_ y_5_gmm/dd
VideoOut NTSC
97
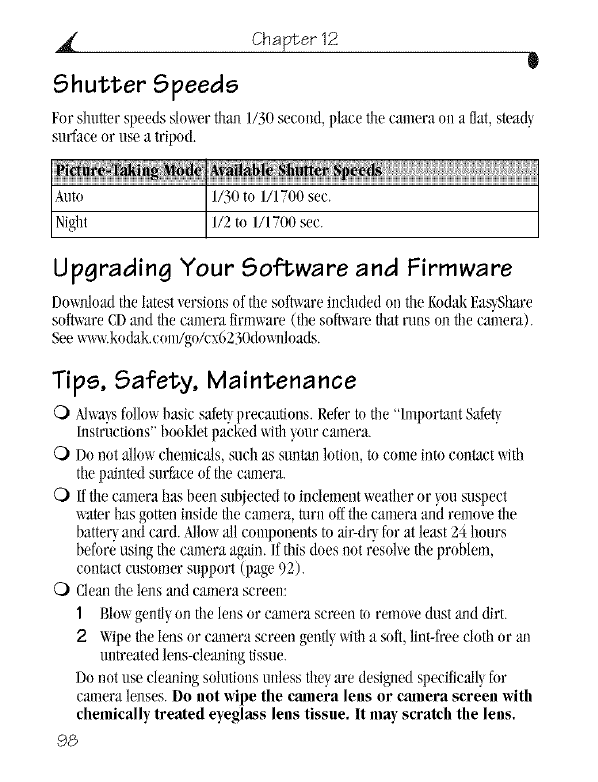
Chapter 12 0
Shutter Speeds
I.'orsftmter speedsslm_er than 1/30 second, place the camera on a flat,steady
surfaceor use a tripod.
Upgrading Your Software and Firmware
D(mnkmdtilelatest _ersions of tilesolid,are included on the KodakF.as_Sftare
sof_vare¢D midtile canlerafirmware (file soft\_arethat runs on the camera).
See_ k{(ak _o /g{/_x623!)&m olds
Tips, Safety, Maintenance
Q) Mwaysfollm_basie safeWprecautions. Refer to the "/uw)rtant Safeu
Instructions"bookletpacked witftyour camera.
O Do not allowcftemicals,sucft assuntanlotion, to come into contact with
the painted surface of the c:mlera.
Q) Ifthe camera lastsbeen subjectedto inclement weatheror }ousnspect
water has gotteninside the camera, turn offtftecamera and renlme the
batteUand card. Mlowall conlponents to air-dUfor at least 24 ftonrs
before usingthe camera again./f this does not resolve the problem,
contactcustomer support (page 92).
O Cleantftelens and camera screen:
1 Blowgentlyon the lens or camera screen m removedust and dirt.
2 Wipetbe lens or cmnera screen gent/}witha soft,lint-freecloth or an
lmtreatedlens-cleaningtissue.
Do not use cleaning solutionsunless they are designed specificall}for
camera lenses. Do not wipe the camera lens or camera screen with
chemically treated eyeglass lens tissue. It may scratch the lens.
98
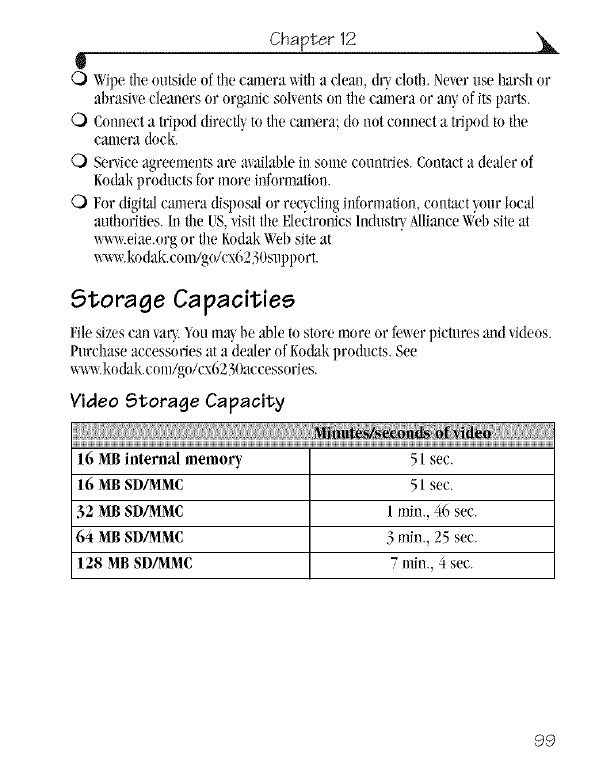
Chapter 12
e
O Wipethe nntskteof tilt'camera with a clean, dUcloth. Neu,r use harsh or
abrasiw clemlersor organic solventson the camera or anyof itsparts.
O Connecta tripod directb to the camera; do notconnect a tripod to the
cmnera dock.
O Set/ice agreementsare a/a]lable in some countries. Contacta dealer of
Kodakproducts fnrmore infnrmation.
O For digitalcamera (liq)osal or rec}clinginformation, contact_nur local
anthoritJes.Illthe US,visitthe F./ectronicsIndusW Alliance',_;el)siteat
wwx_.eiae.orgor tileKodak\'Vd)site at
ww_.kndak.conggo/cx6230support.
Storage Capacities
Filesizescan_ar_ _numa_ be able to store more or fe_er pictures and',idens.
Purchaseaccessories ata dealer of Kodakproducts. See
_ ko{ak co /go/cx6230a{ {essor es
Video Storage Capacity
16 MBinternal memory 51 sec.
16 MBSD/MMC 51 sec.
32 MBSD/MMC 1min., 46 sec.
64 MBSD/MMC 3 min., 25 sec.
128 MB SD/SMMC 7 nlin., 4 sec.
99
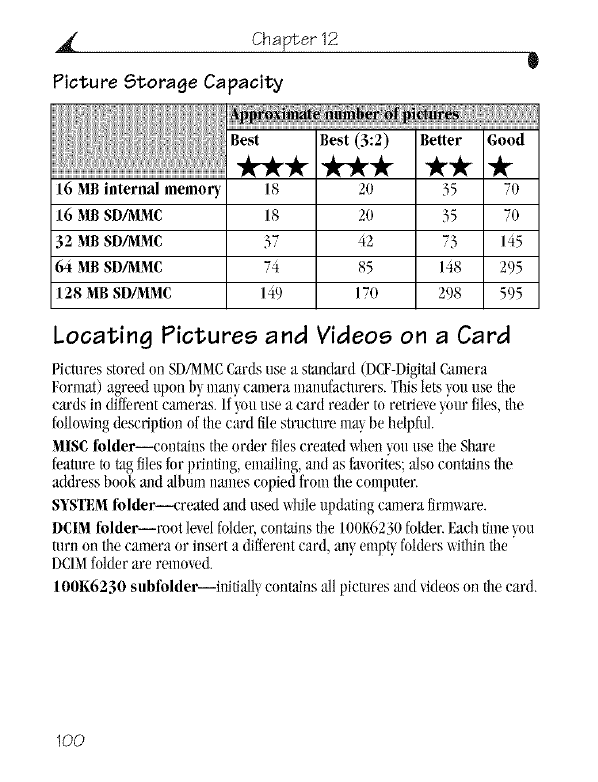
Chapter 12 0
Picture Storage Capacity
iiiiiiiiiiiiiiiiiiiiiiiiiiiiiiiiiiiiiiiiiiiiiiiiiiiiiiiiiiiiiiiiiiiiiiiiiiiiiiiiiiiiiiiiiiiiiiiiiiiiiiiiiiiiiiiiiiiiiiiiiiiiiiiiiiiiiiiiiiiiiiiiiiii- ir.** -k
16 MB internal memory 18 20 35 70
16 MB SD/_MMC 18 20 35 70
32 MB SD/WiMC 37 42 73 145
64 MB SD/_MMC 74 85 148 295
128 MBSD/MMC 149 170 298 595
Locating Pictures and Videos on a Card
Pietures stored on SDAMMCCards use a standard (DCF-DigitalCamera
Format) agreed upon by manycim_erammnlfactnrers.Thislets}on use tile
cardsin different cmneras.If}on use a card rea&r to retrieveyonr files,the
follnwingdescription of tilecard filestnlctnm nla}be helpfifl.
MISt folder--contains the order files created _qlen }on use tileShare
featureto *tagfilesfor printing, ema]ling,and as favorites;also contains the
address book mid albumnames copiedfrom tile cmnputer.
SYSTEMfolder--created mid used _qlileupdating camerafirmware.
DCIMfolder--mot levelfolder,conFainsthe 100K6230folder.Eachtime}ou
turn onthe camera or insert a differentcard, an} emp_ folderswitfiinthe
DCIMfolderare returned.
100K6230 subfolder--initia/l_ contains allpictures aid videoson the card.
100
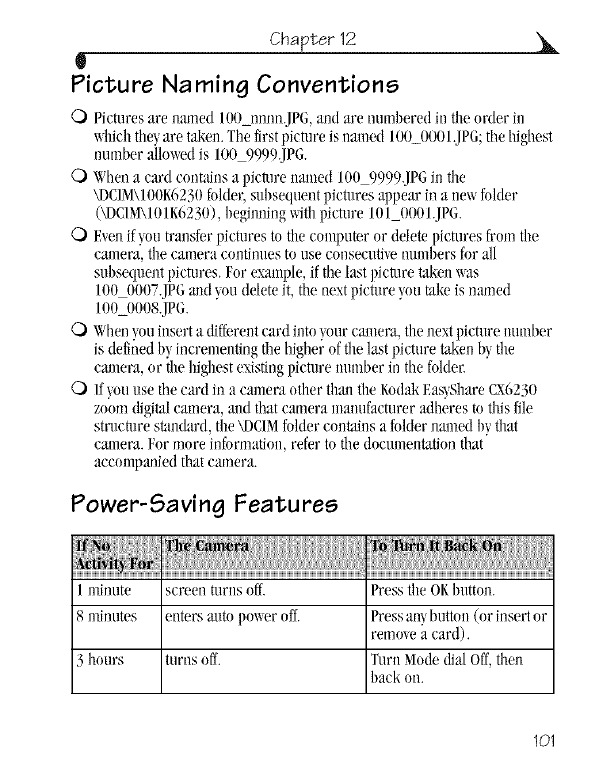
Chapter 12
W
Picture Naming Conventions
C) Pictures are named lot) nmm.JPG,and are nunti)eredin tilt, order in
_llieh theyare taken.The firstpicture is named lot)O001.JP6; the highest
nmnber allowedis 100 9999.JPG.
Q) Whena card contains a picture named 100 9999.jPGin tile
\DCI\_I\I00K6230folder,suhsequent pictures appear in a newfolder
(kDC/M\I01K6230),hegimlingwith picture 101000 I.JPG.
O Evenif}ou transfer pictures to the conlputer or delete pictures from tim
camera, tilecamera contimlesto use consecutiw numhers for all
suhsequempietures. For example,if the last pic_lre taken was
IO00007.JPG aJld}ou delete it, the next picture you rake is named
100 0008.JPG.
O When}ouinsert a differemcard into}our camera, tilenext picturenumber
is defined byincrementing the higher of the last picture take_lh} tile
camera, or tllehighestexistingpicturemm_berin the folder.
O/f}ou use the card in a canleraother thaT1the KodakEas}ShareCX6230
zoom digitalcamera, alld tilat camera mmmfactureradheres to this file
stnlcture standard,tilek/)ClMfolderconchs a foldernamed hythat
camera. Formore information, refer to the docume_l_tionthat
accompaniedtimtcamera.
Power-Saving Features
1 minute screen turns off. Press tile OKbutton.
8 minutes enters mlto power off. Press anybutton (orinsert or
removea card).
3 hours turns off. Turn ._lo(ledialOff,then
hack on.
101
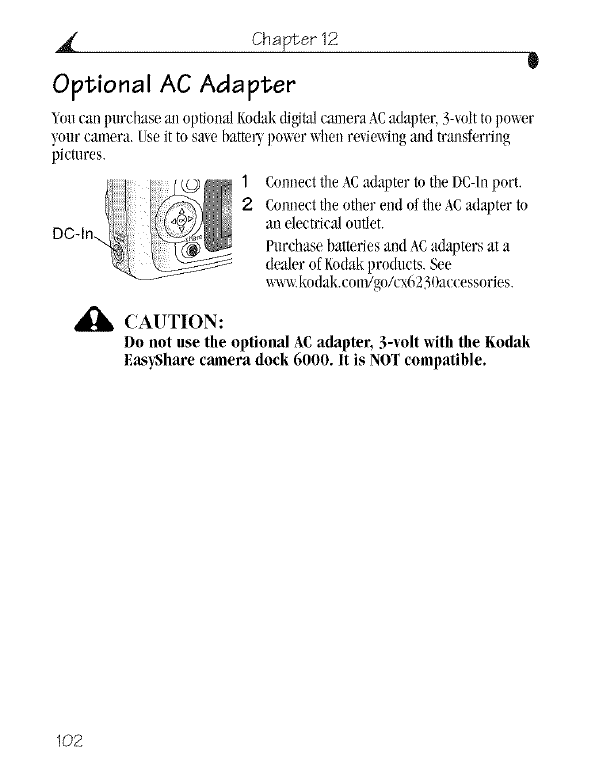
Chapter 12 0
Optional AC Adapter
_ou can purchase anopti{malKodakdi_tzl camera ACadapter, 34olt topox_er
your camera. Useit to sa_ebatter_pm_er xq_e_re'qm_ingaM tral_sferring
pictures.
1Connectthe ACadapter to the DC-Inport.
2 Com_ectthe other end of the _.Cadapter to
an electrical outlet.
Purchase batteries and ACadapters at a
dealer of Kodakproducts. See
_ kodak.com/go/cx6230accessories.
,i_ CAUTION:
Do not use tile optional AC adapter, 3-_olt with tile Kodak
EasyShare camera dock 6000. It is NOT compatible.
102

Chapter 12
l
FCC Compliance and Advisory
,X
Kodak EasyShare CX6230 zoom digital camera ]
Tested to comply with FCC Standards.
FOR HOME OR OFFICE USE
ThisequipmentMs been tested and found to comply_qththe limitsfor a Class
Bdigitalde_ice,pursuant to Part15oftile FCCRllles.Theselimitsare designed
toprmide reasonallle protection againstharmflll interferencein a residential
installation.
Thisequipment generates,uses, _ld can radiate radio frequenQ ene_ and, if
notinstalled or used illaccordance Mth tileinstructions, ma},cause harmflll
interferenceto radio communications.Hinderer,flmreis _loguaramee that
interference_dllnot occur in a particular insta[lation.
/f this equipment does cm_seharmfulinterference to radio or television
reception, whichcan be determi_ledbymrni_lgtile equipment offmid on, tile
user is encouragedto tU to correct the imerference by one or more of the
follmdngmeasures: 1) reorient or relocate the receivingantenna; 2) i_lcrease
tileseparation bet_een the equipmentand the receiver;3) connectthe
equipmentto aJ1outleton a circuit differentfrom thatto xqdch the receiver is
comlected;4) consult tiledealer or all experienced radio/rV technician for
additionalsuggestions.
AWchmlgesor modifications_lotexpresslyapproved b_ the paW respo_lsible
for compliance could voidthe user's authori_ to operate the equipment.
Whereshieldedinterface cableshavebeen provided_itll the product or
specifiedadditional components or accessorieselse_qleredefined to be used
withthe installationof the product, theymust be used in order to ensure
compliancexdth FCCregulation.
Canadian DOC Statement
DOCClass B Compliance--This ClassBdigi'talapparatus compliest_ith
Canadian/CES-O03.
Observation des normes-Class B--Cet appamil mml_rique de la classeB
est conforme "Xla _lormeNMB-003du Cmlada.
103

Numerics
4-x_aycontroller, ii, 6
A
A/V out, iii, 48, 59
ACadapter
3-volt,camera, 102
5-volt,cameradock, 69
accessories
ACadapter, camera, 102
batteu, 15
buying,91
camera dock,67
printer dock,66
SD/MMCcard, 11
adjustingscreen displa},7
albums,tagging
in revie;_mode, 46
pictures,32
videos,38
alkalinebatteries, warning,4
alltO
flash,22
mode, 18
power-down,101
Index
B
batteries
alkalinewarning, 4
chargeviacamera dock, 72
door location,iv
expectedlife, 14
extendinglife, 15
loading,4, 70
safeb and handling,15
bpes, 14
black &whitepictures, 31
button
4-_ay controller,6
delete,ii, 20
flash/stares,ii, 22
lllellll, ii
OK,ii, 6
review,ii, 41
Share,ii, 51
shutter,i, ii, iv
Z()()111_ii
c
cable
audio/video, 3, 48
p(m er, camera dock, 69
USB, 3, 65, 69 105
index
camera dock
cameracompatibilit_,75
chargingbatter_,72
connection,69
COllll,tCtOf Oll Calll,tfa_ IV
dockingcamera, 71
ins.tailingcustominsert, 68
lightssums, 73
packagecontents, 67
reviewingpictures, 74
specifications,74
tmubleshoothlg,75
camera overviews,i--iv
camera screen
adjustingdisplay,7
error messages,83
liveview,19
reviewingpictures/videos,41
staresarea, 9
statusicons, 10
turningoffliveview,57
usingas viewfinder,19
Canadiancompliance,103
capture mode
accessingmenus, 24
overview,18
card
door, i
memor}, 101
caring for your camera, 98
changing
picture _king mode, 18
storagelocation, 12
chargingbatteUviacamera
dock, 72
charginglights,cameradock, 72
checking
camera status,settings,9
storagesetting, 13
clemlingcmnera lens, 98
clock, setting,8
close-up mode, 18
color mode, 31
compllter
connectingcamera, 65
connectingcamera dock, 69
ins.tailingsoftx_are,63
s_stemrequirements, 61
transfer to, 65, 73
connecting
camera dock, 69
camera to cameradock, 71
camera to computer, 65
contents,package
canlera, 3
camera dock, 67
copypictures
cad to memou, 49
106
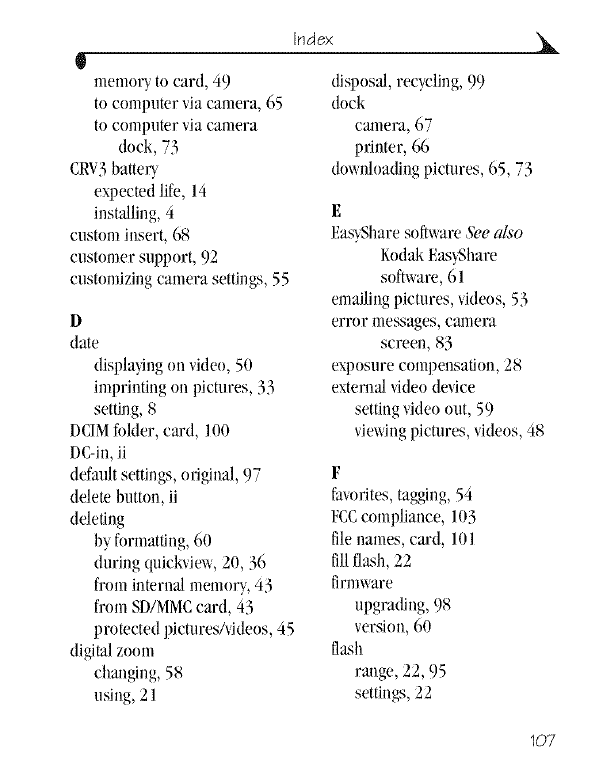
index
t
memor_to card, 49
to computerviacamera, 65
to compllter via canlera
dock, 73
CRY3batteU
expectedlife, 14
installing,4
custominsert, 68
customersupport, 92
customizingcamera settings,55
D
date
displa_ing on video, 50
imprinting on pictures, 33
setting, 8
DCIMfolder, card, 100
DC-in, ii
default settings, original, 97
ddete button, ii
ddeting
b} formatting, 60
during quickviex_, 20, 36
from internal memory, 43
from SD/MMCcard, 43
protected pictures/videos, 45
digi.ta]zoom
changing, 58
tlshlg, 2 ]
disposal recycling,99
dock
camera, 67
printer, 66
do\_nloadingpictures, 65, 73
E
EawShare software &,e also
Kodak Eas_Share
software, 61
emailing pictures, videos, 53
error messages, camera
screen, 83
e,,posure compensation, 28
extemaJ video device
setting video out, 59
viewing pictures, videos, 48
F
favorites,tagging,54
FCCcompliance, 103
filenames, card, 101
fillflash, 22
firmware
upgrading,98
version,60
flash
range, 22, 95
settings,22
107
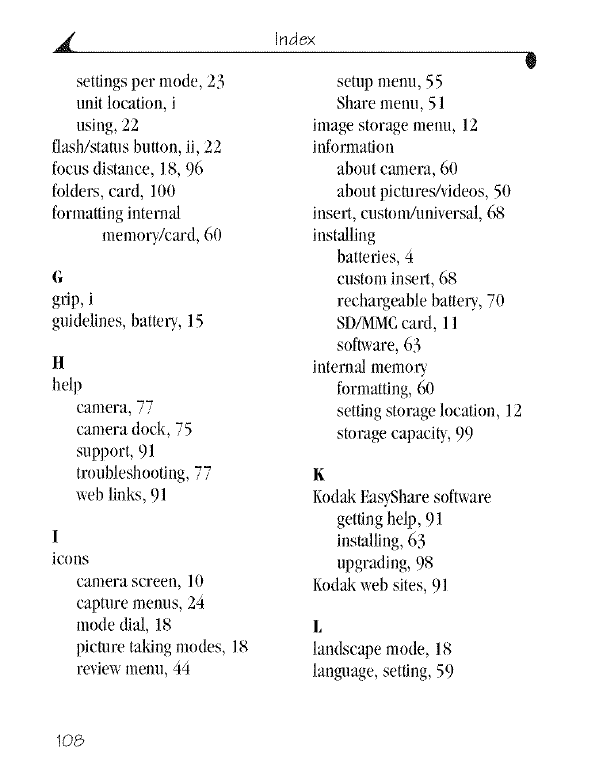
index
settings per mode, 23
unitlocation, i
using, 22
flash/stanls button, ii, 22
focus distance, 18, 96
folde_, card, 100
formatting intenm3
memory/card, 60
G
grip, i
guidelines, battew, 15
H
help
camera, 77
camera dock, 75
support, 91
troubleshooting, 77
web links, 91
I
iCOI1S
camerascreen, 10
capture menus,24
modedial, 18
picturetaMngmodes, 18
reviewmellll,44
setup menu, 55
Share menu, 51
imagestoragemenu, 12
information
about camera, 60
about picmreJvideos, 50
insert, customJuniversa],68
installing
batteries,4
custominsert, 68
rechargeablebatte_, 70
SD/MMCcard, 11
software,63
intema3memoU
formatting,60
settingstorageh)cation, 12
storagecapacig, 99
K
KodakEas2_haresoftware
gettinghelp, 91
installing,63
upgrading,98
Kodakwebsites, 91
L
landscape mode, 18
language,setting,59
108
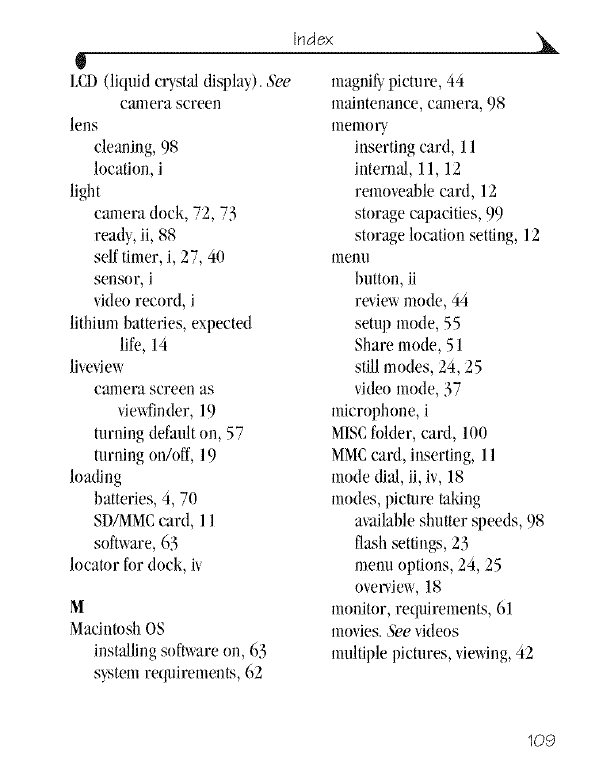
index
!
I,C_ (liquid crystaJ displw). &_e magni_ picture, 44
camera screen nlaJntenance_ calllera_ 9s
lens mem(W
cleaning,98 insertingcard, 11
lncatJ(m,i intema3,11, 12
light remnveablecard, 12
cameradnck, 72, 73 storage capacities,99
readL ii, 88 storagelocation setting,12
sdf timer,i, 27, 40 menu
sensnr, i button, ii
viden recnrd, i revie_ mode, 44
lithiumbatteries, expected seml) mode, 55
life, 14 Share mode, 51
liw._view still modes, 24, 25
camerascreen as vide()mode, 37
viewfinder,19 microphone, i
turningdefaulton, 57 MISCfolder, card, 100
turningnn/nff, 19 MMCcard, inserting, 11
lnading mode dial, ii, iv, 18
batteries,4, 70 modes,picture mMng
SD/MMCcard, 11 availableshutter q)eeds, 98
snftware,63 flash settings,23
lncator for dnck, iv metal options, 24, 25
nverview,18
M monitor,requirements, 61
MacintoshOS movies.&,evidens
instaJlingsnfmare on, 63 multiplepicmres, viewing,42
s_stemrequirements,62
109
index
N
night (node, 18
Ni-MHrechargeable batte U
expected life, 14
ins'tailing, 70
NTSC,vide(( out setting, 59
O
OKbutton, ii, 6
online prints, ordering, 66
optica3 zoom, 37
orientation sensor, 34
overview
canlera, ii
picture taMng modes, 18
P
package contents
camera, 3
camera dock, 67
PAl,,video out setting, 59
picmres
checking location, 13
copying, 49
date imprint, 33
deleting, 43
emaJling tagged, 53
file naming, 101
locating on card, l O0
magnifying,44
printing,66
printi((gtagged,52
protecting,45
quaJib,setting,29
reviewing,41, 74
storagecapacib', 99
tagging,32, 46
taking, 17
taking,modes, 18
transfer viacamera, 65
transfer viacamera dock,73
viewingmulti-up,42
viewingon tdevision, 48
playinga vide((,42
power
auto off, 10 l
can(eva,6
camera dock,69
printer dock, 66
pnnting
4 x 6 prints,29
changingdefaultquantig, 56
from a card, 66
optimizingprinter, 91
order onli((e,66
pictures, 66
taggedpictures, 52, 66
110
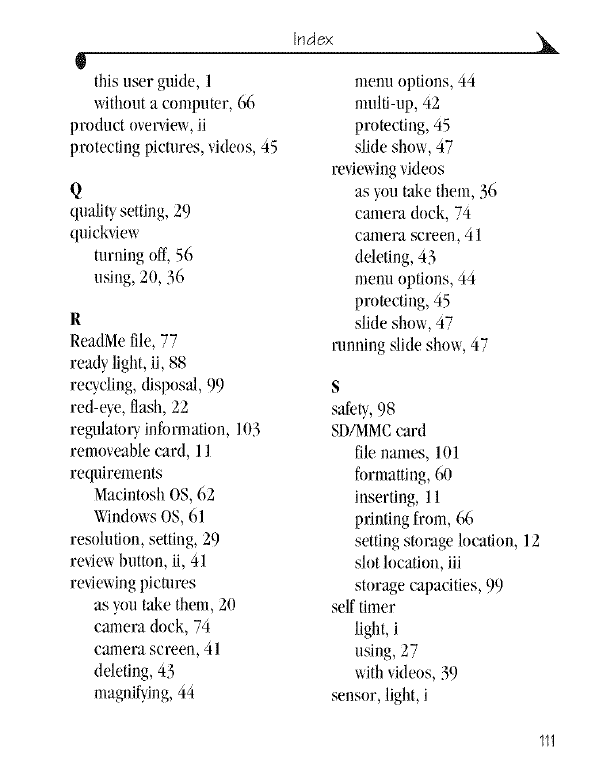
index
t
thisuser guide, 1
withouta cumputer,66
product uverview,ii
protectingpictures, videus,45
menu ul)ti(ms, 44
multi-up, 42
protecting, 45
slide show, 47
reviewing videus
Q
quafiU setting,29
quickview
turningoff, 56
using,20, 36
R
ReadMefile,77
readylight,ii, 88
recycling,disposal, 99
red-e_, flash,22
regulatoUinformatiun, 103
remuveablecard, 11
requirements
MadntushOS,62
WindowsOS,61
resolution,setting,29
reviewbutton, ii, 41
reviex@lgpictures
as you takethem, 20
camera duck, 74
calllerascreell, 4]
ddetJng,43
magni_ing,44
as you take them, 36
camera duck, 74
camera screell, 4 ]
ddetJng, 43
menu uptiuns, 44
protecting,45
slide show,47
running slideshow,47
S
safeg, 98
SD/MMCcard
filenames, 101
formatting,60
inserting, 11
printingfrom, 66
settingstoragelocation, 12
slutlocation, iii
storage capacities,99
selftimer
light,i
using,27
withvideos,39
sensor, light,i
111
index
sepia tone pictures, 31
service and support, telephone
numbers, 92
setting
date and time, 8
flash, 22
language, 59
picture quality, 29
picum, taking mode, 18
resolution, 29
review menu options, 44
self timer, 27, 39
storage location, 12
video out, 59
setup mode, 55
Share button, ii, 51
shutoff, auto, 101
shutter
prol)lems, 78
self timer delay, 39
speeds, available, 98
shutter button
location, i, ii, iv
self timer ddab 27
sleep mode, 1O1
slide show
changing displa_ time, 47
continuous loop, 48
problems, 80
viewing on camera, 47
viewing on tdevision, 48
software
getting help, 91
installing, 63
upgrading, 98
spedfications
cmnera, 95
camera dock, 74
status
camera dock, charging
lights, 72
camera dock, trmlsfer
light, 73
camera rea(b light, 88
checking on screen, 9
screell iCOllS, ] 0
storage location, 13
storage capacit b 99
strap, wrist, 5
support, technical 92
system folder, card, 100
system requirements
Macintosh OS, 62
Windows OS,61
T
tagging
favorites, 54
112
index
t
for aJlmms,32, 38, 46
for emaJl,53
for print, 52
when to tag, 51
takingpictures, 17
taMngvideos, 35
telephonesupport, 93
telephotobutton,ii
television,slideshow,48
thumbrest, ii
time,setting,8
timer, shutter ddaL 27, 39
upgrading software,
firmware, 98
URLs,Kodak web sites, 91
USB (unive_a] seria3 bus)
connecting to camera, 65
collllectJllg to calllera
dock, 69
connection location, iii
transferring pictures, 65
V
videos
tilts
batteryguidelines, 15
maintenance,safety,98
ReadMefile,77
transfer
via camera,65
via cameradock, 73
trash can, deleting,20, 36
tripod socket,iv
troubleshooting
canlera, / /
camera dock, 75
turningcamera on and off,6
u
univemalinsert, 68
checkinglocation, 13
cop_ing,49
date displaL50
ddetJng, 43
emaJlingtagged,53
filenaming, 101
locatingon card, 1O0
mode, 18
protecting,45
record light,i
retie'wing,41, 42
storage capacities,99
tagging,38
taMng,35
transfer to computer, 65, 73
vie'_ing,41
ll3
index
viewfinder
lens,i
location,ii
usingcamera screen, 19
viewing
camerainformation,60
magnifiedpicture, 44
picmmafter taking, 20, 41
picture/video
inf(mnation,50
pictures andvideos, 41
videoafter taking,36, 41
W
wide angle button,ii
WindowsOS
installingsofh_are,63
s_stemrequirements,61
wrist strap, 5
wrist strap post, i
Z
zoonl
button,ii
digital,21, 58
opticaJ,video,37
114

EastmmlKodakCompany
343 S'tateStreet
Rochester,New'turk 14650
© EastmanKodakCompan},2003
Allscreen images are simulated.
Kodak,Eas}Share,Ma\, and Retinar are trademarks of EastmanKodak
Compml_,.
P/N 6B8755
