KTC Technology 00003 8 inch PAD User Manual
Shenzhen KTC Technology Co., Ltd. 8 inch PAD
Contents
- 1. User manual
- 2. User Manual
User manual
Model: 800P11B
800P11B ( MTK8377 )

CONTENTS
Special Features .........................................................1
Important Safety Attentions .......................................2
Accessories List .........................................................6
Buttons and Ports .......................................................7
Installation Instruction ...............................................9
Micro SD Card Installation and Uninstallation .............9
SIM/USIM Card Installation and Uninstallation ..........11
Connecting the Tablet to PC .....................................12
QuickStart .................................................................13
Battery Charging ......................................................13
Power-on .................................................................13
Unlocking .................................................................13
Locking ....................................................................13
Power-off .................................................................14
Volume Adjustment ..................................................14
Touch Screen Operation ...........................................14
Introduction to the Home Screen of PAD....................15
Basic Operation Method ...........................................16
System Time and Date Setting .................................17
Input Method Selection ............................................18
Application ................................................................18
Browser ...................................................................18
Video Player ............................................................22
Music Player ............................................................24
Image Player ...........................................................25
File manager ............................................................26
Call functions ...........................................................28
Messaging................................................................30
Camera ....................................................................30
E-mail ......................................................................32
800P11B ( MTK8377 )

System Settings ........................................................33
Set the Wi-Fi Network...............................................33
Set Bluetooth ...........................................................35
Set the Mobile Traffic Warning ..................................37
Set the Virtual Private Network (VPN) .......................38
Set the Portable Hotspot ..........................................38
Connect and Set the Mobile Network ........................39
Audio profiles ...........................................................39
Display .....................................................................40
Storage ....................................................................40
Battery .....................................................................40
Apps ........................................................................40
Location access .......................................................41
Security ....................................................................41
Language & input .....................................................42
Backup & reset .........................................................42
ACCOUNTS .............................................................42
Date & time ..............................................................43
Scheduled power on & off .........................................43
Accessibility .............................................................43
Developer options ....................................................43
About tablet ..............................................................43
Troubleshooting ........................................................44
Important Statements ...............................................45
Technical Specifications ...........................................47
800P11B ( MTK8377 )

Special Features
1. Includes a LED backlit screen with a high resolution
ratio.
2. Includes a capacitive touch screen with high sensitivity,
supporting multi-touch.
3. Employs ARM Cortex A9 core, with CPU dominant
frequency at 1.0GHz,
4. Employs the Google Android4.1 system.
5. A built-in Wi-Fi module supports the 802.11 b/g/n
wireless standard.
6. Built-in bluetooth module.
7. Built-in 0.3 Mega Pixel front camera and 2 Mega Pixel
rear camera, which can have the functions of video
chatting, photographing and shooting.
8. Support WCDMA, GSM, GPRS, EDGE; HSPA Internet
calls.
9. Includes a built-in speaker with high quality.
10. Supports output of high-fidelity stereo headphone;
11. A built-in 3-axis gravity sensor supports the screen to
auto rotate in 4 directions;
12. Integrate A/V hard decoder, allow playing mainstream
A/V formats on the market.
13. A built-in lithium battery with high capacity.
1
800P11B ( MTK8377 )
Important Safety Attentions
Thank you for purchasing our high performance and
multi-function tablet PC. It will bring you a better visual
and aural experience. To make sure safety, extend the
service life of the product, and give full play to the best
performance of the product, please read all the
instructions and nameplates carefully, follow the safety
attentions, and keep the user manual for future use.
Medical Device
Electromagnetic wave produced by the device in
working condition may interfere with the normal work of
implantable medical devices or personal medical devices
like pacemaker, embedding cochlea, hearing-aid, etc. If
you are using the above mentioned medical devices,
please consult with the manufacturer for the conditions or
limitations of using the product.
Hearing Protection
Use careful with the earphone maybe
possible excessive sound pressure from
earphones and headphones can cause
hearing loss.
Please plug the earphone with the audio source and
turn down volume of the device before putting the
earplugs into ears.
To avoid damaging hearing, it is suggested to use
the lowest volume when listening to music or making a
voice call by earphone.
Please don't use earplugs for a prolonged period.
2
800P11B ( MTK8377 )
Traffic Safety
Please don't use the device when crossing the road,
riding a bike or driving, which may get you distracted and
cause accident.
Wireless devices may interfere with the flight system
of a plane, so please comply with relevant rules of airline
companies; turn off the device in places where wireless
devices are prohibited.
Operation Environment
Please don't use the device in places with water
source, such as bathtubs, pools, washing machines or
moist basements and other similar environments. Once
the device is with splash, please turn off the device at
once, and don't use it before being aired.
To avoid internal circuit fault of the device, please
don't charge or use the device in places of dusty, moist,
dirty or places near magnetic fields.
Please don't put the device and its accessories with
flammable liquid, flammable gas or explosive objects in
the same case for storage or transportation.
Please turn off the device in places where using of
wireless devices are expressly prohibited.
Working environment temperature for the device is
-10 ~ 40. Please don't use The device when the
temperature goes out of the range, otherwise, fault may
occur.
Child Health
The device and its accessories may include several
3
800P11B ( MTK8377 )
small parts, please keep them out of children reach. Or
else children may damage the device and its accessories
by accident, or swallow small parts, resulting in apnea or
other damage.
Environment Protection
Please comply with the local laws of disposing of the
device, battery and its accessories, and support recycling.
Don't dispose of the device, battery and its accessories
as ordinary household garbage.
Accessory Requirement
It is only allowed to use the adapter and accessories
authorized by the device manufacturer and compatible
with the model number of the device. If other type of
adapters and accessories are used, it may violate the
guarantee clause and related provisions of the country
where the device located, resulting in safety accidents. If
authorized batteries, adapters and accessories are
needed, please contact with Dealers.
Safety Use of Battery and Adapter
Adapter shall be installed near the equipment and
shall be easily accessible.
After charging completes or in none-charging
conditions, please cut off the connection with the device
and unplug the adapter from the power socket.
Don't place the device around any heating devices
like microwave ovens, ovens or radiators, etc.
Overheated battery may cause explosion.
4
800P11B ( MTK8377 )

Don't disassemble or refit the batteries, so as not to
cause leaking liquid, overheating, fire or explosion.
If the battery leaks, please keep your skin or eyes
away from the leaking liquid; if you skin or eyes get touch
with the leaking liquid, please wash it with clean water,
and go to hospital for medical handling.
If the power cord of the adapter has been damaged,
don't continue to use it, so as to avoid electric shock or
fire.
Maintenance
Please keep the device and its accessories dry, and
don't use external heating devices like microwave ovens
to dry them.
Don't make the device and its accessories impacted
intensively or shocked, so as not to damage the device
and its accessories, or cause fire or explosion to the
batteries.
Don't place the device and its accessories in areas
with over-high or over-low temperature, or else it may
cause accident, fire or explosion to the device, battery
and adapter. When the temperature is lower than 0, the
performance of the battery may be limited.
Don't place sharp metal objects like large-head pins
near the speaker; it may suck such kind of objects by its
magnetism, resulting in damage when using the device.
Don't use strong chemicals, abluent or detergent to
clean with the device or its accessories. Before cleaning
or maintenance, please turn off the device and cut off the
connection between the adapter and the device.
5
800P11B ( MTK8377 )
Don't disassemble the device and its accessories by
yourself; the damage caused in this case won't be
covered by maintenance.
If the device impacts hard objects or gets intense
impact from outside, causing crush to the screen, don't
touch or try to remove the broken part, please stop using
it and contact with the specific maintenance point at once.
Screen Protection
Don't place any objects on the device, so as to avoid
laceration.
Don't use a sharp object to touch the screen.
Proper Use
The device complies with RF specifications when
the device used at 0mm form your body
Don't indulge in the cyber world and games, as
using the internet and playing games for a prolonged
period will be harmful for your health.
Accessories List
Tablet PC (1) Power Adapter (1)
User Manual (1) USB Data Cable (1)
6
800P11B ( MTK8377 )
7
MIC
TF
SIM
1
23
4
5
6
7
8
910 11 12 13
A
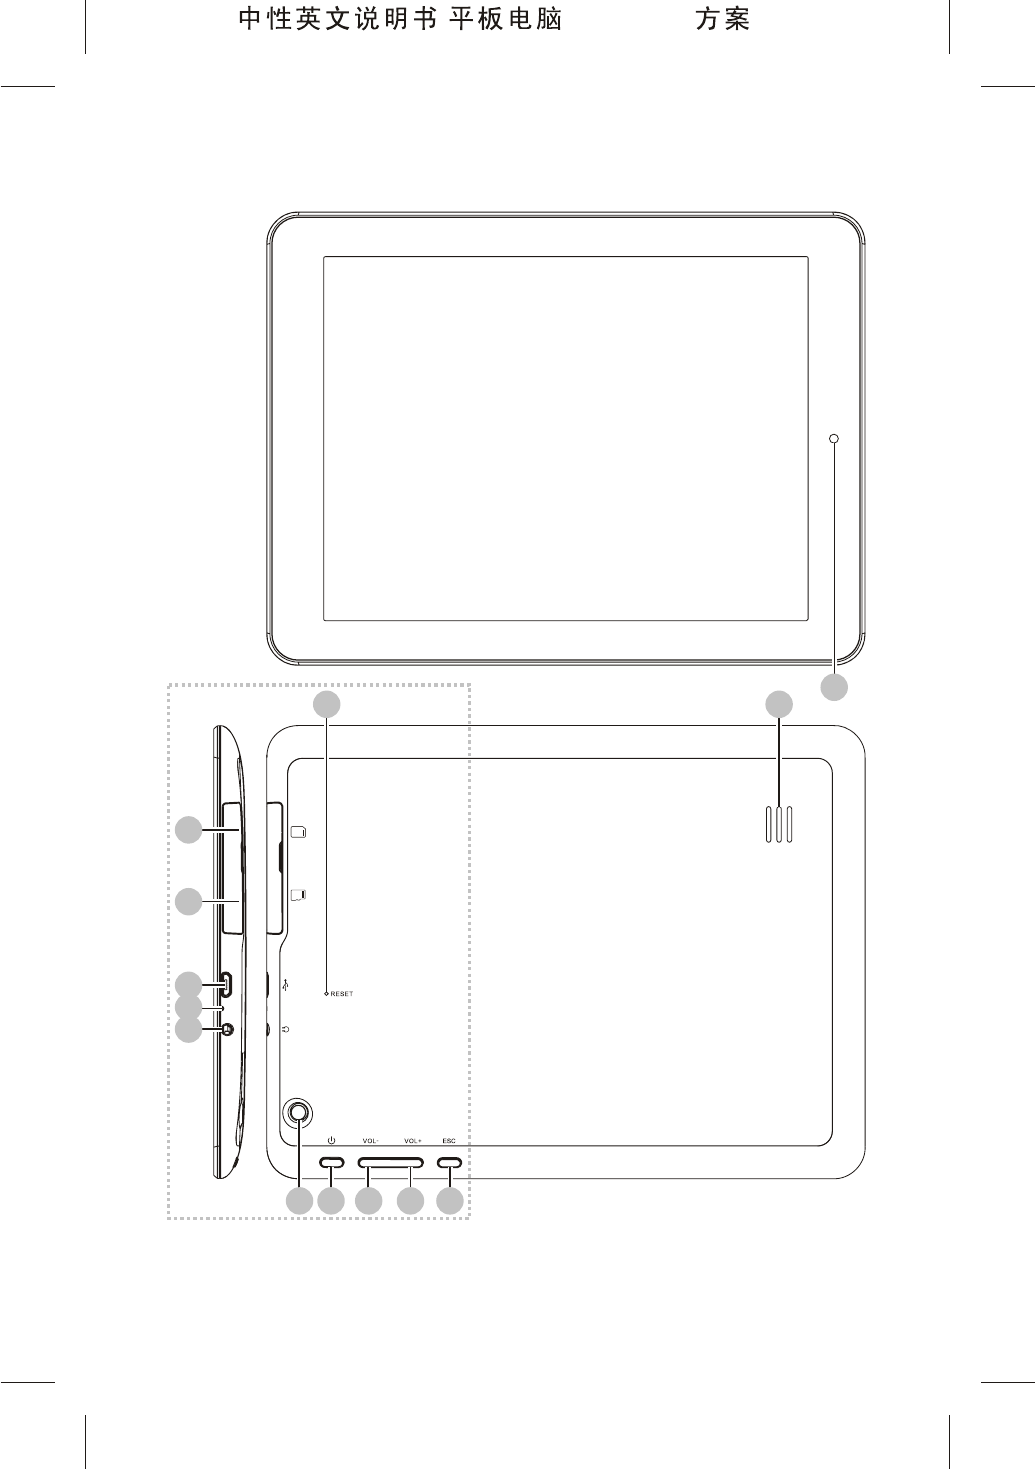
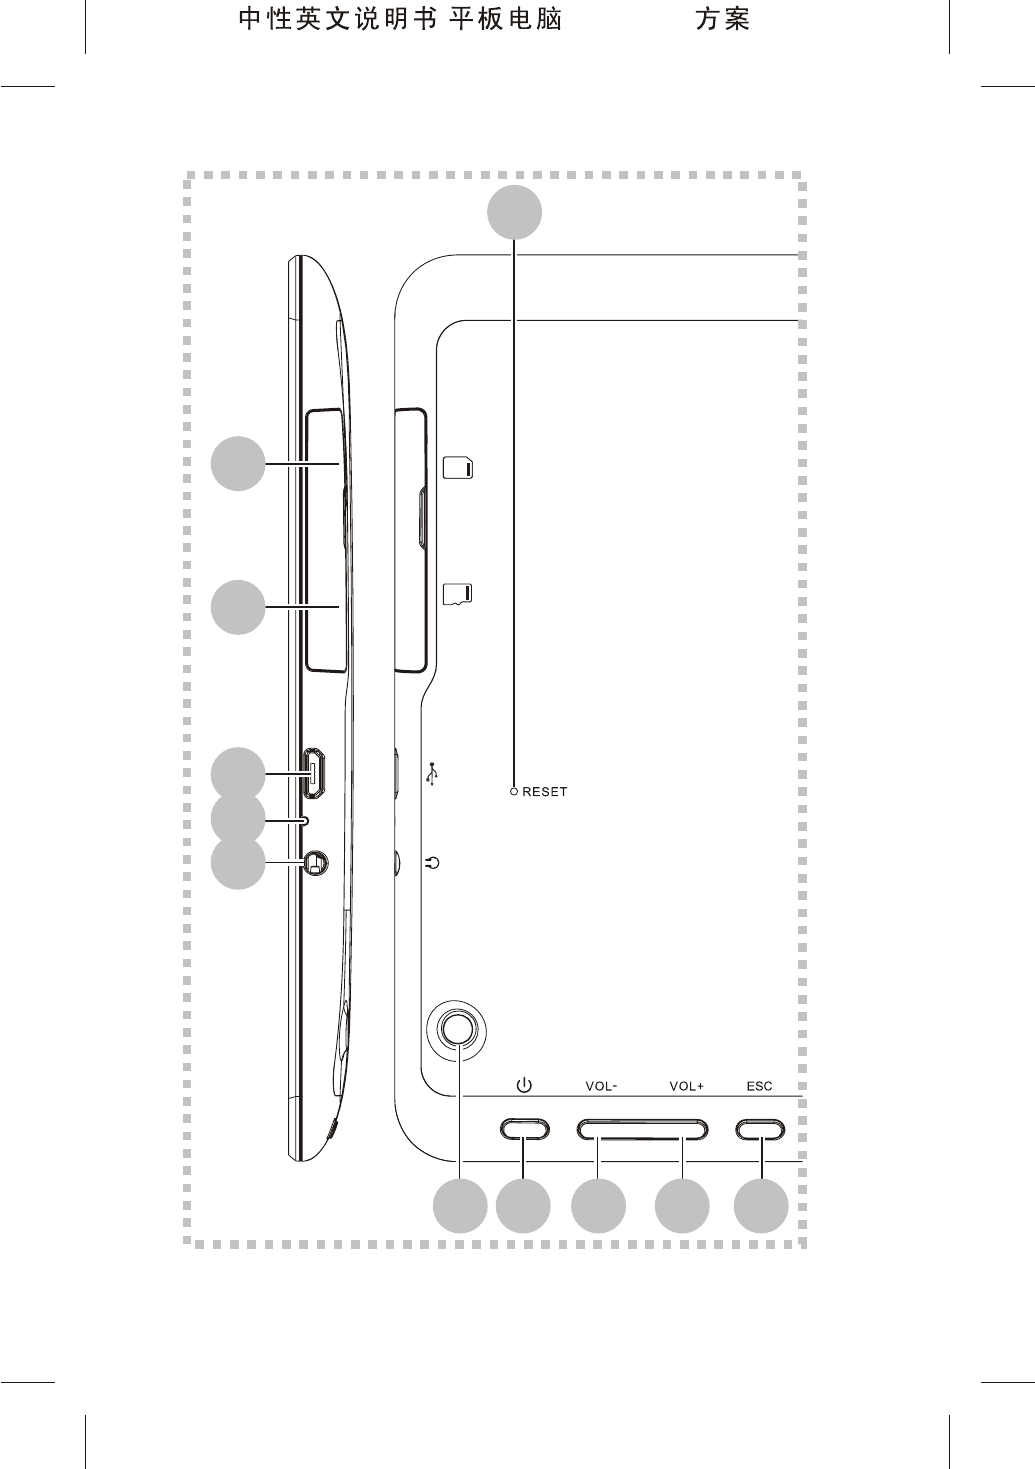
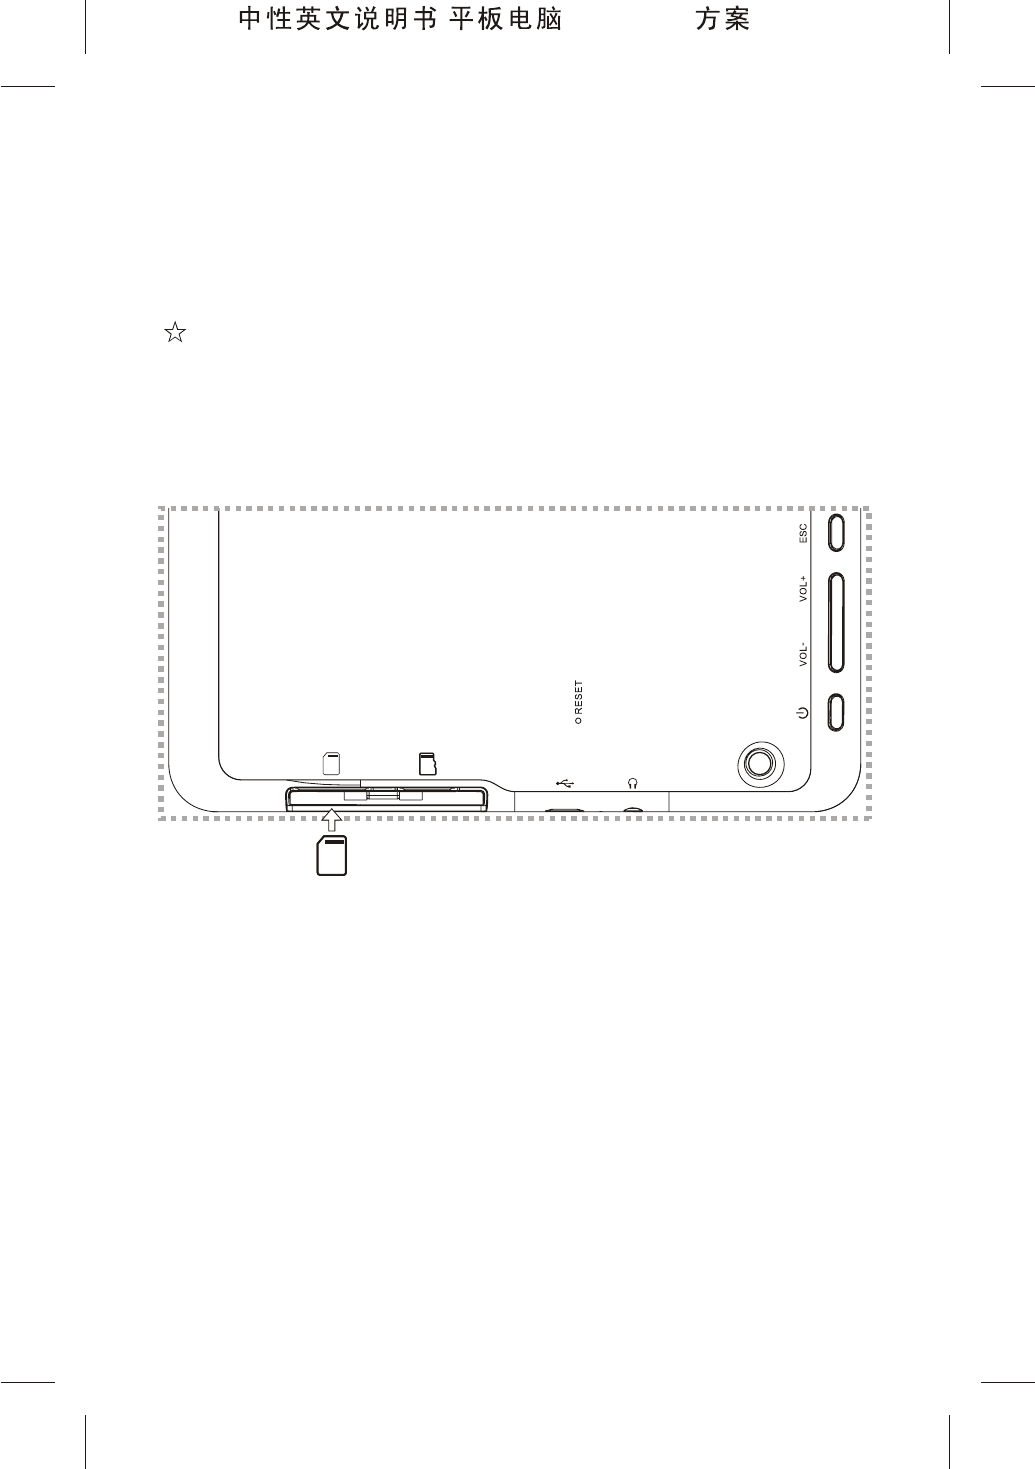
Buttons and Ports
Front View
Rear View
Right View
800P11B ( MTK8377 )
MIC
TF
SIM
3
4
5
6
7
8
910 11 12 13
A
8
800P11B ( MTK8377 )
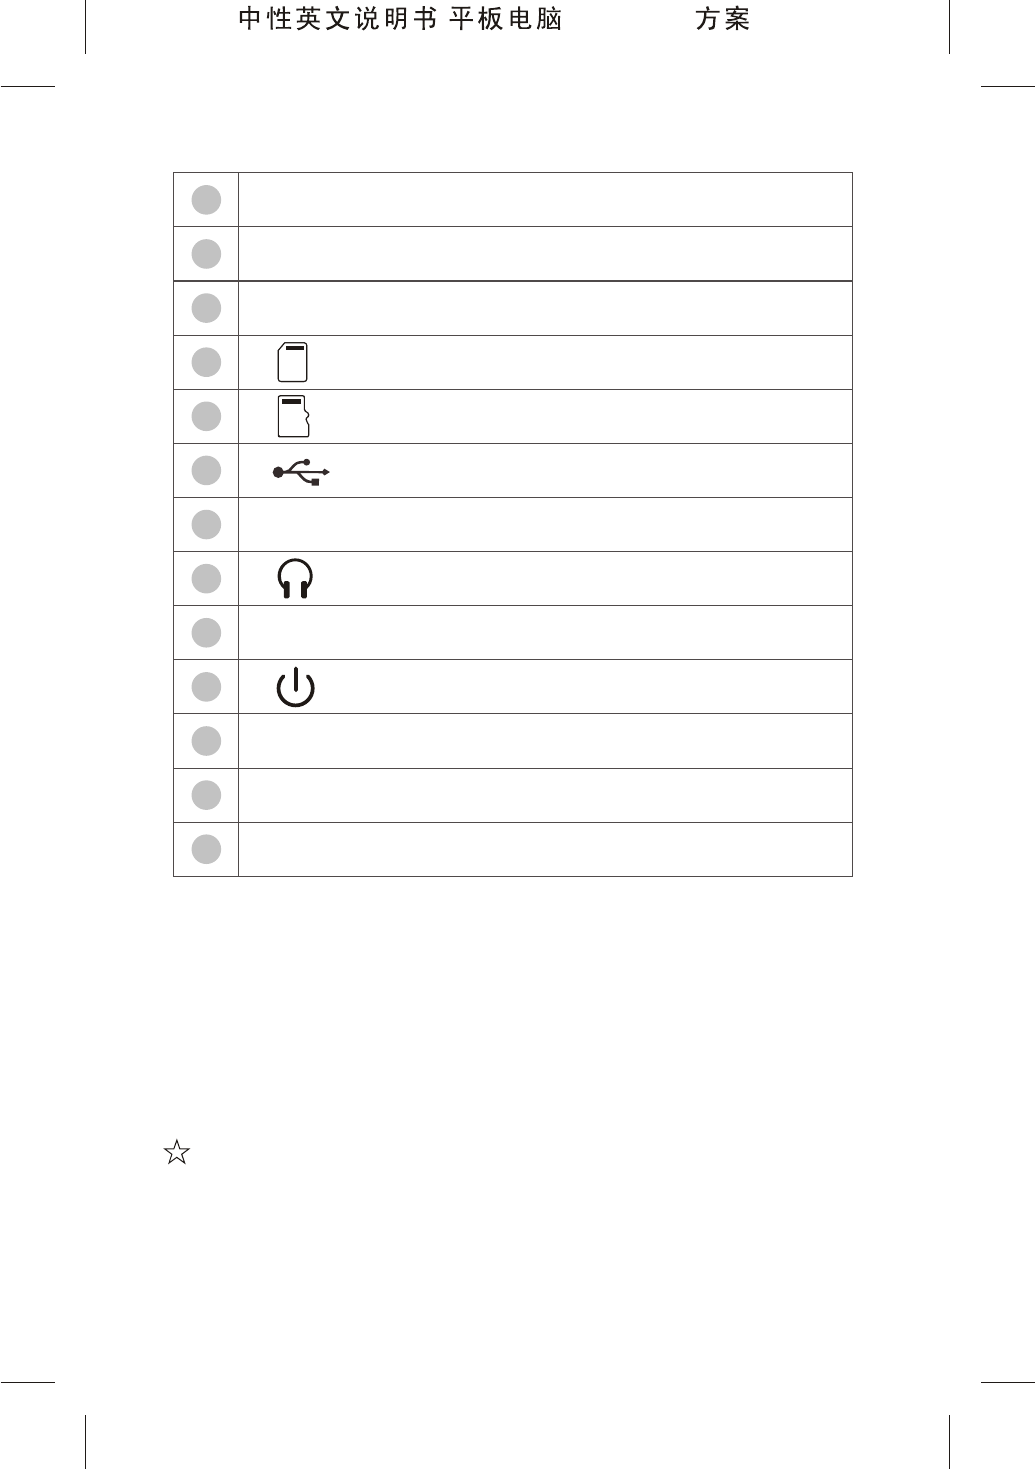
Front Camera
Speaker
RESET: Hard Reset Button Hole
: SIM Card Slot
: Micro SD Card Slot
: Micro USB Port / Power Input Port
MIC: Microphone
: Earphone port
Rear Camera
: Power Button
VOL-: Volume- Button
VOL+: Volume+ Button
ESC: Return Button
TF
SIM
11
12
13
7
8
9
10
6
5
4
3
2
1
Notes:
Hard Reset Button Hole: In case of dead halt etc., insert
a toothpick or similar object to the port, and press the reset
button in the port to execute the forced shutdown operation.
Installation Instruction
Micro SD Card Installation and Uninstallation
The device supports a standard Micro SD storage card
9
800P11B ( MTK8377 )

Installation:
Push a SD card into the bottom of the slot as shown in
the figure below until you hear a "Tap" sound, which means
the SD card is successfully installed.
Uninstallation:
1. TapSettings>Storage in the application list.
2. Find out the SD card in the Storage details, and tap
Unmount SD card.
10
MIC
TF
SIM
Micro
SD
800P11B ( MTK8377 )
3. Push the SD card towards the inner side of the slot
until it can be moved ahead, release the SD card, then
the SD card will be popped out.
Installation:
Insert the standard SIM/USIM card into the slot along
the direction shown in the figure until a click sound is
heard.
Note: The SIM card can't be recognized if it is inserted
when the tablet is powered on. Please turn it off before
installing the SIM card.
Uninstallation:
first turn off the tablet, push the SIM/USIM card to the
inside of the slot until the end, and then release to eject
the SIM/USIM card.
11
MIC
TF
SIM
SIM
SIM/USIM Card Installation and Uninstallation
800P11B ( MTK8377 )
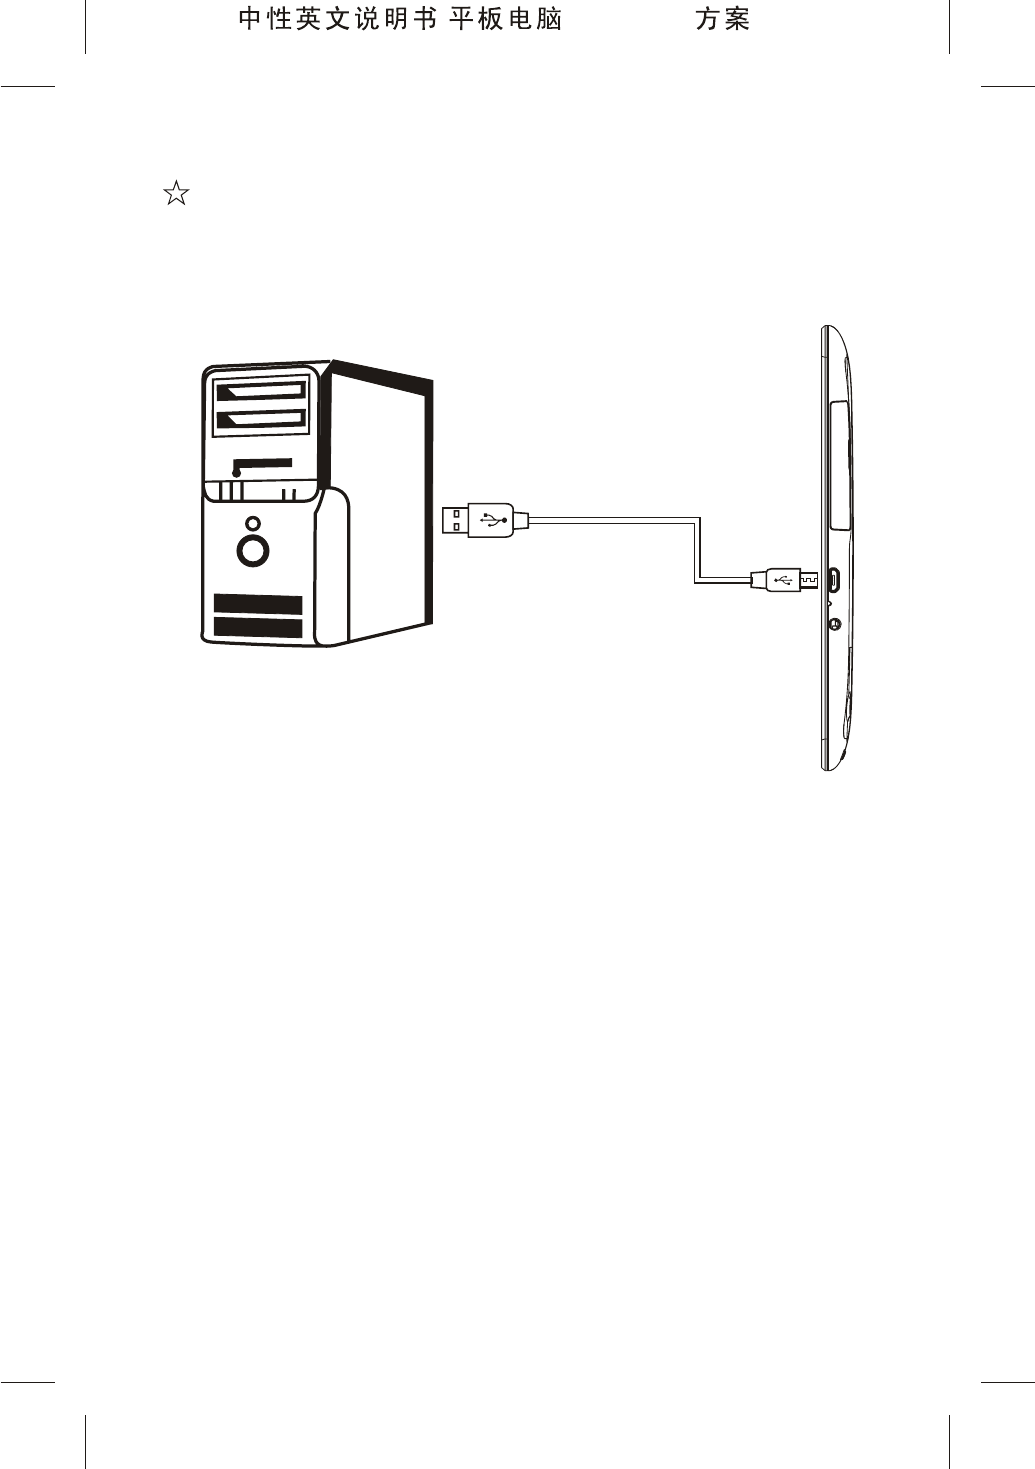
Connecting the Tablet to PC
Connection:
Connect the USB terminal of the cable to PC, and
connect the micro USB terminal to the tablet.
Settings:
1. Connect the tablet and PC with the USB cable, and
the system notification bar shows USB Connected.
2. Click the notification bar to show the window on the
screen, and click USB Connected in the notification bar.
3. USB mass storage device is opened on the screen.
4. After copying files, click to close USB mass storage
device, and unmount the SD card and built-in storage of
Android device from PC.
Note: When the USB mass storage device is turned on,
certain applications you are using may be stopped, and
are unavailable until you turn off the USB mass storage
device.
USB cable
12
800P11B ( MTK8377 )
QuickStart
Battery Charging
Before the first use, charging for the battery is a must.
Plug the power socket port of the adapter supplied with
the device into an AC socket of 100-240V, and plug the
output port into the power input interface of the device;
When the charging is normal, the icon in the status bar
indicates charging battery; when the charging is finished,
the status bar will prompt electric quantity 100%.
Note: To make sure the battery is fully charged, please
ensure that the first charging time is over 4 hours.
Power-on
Long press the power button for about 4 seconds to
start the device.
Unlocking
When the system is locked, press the power button ,
and the screen become bright, then press the lock icon,
and right-drag it towards the unlock icon to unlock the
touch screen and the system.
Locking
1. When the system is powered-on, press the power
button , and there is no display on screen, then system
is locked.
2. When there is not any operation on the screen for
minutes, the system will be auto locked.
Note: you can adjust the standby time in the Settings
1
13
800P11B ( MTK8377 )

14
>Display.
Power-off
When the system is powered-on, long press the Power
button for 2 seconds, then the power-off dialog box will
display on the screen, tap the OK option in the box to
auto power-off the system.
Volume Adjustment
Press the VOL+/VOL- key in the device to adjust the
volume.
Touch Screen Operation
The Android system defines several touch operations,
so as to give you a more convenient and efficient
experience.
Tap : Tap a target file with your finger.
Double-Tap: Double-tap a target file fast.
Long-Tap: Long-tap a target file for 2 seconds or more.
Drag: Drag a target file and slide to a new position.
Slide: Tap the blank place on the screen and fast move
in the up/down/left/right direction to browse a webpage or
turn to another page etc.
Zoom in/out: Put two fingers on the screen, and pinch
them together to zoom out or move them apart to zoom in.
Note: Please use the fingertip to tap the screen; the
touch screen doesn't respond if you tap with the
fingernail.
800P11B ( MTK8377 )

Introduction to the Home Screen of PAD
Introduction to Icons of the Notification Bar
Tool Bar Desktop Notification Bar
The device is connected with a PC.
Charging for the battery.
Indication for battery power.
Downloading/Uploading files.
Notification for new emails.
Wi-Fi has been activated.
Uploading/Downloading Data by Wi-Fi
Warning Information
Software update notification
15
800P11B ( MTK8377 )
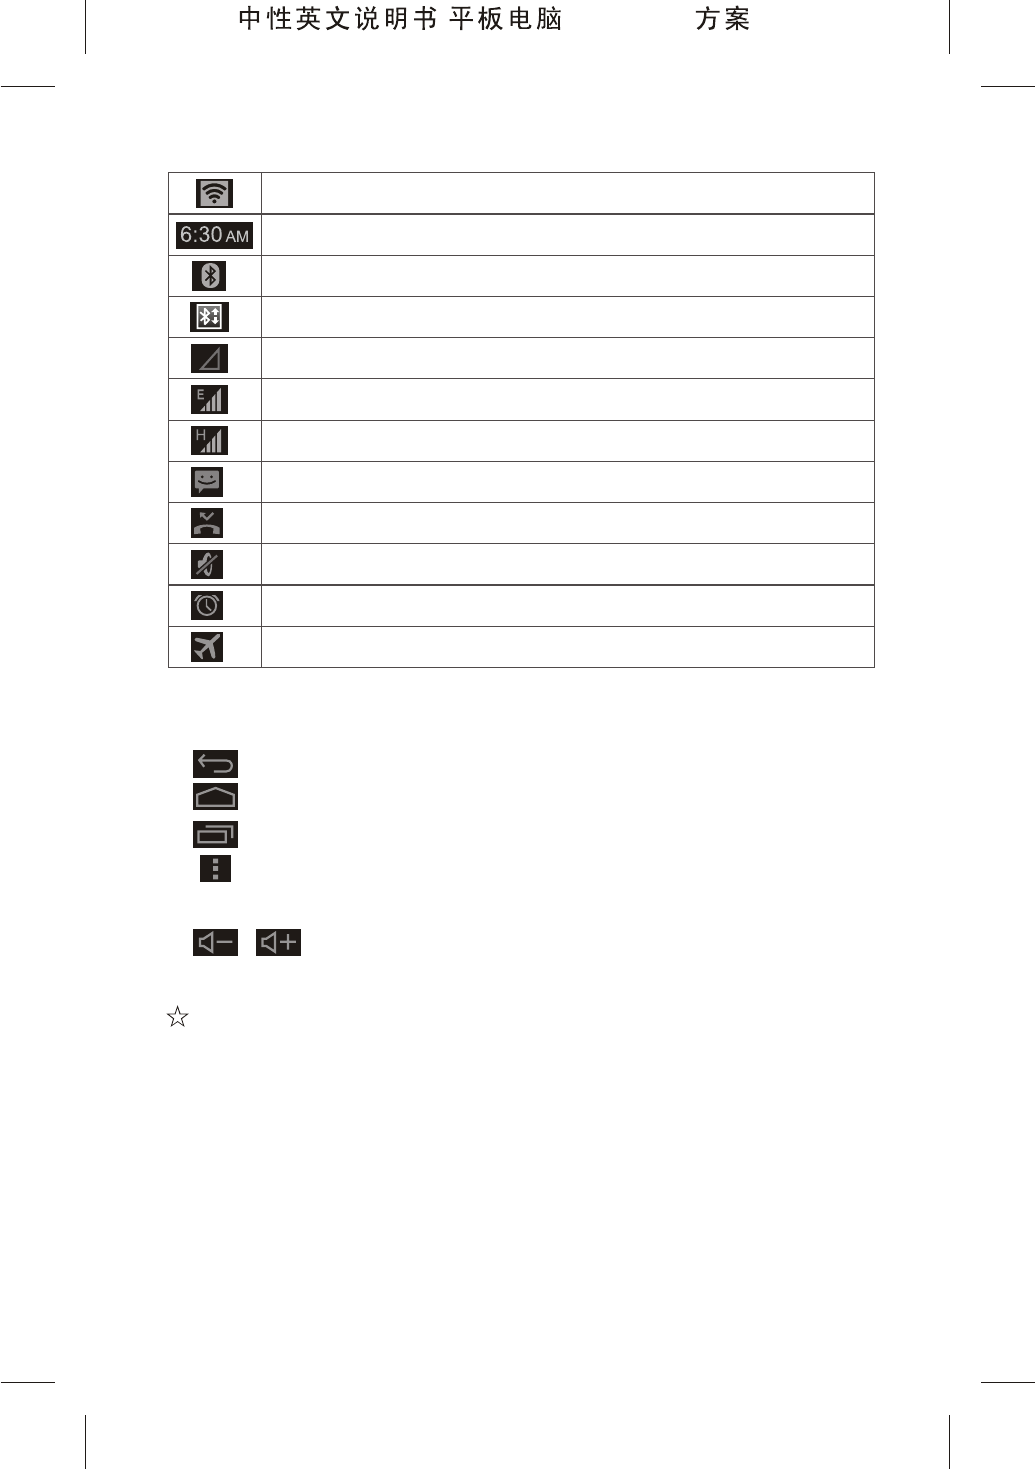
Introduction to Icons of the Tool Bar
Return: tap the icon to return to the previous page.
Desktop:tap the icon to return to the desktop.
: tap the icon to view recently visited applications.
: Shortcut menu: Tap on this icon to display the
shortcut menu options.
/ : Volume +/ Volume-: Adjust the volume.
Basic Operation Method
1. Tap the screen and left-slide it to turn to the previous
page; right-slide it to turn to the next page.
2. Tap a system notification icon to view details of the
notification icon.
3. Press the blank space on the desktop to display
Choose wallpaper form, tap Wallpaper/Live Wallpaper
16
Portable WLAN hotspot is enabled
Current system time
Bluetooth activated
File transfer via Bluetooth
No signal
2G network signal strength
3G network signal strength
New message
Missed call
Tablet mute
Alarm clock on
Flight mode
800P11B ( MTK8377 )
/ /Gallery to select a wallpaper.
4. Press an icon on the desktop and drag it to other
location: drag an icon to the Xicon on the top of the
screen to delete the icon; drag the icon to the box on the
left or right side of the screen to drag it to the previous
page or the next page; drag the icon on another icon to
put these two icons together, and the system will create a
new folder for them; if they are game applications, tap the
folder and tap the Unnamed Folder to name the folder as
"game".
5. Tap the option on the upper right of the desktop to
enter the application list.
6. Long-tap an application icon to place the icon to the
desktop.
7. Tap an application icon to run the application.
System Time and Date Setting
1. Tap the option on the upper right of the desktop to
enter the application list.
2. Tap Settings > Date & time > Set date/Set time in
the application list. After the setting completes, tap Set to
confirm and exit.
3. Tap Use 24-hour format and Choose date format
to set a time display format.
Note: If the device is connected with the internet, you
can tap Select time zone to select the area where you
locate, and tap Automatic date & time to auto obtain the
current time by the system from the internet.
Video Wallpapers
17
800P11B ( MTK8377 )
Input Method Selection
Tap Settings >Language & Input, and tap an input
method desired in the KEYBOARD & INPUT METHOD.
Application
Notes: The device has very complicated functions; you
can install an application by yourself. Operation methods
differ according to different applications. Please operate
applications according to the computer knowledge you
possess; the operation of applications in the manual is
only for reference.
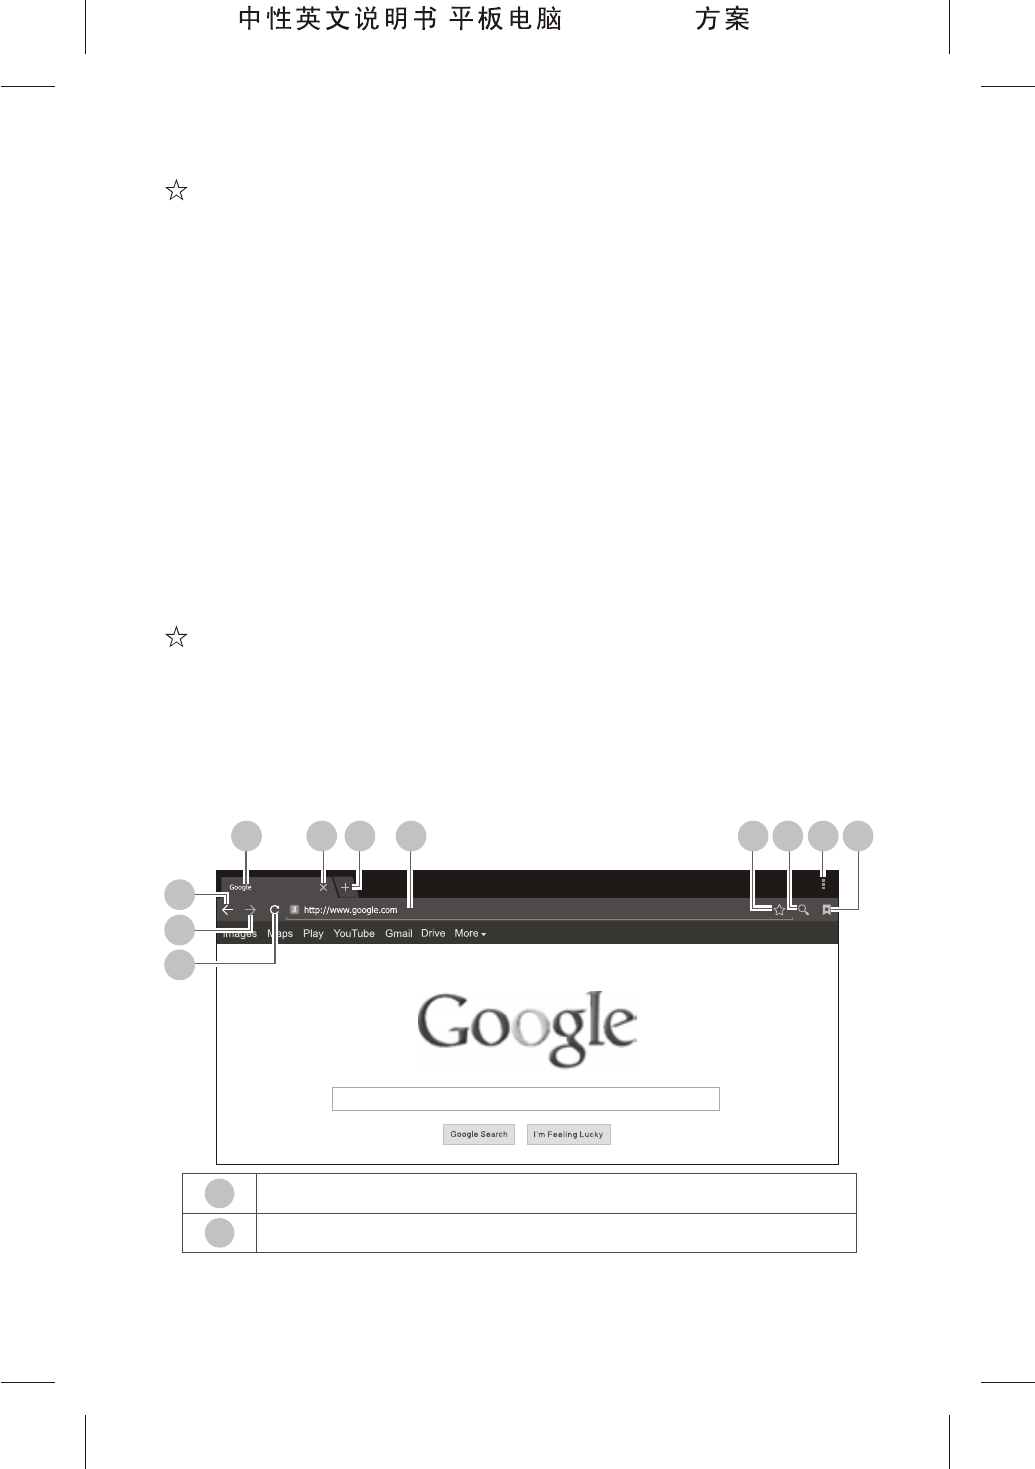
Browser
Tap the browser icon in the application list to run the
browser.
Introduction to the option icon of the browser
18
4567 11
1098
1
2
3
2
1Return to the previous webpage
Go ahead to the next webpage
800P11B ( MTK8377 )
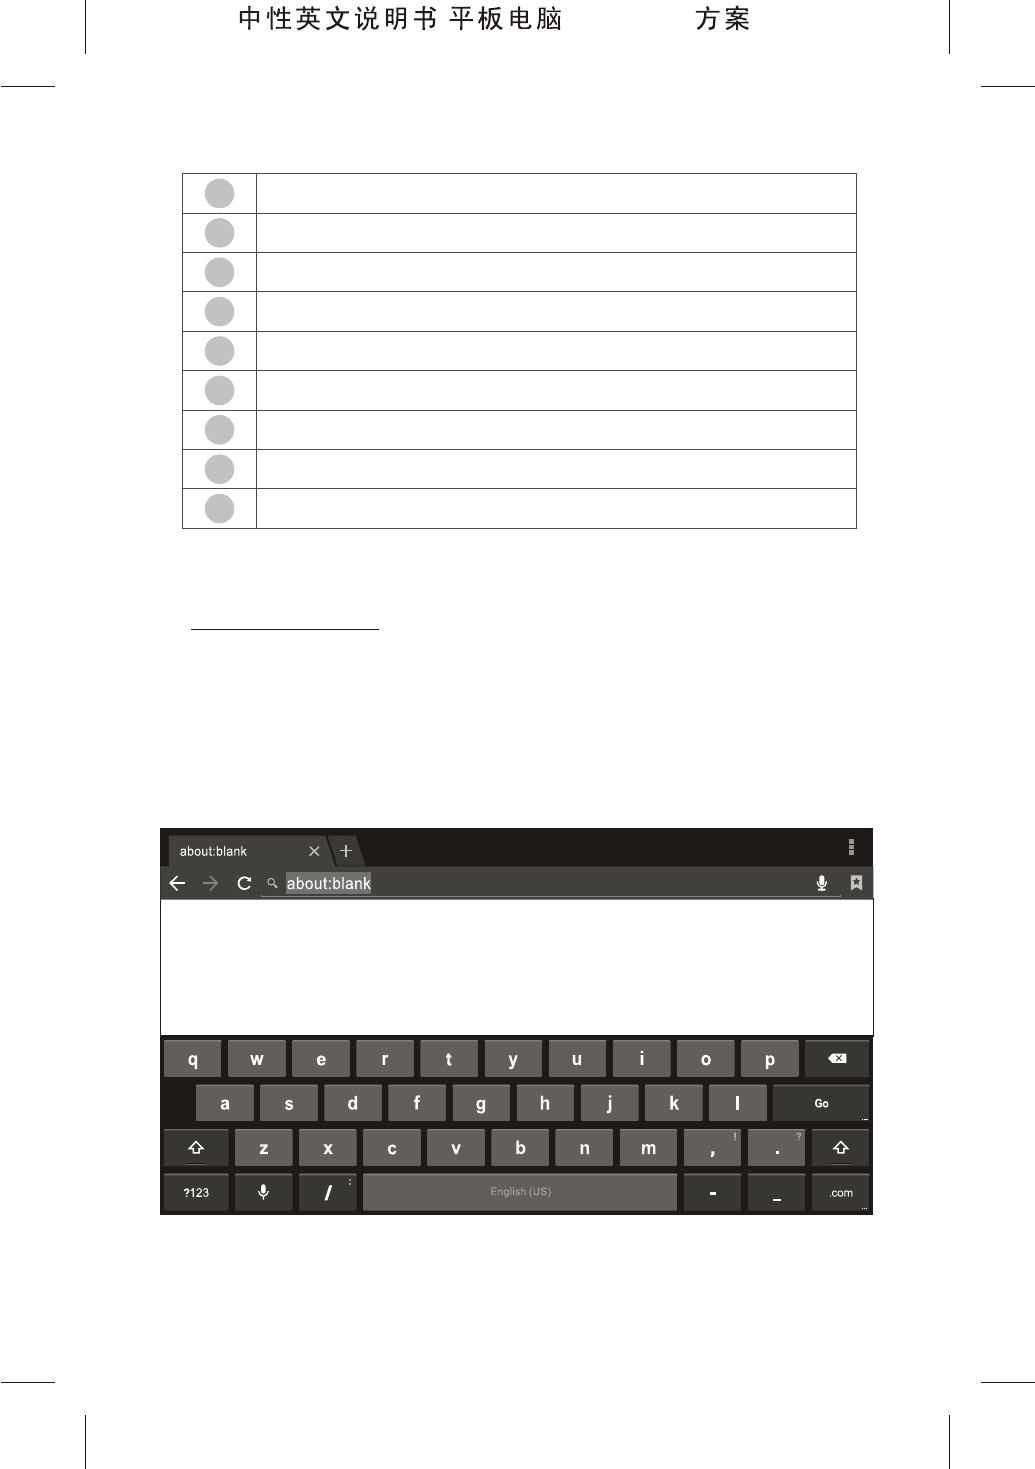
Basic Operations for Browser
Visit Websites
Before visiting websites, please connect your device to
the Internet via Wi-Fi, mobile Internet or Ethernet (refer to
"System Settings" for specific settings).
1. Tap the address bar in the browser, and you will see
a virtual keyboard.
11
10
9
8
7URL input box
Add Bookmark option
Input URL option
Browser Menu option
View Bookmark option
6
5
4
3Refresh webpage
Window of a browser webpage
Close the current webpage window
Create a new webpage window
19
800P11B ( MTK8377 )
2. Tap the virtual keyboard to input the correct address
and then tap the GO key at the virtual keyboard to visit
the relevant website.
Touch Screen Operations for Webpage Browsing
1. Zoom in the webpage:put two fingers closely
together on the target part of the webpage and separate
them quickly, or double tap the target part of the
webpage.
2. Drag the webpage:put a finger on the screen and
slide it upwards, downwards, leftwards or rightwards
quickly to drag the webpage upwards, downwards,
leftwards or rightwards.
3. Tap Text/Link/Image to display and edit the editable
items.
Use of Bookmark
You can use the bookmark to save your favorite
webpages so that you can find and open them easily next
time.
Save a Webpage as a Bookmark
1. Tap the add bookmark icon in the browser.
2. Tap the virtual keyboard to input the browser tabs.
3. Make sure the address displayed in the address bar
is correct.
4. Tap Account and Add to to display the relevant
drop-down lists, tap account and target storage
location, and then tap OK.
View a Bookmark
1. Tap the view bookmark icon in the browser.
20
800P11B ( MTK8377 )
2. Tap the target bookmark to open it.
Delete or Edit a Bookmark
1. Tap the view bookmark icon in the browser.
2. Long-tap the target bookmark.
3. Edit the relevant editable items.
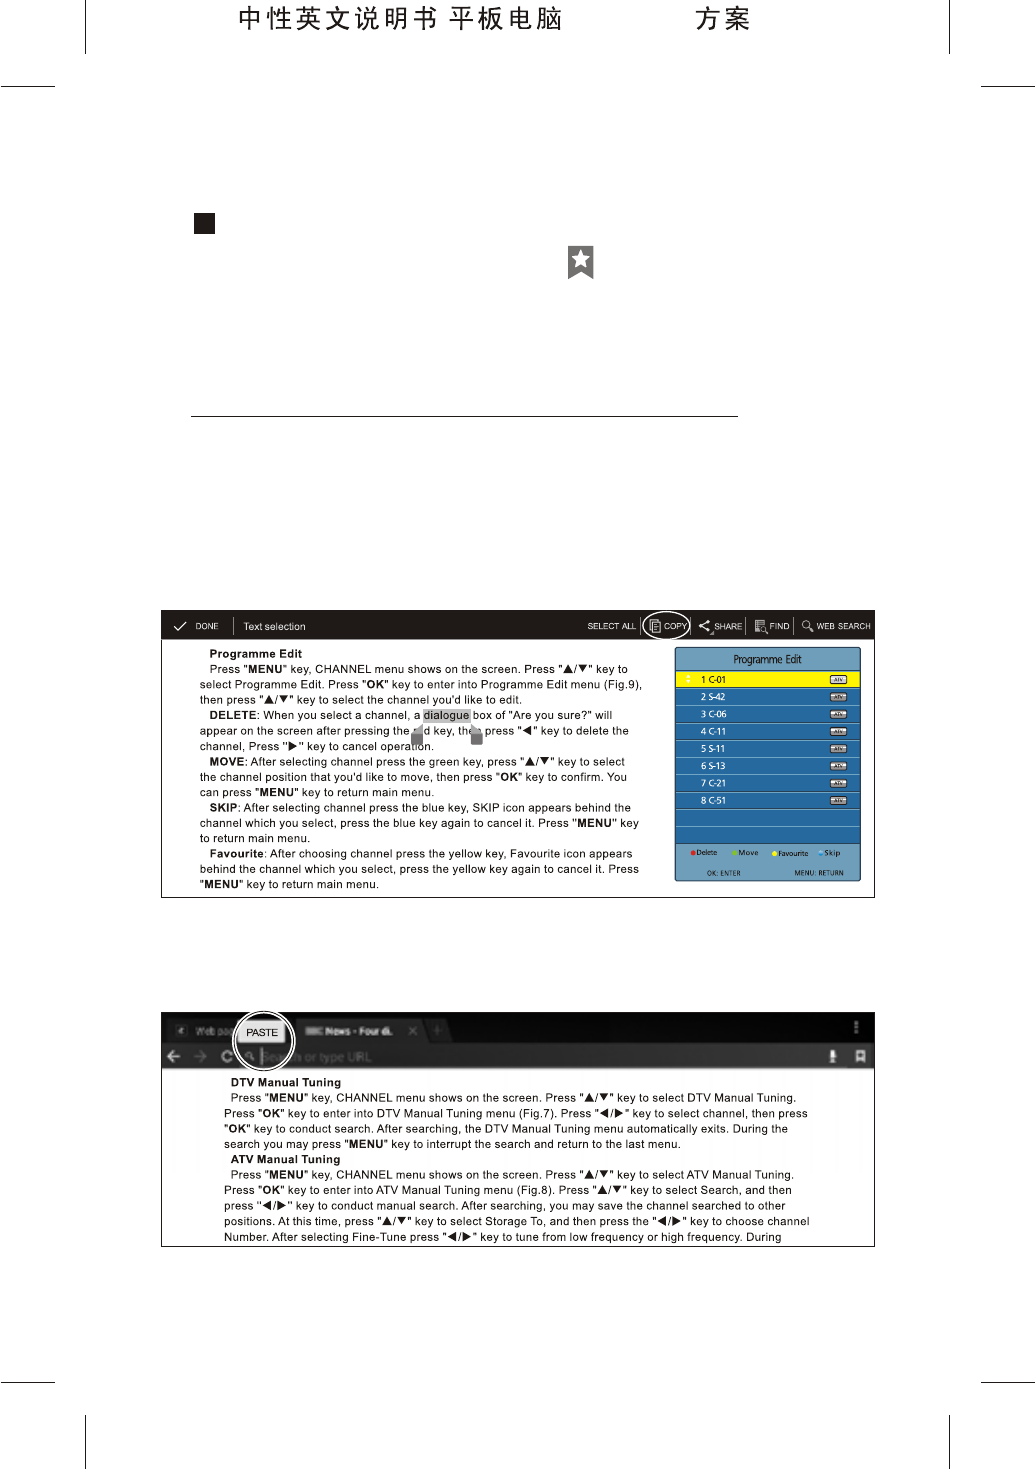
Copy and Paste the Text from the Internet
1. Long-tap the target text on the Internet page, and
you will see the editing options on the upper part of the
screen. Drag the cursor select the text that you want to
copy.
2. Tap the COPY option on the browser toolbar.
3. Long tap the textbox to display the option paste. Tap
PASTE to paste the copied text into the textbox.
21
800P11B ( MTK8377 )
Save the Image from the Internet
1. Long tap the target image on the Internet page, and
then tap Save image in the editing option.
2. Tap the system notification bar to check the
downloading progress. When the downloading finishes,
please tap View Details.
Download the Information from the Internet
1. Input the relevant link address in the address bar.
2. Open the link to find and tap the Save/Download
option, and the system will auto start downloading.
3. Tap the system notification bar to check the
downloading progress and details.
Browser Settings
1. Tap the menu icon at the upper right corner of the
browser and then tap the Settings option.
2. Tap General >Set Homepage to set the homepage
address for the browser.
3. Tap Privacy & Security >Clear cache to clear the
browser's locally stored cache files.
Please complete other settings as per your specific
needs.
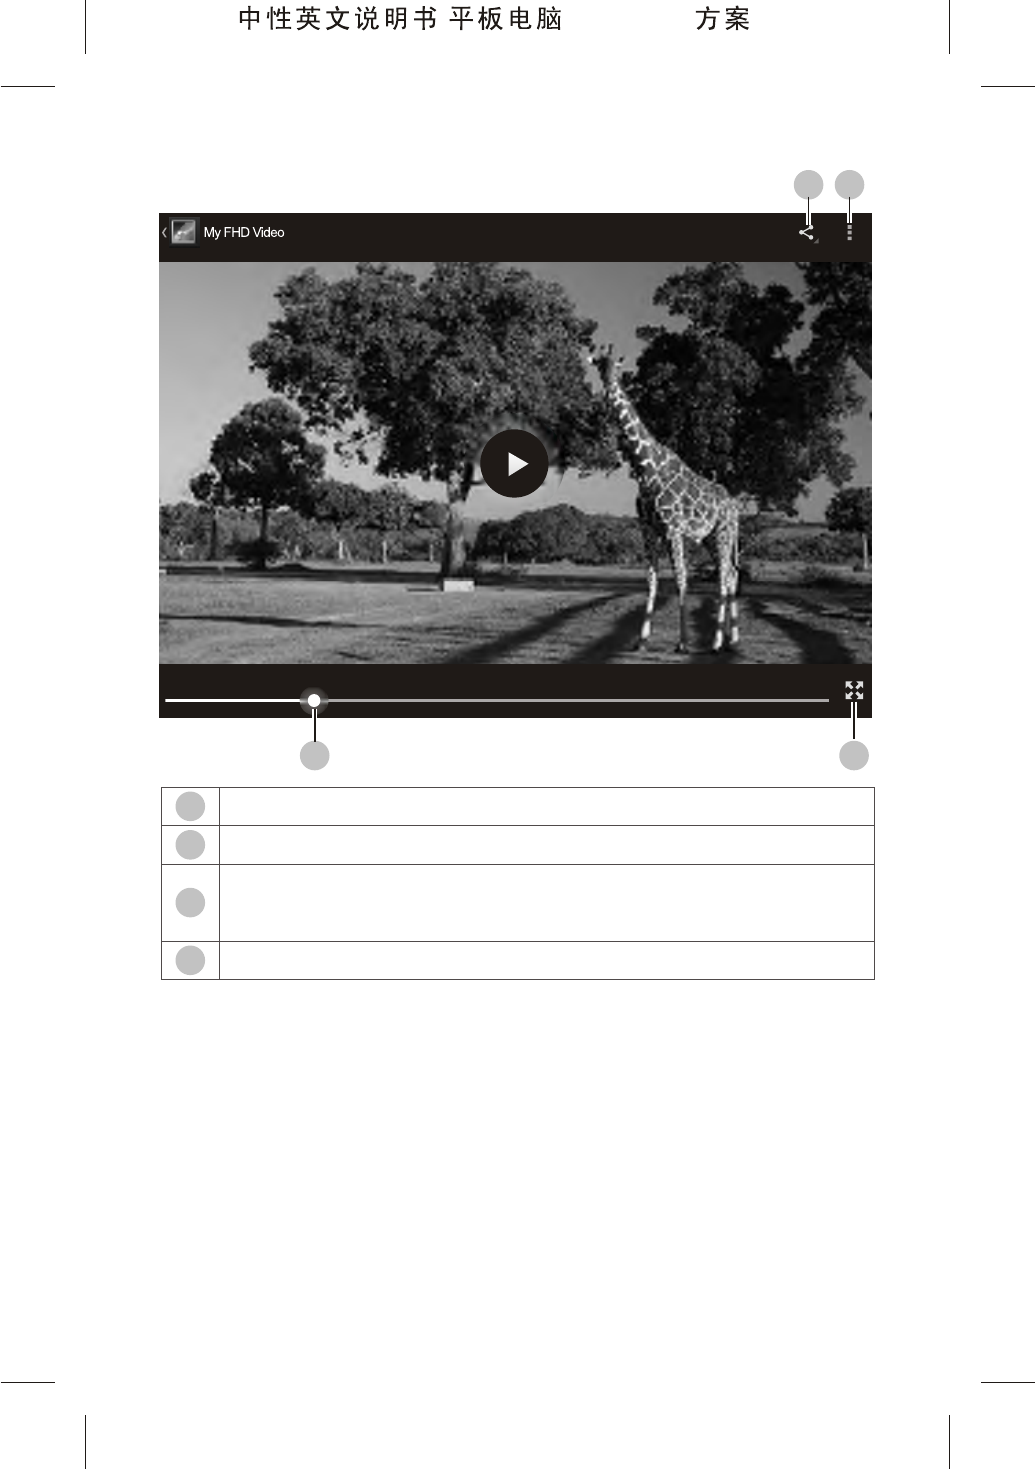
Video Player
Tap video player in the application list. tap a video file
to play it.
Introduction to the Icons on the Video Player
22
800P11B ( MTK8377 )
Note: If the video is stuck while playing with the video
player of the tablet, the video file may be too large, or the
hard decoding of the tablet doesn't support the video
format. Please download a third party application from
Android Market.
01:5500:26
3
2
1
4
Share icon: select the mode to share this video.
Settings menu icon.
Progress bar: long tap the cursor and drag it to
adjust the playing progress.
Aspect ratio: Original, 16:9, 4:3.
23
1 2
34
800P11B ( MTK8377 )
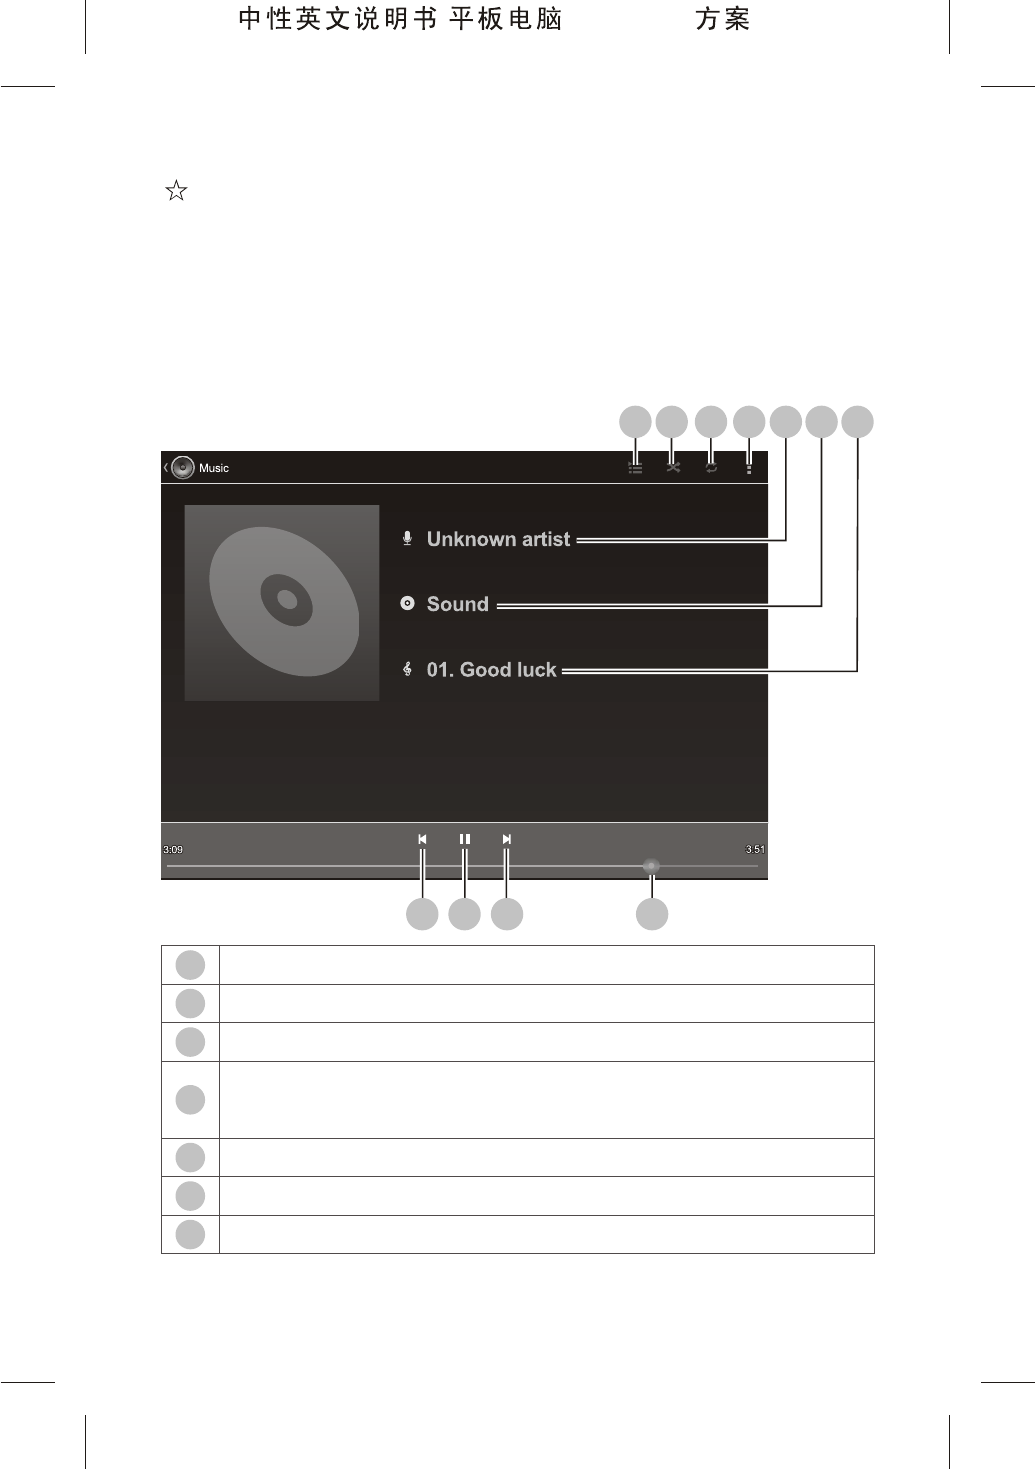
Music Player
Tap Music player in the application list.
The music player supports the artist list, album list and
song list. Select a song from the song list to play it.
Introduction to the Icons on the Music Player
3
2
1Display the play list.
Play songs at random.
Set the loop playback mode.
Settings option: tap the icon to set up the playing
sound effect.
Artist name of the current song.
Album name of the current song.
Name of the current song.
1
23
45
67
8910
11
4
5
6
7
24
800P11B ( MTK8377 )
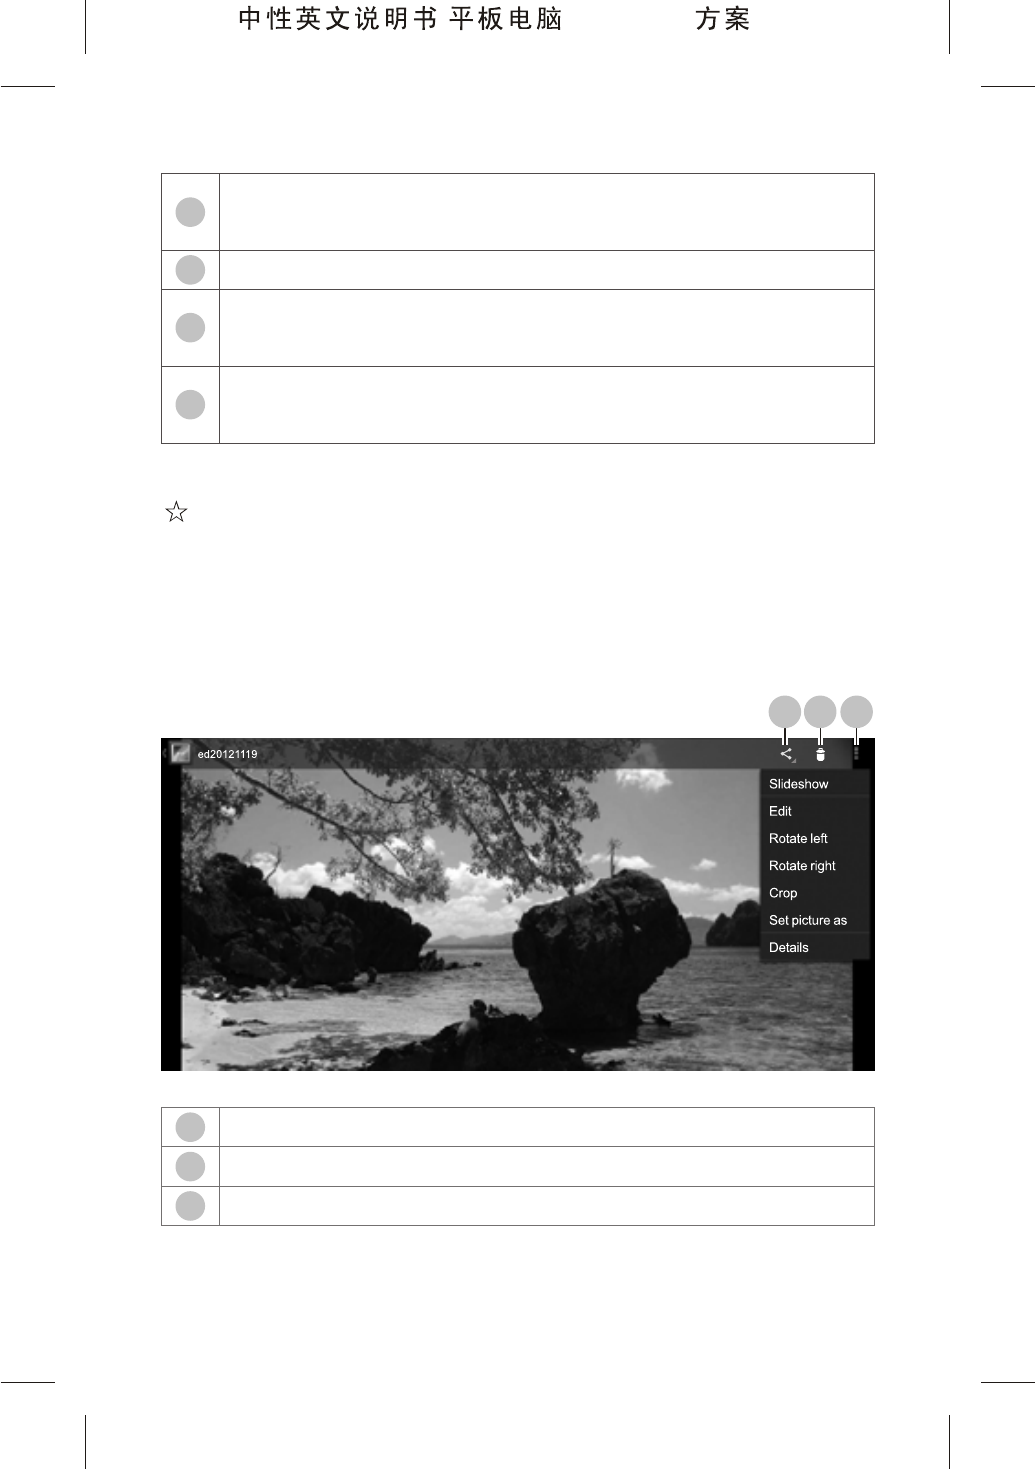
Image Player
Tap Gallery in the application list and then tap a file to
play it.
Introduction to the Icons on the Image Player
25
1 2 3
Previous/Fast Rewind: tap it to play the previous
song, or long tap it to fast rewind.
Play/Pause
Next/Fast Forward: tap it to play the next song, or
long tap it to fast forward.
Progress bar: long tap the cursor and drag it to
adjust the playing progress.
8
9
10
11
3
2
1Share the image.
Delete the image.
Settings.
800P11B ( MTK8377 )
Basic Operations for Image Player
1. Zoom in the image:put two fingers closely together
on the screen and separate them quickly, or double tap
the screen.
2. Zoom out the image:put two separated fingers on
the screen and quickly pinch them together, or double tap
the screen.
Note: The image can not be zoomed out when played
in original size.
3. Page up/down:long tap the screen and slide it
leftwards/rightwards quickly to play the previous/next
image.
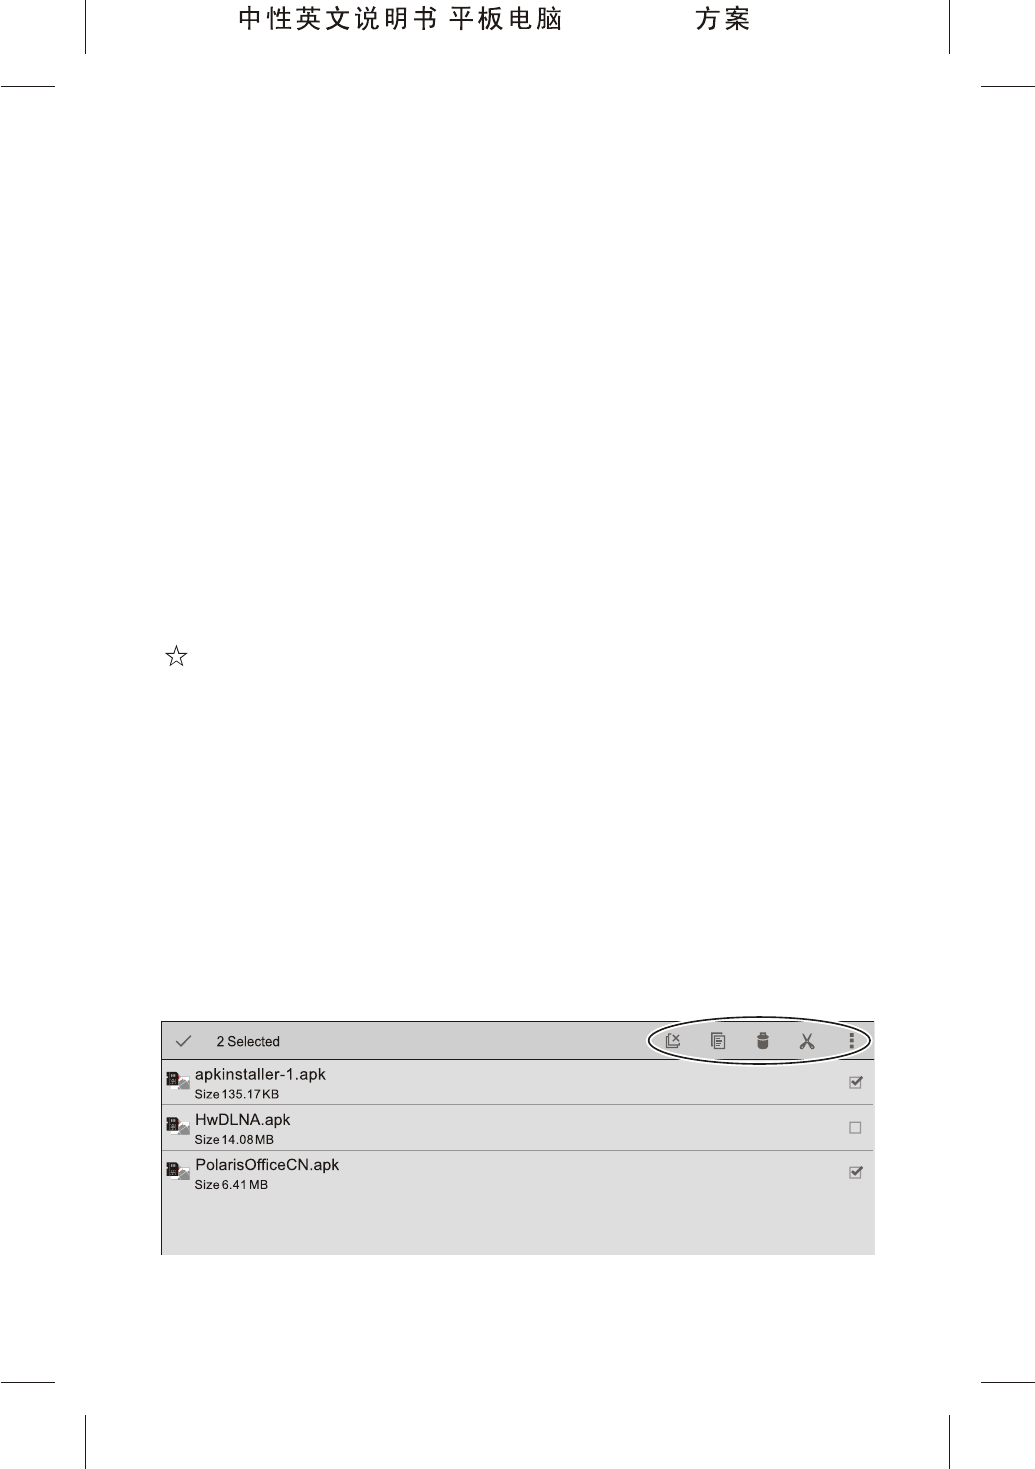
File manager
Tap File manager in the application list.
Edit a File
1. Tap the disk where the target file is located.
2. Tap the folder where the target file is located.
3. Tap the target file to run it.
4. Long tap the top of the screen of the destination file
to show the edit menu, including Select All, Copy, Delete
and Cut, Menu, and perform the operations accordingly.
26
800P11B ( MTK8377 )
5. Tap the boxes to the right of the file names to select
multiple files (the selected file names are ticked in blue);
on the edit menu, tap Copy, Delete, Cut and Menu to
perform the operations accordingly.
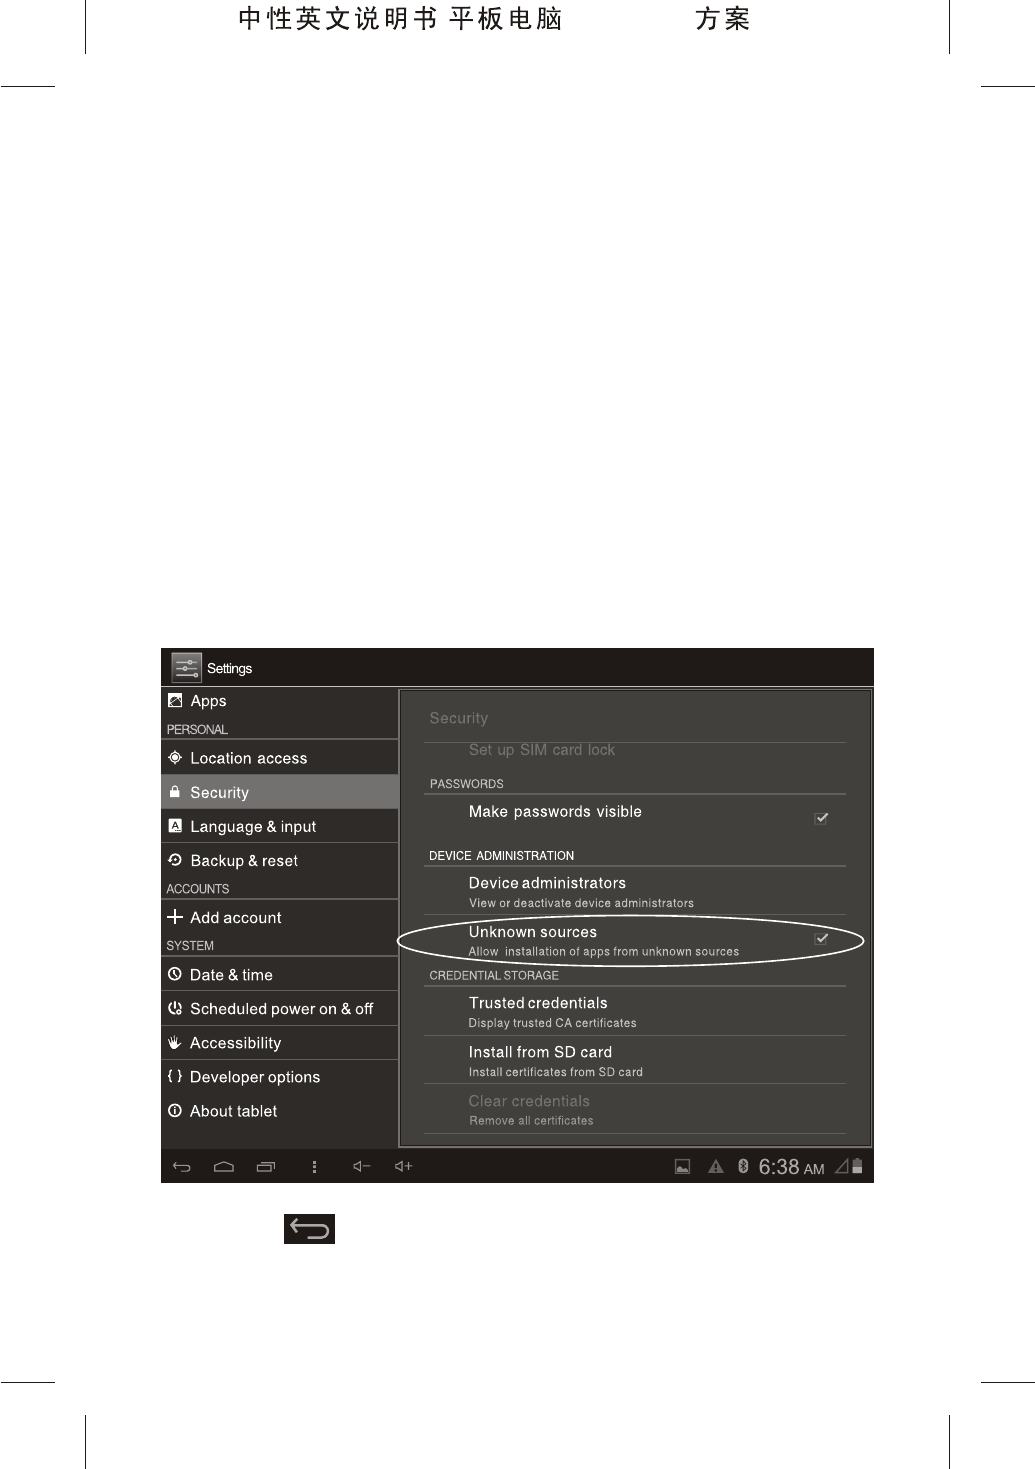
Installing application
1. In the file directory, find the application to be
installed, and tap on the application.
2. The system displays prompt box to prohibit the
installation (by default, the system prohibits installing
applications from unknown sources). You need to tap
Settings >Security >DEVICE ADMINISTRATION to
check the Unknown sources option.
3. Tap to return to the installation page, tap the
27
800P11B ( MTK8377 )
application installation package again to begin installing,
and tap Done after installed. After the application has
been successfully installed, the icon will be added to the
application list, and you can tap the icon in the application
list to start the application.
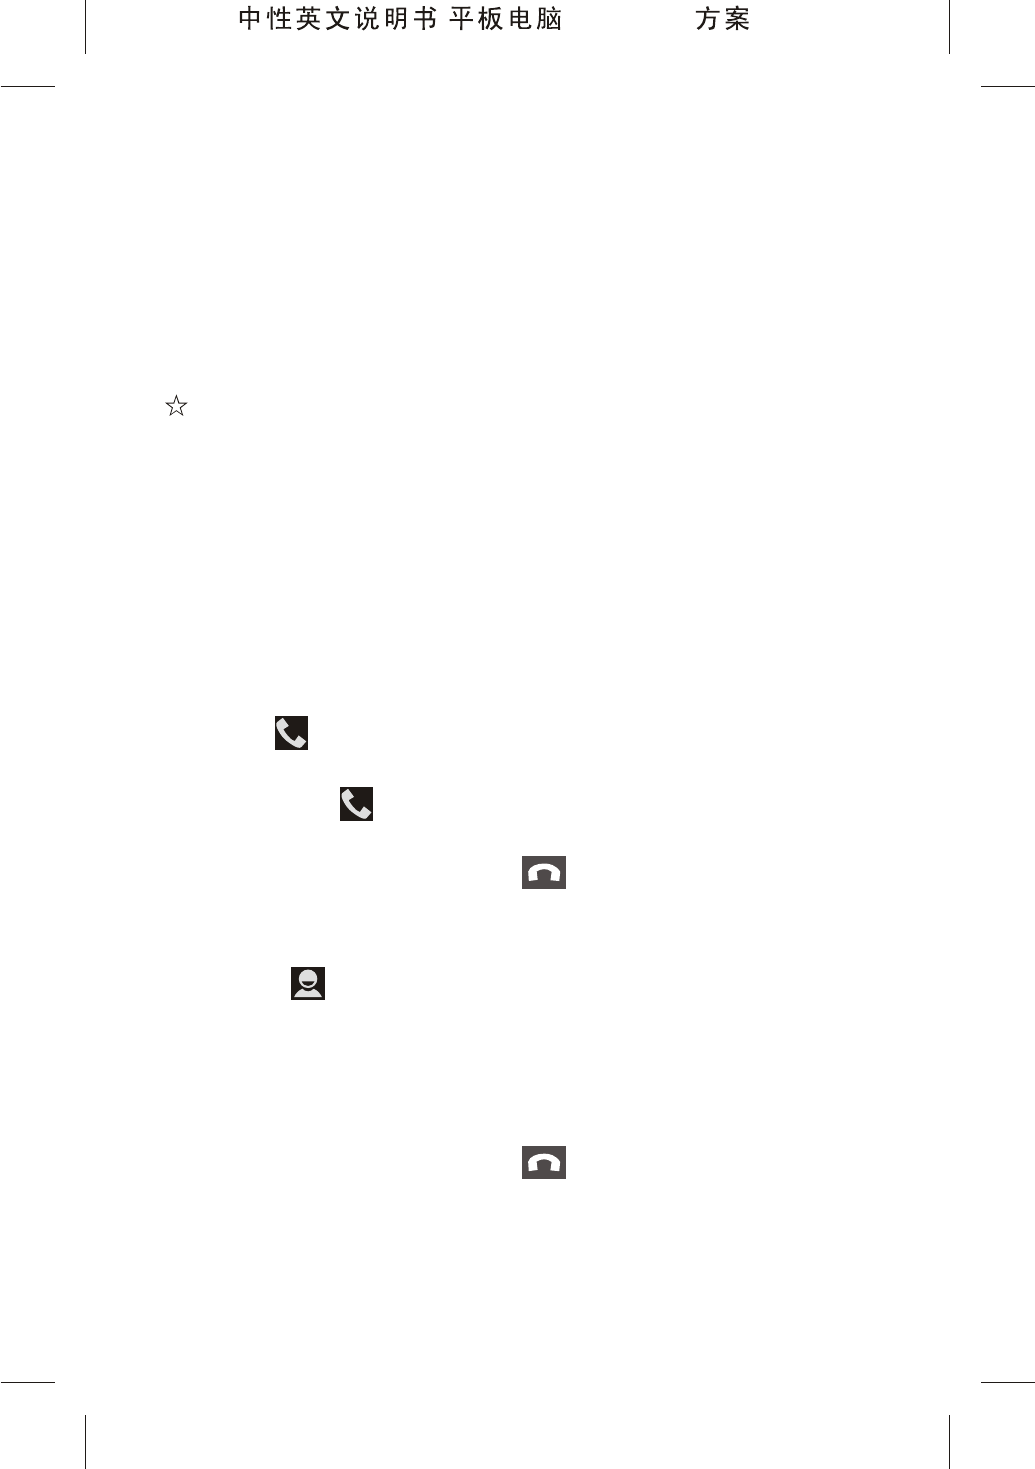
Call functions
Tap theDial option in the application list.
Note: Before using dial and message functions, please
check if the SIM card is installed; if not, turn off the tablet
first, insert the SIM card into the slot (the SIM card can't
be recognized if it is installed when the tablet is powered
on), and then restart the tablet.
Calling via direct-dial
1. Tap in the upper left corner of the dial interface.
2. Tap the virtual dial keys to enter the phone number,
and then tap in the bottom of the screen to call the
number.
3. When the call ends, tap to end.
Calling via Contacts
1. Tap in the upper right corner of the dial-up
interface to access to local contacts.
2. Find the number in the Contacts list, and tap on the
contact to begin calling (please refer to Contacts on how
to create a contact).
3. When the call ends, tap to end.
28
800P11B ( MTK8377 )
Calling via Call log
1. Tap in the top of the dial interface to view recent
call log.
2. In the call log list, the blue arrow indicates incoming
calls, green arrow indicates outgoing calls, and red arrow
indicates missed calls. In the list, tap on the right to
call the number.
3. When the call ends, tap to end.
Answering or rejecting a call
1. When receiving a call, Long tap , and slide left to
to reject the call, slide right to to answer the call,
slide up to to reject the call and reply in message.
2. In the call interface, tap to show the keypad, tap
to turn on the speaker, tap to turn off the
microphone, tap to pause the call, tap to enter the
dial interface, and add a third party to join the call; tap
to create a conference call. (Pause, third-party call and
conference call require network support. Please consult
the network operator for details).
People
Tap a People in the application list.
Creating a contact
1. Tap in the contacts screen.
2. Enter the basic information and numbers of the
contact.
3. TapDone to save the contact information.
Saving received call / missed call as a contact
1. Tap the dial application, and tap in the Call log
29
800P11B ( MTK8377 )
interface.
2. When the system asks whether to add the number to
Contacts, tap OK.
3. If you have previously saved the contact details, find
the contact and save the number to the contact; if the
contact hasn't been created, tap Create contact to create
a new contact.
Messaging
Tap Messaging in the applications list.
Creating a messaging
1. Tap in the messaging screen.
2. Enter the recipient number or tap and add the
recipient number from People.
3. Enter the message content, tap on the top of the
screen to add attachment (the message will be
automatically converted to MMS when attachment is
added), and tap to send the message.
Replying messaging
1. Tap the message to be replied in the messaging list.
2. Enter the message content and tap to send the
message.
Camera
Tap Camera in the application list.
Introduction to the Icons on the Camera
30
800P11B ( MTK8377 )
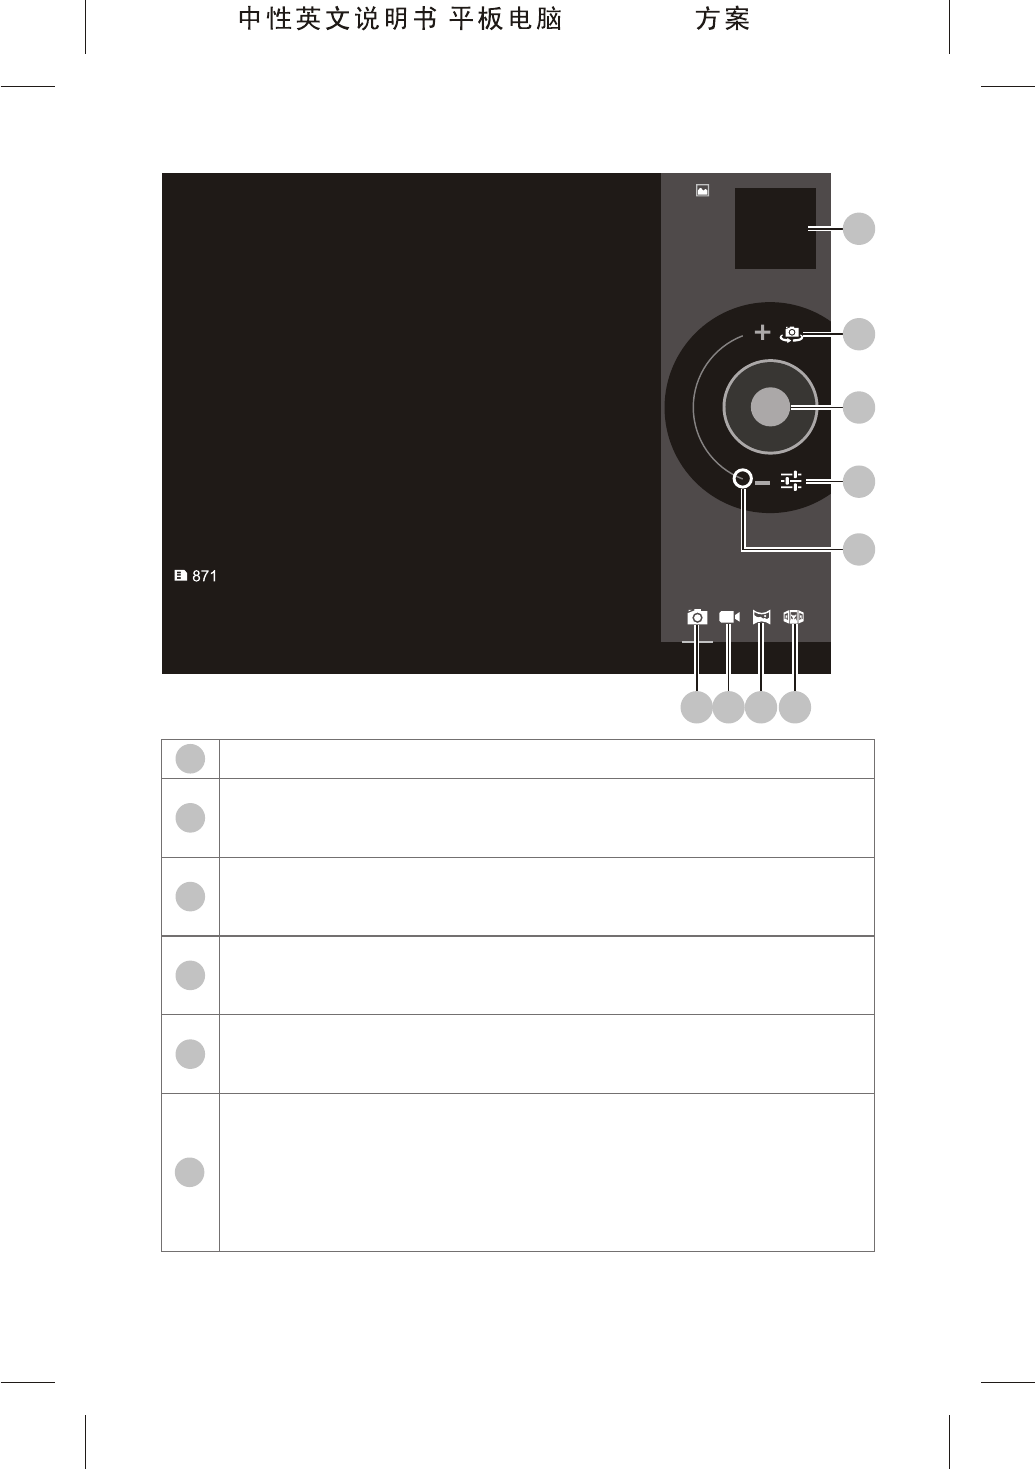
4
3
2
1Camera mode: tap it to switch to the camera mode.
Video recording mode: tap it to switch to the video
recording mode.
Panoramic shooting, tap this item to switch to
panoramic shooting model.
Multi-angle shooting; tap this option to switch to
multi-angle shooting mode.
Zooming: slide it towards " + " / " - " to zoom in/out
the focal length.
Settings: enter the settings mode.
AW: set the white balance.
SCN: set the view finding mode (the white balance
does not work in Night mode).
6
5
1
23
4
6
7
5
8
9
31
800P11B ( MTK8377 )
32
Note: Tap on the tool bar to pop out operation icons,
and tap to exit Camera.
E-mail
Tap Email in the application list.
Set and add your E-mail account at first use.
1. Input your E-mail address and password and then
tap Next. (For general e-mail accounts, it will skip to step
5 when you tap Next; for the corporate e-mail accounts,
you also need to set up according to step 2, 3 and 4).
2. Select an account type from POP3, IMAP and
Exchange based on the service provided by your E-mail
provider.
3. Confirm the settings for the receiving server and
then tap Next.
4. Confirm the settings for the sending server and then
tap Next.
5. Now your E-mail account has been set successfully.
tap Gave this account a name to set the account name
and tap your name to set your signature for outbox E-
mails.
6. TapInbox to receive E-mails.
7
8
: Camera settings: set the photo size.
: exit the camera settings.
Shoot: tap it to shoot a photo.
Front/rear camera switch key.
View: tap it to view the photos.
8
6
800P11B ( MTK8377 )
Send an E-mail
1. Login your E-mail account and then tap the icon
on the upper part of the screen.
2. Complete the Receiver and Subject, input the E-mail
text, tap the icon to add attachments, and then tap the
option Send on the upper part of the screen to send the
E-mail.
System Settings
Settings option helps users configure the wireless
network, change the system time, set the input method,
view system properties and so on.
Set the Wi-Fi Network
1. Tap Settings in the application list.
2. Tap the Wi-Fi switch to enable the Wi-Fi function.
Tap at the upper right corner of the screen, then tap
Scan to search the Wi-Fi network. When the searching is
finished, please tap the target network. If the target Wi-Fi
network is encrypted, the icon will appear at the lower
right side of the signal strength icon.
3. Tap the password box to input the connection
password. If you use DHCP on your router, just tap
Connect to complete the network connection after
inputting the password. If your router has no DHCP or
does not support DHCP, please follow the steps below to
complete the network connection.
33
800P11B ( MTK8377 )
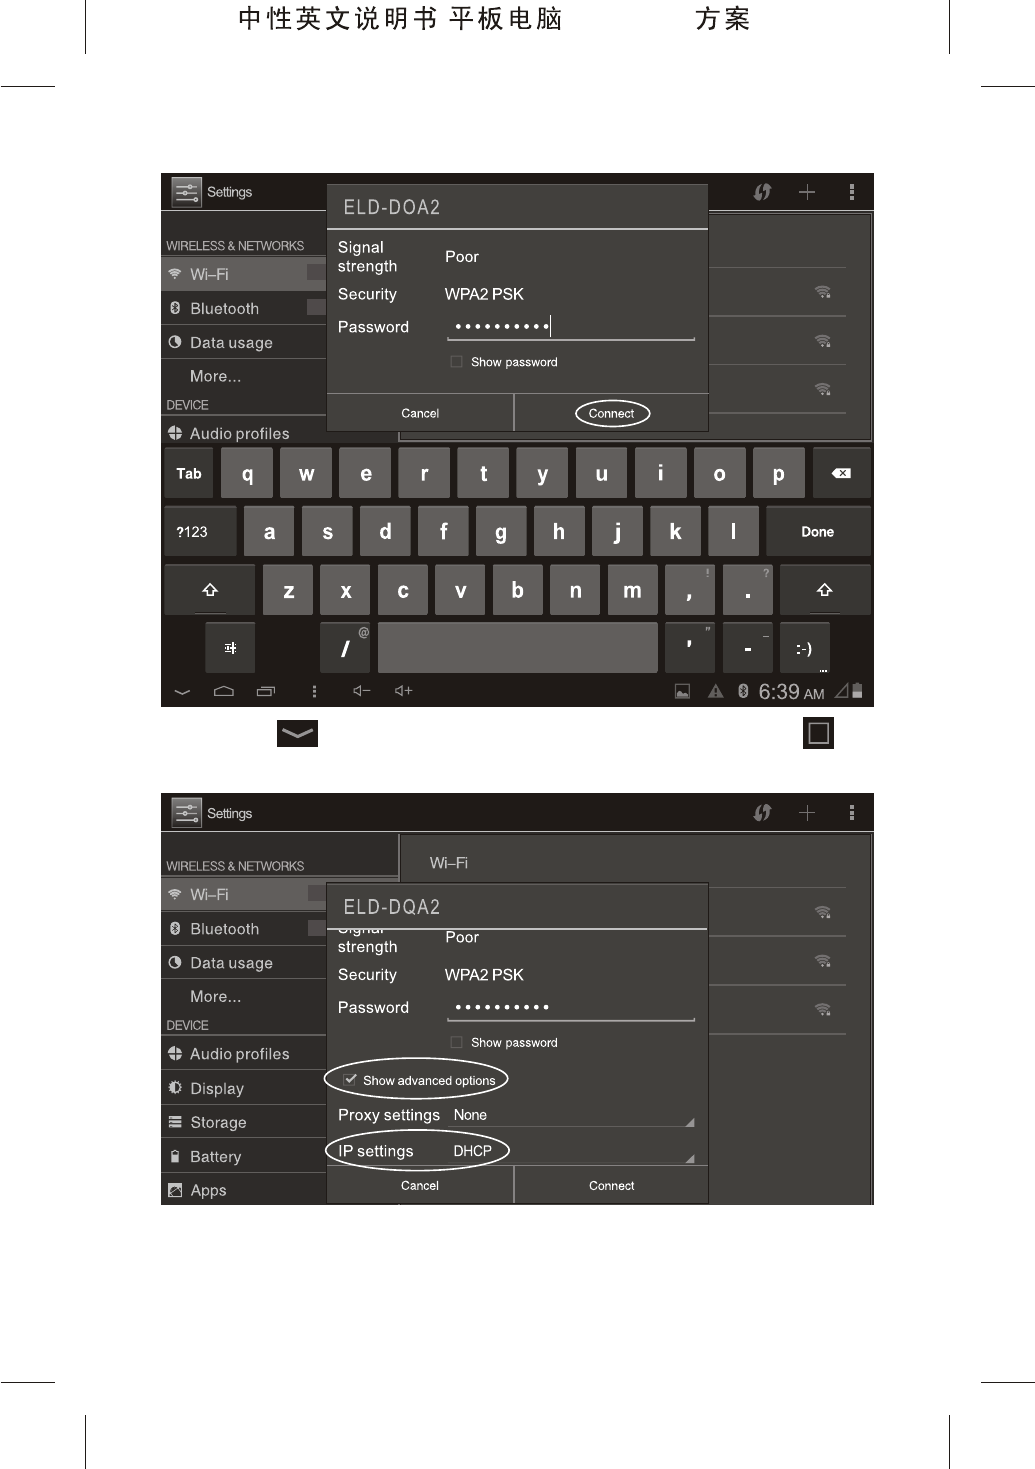
4. Tap to hide the input method and then tap on
the left of Show advanced options.
5. Tap the IP settings box to select Static, complete
34
800P11B ( MTK8377 )
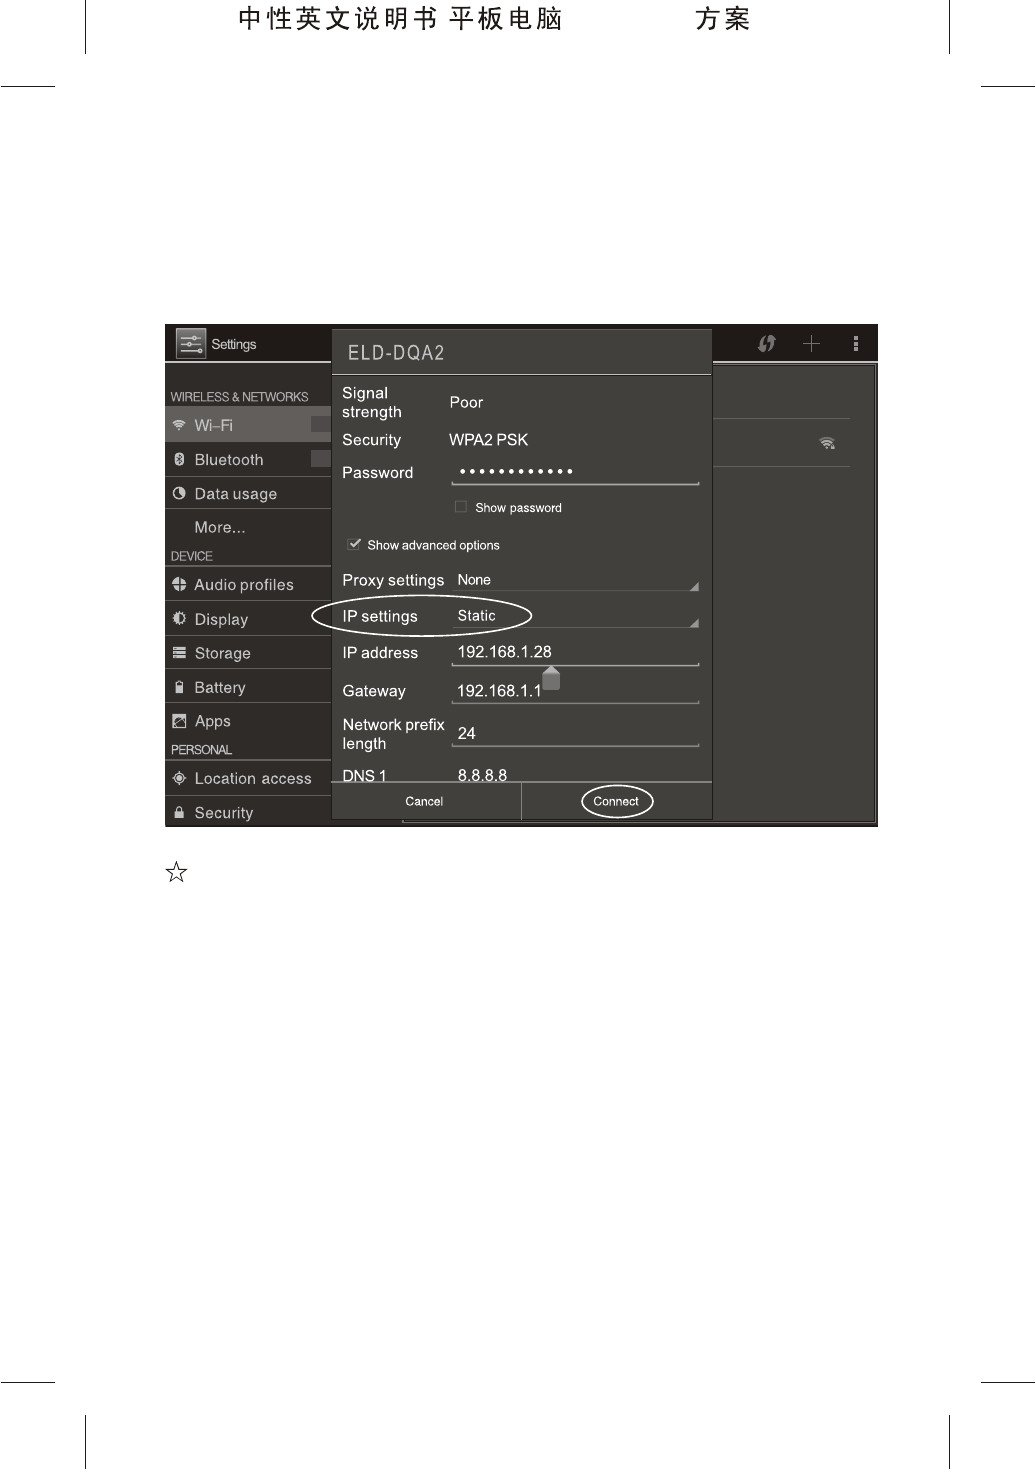
the IP address,Gateway,Network prefix length,DNS1
and DNS2 (the settings in the figure below are for
reference only), and then tap Connect to complete the
network connection.
Set Bluetooth
Bluetooth is a wireless technology enabling devices to
communicate over a short distance. Keep the distance
between devices within 10m and make sure no solid
barrier between them, so as to receive the best signal.
Enable Bluetooth and Pair Devices
1. Tap Bluetooth in Settings, and set Bluetooth switch
to on to enable it to search for Bluetooth devices nearby
automatically. (Make sure that the target device enables
Visible to All nearby Bluetooth devices before
35
800P11B ( MTK8377 )
searching.)
2. After tapping the target device in the list of available
devices, the system will display the dialog box of
Bluetooth pairing request.
3. Tap Pairing after confirming the connection key in
the dialog box.
Send Files
1. In the applications list, tap File Manager and find the
desired files in the directory, long tap the file until a tick
appears later in the file, then tap the icon in the upper
right corner of the screen and tap Share in the pop-up
dialog box.
2. Tap Send > Bluetooth in the displayed menu, and
the Bluetooth device chooser menu will be shown;
3. After tapping Scan for devices in Bluetooth device
chooser, the device starts to scan for the Bluetooth
devices nearby.
4. Tap the receiver's name in the list of visible devices.
5. TapReceive File in the receiver.
Receive Files
1. TapBluetooth in Settings.
2. Switch Not visible to other Bluetooth devices in
the right setting area to Visible to all nearby Bluetooth
devices, and be ready to receive files.
3. When any file arrivals,
will be shown in the notification bar.
4. Tap the notification message to display the File
transfer dialog box.
Receives the file request
36
800P11B ( MTK8377 )
5. TapAccept in the dialog box to receive the files.
6. TapNotification Bar to check the receiving progress.
7. Tap File manager in the application list, open the
Bluetooth folder in the Internal Memory device to check
the received files.
Note: The files may fail to transfer between different
Bluetooth devices due to problems of interoperability and
compatibility.
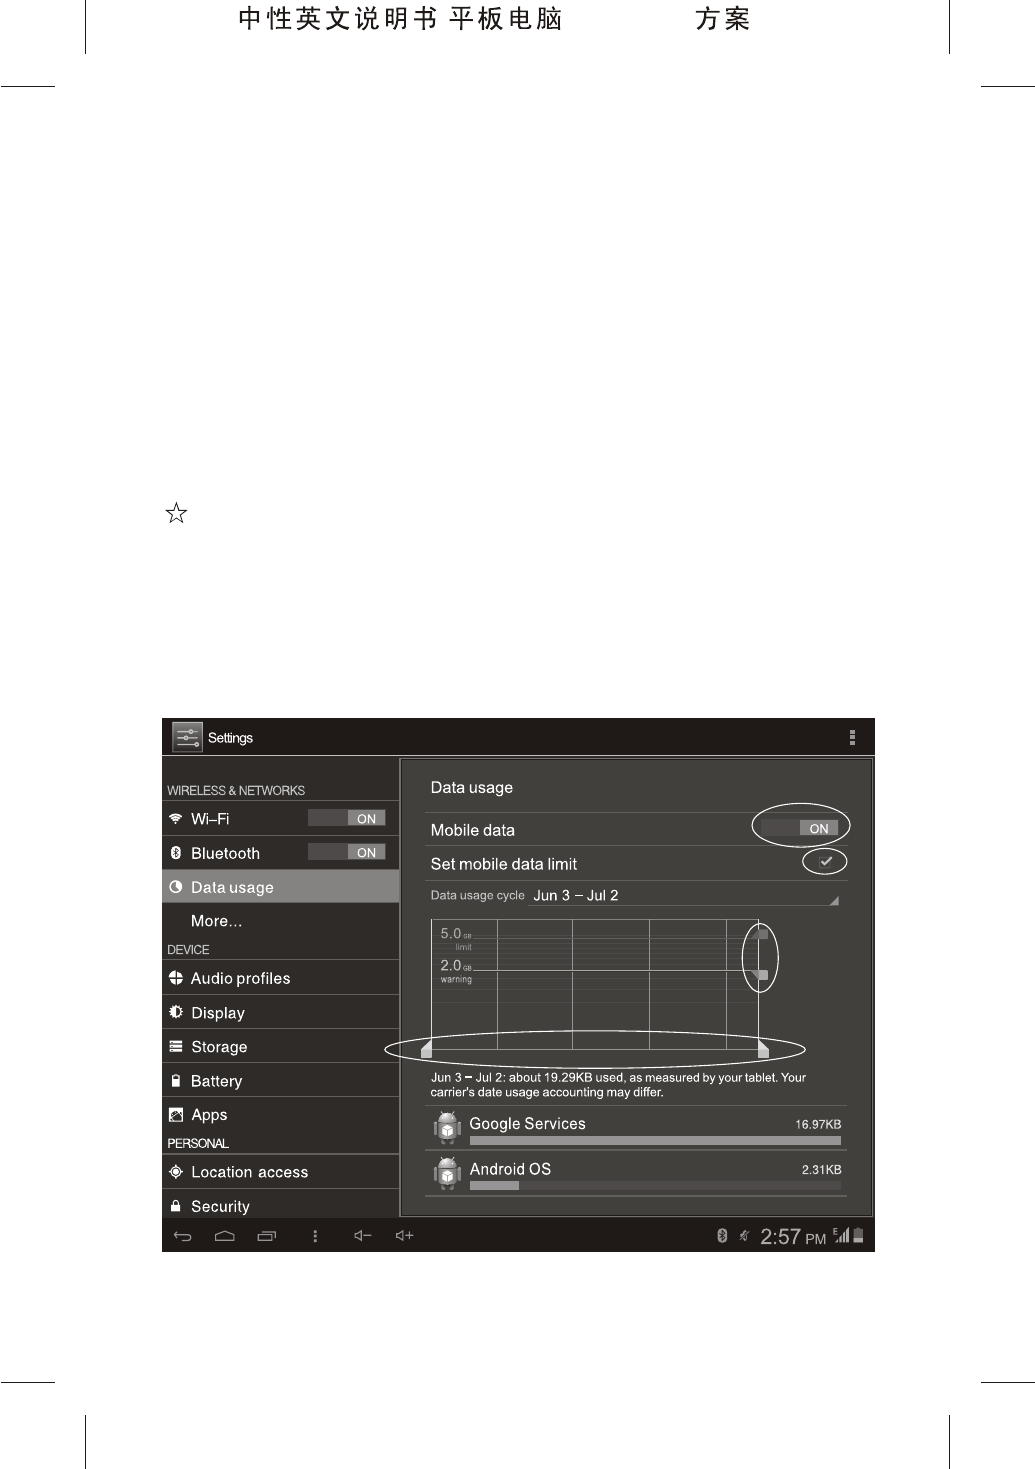
Set the Mobile Traffic Warning
To use the mobile data traffic, please set the traffic
warning to avoid extra expenses incurred by excessive
mobile data traffic.
1. Tap ON on the right of the Mobile data to enable the
mobile data traffic.
37
800P11B ( MTK8377 )
38
2. Tap on the right of the option Set mobile data
limit, tap Data usage cycle to select a monthly payment
cycle for the traffic package, long tap the time axis and
drag it leftwards/rightwards to adjust the days of a traffic
cycle, and long tap the traffic limit axis and drag it
upwards/downwards to adjust the traffic warning and
limit.
Set the Virtual Private Network (VPN)
The VPN can access the internal network resources of
your company via public network. To set the VPN, the IP
address of the server provided by the network manager of
your company is required.
1. TapSettings >More... >VPN.
2. Tap Add Network and enter Change VPN to add
network: input the VPN name, type and server address,
and then tap Save.
3. The network set in step 2 will be added to the
network list. Tap this network, input the user name and
password, and then tap Connect.
Set the Portable Hotspot
The portable hotspot allows your device to act as Wi-Fi
hotspot. Any device connected to your hotspot can
access the Internet through the mobile data traffic of your
device.
1. Tap More... and then tap Portable hotspot in the list
on the right.
2. Tap on the right of the option Portable hotspot to
enable the portable Wi-Fi hotspot, and then tap Set up
800P11B ( MTK8377 )

39
Wi-Fi hotspot.
3. Tap Network SSID to input the network name, tap
Security to select an encryption method, tap Password
to input the password, and then tap Save to complete the
setting process. The Wi-Fi hotspot indicator icon will
appear in the notification bar.
Connect and Set the Mobile Network
This option can be set only when the SIM / USIM card
has been inserted.
Data enabled:enable the mobile data traffic function.
Data roaming:select to allow or disallow the use of
mobile data traffic in roaming state.
Network Mode: Select the network connection mode.
Access Point Names:set the mobile data access
point based on the data provided by your mobile provider.
Network operator:manually or automatically search
the network operator.
Mobile data service preferred: Allows data transfer
rate to be the maximum.
Audio profiles
Select or set the profiles. The system has three profiles
by default: General, Conference and Outdoor (tap on
the right of Profiles to select the option). Users can add
other profiles, such as "Rest".
Adding and modifying a profile
1. Tap Add in the upper right of the Profiles interface.
800P11B ( MTK8377 )
40
2. Enter the profile name "Rest" and tap OK to add.
3. In the Profiles list, tap "Rest".
4. In the Menu option, tap Volumes, Voice Call
Ringtone, Video Call Ringtone, Dial pad Touch tones,
Touch sounds or Screen Lock sound to configure. After
setting, the system automatically saves the settings.
Display
Brightness:adjust the screen brightness.
Wallpaper: select an image as the wallpaper.
Auto-rotate screen: Allows the system to identify your
current viewing angle of the screen so that the system
automatically adjusts display orientation based on your
viewing angle.
Sleep: set the time for the screen to be auto locked in
case of no operation.
Font size: set the font size.
Storage
Check the details of the internal storage space, internal
storage device, SD card or USB memory, or uninstall/
format the memory.
Note: Please backup your important personal files
before formatting the memory.
Battery
Check the battery state.
Apps
Enter the Apps option, and you can check
800P11B ( MTK8377 )
41
downloaded applications, applications stored in the SD
card, running applications, storage space, etc. You can
also tap an application to stop it running or uninstall it.
Location access
Wi-Fi & mobile network location: By this function, the
system can send anonymous location data to Google;
and the authorized applications can receive data from Wi-
Fi and mobile network, so as to locate your position.
GPS satellite: Turn on GPS positioning function.
GPS EPO assistance: Use GPS assist data (EPO) to
speed GPS positioning process. EPO technique uses
offline server-based GPS assisted positioning function,
and supports up to 30 days of GPS satellite orbit
prediction data thus shortening the first GPS positioning
time.
EPO settings: Tap to modify EPO configuration
information.
A-GPS: A-GPS can speed up positioning by accessing
data through network connection, thus shortening the first
GPS positioning time.
A-GPS settings: Modify A-GPS settings.
Location & Google search: By this function, Google
can use your location information for a better search
results and other services.
Security
Protect the security options for the device.
Screen Lock: set the lock mode for the screen.
800P11B ( MTK8377 )

42
Encrypt tablet: You have to enter the numeric PIN or
password to decrypt the Tablet PC each time you turn it
on.
Set up SIM card lock: Activate the SIM card lock.
Make passwords visible: under the password lock
mode, you will be requested to input the unlock
passwords to unlock the device. In this mode the
password you input will be displayed.
Device administrators: view or stop the device
administrators.
Unknown source: enable the device to install
applications from unknown source.
Trusted credentials: display the trusted credentials.
Install from SD card: install credentials from SD card
Clear credentials: delete all credentials.
Language & input
Set the system language and input method.
Backup & reset
Back up my data: back up the application data, Wi-Fi
passwords and other settings to the Google Server.
Factory data reset: delete all settings on the tablet PC
and restore to the factory settings. (This operation will
clear all data in the memory device of the tablet PC.)
ACCOUNTS
Add or Check the local accounts and synchronize them
by connecting them to the Internet.
800P11B ( MTK8377 )
43
Date & time
Automatic data & time::use the time on the Internet.
Set date: manually set the date.
Set time: manually set the time.
Select time zone: manually select a time zone.
Choose date format: set the date format.
Scheduled power on & off
Set up the time of schedule power on & off.
Accessibility
Large text: display text in large font.
Power button ends call: whether to allow ending the
call by pressing the power button.
Auto-rotate screen: the system will auto rotate the
screen if you change the direction of the screen.
Enhance web accessibility: the scripts from Google
can be installed by apps, so that you can browse the apps
content in the webpage.
Developer options
These options are only used for developers. Once
enabled, the system and applications may crash or work
abnormally.
About tablet
Check the information about tablet like system update,
model, system version, and core version.
800P11B ( MTK8377 )
44
Troubleshooting
Your device can't be turned on.
The battery power is used up. Please fully charge your
device.
Your device cannot access the Internet via Wi-Fi.
1. Check whether your device can receive any Wi-Fi
signal.
2. Check whether the wireless router supports DHCP. If
not, please configure a static IP address.
3. Check whether the wireless router has been
connected to the Internet.
Your device responds to operations slowly.
1. Check whether too many applications are running in
the background.
2. Check whether any incompatible-version application
has been installed.
3. Use the antivirus software to scan and kill the
malicious programs (if any).
Your device gets warm in use.
It is normal that your device get warm in a long-time
use or in charging.
Your device crashes and its keys do not work.
Long press the power button for 6 seconds, and the
power-off dialog box will display on the screen, then tap
the OK option in the box to auto power-off the system.
After that restart your device. If this fails, insert a slim
needle to the reset button hole to realize the forced
shutdown.
The total memory is smaller than the actual
memory.
800P11B ( MTK8377 )
45
A certain space has been used to store the system files
and install user applications, so it appears that the total
memory is smaller than the actual memory.
Some video files can't be played.
Your device supports most of the common audio and
video file formats, except a few special formats. We
suggest that you download a third-party player from the
application market to play those exceptional files.
Important Statements
All contents and services obtained through your device
shall belong to a third party under the protection of
copyright, patent, trademark or other intellectual
properties, and shall be used for your personal non-
commercial purposes only. You are not allowed to use
any content or service in any way without the
authorization of the content or service provider.
In no case shall we be held liable for any direct, indirect
or accidental loss or damage caused by your accessing
any content, service, information or third-party software
through your device.
Third-party services are subject to change, deletion or
stop without prior notice. We shall not imply or assure that
all services and contents will be kept available at all time.
We shall not be responsible for providing any related
customer service for any third-party service or content.
Please refer your questions and service requests directly
to the relevant content or service provider.
Please remember to backup the data when using your
device. We shall not be held liable for any personal data
800P11B ( MTK8377 )

loss or damage caused by software or hardware
misoperation, product repair, battery replacement or any
other unexpected situations, or for any other indirect loss
arising thereof. Any of your misunderstandings for this
Manual shall be beyond our control, so we shall not bear
any liability for any accidental loss caused by the use of
this Manual or for any third-party claim caused by the use
of your device.
Trademark
"Android" is the trademark of Google Inc.
"Micro SD" is the trademark of SD Card Association.
Other company names, product names or services may
be also the registered trademarks of other companies,
and shall be subject to the applicable laws, regulations
and international conventions, whether indicated and
marked on the product and in this Manual or not.
46
800P11B ( MTK8377 )
47
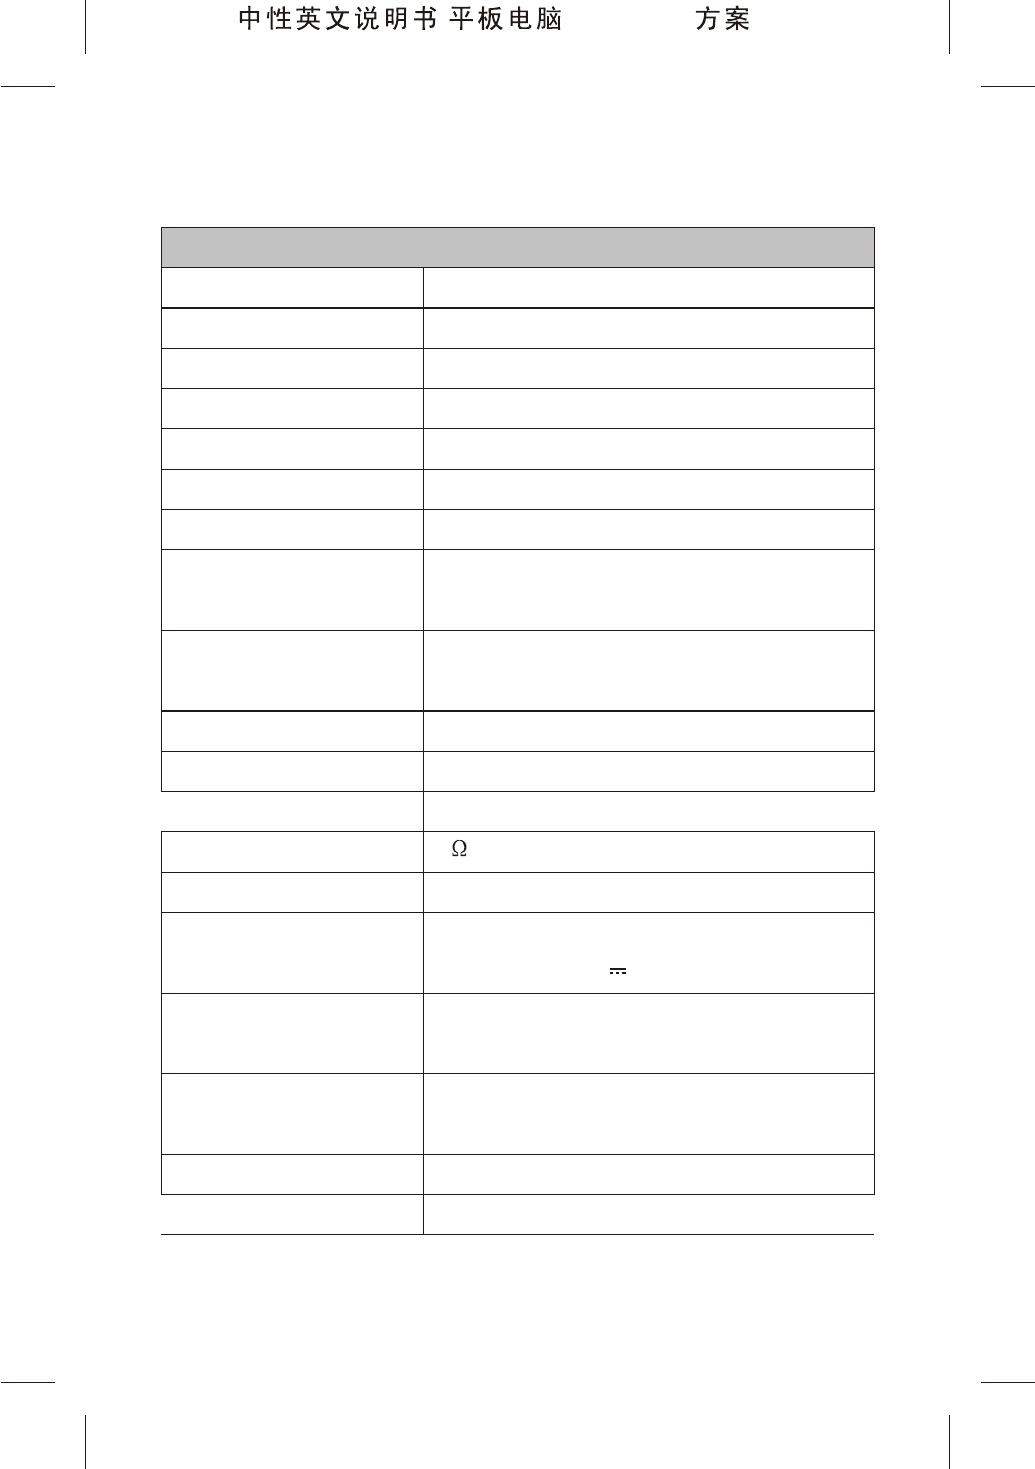
Dual-core 1.0GHz
1GB
8GB
Android 4.1
Wi-Fi, 802.11b/g/n
Micro USB 2.0
Standard SIM / USIM card
Front Camera, 0.3 Mega Pixel
Rear Camera, 2 Mega Pixel
GSM, GPRS, EDGE; WCDMA,
HSPA (DL 7.1Mbps, UL 5.76Mbps)
Built-in
Built-in
Built-in
8 /1W
Basic Parameters
CPU Frequency
DDR-RAM
NAND FLASH
Operating System
Network Access
USB Port
SIM card slot
Camera
Data services
Electronic compass
G-sensor
Microphone
Speaker
Technical Specifications
Li-polymer Battery, 3.7V, 3700mAh
201.4mm x 152.5mm x 10.9mm
430g
Input: 100-240VAC, 50-60 Hz
Output: DC 5V 2A
32G max.
8-inch LED backlight Screen,
Resolution: 1024 x 768
Standard Battery
Power Adapter
Micro SD Card (
Main Screen
to
expand capacity)
Product Size
Product Weight
800P11B ( MTK8377 )
Disclaimer: These specifications are for reference only
and shall not constitute any commitment in any way.
Considering the product improvement, we shall reserve
the right to change the product specifications without
further notice.
48
APK Installer, File manager
Chromelite browser
Standard Android Keyboard,
Supporting Third-party Input
Methods
Calendar, Alarm Clock, Calculator,
Paper Note, Clock, Voice Recorder
Video, Gallery, Music.
Application
File Manager
Network
Input Method
Tool
Entertainment
800P11B ( MTK8377 )
800P11B (MTK8377 )
FCC Warning
This device complies with part 15 of the FCC Rules.
Operation is subject to the following two conditions: (1)
This device may not cause harmful interference, and (2)
this device must accept any interference received,
including interference that may cause undesired
operation. Any changes or modifications not expressly
approved by the party responsible for compliance could
void the user's authority to operate the equipment.
15.105B: For a Class B digital device or peripheral, the
nstructions furnished the user shall include the following
or similar statement, placed in a prominent location in the
text of the manual: Note: This equipment has been tested
and found to comply with the limits for a Class B digital
device, pursuant to part 15 of the FCC Rules. These limits
are designed to provide reasonable protection against
harmful interference in a residential installation. This
equipment generates, uses and can radiate radio
frequency energy and, if not installed and used in
49

accordance with the instructions, may cause harmful
interference to radio communications. However, there is
no guarantee that interference will not occur in a
particular installation. If this equipment does cause
harmful interference to radio or television reception,
which can be determined by turning the equipment off
and on, the user is encouraged to try to correct the
interference by one or more of the following measures:
Reorient or relocate the receiving antenna. Increase
the separation between the equipment and receiver.
Connect the equipment into an outlet on a circuit different
from that to which the receiver is connected. Consult
the dealer or an experienced radio/TV technician for help.
15.21 Statement: Information to user: the user's
manual or instruction manual for an intentional or
unintentional radiator shall caution the user that changes
or modifications not expressly approved by the party
responsible for compliance could void a sample
statement is below: Note: The manufacturer is not
responsible for any radio or TV interference caused by
unauthorized modifications to this equipment. Such
modifications could void the user's authority to operate
the equipment.
50
800P11B ( MTK8377 )