KTC Telecom KFM-1256 Win Drive User Manual KFM 1256 UserMan 1
KTC Telecom Co., Ltd. Win Drive KFM 1256 UserMan 1
UserManual.wiki
>
KTC Telecom
>
KFM 1256 User Manual
users manual
Navigation menu
Upload a User Manual
Namespaces
Wiki Guide
HTML
PDF
Info
Views
User Manual
Discussion / Help
Navigation

![Using the Software On the Windows Platform Installing/Uninstalling the Application Software: Installing the software: If you are installing the application software onto Windows OS, you must first log on as the administrator and then install the application software. Precaution about the USB Interface Ø Please connect the device to the USB port of your computer when you install the application software. Ø If you do not connect the device to the USB port and install the application software in Win XP OS, when you plug in the device you have to install the Win Drive driver again. Ø In Windows 98 SE and Win Me, after install the driver you need to unplug the Win Drive and plug again in order to use the correct driver. 1. Find the “WinDriveTools2.33_En.exe” program. You can find the program in the Win Drive, CD-ROM, or Floppy. 2. Double-click the [WinDriveTools2.33_En.exe] icon. 3. Follow the on-screen instructions to proceed. Uninstalling the software: To remove the installed software, you can click the windows [Start] menu and select [Setting], [Control Panel] and [Add/Remove Programs]. The application software can also be uninstalled by clicking the [Start] menu and selecting [Programs], [Win Drive], [Uninstall Win Drive]. Notes: Ø The USB driver only needs to be installed the first time the Win Drive is connected via the USB port. Installation is not required from the second time onward. Ø Do not cancel the installation during the procedure. The Win Drive may not operate correctly if the installation is incomplete.](https://usermanual.wiki/KTC-Telecom/KFM-1256/User-Guide-292300-Page-10.png)
![Ø Read the “Troubleshooting” Section if the installation cancels itself during the procedure, if the installation did not proceed as described, or if you feel that the driver are not properly installed. Installing the USB Driver: In some Windows system, users should log on as the Administrator before installation. Once you have attached the Win Drive to the computer. The OS will find the appropriate driver or the “Add New Hardware Wizard” dialog will appear after a moment. You can do the installation of the Driver manually. Or just find out the “Setup.exe” program to do the driver installation. During the installation procedure, if the “Digital Signature Not Found” message displays, just click the [Yes] button in the showing window. Using WinDriveTools2.33_En.exe Program the First Time: Warning Due to the WinDriveTools2.33_En.exe can only handle one Win Drive device at the same time. If you will not use the function of the WinDriveTools2.33_En.exe, like “Resize”, “Change Password”, or “Log In”, etc., you can insert more than two Win Drive devices. If you want to use the function of the program, please remove all other Win Drive device. Otherwise, the WinDriveTools2.33_En.exe may perform not properly even cause data lost. After you installed the software and driver correctly, the Win Drive icon will appear in the notification area automatically. Or The display will depend on the status of the device. Ø You can use the right button of your mouse to pop up the selection menus as the](https://usermanual.wiki/KTC-Telecom/KFM-1256/User-Guide-292300-Page-11.png)
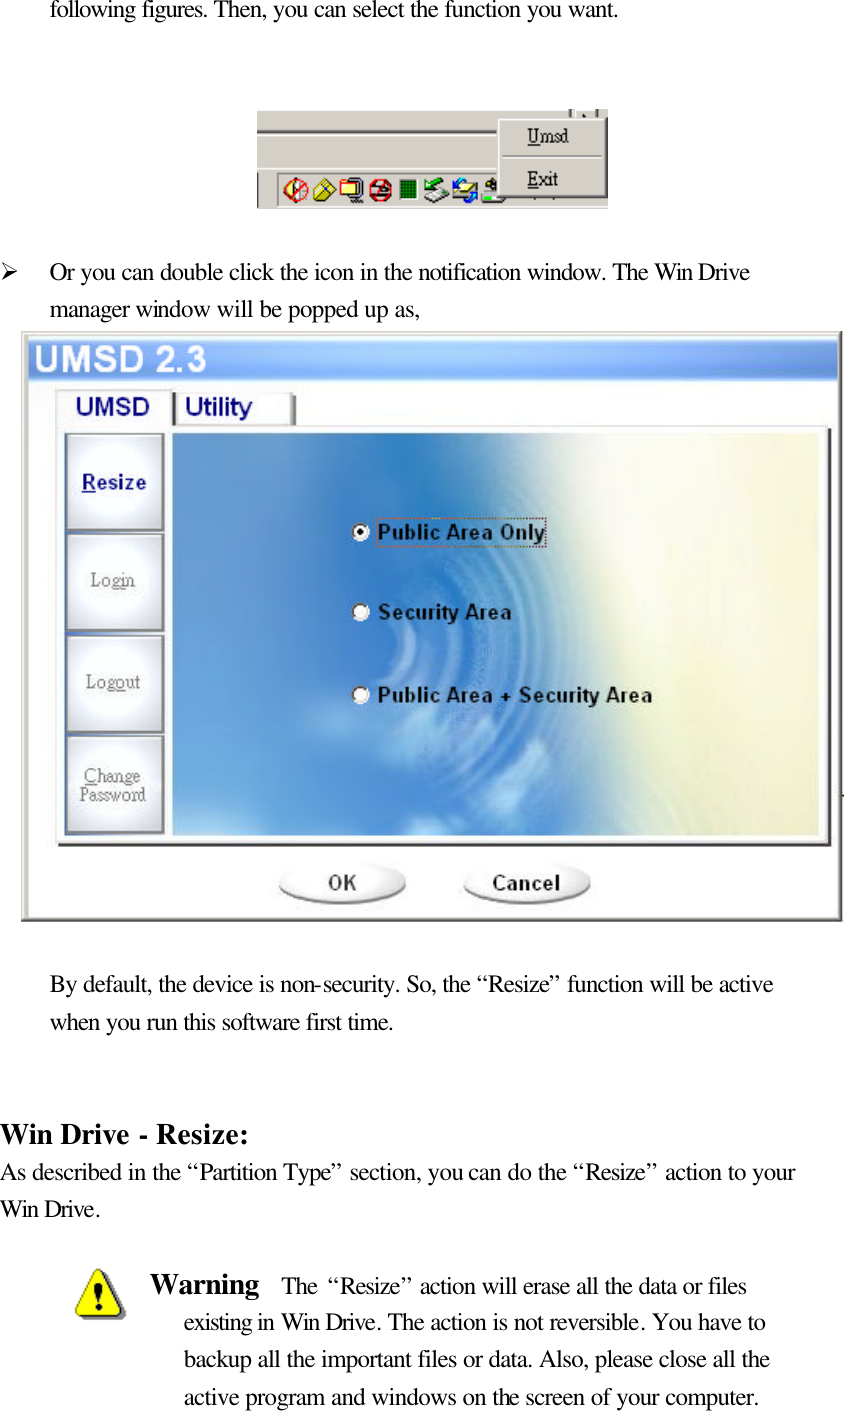
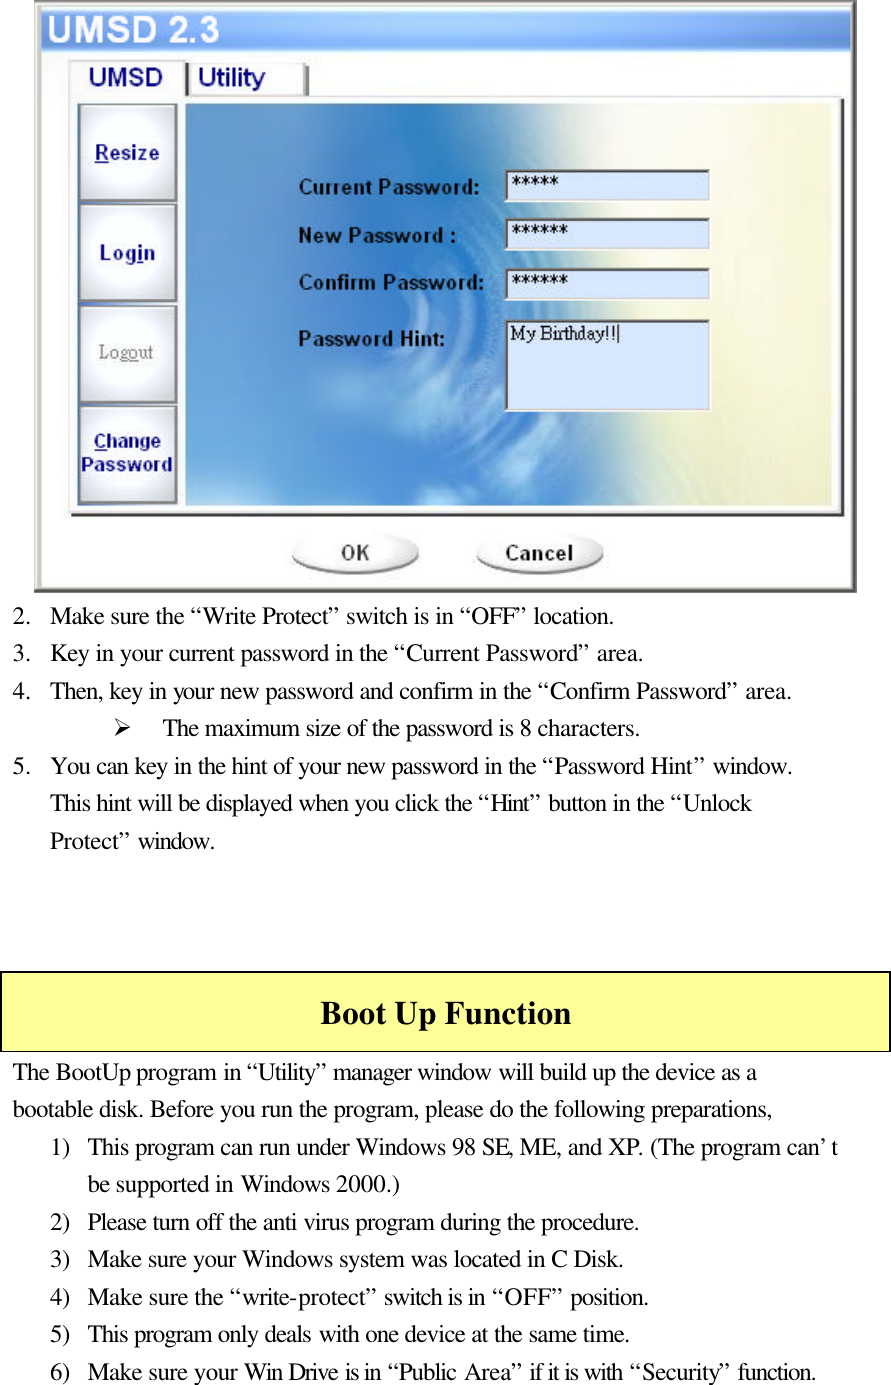
![1. Click the Resize button in the Win Drive manager window. The following “Resize Partition” window will be popped up. 2. Select the partition type you want. 3. If you select the “Public Area Only”, then click the [OK] button. The “Confirmation” window will be popped up. Please make sure you already backup all the important files or data. 4. If you select the “Security Area”, then the following “Security Area Resize” window will be popped up. You can drag the scroll bar in the middle of the window to set the size of the “Public Area” and “Security Area”. Or you can type in the size of each Zone you want in the “Size” window. You can set the password for accessing the security area in the “New Password” window. The](https://usermanual.wiki/KTC-Telecom/KFM-1256/User-Guide-292300-Page-13.png)
![maximum size of the password is 8 characters. You can key in the hint of your new password in the “Password Hint” window. This hint will be displayed when you click the “Hint” button in the “Unlock Protect” window. The maximum size of the Hint is 32 characters. After you finished the setting, click the [OK] button. The “Confirmation” window will be popped up. Please make sure you already backup all the important files or data. 5. If you select the “Public Area + Security Area”, then the following “Public/Security Area Resize” window will be popped up. You can drag the scroll bar in the window to set the size of each area. First, please set the size of the “Public Area” of LUN1. The minimum size for each area is 1MB. The maximum size of the “Public Area” of LUN1 is 1/4 of the total size. Once the size of the “Public Area” of LUN1 was set, the scroll bar of the “Public Area” and “Security Data Zone” of LUN0 will be set in the middle automatically. Or you can type in the size of each Zone you want in the “Size” window. You can set the password for accessing the security area in the “New Password” window. The maximum size of the password is 8 characters. You can key in the hint of your new password in the “Password Hint” window. This hint will be displayed when you click the “Hint” button in the “Unlock Protect” window. The maximum size of the Hint is 32 characters. After you finished the setting, click the [OK] button. The “Confirmation” window will be popped up. Please make](https://usermanual.wiki/KTC-Telecom/KFM-1256/User-Guide-292300-Page-14.png)
![sure you already backup all the important files or data. 6. Once the resize finished, the following message will be popped up. 7. After you finished the “Resize”, the “Setup.exe” program will be copied into the “Public Area” (in LUN 0) automatically. It’s removable. However, it is needed when you insert your device into another computer. It will install the Win Drive software for you in the computer. Login the Security Area: If you partition the device with security, you can execute the following “Login” function to access the security Area. 1. Double click the Win Drive icon in the notification window or click the [Login] button in the Win Drive manager window. The “Unlock Protect” window will be](https://usermanual.wiki/KTC-Telecom/KFM-1256/User-Guide-292300-Page-15.png)
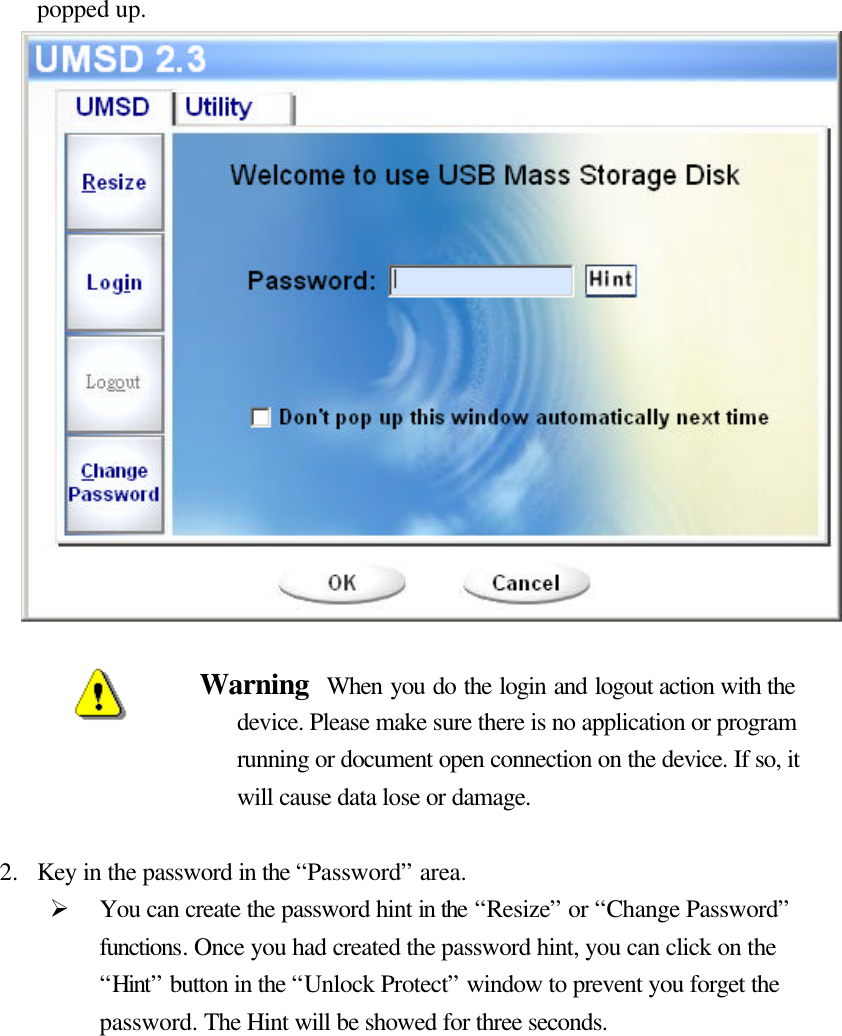
![] Ø If you key in the wrong password, the following message will be showed. Ø You have three tries to input the password. After three tries, the following message will popped up. And you have to unplug and plug the device in order to do future action. Ø When you do the login or logout action, please make sure you close all the](https://usermanual.wiki/KTC-Telecom/KFM-1256/User-Guide-292300-Page-17.png)
![programs or documents open connection on the device. If there is some application program is running or document open connect on the device, the following message will be popped up. In Win2000, even the “file manager” has accessed the device it will be treated as “busy”. You have to close the file manager in order to do the “Login”. However, not all the connection could be checked in all kind of OS. 3. Click on the “OK” button. 4. Once the file manager window contains the “Security Area” was popped up, you can do the operation you want with the Security Area. The file manager window will be like the following figure. The background is colorful. Logout the Security Data Zone: 1. Double click the Win Drive icon in the notification window or select the [Logout] button in the Win Drive manager window.](https://usermanual.wiki/KTC-Telecom/KFM-1256/User-Guide-292300-Page-18.png)
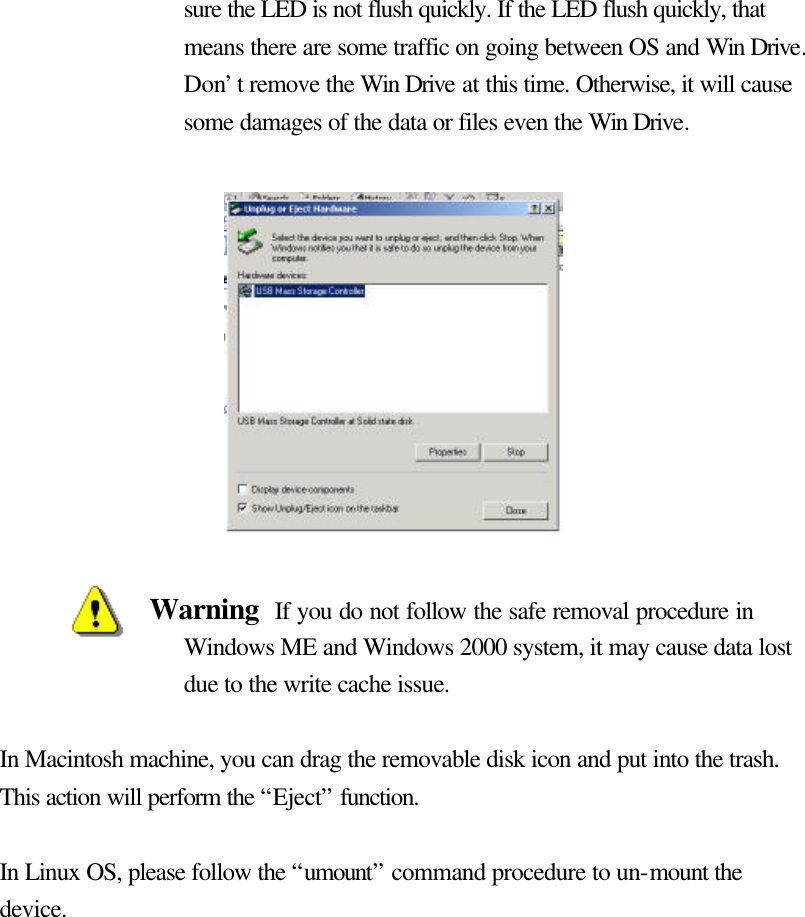
![Warning When you do the login and logout action with the device. Please make sure there is no application or program running or document open connection on the device. If so, it will cause data lose or damage. Ø When you do the login or logout action, please make sure you close all the programs or documents open connection on the device. If there is some application program is running or document open connect on the device, the following message will be popped up. In Win2000, even the “file manager” has accessed the device it will be treated as “busy”. You have to close the file manager in order to do the “Login”. However, not all the connection could be checked in all kind of OS. 2. Once the file manager window contains the “Public Area” was popped up, you can do the operation you want with the Public Area. Change Password: User can change password and key in the password hint using the “Change Password” selection in the Win Drive menu. You can only select this item in “Security AP Zone”. 1. Click the Win Drive menu in the notification window using the right button of your mouse and select the [Change Password] selection of the Win Drive menu. The following “Change Password” window will be popped up.](https://usermanual.wiki/KTC-Telecom/KFM-1256/User-Guide-292300-Page-19.png)
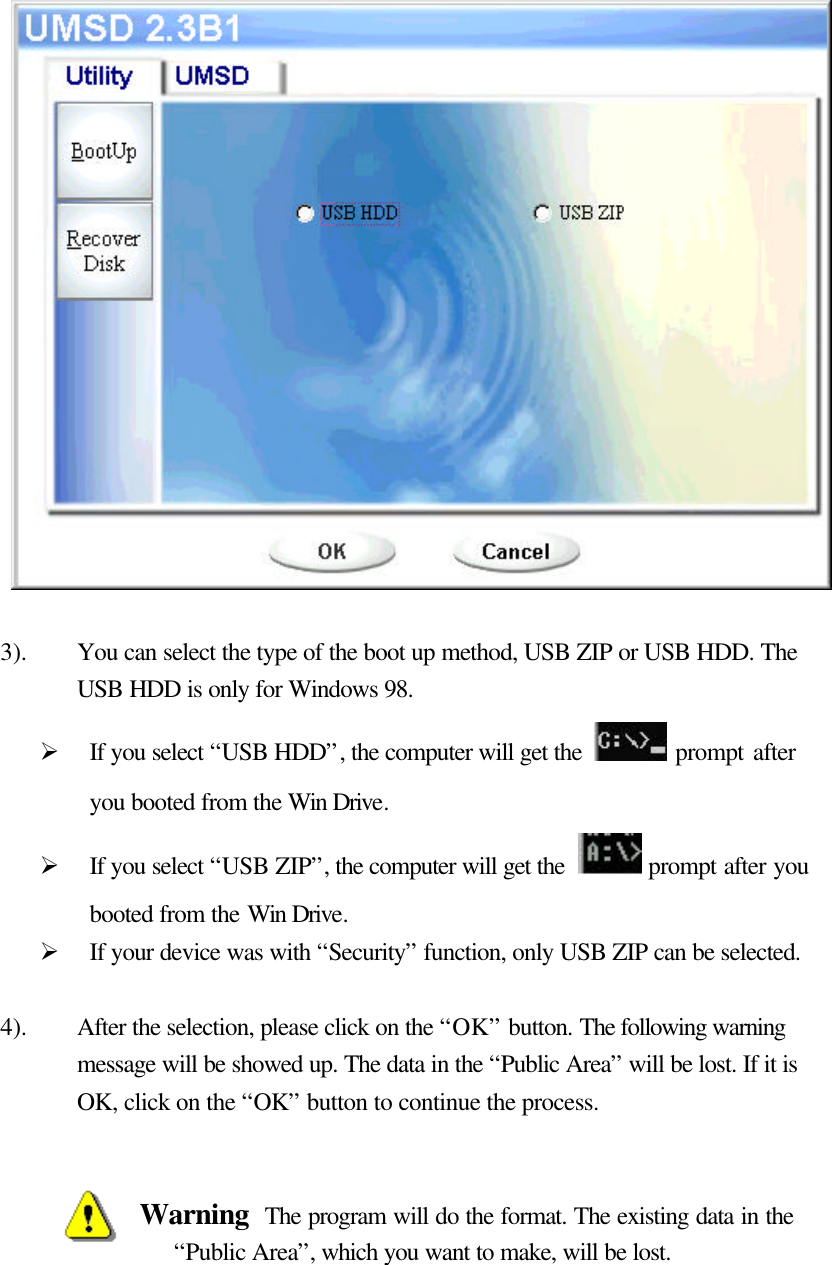
![7) If you want to make your device as a bootable USB HDD, you can’t make the device as a “Security” one. This option is only supported in Windows 98 SE. Warning If you performed the “Log In” action with your Win Drive and located in “Security Area” and run the BootUp function, it will do the “Log Out” and erase all the data in “Public Area”. When you are ready to process, follow the following procedures, the procedures for Windows XP is different from Windows 98 and ME. This program can not be run in Windows 2000. Windows 98 SE and Windows ME: 1). You can click the [Utility] button in the Win Drive manager window to execute the BootUp utility. 2). The following window will be showed up.](https://usermanual.wiki/KTC-Telecom/KFM-1256/User-Guide-292300-Page-21.png)
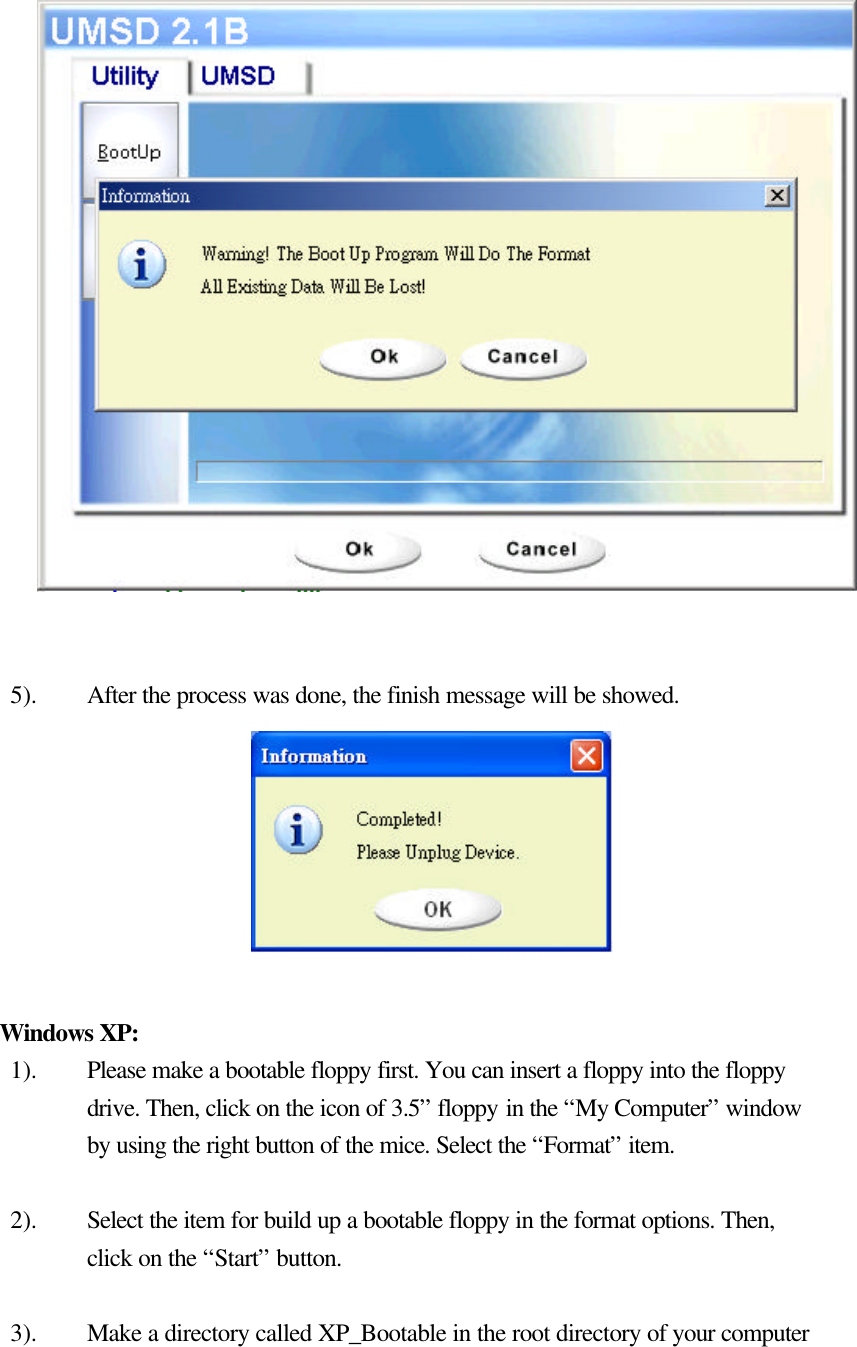
![system disk. 4). Copy all the files in the floppy to the XP_Bootable directory. 5). Click on the [Utility] button in the Win Drive manager window. Then, select the USB ZIP. Click on the “OK” button. 6). After the process was done, the finish message will be showed.](https://usermanual.wiki/KTC-Telecom/KFM-1256/User-Guide-292300-Page-24.png)
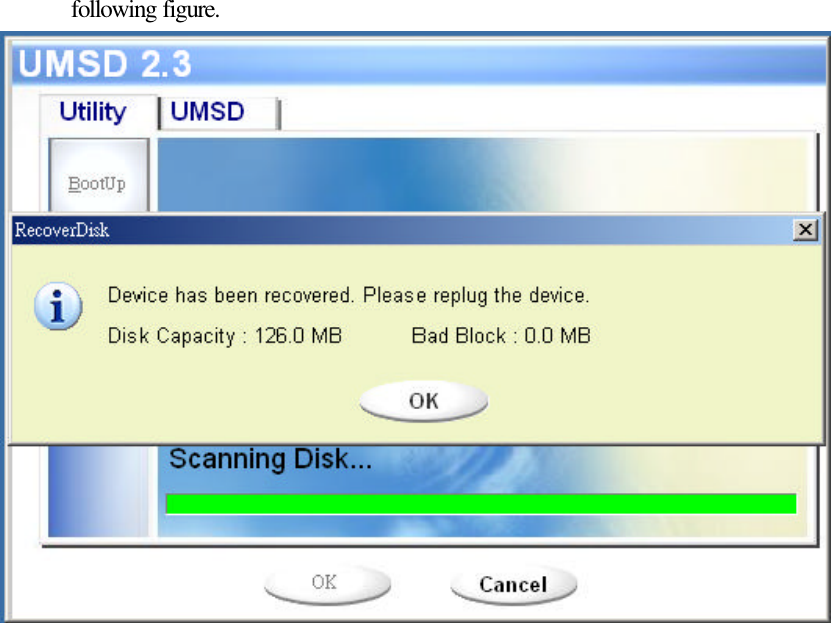
![Notes: Ø After you finished the program, you will see different disk property when you select different disk type. For example, if you select it as “USB HDD”, you will see the hard disk icon in the file manager window. If you select it as “USB ZIP”, you will see the removable disk icon in the file manager window. However, only Windows 2000 and above can identify the difference. In Windows 98, you just can see the “Removable Disk”. Ø After you finished the program, the device contains the files necessary for boot up function. Please don’t remove any file in this area. Otherwise it will cause failure when you do the boot up procedure of your computer. Ø When you want to use the Win Drive to boot up your computer, please select the appropriate setting of the BIOS. Please refer to the user manual of the mother board. Ø Due to the BIOS design of each motherboard is quite different; we can not guarantee the boot up device is suitable for every computer. Ø Because Award changed his BIOS spec. since March, 2002, the boot up procedure is different from before. We can not identify if the BIOS is new or old. So, this boot up utility is not suitable for Award’s new BIOS if you using USB ZIP boot up option. Recover Disk Once your device was damaged, you can use this utility to recover the device. It will make the device back to its initial status. However, if there are some bad blocks in the flash memory, after you run this utility with scan option, its size maybe less than its initial size. 1). After you click on the [RecoverDisk] in [Utility] portion of Win Drive manager windows, the following window will be popped up.](https://usermanual.wiki/KTC-Telecom/KFM-1256/User-Guide-292300-Page-26.png)
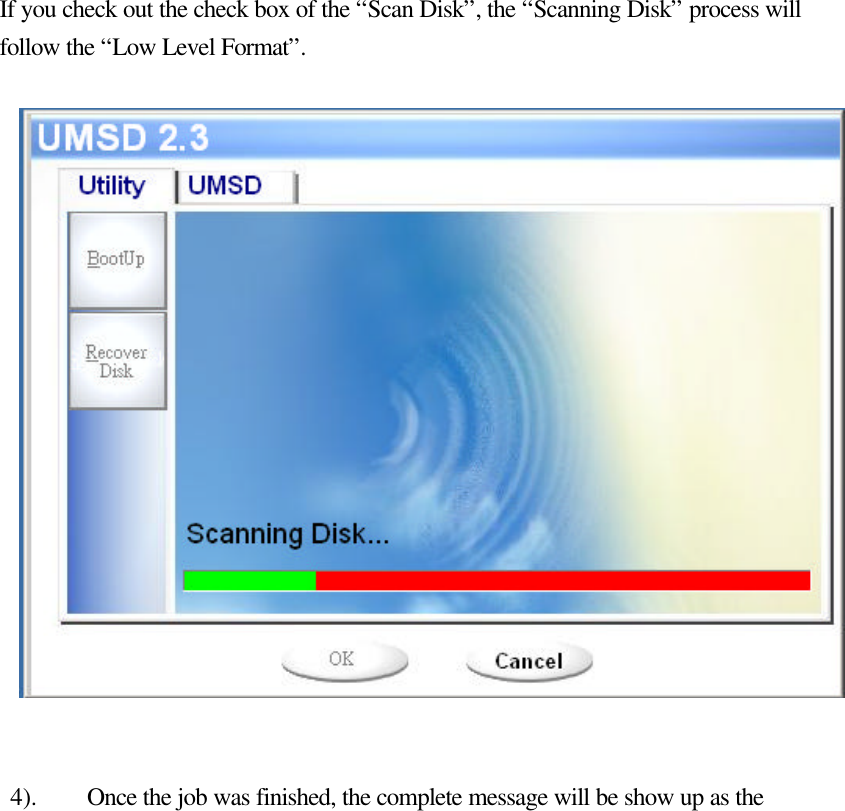
![Warning The “Recover Disk” action will erase all the data or files existing in Win Drive. The action is not reversible. You have to backup all the important files or data. 2). You can check out the check box of “Scan Disk” for the “Read/Write” testing for each block. It will take a long time for scan each block. You can estimate the time will be taken. It will take about 1.5 minutes for each 16 MB. 3). After you click the [OK] button in the window, the low level format process will be started.](https://usermanual.wiki/KTC-Telecom/KFM-1256/User-Guide-292300-Page-27.png)