KUANHAUR TECHNOLOGIES DT821 Diagnostic Tool User Manual
KUANHAUR TECHNOLOGIES CO., LTD. Diagnostic Tool
User Manual

寬 豪 科 技 股 份 有 限 公 司
KUANHAUR TECHNOLOGIES CO., LTD.
1
Table of Contents
1. SAFETY PRECAUTIONS AND WARNINGS ................................................... 2
2. TOOL INFORMATION ....................................................................................... 3
2.1 TOOL DESCRIPTION .................................................................................. 3
2.2 Tool Button Description.................................................................................. 4
2.3 Tool Specification............................................................................................. 5
2.4 Accessories Included ....................................................................................... 5
2.5 BATTERY CHARGING................................................................................ 5
3. SYSTEM SETTING …......................................................................................... 6
3.1 Check Sensor information.................................................................... 6-8
3.2 Program Sensor ...............................................................................................9-11
3.3 Auto create ID ................................................................................................12-13
3.4 Auto create ID ................................................................................................14-15
3.5 Settings Tool ..................................................................................................16-17
3.6 System Info......................................................................................................17
4. WARRANTY AND SERVICE ...........................................................................18

寬 豪 科 技 股 份 有 限 公 司
KUANHAUR TECHNOLOGIES CO., LTD.
2
1. Safety Precautions and Warnings
To prevent personal injury or damage to vehicles and/or the
scan tool, read this instruction manual first and observe the following
safety precautions at a minimum whenever working on a vehicle:
1. Always perform diagnosis or service in a safe environment.
2. Wear safety eye protection that meets ANSI standards.
3. Keep clothing, hair, hands, tools, test equipment, etc. away from all
moving or hot engine parts.
4. Operate the vehicle in a well ventilated work area: Exhaust gases are
poisonous.
5. Put blocks in front of the drive wheels and never leave the vehicle
unattended while running tests.
6. Use extreme caution when working around the ignition coil, distributor
cap, ignition wires and spark plugs.
7. These components create hazardous voltages when the engine is
running.
8. Keep a fire extinguisher suitable for gasoline/chemical/electrical fires
nearby.
9. Put the transmission in PARK (for automatic transmission) or
NEUTRAL (for manual transmission) and make sure the parking brake
is engaged.
10. Always turn the ignition off before connecting/disconnecting the OBDII
Cable to/from the TPMS tool; otherwise it may cause the Malfunction
Indicator Light (MIL) to turn on.
11. Refer to the user’s manual for the vehicle being serviced and adhere to
all diagnostic procedures and precautions. Otherwise personal injury or
unneeded repairs may result.
12. Keep the TPMS tool dry, clean, free from oil, water and grease.
13. Use a mild detergent on a clean cloth to clean the outside of the tool
when necessary
寬 豪 科 技 股 份 有 限 公 司
KUANHAUR TECHNOLOGIES CO., LTD.
3
2. Tool Information
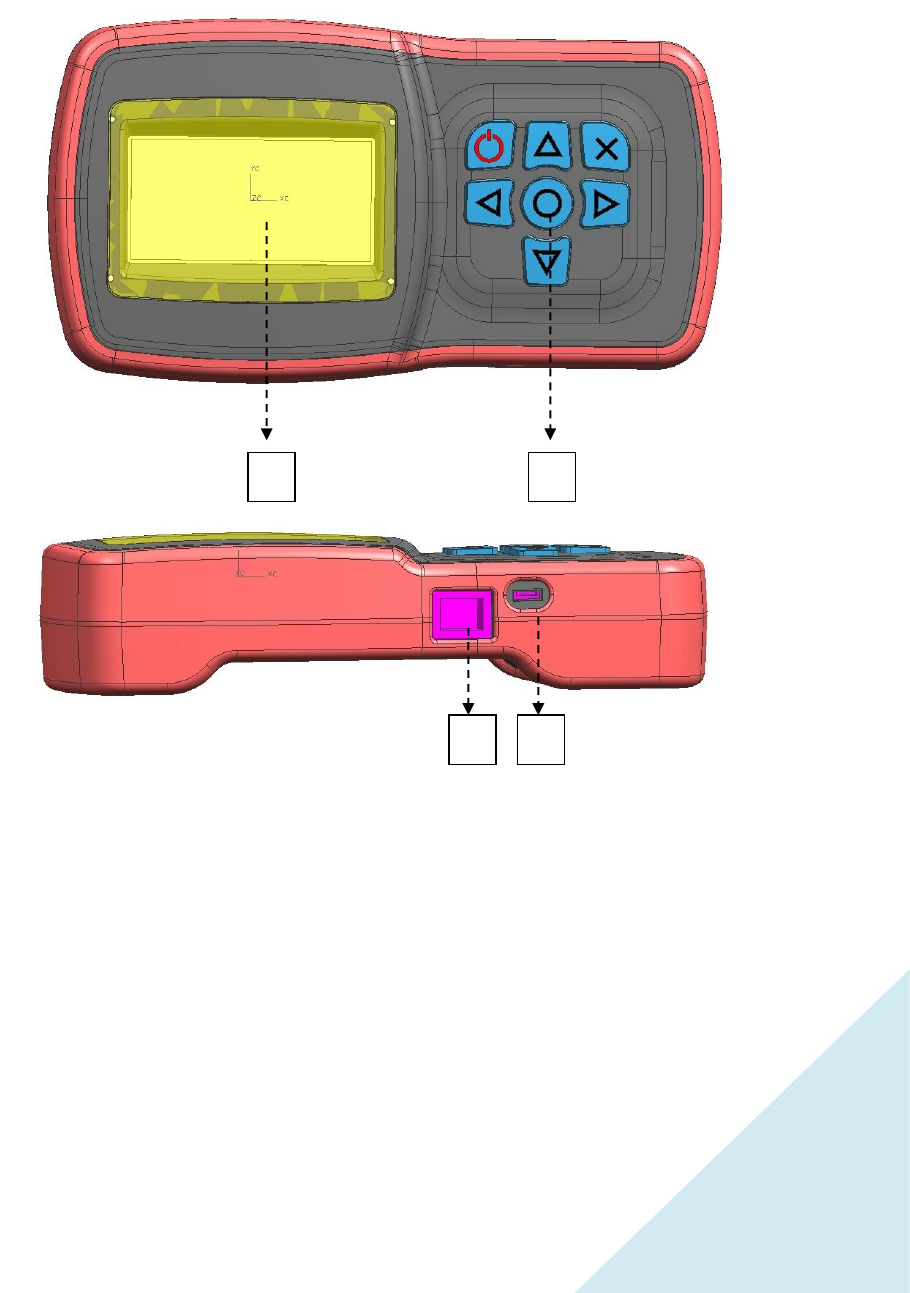
2.1 Tool Description
1) LCD Display – Display the menus and test screens
2) Function Control Button – choose Tool Function
3) Extended Functionality Port –Need Connect other device
4) USB Port – Connect the TPMS tool to PC for software update, data
printing or battery charging
1
2
4
3

寬 豪 科 技 股 份 有 限 公 司
KUANHAUR TECHNOLOGIES CO., LTD.
4
2.2 Tool Button Description
1) Power Button – Tool Power On & Off
2) ESC Button – Press to return the previous menu
3) OK Button – Press to get into the selected menu
4) Scroll Button - Press to choose
menu

寬 豪 科 技 股 份 有 限 公 司
KUANHAUR TECHNOLOGIES CO., LTD.
5
2.3 Tool specification
Dimensions :
187(7.36")x101(3.95")x43mm(1.7")
Battery :
3.7V, 2600mAh
Communication ports :
USB, RS232
Display :
Graphic LCD 256x128 pixels
Weight :
421g (0.85lb)
Operational temp :
41°F to 113°F
Relative humidity :
70-80%
RF Reception
315 and 433 MHz
2.4 Accessories Included
1) User’s Manual -- Instructions on tool operations
2) USB Cable -- Allows easy online update, data printing, and
power charging via PC connection
3) Charger -- Charges or recharges the built-in battery
2.5 Battery Charging
The TPMS tool has a 3.7V built-in Lithium-Ion polymer rechargeable
Battery. There are two means of battery charging:
1) Connect the device and the computer with the USB cable.
IMPORTANT: Charge battery in time, otherwise the test results may be
incorrect
寬 豪 科 技 股 份 有 限 公 司
KUANHAUR TECHNOLOGIES CO., LTD.
6
3. SYSTEM SETTING
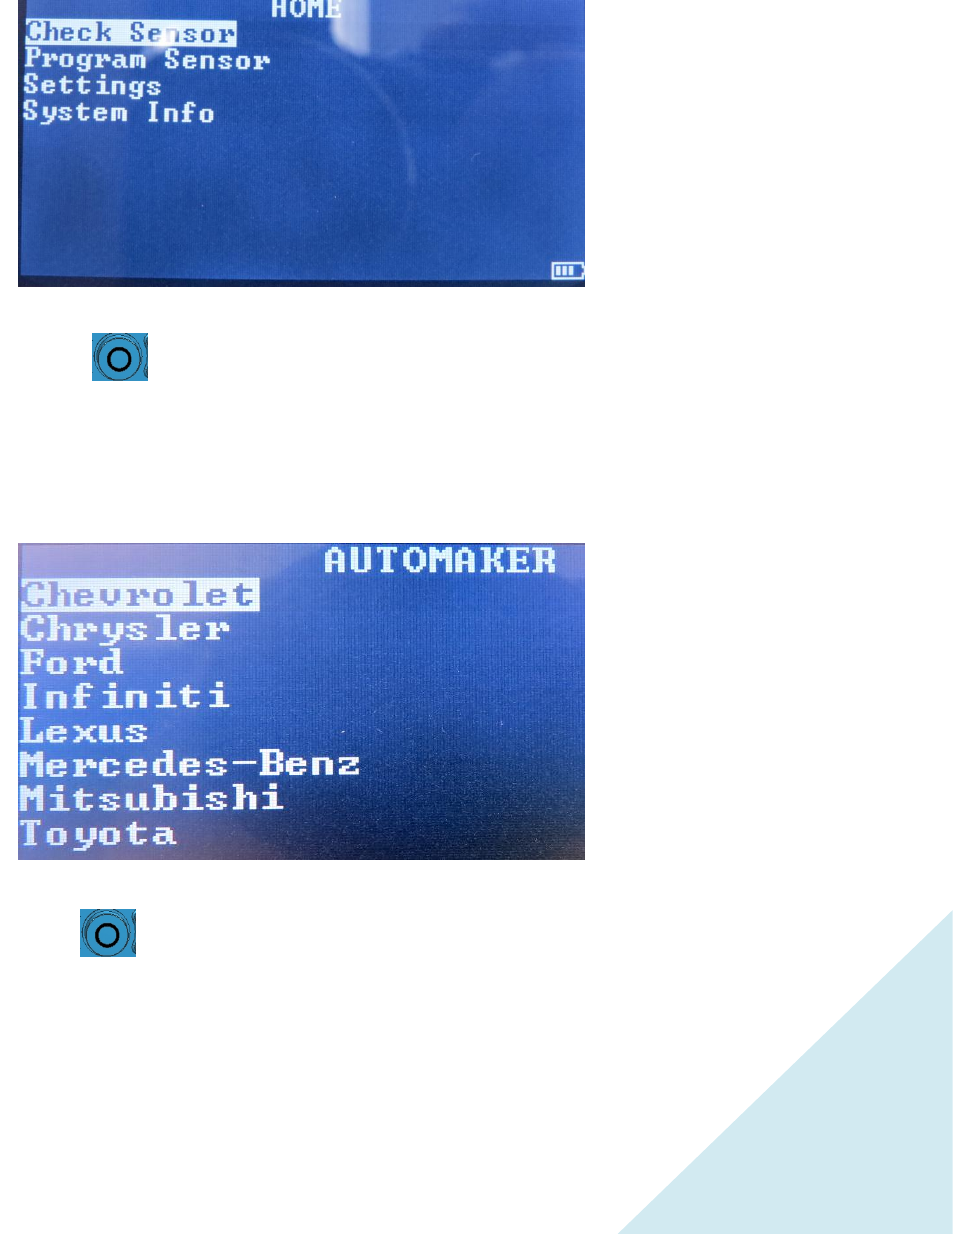
3.1 Check Sensor information
Press to in to the previous menu
3.1-1 Choose car dealer
Press to in to the previous menu
寬 豪 科 技 股 份 有 限 公 司
KUANHAUR TECHNOLOGIES CO., LTD.
7
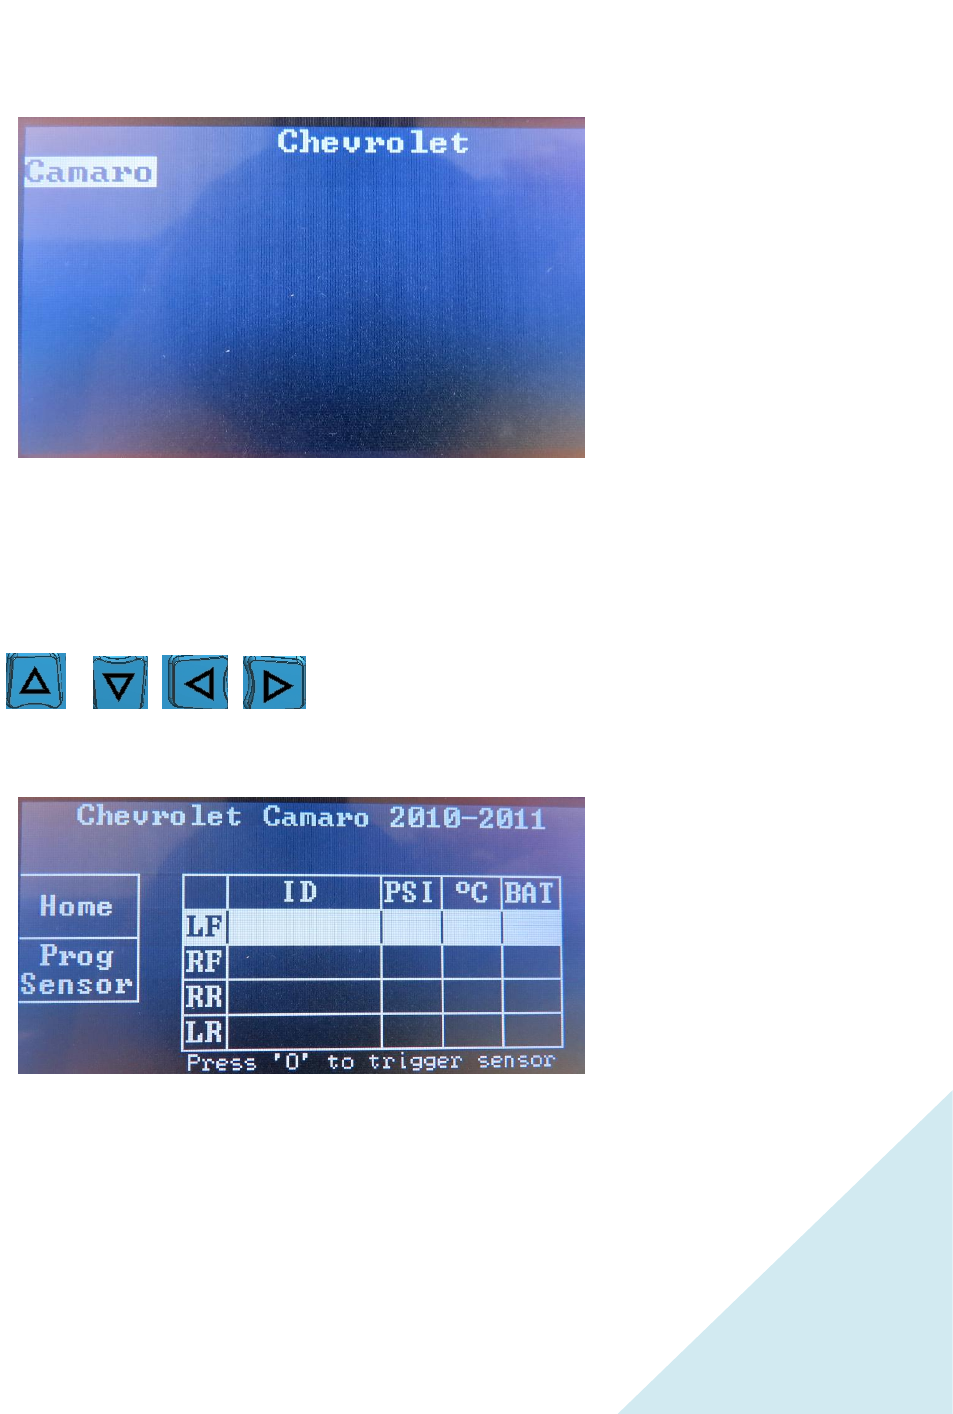
3.1-2 Choose car series
3.1-3 Check the main screen, you can choose the location of the sensor in the
car's tire, LF(Left Front),RF( Right Front) RR (Right Rear) LR(Left Rear ),
Use the Scroll Button to move the white bar to
the corresponding position
寬 豪 科 技 股 份 有 限 公 司
KUANHAUR TECHNOLOGIES CO., LTD.
8
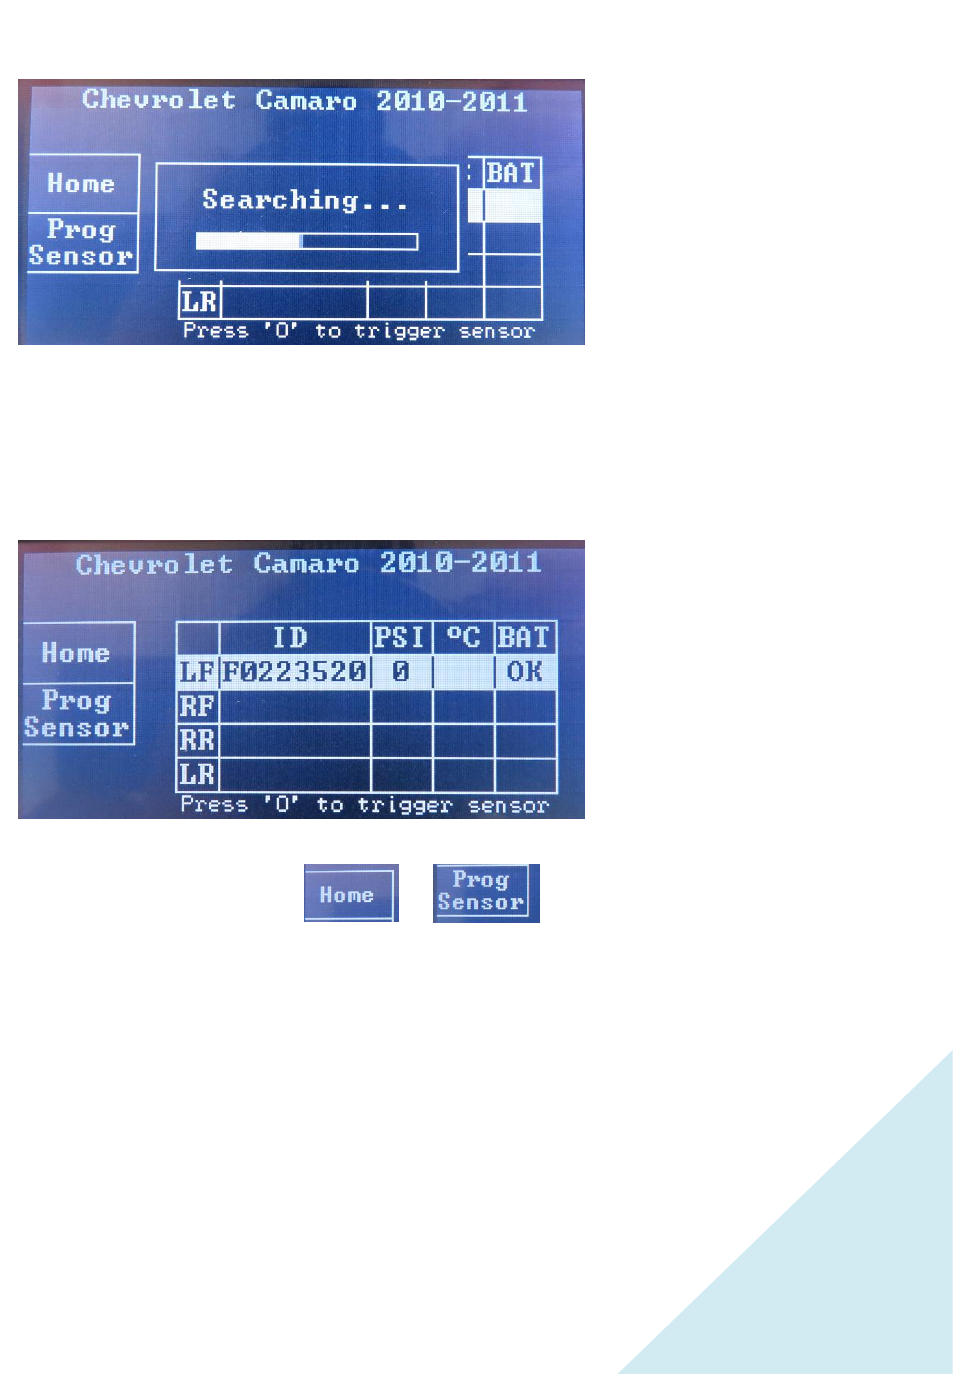
3.1-4 Into the Searching of the main screen
3.1-5 Get Sensor Information
3.1-6 Can move the white bar & jump directly to the
desired screen
寬 豪 科 技 股 份 有 限 公 司
KUANHAUR TECHNOLOGIES CO., LTD.
9
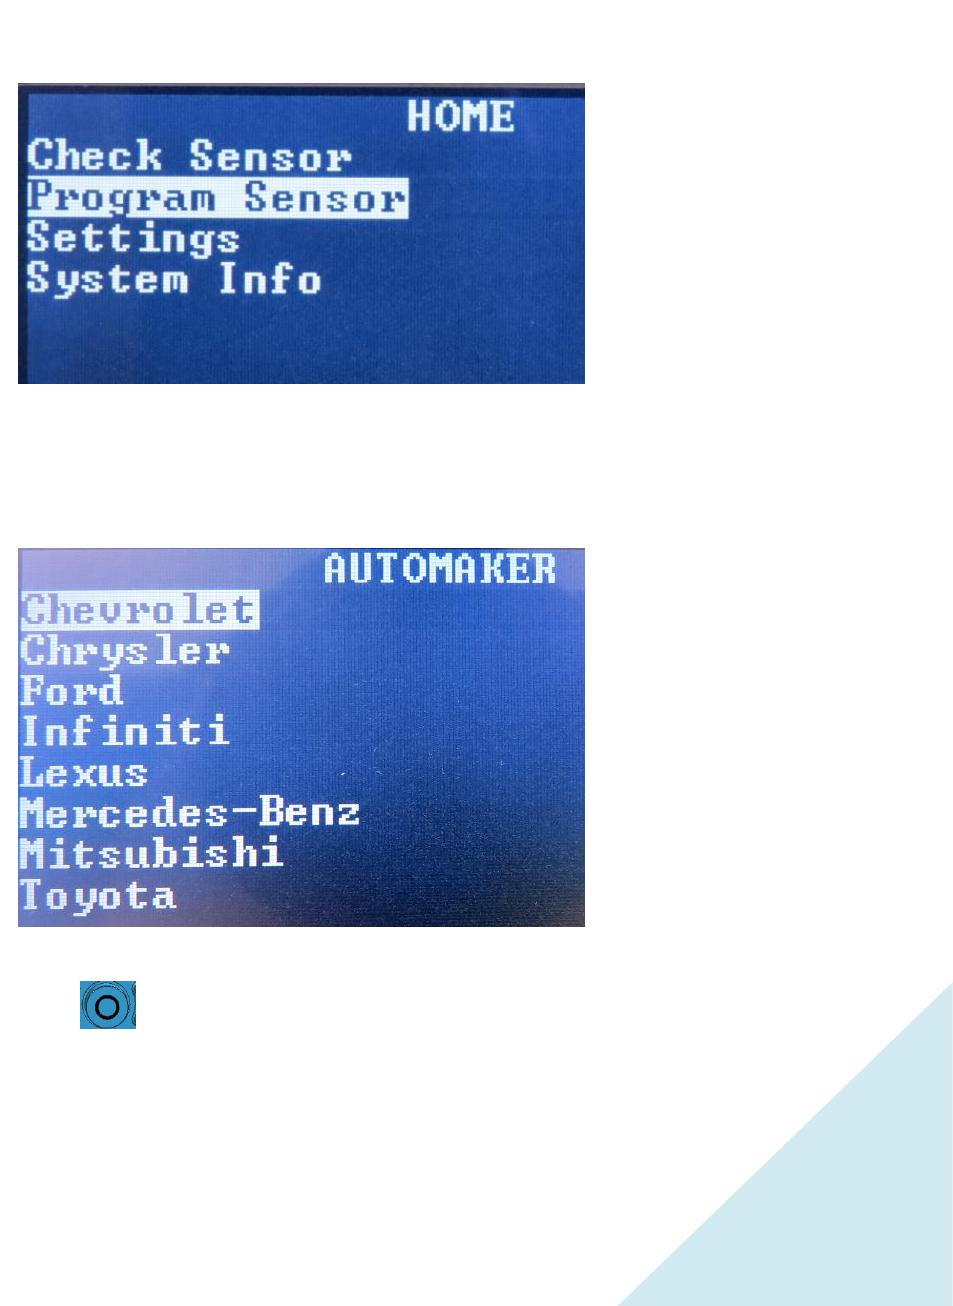
3.2 Program Sensor
3.2-1 Move the white area to Program Sensor item
3.2-2 Choose car dealer
Press to in to the next menu
寬 豪 科 技 股 份 有 限 公 司
KUANHAUR TECHNOLOGIES CO., LTD.
10
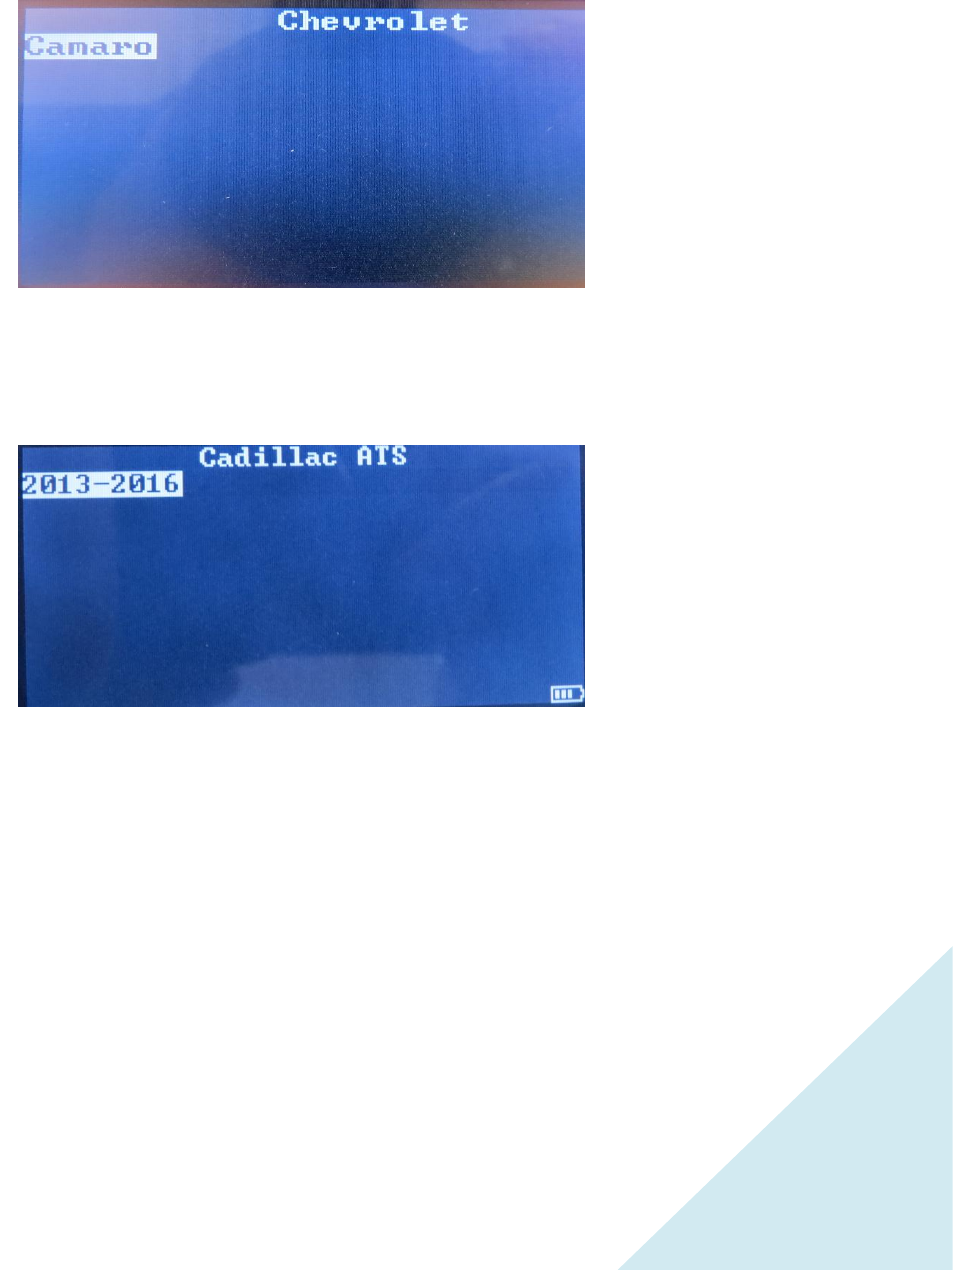
3.2-3 Choose car series
3.2-4 Choose car year item
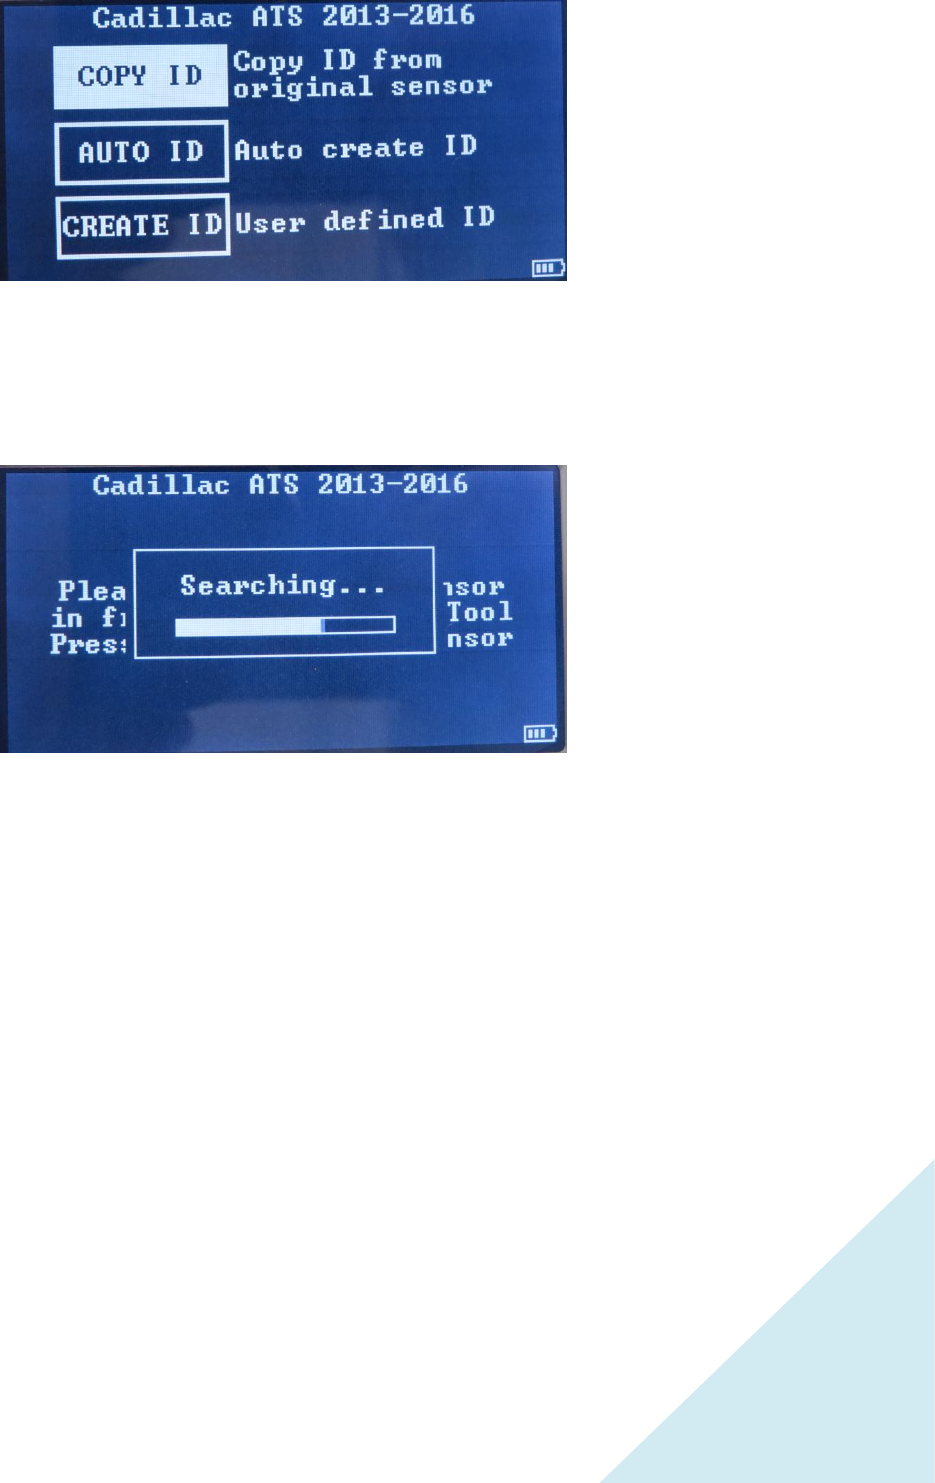
3.2-5 Copy ID from original sensor
寬 豪 科 技 股 份 有 限 公 司
KUANHAUR TECHNOLOGIES CO., LTD.
11
3.2-5 Searching & Get original ID information

寬 豪 科 技 股 份 有 限 公 司
KUANHAUR TECHNOLOGIES CO., LTD.
12
3.3 Auto create ID
3.3-1 Auto ID
3.3-2 The system will generate a group of ID in the white place automatically.
Press the confirmation key to start Program.
寬 豪 科 技 股 份 有 限 公 司
KUANHAUR TECHNOLOGIES CO., LTD.
13
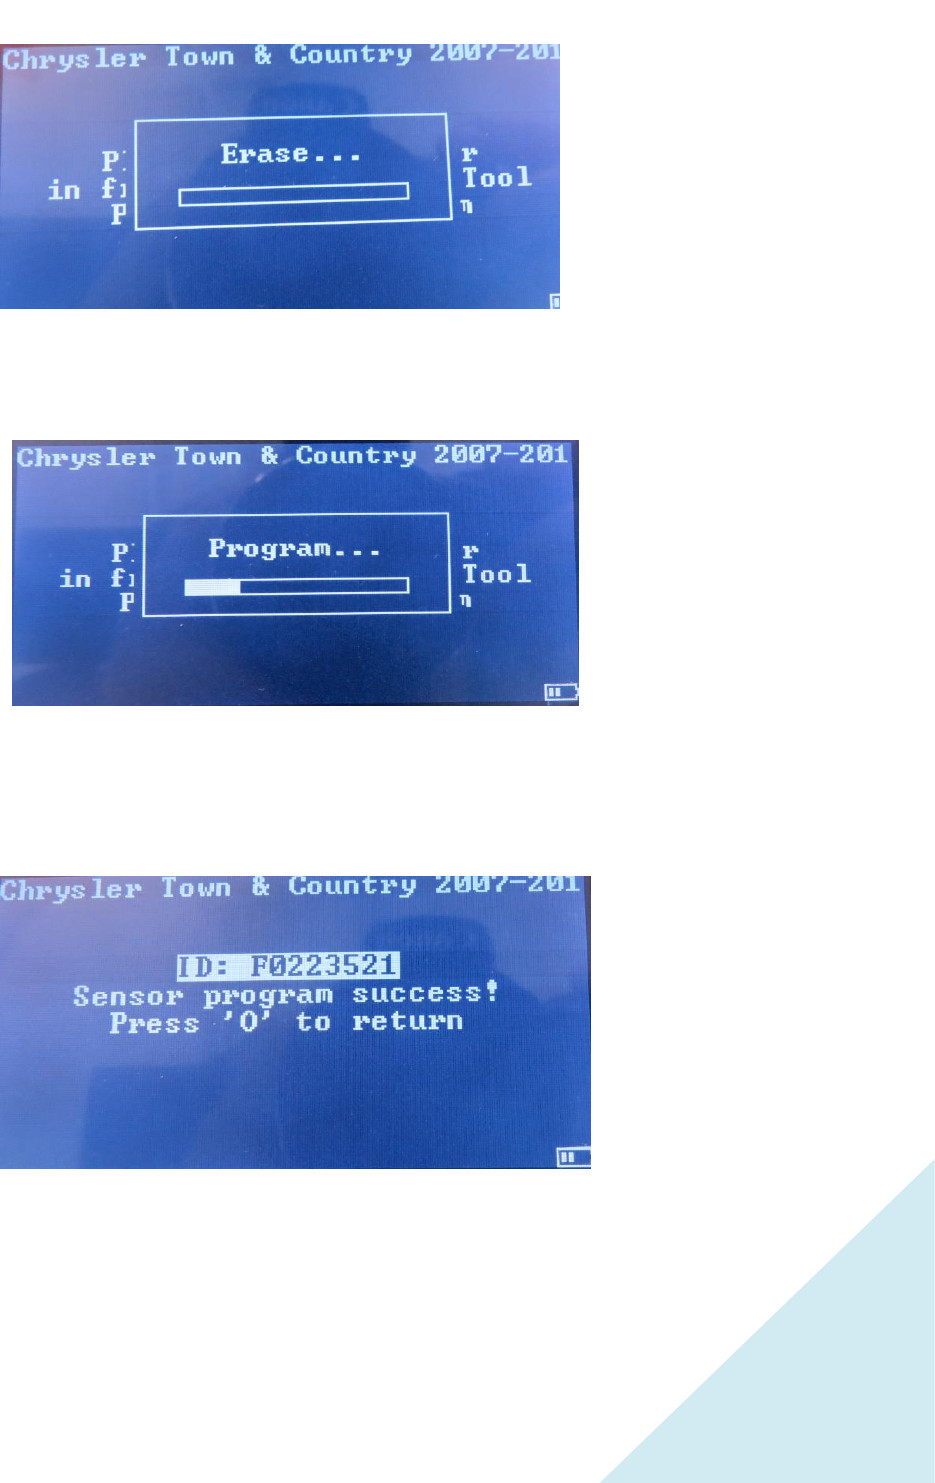
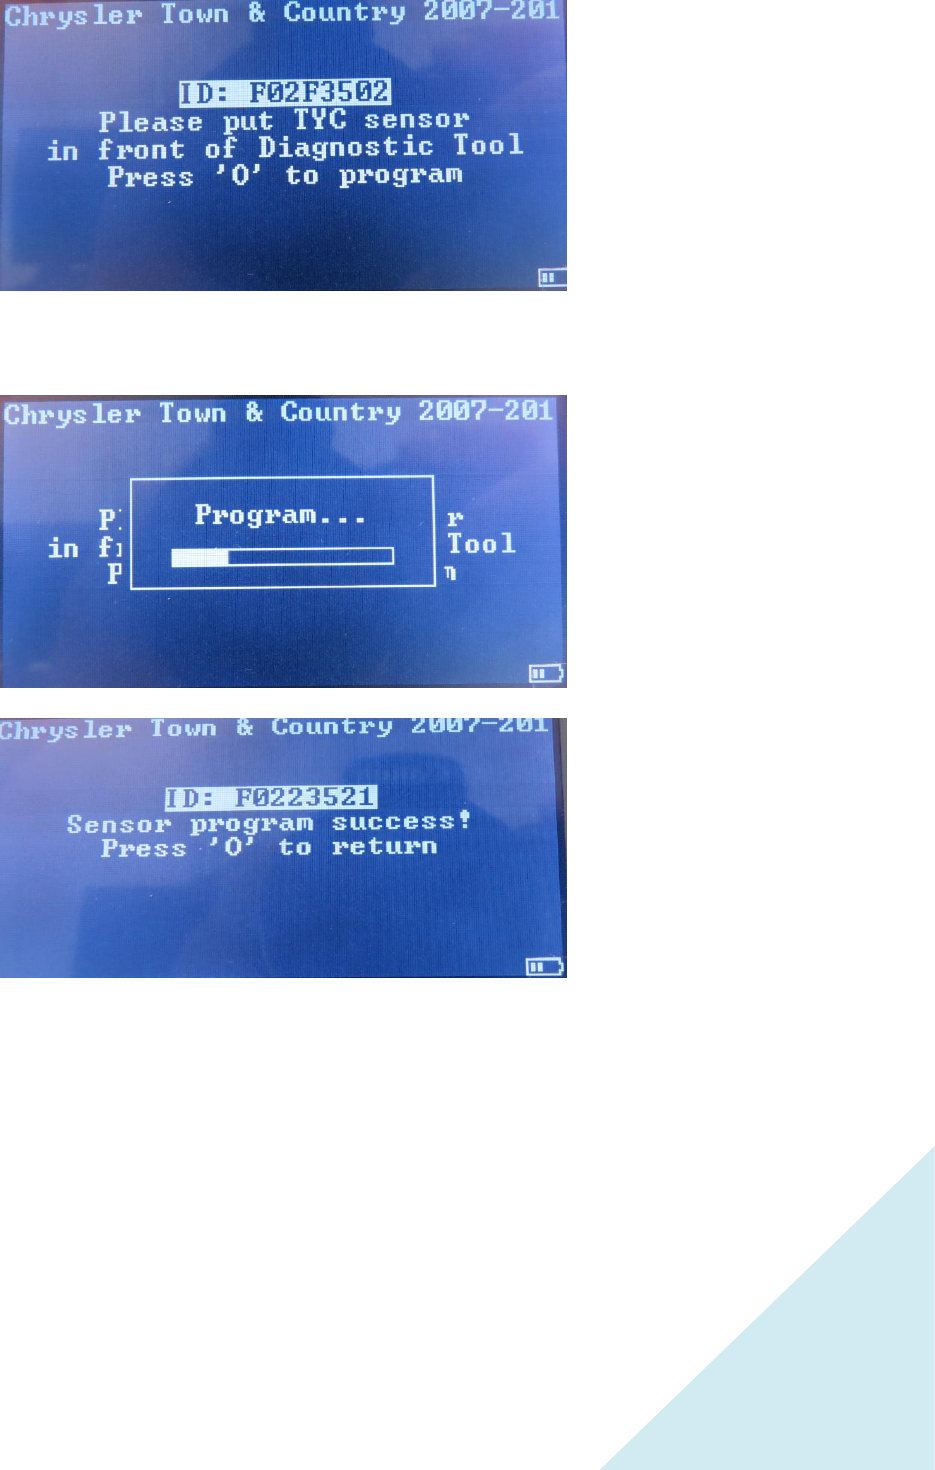
3.3-3 Clear Sensor internal data
3.3-4 Program Sensor
3.3-5 Program Sensor OK & Finish
寬 豪 科 技 股 份 有 限 公 司
KUANHAUR TECHNOLOGIES CO., LTD.
14
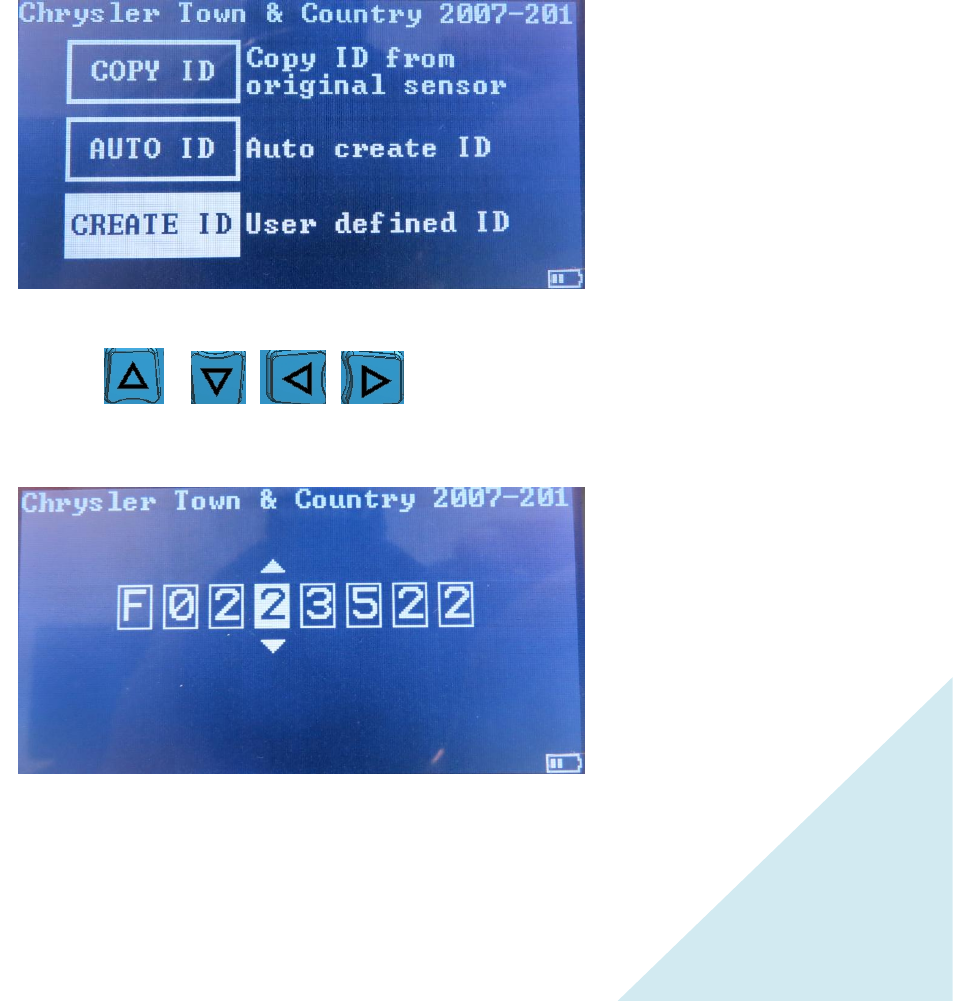
3.4 Create ID
3.4-1 User defined ID
3.4-2 Use the Scroll Button to move the
white bar to the corresponding position
3.4-3 Check ID number
寬 豪 科 技 股 份 有 限 公 司
KUANHAUR TECHNOLOGIES CO., LTD.
15
3.4-4 Program Sensor OK & Finish
寬 豪 科 技 股 份 有 限 公 司
KUANHAUR TECHNOLOGIES CO., LTD.
16
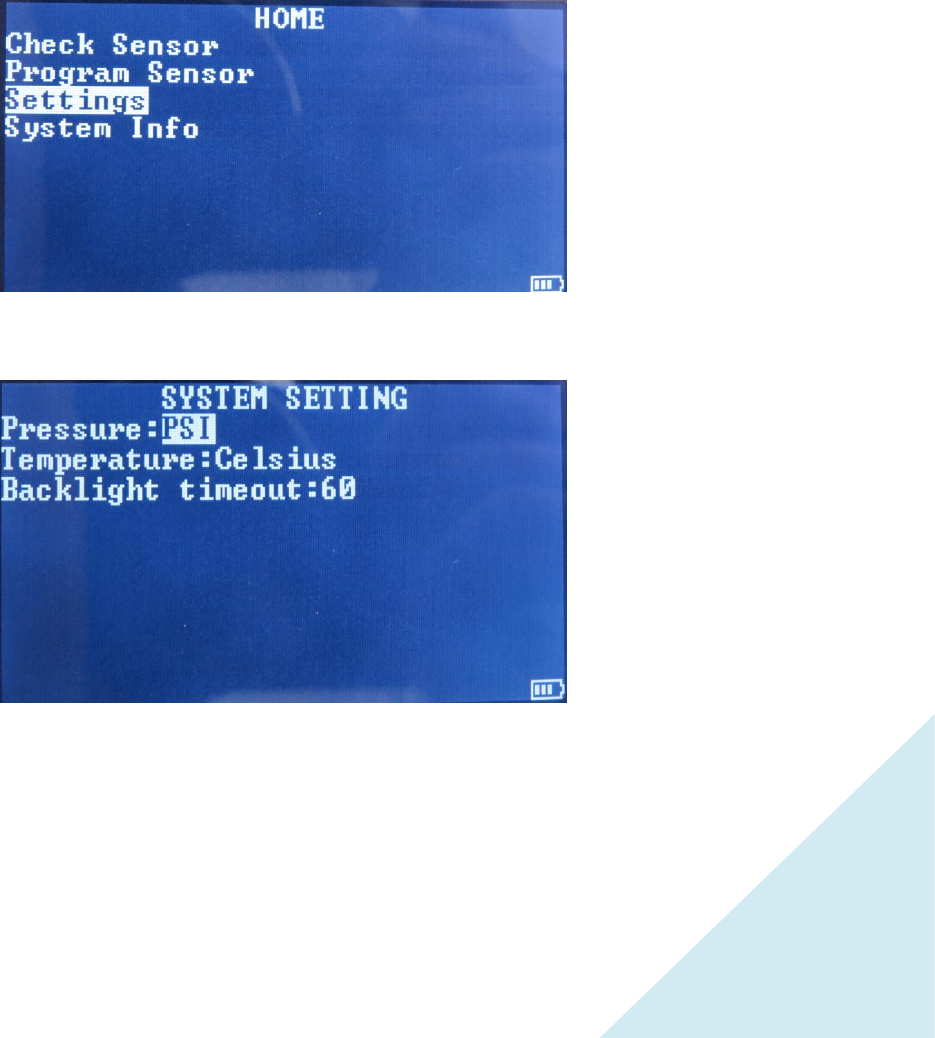
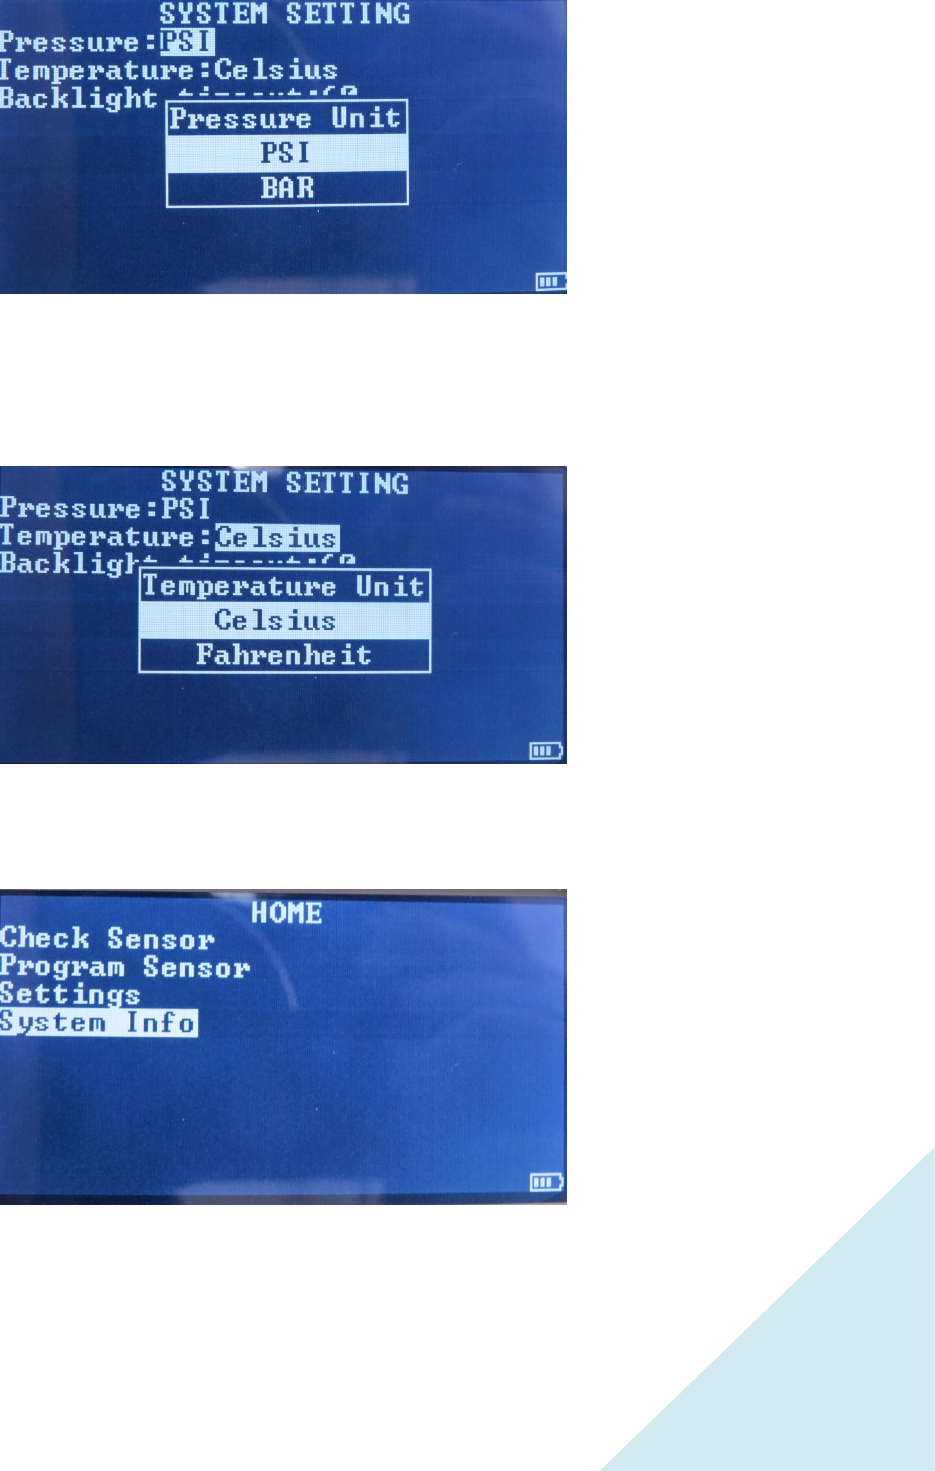
3.5 Settings Tool
3.5-1 Settings Pressure & Temperature
寬 豪 科 技 股 份 有 限 公 司
KUANHAUR TECHNOLOGIES CO., LTD.
17
3.6 System Info

寬 豪 科 技 股 份 有 限 公 司
KUANHAUR TECHNOLOGIES CO., LTD.
18
WARNING
TYC Tool Pressure Sensors and Valves are for professional installation only.
Read all instructions, warnings carefully, and review all illustrations before installing. Tire Pressure Monitoring
System tool assemblies are replacement or maintenance parts for motor vehicles that have factory installed TPMS
only. Failure to follow installation instructions may result in the failure of the motor vehicle TPMS sensor to operate
properly. TYC does not assume any liability in case of faulty installation.
FAILURE TO FOLLOW INSTALLATION INSTRUCTION CAN CAUSE THE TYC TIRE PRESSURE SENSORS TO MALFUNCTION,
WHICH CAN CAUSE PROPERTY DAMAGE, SERIOUS INJURY AND EVEN DEATH.
CAUTION
Each TYC tool is designed and manufactured to operate in blank at initial status
Use the proper frequencies to communicate with the motor vehicle TPM System
Be sure to configure TYC sensor with appropriate programming tool before use.
Follow the installation instructions for TYC Tire Pressure Sensors.
The valve must be replaced during every tire change.
Do not install TPMS in damaged wheels.
TYC sensor is using fixed valve angle, avoid sensor housing have any contact with the rim.
When installing with rubber valve, do not coat the sensor with tire bead lubricant.
Upon completion of installation, test the motor vehicle TPM System with procedures described in original
manufacturer’s service manual.
If the TPM System fails to operate properly, check all installation procedures to ensure proper installation and retest.
If the TPM System continues to fail to operate, immediately consult with an authorized motor vehicle dealership.
TYC TPMS sensor assemblies are designed to operate in Original Equipment wheels and tires only.
TYC WARRANTY and WARRANTY LIMITATIONS
All products sold are warranted against defects in workmanship and material under normal use and service for a period of 3
years from the date of sale to distributors. TYC will either repair or replace any product which fails within this period at no
cost to customers. This warranty does not include any accident, modification, misuse or abuse to this product and the limited
obligations will hereunder be void. THIS IS THE SOLE AND EXCLUSIVE WARRANTY AND LIABILITY TO CUSTOMER. TYC GENERA
DISCLAIMS ANY OTHER WARRANTY INCLUDING THE WARRANTIES OF MERCHANTABILITY, FITNESS FOR PURPOSE FOR OTHER
IMPLIED OR EXPRESS WARRANTIES. UNDER NO CIRCUMSTANCES SHALL TYC BE LIABLE TO CUSTOMER FOR ANY OTHER
AMOUNTS INCLUDING LABOR CHARGES FOR INSTALLATION OF PRODUCTS NOR SHALL TYC BE LIABLE UNDER ANY THEORY
FOR ANY OTHER DAMAGES INCLUDING BUT NOT LIMITED TO DIRECT, INDIRECT, SPECIAL, CONSEQUENTIAL AND INCIDENTAL
DAMAGES.
IMPORTANT WARRANTY INFORMATION
Professional installer: when replacing an entire TYC Sensor assembly, please complete the following warranty information
giving one copy to the customer and send the duplicate copy to the indicated address.
CUSTOMER TYC TPMS SENSOR INFORMATION CARD (Please keep in motor vehicle glove box)
Sensor Installation Date: (M)_______ /(D)________/(Y)_______ Professional Installer name:
_______________________Place of Repair: ___________________Address:
____________________________________________________
Phone: ___________________Vehicle Owner Name: _________________________Address:
____________________________________________________

寬 豪 科 技 股 份 有 限 公 司
KUANHAUR TECHNOLOGIES CO., LTD.
19
MOTOR VEHICLE INFORMATION
Maker: ___________________Model: __________________
Year: ________________VIN Number: __________________
Sensor ID (__digit marked on housing):__________________
TYC GENERA
2800 Saturn Street, Brea, CA 92821 USA
Tel: (714) 203-0800
Tech. Support
Tel:
Email:
http://www.tycusa.com/
−−−−−−−−−−−−−−−−−−−−−−−−−−−−−−−−−−−−−−−−−−(Tear here)−−−−−−−−−−−−−−−−−−−−−−−−−−−−−−−−−−−−−−−−−−
IMPORTANT WARRANTY INFORMATION
To activate warranty, please complete the following section and send to:
TPMS Sensor Warranty TYC GENERA ∙ 2800 Saturn Street, Brea, CA 92821
Sensor Installation Date: (M)_______/(D)________/(Y)_______Professional Installer name: _________________________Place of Repair: _________________________Address: ___________________________________________________Phone:
_________________________
Vehicle Owner Name: _________________________Address: _________________________
MOTOR VEHICLE INFORMATION
Maker: _________________________Model: _________________________Year: _________________________VIN Number: _________________________Mileage: _________________________Sensor ID (__digit marked on housing):
_______________________Part number of sensor being replaced (take from old sensor housing): _________________________
FCC Statement
This equipment has been tested and found to comply with the limits for a Class B digital
device, pursuant to Part 15 of the FCC Rule.
These limits are designed to provide reasonable protection against harmful interference
in a residential installation.
This equipment generates uses and can radiate radio frequency energy and, if not
installed and used in accordance with the instructions, may cause harmful interference
to radio communications. However, there is no guarantee that interference will not
occur in a particular installation.
If this equipment does cause harmful interference to radio or television reception, which
can be determined by turning the equipment off and on, the user is encouraged to try to
correct the interference by one of the following measures:
- Reorient or relocate the receiving antenna.
- Increase the separation between the equipment and receiver.
- Connect the equipment into an outlet on a circuit different from that to which the
receiver is connected.
- Consult the dealer or an experienced radio/TV technician for help.
FCC Caution
Any changes or modifications not expressly approved by the party responsible for
compliance could void the user's authority to operate this equipment.
This device and its antenna(s) must not be co-located or operating in conjunction with

寬 豪 科 技 股 份 有 限 公 司
KUANHAUR TECHNOLOGIES CO., LTD.
20
any other antenna or transmitter.
FCC Notice
This device complies with Part 15 of the FCC Rules. Operation is subject to the
following two conditions:
(1) This device may not cause harmful interference, and(2) this device must accept any
interference received, including interference that may cause undesired operation.
NCC Notice
◆第十二條→經型式認證合格之低功率射頻電機,非經許可,公司,商號或使用者均不得擅自變更頻率、加大
功率或變更原設計之特性及功能。
◆第十四條→低功率射頻電機之使用不得影響飛航安全及干擾合法通信;經發現有干擾現象時,應立即停用,
並改善至無干擾時方得繼續使用。
前項合法通信,指依電信法規定作業之無線電通信。 低功率射頻電機須忍受合法通信或工業、科學及醫療用
電波輻射性電機設備之干擾。