KUNSHAN KONKA ELECTRONICS WD48UW4490 LCD TV User Manual
KUNSHAN KONKA ELECTRONICS CO., LTD LCD TV
User Manual

WD48UW4490

1
En
CONTENTS
Important Safety Instructions
Safety Information
Preparation
What's Included
Front View
Rear View
Installing the Stand
Removing the Stand for Wall-Mounting
Remote Control
Connecting External Devices
Customizing TV Settings
Initial Setup
Navigating the Setup Settings
Apps
Media
Viewing Photos
Playing Motion JPG
Source
Setup
System
Channel
Support
Lock
Picture
Network
Audio
Parental Control
Troubleshooting
Maintaining
Specication
OTT APP Service
2
3
4
4
5
6
7
7
8
9
10
10
11
12
13
13
14
14
15
15
17
17
18
19
20
21
22
24
25
26
27
2
En
IMPORTANT SAFETY INSTRUCTIONS
• Read these instructions – All the safety and
operating instructions should be read before this
product is operated.
• Keep these instructions – The safety and
operating instructions should be retained for future
reference.
• Heed all warnings – All warnings on the appliance
and in the operating instructions should be adhered
to.
• Follow all instructions – All operating and use
instructions should be followed.
• Do not use this apparatus near water – The
appliance should not be used near water or
moisture – for example, in a wet basement or near
a swimming pool, and the like.
• Clean only with dry cloth.
• Do not block any ventilation openings. Install in
accordance with the manufacturer’s instructions.
• Do not install near any heat sources such as
radiators, heat registers, stoves, or other apparatus
(includingampliers)thatproduceheat.
• Do not defeat the safety purpose of the polarized
or grounding-type plug. A polarized plug has two
blades with one wider than the other. A grounding-
type plug has two blades and a third grounding
prong. The wide blade or the third prong are
provided for your safety. If the provided plug does
not fit into your outlet, consult an electrician for
replacement of the obsolete outlet.
• Protect the power cord from being walked on
or pinched particularly at plugs, convenience
receptacles, and the point where they exit from the
apparatus.
• Onlyuseattachments/accessoriesspeciedbythe
manufacturer.
• Use only with the cart, stand, tripod, bracket, or
tablespeciedbythemanufacturer,orsoldwiththe
apparatus. When a cart is used, use caution when
moving the cart/apparatus combination to avoid
injury from tip-over.
WARNING:Toreducetheriskofreorelectricshock,
do not expose this apparatus to rain or moisture.
The apparatus should not be exposed to dripping or
splashing. Objects filled with liquids, such as vases
should not be placed on apparatus.
WARNING: The batteries shall not be exposed to
excessiveheatsuchassunshine,reorthelike.
WARNING: The mains plug is used as disconnect
device, the disconnect device shall remain readily
operable.
WARNING: To reduce the risk of electric shock, do not
removecover(orback)astherearenouser-serviceable
partsinside.Referservicingtoqualiedpersonnel.
• Unplug this apparatus during lightning storms or
when unused for long periods of time.
• Refer all servicing to qualified service personnel.
Servicing is required when the apparatus has
been damaged in any way, such as the power-
supply cord or plug is damaged, liquid has been
spilled or objects have fallen into the apparatus, the
apparatus has been exposed to rain or moisture,
does not operate normally, or has been dropped.
• Please keep the unit in a well-ventilated
environment.
This lightning flash with arrowhead symbol
within an equilateral triangle is intended to
alert the user to the presence of non-insulated
“dangerous voltage” within the product’s
enclosurethatmaybeofsufcientmagnitudeto
constitute a risk of electric shock.
The exclamation point within an equilateral
triangle is intended to alert the user to
the presence of important operating and
maintenance instructions in the literature
accompanying the appliance.
This equipment is a Class II or double insulated
electrical appliance. It has been designed in
such a way that it does not require a safety
connection to electrical earth.
This product contains electrical or electronic
materials. The presence of these materials
may,if not disposed of properly, have potential
adverse effects on the environment and human
health. Presence of this label on the product
means it should not be disposed of as unsorted
waste and must be collectedseparately. As a
consumer, you are responsible for ensuring that
this product is disposed of properly.
This product meets ENERGY
STAR® guidelines for energy
efficiency. ENERGY STAR and
the ENERGY STAR mark are
registered U.S. marks. ENERGY
STAR is a registered mark
owned by the U.S. government.

3
En
SAFETY INFORMATION
To ensure reliable and safe operation of this equipment, please carefully read all the instructions in
this user guide, especially the safety information below.
Electrical Safety
•The TV set should only be connected to a main power supply with voltage that matches the
label at the rear of the product.
•To prevent overload, do not share the same power supply socket with too many other
electronic components.
•Do not place any connecting wires where they may be stepped on or tripped over.
•Do not place heavy items on any connecting wire, which may damage the wire.
•Hold the main plug, not the wires, when removing from a socket.
•During a thunderstorm or when not in using the television for long periods, turn off the power
switch on the back of the television.
•Do not allow water or moisture to enter the TV or power adapter. Do NOT use in wet, moist
areas, such as bathrooms, steamy kitchens or near swimming pools.
•Pull the plug out immediately, and seek professional help if the main plug or cable is damaged,
liquid is spilled onto the set, if the TV set accidentally exposed to water or moisture, if anything
accidentally penetrates the ventilation slots or if the TV set does not work normally.
•Do not remove the safety covers. There are no user serviceable parts inside. Trying to service
theunityourselfisdangerousandmayinvalidatetheproduct’swarranty.Qualiedpersonnel
must only service this apparatus.
•To avoid a battery leakage, remove batteries from the remote control, when the remote is not
use for long period, or when the batteries are exhausted.
•Donotbreakopenorthrowexhaustedbatteriesintoare.
•Forbestresults,usetypeAAA(example-alkaline,carbon-zinc,etc.)batteries.
•Install only new batteries of the same type in your product.
•Failure to insert batteries in the correct polarity, as indicated in the battery compartment, may
shorten the life of the batteries or cause batteries to leak.
•Do not mix old and new batteries.
•DonotmixAlkaline,Standard(Carbon-Zinc)orRechargeable(NickelCadmium)or(Nickel
MetalHydride)batteries.
•Batteries should be recycled or disposed of as per state and local guidelines.
•Do not attempt to recharge disposable batteries.
•Do not short circuit battery terminals.
•Keep away from children.
Physical Safety
•Do not block ventilation slots in the back cover. You may place the TV in a cabinet, but ensure
atleast5cm(2’’)clearanceallaround.
•Do not tap or shake the TV screen, or you may damage the internal circuits. Take good care
of the remote control.
•TocleantheTVuseasoftdrycloth.Donotusesolventsorpetroleumbaseduids.
•Do not install near any heat sources such as radiators, heat registers, stoves or other
apparatus(includingampliers)thatproduceheat.
•Do not defeat the safety purpose of the polarized or grounding-type plug. A polarized plug
has two blades with one wider than the other. A grounding plug has two blades and a third
grounding prong, the wide blade,or the third prong is provided for your safety. If the provided
plugdoesnottintoyouroutlet,consultanelectricianforreplacementoftheobsoleteoutlet.
•Protect the power cord from being walked on or pinched particularly at plugs.
•Unplug the apparatus during lightning storms or when unused for long periods.
•Referallservicingtoaqualiedservicepersonnel.Servicingisrequirediftheapparatusdoes
not operate normally or if the apparatus, including the power supply cord or pulg, has been
damaged in any way.
•Servicing is also required if liquid has been spilled, or objects have fallen into the apparatus;
when the apparatus has been exposed to rain or moisture; or if the apparatus has been
dropped.
•Always connect your television to a power outlet with protective ground connection.
4
En
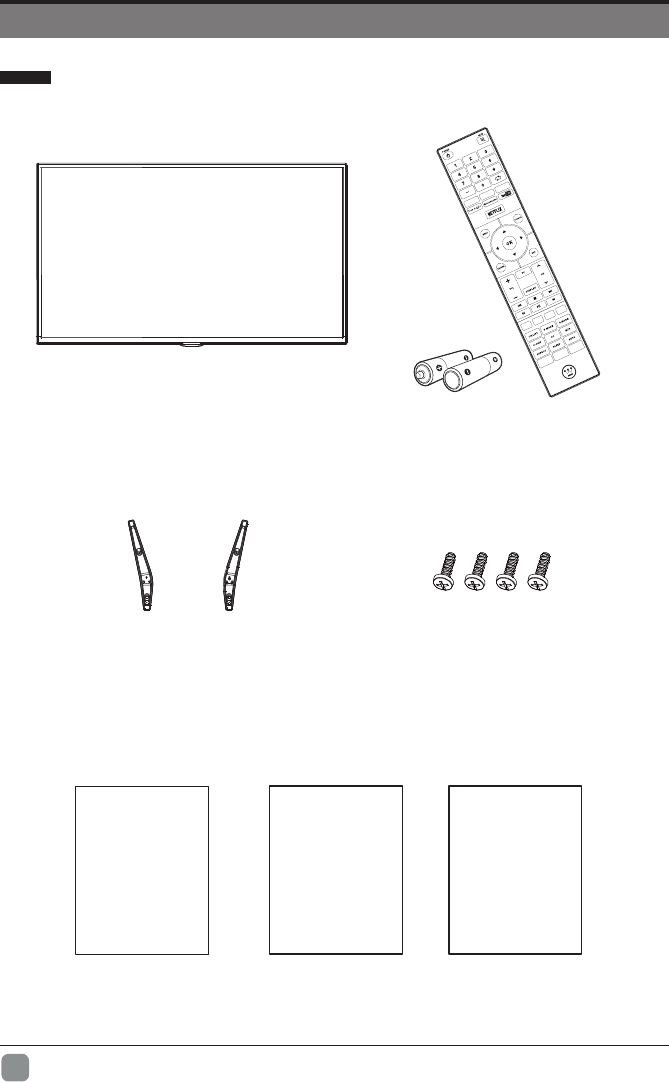
PREPARATION
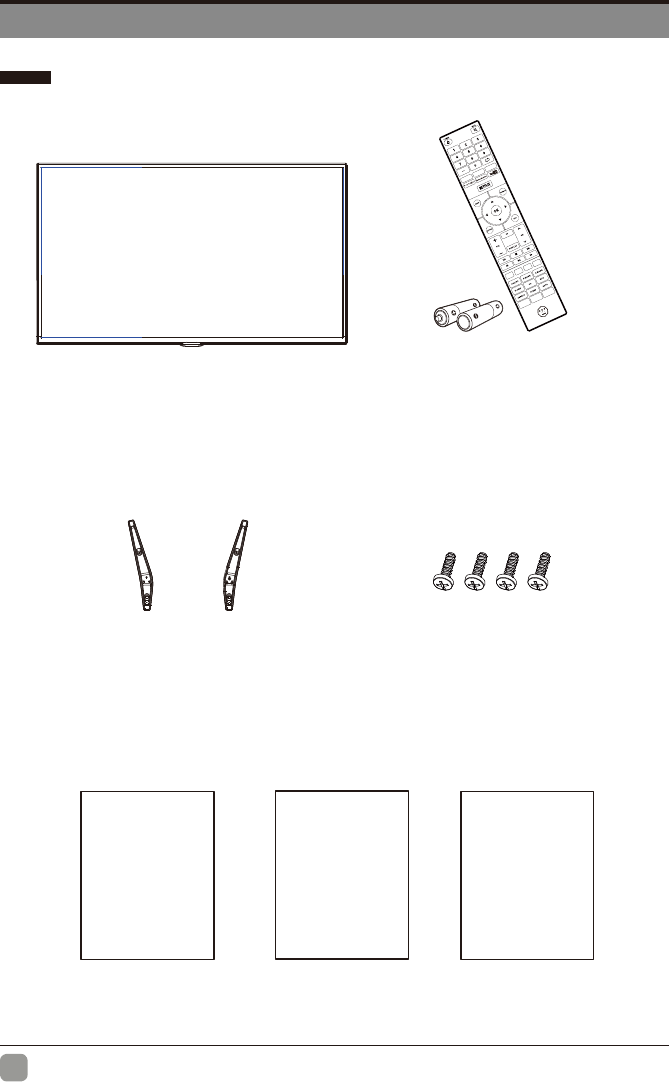
What's Included
Quick Connect Guide
Quick
Connect
Guide
User Manual
User Manual
Remote Control with Batteries
Warranty Card
Warranty
Card
TV Set
TV Stand Four Screws (M4x12)
5
En
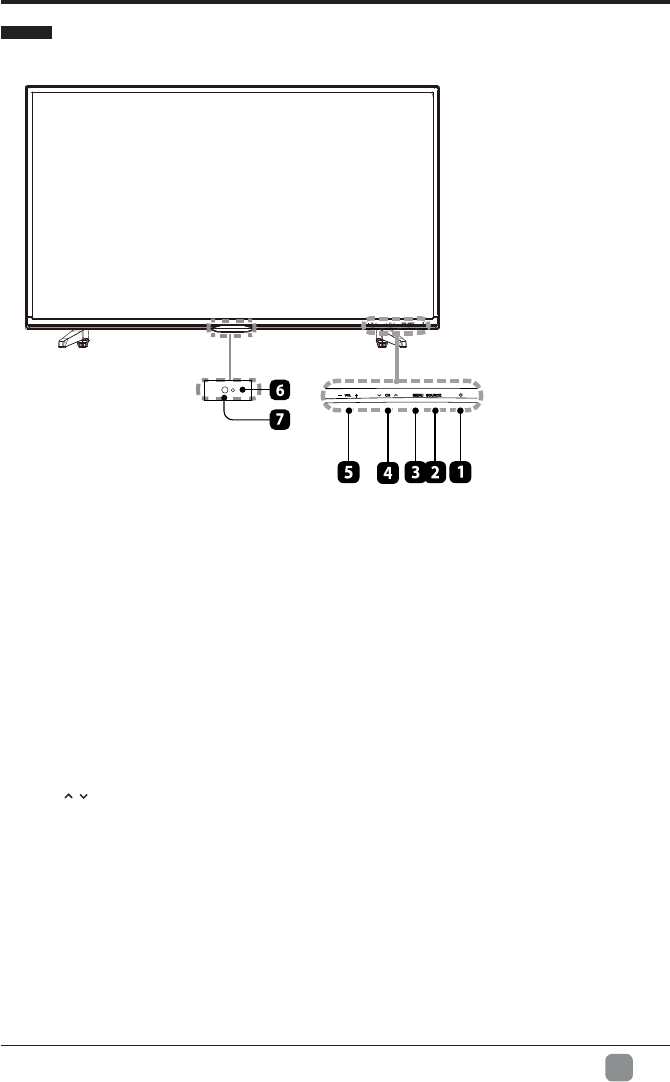
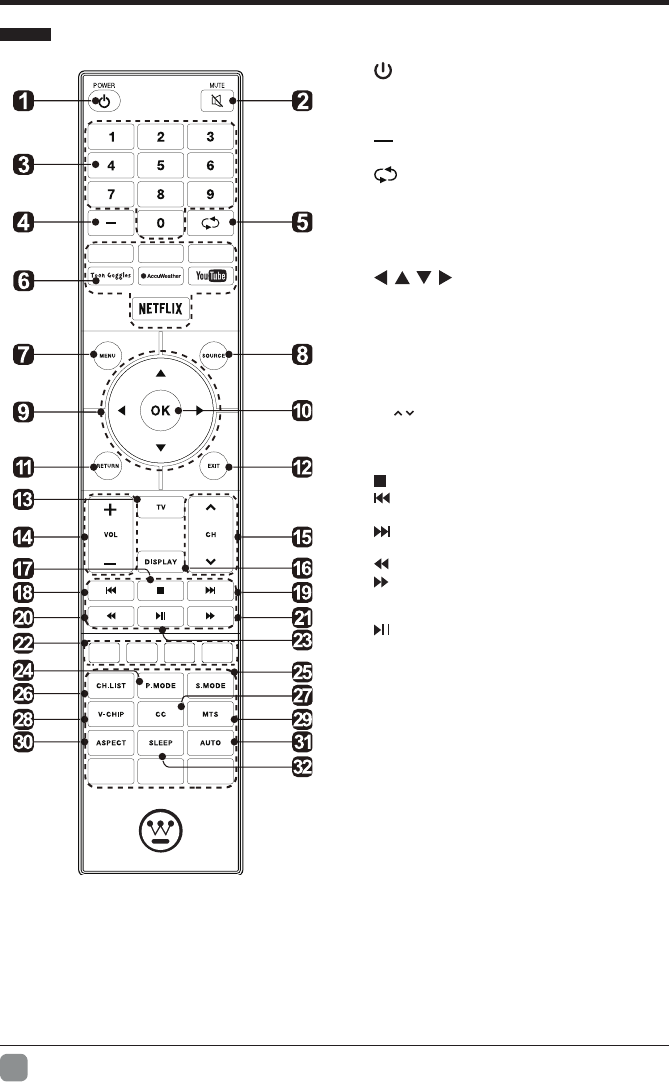
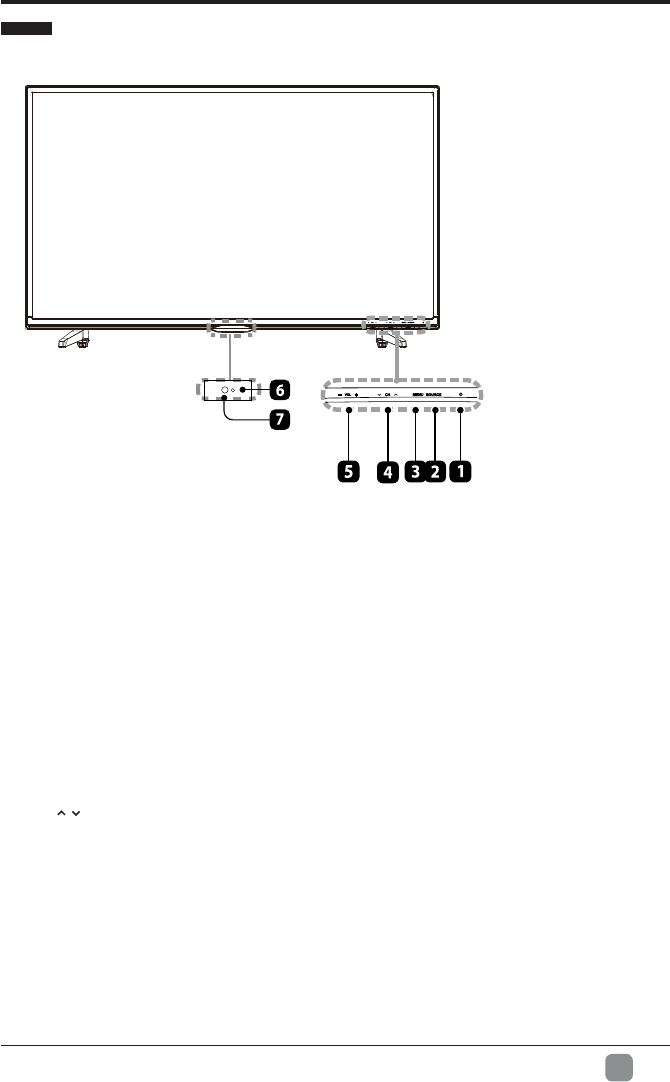
1. POWER
Switch the TV between On / Standby mode.
2. SOURCE
Press to select among different input signal sources.
3. MENU
Display the main menu.
4. CH /
Press to select a channel.
5. VOL +/-
Press to adjust the volume.
6. POWER Indicator
Illuminate blue when the TV is turned on. Illuminate red when the TV is in standby mode.
7. IR(InfraredReceiver)
Receive IR signals from the remote control.
PREPARATION
Front View

6
En
PREPARATION
Rear View
1. Power Cord
Connect to AC power outlet.
2. OPTICAL Output
Connect a digital sound system to this
jack.
3. USB Port
ConnecttoaUSBstoragedevicetoplaycompatiblemovieandphotoles.
4. LAN
Network connection port.
5. HDMI Input
ConnecttoaHigh-Denition(HD)signalinputdevice.
6. VGA Input
Connect to a computer or other devices with a VGA interface.
7. PC AUDIO Input
Connect to a computer audio output.
8. DTV/TV Input
Connecttotheantenna(75ΩVHF/UHF)socketwiththeRFcoaxialcable.
9. Headphone Socket
Connect to the Headphones.
10. AUDIO Input
ConnecttotheAUDIO(L/R)outputsocketsonexternalaudiodevices.
11. COMPOSITE/COMPONENT IN
ConnecttoAVdeviceswithcomposite/component(Y/Pb/Pr)videoandaudiooutputsockets.
COMPOSITEVIDEOandCOMPONENT(Y/PB/PR)sharewithAUDIOIN(L/R).
LA N
OPTICAL PC AUDI O
VGA
HDMI1HDMI2
10
COMPONENTAUDIO
900
HDMI3
7
En
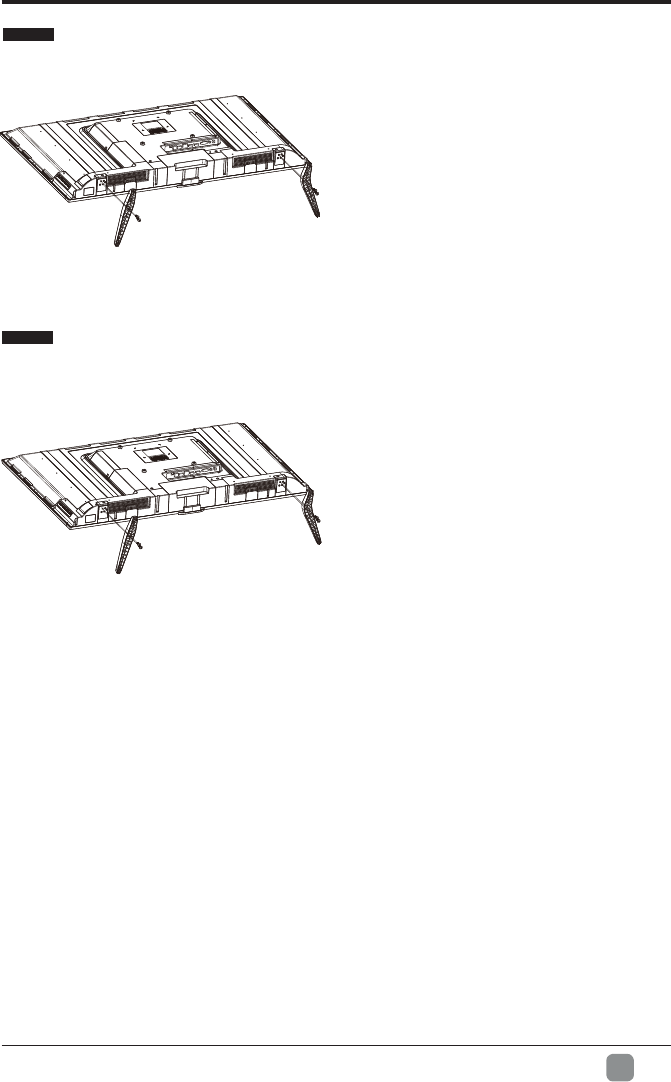
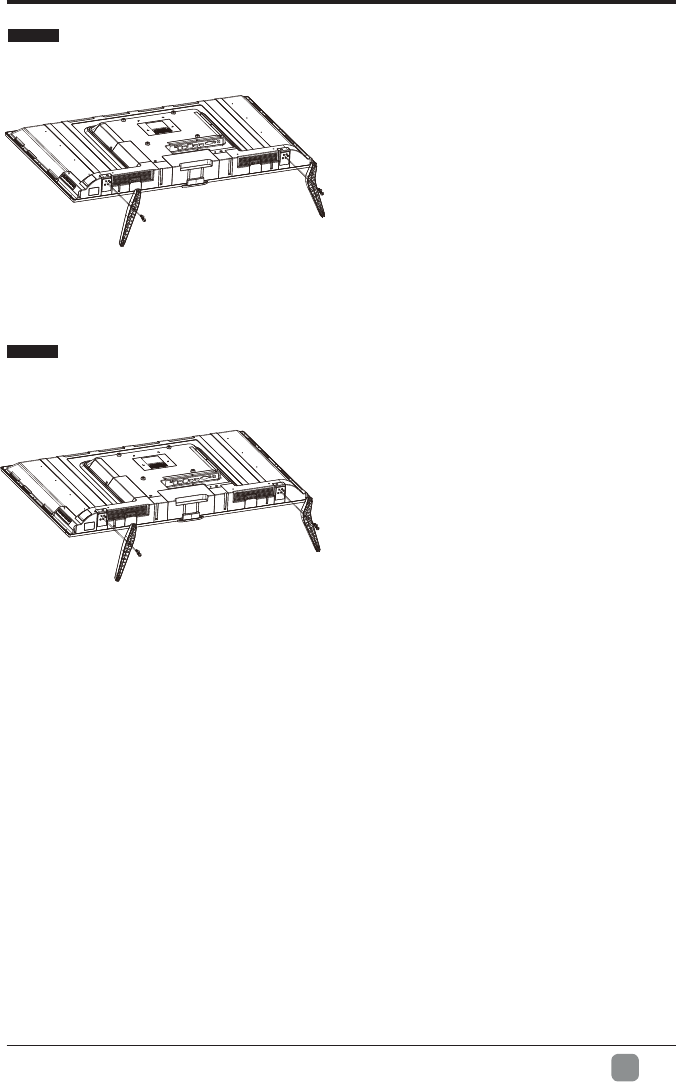
Installing the Stand
WARNING: This apparatus is intended to be supported by UL Listed wall mount bracket.
Removing the Stand for Wall-Mounting
PREPARATION
• 1. Lay the TV face down on a flat,
cushioned surface to avoid damaging
or scratching.
• 2.Fix the Left Connecting Base to the
main unit using the 2 provided screws.
• 3.Fix the Right Connecting Base to
the main unit using the 2 provided pcs
provided screws.
• 1.Lay the TV face down on a flat,
cushioned surface to avoid damaging
or scratching.
• 2.Untighten the 4 pcs screws holding
the stand assembly and remove them.
• 3.Attach the wall-mount bracket to
the TV using the mounting holes on
the back of the TV. Mount this TV
according to the instructions included
in the wall-mount bracket.
8
En
PREPARATION
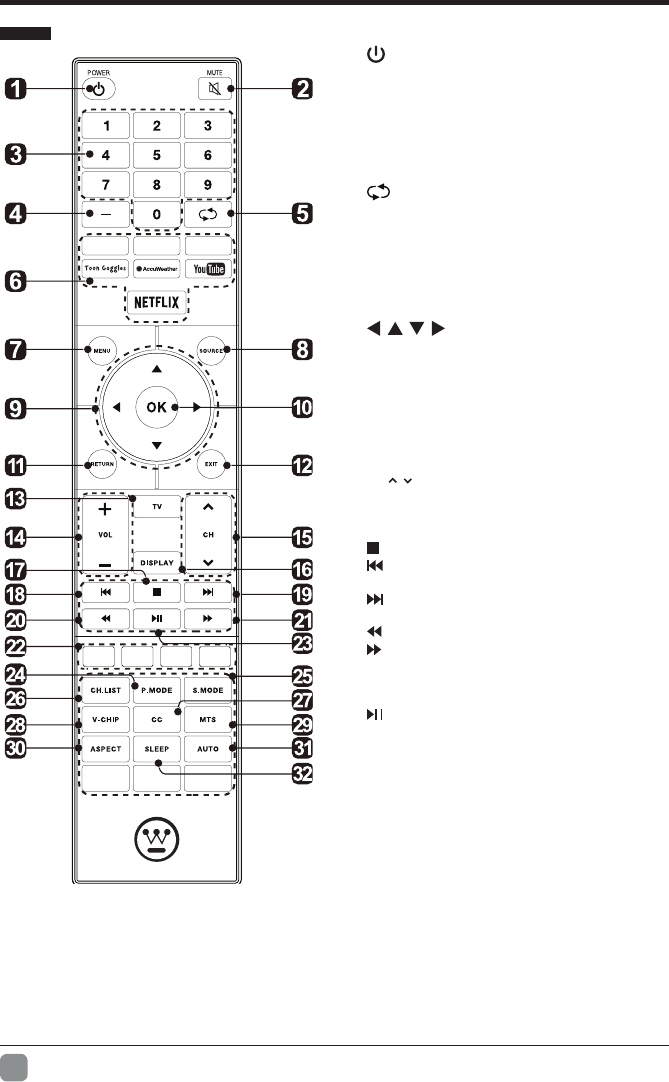
Remote Control
1. : Switch the TV between On and Standby
mode.
2. MUTE: Mute and restore TV sound.
3. 0~9:Selectaprogram.(ATV/DTVmode)
4. : Enter multiple program channel number
such as 2-1.
5. : Return to the previous viewing channel.
6. APP: Press to select the desired APP.
7. MENU: Display the main menu.
8. SOURCE: Select among the different input
signal sources:TV/HDMI1/HDMI2/HDMI3/USB/
VGA/AV/Component.
9. : Allows you to navigate the on
screen display menus and adjust the system
settings to your preference.
10. OK:Conrmtheselection.
11. RETURN: Return to previous menu.
12. EXIT: Exit the on screen display menu.
13. TV: Press to turn to TV mode.
14. VOL+/-: Adjust the volume.
15. CH / : Select the channel.
16. DISPLAY: Display the present screen
information such as the current channel and
input source.
17. : Stop the playback.
18. : Skip to the beginning of the previous
chapter/track/photo.
19. : Skip to the beginning of the next chapter/
track/photo.
20. : Reverse playback rapidly.
21. : Advance playback rapidly.
22. COLOR BUTTONS: Press to access directly to
the corresponding function in APP service.
23. : Start playback or pause.
24. P.MODE: Select picture mode: dynamic/movie/
user/standard.
25. S.MODE: Select sound mode: standard/music/
movie/user.
26. CH.LIST: Display program list.
27. CC: Closed Caption selection: ON/OFF/CC On
Mute.
28. V-CHIP: Set up parental control.
29. MTS: Switch among different audio channels:
STEREO/MONO/SAP.
30. ASPECT: Select the aspect ratio
settings:standard/wide/wide zoom/zoom.
31. AUTO: Press to adjust the picture automatically
in VGA source.
32. SLEEP: Set the TV sleep timer:
OFF/5/10…/180/240 min.
9
En
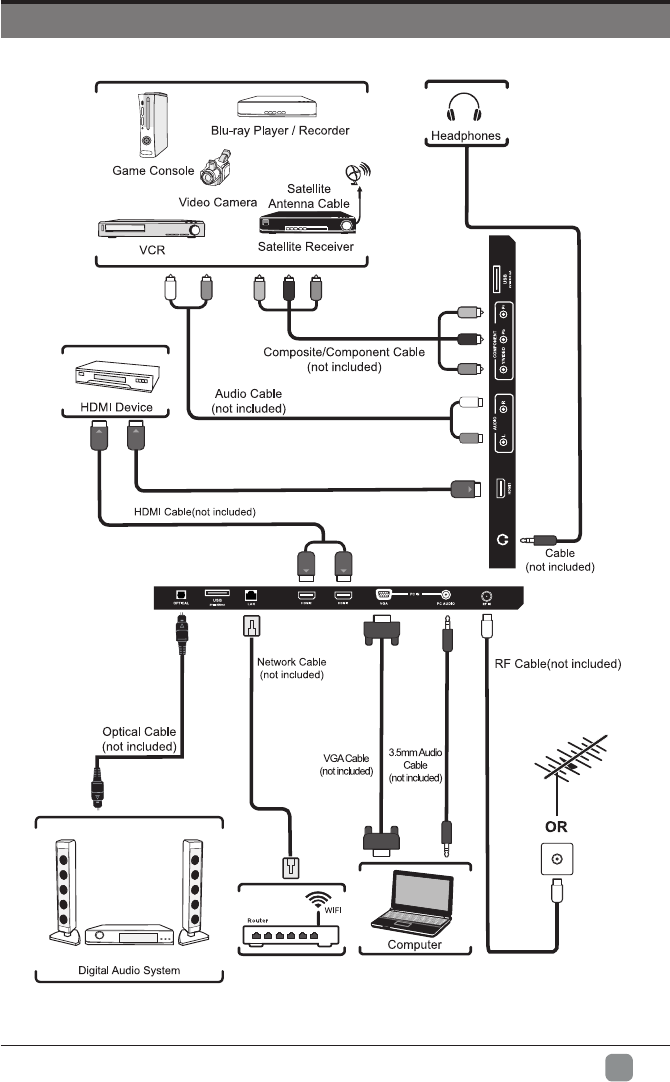
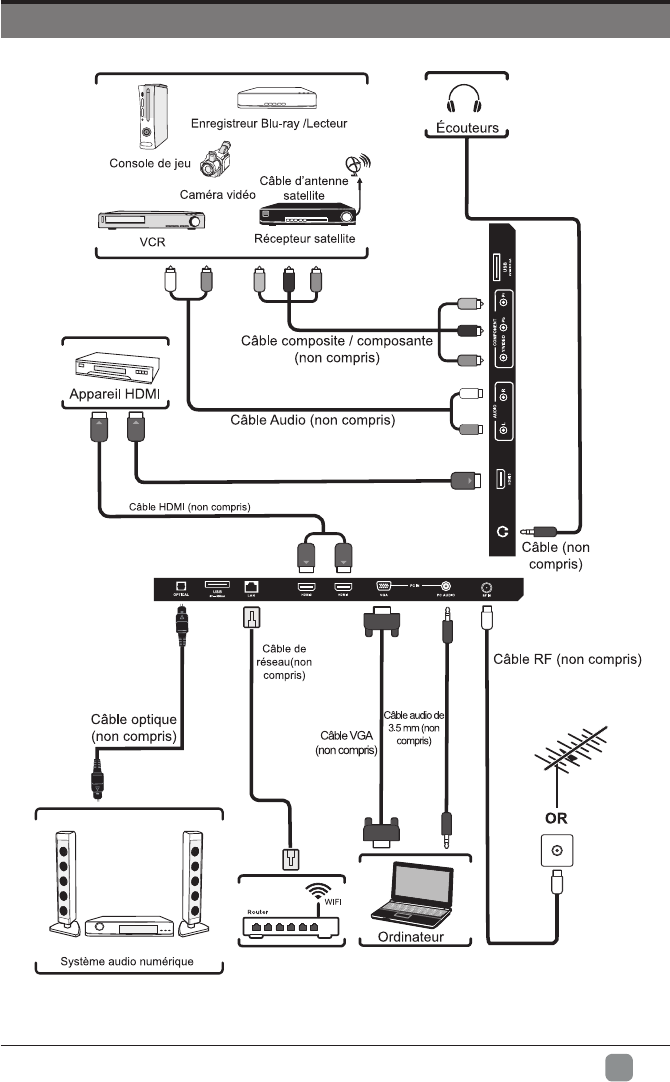
CONNECTING EXTERNAL DEVICES
10
En
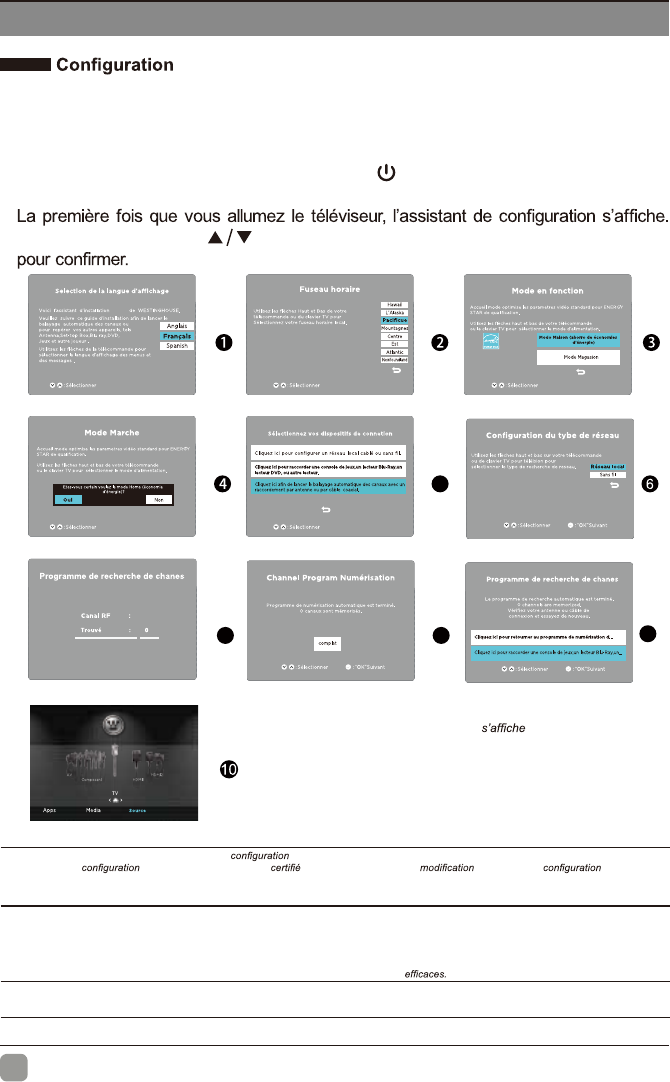
CUSTOMIZING TV SETTINGS
Initial Setup
• Connect the power cord to the power socket after you have completed all the
physical connections. At this stage, the TV will enter Standby Mode and the red
LED indicator will illuminate.
• In Standby Mode, press the button on the main unit or on the remote control to
turn the TV on. The red LED indicator will turn blue.
• The first time you turn the TV on, it will go into the Setup Wizard. Press
buttons to select your desired mode and press OK to
• If channels can not be
found, this frame will be
displayed automatically.
5
7
8
9
Follow this guide to help setup your UHDTV
for scanning channels or accessing your
external devices for Antenna, Set-top Box,
Blu-ray, DVD, Games and other players.
Welcome to the WESTINGHOUSE UHDTV Setup Wizard.
Apps Media Setup
Source
OK :
Next
Follow this guide to help setup your UHDTV
for scanning channels or accessing your
external devices for Antenna, Set-top Box,
Blu-ray, DVD, Games and other players.
Welcome to the WESTINGHOUSE UHDTV Setup Wizard.
Are you sure you want Home Mode(Energy Saving)?
Click here to set Wired or Wireless network.
Click here to scan channels from the antenna or coaxial cable input.
Click here to connect a Game, Blu-ray, DVD or other players.
Select Your Connection Devices
OK :
Next
OK :
Next
OK :
Next
OK :
Next
Hawaii
Alaska
TV
HDMI1 HDMI2
Component AV
OK :
Next
OK :
Next
OK :
Next
Click here to return to Scanning Channel Program.
Click here to connect a Game, Blu-ray, DVD or other players.
Scanning Channel Program
RF CH : 51
Found : 0
MENU:
Skip
EXIT :
Quit
DTV
Home Mode (Energy Saving) is the default as-shipped television and settings. And Home Mode (Energy
Saving) is the setting in which the product qualifies for Energy Star®. Any changes to default as-shipped television
and settings would change the energy consumption. And enabling certain optional features and functionalities
may increase energy consumption beyond the limits required for Energy Star® as applicable.
Retail Mode : Select Retail Mode if you would like your picture to be brighter. At times this mode may use more energy to
operate the Volume/Sound Mode and the Picture Mode. In this setting, the power consumption may possibly exceed the
limited requirement of the Energy Star®
Energy Star® is a set of power-saving guidelines issued by the U.S. Environmental Protection Agency(EPA).
Energy Star® is a joint program of the U.S. Environmental Protection Agency and the U.S. Department of Energy helping us
all save money and protect the environment through energy products and pratices.
• The ON-MODE Power under Home Mode should be less than 70W
• The SLEEP-MODE Power should be less than 0.5 W.
Check your antenna or cable connections
andtry again
HDMI1HDMI1

11
En
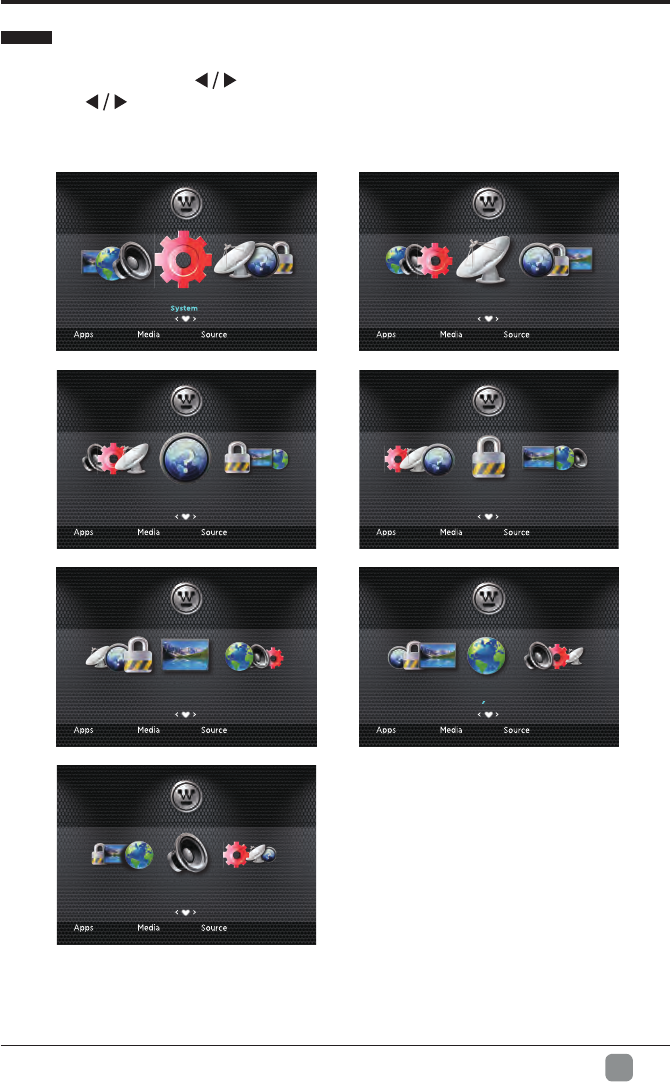
CUSTOMIZING TV SETTINGS
Navigating the Setup Settings
• Press the MENU button to display the main menu.
• Use buttons to select Setup menu and then press buttons to navigate
and select the available menu.
Channel Support
Audio
Network
Channel
SupportSystem
LockAudio
Support
LockChannel
PictureSystem
Lock
PictureSupport
NetworkChannel
Picture
NetworkLock
AudioSupport
Network
AudioPicture
SystemLock
Audio
SystemNetwork
ChannelPicture
12
En
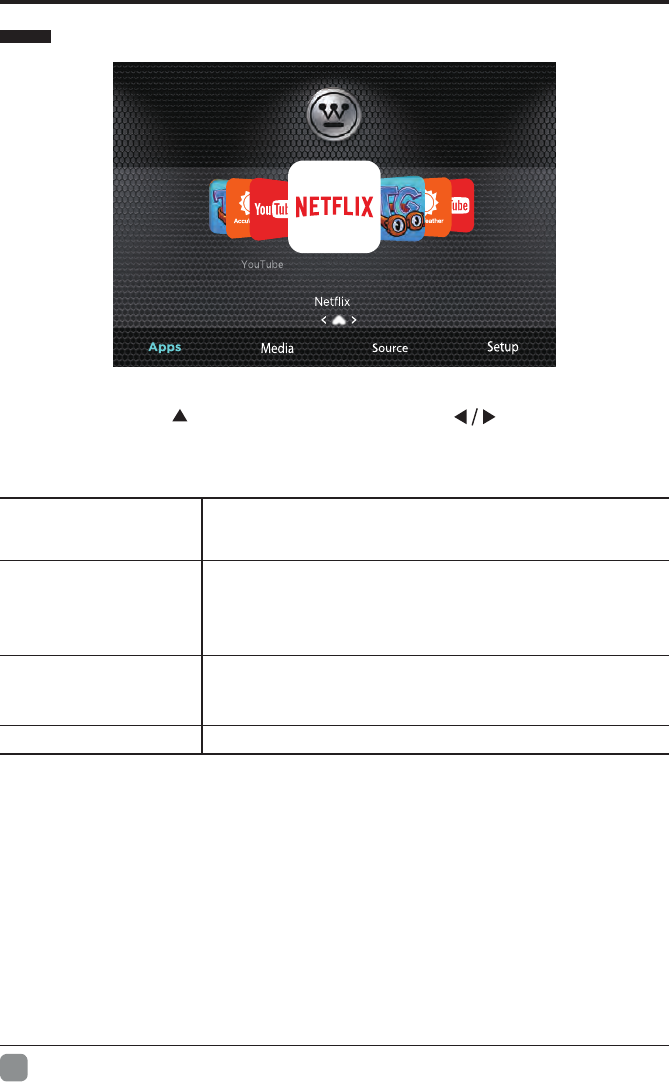
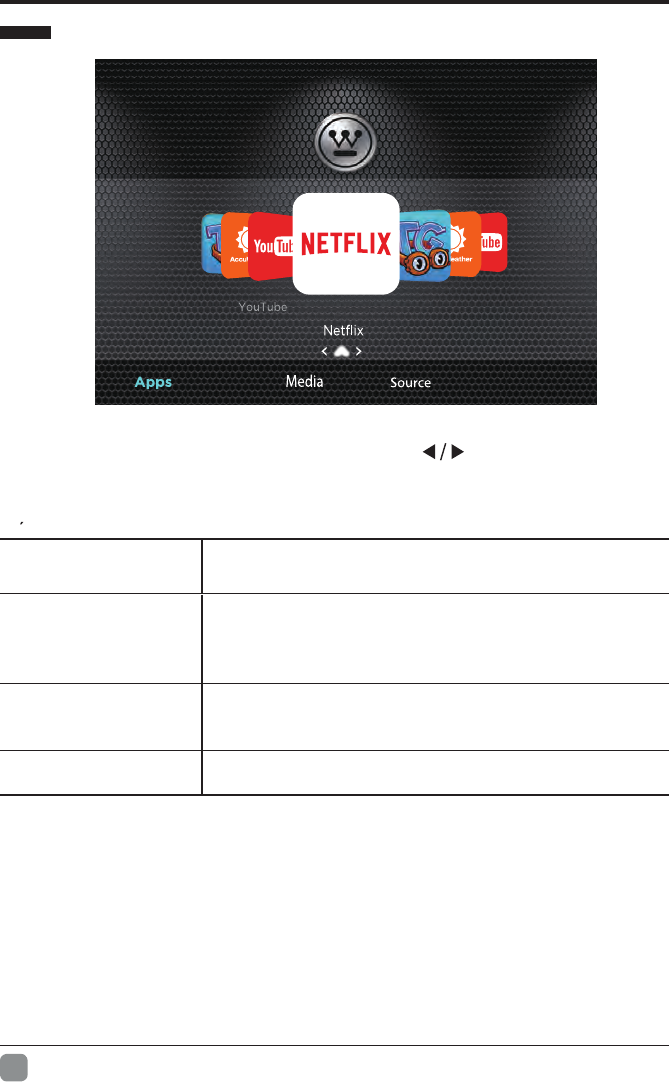
Apps
• Press the MENU button on the main unit or on the remote control to display the
Apps. Then press to enter the streaming and use to select the desired
APP and press OK button to view. Or press the hotkey on the remote control to
enter the APP directly.
Netix Enjoys TV shows & movies streamed instantly over the
Internet.
Toon Goggles
A subscription video on-demand platform that offers
animated, fun and educational cartoons, engaging
games and songs from all over the world and in many
different languages to children.
AccuWeather Displays the current weather conditions and the
temperature anywhere in the world in centigrade or
Fahrenheit.
YouTube YouTube your way on the best screen in your house.
CUSTOMIZING TV SETTINGS
Toon Goggles
13
En
CUSTOMIZING TV SETTINGS
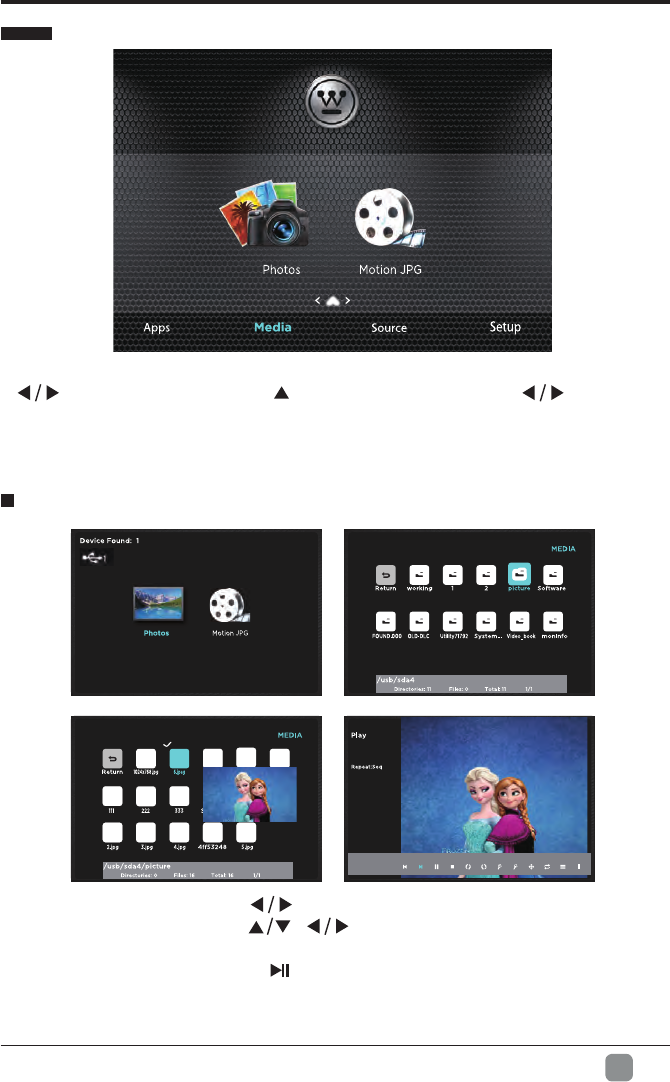
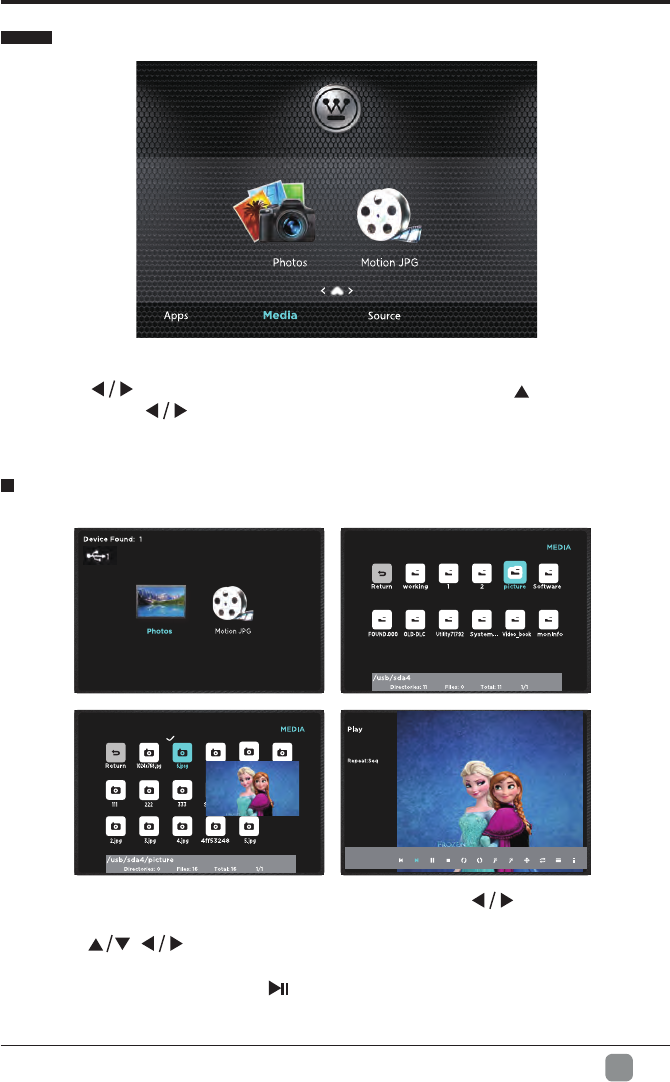
Media
• Press the MENU button on the main unit or on the remote control, then press
to select Media, and use to enter the media and use to select the
desired option.
Viewing Photos
NOTE:Portablestoragedevices(USBdiskorHarddisk)shouldbeinserted.
• After entering Media, press buttons to select Photos and then select the
disk type to enter. Then use / buttons to navigate in the picture folder
to select the desired photo, then a subscreen will pop up. Press OK button, when
√appearsonthetopleft,press to display the photo.
Note: File format supported: JPEG.
14
En
CUSTOMIZING TV SETTINGS
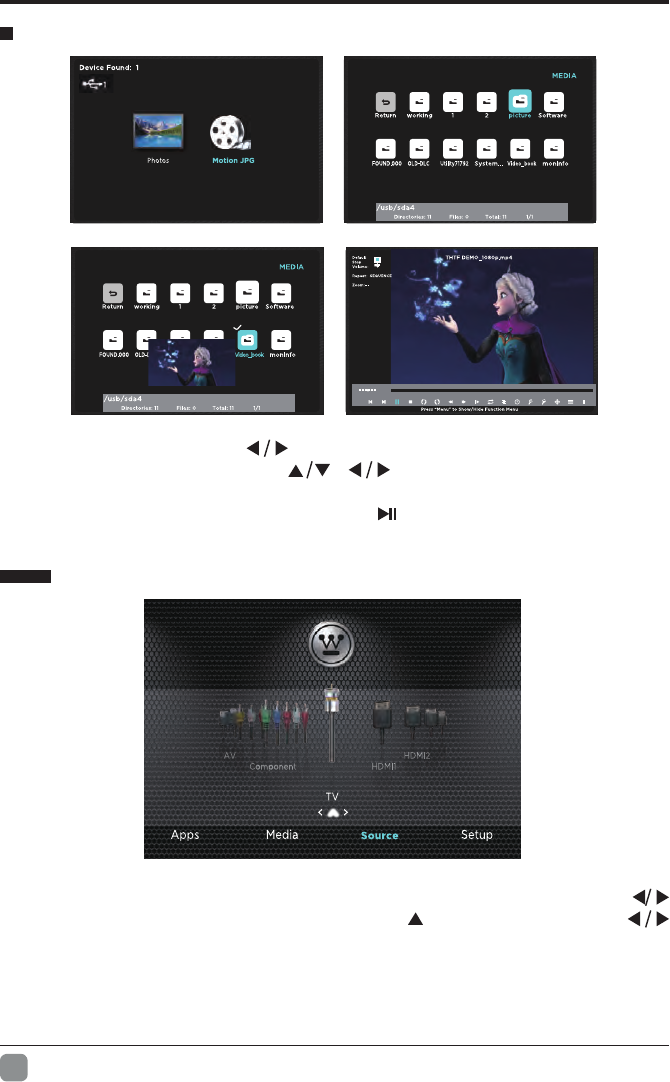
Playing Motion JPG
• After entering Media, press buttons to select Motion JPG and then select
the disk type to enter. Then use / buttons to navigate in the motion
JPG folder to select the desired video, then a subscreen will pop up. Press OK
button,when√appearsonthetopleft,press to display the video.
Note: File format supported: Motion JPG.
Source
• Press the MENU button on the main unit or on the remote control and press
buttons to select the Source menu. Then press to enter source,and use
buttons to select different input sources among: TV/ HDMI1/ HDMI2/ HDMI3/
USB/ VGA/ AV/ Component and press OKbuttontoconrm.
15
En
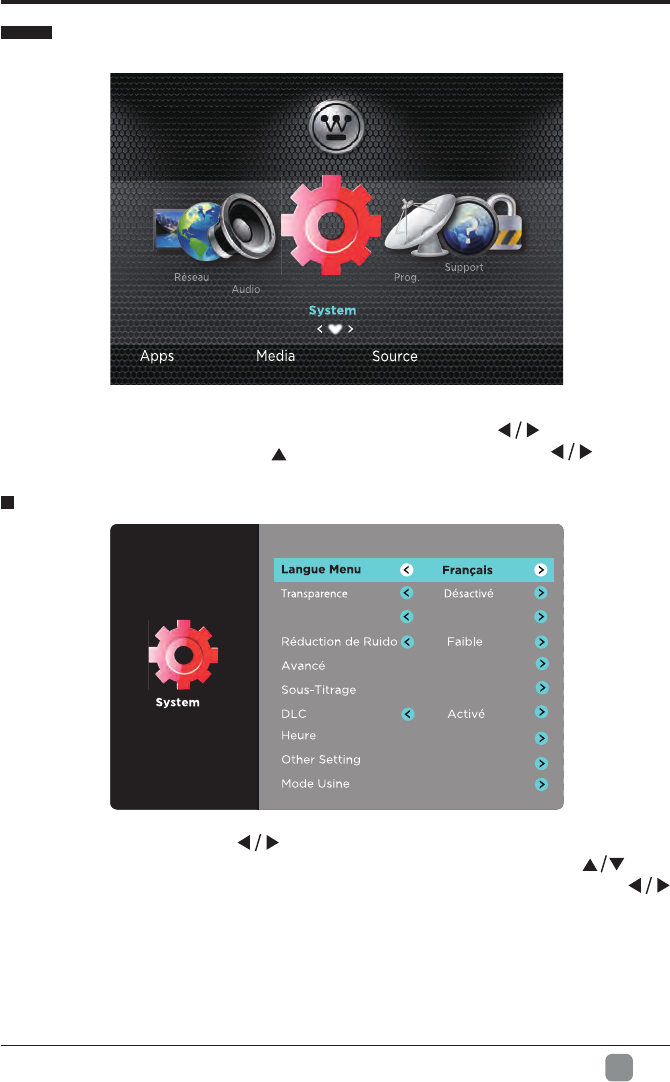
Setup
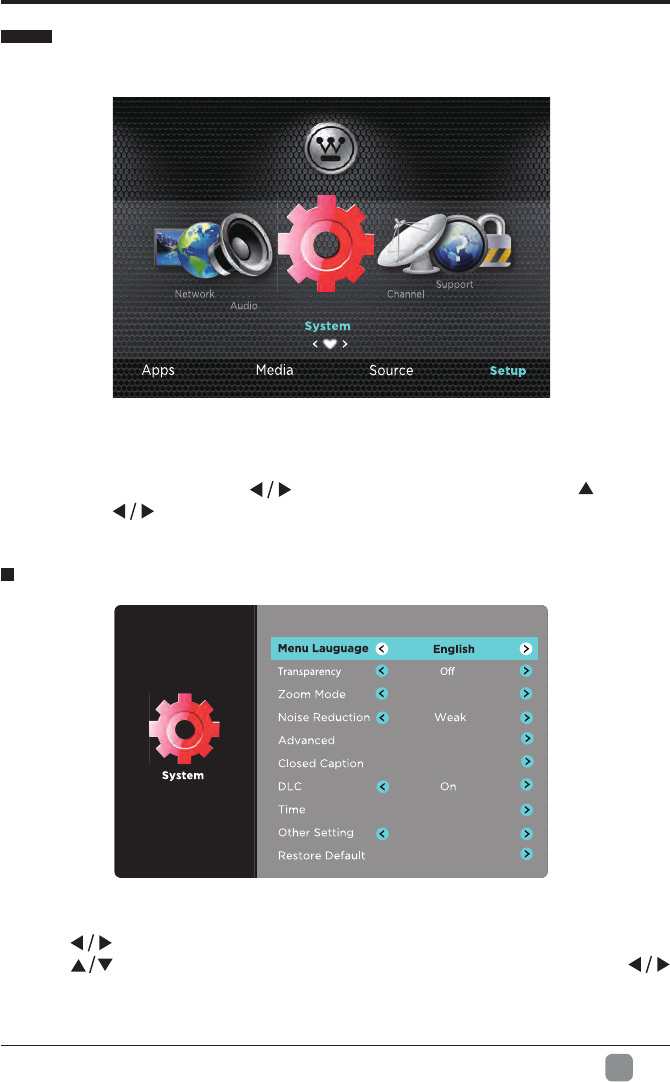
• Press the MENU button on the main unit or on the remote control to display the
main interface. Then press to select Setup menu and press to enter.
Then press to select the desired option.
System
• Press buttons to select System menu and then press OK button to enter.
Press buttons to select the following setting options and then press
buttons to adjust each option’s setting.
CUSTOMIZING TV SETTINGS
Wide Zoom

16
En
CUSTOMIZING TV SETTINGS
Advanced Adjust advanced option’s setting: H-POS, V-POS, Clock,
Phase or Auto. (VGAsourcemodeonly)
Closed Caption
CC Mode Select CC mode : On, Off or CC
on Mute.
Basic Selection Basic Selection: CC1, CC2,
CC3, CC4, Text1, Text2, Text3,
Text4.
Advanced Selection Advanced Selection: Service1,
Service2, Service3, Service4,
Service5, and Service6.
OPTION
Options: Mode, Font Style ,
Font Size, Font Edge Style,
Font Edge Color, FG_Color,
BG_Color, FG_ Opacity, BG_
Opacity..
DLC Select to turn On/Off the dynamic luminance control.
Time
Sleep Timer:Select a period of time after which
the TV automatically switches to standby mode:
Off/5/10/…/180/240 min. Alternative: You may press the
SLEEP button repeatedly to select the number of minutes
directly.
Time Zone:SelectaTimeZone:Hawaii/Alaska/Pacic/
Mountain/ Central/ Eastern/ Atlantic/ Newfoundland.
Daylight Saving Time:Select to turn On/Off daylight saving
time.
Other Setting
Set other settings:
HDMI EDID: select the HDMI version: HDMI 2.0/HDMI
1.4.
INlink(HDMI-CEC): set the following settings: INlink
Control, Device Power Off, TV Power On, Audio Receiver,
INlink Device List, Root Menu.
Restore Default Restore the TV to factory default settings.
Menu Language Select menu language : English, Français or Español.
The default on-screen menu language is English.
Transparency Select to turn On/Off transparency function.
Zoom Mode Select zoom mode : Standard/Wide/Wide Zoom/Zoom.
Note: Different input source, the zoom mode options
may differ.
Noise Reduction Reduce the noise level of the connected device: Off/
Weak/Middle/Strong.
17
En
COSTOMIZING TV SETTINGS
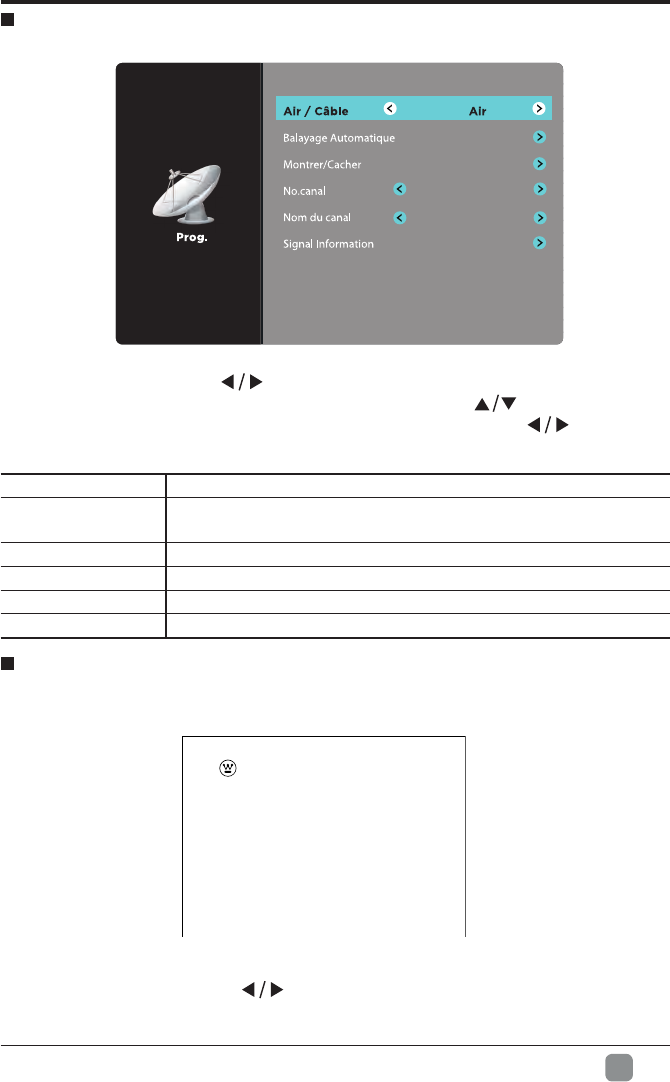
Channel
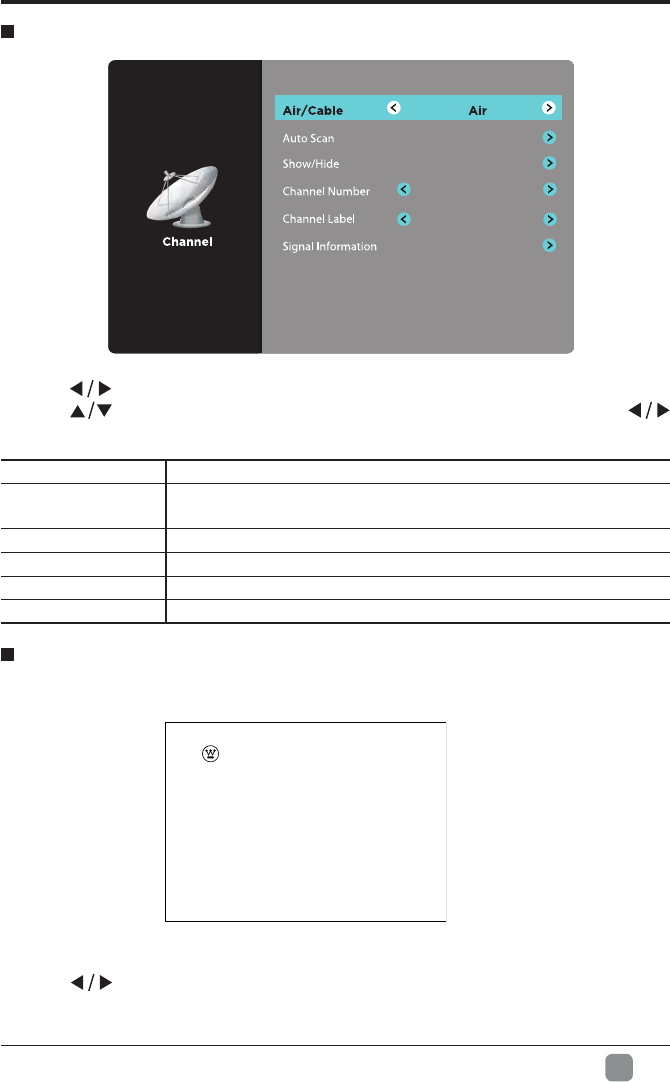
• Press buttons to select Channel menu and then press OK button to enter.
Press buttons to select the following channel options and then press
buttons to adjust each option’s setting.
Air/Cable Select antenna between Air and Cable.
Auto Scan Select Auto Scan to search the available Air or Cable
channels.
Show/Hide Show/Hide the selected channel.
Channel Number Display the current channel number.
Channel Label Display the current channel label.
Signal Information Display the information of current signal.
• Press buttons to select Support menu and then press OK button to view
the built-in user manual.
Support
USER’S MANUAL
MANUEL DE L’UTILISATEUR
MANUAL DEL USUARIO
WD48 UW2 490
18
En
CUSTOMIZING TV SETTINGS
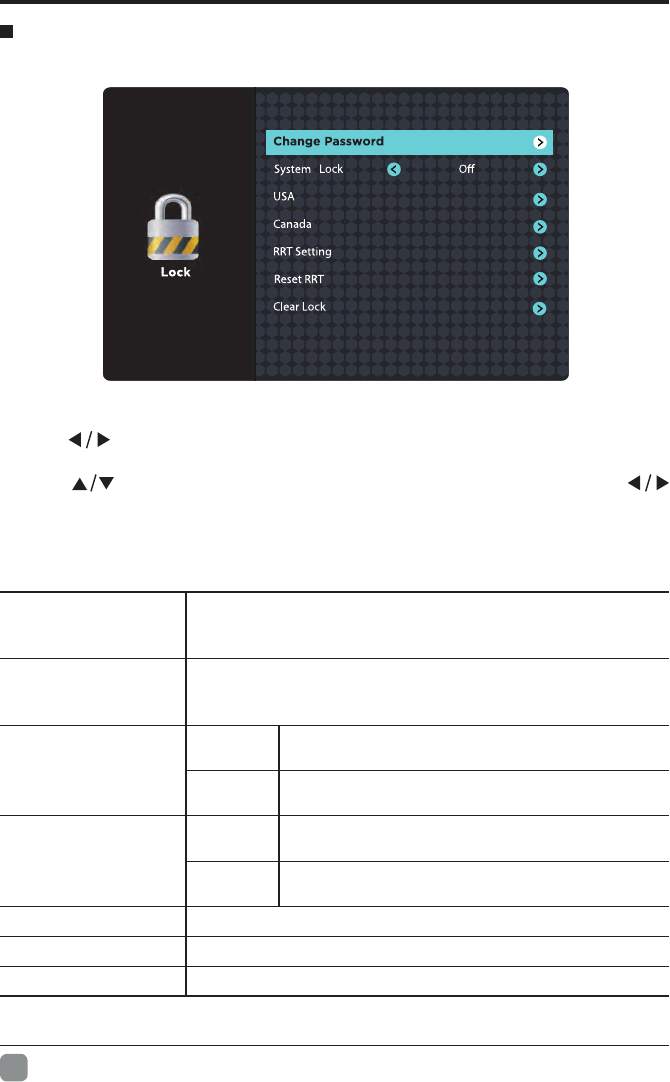
Lock
• Press buttons to select Lock menu and then press OK button to enter. Use
the 0-9 buttons to input 4-digit password to enter the Lock menu.
• Press buttons to select the following lock options and then press
buttons to adjust each option’s setting.
Note: the default password is “0000”.
Change Password Use 0-9 buttons to input the old password and then input
the new 4-digit password. Re-enter new password for
conrmation.
System Lock Select to turn On/Off system lock. The following options
(USA,Canada,RRTSettingandRRTReset)willonlybe
accessible when you turn the system lock on.
USA TV TV RATING: Press OK button to lock or unlock
TV rating.
MPAA Select MPAA rating : N/A,G, PG, PG-13, R,
NC-17,or X.
Canada
Canada
English Select MPAA rating for English-speaking
Canada : E, C, C8+, G, PG, 14+, 18+.
Canada
French Select MPAA rating for Quebec Canada : E, G,
8 ans+, 13 ans+, 16 ans+, 18 ans+.
RRT Setting Set Rating Region Table.
Reset RRT Select to reset the RRT setting.
Clear Lock Clear all lock settings.
19
En
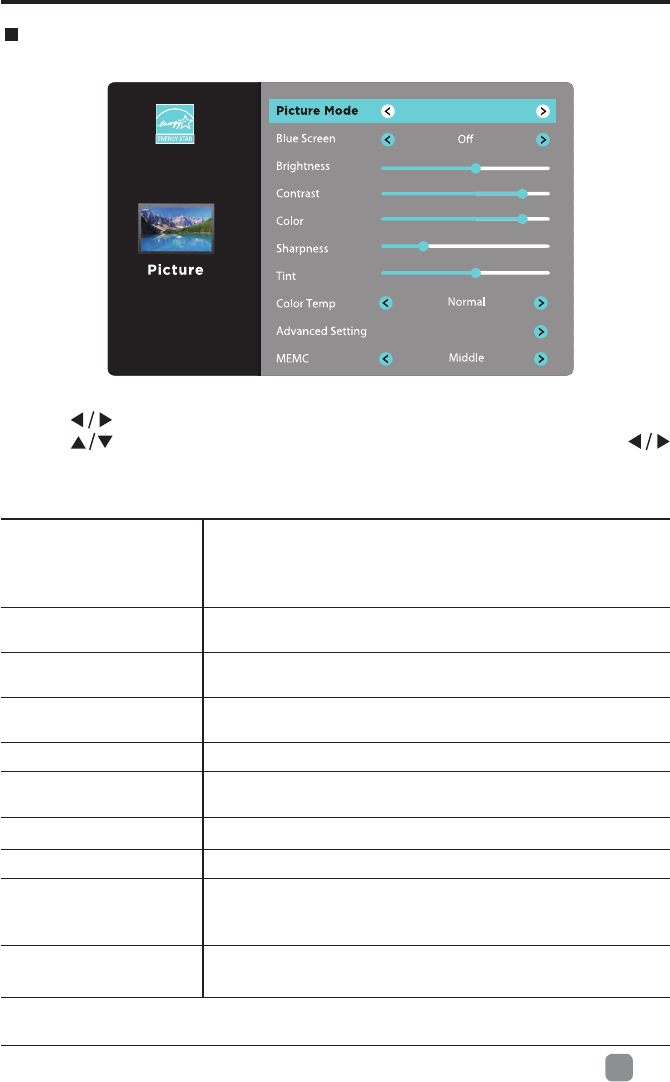
• Press buttons to select Picture menu and then press OK button to enter.
Press buttons to select the following picture options and then press
buttons to adjust each option’s setting.
Picture
Picture Mode
Cycle among picture mode: Dynamic/Movie/Energy
Saving/User/Standard.
Alternative: you may press the P.MODE button to
select the picture mode directly.
Blue Screen Allow the blue background to turn On/Off during weak or
no signal conditions.
Brightness Increase or decrease the amount of white in the picture.
(ForUsermode)
Contrast Adjust the difference between light and dark levels in
the pictures. (ForUsermode)
Color Control the color intensity. (ForUsermode)
Sharpness Adjust the level of crispness in the edges between light
and dark areas of the picture. (ForUsermode)
Tint Adjust the balance between red and green levels.
Color Temp Cycle among color temperatures: Cool/Normal/Warm.
Advanced Setting Color Space: To adjust the following settings: Color
Mode, Color, Hue, Saturation, Brightness and Reset.
White Balance: To adjust the settings of white balance.
MEMC Cycle among Motion Estimate and Motion
Compensation modes:Middle/High/Off/Low.
COSTOMIZING TV SETTINGS
Energy Saving
20
En
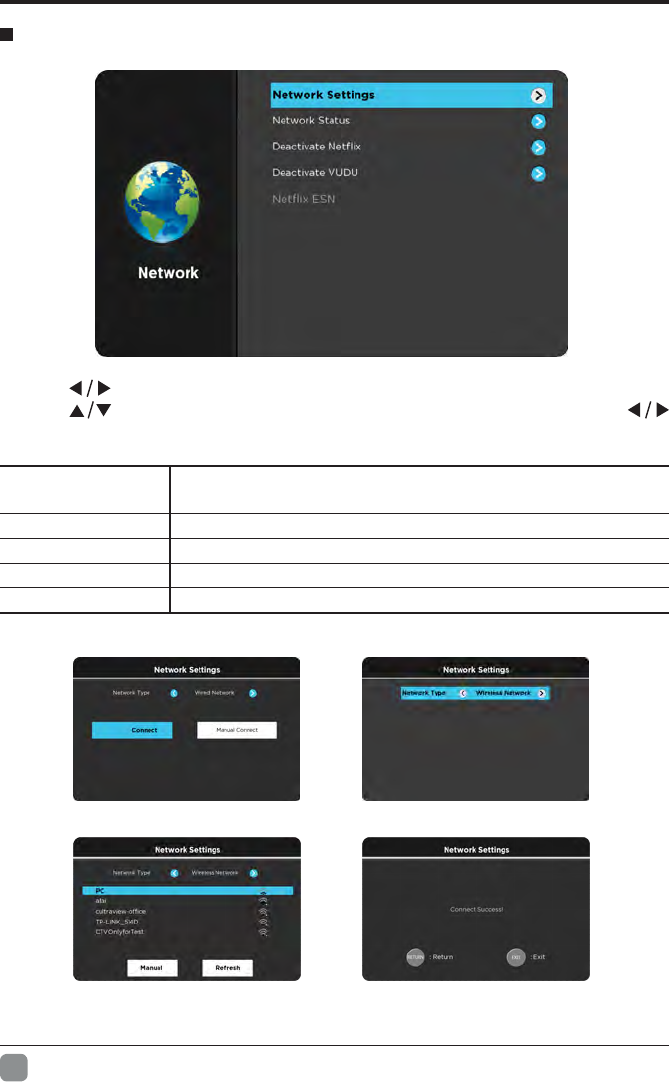
• Press buttons to select Network menu and then press OK button to enter.
Press buttons to select the following network options and then press
buttons to adjust each option’s setting.
Network
Network Settings
Select two types of network: Wireless Network or Wired
Network.
DeactivateNetix DeactivateNetixandcleartheaccountinformation.
Deactivate Vudu Deactivate Vudu and clear the account information.
NetixESN Electronic Serial Number
CUSTOMIZING TV SETTINGS
Auto
Network Status Show the network status.
THTF4KOTT-00000000000000000000
000100029265
Scanning.Please wait...
21
En
COSTOMIZING TV SETTINGS
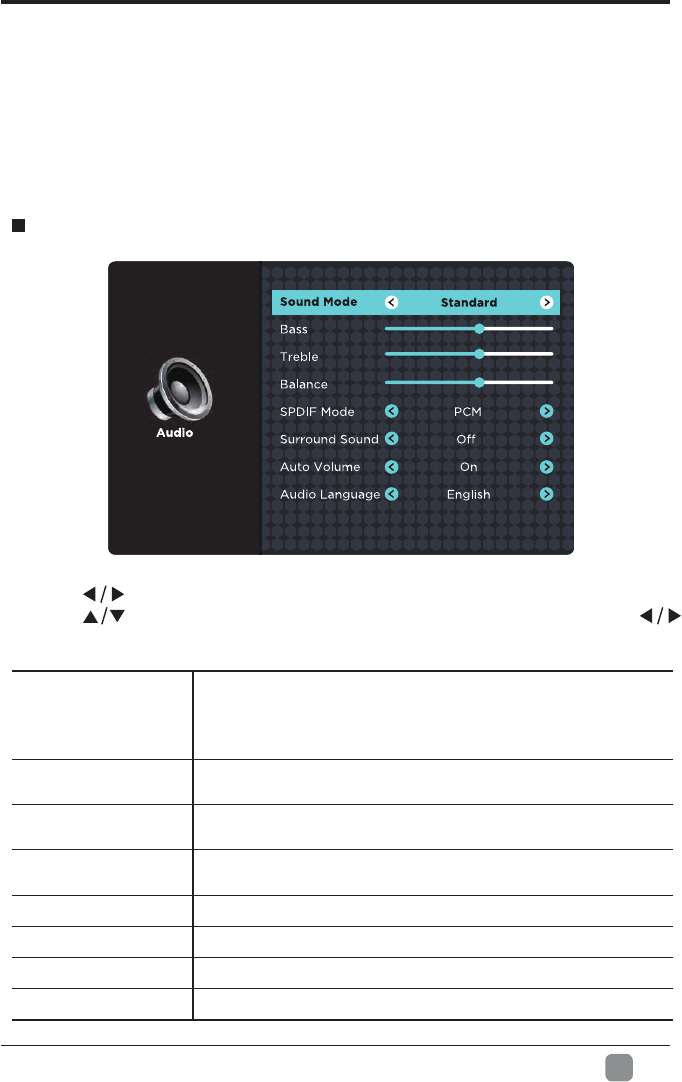
• Press buttons to select Audio menu and then press OK button to enter.
Press buttons to select the following audio options and then press
buttons to adjust each option’s setting.
Audio
Reminder for internet connection:
•BelowoccasionsarepossiblewhileyourinternetisconnectedtoenjoyyourOTT
services.
•1.Pleasecheckyourinternetsignalstrengthwhileinternetisconnected,signal
strength below 50 may result bad connection and non-smooth picture.
•2.ToenterOTTservices,30secondsmayberequiredforinternetconnection.
Recommended 10Mb above internet speed
Sound Mode
Allow the selection of an audio-enhancement technique:
Standard/Music/Movie/User.
Alternative: you may press the S.MODE button to select
the sound mode directly.
Bass Control the relative intensity of lower-pitched sounds. (For
Usermode)
Treble Control the relative intensity of higher-pitched sounds. (For
Usermode)
Balance Adjust the relative volume of the speaker in a multiple
speaker system.
SPDIF Mode Select the digital audio output mode between RAW/PCM.
Surround Sound Turn On/Off to provide an enhanced listening experience.
Auto Volume Turn On/Off to automatically control volume levels.
Audio Language Select audio language among: English, French, Spanish

22
En
PARENTAL CONTROL
Press the MENU button on the main unit or on the remote control and then press
buttons to select LOCK menu. Use the 0-9 buttons to input the 4-digit password to enter
the LOCK menu. If used, this option feature can "block'' undesirable programming from
appearing on the TV. Parental Control offers the user a wide variety of options and
settings that restrict or "block'' the programming that can appear on the TV. Parental
Control allows the user to define which program rating they consider acceptable for
younger more sensitive viewer. It can be preset and turned either on or off by the user
whospeciesthesecret4-numbercode,thepassword.Thenumberofhoursblockedare
specied.GeneralaudiencesandchildrenblocksshouldbebothprogrammedintotheTV's
memory.SeparatedifferentviewerratingsarespeciedforbothTVandthemotionpicture
Industry; both rating systems should be used and based on the ages of children.
Overview
ToensurecompletecoverageforallTVprograms,(moviesandregularTVshows)choose
a rating for MPAA, from the selections below,as well as ratings from the TV Parental
Guidelines Rating Systems below, using the Age Block option for General Audiences, and
for children.In addition, you may wish to add additional restrictions from the content block
menu, and submenus examples below.
Things to Consider before Setting up Parental Control
Determine which rating you consider acceptable to the viewer. (For example,if you choose
TV-PG, more restrictive ratings will be automatically blocked; the viewer will not be able
tosee:TV-PG,TV-14,orTV-MAratedprogramming.)Youmayblocktheauxiliaryvideo
source entirely. (Blocks the signal sent by the equipment, such as VCR, connected to the
TVAudio/VIdeoInputJacks)orremainunblocked,thenchooseacceptableratings.Block
program "Content" based on individual parameters such as: Strong Dialog, Bad Language,
Sex Scenes,Violence Scenes or Fantasy. Violent Scenes; in Content Blk option. Select
a secret password, in the Set Password option, using the numbers keys on the remote
control.Save the password, it is the only way to access the Parental Control menu and
change rating setting, or turn off Parental Control.
• You can set different Parental Control viewing restrictions for general audiences and
for children, both can be active at the same time.
• Simply specifying one content block such as Sex Scenes, will not automatically restrict
the programming that appears from the video sources.
• Even If you choose to leave the AUX Inputs unblocked, the ratings you specify will
automatically restrict the programming that appears from the video sources.
• You cannot disable Parental Control by disconnecting the TV from power. Block
hourswillbeautomaticallyresettotheoriginalblocktimesettingspeciedifpoweris
disconnected.
23
En
• Motion Picture Association of America (MPAA) Rating System
Grade Meaning
GGeneral Audiences Content not offensive to most viewers.
PG Parental Guidance
Suggested Content is such that parents may not want their
children to view the program.
PG-13 Parents Strongly
Cautioned
Program is inappropriate for preteens, with a greater
degree of offensive material suggested than a PG
rated program.
RRestricted Not for children under 17-contains strong element of
sex and/or violence.
NC-17 No children under
age 17 Not for children under 17-under any circumstances.
Contains strong sexual content.
XHard Core Films Same as NC-17 rating.
No Rating No Rating MPAA did not rate
• TV Parental Guideline Rating System
Grade Meaning
TV-Y All Children Content not offensive to most viewers.
TV-Y7 Directed to Older
Children Considered suitable for children over 7- may contain
fantasy violence scenes.
TV-G General Audience Considered suitable for all audience; children may
watch unattended.
TV-PG Parental Guidance
Suggested
Suggested unsuitable for younger children-may
contain suggestive language, bad language, sex and
violence scenes.
TV-14 Parents Strongly
Cautioned unsuitable for children under 14 - may contain strong
language, bad language, sex, and violence scenes.
TV-MA Mature Audience
Only Adults only- may contain strong language, bad
language, sex, and violence scenes.
Canadian Rating:
CanadianEnglishisusedthroughoutallEnglish-speakingCanada(C,C8+,G,PG,14+,18+).
CanadianFrenchisusedinQuebec(G,8ans+,13ans+,16ans+,18ans+)
Note:TheV-Chlpwillautomaticallyblockcertaincategoriesthatare"morerestrictive".IfyoublockTV-Y
category,thenTV-Y7willbeautomaticallyblocked.Similarly,ifyoublockTV-Gcategory,thenallthe
categoriesinthe"youngadult"willbeblocked(TV-G,TV-PG,TV-14,andTV-MA).
PARENTAL CONTROL

24
En
TROUBLESHOOTING
If your TV does not operate normally or cannot be turned on, please check the following
troubleshooting questions. Remember also to check any other connected electronic
device, such as DVD or Blu-ray player to pinpoint the problem. If the TV still fails to operate
normally, please contact technical support.
The TV does not operate properly
The TV does not respond
when pressing any
buttons
• The TV may freeze up during use. Disconnect the power
cord from the power socket for a few minutes. Reconnect the
power cord and try to operate it again as usual.
TV cannot be switched on
• Check that the TV is connected to the power supply.
• Make sure all connected AV devices are switched off before
switching on your TV.
The remote control does
not work
• Check to see if there are any objects between the TV and the
remote control causing an obstruction. Ensure that you are
pointing the remote control directly at the TV.
• Ensure that the batteries are installed with the correct polarity
(+to+,-to-).
• Install new batteries.
Power is suddenly turned
off
• Check the power of the TV. The power supply maybe
interrupted.
• Check if the sleep timer is set.
• Check whether the Auto Standby is activated.
The video function does not work
No picture & No Sound
• Check whether the TV is switched on.
• Try another channel. The problem may be caused by the
broadcaster.
Picture appears slowly
after switching on
• This is normal; the image is muted during the TV startup
process. Please contact your service centre if the picture has
notappearedafterveminutes.
No or poor color or poor
picture
• Adjust the settings in the PICTURE menu.
• Try another channel. The problem may be caused by the
broadcaster.
• Check if video cables are connected properly.
Horizontal/Vertical bar or
picture shaking
• Check for local interference such as an electrical appliance
or power tool.
Poor reception on some
channels
• The station or cable channel may be experiencing problems;
tune to another station.
• Station signal may be weak, reposition the antenna for better
reception.
• Check for sources of possible interference.
Lines or streaks in
pictures • Checkantenna(changethepositionoftheantenna.)
No pictures when
connecting HDMI • Check if the input source is HDMI1/HDMI2/HDMI3.
Pictures appear in wrong
ratio
• Adjust the Aspect Ratio settings in the SETUP menu or press
the ASPECT button on the remote control.
25
En
The audio function does not work
Picture OK but no sound
• Press the VOL +/- buttons.
• Sound muted? Press the MUTE button.
• Try another channel. The problem may be caused by the
broadcaster.
No output from one of the
speakers • Adjust the Balance settings in the AUDIO menu.
Unusual sound from
inside the TV
• A change in ambient humidity or temperature may result in
an unusual noise when the TV is switched on or off and does
not indicate a fault with the TV.
No sound when
connecting HDMI • Check if the input source is HDMI1/HDMI2/HDMI3.
Audio noise • Keep the RF coaxial cable away from the other connected
cables.
Password
Lost password
• Select the SET Password setting in the LOCK menu, then
enter the following master password “8899”. The master
password clears your previous password and allows you to
enter a new password.
There is a problem in PC mode
The signal is out of range
(invalidformat)
• Adjust the resolution, horizontal frequency, or vertical
frequency.
Vertical bar or stripe on
background & Horizontal
Noise & Incorrect position
• UseAutoconguresoradjustclock,phase,orH/Vposition.
Screen color is unstable
or show a single color
• Check the signal cable.
• Reinstall the PC video card.
Maintaining
•DonotuseyourTVinareasthataretoohotortoocold,becausethecabinetmay
warp or the screen may malfunction. Your TV works best in temperatures that are
comfortable to you.
•Storagetemperaturesare32°to122°F(0°to50°C)
•Workingtemperaturesare32°to95°F(0°to35°C)
•DonotplaceyourTVindirectsunlightornearaheatsource

27
En
The FCC Wants You to Know
This device complies with Part 15 of the FCC Rules and Industry Canada license-exempt
RSS standard(s). Operation is subject to the following twoconditions:(1)Thisdevicemay
not cause harmful interference, and(2)This device must accept any interference received,
including interference that may cause undesired operation. Changes or modifications not
expressly approved by the party responsible for compliance could void the user's authority
to operate the equipment.
NOTE: This equipment has been tested and found to comply with the limits for a Class B
digital device, pursuant to Part 15 of the FCC Rules. These limits are designed to provide
reasonable protection against harmful interference in a residential installation.
This equipment generates uses and can radiate radio frequency energy and, if not installed
and used in accordance with the instructions, may cause harmful interference to radio
communications. However, there is no guarantee that interference will not occur in a particular
installation.
If this equipment does cause harmful interference to radio or television reception, which can
be determined by turning the equipment off and on, the user is encouraged to try to correct the
interferencebyoneormoreofthefollowingmeasures:1)Reorientorrelocatethereceiving
antenna;2)Increasetheseparationbetweentheequipmentandreceiver;3)Connectthe
equipmentintoanoutletonacircuitdifferentfromthattowhichthereceiverisconnected;4)
Consult the dealer or an experienced radio/TV technician for help.
FCC Radiation Exposure Statement
This equipment complies with FCC radiation exposure limits set forth for an uncontrolled
environment. This equipment should be installed and operated with minimum distance 20cm
between the radiator & your body.
SPECIFICATION
Panel Size 47.6 inch diagonally
Display Type DLED
Panel Technology TFT
Panel 60 Hz Vs. 120 Hz 60 Hz
Display Resolution 3840 x 2160
HDMI Support 3840 x 2160 60Hz
Panel Resolution 3840 x 2160
Aspect Ratio 16:9
Dynamic Contrast Ratio-Panel 1000:1
ResponseTime(GToG) 8 ms
LampLife(Typ.Hours) 20,000 hours
HorizontalViewingAngle(AtCR>10) 178
VerticalViewingAngle(AtCR>10) 178
Wall-mount(LxW-mm) 400*400VESA(mm)
27
En
If you want to know about these APP information or get more service. Please refer to following
content.
• Netix
You can call the following telephone for more help: 866-579-7172
If your matter is regarding customer service, please refer to https://contactus.netix.com/help for
alternative contact information.
• YouTube
You can browse the following website for more help:
https://productforums.google.com/forum/#!categories/youtube/smart-tvs
• TG
You can call the following telephone for more help: 888-874-5411
Pandora
• AccuWeather
You can send E-mail to AccuWeather for more help: CustomerService@AccuWeather.com
OTT APP SERVICE

1
Fr
CONTENTS
Consignes de sécurité importantes
Renseignements sur la sécurité
Préparation
Éléments compris
Vue avant
Vue arrière
Installation du socle
Retrait du socle en vue d’un montage mural
Télécommande
Connexion des appareils externes
Personnalisation des paramètres du téléviseur
Conguration initiale
Navigation dans les paramètres de conguration
Apps
Médias
Visualisation de photos
Jouer Mouvement JPG
Source
Option
System
Prog.
Support
Verro
Image
Réseau
Audio
Contrôle parental
Dépannage
Entretien
Caractéristiques technique
OTT APP Service
2
3
4
4
5
6
7
7
8
9
10
10
11
12
13
13
14
14
15
15
17
17
18
19
20
CONTENU
21
22
24
25
26
27
2
CONSIGNES DE SÉCURITÉ IMPORTANTES
• Lisez ces consignes – Avant d’utiliser ce produit, vous
devez lire toutes les consignes liées à la sécurité et au
fonctionnement de l’appareil.
• Conservez ces consignes – Nous vous conseillons
de conserver les consignes liées à sécurité et au
fonctionnement de l’appareil pour consultation future.
• Observez toutes les mises en garde –Vous devez
suivre toutes les consignes liées au fonctionnement et
à l’utilisation de l’appareil.
• Suivez toutes les consignes – Vous devez suivre
toutes les consignes liées au fonctionnement et à
l’utilisation de l’appareil.
• N’utilisez pas cet appareil près de l’eau – L’appareil
ne doit pas être utilisé près de l’eau ou dans un lieu
humide, par exemple dans un sous-sol humide ou près
d’une piscine et autres.
• Nettoyez uniquement à l’aide d’un chiffon sec.
• N’obstruez pas les orifices de ventilation. Installez
l’appareil conformément aux consignes du fabriquant.
• N’installez pas l’appareil à proximité d’une source de
chaleur comme un radiateur, une bouche de chaleur,
une cuisinière ou d’autres appareils qui produisent de
la chaleur (y compris les amplicateurs).
• Ne contournez pas le dispositif de sécurité de la che
polarisée ou de la che de mise à la terre. Une che
polarisée comporte deux lames dont l’une est plus large
que l’autre. Une fiche avec mise à la terre comporte
deux lames, en plus d’une broche de masse. La lame
plus large ou la broche de masse vise à assurer votre
sécurité. Si la che fournie n’est pas compatible avec
votre prise, adressez-vous à un électricien pour faire
remplacer la prise, qui est probablement désuète.
Protect the power cord from being walked on or pinched
particularly at plugs, convenience receptacles, and the
point where they exit from the apparatus.
• Placez le cordon d’alimentation de sorte qu’il ne risque
pas d’être piétiné ou coincé, particulièrement au niveau
de la che et de la prise de courant, ainsi qu’au point
de sortie de l’appareil.
• N’utilisez que les fixations et les accessoires
recommandés par le fabricant.
• Utilisez l’appareil uniquement avec le chariot de
manutention, le support, le trépied ou la table
recommandé par le fabricant ou vendu avec l’appareil.
Si vous utilisez un chariot, déplacez- l e avec précaution
an d’éviter de le renverser et de vous blesser.
• Débranchez l’appareil en cas d’orage ou lorsqu’il reste
inutilisé pendant une période prolongée.
• Confiez toute réparation à un technicien qualifié.
Une réparation est nécessaire si l’appareil a été
endommagé d’une manière ou d’une autre, par
exemple lorsque le cordon d’alimentation ou la che est
endommagé, si un liquide a été renversé sur l’appareil,
ou si des objets sont tombés sur celui-ci, l'appareil a été
exposé à la pluie ou à l'humidité, s’il fonctionne mal ou
s’il est tombé.Please keep the unit in a well-ventilated
environment.
• Veuillez installer l’appareil à un endroit bien aéré.
MISE EN GARDE : pour réduire les risques d’incendie
et de choc électrique, n’exposez pas cet appareil à la
pluie ou à l’humidité. Ne l’exposez pas non plus aux
égouttements ou aux éclaboussures. Ne placez pas
d’objets remplis de liquide, par exemple un vase, sur le
dessus de l’appareil.
MISE EN GARDE : n’exposez pas les piles à une
chaleur excessive comme celle induite par la lumière du
soleil, un feu ou autrement.
MISE EN GARDE :la prise secteur sert de dispositif
de désaccouplage; elle doit demeurer facilement
accessible.
MISE EN GARDE : afin de réduire les risques
d’électrocution, retirez pas le couvercle (ou le panneau
arrière), car il n’y a aucune pièce réparable par
l’utilisateur à l’intérieur. Confiez les réparations à un
technicien qualié.
Le symbole représentant un éclair terminé
par une flèche à l’intérieur d’un triangle
équilatéral vise à avertir l’utilisateur du danger
de la présence d’une«tension dangereuse
»présentée pardes pièces non isolées
à l’intérieur de l’appareil, éventuellement
suffisante pour constituer un risque
d’électrocution.
Le symbole de point d’exclamation à l’intérieur
un triangle équilatéral, vise à informer l’utilisateur
de la présence de consignes de fonctionnement
et de maintenance importantes dans la
documentation qui accompagne l’appareil.
Cet équipement est un appareil électrique de
classe II ou à double isolation. Il a été conçu
de sorte àne pas nécessiter une connexion de
sécurité mise à la terre.
Ce produit contient des composants électriques
ou électroniques. S’ils ne sont pas mis
auxrebuts adéquatement, ces composants
pourraient nuire à l’environnement ou à la santé
des humains.
La présence de cette étiquette sur le produit
signie qu’il ne doit pas être mis aux rebuts en
tantque déchet non trié, mais faire l’objet d’une
collecte sélective. Comme consommateur, vous
devez vous assurer que ce produit est mis aux
rebuts de la bonne manière.
Ce produit est conforme aux
directives ENERGY STAR®
pour l'efficacité énergétique.
ENERGY STAR et la marque
ENERGY STAR sont des
marques américaines déposées.
ENERGY STAR est une marque
déposée appartenant au
gouvernement des États-Unis.
Fr

3
Fr
RENSEIGNEMENTS SUR LA SÉCURITÉ
Pour vous assurer du fonctionnement able et sécuritaire de cet équipement, veuillez lire avec attention les consignes de
ce guide d’utilisation, et plus particulièrement les renseignements ci-dessous portant sur la sécurité.
Sécurité électrique
• Le téléviseur ne doit être raccordé qu’à l’alimentation principale, à une tension correspondant à celle indiquée sur
l’étiquette à l’arrière de l’appareil.
• Pour éviter les surcharges, ne branchez pas plusieurs autres appareils électroniques sur la prise utilisée pour le
téléviseu.
• Pour éviter le piétinement et les chutes, ne placez pas les câbles de connexion à des endroits où les gens circulent.
• Pour éviter d’endommager les câbles de connexion, ne posez pas d’objets lourds sur ceux-ci.
• Lors du désaccouplement de la che d’une prise, tirez sur la che et non sur le câble.
• En cas d’orage ou lorsque le téléviseur reste inutilisé pendant une période prolongée, fermez l’interrupteur
d’alimentation à l’arrière de l’appareil.
• Évitez de laisser de l’eau ou de l’humidité pénétrer à l’intérieur du téléviseur ou de l’adaptateur de courant. N’utilisez
PAS l’appareil dans une pièce mouillée ou humide, comme une salle de bain ou une cuisine pleine de vapeur, ou
près d’une piscine.
• Débranchez immédiatement l’appareil et demandez l’aide d’un professionnel si la che ou le câble est endommagé,
si du liquide a été renversé sur le téléviseur, si celui-ci est exposé accidentellement à de l’eau ou de l’humidité, si
un objet quelconque pénètre dans les orices de ventilation par inadvertance ou si le téléviseur ne fonctionne pas
normalement.
• Laissez les couvercles de sécurité en place. Il n’y a aucune pièce réparable par l’utilisateur à l’intérieur. Il est
dangereux de tenter par vous-même de réparer l’appareil; en outre, cela pourrait annuler la garantie du produit. Seuls
des techniciens qualiés peuvent réparer cet appareil.
• Pour éviter qu’elles fuient, retirez les piles de la télécommande si vous ne l’utilisez pas pendant une période
prolongée ou si les piles sont épuisées.
• N’ouvrez pas les piles et ne les jetez pas au feu lorsqu’elles sont épuisées.
• Pour de meilleurs résultats , utilisez le type AAA ( exemple - alcalines , carbone - zinc , etc. ) batteries.
• Installez uniquement des piles neuves du même type dans votre produit.
• Le défaut d'insérer les piles en respectant la polarité , comme indiqué dans le compartiment de la batterie , peut
raccourcir la durée de vie des batteries ou piles risqueraient de fuir.
• Ne pas mélanger piles neuves et anciennes.
• Ne pas mélanger des piles alcalines , standard ( carbone - zinc) ou rechargeables ( nickel-cadmium ) ou ( nickel
métal hydrure ) rechargeables.
• Les batteries doivent être recyclées ou éliminées conformément aux lignes directrices nationales et locales.
• Ne tentez pas de recharger les piles jetables.
• Ne pas les bornes de la batterie en court-circuit.
• Gardez loin des enfant.
Sécurité physique
• N’obstruez pas les orices de ventilation sur le panneau arrière. Vous pouvez placer le téléviseur dans un meuble,
mais assurez-vous de . laisser un espace de dégagement d’au moins 5 cm (2 po) tout autour.
• Ne tapez sur l’écran du téléviseur et ne le secouez pas; vous risqueriez d’endommager les circuits à l’intérieur.
Prenez bien soin de la télécommande.
• Pour nettoyer le téléviseur, utilisez un chiffon doux sec. N’utilisez pas de solvants, ni de liquides à base de pétrole.
• N’installez pas l’appareil à proximité d’une source de chaleur comme un radiateur, une bouche de chaleur, une
cuisinière ou d’autres appareils .quiproduisent de la chaleur (y compris les amplicateurs).
• Ne contournez pas le dispositif de sécurité de la che polarisée ou de la che de type mise à la terre. Une che
polarisée comporte deux lames dont l’une est plus large que l’autre. Une che avec mise à la terre comporte deux
lames, en plus d’une broche de masse. La lame plus large ou la broche de masse vise à assurer votre sécurité. Si la
che fournie n’est pas compatible avec votre prise, adressez-vous à un électricien pour faire remplacer la prise, qui
est probablement désuète.
• Placez le cordon d’alimentation de sorte qu’il ne risque pas d’être piétiné ou coincé, particulièrement au niveau de la
che.
• Conez toute réparation à un technicien qualié. Une réparation est nécessaire si l’appareil fonctionne mal ou s’il a
été endommagé d’une manière ou d’une autre (y compris le cordon d’alimentation ou la che).
• Une réparation est aussi nécessaire lorsqu’un liquide a été renversé sur l’appareil ou que des objets sont tombés sur
celui-ci, si l’appareil a été exposé à la pluie ou à l’humidité, ou s’il est tombé.
• Raccordez toujours votre téléviseur à une prise de courant protégée par une connexion de masse.
4
PRÉPARATION
Éléments compris
Guide de Connexion
Rapide Garantie Carte
Guide de
Connexion
Rapide
Garantie
Carte
Manuel d’utilisation
Manuel
d’utilisation
Télécommande et piles
Socle de télévision
Poste de télévision
Fr
Quatre Vis (M4x12)
5
PRÉPARATION
1. MISE SOUS TENSION
Pour faire basculer le téléviseur entre les modes Sous tension et Veille.
2. SOURCE
Appuyez sur cette touche pour choisir la source du signal d’entrée.
3. MENU
Afcher le menu principal.
4. CH /
Appuyez sur cette touche pour choisir un canal.
5. VOL +/-
Appuyez sur cette touche pour régler le volume.
6. Témoin de mise sous tension
Apparaît en bleu lorsque le téléviseur est allumé. Apparaît en rouge lorsque le téléviseur
est en mode veille.
7. IR (Récepteur infrarouge)
Reçoit les signaux IR de la télécommande.
Vue avant
Fr

6
1. Cordon d’alimentation
Se branche dans une prise de courant c.a.
2. OPTIQUE
Pour connecter un système de son numérique à cette prise.
3. Port USB
Se raccorde à un dispositif de stockage USB an de lire des chiers de im et de photos
compatibles.
4. LAN
Le port de connexion de réseau.
5. Entrées HDMI
Se raccordent à un appareil avec signal de sortie haute dénition (HD).
6. Entrée VGA
Se raccorde à un ordinateur ou à d’autres appareils dotés d’une interface VGA.
7. Entrée PC AUDIO
Se raccorde à la sortie audio d’un ordinateur.
8. Entrée DTV/TV
Se raccorde à la prise de l’antenne (75Ω VHF/UHF) à l’aide du câle coaxial RF.
9. Prise pour écouteurs
Se raccorde aux écouteurs.
10. Entrée Audio
Se raccorde à la prise AUDIO (L / R) de connecteurs de sortie des appareils audio
externes.
11. COMPOSITE/COMPOSANT IN
Se raccorde aux appareils AV avec prises de sortie vidéo et audio pour composite/composants (Y/Pb/
Pr). La vidéo composite/ composante(Y/PB/PR) partage avec l’entrée audio (D/G).
PRÉPARATION
Fr
LA N
OPTICAL PC AUDI O
VGA
HDMI1HDMI2
10
COMPONENTAUDIO
900
HDMI3
Vue arrière
7
Installation du socle
MISE EN GARDE : Cet appareil doit être retenu par un support mural homologué UL.
• 1.Couchez le téléviseur face vers le
bas sur une surface plate et coussinée
pour éviter de l’endommager ou de
rayer l’écran.
• 2.Desserrez les 4 vis en tenant le
socle, puis retirez-les.
• 3.Fixez le support mural au téléviseur
en utilisant les trous de fixation à
l’arrière du téléviseur. Installez ce
téléviseur en suivant les consignes
comprises avec le support mural.
Retrait du socle en vue d’un montage mural
PRÉPARATION
• 1. Couchez le téléviseur face vers le
bas sur une surface plate et coussinée
pour éviter de l’endommager ou de
rayer l’écran.
• 2.Fixer le raccordement Base Gauche
à l'unité principale à l'aide des 2 vis
fournies.
• 3.Fixer le droit Raccordement de base
à l'unité principale en utilisant les 2
pièces fournies vis fournies.
Fr
8
1. : Pour basculer le téléviseur entre les modes
Sous tension et Veille.
2. MUSE: Pour activer ou désactiver le son du
téléviseur.
3. 0~9: Pour sélectionner un canal. (Mode ATV/
DTV)
4. —: Pour entrer plusieurs numéros de canal, par
exemple 2-1.
5. : Pour revenir au canal précédent.
6. APPS:Appuyez sur pour sélectionner l'APPS
souhaitée.
7. MENU: Pour afficher le menu d’affichage à
l’écran.
8. SOURCE: Pour choisir parmi les différentes
sources du signal d’entrée. TV/HDMI1/HDMI2/
HDMI3/USB/VGA/AV/Component.
9. :Vous permet de naviguer dans les
menus afchés et de régler les paramètres du
système en fonction de vos préférences.
10. OK: Confirme la sélection dans les menus
afchés.
11. RETURN:Retour au menu précédent.
12. EXIT: Pour quitter le menu OSD.
13. TV:Appuyez sur pour mettre en mode TV.
14. VOL+/-: Pour régler le volume.
15. CH / : Pour sélectionner un canal.
16. DISPLAY:Afficher les informations de l'écran
présente comme le canal actuel et la source
d'entrée.
17. : Arrêter la lecture.
18. : Passer au début de la précédente chapitre /
piste / photo.
19. : Passer au début de la prochaine chapitre /
piste / photo.
20. : Inverser rapidement la lecture.
21. : Avancer rapidement la lecture.
22. COLOR BUTTONS: Appuyez sur pour accéder
directement à la fonction correspondante dans
le service APP.
23. : Lancez la lecture ou mettre en pause.
24. P.MODE: Pour sélectionner le mode de l’image :
dynamique / lm / utilisateur / standard.
25. S.MODE: Pour sélectionner le mode audio :
standard/musique/lm/utilisateur.
26. CH.LIST: Pour afcher la liste des programmes.
27. CC: sélection du sous-titrage : ON/OFF/CC On
Mute(ACTIVÉ/DÉSACTIVÉ/ST activé sur son
désactivé).
28. V-CHIP:Pour congurer le contrôle parental.
29. MTS: Pour basculer entre les différents canaux
audio : STEREO/MONO/SAP.
30. ASPECT: Pour sélectionner le format de l’image
: standard/wide/wide zoom/zoom.
31. AUTO:Appuyez sur cette touche pour régler
automatiquement l’image de la source VGA
32. SLEEP: pour régler le minuteur de mise en
veille du téléviseur : DÉSACTIVÉ/5/10.../180/240
min.
PRÉPARATION
Fr
Télécommande
9
CONNEXION DES APPAREILS EXTERNES
Fr
10
initiale
• Une fois toutes les connexions physiques établies, branchez le cordon d’alimentation
dans la prise de courant. À cette étape, le téléviseur passera en mode Veille et le
témoin DEL rouge s’allumera.
• Une fois sous ce mode, appuyez sur la touches de l’appareil ou de la télécommande
pour allumer le téléviseur. Le témoin DEL rouge passera au bleu.
• Appuyez sur les touches pour sélectionner le mode désiré, puis appuyez sur OK
• S’il est impossible de trouver
des canaux,cette fenêtre
automatiquement.
5
9
7
8
PERSONNALISATION DES PARAMÈTRES DU TÉLÉVISEUR
OK:Suivant
OK:Suivant OK:Suivant
OK:Suivant OK:Suivant
UHDTV
EXIT:Quitter
DTV
51
MEMU:Skip
5
9
7
8
Home Mode (économie d’énergie) constitue la par défaut de la télévision au moment de la livraison. Et Home Mode (économie
d’énergie) est la pour laquelle le produit est ENERGY STAR®. Toute apportée à la par défaut du
téléviseur entraîne des changements au niveau de la consommation d’énergie. L’activation de certaines fonctions et fonctionnalités facultatives peut
augmenter la consommation d’énergie de ce produit au-delà des critères requis pour l'appellation ENERGY STAR®.
Retail Mode : Sélectionner le mode magasin pour une image plus claire. Ce mode peut parfois consommer plus d’énergie pour utiliser le Volume/
Sound Mode (mode volume/son) et le Picture Mode (mode image). Lorsque ce mode est activé, il est possible que la consommation d’énergie aille
au-delà des critères requis pour l’appellation ENERGY STAR® .
Energy Star® est un ensemble de directives d'économie d'énergie émis par les Etats-Unis de l'environnement Protection Agency (EPA).
Energy Star® est un programme de l’Agence de protection de l’environnement et du ministère de l’Énergie des États-Unis visant à fournir des
directives d'économie d'énergie et à promouvoir les produits et pratiques énergétiquement
• La consommation d’énergie du ON-MODE (mode marche) du Home Mode (mode domicile) devrait être inférieure à W.
• La consommation d’énergie du SLEEP-MODE (mode veille) devrait être inférieure à 0.5 W.
Fr
Option
70
11
Navigationdanslesparamètresdeconguration
• Appuyez sur la touche MENU pour afcher le menu principal.
• Utilisez les boutons sélectionner le menu Setup, puis appuyez sur les
touches pour naviguer et sélectionner le menu disponible.
PERSONNALISATION DES PARAMÈTRES DU TÉLÉVISEUR
Fr
Prog Support
Audio
R
Prog
SupportSystem
VAudio
Support
System
Support
AudioSupport
Audio
System
Audio
System
I
Option Option
Option Option
Option
Option
Option
Image Reseau
.
.
Prog
.
Prog
.
Prog
.
Verro
eseau
erro
R eseau
R eseau
R eseau
mag e
I mag e
I mag e
I mag e
V erro
V erro
V erro
12
Apps
Netix Visionnez instantanément des émissions et des lms en
diffusion continue sur Internet.
Toon Goggles
Une plateforme de vidéo sur demande par abonnement
qui propose des dessins animés amusants et éducatifs,
des jeux stimulants et des chansons du monde entier et
en plusieurs langues aux enfants.
AccuWeather Indique la température et les conditions météorologiques
du moment partout dans le monde en degrés Celsius ou
Fahrenheit.
YouTube Visionnez vos contenus YouTube sur le meilleur écran
de la maison.
• Appuyez sur la touche MENU de l’appareil principal ou de la télécommande
pour afcher Apps. Puis appuyez sur les touches pour sélectionner la APP
souhaitée, appuyez ensuite sur la touche OK pour entrer. Ou appuyez sur la
touche rapide de la télécommande pour accéder directement à l’APPLICATION
voulue.
PERSONNALISATION DES PARAMÈTRES DU TÉLÉVISEUR
Fr
Option
Toon Goggles
13
Médias
• Appuyez sur le bouton MENU de l'unité principale ou de la télécommande, puis
appuyez sur pour sélectionner Médias, et l'utiliser pour saisir les médias
et utiliser pour sélectionner l'option souhaitée.
REMARQUE: Dispositifsdestockageportatifs(disqueUSBoudisquedur)doiventêtreinsérés.
• Après avoir entré Médias, appuyez sur les boutons pour sélectionner
JPEG, puis sélectionner le type de disque pour entrer. Ensuite, utilisez les
boutons / pour naviguer dans le dossier de photos, puis sélectionnez
l'image souhaitée et appuyez sur le bouton OK, quand √ apparaît en haut à
gauche, appuyez sur le bouton pour lire l'image.
PERSONNALISATION DES PARAMÈTRES DU TÉLÉVISEUR
• Remarque : Formatdechierprisencharge:JPEG.
Fr
Visualisation de photos
Option
14
Jouer Mouvement JPG
Source
• Appuyez sur le bouton MENU de l’unité principale ou sur les boutons de
commande et appuyez sur la télécommande pour sélectionner le menu Source.
Puis appuyez sur pour entrer source et utilisez les boutons pour sélec-
tionner différentes sources d’entrée entre: TV / HDMI1 / HDMI2 / HDMI3 / USB /
VGA / AV / Component et appuyez sur le bouton OK pour conrmer.
• Après avoir entré Médias, appuyez sur les boutons pour sélectionner
Motion JPG et puis sélectionnez le type de disque pour entrer. Ensuite, utilisez
les boutons / pour naviguer dans le dossier de la vidéo et puis
sélectionnez la vidéo souhaitée puis appuyez sur le bouton OK, quand √ apparaît
en haut à gauche, appuyez sur le bouton pour lire la vidéo.
PERSONNALISATION DES PARAMÈTRES DU TÉLÉVISEUR
• Remarque :Formatdechierprisencharge:Movimiento JPG
Fr
Option
15
Option
System
• Appuyez sur les boutons pour sélectionner le menu de Système, puis
appuyez sur le bouton OK pour entrer. Appuyez sur les boutons pour
sélectionner les options de réglage suivantes, puis appuyez sur les boutons
pour ajuster le réglage de chaque option.
PERSONNALISATION DES PARAMÈTRES DU TÉLÉVISEUR
• Appuyez sur le bouton MENU de l'appareil ou sur la télécommande pour
afficher l'interface principale. Ensuite, appuyez sur pour sélectionner le
menu Option et appuyez sur pour entrer. Ensuite, appuyez sur pour
sélectionner l'option souhaitée.
Fr
Option
Wide Zoom
Format

16
Langue Menu Pour sélectionner la langue des menus : anglais, français
ou espagnol. Par défaut, la langue des menus à l’écran
est l’anglais.
Transparence Pour activer ou désactiver la fonction de transparence.
Pour sélectionner le mode de zoom:Standard/Wide/Wide
Zoom/Zoom.
Remarque : Source d’entrée différente, les options
dumode zoom peuvent varier.
Réduction de Ruido Pour réduire le niveau de bruit de l’appareil connecté :
DÉSACTIVÉ/Faible/Moyen/Fort.
Avancé Pour régler les paramètres des options avancées :
H-POS,V-POS, Horloge, Phase ou Auto. (Mode Source
VGA seulement)
Sous-Titrage
Mode CC Sélectionnez le mode CC: On,
Off ou CC sur Muet.
Sélection de base Sélection de base: CC1, CC2,
CC3, CC4, Texte1, Texte2,
Text3, Text4.
Sélection avancée Sélection avancée: Service1,
Service2, Service3, Service4,
Service5 et Service6.
OPTION
Options: mode, style de police,
taille de police, la police bord
style, la police couleur de
bord, FG_Color, bg_color, FG_
Opacité, BG_Opacity.
DLC Sélectionnez cette option pour activer ou désactiver la
fonction de commande dynamique de la luminance.
Heure
Veille: Sélectionnez une période de temps après laquelle
le téléviseur passe automatiquement en mode veille:
Off / 5/10 / ... / 180/240 min. Alternative: Vous pouvez
appuyer sur le bouton SLEEP à plusieurs reprises pour
sélectionner le nombre de minutes directement.
Fuseau horaire: Sélectionnez un fuseau horaire: Hawaii /
Alaska / Pacique / Montagne / Centrale / Est / Atlantique
/ Terre-Neuve.Heure d'été: Sélectionnez cette option pour
activer / désactiver l'heure d'été.
Other setting
Dénissezlesautresparamètres:
EDID HDMI: sélectionnez la version HDMI: HDMI 2.0 /
HDMI 1.4.
INlink(HDMI-CEC): définir les paramètres suivants:
contrôle INlink, alimentation de l'appareil Off, TV Power
On, récepteur audio, INlink Liste de périphériques, Racine
Menu.
Mode Usine Restaurer le téléviseur aux réglages d'usine par défaut.
PERSONNALISATION DES PARAMÈTRES DU TÉLÉVISEUR
Fr
Format
17
Support
Air / Câble Pour sélectionner l’antenne : Air ou Câble.
Balayage
Automatique Sélectionnez Auto Scan pour rechercher les canaux à air ou
câble disponibles.
Montrer/Cacher Pour afcher ou masquer le canal sélectionné.
No.canal Pour afcher le nom du canal actuel.
Nom du canal Pour afcher l’étiquette du canal actuel.
Signal Information Pour afcher la information du signal actuel.
PERSONNALISATION DES PARAMÈTRES DU TÉLÉVISEUR
Prog.
• Appuyez sur les boutons pour sélectionner le menu de Prog., puis appuyez
sur le bouton OK pour entrer. Appuyez sur les boutons pour sélectionner
les options de réglage suivantes, puis appuyez sur les boutons pour ajuster
le réglage de chaque option.
• Appuyez sur les boutons pour sélectionner le menu de Support,puis
appuyez sur le bouton OK pour voir le mode d'emploi intégré.
USER’S MANUAL
MANUEL DE L’UTILISATEUR
MANUAL DEL USUARIO
Fr
WD48 UW2 490
18
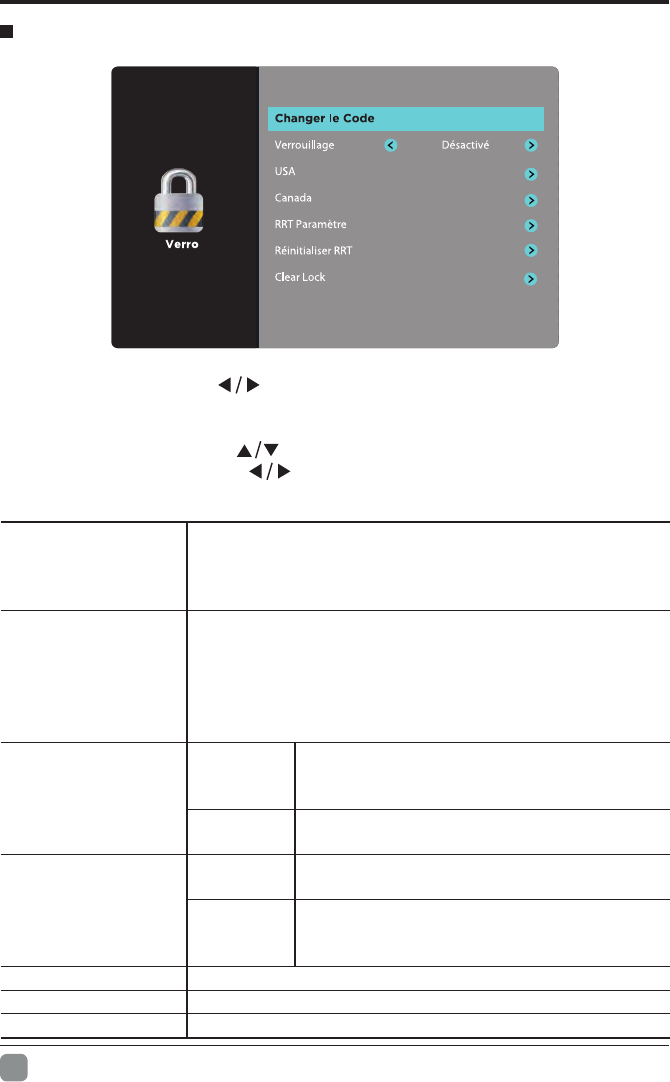
• Appuyez sur les touches pour sélectionner le menu Verro, puis appuyez sur
la touche OK pour entrer. Utilisez les touches 0 à 9 pour entrer le mot de passe à
4 chiffres qui vous permettra d’ouvrir le menu Verro.
• Appuyez sur les touches pour sélectionner les options de verrouillage
suivantes, puis sur la touche pour régler les paramètres de chaque option.
Verro
Remarque : Le mot de passe par défaut est « 0000 ».
Changer le Code
Utilisez les touches 0 à 9 pour entrer l’ancien mot de
passe, puis entrez le nouveau mot de passe à 4 chiffres.
Entrez le nouveau mot de passe une autre fois pour le
conrmer.
Verrouillage
Sélectionnez cette option pour activer ou désactiver le
verrouillage du système. Les options suivantes [US,
Canada, RRT Setting and Reset RRT (USA, Canada,
Réglage RRT et Réinitialisation RRT)] ne seront
accessibles que lorsque vous activerez le verrouillage du
système.
USA Télévision CLASSEMENT TÉLÉ: Appuyez sur la
touche OK pour verrouiller ou déverrouiller
le classement télé.
MPAA Sélectionner le classement de la MPAA : N/
A,G, PG, PG-13, R, NC-17 ou X.
Canada
Canada
Anglais Permet de sélectionner le classement de la
MPAA pour les anglophones
Canada
Français
Permet de sélectionner le classement de
la MPAA pour le Québec : E, G, 8 ans+, 13
ans+, 16 ans+, 18 ans+.
RRT Paramètre Pour dénir le tableau régional de classication.
Réinitialiser RRT Select to reset the RRT setting.
Clear Lock Effacer tous les paramètres de verrouillage.
PERSONNALISATION DES PARAMÈTRES DU TÉLÉVISEUR
Fr
19
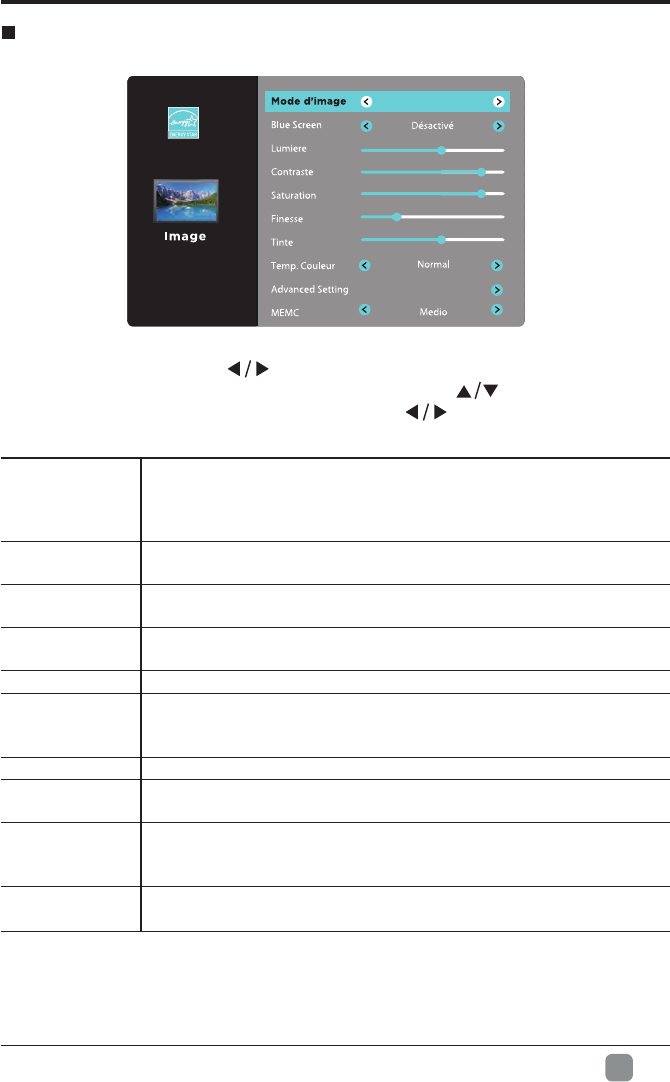
Image
Mode d’image
Permet de basculer entre les modes d’image : Dynamique / Film /
Energy Saving /Utilisateur / Standard.
Alternative : vous pouvez appuyer sur la touche P.MODE pour
sélectionner le mode imagen directement.
Blue Screen Permet l’afchage de l’arrière-plan en bleu si le signal est faible ou
inexistant.
Lumiere Permet d’accroître ou de diminuer la quantité de blanc dans l’image.
(Pour le mode Utilisateur)
Contraste Permet de régler l’écart entre les parties éclairées et sombres de
l’image. (Pour le mode Utilisateur)
Saturation Permet de régler l’intensité des couleurs. (Pour le mode Utilisateur)
Finesse Permet de régler le niveau de netteté des contours entre les parties
éclairées et sombres de l’image. (Pour le mode Utilisateur)
Tinte Permet de régler l’équilibre entre les niveaux de rouge etde.
Temp. Couleur Permet de basculer entre les températures de couleur : Froid/
Normal/Chaude.
Advanced
Setting
Espace colorimétrique: Pour régler les paramètres suivants:
Mode couleur, Teinte, Saturation, Luminosité et Reset.White
Balance: Pour régler les paramètres de balance des blancs.
MEMC Cycle parmi Mouvement Estimation et Motion Modes de
rémunération: Medio / Haut / Desactive / Bas.
• Appuyez sur les touches pour sélectionner le menu Image, puis appuyez
sur la touche OK pour entrer. Appuyez sur les touches pour sélectionner les
options de image suivantes, puis sur la touche pour régler les paramètres
de chaque option.
PERSONNALISATION DES PARAMÈTRES DU TÉLÉVISEUR
Fr
Energy Saving
20
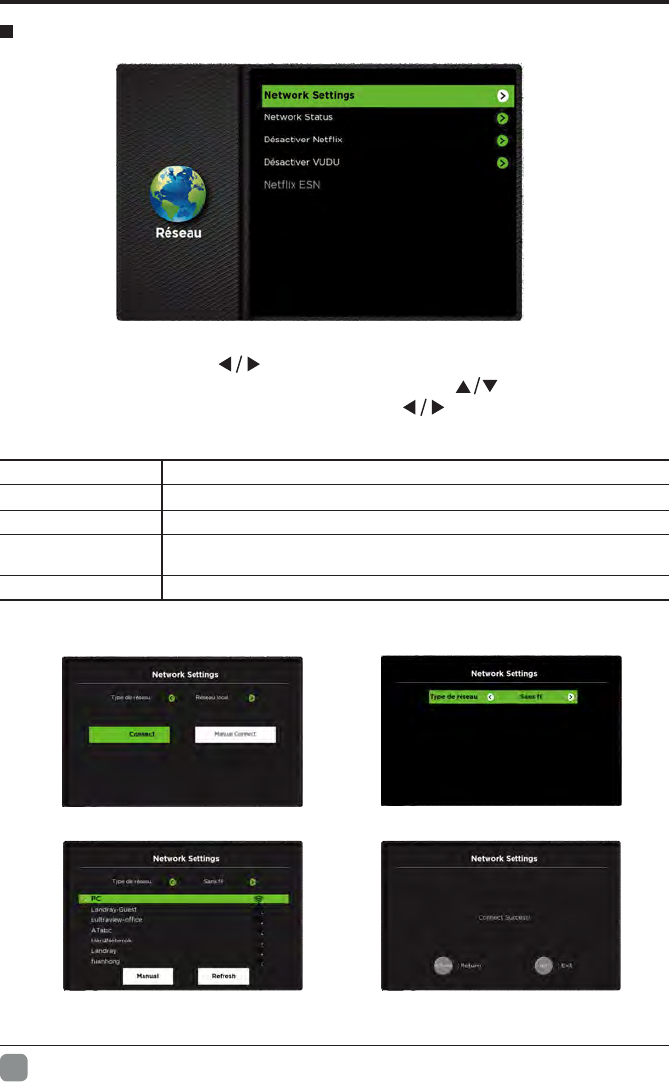
Réseau
Choisissez deux types de réseau : Sans l ou local.
Déactivate Netix Désactiver Netix et effacer les informations du compte.
Déactivate
VUDU Désactiver Vudu et effacer les informations du compte.
NetixESN Numéro de série électronique.
• Appuyez sur les touches pour sélectionner le menu RÉSEAU, puis appuyez
sur la touche OK pour entrer. Appuyez sur les touches pour sélectionner les
options de réseau suivantes, puis sur la touche pour régler les paramètres
de chaque option.
PERSONNALISATION DES PARAMÈTRES DU TÉLÉVISEUR
Fr
Network Settings
Auto
Afficher l'état du réseau.
Network Status
THTF4KOTT-00000000000000000000
000100029265
Scanning.Please wait...
21
PERSONNALISATION DES PARAMÈTRES DU TÉLÉVISEUR
Fr
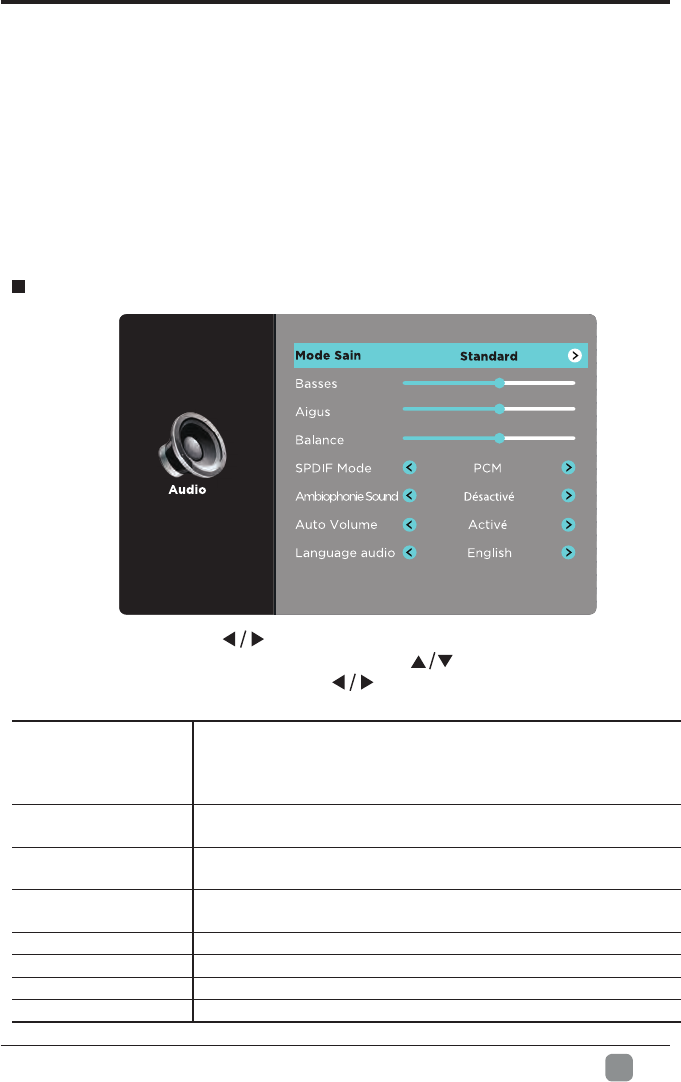
Audio
• Appuyez sur les touches pour sélectionner le menu Audio, puis appuyez sur la
touche OK pour entrer. Appuyez sur les touches pour sélectionner les options
de audio suivantes, puis sur la touche pour régler les paramètres de chaque
option.
Mode Sain
Permet de sélectionner une technique d’amélioration audio : Standard /
Musique / Cinéma / utilisateur
Alternative : vous pouvez appuyer sur la touche S.MODE pour
sélectionner le mode audio directement.
Basses Pour régler l’intensité relative des sons plus graves. (Pour le mode
Utilisateur)
Aigus Pour régler l’intensité relative des sons plus aigus. (Pour le mode
Utilisateur)
Balance Pour régler le volume relatif des haut-parleurs dans un système qui
en compte plusieurs.
SPDIF Mode Pour sélectionner le mode de sortie audio numérique : RAW/PCM.
Ambiophonie Sound Pour améliorer votre expérience d’écoute.
Auto Volume Pour régler automatiquement les niveaux de volume.
Language audio Pour sélectionner la langue audio : English, français, espagnol.
Rappel concernant la connexion Internet :
• Les situations suivantes peuvent se produire lorsque vous vous connectez à
Internet pour utiliser vos services TPC.
• 1. Veuillez vérifier la puissance de votre signal Internet lorsque vous vous
connectez à Internet. Une puissance du signal inférieure à 50 peut entraîner une
mauvaise connexion et une image moins uide.
• 2. L'accès aux services TPC peut prendre jusqu'à 30 secondes lors de la
connexion à Internet.
Vitesse Internet de 10 Mo ou plus recommandée