KYE SYSTEMS GMZK7 WIRELESS MOUSE User Manual Hardware Installation
KYE Systems Corp WIRELESS MOUSE Hardware Installation
User Manual
English
-1-
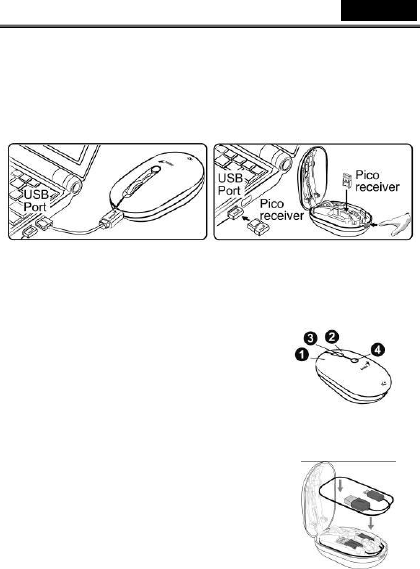
Hardware Installation
Note: Supports Windows 8/7/Vista/XP
1. Connect the Micro USB charging cable to the mouse to any PC USB port to
charge the capacitor.
2. In charging mode, the red LED light will be on and will turn off when charged.
3. Connect the receiver to a USB port of a PC.
4. Make sure that you have switched on the power switch underneath the mouse.
Remark:
It takes around five minutes to charge up the capacitor and you can use the mouse for
about four hours. Actual performance varies according to the conditions.
Mouse Button Assignments
1. Left Button: Provides traditional mouse
functions like click, double click and drag.
2. Magic-Roller: Press the “Magic-Roller” to surf
the Internet and Windows documents.
3. Right Button: Provides traditional mouse click
functions.
4. DPI adjustment: Default is 1600 dpi, press once
for 800 dpi. Quick red flashing is 1600 dpi and
slow red flashing is 800 dpi.
Note: Download the programmable driver from our website: www.geniusnet.com
Capacitor low indication
If the LED is flashing, then the capacitor level is low,
you need to recharge the mouse immediately.
Micro USB charging cable storage
When you aren’t using the Micro USB charging cable,
you can put it inside the mouse.

English
-2-
Warning: (Troubleshooting)
1. Do not use the wireless optical/laser mouse on a desk which is made of glass or
mirror.
2. The connection of the wireless device is factory preset, so when you plug the
USB receiver into any USB port, the connection between the micro receiver and
the mouse will be established automatically.
3. In case your PC did not install the hardware successfully, remove the micro
receiver from the USB port and go Human Interface Devices under Device
Manager to remove the mouse, then plug in the micro receiver to a USB port
again.
4. Keep the mouse away from heat in order to prevent damage to the capacitor.
Note: Changes or modifications not expressly approved by the party responsible for compliance could void
the user's authority to operate the equipment. (15.21)
This device complies with part 15 of the FCC Rules. Operation is subject to the following two conditions: (1) This
device may not cause harmful interference, and (2) this device must accept any interference received, including
interference that may cause undesired operation.(15.19(a)(3))
FEDERAL COMMUNICATIONS COMMISSION
INTERFERENCE STATEMENT
This equipment has been tested and found to comply with the limits for a Class B digital device, pursuant to Part 15
of the FCC Rules. These limits are designed to provide reasonable protection against harmful interference in a
residential installation. This equipment generates, uses and can radiate radio frequency energy and, if not installed
and used in accordance with the instructions, may cause harmful interference to radio communications. However,
there is no guarantee that interference will not occur in a particular installation. If this equipment does cause harmful
interference to radio or television reception, which can be determined by turning the equipment off and on, the user is
encouraged to try to correct the interference by one or more of the following measures:

English
-3-
– Reorient or relocate the receiving antenna.
– Increase the separation between the equipment and receiver.
– Connect the equipment into an outlet on a circuit different from that to which the receiver is connected.
– Consult the dealer or an experienced radio/TV technician for help.
CAUTION:
Any changes or modifications not expressly approved by the party responsible for compliance could void the
user's authority to operate the equipment.