KYE SYSTEMS GTAA1 MousePen M508WX (GT-110007) User Manual
KYE Systems Corp MousePen M508WX (GT-110007) Users Manual
Users Manual
ENGLISH
1
GENIUS GRAPHIC TABLET
Q U I C K I N S T A L L A T I O N G U I D E
CAUTION: INSERT THE DRIVER CD INTO YOUR COMPUTER FIRS T AND THEN
FOLLOW THE INSTRUCTIONS TO COMPLETE YOUR SETUP PROCESS.
NO T E : REM O V E T H E S C R E E N P R O T E C TO R B E F O R E U S ING T H E TA BLET.
INTRODU C TION
DRIVER I N S TALLATION
Windows:
1. Insert the driver disc into your computer’s CD-ROM drive. When prompted, select “Driver Setup”, and press OK to
install driver.
Note: In most systems, the Setup Wizard will start automatically. If Automatic Setup does not begin, start the Setup
program manually by selecting “Start/Run”, type "E:\setup", where “E:” represents the location of the CD-ROM
drive, then press “Enter”.
Note: In certain cases, Windows might ask for your permission because it cannot recognize the driver you are
downloading. If this occurs, select “Continue Anyway” and continue to install.
Macintosh:
1. Insert the driver disc into your computer’s CD-ROM drive.
2. Check to see if the “Genius Tablet” is shown on the screen. Double click the icon then follow the instructions.
3. Enter your administrator name and password to process the next step till it’s finished.
Note: For more information, refer to the MAC user manual on the driver disc.
CAUTION: ONCE THE INSTALLATION HAS BEEN COMPLETED, REBOOT YOUR MACINTOSH BEFORE
PLUGGING THE DEVICE INTO YOUR COMPUTER.
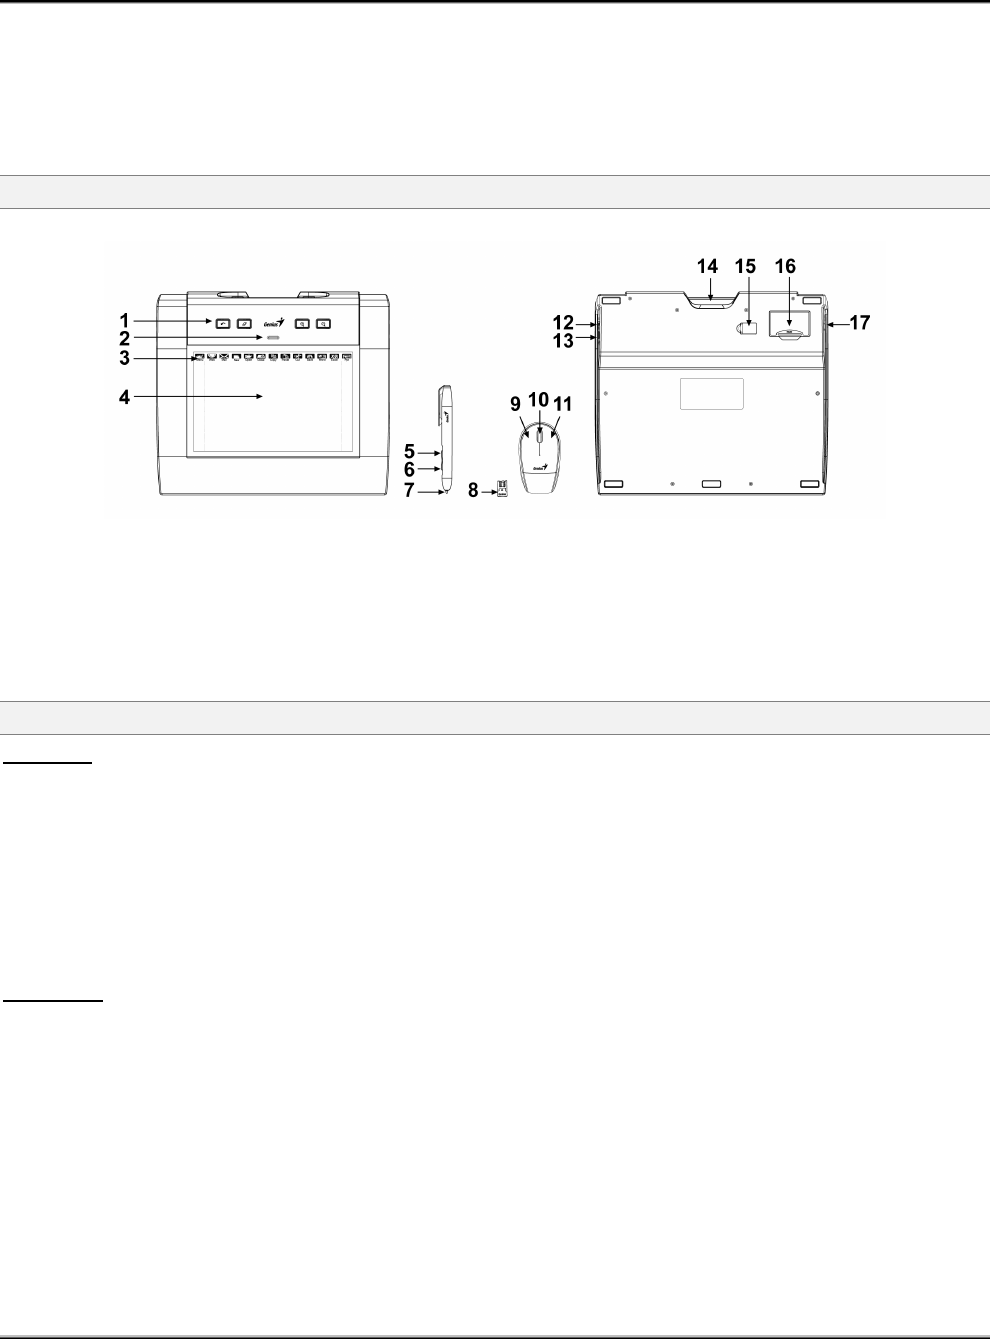
1 —Express Key
2 —LED indicator
3 —Hot cells
4 —Working area
5 —Button 2
6 —Button 1
7 —Pen tips
8 —USB Dongle
9 —Left button
10 —Scroll wheel
11 —Right button
12 —Power switch
13 —USB port
14 —Digital pen slot
15 —Dongle slot
16 —Battery slot
17 —Resume button
ENGLISH
2
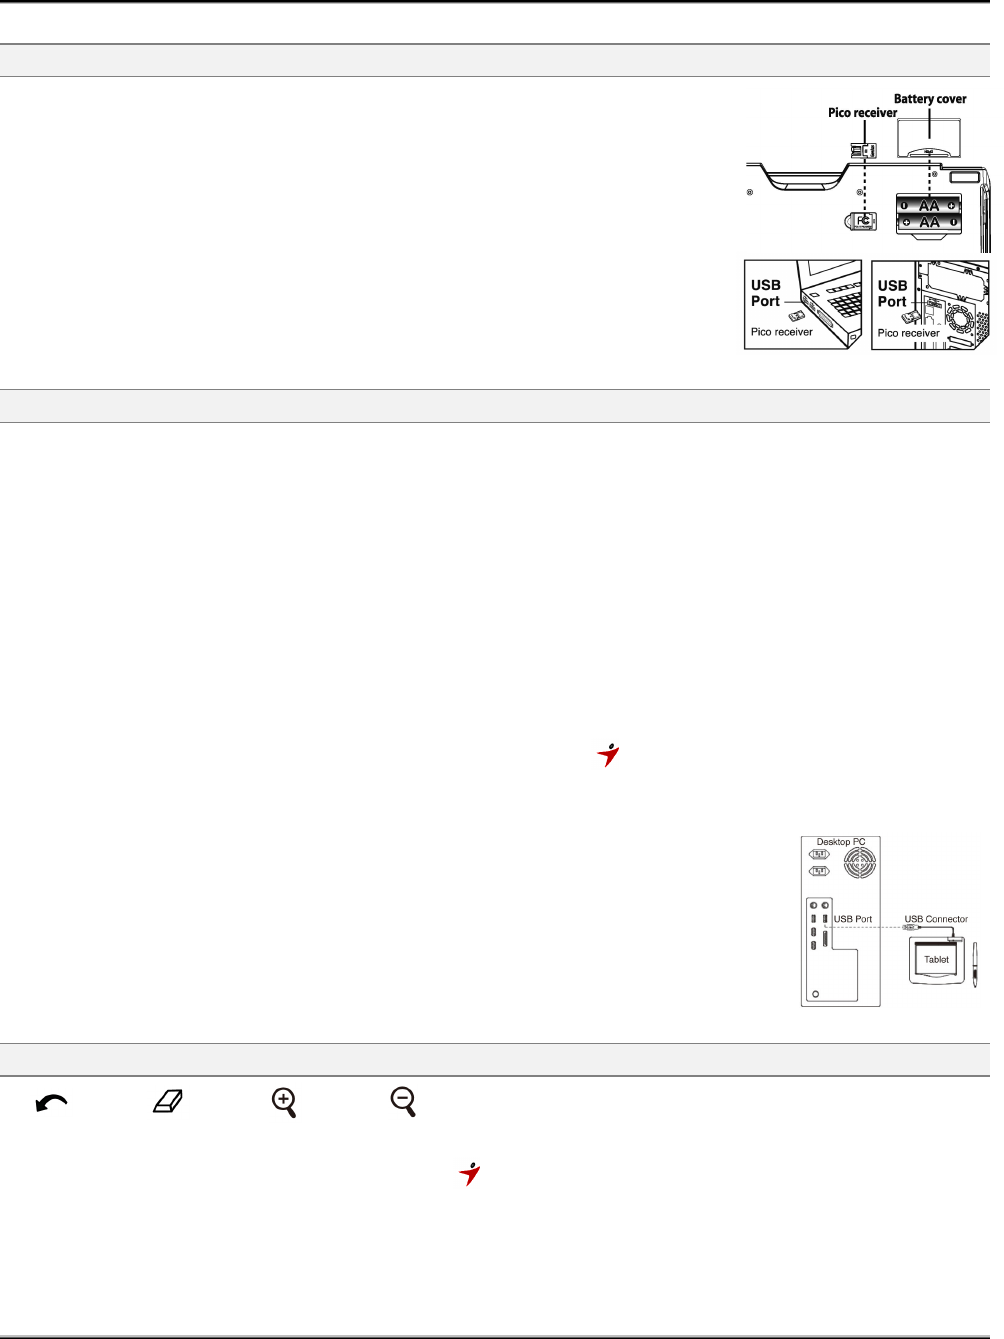
HARDWARE INSTALLATION
CAUTION: MAKE SURE THAT YOU HAVE INSTALLED THE DRIVER
SOFTWARE (SEE ABOVE) INTO YOUR COMPUTER BEFORE
INSTALLING THE HARDWARE.
1. Put the batteries into the back of tablet.
2. Plug the tablet dongle into your computer’s USB port (located on the computer,
display, or keyboard). The tablet’s LED light will indicate the operational status,
and your computer screen will display a “found new hardware” message.
Note : Do not mix or use different types of batteries at the same time such as
Li-Ion, Alkaline, etc; and remember do not put the batteries in the wrong direction.
VERIFYING THE INSTALLATION
To ensure that everything has been installed properly, follow the procedures below. Check the User’s manual on the
CD-ROM for more information.
VERIFYING HARDWARE AND DRIVER FUNCTIONS
The LED light on the tablet is the main indicator for hardware operation. The light normally stays off, and will light up
in various situations. Watch the status of the tablet LED light as you go through these steps. None of the steps, except
the last two, require the tablet driver to be installed.
1. As soon as the tablet detects the presence of the digital pen or the pressure of express keys or the wireless
mouse, the LED light will come on briefly, and will normally stay off.
2. When the working area detects the presence of the pen, the LED light will stay on. This happens when the
pen tip is directly above the working area of the tablet and is low enough.
3. When you press a button on the body of the pen or the mouse, the LED light will come on.
4. When you press the pen tip against the tablet anywhere in the working area, the light will also come on.
5. If the tablet driver has been properly installed, a small tablet icon ( ) will appear in system the Task Bar
area, normally at the lower right corner of the screen.
6. With the tablet driver properly installed, moving the pen tip or the mouse over the working area will cause the cursor
on the screen to move accordingly.
7. Test your wireless stylus pen in the tablet working area, if it doesn't work, change the
battery or plug the USB cable into your PC.
8. When in low battery status, the red LED of the tablet will be blinking continuously; it will
stay off when the batteries have been changed. You can remove the USB cable from your
PC and the tablet.
Note : Do not mix or use different types of batteries at the same time such as Li-Ion,
Alkaline, etc; and remember do not put the batteries in the wrong direction.
EXPRESS KEY FUNCTION
Undo Eraser Zoom in Zoom out
These keys are programmable. Go to the Tablet Menu ( ) to set up (check the electronic manual for more information).
ENGLISH
3
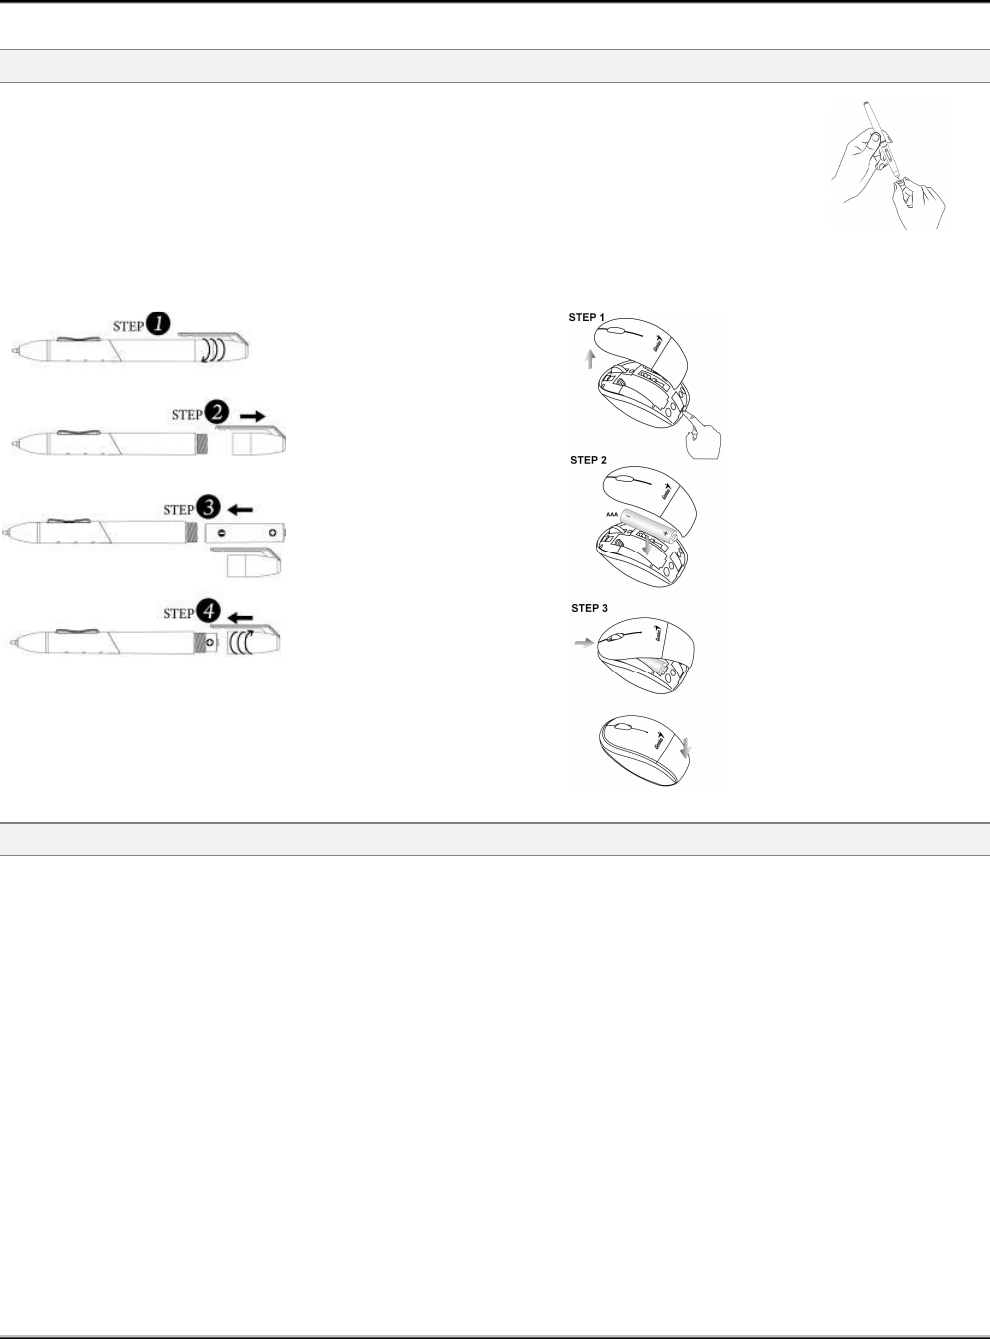
TO CHANGE T H E PEN TIP
1. Place the Pen tip into the tip remover.
2. Simply pull the Pen tip out, and then insert a new tip.
Note: Pliers (not included in package) may also be used to remove the pen tip.
To replace the Tablet Pen battery: To replace the Tablet Mouse battery:
1. Twist off the pen
cap.
2. Pull the pen cap to
open it.
3. Put one AAA battery
into the pen in the
correct direction.
4. Twist the pen cap
back on the pen.
1. Open the mouse
battery cover.
2. Put one AAA
battery into the
mouse.
3. Covered with
battery cover.
NOTES ON B ATTERY USAGE
When you use the battery, carefully read and strictly observe the Safety Instructions and the notes described below:
Different battery types and surrounding temperatures may affect the battery performance.
Avoid using batteries in extremely cold environments as low temperatures can shorten the battery life and reduce
wireless device performance.
If you are using a new rechargeable battery or rechargeable battery that has not been used for an extended period of
time (batteries that pass the expiry date are exceptions) it might affect the period of time you can use this device.
Therefore, to maximize their performance and lifetime, we recommend that you fully charge the batteries and
discharge them for at least one complete cycle before use.
The battery may feel warm when using the wireless device for an extended period of time or using the flash
continuously. This is normal and not a malfunction.
The wireless device may feel warm when being used continuously or for an extended period of time. This is normal
and not a malfunction.
If you will not be using the batteries for an extended period of time, remove them from the wireless device to prevent
leakage or corrosion.
Always keep the terminals in a clean state.
Never use manganese batteries.
Risk of explosion if battery is replaced by an incorrect type.
Dispose of used batteries according to the instructions.

FCC Compliance and Advisory Statement
This device complies with Part 15 of the FCC rules. Operation is subject to the following two
conditions:(1) this device may not cause harmful interference, and (2) this device must accept
any interference received, including interference that may cause undesired operation.
This equipment has been tested and found to comply with the limits for a Class B digital
device,
according to Part 15 of the FCC rules. These limits are designed to provide reasonable
protection against harmful interference in a residential installation. This equipment generates,
uses and can radiate radio frequency energy and if not installed and used in accordance with
the instructions, may cause harmful interference to radio communications. However, there is
no guarantee that interference will not occur in a particular installation. If this equipment does
cause harmful interference to radio or television reception, which can be determined by turning
the equipment off and on, the user is encouraged to try correct the interference by one or more
of the following measures:
1.Reorient the receiving antenna.
2.Increase the separation between the equipment and receiver.
3.Connect the equipment into and outlet on a circuit different from that to which the receiver is
connected.
4.Consult the dealer or an experienced radio/TV technician for help.
Any special accessories needed for compliance must be specified in the instruction manual.
Warning: A shielded-type power cord is required in order to meet FCC emission limits and
also to prevent interference to the nearby radio and television reception. It is essential that
only the supplied power cord be used. Use only shielded cables to connect I/O devices to this
equipment.
CAUSION: Any changes or modifications not expressly approved by the party responsible for
compliance could void your authority to operate the equipment.
IC statementThis Class B digital apparatus complies with Canadian ICES-003.Cet appareil
numérique de la classe B est conforme à la norme NMB-003 du Canada.
FCC ID: FSUGTAA1