Kaba Mas BTCENMDB Cencon Motorized Dead Bolt 30N User Manual FCC Part 15
Kaba Mas LLC Cencon Motorized Dead Bolt 30N FCC Part 15
Kaba Mas >
Manual

2320 Presidential Drive, Suite 101, Durham, NC 27703 USA Voice: 919-381-4235 Fax: 770-831-8598
Certification Exhibit
FCC ID: 2AHFM-BTCENMDB
IC: 21164-BTCENMDB
FCC Rule Part: 15.247
IC Radio Standards Specification: RSS-247
ACS Project Number: 15-3053
Manufacturer: Kaba Mas LLC
Model: Cencon MDB 30N
Manual
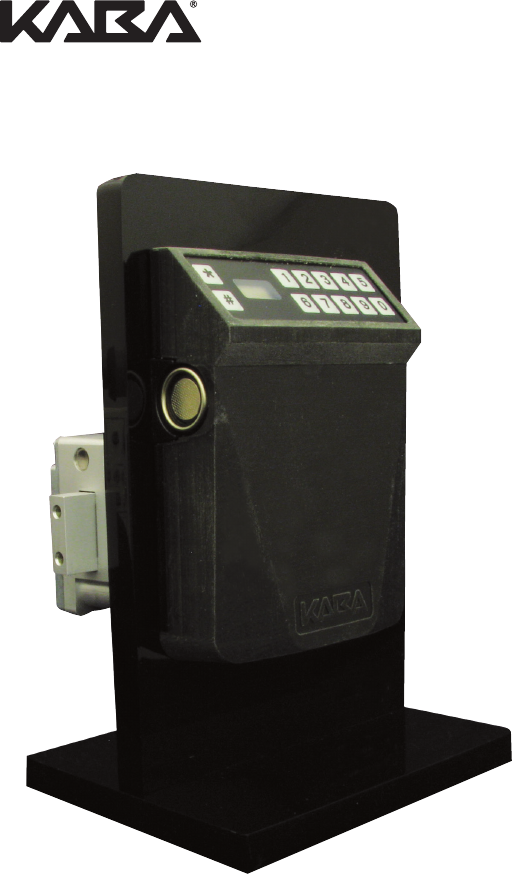
CENCON
Motorized Dead Bolt
ATM Security Lock
INSTALLATION INSTRUCTIONS
PRELIMINARY
05/26/2016

2
Table of ConTenTs
INTRODUCTION ............................................................ 4
CENCON LOCK PARTS FOR INSTALLATION .............. 5
BASIC TOOLS AND MATERIALS NEEDED .................................................... 5
PREPARE FOR NEW INSTALLATION OF THE LOCK ....................................5
PART I - INSTALL FRONT HOUSING ASSEMBLY ....... 6
PART II - INSTALL LOCK CASE ASSEMBLY................ 8
PART III - INTERCONNECT BOX INSTALLATION ....... 8
BASIC LOCK OPERATIONS ........................................ 10
OPENING IN SHELVED MODE .....................................................................10
CHANGE THE SHELVED MODE COMBINATION.........................................11
GEN2 LOCK MENU COMMAND LIST .........................................................12
CENCON LOCK LCD TERMINOLOGY ........................................................13
QUERY THE LOCK VIA THE KEYPAD ..........................................................14
DISPLAY TOTAL AUDIT COUNT ..................................................................14
Document Number 2112.0315 Rev. A -PRELIMINARY

3
InTroduCTIon
Please read all instructions carefully before you install and use your Cencon ATM
Security Lock. This will help you avoid unnecessary costs and concerns resulting
from improper installation.
The installation instructions are the basis for Security Agency Approvals. The lock
installation must be done in accordance to these instructions in order to maintain
the labeled approval level.
In order to maintain VdS Class 2/EN 1300 Class B lock approval levels in a container where multiple locks are
required, special considerations must be observed. The lock must be the first one secured by the boltworks.
Check the locked status of the container with the handle of the boltworks.
Notice: The audit features, the software features associated with peripheral devices and systems, the optional USB
interconnect box and its associated features, features involving the use of user keys, Bluetooth functionality and
other additional features have not been evaluated by UL. The lock was also not evaluated by UL for 24V operation.
FCC INFORMATION
This device complies with Part 15 of the FCC Rules. Operation is subject to the following two conditions:
(1) This device may not cause harmful interference, and
(2) This device must accept any interference received, including interference that may cause
undesired operation.
Changes or modifications made by the user and not expressly approved by the party responsible for
compliance could void the user’s authority to operate the equipment. NOTE: This equipment has been tested
and found to comply with the limits for a Class B digital device, pursuant to part 15 of the FCC Rules. These
limits are designed to provide reasonable protection against harmful interference in a residential installation.
This equipment generates, uses and can radiate radio frequency energy and, if not installed and used in
accordance with the instructions, may cause harmful interference to radio communications. However, there is
no guarantee that interference will not occur in a particular installation. If this equipment does cause harmful
interference to radio or television reception, which can be determined by turning the equipment off and on,
the user is encouraged to try to correct the interference by one or more of the following measures:
• Reorient or relocate the receiving antenna.
• Increase the separation between the equipment and receiver.
• Connect the equipment into an outlet on a circuit different from that to which the receiver is connected.
• Consult the dealer or an experienced radio/TV technician for help.
IC INFORMATION
This device complies with Industry Canada license-exempt RSS standard(s). Operation is subject to the
following two conditions: (1) this device may not cause interference, and (2) this device must accept any
interference, including interference that may cause undesired operation of the device.
Le présent appareil est conforme aux CNR d’Industrie Canada applicables aux appareils radio exempts
de license. L’exploitation est autorisée aux deux conditions suivantes: (1) l’appareil ne doit pas produire
de brouillage, et (2) l’utilisateur de appareil doit accepter tout brouillage radioélectrique subi, même si le
brouillage est susceptible d’en compromettre le fonctionnement.
RF EXPOSURE
This equipment complies with radiation exposure limits set forth for an uncontrolled environment. This
equipment should be installed and operated with minimum distance of 20 cm between the radiator and
your body. This transmitter must not be co-located or operating in conjunction with any other antenna or
transmitter.
“Cet équipement est conforme aux limites d’exposition aux radiations dans un environnement non contrôlé.
Cet équipement doit être installé et utilisé à distance minimum de 20 cm entre le radiateur et votre corps. Cet
émetteur ne doit pas être co-localisées ou opérant en conjonction avec une autre antenne ou transmetteur.

4
BASIC TOOLS AND MATERIALS NEEDED
• Medium Phillips head screwdriver (#2) (recommended magnetized tip)
• ESD wrist band
Recommended, but not required:
• Torque screwdriver (30 inch-pounds/3.4 Newton-Meters capacity)
• Loctite® 262 (Red) for use on lock case mounting screws
WARNING: Kaba Mas locks are protected from 25,000 V Electrostatic Discharge
(ESD) damage when correctly installed. Follow these precautions to avoid ESD
damage when installing the lock:
• Handle the keypad assembly by the outer edge only.
• Use an ESD wrist band grounded to the lock or container during installation.
DESIGN PARAMETERS FOR MOTORIZED DEAD BOLT LOCKS
1. Bolt dimensions (nominal): .312 inches x 1.000 inches/8 x 25.4mm
2. Bolt movement (nominal): .465 inches/11.8mm
3. Bolt extension: .465 inches/11.8mm
4. Maximum load movable by the bolt: 6.7 lbs. (30N)
NOTE: Motorized Dead Bolt locks may not open if more than 6.7 lbs. (30N) of
force is applied to the end or side of the bolt.
5. Maximum load against bolt when thrown (all directions): 224.8 lbs. (1kN)
6. Thelockcanbettedtosafesorvaultdoorsofanymaterial.
NOTE: As is the case with all mechanical and electronic locking devices, the
container and boltworks must be designed to protect the lock.
PREPARE FOR NEW INSTALLATION OF THE LOCK
1. Using the lock parts along with the template provided, establish the exact
location for the drilled and tapped holes. For the Motorized Dead Bolt, only 3 of
the 4 mounting holes are required.
Caution: The lock case must be mounted exactly according to the template if
mounted over the cable routing hole. Otherwise, the lock case must be mounted
so that no part of the case covers the cable routing hole.
2.Thecableholediametercanbeaminimumof.406”(10.3mm)toamaximumof
.438”(11.1mm).The.406”(10.3mm)diameterisrecommended.Thecablehole
must be deburred.
3.Thedialassemblymountingscrewsrequiredrilledandtappedholesto3/8”
(9.5mm)depthifpossible(minimum1/4”or6.4mmdepthrequired.)Drilleither
the two horizontal mounting holes or the two vertical holes.
4. When mounting the lock unit (i.e., integrating it into a boltwork), make sure the
lockbolthasclearancetofreelymovetoitsendpositionsandtheshiftingforce
worksonlyintheaxialdirection(directionofmovement).Lateralforcesshould
not be exerted on the lock.
5
ParT I: InsTall fronT HousIng assembly
Install Instructions for Cencon Motorized Deadbolt Entry Assembly
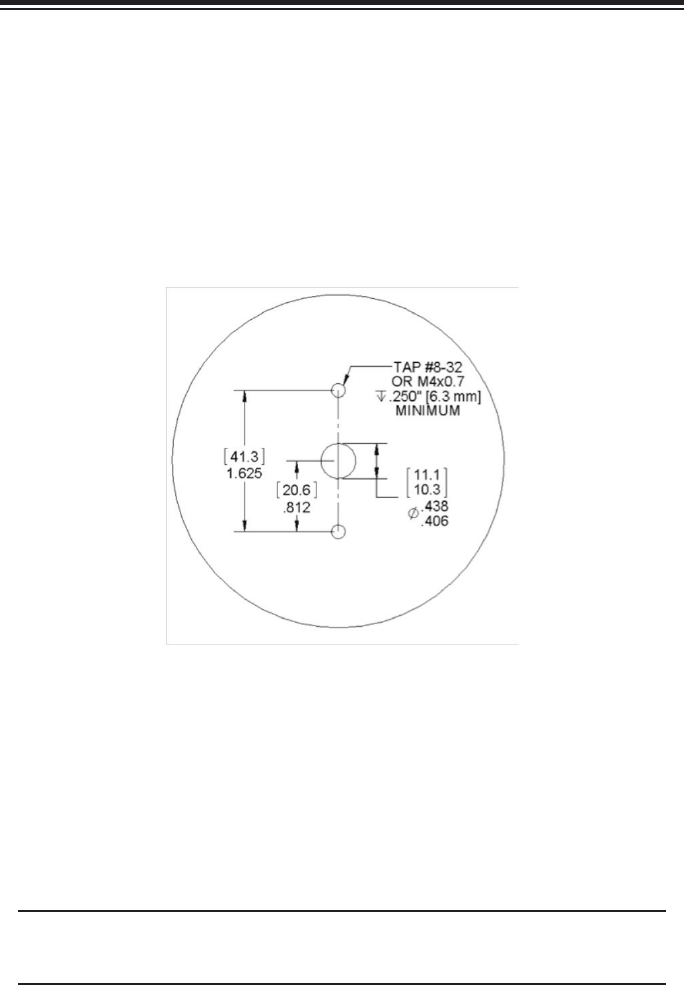
1. Use the dimensions provided in Figure 2 to establish the exact locations
(relativetothespindlehole)ofthemountingholesfortheEntryDeviceandthe
lockassembly.Besuretoconsiderthecablelengthfromtheentrydevicetothe
lock.
2. Thespindleholediametercanbeaminimumof.406”(10.3mm)toamaximum
of.438”(11.1mm).The.406”(10.3mm)diameterisrecommended.Spindlehole
must be deburred.
3. TheEntryDevicemountingscrewsrequiredrilledandtappedholesto3/8”
(9.5mm)depthifpossible(minimum1/4”or6.4mmdepthrequired.)
(Figure 2 – Hole Locations. Not to scale)
4. Screwthetwomountingstudsintothestudmountingholesjustdrilled.Tighten
to approximately 15-20 inch-pounds.
5. Openthesafedoorandkeepitopen.
6. Feedtheassembly’stwocablesthroughthespindleholeoneatatime.Note:
maximumdoorthicknessis5inchestoallowforcurrentcablelength.
7. Placetheentryassemblyontothefrontofthesafedoor.Placethetwolarger
holesoftheentryassemblyoverthetwomountingstudsasshowninFigure
2, and then apply downward pressure to pop the mounting studs onto the wall.
Pullupslackinthecablesfromtheinsideofthesafedoorasyouplacethe
assembly so that the cables will not be damaged. The entry should now be held
in place by the mounting studs.
NOTE: To remove the entry assembly, apply upward pressure to the entry unit until
the entry studs are moved out of the way, and then rotate it laterally to the left to
reveal the entry’s reverse side.
6
ParT II: InsTall loCk Case assembly
WARNING: Do not take the lock case assembly apart. This action will
void the lock warranty.
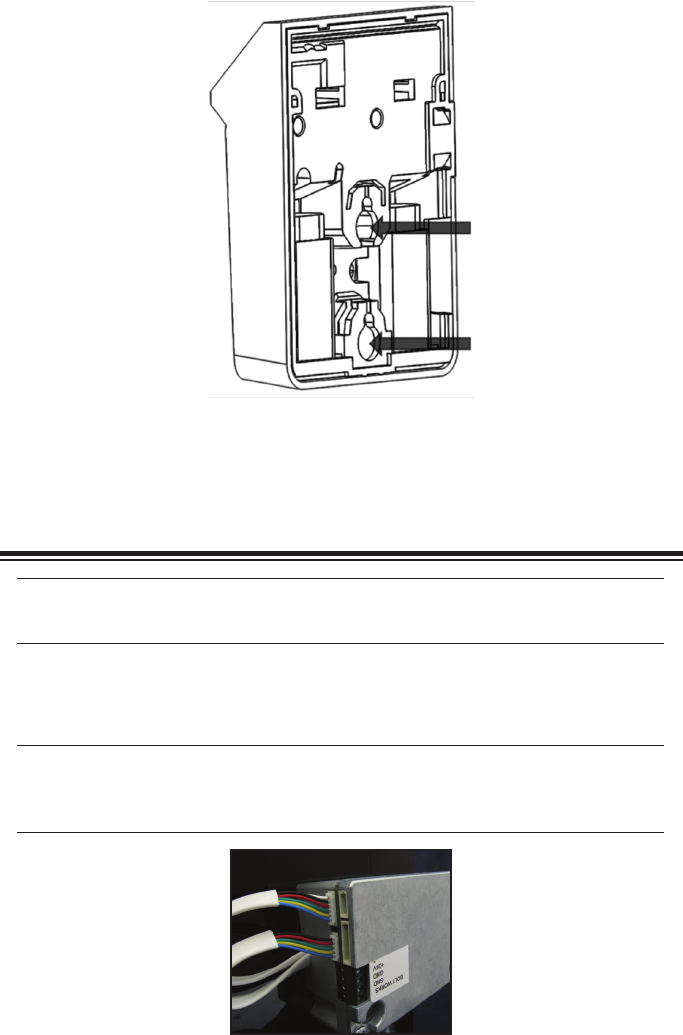
1. Ensure the cables lay in the cable channel as you mount the lock case
assembly to the inside of the container door using the three 1/4-20
(or M6-1) screws (Torque 25-30 lbs., 2.8-3.4 N-M), allowing 1/20” (1.27mm)
clearance between the lock bolt and the container locking bar.
Note: The lock case assembly can be mounted in all orientations for all
mounting locations. It is recommended that you use Loctite® 262 (Red)
on the lock case mounting screws.
Figure 5
Figure 3 - Mounting Stud Alignment

7
AFTER LOCK CASE INSTALLED
Warning: Do not insert batteries into input unit prior to having all
connections into lock secured. Also, ensure no power is applied to the
24V terminal prior to all connections being completed.
1. Attach Power Cable to lock while not connected to power supply. Insert the
red wire into +24 Volt terminal and tighten screw terminal with small flathead
screwdriver. Insert the black wire into GND terminal and tighten screw terminal
with small flathead screwdriver
Warning: The bolt works sensor must be used and attached for correct
operation of the motorized dead bolt. Incomplete connections or faulty
sensor operation could result in lock malfunctions. Ensure correct
operation by following Bolt works sensor command (#75 as described
later in document).
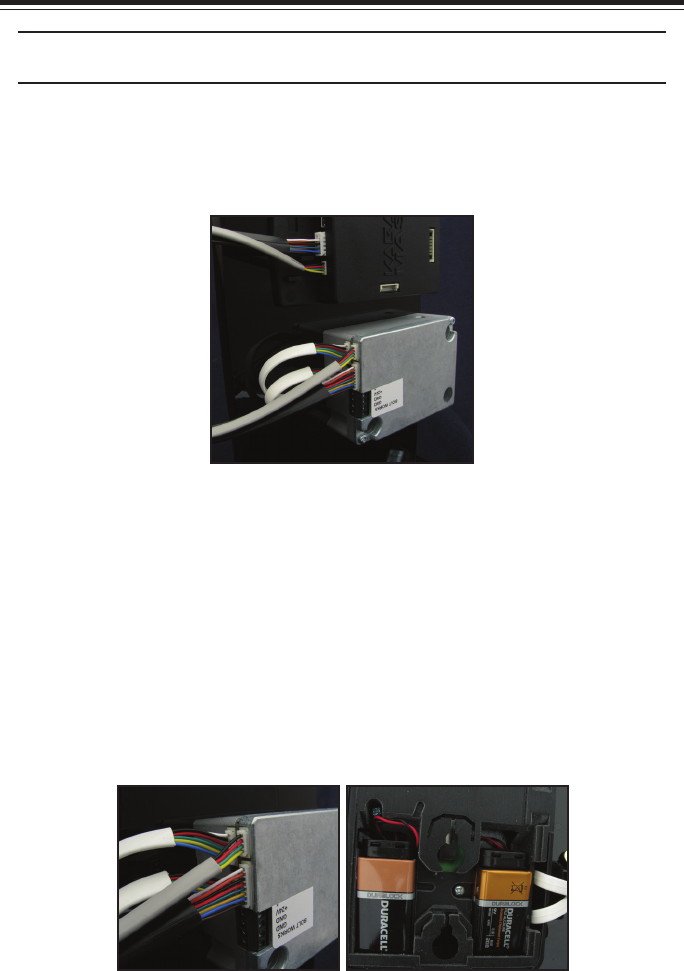
2. Attach bolt works sensor nominally open wire to indicated terminal (Figure 5).
Tighten screw with flathead screwdriver.
3. Attach bolt works sensor common to GND terminal. Tighten screw with
flathead screwdriver.
4. Attach 5-pin cable from the entry assembly into the 5-pin port on the lock
(Figure 5).
5. Attach 6-pin cable from the entry assembly into the 6-pin port on the lock
(Figure 5). (For Bluetooth operation only.)
6. Double check all cables are inserted into the correct slots on the lock.
8
ParT III: InTerConneCT box InsTallaTIon
(oPTIonal)
NOTE: All connections made to the lock are keyed by plastic ribs on the side of
the connectors. Strain relief should be applied to all cables as necessary.
1. Attach the 8 pin serial connector to the lock case and then to the Interconnect
Box.
2. Attach 4-Pin cable to the 4-Pin port on the lock and the other end to the
Interconnect Box (Figure 4).
3. Take the double sided taped provided and mount the Interconnect Box in a
suitable location
Figure 4 - Interconnect Box Cables
4. Double check all cables are inserted into the correct slots on the lock and
Interconnect Box (Figure 6).
5 Remove front entry assembly from container by gently pushing in and up on
the unit until it slides off of the 2 bolts. Do not tug on the cables unnecessarily.
6. Place 2 new fresh alkaline 9 V batteries into the 2 slots, connecting the
terminals to the provided connectors (Figure 7).
7. Replace entry assembly by pressing in and down over the 2 extruded bolts,
taking care that the cables are not pinched.
Figure 6 Figure 7

9
basIC loCk oPeraTIons
For the complete Cencon lock and software operating instructions in FLM, Route,
and Bank modes, please see the Cencon Reference Manual on the documentation
section at www.kaba-mas.com.
Opening Lock in Shelved Mode
Each lock is shipped from the factory in Shelved Mode. The “one time only”
combination feature is not available when the lock is shelved. Instead, the
Shelved Mode combination is used to open the lock. The default Factory
Combination is set to 50-25-50. The default combination may be changed,
in which case the new combination would be used to open the lock while in
Shelved Mode. The correct opening procedure for a shelved lock is:
1. Press * Key →EC
Press*keyuntilthelettersEC(EnterCombination)appearinthedisplay
window.
2. EC→EnterShelvedModeCombination→ OPn
EnterthecurrentShelvedModecombination,whetheritbetheFactory
Combinationof50-25-50oranewShelvedModecombination,bysequentially
pressing those digits on the lock keypad. The lock will display the numbers as
the combination is entered. When the combination has been correctly
entered,theboltwillbeginmovingtoopenthelockandthelockwilldisplay“---”
while the bolt is moving. The bolt will stop moving when it reaches the
openpositionandthelockwilldisplayOPn.ThelockwillproceedfromOPnto
CLostepsautomaticallyifthelockboltworkshasn’tbeenretracted
within the OPn timeout.
3. OPn → Retract Bolt
Rotate the container handle to to unlock the lock, and the lock display will
be cleared.
4. OpenContainerDoor
5. CloseContainerDoor
6. ExtendBolt→CLoRotatethecontainerhandletoextendthebolt.Thelockwill
display“---”whiletheboltismoving.Theboltwillstopmovingwhenit
reachestheclosedpositionandthelockwilldisplayCLo.

10
Change the Shelved Mode combination
You may change the default Factory Combination of 50-25-50 to a new
combination to be used while the lock is still in Shelved Mode. Once you
have changed the combination for the first time, you may want to change the
combination again to a different Shelved Mode combination. You can even
change it back to the Factory combination of 50-25-50 if you would like.
CAUTION: For security purposes, do not select a combination from personal data such as birth date,
phone number, etc. You also should not share the combination. It is a secret.
REQUIRED ITEMS:
CURRENT SHELVED MODE COMBINATION
NOTE: You can only change the Shelved Mode combination while operating
in Shelved Mode. Once a lock is “activated” in any mode, the Shelved Mode
combination returns to the Factory Default of 50-25-50.
TochangetheShelvedModecombination:
1. Press * Key →EC
Press*keyuntilthelettersEC(EnterCombination)appearinthedisplay
window.
2. EC→EnterShelvedModeCombination→ OPn
EnterthecurrentShelvedModecombination(either50-25-50orachanged
ShelvedModecombination)bysequentiallypressingthosedigitsonthelock
keypad.ThenumberswillbedisplayedontheLCDastheyareentered.When
the combination has been correctly entered, the bolt will begin moving to
openthelockandthelockwilldisplay“---”whiletheboltismoving.Theboltwill
stop moving when it reaches the open position and the lock will display OPn.
3. OPn → Retract Bolt
Rotate the container handle to to unlock the lock, and the lock display will be
cleared.
4. OpenContainerDoor
5. Press * Key →CLb
Press*keyuntilCLbisdisplayed.
6. CLb→ Press #8 →EcF
Pressthe“#”buttonfollowedbythe“8”button.EcF(EntercurrentFactory
combination) will be displayed.
7. EcF→EnterCurrentShelvedModeCombination→EnF
Enterthecurrentshelvedmodecombination,“EnF”(EnternewFactory
combination) will be displayed.
8. EnF→EnterNewCombination→CnF
Selectandenterthenewcombination.“CnF”(ConrmnewFactory
combination) will be displayed.
NOTE: The new Shelved Mode combination should be recorded and stored in a
secure area.
9. CnF→EnterNewCombination
Enternewcombinationagaintoconrm.EOP(EndofProcess)willbe
displayed.
11
10. Press * Key →CLb
Press*keyuntilCLbisdisplayed.
11.CloseContainerDoor
12.ExtendBolt→CLoRotatethecontainerhandletoextendthebolt.Thelockwill
display“---”whiletheboltismoving.Theboltwillstopmovingwhenit
reachestheclosedpositionandthelockwilldisplayCLo.
13. Press * Key →EC
Press*keyuntilthelettersEC(EnterCombination)appearinthedisplay
window.
14EC→EnterNewShelvedModeCombination→ OPn
Enterthenewshelvedmodecombinationbypressingthosedigitsonthelock’s
keypad. The numbers will be displayed as they are entered. The lock
willdisplay“---”whiletheboltismoving.Theboltwillstopmovingwhenit
reaches the open position and the lock will display OPn.
15. OPn → Retract Bolt
Rotate the container handle to to unlock the lock, and the lock display will be
cleared.
16.OpenContainerDoor
17.CloseContainerDoor
18.ExtendBolt→CLoRotatethecontainerhandletoextendthebolt.Thelockwill
display“---”whiletheboltismoving.Theboltwillstopmovingwhenit
reachestheclosedpositionandthelockwilldisplayCLo.
Gen2 Lock Menu Command List
# # Display Audit Count (opening count)
# 0 Perform SA Key Operations (audit download, resync, clock set, bank user
table download, etc.)
# 1 Display Lock Level
# 2 Display Lock’s Serial Number
# 3 Display Lock’s Total Audit Count
# 4 Display Last Close Seal
# 8 Change shelved-mode or bank user’s combination
# 50 Enable Remote Administration
# 70 Display Active Modes and Activator Identification
# 71 Display Internal UTC/GMT Date/Time
# 72 Display Local Date/Time
# 73 Display Key Type and Key Serial Number
# 74 Display Door Contact Switch Status
# 76 Display Activated Mode’s Software Level
# 77 Display Personal Identifier Clock
# 78 Display Last Opening, Local Date/Time
# 79 Display Activation Event, Local Date/Time
Lock requires mode user key to be presented.
All the prompts that request that a user key (blue FLM, yellow Route, or green Bank)
will do so by displaying the “IPI” after the command is entered. The difference to
note is that #73 and #77 will be reading and displaying information unique to a
particular key, whereas ##, #4, #72, #76, #78, and #79 are reading which particular
mode this key is associated with (FLM, Route, or Bank) and then displaying
information for that entire mode.

12
Previous to a lock being activated in any mode, the prompts ##, #4, and #70, 72, 76,
78 and 79 will display the error. #72 only applies to Gen2 locks activated with a USB
Key Box.
After a particular mode is shelved, the ## and #4 prompts will still display “” to give
information about a mode the last time it was active, though the remaining #7x
prompts mentioned will start showing the error again.
Cencon Lock LCD Terminology
The first step in learning the operation of the Cencon Lock is understanding what is
shown on the display.
Note: The Cencon LCD uses a 7-segment font, displaying up to 3 characters
at a time. Some displays will be a mixture of numbers and both capital and
lower case letters.
Lock Displays/Prompts Used on Swing Bolt Gen2
1. = DL Dial briskly in either direction to power the lock.
2. = EC Enter Combination
3. = OPr Turn bolt handle to open the container door.
4. = CLb (Change Key Function Activated)
5. = Enter Current combination (Shelved mode/Factory)
6. = Enter New combination (Shelved mode/Factory mode)
7. = Confirm New combination (Shelved mode/Factory mode)
8. = Lightning Bolt (Error); usually wrong combination
9. = LockOut condition due to 5 lightning bolts
10. = Insert Personal Identifier (key) 1
11. = Close Seal number (where 0 is a number)
12. = EOP (End Of Process)
13. = “?” displayed when the command key (#) is pressed
14. = (##) - Seal Count** for an active mode by user key
15. = (##) - Seal count** for a Shelved mode by user key
16. = (#1) - Lock firmware code Level
17. = (#1) - Hardware Level of lock back cover
18. = (#2) - Serial Number of lock back cover
19. = (#3) - Total (All modes) opening Count
**Seal count, Opening Count, and Audit Count are terms used
interchangeably throughout the documentation.
21. = Indicates Gen2 lock during power-up
22. = Remote Lock Out signal; keypad entry is prevented
23. = (#71) - UTC/GMT date and time of lock
24. = (#71) - Date, starting with Year, then Month, then Day
25. = (#71) - Time, starting with Hour, then Minute, then Second
26. = (#73) - Cencon iButton (key) Model Number
27. = (#73) - Cencon iButton (key) Serial Number
28. = (#74) - OPened Door
29. = (#74) - CLosed Door
30. = (#74) - No door Contact Connection
31. = (#77) - UTC/GMT date and time on Personal Identifier Key’s Clock
For a full listing of Lock LCD Terminology, including displays only shown while the
lock is activated, refer to the Cencon 5 Software Reference Manual, Appendix C.
13
Query the Lock via Keypad
The Gen2 lock allows the user to gather information in the field simply by pressing
keypad commands, sometimes presenting their user key, and then reading the LCD.
DISPLAY LOCK LEVEL (#1)
It is sometimes necessary to determine the code level of the Cencon Lock with
which you are working. This can be done through the keypad with the level displayed
on the LCD. Use the following procedure:
1. Press * Key → EC
Press * key until the letters EC (Enter Combination) appear in the display window.
“ Enter the #1 keypad command.
2. All Gen2 locks will display “LL-” , “G 2”, followed by 4 sets of 3 numbers,
followed by “HL-” with 2 number pairs. If the LCD instead shows the letters
“LL-” followed by a string of number pairs then “HL-” followed by 2 number
pairs, then this lock is a Gen1 lock.
DISPLAY SERIAL NUMBER (#2)
The Gen2 lock’s Serial Number is a 9-digit number. To display the Lock Serial
Number, press “#” and then “2” when “EC” is displayed.
Until a time when the first 3 digits of the 9-digit serial number are non-zero, the lock
will only display 6 digits. The Gen2 Cencon lock will display a series of two or three
3-digit numbers, depending on what the value of the first three numbers of the
serial number are. When taken together, this series of numbers is the serial number
of the lock.
Example 1: Gen 2 Serial Number (9 digits with first 3 digits “000”)
Serial number of the lock is “000023456”
The lock will display “Sn-” followed by a series of two 3-digit numbers: “023” “456”
Example 2: Gen 2 Serial Number (9 digits with first 3 digits non-zero)
Serial number of the lock is “001348729”
The lock will display “Sn-” followed by a series of three 3-digit numbers: “001”
“348” “729”
DISPLAY TOTAL AUDIT COUNT (#3)
The lock always keeps track of how many times it has been opened (Total Audit
Count) no matter in which mode the opening occurred, including Shelved Mode,
FLM, Route, and Bank. To learn the Total Audit Count, press the pound symbol, “#,”
followed by the “3” whenever “EC” is displayed on the LCD. The display will flash
two sets of numbers alternately on the screen. When taken as one four-digit number,
this represents the Total Audit Count. For instance, if the LCD flashes “AC-” then
“00” followed by “07,” the lock has a Total Audit Count of “0007,” meaning the lock
has been opened seven times in all modes combined. This display can be cancelled
by pressing the asterisk (*) button. The Total Audit Count does not reset when the
lock is shelved. Once the counter exceeds 9999 openings, the Gen2 lock begins
displaying more digits.
DISPLAY INTERNAL GMT (UTC) DATE/TIME (#71)
The UTC/GMT date and time are initialized in a Gen2 lock at the time of manufacture
at Kaba Mas. When #71 is pressed, the current lock date & time are displayed. This
display can be canceled by pressing the asterisk (*) key, or it will automatically be
canceled when the lock powers down.

14
For each of the commands that displays either current or historic Date and Time
(#71, #72, #78, and #79), the format is the same: Starting from the largest time
increment (4-digit Year) and moving down to the smallest (2-digit second). For
readability, the date and the time are broken apart by the “Hr-” (hour) prompt in the
middle. (For example, “UtC”, “Yr-”, “ 20”, “ 09”, “ 12”, “ 25”, “Hr-”, “ 22”, “ 30”, “
59”)
DISPLAY DOOR CONTACT SWITCH STATUS (#74)
The Gen2 lock has a 4-pin signal input cable to optionally use Door Contact switches
and for a Remote Disable function. After installing the door contact switches, the
customer will want to determine the status of these sensor, often while the lock is still
in factory mode, and later when the lock is activated.
(For example, “OPd” for “OPened door”, “CLd” for “closed door”, or “nCC” for “no
door contact connection” accordingly.)
Note: Check for Remote Disable Signal by entering 50-25-50 and looking for
“rLO” on display before closing door.
#75: Displayboltworkssensorcontactswitchstatus
TheGen2Swingboltlockhasa6-pinalarminputcabletooptionallyuse
DoorContactswitches,mandatoryBoltWorksContactSwitches,andfora
RemoteDisablefunction.Afterinstallingtheboltworkscontactswitches,the
customerwillwanttodeterminethestatusofthesesensor,oftenwhilethe
lockisstillinfactorymode,andlaterwhenthelockisactivated(For
example,“bSE”for“BoltWorksSensorExtended”,“bSr”for“BoltWorks
SensorRetracted”,or“nCC”for“noboltworkssensorcontact
connection”accordingly).

Document Number 2112.0315 Rev. A - PRELIMINARY
Notice: The information in this manual is subject to change without notice and does not represent a
commitment on the part of Kaba Mas. Kaba Mas shall not be liable for technical or editorial errors or
omissions contained herein; nor for incidental or consequential damages resulting from the furnishing,
performance or use of this material.
© 2016 Kaba Mas
All rights reserved.
Kaba Mas LLC
749 W. Short Street,
Lexington, KY 40508 USA
Phone: 859-253-4744 FAX: 859-255-2655
Technical Support: 800-950-4744
www.kaba-mas.com