Kangtai Electric 064 Remote control adaptor with WIFI function User Manual REV1
Kangtai Electric Co.,ltd Remote control adaptor with WIFI function REV1
User Manual-REV1

Plug-in wifi socket with RF function
Model: 51064USA,51067 USA,51090 USA,51073 USA, 51076 USA
Introduction
WIFI socket which is base on cloud-technology can control multiple home appliances
through your intelligent phone in anytime & anywhere.The latest technology: Smart Link
is used. How to set the device? It is just to fill in the WIFI password to complete the
setting. The timing and delay task is supported. According to your habits,you can set the
switch time of device to make your life more comfortable.
ON/OFF Button
Reboot Button
Power-LED
Link-LED
Specification
Operating Voltage:120V~,60Hz
Max. Load: 1800W
Current: 15A
Radio Frequency: 2.412 ~ 2.484 GHz(WiFi)/ 433.92Mhz (RF)
WiFi Standards: IEEE802.11b / g / n
Caution:
This device complies with Part 15 of the FCC Rules / Industry Canada licence-exempt
RSS standard(s). Operation is subject to the following two conditions: (1) this device
may not cause harmful interference, and (2) this device must accept any interference
received, including interference that may cause undesired operation.
Le présent appareil est conforme aux CNR d'Industrie Canada applicables aux
appareils radio exempts de licence. L'exploitation est autorisée aux deux conditions
suivantes : (1) l'appareil ne doit pas produire de brouillage, et (2) l'utilisateur de
l'appareil doit accepter tout brouillage radioélectrique subi, même si le brouillage est
susceptible d'en compromettre le fonctionnement.
Changes or modifications not expressly approved by the party
responsible for compliance could void the user's authority to operate the
equipment.
This equipment has been tested and found to comply with the limits for
a Class B digital device, pursuant to part 15 of the FCC Rules. These
limits are designed to provide reasonable protection against harmful
interference in a residential installation. This equipment generates
uses and can radiate radio frequency energy and, if not installed and
used in accordance with the instructions, may cause harmful interference
to radio communications. However, there is no guarantee that interference
will not occur in a particular installation. If this equipment does cause
harmful interference to radio or television reception, which can be
determined by turning the equipment off and on, the user is encouraged
to try to correct the interference by one or more of the following
measures:
—Reorient or relocate the receiving antenna.
—Increase the separation between the equipment and receiver.
—Connect the equipment into an outlet on a circuit different from that
to which the receiver is connected.
—Consult the dealer or an experienced radio/TV technician for help.
Under Industry Canada regulations, this radio transmitter may only operate using an
antenna of a type and maximum (or lesser) gain approved for the transmitter by
Industry Canada. To reduce potential radio interference to other users, the antenna
type and its gain should be so chosen that the equivalent isotropically radiated power
(e.i.r.p.) is not more than that necessary for successful communication.
Conformément à la réglementation d'Industrie Canada, le présent émetteur radio peut
fonctionner avec une antenne d'un type et d'un gain maximal (ou inférieur) approuvé
pour l'émetteur par Industrie Canada. Dans le but de réduire les risques de
brouillage radioélectrique à l'intention des autres utilisateurs, il faut choisir le type
d'antenne et son gain de sorte que la puissance isotrope rayonnée équivalente
(p.i.r.e.) ne dépasse pas l'intensité nécessaire à l'établissement d'une communication
satisfaisante.
MPE Reminding
To satisfy FCC / IC RF exposure requirements, a separation distance of 20 cm or more
should be maintained between the antenna of this device and persons during device
operation.
To ensure compliance, operations at closer than this distance is not recommended.
Les antennes installées doivent être situées de facon à ce que la population ne puisse
y être exposée à une distance de moin de 20 cm. Installer les antennes de facon à ce
que le personnel ne puisse approcher à 20 cm ou moins de la position centrale de l’
antenne.
La FCC des éltats-unis stipule que cet appareil doit être en tout temps éloigné d’au
moins 20 cm des personnes pendant son functionnement.
Installation
1. On your mobile phone, download and install the APP from Apple App Store or Google
Play by searching for "WiFi Socket ".
2. Launch the App on your mobile phone.
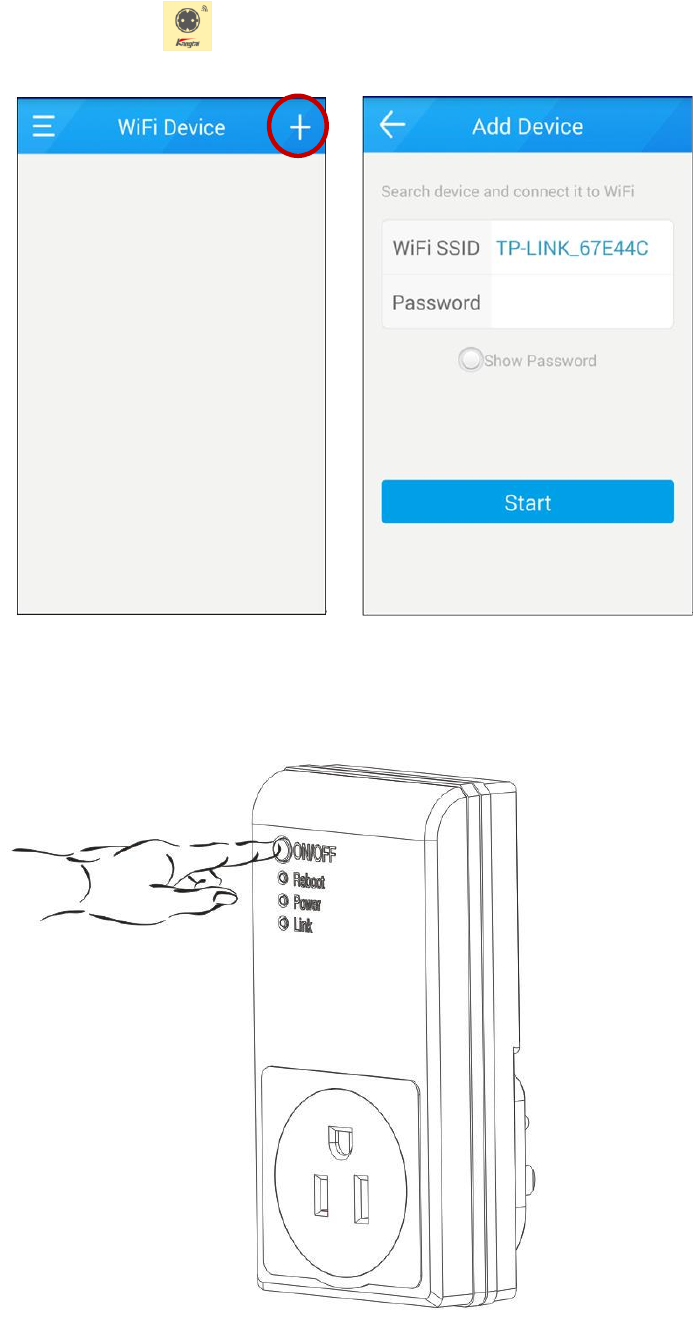
3. You can click the button “+” to enter the setting page when you have login.
4. Please make sure the phone has been connected to the Wireless Router, then press
the “ON/OFF” button on WIFI socket and hold it at least 3 seconds. When the green
lamp start twinkling quickly, it means the device has been in pairing mode.

5. Enter your router’s Wi-Fi password in the given field. Then, tap Start.
6. After setting finished, we can control the device by clicking the ON/OFF symbol.
7. RF Device Setting
Click the symbol as the left picture and go to
the RF page.
You can click the button “+” to add
a RF device.
Input device name.
Select RF device type.
To specify which WiFi socket forward
to RF signal.
Specify the default icon for the RF devices
or custom icon.
You can click the “√” button to save the
revised password.
8. RF device pairing
Jump out the page, says it has successful to add
the new RF device in the APP. Next step you need
to match the device and the actual products to
achieve control.
You can click the device symbol as the left
picture to enter setting page of RF device.
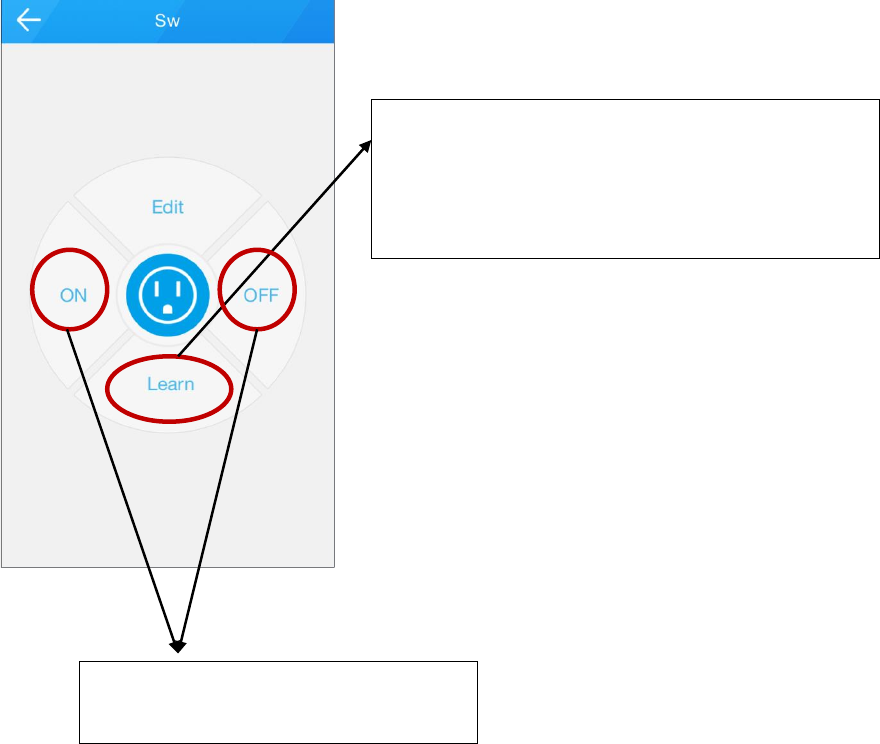
Pair the RF device by clicking Learn icon when the RF
device is on learning mode.
Remarks: Please refer to RF device instruction about
how to enter LEARNING mode.
After pairing finished, we can control the
device by clicking the ON/OFF symbol.

Kangtai Electric co., ltd.
NO.5, kangtai Road, Huanghua Industrial District, Yueqing, Zhejiang ,China
APP Function
Catalog
1. Register& Login .................................................................................................................................................. 12
2. Add the device ................................................................................................................................................... 15
3. Device operate ................................................................................................................................................... 17
1) Switch the device ....................................................................................................................................... 17
2) Lock Setting ................................................................................................................................................ 18
3) Socket Modify ............................................................................................................................................ 19
4) Timer, Countdown, Absence ...................................................................................................................... 20
4. RF Device Setting ............................................................................................................................................... 29
1) Add new RF Device .................................................................................................................................... 29
2) Device Pairing ............................................................................................................................................ 32
3) Operation ................................................................................................................................................... 33
4) Timer of RF device ..................................................................................................................................... 34
5. Change Password ............................................................................................................................................... 36
6. Logout ................................................................................................................................................................ 38
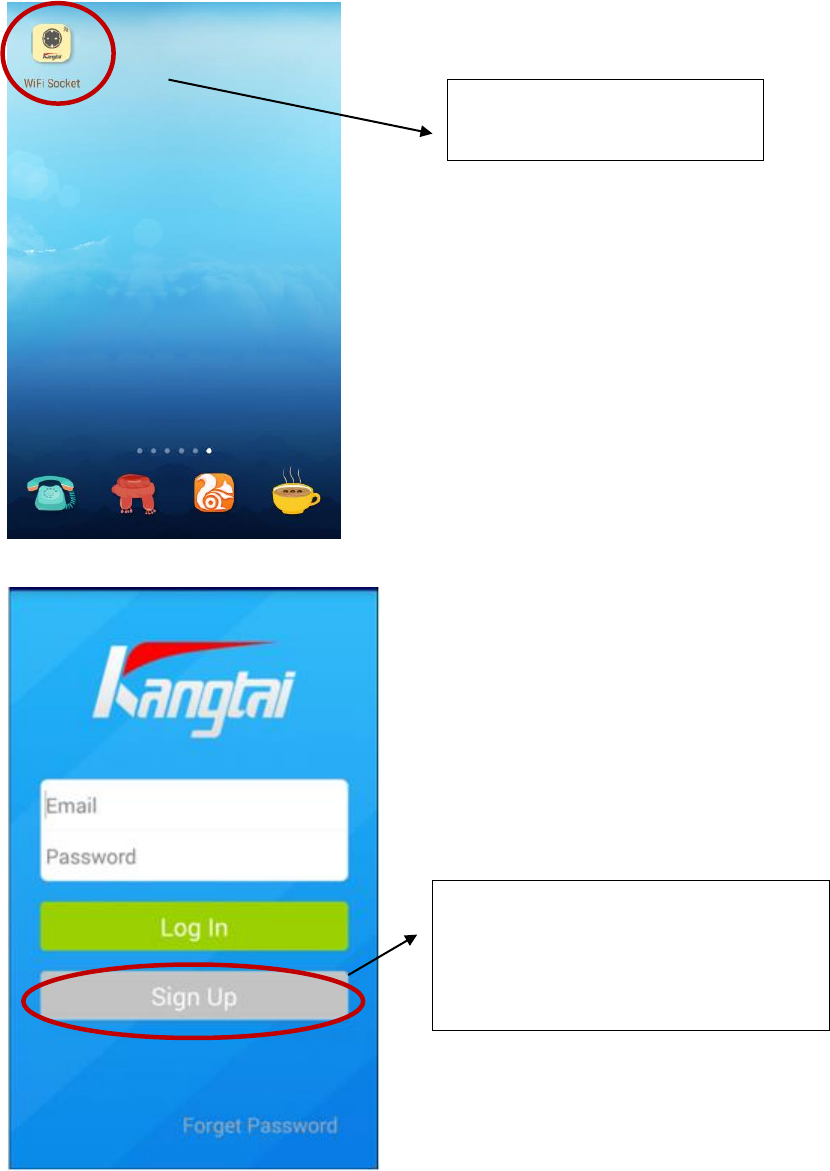
1. Register& Login
After installing the APP, please
click it as the picture show.
First of all, please click “sign up” button (if
you have registered, please skip this
step).It is necessary to connect with
internet when you try to register and login.
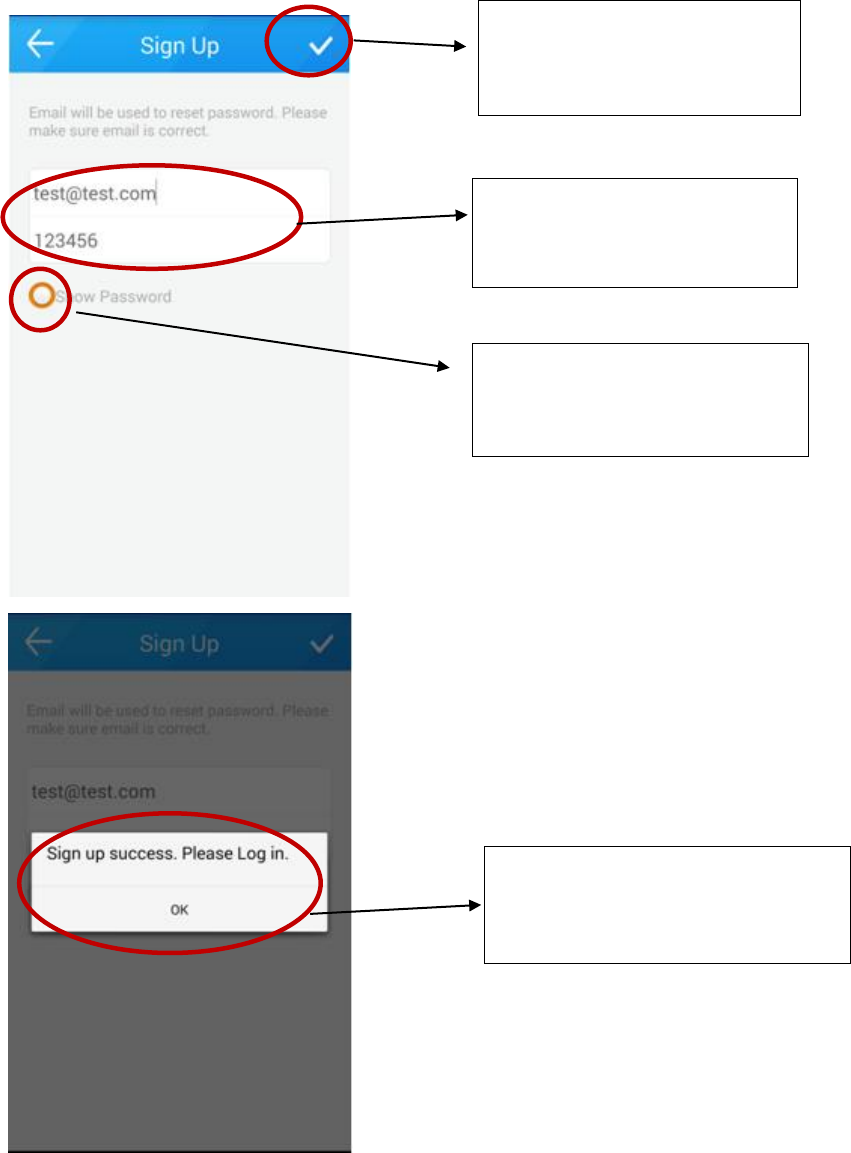
1、You can fill in your email
address and password separately
in this area.
2、Click here to show the password
and hide it. In current mode, the
password is visible.
Please click the “OK” button to
complete the register and it will return
to the Login screen.
After the input is completed, click
this button to save the
information.
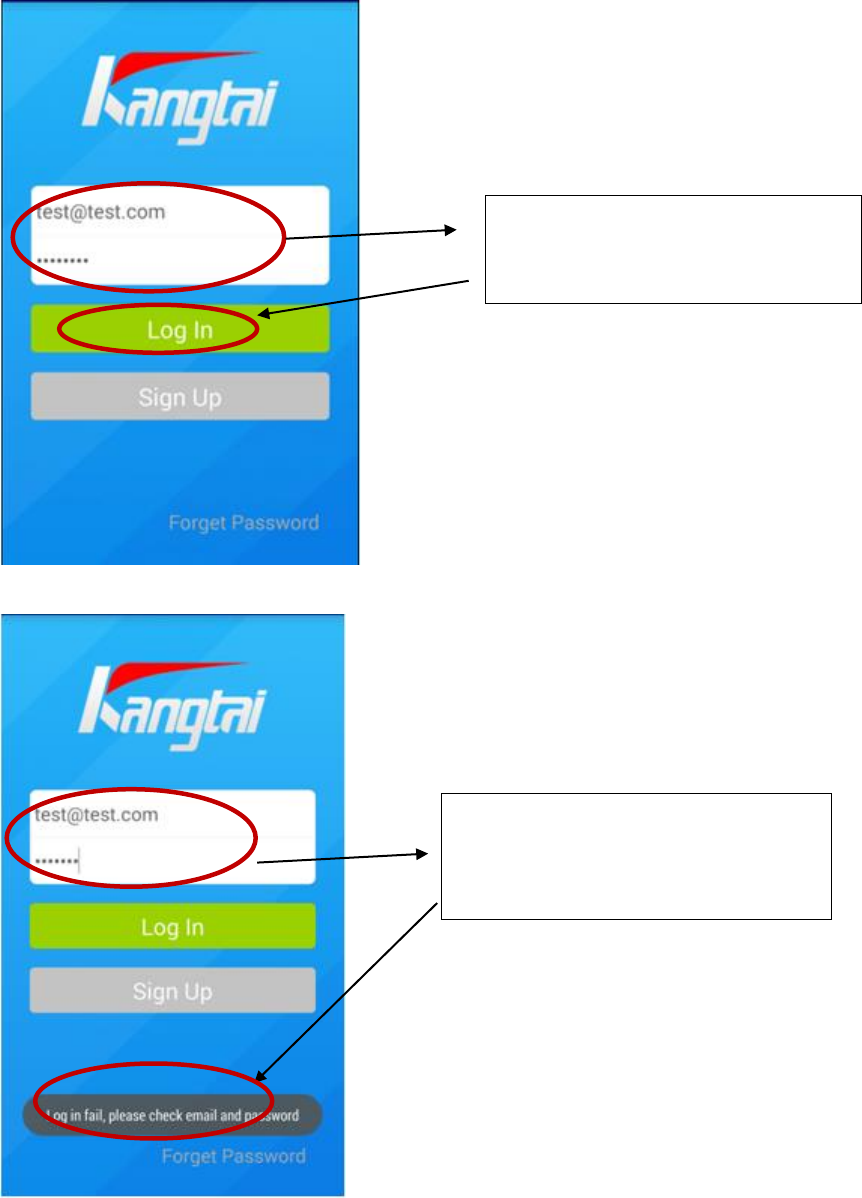
Please fill in your registered ID and
correct password to login system.
If the information is incorrect, you can see
the information as “Log in fail, Please
check email and password”
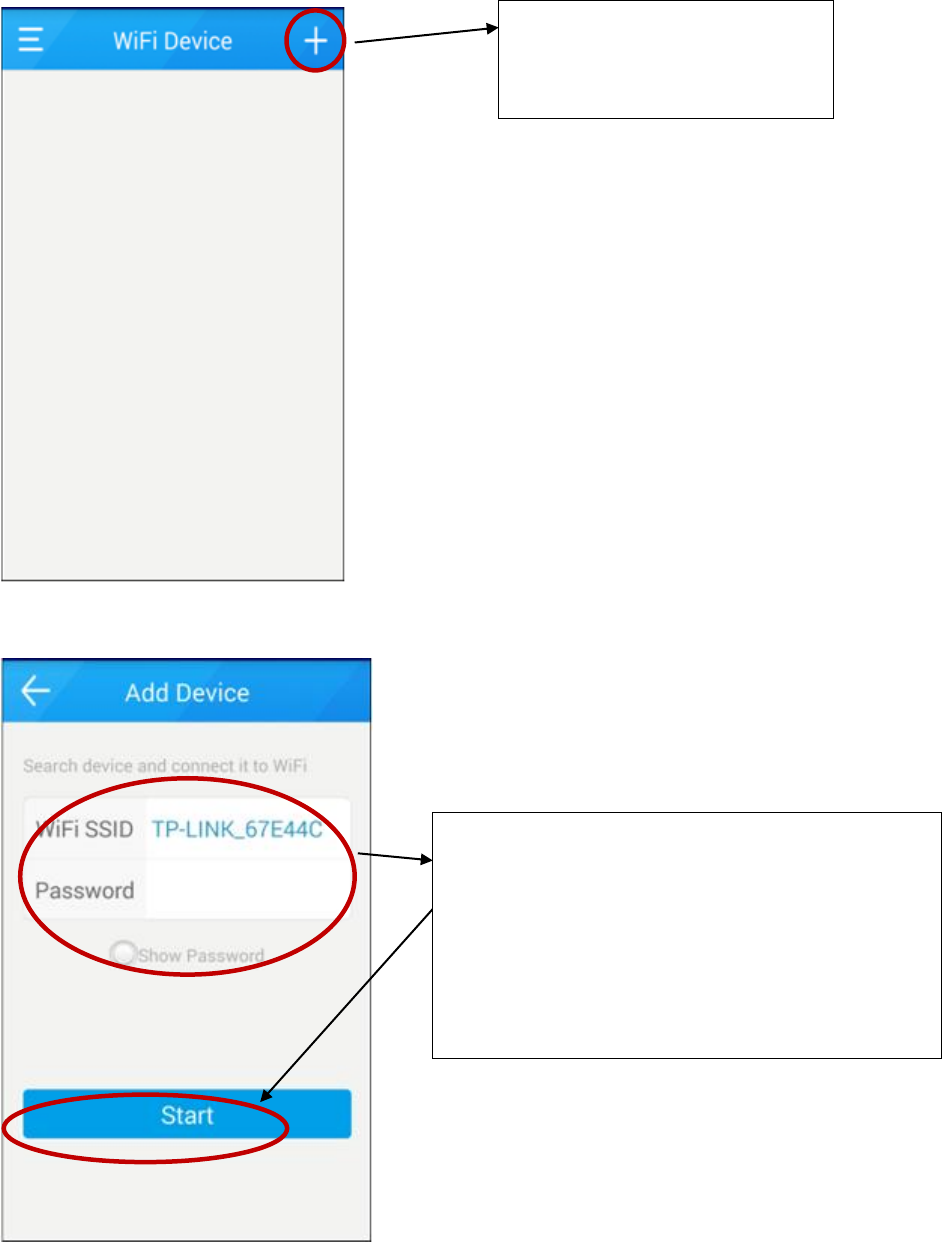
2. Add the device
You can click the button “cross
symbol” to enter the setting page
when you have login.
Please make sure the phone has been connected to the
Wireless Router, and fill in the correct password. Before
click the “Start” button, please press the “ON/OFF”
button on WIFI socket and hold it at least 3 seconds.
When the green lamp start twinkling quickly, it means
the device has been in the setting status, then click the
“Start” button.
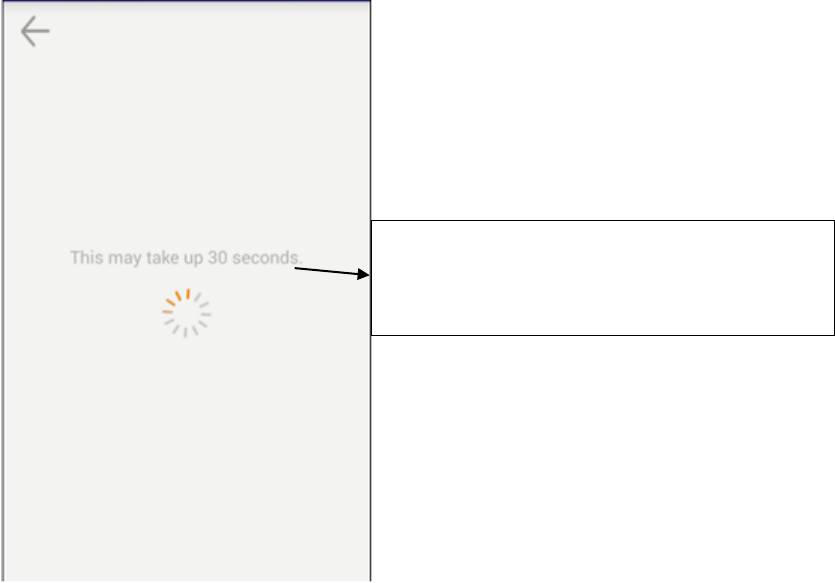
After click the “START” button, you can see the
sentence “This may take up 30 seconds” .It is the
witness that the device is in setting mode.
3. Device operate
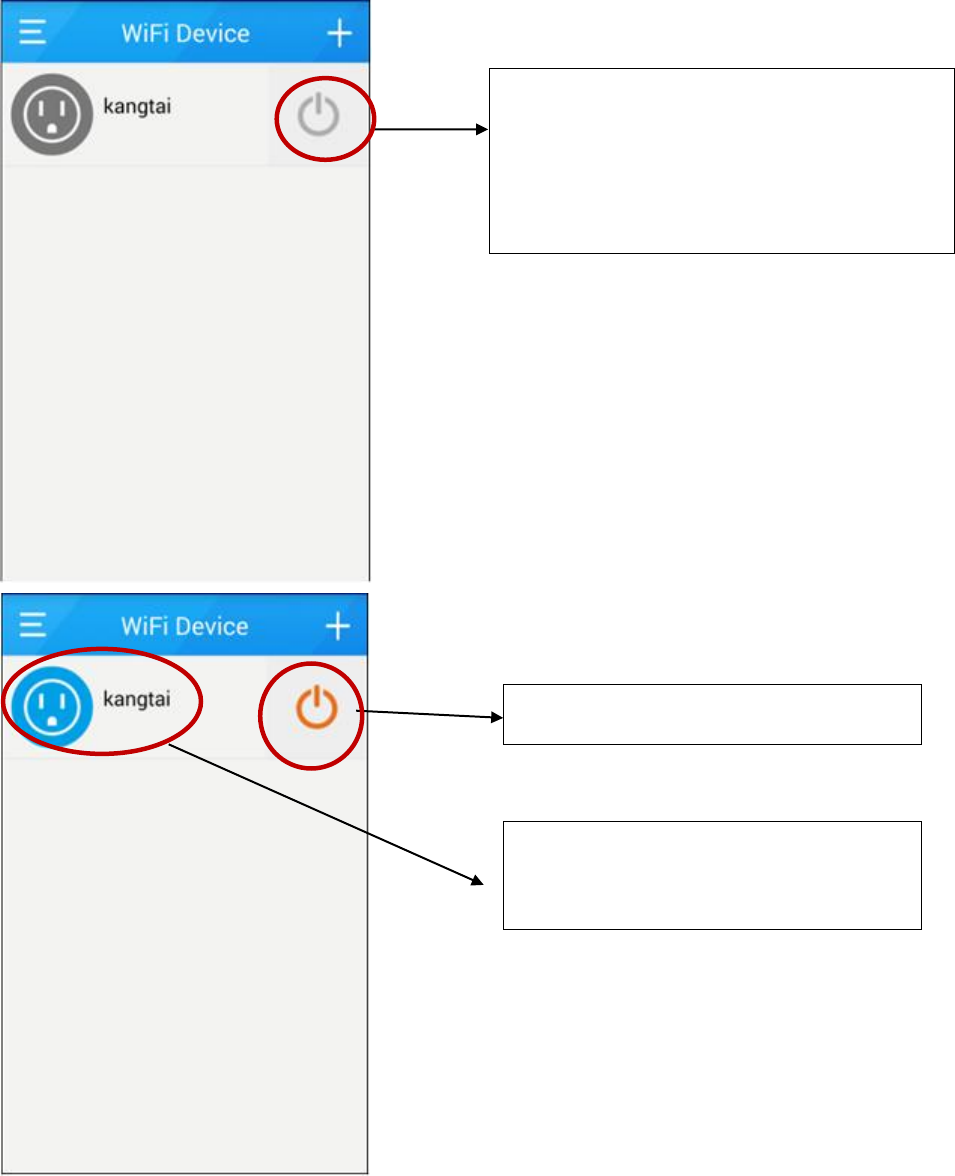
1) Switch the device
If you can see the scene as the left picture, it
proves that the setting is success. You can
operate the device which has been connected .The
device on left picture is turn off and you can click
the right button to turn on it.
This status is “Turn on” mode.
You can click the device symbol as the left
picture to enter the socket setting page.
Attention: the add methods of the WiFi socket with metering and RF socket’s are in accordance with the above
operation. Only the add display equipment icon is difference.
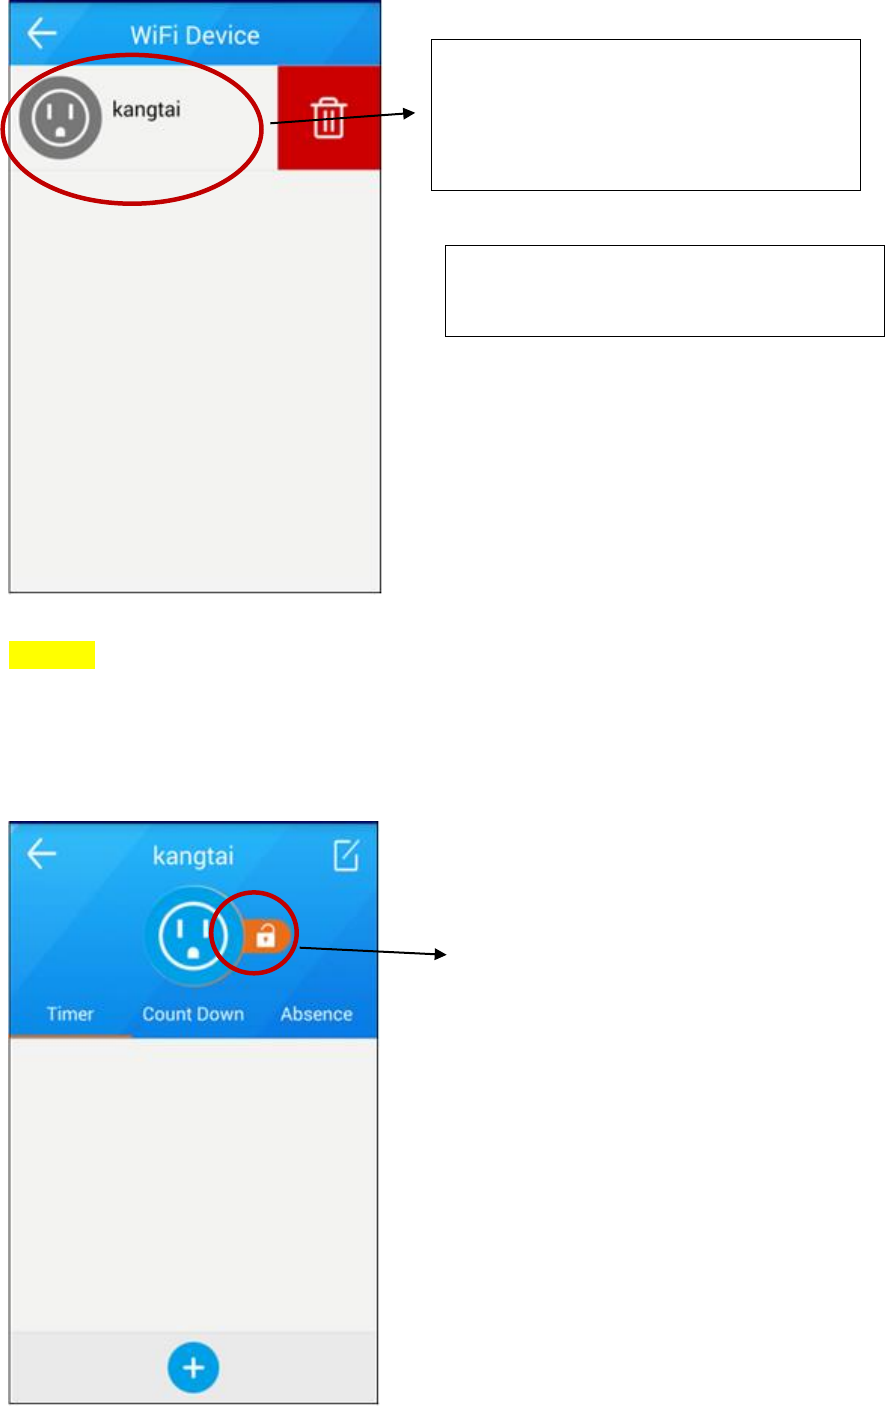
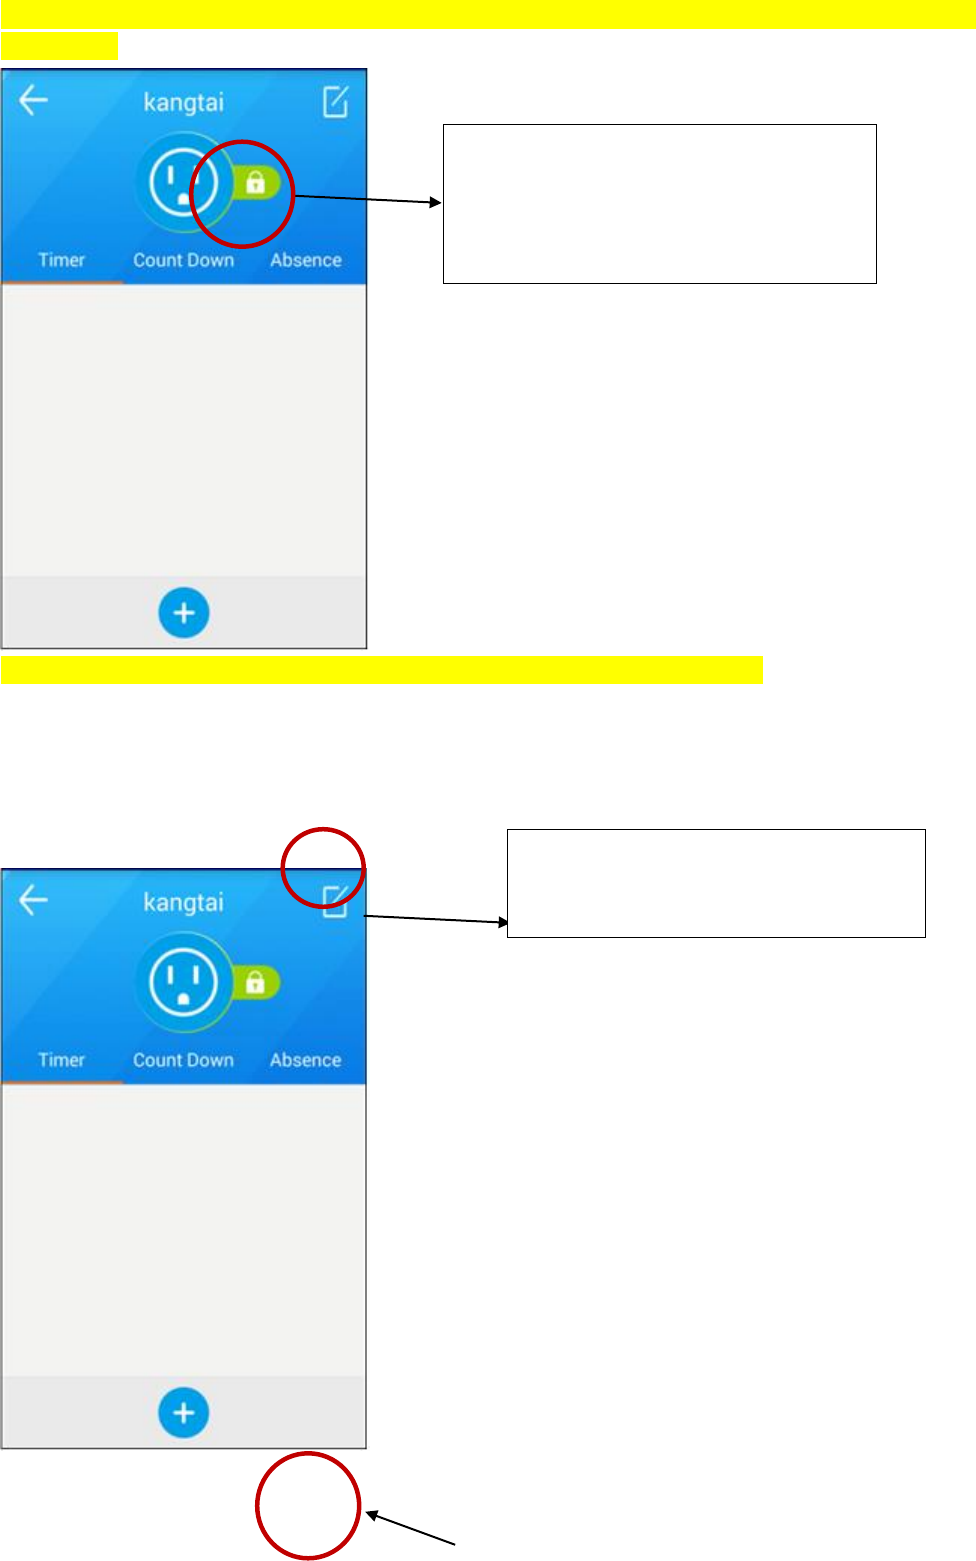
2) Lock Setting
If the “Lock” icon is open status, you can modify
the device setting by click the icon.
If you press the device icon for several
seconds, you can see the “DELETE” icon and
click it to delete the device.
All users who could log in same router can search and control the device When the device is in open mode as
above picture.
Others couldn’t search or control the device when it is in lock mode as attached picture except for the user who
has been already registered.
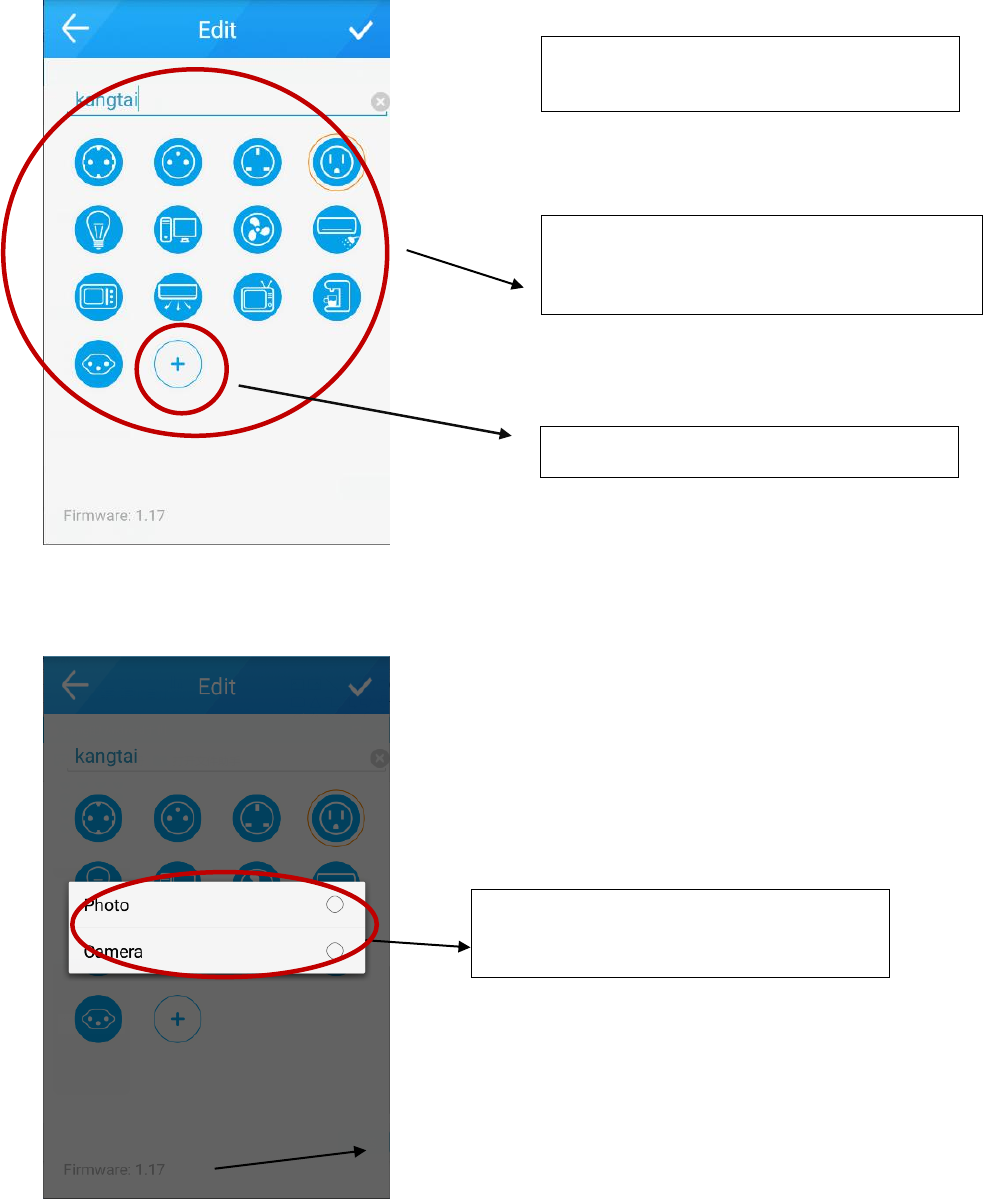
3) Socket Modify
If the “ Lock” icon is close status, you can
click the icon to change the current status.
Click the icon on top right corner to modify
the icon of device, device name and so on.
4) Timer, Countdown, Absence
a) Timer
You can modify device name , device icon when
it is at modify mode.
Click the “+” button to add different icon.
You can get the individual icon through two
ways as your requirement.
After the setting is finished, you can save it
by clicking the icon.
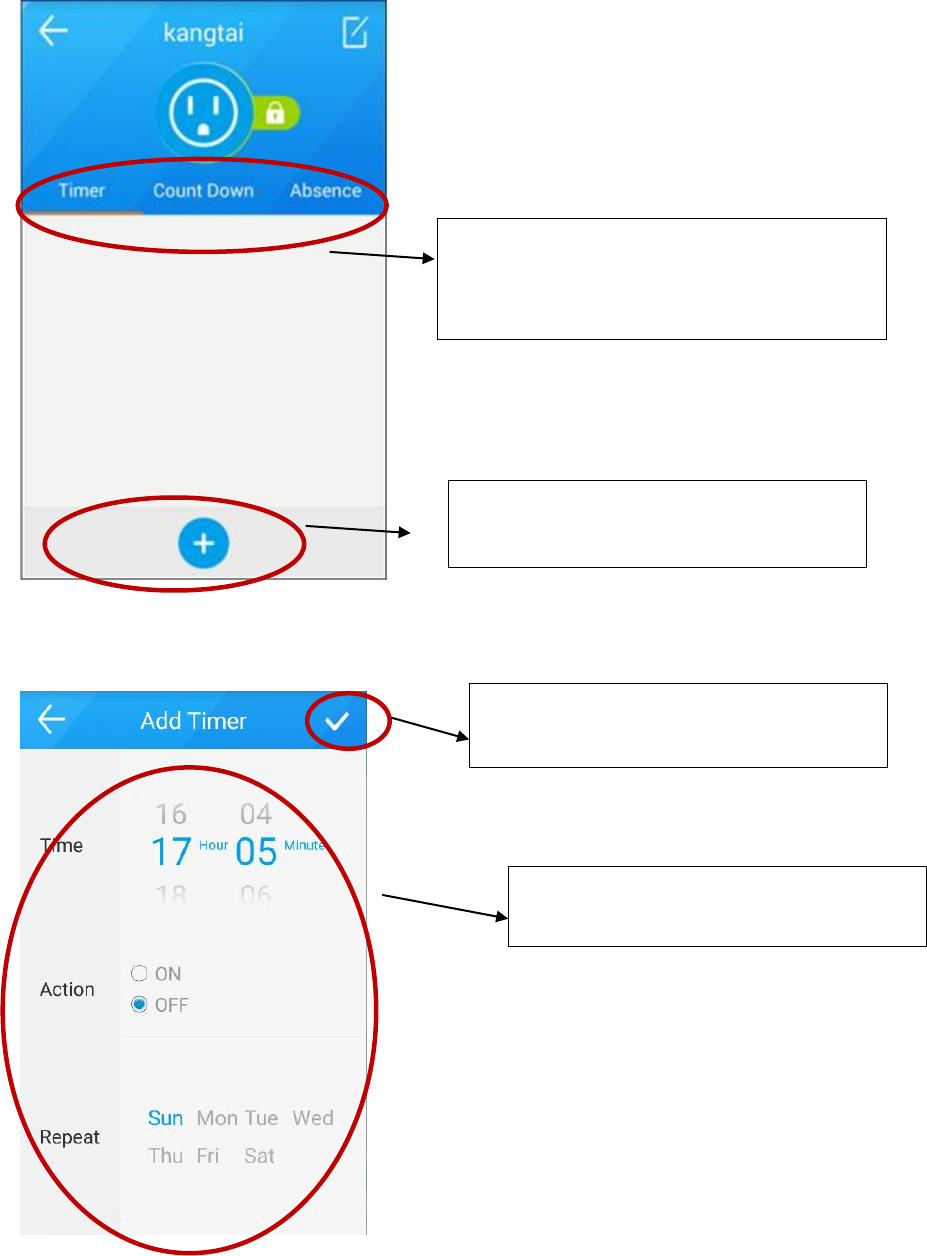
We can set the Timer, Countdown and Absence
function in this page. The left picture shows the
operation of timer.
Click this Icon and enter the time setting
scene.
You can click the “SAVE” icon to save the
timer setting.
The left picture show the shut down time of
socket is 17:05 every Sunday.
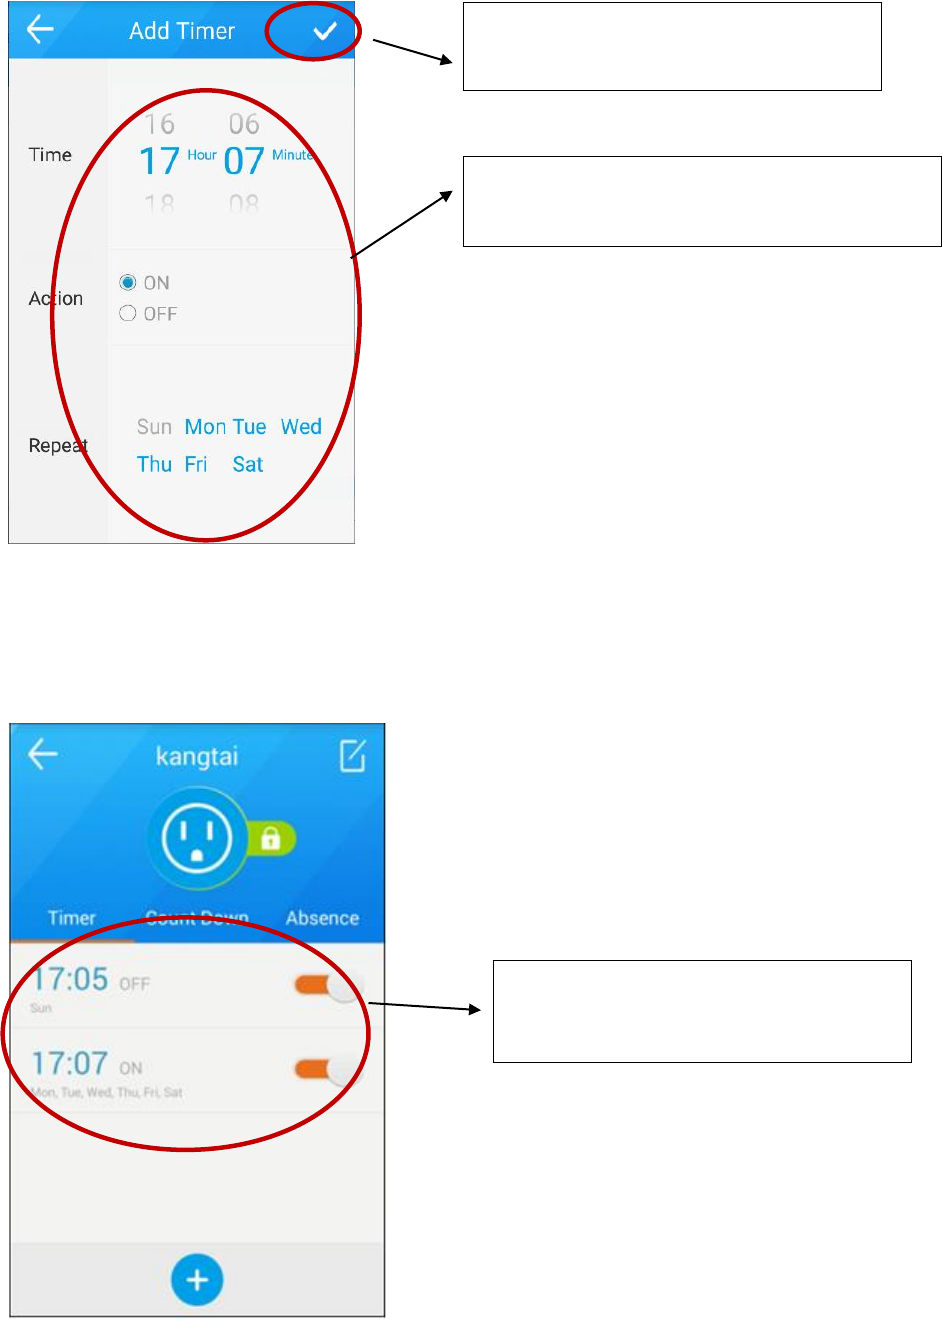
The left picture shows that the device will repeat to
be turned on 17:07 from Monday to Saturday.
You can click the “SAVE” icon to save the
timer setting.
The timer function is ready. (17:05 turn
off/17:07 turn on)
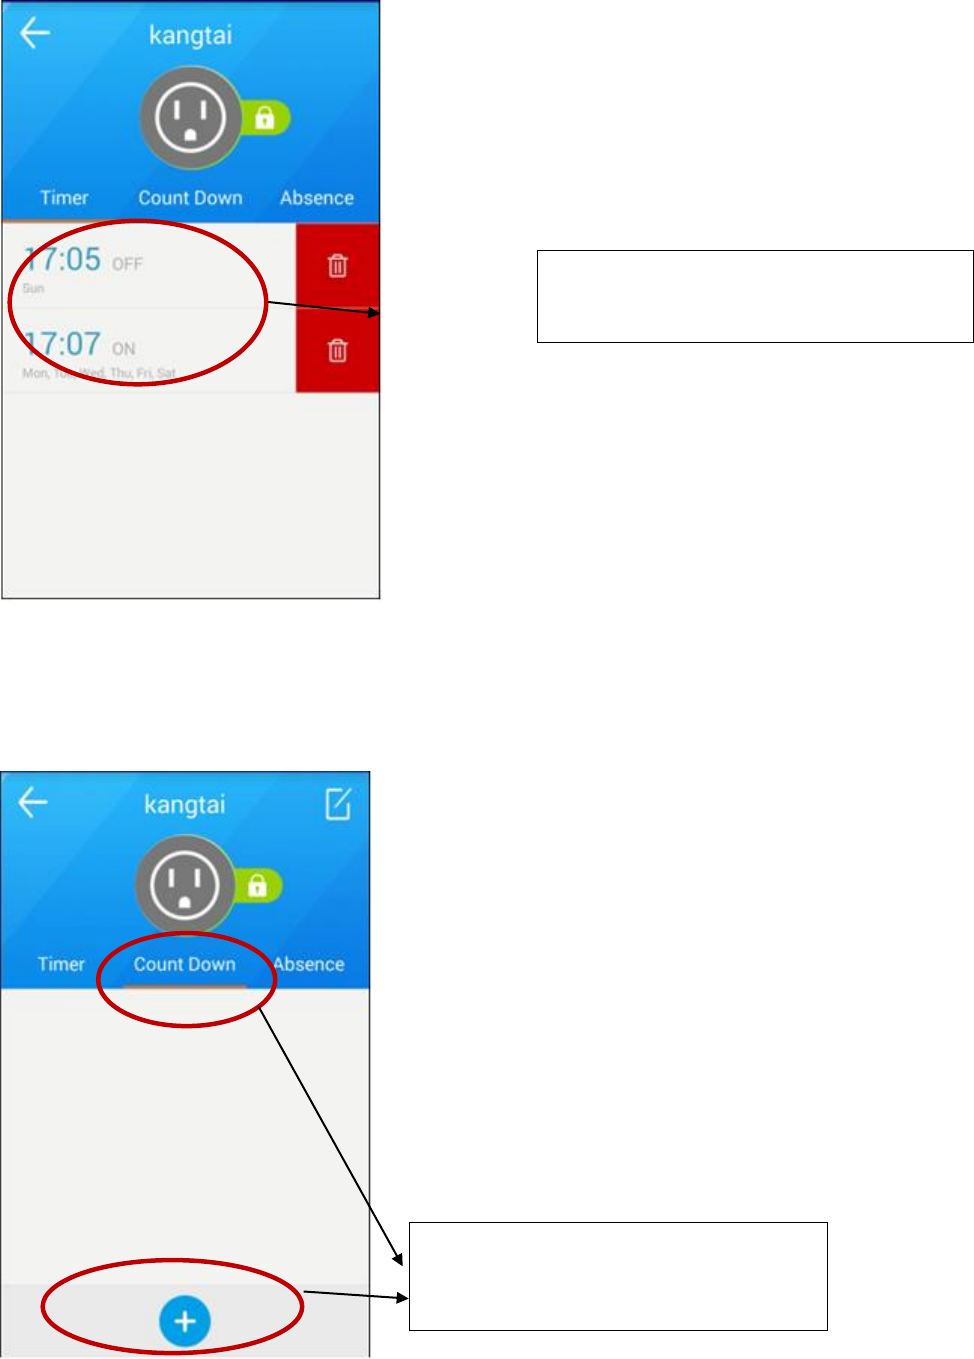
b) Count Down
Press this area for several seconds and click the
red icon to delete the timer setting.
Click the “Count Down” icon to enter the
setting scene.
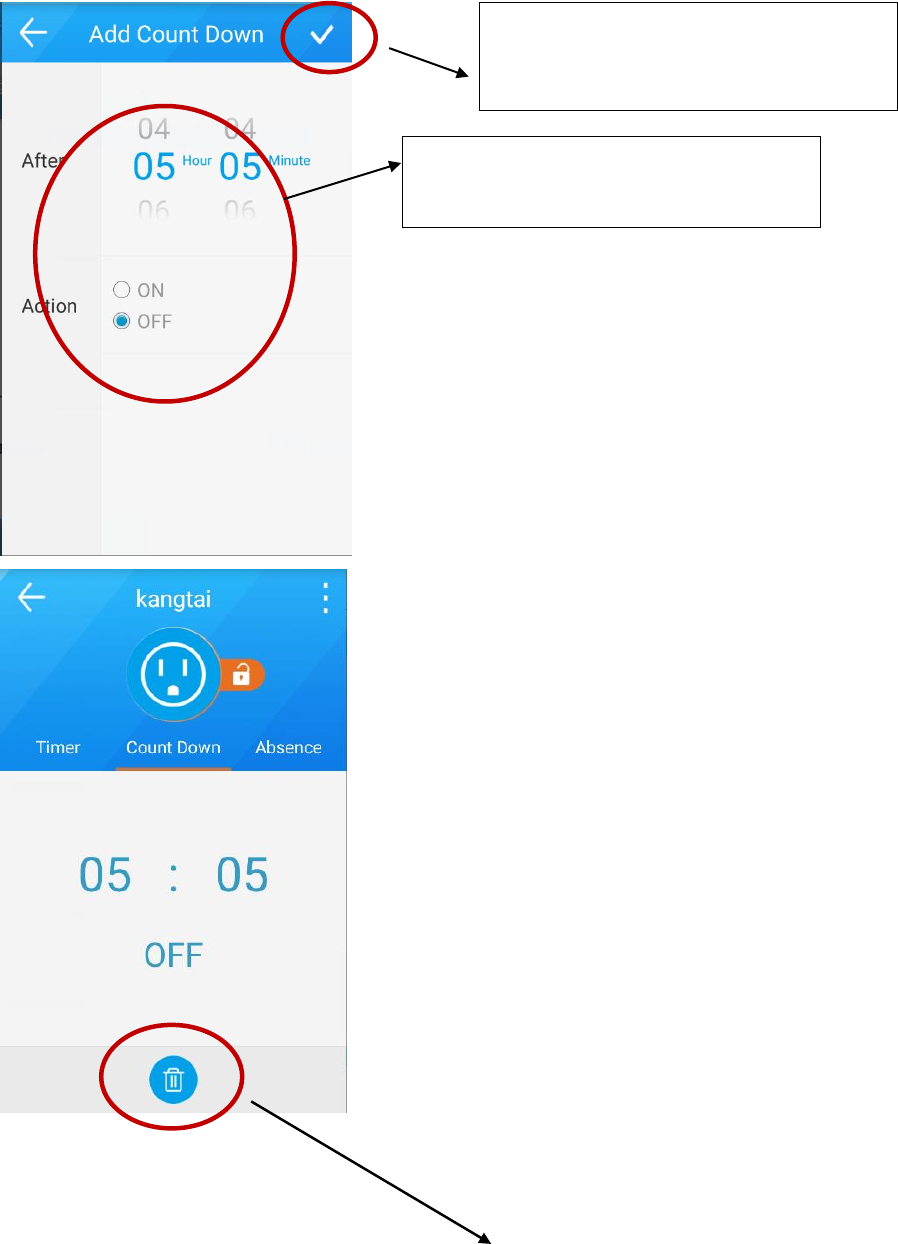
The left picture shows that the socket will be
switched on after five hours, five minutes.
You can click the “SAVE” icon to save the
setting.
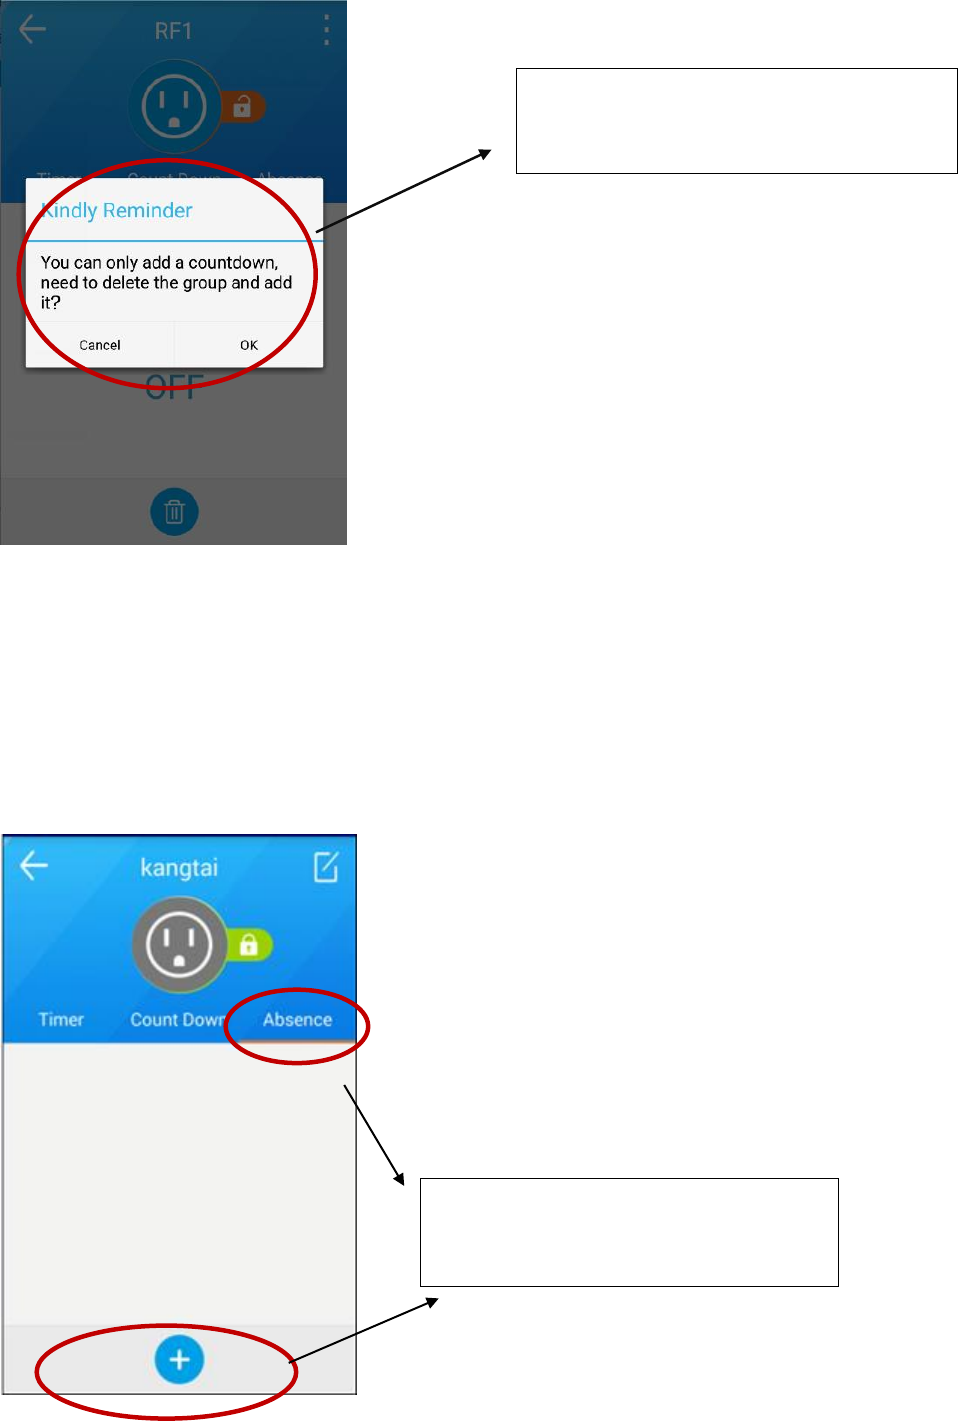
c) Absence
Click the “Absence” icon to enter the
setting scene.
The Count Down function only can be set to be
one group.
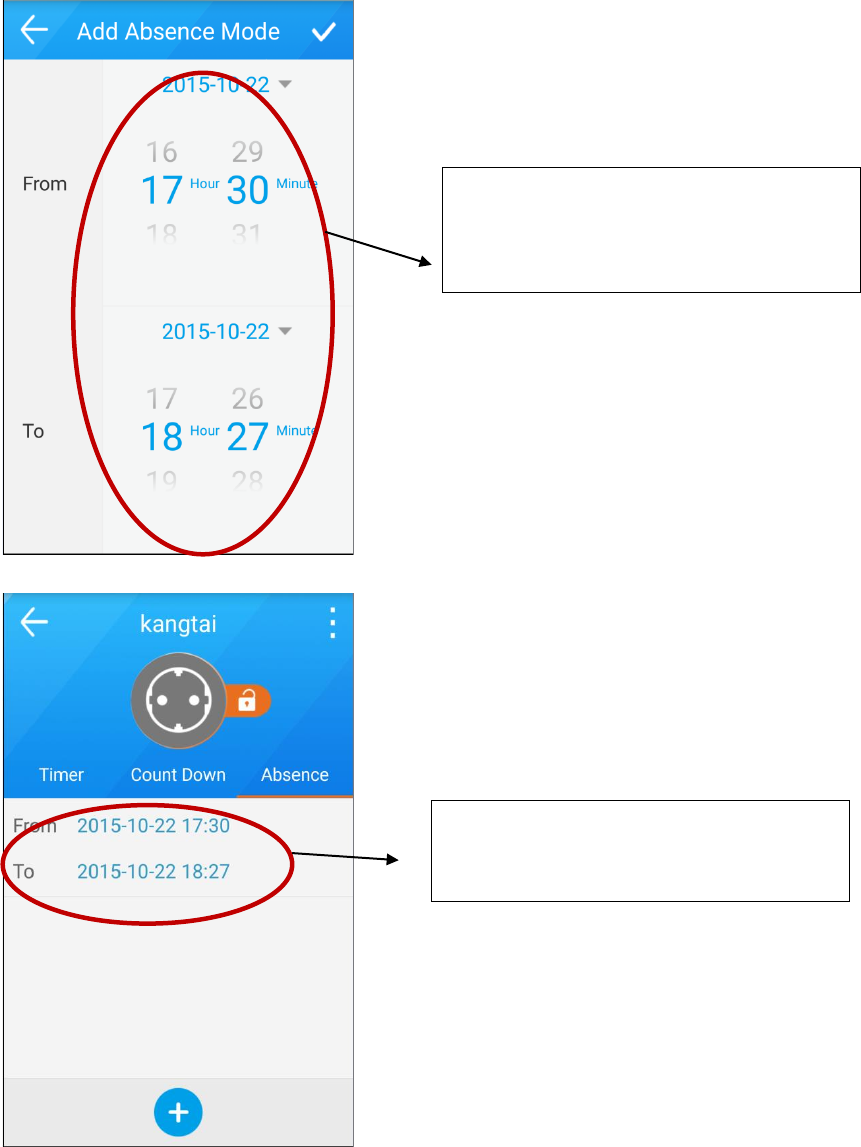
You can set the start time, start date, finish
time and finish date. (Attention: the finish
time can not be earlier than the start time)
You can see the setting information after you
save it.
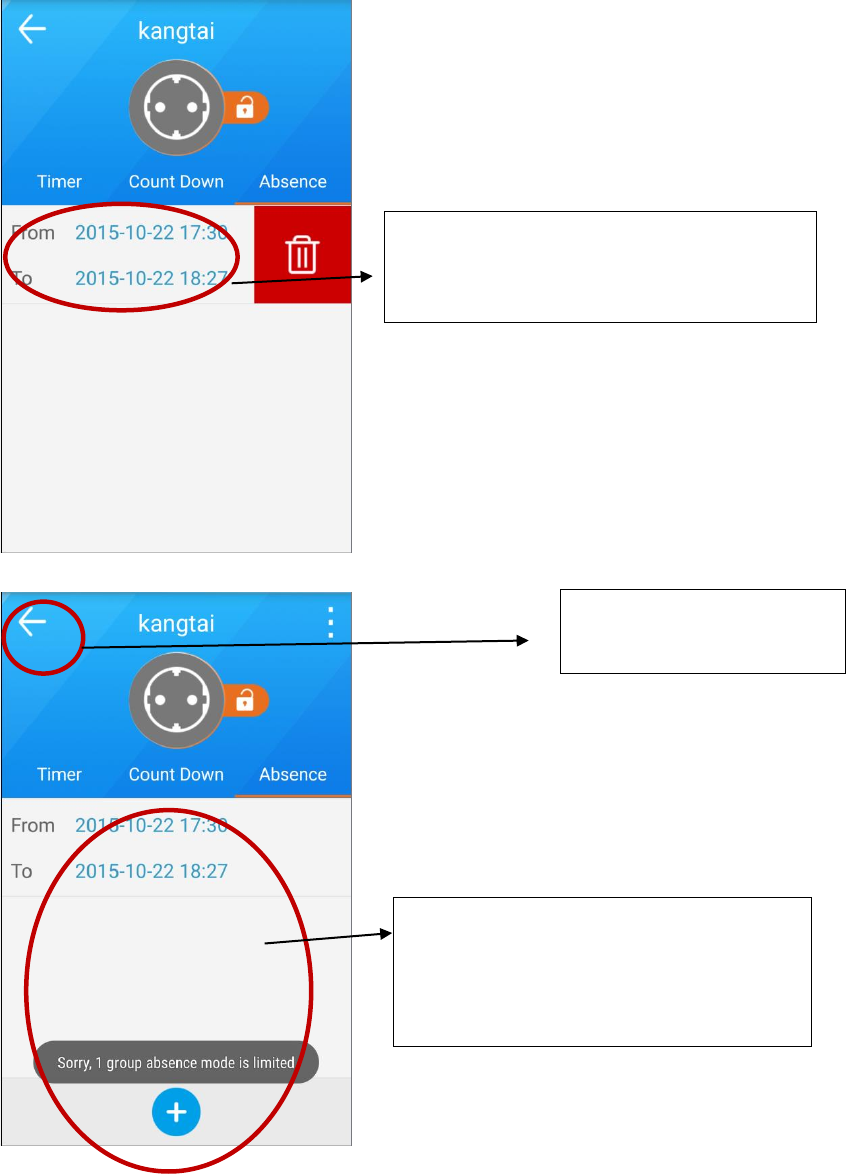
Press this area for several seconds and click the
red icon to delete the Absence. Then you can
set the new Absence.
The Absence function only can be set to only
one group. If you add more than one group,
you can see the sentence as “ Sorry, 1 group
Count Down is limited”.
Click the “arrow” icon and go
back to the device list.
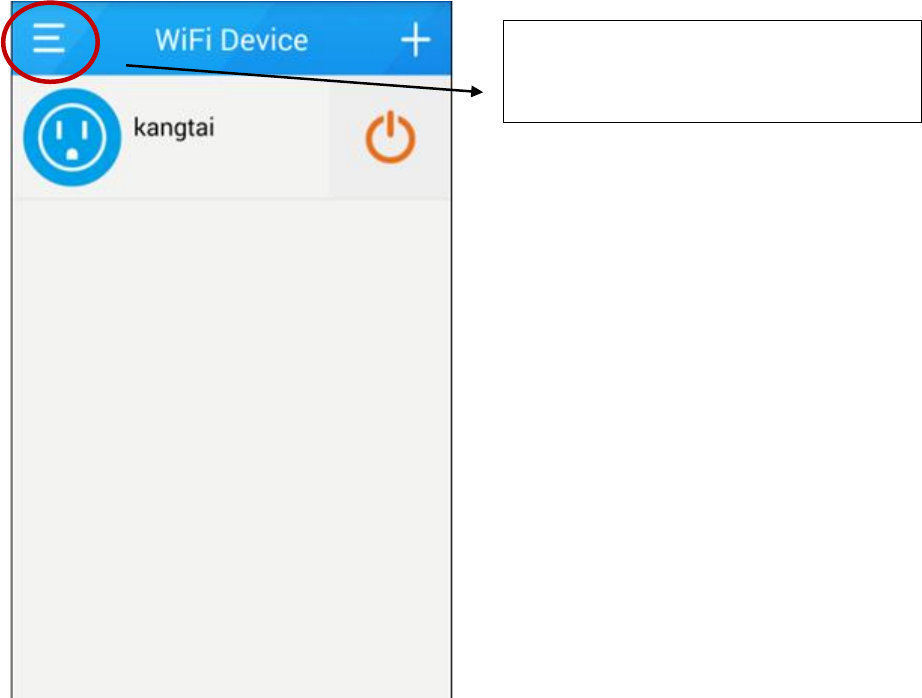
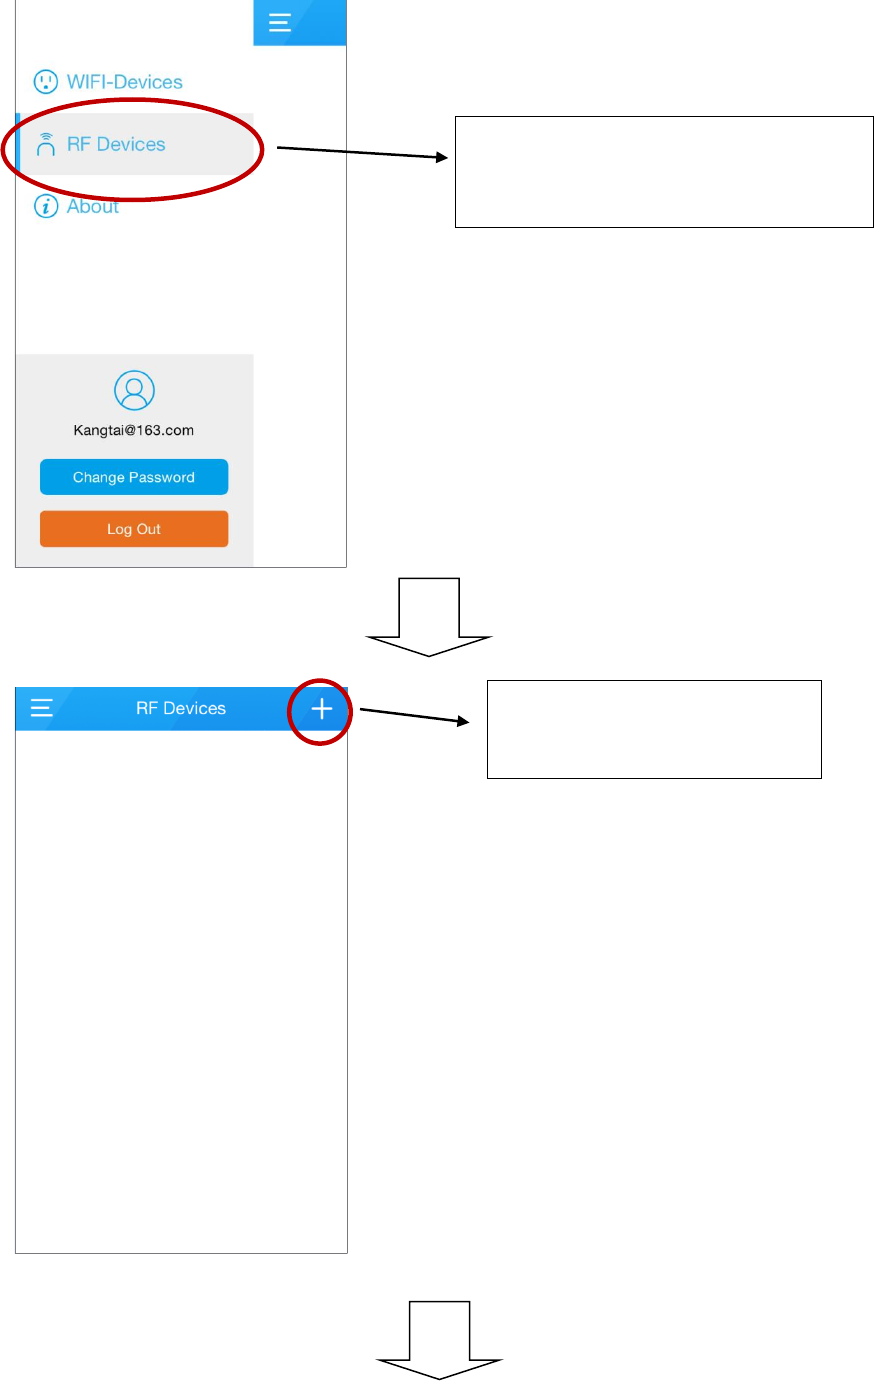
Click the symbol as the left picture and go to
the menu.
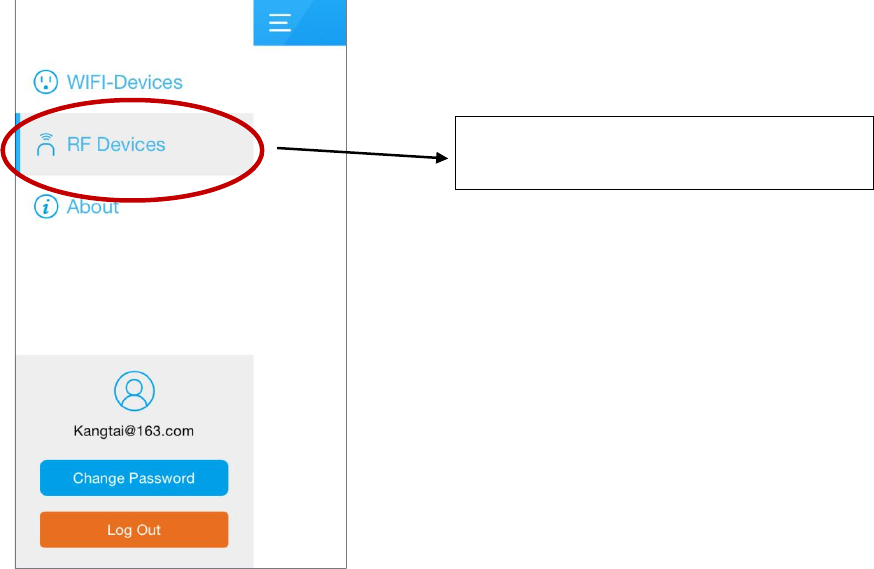
4. RF Device Setting
1) Add new RF Device
Click the symbol as the left picture and go to
the RF page.
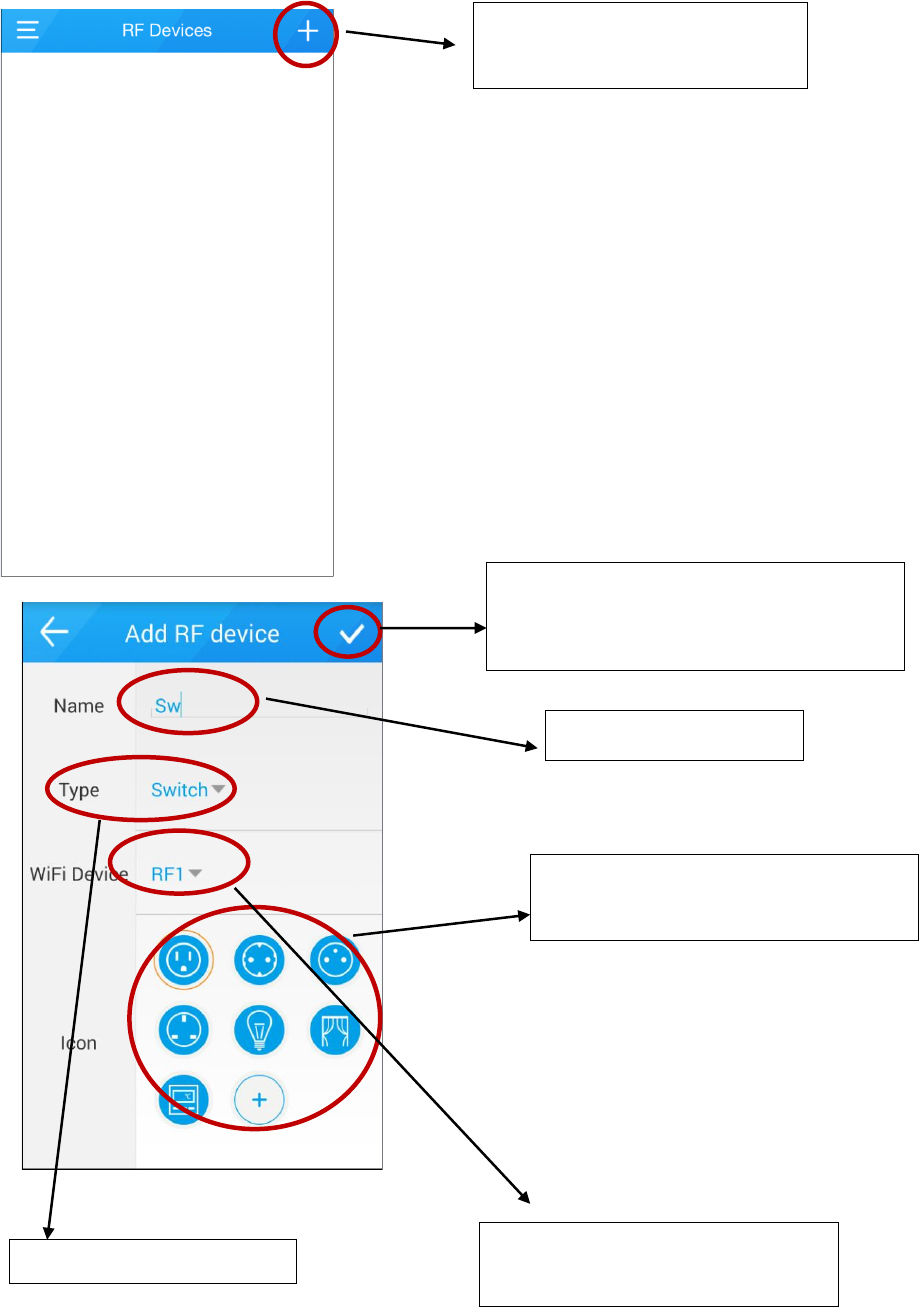
You can click the button “cross
symbol” to add a RF device.
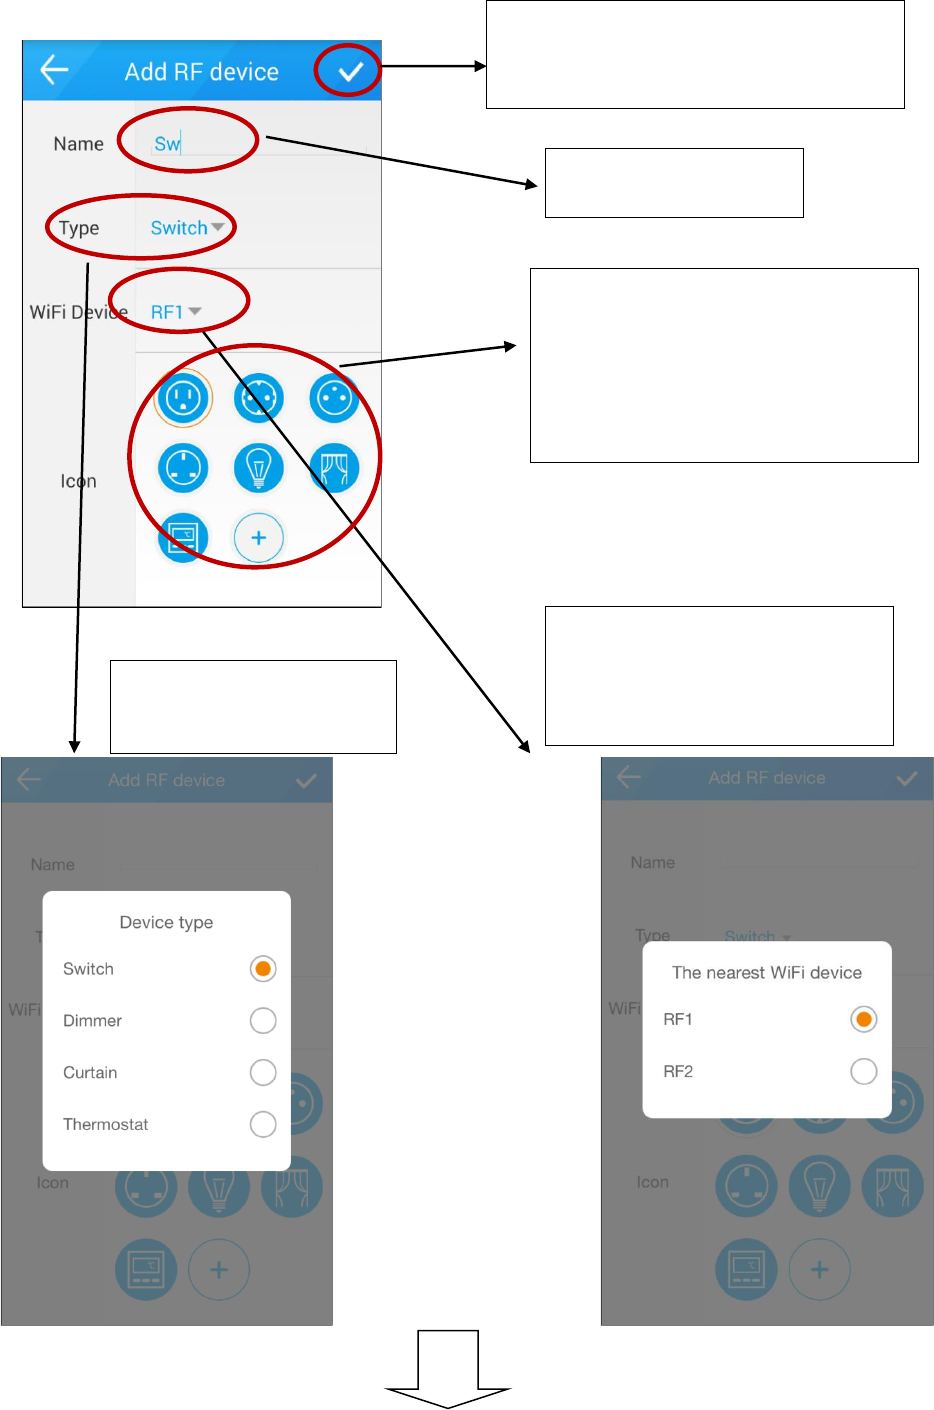
Input device name.
Choose RF device type.
To specify which WiFi socket forward
to RF signal.
Specify the default icon for the RF devices
or custom icon.
You can click the “SAVE” button to save the
revised password.
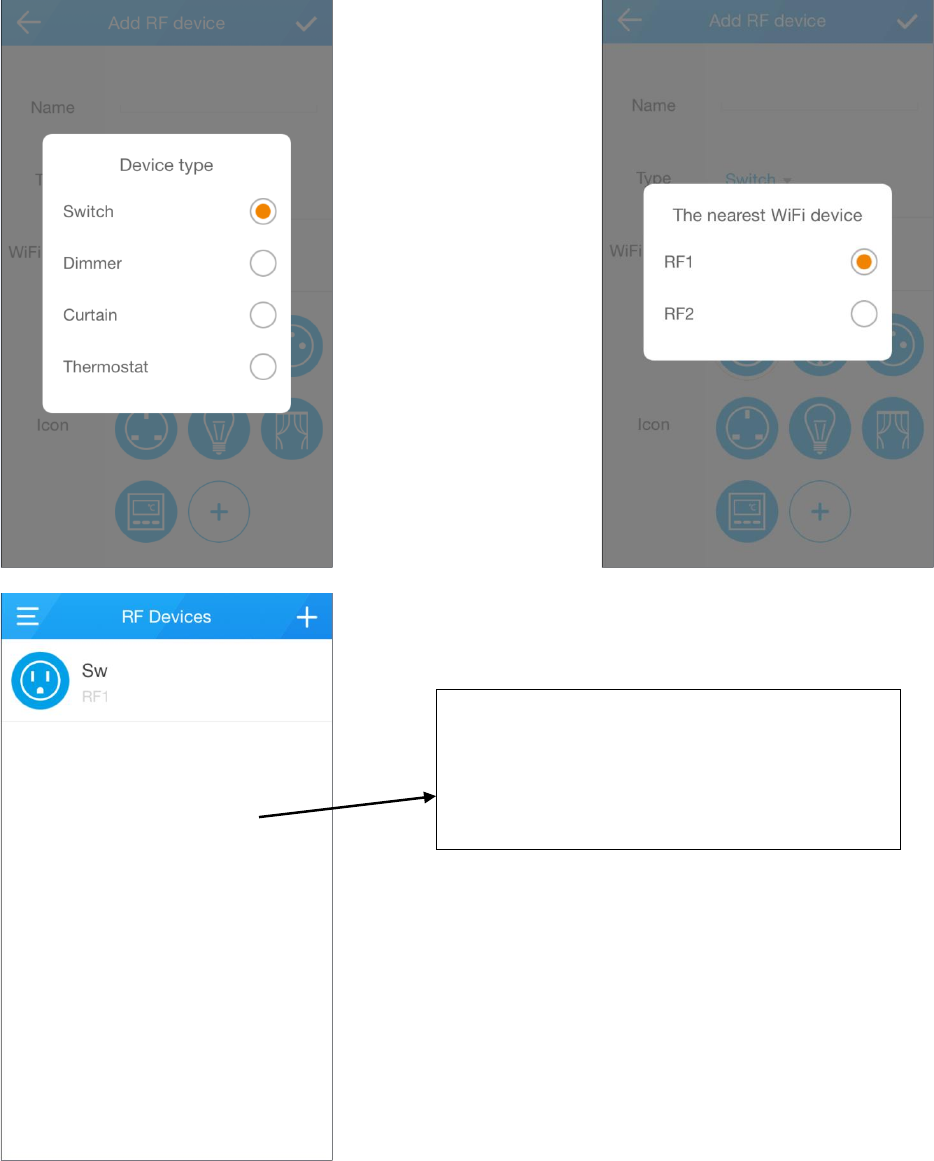
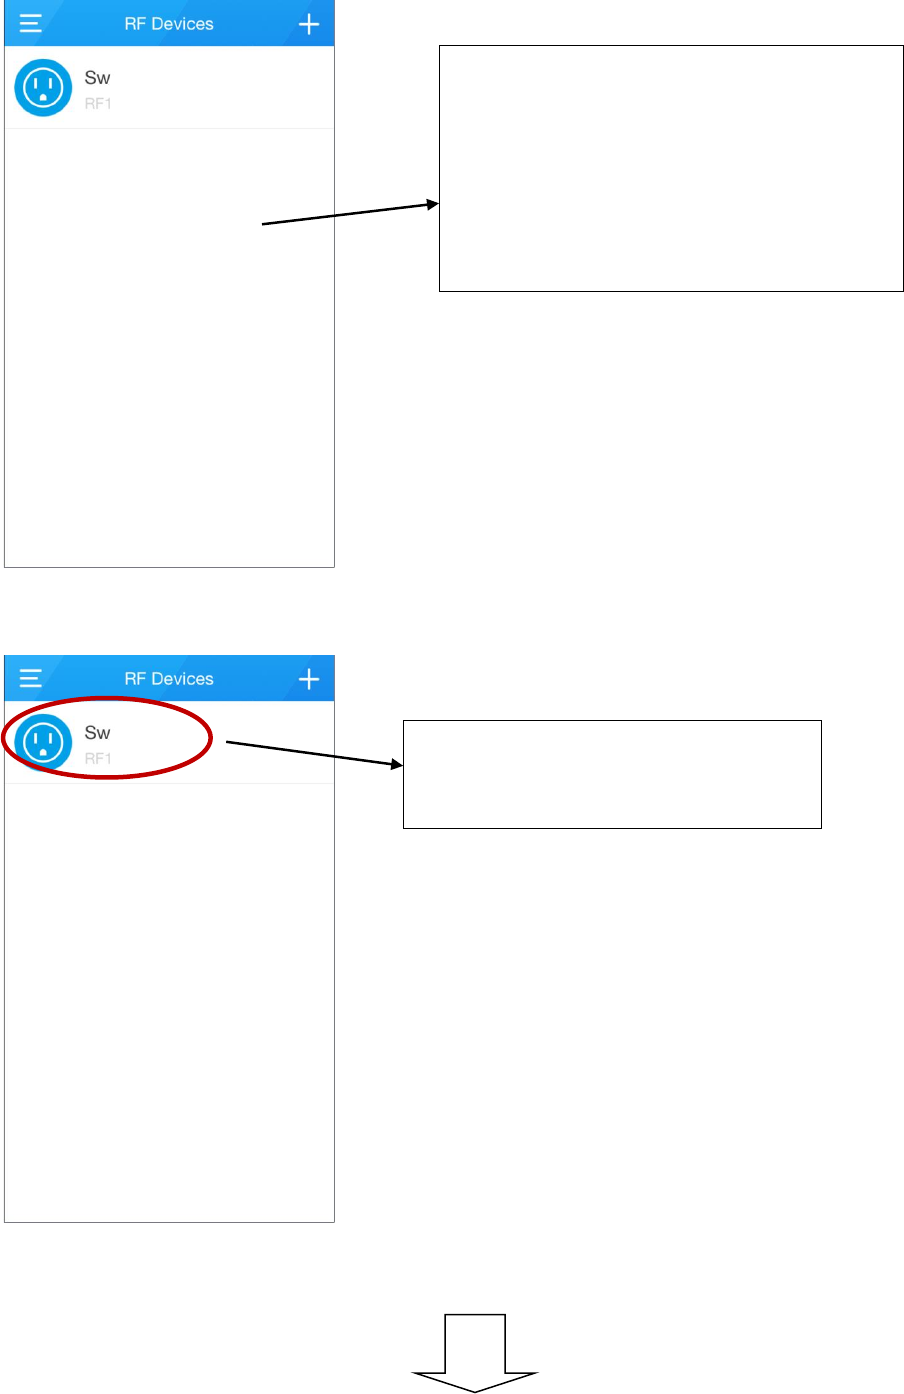
Jump out the page, says it has successful to add
the new RF device in the APP. Next step you need
to match the device and the actual products to
achieve control.
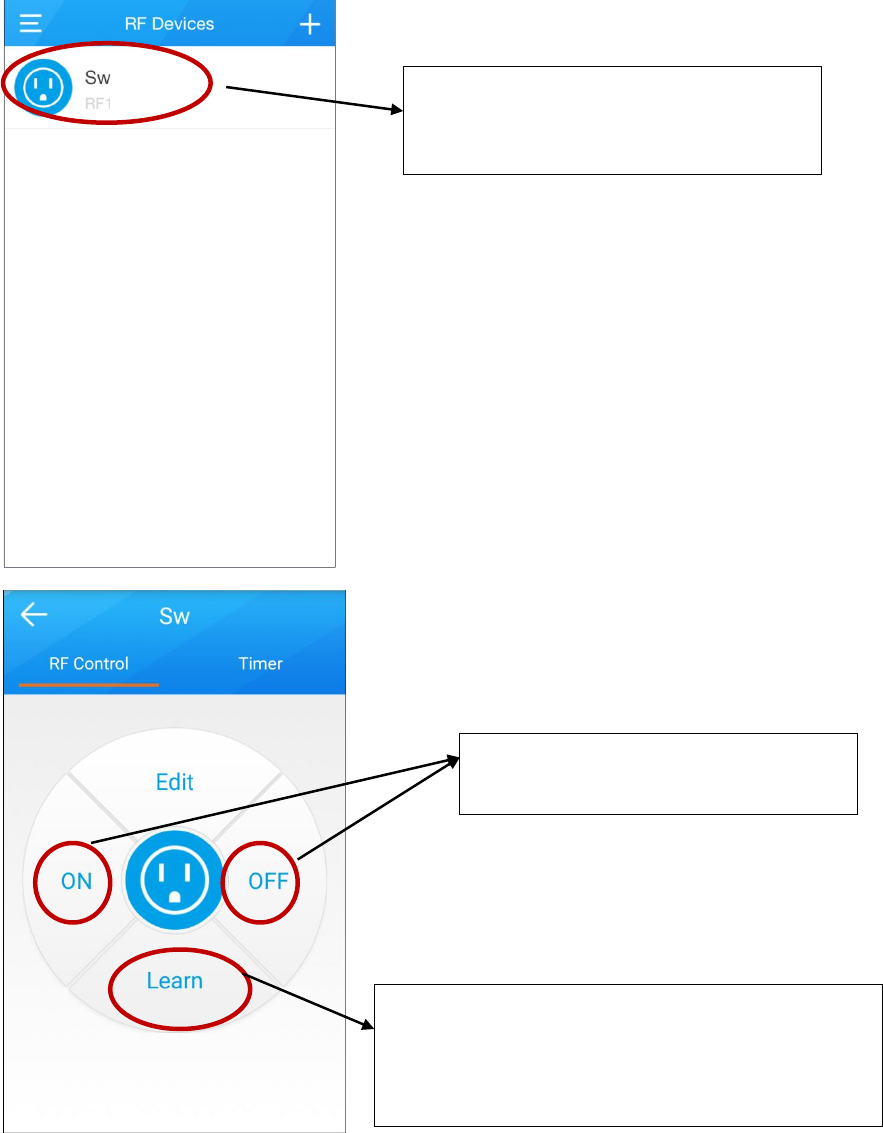
2) Device Pairing
You can click the device symbol as the left
picture to enter setting page of RF device.
Pair the RF device by clicking Learn icon when the RF
device is on learning mode.
Remarks: Please refer to RF device instruction about
how to enter LEARNING mode.
After pairing finished, we can control the
device by clicking the ON/OFF symbol.
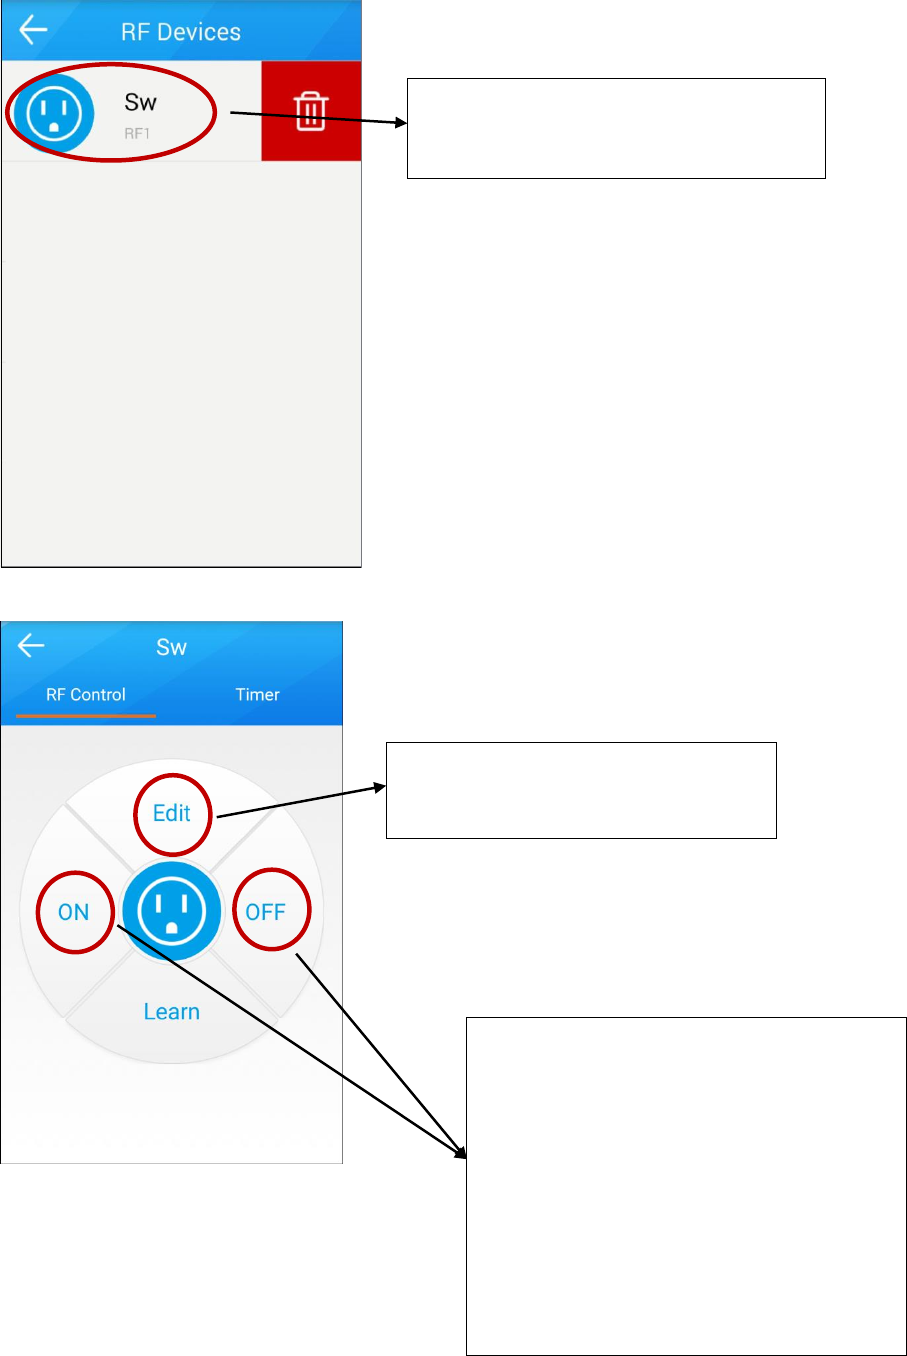
3) Operation
Press the device icon for several seconds
until you see the “DELETE” icon and then
click it to delete the device.
The two symbols are to control RF device.
When device type is different, the symbol
function will change.
a) When RF device type as Switch or
Dimmer, these two symbols are
ON/OFF.
b) When RF device type as Curtain, these
two symbols are Up/Down.
c) When RF device type as Thermostat,
these two symbols are High/Low.
Click the symbol and go to RF device
configuration page.
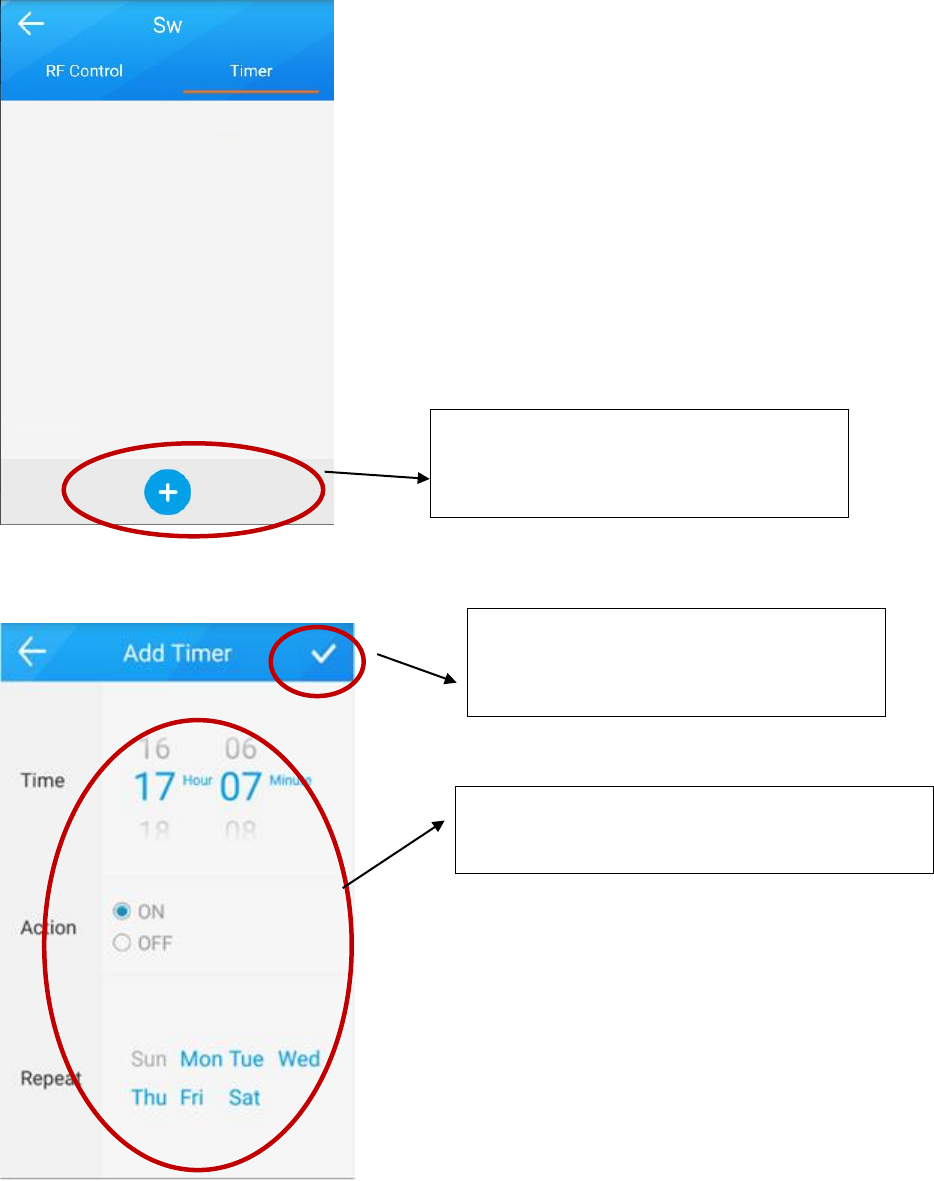
4) Timer of RF device
The left picture showing the RF device will repeat
turning on 17:07 from Monday to Saturday.
You can click the “SAVE” icon to save the
timer setting.
Click this Icon and enter the timer setting
scene.
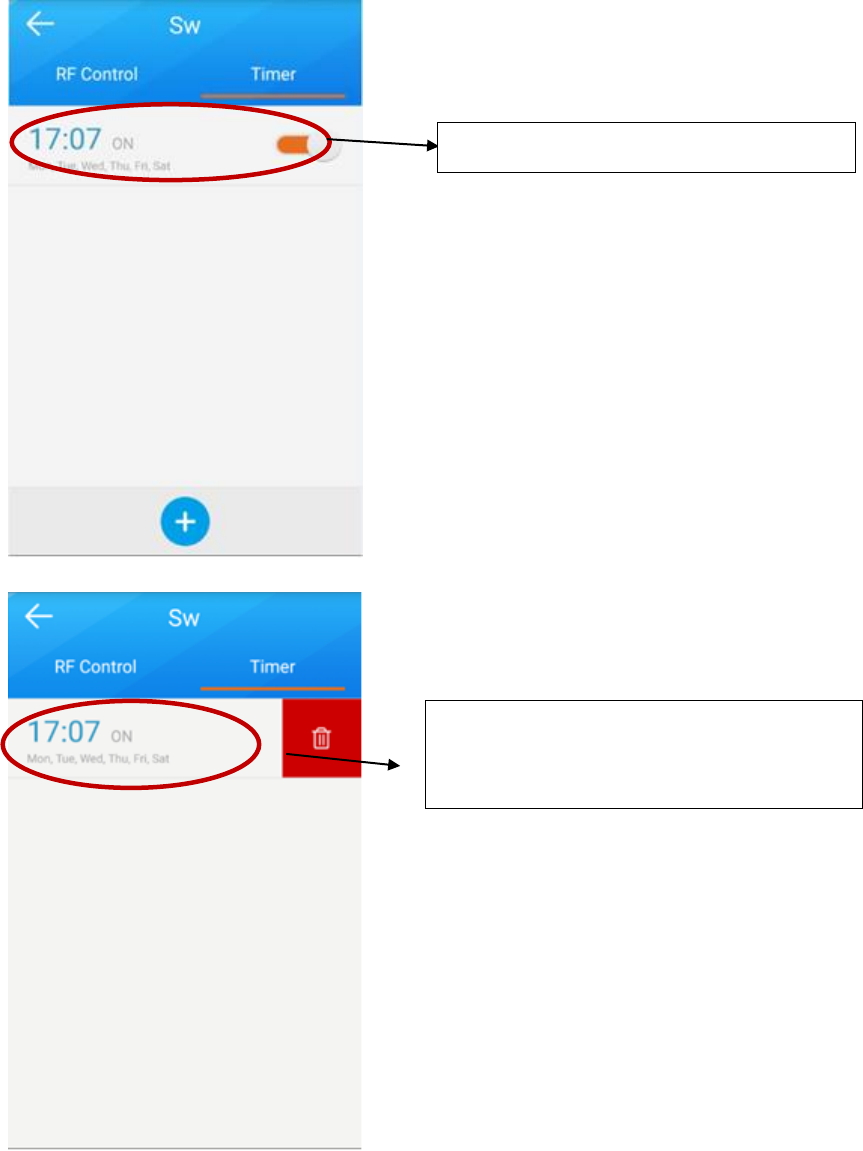
The timer function is ready.
Press the device icon for several seconds until
you see the “DELETE” icon and then click it to
delete the timer task.
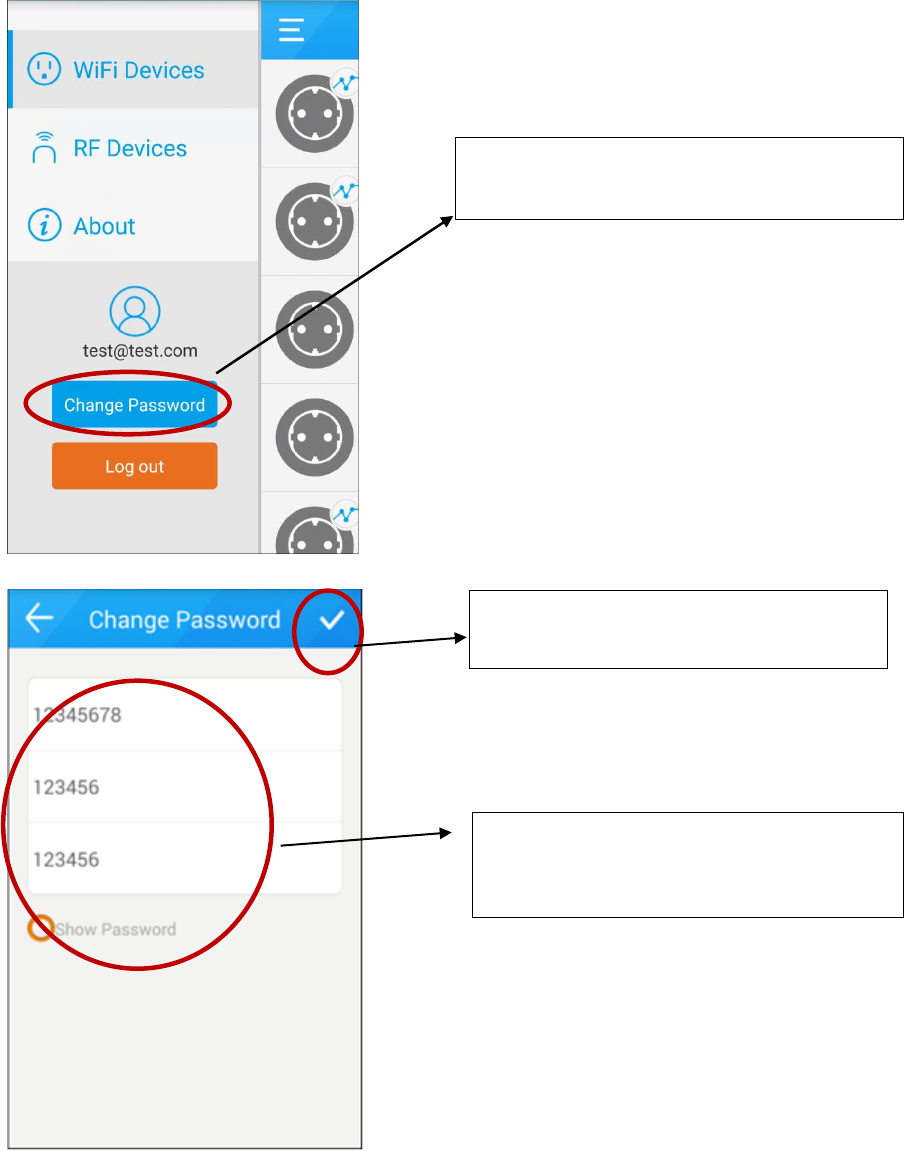
5. Change Password
You can see the ID information under this option
and you can change the password.
Input the old password first, and then input
the new password twice to change the
password.
You can click the “SAVE” button to save the
new password.
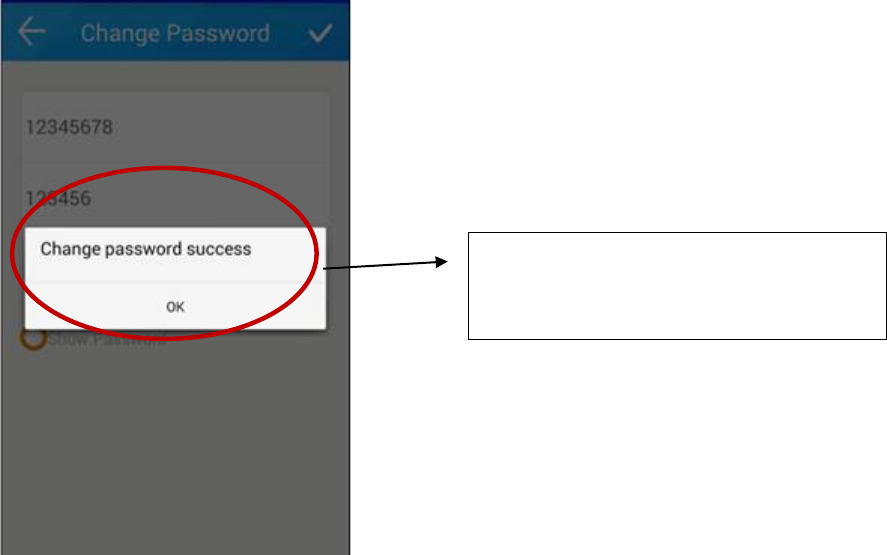
After the password is changed, you can click
“ok” button to finish.
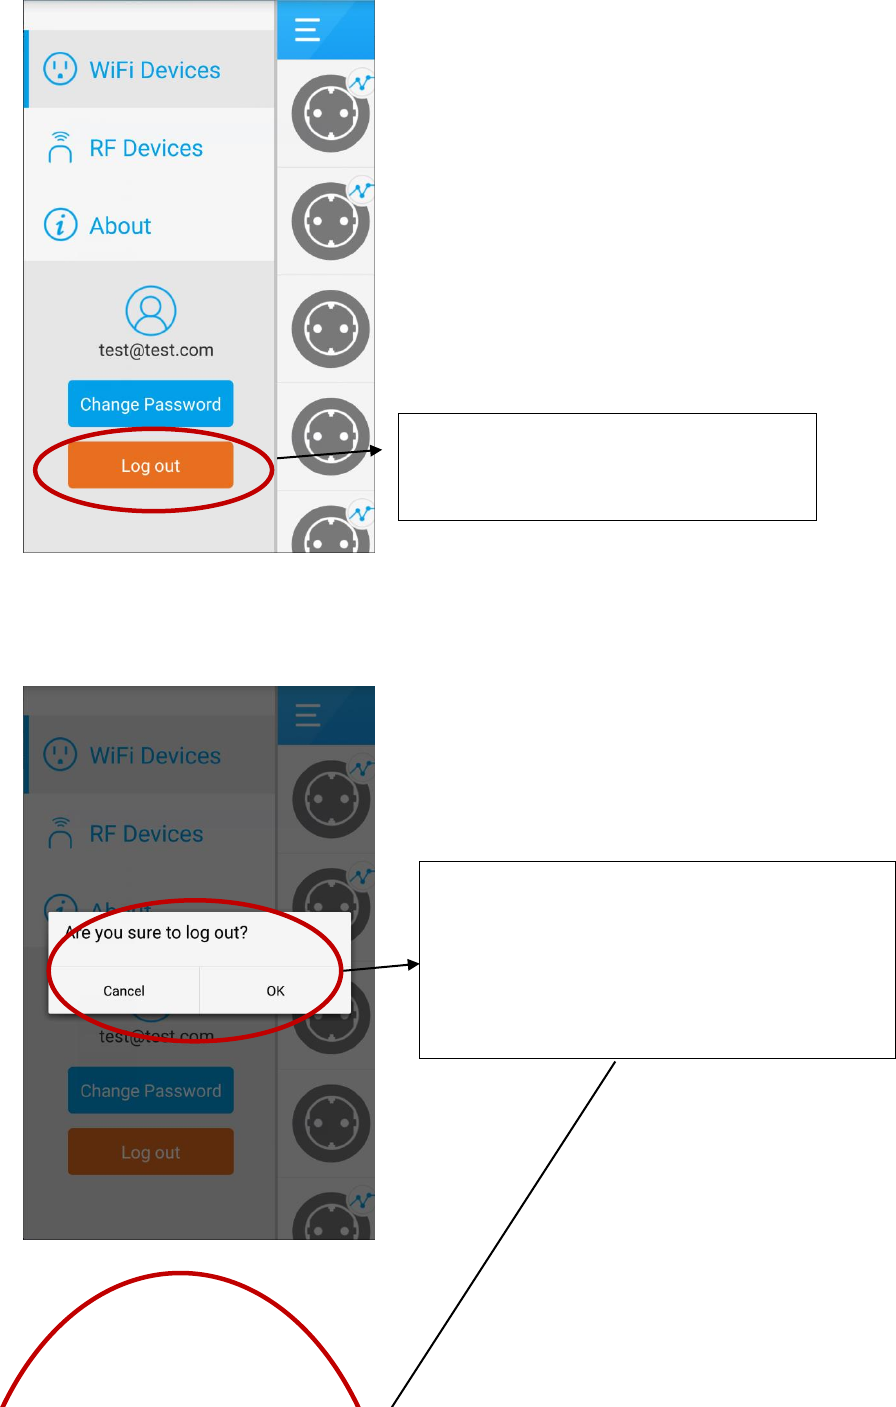
6. Logout
If you need to login the new ID, please click
the “log out” button to quit.
If you click the “cancel” button, you will stay in
current page. If you click the “OK” button, you will
go back to the Login page.