Kasda Networks KA1750 Wireless Router User Manual KE318EU
Kasda Networks inc Wireless Router KE318EU
Users Manual

KA1750 Wireless Router User Manual
NOTICE
This document contains proprietary information protected by copyright, and this
Manual and all the accompanying hardware, software, and documentation are
copyrighted. All rights are reserved. No part of this document may be photocopied or
reproduced by mechanical, electronic, or other means in any form.
The manufacturer does not warrant that the hardware will work properly in all
environments and applications, and makes no warranty or representation, either
expressed or implied, with respect to the quality, performance, merchantability, or
fitness for a particular purpose of the software or documentation. The manufacturer
reserves the right to make changes to the hardware, software, and documentation
without obligation to notify any person or organization of the revision or change.
All brand and product names are the trademarks of their respective owners.
© Copyright 2014
All rights reserved.

KA1750 Wireless Router User Manual
FCC Warning:
Any Changes or modifications not expressly approved by the party responsible for
compliance could void the user's authority to operate the equipment.
This device complies with part 15 of the FCC Rules. Operation is subject to the following
two conditions: (1) This device may not cause harmful interference, and (2) this device
must accept any interference received, including interference that may cause
undesired operation.
Note: This equipment has been tested and found to comply with the limits for a Class B
digital device, pursuant to part 15 of the FCC Rules. These limits are designed to
provide reasonable protection against harmful interference in a residential installation.
This equipment generates, uses and can radiate radio frequency energy and, if not
installed and used in accordance with the instructions, may cause harmful interference
to radio communications. However, there is no guarantee that interference will not
occur in a particular installation. If this equipment does cause harmful interference to
radio or television reception, which can be determined by turning the equipment off and
on, the user is encouraged to try to correct the interference by one or more of the
following measures:
—Reorient or relocate the receiving antenna.
—Increase the separation between the equipment and receiver.
—Connect the equipment into an outlet on a circuit different from that to which the
receiver is connected.
—Consult the dealer or an experienced radio/TV technician for help.

KA1750 Wireless Router User Manual
FCC Radiation Exposure Statement:
This equipment complies with FCC radiation exposure limits set forth for an uncontrolled
environment .This equipment should be installed and operated with minimum distance
20cm between the radiator& your body.
This transmitter must not be co-located or operating in conjunction with any other
antenna or transmitter.

KA1750 Wireless Router User Manual
1
Content
1 INTRODUCTION ...................................................................................................................... 3
1.1 MAIN FEATURES .............................................................................................................. 3
1.1.1 Wireless ............................................................................................................................... 3
1.1.2 Network Protocol and Features ........................................................................................... 3
1.1.3 Firewall ............................................................................................................................... 3
1.1.4 Management Support ........................................................................................................... 4
1.1.5 Operating System Support ................................................................................................... 4
1.1.6 Environmental ...................................................................................................................... 4
1.2 PACKET CONTENTS ....................................................................................................... 4
1.3 SYSTEM REQUIREMENTS ............................................................................................... 4
1.4 FACTORY DEFAULTS ...................................................................................................... 5
1.5 WARNINGS AND CAUTIONS ............................................................................................. 5
2 HARDWARE DESCRIPTION................................................................................................... 6
3 HARDWARE INSTALLATION ............................................................................................... 8
4 PC CONFIGURATION GUIDE .............................................................................................. 9
4.1 LOCAL PC CONFIGURATION IN WINDOWS 95, 98, ME, XP,7 .............................................. 9
4.2 LOCAL PC CONFIGURATION IN WINDOWS 2000 ................................................................ 9
5 QUICK SETUP OF THE ROUTER ........................................................................................ 10
6 WEB-BASED BASIC MANAGEMENT GUIDE..................................................................... 13
6.1 HOME PAGE BASIC SETTING ............................................................................................ 13
6.1.1 Network (WANSettings) ..................................................................................................... 13
6.1.2 LAN Settings ...................................................................................................................... 15
6.1.3 Wireless Settings ................................................................................................................ 17
6.2 PARENTAL CONTROL .................................................................................................... 17
6.3 ADMINISTRATION .......................................................................................................... 18
6.3.1 Time setting ........................................................................................................................ 18
6.3.2 Password: .......................................................................................................................... 19
6.3.3 Backup/restore/reset .......................................................................................................... 19
6.3.4 Firmware update ............................................................................................................... 20
7 WEB-BASED ADVANCE MANAGEMENT GUIDE ............................................................. 21
7.1 SETUP ............................................................................................................................ 21
7.1.1 WAN setup ......................................................................................................................... 21
7.1.2 LAN setup........................................................................................................................ 24
7.1.3 IPV6 ................................................................................................................................... 25
7.1.4 Advanced Routing Setup ................................................................................................. 26
7.2 WIRELESS SETUP ........................................................................................................... 27
7.2.1 Wireless Basic Settings ...................................................................................................... 27
7.2.2 Guest Access ...................................................................................................................... 28
7.2.3 Security .............................................................................................................................. 29
7.2.4 WPS Setup .......................................................................................................................... 30
7.2.5 Wireless Access Setup ........................................................................................................ 31

KA1750 Wireless Router User Manual
2
7.2.6 WDS Setup ......................................................................................................................... 32
7.3 SERVICE – QOS SETUP ................................................................................................. 35
7.4 SECURITY SETUP ......................................................................................................... 36
7.4.1 Firewall setup .................................................................................................................... 36
7.4.2 URL Setup .......................................................................................................................... 37
7.4.3 Remote Access Setup ......................................................................................................... 37
7.4.4 DoS .................................................................................................................................. 38
APPENDIX: FREQUENT ASKED QUESTIONS ...................................................................... 39

KA1750 Wireless Router User Manual
3
1 Introduction
Thank you for choosing our product. The KA1750 Wireless Router uses
Broadcom’s CPE solution that fully complies with IEEE802.11b/g/n/ac standards. It
will provide your SOHO with convenient Internet.
1.1 Main Features
1.1.1 Wireless
Fully IEEE 802.11b /g /n & IEEE 802.11ac compatible.
Wireless data rate up to 1750 Mbps
Operating in the unlicensed 2.4 GHz &5GHz ISM band
Supports 64/128 bits WEP, WPA, WPA2, WPA/WPA2-PSK,
802.1x
1.1.2 Network Protocol and Features
Ethernet to ADSL Self-Learning Transparent Bridging
Internet Control Message Protocol (ICMP)
IP Static Routing
Routing Information Protocol (RIP, RIPv2)
Network Address Translation (NAT)
Virtual Server, Port Forwarding
Dynamic Host Configuration Protocol (DHCP)
DDNS
Simple Network Time Protocol (SNTP)
VPN pass-through (IPSec/PPTP/L2TP)
Parent control
1.1.3 Firewall
Built-in NAT
MAC Filtering
Packet Filtering

KA1750 Wireless Router User Manual
4
Stateful Packet Inspection (SPI)
Denial of Service Prevention (DoS)
DMZ
1.1.4 Management Support
Web Based GUI
Upgrade or update via FTP/HTTP
Command Line Interface via Telnet
Diagnostic Test
Firmware upgrade-able for future feature enhancement
1.1.5 Operating System Support
WINDOWS 98/SE/ME/2000/XP/VISTA/7
Macintosh
LINUX
1.1.6 Environmental
Operating humidity: 10%-90% non-condensing
Non-operating storage humidity: 5%-95% non-condensing
1.2 Packet Contents
The packet contents are as the following:
Router x 1
Power Adapter x 1
Ethernet Cable x 1
CD x 1
1.3 System Requirements
Broadband Internet Access Service (DSL/Cable/Ethernet)
One DSL/Cable Modem that has an RJ45 connector (which is not
necessary if the Router is connected directly to the Ethernet)

KA1750 Wireless Router User Manual
5
PCs with a working Ethernet Adapter and an Ethernet cable with RJ45
TCP/IP protocol on each PC
Web browser, such as Microsoft Internet Explorer, Mozilla Firefox or
Apple Safari
1.4 Factory Defaults
The device is configured with the following factory defaults:
IP Address: 192.168.1.1
Subnet Mask: 255.255.255.0
1.5 Warnings and Cautions
never use the product near water.
To prevent dangerous overloading of the power circuit, be careful about
the designed maximum power load ratings. Not to follow the rating
guideline could result in a dangerous situation.
Please note that telephone line on modem must adopt the primary line
that directly outputs from junction box. Do not connect Router to
extension phone. In addition, if your house developer divides a telephone
line to multi sockets inside the wall of house, please only use the
telephone that has connected with the splitter of ADSL Router when you
access the Internet. Under the above condition, if you also install
telephone with anti-cheat-dial device, please pull out this kind of
telephone, otherwise ADSL Router may occur frequently off-line.
KA1750 Wireless Router User Manual
6
2 Hardware Description
Front Panel
LED
Color
Function
Blue
Off: Power Not Supplied
On: Power Supplied
Blue
On: The WAN port has detected a link with an attached device
Blinking: Data is being transmitted or received by the WAN port
Off: No WAN link via the WAN port
Blue
On: LAN link established and active via LAN port
Blinking: ADSL data activity occurs
Off: No LAN link via LAN port
Blue
On: The 2.4GHz or 5GHz wireless module is ready and idle
Blinking: Data transmitting or receiving over WLAN
Off: The 2.4GHz or 5GHz wireless function is off
Blue
On: WPS connection is established
Blinking: Trying to establish a WPS connection
Off: WPS function is off or no WPS connection
Blue
On: USB connection is established
Blinking: : Data transmitting or receiving over USB.
Off: USB function is off or no WPS connection
KA1750 Wireless Router User Manual
7
Rear panel
Port
Function
WAN
Connect the device to a cable or DSL modem
ETH1,2,3,4
Connect the device to your PC's Ethernet port, or to
the uplink port on your hub/switch, using a RJ-45
cable
RESET
System reset or reset to factory defaults
WPS
On: WPS connection is established
Blinking: Trying to establish a WPS connection
Off: WPS function is off or no WPS connection
ON/OFF
Switch it on or off
PWR
Connect to the supplied power adapter
USB2.0/3.0
Connect to a printer.
KA1750 Wireless Router User Manual
8
3 Hardware Installation
This chapter shows you how to connect Router. Meanwhile, it introduces
the appropriate environment for the Router and installation instructions.
1. Using an Ethernet Cable to connect the WAN port of the ROUTER to a
cable or DSL modem.
2. Using an Ethernet Cable to connect the LAN port of the ROUTER to your
LAN or a PC with network card installed.
3. Connect the power cable to the PWR connector on ROUTER, then plug in
the power adapter to the AC power outlet, and then press the on-off button.

KA1750 Wireless Router User Manual
9
4 PC Configuration Guide
4.1 Local PC Configuration in Windows 95, 98, ME, XP,7
1. In the Windows task bar, click the “Start” button, point to “Settings”, and then
click “Control Panel”.
2. Double-click the “Network” icon.
3. On the “Configuration” tab, select the TCP/IP network associated with your
network card and then click “Properties”.
4. In the “TCP/IP Properties” dialog box, click the “IP Address” tab. Set the IP
address as 192.168.1.x (x can be a decimal number from 2 to 254.) like
192.168.1.2, and the subnet mask as 255.255.255.0.
5. On the “Gateway” tab, set a new gateway as 192.168.1.1, and then click “Add”.
6. Configure the “DNS” tab if necessary. For information on the IP address of the
DNS server, please consult with your ISP.
7. Click “OK” twice to confirm and save your changes.
8. You will be prompted to restart Windows. Click “Yes”.
4.2 Local PC Configuration in Windows 2000
1. In the Windows task bar, click the “Start” button, point to “Settings”, and then
click “Control Panel”.
2. Double-click the “Network and Dial-up Connections” icon.
3. In the “Network and Dial-up Connections” window, right-click the “Local Area
Connection” icon, and then select “Properties”.
4. Highlight “Internet Protocol (TCP/IP)”, and then click “Properties”.
5. In the “Internet Protocol (TCP/IP) Properties” dialog box, set the IP address as
192.168.1.x (x can be a decimal number from 2 to 254.), and the subnet mask as
255.255.255.0 and the default gateway as 192.168.1.1. Then click “OK”.
6. Configure the “DNS” tab if necessary. For information on the IP address of the
DNS server, please consult with user’s ISP.
7. Click “OK” twice to confirm and save user’s changes.
KA1750 Wireless Router User Manual
10
5 Quick Setup of the Router
In order to use the web-based management software, it will be necessary to use
a computer that occupies the same subnet as the Router. The simplest way to do this
for many users will be to use DHCP server that is enabled by default on the
Router.please make sure the wan connection is ok.
Internet Connection Setup Wizard will guide you through a step-by-step process
to configure your router and connect to the Internet.ill guide you through a
step-by-step process to configure your router and connect to the Internet.
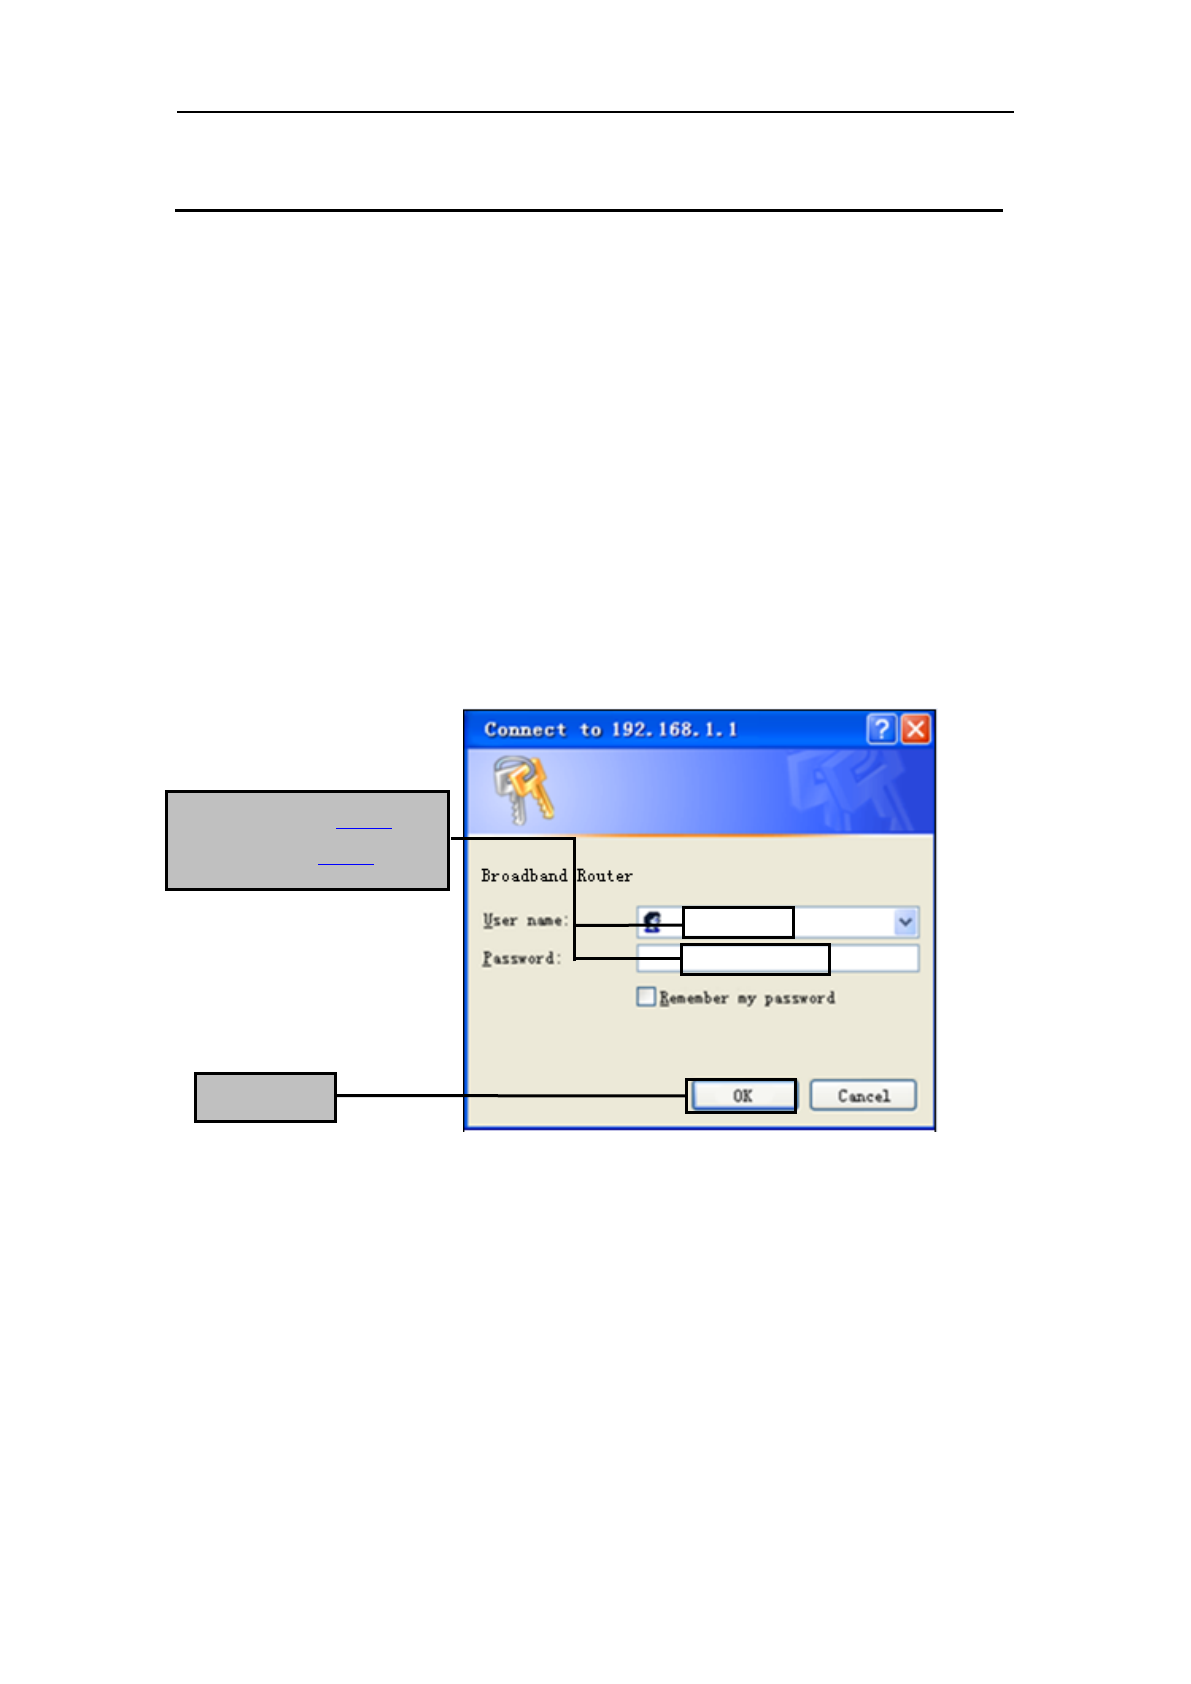
(1) Launch a web browser, such as Internet Explorer, and then use
http://192.168.1.1 to log on to the setting pages. Enter username “admin”and
password “admin”,then click “OK”.
(2) After log on ,you will see the following page. click next button. When
WAN connection is ok,please press next. When the wan connection is bad, please
check your cable.
Click OK
Enter username ‘admin’
and password ‘admin’
KA1750 Wireless Router User Manual
11
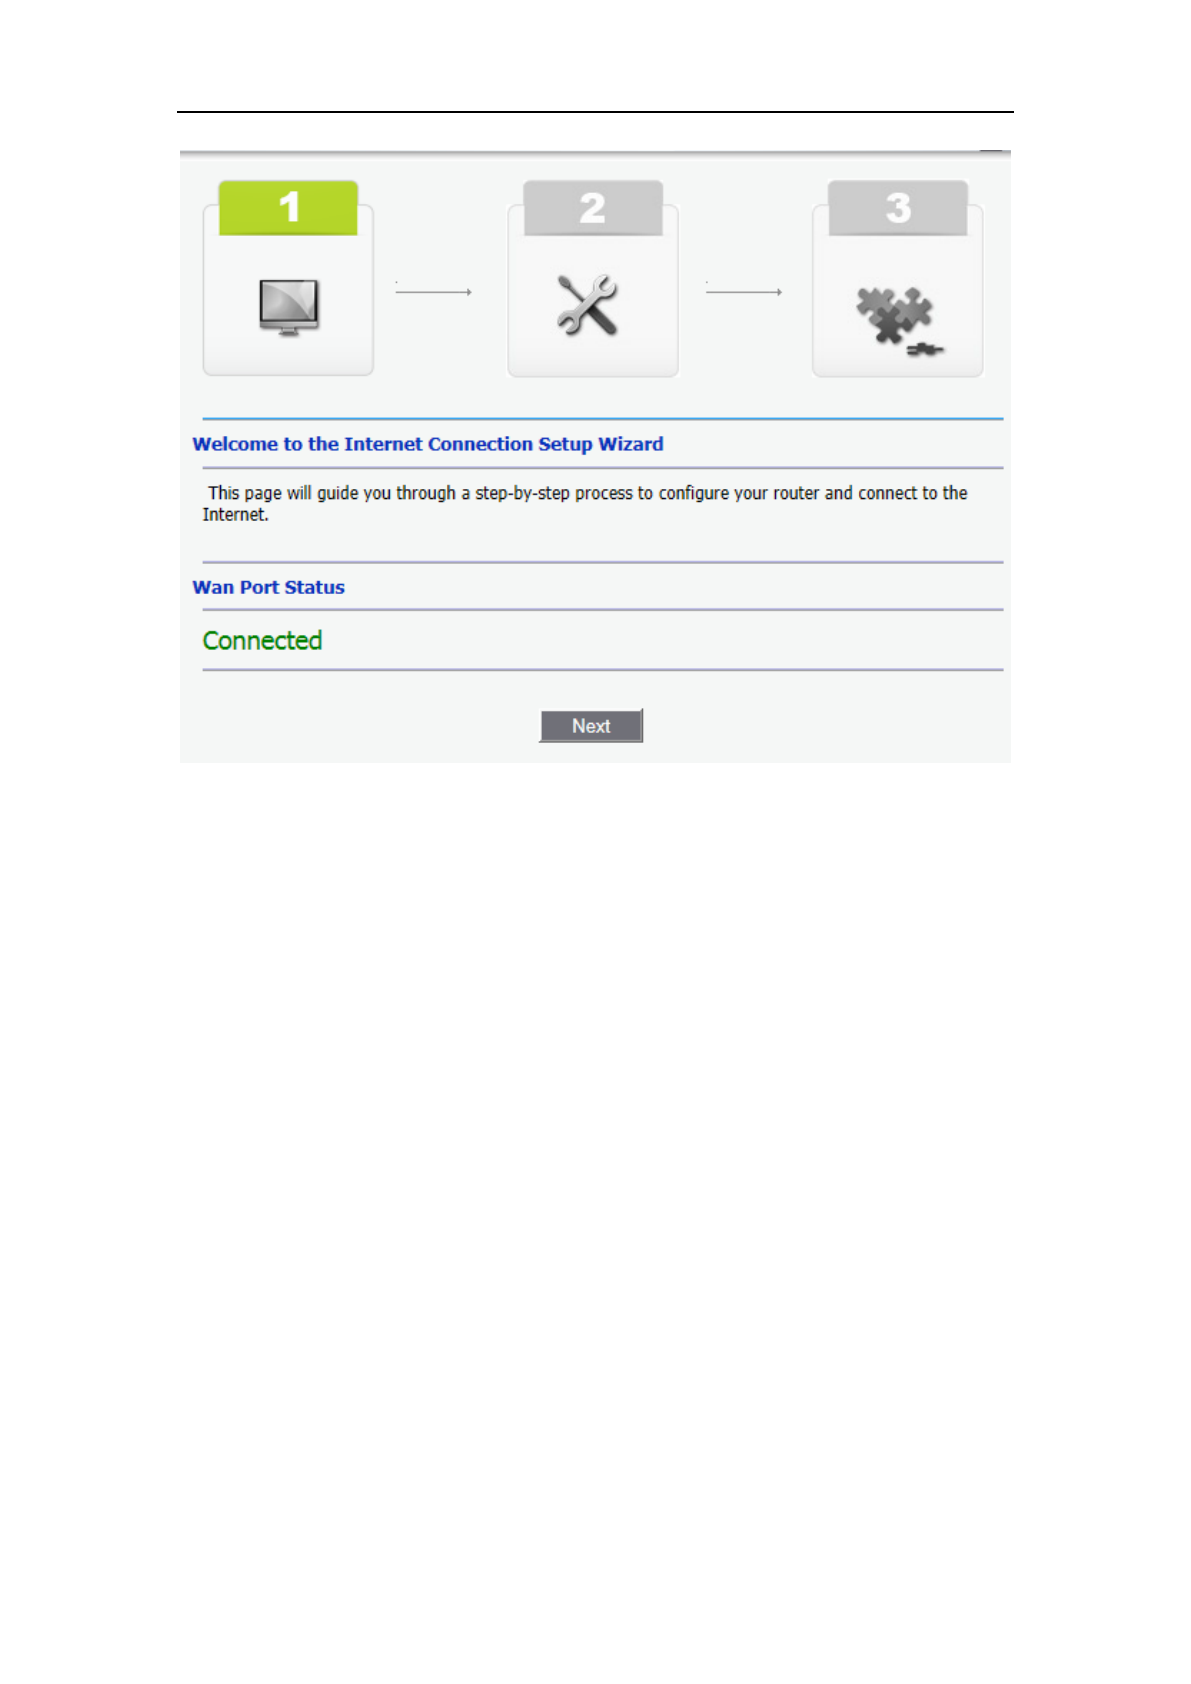
(3) The WAN connection type will appear,the quick setup supports two popular
mode PPPoE, DHCP(Dynamic IP) to connect to the internet,If the conncetion type is
PPPoE , enter the username and password provided by your ISP.If the connection
type is dynamic IP,the router will obtain an IP automatically from you ISP. Select a
wifi interface.2.4GHz or 5GHz. please enter SSID and Password for wireless network
Then click“next”.
KA1750 Wireless Router User Manual
12
(4)The Internet Connection Setup Wizard is complete. Click the Apply button
to save and apply your settings.
After the configuration above, Now you can surf the Internet.
KA1750 Wireless Router User Manual
13
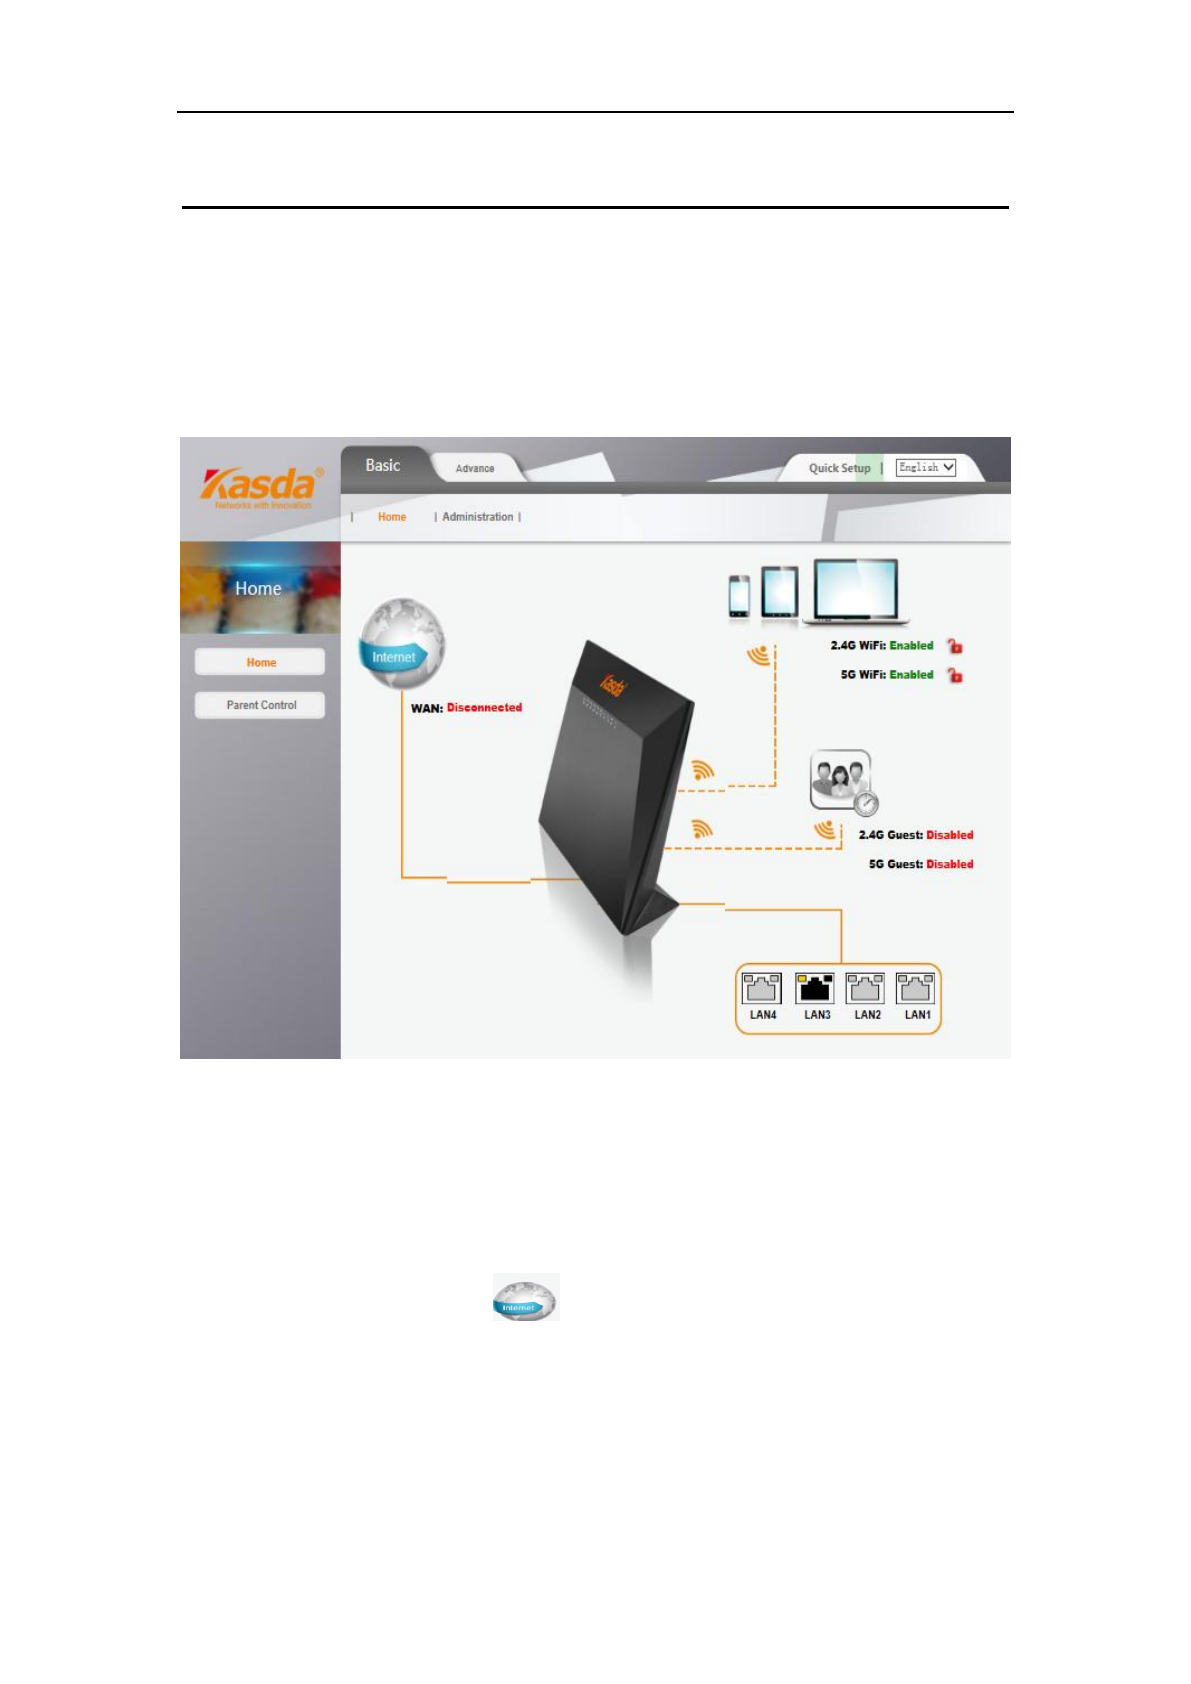
6 Web-based basic Management Guide
This chapter will introduce how to configure your router in detail,the home
page is as shown. From home page, you can find basic & Advanced Setup option on
the top router home configuration page. Basic menu has two options ,one is home
and the other is administration .Below the home menu,there are two options:
home & parent control.
6.1 home page basic setting
6.1.1 Network (WANSettings)
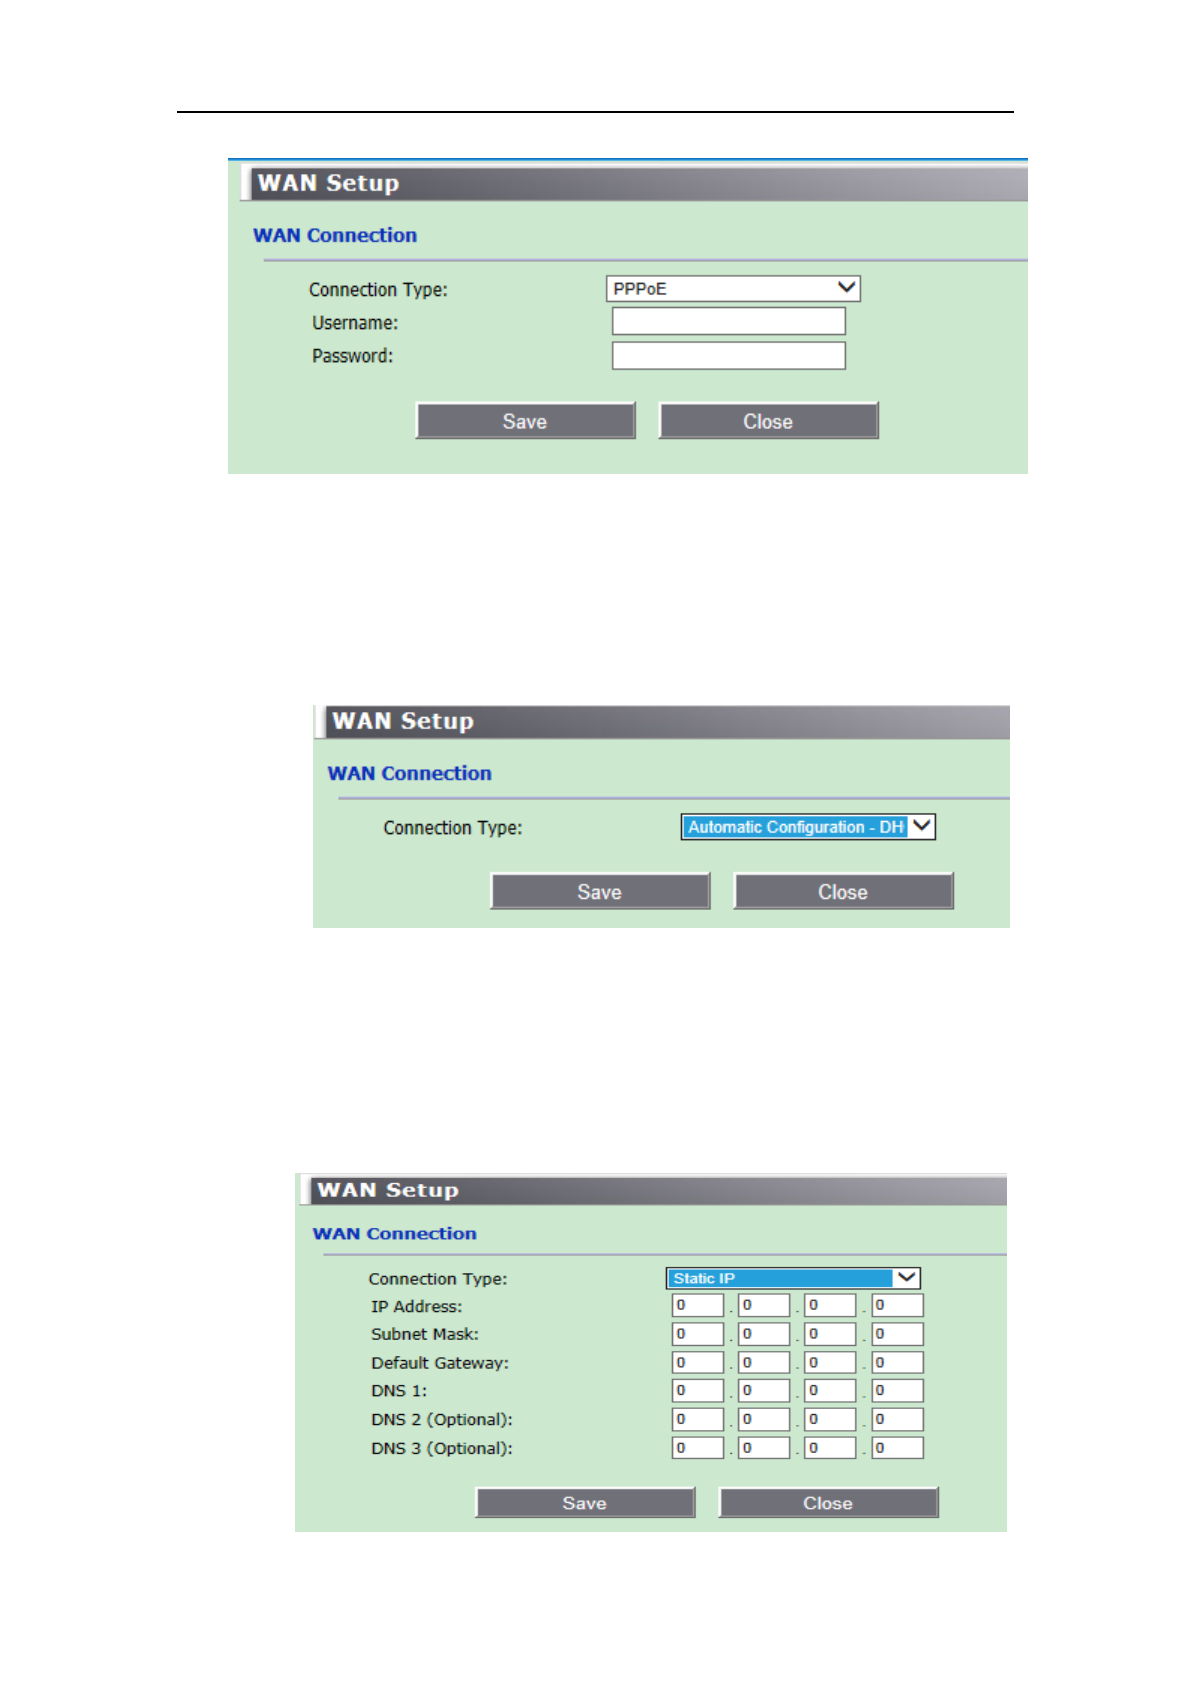
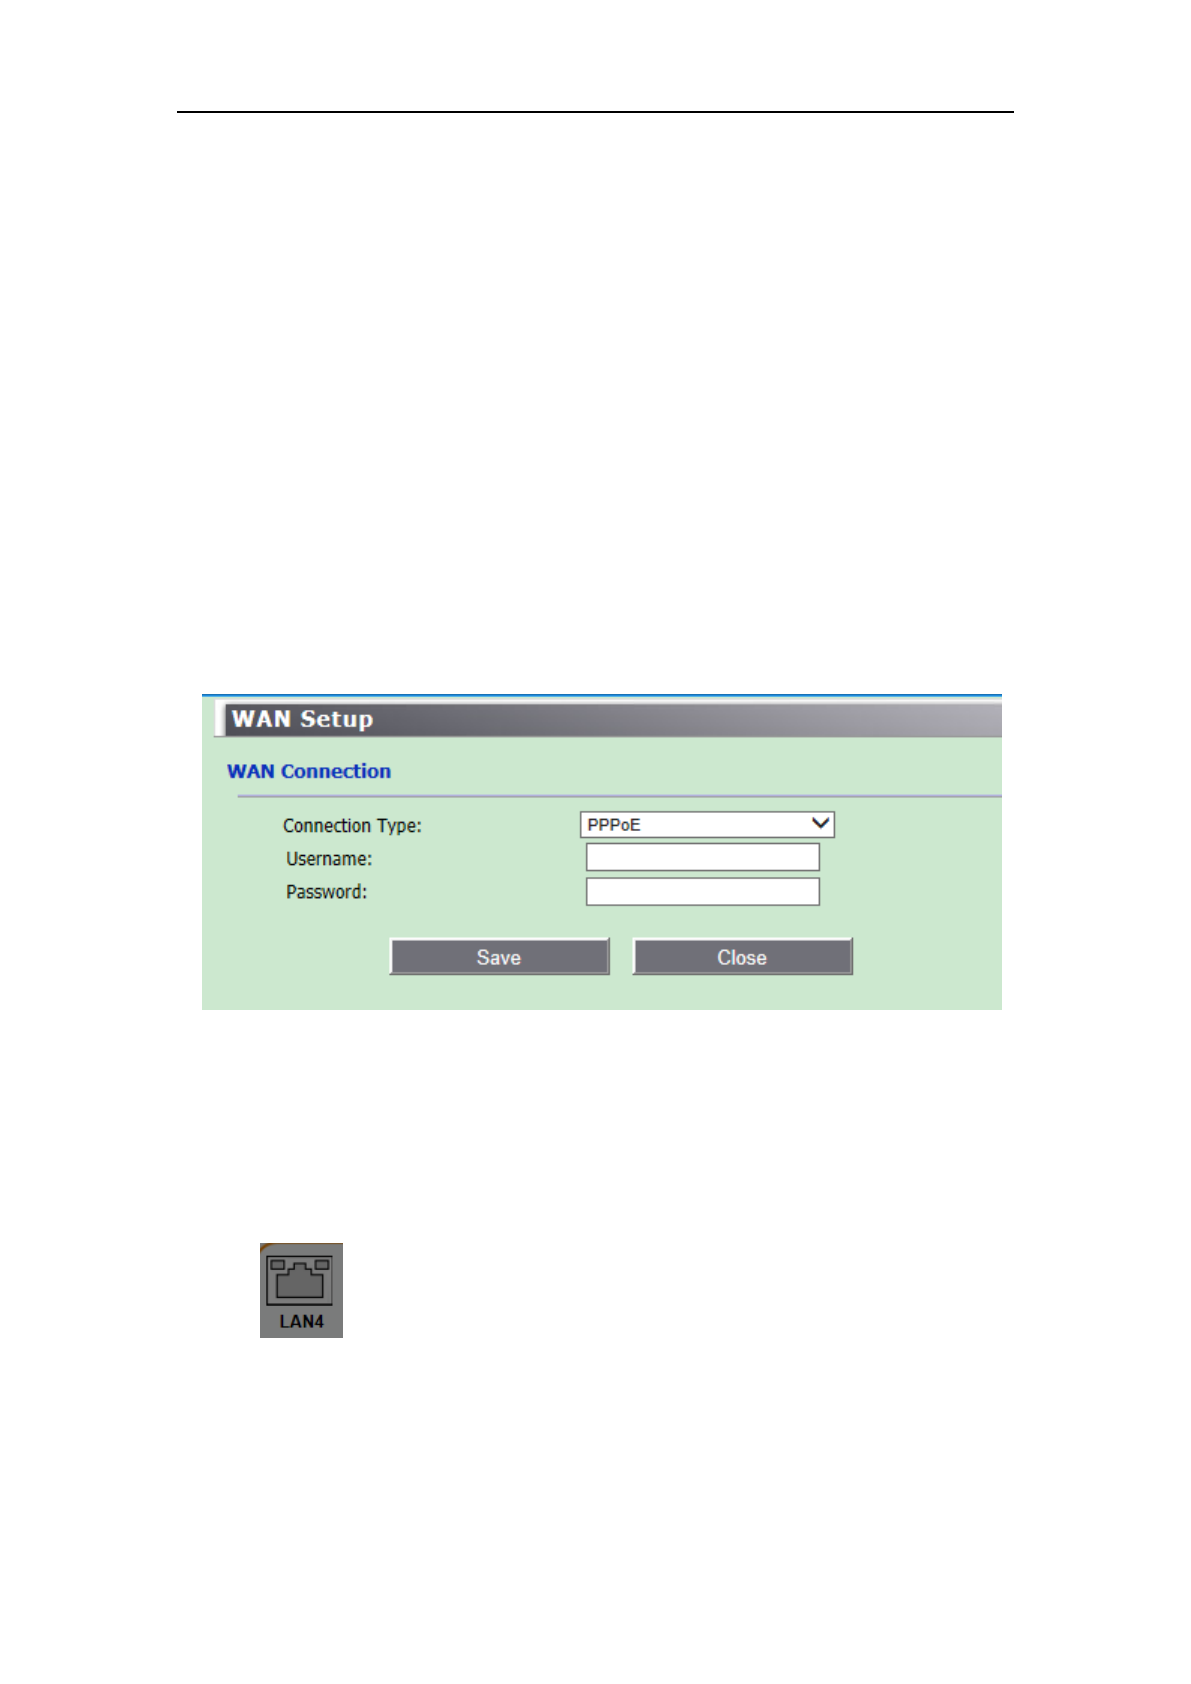
KA1750 supports three types WAN connection. They are DHCP, Static IP,
PPPOE, Select any of them you will be able to configure the corresponding connection
of WAN. Click the icon ,the wan setup page will appear,as shown,
you can configure the IP WAN parameters
KA1750 Wireless Router User Manual
14
DHCP connection type
If your ISP provides the DHCP service, please choose Dynamic IP type, and the
Router will automatically get IP parameters including IP address, Subnet Mask,
Default Gateway, from your ISP. You can see the page as follows .,
Click the Save Settings button to save your settings.
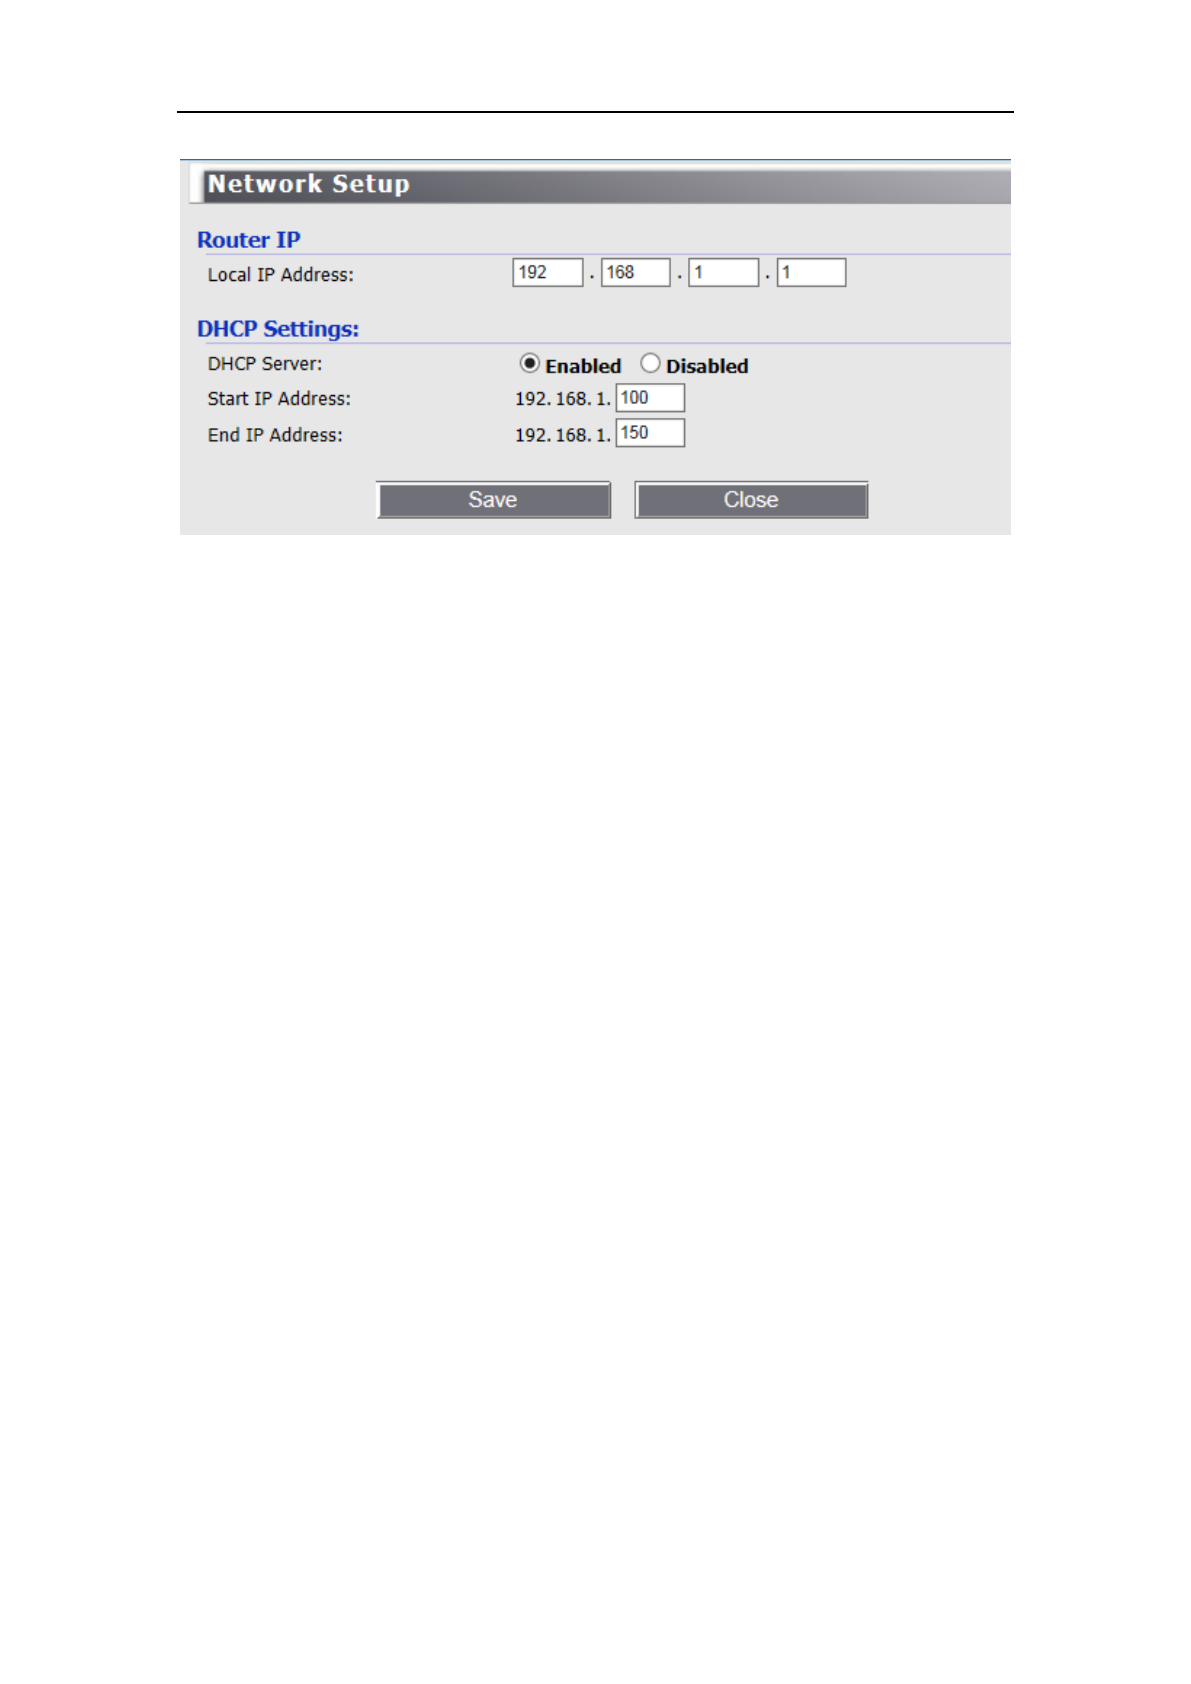
Static IP
If your ISP provides a static or fixed IP Address, Subnet Mask, Gateway and DNS
setting, select Static IP. The Static IP settings page will appear.
KA1750 Wireless Router User Manual
15
IP Address: Enter the IP address in dotted-decimal notation provided by your ISP.
Subnet Mask: Enter the subnet Mask in dotted-decimal notation provided by your
ISP, usually is 255.255.255.0.
Default Gateway:(Optional) Enter the gateway IP ddress in
dotted-decimal notation provided by your ISP.
DNS1/DNS2(Optional) /DNS3(Optional) : Enter one or two DNS addresses in
dotted-decimal notation provided by your ISP.
Click the Save button to save your settings.
PPPOE
If your ISP provides a PPPoE connection, select PPPoE option. And you should
enter the following parameters.
User Name/Password - Enter the User Name and Password provided by your ISP. These
fields are case-sensitive.
Click the Save button to save your settings.
6.1.2 LAN Settings
Click (any lan port is OK) icon, you can configure the IP parameters of the LAN
on the screen as below.
KA1750 Wireless Router User Manual
16
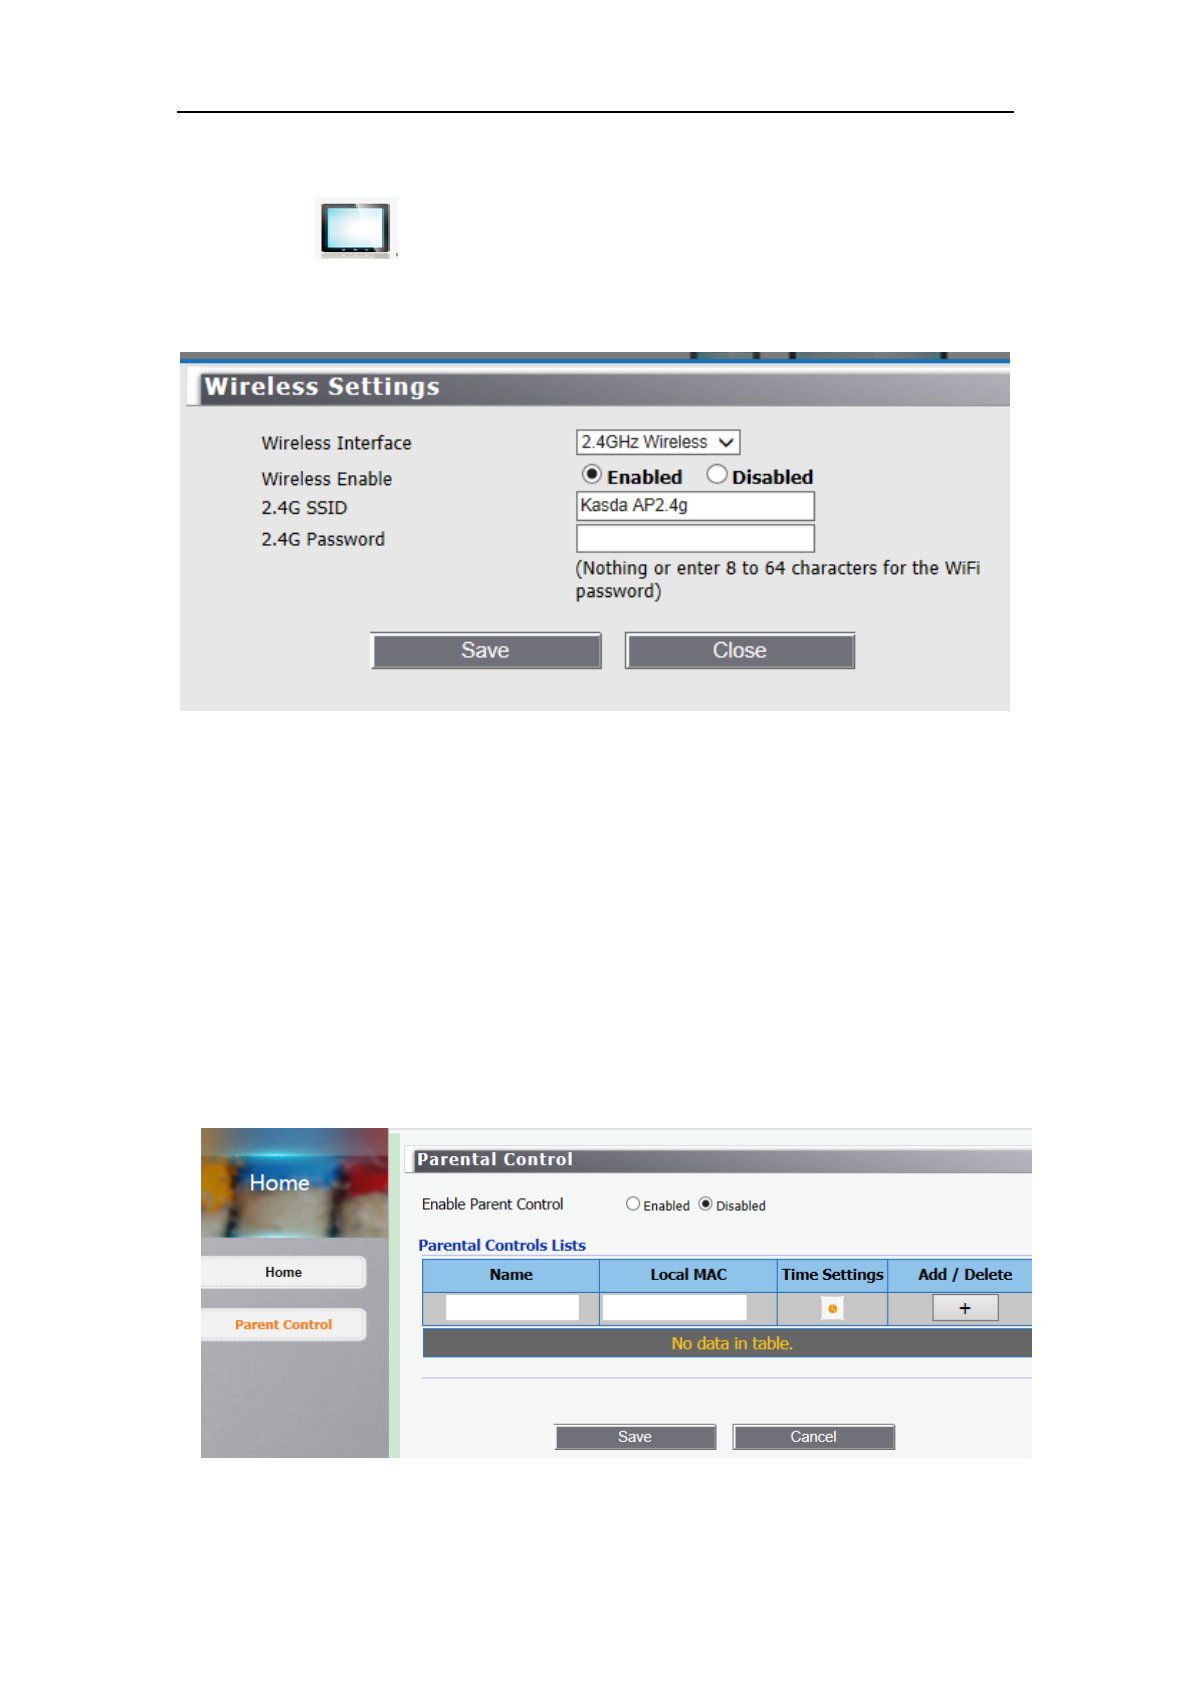
Local IP Address:Enter the IP address of your Router or reset it in dotted-decimal notation
(factory default: 192.168.1.1).
DHCP Server:Enable or Disable the DHCP server. If you disable the Server, you must have
another DHCP server within your network or else you must configure the computer manually.
Start IP Address:Specify an IP address for the DHCP Server to start with when assigning IP
addresses. 192.168.1.100 is the default start address.
End IP Address:Specify an IP address for the DHCP Server to end with when assigning IP
addresses. 192.168.1.150 is the default end address.
Click the Save button to save your settings.
Note:
1) If you change the IP Address of LAN, you must use the new IP Address to log in the
Router.
2) If the new LAN IP Address you set is not in the same subnet, the IP Address pool of the
DHCP server will change accordingly at the same time,while the Virtual Server and
DMZ Host will not take effect until they are re-configured.
KA1750 Wireless Router User Manual
17
6.1.3 Wireless Settings
Click icon,you can configure the basic settings for the wireless network of
2.4GHz or 5GHz on this page.
Wireless interface: please select 2.4GHz or 5GHz wireless depending on your application.
Wireless enable :Enable or disable the Wirless function here.
Network Name(SSID): Also called the SSID. Enter a value of up to 32 characters. The
same name must be assigned to all wireless devices in your network .
Wireless password : nothing or enter 8~64 characters for the wifi password.
Click the Save button to save your settings.
6.2 Parental Control
Parental control allows you to set the time limit for a client's network usage.
KA1750 Wireless Router User Manual
18
1. In the [Service Name] column, select the client whose network usage you want to
control. You may also key in the clients MAC address in the [Local MAC] column.
2. In the [Add / Delete] column, click the Edit icon.
3. Set up allowed time limits in the [Time Settings] map. Drag and drop to desired
day/time.
6.3 Administration
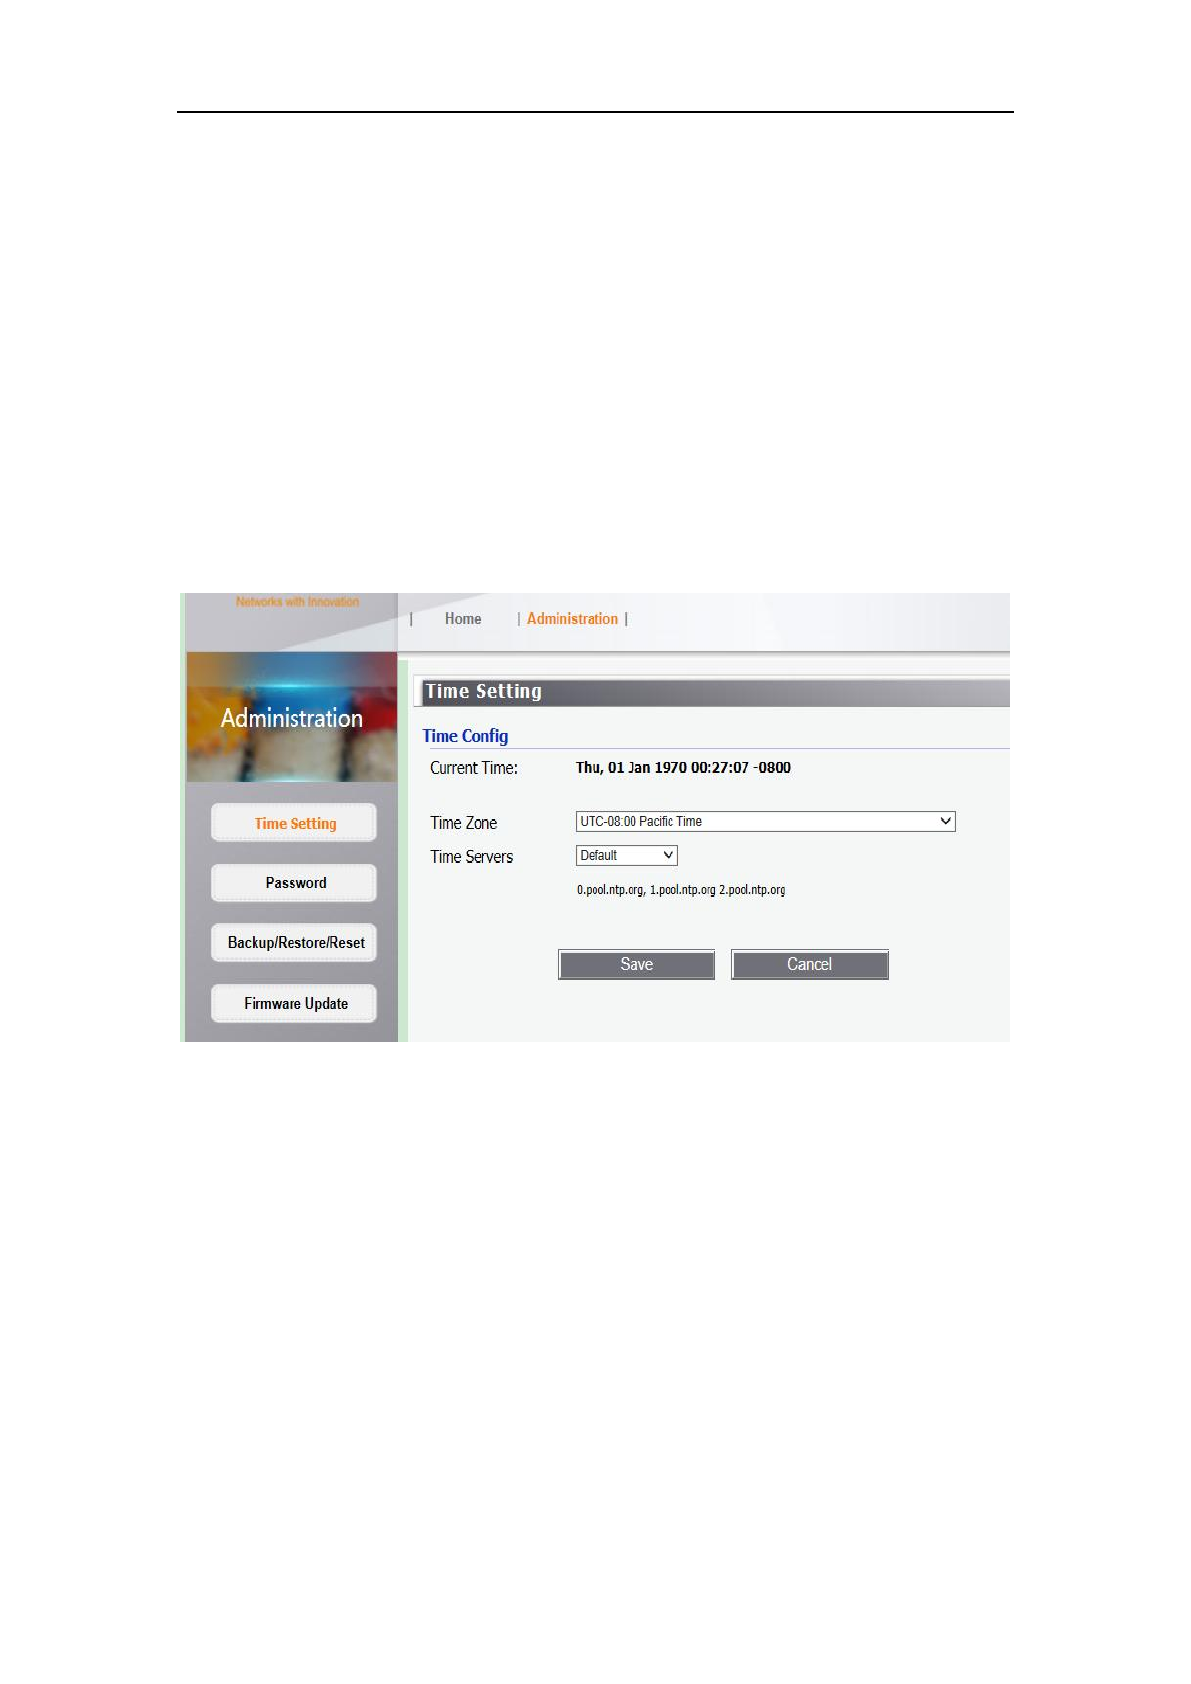
6.3.1 Time setting
This page allows you to set the time manually or to configure automatic time
synchronization. The Router can automatically update the time from an NTP server via the
Internet.
Time Zone - Select your local time zone from this pull-down list.
Time Servers - Select the time servers.You can choose the place where you are.Or
select Custom to configure the servers by yourself.
Time will show up on the page(Advanced--Status--Status,Current Time).
Note: After you have made your changes, Click Save to apply the changes.
KA1750 Wireless Router User Manual
19
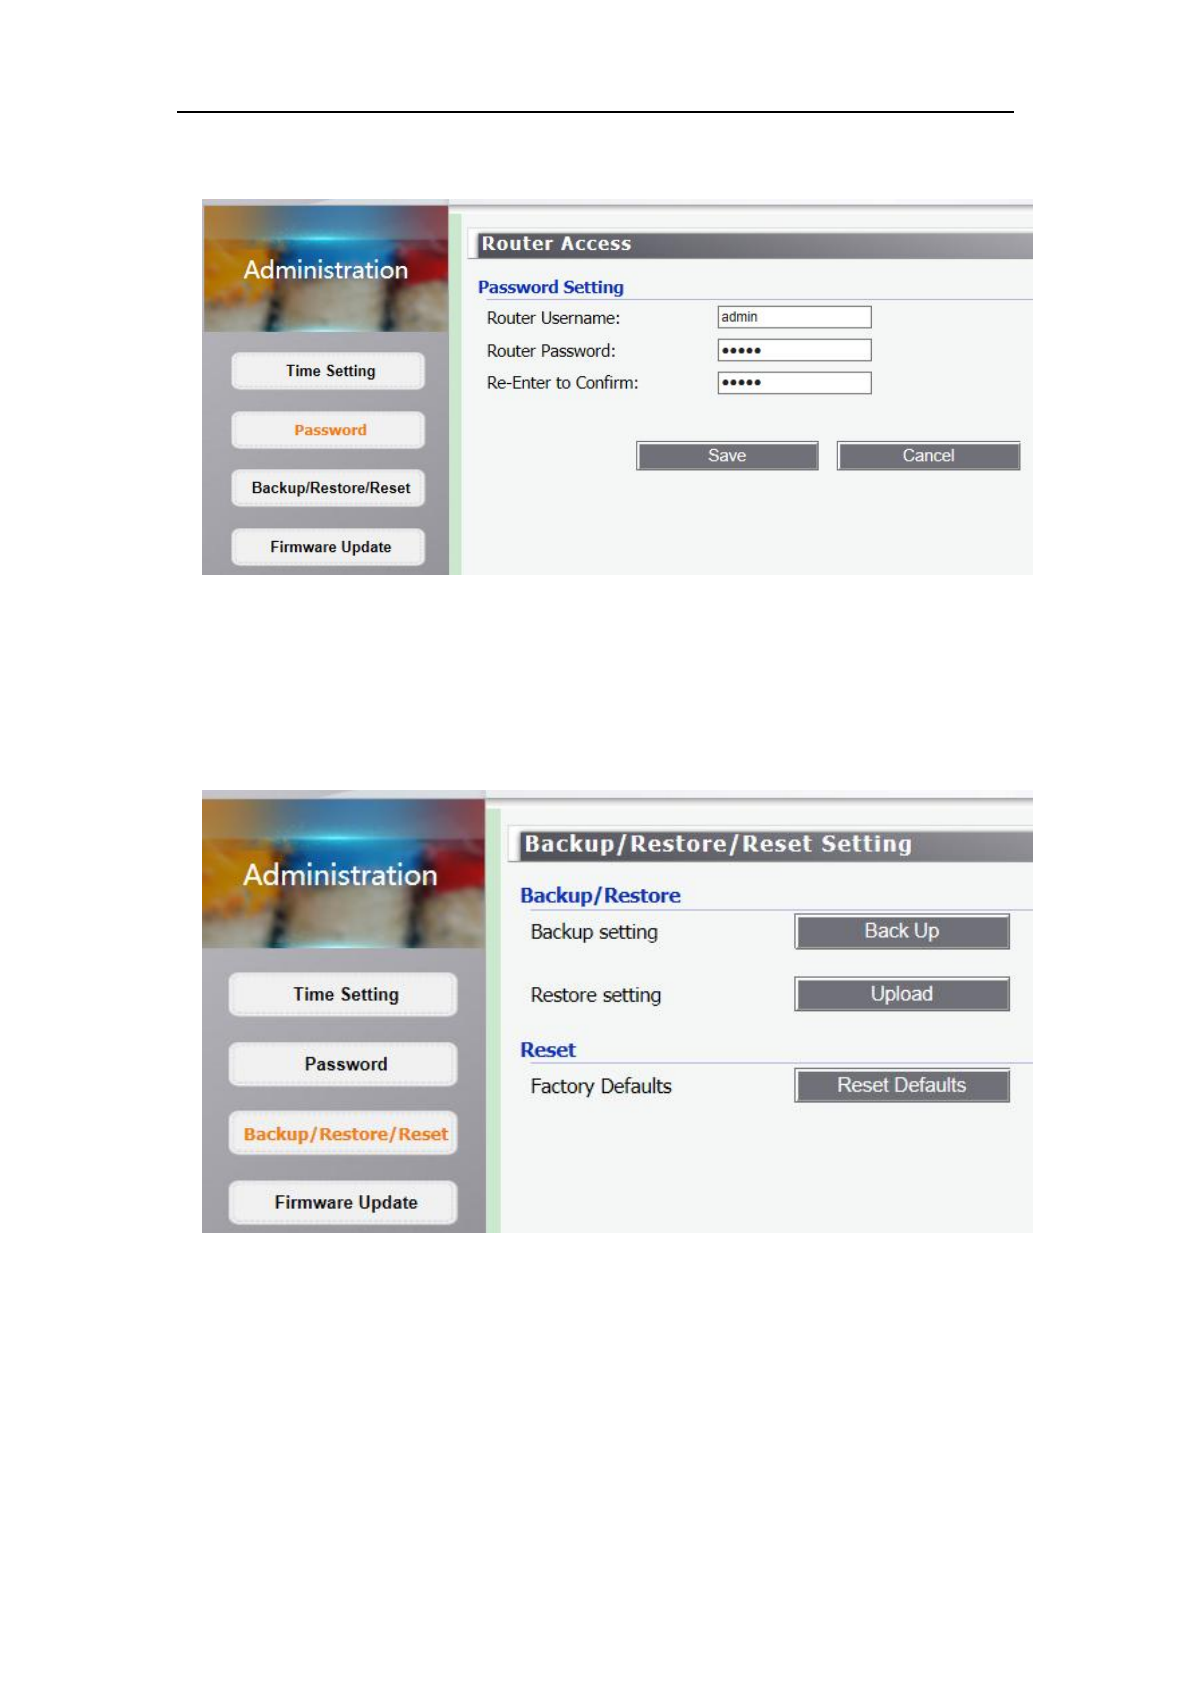
6.3.2 Password:
It is strongly recommended that you change the factory default user name and
password of the Router. All users who try to access the Router's web-based utility will be
prompted for the Router's user name and password.
6.3.3 Backup/restore/reset
Click the Backup button to save all configuration settings to your local
computer as a file. Click the Browse button to find the configuration file which you
want to restore.
Click the Upload button to update the configuration with the file whose path is
the one you have input or selected in the blank.
KA1750 Wireless Router User Manual
20
Click the Reset Defaults button to reset all configuration settings to their default
values.
The default User Name: admin
The default Password: admin
The default Subnet Mask: 255.255.255.0
Note: All changed settings will be lost when defaults are restored.
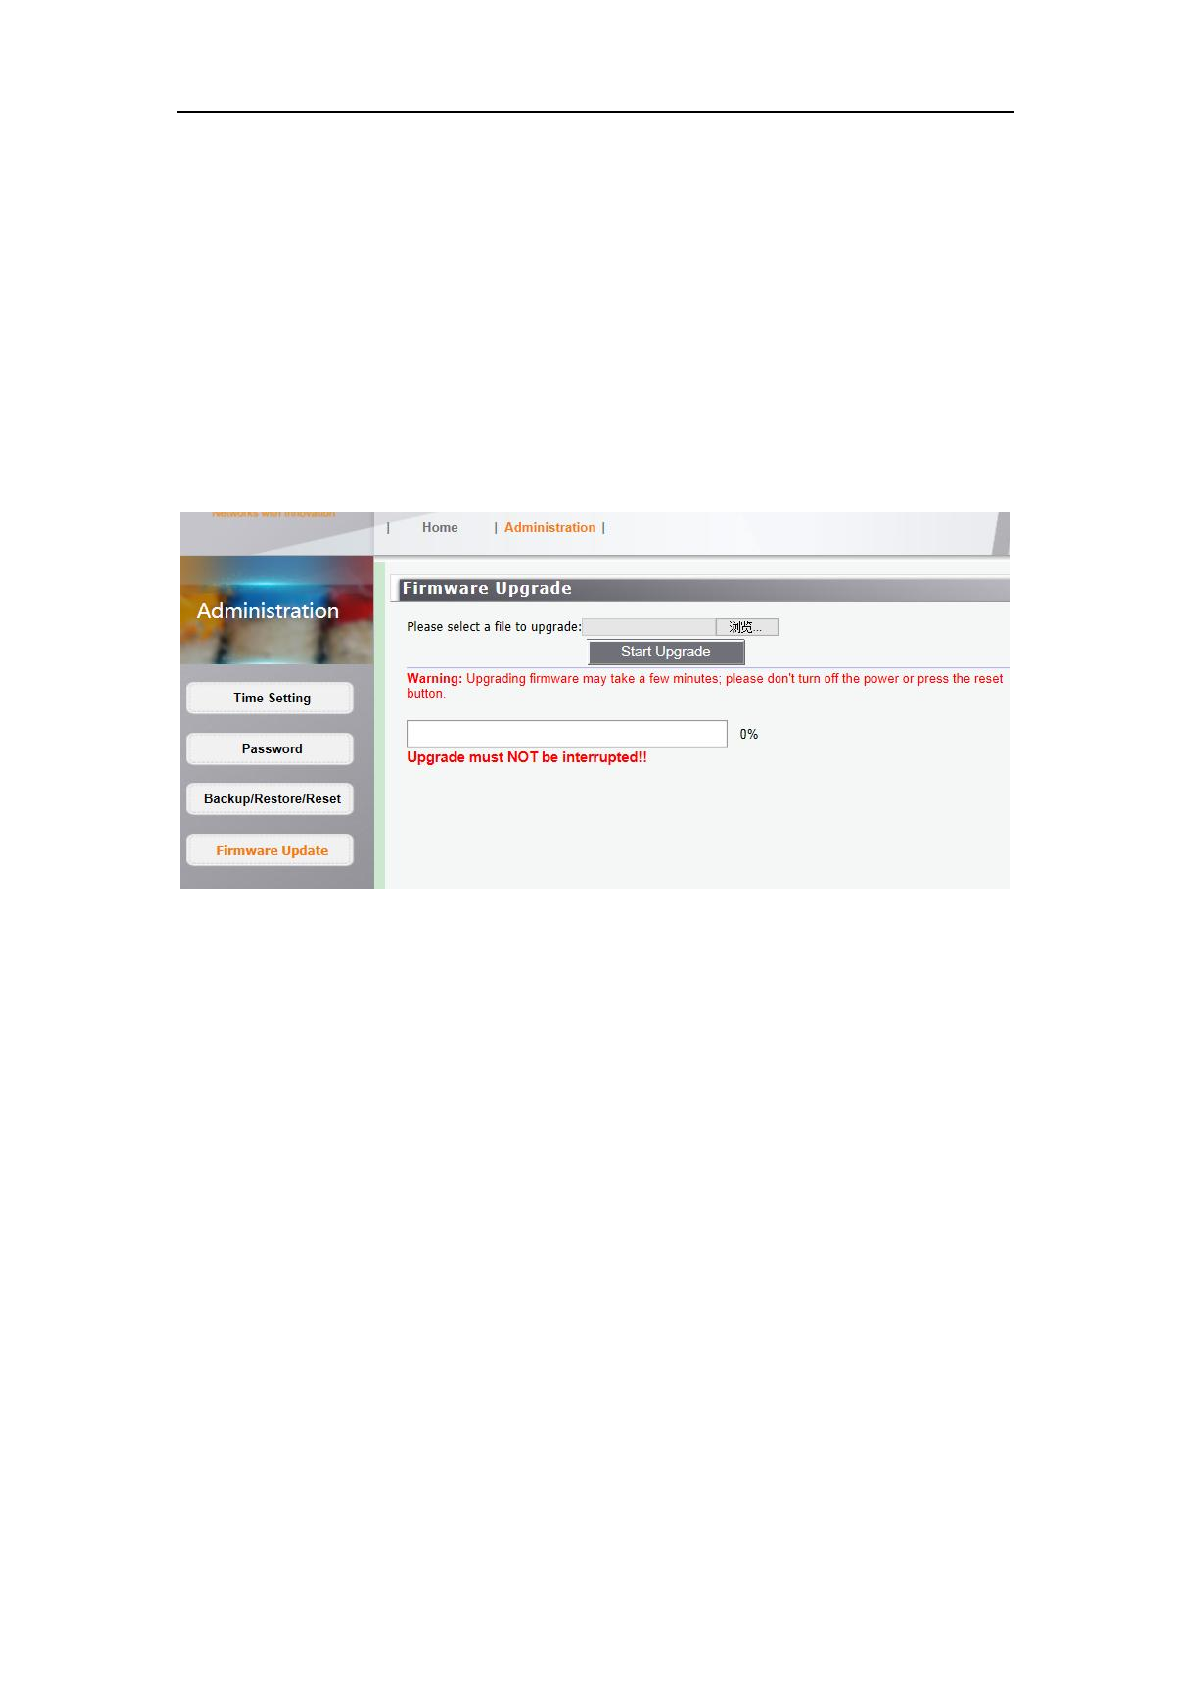
6.3.4 Firmware update
Click Browse/Choose and select the firmware upgrade file. Then click Start Upgrade.
Warning: Upgrading firmware may take a few minutes; please don't turn off the power or
press the reset button.
Upgrade must not be interrupted!!
KA1750 Wireless Router User Manual
21
7 Web-based Advance Management Guide
This chapter will introduce how to configure your router advanced,behind
the advanced menu,there are six options :status,setup,wireless,service,security,
administration.
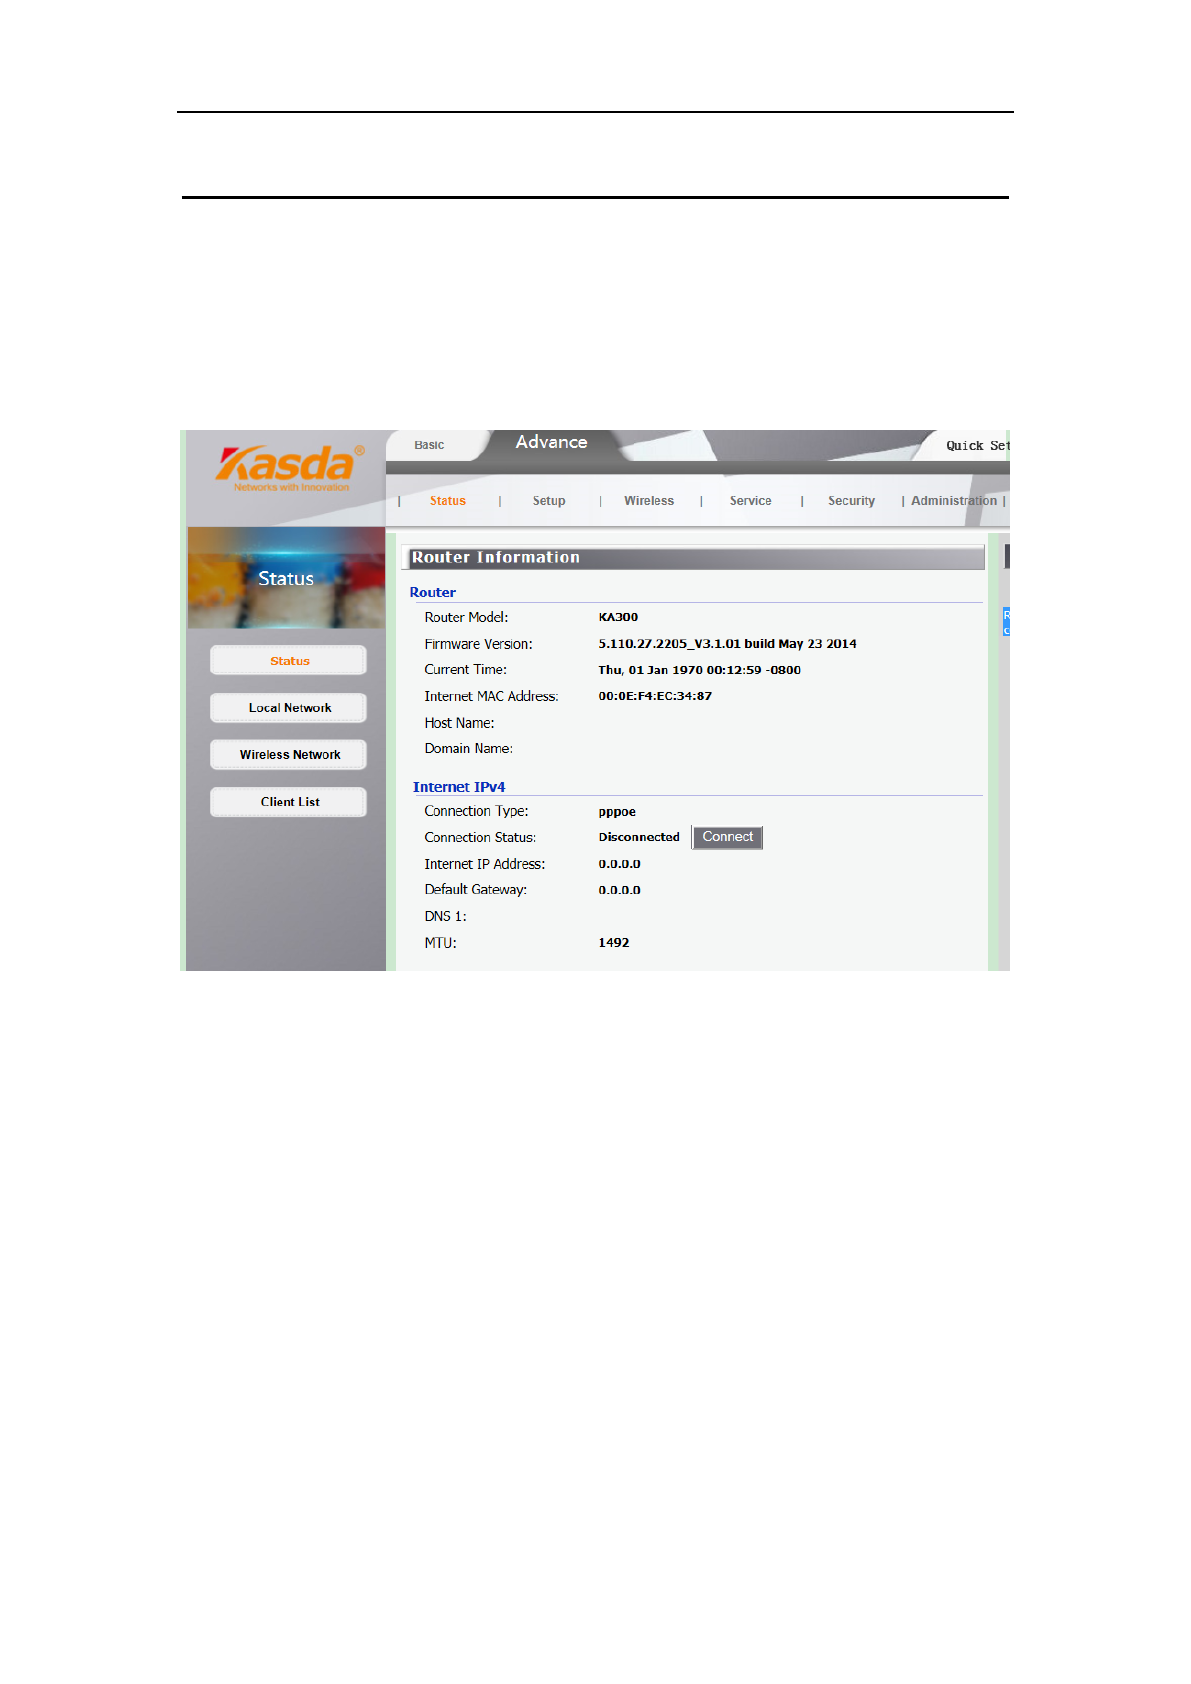
The Status page displays the Router's current status and wan configuration.
7.1 Setup
Click advanced menu,and then click setup,you can set up WAN, LAN, IPV6,
Advanced Routing
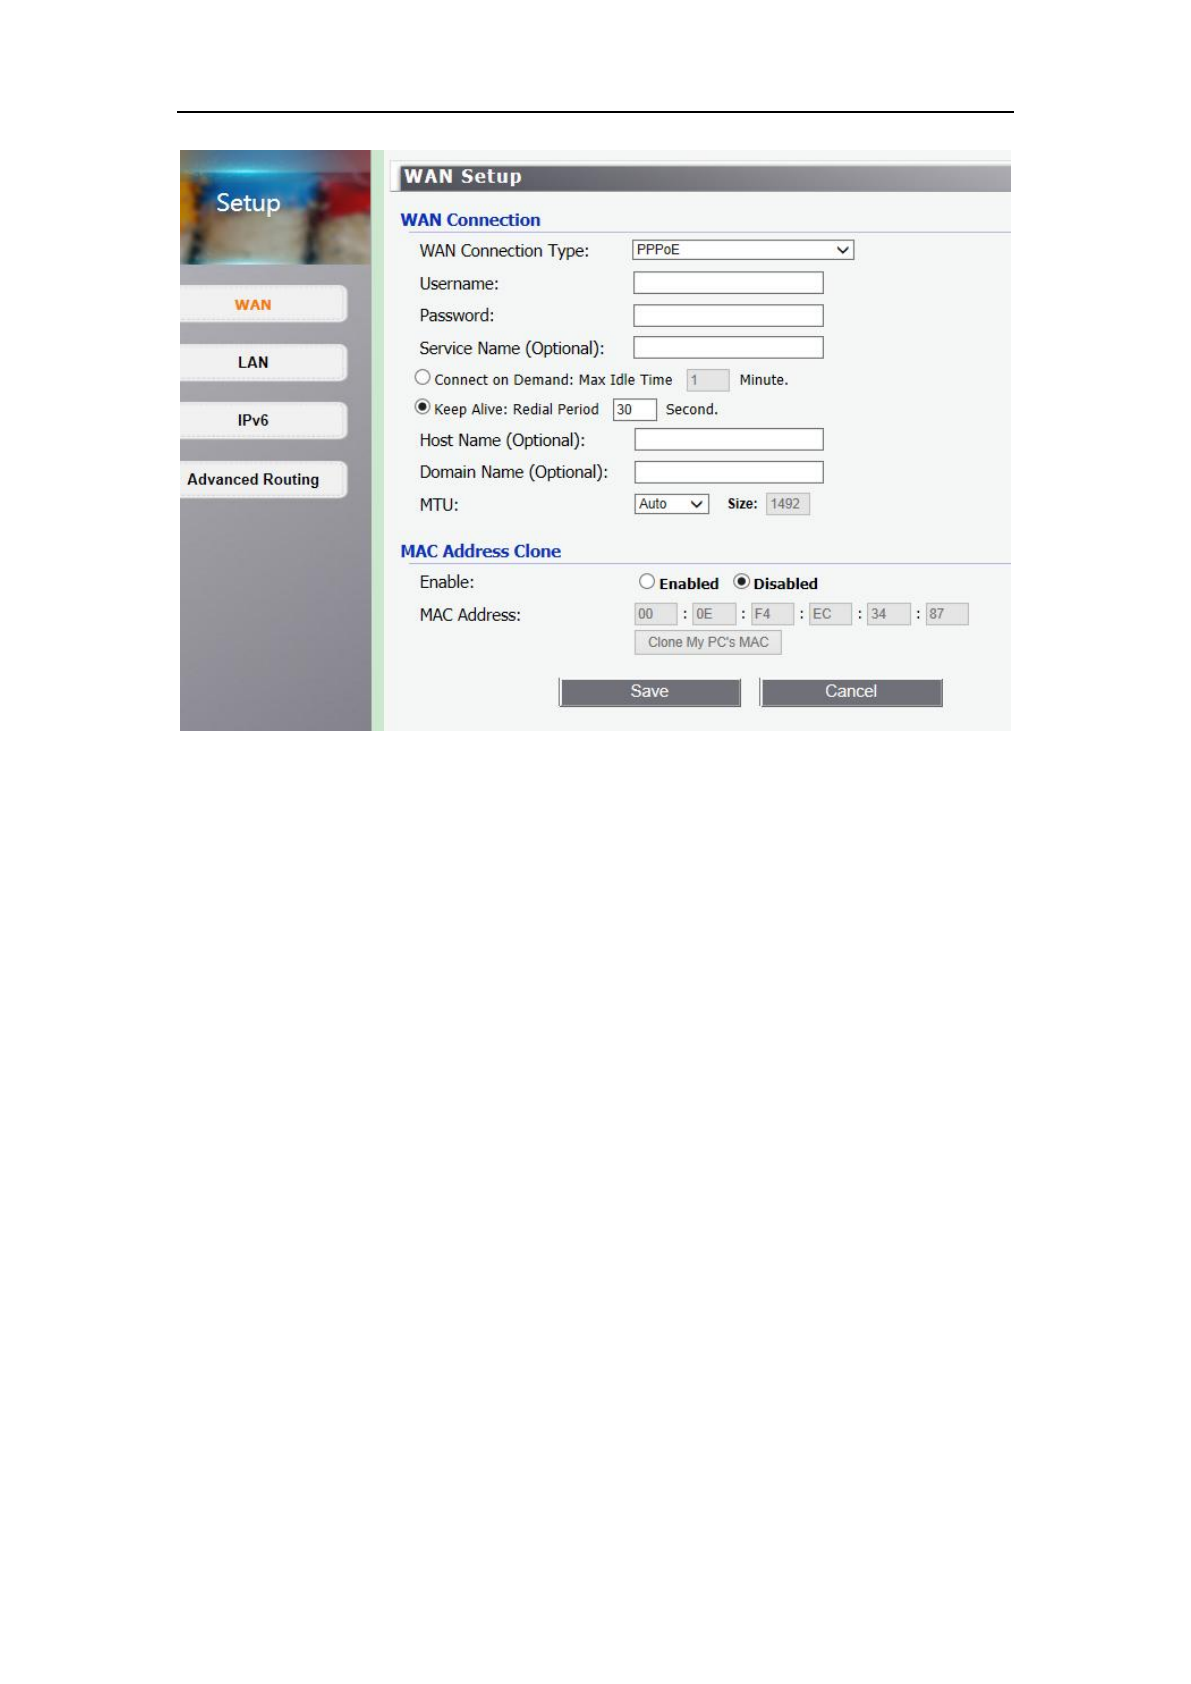
7.1.1 WAN setup
Some Internet Service Providers (ISPs) will require that you enter specific
information, such as User Name, Password, IP Address, Default Gateway Address, or
DNS IP Address. This information can be obtained from your ISP, if required.
KA1750 Wireless Router User Manual
22
WAN Connection Type
(1) Automatic Configuration – DHCP
If you connect using a dynamic IP address or cable modem, keep the default:
Automatic Configuration - DHCP.
(2) Static IP .
To use a fixed IP address to connect to the Internet, select Static IP.
Internet IP Address – Enter the IP address provided by your ISP.
Subnet Mask – Enter the subnet mask provided by your ISP.
Default Gateway – Enter the gateway IP address provided by your ISP.
DNS 1-3 – Enter the DNS (Domain Name System) server IP address(es) provided
by your ISP.
(3) PPPoE
If you use a DSL or PPPoE connection, select PPPoE.
Username – Enter the username provided by your ISP. Password – Enter the
password provided by your ISP.

KA1750 Wireless Router User Manual
23
Service Name (Optional) – Enter the Service Name, if required by your ISP.
Connect on Demand: Max Idle Time – You can configure the router to
disconnect your Internet connection after a specified period of inactivity (Max Idle
Time). If your Internet connection has been terminated due to inactivity, Connect on
Demand enables the router to automatically re-establish your connection as soon as
you attempt to access the Internet again. If you want your Internet connection to
remain active at all times, enter 0 in the Max Idle Time field. Otherwise, enter the
number of minutes you want to have elapsed before your Internet connection
terminates.The default is 15 minutes.
Keep Alive: Redial Period – This option keeps you connected to the Internet
indefinitely, even when your connection sits idle. To use this option, click the radio
button next to Keep Alive. The default Redial Period is 30 seconds (in other words,
the router will check the Internet connection every 30 seconds).
Host Name (Optional) – Enter a host name for the Router, if required by your
ISP.
Domain Name (Optional) – Enter a domain name for the Router, if required by
your ISP.
MTU – MTU is the Maximum Transmission Unit. It specifies the largest packet
size permitted for Internet transmission. Keep the default setting, Auto, to have the
router select the best MTU for your Internet connection. To specify a MTU size,
select Manual, and enter the value desired (default is 1400). You should leave this
value in the 1200 to 1500 range.
MAC Address Clone
The router's MAC address is a 12-digit code assigned to a unique piece of
hardware for identification. Some ISPs require that you register the MAC address of
your network card/adapter, which was connected to your cable or DSL modem during
installation.
KA1750 Wireless Router User Manual
24
To clone your network adapter's MAC address onto the router, select Enable and
enter your adapter's MAC address in the Clone WAN MAC field or click Get My
PC's MAC to fill in the MAC address of your PC you are using. Then save your
changes by clicking on the Apply button.
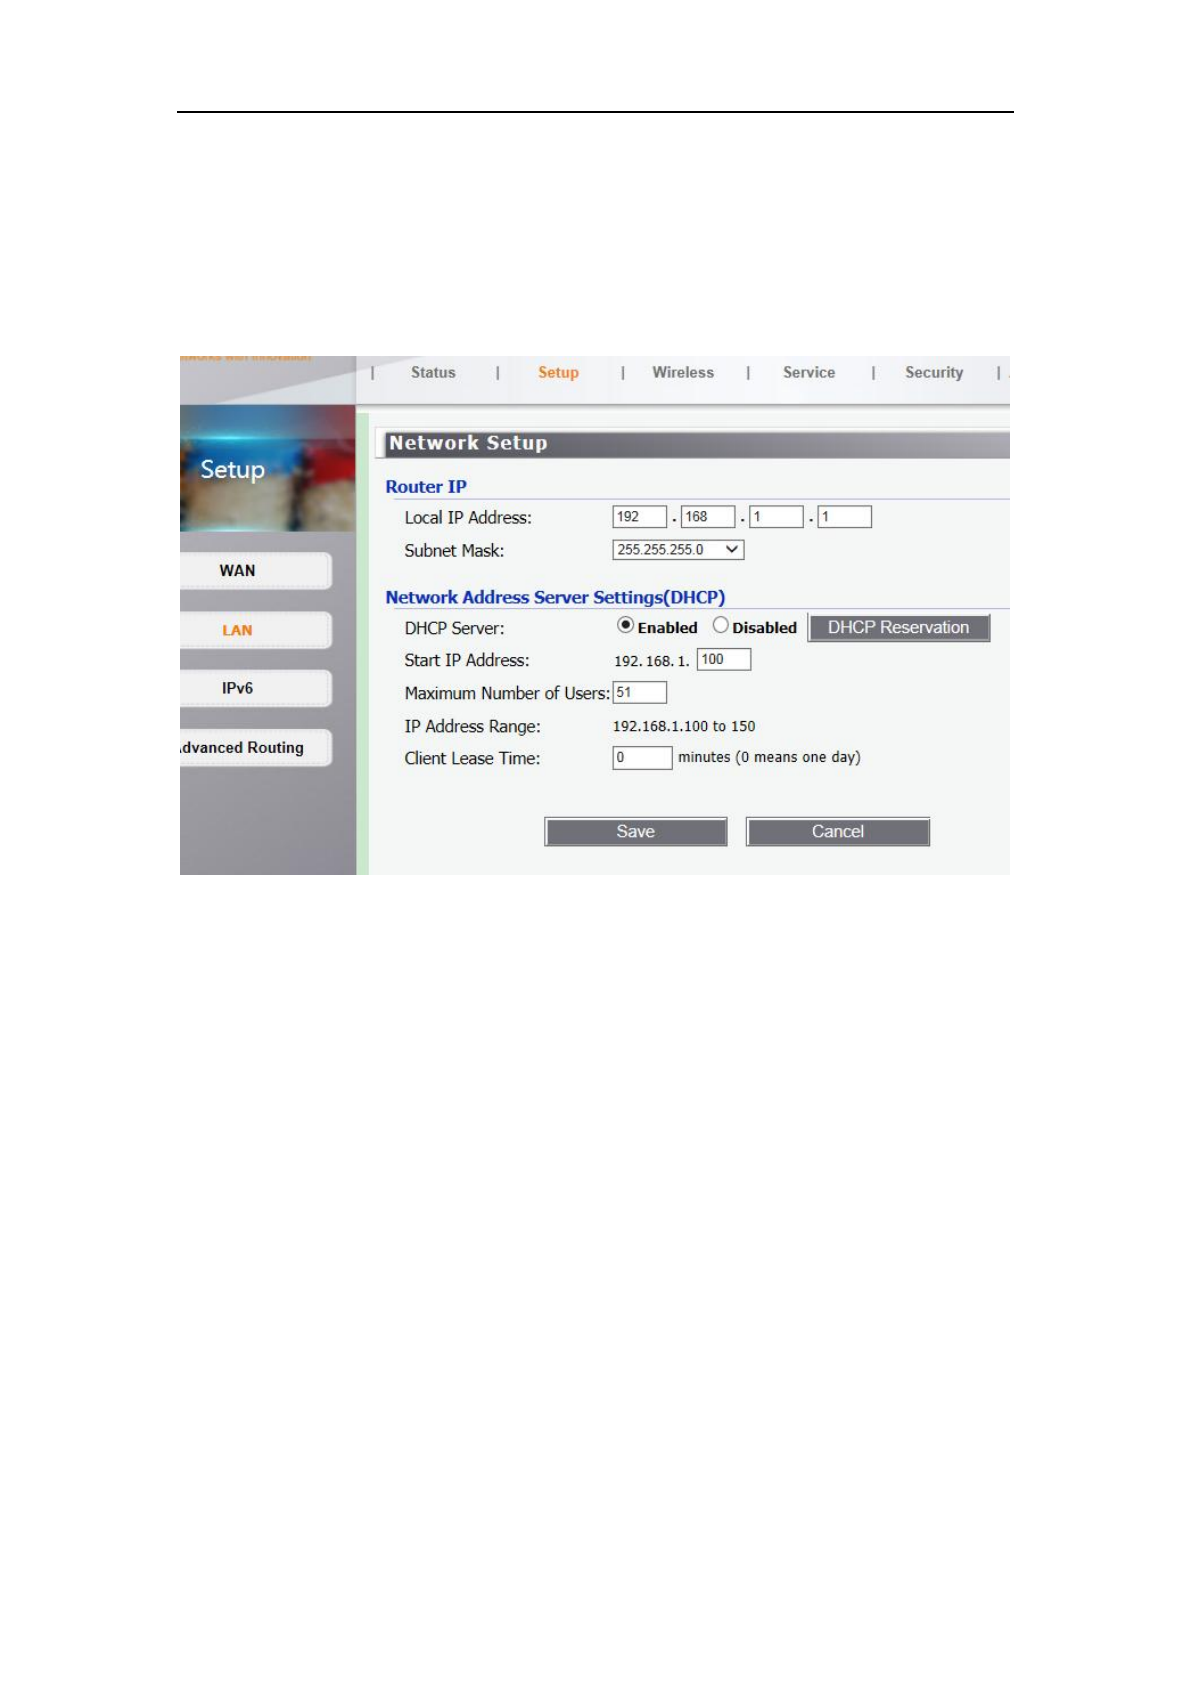
7.1.2 LAN setup
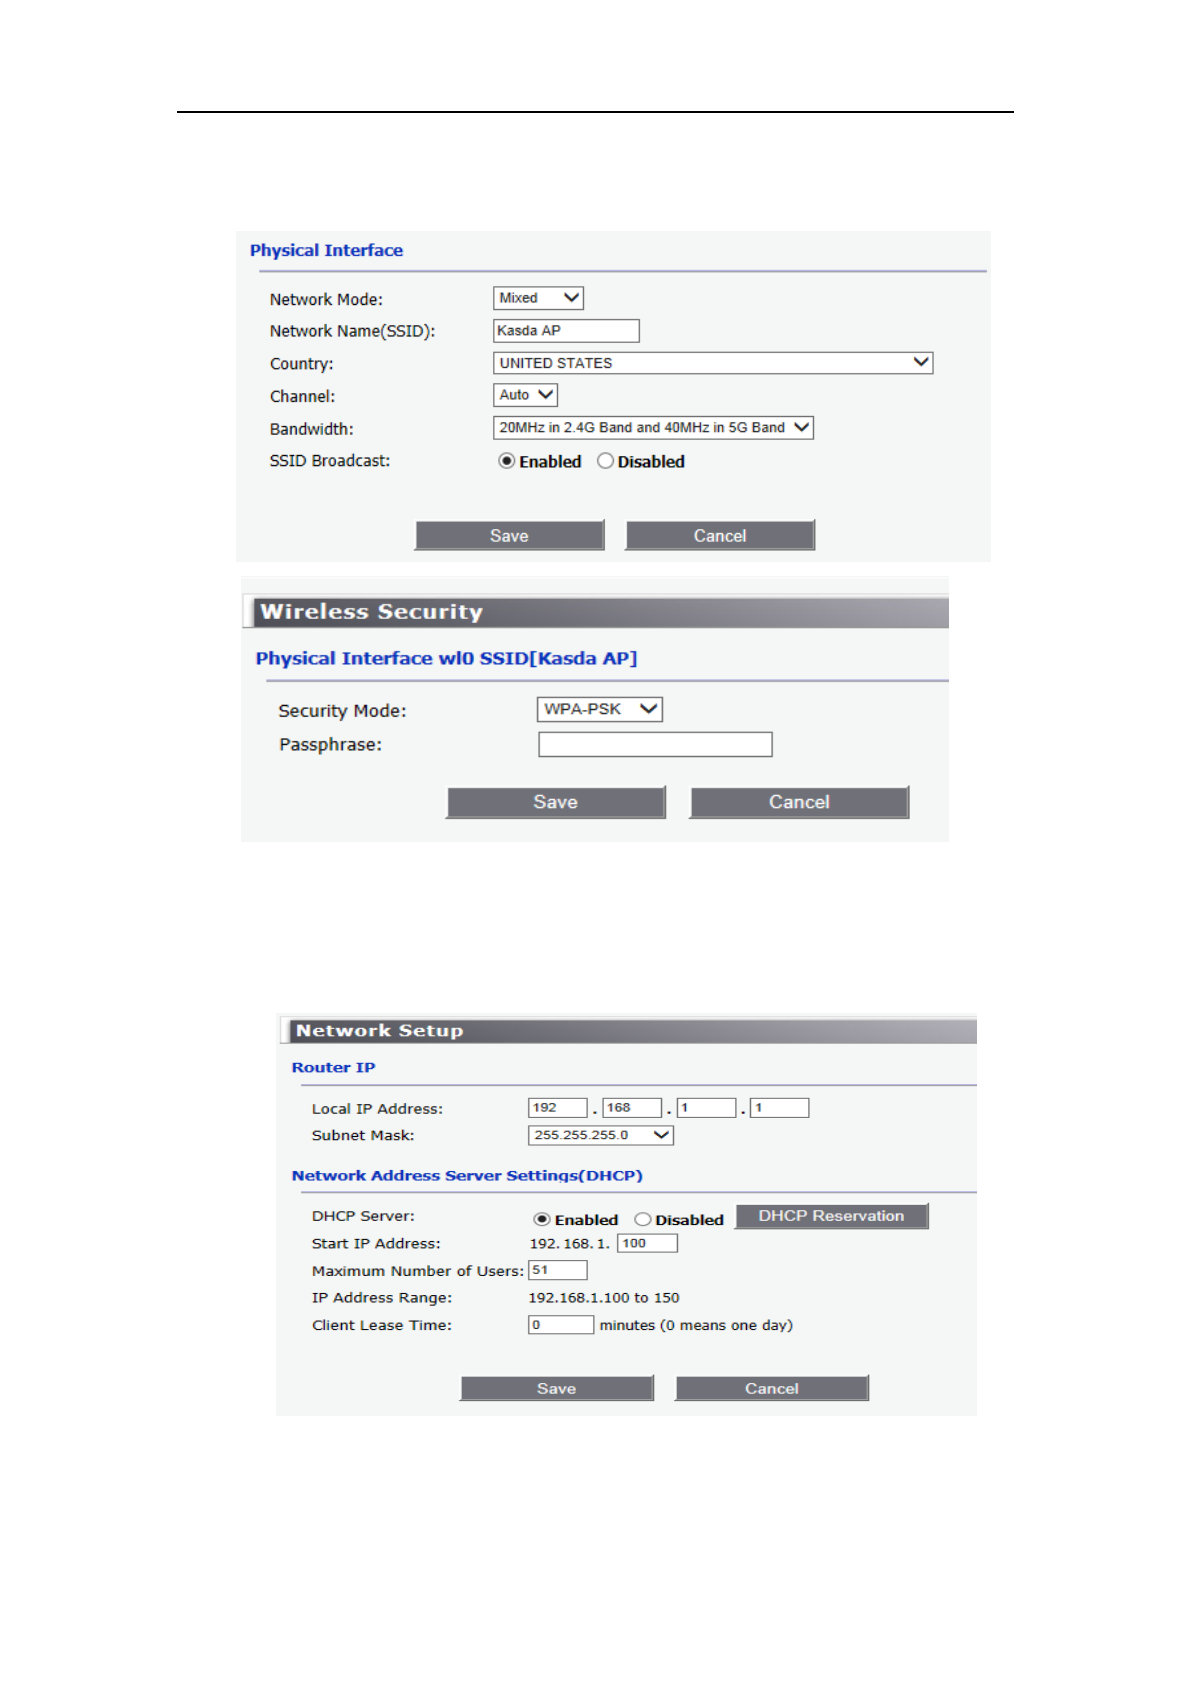
Router IP
Local IP Address / Subnet Mask: This is the router IP Address and Subnet Mask
as seen on the internal LAN. The default value is 192.168.1.1 for IP Address and
255.255.255.0 for Subnet Mask.
Network Address Server setting(DHCP)
DHCP Server – Keep the default, Enable, to enable the router's DHCP server
option. If you already have a DHCP server on your network or you do not want a
DHCP server, then select Disable.
Maximum DHCP Users – Enter the maximum number of PCs that you want the
DHCP server to assign IP addresses to. The absolute maximum is 253, possible if
192.168.1.2 is your starting IP address.
Client Lease Time – Enter the length of time, in minutes, that a DHCP client
will be allowed to use a dynamic IP address. The default is 0 minutes, which means
one day. After this time is up, the client will be automatically assigned a new dynamic
IP address, or the lease will be renewed.
DHCP Reservation:DHCP Reservation is usefull for controlling access of
specific computers in the LAN.
KA1750 Wireless Router User Manual
25
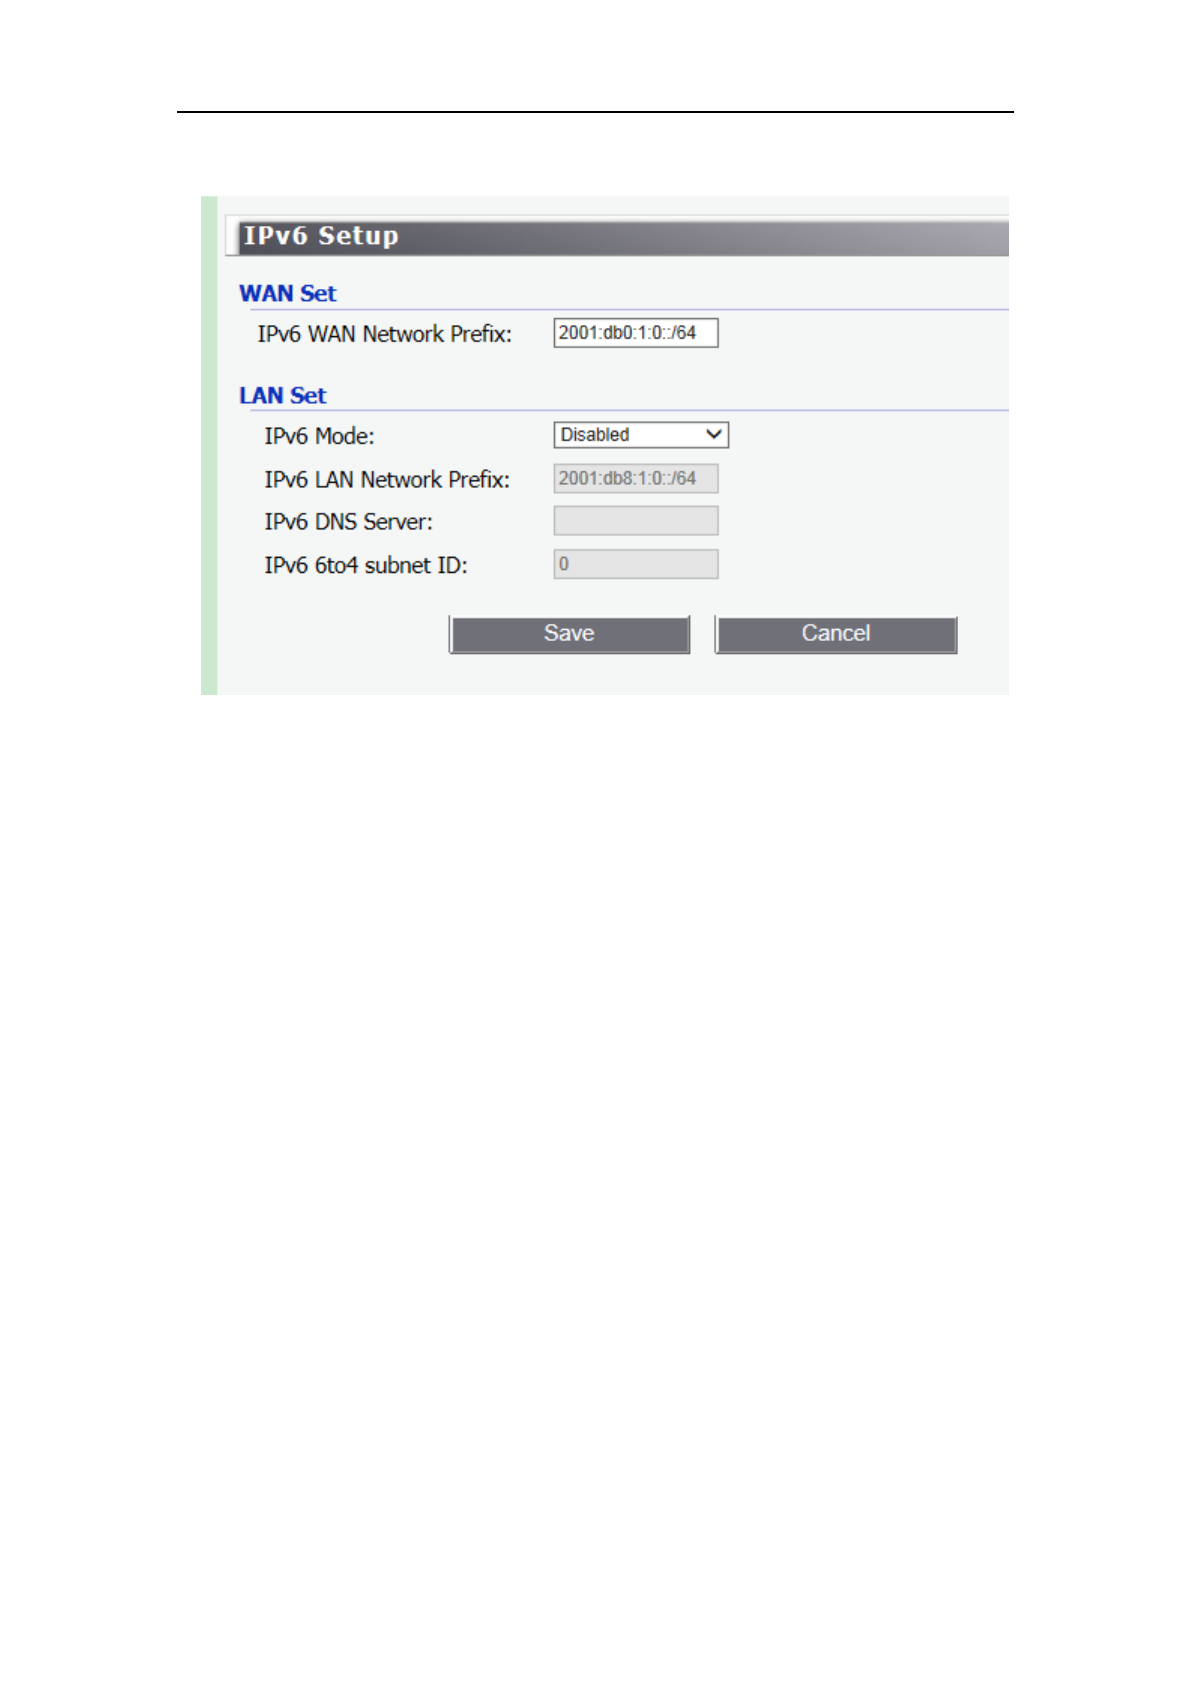
7.1.3 IPV6
WAN Set
IPv6 WAN Network Prefix – Sets the IPv6 Network Prefix for WAN.
LAN Set
IPv6 LAN Network Prefix – Sets the IPv6 Network Prefix for LAN.
IPv6 DNS Server – Sets the IP addresses of the DNS servers to use for resolving
host names.
IPv6 6to4 subnet ID – Sets the 6to4 subnet ID(0-65535).
KA1750 Wireless Router User Manual
26
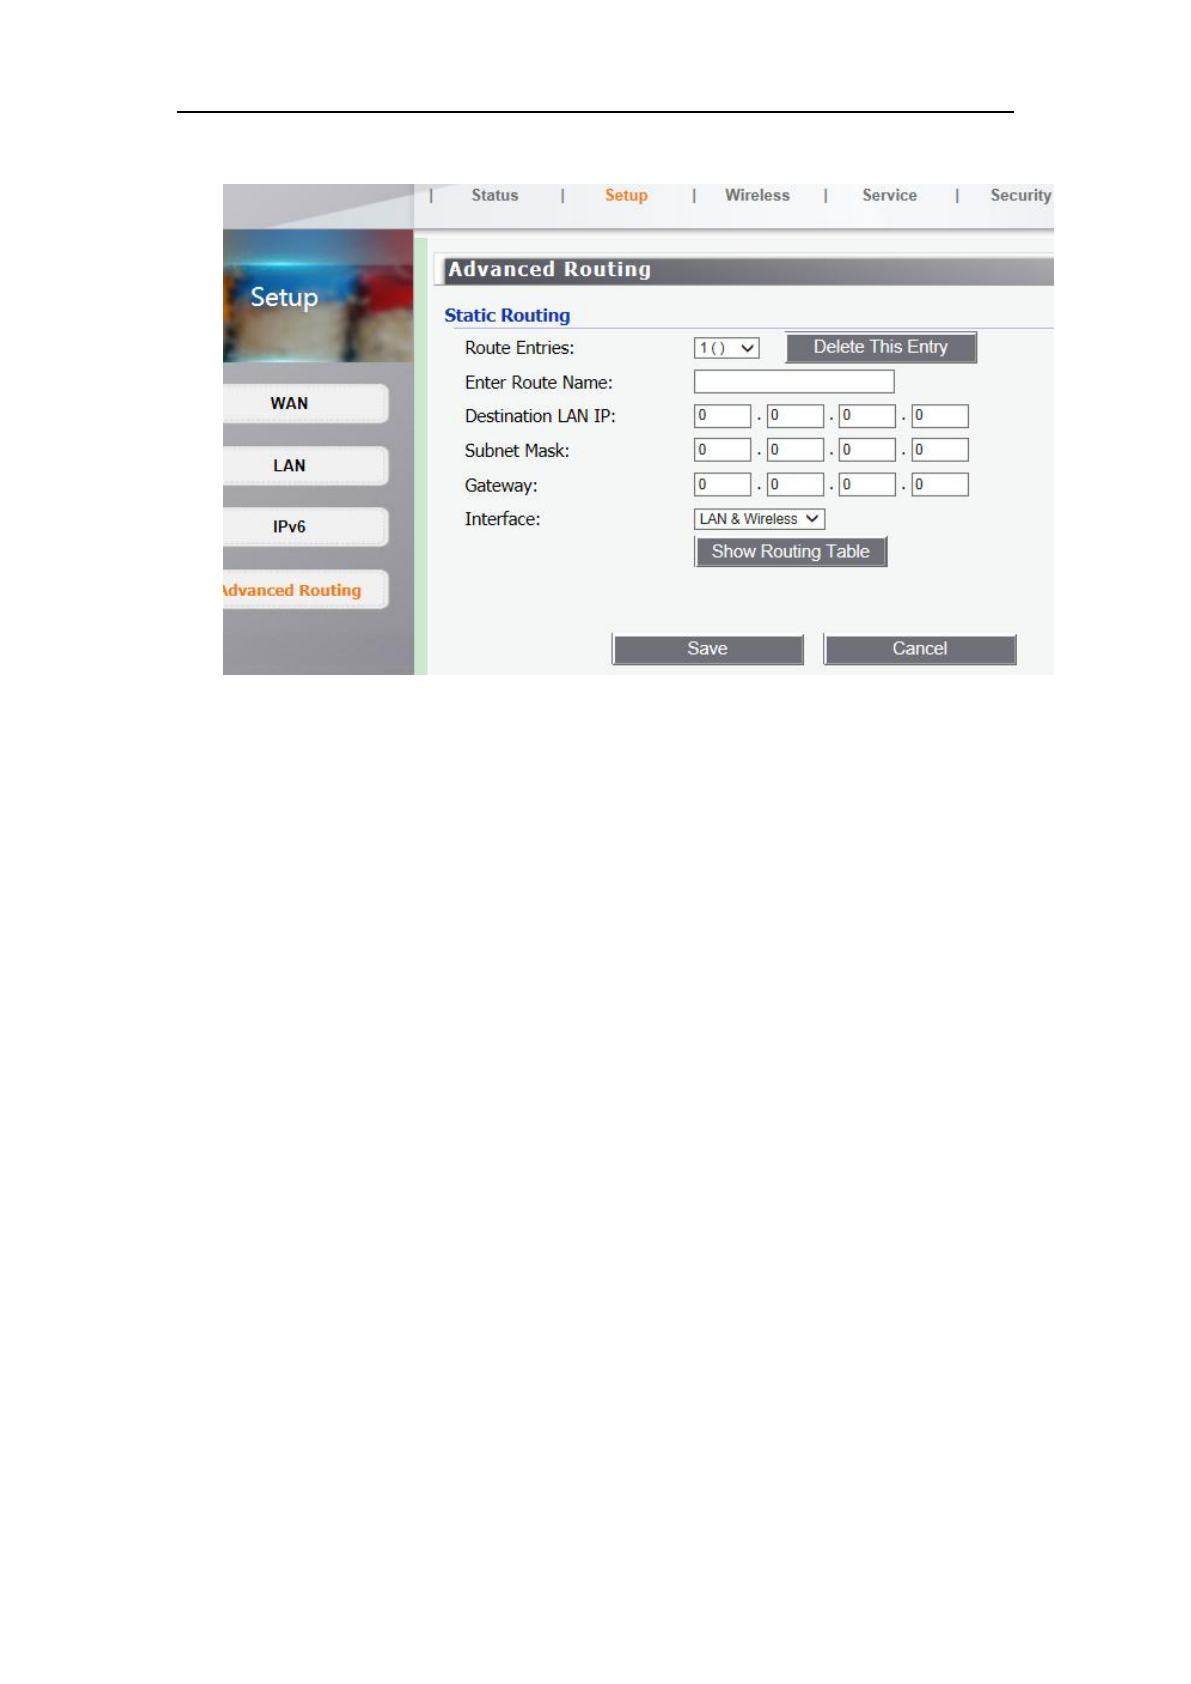
7.1.4 Advanced Routing Setup
Static Routing
A static route is a pre-determined pathway that network information must travel
to reach a specific host or network.
To set up a static route between the router and another network:
1.Select a number from the Static Routing drop-down list.
2.Enter the following data:
• Destination IP Address – The Destination IP Address is the address of the
network or host to which you want to assign a static route.
• Subnet Mask– The Subnet Mask determines which portion of an IP address is
the network portion, and which portion is the host portion.
• Gateway – This is the IP address of the gateway device that allows for
contact between the router and the network or host.
3.Depending on where the Destination IP Address is located, select LAN &
WLAN or WAN from the Interface drop-down menu.
4.Click the Apply button to save your changes. To cancel your unsaved changes,
click the Cancel button. For additional static routes, repeat steps 1-4.
To delete a static route entry:
1.From the Static Routing drop-down list, select the entry number of the static
route.
2.Click the Delete This Entry button.
3.To save a deletion, click the Apply button. To cancel a deletion, click the
Cancel button.
KA1750 Wireless Router User Manual
27
7.2 Wireless Setup
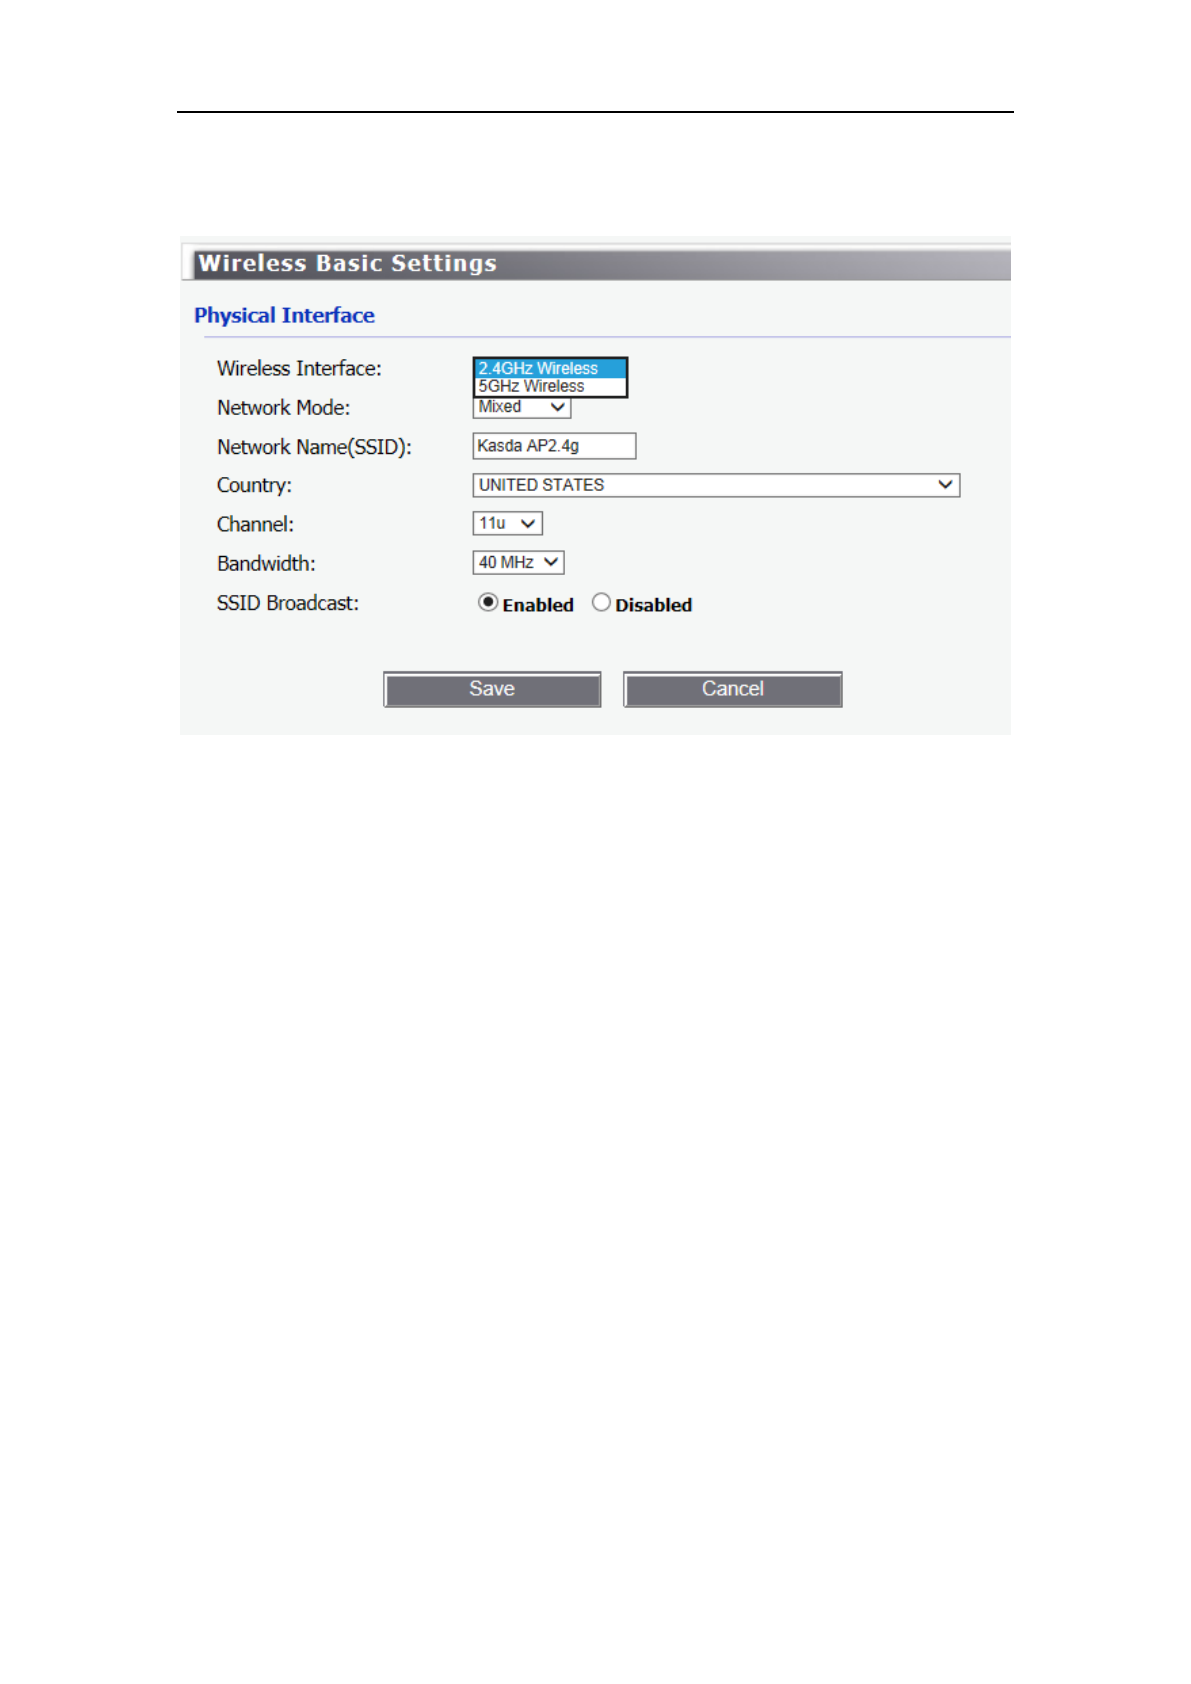
7.2.1 Wireless Basic Settings
• Network Mode – If you have Wireless-G and 802.11b devices in your
network, then keep the default setting, Mixed. If you have only Wireless-G devices,
select G-Only. If you would like to limit your network to only 802.11b devices, then
select B-Only. If you want to disable wireless networking, select Disable. Note that
B-Only mode is not supported under WDS.
• Network Name(SSID) – Enter the name of your wireless network.
• Country – Select your Country from the pull-down list. This field specifies
the Country where the wireless function of the Router can be used. It may be illegal to
use the wireless function of the Router in a region other than one of those specified in
this filed. If your country or region is not listed, please contact your local government
agency for assistance.
• Channel – This field determines which operating frequency will be used.
It is not necessary to change the wireless channel unless you notice interference
problems with another nearby access point. If you select auto, then AP will choose the
best channel automatically.
• Bandwidth – The bandwidth of the wireless channel.
• SSID Broadcast – When wireless clients survey the local area for
wireless networks to associate with, they will detect the SSID broadcast by the router.
To broadcast the router SSID, keep the default setting, Enable. If you do not want to
broadcast the router SSID, then select Disable

KA1750 Wireless Router User Manual
28
7.2.2 Guest Access
Use the Guest Access feature to provide guests visiting your home with Internet
access only. The guest network is a wireless network separate from your local
network.
• Allow Guest Access – To allow Internet access through a guest network,
select yes.
• Guest Network Name – The name of the guest network is displayed.
• Total Guests Allowed – Select the number of guests you want to allow on
your guest network.
• SSID Broadcast – When wireless devices survey the local area for wireless
networks to associate with, they will detect the SSID (wireless network name)
broadcast by the Router. To broadcast the SSID of the guest network, keep the default,
Enabled.
KA1750 Wireless Router User Manual
29
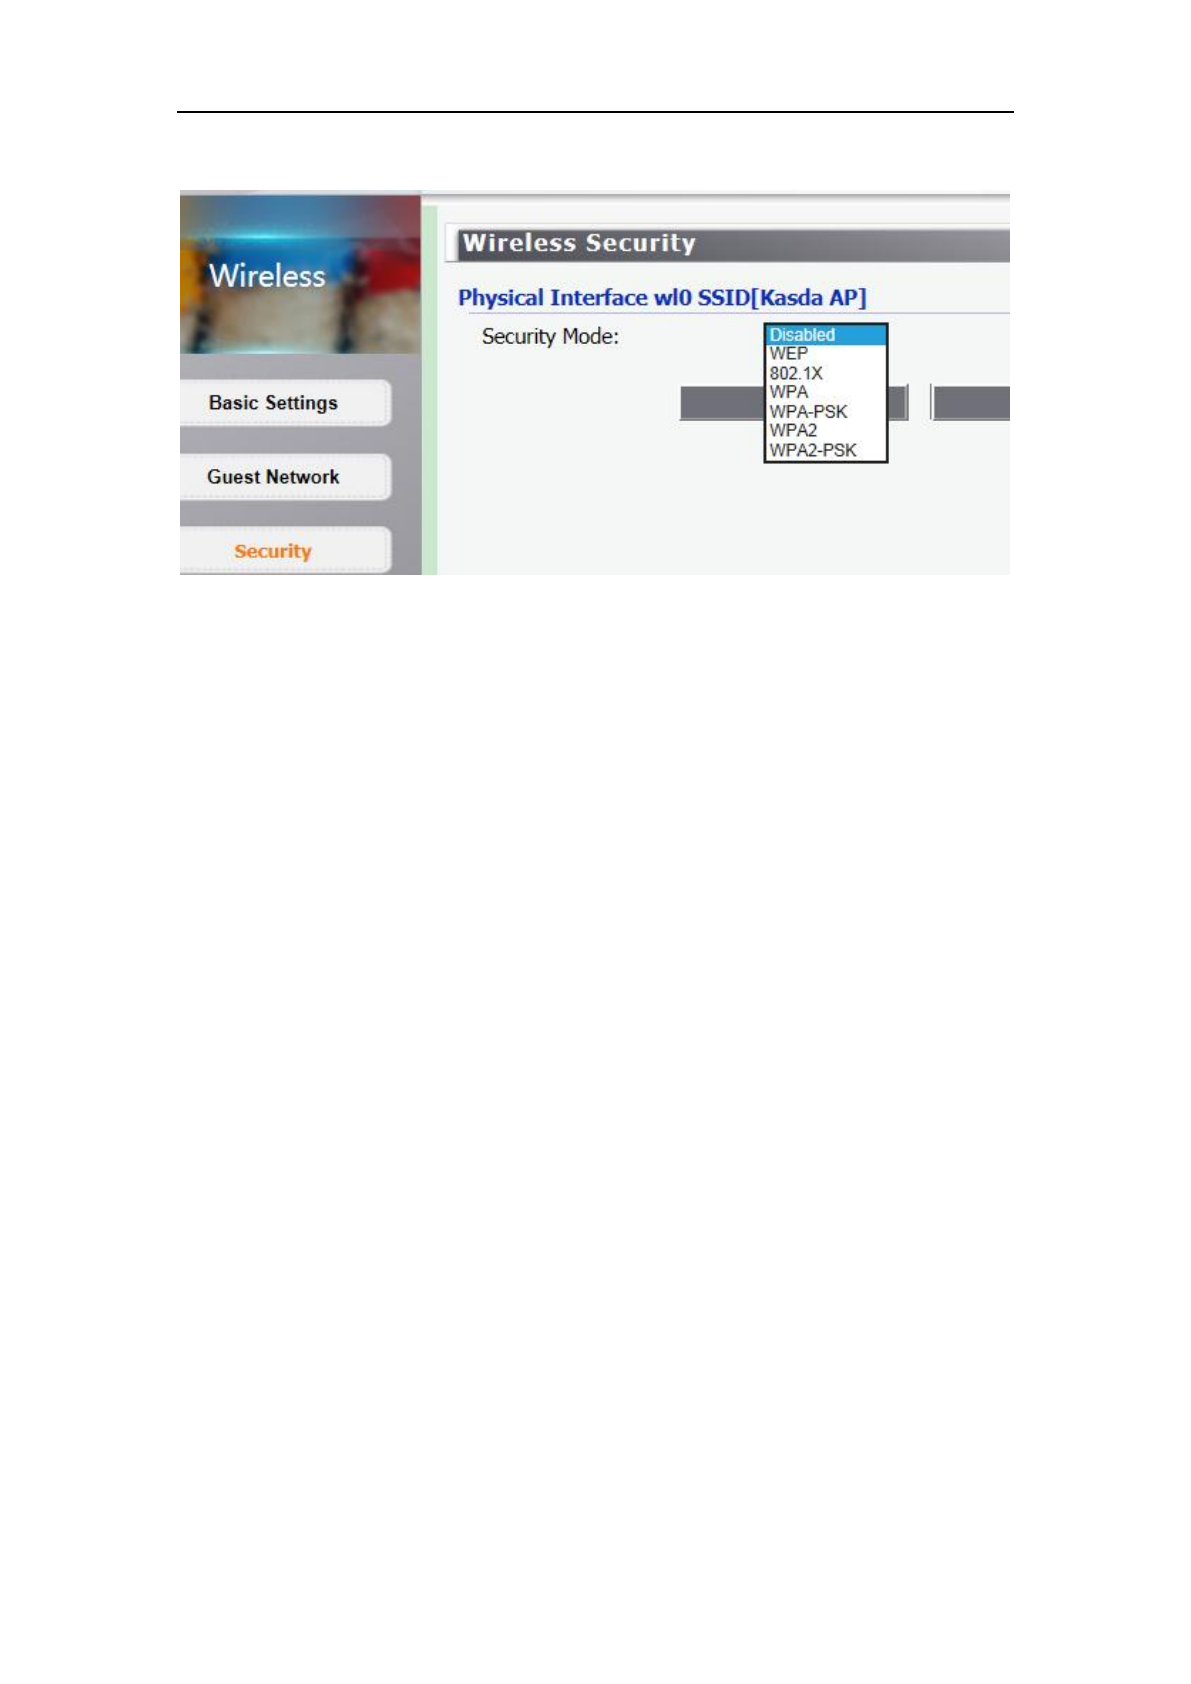
7.2.3 Security
You can select one of the following security options:
• Disabled – The wireless security function can be enabled or disabled. If
disabled, the wireless stations will be able to connect the Router without encryption. It
is recommended strongly that you choose one of following options to enable security.
• WEP – Select 802.11 WEP security.
• WPA/WPA2 - Personal – Select WPA based on pre-shared passphrase.
• WPA/WPA2 - Enterprise – Select WPA based on Radius Server.
Each security option has its own settings as described follows.
WEP
Select a level of WEP encryption.
• Passphrase – Enter a passphrase to automatically generate WEP keys. Then
click Generate.
• Key 1 – If you did not enter a passphrase, enter the WEP key(s) manually.
• Key 2 – If you did not enter a passphrase, enter the WEP key(s) manually.
WPA/WPA2 - Enterprise
Version - You can select one of following versions,
• WPA – Wi-Fi Protected Access.
• WPA2 – WPA version 2.
KA1750 Wireless Router User Manual
30
• RADIUS Server – Enter the IP address of the RADIUS server.
• RADIUS Port – Enter the port number of the RADIUS server. The default
is1812.
• Shared Key – Enter the key shared between the Router and the server.
WPA/WPA2 - Personal(WPA-PSK/WPA2-PSK)
Version - You can select one of following versions,
• WPA-PSK – Pre-shared key of WPA.
• WPA2-PSK – Pre-shared key of WPA2.
• PSK Password –You can enter ASCII or Hexadecimal characters. For
Hexadecimal, the length should be between 8 and 64 characters; for ASCII, the length
should be between 8 and 63 characters.
7.2.4 WPS Setup
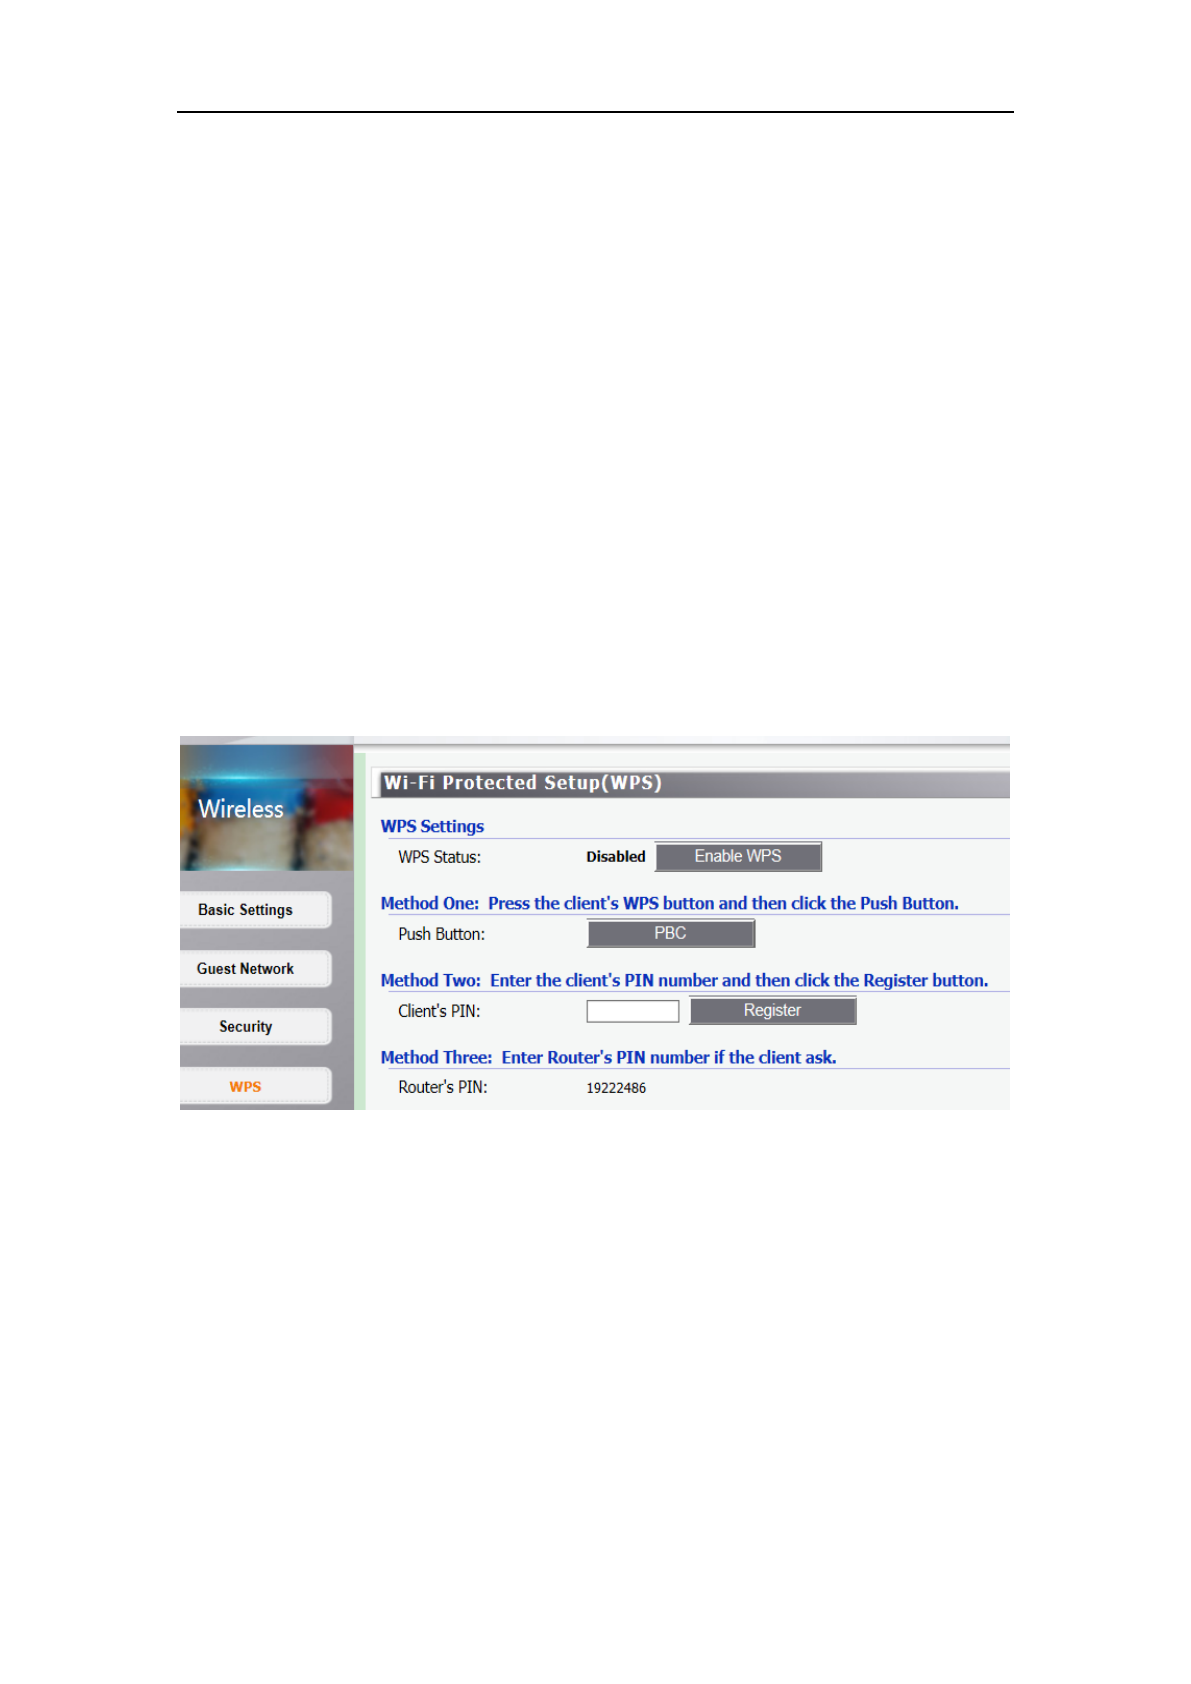
Wi-Fi Protected Setup(WPS)
WPS function will help you add a new device to the network quickly. If the new
device supports Wi-Fi Protected Setup and is equipped with a configuration button,
you can add it to the network by pressing the configuration button on the device and
then press the button on the Router within two minutes. The status LED on the Router
will light blue for five minutes if the device has been successfully added to the
network. If the new device supports Wi-Fi Protected Setup and the connection way
using PIN, you can add it to the network by entering the Router's PIN.
• WPS Status – Enable or disable the WPS function here.
KA1750 Wireless Router User Manual
31
• Push Button – This button's function is same to the physical button on the
router.
• Client's PIN – If the client supports the connection way by entering its
PIN.Enter the Client's PIN.Click Register button to connect the client.
• Router's PIN – The current value of the Router's PIN displayed here.
7.2.5 Wireless Access Setup
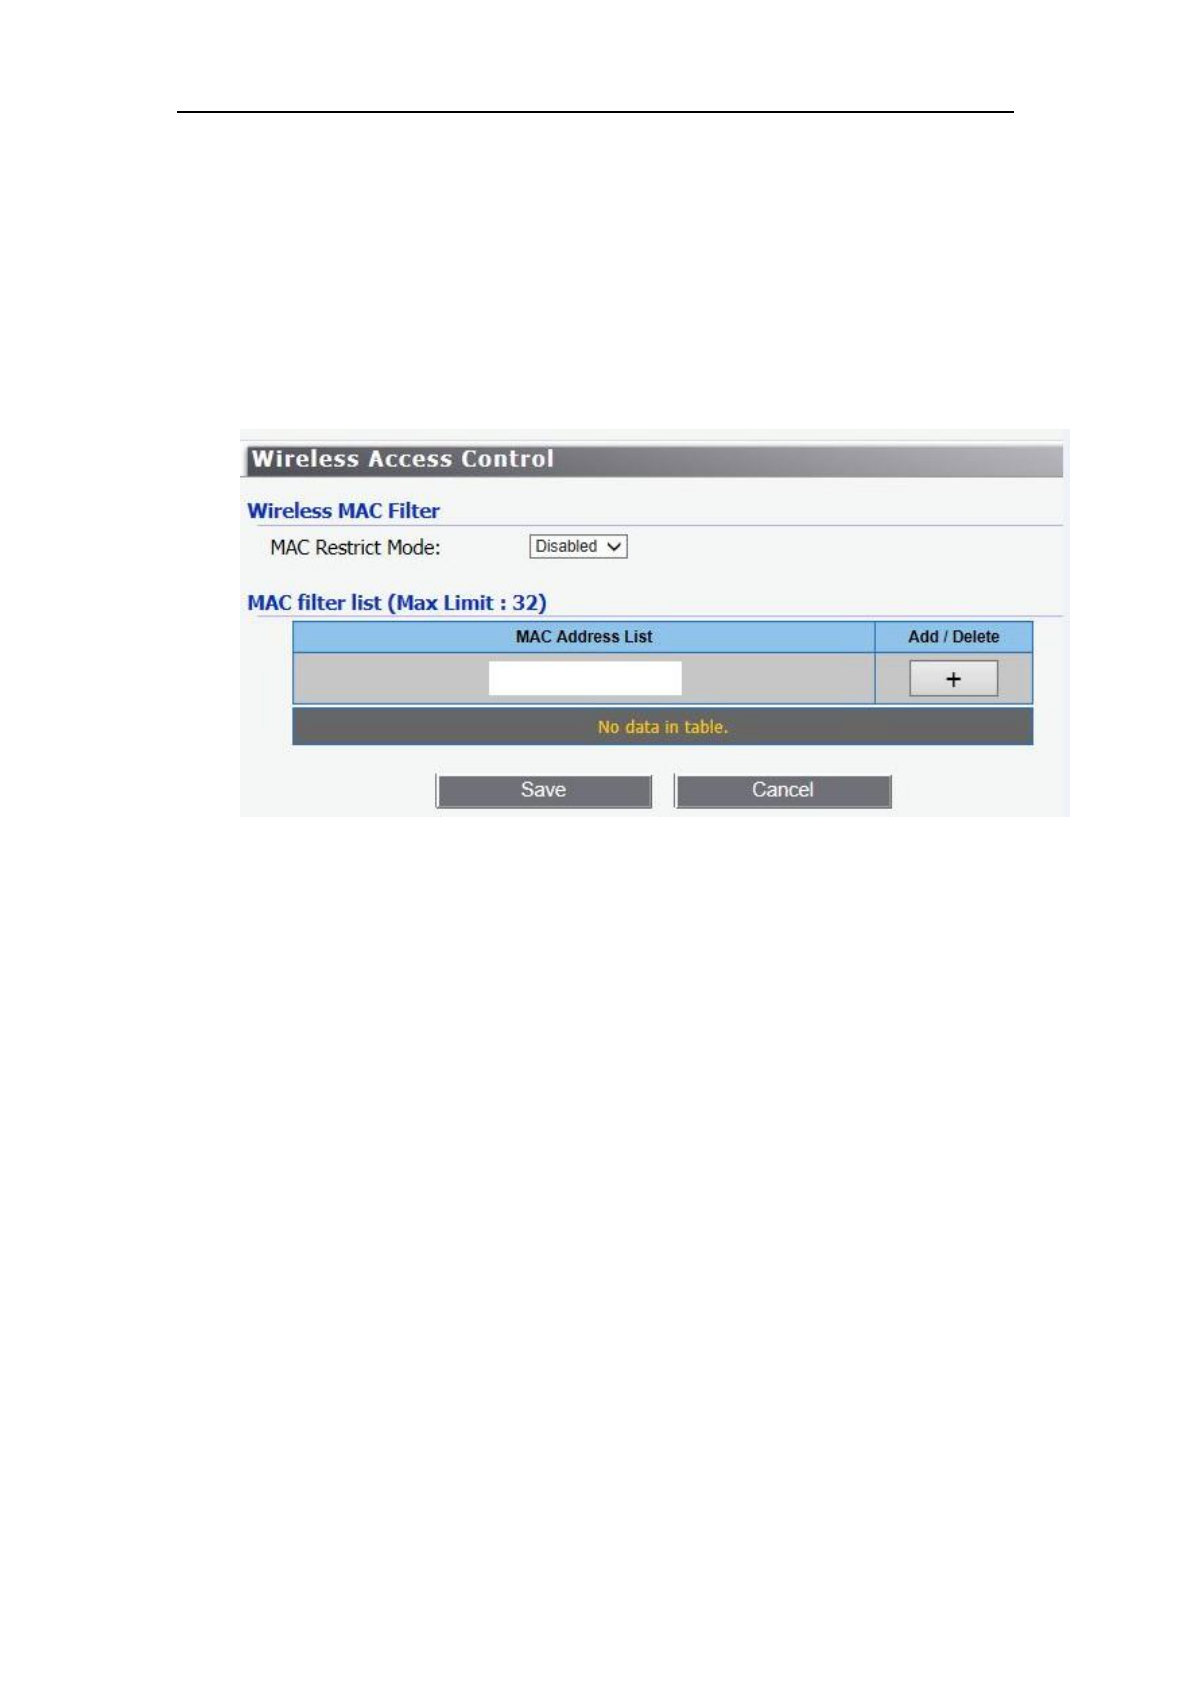
MAC Filter
The Wireless MAC Address Filtering feature allows you to control the
wireless stations accessing the AP, which depend on the station's MAC addresses.
• MAC Restrict Mode – To disable the Wireless MAC Address Filters
feature, keep the default setting, Disable.
– First, you must decide whether the specified wireless stations can or cannot
access the AP. If you desire that the specified wireless stations can access the AP,
please select Allow, otherwise, select Deny
MAC Address List – The wireless station's MAC address that you want
to access.
KA1750 Wireless Router User Manual
32
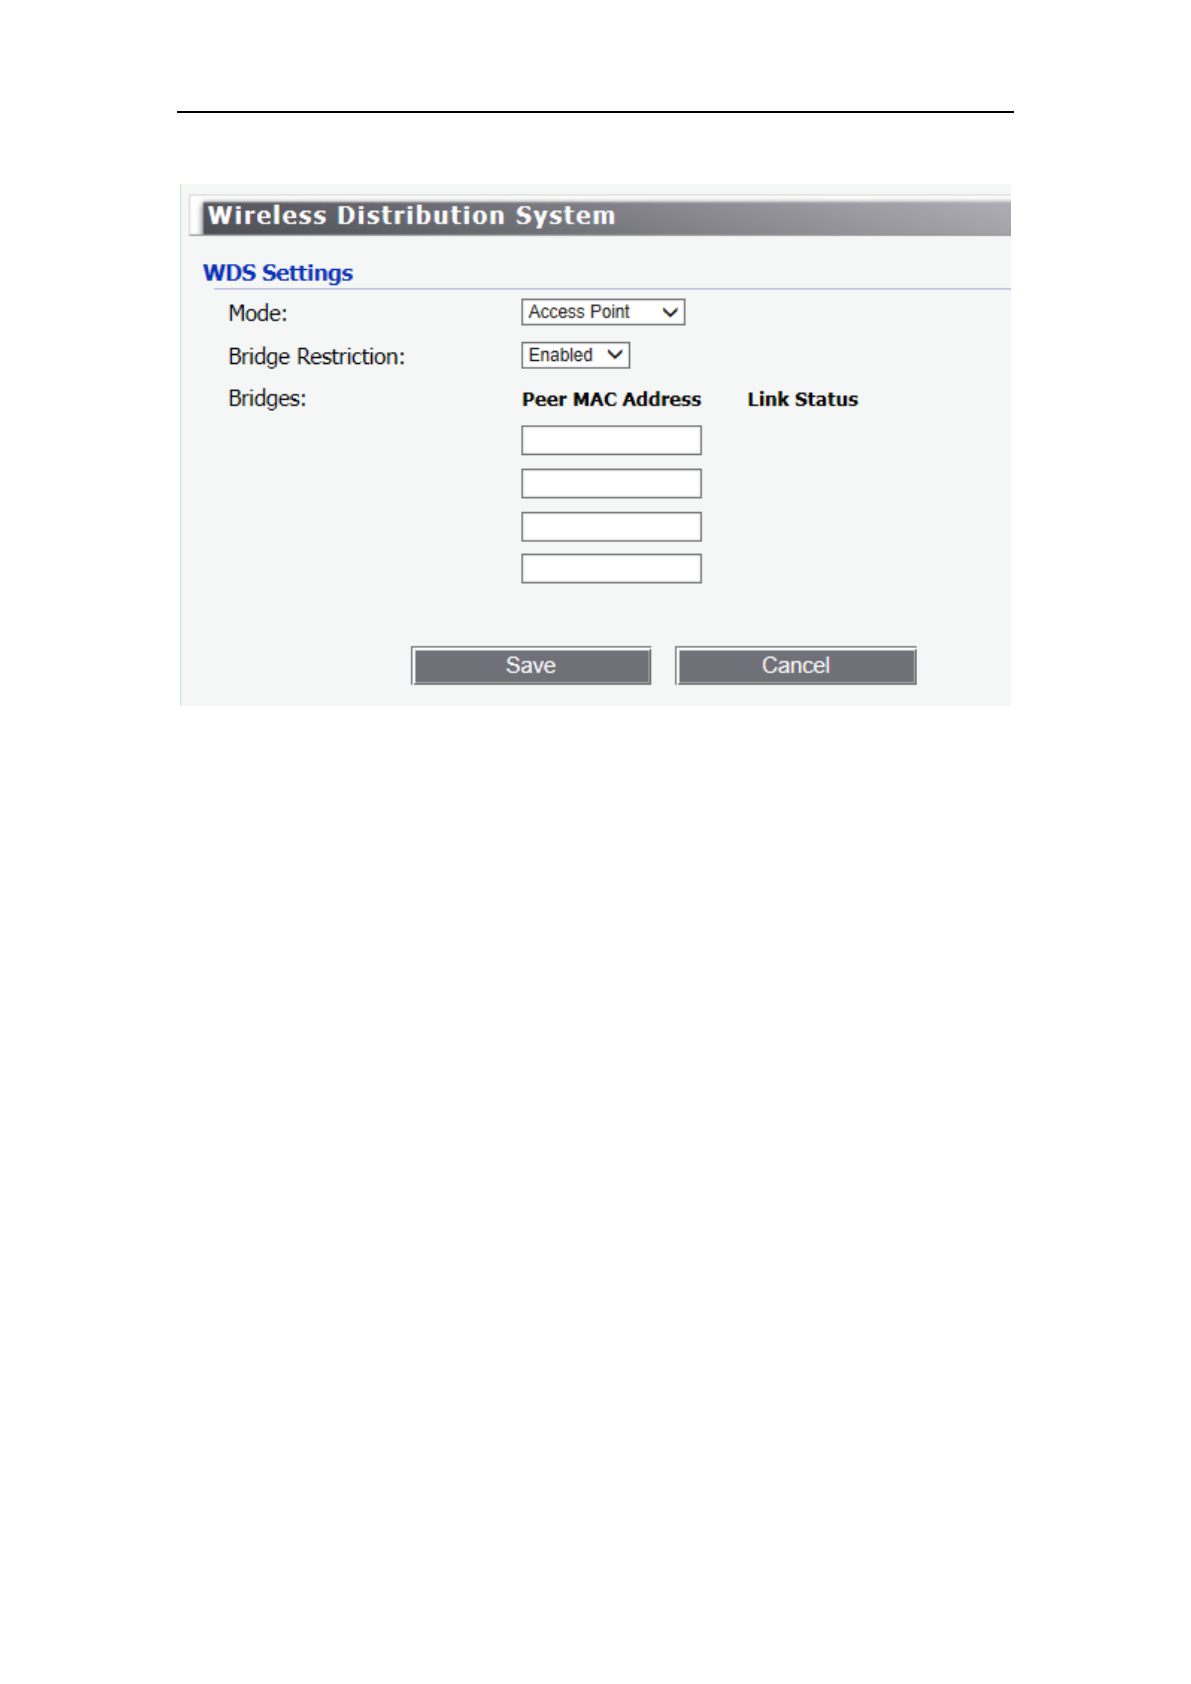
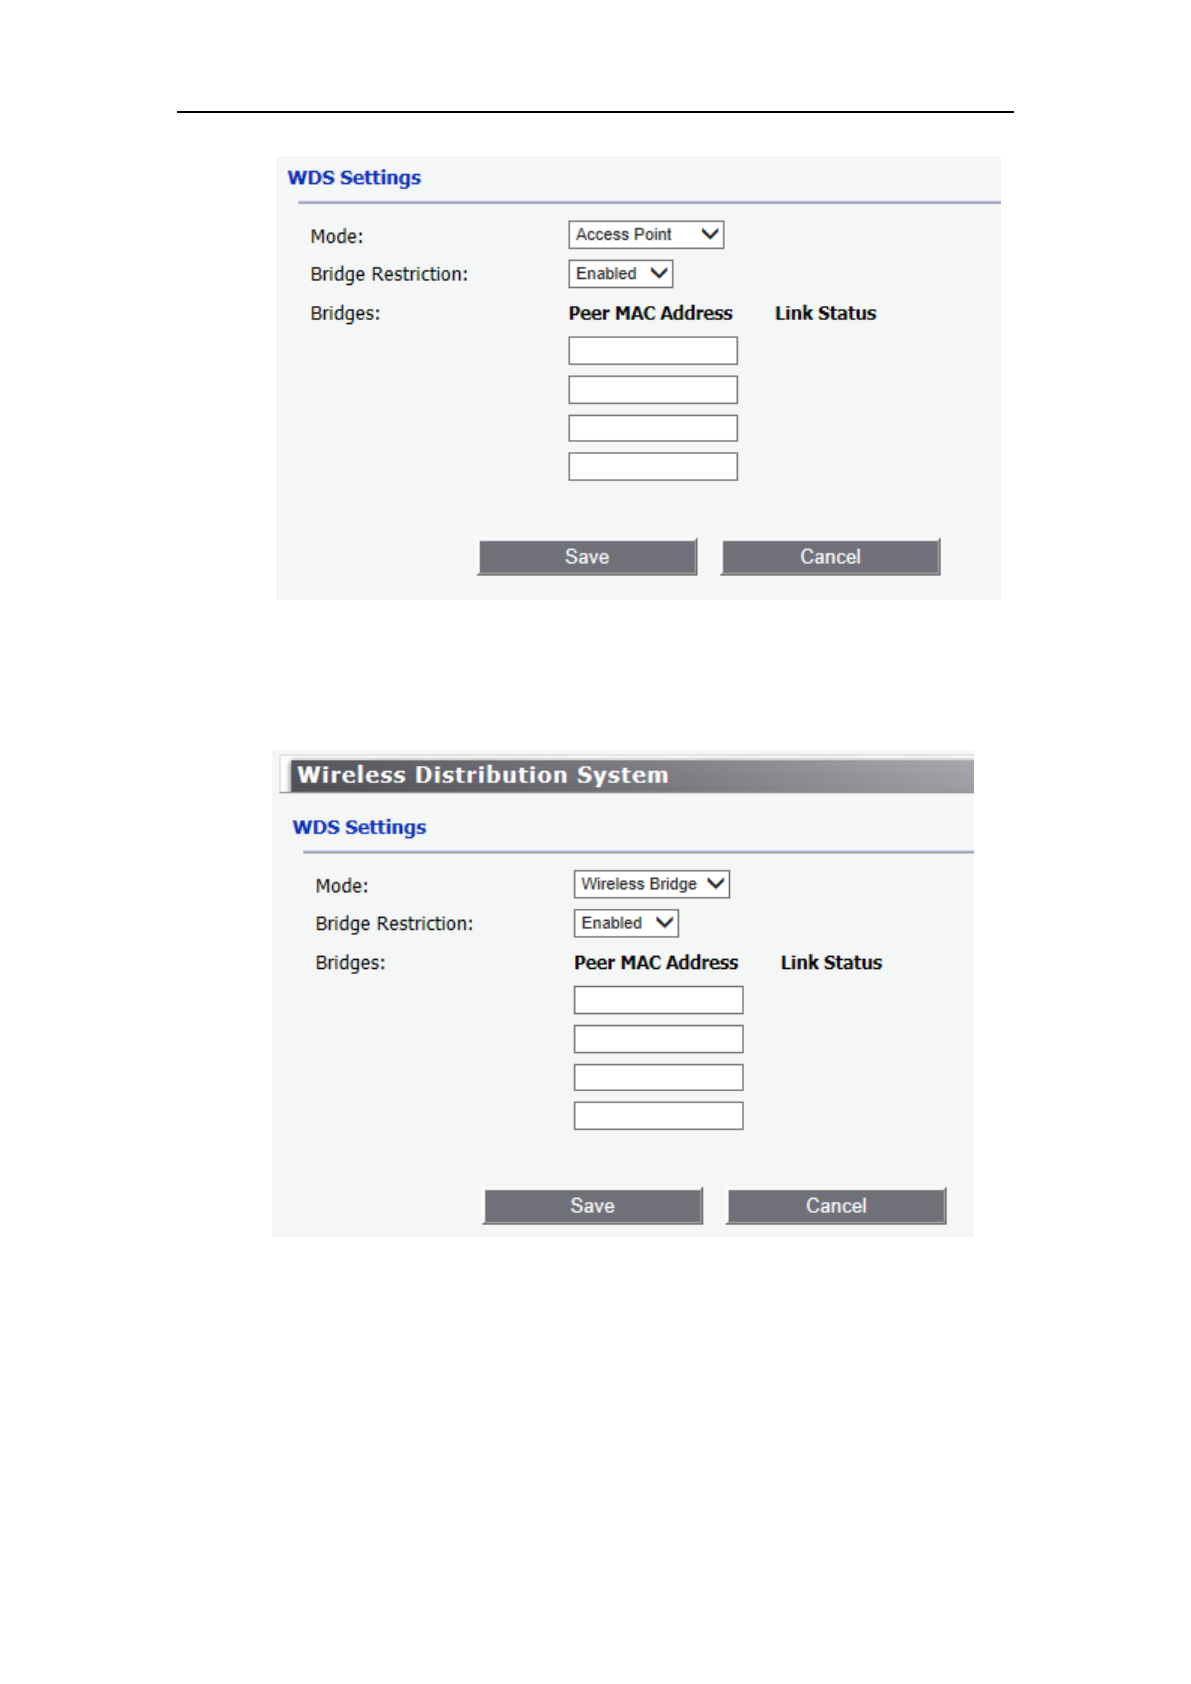
7.2.6 WDS Setup
WDS (Wireless Distribution System) is a Wireless Access Point mode that
enables wireless bridging in which WDS APs communicate only with each other only
(without allowing for wireless clients or stations to access them), and/or wireless
repeating in which APs communicate both with each other and with wireless stations
(at the expense of half the throughput).
• Mode – Selecting Wireless Bridge disables access point functionality. Only
wireless bridge (also known as Wireless Distribution System or WDS) functionality
will be available. Selecting Access Point enables access point functionality. Wireless
bridge functionality will still be available and wireless stations will be able to
associate to the AP.
• Bridge Restriction – Selecting Disabled disables wireless bridge restriction.
Any wireless bridge (including the ones listed in Remote Bridges) will be granted
access. Selecting Enabled enables wireless bridge restriction. Only those bridges
listed in Remote Bridges will be granted access.
• Bridges – Enter the peer wireless MAC addresses of any wireless bridges
that should be part of the wireless distribution system (WDS).
We will describe how to configure WDS to connect 2 ROUTERs.
KA1750 Wireless Router User Manual
33
1. Make these 2 routers same channel ( not Auto ) and security mode and
passphrase in Wireless – Basic Settings & wireless security.
2. ROUTER1 can use default IP address 192.168.1.1, and ROUTER2 should
change the IP address to other IP address but in same segment like
192.168.1.2. And user should disable ROUTER2’s DHCP function in
Setup– LAN page.
3. ROUTER 1 : Go to advance=>wireless=>WDS page, Select Access Point in
Mode. Add ROUTER 2’s wireless interface MAC address (BSSID) to
ROUTER 1’s Bridges:. And then Click save button.
KA1750 Wireless Router User Manual
34
4. ROUTER 2 : Go to Setup=>WLAN=>WDS page, Select Wireless Bridge in
Mode. Add ROUTER 1’s wireless interface MAC address (BSSID) to
ROUTER 2’s AP MAC Address. And then Click save.
If you can access the Internet from ROUTER 1, then you can set the PC which
connect with ROUTER 2 as this: IP Address: 192.168.1.x Subnet mask:
255.255.255.0 Gateway: 192.168.1.1 DNS: 192.168.1.1 So you can access the
Internet from ROUTER 2.
KA1750 Wireless Router User Manual
35
7.3 Service – QoS Setup
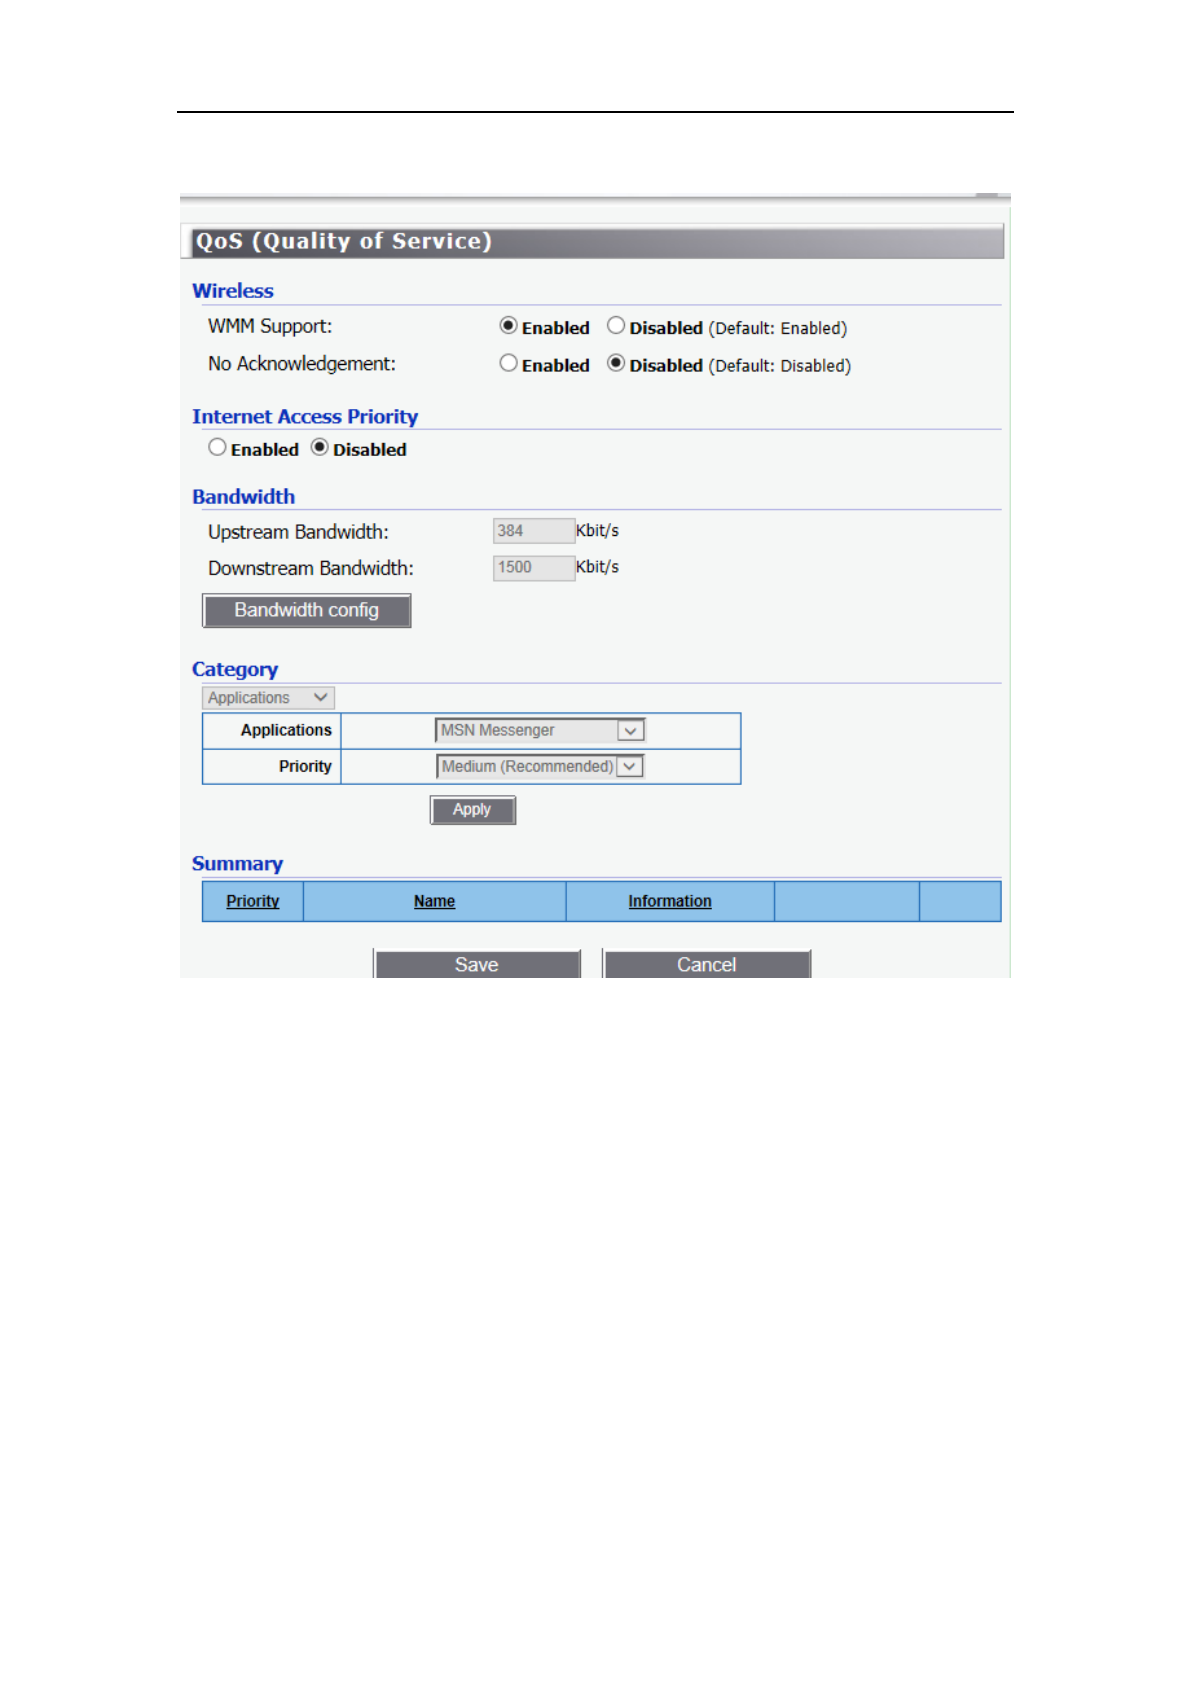
QoS (Quality of Service)
QoS assigns different levels of priority to specific types of network traffic, so it
helps to ensure optimal performance for demanding, real-time applications, such as
online gaming, VoIP calls, and video streaming.
Wireless
No Acknowledgement – No Acknowledgement – If you want the Router to
re-send data if an error occurs, keep the default, Disabled. If you do not want the
Router to re-send data if an error occurs, select Enabled.
Internet Access Priority
QoS is only applied to traffic streams that are uploaded to the Internet.
• Enabled/Disabled – To use the QoS policies you set, select Enabled.
KA1750 Wireless Router User Manual
36
Upstream Bandwidth
This option sets the maximum upstream bandwidth of your Internet connection.
To allow the Router to detect the maximum, keep the default, Auto. To specify the
maximum, select Manual. Then enter the appropriate bandwidth and select Kbps or
Mbps.
Category
Select the appropriate category. Go to the instructions for your selection.
• Applications – Select the appropriate application. If you select Add a New
Application, follow the instructions in the Add a New Application section.
• Priority – Select the appropriate priority.
Click Apply to save your changes.
Summary
This lists the QoS entries you have created for your applications and devices.
7.4 Security Setup
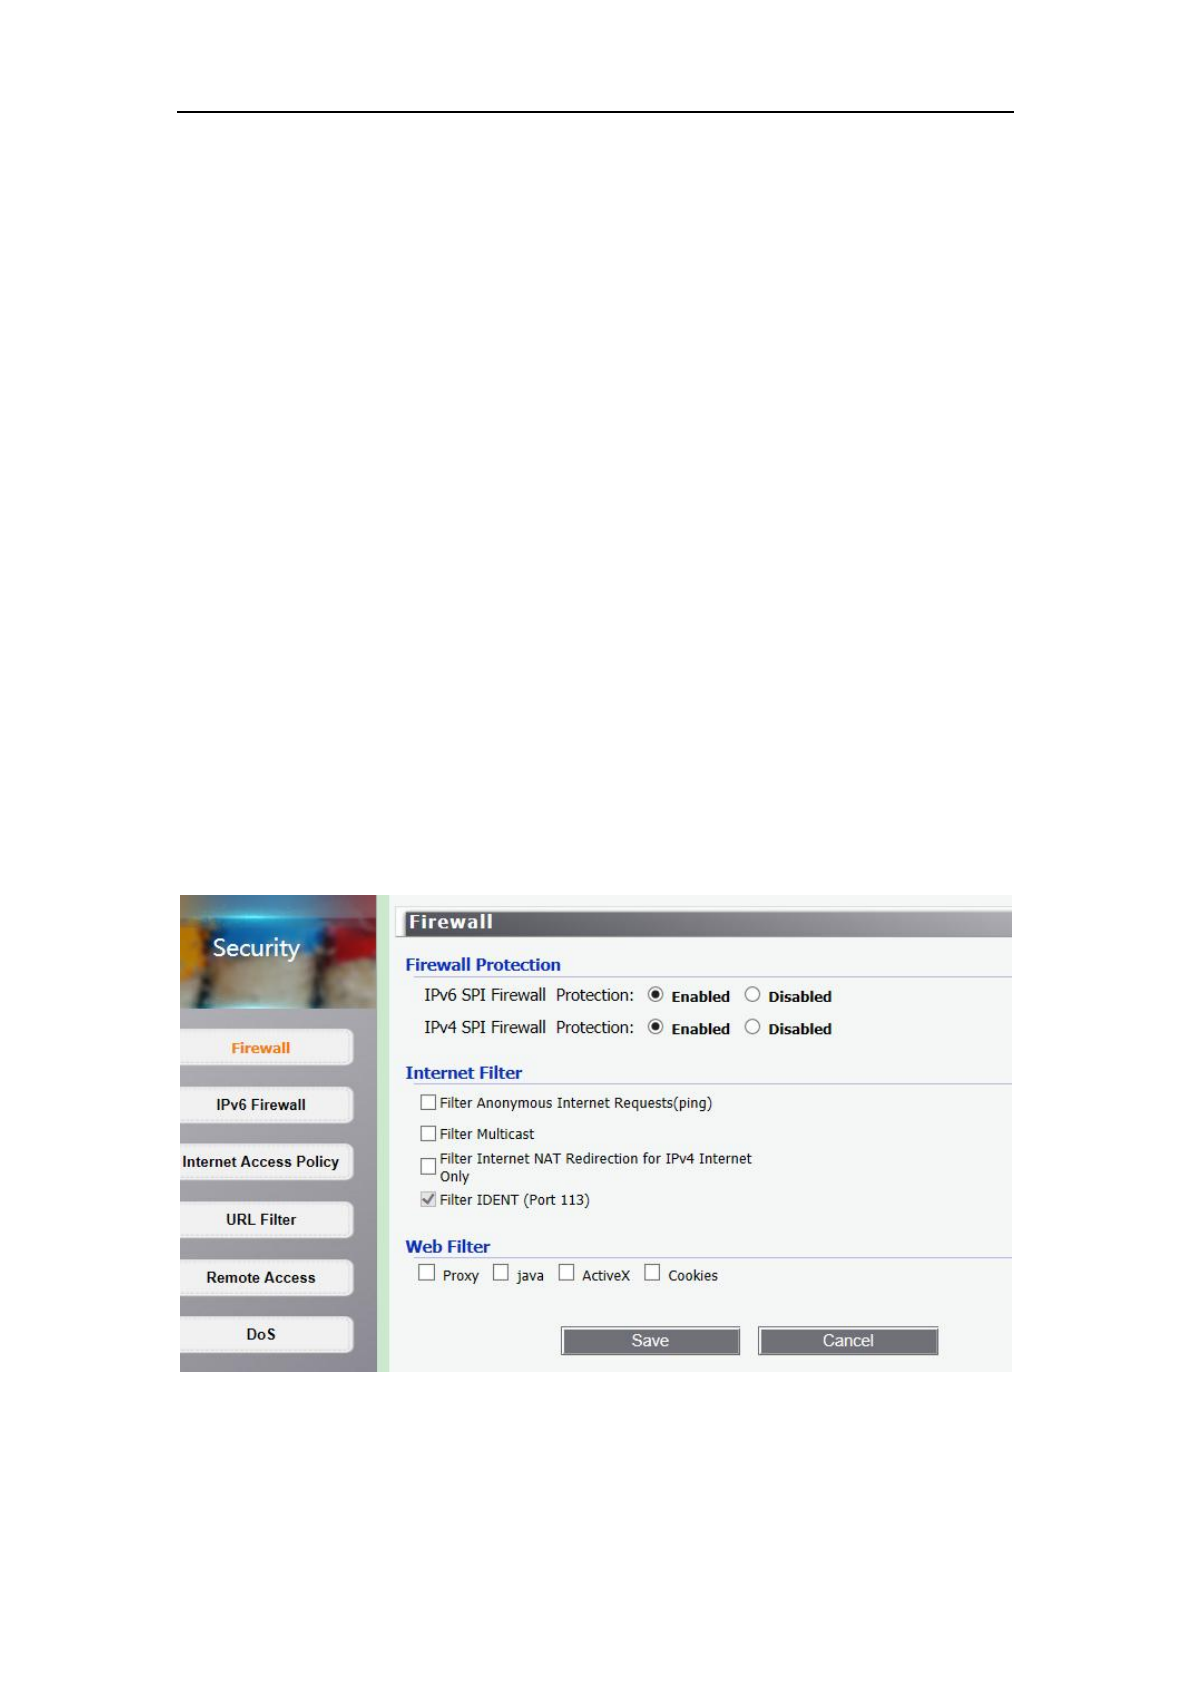
7.4.1 Firewall setup
Internet Filter
• Filter Anonymous Internet Requests – Stops the router from responding to
"pings" from the WAN.
KA1750 Wireless Router User Manual
37
• Filter Multicast – Prevents multicast packets from reaching the LAN.
• Filter Internet NAT Redirection for IPv4 Internet Only – Prevents hosts on
LAN from using WAN address of router to contact servers on the LAN (which have
been configured using port redirection).
• Filter IDENT (Port 113) – Prevents WAN access to port 113.
Web Filter
• Proxy – Blocks HTTP requests containing the "Host:" string.
• Java – Blocks HTTP requests containing a URL ending in ".js" or ".class".
• ActiveX – Blocks HTTP requests containing a URL ending in ".ocx" or
".cab".
• Cookies – Identifies HTTP requests that contain the "Cookie:" string and
mangle the cookie. Attempts to stop cookies from being used.
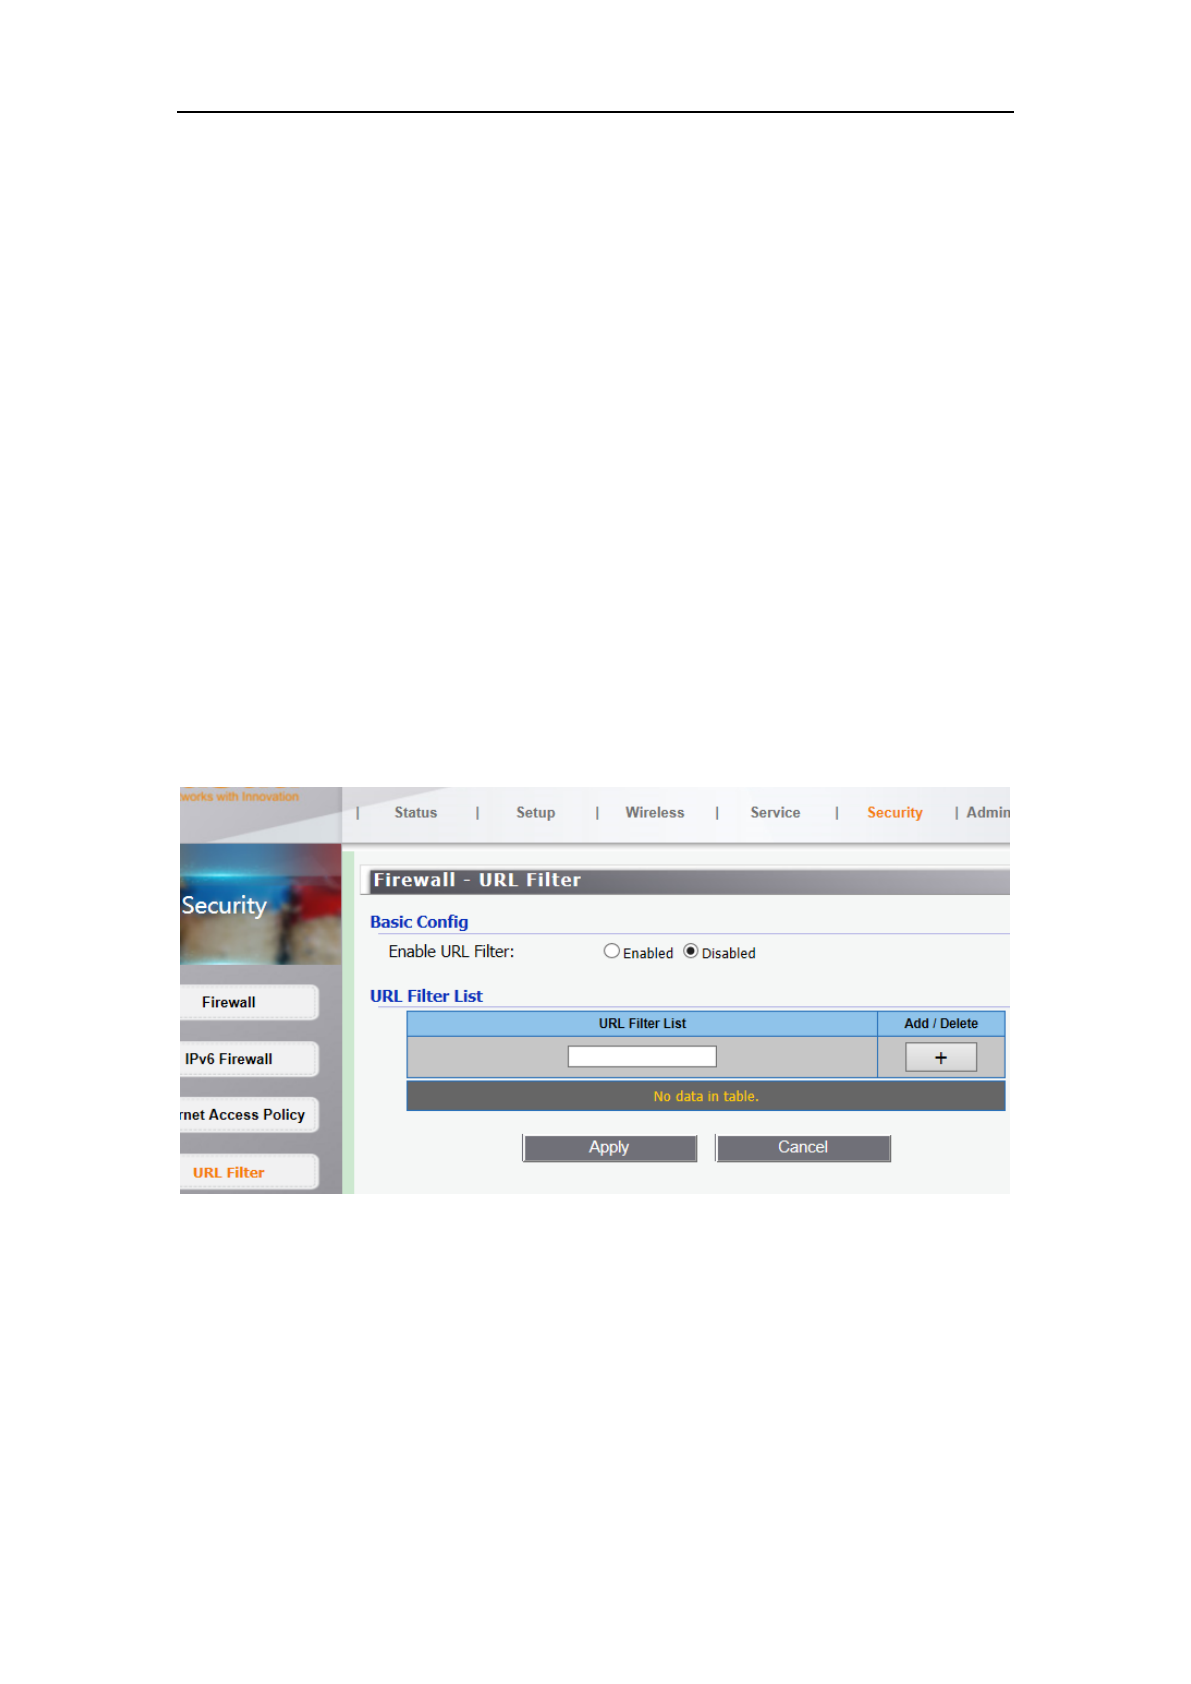
7.4.2 URL Setup
Enter the keywords for the sites that you want to block. For example, enter
"XXX" in the list The URL filter will block the http://www.abcXXX.com,
http://www.XXXbbb.com and so on.
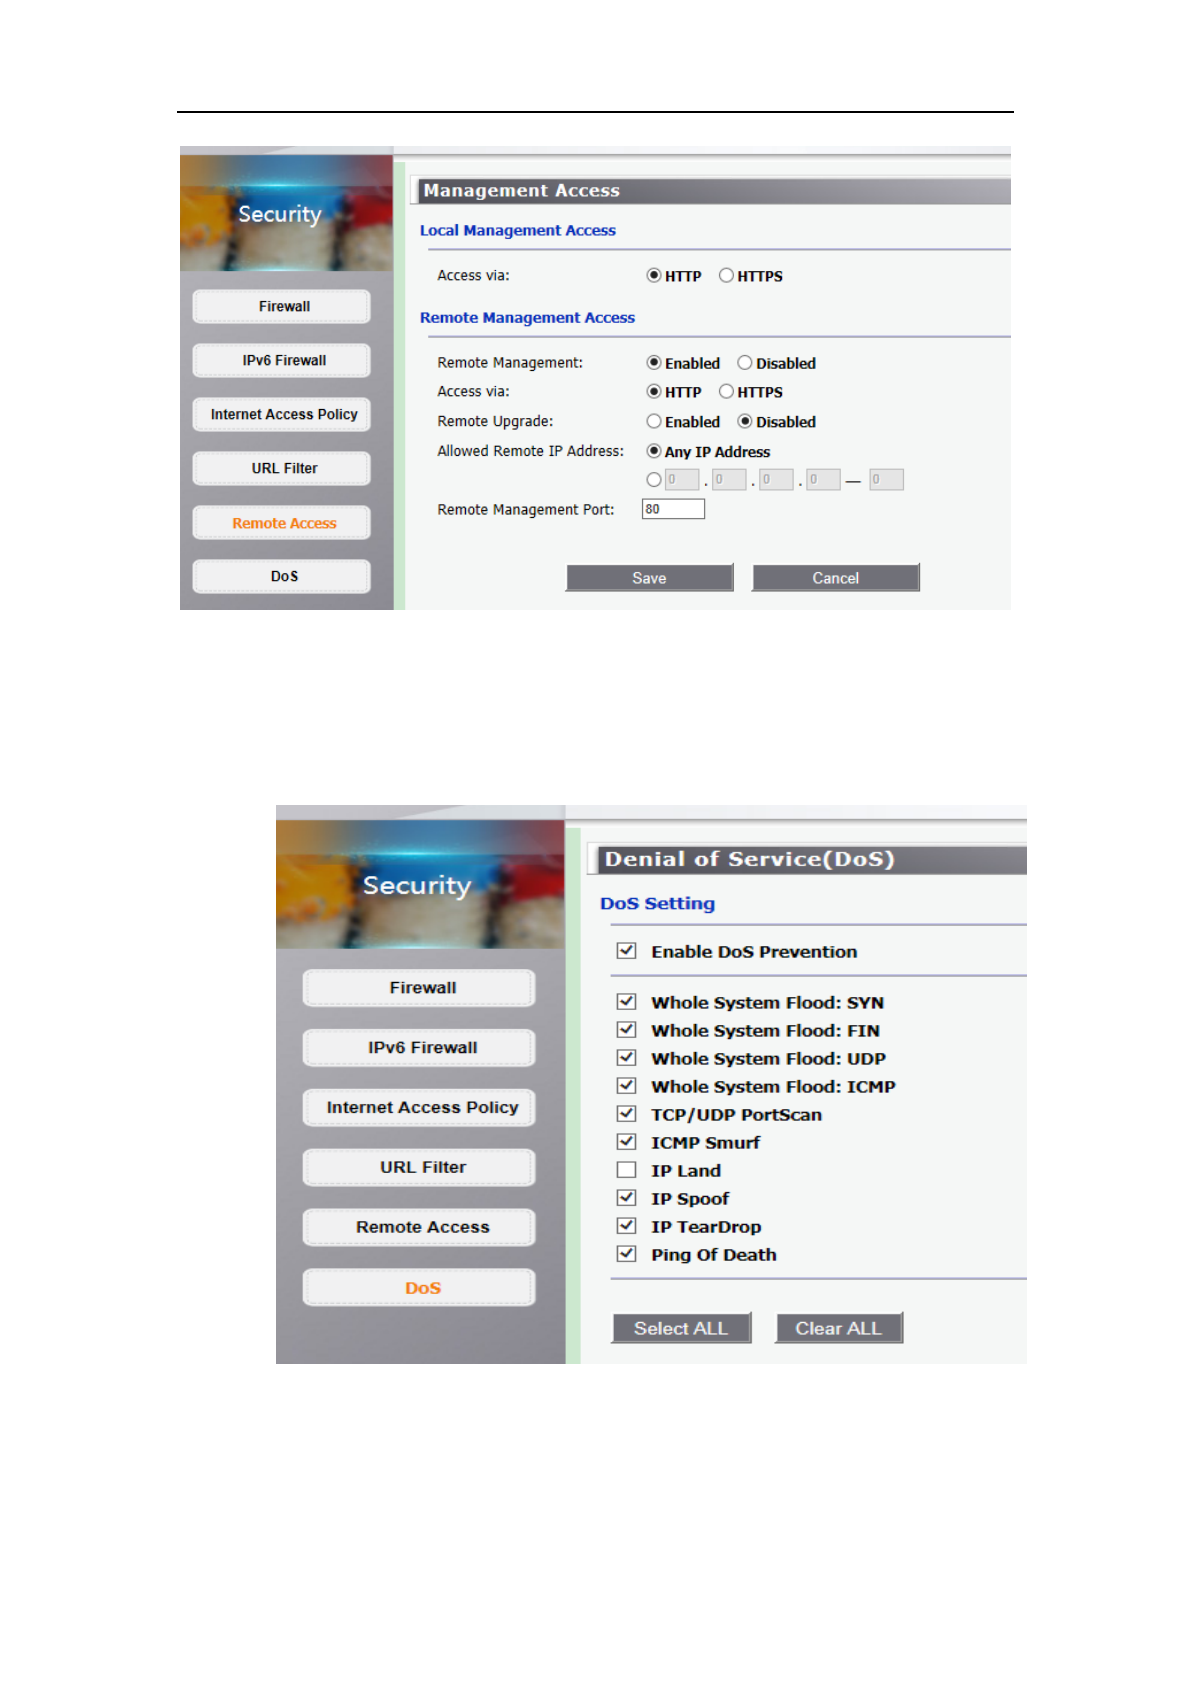
7.4.3 Remote Access Setup
This feature allows you to manage your Router from a remote location via the
Internet or Internat.
KA1750 Wireless Router User Manual
38
7.4.4 DoS
A "denial-of-service" (DoS) attack is characterized by an explicit attempt by
hackers to prevent legitimate users of a service from using that service.
• Enable DoS Prevention – Enable or disable DoS Prevention. And choose
what you want.

KA1750 Wireless Router User Manual
39
Appendix: Frequent Asked Questions
Q: None of the LEDs are on when user power on the router?
A: Please make sure what user use is the power adaptor attached with the router
package, and check the connection between the AC power and router.
Q: LAN LED does not turn on after connect Ethernet cable?
A: Please make sure Ethernet cable is connected hub/PC and router correctly. Then
please make sure the PC/hub have been power on.
Please make sure that user use parallel network cable to connect UpLink port of
hub, or use parallel network cable to connect PC. If connect normal port of hub
(not UpLink port), user must use cross-cable. Please make sure that user’s
network cables meet the networking requirements above.
Q: PC cannot access the Router?
A: Please make sure that all devices communicating with the device must use the
same channel (and use the same SSID). Otherwise user’s PC will not find the
wireless Router.
Q: PC cannot access the Internet?
A: First check whether PC can ping the interface Ethernet IP address of this product
successfully (default value is 192.168.1.1) by using ping application. If ping
application fails, please check the connection of Ethernet cable and check
whether the states of LEDs are in gear.
If the PC uses private IP address that is set manually (non-registered legal IP
address), please check:
1. Whether IP address of the PC gateway is legal IP address. Otherwise please
use the right gateway, or set the PC to Obtain an IP address automatically.
2. Please confirm the validity of DNS server appointed to the PC with ADSL
operator. Otherwise please use the right DNS, or set the PC to Obtain an IP
address automatically.
3. Please make sure user have set the NAT rules and convert private IP address
to legal IP address. IP address range of the PC that user specify should meet
the setting range in NAT rules.
4. Central Office equipment may have problem.
5. The country or the wireless network type user selected is wrong.

KA1750 Wireless Router User Manual
40
Q: PC cannot browse Internet web page?
A: Please make sure DNS server appointed to the PC is correct. User can use ping
application program to test whether the PC can connect to the DNS server of the
ADSL operator.
If the cause is not above given
,
please contact user’s local service provider!