KatchAll Technology Group TT04 Temperature Data Transceiver User Manual guide
KatchAll Technology Group Temperature Data Transceiver guide
Contents
- 1. TempTrak Users Guide
- 2. Operating instructions
TempTrak Users Guide

Registration Card
User Information
Hardware Serial Numbers
Commanders Sentries Echos
XPs Liberators Communicators
2000, KatchAll Technology Group, Inc. — All Rights Reserved —Temp Trak & Temp Trak Plus are products of the KatchAll Technology Group.
Questions
First Name Middle Initial Last Name
Name of Establishment, Organization or Company
Street Address
City State ZIP Code
Phone E-Mail
( ) ( )
FAX
What kind of food service operation is
your establishment?
£Independent Restaurant
£Chain Unit Company Store
£Chain Unit Franchise Store
£Caterer
£Health Care Provider
£School System
£Lodging Property
£Correctional Facility
£Private Club
£In-House Food Service
£Other:_______________
How did you hear about Temp Trak?
£Advertisement
£Dealer Recommendation
£KatchAll Factory Representative
£Another Food Service Operator
£Health & Safety Inspector
£Trade Article
£Trade Show Visit
£Other:_______________
Who purchased your Temp Trak or
Temp Trak Plus system?
£Owner / Operator
£Chain HQ Management
£Organizational Management
How do you intend to use your Temp
Trak System?
£Inventory Processing / Control
£Fixed Temperature Monitoring
£Random Temperature Monitoring
£HACCP Monitoring
£Check on Employee Monitoring Routine
£Product Rotation Tool
£Prepared Product Tracking / Use Tool
£Use By Dating Tool
£Non-Food Temperature Monitoring
£After-Hours Monitoring / Alerting on
Temperatures
This registration card must be completed and returned to KatchAll Technology Group, Inc. within
30 days of purchase in order to validate the warranty on your new Temp Trak software and
hardware components.
By registering your Temp Trak system, you will receive free software upgrades for one year from
purchase date and notification of any new modules or advances to the system.

5800 Creek Road
Cincinnati, OH 45242
PLACE
STAMP
HERE

KatchAll
Technology Group, Inc.
A wholly owned subsidiary of
KatchAll Industries International, Inc.
5800 Creek Road
Cincinnati, OH 45242
FAX 513-793-4895
www.katchall.com
2000, KatchAll Technology Group, Inc.
Patents Pending, All Rights Reserved, Printed in USA
Version 1.0.1

"
INTRODUCTION

#
Congratulations!
Temp Trak is a quantum leap into the future of food service
management, and you have its benefits today.
With Temp Trak, you possess the most advanced total quality
management and time-on-task breakthrough in the history of our
industry. It is easy to learn and user friendly to operate.
Temp Trak is a unique, innovative system that gives you the
capability to read and record temperatures, and with Temp Trak
Plus — track inventory, all automatically! Both Temp Trak and
Temp Trak Plus are wireless, accurate and global, allowing man-
agement to obtain precise operating information anytime, any-
where.
Welcome to the world of Temp Trak, the new standard in food
service management from KatchAll Technology Group — Bring-
ing you the Future in Food Safety!
Need Help?!
Temp Trak and Temp Trak Plus include a wide range of on-line
help files that assist with many common problems. For instance,
if you’re having trouble setting up a new printer, on-line help will
guide you through the process — just click on the Help button,
it’s that easy!
If you would like to visit our web site, direct your browser to:
http://www.katchall.com
There you will find answers to commonly asked questions, soft-
ware upgrades and new products.
Warranty & FCC Licensing
Temp Trak and Temp Trak Plus both come with a standard 90
day warranty on parts and labor.
The Temp Trak units have been tested and found to comply with
the limits for a Class A digital device, pursuant to Part 15 of the
FCC rules. Operation is subject to the following two conditions:
1. This device may not cause harmful interference, and 2. This
device must accept any interference that may cause undesired
operation.
INTRODUCTION

$
END-USER LICENSE AGREEMENT FOR TEMP TRAK SOFT-
WARE
IMPORTANT – READ CAREFULLY: This End-User license Agreement (“EULA”) is a legal agreement between you (either an
individual or a single entity) and KatchAll Technology Group, Inc. (“KatchAll”) for the Temp-Trak software product identified
above, which includes computer software and may include associated media, printed materials, and “online” or electronic
documentation (“SOFTWARE PRODUCT”). The SOFTWARE PRODUCT also includes any updates and supplements to the
original SOFTWARE PRODUCT provided to you by KatchAll. Any software provided along with the SOFTWARE PRODUCT that
is associated with a separate end-user license agreement is licensed to you under the terms of that license agreement. By
installing, copying, downloading, accessing or otherwise using the SOFTWARE PRODUCT, you agree to be bound by the terms
of this EULA. If you do not agree to the terms of this EULA, do not install or use the SOFTWARE PRODUCT; you may, however,
return it to your place of purchase for a full refund.
SOFTWARE PRODUCT LICENSE
The SOFTWARE PRODUCT is protected by copyright laws and international copyright treaties, as well as other intellectual
property laws and treaties. The SOFTWARE PRODUCT is licensed, not sold.
1. GRANT OF LICENSE. This EULA grants you the following rights:
•Systems Software. You may install and use one copy of the SOFTWARE PRODUCT on a single
computer, including a workstation, terminal or other digital electronic device (“COMPUTER”).
•Storage/Network Use. You may also store or install a copy of the SOFTWARE PRODUCT on a storage
device, such as a network server, used only to install or run the SOFTWARE PRODUCT on your other
COMPUTERS over an internal network; however, you must acquire and dedicate a license for each
separate COMPUTER on or from which the SOFTWARE PRODUCT is installed, used, accessed,
displayed or run. A license for the SOFTWARE PRODUCT may not be shared or used concurrently on
different COMPUTERS.
2. DESCRIPTION OF OTHER RIGHTS AND LIMITATIONS.
•Academic Edition Software. If the SOFTWARE PRODUCT is identified as “Academic Edition” or “AE,”
you must be a “Qualified Educational User” to use the SOFTWARE PRODUCT. If you are not a
Qualified Educational User, you have no rights under this EULA. To determine if you are a Qualified
Educational User, please contact KatchAll or the KatchAll distributor serving your area of the country.
•Not for Resale Software. The SOFTWARE PRODUCT is “Not For Sale” or “NFR,” and, notwithstanding
other sections of this EULA, your use of the SOFTWARE PRODUCT is limited to your own use including
demonstration, test, or evaluation purposes and you may not resell, or otherwise transfer for value, the
SOFTWARE PRODUCT.
•Limitations on Reverse Engineering, Decompilation, and Disassembly. You may not reverse
engineer, decompile, or disassemble the SOFTWARE PRODUCT, except and only to the extent that
such activity is expressly permitted by applicable law notwithstanding this limitation.
•Separation of Components. The SOFTWARE PRODUCT is licensed as a single product. Its
component parts may not be separated for use on more than one computer.
•Rental. You may not rent, lease or lend the SOFTWARE PRODUCT.
•Trademarks. This EULA does not grant you any rights in connection with any trademarks or service
marks of KatchAll.
•Support Services. KatchAll may provide you with support services related to the SOFTWARE
PRODUCT (“Support Services”). Use of Support Services is governed by the KatchAll policies and
programs described in the user manual, in “online” documentation and/or other KatchAll provided
materials. Any supplemental software code provided to you as part of the Support Services shall be
considered part of the SOFTWARE PRODUCT and subject to the terms and conditions of this EULA.
With respect to technical information you provide to KatchAll as part of the Support Services, KatchAll
may use such information for its business purposes, including for product support and development.
KatchAll will not utilize such technical information in a form that personally identifies you.
•Software Transfer. The initial user of the SOFTWARE PRODUCT may make a onetime permanent
transfer of this EULA and SOFTWARE PRODUCT only directly to an end user. This transfer must
include all of the SOFTWARE PRODUCT (including all component parts, the media and printed
materials, any upgrades, this EULA, and, if applicable, the Certificate of Authenticity). Such transfer may
not be by way of consignment or any other indirect transfer. The transferee of such onetime transfer
must agree to comply with the terms of this EULA, including the obligation not to further transfer this
EULA and SOFTWARE PRODUCT.
•Termination. Without prejudice to any other rights, KatchAll may terminate this EULA if you fail to
comply with the terms and conditions of this EULA. In such event, you must destroy all copies of the
SOFTWARE PRODUCT and all of its component parts.
3. UPGRADES. If the SOFTWARE PRODUCT is labeled as an upgrade, you must be properly licensed to use a
product identified by KatchAll as being eligible for the upgrade in order to use the SOFTWARE PRODUCT. A SOFTWARE
PRODUCT labeled as an upgrade replaces an/or supplements the product that formed the basis for your eligibility for the
upgrade. You may use the resulting upgraded product only in accordance with the terms of this EULA. If the SOFTWARE
PRODUCT is an upgrade of a component of a package of software programs that you licensed as a single product, the
SOFTWARE PRODUCT may be used and transferred only as part of that single product package and may not be separated for
use on more than one computer.
4. COPYRIGHT. All title and intellectual property rights in and to the SOFTWARE PRODUCT (including but not
limited to any images, photographs, animations, video, audio, music, and text, incorporated into the SOFTWARE PRODUCT are
owned by KatchAll or its suppliers. All title and intellectual property rights in and to the content which may be accessed through
use of the SOFTWARE PRODUCT is the property of the respective content owner and may be protected by applicable copyright
or other intellectual property laws and treaties. This EULA grants you no rights to use such content. All rights not expressly
granted are reserved by KatchAll.
INTRODUCTION

%
5. DUAL-MEDIA SOFTWARE. You may receive the SOFTWARE PRODUCT in more than one medium.
Regardless of the type or size of medium you receive, you may use only one medium that is appropriate for your single computer.
You may not use or install any other medium on another computer. You may not loan, rent, lease, lend or otherwise transfer any
other medium to another use, except as part of the permanent transfer (as provided above) of the SOFTWARE PRODUCT.
6. BACKUP COPY. After installation of one copy of the SOFTWARE PRODUCT pursuant to this EULA, you may
keep the original media on which the SOFTWARE PRODUCT was provided by KatchAll solely for backup or archival purposes. If
the original media is required to use the SOFTWARE PRODUCT on the computer, you may make one copy of the SOFTWARE
PRODUCT solely for backup or archival purposes. Except as expressly provided in this EULA, you may not otherwise make
copies of the SOFTWARE PRODUCT or the printed material accompanying the SOFTWARE PRODUCT.
7. U.S. GOVERNMENT RESTRICTED RIGHTS. The SOFTWARE PRODUCT and documentation are provided
with RESTRICTED RIGHTS. Use, duplication, or disclosure by the Government is subject to restrictions as set forth in
subparagraph (c)(1)(ii) of the Rights in Technical Data and Computer Software clause at DFARS 252.227-7031 or subparagraphs
(c)(1) and (2) of the Commercial Computer Software Restricted Rights at 48 DFR 52.227-19, as applicable. Manufacturer is
KatchAll Technology Group, Inc. 5800 Creek Road, Cincinnati, Ohio 45242.
8. EXPORT RESTRICTIONS. You agree that you will not export or reexport the SOFTWARE PRODUCT to any
country, person, entity or end user subject to U.S. export restrictions. You specifically agree not to export or reexport the
SOFTWARE PRODUCT: (i) to any country to which the U.S. has embargoed or restricted the export of goods or services, which
currently include, but are not necessarily limited to Cuba, Iran, Iraq, Libya, North Korea, Sudan and Syria, or to any national of
any such country, wherever located, who intends to transmit or transport the products back to such country; (ii) to any end-user
who you know or have reason to know will utilize the SOFTWARE PRODUCT or portion thereof in the design, development or
production of nuclear, chemical or biological weapons; or (iii) to any end-user who has been prohibited from participating in U.S.
export transactions by any federal agency of the U.S. government.
MISCELLANEOUS
If you acquire this product in the United States, this EULA is governed by the laws of the State of Ohio.
If this product was acquired outside the United States, then local law may apply.
Should you have any questions concerning this EULA, or if you desire to contact KatchAll for any reason, please write:
KatchAll Industries International, Inc.
5800 Creek Road
Cincinnati, Ohio 45242
LIMITED WARRANTY
LIMITED WARRANTY. KatchAll warrants that (a) the SOFTWARE PRODUCT will perform substantially in accordance with the
accompanying written materials for a period of ninety (90) days from the date of receipt, and (b)any Support Services provided by
KatchAll shall be substantially as described in applicable written materials provided to you by KatchAll, and KatchAll support
engineers will make commercially reasonable efforts to solve any problem. To the extent allowed be applicable law, implied
warranties in the SOFTWARE PRODUCT, if any, are limited to ninety (90) days. Some states/jurisdictions do not allow limitations
on duration of an implied warranty, so the above limitation may not apply to you.
CUSTOMER REMEDIES. KatchAll’s and its suppliers’ entire liability and your exclusive remedy shall be, at KatchAll’s option,
either (a) return of the price paid, if any, or (b) repair or replacement of the SOFTWARE PRODUCT that does not meet KatchAll’s
Limited Warranty and that is returned to KatchAll with a copy of your receipt. This Limited Warranty is void if failure of the
SOFTWARE PRODUCT has resulted from accident, abuse, or misapplication. Any replacement SOFTWARE PRODUCT will be
warranted for the remainder of the original warranty period or thirty (30) days, whichever is longer. Outside the United States,
neither these remedies nor any product support services offered by KatchAll are available without proof of purchase from an
authorized international source.
NO OTHER WARRANTIES. TO THE MAXIMUM EXTENT PERMITTED BY APPLICABLE LAW, KATCHALL AND ITS
SUPPLIERS DISCLAIM ALL OTHER WARRANTIES AND CONDITIONS, EITHER EXPRESS OR IMPLIED, INCLUDING, BUT
NOT LIMITED TO, IMPLIED WARRANTIES OR CONDITIONS, OF MERCHANTABILITY, FITNESS FOR A PARTICULAR
PURPOSE, TITLE AND NON-INFRINGEMENT, WITH REGARD TO THE SOFTWARE PRODUCT, AND THE PROVISION OF
OR FAILURE TO PROVIDE SUPPORT SERVICES. THIS LIMITED WARRANTY GIVES YOU SPECIFIC LEGAL RIGHTS. YOU
MAY HAVE OTHERS, WHICH VARY FROM STATE/JURISDICTION.
LIMITATION OF LIABILITY. TO THE MAXIMUM EXTENT PERMITTED BY APPLICABLE LAW, IN NO EVENT SHALL
KATCHALL OR ITS SUPPLIERS BE LIABLE FOR ANY SPECIAL, INCIDENTAL, INDIRECT, OR CONSEQUENTIAL DAMAGES
WHATSOEVER (INCLUDING, WITHOUT LIMITATION, DAMAGES FOR LOSS OF BUSINESS PROFITS, BUSINESS
INTERRUPTION, LOSS OF BUSINESS INFORMATION, OR ANY OTHER PECUNIARY LOSS) ARISING OUT OF THE USE
OF OR INABILITY TO USE THE SOFTWARE PRODUCT OR THE FAILURE TO PROVIDE SUPPORT SERVICES, EVEN IF
KATCHALL HAS BEEN ADVISED OF THE POSSIBILITY OF SUCH DAMAGES. IN ANY CASE, KATCHALL’S ENTIRE
LIABILITY UNDER ANY PROVISION OF THIS EULA SHALL BE LIMITED TO THE GREATER OF THE AMOUNT ACTUALLY
PAID BY YOU FOR THE SOFTWARE PRODUCT OR U.S. $5.00; PROVIDED, HOWEVER, IF YOU HAVE ENTERED INTO A
KATCHALL SUPPORT SERVICES AGREEMENT, KATCHALL’S ENTIRE LIABILITY REGARDING SUPPORT SERVICES
SHALL BE GOVERNED BY THE TERMS OF THAT AGREEMENT. BECAUSE SOME STATES/JURISDICTIONS DO NOT
ALLOW THE EXCLUSION OR LIMITATION OF LIABILITY, THE ABOVE LIMITATION MAY NOT APPLY TO YOU.
INTRODUCTION

&
INSTALLATION
'
Step 1 Installing The Program
— Insert the Temp Trak CD into your CDROM drive.
— Follow the instructions on the screen.
— Double-Click on the Temp Trak icon.
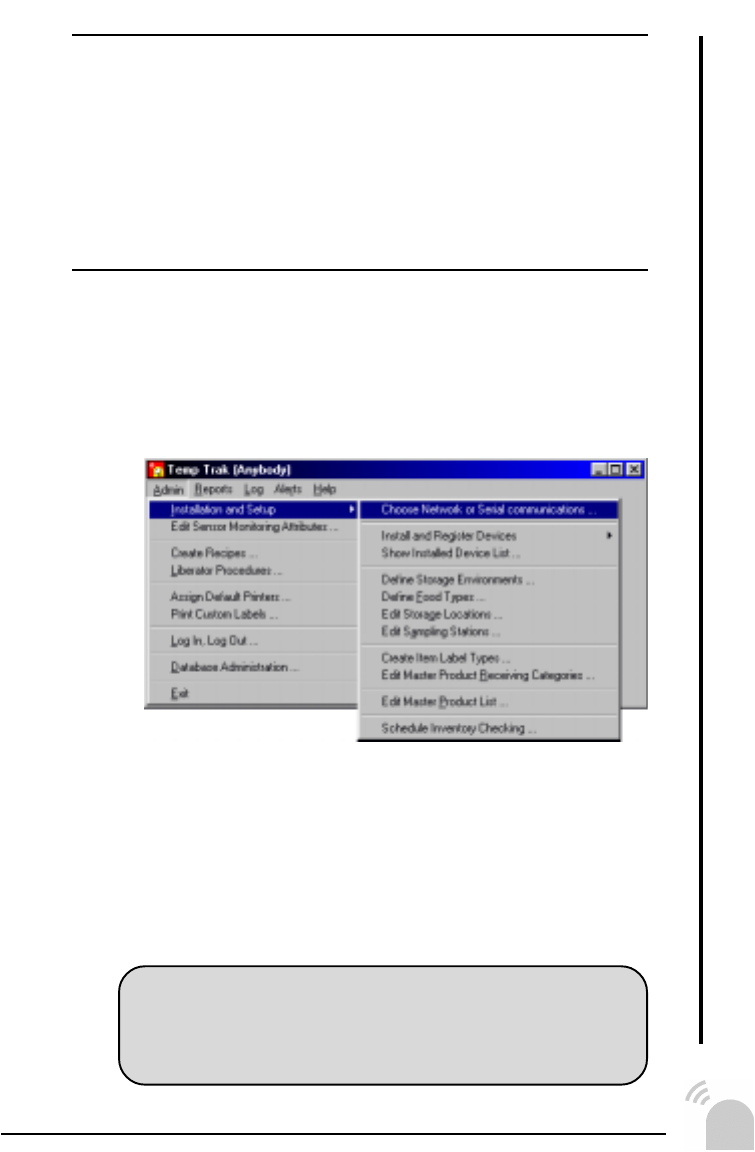
Step 2 Communications Setup
During Installation and Setup use the serial cable provided
to connect the Commander units to the PC, even if you
will eventually use a computer network.
— Select Communications Setup from the menu.
— Set CommType to Serial.
— Select an appropriate Comm Port.
INSTALLATION
If you do not know how to determine which comm
port is which, refer to your computer manufacturer’s
manual or contact your system administrator.
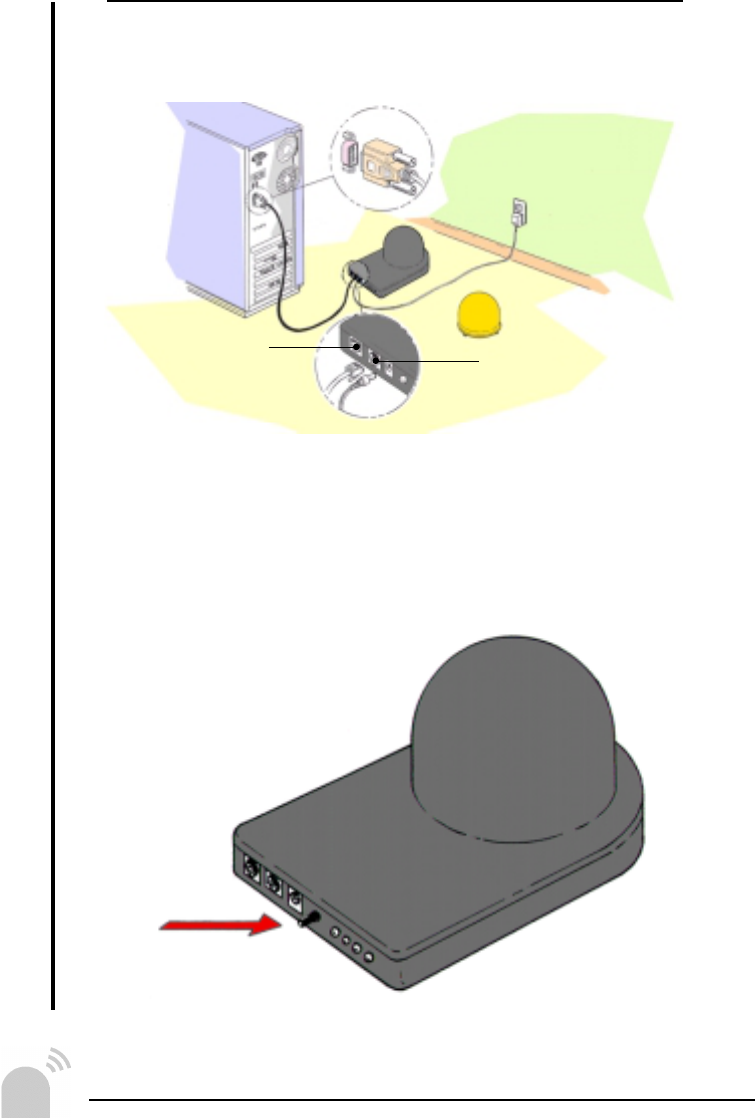
Step 3 Registering the Commander
(Repeat this step to register additional Commanders)
— Connect the system as shown.
— Press the Attention button on the Commander.
INSTALLATION
Sentry
PC
Commander
Ethernet Port Serial Port
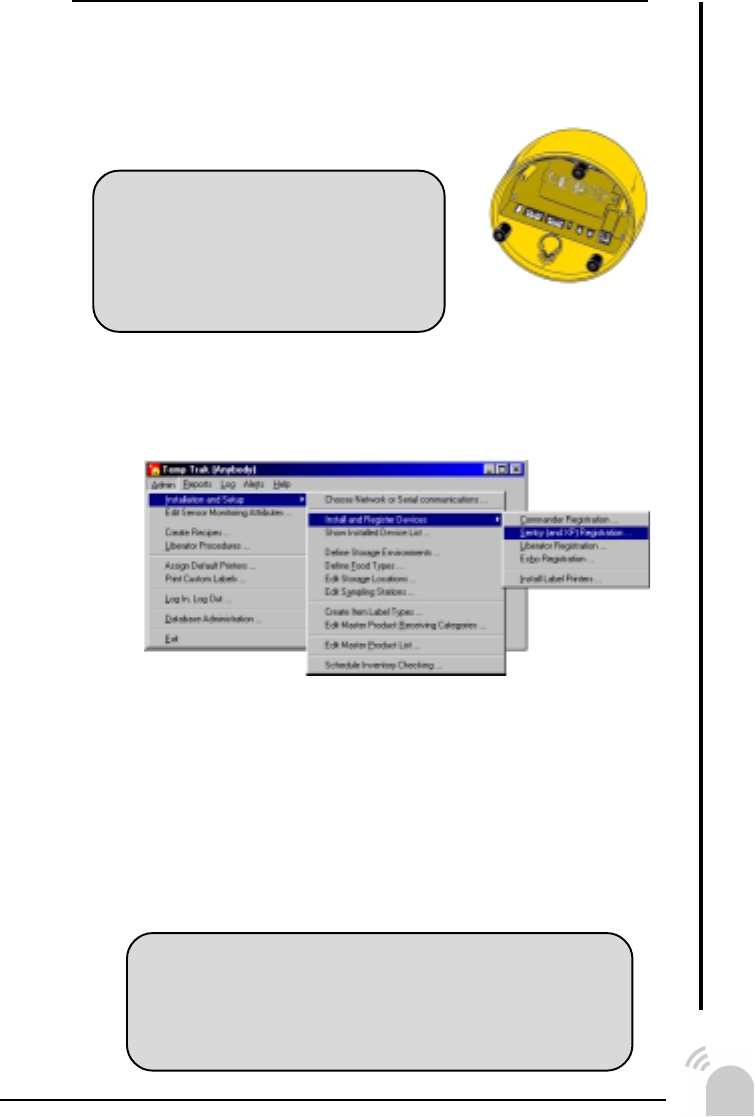
Step 4 Registering Sentries
(Repeat this step to register additional Sentries)
— Insert a 9V battery into the Sentry or plug it into a
wall outlet with the AC power adapter.
— Place the Sentry next to the Commander.
— Select Sentry (and XP) Registration from the menu.
— Follow the instructions from the Sentry Registration
window prompt.
— You may change the sampling interval at this time
or wait until Step 9 where we will discuss this in
further detail.
INSTALLATION
When the attention button on the Sentry unit is
pressed a series of beeps will be heard. Within 5 to
10 seconds the bar code identification and tempera-
ture sampling interval will appear on the screen.
For added protection for you
investment, it is suggested that
you use a surge protector when
using AC power adapters to power
your Temp Trak system.
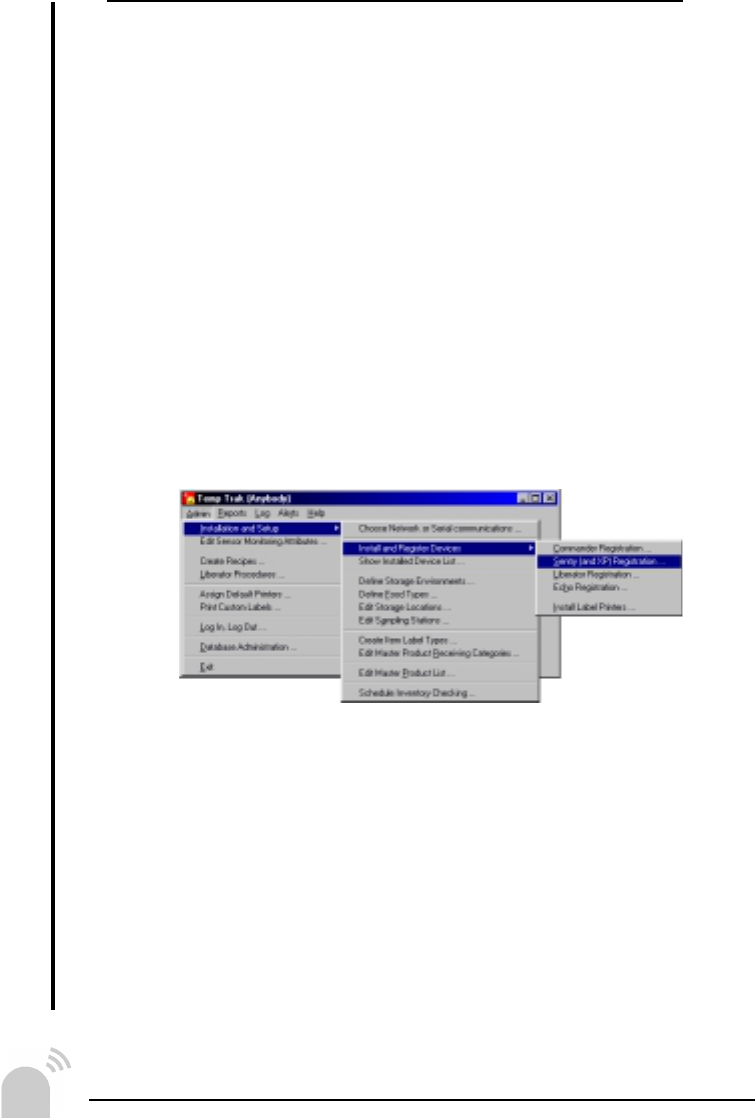
Step 5 Registering Sentry XPs
(Repeat this step to register additional Sentry XPs)
The Sentry XP is very similar to the Sentry in many re-
spects. The major difference and advantage of the Sentry
XP over the Sentry is that it has eight thermocouple ports
instead of two. This expansion to the Sentry allows the
user to monitor more temperatures in a given area without
having to have multiple Sentries.
When registering the Sentry XPs follow the same proce-
dure as when registering a Sentry.
— Plug the Sentry XP it into a wall outlet with the AC
power adapter.
— Place the Sentry XP next to the Commander.
— Select Sentry (and XP) Registration from the menu.
— Follow the instructions from the Sentry Registration
window prompt.
— You may change the sampling interval at this time
or wait until Step 9 where we will discuss this in
further detail.
INSTALLATION
!
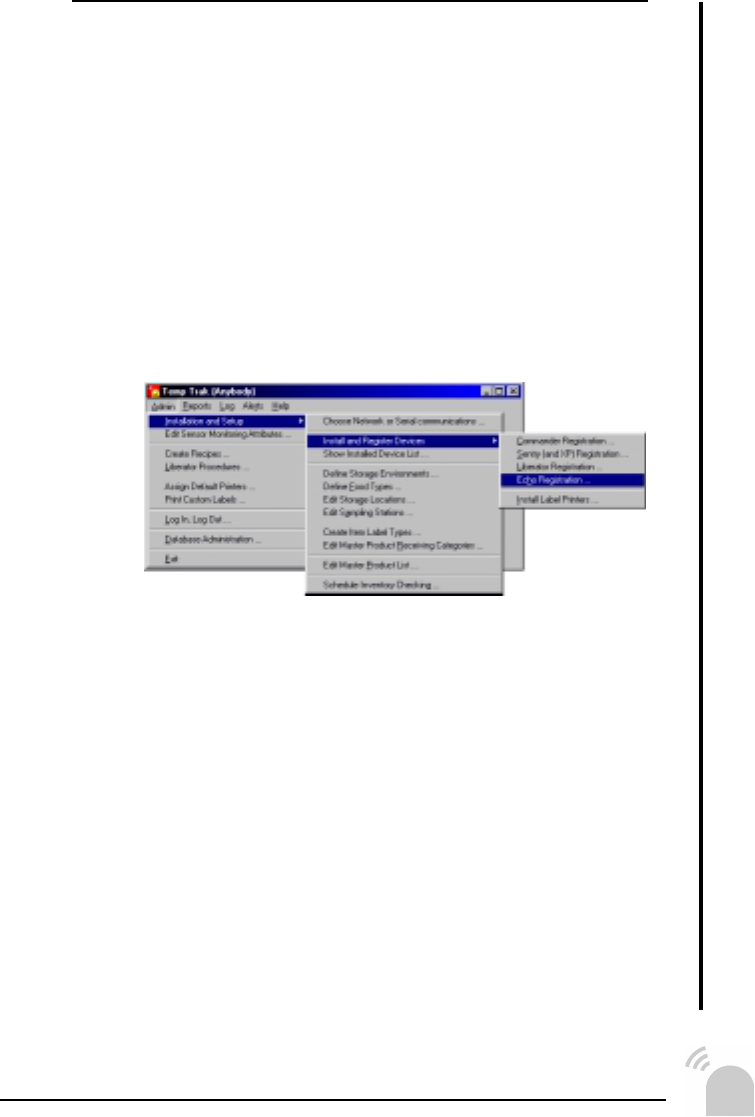
Step 6 Registering Echos
(Repeat this step to register additional Echo units)
If you have to go the extra distance or have to reach around
corners or large obstacles, you may need to use an Echo.
This unit aids in extending your radio range by acting as a
“repeater” to a local Commander unit. The Echos can be
strung together one after another in a fire chain fashion in
order to reach a maximum distance of 300 meters (or four
Echo units in a row). When placing echos in your facility,
follow the same procedures as when positioning Sentries.
— Place the Echo next to the Commander.
— Select Echo Registration from the menu.
— Follow the instructions from the Echo Registration
window prompt.
When selecting a location within the current configuration
tree for the echo unit, be aware that the hierarchy displayed
in the tree must mimic your physical configuration for the
system to work properly. For instance if your echo unit to
be registered is going to communicate with Commander-
TTB0000000999TT in the field, this is the unit you must
select in the configuration tree when you register the Echo
unit. If you are going to configure the Echo unit to commu-
nicate to another Echo unit, you must select that Echo unit
in the configuration tree when registering the new Echo.
As a note, you may have multiple echo units communicate
to a single commander or other echo unit, but the maxi-
mum number of “children” that can talk to a single “parent”
is three and the maximum number of “generations” allowed
is four.
INSTALLATION
"
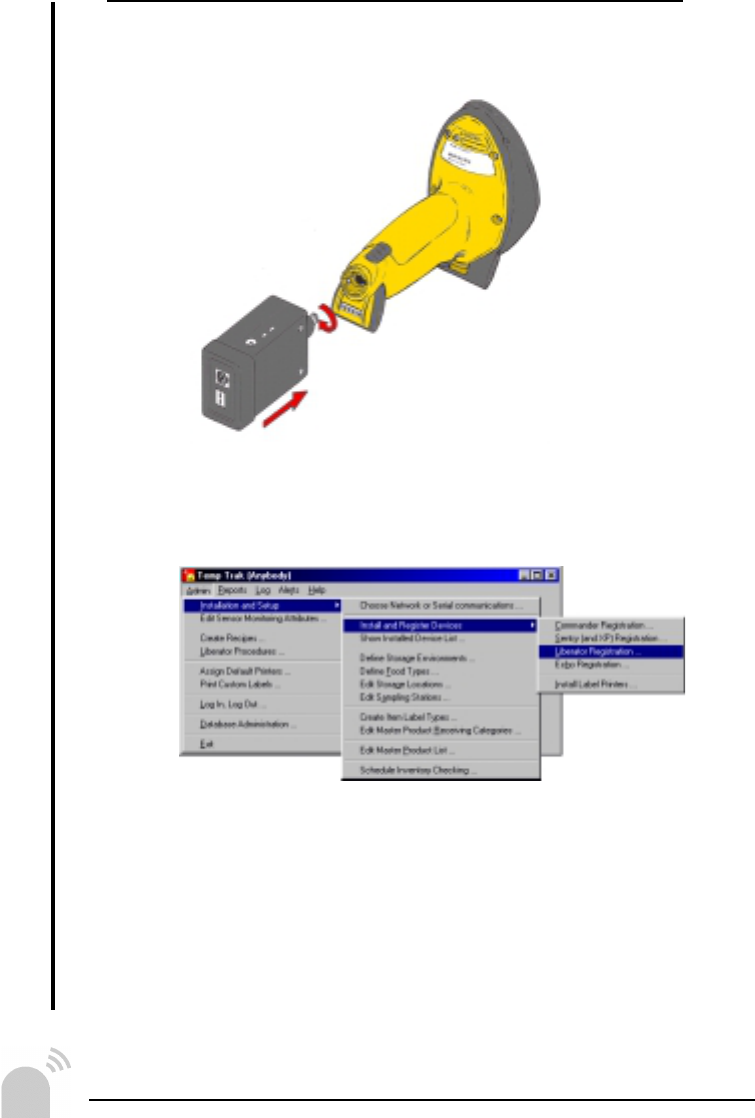
Step 7 Registering the Liberator
(Repeat this step to register additional Liberators)
— Assemble the Liberator and the Communicator.
— Hold the Liberator next to the Commander.
— Select Liberator Registration from the menu.
— Pull the Liberator trigger to wake it up.
— Follow the instructions from the Liberator Registra-
tion window prompt.
— Use the up/down arrows on the liberator keypad to
select option 4. Attention.
— Press the Enter button on the Liberator to select
the Attention option.
INSTALLATION
Liberator
Communicator
#
Step 8 Printer Setup
There are two types of printers that Temp Trak Plus uses,
Auto Labeler label printers for printing labels and regular
office printers for printing placards. Placards can only be
printed from the Temp Trak software and only to an office
printer connected to that PC. Labels, however, can be
printed from and to almost anywhere as long as you have
installed and assigned an Auto Labeler correctly.
Auto Labelers can be physically connected to a PC, Com-
mander, Echo, or Liberator and can be printed to by any
operator using a Liberator or PC. The only exception is
that an operator can only print to Portable Auto Labelers
that are directly connected to their Liberator.
To use an Auto Labeler you must first install your Auto
Labeler and then assign it to be the default printer for a PC
or Liberator. Once assigned as a default printer, the Lib-
erator or PC will print to that Auto Labeler until the default
printer is reassigned.
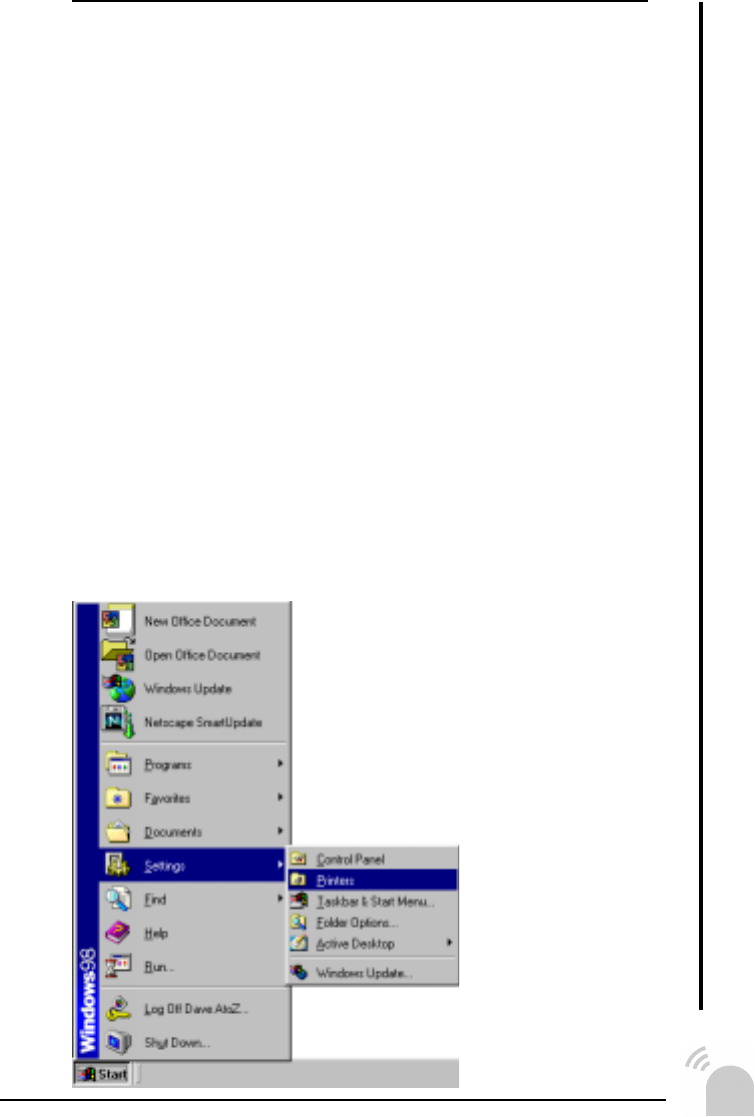
— Connect the Auto-Labeler printer to PC using a
standard parallel printer cable.
— Open the Printers folder. This
is found under the Start Menu
and then under Settings.
— Double-click on the Add
Printer icon.
— Click Next.
— Select Local
Printer and click
Next.
— Under the
Manufacturers
list, select
Generic.
INSTALLATION
$
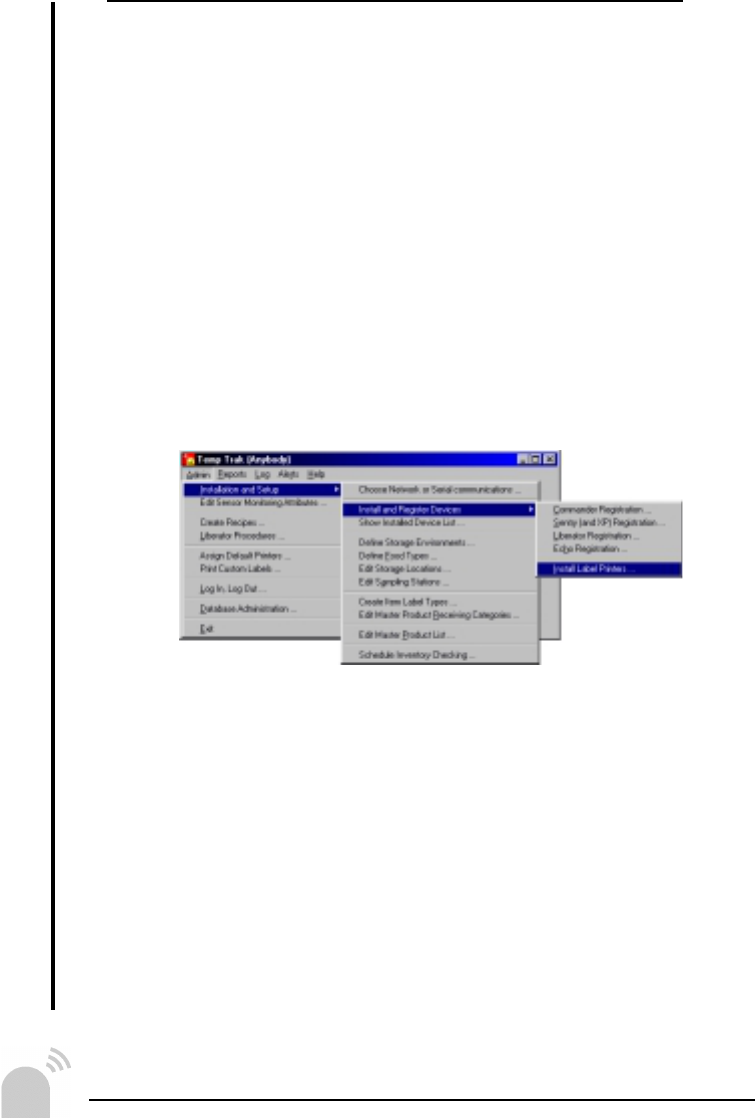
Step 8 (...continued)
— Under the Printers list, select Generic / Text Only.
— Click Next.
— Under the Available Ports list, select LPT1.
— Click Next.
— Click Next.
— Select No for printing a Test Page and click Finish.
— In Temp Trak select Install Label Printers from the
menu.
— Click Setup.
— Follow the instructions in the Label Printer Set Up
window.
INSTALLATION
%
INSTALLATION
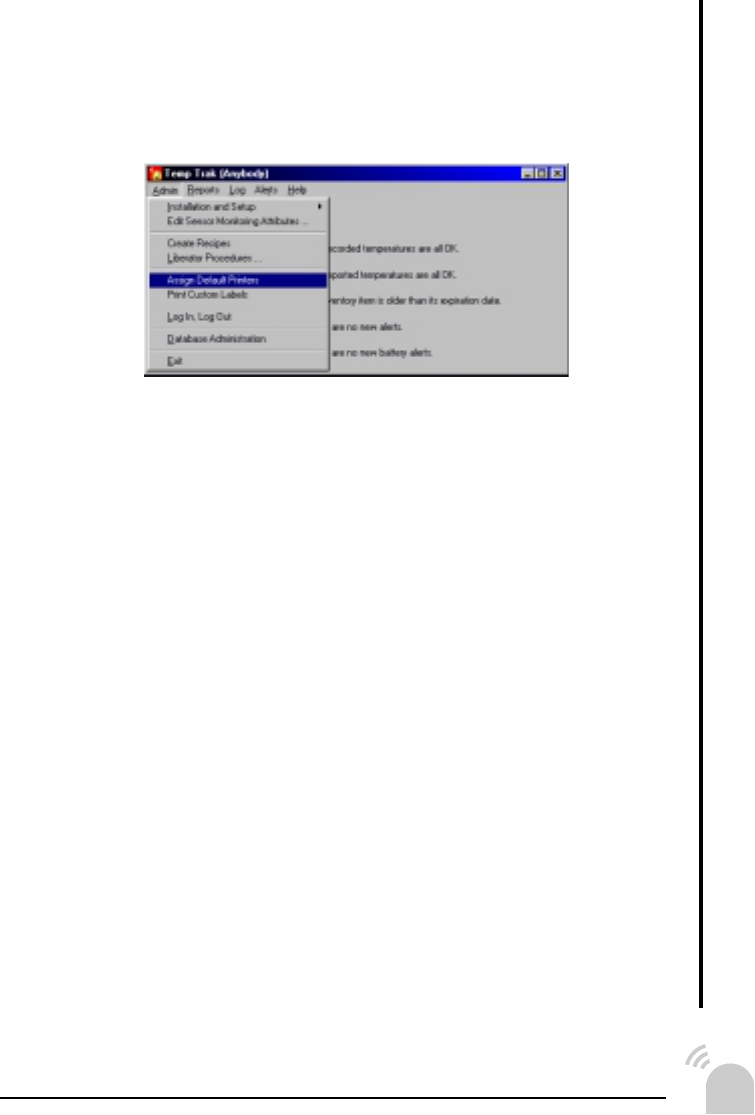
— Repeat this for each of your printers.
— Now assign a default printer for your computer and
each of your liberators. Select Assign Default
Printers from the menu.
— Next to each of the devices listed click on the ‘...’ to
select a printer to be the default printer for that
device.
Multiple Auto Labelers can be used in a Temp Trak Plus
system. To change printers, simply reassign the default
printer to the desired printer.

&
SYSTEM SETUP
'
Step 9 Configuring Sentries
— Make sure a Commander unit is connected to the
PC with the serial cable (Step 3).
Even if you are eventually going to use an existing com-
puter network to communicate to your Commander unit(s),
connect just one Commander to your PC using the serial
cable provided.
— Place all of your
Sentries near the
Commander.
— Repeat Step 4 and
set the Sampling Interval for each Sentry.
Sampling Interval is the time that the Sentry unit will wait
before it “wakes up” and takes a temperature reading, or a
sample. Between each sample, the Sentry sleeps and uses
little or no power, which means that the longer the Sentry
sleeps the longer its battery will last. Conversely, the more
often the Sentry takes samples (or the shorter the Sam-
pling Interval), the more power will be used, therefore short-
ening the battery life.
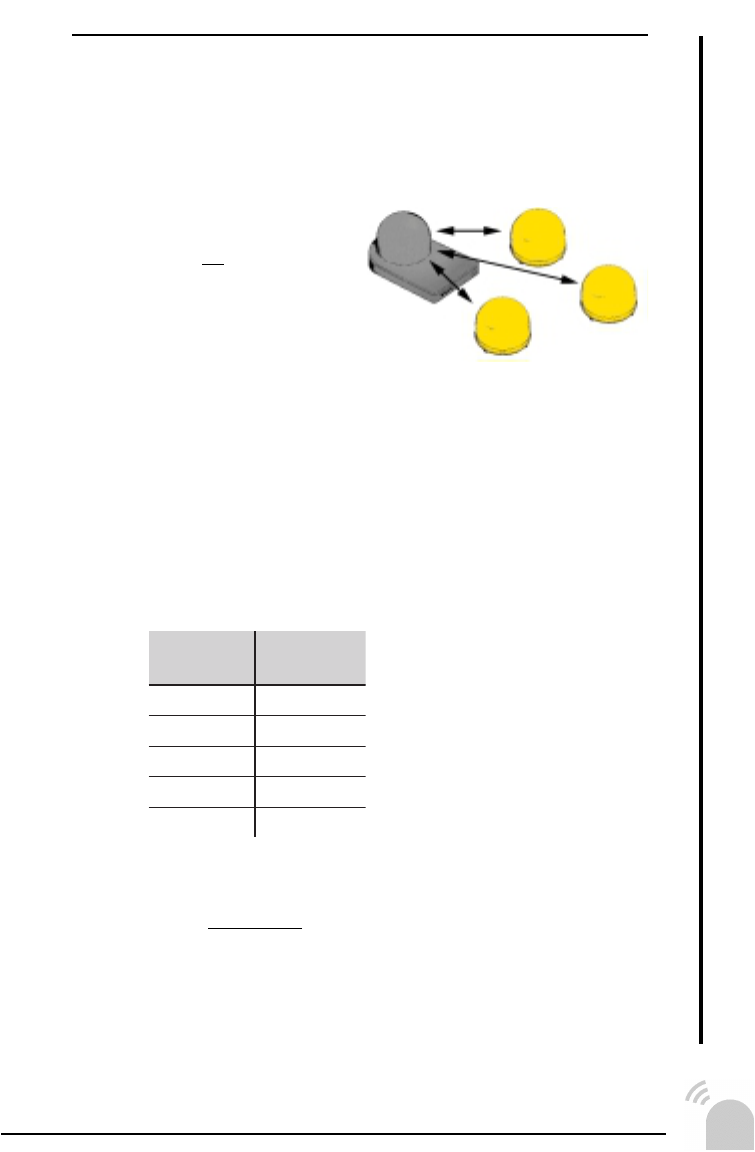
To the left is a table with esti-
mated battery lifetimes and
Sampling Intervals. These num-
bers are only a rough estimate
and will vary depending on the
type of battery used and the
conditions your system is run-
ning in. Note that any Sentry
operating with a Sampling Inter-
val of 1 minute or less will use
up batteries in a matter of
weeks! In situations where an
interval of 5 minutes or less is
necessary, it is strongly sug-
gested that a power cable is used to supply the Sentry
with power.
When choosing an appropriate Sampling Interval make sure
to take into consideration what the sentry will be monitor-
ing.
SYSTEM SETUP
By default the Sam-
pling Interval is set to
30 minutes.
gnilpmaS
lavretnI
yrettaB
emitefiL
etuniM5shtnoM3
etuniM01shtnoM6
etuniM03sraeY5.1
ruoH1sraeY2
sruoH2sraeY2
SYSTEM SETUP
Step 9 (...continued)
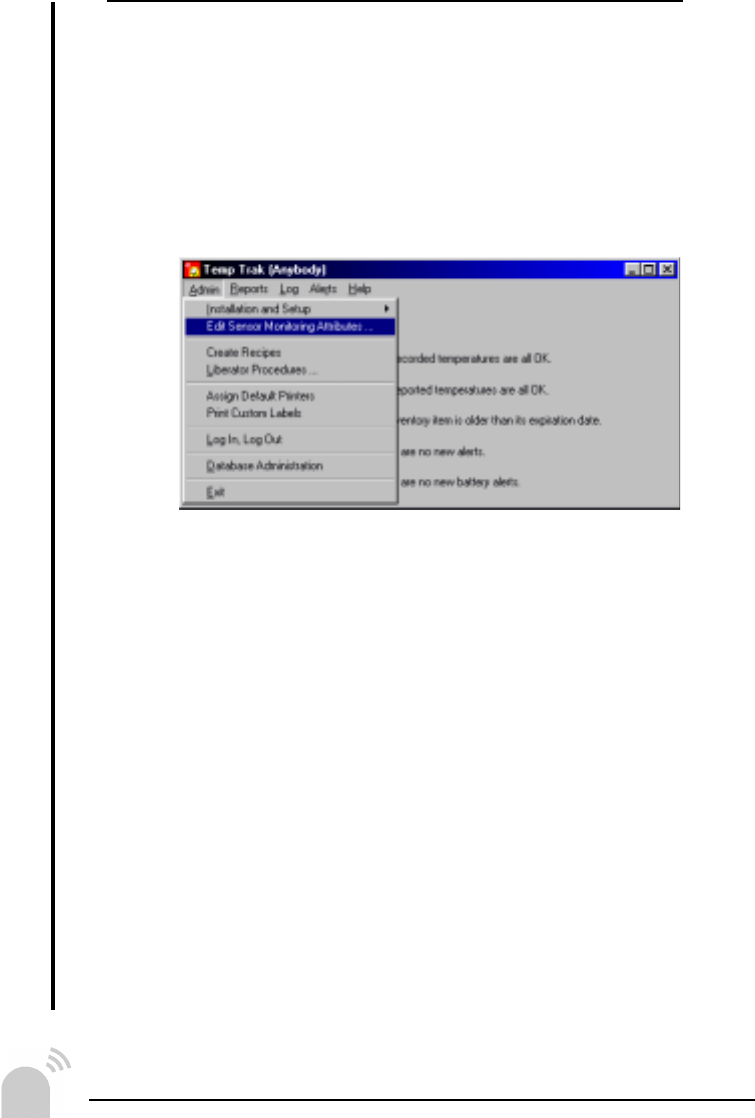
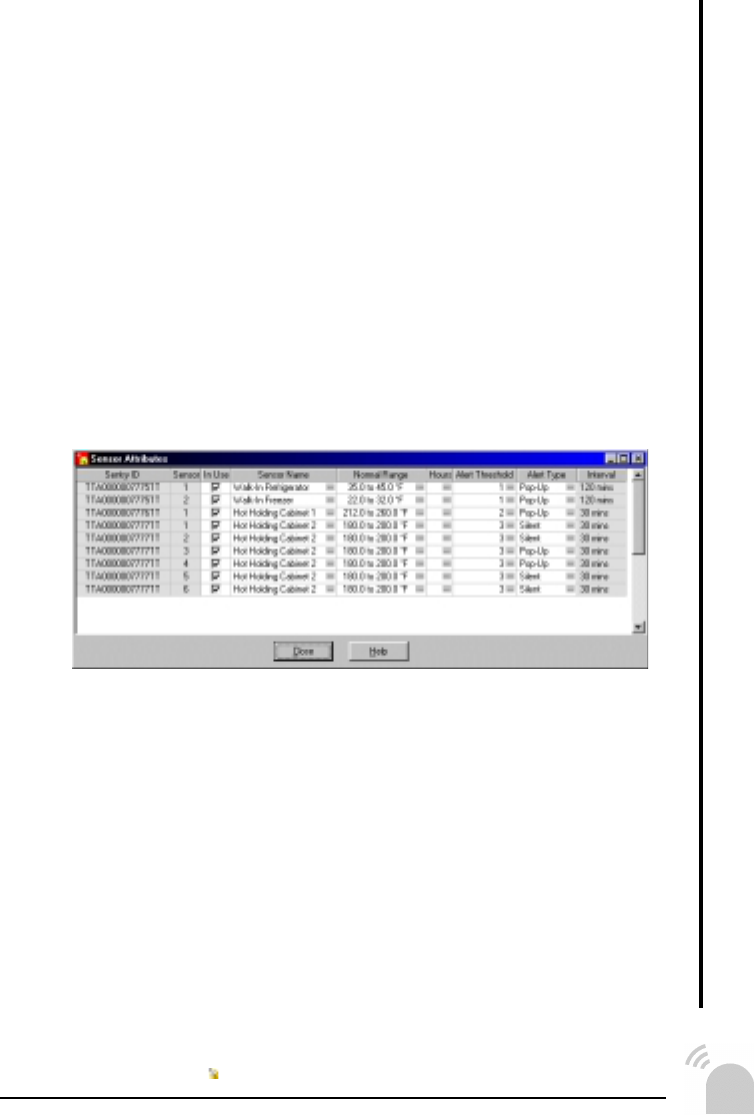
— Set the Sensor Attributes for each Sentry.
For each Sentry in your system you can define certain
attributes such as Normal Working Range, Hours of Op-
eration, Alert Thresholds and Alert Types. In addition you
can give each temperature sensor on each Sentry a name
that is appropriate, such as “Hot Holding Cabinet” or “Walk-
In Freezer.” This can be done by selecting Edit Sensor
Monitoring Attributes from the menu.
Step 10 Network Configuration
This step will assume that you are connecting to a preex-
isting 10BaseT compatible ethernet network. If you are
not sure if this is what you have, please contact your
system administrator.
— Install your ethernet card.
Follow the directions supplied by the manufacturer of your
ethernet card to physically install the card and setup your
PC to recognize it.
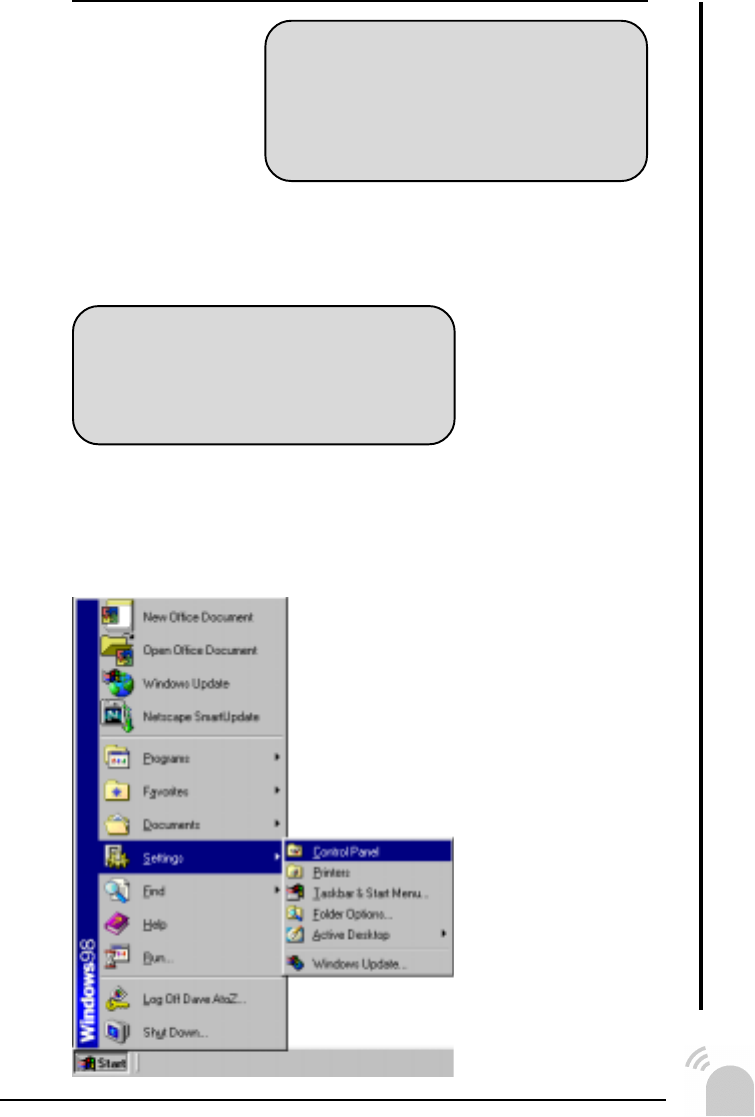
— Open the Control Panel. This
is found under the Start
Menu and then under Set-
tings.
— Double-click on the Network
icon.
If your system involves only one
Commander unit and this unit will be
connected to the PC with the serial
cable, you may skip this step and go
to Step 11.
SYSTEM SETUP
SYSTEM ADMINISTRATORS
This step of the system setup will
configure a pre-installed ethernet card
to use the TCP / IP protocol.

SYSTEM SETUP
Step 10 (...continued)
— If TCP / IP is not in the installed network component
list and bound (denoted by the ->) to your ethernet
card you must add a new protocol.
Adding the TCP / IP protocol
— Click Add...
— Select Protocol.
— Click Add...
— In the Manufacturers list select Microsoft.
— In the Network Protocols list select TCP / IP.
— Click OK.
— Select the TCP / IP protocol which is bound to your
ethernet card from the installed network component
list.
— Click Properties.
— Select the IP Address tab.
— Select Specify an IP Address.
— Enter the IP Address (such as 192.168.0.1)
(See your network administrator for this number.)
— Enter the Subnet Mask (such as: 255.255.255.0)
(See your network administrator for this number.)
— Click OK.
— Click OK.
!
SYSTEM SETUP
— Restart your PC.
— Connect your PC to the network.
— Connect the Commander units to the network.
— In Temp Trak select Commander Registration from
the menu.
— From the Commander Registration window select
each Commander and click Edit.
— Select Network Connection and enter an IP Ad-
dress (such as 192.168.0.2)
(See your network administrator for this number.)
— Configure the IP Address for each Commander.
— Select Communications Setup from the menu.
— Set CommType to Network.
Each Commander must be
given a unique IP address.

"
Step 11 Locating the System
When placing the Temp Trak Commander and Sentry units
within your facility you must follow a few simple rules.
Rule #1 — If possible, place the Sentry units in direct
line of sight with a Commander unit.
Direct line of sight — means that between two units (a Sentry
and a Commander) there
are no physical objects ob-
structing their view of one
another. While this is opti-
mal, the Sentry and Com-
mander units can communi-
cate through interior, non-
metallic walls if necessary.
Rule #2 — Place the Commander units “high” to avoid
transmission blockages such as counters, cabinets,
people, etc. The fewer obstacles that the radio waves
must travel through, the better the range.
The Sentries, Commanders and Liberators all communicate over
radio waves just like cell phones and cordless phones. As such,
the Temp Trak equipment is susceptible to interferences that
you would normally hear as static or bad reception. To reduce
reception interference, try to limit the number of walls that the
units must communicate through over long distances. For in-
stance if you need to place a Sentry 100 feet away from the
nearest Commander, try not to put more than one wall between
them. In addition, stay away from metal hoods and metal cabi-
nets since radio waves will not travel through metallic objects.
The range between Sentries / Liberators and Commander / Echos
is dependent upon the physical environment in which the radio
waves must travel. Range of up to 250ft is possible in an ideal
line of sight environment, although typically ranges are roughly
100ft to 150ft in most cases. Liberator communication range is
usually less due to physical blockage of the radio signal by the
operator.
After you have located your Sentries and Commanders, verify
that each Sentry is in communication with a Commander. Place
the Sentry in the desired location and press the attention button.
When you hear a series of short beeps the Sentry and Com-
mander are communicating. If you are having trouble getting your
system to communicate try placing the units above head height
or try rotating the modules by 90 degrees.
SYSTEM SETUP

#
SYSTEM SETUP
Rule #3 — Use batteries in conjunction with AC power
adapters.
The Sentry can be powered by either an AC adapter plugged into a
wall outlet or by a 9V battery. The advantage of the 9V battery is that
your Sentry can be placed virtually anywhere. The problem is that a
9V battery does not last forever, and depending on the configuration
of your Sentry possibly only a month or two (Please refer to Step 9
for more details on battery life). Plugging your Sentry into the wall
resolves this problem except when there are power outages. The
best solution is to both install a battery in the Sentry and use the AC
wall adapter. In this configuration, the Sentry will use the AC power
as long as there is power to your building, but in the event of a power
outage, the Sentry will automatically switch to the 9V battery. This
will extend the life of the 9V battery and provide your system with
uninterrupted power for a longer period of time.
During power outages your Commander units will not operate since
they only run with an AC wall adapter. As long as your Sentries have
a good battery installed they will continue to collect temperature data,
store it to memory and when the Commanders come back on-line,
upload the backlogged data so your Temp Trak system won’t miss a
beat.
If for some reason your Sentries are running low on power, Temp
Trak will let you know. The green indicator on the main screen next
to the Battery Alerts button will turn red indicating that at least one
Sentry has a low battery. Clicking on the Battery Alerts button will
display a screen with more details on each Sentry that is reporting a
low battery.
Rule #4 — Keep Sentry sampling intervals within a rea-
sonable range.
As mentioned in Step 9 of this guide, the sampling interval for each
Sentry has a direct effect on the lifetime of its battery. It also has a
direct impact on the performance of the Temp Trak system as a
whole.
For most applications the default setting of 30 minutes is usually
enough precision, but if you find yourself needing more data you can
reduce the sampling time. Beware that reducing the sampling inter-
val on a number of Sentries could dramatically inhibit the performance
of the system. It is a good idea to use the longest sampling interval
as possible (based on your needs and the situation). For example,
using a sampling interval of 5 minutes for a freezer is extremely ex-
cessive since freezers are usually insulated and fairly stable, while
for a grill 5 minutes may be reasonable since the temperature of a
grill may fluctuate dramatically over a short period of time.

$
USING
TEMP TRAK
%
Overview of Temp Trak
Temp Trak gives you the power to monitor the tempera-
ture of many parts of your operation – automatically.
By placing Sentries or Sentry XPs near your food or equip-
ment to be monitored, Temp Trak will measure and log
temperature readings day and night if need be of all the
stationary points in your operation. Each Sentry unit has
one on board sensor for ambient temperature readings and
two external ports for K type thermal probes. With Temp
Trak in place you can sleep easy knowing that your opera-
tion is under constant watch.
USING TEMP TRAK
Reports
The Temp Trak system logs and stores a massive amount
of data which can be somewhat overwhelming. Fortunately
Temp Trak also provides an easy way to sort through all
this information and view it in useful formats.
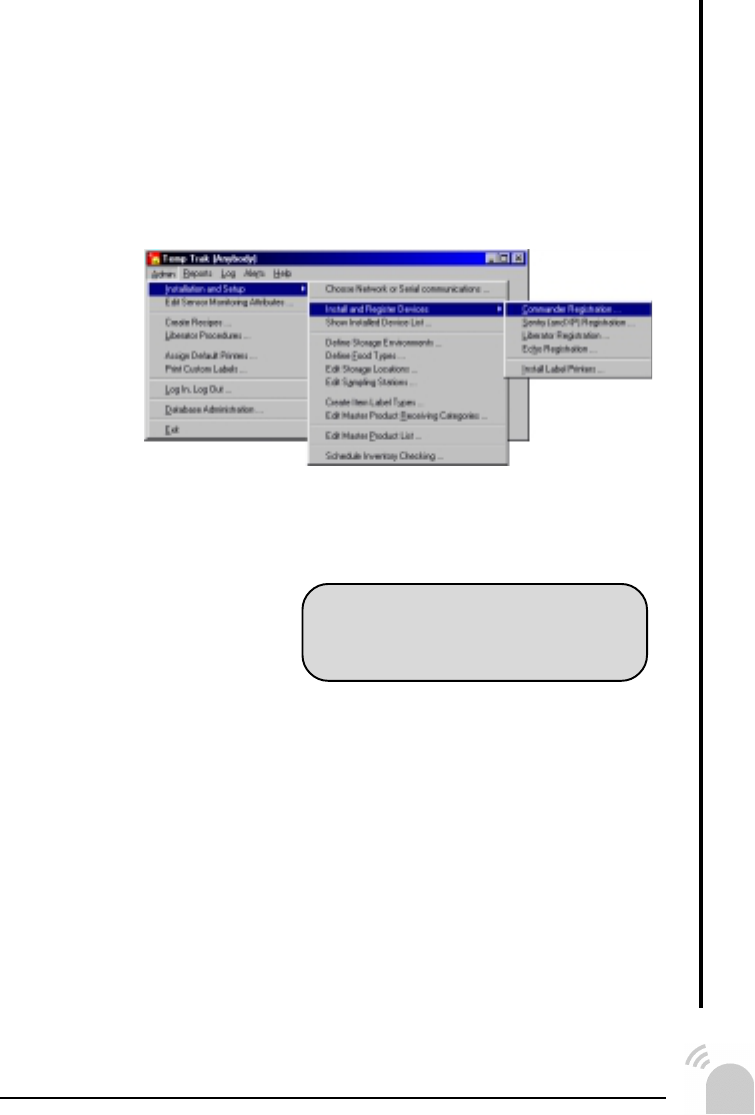
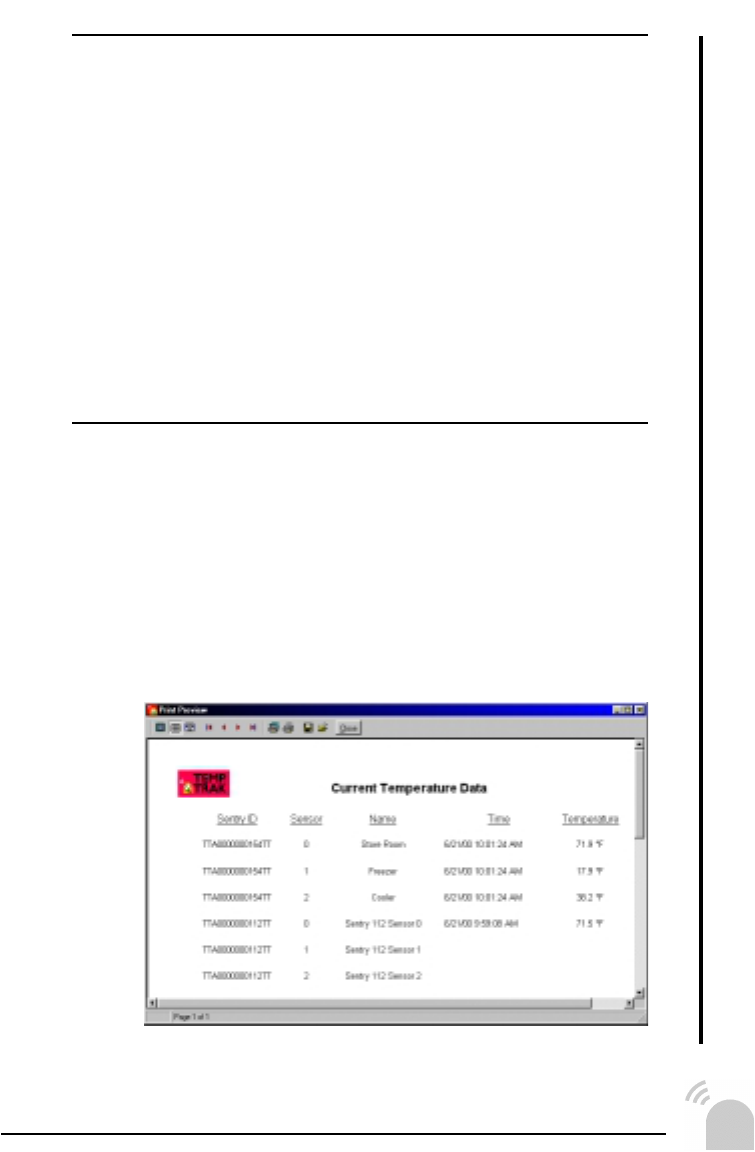
Temp Trak allows you to view the current status and his-
tory of any and all sensors in your operation. Selecting
Current Temperature Report from the menu will display a
list of all the sensors and their current temperatures.
&
USING TEMP TRAK
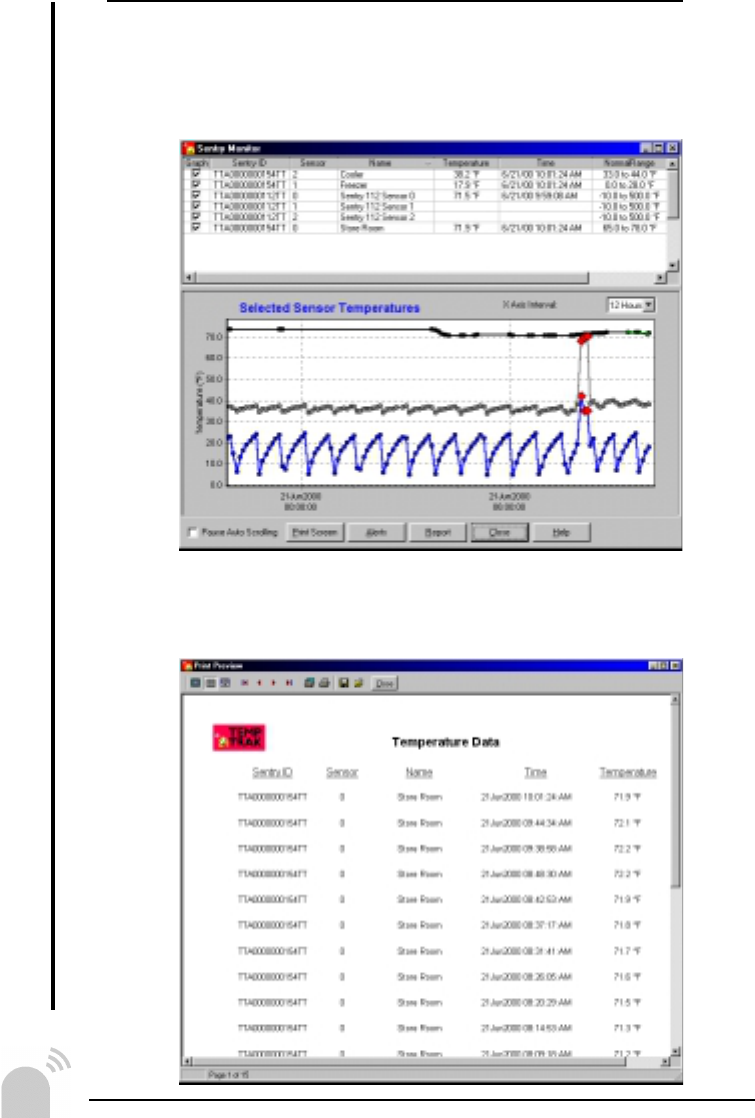
Reports (...continued)
Selecting Review Temperature Sensor Data from the menu
will display a plot of selected sensor data from the current
time backwards in history.
To make a report of the plotted data, click Report.
'
USING TEMP TRAK
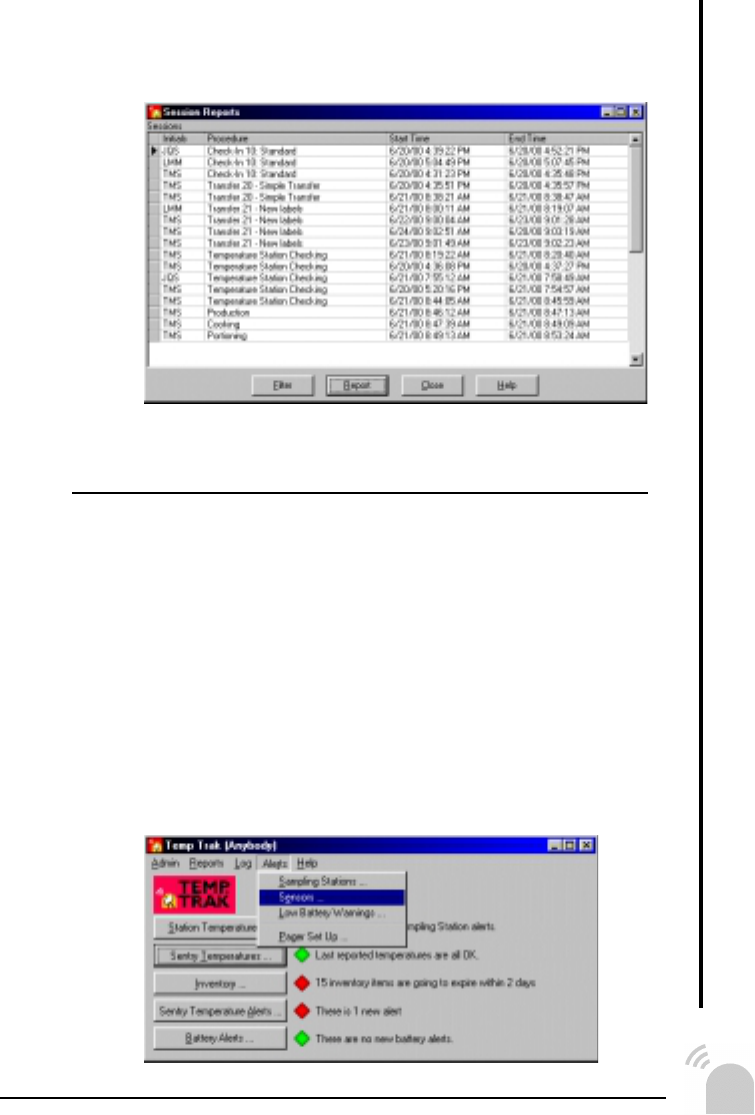
As users operate Temp Trak, all of their actions are logged
in the database and can be viewed by selecting Session
Reports from the main menu.
Alerts
When configuring the Sentries, you had the opportunity to
establish alerts and alert thresholds. In doing so you con-
figured Temp Trak to know when monitored temperatures
ventured out of normal operating range. In addition you
also configured Temp Trak to know how many of these
range violations constituted an actual alert.
During operation Temp Trak logs any and all alerts and
allows you to address each one. Select Sensors from the
Alerts menu item to display a list of alerts resulting from
temperature sensors which have measured too many out
of range temperatures.
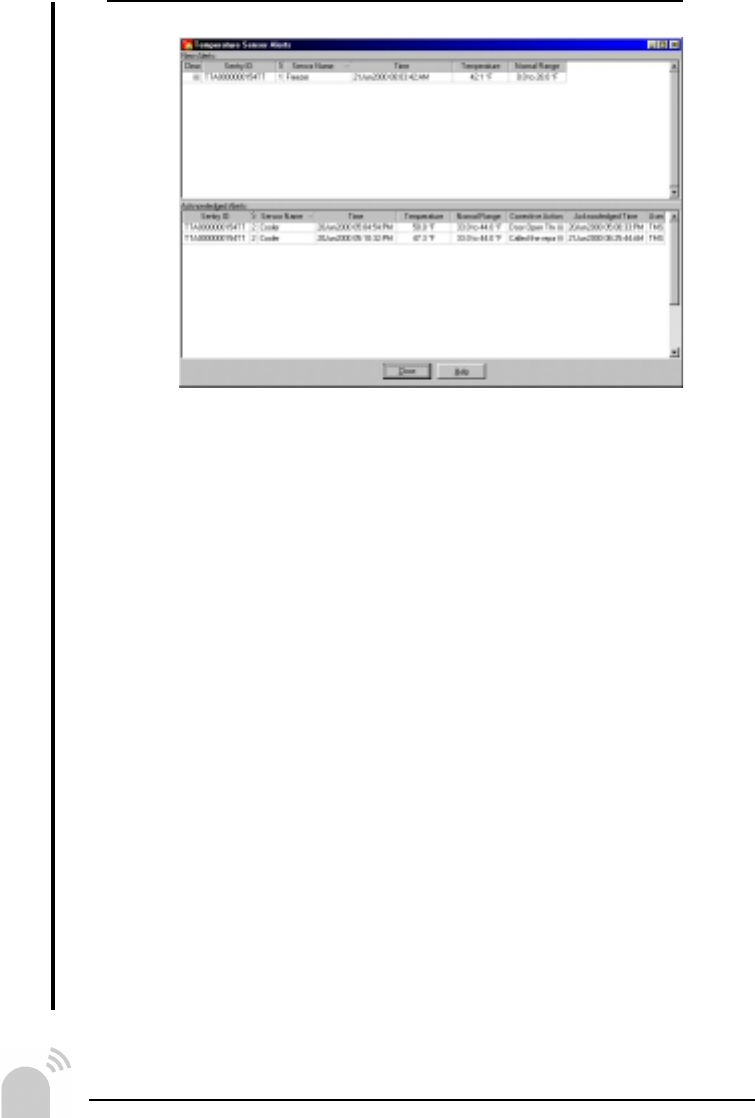
!
The top portion of this window lists the alerts that have
occurred but have not been addressed by a user. To clear
an alert, click on the ‘...’ next to the alert. You will be
prompted to select an action to take on the alert that would
show that it was taken care of. The list of actions is edit-
able and can be customized to anything the user feels nec-
essary.
When the alert is cleared it is moved automatically to the
bottom half of the window where it remains for historical
purposes. The same alert monitoring feature is also avail-
able for Sampling Stations, and Low Battery Warnings.
USING TEMP TRAK
Alerts (...continued)

!
USING TEMP TRAK
!
Temp Trak Tale I
Basic Monitoring
1 — Commander
2 — Sentries
1 — Sentry XP
Overview
A restaurant manager, Patti, would like to monitor the tempera-
ture of a combination walk-in refrigerator and freezer and a hot
holding cabinet she uses to keep her side dishes warm. The
Temp Trak System will allow her to inspect current tempera-
tures of monitored devices and also easily review accumulating
temperature trends.
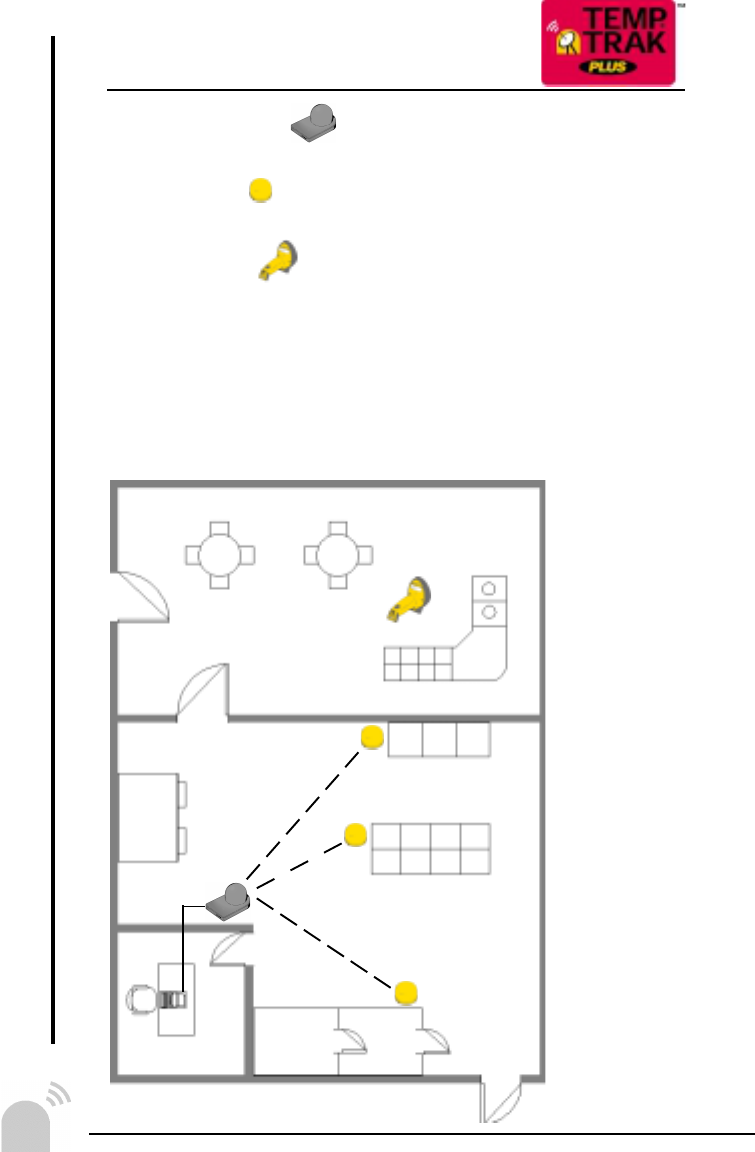
USING TEMP TRAK
Front
of
House
Back
of
House
A
B
OFFICE
WALK-IN
Refrig.
REACH-IN
Freezer
Hot Holding
Hot Holding
Freezer
C
!!
USING TEMP TRAK
Installing the System
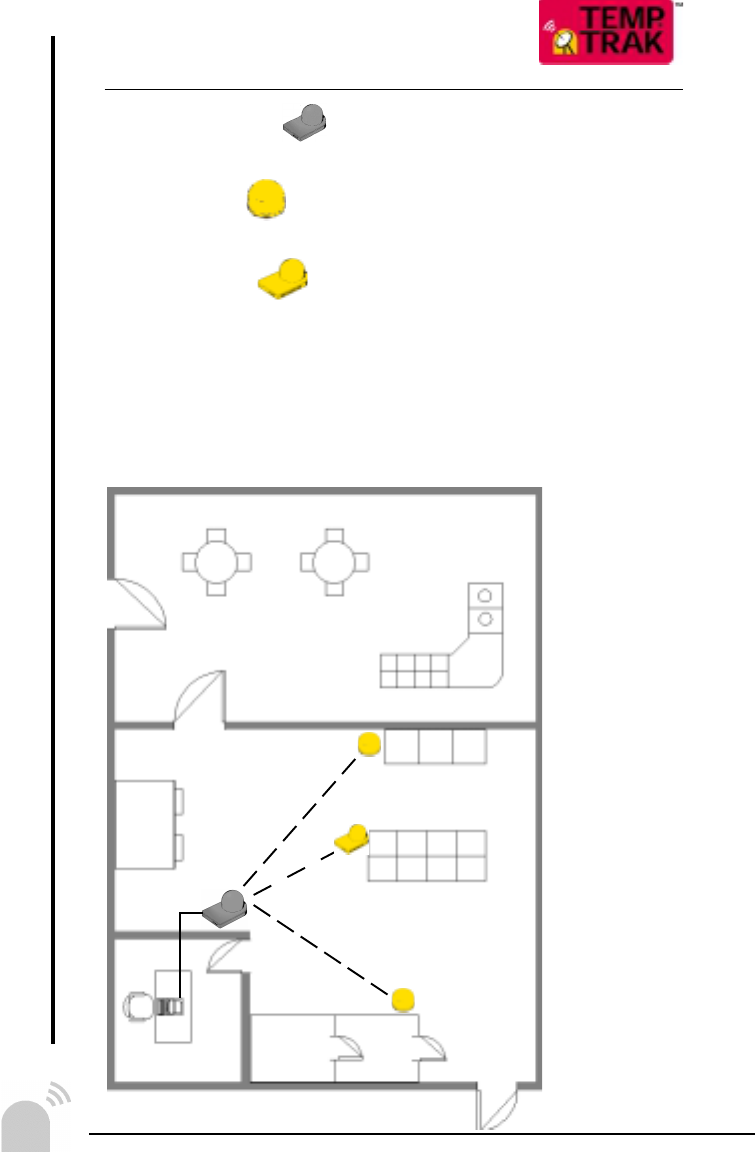
Positioning the Commander unit
Patti first locates the Commander unit outside of her back office
on a wall that overlooks as much of the kitchen as possible.
Locating the Sentries
By standing in each potential Sentry spot, Patti can look back to
see if the grey dome of the Commander is visible. If it is, then
she knows that this is a good spot. If not, she repositions the
Commander until she can see it. By repeating this process for
each location she can be confident that each Sentry is in direct
line of site of the Commander. While direct line of site is optimal,
the Sentry and Commander units may communicate through in-
terior, nonmetallic walls. To verify the units are communicating,
press the attention button on the Sentry or Sentry XP and listen
for a series of beeps.
Monitoring
Hot Holding Cabinet
Patti would like to monitor her hot holding cabinets just during
normal business hours (since this is the only time these appli-
ances will be in use). Patti configures Sentries B and C (Step 9
in this guide) based on the table above. She uses the Setup
button under the Sensor Attributes menu item to establish mini-
mum and maximum temperature values for each sensor on each
Sentry.
Walk-In Refrigerator & Freezer
These appliances need to be monitored 24 hours a day but re-
quire less data than the other areas. Patti determines that she
will set her sampling interval for both sensors on Sentry A to 2
hours. In the Temp Trak program, Patti configures Sentry A and
establishes minimum and maximum temperature values for each
sensor.

!"
USING
TEMP TRAK PLUS

!#
Overview of Temp Trak Plus
Temp Trak Plus gives you the power to track inventory
items throughout their entire life-span. By scanning items
as they are moved from one location to another, Temp Trak
Plus can monitor each item and determine whether it has
been out of its normal temperature range for too long.
With the Liberator Temp Trak Plus can expand your moni-
toring world to include mobile points in your operation. Go
off line with the Liberator and log temperature after tem-
perature without having to be in constant communication
with a Commander. When you return from your mission,
the Liberator will upload all the data you took to the nearest
Commander.
Operators log in to the system via the program or a Libera-
tor using a user ID or PIN number. If you are setting up the
system, assign a four digit number to each person who will
be using your system. During operation all actions and
events are logged and associated with the ID or PIN num-
ber of the user currently logged into the system. Be sure
each user logs out of the system when they are done with
their operation, otherwise actions and events will be asso-
ciated with the wrong person. If you are a user and the
system has already been setup, refer to your system ad-
ministrator or manager to be assigned an ID or PIN num-
ber.
Tracking of the inventory usually starts when the items are
received from shipping. Each item is entered into the sys-
tem by scanning the manufacturer’s bar code with the Lib-
erator. On entering the system, Temp Trak Plus will print a
new bar code label to be placed on the new item. From this
point forward, the normal manufacturer’s bar code is no
longer utilized.
Once your inventory has been received and entered into
the Temp Trak Plus, use the Liberator to let the system
know when inventory moves from one storage location to
another.
USING TEMP TRAK PLUS

!$
USING TEMP TRAK PLUS
The Basics of the Liberator
Scan the Entire Bar Code
— Pull the trigger of the Liberator to activate the scan beam.
— Your scan beam must cross every bar and space on the
symbol.
— The larger the symbol, the farther away you should hold
the scanner.
— Hold the scanner closer for symbols with bars that are
close together.
— A short, high tone beep indicates a good decode.
gp g
Right Wrong
Hold at an Angle
Do not hold the Liberator directly over the bar code. Laser
light reflecting directly back into the Liberator from the bar
code is known as specular reflection. This strong light can
“blind” the Liberator and make decoding difficult. The area
where specular reflection occurs is known as a “dead zone.”
You can tilt the Liberator up to 65° forward or back and still
achieve a successful decode.
Simple practice quickly shows what tolerances to work
within.
Getting Around the Keypad
If nothing appears on the LCD screen of the liberator, press
the trigger. This will wake up the Liberator.
Use the up and down arrows to change menu items. To
select an item, press the Enter key.
To back out of a menu item, press the FUNC key and then
press the BK key.
For more details on using the Liberator keypad see the
appendix.
!%
Sampling & the Liberator
Sampling empowers the user of Temp Trak to take tem-
perature samples of anything — anytime! All you have to
do is configure Temp Trak to recognize an area or item in
your facility as a sampling station (items on a salad bar for
instance). Then with the help of the Liberator, you can take
temperature readings of your sampling station anytime you
would like, and Temp Trak will record all the data. No need
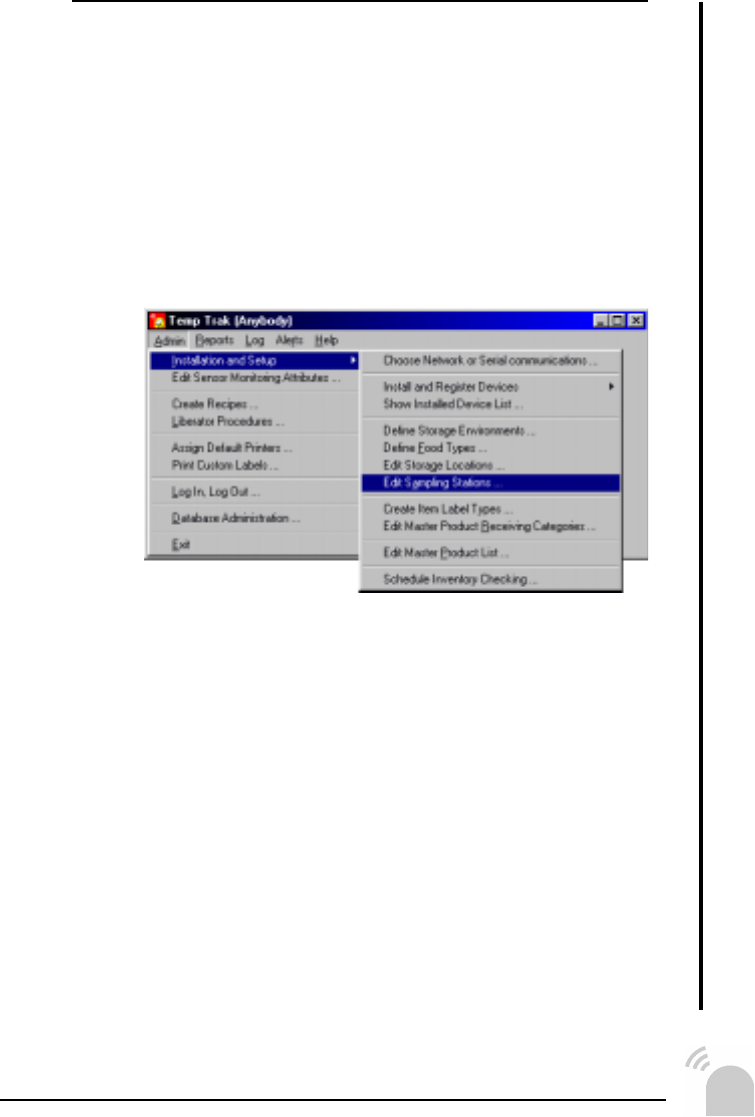
for clip boards or note pads.
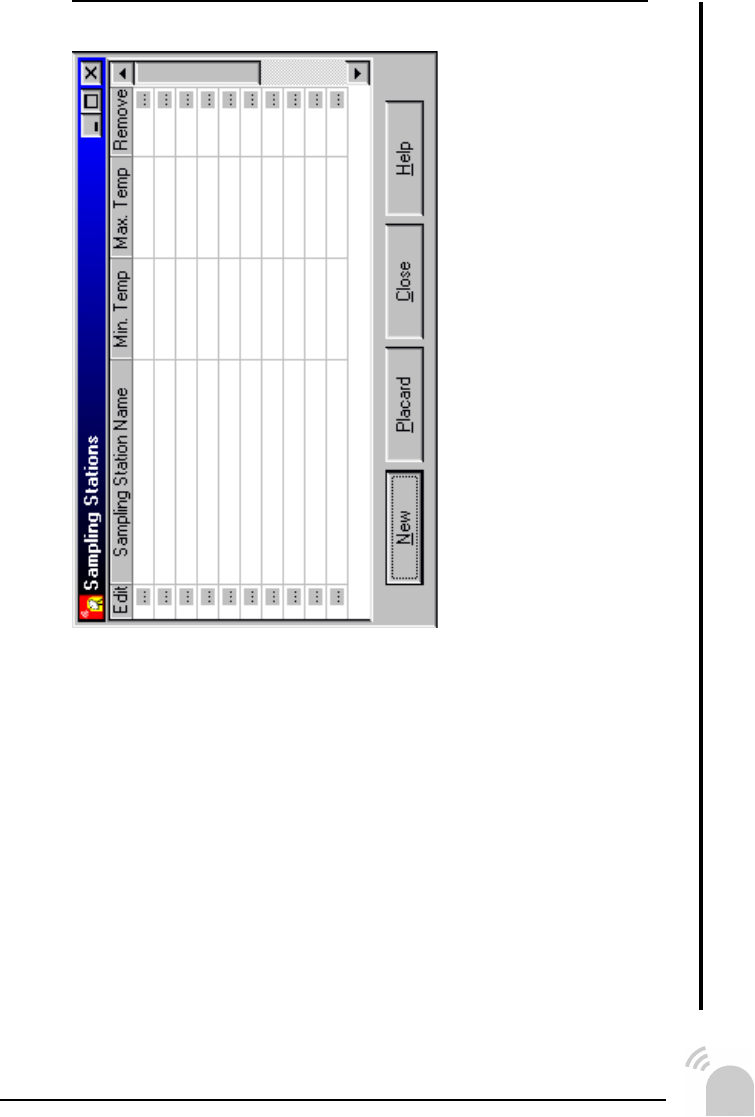
— Select Edit Sampling Stations from the menu.
— Create a new sampling station or edit an existing
one and print a station label.
Here you can assign a name to the sampling station and
configure a normal operating temperature range.
— Attach a thermal probe to the Liberator.
— Log into the Liberator.
Select Login on the Liberator menu and enter your ID.
— Enter process number 30 (Sampling Mode).
Use the trigger on the Liberator to accept the temperature
and send the data to the system. The Liberator will prompt
you for the next reading.
— Exit to the main menu of the Liberator.
Press the FUNC key then press the BK key.
USING TEMP TRAK PLUS
!&
USING TEMP TRAK PLUS
Temp Trak Tale II
Sampling Stations
1 — Commander
3 — Sentries
1 — Liberator
Overview
Omar was expanding his franchise of all you can eat buffets and
had bought Patti’s old delicatessen. In the deal Omar inherited
Patti’s Temp Trak system. While Omar understood the advan-
tages of the current system, he also realized that his needs
were going to be different. He wanted to expand the system to
periodically monitor the food in the dining area as well as what
Patti’s original system monitored in the kitchen.
Front
of
House
Back
of
House
A
C
B
OFFICE
WALK-IN
Refrig.
REACH-IN
Freezer
Hot Holding
Hot Holding
Sampling
Freezer

!'
USING TEMP TRAK PLUS
Sampling Stations
Temp Trak to Temp Trak Plus
Temp Trak Plus includes a Liberator unit which is a hand-held
data acquisition device which allows the user the freedom to be
mobile and record temperature data from virtually anywhere. The
Liberator is ideal for situations where a Sentry may be impracti-
cal or overbearing, perfect for buffet counters, salad bars and
random temperature gathering.
How to Sample
Omar placed a bar code label printed from the Auto-Labeler next
to each of the four dishes he wanted to monitor on the buffet
table. An operator could then scan the bar code which identified
the dish and take a temperature reading — at any time! The
Temp Trak system then automatically would log the bar code
information and it’s associated temperature for later analysis.
Setting Up Temp Trak Plus
To get this up and running, Omar had to first setup his Auto-
Labeler label printer (Step 8 in this guide) and then configure the
software to be aware of his new setup. In the Temp Trak pro-
gram Omar selected the Editing Sampling Stations menu item to
add the four new stations to the list. For each station he could
specify a name and an appropriate temperature range for alert-
ing the user when an item was out of range. In addition, Omar
printed a combination of labels and placards to be posted to
identify the particular stations (see the appendix for more details
on placards). Omar placed his placards in the kitchen area, while
for the dinning room he printed individual labels that he could
discreetly affix to the edge of the buffet table.
Using the Liberator
When sampling the food on his salad bar, Omar first logs into
the Temp Trak system via the Liberator and then inputs process
30 at the liberator prompt. The liberator prompts him to scan a
sampling station code, which he does. The Liberator then tells
him to take a temperature. Omar places his temperature probe
into his first pan and waits for the temperature to stabilize. Dur-
ing the reading, the liberator tells Omar wether or not the food
being measured is within normal range. When he’s satisfied with
the temperature reading, Omar pulls the trigger and the reading
is locked in and sent to the PC. The Liberator then prompts him
for the next station.
Omar repeats this procedure of scanning station labels and tak-
ing temperatures until he is finished. He presses the FUNC key
and then the BK key to back out to the main menu.

"
USING TEMP TRAK PLUS
Tracking Inventory
Temp Trak gives you the power to track inventory items
throughout their entire life-span. By logging (or scanning)
items as they are moved from one location to another, Temp
Trak can monitor each item and determine whether it has
been out of its normal temperature range for too long.
Shelf life of your inventory varies and depends on food type
and where it is being stored. The user needs to define stor-
age environments and then assign them to storage loca-
tions. Think of it as describing the different generic types of
places inventory can be stored for a period of time and
then assigning a specific location to be similar to that type.
The type of storage environment is defined in Temp Trak
and has characteristics that tell Temp Trak how long any
type of food can stay there.
Based on these assignments, Temp Trak then calculates
the expiration date when an item is received into a storage
location. If the storage location of the product is changed
(i.e. transferred) a new expiration date is calculated. The
operator has the option to print a new Temp Trak label with
the new expiration date.
If a new label is printed, the old label, and bar coded Temp
Trak ID number, become inactive. The new label with a
new Temp Trak ID number is now used to track the item.
If no new label is printed, the old label remains active, but
the expiration date on the label may no longer be correct.
The PC will track the updated expiration date correctly. If
you do not want to reprint labels you may want to omit the
expiration date from your labels.
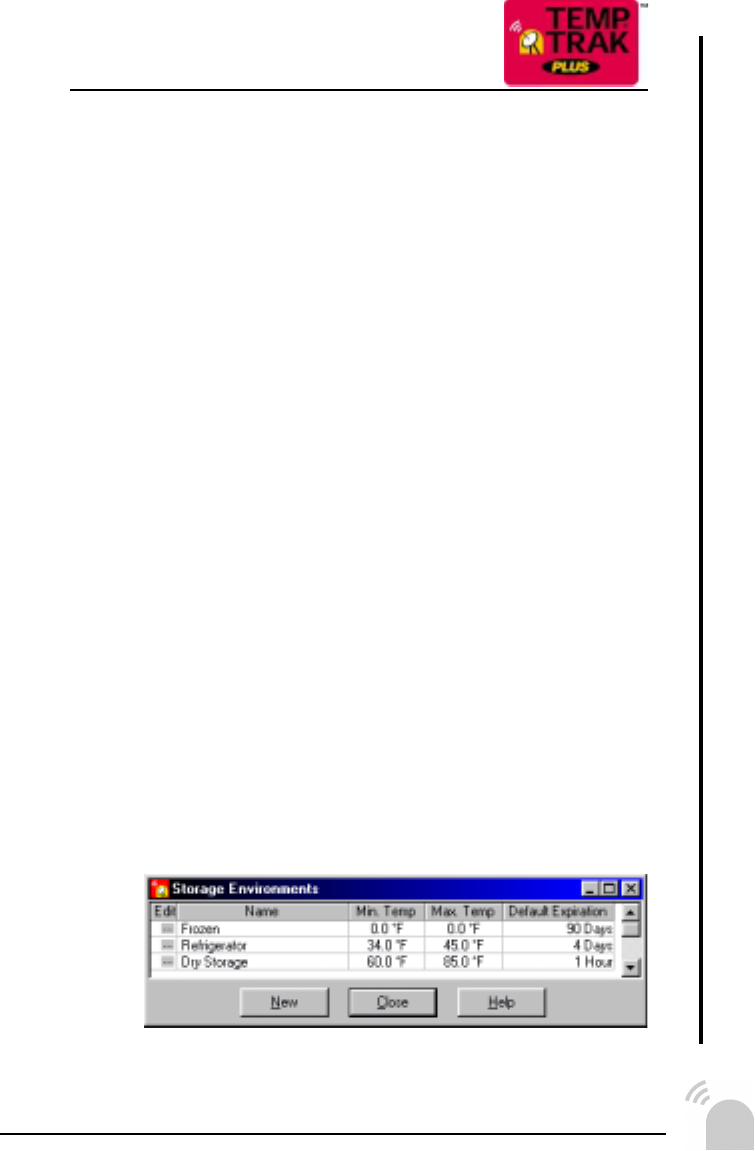
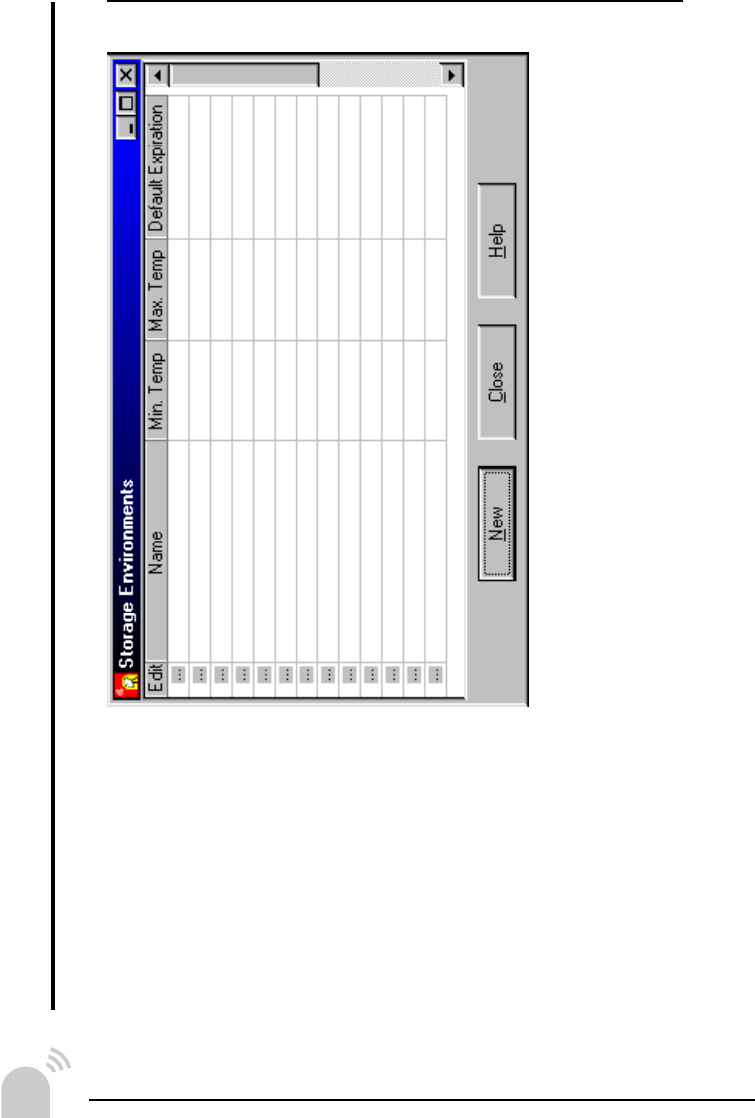
— Select Define Storage Environments from the
menu.
"
USING TEMP TRAK PLUS
— Create a new storage environment or edit an
existing one.
Here you can assign a name to the storage environment
and configure a normal operating temperature range as
well as a default expiration date.
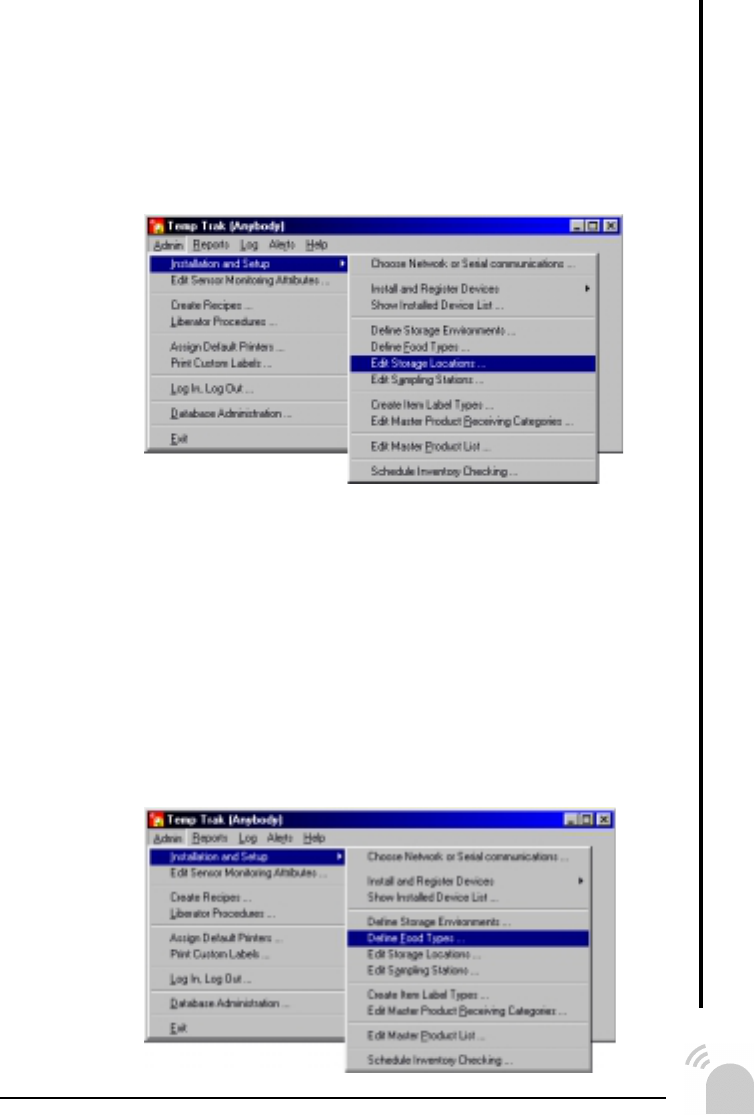
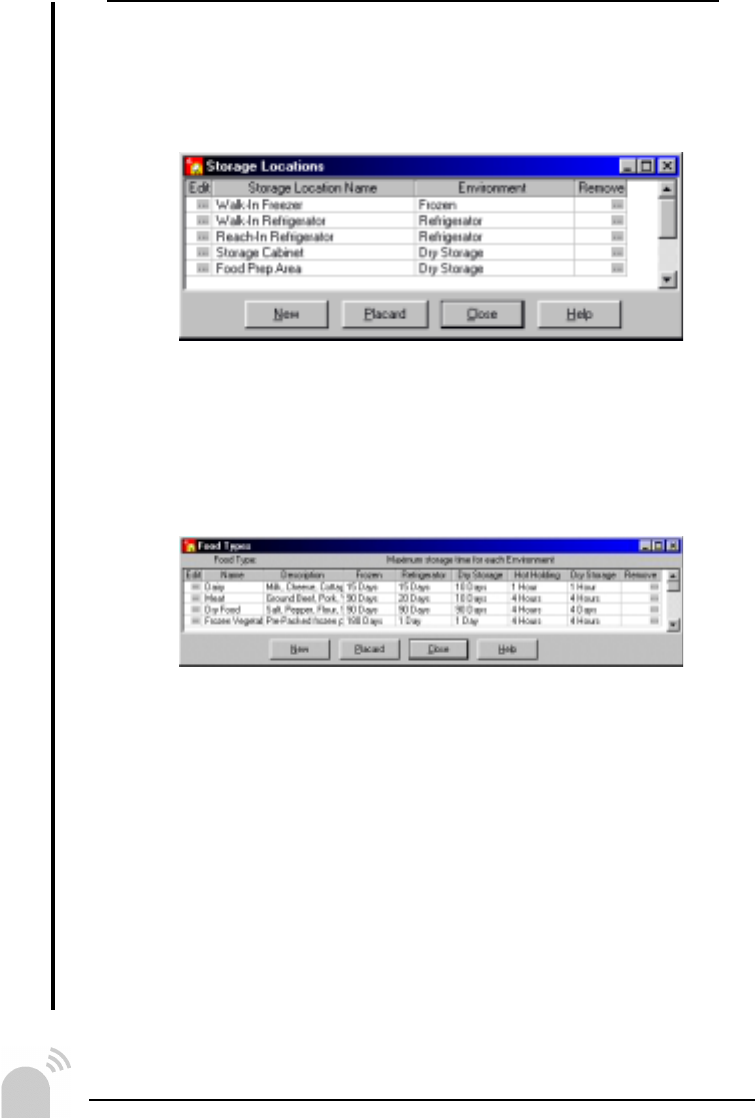
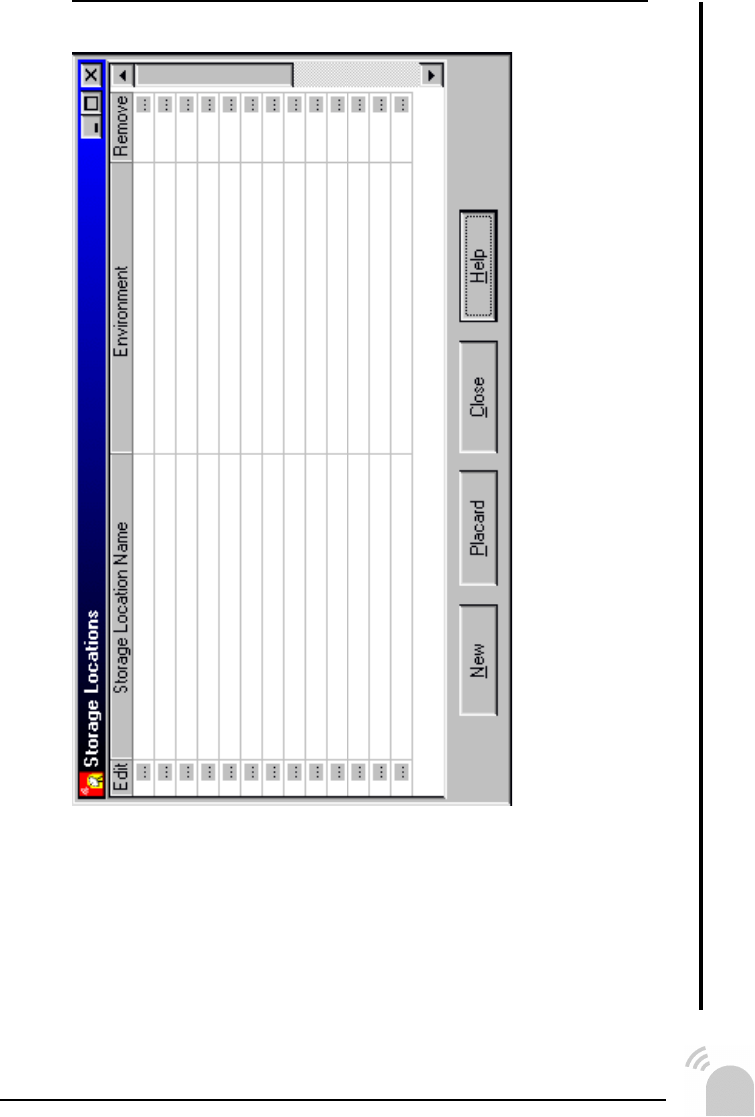
— Select Edit Storage Locations from the menu.
— Create a new storage location or edit an existing
one.
Here you can assign a name to the storage location and a
storage environment type.
— Print a storage location label or a placard of all the
storage location bar codes.
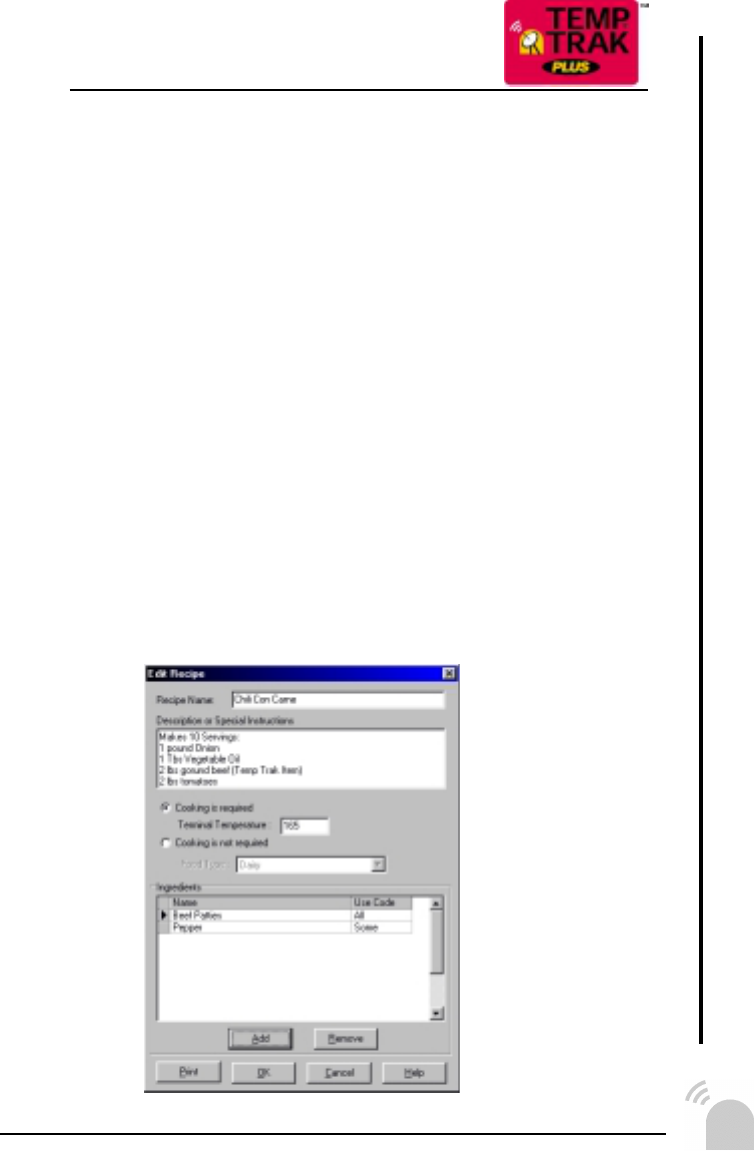
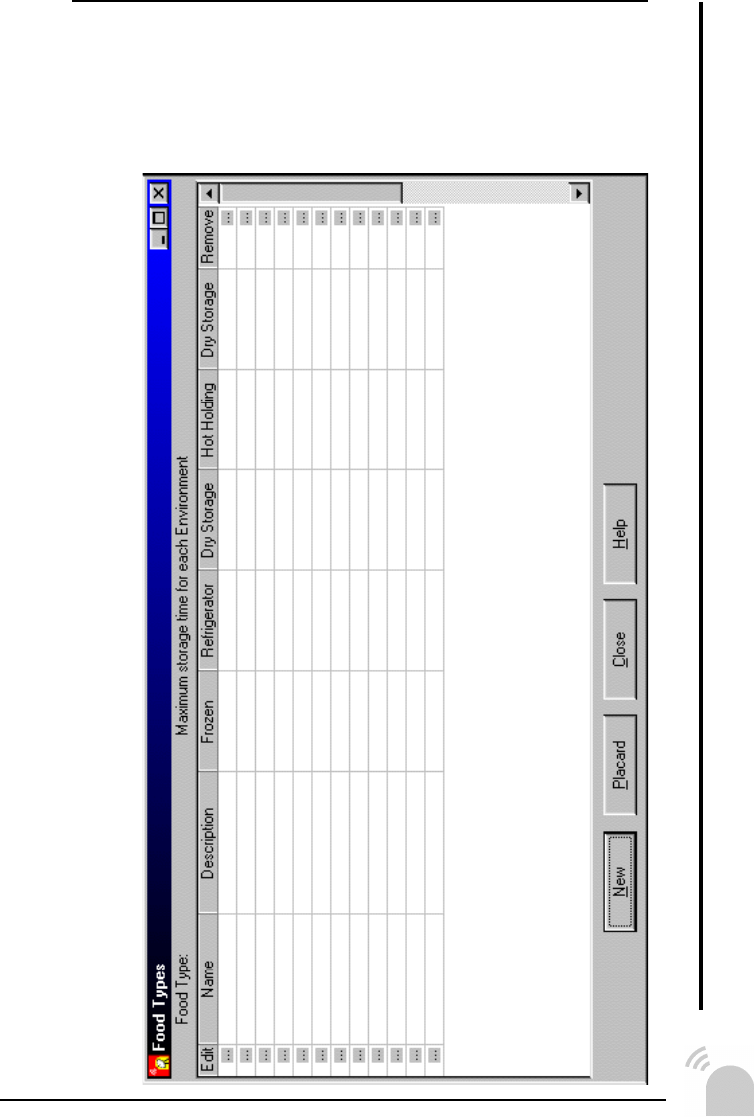
— Select Define Food Types from the menu.
"
USING TEMP TRAK PLUS
Tracking Inventory (...continued)
Food Types are used when adding a specific item to be
received into your operation. Each item that is received is
assigned a food type so that it may take on the predefined
rules of that food type.
When defining a food type, you specify maximum storage
times for each of the predefined storage environments in
your operation. In this way Temp Trak will automatically
know how long each item is allowed to stay resident in a
storage location without spoiling.
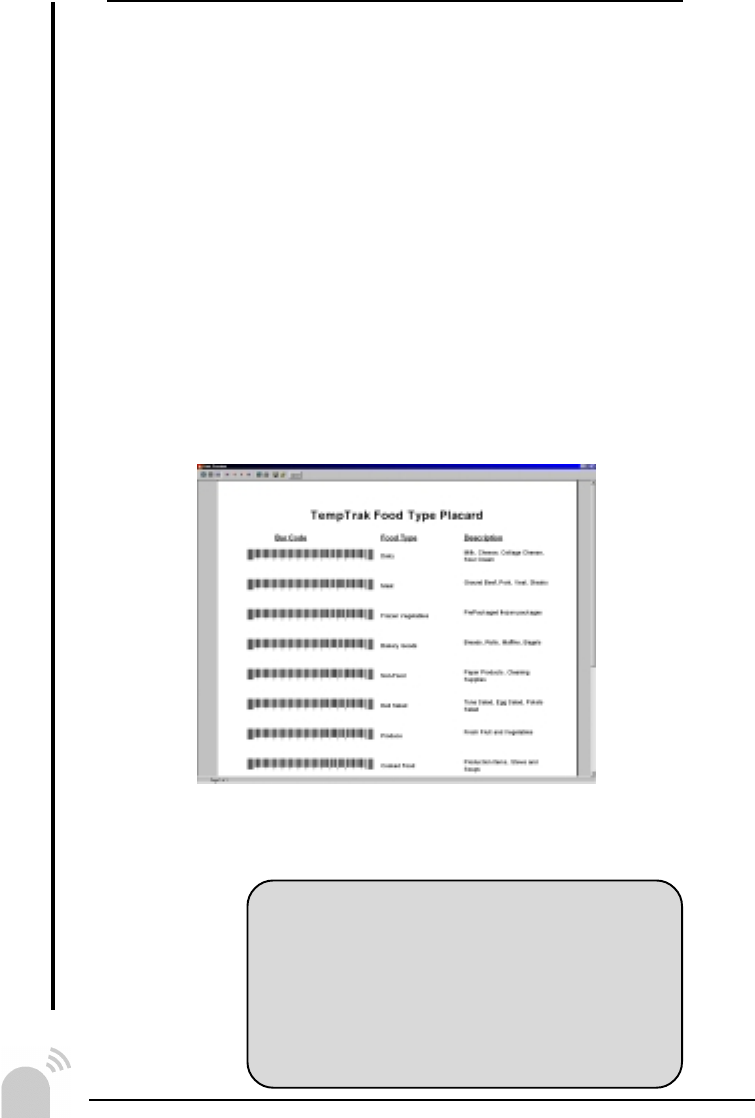
— Create a new food type or edit an existing one.
Here you can assign a name, description and default expi-
ration times to the food type.
— Print a placard of all the food type bar codes.
To aid in setting up your system, refer
to the Workbook section in the Appendix.
There you will find blank worksheets to fill
out while you are planning your system. You
may find it helpful to fill these sheets out
and carry them with you as you install
components and setup the software.
"!
Receiving & the Liberator
Tracking of the inventory usually starts when the items are
received from shipping. Each item is entered into the sys-
tem by scanning the manufacturer’s bar code with the Lib-
erator. On entering the system, Temp Trak will print a new
bar code label to be placed on the new item. From this
point forward, the normal manufacturer’s bar code is no
longer utilized by Temp Trak.
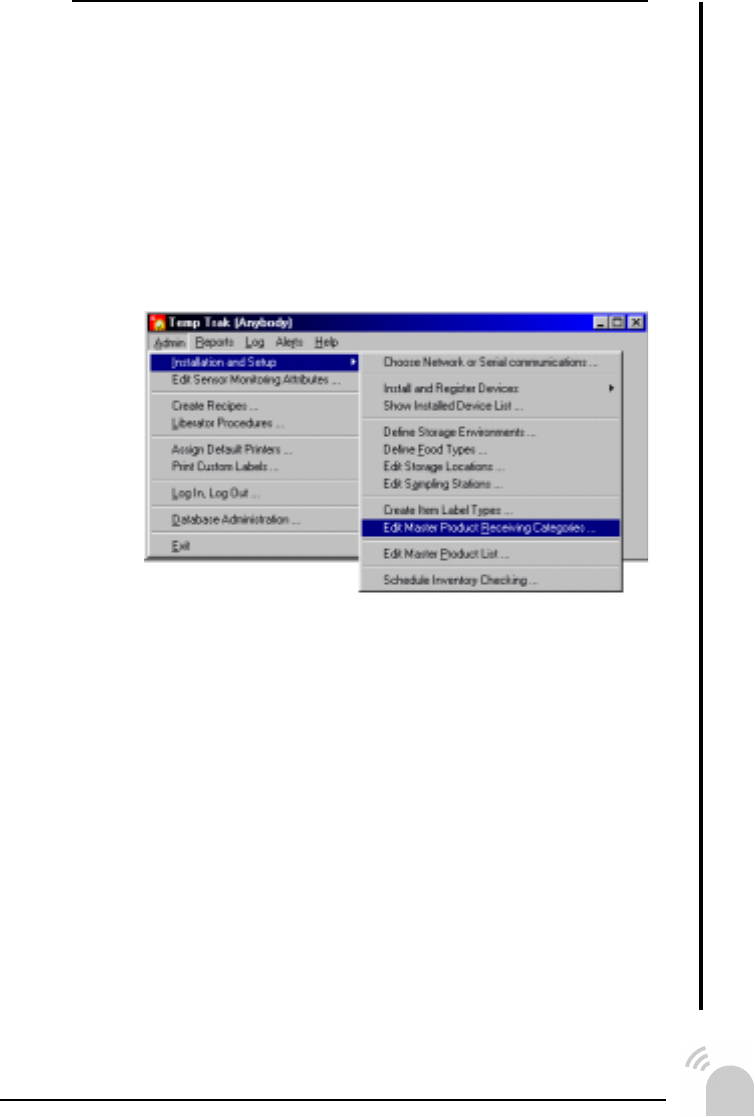
— Select Edit Master Product Receiving Categories
from the menu.
— Create a new category or select an existing one.
Here you can assign a name to the category, enter a de-
scription, and configure options that will prompt the user
when an item is received for the first time.
— Log into the Liberator.
— Enter process number 10 (Check-In 10: Standard).
— Follow the Liberator prompts to scan the
manufacturer’s bar code.
— Enter the number of labels to print (if prompted).
For food items that can be split into smaller packages Temp
Trak allows you to print a label for each of the packages.
— Exit to the main menu of the Liberator.
USING TEMP TRAK PLUS

""
USING TEMP TRAK PLUS
Transferring & the Liberator
Once your inventory has been received and entered into
the Temp Trak system, use the Liberator to let Temp Trak
know when inventory moves from one storage location to
another.
— Log into the Liberator.
— Enter process number 20 (Transfer 20 - Simple
Transfer).
— Follow the Liberator prompts to the scan the new
storage location from the storage location placard.
— Scan the Temp Trak labels of all the item being
transferred to the new storage location.
— Exit to the main menu of the Liberator.
Process #20 is a predefined procedure which does not
specify that a new label is to be printed each time a prod-
uct is moved from one storage location to another. If you
would like to have a new label printed each time use pre-
defined procedure #21 (Transfer 21 - New Labels).
Liberator Stand Alone Mode
During normal operation the Liberator is in constant com-
munication with the Temp Trak system. This requires the
operator to be range of a Commander or Echo Unit. If this
is not possible you can switch the Liberator into stand alone
mode. In this mode of operation the Liberator will prompt
the user to scan a Temp Trak bar code and take a tem-
perature reading. This will repeat as long as desired. When
the operator returns to within communication range of the
Temp Trak system, the user can select “Upload” to upload
all of the Liberator’s archived data.
"#
Temp Trak Tale III
Basic Inventory
Overview
At this point Omar was fairly familiar with his Temp Trak system
and decided to expand to track inventory. Basically, he wanted
to track cheese, ground beef and a few basic vegetables as they
made their way through his restaurant to verify his system main-
tains the proper temperature of his product.
Setting Up Temp Trak
Temp Trak gives you the power to track inventory items through-
out their entire life-span. By logging (or scanning) items as they
are moved from one location to another, Temp trak can monitor
each item and determine whether it has been out of its normal
temperature range for too long.
Temp Trak does not inherently know what the normal tempera-
ture range is for any one item or what types of storage locations
exist in any one facility. You, the user, need to provide Temp
Trak with this basic information.
Defining Storage Environments
A Storage Environment is a generic, physical location where an
item from your inventory can reside, even if only for a few min-
utes.
Now Omar happened to have two refrigerators, but he only has
one location type to describe both since they both ran within the
same temperature range. In fact operating temperature range
and default expiration times are what distinguish one environ-
ment from another. Dry Storage was a type he used to describe
his pantry and kitchen shelve storage. The temperature ranges
for these areas was room temperature and anything stored in
these areas that could spoil would spoil in only an hour. Omar
set up his storage environment as follows:
Temp Trak Tale III — Basic Inventory — Continued on next page...
USING TEMP TRAK PLUS
"$
USING TEMP TRAK PLUS
Temp Trak Tale III (...continued)
Editing Storage Locations
After defining the different types of storage environments, Omar
needed to configure Temp Trak with the specific storage loca-
tions that he had. In doing so he assigned an environment to
each specific location:
Defining Food Types
Food Types are similar to storage environments in that they are
a generic. But instead of describing places of storage, food types
describe different classifications of food such as Dairy, Beef,
Bread, etc. Each item in your inventory should be classified with
a food type. In Omar’s case he defined the following food types:
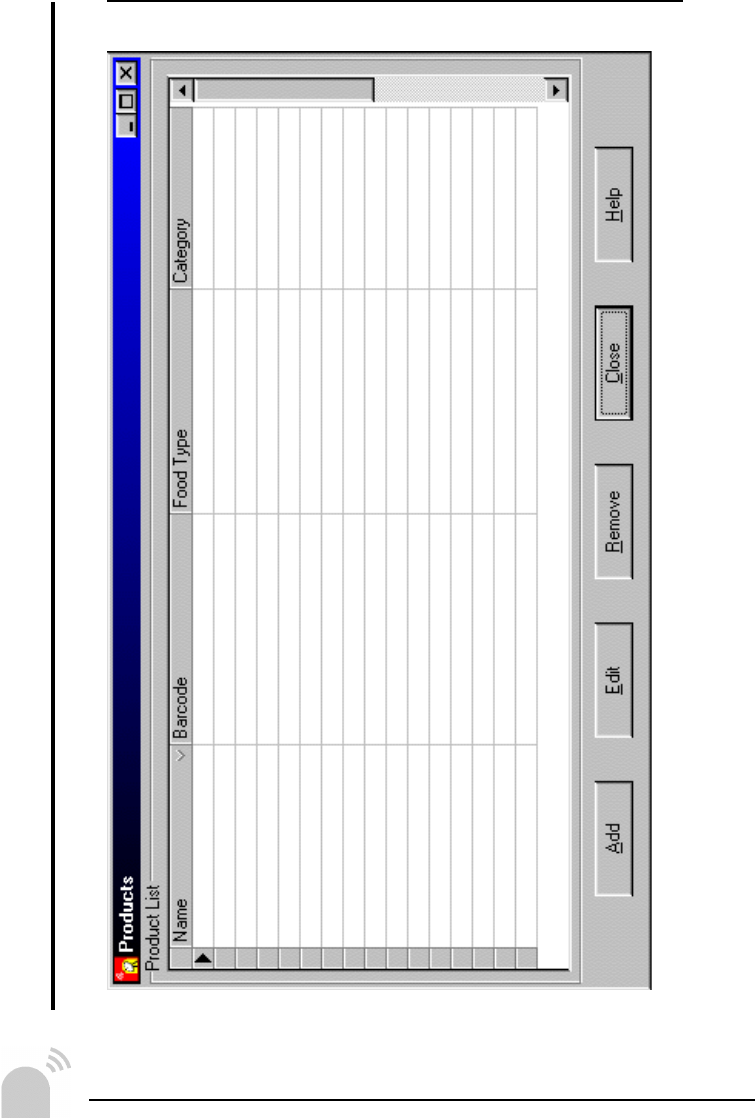
Product Categories
Product Receiving Categories are classifications for specific in-
ventory items (like food types) but instead of describing what the
item is, categories describe how to treat it when it is received
into the system. For instance on receipt of an item, a tempera-
ture reading can be required, labels can be printed and if the
item can be split (i.e. a pallet of beef), multiple labels can be
printed. The receiving categories define how the Liberator will
prompt the user when using the receiving procedures 10 - 19.
Tracking Inventory
Tracking of the inventory usually starts when the items are re-
ceived from shipping. Each item is entered into the system by
scanning the manufacturer’s bar code with the Liberator. On
entering the system, Temp Trak will print a new bar code label to
be placed on the new item. From this point forward, the normal
manufacturer’s bar code is no longer utilized by Temp Trak.

"%
USING TEMP TRAK PLUS
Receiving Inventory
At the receiving dock, Omar’s number one employee, Mary stands
among the new shipment of boxes. With her Liberator in hand,
she logs into the Temp Trak system and begins her receiving
procedure #10.
She scans the bar code on her placard that reads Walk-In
Freezer. Looking around, Mary finds all the boxes destined for
the freezer and starts to scan. For each box she scans a label is
printed on her Auto—Labeler printer. Mary affixes this new Temp
Trak label on the box she has just scanned and places the box
on her cart.
When she scans the box labeled frozen peas, the Liberator
prompts her to enter a number of labels to be printed. She real-
izes that in this box there is a dozen bags of frozen peas. Each
one of these bags is to be tracked individually, so she enters 12
and the Auto–Labeler hums away. She affixes one label on each
bag and replaces them in their original box for easy storage.
Scanning the box of hamburger patties initiates a required tem-
perature reading. Mary uses the temperature probe on the Lib-
erator and takes 3 readings, since this is what Omar had config-
ured Temp Trak to require for all boxes containing hamburger
meat. Once Mary completes the receiving procedure for all new
boxes of food, she logs out of Temp Trak and stores everything
in their appropriate areas.
Transferring Inventory
Mary’s friend, Evan works as a cook at Omar’s all you can eat
buffet. In the morning Evan’s job is to prepare the kitchen for the
afternoon lunch.
One of his first duties is to move some of the hamburger meat
from the walk-in freezer to the walk-in refrigerator to thaw. Evan
picks up the Liberator and logs in using the ID code that was
assigned to him. He enters item transfer procedure #20 into the
Liberator to enter the transfer mode. The predefined transfer
procedure will guide Evan through moving the meat from one
storage location to another.
Evan is prompted to scan the new location from the placard Omar
has posted next to the walk-in freezer and walk-in refrigerator.
Evan scans the bar code next to Walk-In Refrigerator, since this
is where the meat is destined. The Liberator then prompts him to
scan the Temp Trak label of each item he is going to transfer to
the refrigerator.
When Evan is finished, he logs out of the system and returns the
Liberator secure in the knowledge that Temp Trak is on the job.

"&
Creating Recipes
Recipes in Temp Trak are no different than regular cook-
ing recipes; procedures to create a food item that is cre-
ated from a number of combined foods. By creating a recipe
in Temp Trak and telling the system what is in it, Temp
Trak will then know how to associate the items to the recipe.
— Select Create Recipes from the menu.
— Create a new recipe or edit an existing one.
Here you can assign a name to the recipe, enter a descrip-
tion or special instructions, define the cooking requirements
and tell Temp Trak which food items are used in the recipe.
— Print a recipe placard.

"'
Producing A Recipe
— Log into the Liberator.
— Enter process number 40 (Production Procedure).
— Follow the Liberator prompts to scan the recipe bar
code and all the ingredients from the recipe plac-
ard.
— Scan the Last Ingredient bar code after scanning
the last ingredient’s bar code.
— Print the production label.
— Exit to the main menu of the Liberator.
Cooking A Recipe
— Log into the Liberator.
— Enter process number 50 (Cooking Procedure).
— Follow the Liberator prompts to scan the production
bar code and take a temperature reading.
— Validate the terminal temperature reading.
If the temperature has reached the terminal temperature of
the recipe the Liberator will display OK, otherwise it will
display REJ. Each time a temperature reading is made, it
is logged into the system and recorded.
— Exit to the main menu of the Liberator.

#
USING TEMP TRAK PLUS
Portioning A Recipe
After producing and cooking a recipe (chili for example)
you may want to divide the initial batch into smaller por-
tions and store away in a refrigerator for later use. Temp
Trak Plus allows you to do this and continue tracking each
of the portions separately.
— Log into the Liberator.
— Enter process number 60 (Portioning Procedure).
— Follow the Liberator prompts to scan the production
bar code and the bar code of the storage location
where each of the smaller portions will be stored.
— Enter number of labels to print (one per container).
— Exit to the main menu of the Liberator.
Spoilage & Consume Procedures
To declare an item spoiled or consumed and ultimately re-
move it from the Temp Trak system, use procedures 90
and 91.
— Log into the Liberator.
— Enter process number 90 (Spoilage Procedure) or
Enter process number 91 (Consume Procedure).
— Scan the production bar code of the item to be
declared spoiled or consumed.
— Exit to the main menu of the Liberator.
#
USING TEMP TRAK PLUS
Temp Trak Tale IV
Recipes
Overview
Omar decided that to complete the total Temp Trak experience,
he needed to track produced food products such as chili, soup
and chili from the very beginning. The ability to track the indi-
vidual components of one recipe was very powerful. If he had
made a batch of chili which had ground beef in it that had been
recalled, he could trace the meat back to its original box. From
there he could trace forward and find all the other composite
foods that had used this particular box of meat. With Temp Track
Omar could trace, backwards and forwards, everything he used
and identify any out of date ingredient he had happened to use.
Working with Recipes
A recipe describes a food product that is created from a number
of combined ingredients. By creating a recipe in Temp Trak and
telling the system what is in it, Temp Trak will then know how to
associate the items to the recipe.
Creating Recipes
Omar set his head chef, Tim, on the task of configuring Temp
Trak with all the recipes he used on a daily basis. Tim started
with his chili...
`
#
USING TEMP TRAK PLUS
Temp Trak Tale IV (...continued)
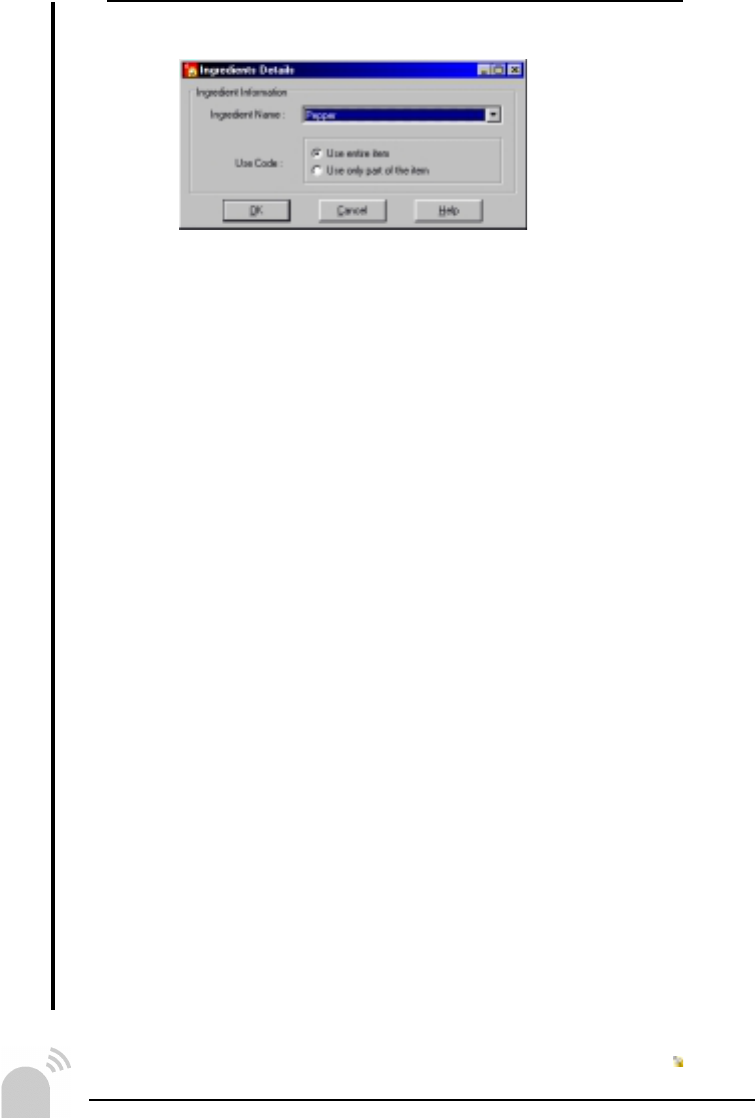
Tim added each of his ingredients one by one.
The use code is to let Temp Trak know if any of the food in the
package is left unused. If there is any left over, the use code is
some and Temp Trak continues to track the unused portion.
When it was time for Tim to actually make his chili, he took his
Liberator and logged in. By entering production procedure #40,
he was ready to start making the chili. The Liberator prompted
Tim to scan the recipe bar code on the chili placard and then
each of the ingredients used. When Tim reached the last ingre-
dient in the list, he scanned the Last Ingredient bar code. This
caused Temp Trak to print out a new label to be associated with
the chili as it cooked.
Cooking Recipes
While the chili cooked, Tim monitored its temperature to deter-
mine when it was done. Already logged into Temp Trak via the
Liberator, he entered Cooking Procedure #50. Tim was then
prompted to scan the newly printed production label and to take
a temperature reading of the chili. Tim continued this process
every half hour or so until the temperature he read was equal to
the terminal cooking temperature of the chili denoted by the OK
displayed on the Liberator.
When Recipes Are Done (Portioning)
Once the chili was fully cooked, Tim needed to portion it into
several containers and store it in the refrigerator for later use. To
do this in Temp Trak Tim entered the portioning procedure #60
into the Liberator and followed the prompts. Temp Trak asked
him to scan the production code of the chili so Temp Trak would
know what Tim was going to portion out. He then was prompted
to scan the code for the destination location of the final portions
of chili. Temp Trak knew what he was going to split up and where
it was all going so it directed Tim to enter the number of labels to
be printed. Tim entered four since he had made his usual two-
gallon pot of chili and liked to store it in half-gallon jugs. Temp
Trak then printed out his labels, Tim affixed them to the pans of
chili and finally he stored them in the refrigerator for later use.

#!
APPENDIX

#"
Liberator Keypad Operation
To enter numeric characters, press the number key on the
keypad. A high-pitched click lets you know that the entry
was accepted.
To enter alpha characters, press the Mode key once to put
the Liberator in Alpha Mode. Press the numeric key with
the letter you want above it - once for the first letter, quickly
twice for the second letter, or quickly three times for the
third letter. Every time you press the key, you hear a low-
pitched click to let you know that the entry was registered
but not accepted yet, and a high-pitched key click after a
second or so to let you know that the entry was accepted.
You can go from one key to another before hearing the
high key click (i.e., from the “a” to the “d”), but you must
first hear the high click to go to a different letter on the
same key (i.e., the “a” to the “c”).
To return to numeric mode, press the Mode key again.
To put a decimal point into numeric data, type in the num-
bers before the decimal point. Then press the mode key,
press the decimal, and press the mode key again. Now
resume typing in the numeric entry.
Menu Options
1. Login —
Log into the Temp Trak System. All operations will be
associated with the Login ID entered.
2. Stand Alone —
Allow the user to roam and collect data without having to
communicate to a commander unit.
3. Upload Data —
Upload all data to the Commander collected during Stand
Alone operations.
4. Attention —
Used during Liberator Registration
5. Clear Data —
Erases all the data collected during Stand Alone operation.
6. Version —
Displays the version number of the Temp Trak System
7. Reset —
Resets the Liberator software but does not affect data stored
on the PC.
APPENDIX

##
APPENDIX
Liberator Troubleshooting
Nothing happens when you follow the operating in-
structions?
You Should
— Check for loose cable connections at the scanner, AC
power supply, or host device.
— Check the Liberator’s battery.
— Check the symbol to make sure it is not defaced.
— Try scanning similar symbols of the same code type.
— Be sure you’re within the proper scanning range.
The Liberator emits transmit errors (error beeps after
decode)?
You Should
— Check that the Liberator is powered up and that its cable
connections are secure.
— Be sure the cable connection to the host is secure.
Liberator Maintenance
— Do not allow any abrasive material to touch the Libera-
tor window.
— Remove any dirt particles with a damp cloth.
— Wipe the Liberator window using a damp cloth, and if
necessary, a non-ammonia based detergent.
— Do not spray water or other cleaning liquids directly into
the Liberator window.
— Change the battery when it no longer provides 8 hours
of scanning in typical usage. This should occur after 2
years or more, depending on your daily use.
Liberator Changing the Battery
Removing the Battery
1. Slide the battery compartment release switch down.
2. Remove the battery compartment cover.
3. Slide the battery towards the bottom of the Liberator.
4. Pull the bottom of the battery out and away from the
Liberator.

#$
Replacing the Battery
1. Seat the battery fully in the Liberator.
2. Slide it up in the handle.
3. Replace the battery compartment cover.
4. Slide the release latch up to secure the cover in place.
Note: Replacement battery part number is: TTP-L-112.
APPENDIX
As food for thought, here’s a small list of other things you could track
with your Temp Trak system:
refrigerators
walk-ins
freezers
cold-holding systems
cold-holding transporters
blast chillers
refrigerated trucks
compressors
deep-fat fryers
griddles
grills
kettles
wood-fired ovens
hot-holding systems
hot-holding transporters
ovens
ranges
cooking foods
cooked foods ready to serve
buffet foods in service
salad bars
sandwich stations
dipping cabinets for ice cream
beverage dispensers
iced tea makers
coffee makers
espresso makers
pizza delivery pouches
air temperatures at drive-up
windows
ambient temperatures in kitchens
external temperatures for effi-
ciency calculations of HVAC units
HVAC output
exhaust from range foods
hot water heater
dishwasher water temp
and more!
#%
APPENDIX
Workbook
To help in setting up your system the following pages are
blank worksheets for you to use and fill out while thinking
of your system as a whole. The worksheets are designed
to mirror the data you will actually enter into the Temp Trak
system.
#&
APPENDIX
Workbook
#'
APPENDIX
Workbook
$
APPENDIX
Workbook
$
APPENDIX
Workbook