Kawasaki FE290 User Manual To The E7933203 045b 4f54 B9ce 8c1cca4d5bd1
User Manual: Kawasaki FE290 to the manual
Open the PDF directly: View PDF ![]() .
.
Page Count: 101 [warning: Documents this large are best viewed by clicking the View PDF Link!]

FE120 FE170
FE250 FE290
FE350 FE400
4–stroke air-cooled gasoline engine
Service Manual
All rights reserved. No parts of this publication may be reproduced, stored in a retrieval system, or transmitted in any
form or by any means, electronic mechanical photocopying, recording or otherwise, without the prior written permission of
Quality Assurance Department/Consumer Products & Machinery Group/Kawasaki Heavy Industries, Ltd., Japan.
No liability can be accepted for any inaccuracies or omissions in this publication, although every possible care has been
taken to make it as complete and accurate as possible.
The right is reserved to make changes at any time without prior notice and without incurring an obligation to make such
changes to products manufactured previously.
All information contained in this publication is based on the latest product information available at the time of publication.
Illustrations and photographs in this publication are intended for reference use only and may not depict actual model
component parts.
© Kawasaki Heavy Industries, Ltd., 2000 First Edition (1) : Sep. 1, 2000 (K)

LIST OF ABBREVIATIONS
A ampere(s) lb pound(s)
ABDC after bottom dead center m meter(s)
AC alternating current min minute(s)
ATDC after top dead center N newton(s)
BBDC before bottom dead center Pa pascal(s)
BDC bottom dead center PS horsepower
BTDC before top dead center psi pound(s) per square inch
C degree(s) Celsius r revolution
DC direct current rpm revolution(s) per minute
F farad(s) TDC top dead center
F degree(s) Fahrenheit TIR total indicator reading
ft foot, feet V volt(s)
g gram(s) W watt(s)
h hour(s) ohm(s)
L liter(s)
Read OWNER’S MANUAL before operating.

EMISSION CONTROL INFORMATION
To protect the environment in which we live, Kawasaki has incorporated crankcase emission (1) and exhaust emission
(2) control systems in compliance with applicable regulations of the United States Environmental Protection Agency and
the California Air Resources Board.
1. Crankcase Emission Control System
A sealed-type crankcase emission control system is used to eliminate blow-by gasses. The blow-by
gasses are led to a breather chamber through the crankcase and from there to the air cleaner.
Oil is separated from the gasses while passing through the inside of the breather chamber from the
crankcase, and then returned to the bottom of the crankcase.
2. Exhaust Emission Control System
The exhaust emission control system applied to this engine consists of a carburetor and an ignition
system having optimum ignition timing characteristics.
The carburetor has been calibrated to provide lean air/fuel mixture characteristics and optimum fuel
economy with a suitable air cleaner and exhaust system.
TAMPERING WITH EMISSION CONTROL SYSTEM PROHIBITED
Federal law and California State law prohibits the following acts or the causing thereof: (1) the removal or rendering
inoperative by any person other than for purposes of maintenance, repair, or replacement, of any device or element of
design incorporated into any new engine for the purpose of emission control prior to its sale or delivery to the ultimate
purchaser or while it is in use, or (2) the use of the engine after such device or element of design has been removed or
rendered inoperative by any person.
Among those acts presumed to constitute tampering are the acts listed below:
Do not tamper with the original emission related part.
•Carburetor and internal parts
•Spark plugs
•Magneto or electronic ignition system
•Fuel filter element
•Air cleaner elements
•Crankcase
•Cylinder heads
•Breather chamber and internal parts
•Intake pipe and tube
Foreword
This manual is designed primarily for use by trained
mechanics in a properly equipped shop. However, it
contains enough detail and basic information to make
it useful to the owner who desires to perform his own
basic maintenance and repair work. A basic knowledge
of mechanics, the proper use of tools, and workshop
procedures must be understood in order to carry out
maintenance and repair satisfactorily. Whenever the
owner has insufficient experience or doubts as to his
ability to do the work, all adjustments, maintenance, and
repair should be carried out only by qualified mechanics.
In order to perform the work efficiently and to avoid
costly mistakes, read the text, thoroughly familiarize
yourself with the procedures before starting work, and
then do the work carefully in a clean area. Whenever
special tools or equipment are specified, do not use
makeshift tools or equipment. Precision measurements
can only be made if the proper instruments are used,
and the use of substitute tools may adversely affect safe
operation.
To get the longest life out of your engine:
•Follow the Periodic Maintenance Chart in the Service
Manual.
•Be alert for problems and non-scheduled maintenance.
•Use proper tools and genuine Kawasaki engine parts.
Genuine parts provided as spare parts are listed in the
Parts Catalog.
•Follow the procedures in this manual carefully. Don’t
take shortcuts.
•Remember to keep complete records of maintenance
and repair with dates and any new parts installed.
How to Use This Manual
In preparing this manual, we divided the product into
its major systems. These systems became the manual’s
chapters. All information for a particular system from
adjustment through disassembly and inspection is located
in a single chapter.
The Quick Reference Guide shows you all of the
product’s system and assists in locating their chapters.
Each chapter in turn has its own comprehensive Table of
Contents.
The Periodic Maintenance Chart is located in the
General Information chapter. The chart gives a time
schedule for required maintenance operations.
If you want spark plug information, for example, go to
the Periodic Maintenance Chart first. The chart tells you
how frequently to clean and gap the plug. Next, use the
Quick Reference Guide to locate the Electrical System
chapter. Then, use the Table of Contents on the first page
of the chapter to find the Spark Plug section.
Whenever you see these WARNING and CAUTION
symbols, heed their instructions! Always follow safe
operating and maintenance practices.
This warning symbol identifies special instruc-
tions or procedures which, if not correctly fol-
lowed, could result in personal injury, or loss of
life.
CAUTION
This caution symbol identifies special instruc-
tions or procedures which, if not strictly ob-
served, could result in damage to or destruction
of equipment.
This manual contains four more symbols (in addition to
WARNING and CAUTION) which will help you distinguish
different types of information.
NOTE
This note symbol indicates points of particular in-
terest for more efficient and convenient operation.
•Indicates a procedural step or work to be done.
Indicates a procedural sub-step or how to do the work
of the procedural step it follows. It also precedes the
text of a WARNING, CAUTION, or NOTE.
Indicates a conditional step or what action to take based
on the results of the test or inspection in the procedural
step or sub-step it follows.
In most chapters an exploded view illustration of the
system components follows the Table of Contents. In
these illustrations you will find the instructions indicating
which parts require specified tightening torque, oil, grease
or a locking agent during assembly.

GENERAL INFORMATION 1-1
General Information
Table of Contents
1
Before Servicing.................................................................................................................................................................1-2
General Specifications.......................................................................................................................................................1-4
Periodic Maintenance Chart...............................................................................................................................................1-6
Special Tools......................................................................................................................................................................1-7
Exploded View....................................................................................................................................................................1-8

1-2 GENERAL INFORMATION
Before Servicing
Before starting to service the engine, carefully read the applicable section to eliminate unnecessary work. Photographs,
diagrams, notes, cautions, warnings, and detailed descriptions have been included wherever necessary. Nevertheless,
even a detailed account has limitations, a certain amount of basic knowledge is required for successful work.
Especially note the following:
(1) Dirt
Before removal and disassembly, clean the engine. Any dirt entering the engine, carburetor, or other parts, will
work as an abrasive and shorten the life of engine. For the same reason, before installing a new part, clean off any
dust or metal filings.
(2) Battery Ground
Remove the ground (—) lead from the battery before performing any disassembly operations on the equipment.
This prevents:
(a) the possibility of accidentally turning the engine over while partially disassembled.
(b) sparks at electrical connections which will occur when they are disconnected.
(c) damage to electrical parts.
(3) Tightening Sequence
Generally, when installing a part with several bolts, nuts, or screws, start them all in their holes and tighten them to
a snug fit. Then tighten them evenly, in a staggered sequence. This is to avoid distortion of the part and/or causing
gas or oil leakage. Conversely, when loosening the bolts, nuts, or screws, first loosen all of them by about a quarter
of a turn and then remove them. Where there is a tightening sequence indication in this Service Manual, the bolts,
nuts, or screws must be tightened in the order and method indicated.
(4) Torque
When torque values are given in this Service Manual, use them. Either too little or too much torque may lead to
serious damage. Use a good quality, reliable torque wrench.
(5) Force
Common sense should dictate how much force is necessary in assembly and disassembly. If a part seems especially
difficult to remove or install, stop and examine what may be causing the problem. Whenever tapping is necessary, tap
lightly using a wooden or plastic-faced mallet. Use an impact driver for screws (particularly for the removal of screws
held by a locking agent) in order to avoid damaging the heads.
(6) Edges
Watch for sharp edges, especially during major engine disassembly and assembly. Protect your hands with gloves
or a piece of thick cloth when lifting the engine or turning it over.
(7) High-Flash Point Solvent
A high-flash point solvent is recommended to reduce fire danger. A commercial solvent commonly available in North
America is Standard solvent (generic name). Always follow manufacturer and container directions regarding the use
of any solvent.
(8) Gasket, O-Ring
Do not reuse a gasket or O-ring once it has been in service. The mating surfaces around the gasket should be
free of foreign matter and perfectly smooth to avoid oil or compression leaks.
(9) Liquid Gasket, Non-Permanent Locking Agent
Follow manufacturer’s directions for cleaning and preparing surfaces where these compounds will be used. Apply
sparingly. Excessive amounts may block engine oil passages and cause serious damage. An example of a non-
permanent locking agent commonly available in North America is Loctite Lock’n Seal (Blue).
(10) Press
A part installed using a press or driver, such as a journal, should first be coated with oil on its outer or inner
circumference so that it will go into place smoothly.
(11) Ball Bearing
When installing a ball bearing, the bearing race which is affected by friction should be pushed by a suitable driver.
This prevents severe stress on the balls and races, and prevents races and balls from being dented. Press a ball
bearing until it stops at the stop in the hole or on the shaft.
(12) Oil Seal and Grease Seal
Replace any oil or grease seals that were removed with new ones, as removal generally damages seals.
When pressing in a seal which has manufacturer’s marks, press it in with the marks facing out. Seals should be
pressed into place using a suitable driver, which contacts evenly with the side of seal, until the face of the seal is even
with the end of the hole.
(13) Seal Guide
A seal guide is required for certain oil or grease seals during installation to avoid damage to the seal lips. Before
a shaft passes through a seal, apply a little oil, preferably high temperature grease on the lips to reduce rubber to
metal friction.
(14) Circlip, Retaining Ring
Replace any circlips and retaining rings that were removed with new ones, as removal weakens and deforms them.
When installing circlips and retaining rings, take care to compress or expand them only enough to install them and
no more.

GENERAL INFORMATION 1-3
Before Servicing
(15) Cotter Pin
Replace any cotter pins that were removed with new ones, as removal deforms and breaks them.
(16) Lubrication
Engine wear is generally at its maximum while the engine is warming up and before all the rubbing surfaces have
an adequate lubricative film. During assembly, oil or grease (whichever is more suitable) should be applied to any
rubbing surface which has lost its lubricative film. Old grease and dirty oil should be cleaned off. Deteriorated grease
has lost its lubricative quality and may contain abrasive foreign particles.
Don’t use just any oil or grease. Some oils and greases in particular should be used only in certain applications and
may be harmful if used in an application for which they are not intended. This manual makes reference to molybdenum
disulfide grease (MoS2) in the assembly of certain engine parts. Always check manufacturer recommendations before
using such special lubricants.
(17) Electrical Wires
All the electrical wires are either single-color or two-color and, with only a few exceptions, must be connected to
wires of the same color. On any of the two-color wires there is a greater amount of one color and a lesser amount of
a second color, so a two-color wire is identified by first the primary color and then the secondary color. For example,
a yellow wire with thin red stripes is referred to as a "yellow/red" wire; it would be a "red/yellow" wire if the colors were
reversed to make red the main color.
(18) Replacement Parts
When there is a replacement instruction, replace these parts with new ones every time they are removed. There
replacement parts will be damaged or lose their original function once removed.
(19) Inspection
When parts have been disassembled, visually inspect these parts for the following conditions or other damage. If
there is any doubt as to the condition of them, replace them with new ones.
Abrasion Crack Hardening Warp
Bent Dent Scratch Wear
Color change Deterioration Seizure
(20) Specifications
Specification terms are defined as follows:
"Standards" show dimensions or performances which brand-new parts or systems have.
"Service Limits" indicate the usable limits. If the measurement shows excessive wear or deteriorated performance,
replace the damaged parts.
1-4 GENERAL INFORMATION
General Specifications
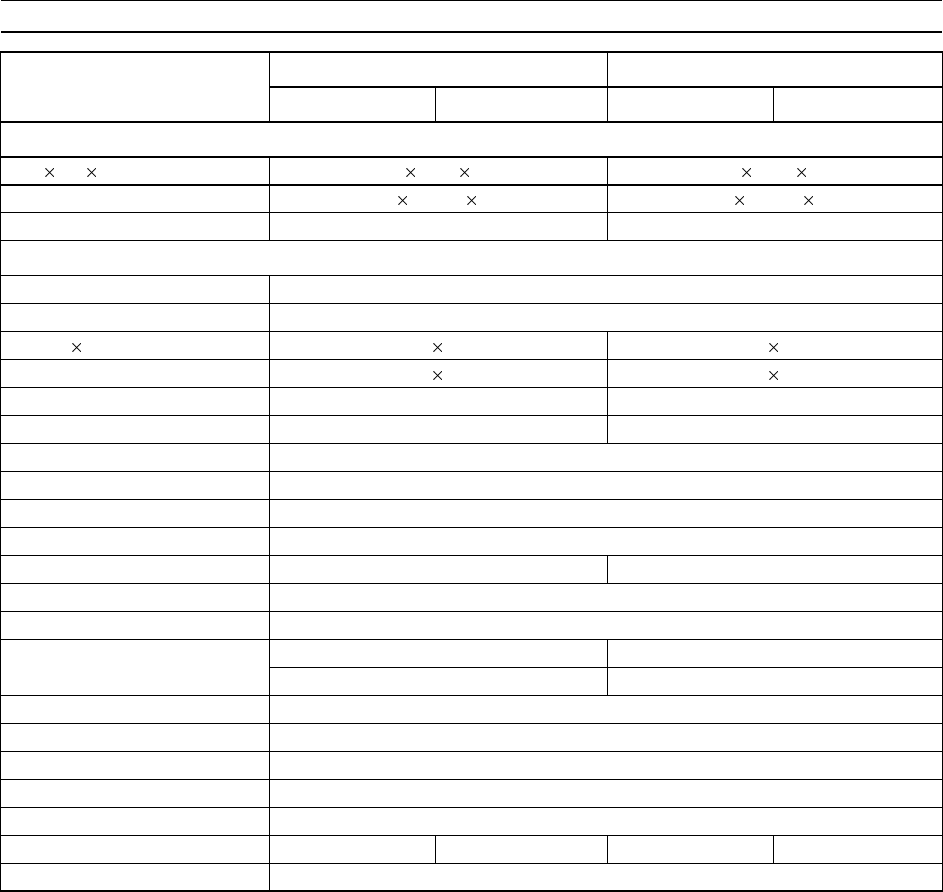
Item FE120 FE170
Type D Type G Type D Type G
Dimensions:
L W Hmm 291 349 344 300 354 370
in 11.46 13.43 19.54 11.81 13.94 14.57
Dry Weight kg 14.5 16.8
Engine:
Type of engine Air cooled, 4-stroke, OHV, Single cylinder, Gasoline engine
Number of Cylinder 1
Bore Stroke mm 60 44 66 50
in 2.36 1.73 2.60 1.97
Displacement mL 124 171
cu.in 7.6 10.4
Direction of rotarion Counterclockwise facing PTO Shaft
Fast Idle Speed rpm 4000
Slow Idle Speed rpm 1600
Fuel information Unleaded Gasoline
Fuel tank capacity L 2.5 3.4
Lubrication system Splash
Engine Oil SAE 10W30 (SF, SG, SH, or SJ)
Oil Pan Capacity Max. 0.6 L 0.6 L
Min. 0.35 L 0.35 L
Carburetor Float, Butterfly Type
Ignition system Transistor Flywheel Magneto
Spark Plug NGK BPR 5ES
Starting system Recoil starter with ACR or electric starter
Governor Mechanical flyweight
Type of Reduction --- 1/2 gear reduction --- 1/2 gear reduction
Air Cleaner Dual Element
Specifications are subject to change without notice, and may not apply to every country.
GENERAL INFORMATION 1-5
General Specifications
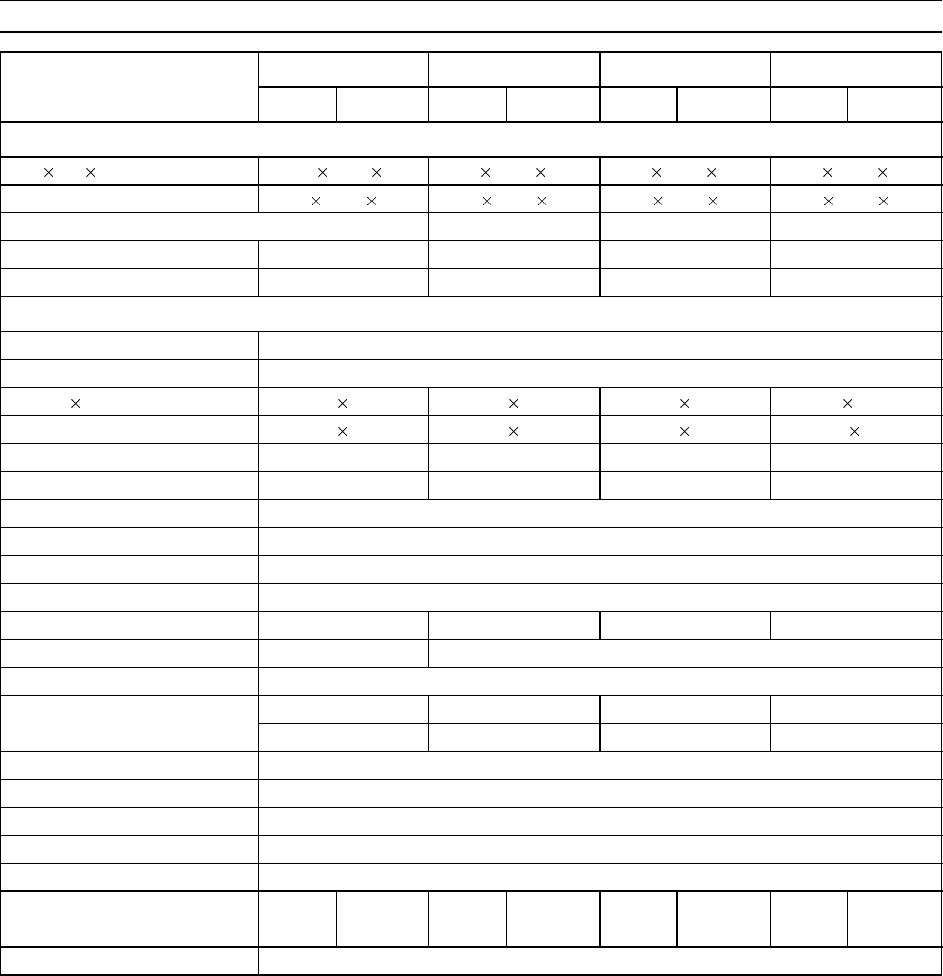
Item FE250 FE290 FE350 FE400
Type D Type G Type D Type G Type D Type G Type D Type G
Dimensions:
L W Hmm344.5 395 432 363 408 441 378 422 454 378 422 459
in 13.56 15.55 17.01 14.29 16.06 17.36 14.88 16.61 17.87 14.88 16.61 18.07
Dry Weight
With recoil starter kg 26.8 30.4 34.4 34.5
With erectic starter kg 30.0 33.6 38.2 38.5
Engine:
Type of engine Air cooled, 4-stroke, OHV, Single cylinder, Gasoline engine
Number of Cylinder 1
Bore Stroke mm 76 55 78 60 83 65 87 67.5
in 2.99 2.17 3.07 2.36 3.27 2.56 3.43 2.66
Displacement mL 249 286 351 401
cu.in 15.2 17.5 21.4 24.5
Direction of rotation Counterclockwise facing PTO Shaft
Fast Idle Speed rpm 4000
Slow Idle Speed rpm 1300
Fuel information Unleaded Gasoline
Fuel tank capacity L 5.3 6.0 6.4 6.4
Lubrication system Splash Pressurized lubrication with oil filter
Engine Oil SAE 10W30 (SF, SG, SH, or SJ)
Oil Pan Capacity Max. 1.1 L 1.1 L 1.3 L 1.3 L
Min. 0.8 L 0.8 L 1.0 L 1.0 L
Carburetor Float, Butterfly Type
Ignition system Transistor flywheel magneto
Spark Plug NGK BPR 5ES
Starting system Recoil starter with ACR or electric starter
Governor Mechanical flyweight
Type of Reduction – 1/2 gear – 1/2 gear – 1/2 gear – 1/2 gear
reduction reduction reduction reduction
Air Cleaner Dual Element
Specifications are subject to change without notice, and may not apply to every country.

1-6 GENERAL INFORMATION
Periodic Maintenance Chart
To ensure satisfactory operation over an extended period of time, any engine requires normal maintenance regular
intervals. The Periodic Maintenance Chart below shows periodic inspection and maintenance items and suitable intervals.
The bullet mark (•) designates that the corresponding item should be performed at that interval.
Some adjustments require the use of special tools or other equipment. An electronic tachometer will facilitate setting
idle and running speeds.
Always remove the spark plug cap from spark plug when servicing the engine to prevent accidental starting.
INTERVAL
MAINTENANCE Daily First Every Every Every Every Every
8 25 50 100 200 300
hr. hr. hr. hr. hr. hr.
Check and add engine oil, •
Check for loose or lost nuts and screws •
Check for fuel and oil leakage •
Check battery electrolyte level •
Check or clean air intake screen •
Tighten nuts and screws •
Clean air cleaner foam element •
Clean air cleaner paper element •
Clean fuel filter element •
Change engine oil (without oil filer) • •
Change engine oil (with oil filer) • •
Clean and regap spark plug •
Change oil filter •
Replace air cleaner paper element •
Clean dust and dirt from cylinder •
and cylinder head fines
K Clean combustion chamber •
K Check and adjust valve clearance •
K Clean and lap valve seating surface •
NOTE:The service intervals indicated are to be used as a guide. Service should be performed more frequently as
necessary by operating condition.
: Service more frequently under dusty conditions.
K: Have an authorized Kawasaki engine dealer perform those services.
GENERAL INFORMATION 1-7
Special Tools
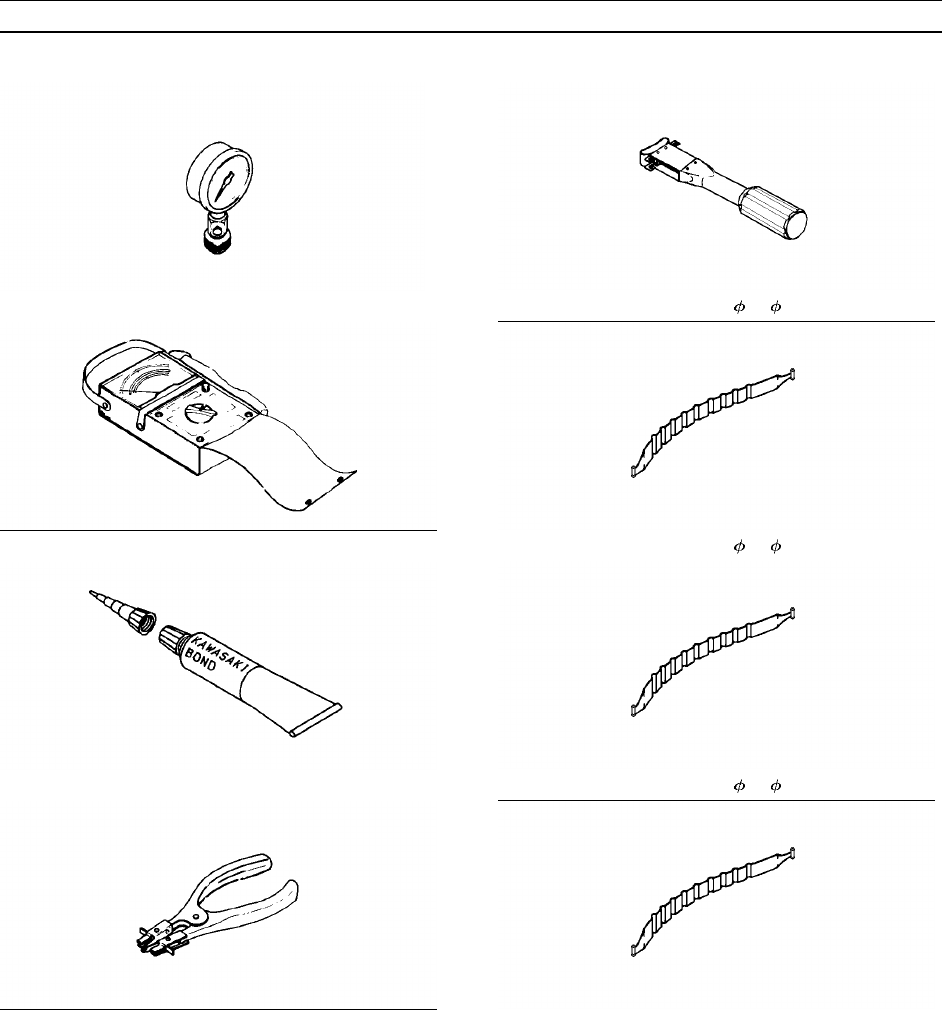
Compression Gauge: 57001–221
Hand Tester: 57001–1394
Kawasaki Bond (Silicone Sealand): 56019–120
Piston RIng Pliers: 57001–115
Piston Ring Compression Grip: 57001–1095
Piston Ring Compression Belt, 50– 67: 57001–1096
Piston Ring Compression Belt, 67– 79: 57001–1097
Piston Ring Compression Belt, 80– 91: 57001–1320
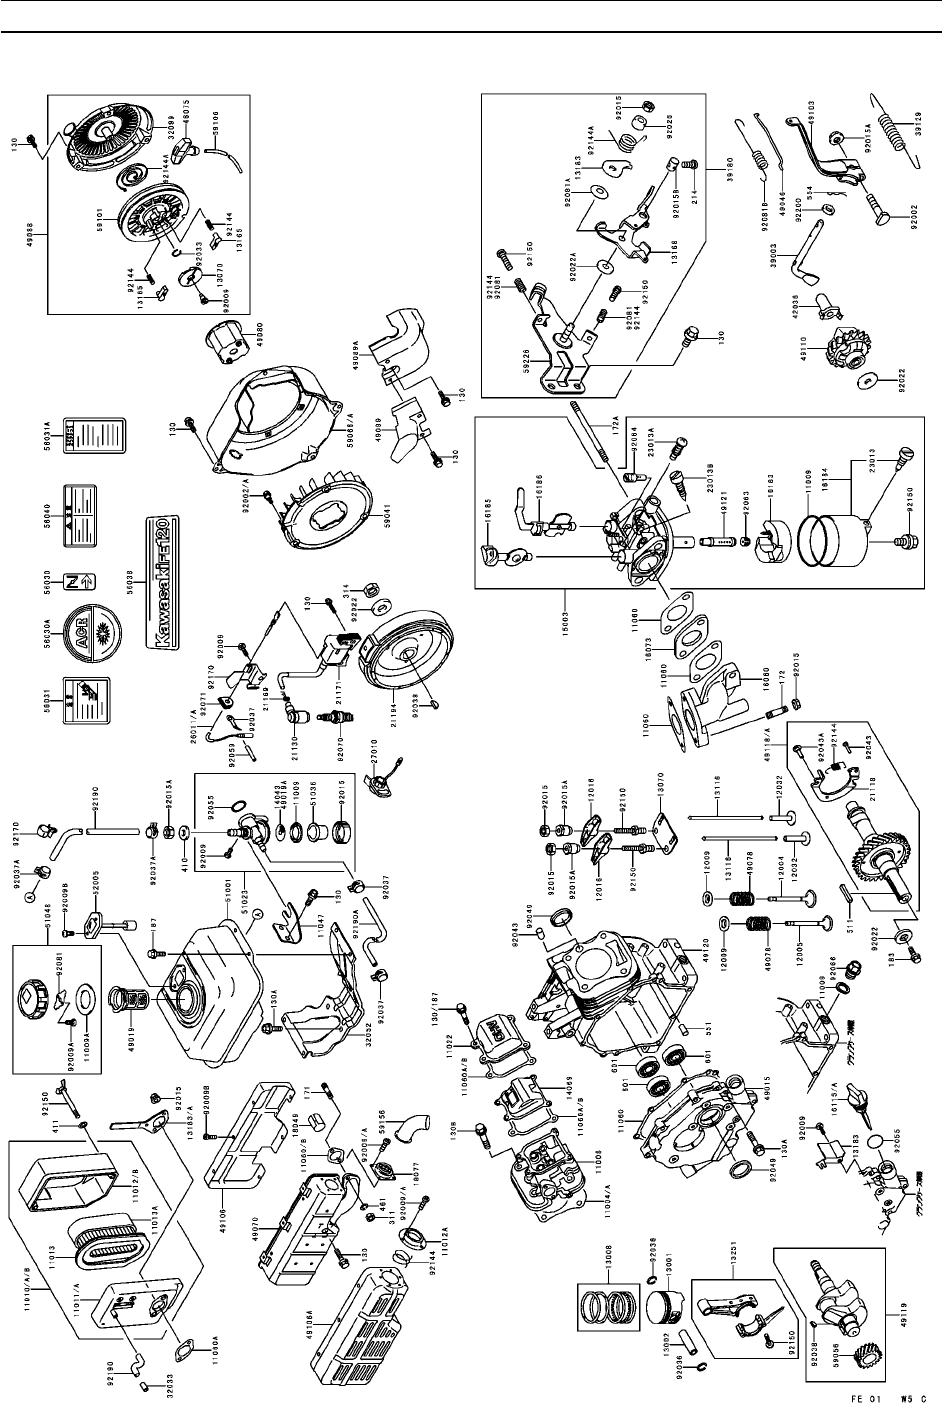
1-8 GENERAL INFORMATION
Exploded View
FE120
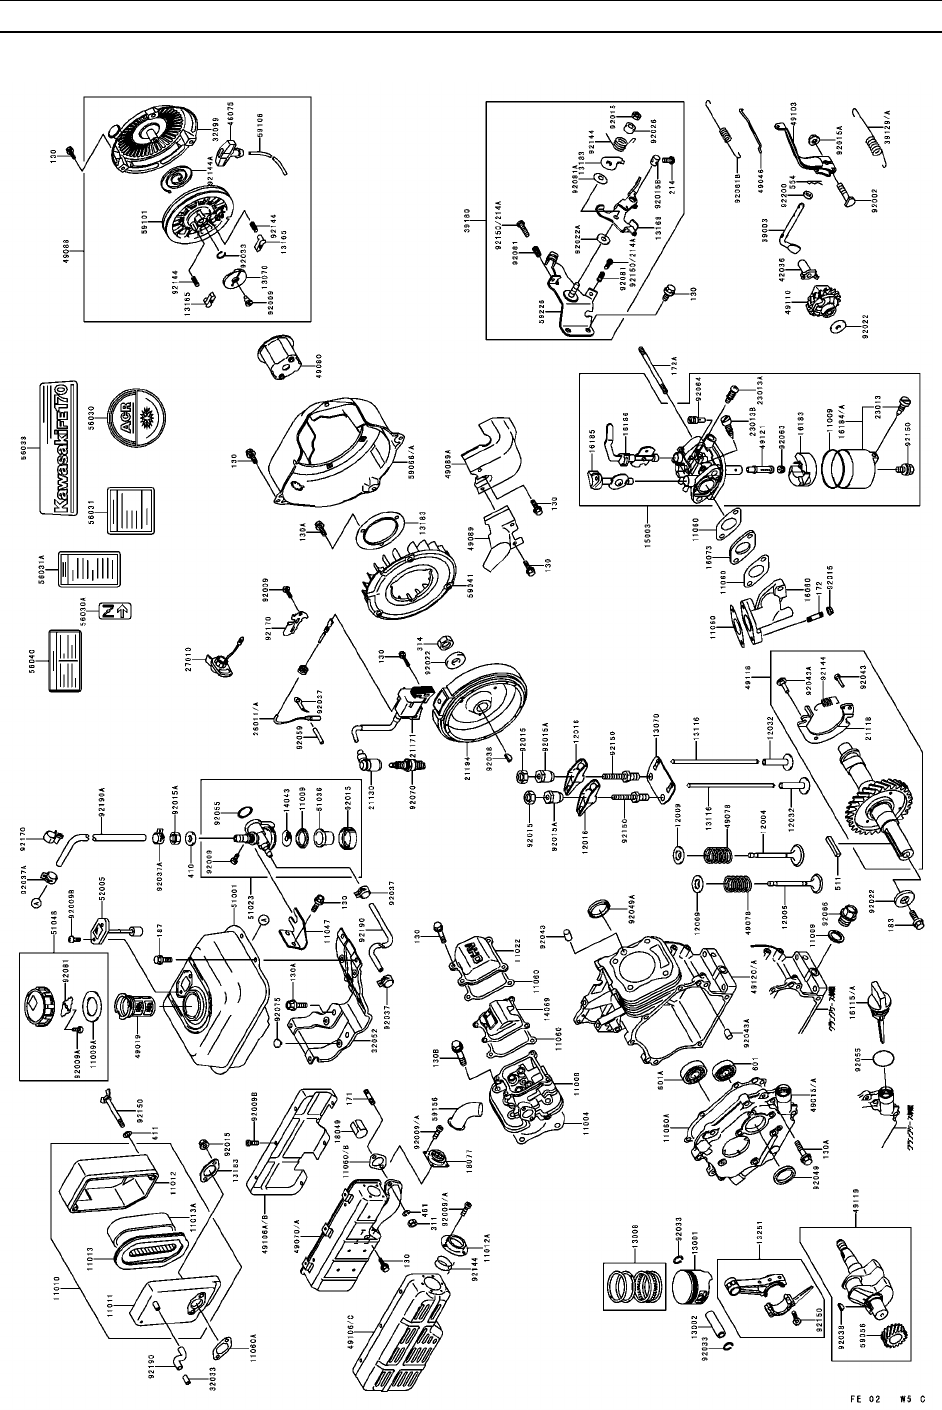
GENERAL INFORMATION 1-9
Exploded View
FE170
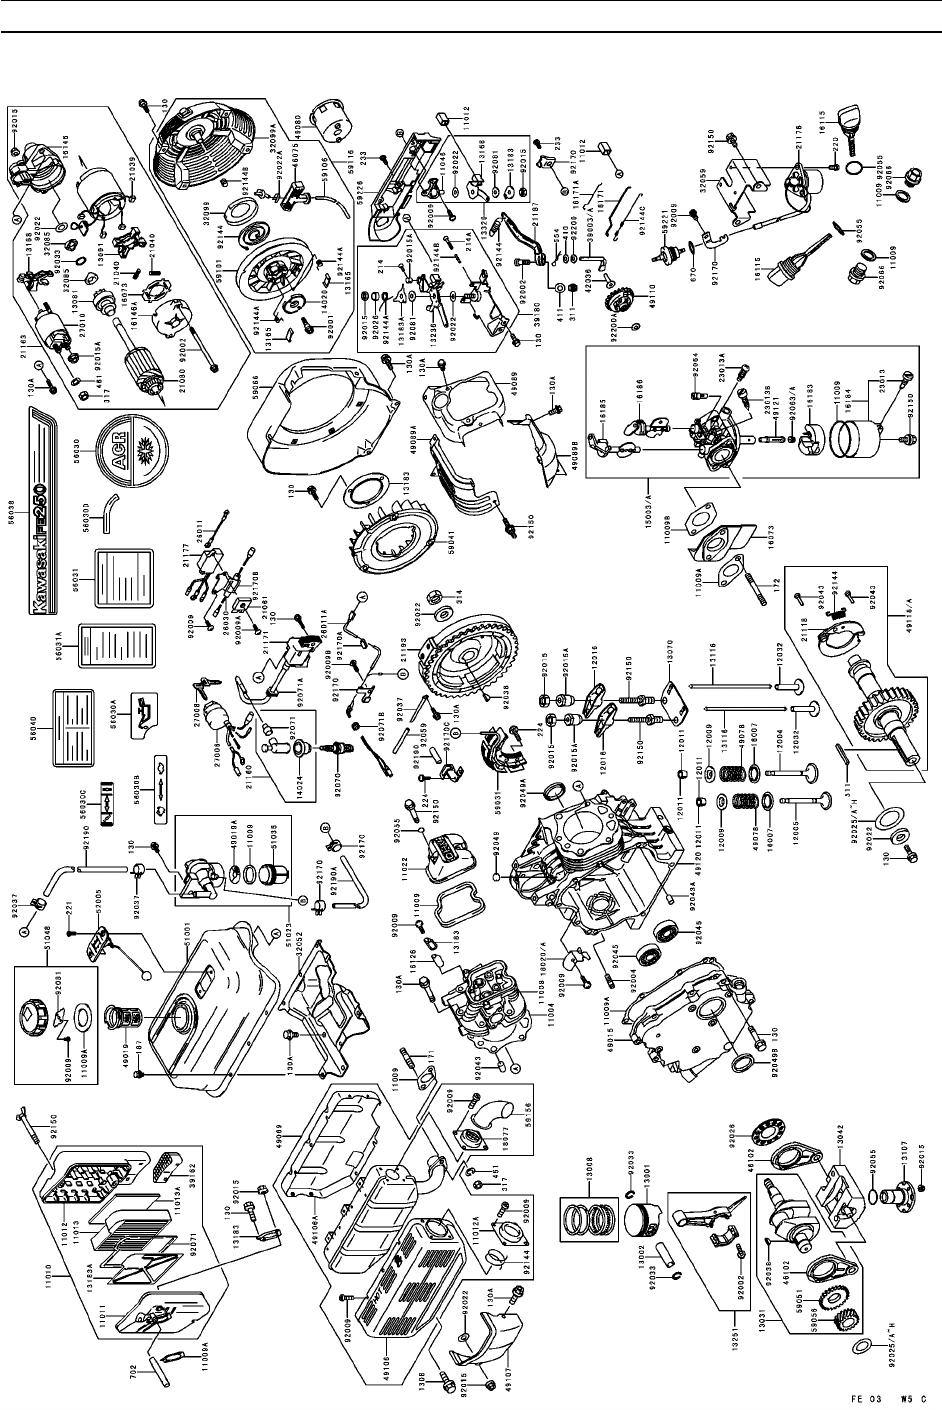
1-10 GENERAL INFORMATION
Exploded View
FE250

GENERAL INFORMATION 1-11
Exploded View
FE290

1-12 GENERAL INFORMATION
Exploded View
FE350

SERVICE DATA 2-1
Service Data
Table of Contents
2
Service Specifications........................................................................................................................................................2-2
Adjustment Specifications..................................................................................................................................................2-8
Tightening Torque Specifications.......................................................................................................................................2-9
Wiring Diagram.................................................................................................................................................................2-10
Troubleshooting................................................................................................................................................................2-12
Starter Motor Troubleshooting and Actions...............................................................................................................2-17
Disassembly Sequence (FE120, 170)..............................................................................................................................2-18
Disassembly Sequence (FE250, 290, 350, 400).............................................................................................................2-19
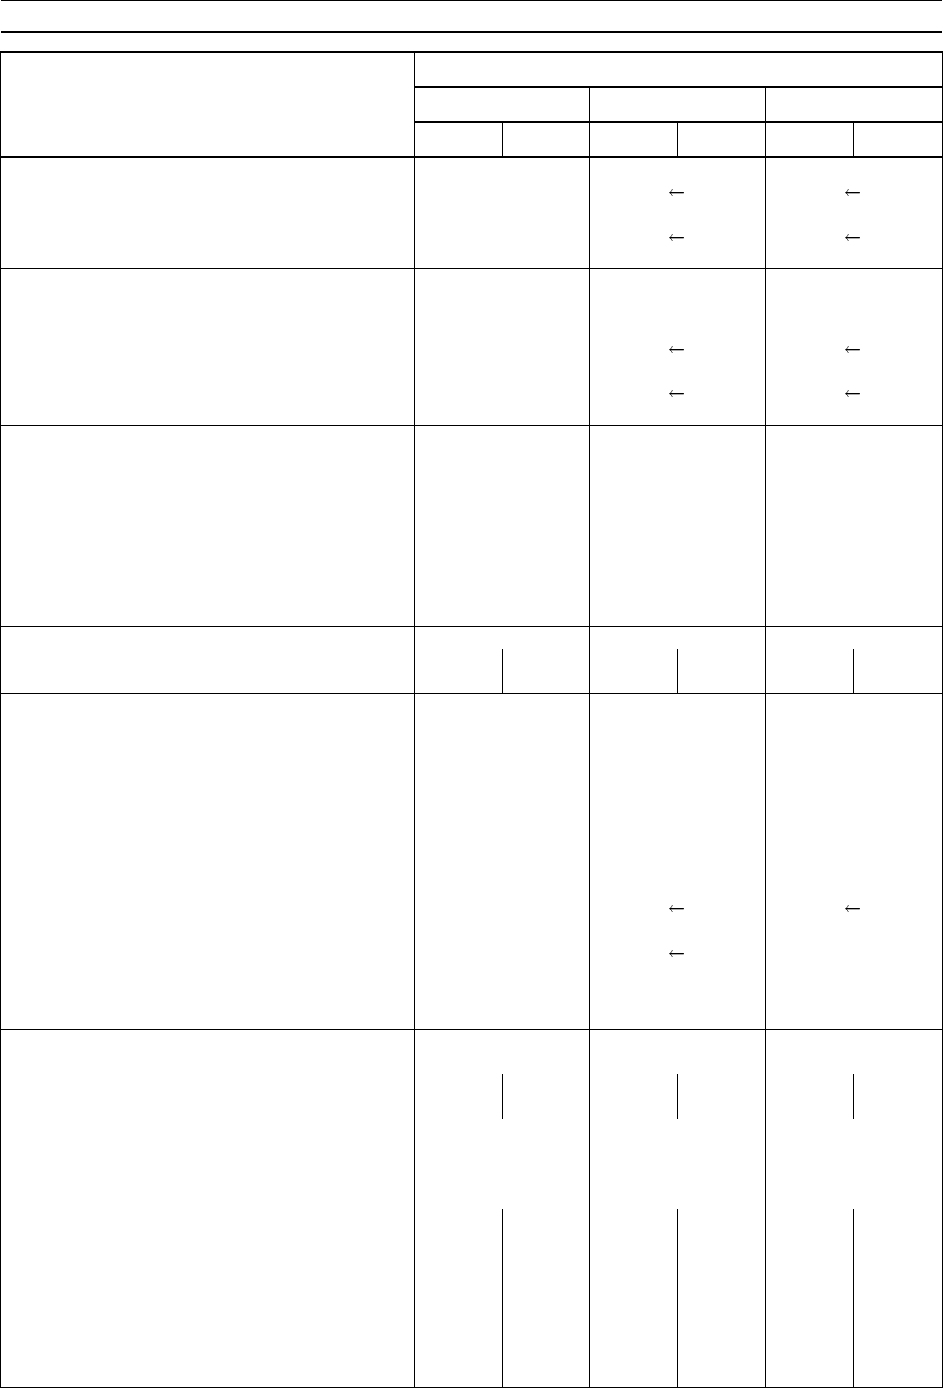
2-2 SERVICE DATA
Service Specifications
Service Limit (mm)
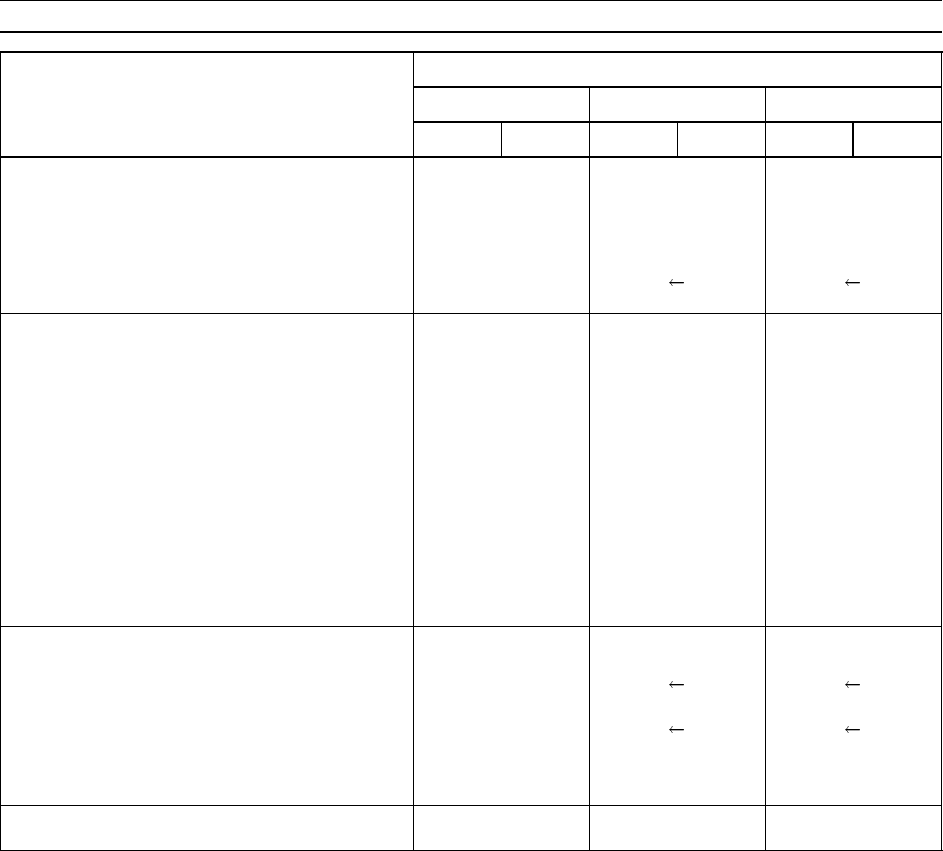
FE120 FE170 FE250Item
Type D Type G Type D Type G Type D Type G
Compression (minimum)
with Recoil Starter 290 kPa
(3 kg/cm2, 42 psi)
with Electric Starter 390 kPa
(4 kg/cm2, 57 psi)
Cylinder
Bore (maximum) 60.067 66.067 76.070
(2.3648 in) (2.3648 in) (2.9949 in)
Roundness (maximum) 0.056
(0.0022 in)
Boring Size (oversize) 0.50
(0.0120 in)
Crankcase Area
Crankshaft Bearing Bore (maximum) ––– ––– –––
Camshaft Bearing Bore (maximum) 15.063 16.063 20.063
(0.593 in) (0.6324 in) (0.7899 in)
Balancer Shaft Bearing Bore (maximum) ––– 15.063 –––
(0.5930 in)
Oil Pump Housing Bore (maximum) ––– ––– –––
Oil Pump Housing Depth (maximum) ––– ––– –––
Oil Pump Shaft Bearing Bore (maximum) ––– ––– –––
Crankcase Cover ––– ––– –––
Camshaft Bearing Bore (maximum) 15.063 ––– 16.063 ––– 20.063 –––
(0.5930 in) (0.6324 in) (0.7899 in)
Crankshaft
Crankpin Diameter (minimum) 25.944 28.944 33.944
(1.0214 in) (1.1395 in) (1.3363 in)
Crankshaft Journal Diameter
PTO Side (minimum) 19.930 24.930 29.930
(0.7846 in) (0.9815 in) (1.1783 in)
Flywheel Side (minimum) 19.930 24.930 29.930
(0.7846 in) (0.9815 in) (1.1783 in)
Balancer Link Rod Journal (minimum) ––– ––– –––
Shaft Runout: TIR (maximum) 0.05
(0.0020 in)
Axial Play (maximum) 0.5 0.35
(0.0197 in) (0.0138 in)
(standard: 0 ~ 0.24) (standard: 0.03 ~ 0.30) (standard: 0.05 ~ 0.17)
(0 ~ 0.0094 in) (0.0012 ~ 0.0119 in) (0.0020 ~ 0.0067 in)
Camshaft
Camshaft Journal Diameter
PTO Side (minimum) 14.910 19.930 15.910 24.930 19.927 29.930
(0.5870 in) (0.7846 in) (0.6264 in) (0.9815 in) (0.7845 in) (1.1783 in)
Flywheel Side (minimum) 14.910 15.910 19.927
(0.5870 in) (0.6264 in) (0.7845 in)
Cam Lobe Height: Intake, Exhaust (minimum) 26.157 30.024 31.040
(1.0298 in) (1.1820 in) (1.2220 in)
Axial Play (maximum) ––– 0.50 ––– 0.50 0.35 0.35
(0.0197 in) (0.0197 in) (0.0138 in) (0.0138 in)
(standard: (standard: (standard: (standard:
0.08 ~ 0.34) 0.08 ~ 0.34) 0.05 ~ 0.23) 0.05 ~ 0.17)
(0.0031 ~ (0.0031 ~ (0.0020 ~ (0.0020 ~
0.0134 in) 0.0134 in) 0.0091 in) 0.0067 in)
SERVICE DATA 2-3
Service Specifications
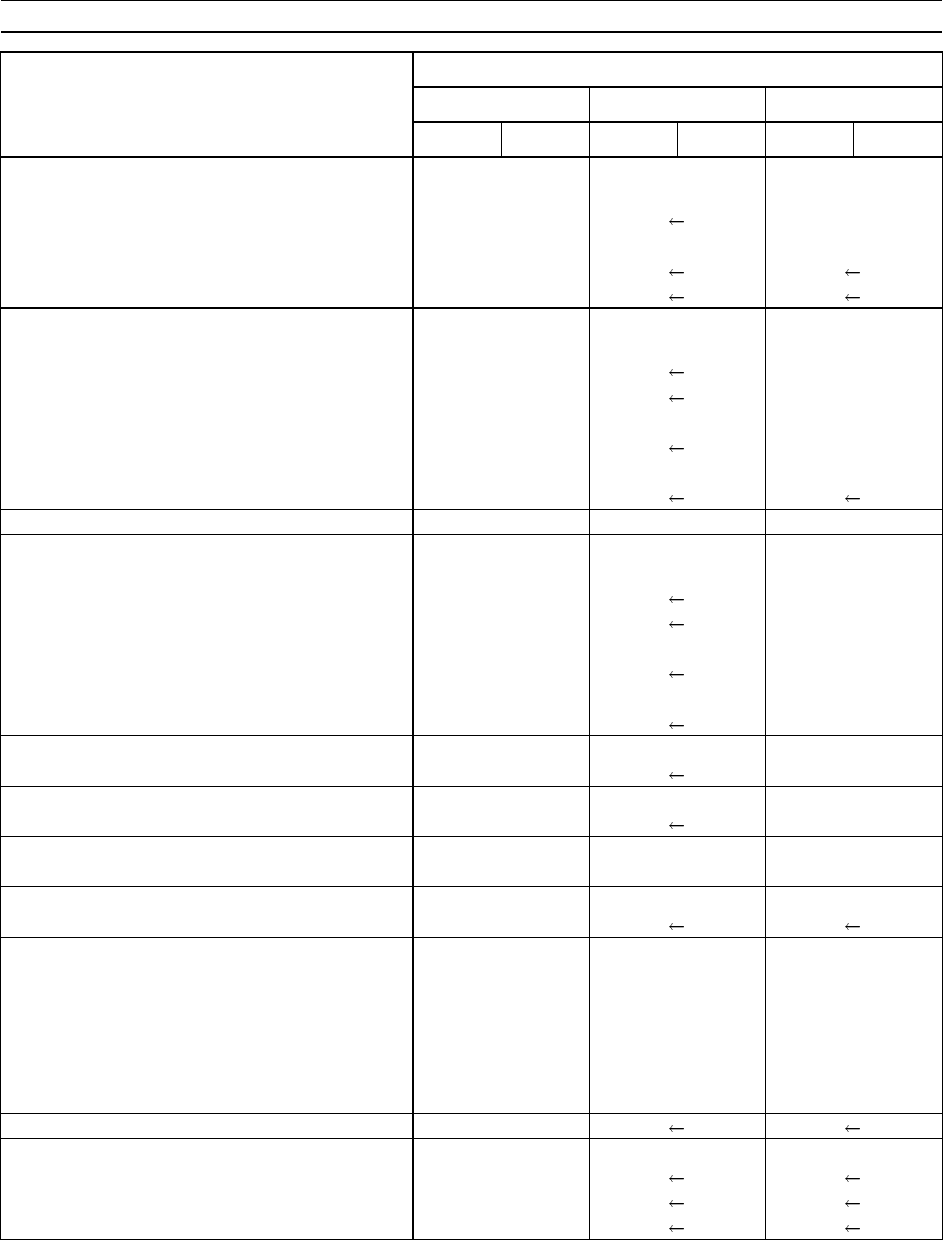
Service Limit (mm)
FE120 FE170 FE250Item
Type D Type G Type D Type G Type D Type G
Connecting Rod
Connecting Rod Big End Bore (maximum) 26.052 29.052 34.067
(1.0257 in) (1.1438 in) (1.3412 in)
Connecting Rod Small End Bore (maximum) 14.042 16.047 18.051
(0.5528 in) (0.6318 in) (0.7107 in)
Connecting Rod Bend and Twist (maximum) 0.15/100
(0.006/100 in)
Dynamic Balancer
Balancer Shaft Journal Diameter
PTO Side (minimum) ––– 14.943 –––
(0.5883 in)
Flywheel Side (minimum) ––– 14.933 –––
(0.5883 in)
Weight Guide Hole Bore (maximum) ––– ––– 26.118
(1.0283 in)
Balancer Guide Diameter (minimum) ––– ––– 25.907
Link Rod Bearing Bore (1.0200 in)
Small End Bore (maximum) ––– ––– 12.057
(0.4747 in)
Big End Bore (maximum) ––– ––– 47.106
(1.8546 in)
Piston
Piston Ring/Groove Clearance (with new rings)
Top Ring (maximum) 0.15
(0.0059 in)
Second Ring (maximum) 0.12
(0.0047 in)
Piston Pin Hole Bore (maximum) 14.033 16.033 18.033
(0.5525 in) (0.6312 in) (0.7100 in)
Piston Pin Diameter (minimum) 13.975 15.975 17.975
(0.5502 in) (0.6289 in) (0.7077 in)

2-4 SERVICE DATA
Service Specifications
Service Limit (mm)
FE290 FE350 FE400Item
Type D Type G Type D Type G Type D Type G
Compression (minimum)
with Recoil Starter 290 kPa
(3 kg/cm2, 42 psi)
with Electric Starter 390 kPa
(4 kg/cm2, 57 psi)
Cylinder
Bore (maximum) 78.067 83.067 87.067
(3.0735 in) (3.2703 in) (3.4278 in)
Roundness (maximum) 0.056
(0.0022 in)
Boring Size (oversize) 0.50
(0.0197 in)
Crankcase Area
Crankshaft Bearing Bore (maximum) 30.075 35.075
(1.1841 in) (1.3809 in)
Camshaft Bearing Bore (maximum) 23.063
(0.9080 in)
Balancer Shaft Bearing Bore (maximum) ––– ––– –––
Oil Pump Housing Bore (maximum) 40.766
(1.6050 in)
Oil Pump Housing Depth (maximum) 10.170
(0.4004 in)
Oil Pump Shaft Bearing Bore (maximum) 12.770
(0.5028 in)
Crankcase Cover
Camshaft Bearing Bore (maximum) 23.063 ––– 23.063 ––– 23.063 –––
(0.9080 in) (0.9080 in) (0.9080 in)
Crankshaft
Crankpin Diameter (minimum) 35.444 37.444
(1.3954 in) (1.4742 in)
Crankshaft Journal Diameter
PTO Side (minimum) 29.930 34.930
(1.1783 in) (1.3752 in)
Flywheel Side (minimum) 29.930 34.930
(1.1783 in) (1.3752 in)
Balancer Link Rod Journal (minimum) 46.924 49.924
(1.8474 in) (1.9655 in)
Shaft Runout: TIR (maximum) 0.05
(0.0020 in)
Axial Play (maximum) 0.35 0.35 0.35
(0.013 in) (0.013 in) (0.013 in)
(standard: 0.09 ~ 0.20) (standard: 0.08 ~ 0.22) (standard: 0.08 ~ 0.22)
(0.0035 ~ 0.0079 in) (0.0031 ~ 0.0089 in) (0.0031 ~ 0.0087 in)
Camshaft
Camshaft Journal Diameter
PTO Side (minimum) 22.927 29.930 22.927 34.930 22.927 34.930
(0.9026 in) (1.1783 in) (0.9026 in) (1.3752 in) (0.9026 in) (1.3752 in)
Flywheel Side (minimum) 22.927
(0.9026 in)
Cam Lobe Height: Intake, Exhaust (minimum) 32.700 33.240
(1.2874 in) (1.3087 in)

SERVICE DATA 2-5
Service Specifications
Service Limit (mm)
FE290 FE350 FE400Item
Type D Type G Type D Type G Type D Type G
Axial Play (maximum) ––– 0.35 0.35 0.35 0.06 0.35
(0.013 in) (0.013 in) (0.013 in) (0.024) (0.013 in)
(standard: (standard: (standard: (standard: (standard:
0.07 ~ 0.21) 0.06 ~ 0.24) 0.07 ~ 0.21) 0.06~ 0.24) 0.07 ~ 0.21)
(0.0028 ~ (0.0024 ~ (0.0028 ~ (0.0024 ~ (0.0028 ~
0.008 in) 0.009 in) 0.008 in) 0.009 in) 0.008 in)
Connecting Rod
Connecting Rod Big End Bore (maximum) 35.567 37.567
(1.4003 in) (1.4790 in)
Connecting Rod Small End Bore (maximum) 19.051 20.051
(0.7500 in) (0.7894 in)
Connecting Rod Bend and Twist (maximum) 0.15/100
(0.006/100 in)
Dynamic Balancer
Balancer Shaft Journal Diameter
PTO Side (minimum) ––– ––– –––
Flywheel Side (minimum) ––– ––– –––
Weight Guide Hole Bore (maximum) 26.118 26.097
(1.0283 in) (1.0274 in)
Balancer Guide Diameter (minimum) 25.907
(1.0120 in)
Link Rod Bearing Bore
Small End Bore (maximum) 12.064 12.057
(0.4750 in) (0.4747 in)
Big End Bore (maximum) 47.126 50.106
(1.8554 in) (1.9727 in)
Piston
Piston Ring/Groove Clearance (with new rings)
Top Ring (maximum) 0.16
(0.0063 in)
Second Ring (maximum) 0.14
(0.0055 in)
Piston Pin Hole Bore (maximum) 19.033 20.033
(0.7493 in) (0.7887 in)
Piston Pin Diameter (minimum) 18.975 19.975
(0.7470 in) (0.7864 in)
2-6 SERVICE DATA
Service Specifications
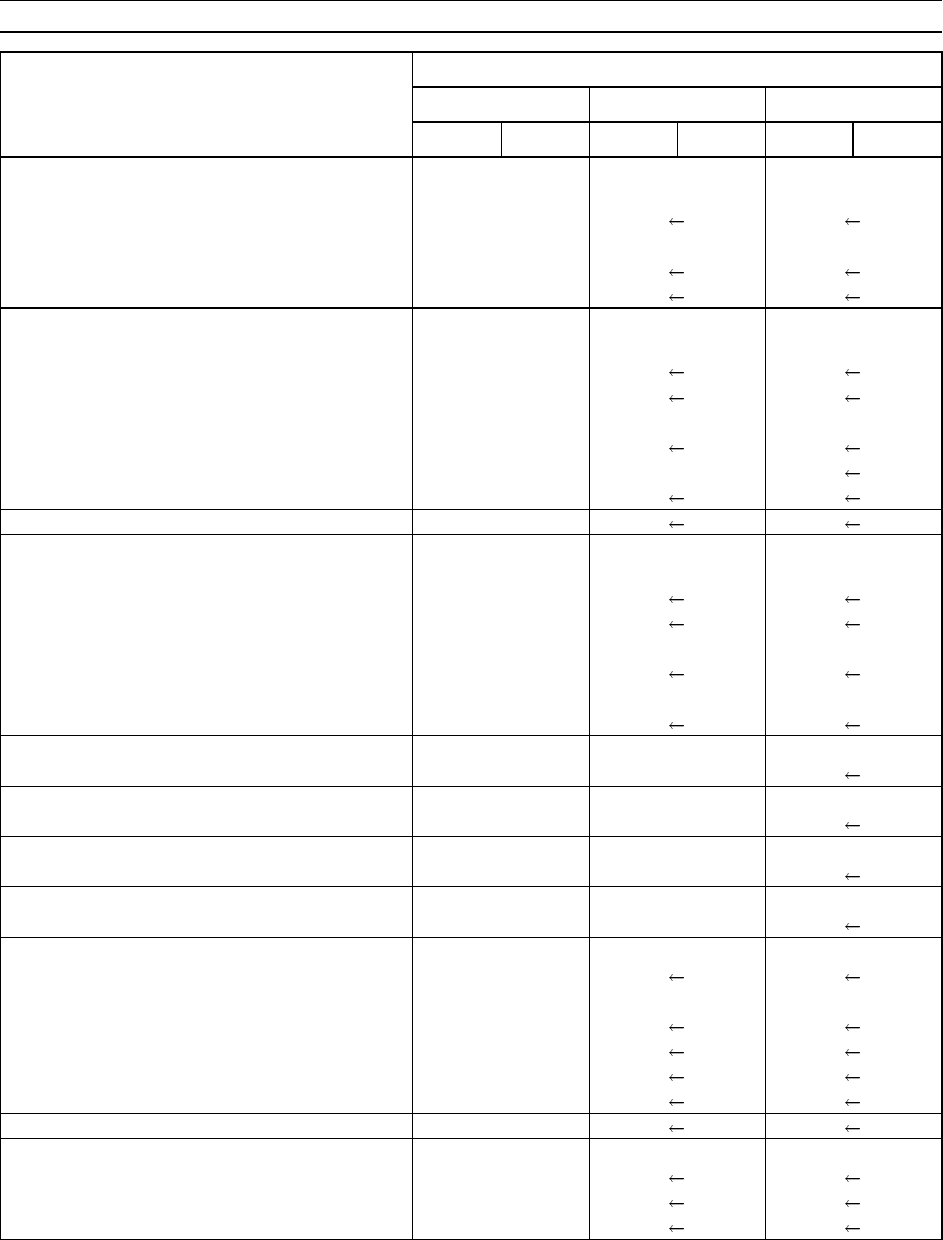
Service Limit (mm)
FE120 FE170 FE250Item
Type D Type G Type D Type G Type D Type G
Piston Ring
Piston Ring Thickness (minimum)
Top, Second 1.42 (0.056 in) 1.44 (0.057 in)
Piston Ring End Gap (maximum)
Top, Second 1.0 (0.039 in)
Oil Ring Visual Inspection
Cylinder Head
Valve Seating Surface Width
Standard 0.7 (0.028 in) 0.8 (0.031 in)
Maximum 1.7 (0.067 in) 1.9 (0.075 in)
Valve Guide Bore (maximum)
Intake, Exhaust 5.562 (0.2190 in) 6.065 (0.2388 in)
Rocker Arm Bearing Bore (maximum) ––– ––– –––
Gasket Surface Warp (maximum) 0.05 (0.002 in)
Rocker Arm Shaft Diameter (minimum) ––– ––– –––
Valve
Valve Stem Diameter
Intake Valve (minimum) 5.430 (0.2138 in) 5.930 (0.2335 in)
Exhaust Valve (minimum) 5.415 (0.2132 in) 5.915 (0.2329 in)
Valve Stem Runout (maximum)
Intake, Exhaust 0.05 (0.002 in) 0.03 (0.001 in)
Valve Head Thickness (minimum)
Intak, Exhaust 0.5 (0.020 in) 0.6 (0.024 in)
Valve Spring Free Length (minimum)
Intake, Exhaust 31.8 (1.252 in) 32.8 (1.291 in)
Rocker Arm Pushrod Runout (maximum)
Intak, Exhaust 0.5 (0.020 in) 0.3 (0.012 in)
HLA Device Leak-Dwon Dimension (maximum)
Intake, Exhaust ––– ––– –––
Valve Lift Height by ACR (minimum)
Exhaust 0.6 (0.024 in)
Oil Pump
Inner Rotor Shaft Diameter (minimum) ––– ––– –––
Outer Rotor
Diameter (minimum) ––– ––– –––
Width (minimum) ––– ––– –––
Inner/Outer Rotor Clearance (maximum) ––– ––– –––
Relief Valve Spring Free Length (minimum) ––– ––– –––
Breather Valve Air Gap (maximum) 0.2 (0.008 in)
Starter Motor
Carbon Brush Length (minimum) *
Commutator Diameter (minimum) *
Commutator Groove Depth (minimum) 0.2 (0.008 in)
*: Refer to Electric Starter System
SERVICE DATA 2-7
Service Specifications
Service Limit (mm)
FE290 FE350 FE400Item
Type D Type G Type D Type G Type D Type G
Piston Ring
Piston Ring Thickness (minimum)
Top, Second 1.44 (0.057 in)
Piston Ring End Gap (maximum)
Top, Second 1.2 (0.047 in)
Oil Ring Visual Inspection
Cylinder Head
Valve Seating Surface Width
Standard 0.8 (0.031 in)
Maximum 1.9 (0.075 in)
Valve Guide Bore (maximum)
Intake, Exhaust 7.065 (0.2781 in)
Rocker Arm Bearing Bore (maximum) 12.074 (0.4754 in) 12.3 (0.484 in)
Gasket Surface Warp (maximum) 0.05 (0.002 in)
Rocker Arm Shaft Diameter (minimum) 11.949 (0.4704 in)
Valve
Valve Stem Diameter
Intake Valve (minimum) 6.930 (0.2728 in)
Exhaust Valve (minimum) 6.915 (0.2722 in)
Valve Stem Runout (maximum)
Intake, Exhaust 0.03 (0.001 in)
Valve Head Thickness (minimum)
Intak, Exhaust 0.6 (0.024 in)
Valve Spring Free Length (minimum)
Intake, Exhaust 32.8 (1.291 in) 38.1 (1.500 in)
Rocker Arm Pushrod Runout (maximum)
Intak, Exhaust 0.3 (0.012 in) 0.5 (0.02 in)
HLA Device Leak-Dwon Dimension (maximum)
Intake, Exhaust ––– 0.5 (0.02 in)
Valve Lift Height by ACR (minimum)
Exhaust 0.6 (0.024 in) 1.0 (0.039 in)
Oil Pump
Inner Rotor Shaft Diameter (minimum) 12.627 (0.4971 in)
Outer Rotor
Diameter (minimum) 40.467 (1.5932 in)
Width (minimum) 9.920 (0.3906 in)
Inner/Outer Rotor Clearance (maximum) 0.3 (0.012 in)
Relief Valve Spring Free Length (minimum) 19.0 (0.748 in)
Breather Valve Air Gap (maximum) 0.2 (0.008 in)
Starter Motor
Carbon Brush Length (minimum) *
Commutator Diameter (minimum) *
Commutator Groove Depth (minimum) 0.2 (0.008 in)
*: Refer to Electric Starter System
2-8 SERVICE DATA
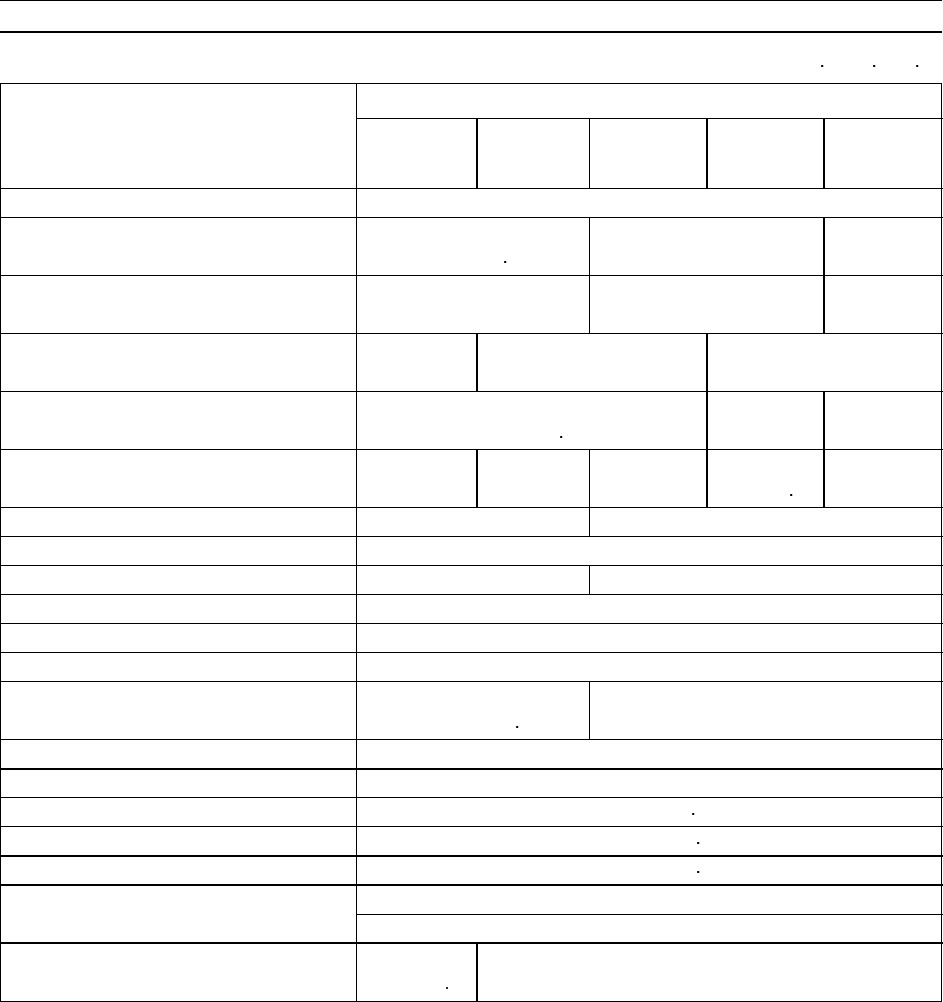
Adjustment Specifications
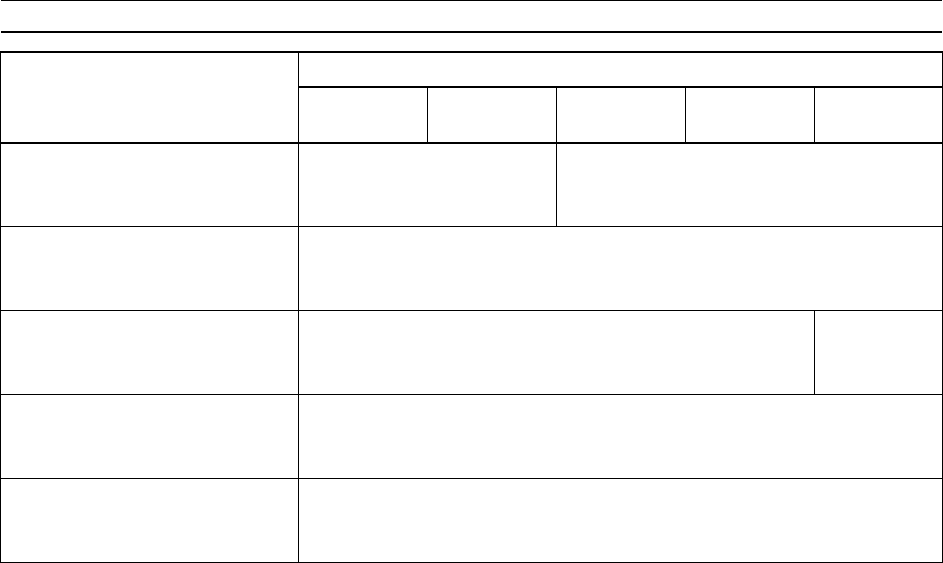
Adjustment Specifications
FE350
Item FE120 FE170 FE250 FE290 FE400
Idle Speed Setting
(crankshaft) 1600 rpm 1300 rpm
No-Load Maximum Speed Setting
(crankshaft) 4000 rpm
Valve Clearance:
Intake, Exhaust Adjustment
(clearance on cold engine) 0.12 mm (0.0047 in) unnecessary
Spark Plug Electrode Gap 0.7 ~ 0.8 mm (0.028 ~ 0.031 in)
Ignition Coil Air Gap
Standard: 0.3 mm (0.012 in)
Adjustment range: 0.25 ~ 0.4 mm (0.010 ~ 0.016 in)
SERVICE DATA 2-9
Tightening Torque Specifications
Tightening Torque Specifications Unit: N m (kg m, ft lb)
Tightening Torque
FE350Tightening Location FE120 FE170 FE250 FE290 FE400
Cylinder Head Bolts 25 (2.5, 18)
Connecting Rod Bolts 12 20 23
(Apply Oil to Threadss before Tightening) (1.2, 8.9 in lb) (2.0, 15) (2.3, 17)
Flywheel Retaning Nut 64 86 137
(thoroughly degrease tapered area) (6.5, 47) (8.8, 63) (14.0, 101)
9.8 22 31
Crankcase Cover (1.0, 7.2) (2.2, 16) (3.2, 23)
6.9 9.8
Rocker Arm Lock Nut (0.7, 61 in lb) (1.0, 7.2) –––
8.8
Valve Clearance Adjustment Lock Nut ––– ––– ––– (0.9, 78in lb) –––
Muffler Flange Nut 9.8 (1.0, 7.2) 20 (2.0, 15)
Fan Retaining or Fan Presser Plate 9.8 (1.0, 7.2)
Electric Starter Retaining Bolt 15 (1.5, 11) 20 (2.0, 15)
Oil Drain Plug 32 (3.3, 24)
Spark Plug 23 (2.3, 17)
Fuel Tank 9.8 (1.0, 7.2)
Retaining Bolts for:
Fan Housing, Shroud, Recoil Starter 5.9 (0.6, 52 in lb) 9.8 (1.0, 7.2)
General Bolts and Nuts:
M8 15 (1.5, 11)
M6 5.9 (0.6, 52 in lb)
M5 3.4 (0.35, 30 in lb)
M4 1.2 (0.12, 11 in lb)
Oil Level Sensor Bracket 9.8 (1.0, 7.2)
(M6 Tapping Screws)
3.4 9.8
Starter Motor Battery Terminal Nut (0.35, 30 in lb) (1.0, 7.2)

2-10 SERVICE DATA
Wiring Diagram
Ignition Coil/Ignition Separate Type

SERVICE DATA 2-11
Wiring Diagram
Ignition Coil/Igniter Integrated Type

2-12 SERVICE DATA
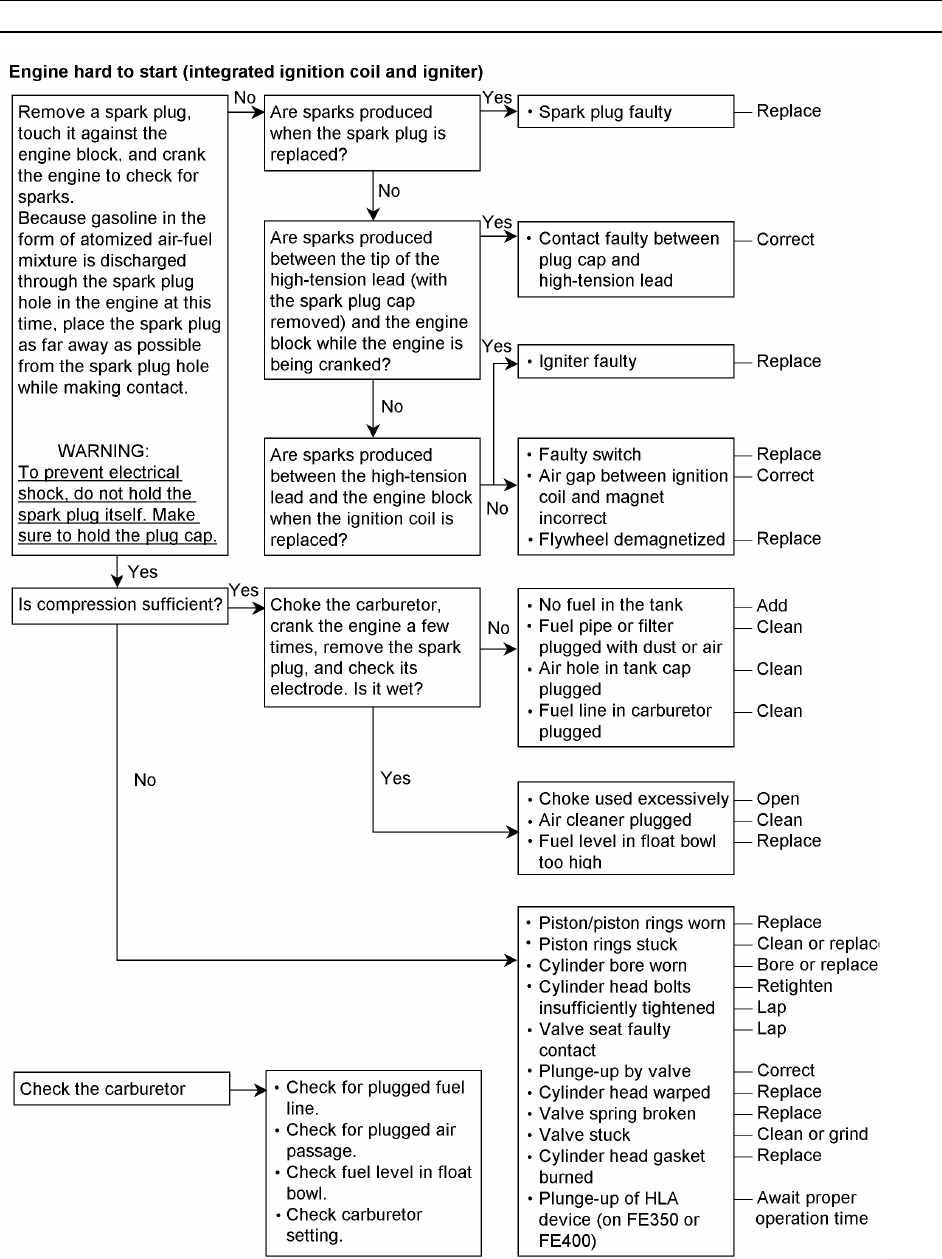
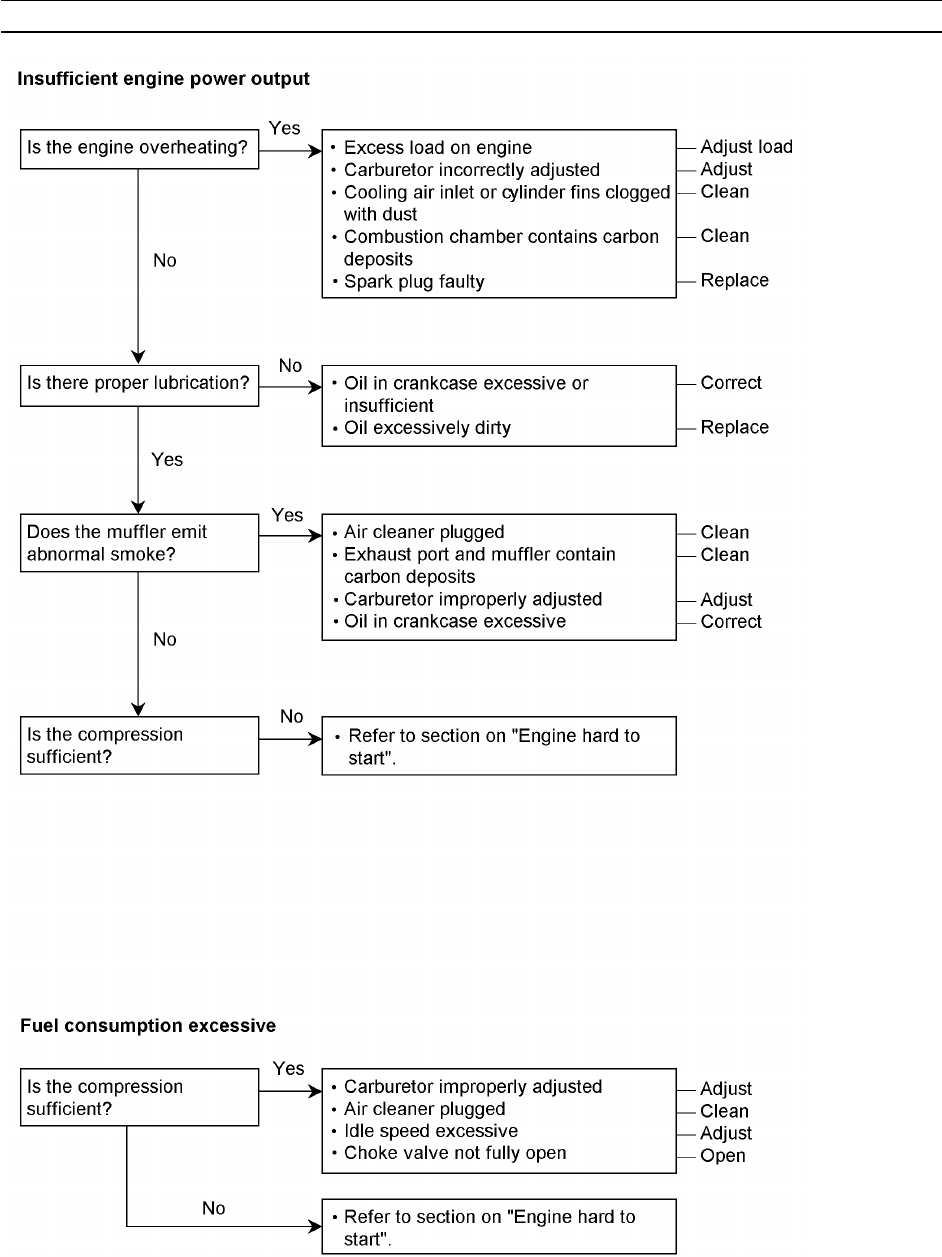
Troubleshooting
If the engine malfunctions, first check whether th engine has been operated correctly. Then, systematically carry out
the troubleshooting procedure starting with simple items. This troubleshooting chart lists typical malfunctions. Do not
unnecessarily disassemble any parts before the cause of the problem is identified.
SERVICE DATA 2-13
Troubleshooting
2-14 SERVICE DATA
Troubleshooting

SERVICE DATA 2-15
Troubleshooting

2-16 SERVICE DATA
Troubleshooting
SERVICE DATA 2-17
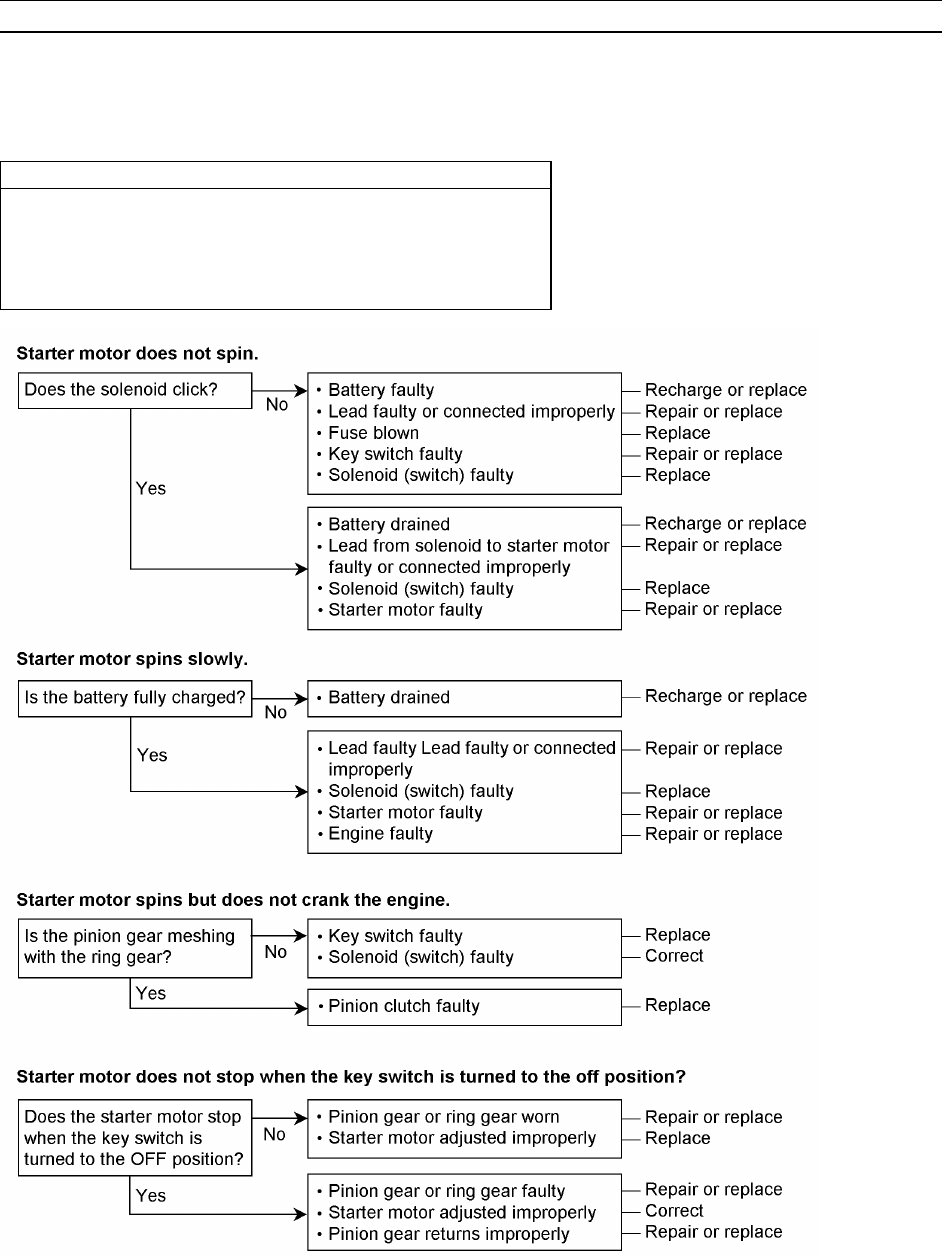
Troubleshooting
Starter Motor Troubleshooting and Actions
•Remove the spark plug cap and ground the high-tension lead
terminal.
•Perform an inspection by turning the key switch to the START position.
CAUTION
Do not touch the parts or accessories other than the starter
motor when troubleshooting the starter motor.
If the starter motor does not stop even when the key switch is
turned OFF, quickly disconnect the negative (–) lead from the
battery.

2-18 SERVICE DATA
Disassembly Sequence (FE120, 170)
Bolt to be removed for tool
Disassembly Precaution Name Quantity
Drain Plug Warm up engine and drain oil. 14 across flats
Fuel Tap, Fuel Tank Drain fuel before disassembly. 17 across flats (tap) 1
M6 bolt (tank) 4
Spark Plug 21 across flats
Shroud M6 bolt 6
Muffler Assembly Remove flange retaining nuts. M6 nut 2
Remove stay retaining bolt. M8 bolt 1
Air Cleaner M5 butterfly bolt 2
Carburetor Tighten it together with air cleaner case. M6 nut 2
Governor Arm, Control Panel M6 nut 1
M6 bolt 2
Fan Housing Disconnect wire to stop switch. M6 bolt 5
(FE120 = 4)
Electrical:
• Ignition Coil * FE120 uses M6 bolts. M5 bolt 2
• Flywheel M14 nut 1
Cylinder Head:
• Rocker Case M6 bolt 4
• Cylinder Head Loosen boltss evenly in the reverse M8 bolt 4
order of tightening.
Valve System:
• Pushrods Identify intake and exhaust.
• Rocker Arms Identify intake and exhaust. M6 nut 2
• Exhaust Valve
Crankcase Cover Loosen bolt evenly in the reverse
order of tightening.
for FE120 M6 bolt 8
for FE170 M8 bolt 7
Camshaft Remove shaft from a position where
cam gear marks are aligned.
Tappets Identify intake and exhaust.
Governor Shaft (Arm Pivot) Remove snap ring and pull it out Snap ring 2
of crankcase.
Connecting Rod Cap 10 across (bolt) 2
Crankshaft Remove from a position where it
does not interfere with connecting rod.
Piston/Connecting Rod Assembly Pull it downward from cylinder bore.
Connecting Rod Remove snap ring and pull piston pin out. Snap ring 2
Assembly sequence (for FE120, 17):
Assembly parts in the reverse order of disassembly.

SERVICE DATA 2-19
Disassembly Sequence (FE250, 290, 350, 400)
Bolt to be removed for tool
Disassembly Area Precaution Name Quantity
Drain Plug Warm up engine and drain oil. 14 across
Fuel Tap, Fuel Tank Drain fuel before disassembly. M6 bolt (tap) 1
M6 bolt (tank) 6
Spark Plug 21 across
Muffler Assembly Remove the exhaust pipe cover. M6 bolt 2
M6 nut (with washer) 1
Remove the muffler assembly. M8 nut 2
M8 bolt 1
Wiring Related Disconnect ground wire. M8 nut 1
Disconnect connecting terminals.
Panel Control Remove it from tank bracket. M5 screw 4
Tank Bracket M8 bolt 4
Control Related:
• Link Rod and Spring
• Governor Arm M6 nut 1
• Control Panel Assembly M6 bolt 2
Starter Motor M8 bolt 2
Air Cleaner M6 batterfly bolt 2
Carburetor Also remove insulator. M6 nut 2
M6 bolt 1
Three-piece Shroud and Fan
Housing M6 bolt 15
M6 tower bolt 1
Electrical: Remove clamp and lead. M5 tapping screw 2
• Ignition Coil M5 bolt 2
• Flywheel * FE350, 400 use M18 nut. *M16 nut 1
•ACG M6 screw 2or4
Cylinder Head:
• Rocker Case M6 bolt 2
• Cylinder Head Loosen bolts evenlly in reverse of tightening. M8 bolt 6
Valve System:
• Pushrods Identify intake and exhaust.
(Identification unnecessary for FE350, 400.)
• Rocker Arm Identify intake and exhaust.
* for FE250 M6 nut 2
* for FE290, 350, 400 E-ring 1
• Exhaust Valve
Crankcase Cover
Shaft Adjust Shims Identify shims for crankshaft and camshaft. M8 bolt 8
Camshaft Remove shaft from a position where cam gear
marks are aligned.
Tappets (FE250, 290) Identify intake and exhaust.
or HLA Devices (FE350, 400) Face snap ring side of HLA device upward.
Governor Shaft (arm pivot) Snap ring 1
Balancer Guide M6 nut 4
Connecting Rod Gap 12 across flats (bolt) 2
Crankshaft Remove from to a position where it does not
interfere with connecting rod.
Piston/Connecting Rod Assembly Pull it downward from cylinder bore.
Connecting Rod Remove snap ring and pll piston pin out. Snap ring 2
Oil Pump M6 bolt 6
Oil Filter Remove plate. M5 bolt 2
Assembly sequence (for FE250, 290, 350, 400)
Assemble parts in the reverse order of disassembly.

DISASSEMBLY, REASSEMBLY, INSPECTION, AND MAINTENANCE 3-1
Disassembly, Reassembly, Inspection, and Maintenance
Table of Contents 3
Carburetor....................................................................3-2
Construction and Function...................................3-2
Disassembly, Cleaning, and Reassembly Precau-
tions......................................................................3-3
Adjustment............................................................3-4
Carburetor with Fuel Cutoff Valve........................3-6
Governor Mechanism..................................................3-7
Governor Operating Mechanism..........................3-7
Governor Gear Assembly Installation...................3-8
Governor Arm Installation (Setting the Governor)3-8
Air Cleaner.................................................................3-10
Element Cleaning...............................................3-10
Cooling System.........................................................3-11
Fuel Tank and Filter...................................................3-12
Ignition System..........................................................3-13
Description of Function.......................................3-13
Spark Inspection.................................................3-14
Spark Plug Cleaning and Inspection..................3-14
Ignition Coil Inspection.......................................3-15
Igniter Inspection................................................3-16
Flywheel Disassembly and Reassembly............3-17
Ignition Coil Reassembly (Air Gap Adjustment).3-18
Key Switch (engine switch) Inspection...............3-18
Charging System.......................................................3-19
Charging System Inspection...............................3-19
ACG Inspection...................................................3-19
Rectifier Inspection.............................................3-19
Regulator Inspection...........................................3-20
Starter System...........................................................3-21
Starter Motor Construction.................................3-21
Solenoid (Starter Motor) Wiring Inspection........3-22
Starter Motor Inspection.....................................3-23
Recoil Starter.............................................................3-25
Disassembly........................................................3-25
Reassembly........................................................3-25
Cylinder Head............................................................3-26
Compression Inspection.....................................3-26
Disassembly........................................................3-26
Cleaning and Inspection.....................................3-27
Reassembly........................................................3-27
Valve System.............................................................3-28
Hydraulic Lash Adjuster (HLA)...........................3-28
Valve Clearance Inspection and Adjustment......3-31
Automatic Compression Release (ACR) Device In-
spection..............................................................3-32
Valve Disassembly and Reassembly..................3-32
Valve Guide Inspection.......................................3-33
Valve Inspection..................................................3-33
Valve Spring Inspection......................................3-34
Valve Seat Inspection and Lapping....................3-35
Valve Seat Correction.........................................3-35
Rocker Arm and Rocker Shaft............................3-36
Pushrod Inspection.............................................3-36
Piston and Connecting Rod......................................3-37
Disassembly........................................................3-37
Reassembly........................................................3-37
Piston Inspection................................................3-39
Piston Pin Inspection..........................................3-40
Piston Ring Inspection........................................3-40
Connecting Rod Inspection................................3-41
Cylinder Block and Crankcase Cover.......................3-43
Cylinder Inspection.............................................3-43
Crankcase Cover................................................3-43
Ball Bearing........................................................3-44
Oil Seal...............................................................3-45
Plain Bearing Area Inspection............................3-45
Lubrication System....................................................3-46
Lubrication Method.............................................3-46
Oil Pump Disassembly and Reassembly...........3-47
Oil Pump Inspection...........................................3-48
Oil Level Warning Device...................................3-49
Breather..............................................................3-52
Air Filter (cartridge type).....................................3-52
Crankshaft.................................................................3-54
Disassembly........................................................3-54
Crankshaft Inspection.........................................3-55
Crankshaft Axial Play Adjustment......................3-55
Reassembly........................................................3-56
Balancer.....................................................................3-57
Reciprocal Movement Balancer (FE400, 350, 290,
250).....................................................................3-58
Uniaxial Rotation Balancer (FE170)...................3-59
Camshaft...................................................................3-61
Disassembly........................................................3-61
Inspection...........................................................3-61
Reassembly........................................................3-62
Camshaft Axial Play Adjustment........................3-63
3-2 DISASSEMBLY, REASSEMBLY, INSPECTION, AND MAINTENANCE
Carburetor
Construction and Function
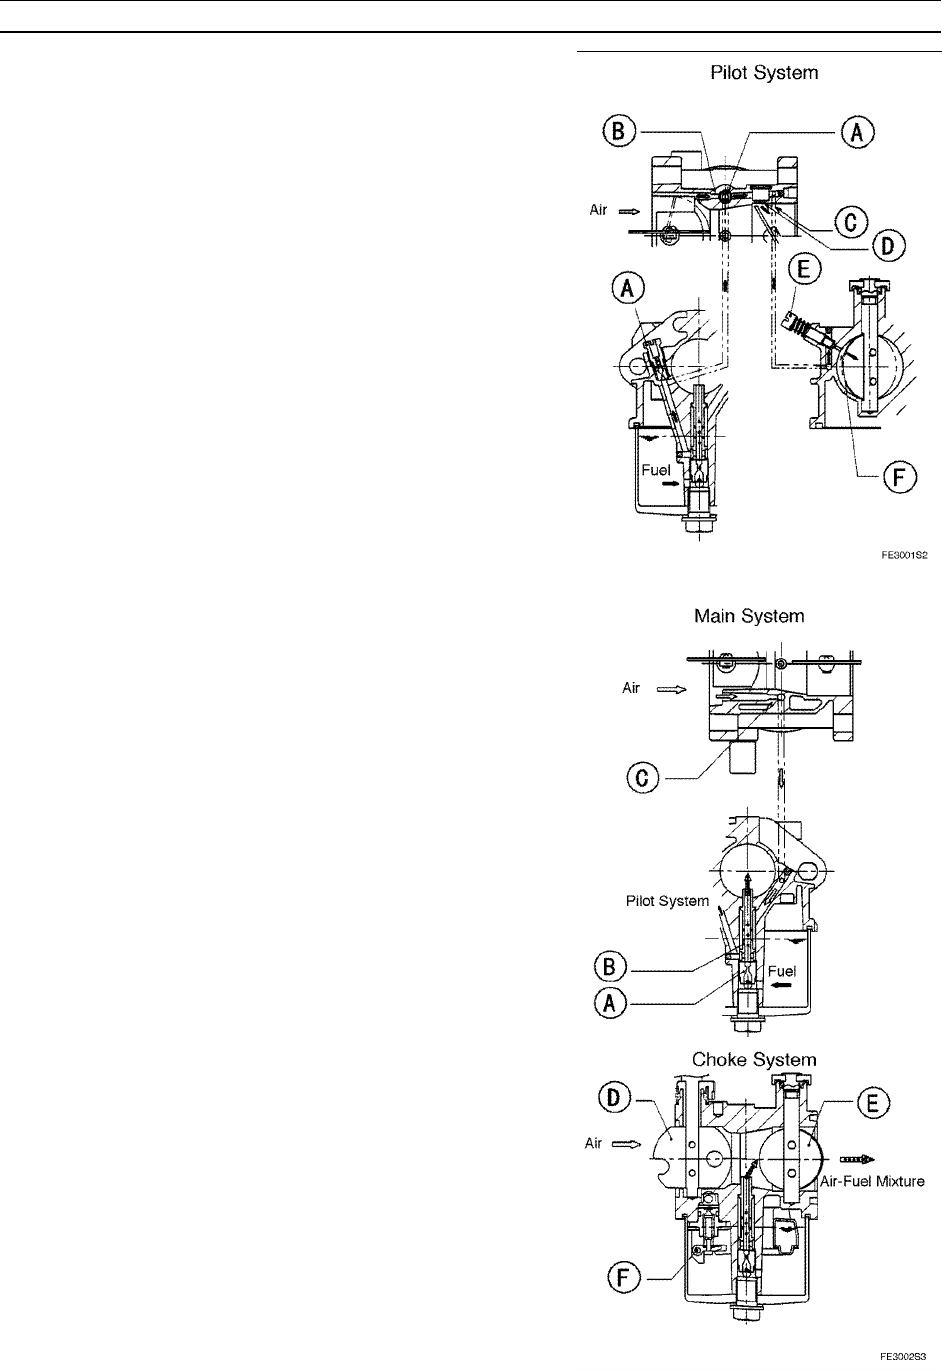
The function of a carburetor is to mix fuel and air by applying the
principle of an atomizer, thus creating an appropriate air-fuel mixture in
accordance with load fluctuations. The major functions of a carburetor
consist of the following four systems.
Pilot System
The function of this system is to supply fuel during the idling and the
low-speed, light-load operating conditions.
The fuel that is regulated by the pilot jet mixes with the air that is
regulated by the pilot air jet, and the resulting mixture is supplied via
the pilot port and bypass port to the engine.
The fuel that is used during idling is supplied primarily via the pilot
port.A: Pilot Jet
B: Pilot Air Jet (Body Jet)
C: Pilot Port
D: Bypass Port
E: Pilot Screw
F: Pilot Port
Main system
The function of this system is to supply fuel during medium- to high-
speed, high-load operating conditions. Fuel is regulated by the main jet
and flows through the main nozzle.
The air that is regulated by the main air jet intermixes with the fuel
via the bleed hole of the main nozzle, and is discharged into the venturi
in an emulsion form (in which the liquid is intermixed with air bubbles).
In the venturi, the airflow from the air cleaner causes the fuel to
become atomized, and the resulting air-fuel mixture is fed into the
cylinder.
Choke System
Closing the choke valve decreases the volume of air intake and
increases the intake vacuum during the intake stroke. As a result, a
greater volume of fuel than normal is discharged from the pilot and
main systems to facilitate the starting of a cold engine.
Float System
The function of the float is to maintain the fuel in the float chamber
of the carburetor at a constant level so that the proper amount of fuel
can be supplied to the engine.
Setting the fuel level in the float chamber to low makes it more difficult
for the carburetor to draw the fuel up to the venturi, resulting in a leaner
air-fuel mixture.
Setting the fuel level to high increases the volume of fuel that is drawn
up to the venturi, resulting in a richer air-fuel mixture
A: Main Jet
B: Main Nozzle
C: Main Air Jet (body jet)
D: Chocke Valve
E: Throttle Valve
F: Float Hinge Pin
DISASSEMBLY, REASSEMBLY, INSPECTION, AND MAINTENANCE 3-3
Carburetor
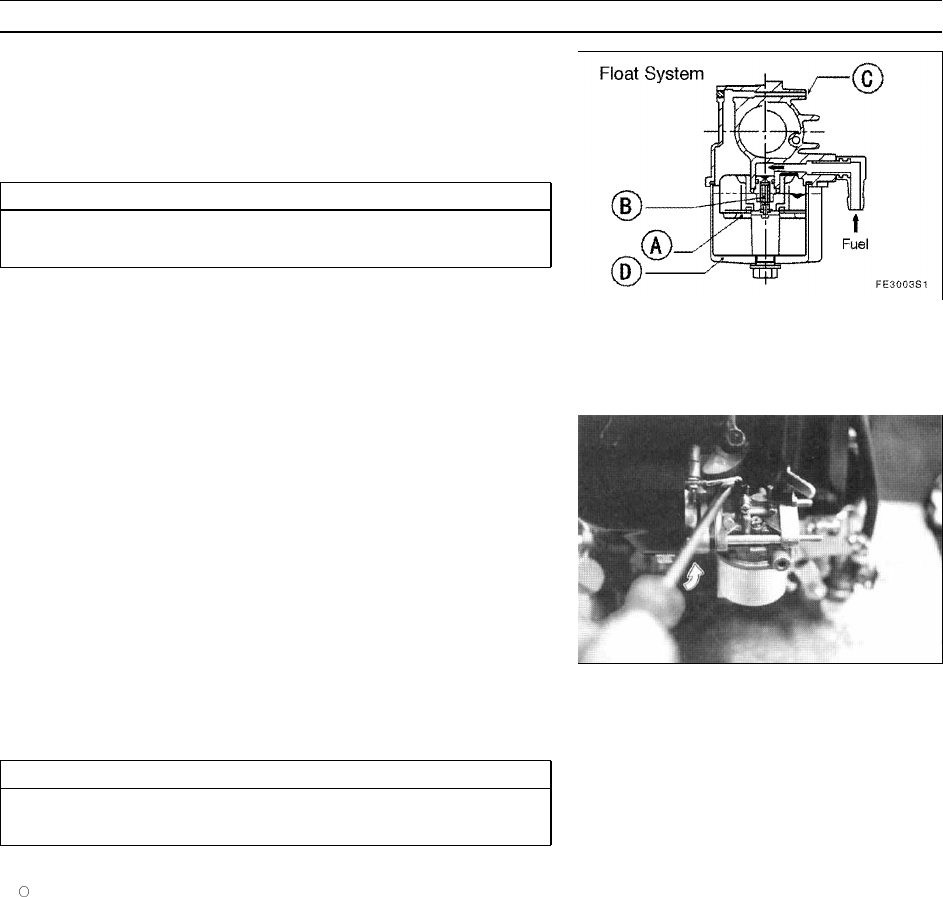
An optimal fuel level is prescribed at the time the carburetor is
designed. Along with the fluctuations in the fuel level, the float moves
up and down in order to open and close the float valve. The flow of fuel
into the float chamber is enabled or stopped in this manner in order to
maintain the fuel level at the prescribed level.
CAUTION
The fuel level of the carburetor of the FE series engines cannot
be adjusted. Replace the float if it is defective.
The air pressure in the float chamber is constantly maintained at
atmospheric pressure via the air vent.
A: Float
B: Float Valve
C: Air Vent
D: Float Chamber
Disassembly, Cleaning, and Reassembly Precautions
•Here are the instructions for removing and reinstalling the link rod
and the linkage spring that connect the carburetor to the governor
arm: With the carburetor mounted on the engine, insert a flat-blade
screwdriver between the throttle lever at the carburetor and the link
rod, and gently twist the screwdriver to pry up on the link rod, thus
removing the link rod from the hole in the throttle lever. To reinstall
the link rod, use your fingers to press the link rod into the hole. Use
a pair of pliers or a flat-blade screwdriver to remove and reinstall the
linkage spring.
•During disassembly, carefully note the orientation (top, bottom, right,
left, etc.) of the gaskets so that they can be replaced correctly during
reassembly. All gaskets must be replaced with new ones.
•Use a solvent with a high flash point to wash the carburetor and make
sure to prevent contamination by foreign matter.
CAUTION
Gasoline is extremely dangerous due to its high volatility. Han-
dle it away from sparks or fire and ensure proper ventilation.
NOTE
Do not use a solvent with rubber or plastic parts.
•Spray carburetor cleaner into the internal holes in the carburetor to
ensure their opening. Then, wash the carburetor in hot water, allow
it to dry naturally, and blow clean compressed air through the holes
if necessary.
3-4 DISASSEMBLY, REASSEMBLY, INSPECTION, AND MAINTENANCE
Carburetor
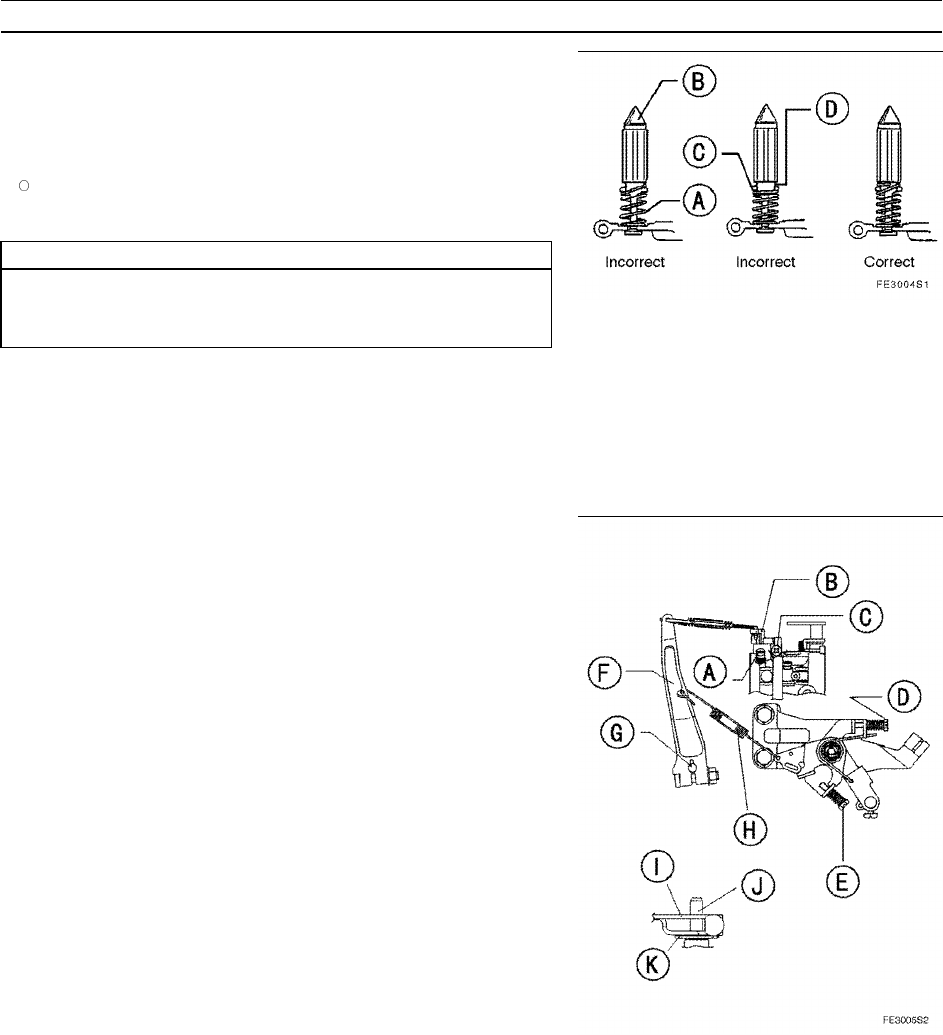
•Check how the float valve spring is fitted. Make sure that the first coil
of the float valve spring is completely wrapped in both spring grooves
that are provided at the two ear-shaped protrusions on the float valve
body.
NOTE
Do not unnecessarily disassemble the float valve spring because
this could damage the valve spring.
CAUTION
Do not use large tools to apply excessive force in order to
tighten the screws. Make sure to use a tool that is appropriate
for the respective part and carefully tighten the screws.
•The screws used for retaining the throttle valve and the choke valve
are crimped at their threaded ends to prevent them from loosening.
Therefore, do not disassemble them unnecessarily.
A: Spring
B: Float Valve
C: Ear-Shaped Protrusion
D: Spring Groove
Adjustment
Ordinarily, it is not necessary to adjust the carburetor because it is
adjusted at the factory to an optimal fuel setting. However, if the engine
runs poorly, follow the procedures given below to adjust the carburetor.
Pilot Screw Adjustment
•Slowly turn the pilot screw in the clockwise direction until a slight
resistance is felt.
•Then, back out the pilot screw two turns counterclockwise (for
tentative setting).
•Install the air cleaner in the normal manner and warm up the engine
by operating it without a load.
•Set the speed adjustment lever to the low-speed (idling) position.
•Keep the throttle lever on the carburetor pushed gently to the fully
closed position, and turn the idle adjustment screw so that the engine
attains the idle speed.
•Keep the throttle lever pushed to the fully closed position, and turn
the pilot screw in and out to find the position in which the idle speed
of the engine is at the highest rpm. From that position, back out the
pilot screw one-quarter of a turn in the counterclockwise direction.
This completes the pilot screw adjustment.
A: Pilot Screw
B: Throttle Lever
C: Idle Adjustment Screw
D: Low-Speed Set Screw
E: Hight-Speed Set Screw
F: Governor Arm
G: Pivot Arm
H: Governor Spring
I: Governor Arm
J: Pivot Arm
K: Snap Pin
DISASSEMBLY, REASSEMBLY, INSPECTION, AND MAINTENANCE 3-5
Carburetor
Minimum No-Load Speed Adjustment
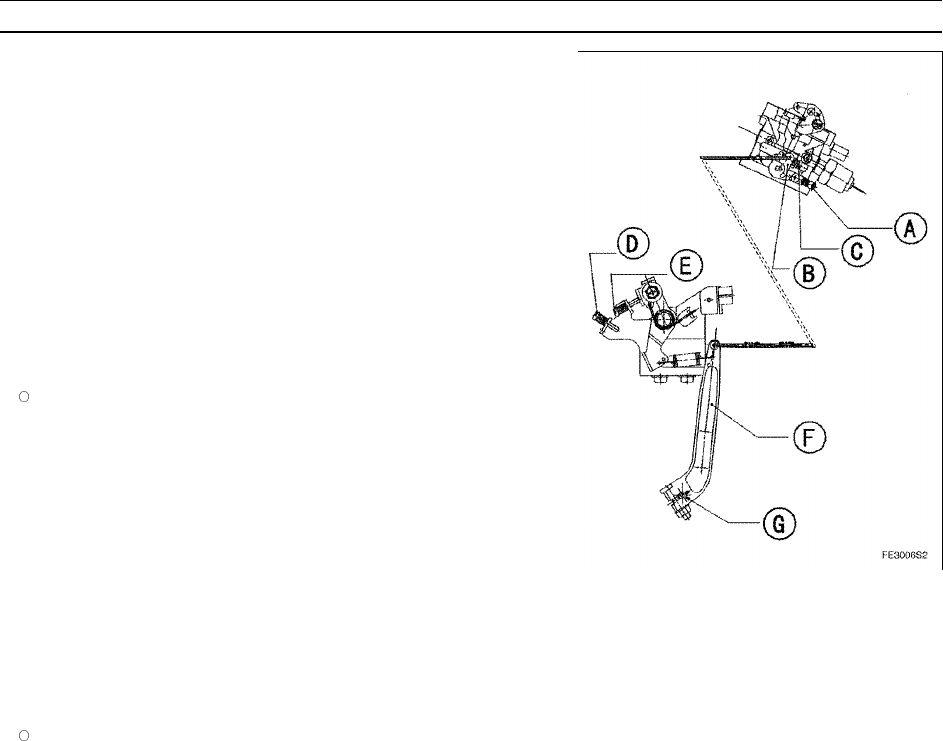
•After completing the pilot screw adjustment, the minimum no-load
adjustment must be adjusted.
•Keep the throttle lever on the carburetor pushed gently to the fully
closed position, and turn the idle adjustment screw so that the engine
runs at 100 rpm lower than the set idle speed. (This is called the
"carburetor’s idle speed setting".)
•Release the throttle lever of the carburetor to free the speed
adjustment lever. Turn the low-speed set screw on the control panel
to set the engine speed to the minimum no-load speed.
Minimum No-Load Speed (idling) Setting (crankshaft speed)
FE120, 170: 1600 rpm
FE250, 290, 350, 400: 1300 rpm
NOTE
If the minimum no-load speed is specified for a particular piece of
equipment, follow that specification.
Maximum No-Load Speed Adjustment
•After completing the minimum no-load speed, it is necessary to adjust
the maximum no-load speed.
•Keep the speed adjustment lever to the high-speed side, and turn the
high-speed set screw on the control panel to set the engine speed
to the specified maximum no-load speed. (If the maximum no-load
speed is specified for a particular piece of equipment, follow that
specification.)
Maximum No-Load Speed Setting
4000 rpm (crankshaft)
NOTE
All adjustments described in steps "1." through "3." must be
performed on a warm engine and do not change their adjustment
sequence.
A: Pilot Screw
B: Throttle Lever
C: Idle Adjustment Screw
D: High-Speed Set Screw
E: Low-Speed Set Screw
F: Governor Arm
G: Pivot Arm
3-6 DISASSEMBLY, REASSEMBLY, INSPECTION, AND MAINTENANCE
Carburetor
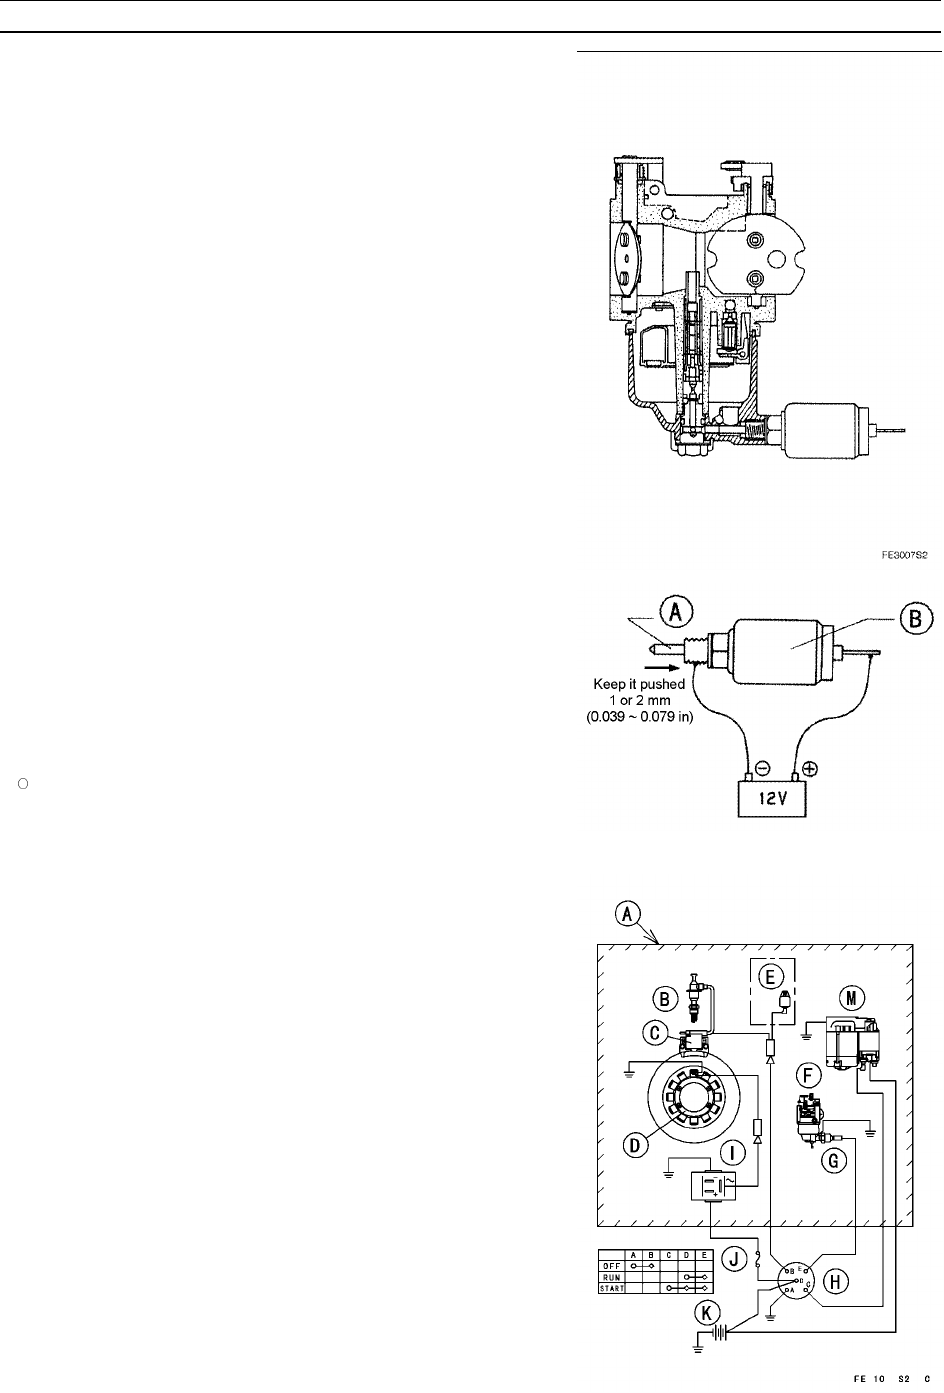
Carburetor with Fuel Cutoff Valve
To prevent after-burns that occur in the form of combustion in the
muffler when the engine is stopped, the float chamber of this carburetor
is provided with a solenoid-actuated fuel cutoff valve.
When the engine switch is turned to the STOP position, the solenoid
operates the fuel shut off solenoid valve to stop the flow of the fuel that
is supplied to the main jet.
When the engine switch is turned to the START or RUN position, the
fuel shut off solenoid valve opens automatically to supply the fuel.
Inspect the fuel shut off solenoid valve as follows:
•Remove the fuel shut off solenoid valve by turning it counterclockwise.
•Keep the tip of the fuel shut off solenoid valve pushed 1 to 2 mm,
and connect 12 V DC current as shown in the diagram.
•If the fuel shut off solenoid valve does not retract when the power is
connected, the solenoid is defective. In this case, the fuel shut off
solenoid valve must be replaced.
NOTE
To enable the shut off solenoid valve to retract, the tip of the shut
off solenoid valve must be pushed slightly.
A: Shut off Solenoid Valve
B: Solenoid
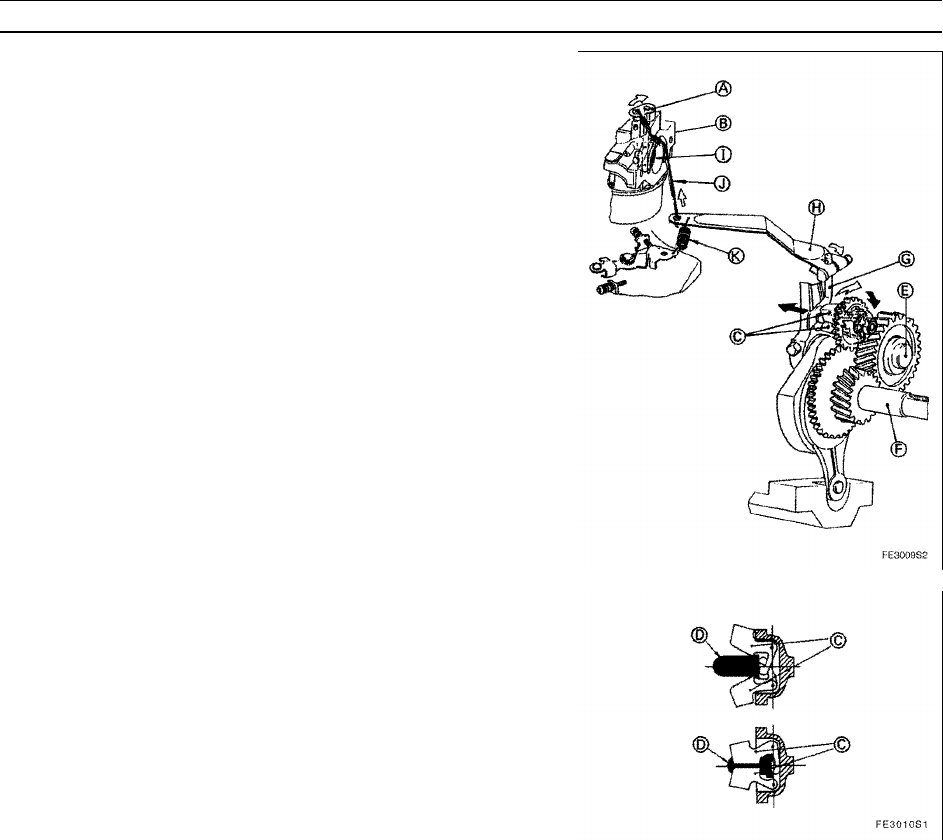
A wiring diagram for the carburetor with a fuel shut off solenoid valve
is shown on the right.
A: Engine
B: Spark Plug
C: Ignition Coil
D: ACD
E: Igniter (separate type)
F: Carburetor
G: Fuel Shut off Solenoid Valve
H: Key Switch
I: Regulator
J: Fuse
K: Battery
M: Starter Motor
DISASSEMBLY, REASSEMBLY, INSPECTION, AND MAINTENANCE 3-7
Governor Mechanism
Governor Operating Mechanism
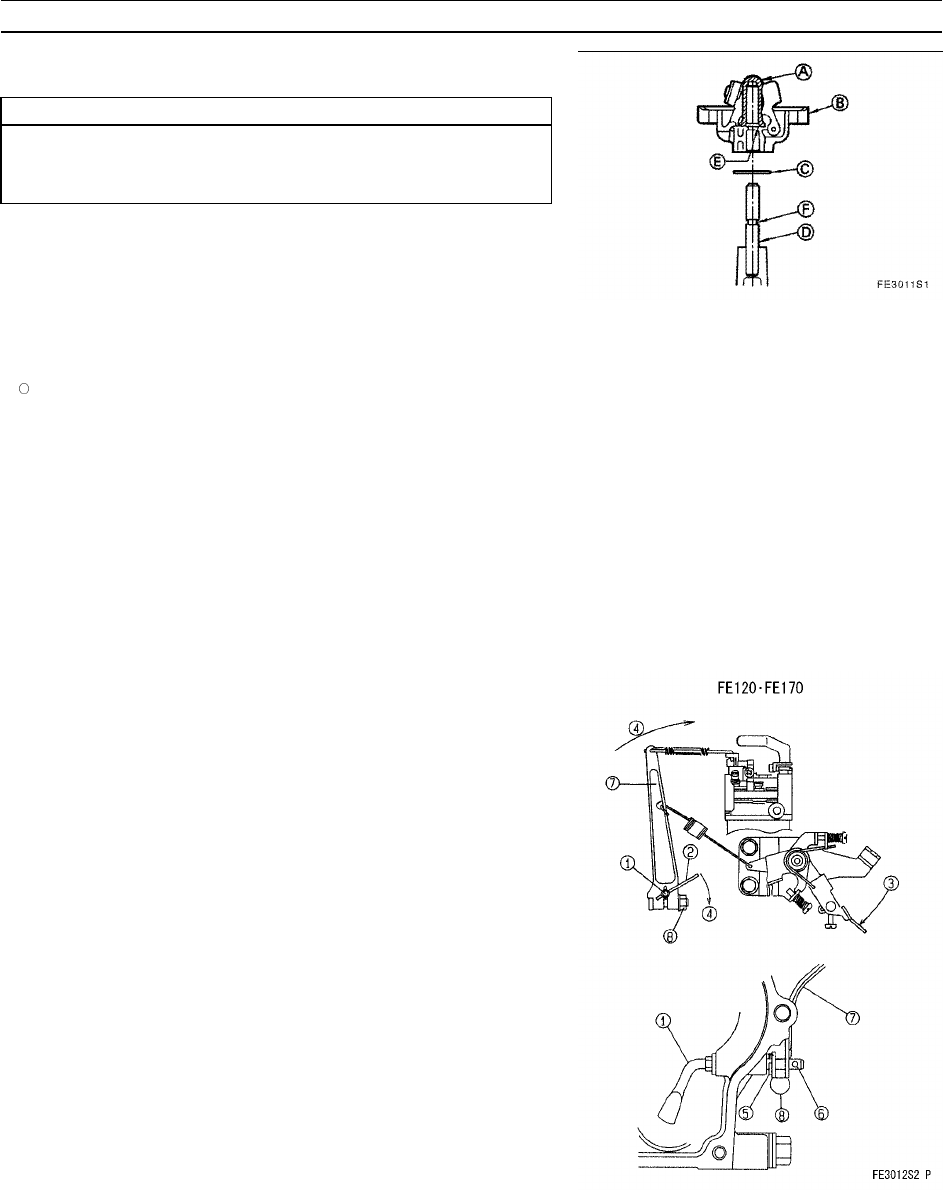
Connected to the throttle lever on the carburetor via a link rod, the
governor operates automatically in accordance with load fluctuations in
order to maintain a constant engine speed.
The governor relies on centrifugal force for its operation. When the
engine speed increases, the governor weight (which is attached to the
governor gear that is meshed to the crankshaft gear) opens outward
by centrifugal force. This movement pushes the sleeve outward, which
moves the governor lever in the direction to close the throttle valve.
Conversely, when the engine speed decreases, the governor lever
moves in the direction to open the throttle valve.
Ordinarily, fluctuations in the load that is applied to the engine
also cause the engine speed to fluctuate. When the load decreases
suddenly, the engine speed increases momentarily, but because the
governor weight moves the throttle valve in the closing direction, the
engine speed is kept constant. When the load increases suddenly, the
engine speed decreases momentarily, but because the governor arm
is retracted by the governor spring, the throttle moves in the opening
direction to keep the engine speed constant.
A: Throttle Lever
B: Carburetor
C: Governor Weight
D: Sleeve
E: Camshaft
F: Crankshaft
G: Governor Shaft
H: Governor Arm
I: Throttle Valve
J: Link Rod
K: Governor Spring
3-8 DISASSEMBLY, REASSEMBLY, INSPECTION, AND MAINTENANCE
Governor Mechanism
Governor Gear Assembly Installation
CAUTION
Do not remove the governor gear assembly unless the parts
are to be replaced. The parts cannot be reused once they are
removed.
•Use two screwdrivers of an appropriate size to remove the governor
gear assembly. Protect the surface of the gasket on the crankcase
cover to prevent it from becoming damaged during the removal of the
governor gear assembly.
•Install the sleeve on the governor gear assembly before the installa-
tion of the governor gear assembly.
NOTE
The sleeve cannot be installed after the governor gear assembly
has been installed.
•To install, first place the thrust washer over the shaft. Then, install
the governor gear assembly (with the sleeve attached) on the shaft
so that step [E] is fitted securely in groove [F].
•After installing the assembly, gently turn the governor by hand to make
sure that the governor weight and the sleeve move smoothly.
A: Sleeve
B: Governor Gear Assemblly
C: Thrust Washer
D: Shaft
E: Step
F: Groove
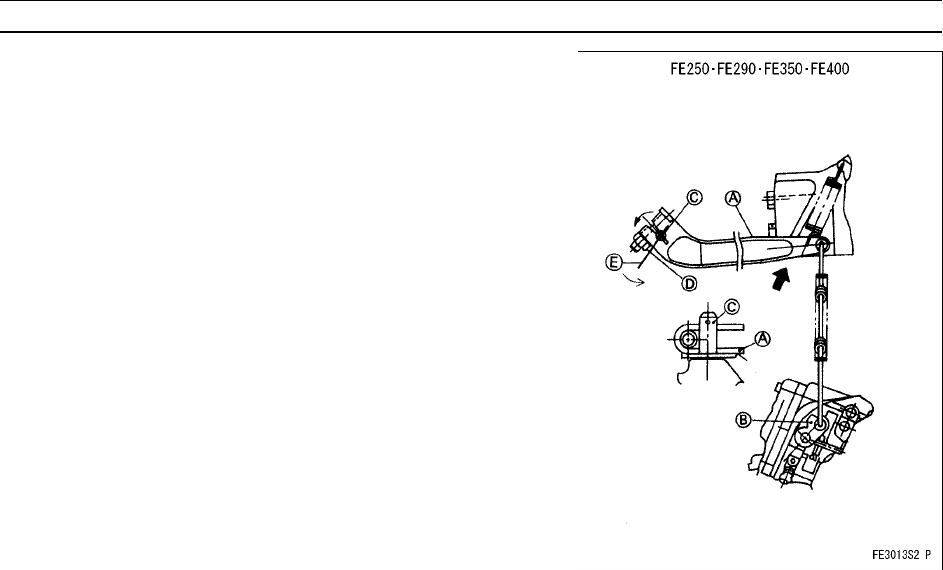
Governor Arm Installation (Setting the Governor)
•Install the throttle linkage and the spring on the governor arm.
•Install the governor arm on the governor shaft and hand-tighten the
clamp nut.
•Loosen the clamp nut, and turn the end of the governor arm all
the way in the direction indicated below to keep the throttle valve
fully open. Meanwhile, insert the pin into the hole at the end of the
governor shaft, turn the end of the governor shaft all the way in the
direction indicated below, and tighten the clamp nut.
Direction of Rotation for Tightening the Governor Arm
and the Governor Shaft
FE120, 170: Clockwise
FE250, 290, 350, 400: Counterclockwise
1. Governor Shaft
2. Pin
3. Idling Posirion
4. Clockwise
5. Clip
6. End Hole
7. Governor Arm
8. Calmp Nut
DISASSEMBLY, REASSEMBLY, INSPECTION, AND MAINTENANCE 3-9
Governor Mechanism
A: Governor Arm
B: Throttle Valve
C: Governor Shaft
D: Clamp Nut
E: Pin

3-10 DISASSEMBLY, REASSEMBLY, INSPECTION, AND MAINTENANCE
Air Cleaner
The quality of the inspection or maintenance of the air cleaner
significantly affects the durability and the performance of the engine.
If the engine is used in a dusty area, the air cleaner element should be
cleaned more frequently than the regular inspection intervals.
Element Cleaning
•The sponge element should be used slightly wet with oil. To clean
the sponge element, first wash it thoroughly in cold or warm water
that contains detergent. Then, rinse it in plain water and allow it to
dry. Immerse the element in fresh engine oil, wrap it in a clean cloth,
squeeze the oil out of it, and install the element while it retains some
oil.
•To clean the paper element, gently tap on the steel end plate of the
element to remove the dust. Otherwise, wash it in a soap solution by
shaking it, rinse it in water, and allow it to air dry. If the element is
extremely dirty, replace it with a new one.
Type A: for FE120, 170
Type B: for FE250, 290, 350, 400
1. Sponge Element
2. Paper Element
DISASSEMBLY, REASSEMBLY, INSPECTION, AND MAINTENANCE 3-11
Cooling System
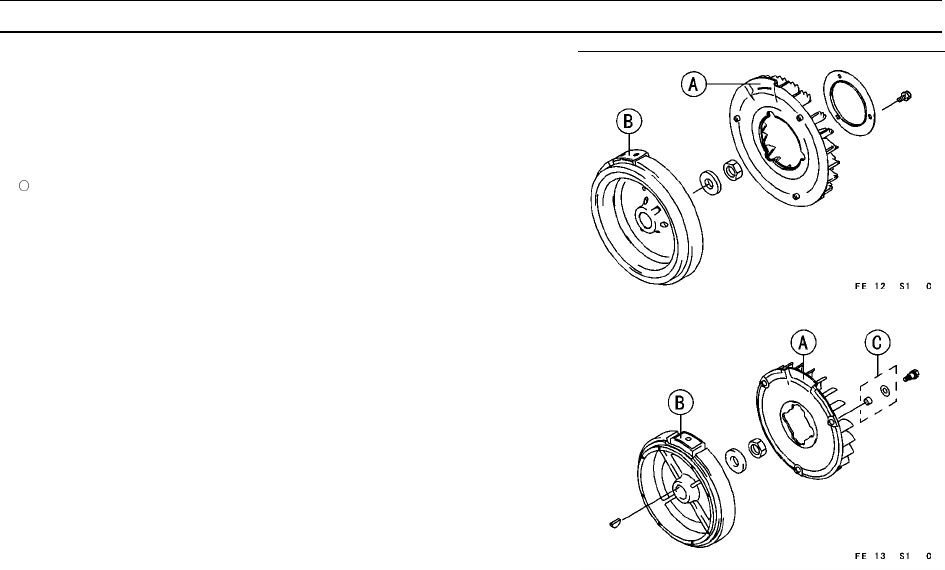
All the cooling fans of the FE series engines are the separate type
that can be separated from the flywheel.
FE290 type:
NOTE
On the engine produced before May 1996, the flywheel and the
cooling fan are integrated and cannot be disassembled.
•A separate type cooling fan can be assembled by aligning the concave
portions along the circumference of the fan with the magnets on the
flywheel.
•Clean the cooling fan blades if they have debris or dust on them.
•If the fan blades are damaged, replace the cooling fan with a new
one.
A: Convex Area of Cooling Fan
B: Mgnet Portion
C: FE120D-AB00 only
3-12 DISASSEMBLY, REASSEMBLY, INSPECTION, AND MAINTENANCE
Fuel Tank and Filter
•Place an appropriate container under the fuel filter to catch the fuel.
Remove the filter pot, turn the fuel tap ON, and completely drain the
fuel from the fuel tank and the fuel line.
If the drained fuel contains dust or water, the fuel line from the fuel
filter to the carburetor must be inspected and cleaned.
CAUTION
Gasoline is extremely dangerous due to its high volatility. Han-
dle it away from sparks or fire and ensure proper ventilation.
•If the fuel tank is deformed, cracked, or rusted, replace it with a new
one.
•After draining the fuel from the tank, pour a cleaning solvent into the
tank and shake it well. Discard dust and sediments together with the
cleaning solvent.
•Using compressed air, thoroughly dry the inside of the fuel tank and
the fuel filter before installing them.
•Make sure that the fuel gauge operates smoothly, and replace it with
a new one if it is defective.
•Inspect the breather hole in the tank cap and the air passage to make
sure that they are not plugged.
•Remove retaining screw [8] on the inside of the tank cap and remove
spring plate [7].
NOTE
Retaining screw [8] is a tapping screw, so make sure not to crush
the threads. It is best not to overtighten the screw.
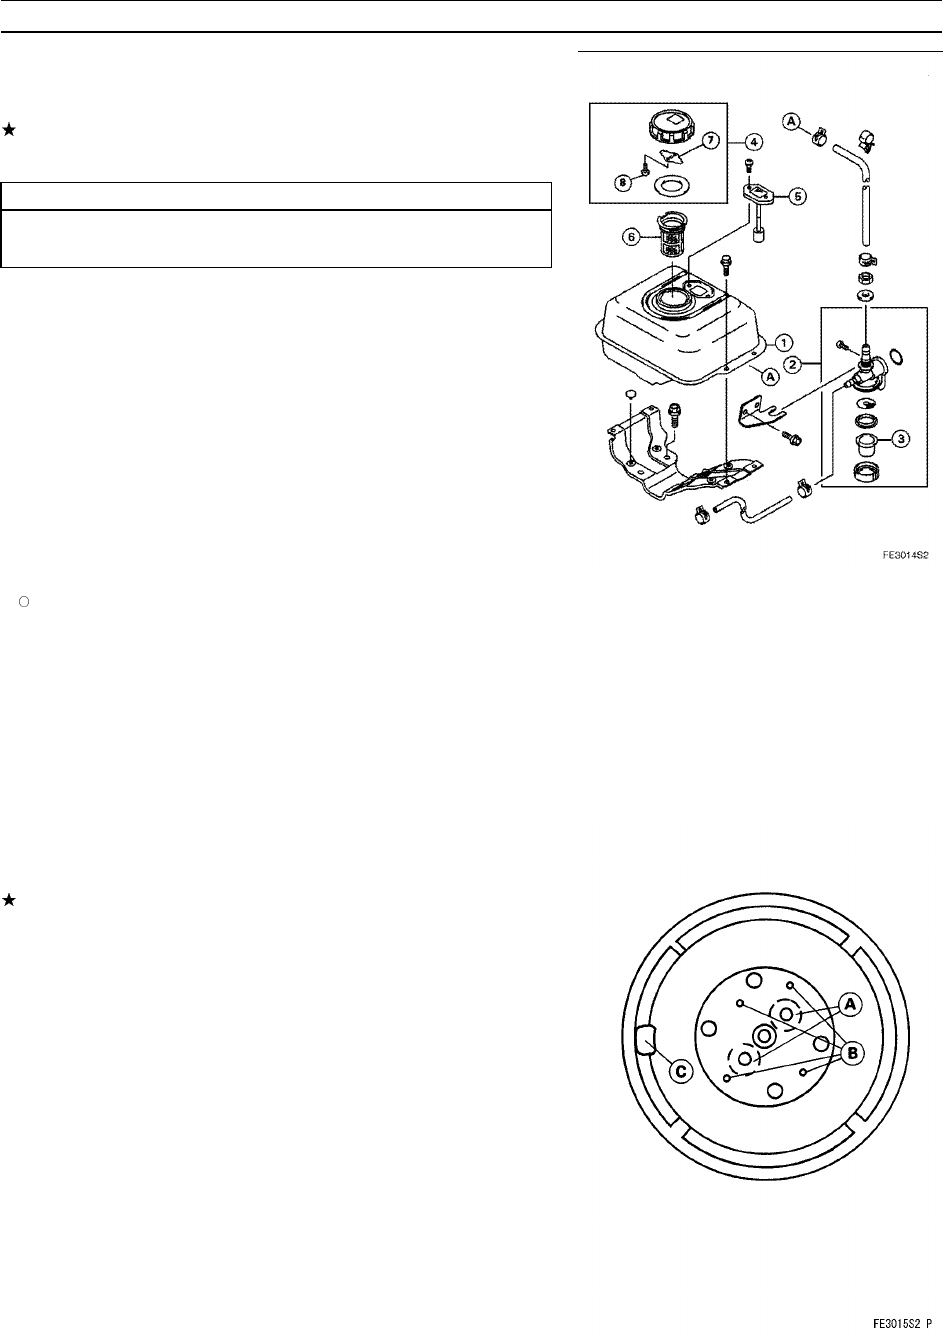
1. Fuel Tank
2. Fuel Filter (fuel tap)
3. Filter Pot
4. Tank Cap
5. Fuel Gauge
6. Filter (strainer)
7. Spring Plate
8. Retaining Screw
•Use adhesive tape to cover hole [A] from which the screw was
removed. Place your mouth on air hole [B] to blow air into it and
verify that air comes out with great force from air passage [C].
If air does not come out of the air passage or if it is weak, replace
the tank cap with a new one.
A: Thread Hole
B: Air Hole
C: Air Passage
DISASSEMBLY, REASSEMBLY, INSPECTION, AND MAINTENANCE 3-13
Ignition System
Description of Function
The ignition mechanism is the transistorized type and consists of the
following parts:
Ignition Coil
Igniter
Flywheel (with permanent magnet)
These components do not contain mechanical contact parts and do
not require regular inspection.
Electronic Ignition Device
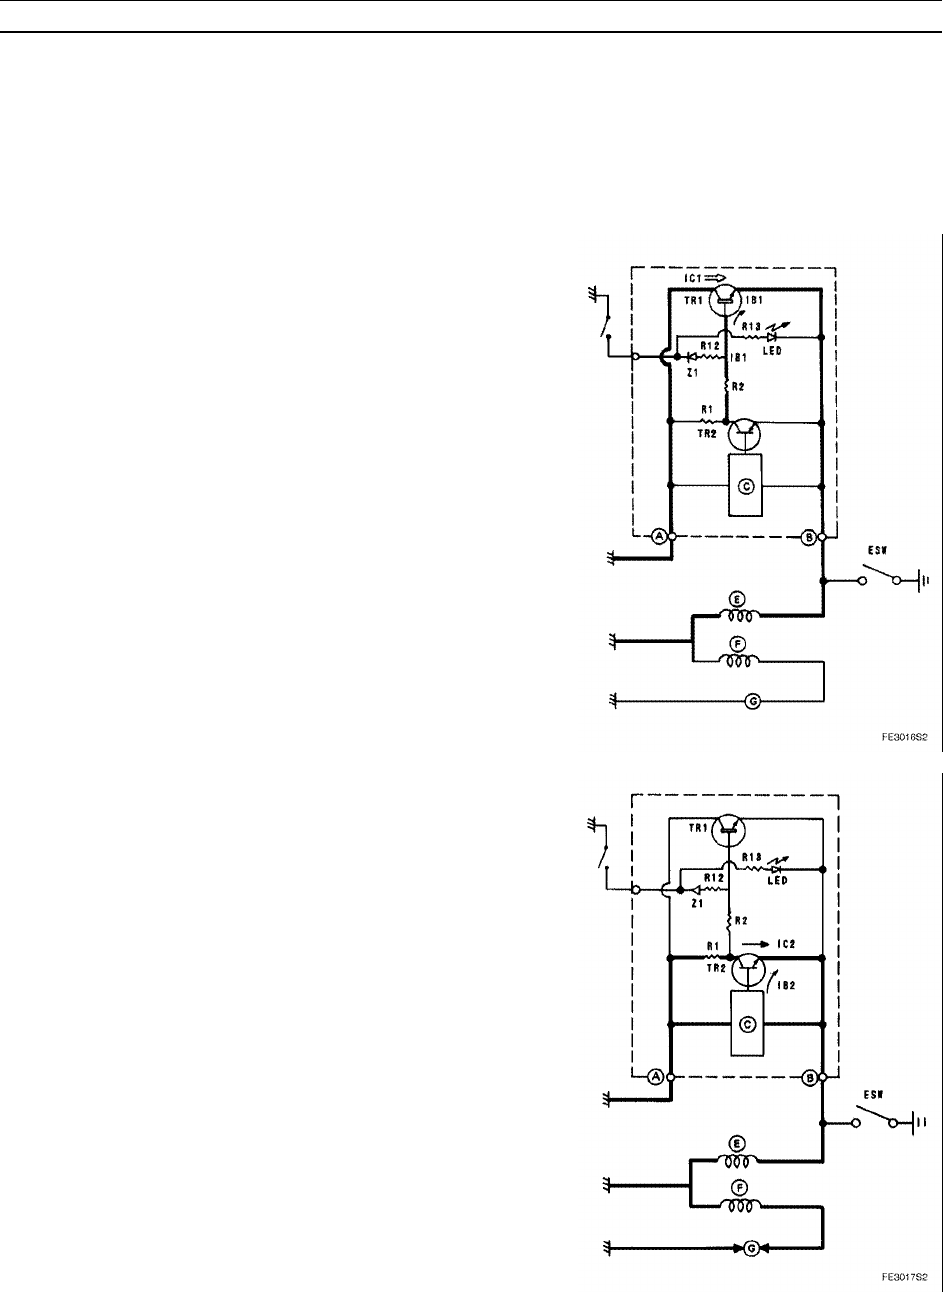
•The revolution of the flywheel generates voltage between terminals
[A] and [B], causing base current IB1 to flow from TR1. Then, current
IC1 that is amplified by TR1 flows to form the primary circuit.
•The flywheel revolves further and the voltage that is generated
between terminals [A] and [B] increases. When the flywheel reaches
the position of the ignition timing, signal base current IB2 flows from
automatic ignition advance circuit C to transistor TR2. At that instant,
the current changes into collector current IC2, which is amplified by
transistor TR2.
•In the meantime, because the internal resistance of TR2 is consider-
ably lower than TR1, IB1 that was flowing through TR1 until then will
turn into IC2, thus changing its direction to flow via TR2.
•In this manner, base current IB1 of TR1 will not momentarily flow,
thus causing large current IC1 that was flowing between terminals
[A] and [B] until then to stop suddenly.
•Due to the sudden change in the current in the primary circuit, a high
voltage is generated in secondary side [F], causing spark plug [G] to
spark.
A, B: Igniter Terminal
C: Automatic Ignition Advance Circuit
E: Primary Coil
F: Secondary Coil
G: Spark Plug
ESW: Engine Switch
3-14 DISASSEMBLY, REASSEMBLY, INSPECTION, AND MAINTENANCE
Ignition System
Automatic Ignition Advance Device
This device enables the engine to achieve appropriate ignition timing
in all speed ranges. The ignition timing must be retarded slightly when
the engine is started and at the low- to medium-speed range. On the
other hand, the ignition timing must be advanced in the high-speed
range in order to generate the sparks early on, because the intervals of
the air-fuel mixture ignition and expansion are shorter.
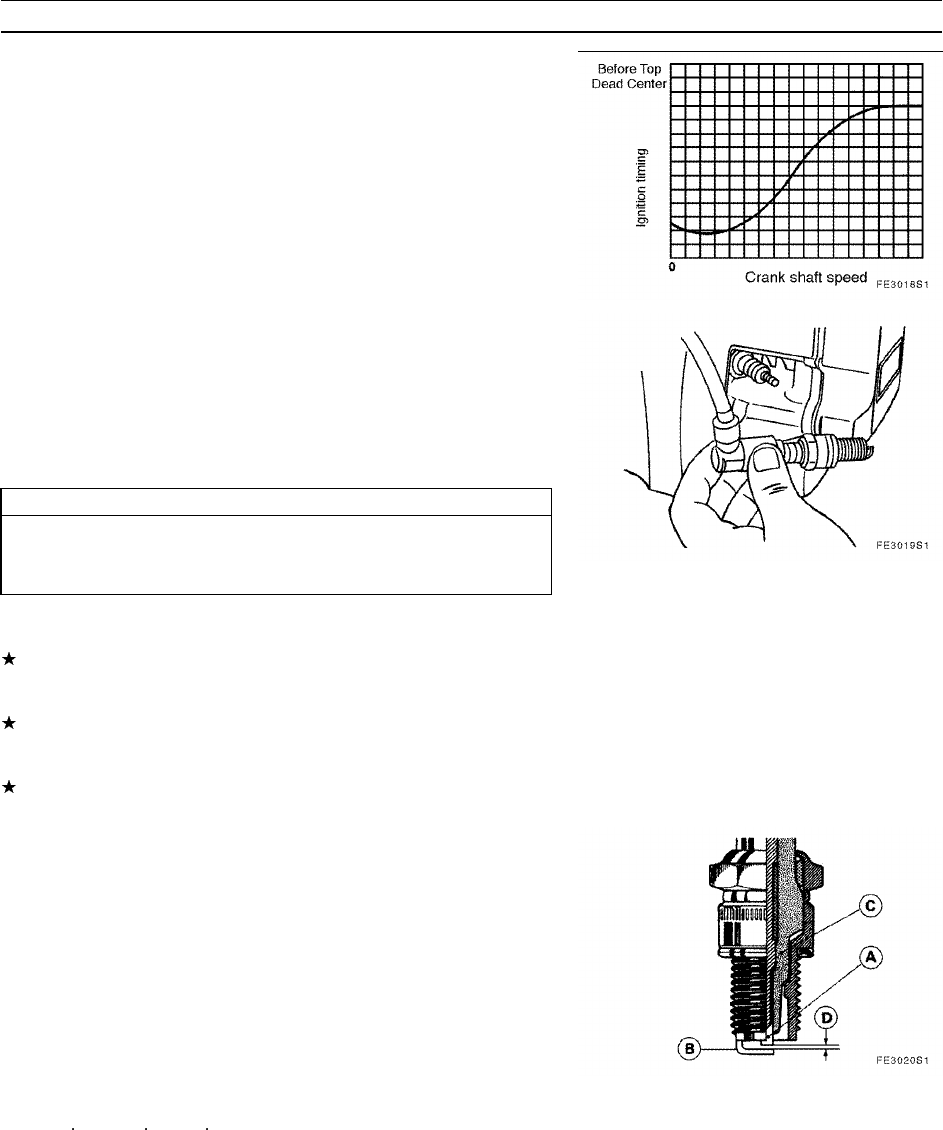
The diagram on the right shows the relationship between the
crankshaft speed and the ignition timing (degrees before the top dead
center) of the automatic ignition timing device of the FE series.
Spark Inspection
Check for sparks as follows:
•Remove the spark plug, connect it to the plug cap that is attached
to the high-tension lead, and place the spark plug in contact with the
engine block. When doing so, place the spark plug as far away as
possible from the spark plug hole and make contact at an area that
does not contain gasoline.
CAUTION
Perform the spark inspection after making sure that there is no
presence of gasoline in the area in order to prevent unintended
ignition.
•Turn the stop switch or the key switch ON to turn the crankshaft, and
check if sparks are generated at the electrode of the spark plug.
If there are no sparks or the sparks are weak, clean the spark plug,
adjust the spark plug electrode gap to between 0.7 and 0.8 mm, and
check for sparks again.
If there are no sparks or the sparks are weak even after cleaning the
spark plug and adjusting its electrode gap, replace the spark plug
with a new one and check for sparks again.
If there are no sparks or the sparks are weak even after installing a
new spark plug, inspect the ignition system.
Spark Plug Cleaning and Inspection
•Using a wire brush, remove the carbon deposits from the spark plug.
If the spark plug is contaminated with oil, wash it in a cleaning solvent.
•If the electrode is worn or the insulator is cracked, replace the spark
plug.
•Using a gap gauge, measure the electrode gap of the spark plug.
If the gap is incorrect, adjust it to the correct gap by bending the
horizontal electrode.
Spark Plug Electrode Gap
Standard: 0.7 ~ 0.8 mm (0.030 ~ 0.032 in)
•Tighten the spark plug to the specified torque.
Ignition Plug Specification Tightening Torque
23 N m (2.3 kg m, 17 ft lb)
A: Center Electrode
B: Horizontal Electrode
C: Insulator
D: Electrode Gap
DISASSEMBLY, REASSEMBLY, INSPECTION, AND MAINTENANCE 3-15
Ignition System
Ignition Coil Inspection
Spark Characteristics Measurement
•Connect the ignition coil to a coil tester to measure its spark
characteristics. Follow the measurement instructions provided by
the tester manufacturer for the proper measurement procedure. (For
testing purposes, remove the plug cap from the ignition coil.)
Ignition Coil Spark Characteristics (three-wire spark gap)
Standard: 7 mm (0.28 in) minimum
If the spark characteristics are below the standard, the ignition coil
is defective. If the spark characteristics are normal, the plug cap is
defective.
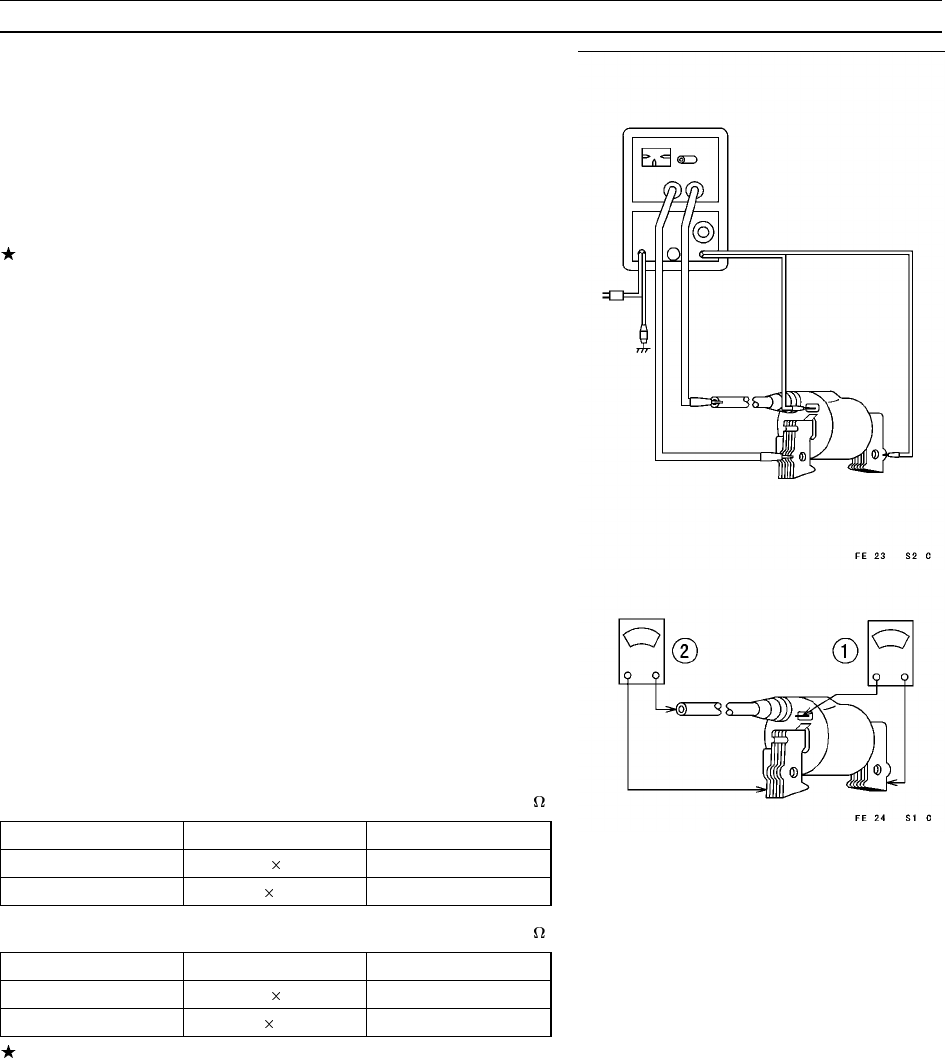
Ignition Coil Resistance Measurement
If a coil tester is unavailable, use a hand tester (P/N 57001-1394)
to measure the internal resistance of the coil. Although this test is not
sufficient to determine the integrity of the coil, it will serve as a criterion
for making a judgment.
•Connect the hand tester as shown in the diagram on the right, set
it to the measurement ranges listed in the table below, and measure
the resistance values. 2 Ignition Coil Internal Resistance (separate
igniter type)
Ignition Coil Internal Resistance (separate igniter type) ( )
Measurement Area Measurement Range Resistance
Primary Coil R 1 0.6 ~ 1.10
Secondary Coil R 1k 6.0 ~ 10.0 k
Ignition Coil Internal Resistance (integrated igniter type) ( )
Measurement Area Measurement Range Resistance
Primary Coil R 1 0.6 ~ 1.4
Secondary Coil R 1k 6.0 ~ 11.0 k
If the measured value is within the range given above or greater, the
coil is normal. If the measured value is lower than the above, the coil
is defective and it must be replaced with a good one.
1. Measurement of Primary Coil Resistance
2. Measurement of Secondary Coil Resistance
3. Ignition Coil
3-16 DISASSEMBLY, REASSEMBLY, INSPECTION, AND MAINTENANCE
Ignition System
Igniter Inspection
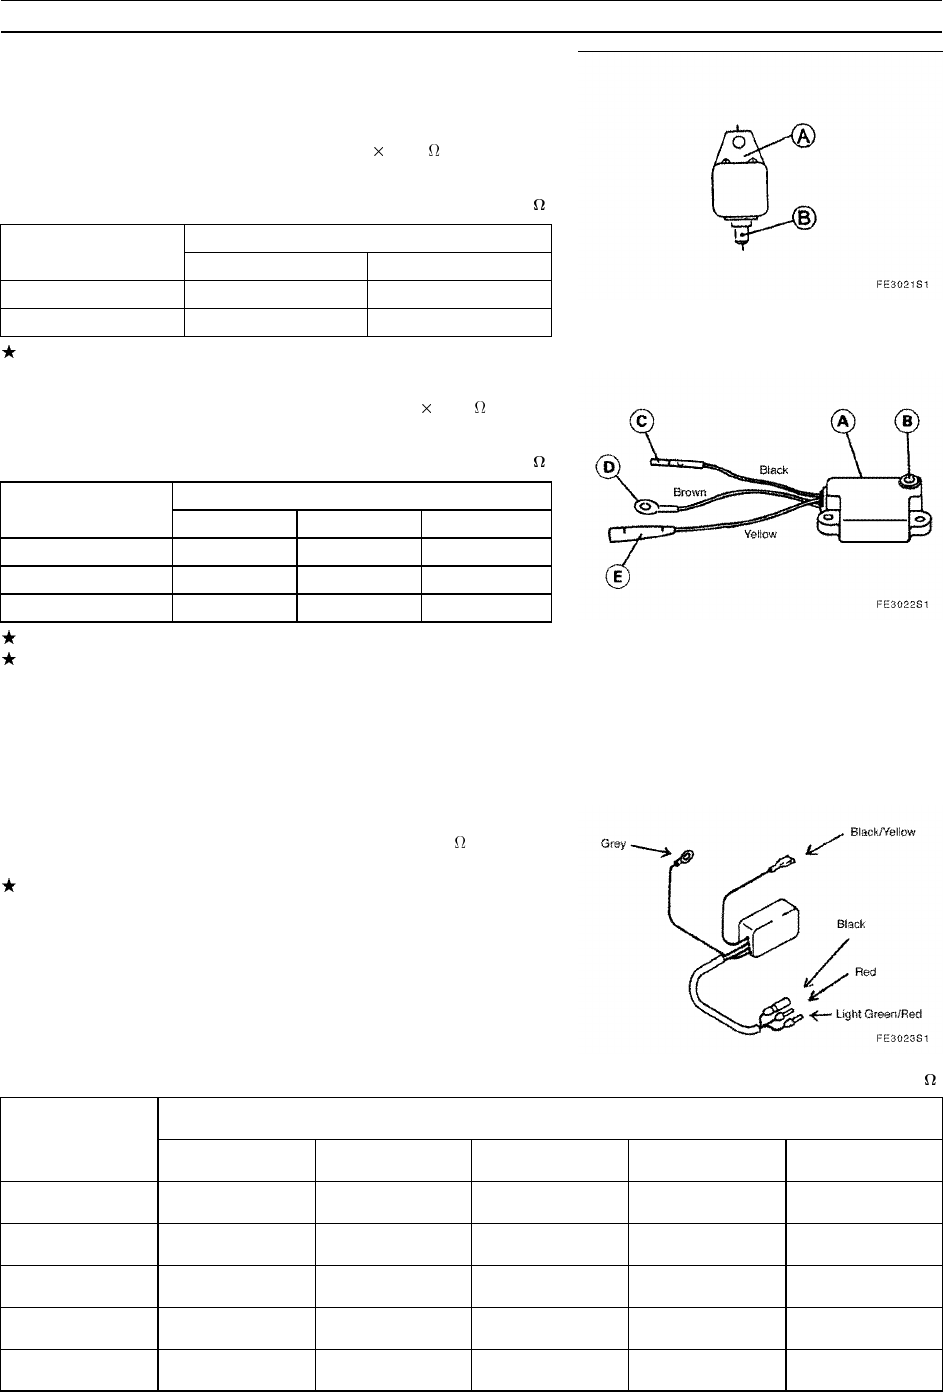
Measure the internal resistance of the igniter.
Individual Igniter Inspection
•To test the individual igniter shown in the diagram on the right, set the
measurement range of the hand tester to R 100 and measure
the resistance.
Individual Igniter Resistance (k )
Tester negative (–) Tester positive (+) terminal
Terminal Case (A) Terminal (B)
Case (A) ––– 0.1 ~ 1.0
Terminal (B) 1~10 –––
If the measured value differs from the above, replace the igniter.
Igniter (with Oil Warning Light) Measurement
•Set the measurement range of the hand tester to R 100 in order
to measure the resistance at the areas given in the table below.
Igniter (with Oil Warning Light) Resistance (k )
Tester Negative (–) Tester Positive (+) Terminal
Terminal D (brown) C (black) E (yellow)
D (brown) ––– 0.1 ~ 1.0 1~10
C (black) 1~10 ––– 5~20
E (yellow) 10 ~ ∞10 ~ ∞–––
If the measured value differs from the table above, replace the igniter.
To inspect the oil warning light (LED), refer to the section on the
lubrication system.
A: Igniter
B: Oil Warning Light
C: Primary Terminal
D: Ground Terminal
E: Oil Level Sensor Terminal
CDI Igniter Measurement
•Set the measurement range of the hand tester to Rx100 in order to
measure the resistance at the areas given in the table below.
If the measured value differs from the table above, the igniter is
defective and it must be replaced.
CDI Igniter Resistance ( )
Tester Positive (+) Terminal
Tester
Negative (–)
Terminal Black (switch) Red (exciter) Light Green/
Red (pulser) Grey (ground) Black/Yellow
(ignition)
Black (switch) ––– 10 ~ ∞10 ~ ∞10 ~ ∞10 ~ ∞
Red (exciter) 200 ~ 2 k ––– 10 ~ ∞10 ~ ∞10 ~ ∞
Light Green/
Red (pulser) 10 ~ ∞10 ~ ∞––– 10 ~ ∞10 ~ ∞
Grey (ground) 1k~10k 200 k ~2 k 10 ~ ∞––– 10 ~ ∞
Black/Yellow
(ignition) 10 ~ ∞10 ~ ∞10 ~ ∞10 ~ ∞–––
DISASSEMBLY, REASSEMBLY, INSPECTION, AND MAINTENANCE 3-17
Ignition System
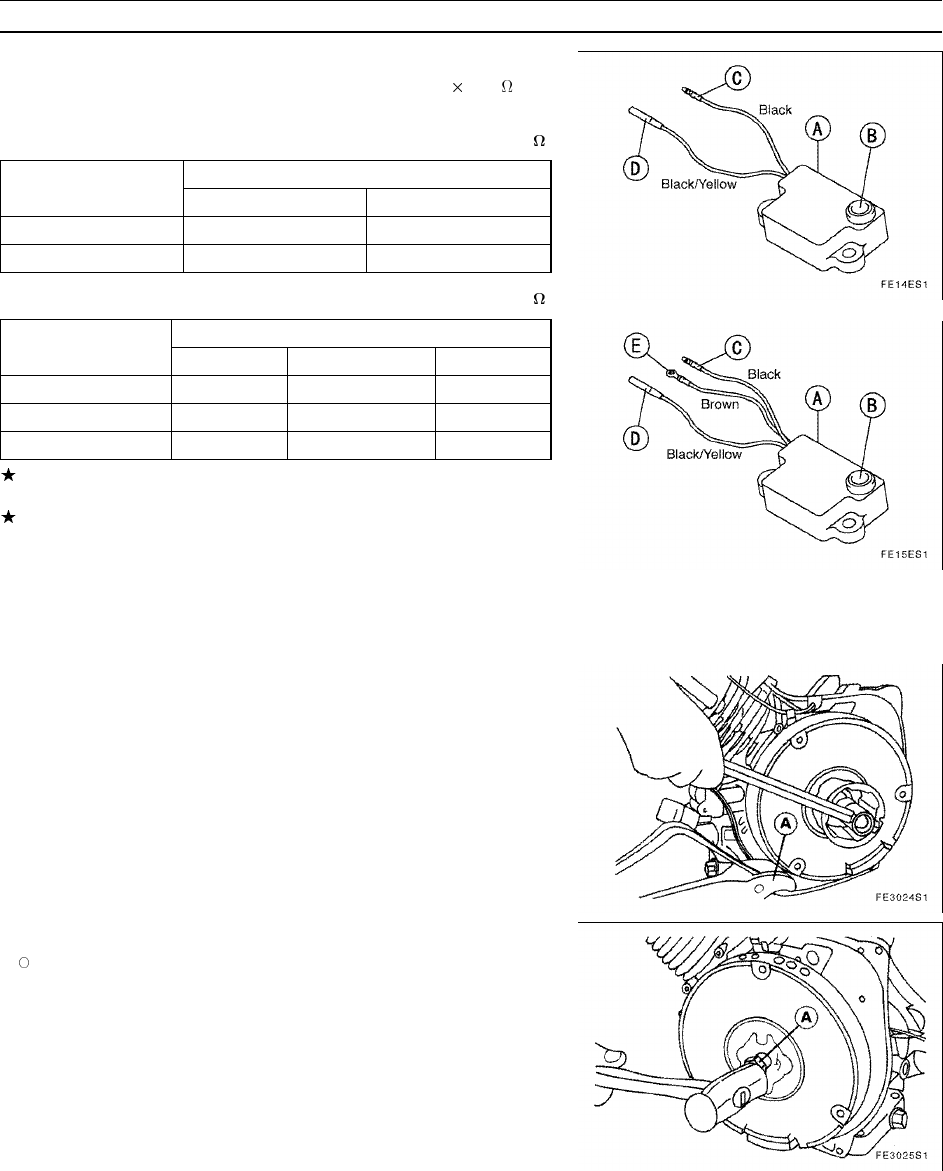
Controller (with Warning Light) Measurement
•Set the measurement range of the hand tester to R 1k and
measure the resistance at the areas given in the table below.
Controller (without ground) Resistance (k )
Tester (–) Negative Tester Positive (+) Terminal
Terminal C (black) D (black/yellow)
C (black) ––– 50 ~∞
D (black/yellow) 1~7 –––
Controller (with ground) Resistance (k )
Tester (–) Negative Tester Positive (+) Terminal
Terminal C (black) D (black/yellow) E (brown)
C (black) ––– 50 ~ ∞50 ~ ∞
D (black/yellow) 1~7 ––– 50 ~ ∞
E (brown) 50 ~ ∞50 ~ ∞–––
If the measured value differs from the table above, replace the
controller.
To inspect the oil warning light (LED), refer to the section on the
lubrication system.
A: Igniter
B: Oil Warning Light
C: Primary Terminal
D: Oil Level Sensor Terminal
E: Ground Terminal
Flywheel Disassembly and Reassembly
•Using a strap wrench, hold the flywheel and remove the flywheel
retaining nut.
•Use a flywheel puller to remove the flywheel.
A: Strap Wrench
NOTE
If an appropriate flywheel puller is unavailable, position the flywheel
nut flush with the crankshaft end, and strike it with a mallet to
remove the flywheel.
•Before reassembly, wipe the flywheel and the tapered portion of the
crankshaft to remove any dust or oil.
•Make sure that the woodruff key is installed correctly in the groove of
the crankshaft, install the flywheel, and install the retaining nut.
•Using a strap wrench, hold the flywheel, and tighten the flywheel nut
to the specified torque. (Refer to the Tightening Torque Specifications
table.)
A: Flywheel Nut

3-18 DISASSEMBLY, REASSEMBLY, INSPECTION, AND MAINTENANCE
Ignition System
Ignition Coil Reassembly (Air Gap Adjustment)
•Rotate the flywheel so that the magnet on the flywheel is on the
opposite side of the area in which the ignition coil is to be installed.
•Use two bolts to hand-tighten the ignition coil to the area in which the
coil is to be installed, and slide a 0.3 mm gap gauge between the foot
of the coil and the periphery of the flywheel.
•Keep the ignition coil pressed towards the flywheel and evenly tighten
the coil retaining bolts to the specified torque.
Ignition Coil Air Gap
Standard: 0.3 mm (0.012 in)
Adjustable Range: 0.25 ~ 0.4 mm (0.010 ~ 0.016 in)
Ignition Coil Retaining Bolt Specified Tightening Torque
FE120 (M6 bolt): 6.0 N m (0.6 kg m, 53 in lb)
FE170, 250, 290, 350, 400: 3.5 N m (0.35 kg m, 31 in lb)
A: Magnet
B: Coil Foot
C: Coil Retaining Botls
D: Gap Gauge
Key Switch (engine switch) Inspection
•Set the measurement range of the hand tester to Rx1 and check
whether the lead from the key switch exhibits the continuity indicated
in the table on the right.
If the leads exhibit the continuity indicated in the table on the right,
the key switch is good.
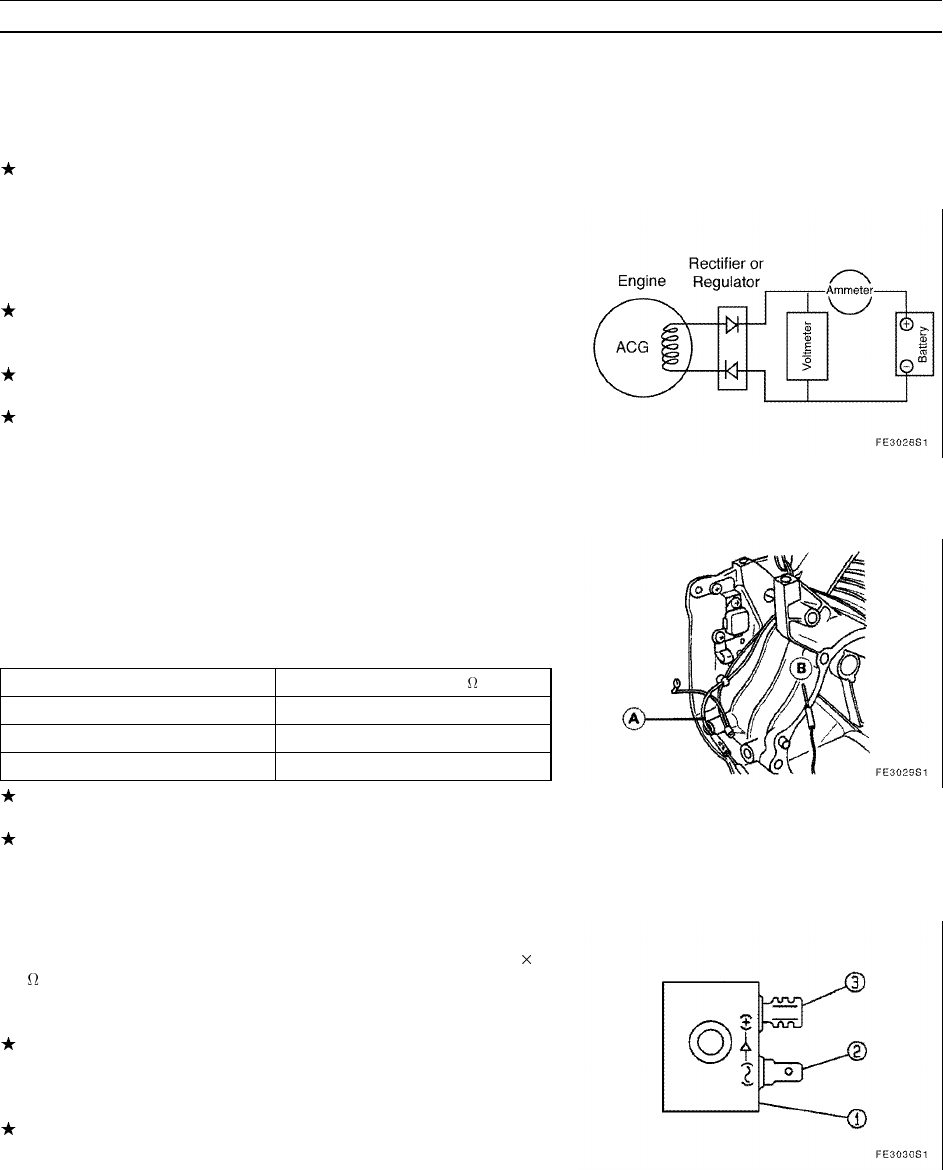
DISASSEMBLY, REASSEMBLY, INSPECTION, AND MAINTENANCE 3-19
Charging System
The state of charge of the battery must be determined by measuring
the terminal voltage of the individual battery.
Individual Battery’s Terminal Voltage
Standard: 12 V
If the terminal voltage is below the standard, the battery must be
recharged.
Charging System Inspection
Fully recharge the battery before inspecting the charging system.
•Warm up the engine.
•Connect a voltmeter to the battery terminals to measure the voltage.
When the engine speed is low, the voltmeter reads the battery voltage.
The voltage increases with an increase in the engine speed, although
the voltage fluctuation range will be within the specified values.
If the output voltage is higher than the specified value, the rectifier is
damaged or the lead is disconnected.
If the output voltage does not increase with an increase in the engine
speed, the rectifier is damaged or the alternator output is insufficient
for the applied load.
Rectifier Output Specified Voltage
Specified Value: Battery Voltage ~ 15 V
ACG Inspection
•Disconnect the connectors from the alternator, connect a hand tester
to the lead of the charging coil and the ground in order to measure
the internal resistance of the charging coil.
ACG Internal Resistance
Coil Type Specified Range ( )
12 V – 2 A 0.40 ~ 0.67
12 V – 4 A 0.82 ~ 1.38
12 V – 13 A 0.26 ~ 0.44
If the measured value is out of the specified range, replace the
charging coil.
If the resistance of the coil is normal but there is no voltage, the rotor’s
magnetic force has diminished, so the rotor must be replaced.
A: ACG Lead (green/white)
B: Ground
Rectifier Inspection
•Set the resistance measurement range of the hand tester to R 1
k.
•Measure the resistance between the male and female connectors in
both positive and negative directions.
If the measured values are lower in one direction, and the other
direction is ∞, the rectifier is normal. The lower value should generally
be between 0 and the halfway point of the scale, although this could
vary from tester to tester.
If the measured value differs from the above, the rectifier is defective,
so it must be replaced with a good one.
1. Rectifier
2. Male Connector
3. Female Connector
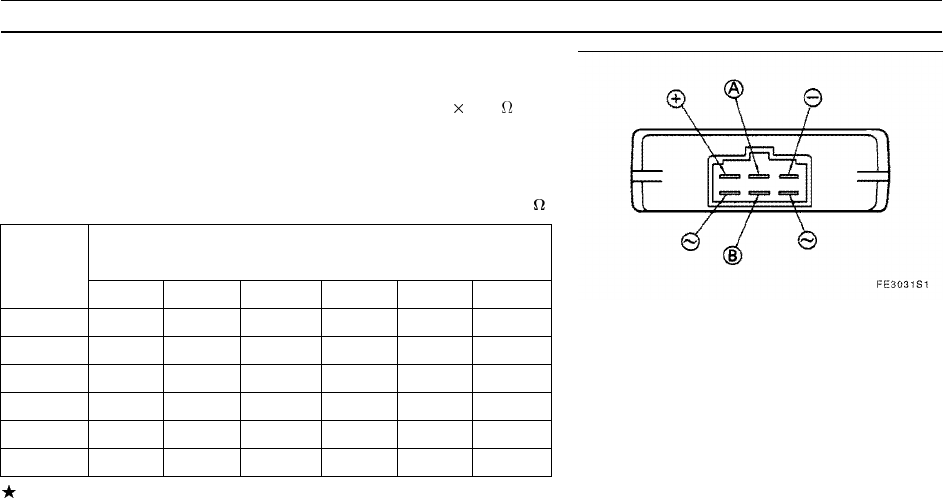
3-20 DISASSEMBLY, REASSEMBLY, INSPECTION, AND MAINTENANCE
Charging System
Regulator Inspection
•Disconnect the connector from the regulator.
•Set the measurement range of the hand tester to R 1k and
measure the resistance at the areas given in the table below.
•Although this test is not sufficient to determine the integrity of the
regulator, it will serve as a criterion for making a judgment.
Regulator Internal Resistance (k )
Tester
Negative
(–)
Tester Positive (+) Terminal
Terminal + A – ~ ~ B
+--- ∞ ∞ ∞ ∞ ∞
A4~20 --- 0.2 ~ 1 1~5 1~5 200 ~ ∞
–3~15 0.2 ~ 1 --- 1~5 1~5 200 ~ ∞
~1~5 ∞ ∞ --- ∞ ∞
~1~5 ∞ ∞ ∞ --- ∞
B10~50 1~5 1.5 ~ 7.5 4~20 4~20 ---
If the measured resistance differs from the table above, replace the
regulator.
A: Key Switch
B: Charging Indicator Light
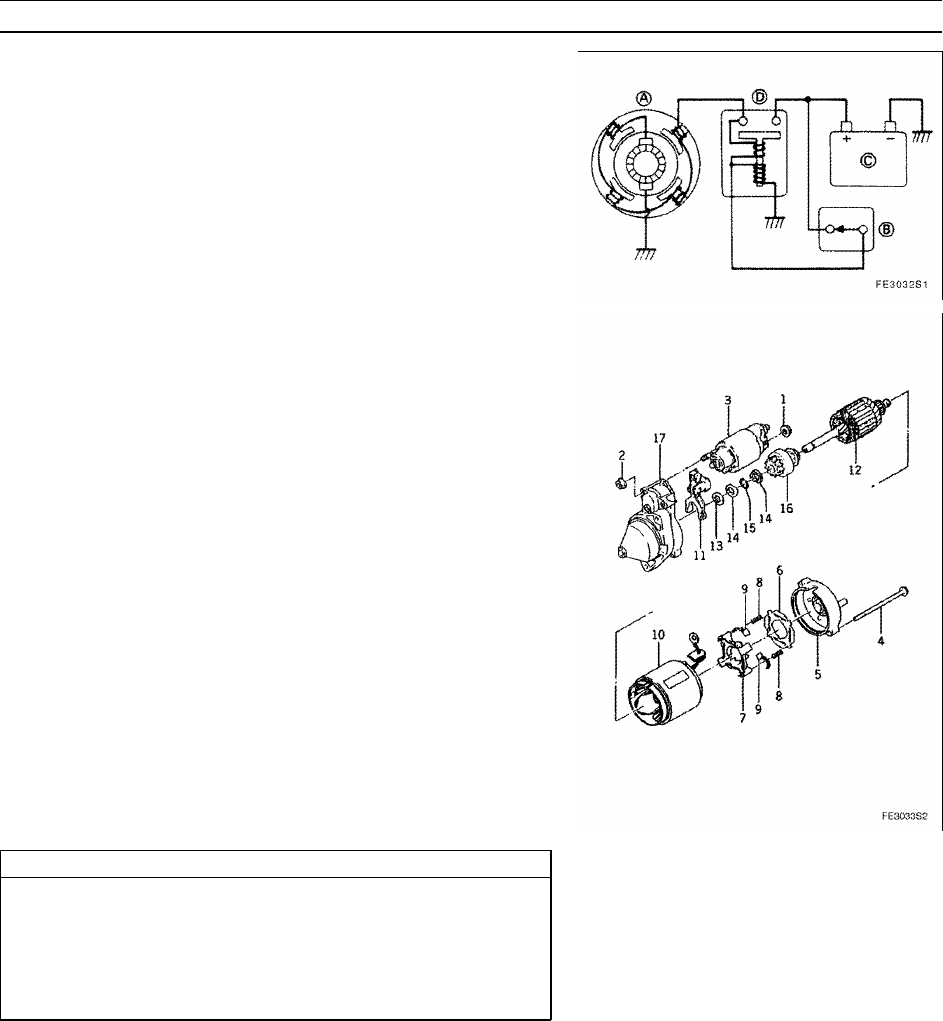
DISASSEMBLY, REASSEMBLY, INSPECTION, AND MAINTENANCE 3-21
Starter System
Starter Motor Construction
An FE series engine comes with a Bendix type or shift-lever type
starter motor.
The electrical circuit of a starter motor consists of a key switch (engine
switch), solenoid (or solenoid switch on the Bendix type), battery, and
starter motor.
A: Starter Motor
B: Key Switch
C: Battery
D: Solenoind
With the shift lever type, turning the key switch to the START position
causes a small amount of current to flow to the solenoid, which actuates
the plunger, which in turn moves the shift lever in order to engage the
pinion gear of the starter motor with the ring gear of the flywheel. At the
same time, a large amount of driving current flows to rotate the motor,
which transmits the rotational movement to the crankshaft.
With the Bendix type, turning the key switch to the START position
causes a small amount of current to flow to the solenoid switch, thus
causing the solenoid to actuate and the solenoid switch to close. This
causes a large current to flow to the starter motor, enabling the starter
motor to start rotating. When the starter motor starts rotating, the pinion
moves by inertia to the ring gear (outer side) along the free-sliding
threads that are cut on the armature’s outer periphery and on the inside
of the pinion gear. As the pinion gear meshes with the ring gear in this
manner, the rotational movement of the starter motor is transmitted to
the crankshaft.
When the engine starts and the key switch is turned to the ON (run)
position, the current to the solenoid is cut off, causing the plunger and
the solenoid switch to return to their original positions. On the shift
lever type, the pinion gear separates from the ring gear and returns to
its original position, simultaneously with the return of the plunger. On
the Bendix type, the inertia of the ring gear causes the pinion gear
to return to the starter (inner side) along the free-sliding threads, thus
returning to its original position.
CAUTION
Do not operate the starter motor continuously for more than
5 seconds. Turn OFF the switch after 5 seconds, then allow
approximately 15 seconds to elapse before operating the
starter again.
Operating the starter for a long time could drain the battery
and burn the starter motor.
1. Nut
2. Nut
3. Solenoid
4. Bolt
5. Rear Cover
6. Insulator
7. Brush Holder
8. Brush Spring
9. Brush
10. Yoke Assembly
11. Shift Lever
12. Armature
13. Washer
14. Stopper
15. Snap Ring
16. Clutch Assembly
17. Front Cover

3-22 DISASSEMBLY, REASSEMBLY, INSPECTION, AND MAINTENANCE
Starter System
1. Snap Ring
2. Collar
3. Spring
4. Clutch Assembly
5. Nut
6. Spring Washer
7. Bolt
8. Rear Cover
9. Washer
10. Brush Holder
11. Brush Spring
12. Brush
13. Yoke Assembly
14. Armature
15. Washer
16. Front Cover
Solenoid (Starter Motor) Wiring Inspection
Although the following procedure gives the steps for inspecting the
shift-lever type starter motor, it can also be applied to the Bendix type
by replacing the word "solenoid" with "solenoid switch".
NOTE
First check the battery and make sure that it is fully charged.
•Detach lead [A] from the solenoid terminal of the starter motor, and
keep it away from the solenoid terminal.
•Detach lead [B] that connects the key switch to the solenoid, set the
measurement range of the tester to DC25 V, and connect it to lead [B]
and a ground on the unit. Turn the key switch to the START position
and read the voltage on the tester.
If the voltage is 0 or lower than the battery voltage, inspect the key
switch and the wiring. (Refer to the switch section of the Ignition
System.)
If the voltage is the same as the battery voltage, it is normal.
•Set the measurement range of the tester to Rx1 , and read the
resistance between terminal [C] and a ground on the unit.
The solenoid is normal if the resistance is approximately 0 .Ifitis
not, replace the solenoid.
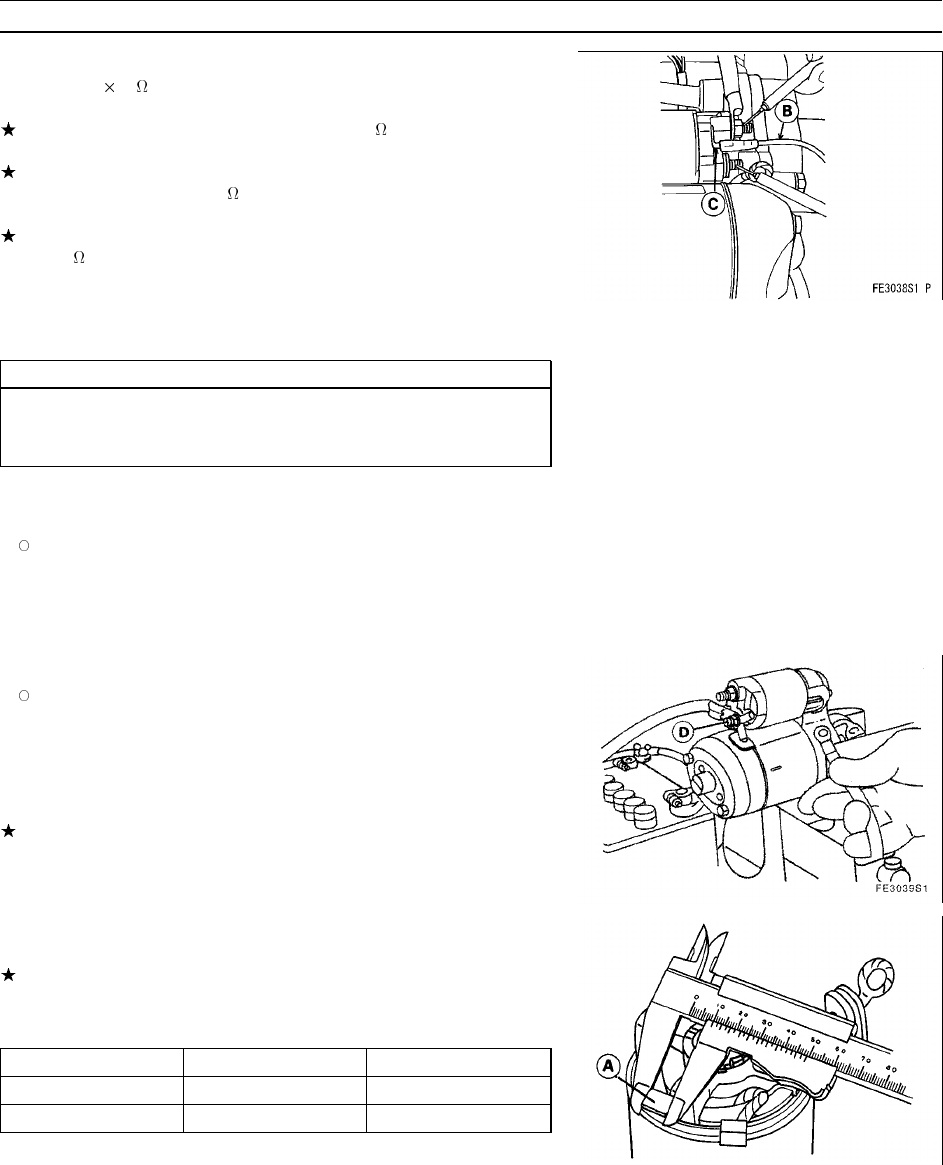
DISASSEMBLY, REASSEMBLY, INSPECTION, AND MAINTENANCE 3-23
Starter System
•Connect lead [B] to terminal [C]. Set the measurement range of the
tester to R 1 , and connect it to the two terminals on the solenoid.
Turn the key switch to the START position to read the tester.
If the solenoid clicks once, the tester reads 0 , and the pinion gear
advances forward, the solenoid and the wiring are normal.
If the solenoid does not make a clicking sound, and the reading on
the tester is greater than 0 , the solenoid is defective and it must be
replaced.
If the solenoid clicks once and the reading on the tester is greater
than 0 , the solenoid is defective and it must be replaced.
Starter Motor Inspection
CAUTION
Make sure that there are no flammable substances in the work
area. Always keep the pinion gear of the starter motor away
from your body.
•Disconnect the leads at the battery before removing the starter motor.
NOTE
First disconnect the negative [-] lead of the battery, followed by the
positive [+] lead, to prevent sparks from being created during the
operation.
•Remove the starter motor from the engine.
•Secure the starter motor on a vise.
NOTE
Be careful not to deform the starter motor when securing the starter
motor on a vise.
•Connect the positive [+] lead of the battery to terminal [D] of the
solenoid.
•Momentarily place the negative [-] lead of the battery in contact with
a non-painted area of the starter motor body.
If the pinion gear does not spin, repair or replace the starter motor.
Brush Overall Length Measurement
Measure the overall length of the brushes.
If the brushes are shorter than their service limit, replace them with
new ones.
Brush Overall Length Service Limit (minimum)
Sift Lever Type: P/N 21163-2089, 2095 6.0 mm (0.24 in)
Bendix Type: P/N 21163-2108 3.5 mm (0.14 in)
Bendix Type: P/N 21163-2096 8.5 mm (0.33 in)
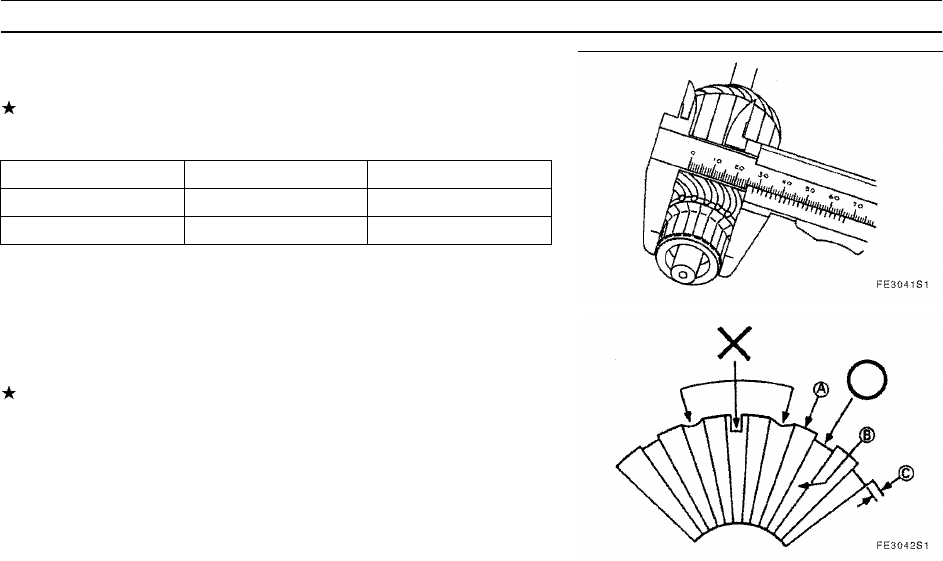
3-24 DISASSEMBLY, REASSEMBLY, INSPECTION, AND MAINTENANCE
Starter System
Commutator Diameter Measurement
Measure the diameter of the commutator at several areas.
If the diameter is smaller than the service limit, replace the armature.
Commutator Diameter Service Limit (minimum)
Sift Lever Type: P/N 21163-2089, 2095 27 mm (1.06 in)
Bendix Type: P/N 21163-2108 23 mm (0.91 in)
Bendix Type: P/N 21163-2096 27 mm (1.06 in)
Commutator Groove Depth
Measure the depth of the grooves between the segments of the
commutator.
If the groove depth is smaller than the service limit, use a thin file or
a piece of steel to file the insulation portion to the standard depth.
Commutator Groove Depth
Standard: 0.5 ~ 0.8 mm (0.020 ~ 0.032 in)
Service Limit: 0.2 mm (0.008 in)
A: Segment
B: Insulation Portion
C: Groove Depth

DISASSEMBLY, REASSEMBLY, INSPECTION, AND MAINTENANCE 3-25
Recoil Starter
CAUTION
The recoil spring is stored in the reel under high tension. Hold
it firmly when handling so that the spring does not jump out.
Disassembly
•Pull the rope out approximately 350 mm, and tentatively tie a knot at
that position.
•Pull out the knot of the rope that is pushed into the recess in the
handle, undo the knot, and remove the handle.
•While holding the reel with your hand, undo the knot of the rope, and
pull the rope out through the hole in the case. Hook the rope on the
cutout of the reel, and slowly allow the reel to retract in a direction
that will relieve the tension of the coil spring.
•Remove the retaining screw from the center of the reel, and remove
the parts while making sure not to allow the recoil spring to jump out.
•To remove the recoil spring, make sure that the tension of the spring
has been completely relieved. Then, remove the reel by carefully
pulling the reel straight up. The recoil spring remains retracted in the
reel or spring case.
•During the removal of the recoil spring, carefully separate it from the
reel, while retracting it outward from the center of the spring.
NOTE
On the FE120, 170, 250, 290, 350, and 400 also, handle the recoil
spring carefully to prevent it from jumping out, and do not reverse
the winding direction of the recoil spring and the rope.
T1: Tightening Torque 10 N m (1.0 kg m, 7.2 ft lb)
T2: Tightening Torque 6 N m (0.6 kg m, 4.3 ft lb)
G: Apply grease.
L: Apply non-coagulating thread lock
Reassembly
•Do not reverse the direction of the coil spring during reassembly. Ap-
ply grease to the recoil spring and the case shaft before reassembly.
•Attach the reel to the case so that the inner hook of the recoil spring
engages securely with the case hook.
•Assemble the tab, tab spring, and guide plate in their original
positions. Apply a non-coagulating type thread lock on the threaded
portion of the retaining screw and tighten the screw.
•To apply an initial load to the recoil spring, rotate the reel two turns in
a direction that compresses the recoil spring. Hold the reel, pass the
end of the rope through the hole in the case, and make a tentative
knot.
•Insert the end of the rope into the handle, make the final knot there,
and undo the tentative knot.
•Pull on the rope and make sure that the tab operates normally.
A: Recoil Spring Inner Hook
B: Case Hook
C: Case Shaft
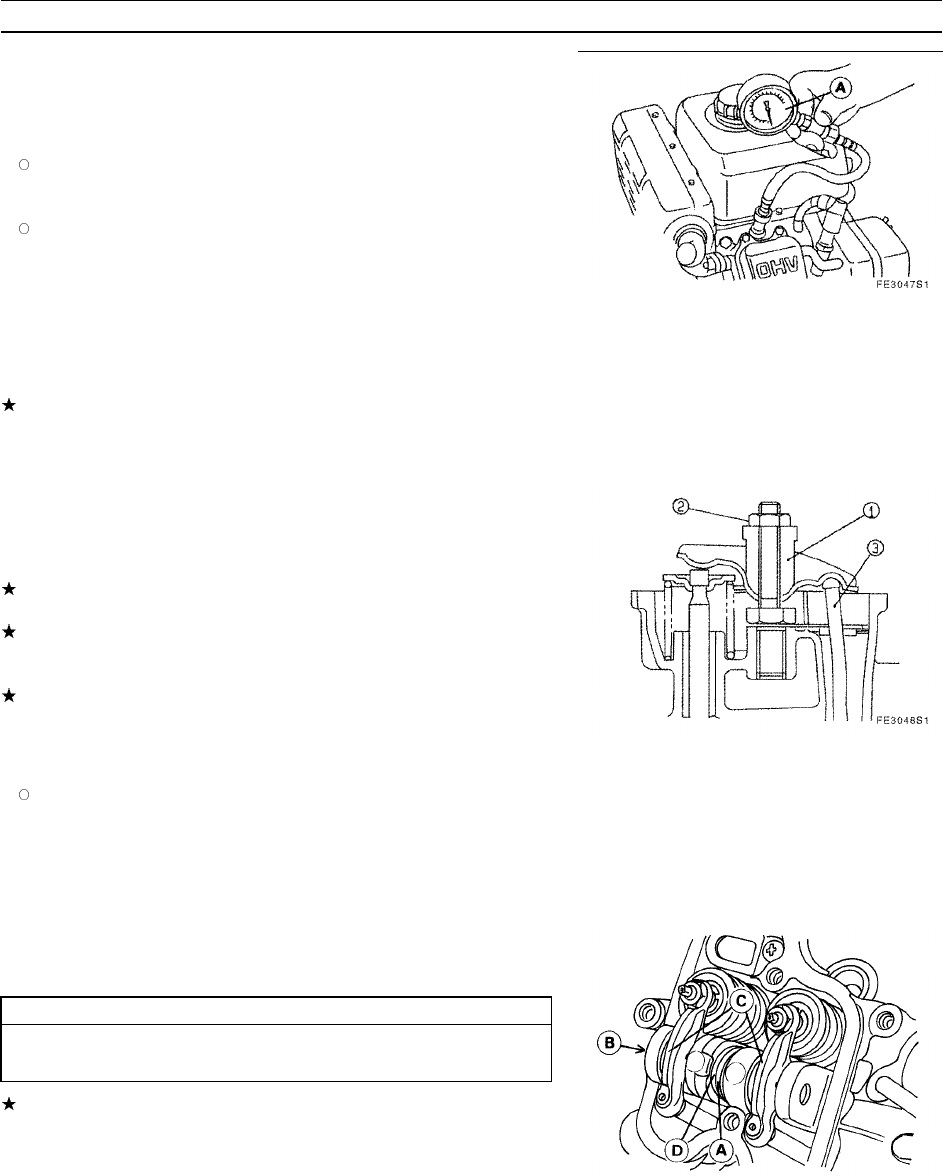
3-26 DISASSEMBLY, REASSEMBLY, INSPECTION, AND MAINTENANCE
Cylinder Head
Compression Inspection
•After warming up the engine, stop the engine. Remove the spark
plug and connect a compression gauge to the spark plug hole.
NOTE
Connect the spark plug cap to the removed spark plug and ground
the spark plug against the engine body. Make sure that there are
no flammable substances in the surrounding area.
If the engine is equipped with an electric starter, make sure that
the battery is fully charged.
•Fully open the engine throttle and the choke valve. Operate the recoil
starter or electric starter and read the maximum compression.
Compression (minimum)
with Recoil Starter: 290 kPa (3 kg/cm2, 42 psi)
with Electric Starter: 390 kPa (4 kg/cm2, 57 psi)
If the compression reading is lower than the minimum value given
above, refer to the Troubleshooting section in order to repair the
engine.
A: Installing the compression gauge
Disassembly
•Remove the retaining bolts from the rocker cover and remove the
rocker cover together with the breather pipe.
•Remove the rocker arm.
Bring the piston to the top-dead-center of the compression stroke.
This will allow the rocker arm to move freely (except FE350 and 400).
On the FE120, 170, and 250, loosen the lock nut on the rocker arm
pivot to remove the lock nut and the rocker arm pivot. Then, remove
the rocker arm.
On the FE290, 350, and 400, remove the E-ring, push the rocker shaft
towards the exhaust side, and remove the washer and the rocker arm.
•Remove the pushrods.
NOTE
Mark the pushrods to prevent the intake and exhaust positions from
becoming interchanged during reassembly. This is not necessary
on the FE350 and 400.
1. Rocker Arm Pivot
2. Lock Nut
3. Pushrod
•Loosen the cylinder head retaining bolts little by little, evenly in the
reverse order of tightening, to remove the cylinder head.
CAUTION
The cylinder head could become warped if the head bolts are
not loosened evenly.
To ensure the proper loosening sequence, refer to the tightening
sequence on the next page.
A: E-ring
B: Rocker Shaft
C: Rocker Arm
D: Washer
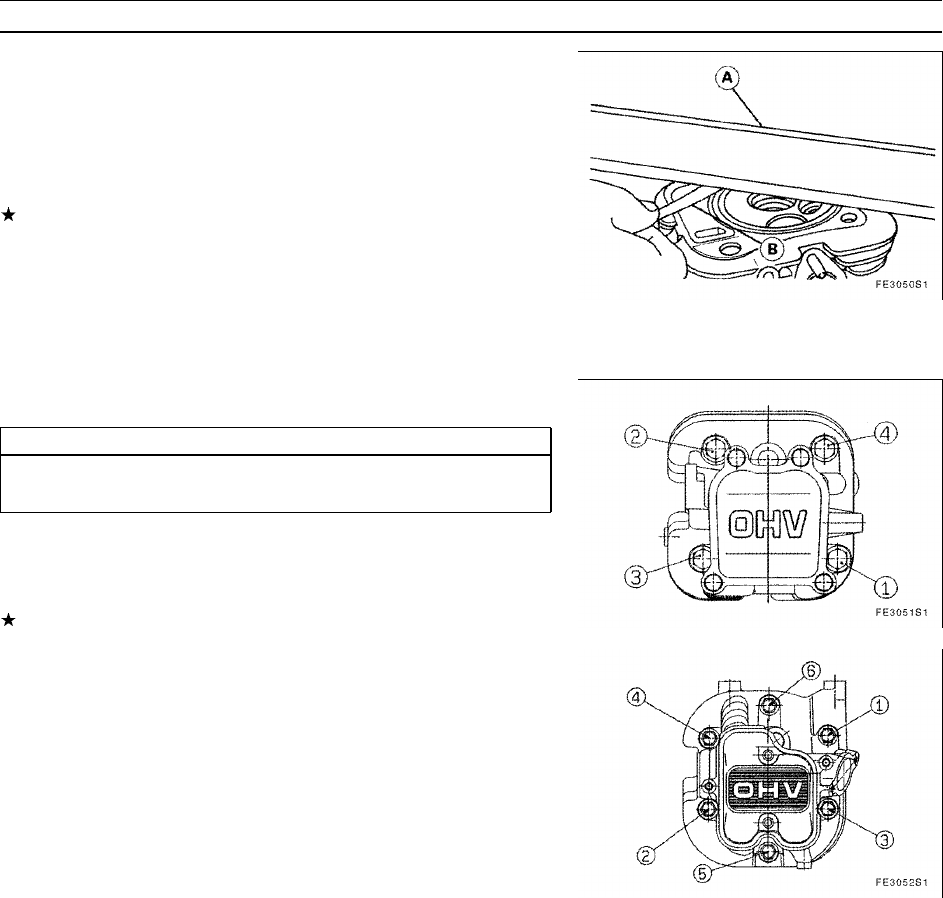
DISASSEMBLY, REASSEMBLY, INSPECTION, AND MAINTENANCE 3-27
Cylinder Head
Cleaning and Inspection
•Inspect the cylinder head for the presence of any cracks or missing
fins. Replace the cylinder head if any of those conditions exist.
•Clean the carbon deposits off the combustion chamber and the
exhaust port, and wash the cylinder head in a cleaning solvent.
•Place a straightedge against the combustion chamber side of the
cylinder head and use a gap gauge to inspect for warpage.
If the warpage exceeds the service limit, replace the cylinder head.
Cylinder Head Warpage (maximum)
Service Limit: 0.05 mm (0.002 in)
•Inspect the breather valve. (Refer to the breather section in
Lubrication System.)
A: Straightedge
B: Gap Gauge
Reassembly
CAUTION
Make sure that the piston is in the top-dead-center of the
compression stroke.
•Clean the mating surfaces of the cylinder and the cylinder head, and
replace the gasket with a new one.
•Place the pushrods in their original positions in the cylinder block and
install the cylinder head.
At this time, make sure that each end of a pushrod is properly fitted
in the recessed area of the tappet and the rocker arm.
•Tighten the cylinder head retaining bolts little by little, evenly in
accordance with the tightening sequence given in the diagram on the
right, to their specified torque. (Refer to the section on Tightening
Torque Specifications.)

3-28 DISASSEMBLY, REASSEMBLY, INSPECTION, AND MAINTENANCE
Valve System
Hydraulic Lash Adjuster (HLA)
The FE350 and 400 are equipped with a Hydraulic Lash Adjuster
(HLA) to automatically adjust the valve train to zero clearance through
hydraulic means.
Purpose of the HLA
The HLA hydraulically adjusts the valve train to zero clearance by
automatically absorbing the changes in the clearance that are created
through thermal expansion or wear. The purpose of the HLA is to
eliminate the need to adjust the clearance of the valve train, reduce
the noise generated by the valve train, and stabilize the performance of
the engine.
HLA Position and Oil Supply Path
The HLA needs the pressurized oil from the oil pump. The diagram
shows the position in which the HLA is installed and the oil supply path.
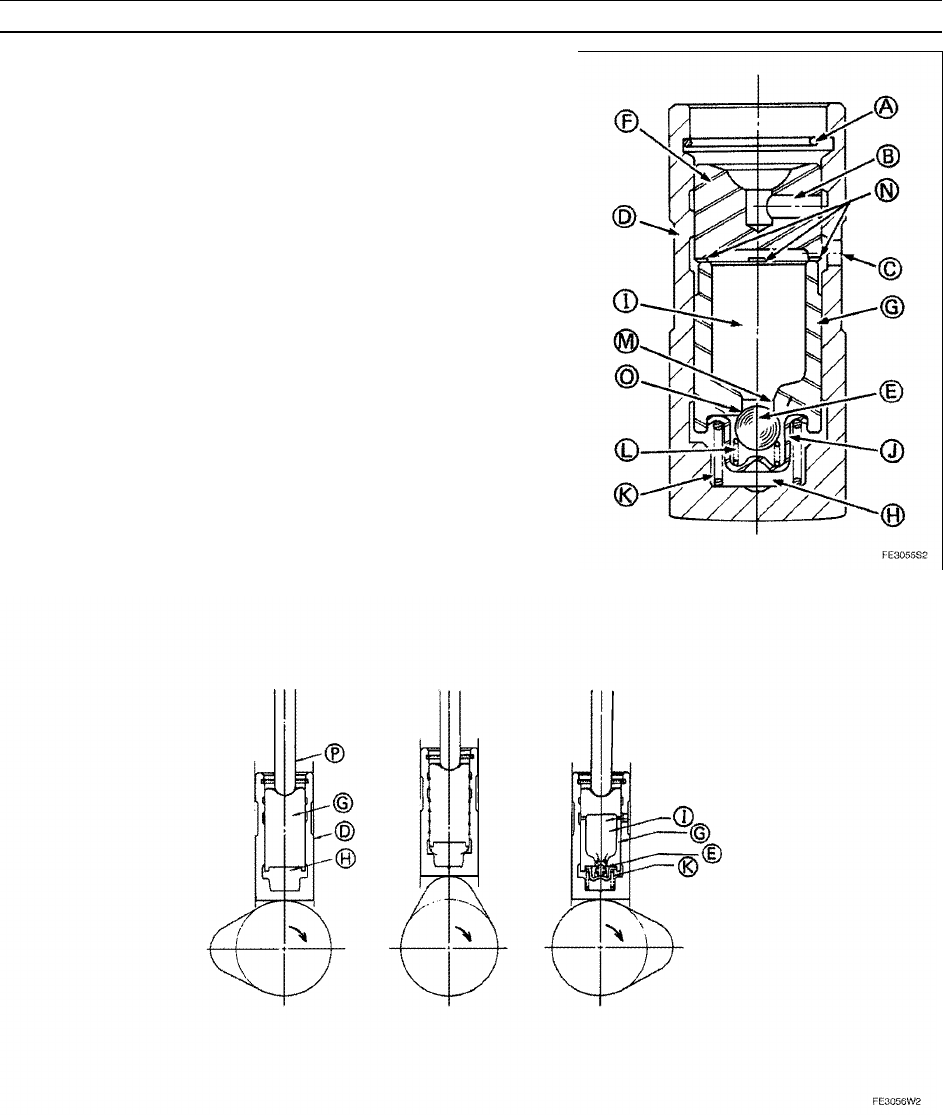
DISASSEMBLY, REASSEMBLY, INSPECTION, AND MAINTENANCE 3-29
Valve System
HLA Construction and Operation
•When the cam pushes the HLA upward, the oil in the high-pressure
chamber [H] tries to flow back to the oil pool [I] of the plunger [G]
by passing through the passage [M], but because the check ball [E]
closes the passage [M], the oil cannot flow back and it causes the
hydraulic pressure in the high-pressure chamber [H] to rise.
•The oil of the high-pressure chamber [H] in which the hydraulic
pressure has risen leaks little by little through the gap (leak-down
rand) between the plunger [G] and the HLA body [D]. As a result, the
HLA shrinks slightly and pushes the pushrod [P] upward.
•When the rotation of the cam causes the HLA to descend to the cam
base circle, the pressurized oil from the oil pump passes through the
oil hole [C] in the HLA body [D], travels through the oil groove [N] that
is cut into the socket [F], and enters the oil pool [I] in the plunger [G].
•After filling the oil pool [I], the oil pushes open the check ball [E], and
flows into the lifter cage [J] and the high-pressure chamber [H], in
order to correct the valve train to achieve zero clearance.
A: Snap Ring
B: Oil Metering Hole
K: Plunger
L: Check Valve Spring
O: Check Valve Seat
P: Pushrod

3-30 DISASSEMBLY, REASSEMBLY, INSPECTION, AND MAINTENANCE
Valve System
HLA Removal
CAUTION
Always keep the HLA upright, with the end of the HLA on which
the snap ring is visible facing up (socket "A" faces up). If it is
placed on its side or upside down, the oil that is sealed in the
high-pressure chamber [B] could leak out, disabling the HLA
function.
CAUTION
Do not disassemble the HLA because it is extremely difficult
to replenish the oil that is sealed in it.
•Make sure that the piston is in the top-dead-center of the compression
stroke.
•Pull the HLA [A] out towards the cylinder head.
HLA Inspection
If the valve train noise does not go away after the engine is started,
it could be due to the following reasons:
•Wear at the clearance between the HLA body [D] and the plunger
[G].
•Debris wedged in the HLA body between the check ball [E] and the
check valve seat [O].
•A drop in the hydraulic pressure of the oil supply path for some reason
(refer to the section on the Lubrication System).
NOTE
If debris becomes wedged in the HLA body between the check
ball [E] and the check valve seat [O], it is structurally unfeasible
to perform a repair. Therefore, it is very important to prevent
contamination when changing the engine oil or repairing the engine.
To inspect the HLA, perform a leak-down test as follows:
•Place the HLA with its snap ring facing up on a surface plate and
measure the leak-down dimension.
•Using your finger or a rod with a rounded tip, firmly press the socket
[A] down. Measure the extent of the recess of the socket [A], which
is the leak-down dimension.
•If the leak-down dimension is greater than the service limit, replace
the HLA with a new one.
HLA Leak-Down Dimension (maximum)
Service Limit: 0.5 mm (0.002 in)

DISASSEMBLY, REASSEMBLY, INSPECTION, AND MAINTENANCE 3-31
Valve System
HLA Reassembly
•Make sure that the piston is at the top-dead-center of the compression
stroke.
CAUTION
Make sure to apply engine oil to all the sliding areas of the
HLA, pushrod, rocker arm, rocker shaft, and valve before
reassembly.
•Insert the HLA (with its end on which the snap ring is visible facing
up) from the cylinder head side of the engine block.
•Mate the tip of the pushrod to the recess in the HLA, and the other
end with the recess in the rocker arm, and install the cylinder head.
A: Pushrod
B: Rocker Shaft
C: Rocker Arm
D: Valve
E: HLA
F: Engine Block
G: Cylinder Head
HLA Operation Precaution
The HLA comes filled with low-viscosity oil.
Once the engine starts, the low-viscosity oil is gradually replaced with
the engine oil.
After an engine that has previously operated is rebuilt, the valve takes
approximately 20 minutes to seat itself. Therefore, start a rebuilt
engine 20 minutes after it has been rebuilt. This prevents the engine
from starting poorly due to a compression leak.
If the engine is restarted after the HLA has been replaced with a new
one, the valve could be noisy, but the noise will go away after the
engine is operated for a while in the medium speed range.
Valve Clearance Inspection and Adjustment
NOTE
Inspect and adjust the valve clearance on a cold engine.
•Rotate the crankshaft in the normal direction in order to bring the
piston to the top-dead-center of its compression stroke.
•Using a gap gauge, measure the clearance of the intake and exhaust
valves.
•If the clearance differs from the specified value, adjust it to the
specified value.
Specified Valve Clearance on Cold Engine
Intake: 0.12 mm (0.005 in)
Exhaust: 0.12 mm (0.005 in)
•Loosen the lock nut. Turn the rocker arm pivot in or out to attain the
specified clearance. (FE120, 170, 250)
On the FE290, use a pair of pliers to hold the adjustment bolt, and
then loosen the lock nut. Turn the adjustment bolt in or out to attain
the specified clearance.
For FE120, 170, 250
A: Rocker Arm Pivot
B: Rocker Arm
C: Locknut
D: Valve
E: Valve Clearance

3-32 DISASSEMBLY, REASSEMBLY, INSPECTION, AND MAINTENANCE
Valve System
•Using a wrench, secure the rocker arm pivot, and tighten the lock nut
to the specified torque. (Refer to the section on Tightening Torque
Specifications.)
On the FE290, use a pair of pliers to hold the adjustment bolt, and
tighten the lock nut to the specified torque. (Refer to the section on
Tightening Torque Specifications.)
A: Adjustment Bolt
B: Locknut
C: Gap Gauge
Automatic Compression Release (ACR) Device Inspection
The ACR reduces the compression of the cylinder in order to facilitate
the revolution of the crankshaft during the starting of the engine.
•Detach the rocker cover and remove the spark plug.
•Check whether the valves have the specified clearance.
•Slowly turn the crankshaft in the direction of the engine rotation and
observe the movement of the exhaust valve [A] and the rocker arm
[B].
Immediately after the intake valve has closed, the rocker arm [B]
should push open the exhaust valve [A] to attain a lift that is greater
than the service limit given below. If the exhaust valve does not lift to
that height, the ACR that is provided on the camshaft is faulty. (Refer
to the section on Camshaft Inspection.)
Valve Lift Height Service Limit (minimum) by ACR - for Exhaust
FE120, 170, 250, 290: 0.6 mm (0.024 in)
FE350, 400: 1.0 mm (0.039 in)
Valve Disassembly and Reassembly
For FE120, 170:
Disassembly
•Place an appropriate receiving plate on the combustion chamber side
of the cylinder head.
•Using your thumbs, push down the spring retainer, slide the retainer
towards the side hole, and remove the retainer.
•Remove the spring and the valve.
Reassembly
•Verify that the valve seat is making proper contact and that the valve
stem moves smoothly in the guide.
•The reassembly is the opposite of the disassembly.
•Apply engine oil to the valve stem before reassembling the valve.
A: Spring Retainer
B: Side Hole
C: Sliding Direction
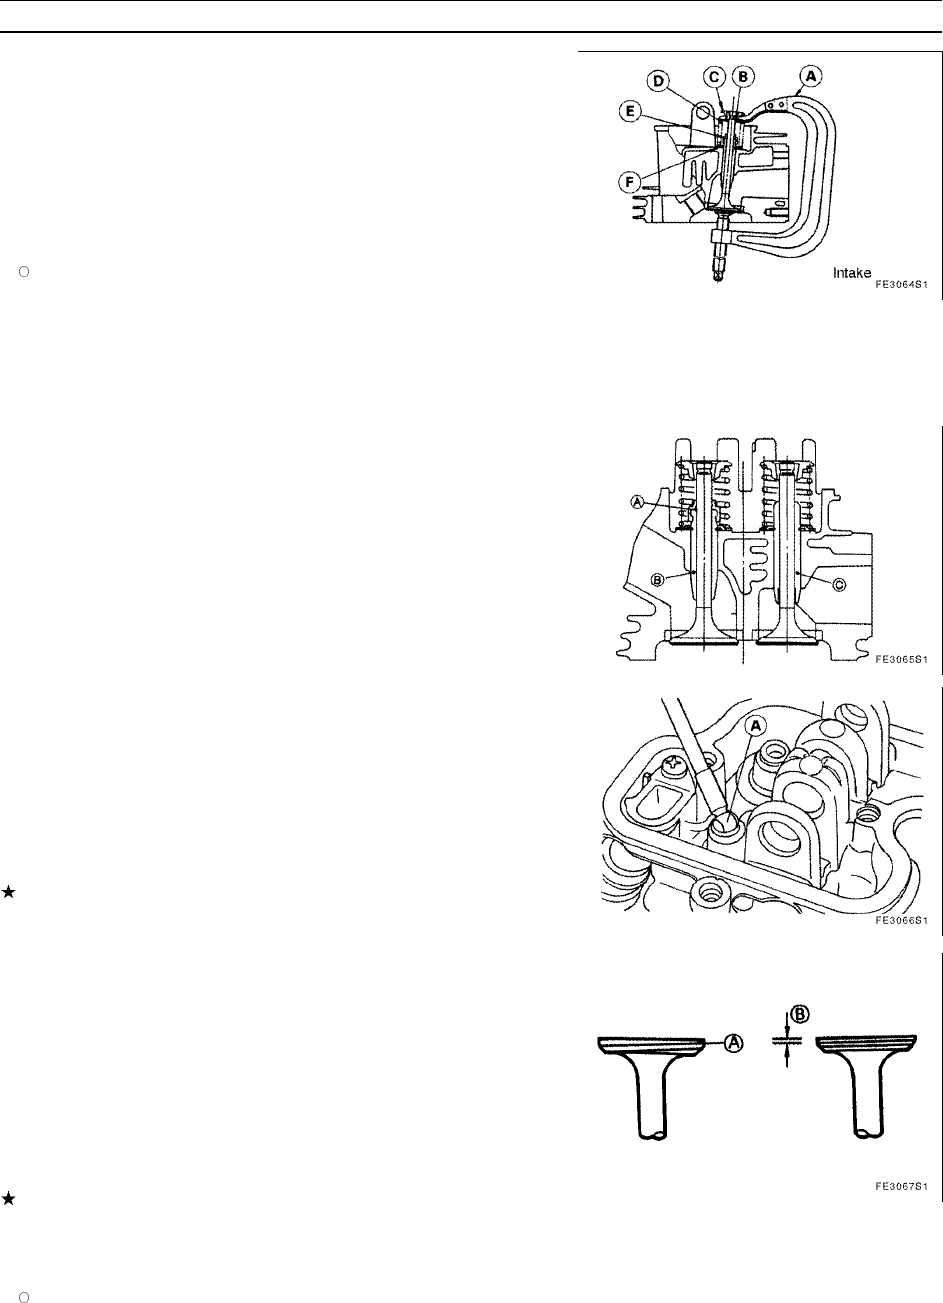
DISASSEMBLY, REASSEMBLY, INSPECTION, AND MAINTENANCE 3-33
Valve System
For FE250, 290, 350, 400:
Disassembly
•Use a valve spring compressor to compress the valve spring and
remove the collet.
•Remove the valve spring compressor.
•Remove the retainer, valve spring, and valve.
•If the stem seal that is provided on the intake side of the FE290, 350,
or 400 is damaged, replace the stem seal with a new one.
NOTE
Do not remove the stem seal unless it is necessary to do so.
A: Valve Spring Compressor
B: Collet
C: Retainer
D: Valve Spring
E: Stem Seal
F: Spring Seat
Reassembly
•Verify that the valve seat is making proper contact and that the valve
stem moves smoothly in the guide.
•The reassembly is the opposite of the disassembly.
•Apply engine oil to the valve guide and the lip of the valve stem seal
before reassembling the valve.
Valve Guide Inspection
•Use a bore micrometer to measure the bore of the valve guide.
Valve Guide Bore Service Limit (maximum)
- for both Intake and Exhaust
FE120: 5.562 mm (0.2190 in)
FE170: 5.562 mm (0.2190 in)
FE250: 6.065 mm (0.2388 in)
FE290, 350, 400: 7.065 mm (0.2782 in)
If the measured value exceeds the service limit, replace the valve
guide with a new one.
A: Bore Micrometer
Valve Inspection
•Inspect the valve head for the presence of any abnormal deposits or
gas leakage.
•Use a wire brush to remove any deposits from the valve.
•Inspect the valve for any depression in its contact surface [A], and
whether the thickness of the valve head [B] is below the service limit.
Valve Head Thickness Service Limit (minimum)
- for both Intake and Exhaust
FE120, 170: 0.5 mm (0.020 in)
FE250, 290, 350, 400: 0.6 mm (0.024 in)
If the valve head is smaller than the service limit given above, replace
the valve with a new one. 4. Inspect the valve stem for the presence
of any gummy deposits, discoloration due to seizure, or corrosion.
NOTE
Gummy deposits are caused by the use of old, deteriorated
gasoline. Instruct the user to use fresh, unleaded gasoline.

3-34 DISASSEMBLY, REASSEMBLY, INSPECTION, AND MAINTENANCE
Valve System
Use a wire brush to remove the deposits from the valve stem. If the
valve stem does not move smoothly in the valve guide or the stem
shows abnormal wear, replace the valve with a new one.
•Using a micrometer, measure the valve stem diameter in several
places.
If the measured value is smaller than the service limit, replace the
valve with a new one.
Valve Stem Diameter Service Limit (minimum)
Intake Valve Exhaust Valve
FE120, 170: 5.430 mm (0.2138 in) 5.415 mm (0.2132 in)
FE250: 5.930 mm (0.2335 in) 5.915 mm (0.2329 in)
FE290, 350, 400: 6.930 mm (0.2728 in) 6.915 mm (0.2722 in)
•Support both ends of the valve stem on V blocks [A] as shown in the
diagram. Place a dial gauge [B] against the center, and gently rotate
the valve stem to measure the bend of the stem (by reading the entire
fluctuation of the dial gauge).
Valve Stem Bend Service Limit (maximum)
– for both Intake and Exhaust
FE120, 170: 0.05 mm (0.0020 in)
FE250, 290, 350, 400: 0.03 mm (0.0012 in)
If the measured value is greater than the service limit, replace the
valve with a new one.
Valve Spring Inspection
•Inspect the valve spring for the presence of corrosion or cracks, and
replace it with a new one if necessary.
•Using a vernier caliper, measure the free length of the valve spring.
Valve Spring Free Lenght Service Limit (minium)
- for both Intake and Exhaust
FE120, 170: 31.8 mm (1.25 in)
FE250, 290: 32.8 mm (1.29 in)
FE350, 400: 38.1 mm (1.50 in)
If the free length is shorter than the service limit, replace the valve
spring with a new one.
NOTE
During reassembly, beware that the spring pitch is smaller at the
valve seat side of the valve spring on the FE250, 290, 350, and
400. For both intake and exhaust valves.
A: Valve Spring
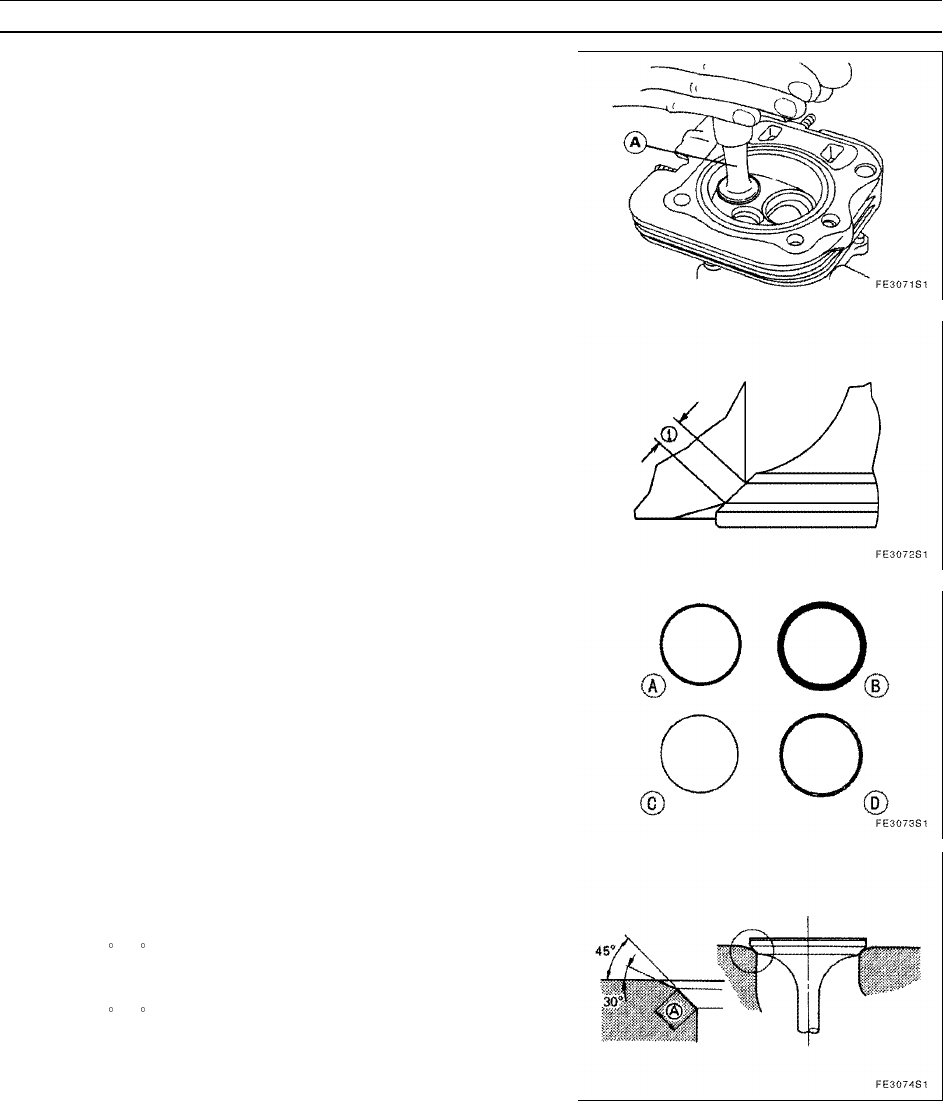
DISASSEMBLY, REASSEMBLY, INSPECTION, AND MAINTENANCE 3-35
Valve System
Valve Seat Inspection and Lapping
A prerequisite for inspecting the valve seat contact is that the valve
guide and the valve stem are normal.
•Apply a thin layer of fine lapping compound on the contact surface of
the valve.
•Using a lapper [A], lap the valve against the seat by rotating the valve.
•Pull out the valve and inspect whether there is an even contact at the
valve seat along its entire circumference. If not, lap the valve and the
valve seat.
•Lap 8 to 10 times and inspect the contact each time. Repeat this
process until there is contact along the entire circumference.
•After completing the lapping, completely wash off the compound from
all parts and allow the cylinder head to dry.
A: Lapper
1. Valve Seat Contact Width
Valve Seat Correction
If the contact width of the valve seat is nearing the service limit, or
there are small depressions or wear on the valve seat, correct the valve
seat.
•Using a 45 (30 only for the intake on FE350 and 400) valve seat
cutter, apply a light force to smoothly cut the valve seat to create a
concentric circle.
•Using a 30 (15 only for the intake on FE350 and 400) valve seat
cutter, make a shallow cut so that the valve seat contact [A] will have
the standard width.

3-36 DISASSEMBLY, REASSEMBLY, INSPECTION, AND MAINTENANCE
Valve System
Valve Seat Contact Standard Width and Service Limit (minimum)
– for both Intake and Exhaust Standart Service Limit
FE120, 170: 0.7 mm (0.028 in) 1.7 mm (0.067 in)
FE250, 290, 350,
400:
0.8 mm (0.031 in) 1.9 mm (0.075 in)
•Using a 45 (30 only for the intake on FE350 and 400) valve seat
cutter, apply a light force to remove the burrs from the seat.
•Use a marker (blue ink) on the valve seat to inspect the contact
between the valve and the valve seat. The valve and the seat must
make contact in the center of the contact surface along the entire
circumference as shown in the diagram.
•If the contact width is inadequate, cut the seat again and lap the
valve.
Rocker Arm and Rocker Shaft
For FE120, 170, 250
•If abnormal wear is present on the ball surface of the rocker arm,
or the surface that comes in contact with the valve stem and the
pushrod, replace the rocker arm with a new one.
For FE290, 350, 400
•Using an inside micrometer, measure the bore of the rocker arm
bearing in several places. Because the rocker arm of the FE350
and 400 is made of sheet metal, use a vernier caliper to measure its
bore.
1. Ball surface of rocker arm
Rocker Arm Bearing Bore Service Limit (maximum)
FE290: 12.074 mm (0.4754 in)
FE350, 400: 12.3 mm (0.4843 in)
If the measured value is greater than the service limit, replace the
rocker arm.
•Using a micrometer, measure the diameter of the rocker shaft in
several places.
A: Rocker Arm
Rocker Shaft Diameter Service Limit (minimum)
FE290, 350, 400: 11.949 mm (0.4704 in)
If the measured value is smaller than the service limit, replace the
rocker shaft
A: Rocker Shaft
Pushrod Inspection
•Support both ends of the pushrod on V blocks and place a dial gauge
against the center.
•Gently rotate the pushrod to measure its bend through the fluctuation
of the dial gauge.
Pushrod Bend - for both Intake and Exhaust
FE290, 170: 0.5 mm (0.020 in)
FE250, 290: 0.3 mm (0.012 in)
FE350, 400: 0.5 mm (0.020 in)

DISASSEMBLY, REASSEMBLY, INSPECTION, AND MAINTENANCE 3-37
Piston and Connecting Rod
Disassembly
•Drain the engine oil into an appropriate container.
•Remove the retaining bolts from the crankcase cover. Using a
wooden or a plastic mallet, gently tap on the crankcase cover at
the area where the cover is fastened to the crankcase, and remove
the crankcase cover. (Refer to the section on Crankcase Cover
Disassembly.)
•Refer to the section on Camshaft Disassembly and remove the
camshaft and the tappet. * When working on the FE170 that is
equipped with a uniaxial rotation balancer, remove the balancer.
•Turn the crankshaft to a position in which the cap bolt [A] is easily
visible.
•Remove the two cap bolts and remove the connecting rod cap [B].
•Push the big end of the connecting rod towards the cylinder head and
push out the piston and connecting rod assembly.
NOTE
Clean off the carbon from the cylinder bore before pushing out the
piston and connecting rod assembly.
•Remove the snap ring from the piston, pull out the piston pin, and
take out the piston.
•Using your fingers, open the piston ring [A] at the area where its ends
meet, and push up the piston ring at the opposite end to remove it
from above the piston.
Reassembly
The reassembly is the opposite of the assembly.
•Reassemble the piston rings in the following sequence: lower rail [A1]
spacer [B] upper rail [A2] second ring [C] top ring [D]
NOTE
Install the top ring and the second ring so that their marked side
faces the top of the piston.
•Beware of the proper direction of the piston when reassembling the
piston with the connecting rod.
NOTE
Apply engine oil to the piston pin holes of the piston and the
connecting rod before assembling them.
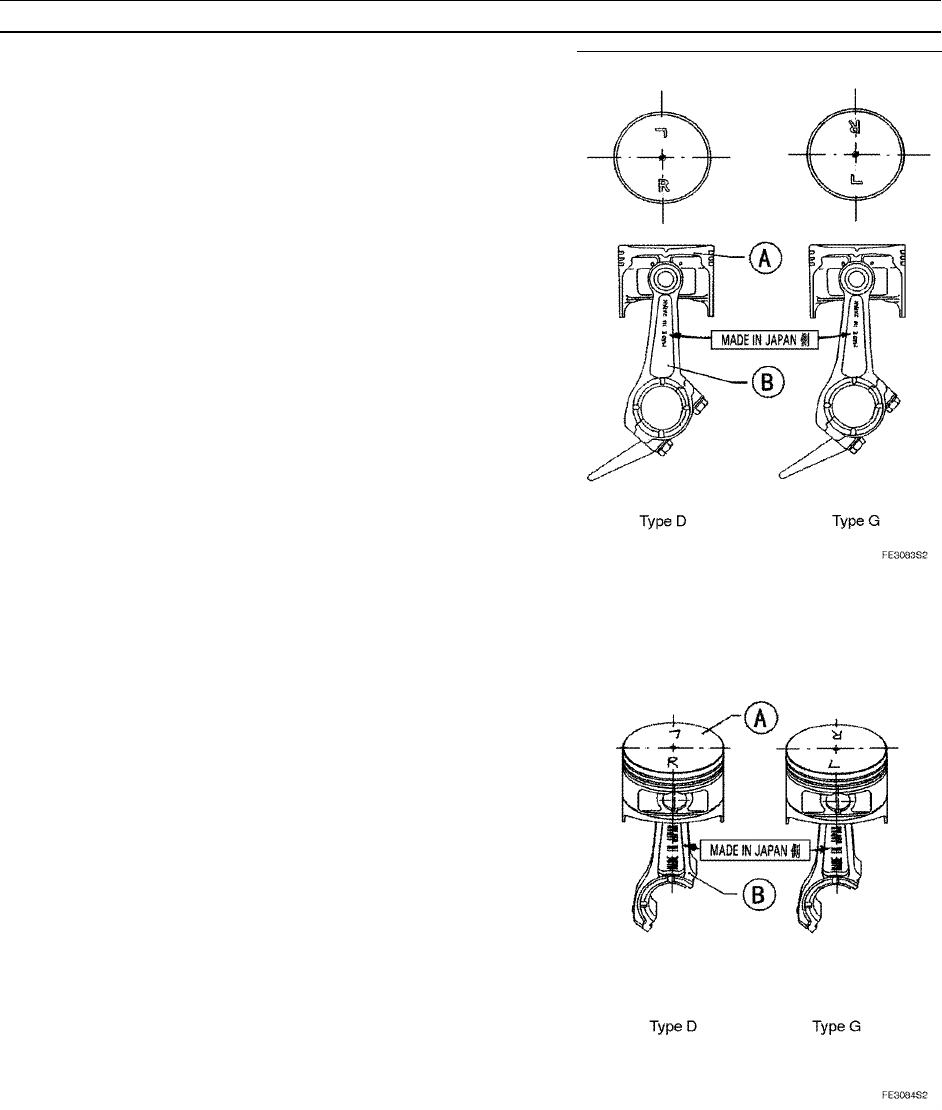
3-38 DISASSEMBLY, REASSEMBLY, INSPECTION, AND MAINTENANCE
Piston and Connecting Rod
For FE120, 170, 250, 350, 400
•On type D, face the "R" mark on the top of the piston towards the
side of the connecting rod marked "MADE IN JAPAN".
•On type G, face the "L" mark on the top of the piston towards the
side of the connecting rod marked "MADE IN JAPAN".
A: Piston
B: Connecting Rod
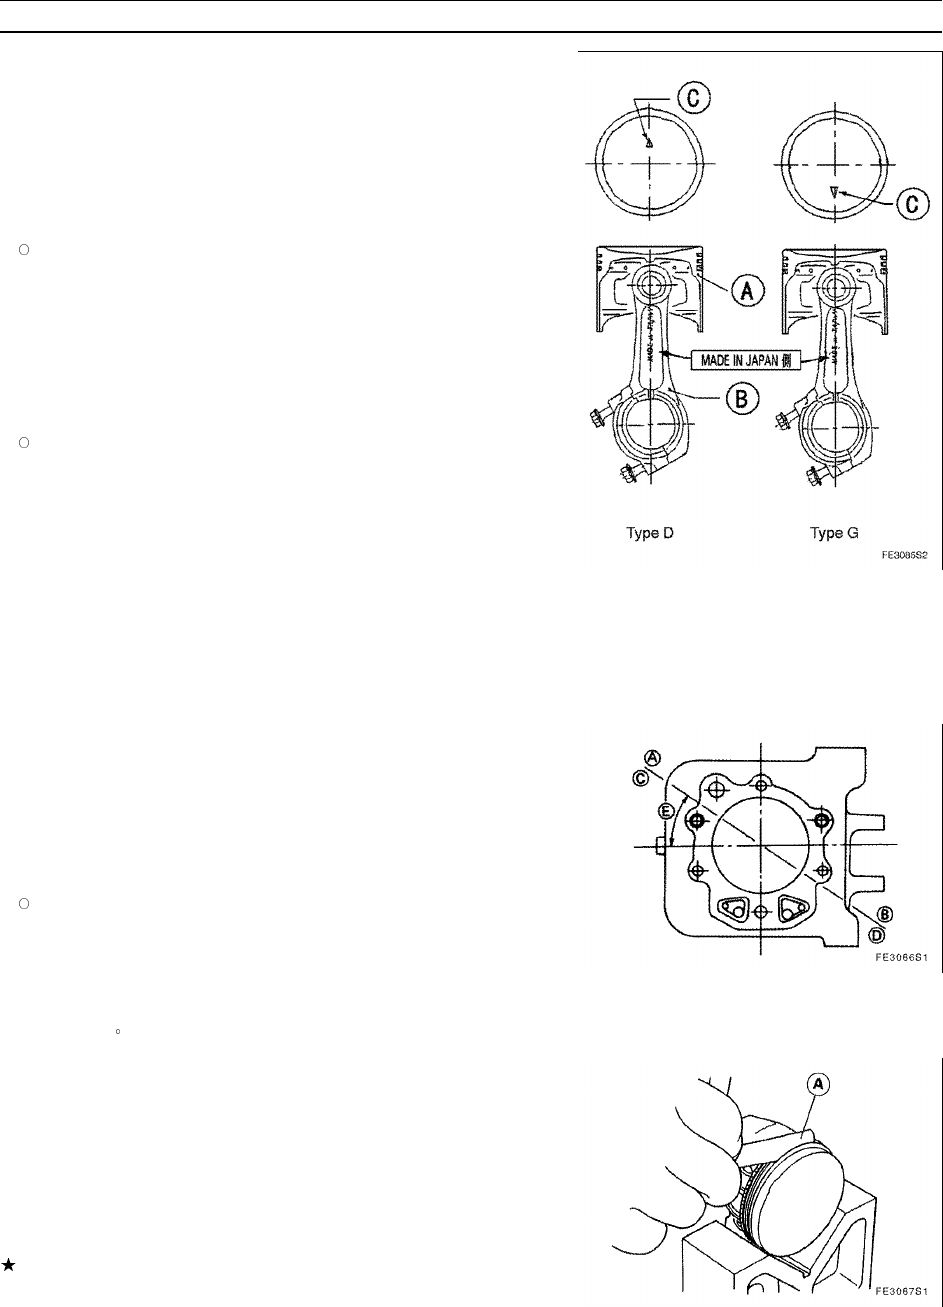
DISASSEMBLY, REASSEMBLY, INSPECTION, AND MAINTENANCE 3-39
Piston and Connecting Rod
For FE290
•On type D, face the arrow on the top of the piston opposite to the
side of the connecting rod marked "MADE IN JAPAN".
•On type G, face the arrow on the top of the piston towards the side
of the connecting rod marked "MADE IN JAPAN".
•Replace the snap ring for the piston pin with a new one and fit it
securely into the groove of the piston pin hole.
NOTE
Do not reuse an old snap ring. Once a snap ring is removed, it
could be deformed or it could have lost its tension. If it is reused, it
could fall out while the engine is running, and damage the cylinder
wall.
•When installing the piston and connecting rod assembly into the
cylinder, beware of the direction of the "MADE IN JAPAN" side of
the connecting rod.
NOTE
Apply engine oil to the cylinder bore, crank pin area, connecting
rod big end, and connecting rod bolts before reassembly.
A: Piston
B: Connecting Rod
C: Arrow
For FE120, 170, 250, 350, 400
•On both types D and G, the "MADE IN JAPAN" side of the connecting
rod must face the magneto.
For FE290
On both types D and G, the "MADE IN JAPAN" side of the connecting
rod must face the output shaft.
•Arrange the gaps of the piston rings as shown in the diagram, and
use a ring compressor to install the piston from the cylinder head
side.
•Mate the connecting rod cap to the big end of the connecting rod and
tighten the connecting rod bolts to the specified torque. (Refer to the
section on Tightening Torque Specifications.)
NOTE
After tightening the bolts, make sure that the connecting rod moves
easily in the axial direction along the crank pin.
A: Top Ring Gap Position
B: Second Ring Gap Position
C: Upper Side Rail Gap Position
D: Lower Side Rail Gap Position
E: 30 ~ 45
Piston Inspection
•Clean the carbon deposits off the piston.
•Using a new piston ring, use a gap gauge [A] to measure the
clearance between the ring groove and the ring.
Piston Ring Groove Clearance Service Limit (maximum)
Top Ring Second Ring
FE120, 170, 250: 0.15 mm (0.0059 in) 0.12 mm (0.0047 in)
FE290, 350, 400: 0.16 mm (0.0063 in) 0.14 mm (0.0055 in)
If the measured value is greater than the service limit, replace the
piston with a new one.

3-40 DISASSEMBLY, REASSEMBLY, INSPECTION, AND MAINTENANCE
Piston and Connecting Rod
•Using an inside micrometer, measure the pin hole bore of the piston
in several places.
Piston Pin Hole Bore Service Limit (maximum)
FE120: 14.033 mm (0.5525 in)
FE170: 16.033 mm (0.6312 in)
FE250: 18.033 mm (0.7100 in)
FE290: 19.033 mm (0.7493 in)
FE350, 400: 20.033 mm (0.7890 in)
If the measured value is greater than the service limit, replace the
piston with a new one.
Piston Pin Inspection
•Using a micrometer, measure the piston pin diameter in several
places.
Piston Pin Diameter Service Limit (minimum)
FE120: 13.975 mm (0.5502 in)
FE170: 15.975 mm (0.6290 in)
FE250: 17.975 mm (0.7077 in)
FE290: 18.975 mm (0.7470 in)
FE350, 400: 19.975 mm (0.7864 in)
If the measured value is smaller than the service limit, replace the
piston pin with a new one.
A: Piston Pin
Piston Ring Inspection
•Using a micrometer, measure the thickness of the piston ring in
several places.
Piston Ring Thickness Service Limit (minimum)
- for both Top and Second Rings
FE120, 170: 1.42 mm (0.056 in)
FE250, 290, 350, 400: 1.44 mm (0.057 in)
If the measured value is smaller than the service limit, replace the
piston rings as a set.
•Fit the piston ring inside the cylinder, and use the top of the piston to
insert the piston ring perpendicularly to the skirt area at the bottom
of the cylinder. Then, use a gap gauge to measure the clearance of
the ring gap.
Piston Ring Gap Clearance Service Limit (maximum)
Top Ring Second Ring
FE120, 170: 1.0 mm (0.039 in) 1.0 mm (0.039 in)
FE290, 350, 400: 1.2 mm (0.047 in) 1.2 mm (0.047 in)
If the measured value is greater than the service limit, replace the
piston rings as a set. (This is because of the difficulty in properly
measuring the oil ring.)
A: Piston Ring
B: Ring Gap Clearance

DISASSEMBLY, REASSEMBLY, INSPECTION, AND MAINTENANCE 3-41
Piston and Connecting Rod
Connecting Rod Inspection
•Inspect the big end of the connecting rod for wear or any traces of
seizure scratches or discoloration.
Abnormal wear or scratches could be caused by the presence of
foreign particles in the engine oil.
Vertical scratches or discoloration on the bearing surface is a
symptom that results from insufficient lubrication or overheating.
Clean the inside of the engine and change the engine oil.
Inspect and clean the cooling system.
Inspect the oil pump, oil filter, and oil passage and repair or replace
as needed.
When reusing the connecting rod or the crankshaft, carefully file off
any protrusions from their bearing surface.
•Using an inside micrometer, measure the bore of the bearing area of
the small end in several places.
Connecting Rod Small End Bearing Area Bore Service Limit (maximum)
FE120: 14.042 mm (0.5528 in)
FE170: 16.047 mm (0.6318 in)
FE250: 18.051 mm (0.7107 in)
FE290: 19.051 mm (0.7500 in)
FE350, 400: 20.051 mm (0.7894 in)
If the measured value is greater than the service limit, replace the
connecting rod with a new one.
•Mate the connecting rod cap to the big end of the connecting rod and
tighten the connecting rod bolts to the specified torque. Make sure to
apply engine oil to the threaded portion of the connecting rod bolts
before tightening them. (Refer to the section on Tightening Torque
Specifications.)
•Using an inside micrometer, measure the bore of the bearing area of
the big end in several places.
Connecting Rod Big End Bearing Area Bore Service Limit (maximum)
FE120: 26.052 mm (1.0257 in)
FE170: 29.052 mm (1.1438 in)
FE250: 34.067 mm (1.3412 in)
FE290: 35.567 mm (1.4003 in)
FE350, 400: 37.567 mm (1.4790 in)
If the measured value is greater than the service limit, replace the
connecting rod with a new one.
•Insert a bar each, measuring approximately 100 mm in length and
almost the same diameter as the respective bore into both the big
and small ends of the connecting rod. Then, set the V block and the
dial gauge as shown in the diagram in order to measure the bend
and twist of the connecting rod.
If the measured value is greater than the service limit, replace the
connecting rod with a new one.
Connecting Rod Bend and Twist Service Limit (maximum)
Service Limit: 0.15/100 mm (0.006/100 in)
A: Big End Bearing Area
B: Small End Bearing Area

3-42 DISASSEMBLY, REASSEMBLY, INSPECTION, AND MAINTENANCE
Piston and Connecting Rod
A: Dial Gauge
B: V Block

DISASSEMBLY, REASSEMBLY, INSPECTION, AND MAINTENANCE 3-43
Cylinder Block and Crankcase Cover
Cylinder Inspection
•Inspect the cylinder wall for the presence of any scratches, the
cylinder exterior for any broken fins, and for any other damage.
If the cylinder has non-repairable damage, replace the cylinder block
with a new one.
•Using a cylinder gauge, measure the cylinder bore in the longitudinal
and latitudinal directions at the locations given in the diagram on the
right.
Cylinder Bore Service Limit (maximum)
FE120: 60.067 mm (2.3648 in)
FE170: 66.067 mm (2.6011 in)
FE250: 76.067 mm (2.9948 in)
FE290: 78.067 mm (3.0735 in)
FE350: 83.067 mm (3.2703 in)
FE400: 87.067 mm (3.4278 in)
Cylinder Bore Roundness (maximum)
Service Limit: 0.56 mm (0.0220 in)
If the measurement shows that even one area of the cylinder has a
greater bore or roundness than the service limit, bore the cylinder to
an oversize or replace the cylinder block.
The oversize piston and piston rings come in + 0.50 mm (0.020 in)
oversize.
1. 10 mm (0.394 in)
2. Center Point
3. 8 mm (0.315 in)
Crankcase Cover
Disassembly
•Drain the engine oil into an appropriate container.
•Loosen the crankcase cover retaining bolts in the reverse sequence
of the tightening sequence given on the next page. Using a hammer
or a plastic mallet, gently tap on the crankcase cover at the area
where the cover is fastened to the engine, and remove the crankcase
cover.
A: Crankshaft Gear
B: Camshaft Gear
C: Timing Mark
Reassembly
•Clean the mating surface and place a new gasket on it.
•Apply high-temperature grease to the area in which the oil seal lip
faces the rotating shaft. Apply engine oil to the bearing areas.
•Verify that the respective timing marks on the crankshaft gear and the
camshaft gear, as well as on the crankshaft gear and the balancer
gear (optional equipment on FE170) are properly aligned.
CAUTION
Make sure to remove the oil pump before installing the
camshaft. Serious damage to the engine will result if the
camshaft is installed with the oil pump in place.
A: Crankshaft
B: Timing Mark
C: Balancer Gear
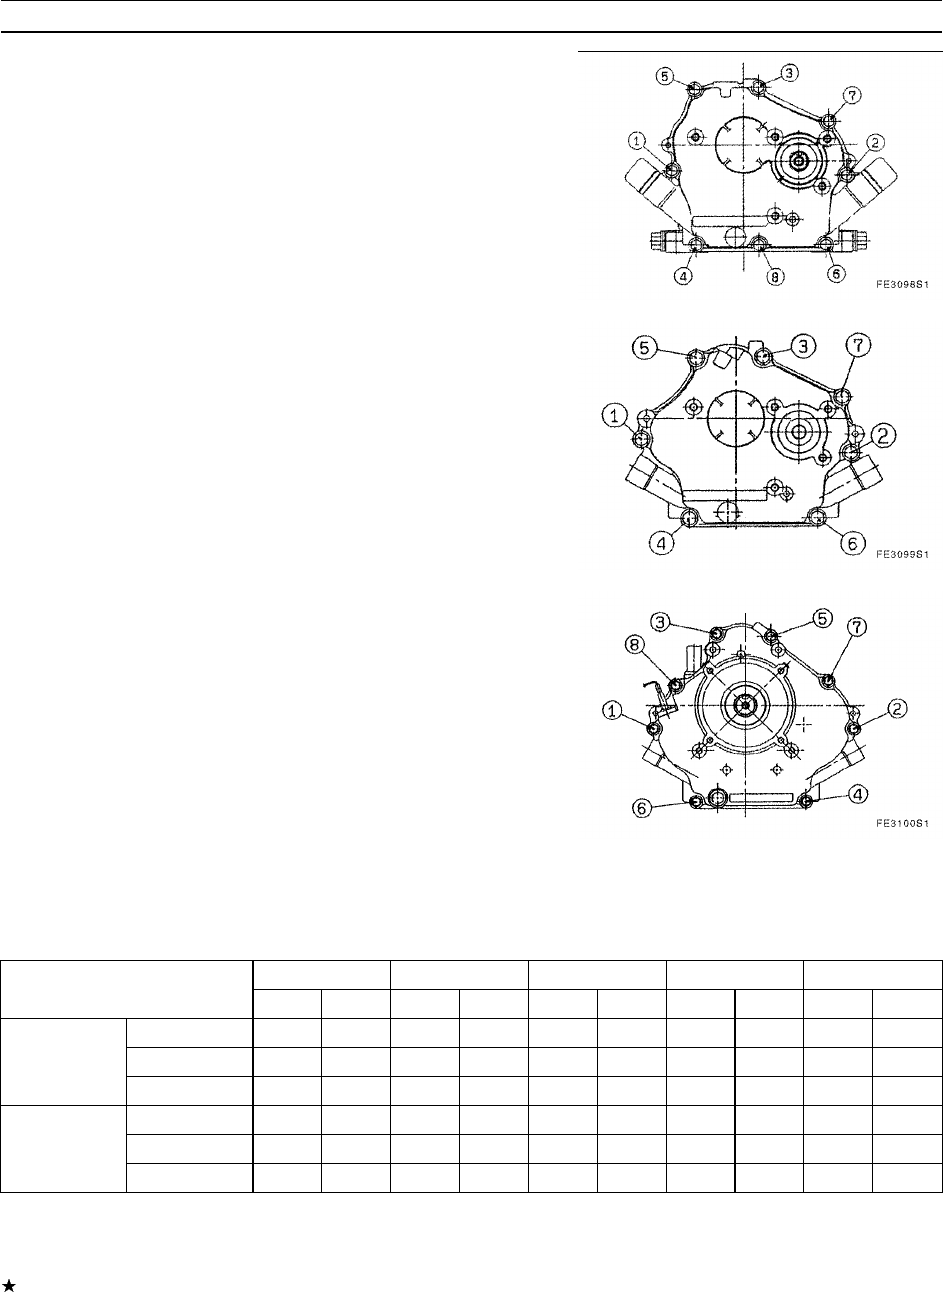
3-44 DISASSEMBLY, REASSEMBLY, INSPECTION, AND MAINTENANCE
Cylinder Block and Crankcase Cover
•Verify that a crankshaft or the camshaft that requires an axial play
adjustment shim is provided with an adjustment shim. (Refer to the
section on Axial Play Adjustment.)
•Verify that the governor weight is closed. Also verify that the governor
arm is positioned so that its front receives the end of the governor
sleeve. (Refer to the section on Governor Mechanism.)
•Install the crankcase cover while paying attention to the meshing of
the governor gear, evenly tighten the retaining bolts in the sequence
given in the diagram, and tighten them to the specified torque. (Refer
to the section on Tightening Torque Specifications.)
Ball Bearing
•The table below lists the areas in which ball bearings are used. An
empty area signifies that the case acts directly as a plain bearing.
Ball Bearing Areas and Nominal Numbers
FE120 FE170 FE250 FE290 FE350, 400
Type D Type G Type D Type G Type D Type G Type D Type G Type D Type G
Crankshaft 6204 6204 6305 6305 6206 6206
Flywheel Side Camshaft
Balancer Shaft - - - - - - - -
Crankshaft 6204 6204 6205 6205 6206 6206 6306 6306 6207 6207
PTO Side Camshaft 6204 6205 6206 6306 6207
Balancer Shaft - - 6202 6202 - - - - - -
Note: The numbers indicate the nominal numbers of the ball bearings.
•To inspect a ball bearing, first clean the bearing in solvent and allow
it to dry. Then, apply engine oil and gently spin it with your hand.
If the bearing is noisy, does not spin smoothly, or has excessive play,
replace the bearing.
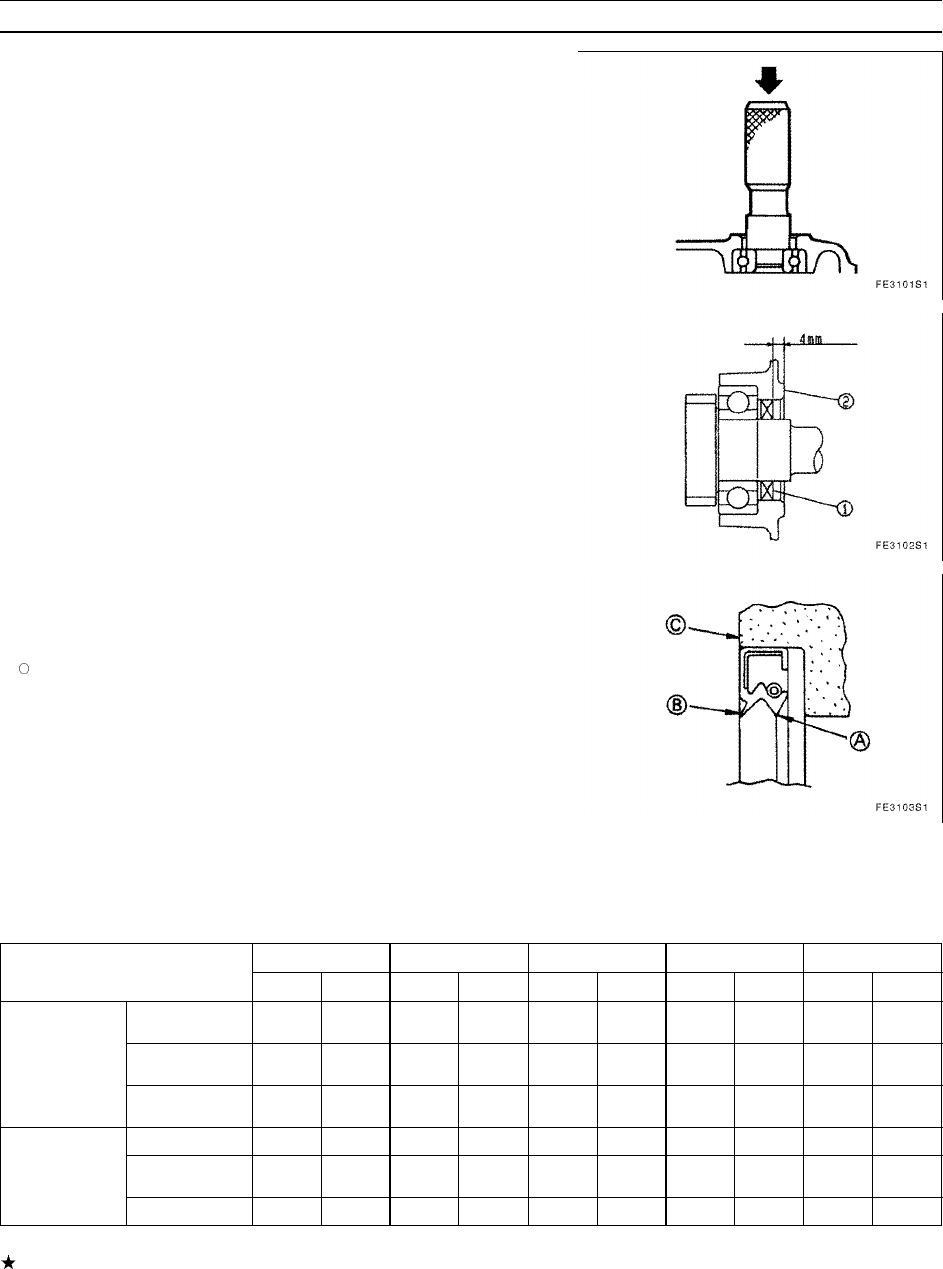
DISASSEMBLY, REASSEMBLY, INSPECTION, AND MAINTENANCE 3-45
Cylinder Block and Crankcase Cover
Replace a ball bearing in the following manner:
•Remove the oil seal. Do not reuse an oil seal once it has been
removed.
•Using a bearing puller as shown in the diagram on the right, remove
the bearing.
•Clean the bearing housing and allow it to dry.
•Apply oil to a new bearing.
•Using a bearing driver, drive the bearing in until it is flush with the
end face of the housing.
Oil Seal
•Once an oil seal is removed, replace it with a new one.
•To install an oil seal, use a press or a seal driver.
•Only on the PTO side of the type D engine, the oil seal must be
driven in 4 mm lower than the crankcase cover surface as shown in
the diagram. Other oil seals must be installed flush with the case
surface.
1. Oil Seal
2. Crankcase Cover
•Fill the area between oil seal lips [A] and [B] with high-temperature
grease before installing the oil seal.
NOTE
Use a guide jig to install the oil seal without damaging its lip.
A: Lip A
B: Lip B
C: Crankcase or Crankcase Cover
Plain Bearing Area Inspection
•Using a cylinder gauge, measure the bore of the plain bearing areas
of the cylinder block and the crankcase cover.
Plain Bearing Area Bore Service Limit (maximum) (Unit: mm)
FE120 FE170 FE250 FE290 FE350, 400
Type D Type G Type D Type G Type D Type G Type D Type G Type D Type G
30.075 30.075 35.075 35.075
Crankshaft (1.184 in) (1.184 in) (1.381 in) (1.381 in)
15.063 15.063 16.063 16.063 20.063 20.063 23.063 23.063 23.063 23.063
Camshaft (0.593 in) (0.593 in) (0.632 in) (0.632 in) (0.790 in) (0.790 in) (0.908 in) (0.908 in) (0.908 in) (0.908 in)
Flywheel Side
(cylinder block)
15.063 15.063
Balancer Shaft – (0.593 in) (0.593 in) – – – – – –
Crankshaft
15.063 16.063 20.063 23.063 23.063
Camshaft (0.593 in) (0.632 in) (0.790 in) (0.908 in) (0.908 in)
PTO Side
(crankcase
cover) Balancer Shaft – – – – – – – –
Note: An empty area signifies that a ball bearing is used.
If the measured value is greater than the service limit, replace the part with a new one.
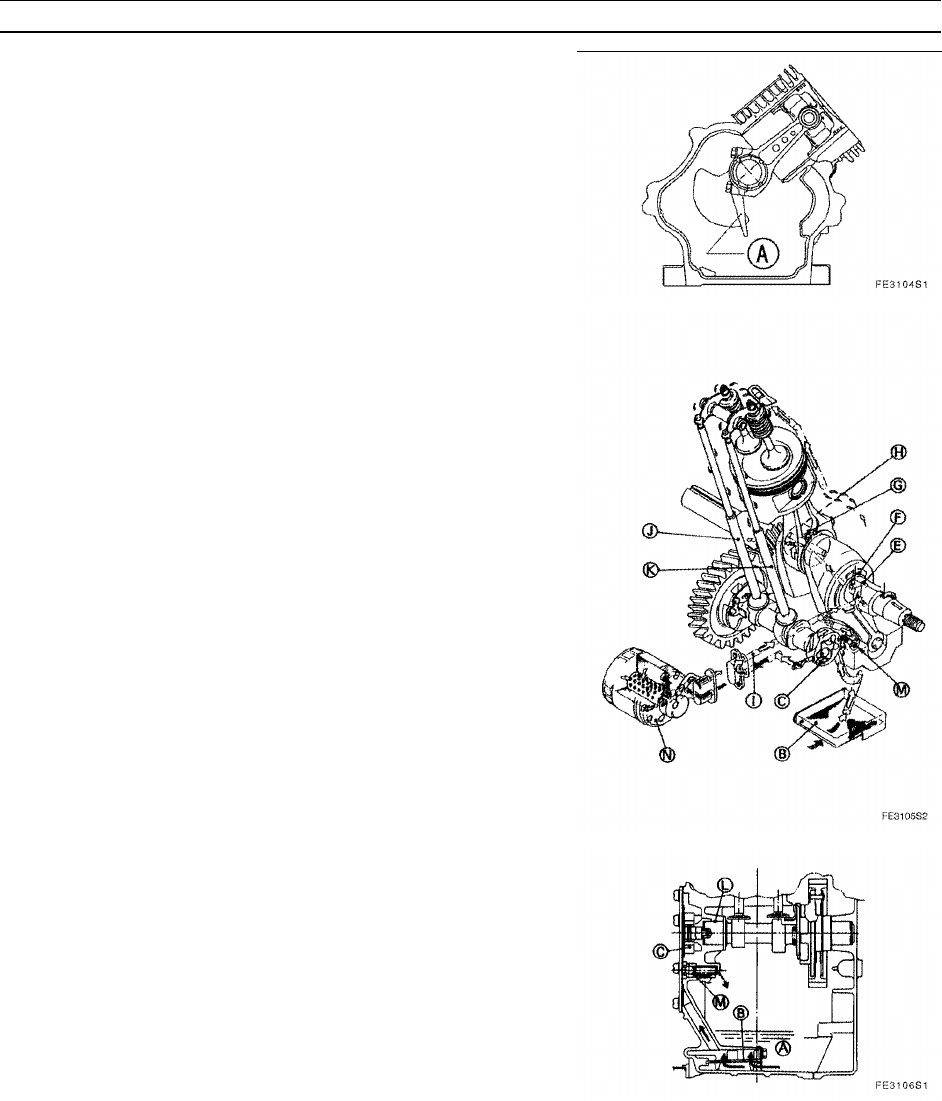
3-46 DISASSEMBLY, REASSEMBLY, INSPECTION, AND MAINTENANCE
Lubrication System
Lubrication Method
For FE120, 170, 250
As shown in the diagram on the right, the revolution of the crankshaft
causes the splash arm that is provided at the big end of the connecting
rod to pick up the engine oil from the crankshaft chamber and splash it
in a spray form to lubricate the internal parts. (Forced splashing type)
For FE290, 350, 400
A forced pumping lubrication method through the use of an oil pump
has been adopted. (Forced pumping type) The oil pump draws in the
oil and pumps the oil through the oil passages described below.
The oil pump is provided with a relief valve at its outlet side. When
the oil pressure is higher than the preset pressure of the relief valve,
the relief valve opens to discharge the oil into the crankcase. When the
oil pressure is lower than the preset pressure, the relief valve closes.
If the oil pressure becomes excessively high, it could break the seal in
the oil passage, critically damaging the engine.
For the oil passage on the FE350 and 400, refer to the following
section: Valve System - HLA.

DISASSEMBLY, REASSEMBLY, INSPECTION, AND MAINTENANCE 3-47
Lubrication System
Oil Pump Disassembly and Reassembly
Disassembly
•Remove the six retaining bolts from the oil pump cover and remove
the oil pump cover, gasket, and plate, in that order.
A: Retaining Bolts
B: Oil Pump Cover
•Remove the inner rotor and outer rotor, in that order.
A: Inner Rotor
B: Outer Rotor
Reassembly
CAUTION
Make sure to install the camshaft before installing the oil
pump. If the camshaft is installed with the oil pump already in
place, it will cause serious damage to the engine.
A: Cutout at the End of Camshaft
B: Protrusion on the Inner Rotor
C: Oil Filter (FE350, 400 only)
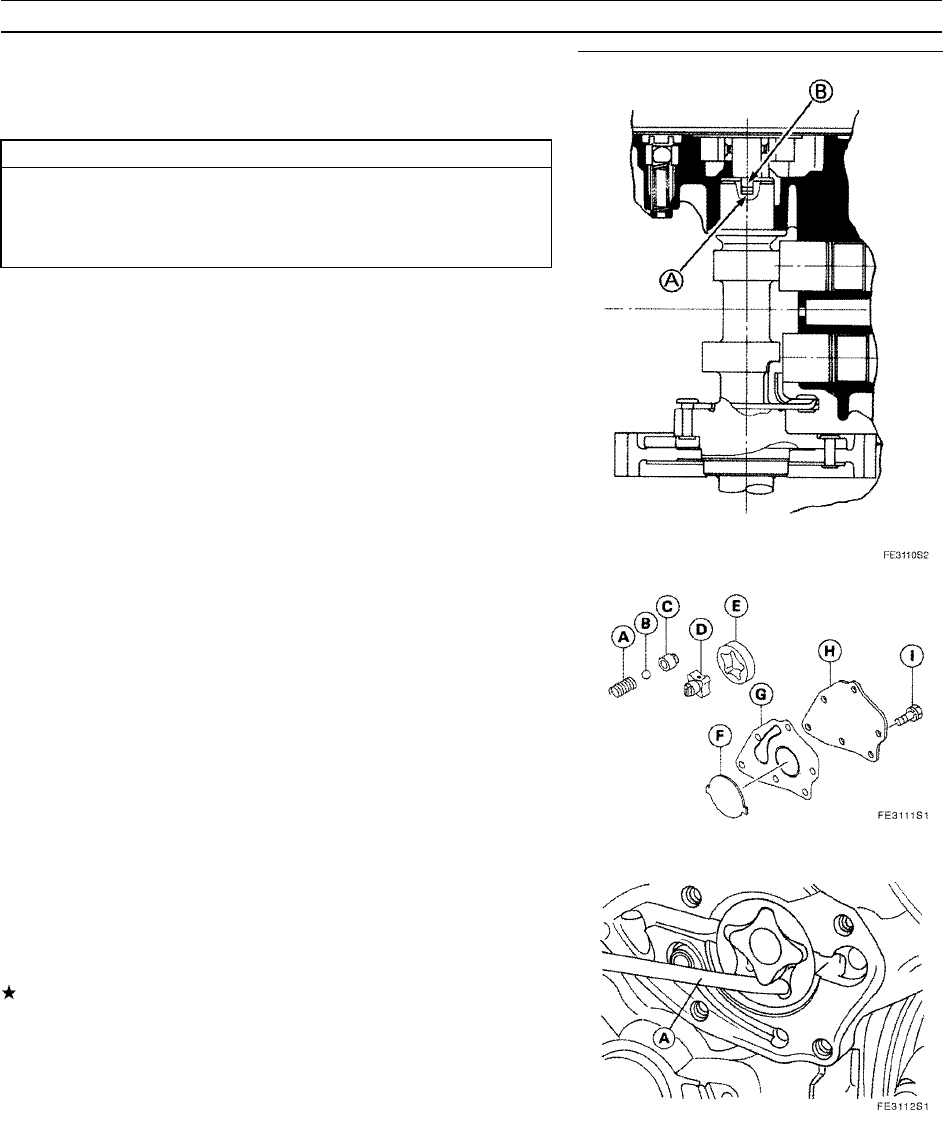
3-48 DISASSEMBLY, REASSEMBLY, INSPECTION, AND MAINTENANCE
Lubrication System
•The reassembly is the reverse order of disassembly.
•Install the outer rotor and the inner rotor, in that order, making sure
to prevent dust from entering the oil pump.
CAUTION
To install the inner rotor, make sure that the protrusion [B] of
the inner rotor properly mates with the cutout [A] at the end
of the camshaft. If they are not mated correctly, it could cause
serious damage.
•On the FE350 and 400, verify that the oil filter [C] is securely fitted.
Oil Pump Inspection
The oil pressure specification is 31.4 kpa (3.2 kg/cm2, 0.46 psi)
minimum at the maximum no-load speed. If the oil pressure is low,
inspect the oil pump and the relief valve.
A: Spring
B: Relief Valve
C: Valve Seat
D: Inner Rotor
E: Outer Rotor
F: Plate
G: Gasket
H: Cover
I: Bolt
•Using a gap gauge, measure the minimum clearance between the
inner and outer rotors.
Inner and Outer Rotor Clearance (maximum) - for FE290, 350, 400
Service Limit: 0.3 mm (0.012 in)
If the measured value is greater than the service limit, replace the
rotors as a set.
A: Gap Gauge

DISASSEMBLY, REASSEMBLY, INSPECTION, AND MAINTENANCE 3-49
Lubrication System
•Using a micrometer, measure the following parts:
Inner Rotor Shaft Diameter (maximum) - for FE290, 350, 400
Service Limit: 12.627 mm (0.4971 in)
Outer Rotor Diameter (maximum) - for FE290, 350, 400
Service Limit: 40.467 mm (1.5932 in)
Outer Rotor Width (maximum) - for FE290, 350, 400
Service Limit 9.920 mm (0.3906 in)
Even if one of the measured values is smaller than the service limit,
replace the rotors as a set.
A: Innter Rotor Shaft Diameter
B: Outer Rotor Diameter
C: Outer Diameter Width
•Inspect the relief valve and the valve seat contact area, and repair or
replace it with a new one if any abnormal condition is present.
•Using a vernier caliper, measure the free length of the relief spring.
Relief Spring Free Length (maximum) - for FE290, 350, 400
Service Limit: 19.0 mm (0.75 in)
If the measured value is smaller than the service limit, replace the
spring.
A: Valve Seat
B: Relief Valve
C: Spring
Oil Level Warning Device
The oil level warning device is incorporated in the electronic ignition
circuit. It consists of the following parts:
A: Igniter (LED: with oil warning light) (separate type)
Controller (LED: with oil warning light) (intergrated type)
B: Ignitioi Coil
C: Flywheel
D: Ignition Plug
E: Oil Level Sensor Switch
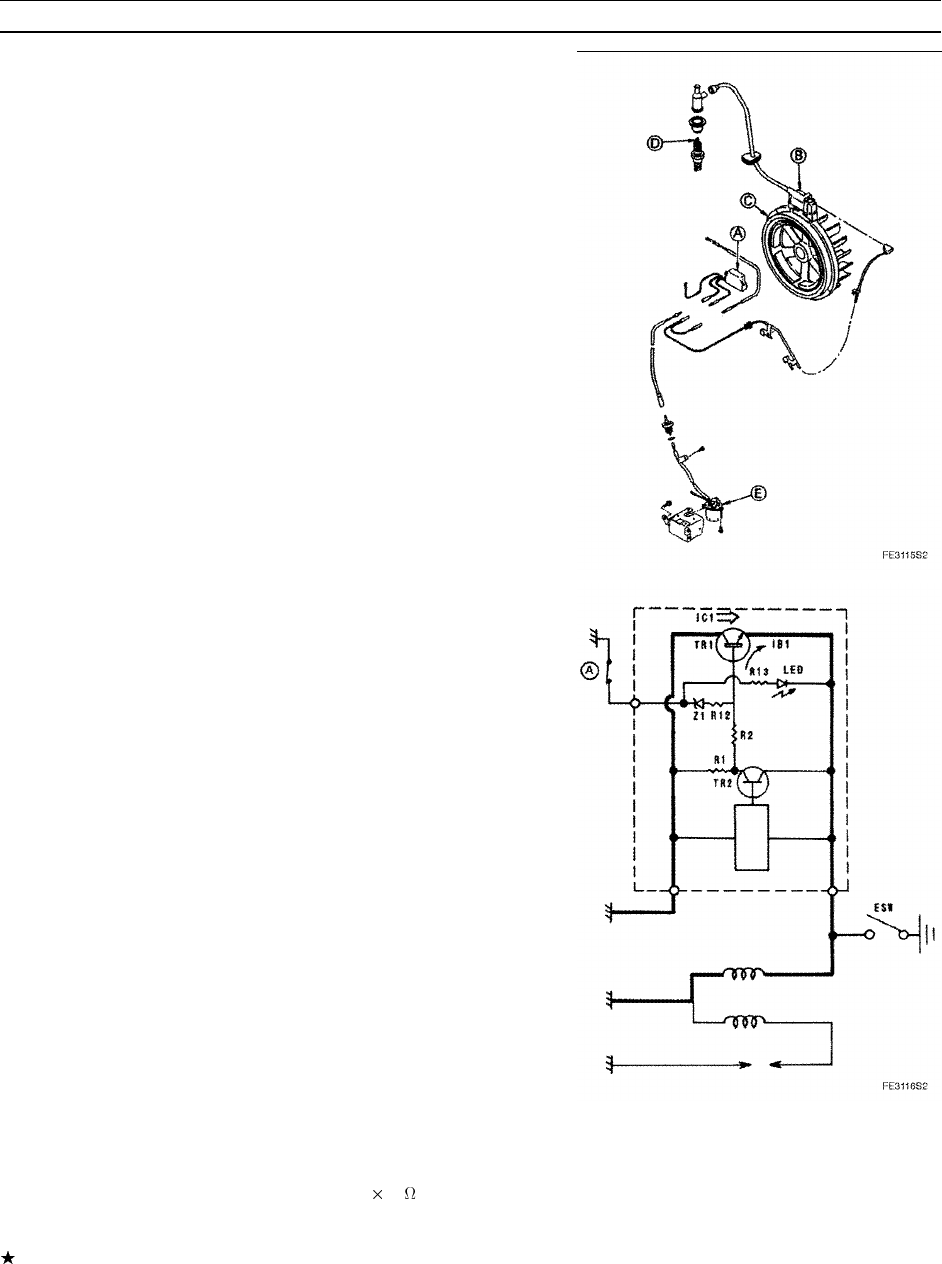
3-50 DISASSEMBLY, REASSEMBLY, INSPECTION, AND MAINTENANCE
Lubrication System
Oil Level Sensor Switch
If the oil level becomes lower than the preset value, the sensor switch
[A] closes. As a result, the base current [IB1] passes through the Zener
diode [Z1] and the resistor [R12] to flow to [TR1] to maintain the circuit.
The base current [IB1] is held by the amplified collector current [IC1],
and as a result, the spark current does not generate, causing the engine
to stop. (Refer to the section on Ignition System for comparison.)
A: Oil Level Sensor Switch
ESW: Engine Switch
Inspection method
•Verify that the oil level of the engine is normal.
•Disconnect the wire from the oil level sensor terminal.
•Set the measurement range of the tester to R 1 and connect one
of the tester leads to the terminal of the sensor and the other end to
ground. The tester should read ∞.
If the tester does not read ∞, the oil level sensor switch is faulty.
•Gently lift the PTO side to tilt the engine.
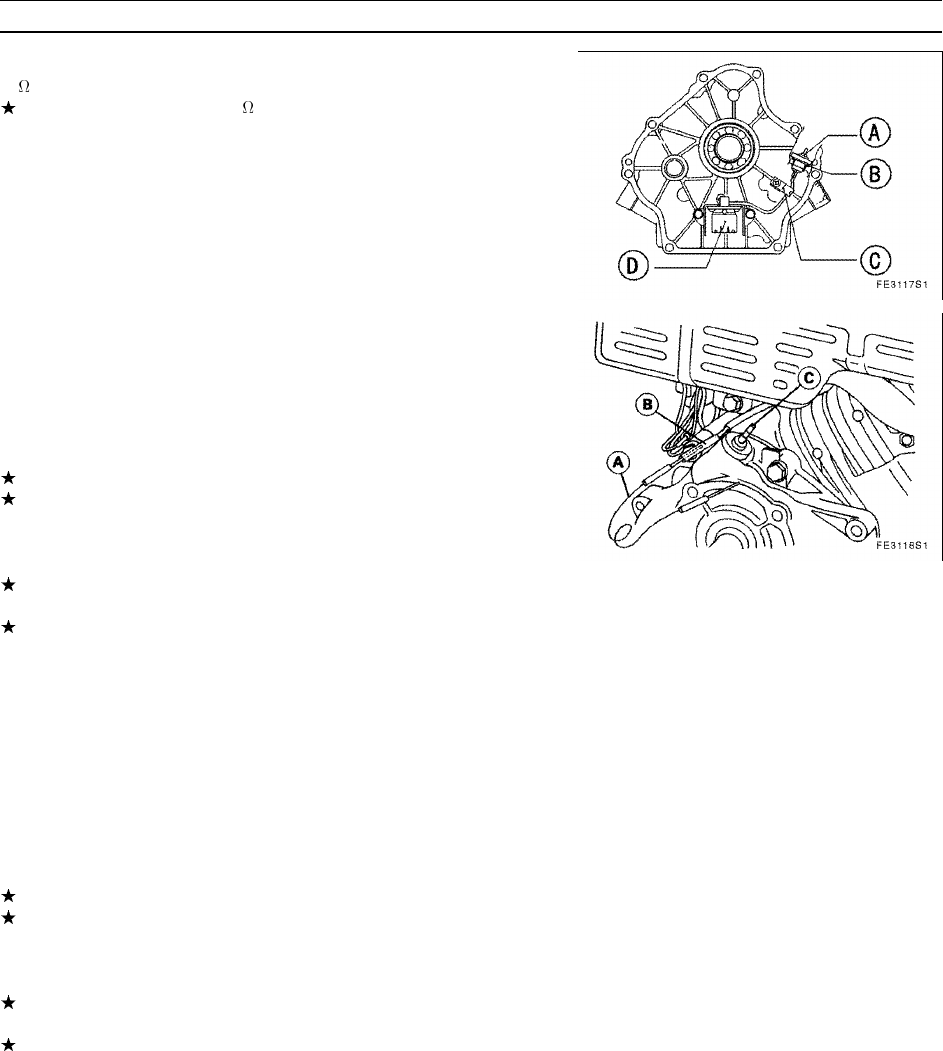
DISASSEMBLY, REASSEMBLY, INSPECTION, AND MAINTENANCE 3-51
Lubrication System
•When the engine is tilted to a certain angle, the tester should read 0
.
If the tester does not read 0 , but remains at ∞, the oil level sensor
switch is faulty.
A: Terminal
B: O-ring
C: Clamp
D: Oil Level Sensor Switch
Igniter (with oil level warning light) Inspection (separate type)
•Verify that the oil level in the engine is normal.
•Disconnect the wire from the oil level sensor terminal.
•Start the engine and operate it at a low speed.
•Connect one of the test leads to the wire that was disconnected in
step 2 above, and the other end to the engine ground to stop the
engine.
If the engine does not stop, inspect the wires and connections.
If the wires and connections are normal, the igniter (with oil level
warning light) is faulty and must be replaced.
•Connect the test leads in the same way as in step 4 above and start
the engine again.
If the oil level warning light illuminates and the engine does not start,
the system is normal.
If the oil level warning light does not illuminate, the oil level warning
light (LED) is faulty and the igniter must be replaced.
A: Test Lead
B: Connection
C: Oil Level Sensor Terminal
Controller (with oil level warning light) inspection (integrated type)
•Verify that the oil level in the engine is normal.
•Disconnect the wire from the oil level sensor terminal.
•Start the engine and operate it at a low speed.
•Connect one of the test leads to the wire that was disconnected in
step 2 above, and the other end to the engine ground to stop the
engine.
If the engine does not stop, inspect the wires and connections.
If the wires and connections are normal, the controller (with oil level
warning light) is faulty and must be replaced.
•Connect the test leads in the same way as in step 4 above and start
the engine again.
If the oil level warning light illuminates and the engine does not start,
the system is normal.
If the oil level warning light does not illuminate, the oil level warning
light (LED) is faulty and the controller must be replaced.
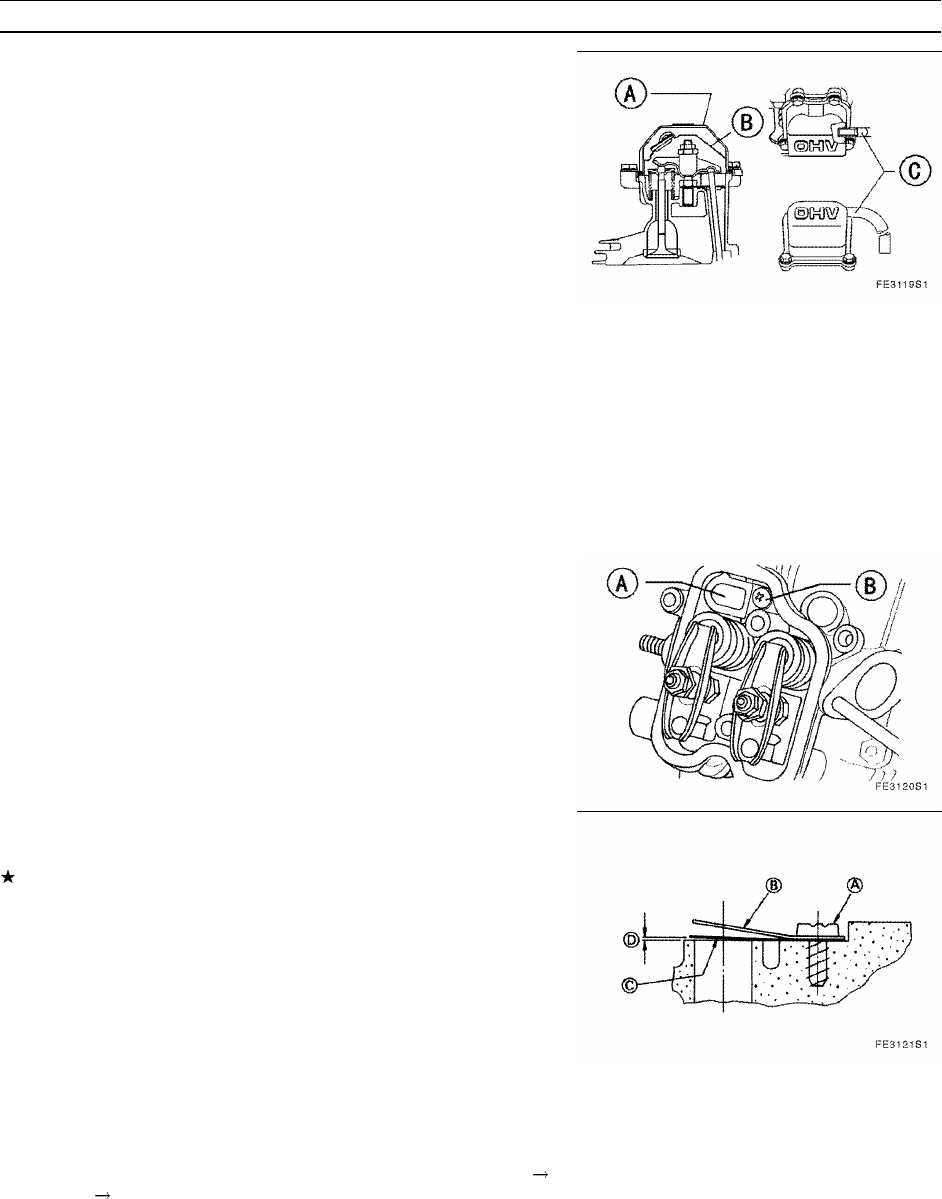
3-52 DISASSEMBLY, REASSEMBLY, INSPECTION, AND MAINTENANCE
Lubrication System
Breather
The function of the breather is to maintain a vacuum in the crankcase
to prevent the engine oil from being discharged outside the engine.
The breather valve regulates the flow of the air that is created by the
movement of the piston by allowing the air to flow from the inside of the
crankcase to the outside, while preventing the air from the outside of
the crankcase to enter inside.
In the rocker case, the maze and the volumetric expansion of the
rocker case causes the air containing oil to separate into oil and air.
The air from the crankcase ultimately flows to the air cleaner and mixes
with the intake air.
Inspection Method
•With the rocker case installed in place, blow air or apply suction to
the breather pipe in order to activate the breather valve. Verify that
the breather valve closes when air is blown into the pipe.
•Remove the retaining screws from the breather valve, and inspect the
valve and valve seat for the presence of damage, cracks, or wear.
•Using a gap gauge, measure the clearance between the breather
valve and valve seat.
A: Rocker Case
B: Breather
C: Oil Level Sensor Terminal
A: Breather Valve
B: Retaining Screw
Breather Valve Air Gap (maximum)
Service Limit: 0.2 mm (0.008 in)
If the air gap is greater than the service limit or if the breather valve
is defective, replace the breather valve with a new one.
A: Retaining Screw
B: Backing Plate
C: Breather Valve
D: Air Gap
Air Filter (cartridge type)
With the cartridge type oil filter, the engine oil change interval can
be extended to 100 hours. (The engine oil must be changed every 50
hours in an engine without the cartridge type filter.)
Ordinarily, the engine oil flows in the following order: entrance [A]
element [B] exit [C].
If the element becomes clogged, the oil flows through the bypass
[D], thus preventing the engine from operating without oil, although the
filtering function is bypassed.

DISASSEMBLY, REASSEMBLY, INSPECTION, AND MAINTENANCE 3-53
Lubrication System
Oil Filter Replacement Procedure
NOTE
Be careful with hot oil to prevent burns.
Always use a genuine Kawasaki oil filter for replacement. Other
brands of oil filters may also fit but they may be of poor quality.
•Drain the engine oil into an appropriate container.
•Remove the oil filter by turning it counterclockwise.
•Apply oil to the seal [E] of the new oil filter.
•Turn the new oil filter clockwise until its seal [E] comes in contact with
the mating surface. Then, turn the oil filter by hand an additional 3/4
turn.
•Pour in the specified amount of engine oil.
•Start the engine, operate it approximately 3 minutes, and then stop
the engine. Inspect around the oil filter to make sure that there is no
oil leak.
•The oil level decreases by an amount that is equivalent to the capacity
of the oil filter. Replenish the oil to this amount.
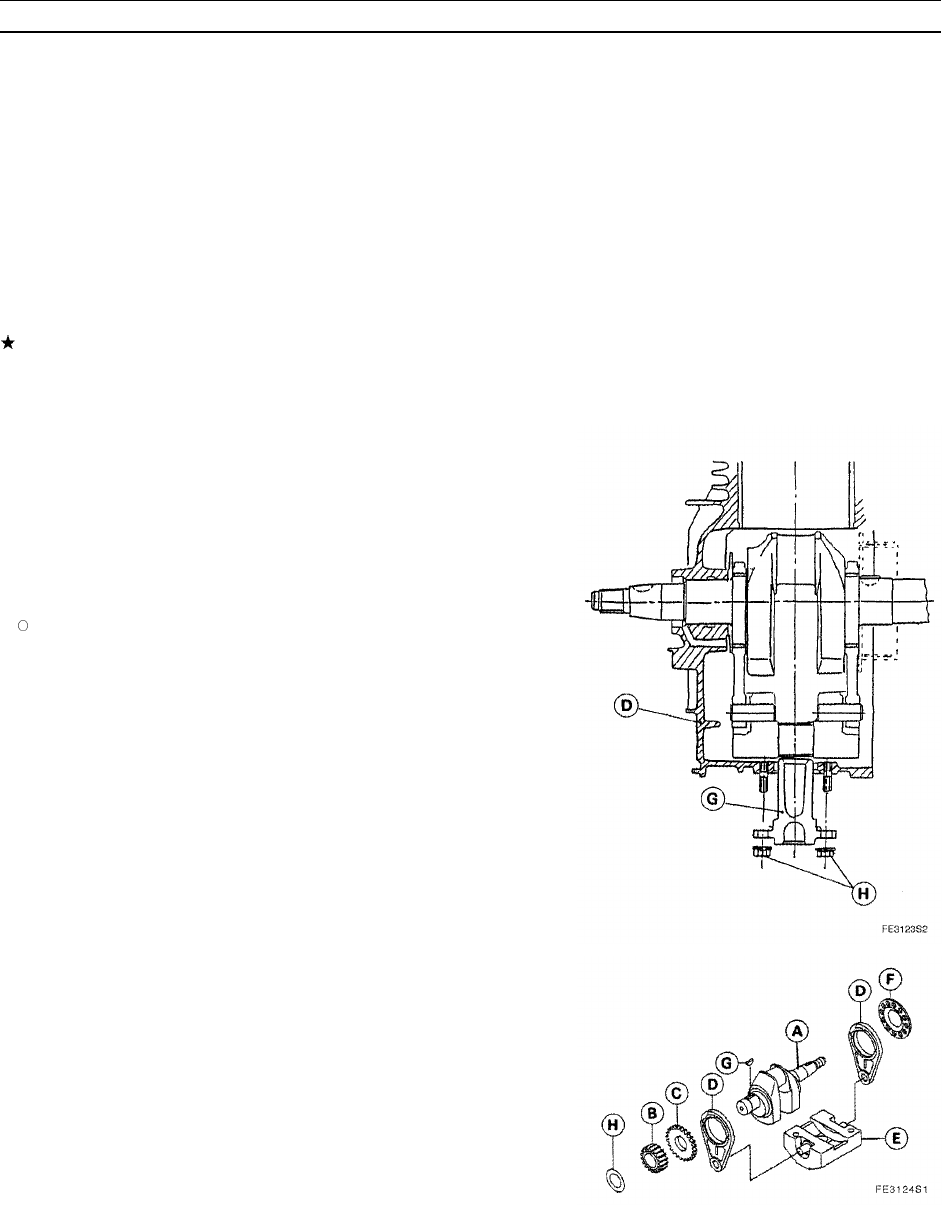
3-54 DISASSEMBLY, REASSEMBLY, INSPECTION, AND MAINTENANCE
Crankshaft
Disassembly
•Remove the crankcase cover.
•If axial play adjustment shims are provided for the crankshaft and the
camshaft, remove the shims and identify them so that they can be
installed correctly during reassembly.
•Place the cylinder block on a base so that the flywheel side faces
down. Keep the tappet (or the HLA on FE350 or 400) pushed up
towards the cylinder head.
•After aligning the matching marks on the crankshaft gear and the
camshaft gear, take out the camshaft.
•Remove the tappet (or the HLA on FE350 or 400) from the crankcase
and place an identification mark on it so that the tappet can be
reinstalled in its original position.
After taking out the HLA of the FE350 or 400, keep the side in which
the snap ring is visible upright. If it is placed on its side or upside
down, the oil that is sealed in the HLA unit could leak out, disabling
the HLA function.
•On the FE250, 290, 350, or 400 engine, remove the retaining nuts
[H] from the balancer guide [G], and pull out the balancer guide from
the crankcase [D].
•Remove the connecting rod bolts and the connecting rod cap.
•Remove the crankshaft from the crankcase. If it is equipped with a
balancer, take out the complete crankshaft assembly as is from the
crankcase.
NOTE
Be careful not to damage the oil seal.
A: Crankshaft
B: Crankshaft Gear
C: Governor Drive Gear
D: Balancer Link Rod
E: Balancer Weight
F: Spacer
G: Key
H: Shim
On Type G, however, the link rod on the crankshaft gear side cannot
be disassembled because the crankshaft gear is pressed in.
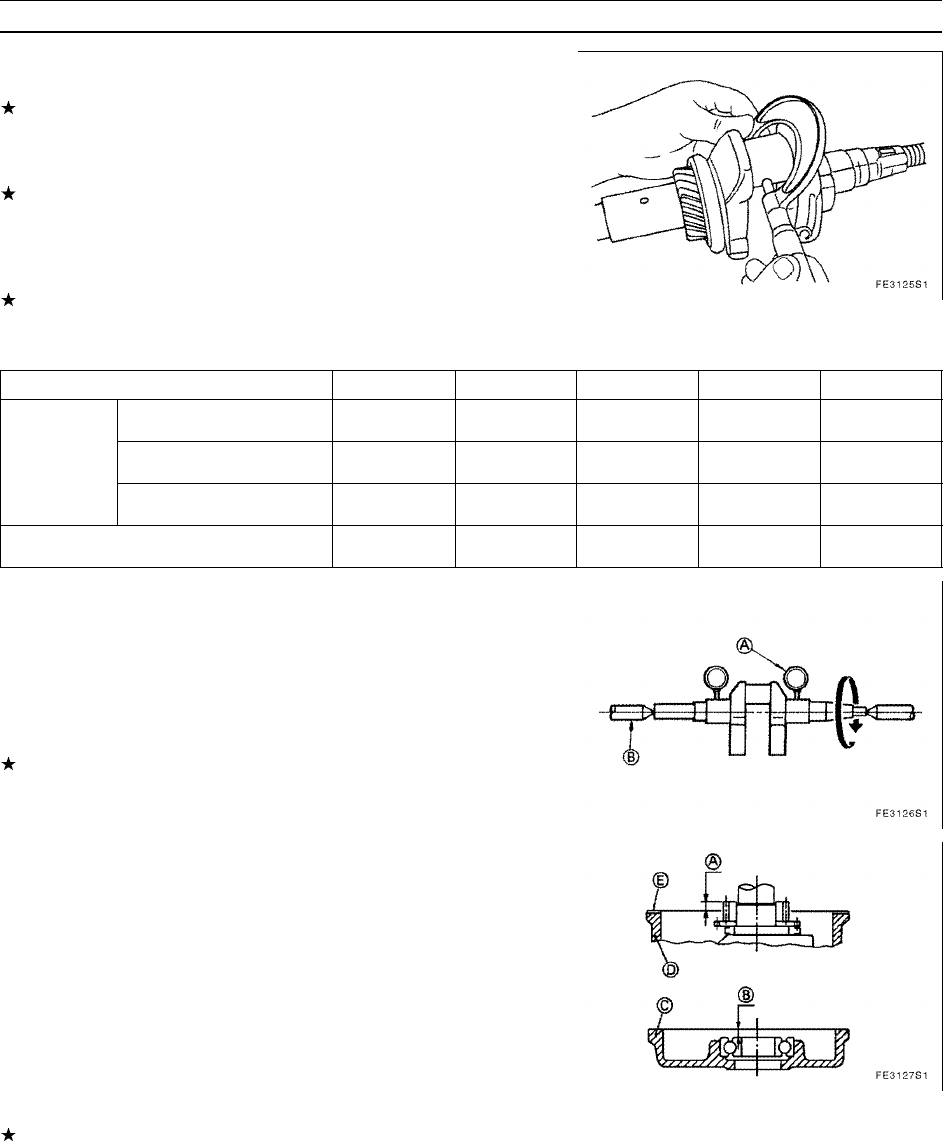
DISASSEMBLY, REASSEMBLY, INSPECTION, AND MAINTENANCE 3-55
Crankshaft
Crankshaft Inspection
•Inspect the crank pin and the journal for galling, wear, or rust.
If the crank pin exhibits damage as described above, carefully inspect
and repair the big end of the connecting rod, or replace the connecting
rod or the crankshaft with a new part.
•Inspect the crankshaft gear for abnormal wear or damaged teeth.
If the crankshaft gear is worn as described above, replace the
crankshaft gear with a new one.
•Using a micrometer, measure the diameter of both journals of the
crankshaft, the diameter of the journal for the balancer link rod, and
the diameter of the crank pin in several places.
If the measured value is smaller than the service limit given below,
replace the crankshaft with a new one.
Crankshaft Journal Diameter Service Limit (minimum) (unit: mm)
FE120 FE170 FE250 FE290 FE350, 400
19.930 24.930 29.930 29.930 34.930
TPO Side (0.7846 in) (0.9815) (1.1783 in) (1.1783 in) (1.3752 in)
19.930 24.930 29.930 29.930 34.930
Flywheel Side (0.7846 in) (0.9815) (1.1783 in) (1.1783 in) (1.3752 in)
Journal
Diameter
46.924 46.924 49.924
Balancer Link Rod Journal – – (1.8474 in) (1.8474 in) (1.9655 in)
25.944 28.944 33.944 35.444 37.444
Crankpin Diameter (1.0214 in) (1.1395 in) (1.3394 in) (1.3954 in) (1.4742 in)
•Using center support tools [B] as shown in the diagram, support both
ends of the crankshaft. Place a dial gauge [A] on the journal and
slowly turn the crankshaft to measure the fluctuation (the variance
between the maximum and minimum values) of the dial gauge, which
is the runout of the crankshaft.
Crankshaft Runout Service Limit (maximum)
Service Limit: 0.5 mm (0.02 in) (TIR)
If the measured value is greater than the service limit, replace the
crankshaft with a new one.
Crankshaft Axial Play Adjustment
If a part that affects the axial play has been replaced, the axial play
must be adjusted as described below. Shim adjustment is not available
on the FE120 and 170. Note: Except the FE170 for pump application.
•Place a gasket on the crankcase and measure and record the
distance from the gasket surface to the crankshaft gear surface
(measurement A).
•Measure and record the distance from the crankcase cover mating
surface to the end face of the crankshaft bearing inner race (mea-
surement B).
•Place these measurements on the crankshaft shim selection table,
and trace the respective line.
•Select the next thinner shim that appears on the shim selection table.
For example, on the FE290, if measurement [A] is 14.62 mm (0.576
in) and measurement [B] is 16.18 mm (0.637 in), the correct shim
thickness is t = 1.33 mm.
A: Measurement [A]
B: Measurement [B]
C: Crankcase Cover
D: Crankcase
E: Gasket
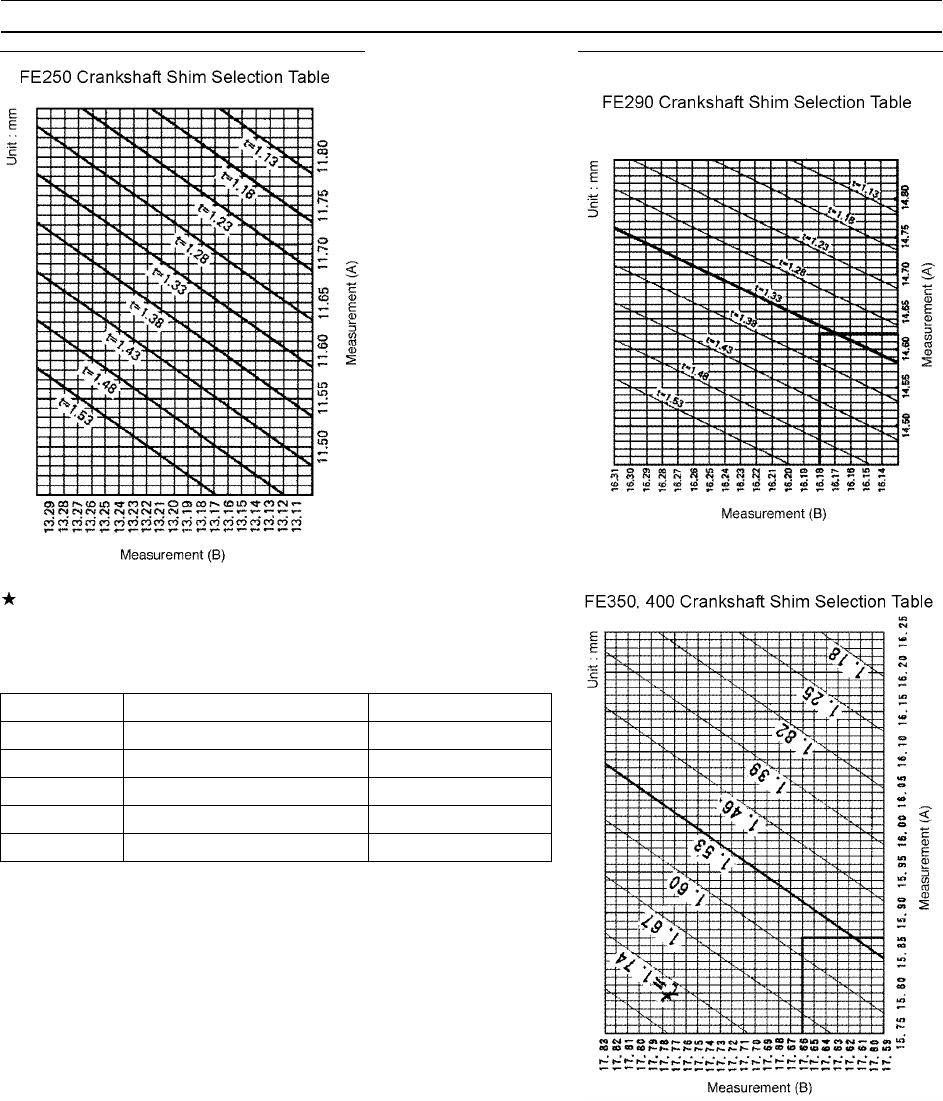
3-56 DISASSEMBLY, REASSEMBLY, INSPECTION, AND MAINTENANCE
Crankshaft
For example, on the FE350, if measurement [A] is 15.87 mm and
measurement [B] is 17.66 mm, the correct shim thickness is t = 1.53
mm.
Crankshaft Axial Play Standard and Service Limit (maximum) (unit: mm)
Standard Service Limit
FE120 0 ~ 0.24 (0 ~ 0.009 in) 0.5 (0.0197 in)
FE170 0.03 ~ 0.30 (0.0011 ~ 0.0118 in) 0.5 (0.0197 in)
FE250 0.05 ~ 0.17 (0.0020 ~ 0.0067 in) 0.35 (0.0138 in)
FE290 0.09 ~ 0.20 (0.0035 ~ 0.0079 in) 0.35 (0.0138 in)
FE350, 400 0.08 ~ 0.22 (0.0031 ~ 0.0087 in) 0.35 (0.0138 in)
Reassembly
The reassembly is the reverse order of disassembly.
•Clean the mating surfaces of the crankcase and the crankcase cover
of any residues and install a new gasket.
•Apply high-temperature grease to the lip of the crankcase oil seal.
(Refer to the section on Oil Seal.) Apply oil to the journals of each
part.
•On the FE221 ~ 400 with a reciprocal movement balancer, install the
reciprocal movement balancer parts on the crankshaft. (Refer to the
section on Balancer.)
•Install the crankshaft in the crankcase, making sure not to damage the
oil seal lip with the key groove at the tapered area of the crankshaft.

DISASSEMBLY, REASSEMBLY, INSPECTION, AND MAINTENANCE 3-57
Balancer
Engine vibration is generated primarily by the inertia that is created
through the reciprocal movement mass such as the piston, piston pin,
piston ring, and the small end of the connecting rod.
On the FE400, 350, 290, and 250, a reciprocal movement balancer
system in which balance weight is linked to the crankshaft has been
adopted. This is the most effective method for canceling the inertia that
is generated by the reciprocal movement mass, thus reducing vibration.
A: Crankshaft
B: Link Rod
C: Spacer
D: Crankcase
E: Balance Weight
F: O-ring
G: Balancer Guide
H: Nut
The FE170 can be provided with a uniaxial rotation balancer as a
factory option.
A: Crankshaft
B: Balancer Drive Gear
C: Balancer Shaft
D: Balancer Gear
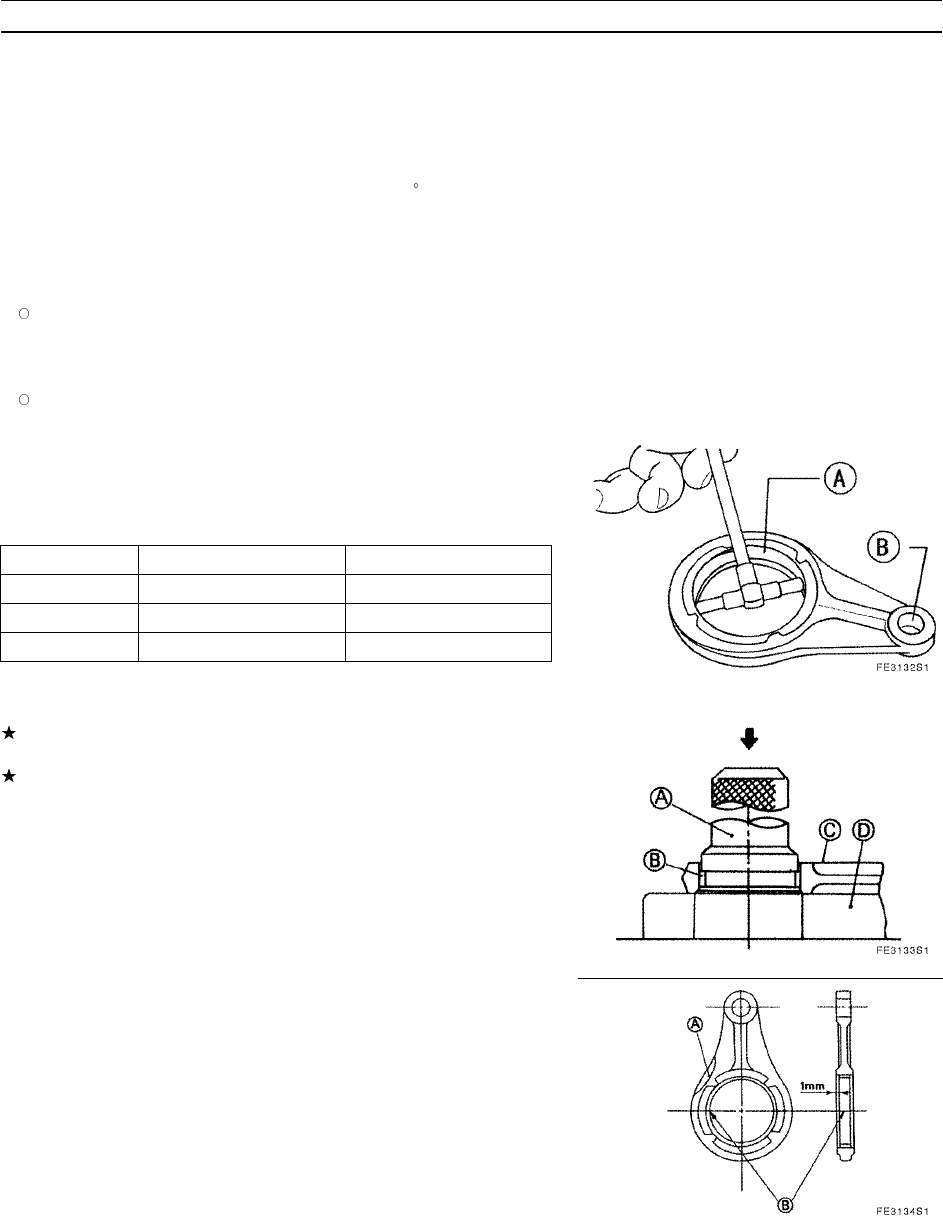
3-58 DISASSEMBLY, REASSEMBLY, INSPECTION, AND MAINTENANCE
Balancer
Reciprocal Movement Balancer (FE400, 350, 290, 250)
Disassembly
•Remove the retaining nuts from the balancer guide and pull out the
balancer guide from the crankcase.
•Remove the connecting rod bolt and remove the connecting rod cap.
•Turn the crankshaft to be near the top-dead-center to push the
connecting rod up. Then, turn the crankshaft 90 counterclockwise
as viewed from the PTO side. Remove the crankshaft (together with
the balancer) from the crankcase, through an area in which it does
not interfere with the connecting rod.
NOTE
Be careful not to damage the oil seal when removing the crankshaft.
•Remove the balancer link rod from the crankshaft.
NOTE
The balancer link rod on the PTO side cannot be disassembled
because the crankshaft gear is pressed in.
Inspection and Repair
•Using a micrometer, measure the bearing bore of the big and small
ends of the link rod in several places.
Link Rod Bearing Bore Service Limit (maximum) (Unit: mm)
Small End Bore Big End Bore
FE250 12.057 (0.4747 in) 47.106 (1.855 in)
FE290 12.064 (0.4750 in) 47.126 (1.855 in)
FE350, 400 12.057 (0.4747 in) 50.106 (1.973 in)
A: Link Rod Big End Bearing Bore
B: Small End Bearing Bore
If the measured value is greater than the service limit, replace the
link rod. On the FE290, the bushing can be replaced.
Replace the link rod bushing as follows:
•Support the big end of the link rod as described in the diagram, and
use a driver to pull the bushing out.
A: Bushing Driver
B: Bushing
C: Link Rod
D: Tool Base
•Wash the disassembled parts and allow them to dry.
•Apply engine oil to the new bushing.
•Using a bushing driver, install the bushing so that the gap of the
bushing is positioned as shown in the diagram. Drive the bushing so
that it is 1mm deeper than the end face of the link rod.
A: Depression
B: Bushing Gap

DISASSEMBLY, REASSEMBLY, INSPECTION, AND MAINTENANCE 3-59
Balancer
•Using a micrometer, measure the balancer guide hole bore of the
balance weight in several places.
Balancer Guide Hole Bore Service Limit (maximum)
FE250, 290: 26.118 mm (1.0283 in)
FE350, 400: 26.097 mm (1.0274 in)
If the measured value is greater than the service limit, replace the
balance weight. On the FE350 and 400, the bushing can be replaced.
A: Guide Hole
B: Balance Weight
NOTE
To install a new bushing, drive it in so that the end face of the
bushing is flush with the end face of the balance weight as shown
in the diagram on the right.
A: Bushing
B: Balance Weight
•Using a micrometer, measure the diameter of the balancer guide in
several places.
Balancer Guide Diameter Service Limit (minimum)
FE250, 290, 350, 400: 25.907 mm (1.0593 in)
If the measured value is smaller than the service limit, replace the
balancer guide with a new one.
Reassembly
•Make sure to apply fresh engine oil to the sliding and rotating areas.
2. Install the balancer on the crankshaft in the following order:
Balance weight link rod spacer
NOTE
Install the spacer with its chamfered end facing the link rod.
A Balancer Weight
B: Spacer
C: Link Rod
Uniaxial Rotation Balancer (FE170)
Disassembly
•Remove the crankcase cover and align the matching marks on the
balance drive gear of the crankshaft and the balance gear.
•Take out the balancer shaft from the crankcase.
Inspection
•Inspect the balancer gear for wear or broken teeth.
If the gear is excessively worn, replace the balancer shaft.
•Using a micrometer, measure the diameter of the balancer journal in
several places.

3-60 DISASSEMBLY, REASSEMBLY, INSPECTION, AND MAINTENANCE
Balancer
Balancer Shaft Journal Diameter Service Limit (minimum)
PTO Side Flywheel Side
FE170: 14.943 mm (0.5883 in) 14.933 mm (0.5879 in)
If the measured value is smaller than the service limit, replace the
balancer shaft.
* For details on the bore of the balancer shaft bearing hole, refer to
the section on Crankcase/Plain Bearing.
A: Crankshaft
B: Balancer Gear
C: Matching Mark
Reassembly
•Install the balancer shaft in the crankcase by aligning the matching
mark on the balancer gear with the matching mark on the balancer
drive gear of the crankshaft.
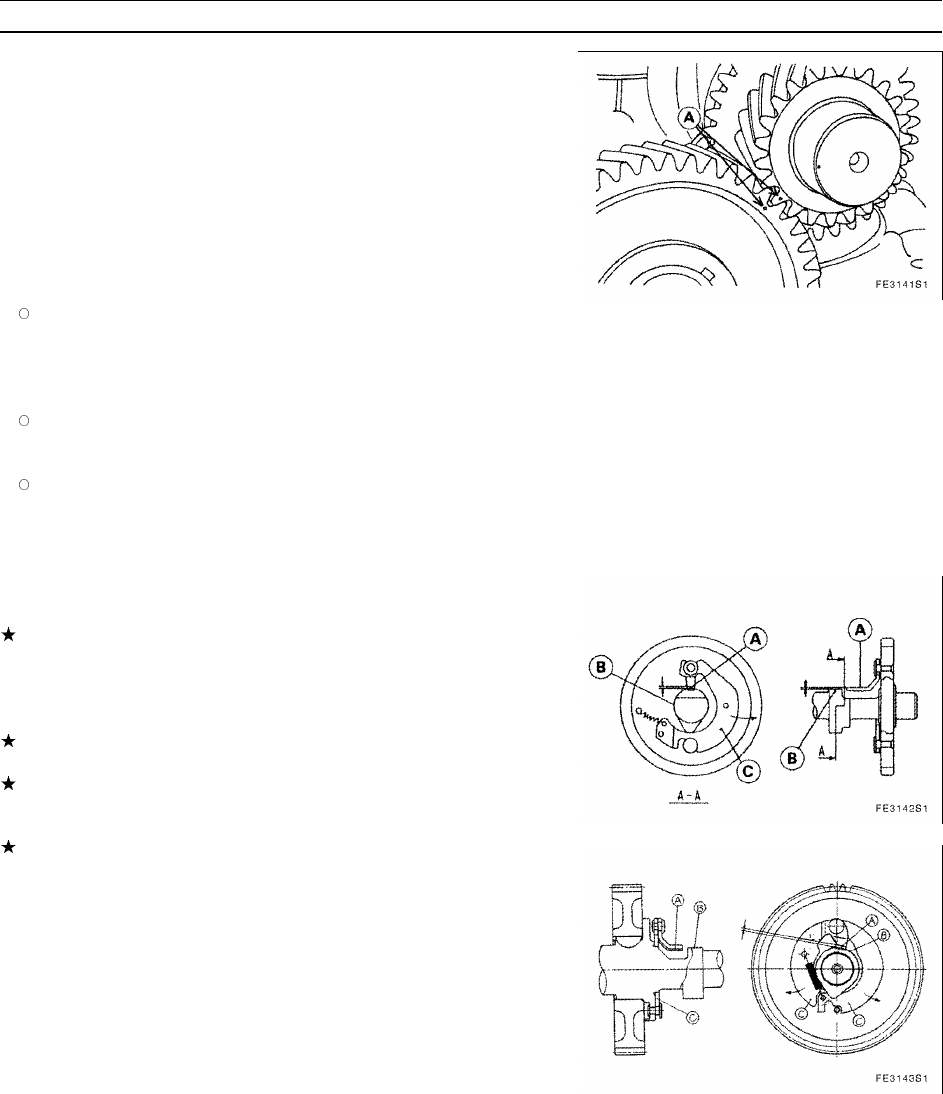
DISASSEMBLY, REASSEMBLY, INSPECTION, AND MAINTENANCE 3-61
Camshaft
Disassembly
•Remove the crankcase cover.
•If axial play adjustment shims are provided for the crankshaft and the
camshaft, remove the shims and identify them so that they can be
installed correctly during reassembly.
•Place the cylinder block on a base so that the flywheel side faces
down. Keep the tappet (or the HLA on FE350 or 400) pushed up
towards the cylinder head.
•After aligning the matching marks on the crankshaft gear and the
camshaft gear, take out the camshaft.
NOTE
Clean the mating surfaces of the crankcase and the crankcase
cover of any gasket residues.
•Take out the tappet or the HLA from the crankcase.
NOTE
After removing the tappet, place marks on them to identify the
intake and exhaust tappets so that they can be reinstalled in their
original positions.
Keep the end of the HLA in which the snap ring is visible upright.
If it is placed on its side, the oil that is sealed in the unit could leak
out, disabling the HLA function.
A: Matching Marks
Inspection
•Inspect the camshaft and cam gear for any broken teeth or wear.
If they are abnormally worn or have broken teeth, replace the
camshaft with a new one.
•Inspect the camshaft to make sure that its automatic compression
Reduction (ACR) function operates smoothly and does not have any
damage or abnormal wear.
When the weight [C] is closed, if the top of the arm [A] is lower than
the base [B], replace the ACR with a new one.
When the weight [C] is pulled entirely outward with your finger, if the
top of the arm [A] is higher than the cam base [B], replace the ACR
with a new one.
If ACR parts are worn, replace the ACR with a new one.
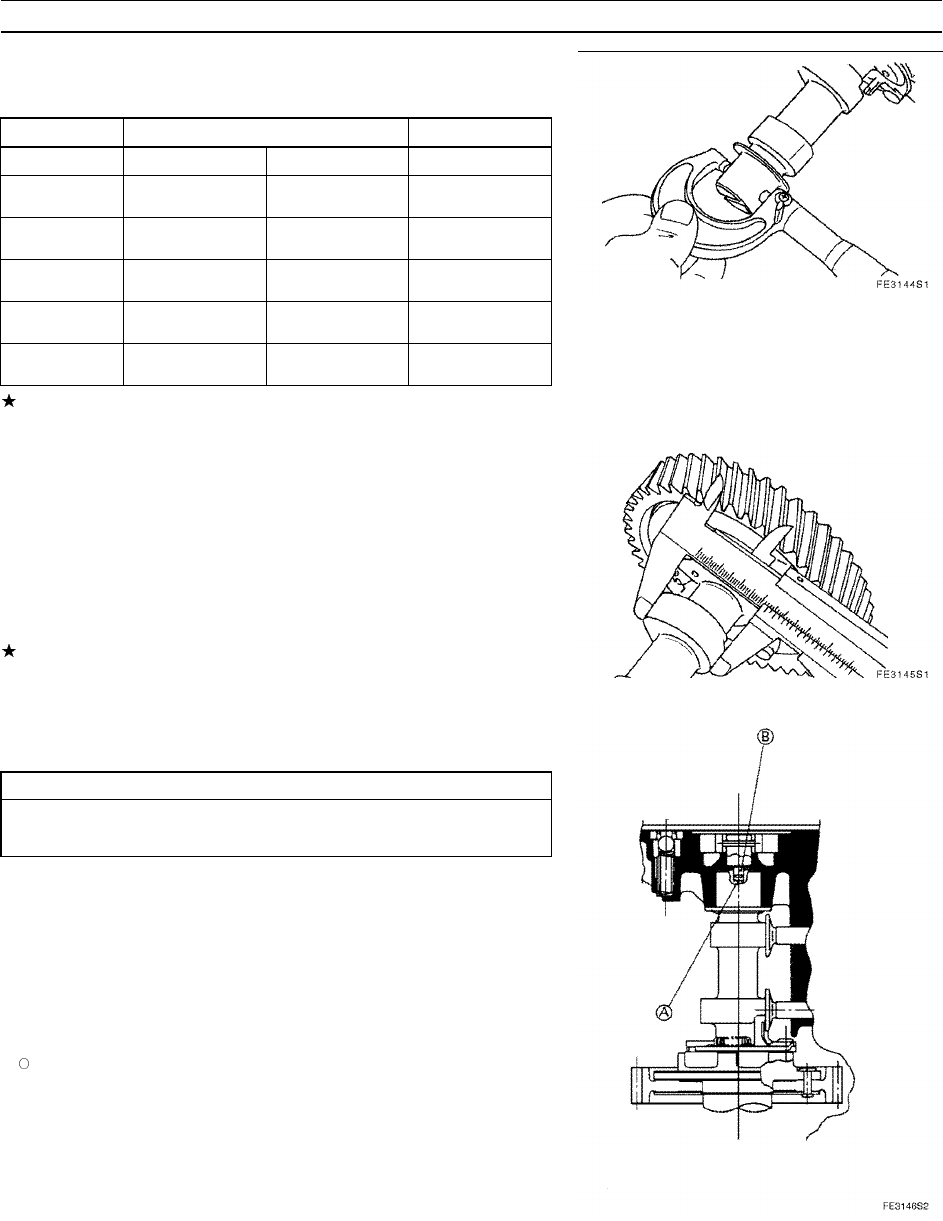
3-62 DISASSEMBLY, REASSEMBLY, INSPECTION, AND MAINTENANCE
Camshaft
•Using a micrometer, measure the camshaft journal in several places.
Camshaft Journal Diameter Service Limit (minimum) (Unit: mm)
PTO Side Flywheel Side
Type D Type G Type D, G
14.910 19.930 14.910
FE120 (0.5870 in) (0.7846 in) (0.5870 in)
15.910 24.930 15.910
FE170 (0.6264 in) (0.9815 in) (0.6264 in)
19.927 29.930 22.927
FE250 (0.7845 in) (1.1783 in) (0.9026)
22.927 29.930 22.927
FE290 (0.9026 in) (1.783 in) (0.9026 in)
22.927 34.930 22.927
FE350, 400 (0.9026 in) (1.3752 in) (0.9026 in)
If the measured value is smaller than the service limit, replace the
camshaft with a new one.
•Using a vernier caliper, measure the overall height of the cam of the
camshaft.
Cam Overall Height Service Limit (minimum) - for Intake and Exhaust
FE120: 26.157 mm (1.0298 in)
FE170: 30.024 mm (1.1820 in)
FE250: 31.04 mm (1.2220 in)
FE290: 32.70 mm (1.2874 in)
FE350, 400: 33.24 mm (1.3087 in)
If the measured value is smaller than the service limit, replace the
camshaft with a new one.
Reassembly
•Make sure to reinstall the camshaft with the oil pump removed.
CAUTION
If the camshaft is reinstalled with the oil pump attached to it,
it will cause serious damage to the engine.
•Place the cylinder block on a base with the flywheel side facing down.
•Reinstall the tappets or the HLAs in their original positions in
accordance with the intake and exhaust identification marks. Push
the tappets or the HLAs all the way against the cylinder head so that
they will not obstruct the installation of the camshaft.
•With the matching marks of the crankshaft gear and the camshaft
gear aligned, install the camshaft in the crankcase.
NOTE
On the FE290, FE350, and FE400, verify that the tab [B] of the
oil pump is securely fitted into the groove [A] at the end of the
camshaft.
A: Groove at end of camshaft
B: Oil Pump Tab

DISASSEMBLY, REASSEMBLY, INSPECTION, AND MAINTENANCE 3-63
Camshaft
A: Matching Marks
Camshaft Axial Play Adjustment
If a part that affects the axial play has been replaced, the axial play
must be adjusted as described below.
Shim adjustment is not available on the FE120 and 170.
•Place a gasket on the crankcase and measure and record the
distance from the gasket surface to the crankshaft gear surface
(measurement A).
A Measurement [A]
B: Measurement [B]
C: Crankcase Cover
D: Crankcase
E: Gasket
•Measure and record the distance from the crankcase cover mating
surface to the end face of the crankshaft bearing inner race (mea-
surement B).
•Apply these measurements on the crankshaft shim selection table,
and trace the respective line.
•Select the next thinner shim that appears on the shim selection table.
For example, on the FE290, if measurement [A] is 14.62 mm and
measurement [B] is 16.24 mm, the correct shim thickness is t =1.38
mm.
NOTE
The FE290D camshaft has no shim adjustment.
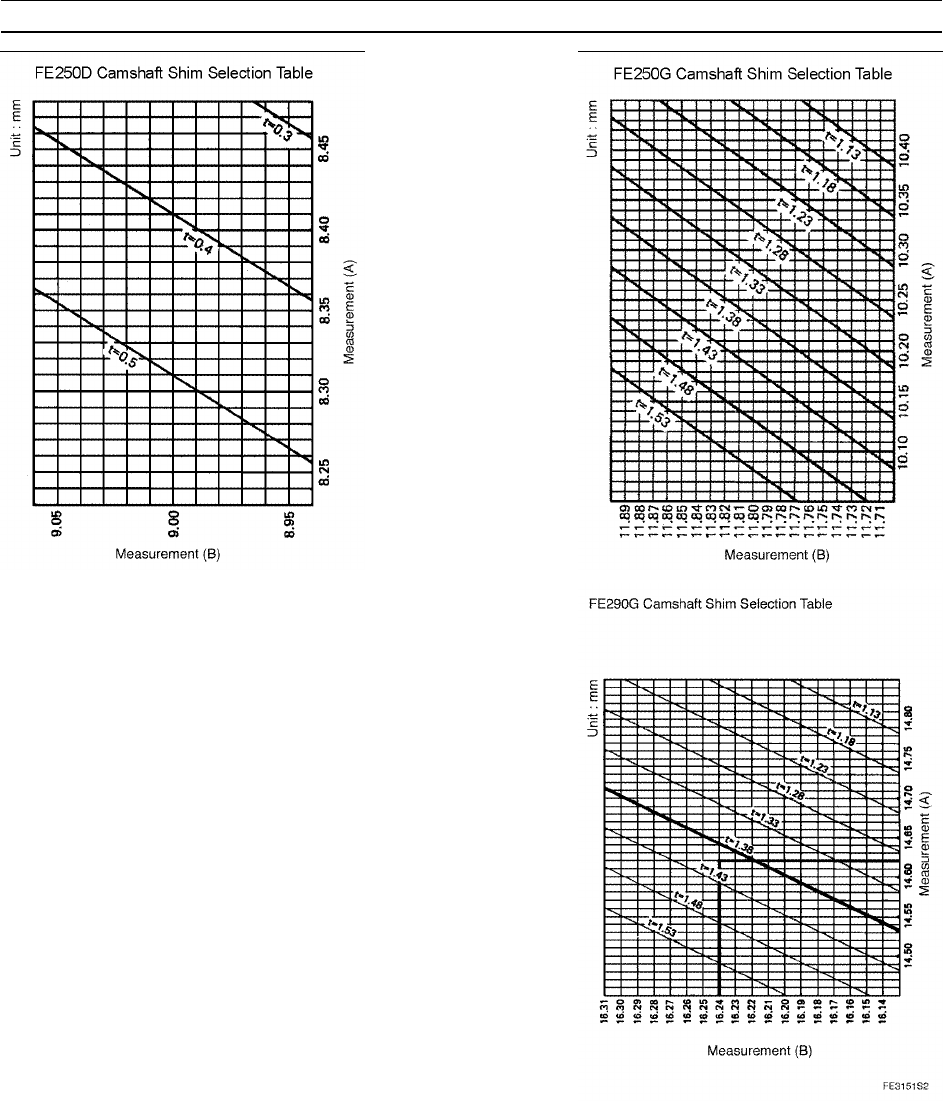
3-64 DISASSEMBLY, REASSEMBLY, INSPECTION, AND MAINTENANCE
Camshaft
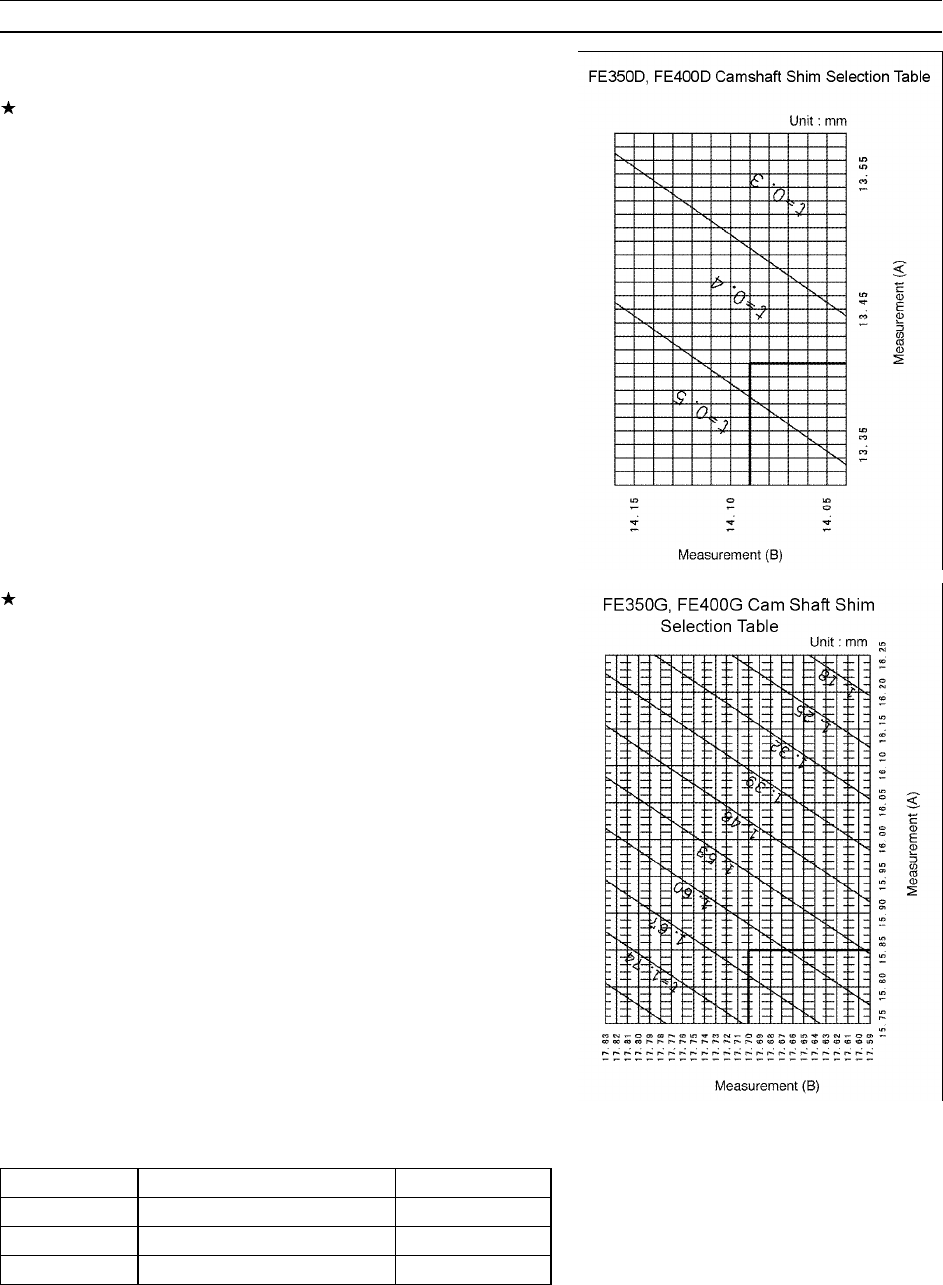
DISASSEMBLY, REASSEMBLY, INSPECTION, AND MAINTENANCE 3-65
Camshaft
Apply these measurements on the crankshaft shim selection table,
and select the next thinner shim.
For example, on the FE350D, if measurement [A] is 13.41 mm and
measurement [B] is 14.09 mm, the correct shim thickness is t = 0.4
mm.
For example, on the FE350G, if measurement [A] is 15.85 mm and
measurement [B] is 17.70 mm, the correct shim thickness is t =1.60
mm.
Cam Shaft Axial Play Standard and Service Limit (maximum)
- for Type G (Unit: mm)
Srandard Service Limit
FE120, 170 0.08 ~ 0.34 (0.0031 ~ 0.0134 in) 0.50 (0.0197 in)
FE250 0.05 ~ 0.17 (0.0020 ~ 0.0067 in) 0.35 (0.0138 in)
FE290, 350, 400 0.07 ~ 0.21 (0.0028 ~ 0.0083 in) 0.35 (0.0138 in)