Kenetics Innovations HH-MR3 Volare HH-MR3 Reader User Manual
Kenetics Innovations Pte Ltd Volare HH-MR3 Reader
User Manual

Kenetics HH-MR3 Reader
Quick Start Guide
Document Version: 1.00
Release: 2016 Jan
Prepared By: Approved By:
Zou QiZhang

1 Packing Lists, Accessories and CD-Rom Contents
1.1 Basic Packing List
1 x HH-MR3 Reader
1 x CD-ROM
1 x USB cable
1 x rechargeable 7.2V battery pack
1.2 Accessories
AC/DC Universal Power adapter (Universal 100V/240V AC to 12 VDC, 1A)
1.3 CD-Rom Contents
Software
User Guide
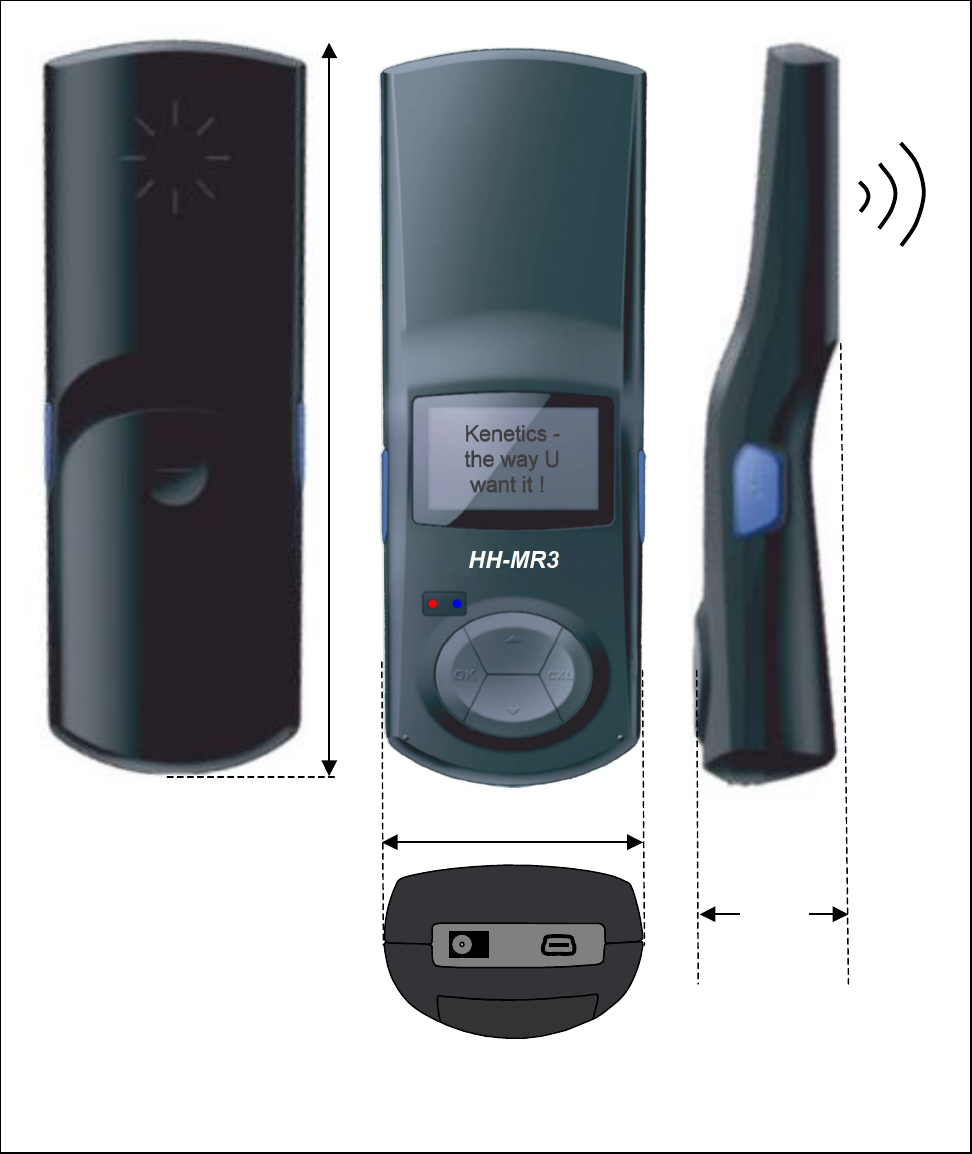
Bottom
Figure 1.1 HH-MR3 Reader
Front View
Back Side
43 mm
2 Details on Front Face and Menu Navigation
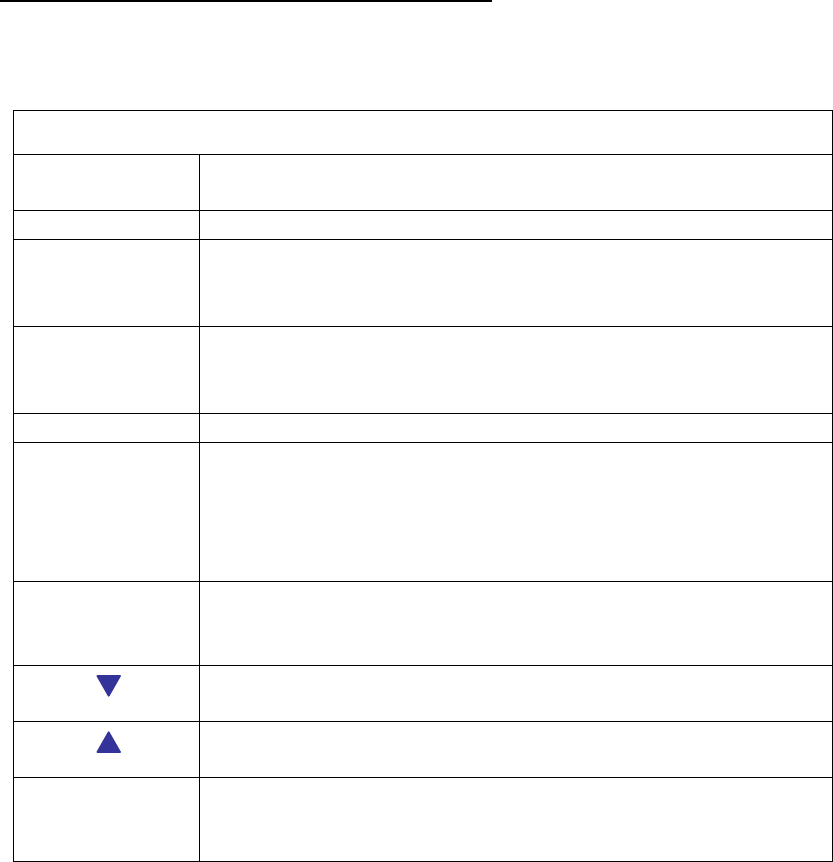
2.1 Front Face Information
Front Face Information
Reference
Figure Figure 6.1
LCD 8 rows, 16 characters per row.
Power LED
Indicator
(Red color)
When lighted:
Normal State: On
When operating: On / Blinks
Activity LED
Indicator
(Blue color)
When lighted:
Normal State: Off
When operating: On / Blinks
Keypad Buttons
√
Enter/Accept button: To exit demo mode, or execute a
function.
On button: To turn on the unit, press and release the OK button
Off button: To turn off the unit, press and hold the OK button
until the LCD and the LED go off.
X Cancel Esc/Back button: To back-up to a parent menu or
to clear memory and restart a
scanning action.
Next Item: To scroll forward the items in a menu or to scroll
forward a list of categories.
Previous Item: To scroll backward the items in a menu or to
scroll backward a list of categories.
Scan tags button: There are two such buttons on the side of
the HH-MR3. It is used to activate the RF
power for scanning tags.
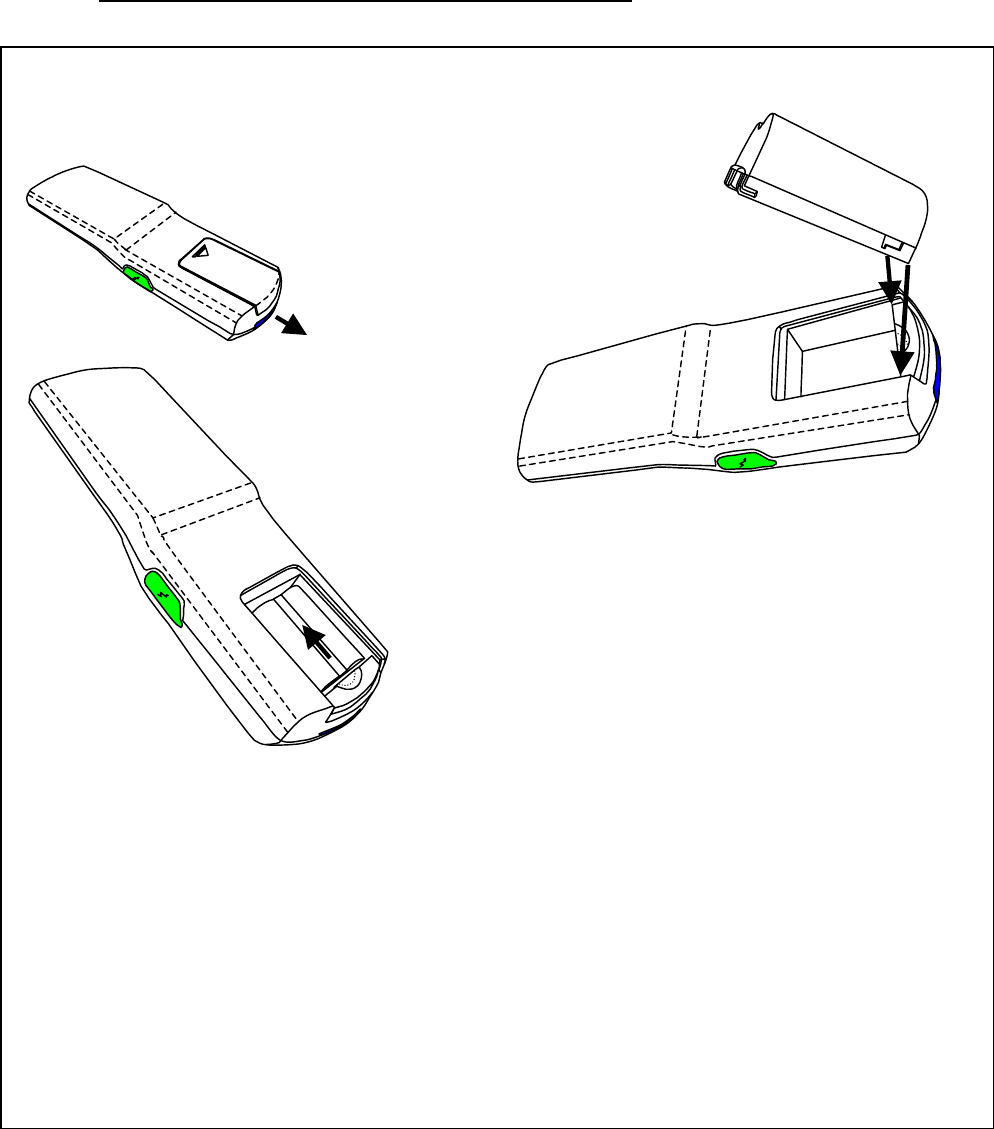
3 Getting Started – Install and charge the battery
Step 1: Remove
Battery Cover
Slide down
Step 2: Align the base of
battery pack with the base of
battery compartment before
inserting the battery pack. 7.2 volts Battery
Connector
side
base
Step 3: Slide the
battery pack up
so that the
connector clicks
into place.
Replace the
Battery Cover.
Step 4: Use an AC/DC adaptor to
supply 12 VDC to charge the
battery for at least 3 hours. Red
LED will blink when charging is
in progress. Red LED will stop
blinking when charging is
complete.
3.1 Switch the reader on and off
To switch the reader on, press and hold the power key <√> until you see the red LED
is on. If the LCD displays “Battery Low”, please charge the reader. To switch the
reader off, press and hold the power key <√> for 2 seconds.
3.2 Standby Mode
A blank screen overwrites the display when no function of the reader has been used
for a certain period of time, unless the reader is connected to USB/Bluetooth/WIFI or
Charger. To deactivate the screen saver, press and hold the <√> button for one
second.
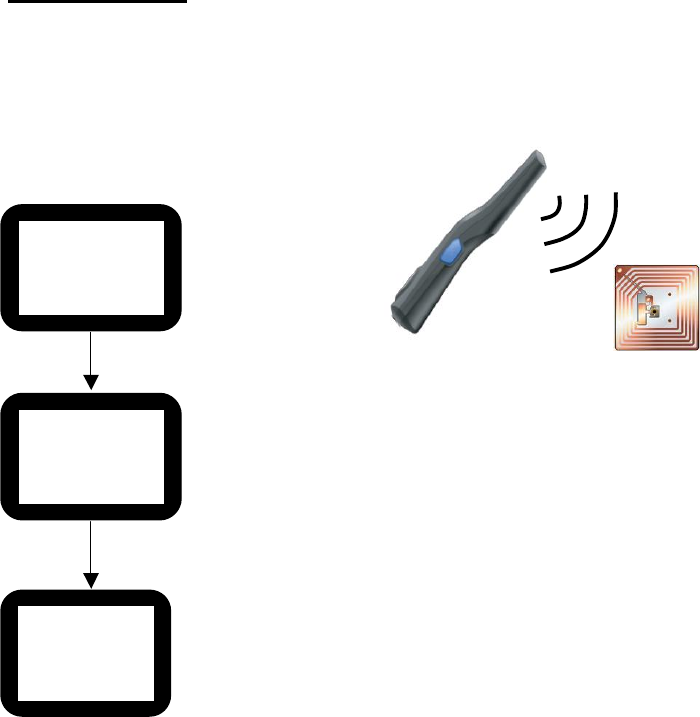
4 Scan Functions
4.1 Scan Functions without USB/Bluetooth/WIFI Connection
4.1.1 Guide for UID Scanning
SCANNED
0000
Press “
X
”
Waiting for
Xxxxxxxxxxxxxxx
Xxxxxxxxxxxxxxx
Press X to exit
1.Press and hold down
buttons to start scan tags
2.Direct reader to tag while
holding down the
buttons.
3. Release buttons to
stop scan tags
Kenetics
HH-MR3
V1.0 06 Jan 16
Demo mode
4.2 Scan Functions with USB/Bluetooth/WIFI Connection
Note: Before use the Bluetooth/WIFI ,need to connect the reader to PC with USB cable, then configure the
reader with “ILT Tool” in the CD. Refer to document “Item Level Tagging User Guide-Ver 2.0.docx”
found in CDROM.
4.2.1 USB connection stet up procedure
4.2.1.1 Power on the reader
4.2.1.2 Connect the reader to PC with USB cable
4.2.1.3 Install the reader driver with “atm6124_cdc_signed”in the CD (only for
the first time)
4.2.1.4 After the driver installed successfully, there will be a new comport in
“Computer->Manage->Device Manger->Port(COM&LPT)”.
4.2.2 Bluetooth connection stet up procedure
4.2.2.1 Power on the reader
4.2.2.2 Connect to PC with USB cable, run” ILT Tool” (only for the first time)
4.2.2.3 Follow document” Item Level Tagging User Guide-Ver 2.0.docx” to open
comport and set PIN code and set Wireless communication module to
Bluetooth in setting tab control(only for the first time).
4.2.2.4 Close ” ILT Tool” and plug out USB cable (only for the first time)
4.2.2.5 Install a Bluetooth adapter or dongle to PC.
4.2.2.6 Click “Add a device” in “Control Panel\Hardware and Sound\Devices and
Printers” to add the reader’s Bluetooth(HH-MR3) to PC(only for the first
time)
4.2.2.7 Find out the comport name in “Computer->Manage->Device Manger-
>Port(COM&LPT)” (only for the first time)
4.2.2.8 Follow document” Item Level Tagging User Guide-Ver 2.0.docx” to open
comport in ” ILT Tool” , then the Bluetooth will be connected to PC.
4.2.3 WIFI connection stet up procedure
4.2.3.1 Power on the reader
4.2.3.2 Connect to PC with USB cable, run” ILT Tool” (only for the first time)
4.2.3.3 Follow document” Item Level Tagging User Guide-Ver 2.0.docx” to open
comport and set Wireless communication module to WIFI in setting tab
control(only for the first time)
4.2.3.4 Close ” ILT Tool” (only for the first time)
4.2.3.5 Plug out USB cable then plug in USB cable again to PC, run” ILT Tool”
(only for the first time)
4.2.3.6 Follow document” Item Level Tagging User Guide-Ver 2.0.docx” to open
comport and set WIFI parameter in WIFI tab control(only for the first
time)
4.2.3.7 Follow document” Item Level Tagging User Guide-Ver 2.0.docx” to close
comport (only for the first time). Plug out USB cable.
4.2.3.8 Follow document” Item Level Tagging User Guide-Ver 2.0.docx” to create TCP
socket with Net tab
4.2.4 Scan for UID with USB/Bluetooth/WIFI
SCANNED
0000
USB/Bluetooth/
WIFI connected
Waiting for
Xxxxxxxxxxxxxxx
Xxxxxxxxxxxxxxx
Press X to exit
1.Press and hold down
buttons to start scan tags
2.Direct reader to tag while
holding down the
buttons.
3. Release buttons to
stop scan tags
Kenetics
HH-MR3
V1.0 06 Jan 16
Online mode

5 Compliance Statement
Regulatory Notes
An RFID system comprises an RF transmission device, and is therefore subject to
national and international regulations. Prior to the powering and operation of the
HHMR3 reader, relevant compliance certificate should be obtained from the associated
watchdog agency. Sale, lease or operation in some countries may be subject to prior
approval by the respective government body or other international compliance
organization.
For countries requiring FCC certification, a typical system configuration containing the
HHMR3 reader has been tested and found to be compliant with the limits for a FCC Part
15C (intentional radiator) device. Nonetheless, it is still the responsibility of the
customers to have their complete system tested and approved for use from the appropriate
compliance agencies/authorities before operating or selling the system. As part of FCC
part 15 compliance requirements, it should be noted that:
Modifications not expressly approved by this company could void the user’s authority
to operate the HHMR3 reader.
The HHMR3 reader complies with Part 15 of the FCC Rules. Operation is subject to
the following two conditions: (1) The HHMR3 reader may not cause harmful
interference, and (2) must accept any interference received, including interference
that may cause undesired operation.
Note: This equipment has been tested and found to comply with the limits for a Class B
digital device, pursuant to part 15 of the FCC Rules. These limits are designed to provide
reasonable protection against harmful interference in a residential installation. This
equipment generates, uses and can radiate radio frequency energy and, if not installed and
used in accordance with the instructions, may cause harmful interference to radio
communications. However, there is no guarantee that interference will not occur in a
particular installation. If this equipment does cause harmful interference to radio or
television reception, which can be determined by turning the equipment off and on, the
user is encouraged to try to correct the interference by one or more of the following
measures:
Reorient or relocate the receiving antenna.
Increase the separation between the equipment and receiver.
Connect the equipment into an outlet on a circuit different from that to which the
receiver is connected.
Consult the dealer or an experienced radio/TV technician for help.