Kenmore Elite 25344383401 User Manual REFRIGERATOR Manuals And Guides L0412476
KENMORE ELITE Side by Side Refrigerator Manual L0412476 KENMORE ELITE Side by Side Refrigerator Owner's Manual, KENMORE ELITE Side by Side Refrigerator installation guides
User Manual: Kenmore Elite 25344383401 25344383401 KENMORE ELITE REFRIGERATOR - Manuals and Guides View the owners manual for your KENMORE ELITE REFRIGERATOR #25344383401. Home:Kitchen Appliance Parts:Kenmore Elite Parts:Kenmore Elite REFRIGERATOR Manual
Open the PDF directly: View PDF ![]() .
.
Page Count: 34
Side by Side Refrigerator
Use & Care Guide
Lado a Lado Refrigerador
Guia para su uso y cuidado
Compartiments C6te _ C6te R_frig_rateur
Guide d'utilisation et d'entretien
Sears, Roebuck and Co., Hoffman Estates, IL 60179 U.S.A.
Sears Canada, Inc., Toronto, Ontario, Canada M5B 2B8
www.sears.com
241566601 (0409)
2
Congratulations on your purchase of a new refrigerator! At Sears, we are very proud of
our product and completely committed to providing you with the best service possible.
Your satisfaction is our #1 priority.
Thank you for choosing Sears; we hope you will consider us for future purchases.
Pleaseread andsavethisdocument
This Use & Care Guide provides specific operating instructions for your model. Use your
refrigerator only as instructed in this manual. These instructions are not intended to
cover every possible condition and situation that may occur. Common sense and caution
must be practiced when installing, operating and maintaining any appliance.
Please record your model and serial numbers below for future reference. This
information is found on the serial plate located inside the refrigerator compartment.
Record your product reference information here.
Model Number: 253-
SerialNumber:
PurchaseDate:
Use only soap and water to clean the serial plate.
Welcome& Congratulations............................................................................................2
ImportantSafety Instructions...........................................................................................3
WarrantyInformation.......................................................................................................4
ProtectionAgreements....................................................................................................6
Installation........................................................................................................................7
DoorRemovalInstructions.............................................................................................10
FeatureOverview...........................................................................................................12
Controls& Settings........................................................................................................13
StorageFeatures...........................................................................................................17
AutomaticIce& WaterDispenser..................................................................................20
ReplacingFilters............................................................................................................23
StoringFood& SavingEnergy.......................................................................................25
NormalOperatingSounds&Sights...............................................................................27
Care& Cleaning.............................................................................................................28
BeforeYouCall..............................................................................................................31
3
Pleasereadall instructionsbeforeusingyour newrefrigerator.
ForYourSafety
•Do not store or use gasoline, or other flammable liquids in the vicinity of this or any
other appliance. Read product labels for warnings regarding flammability and other
hazards.
•Do not operate the refrigerator in the presence of explosive fumes.
•Avoid contact with any moving parts of automatic ice maker.
•Remove all staples from the carton. Staples can cause severe cuts, and also destroy
finishes if they come in contact with other appliances or furniture.
Child Safety
Destroy or recycle the carton, plastic bags, and any exterior wrapping material
immediately after the refrigerator is unpacked. Children should never use these items to
play. Cartons covered with rugs, bedspreads, plastic sheets or stretch wrap may
become airtight chambers, and can quickly cause suffocation.
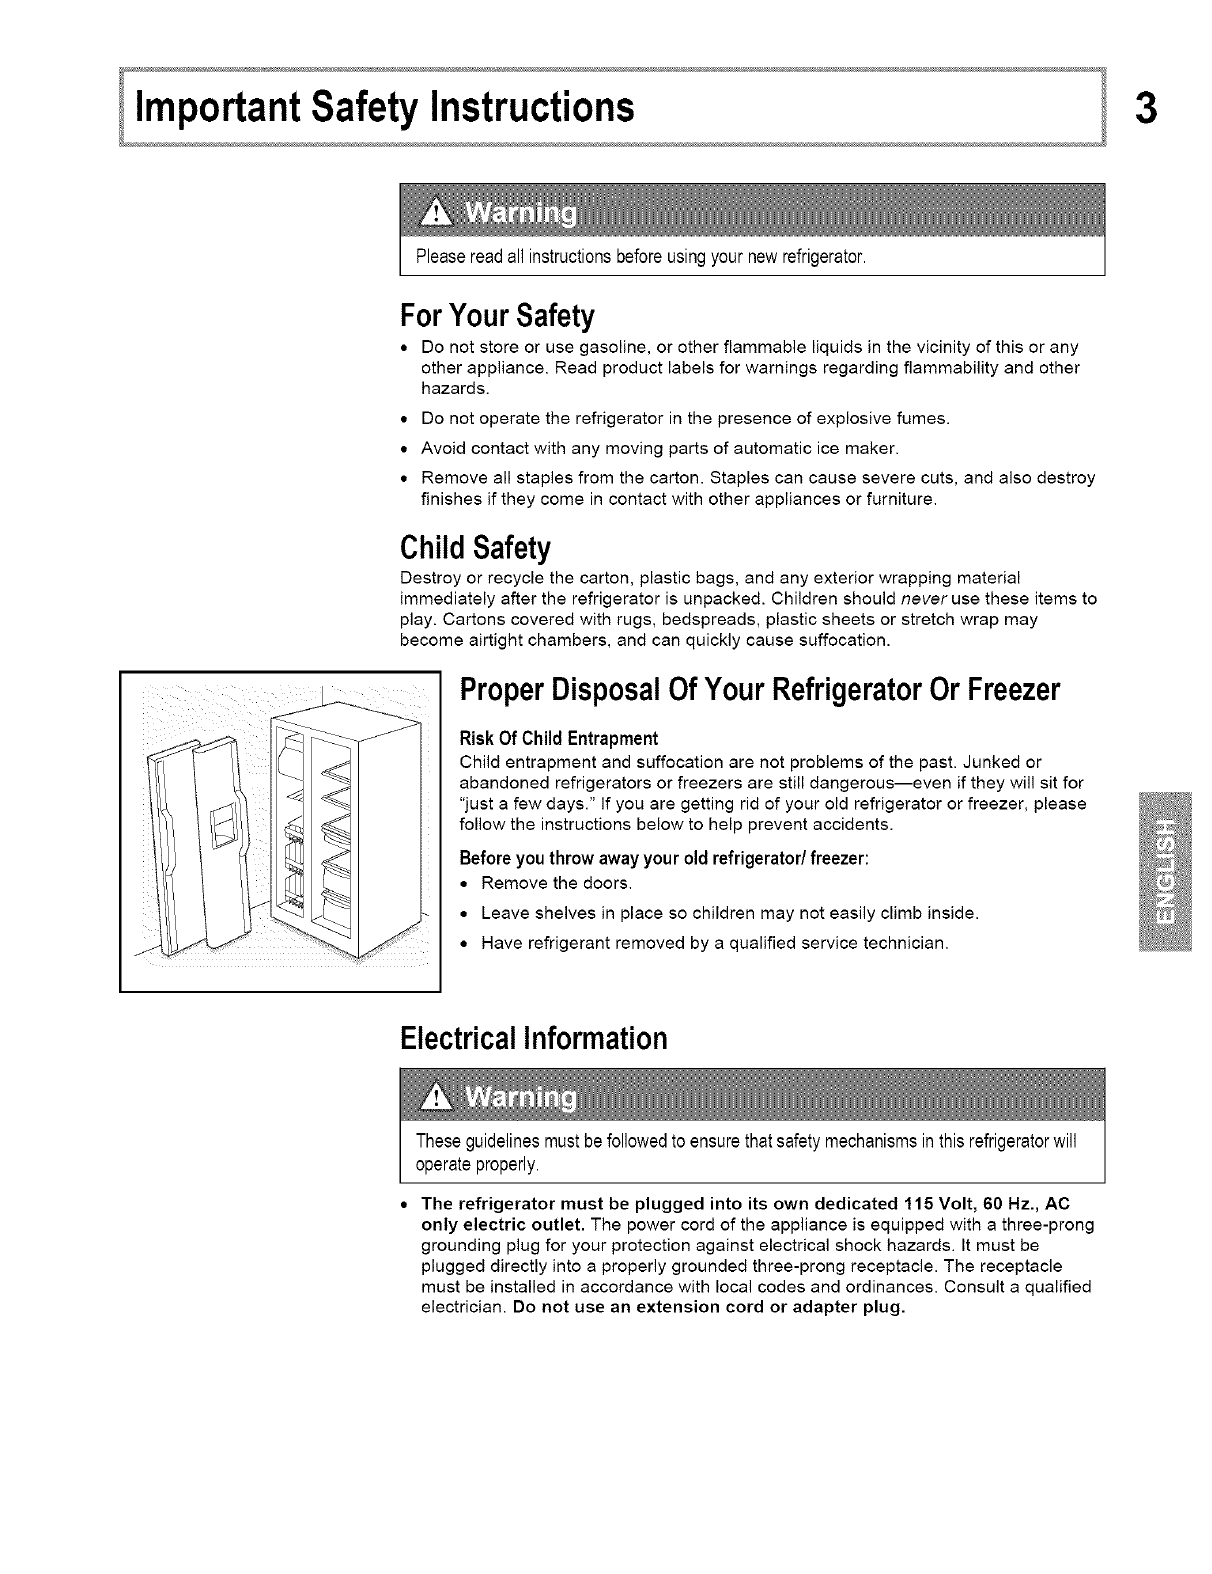
ProperDisposalOfYourRefrigeratorOr Freezer
Risk Of Child Entrapment
Child entrapment and suffocation are not problems of the past. Junked or
abandoned refrigerators or freezers are still dangerous--even if they will sit for
"just a few days." If you are getting rid of your old refrigerator or freezer, please
follow the instructions below to help prevent accidents.
Before you throw away your old refrigerator/freezer:
•Remove the doors.
•Leave shelves in place so children may not easily climb inside.
•Have refrigerant removed by a qualified service technician.
ElectricalInformation
Theseguidelinesmustbefollowedto ensurethatsafetymechanismsinthisrefrigeratorwill
operateproperly.
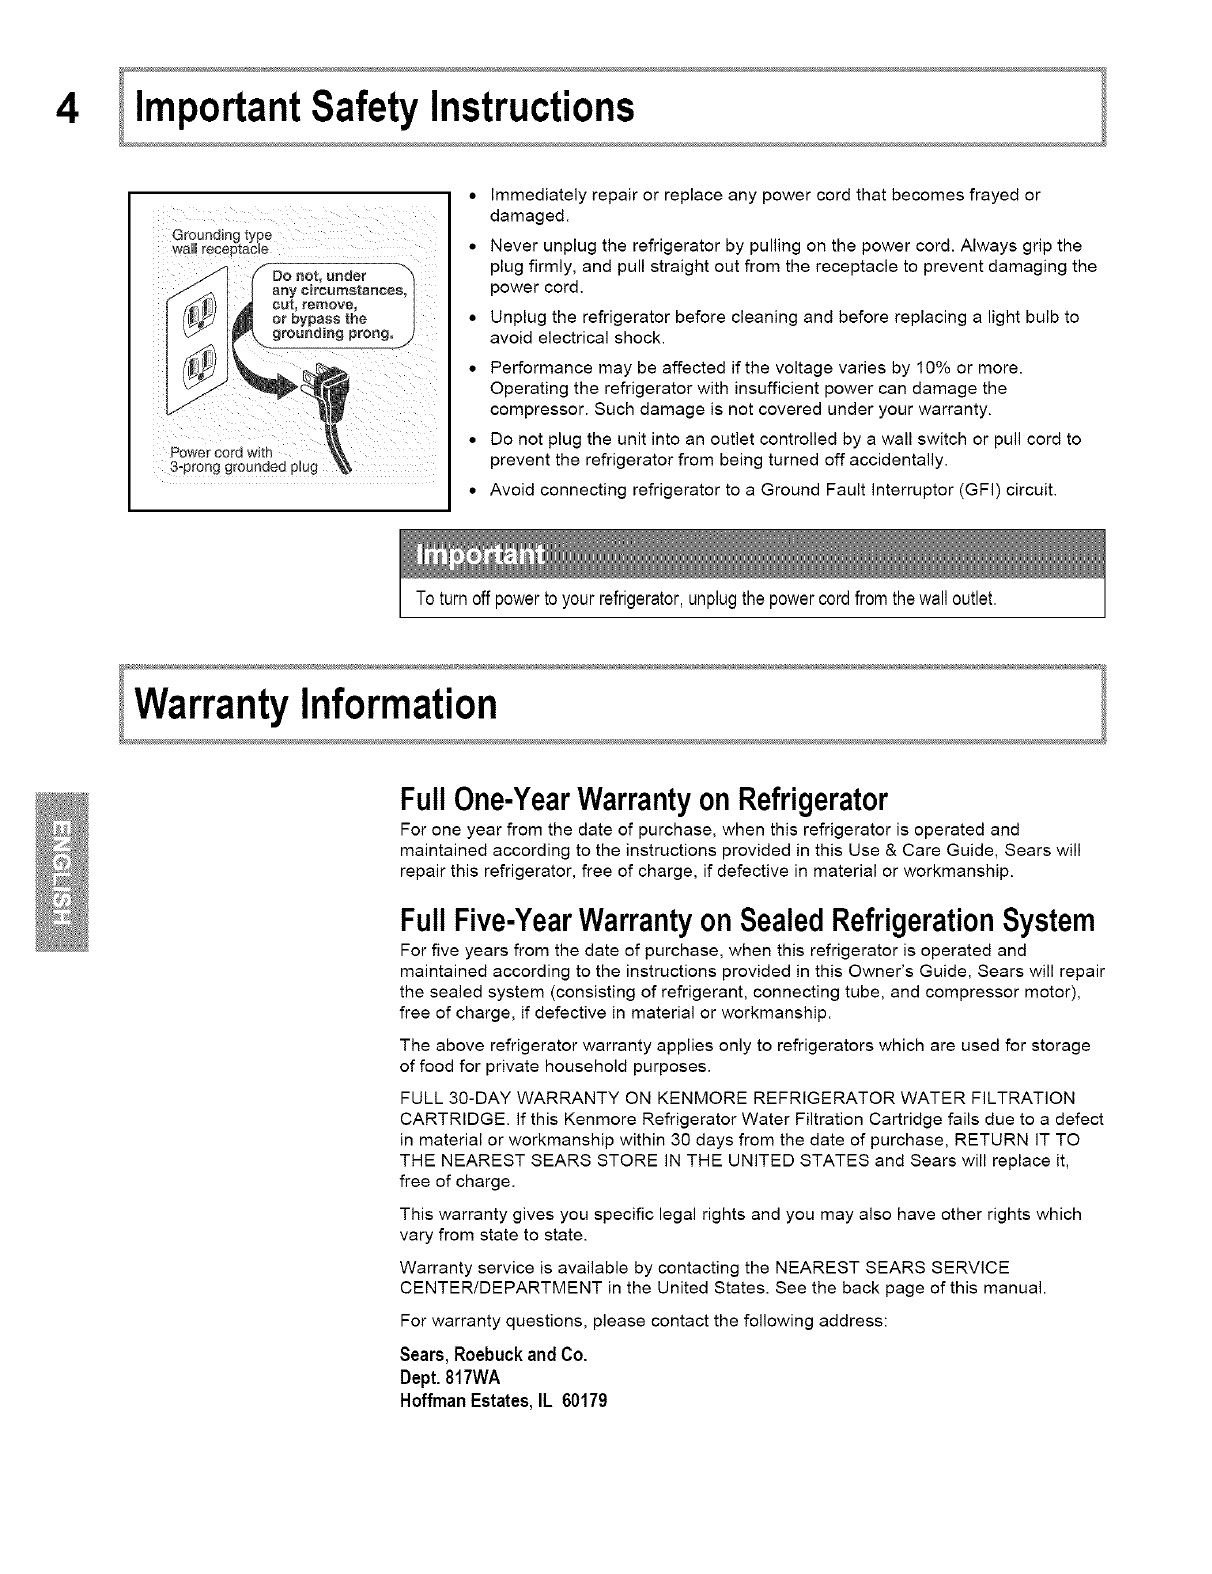
The refrigerator must be plugged into its own dedicated 115 Volt, 60 Hz., AC
only electric outlet. The power cord of the appliance is equipped with a three-prong
grounding plug for your protection against electrical shock hazards. It must be
plugged directly into a properly grounded three-prong receptacle. The receptacle
must be installed in accordance with local codes and ordinances. Consult a qualified
electrician. Do not use an extension cord or adapter plug.
4
• Immediately repair or replace any power cord that becomes frayed or
damaged.
• Never unplug the refrigerator by pulling on the power cord. Always grip the
plug firmly, and pull straight out from the receptacle to prevent damaging the
power cord.
• Unplug the refrigerator before cleaning and before replacing a light bulb to
avoid electrical shock.
• Performance may be affected if the voltage varies by 10% or more.
Operating the refrigerator with insufficient power can damage the
compressor. Such damage is not covered under your warranty.
• Do not plug the unit into an outlet controlled by a wall switch or pull cord to
prevent the refrigerator from being turned off accidentally.
• Avoid connecting refrigerator to a Ground Fault Interruptor (GFI) circuit.
To turn offpowerto yourrefrigerator,unplugthe powercordfromthewall outlet.
Full One-YearWarranty on Refrigerator
For one year from the date of purchase, when this refrigerator is operated and
maintained according to the instructions provided in this Use & Care Guide, Sears will
repair this refrigerator, free of charge, if defective in material or workmanship.
Full Five-YearWarranty on SealedRefrigerationSystem
For five years from the date of purchase, when this refrigerator is operated and
maintained according to the instructions provided in this Owner's Guide, Sears will repair
the sealed system (consisting of refrigerant, connecting tube, and compressor motor),
free of charge, if defective in material or workmanship.
The above refrigerator warranty applies only to refrigerators which are used for storage
of food for private household purposes.
FULL 30-DAY WARRANTY ON KENMORE REFRIGERATOR WATER FILTRATION
CARTRIDGE. If this Kenmore Refrigerator Water Filtration Cartridge fails due to a defect
in material or workmanship within 30 days from the date of purchase, RETURN IT TO
THE NEAREST SEARS STORE IN THE UNITED STATES and Sears will replace it,
free of charge.
This warranty gives you specific legal rights and you may also have other rights which
vary from state to state.
Warranty service is available by contacting the NEAREST SEARS SERVICE
CENTER/DEPARTMENT in the United States. See the back page of this manual.
For warranty questions, please contact the following address:
Sears, RoebuckandCo.
Dept.817WA
HoffmanEstates,IL 60179
5
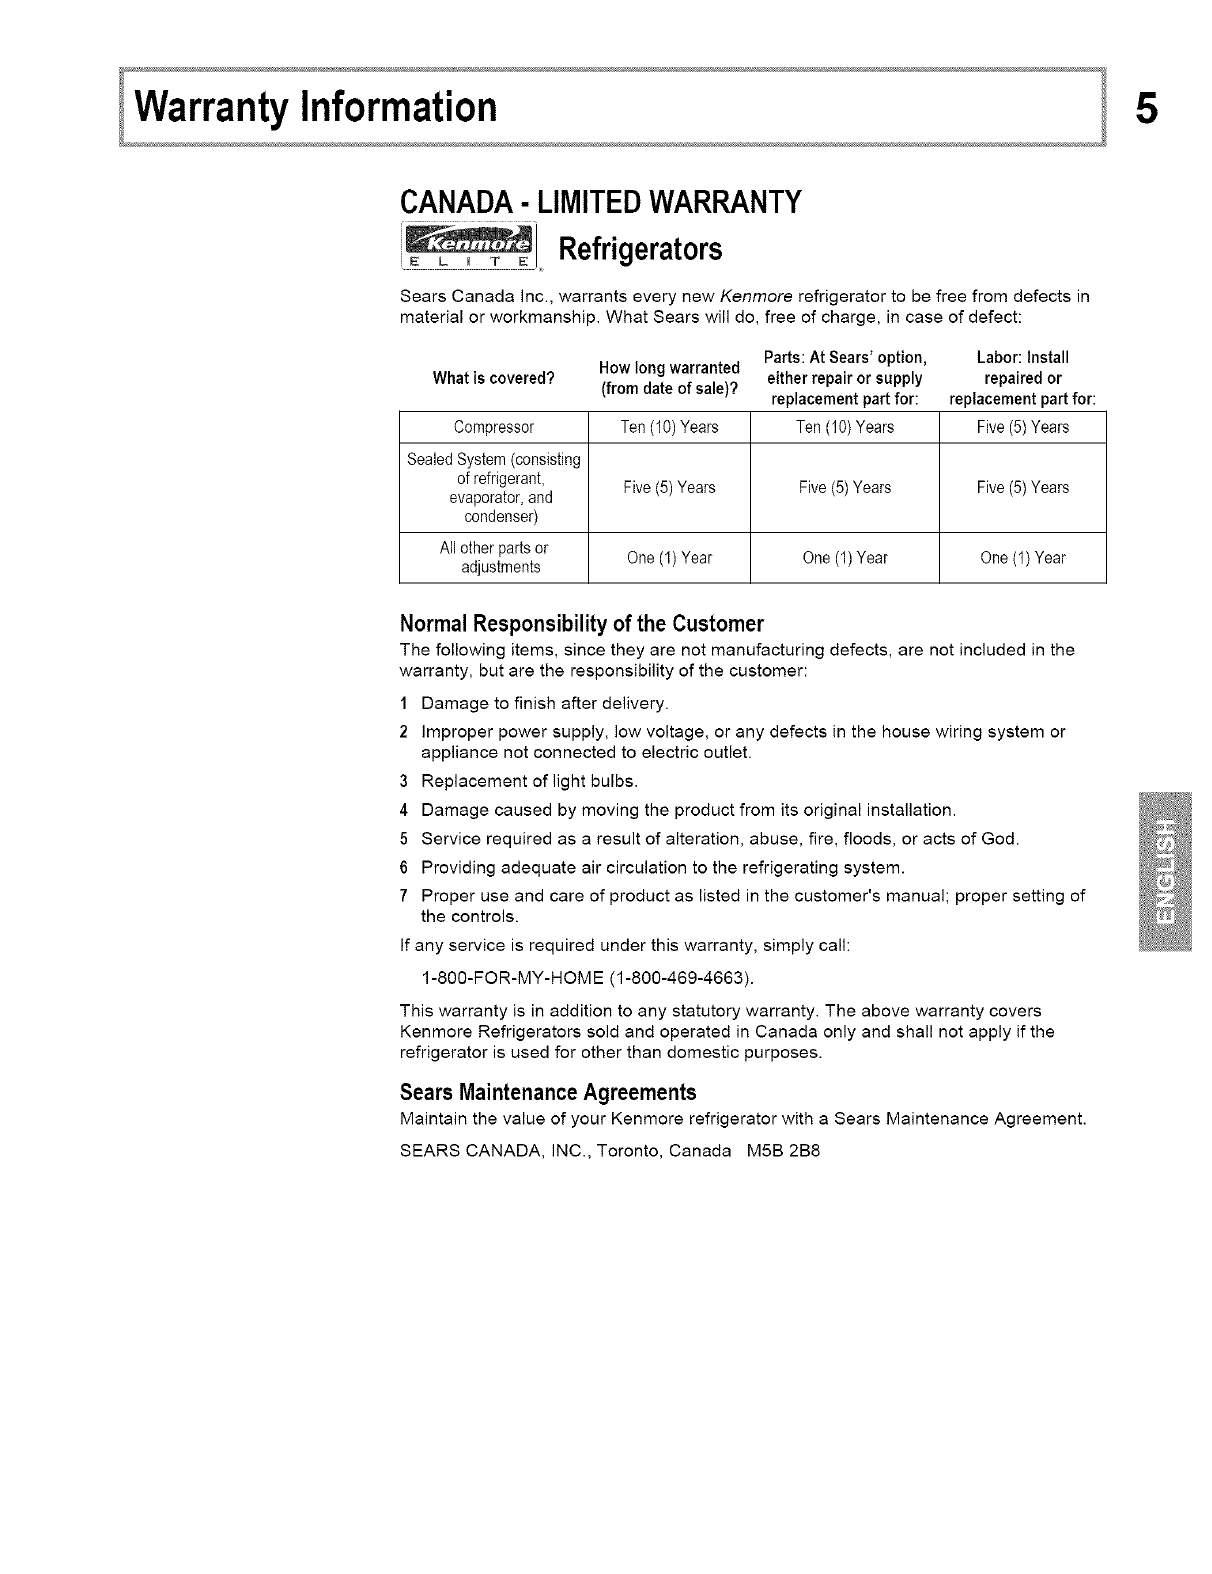
CANADA- LIMITEDWARRANTY
Refrigerators
Sears Canada Inc., warrants every new Kenmore refrigerator to be free from defects in
material or workmanship. What Sears will do, free of charge, in case of defect:
How long warranted Parts: At Sears' option, Labor: install
What is covered? (from date of sale)? either repair or supply repaired or
replacement part for: replacement part for:
Compressor Ten (10) Years Ten (10) Years Five (5) Years
Sealed System (consisting
of refrigerant, Five (5) Years Five (5) Years Five (5) Years
evaporator, and
condenser)
All other parts or
adjustments One (I) Year One (I) Year One (1) Year
Normal Responsibility of the Customer
The following items, since they are not manufacturing defects, are not included in the
warranty, but are the responsibility of the customer:
1 Damage to finish after delivery.
2 improper power supply, low voltage, or any defects in the house wiring system or
appliance not connected to electric outlet.
3 Replacement of light bulbs.
4 Damage caused by moving the product from its original installation.
5 Service required as a result of alteration, abuse, fire, floods, or acts of God.
6 Providing adequate air circulation to the refrigerating system.
7 Proper use and care of product as listed in the customer's manual; proper setting of
the controls.
If any service is required under this warranty, simply call:
1-800-FOR-MY-HOME (1-800-469-4663).
This warranty is in addition to any statutory warranty. The above warranty covers
Kenmore Refrigerators sold and operated in Canada only and shall not apply if the
refrigerator is used for other than domestic purposes.
Sears MaintenanceAgreements
Maintain the value of your Kenmore refrigerator with a Sears Maintenance Agreement.
SEARS CANADA, INC., Toronto, Canada M5B 2B8
6
Inthe U.S.A.
Master ProtectionAgreements
Congratulations on making a smart purchase. Your new
Kenmore ® appliance is designed and manufactured for
years of dependable operation. But like all products, it
may require preventive maintenance or repair from time
to time. That's when having a Master Protection
Agreement can save you money and aggravation.
Purchase a Master Protection Agreement now and
protect yourself from unexpected hassle and expense.
The Master Protection Agreement also helps extend the
life of your new appliance. Here's what's included in the
Agreement:
_" Expert service by our 12,000 professional repair
specialists
_" Unlimited service and no charge for parts and labor
on all covered repairs
_" "No-lemon" guarantee - replacement of your
covered product if more than three product failures
occur within twelve months
_" Product replacement if your covered product can't
be fixed
_" Annual Preventive Maintenance Check at your
request - no extra charge
_" Fast help by phone - non-technical and instructional
assistance on products repaired in your home, plus
convenient repair scheduling
_" Power surge protection against electrical damage
due to power fluctuations
_" Rental reimbursement if repair of your covered
product takes longer than promised
Once you purchase the Agreement, a simple phone call
is all that it takes for you to schedule service. You can
call anytime day or night, or schedule a service
appointment online.
Sears has over 12,000 professional repair specialists,
who have access to over 4.5 million quality parts and
accessories. That's the kind of professionalism you can
count on to help prolong the life of your new purchase
for years to come. Purchase your Master Protection
Agreement today!
Some limitations and exclusions apply. For prices
and additional information, call 1-800-827-6655.
Sears Installation Service
For Sears guaranteed professional installation of home
appliances and items like garage door openers and
water heaters, in the U.S.A. call 1-800-4MY-HOME ®.
In Canada
MaintenanceAgreements
Your purchase has added value because you can depend
on Sears HomeCentral ® for service. With over 2400
Service Technicians and access to over 900,000 parts and
accessories, we have the tools, parts, knowledge and skills
to ensure the pledge: We Service What We Sell.
Your Kenmore ® appliance is designed, manufactured and
tested to provide years of dependable operation. Yet any
major appliance may require service from time to time. The
Sears Maintenance Agreement offers you an outstanding
service program, affordably priced.
The Sears Maintenance Agreement
• Is your way to buy tomorrow's service at today's price.
• Eliminate repair bills resulting from normal wear and
tear.
• Provides for non-technical and instructional assistance.
• Even if you don't need repairs, provides an annual
Preventive Maintenance Check, at your request, to
ensure that your appliance is in proper running
condition.
Some limitations apply. For information concerning
Sears Canada Maintenance Agreements, call 1-800-
361-6665
7
This Owner's Guide provides specific operating instructions for your model. Use the
refrigerator only as instructed in this Use & Care Manual. Before starting the
refrigerator, follow these important first steps.
Location
• Choose a place that is near a grounded electrical outlet. Do Not use an extension
cord or an adapter plug.
• If possible, place the refrigerator out of direct sunlight and away from the range,
dishwasher or other heat sources.
• The refrigerator must be installed on a floor that is level and strong enough to support
a fully loaded refrigerator.
• Consider water supply availability for models equipped with an automatic ice maker.
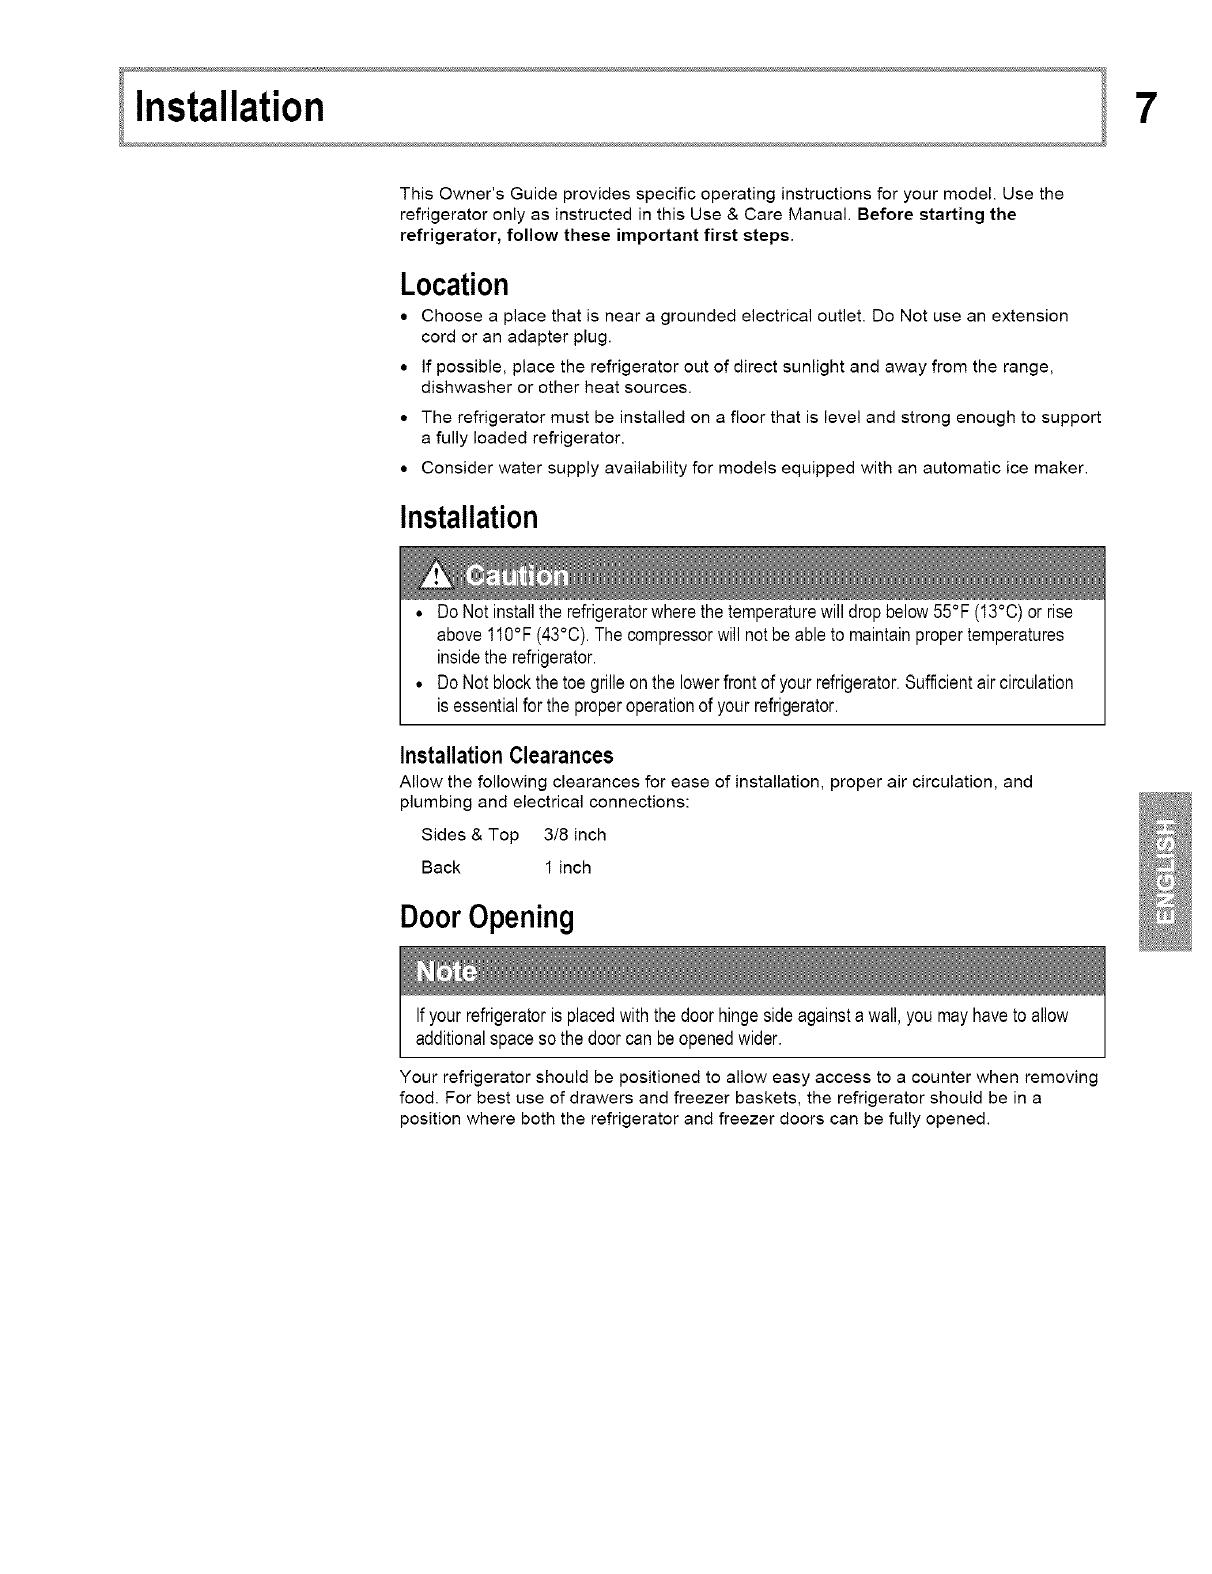
Installation
• Do Notinstallthe refrigeratorwherethe temperaturewill dropbelow55°F (13°C)or rise
above110°F(43°C).Thecompressorwill notbe ableto maintainpropertemperatures
insidethe refrigerator.
• Do Notblockthe toe grilleon the lowerfrontof your refrigerator.Sufficientaircirculation
is essentialfor the properoperationof your refrigerator.
InstallationClearances
Allow the following clearances for ease of installation, proper air circulation, and
plumbing and electrical connections:
Sides & Top 3/8 inch
Back 1 inch
DoorOpening
Ifyour refrigeratoris placedwiththe doorhingesideagainsta wall,youmay haveto allow
additionalspaceso the doorcan beopenedwider.
Your refrigerator should be positioned to allow easy access to a counter when removing
food. For best use of drawers and freezer baskets, the refrigerator should be in a
position where both the refrigerator and freezer doors can be fully opened.
8
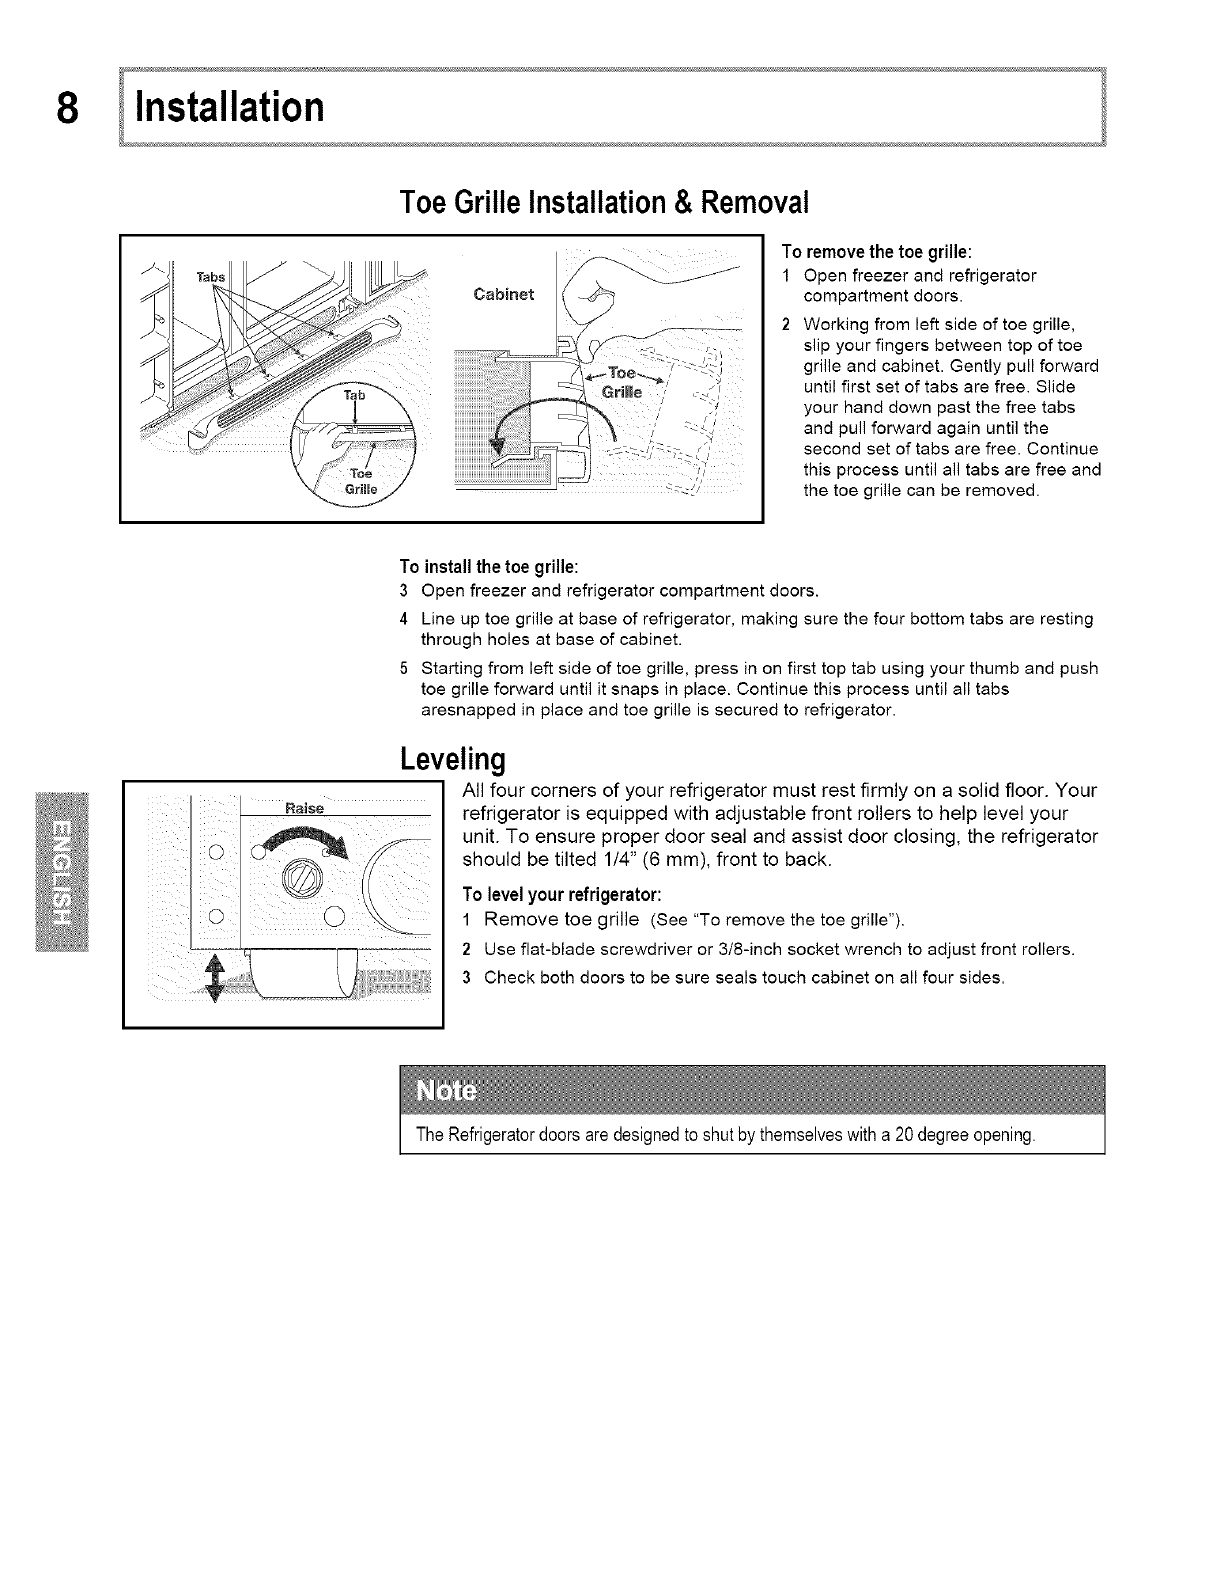
Toe GrilleInstallation& Removal
To remove the toe grille:
1 Open freezer and refrigerator
compartment doors.
2 Working from left side of toe grille,
slip your fingers between top of toe
grille and cabinet. Gently pull forward
until first set of tabs are free. Slide
your hand down past the free tabs
and pull forward again until the
second set of tabs are free. Continue
this process until all tabs are free and
the toe grille can be removed.
To install the toe grille:
3Open freezer and refrigerator compartment doors.
4 Line up toe grille at base of refrigerator, making sure the four bottom tabs are resting
through holes at base of cabinet.
5Starting from left side of toe grille, press in on first top tab using your thumb and push
toe grille forward until it snaps in place. Continue this process until all tabs
aresnapped in place and toe grille is secured to refrigerator.
Leveling
All four corners of your refrigerator must rest firmly on a solid floor. Your
refrigerator is equipped with adjustable front rollers to help level your
unit. To ensure proper door seal and assist door closing, the refrigerator
should be tilted 1/4" (6 mm), front to back.
To level your refrigerator:
1 Remove toe grille (See "To remove the toe grille").
2 Use flat-blade screwdriver or 3/8-inch socket wrench to adjust front rollers.
3 Check both doors to be sure seals touch cabinet on all four sides.
The Refrigeratordoorsaredesignedto shutby themselveswitha 20degreeopening.
9
ConnectingThe Ice MakerToYourWaterSupply
To avoidelectricshock,whichcan causedeathor severepersonalinjury,disconnectthe
refrigeratorfromelectricalpowerbeforeconnectinga watersupplylineto the refrigerator.
To AvoidPropertyDamage:
• Coppertubingis recommendedfor the watersupplyline.Watersupplytubingmaded¼"
plasticis not recommendedsinceit greatlyincreasesthe potentialfor waterleaks.
Manufacturerwill notbe responsible
for anydamageif plastictubingis usedfor supplyline.
• DO NOTinstallwatersupplytubinginareaswheretemperaturesfall belowfreezing.
• Chemicalsfroma malfunctioningsoftenercan damagethe icemaker.Ifthe ice makeris
connectedto soft water,ensurethatthesofteneris maintainedandworkingproperly.
Ensurethatyourwatersupplylineconnectionscomplywithall localplumbingcodes.
Before installingthe water supply line, you will need:
• Basic Tools: Adjustable wrench, flat-blade screwdriver, and Phillips TM screwdriver.
,, Access to a household cold water line with water pressure between 20 and 100 psi.
• A water supply line made of 4¼inch (6.4 mm) OD, copper tubing. To determine the
length of copper tubing needed, you will need to measure the distance from the ice
maker inlet valve at the back of the refrigerator to your cold water pipe. Then add
approximately 7 feet (2.1 meters), so the refrigerator can be moved out for cleaning
(as shown).
,, A shutoff valve to connect the water supply line to your household water system. DO
NOT use a self-piercing type shutoff valve.
• A compression nut and ferrule (sleeve) for connecting the water supply line to the ice
maker inlet valve.
A waterlinekitis availablefromyour appliancedealerat additionalcost.Itcontains25feet
(7.6meters)of ¼ inchOD coppertubing,a saddletypeshutoffvalve(non-piercing),(2)¼
inchbrasscompressionnuts,(2)ferrules/sleeves,andinstructionsfor installingawater
supplyline.
10
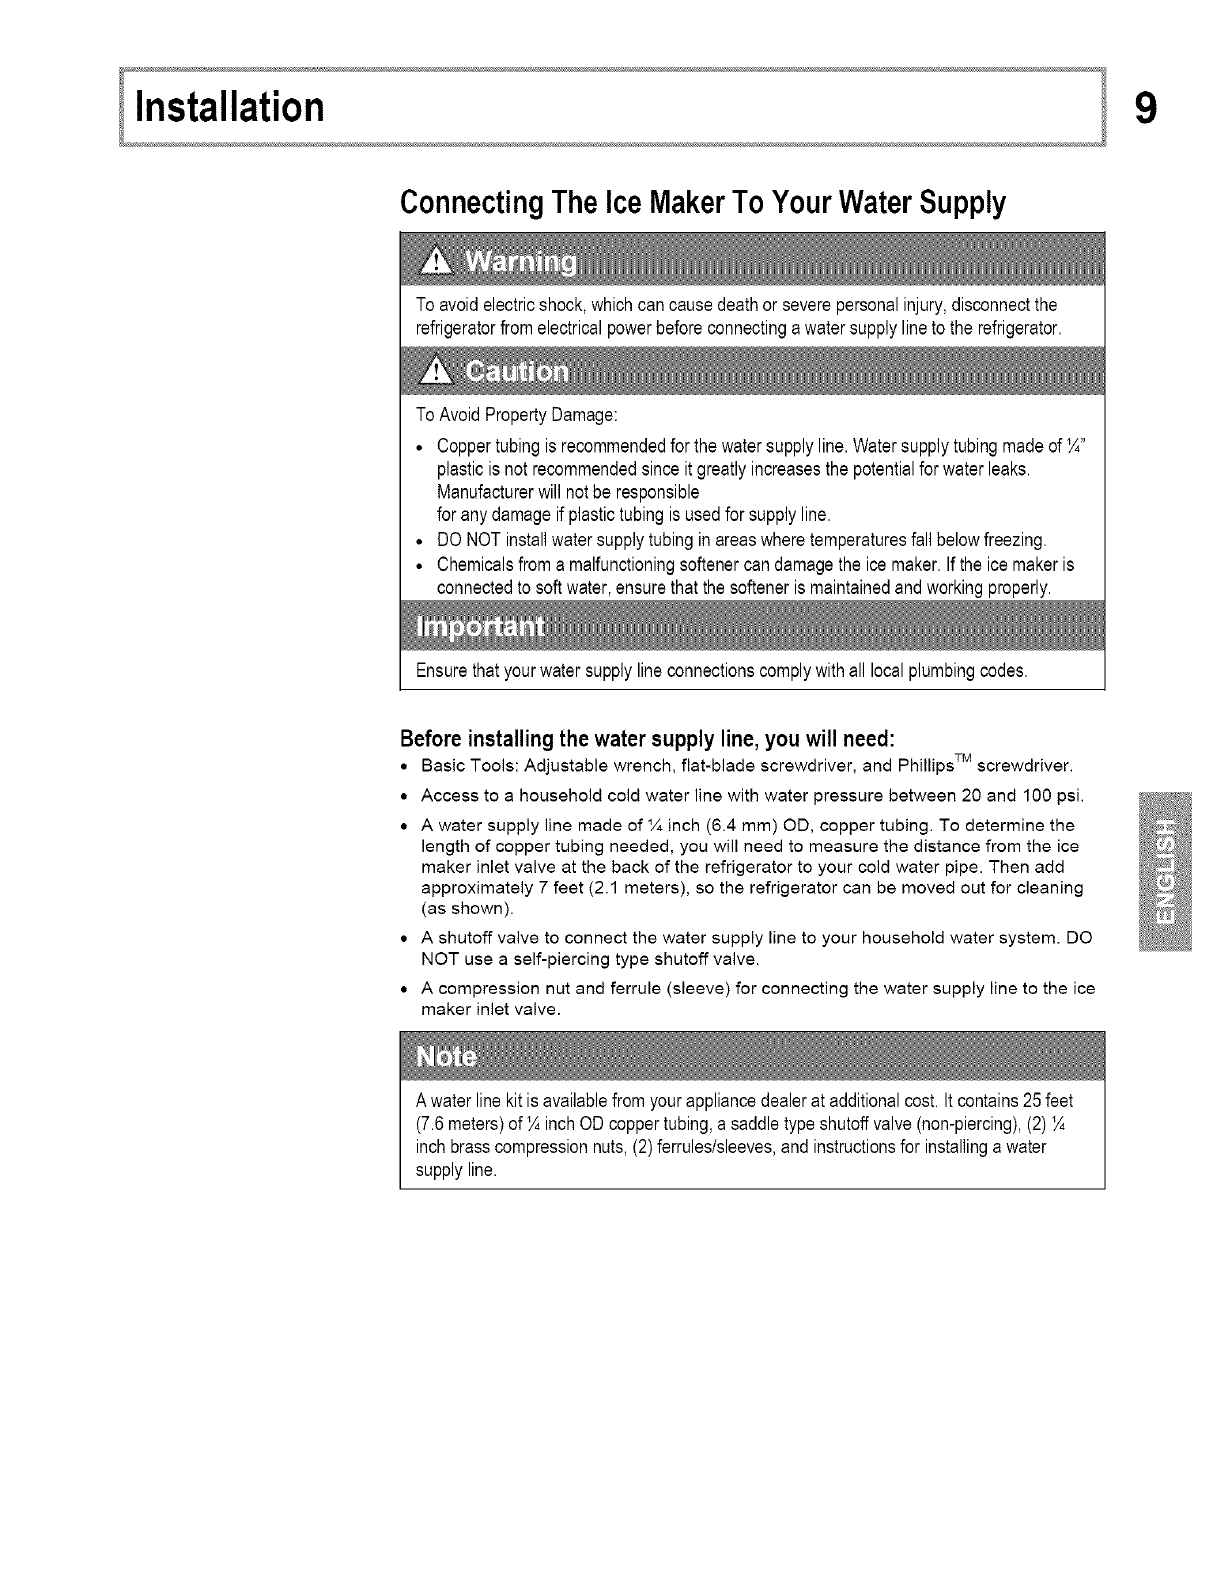
To connect your water supply line to the ice maker inlet valve:
1Disconnect refrigerator from electric power source.
2 Place end of water supply line into sink or bucket. Turn ON water
supply and flush supply line until water is clear. Turn OFF water
supply at shutoff valve.
3 Unscrew plastic cap from water valve inlet and discard cap.
4 Slide brass compression nut, then ferrule (sleeve) onto water supply
line, as shown.
5 Push water supply line into water valve inlet as far as it will go (%
inch). Slide ferrule (sleeve) into valve inlet and finger tighten
compression nut onto valve. Tighten another half turn with a wrench;
DO NOT over tighten.
6 With steel clamp and screw, secure water supply line to rear panel of
refrigerator as shown.
7 Coil excess water supply line (about 2% turns) behind refrigerator as
shown and arrange coils so they do not vibrate or wear against any
other surface.
8 Turn ON water supply at shutoff valve and tighten any connections
that leak.
9 Reconnect refrigerator to electrical power source.
10 To turn ice maker on, lower wire signal arm (see ice maker front cover
for ON/OFF position of arm).
Ittakesapproximately24 hoursfor the ice makerto beginproducingice.Air in newplumbing
linesmaycauseicemakerto cycletwoor threetimesbeforemakinga fulltrayof ice.New
plumbingmaycauseice to bediscoloredor havepoorflavor.Discardice madeduringthe
first 24 hours.
If it is necessary to move your refrigerator through narrow doorways, follow these steps
to remove them.
Beforeyoubegin,unplugthe powercordand removeanyfoodfromdoorshelves.
11
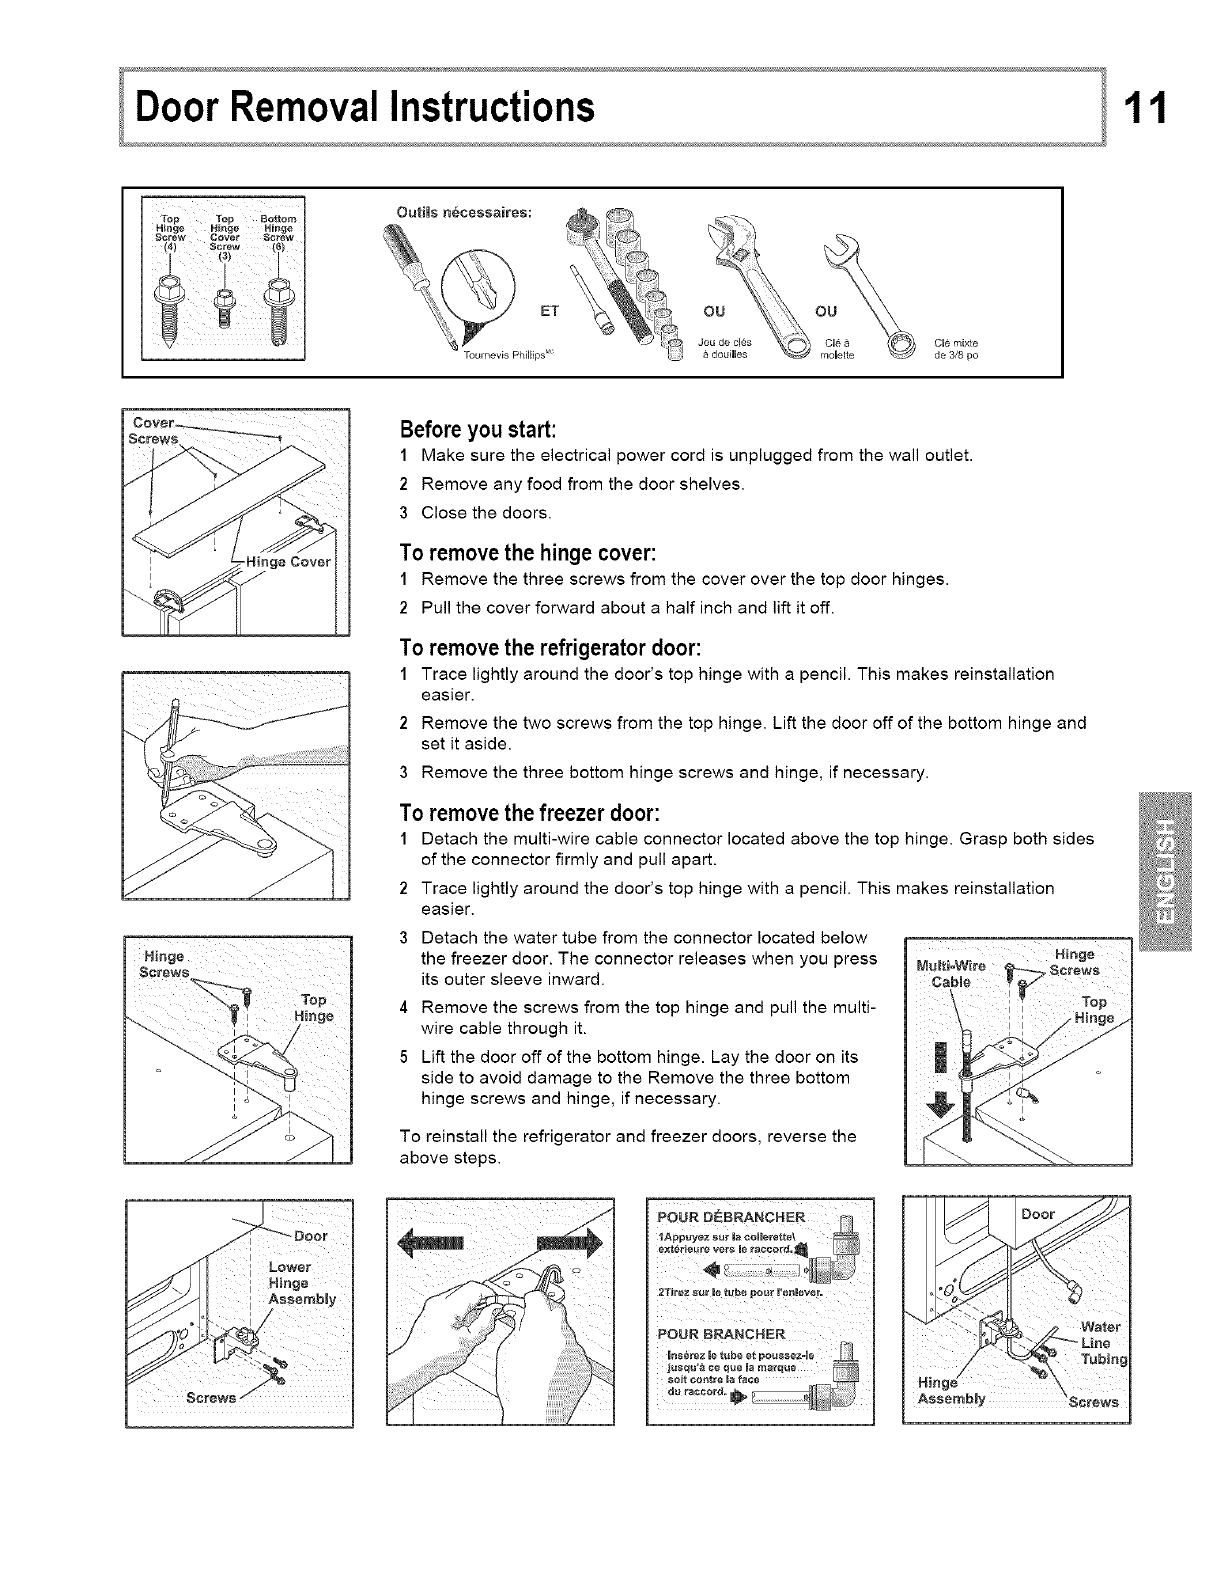
Outiis n6cessaires:
ET
CU6 mixte
Toumevis Phillips _' de 3/8 Do
SC_'eWS j
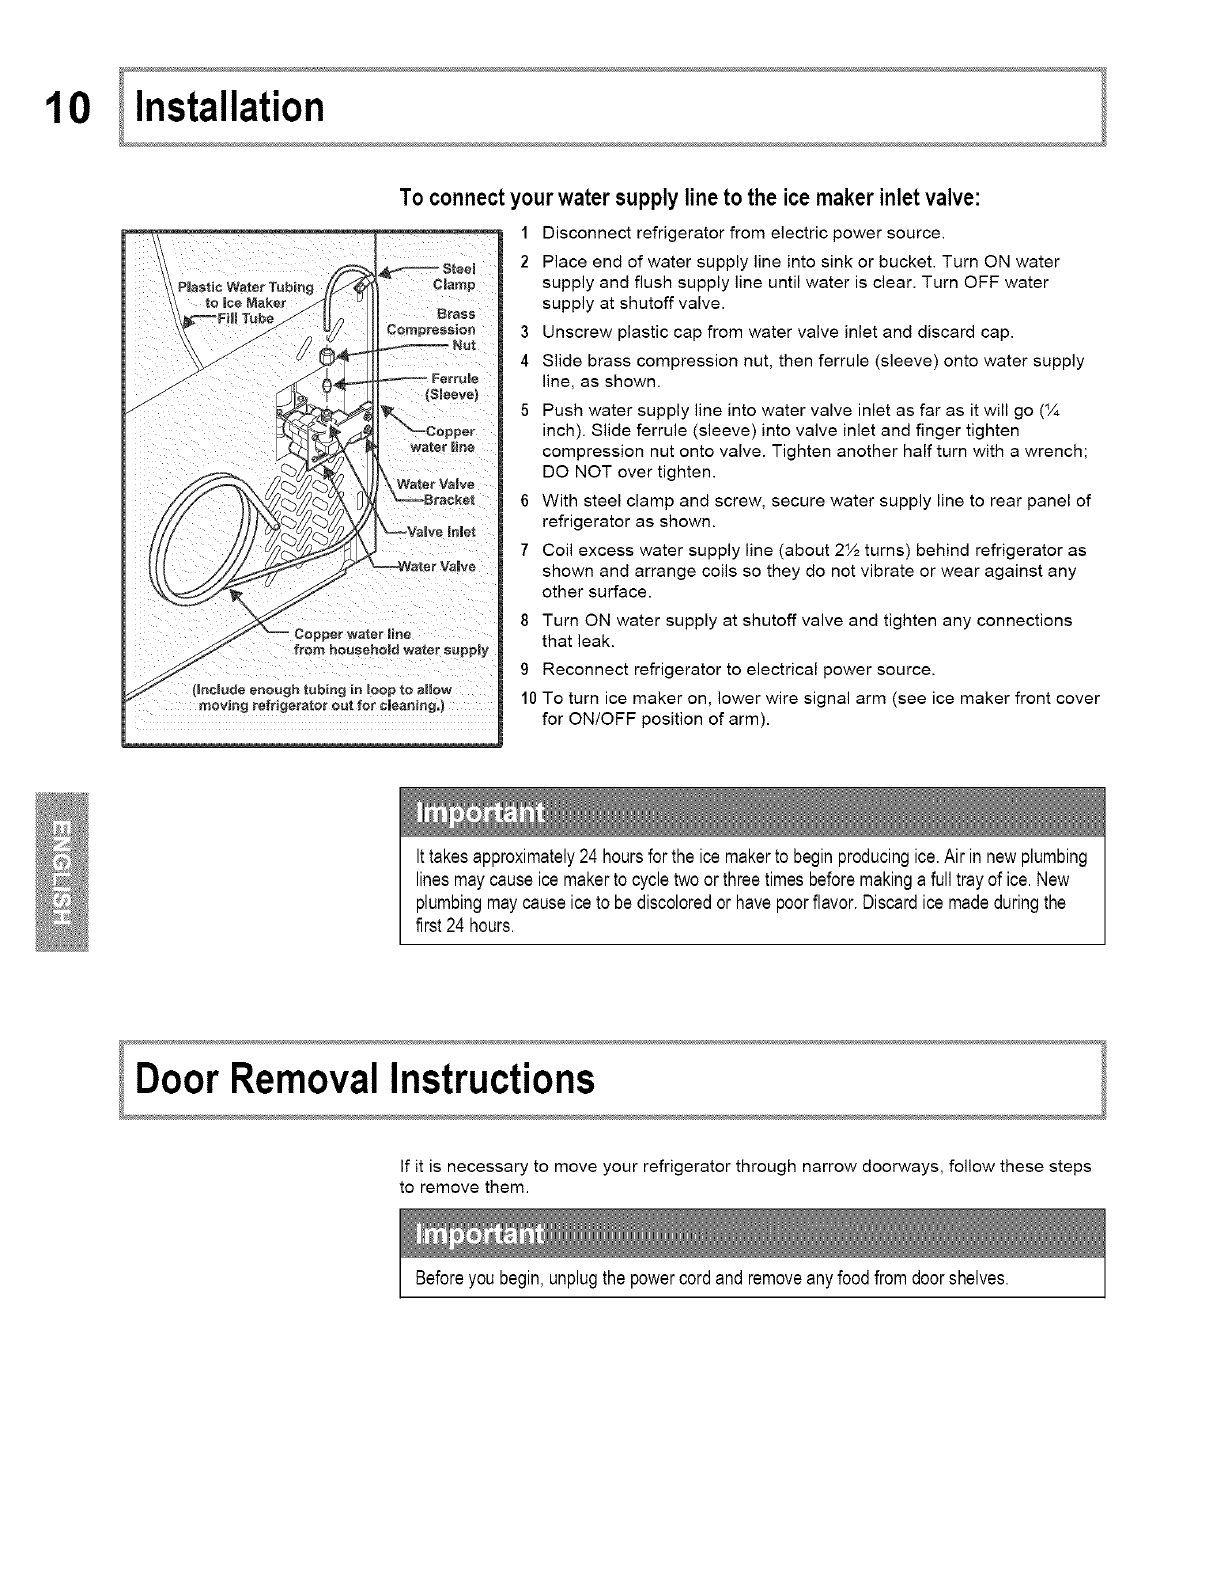
Before you start:
1 Make sure the electrical power cord is unplugged from the wall outlet.
2 Remove any food from the door shelves.
3 Close the doors.
To remove the hinge cover:
1 Remove the three screws from the cover over the top door hinges.
2 Pull the cover forward about a half inch and lift it off.
To remove the refrigerator door:
1 Trace lightly around the door's top hinge with a pencil. This makes reinstallation
easier.
2 Remove the two screws from the top hinge. Lift the door off of the bottom hinge and
set it aside.
3 Remove the three bottom hinge screws and hinge, if necessary.
To remove the freezer door:
1 Detach the multi-wire cable connector located above the top hinge. Grasp both sides
of the connector firmly and pull apart.
2 Trace lightly around the door's top hinge with a pencil. This makes reinstallation
easier.
3 Detach the water tube from the connector located below
the freezer door. The connector releases when you press
its outer sleeve inward.
4 Remove the screws from the top hinge and pull the multi-
wire cable through it.
5 Lift the door off of the bottom hinge. Lay the door on its
side to avoid damage to the Remove the three bottom
hinge screws and hinge, if necessary.
To reinstall the refrigerator and freezer doors, reverse the
above steps.
12
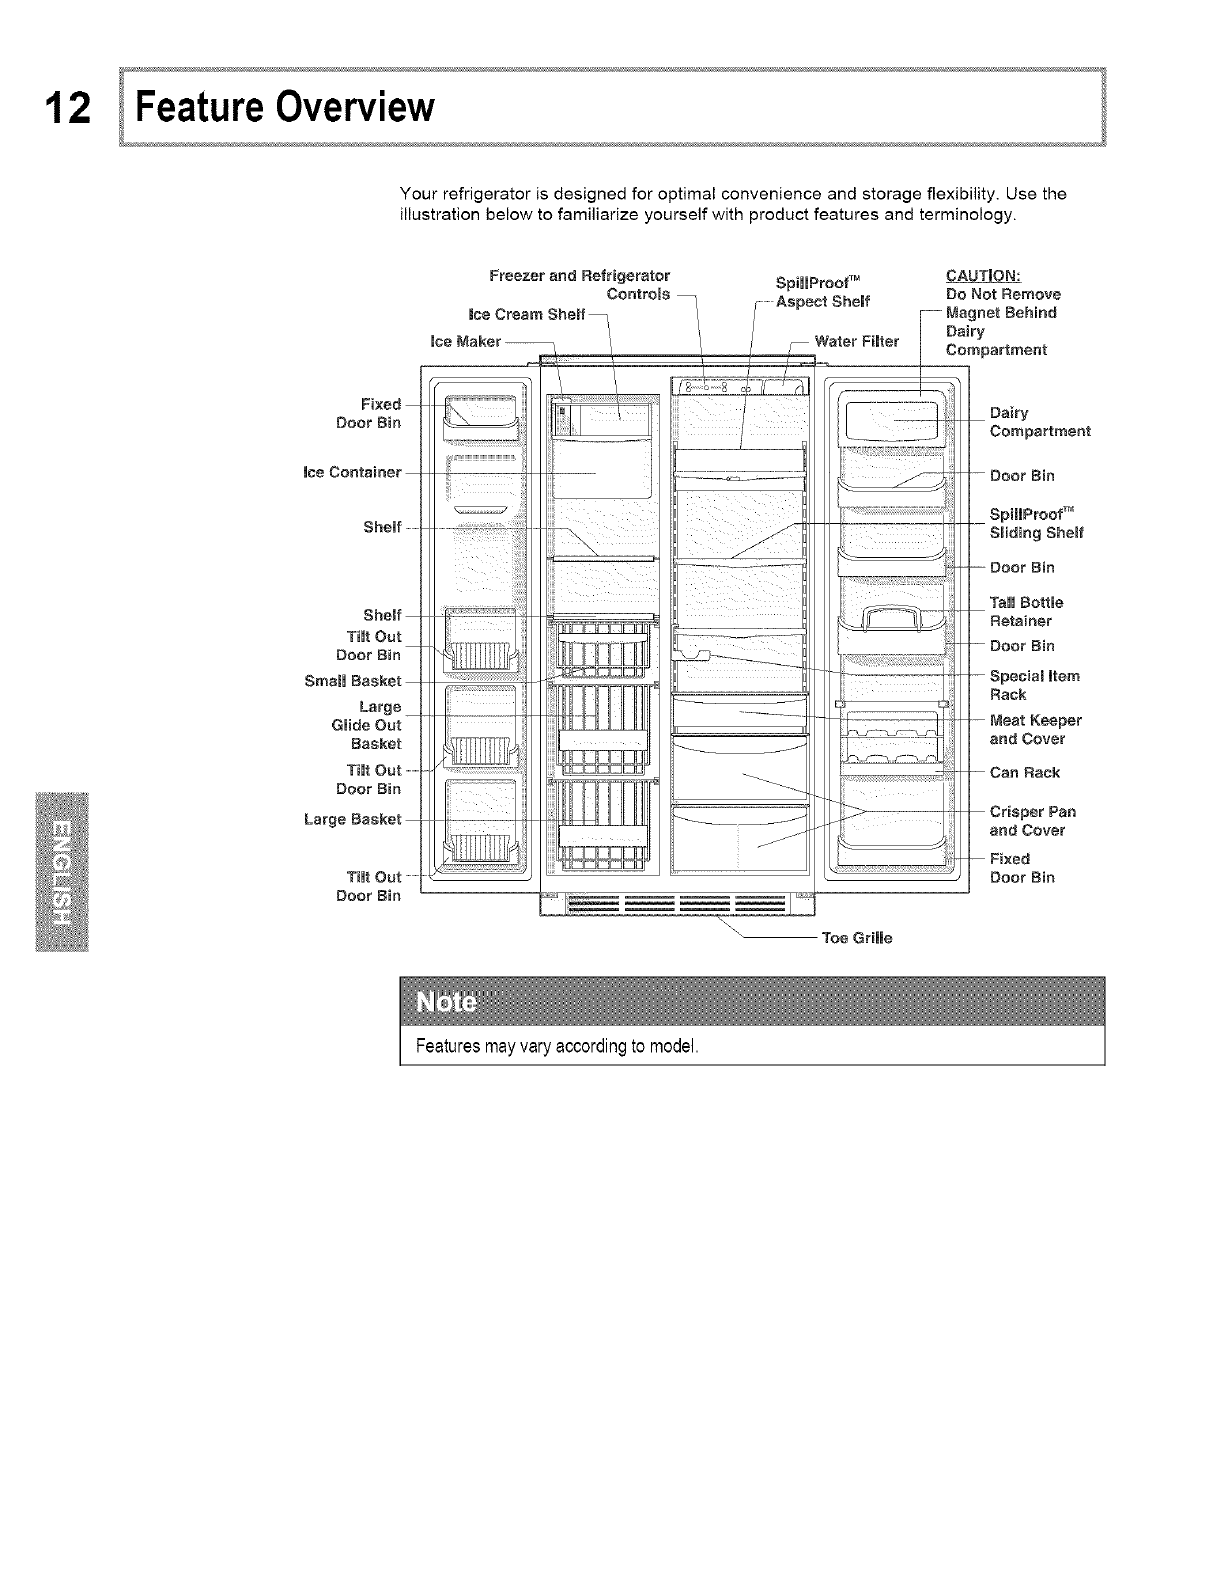
Your refrigerator is designed for optimal convenience and storage flexibility. Use the
illustration below to familiarize yourself with product features and terminology.
Fixed
Door Bin
lee Container
Shelf ............
Shelf
Tilt Out
Door Bin
Small Basket
Large _
Glide Out
Basket
Tilt Out ............
Door Bin
Large Basket
Tilt Out ............
Door Bin
Freezer and Refrigerator SpiilProof-rM CAUTION:
Controls _ ..............Aspect Shelf Do Not Remove
ice Cream Shelf _ Inet Behind
ice Maker- Filter Dairy
_ Compartment
iiiii
7_
-,UtUDDDD_
----_ f
_J
\Toe Grille
SpillProof TM
Shelf
Tall Bottle
Retainer
r Bin
and Cover
and Cover
Door Bin
Featuresmayvaryaccordingto model.
13
AllowingCoolingTime BeforeUse
To ensure reliable food storage, allow your refrigerator and freezer to operate with the
doors closed for 8 to 12 hours before placing food inside. During this cooling period, you
do not need to adjust the controls, which are preset at the factory.
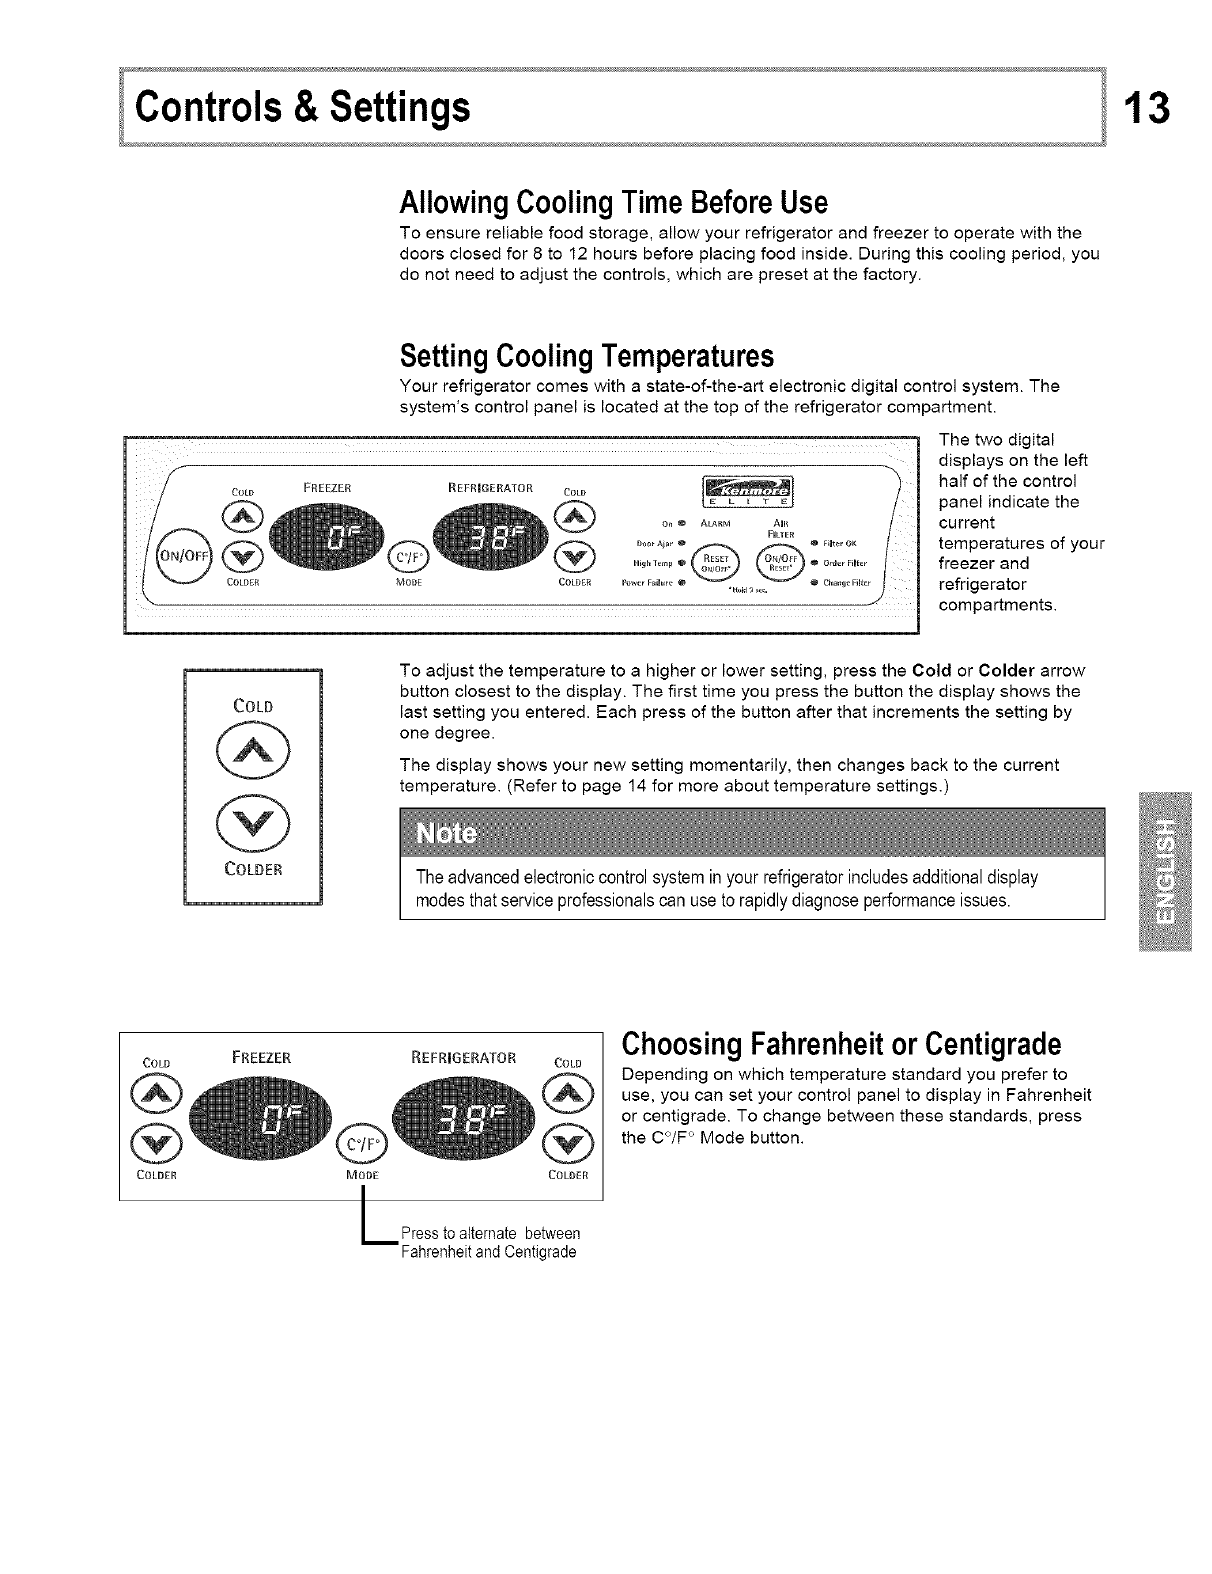
SettingCoolingTemperatures
Your refrigerator comes with a state-of-the-art electronic digital control system. The
system's control panel is located at the top of the refrigerator compartment.
COLD FREEZER REFRIGERATOR COLD
The two digital
displays on the left
half of the control
panel indicate the
current
temperatures of your
freezer and
refrigerator
compartments.
COLD
COLDER
To adjust the temperature to a higher or lower setting, press the Cold or Colder arrow
button closest to the display. The first time you press the button the display shows the
last setting you entered. Each press of the button after that increments the setting by
one degree.
The display shows your new setting momentarily, then changes back to the current
temperature. (Refer to page 14 for more about temperature settings.)
The advancedelectroniccontrolsystemin yourrefrigeratorincludesadditionaldisplay
modesthatserviceprofessionalscan useto rapidlydiagnoseperformanceissues.
COLD FREEZER
COLDER
REFRIGERATOR COLD
Q
MODE COLDER
L Press to alternate between
Fahrenheit and Oentigrade
Choosing Fahrenheit or Centigrade
Depending on which temperature standard you prefer to
use, you can set your control panel to display in Fahrenheit
or centigrade. To change between these standards, press
the C°/F ° Mode button.
14
MakingTemperatureAdjustments
After running your refrigerator for 24 hours, you can adjust temperatures as needed.
Make your adjustments small and gradual, allowing time for temperatures to change and
stabilize. Refer the following guidelines for temperature settings.
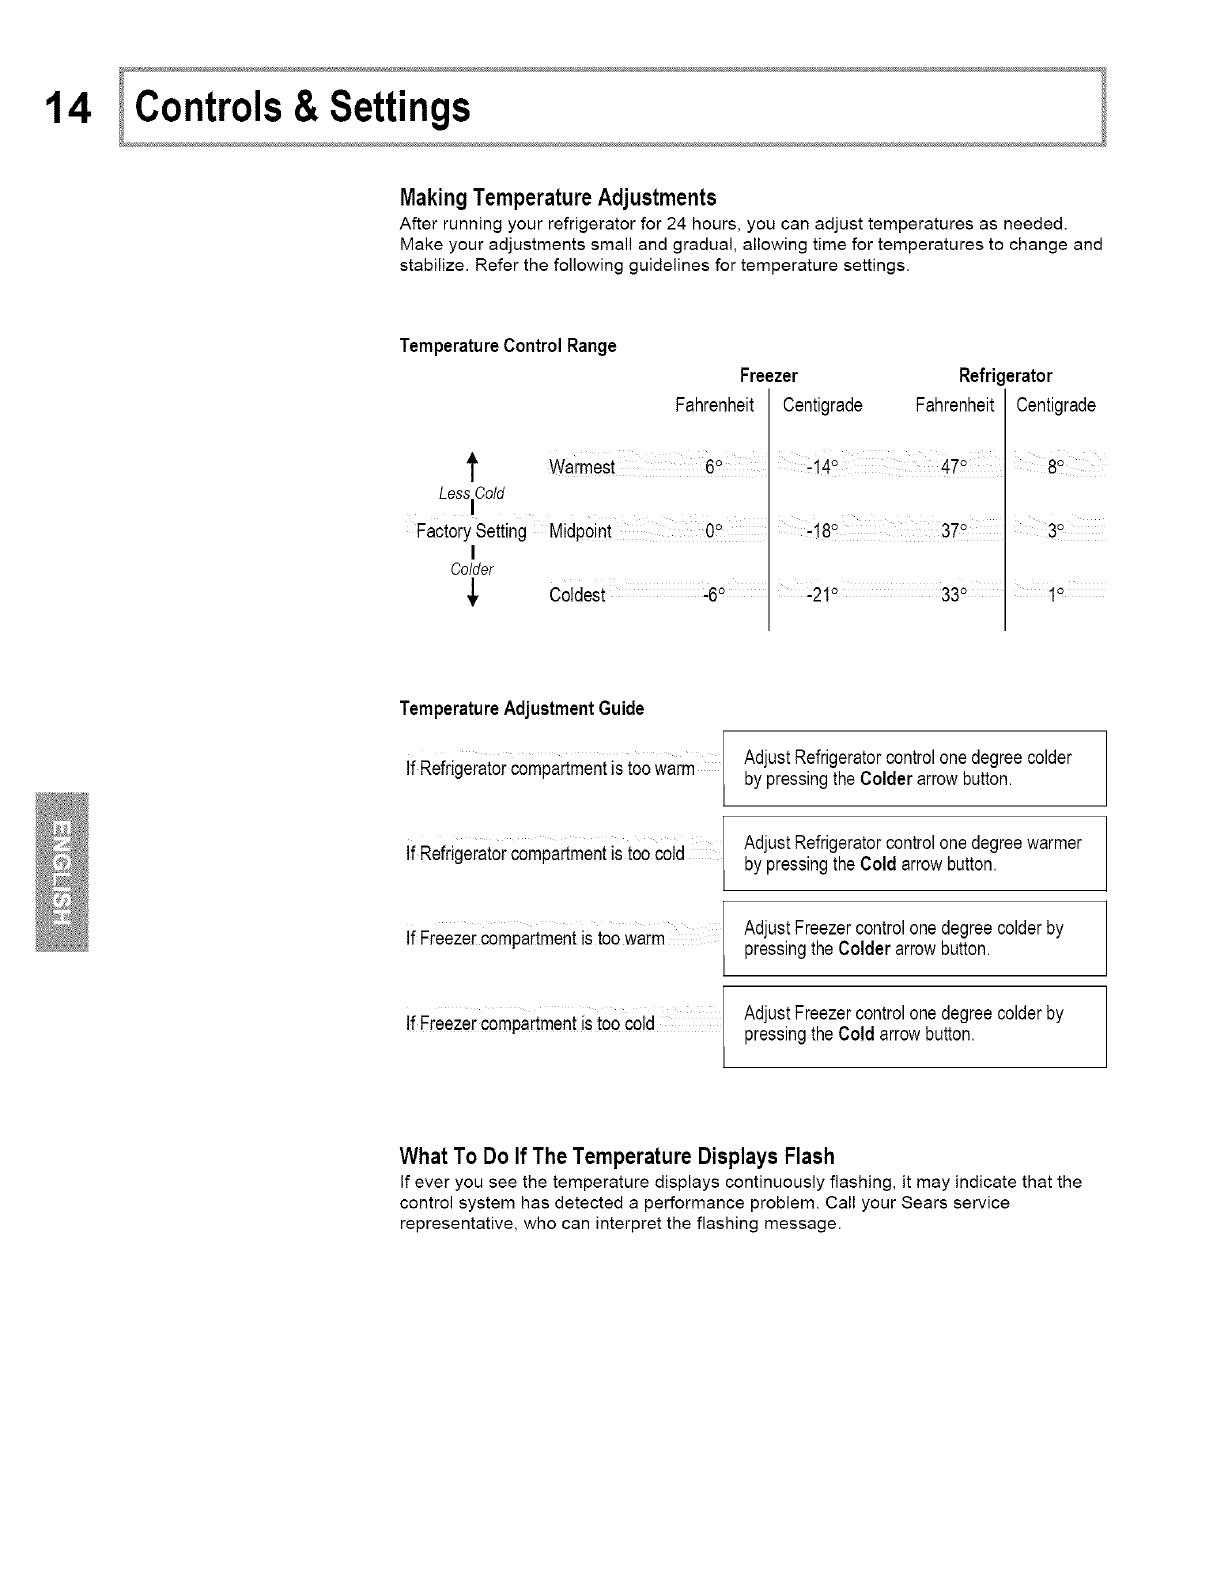
TemperatureControlRange
Freezer Refri
Fahrenheit Centigrade Fahrenheit
Warmest 60 ,14° 470
Less Cold
FactorySetting Midpoint 0° -18o 370
I
Colder
_, Coldest :6° '210 330
orator
Centigrade
i 0
TemperatureAdjustmentGuide
If Refrige;at0rcompartmentis too warm
If Refrigeratorcompartmentis too c0id
if Freezeicompartmentis too waim
If Freezercompartmentis too c0!d
AdjustRefrigeratorcontrolonedegreecolder
by pressingtheColder arrowbutton.
AdjustRefrigeratorcontrolonedegreewarmer
by pressingtheCold arrowbutton.
AdjustFreezercontrolonedegreecolderby
pressingthe Colder arrowbutton.
AdjustFreezercontrolonedegreecolderby
pressingthe Cold arrowbutton.
What To Do If The Temperature Displays Flash
If ever you see the temperature displays continuously flashing, it may indicate that the
control system has detected a performance problem. Call your Sears service
representative, who can interpret the flashing message.
15
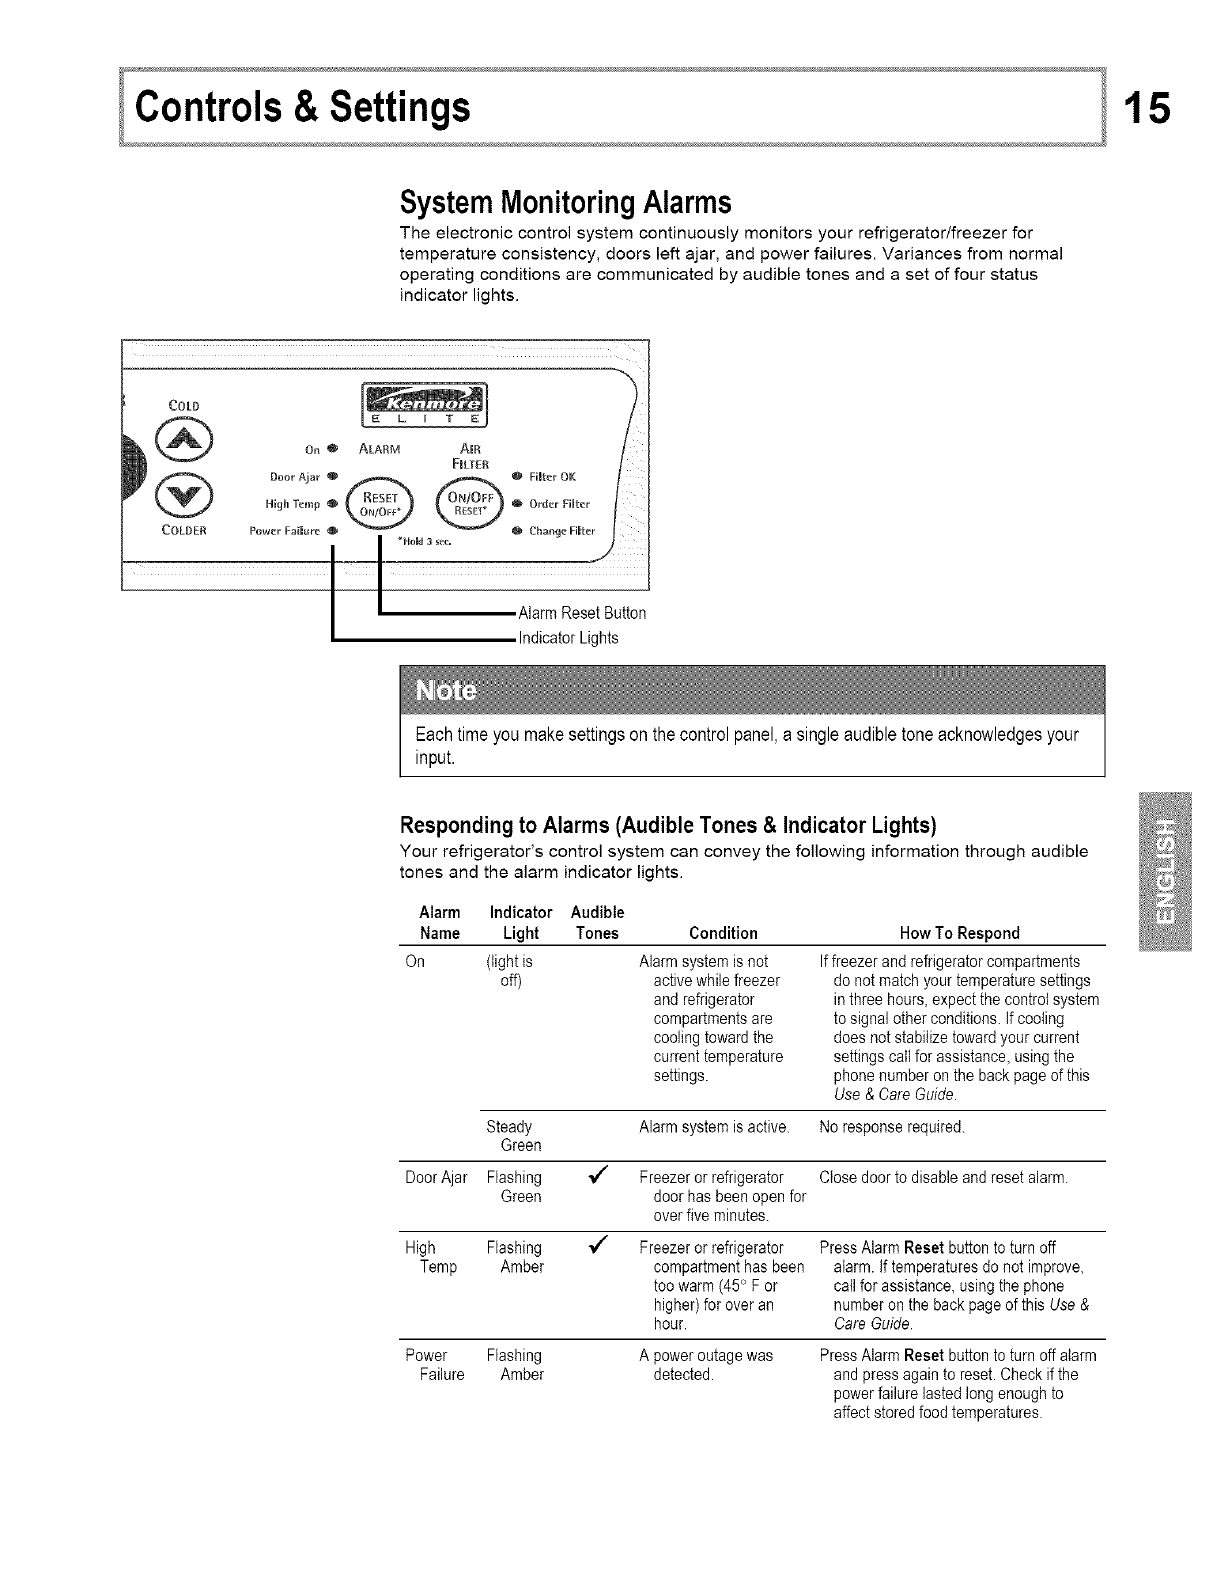
SystemMonitoringAlarms
The electronic control system continuously monitors your refrigerator/freezer for
temperature consistency, doors left ajar, and power failures. Variances from normal
operating conditions are communicated by audible tones and a set of four status
indicator lights.
COLD
AlarmResetButton
IndicatorLights
Eachtimeyou makesettingson thecontrolpanel,a singleaudibletoneacknowledgesyour
input.
Respondingto Alarms (Audible Tones &Indicator Lights)
Your refrigerator's control system can convey the following information through audible
tones and the alarm indicator lights.
Alarm Indicator Audible
Name Light Tones
On (light is
off)
Condition
Alarm system is not
active while freezer
and refrigerator
compartments are
cooling toward the
current temperature
settings.
How To Respond
If freezer and refrigerator compartments
do not match your temperature settings
in three hours, expect the control system
to signal other conditions, if cooling
does not stabilize toward your current
settings call for assistance, using the
phone number on the back page of this
Use & Care Guide.
Steady Alarm system is active. No response required.
Green
Door Ajar Flashing _/" Freezer or refrigerator Close door to disable and reset alarm.
Green door has been open for
over five minutes.
High Flashing _ Freezer or refrigerator Press Alarm Reset button to turn off
Temp Amber compartment has been alarm. If temperatures do not improve,
too warm (45 ° F or call for assistance, using the phone
higher) for over an number on the back page of this Use &
hour. Care Guide.
Power Flashing A power outage was Press Alarm Reset button to turn off alarm
Failure Amber detected, and press again to reset. Check if the
power failure lasted long enough to
affect stored food temperatures.
16
ALARM
@
UsingThe Alarm Reset Button
You can disable or activate the alarm system by pressing and holding the Reset button
for three seconds. Use it, for example, to turn off audible tones and/or flashing indicator
lights.
The alarmsystemdoesnot automaticallyresetif you disconnectand reconnectyour
refrigerator'spowercord.It canonlybe reactivatedby pressingthe AlarmResetbutton.
Once you disable the alarm system, you must again press and hold the Alarm Reset
button for three more seconds to reset (activate) the alarm system. The On indicator
light remains off while the freezer and refrigerator compartments cool toward the current
cooling settings. When temperature settings are reached, the On light displays green to
indicate an active alarm system.
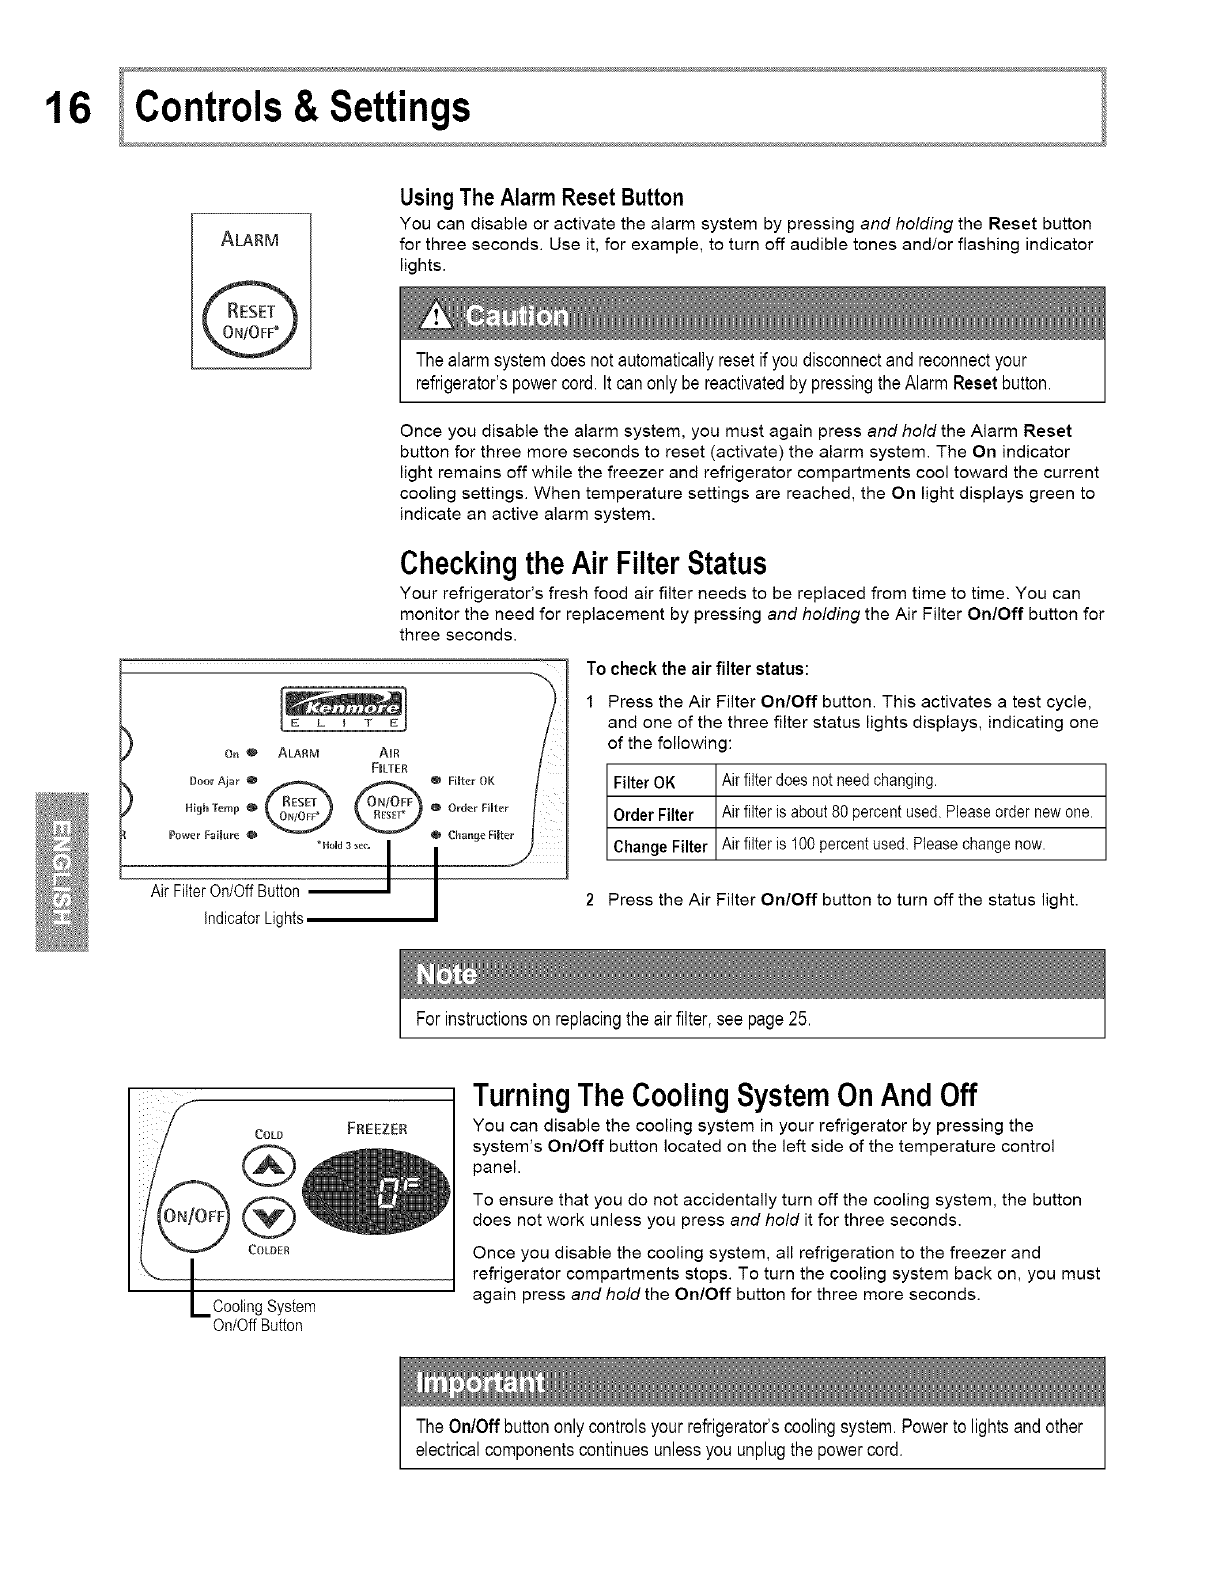
Checking theAir FilterStatus
Your refrigerator's fresh food air filter needs to be replaced from time to time. You can
monitor the need for replacement by pressing and holding the Air Filter On/Off button for
three seconds.
To checkthe airfilterstatus:
1 Press the Air Filter On/Off button. This activates a test cycle,
and one of the three filter status lights displays, indicating one
of the following:
Filter OK Air filter does not need changing.
Order Filter Air filter is about 80 percent used. Please order new one.
Change Filter Air filter is 100 percent used. Please change now.
AirFilter On/OffButton
indicatorLights 2 Press the Air Filter On/Off button to turn off the status light.
Forinstructionsonreplacingtheairfilter, see page25.
COLD FREEZER
COLDER
X"_h Cooling System
On/Off Button
Turning The Cooling SystemOn And Off
You can disable the cooling system in your refrigerator by pressing the
system's On/Off button located on the left side of the temperature control
panel.
To ensure that you do not accidentally turn off the cooling system, the button
does not work unless you press and hold it for three seconds.
Once you disable the cooling system, all refrigeration to the freezer and
refrigerator compartments stops. To turn the cooling system back on, you must
again press and hold the On/Off button for three more seconds.
The On/Offbuttononlycontrolsyourrefrigerator'scoolingsystem.Powerto lightsandother
electricalcomponentscontinuesunlessyou unplugthepowercord.
17
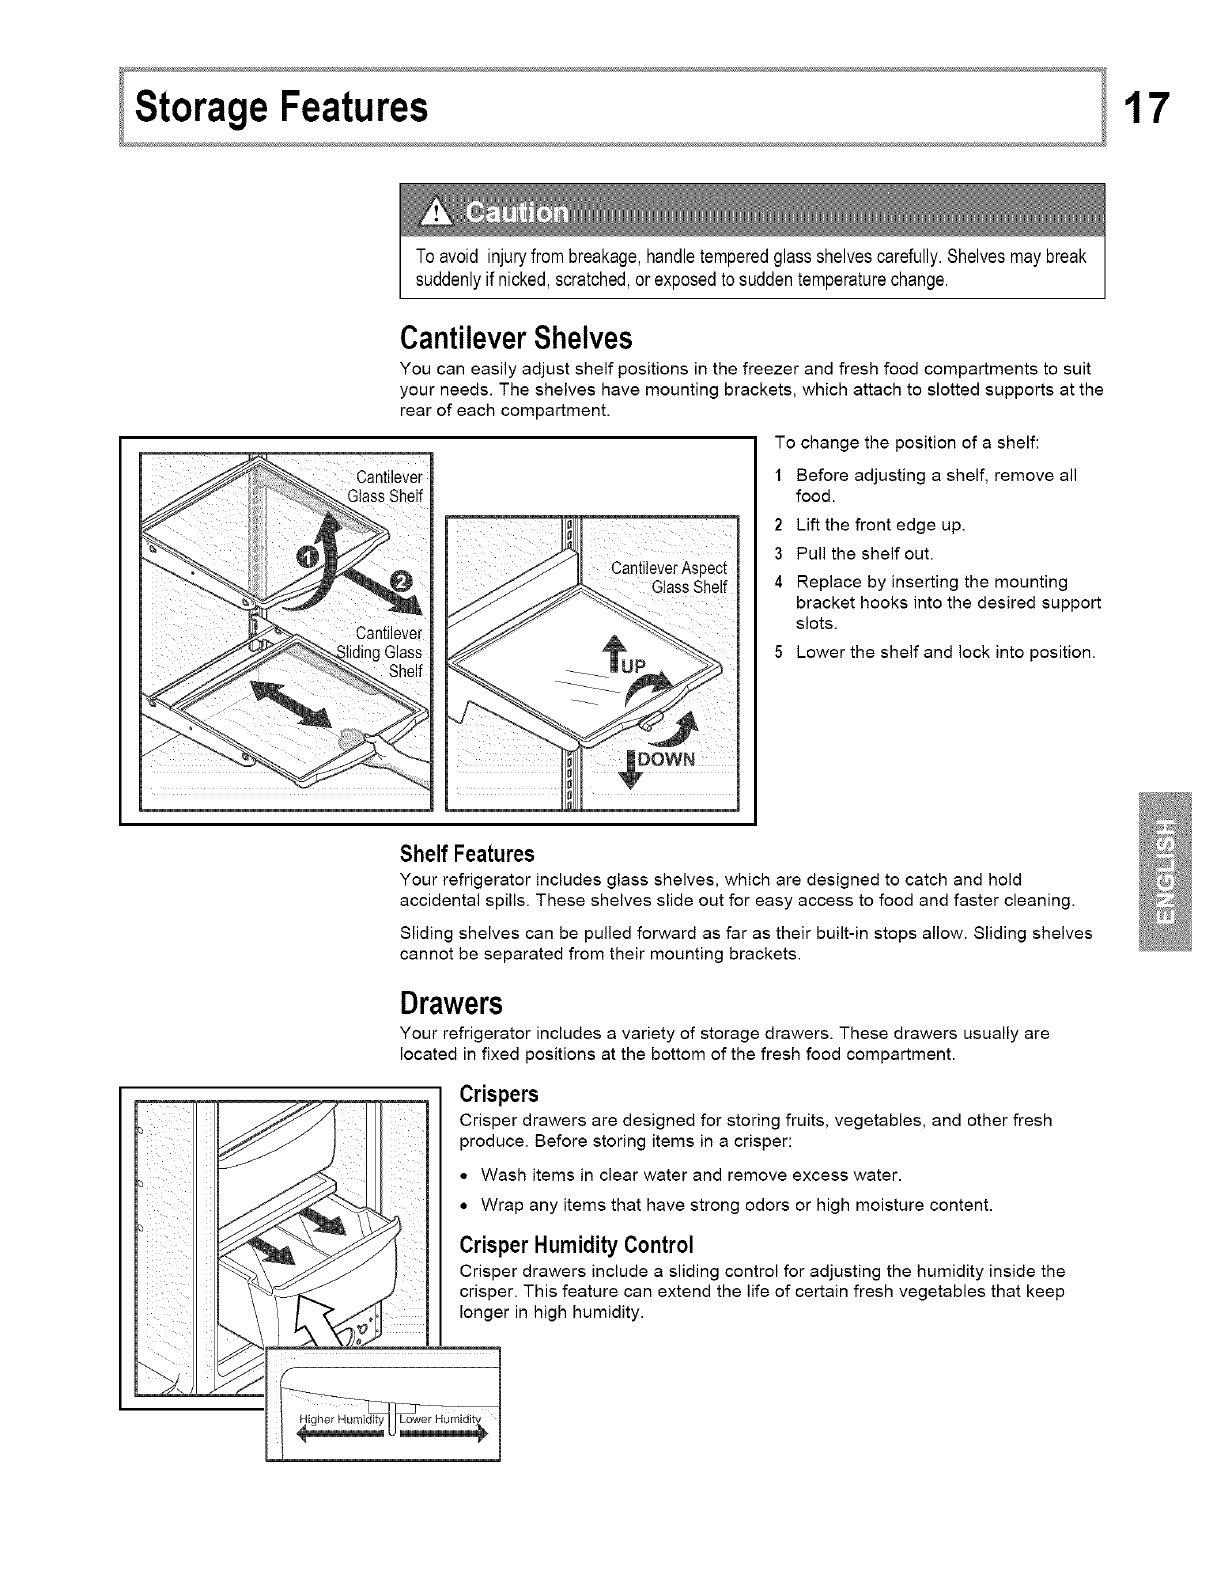
To avoid injuryfrombreakage,handletemperedglassshelvescarefully.Shelvesmaybreak
suddenlyif nicked,scratched,or exposedto suddentemperaturechange.
Cantilever Shelves
You can easily adjust shelf positions in the freezer and fresh food compartments to suit
your needs. The shelves have mounting brackets, which attach to slotted supports at the
rear of each compartment.
To change the position of a shelf:
1 Before adjusting a shelf, remove all
food.
2 Lift the front edge up.
Cantilever Aspect 3 Pull the shelf out.
4 Replace by inserting the mounting
bracket hooks into the desired support
slots.
5 Lower the shelf and lock into position.
Shelf Features
Your refrigerator includes glass shelves, which are designed to catch and hold
accidental spills. These shelves slide out for easy access to food and faster cleaning.
Sliding shelves can be pulled forward as far as their built-in stops allow. Sliding shelves
cannot be separated from their mounting brackets.
Drawers
Your refrigerator includes a variety of storage drawers. These drawers usually are
located in fixed positions at the bottom of the fresh food compartment.
i i
Crispers
Crisper drawers are designed for storing fruits, vegetables, and other fresh
produce. Before storing items in a crisper:
•Wash items in clear water and remove excess water.
•Wrap any items that have strong odors or high moisture content.
Crisper Humidity Control
Crisper drawers include a sliding control for adjusting the humidity inside the
crisper. This feature can extend the life of certain fresh vegetables that keep
longer in high humidity.
Lower Humid+t
18
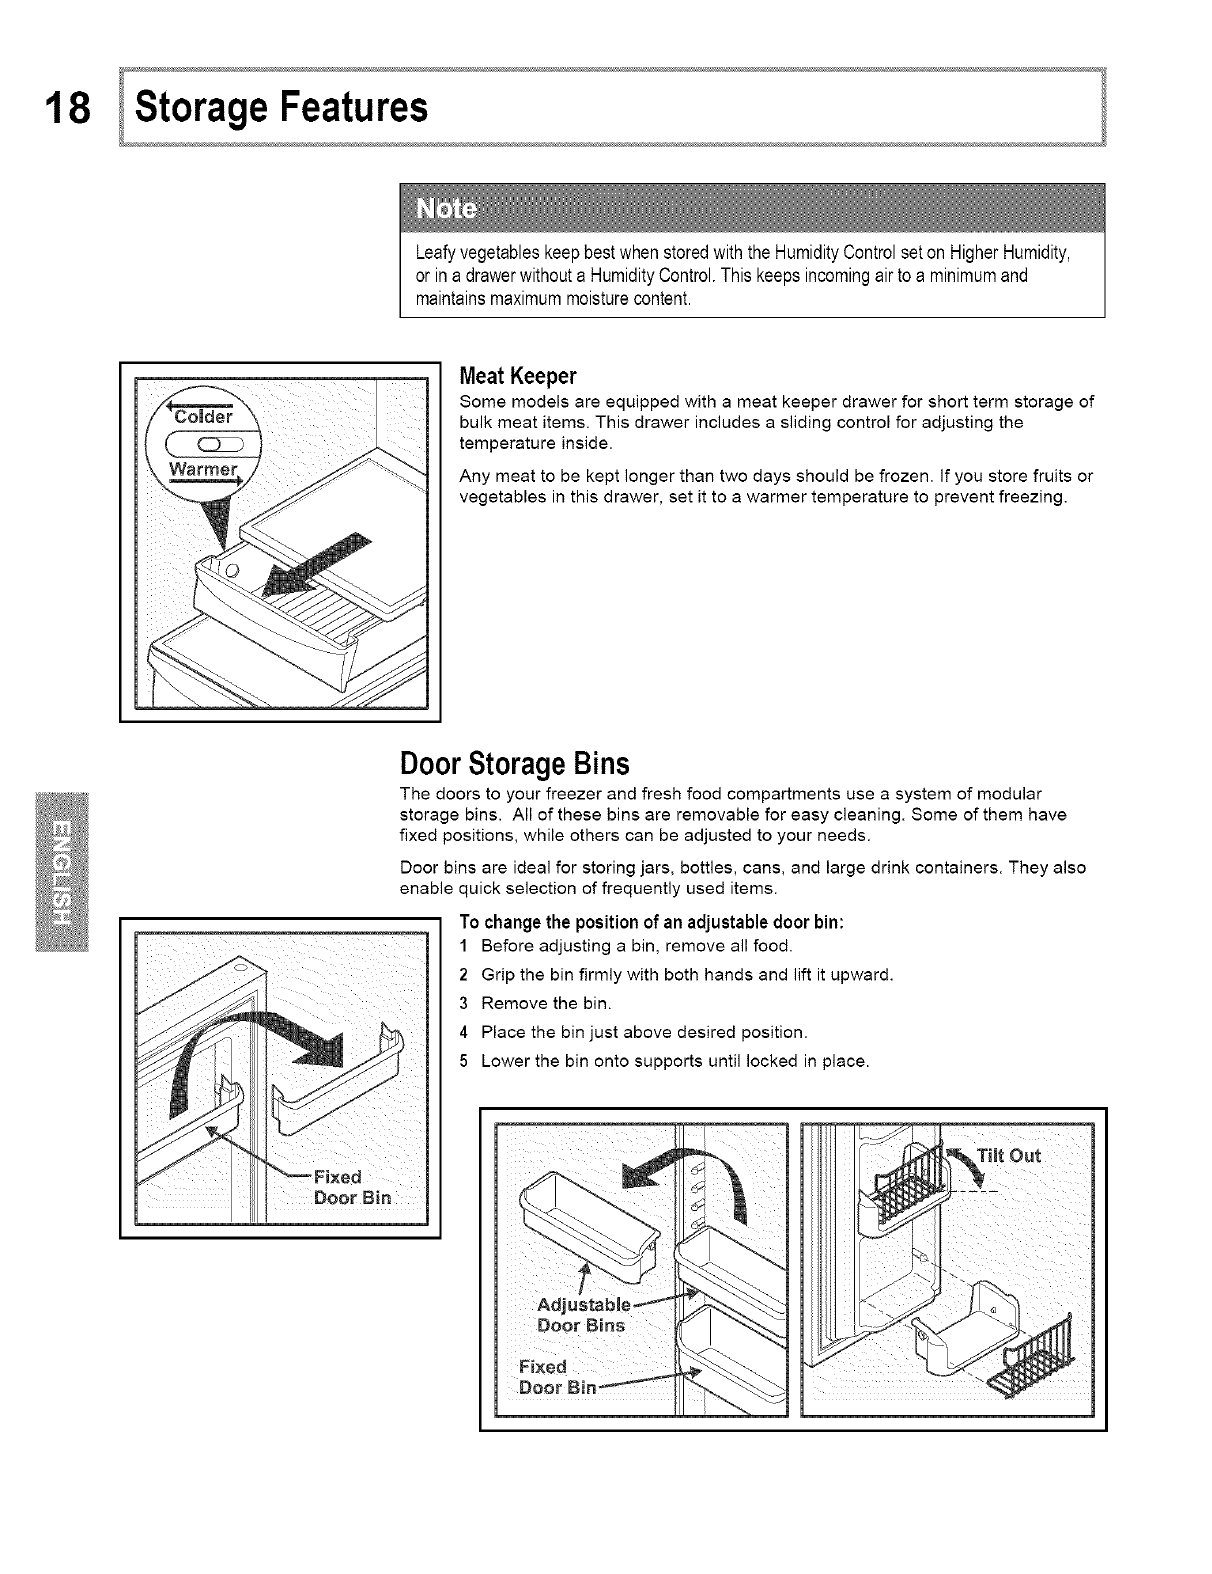
Leafyvegetableskeepbestwhenstoredwiththe HumidityControlseton HigherHumidity,
or in adrawerwithouta HumidityControl.Thiskeepsincomingairto a minimumand
maintainsmaximummoisturecontent.
Meat Keeper
Some models are equipped with a meat keeper drawer for short term storage of
bulk meat items. This drawer includes a sliding control for adjusting the
temperature inside.
Any meat to be kept longer than two days should be frozen. If you store fruits or
vegetables in this drawer, set it to a warmer temperature to prevent freezing.
DoorStorageBins
The doors to your freezer and fresh food compartments use a system of modular
storage bins. All of these bins are removable for easy cleaning. Some of them have
fixed positions, while others can be adjusted to your needs.
Door bins are ideal for storing jars, bottles, cans, and large drink containers. They also
enable quick selection of frequently used items.
To changethe position of an adjustable door bin:
1 Before adjusting a bin, remove all food.
2 Grip the bin firmly with both hands and lift it upward.
3 Remove the bin.
4 Place the bin just above desired position.
5 Lower the bin onto supports until locked in place.
19
Tail BottleRetainer
Shelf
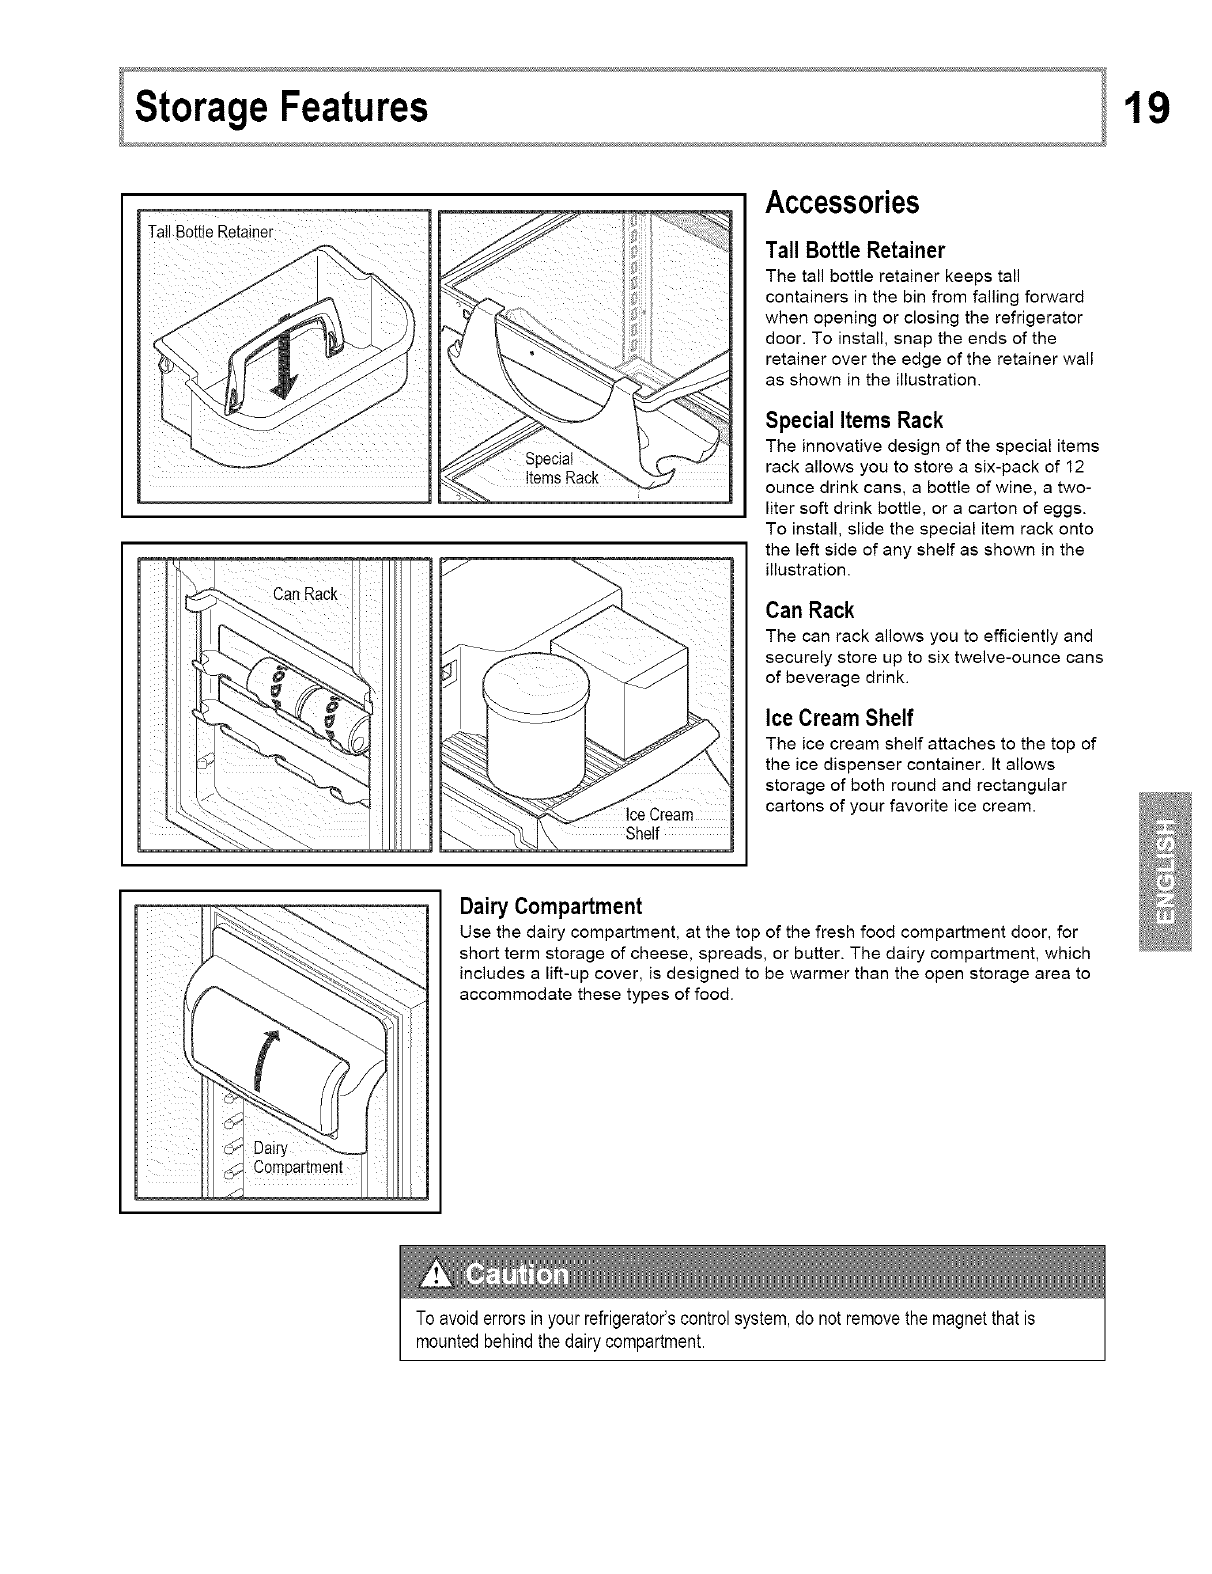
Accessories
Tall Bottle Retainer
The tall bottle retainer keeps tall
containers in the bin from falling forward
when opening or closing the refrigerator
door. To install, snap the ends of the
retainer over the edge of the retainer wall
as shown in the illustration.
Special Items Rack
The innovative design of the special items
rack allows you to store a six-pack of 12
ounce drink cans, a bottle of wine, a two-
liter soft drink bottle, or a carton of eggs.
To install, slide the special item rack onto
the left side of any shelf as shown in the
illustration.
Can Rack
The can rack allows you to efficiently and
securely store up to six twelve-ounce cans
of beverage drink.
Ice Cream Shelf
The ice cream shelf attaches to the top of
the ice dispenser container. It allows
storage of both round and rectangular
cartons of your favorite ice cream.
Dairy Compartment
Use the dairy compartment, at the top of the fresh food compartment door, for
short term storage of cheese, spreads, or butter. The dairy compartment, which
includes a lift-up cover, is designed to be warmer than the open storage area to
accommodate these types of food.
To avoiderrorsinyour refrigerator'scontrolsystem,do not removethe magnetthat is
mountedbehindthe dairycompartment.
20
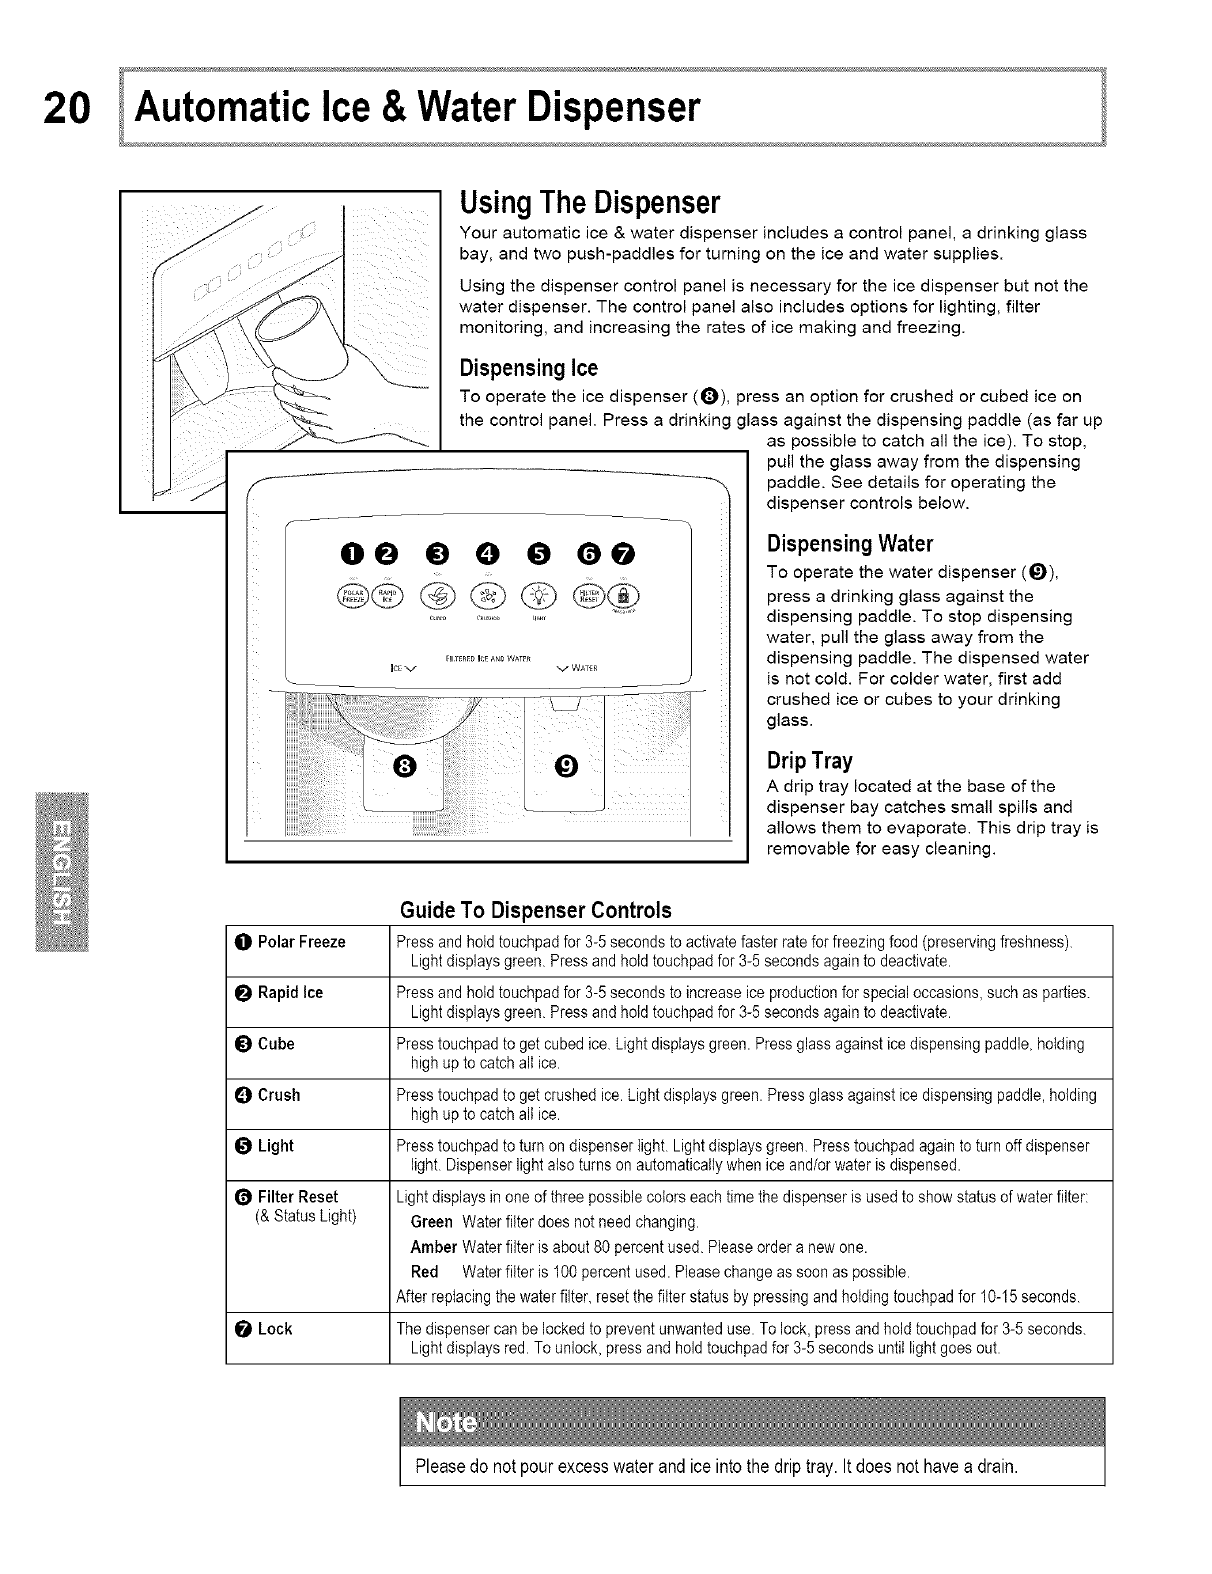
UsingThe Dispenser
Your automatic ice & water dispenser includes a control panel, a drinking glass
bay, and two push-paddles for turning on the ice and water supplies.
Using the dispenser control panel is necessary for the ice dispenser but not the
water dispenser. The control panel also includes options for lighting, filter
monitoring, and increasing the rates of ice making and freezing.
DispensingIce
To operate the ice dispenser (O), press an option for crushed or cubed ice on
the control panel. Press a drinking glass against the dispensing paddle (as far up
as possible to catch all the ice). To stop,
pull the glass away from the dispensing
--, paddle. See details for operating the
dispenser controls below.
®® @@@®®
FHITEREB I_E ANO WAT_
_C_ V V WATER
DispensingWater
To operate the water dispenser (I_1),
press a drinking glass against the
dispensing paddle. To stop dispensing
water, pull the glass away from the
dispensing paddle. The dispensed water
is not cold. For colder water, first add
crushed ice or cubes to your drinking
glass.
Drip Tray
A drip tray located at the base of the
dispenser bay catches small spills and
allows them to evaporate. This drip tray is
removable for easy cleaning.
0 PolarFreeze
RapidIce
_) Cube
0 Crush
Light
(_ Filter Reset
(& StatusLight)
_Lock
Guide To Dispenser Controls
Press and hold touchpad for 3-5 seconds to activate faster rate for freezing food (preserving freshness).
Light displays green. Press and hold touchpad for 3-5 seconds again to deactivate.
Press and hold touchpad for 3-5 seconds to increase ice production for special occasions, such as parties.
Light displays green. Press and hold touchpad for 3-5 seconds again to deactivate.
Press touchpad to get cubed ice. Light displays green. Press glass against ice dispensing paddle, holding
high up to catch all ice.
Press touchpad to get crushed ice. Light displays green. Press glass against ice dispensing paddle, holding
high up to catch all ice.
Press touchpad to turn on dispenser light. Light displays green. Press touchpad again to turn off dispenser
light. Dispenser light also turns on automatically when ice and/or water is dispensed.
Light displays in one of three possible colors each time the dispenser is used to show status of water filter:
Green Water filter does not need changing.
Amber Water filter is about 80 percent used. Please order a new one.
Red Water filter is 100 percent used. Please change as soon as possible.
After replacing the water filter, reset the filter status by pressing and holding touchpad for 10-15 seconds.
The dispenser can be locked to prevent unwanted use. To lock, press and hold touchpad for 3-5 seconds.
Light displays red. To unlock, press and hold touchpad for 3-5 seconds until light goes out.
Pleasedonot pourexcesswaterandiceinto the driptray. Itdoes nothavea drain.
l Aut--° ° °omaticIce & Water Dispenser 21
PrimingTheWaterSupplySystem
Your refrigerator's water supply system includes several tubing lines, an advanced water
filter, a distribution valve bank, and a reserve tank to ensure ample supply to the ice and
water dispenser at all times. This system needs to be completely filled with water when
first connected to an external supply line.
Forproperdispenseroperation,recommendedwatersupplypressureshouldfall between20
psiand 100psi.Excessivepressuremaycausewaterfilterto malfunction.
To prime the water supply system:
1Begin filling the tank by pressing and holding a drinking glass against the water
dispenser paddle.
2 Keep the glass in this position until water comes out of the dispenser. It may take
about 1'/2 minutes.
3Continue dispensing water for about 3 minutes to flush the system and plumbing
connections of any impurities (stopping to empty the glass as necessary).
The waterdispenserhasa built-indevicethatshutsoff thewaterflowafter3 minutesof
continuoususe.To resetthisshutoffdevice,simplyreleasethe dispenserpaddle.
Pushingthe dispensingpaddlein for morethan4 minutesmaycausethedispensermotorto
overloadandstop.The overloadprotectorresetsautomaticallyafter3-4 minutes.
Ice DispenserOperation& Care
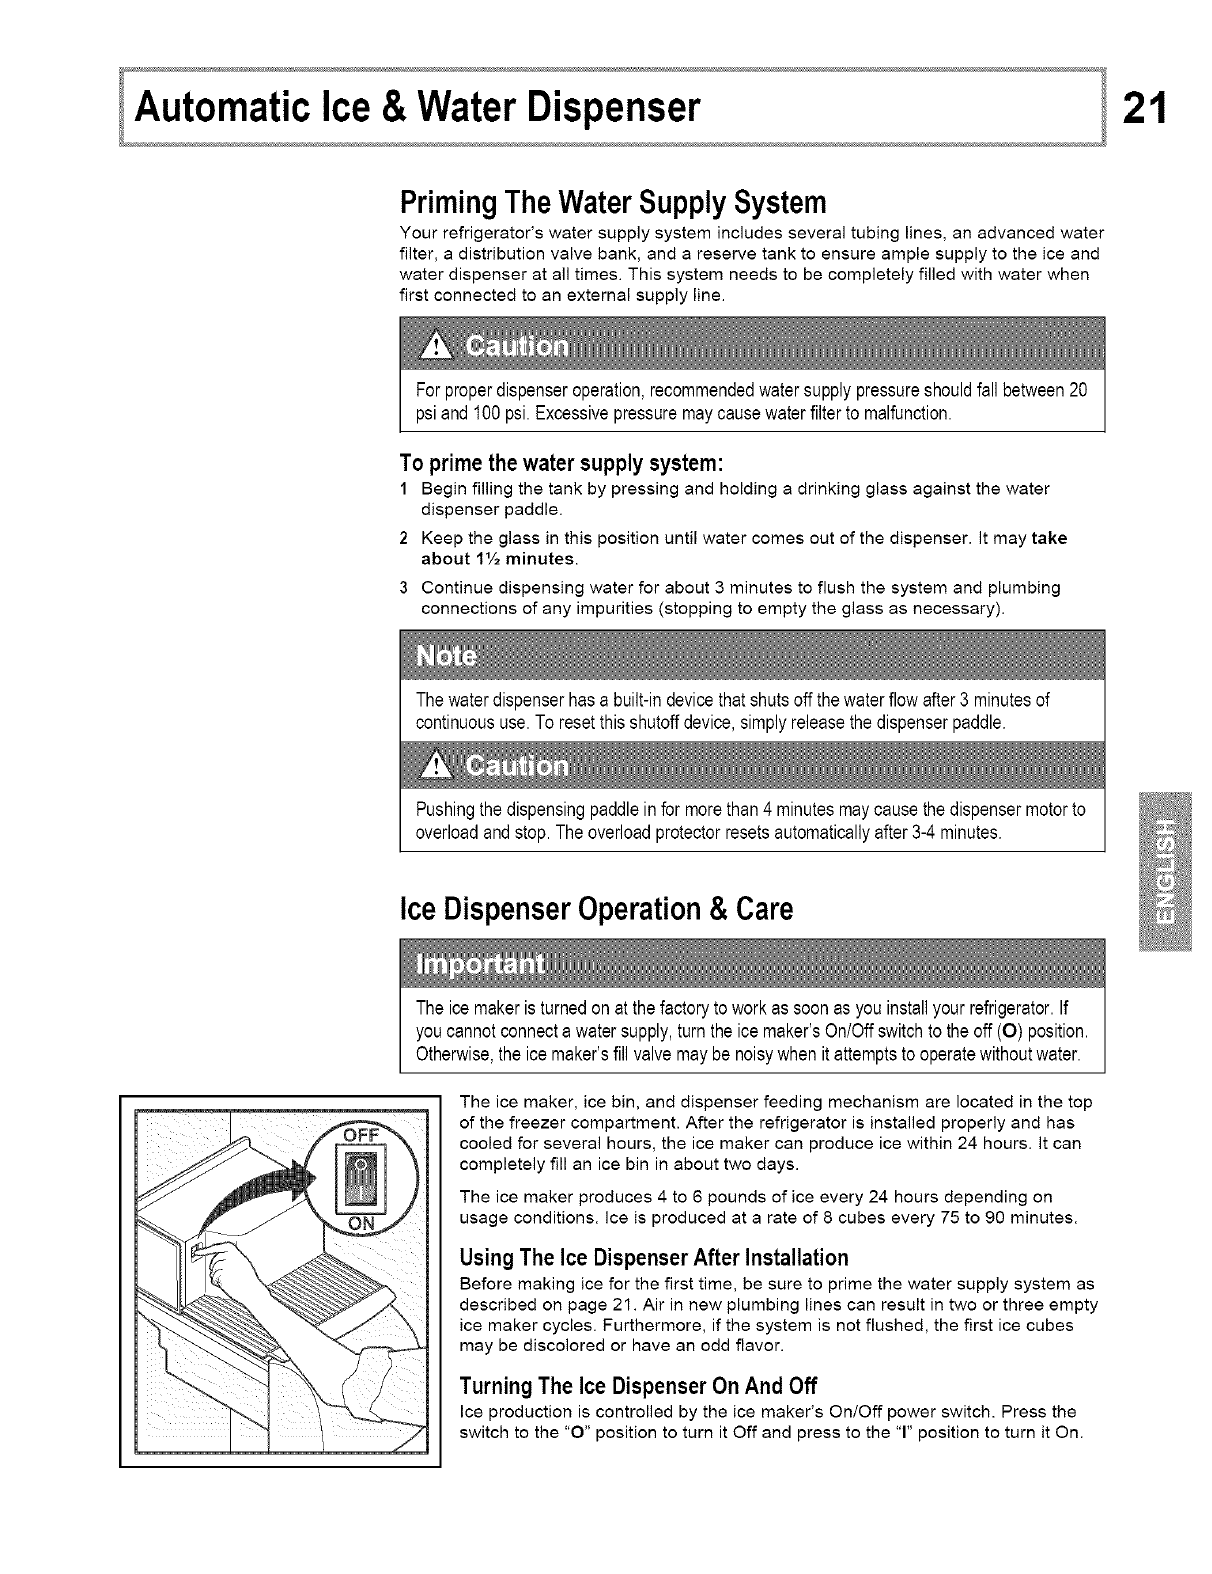
The ice makeris turnedon at thefactoryto workas soonas you installyourrefrigerator.If
you cannotconnectawatersupply,turn theice maker'sOn/Offswitchto theoff (O) position.
Otherwise,the icemaker'sfill valvemaybenoisywhenit attemptsto operatewithoutwater.
The ice maker, ice bin, and dispenser feeding mechanism are located in the top
of the freezer compartment. After the refrigerator is installed properly and has
cooled for several hours, the ice maker can produce ice within 24 hours. It can
completely fill an ice bin in about two days.
The ice maker produces 4 to 6 pounds of ice every 24 hours depending on
usage conditions. Ice is produced at a rate of 8 cubes every 75 to 90 minutes.
UsingThe Ice Dispenser After Installation
Before making ice for the first time, be sure to prime the water supply system as
described on page 21. Air in new plumbing lines can result in two or three empty
ice maker cycles. Furthermore, if the system is not flushed, the first ice cubes
may be discolored or have an odd flavor.
Turning The Ice Dispenser On And Off
Ice production is controlled by the ice maker's On/Off power switch. Press the
switch to the "O" position to turn it Off and press to the 'T' position to turn it On.
22
The ice makeralsohasa built-inwire signalarm,whichautomaticallystopsiceproduction
whenthe ice binis full.Thissignalarmshouldnotbe usedto manuallystoptheice maker.
Ice Dispenser Tips
• Ice cubes stored too long may develop an odd flavor. Empty the ice container as
explained on the next page.
• Occasionally shake the ice container to keep ice separated.
• If your refrigerator is not connected to a water supply or the water supply is turned off,
turn off the ice maker by pressing the On/Off switch to the "O" position.
• If you need a large quantity of ice at one time, it is best to get cubes directly from the
ice container.
• The following sounds are normal when the ice maker is operating:
• Motor running
• Ice dropping into ice container
• Water valve opening or closing
• Ice loosening from tray
• Running water
• Turn off the ice maker when cleaning the freezer and during vacations.
• If you turn off the ice maker for a long period of time, you should also turn off the
water supply valve.
Chemicalsfroma malfunctioningwatersoftenercandamagethe ice maker.If thewater
supplyto your refrigeratoris softened,be surethe softeneris maintainedto workproperly.
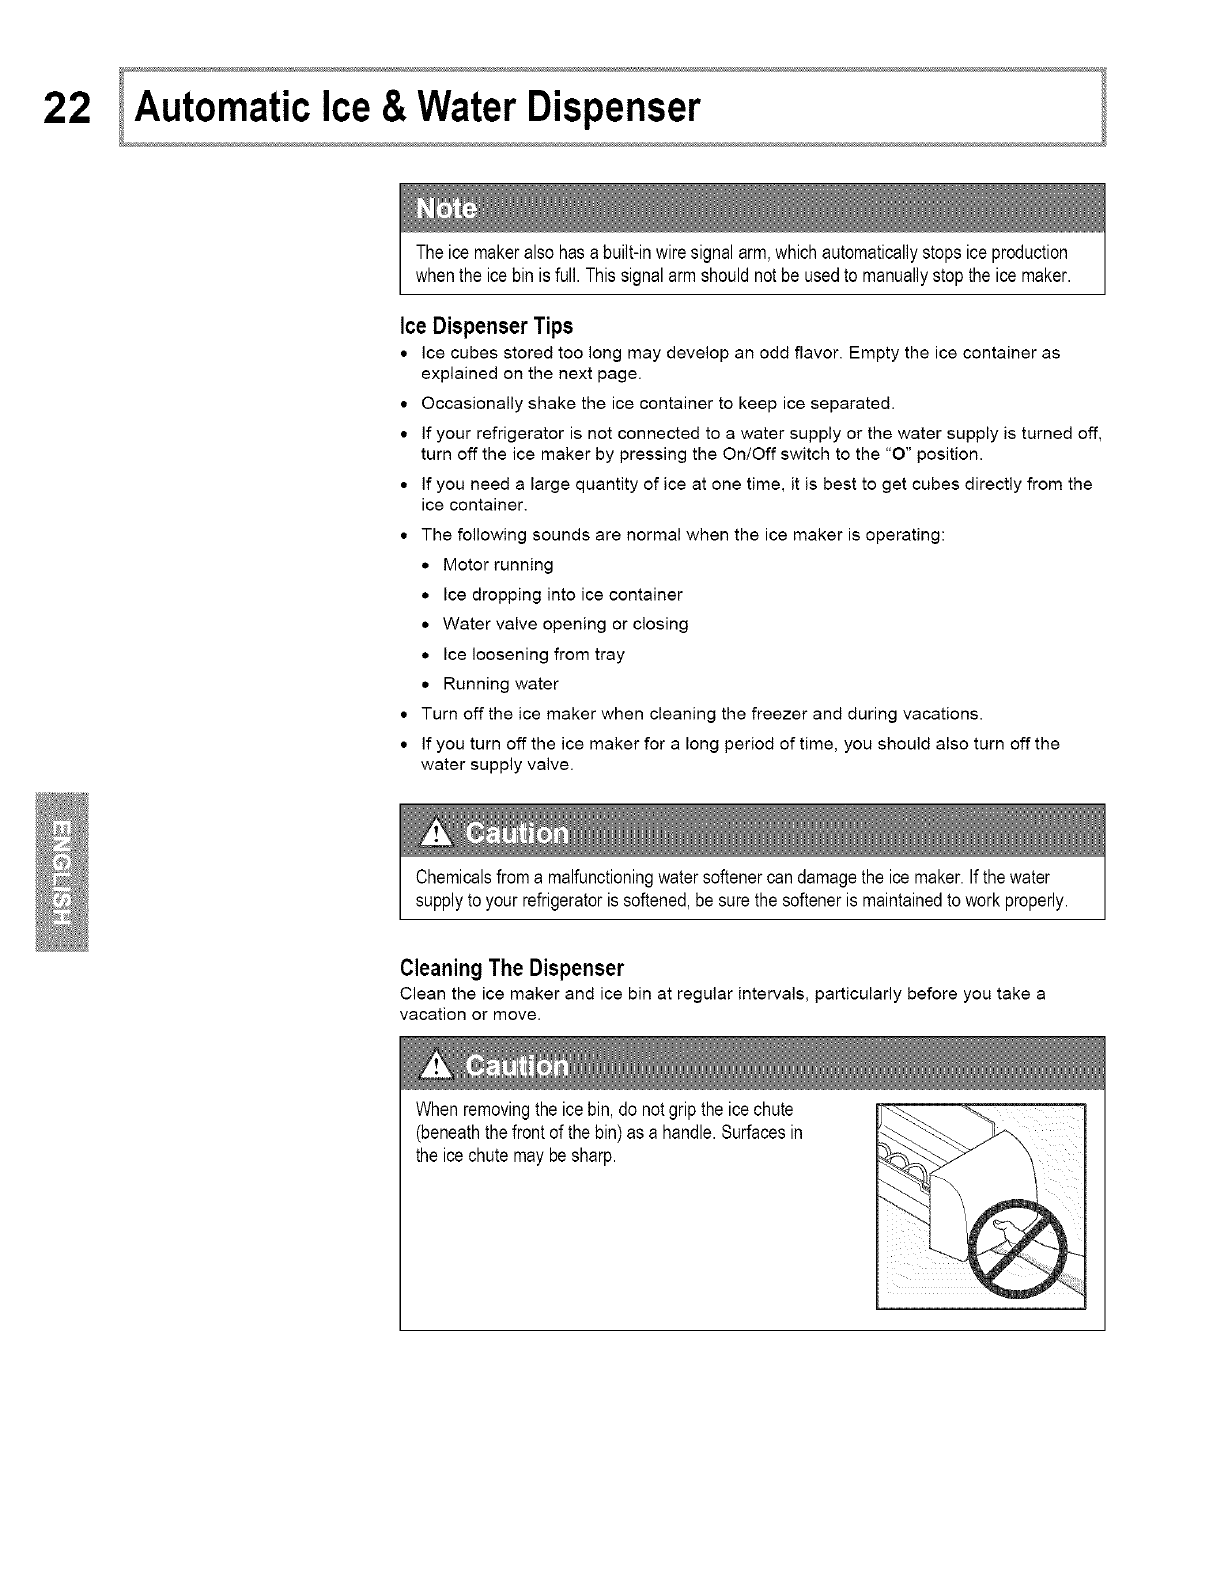
Cleaning The Dispenser
Clean the ice maker and ice bin at regular intervals, particularly before you take a
vacation or move.
Whenremovingthe icebin, do notgripthe icechute
(beneaththefrontof the bin)as a handle.Surfacesin
the ice chutemaybesharp.

l+Aut+++omaticIce & Water Dispenser 23
To clean the ice dispenser:
1Turn off ice production by pressing the On/Off switch to the "O" position.
2 Remove the ice bin by lifting up and out.
3 Empty and carefully clean the ice bin with mild detergent. Rinse with clear water. Do
not use harsh or abrasive cleaners.
4 Allow the ice bin to dry completely before replacing in the freezer.
5 Remove ice chips and clean the ice bin shelf and the freezer door chute (for more tips
on care and cleaning, see page 29).
6 Replace the ice bin. Press the Off/On the 'T' position switch to resume ice production.
Removeand emptythe ice storage bin if:
• An extended power failure (one hour or longer) causes ice cubes in the ice storage
bin to melt and freeze together, jamming the dispenser mechanism.
• You do not use the ice dispenser frequently. Ice cubes will freeze together in the bin,
jamming the dispenser mechanism.
Remove the ice storage bin and shake to loosen the cubes or clean as explained above.
Never use an ice pick or similar sharp instrument to break up the ice. This could damage
the ice storage bin and dispenser mechanism.
Whenremovingthe icebin, avoidrotatingthe auger
insidethe bin.The augermustalignwith itsdrive
mechanismwhenthe binis replaced.If you accidentally
movetheauger,realignby makingquarterturnsuntil
the ice binfits backinplace.
LocatingThe Filters
Your refrigerator is equipped with separate water and air filtering systems. The water
filter system filters all dispensed drinking water, as well as the water used to produce
ice. The air filter removes odors and impurities from the refrigerator compartment.
FWater Filter
Water Filter
The water filter is located at the top of the fresh food compartment, next to the
electronic control system panel. For more information about when to replace the
filter, see "Using The Dispenser" on page 20.
Air Filter
The air filter is located inside the refrigerator compartment at the top rear corner.
For more information about when to replace the filter, see "Checking the Air Filter
Status" on page 16.
24
OrderingReplacementFilters
Order new filters through the dealer where you bought your refrigerator, or contact the
Sears PartsDirect at 1-800-366-PART. You may want to consider ordering extra filters
when you first install your refrigerator. Here are the product number to request when
ordering:
Water Filter Kenmore Replacement Cartridge 9916
Air Filter Kenmore Replacement Filter 9917
n
S _de Filter
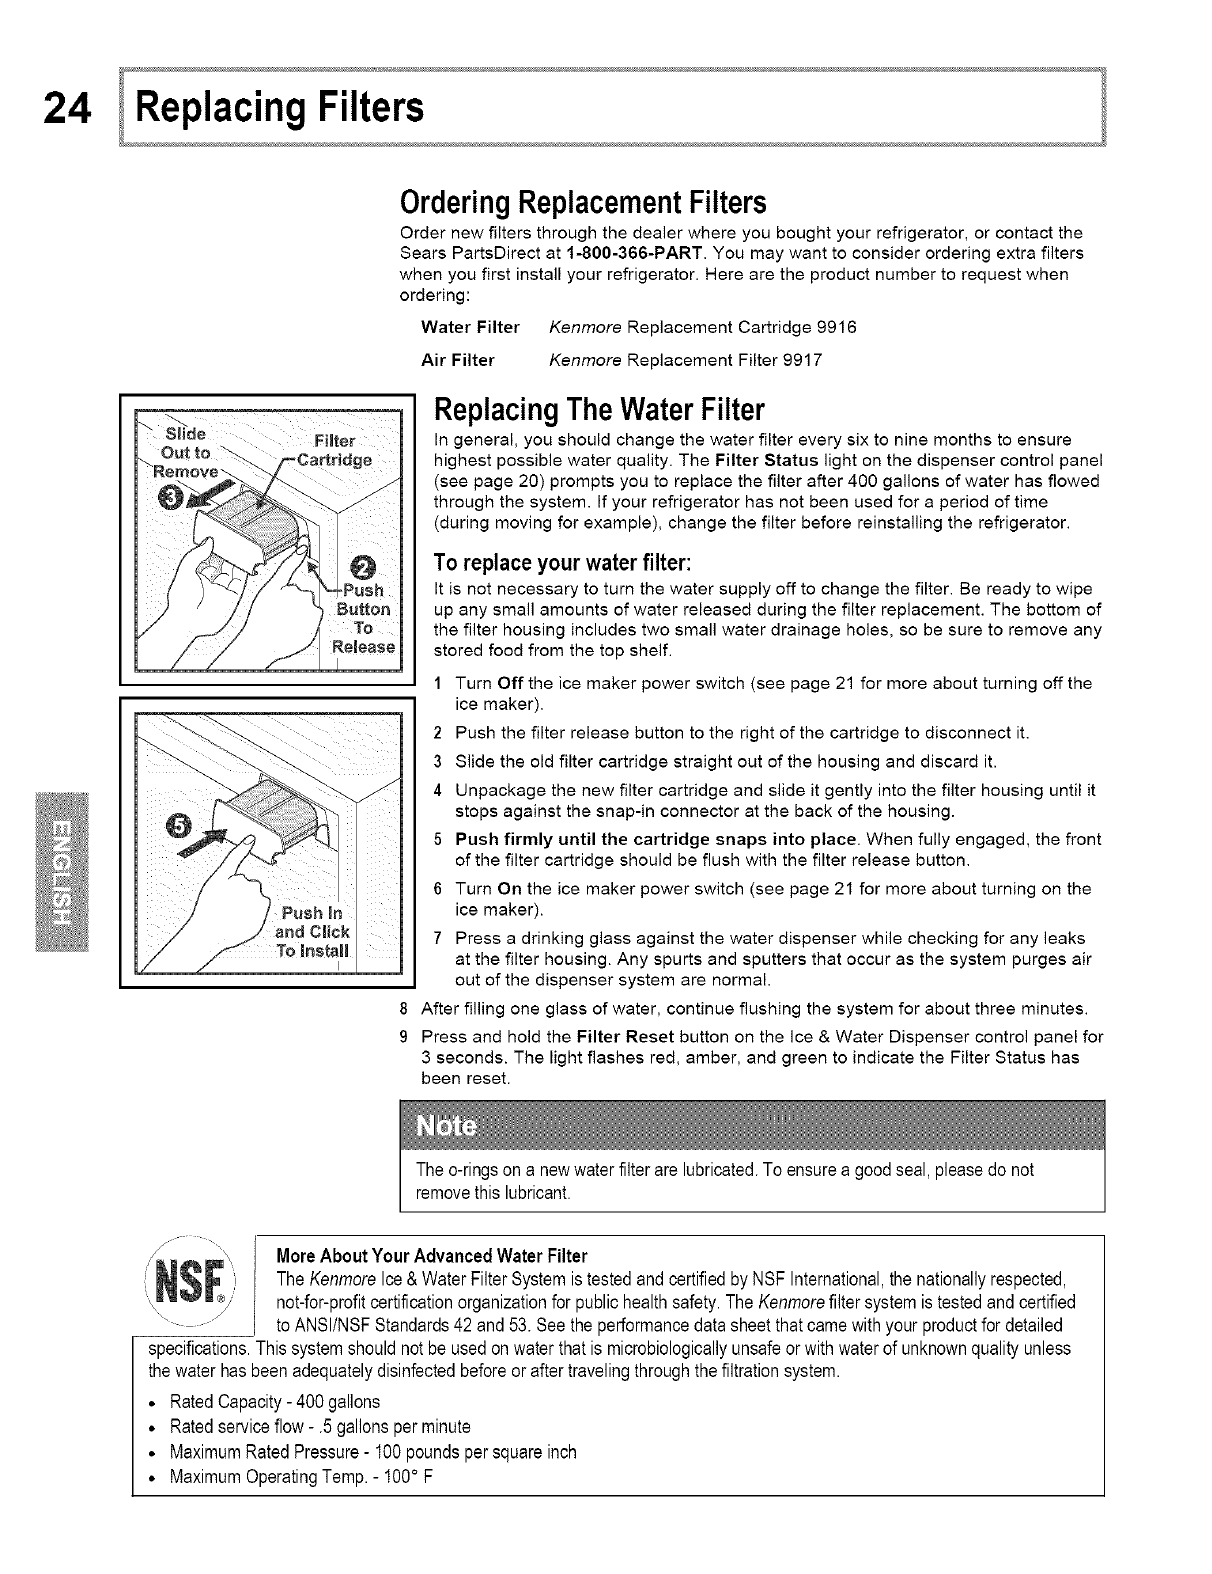
ReplacingTheWater Filter
In general, you should change the water filter every six to nine months to ensure
highest possible water quality. The Filter Status light on the dispenser control panel
(see page 20) prompts you to replace the filter after 400 gallons of water has flowed
through the system. If your refrigerator has not been used for a period of time
(during moving for example), change the filter before reinstalling the refrigerator.
To replace your water filter:
It is not necessary to turn the water supply off to change the filter. Be ready to wipe
up any small amounts of water released during the filter replacement. The bottom of
the filter housing includes two small water drainage holes, so be sure to remove any
stored food from the top shelf.
1Turn Off the ice maker power switch (see page 21 for more about turning offthe
ice maker).
2 Push the filter release button to the right of the cartridge to disconnect it.
3 Slide the old filter cartridge straight out of the housing and discard it.
4 Unpackage the new filter cartridge and slide it gently into the filter housing until it
stops against the snap-in connector at the back of the housing.
5 Push firmly until the cartridge snaps into place. When fully engaged, the front
of the filter cartridge should be flush with the filter release button.
6 Turn On the ice maker power switch (see page 21 for more about turning on the
ice maker).
7 Press a drinking glass against the water dispenser while checking for any leaks
at the filter housing. Any spurts and sputters that occur as the system purges air
out of the dispenser system are normal.
8 After filling one glass of water, continue flushing the system for about three minutes.
9 Press and hold the Filter Reset button on the Ice & Water Dispenser control panel for
3 seconds. The light flashes red, amber, and green to indicate the Filter Status has
been reset.
The o-ringsona newwaterfilterarelubricated.To ensurea goodseal,pleasedo not
removethislubricant.
MoreAboutYourAdvancedWaterFilter
TheKenmoreIce& WaterFilterSystemis testedandcertifiedby NSFInternational,the nationallyrespected,
not-for-profitcertificationorganizationfor publichealthsafety.The Kenmorefiltersystemis testedandcertified
to ANSIiNSFStandards42 and53. Seetheperformancedatasheetthatcamewithyour productfor detailed
specifications.Thissystemshouldnotbe usedonwaterthatis microbiologicallyunsafeor withwaterof unknownqualityunless
thewaterhasbeenadequatelydisinfectedbeforeor aftertravelingthroughthefiltrationsystem.
•RatedCapacity- 400gallons
• Ratedserviceflow- .5 gallonsper minute
• MaximumRatedPressure- 100poundspersquareinch
• MaximumOperatingTemp.- 100° F
l+ReplacingFilters it 25
ReplacingTheAir Filter
In general, you should change the air filter every six months to ensure optimal filtering of
refrigerator odors. You may want to adjust this time period depending on the types and
amounts of food you typically store in your refrigerator.
The electroniccontrolpanel,locatedat the top dthe refrigeratorcompartment,includes
controlsto monitorthe statusof yourairfilter, includingindicatorlightsthatremindyou when
to orderandchangethefilter. For moreinformationaboutthesecontrols,see "Checkingthe
Air FilterStatus"on page16.
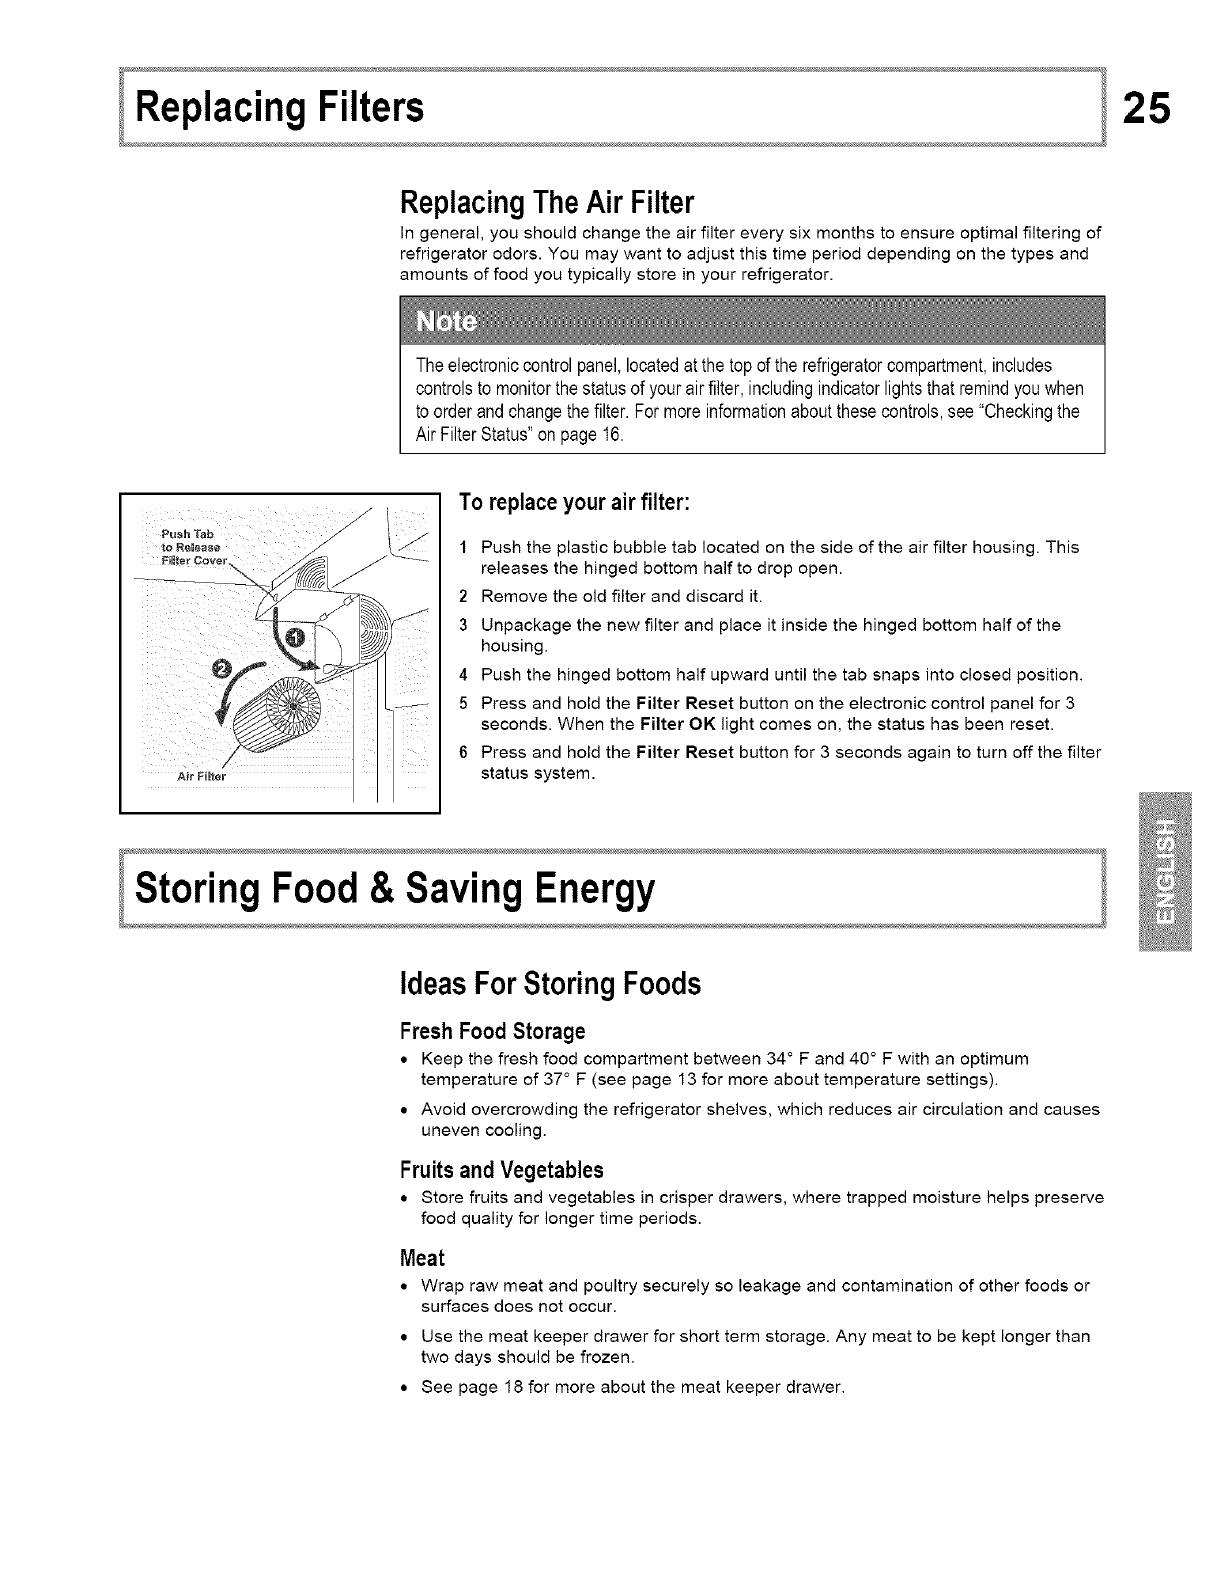
To replace your air filter:
1 Push the plastic bubble tab located on the side of the air filter housing. This
releases the hinged bottom half to drop open.
2 Remove the old filter and discard it.
3 Unpackage the new filter and place it inside the hinged bottom half of the
housing.
4 Push the hinged bottom half upward until the tab snaps into closed position.
5 Press and hold the Filter Reset button on the electronic control panel for 3
seconds. When the Filter OK light comes on, the status has been reset.
6 Press and hold the Filter Reset button for 3 seconds again to turn off the filter
status system.
IdeasFor StoringFoods
Fresh Food Storage
• Keep the fresh food compartment between 34 ° F and 40 ° F with an optimum
temperature of 37 ° F (see page 13 for more about temperature settings).
• Avoid overcrowding the refrigerator shelves, which reduces air circulation and causes
uneven cooling.
Fruitsand Vegetables
• Store fruits and vegetables in crisper drawers, where trapped moisture helps preserve
food quality for longer time periods.
Meat
• Wrap raw meat and poultry securely so leakage and contamination of other foods or
surfaces does not occur.
• Use the meat keeper drawer for short term storage. Any meat to be kept longer than
two days should be frozen.
• See page 18 for more about the meat keeper drawer.
26
Frozen FoodStorage
• Keep the freezer compartment at 0 ° F or lower (see page 14 for more about
temperature settings).
,, A freezer operates most efficiently when it is at least 2/3 full.
Packaging Foodsfor Freezing
• To minimize food dehydration and quality deterioration, use aluminum foil, freezer
wrap, freezer bags or airtight containers. Force as much air out of the packages as
possible and seal them tightly. Trapped air can cause food to dry out, change color,
and develop an off-flavor (freezer burn).
• Wrap fresh meats and poultry with suitable freezer wrap prior to freezing.
• Do not refreeze meat that has completely thawed.
Loadingthe Freezer
• Avoid adding too much warm food to the freezer at one time. This overloads the
freezer, slows the rate of freezing, and can raise the temperature of frozen foods.
• Leave a space between packages, so cold air can circulate freely, allowing food to
freeze as quickly as possible.
• Avoid storing hard-to-freeze foods, such as ice cream and orange juice, on the
freezer door shelves. These foods are best stored in the freezer interior where the
temperature varies less.
Ideas For SavingEnergy
Installation
*Locate the refrigerator in the coolest part of the room, out of direct sunlight, and away
from heating ducts or registers. Do not place the refrigerator next to heat-producing
appliances such as a range, oven, or dishwasher. If this is not possible, a section of
cabinetry or an added layer of insulation between the two appliances will help the
refrigerator operate more efficiently.
. Level the refrigerator so that the doors close tightly.
Temperature Settings
*Refer to earlier sections in this Use & Care Manual (beginning on page 12) for
recommendations on temperature control settings.
FoodStorage
*Avoid overcrowding the refrigerator or blocking cold air vents. Doing so causes the
refrigerator to run longer and use more energy.
. Cover foods and wipe containers dry before placing them in the refrigerator. This cuts
down on moisture build-up inside the unit.
. Organize the refrigerator to reduce door openings. Remove as many items as needed
at one time and close the door as soon as possible.
Normal OperatingSounds& Sights
Your new high-efficiency refrigerator may introduce unfamiliar sounds. These sounds
normally indicate your refrigerator is operating correctly. Some surfaces on floors, walls,
and kitchen cabinets may make these sounds more noticeable.
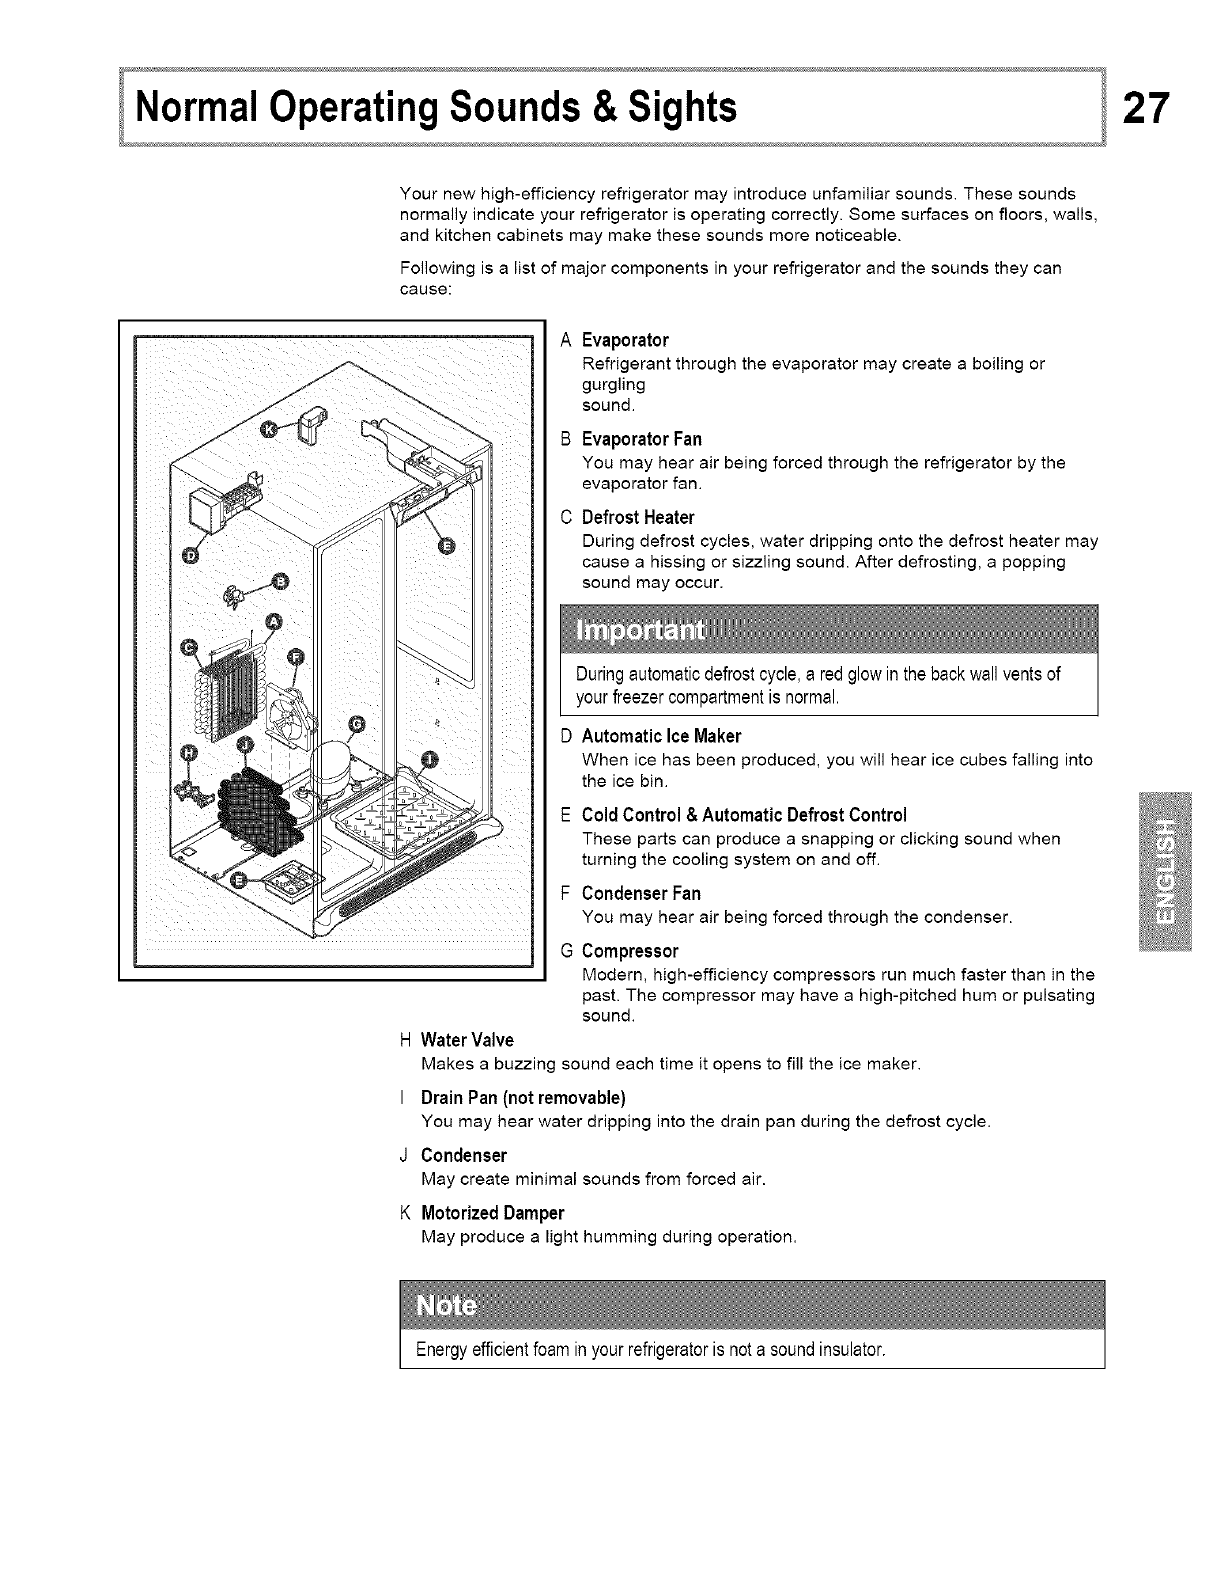
Following is a list of major components in your refrigerator and the sounds they can
cause:
Evaporator
Refrigerant through the evaporator may create a boiling or
gurgling
sound.
B Evaporator Fan
You may hear air being forced through the refrigerator by the
evaporator fan.
CDefrost Heater
During defrost cycles, water dripping onto the defrost heater may
cause a hissing or sizzling sound. After defrosting, a popping
sound may occur.
Duringautomaticdefrostcycle,a redglow inthe backwall ventsof
yourfreezercompartmentis normal.
DAutomatic Ice Maker
When ice has been produced, you will hear ice cubes falling into
the ice bin.
E Cold Control & Automatic Defrost Control
These parts can produce a snapping or clicking sound when
turning the cooling system on and off.
F Condenser Fan
You may hear air being forced through the condenser.
G Compressor
Modern, high-efficiency compressors run much faster than in the
past. The compressor may have a high-pitched hum or pulsating
sound.
H Water Valve
Makes a buzzing sound each time it opens to fill the ice maker.
IDrain Pan (not removable)
You may hear water dripping into the drain pan during the defrost cycle.
J Condenser
May create minimal sounds from forced air.
KMotorized Damper
May produce a light humming during operation.
27
Energyefficientfoaminyour refrigeratoris not a soundinsulator.
28
ProtectingYourInvestment
Keeping your refrigerator clean maintains appearance and prevents odor build-up. Wipe
up any spills immediately and clean the freezer and fresh food compartments at least
twice a year. When cleaning, take the following precautions:
• Never use any type of scouring pads, brushes, abrasive cleaners or strong alkaline
solutions on any surface.
• Do not wash any removable parts in a dishwasher.
• Always unplug the electrical power cord from the wall outlet before cleaning.
Ifyou setyourtemperaturecontrolsto turnoff cooling,powerto lightsandotherelectrical
componentscontinuesuntilyou unplugthe powercordfromthewall outlet.
• Remove adhesive labels by hand. Do not use razor blades or other sharp instruments
which can scratch the appliance surface.
• Do not remove the serial plate.
Refer to the guide on the next page for details on caring and cleaning specific areas of
your refrigerator.
• Pullthe refrigeratorstraightout to moveit.Shiftingit fromsideto side maydamage
flooring.Becarefulnotto movethe refrigeratorbeyondthe plumbingconnections.
• Dampobjectsstickto cold metalsurfaces.Do nottouchrefrigeratedsurfaceswithwet or
damphands.
• NeveruseCHLORIDEto cleanstainlesssteel.
Ifyou storeor moveyourrefrigeratorinfreezingtemperatures,besureto completelydrain
the watersupplysystem.Failureto do so couldresultinwaterleakswhenthe refrigeratoris
putbackintoservice.Contacta servicerepresentativeto performthisoperation.

29Care & Cleanln
Care& CleaningTips
Part Cleaning Agents Tipsand Precautions
Interior& DoorLiners • Soapandwater •Use2 tablespoonsof bakingsodain 1 quartof warmwater.
• Bakingsodaandwater •Be sureto wringexcesswateroutof spongeorcloth beforecleaningaround
controls,lightbulbor anyelectricalpart.
DoorGaskets • Soapandwater •Wipegasketswitha cleansoftcloth.
Drawers& Bins • Soapandwater •Usea soft clothto cleandrawerrunnersandtracks.
•Donotwash any removableitems(bins,drawers,etc.) indishwasher.
GlassShelves • Soapandwater •Allowglass towarm to roomtemperaturebeforeimmersinginwarmwater.
• Glasscleaner
• Mildliquidsprays
ToeGrille • Soapandwater
• Mildliquidsprays
• Vacuumattachment
Exterior& Handles • Soapandwater
• NonAbrasiveGlassQeaner
Exterior & Handles
(Stainless Steel
Models Only)
Occasion
ShortVacations
LongVacations
Moving
• Soap and water
• Ammonia
• Stainless Steel Cleaners
•Vacuum dust from front of toe grille.
•Remove toe grille (see Installation Instructions.).
•Vacuum backside and wipe with sudsy cloth or sponge. Rinse and dry.
•Do not use commercial household cleaners, ammonia, or alcohol to clean handles.
•Use a soft cloth to clean smooth handles.
•Do not use a dry cloth to clean smooth doors.
•CAUTION: Never use CHLORIDE to clean stainless steel.
•Clean stainless steel front and handles with non-abrasive soapy water and a
dishcloth. Rinse with clean water and a soft cloth.
•Wipe stubborn spots with an ammonia-soaked paper towel, and rinse. Use a non-
abrasive stainless steel cleaner. These cleaners can be purchased at most home
improvement or major department stores. Always follow manufacturer's instruction.
Always, clean, wipe and dry with grain to prevent scratching.
•Wash the rest of the cabinet with warm water and mild liquid detergent. Rinse well,
and wipe dry with a clean soft cloth.
Vacation & MovingTips
Tips
• Leave refrigerator operating during vacations of 3 weeks or tess.
• Use all perishaNe items from refrigerator compartment.
• Turn automatic ice maker off and empty ice bucket, even if you will only be gone for a few days.
• Remove all food and ice if you will be gone one month or more.
• Turn the cooling system off (see page 15 for location of On!Off button) and disconnect power cord.
• Turn off automatic ice maker and turn water supply valve to closed position.
• Clean interior thoroughly.
• Leave both doors open to prevent odors and mold build-up. Block doors open if necessary.
• Remove all food and ice.
• If using handcart, toad from side.
• Adjust rollers all the way up to protect them during sliding or moving.
• Pad cabinet to avoid scratching surface
30
ReplacingLightBulbs
Both the freezer and fresh food compartments of your refrigerator include light bulbs that
will need replacing from time to time. Some lights have covers that you will need to
remove before replacing the bulbs. Always use bulbs that are designed for appliance
lighting.
Weargloveswhenreplacinglightbulbsto avoidgettingcut.
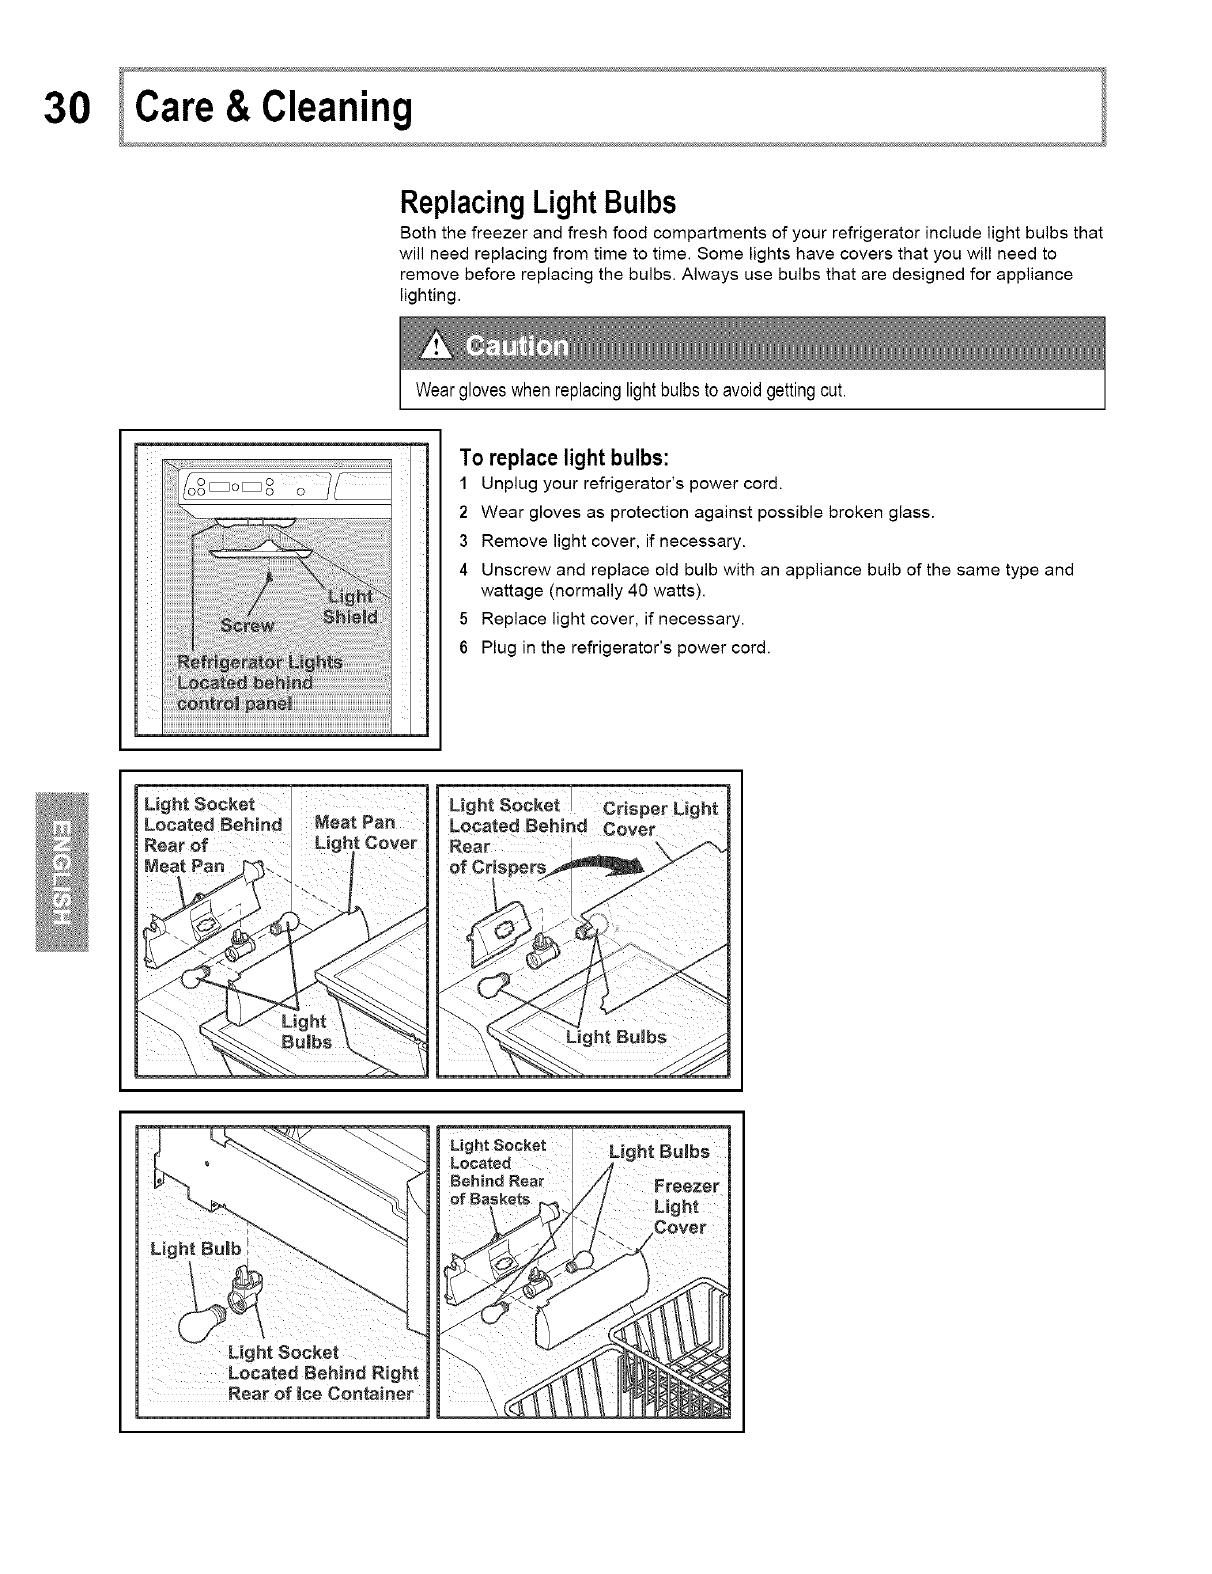
To replace light bulbs:
1 Unplug your refrigerator's power cord.
2 Wear gloves as protection against possible broken glass.
3 Remove light cover, if necessary.
4 Unscrew and replace old bulb with an appliance bulb of the same type and
wattage (normally 40 watts).
5 Replace light cover, if necessary.
6 Plug in the refrigerator's power cord.
Located Behind Meat Pan
Rear of Light Cover Locate d Behind Cover
Rear of BceContainer

31
Before YouCall
BeforeYou Call...
If you experience a problem with your refrigerator or notice a product behavior or
condition you do not understand, you can usually avoid a call to your service
representative by referring to this section for an answer. Beginning with the following
table, this information includes common problems, causes, and suggested solutions.
RunningYour Refrigerator
Problem Cause Correction
Compressordoesnot run.
Refrigeratorrunstoo muchortoo
long.
•Cooling system is turned Off.
•Refrigerator is in defrost cycle.
•Plug at wall outlet is disconnected.
•House fuse blown or tripped circuit
breaker.
•Power outage.
•Room or outside weather is hot.
•Refrigerator has recently been
disconnected for a period of time.
•Automatic ice maker is operating.
•Doorsareopenedtoofrequentlyortoo
long.
•Refrigerator/freezerdoormaybe
slightlyopen.
•Freezercontrol is set toocold (control
foundinfresh foodsection).
•Freshfood/freezergasketis dirty,
worn,cracked,or poorlyfitted.
•Turn cooling system On. See page 16 for location of
cooling system On/Off button.
•This is normal for a fully automatic defrost refrigerator.
The defrost cycIe occurs periodically, tasting about 30
minutes.
•Ensure plug is tightly pushed into outlet.
•Check/replace fuse with a 15 amp time-delay fuse.
Reset circuit breaker.
•Check house lights. Call local Electric Company.
•it's normal for the refrigerator to work longer under these
conditions.
•it takes 8-12 hours for the refrigerator to cool down
completely.
•ice maker operation causes refrigerator to run slightly
more.
•Warm air entering the refrigerator causes it to run more.
Open doors less often.
• Ensure refrigerator is levet. Keep food and containers
from blocking door. See Problem section Opening/
Closing of Doors/Drawers.
•Set freezer control to warmer setting until refrigerator
temperature is satisfactory. Allow 24 hours for
temperature to stabilize.
•Clean or change gasket. Leaks in door seal will cause
refrigerator to run longer in order to maintain desired
temperatures.
Compressor does not run. • Electronic control system keeps the • This is normal. Refrigerator goes on and off to keep
refrigerator at a constant temperature, temperature constant.
Digital temperature displays are • Electronic control system has detected • Call your Sears service representative, who can interpret
flashing, a performance problem, any messages or number codes flashing on the digital
displays.
Temperatures Are Too Cold
Problem Cause Correction
Freezer temperature too cold. • Freezer control is set too cold. • Set freezer control to a warmer setting. Allow 24 hours for
Refrigerator temperature is temperature to stabilize.
satisfactory.
Refrigerator temperature too cold. • Refrigerator control is set too cold. • Set refrigerator control to a warmer setting. Allow 24
Freezer temperature is hours for temperature to stabilize.
satisfactory.
Food stored in drawers freezes. • Refrigerator control is set too cold. • See solution above.
Food stored in Meat Keeper • Meat Keeper temperature control is • Adjust Meat Keeper temperature control to a lower
freezes (some models), set too cold. setting. Meat should be stored at a temperature just
below the freezing point for maximum fresh storage time.
it is normal for ice crystals to form due to the moisture
content of meat.
32
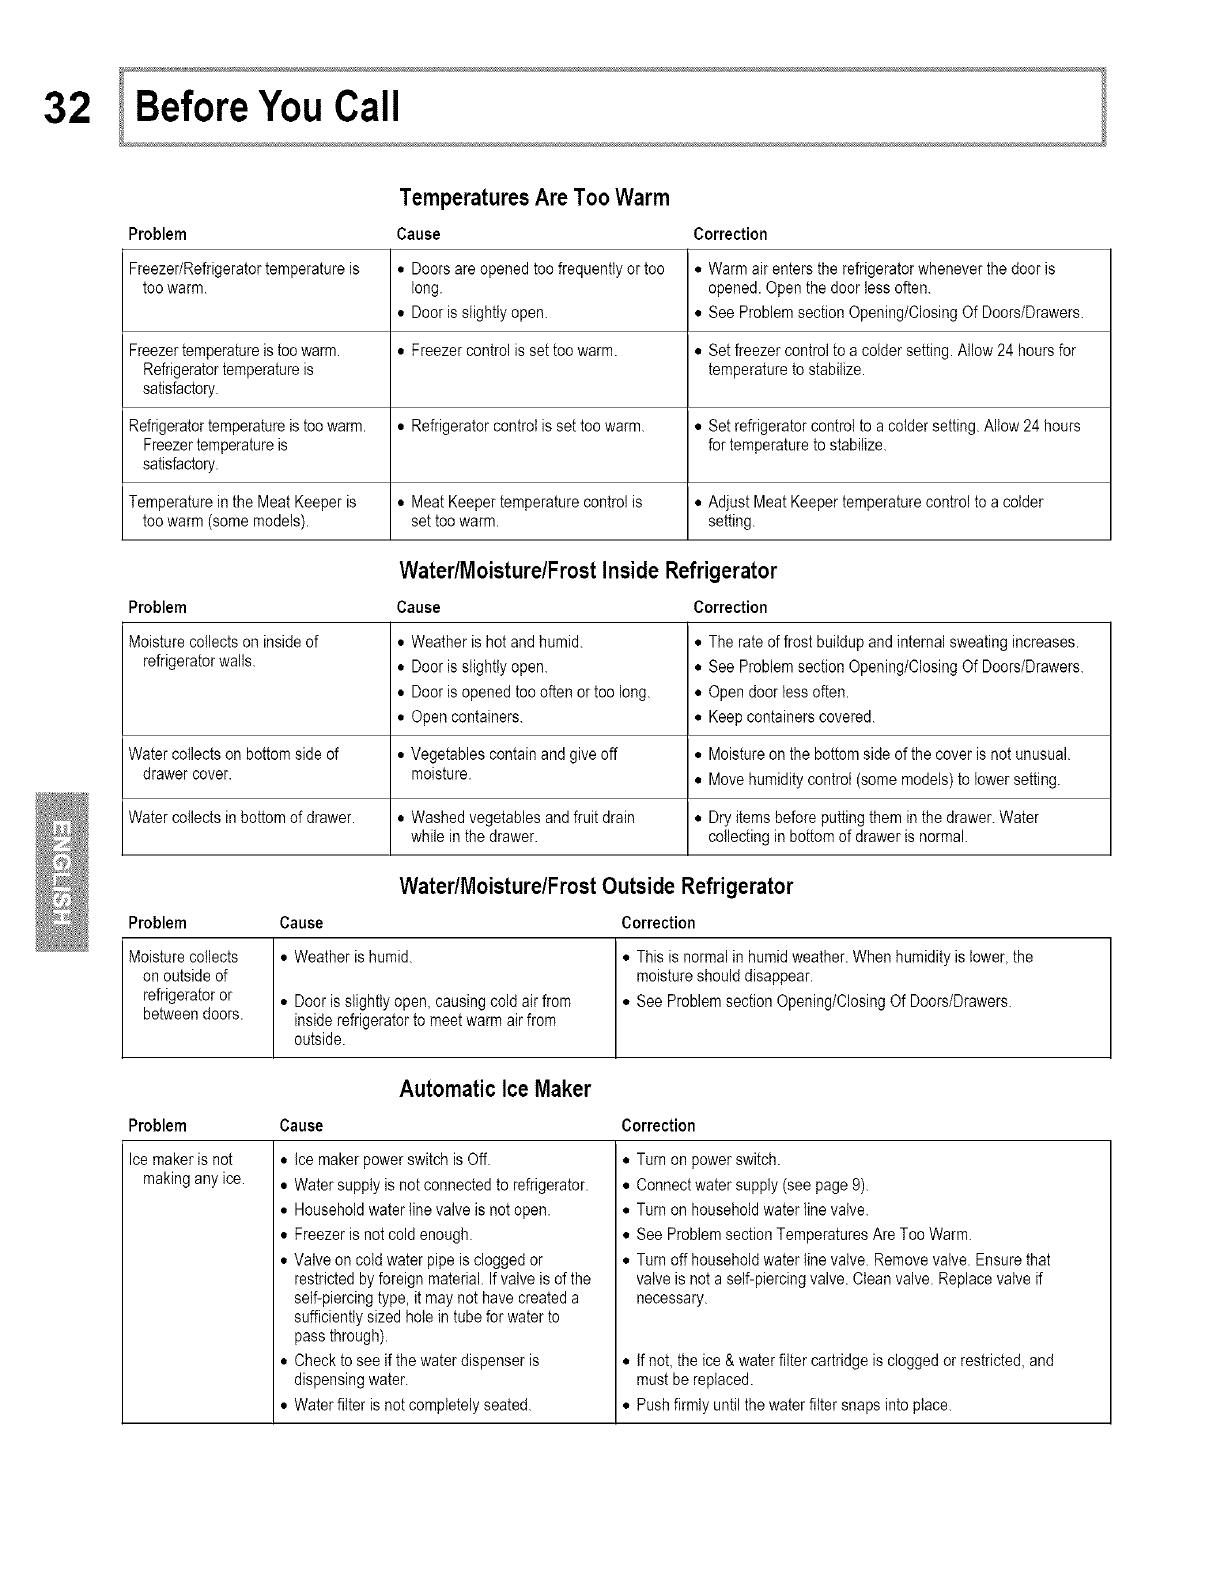
Temperatures Are Too Warm
Problem Cause Correction
Freezer/Refrigerator temperature is • Doors are opened too frequently or too •Warm air enters the refrigerator whenever the door is
too warm. long opened Open the door less often.
• Door is slightly open. • See Problem section Opening/Closing Of Doors/Drawers.
Freezer temperature is too warm •Freezer control is set too warm •Set freezer control to a colder setting Allow 24 hours for
Refrigerator temperature is temperature to stabilize
satisfactory
Refrigerator temperature is too warm •Refrigerator control is set too warm. •Set refrigerator control to a colder setting. Allow 24 hours
Freezer temperature is for temperature to stabilize.
satisfactory
Temperature in the Meat Keeper is • Meat Keeper temperature control is • Adjust Meat Keeper temperature control to a colder
too warm (some models) set too warm setting.
Water/Moisture/Frost Inside Refrigerator
Problem Cause Correction
Moisture collects on inside of • Weather is hot and humid. • The rate of frost buildup and internal sweating increases
refrigerator walls. • Door is slightly open. • See Problem section Opening/Closing Of Doors/Drawers.
• Door is opened too often or too long. • Open door less often
• Open containers. • Keep containers covered.
Water collects on bottom side of • Vegetables contain and give off • Moisture on the bottom side of the cover is not unusual.
drawer cover moisture • Move humidity control (some models) to lower setting
Water collects in bottom of drawer •Washed vegetables and fruit drain •Dry items before putting them in the drawer. Water
while in the drawer collecting in bottom of drawer is normal.
Water/Moisture/Frost Outside Refrigerator
Problem Cause Correction
Moisture collects • Weather is humid. • This is normal in humid weather When humidity is tower, the
on outside of •Door is slightly open, causing cold air from moisture should disappear
refrigerator or • See Problem section Opening/Closing Of Doors/Drawers.
between doors inside refrigerator to meet warm air from
outs de
Automatic Ice Maker
Problem Cause Correction
Ice maker is not
making any ice
•ice maker power switch is Off
•Water supply is not connected to refrigerator
•Household water tine valve is not open
• Freezer is not cold enough
• Valve on cold water pipe is clogged or
restricted by foreign material. If valve is of the
self-piercing type, it may not have created a
sufficiently sized hole in tube for water to
pass through)
• Check to see if the water dispenser is
dispensing water.
• Water filter is not completely seated.
•Turn on power switch
• Connect water supply (see page 9)
• Turn on household water line valve.
• See Problem section Temperatures Are Too Warm.
• Turn off household water line valve. Remove valve Ensure that
valve is not a self-piercing valve Clean valve Replace valve if
necessary.
•if not, the ice & water filter cartridge is clogged or restricted, and
must be replaced
• Push firmly until the water filter snaps into place.
33
Before YouCall
Problem
Ice maker is not
making enough
ice.
Ice maker will not
stop making ice.
Ice maker is not
separating the
ice cubes.
Ice has bad odor
and taste.
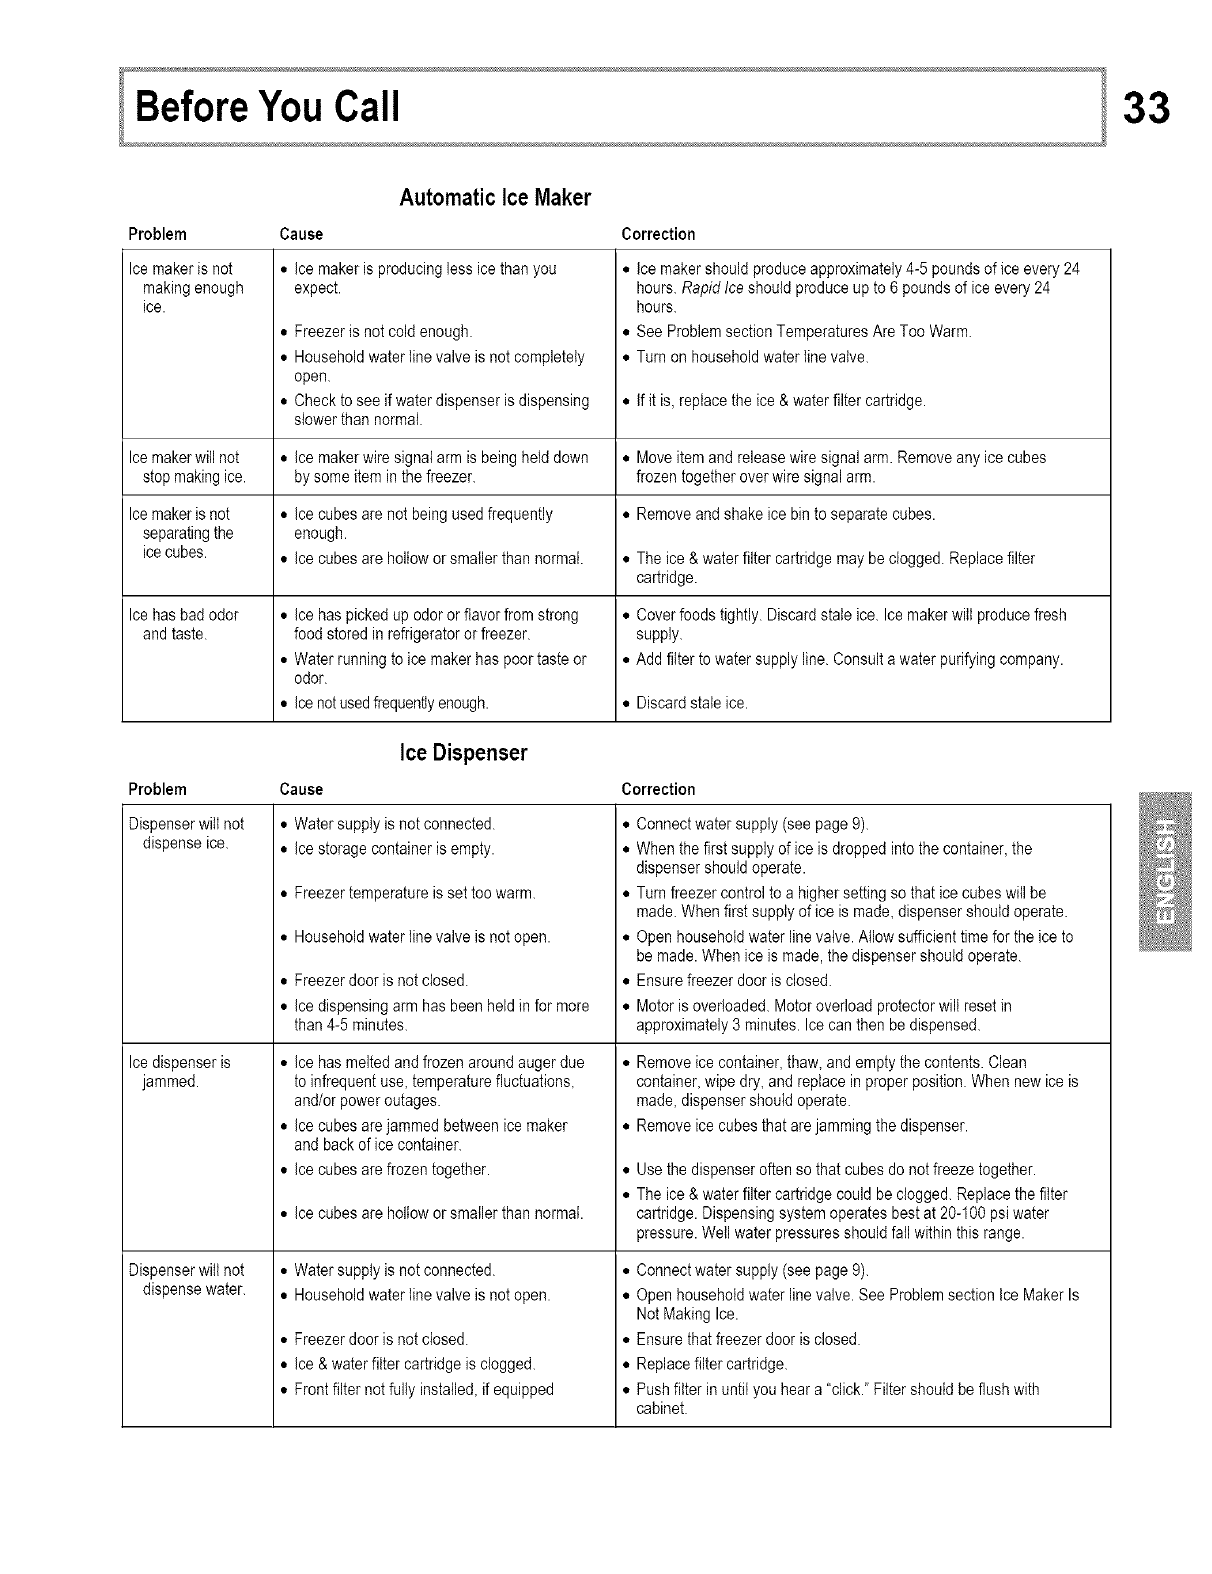
Automatic Ice Maker
Cause Correction
•ice maker is producing less ice than you
expect.
•Freezer is not cold enough.
• Household water line valve is not completely
open.
•Check to see if water dispenser is dispensing
slower than normal.
•ice makerwiresignalarm is beinghelddown
bysome iteminthe freezer.
•ice cubes are not being used frequently
enough.
• ice cubes are hollow or smaller than normal.
•ice has picked up odor or flavor from strong
food stored in refrigerator or freezer.
• Water running to ice maker has poor taste or
odor.
• ice not used frequently enough.
•ice maker should produce approximately 4-5 pounds of ice every 24
hours. Rapid Ice should produce up to 6 pounds of ice every 24
hours.
• See Problem section Temperatures Are Too Warm.
• Turn on household water line valve.
•if it is, replace the ice & water filter cartridge.
•Move item and release wire signal arm. Remove any ice cubes
frozen together over wire signal arm.
•Remove and shake ice bin to separate cubes.
•The ice & water filter cartridge may be clogged. Replace filter
cartridge.
•Cover foods tightly. Discard state ice. Ice maker will produce fresh
supply.
• Add filter to water supply line. Consult a water purifying company.
•Discard stale ice.
Ice Dispenser
Problem Cause Correction
Dispenser will not • Water suppty is not connected.
dispense ice. • ice storage container is empty.
Ice dispenser is
jammed.
Dispenser will not
dispense water.
•Freezer temperature is set too warm.
•Household water line valve is not open.
•Freezer door is not closed.
• Ice dispensing arm has been held in for more
than 4-5 minutes.
•Ice has melted and frozen around auger due
to infrequent use, temperature fluctuations,
and/or power outages.
• ice cubes are jammed between ice maker
and back of ice container.
• Ice cubes are frozen together.
•Ice cubes are hollow or smaller than normal.
•Watersupplyis notconnected.
•Householdwaterline valveisnotopen.
•Freezer door is not closed.
• ice & water filter cartridge is clogged.
• Front filter not fully installed, if equipped
•Connect water supply (see page 9).
• When the first supply of ice is dropped into the container, the
dispenser should operate.
•Turn freezer control to a higher setting so that ice cubes will be
made. When first supply of ice is made, dispenser should operate.
• Open household water line valve. Allow sufficient time for the ice to
be made. When ice is made, the dispenser should operate.
•Ensure freezer door is closed.
•Motor is overloaded. Motor overload protector will reset in
approximately 3 minutes. Ice can then be dispensed.
•Remove ice container, thaw, and empty the contents. Clean
container, wipe dry, and replace in proper position. When new ice is
made, dispenser should operate.
• Remove ice cubes that are jamming the dispenser.
•Use the dispenser often so that cubes do not freeze together.
• The ice & water filter cartridge could be clogged. Replace the filter
cartridge. Dispensing system operates best at 20-100 psi water
pressure. Well water pressures should fail within this range.
• Connect water supply (see page 9).
• Open household water line valve. See Problem section ice Maker Is
Not Making Ice.
•Ensure that freezer door is closed.
• Replace filter cartridge.
• Push filter in until you hear a "click." Filter should be flush with
cabinet.
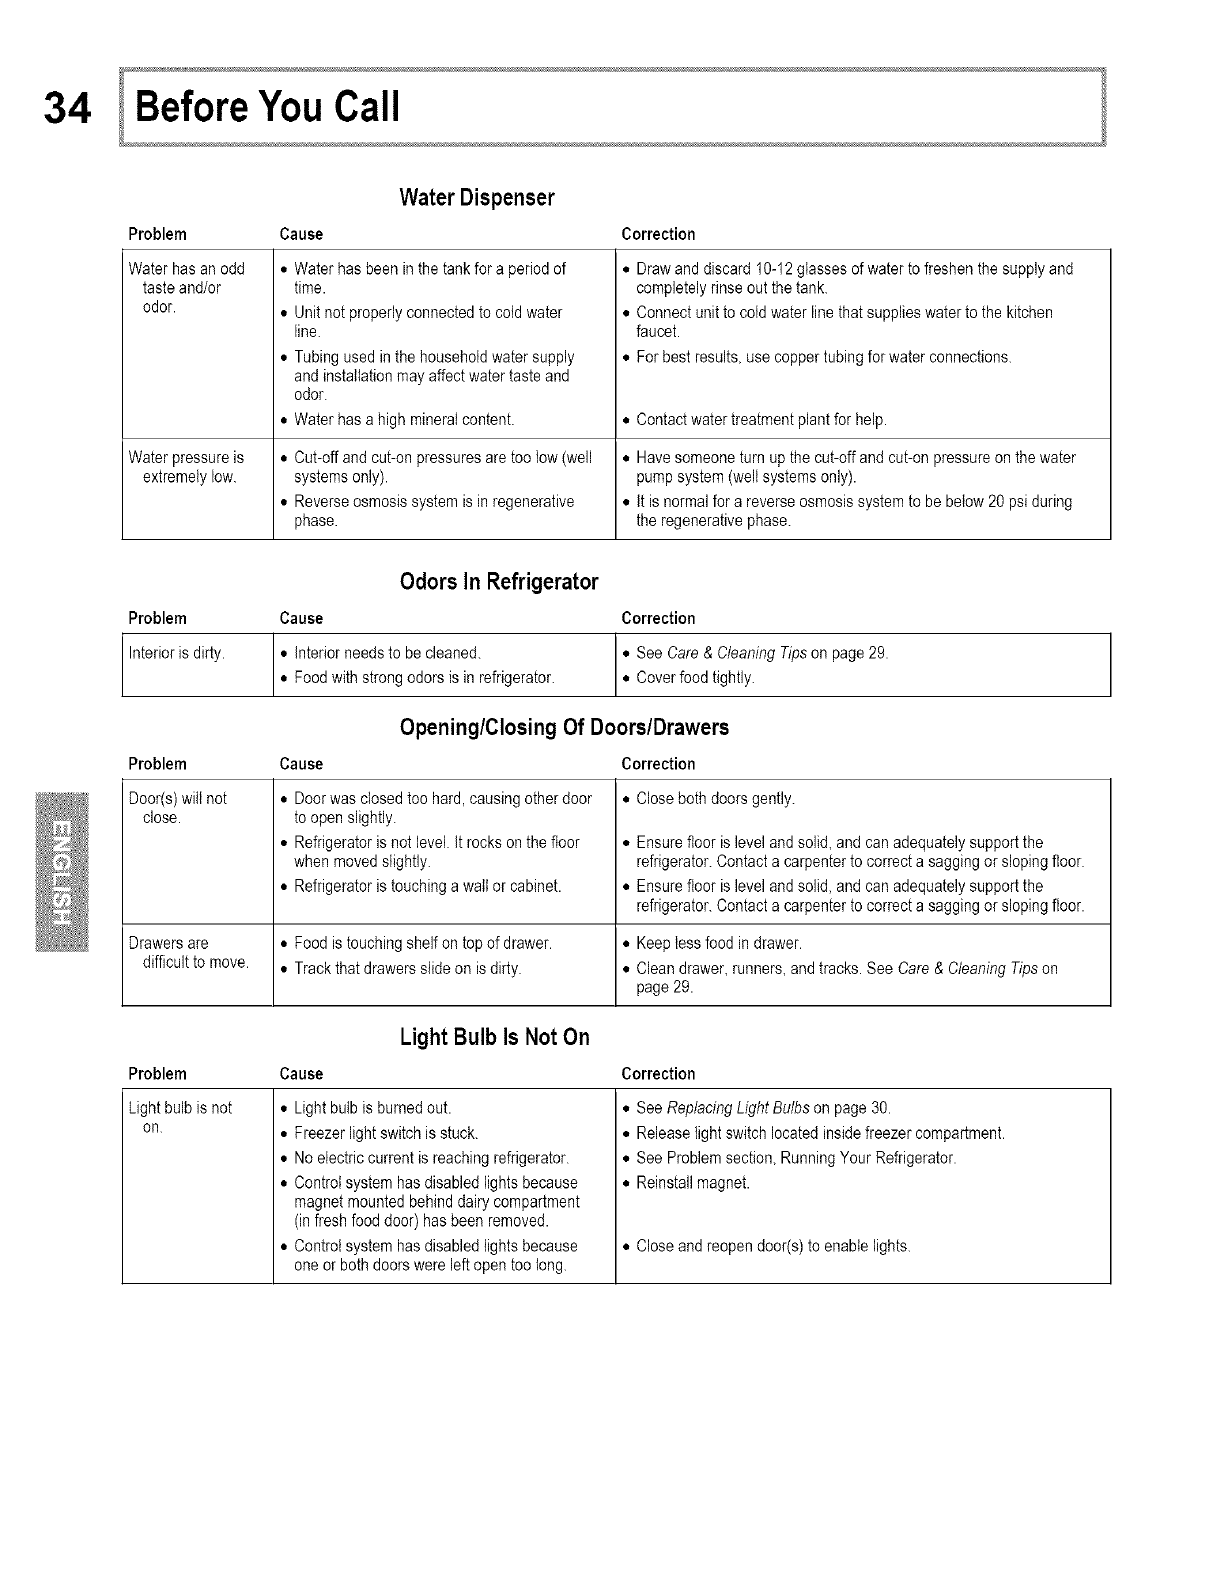
34
Problem
Waterhasan odd
tasteand/or
odor.
Water Dispenser
Cause Correction
•Water has been in the tank for a period of
time.
• Unit not properly connected to cold water
line.
• Tubing used in the household water supply
and installation may affect water taste and
odor.
• Water has a high mineral content.
• Draw and discard 10-12 glasses of water to freshen the supply and
completely rinse out the tank.
• Connect unit to cold water line that supplies water to the kitchen
faucet.
• For best results, use copper tubing for water connections.
• Contact water treatment plant for help.
Water pressure is • Cut-off and cut-on pressures are too low (well • Have someone turn up the cut-off and cut-on pressure on the water
extremely low. systems only), pump system (well systems only).
• Reverse osmosis system is in regenerative • It is normal for a reverse osmosis system to be below 20 psi during
phase, the regenerative phase.
Odors In Refrigerator
Problem Cause Correction
Interior is dirty. • interior needs to be cleaned. • See Care & Cleaning Tips on page 29.
oFood with strong odors is in refrigerator. •Cover food tightly.
Opening/Closing Of Doors/Drawers
Problem Cause Correction
Door(s) will not °Close both doors gently.
close. • Door was closed too hard, causing other door
to open slightly.
• Refrigerator is not level. It rocks on the floor
when moved slightly.
• Refrigerator is touching a wail or cabinet.
• Ensure floor is level and solid, and can adequately support the
refrigerator. Contact a carpenter to correct a sagging or sloping floor.
• Ensure floor is level and solid, and can adequately support the
refrigerator. Contact a carpenter to correct a sagging or sloping floor.
Drawers are • Food is touching shelf on top of drawer. • Keep tess food in drawer.
difficult to move. • Track that drawers slide on is dirty. • Clean drawer, runners, and tracks. See Care & Cleaning Tips on
page 29.
Problem
Light bulb is not
on.
LightBulb Is Not On
Cause
°Light bulb is burned out.
•Freezer light switch is stuck.
• No electric current is reaching refrigerator.
• Control system has disabled lights because
magnet mounted behind dairy compartment
(in fresh food door) has been removed.
• Control system has disabled lights because
one or both doors were left open too long.
Correction
• See Replacing Light Bulbs on page 30.
• Release light switch located inside freezer compartment.
• See Problem section, Running Your Refrigerator.
• Reinstall magnet.
• Close and reopen door(s) to enable lights.
