Kenmore Pro 40140483800 User Manual REFRIGERATOR Manuals And Guides L0811053
KENMORE PRO Side by Side Refrigerator Manual L0811053 KENMORE PRO Side by Side Refrigerator Owner's Manual, KENMORE PRO Side by Side Refrigerator installation guides
User Manual: Kenmore Pro 40140483800 40140483800 KENMORE PRO REFRIGERATOR - Manuals and Guides View the owners manual for your KENMORE PRO REFRIGERATOR #40140483800. Home:Kitchen Appliance Parts:Kenmore Pro Parts:Kenmore Pro REFRIGERATOR Manual
Open the PDF directly: View PDF ![]() .
.
Page Count: 16
rlrM
MOflel
401.40483800
S|DE-BY-SIDE
REFRIGERATOR
Always consult the Use & Care Guide
for more operating information.
86002-2008 085 JR
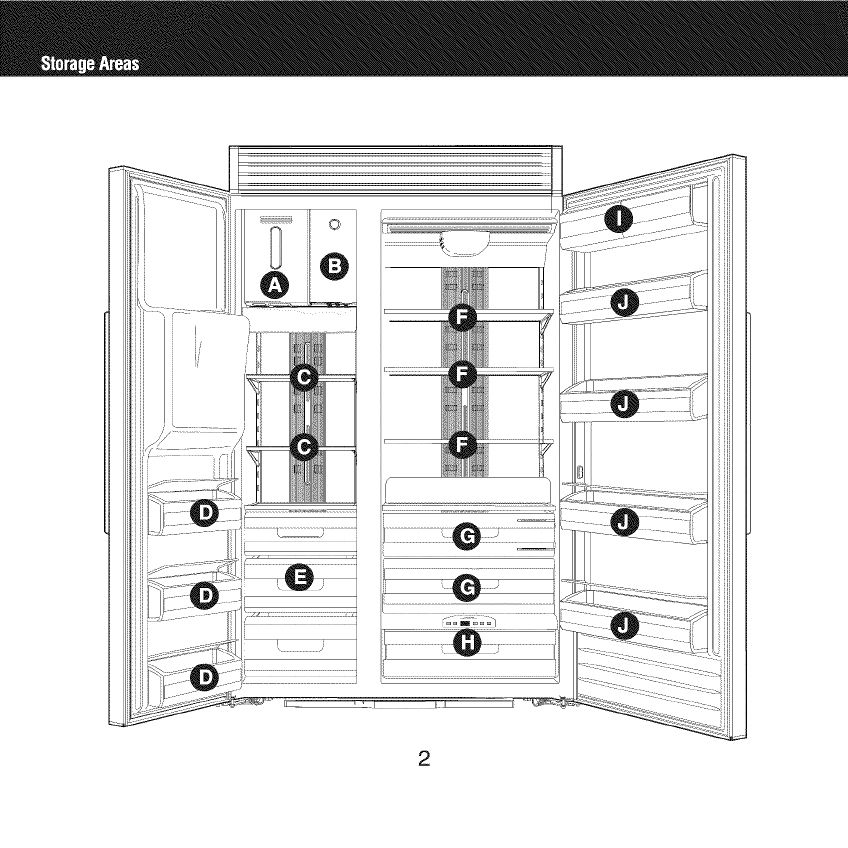
OiCE BiN
For storage of ice cubes made by the icemaker. Do not store anything except ice inthe ice bin.
OFREEZER STORAGE
For storage of frozen pizzas, ice cream, etc. There is a fold-up shelf for pizza storage.
FREEZER COMPARTMENT SHELVES
For storage of various kinds of frozen food, such as meat, fish, ice cream, etc.
FREEZER DOOR BINS
For storage of small packaged frozen food such as vegetables. DO NOT use the freezer door
bins to store ice cream or foods intended for long-term storage.
DRIED FOOD & MEAT KEEPER
For long-term storage of various kinds of frozen food, and for storage of meat and poultry
after wrapping with aluminum foil or plastic wrap.
REFRIGERATOR COMPARTMENT SHELVES
For storage of a wide variety of refrigerated foods.
@ VEGGIF_./FRUIT DRAWERS
For storage of vegetables and fruits to keep them fresh. Push the humidity slide to low for fruits
and non-leafy vegetables, and to high for leafy vegetables.
TEMPERATURE CONTROL DRAWER
The Temperature Control Drawer can be used to customize storage temperatures for various
types of foods and purposes.
ODAIRY BiN
For storage of dairy products such as butter and cheese.
OREFRIGERATOR DOOR BINS
The top two bins are for storage of small packaged refrigerated foods. The two lower bins
have a wire retainer to store beverages such as milk, fruit juice, soda, etc.
Always consult the Use & Care Guide for more operating information.
3
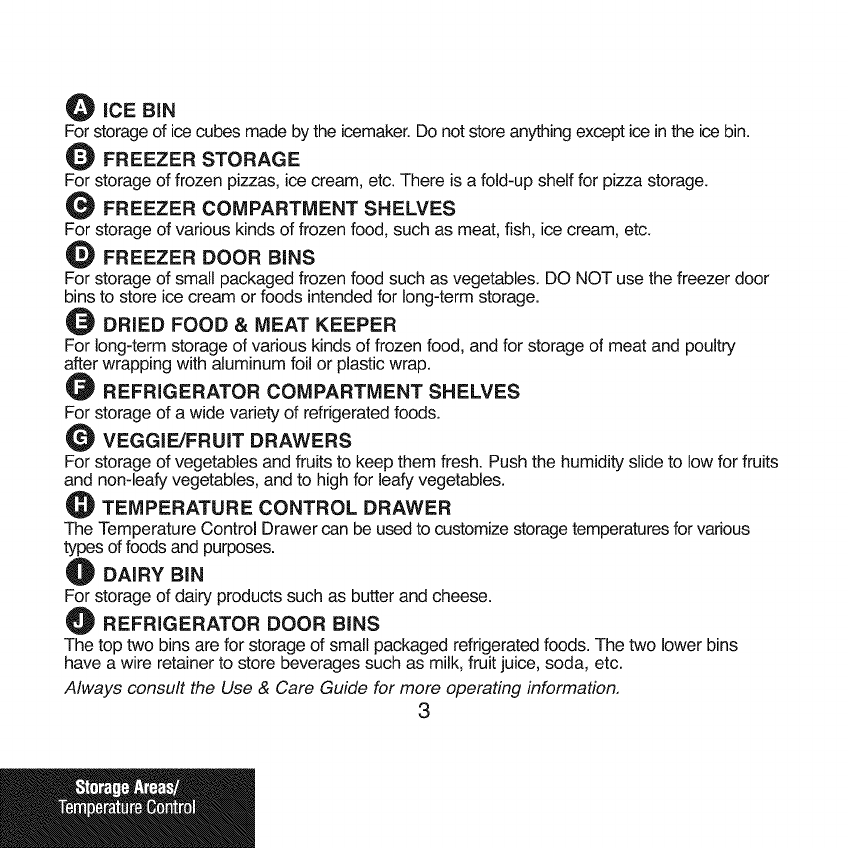
Gauge
Display ---- _
Freezer Fridge
Temp. Rapid Ice Cubed Crushed Water Filter Light Lock Temp.
,!
(Hold _s_cl
- Gauge
-------- Display
Setting the Temperature Controls
Setting the Refrigerator Control
Press and hold the Fridge Temp pad on the control panel until the
desired set temperature is in the display. The digital display will show the
set temperature for 5 seconds, and will then show the actual temperature.
The large analog gauge always shows the actual temperature. If the set
temperature varies from the actual temperature, the refrigerator will
automatically adjust the actual temperature to match the set temperature.
Refrigerator temperatures can be set between 34°F (1°C) and 46°F (8°C),
at increments of 2°R The factory default (and recommended) setting is 38°F
(3°C) Allow time after each adjustment for the refrigerator to reach the
temperature you set.
Always consult the Use & Care Guide for more operating information.
4
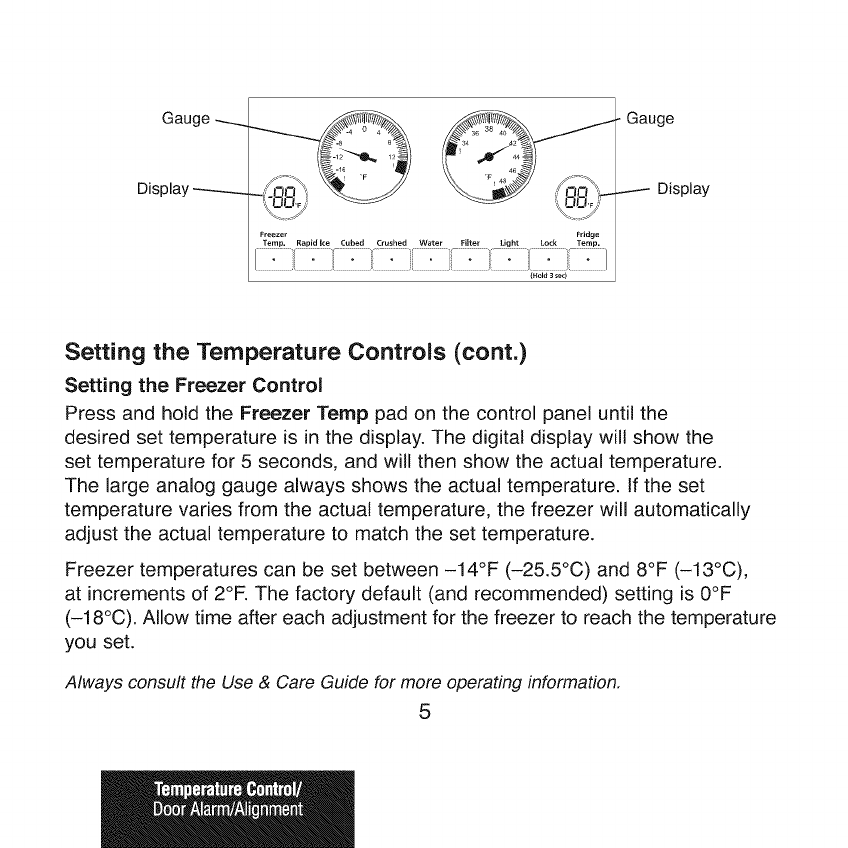
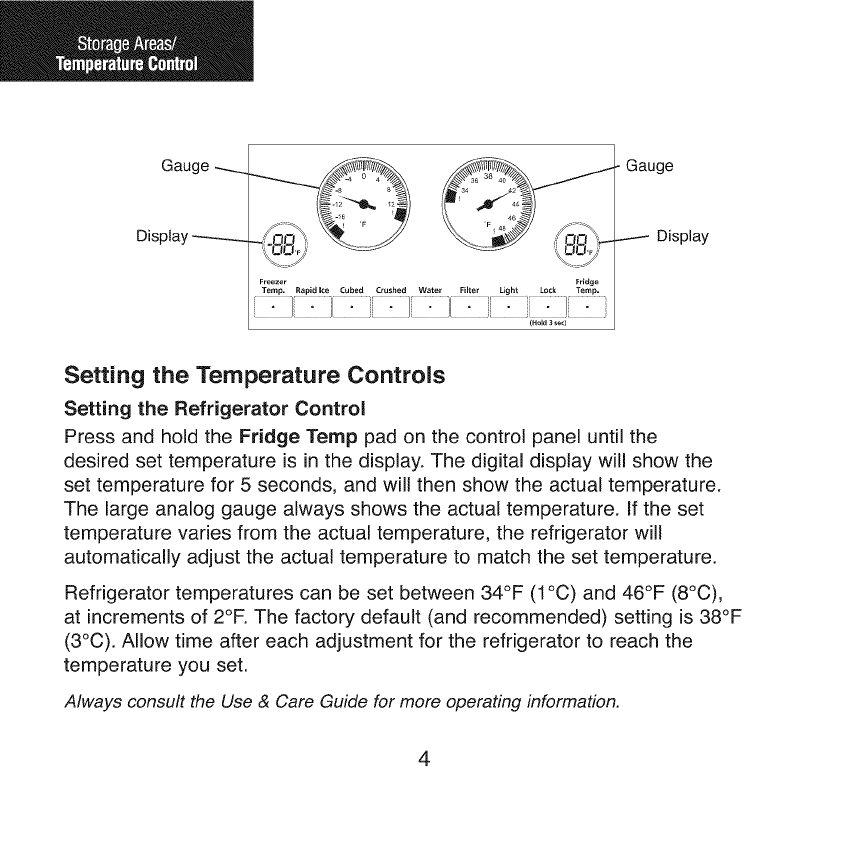
Gauge _ Gauge
Display ....
\-TY \-CY
Freezer Fridge
Temp. Rapid ke Cubed Crushed Water Filter Light Lock Temp. I
(Hold 3_ecl
I Display
Setting the Temperature Controls (cont.)
Setting the Freezer Control
Press and hold the Freezer Temp pad on the control panel until the
desired set temperature is in the display. The digital display will show the
set temperature for 5 seconds, and will then show the actual temperature.
The large analog gauge always shows the actual temperature. If the set
temperature varies from the actual temperature, the freezer will automatically
adjust the actual temperature to match the set temperature.
Freezer temperatures can be set between -14°F (-25.5°C) and 8°F (-13°C),
at increments of 2°F. The factory default (and recommended) setting is 0°F
(-18°C). Allow time after each adjustment for the freezer to reach the temperature
you set.
Always consult the Use & Care Guide for more operating information,
5
Door Alarm
The door alarm will sound when the refrigerator door is ajar for more than
2 minutes. Initially, the alarm sounds with 10 consecutive rings, then rings
10 consecutive times every minute.
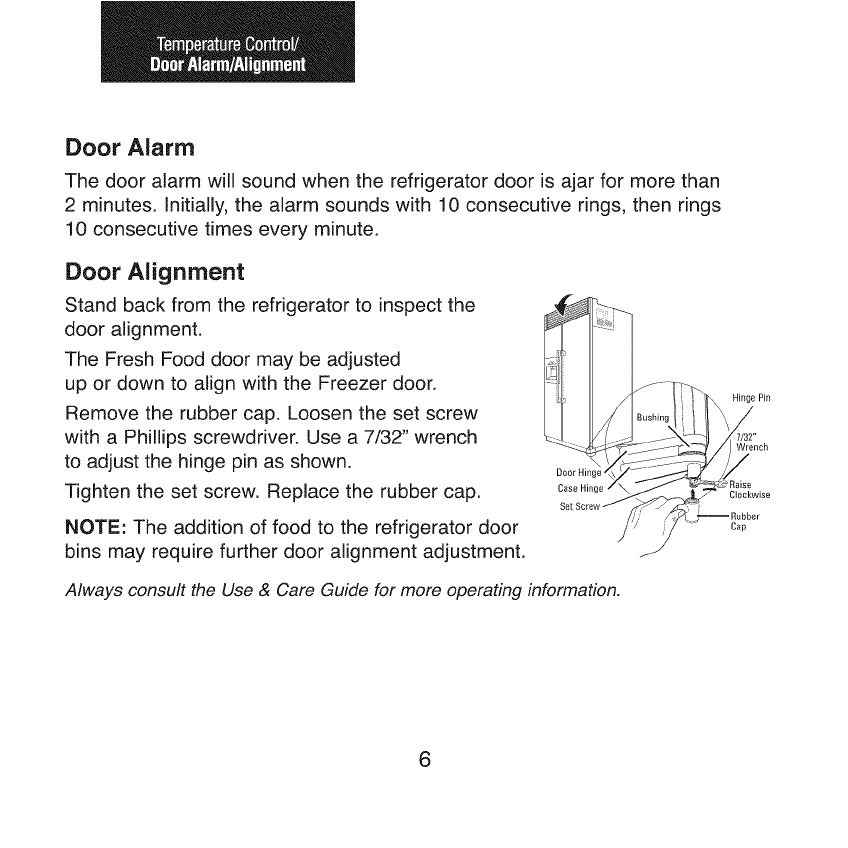
Door Alignment
Stand back from the refrigerator to inspect the
door alignment.
The Fresh Food door may be adjusted
up or down to align with the Freezer door.
Remove the rubber cap. Loosen the set screw
with a Phillips screwdriver. Use a 7/32" wrench
to adjust the hinge pin as shown.
Tighten the set screw. Replace the rubber cap.
NOTE: The addition of food to the refrigerator door
bins may require further door alignment adjustment.
Case Hinge
Set Screw /
/.....
Bushin
/J
Always consult the Use & Care Guide for more operating information.
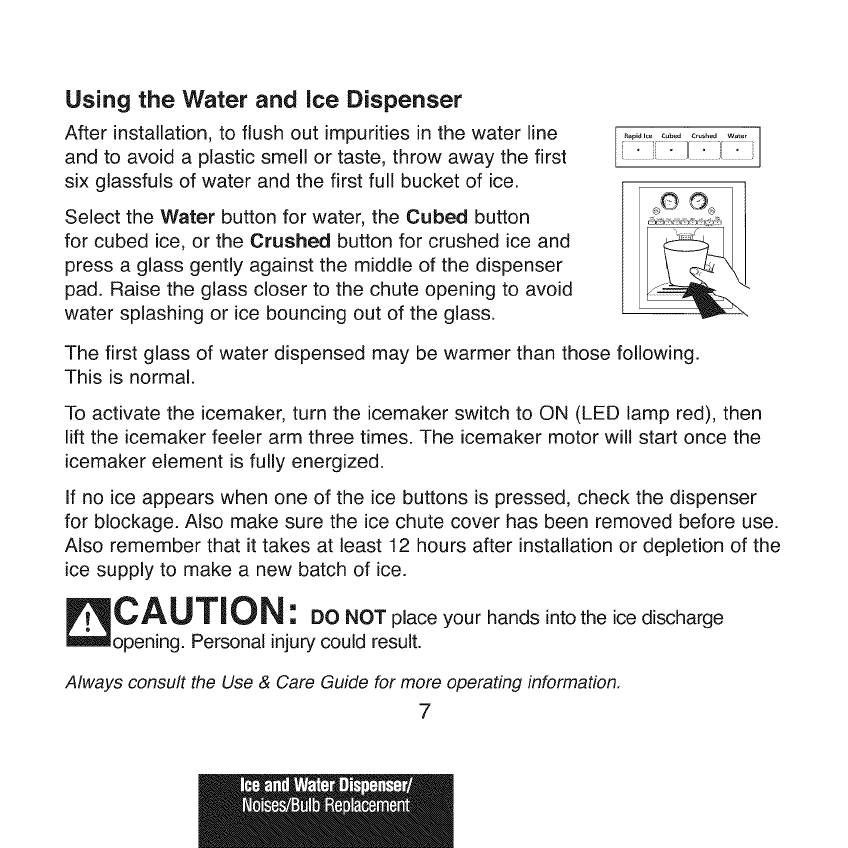
Using the Water and ice Dispenser
After installation, to flush out impurities in the water line
and to avoid a plastic smell or taste, throw away the first
six glassfuls of water and the first full bucket of ice.
Select the Water button for water, the Cubed button
for cubed ice, or the Crushed button for crushed ice and
press a glass gently against the middle of the dispenser
pad. Raise the glass closer to the chute opening to avoid
water splashing or ice bouncing out of the glass.
............][............
The first glass of water dispensed may be warmer than those following.
This is normal.
To activate the icemaker, turn the icemaker switch to ON (LED lamp red), then
lift the icemaker feeler arm three times. The icemaker motor will start once the
icemaker element is fully energized.
If no ice appears when one of the ice buttons is pressed, check the dispenser
for blockage. Also make sure the ice chute cover has been removed before use.
Also remember that it takes at least 12 hours after installation or depletion of the
ice supply to make a new batch of ice.
CAUTION: DO NOT place your hands into the ice discharge
opening. Personal injurycould result.
Always consult the Use & Care Guide for more operating information,
These Sounds are Normal
HUMMM... WHOOSH...
• The new high efficiency compressor may run faster and longer than your old
refrigerator and you may hear a high-pitched hum or pulsating sound while
it is operating.
= You may hear a whooshing sound when the doors close. This is due
to pressure equalizing within the refrigerator.
WHIR!
= You may hear the fans spinning at high speeds. This happens when the
refrigerator is first plugged in, when the doors are opened frequently, or when
alarge amount of food is added to the refrigerator or freezer compartments.
The fans are helping to maintain the correct temperatures.
CLICKS, POPS, CRACKS, AND CHIRPS
• You may hear cracking or popping sounds when the refrigerator is first
plugged in. This happens as the refrigerator cools to the correct temperature.
• The compressor may cause a clicking or chirping sound when attempting
to restart (this could take up to 5 minutes).
• Expansion and contraction of cooling coils during and after defrost can cause
a cracking or popping sound.
•On models with an icemaker, after an icemaking cycle, you may hear the ice
cubes dropping into the ice bin.
Always consult the Use & Care Guide for more operating information.
These Sounds are Normal (cont.)
WATER SOUNDS
•The flow of refrigerant through the freezer cooling coils may make a gurgling
noise like boiling water.
•Water dropping on the defrost heater can cause a sizzling, popping, or buzzing
sound during the defrost cycle.
•A water dripping noise may occur during the defrost cycle as ice melts from the
evaporator and flows into the drain pan.
•Closing the door may cause a gurgling sound due to pressure equalization.
Light Bulb Replacement
WARNING: ElootrioalS.oo..oz rd.Beforereplacing a
burned-out light bulb, turn the master power switch to O (OFF), unplug the
refrigerator, or turn off power at the circuit breaker or fuse box.
There are two light shields inthe refrigerator compartment (one at the top, and one
in the middle of the compartment), each containing two 40 watt appliance bulbs.
There is also a light shield in the freezer compartment containing two 40 watt
appliance bulbs, if a bulb burns out, it is best to replace both bulbs in the light
shield at the same time with an appliance bulb of the same wattage.
To access the bulbs inside the top refrigerator light shield, pull down on the latch
at the back of the lightshield to release it.
Always consult the Use & Care Guide for more operating information.
9
Light Bulb Replacement (cont.)
To access the bulbs insidethe middle refrigerator light shield, push up on the bottom
of the light shield and pull straight out.
To access the freezer light bulbs, push up on the bottom of the light shield and
pull straight out.
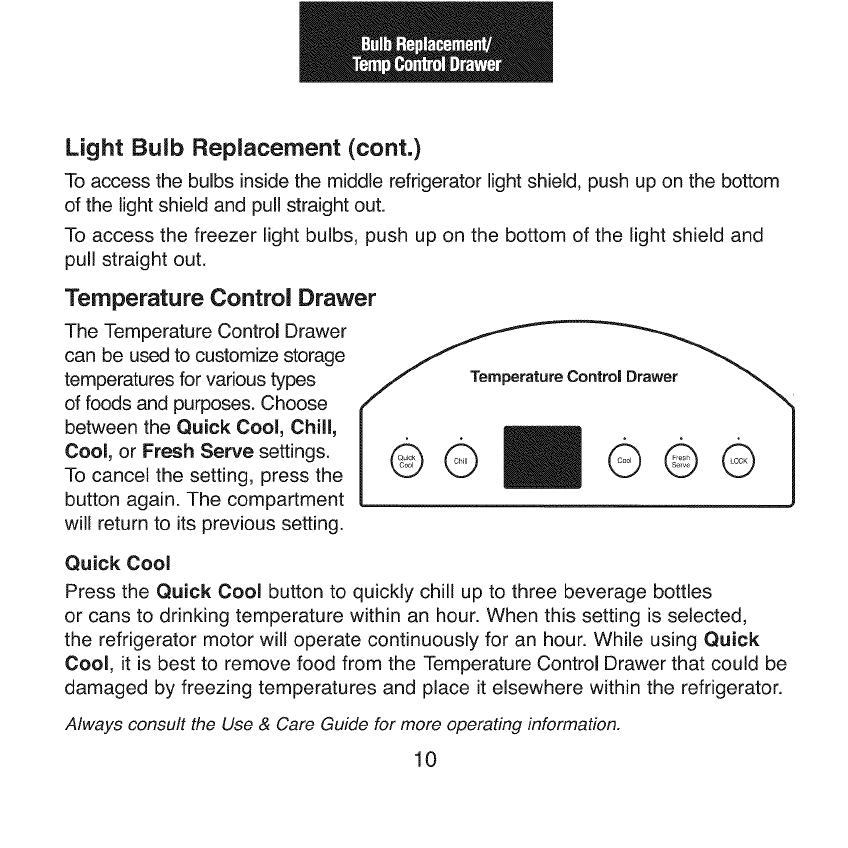
Temperature Control Drawer
The Temperature Control Drawer
can be used to customize storage
temperatures for various types
of foods and purposes. Choose
between the Quick Cool, Chill,
Cool, or Fresh Serve settings.
To cancel the setting, press the
button again. The compartment
will return to its previous setting.
Quick Cool
Press the Quick Cool button to quickly chill up to three beverage bottles
or cans to drinking temperature within an hour. When this setting is selected,
the refrigerator motor will operate continuously for an hour. While using Quick
Cool, it is best to remove food from the Temperature Control Drawer that could be
damaged by freezing temperatures and place it elsewhere within the refrigerator.
Always consult the Use & Care Guide for more operating information.
10
Temperature Control Drawer(cont.)
Chill
Press the Chili button to set the Temperature Control Drawer to 32°F (0°C).
This setting will keep fresh meat, poultry, or fish that you are about to cook
in optimum condition.
Cool
Press the Cool button to set the Temperature Control Drawer to 38°F (3°C)
(normal refrigeration temperature). Using the Cool function gives you more
regular refrigeration space by allowing the Temperature Control Drawer to
function at regular refrigeration temperatures.
Fresh Serve
Press the Fresh Serve button to set the Temperature Control Drawer to
approximately 41°F (5°C) (warmer than normal refrigeration temperature).
This setting provides for optimum temporary storage of recently prepared
salads, cheese platters, or cold hors d'oeuvres that you are about to serve.
Lock
Press the Lock button to lock the Temperature Control Drawer at its current
setting and disable all other Temperature Control Drawer buttons. To cancel
the Lock function, press the Lock button again.
Always consult the Use & Care Guide for more operating information.
11
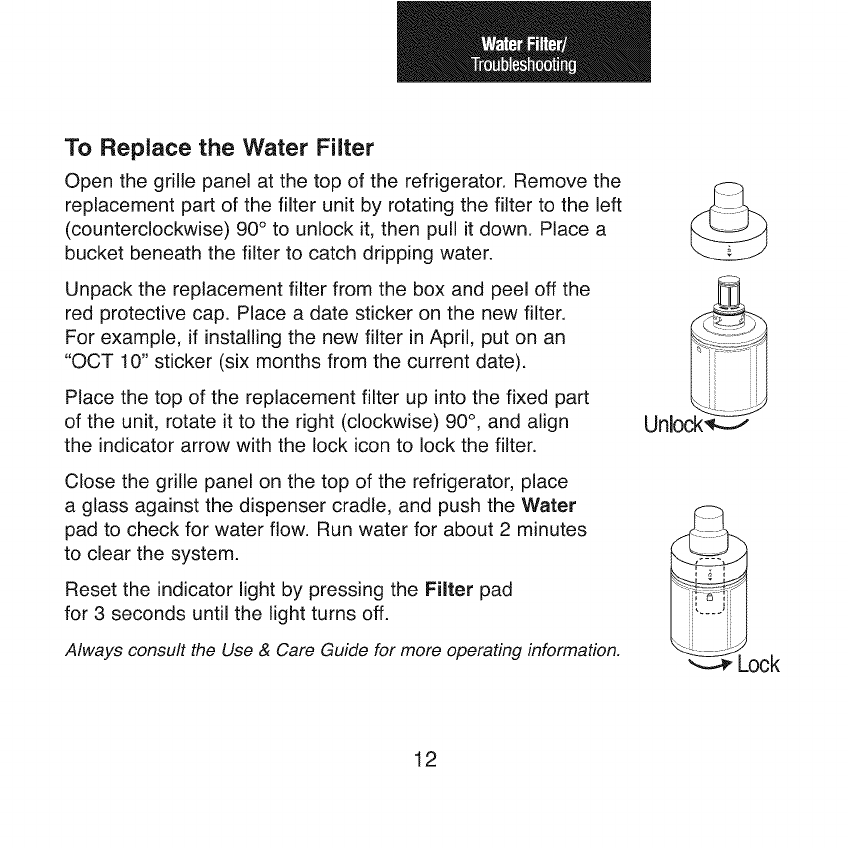
To Replace the Water Filter
Open the grille panel at the top of the refrigerator. Remove the
replacement part of the filter unit by rotating the filter to the left
(counterclockwise) 90° to unlock it, then pull it down. Place a
bucket beneath the filter to catch dripping water.
Unpack the replacement filter from the box and peel off the
red protective cap. Place a date sticker on the new filter.
For example, if installing the new filter in April, put on an
"OCT 10" sticker (six months from the current date).
Place the top of the replacement filter up into the fixed part
of the unit, rotate it to the right (clockwise) 90 °,and align
the indicator arrow with the lock icon to lock the filter.
Close the grille panel on the top of the refrigerator, place
a glass against the dispenser cradle, and push the Water
pad to check for water flow. Run water for about 2 minutes
to clear the system.
Reset the indicator light by pressing the Filter pad
for 3 seconds until the light turns off.
Always consult the Use & Care Guide for more operating information.
_Lock
12
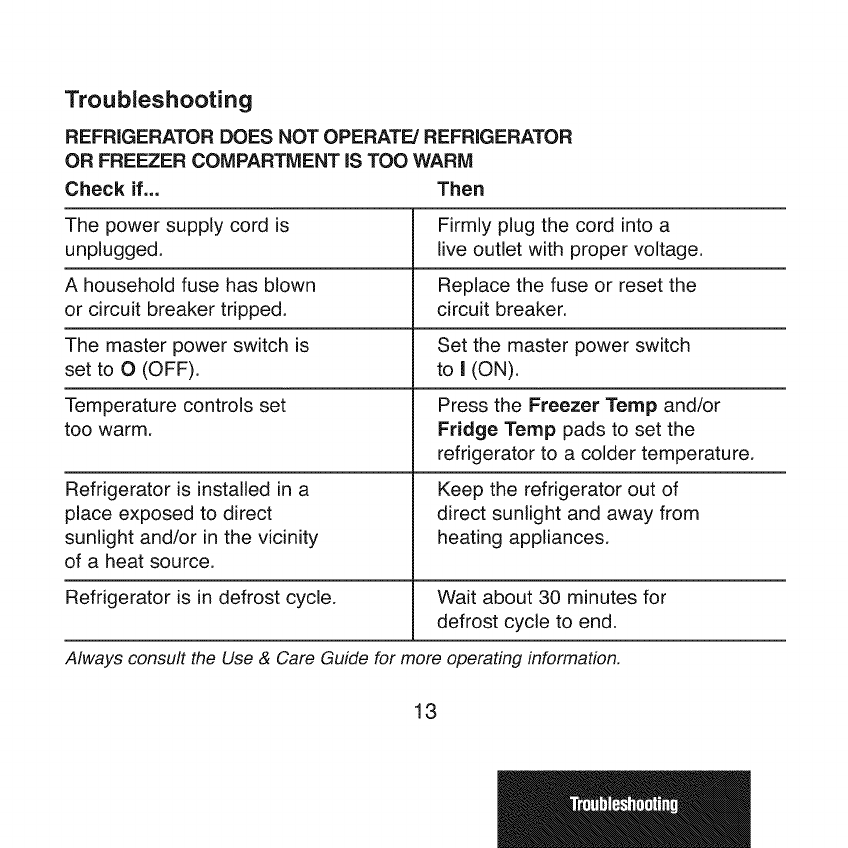
Troubleshooting
REFRIGERATOR DOES NOT OPERATE/REFRIGERATOR
OR FREEZER COMPARTMENT iS TOO WARM
Check if... Then
The power supply cord is Firmly plug the cord into a
unplugged, live outlet with proper voltage.
A household fuse has blown Replace the fuse or reset the
or circuit breaker tripped, circuit breaker.
The master power switch is Set the master power switch
set to O (OFF). to I (ON).
Temperature controls set Press the Freezer Ternp and/or
too warm. Fridge Temp pads to set the
refrigerator to a colder temperature.
Refrigerator is installed in a Keep the refrigerator out of
place exposed to direct direct sunlight and away from
sunlight and/or in the vicinity heating appliances.
of a heat source.
Refrigerator is in defrost cycle. Wait about 30 minutes for
defrost cycle to end.
Always consult the Use & Care Guide for more operating information,
13
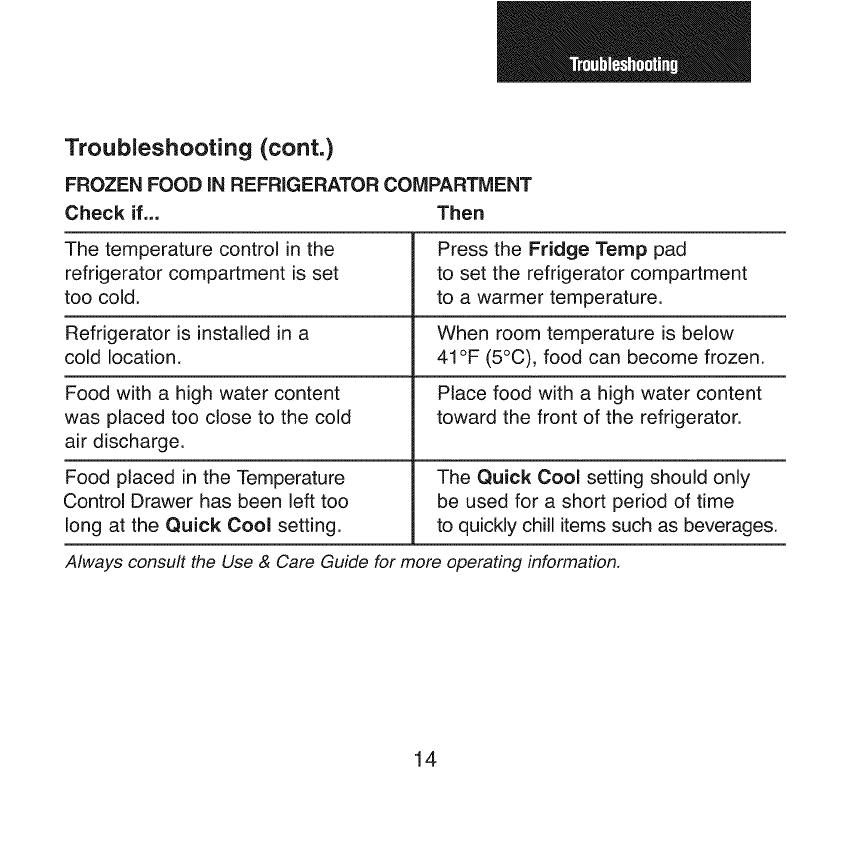
Troubleshooting (cont.)
FROZEN FOOD iN REFRIGERATOR COMPARTMENT
Check if... Then
The temperature control in the
refrigerator compartment is set
too cold.
Refrigerator is installed in a
cold location,
Food with a high water content
was placed too close to the cold
air discharge.
Food placed in the Temperature
Control Drawer has been left too
long at the Quick Cool setting.
Press the Fridge Temp pad
to set the refrigerator compartment
to a warmer temperature.
When room temperature is below
41°F (5°C), food can become frozen.
Place food with a high water content
toward the front of the refrigerator.
The Quick Cool setting should only
be used for a short period of time
to quickly chill items such as beverages.
Always consult the Use & Care Guide for more operating information.
14
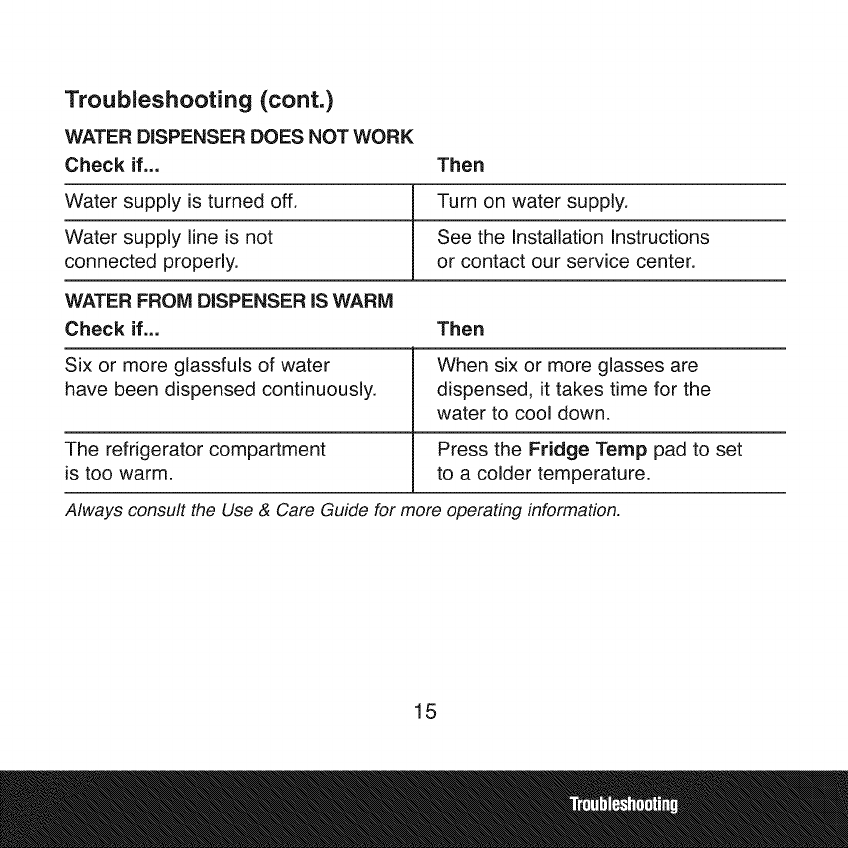
Troubleshooting (cont.)
WATER DISPENSER DOES NOT WORK
Check if,.. Then
Water supply is turned off. Turn on water supply.
Water supply line is not See the Installation Instructions
connected properly, or contact our service center.
WATER FROM DISPENSER iS WARM
Check if... Then
Six or more glassfuls of water When six or more glasses are
have been dispensed continuously, dispensed, it takes time for the
water to cool down.
The refrigerator compartment Press the Fridge Temp pad to set
is too warm. to a colder temperature.
Always consult the Use & Care Guide for more operating information.
15
NEED MORE HELP?
You'll find the answer and more on managemyhomeocom - for free!
Find this and all your other product manuals online.
Get answers from our team of home experts.
Get a personalized maintenance plan for your home.
Find information and tools to help with home projects.
rnanage horne
brought to you by Sears
Sears, Roebuck and Co., Hoffman Estates, IL 60179 U.S.A.
Printed in Korea
WWW, Sears.com
