Kenmore 10080005 User Manual TOASTER OVEN Manuals And Guides L0709298
KENMORE Toaster oven Manual L0709298 KENMORE Toaster oven Owner's Manual, KENMORE Toaster oven installation guides
User Manual: Kenmore 10080005 10080005 KENMORE TOASTER OVEN - Manuals and Guides View the owners manual for your KENMORE TOASTER OVEN #10080005. Home:Small Kitchen Appliance Parts:Kenmore Parts:Kenmore TOASTER OVEN Manual
Open the PDF directly: View PDF ![]() .
.
Page Count: 10
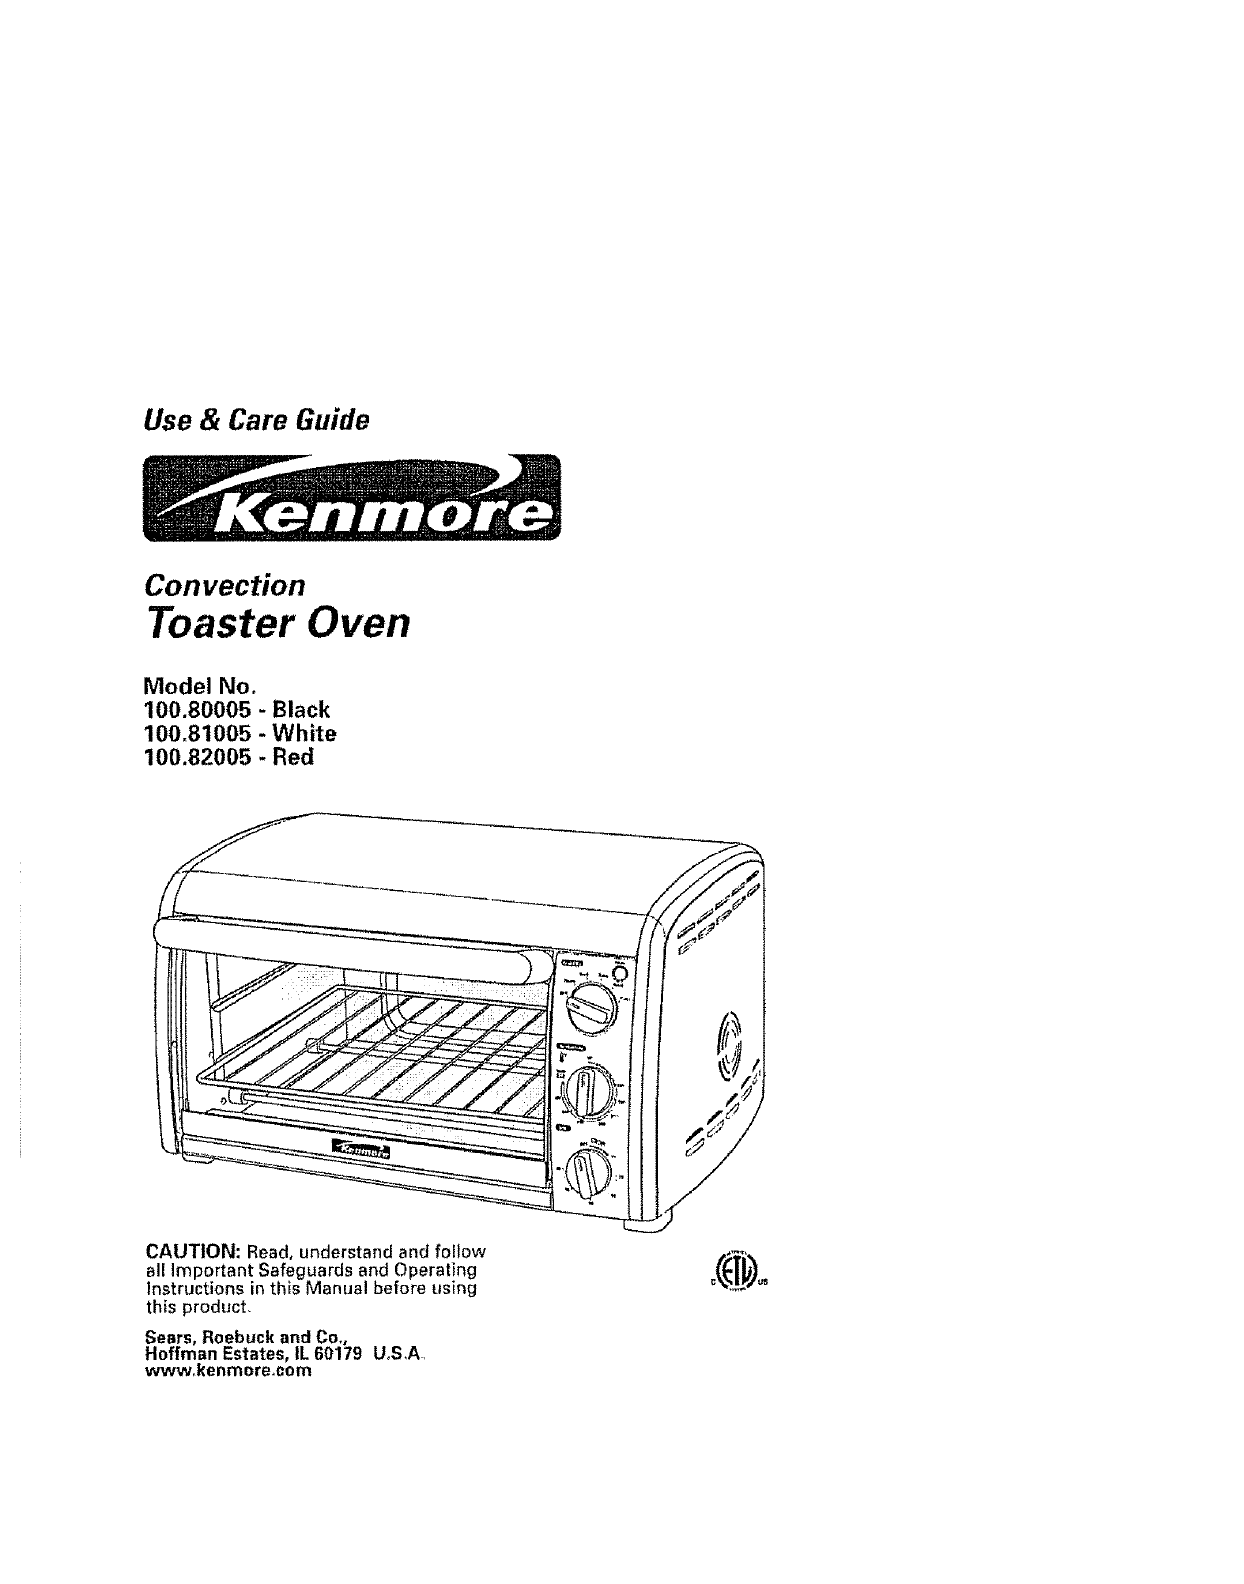
Use & Care Guide
Convection
Toaster Oven
Model No.
100.80005 -Black
100o81005 -White
100.82005 - Red
CAUTION: Read, understand and foElow
all Important Safeguards and Operating
Instructions in this Manual before using
this product,
Sears, Roebuck and Co.,
Hoffman Estates, IL 60179 UoS,A
www_kenmore.com

KENMOREFULLWARRANTY
If this product fails due to a defect in maledW or workmanship within two years from the
dale of purchase, return it to any Sears store or other Kenmora outtet in the United States
for free replacement
This warranty does not incJude e×pendable parts, such as filters or blades, which can wear
oul from normal use within the warranty penod
This warranty applies for only 90 days _fIhis product is ever used for other than private
household purposes
This warranty applies only while this prod_Jcl is used in the United States,,
This warranty gives you specific legal rights, and you may also have other rights which vary
from stale to state
Sears, Roebuck and Co, Hottman Estales, IL 60179
When using electrical appliances, basic safety precautions should always be
followed, Including the following:
1Read all instructions.
2DO NOT touch hot surfaces Use handles or knobs
3 To protect against electric shock, DO NOT immerse cord, plug, or Toaster Oven
In water or other liquids_
4 Close supervision is necessary when any appliance is used by or near children
5 UNPLUG from outlet when not in use and belore cleaning Allow to coo! before
putting on or taking off parts
6 DO NOT operate anyapplianee with a damaged cord or ptug or after the appliance
malfunctions or has been dropped or damaged in any manner, Return appliance to
the nearest authorized service facility for examination, repair or adjustment
7 The use of accessory ailachments not recommended by the appliance manufacturer
may cause Injul';es
8 DO NOT use outdoors,
9 NEVER let the cm'd hang over the edge of table or counter, or touch hot surfaces
10DONOTpieceonornearahotgasorelectricburner,orinaheatedoven.
"_1 Extreme caution must be used when moving an appliance containing hot oil or other
hot liquids
12 DO NOT use this appliance for anything other than Its Inlended use
13 Oversized leeds or metal utensils must not be inserted in a toaster oven, as they may
create a fire or risk of electric shock
14 A fire may occur if the !oaster oven is covered or touching flammable material,
including curtains, draperies, walls and the like when in operation Do not store any
item on top of the appfiance during operation
15 DO NOT cEean with mole] scoudng pads Pieces can break off the pad and touch
e{ectricat parts invofving a risk of eteclfic shock,,
16 Extreme caution should be exercised when using containers constructed of materials
other than mete] or glass
17 DONOTstoreanymaterials, otherthanmanufacturersrecornmendedaccessories,
in this toaster oven when not in use
18 DO NOT place the following materials in the 1easter oven: cardboard, plastic, paper.
or other flammable materials
19 DO NOT cover Crumb Tray or any part of the toaster oven with metal foil This will
cause overheating of the toaster even
20 To turn toaster oven power Oft, push and hold the START/STOP button until the unit
beeps and shuts off, then unplug
21 To protect against electrical shock, this appliance is equipped with a cord having
a 3-prong grounding-type ptug for insertion into a proper grounding-type receptacle
DO NOT alter the piug for use in a 2-prong receptacle, tf the plug wiltnot fit into
a receptacle, have the proper receptacle Installed by a qualified electrician.
=2SAVE THESE INSTRUCTIONS[
a) A short power-supply cord should be used toreduce the risk resulting from
becoming entangled in or tripping over a longer cord
b) Extension cords are available and may be used if care is exercised in their use
c) if extension cord is used:
t) The marked electrical Fating of the cord set or extension cord shouEd be at leasL
as great as the electrical rating of the appliance; and
2) The cord should be arranged so that it will not drape over the countertop or
labletop where tl can be pulled on by children or tripped over unlnlentionally
3) The extension cord should be a grounding-type 3-wire cord
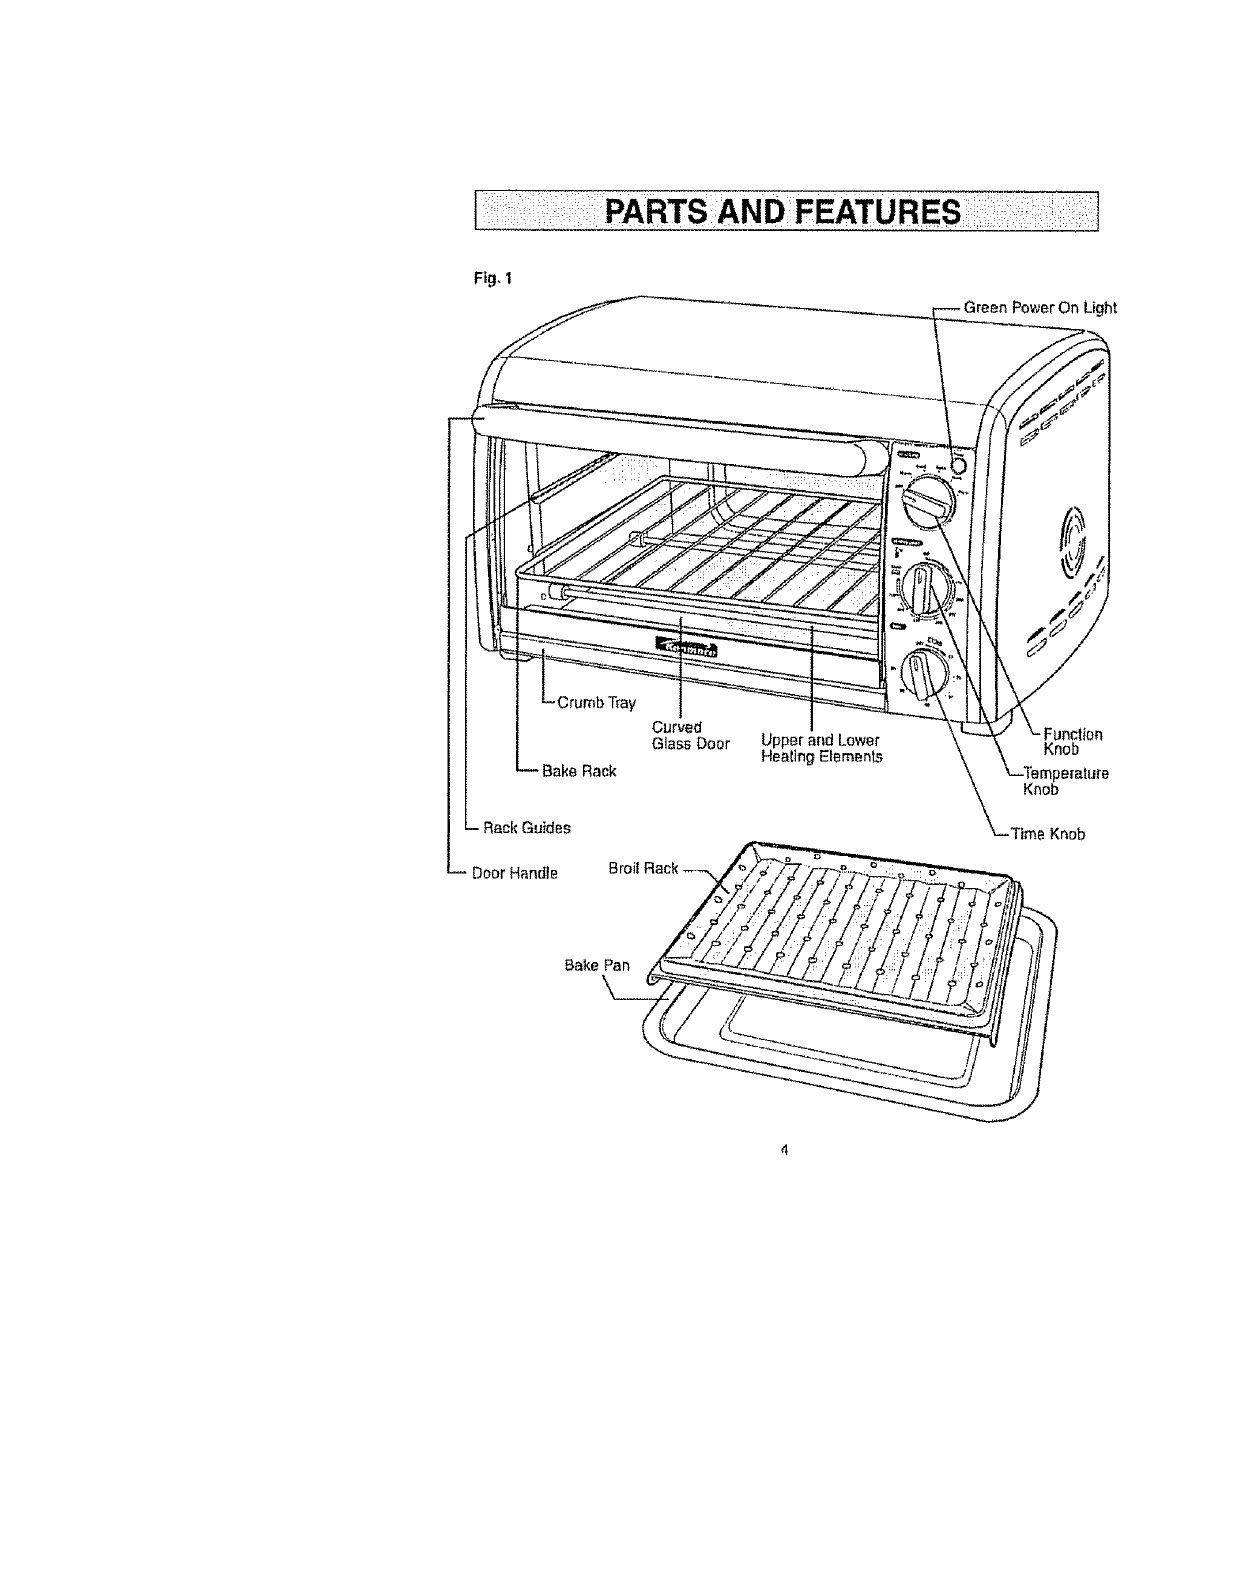
Fig, 1
Light
Rack Guides
Door Handle
Curved
Glass Door
Rack
Broil Rack_
I_/_ /
Bake Pan
UpperandLower Knob
Healing Etem_nW
Knob
rfm_ Knob
!
_ AUTION: Appliance surlaces are hot during and afler use Always wear
proleclive, insuJated oven milts when touching hot toaster oven or hot dishes and
food, or when inserting or removing Bake Rack, Broil Reck, or other baking dishes
BEORE FIRST USE:
I Place Toaster Oven on a dry, fiat, ievel surface such as a cauntertep or table
2 Be sure the sides, back and lop of lhe oven are al leasl four inches away from any wafts,
cabinets or objects on the counter or lable
3Remove al! accessories and wash lhem in hot sudsy waler Dry Ihoroughly before
placing in theoven,
BEFORE EACHUSE:
1 Removeall ilems not requiredfor thenext cooking procedure
2 Plug power cord tnto a standard "I20-V, 60 Hz AC-only 3-prong eleclrlcal culler
The Toaster Oven should be the only appliance operating on the circuit
This Toaster Oven has Convection Technology for betler, more efficient use of heat
Hot air circulating through your oven cooks food more evenly, at lower temperalures,
and orlon wilh belier and faster results. Moving air speeds up the rate of heal lransferenoe
that naturally occurs when air of two different temperalures converges The rushof heal
speeds up the chemical reactions thai occur when food cooks. Food cooks in less time in
the conveclion oven When the Toaster Oven is in the Bake, Warm or Pizza mode, the
conveclionfeature{son
CAUTION: NEVER leave Toaster Oven unattended while it is in use
TOASTING
The large capacity oven allows for toasting 4 to 6 slices of bread or6 Engiish muffin helves,
frozen wattles, or frozen pancakes When toasting only 1 or 2 items, place the food In the
cenler of the Toasler Oven's rack
1 Be sure the crumb tray is in place
2 Bake rack should be in the lower reck guide.
3 Turn the Function knob toToasl
4 Sol the Temperature knob to Toast
5. Place lhe food to be toasted on lhe bake rack and close the door
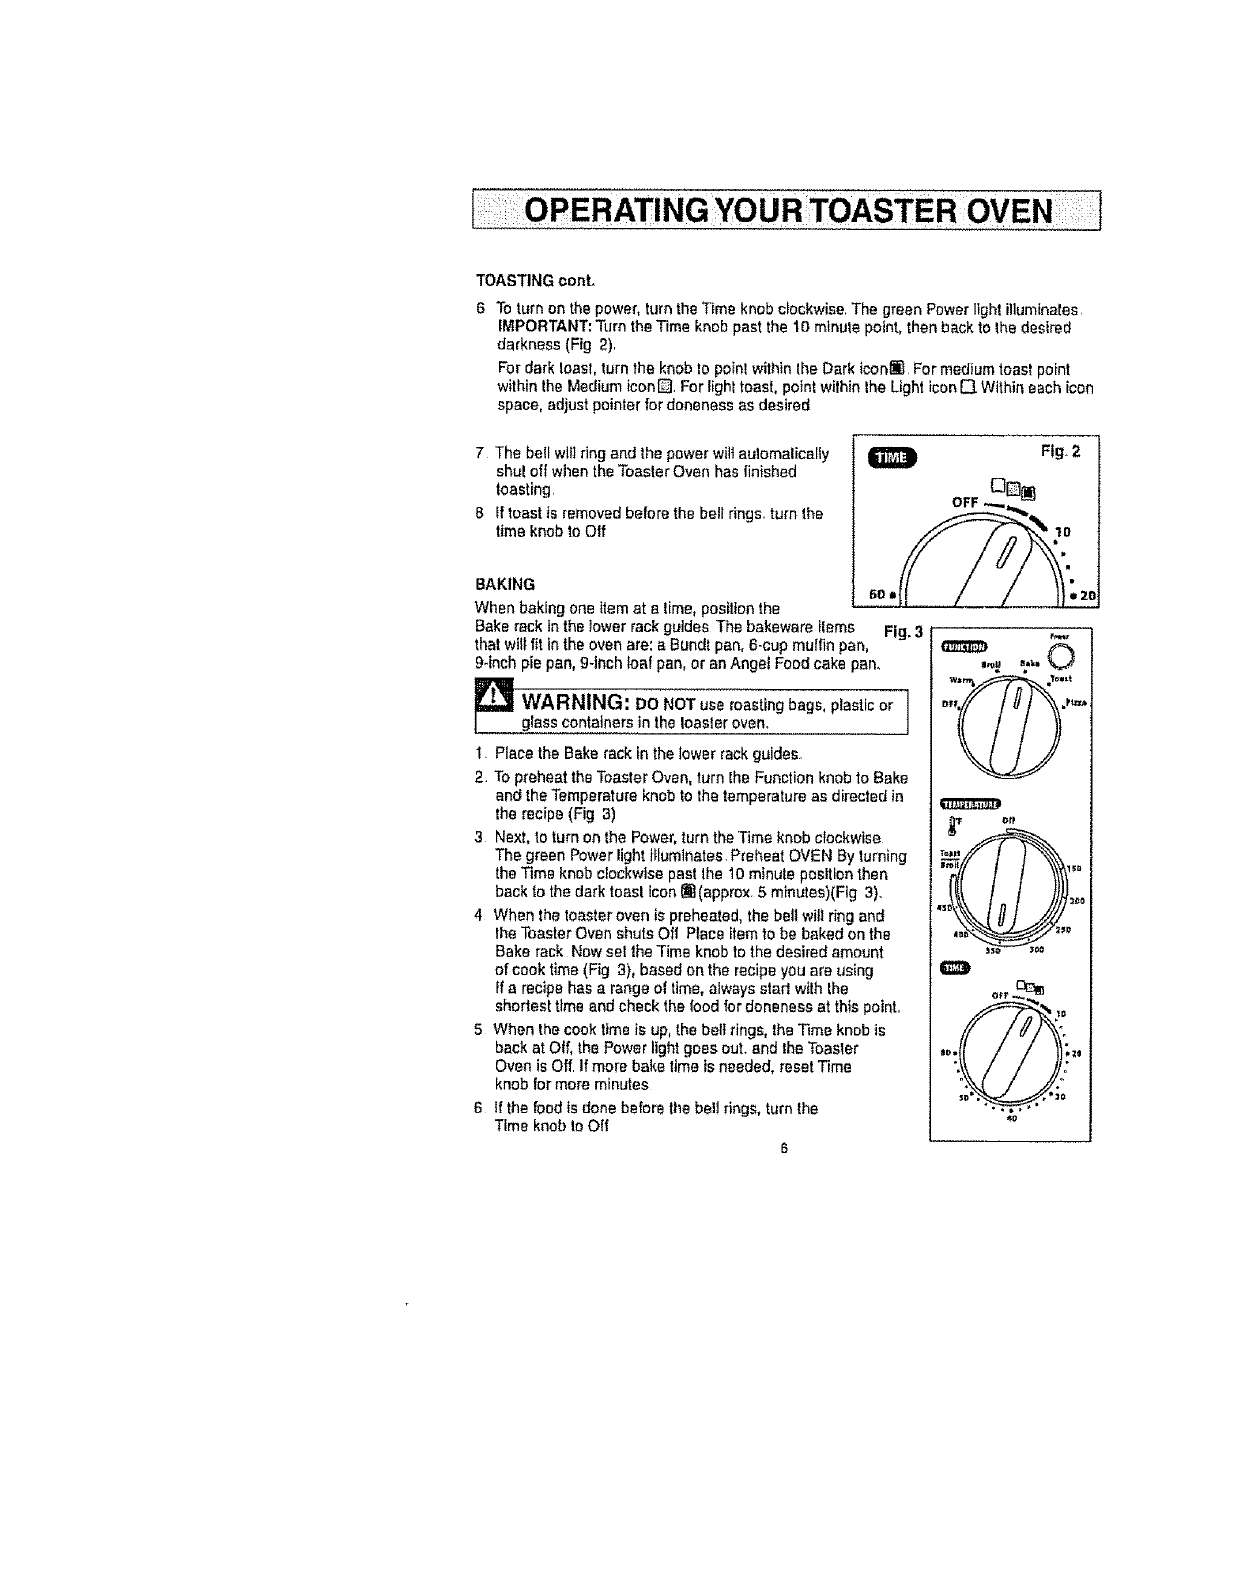
TOASTING cent,
6 To turn on the power, turn the Time knob clockwise The green Power light illuminates
IMPORTANT: Turn the Time knob past the 10 minule point, then back to lhe desired
darkness (Fig 2).
For dark least, turn the knob to poin!within Ihe Dark ieonl For medium toast point
within the Medium icon_. For Iight toast, point within Ihe Light icon O Within each }con
space, adjust pointer for doneness as desired
7 The bell witl ring and the power wilt aulomalically
shul off when the Toaster Oven has finished
toasting.
8 If toast iS removed before the bell rings, turn the
time knob to Otf
BAKING
When baking one Item at a lime, position the
Bake rack tn the lower rack guides The bakeware tlems Fig. 3
that wilt fit in the oven are: a Bundt pan, 6-cup muIfin pan,
g-Inch pie pan, 9-inch loaf pan, or an Angel Food cake pan.
_WARNING: DO NOT use roasting bags, plastic or I
g{ass containers tn the Ioasler oven. l
I Place the Bake rack in the lower rack guides
2 TO preheat the Toaster Oven, turn lhe Function knob to Bake
and the Temperatu_e knob to the temperature as directed in
the recipe (Fig 3)
3Next, to turn on the Power, turn the Time knob clockwise
The green Power light illuminates Preheat OVEN By turning
the Time knob clockwise past the 10 minute position then
back to the dark toast Icon J](approx. 5 minutes)(Fig 3)..
4 When the toaster even is preheated, the boil witl ring and
lhe Toaster Oven shuts Oft Place item to be baked on the
Bake rack Now sel the Time knob to the desired amount
of cook time (Fig 3), based on the recipe you are using
if a recipe has a range of time, always start with Ihe
shortest time and check the food for aloneness at this point..
5 When the cook time is up, the belt rings, the Time knob is
back at Otf, the Power light goes out. end the Toasler
Oven is Off If more bake time is needed, reset Time
knob for more minutes
6If the feed is done before the bell rings, turn the
Time knob to eli
6
Fig, 2
I
DFF_ *P_'j
G_P
4$0 :t_O
OFt _
40
BAKING cant,,
Positioning the Bake Rack
Cookies can be baked using either set of rack guides, or both positions at once
(with an additional rack sold separalely)
Layer cakes are baked on the lower rack guide position.. Pies can be baked in
either or both positions Always bake pies on a cookie sheet to catch any spt_lsor drips.
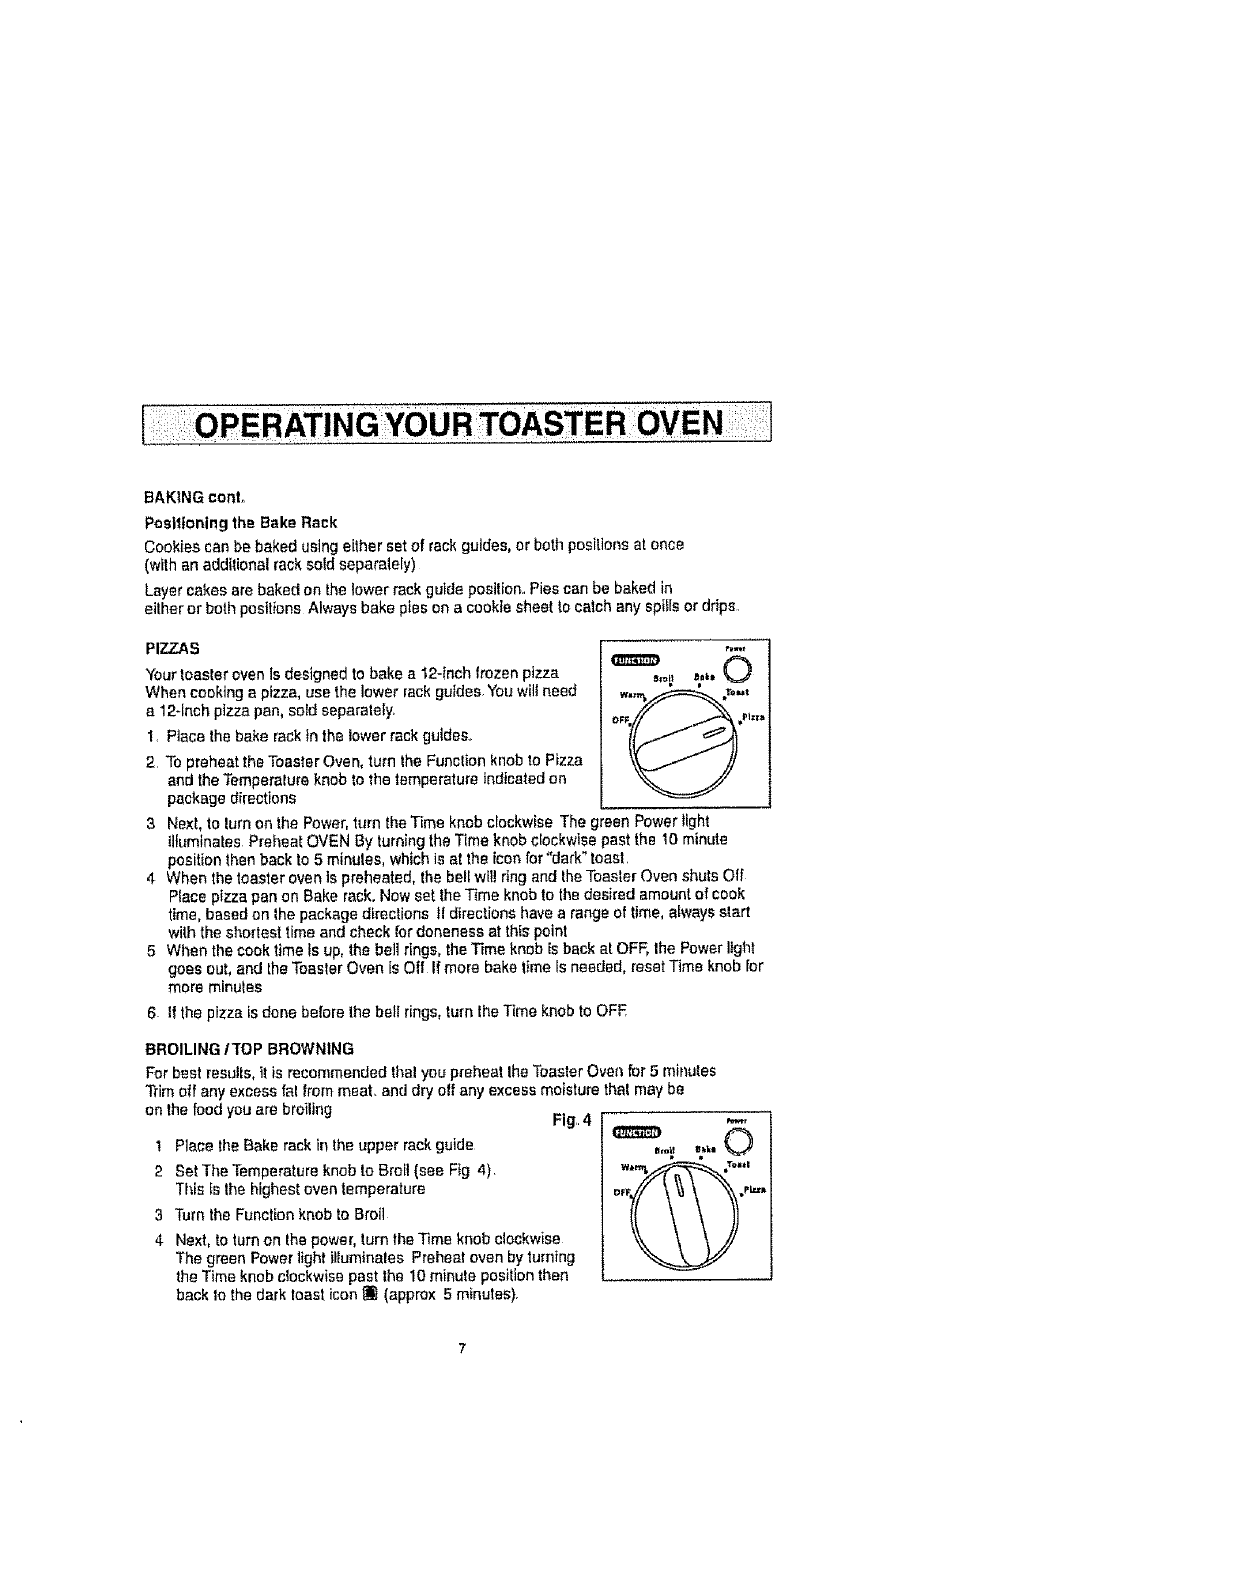
PIZZAS
Your toaster oven is designed to bake a 12-Inch frozen pizza
When cooking a pizza, use the lower rack guides You will need
a 12-inch pizza pan, sold separately.
1. Piece the bake rack in the lower rack guides..
2 To preheat the Toaster Oven, turn the Function knob to Pizza
and the Temperalure knob to the temperature indicated on
package directions
3 Next, te lure on the Power, turn the Time knob clockwise The
,==, ©
reen Power light
tltt_minates Preheat OVEN By turning the Time knob clockwise _ast the 10 minute
position then back to 5 minutes, which is at the icon fat"dark" toast.
4 When the toaster oven ts preheated, the bell wil! dng and the Toaster Oven shuts Off
Piace pizza pan on Bake rack. Now set the _me knob to the desired amount of cook
time, based on the package directions If directions have a range of time, always start
with the shortest time and check for donenesa at this point
5 When the cook time is up, the bell r_ngs, the Time knob is back at OFF, Ihe Power light
goes out, and the Toaster Oven is Off if more bake time Is needed, reset Time knob for
more minutes
6 If the pizza is done betore 1he bell rings, turn lhe Time knob to OFE
BROILING/TOP BROWNING
For best results, it is recommended the! you preheat Ihe Toaster Oven for 5 mir_utes
Trim off any excess fal from meat. and dry off any excess moisture that may be
on the food you are broiling Fig..4
1 Place the Bake rack in the upper rack guide
2 Set The Temperature knob to Broil {see FSg 4)
This _sthe highest oven temperature
3Turn the Function knob to Broil
4 Next, to turn on the power, turn the rime knob clockwise
The green Power light illuminales Preheal oven by turning
the Time knob clockwise past the 10 minute position then
back to the dark least icon _ (approx 5 minutes).
V_Wr
©
Bro_l tf_lca
i,
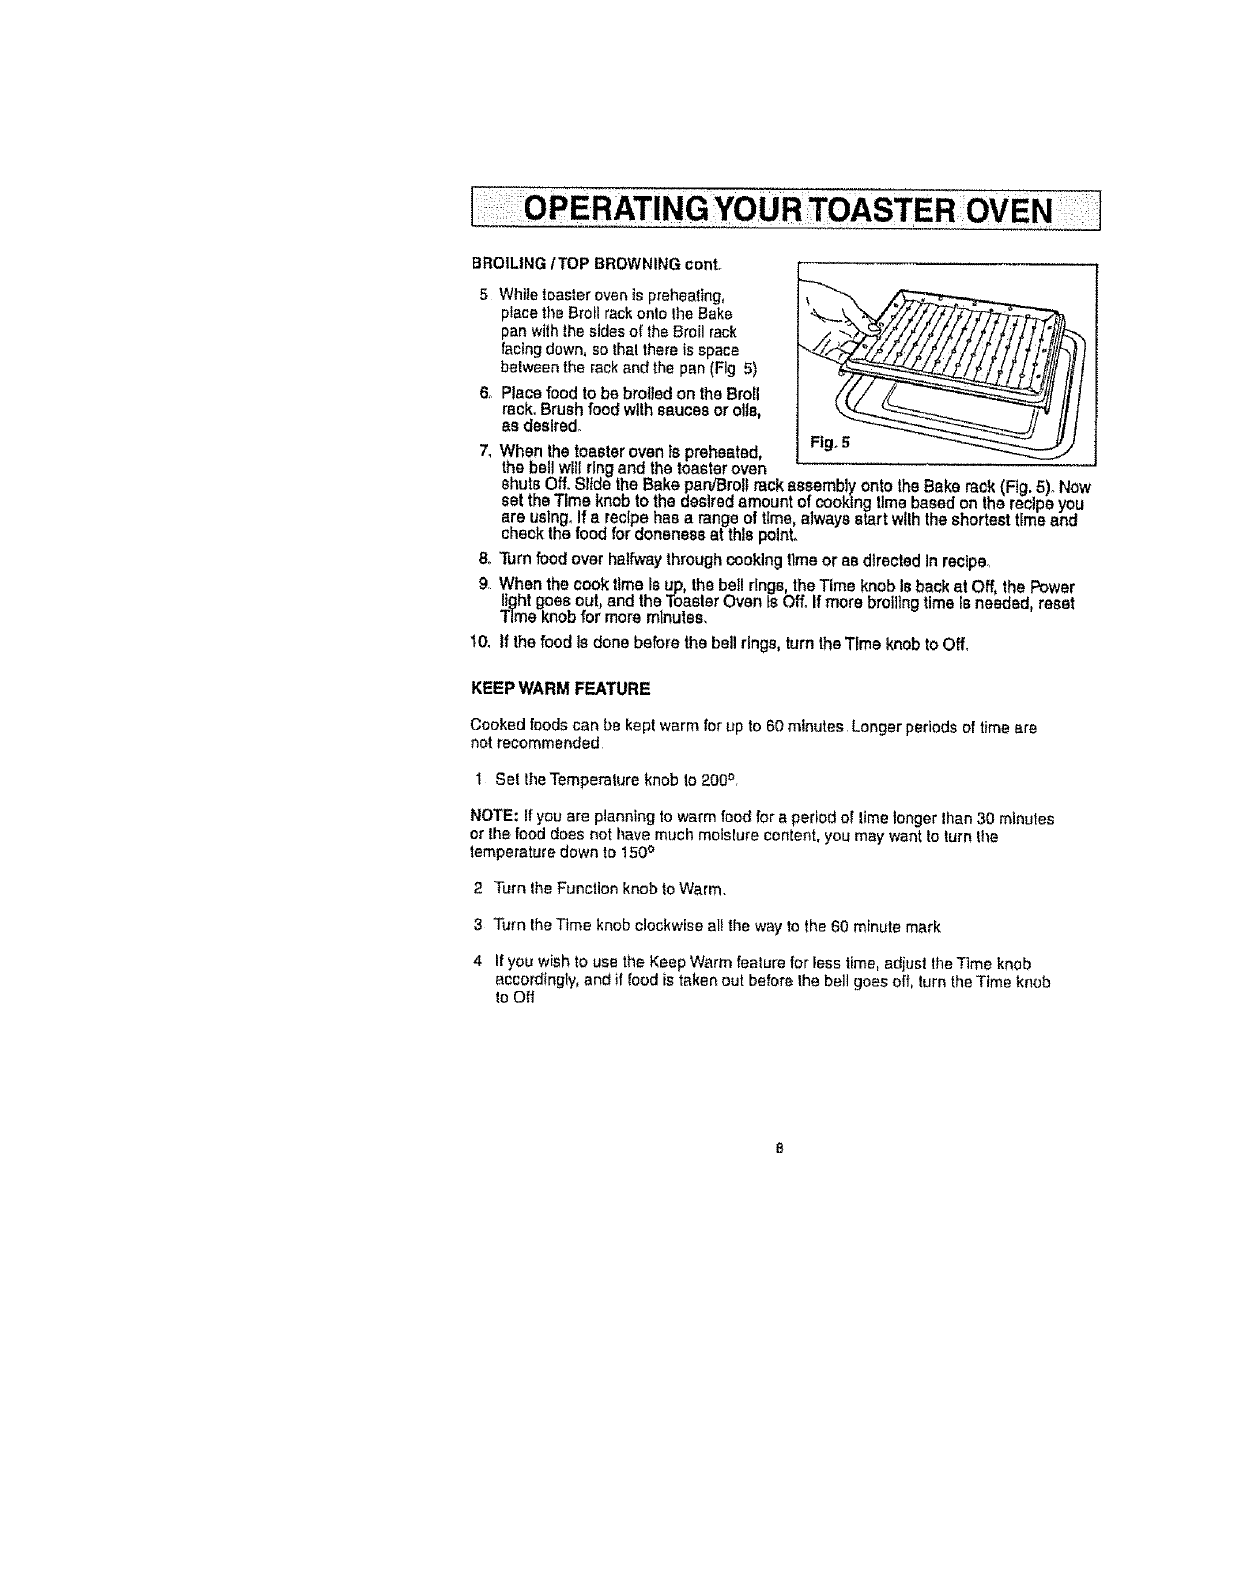
BROILING/TOP BROWNING cent.
5 White toaster oven is preheating,
place the Broil rack onto Ihe Bake
pan with ihe sides of the Broil rack
facing down, so that there is space
between the rack and the pan (Fig 5)
6. Place food to be broiled on the Broil
reck. Brush food with sauces or ells,
as desired.
7, When the toaster oven is preheated,
the bell willringand the toasteroven
shuts Off. Slidethe Bake par',fBrollrackassembly onto theBake rack (Fig. 5). Now
set theTime knob to the desiredamountof cookingtime basedon therecpe you
are using,If erecipehasa range of time, always startwllh theshortesttimeand
checkthe foodfor alonenessat this point.
8oTurnfoodover halfwaythroughcookingllmeor as directedIn recipe..
9When the cook time Is up the be]!dngs, the Time knob Is back at Off, thePower
light goes out, end the ToasterOven ts Off° If more broiltng time Is needed, reset
Time knob for more minutes,
10_If thefood Is done before the bell rings, turn the Time knob to Off,
KEEPWARM FEATURE
Cooked foods can be kept warm for up to 60 minutes Longer periods of time ere
not recommended
1 Set the Temperature knob lo 200 r_,
NOTE: If you are planning to warm food for a period of time longer Ihan 30 minutes
or the food does net have much moisture content, you may want to turn lhe
lempereIure down to t50 °
2 Turn Ihe Function knob to Warm.
3 Turn the Time knob clockwise el! the way to the 60 m_nule mark
4 If you wish to use the Keep Warm feature for less time, adjust the Time knob
accordingly, and if food is taken out before Ihe bell goes eft, turn the Time knob
to Off
1, Allow oven and accessories to coolcompletelybefore cieaningo
NOTE: Sugarand Salt based foods have a tendencyto stick to eli surfaces end are
very hard to dean. When cookingthese typesof foods with the Bake Pan and Broli
Rack, soak end clean them immediately after each use.
2. All accessories shouldbe washedby hand In hot sudsy water.Rinse and dry oil
eccessorEesthoroughly Automaticdlshwashlng not recommended,
3, The Glass Door can be wiped cleanwitha damp sponge and wiped dry with
a paper or cloth towel.
WARNING:
• DO NOT immerse Toaster Oven In water or any other I{quld
• ALWAYS make sure Time knob is in the 8 (Off) position and
UNPLUG toaster oven from the electr{c outlet before c{ean{ng.1
4 To clean the crumb tray, slide it out of the oven and brush off crumbs
Wipe with adamp cloth and dry thoroughly
5Baked on stains can be removed with a paste made from baking soda
and water Rinse and dry thoroughly
6 Clean the oulside with a clean damp sponge or cloth and dry thoroughly
A non-abrasive liquid cleaner may be used [or stubborn stains,, Rinse and dry
thoroughly NEVER immerse Toasler Oven in water or any liquid,
5"N-'_"NEVER use sfeel wool, scoudng pads or abrasive I
to clean any parts of Toasler Oven lnlerior, exterior,
sories
7 Allow air parts and surfaces to dry thoroughly before plugging
in and using Toaster Oven

Your Home
For repair- in your home -of all major brand appliances,
lawn and garden equipment, or heating and cooling systems,
no matter who made it, no matter who sold itl
For the replacement parts, accessories and
owner's manuals that you need to do-it-yourself
For Sears professional installation of home appliances
and items like garage door openers and water heaters
1-800-4-MY.HOME ®Cell anytlme_ day or night
('1-800-469-4663) (U SA andCanada)
www eeerB corn www, _ears.ca
For et_pert home solutions advice: www managemyhome,com
Our Home
For repair of carry-m products like vacuums, lawn equipment,
and electronics, call or go on-line for the nearest
Sears Parts & Repair Service Center
1-800-488-1222 (u s A ) 1-800-469-4663 (Canada)
Cell enytfme, day or night
W_VW eeerB ,com WWW ,see$s,c_
To purchase a pmteclion agreement on a producl serviced by Sears:
1-800-827-8655 (USA) 1-800-361-6665 (Cereals)
Pare pedir servicio de reparaciSn Au Canada pour service en fran;ais:
adomicMo,y pare ordenar piezas: 1.800.LE..FOYERMC
1,881]-SU-HOGAR® (1-800-533-6937)
(1.888,-7B4_27) www seers ca
...........Sea/m
©_Sm_,LLO
®Regls_emdTrademark /TM Trademark Is_ Service Mark of Sears Brands,LLC
® Mares Reg_stredetTM Marce de F_bdca /s=+Meres de Setvlc_o de Sears Stands LLC
L,_Marque de commerce /_ Marque d_pes_e de Sears Brenda LLC
