Kenmore 11626212690 User Manual CANISTER VACUUM CLEANER Manuals And Guides L0803494
KENMORE Attachments (Vacuum) Manual L0803494 KENMORE Attachments (Vacuum) Owner's Manual, KENMORE Attachments (Vacuum) installation guides
User Manual: Kenmore 11626212690 11626212690 KENMORE CANISTER VACUUM CLEANER - Manuals and Guides View the owners manual for your KENMORE CANISTER VACUUM CLEANER #11626212690. Home:Vacuums & Floor Care Parts:Kenmore Parts:Kenmore CANISTER VACUUM CLEANER Manual
Open the PDF directly: View PDF ![]() .
.
Page Count: 36
Vacuum Cleaner
OWNER'SMANUAL
READ THIS MANUAL for important safety,
assembly and operating instructions.
Cg1ZAEX1gUgg_437gg6!
CONTENTS
WARRANTY ........................ 2
SERVICE ......................... 2
IMPORTANT SAFETYINSTRUCTIONS ..... 3
PARTSAND FEATURES........... 4-5
ASSEMBLY...................... 6-7
USE ........................ 8
How to Staff ................... 8
Vacuuming Tips ................ 9
Suggested Pile Height Sefttngs ......... 9
Attachments ...................... 10
Aflachment Use Chaff ........... t0
Performance Features ........... t 1
HOW YOUR VACUUM WORKS ......... 12
CANISTERCARE ................. ]2
Bag Changing ........ 12
Motor Safety Filter Cleaning .... t3
Cleaning Ex'fertor and Attachments t3
POWER-MATETM CARE .... 14
Light Bulb Changing ........... 14
Belt Changing and Brush Cteanlng . 14-15
Brush Semiclng ............... t6
Brush Assembly ........ 16
TROUBLESHOOTING ........... 17
Proper assembly and safe use of your vacuum cleaner are your responsibililies. Your cleaner is intend-
ed only for household use° The cleaner should be stored in a dry, indoor area. Read this Owner's Manu _
al carefully for important use and safety information,, I
WARRANTY
KENMORE VACUUM CLEANER
FULLONE-YEAR WARRANTY
When used for private household purposes, if within
one year from the date of purchase, this vacuum
cleaner fails due to a defect in material ar workmanship,
RETURNIT TO THE NEARESTSEARS SERVICE CENTER/
DEPARTMENT IN THE UNffED STATES,and Sears will
repair it free of charge
If this vacuum cleaner is used for commercial or rental
purposes, the above warranty coverage applies for
only 90 days from the date of purchase
This watTaniy gives you specific legal rights, and you
may also have other rights which van/from state to slate
SEARS,ROEBUCKAND CO,, D/817 WA,
HeRman Estates, IL 60179
if you need service or pars, visit your nearest Sears
Service Center or the Service Department located at
most Sears Retail Stares They wilt be able to sotve
your problem and supply any needed replacement
pads. Any service needed other than described in
this Owner's Manual should be done by a Sears
authored service representative
How to Order Repair Parts
When requesting service or ordering pars, have the
following information available:
1. Canister mode! number and serial number
2_ POWER-MATE TM model number and serial number
3. Description of problem
4. Part number
5. Name of part
6. Location of pad - Canister or POWER-MATETM
EngIlsh Speaking:
To Call Tat! Free For Service: (t-800-4-REPAIR)
[1-800-473-7247)
To Call Tott Free For Parts: (1-800-FON-PART)
[1-80G366-727B)
Spanish Speaking:
To Coil Toll Free For Service: 0*800-626-58} i)
To Call Tall Free For PaRs: (1-800-659-7084)
'..MPORTANTSAFETYINSTRUCTIONS
WARNING
To reduce the risk of fire, electrical shock, in}ury to persons or damage when using your
vacuum cleaner, follow basic safely precautions including the following:
Read this manua! before assembling or using
your vacuum cieaner_
Use your cleaner only as described in this
manual, Use oniy with Sears recommended
attachments
Toreduce the riskof electrical shock - Do not
use outdoors or on wet surfaces,
Disconnect electrical supply before servicing
or cleaning out brush area, Failure to do so
could result in electrical shock or brush
suddeniy staffing
Always turn cleaner off before connecting or
disconnecting the hose or POWER-MATETM,
Atways turn cieaner off before unplugging.
Do not unpiug by purling on cord To unplug,
grasp the plug. net the cord
Hold plug when rewinding onto cord reel Do
not allow plug to whip when rewinding
Do not use with damaged cord or plug if
cleaner is not working as it should, has been
dropped, damaged, left outdoors, or dropped
into water, return It to a Sears Servlce
Center/Department.
Do not puff or carry by cord, use cord as a
handie, close door on cord, or purl cord
around sharp edges or corners. Do not run
cleaner over cord. Keep cord away from
heated surfaces,
De not leave cleaner when plugged in. Unplug
from outlet when not In use and before servicing
Do net allow to be used as a toy, Close attention
is necessary when used by or near children.
Do not handle plug or cleaner with wet hands,
Do not operate cleaner with a punctured hose.
The hose on some models contains electrical
wires. Replace if cut or worn, Avoid picking up
sharp objects+
Do not put any objects into openings,
Do not use with any opening blocked; keep
free of dust, lint, hair and anything that may
reduce air flow
Keep hair, loose clothing, fingers, end all parts
of body away from openlngs and moving parts,
Do not use cleaner without dust bag/and or
filters in place, Always change the dust bag
after vacuuming carpet cleaners or freshener.
powders and fine dust, These products clog
the bag, reduce airflow and can cause the
bag to burst, Failure to change bag coutd
cause permanent damage to the cleaner.
Do not use the cleaner to pick up sharp hard
objects, small toys, pins, paper, etc They may
damage the cleaner or dust bag-
Do not pick up anything that is burning or
smoktng, such as cigarettes, matches, or hot
ashes,
Do not use cleaner to pick up flammable or
combustible Uquids (gasoline, cleaning fluids,
perfumes, etc.), or use in areas _vhere they
may be present The fumes from these
substances can create a fire hazard orexplosion,
Use extracare when cleaningon #airs.Do not
put on chairs,tabEes,etc.Keep onfloor.
You are responsible for maNng sure that your
vacuum cleaner isnot used by anyone unable
to operate It properly.
SAVETHESEINSTRUCTIONS
Proper assembly and safe use of your vacuum cleaner are your responsibilities.
Your cleaner is intended only for household use.
Read this Owner's Manual carefully for important use and safety informatbn.
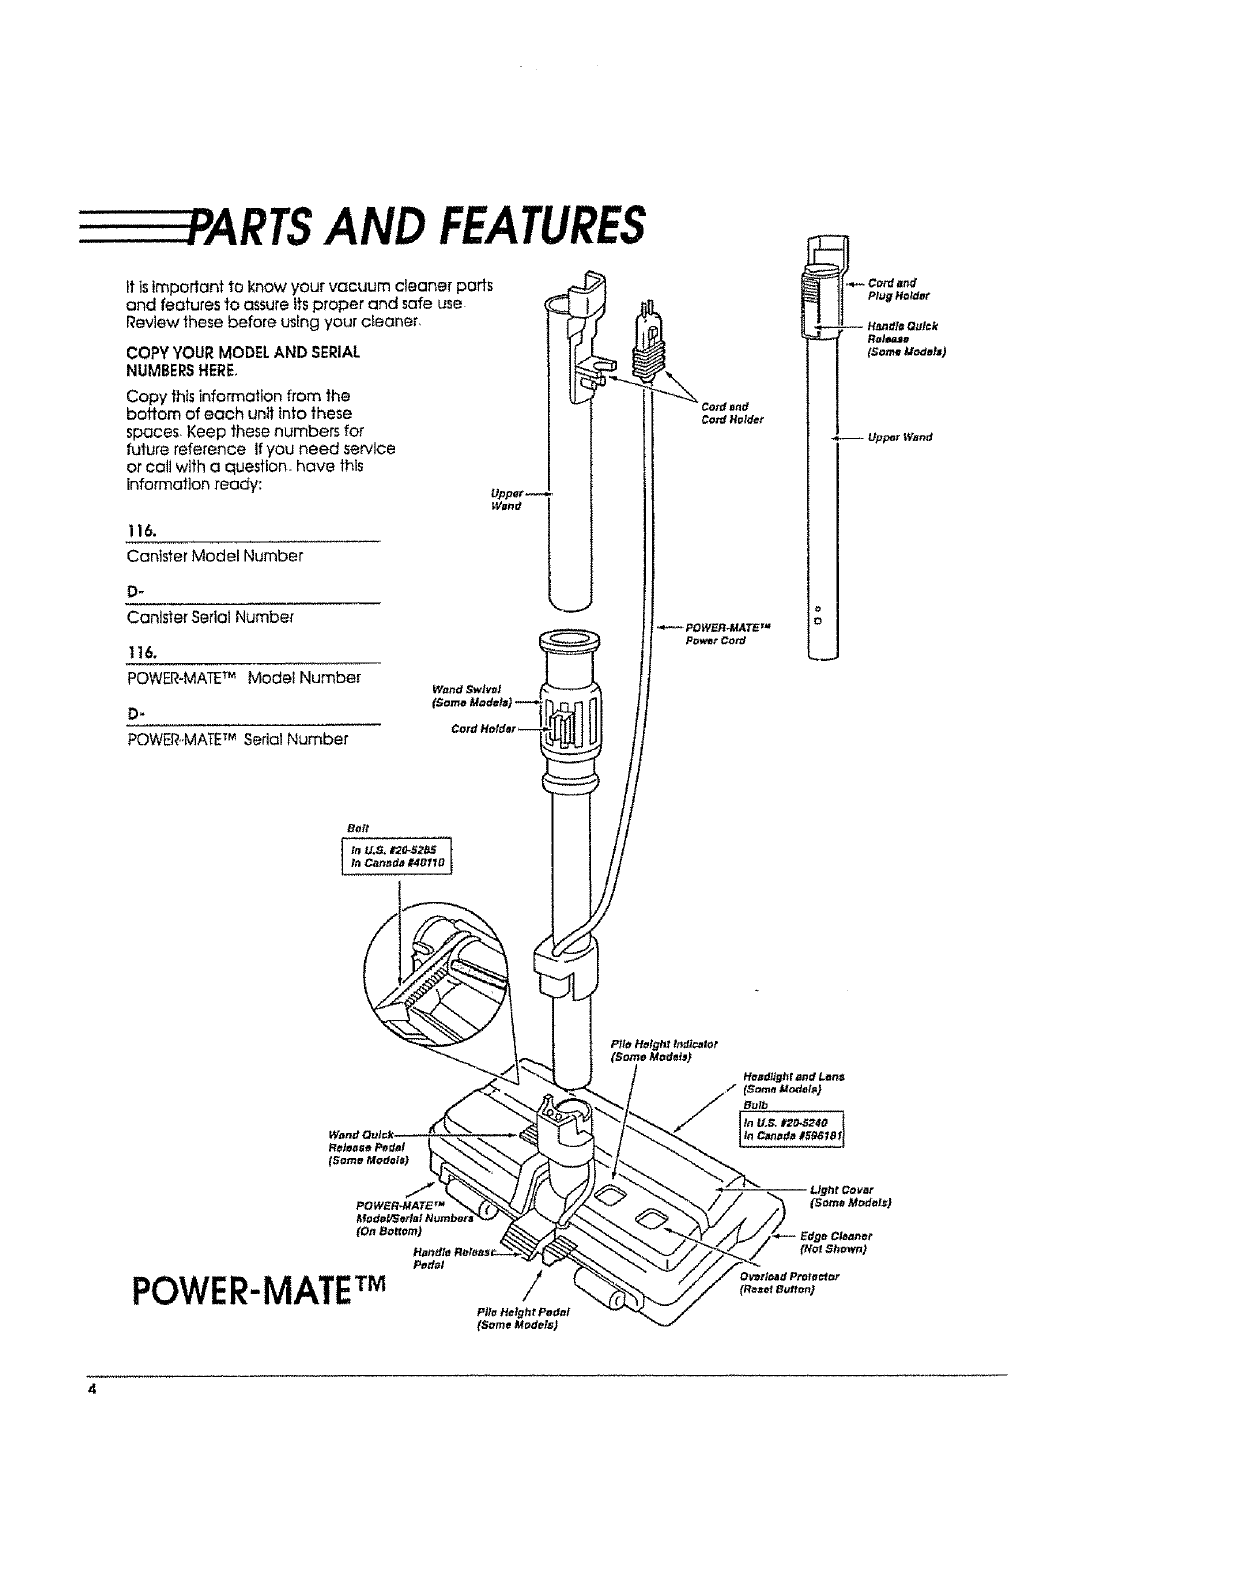
fARTSAND FEATURES
It isimportant to know your vacuum cleaner parts
and features to assure its proper and sate use
Review these before using your cleaner,
COPY YOUR MODEL AND SERIAL
NUMBERSHERE,
Copy thls information from the
boffom of each unit into these
spaces, Keep these numbers for
future reference if you need service
ot call with a question, have this
information ready:
116.
Canister Model Number
D-
Canister Serial Number
tt6.
POWER-MATETM Model Number
D-
POWER,MATETM Serial Number
W_ndSwlwl
(On Bo_omj
POWER-MATETM
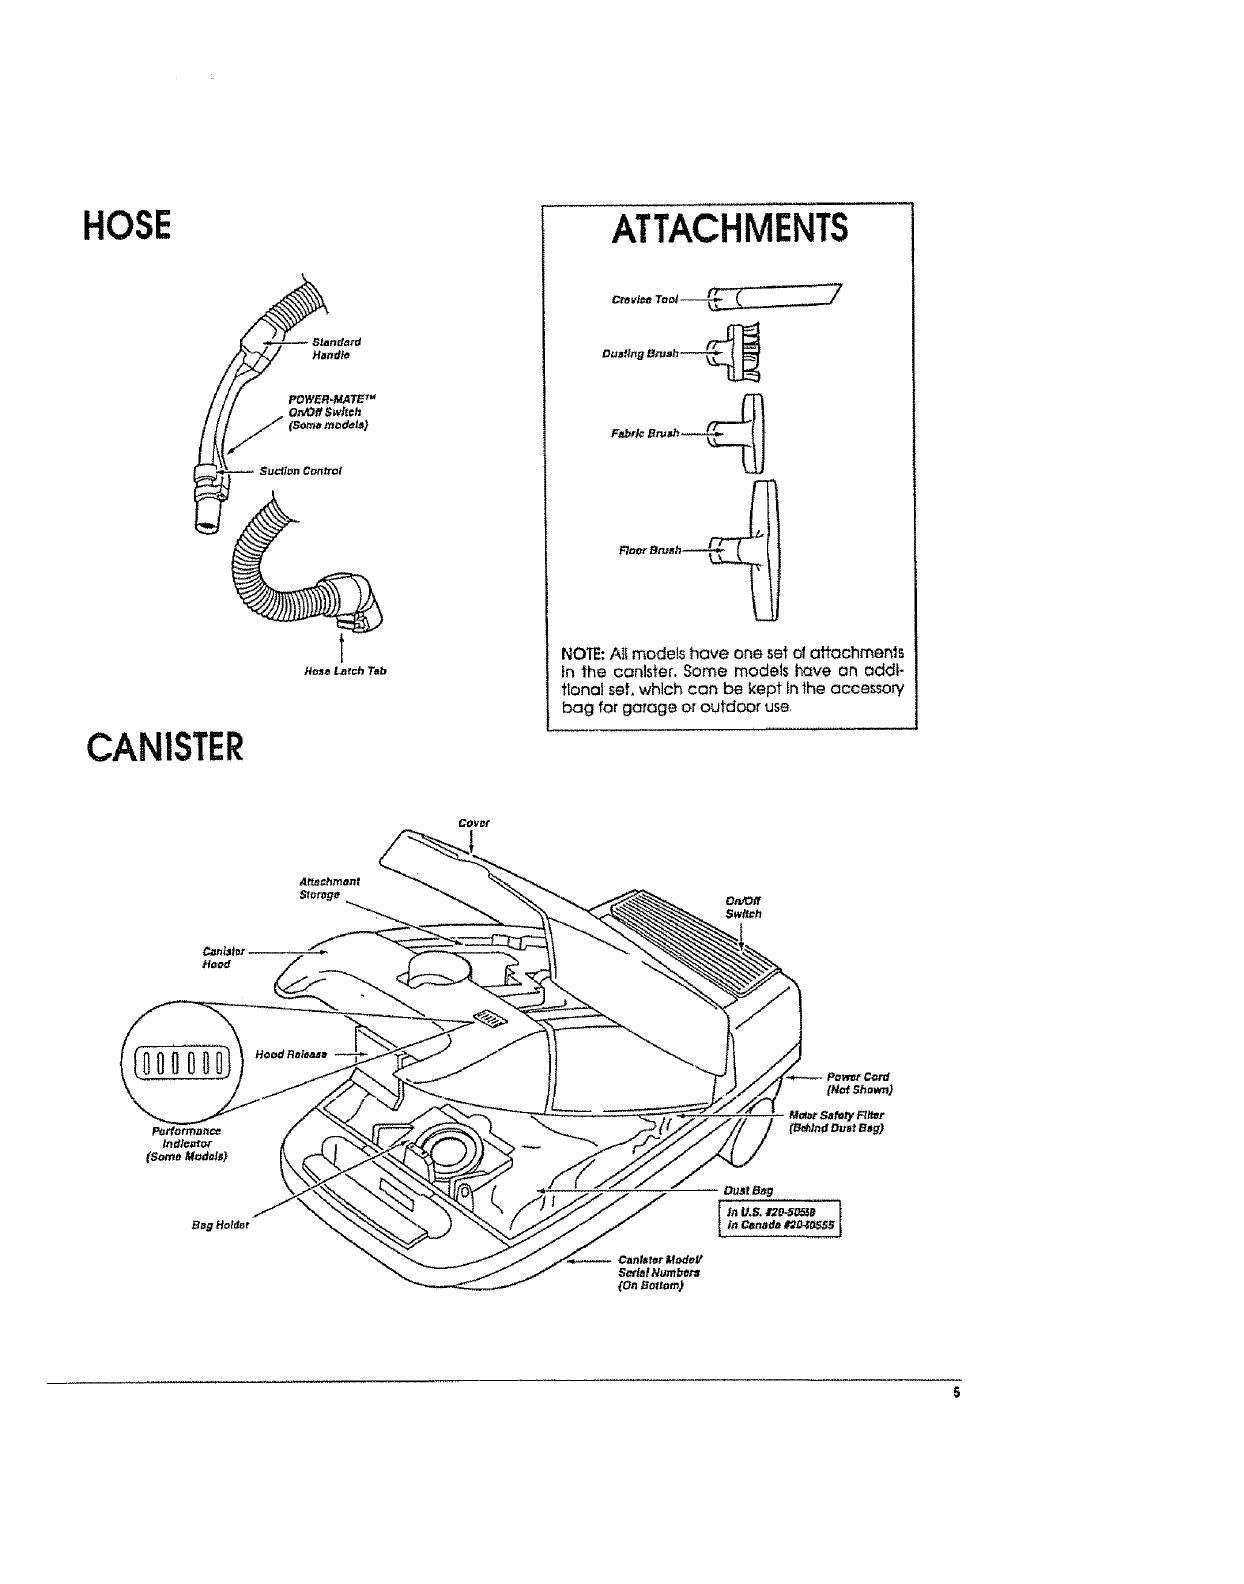
HOSE
CANISTER
H_nd_
POWER=MATE TM
ATTACHMENTS
Cravt¢o Toot __
DuMtng EIt*Jah""-"-"_
F_rl¢ Bru_h_
Floor BpJ_h--"_*_
NOTE: Ati models have one set of affachmenis
in the canister, Some models hc_ve on addi-
tional set, which can be kept in the accessory
bag for garage or outdoor use,
COV_"
Du*! e_g

ASSEMBLY
Before assembllng your vacuum cleanero be sure you
have aiJ parts shown in PARTSAND FEATURES
!ii i
WARNING
EIec#Icat Shock Hazard
Do not plug Into electrical supply until assembly Is
complete. Failure to do so could result in elec#Ical
shock or Injury.
WANDS
SIide wands together
until wand button
snaps into place, Turn
wand buttontothe
#oiledarea of the
wand swivel
The swtvel allows you
to turn the handle to
the left slde to reach
farther under low
furnffure _Cord
.'J HOl#O_"
POWER-MATETM
1. Insert wands Into POWER-MATE _Muntil the wand
buttons snaps into place
2,Connect
POWERoMATE _
plug and cord as
shown. DO NOT
force.Raisedarea
of plug must be
R_I_#_A_ toward hand
3,Secure cord into
cord holderon
wand swivel.
To remove:
Disconnect cord
and step on wand
release pedal
then put1 up on
wands
--W_nd
o_-J--..--_Wand
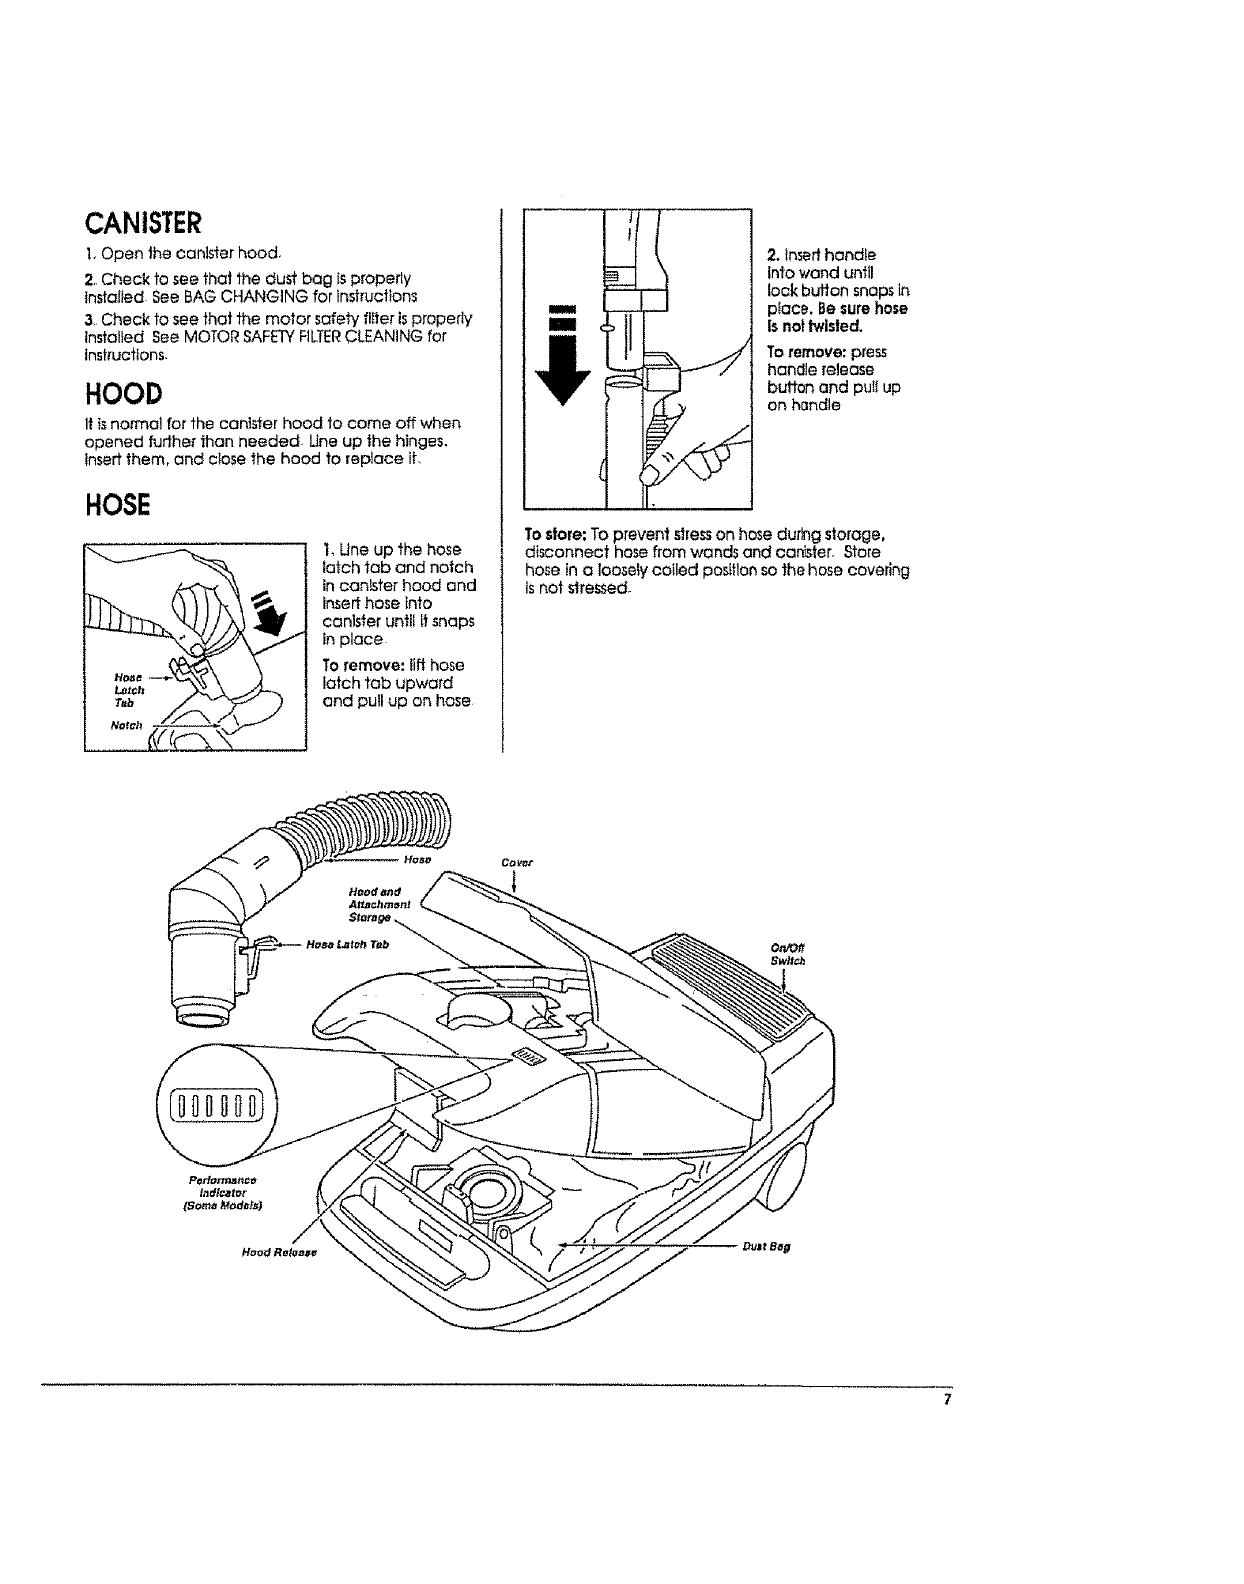
CANISTER
1. Open the caNster hood.
2. Check to see that the dust bag is properly
Installed- See BAG CHANGING for instructions
3Check to see that the motor safety flfter is properly
installed See MOTOR SAFETYFILTERCLEANING for
instructions.
HOOD
It is normal for the canister hood to come off when
opened fudher than needed. Une up the hinges.
insert them, and c_ose the hood to replace it.
HOSE
1, Une up the hose
latch tab and notch
in canister hood and
insert hose Into
canister until it snaps
in place
To remove: lift hose
latch tab upward
and pull up on hose
2. tmert handle
tnto _'and until
lock buflon snaps in
place. Be sure hose
Is nottwisted.
To remove: press
handle release
button and pul! up
on handle
To store: To prevent stre_son hose durhg storage,
disconnect hose from wands and canister. Store
hose in oloosely cotled position so the hose covering
Is not stressed_
Colr_r
DuJt Bag
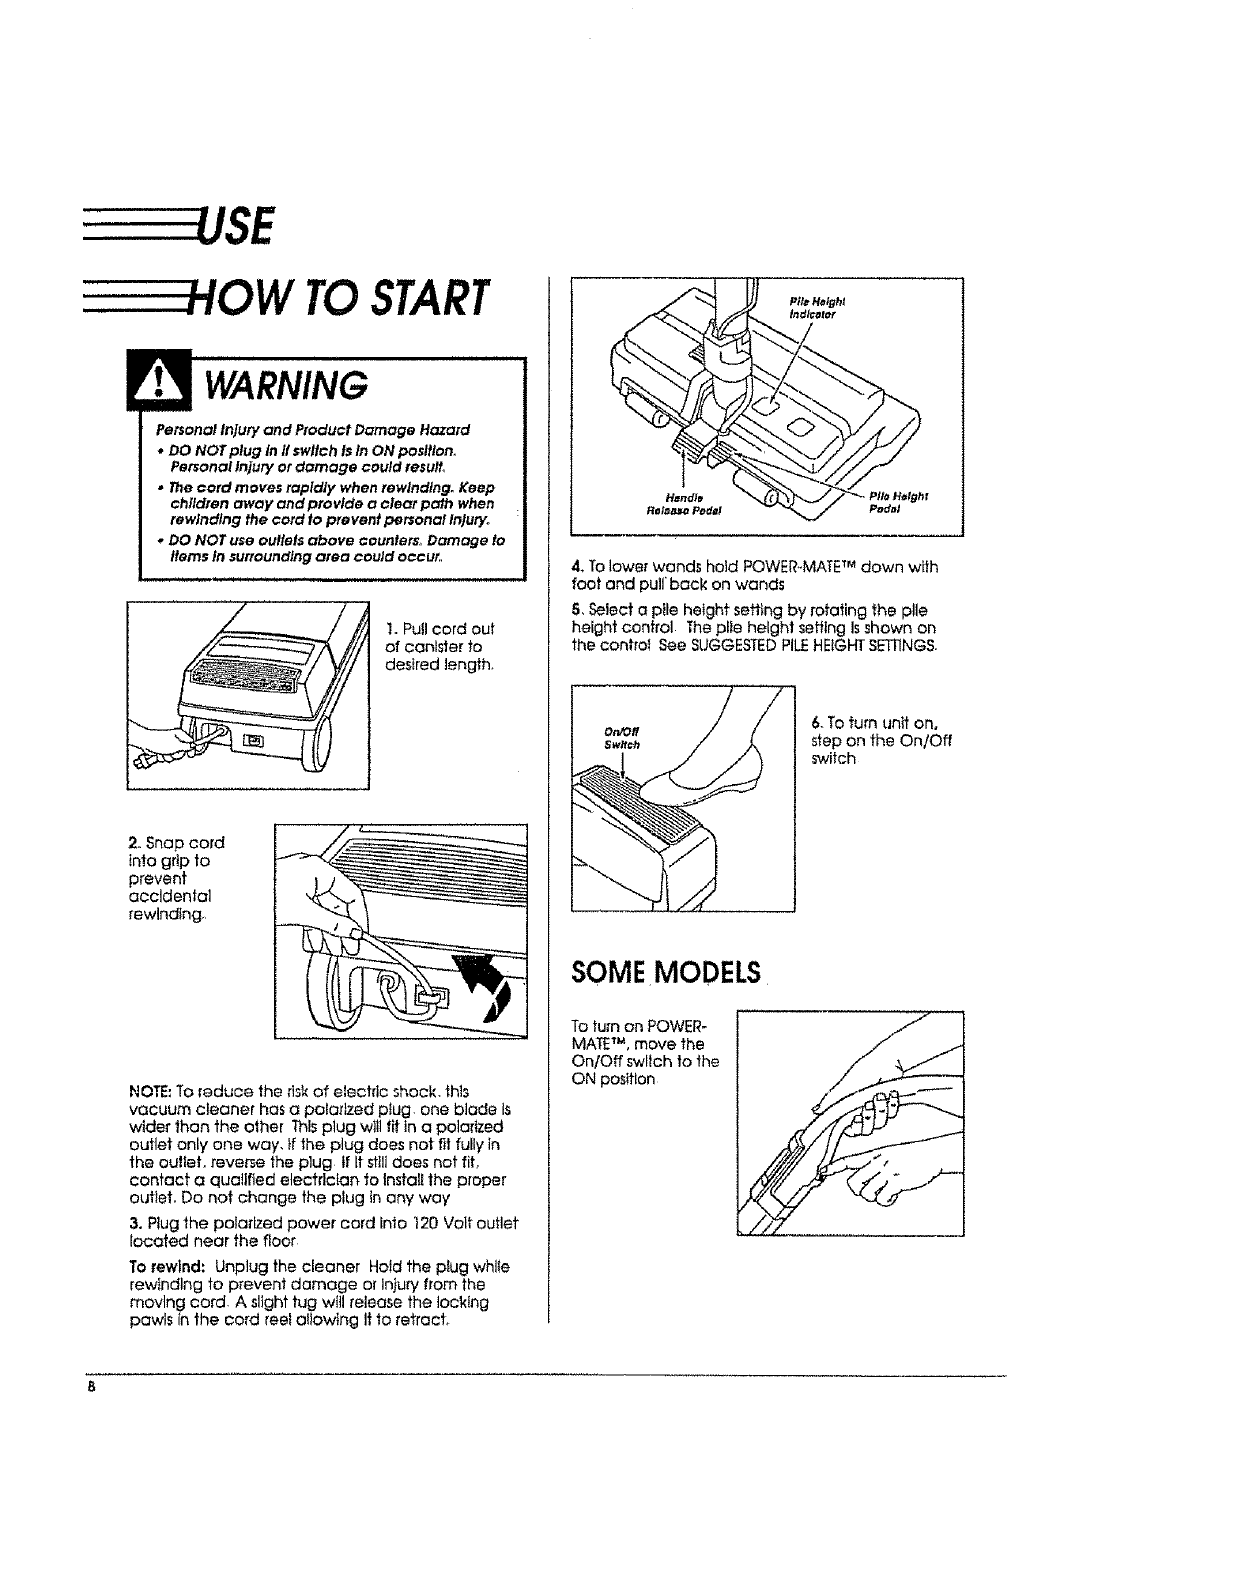
USE
HOW TOSTART
Personal Injury and Product Damage Hazard
* DO NOT plug in If swltch Is in ON position.
Personal lnjury or damage could resulL
* The cord moves rapldly when rewinding. Keep
children away and provlde a clear path when
rewinding the cord to prevent personal injury°
, DO NOT use ouflefsabove counters, Damage to
items In surrounding area could occur.,
I.Pu!l cord out
of canisterto
desired length,
2. Snap cord
intogripto
prevent
accidental
rewinding.
NOTE: To reduce the rlsk of electric shock, thls
vacuum c_eaner has a polarized ptug. one blade is
wider than the other This plug will fit in apolarized
outlet only one way, if the plug does not fit fully in
the oultet, reverse the plug tf it still does not fit,
contact a qualified electrician to Install the proper
outlet. Do not change the p_ug in any way
3. Plug the patarized power cord into 120 Volt outlet
located near the floor
To rewind: Unplug the cleaner Hotd the plug whlIe
rewinding to prevent damage or Injury from the
moving cord A slight tug will release the locking
pawls h the cord reel allowing It to retract,
4, To lower wands hotd POWER-MATE_Mdown with
foot and pull back on wands
5, Seiect a pile height setttng by rotating the pile
height control The pile height setting Isshown on
the control See SUGGESTED PILEHEIGHT SETRNGS.
6_To turn unit on,
step on the On/Off
switch
SOMEMODELS
To turn on POWER-
MATET_, move the
On/Off switch to the
ON position
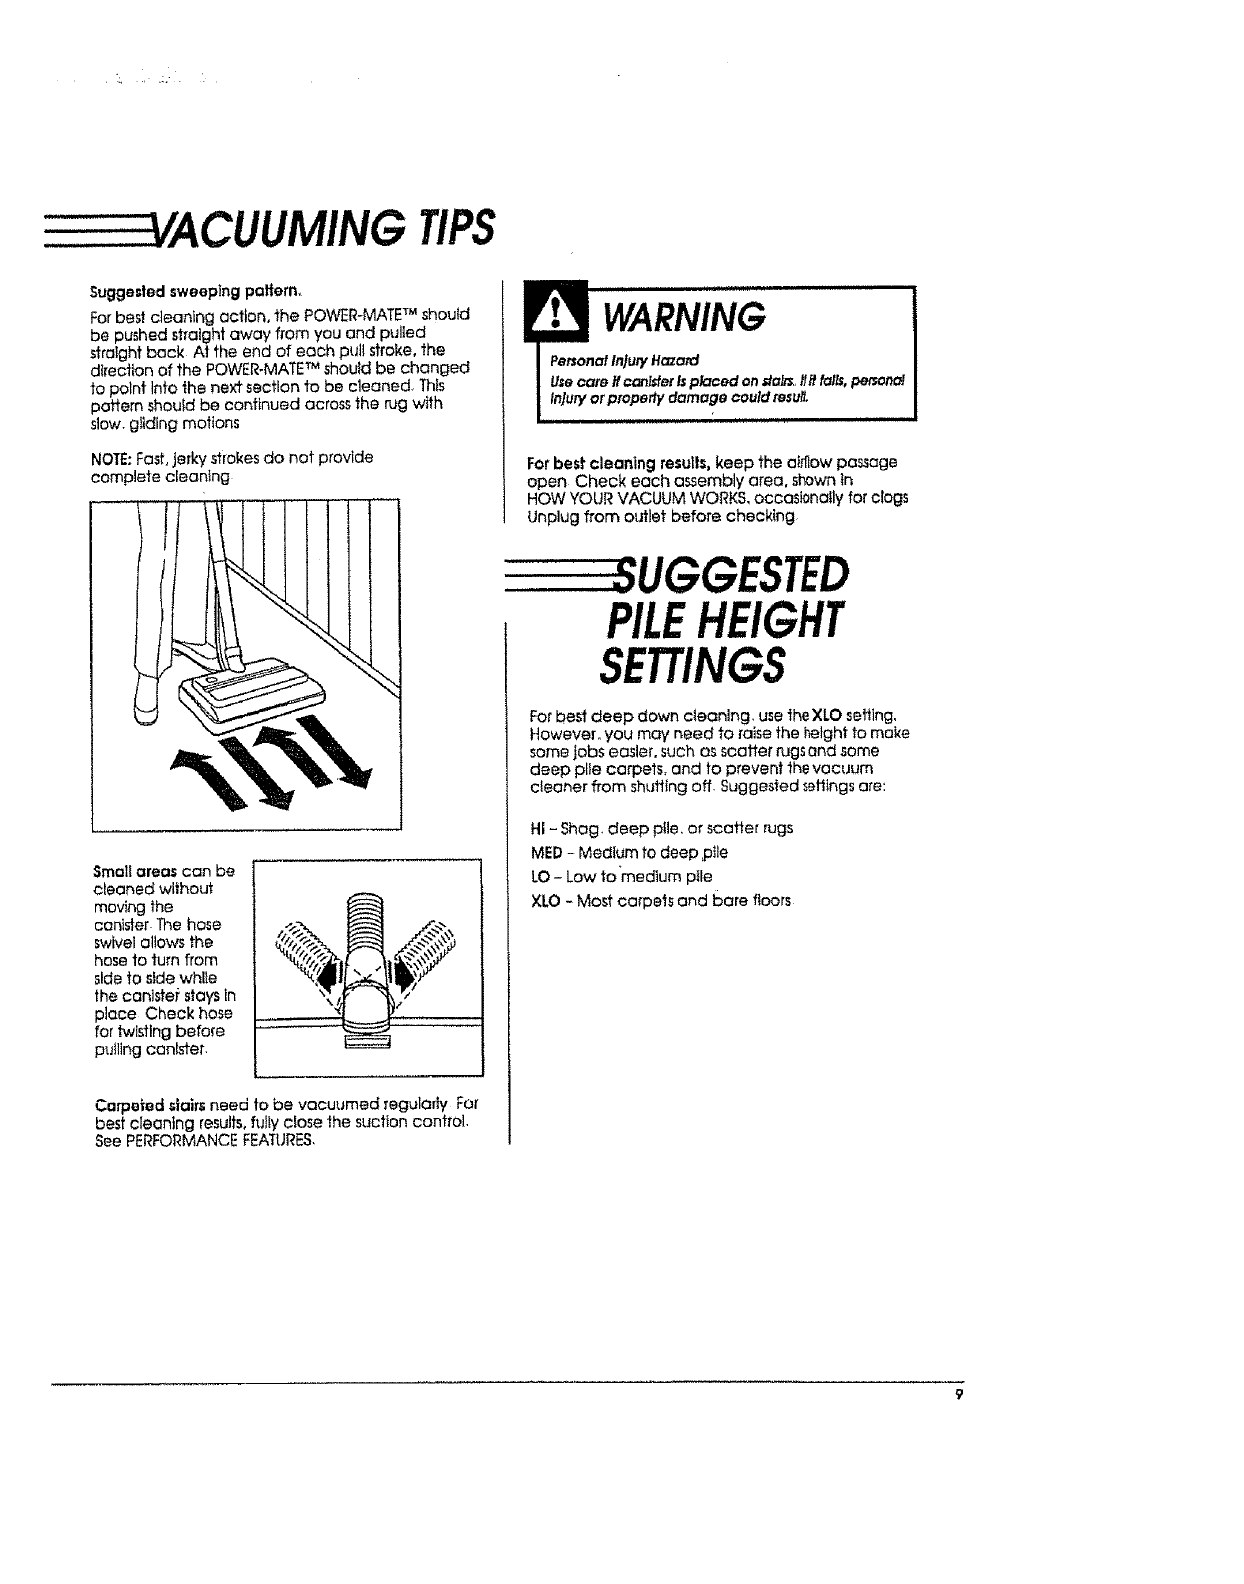
TIPS
Suggested sweeping paffern,
Forbest cleaningaction,the POWER-MATE TM should
be pushed straight away from you and pulled
straight back At the end of each pul! stroke, the
direct[on of the POWER-MATETM should be changed
to point Into the next section to be cleaned_ This
pattern should be continued across the rug with
slow. g}tding motions
NOTE: Fast, jerky strokes do not provide
camp]ere cleaning
Small areas can be
cleaned without
moving the
canister The hose
swivel allows the
hose to turn from
side to side while
the canlstet stays in
place Check hose
for twl_tlng before
pu_llng canister.
Carpeted stairs need to be vacuumed regularly For
best cleaning results, fuity close the suction control.
See PERFORMANCE FEATURES.
!, i lu ul ,,,,,, i,, ii i,
WARNING
PersonalInjuryHazard
Usecare ff canlder isplaced on stal_, flit lolls, personal
in}uryorproperty damage could tesu_f.
Forbestcleaningresu|Is,keep theaI_ow passage
open Check each assemblyarea,shownin
HOW YOUR VACUUM WORKS, occasi0nailyforclogs
Unplugfromoutletbeforechecking
UGGESTED
PILEHEIGHT
SETTINGS
For best deep down cleaning, use the XLO sefflng,
However. you may need to raise the height to make
some jobs easier, such as scatter rugsend some
deep pile carpets, and to prevent the vacuum
cteaner from shutting off. Suggested settings are:
HI - Shag, deep pile. or scatter rugs
MED -Medium to deep,pile
LO - Low to'medlum pile
XLO - Most carpets and bare floors
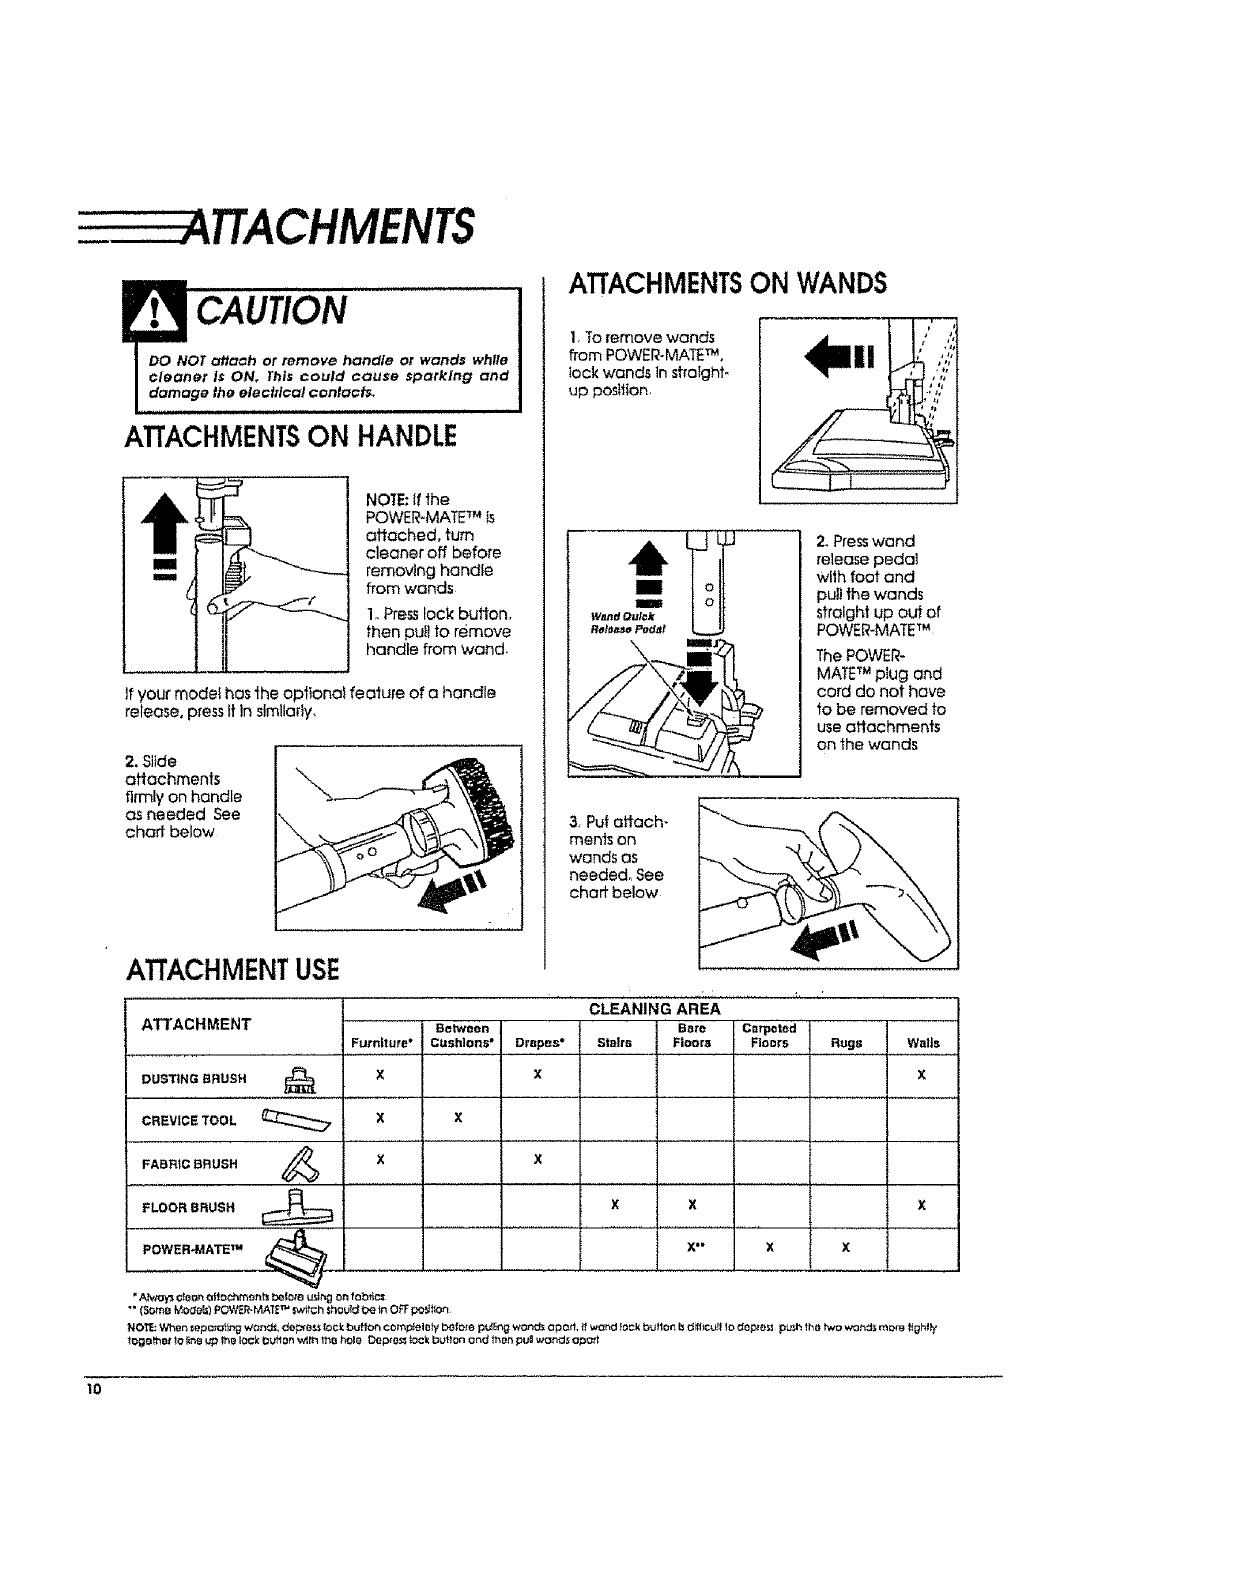
ATTACHMENTS
CAUTION
OT attach or remove handle or wands while
et Is ON, This could cause sparking and
ge the electrical contoct_
ATTACHMENTSON HANDLE
NOTE: If the
POWER-MATE TM is
attached, turn
cleaner off before
removing handle
from wands
1,.PresSfock button,
then pull to remove
handle from wand.
tf your modei has the optionai feature of a handle
release, press it in similarly,
2,Slide
affachments
firmly on handle
as needed See
chart below
ATTACHMENTSON WANDS
|
1, To remove wands |
from POWER-MATE TM,
i
lock wands in straight-
up position,
W_d Quick of
_t._, e_f POWER-MATETM
The POWER-
MATETM plug and
cord do not have
to be removed to
use attachments
on the wands
3, Putattach-
ments on
wands as
needed, See
chaff below
ATTACHMENTUSE
CLEANING AREA
A11ACHMENT Between Bsre Carpeted
Furniture* Cush]ons' Drspes* Stairs Floors Floors Rugs WstJs
DUSTING BRUSH _XXX
CREVICETOOL X X
FABRICBRUSH /_ X
BRUSH _ X X X
FLOOR
POWER.MATE_ _X" X X
* A_ayS c_ear_aHt:tchmort hbefore u_trtg on fab6cs
"' (SoffiB MocfeLt) POWeR-MAlETM _vftc h _houlc{be tn OFF po_flOr_
NO'i'_ When sepc_atlng wench, do_oss {OCkb_l_on comp_elo_ be fate pt_ng wc_ _,sopo_t, if wor, d tack button t_diffic_l to depte_ p_h ths two wond,_ more tfght_
_Dgt3thef _o _P,8 Up f_h{_loc_ button _frl I_8 hal8 Depto_ _ci( button on_ _h_r_ pt._ wands opot_
10
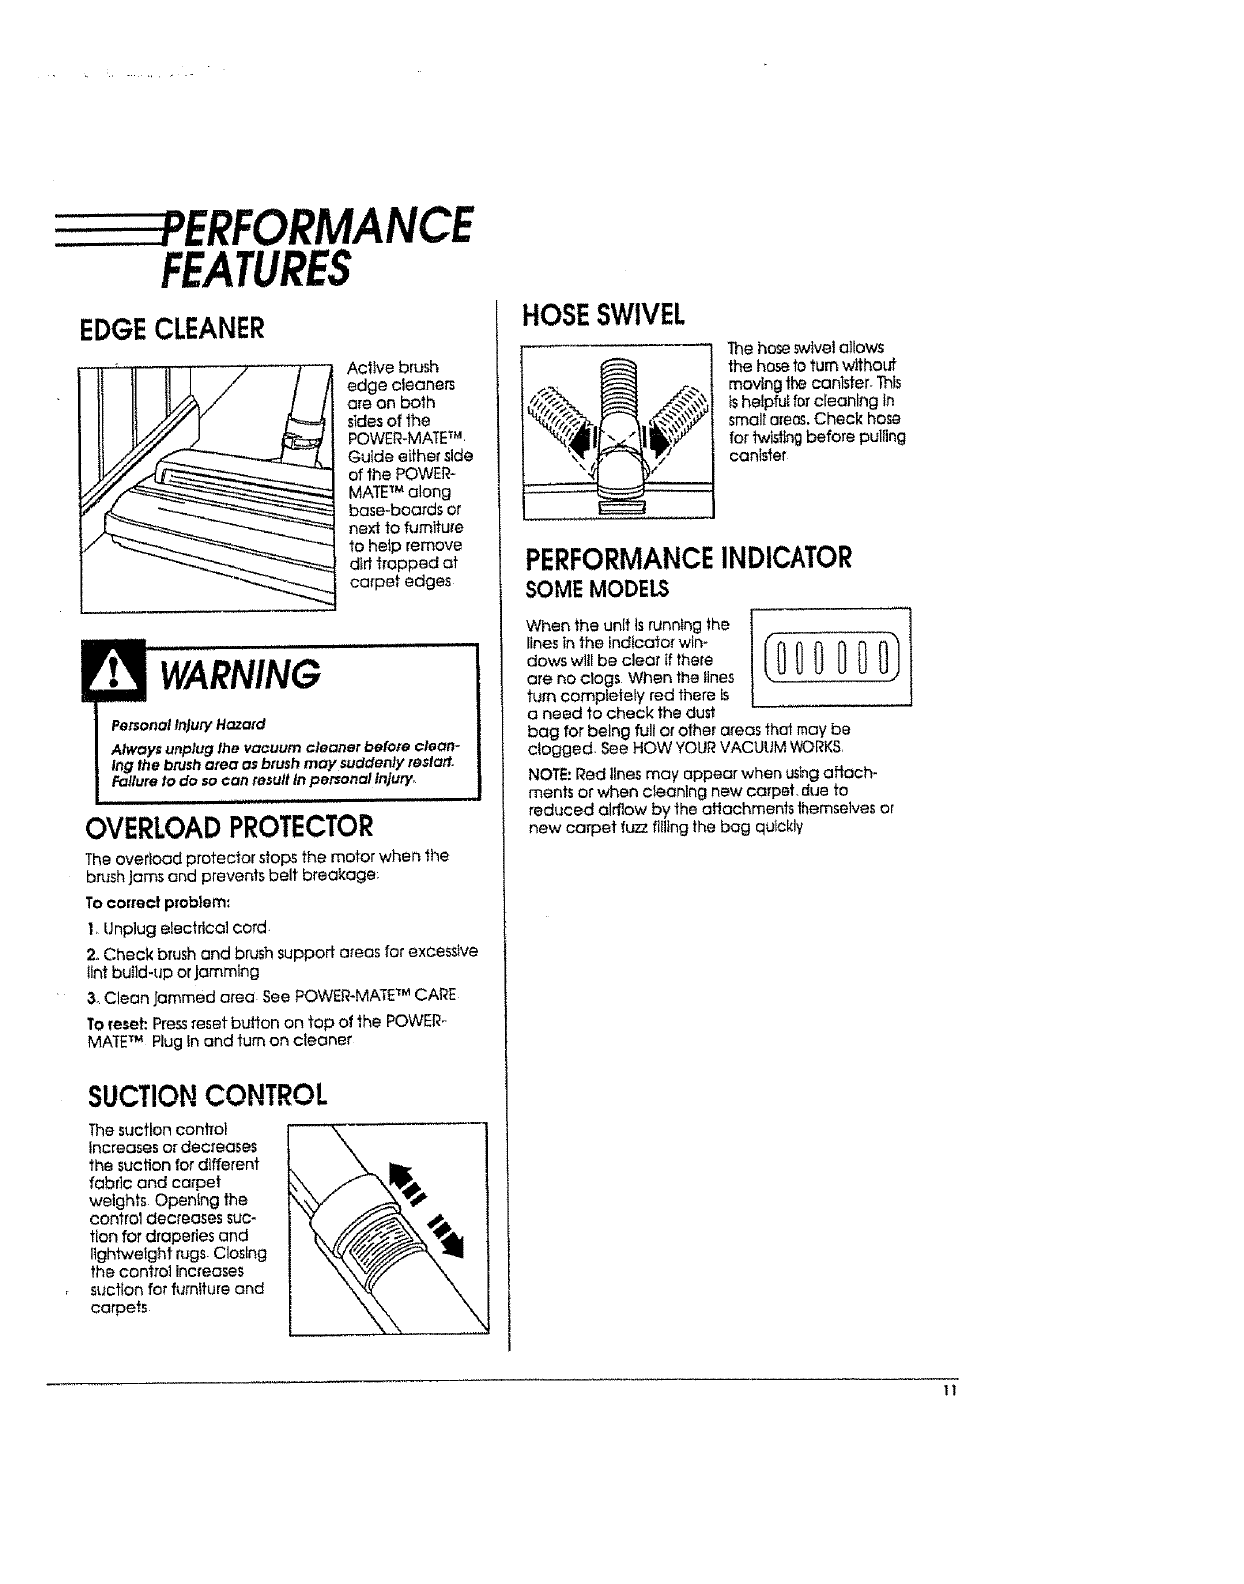
....PERFORMANCE
FEATURES
EDGECLEANER
Active brush
edge cleaners
are on both
stdes of the
POWEQ-MATETM
Guide either side
of the POWER-
MATETM along
base-boards or
next to furniture
to help remove
dirt trapped at
carpet edges
WARNING
Personal Injun/ Hazard
Always unplug the vacuum cleaner before clean-
Ing the brush area as brush may suddenly resla/t
Failure to do so can result In personal injuq/o
OVERLOADPROTECTOR
The overload protector stops the motor when the
brush Jams and prevents belt breakage_
To correct problem:
IUnplug electrical cord.
2. Check brush and brush support areas for excessive
tint build-up or Jamming
3, Clean Jammed area See POWER-MATE TM CARE
To reseE Press reset bulton on top of the POWER_
MATETM Plug in and turn an cleaner
SUCTIONCONTROL
The suction conhol
increases or decreases
the suction for different
fabric and carpet
weights Opentng the
control decreases suc-
tion for draperies end
lightweight n_gs Closing
the control increases
suction for furniture and
carpets
1
HOSESWIVEL
The hose sv_lve] allows
the hose Ioturn wlthot#
moving the canister. This
ishelpful for cleaning in
small arec& Check hose
for twisting before pulling
canister
PERFORMANCEINDICATOR
SOME MODELS
When the unit Is running the [[_
lines in the indicator win-
dowswlllbecleartfthere 0 0 0 0
are no clogs When the lines
turn completely red there Is
a need to check the dust
bag for being full or other areas thai may be
clogged. See HOW YOUR VACUUM WORKS,
NOTE: Red lines may appear when using attach-
ments or when cleaning new carpet, due to
reduced alrtlow by the altachments themselves or
new caret fuzz tilling the bag quickly
I1
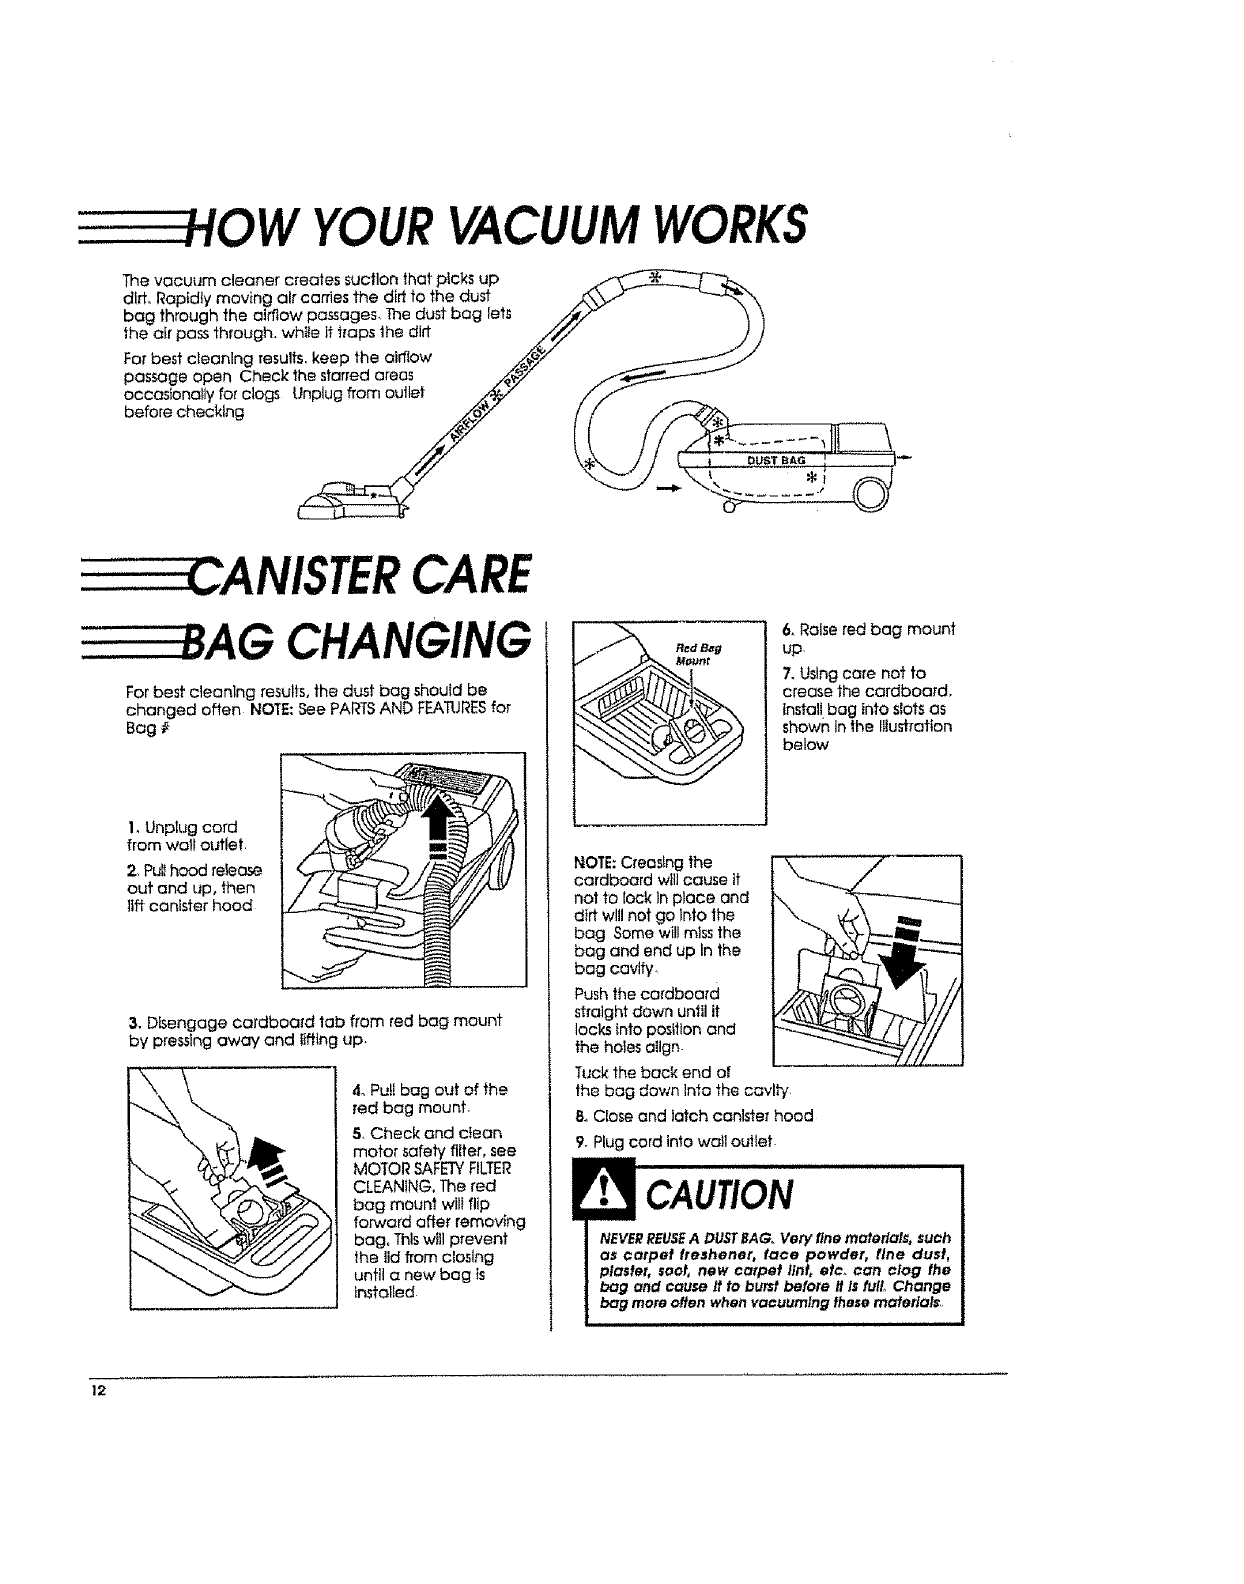
HOW YOURVACUUMWORKS
The vacuum cleaner creates suction that picks up
dlrL Roptdty moving air carries the dirt to the dust
bag through the airflow passages, The dust bog lets
the air pass through, while It traps the dirt
Far best cleaning results, keep the airflow
passage open Check the starred areas
occasionally for clogs Unplug from outlet
before checking
CARE
CHANGING
For best cleaning results, the dust bag should be
changed often NOTE: See PARTSAND FEATURESfor
Bag #
1, Unplug cord
from wall outlet
2, Pullhood release
out and up, then
llft canister hood
\
3. Disengage cardboard tab from red bag mount
by pressing away and iiffing up.
4. Pull bag out of the
red bag mount,
5, Check and cIean
motor safety fitter, see
MOTOR SAFETYFILTER
CLEANING. The red
bag mount wlli flip
forward affei" removing
bag. This will prevent
the lid from closing
until a new bag is
installed
6,Raise red bag mount
up.
7oUsing care not to
crease the cardboard.
install bag into slots as
shown in the Illustration
below
NOTE: Creasing the
cardboard wlil cause it
not to lock In place and
dirt will not go Into the
bag Some will miss the
bag and end up in the
bag cavity
Push the cardboard
straight down until it
locks into position and
the holes align
Tuck the back end of
the bag down Into the cavlt'y
& Close and latch canister hood
9. Plug cord into wail outlet.
I c.,,urloN
NEVERREUSEA DUSTBAG,.Very tlne materials, such
as carpet treshener, face powder, tlne dust,
plaster, soot, new carpet llnt, etc_ can clog the
bag and cause it to burst before It Is full. Change
bag more often when vacuuming these materials.
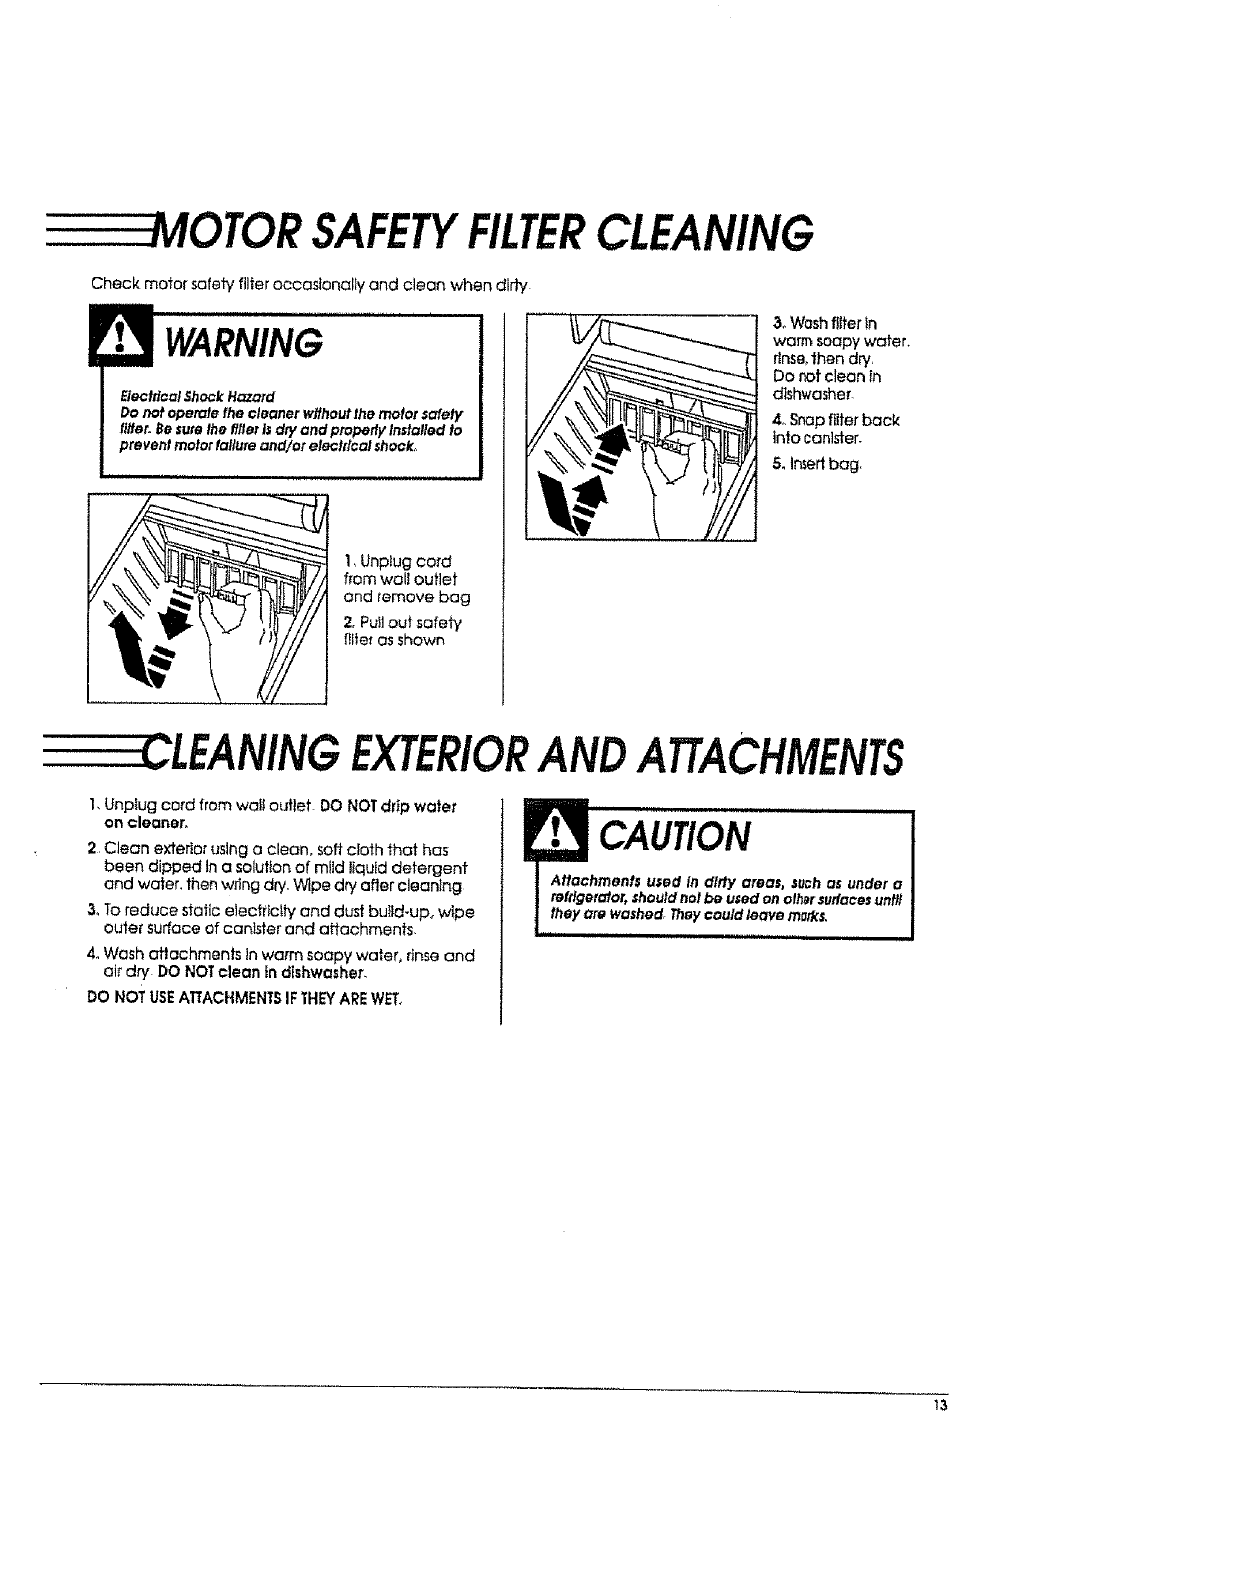
MOTORSAFETYFILTERCLEANING
Check motor safety filter occasionally and clean when dirty
WARNING
1, Unplug cord
from wall outlet
and remove bag
2, Pull out safety
fllier as shown
3, Wash filter in
warm soapy water.
rinse,then dry,
Do notcleon in
dishwasher.
4,, Snap filter back
Into canister.
5. Insedbag,
LEANINGEXTERIORANDATTACHMENTS
1,Unplug cord from walloutletDO NOT dripwater
on cleaner,
2Clean exterior using a clean, soft cloth that has
been dipped tn a solution of mild liquid detergent
and water, then w_ing dq/. Wipe d_/after cleanlng
3. To reduce static elecftlctly and dust btJtld-up_ wipe
outer surface of canister and attachments,
4. Wash aflachments tn warm soapy water, rinse and
air dry DO NOT clean in dishwasher,
DO NOT USEAITACHMENTS IF THEYARE WET.
.CAUTiON.............. I
|Attachments u_ed In dirty areas, such as under a
Ireftlgerator,shouldnotbeusedonofh_rsuffacesuntll
Ithey are washed Theycould leave marks,
l,ml,, ,,N i
_3
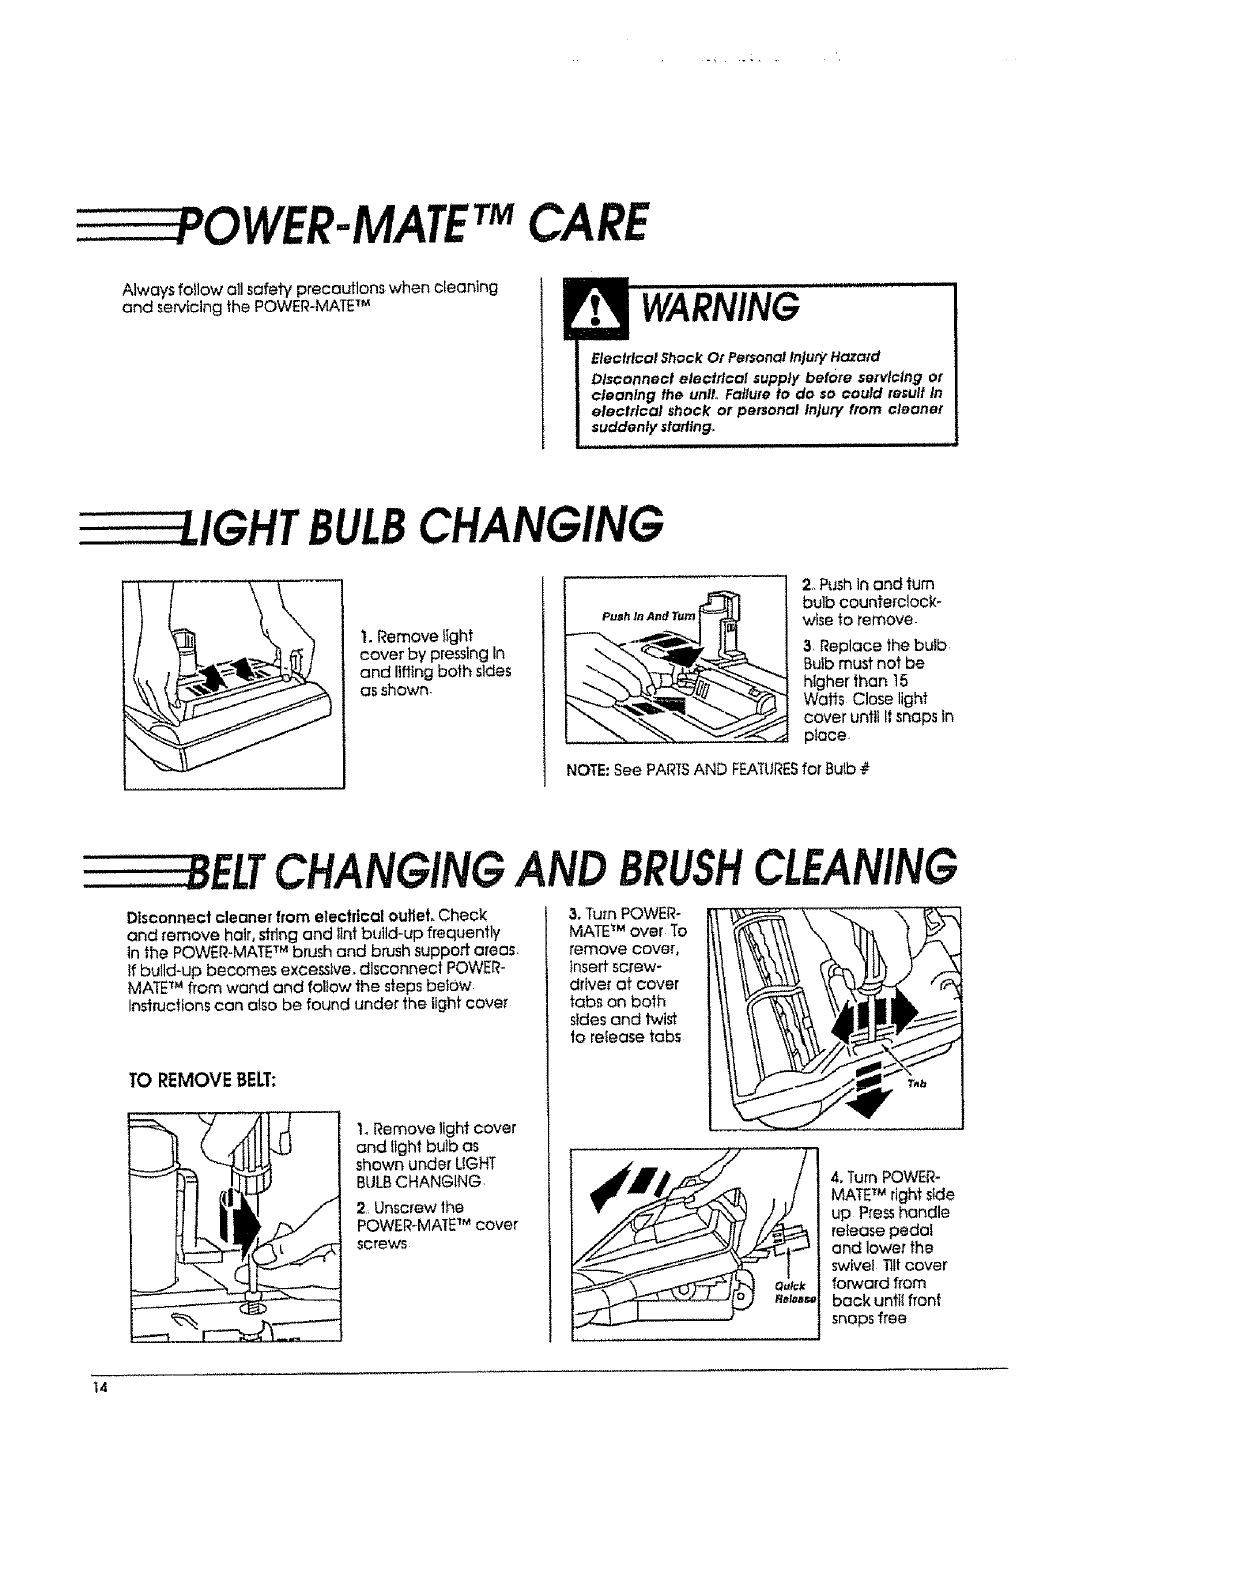
"YOWER-MATE TMCARE
Always fotlow all safety precautions when cleaning
and serv_cing the POWER-MATE TM !rtJ WARNING
Electrical Shock Or Personal Injury Hazard
Disconnect electrical supply before servicing or
cleaning the unlt., Failure to do so could result In
electrical shock or personal injury from cleaner
suddenly starting..
J_u- t
BULBCHANGING
I.Remove }Ight
cover by pressingIn
and lifting both sides
as shown.
2, Push in and turn
bulb counterclock-
wise to remove
3Replace the bulb
Buib must not be
higher than 15
Watts Close light
cover unttl It snaps In
place
NOTE: See PARTSAND FEATURESfor Butb #
ELTCHANGINGAND BRUSHCLEANING
Disconnect cleaner from electrical outlet, Check
and remove hair, string and lint build-up frequently
In the POWER-MATE TM brush and brush support areas,
if build-up becomes excessive, disconnect POWER-
MATE TM from wand and follow the steps beIow
Instructions can also be found under the light cover
TO REMOVEBELT:
LRemove fight cover
and Ilght bulb as
shown under LIGHT
BULBCHANGING
2,Unscrew the
POWER-MAE TM cover
screws
3.Turn POWER-
MATE TM over To
remove cover,
_nsertscrew-
driver at cover
tabs on both
sides and twist
to release tabs
4, Turn POWER-
MATETM right side
up Press handle
release pedat
and lower the
swivel lilt cover
forward from
back until front
snaps free
14
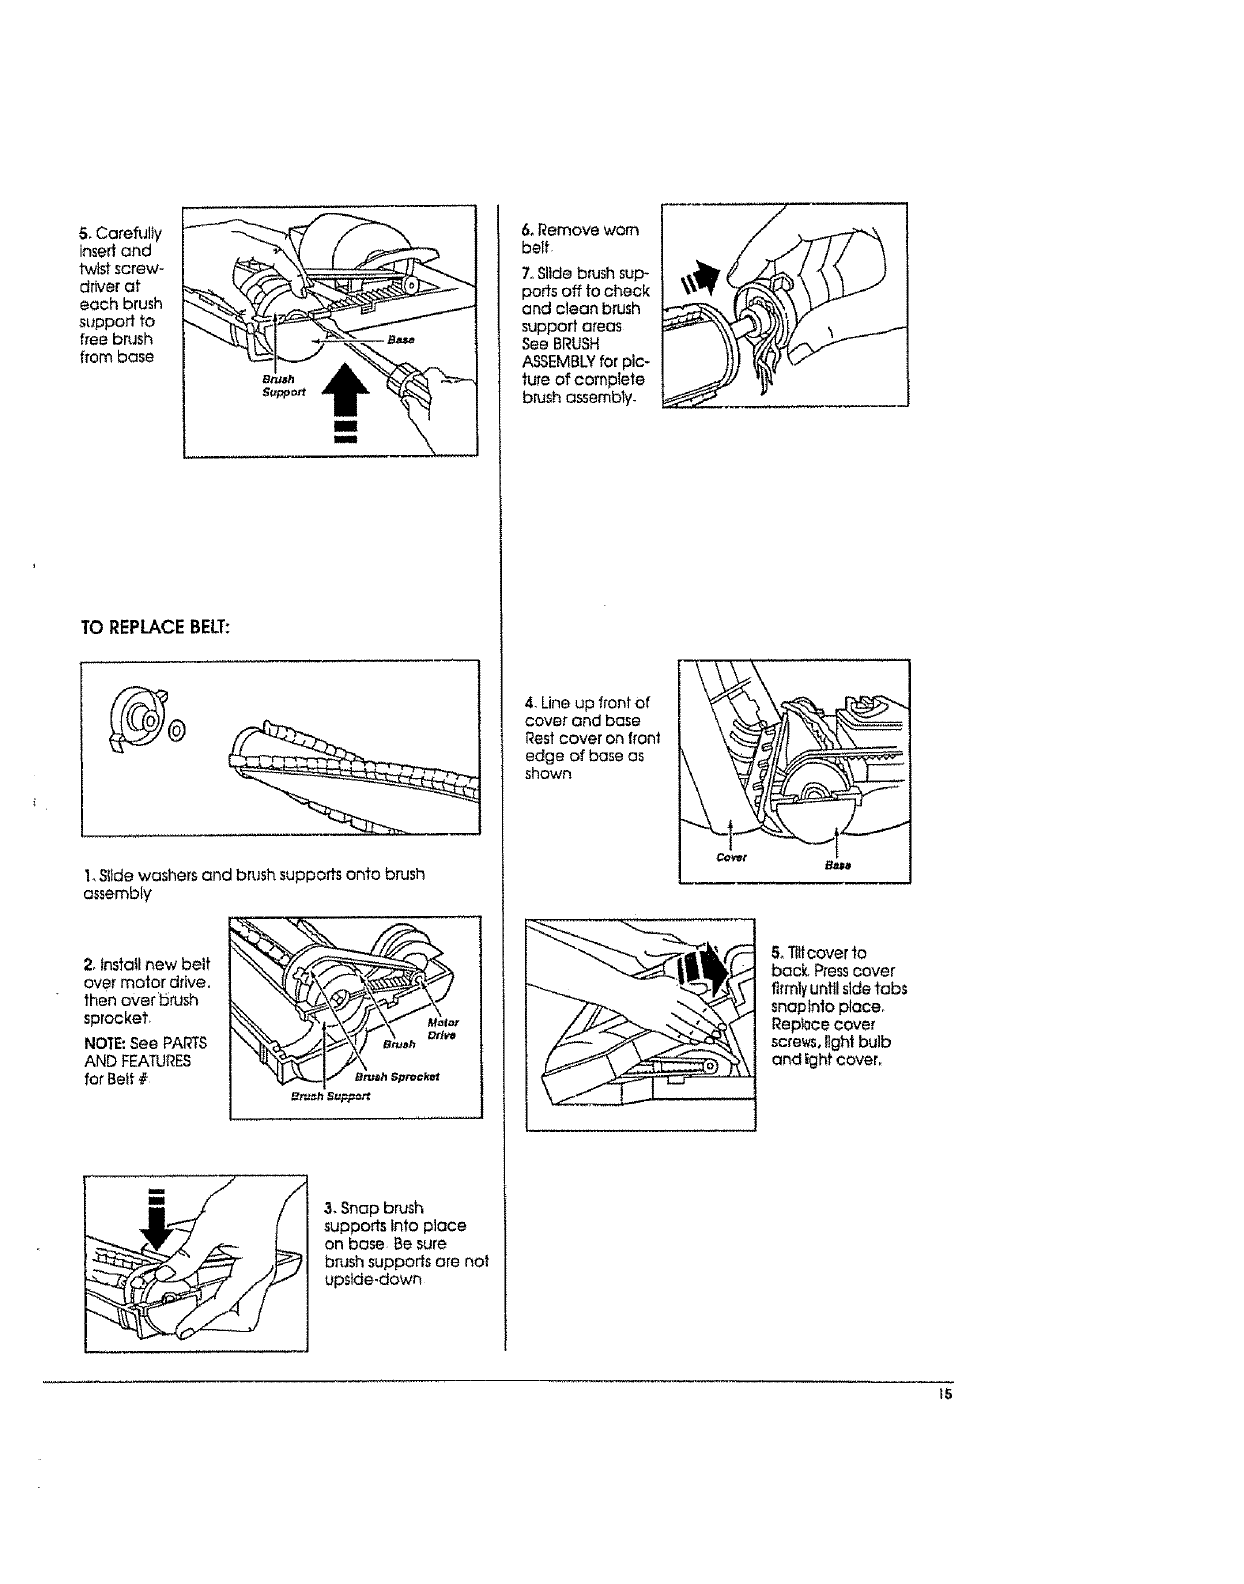
5, Carefully
insert and
twist screw-
driver at
each brush
support to
free brush
from base
TO REPLACEBELT:
1, Sitde washers and brush supports onto brush
assembly
2, install new belt
over motor drive.
then over brush
sprocket,
NOTE: See PARTS
AND FEATURES
for Belt # Bt'J_h Sprocket
_r_==h SuFr_rf
& Snap brush
supports into place
on base Be sure
brush supports are not
upside-down
6, Remove won
belt.
7. Slide brush sup-
ports off to check
and clean brush
support areas
See BRUSH
ASSEMBLY for pic-
ture of complete
brush assembly_
4, Line up front of
cove_ and base
Rest cover on front
edge of base as
shown
& 1"titcoverto
back, Presscover
firmlyuntil stdetabs
snaplnto place,
Rep_0cecover
screws,light bulb
and fghfcover.
15

SERVICING
WARNING
Electrical Shock Or Personal Injury Hazard
Dlsconnecl electrical supply before servicing or
¢leanlng the unit. Failure to do so can result In
electrical shock or personal Injury from cleaner
suddenly starling.
TO CHECKBRUSH:
When brushes
are wofn to the
level of the base
support bars,
replace the
brushes.
TO REPLACE BRUSH:
1. Remove POWER-MATE TM cover, belt and brush
assembly. See "To remove bell" in BELTCHANGING
AND BRUSHCLEANING.
2. Remove brush supports, washers, screws, end
brush, brush sprocket pieces from ends of brush
assembly
3. Push out worn
brushes. If the
beater bar is
chipped or
gouged.
replace It
4. Slide new
beater bar and
brushes Into
sfots
NOTE: New
brushes and
beater bar may
be easier to
fnstatl ff they are
soaked In warm
water for a few
minutes. D_
thoroughly
before installing
5. Reassemble brush assembly. To line up screw holes
in dowel, sprocket and end brush, be sure beater bar
porlion of end brush lines up with beater bar on
brush dowel
6oReplace belt, brush assembly, POWER-MATE TM
cover, light bulb and light cover, See "To replace
belt" In BELTCHANGING AND BRUSHCLEANING
ASSEMBLY
16
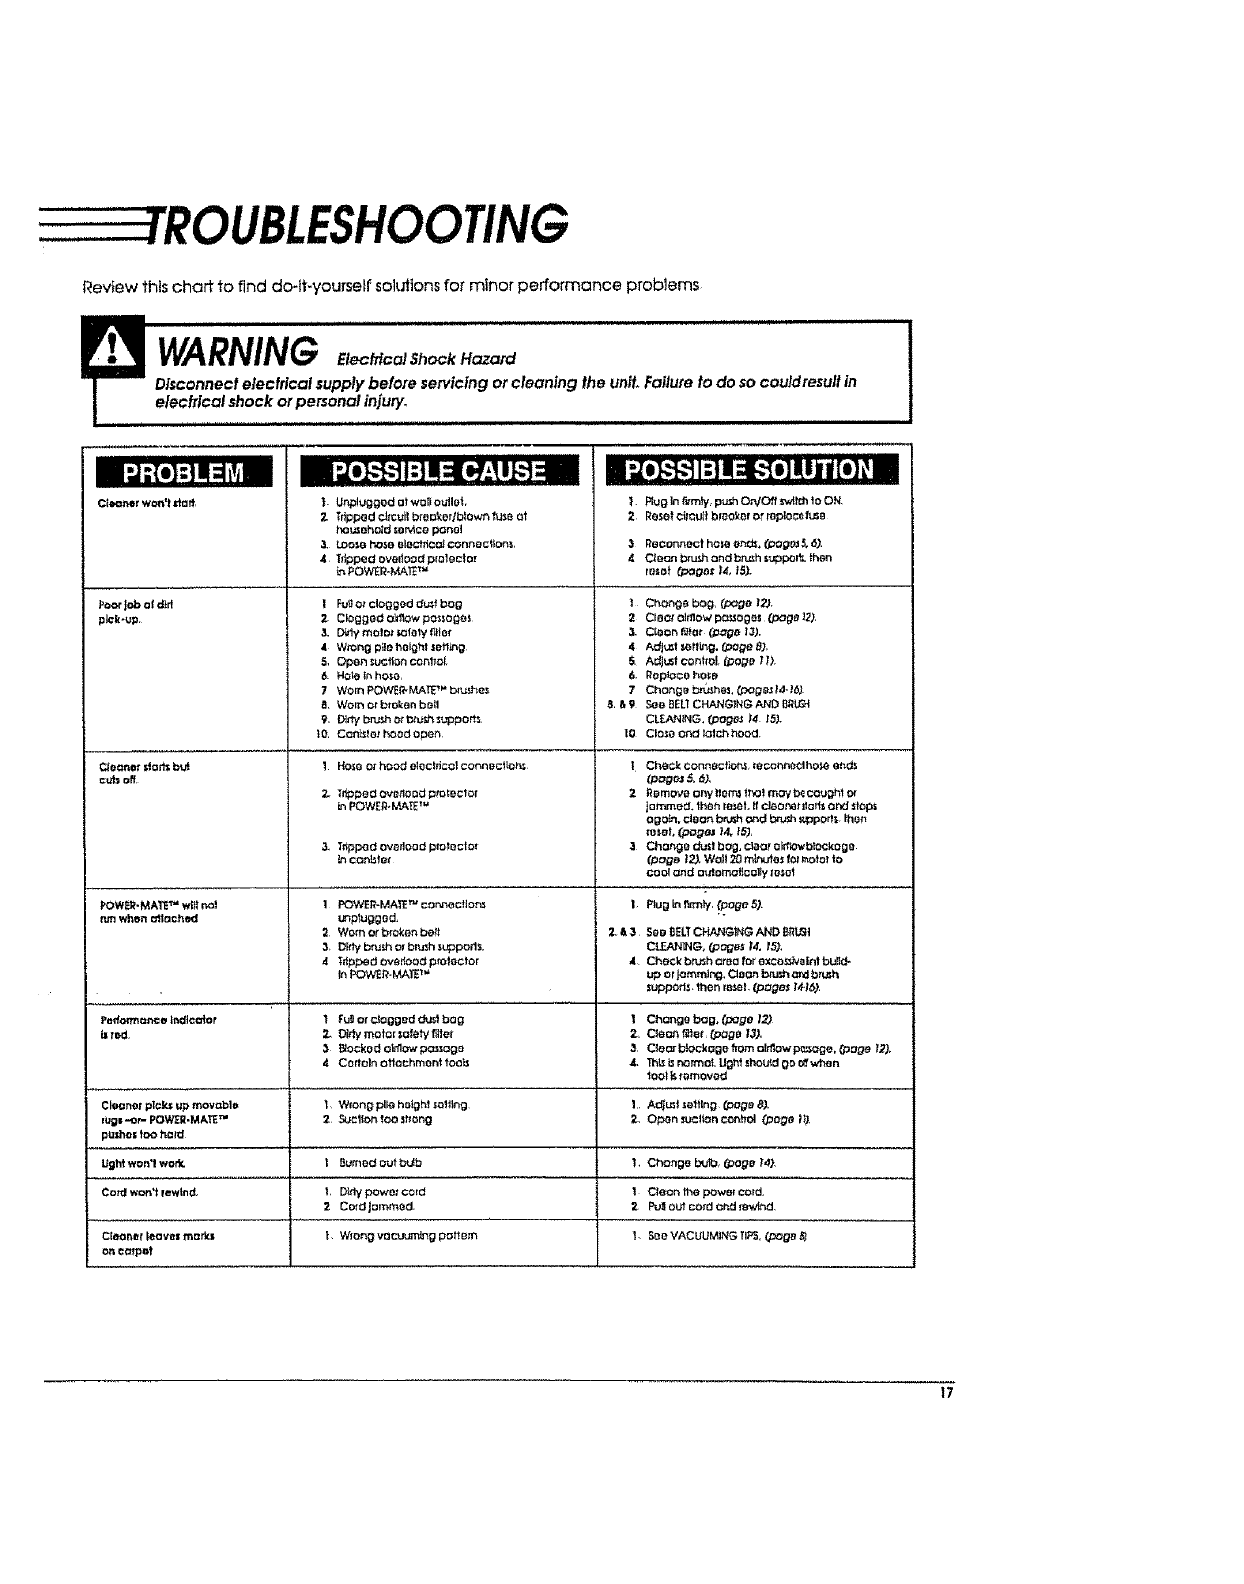
ROUBLESHOOTING
Review this chart to find do-it-yourself sek/ttens for miner performance prob]ems
ii ii ,,,,,, ,,,,, ,,,, ,,,,,,,,,,,,,,, ,u, ,,,, ,u,,,,,
WARNING
Disconnect electrical supply before servicing or cleaning the uniL Failure to do so couldresult in
electrical shock or personal injutyo
PoorJob ol diff
plck-up
Oo(_nor do_ bu_
cutsoff
POW_-MAT_ +r" willnoJ
PJnwhen alia°heal
Pedorrnan¢o Indlccdor
i=red
Cleaner plo_ Up movable
eUgl -Or- POWER.MATETM
pUdlol _oOh_lld
Ught won'l wo_
2
t. U_iugged at wo_to_let.
2- Tdpped dtcuLt b_eeker/blowr_ _dse ot
_eh_d seMce _nol
3. LOo_ hose elect_ol connectton_,
4T_jpped ovedood plole_ter
h Pew_R*MAR TM
I F_ O_clogged du_.fbog 1
ZOogged o]rnow pos_oges 2
3. D_dymoto_ mfety flffer 3.
4 Wrong p_lehe,hi seflL_g 4
5, Open r;ucflon con_oL S
6. HO_a Inhose, 6.
7worn POWE_ MA_'* b_he_ 7
8 Wor_orbtokenbell _&9
9 D_rtybru_ et _ su_por_
t0 Cot@;lerhood open 1O
1HO_O Ot hood oleChlColconn_c_lon_ I
t_opec_ovetloe_p_lector 2
POW_MA_ TM
& T_'_pp_d ov_doo dpm_e clo_
ineonL_er
I POWEF_-MA_ _conne cfl on_ !
unplugged,
2Wo_otbrok_t_be# 2. &3
3, OIfly _4_ _ brush _poMs.
4Tdpped over_oecl ptoloctor 4
In POW_-MA_ TM
I ru_ or C_ogged dust bag 1
2, D_r_/motorsole_ f_or 2,
3_ocked a_ p_age 3
4Cor_o_ offachmont too_ 4,
W_e_g p_Io h_lOht sol]_ng 1,
Eu:llontoo _l_ong 2.
t_rnod out b_b l,
t, D'.,Iy power co_d I
2 Co_d jammed, 2
|W_ong vacuuming payee ]
2Rese_cecu]_ bleoke_ o_mp_oc_ fuss
3 I_ecormect ho=a e_=, G)egre& 6).
40eon b_L_h end brushs_ppoP_ then
re=of (poges _4_iS).
Chonge bog, (page 12.j,
Cleat olnlow po4Joges (page 12),
Cteon _er (p_ge 13).
Adlu_t_#Ing. _oge S),
AdjustCOn_elr _eg_ 11}.
_p_=e here
s_o SELlCHANGING AND B_
CLEANING. (poge_ _4 15).
Clo;e end _tc_ hoo_,
CheCk connecfior_,:econn#e_ho_ en_
_po# e,_& 6),
£emeve ony IIer_lholmay _ ceugh_ or
jerome& the_ reef, # rJeoner _a_ end stops
ogo_n, clean b_sh o_d b_u_ _pport_,lhen
m_el, (poges 14_tS],
Cho_e duslbog, _aor o_owbloekoge
(_t_gm _2).Wall 20 m_os f_ motet to
COOl end ot_ornailco_yloser
Plug _r_rn_y,_oge 57.
SoeB_LTCHANG_G AND _'/b_I
CLF_,,NING, _es 14. 15).
Chock b_,'_h _tea for excor_,,_v0_nl buR:b
up or jamming, Oeon _ _ b_._h
=uppeds. tt_n reset. _ogers _4,16).
Change bog, (page 123
Clea_ f_let (page 13).
Clear blockage f_em olrflow _ge, (page 12).
TnL__snon'not,_ght sho_d go _ when
Ioo1I_removed
AC_L_I:e_lng (poge 8).
Open _ueI_onconhol (poge H,_,
Chonge bu_o, (page t4),
CIeo_ the pOWm _Otd.
Pu_ out cord ond rewind,
Co_d won't lewtnd,
Cleaner leavel marks
on carpet
17
8HAR8
SEARS, ROEBUCK AND CO., HOFFMAN ESTATES, IL 60179 U.S.A.
PARTNO. C_IZAEXI_U_-437_61
Printed in U_SoA_

8E_S
Aspiradora
MANUAL DELPROPIETARIO
LEA ESTE MANUAL para enterarse de instrucciones importantes
acerca de la segurldad, armado y funcionamlento.
Cg IZAEX1_llgg-437gg61

DECONTENIDO
GAItANT{A .........................2
SERVIClO ............ 2
INSTRUCClONESIMPORTANTES DE
SEGURIDAD 3
PIEZASY CARACTER{STICAS 4-5
ARMADO 6-7
USO ..... 8
Pare comemar .8
Sugerenc_os pare aspirer .... 9
SugerencIas sabre el aJuste de nfvel de pelo
de ]aalfombra ....................... 9
Accesodos ..................... I0
Use de los accesorios ........... 10
Caracteristlcasde rendlmiento ........ 11
FUNCIONAMIENTO DE SU ASPIRADORA 12
CUIDADO DELRECEPT/_.CULO t2
Camblo de la boise .... t2
Limpleza del fliffo de segurldad del motor 13
Umpleza del exterior y de los accesados 13
CUIDADO DE LAPOWER-MATETM t4
Camblo de la bambltla ....... M
Camblo de ta correa y limpieza del cepilto 14-15
Cuidado de[ ceptllo ................ 15
Ensemble del cepll!o............ 16
RECONOClMIENTO DE PROBLEMAS 17
IEl arrnado ¥ useseguro de su asp{{adora son su tespensabilldad. E#a aspltadota ha sldo diserlada exclusivamente I
pare usa dom{_sflco,La aspltadora debet_ atmacenarse on un lugar seco y on el Inteflet_ lea este Manual del
ptopietario dotenidamente, pues confiene intonnocl6n {mportanfe sabre seguridad y use,
U,Ul i,i . HI iHllU
SERVICIO
ASPIRADORAKENMORE
GARANTIACOMPLETA
FORUN ANO
Mien#as su use _eUmttea fines dom6stlcos particulates, sl
e#a aspiradora folio den#o de un perfodo de un ar_o a
partir de ]a fecha de compra, par razanes de defectos
en materlotes omane de obra, DEVU_LVALA AL CEN-
TRe O DEPARTAMENTODE SERVICIODE SEARSM,_SCER-
CANe y Sears1oreparar6sinnlngencargo
En el case de que esta aspiradora sea utllizada con
fines cornerctdes o pare afrendamtenfo, ia anterior-
monte cttada garanffa de cobeffura set6 v6Hda 6nlca-
mente par un per[ode de 90 dies a parttr de la fecha de
cornpra
Estagarantia {e cenfiere derechos tegales especiftcos y
adem6s puede qua tenga arras derechos que dlfleren
en#e e#ados
SEARS,ROEBUCKAND CO,, D/817 WA,
HolfmanEstates,IL60179
SI neceslta serviclo o piezas, visite el Centre de ser-
vicio de Sears m6s cefaano o el Departamento de
serv[cio ubfcado en la mayorfa de los ttendos Sears
Dtcha departamento solucionar6 su problema y le
faciiltar6 cualquler repuesto necesarlo. Cualquter
serviclo requerido adem6s de [as que se descrlben
en este Manua! dei proptetarto deber6 set reat_zado
per un representante de servlc]o autodzado per
Sears
C6mo pedir repuestos:
Cucr_do so_cffe se_do o plda repue_os, tenga dtsponib{e
la slguiente {nformacl6n:
LNQmero de modelo y nOmero de _edede la asp_radoro
de recept6culo.
2NG_lerode mode{o y _erO de setlede la POWEQ'MATE_
3OescrlpcI6n del problema
4, NOmero de la pleza
5. Nombre de la pIeza.
6Ubtcac{6n de la pIeza (aspl[Gdora de mcept6culo
e POWER-MATETM )
Para hablar en Ingle.s:
Uame gratis para solicitor serviclo al: (t_S00-4-REPAfR)
(1-800-473-7247)
Uame gratis pare solicitor piezas al: (1-800-FeN-PART)
(1-800-366-7278)
Pare hablat en espa_ol:
Uame gratis pare sollcttar servtc_o al; (1-800-626.5811)
Uame gratis pare seIlcitar ptezas or: (t-880-659-7084)
INSTRUCCIONESIMPORTANTESDESEGURIDAD
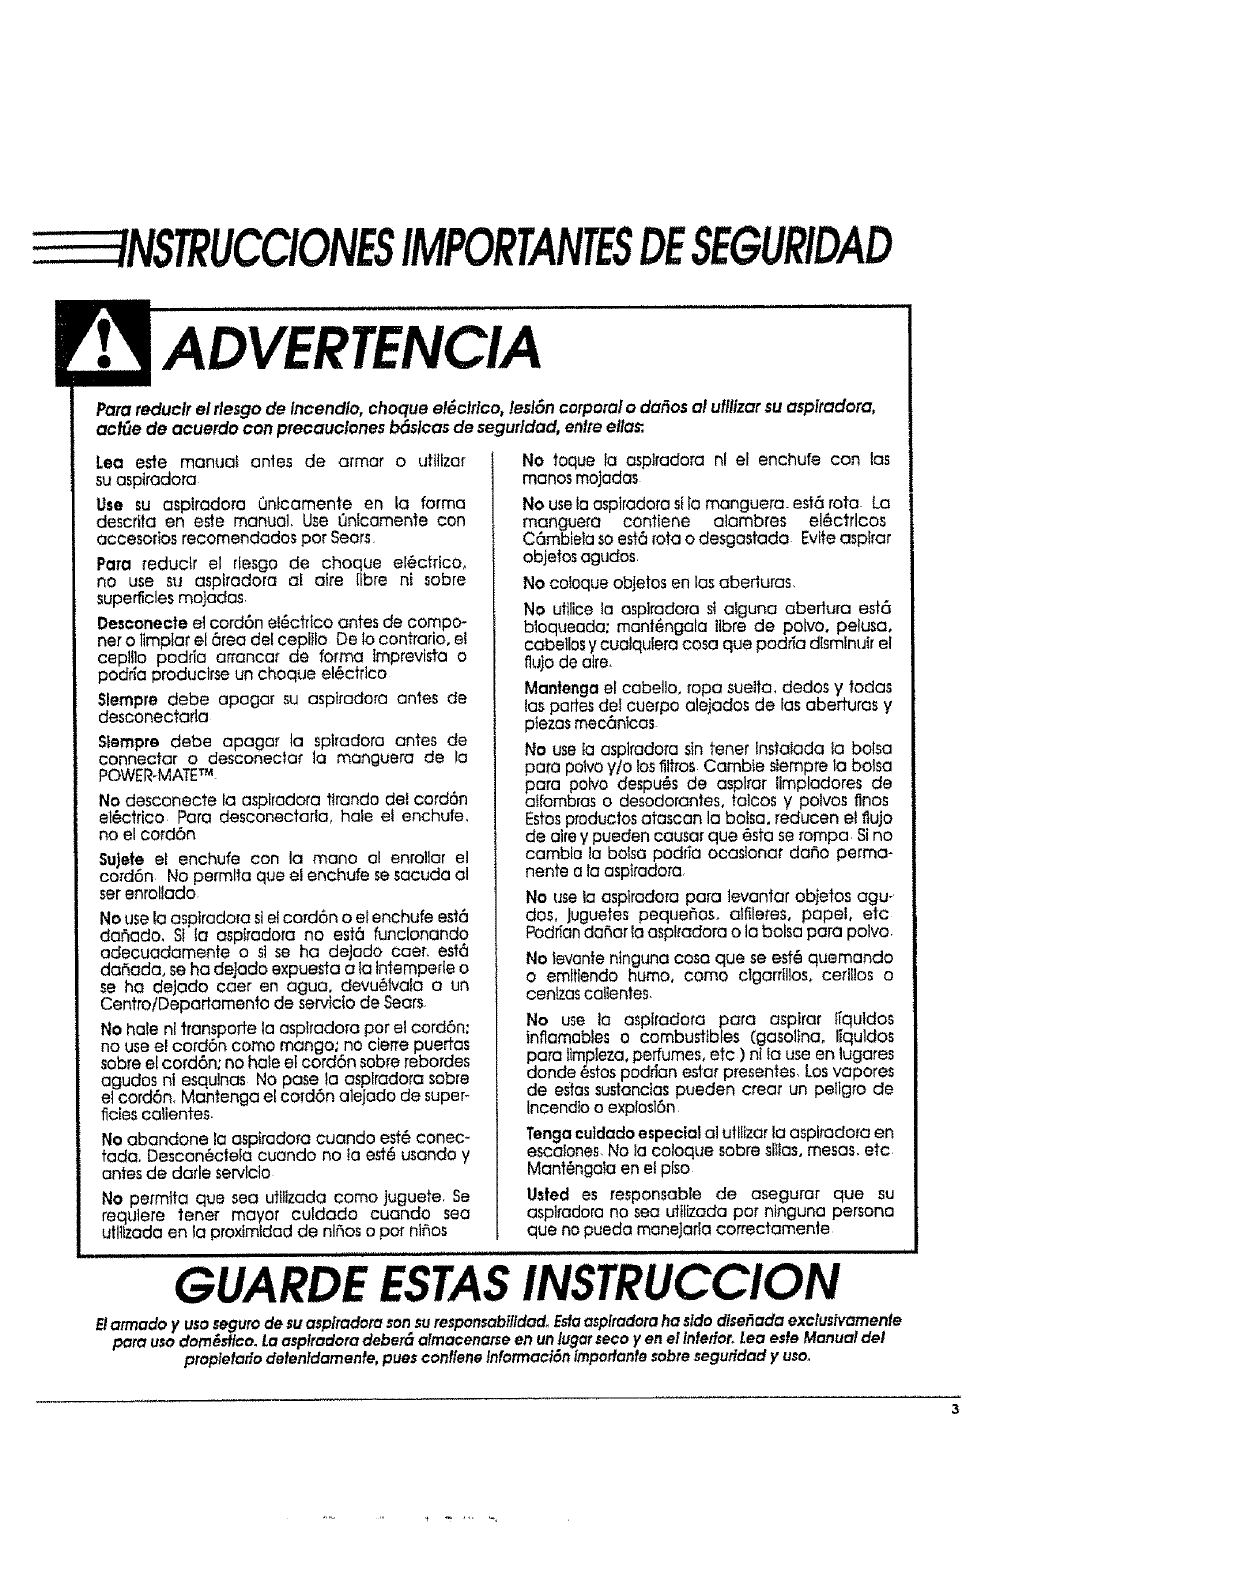
ADVERTENCIA
Para reduclr el rlesgo de incendlo, cheque el_ctrico, lesl6n corporalo da_os al utflizarsu asplradora,
ac_e de acuerdo con precauclones b6slcas de segufldad, entreelias:.
Lea este manual antes de armor o utillzar
su asptradora
Use su asplradora Qnlcamente en ta farina
descflta en este manual Use Qnicamente con
aceesoflos recomendodos par Sears
Para reduclr el r[esgo de choque e!_ctrtcoo
no use su aspiradora al atre [ibre ni sabre
superficies mojadas
Deseonecte et cord6n ei_ctflco antes de compo-
net o ]implarel 6rea de[ ceplflo De Io contrario, el
ceplt]o podria arrancar de farina tmprevista o
podrla produclrseun cheque el_ctrico
Slempre debe apagar su asptradora antes de
desconectafla
Slempre debe apagar la sptradora antes de
connector o desconeclar la manguera de la
POWER-MATETM
No desconecte la asplrodora tirando del cord6n
el6etrico Para deseonectafla, haie ei enchufe,
no el cord6n
Sulete el enchufe con la mane ol enrollar el
cord6n No permlta qua el enchufe sesacuda a]
ser enrollado
No usela asptradora siel card6n oei enchufe est6
da5ado, SIla aspiradora no est6 funclonando
adecuadamente o sl se ha deJado caer. est6
dar_ada, se ha dejado expuesta a la lntempefle o
se ha dejado caer en agua, devu6tvala a un
Cenffo/Departamento de servlcIo de Sears,
No hale ni transperte la aspiradora per el cord6n;
no useel cord6n coma mango; no cie_e puertas
sabreel cord6n; no hale e[ cord6n sabrerebordes
agudos nt esqu]nas No pase ta asplradora sabre
e] cord6n. Mantenga el coTd6n alejado de super-
ficies calientes.
No abandone lo aspiradora cuando est6 conec-
tada, Descon_ctela cuando no to est_ usando y
antes de darle servlclo
No permita qua sea uttiizada come juguete. Se
requ]ere tenet mayor culdado euando sea
utl]izada en la proxtmfdad de nl_os o per nifios
No toque fa asplradora nf el enchufe con las
manes mojadas
No use la asptradora si Ia manguera_ esta rata La
manguera contiene atambres el_ctflcos
C6mblela so est6 iota o desgastada Evite aspfrar
objetos agudos
No coloque objetos en [as abeduras,
No uti]ice la aspiradora st alguna aberfura est6
b]oqueada: man|_ngala tibre de polvo, pelusa,
cabellos y cualqufera cosa qua podrla dlsmfnutr el
flute de aire,
Mantenga ei cabelio. _opa suelta, dedos y todas
los partes dei cuerpo aleiados de [as aberturas y
piezos mec6nicas
No use [a asplradoi'a sin tenet instalada ta balsa
para potvo y/o fos filtros Camble stempre la botsa
para potvo despu6s de asplrar limpladores de
aifombras o desodorantes, talcos y pelves fines
Estos produclos atascon la balsa, reducen el flute
de aire y pueden causal" que 6sta se tampa Si no
camblo la balsa podr]a ocasionar daho perma-
nente a [a aspirado_a,
No use la aspirado_a para levantar objetos agu-
dos, Juguetes pequeflos, aifileres, papei, etc
Podr[an dafter la asplradora o la balsa par(:] polvo.
No tevante ntnguna cosa que se est_ quemando
o emltiendo humo, coma eigarfl]]oso cerillos o
cenlzas callentes,
No use la asplradora para aspirar ffquldos
inflamobles o combustibles (gasolina, liquidos
para llmpieza, perfumes, etc ) nt fa use en lugares
deride _stos pedrian estar presentes, Los vapores
de estas sustanctas pueden crear un pe_lgro de
[neendto o explesl6n
Tenga culdado especial al ufl_izar Ia asplradora en
escalenes No la coloque sabre siIlas, mesas, etc
Mant_ngala en el p[so
Usted es tesponsabie de asegurar que su
aspiradora no sea utilizada par ntnguna persona
que no pueda maneJarfa correctamenJe
GUARDE ESTASINSTRUCCION
El armada y usa seguro de su asplradora son suresponsabilldad_ Esfoasplradora ha sldo dlse_ada exclusivamenle
para usa dom_stlco. La asplradora deber6 almocenarse en un lugar seco yen el interior. Lea esfe Manual del
ptopletario detenldamenfe, pues conflene Infotmaci{)n importante sabre segufidad y usa.
YCARACTERISTICAS
EsimporlQnfe c0nocer las piezas y caracteristicas de su
aspltadora pare asegular su use adecuado y seguro
Exam[nelas antes de user su asplradora,
ESCRIBAELNUI_ERODEMODELO Y ELNOMERODE
SERIEAQU[
Cople esta tnto_acl6n de la pane Inferior de la aspl-
fedora y e_cn'bola en los espaclos ptoporclonados a
conflnuacl6n, Conserve estos nQmefos pale feferen-
cla posterior_ Teflga esfa tnformact6n dtsponlble sl su
asplradora nece_ta semicio o desea Ilama_ con
alguna pregunfa:
116.
N_mero de modelo de asplradora
de recepf6culo
D-
NOmero de serle de aspiradora
de recept_culo
116.
N_mei'o de modeto de POWER-MATETM
D-
N_melo de serte de POWER-MATETM
SuJet_d_t de/
con_tdnyet
_n_hute
BatOn do
tlbera=l_n
_pida del
mange
{Algun_
madeto_)
-- Tuba
_tor
MANGUERA
RECEPTACULO
ACCESORIOS
pBr_ het_dldur_s
Ceptlto parB _
pf_os _j
NOTA: Todos los modelos cuenfan con un jue-
go de acceso_ios en el recepfScu!o Algunos
modelos cuenfan con un juego adictonal que
puede almacenarse en la bolsa para occeso-
dosde uso en e[ garaje o en el exterior
CUbl_tta
ARMADO
Antes de atmatsu osplladora osegQrese de tenor
disponibles tgdas los piezas que se mue_tran en PIEZAS
Y CARACTERtCAS
ADVERTENCIA
Pellgro de choqueet6ctrlco
No conecfe la asphado_a hasta que tetmlne de
armafla. De io confratlo podrfa causar un choque
el_ctrlco o_eslSncorporal
TUBOS
Una los _bos
desllz6ndolas haste
que el bot6n
quede fiJo en
poslcl6n. Glre et
bofSn del _be
hacla la zona
ranurada del
dlsposltivo giraforlo
dei fubo
Eldispo_'divo
g]ratodo le permife
girar el mango
hacla laIzqulelda
para llmp]armeier
debajo de lo_
mueb;es baJos,
Ol_pajitive -'
gfr_totto
del tnango
POWER-MATETM
I.lntroduzca {o_tubas en la POWER_MATE_ haste que
et bot6n de1 tuba quede fifo on posict6n
2, Conecfe el enchufe
ycord6n de la
POWER-MATE_M coma
se muestro NO LO
fuetce_ El6rea etevada
deJ enchufe fIene que
esfarhacialamona
3, Assgure el cord6n
denfro del sulelador
del cord6n en el
giratorlode lamango
Para tefirat:
Desconecte el cordSn
y pise ei pedal de
{Iberacl6n r6plda del
tuba y flre dot tubas
hacia arriba
g--
JUIJ gir_orlo
d_l mango
i -- Tubo
POWER-MATETM-J

RECEPT, .CULO
1, Abra la tapa del recept6culo
2oExamine ta balsa para peivo este Instalade
cerrectamante Censulte los Instrucciones de
instalact6n en ia CAMBIO DE LA BALSA
3oExamine el fllffo de segurldad del motor este
instalado correctamante, Consulte lostnstrucclones de
Instalaci6n en UMPtEZA DELRLTRO DE SEGURIDAD DEL
MOTOR
CUBIERTA
Esnerma_ que ]a tapa dei recept6cule se desprenda af
set ab!erta m_s de lo necesado Para cobcar nueva-
mente ia tapa. alinee fasbisagras, ins_ffelas yde[re !a
tapa.
MANGUERA
mlngu_¢_
R_num g_
I, Allneelapestaha de
suJecl6nde lamanguera
y laranurade lacubleffo
delrecept6culoe In#o-
duzca lo manguera e_ el
recept6cub hasta que
quede fija en peslcl6n
Para retirar: levante
el pesflllo de la mon-
guera y tire de la man-
guera
2_Introduzca el
mango en et tube
haste que el betSn
quede en poslci6n
Aseg6rese de que
la manguera no
esl_lorclda.
Para mlitar: oprlma
e! bot6n pa_'a
liberar el mange y
tiredel mango
hacta arrtba
Para Guardar: Para prevenlr la precf6n de la mangua
mlentras se guarda, desuna la mangua dot tuba de la
asplradora Guarde lamagua en una postctSn enrolla-
day flojamente de tal manera que ta tepa de la man-
gua ne se estire
Cub/_rta
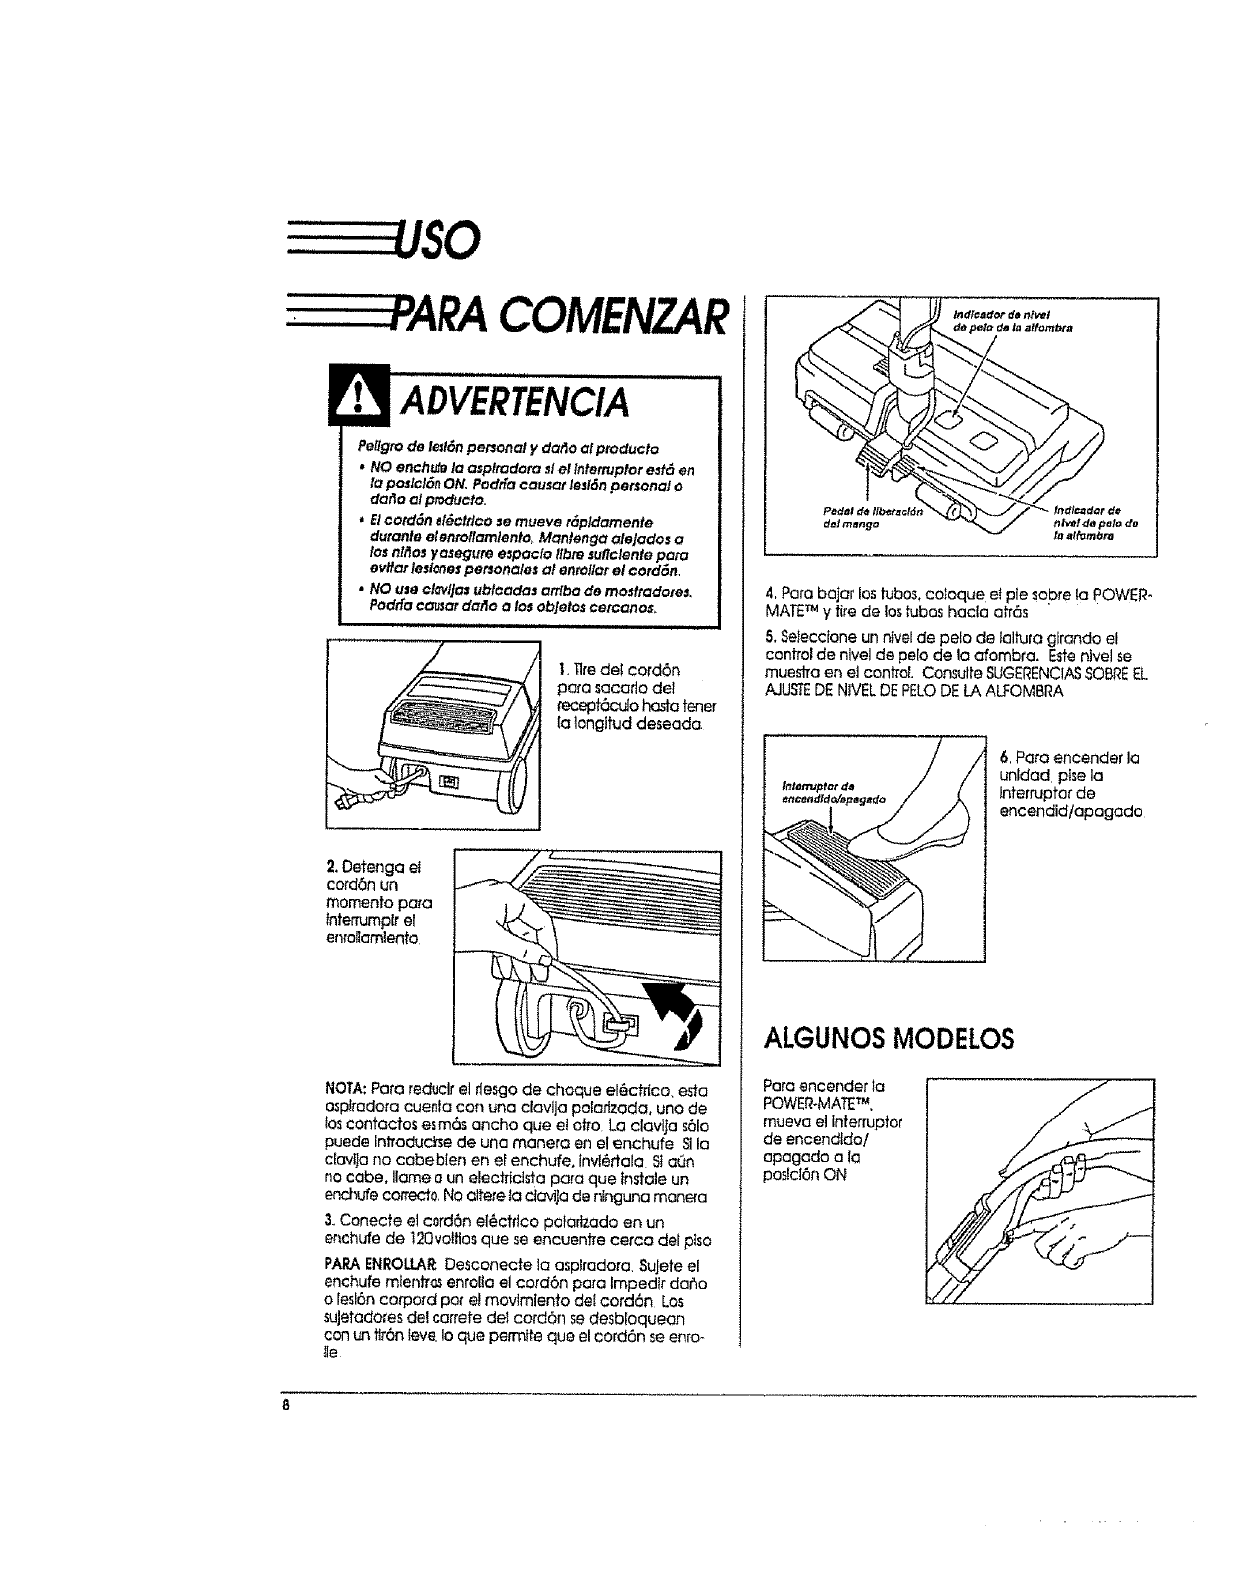
COMENZAR
Pellgro de led6n personal y da_o el ptoducto
•NO ench_ la asplradora sl el Interrupfor e_ en
la poslcl6n ON, Pedt_a causer led6n personal e
darlo al ptoducto,
*El cotd6n d_cttico se mueve r_plclamente
detente elenroflarnlento Mantenga alejados a
los nl_os yasegure espaclo llbte suflclente pate
evlfar leslones pet_onales al entailer el cordon,
,NO use €lavlJas ublcadas arrlba de rnostradore&
Podffa causer daAo a los objetos cetcanos,
1, Tiredel cord6n
pata secede del
recepf_Jo haste tenet
{a ]ongftud deseada
2. Detenga el
cord6n un
memento para
Intenumpkel
enreHamlento
NOTA: Pafa reduclrelrlesgode cheque el6cfdco,esta
ospiredoracueNa con una clavijapolatlzada,uno de
loscontactosesm6s ancho que elafro La clavljas61o
puede Intraduche de una manera en el enchufe SI la
cluvita no cabebien en e[ enchufe, lrM_rtala StaQn
no cabe, llama a un electrictsta pare que instate un
enchufe correcto, No altere la clovlja de ninguna man_a
3. Conecte et c0rd6n el6ctrlco potarlzado en un
enehufe de 12Qvoiflos que se encuenfre cerca del ptso
PAPAENROI.tA& Desconecte la asplradoro SuJete el
enchufe mtenfrr_ enrolla el cord6n pare Impedlr daho
o lesl6n corporal par e! movlmlento del cord6n Los
suJetadores del carrete del cord6n se desbloquearl
con un tk6n teve, Io que permtte que el cord6n se enro-
lie
4, Pare bajar los tubo_, coIoque et pie sabre !a POWER-
MATETM y tire de los tubas hacta atr6s
5. Selecclone un nivel de pete de laltura gtrando el
control de nivel de pelo de laafombra, Este nivel se
muestra en el control Consulte SUGERENCIASSABREEL
AJUSTEDE NJVELDE PELO DE LA ALFOMSRA
6, Pare encender la
unldad plse la
Interrupter de
encendid/apagada
ALGUNOSMODELOS
Para encender la
POWER-MATETM,
mueva et Interrupter
de encendfdo/
apagado ala
poslcl6n ON
t.
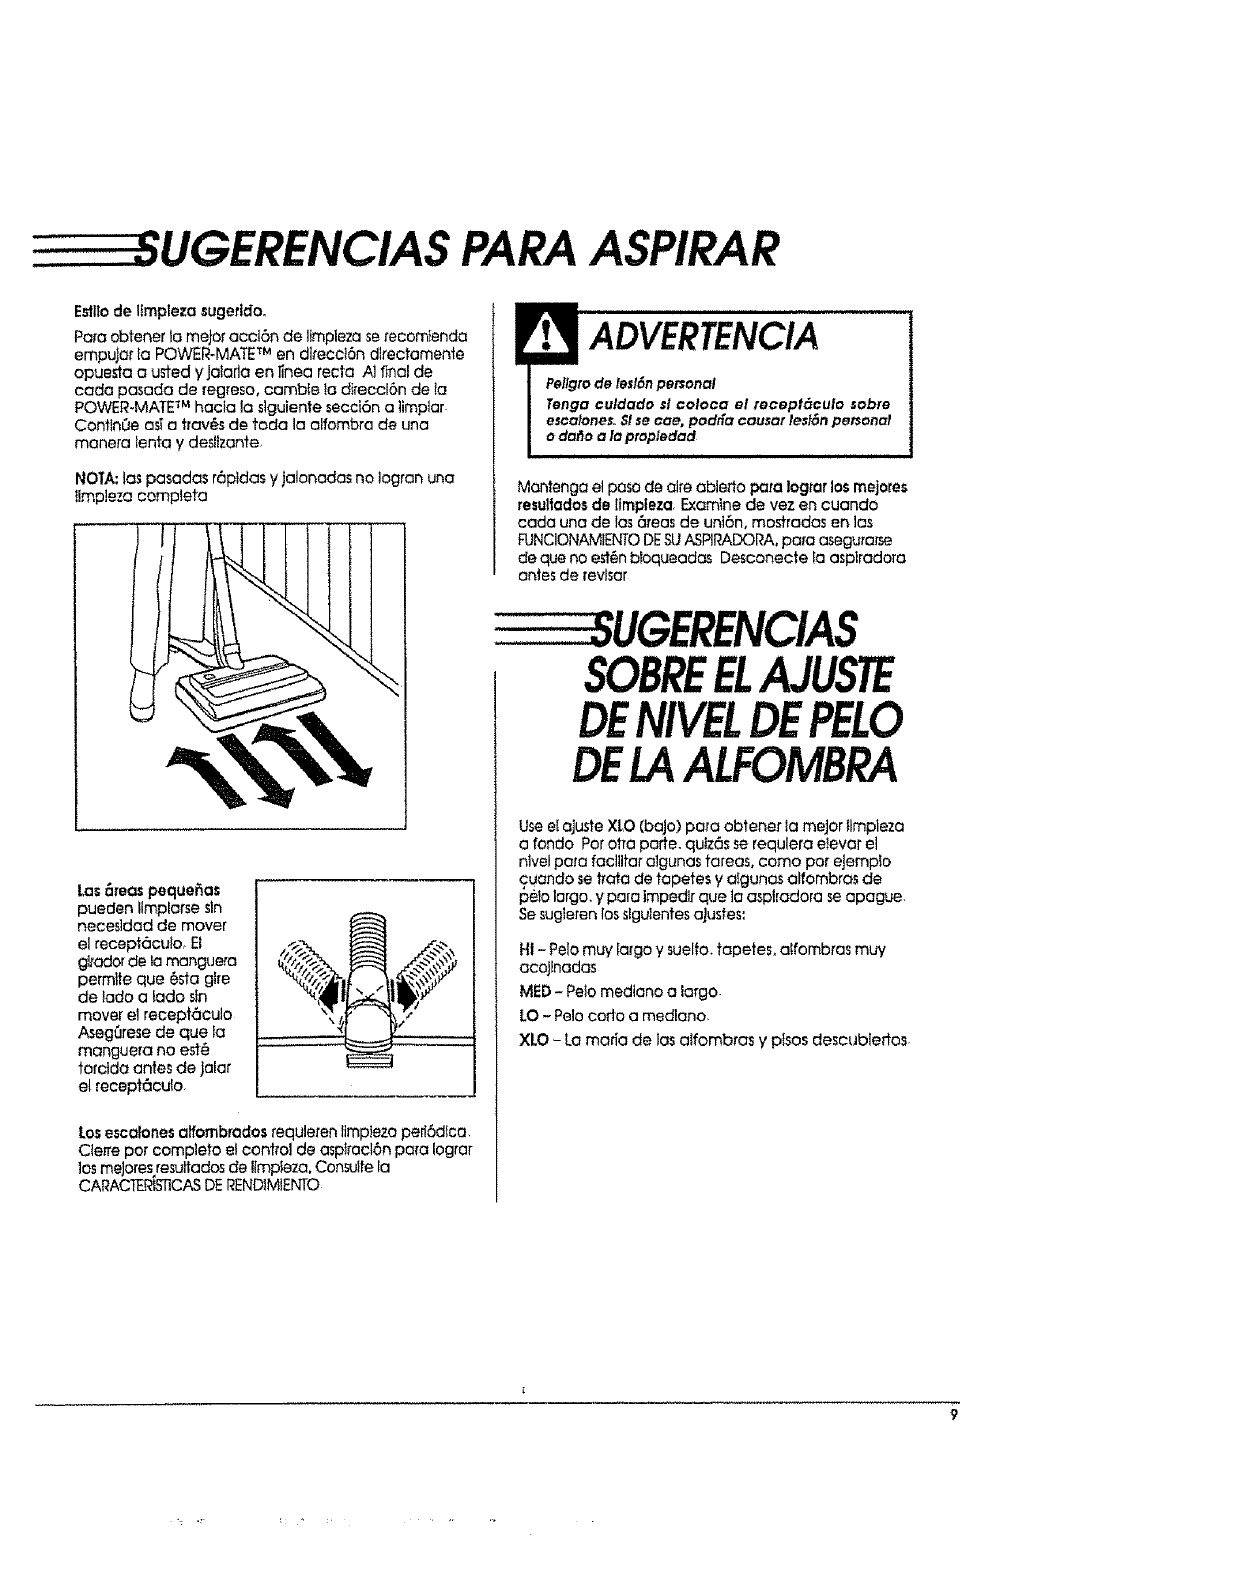
UGERENCIAS PARA ASPIRAR
Es'fl_ode llmpleza sugeddoo
Para obtener _a meJor accl6n de limpieza se recomlenda
empuJar la POWER-MATE TM en dlreccl6n dlrectamente
apuesla ousted yJalarla en _nea recta A} final de
coda pasada de regreso, camble ta d]recd6n de {a
POWER-MATE TM hacia !a slguiente secci6n a limplar
ConttnOe as_a troves de toda la alfombra de una
manera lento y desflzante
NOTA: !os pasadas r6pidas yjalonodas no Iogran una
ilmpleza completa
Irv. ADVERTENCIA
Pellgrode lesl6n personal
Tenga culdado st coloca el receptdculo sabre
escalones.$1se cae, podffa causar lesI6n personal
oda_o a la propiedad
i i ill ii Ill i llllluHu
Mantenga el paso de alre able,to para Iograr los mejores
resultados de limpleza,Examine de vez en cuando
cada una de los 6teas de uni6n, mostradas en los
FUNCIONAMIENTODESUASPIRADORA, papa asegu_ar,_e
de qua no est_n bioqueadas Desconecte ta asplradora
antes de revisor
Las _reOS peque_as
pueden Ilmplarse sln
necesldad de mover
el recept6calo, B
glrador de la mangue_a
permtte que 6sta gfre
de lade a lado sin
mover el recept6culo
Asegtlrese de que to
manguera no est_
terctda antes de jalar
el recept6cuio.
t{t, "_
Losescafones alfombradosrequleren tlmpleza peri6dtco
Cierre par complete el con#a1 de asptractbn para Iograr
los meJores resultados de ;Impleza, Consulte la
CARACTERISTICASDE RENDIMIENTO
SOBREELAJUSTE
DENIVELDEPELO
DELAALFOMBRA
Use e[ ajuste XLO (bajo) para obtener la major llmpieza
a rondo Par otto paffe, qutz6s se requlera etevar el
ntvel pata facllifar a]gunas tareas, coma par eJemplo
cuando se #ata de tapetes y c_fgunos alfombras de
l_e_olargo, y para impedlr que la osptradora se apague.
Se sugleten losslgulentesaJusfes:
HI - Pelo muy Ia{go y suelto, tapetes, alfombras muy
acojlnadas
MED - Peio mediane a largo.
LO - Pelo code a mediano.
XLO - La maria de los aifombras y ptsos descubiertos
"'"H'II' I' t IIII II
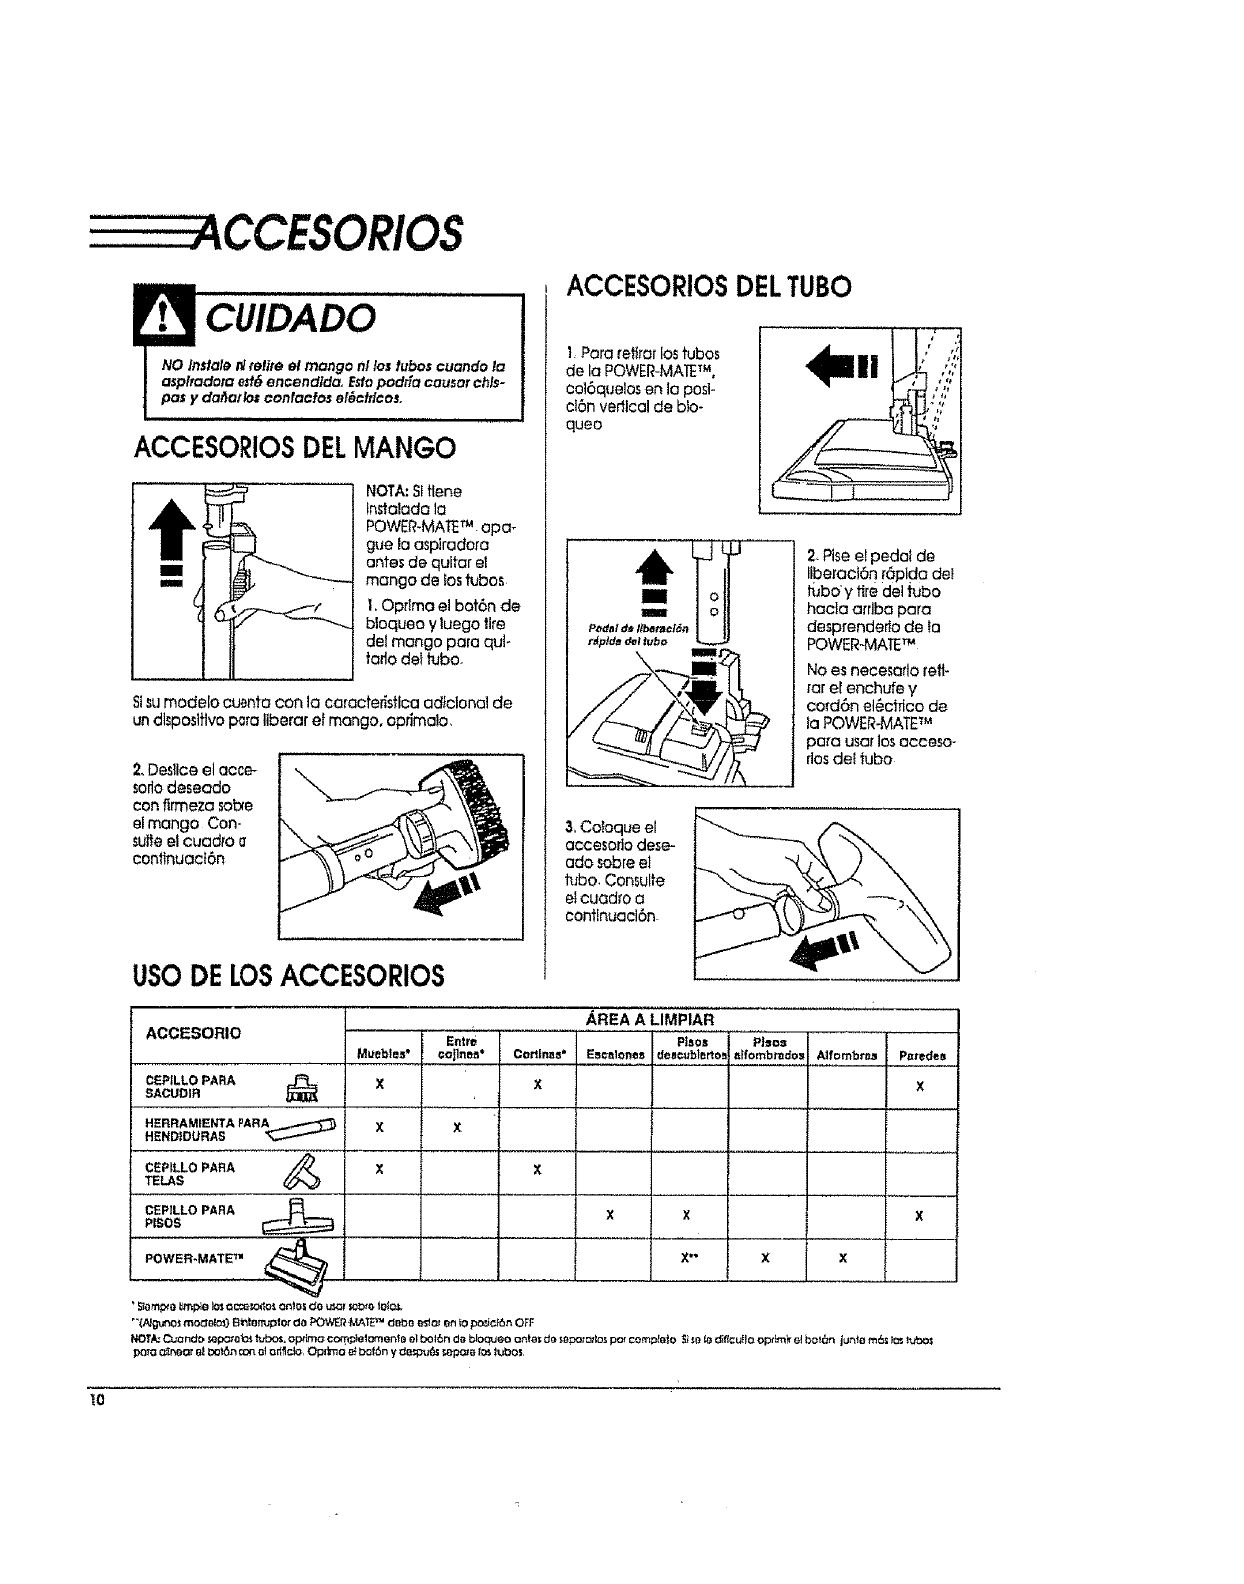
cu,oAoo !
NO }ndale _retire el mango nl lostubos ¢uando la
Iasp#adotaest6enoendlda, Esfopodr[acausorchls-
Ipasyda_al_osconfactosel_ctflcoso
ACCESORIOSDELMANGO
NOTA: SitleneInstalada 10
POWER-MATEm.apo-
gue la aspiradora
antes de quitar el
mango de los tubes
I. Opdma el bot6n de
bloqueo y luego tire
del mango para qut-
|ado del tuba.
Slsumodelo cuenta con la coracteffsflca adlcional de
un dlsposttlvo pore liberar el mango, oprlmaio,
2, Desllce el acce-
sorlo deseado
con flrmeza sob'e
el mango Con-
suiteel cuadro o
conflnuaci6n
USODELOSACCESORIOS
ACCESORIOSDELTUBO
L Para reflrar los tubas
de la POWER-MATETM,
col6quelos en la posi-
cl6n vertical de bb-
queo
3, Co_oque el
accesodo dese-
ado sabre el
tuba.Con_ulfe
el cuod_o a
conflnuacl6n.
2, Pise er pedal de
Ilberact6 n r6pida dei
h_bo:y fire del tuba
hacla arrlba para
desprenderto de la
POWER-MATETM
No es nece_arlo refl-
tarel enchufe y
co_d6n el_chico de
laPOWER-MATETM
pa_Q usar los acceso-
dos dee tube
I_REA A LIMPiAR
ACCESORIO Entr_ p_os...................P'i,os
Muebles" €alines* Call,haS' Escalonesdeecubl=rtol_lfombmdos Atfombrcs PrJtedeB
CEPILLOPARA _X X X
SACUDIR
H_'RRAMtENTA PARA _ X X
HENDIDURAS
CEP_LLOPARA //_ X X
TELAS
PIsosCEP1LLOPARA _X X X
POWER-MATE_X" X X
' _omp_e _m#o I_ oct.e_,_e_ anne= c_e_ _bte toI_t
"(/_;unol modolo_) Bt_lelluptor do _OWER,MA'E _ deioo _'_a_ en fo po_iciSn OFF
NOIA: OJoncf_>_lx_ob_ tubas, opdmct cornpiolm"_onfe el bo_6n de bloqueo onto_ _e sep_mlos pa_ com_!e_o _ _a_adificuIlo opdm_" e_bot6n jur_ta m(&;I_ _vt_
para t_r_o_ 8_I;x316nconot or_flcto, Op_o _botbn yde_ _pme fo_t_bo_
tO
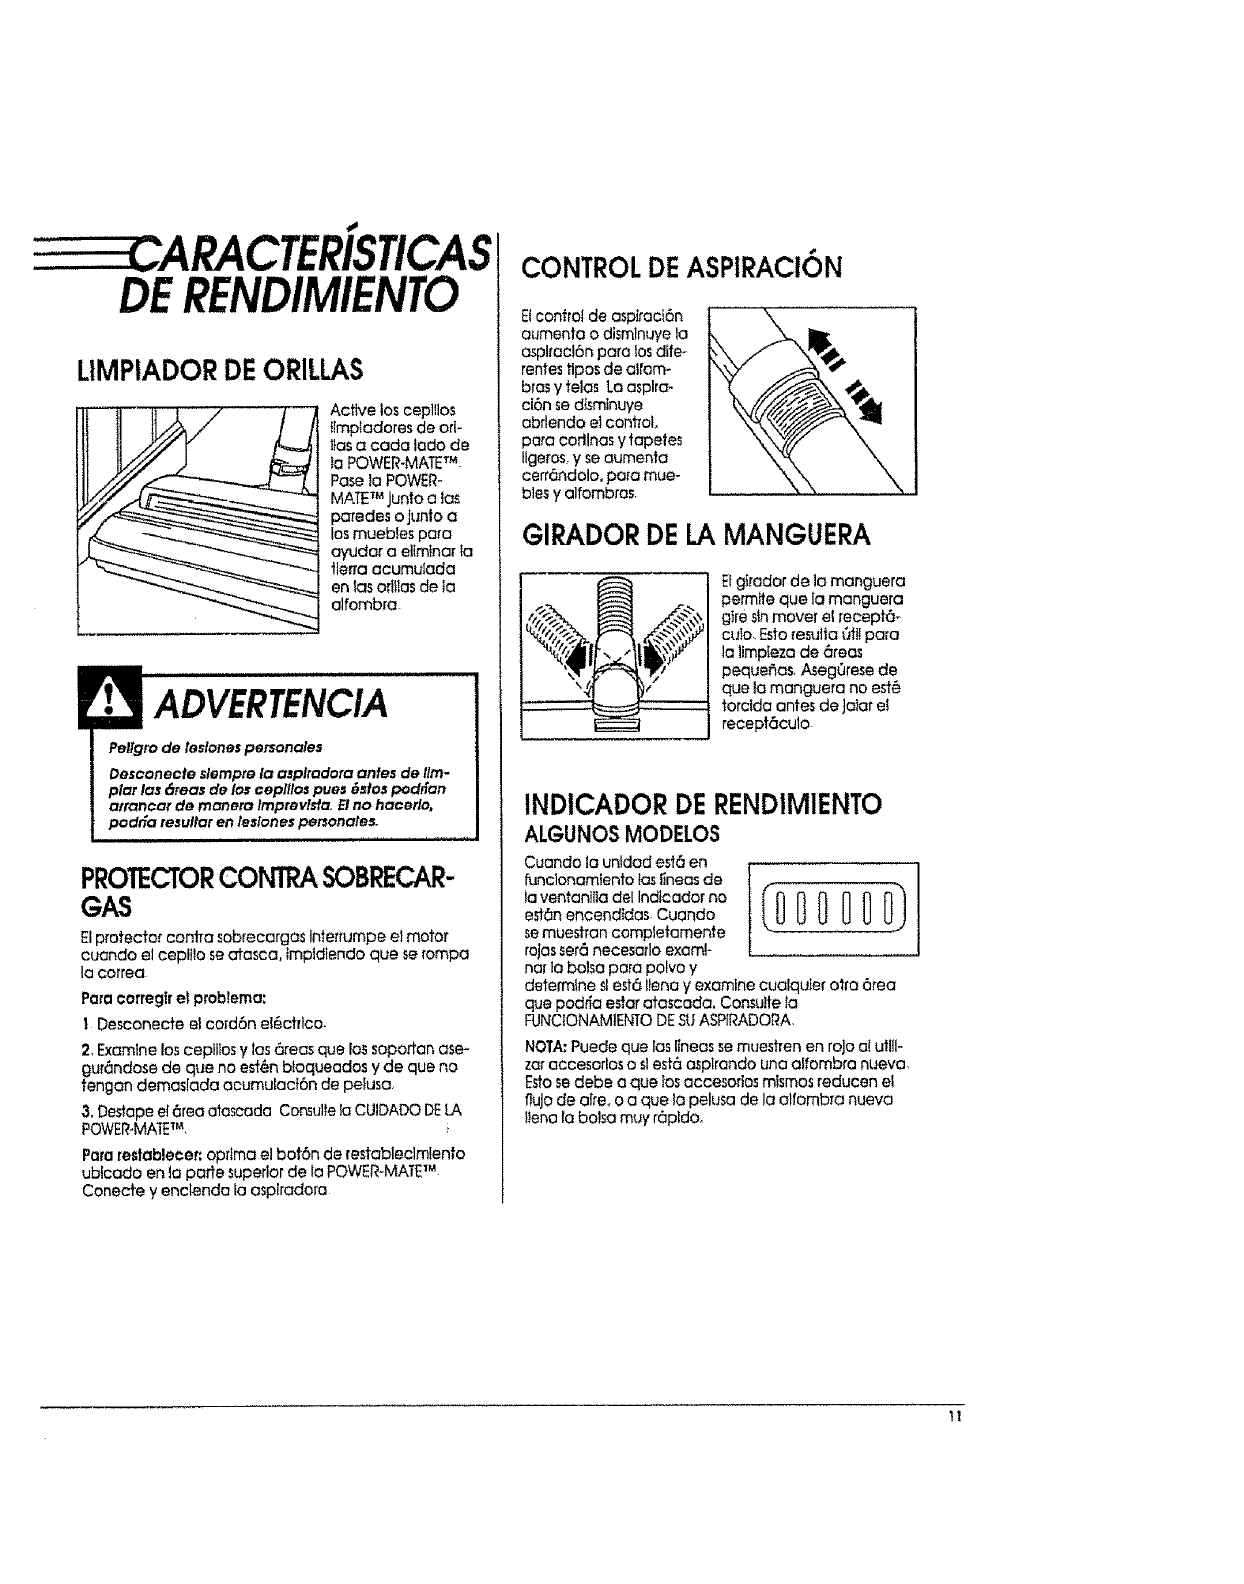
ARACTERISTICAS +
DERENDIMIENTO
LIMPIADORDEORILLAS
Active los cep]llos
ilmp_adoresde o_l-
l}asa cada lade de
ta POWER-MATETM
Pose lo POWER-
MATETM junto a lax
paredes o junto a
los muebles pare
ayudar e ellm_nar le
Jte#a acumulada
en las oriilas de la
alfombra
ADVERTENCIA
Pelig_o de lesiones persenales
Oesconecfe slempm la a_p#adora antes de tim.
plat las _reas de los ¢epillos pues {J_tos pod_an
afrancat de manera imprevlsf_, El no hacerlo,
poclda resultar en leslones porsonales,
PROTECTORCONTRASOBRECAR-
GAS
Elprotector conlTa sobrecargas Interrumpe el motor
cuando el ceplllo se atasca, tmptdtendo que se tampa
la cotrea
Para correglr el problema:
IDesconecte e_cord6n el_ctrlco
2, Examine los cepllIos y les &'ees que los soportan ase=
gur_ndose de que no est6n btoqueados yde que no
tengan demaslada acumulacf6n de peluso
3. Destape el 6rea atascada Comulle la CUIDADO DE[A
POWER-MAIET_, i
Pare restablecer: optima el bofbn de restableclmlenfo
ubicado en ta parle supedor de la POWER-MATETM
Conecte y enclende la aspiradoro
CONTROLDEASPIRACI6N
Elcontrol de aspiraci6n
aumenta o dismlnuye la
aspltocl6n pare ios dlfe-
rentes tlposde alfom-
brasytelasLa asplra-
cl6n se d_smlnuye
abrtendo el cont_oL
pa_a codlnas y tapetes
Ugeros,y se aumenta
cerr6ndolo, pare mue-
bles y alfombros,
GIRADORDELAMANGUERA
Elglrador de la manguera
permlte que lamanguera
gtre stnmover el recept6=
cuio, Esto resulta _tlI pare
lallmpleze de 6tees
pequefias, AsegQrese de
que to manguera no est@
torcida ante_ de Jaiar el
recept6culo
INDICADOR DERENDIMIENTO
ALGUNOS MODELOS
Cuando la unidad est6 en
funclonamiento los i_neas de
la ventanliie de! Indicador no
e_len encendfdas Cuando
se muestran cempletamente
rajas ser6 necesarlo exam!-
nor la balsa pare polvo y
(oooooo)1
determine sl est6 _lena y examine eualquter otto 6tea
que pod_a ester atoscada. Consulte la
FUNCIONAMENTO DESU ASPfRADORA,
NOTA: Puede que las [ineas se muestren en roJo a! utili-
zer accesor[os o sl est6 asplrando una e_fombra nueve,
Estose debe a que los accesodes mismos redueen el
fluJo de alre, o a que la pe[usa de la alfomb_a nueva
Uena la balsa muy r,Spldo_
tl

'FUIVCIONAMIENTODESUASPIRADORA
La asplradora croa succien oasptraclen que levanta
la tterra La flerraes impuisada a #ayes de [asvies de
flujo atre ha#a lo be]so par una replda corrtente de
alre La boise papa poivo permite el flufo de atre. pero
afrapa ta tterra
Pore fogror los rn_iores fesuttados de ltmpieza,
mantengo obtertos los v_osde aire Examine
ped6dlcamente los 6reas tndicadas con
osterlscos para osegurarse de que no
est_n b!oqueades, Desconecte del
receptecu!o de _evlsarlo
- CUIDADO DELRECEPT, CULO
DELA
BOLSA '
La bol_a debe carnbtarse seguido papa iograr los meJores
resultados de ]Jmpleza NOTA:Consutte la PIET_.ASY
CARAC1ERiSTICASpare deterrnlnar el N -de la botso,
1, Desconecfe e_
cordSn et_cfrt¢o
de la clavlla de Io
pared,
2, Tire del pes_tllo
de la tape haole
fuera y haole
anlba; luego
levante la tapa
del reeepteeulo
3, Des#abe la pesta._a de carten del montaJe roJo de !a
balsa empujando haela afuera y tirando haole arriba
4, Soque la balsa del
montaJe roJo
& Examine y fimple el tilde
de segurldad del motor.
Consulfe Ia UMPIEZADEL
RLTRODE SEGURIDAD DEL
MOTOR E]montaJe rojo
de la balsa se Inc!_r6 ha-
do adelante despu_s de
que retire la boise Esto
lmpedlre que ia tape se
elerre antes de instalar
una balsa nueva,
eo}_ de!
no_le solo 6. Levante el rnontoje rojo,
7, Imtale la balsa nueva
en los ranuros coma se
muestro en {o tlustrocten
(abajo). tenJendo culdodo
de no debtor e] corten
NOTA. Si el carfen se dobla,
no padre aJu#arse b3en y
no todo la fler/a llegar(_ ala
balsa, slnoque quedor6 en
el reeepteculo
EmpuJe el carten
directamente hacia abaJo
haste que quede blen
asentado y los oriflclos que-
den allneados
Doble y cotoque laporte
posteriorde labalsaen el
recepteculo
8, BaJe la cublerta del receptecula y cterre el pestitio,
9, Conecte el cord6n el_cttico en la clcMja de ia pared
CUIDADO
JNUNCA REUTILICE UNA BOLSA PAPA POLVO. Los
mateflales muy flnos, tales como desodo_antes
pare alfombras, taleo facial, polvo flno, yeso, hol_no
peruse de aItombras nuevas, etc., pueden atascar
la boise y causer clue se rompa antes de que est(_
llena. Camble la bolsa rn6s seguIdo cuando aspire
este tlpo de ma_erlales.
12

LIMPIEZADELFILTRODESEGURIDAD
DELMOTOR
Examine e! ill|re de segurldad del motor de vez en cuando y I_mpleio cuando est_ suclo
_ADVERTENCIA
Pellgro de cheque o!{_c#Ico
No opera la atplrodora sin el flttto de segufldad del
roofer. A_eg_rese de que el fltlro e_t6 teco eInsta-
lade ad_-ua_eamente para Impedlr que el motor
falle y/o q_Je$0 produzca un cheque el{_cMco,
1, Desconecte el
cord6n el_o_¢o
de laclavija de
la pared y re,re
_abalsa
2. Retire el flltTo
de segurldad
coma se muestra
en la ilushaat6n,
3. Lave el flitro en
agua tibia yJabonosa;
enju6guela y d6jeb
secar No llmple el fil-
1Toen iavadora de
plates ntlo Instale
cuando est_ hQmedo,
4, Rein#ale et filtra en
el recept6culo.
5. tn#ale la balsa.
DELEXTERIORYDELOS
ACCESORIOS
t. Desconecte el cord6n el_clrico de ta clavIja de la
pared NO ehoree agua sobre la aspITadora.
2, Umple et exterior con un trope suave y Ifmplo. que ha
side expr_mido despu_s de remojar en una solucl6n de
agua y detergente riquldo llgero, Seque el e#erior
con un trapo seco despu,_s de Ilmplar
3. Limpfe la superticle exterior del recept6culo y de los
accesorios para reduclr fa etectricldad est6tlca y la
acumutacl6n de polva.
4Love los acceso_ios en agua tibia jabonosa, enjuague
y deje secar al a_re NO loslave en lavadora de
plates.
NO USEIOS ACCESORIOSSl EST,/_NMOJADOS
__=_,CUIDADO I
soflosClUese utltlcenen _eas suctas,deba]o
erador,no deben usarseen etras superficies
t3
CIJIDADODELAPOWER-MATE TM
Slempre deber6n segulrse todas lax precauc!ones de
seguridad al ltrnplar y dar se_vicio a la POWER-MATE TM ADVERTENCIA
Pellgto de choque ei6c#Ico o lesl6n corporal
Desconecte la unldad antes de llmplafla o dade set*
vlclo. De Io conlraflo podr_a produclne un choque
el6ctdco o causar lesi6n corporal sl la asplradora
arranca de manera Imprevista.
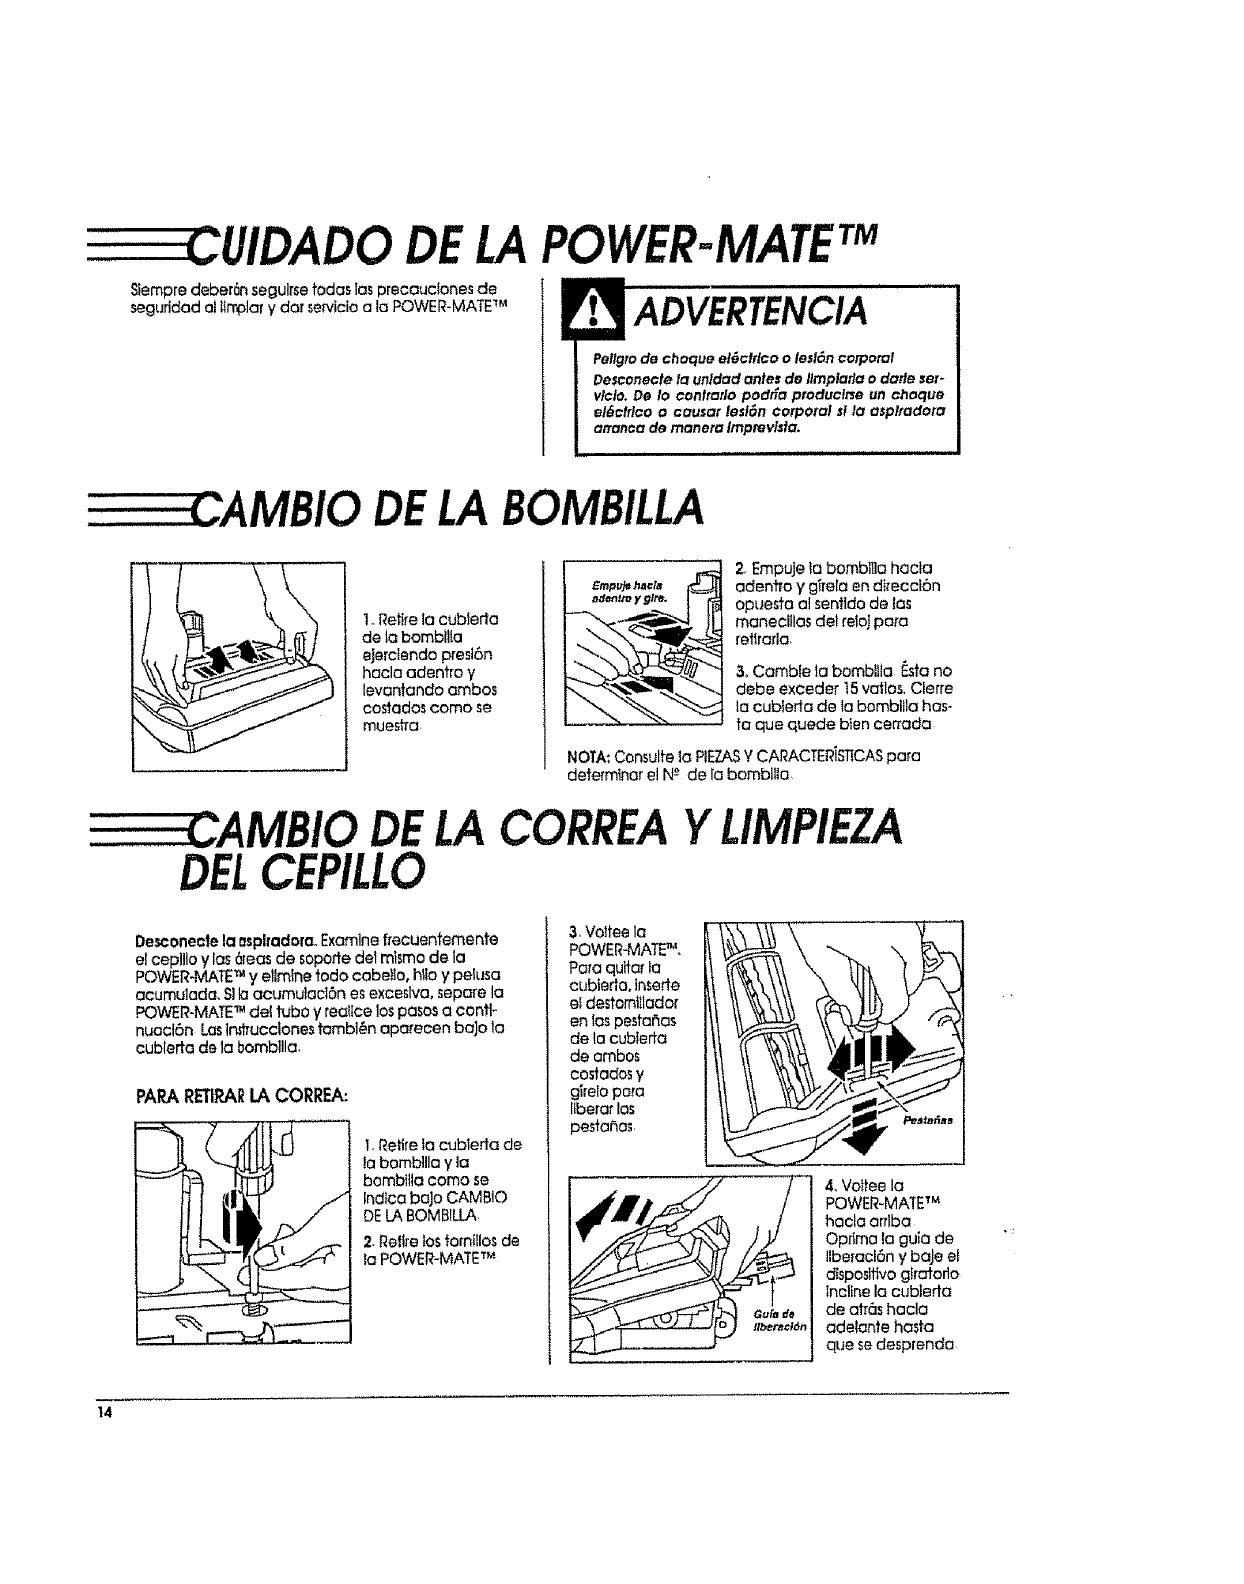
DELA BOMBILLA
1. Retire la cubieda
de la bombUla
ejerdendo presl6n
hacla adentro y
levantando ambos
costados coma se
mue_a
2Empuje {a bombllla hacia
adent_o y girela en di_ecct6n
opuesta al senfldo de las
maneclllas det reloj para
retlrarla_
& Camble ta bembllla Esta no
debe exceder t5 vatlos, Clerre
la cubierta de la bombllla has-
te que quede bten cerrada
NOTA: Consulte la PIEZASY CARACTER]S11CASpara
detefmtnar el N-_de la bomblila
DELACORREAYLIMPIEZA
DELCEPILLO
Desconecte la osplrador_ Examine frecuentemente
et ceplllo ylas 6teas de soporte del mismo de la
POWER-MATETM y ellmine redo cabe}lo, h_Ioy pelusa
acumulada, S]ta ac_nulacl6n es exceslva, separe la
POWER-MATETM del lubo y reatIce los pasos a confl-
nuacl6n LosIr_irucclonestambl_n aparecen baJo la
cublerta de 1obombllla.
PARARETIRARLACORREA:
I_ Reti{e la cubleda de
ta bombllla y la
bombltla coma se
Indtca baJo CAMBIO
DE LA BOMBILLA
2. Retire los families de
ta POWER-MATE TM
3, Voffeela
POWER.MATE_'L
Papa quitor ta
cubterlo, tnsede
el destorntilador
en lospestahas
de la cublerta
de ambos
costados y
g_reio pata
llberar los
pestaSas
4.Voitee la
POWER-MATE TM
haclo arrlba
Oprtmo laguia de
Ilberacl6n y baJe ei
dlsposltfvo gfratodo
incline la cublerta
de atr_s hacla
adelontehasta
que se desprenda
t4
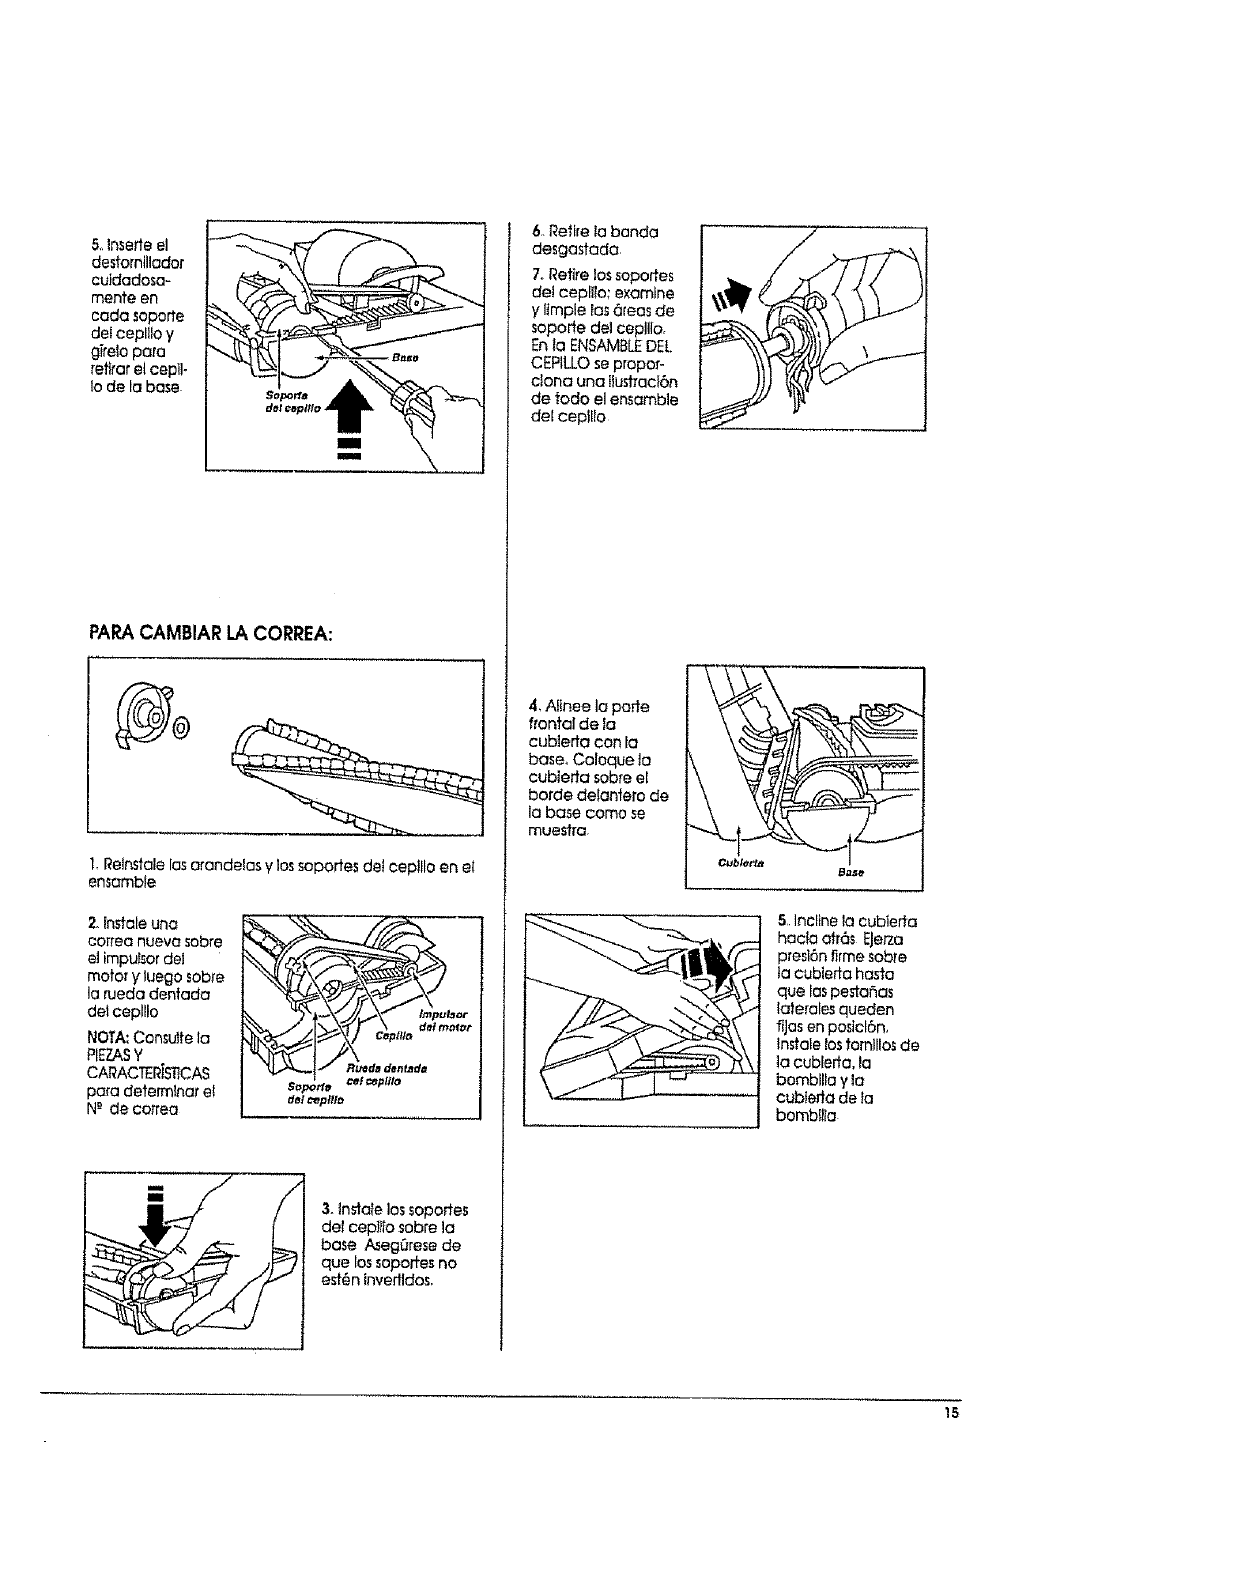
5,,lnserte el
desfomtllador
cuidadosa-
mente en
cada soporte
det ceplUo y
gTrelo pa.ra
_'eflrarel cepil-
lo de la base
PAPACAMBIAR LACORREA:
I. Reinstale las arandelas y lossoportes det ceptllo en eI
ensambfe
2oIngale una
correa nueva sabre
el impuIsor del
motor y luego sabre
la rueda dentada
dei ceplllo
NOTA: Consuffe la
PIEZASY
CARACTI:RiS'flCAS
para deterrninat e_
N-" de cotrea
Irnpu_or
Cepllte der motor
R_da dented8
del c_ep/llo
3. lnstafe los sopo#es
del ceplIto sabre la
bose Aseggrese de
que lossopoffes no
est6n Inverlldos,
6, Retire la banda
desgastada
7.,Retire los sopoffes
deJ ceplllo; examine
y llmple las 6teas de
soporte del ceplllo,
En to ENSAMBLEDEL
CEPILLO se propor-
clona una tlu_acl6n
de todo el ensamble
del ceptl!o
4, Aiinee la porte
frontal de Ia
cublerta con fa
baser Coloque !o
cubieffa sabre eL
borde delantero de
la base come se
muestca
5Inclfne la cubleffa
hacia atr6s EJerza
preslSn firme sob_e
ta cublerta hasta
que las pesta_as
taterales queden
flJas en posicl6n,
In#ale lostornlllo_ de
]a cublerta, ta
bomblllo y la
cubtefla de !a
bombilia
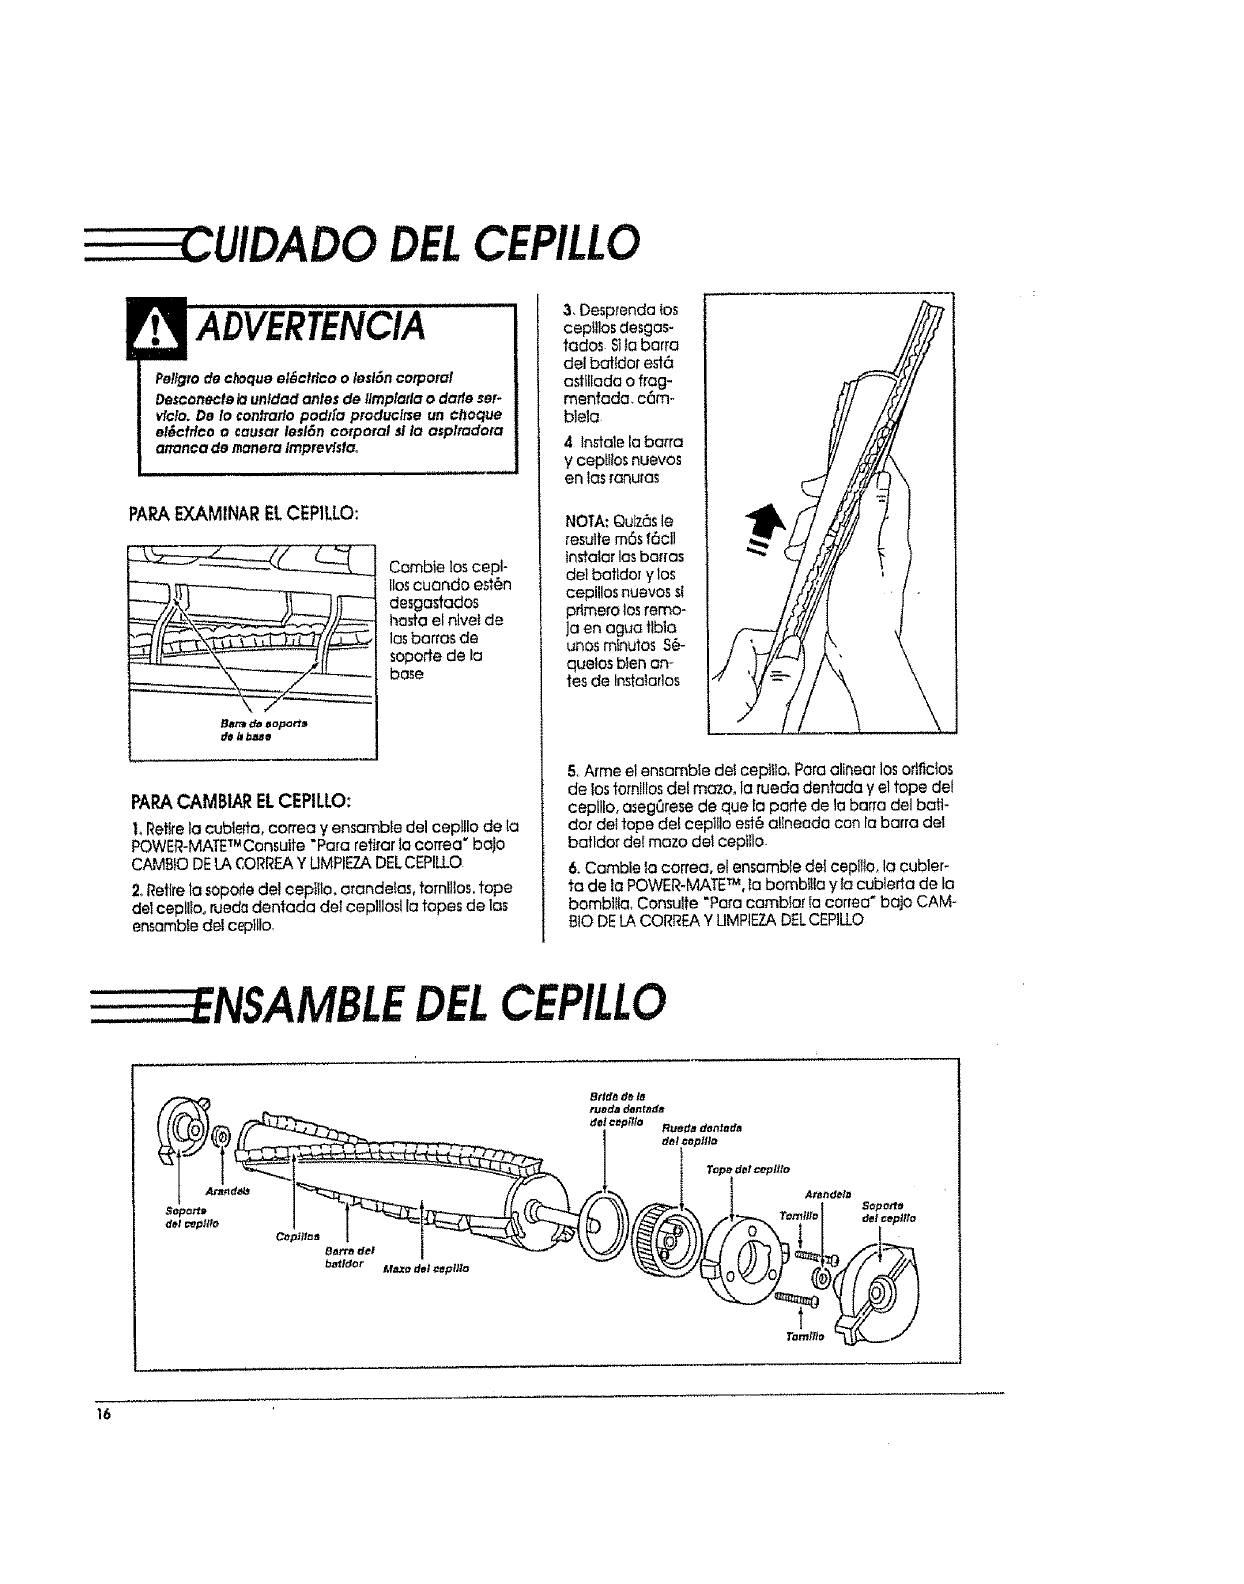
CUIDADODELCEPILLO
ADVERTENCIA
Pe#grode c_oque el6ctrico o/eslSn corporal
Desconecto k_unldad antes de llmplarla odate ser-
viclo.De Io con#ate podga produclr_e un cheque
el6ctrlco oCauser lesl6n corporal sl ia asplradora
arranca de manera Imprevista,
PAPAEXAMINARELCEPILLO:
B,_rmd_ eopa_e_
de _beJe
Cembte los cepl-
lies cuando est6n
desgastados
hesta el nlvei de
losbarrasde
soporfe de la
bose
PAPACAMBIARELCEPILLO:
LRetire ta cublede, correa y ensemble del cep_llo de !a
POWER-MATE_Consulte "Pare retirarlacorrea"bajo
CAMBIO DE LA ¢ORREA Y UMPIE7.ADEL CEPILLO
2. Retire ta sopo_e del cepfilo, atande}as, families, tope
delceplffo,ruea_:]dentada de{ eepiflosllatopes de los
ensemble de_cepillo,
3.Desprenda _os
cepl]los desgas-
tados SIIobarra
delbotldore#6
astiIladao flag-
mentada, c6m°
btela
4 In#a_e la ba_'ra
y ceptffos nuevos
en losranuras
NOTA: Qulz6s le
resulte m6s f6ctl
in#alarlos borras
deI batider y los
cepillos nuevos st
primero losremo-
Ja en agua tibia
unos minutes S_-
queios bien an-
tesde Instalarios
5. Arme el ensambie de! cep_tlo, Para alinear los oflficios
de Ios tomlllos deI mazo, la fuede dentada yet tope de!
ceplllo, a_egQrese de que la paffe de I0 barra del batl-
dot dei tope de! ceplllo est_ allneodo con Ia barra del
batldorde{mazo deIcepiIlo.
6. Camble ta correa, el ensombb del cepllb, la cubleP
ta de ia POWER-MATE_M,to bombtiia y Iacubierta de la
bombliia, Consuite "Poracambtar !a correo" bojo CAM-
BtO DE LA CORREA Y UMPtEZA DELCEPILLO
DELCEPILLO
Tape dot cepltto
Arandeln
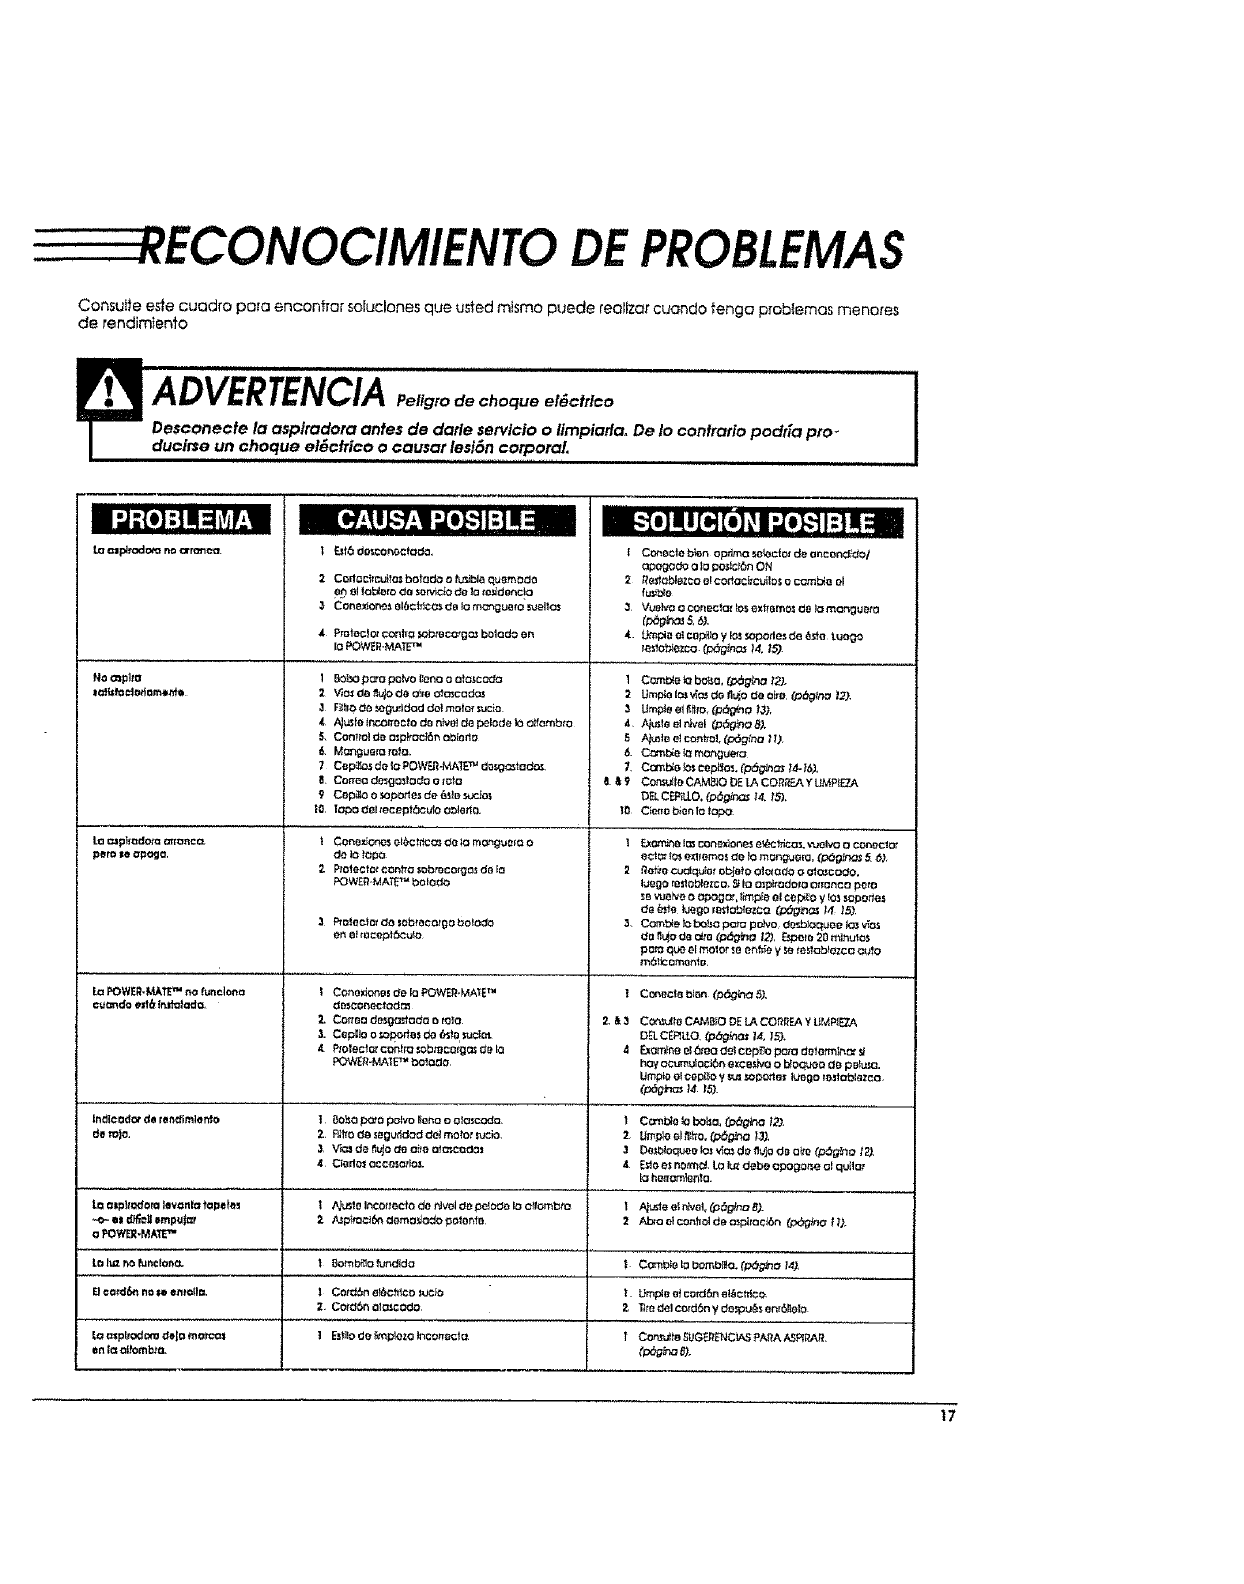
----RECONOCIMIENTO DEPROBLEMAS
Consutte e_e cuadro pota enconhor so[uclones que usted mismo puede realizar cuando fenga probiemas menotes
de rendimtento
ADVERTENCIApe,,g,o,eohoqueo1,o,,oo
Desconecte la aspiradota antes de darle servlcio o limpiarlao De to contratio podr_a pro-
duclr_e un choque et6ctrico o causar lesiSn corporal.
b_ ml_nxlo_ na rxra_a.
No ==p#o
LO04pIIodOta _CO,
peru _e opoga.
t Est6do_¢or_oCtOdo.
2
4
Cortoc_icu_Io_bo$odo o hJ_blaq_em_Oo
en e__o_ero Oo sorv_o de Io_e_denc!o
Consx_ore_,el0c_¢c:sc_o_ m_uolo sueHos
Pro|e_Iot_onho _bm¢o_ bolodo on
IoPOWER*h_'4TETM
1BoL_ p_o poh,o I_no o olo_c_:_o
2V_o:_o flu_O_ o!_eo_a_cadc_
3 F,_hOOe m_'_urldoddotmoto_ _c_
4A_u_leInco_o_o do nlvolde pelode_oolfombro
5, Conlto]de o_p_oc_n ob{odo
_k Mor_uem mla.
7 Cep_b_ de to POW_-MAIE_ do_g_4adm
9Cop_o o sopodes de &_B sucJo_.
do Io _po
2P_otectot contro sobr_c_as da la
F=OW_-MA_ TM bolo_o
3 Pro_eC_c__ SObeOco_gobolodo
II I1'....
=J-'{, o] lUJ)w]to_l_/'.,,[o].']1.1N--
IConscla b_n opdmo SO_OC{O;de oncon_dol
opogo¢_o O IopositionON
2t_e_t3b!_z_o e! co_citct_ilos ocomt_o ol
3VusIvo o c_nec_I _osexf_emo_ 0e Ictmongu_ro
4_Jmploo_cop_o y Io4sopode_de _e tuor3o
3Umpieelfi_ho,(p_a _3),
4Aiu_le_dt_vel G)_f_aS).
A,_le e_conlro), (p_gina _I)
8 &9 Con,9_lO CA,M_iO DE L_ CORR_ _,YUMP]£ZA
I0 Cieno tfie.n to fopo
Lo POWER.&t&TETM no funclono I Cor_o_ones de _ £OW_MA;E TM !Conecte bIBn (pbgho 5),
2. Co_adosga_adao(oI_ 2.&3 COt_dtBCAMBIODELACO_R6_YUMP_A
P_olect_c_ntr_ _bmcorg_ _e _ 4 ExomFnechorea _e_ cep_o p_o deform]nor _
POWER-MAlETM bolo_o hay ocumulocJbne_ceslvo o b_oque_ d_ pBSUS_.
Umpto el cepi_o y _u_SOpOtte_ _ego i_,_leblezco
lndlcad_ de rendimlerffo 1Oo_ _;:_0polvo_eno oolc_coda, 1 Ccrnb_O_Obo_o_ (p_r_ 12).
dem)o, _. F_hodesoguddaddelmofot_Jdo 2, Um_OBI_II_O,_ _3),
3VK:: de f_jo do o;_oa_c_aa_ :1 D_loquee fo_ v_= do fluJode aim (pc_g_o I_.
4Ciodos OCCeSO_'_S. 4E_IOe:_n@_r_c_.LO _d_be _pOgO_ al quHor
k_ honomlg_gto,
I_osp]_t_ffomlov_rllafope_a= I_Iolnco_tocfodo_vot_epo_o_olool;omDto IAj_eelr_voL(pS_naS).
,_,-_sd_llempuJnf 2. A_plraci_qOomo,dodopolonfo 2 _oolconflo_deas1_itoC_Sn _-_glna ;/},
oPOWER-MAlETM
Loll._l_nclo_ tBomb_o_nGdo }C_Oielobomb_o,(p@g_a 14),
ElcordS_ no*_ enmllo, ICordOn el_cNco _._ IUmpi_ of cordSn el_ctdco.
2Cofcf_t_ 010.scOdo 2, _I0 del cordbn y de_p'd_ en_6_ob
I,aa*phod_'odalommcal 1B_tlode_t_ozolnconec_o f ComultBSUGEIt_NCIASpA£AASRRAR,
In ta olbmbto. (p&g_-,o8)-
't7
SEARS,ROEBUCK AND COo, HOFFMAN ESTATES,IL60179 EUA
PIEZAN_-_CgIZAEX1gUgg-437gg61
Impresoen EUA
,=
c_
>..,_
