Kenmore 11629319800 User Manual VACUUM CANISTER Manuals And Guides L0902276
KENMORE Vacuum, Canister Manual L0902276 KENMORE Vacuum, Canister Owner's Manual, KENMORE Vacuum, Canister installation guides
User Manual: Kenmore 11629319800 11629319800 KENMORE VACUUM CANISTER - Manuals and Guides View the owners manual for your KENMORE VACUUM CANISTER #11629319800. Home:Vacuums & Floor Care Parts:Kenmore Parts:Kenmore VACUUM CANISTER Manual
Open the PDF directly: View PDF ![]() .
.
Page Count: 44
Use & Care Guide
Manual de Uso y Cuidado
Vacuum Cleaner
Aspiradora
Model, Modelo 116.29319
IMPORTANT
Before returning this product-
For replacement =parts,please contact:
Sears Parts and Repair Center
(1-800-488-1222)
Anytime, day or night
(U.,S,A,,only)
For any other issue,please contact:
Vacuum Cleaner Help Line
(1-877-531-7321)
8:00am-5:00pm EST, M-F
(US.A., and Canada)
CAUTION:
Read and follow aIl
safety and operating
instructions before first
use of this product
CUIDADO:
Lea y siga todas las
instrucciones de operaci6n
y segufidad antes del uso de
este producto_
Sears, Roebuck and Co. Hoffman Estates, IL 60179 U.SoA.
www.sears.com
Part No. CO IZDGW 10UOO-KC01ZDGWZOUO Printed in Mexico
Impreso en M_xico
Before Using Your New
Vacuum Cleaner ................... 2
Packing List ............................ 2
Kenmore Vacuum Cleaner Warranty , 3
important Safety Instructions ......... 4
Parts and Features ................. 5-6
Assembly Instructions ............... 7-8
Operating Instructions ............ 9
How to Start .......................... 9
Vacuuming Tips ................... 10
Attachments ....................... 11
Attachment Use Table .............. 12
Performance Features ................ 13
Suggested Pile Height Settings ........ 14
How Your Vacuum Cleaner Works ...... 14
Canister Care ......................... 15
Bag Changing ....................... 15
Cleaning Exterior and Attachments ....... 15
Motor Safety Filter Cleaning ............ !6
Exhaust Filter Changing ................ !6
Power-Mate = Care ....................... 17
Belt Changing and Agitalor Cleaning ,, !7-18
Light Bulb Changing ................ 18
Agitator Servicing .................... 19
Troubleshooting ....................... 20
Master Protection Agreements ..... 21
Notes ............................... 22
Requesting Assistance
Or Service .................. BackCover
Please read this guide,, It will help you assemble and operate your new Kenmore vacuum
cleaner in the safest and most effective way
For more information about vacuum cleaner care and operation, call your nearest Sears
store., You will need the complete model and serial numbers when requesting information,
"Yourvacuum cleaner's model and serial numbers are located on the Model and Serial
Number Plate,
Use the space below to record the model number and serial number of your new Kenmore
vacuum cleaner
Model No.
Serial No,
Date of Purchase
Keep this book and your sales check (receipt) in a safe place for future reference.
PACKING LIST
Your KENMORE VACUUM CLEANER is packaged with the following parts and compo-
nents assembled separately in the carton:
1 Canister Vacuum Cleaner 1 Combination Brush*
1 Power-Mate® 1 UpperWand
1 Hose Assembly 1 LowerWand
1 Handi-Mate Jr.® 1 Use & Care Guide
I Floor Brush* 1 Repair Parts List
1 Crevice Tool*
Each of the above assemblies are shown in detail inside the repair parts list,,
*These items are found under the Too! Cove[.
OneYear Limited Warranty
When assembled, operated and maintained according to all instructions supplied with
the product, if this vacuum cleaner fails due to a defect in matedal or workmanship within
one year from the date of purchase, return it to any Sears store, Sears Parts & Repair
Center or other Kenmore outlet for free repair..
tf this vacuum cleaner is used for other than private family purposes, this warranty
applies for only 90 days from the date of purchase._
This warranty covers only defects in material and workmanship.. Sears wilt NOT
pay for:
t.. Expendable items that can wear out from normal use, including but not limited to
filters, belts, light bulbs, and bags..
2. A service technician to instnJct the user in correct product assembly, operation or
maintenance.
3.. A service technician to clean or maintain this product.
4.. Damage to or failure of this product if it is not assembled, operated or maintained
according to all instructions supplied with the product
5.. Damage to or failure of this product resulting from accident, abuse, misuse or use for
other than its intended purpose..
6. Damage to or failure of this product caused by the use of detergents, cleaners,
chemicals or utensils other than those recommended in all instructions supplied with
the product..
7.. Damage to or failure of parts or systems resulting from unauthorized modifications
made to this product..
Disclaimer of implied warranties; limitation of remedies
Customer's sole and exclusive remedy under this limited warranty shall be product repair
as provided herein.. Implied warranties, including warranties of merchantability or fitness
for a particular purpose, are limited to one year or the shortest pedod allowed by law
Sears sha!l not be liable for incidental or consequential damages.. Some states and
provinces do not allow the exclusion or limitation of incidental or consequential damages,
or limitations on the duration of implied warranties of merchantability or fitness, so these
exclusions or limitations may not apply to you.
This warranty applies only while this vacuum cleaner is used in the United States and
Canada.
This warranty gives you specific lega! rights, and you may also have other rights which
vary from state to state.,
Sears, Roebuck and Co., Hoffman Estates, IL 60179
Sears Canada lnc,., Toronto, Ontario, Canada M5B 2B8
Read all insLructions in this manual before assembling or using your vacuum cleaner.,
WARNING
Your safety is important to us. To reduce the risk of fire, electrical shock,
injury to persons or damage when using your vacuum cleaner, follow basic
safety precautions including the following:
Use your vacuum cleaner only as
described in this manual Use onty with
Sears recommended attachments
Disconnect electrical supply before
servicing or cleaning out brush area.
Failure to do so could result in electrical
shock or brush suddenly starting.
Do not leave vacuum cleaner when
plugged in.. Unplug from outlet when not in
usa and before servicing
To reduce the risk of electrical shock - Do
not use outdoors or on wet surfaces
Do not allow to be used as a toy.. Close
attention is necessary when used by or
near children
Do not use with damaged cord or plug. tf
vacuum cleaner is not working as it should,
has been dropped, damaged, left outdoors,
or dropped into water, return it to a Sears
Service Center.
Do not pull or carry by cord, use cord as a
handle, close door on cord, or pull cord
around sharp edges or comers Do not run
vacuum cleaner over cord Keep cord away
from heated surfaces,,
Do not unplug by pulling on cord. To
unplug, grasp the plug, not the cord.
Do not handle ptug or vacuum cleaner with
wet hands,
Do not put any objects into openings
Do not use with any opening blocked; keep
free of dust, lint, hair and anything that may
reduce airflow..
Keep hair, loose clothing, fingers, and all
parts of body away from openings and
moving parts..
Turn off all controls before unplugging
Use extra care when cleaning on stairs. Do
not put on chairs, tables, etc Keep on
floor
Do not use vacuum cleaner to pick up
flammable or combustible liquids (gasoline,
cleaning fluids, perfumes, etc ), or use in
areas where they may be present,, The
fumes from these substances can create a
fire hazard or explosion
Do not pick up anything that is burning or
smoking, such as cigarettes, matches, or
hot ashes
Do not use vacuum cleaner without dust
bag andtor filters in place
Always change the dust bag after
vacuuming carpet cleaners or freshener,
powders and fine dust. These products clog
the bag, reduce airflow and can cause the
bag to burst.. Failure to change bag coutd
cause permanent damage to the vacuum
cleaner.
Do not use the vacuum cleaner to pick up
sharp hard objects, small toys, pins, paper
clips, etc They may damage the vacuum
cleaner or dust bag
Do not operate vacuum cleaner without the
exhaust filter or exhaust filter door in place
(If applicable)
The hose contains electrical wires. Do not
use when damaged, cut, or punctured
Replace if cut or worn Do not pick up
sharp object&
Always turn off and unplug the vacuum
cleaner before connecting or disconnecting
either hose, Handi-Mate Jr.® (if applicable),
or nozzle
Hold plug when rewinding onto cord reel.
Do not allow plug to whip when rewinding
You are responsible for making sure that
your vacuum cleaner is not used by anyone
unable to operate it propedy
SAVE THESE iNSTRUCTiONS
Proper assembly and safe use of your vacuum cleaner are your responsib_ities,.
ur vacuum cleaner is intended for Household use.. Kead mrs use & bare L_uiae
carefully for important use and safety information.. This guide contains safety
statements unaer warning and caution symbols..
4
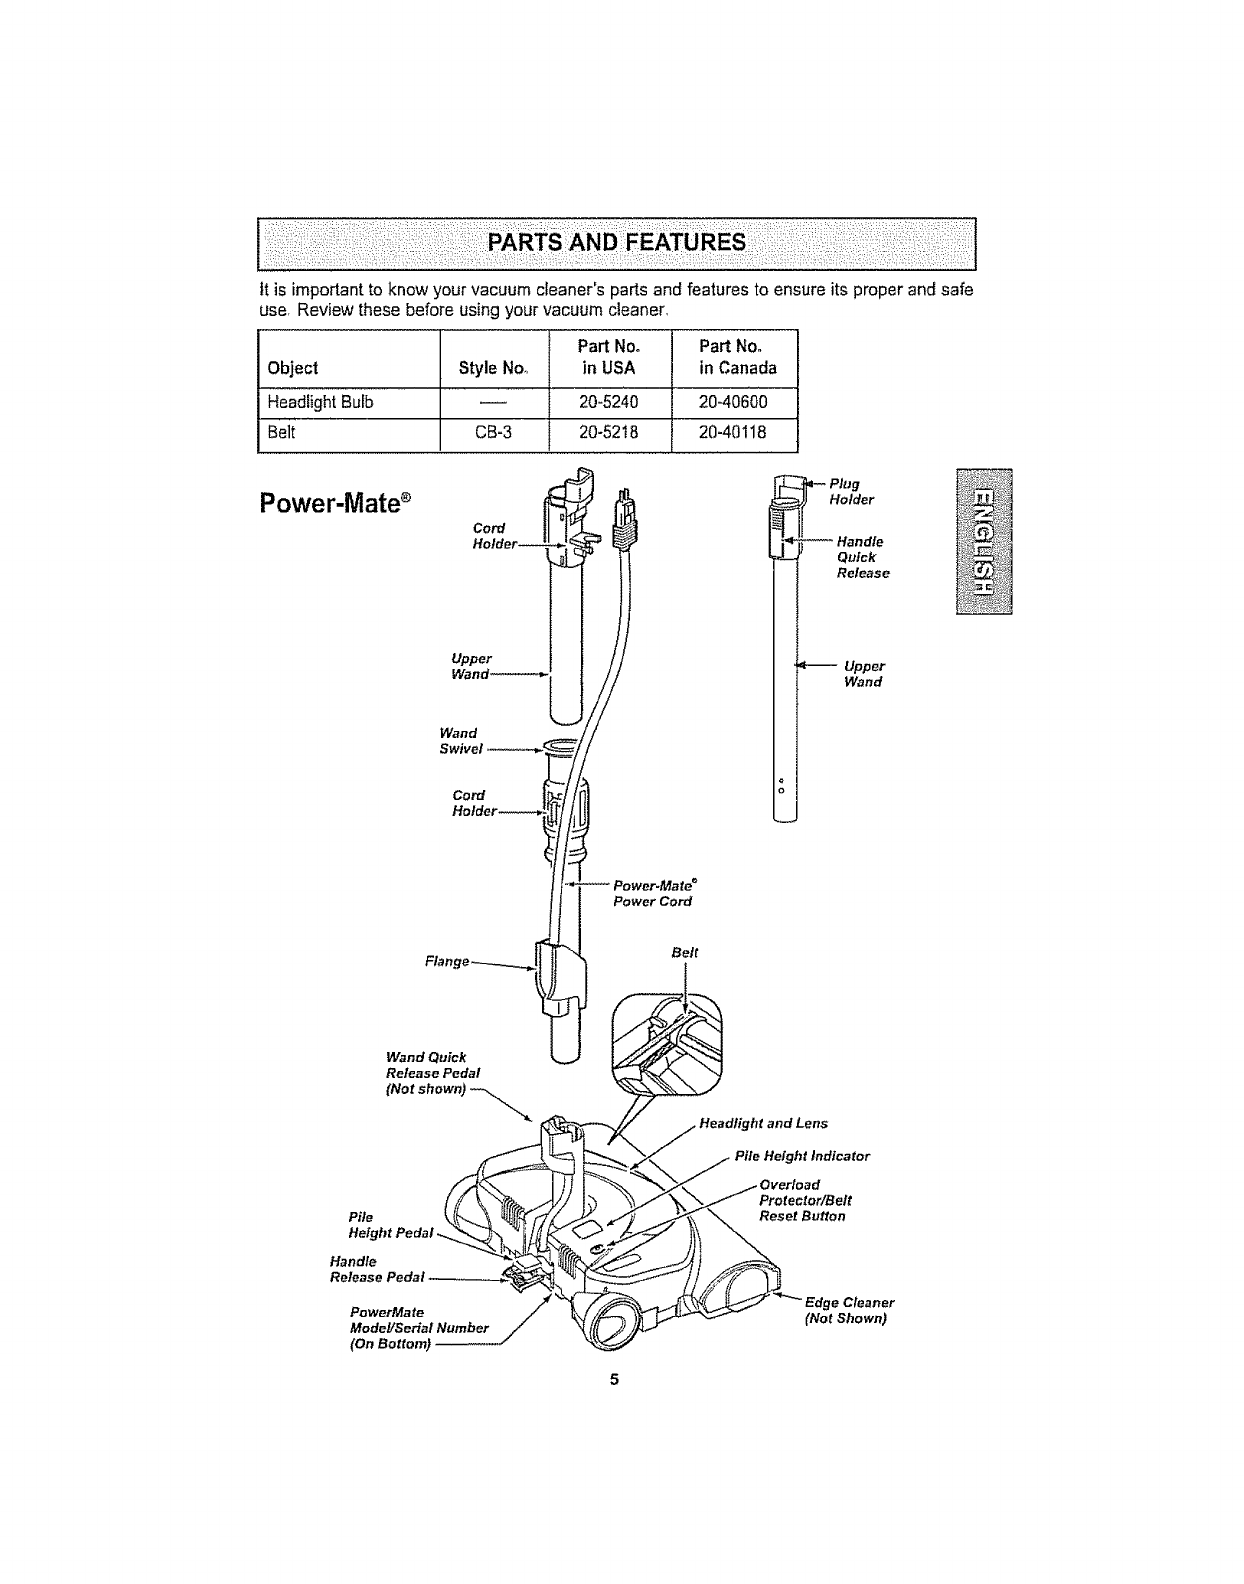
Itisimportanttoknowyourvacuumcleaner'spartsandfeaturestoensureitsproperandsafe
use,Reviewthesebeforeusingyourvacuumcleaner,
Part No° Part Nee
Object Style No,,
Headlight Bulb
Beii CB-3
Power-Mate ®
Cord
Holder_
Upper
Wand-.-.--..._
Wand
Swivel
Cord
Holder-*_
Wand Qu_k
Re_asePedal
(Notshewn
in USA
20-5240
2O-52t8
t
power.Mate _
Power Cord
Belt
t
in Canada
20-40600
20-40118
q-- Plug
Holder
Handle
Quick
Release
_- Upper
Wand
Headlight and Lens
Pile Helgitt Indicator
Pile
Height Pedal.
Protector/Belt
Reset Button
Handle
PowerMate
ModeL/Serial Number
(On Bottom)
(Not Shown)
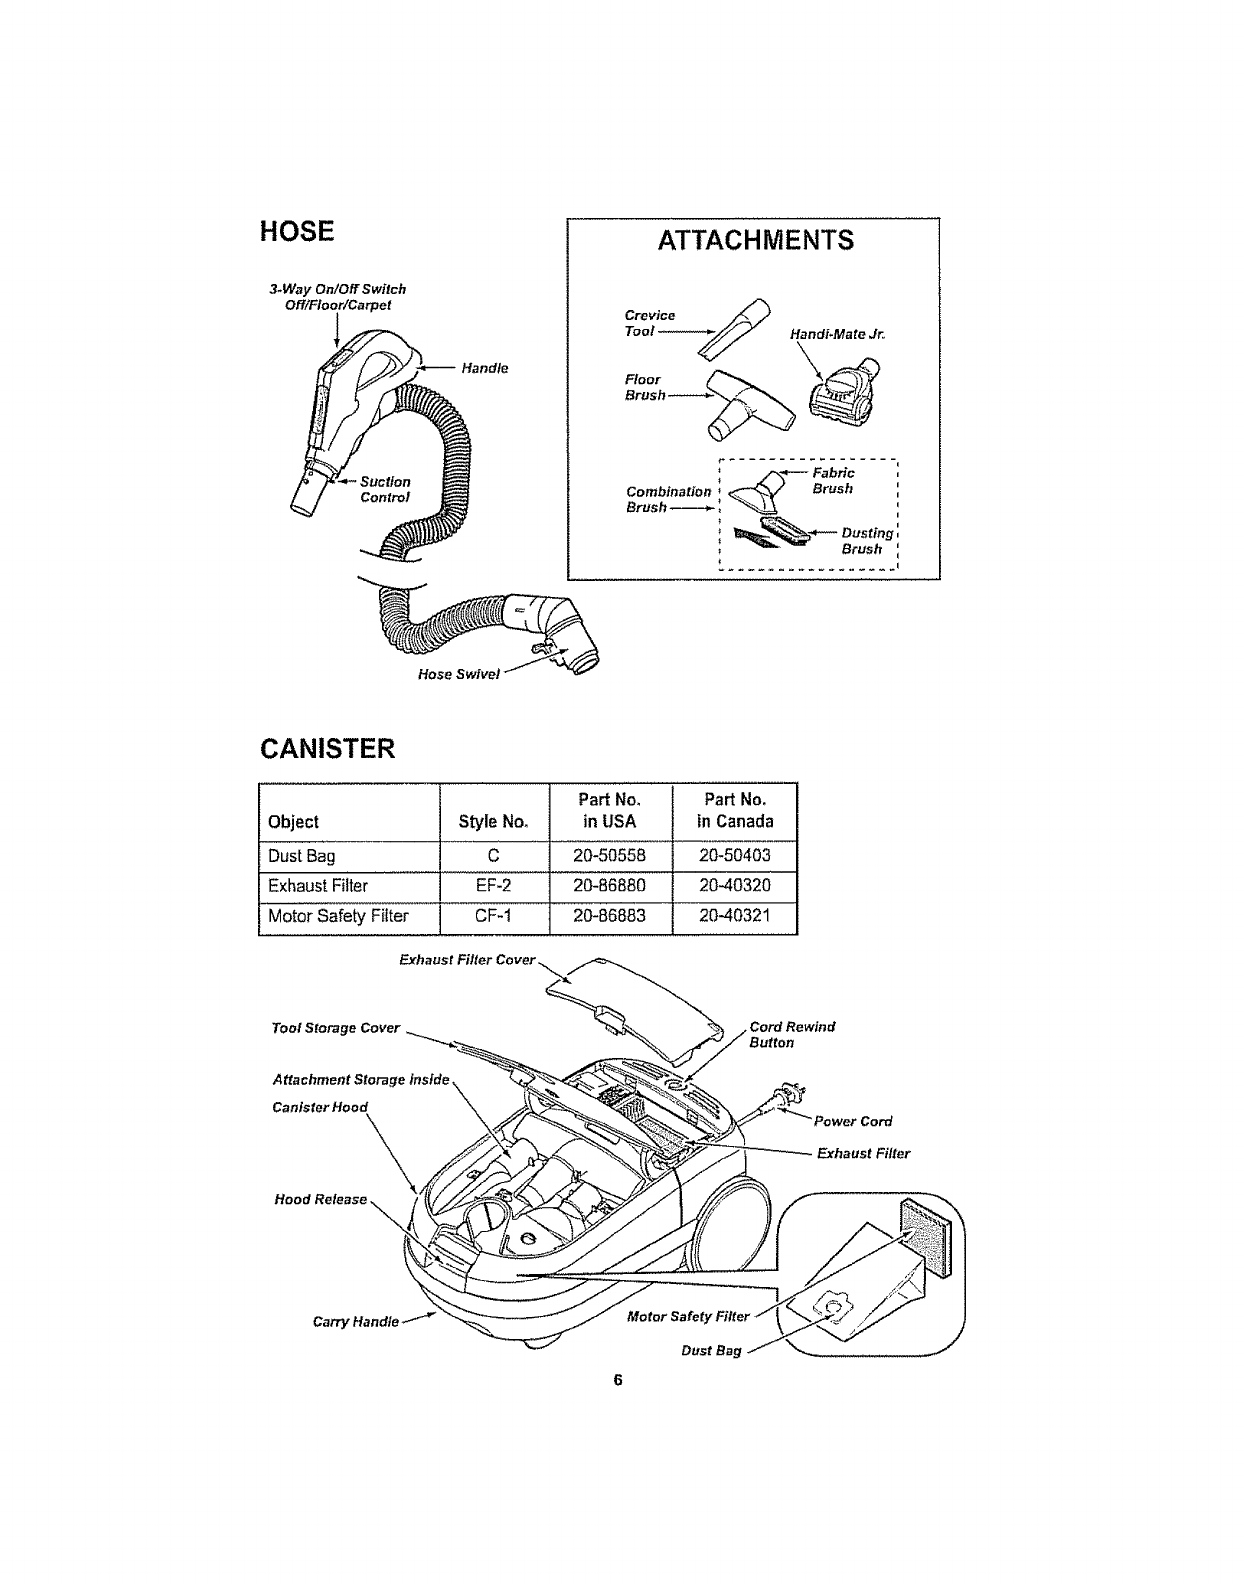
HOSE
3.Way On/Off S witch
Off/Fioor/Carpet
Handle
ATTACHMENTS
Handi_Mate Jr,,
'_ ."_"*--- Fabric
Combination _ _/_ Brush
Brush--_-_- :
*Dusting,
,Brush _1
Hose Swivel
CANISTER
Part Nor Part Noo
Object Style No_ in USA in Canada
Dust Bag c 20-50558 '20-50403
Exhaust Filter EF-2 20-86880 2040320
Motor Safety Filter CF-1 20-86883 20-40321
E_rhaust
Attachment Storage inside,\\
Canister Hood _
.Cord Rewind
Button
Cord
Filter
Carry Handle Motor Safer
Dust Bag
6
i
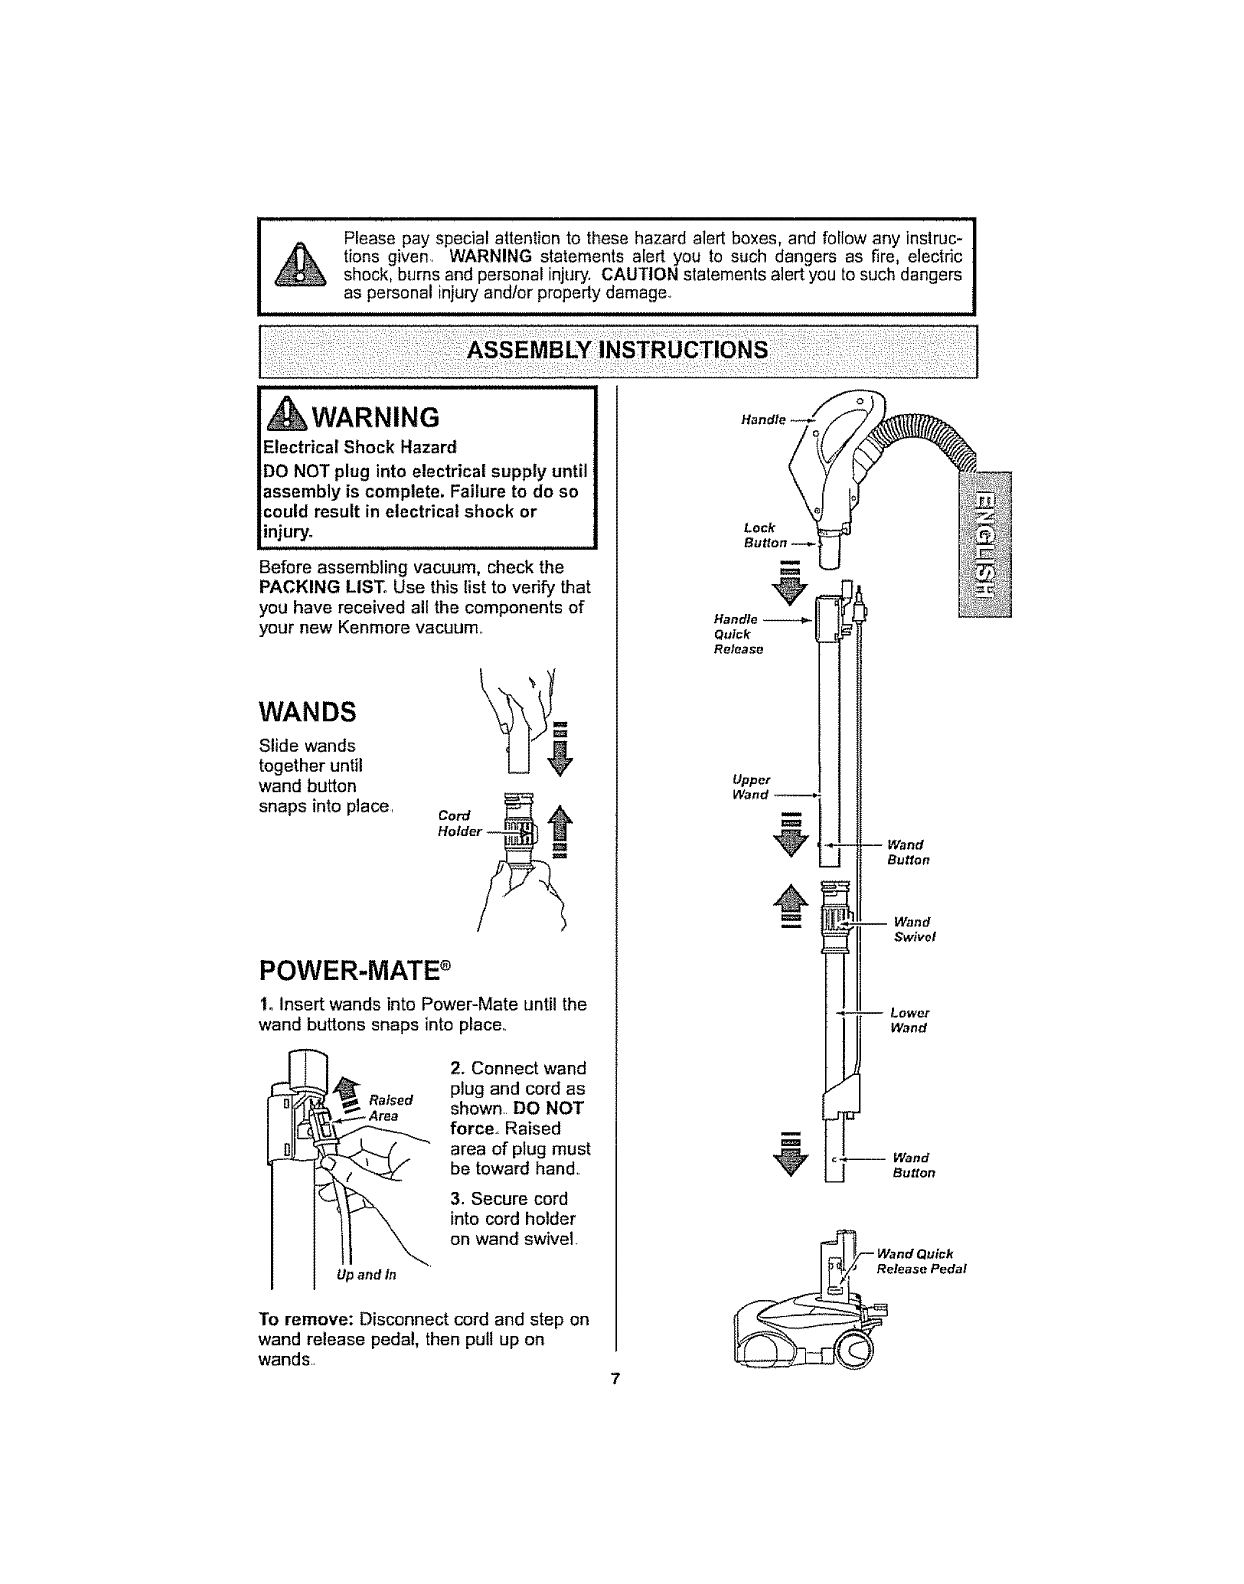
Please pay special attention to these hazard alert boxes, and follow any instruc-
tions given. WARNING statements alert you to such dangers as fire, electdc
shock, burns and personal injury. CAUTION statements alert you to such dangers
as personal injury andlor property damage.
WARNING
Electrical Shock Hazard
DO NOT plug into electrical supply until
assembly is complete. Failure to do so
could result in electrical shock or
injury.
Before assembling vacuum, check the
PACKING LISTo Use this list to verify that
you have received all the components of
your new Kenmore vacuum..
WANDS
Slide wands
together until
wand button
snaps into place, Cord
POWER-MATE
1. insert wands into Power-Mate until the
wand buttons snaps into place,.
Up and la
2. Connect wand
plug and cord as
shown.. DO NOT
force., Raised
area of plug must
be toward hand..
3. Secure cord
into cord holder
on wand swivel
To remove: Disconnect cord and step on
wand release pedal, then pult up on
wands..
-- Wand
Button
CANISTER
1. Open the canister hood
2. Check to see that the dust bag is properly
installed See BAG CHANGING for instruc-
tions
3. Check to see that the motor safety filter is
properly installed. See MOTOR SAFETY
FILTER CHANGING for instructions
HOOD AND TOOL
STORAGE COVER
It is normal for the canister hood and tool
slorage cover to come off when opened fur-
ther than needed. Line up the hinge slots,
insert the hinges into the slots, and close
the hood and tool storage cover to reinstall.
CAUTION
Never open canister hood with the tool
storage cover open. This wilt help to
prevent damage from occurring to the
canister hood andlor tool storage cover,
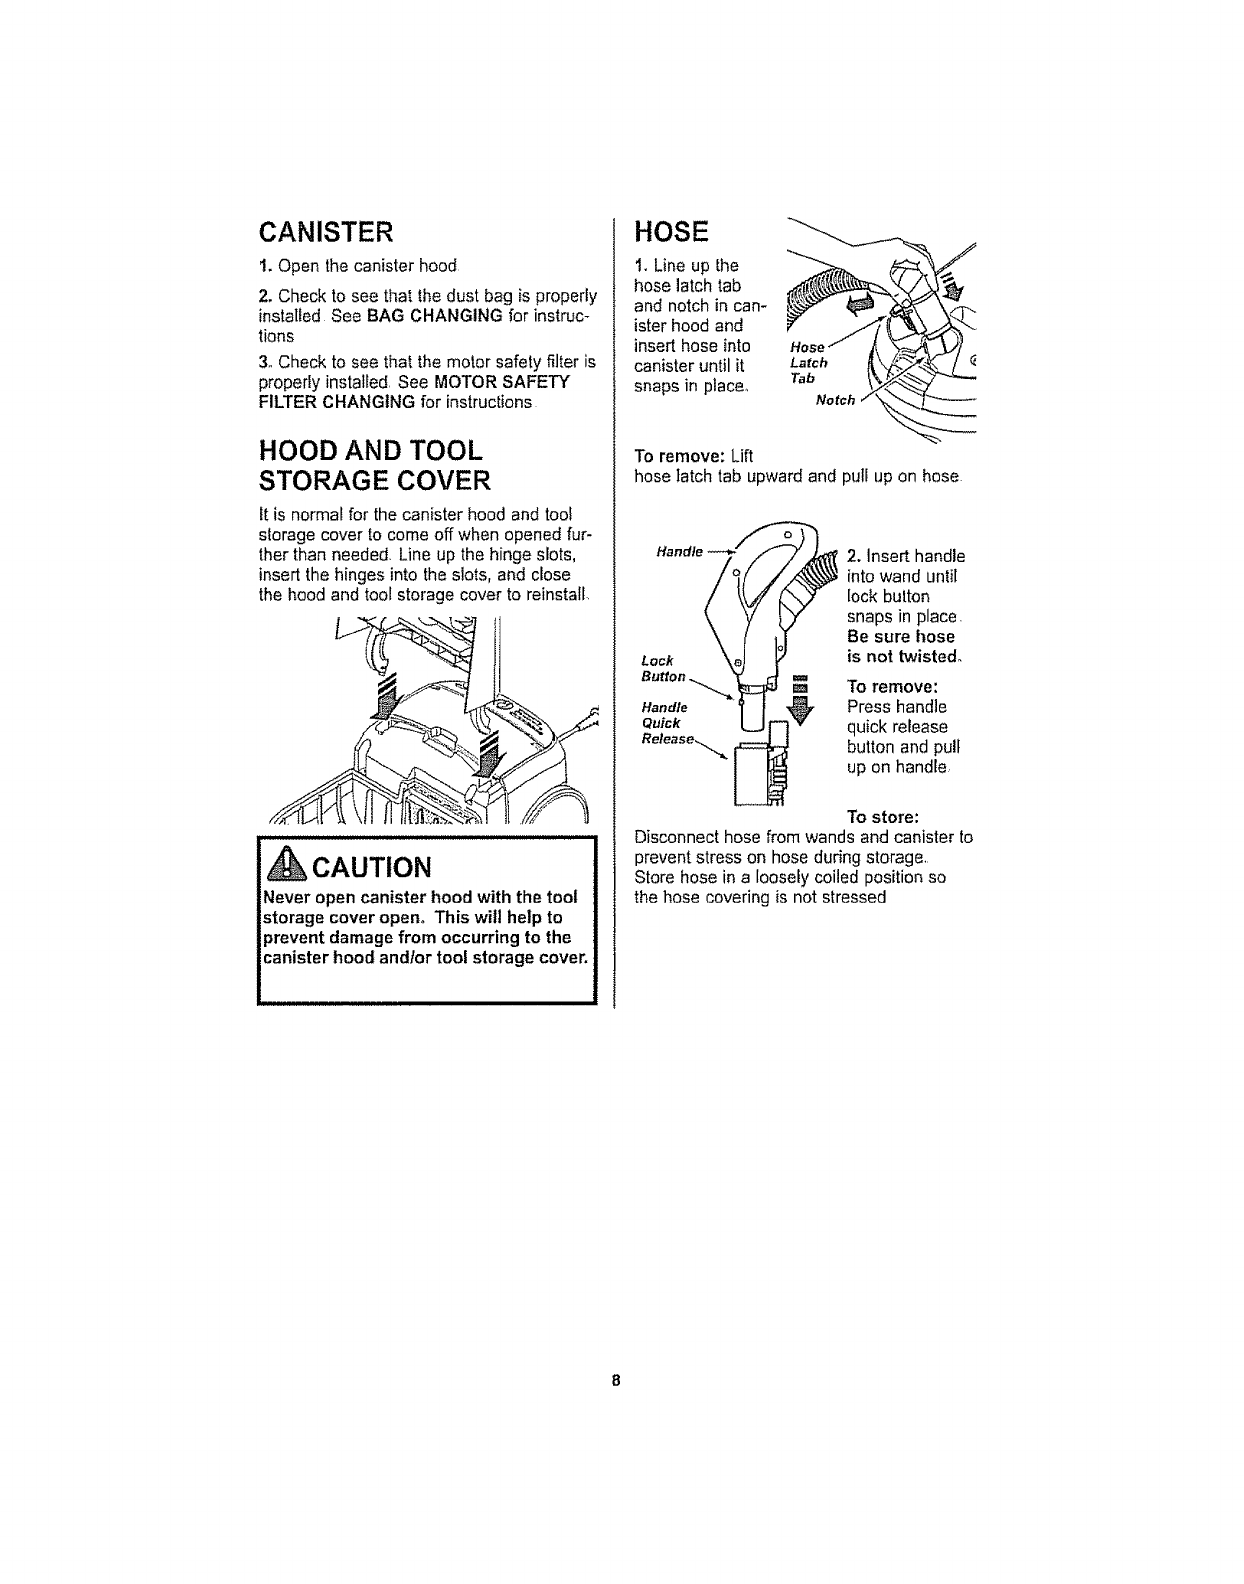
HOSE
1. Line up the
hose latch tab
and notch in can-
ister hood and
insert hose into
canister until it
snaps in place°
Latch
Tab
Notch
To remove: Lift
hose latch tab upward and pull up on hose
Handle
Lock
2. Insert handle
into wand until
lock button
snaps in place.
Be sure hose
is not twisted.
To remove:
Handle Press handle
Q.ick quick release
Release._ button and pull
up on handle
To store:
Disconnect hose from wands and canister to
prevent stress on hose during storages.
Store hose in a loosely coiled position so
the hose covering is not stressed
CAUTION
Moving parts! To reduce the risk of personal injury,
DO NOT touch the agitator when vacuum cleaner is
on. Contacting the agitator while it is rotating can
cut, bruise or cause other injuries_ Always turn off
and unplug from electrical outlet before servicing
Use caution when operating near children,,
HOW TO START
WARNING
Personal Injury and Product Damage
Hazard
DO NOT plug in if switch is in ON
position. Personal injury or property
damage could result.
The cord moves rapidly when
rewinding. Keep children away
and provide a clear path when
rewinding the cord to prevent
personal injury.
DO NOT use outlets above counters_
Damage from cord to items in
surrounding area could occur°
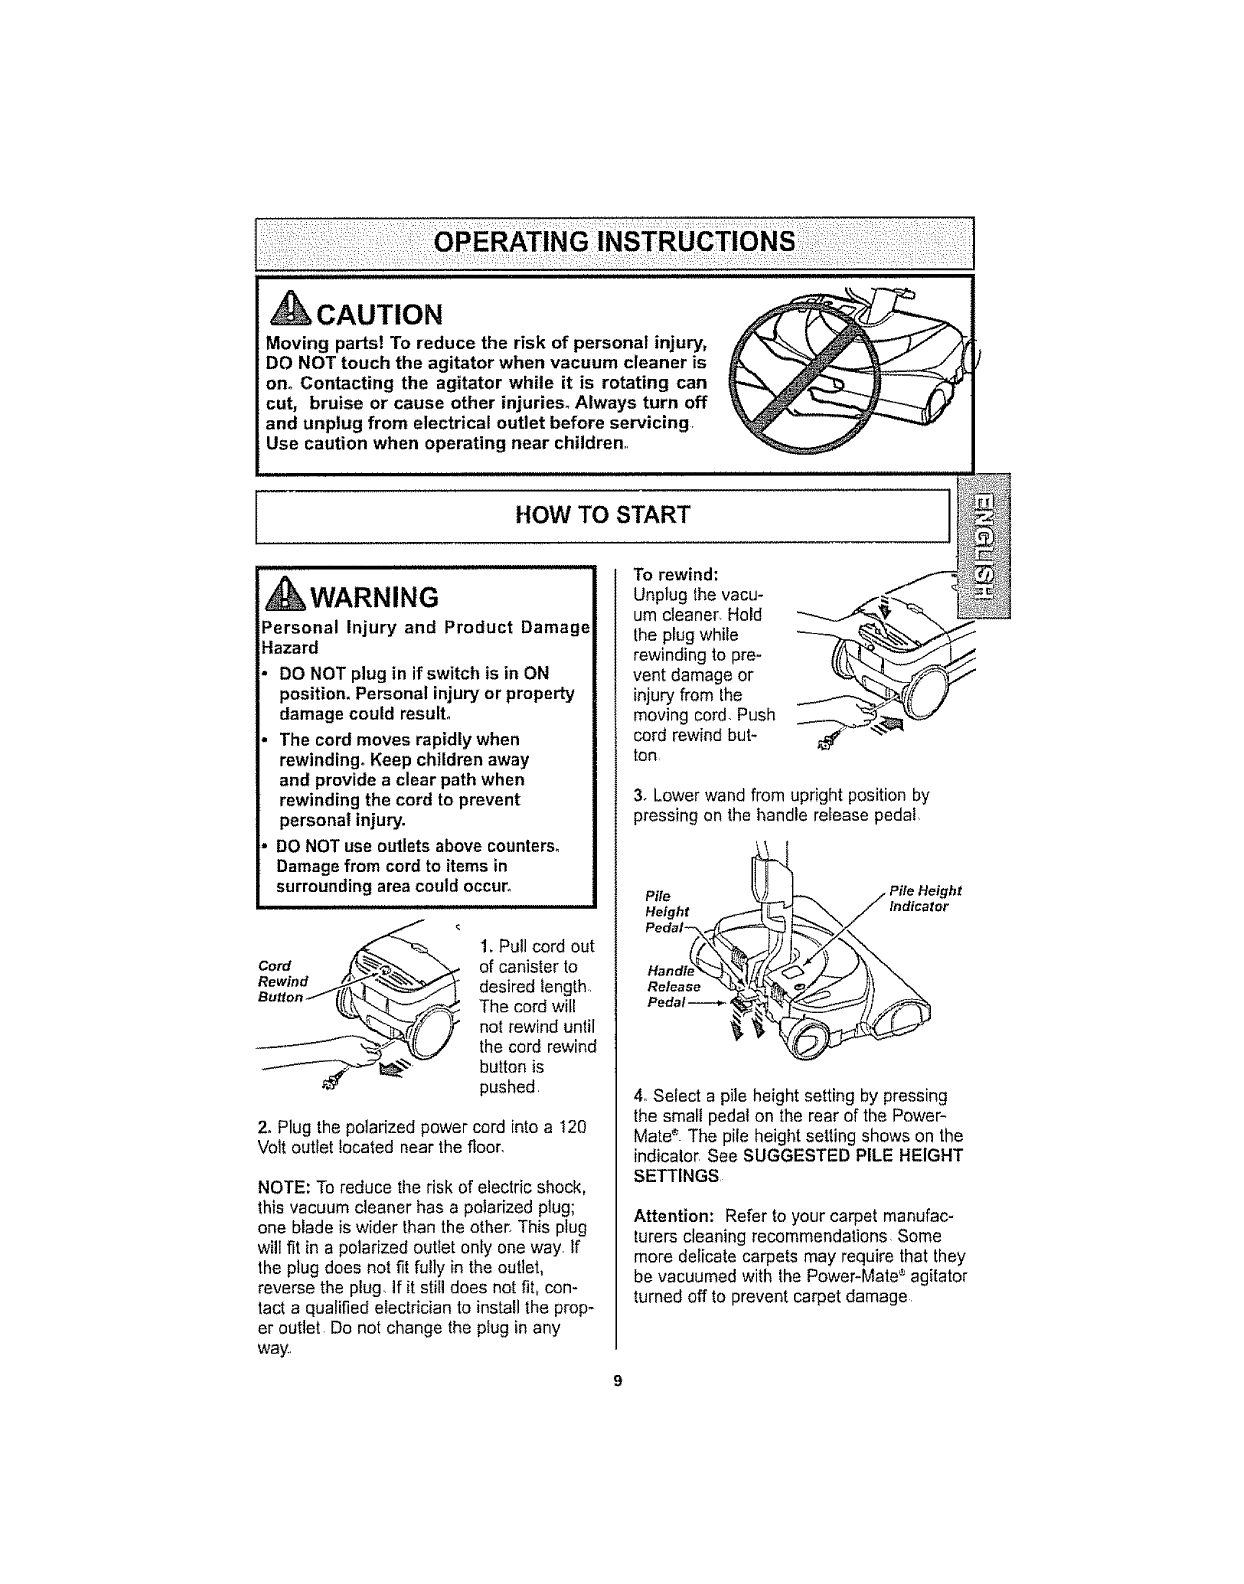
1. Pull cord out
of canister to
desired length..
The cord will
not rewind until
the cord rewind
button is
pushed,
2. Plug the polarized power cord into a !20
Volt outlet located near the floor.
NOTE: To reduce tile risk of electric shock,
this vacuum cleaner has a polarized plug;
one blade is wider than the other. This plug
will fit in a polarized outlet only one way. If
the plug does not fit fully in the outlet,
reverse the pEug.if it stifi does not fit, con-
tact a qualified electrician to install the prop-
er outlet Do not change the plug in any
way,
To rewind:
Unplug lhe vacu-
um cleaner. Hold
the plug while
rewinding to pre-
vent damage or
injury from the
moving cord, Push
cord rewind but-
ton,
3. Lower wand from upright position by
pressing on the handle release pedal
4. Select a pile height setting by pressing
the small pedal on the rear of the Power-
Mate_'.The pile height setting shows on the
indicator See SUGGESTED PILE HEIGHT
SETTINGS,
Attention: Refer to your carpet manufac-
turers cleaning recommendations. Some
more delicate carpets may require that they
be vacuumed with the Power-Mate _ agitator
turned off to prevent carpet damage
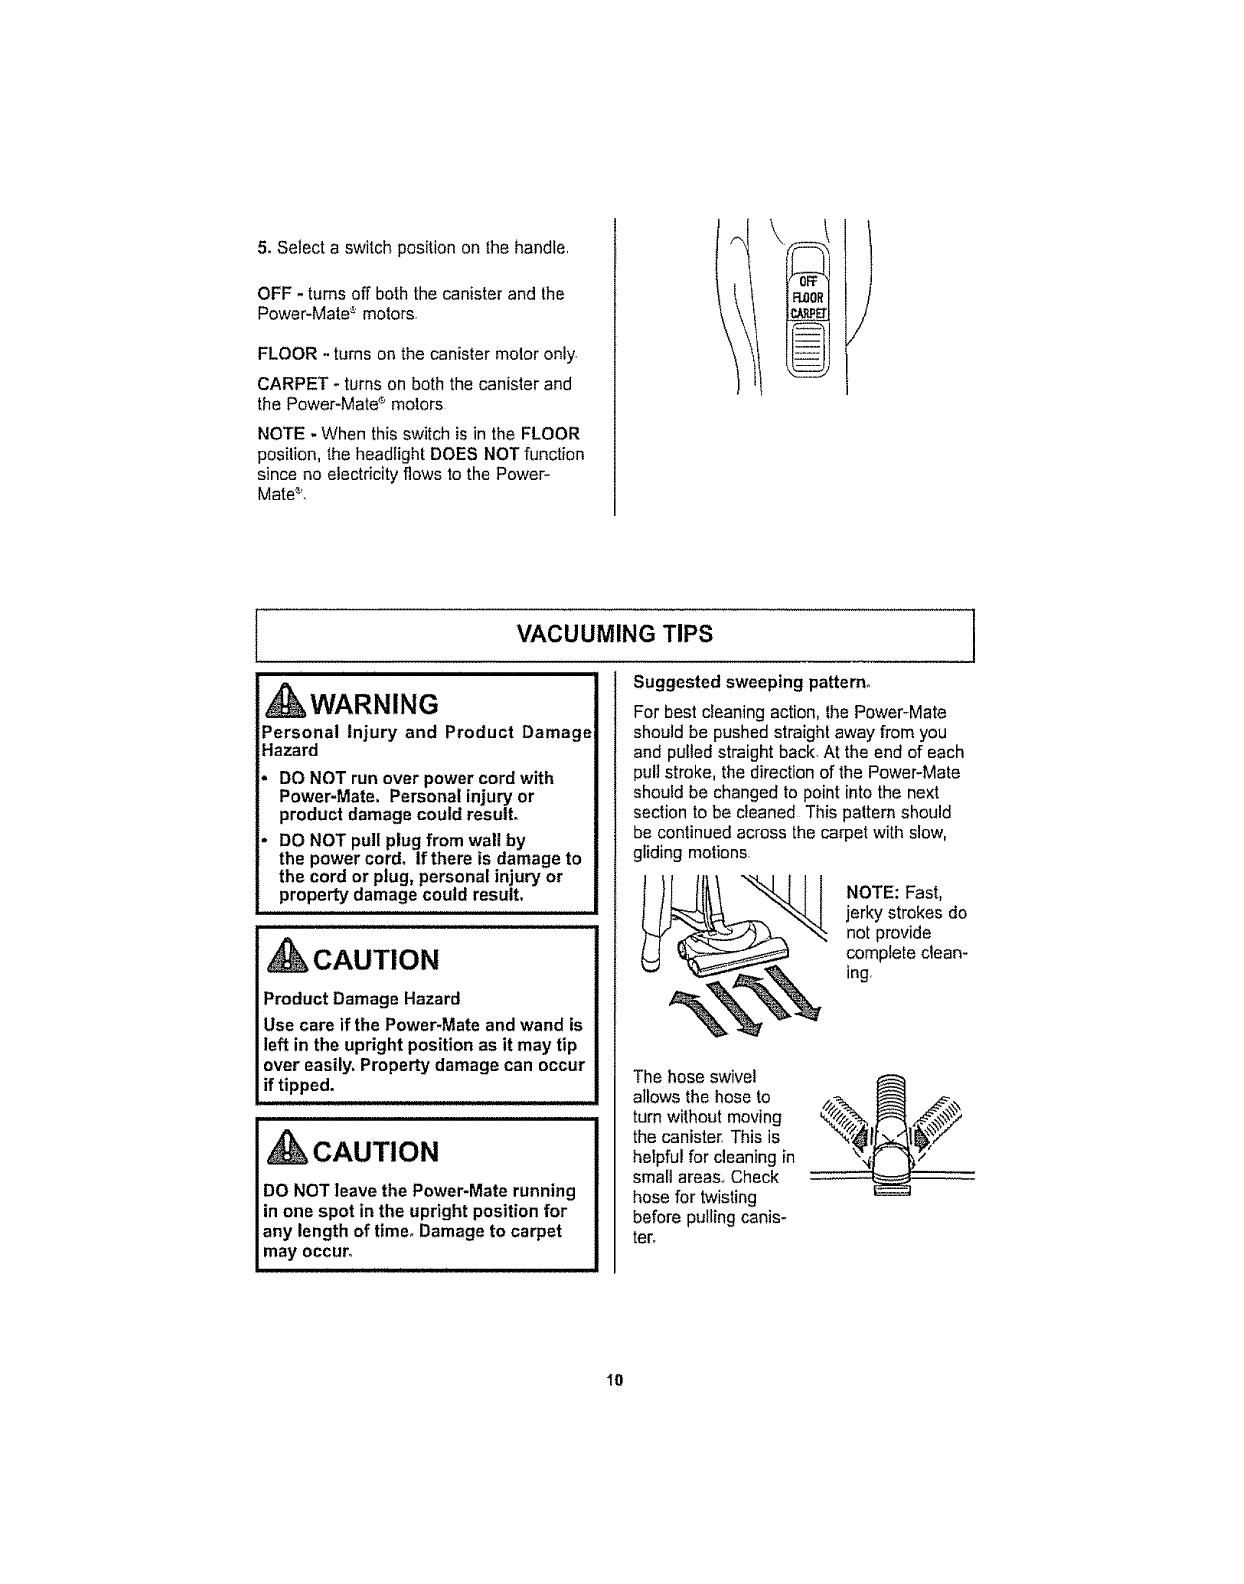
5. Select a switch position on the handle,
OFF - turns off both the canister and the
Power-Mate s motors.
FLOOR .. turns on the canister molor only.
CARPET - turns on both the canister and
the Power-Mate e motors
NOTE -When this switch is in the FLOOR
position, the headlight DOES NOT function
since no electricity flows to the Power-
Mates'.
VACUUMING TIPS
Suggested sweeping pattern.
WARNING
Personal Injury and Product Damage
Hazard
DO NOT run over power cord with
Power-Mate, Personal injury or
product damage could result.
DO NOT pull plug from wall by
the power cord, If there is damage to
the cord or plug, personal injury or
property damage could result,
i i nl iiii illlllllnllll ill I ill ii illl ulullll
kCAUTION
Product Damage Hazard
Use care if the Power-Mate and wand is
left in the upright position as it may tip
over easily, Property damage can occur
if tipped.
CAUTION
I DO NOT leave the Power-Mate running
in one spot in the upright position for
any length of time. Damage to carpet
may occur°
For best cleaning action, the Power-Mate
should be pushed straight away from you
and pulled straight back. At the end of each
pull stroke, the direction of the Power-Mate
should be changed to point into the next
section to be cleaned This pattern should
be continued across the carpet with slow,
gliding motions.
NOTE: Fast,
jerky strokes do
not provide
complete clean-
ing,
The hose swive!
allows the hose to
turn without moving
the canister_ This is
helpful for cleaning in
small area&, Check
hose for twisting
before pulling canis-
tero
10
Personal Injury Hazard
Use care if canister is placed on stairs,.
It may fall, causing personal injury or
property damage.
CAUTION
Product Damage Hazard
Do not pull on the hose to move the
canister from one stair to the next°
When finished cleaning in one area
use the handle grip on the canister to
move the vacuum cleaner to anew
location for further cleaning.
i ii i i,,l, Hll,i,HI,IH
Suction
Control
Carpeted stairs need to be vacuumed
regularly For best cleaning results, fully
close the suction control,
For best cleaning results, keep the
airflow passage open_. Check each
assembly area in HOW YOUR VACUUM
CLEANER WORKS occasionally for clogs.
Turn off and unplug vacuum cleaner
from outlet before checking.
ATTACHMENTS
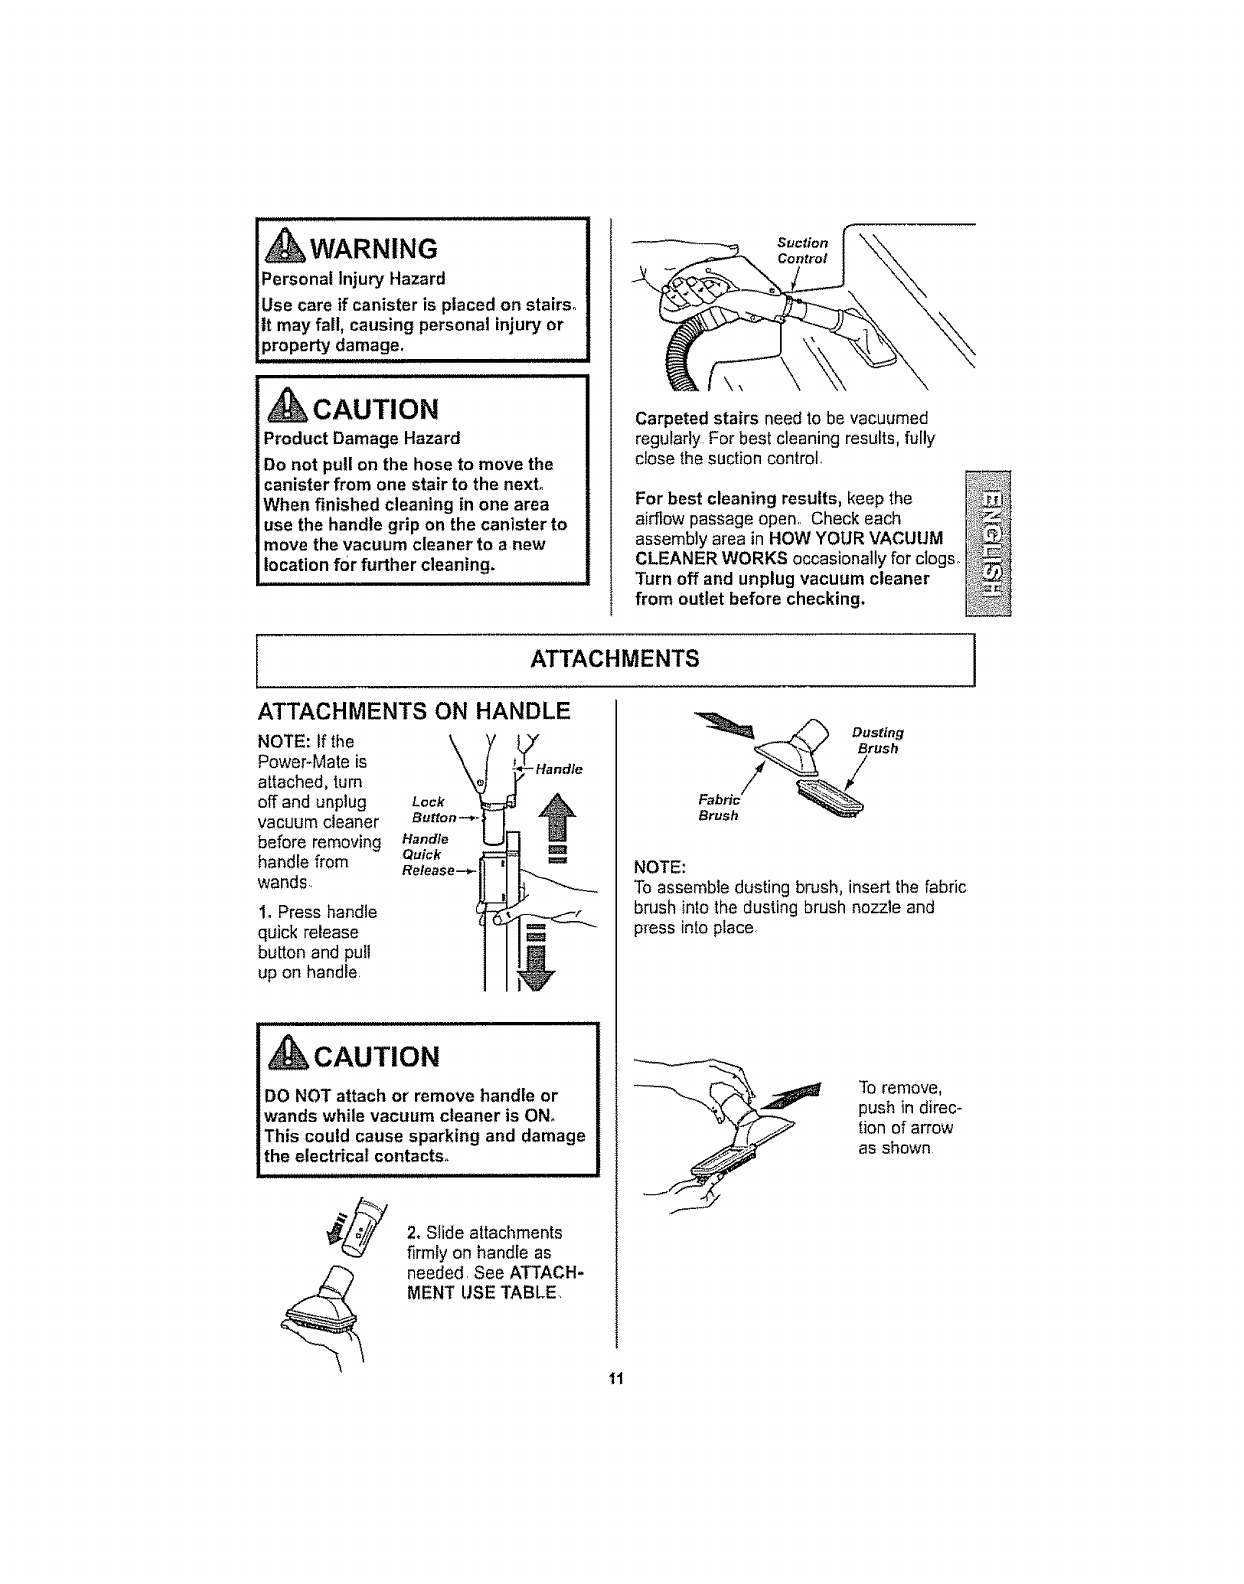
ATTACHMENTS ON HANDLE
NOTE: If the \
Power_Mate is \. "Handle
attached, turn
off and unplug Lock ,_
vacuum cleaner Button--*_ T
before removing Handle
Quick
handle from Release--.-
wands,
1. Press handle
quick release
button and pull
up on handle.
CAUTION
DO NOT attach or remove handle or
wands while vacuum cleaner is ONo
This could cause sparking and damage
the electrical contacts°
2. Slide attachments
firmly on handle as
needed, See ATTACH-
MENT USE TABLE,
Brush
NOTE:
To assemble dusting brush, insertthe fabric
brush into the dusting brush nozzle and
press into place.
To remove.
push in direc-
tion of arrow
as shown
11
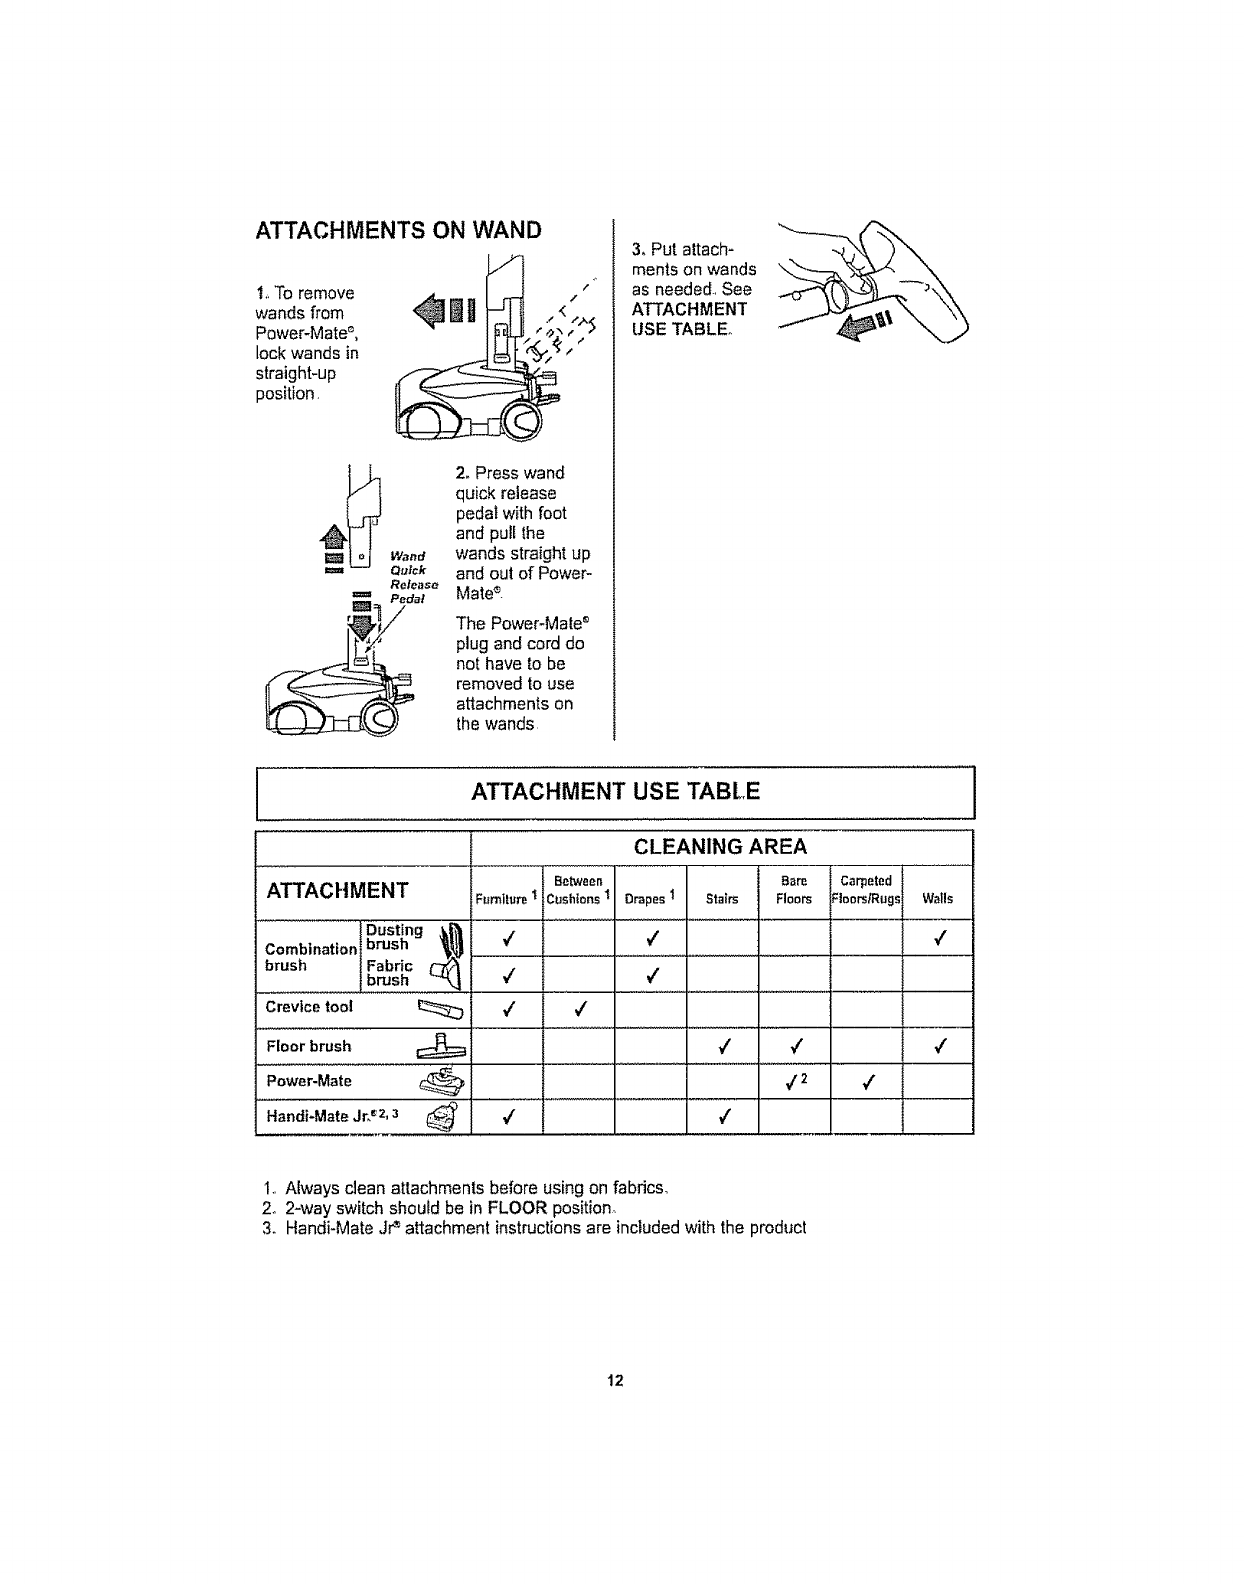
ATTACHMENTS ON WAND
t. To remove
wands from
Power-Mate _,
lock wands in
straight-up
position.
.I
__ 2oPress wand
quick release
pedal with foot
and pull the
Wa.d wands straight up
_utck and out of Power-
Release Mate_
The Power-Mate ®
plug and cord do
not have to be
removed to use
attachments on
the wands,
3, Put attach-
ments on wands
as neede& See
ATTACHMENT
USE TABLE_
ATTACHMENT USE TABLE
CLEANING AREA
Between Bare Carpeted
ATTACHMENT Furniture ICushionsIDrapes tStairS FloorS =leers/Rugs Walls
Dusting _
Combination brush vz_ -,/
brush Fabric
brush _#" =
Crevice tool _
Floorbrush _ ,,/
,/2 #"
Handi*MateJr,_2,_ _ V'
I.. Always clean attachments before using on fabdcs.
2. 2-way switch should be in FLOOR position.
3. Handi-Mate Jr_ attachment instructions are includedwith the product
12
PERFORMANCE FEATURES
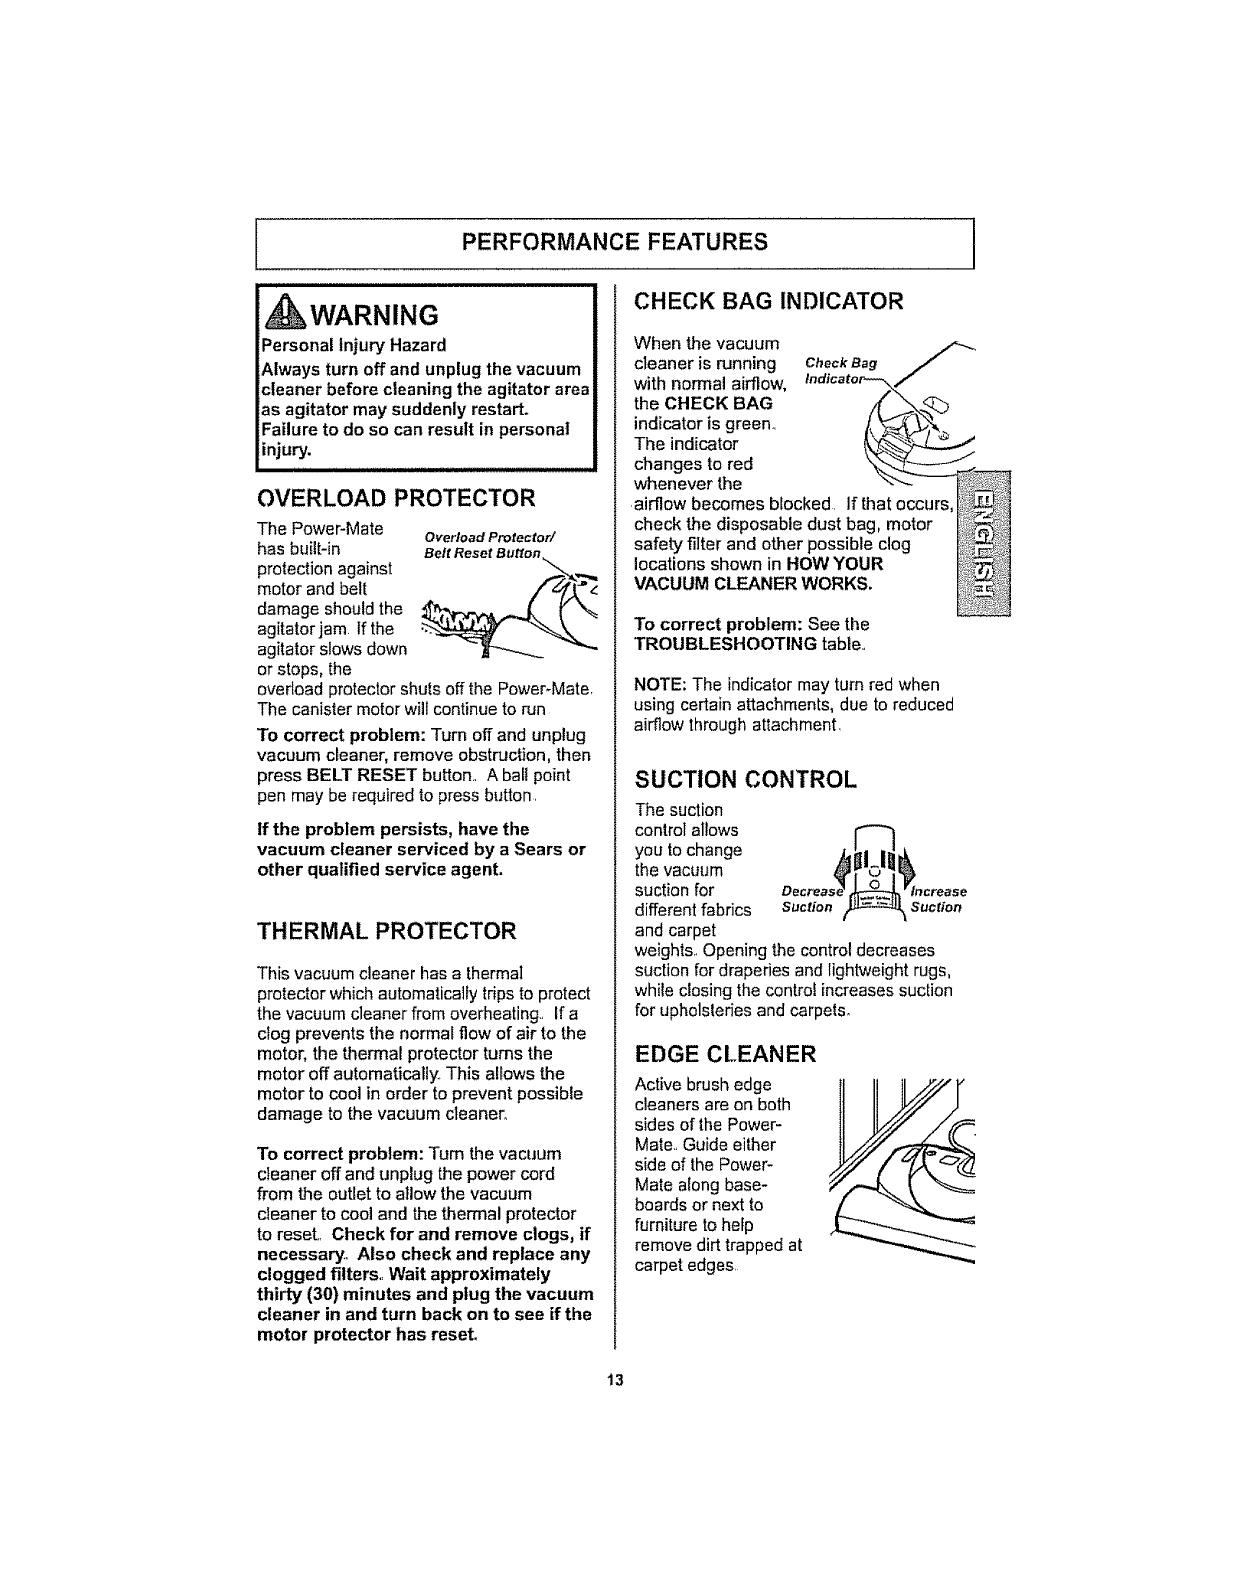
WARNING
Personal Injury Hazard
Always turn off and unplug the vacuum
cleaner before cleaning the agitator area
as agitator may suddenly restart.
Failure to do so can result in personal
injury.
OVERLOAD PROTECTOR
The Power-Mate OverloadProtector/
has built-in Belt Reset Button
protection against
motor and belt
damage should the
agitator jam If the
agitator slows down
or stops, the
overload protector shuts off the Power-Mater
The canister motor will continue to run
To correct problem: Turn off and unplug
vacuum cleaner, remove obstruction, then
press BELT RESET button,. A ball point
pen may be required to press button.
If the problem persists, have the
vacuum cleaner serviced by a Sears or
other qualified service agent.
THERMALPROTECTOR
This vacuum cleaner has a thermal
protector which automatically trips to protect
the vacuum cleaner from overheating.. If a
ctog prevents the normal flow of air to the
motor, the thermal protector turns the
motor off automatically, This allows the
motor to cool in order to prevent possible
damage to the vacuum cleaner,
To correct problem: Turn the vacuum
cleaner off and unplug the power cord
from the outlet to allow the vacuum
cleaner to cool and the thermal protector
to reseL Check for and remove clogs, if
necessary. Also check and replace any
clogged filters,, Wait approximately
thirty (30) minutes and plug the vacuum
cleaner in and turn back on to see if the
motor protector has reset°
CHECK BAG INDICATOR
When the vacuum
cleaner is running ChockBag
with normal airflow, Indicator---.\J
theCHECKBAG
indicator is green., i_,_j _.
The indicator __
changes to red __
whenever the -- ---
.airflow becomes blocked. If
check the disposable dust b
safety filter and other possibl
locations shown in HOW YO
VACUUM CLEANER WORK
To correct problem: See the
TROUBLESHOOTING table..
NOTE: The indicator may turn red when
using certain attachments, due to reduced
airflow through attachment.
SUCTION CONTROL
The suction
control allows
you to change
the vacuum
suction for
different fabrics suction
and carpet
weights.. Opening the control decreases
suction for draperies and lightweight rugs,
while closing the control increases suction
for upholsteries and carpets.
Suction
EDGE CLEANER
Active brush edge
cleaners are on both
sides of the Power-
Mate.. Guide either
side of the Power-
Mate a{ong base-
boards or next to
furniture to help
remove dirt trapped at
carpet edges.
13
SUGGESTED PILE HEIGHT SETTINGS
For best deep down cleaning, use the XLO
setting. However, you may need to raise the
height to make some jobs easier, such as
scatter rugs and some deep pile carpets,
and to prevent the vacuum cleaner from
shutting off, Suggested settings are:
HI - Shag, deep pile, or scatter rugs,
MED - Medium to deep pile.
LO - Low to medium pile,
XLO -Most carpets and bare floors,,
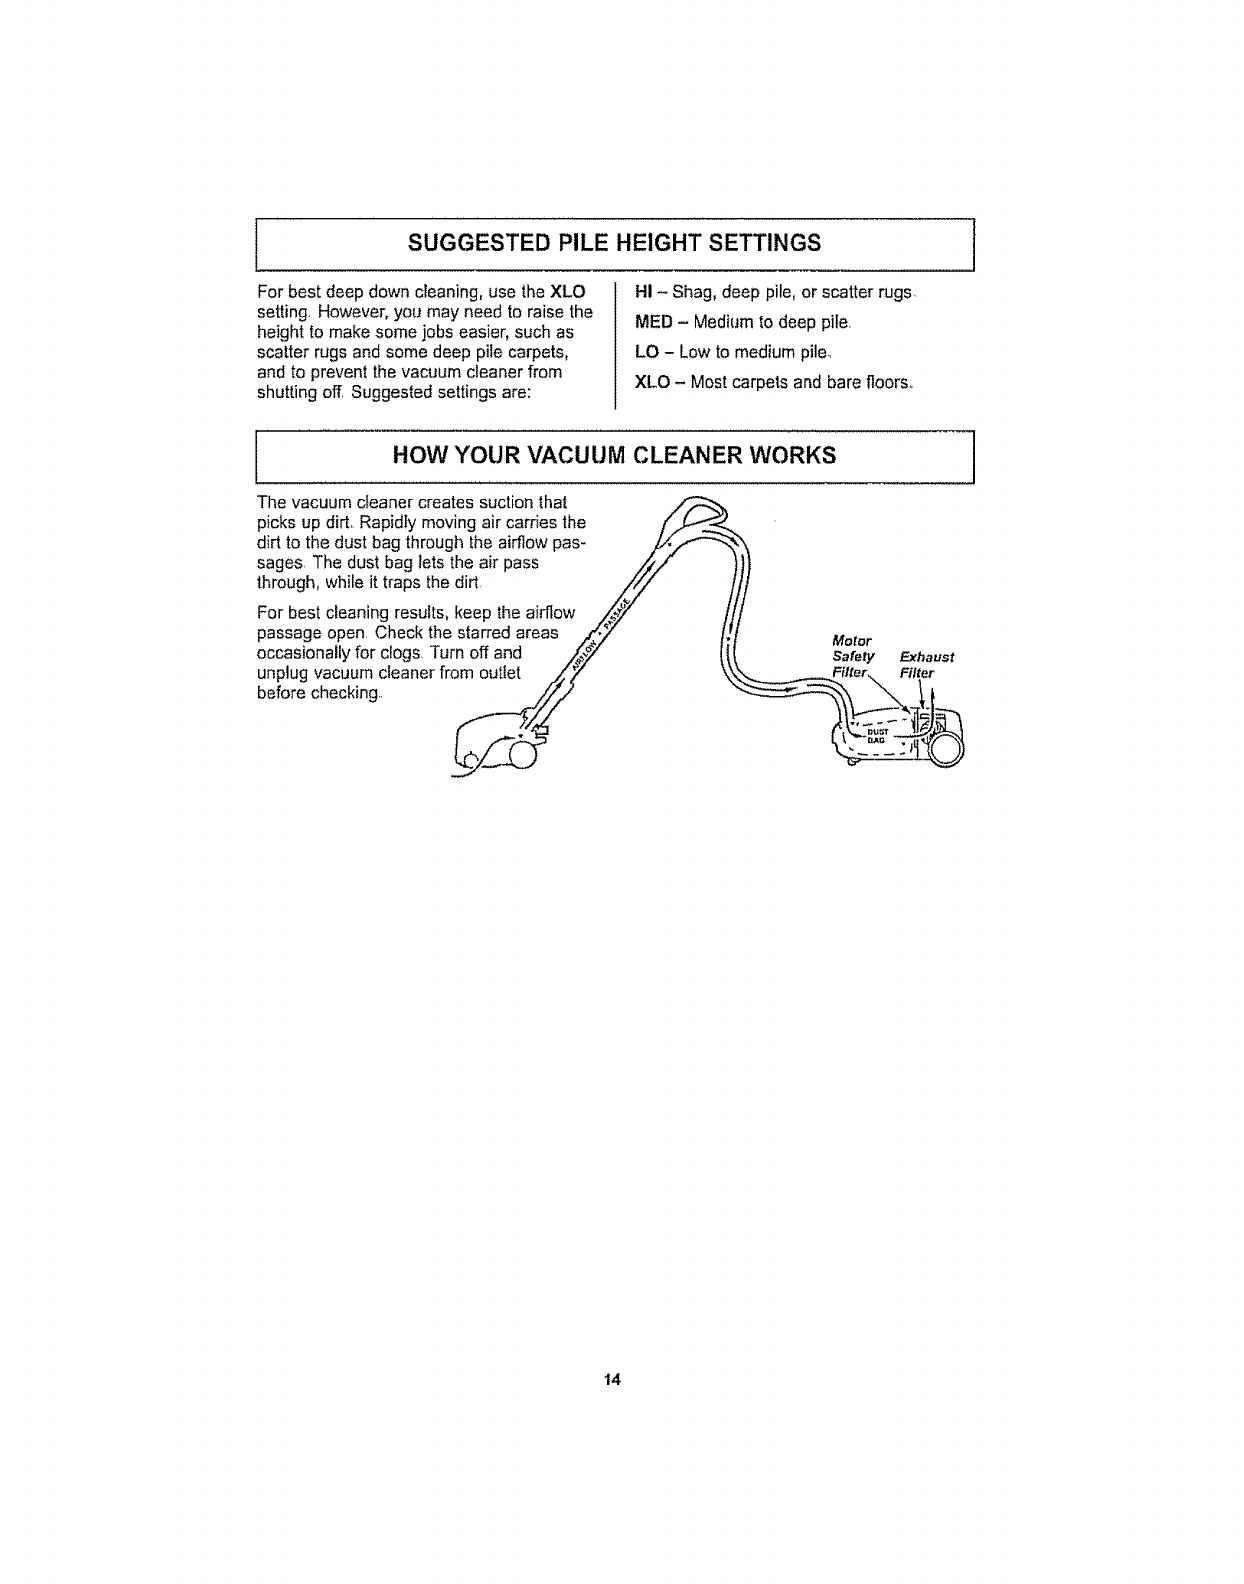
HOW YOUR VACUUM CLEANER WORKS
The vacuum cleaner creates suction that
picks up dirt,. Rapidty moving air carries the [" .L-,-"__..,
dirt to the dust bag through the airflow pas- ./A'_
sages, The dust bag lets the air pass .,,_/.f
through, while it traps the dirt //_/
For best cleaning results, keep the airflow X/_y
passage open, Check the starred areas /I"ZY
occasionally for clogs, Turn off and _' Motor
Safety Exhaust
unplug vacuum cleaner from outlet ._zZ ,. .........Filter_ Filter
before checking.. _ ___ _,_. I.
14

IBAG CHANGING
For best cleaning results, the dust bag
should be changed often.,The CHECK BAG
indicator will change to red when the bag
needs to be changed or the airflow is
blocked
NOTE: See PARTS AND FEATURES for
Bag Number.
t, Turn off and unplug vacuum cleaner from
wall outlet,,
2. Remove hose from canister_,
3, Pull up hood
release and lift
canister hood.
4, Disengage
cardboard tab from
red bag mount by
pulling away and
lifting up,
Motor.
-Filter 5, Pull bag out
of the red bag
mount,,
6oCheck the motor safety filter and replace,
if necessary,,
i
7,,The red bag mount will flip forward after
removing bag. This will prevent the hood
from closing until a new bag is installed
Note: DO NOT bend or crease the
middle of the cardboard when installing
the bag into the bag mount slots.
& Rotate red bag ._,_.._<:, __
mount down and
install bag into slots - _i,'_
as shown, pushing _
down until the
cardboard tab locks _,_;_:_
into position and the ,..__r_" J_F-Y_
holes align Tuck __//,,....... / /
the bag securely
into the bag cavity so that none of it will be
pinched by the hood
9oClose and latch canister hood..
iOoReinstall hose
11. Plug cord into wall outlet
CAUTION
NEVER REUSE ADUST BAG. Very fine
materials, such as carpet freshener,
face powder, fine dust, plaster, soot,
new carpet lint, etco can clog the bag
and cause it to burst before it is full
and may cause damage to vacuum
cleaner motor. Change bag more often
when vacuuming these materials,
CLEANING EXTERIOR AND ATTACHMENTS
i
1. Turn off and unplug vacuum cleaner. DO
NOT drip water on vacuum cleaner_
2. To clean exterior, or to reduce static elec-
tdcity and dust build-up, wipe outer surface
of vacuum cleaner and attachments. Use a
clean, soft cloth that has been dipped in a
solution of mild liquid detergent and water,
then wnmg dry..Wipe dry after cleaning.
i i i iiii i iii i nl Ii,i i
CAUTION
Do not use attachments if they are wet°
Attachments used in dirty areas, such
as under a refrigerator, should not be
used on other surfaces until they are
washed. They could leave marks,
15
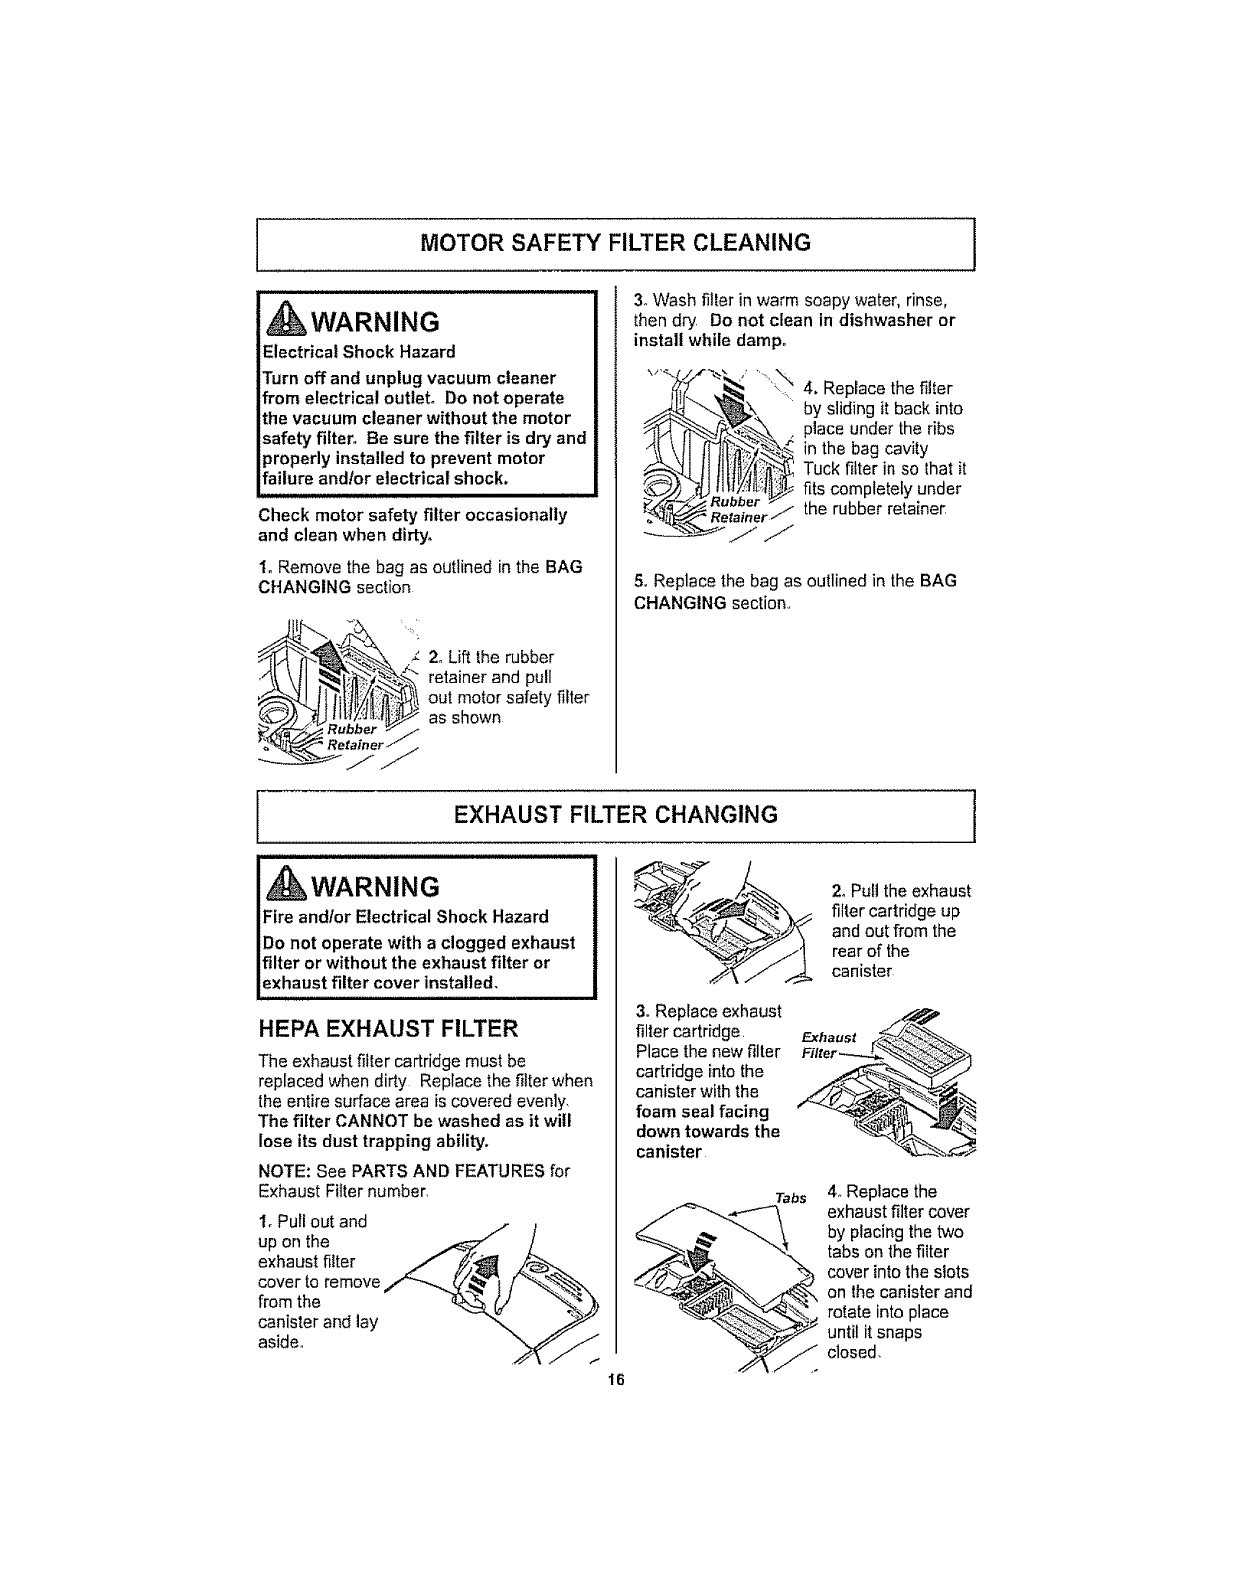
MOTOR SAFETY FILTER CLEANING
WARNING
Electrical Shock Hazard
Turn off and unplug vacuum cleaner
from electrical outlet. Do not operate
the vacuum cleaner without the motor
safety filter,, Be sure the filter is dry and
properly installed to prevent motor
failure and!or electrical shock.
JUIUJIJIHUI,nl
Check motor safety filter occasionally
and clean when dirty.
l oRemove the bag as outlined in the BAG
CHANGING section
2. Lift the rubber
retainer and pull
out motor safety filter
as shown
3. Wash filler in warm soapy water, rinse,
then dry, Do not clean in dishwasher or
install while damp.
._j_i_._._._ '_ 4. Rep,ace the filter.....by sliding it back into
___ place under the ribs
__ in the bag cavity
_-'_'q"_ j !llt_l_,:{_[_ Tuck filter in so that it
_#._,rs,_ fits completely under
_)tai_er_ -_ the rubber retainer.
5. Replace the bag as outlined in the BAG
CHANGING section,,
EXHAUST FILTER CHANGING
kWARNING
Fire andlor Electrical Shock Hazard
Do not operate with a clogged exhaust
filter or without the exhaust filter or
exhaust filter cover installed.
HEPA EXHAUST FILTER
The exhaust filter cartridge must be
replaced when dirty Replace the filter when
the entire surface area is covered evenly,
The filter CANNOT be washed as it will
lose its dust trapping ability.
NOTE: See PARTS AND FEATURES for
Exhaust Filter number_
t, Pull out and
up on the
exhaust filter
cover to remove
from the
canister and lay
aside,,
16
3. Replace exhaust
filter cartridge,
Place the new filter
cartridge into the
canister with the
foam seal facing
down towards the
canister
Tabs
2oPull the exhaust
filter cartridge up
and out from the
rear of the
canister
Filte_
4. Replace the
exhaust filter cover
by placing the two
tabs on the filter
cover into the slots
on the canister and
rotate into place
until it snaps
closed.
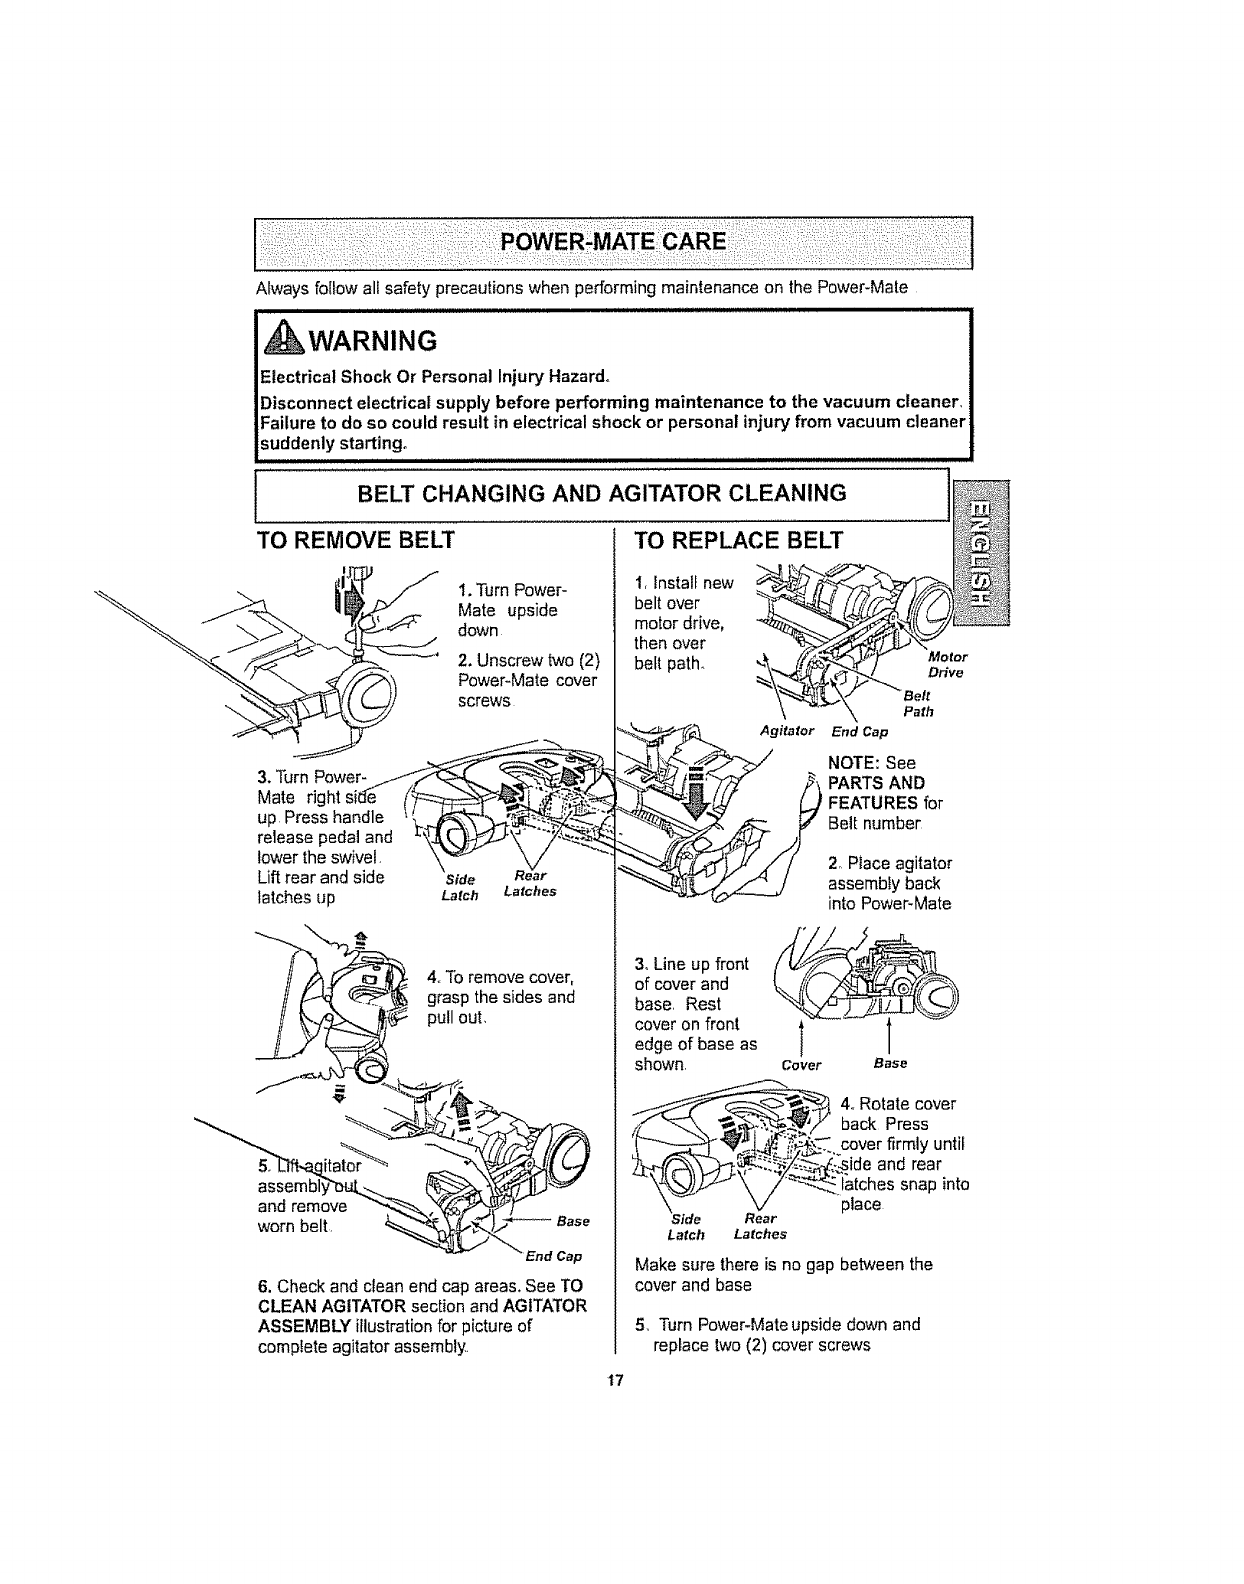
AlwaysfollowallsafetyprecautionswhenperformingmaintenanceonthePower-Mate
i i i i i lu uluiJllUtlrltlruJJJHlluluuur,
,d WARNING
Electrical Shock Or Personal Injury Hazard°
Disconnect electrical supply before performing maintenance to the vacuum cleaner,
Failure to do so could result in electrical shock or personal injury from vacuum cleaner
suddenly starting°
I CHA.O,.OANO.O'TATO",.O
TO REMOVE BELT m REPLACE BELT
Mate upside motor drive,
_,_F" down
_,._. then over '%_y_f ..=iJ_\_"
2. Unscrew two (2) beltpath., _.__ 'y Mo%r
._ _ screwsP°wer'Matecover _V'\__End Cap PBaeli-
NOTE: See
PARTS AND
FEATURES for
Belt number
latches up Latch Latches
and remove
worn belt,
4.,To remove cover,
grasp the sides and
pull out,
End Cap
6. Check and clean end cap areas. See TO
CLEAN AGITATOR section and AGITATOR
ASSEMBLY illustration for picture of
complete agitator assembly.
2, Place agitator
assembly back
into PoweFMate
3oLine up front
of cover and
base, Rest
cover on front
edge of base as
shown. Cover Base
4oRotate cover
back Press
'_--'----____,_.. cover firmly untif
___/=:_.._:4_lde and rear
_'__, 7-"_ latches snap into
\ - .V place
Side Rear
Latch Latches
Make sure there is no gap between the
cover and base
5, Turn Power-Mate upside down and
replace two(2) cover screws
'I7
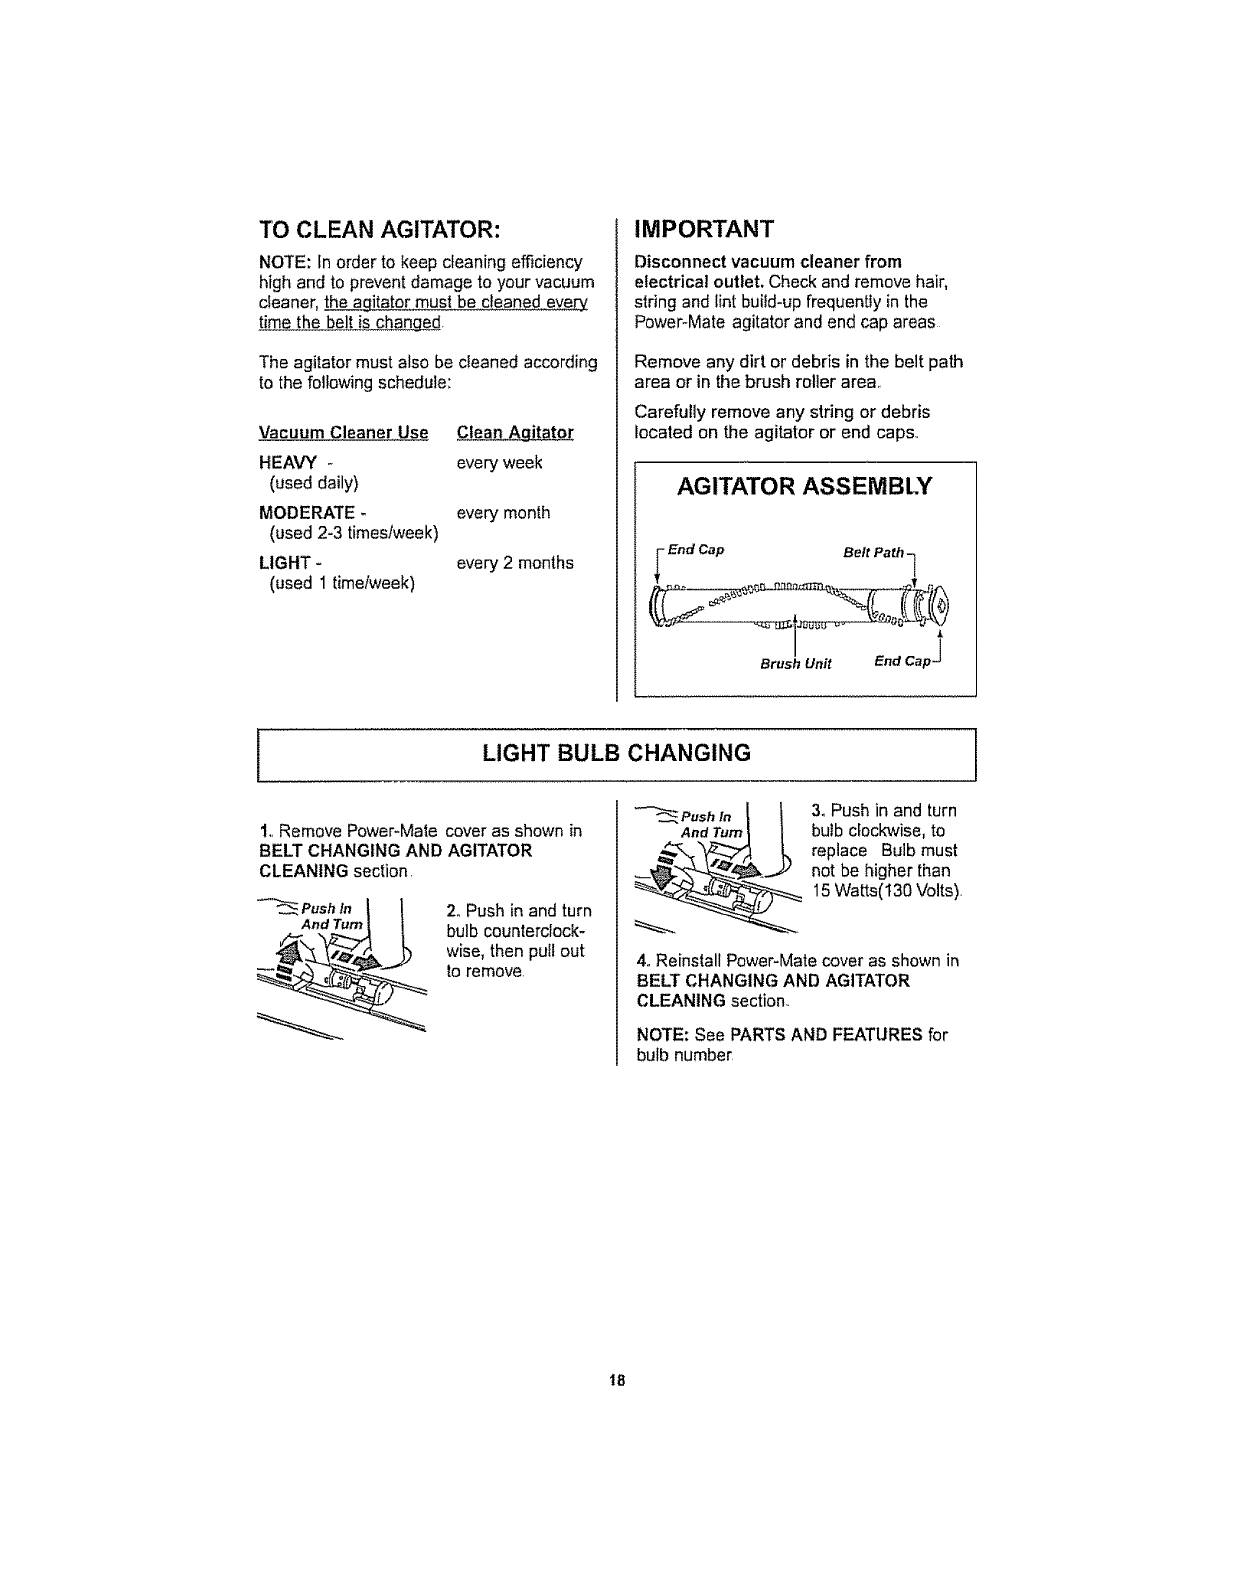
TO CLEAN AGITATOR:
NOTE: In order to keep cleaning efficiency
high and to prevent damage to your vacuum
cleaner, the agitator must be cleaned every_
time the belt is changed
The agitator must also be cfeaned according
to the following schedule:
Vacuum Cleaner Use Clean Agitator
HEAVY - every week
(used daily)
MODERATE _every month
(used 2-3 times/week)
LIGHT - every 2 months
(used 1 timetweek)
IMPORTANT
Disconnect vacuum cleaner from
electrical outlet. Check and remove hair,
string and lint buitd-up frequently in the
Power-Mate agitator and end cap areas
Remove any dirt or debris in the belt path
area or in the brush roller area,,
Carefully remove any string or debris
located on the agitator or end caps.,
AGITATOR ASSEMBLY
_Endt Cap Belt Path q
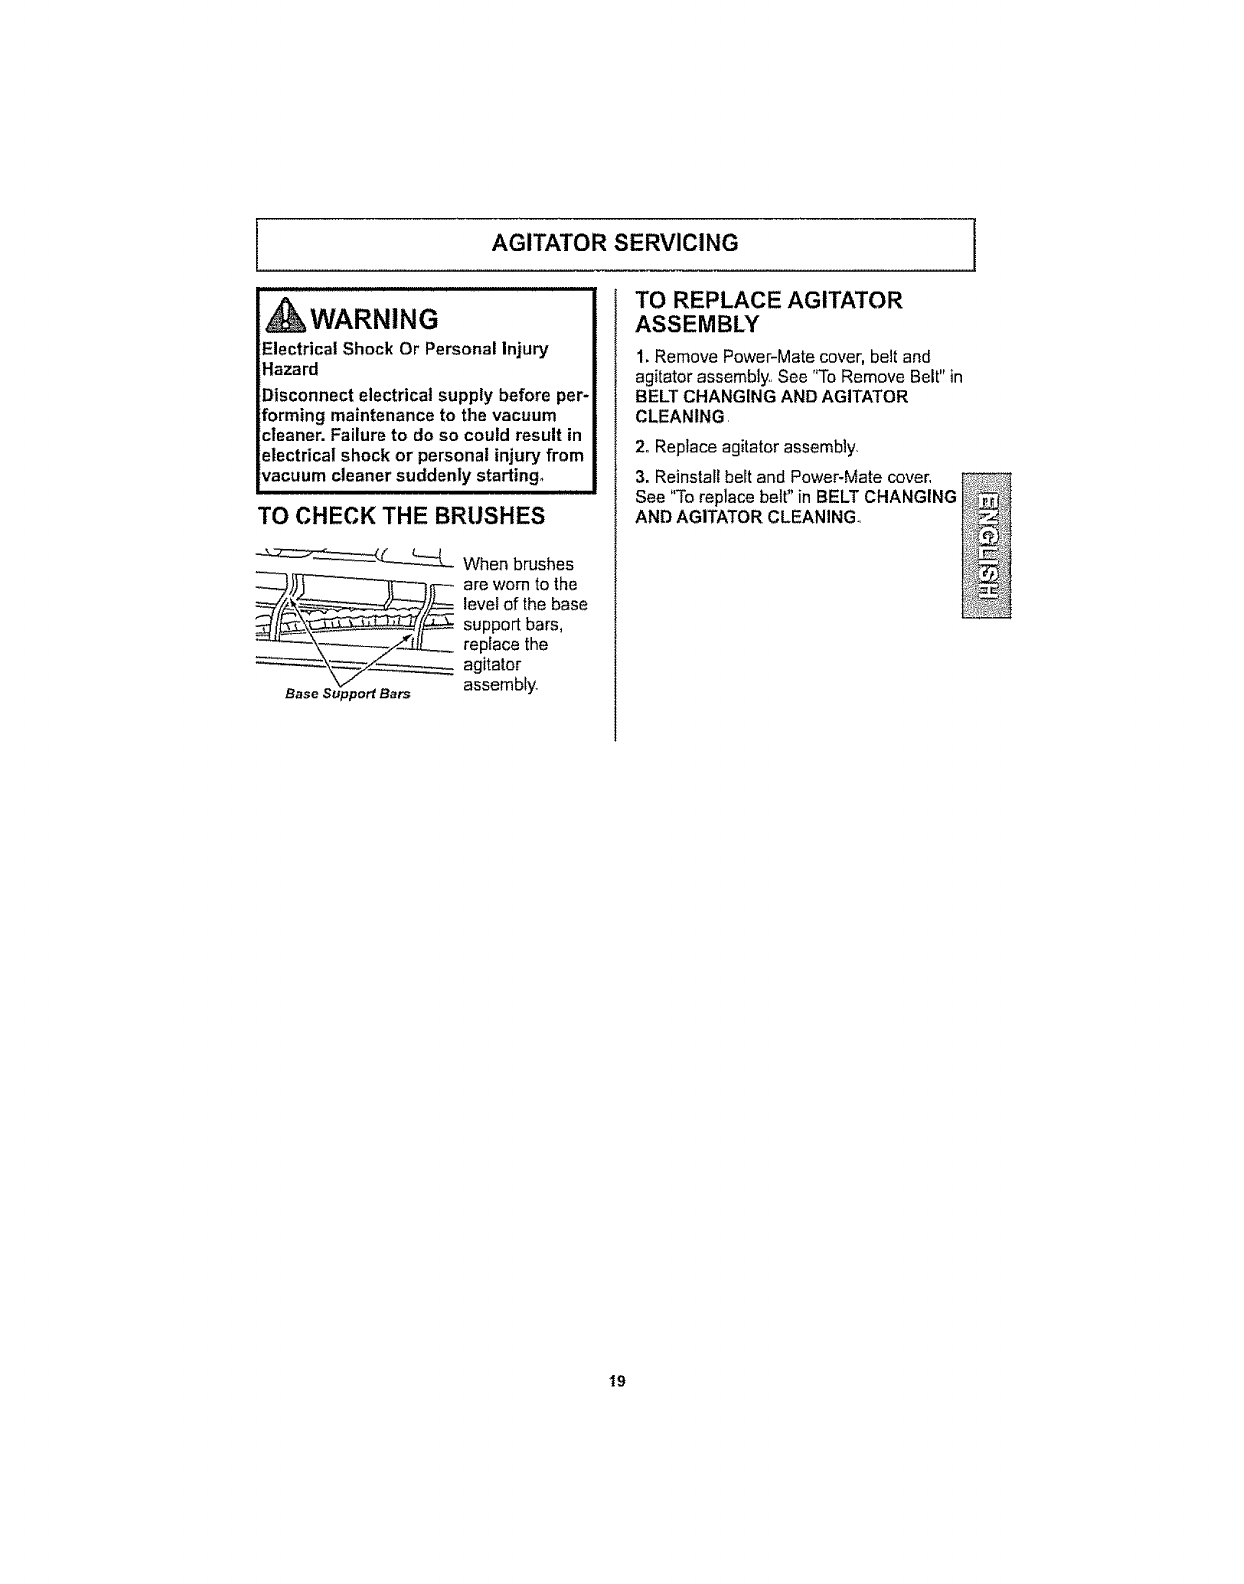
LIGHT BULB CHANGING I
1,,Remove Power-Mate cover as shown in
BELT CHANGING AND AGITATOR
CLEANING section.
2,,Push in and turn
bulb counterclock-
wise, then puU out
to remove,
_:_/_rn I / 3. Push in and turn
butb cfocl_wise, to
_ eplace Bulb must
not be higher than
15 Watts(t30 Volts),
4,,Reinstall Power-Mate cover as shown in
BELT CHANGING AND AGITATOR
CLEANING section.,
NOTE: See PARTS AND FEATURES for
bulb number,
18
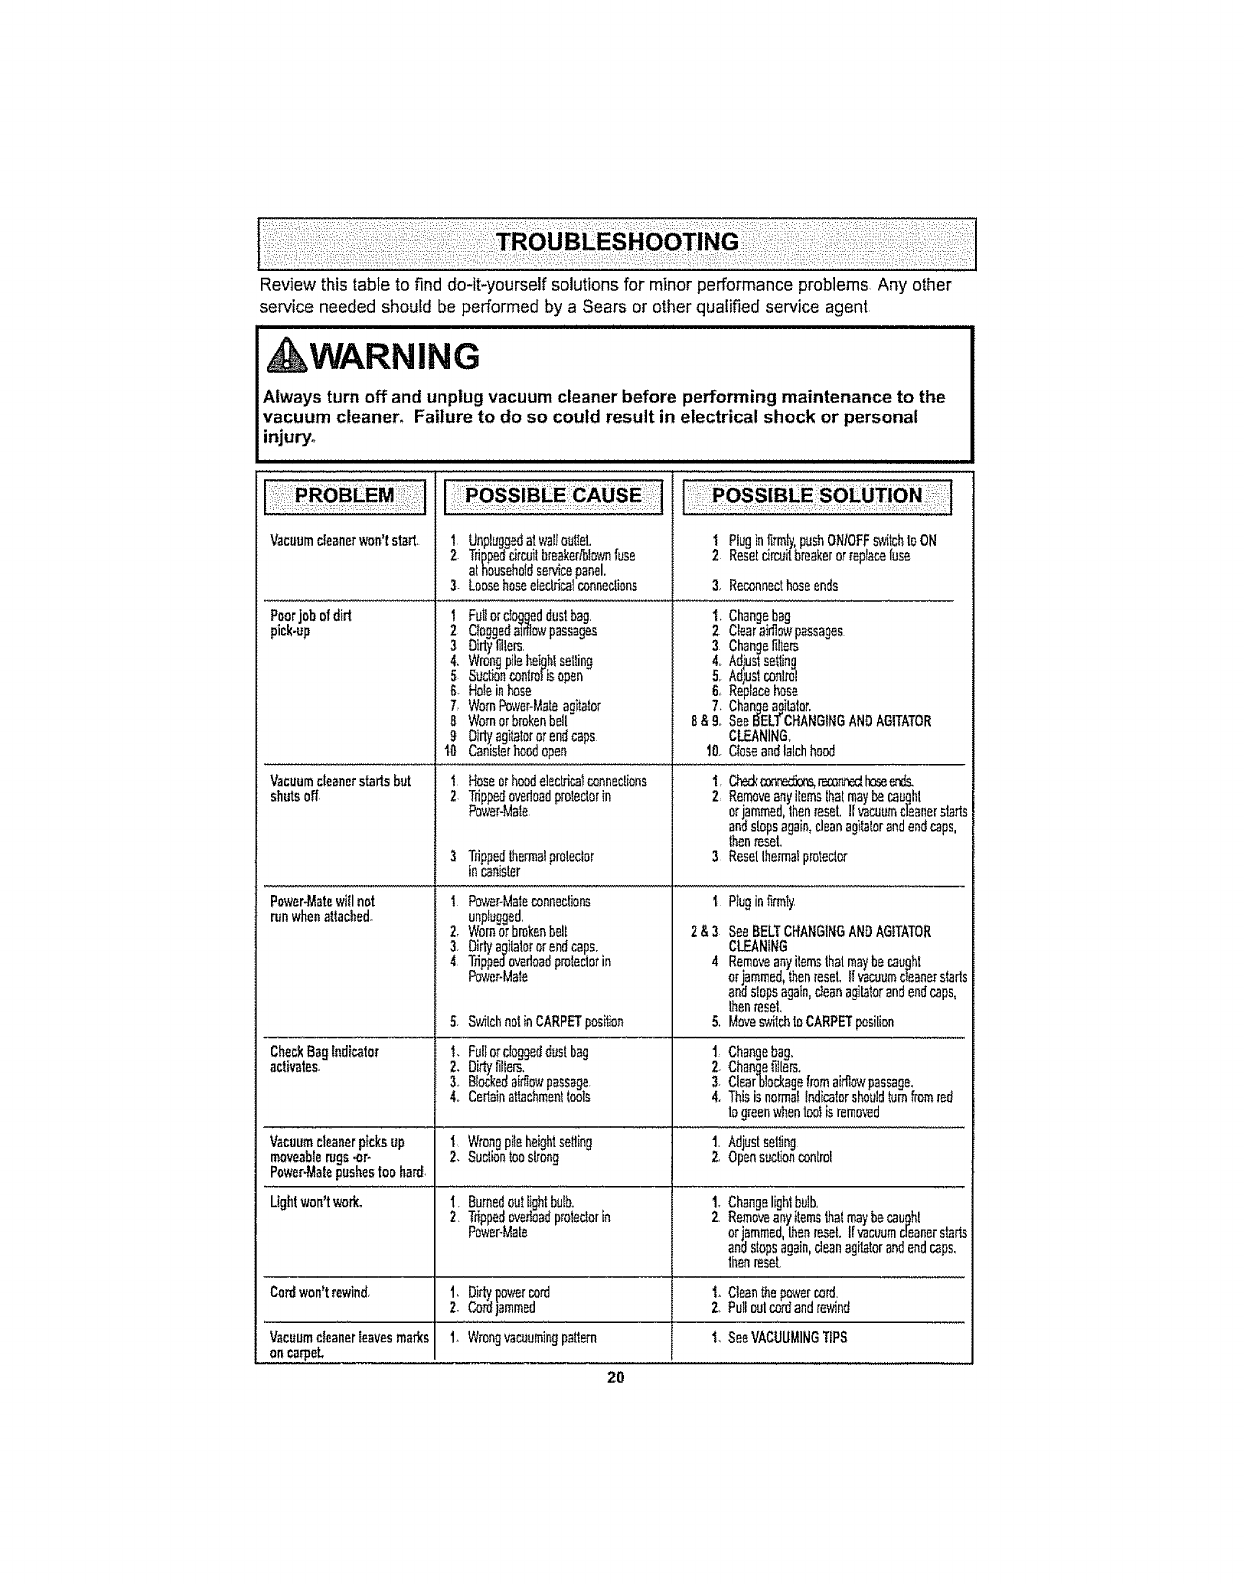
AGITATOR SERVICING
_WARNING
Electrical Shock Or Personal Injury
Hazard
Disconnect electrical supply before per-
forming maintenance to the vacuum
cleaner. Failure to do so could result in
electrical shock or personal injury from
vacuum cleaner suddenly starting.
TO CHECKTHEBRUSHES
__-_--.___L_ When brushes
level of the base
support bars,
replace the
agitator
Base Support Bars assembly
TO REPLACE AGITATOR
ASSEMBLY
1. Remove Power-Mate cover, belt and
agitator assembly. See "To Remove Belt" in
BELT CHANGING AND AGITATOR
CLEANING
2oReplace agitator assembly_
3. Reinstall belt and Power-Mate cover,
See "To replace belt" in BELT CHANGING
AND AGITATOR CLEANING..
19
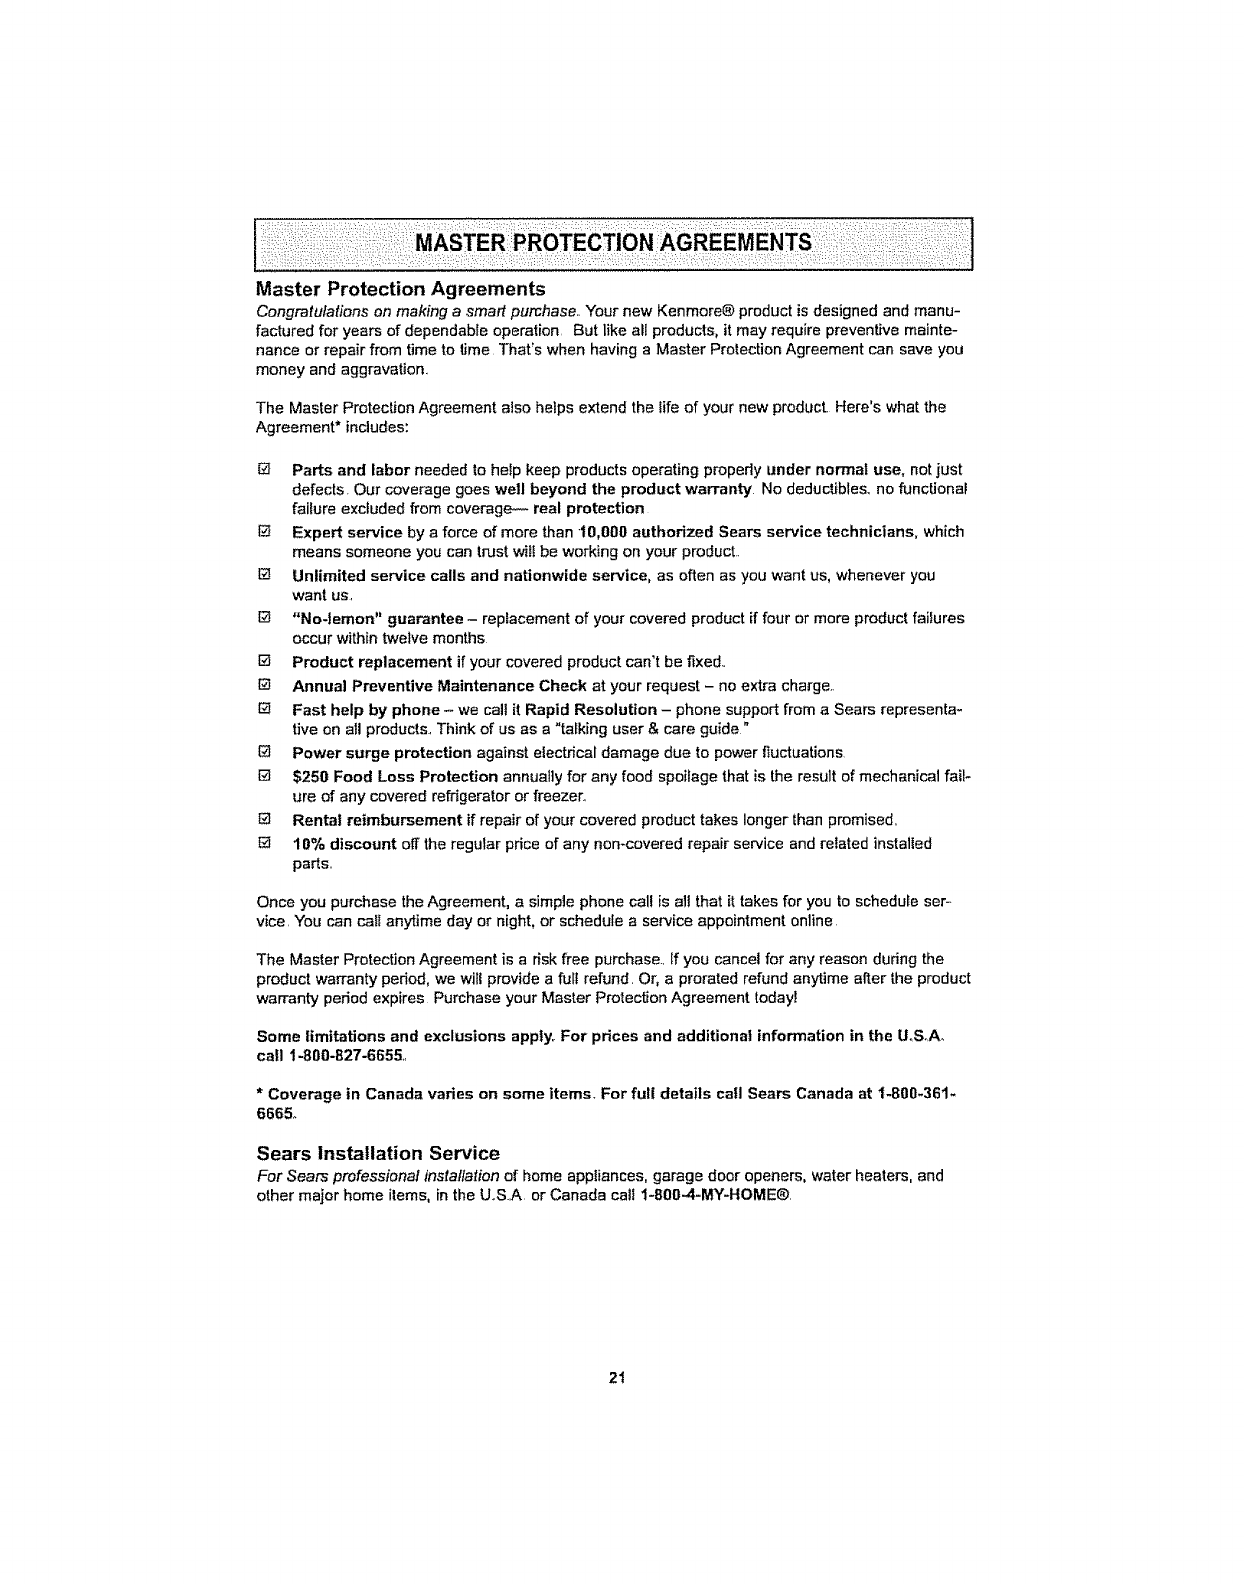
Review this table to find do-it-yourself solutions for minor performance problems Any other
service needed should be performed by aSears or other quaEifiedservice agent
W-JARNING
Always turn off and unplug vacuum cleaner before performing maintenance to the
vacuum cleanen Failure to do so could result in electrical shock or personae
injury_
I I III III II I I I IIIII III I III I I I I I I II I I I II I II
Vacuumcleanerwon'tstart.
Poorjobofdirt
pick-up
1UnpluggedatwalloulteL
2Trippeddrcuitbreakedblovmfuse
athouseholdservicepanel,
3- Loosehoseelectric]connecUons
I Fullordoggeddustbag
Cloggedairflowpassages
i Girlyl_llers,
. Wrongpileheighlsetting
;SucGoncontmlisopen
6- Holeinhose
7. WornPower-Mal_agi_alor
8 Wornorbrokenhell
I Pluginfirmly,pushON/OFFswitchtoON
2Resetcircuitbreakerorreplacefuse
3_ Reconnecthoseends
"I.Changebag
2Clearainlowpassages
3Changel_l_ers
4..Adiustsetting
5. Ad)uslcontrol
,, Replacehose
• Changeagitator.
8&9° SeeBELTCHANGINGANDAGITATOR
gDirtyagitatororendcaps CLEANING,
tQ Canisterhoodopen 10. Ctoseand!alchhood
Vacuumcleanerstartsbut iHoseorhoodelecludcalconneclions I,C_conred_rs_nredhoseen_
Removeanyilemsthatmaybecaughl
shutsoff 2Trippedpower_Maleovedoadprolectorin 2 orjamm_d,,_thenreset.IIvacuumcleanerostarts
andstopsagain,cleanagila_orandendcaps,
thenreset,
3Tdppedthermalproleclor 3 ResetIhermatprolector
incanister
Power-Matewitlnot I Powu-Mater..onnections tPlugin_nnly
mn whenattached_ unplugged.
2, WornorbrokenbelR 2 &3 SeeBELTCHANGINGANDAGITATOR
3, Dirtyagitatororendcaps. CLEANING
RemoveanyHemsthaimaybecaught
4Tdppedovedoadpower.Mateprotectorin 4 orjammed,thenreseLIfvacuumcleanersleds
andslopsa_ain,deanagiLatarandendcaps,
thenresel,
5, SwilchnotinCARPETposition 5, MoveswitchtoCARPETpesilion
CheckBagIndicator I, Fullorcloggeddustbag IChangebag. _......................
activates. 2, Di_ fillers, 2, Changefillers.
3, Blockedaiffl_vpassage. 3, Clearblockagefromairllowpessage.
4, Certainatbchmenlfools 4, ThisisnormalIndicalorshouldturnfromred
to greenwhentooliaremoved
Vacuumcleanerpecksup i Wrongpileheightsetting I.Adjustselling
moveablerugs.or- 2, Suctiontoos[rong 2, Opensuctionconlrol
Power-Malepushestoohard,
Lightwon'twork. I. Burnedoutlightbulb. 1, Changelightbulb.
Removeanyilemsthalmaybecau_hl
2Trippedpower.MaleoveHoadp_otaclorin 2 orjammed,thenreset.Irvacuumcleanerstarts
andslopsagain,cleanagi_torandendcaps,
thenreset.
Cordwon'trewind, 1, Dillypowercord 1, Cleanthepowercord,
2. Cordlammed 2_Pulloulcordandrewind
Vacuumc_eanerleavesmarks 1, Wrongva_um]ngpatlem t, SeeVACUUMINGTIPS
on carpel
2O
Master Protection Agreements
Congratulations on making a smart purchase.. Your new Kenmore® product is designed and manu-
factured for years of dependable operation. But like all products, it may require preventive mainte-
nance or repair from time to time That's when having a Master Protection Agreement can save you
money and aggravation.
The Master Protection Agreement also helps extend the life of your new product. Here's what the
Agreement* includes:
Parts and labor needed to help keep products operating propedy under normal use, not iust
defects. Our coverage goes well beyond the product warranty No deductibles, no functional
failure excluded from coverage-- real protection
1_ Expert service by a force of more than I 0,000 authorized Sears service technicians, which
means someone you can trust wifI be working on your product.
[] Unlimited service calls and nationwide service, as often as you want us, whenever you
want us.
[] "No-lemon" guarantee - replacement of your covered product if four or more product failures
occur within twelve months
[] Product replacement if your covered product can't be fixed..
[] Annual Preventive Maintenance Check at your request - no extra charge..
I_ Fast help by phone- we call it Rapid Resolution -phone support from a Sears representa-
tive on all products.. Think of us as a "talking user & care guide"
[_ Power surge protection against electrical damage due to power fluctuations
[] $250 Food Loss Protection annualty for any food spoilage that is the result of mechanical fail-
ure of any covered refrigerator or freezer..
[] Rental reimbursement if repair of your covered product takes longer than promised..
[] t0% discount off the regular price of any nomcovered repair service and related instalied
parts..
Once you purchase the Agreement, a simple phone call is alt that it takes for you to schedule ser-
vice. You can call anytime day or night, or schedule a service appointment online
The Master Protection Agreement is a risk free purchase., If you cancel for any reason during the
product warranty pedod, we will provide afull refund. Or, a prorated refund anytime after the product
warranty period expires Purchase your Master Protection Agreement today_
Some limitations and exclusions apply, For prices and additional information in the U..S_A_
call 1-800-827-6655.,
* Coverage in Canada varies on some ltems+ For full details call Sears Canada at %800_36t-
6665_
Sears Installation Service
For Sears professional installation of home appliances, garage door openers, water heaters, and
other major home items, in the U..S..A.or Canada call 1-800..4-MY-HOME®.
21

22
Antes de usar su aspiradora nueva ..... I
Listadeembalaie ..................... t
Garantia de la aspiradora de Kenmore 2
lnstrucciones importantes de
seguridad ...................... 3
Piezas y caracterisficas ............... 4-5
Instrucciones de
ensamble ..................................... 6-7
Instrucciones de operaci6n ............ 8
Para comenzar ..................... 8
Sugerendas para aspirar ............... 9
Accesorios ............................ I0
Cuadro de uso de los accesorios ......... 11
Caracterlsticas de rendimiento .......... 12
Sugerencias sobre el ajusle de nivel de
pelo de la alfombra ............. 13
Funcionamiento de su aspiradora ....... 13
Cuidado de! recept&culo ........... 14
Cambio de ]a bolsa .................. 14
Limpieza del exterior y de los accesodos., 14
Limpieza del filtro de seguridad del motor .. 15
Cambio de1fittro de escape ......... 15
Cuidado de la Power-Mate ® ............ 16
Cambio de la correa y limpieza
del agilador ...................... 16-17
Cambio de la bombilla ............. 17
Cuidado del agilador ............. 18
Reconocimiento de problemas ...... 19
Acuerdos maestros de protecci6n ....20
Notas ......................................... 21
Informaci6n de
asistencia oservicio CubiedaPosterior
Pot favor lea esla guia qae Ie ayudara a ensamblar y operar su aspiradora nueva de Kenmore en una manera
m_s segura y efectiva.
Para mas informaciOnacerca det cuidado y operaci6n de esta aspiradora, llame a su tienda Sears mas car-
cana Cuando pregunte por informaci6n usled necesitar& el numero complelo de serie y mode!o de la aspi-
radora que es1&localizado en la placa de los nt]meros de modelo y sede
Use el espacio de abajo para registrar el mJmero de modelo y serie para su nueva aspiradora de Kenmore
Numero de Modelo
N_mero de Sede
Fecha de Compra
Mantenga este l{broy su recibo en un lugar seguro para futuras referencias |
_u _D-_" K'E_E _ _ _on _ piezas y componentes pot _S_,:,,_
separado:
i Recept&culo 1 Cepillo para combinaciSn*
1 Power-Mate® 1 Tubosuperior
1 Manguera 1 Tuboinferior
1 Handi-Mate Jr.® 1 Manual de uso y cuidado
1 Cepillo para pisos* 1 Lista de partes de reparaciOn
1 Herramienta para hendiduras*
Coda uno de estos ensambles es mostrado detalfadamente en la lista de piezas para
reparaciOn.,
*Estos articulos se encuentran bajo la cubierta de almacenamiento para accesorios
Garantia limitada de un afio
Si esta aspiradora falta per un defecto en sus materiales ofabricaci6n en el periodo de
un afio desde la fecha de compra, cuando se instata, maneja y mantiene siguiendo
todas las instnJcciones incluidas con et producto, devu61vala a cuaJquier tienda Sears,
Sears Parts & Repair Center (Centre de Reparaciones y Piezas Sears) o a otto
distribuidor Kenmore para que reparen el aparato de forma gratuita.
Siesta aspiradora se utiliza para otros fines que no sea use familiar privado, esta
garantia es v&lida solamente durante 90 dias desde la fecha de compra.
Esta garantia cubre exclusivamente los defectos de materiales y fabricaci6n.
Sears NO pagar_:
I.. Los elementos desechables que puedan desgastarse con un use normal, incluyendo
sm car&cter excluyente, filtros, correas, I&mparas y bolsas..
2.. Un t6cnico del servicio t6cnico para que ensefie al usuario a instalar, manejar o
mantener correctamente el producto..
3.. Un t6cnico del servicio t6cnico para limpiar o mantener este producto..
4. Dafios o averia de este producto si no se ha instalado, manejado o mantenido
siguiendo todas tas instrucciones incluidas con el producto..
5 Dafios o averia de este producto originados per accidente, abuse, use incorrecto o
use del producto para otros fines distintos de los indicados.
6, Dafios o averia de este producto causados per et use de detergentes, limpiadores,
proctuctos quimicos o utensilios diferentes a los recomendados en todas las
instrucciones que se incluyen con el producto..
7.. Dafios o averia de las piezas o sistemas causados per modificaciones no
autodzadas que se hayan hecho a este producto.
Limitaci6n de responsabilidad de las garantias implicitas; limitaci6n de remedies
I_1unico y exclusive remedio del cliente bajo esta garantia limitada ser_ la reparaciSn dei
producto segun Io inclicado en este documento_ Las garantias implicitas, inciuyendo las
garantfas de comerciabiEidad o idoneidad para un prop6sito especifico, se limitan a un
afio o el periodo mrs corto permitido per la ley. Sears no ser_ responsable per dafios
incidentales ni consecuenciales. Algunos estados o provincias no permiten la exclusi6n
olimitaci6n de dafios incidentales o censecuenciales, ni limitaciones en la duraci6n de
las garantias impticitas de comerciabilidad o idoneiclad, per Io que estas exclusiones o
limitaciones podrian no apiicar en su case..
Esta garantia aplica solamente cuando esta aspiradora se utiliza en Estados Unidos o
Canad,_
Esta garantia le otorga derechos legales especificos, y usted podria tener otros
derechos que varian en funci6n de cada estado.,
Sears, Roebuck and Coo, Hoffman Estates, IL 60179
Sears Canadb Inc,,, Toronto, Ontario, Canad_ M5B 2B8
Lea las instrucciones en este manual antes de armar o usar su aspirador.
ADVERTENCIA
SU seguridad es muy importante para nosotros. Para reducir el riesgo de incendio,
cheque et_ctrico, tesi6n corporal o daSos al utilfzar su aspiradora, act_e de acuerdo
con precauclones b,_sicas de seguridadj entre elias:
Use su aspiradora tJrficamente en la farina
descdta eta este manual Use L_nicamente con
accesorios recomendados par Sears
Desconecte el cord6n el_ctrico antes de
componer o limpiar el _rea del cepillo. De 1o
contrario, et cepi]Io podrfa arrancar de farina
imprevista o podrfa producirse un cheque
el6ctrico
No abandone fa aspiradora cuando est6
conectada Descon_ctela cuando no la est6
usando y antes de dade servicio
Para reducer el desgo de cheque electrico, no
use su aspiradora al aire libre ni sabre
superficies mojadas
No permita que sea utitizada coma juguete
Se requiere tenor mayor cuidado cuando sea
utifizada en la proximidad de niAos o par
nifios
No use la aspiradora st el cord6n o el enchufe
est&n daSados, Si ta aspiradora no est_
funcionando adecuadamente o si se ha
dejado caer, est_ daSada, se ha dejado
expuesta a ta intempede o se ha dejado caer
en agua, devu_lvala a un Centre de servicio
de Sears
No jale ni transporte la aspiradora par el
cord6n; no use el cord6n coma mango; no
cierre puertas sabre eI cord6n; no jaIe el
cord6n sabre rebordes agudos ni esquinas
No paso Ia aspiradora sabre el cord6n
Mantenga e! cord6n alejado de superficies
ca{ientes
No descanecte la aspiradora tirando del
cord6n el6c_co Para desconectada, jafe el
enchufe, no el cord6n
No toque Ia aspiradora ni et enchufe con tas
manes mojadas
No co!oque objetos en las aberturas..
No utitice ta aspiradora si alguna abertura
est_ bloqueada; mant_ngala libre de polvo,
pelusa, cabeltos y cualquiera cosa que podria
disminufr el flujo de aire.
Mantenga el cabeHo, ropa suetta, dedos y
todas las partes de! cuerpo atejados de las
aberturas y piezas mecr_nicas
Apague redes los controtes antes de
desenchufar.
Tonga cuidado especial al utilizar la
aspiradora en escalenes No la co!oque sabre
sillas, mesas, etc Mant6ngala en el piso.
No use la aspiradora para aspirar Iiquidos
inflamables o combustibles (gasolina, Ifquidos
para limpieza, perfumes, etc) ni la use en
lugares donde 6stos podrian estar presentes
Los vapores de estas sustancias pueden crear
un peligro de incendio o explosi6n
No levante ninguna cosa que se est8
quemando o emffiendo humo, coma
cigardllos, cerillos o cenizas calientes.
No use la aspiradora sin tenor inststada la
balsa para polvo y/o los filtros
Caml3ie siempre la balsa para polvo despues
de aspirar Iimpiadores de alfombras o
desodorantes, talcos y pelves fines Estos
productos atascan fa boisa, reducen el flujo de
aire y pueden causar que 6sta se rompa Si
no cambia la balsa podda ocasionar darSo
permanente a la aspiradora
No use la aspiradora para levantar objetos
agudos, juguetes pequeSos, alfiteres,
sujetapapetes, etc. Podrian da_,ar la
asptrador8 o la balsa para polvo.
No opere sin el filtro de escape ni la cubierta
del filtro de escape instalados
La manguera contiene cables el_ctricos No
la use cuando est,_ daQada, cortada, o
perforada. Reemplace si est_i cortada o
desgastada No levante objetos afilados
Slempre apagu_ y desconecte la aspiradora
antes de conectar o desconectar la manguera,
Handi-Mate ,Jr,@ (si aplicable), ola boquilla
Sujete el enchufe con la mane 81enroliar el
cord6n el@ctrico, Para desconectafla, jale el
enchufe, no el cordSn
Usted es responsable de asegurar que su
aspiradora no sea utilfzada par ninguna
persona que no pueda manejada
correctamente
GUARDE ESTAS INSTRUCCIONES
El armada y usa seguro de su aspiradora son su responsabilidad. Esta aspiradora ha side
disefiada exclusivamente para usa dom_stico L8 aspiradora deber_ almacenarse en un lugar
seco yen el interior. Lea este Manual de Usa y Cuidado detenidamente pues contiene
informaci6n importante sabre seguddad y us.o. Esta guia contiene informaciOn sabre
seguridad debajo de simbolos de advertencia cuieaeo.
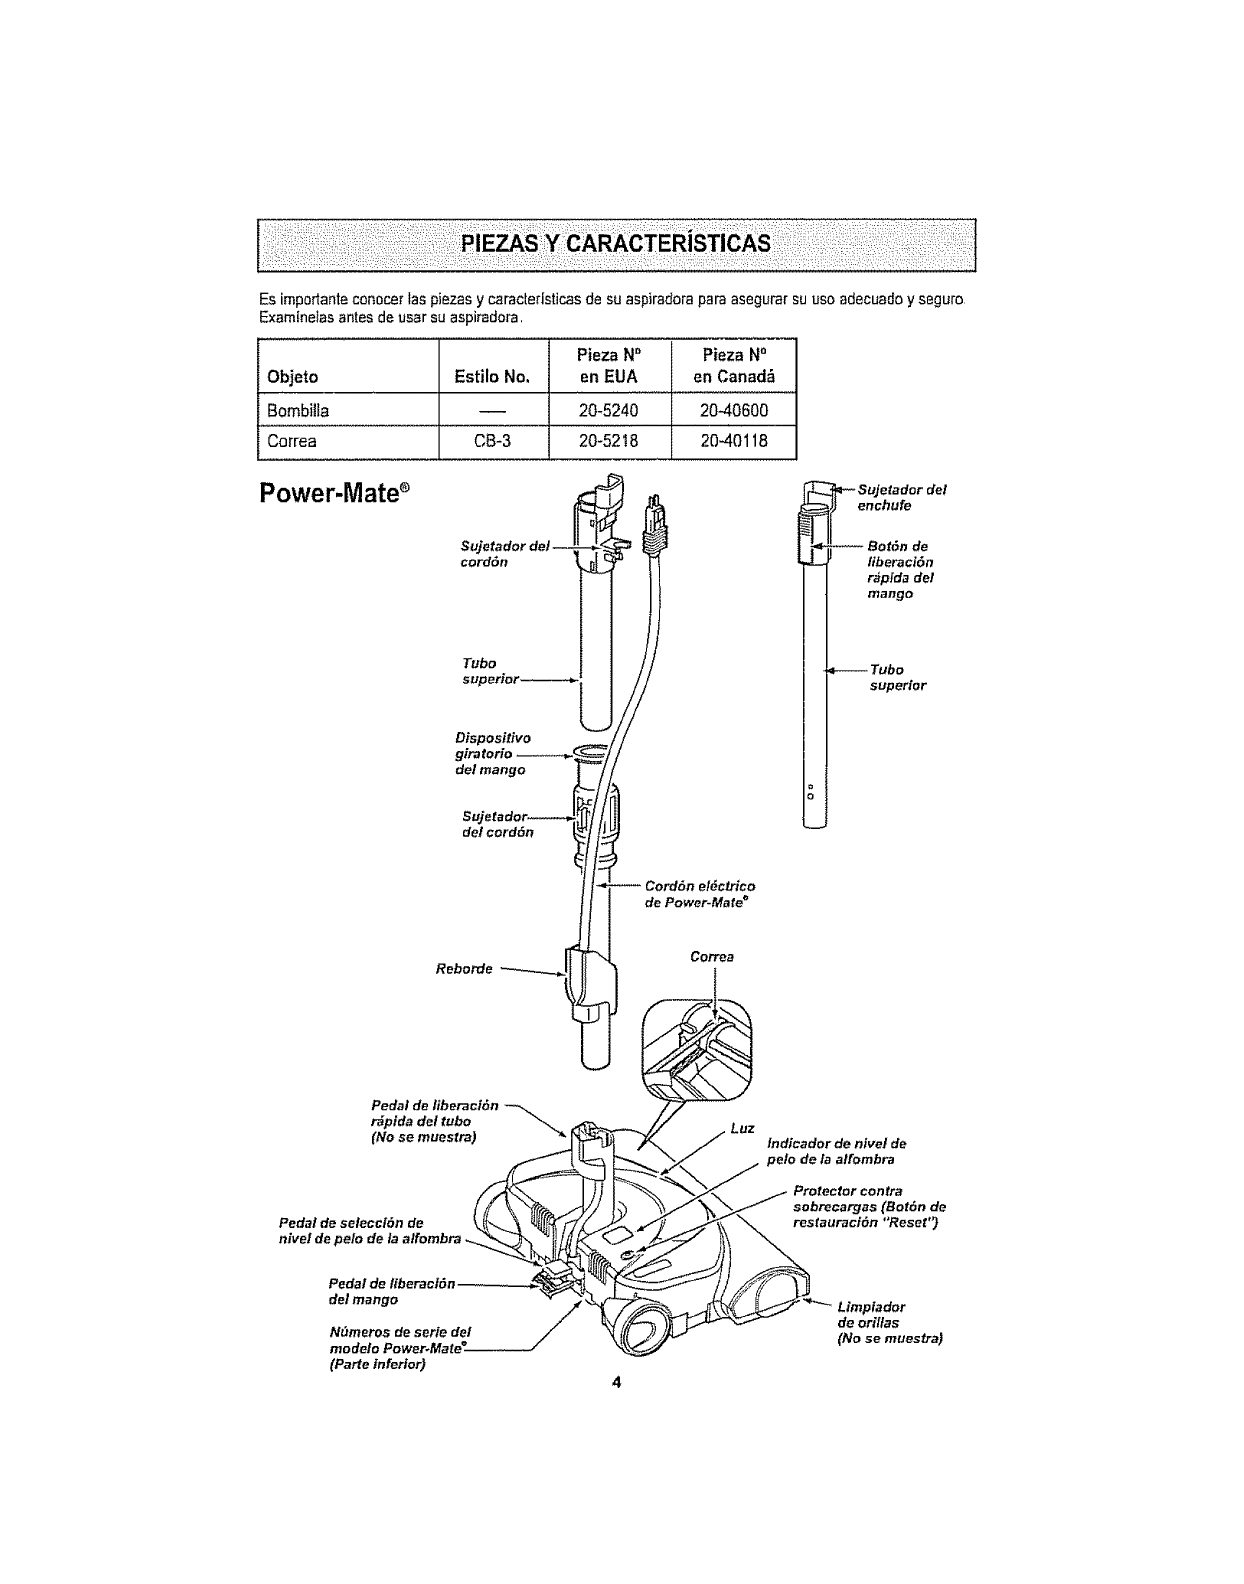
Esimportanteconecerlaspiezasycaracteflsticasdesuaspiradoraparaasegurarsuuseadecuadoyseguro,
E×am[nelasantesdeusarsuaspiradora,
Pieza N" Pieza No
Objeto Estilo No, en EUA en Canad&
Bombilta -- 20-5240 20-40600
Correa Ct-3 20-52 _8 20-40118
Power.Mate
Sujetador de/
cord6n
Tube
superior-------**
Dispositivo
gira torio _ _,
del mango
Reborde
iSujetador del
enchufe
@
Bofdn de
liberaci6n
r_Jptda de/
mango
Tube
superior
Pedal de liberaci6n
r_pida del tubo
(No se muestra)
Pedal de selecct6n de
nivel de pelo de la alfombra
LtJz lndicador de nfcel de
pelo de la alfombra
del mango
Nt_meros de serte del
(Parte inferior)
Limptador
de orillas
(Nose muestra)
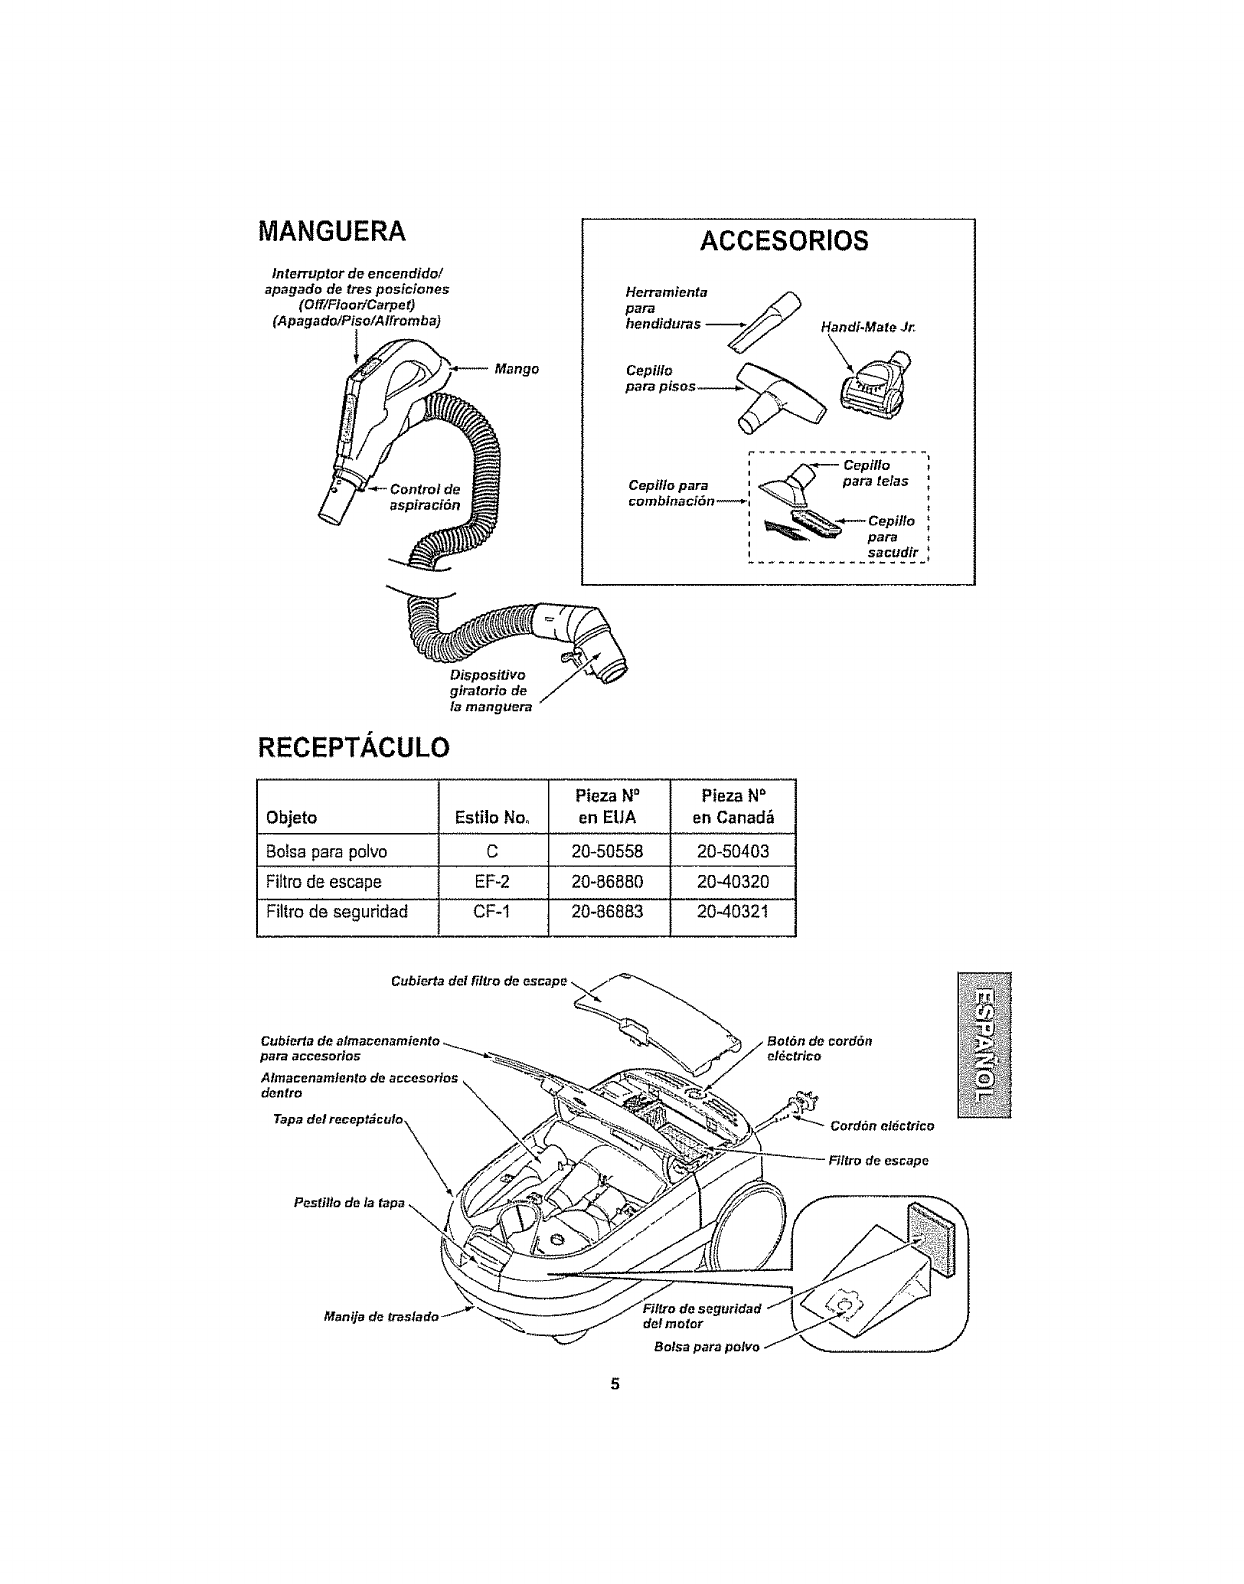
MANGUERA
Interrupter de encendido/
apagado de tres posiciones
(Off/Fioor/Carpet)
(Apagado/Piso/Alfromba)
Mango
ACCESORIOS
Handi.Male Jr
r ................. 1
Cep#lo
Cepi/lo para _para te/as _,
combinacidn_;
............s."3.ud._.r.:
Dispositivo
giratorfo de
la manguera
RECEPT, ,CULO
Pieza No Pieza No
Objeto Estilo Nee en EUA en Canad&
i3olsapara polvo C 20-50558 20-50403
Filtro de escape EF-2 20-86880 20-40320
Filtro de seguridad CF-I 20-86883 20-40321
Cubierta del ill,re de
para aceesol'to5
Pestlllo de la tapa
el_ctrico
Cord6n eldctrico
de escape
Manija
Bolsa
....... ....P0;,oVo;p0,_oo.poc..,.tooc.,o,.,0.=o..o.cO,o,o.I.o,o._oA,.o.o°o,.IE..o!
informaci6nlealertar,_delpeligrodefuego,chequesel_.ctdcos,quemadasy lesiones Cuidado: i
Estainformaci6nlealertaradepetigroscomelesionesy daSosde propiedad, i
I
,_ADVERTENCIA
Peligrodechequee!_ctrico
No conecteia aspiradorahastequa terrain°de
armarla.Deto contrariopodriacauserun
chequeel_ctricoo lesi6ncorporal,
ii i i ij i iii ii iii llll
Antes de arrnar la aspiradora, reivise la
LISTA DE EMBALAJEo Use esta lista para
vedficar qua ha recibido redes los compo-
nantes de su nueva aspiradora Kenmore.
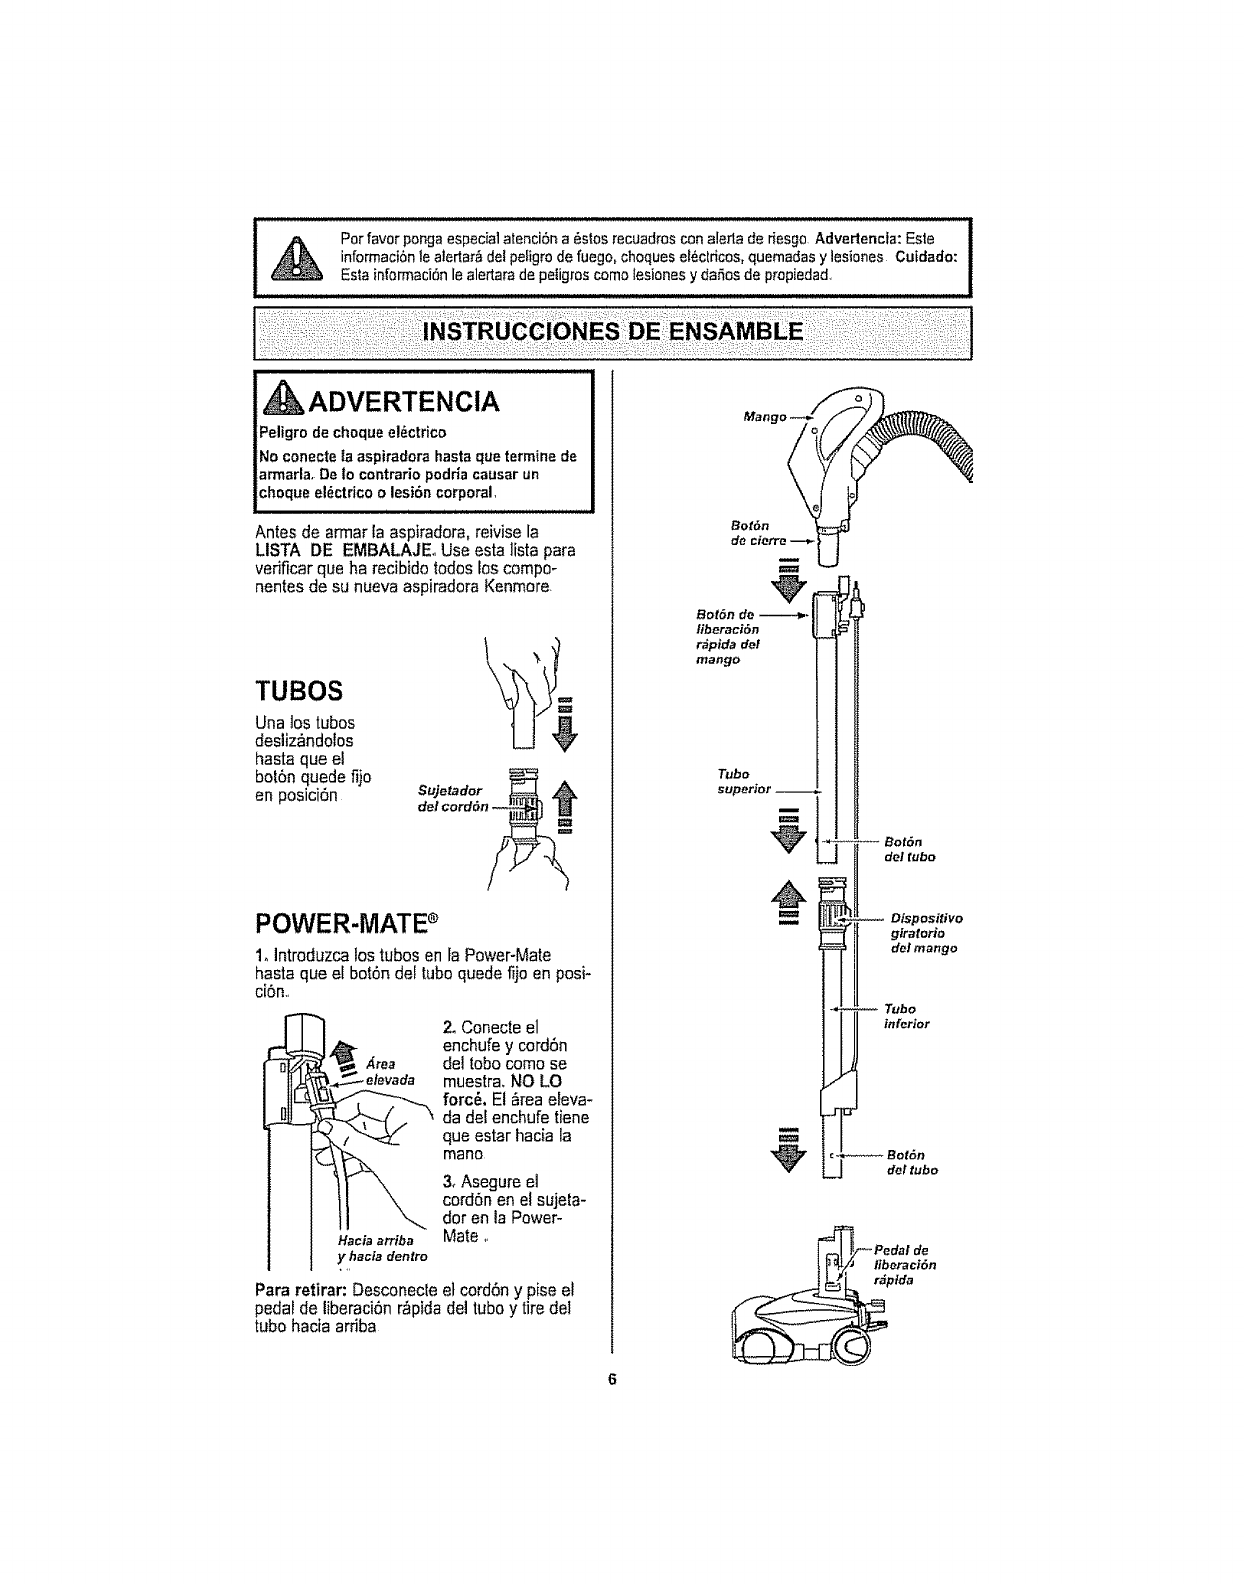
TUBES 1\__;_
Una los tubes
desliz_ndolos
haste qua el
botSn quede ilia
en posici6n Sujetador
del cord6n
POWER-MATE_
1_Introduzca los tubes en fa Power-Mate
hasta qua el bot6n de$tube quede fijo en posi-
ci6n,,
-elevada
Hacia arriba
y hacia dentro
2. Conecte el
enchufe y cord6n
del robecome se
muestra, NO LO
forc&. El _rea e_eva-
da del enchufe tiene
qua estar hacia la
mane
3_Asegure el
cord6n en e! suje{a-
dot en la Power-
Mate _,
Pare retirar: Desconecle el cordbn y pise el
pedal de liberaci6n r_pida del tube y tire del
tube hacia arriba
BotSn
do ciefro--_
Bot6n de ------_.
liberacibn
rdpida del
mango
Tube.
superior --
-_-_ _ Bot6n
del fubo
_Ofspositivo
gJ:;'2:':_o
_:,',%o
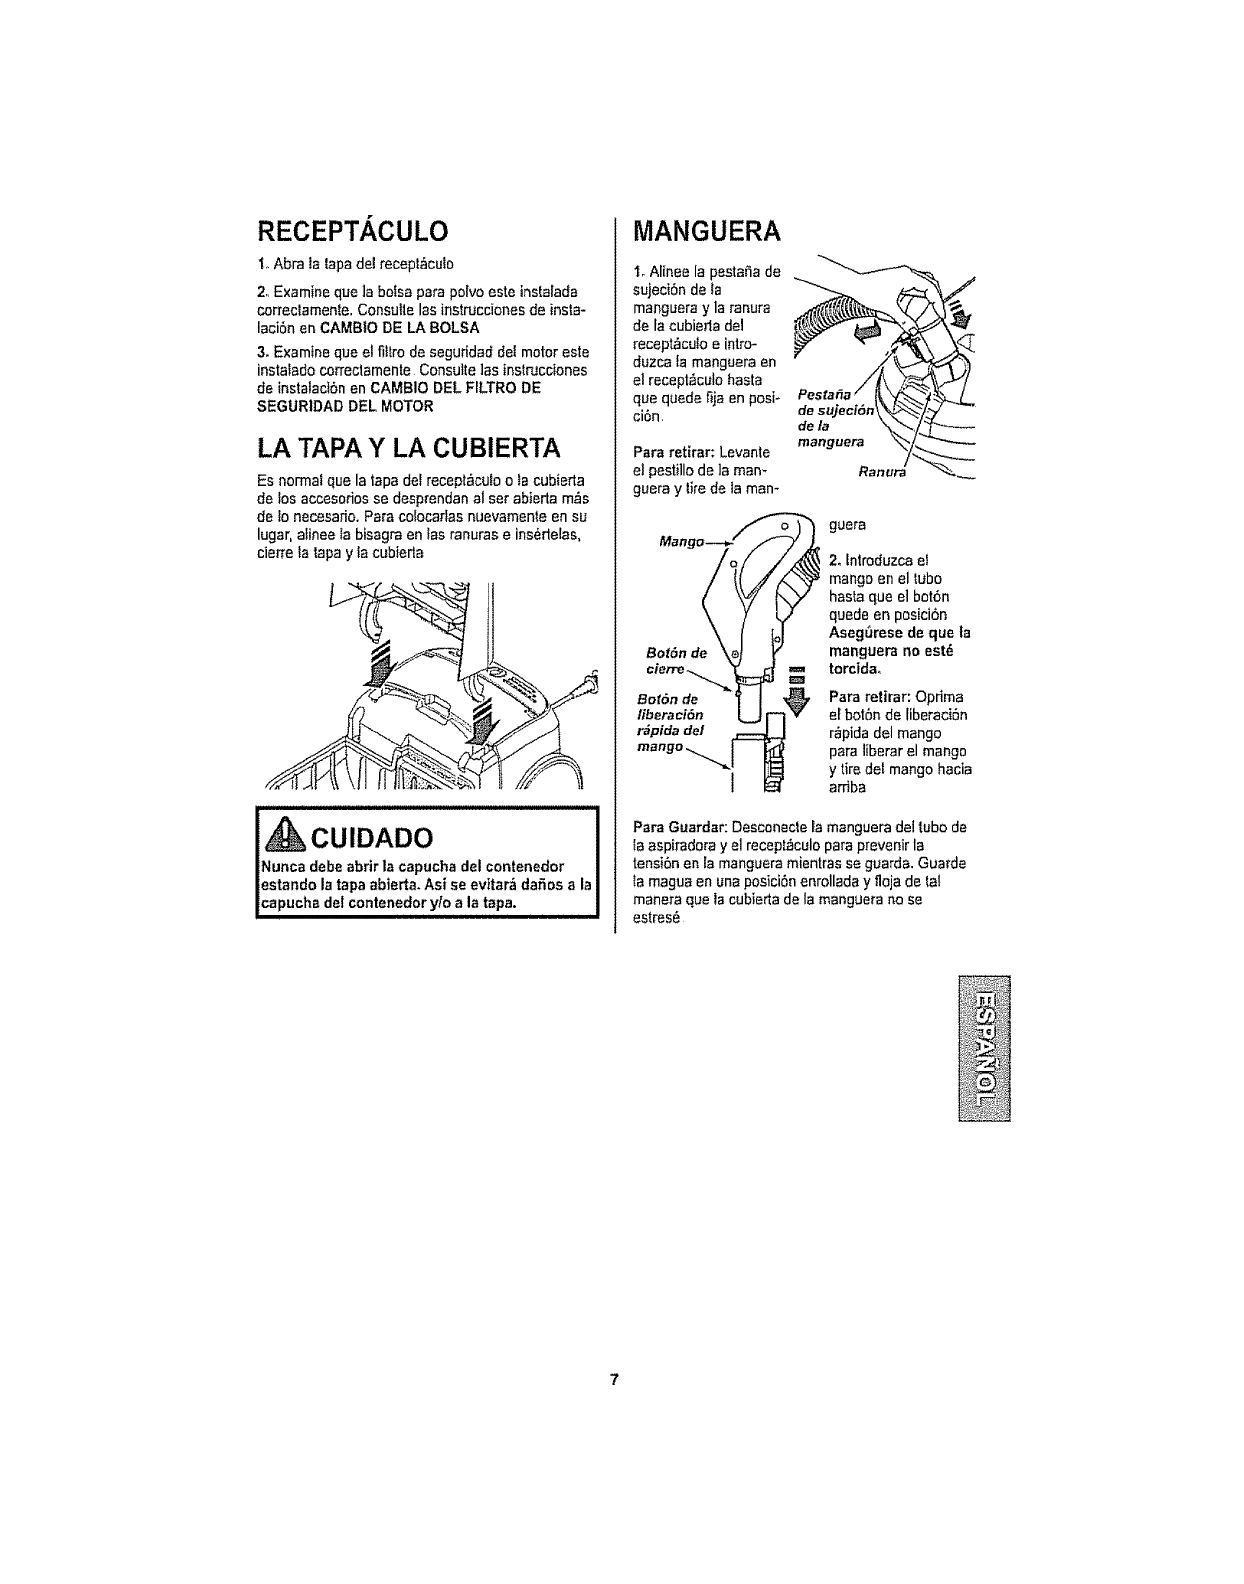
RECEPTACULO
I.Abra la{apade]recept_culo
2. Examine que ]a be{so para pofvo este instalada
correc[amente. Consu]te las instruccionesde insta-
laci6n en CAMBIO DE LA BOLSA
3. Examine que el fitlrode seguridad det motor este
instatado correclamente. Consu_te ]as inst_cciones
de instalact6n en GAMBle DEL FILTRO DE
SEGURIDAD DEL MOTOR
LA TAPAY LA CUBIERTA
Es normat que la tapa deI recept#_cuioota cubieda
de Ios accesodos se desprendan al set abierta m=fis
de Io necesafio. Para colocarfas nuevamente en su
lugar, alinee Ia bisagra en Ias ranuras e ins_rlelas,
cierre Ia tapa y la cubierta
, CUIDADO
Nunca debe abrir la capucha del contenedor
estando la tapa abierta. Asi se evitar_ dafios a la
capucha de! contenedor y{o a,la tapa. , ....
MANGUERA
Io Al[nee la pestafia de
sujeci6n de {a
manguera y la ranura
de la cubierla del
recept_cu{o e intro-
duzca [a manguera en
el recept&culo hasta
que quede fija en posi-
clan.
Para retirar; Levante
el pestillo de la mare
guera y tke de la man-
de la \. ".../ _
manguera _/_"_
/,...--.__
Ranura "_
guera
2olntroduzca ei
mango en el lubo
hasta que el botbn
quede en pesici6n
Aseg_rese de que la
manguera no est6
torcidao
Para retirar: Optima
el bot6n de liberaci6n
r_pida del mango
para liberar el mange
ytiredot mango hacia
arfiba
Para Guardar: Desconecle la manguera del tube de
{a aspiradora y el recept_culo para prevenir ta
tensi6n en la manguera mientras se guarda. Gua_de
ia magua en una posici6n enrollada y floja de _a!
manera que la cubierta de la manguera no se
estres_

CUIDADO
iPartes en movimiento! Para reducir el riesgo de dafios
corporales, no toque el agitador cuando ta aspiradora est_
encendid& Et tocar el agitador mientras que est_ girando
puede cortar, contusionar o causer otras iesiones. Siempre
apague y desconecte del tomacorriente antes de dar
mantenimiento.. Tenga cuidado ai aspirar cerca de niSos..
PARA COMENZAR
ADVERTENCIA
Peligro de lesi6n persona! y da_e al producto
NO enchufe la asp|radora si el
intereJptor est_ en la posici6n ON,
Podria causer lesi6n personal o daBo
al productm
El cord6n el_ctrico se mueve
r_pidamente durante el enroUamfento.
Mantenga aleJadosalos ni_os y
asegure dejar espacio suficiente pare
evitar lesiones personales al enrollar
el cord6m
NO use los enchufes Iocalizados sobre
los muebles,,Los objetos cercanos
podrian resultar daSados,_
Io Sre de! cord6n
para sacatio del
recept_cu_ohasta
tenet la longitud
deseada Et cor-
d6n no se enrolla-
r_ hasta que opd-
ma el bot6n para
enrollarlo
2. Conecte el cord6n el_ctdco poladzado en un
enchufe de 120 voltios que se encuentre cerca del
piso
NOTA: Para reducir eI r;esgo de cheque el_cttico,
esta aspiradora cuenta con una clavija peladzada,
uno de los contactos es m_s ancho que el otto. La
clavija s6[o puede introducirse de una manera en el
enchufe Si _aclavija no cabe bien en el enchufe,
invi_rtala Si a_n no cabs, [lamea un eleclticista
para que instals un enchufe correcto No allere ia
clavija de ninguna manera
Para enrollar: desco-
necte Ia aspiradora
Sujete el enchufe
mientras enro!la el
cord6n para impedir
daSo o test6ncorporal
per e! movimiento del
cord6n Optima el
control para bot6n el
cord6n e!_cttico con
la mane o con el pie.
3. Baje e_tube desde la posici6n vertical pisando el
pedaI de liberaci6n del mango
Pedal de selecci6tl
de nfve! de
pelo de la
Indicador de
nivel de pelo
de la affombra
Pedal de
liberaci6n
del mango _--_- '
4. Seleccione una altura de pelo de Ia alrombra
usando el pedal pequefio ubicado en Eaparte poste-
rior de la Power-Mate_ E[ nivel de pelo la alfombra
se muestra en el inclicador. Consul[e SUGEREN-
ClAS SOBRE EL AJUSTE DE NIVEL DE PELO DE
LA ALFOMBRA
Atenci6n: Refi_rase alas recomendaciones del fab-
ticante para limpiar su alfombra. Algunas alfombras
m_s de_icadas pueden requedr el use de la aspi-
radora con et agitadoi" Power-Mate_ desconectado
para prevenir que Ia alfombra sea dafiada
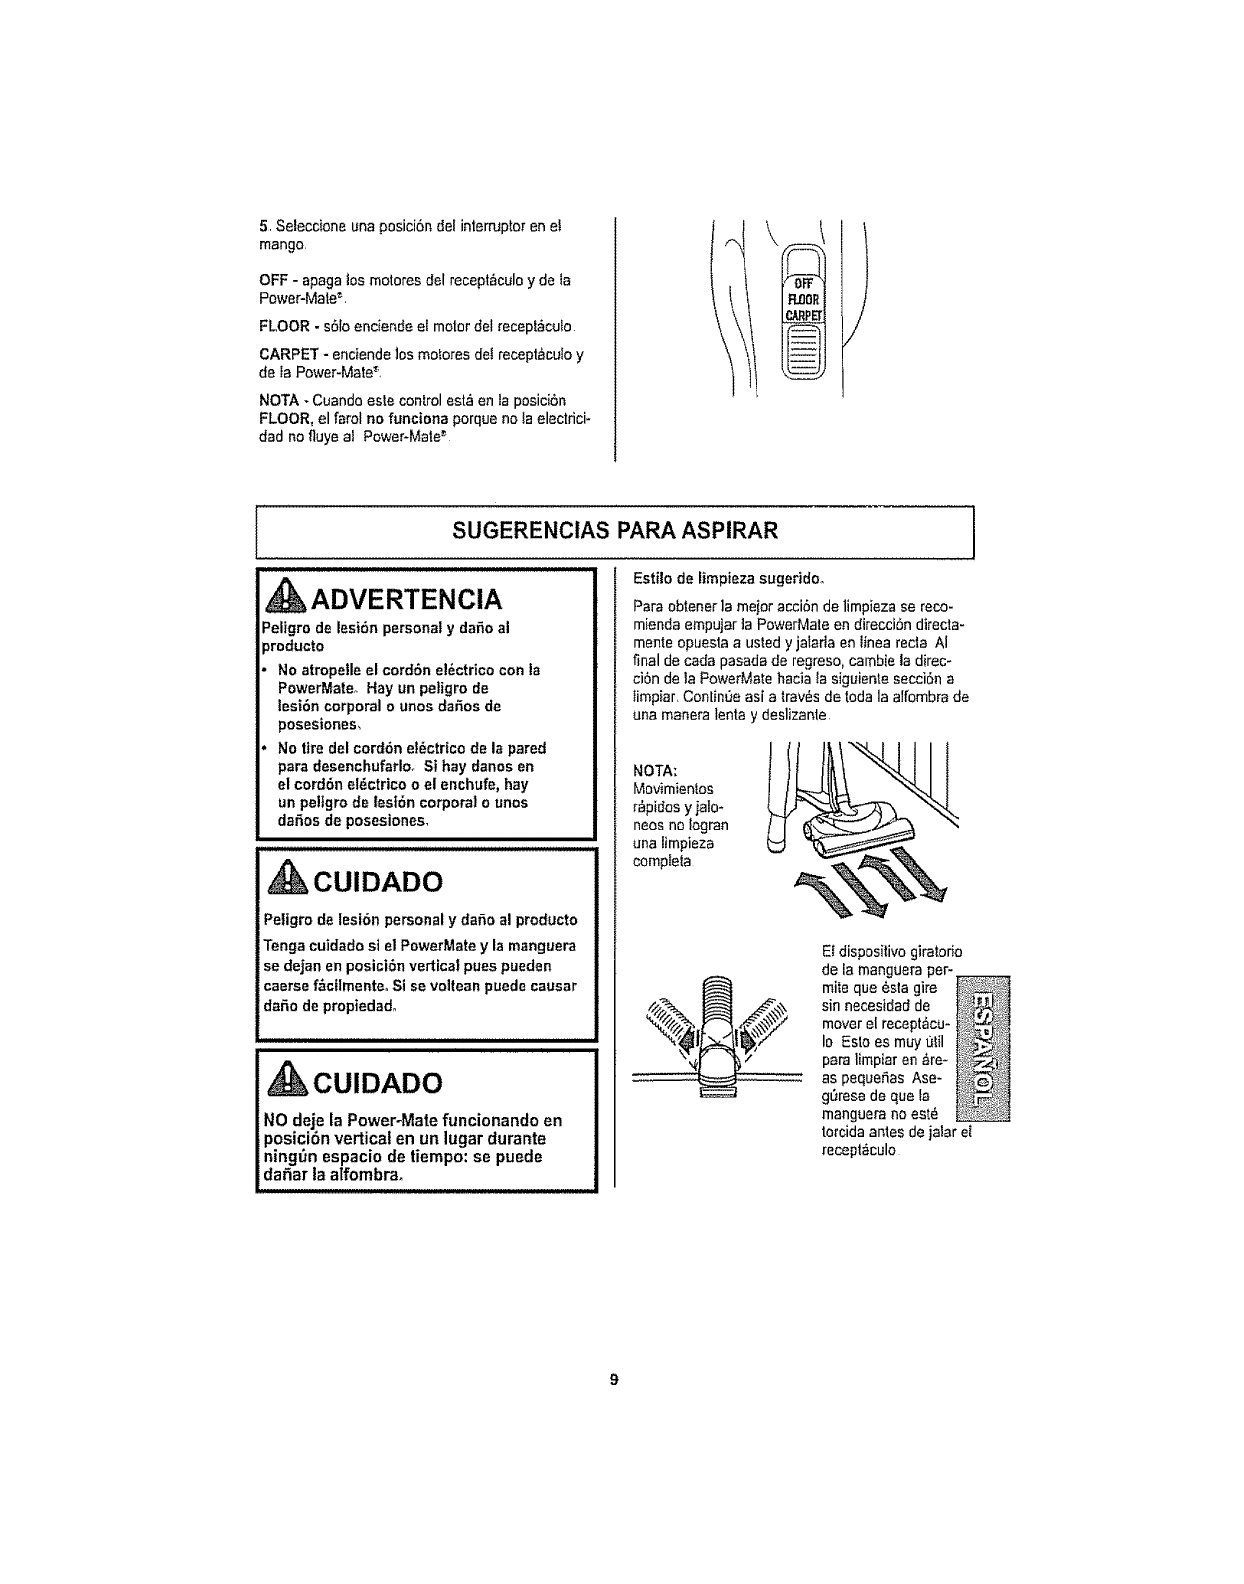
5. Seleccione una posici6n del interrupter en e!
mango.
OFF - apaga tos motores del recept6culo y de ta
Power-Male _,
FLOOR - s6Io enciende elmotor del recept6cuIo
CARPET - enciende los motores de! receptacuto y
de ia Power-Mate _',
NOTA - Cuando esie control est,_en ta posici6n
FLOOR, el farol no funciona porque no Ia electrici-
dad no fluye al PoweFMale"
SUGERENCIAS PARA ASPIRAR
Estilo de limpieza sugerido_
, kADVERTENCIA
Peltgro de lesi6n personal y dafio al
)roducto
No atropetle el cord6n el6ctrico con la
PowerMateo Hay un peligro de
lesi6n corporal o unos daSos de
posesiones,
No tire del cord6n el6ctrico de la pared
para desenchufarlo° St hay danos en
el cord6n el6ctrico o el enchufe, hay
un pelIgro de test6n corporal o unos
da6os de posesiones,
CUIDADO
Petigro de lesi6n personal y da6o al producto
Tonga cuidado si el PowerMate y la manguera
se dejan en posici6n vertical pues pueden
caerse f_ctlmente° Si se voltean puede causar
da6o de propieda&
i i i i i
CUIDADO
NO deje la Power-Mate funcionando en
posici6n vertical en un lugar durante
ning_n espacio de tiempo: se puede
da5ar ta alfombra.
Para obtener la major acci6n de limpieza se reco-
mienda empujar ]a PowerMate en direcci6n direcla-
mente opuesta a usled y jaIada en ifnea recta AI
final de cada pasada de regreso, cambie la direc-
ciSn de la PowerMate hacia la siguiente seccidn a
limpiar. ContinUe as[ a tray, s de toda la aifombra de
una manera lenta y deslizante.
NOTA;
Movimientos
r_pidos y jalo-
neos no Iogran
una limpieza
completa
Et dispositivo giratorio
de ia manguera per-
mite que 6sla gire i
sin necesidad de ;
mover el recept_cu- _,
Io Esio es muy ulil
para limpiar en Are-
as peque6as Ase-
gL_resede qua la
manguera na est6
torcidaantes de jalar el
recept_culo
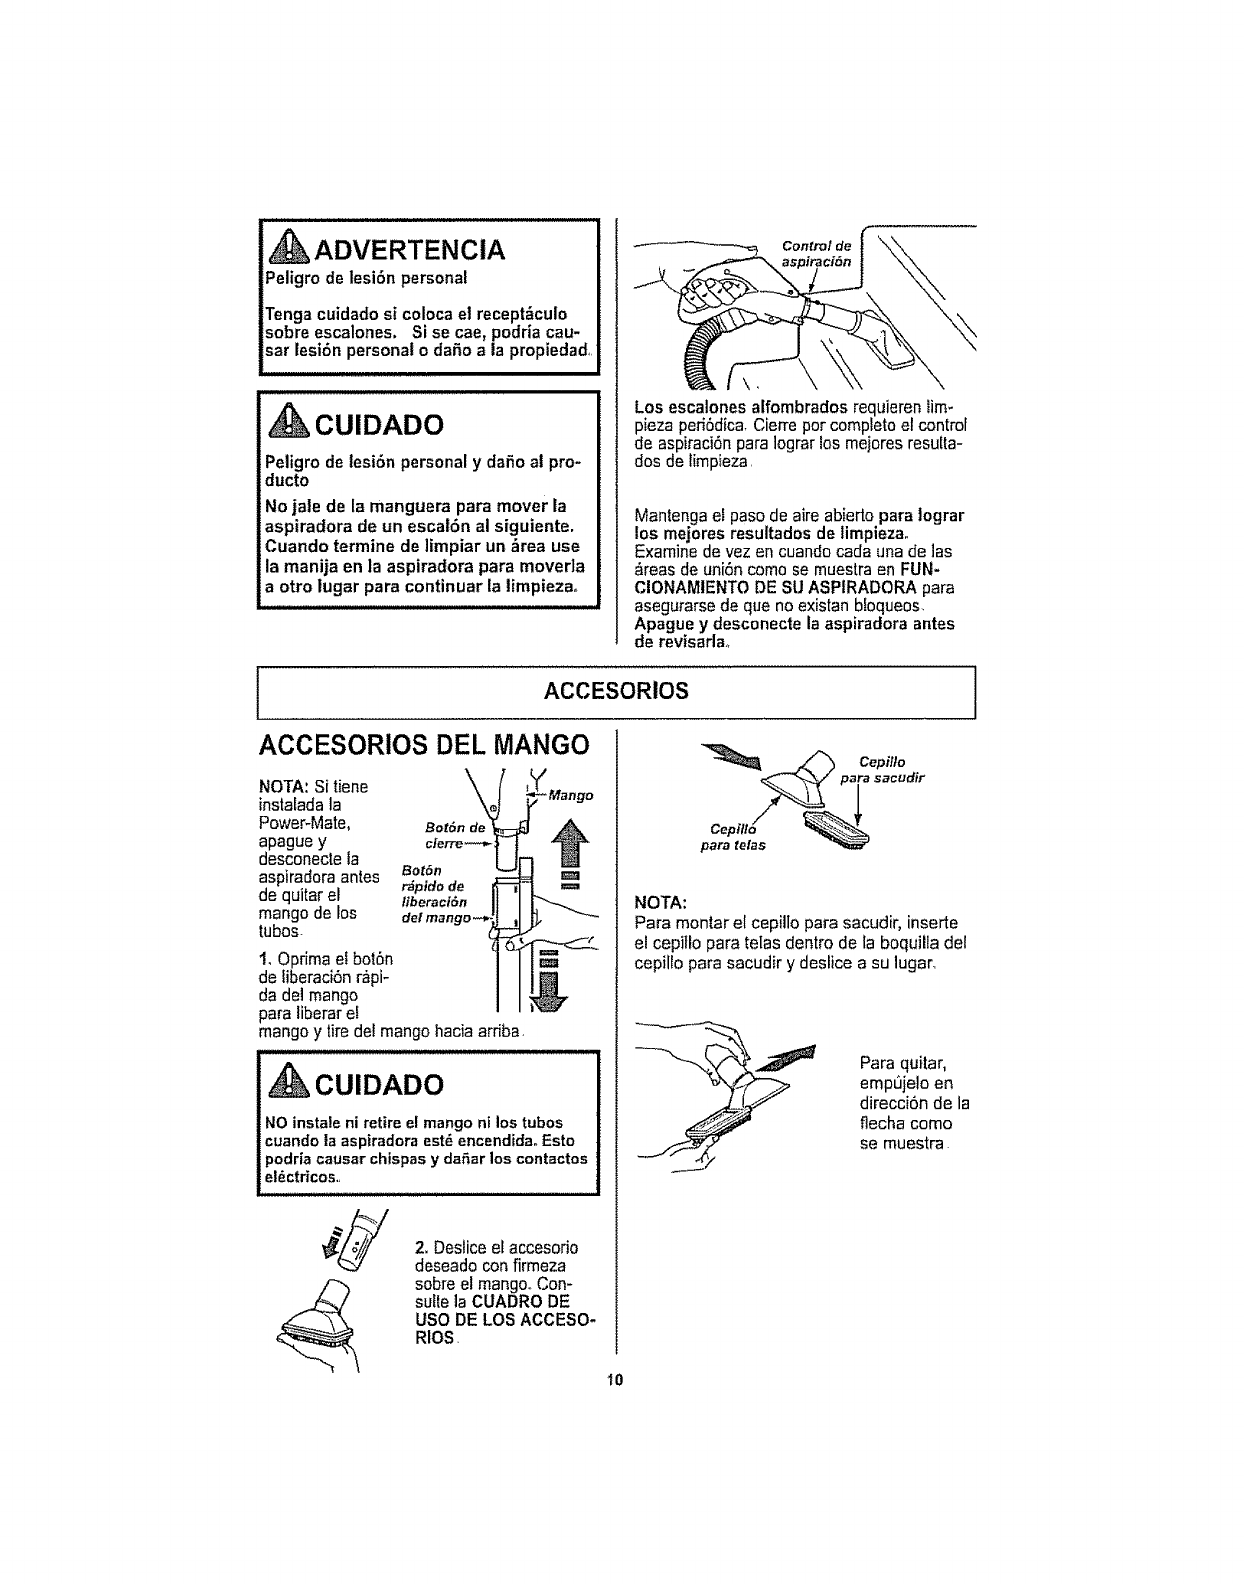
ADVERTENCIA
Peligro de lesi6n personae
Tenga cuidado si coloca el recept&culo
sobre escalones, Si se cae, podria cau-
sar lesi6n personaeo dafio a la propiedad,
CUIDADO
Peligro de lesi6n personaey dafio al pro-
ducto
No jale de la manguera para mover la
aspiradora de un escal6n al siguiente.
Cuando termine de limpiar un _rea use
la manija en la aspiradora para moverla
aotro |ugar para continuar la limpieza,
Control de
Los escalones alfombrados requieren tim-
pieza peri6dica, Cierre por completo et control
de aspiraci6n para Iograr los mejores resulta-
dos de limpieza,
Mantenga el paso de aire abierto para Iograr
los mejores resultados de limpiezao
Examine de vez en cuando cada una de las
_reas de uni6n como se muestra en FUN-
ClONAMIENTO DE SU ASPIRADORA para
asegurarse de que no existan bloqueos,
Apague y desconecte la aspiradora antes
de revisarlao
IACCESORIOS
ACCESORIOS DEL MANGO
NOTA: Si tiene
instaiada la
Power-Mate, Bot_n
apague y cferre_-
desconecte la
aspiradora antes Bot6n
de quitar el r_pidode
liberaci6n
mango de los
tubos-
!, Oprima el bot6n
de liberaciOnr_pi-
da del mango
para liberar e!
mango y tire del mango hacia arriba,
CUIDADO
NO instale ni retire el mango ni los tubos
cuando la aspiradora est_ encendidao Esto
podria causar chispas y dafiar los contactos
el_ctdcos,
2,,Destice el accesorio
deseado con firmeza
sobre el mango,,Con-
suite la CUADRO DE
USO DE LOS ACCESO-
RIOS.
para telas
Cepillo
NOTA:
Para montar el cepillo para sacudir, inserte
el cepitlo para telas dentro de la boquilla del
cepillo para sacudir y deslice a su lugar_
Para quitar,
emp_jelo en
direcci6n de la
flecha como
se muestra
I0
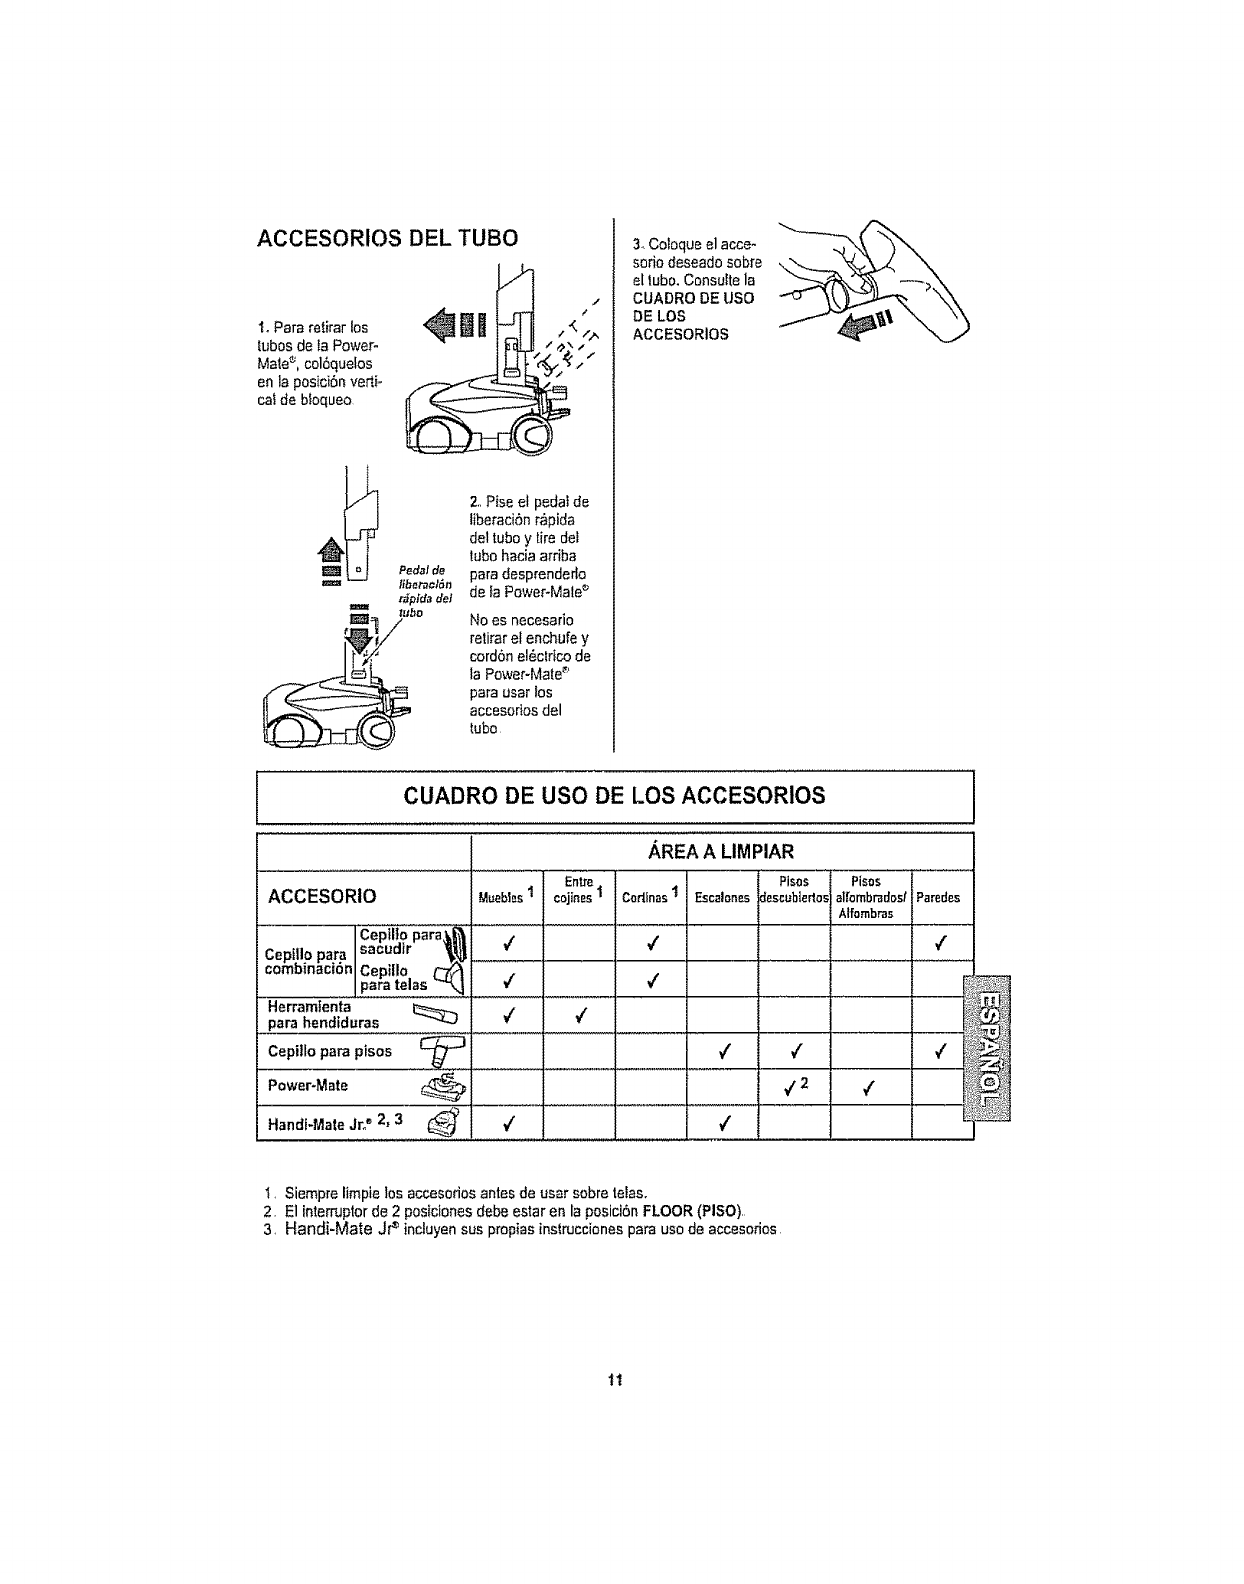
ACCESORIOS DEL TUBe
"L Para retirar los
tubes de la Power-
Mates, col6quelos
en la pos;ci6n verti-
cal de bIoqueo
//
2,,Pise el pedal de
liberaciSn r&pida
del tubo y tire del
tube hacia arriba
Pedalde para desprenderlo
•_pfdade! de la Power-Male_
No es necesario
retirar el enchufe y
cordon el_clrico de
la Power-Mate _'
para usar los
accesorios del
tube
3. Coleque el acce-
sofio deseado sobre
el tube. Consulte la
CUADRO DE use
DE LOS
ACCESORIOS
CUADRO DE USO DE LOS ACCESORIOS
,&REAA LIMPIAR
Entre. Pisos Pisos
ACCESORIO MueU_stcojines1Codinas1Escalonesdescubierlosla|romb_dos/ Paredes
Alfombras
Cepil_.9para_ l
Cepillo para sacurllr _._ _f /
combinaci6n Cepillo t'_
para te as "'k 4 _/
Herramlenta ' '
para hendiduras V" vt
Cepillo para pisos ,z ,( €.
Power-Male _/2 /
Handi-Mate Jro®2, 3_ vf
i, Siempre limpie los accesodos antes de usar sobre telas.
2. E1interrupter de 2 posiciones debe estar en la posiciOnFLOOR (PISO),,
3, Handi-Mate Jr _ incluyen sus propias instrucciones para use de accesories
11
CARACTER{STICAS DE RENDIMIENTO I
ADVERTENCIA !
Peligro de lesiones person_les
Siempre apague y desconecte {a aspiradora
antes de limptar las areas de! agltador ya que
_stos podrian arrancar de manera imprevistao
El no hacedo, podria resultar en lesiones
personales.
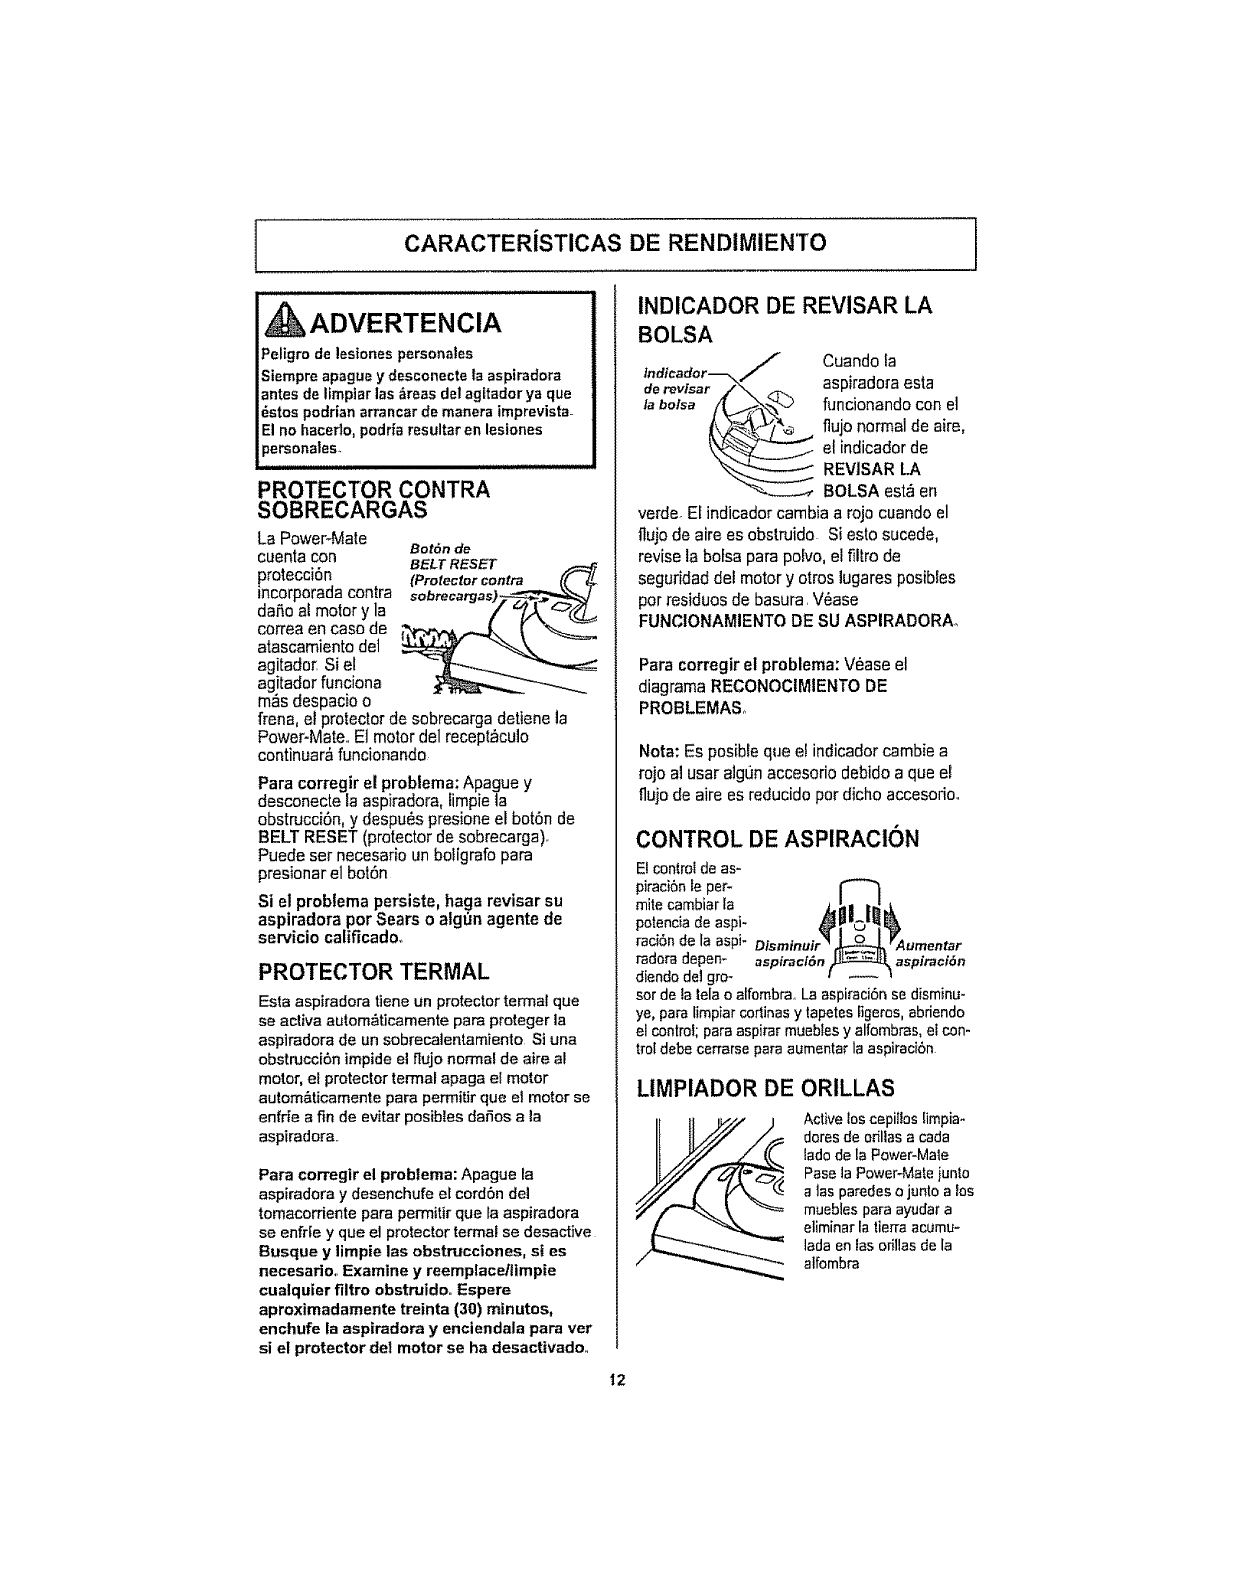
PROTECTOR CONTRA
La Power-Male Bot6n de
cuenta con BELT RESET
p[oteCCi6R (Protector centre {(
incorporada contra sobrecatgas__
daSo at motor y la
correa en case de ,,_,1._.,_ .....£ | "__..
atascamiento del
agitaBor, Si el
agitador funciona
m,% despacio o
frena, el proteclor de sobrecarga detiene la
Power-Mate., Et motor del recept_culo
continuar,_ funcionando
Para corregir el problema: Apague y
desconecte ta aspiradora, fimpiela
obstrucci6n, y despu_s presione el bot6n de
BELT RESET (protector de sobrecarga)_
Puedeset necesario un bo!igrafo para
presionar el bot6n
Si el problema persiste, haga reviser su
aspiradora per Sears o atgt_n agente de
servicio calificado,,
PROTECTOR TERMAL
Esta aspiradora tiene un protector termal que
se activa autom_ticamente pare proteger la
aspiradora de un sobrecalentamiento Si una
obstrucci6n impide el flujo normal de aire al
motor, el protector termal apaga el motor
autom&ticamente pare permitir que et motor se
enfrte a fin de evitar posibles dafios ala
aspiradora..
Pare corregir el problema: Apague la
aspiradora y desenchufe el cord6n del
tomacorriente pare permitir queta aspiradora
se enfr[e y que el protector termal se desactive
Busque y limpie las obstrucciones, si es
necesario.. Examine y reemplace/limpie
cualquier filtro obstruido.. Espere
aproximadamente treinta (30) minutos,
enchufe la aspiradora yenciendala para ver
si el protector del motor se ha desacttvado..
INDICADOR DE REVISAR LA
BOLSA
lndicador_/ Cuando la
de revisar /_/_ aspirado_a esta
labofsa [_ funcionando con el
flujo normal de aire,
el indicador de
REVISAR LA
BOLSA est_ en
verde° El indicador cambia a rojo cuando el
ftujo de aire es obstruido Si esto sucede,
revise la bofsa para polvo, el filtro de
seguridad del motor y otros lugares posibles
per residues de basura, V6ase
FUNCIONAMIENTO DE SU ASPIRADORA.,
Pare corregir el problema: V_ase el
diagrama RECONOCIMIENTO DE
PROBLEMASo
Note: Es posible que el indicador cambie a
rojo al usar algt]n accesorio debido a que el
flujo de aire es reducido per dicho accesodo_
CONTROL DE ASPIRACION
El control de as-
piraci6n le per-
mite cambiar la
potencia de aspi-
raci6n de ta aspi-
fedora depen-
diendo del gro-
sor de 13tela oalfombra, La aspiraciSn se disminu-
ye, pare limpiar cortinas y tapetes Bgeres, abriendo
el control; pare aspicat muebles y alfombras, el con-
trol debe cerrarse para aumentar la aspiraci6n
LIMPIADOR DE ORILLAS
Active los cepii!oslimpia-
dotes de odllas a cada
lade de la Power-Male
Paso la PoweroMate junto
alas paredes ojunto a los
muebles para ayudar a
eliminar la fiesTaacumu-
lada en las orfllas Be la
alfombra
12
ISUGERENClAS SABRE ELAJUSTE DE NIVEL DE PELO DE LA ALFOMBRA I
Use el ajusle XLO (bajo) pare obtener Ia mejor lim-
pieza arondo. Par olra parle, quiz&s se requiera
elevar el nivel pare facilitar algunas tareas, coma
par ejemplo cuanda se trata de tapetes y algunas
atfombras de pelo largo, y pare impedir que la aspi-
radora se apague Se sugieren los siguientes ajus-
tes:
HI - Pe!o muy Iarga y sueito, lapetes, alfombras
muy acojinades.
MED - Pelo mediano a largo
LO - Pelo coda a mediano
XLO - La mayeria de las alfombras y pisos
descubiedos
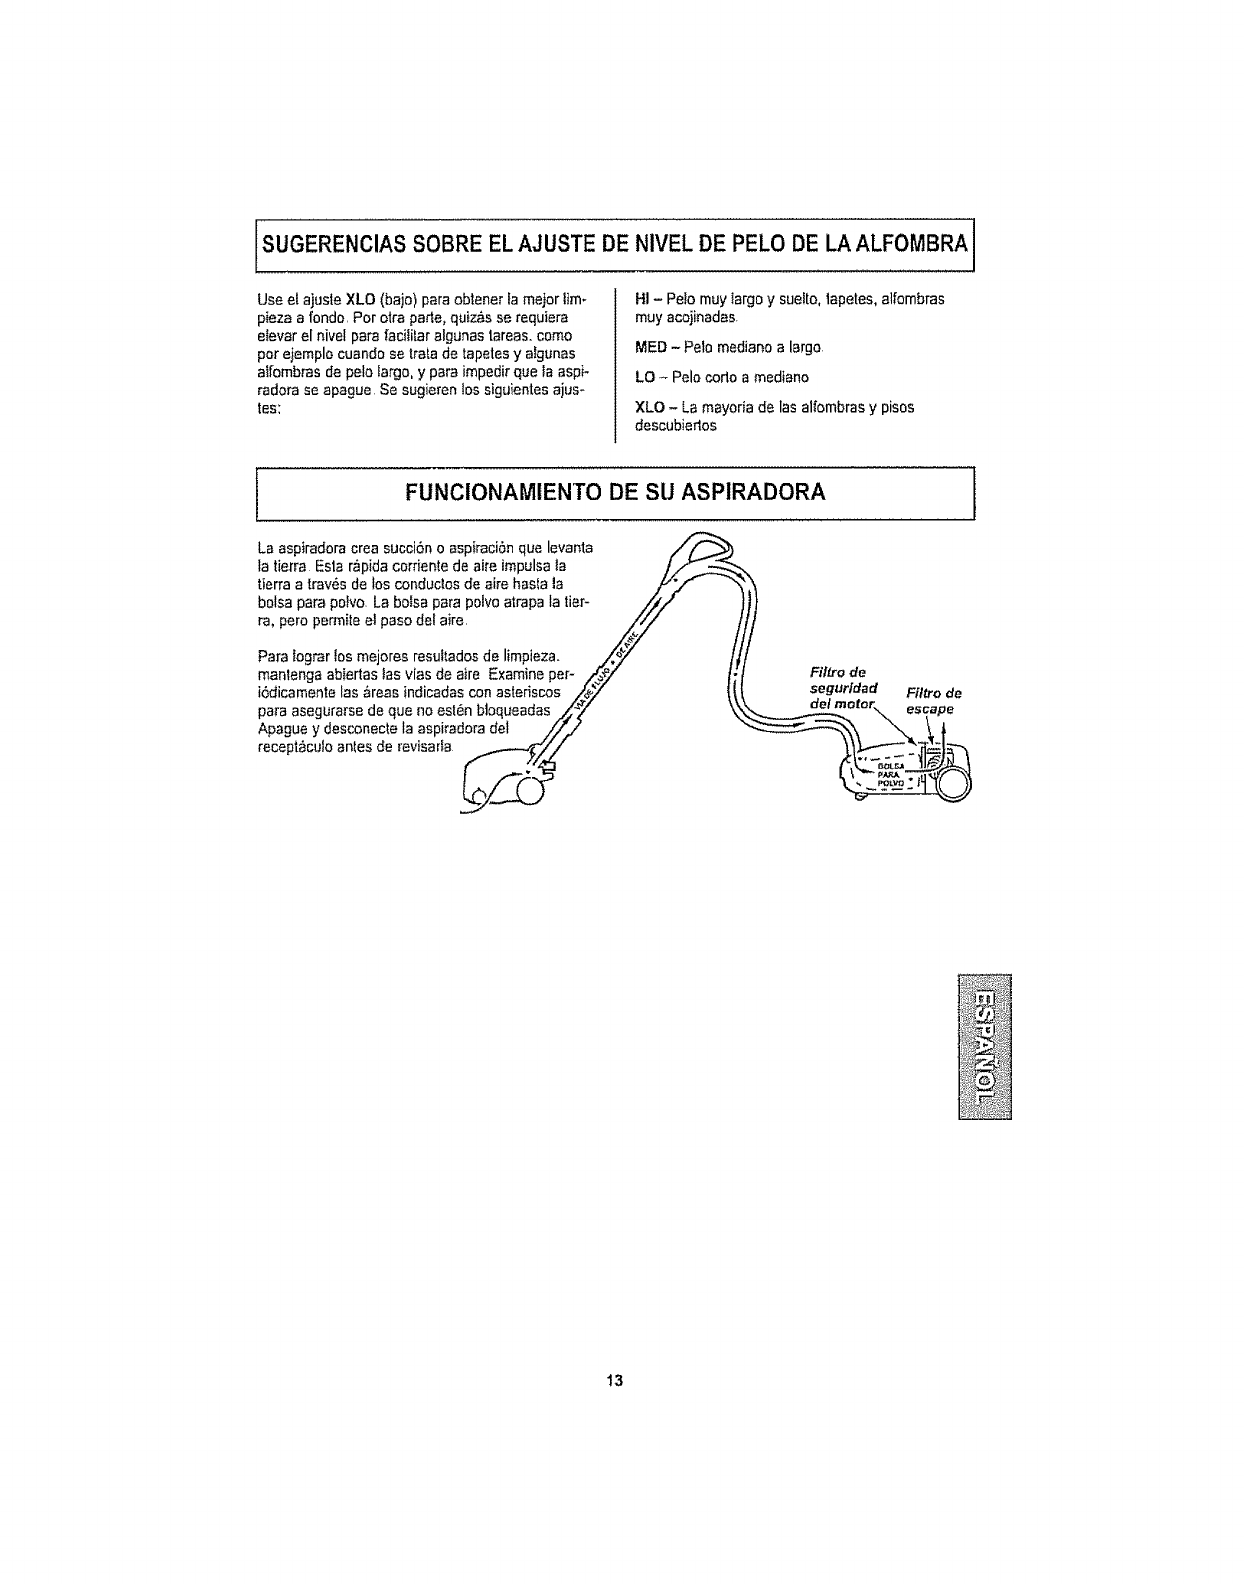
[
La aspiradora crea succi6n o aspiraciOn que levanta
la tierra Esta r_pida corriente de aire impulsala //Y-..-_
tierra a tray, s de los conduclos de aire hasta ta /#'_'- ""
balsa pare palvo. La balsa pare palvo atrapa la tier- //'/'
ra, pero permite el paso deI aire. Z/
Para tograr los mejores resuttados de limpieza, j_._T/
manlenga abiedas las vies de aire Examine per- .._zi"
iSdicamente las &reas indicadas con asteriscos _,'J
para asegurarse de que no est6n bloqueadas .,_-j_i"
Apague y desconecte la aspiradora del //'_/
recept_cuto antes de revisarla ..._.--...,_/f
FUNCIONAMIENTO DE SU ASPIRADORA
Filtro de
seguridad Filtro de
13
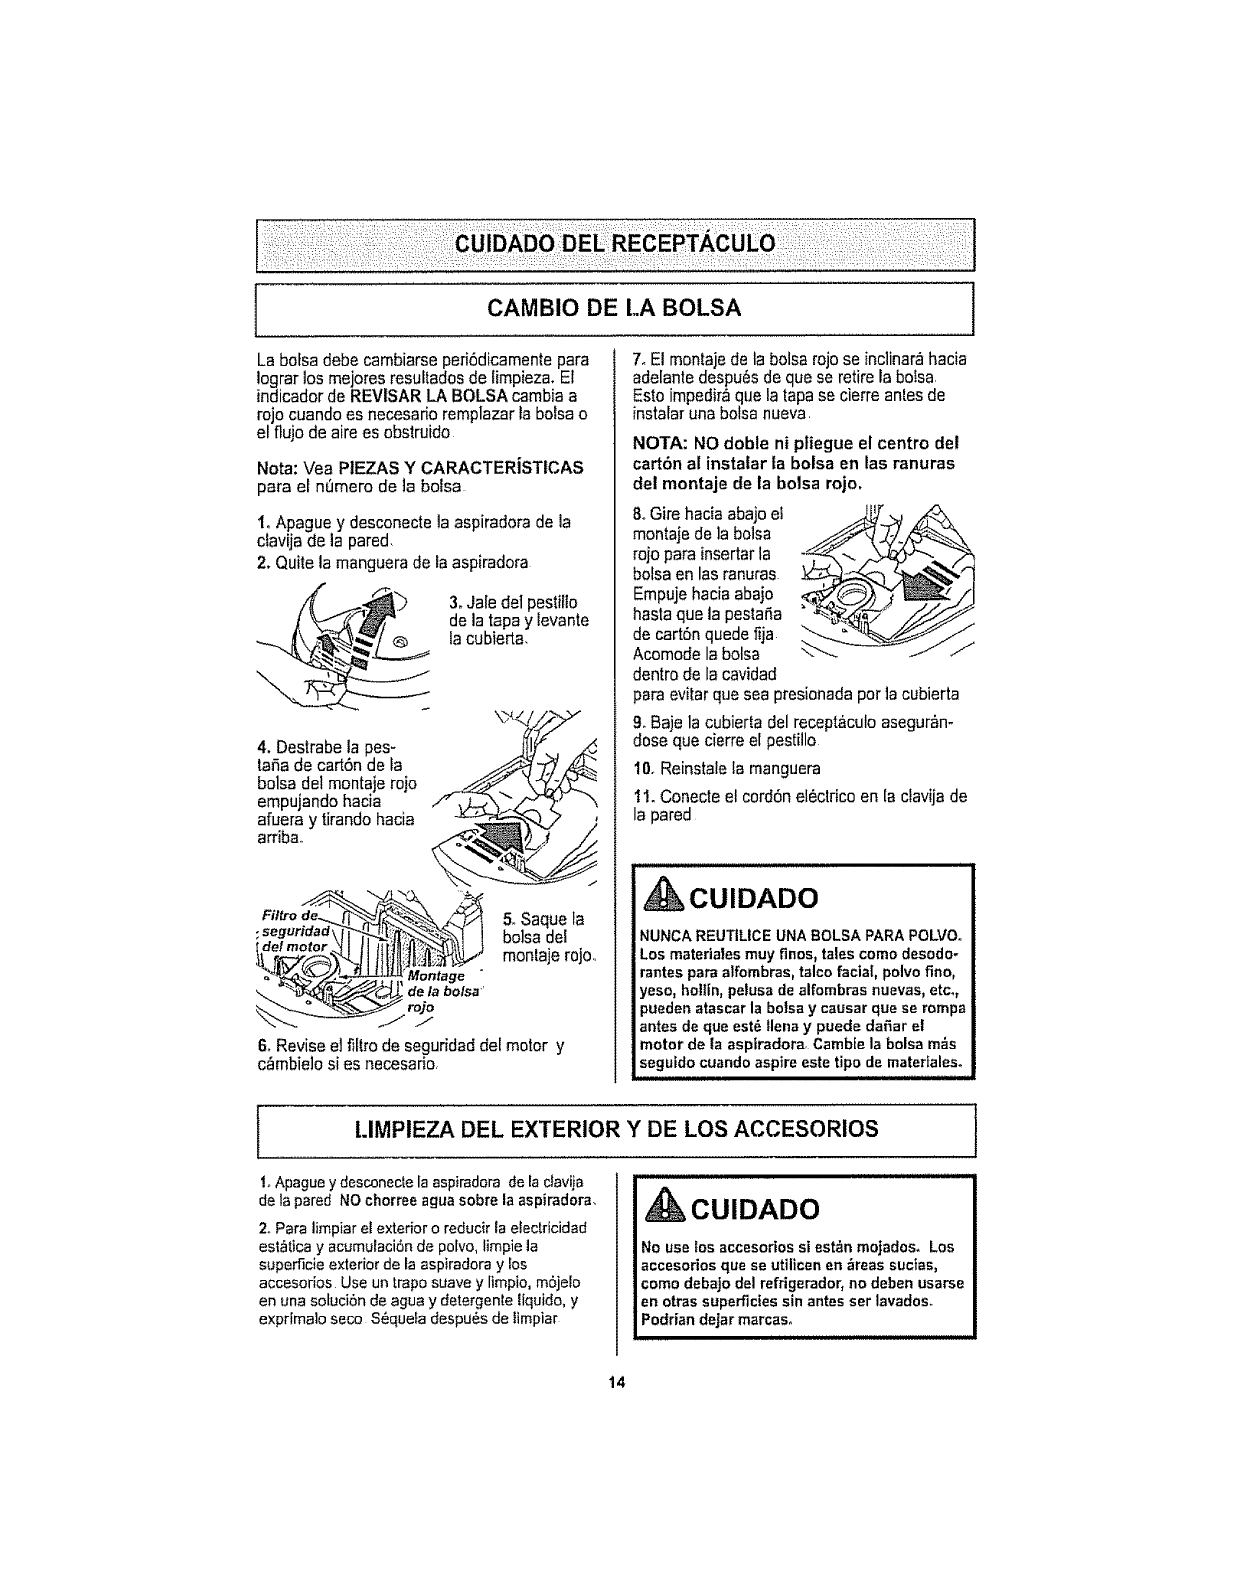
CAMBIO DE LA BOLSA i
La bolsa debe cambiarse peri6dicamente para
lograr los mejores resultados de limpieza, Et
indicador de REVISAR LA BOLSA cambia a
rojo cuando es necesado remplazar la bolsa o
et flujo de aire es obstruido
Nora: Vea PIEZAS Y CARACTERiSTICAS
para el ntJmero de la bolsa
I, Apague y desconecte la aspiradora de la
clavija de ia pared,
2. Quite la manguera de la aspiradora
3. Jale det pestillo
de la tapa y levante
ta cubierta.
4. Destrabe la pes-
tafia de cartSn de la
bolsa del montaje rojo
empujando hacia
afuera y tirando hacia
arribao
5,,Saque la
;seguridad_ bolsa dei
montaje rojo.,
_ontage "
de la bolsa"
ro]o
.I
& Revise el fittrode seguddad del motor y
c_mbie]o si es necesado,
7_El montaje de la bolsa roJose inclinar_ hacia
adelante despu_s de que se retire la boisa,
Esto impedir& que ia tapa se cierre antes de
instalar una bolsa nueva.
NOTA: NO doble ni ptiegue el centro del
cart6n al instalar la bolsa en las ranuras
del montaje de ta bolsa rojo,
& Gire hacia abajo el
montaje de ]a bolsa
rojo para insertar la
bolsa en las ranuras
Empuje hacia abajo
hasta que ta pestaSa
de cart6n quede fija
Acomode la bolsa
dentro de la cavidad
para evitar que sea presionada por la cubierta
9. Baje la cubierta del recept&culo asegur_n-
dose que cierre el pestillo
t0. Reinstale la manguera
11. Conecte el cord6n el6ctrico en [a clavija de
la pared
, CUIDADO
NUNCA REUTILICE UNA BOLSA PARA POLVOo
Los materiates muy finos, tales come desodo-
rantes para alfombras, talco facial, polvo fino,
yeso, hollin, pelusa de alfombras nuevas, etc,,
pueden atascar la bolsa ycausar que se rompa
antes de que est6 tlena y puede dafiar el
motor de la asptradora, eatable la bolsa m_s
seguido cuando aspire este tipo de materfales,
ILIMPIEZA DEL EXTERIOR Y DE LOS ACCESORIOS I
1oApague y desconecte la aspiradora de la cfavija
de la pared NO chorree agua sobre la aspiradora,
2oPara limpiar el exterior o reducir la efectricidad
est,_tica y acumulaci6n de pofvo, limpie la
superficle exterior de la aspiradora y los
accesorios Use un Irapo suave y limpio, mSjelo
en una sotuci6n de agua y detergenle llquido, y
expr[malo seco S6quefa despu6s de limpiar
CUIDADO
No use los accesorios si est&n mojados, Los
accesorios que se util]cen en z_reassuctas,
como debajo del refrigerador, no deben usarse
en otras superficies sin antes set lavados.
Podrian dejar marcaso
t4
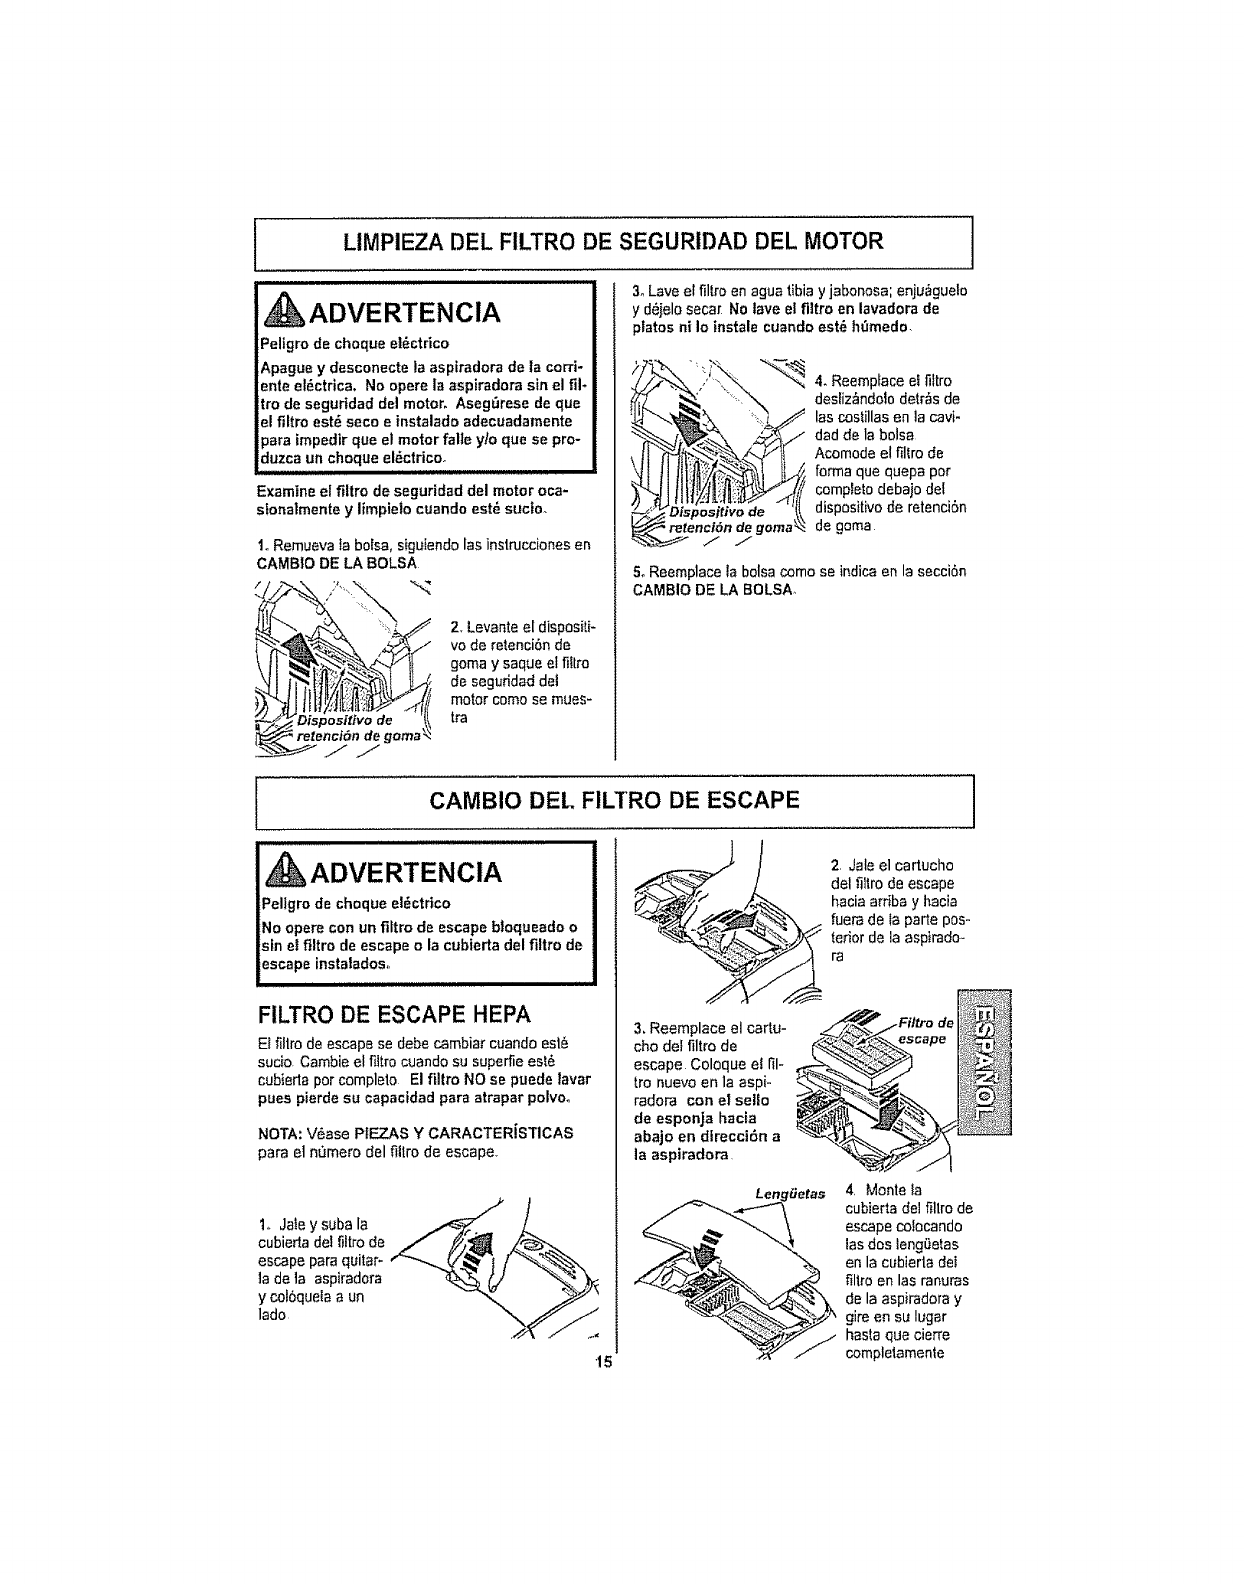
LIMPIEZA DEL FILTRO DE SEGURIDAD DEL MOTOR
VERTENCIA 3°Laveelfil,roenaguatibiayjabonosa',enju,guelo
AD y d6jelo secar No lave el flltro en lavadora de
ptatos ni Io instale cuendo est'_ h_mede,
Peligro de cheque el_ctrico
Apague y desconecte la aspiradora de la corri-
ente el_.ctrica, No opere la aspiradora sin el film
ire de seguridad del motor, Aseg_rese de que
el filtro est_ seco einstalado adecuadamente
para impedlr que el motor falte ylo que se pro-
duzca un cheque el_ctricoo
Examine el filtro de seguridad del motor oca-
stonalmente y limpielo cuando est6 suctoo
1oRemueva ia bofsa, siguiendo las instnJcciones en
CAMBIO DE LA BOLSA
2_Levante el dispositi-
vo de retenci6nde
goma y saque el fiitro
de seguridad del
motor come se mues-
tra
4. Reempface e! filtro
desliz_ndo!o detr_s de
las costillas en la cavi-
dad de la boise
Acomode el fiffro de
ferrna que quepa per
campleto debajo det
dispositivo de retenci6n
de gama
5oReemplace la boise come se indica en la secci6n
CAMBIO DE LA BOLSA_
CAMBIO DEL FILTRO DE ESCAPE
ADVERTENCIA
Peligro de cheque el_ctrico
No opere con un filtro de escape bloquearto o
sin el ftltro de escape ola cubterta del filtro de
escape instatados,,
FILTRO DE ESCAPE HEPA
Et fillro de escape se debe cambiar cuandoest_
sudo Cambie el filtro cuando su superfie est6
cubierta per complete El filtro NO se puede lavar
pues pierde su capactdad para atrapar polvm
NOTA: V6ase PIEZAS Y CARACTERiSTICAS
para el n_mero del filtro de escape
1o Jale y suba la
cubierta del filtro de
escape pare quitar-
la de la aspiradora
y col6queta a un
lade
15
2. Jale el cartucho
del fittro de escape
G- hacia arriba y hacia
i_uerade ia parle poso
=:,_,, terior de la aspirado-
ra
/./ x/,/_
3, Reemplace el cartu-
cho del filtro de
escape Coloque el fil-
tro nuevo en la aspi-
radora con el sello
de esponja hacia
abajo en direcci6n a
la aspiradora
4_ Monte Ia
de
cubierta del filtro de
escape co!ocando
ias dos iengi_etas
en la cubierla deI
fillro en las ranuras
de la aspiradora y
gire en su lugar
basra qua cierre
completamente
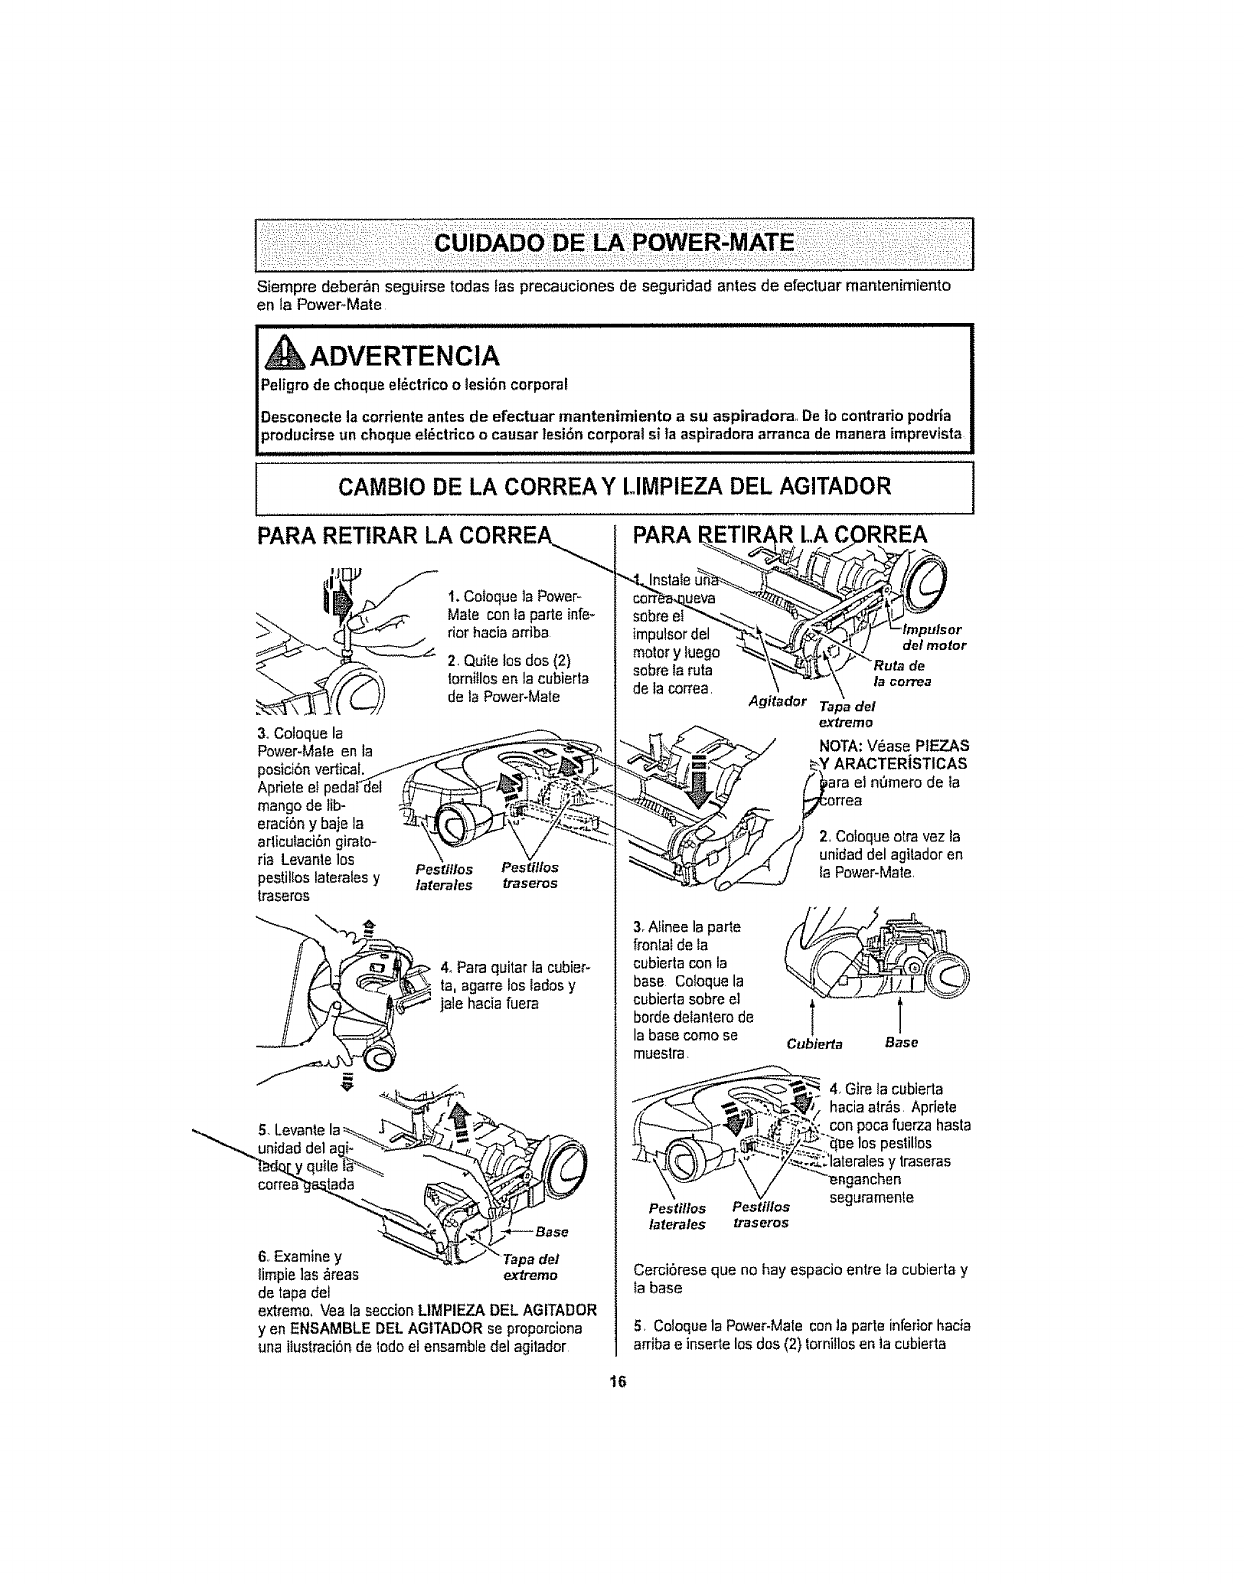
Siempredeber_nseguirsetodasfeeprecaucionesdeseguridadantesdeefectuarmantenimiento
enlaPower-Mate
ADVERTENCIA
Peligro de choque el_ctrico o lesion corporal
Desconecte la corriente antes de efectuar mantenimiento a su aspirador& De Io contrado podrFa
un choque el_ctrico o causar lesi6n corporal si ia aspiradora arranca de manera imprevista
CAMBIO DE LA CORREA Y LIMPIEZA DEL AGITADOR
PARA RETtRAR LA CORREA
riar hacia arriba
2Quite los dos (2)
__t torn,,losen ,a cubiarta
de la Power-Mate
& Coloque la
Power-Mate en la
Apriete el peda_-_>,_,_
mango de fib- __,_.__"
eractony baje I__:_.._'r_
ria Levanle los = , .... .-'.o
pestilloslater:alesy F_es_I°ss_-_ass_ss
traseros
&Para quitar la cubier-
to, agarre los iados y
jale hacia fuera
5Levante la ,........_r-,, _, ,2_'_ _.,_
qu,o-l I/((J
6. Examine y _L.t" _"Tape del
limpie lax _reas extremo
de tapa del
extreme, Vea la seccion LIMPIEZA DEL AGITADOR
yen ENSAMBLE DEL AGITADOR se proporciona
una ifuslraci6n de lodo el ensamble del agitador
PARA RETIRAR LA CORREA
•impulsor
Y g
sob,e,a --
dela correa. \ _-- \ la con'ea
A_i_ador Tapa del
extremo
NOTA: Vease PIEZAS
_Y ARACTERiSTICAS
are el n0mero de ia
rrea
Coloque otra vez la
idad del agitador en
Power-Mate.
3.Afinee la parle
fronlal de la
cubierta con la
base Coloque la
cubierta sobre el
borde detanlero de
la base como se
muestra. Cubierta Base
4, Gire la cubierta
___&_,_; haciaatr_s Apriete
__. con poca fuerza hasta
L_ __JZ-_ "_I]e los pesiillos
J-___:.'laterales y traseras
,,\_v "k /_-enganchen
\ v seguramente
Pestillos Pestillos
latera/es traseros
Cerci6rese que no kay espacio entre la cubierta y
ia base
5, Co!oque la Power-Mate con la parte inferior hacia
arriba e insede los dos (2) tornillos an ta cubierta
16
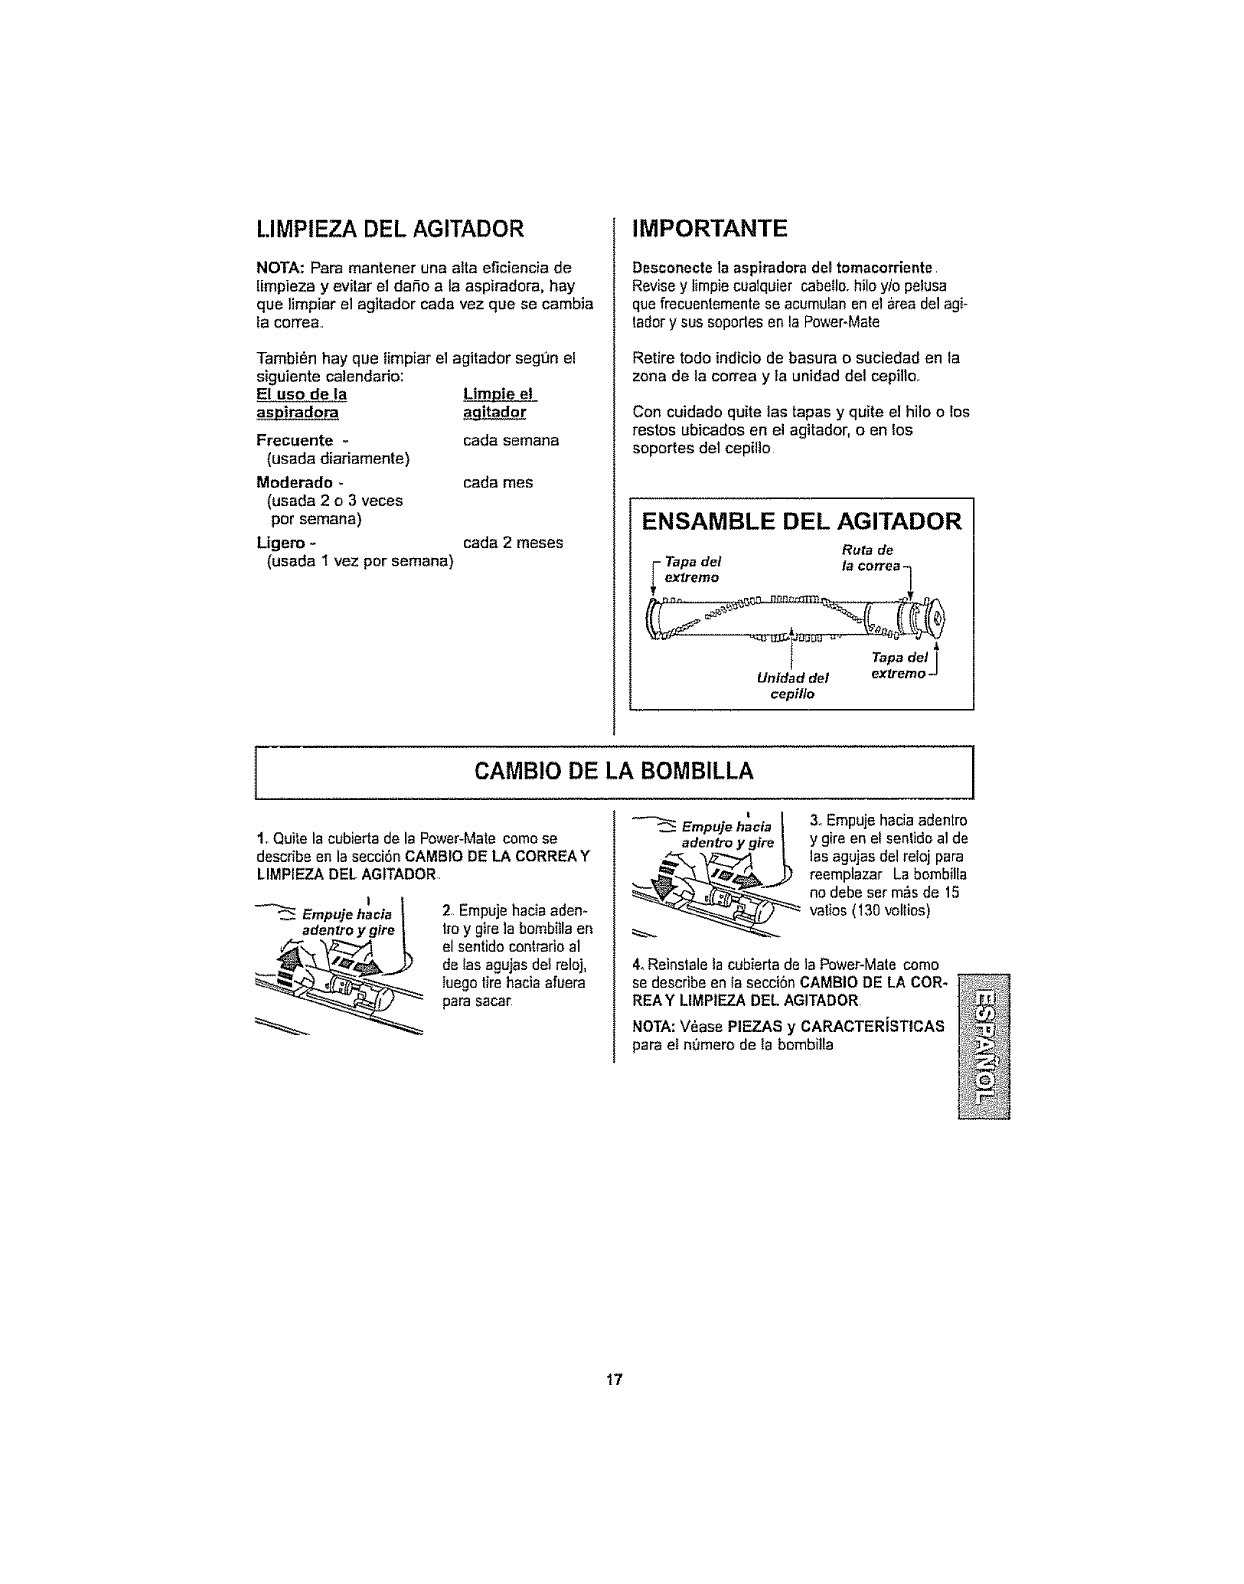
LIMPIEZA DEL AGITADOR
NOTA: Para mantener una alta eficiencia de
[impieza y evitar e] dafio a la aspiradora, hay
que limpiar el agitador cada vez que se cambia
fa colTea.
Tambi6n hay que timpiar elagitador segun el
siguiente calendado:
El use de la Limpie et
aspiradora agitador
Frecuente - cada semana
(usada diariamente)
Moderado - carla mes
(usada 2 o3 veces
per semana)
Ltgero - cada 2meses
(usada t vez per semana)
IMPORTANTE
Desconecte ta aspiradora del tomacorriente.
Revise y limpie cualquier cabetlo, NIo y/o pelusa
que frecuentemente se acumutan en el area del agi-
tador y sus soportes en la Power-Mate
Retire todo indicio de basura o suciedad en la
zona de la correa y la unidad del cepillo,,
Con cuidado quite las tapas yquite el hilo o los
restos ubicados en el agitador, o en !os
soportes del cepilto
ENSAMBLE DEL AGITADOR
Ruta de
_Tapa del la correa-_
extremo _
uo,,!,,o,J
ceptlto
CAMBIO DE LA BOMBILLA I
t,. Qui_e la cubiertade la Power-Mate come se
descdbe en la secci6n CAMBIO DE LA CORREAY
LIMPIEZA DEL AGITADOR,,
I
Empuje haeia
adentro y gfre
2. Empuje hacia aden-
Ire y g_rela bombitla en
el sentido cantrario al
de ias agujas de1reloj,
Iuego tirehacia afuera
para sacar
I
Empuje hacia
adentro y Bite
3,, Empuje hacia adentro
y gire en e! sentido al de
las agujas del reloj para
reemplazar La bombilla
no debe set m_s de 15
ratios (130 volties)
4. Reinstale ta cubierta de la PoweFMate come
se describe en ta secci6n CAMBIO DE LA COR-
REAY LIMP|EZA DEL AGITADOR
NOTA:V_ase PIEZAS y CARACTERISTICAS
para el n0mero de la bombi!la
17
CUIDADO DEL AGITADOR
_kADVERTENCIA
Peligro de cheque eI_ctrico o lesi6n corporal
Desconecte la corriente antes de efectuar el
mantenimiento a su aspiradora, De io con-
trarto podria productrse un cheque el_ctrico o
causar lest6n corporal si la asplradera arranca
de manera tmprevista,
= i = i =l ii =
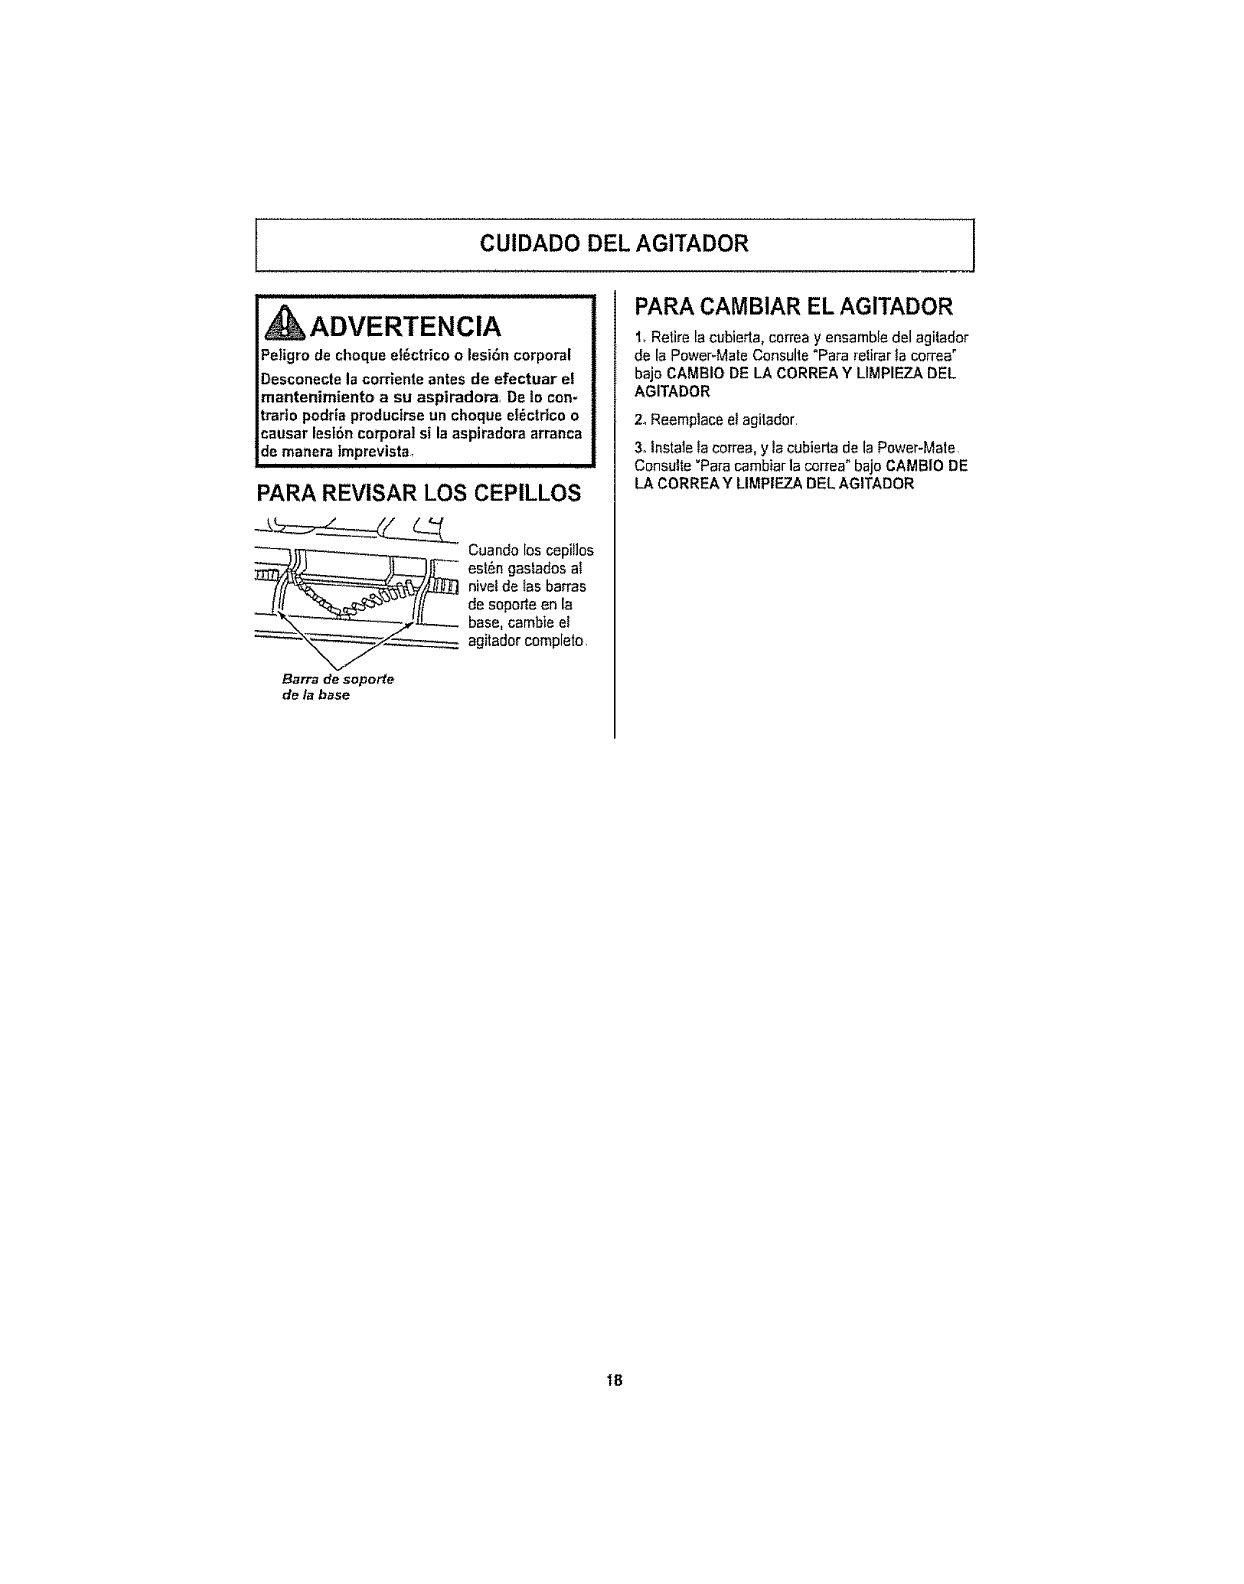
PARA REVISAR LOS CEPILLOS
Barra de soporte
de la base
Cuando los cepiIlos
est_n gastados aI
nivel de tas barras
de soporte en la
base, cambie eI
agitador complete.
PARA CAMBIAR EL AGITADOR
1_Retire la cubierta, correa y ensamble del agitador
de la Power-Mate Consulte "Para relirar ta correa°
bajo CAMBIO DE LA CORREA Y LIMPIEZA DEL
AGITADOR
2oReemplace et agitader.
3. Instate ia correa, y la cubiertade la Power-Mate
Consuite "Para cambiar la correa" bajo CAMBIO DE
LA CORREA Y LIMPIEZA DEL AGITADOR
1B
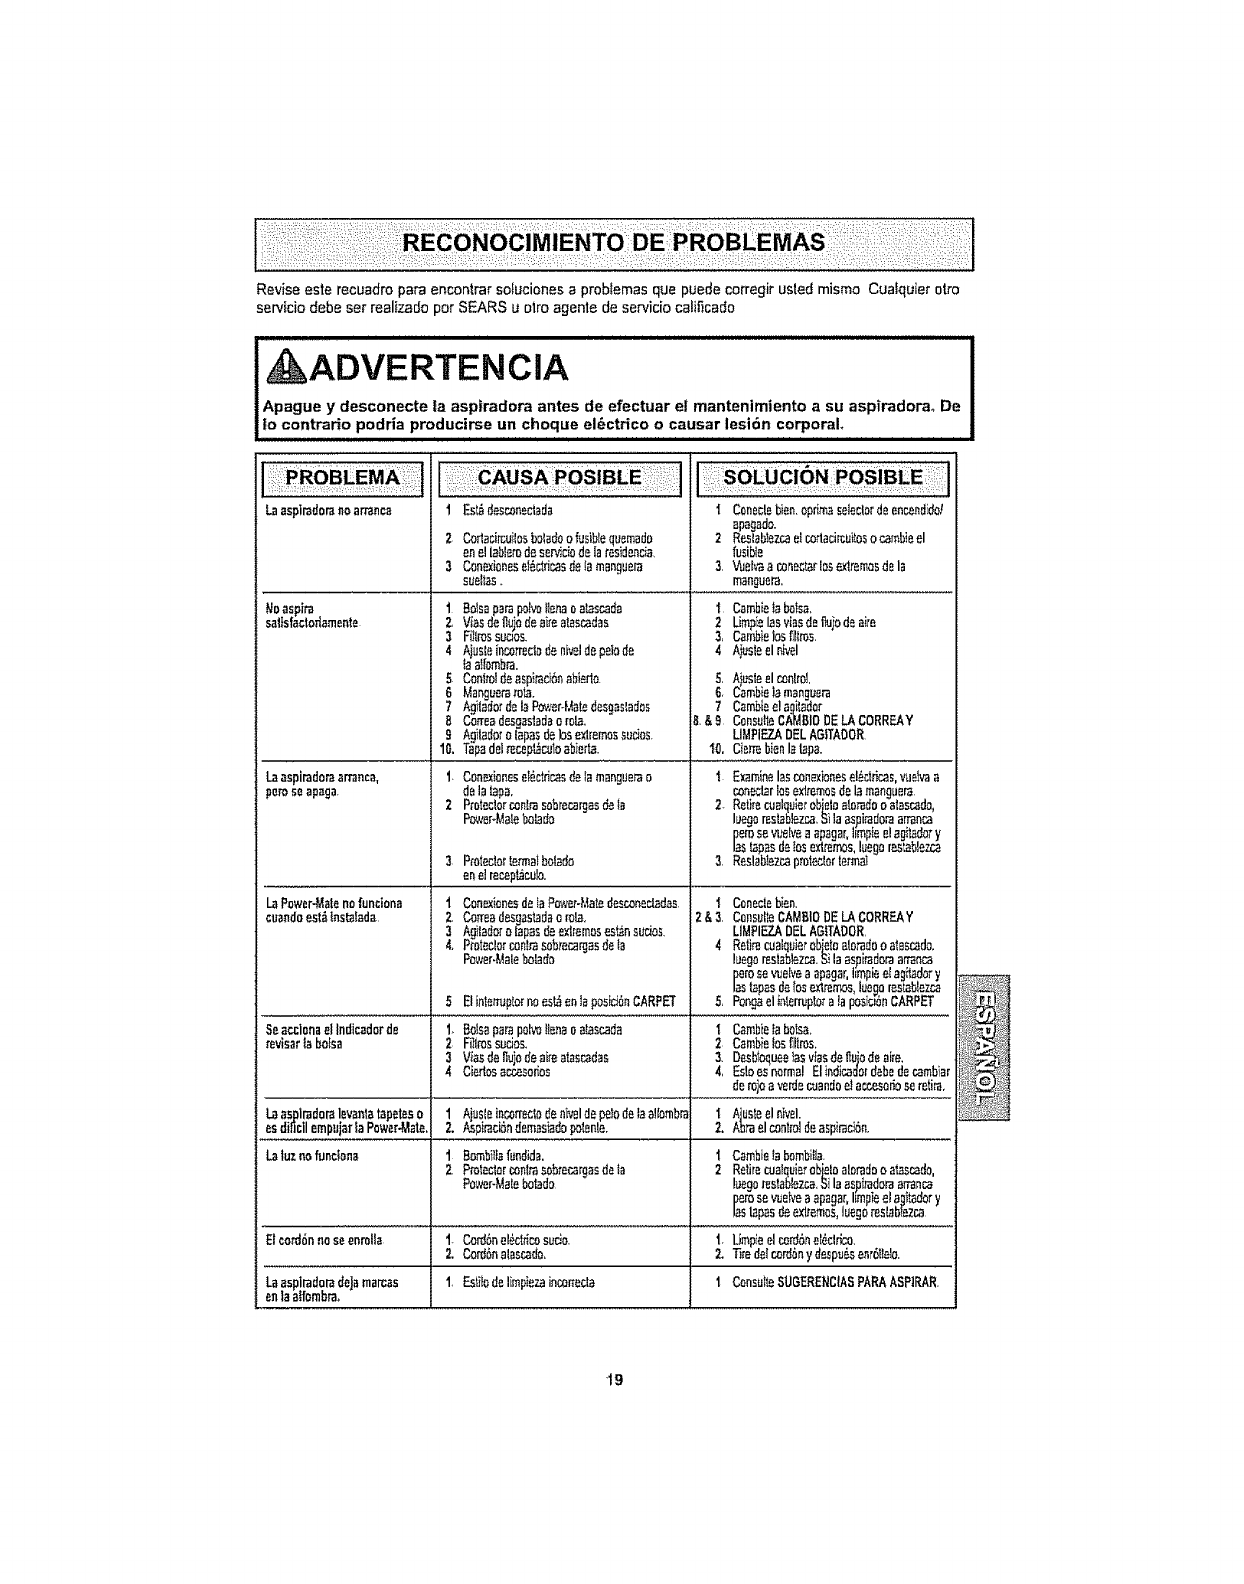
Reviseesterecuadropareencontrar sotuciones a probIemas que puede corregir usled mismo Cuafquier otro
servicio debeser realizado par SEARS u olro agente de ser¢icio caliScado
, I0kADVERTENCIA
Apague y desconecte |a aspiradora antes de efectuar el mantenimiento asu aspiradora, De
,,!,o,,,,contrariopodria producirse un cheque el_ctrico o causar lesi6n corporal.
Au P0S,8 IE :1 :1
Laasplradoranoa_nca I _ desc,,)neciBda i Coneciebien.opdm_seleclordeen_ndido/
Bpagado.
2 Coriaci_JflOsboladoofusiblequemado 2 Reslabtezc_elcodacircuitoso_mbieel
an ellablemdese_cio de (atesid_cla, fusible
3Cone.xionesele'.c_dr.asdeIamBnguem 3. %alvaa con_tarlosextremesde la
sue)tee, manguera.
Noaspira
saUsfactodamente
La aspJrad0i'aarra_lCa,
peteeeapaga
I Balsaparepolvo)lenaoa_as_da
2, Viesdeflujodesireslsscadas
3FOlmssuoos.
4 kusle(n_n'eclodeniveldepeiode
(aa(ombra.
5 Controldeaspimci6nebiedo.
6Manguerarata.
7kgitadsrdelaPov._er4,(atedesgaslades
8Co(Teadesgasiadaomb.
9Agiladoro lepasdelosexlremossodas.
10.Tapedelnzcep_culoabierL_,
I,Con_ioneseI6ctdr..asde(amanguerao
deblapa,
2Pmtedorconlrasobrecargasdeb
PowerJ,4a(ebobde
LaPower-Matenofunciona
3Protectorlegal botado
enel{ecepl_cula.
1CsnexionesdebPower-Matedescon.dadas
iCambiela boise,
2 Umlo!elasvbs dBlluisde aide
3, Cama]e)asIi)lms.
4 A)usleel nivel
S, kiusleel con),'oL
6, CamToie)amanguera
7Cambieel ag_ador
8. &9C0nsutteCKMBID DELACORREAY
LIMPIE7_.ADELAG$TADOR
_0. Cie_ bienla l_pa.
t Examinelascon_xionese!_ci_icas,vu._ a
cons_r lOSexlr_mssdsla manguera
2RelirecuBlquierobjelaaloradooalascado,
begems_b)_ca,Sila aspiradoraarranca
pen>sevuelveaapagar,hmpiee!agiiedo_y
las_pssde(as_mmos,muegor_tablezca
3. ReslabIezcapraiectortermai
i Coneclebien.
cuandoest_ fnst_lada, 2, Coneadesgastadao ra{_. 2 &3, Consul_eCAMBIODELACORREAY
3Agil_doFo tapesdeextremeses_nsudos, LIMPIF..ZAeEL AGITADOR,
4. Proteclorcontrasobrecargesdeb 4 Relirecualquierobietoa_sradooata_cado.
Power.Malebolado IL_egoms)ab)eZrl_,Silaaspiradoraan'anr._
pen:)serue)reaapagar,l_mpieelagitedary
lastapesdelosex1_emosluegere..stablezca
5Elinterrupternoes_ien)sposici6nCARPET 5, Pangseln_ermplstslapssb6nCARPET
Seaeclona el lndicadorde I. Balsaparepelvo)lenao alascada I Camb)ebbolsa_
_evisarla balsa 2 FiI(rossudos. 2Cambielos llllras,
3Viesdeflujsdeaireetssr.,ada_ 3. Desbbquee)asviasde flujsde sire,
4 Ciedosar..r_.esodos 4, EsloesnormalElindicadordebtdecambiBr
derajoaverd_cuandoelacr,,esaHoaeratira.
_asplrademlevantatapetes0 1Ausleinr,0rre_tsden_ldspelsdebaUombra i Ajusteelnivel.
esdiIlcllempujarlaPower-Mate,( 2. _piraci6n demasiac)opolene. 2. kbrael controlde aspirac)6n.
La luz no funclona i Bombi[lafundJda. I Cambie(ebomb[Ua.
2. Pmteclorcontrasob_ecargasdela 2Retirecualquie_'obieloaIemdooalascads,
Power-Malebobdo begorestablezca,Si laa_piradoraarranca
pe_osevuek,e aapagar,l_mpieel agitadory
leslapasde e_emoa,luegoresbb)ezca
El eord6nnoseenrolla i- Cord6nel_cldcosurJo. 1. Ump]eelconJ6nel_cldco,
2. e..,or_6nalas_do. 2. _re delcord6ny despu6aenr611elo,
Laasplradoradejamaraas 1, Eslilsdelimpiezaino_n'ecla I Consu)teSUGERENCIASPARA ASPIRAR
enla alfombra.
11
19
Acuerdos Maestros de Proteccibn
Enhorabuena per hacer una compra intetigente. Su nuevo producto Kenmore_est_ dise_ado y fabri-
carlo para ofrecefle aSos de funcionamiento confiable. Pete al igual que todos los productos pueden
precisar un mantenimiento preventive o alguna reparaci6n de vez en cuando.+ Per este motive, tener
un Acuerdo Maestro de Protecci6n puede ahorrade dinero e inconvenientes
EI Acuerdo Maestro de Protecci6n tambi_n le ayuda a prolonger la vida util de su nuevo producto+ A
continuaci6n indicamos Io que el Acuerdo* incluye:
1_ Partes y mane de obra necesados para ayudar a que estos productos funcionen correctamente
bajo condicionales normales de use, no simptemente defectos. Nuestra cobertura va touche
m_s all_ de la garantia del producto+. Ning_n deducible, ninguna averia funcional queda exclu-
ida de la cobertura+ protecci6n real,
[] Servicio experto ofrecido per una lista de mds de t0.,000 t_cnicos autortzados del servicio
t_cnico de Sears, Io que significa que alguien en quien usted puede confiar estar_ trabajando
en su producto.
N_mero ilimitado de Ilamadas al servicio t_cnico y servicio en toda la naci6n, tan continue
come usted nos _osolicite, sin importar donde est6..
Garantia seria de sustituci6n de! producto.. La sustituci6n de su producto cubierto si se pro-
ducen cuatro o m_s averias en doce meses
Sustituct6n del producto per otro nuevo si su producto cubierto no puede repararse.
Revisi6n y mantenimiento anual preventive siempre que Io desee y sin cargo afguno.
Ayuda r_pida per tel_fono - Nosotros to Ilamamos Resoluci6n r=fipida. Soporte telef6nico de
un representante de Sears en redes los productos.. Piense en nosotros come un "manual de use
y cuidado parlante"..
[] Protecci6n contra subidas de tensi6n que provoquen daSos el_ctdcos causados per las f[uc-
tuaciones de la corriente+
I_ $250 de protecci6n contra la p_rdida de alimentos anuafmente en case de que se estropee
algbn alimento come resuttado de una averia mec_nica de cualquier cengetador o refrigerador
cubierto.
[] Reembolso del alquiler si la reparaci6n de su producto cubierto toma robs tiempo del prometi-
do.
[] 10% de descuento en el precio regular de cuatquier servicio de reparaci6n no cubierto y de las
piezas instaladas retacionadas.
Una vez que compre el Acuerdo, s61o bastar_ una simple Ilamada telefSnica para que pueda progra-
mar un servicio.. Puede llamar a cuafquier hera del dia o de la noche, o concertar una cita de servicio
en ltnea
El Acuerdo maestro de protecci6n es una compra fibre de riesgos Si per cualquier raz6n cancela
durante el pertodo de garantia del producto, le devolveremos todo el dinero O, un reembotso pror-
rateado despu_s del periodo de vencimiento de la garantfa iCompre su Acuerdo maestro hey!
Aplican algunas limltaciones y exclusiones.. Para precios y m,_s informaci6n en EE.UU.+, Ilame
al 1-800,827-6655°
*La cobertura en Canad_ varia en algunos articulos, Para obtener todos los detalles, flame a
Sears Canad,i al 1-800-361-6665.
Ser,/icio de instalaci6n de Sears
Para La instataci6n profesionat per parte de Sears de etectrodom6sticos, abddores de puertas de
garajes, calen_dores de agua y otros articulos principales para el hogar, en EE.UU. o Canad_ Ilame
al 1°800-4-MY-HOME®,.
2O

2'1
Get it fixed, at your home or ours!
Your Home
For expert troubleshooting and home solutions advice:
www,,manag emyhome.corn
For repair- in your home - of all major brand appliances,
lawn and garden equipment, or heating and cooling systems,
no matter who made it, no matter who sold it!
For the replacement parts, accessories and
owner's manuals that you need to doqt-yourself
For Sears professional installation of home appliances
and items like garage door openers and water heaters
1-80O-4-MY-HOME® calla_ime,_, ornight
(%800-4694663) (U,,S A and Canada)
WV_,,sears,,CO In w'ww,,sear:s,,ca
Our Home
For repair of carry-in items tike vacuums, lawn equipment,
and electronics, call anytime for the location of the nearest
Sears Parts & Repair Service Center
1-800-488-1222 (U.S.A) 1-800-469-4663 (Canada)
www_sear_,,com V£W'W,,S e a rs,,c a
To purchase a protection agreement on a product serviced by Sears:
1-800-B27-6655 (u aA.) 1-800-361-6665(Canada)
Para pedir servicio de reparaciOn Au Canadapour service en fran_ais:
a domicilio,y paraordenar piezas: 1.800.LE.FOYERMC
1-888-SU-HOGAR® (I-800-533-6937)
(I-888-784-6427) www sears, ca
Serifs
© SearsBrands,LLC
® Registered Trademark /Trademark /"_ Service Mark of Sears Brands. LLC
® Mama Registrada lTM Marca de F_brlcafs_ Marca de Serviclo de Sears Brands. LLC
MC _D
Marque de commerce IMarque d_pos_e de Sea_s Brands. LLC
