Kenmore 2539235711 User Manual UPRIGHT FREEZER Manuals And Guides L0808364
KENMORE Upright Freezer Manual L0808364 KENMORE Upright Freezer Owner's Manual, KENMORE Upright Freezer installation guides
User Manual: Kenmore 2539235711 2539235711 KENMORE UPRIGHT FREEZER - Manuals and Guides View the owners manual for your KENMORE UPRIGHT FREEZER #2539235711. Home:Kitchen Appliance Parts:Kenmore Parts:Kenmore UPRIGHT FREEZER Manual
Open the PDF directly: View PDF ![]() .
.
Page Count: 8
Kenmore
FROSTLESS
FREEZER OWNER'S MANUAL
Safety First
Unused or abandoned freezers are still dangerous ... even
if they__"just sit in the g__zge a few days" If you are getting
rid of your old freezer, do it safely. Please read the included
_instructions from the Association of Home Appliance
Manufacturers.
HELP PREVENT ACCIDENTS
SafetyFirst..................................FrontCover
IfDoor Must Be Removed ........................,...2
InstallIt...........................................2
LevelIt............................................2
Ground It............................................2
Adjust It......................................
StartIt .........................................3
,iii,,i ",
CONTENTS
Featuxes .................................................. 3-1..5.6
BeforeCallingforService...........................................6
DefrostIt!QuickDefrost..................................7
Clean It...........................................................7
Energy Savings Tips ................................... 7
Vacation and Moving Care......................7
Warranty ...........................................Back Cover
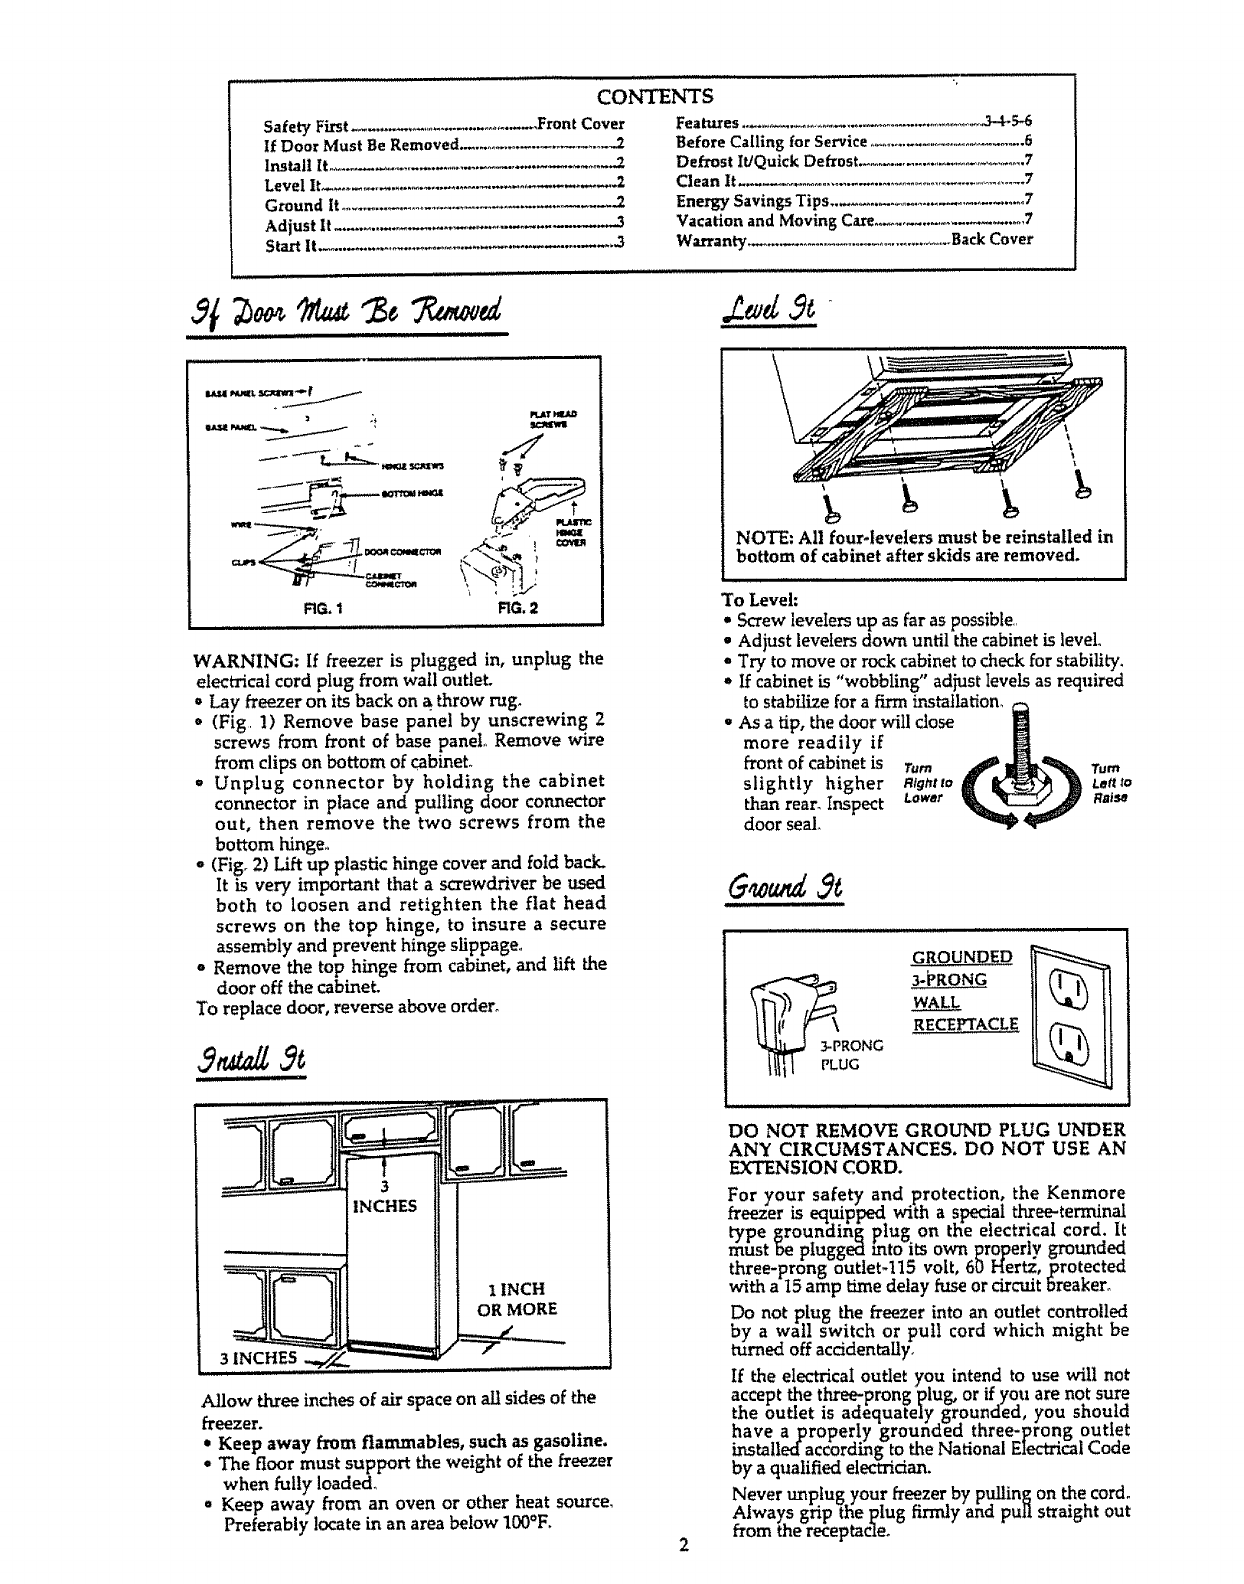
RG. I RG. 2
WARNING: If freezer is plugged in, unplug the
electrical cord plug from wall outlet.
o Lay freezer on its back on a throw rug.
(Fig 1) Remove base panel by unscrewing. 2
screws from front of base panel° Remove wire
from clips on bottom of cabinet.
oUnplug connector by holding the cabinet
connector in place and pulling door connector
out, then remove the two screws from the
bottom hinge.,
,, (Fig° 2) Lift up plastic hinge cover and fold back.
It is very important that a screwdriver be used
both to loosen and retighten the flat head
screws on the top hinge, to insure asecure
assembly and prevent hinge slippage°
o Remove the top hinge from cabinet, and lift the
door off the cabinet.
To replace door, reverse above order°
5. dL
, ,i i
......... i i1,1
3
INCHES
3 INCHES -./__.
i
Allow three inches of air space on all sides of the
freezer.
• Keep away from flammables, such as gasoline.
- The floor must support the weight of the freezer
when fully loaded,
° Keep away from an oven or other heat source_
Preferably locate in an area below 100°F, 2
\
NOTE: All four-levelers must be reinstalled in
bottom of cabinet after skids are removed.
To Level:
•Screw levelersup as faraspossible
•Adiust levelersdown untilthecabinetislevel.
•Try tomove or rockcabinettocheckforstability,
oIfcabinetis"wobbling"adjustlevelsas required
to stabile for a firm installation,
• As atip, the door will dose
more readily if
front of cabinet is Turn Turn
slightly higher atghtto Lento
than rear. Inspect Lowar Ra_sa
door seal
GROUNDED
_p 3"_RONG
WALL
_,, RECEPTACLE
RONG
I_III ['LUG
DO NOT REMOVE GROUND PLUG UNDER
ANY CIRCUMSTANCES. DO NOT USE AN
EXTENSION CORD.
For your safety and protection, the Kenmore
freezer is equipped with a spedal three:termi'nal
type grounciing plug on the electrical cord. It
must be ptuggea into its own properly grounded
three-prong outletql5 volt, 60 Hertz, protected
with a I5 amp time delay fuse or circuit breaker°
Do not plug the freezer into an outlet controlled
by a wall switch or pull cord which might be
turned off accidentally,
If the electrical outlet you intend to use will not
accept the tbxee-prong plug, or if you are not sure
the outlet is adequately grounded, you should
have a properly grounded three-prong outlet
installed according to the National Electrical Code
by a qualified electridan.
Never unplug your freezer by pulling on the cord_
Alway_s grip the plug firmly and pull straight out
from the receptacle.
Ice cream is a good indicator for adjusting freezer temperatures_ Ice cream should be firm.. If it is too soft, turn the cold
control to a higher number. If ice cream is too hard and brick like turn the cold control to a lower number.. After a few
days you may want to "fine tune" the cold control for the best temperature,
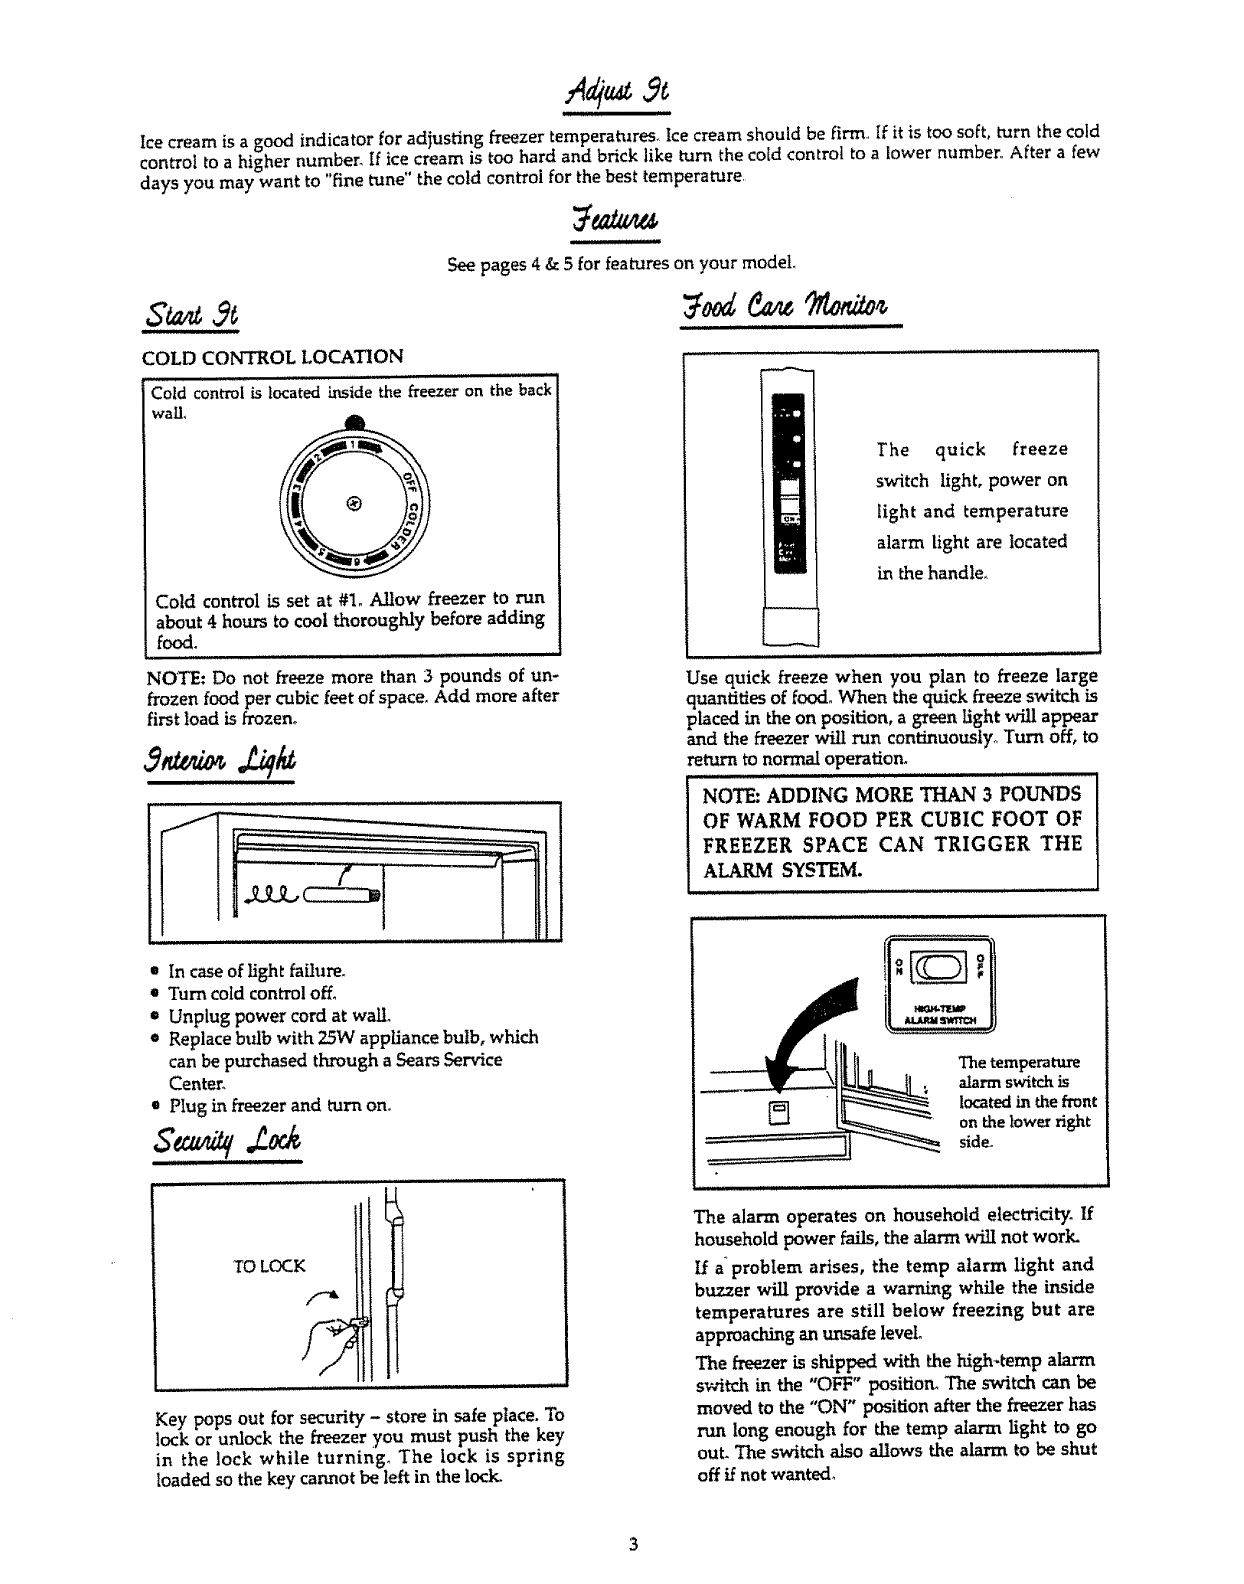
COLD CONTROL LOCATION
See pages 4& 5 for features on your model.
Cold controlis located inside the freezeron the back
wall.
Cold control is set at #1o Allow freezer to run
about 4 hours to cool thoroughly before adding
food.
The quick freeze
switch light, power on
light and temperature
alarm light are located
in the handle.
NOTE: Do not freeze more than 3pounds of un-
frozen food per cubic feet of space,, Add more after
first Ioad is frozen°
J.iq/¢
'_ i ,,, , ii |
,, ,,.... ,,,,,,,,,,,,,,,,,,d
......
• In case of light failure°
• Turn cold control off,
"Unplug power cord at wall.
• Replace bulb with 25W appliance bulb, which
can be purchased through a Sears Service
Center.
• Plug in freezer and turn on.
,,, ,,m,
TO LOCK
Key pops out for security - store in safe place. To
lock or unlock the freezer you must push the key
in the lock while turning. The lock is spring
loaded so the key cannot be left in the lock-
Use quick freeze when you plan to freeze large
quantities of food. When the quick freeze switch is
placed in the on position, a green light will appear
and the freezer will run continuously° Turn off, to
return tonormaloperation.
NOTE: ADDING MORE THAN 3 POUNDS
OF WARM FOOD PER CUBIC FOOT OF
FREEZER SPACE CAN TRIGGER THE
ALARM SYSTEM.
The temperature
alarm switch is
located in the front
on the lower right
side°
The alarm operates on household electricity. If
household power fails, the alarm will not work.
If a"problem arises, the tamp alarm light and
buzzer will provide a warning wldle the inside
temperatures are still below freezing but are
approaching an unsafe level.
The freezeris shipped with the high-temp alarm
switch in the "OFF" position_ The switch can be
moved to the "ON" position after the freezer has
run long enough for the tamp alarm light to go
out.The switchalsoallowsthe alarm to be shut
off if not wanted_
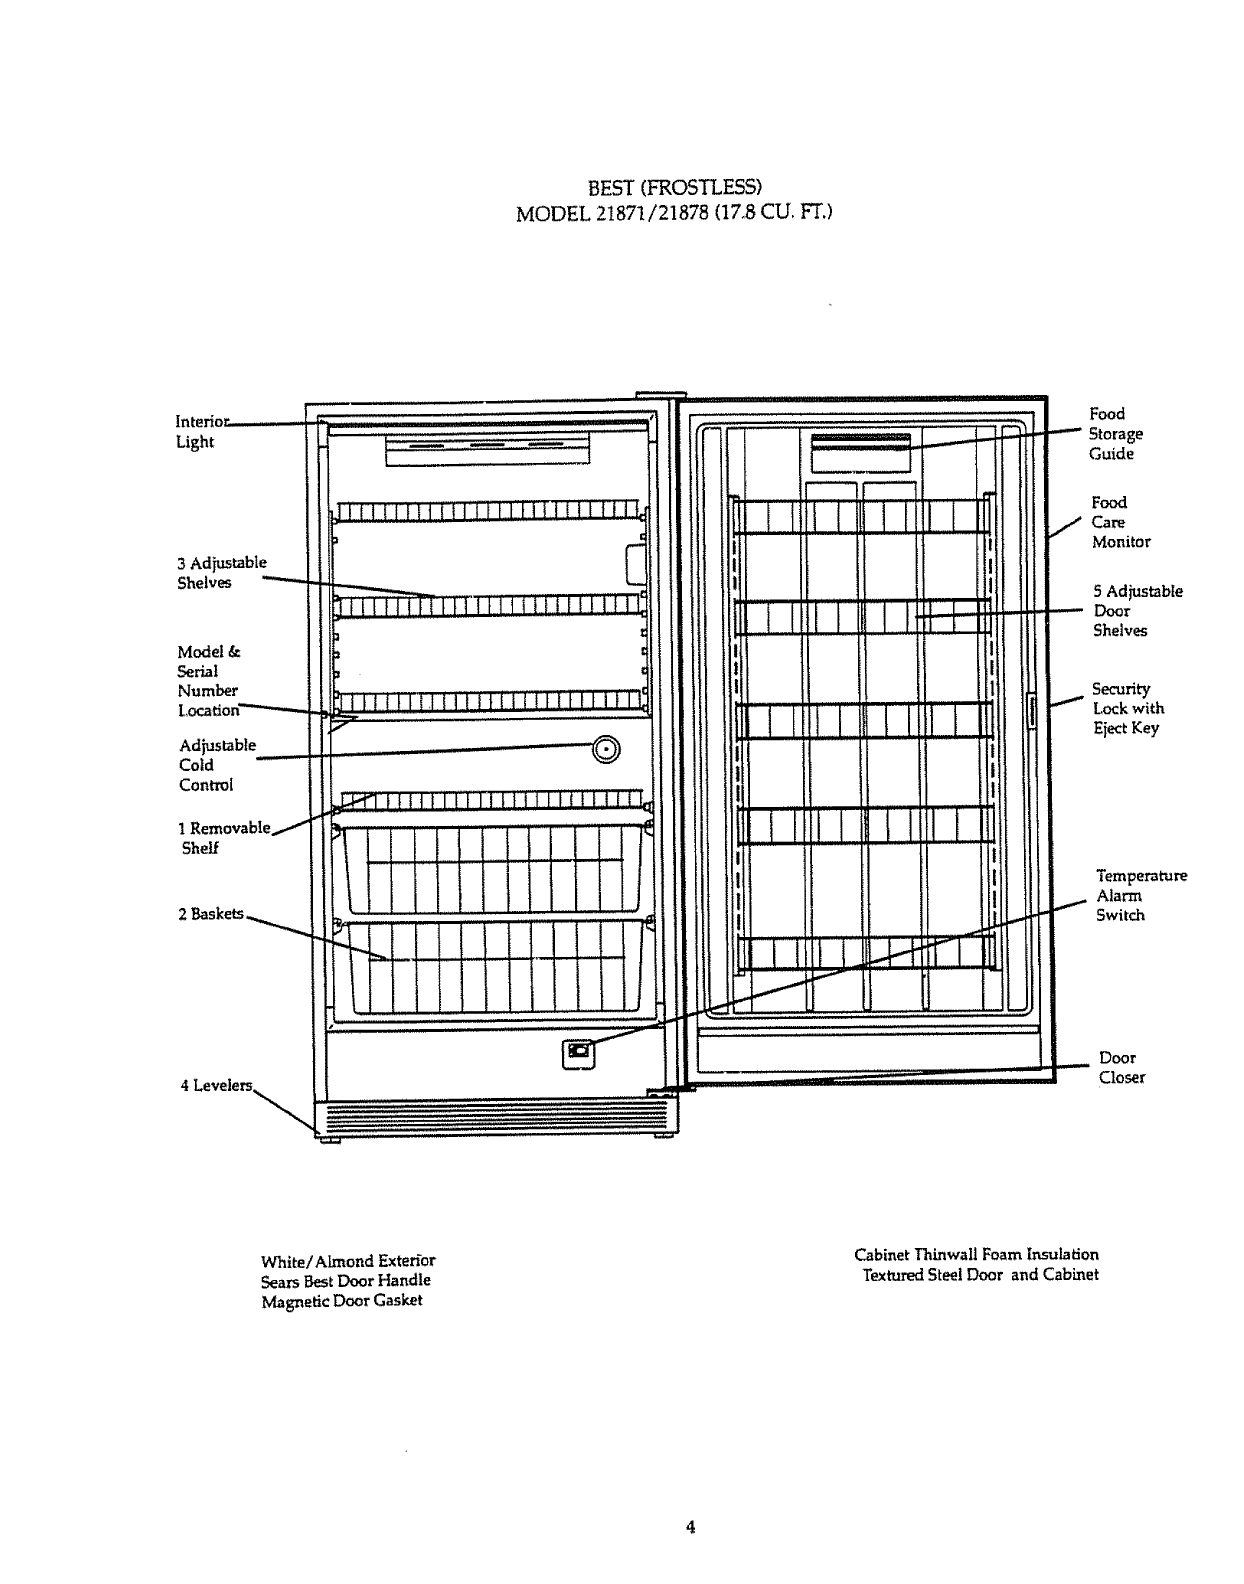
BEST (FROSTLESS)
MODEL 21871/21878 (17.8 CU, FT.)
Light
3Adjustable
Shelves
Model &
Serial
Number
Adjustable
Cold
Control
1
Shelf I__i _l....Lii i,_
l_,!!I!I! 1_tl!!!
_!iI_l¸¸iiI
tI I l _ I I
I.......... !ti
_i1!iI! ....I......LI
I l!!l t111 I,!
! I !__
Food
Storage
Guide
Food
Care
Monitor
5Adjustable
Door
Shelves
Security
Lock with
Eiect Key
Temperature
Alarm
Switch
Door
Closer
White/Almond Exteffor
Sears Best Door Handle
Magnetic Door Gasket
Cabinet Thinwall Foam Insulation
Textured Steel Door and Cabinet
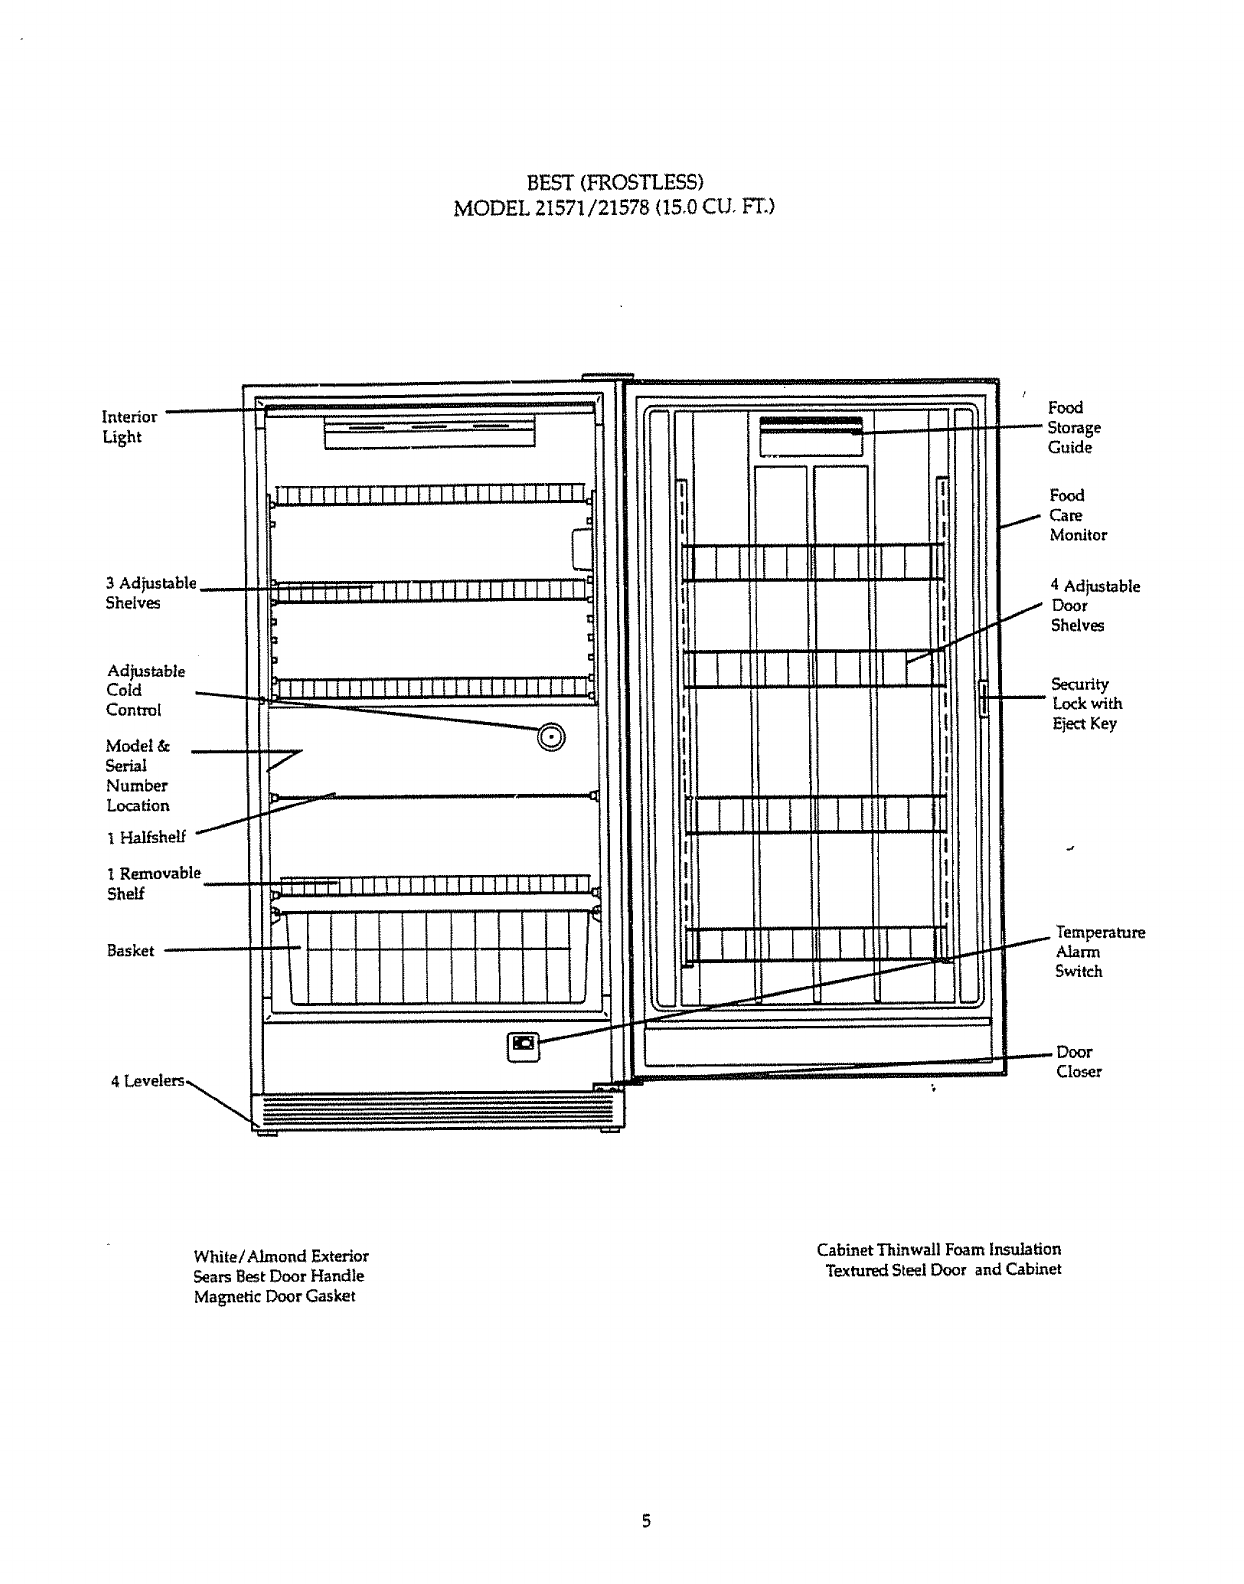
BEST (FROSTLESS)
MODEl. 21571/21578 (15.0 CUo FT.)
Interior
Light
3Ad
Shelves
Adjustable
Cold
Conrm!
Model &
Serial
Number
Location
IHalfshelf
iRemovable
Shelf
Basket
Food
ge
Guide
Food
Care
Monitor
4Adjustable
Door
Shelves
Security
Lock with
Eject Key
A_rm
Switch
Door
Closer
White/Almond Exterior
Sears Best Door Handle
Magnetic Door Gasket
CabinetThinwallFoam Insulation
TexturedSteelDoor and Cabinet
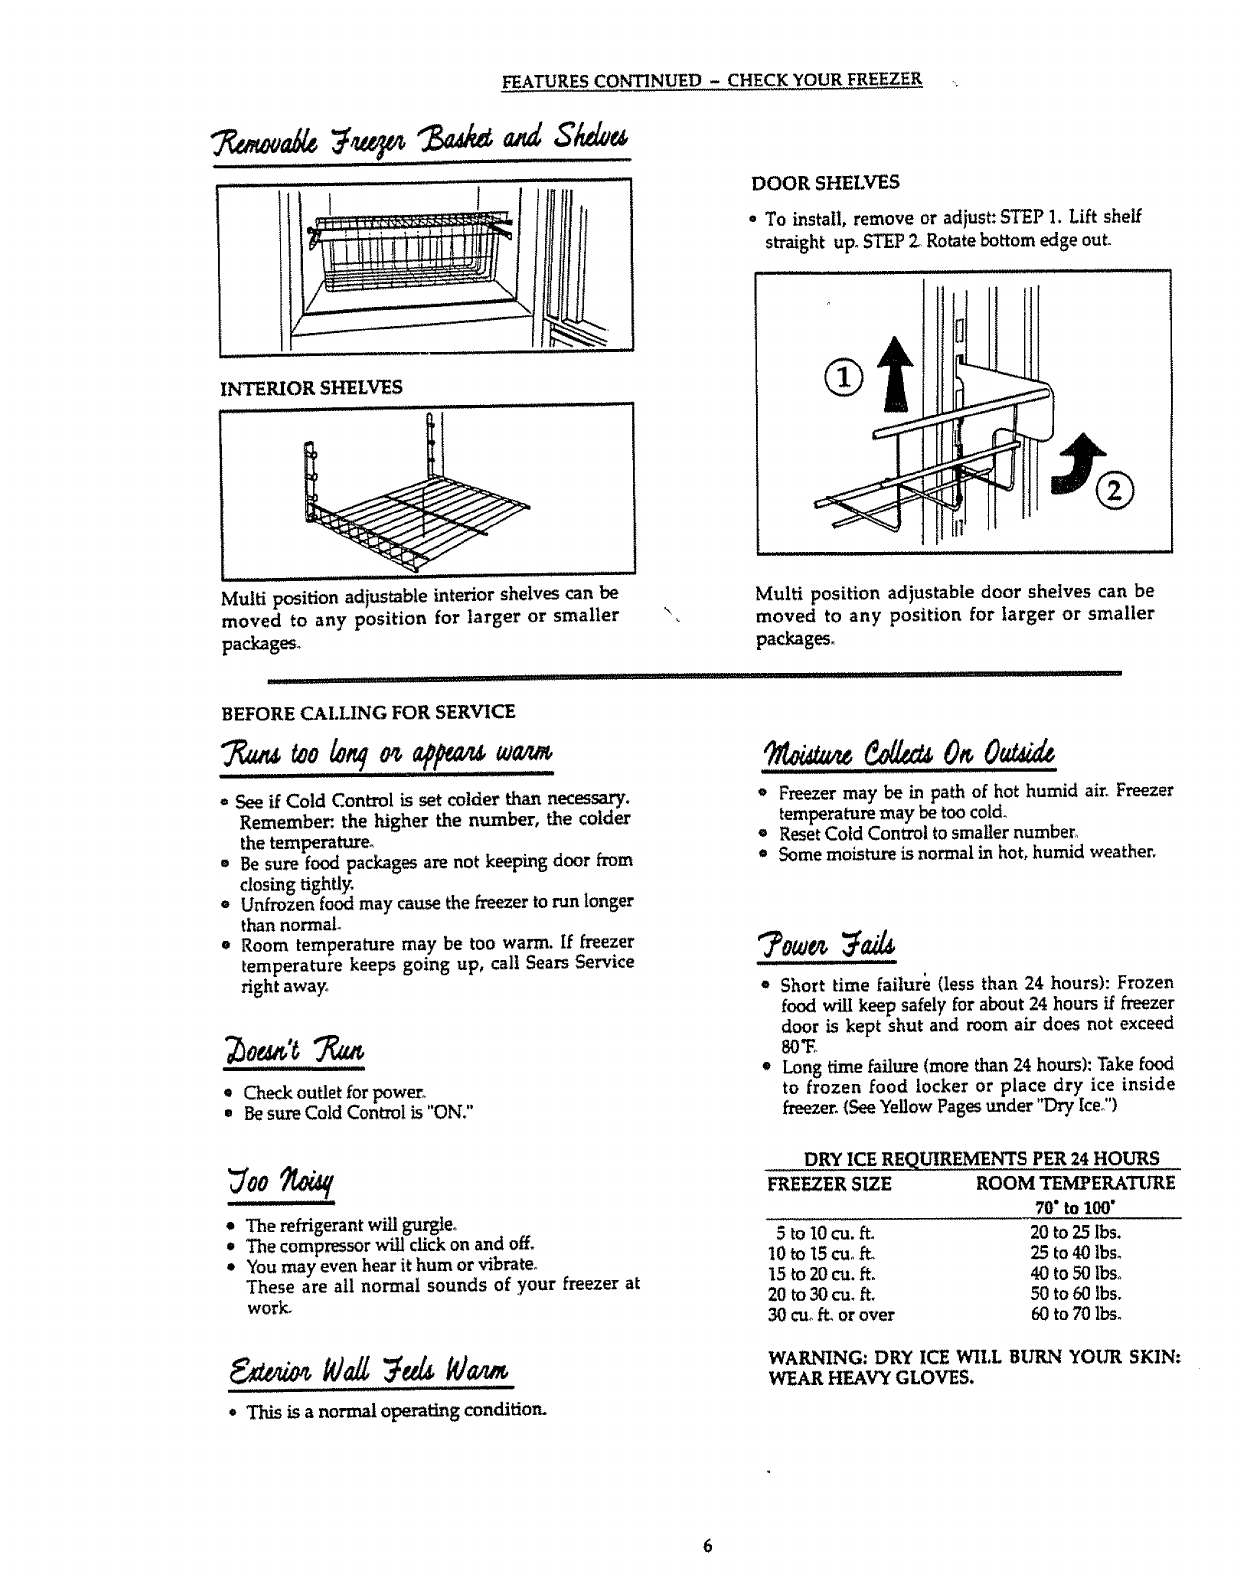
FEATURES CONTINUED - CHECK YOUR FREEZER _
INTERIOR SHELVES
DOOR SHELVES
•To install, remove or adiust: STEP 1, Lift shelf
straight upoSTEP2. Rotate bottom edge out.
Multi posit_on adiusmble interior shelves can be
moved to any position for larger or smaller
packages°
BEFORE CALLING FOR SERVICE
. See if Cold Control is set colder than necessary.
Remember:. the higher the number, the colder
the temperature.
•Be sure food packages are not keeping door from
closing tightly.
•Unfrozen food may cause the freezer to run longer
than normal.
, Room temperature may be too warm. If freezer
temperature keeps going up, call Sears Service
right away.
lllil
-Check outer for pow_
• Besure Cold Control is "ON."
• The refrigerant will gurgte,_
oThe compressor will click on and off.
• You may even hear it hum or vibrate°
These are all normal sounds of your freezer at
work_
•This is a normal olin_rating condition.
Multi position adjustable door shelves can be
moved to any position for larger or smaller
packages.
i/ i/llJ,,ll,l,l,l,ll i i i i iii
o Freezer may be in path of hot humid air Freezer
temperature may be too cold,
Q Reset Cold Control to smaller number,
•Some moisture is normal in hot, humid weather.
?owe,
•Short time failure (less than 24 hours): Frozen
food will keep safely for about 24 hours if freezer
door is kept shut and room air does not exceed
80"E
• Long time failure (more than 24 hours): Take food
to frozen food locker or place dry ice inside
freezer.(See Yellow Pages under "Dry Iceo")
DRY ICE REQUIREMENTS PER 24 HOURS
FREEZER SIZE ROOM TEMPERATIFRE
70" to 100"
5to I0 cu. ft. 20 to 25 Ibs.
10 to t5 _,, ft 25 to 40 lbs.
15 to 20 oa. ft. 40 to 50 Ibso
20 to 30 cu. ft. 50 to 60 Ibs.
30 cuofroor over 60 to 70 lbs.
WARNING: DRY ICE WILL BURN YOUR SKIN:
WEAR HEAVY GLOVES.
In order to ensure that your frozen food is main-
takned at a safe and constant low temperature, your
freezer has a magnetic strip in the gasket to main-
tain an airtight seal
Thissealisso effectivethatthesimpleactionofclos-
ingthedoor willalmostinstantlycreatea vacuum as
thewarm airquicklycools.
This vacuum willleavein aminute or two_Ifyou
must reopen thedoor sooner,trypeelingthegasket
open withfingertipsasdoor ispulledopen.
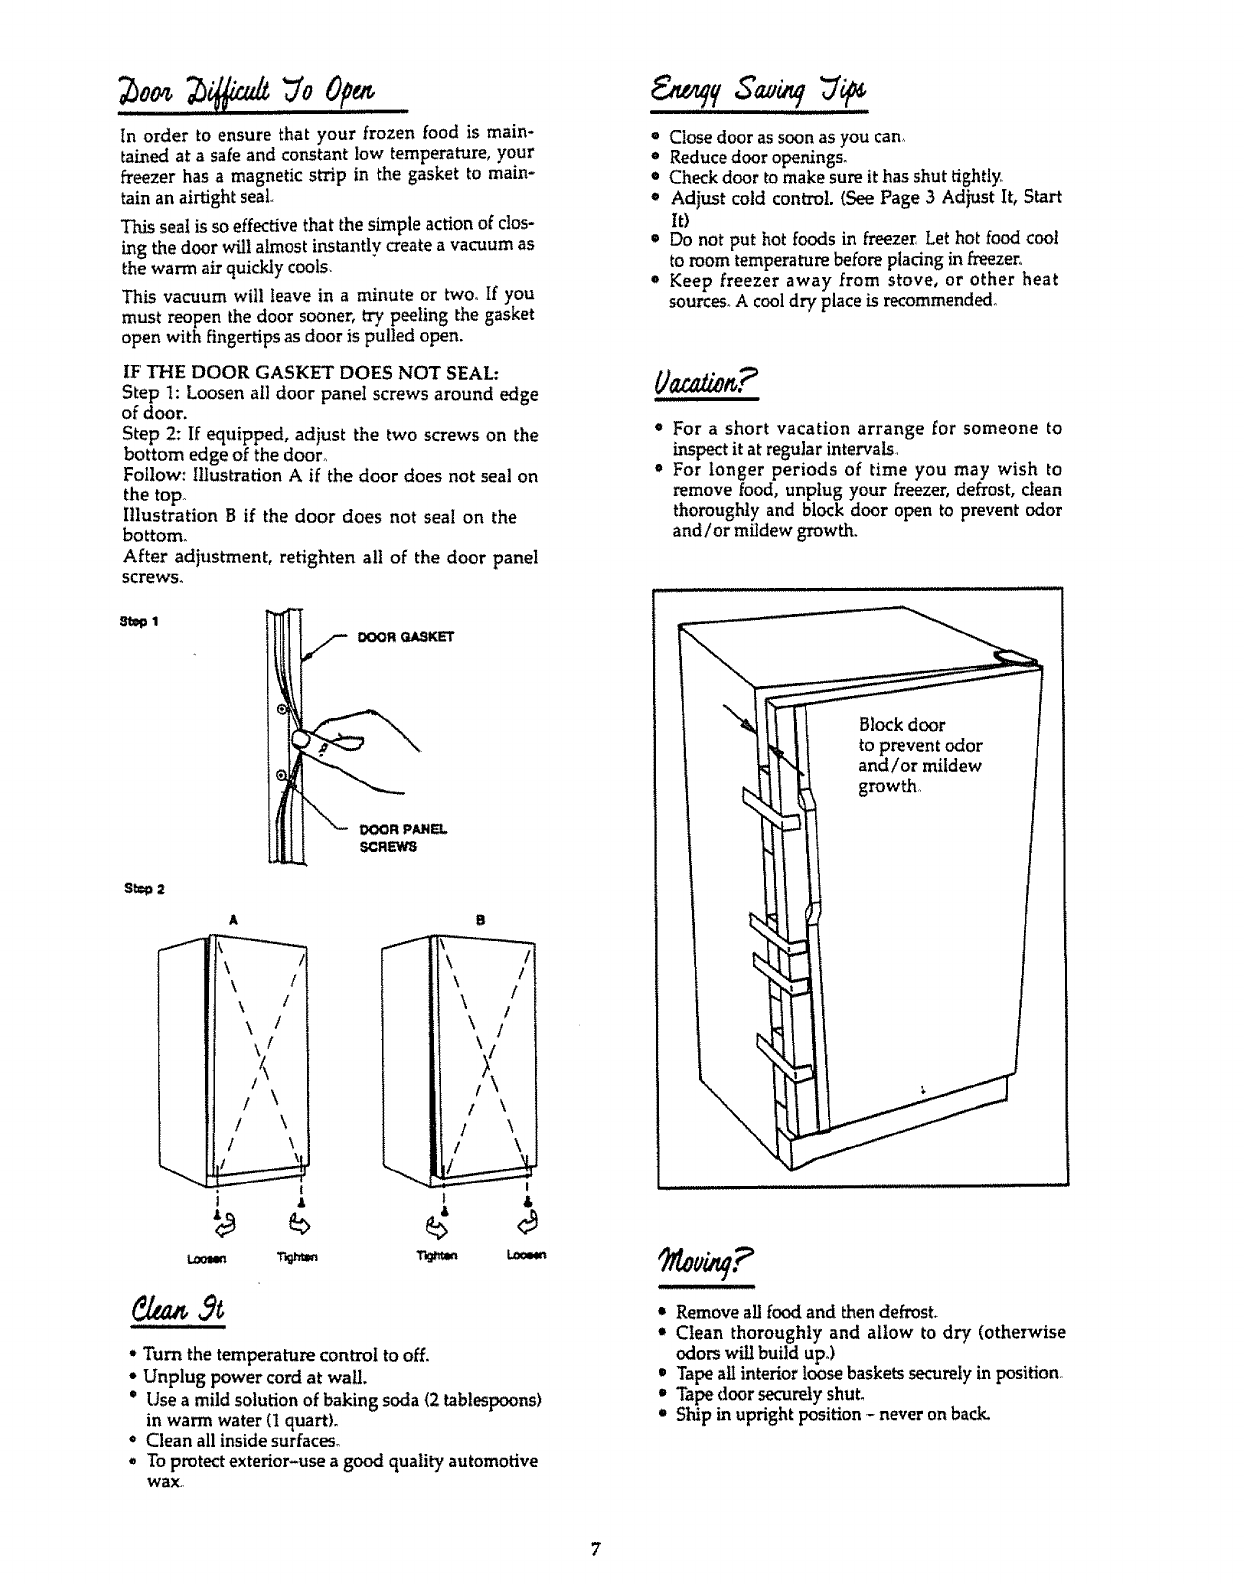
IF THE DOOR GASKET DOES NOT SEAL:
Step 1: Loosen all door panel screws around edge
of door.
Step 2: If equipped, adjust the two screws on the
bottom edge of the door°
Follow: Illustration A if the door does not seal on
the top°
illustration B if the door does not seal on the
bottom_
After adjustment, retighten all of the door panel
screws.
s_ 2
B
• Close door as soon as you can_
•Reduce door openings°
• Check door to make sure it has shut tightly.
• Adjust cold control. (See Page 3 Adjust It, Start
It)
• Do not put hot foods in freezer, Let hot food cool
to morn temperature before placing in freezer°
o Keep freezer away from stove, or other heat
sources°A cool dr/place is recommended°
o For a short vacation arrange for someone to
inspect it at regular intervals,
• For longer periods of time you may wish to
remove food, unplug your freezer, defrost, clean
thoroughly and block door open to prevent odor
and/or mildew growth,
Block door
to prevent odor
and/or mildew
growth,
t I
e4
,,Turn thetemperaturecontroltooff.
•Unplug power cordatwall.
" Use a mildsolutionofbaking soda(2tablespoons)
inwarm water(Iquart)°
oClean allinsidesurfaces°
eTo protectexterior-useagood qualityautomotive
wax..
• Remove all food and then defrost.
"Clean thoroughly and allow to dry (otherwise
odors will build upo)
Tape all interior !oose baskets securely in position..
• Tape door securely shut,
•Ship in upright position -never on back.
7
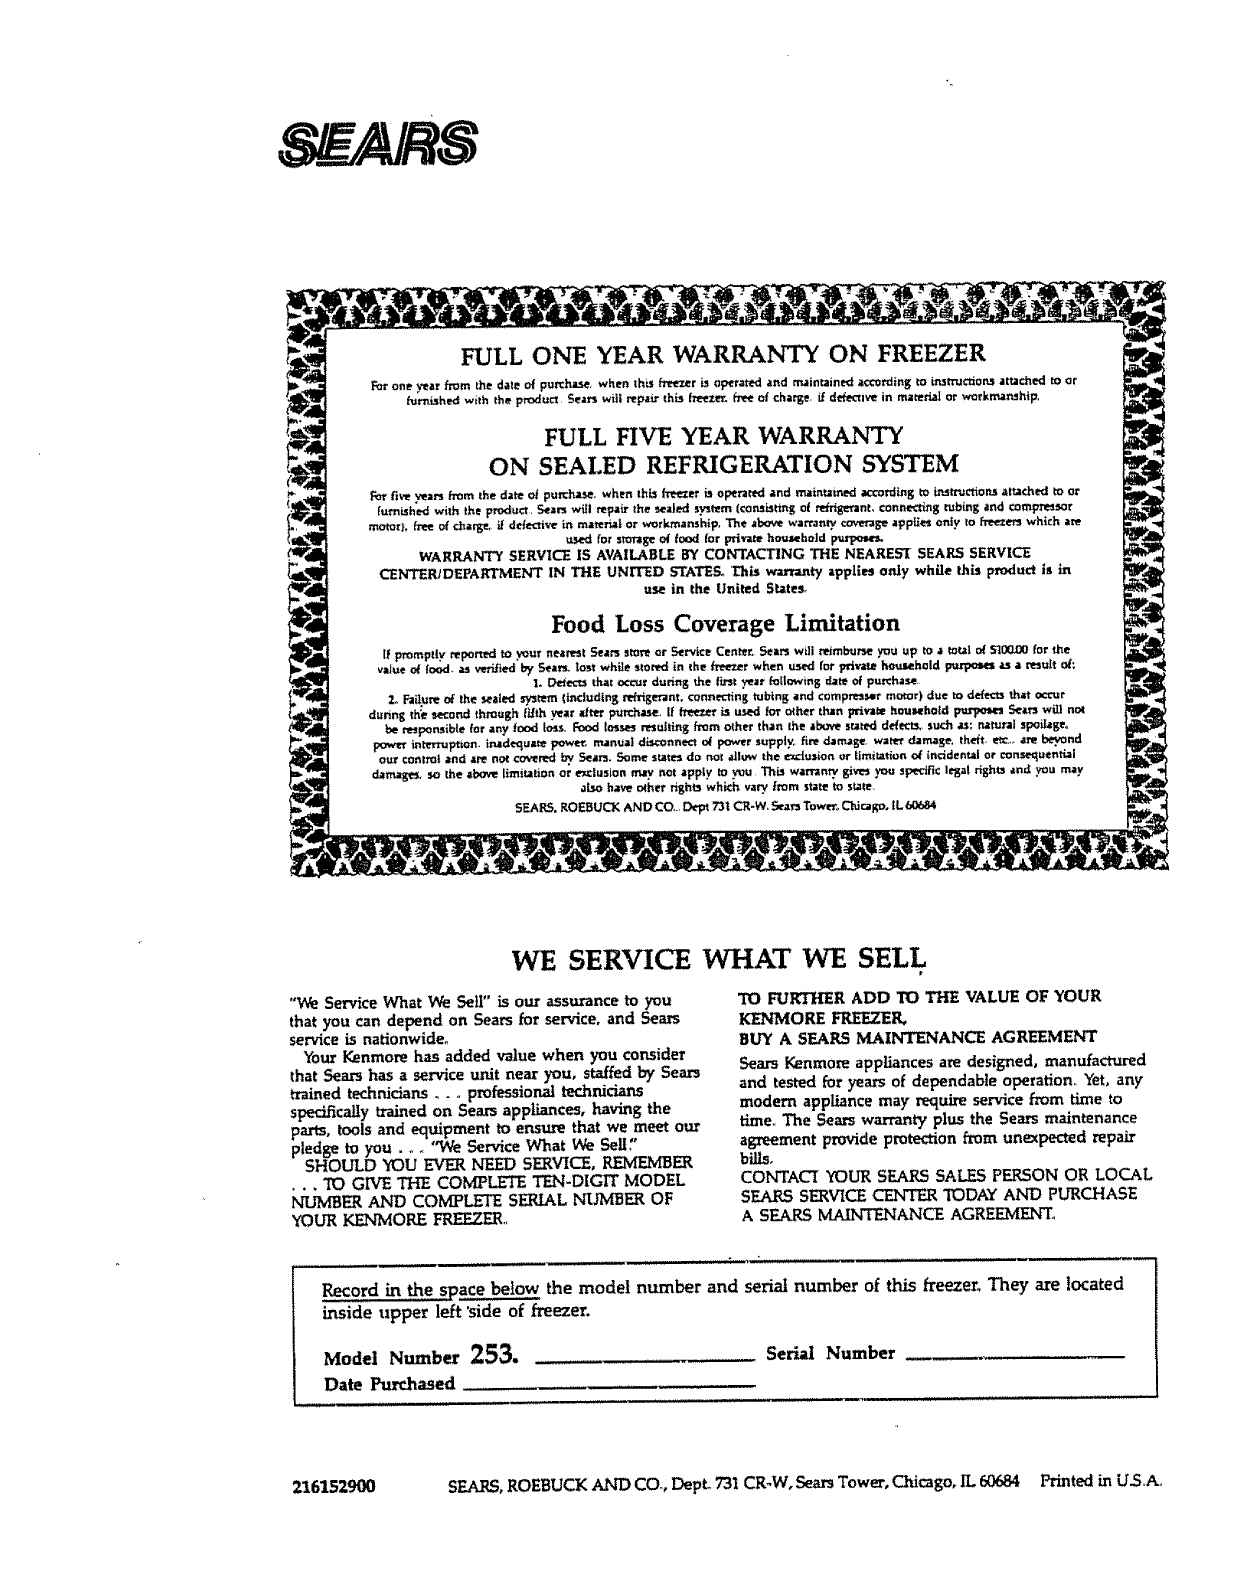
WE SERVICE WHAT WE SELL
"A_ ServiceWhat We Sell"isour assurance to you
that you can depend on Sears for service, and Sears
service is nationwide°
Your Kenmore has added value when you consider
that Sears has a service unit near you, staffed by Sears
trained technicians., oprofessional technicians
specificallytrainedon Sears appliances, having the
parts, tools and equipment to ensure that we meet our
pledge to you .... 'We Semce What We Sell
SHOULD YOU EVER NEED SERVICE, LEMEMBER
... "iO GP_E THE COM?LETE TI_-DIGIT MODEL
NUMBER AND COMPLETE SERIAL NUMBER OF
YOUR FJ_WIOI_JEFRE.ZER_
TO FURTHER ADD TO THE VALUE OF YOUR
KENMORE FREEZER,
BUY A SEARS MAINTENANCE AGREEMENT
SearsKenmore appliancesaredesigned, manufactured
and tested for years of dependable opezation,, Yet, any
modem appliance may require service from time to
thne, The Sears warranty plus the Sears maintenance
agreement provide protection from unexpected repair
bills.
CONTAC_ "fOURSEARS SALES PERSON OR LOCAL
SEARS SERVICECENTER TODAY AND PURCHASE
ASF.#A_SMAIF_'ENANCE AGREEMENT_
Record in the space below the model number and serial number of this freezer, They are !ocated
inside upper left 'side of freezer.
Model Number 253.
Date Purchased
Serial Number
216152900 SEARS, ROEBUCK AND CO_, DepL 731 CR-W, Sears Tower, Cl-ficago, IL 60684 Printed in U3A
