Kenmore 40573092310 User Manual MICROWAVE Manuals And Guides 1307191L
User Manual: Kenmore 40573092310 40573092310 KENMORE MICROWAVE - Manuals and Guides View the owners manual for your KENMORE MICROWAVE #40573092310. Home:Kitchen Appliance Parts:Kenmore Parts:Kenmore MICROWAVE Manual
Open the PDF directly: View PDF ![]() .
.
Page Count: 30
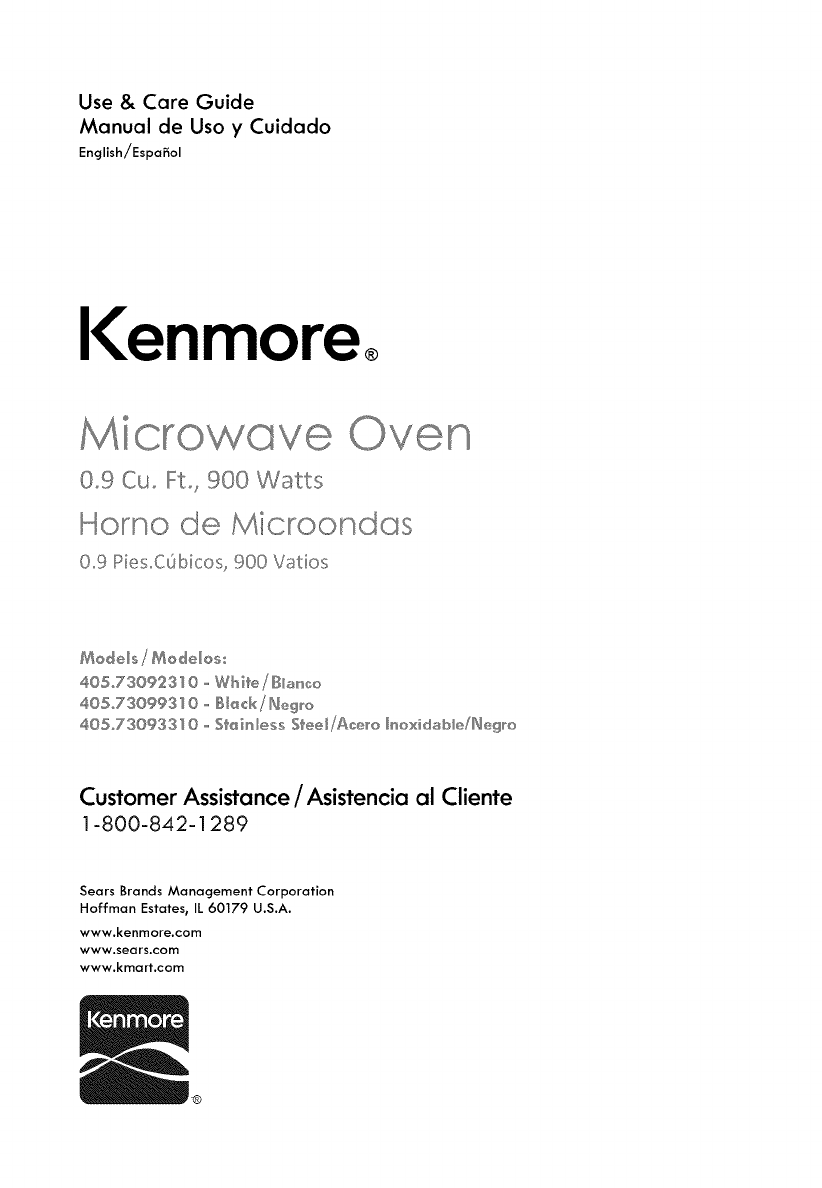
Use & Care Guide
Manual de Uso y Cuidado
English/Espa_ol
I(enmore
icrowave Oven
0°9 Cuo Fto, 900 Watts
Homo de Microondas
09Pl_(._(ul%co 900Vatios
405°730923 ]@,,,,,,%Bi'll'e /IIB_a_:_:_
40,5o730993 ]@,,,,,,IIBI_@/Bbsg_
405o730933] @,,,,,,S'lk_isless S'lkee_//\_sero_noxi_Sable/B_@g_o
Customer Assistance /Asistencia al Cliente
1-800-842-1289
Sears Brands Management Corporation
Hoffman Estates, IL 60179 U.S.A.
www.kenmore.com
www.sears.com
www.kmart.com
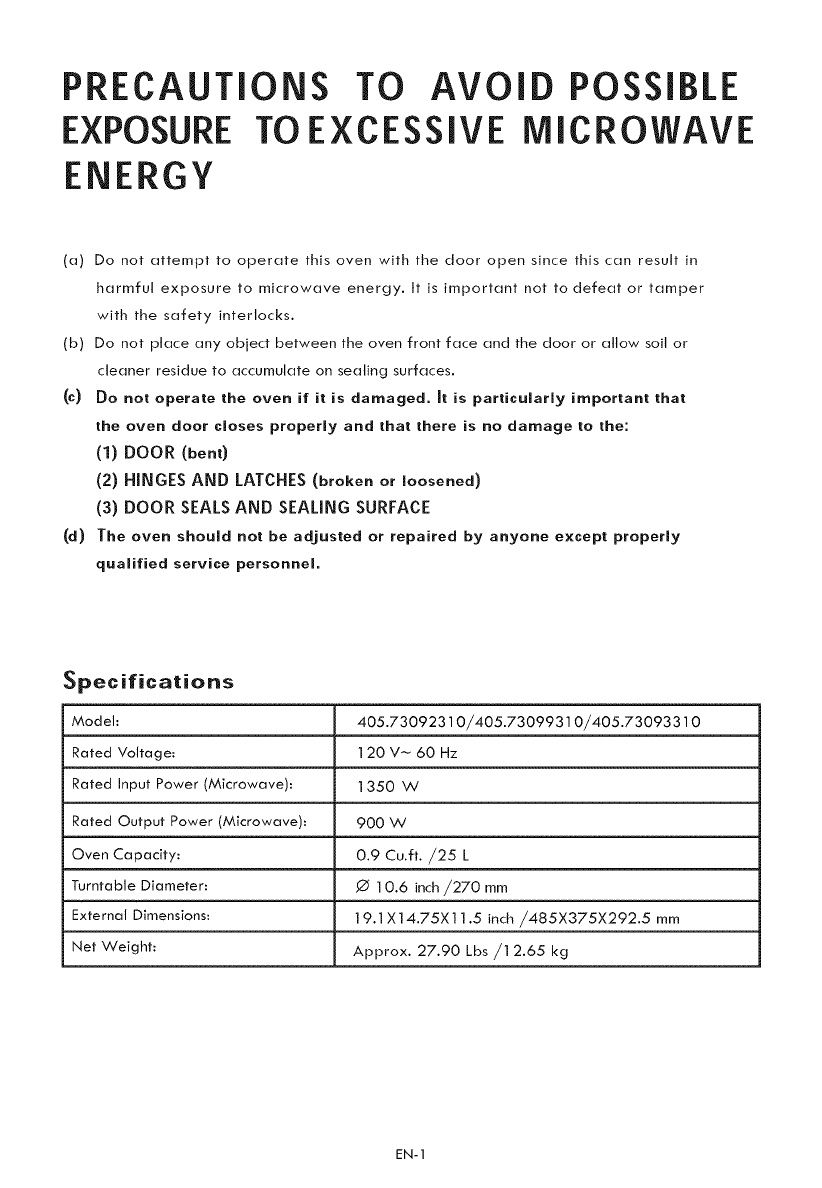
PRECAUTIONS TO AVOID POSSIBLE
EXPOSURE TO EXCESSIVE MICROWAVE
ENERGY
(a) Do not attempt to operate this oven with the door open since this can result in
harmful exposure to microwave energy. It is important not to defeat or tamper
with the safety interlocks.
(b) Do not place any object between the oven front face and the door or allow soil or
cleaner residue to accumulate on sealing surfaces.
(c) Do not operate the oven if it is damaged. Jt is particularly important that
the oven door closes properly and that there is no damage to the:
(1)DOOR (bent)
(2)HINGES AND LATCHES (broken or loosened)
(3)DOOR SEALS AND SEALING SURFACE
(d) The oven should not be adjusted or repaired by anyone except properly
qualified service personnel.
Specifications
Model:
Rated Voltage:
Rated Input Power (Microwave):
Rated Output Power (Microwave): 900 W
Oven Capacity: 0.9 Cu.ft. ,/25 L
Turntable Diameter: ,0 ] 0.6 inch/270 mm
External Dimensions: ] 9.1 X14.75X1 ] .5 inch/485X375X292.$ mm
Net Weight: Approx. 27.90 Lbs/12.65 kg
405.73092310/405.73099310/405.73093310
120 V_ 60 Hz
1350W
EN-1
iMPORTANT SAFETY iNSTRUCTiONS
WA R N IN G Toreducether,skofbums,e,eor cshock, re,,nju topersonsorexposure
to excessive microwave oven energy when using your appliance, follow basic
safety precautions, including the following:
1. Read all instructions before using the
appliance.
2. Read and follow the specific: "PRECAU-
TIONS TO AVOID POSSIBLE EXPOSURE
TO EXCESSIVE MICROWAVE ENERGY"
found on page 1.
3. As with most cooking appliances, close
supervision is necessary to reduce the risk
of a fire in the oven cavity.
4. To reduce the risk of fire in the oven
cavity:
i) Do not overcook food. Carefully attend
the appliance when paper, plastic, or
other combustible materials are placed
inside the oven to facilitate cooking.
ii) Remove wire twist-ties and metal
handles from paper or plastic containers/
bags before placing them in the oven.
iii) If materials inside the oven ignite,
keep the oven door closed. Turn the
oven off, and unplug the appliance.
Disconnect the power cord, shut off
power at the fuse or circuit breaker panel.
iv) Do not use the oven cavity for storage
purposes. Do not leave paper products,
cooking utensils, or food in the cavity
when not in use.
5. This oven must be grounded. Connect
only to properly grounded outlet. See
"GROUNDING INSTRUCTIONS" found
on page 3.
6. Install or locate this oven only in
accordance with the installation
instructions provided.
7. Some products such as whole eggs
and sealed containers-for example,
closed glass jars- are able to explode
and should not be heated in the oven.
8. Use this appliance onlyfor its intended
uses as described in this manual. Do
not use corrosive chemicals or vapors
in this appliance. This oven is
specifically designed to heat or cook
or dry food. It is not designed for
industrial or laboratory use.
9. As with any appliance, close
supervision is necessary when used
by children.
10. Do not operate this oven if it has a
damaged cord or plug, if it is not
working properly or if it has been
damaged or dropped.
11. This microwave should be serviced
only by qualified service personnel.
12. Do not cover or block any openings on
the oven.
13. Do not store or use this appliance
outdoors.
14. Do not use this oven near water, for
example, near a kitchen sink, in a wet
basement, near a swimming pool, or
similar locations.
15. Do not immerse cord or plug in water.
16. Keep cord away from heated surfaces.
17. Do not let cord hang over edge of
table or counter.
18. When cleaning surfaces of door and
oven that comes together on closing
the door, use only mild, nonabrasive
soaps or detergents applied with a
sponge or soft cloth.
19. This appliance is for private household
use only.
EN-2

20.Liquids,suchaswater,coffee,orteaareabletobeoverheatedbeyondtheboilingpoint
withoutappearingtobeboiling.Visiblebubblingorboilingwhenthecontaineris
removedfromthemicrowaveovenisnotalwayspresent.THISCOULDRESULTIN
VERYHOTLIQUIDSSUDDENLYBOILINGOVER WHEN THE CONTAINER IS
DISTURBED OR A SPOON OR OTHER UTENSIL IS INSERTED INTO THE LIQUID.
i) Do not overheat the liquid.
ii) Stir the liquid both before and halfway through heating it.
iii) Do not use straight-sided containers with narrow necks.
iv) After heating, allow the container to stand in the microwave oven for a short time
before removing the container,
v) Use extreme care when inserting a spoon or other utensil into the container.
SAVE THESE INSTRUCTIONS
GROUNDING INSTRUCTIONS
DANGER
ElectricShock Hazard
Touchingsome of the internal
componentscan cause serious
personal injury or death. Do not
disassemble this appliance.
WARNING
ElectricShod<Hazard
An improperly grounded appliance
can resultin electric shock. Do
not plug into an outlet until
appliance isproperly installed
and grounded.
Three-pronged
(grounding) plug
This appliance must be grounded. In the event of
an electrical short circuit, grounding reduces the risk
of electric shock by providing an escape wire for the
electric current. To protect against electrical shock,
this appliance is equipped with a cord having a 3-
prong grounding-type plug for insertion into a proper
grounding-type receptacle. DO NOT alter the plug
for use in a 2-prong receptacle. If the plug will not fit
into a receptacle, have the proper receptacle installed
by a qualified electrician.
Consult a qualified electrician or serviceman if the
grounding instructions are not completely understood
or if doubt exists as to whether the appliance is
properly grounded. If it is necessary to use an
extension cord, use only a 3-wire extension cord that
has a 3-pronged grounding plug, and a 3-slot
receptacle that will accept the plug on the appliance.
The marked rating of the extension cord shall be
equal to or greater than the electrical rating of the
appliance.
EN-3
1.Ashortpower-supplycordisprovidedtoreducetherisksresultingfrombecomingentangledin
ortrippingoveralongercord.
2.Longercordsetsorextensioncordsareavailableandmaybeusedifcareisexercisedin
theiruse.
3.Ifalongcordsetsorextensioncordisused:
i) Themarkedelectricalratingofthecordsetorextensionmarkedelectricalratingofthecord
setorextensioncordshouldbeatleastasgreatastheelectricalratingoftheappliance.
ii)Theextensioncordmustbeagrounding-type3-wirecord.
iii)Thelongercordshouldbearrangedsothatitwillnotdrapeoverthecountertoportabletop
whereitcanbepulledonbychildrenortrippedoverunintentionally.
Radio interference
1. Operation of the microwave oven may cause interference to your radio, TV or similar
equipment.
2. When there is interference, it may be reduced or eliminated by taking the following
measures:
i) Clean door and sealing surface of the oven.
ii) Reorient the receiving antenna of radio or television.
JJJ) Relocate the microwave oven with respect to the receiver.
iv) Move the microwave oven away from the receiver.
v) Plug the microwave oven into a different outlet so that microwave oven and
receiver are on different branch circuits.
CAUTION
Personal injury Hazard
Tightly-closed utensils
could explode. Closed
containers should be opened
and plastic pouches should be
pierced before cooking.
UTENSILS
See the instructions on "A,_teriats you can use in
microwave oven or to be avoided in microwave oven."
There may be certain non- metallic utensils that are not
safe to use for microwaving. If in doubt, you can test the
utensil in question following the procedure below.
Utensil Test:
1. Fill a microwave-safe container with I cup of cold
water (250mt) along with the utensil in question.
2. Cook on maximum power for I minute.
3. Carefully feet the utensil. If the empty utensil is
warm, do not use itfor microwave cooking.
4. Do not exceed 1minute cooking time.
EN-4
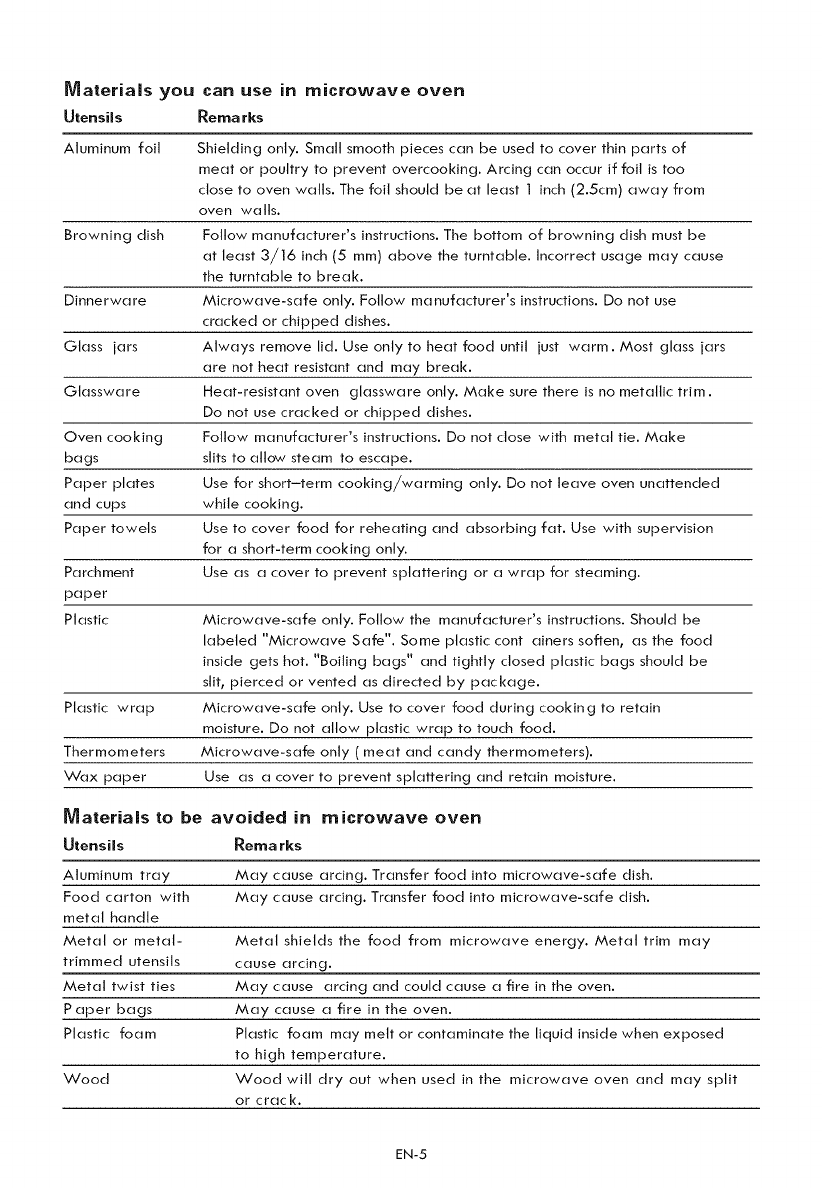
Materials you
Utensils
can use in microwave oven
Remarks
Aluminum foil Shielding only. Small smooth pieces can be used to cover thin parts of
meat or poultry to prevent overcooking. Arcing can occur if foil is too
close to oven walls. The foil should be at least I inch (2.5cm) away from
oven walls.
Browning dish Follow manufacturer's instructions. The bottom of browning dish must be
at least 3/16 inch (5 mm) above the turntable. Incorrect usage may cause
the turntable to break.
Dinnerware Microwave-safe only. Follow manufacturer's instructions. Do not use
cracked or chipped dishes.
Glass jars Always remove lid. Use only to heat food until just warm. Most glass jars
are not heat resistant and may break.
Glassware Heat-resistant oven glassware only. Make sure there is no metallic trim.
Do not use cracked or chipped dishes.
Oven cooking Follow manufacturer's instructions. Do not close with metal tie. Make
bags slits to allow steam to escape.
Paper plates Use for short-term cooking/warming only. Do not leave oven unattended
and cups while cooking.
Paper towels Use to cover food for reheating and absorbing fat. Use with supervision
for a short-term cooking only.
Parchment Use as a cover to prevent splattering or a wrap for steaming.
paper
Plastic Microwave-safe only. Follow the manufacturer's instructions. Should be
labeled "Microwave Safe". Some plastic containers soften, as the food
inside gets hot. "Boiling bags" and tightly closed plastic bags should be
slit, pierced or vented as directed by package.
Plastic wrap Microwave-safe only. Use to cover food during cooking to retain
moisture. Do not allow plastic wrap to touch food.
Thermometers Microwave-safe only ( meat and candy thermometers).
Wax paper Use as a cover to prevent splattering and retain moisture.
Materialslo be avoided in microwave oven
Utensils Rema rks
Aluminum tray May cause arcing. Transfer food into microwave-safe dish.
Food carton with May cause arcing. Transfer food into microwave-safe dish.
metal handle
Metal or metal- Metal shields the food from microwave energy. Metal trim may
trimmed utensils cause arcing.
Metal twist ties May cause arcing and could cause a fire in the oven.
Paper bags May cause a fire in the oven.
Plastic foam Plastic foam may melt or contaminate the liquid inside when exposed
to high temperature.
Wood Wood will dry out when used in the microwave oven and may split
or crack.
EN-5

SETTINGUP YOUR OVEN
Names o{ Oven Parts and Accessories
Remove the oven and all materials from the carton and oven cavity.
Your oven comes with the following accessories:
Glass tray 1
Turntable ring 1
Instruction Manual 1
A
G
E D C B
A) Control panel
B) Turntable shaft
C) Turntable ring
D) Glass tray
E) Observation window
F) Oven Door
G) Safety interlock system
Turntable installation
Hub (underside)
Glass tray
Turntable shaft ....
a. Never place the glass tray upside down. The glass
tray should never be restricted.
b. Both glass tray and turntable ring must always be
used during cooking.
c. All food and cont ainers of food are always placed
on the glass tray for cooking.
d. If glass tray or turntable ring cracks or breaks, contact
the following customer assistance number:
1-800-842-1289.
Turntable ring
EN-6
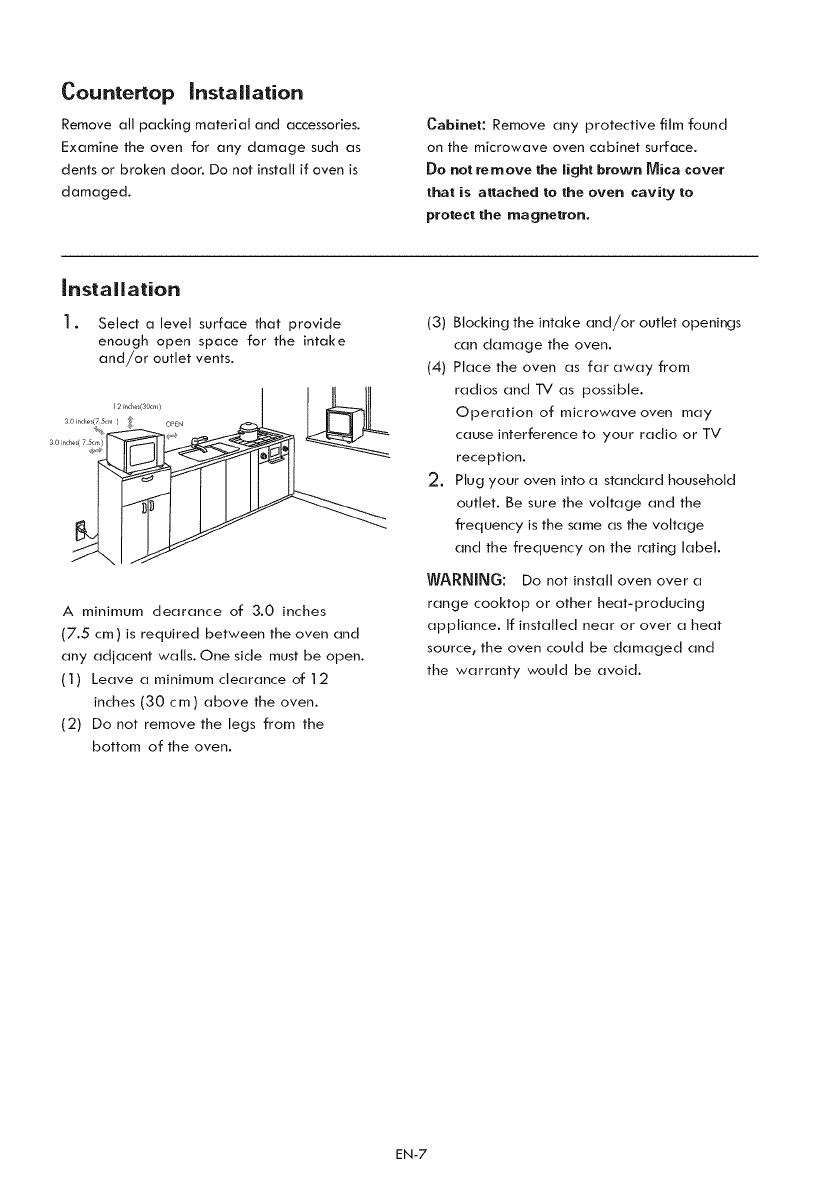
Countertop installation
Remove all packing material and accessories.
Examine the oven for any damage such as
dents or broken door. Do not install if oven is
damaged.
Cabinet: Remove any protective film found
on the microwave oven cabinet surface.
Do not remove the light brown Mica cover
that is attached to the oven cavity to
protect the magnetron.
installation
1. Select a level surface that provide
enough open space for the intake
and/or outlet vents.
I It tfl
12 rn_ es(30_rll ) J _J]!
A minimum dearance of 3.0 inches
(7.5 cm) is required between the oven and
any adjacent walls. One side must be open.
(1) Leave a minimum clearance of 12
inches (30 cm) above the oven.
(2) Do not remove the legs from the
bottom of the oven.
(3) Blocking the intake and/or outlet openings
can damage the oven.
(4) Place the oven as far away from
radios and TV as possible.
Operation of microwave oven may
cause interference to your radio or TV
reception.
2. Plug your oven into a standard household
outlet. Be sure the voltage and the
frequency is the same as the voltage
and the frequency on the rating label.
WARNING; Do not install oven over a
range cooktop or other heat-producing
appliance. If installed near or over a heat
source_ the oven could be damaged and
the warranty would be avoid.
EN-7
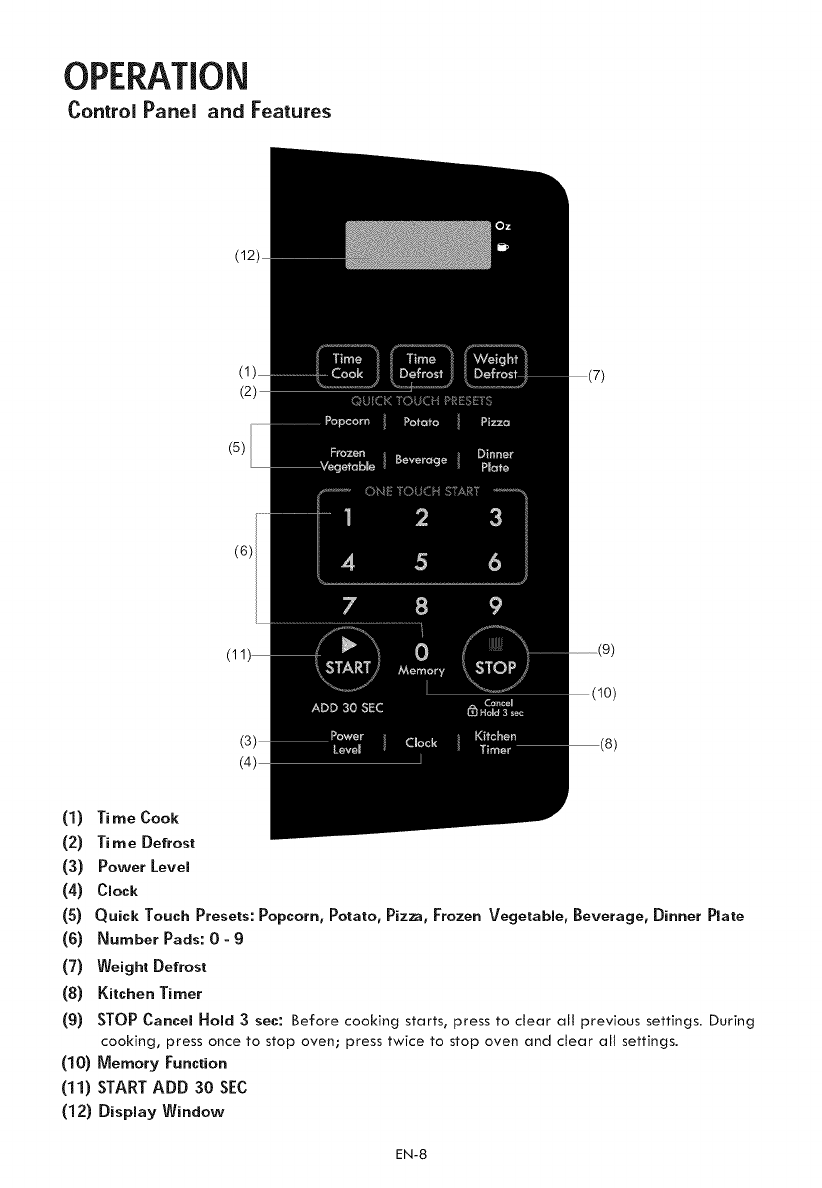
OPERATION
ControlPanel and Features
(1)
(2)
(3)
(4)
(s)
(6)
(7)
(8)
(9)
(5)
(6)
Ti me Cook
Ti me Defrost
Power Level
Clock
Quick Touch Presets: Popcorn, Potato, Pizza, Frozen Vegetable, Beverage, Dinner Plate
Number Pads: 0-9
Weight Defrost
Kitchen Timer
STOP Cancel Hold 3 sec: Before cooking starts, press to clear all previous settings. During
cooking, press once to stop oven; press twice to stop oven and clear all settings.
(10) Memory Function
(11) START ADD 30 SEC
(12) Display Window
EN-8
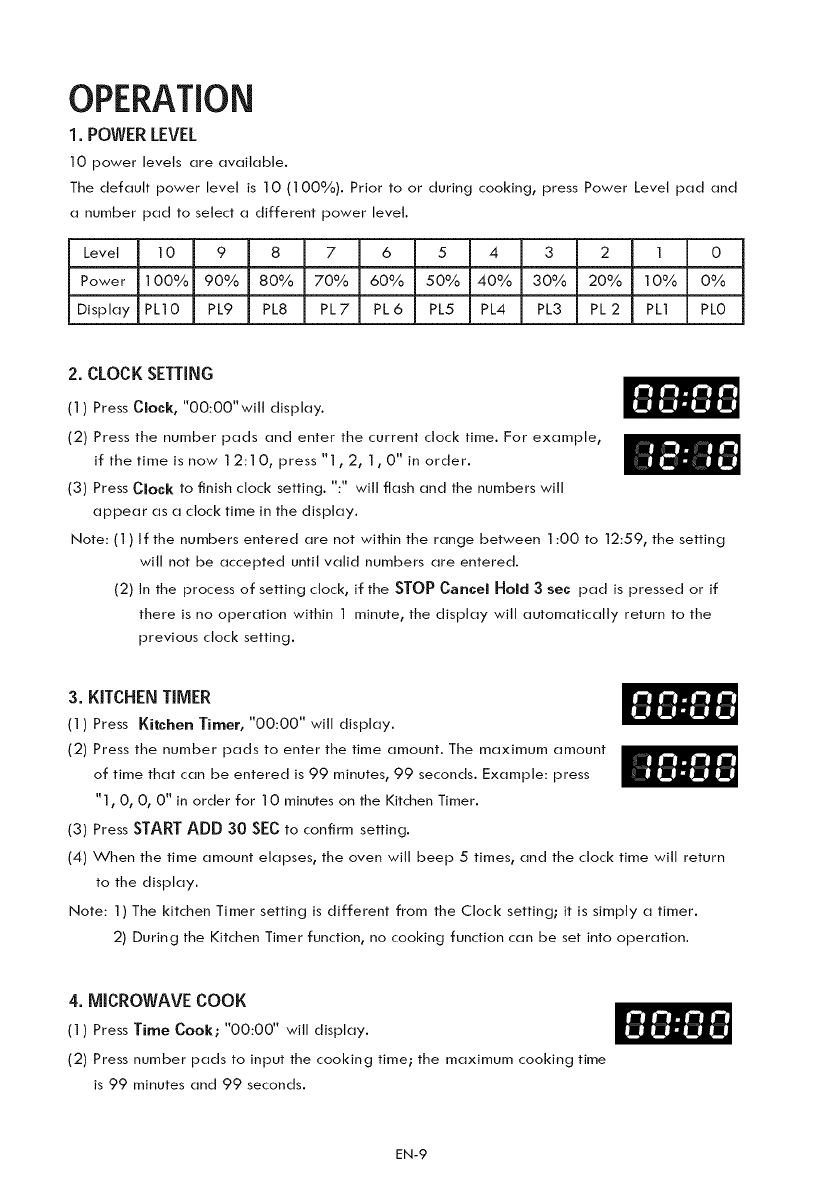
OPERATION
1. POWERLEVEL
10 power levels are available.
The default power level is 10 (100%). Prior to or during cooking, press Power Level pad and
a number pad to select a different power level.
Level 10 987 6 5 4 3 2 1 0
Power 100% 90% 80% 70% 60% 50% 40% 30% 20% 10% 0%
Display PLIO PL9 PL8 PL7 PL6 PL5 PL4 PL3 PL2 PL1 PLO
2.CLOCK SETTING
(1) Press Clock, "O0:O0"will display.
(2) Press the number pads and enter the current clock time. For example,
if the time is now 12:1 O, press "1,2, 1,0" in order.
(3) Press Clock to finish clock setting. ":" will flash and the numbers will
appear as a clock time in the display.
Note: (1) If the numbers entered are not within the range between 1:00 to 12:59, the setting
will not be accepted until valid numbers are entered.
(2) In the process of setting clock, if the STOPCancelHold 3 sec pad is pressed or if
there is no operation within I minute, the display will automatically return to the
previous clock setting.
3.KITCHEN TIMER
(1) Press Kitchen Timer, "00:00" will display.
(2) Press the number pads to enter the time amount. The maximum amount
of time that can be entered is 99 minutes, 99 seconds. Example: press
"1, O, O, 0" in order for 10 minutes on the Kitchen Timer.
(3) Press STARTADD 30 SECto confirm setting.
(4) When the time amount elapses, the oven will beep 5times, and the clock time will return
to the display.
Note: 1) The kitchen Timer setting is different from the Clock setting; it is simply a timer.
2) During the Kitchen Timer function, no cooking function can be set into operation.
4.MICROWAVE COOK
(l) Press Time Cook; "00:00" will display.
(2) Press number pads to input the cooking time; the maximum cooking time
is 99 minutes and 99 seconds.
EN-9
(3)PressPower level; PL1 0 will display. This is the default power level of 1 00%.
Press pads 1 through 9to select a different power level if desired. See the POWER
LEVEL table above.
(4) Press STARTADD 30 SECt_ start cooking.
Example: To cook the food with 50% microwave power for 15 minutes.
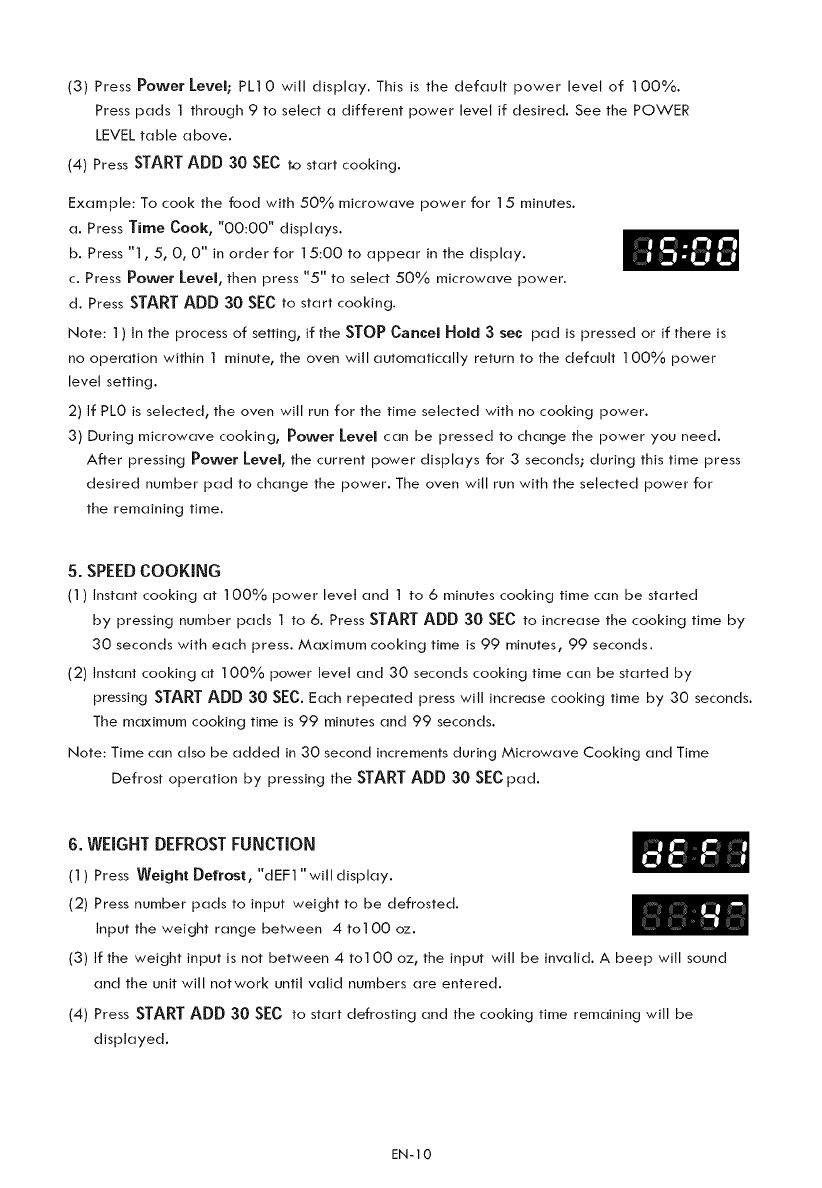
a. Press Time Cook, "00:00" displays.
b. Press "1,5, 0, 0" in order for 15:00 to appear in the display.
c. Press Power level, then press "5" to select 50% microwave power.
d. Press STARTADD 30 SECto start cooking.
Note: 1) In the process of setting, if the STOP Cancel Hold 3sec pad is pressed or if there is
no operation within 1 minute, the oven will automatically return to the default 100% power
level setting.
2) If PL0 is selected, the oven will run for the time selected with no cooking power.
3) During microwave cooking, Power level can be pressed to change the power you need.
After pressing Power level, the current power displays for 3 seconds; during this time press
desired number pad to change the power. The oven will run with the selected power for
the remaining time.
5. SPEEDCOOKING
(1) Instant cooking at ] 00% power level and I to 6 minutes cooking time can be started
by pressing number pads 1 to 6. Press STARTADD 30 SECto increase the cooking time by
30 seconds with each press. Maximum cooking time is 99 minutes, 99 seconds.
(2) Instant cooking at 100% power level and 30 seconds cooking time can be started by
pressingSTARTADD 30 SEC.Each repeated press will increase cooking time by 30 seconds.
The maximum cooking time is 99 minutes and 99 seconds.
Note: Time can also be added in 30 second increments during Microwave Cooking and Time
Defrost operation by pressing the STARTADD 30 SECpad.
6. WEIGHTDEFROSTFUNCTION
(1) Press Weight Defrost, "dEF1 "will display.
(2) Press number pads to input weight to be defrosted.
Input the weight range between 4 to100 oz.
(3) if the weight input is not between 4 to100 oz, the input will be invalid. A beep will sound
and the unit will notwork until valid numbers are entered.
(4) Press STARTADD 30 SEC to start defrosting and the cooking time remaining will be
displayed.
EN-10
7. TIME DEFROSTFUNCTION
(1) Press Time Defrost, "dEF2" will display.
(2) Press number pads to input defrosting time. The time range is between 00:01 and 99:99.
(3) The default microwave power is power level 3. if you want to change the power level,
press Power Level once, and PL3 will display; then press the number pad for the desired
power level.
(4) Press STARTADD 30 SEC to start defrosting. The remaining cooking time will be
displayed.
8. POPCORN
a) Press Popcorn repeatedly until the number you wish appears in the display,
"1.75", "3.0", "3.5" oz will display in order.
For example, press Popcorn once, "1.75" appears.
b) Press STARTADD 30 SECto cook, oven beeps once. Oven beeps 5times when
cooking is finished.
9. POTATO
a) Press Potato repeatedly until the number you wish appears in the display,
"1 ", "2", "3"will display in order.
Press Once : I potato {approx. 8.0 oz)
Press Twice: 2 potatoes ( approx. 16.0 oz)
Press 3 Times: 3 potatoes ( approx. 24.0 oz)
b) Press START ADD 30 SEC to cook, oven beeps once. Oven beeps 5times when
cooking is finished.
10. FROZEN VEGETABLE
a) Press Frozen Vegetable repeatedly until the number you wish appears in the
display, "4.0", "8.0", "16.0" oz will display in order.
b) Press STARTADD 30 SECto cook, oven beeps once. Oven beeps 5times when
cooking is finished.
11. BEVERAGE
a) Press Beverage repeatedly until the number you wish appears in the
display, "1 ", "2", "3" cup will display in order. One cup is about 4.0 oz.
b) Press STARTADD 30 SECto cook, oven beeps once. Oven beeps 5times when
cooking is finished.
EN-1 I
12. DINNER PLATE
a) Press Dinner Plate repeatedly until the number you wish appears in the
display, "9.0", "12.0", "18.0" oz will display in order.
b) Press START ADD 30 SEC to cook, oven beeps once. Oven beeps 5times when
cooking is finished.
13, PIZZA
a) Press Pizza repeatedly until the number you wish appears in the
display, "4.0", "8.0", "14.0" oz will display in order.
b) Press STARTADD 30 SECto cook, oven beeps once. Oven beeps 5times when
cooking is finished.
14. MEMORY FUNCTION
(1) Press 0 Memory to program and choose up to three cooking procedures.
Each procedure wilt be indicated by 1,2 or 3 in the display.
(2) Press 0 Memory until your desired procedure number appears in the display.
Press START ADD 30 SEC to begin it. A maximum of two cooking stages can be set
for each procedure.
(3) To program a procedure, follow the steps listed below. Example: Cook food at 80%
Power Level for 3 minutes and 20 seconds; save as memory 2.
a. Press 0 Memory twice; screen displays 2.
b. Press Time Cook once, then press "3","2" and "0" in order.
c. Press Power Level once, then press "8" for "PL8" to dTsptay.
d. Press STARTADD 30 SECto save the procedure. Oven beeps once. Procedure is saved
as memory 2. Press STARTADD 30 SECagain to immediately start procedure if desired.
e. To choose the procedure from the memory list, press 0 Memory twice. Screen will
disptay "2"; press STARTADD 30 SECto run procedure.
Note: The procedure will remain programmed until the oven is unplugged or there is a
power failure. If either occurs, the procedure will have to be reprogrammed into
the oven.
EN-12
15. MULTI-STAGE COOKING
At most 2 stages can be set for cooking. If one stage is Time Defrost t it will automatically
set to be the first stage.
Note:Quick Touch Presets cannot be used in multi-stage cooking.
Example: 80% Power Level for 5minutes followed by 60% Power Level for 10 minutes;
saved as memory 3.
a. Press 0 Memory 3 times; screen displays 3.
b. Press Time Cook once, then press "5", "0" and "0" to set first stage cook time.
c. Press Power Level once, then press "8" to choose 80% first stage cooking power.
d. Press Time Cook again, then press "1 ", "0", "0" and "0" to set second stage cook time.
e. Press Power Level again, then press "6" to choose 60% second stage cooking power.
f. Press STARTADD 30 SECto save the procedure. Oven beeps once. Procedure is saved as
memory 3. Press STARTADD 30 SECagain to immediately start multi-stage cooking.
g. To choose the procedure from the memory list, press 0 Memory three times. Screen will
display "3"; press STARTADD 30 SECto run procedure.
Note: If you do not want to save a particular multi-stage program as a procedure, do not
press 0 Memory as the first step. Multi-stage cooking will begin the first time you
press STARTADD 30 SECafter programming both stages.
16. INQUIRING FUNCTION
(1)When oven is cooking, press Clock for the time of day to appear for three seconds in the
display.
(2)When oven is cooking, press Power Level pad for cooking power to appear for three
seconds in the display.
17. LOCK FUNCTION
To lock the microwave so that it cannot be operated by children or other unintended users,
press STOP Cancel Hold 3 sec pad for 3 seconds. You will hear a long beep and
!_] will appear in the display.
To Unlock, press STOP Cancel Hold 3 sec for three seconds, you will hear a long beep and
_will disappear from the display.
18. COOKING END REMINDER FUNCTION
The oven will beep five times to alert the user that cooking time has ended.
lg. OTHER SPECIFICATIONS
(1) When setting cooking function, the function abbreviation appears in the display.
(2) When oven is cooking or paused (door opened) in the midst of cooking time, the remaining
cooking time appears in the display.
EN-13
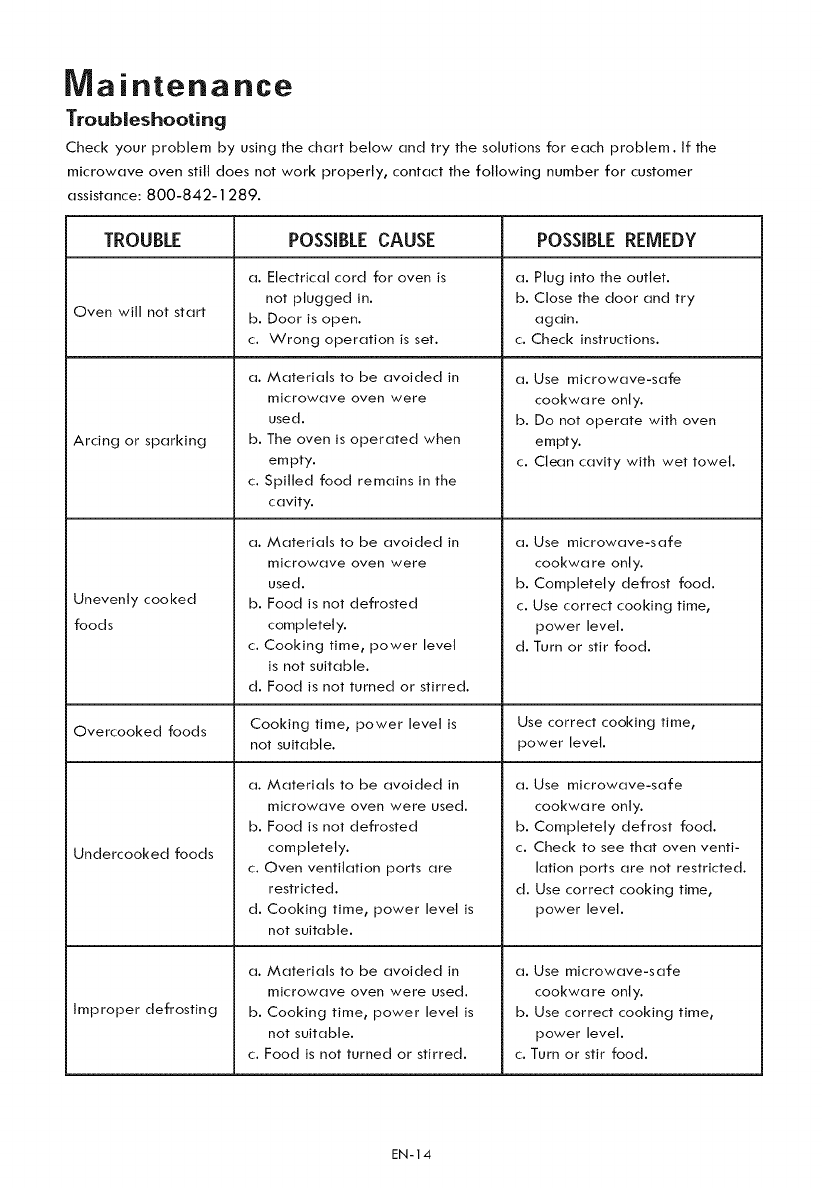
Maintenance
Troubleshooting
Check your problem by using the chart below and try the solutions for each problem. If the
microwave oven still does not work properly, contact the following number for customer
assistance: 800-842-1289.
TROUBLE POSSIBLE CAUSE POSSIBLEREMEDY
a. Electrical cord for oven is a. Plug into the outlet.
not plugged in. b. Close the door and try
Oven will not start b. Door is open. again.
c. Wrong operation is set. c. Check instructions.
Arcing or sparking
Unevenly cooked
foods
a. Materials to be avoided in
microwave oven were
used.
b. The oven is operated when
empty.
c. Spilled food remains in the
cavity.
a. Materials to be avoided in
microwave oven were
used.
b. Food is not defrosted
completely.
c. Cooking time, power level
is not suitable.
d. Food is not turned or stirred.
a. Use microwave-safe
cookwa re only.
b. Do not operate with oven
empty.
c. Clean cavity with wet towel.
a. Use microwave-safe
cookwa re only.
b. Completely defrost food.
c. Use correct cooking time,
power level.
d. Turn or stir food.
Overcooked foods Cooking time, power level is Use correct cooking time,
not suitable, power level.
a. Materials to be avoided in
microwave oven were used.
b. Food is not defrosted
completely.
c. Oven ventilation ports are
restricted.
d. Cooking time, power level is
not suitable.
a. Materials to be avoided in
microwave oven were used.
b. Cooking time, power level is
not suitable.
c. Food is not turned or stirred.
Undercooked _ods
Improper defrosting
a. Use microwave-safe
cookwa re only.
b. Completely defrost food.
c. Check to see that oven venti-
lation ports are not restricted.
d. Use correct cooking time,
power level.
a. Use microwave-safe
cookwa re only.
b. Use correct cooking time,
power level.
c. Turn or stir food.
EN-14
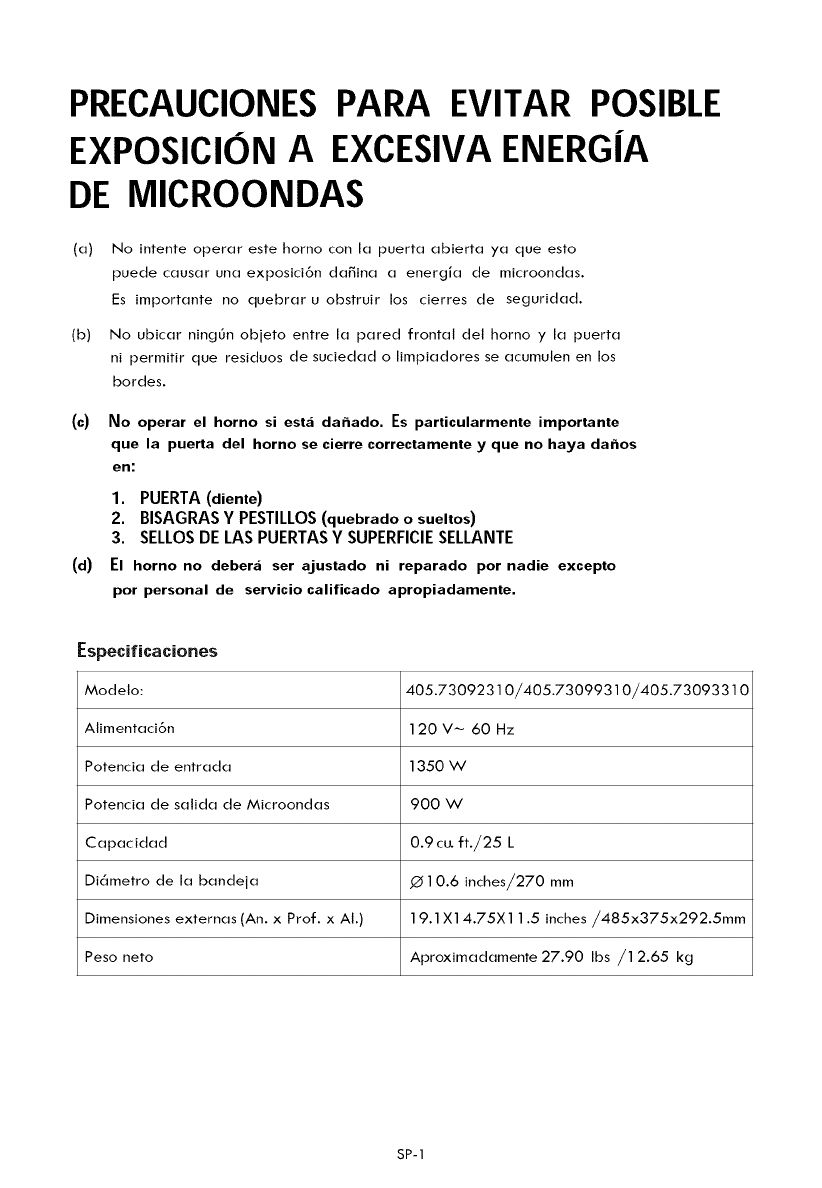
PRECAUCIONES PARA EVITAR POSIBLE
EXPOSICION AEXCESIVA ENERG|A
DE MICROONDAS
(a)
(b)
(c)
(d)
No intente operar este homo con la puerta abierta ya que esto
puede causar una exposici6n daffina a energia de microondas.
Es importante no quebrar u obstruir los cierres de seguridad.
No ubicar ning6n objeto entre la pared frontal del horno y la puerta
ni permitir que residuos de suciedad o limpiadores se acumulen en los
bordes.
No operar el horno sJ est,_ dahado. Es partJcularmente Jmportante
que la puerta del homo se cierre correctamente yque no haya dahos
en:
1. PUERTA(diente)
2. BISAGRASY PESTILLOS(quebrado o sueltos)
3. SELLOSDE LAS PUERTASY SUPERFICIESELLANTE
El homo no debera ser ajustado ni reparado por nadie excepto
por personal de servicio calificado apropiadamente.
Especificaciones
Modelo:
Alimentaci6n
Potencia de entrada
Potencia de salida de Microondas
Capacidad
Di6metro de la bandeja
Dimensiones externas (An. x Prof. x AI.)
Peso nero
405.73092310/405.73099310/405.73093310
120 V_ 60 Hz
1350 W
900 W
0.9 cu.ft./25 L
.(_10.6 inches/270 mm
19.1 X14.75X11.5 inches/485x375x292.5mm
Aproximadamente 27.90 Ibs /1 2.65 kg
SP-1
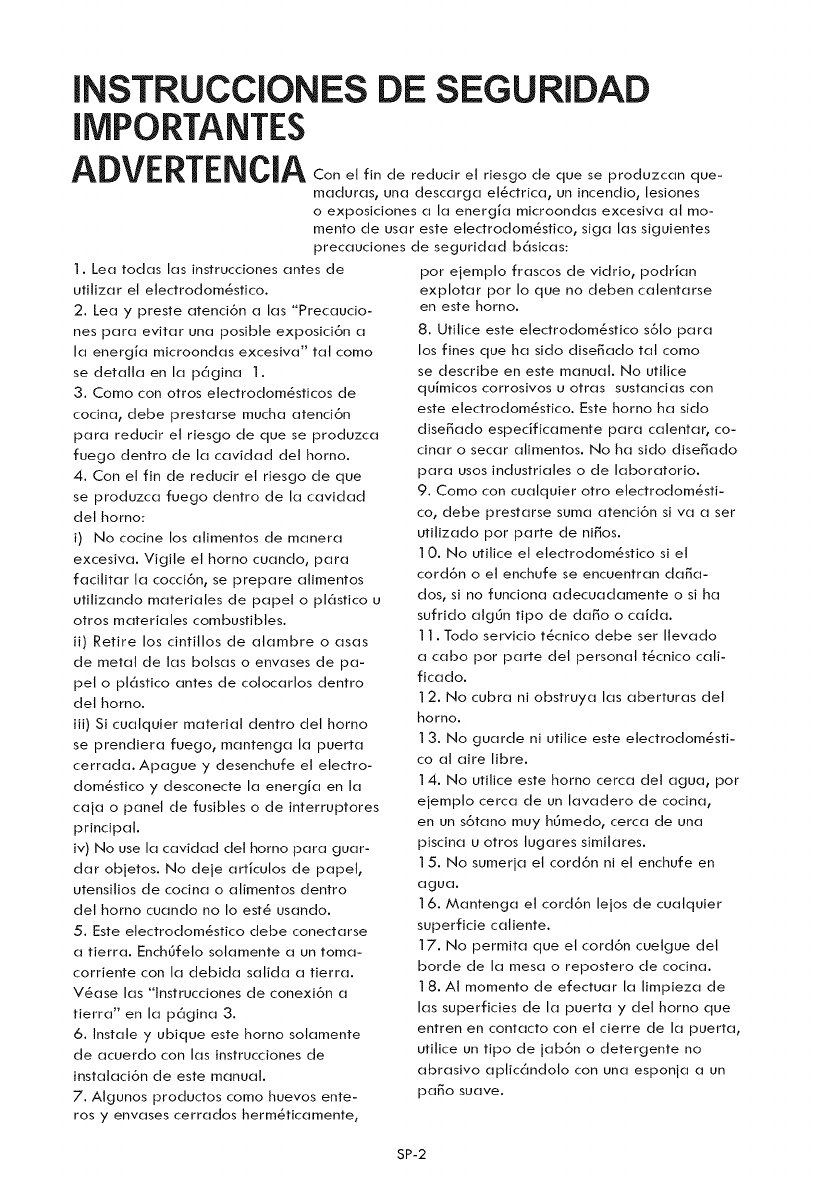
INSTRUCCIONES DE SEGURIDAD
IMPORTANTE$
ADVERTENCIA e,f,ndered0c,re,r,es0ode seprodu c(]n 0e-
m(]dur(]s0 un(] desc(]rg(] et_ctric(]_ un incendio_ lesiones
o exposiciones (] I(] energi(] microond(]s excesiv(] (]t mo-
mento de us(it este etectrodom_sfico, sig(] I(]s siguientes
prec(]uciones de segurid(]d basic(is:
1. Lea rod(is I(]s instrucciones antes de
ufitiz(]r el etectrodom_sfico.
2. Lea y preste (]tenci6n (] I(]s "Prec(]ucio-
nes par(] evit(]r un(] posible exposici6n (]
I(] energJ(] microond(]s excesiv(]" t(]t como
se det(]ll(] en I(] p(_gin(] 1.
3. Como con otros etectrodom_sficos de
cocin(]_ debe prest(]rse much(] (]tenci6n
par(] reducir et riesgo de que se produzc(]
fuego dentro de I(] c(]vid(]d det horno.
4. Con el fin de reducir el riesgo de que
se produzc(] fuego dentro de I(] c(]vid(]d
det homo:
i) No cocine los (]timentos de m(]ner(]
excesiv(]. Vigite el horno cu(]ndo, par(]
f(]citit(]r I(] cocci6n, se prepare (]timentos
utitiz(]ndo m(]terides de p(]pet o pl_stico u
otros m(]teri(]tes combustibles.
ii) Retire los cintitlos de (]t(]mbre o (is(is
de metal de I(]s bots(]s o env(]ses de p(]-
pel o ptastico antes de cotoc(]rtos dentro
det horno.
iii) Si cu(]lquier material dentro det homo
se prendier(] fuego, m(]nteng(] I(] puert(]
cerr(]d(]. Ap(]gue y desenchufe et electro-
dom_stico y desconecte I(] energi(] en I(]
c(]j(] o panel de fusibles o de interruptores
principal.
iv) No use I(] c(]vid(]d del horno par(] gu(]r-
d(]r objetos. No deje (]rficulos de p(]pet,
utensitios de cocin(] o (]timentos dentro
det horno cu(]ndo no Io est_ us(]ndo.
5. Este electrodom_stico debe conect(]rse
(] tierr(]. Enchgfeto sot(]mente (] un tom(]-
corriente con I(] debid(] s(]tid(] (] tierr(].
V_(]se I(]s "lnstrucciones de conexi6n (]
tierr(]" en I(] pagin(] 3.
6. Inst(]le y ubique este homo sol(]mente
de (]cuerdo con I(]s instrucciones de
inst(]t(]ci6n de este manual.
7. Algunos productos como huevos ente-
rosy env(]ses cerr(]dos herm@ic(]mente,
por ejempto fr(]scos de vidrio, podrJ(]n
explot(]r pot Io que no deben c(]tent(]rse
en este horno.
8. Utitice este etectrodom_stico s61o par(]
los fines que ha sido dise_(]do t(]t como
se describe en este manual. No utitice
quJmicos corrosivos u otr(]s sust(]nci(]s con
este etectrodom_stico. Este horno ha sido
dise_(]do especific(]mente par(] c(]lent(]r, co-
cin(]r o sec(]r (]limentos. No ha sido dise_(]do
par(] usos industri(]tes o de I(]bor(]torio.
9. Como con cu(]tquier otro etectrodom_sti-
co_ debe prest(]rse sum(] (]tenci6n si v(] (] ser
utitiz(]do pot p(]rte de ni_os.
] 0. No utitice et etectrodom_stico si el
cord6n o et enchufe se encuentr(]n d(]_(]-
dos_ si no funcion(] (]decu(]d(]mente o si ha
sufrido (]tggn tipo de d(]_o o c(]Jd(].
] ]. Todo servicio t_cnico debe set Ilev(]do
(] c(]bo pot p(]rte det personal t_cnico c(]ti-
fic(]do.
] 2. No cubr(] ni obstruy(] I(]s (]bertur(]s det
horno.
] 3. No gu(]rde ni utitice este etectrodom_sti-
co (]1 (]ire libre.
] 4. No utitice este homo cerc(] del (]gu(]_ por
ejempto cerc(] de un I(]v(]dero de cocin(]_
en un s6t(]no muy hgmedo_ cerc(] de un(]
piscin(] u otros tug(ires simil(]res.
]5. No sumerj(] et cord6n ni el enchufe en
(]gu(].
]6. M(]nteng(] et cord6n lejos de cu(]tquier
superficie c(]liente.
]7. No permit(] que et cord6n cuelgue det
horde de I(] mesa o repostero de cocin(].
] 8. AI momento de efectu(]r I(] limpiez(] de
I(]s superficies de I(] puert(] y det horno que
entren en cont(]cto con et cierre de I(] puert(],
utitice un tipo de j(]b6n o detergente no
(]br(]sivo (]ptic(_ndolo con un(] esponj(] (] un
p(]go suave.
SP-2
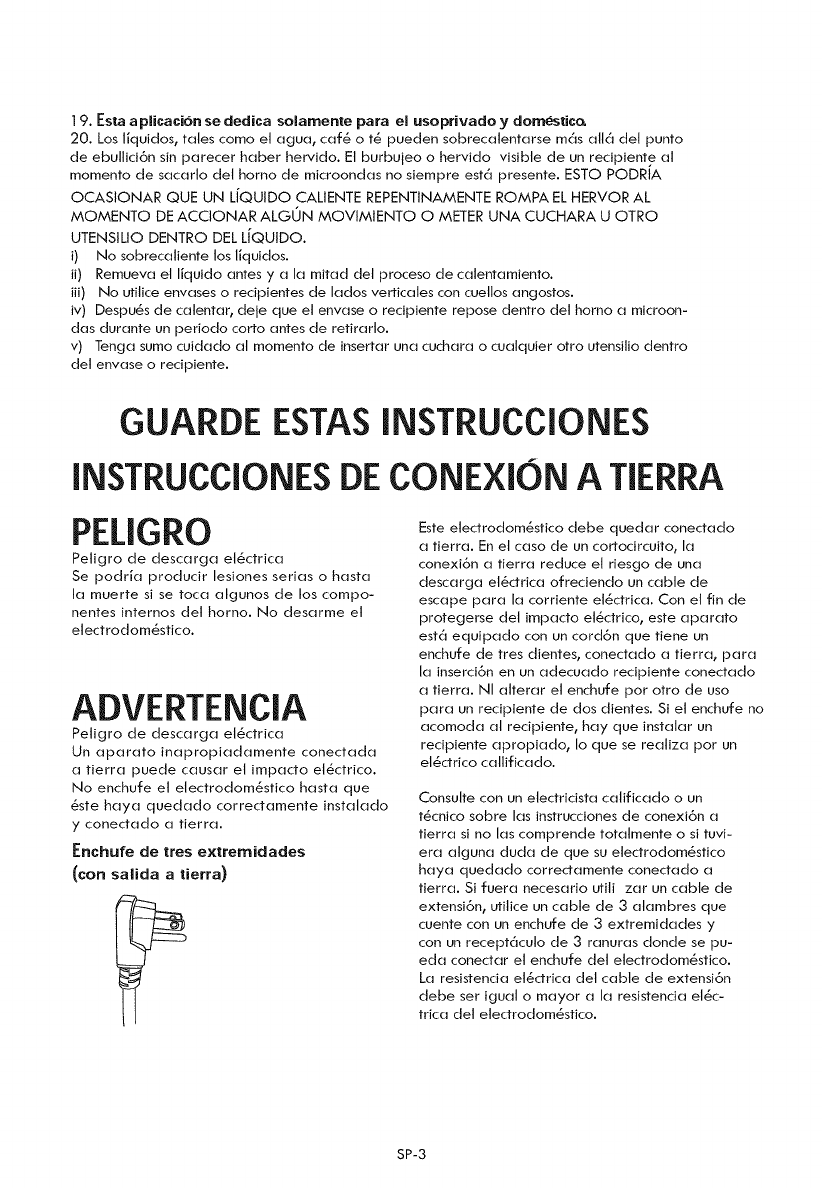
]9. Esta a plJcaci6n se dedica solamente para el usoprivado ydornestic_
20. Los lJquidos, tales como et agua, caf6 o t6 pueden sobrecatentarse m6s all6 del punto
de ebullid6n sin parecer haber hervido. El burbujeo o hervido visible de un redpiente al
momento de sacarlo det homo de microondas no siempre est6 presente. ESTO PODRIA
OCASIONAR QUE UN L[QUIDO CALIENTE REPENTINAMENTE ROMPA EL HERVOR AL
MOMENTO DE ACCIONAR ALGON MOVIMIENTO OMETER UNA CUCHARA U OTRO
UTENSILIO DENTRO DEL L[QUIDO.
i) No sobrecaliente los IJquidos.
ii) Remueva et IJquido antes y a la mitad del proceso de catentamiento.
iii) No utitice envases o recipientes de lados verticales con cuetlos angostos.
iv) Despu6s de catentar, deje que el envase o redpiente repose dentro del homo a microon-
das durante un periodo corto antes de retirarlo.
v) Tenga sumo cuidado at momento de insertar una cuchara o cuatquier otto utensilio dentro
del envase o recipiente.
GUARDE ESTASINSTRUCCIONES
INSTRUCCIONESDECONEXION A TIERRA
PELIGRO
Petigro de descarga et6ctrica
Se podrJa producir lesiones serias o hasta
la muerte si se toca algunos de los compo-
nentes internos del horno. No desarme et
electrodom6stico.
ADVERTENCIA
Petigro de descarga et6ctrica
Un aparato inapropiadamente conectada
a tierra puede causar el impacto et6ctrico.
No enchufe et etectrodom6stico hasta que
6ste haya quedado correctamente instatado
y conectado a tierra.
Enchufe de tres extremidades
(con salida atierra)
Este electrodom6sfico debe quedar conectado
a tierra. En el caso de un cortodrcuito, la
conexi6n a tierra reduce et riesgo de una
descarga el6ctrica ofredendo un cable de
escape para la corriente et6ctrica. Con et fin de
protegerse det impacto et6ctrico, este aparato
est6 equipado con un cord6n que tiene un
enchufe de tres dientes, conectado a tierra, para
la inserd6n en un adecuado redpiente conectado
a tierra. NI atterar el enchufe por otto de uso
para un recipiente de dos dientes. Si el enchufe no
acomoda at recipiente, hay que instalar un
recipiente apropiado, Io que se reatiza pot un
el6ctrico cattificado.
Consulte con un etectricista calificado o un
t6cnico sobre las instrucdones de conexi6n a
tierra si no las comprende totatmente o si tuvi-
era atguna duda de que su electrodom6stico
haya quedado correctamente conectado a
tierra. Si fuera necesario utiti zar un cable de
extensi6n, utitice un cable de 3 atambres que
cuente con un enchufe de 3 extremidades y
con un recept6culo de 3 ranuras donde se pu-
eda conectar el enchufe det etectrodom6stico.
La resistenda el6ctrica del cable de extensi6n
debe set iguat o mayor a la resistencia el6c-
trica del electrodom6stico.
SP-3
1.Uncabledeabastecimientocortoreducelosriesgosderivadosdeenredarseo
tropezarseconuncablemaslargo.
2.Cordonesm_slargosocablesdem_sextensi6nest_ndisponiblesy puedenser
serutilizadossiseejerceetcuidadoensuuso.
3.Siseutilizauncord6nlargooconjuntosdecablesdeextensi6n:
i) Laclasificaci6nel_ctricadetjuegodecablesolaclasificaci6nel_ctricade
lasextensionesdejuegosdecablesoextensionesdecablesdebenseral
menostangrandecomolaclasificaci6nel_ctricadelaparato.
ii)Elcabledeextensi6ndebesercord6natierratipo3-cable;
iii)Elcablem_slargodebesercolocadodemaneraquenocuelguesobreelmostrador
olamesa,dondepuedesertiradoporni_osotropezarseconelsinintenci6n
Interferencia de radio
I. El funcionamiento del microondas puede causar interferencias en la radio, la
televisi6n o aparatos similares.
2. En caso de interferencia, esta puede ser reducida o eNminada tomando las
siguientes medidas:
i) Limpie la puerta y la superficie de sellado del homo.
ii) Reoriente la antena receptora de radio o televisi6n.
iii) Traslade el microondas con respecto al receptor.
iv)/v_ueva el microondas lejos del receptor.
v) Conecte el microondas a una toma diferente de modo que el horno de
microondas y el receptor estSn en circuitos diferentes.
UTENSILIOS
PRECAUCION
Peligro de lesiones personales
Es peligroso para cualquiera que no est8
cualificado realizar reparaciones o
mantenimiento que supongan retirar la
tapa de mica que protege de la exposici6n
alas microondas.
V_anse las instrucciones sobre ""Materiales que
pueden usarse o deben evitarse en et horno
microondas.'" Algunos utensilios no met_licos
pueden no ser seguros para su uso en un horno
microondas. En caso de dudas, puede probar
et utensilio en cuesti6n aplicando el procedimiento
que se describe a continuaci6n.
Prueba de utensilios:
1. Llene un recipiente apto para homo microondas con
un vaso de agua frJa (250mt) e introdUzcalo en et
horno microondas con el utensilio en cuesti6n.
2. Cocine a la potencia m_s alta durante 1 minuto.
3. Toque con cuidado el utensitio. Si est_ caliente, no
Io utilice para cocinar en el horno microondas.
4. No supere 1 minuto de cocci6n.
SP-4
Materiales que se pueden usar en el horno a microondas
Observaciones
L6mina de aluminio
Bandeja doradora
Elementos para comida
Jarras de vidrio
Cristaleria
Bolsas para cocinar en
homo
Platos y vasos de papet
Servilletasdepapel
Pergaminodepapel
PI6sticos
Cubiertas pl6sticas
Term6metros
Papel encerado
Solamente como protecci6n. Peque_as piezas lisas pueden ser usadas
para cubrir partes delgadas de came o potlo para prevenir sobre cocci6n.
Puede ocurrir que se formen arcos si el film est6 muy cerca de las paredes
det horno. El film debe estar por Io menos a 2,5 cm de distancia de las
paredes del horno.
Siga las instrucciones del fabricante. El fondo de la bandeja debe estar al
menos a 5mm arriba det plato giratorio. El uso incorrecto puede resultar en
la rotura det plato giratorio.
Use solamente utensilios seguros para microondas. Siga las instrucciones
del fabricante. No use platos rotos o astillados.
Quiteles siempre la tapa. Use solo para calentar atimentos hasta su punto
justo. La mayoria de las jarras no son resistentes al calory pueden
romperse.
Use solamente cristaleria resistente al calor del homo. Aseg_rese de que no
hay adornos met61icos. No use platos rotos o astillados.
Siga las instrucciones det fabricante. No las cierre con precintos. Aseg_rese
de que tengan aberturas para permitir la salida de vapores
Uselos para cocci6n /calentamiento de corto tiempo. No deje et homo sin
atenci6n mientras cocina /calienta.
Uselas para cubrir los alimentos para que retengan y absorban grasa.
Deben usarse con supervisi6n para cocci6n de corto tiempo.
Useto como cubierta para prevenir salpicaduras o como envoltura para
cocci6n al vapor.
Sotamente aptos para microondas. Siga las instrucciones del fabricante.
Deben estar etiquetados como "Seguros para microondas". Algunos
pl6sticos contienen aislantes de manera que los alimentos en su interior
Iogren calentarse. Las "Bolsas para Hervir" y las bolsas pl6sticas
hermSticamente cerradas deben ser abiertas o perforadas y usar como
vienen empaquetadas.
Solamente aptas para microondas. Uselas para cubrir los alimentos durante
la cocci6n para retener la humedad. No permita que las cubiertas pl6sticas
entren en contacto con los alimentos.
Solamente aptos para microondas. (term6metros para carnes y dulces /
caramelo).
Uselo como una cubierta para prevenir salpicaduras y retener la humedad
Materiales a ser evitados en el horno a microondas
Observaciones Respecto alos utensilios
Bandeja de aluminio Puede causar arcos. Pase los alimentos a un recipiente apto para
microondas.
Caja de alimentos con Puede causar arcos. Pase los alimentos a un recipiente apto para
manija met61ica microondas.
Utensilios de metal o con Los metales evitan que la energia de microondas vayan a los
revestimientos met61icos alimentos. Los adornos de metal pueden causar arcos.
Precintos o cierres de Pueden causar arcos y podrian causar fuego dentro del horno.
metal
Bolsas de papel Pueden causar fuego en el horno.
Espumados pl6sticos Los espumados pl6sticos pueden derretirse o contaminar el liquido
dentro cuando son expuestos a altas temperaturas
Madera La madera se secar6 cuando es usada en et horno a microondas y
puede rajarse o romperse.
SP-5
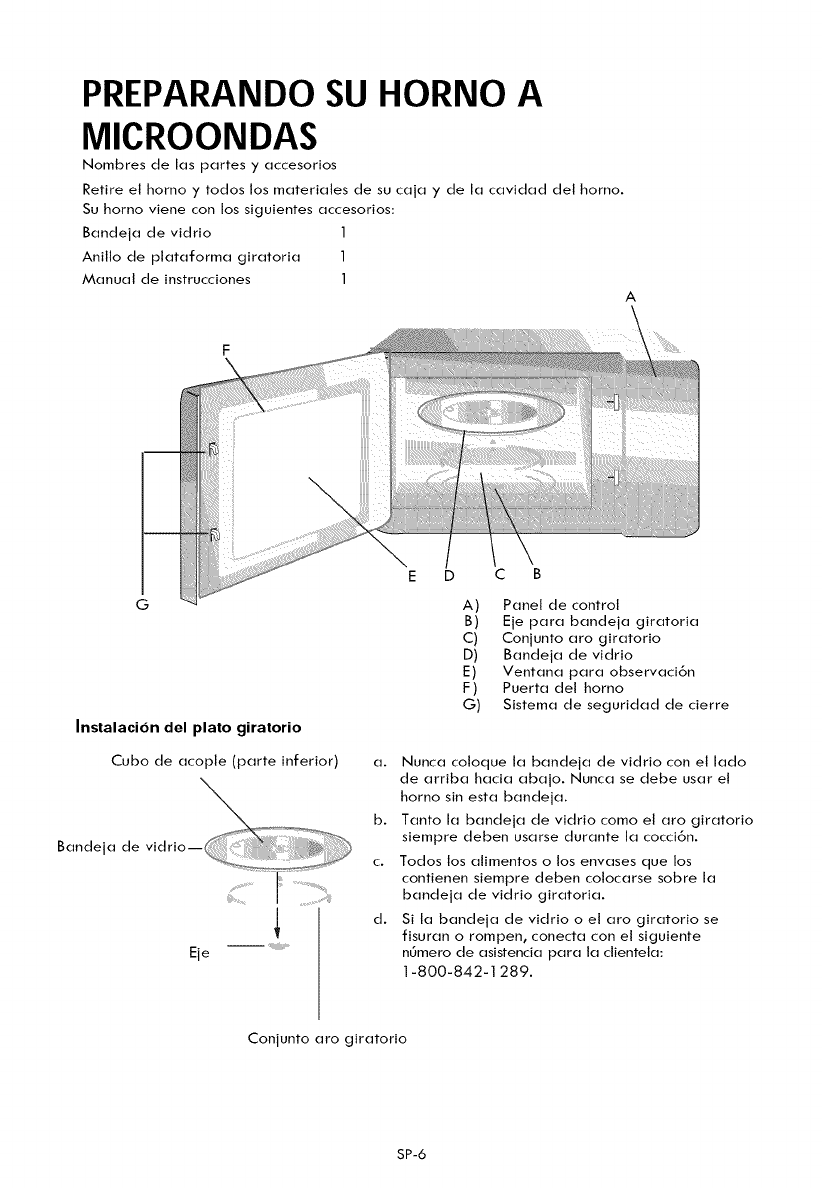
PREPARANDOSU HORNO A
MICROONDAS
Nombres de las partes y accesorios
Retire et homo y todos los materiales de su caja y de la cavidad del horno.
Su homo viene con los siguientes accesorios:
Bandeja de vidrio 1
Anillo de plataforma giratoria 1
Manual de instrucciones 1
A
G
Instalacion del plato giratorio
Cubo de acople (parte inferior)
%
e,a vi r,o--
Eie ....
D C B
A) Panel de control
B) Eje para bandeja giratoria
C) Conjunto aro giratorio
D) Bandeja de vidrio
E) Ventana para observaci6n
F) Puerta del homo
G) Sistema de seguridad de cierre
a. Nunca coloque la bandeja de vidrio con et lado
de arriba hacia abajo. Nunca se debe usar et
horno sin esta bandeja.
b. Tanto la bandeja de vidrio como el aro giratorio
siempre deben usarse durante la cocci6n.
c. Todos los alimentos o los envases que los
contienen siempre deben colocarse sobre la
bandeja de vidrio giratoria.
d. Si la bandeja de vidrio o el aro giratorio se
fisuran o rompen, conecta con el siguiente
n_mero de asistencia para la clienteta:
1-800-842-1289.
Conjunto aro giratorio
SP-6
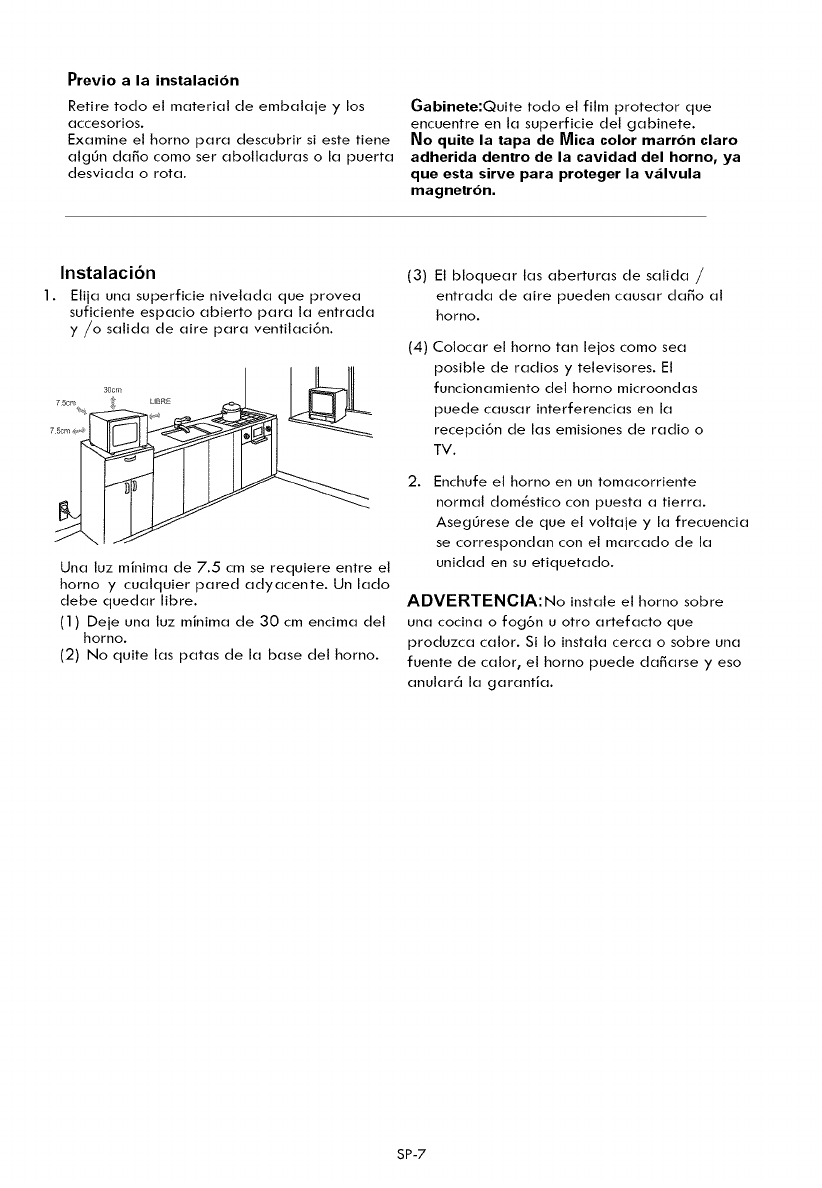
Previo a la instalacion
Retire todo el material de embalaje y los
accesorJos.
Examine el horno para descubrir si este fiene
algL_n da_o como ser abolladuras o la puerta
desviada o rota.
GabJnete:Quite todo el film protector que
encuentre en la superficie del gabinete.
No quite la tapa de Mica color marron claro
adherida dentro de la cavidad del homo, ya
que esta sirve para proteger la v,_lvula
magnetron.
Instalaci6n
1. Elija una superficie nivelada que provea
suficiente espacio abierto para la entrada
y/o salida de aire para ventilaci6n.
7 5cm
Una luz minima de 7.5 cm se requiere entre el
homo y cualquier pared adyacente. Un lado
debe quedar Nbre.
(1) Deje una luz minima de 30 cm encima del
homo.
(2) No quite las patas de la base del horno.
(3)
(4)
2.
El bloquear las aberturas de salida /
entrada de aire pueden causar da_o al
homo.
Colocar el horno tan lejos como sea
posible de radios y televisores. El
funcionamiento del homo microondas
puede causar interferendas en la
recepcibn de las emisiones de radio o
TV.
Enchufe et horno en un tomacorriente
normal dom_stico con puesta a tierra.
AsegL_rese de que el voltaje y la frecuencia
se correspondan con el marcado de la
unidad en su etiquetado.
ADVERTENCIA:No instale et horno sobre
una cocina o fog6n u otro artefacto que
produzca calor. Si Io instala cerca o sobre una
fuente de calor, el horno puede da_arse y eso
anular6 la garantia.
SP-7
FUNCIONAMIENTO
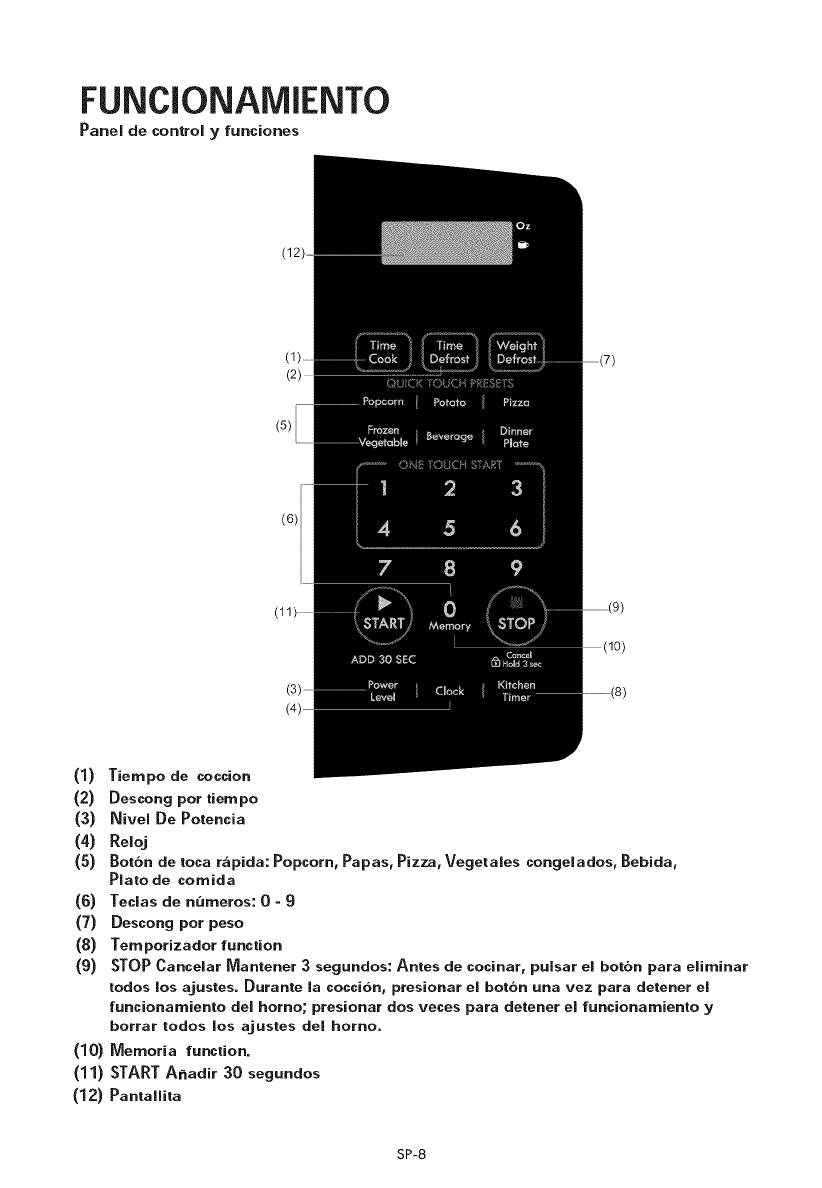
Panel de corttrol yfunciortes
(12)
(5)
(6)
(1) Tiempo de coccion
(2) Descong pot tiempo
(3) Nivel De Potencia
(4) Reloj
(5) Botbn de toca r,'_pida: Popcorn, Papas, Pizza, Vegetales congelados, Bebida,
Plato de comida
(6) Teclas de numeros: 0-9
(7) Descong pot peso
(8) Temporizador function
(9) STOP Cancelar Mantener 3 segundos: Antes de cocinar, pulsar el botbn para eliminar
todos los ajustes. Durante la coccion, presionar el botbn una vez para detener el
funcionamiento del homo; presionar dos veces para detener el funcionamiento y
borrar todos los ajustes del horno.
(10) Memoria function.
(11) STARTA_adir 30 segundos
(12) Pantallita
SP-8
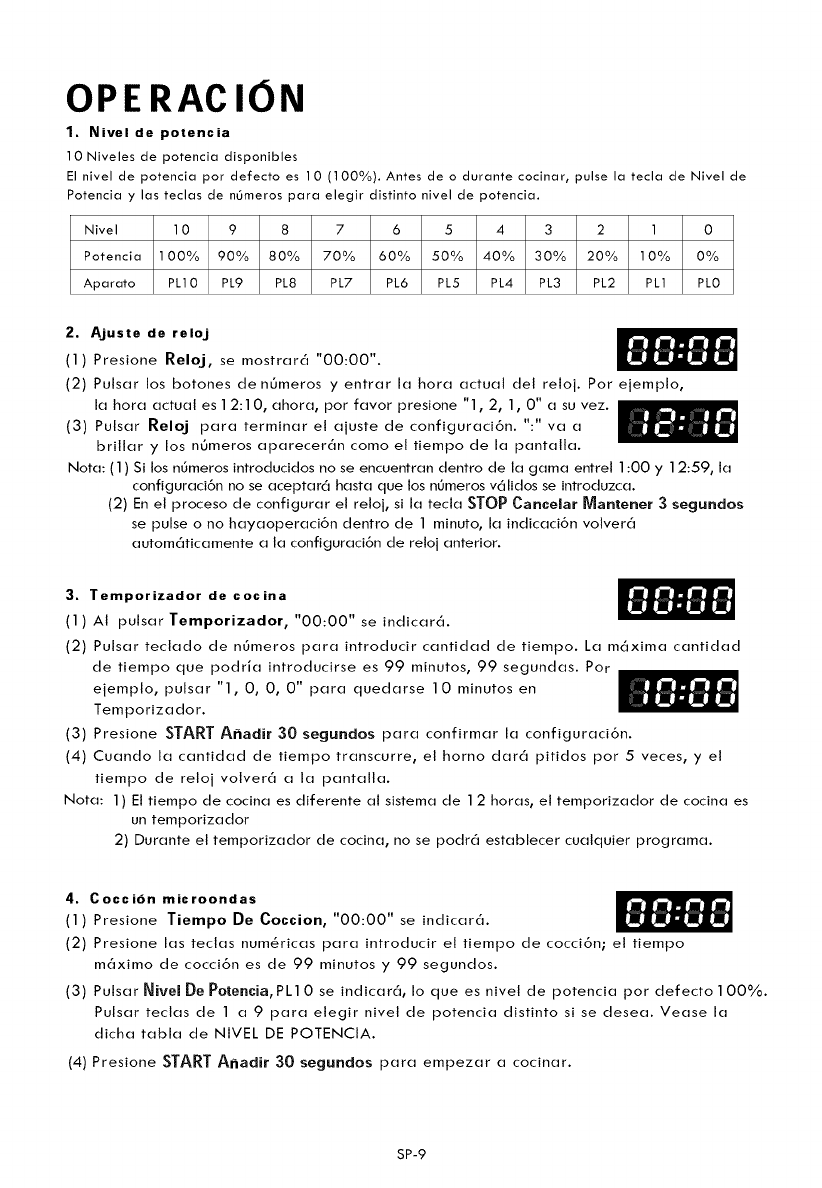
OPERACION
1. Nivel de potencia
10 Niveles de potencia disponibles
El nivel de potencia por defecto es 10 (100%). Antes de o durante cocinar, pulse la tecla de Nivel de
Potencia y las teclas de nOmeros para elegir distinto nivel de potencia.
Nivel 10 987 6 5 4 3 2 1 0
Potencia 100% 90% 80% 70% 60% 50% 40% 30% 20% 10% 0%
Aparato PL10 PL9 PL8 PL7 PL6 PL5 PL4 PL3 PL2 PL1 PL0
2. A.juste de relo.j
(1) Presione Reloj, se mostrar6 "00:00".
(2) Pulsar los botones de n0meros y entrar la hora actual del reloj. Por ejemplo,
la hora actual es 12:10, ahora, por favor presione "1,2, 1,0" a su vez.
(3) Pulsar Reloj para terminar el ajuste de configuraci6n. ":" va a
brillar y los nOmeros aparecer6n como el tiempo de la pantalla.
Nota: (1) Si los n0meros introducidos no se encuentran dentro de la gama entrel 1:00 y 12:59, la
configuraci6n no se aceptar6 hasta que los nOmeros v61idos se introduzca.
(2) En el proceso de configurar el reloj, si la tecla STOP Cancelar Mantener 3 segundos
se pulse o no hayaoperaci6n dentro de 1 minuto, la indicaci6n volver6
autom6ticamente a la configuraci6n de retoj anterior.
3. TemporJzador de cocJna
(1) AI pulsarTemporJzador, "00:00"se indicar6.
(2) Pulsar teclado de n6meros para introducir cantidad de tiempo. La m6xima cantidad
de tiempo que podria introducirse es 99 minutos, 99 segundas. Por
ejemplo, pulsar "1, 0, 0, 0" para quedarse 10 minutos en
Temporizador.
(3) Presione START A_adir 30 segundos para confirmar la configuraci6n.
(4) Cuando la cantidad de tiempo transcurre, el horno dar6 pitidos por 5veces, y el
tiempo de reloj volver6 a la pantalla.
Nora: 1) El tiempo de cocina es diferente al sistema de 12 horas, el temporizador de cocina es
un temporizador
2) Durante el temporizador de cocina, no se podr6 establecer cualquier programa.
4. Coccidn microondas
(1) Presione TJempo De CoccJon, "00:00" se indicar6.
(2) Presione las teclas numSricas para introducir el tiempo de cocci6n; el tiempo
m6ximo de cocci6n es de 99 minutos y 99 segundos.
(3) Pulsar Nivel De Potencia, PL10 se indicar6, Io que es nivel de potencia por defecto100%.
Pulsar teclas de 1 a 9 para elegir nivel de potencia distinto si se desea. Vease la
dicha tabla de NIVEL DE POTENCtA.
(4) Presione STARTA_adir 30 segundos para empezar a cocinar.
SP-9
Ejemplo:paracocinarlosalimentoscon50% de potencia de microondas por minutos.
a. Presione Tiempo De Coccion, "00:00" se indicar('_.
b. Pulsar "1, 5, 0, 0" para que 15:00 aparezca en la pantalla.
c. Presione Nivel De votencia una vez, luego presione "5" para seleccionar el 50% de potencia
de microonda.
d. Presione START A,_adir 30 segundos para empezar a cocinar.
Nota: 1) En el proceso de la configuraci6n, si el bot6n STOP Cancelar Mantener 3 segundos es
pulsado o si no hay ninguna operaci6n en 1 minuto, el homo volver6 autom6ticamente a la
configuraci6n de nivel de potencia 100% por defecto.
2) Si PL0 est6 elegido, et homo marchar6 durante el tiempo elegido sin potencia de cocinado.
3) Durante la cocci6n puede presionarse Nivel De Potencia para cambiar a la potencia que usted
necesita. Despu_s de pulsar el bot6n Nivel De Potencia, la potencia actual es muestra por 3
segundos; durante estos 3 segundos, pulsar los n_meros deseados para cambiar la potencia.
El homo marchar6 con la potencia seteccionada a Io largo deltiempo restante.
5. Cocci6n rdpida
(1) Una cocci6n instantc'_nea a nivel de potencia de 100% y de 1 a 6minutos puede empezar
con et pulso de los n_meros de 1 a 6. Pulsar STARTA,_adir 30 segundos. Para incrementar
tiempo de cocinado por 30 segundos con cada pulsado. El m6ximo tiempo de cocinado es
99 minutos, 99 segundos.
(2) En estado de espera, cocci6n instant6nea al 100% de potencia con 30 segundos de cocci6n
puede ser iniciado presionando STARTA,_adir 30 segundos. Cada presi6n en el
mismo boton incrementara el tiempo de cocci6n en 30 segundos, el tiempo m6ximo de cocci6n
es 99 minutos, 99 segundos.
Nora: Tambi_n tiempo puede a_adirse en aumento de 30 segundos durante la operaci6n
de cocinado de microondas y descongelaci6n mediante pulsar la tecla
START A_adir 30 segundos.
6 . Funci6n descongelante de peso
(1) Presione Descong Por Peso, "dEF1 " se indicar6.
(2) Presione los botones num_ricos para introducir el peso a ser descongetado.
lntroduzca el peso que oscila entre 4 y 1O0 oz.
(3) Si el peso introducido no es entre 4 y 100oz, I aentrada no ser_ v_lida. NingL_n beep sonar_
y la unidad no funcionara hasta que los nL_meros validos sean introducidos.
(4) Presione START Ahadir 30 segundos para iniciar la descongelaci6n y el tiempo de
cocci6n mantenida ser(_ mostrada.
7. Funcidn tiempo de descongelacidn
(1) Presione Descong Por Tiempo, "dEF2" se indicar6.
(2) Presione los nL_meros para introducir el tiempo de descongelaci6n. La gama de
tiempo es 00:01 y 99:99.
(3) La potencia autom6tica del microondas es el nivel 3. Si desea cambiar el nivel de
potencia, potencia, presione Nivel De Potencia una vez, "PL3" se indicar6, luego presione
el n_mero del nivel que desea.
(4) Presione STARTA,_adir 30 segundos para descongelar. El resto del tiempo de cocci6n
se mantendr6 en pantalla.
SP-10
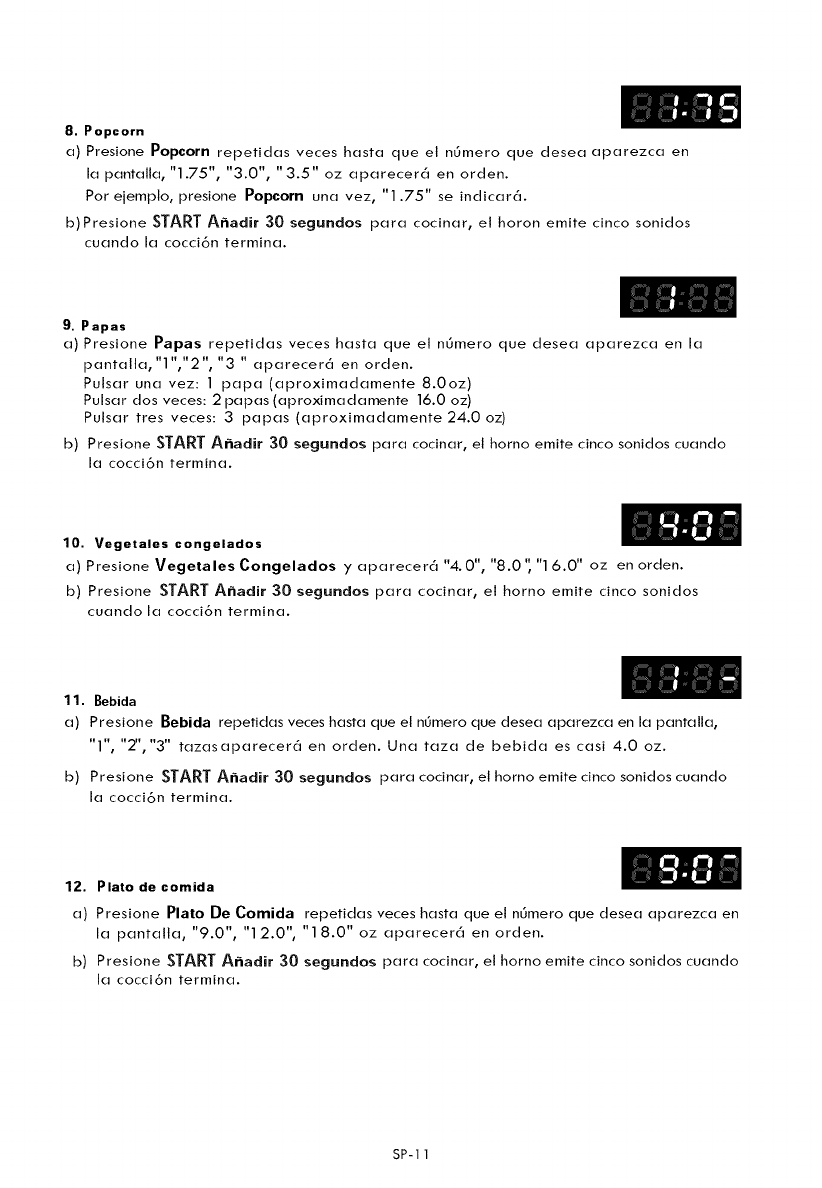
8. Popcorn
a) Presione Popcorn repetidas veces hasta que el n6mero que desea aparezca en
la pantalla, "1.75", "3.0", "3.5" oz aparecer6 en orden.
Por ejemplo, presione Popcorn una vez, "1.75" se indicar6.
b) Presione STARTA_adir 30 segundos para cocinar, el horon emite cinco sonidos
cuando la cocci6n termina.
9. Papas
a) Presione Papas repetidas veces hasta que el n6mero que desea aparezca en la
pantalla, "1 ","2", "3 " aparecer6 en orden.
Pulsar una vez: 1 papa (aproximadamente 8.0oz)
Pulsar dos veces: 2 papas (aproximadamente 16.0 oz)
Pulsar tres veces: 3 papas (aproximadamente24.0oz)
b) Presione STARTA_adir 30 segundos para cocinar, et homo emite cinco sonidos cuando
la cocci6n termina.
10. Vegetales congelados
a) Presione Vegetales Congelados y aparecer6 "4. 0", "8.0 ", "1 6.0" oz en orden.
b) Presione START A_adir 30 segundos para cocinar, el horno emite cinco sonidos
cuando la cocci6n termina.
11. Bebida
a) Presione BebJda repetidas veces hasta que el n6mero que desea aparezca en la pantalla,
"1", "2","3" tazasaparecer6 en orden. Una taza de bebida es casi 4.0 oz.
b) Presione START A_adir 30 segundos para cocinar, et homo emite cinco sonidos cuando
la cocci6n termina.
12. Plato de comida
a) Presione Plato De ComJda repetidas veces hasta que et n6mero que desea aparezca en
la pantalla, "9.0", "1 2.0", "1 8.0" oz aparecer6 en orden.
b) Presione STARTA_adir 30 segundos para cocinar, el horno emite cinco sonidos cuando
la cocci6n termina.
SP-11
13. Pizza
a) Presione Pizza repetidas veces hasta que el n0mero que desea aparezca en la pantalla,
"4.0", "8.0", "14.0" oz aparecer6enorden.
b) Presione STARTA_adir 30 segundos para cocinar, et horno emite cinco sonidos cuando
la cocci6n termina.
14. Funci6n de memoria
(1) Presione 0 Memoria para seleccionar la memoria del procedimiento 1-3. La pantalla
mostrar_ 1,2,3.
(2) Pulsar 0 Memoria hasta que et n_mero deseado del procedimiento aparezca en la
pantalla. Pulsar STARTA_adir 30 segundos para empezar. Un m_ximo de dos etapas
de cocci6n puede ajustar para cada procedimiento.
(3) Para programar un procedimiento, sigue los pasos en la siguiente lista. Ejemplo:
Cocinar alimentos a nivel de potencia de 80% durante 3 minutos y 20 segundos,
guarda como memoria 2.
a. En la etapa de espera, presione 0 Memoria dos veces, deje de presionar cuando la
pantalla muestre "2".
b. Presione Tiempo De Coccion una vez, luego presione "3", "2", "0" en orden.
c. Presione Nivel De Potencia una vez, luego presione "8" y aparecer(_ "PL8".
d. Presione START A_adir 30 segundos para grabar la programaci6n.
Si presiona START AEadir 30 segundos nuevamente, la cocci6n comenzar('_.
e. Si desea iniciar et procedimiento grabado en la etapa de espera, presione 0Memoria
dos veces, la pantalla mostrar_ "2", luego presione START Aaadir 30 segundos
para iniciar.
Nora: El procedimiento quedar_ programado hasta que el horno est_ desconectado
o exista un corte de potencia. Si ninguno de los dos casoso curre, el procedimiento
tendr_ que serreprogramado en el horno.
15. Fase de cocci6n m,_ltiple
Solo 2 etapas pueden ser programadas como m6ximo. En la fase cocd6n m6ltiple, si una etapa es
el descongelamiento, entonces el descongelamiento deber_ ubicarse en la primera etapa
autom_ticamente.
Neta: El bot6n Bot6n de toca rapida no se puede usar en la cocci6n de multi-pasos.
Ejemplo: Potencia de nivel 80% para 5minutos, seguido por potencia de nivet 60% para 10
minutos, se guarda como memory 3.
SP-12
(1) Pulsar0MemorJa tres veces, en la pantalla se muestra 3.
(2) Pulsar Tiempo De Coccion una vez, y luego "5", "0" y"0" para configurar el
tiempo de cocci6n de la primera etapa.
(3) Pulsar Nivel De Potencia una vez, y luego "8" para seleccionar el 80% de la potencia
de cocci6n de la primera etapa.
(4) PulsarTiempo De Coccion otra vez, y luego "1 "," 0"," O" y "0" para ajustar el
tiempo de cocci6n de segunda etapa.
(5) Pulsar Nivel De Potencia otra vez, y luego "6" para seleccionar et 60% de la potencia
de cocci6n de la segunda etapa.
(6) Pulsar STARTA_adir 30 segundos para guardar el procedimiento. El horno emite
un sonido. Et procedimiento se guarda como memoria 3. Pulsar STARTA_adir 30
30segundos otra vez para iniciar inmediatamente la cocci6n de multi-etapa.
(7) Para seteccionar el procedimiento de la lista de memoria, pulsar OMemoria tres
veces. En la pantalla se muestra "3"; pulsar START A_adir 30 segundos para que
el procedimiento funcione.
Nora: Si no quieres guardar un programa particular de multi-etapa como un
procedimiento, no pulsar OMemoria como el primer paso. La cocci6n de multi-etapa
empezar6 una vez pulses STARTA_adir 30 segundos despu_s det funcionamiento de
las dos etapas.
16. Funci6n de verificaci6n
(1) En et estado de cocci6n, presione Reloj, la pantalla mostrar6 el retoj por tres segundos.
(2) En et estado de cocci6n det microondas, presione Nivel De Potencia para ver et nivel de potencia
del microondas, y se mostrar6 la potencia actual. Luego de tres segundos, et homo volver6 al
estado anterior. En et estado m61tiple, la verificaci6n puede realizarse de la misma manera m6s
arriba indicada.
17. Fnucion de bloqueo para nihos
Para bloquear el microondas de modo que no pueda ser operado por ni_os u otros
usuarios sin querer, pulsar STOP Cancelar Mantener 3 segundos 3 segundos.
Escuchar6s un sonido largoy I aparecer6.
Pulsar STOP Cancelar Mantener 3 segundos por 3 segundos, habr6 un beep largo que
avisar6 el desbloqueo.
18. Funci6n recordaoria de la terminacion de cocci6n
Cuando la cocci6n ha terminado, el timbre sonar_ 5beep para avisar que la cocci6n
ha terminado.
19. Otras especificaci0nes
(1) Cuando se establece al funci6n de la cocci6n, la abreviatura de la funci6n aparece en la
pantalla.
(2) Cuando et horno est_ en cocinando o pausado (con la puerta abierta) mientras se cocina,
el tiempo restante de cocci6n aparece en la pantalla.
SP-13
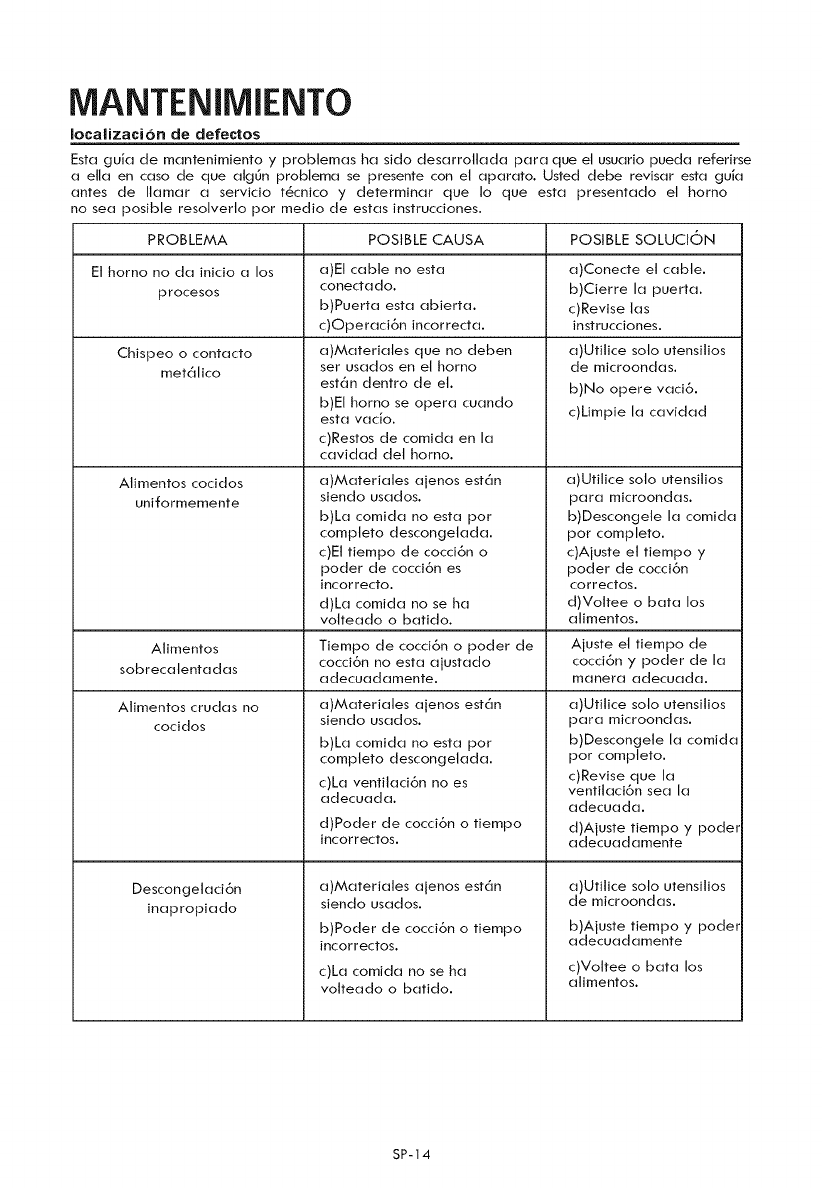
MANTENIMIENTO
Iocalizaci6n de defectos
Fsta guJa de mantenimiento y probtemas ha sido desarrollada para que el usuario pueda referirse
a ella en caso de que atg0n problema se presente con el aparato. Usted debe revisar esta guia
antes de Ilamar a servicio t_cnico y determinar que Io que esta presentado el homo
no sea posible resotverto por medio de estas instrucciones.
PROBLEMA POSIBLE CAUSA POSIBLE SOLUCION
Et horno no da inicio a los a)Et cable no esta
conectado.
procesos b)Puerta esta abierta.
c)Operaci6n incorrecta.
Chispeo o contacto
met61ico
Atimentos cocidos
uniformemente
a)Materiates que no deben
ser usados en et horno
est6n dentro de el.
b)EI homo se opera cuando
esta vacio.
c)Restos de comida en la
cavidad det horno.
a)Materiales ajenos est6n
siendo usados.
b)La comida no esta por
compteto descongelada.
c)Et tiempo de cocci6n o
poder de cocci6n es
Jncorrecto.
d)La comida no se ha
votteado o batido.
Alimentos Tiempo de cocci6n o poder de
sobrecatentadas cocci6n no esta ajustado
adecuadamente.
Alimentos crudas no a)Materiates ajenos est6n
cocidos siendo usados.
Descongelaci6n
inapropiado
b)La comida no esta por
compteto descongelada.
c)La ventitaci6n no es
adecuada.
d)Poder de cocci6n o tiempo
incorrectos.
a)Materiales ajenos estan
siendo usados.
b)Poder de cocci6n o tiempo
incorrectos.
c)La comida no se ha
volteado o batido.
a)Conecte et cable.
b)Cierre la puerta.
c)Revise las
instrucciones.
a)Utitice solo utensitios
de microondas.
b)No opere vaci6.
c)Limpie la cavidad
a)Utitice solo utensitios
para microondas.
b)Descongele la comida
pot completo.
c)Ajuste et tiempo y
poder de cocci6n
correctos.
d)Voltee o bata los
atimentos.
Ajuste el tiempo de
cocci6n y poder de la
manera adecuada.
a)Utitice solo utensitios
para microondas.
b)Descongete la comida
por compteto.
c)Revise que la
ventilaci6n sea la
adecuada.
d)Ajuste tiempo y pode_
adecuadamente
a)Utitice solo utensitios
de microondas.
b)Ajuste tiempo y podet
adecuadamente
c)Voltee o bata los
alimentos.
SP-14
KENMORE ONE YEAR LIMITED WARRANTY
If this product fails due to a defect in material or workmanship
within one year from the date of purchase, return it with proof
of purchase to any Sears store or other Kenmore outlet in the
United States for free replacement.
This warranty does not cover the oven cavity light bulb, which
is an expendable part that can wear out from normal use within
the warranty period.
This warranty is void if this product is ever used for other
than private household purposes.
This warranty gives you specific legal rights, and you may
also have other rights which vary from state to state.
Sears Brands Management Corporation,
Hoffman Estates, IL 60179
KENMORE GARANTJA LJMITADA DE UN AI_IO
Si este producto falla debido a un defecto en material o a la ejecuci6n
en el plazo de un afio a partire de la fecha de la compra, deveulvalo
con comprobante de compra a cualquier tienda Sears o un otro
Kenmore outlet en los Estados Unidos para el reemplazo gratis.
Esta garantia no cubre la cavidad del horno bombilla, una parte
consumible que puede gastarse con el uso normal dentro del periodo
de garantia.
Esta guarantia es invalido si este producto se utiliza para con
excepci6n de los prop6sitos privados de casa.
Esta guarantia le da los derechos legales especificos, y usted puede
tambi_n tener otros derechos que varian de estado a estado.
Sears Brands Management Corporation,
Hoffman Estates, IL 60179
PN: 261800312741
