Kenmore 40783086310 User Manual 8000 BTU PAC RATING LABEL Manuals And Guides 1306002L
User Manual: Kenmore 40783086310 40783086310 KENMORE 8000 BTU PAC RATING LABEL - Manuals and Guides View the owners manual for your KENMORE 8000 BTU PAC RATING LABEL #40783086310. Home:Heating & Cooling Parts:Kenmore Parts:Kenmore 8000 BTU PAC RATING LABEL Manual
Open the PDF directly: View PDF ![]() .
.
Page Count: 44
Use & Care Guide
Manual de Uso y Cuidado
English/Espafiol
I<enmore
Sears Brands Management Corporation
Hoffman Estates, IL 60179 U.S.A.
www.kenmore.com
www.sears.com
www.kmart.com

BeforeUsingYourNewAirConditioner.......2
Important Safeguards .....................................3-5
Kenmore Air Conditioner Warranty .............6
Master Protection Agreement ........................7
Unpacking Instructions....................................8
Air Conditioner Parts.......................................8
Accessories .................................................... 9
Installation ................................................... 9,10
Safety Plug............................................. 11
Control Panel........................................... ti
Remote Control ............................................12,13
Operating Instructions................................14,15
Cleaning & Maintenance ............................16,17
Technical Specifications ..............................18
Troubleshooting ..........................................t9,20
Error Codes...................................................21
Sears Service.....................................Back Cover
READ THIS USE &CARE GUIDE CAREFULLYAND THOROUGHLY BEFOREINSTALLING AND OPERAT-
ING YOUR AIR CONDITIONER.
RETAIN THIS USE& CARE GUIDE FOR FUTURE REFERENCE.
To prevent injury to the user or other people and property damage,
the following instructions must be followed.
Use this appliance only as described in this Use & Care Guide. As with
any electrical appliance, the instructions aim to cover as many eventuali-
ties as possible. Caution and common sense should be used when operat-
ing and installing this air conditioner.
This appliance has been manufactured to cool and dehumidify domestic
environments and should not be used for other purposes.
The appliance should not be installed where the atmosphere may contain
combustible gases, oil or sulfur, or near heat sources.
Always install the portable air conditioner properly. Incorrect assembly
or installation may cause failure to operate including injury, fire and
electric shock hazards.
Do not place the power cord near a heater. It may cause fire or electric
shock.
Do not use the power cord near flammable gas or combustibles such as
gasoline, benzene, thinner, etc. it may cause explosion or fire.
Do not operate or stop the unit by inserting or pulling out the power
plug. It may cause fire or electric shock.
Do not damage or use an unspecified power cord. It may cause fire or
electric shock.
Do not modify the length of the power cord. It will cause fire or electric
shock due to heat generation.
Use the air conditioner on a single outlet circuit. Do not share the outlet
with other appliances. It may cause circuit failure.
Changing the outlet without making the appropriate wiring changes will
create an unsafe condition that could result in fire or electric shock. Refer
all such work to a licensed and qualified electrician.
WARNING: This appliance must be properly grounded. The power cord
of this appliance is equipped with a three-prong LCDI (Leakage Current
Detection and Interruption) plug. To minimize the risk of electric shock,
use the plug with a standard three-slot grounding wall power outlet. If
power outlet does not include a grounding slot, have a qualified electri-
cian replace the outlet before you use your room air conditioner. Do not
cut or remove the grounding prong from the power plug. if you have
doubt whether the air conditioner is properly grounded, have the wall
receptacle and circuit checked by a qualified electrician.
Do not disassemble or modify this appliance. Doing so may cause failure
and electric shock.
3
• DO NOT USE EXTENSION CORDS. Do not use an extension cord due to
potential safety hazards. For temporary situations, use only CSA and UL
certified 3-prong grounded extension cords designed and approved spe-
cifically for air conditioners.
• To prevent injury from handling sharp objects, do not touch the metal
parts of the unit when removing the filter.
•Do not block the air inlet or air outlet. It may cause failure of the appli-
ance.
• Always store and transport the air conditioner upright to maintain the
compressor in a proper condition. Prior to installation, allow air condi-
tioner to stand upright for 12 hours. This ensures all lubricating oil has
settled to the bottom of the compressor, avoiding damage to internal
parts,
• Only operate the unit on an even horizontal surface to ensure no water
leaks.
• This appliance is not intended for use by persons (including children) with
reduced physical, sensory or mental capabilities, or lack of experience
and knowledge, unless they have been given supervision or instruction
concerning use of the appliance by a person responsible for their safety.
Children should be supervised to ensure that they do not play with the
appliance.
•Do not insert the power plug into a wall outlet if either is loose or dam-
aged. It may cause fire and electric shock.
• Unplug the unit if strange sounds, odors or smoke come from it.
• Hold the plug by the head when unplugging the unit. Do not pull on the
cord.
• Unplug the air conditioner if it will not be used for a long period to pre-
vent accidental startup and the possibility of injury.
• Do not place heavy objects on the power cord, and take care so that the
cord will not be damaged.
° Clean the air filters regularly. A contaminated air filter reduces capacity.
° Use a soft cloth to clean. Do not use wax, thinners or a strong detergent.
The appearance of the air conditioner may deteriorate, change color or
develop surface flaws.
• Do not use water to clean inside the air conditioner. Exposure to water
can destroy the insulation, leading to possible electric shock.
° if water enters the product, unplug the power cord from the wall. Leave
unplugged until dry.
° Being exposed to direct airflow for an extended period of time could be
hazardous to your health.
4
Do not usethis air conditioner for refrigeration purposes(e.g. preserving
precisiondevices,food, pets, plants and art objects).
Dueto the possibility of oxygen deficiency within the room, ventilate the
room when usedtogether with stovesor other heating devices.
The air conditioner is a consumercomfort appliance, not a precision cli-
mate control system.
Always insert the filter securely. Never operate without a filter.
Do not drink water drained from air conditioner. It contains contaminants
that may make you sick.
This air conditioner has an ambient operating range of 61°F - 95°F (16°C-
35°C).
5
Kenmore One Year Limited Warranty
When installed, operated and maintained according to all supplied instruc-
tions, if this appliance fails due to a defect in material and workmanship
within one year from the date of purchase, call 1-800-4-MY-HOME® to ar-
range for free repair.
If this appliance is ever used for other than private family purposes, this war-
ranty applies for only 90 days from the date of purchase.
This warranty covers ONLY defects in material and workmanship, and will
NOT pay for.
1. Expendable items that can wear out from normal use, including but not
limited to filters, belts, light bulbs, and bags.
2. Aservice technician to instruct the user in correct product installation,
operation or maintenance.
3. Aservice technician to clean or maintain this product.
,4. Damage to or failure of this product if it is not installed, operated or
maintained according to the all instructions supplied with the product.
5. Damage to or failure of this product resulting from accident, abuse, mis-
use or use for other than its intended purpose.
6. Damage to or failure of this product caused by the use of detergents,
cleaners, chemicals or utensils other than those recommended in all in-
structions supplied with the product.
7. Damage to or failure of parts or systems resulting from unauthorized
modifications made to this product.
Disclaimer of implied warranties; limitation of remedies
Customer's sole and exclusive remedy under this limited warranty shall
be product repair as provided herein. Implied warranties, including war-
ranties of merchantability or fitness for a particular purpose, are limited
to one year or the shortest period allowed by law. Sears shall not be lia-
ble for incidental or consequential damages. Some states and provinces
do not allow the exclusion or limitation of incidental or consequential
damages, or limitation on the duration of implied warranties of mer-
chantability or fitness, so these exclusions or limitations may not apply to
yOU,
This warranty applies only while this appliance is used in the United States.
This warranty gives you specific legal rights, and you may also have other
rights which vary from state to state.
Sears Brands Management Corporation, HofFman Estates, IL 60179
6
Master Protection Agreements
Congratulations on making a smart purchase. Your new Kenmore ® product is
designed and manufactured for years of dependable operation. But like all
products, it may require preventive maintenance or repair from time to time.
That's when having a Master Protection Agreement can save you money and
aggravation.
The Master Protection Agreement also helps extend the life of your new
product. Here's what the Agreement _ includes:
[] Parts and labor not just for repairing defects, but to help keep products operat-
ing properly under normal use. Our coverage goes well beyond the product
warranty. No deductibles, no functional failure excluded from coverage-real
protection.
[] Expert service by a force of more than 10,000 authorized Sears service techni-
cians, which means someone you can trust will be working on your product.
[] Unlimited service calls and nationwide service, as often as you want us, whenev-
er you want us.
[] "No-lemon" guarantee-replacement of your covered product if four or more
product failures occur within twelve months.
[] Product replacement if your covered product can't be fixed.
[] Annual Preventive Maintenance Check at your request-no extra charge.
[] Fast help by phone-we call it Rapid Resolution-phone support from a Sears rep-
resentative on all products. Think of us as a "talking owner's manual".
[] Power surge protection against electrical damage due to power fluctuations.
[] $250 Food Loss Protection annually for any food spoilage that is the result of
mechanical failure of any covered refrigerator or freezer.
[] Rental reimbursement if repair of your covered product takes longer than prom-
ised.
[] 10% discount off: the regular price of any non-covered repair service and relat-
ed installed parts.
Once you purchase the Agreement, asimple phone call is all that it takes for you
to schedule service. You may call anytime, day or night, or schedule a service
appointment online.
The Master Protection Agreement is a risk free purchase. If you cancel for any
reason during the product warranty, we will provide a full refund. Or, a prorated
refund anytime after the product warranty period expires. Purchase your Master
Protection Agreement today!
Some limitations and exclusions apply. For prices and additional information in the
U.S.A. call 1-800-827-6655.
Sears Installation Service
For Sears professional installation of home appliances garage door openers water
heaters, and other home items, call 1-800-4-MY-HOME ®.
?
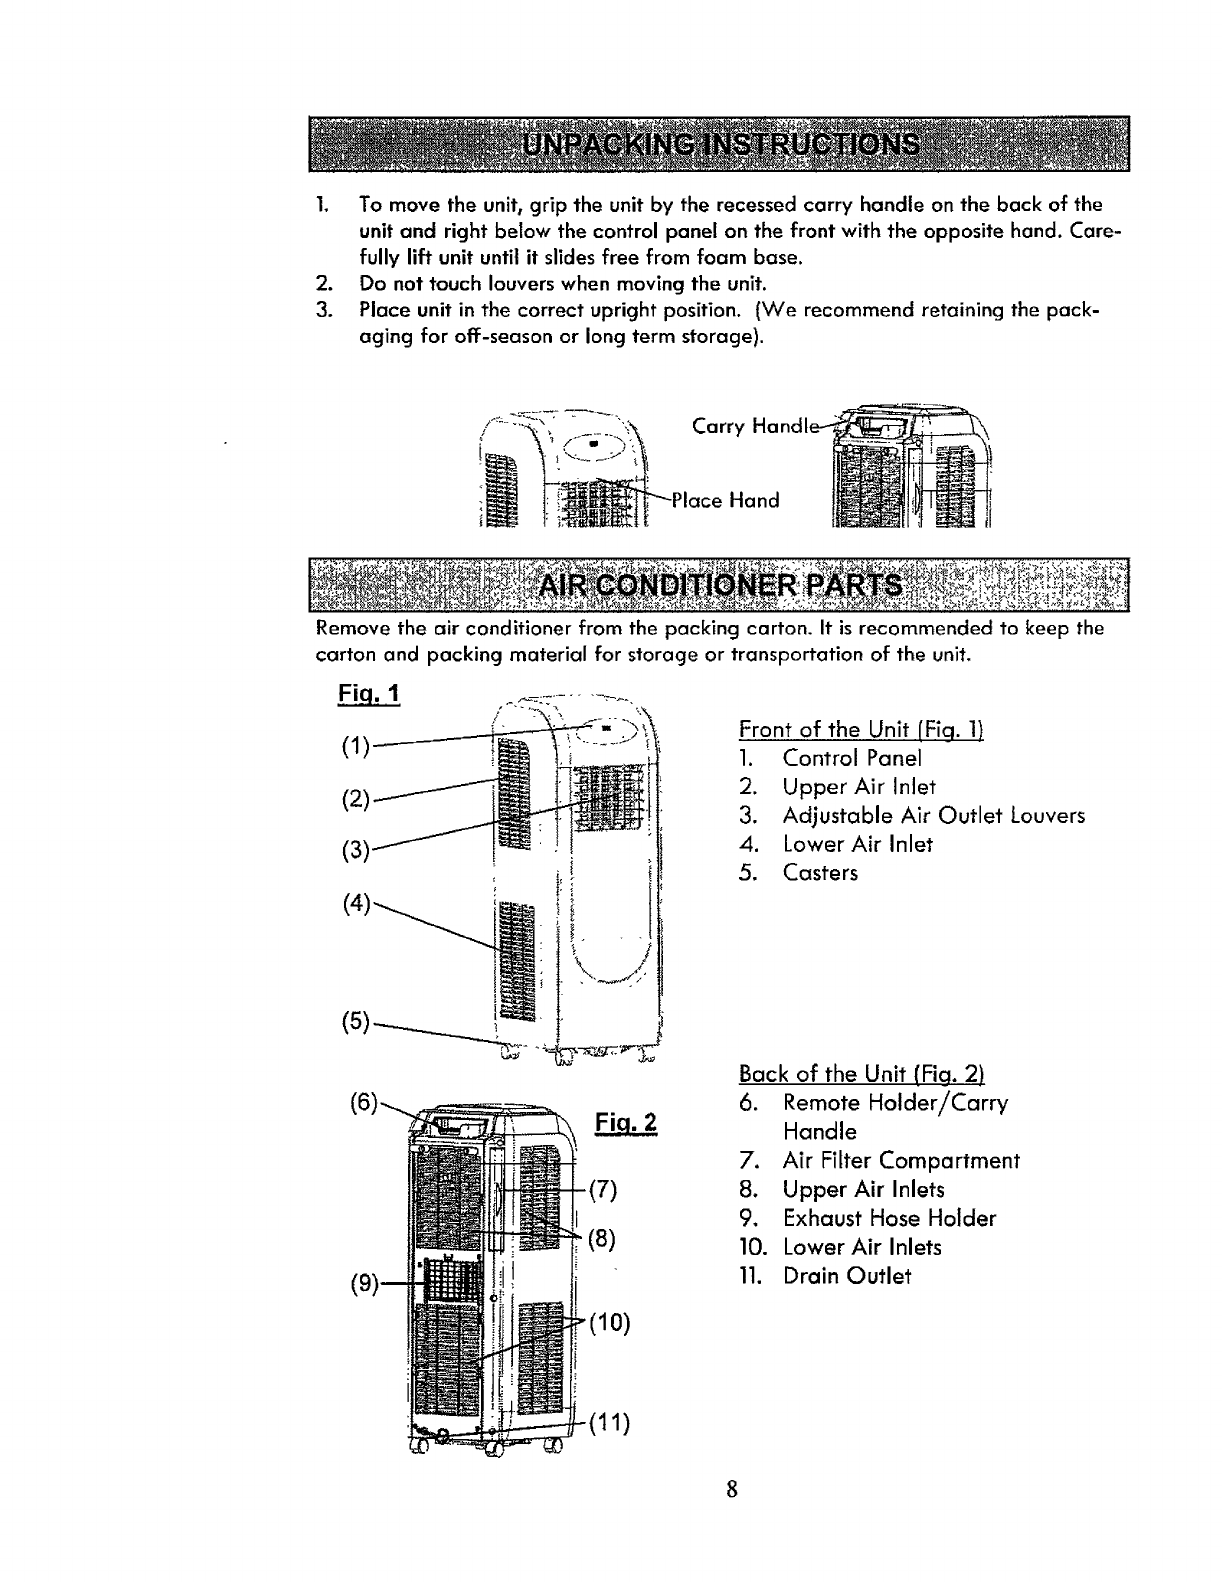
1. Tomovetheunit,grip the unitby therecessedcarry handleon thebackof the
unitand rightbelowthecontrolpanelonthefrontwith the oppositehand.Care-
fully lift unit until it slides free from foam base.
2. Do not touch louvers when moving the unit.
3. Place unit in the correct upright position. (We recommend retaining the pack-
aging for off-season or long term storage).
Carry
Hand
.,_-_ , ._ . ._= _._4._.. . ;: _ _. .,_:z_q_,< _.:_:_.r._:_._,._ .._,_ _:.
Remove the air conditioner from the packing carton. It is recommended to keep the
carton and packing material for storage or transportation of the unit.
(1)
/
(2)
(31
!.
(5)--_..__._.
-(7)
(8)
Front of the Unit [Fig. 1)
1. Control Panel
2. Upper Air Inlet
3. Adjustable Air Outlet Louvers
4. Lower Air Inlet
5. Casters
Back of the Unit (Fig. 2)
6. Remote Holder!Carry
Handle
7. Air Filter Compartment
8. Upper Air Inlets
9, Exhaust Hose Holder
10. Lower Air Inlets
11. Drain Outlet
1)
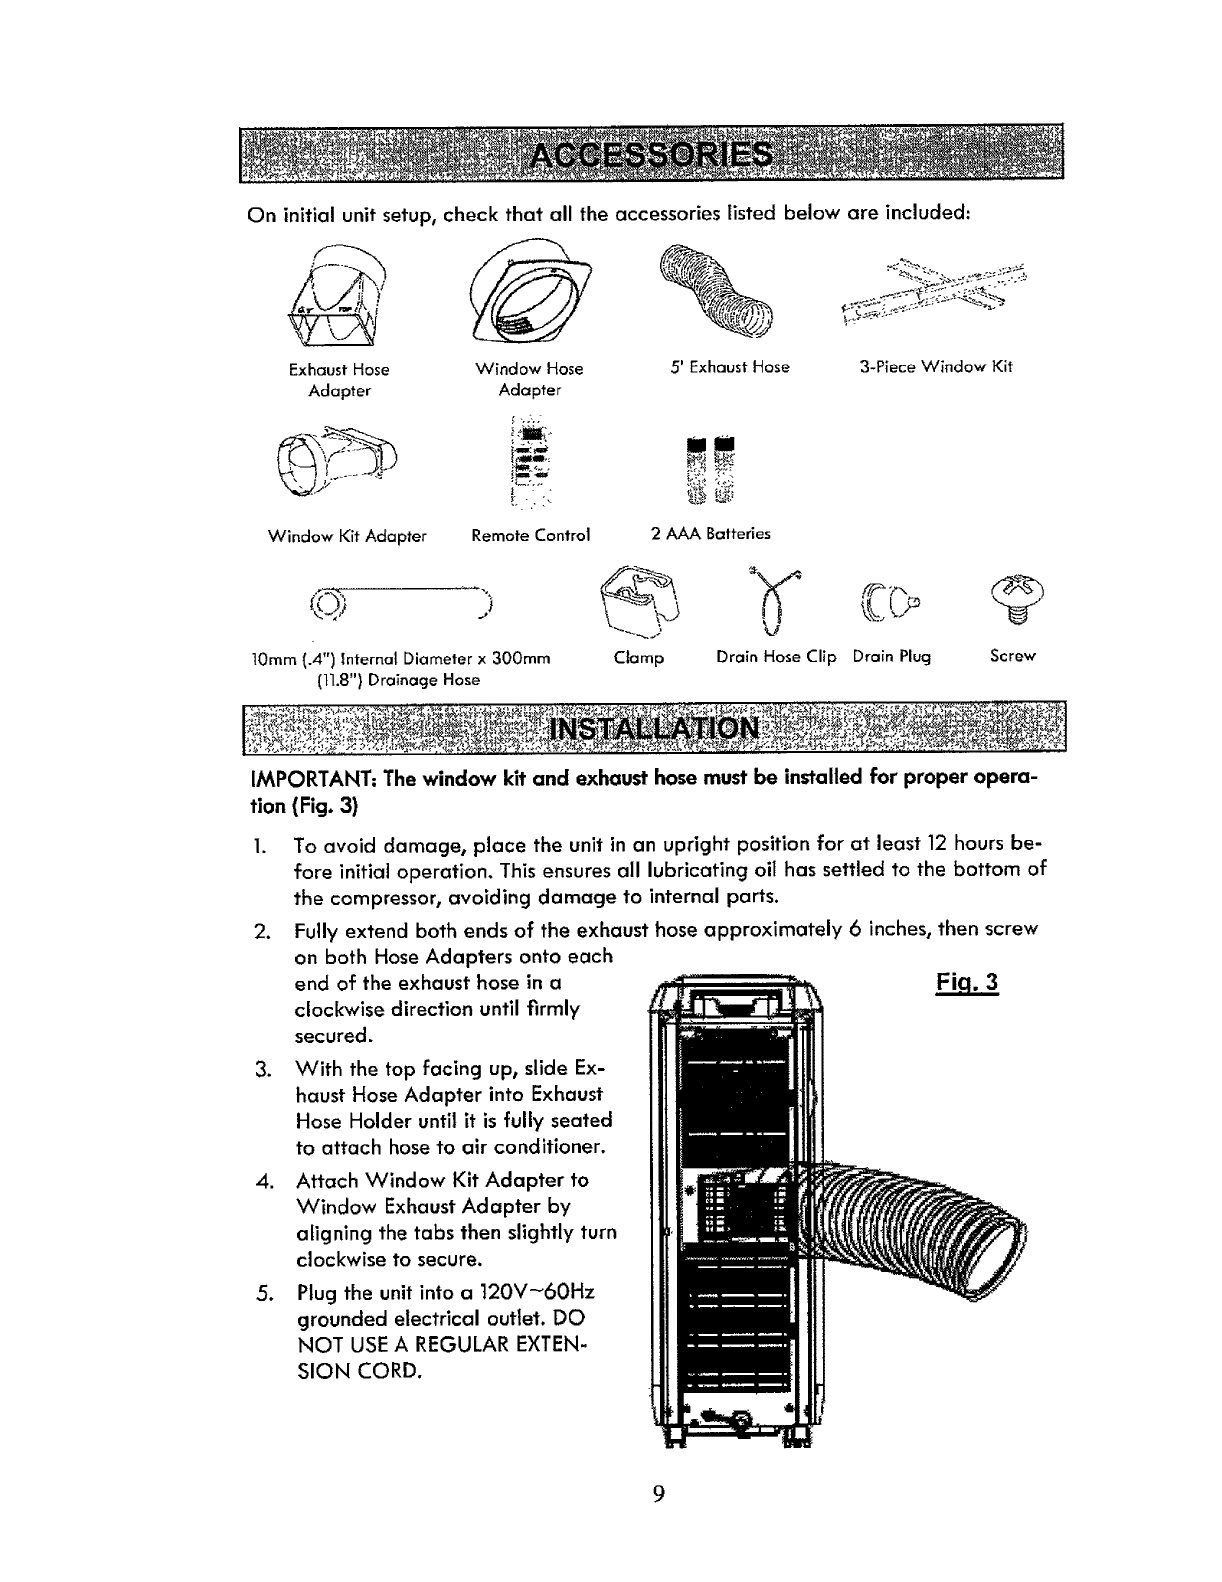
On initial unit setup, check that all the accessories listed below are included:
Exhaust Hose Window Hose
Adapter Adapter
" -.2-.;
l
Window Kit Adapter Remote Control
5' ExhaustHose
2 AAA Batteries
3-Piece Window Kit
10mm(.4") Internal Diameterx 300ram
(tl.8") Drainage Hose
Clamp Drain HoseClip Drain Plug Screw
I_,.,_'_ _r'_ ,.,-__- _l!._,_:o._.:_._-',_ _,_|:l_l__l:e_l'l_.ll_;_._-_;,_:_: "; _:_._2_.__b$_%_|
IMPORTANT: The window kit and exhaust hose must be installed for proper opera-
tion (Fig. 3)
2_
3_
.
,
To avoid damage, place the unit in an upright position for at least 12 hours be-
fore initial operation. This ensures all lubricating oil has settled to the bottom of
the compressor, avoiding damage to internal parts.
Fully extend both ends of the exhaust hose approximately 6inches, then screw
on both Hose Adapters onto each
end of the exhaust hose in a
clockwise direction until firmly
secured.
With the top facing up, slide Ex-
haust Hose Adapter into Exhaust
Hose Holder until it is fully seated
to attach hose to air conditioner.
Attach Window Kit Adapter to
Window Exhaust Adapter by
aligning the tabs then slightly turn
clockwise to secure.
Plug the unit into a 120V_60Hz
grounded electrical outlet. DO
NOT USE A REGULAR EXTEN-
SION CORD.
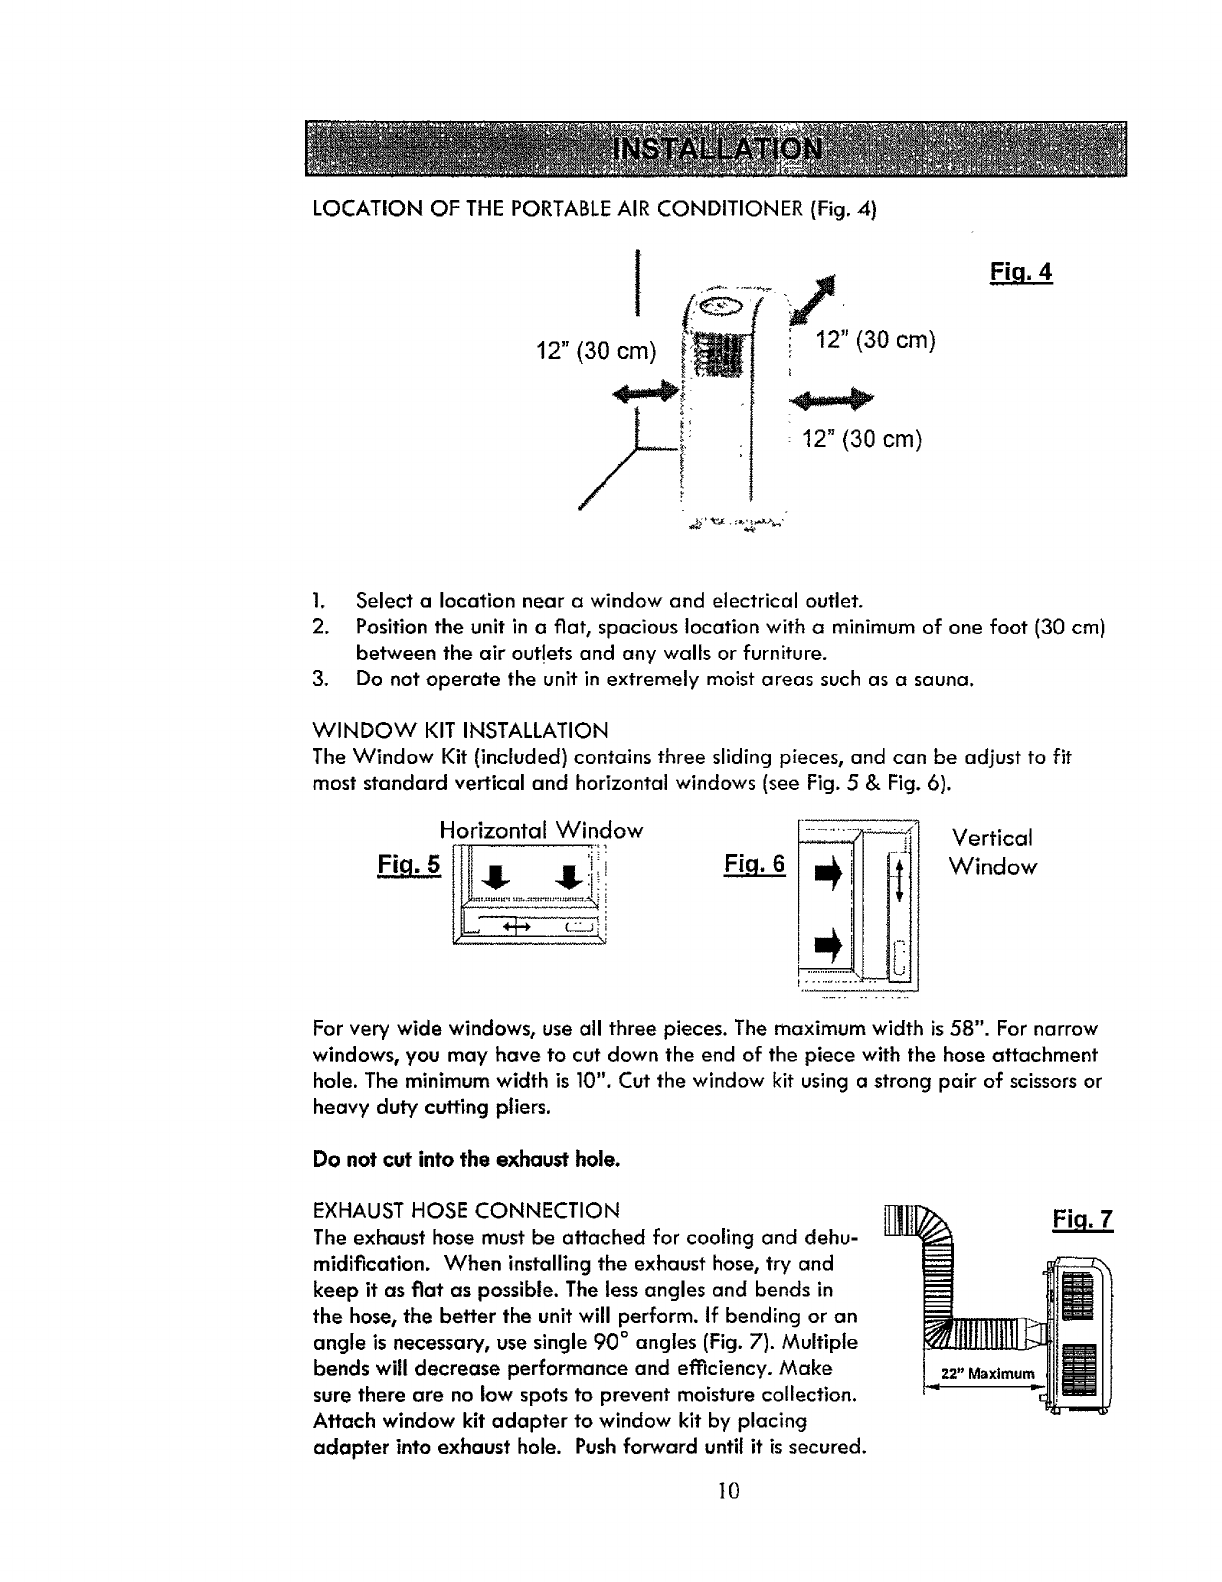
LOCATION OF THE PORTABLE AIR CONDITIONER (Fig. 4)
I
12" (30 cm)
i!,
i
12" (30 cm)
1. Select a location near a window and electrical outlet.
2. Position the unit in a fiat, spacious location with a minimum of one foot (30 cm)
between the air outlets and any walls or furniture.
3. Do not operate the unit in extremely moist areas such as a sauna.
WINDOW KIT INSTALLATION
The Window Kit (included) contains three sliding pieces, and can be adjust to fit
most standard vertical and horizontal windows (see Fig. 5 & Fig. 6).
Horizontal Window Vertical
Window
For very wide windows, use all three pieces. The maximum width is 58". For narrow
windows, you may have to cut down the end of the piece with the hose attachment
hole. The minimum width is 10". Cut the window kit using a strong pair of scissors or
heavy duty cutting pliers.
Do not cut into the exhaust hole.
EXHAUST HOSE CONNECTION
The exhaust hose must be attached for cooling and dehu-
midification. When installing the exhaust hose, try and
keep it as fiat as possible. The less angles and bends in
the hose, the better the unit will perform. If bending or an
angle is necessary, use single 90 ° angles (Fig. 7). Multiple
bends will decrease performance and efficiency. Make
sure there are no low spots to prevent moisture collection.
Attach window kit adapter to window kit by placing
adapter into exhaust hole. Push forward until it is secured.
22" Maximum
}0
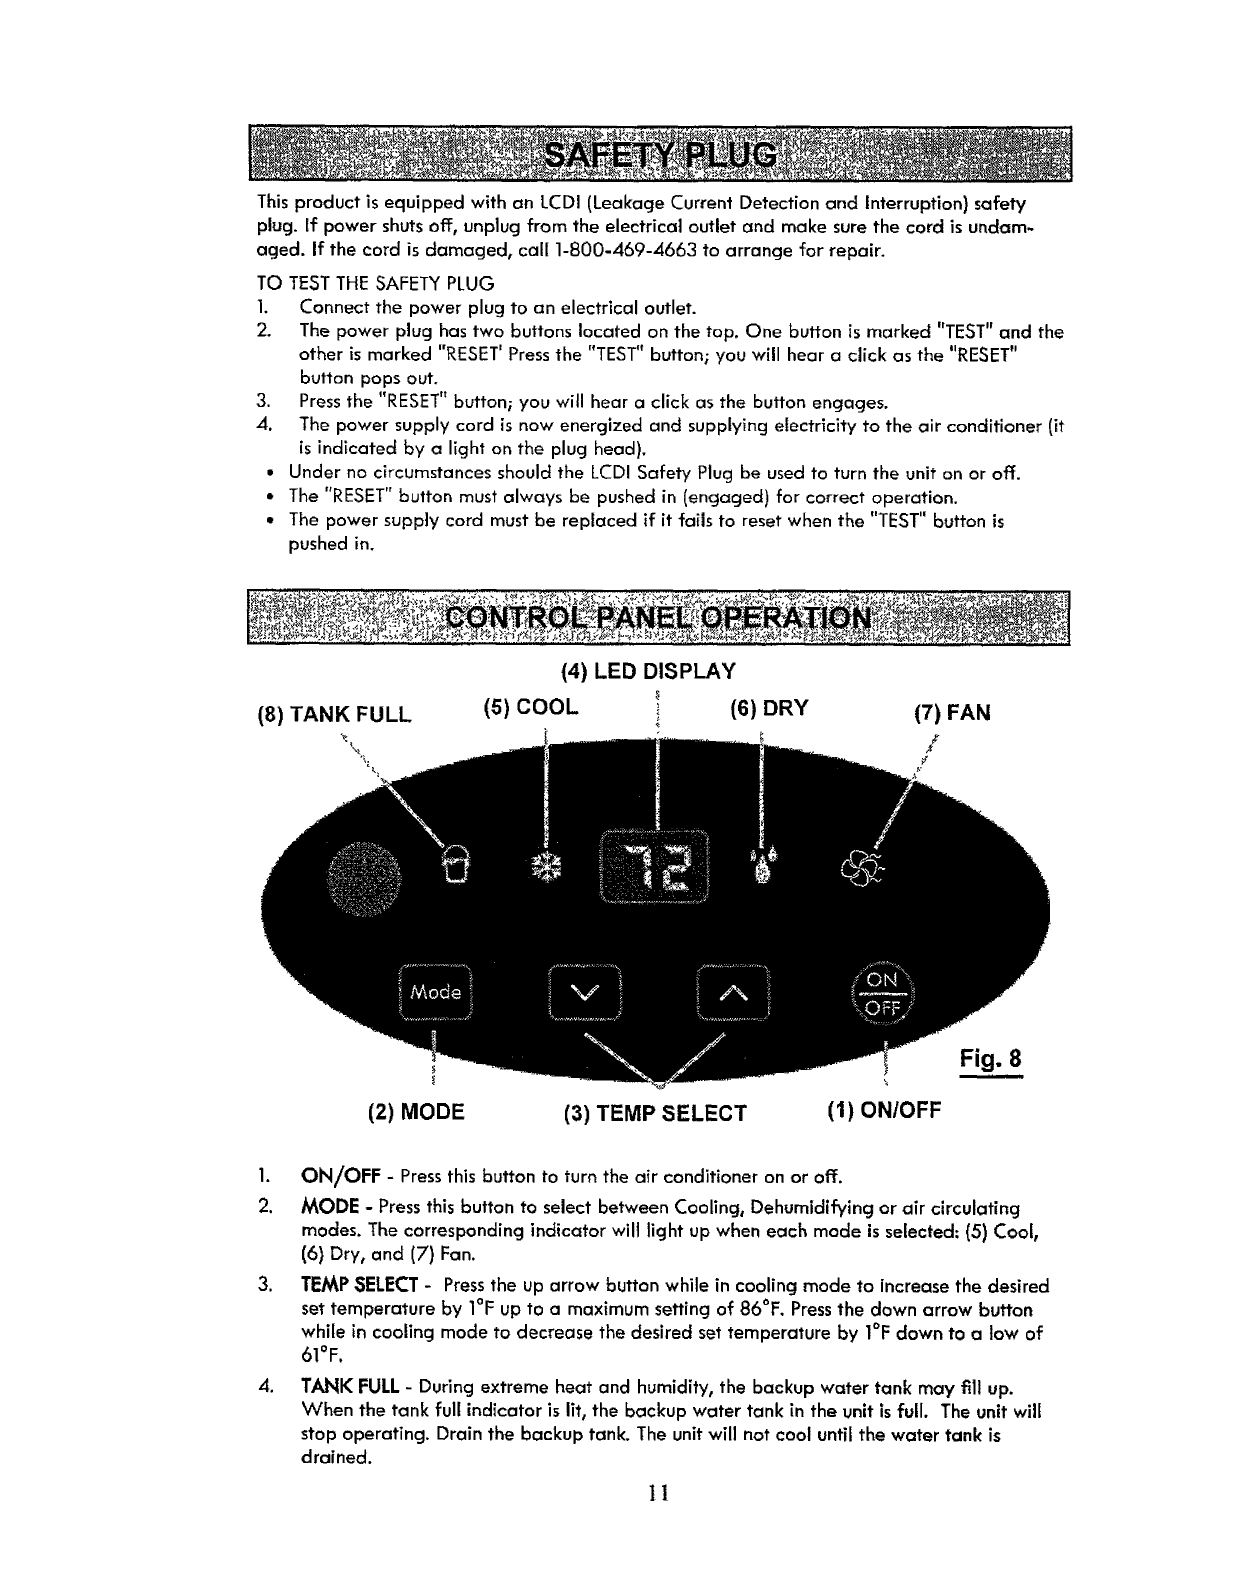
This product is equipped with an LCDI (Leakage Current Detection and Interruption) safety
plug. If power shuts off, unplug from the electrical outlet and make sure the cord is undam-
aged. If the cord is damaged, call 1-800-469-4663 to arrange for repair.
TO TEST THE SAFETY PLUG
1. Connect the power plug to an electrical outlet.
2. The power plug has two buttons located on the top. One button is marked "TEST" and the
other is marked "RESET' Press the "TEST" button; you will hear a click as the "RESET"
burton pops out.
3. Press the "RESET" button; you will hear a click as the button engages.
4. The power supply cord is now energized and supplying electricity to the air conditioner (it
is indicated by a light on the plug head).
• Under no circumstances should the LCD! Safety Plug be used to turn the unit on or off.
•The "RESET" button must always be pushed in (engaged) for correct operation.
• The power supply cord must be replaced if it fails to reset when the "TEST" button is
pushed in.
(4) LED DISPLAY
(8) TANK FULL (5) COOL (6) DRY (7) FAN
(2) MODE (3) TEMP SELECT (I) ON/OFF
Fig. 8
1. ON/OFF -Pressthis button to turn the air conditioner on or off.
2. MODE - Pressthis button to select between Cooling, Dehumidifying or air circulating
modes. The corresponding indicator will light up when each mode is selected: (5) Cool,
(6) Dry, and (7) Fan.
3. TEMP SELECT- Pressthe up arrow button while in cooling mode to increase the desired
set temperature by I°F up to a maximum setting of 86°F. Pressthe down arrow button
while in cooling mode to decrease the desired set temperature by I°F down to a low of
61°F.
oTANK FULL- During extreme heat and humidity, the backup water tank may f111up.
When the tank full indicator is lit, the backup water tank in the unit is full. The unit will
stop operating. Drain the backup tank. The unit will not cool untilthe water tank is
drained.
II
(2)
(4) (3)
(5)
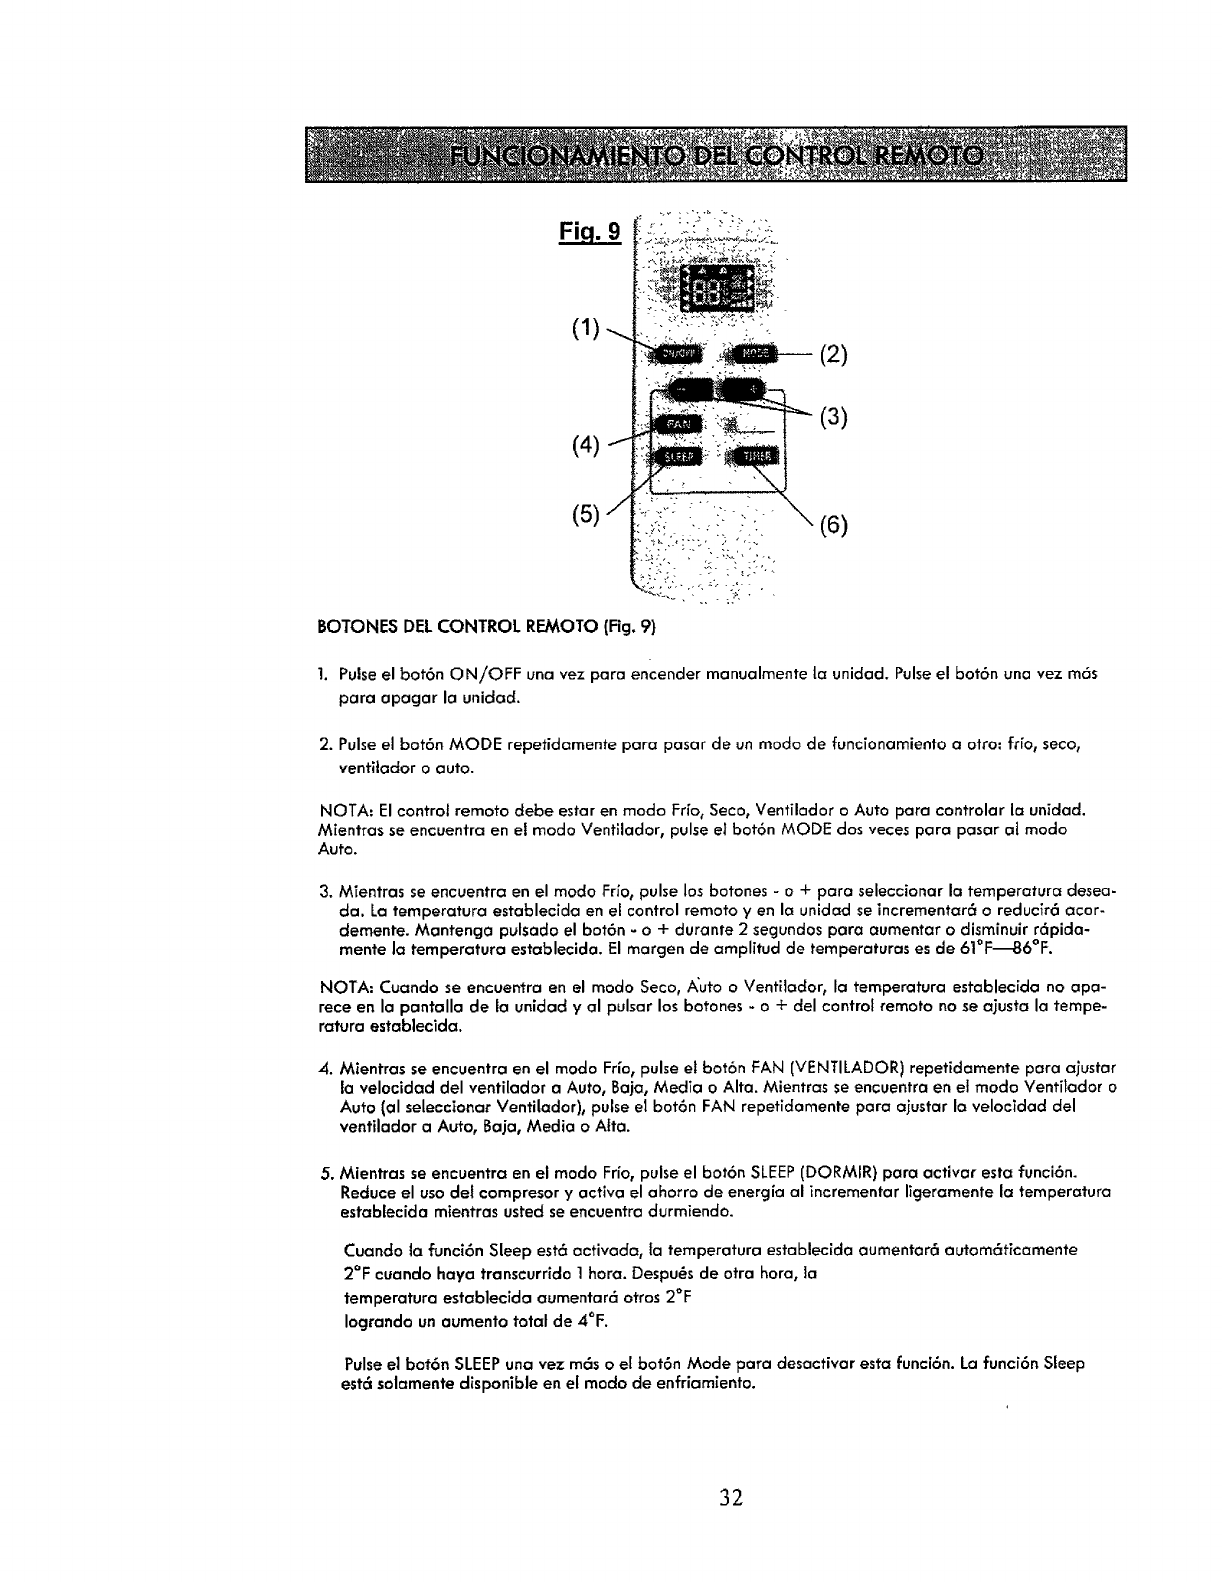
REMOTE CONTROL BUTTONS (Fig. 9)
(6)
1. Press the ON!OFF button once to manu-
ally turn the unit on. Press the button once
more to turn the unit off.
2. Press the MODE button repeatedly to
cycle between the operating modes:
cool, dry, fan or auto mode.
NOTE: Remote control must be in cool,
dry, fan or auto mode to control unit.
While in Fan Mode, press MODE button
twice to advance to Auto mode.
3. While in cool mode, press the - or +but-
tons to select your desired set tempera-
ture. The set temperature on the remote
control and unit will increase or decrease
accordingly. Hold the -and +buttons for
2seconds to rapidly increaseor decrease
the settemperature. Temperature range is
61°F--86°F.
NOTE: When in dry, auto or fan mode,
the set temperature does not appear on
the unit display and pressing the - or +
buttons on the remote wilt not adjust its
set temperature.
,
Su
While in cool mode, press the FAN button
repeatedly to adjust fan speed from Auto,
Low, Medium or High. While in Fan or
Auto (when it selects Fan) mode, press the
FAN button repeatedly to adjust fan
speed from Auto, Low, Medium or High.
While in cool mode, press the SLEEP but-
ton to engage this feature. It reduces
compressor usage and enhances energy
savings by slightly increasing the set tem-
perature while you are sleeping.
When the sleep feature is enabled, the set
temperature will automatically increase
2°F after I hour. After another hour, the
set temperature will increaseanother 2°F
for a total increase of 4°F.
Pressthe SLEEPbutton once more or the
Mode button to disable thisfeature. Sleep
isonly available while in cooling mode.
12

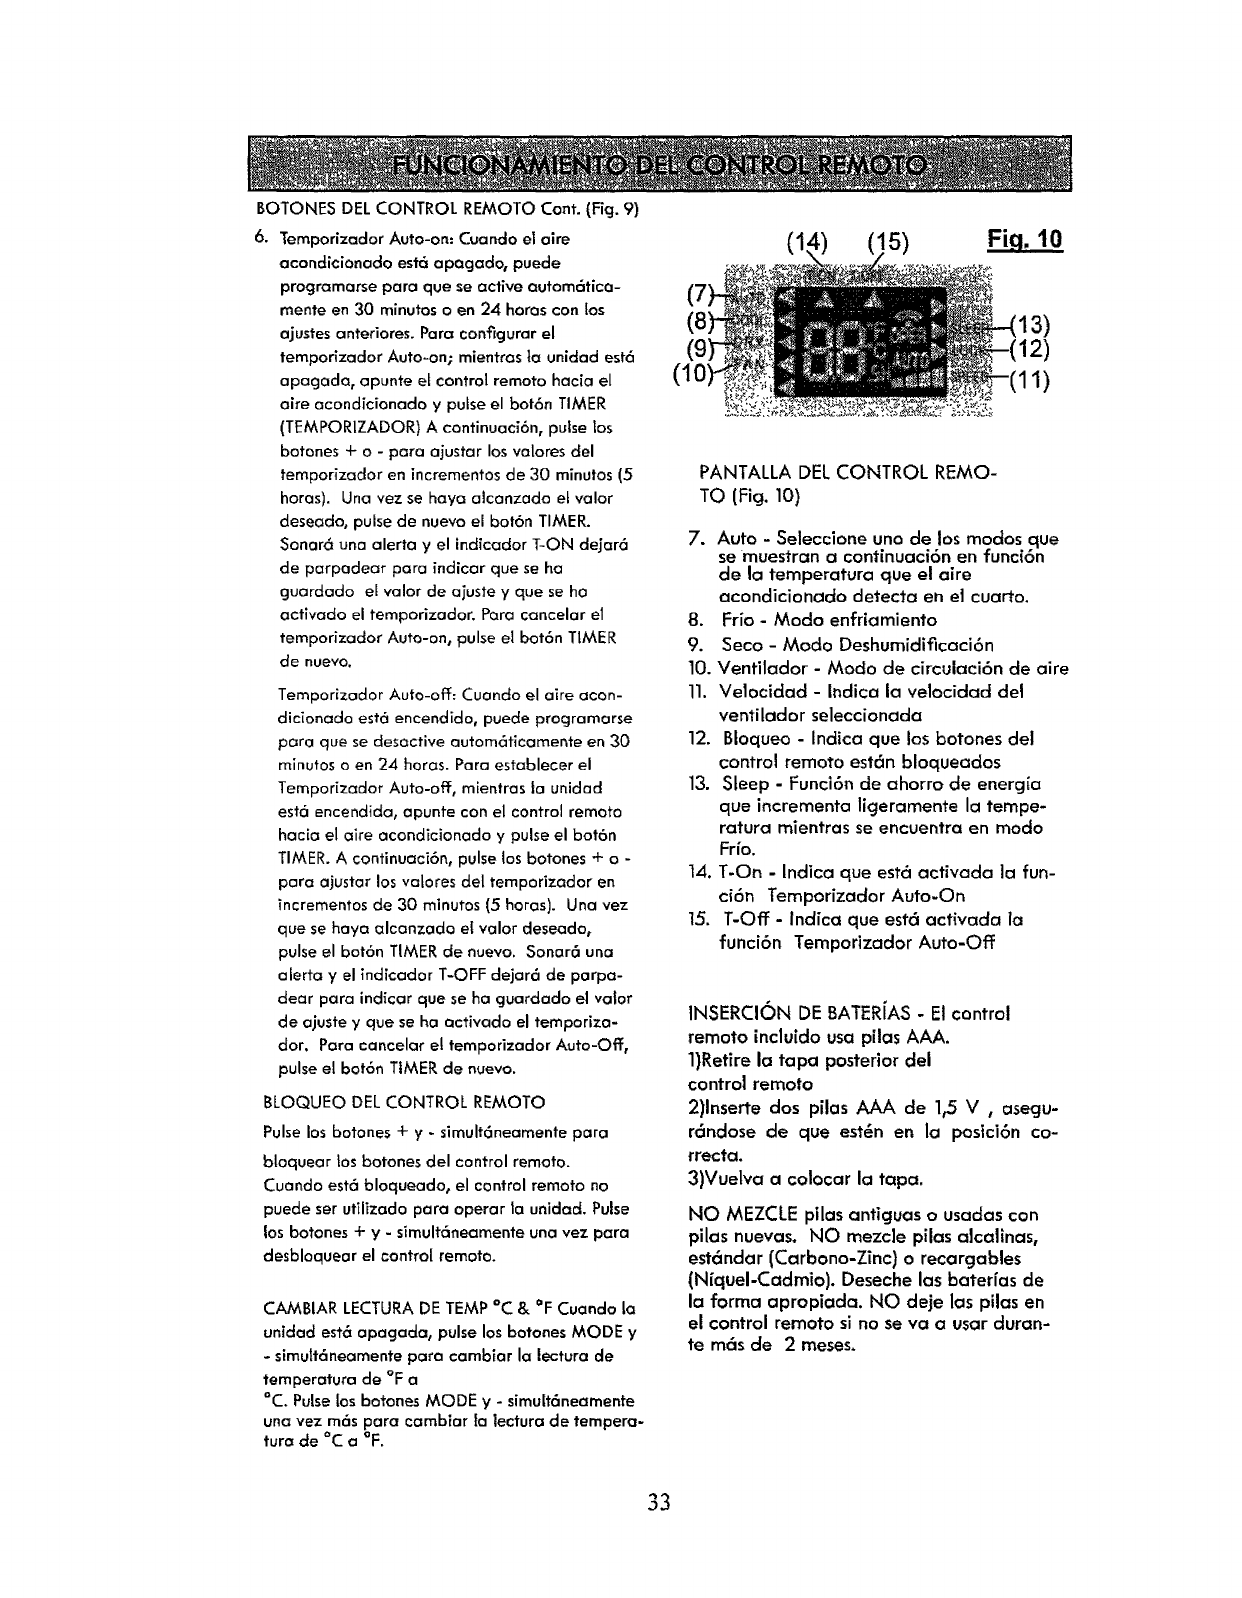
REMOTE CONTROL BUl-irONS Cont. (Rg. 9)
6. Auto-on Timer: When the air conditioner
is off, it can be set to automatically turn
on in 30 minutes to 24 hours at the previ-
ous setting. To set the Auto-on Timer;
while the unit is off, point the remote
control toward the air conditioner and
press the TIMER button. Then press the +
or - buttons to adjust the timer setting in
30 minute increments (.5 hours). Once
desired setting is reached, press TIMER
button again. An audio alert will sound,
and the T-ON indicator will stop flashing
to indicate the setting has been saved
and the timer has been activated. To
cancel the auto-on timer, press the TIMER
button again.
Auto-off Timer: When the air conditioner
is on, it can be set to automatically turn
off in 30 minutes to 24 hours. To set the
Auto-off Timer; while the unit is on, point
the remote toward the air conditioner and
press the TIMER button. Then press the +
or - buttons to adjust the timer setting in
30 minute increments (.5 hours). Once
desired setting is reached, press TIMER
button again. An audio alert will sound,
and the T-OFF indicator will stop flashing
to indicate the setting has been saved
and the timer has been activated. To
cancel the auto-off timer, press the TIMER
button again.
(1: 5) Fiq. 10
1)
REMOTE CONTROL DISPLAY(Rg. 10)
7. Auto -Chooses one of the modes below
based on the temperature the air condi-
tioner senses in the room
8. Cool -Cooling Mode
9. Dry - Dehumidifying Mode
10. Fan - Air circulation mode
11. Speed - Indicates the selected fan speed
12. Lock - Indicates when the remote control
buttons are locked
13. Sleep - Energy saving feature that in-
creases the temperature slightly while in
Cool Mode
14. T-On - Indicates Auto-On Timer is Set
15. T-Off - Indicates Auto-Off Timer is Set
REMOTE CONTROL LOCK
Pressthe + and - buttonssimultaneously to
lock the buttons on the remote control.
When locked, the remote control may not
be used to operate the unit. Pressthe + and
- buttons simultaneously once more to unlock
the remote control.
CHANGE TEMP READING °C &°F
When the unitis powered off, pressthe
MODE and -buttonssimultaneouslyto
change the temperature reading from °F to
°C. Pressthe MODE and - buttons simultane-
ously once more to change the temperature
reading from °C to °F.
INSERTING BATTERIES- The included re-
mote control usestwo AAA batteries.
1) Remove the back cover of the re-
mote control
2) Insert two AAA 1.5V batteries, mak-
ing sure they are in the correct posi-
tion.
3) Replace the cover.
DO NOT mix old and new batteries. DO
NOT mix together Alkaline, Standard
(Carbon-Zinc), or Rechargeable (Nickel-
Cadmium) batteries. Dispose of batteries
properly. DO NOT leave batteries in the
remote if it will not be used for longer than
2 months.
13
IMPORTANT: After switching the unit on, the ventilator fan operates, but the compressor will
not start for approximately three minutes. Cool air wilt begin to blow once the compressor
starts, but it may take another 5 minutes to feel the effect in the room. This feature helps pro-
long the life of the compressor. Further information is available in the "Troubleshooting" sec-
tion. When adjusting the direction of the air flow, only place fingers on the left side of Air
Outlet Louvers where tab appears.
COOL MODE
• Place the unit in the room that requires cooling.
We recommend starting your unit early in the morning on warm days for maximum
effect. This unit has a self-evaporation system to eliminate water that condenses in the
unit during cooling. The exhaust hose must be connected and properly installed to cool
the room properly. See the INSTALLATION instructions on page 9-10 of this USE AND
CARE GUIDE.
• Use the MODE button on the unit control panel or remote and set to COOL. Adjust the
set temperature using the up and down buttons on the unit or - and + buttons on the
remote. The cooling temperature can be set from 61°F to 86°E.
• Using the remote control, press FAN button to adjust fan speed from Auto, Low, Med or
High.
DRY MODE
• Place the unit in the room that requires dehumidlfication.
• The exhaust hose must be connected and properly installed to dehumidify the room
properly. See the INSTALLATION instructions on page 9-10 of this USEAND CARE
GUIDE.
• Use the MODE button on the unit control panel or remote and set to DRY.
• The fan speed is set to low and cannot be ad,iusted in DRY Mode.
•The compressor will run continuously when the unit operates in DRY mode.
• There is a built-in defrost control that sensesfrost buildup on the evaporator coils. During
defrosting, the compressor will automatically turn off. The fan will continue running to
defrost the coils. Once the frost has been removed, the compressor will re-start.
NOTE: The settemperature will notappear on the unit display. The set temperature and fan
speed cannot be adjusted while operating in this mode.
FAN MODE
• Place the unit in the room that requires fanning or air circulation.
• Use the MODE button on the unit control panel or remote and setto FAN. Using the
remote control, press FAN button to adjust fan speed from Auto, Low, Med or High.
• The fan auto setting will change the fan speed to either High or Medium, depending on
the last setting of the cooling mode set temperature.
NOTE: The set temperature will not appear on the unit display and cannot be adjusted while
operating in this mode. 14

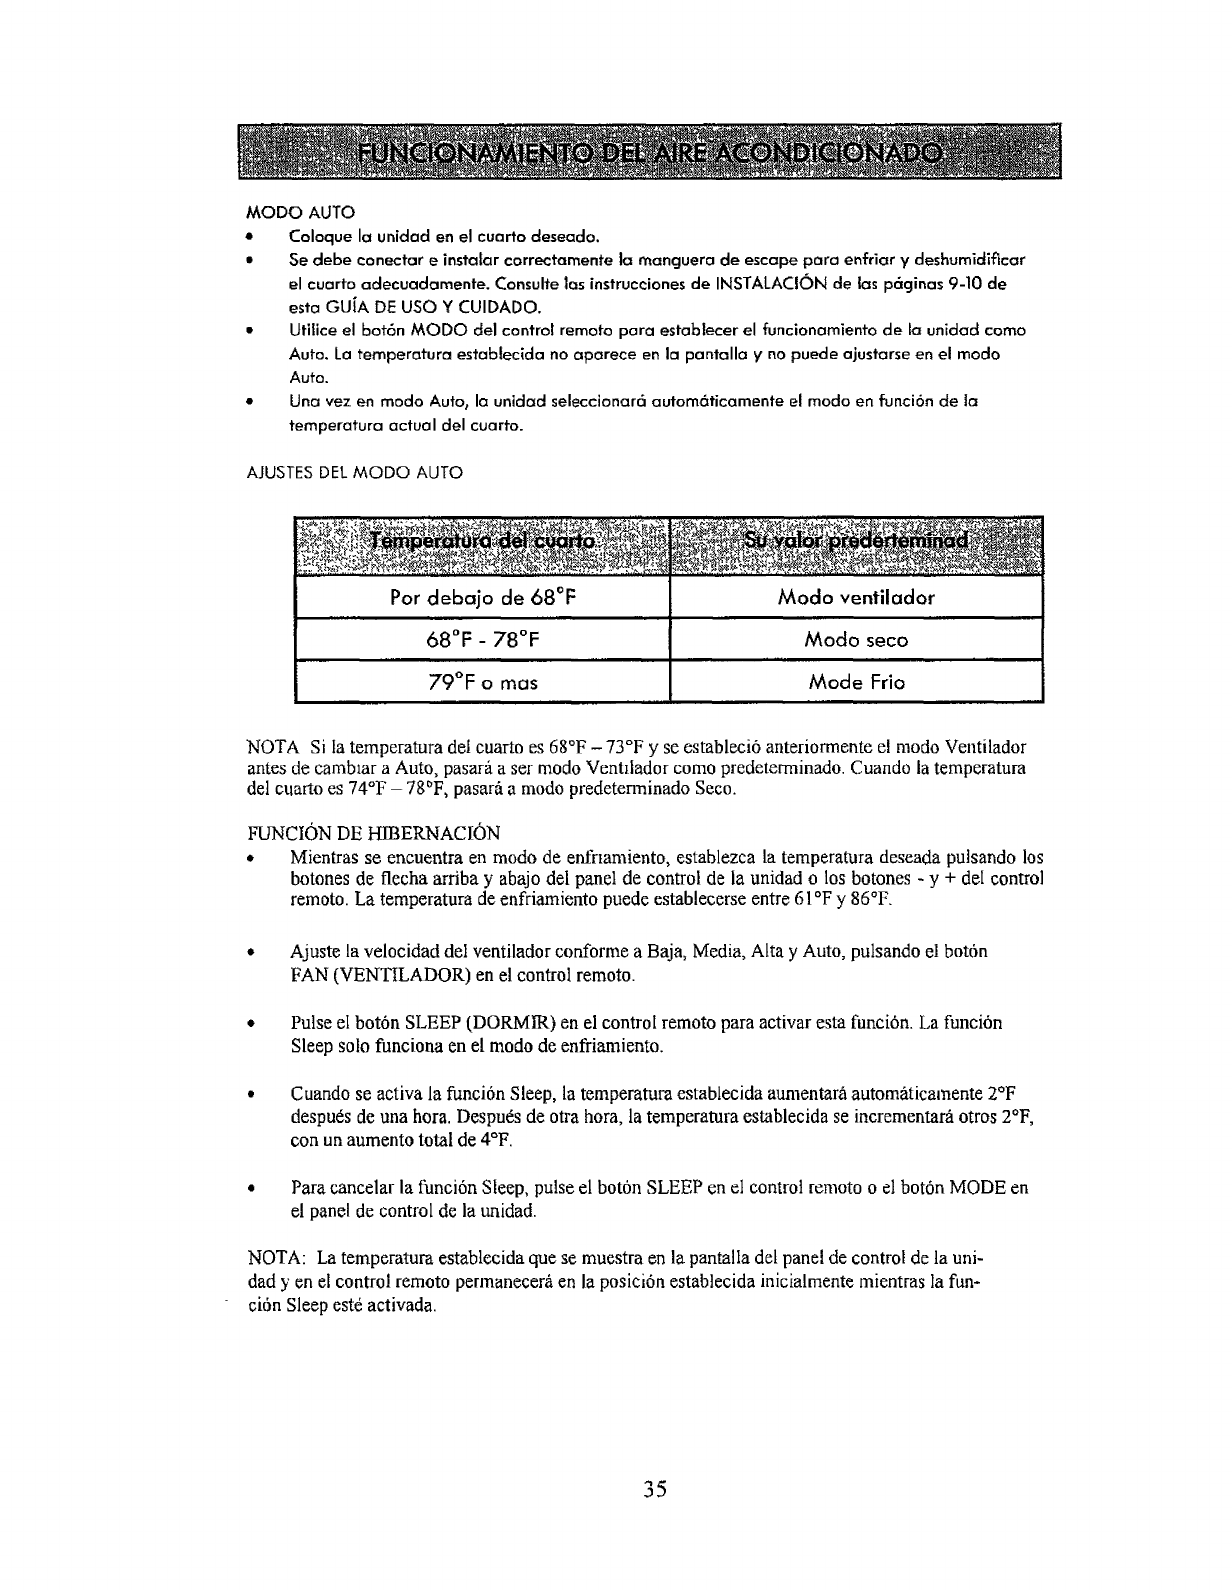
AUTO MODE
•Place the unit in the room the desired room.
• The exhaust hose must be connected and properly installed to coo[ or dehumidify the
room properly. See the INSTALLATION instructions on page 9-10 of this USE AND CARE
GUIDE.
• Use the MODE button on the remote to setthe unit function to Auto. The settemperature
does not appear on the display and cannot be adjusted in Auto Mode.
•Once in auto mode the unit will automatically select the mode based on current room
temperatu re.
AUTO MODE SETTINGS
_"....'"_" . _...... _._., _ _ ._"_._.' ._ .,: ........_._
Below 68°F Fan Mode
68°F -78°F Dry Mode
79°F or Greater Cool Mode
NOTE: If room temperature is 68°F -73°F and the mode was previously set to Fan before
changing to Auto, it will default to Fan mode. When room temperature is 74°!: -78°F, it will
default to Dry mode.
SLEEP FUNCTION
• While in cooling mode, set desired temperature by pressing the up and down arrow but-
tons on the unit control panel or - and -I- buttons on the remote. Cooling temperature can
be set from 61°F to B6°F.
•Adjust the fan speed from Low, Med, High and Auto by pressing the FAN button on the
remote control.
•PressSLEEPbutton on the remote control to activate thisfunction. Sleep will only operate
in cooling mode.
• When Sleep is activated, the settemperature will automatically increase 2°F after I hour.
After another hour, the set temperature will increase another 2°F for a total increase of
4°F.
• To cancel Sleep, press the SLEEPbutton on the remote or MODE button on the unit con-
trol panel or remote.
NOTE: The displayed set temperature on unit control panel and remote will remain at its
initial set positionwhile Sleep function is enabled
15
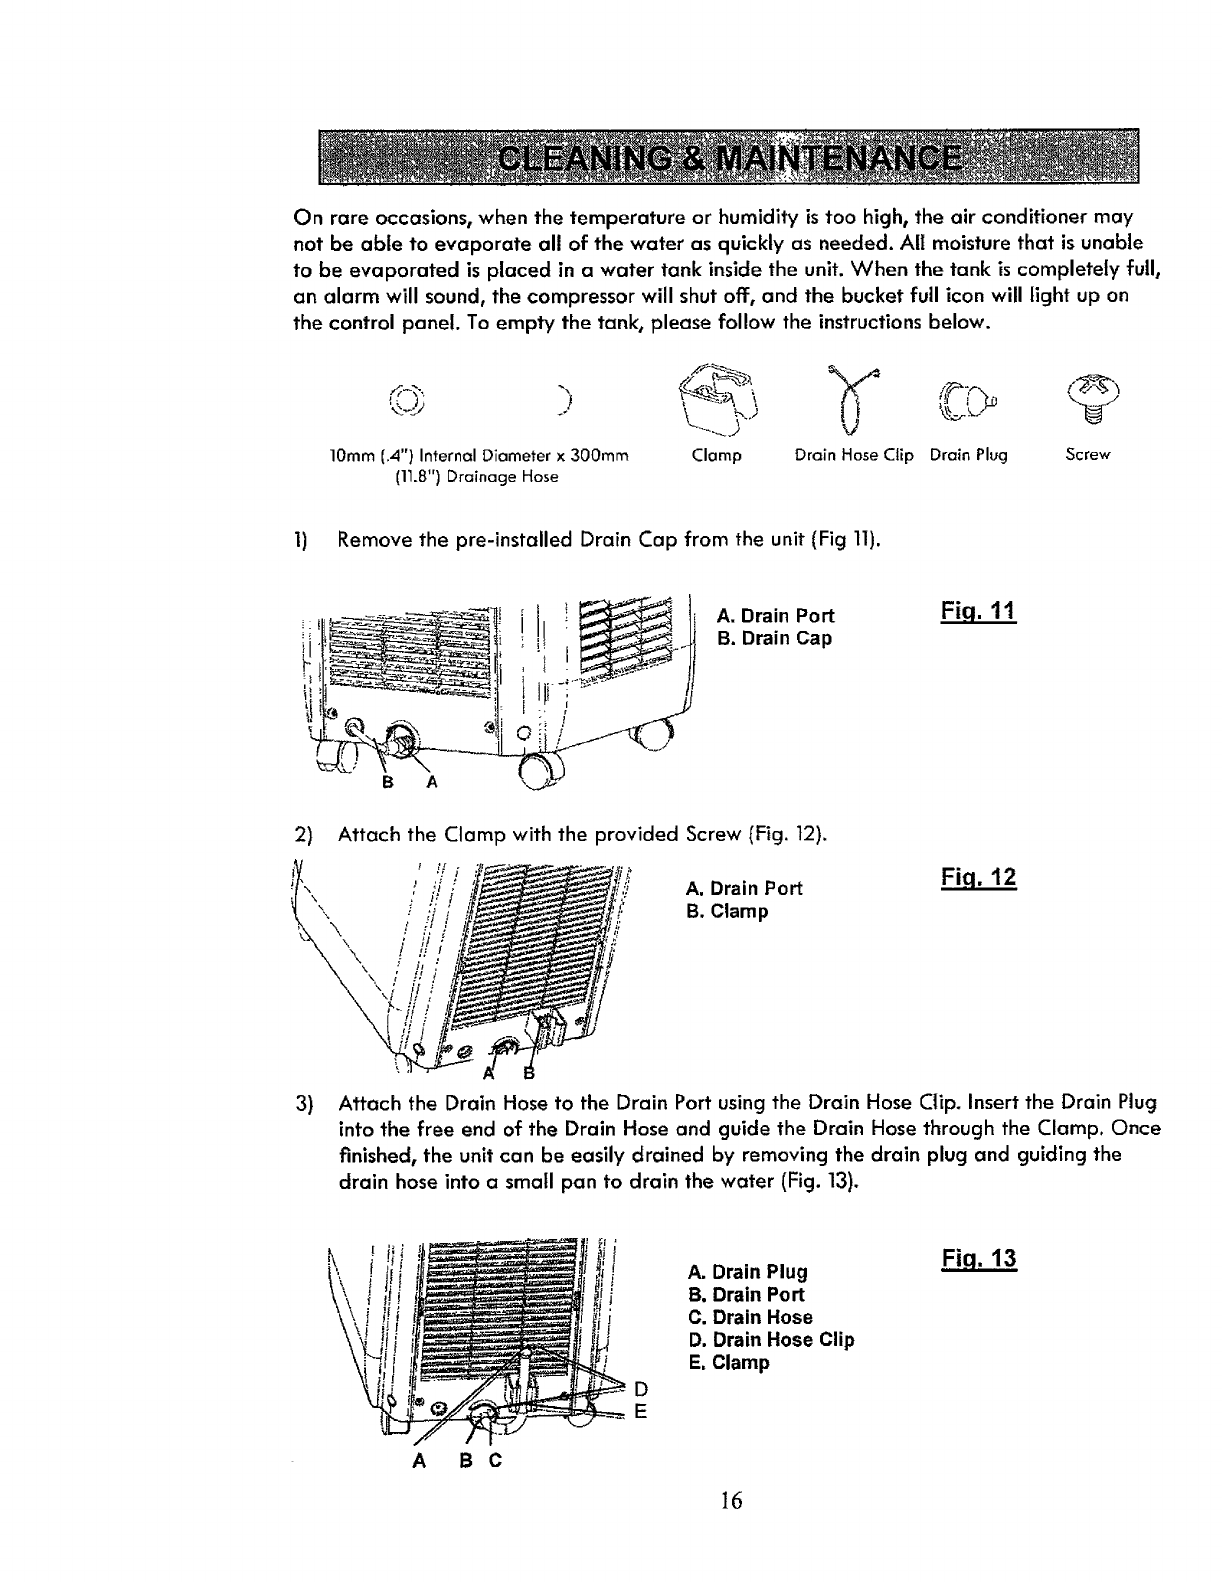
On rare occasions, when the temperature or humidity is too high, the air conditioner may
not be able to evaporate all of the water as quickly as needed. All moisture that is unable
to be evaporated is placed in a water tank inside the unit. When the tank is completely full,
an alarm will sound, the compressor will shut off, and the bucket full icon will light up on
the control panel. To empty the tank, please follow the instructions below.
10mm (.4") Internal Diameter x 300rnm
(11.8") Drainage Hose
Clamp Drain Hose CtEp Drain Plug Screw
1) Remove the pre-installed Drain Cap from the unit (Fig 11).
B A
A. Drain Port Fi,q. 11
B. Drain Cap
2) Attach the Clamp with the provided Screw (Fig. 12).
3)
\\\
A, Drain Port
B. Clamp
Fig. 12
Attach the Drain Hose to the Drain Port using the Drain Hose Clip. Insert the Drain Plug
into the free end of the Drain Hose and guide the Drain Hose through the Clamp. Once
finished, the unit can be easily drained by removing the drain plug and guiding the
drain hose into a small pan to drain the water (Fig. 13).
,!/
!
!
D
E
A. Drain Plug
B, Drain Port
C. Drain Hose
D. Drain Hose Clip
E, Clamp
Fiq. 13
A B C
16
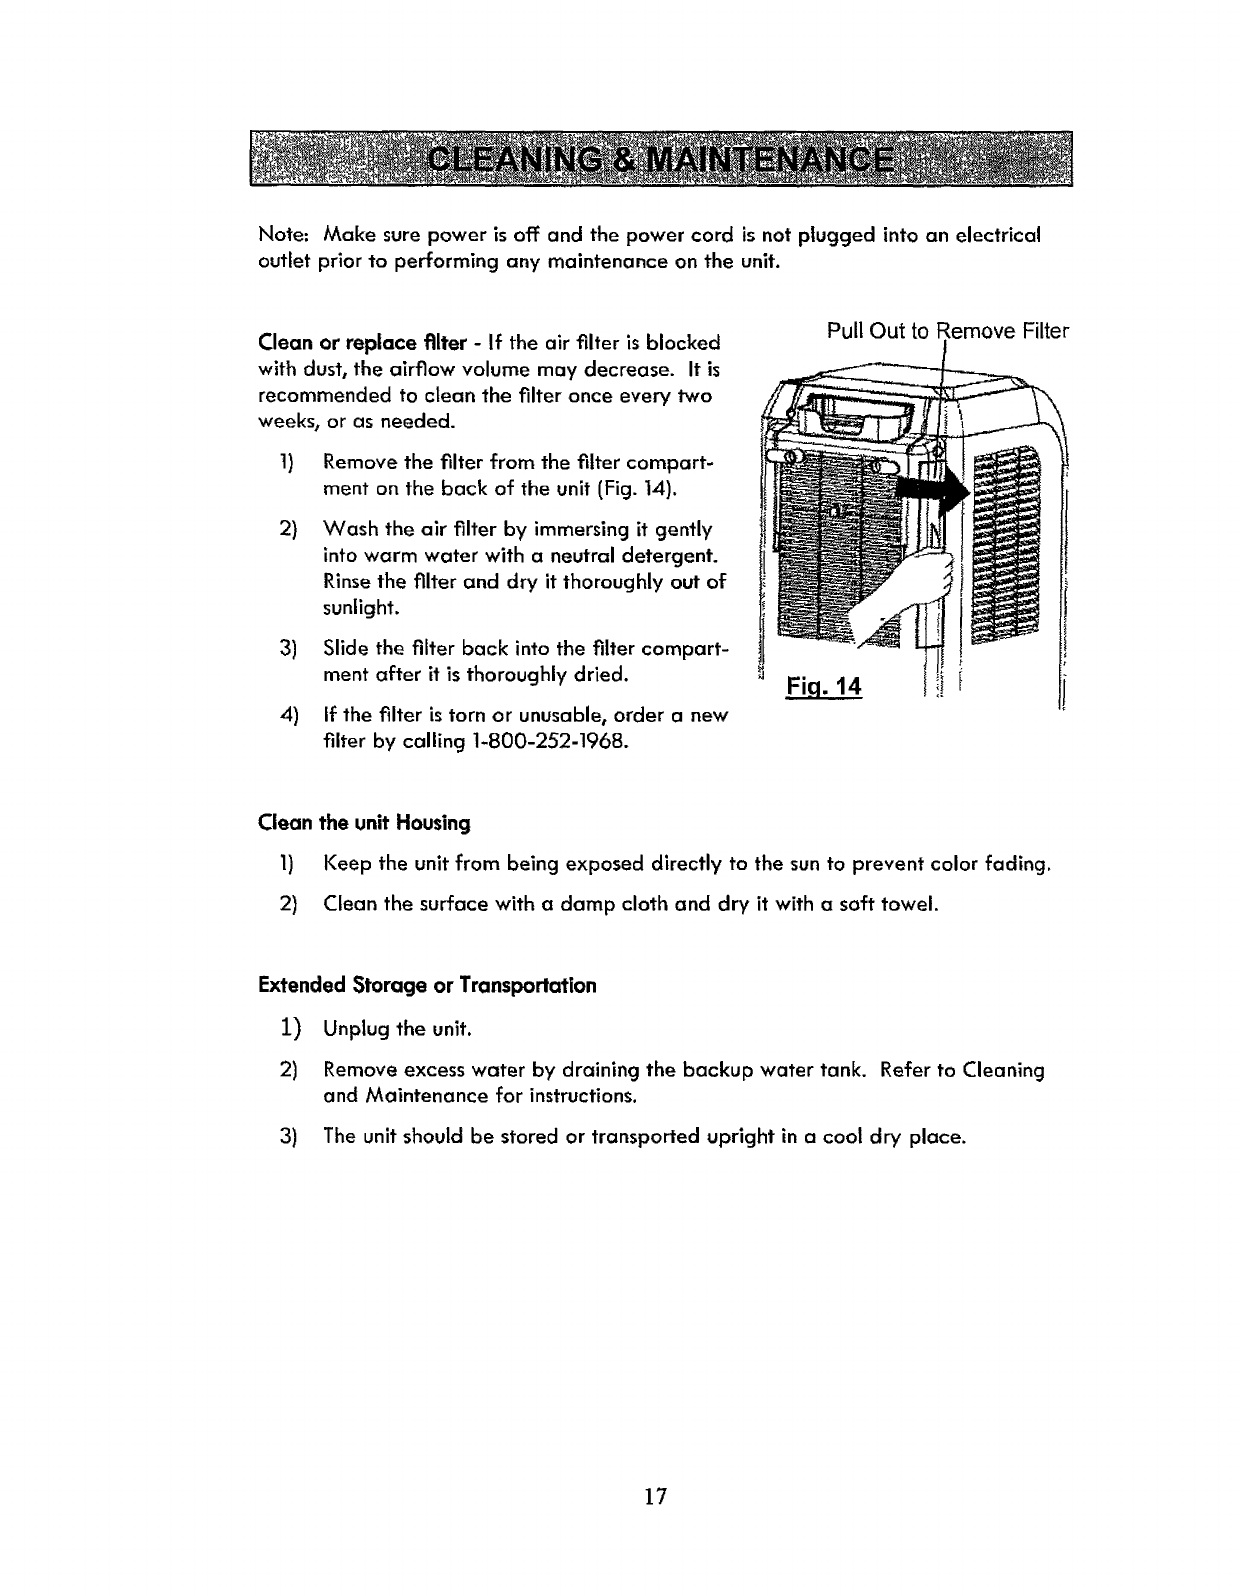
Note: Make sure power is off and the power cord is not ptugged into an electrical
outlet prior to performing any maintenance on the unit.
Clean or replace filter -If the air filter is blocked
with dust, the airflow volume may decrease. It is
recommended to clean the filter once every two
weeks, or as needed.
1) Remove the filter from the filter compart-
ment on the back of the unit (Fig. 14).
2) Wash the air filter by immersing it gently
into warm water with a neutral detergent.
Rinse the filter and dry it thoroughly out of
sunlight.
3) Slide the filter back into the filter compart-
ment after it is thoroughly dried.
4) if the filter is torn or unusable, order a new
filter by calling 1-800-252-1968.
Pull Out to Remove Filter
Fi.q. 14 l f
Clean the unit Housing
1) Keep the unit from being exposed directly to the sun to prevent color fading.
2) Clean the surface with a damp cloth and dry it with a soft towel.
Extended Storage or Transportation
I) Unplug the unit.
2) Remove excess water by draining the backup water tank. Refer to Cleaning
and Maintenance for instructions.
3) The unit should be stored or transported upright in a cool dry place.
17
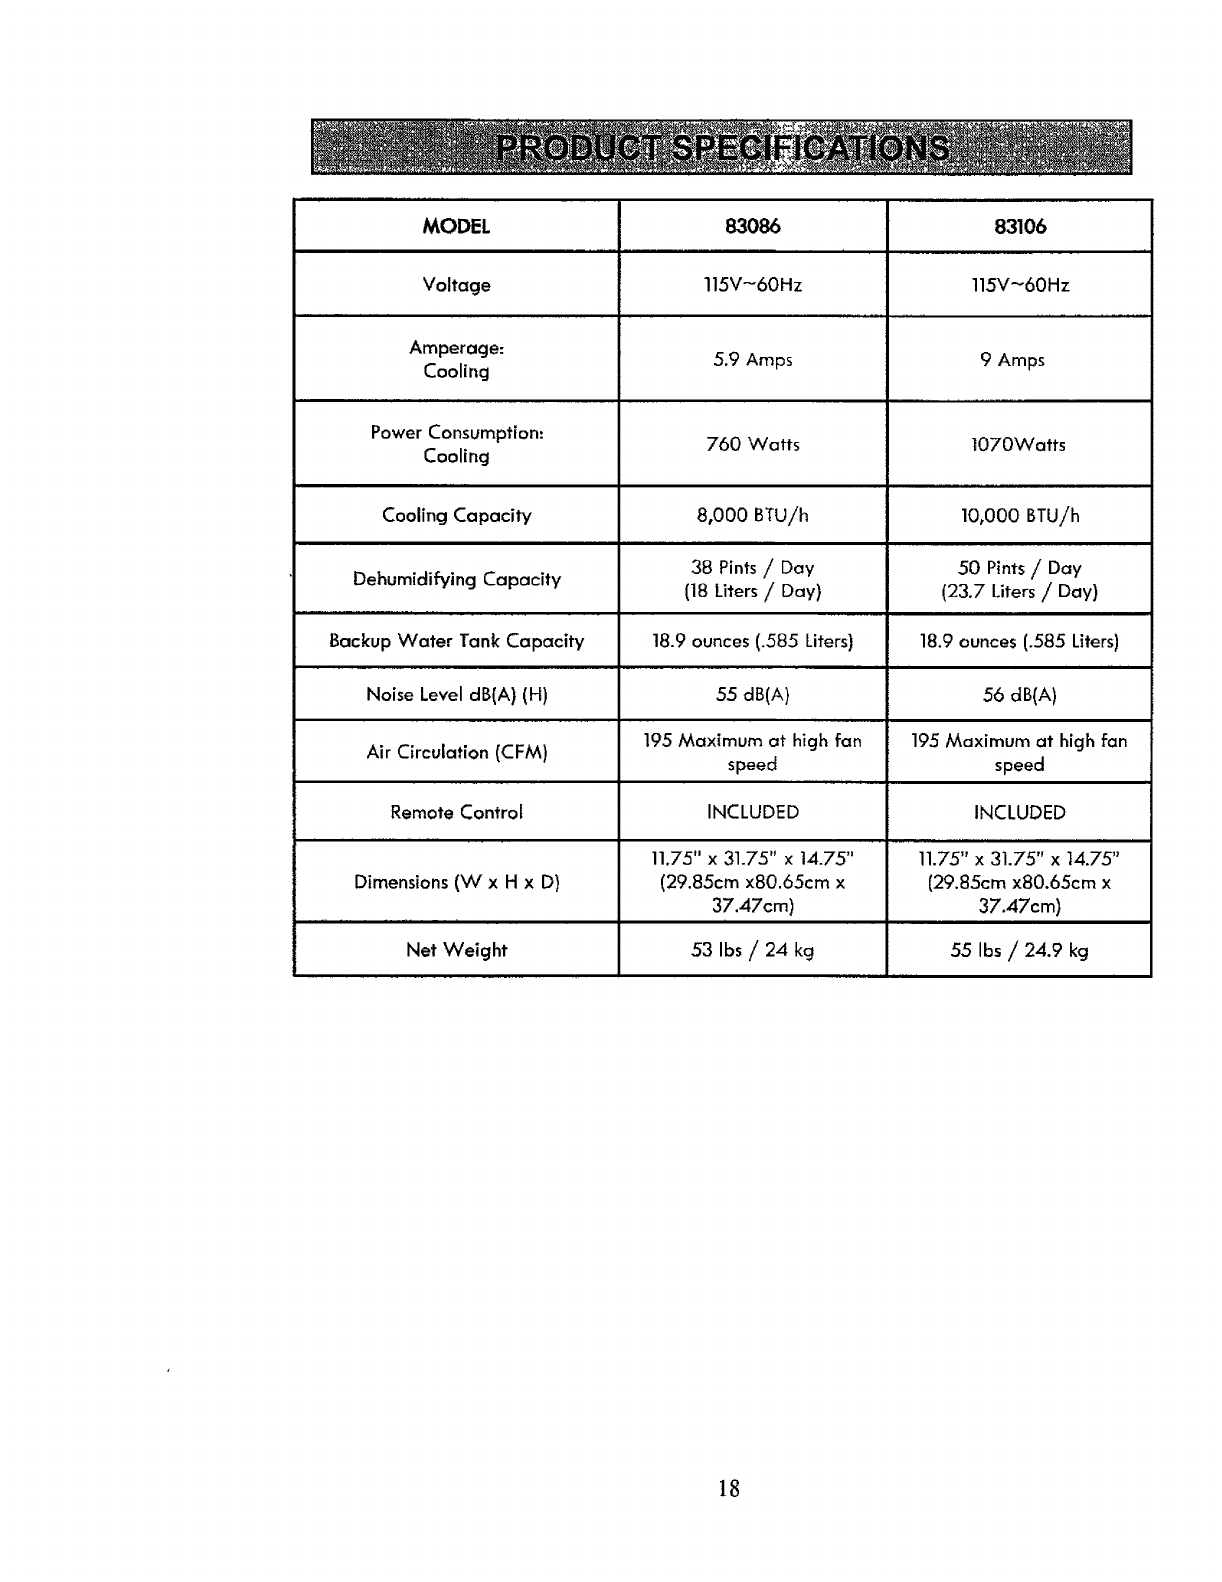
MODEL 83086 83106
Voltage 115V-60Hz 115V-60Hz
,,...,. ...................
Amperage: 5.9 Amps 9 Amps
Cooling
Power Consumption: 760 Watts 1070Watts
Cooling
.,, ..
Cooling Capacity 8,000 BTUih 10,000 BTU/h
38 Pints /Day 50 Pints /Day
Dehumidifying Capacity (18 Liters /Day) (23.7 Liters /Day)
Backup Water Tank Capacity 18.9 ounces (.585 Liters) 18.9 ounces (.585 Liters)
Noise Level dB(A) (H) 55 dB(A) 56 dB(A)
Air Circulation (CFM) 195 Maximum at high fan 195 Maximum at high fan
speed speed
Remote Control INCLUDED INCLUDED
. m.l.i i
11.75" x 31.75" x 14.75" 11.75" x 31.75" x 14.75"
Dimensions (W x H x D) (29.85cm x80.65cm x {29.85cm x80.65cm x
37.47cm) 37.47cm)
ni
Net Weight 53 Ibs /24 kg 55 Ibs /24.9 kg
]8
If your air conditioner fails to operate, please follow these procedures prior to contacting
customer service.
DO NOT ATTEMPT TO OPEN OR REPAIRTHE AIR CONDITIONER YOURSELF.DOING SO
WILL VOID THE WARRANTY AND CAUSE DAMAGE OR PERSONALINJURY.
Problem
Can Iturn the unit on
immediately after
unpacking it?
Unit does not start
when pressing power
button
The air conditioner
does not come on
The air conditioner
works for only a short
time
ii
Room is not cool
enough
i i.. i ii
The air conditioner
does not operate for
about three minutes
after restarting it
.u
Noise or vibrations
Possible Causes
a Room temperature is
lower than the set tem-
perature (cooling mode)
• No electricity
•It is not plugged into the
outlet
•The internal safety device
has tripped
• The safety device on the
plug has tripped
There are bends or kinks
in the air exhaust hose
Something is preventing
the air from being dis-
charged
• Windows/doors in room
are open
• There are heat sources
nearby
• Exhaust hose is not con-
nected or is blocked
•Temperature setting is too
high
• Air filter blocked by dust
I..N
• The compressor control
prevents the unit from
being restarted until three
minutes have elapsed
since it was last turned
off
• Thefloor is not level or
the unit is on an incline
Solutions
• No, The unit must be placed upright for at
least 12 hours after every transport. Oth-
erwise the compressor may be damaged
• Raise the set temperature
•Check house circuit breaker panel for
tripped switch
• Plug into outlet
•Wait 30 minutes; if problem persists, call
1-800-469-4663 to arrange for product
inspection and repair.
•Reset the safety plug
•Position the air hose correctly, keeping it
as short and free of curves as possible to
avoid bottlenecks.
• Check and remove any obstacles ob-
structing air discharge
,i Hi
•Close all windows/doors
• Remove heat sourceif possible
•Connect the exhaust hoseancl make sure
it can function properly
• Decrease the set temperature
•Clean the air filter
nun .
• Wait. This delay is part of normal opera-
tion
•Place the unit on a fiat, level surface
Gurgling Sound • The sound comes from •This is normal
the flowing of refrigerant
in the air conditioner
19
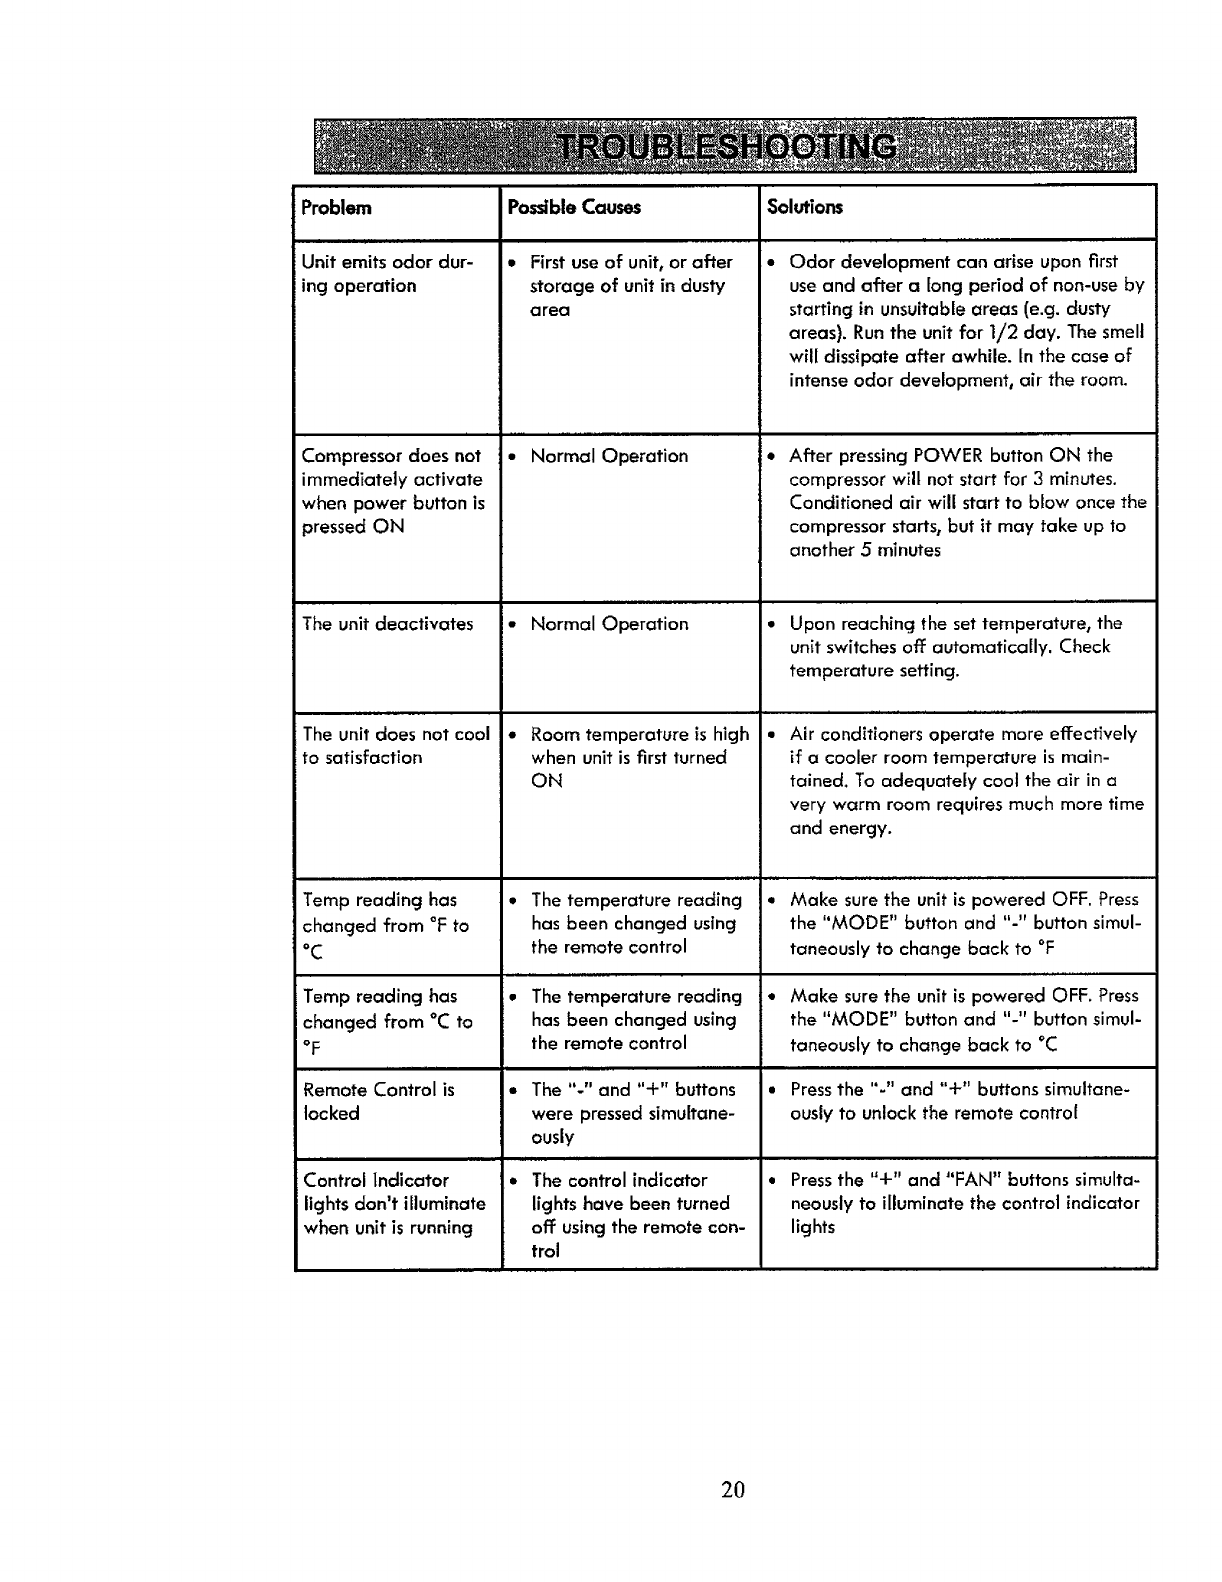
Problem
Unit emits odor dur-
ing operation
Compressor does not
immediately activate
when power button is
pressed ON
The unit deactivates
The unit does not cool
to satisfaction
Temp reading has
changed from °F to
°C
Temp reading has
changed from °C to
°F
Remote Control is
locked
ii
Control indicator
lights don't illuminate
when unit is running
Possible Causes Solutions
Q
• First use of unit, or after
storage of unit in dusty
a rea
................ l.
•Normal Operation
• Normal Operation
• Room temperature is high
when unit is first turned
ON
*The temperature reading
has been changed using
the remote control
ii ii i ii
*The temperature reading
has been changed using
the remote control
• The "-" and "+" buttons
were pressedsimultane-
ously
i• The control indicator
lights have been turned
off: usingthe remote con-
trol
, ii . ,,.. ,...
Odor development can arise upon first
use and after along period of non-use by
starting in unsuitable areas (e.g. dusty
areas}. Run the unit for 1/2 day. The smell
will dissipate after awhile. In the case of
intense odor development, air the room.
i• After pressing POWER button ON the
compressor wilt not start for 3 minutes.
Conditioned air will start to blow once the
compressor starts, but it may take up to
another 5 minutes
Upon reaching the set temperature, the
unit switches off automatically. Check
temperature setting.
,, ,., ,,.., ,
Air conditioners operate more effectively
if a cooler room temperature is main-
tained. To adequately cool the air in a
very warm room requires much more time
and energy.
•Make sure the unit is powered OFF. Press
the "MODE" button and "-" button simul-
taneously to change back to °F
•Make sure the unit is powered OFF. Press
the "MODE" button and "-" button simul-
taneously to change back to °C
Press the "-" and "+" buttons simultane-
ously to unlock the remote control
i . illllrlrl ill
Press the "+" and "FAN" buttons simulta-
neously to illuminate the control indicator
lights
2O
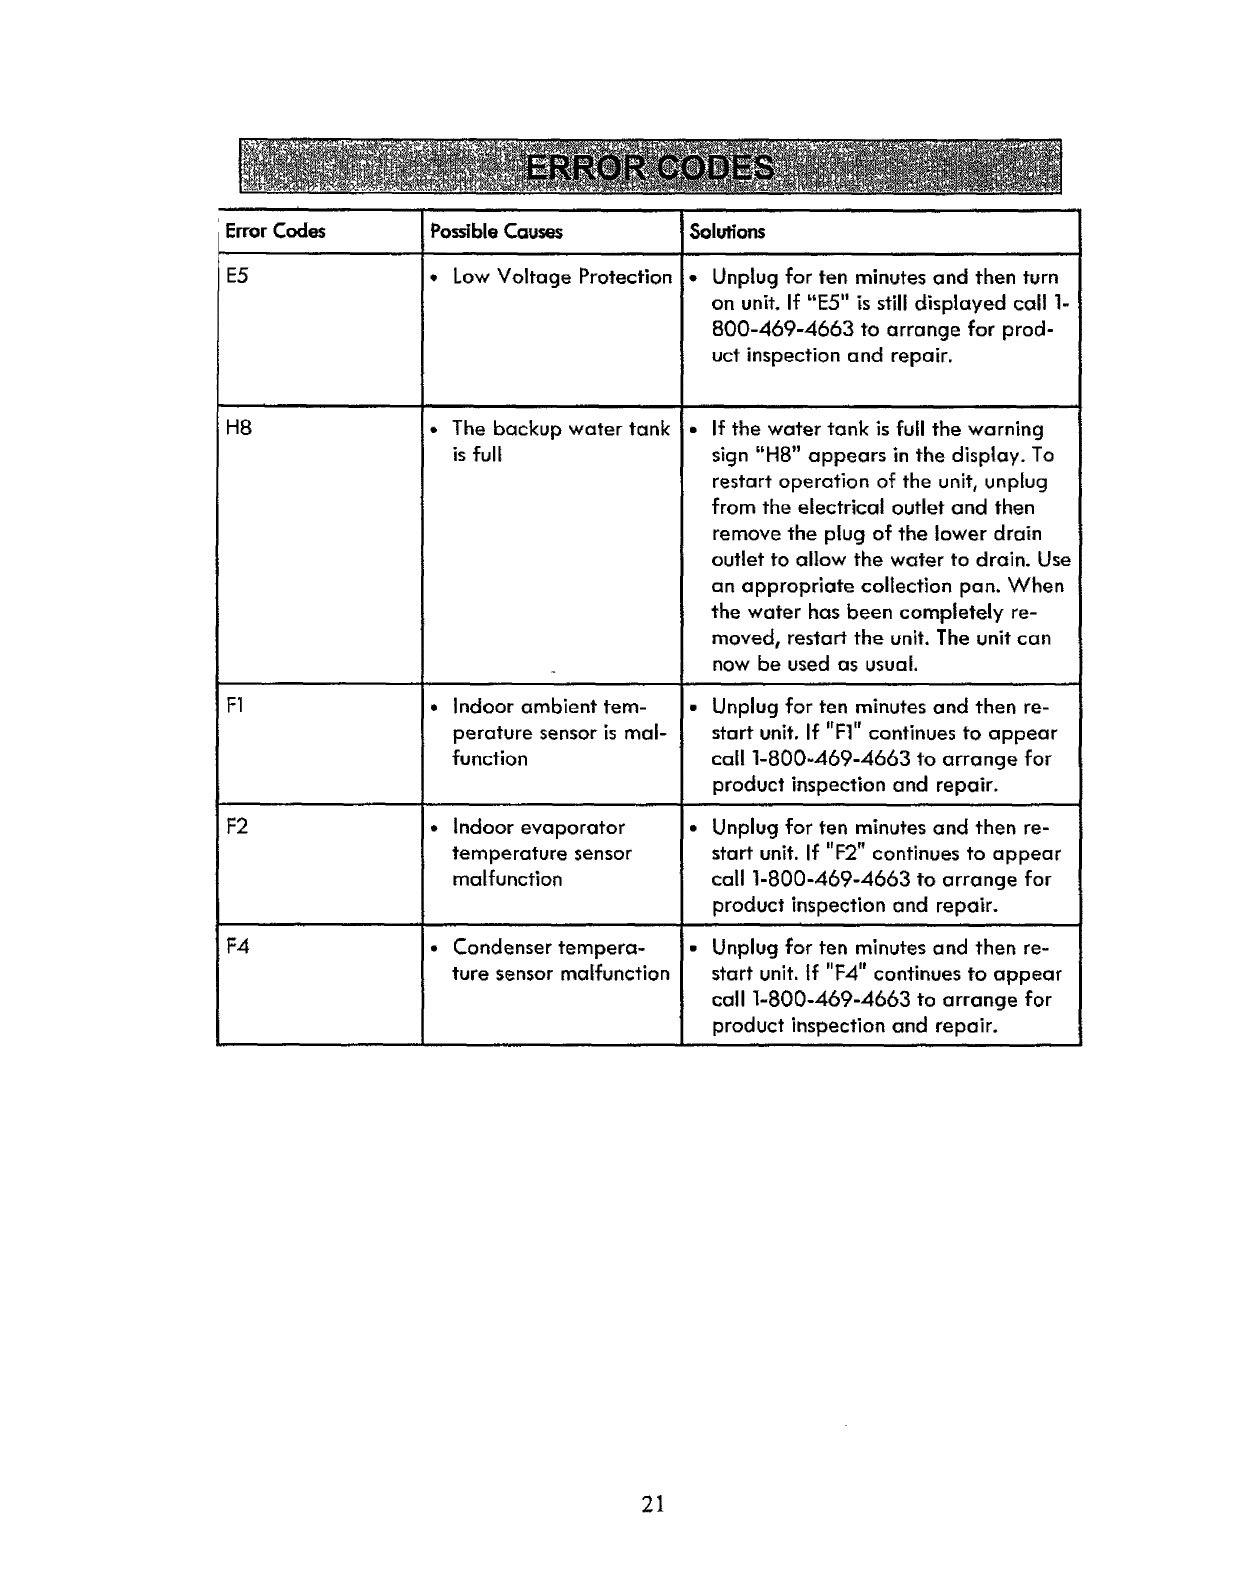
, 1 , ,,
Error Codes Solutions
Q
E5
H8
F1
F2
F4
Possible Causes
• Low Voltage Protection
•The backup water tank
is full
•Indoor ambient tem-
perature sensor is mal-
function
• Indoor evaporator
temperature sensor
malfunction
•Condenser tempera-
ture sensor malfunction
Unplug for ten minutes and then turn
on unit. If "E5" is still disptayed call 1-
800-469-4663 to arrange for prod-
uct inspection and repair.
If the water tank is full the warning
sign "HS" appears in the display. To
restart operation of the unit, unplug
from the electrical outlet and then
remove the plug of the lower drain
outlet to allow the water to drain. Use
an appropriate collection pan. When
the water has been completely re-
moved, restart the unit. The unit can
now be used as usual.
•Unplug for ten minutes and then re-
start unit. If "FI" continues to appear
call 1-800-469-4663 to arrange for
product inspection and repair.
p,,,
• Unplug for ten minutes and then re-
start unit. If "F2" continues to appear
call 1-800-469-4663 to arrange for
product inspection and repair.
Unplug for ten minutes and then re-
start unit. if "F4" continues to appear
call 1-800-469-4663 to arrange for
product inspection and repair.
21
Antes de usarsu nuevo aparato de aire acon-
cficionado .........................................................2
Proteccionesimportate$.................................3-5
Garantia de Kenmore para aire acondiciona-
do.......................................................................6
Convenio patr6n sobre protecci6n ........... 7
Instrucciones para desempacado............ 8
Piezas de aire acondicionado ................ 8
Accesorios .........................................................9
Instalaci6n..................................................... 9,10
Enchufe de seguridad .......................... tl
Panel de control ...................................... 11
Control remoto .............................................12,13
Instrucciones de funcionamiento ............ 14,15
Lirnpieza ymantenimiento ............... 16,17
Especificaciones t_enicas..............................18
Resoluci6n de problemas ................. 19,20
C6digos de error ............................................21
Sears Service...............................Contraportada
LEA CUIDADOS MINUCIOSAMENTE ESTA GUIA DE USO Y CUIDADO ANTES DE
INSTALARY UTILIZAR SU AIRE ACONDICIONADO.
CONSERVE ESTA GU(A COMO FUTURA REFERENCIA
22
Pare prevenir lesiones al usuarJoo a otras personas ydaSos a la propiedad, se
cleben seguir las siguientes instrucciones.
• Utilice este aparato solamente secjgnse describe en esta Guia de usa y cuidado. Come
ocurre con cualquier aparato el6ctrico, las instrucciones tienen come objetivo cubrir
todas las eventualidades que seen posibles. Se deber6 tener precauci6n yusar et senti-
do com0n al utitizar e instalar este aparato de aire acondicionado.
•Este dispositivo ha side fabricado con el fin de enfrier y deshumidificar entornos dom_sti-
cos y no debe utilizarse con nincj0n otro fin.
• El aparato no debe instalarseen lugares en los que la atm6sfera pueda contener gases
combustibles, aceite o sulfuro, ni cerca de fuentes de calor.
•Instale el aire acondicionado port6til siempre de la farina apropiada. Et montaje o insta-
laci6n incorrectos puede causer fallos de funcionamiento e inclusolesiones, incendio y
peligros de descargas el6ctricas.
•No coloque el cable de alimentaci6n cerca de la calefacci6n. Podria causer un incendio
o una descarga el_ctrica.
• No utilice et cable de alimentaci6n cerca de gas inflamable o combustible, per ejempfo
gasoline, benceno, disolvente, etc. Podr{a causer una explosi6n o incendio.
•No poncja en marcha la unidad o la pare insertandoo tirando del enchufe. Podria cau-
ser un incendioo descarga el_ctrica.
• No estropee el cable de alimentaci6n ni utiiice uno no especificedo. Podria causer un
incendio o una descarga el6ctrica.
*No modifique la tongitud del cable de alimentaci6n. Provocara un incendio o una des-
cerga el_ctrica debido e la generaci6n de calor.
*Utilice el aire acondicionado en un circuito de una sole tome de corriente. No com-
parta la toma de corriente con otrosaparetos. Puedecauser unfallo del circuito.
*Cambiar la tome de cordente sinrealizer los cembios de cableedo apropiados prove-
car6 una condici6n no segura que podr[a resultar en incendioo descarga el_ctrica.
Todoslostrabajos de este tipo deben ser remitidos e un electricista cualificado.
• ADVERTENCIA: Esteaparato debe tener la conexi6n apropiada a tierra. El cable de
alimentaci6n de este eparato est6 equipado con un enchufe LCDI (Leakage Current
Detection end Interruption) de tres patillas. Para minimizer el riescjo de descarge el_c-
trice, util[ce el enchufe con una toma de pared est6ndar de tres petillas que tenga
conexi6n a mesa. Si la toma de corriente no incluye une ranura de conexi6n e mesa,
contacte a unelectdcista cuali_cado pare que reemplace la tome de corriente antes
de userel aire acondicionado. No carte ni quite la patilla de conexi6n e mesa del
enchufe. Si tiene dudes sabre si el eke acondicionado tiene conexi6n amesa, haga
que ta toma y circuito de la pared sean examinados per unelectricista cualificado.
•No desmonte ni modifique este eperato. Si Io hace podria provocer elguna fella o des-
carga el_ctrica.
23
NO UTILICE EXTENSIONES DE CABLES. No utilice una extensi6n de cable ya que presenta
peligros potenciales para la seguridad. Para situacionestemporales, use solamente cables de
extensi6n de 3 patillas y conexi6n a masa que est_n certificados pot CSA y UL, dise5adosy
aprobados especificamente para aparatos de aire acondicionado.
• Para prevenir lesiones a causa del mane]o de objetos afilados, no toque las piezas
met_licas de la unidad al extraer el filtro.
• No bloquee la entrada de aire ni la salida de aire. Puede hacer que el aparato falle.
• Para mantener el compresor en la condici6n apropiada, almacene y transporte la
unidad de aire acondicionado siempre en la posici6n vertical. Antes de la instalaci6n,
deje la unidad de aire acondicionado en posici6n vertical durante 12horas. De este
modo se asegura de que todo el aceite lubricante se haya asentado en la parte infe-
rior del compresor y se evite as[ el da5o alas p]ezas internas.
• Haga funcionar la unidad solamente sobre una superficie horizontal nivelada para
asegurarse de que no se procluzcan fugas de agua..
• Esteaparato no est_ disefado para uso por personas (incluidos los niSos) cuyas capaci-
dades fisicas, sensorialeso mentales est6n reducidas, o que carezcan de experiencia y
conocimiento, a menos que una persona responsable de.su seguridad les haya supervisa-
do y les haya dado instruccionesrelativas al uso del aparato. Se debe vigilar a los ni5os
para asegurarse de que no jueguen con el aparato.
•No inserte el enchufe del cable de alimentaci6n en la toma de la pared si seencuentra
flojo o est6 daSado. Podria causar un incendio o descarga el6ctrica.
• Desenchufe la unidad si observa que hay sonidos extra5os, olores o humo que provienen
de ella.
• AI desenchufar la unidad, sujete el enchufe pot su cabeza. No tire del cable.
•$i no va a usar la unidad durante largo tiempo, desconecte el enchufe para prevenir el
arranque accidental y la posibilidad de lesiones.
• No coloque objetos pesados sobre el cable de alimentaci6n y tenga cuidado de que no
se da5e el cable.
•Limpie los filtros de aire con regularidad. Un filtro de aire contaminaclo reduce la capa-
cidad.
• Para limpiar utilice un pa_o suave. No utilice cera, disolventes ni detergentes fuertes. El
aspecto de la unidad de aire acondicionado se puede deteriorar, puede cambiar su
color o pueden aparecer defectos en la superficie.
• No utilice agua para limpiar el interior del aire acondicionado. La exposici6n al agua
puede destruir el aislamiento, Io cual podr[a resultar en descargas el6ctricas.
• Si entra agua en el producto, desconecte el enchufe de la pared. D_jelo desenchufado
hasta que se seque.
• La exposici6n al ftujo de aire directo clurante un periodo largo podria se periudicial para
su salud.
24
No ufilice el aire acondicionado con fines de refr|geraci6n (por ejemplo, para conser-
var aparatos de precisi6n, comida, mascotas, plantas yobjetos de arte).
Debido a que es posible que haya deficiencia de ox|geno en el cuarto, ventile el 6tea
cuando se est_n utilizando tambi_n estufas u otros dispositivos de calefacci6n.
El aire acondicionado es un aparato de confort para el consurnidor, no un sistema de
control climatizado de precisi6n.
Inserte el filtro siempre con seguridad. Nunca haga funcionar la unidad sin filtro.
No beba agua que drenada del aire acondicionado. Contiene elementos contaminantes-
que pueden enfermarle.
Este aparato de aire acondicionado tiene un margen de temperatura ambiente de 61°F -
95°F (16°C-35°C).
25
GARANT[A limitada a un a_o de Kenmore
Cuando se ha instalado, utilizado y mantenido de acuerdo con las instrucciones clue se sumi-
nistran, si este aparato falia debido a un defecto de ma_'erial ode mano de obra en un
periodo de un a_o desde la fecha de la compra, Ilame al tel_fono 1-800-4-MY-HOME(_
para que vengan arepararJo de forma cjratuita.
Si este aparato se usa en alguna ocasi6n para un fin que no sea el uso privado familiar, esta
garantfa s61o ser6 aplicable durante 90 dJas desde la fecha de la compra.
Fsta garantia SOLAMENTE cubre los defectos de material ymano de obra y
NO cubrir6 Io siguiente:
1. Componentes desechables que pueden gastarse con el uso normal, inciuidos los
flltros, correas, bombillas ybolsas, sin limitaci6n a 6stos.
2. Un t6cnico de servicio para instruir al usuario sobre la correcta instataci6n,
uso y mantenimiento.
3. Un t6cnico de servicio para limpiar o mantener et producto.
4. Da_os en el producto o falla de _,ste si no se ha instalado0 utilTzado o
mantenido seg0n todas las instrucciones que se suministran con ei producto.
5. Da_os en el producto o falla de 6ste que resulte de un accidente, abusa, real uso
o uso con otro fin que el original para et que fue dise_.ado.
6. Da_os en el producto o falla de _ste, causados por el uso de detergentes,
limpiadores, productos quimicos o utensilios que no sean los recomendados
en todas las instrucciones que se suministran con el producto.
7. Da_os o fallas en piezas o sistemas, que resulten de modificaciones
no autorizadas hechas a este producto.
Renuncia de derechos sobre garantias implicJtas;limitaci6n de remedios
El 0nico y exclusivo remedio del ciJente, conforme a esta garantla0 ser_
la reparaci6n del producto de la forma aqui dispuesta. Las garantias implicitas, incluidaslas
garantias de
comercio o idoneidad para un fin en particular, estgn
limitadas a un a_o o al periodo m_s corto permitido por la ley. Sears no ser6 responsable
de da_os incidentaleso consecuentes. Algunos estados yprovincias
no permiten la exclusi6n o limitaci6n de da_os incidentaleso consecuentes,
o la limitaci6n de la duraci6n de las garantias implicitas de comercio o
idoneidad0 por tanto estas exclusiones o limitaciones pueden no set
apiicables en su caso.
Esta garantia se aplica solamente cuando este aparate es utilizado en losF:stadosUnidos.
Estagaranfia le otorga derechos legales especificos, aunque tambi_n puede tener otros
derechos que pueden variar de un estado a otro.
Sears Brands Management Corporation, Hofl:man Estates, IL 60179
26
Convenios patr6n sobre protecci6n
Felicidades por hacer una compra inteligente. Su nuevo producto Kenmore ® est_
diseSado y fabricado para funcionar durante aSos de forma confiable. Pero, al igual
que todos los productos, puede requerir mantenimiento preventivo o reparaci6n de
cuando en cuando. Ese es el mornento en que el Convenio patr6n sobre protecci6n
puede ahorrarte clinero ycontrariedades.
El Convenio patr6n sobre protecci6n tambi6n ayuda a prolongar la vida 0til de
su nuevo producto. Esto es Io que incluye el Convenio*:
[] Piezas ymano de obra, no solamente para la reparaci6n de defectos sino tambi6n para
mantener los productos funcionando correctamente en condiciones de uso normal. Nues-
tra cobertura va mucho m_s a!l_ de la garantia del producto. No hay deducibles ni falla
funcional que queden excluidos de la cobertura: es una protecci6n real.
[] Servicio experto proporcionado por una fuerza de trabajo de rags de 10.000 t_cnicos de
servicio autorizados por Sears, Io cual sicjnifica que alguien confiable trabajar_ con su
producto.
[] Llamadas de servicio ilimitadas y servicio de _mbito nacional, con la frecuencia que nos
necesite, en cualquier momento que nosnecesite.
[] No habr_ reemplazo de su producto conforme a la garant(a de productos defectuosos si
se producen cuatro o m6s fallas del producto en un perTodo de doce meses.
[] Reemplazo del producto cubierto por cjaranHa si no puecle repararse.
[] lnspecci6n de mantenimiento preventivo anual cuando Io solicite, sin ninggn cargo extra.
[] Asistencia r6pida por tel6fono - nosotros Io Ilamarnos asistencia telef6nica de R6pida
Resoluci6n - de un representante de Sears, en todos los productos. Consid6renos un
"manual del propietario parlante"
[] Protecci6n ante sobretensi6n contra daSos el_ctricos debidos a la fluctuaci6n de energfa
el_ctrica.
[] 250 $ de protecci6n anual contra p_rdida de alimentos por cualquier desperdicio de
comida como resultaclo de una falla mec6nica de cualquier refrigerador o congela-
dor cubierto por la garantfa.
[] Reembolso clel dinero de alquiler si la reparaci6n de su proclucto cubierto por cjarant(a
tarcle m_s de Io prometido.
[] 10% de descuento sobre el precio habitual en cualquier servicio cle reparaci6n no cu-
bJerto por garantfa, asi como las piezas relacionadas.
Una vez que contrate el Convenio, una simple Ilamada telef6nica es tocto 1oque necesita
para organizar flegada del servicio de reparaci6n. Puede Ilamar en cualquier momento,
de dia o de noche, u organlzar online una cita para el servicio de reparaci6n.
El Convenio patr6n sobre protecci6n es una compra sin riesgo. Si la cancela por alguna
raz6n durante la garant[a del producto, le proporcionaremos un reembolso completo. En
el caso de que el periodo de garantia haya expirado, el reembolso ser_ proporcional.
iCompre hoy su Convenio patr6n sobre protecci6n!
Hay algunas limitaciones y exclusiones aplicables. Para conocer los precios y obtener informa-
ci6n aclicional en EE.UU.Ilame al tel_fono 1-800-827-6655.
Servicio de instalaci6n de Sears
Para obtener servicios de Jnstalaci6n profesional, pot parte de Sears, de aparatos dom_s-
ticos, abridores de puertas de gara]es, calentadores de acjua y otros elementos del hogar,
Ilame a 1-800-4-MY-HOME ®.
27
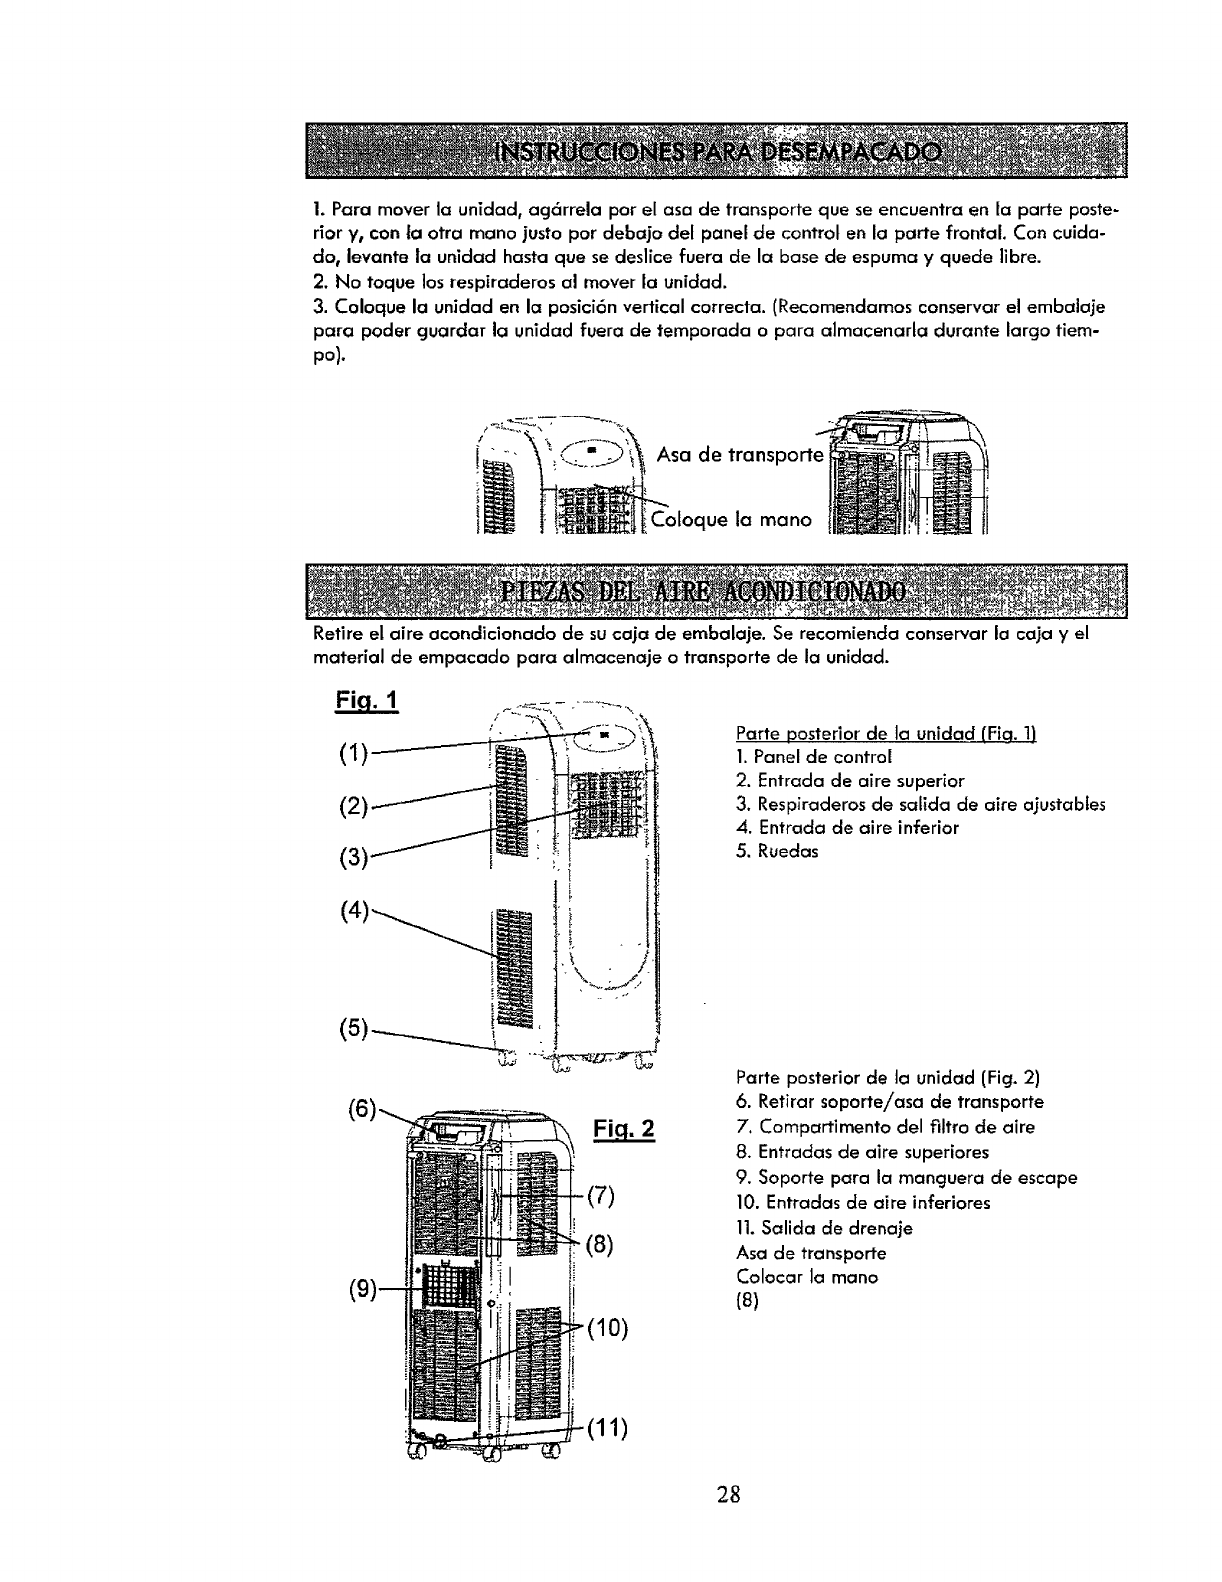
1. Para mover la unidad, ag6rrela por el asa de transporte que se encuentra en la parte poste-
rior y0con la otra mano justo pot debajo det panel de control en la parte frontal. Con cuida-
do, levante ia unidad hasta que se deslice fuera de la base de espuma y quecle Iibre.
2. No toque los respiraderos al mover la unidad.
3. Coloque la unidad en la posici6n vertical correcta. (Recomendamos conservar el embalaje
para poder guardar la unidad fuera de temporada o para almacenarta durante largo tiem-
po).
Asa de transporte
Coloque la mano
Retire el aire acondicionado de su caja de embalaje. Se recomienda conservar lacaja yel
materialde empacado para almacenajeo transportede launiclad.
(1)
(2)
(7)
(8)
(10)
Parte posterior de la unidad (Fiq. 1)
1. Panel de control
2. Entracla de aire superior
3. Respiraderos de salida de aire ajustabtes
4. Entrada de aire inferior
5. Ruedas
Parte posterior de la unidad (Fig. 2)
6. Retirar soporteiasa de transporte
7. Compartimento del filtro de aJre
8. Entradas de aire superiores
9. Soporte para la manguera de escape
10. Entradas de aire inferiores
11.Salida de drenaje
Asa de transporte
Colocar la mano
(8)
(11)
28
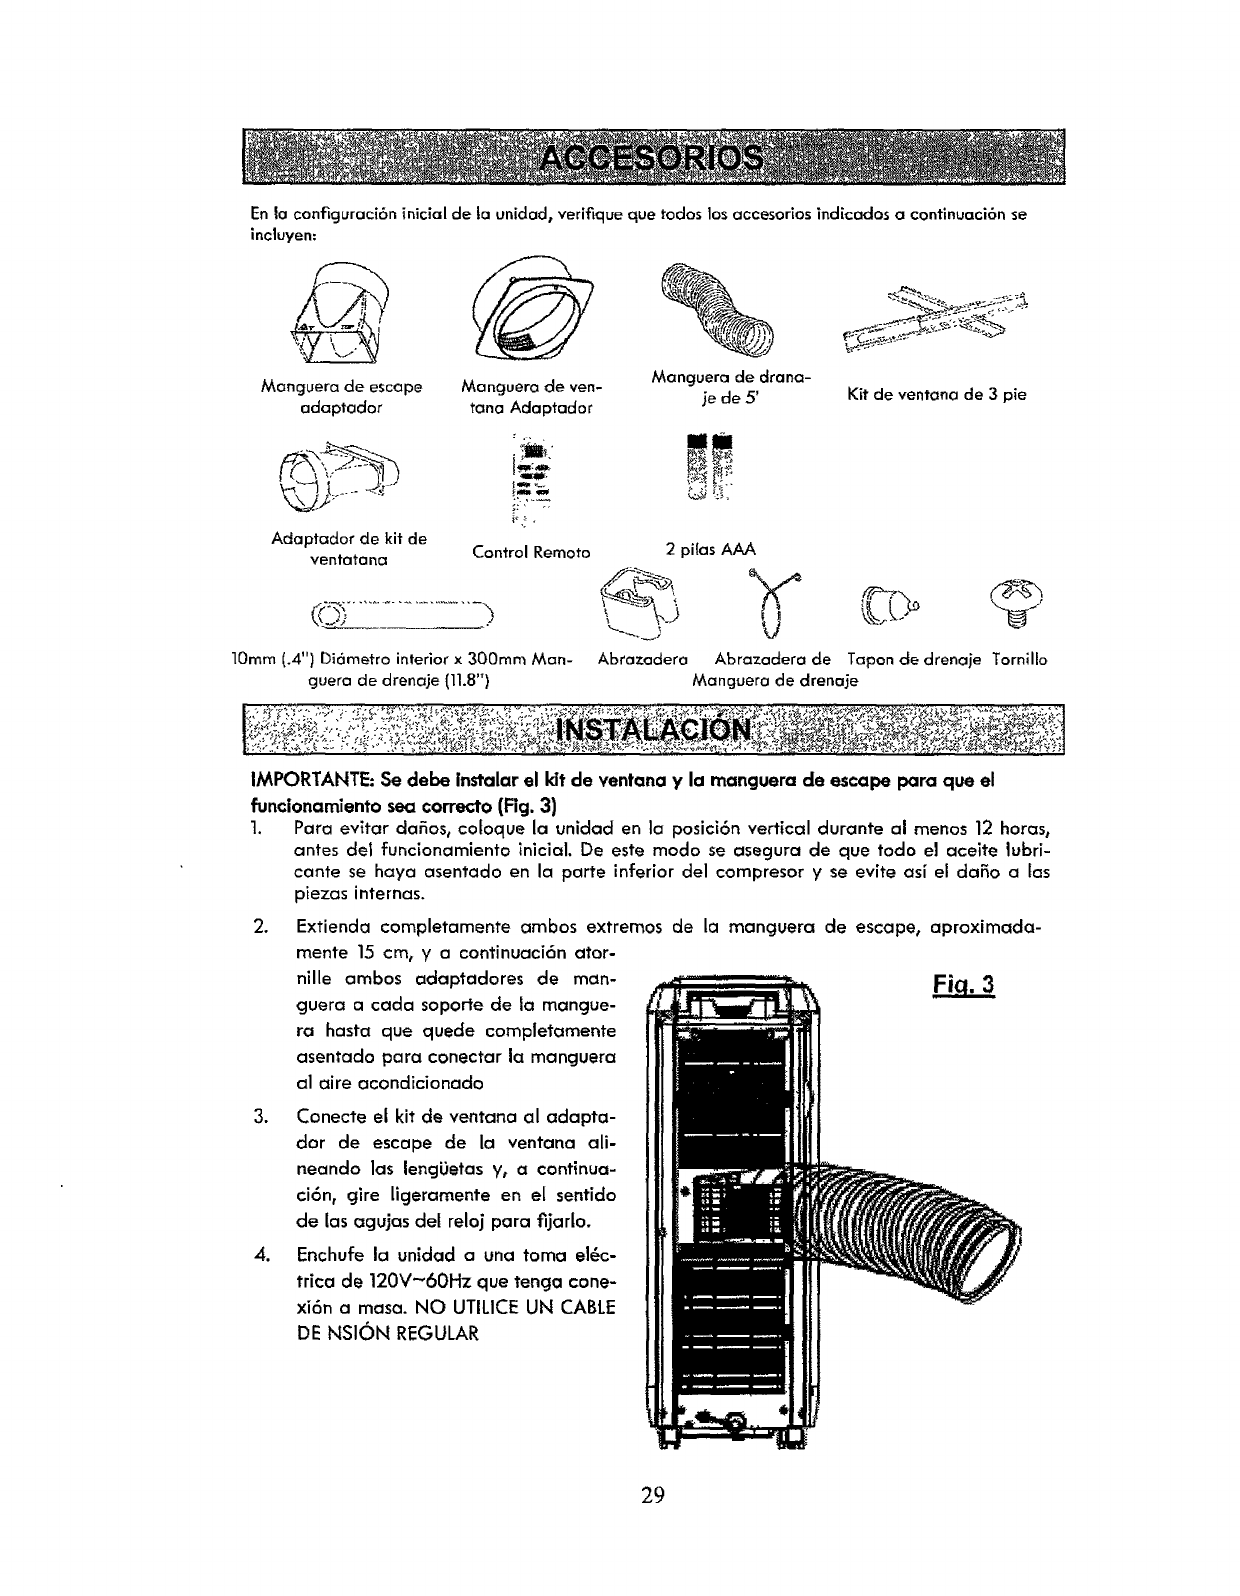
En la configuraci6n inicial de ta unidad, verifique que todos los accesorios indicados a confinuaci6n se
incluyen:
Mancjuera de escape
adaptador
Manguero de ven-
tana Adaptador
Manguera de drano-
je de 5' Kit de ventana de 3 pie
Adaptador de kit de
ventatana Control Remoto 2pilas AAA
Abrazadera Abrazadera de Tapon de drenaje Tornillo10turn (.4") Di6metro interior x 300ram Man-
guera de drenaje (11.8") Manguera de drenaje
IMPORTANTE: Se debe instalar el kit de ventana y la manguera de escape para que el
funcionamiento sea correcto (Fig. 3)
1. Para evitar cla_os, cofoque la unidad en la posici6n vertical durante al menos 12 horas,
antes del funcionamiento inicial. De este modo se asegura de que todo el aceite lubri-
cante se haya asentado en la porte inferior del compresor y se evite asi el da_o alas
piezas internas.
2. Extienda completamente ambos extremos de Ja mancjuera de escape, aproximada-
mente 15 cm, y a continuaci6n ator-
nille ambos adapt'adores de man-
guera a coda soporte de la mangue-
ra hasta que quede completamente
asentado para conectar la manguera
al aire acondicionado
3. Conecte el kit de ventana al adapta-
dor de escape de la ventana ali-
neando los lengi_etas y, a continua-
ci6n, cjire lJcjeramente en el sentido
de las agujas del reloj para fijarlo.
4. Enchufe la unidad a una toma e16c-
trica de 120V-60Hz que tenga cone-
xi6n a masa. NO UTILICE UN CABLE
DE NSION REGULAR
29
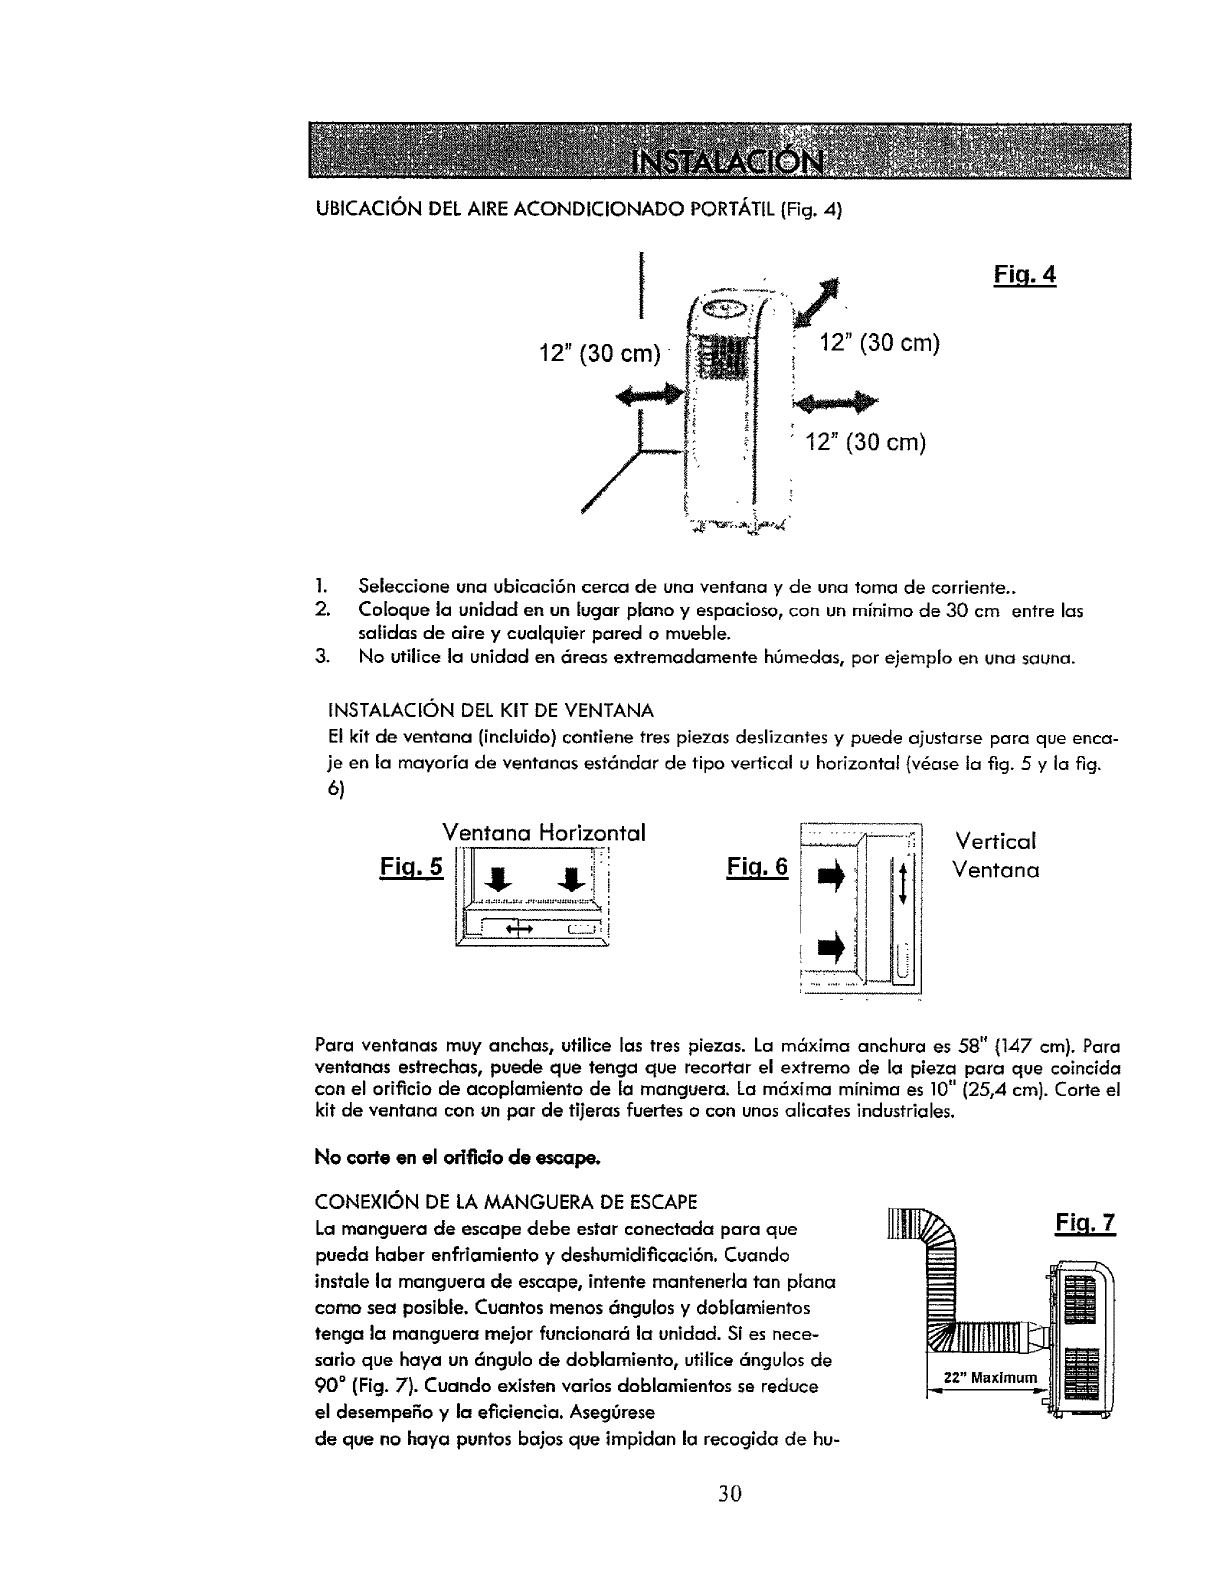
UBICAClON DEL AIRE ACONDICIONADO PORT,_TIL (Fig. 4)
12" (30 cm)
12" (30 cm)
12" (30 cm)
1. Seleccione una ubicaci6n cerca de una ventana y de una toma de corriente..
2. Coloque la unidad en un lugar piano y espacioso, con un minima de 30 cm entre las
salidas de aize y cualquier pared o mueble.
3. No utilice la unidacl en 6reas extremadamente hOmedas, par ejemplo en una sauna.
INSTALACION DEL KIT DE VENTANA
El kit de ventana (incluido) contiene tres piezas deslizantes y puede ajustarse para que enca-
je en la mayoria de ventanas est6ndar de tipo vertical u horizontal (v6ase la fig. 5 y la fig.
6)
Ventana Horizontal
'Ill ' :
!!- !!-:im
....÷
Vertical
Ventana
Para ventanas muy anchas, utilice tas tres piezas. La m6xima anchura es 58" (147 cm). Para
ventanas estrechas, puede que tenga que recortar el extremo de la pieza para que coincida
con el orificio de acoplamiento de la manguera. La m6xima minima es 10" (25,4 cm). Carte el
kit de ventana con un par de tijeras fuertes o con unos alicates industriales.
No corte en el orlflclo de escape.
CONEXION DE LA MANGUERA DE ESCAPE
Lo manguera de escape debe estar canectada para que
pueda haber enfriamiento y deshumidificaci6n. Cuando
instale la manguera de escape, intente mantenerla tan plana
coma sea posible. Cuantos menos 6ngulos y doblamientos
tenga la manguera mejor funcionar6 la unidad. Si es nece-
sario que haya un 6ngulo de doblamiento, utilice 6ngulos de
90 ° (Fig. 7). Cuando existen varios dablamientos se reduce
el desempeSo y la eficiencia. Aseg0rese
de que no haya puntos bajos que impiclan la recocjida de hu-
3O
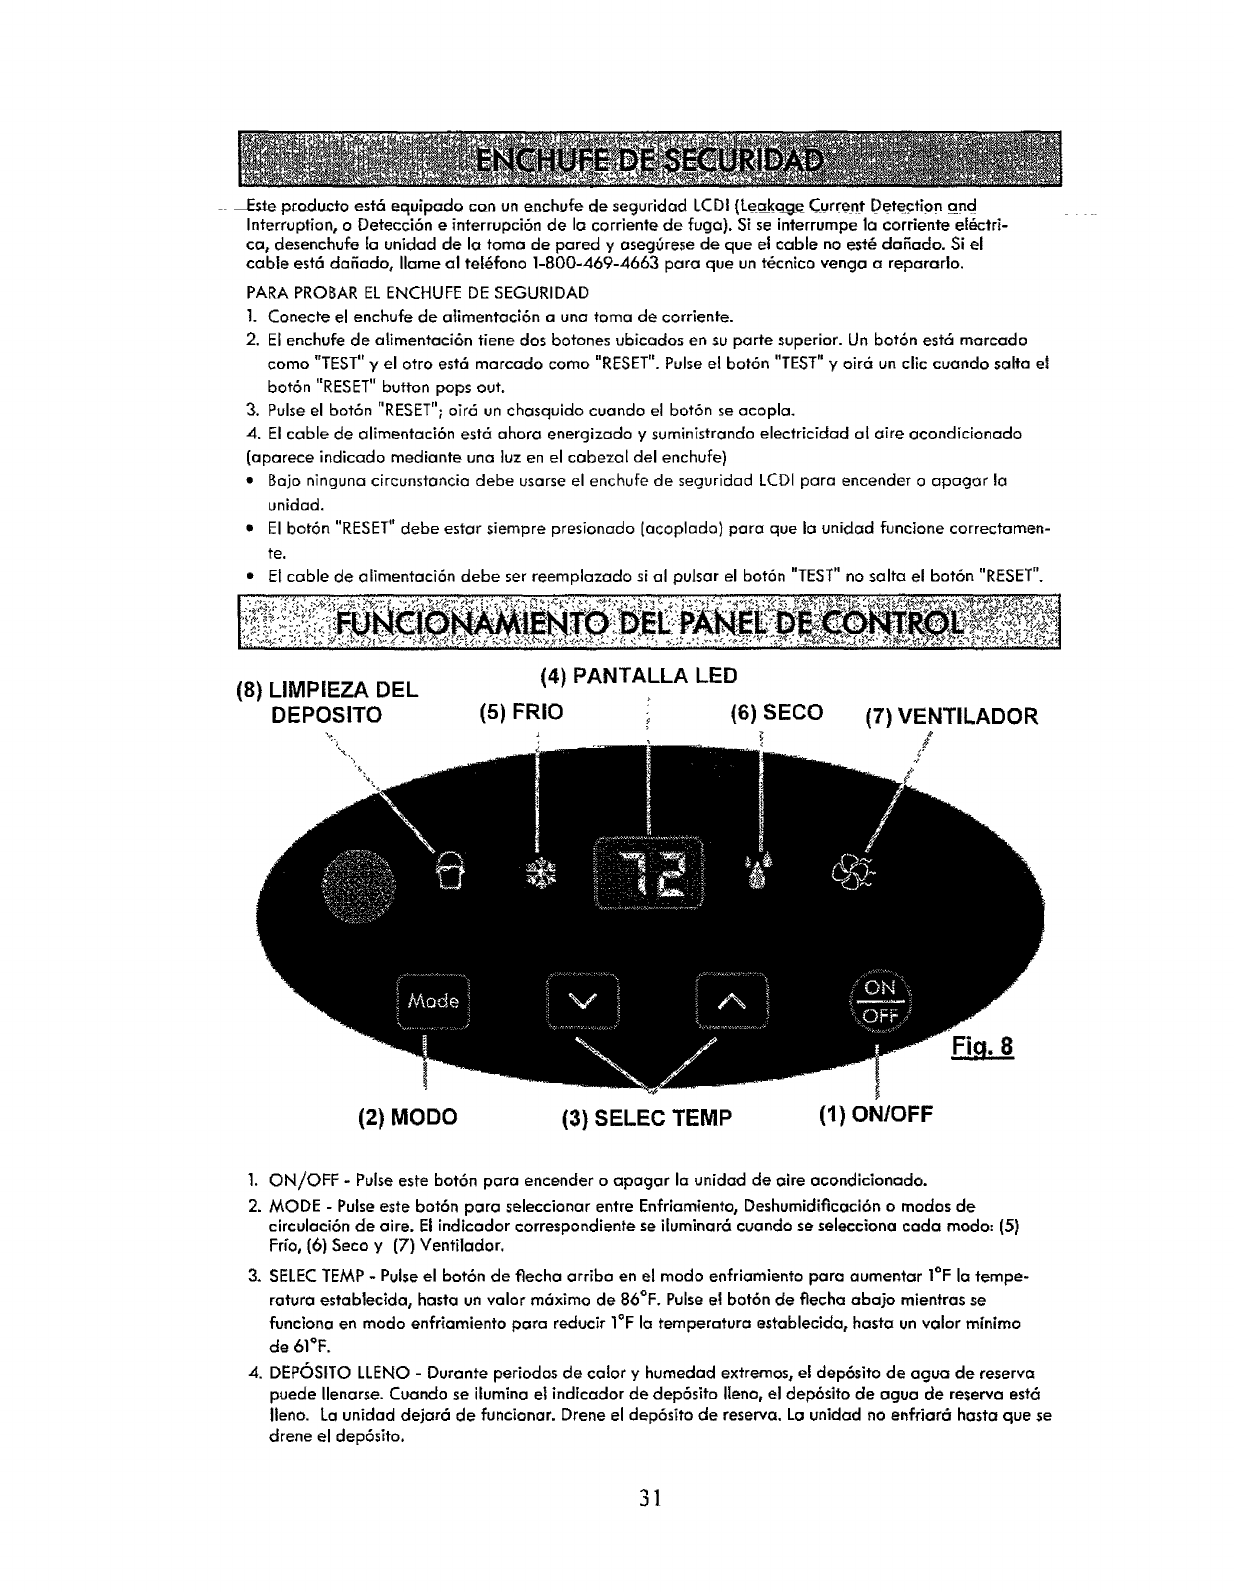
_ste p[oducto est6 equipado con un enchufe de seguridod LCDI (Leakage Current Detection and
Interruption, o Detecci6n e interrupci6n de Io corriente de fuga). Si se interrumpela corriente el6ctri-
co, desenchufe la unidad de la toma de pared yaseggrese de que el cable no est_ daSado. Si el
cable est6 dafado, Ilame al tet6fono 1-800-469-4663 para que un t6cnico venga a repararlo.
PARA PROBAR ELENCHUFE DE SEGURIDAD
1. Conecte el enchufe de a{imentaci6n a una toma de corriente.
2. El enchufe de alimentaci6n tiene dos botones ubicados en su parte superior. Un bot6n est6 marcado
coma "TEST"yel otro est6 marcado coma "RESET".Pulseel bot6n "TEST"yoir_ un clic cuando salta el
bot6n "RESET"button pops out.
3. Pulseel bot6n "RESET";air6 un chasquido cuando el bot6n se acopla.
4. El cable de alimentaci6n est6 ahora energizado y suminlstrando electricidad at oire acondicionado
(aparece indicado mediante una luz en el cobezol del enchufe)
• Bajo ninguna circunstoncio debe usarse el enchufe de seguridad LCDI para encender o opagc_r !a
unidad.
• El bot6n "RESET"debe estar siempre presionado tocoplado) para que In unidad funcione correctamen-
re.
• El cable de alimentaci6n debe ser reemplazado si al pulsar el bot6n "TEST"no salta el bot6n "RESET".
:'__'-'_ ;_'_._ "o "_..... "_ " : ..... _ _".: _'," "'_._'_ -" -'_"" _ _ "_ ." _ _" _': "_ "__" ..... _0"? "'_ _-_" _'_--_" '._'_........ "_ "_ "_"_-= _"_'."b_"_'_'_':
I:
l_..'._x'_,;;'-" .._._;", ,_':.,.::;_.,_I _ :.- "_- _",,':'_L'_-_o_'_ _';; 2-,;-'-.,,'_xr:_.:-._-._- -"_: ,:" :': _.;,_.._:-_- _ -_;:.' '" .%_ "-.___'_._zr _: _?'_'.._._'_:'.'--_._:_a
(4) PANTALLA LED
(8) LIMPIEZA DEL
DEPOSITO (5) FRIO ; (6) SECO (7) VENTILADOR
(2) MODO (3) SELEC TEMP (1) ON/OFF
1. ON/OFF - Pulseeste bot6n para encender o apagar la unided de aire acondicionado.
2. MODE - Pulseeste bot6n para seleccionar entre Enfriamiento, Deshumidificaci6n o modos de
circulaci6n de aire. El indicador correspondiente se iluminar6 cuando se selecciona cada modo: (5)
Fr[o, (6) Seco y (7) Ventilador.
3. SELECTEMP - Pulseel bot6n de tlecha arriba en el modo enfriamiento para aumentor I°F la tempe-
ratura establecida, hasta un valor m6ximo de 86°F. Pulsee! bot6n de flecha abajo mientrasse
funciona en modo enfriamiento para rectucir I°F la temperaturm establecida0 hasta un valor minima
de 61°F.
4. DEPOSITO LLENO - Durante periodos de calory humedad extremos, el dep6sito de agua de reserva
puede Uenarse.Cuando se ilumina el indicador de dep6sito Ileno, el dep6sito de agua de reserva est<_
Ileno. La unidad dejar6 de funcionar. Drene el dep6sito de reserva. Lo unidad no enfriar6 hasta que se
drene el dep6sito.
31
(1) .._.
(4) .t
(5)/(3)
(6)
BOTONES DELCONTROL REMOTO (Fig. 9)
!. Pulseel bot6n ON/OFF una vez para encender manualmente la unidad. Pulseel bot6n una vez m6s
part, apagar la unidad.
2. Pulse el bot6n MODE repetidamente pare pasar de un mode de func[onamiento t, otto: trio, seco,
ventitador o auto.
NOTA. El control remote debe estar en mode I:r[o_ Seco, Ventilador o Auto pare controlar It, unidad.
Mientras se encuentra en el mode Ventilador, pulse el bot6n MODE dos veces part, pasar al mode
Auto.
3. Mientras seencuentra en el mode Fr_o,pulse los botones - o +para selecciont,r It, tempert,tura desea-
da. La temperatura establecida en el control remote yen It, unidt,d se incrementar_ o reducir6 acor-
demente. Mantenga pulsado el bot6n - o + durante 2 segundos part, t,umentar o disminuir r6pidt,-
mente la temperature establecida. El margen de amplitud de tempert,turt,s es de 61°F_6°F.
NOTA: Cuando se encuen/ra en el mode Seco, A'uto o Ventliador, It, temperaturt, estt,blecida no apa-
rece en la pt,ntt,llt, de la unidt,d y al pulsar los botones - o + del control remote no se ajusta la tempe-
ratura establecida.
4. Mientras se encuentrt, en el mode Fr[or pulse el bot6n FAN (VENTILADOR) repetidamente para ajustar
la velocidad del ventilador a Auto, Baja, MedTa o Alto. Mientras se encuentra en el mode Ventitodor o
Auto (al seleccionar Ventilador), pulse el bot6n FAN repetidamente para t,justar It, velocidad del
ventilador a Auto, Bt,ja, Media o Alta.
5. Mientras seencuentra en el mode Frio, pulse el bot6n SLEEP(DORMIR} pare activar esta funci6n.
Reduce el use del compresor y active el t,horro de energia al incrementar ligeramente la tempert,turt,
establecida mientras usted se encuentra durmiendo.
Cuando la funci6n Sleep est6 activada, (a temperatura establecida aumentar6 autom6tict,mente
2°F cuando haya transcurrido 1 hera. Despugs de otrt, hera, la
tempert,turt, establecida aumentar6 otros 2°F
Iogrando un aumento total de 4°F.
Pulseel bot6n SLEEPuna vez m_s o el bot6n Mode para desactivar esta funci6n. La funci6n Sleep
este solamente disponible en el mode de enfriamiento.
32
BOTONES DEL CONTROL REMOTO Cont. (Fig. 9)
6. Temporizador Auto-on: Cuando el aim
acondicionado esta apogado, puede
programarse para que se active autom6tico-
mente en 30 minutos o en 24 horos con los
ajustes anteriores. Para con%urar el
temporizador Auto-on; mientrasla unidad est6
apagada, apunte el control remora hacia el
aire acondicionado ypulse el bot6n TIMER
(TEMPORIZADOR) A continuaci6n, pulse los
botones + o - para ajustar los valores del
temporizador en incrementosde 30 minutos (5
horas). Una vez se haya alcanzada et valor
deseado, pulse de nuevo el bot6n TIMER.
Sonar6 una alerto yel indicador T-ON dejar6
de parpadear para indicar que se ha
guardado el valor de aiuste yque se ha
activado el temporizador. Pora cancelar et
temporizador Auto-on, pulseel bot6n TIMER
de nuevo,
Temporizador Auto-off: Cuando el aire acon-
dicionado est6 eneendido, puede programarse
para que se desactive autom6ticamente en 30
minutos o en 24 horas. Para establecer el
Temporizador Auto-off, mEentrasla unidad
est6 encendida, apunte con el control remora
hac[a el aire acondicionado y pulse el bot6n
TIMER. A continuaci6n, pulse los botones + o -
para ajustar los valores del temporizador en
incrementos de 30 minutos (5 horas). Una vez
que se haya alcanzado ei valor deseado,
pulse el bot6n TIMER de nuevo. Sonar6 una
alerta y el indicador T-OFF dejar6 de parpa-
clear para indicar que se ha guardado el vator
de ajuste y que se ha activado el ternporiza-
dot. Para cancelar et temporizador Auto-Off,
pulse el bot6n TIMER de nuevo.
BLOQUEO DEL CONTROL REMOTO
Pulselos botones+y-simult6neamentepara
bloquear los botones del control remoto.
Cuando est6 bloqueado, el control remoto no
puede ser utilizado para operar la unidad. Pulse
los botones + y- simult6neamente una vez para
desbloquear el control remoto.
CAMBIAR LECTURA DETEMP °C & OFCuanclo la
unidad est6 apagada, pulse los botones MODE y
-simutt6neamente para cambiar la lectura de
temperatura de °F a
°C. Pulseios botones MODE y - simult6neamente
una vez m6s para cambiar fa lectura de tempera-
tura de °C a °F.
(10
(1: !5) Fi.q. 10
13)
1)
PANTALLA DEL CONTROL REMO-
TO (Fig. 10}
7. Auto -Seleccione uno de los modos que
se muestran a continuaci6n en funci6n
de la temperatura que el aire
acondicionado detecta en et cuarto.
8. Frio- Modo enfriamiento
9. Seco- Modo Deshumidificaci6n
10. Ventilador -Modo de circulaci6n de aire
11. Velocidad - Indica la velocidad de1
ventilador seleccionada
12. Bloqueo - Indica que los 10atonesdel
control remoto est6n bloqueados
13. Sleep - Funci6n de ahorro de energia
que incrementa ligeramente la tempe-
ratura mientras se encuentra en modo
Frio.
14. T-On - Indica que est6 activada la fun-
ci6n Temporizador Auto-On
15. T-Off - Indica que est6 act(vada la
funci6n Temporizador Auto-Off
INSERCION DE BATERJAS- El control
remora incluido usa pilas AAA.
1)Retire la tapa posterior del
control remoto
2)lnserte dos pilas AAA de 1,5 V , asegu-
r6ndose de que est_n en la posici6n co-
rrecta.
3)Vuelva acolocar la tapa.
NO MEZCLE pilas antiguas o usadas con
pilas nuevas. NO mezcle pilas alcalinas,
est6ndar (Carbono-Zinc) o recargables
(NiqueI-Cadmio). Deseche las baterias de
la farina apropiada. NO deje los pilas en
el control remoto si no se va a usar duran-
te m6s de 2 meses.
33
IMPORTANTE: Despu6s de encender la unidad el ventitador comienza a funcionar, pero el compresor no
se pondr6 en marcha hasta que transcurran aproximadamente 3 minutos. AI aire fHo comenzarg a
soplar una vez que se ponga en marcha et compresor, pero pueden pasar 5 minutos m6s para que se
note el efecto en el cuarto. Esta funci6n ayuda a proloncjar la vida gtil del compresor. ExTstem6s infor-
maci6n disponible en la secci6n "Resoluci6n de problemas". AI ajustar la direcci6n del fluio de a_re,
coioque los dedos solamente en el lado izqulerdo de los respiraderos de salida del aire, donde aparece
la lencji_eta.
MODO FR|O
Coloque ta unidad en el cuarto que requiere enfriamiento.
Recomendamos que en los dias calurosos ponga en marcha la unTdad a primeras horas de la manana
para obtener el m6ximo efecto. Esta unidad tiene un sistema de auto evaporaci6n que elimina el agua
que se condensa en la unidacl durante el enfriamiento. Se debe conectar e instalar correctomente la
manguera de escape para enfriar et cuarto adecuadamente. Consulte las instrucciones de tNSTALACION
de las p6ginas 9-10 de esta GU(A DE usa Y CUIDADO.
Utilice el bot6n MODE (MODO) del panel de control de la un;dad o del control remora y p6ngalo en
COOL (FRrO). Ajuste la temperatura establecida usando los botones arriba yabajo de la unidad o los
botones - y + de! control rernoto. La temperatura de enfHamiento puede establecerse entre 61°F y 86°F.
Utilizando el control remora0 pulse el bot6n FAN (VENTILADOR} para ajustar la velocidad det ventilador
conforme a Auto, Baja t Media o Alta.
MODO SECO
Coloque la unidad en el cuarto que requiere deshumidiflcaci6n.
Sedebe conectar e instalar correctamente la manguera de escape para deshumidificar el cuarto adecua-
damente. Consulte las instrucciones de INSTALACI6N de las p6cjinas 9-10 de esta GU[A DE usa Y CUI-
DADO.
Utilice el bot6n MODE (MC)DO) del panel de control de la unidad odel control remoto y p6ngalo en DRY
(SECO).
La velocidad del ventilador est6 establecida coma baja y no puede ajustarse en el modo DRY.
ELcompresor funcionar_ continuamente cuando la unidad funciona en modo DRY(SECO).
Hay un control de descongelaci6nintecjrado que detecta la acumulaci6n de congelacT6n en los serpenti-
nes del evaporador. Durante la descongelaci6n el compresor se apaga autom6ticamente. El ventilador
continuar8 funcionando para descongelar los serpentines. Cuando se haya eliminado ta congelaci6n, el
compresorse relmclara.
NOTA: La temperatura establecida no aparecer_ en la pantalla de la unidad. La temperatura estableci-
day la velocidad del ventilador no pueden ajustarse mientras se funciona en este modo.
MODO VENTILADOR
Coloque [a unidad en el cuarto que requiere ventilaci6n ocirculaci6n de aire.
Utilice el bot6n MODE (MODO) del panel de control de la unidad odel control remoto y p6ngalo en
FAN (VENTILADOR).
Utilizando el control remoto_ pulse el bot6n FAN para ajustar la velocidad del venfilador conforme a
Auto, Baja, Media oAlta.
La configuraci6n autom6tica del ventiiador cambiar6 la velocidad de _ste a Alta o Media, en func[6n del
flltimo valor de configuraci6n de [a temperatura establecida en el modo enfriamiento.
NOTA. La temperatura establecida no aparecer_ien la pantalla de la unidad y no puede ajustarse mien-
tras se opera en este modo.
34
MODO AUTO
•Coloque la uniclad en el cuarto deseado.
•5e debe conectar einstalar correctamente la mancjuerade escape para enfriar ydeshumidificar
el cuarto aclecuadamente. Consultelas instruceionesde INSTALACION de las pF,ginas 9-10 de
esta GUiA DE USO Y CUIDADO.
•Utilice el bot6n MODO del control remoto para establecer el funcionamiento de la unidad como
Auto. La temperatura estabtecida no aparece en la pantalla ynopuede ajustarse en el modo
Auto.
• Una vez en modo Auto, la unidad seleccionard autom6ticamente el modo en funci6n de la
temperatura actual del cuarto.
AJUSTES DEL MODO AUTO
Por debajo de 68°F
68°F _ 78°F
79°F o mas
Modo ventilador
Modo seco
Mode Frio
NOTA Si ta temperatura del cuarto es 68°F -73°F yse estableci6 anteriormente el modo Ventilador
antes de camblar a Auto, pasara a set modo Ventilador como predeterrninado. Cuando la temperatura
del cuarto es 74°F - 78°F, pasar_t a modo predeterminado Seco.
FUNCION DE HIBERNACION
• Mientras se encuentra en modo de enfnamiento, establezca la temperatura deseada putsando los
botones de flecha arriba y abajo del panel de control de la unidacl o los botones - y + del control
remoto. La temperatura de enffiamiento puede establecerse entre 61 °F y 86°F.
Ajuste la velocidad del ventilador conforme a Baja, Media, Alta y Auto, pulsando el bot6n
FAN (VENTILADOR) en el control remoto.
Pulse el bot6n SLEEP (DORMIR) en el control remoto para activar esta funci6n. La funci6n
Sleep solo funciona en el modo de enfriarniento.
Cuando se activa la funci6n Sleep, la temperature establecida aumentar_ automaticamente 2°F
despu6s de una hora. Despu6s de otra hora, la temperatura establecida se incrementar_ otros 2°F,
con un aumento total de 4°F.
Para cancelar la funci6n Sleep, pulse el boton SLEEP cn el control remoto o el bot6n MODE en
el panel de control de la unidad.
NOTA: La temperatura establecida que se muestra en la pantalla det panel de control de la uni-
dad yen el control remoto permanecerb, en la posici6n estabtecida inicialmente mientras la fun-
ci6n Sleep est6 activada.
35
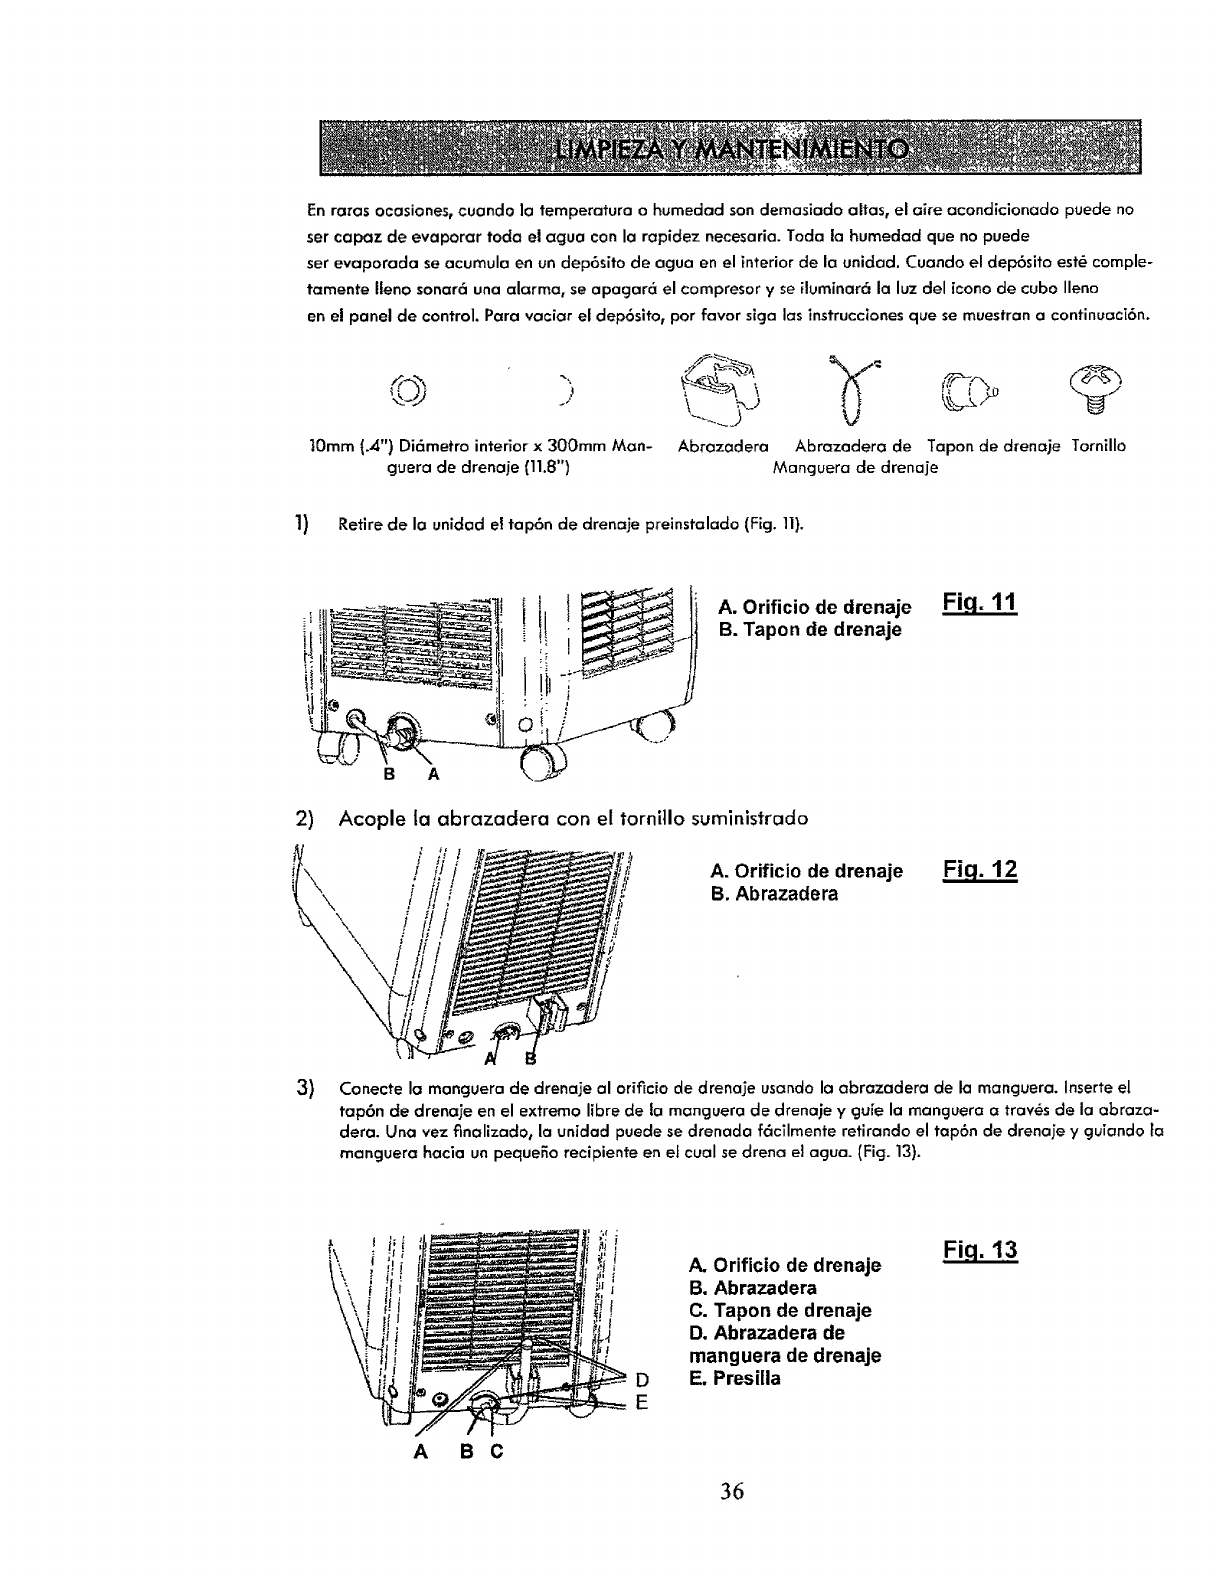
En raros ocasiones, cuondo ]a temperafura ohumedad sondemasiado altas, el aire acondicionado puede no
set capaz de evaporar toda el agua con la rapidez necesaria. Toda la humedad que no puede
ser evaporada se acumula en un dep6sito de agua en el interior de la unidad. Cuando el dep6sito est_ comple-
tamente Ileno sonar6 una alarma, se apagar6 el compresor yse iluminar6 la luz del icono de cubo Ileno
en el panel de control. Para vaciar el dep6sito, pot favor siga las instruccionesque se muestran a continuc_ci6n.
V
10ram (.4") Di6metro interior x 300ram Man- Abrazadera Abrazadera de Tapon de drenc_jeTornillo
guera de clrenaje (11.8") Mancjuera de drena]e
1) Retire de la unidad el tap6n de drenaje preinstalado (Fig. 11}.
A. OrifJcio de drenaje
B. Tapon de drenaje
Fig. 11
B A
2) Acople la abrazaclera con el tornillo suminlstrado
3)
\\\
/
/
A. Orificio de drenaje
B. Abrazadera Fig. 12
Conecte la monguera de drenaje al oriflcio de drenaje usando la abrazadera de la manguera. Inserteel
tap6n de drenaje en el extremo libre de la mQnguera de drenaje y gu[e la manguera atraves de la abraza-
dera. Una vez finalizad0, la unidad puede sedrenada f6cTImente retirando el tap6n de drenaje y gulando la
manguera hacia un peque5o recipiente en el cual sedrena ei agua. (Fig. 13).
D
E
A. Orificio de drenaje
B, Abrazadera
C. Tapon de drenaje
D. Abrazadera de
manguera de drenaje
E. Presilla
Fiq. 13
A B C
36
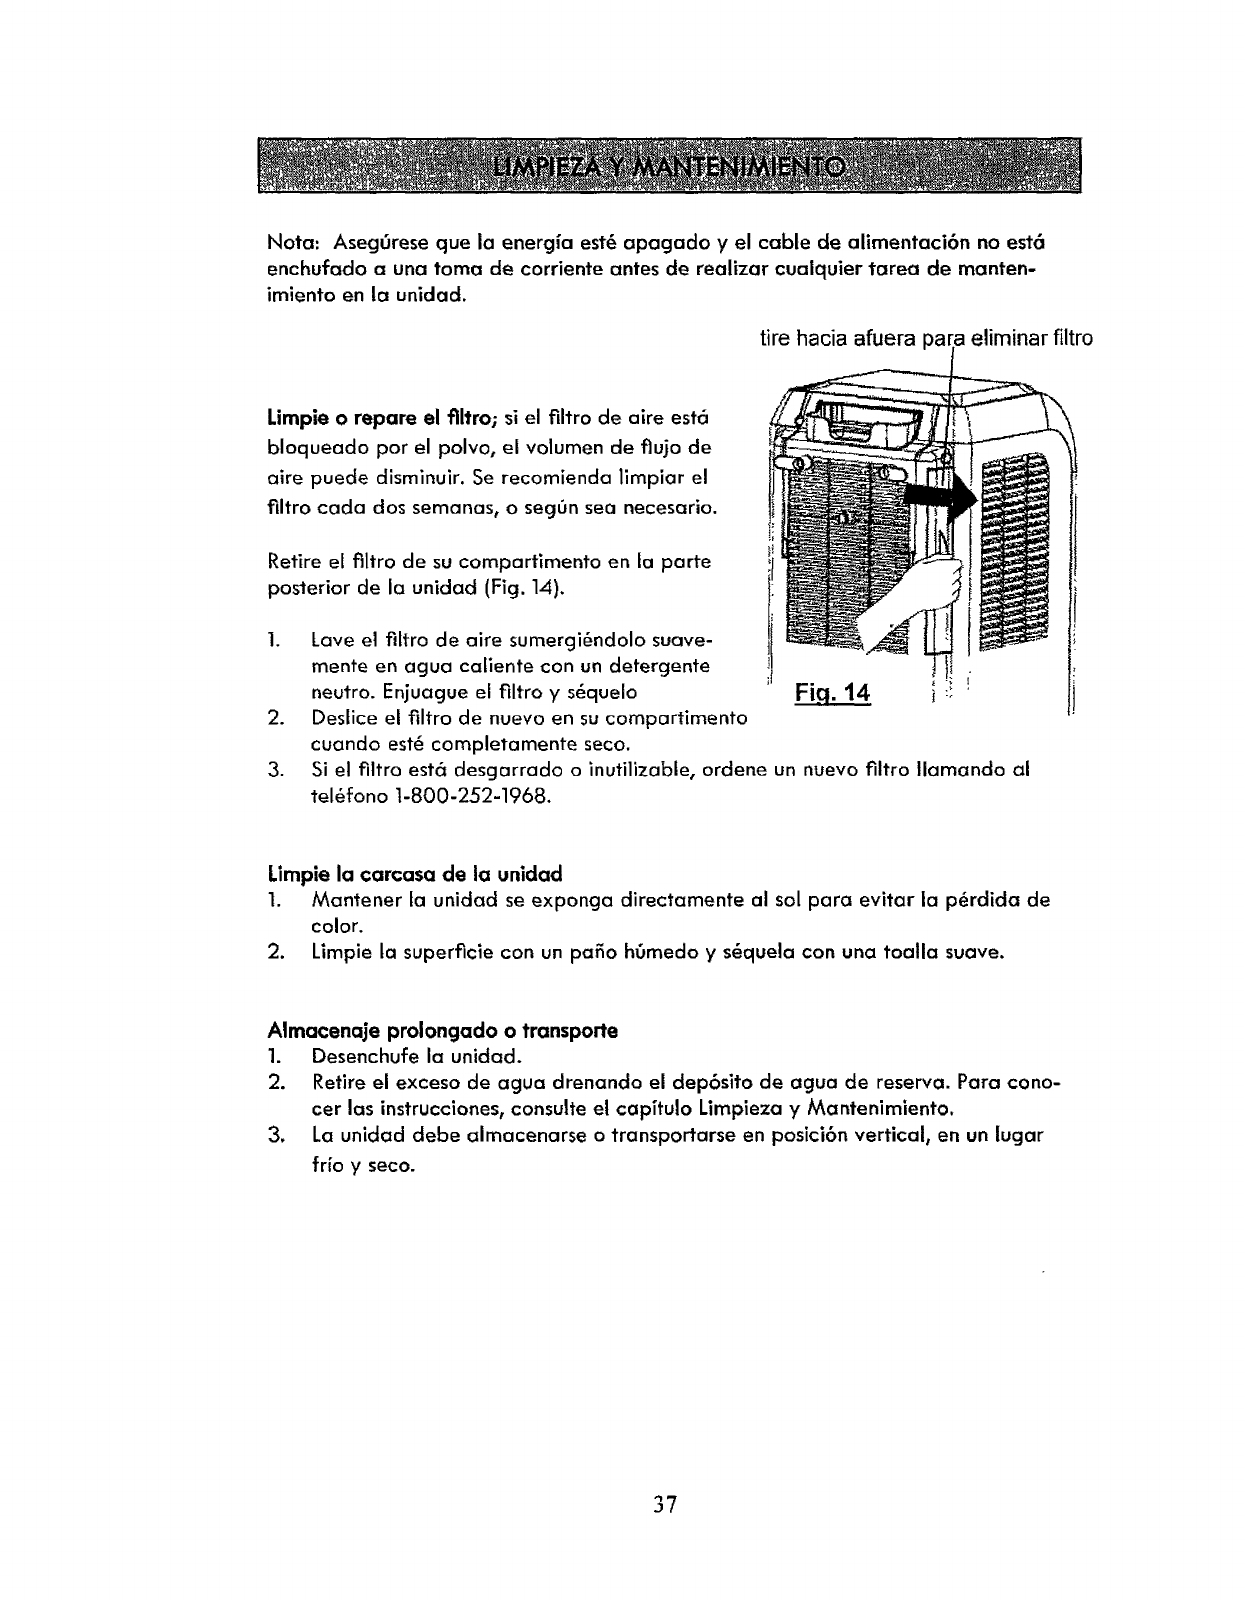
Nota: Aseggrese que ia energ_a est_ apagado y el cable de alimentaci6n no est6
enchufado a una toma de corriente antes de realizar cuaiquier tarea de manten-
imiento en 16 uniclad.
tire hacJa afuera para eliminar filtro
Limpie o repare el flltro; si el tiltro de aire esta
bloqueado por el polvo, el volumen de flujo de
aire puede disminuir. Se recomienda limpiar el
filtro cada dos semanas0 o seggn sea necesario.
Retire el flltro de su compartimento en la parte
posterior de la unidad (Fig. lA).
.
.
3.
Lave el filtro de aire sumergi6ndolo suave-
mente en agua callente con un detergente _l J
neutro. Enjuague el filtro y s6quelo FJq. 14 i i!
Deslice el filtro de nuevo en su compartimento
cuanclo est_ completamente seco.
Si el filtro estc_ desgarrado o inutilizable, ordene un nuevo filtro Ilamando al
tel_fono 1-800-252-1968.
Limpie la carcasa de la unidad
1. Manfener la unidad se exponga directamente al sol para evitar la p_rdida de
color.
2. Limpie la superficie con un patio h0medo y s_quela con una toalla suave.
Almacenaje prolongado o transporte
1. Desenchufe la unidad.
2. Retire ei exceso de agua drenando el dep6sito de agua de reserva. Para cono-
cer las instrucciones, consulte el capffulo Limpieza y Mantenimiento.
3. La unidad debe almacenarse o transportarse en posici6n vertical, en un Jucjar
trio y seco.
37
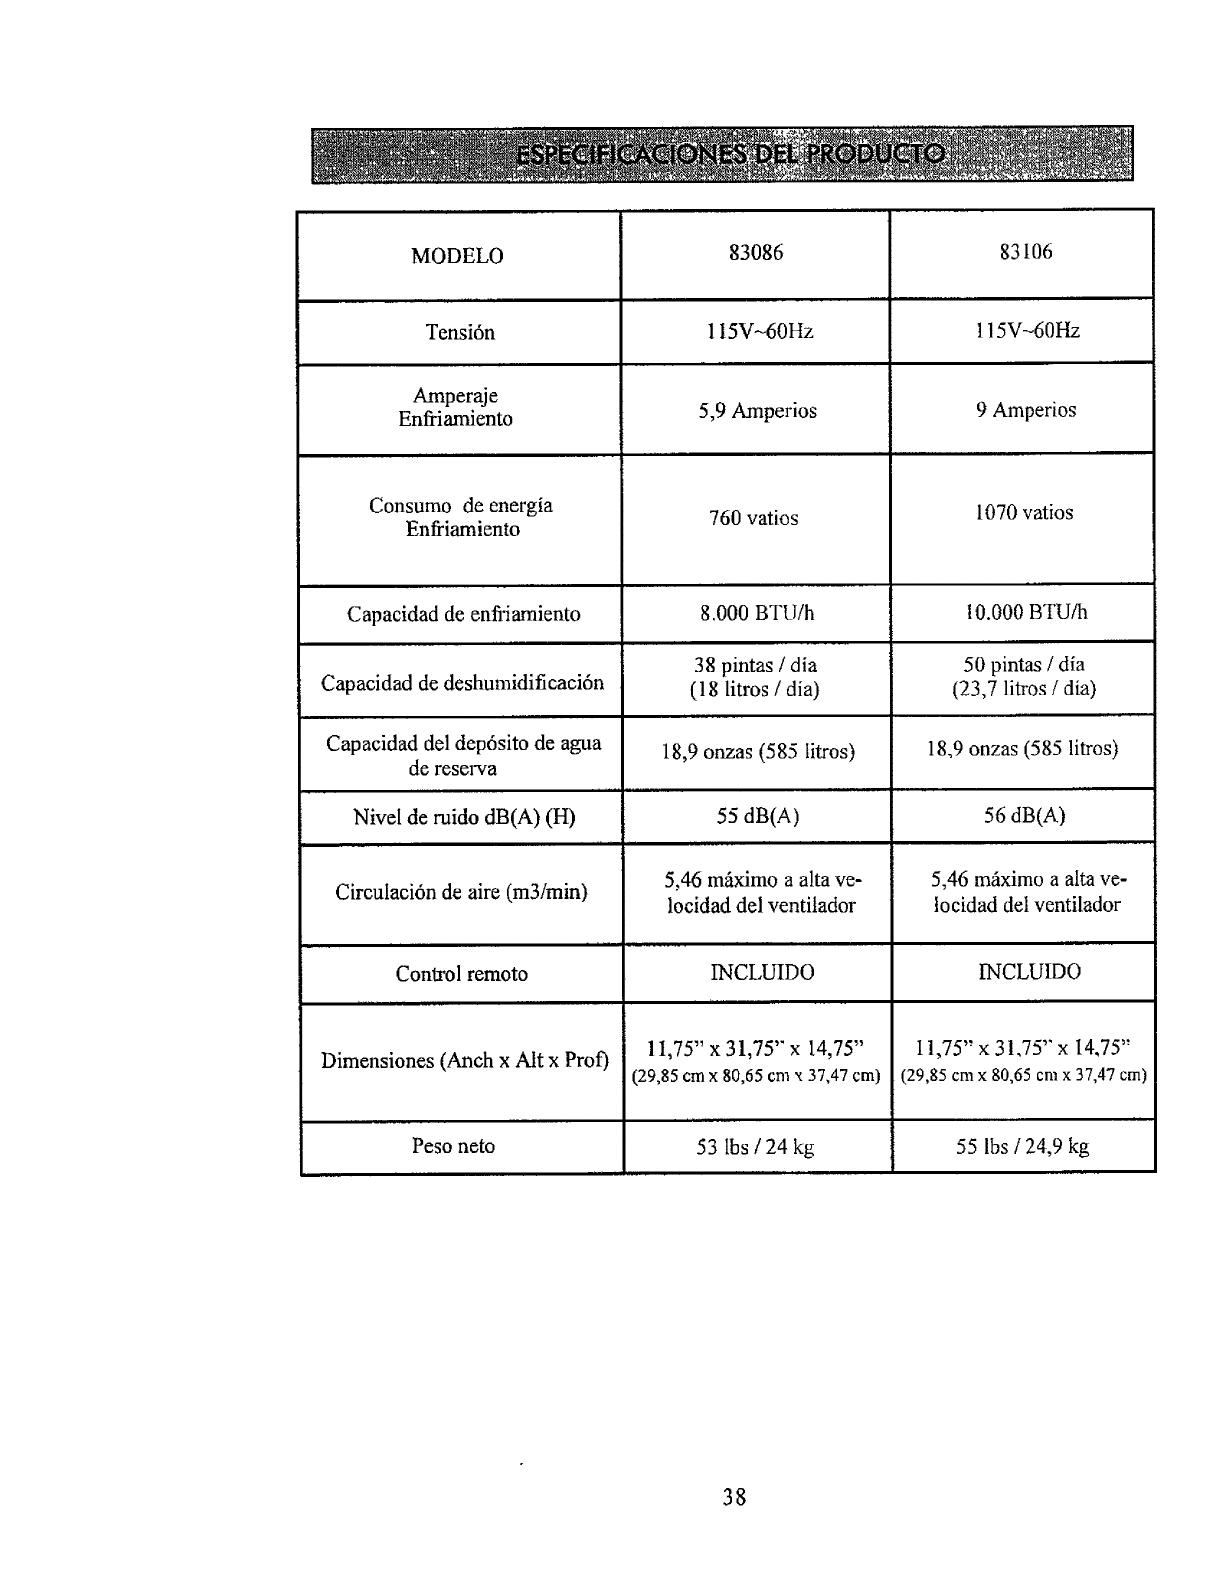
MODELO
,,,,, ,,
Tensi6n
Amperaje
Enfriamiento
Consumo de energia
Enfriamiento
Capacidad de enfi'iamiento
Capacidad de deshumidificaci6n
Capacidad del dep6sito de agua
de reserva
I II II
Nivel de ruido dB(A) (H)
II I
Circulaci6n de aire (m3imin)
Control remoto
Dimensiones (Anch x Aft x Prof)
Peso nero
83086
IIIIIII II
1I5V-60Hz
5,9 Amperios
760 vatios
8.000 BTU/h
38 pintas /dia
(18 litros /dia)
18,9 onzas (585 litros)
55 dB(A)
5,46 mi_ximo a alta ve-
locidad del ventilador
INCLUIDO
Ti.
11,75" x 31,75" x 14,75"
(29,85 cm x 80,65 cmx 37,47 cm)
iii
53 lbs /24 kg
83 I06
, ,,,, ,,
115V-60Hz
9 Amperios
1070 vatios
I0.000 BTU/h
50 pintas /dia
(23,7 litros /dia)
18,9 onzas (585 litros)
56 dB(A)
5,46 m_iximo a alta ve-
tocidad deI ventilador
INCLUIDO
11,75" x 31.75" x 14,75"
(29,85 cmx 80,65 cmx 37,47 cm)
55 lbs /24,9 kg
38
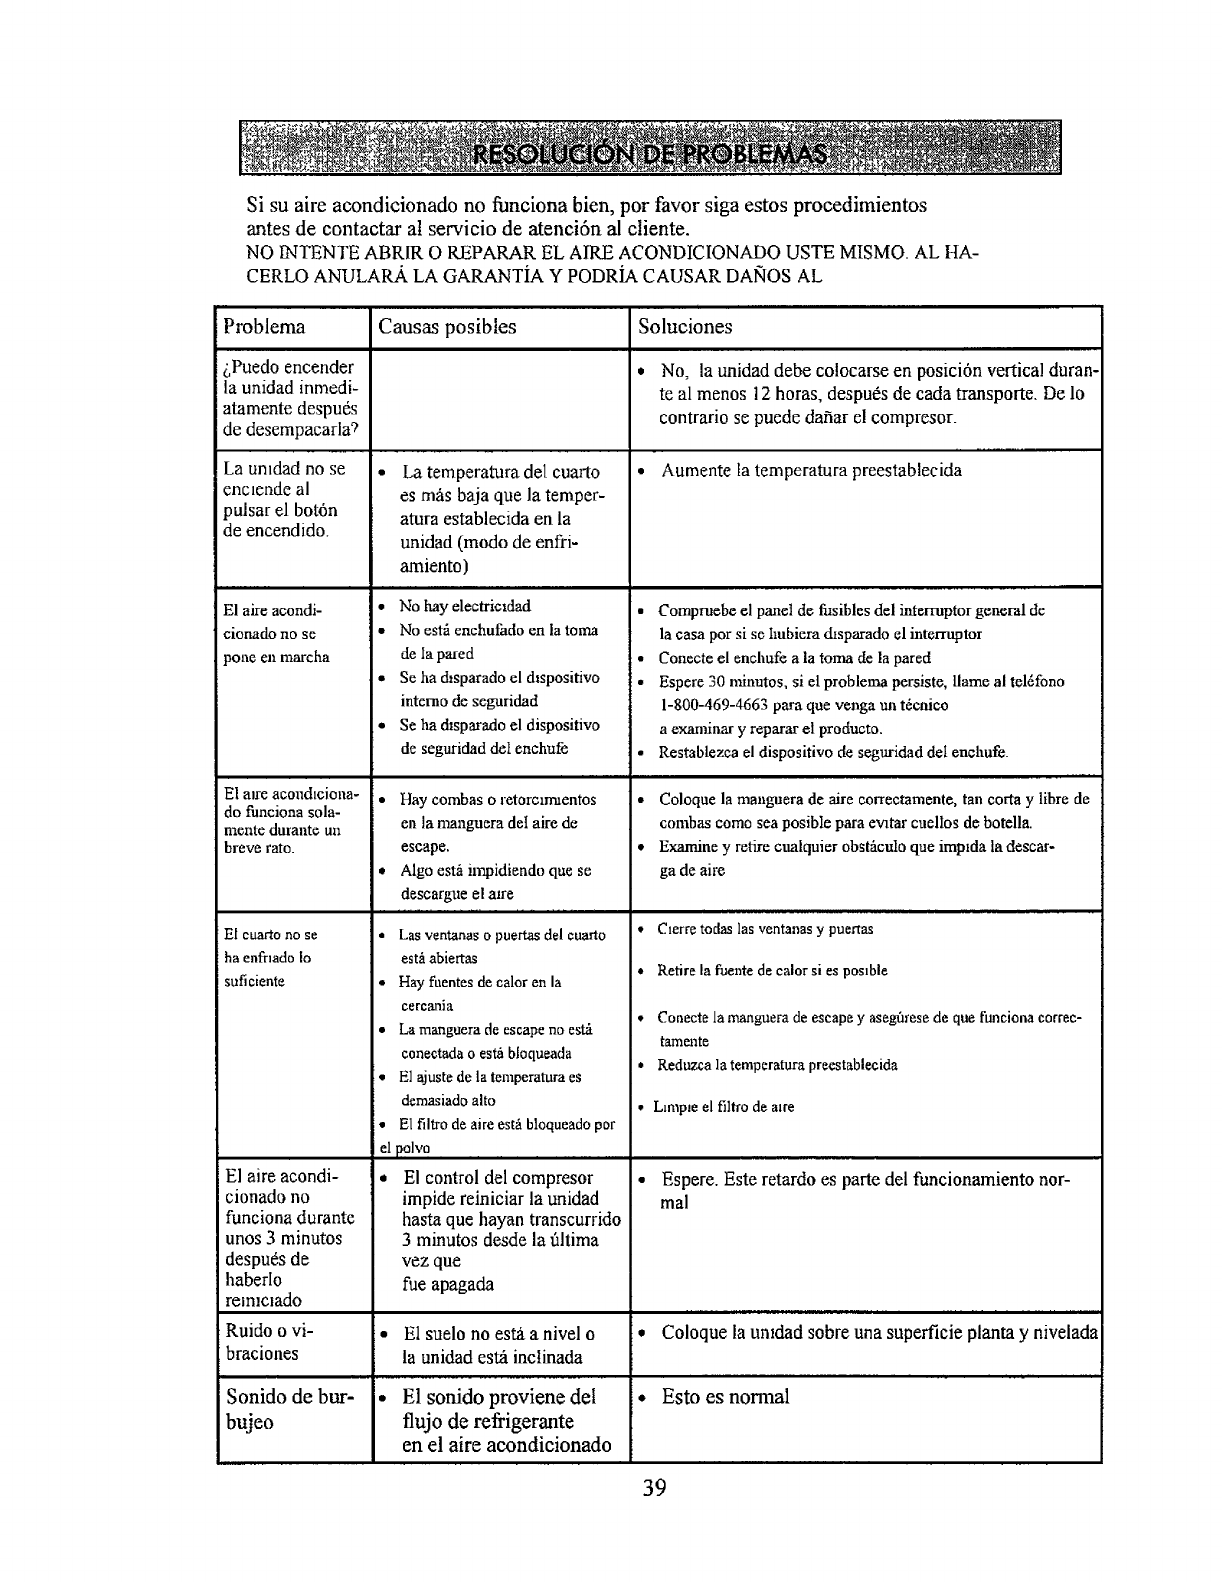
Si su aire acondicionado no funciona bien, por favor siga estos procedimientos
antes de contactar al servicio de atenci6n al cliente.
NO INTENTE ABRIR O REPARAR EL AIRE ACONDICIONADO USTE MISMO. AL HA-
CERLO ANULAR.A. LA GARANTiA Y PODRIA CAUSAR DANOS AL
Problema
dPuedo encender
la unidad inmedi-
atamente despu_s
de desempacarla_
La umdad no se
enclende al
pulsar el bot6n
de encendido.
El ake acondi-
cionado no se
3one en marcha
El aJre acondlciona-
do funciona sola-
mente durante un
breve rato.
El cuarto no se
ha enfrmdo Io
suficiente
El aire acondi-
cionado no
funciona dumnte
unos 3 minutos
despu_s de
haberlo
rem_cmdo
Ruido o vi-
i braciones
Sonido de bur-
bujeo
Causas posibles
La temperatura del cuarto
es m_s baja clue la temper-
atura establecida en la
unidad (modo de enfri-
amiento)
* No hay electricldad
•No estfi enchufado en la toma
de la pared
• Se ha d_sparado el dlspositivo
intcmo de seguridad
• Se ha dlsparado el dispositivo
de seguridad deI enchufe
• Flay combas o retorc_rmentos
en la manguera de1 aire de
escape.
• Algo esth impidiendo que se
descargue el awe
I I I II I ]I II I I I I II
*Las ventanas o puertas del cuarto
est_ abiertas
• Hay fuentes de calor en la
cercania
• La manguera de escape no est_
coaectada oest_ bloqueada
• El ajuste de la temperatura es
demasiado alto
• El filtro de aire est_ bloqueado pot
el polvo ........
* El control del compresor
impide reiniciar la unidad
hasta que hayan transcurrido
3 minutos desde la filtima
vez que
rue apagada
E1suelo no esta a nivel o
la unidad est_ inctinada
E1 sonido proviene del
flujo de refrigerante
en el aire acondicionado
Soluciones
* No_ la unidad debe co!ocarse en posici6n vertical duran-
teal menos 12 horas, despu6s de cada transporte. De 1o
contrario se puede dafiar el compresor_
•Aumente la temperatura preestablecida
• Compruebe el panel de fusibles del interruptor general de
la casa por si se hubiera chsparado el interruptor
• Conecte el enchufe a la torna de la pared
• Espere 30 minutos, si el problema persiste, llame al tel_fono
1-800-469-4663 para clue venga un t6cnico
a exanfinar y reparar el producto.
• Restnblezca el dispositivo de seguridad deI enchufe.
• Coloque la nmnguera de aire eorrectamente, tan corta y libre de
combas como sea posible para ewtar cuellos de botella.
• Examine y retire cualquier obst_tcttlo que impMa la descar-
ga de aire
• Clerre todas las ventanas y puertas
• Retire la fuente de calor si es poslble
• Conecte la manguera de escape y aseg0rese de que funeiona correc-
tamente
• Reduzca la tempcratura preestableeida
, L_mple el filtro de alre
• Espere. Este retardo es parle del funcionamiento nor-
mal
• Coloque la uMdad sobre una superficie planta y nivelada
• Esto es nonrial
39

Problema
La unidad emite un
olor durante el fun-
cionamiento
El compresor no se
activa inmediatamen-
teal pulsar el bot6n
de encendido (ON).
,, , , .... . . ,
La unidad se desacti-
va
La unidad no enfi'ia
de forma satisfacto-
ria.
La lectura de tem-
peratura ha cambi-
ado de °F a
°C
La lectura de tem-
peratura ha cambi-
ado de *C a
oF
El control remoto
est_ bloqueado.
Los indicadores lu-
minosos de control
no se iluminan cuan-
do la unidad est,-i
funcionando.
Causas posibles
, ,.,,. ,,
Primer uso de la uni-
dad, odespu6s de su
atmacenamiento en una
zona polvorienta
,,,.,,...,,,
Funcionmniento nomlal
Funcionamiento normal
i i i
La temperatura del cuarto
es alta cuando se inicia la
unidad por primera vez.
La lectura de tempera-
tufa se ha cambiado
utilizando el contro!
remoto
La lectura de tempera-
tura se ha cambiado
ufilizando el contro!
remoto
Soluciones
]• El desarrollo de olor puede aparecer en
el momento det primer
uso y despu6s de un largo periodo de no
usarse cuando se pone en fimcionamiento
en _reas no adecuadas (por ejemplo, en
fireas polvorientas) Ponga |a unidad en
marcha y ddjela funcionar durante medio
dia. E1 olor se disiparfi despu6s de un rato
En el caso de que el olor sea intenso,
ventile el cuarto.
• Despu6s de pulsar el bot6n de encendido
(POWER) el compresor tardarfi 3 minu-
tosen ponerse en marcha. E1 aire acondi-
cionado comenzari a soplar cuando se
inicie el compresor, pero podria tardar
hasta 5 minutos m_is.
..... .,,,,...,,
• Una vez alcanzada la temperamra
establecida, la unidad se desactiva
automgticamente. Compruebe el ajuste
de Ia temperatura
Ill I VIII I
•Los aparatos de aire acondicionado fun-
cionan de forma mils eficiente si se man-
tiene una temperatura de cuarto mils
fresca. Para enfriar adecuadamente el
aire de un cuarto muy caliente se requiere
mucho m_s tiempo y energ[a.
•Asegflrese de que fa unidad es_ apagada.
Pulse el bot6n "MODE" y el bot6n "-"
simult_neamente para cambiarla de nue-
vo a °F
° Asegf_rese de que la unidad est,5 apagada,
Pulse el bot6n "'MODE" y el bot6n "-'"
simultSneamente para cambiarla de nue-
vO a *C
• illl. i i i i
Se pulsaron simultfinea- , Pulse simult_eamente los botones ....
mente los botones "'-'" y y "'+" para desbloquear el control remo-
"+" to
Los indicadores lumi-
nosos de control han sido
desactivados utilizando
el control remoto
40
Pulse los botones "+" y
"'FAN" (VENTILADOR) simultfinea-
mente para que se iluminen los indica-
dotes luminosos de control.
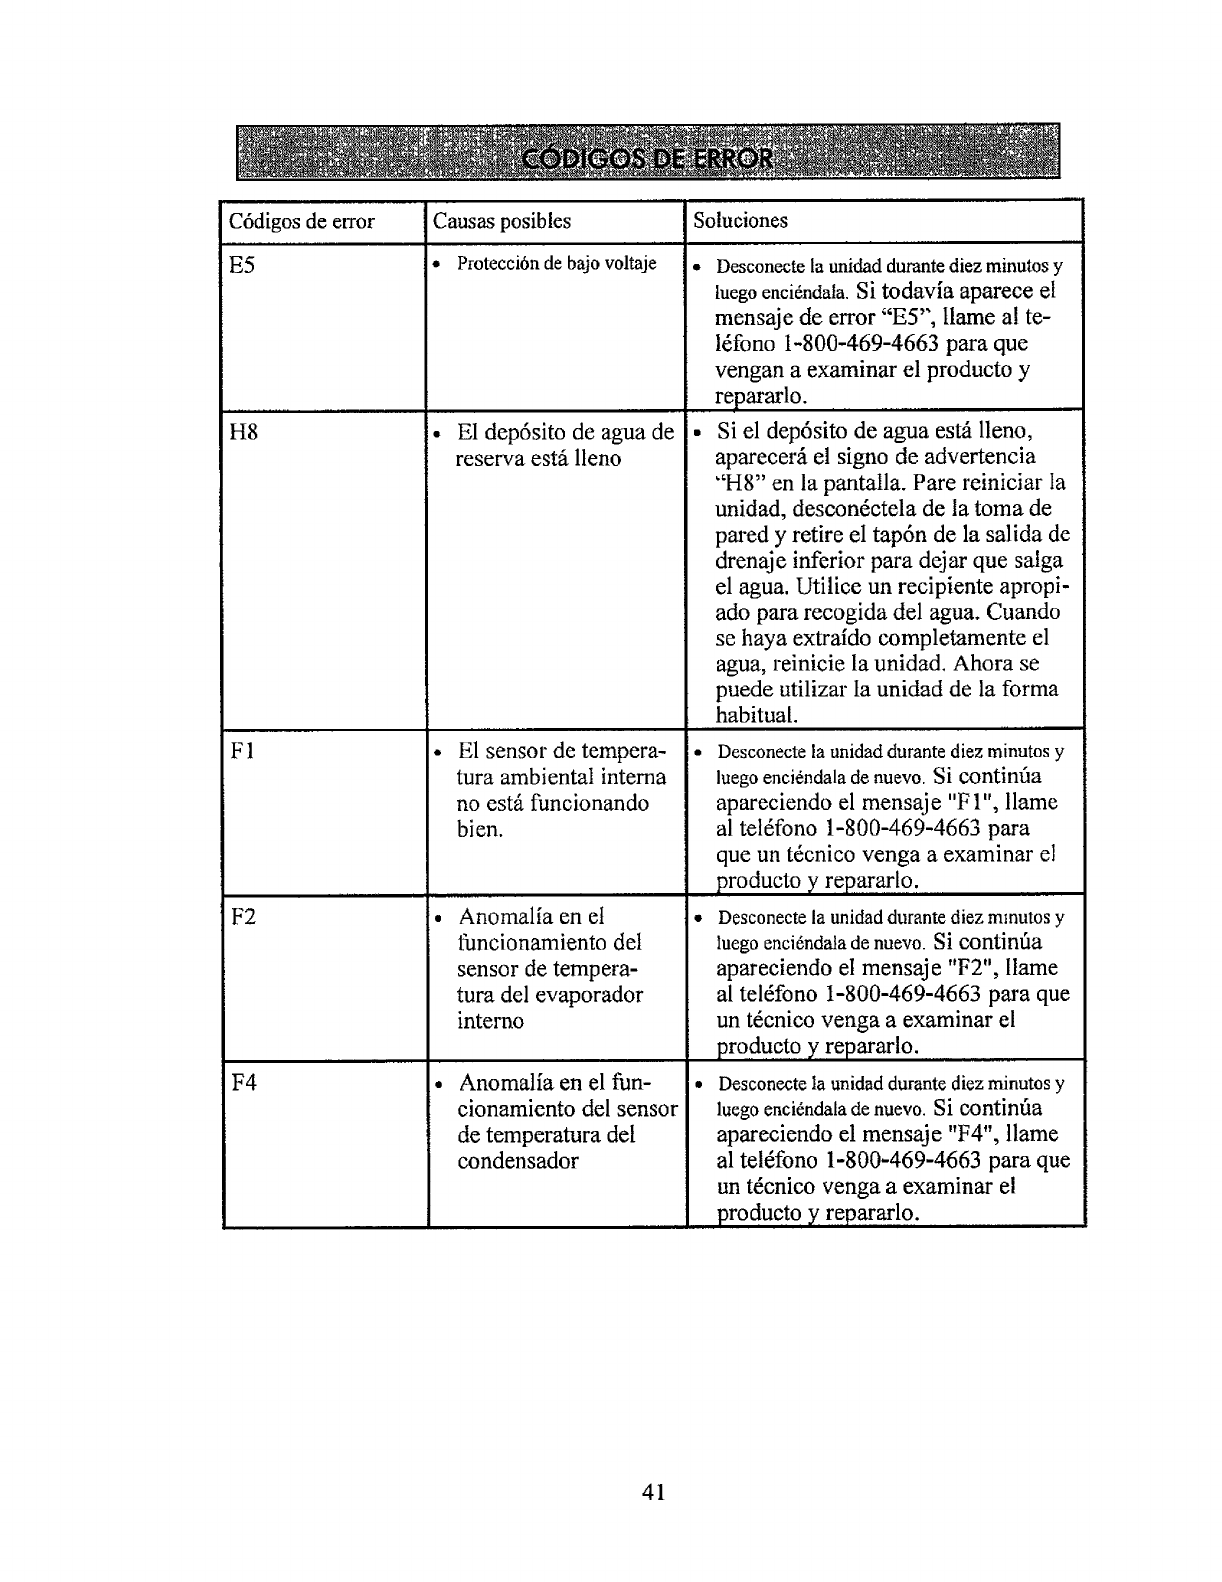
C6digos de error Causas posibles Soluciones
E5 •Protecci6n de bajo voltaje •
H8
F1
F2
F4
• El dep6sito de agua de
reserva estfi lleno
, ,,,,, , ,,
El sensor de tempera-
tura ambiental interna
no est_ funcionando
bien.
Anomalfa en el
funcionamiento del
sensor de tempera-
tufa del evaporador
interno
Anomalia en el fun-
cionamiento del sensor
de temperatura del
condensador
Desconecte la unidad durante diez minutos y
tuegoenci_ndala. Si todavia aparece el
mensaje de error "ES", llame a! te-
l_fono 1-800-469-4663 para que
vengan a examinar el producto y
repararlo.
• Si el depdsito de agua estA lleno,
aparecer_i el signo de advertencia
"H8" en la pantalla. Pare reiniciar Ia
unidad, descon6ctela de la toma de
pared y retire el tapdn de la salida de
drenaje inferior para dejar que salga
el agua. Utilice un recipiente apropi-
ado para recogida del agua. Cuando
se haya extraido completamente el
agua, reinicie la unidad. Ahora se
puede utilizar ta unidad de la forma
habitual. ,,, , ,,
• Desconecte la unidad durante diez minutos y
luego enci_ndala de nuevo. Si continfia
apareciendo el mensaje "FI", llame
al tel6fono 1-800-469-4663 para
que un t6cnico venga a examinar el
producto yrep..ar..at..19...'
• Desconecte la unidad durante diez mmutos y
luego enci6ndala de nuevo. Ni continfla
apareeiendo el mensaje "F2", llame
al tel6fono 1-800-469-4663 para que
un t6cnieo venga a examinar el
pro du.c.t9 y repararlo.
• Desconecte la unidad durante diez minutos y
luego enci_ndala de nuevo. Si contint_a
apareciendo el mensaje "F4", llame
al tel_fono 1-800-469-4663 para que
un t6cnico venga a examinar el
produeto y repararlo.
41
42
43
Your Home
For troubleshooting, product manuals and expert advice:
managemylife
www.m anagemylife.com '
For repair - in your home - of all major brand appliances,
lawn and garden equipment, or heating and cooling systems,
no matter who made it, no matter who sold it!
For the replacement parts, accessories and
owner's manuals that you need to do-it-yourself.
For Sears professional installation of home appliances
and items like garage door openers and water heaters.
,,, ?
:! 1-800-4-MY-HOME _(I-800-469-4663) :"
\.
;_-- Catt anytime, day or mght ..
.rwww.se;trs.com ::;i_
;i : Our Home
For repair of carry-in items like vacuums, lawn equipment,
and electronics, call anytime for the location of your nearest
Sears Parts & Repair Service Center
1-800-488-1222 (uS A)
www.$,e:ar$, ¢ 0 m
;-%
To purchase a protection agreement on a product serviced by Sears: S_..
1-800-827-6655 (u S A) ":_,
%...
.'.,,,:
Para pedir servic_o de reparation
a domicifio, ypara ordenar p=ezas
1-888.SU-HOGAR e
{L888-784-642T_
www se3rs.com
:¢z
.;;..'-
_< •
"7''"
::,:;?,;:.
,-, .-;>, sGcqrs
_Registered Tradem_ !'- Tladema#; of KCD IP, LLC in tt_e Urged States, _r Sears Bts_d[s.LLC in oth_' coun_
_Marc_ R_j_strada !_Marc_ de Fb_ca de KCD IF, LLC en E da_os Unidos. o Seres Brands, LL¢ in e_re_ p_ss_
!1111I!1111111111!1111111111III
66129912642
