Kenmore 40872012210 User Manual AIR CONDITIONER Manuals And Guides 1203606L
User Manual: Kenmore 40872012210 40872012210 KENMORE AIR CONDITIONER - Manuals and Guides View the owners manual for your KENMORE AIR CONDITIONER #40872012210. Home:Heating & Cooling Parts:Kenmore Parts:Kenmore AIR CONDITIONER Manual
Open the PDF directly: View PDF ![]() .
.
Page Count: 13
Use & Care Guide
Manual de Uso y Cuidado
Engllsh/Espa_ol
I<enmore
P/N 620209-0Y-6-A
Sears Brands Management Corporation
Hofl:man Estates, IL 60179 U.S.A.
www.kenmore.com
www.sears.com
Before Using Your New
Air Conditioner ........................ 2
Important Safeguards ............. 3-5
Kemore Air Conditioner
Warranty ............................... 6
Master Protection Agreement ...... 7
Unpacking Instructions ............... 8
Air Conditioner Parts ................. 8
Accessories ............................. 9
Installation .......................... 9-10
Safety Plug ............................ 11
Control Panel ...................... 11-13
Remote Control ................... 13-14
Operating Instructions ........... 15-18
Cleaning & Maintenance ....... 18-19
Storage ............................... 20
Technical Specifications ........... 20
Troubleshooting .................. 21-22
Notes .................................. 23
READ THiS USE & CARE GUIDE CAREFULLY AND
THOROUGHLY BEFORE iNSTALLiNG AND OPERATING
YOUR AiR CONDiTiONER.
RETAIN THiS USE & CARE GUIDE FOR FUTURE REFERENCE.
To prevent injury to the user or other people and property damage,
the following instructions must be followed.
°Use this appliance only as described in this Use & Care Guide. As with any
electrical appliance, the instructions aim to cover as many eventualities as
possible. Caution and common sense should be used when operating and
installing this air conditioner.
°This appliance has been manufactured to cool, heat and dehumidify
domestic environments and should not be used for other purposes.
°The appliance should not be installed where the atmosphere may contain
combustible gases, oil or sulphur, or near heat sources.
°Always install the portable air conditioner properly. Incorrect assembly or
installation may cause failure to operate including injury, fire and electric
shock hazards.
°Do not place the power cord near a heater. It may cause fire or electric
shock.
*Do not use the power cord near flammable gas or combustibles such as
gasoline, benzene, thinner, etc. It may cause explosion or fire.
*Do not operate or stop the unit by inserting or pulling out the power plug.
It may cause fire or electric shock.
*Do not damage or use an unspecified power cord. It may cause fire or
electric shock.
°Do not modify the length of the power cord. It will cause fire or electric
shock due to heat generation.
°Use the air conditioner on a single outlet circuit. Do not share the outlet
with other appliances. It may cause circuit failure.
°Changing the outlet without making the appropriate wiring changes will
create an unsafe condition that could result in fire or electric shock. Refer
aii such work to a licensed and qualified electrician.
°WARNING: This appliance must be properly grounded. The power cord
of this appliance is equipped with a three-prong LCDI (Leakage Current
Detection and Interruption) plug. To minimize the risk of electric shock,
use the plug with a standard three-slot grounding wail power outlet. If
power outlet does not include a grounding slot, have a qualified electrician
replace the outlet before you use your room air conditioner. Do not cut
or remove the grounding prong from the power plug. If you have doubt
whether the air conditioner is properly grounded, have the waft receptacle
and circuit checked by a qualified electrician.
°Do not disassemble or modify this appliance. Doing so may cause failure
and electric shock.
2 3
°TEMPORARY USE OF AN EXTENSION CORD. We strongly discourage the
use of an extension cord due to potential safety hazards. For temporary
situations, use only CSA and UL certified 3-prong grounded extension
cords designed and approved specifically for air conditioners.
°To prevent injury from handling sharp objects, do not touch the metal parts
of the unit when removing the filter.
°Do not block the air inlet or air outlet. It may cause failure of the
appliance.
°Always store and transport the air conditioner upright to maintain the
compressor in a proper condition. Prior to installation, allow air conditioner
to stand upright for 12 hours.
°Only operate the unit on an even horizontal surface to ensure no water
leaks.
°This appliance is not intended for use by persons (including children) with
reduced physical, sensory or mental capabilities, or lack of experience
and knowledge, unless they have been given supervision or instruction
concerning use of the appliance by a person responsible for their safety.
Children should be supervised to ensure that they do not play with the
appliance.
°Do not insert the power plug into a wail outlet if either is loose or
damaged. It may cause fire and electric shock.
°Unplug the unit if strange sounds, odors or smoke come from it.
°Hold the plug by the head when unplugging the unit. Do not puii on the
cord.
°Unplug the air conditioner if it will not be used for a long period to
prevent accidental startup and the possibility of injury.
°Do not place heavy objects on the power cord, and take care so that the
cord will not be damaged.
°Clean the air filters regularly. A contaminated air filter reduces capacity.
°Use a soft cloth to clean. Do not use wax, thinners or a strong detergent.
The appearance of the air conditioner may deteriorate, change color or
develop surface flaws.
°Do not use water to clean inside the air conditioner. Exposure to water can
destroy the insulation, leading to possible electric shock.
°If water enters the product, turn off the power switch of the main body of
the appliance.
°Being exposed to direct airflow for an extended period of time could be
hazardous to your health.
°Do not use this air conditioner for refrigeration purposes (e.g. preserving
precision devices, food, pets, plants and art objects.)
°Due to the possibility of oxygen deficiency within the room, ventilate the
room when used together with stoves or other heating devices.
°The air conditioner is a consumer comfort appliance, not a precision
climate control system.
*Always insert the filter securely. Never operate without a fiJten
°Do not drink water drained from air conditioner. It contains contaminants
that may make you sick.
°Do not use this unit in conditions where the temperature may fall below
50°F (10°C). Failure to do so can cause severe damage to the unit.
45
Kenmore Limited Warranty
When this product is installed, operated and maintained according to all
supplied instructions, the following warranty coverage applies. To arrange for
warranty service, call 1-800-4-MY-HOME ®
°For five years from the date of purchase, this product will be replaced free
of charge if the sealed refrigerant system fails due to defects in material or
workmanship.
°For one year from the date of purchase, this product w[[[ be repaired free of
charge for defects in material or workmanship to a[[ components other than
the sealed refrigerant system.
A[[ warranty coverage applies for only 90 days from the date of purchase if this
product is ever used for other than private family purposes.
This warranty covers only defects in material and workmanship.
Sears will NOT pay for:
1. Expendable items that can wear out from normal use, including but not
limited to filters, belts, light bulbs, and bags.
2. A service technician to instruct the user in correct product installation,
operation or maintenance.
3. A service technician to clean or maintain this product.
4. Damage to or failure of this product if it is not installed, operated or
maintained according to the a[[ instructions supplied with the product.
5. Damage to or failure of this product resulting from accident, abuse, misuse or
use for other than its intended purpose.
6. Damage to or failure of this product caused by the use of detergents,
cleaners, chemicals or utensils other than those recommended in all
instructions supplied with the product.
7. Damage to or failure of parts or systems resulting from unauthorized
modifications made to this product.
Disclaimer of implied warranties; limitation of remedies
Customer's sole and exclusive remedy under this limited warranty shall be
product repair as provided herein. Implied warranties, including warranties of
merchantability or fitness for a particular purpose, are limited to one year or
the shortest period allowed by law. Sears shall not be liable for incidental or
consequential damages. Some states and provinces do not allow the exclusion or
limitation of incidental or consequential damages, or limitation on the duration of
implied warranties of merchantability or fitness, so these exclusions or limitations
may not apply to you.
This warranty applies only while this appliance is used in the United States or
Canada.
This warranty gives you specific legal rights, and you may also have other rights
which vary from state to state.
Sears, Roebuck and Co., Haft:man Estates, [L 60179
Sears Canada Inc., Toronto, Ontario, Canada M5B 2C3
Master Protection Agreements
Congratulations on making a smart purchase. Your new Kenmore ® product is
designed and manufactured for years of dependable operation. But like all
products, it may require preventive maintenance or repair from time to time.
That's when having a Master Protection Agreement can save you money and
aggravation.
The Master Protection Agreement also helps extend the life of your new
product. Here's what the Agreement* includes:
[] Parts and labor not just for reparing defects, but to help keep products
operating properly under normal use. Our coverage goes well beyond the
product warranty. No deductibles, no functional failure excluded from
coverage-real protection.
[] Expert service by a force of more than ]0,000 authorized Sears service
technicians, which means someone you can trust will be working on your
product.
[] Unlimited service calls and nationwide service, as often as you want us,
whenever you want us.
[] "No-lemon" guarantee-replacement of your covered product if four or
more product failures occur within twelve months.
[] Product replacement if your covered product can't be fixed.
[] Annual Preventive Maintenance Check at your request-no extra charge.
[] Fast help by phone-we call it Rapid Resolution-phone support frm a Sears
representative on all products. Think of us as a "talking owner's manual':
[] Power surge protection against electrical damage due to power fluctuations.
[] $250 Food Loss Protection annually for any food spoilage that is the result
of mechanical failure of any covered refrigerator or freezer.
[] Rental reimbursement if repair of your covered product takes longer than promised.
[] 10% discount off: the regular price of any non-covered repair service and
related installed parts.
Once you purchase the Agreement, a simple phone ca[[ is a[[ that it takes for you
to schedule service. You may call anytime, day or night, or schedule a service
appointment online.
The Master Protection Agreement is a risk free purchase. If you cancel for any
reason during the product warranty_ we will provide a full refund. Or, a prorated
refund anytime after the product warranty period expires. Purchase your Master
Protection Agreement today!
Some limitations and exclusions apply. For prices and additional information in
the U.S.A. call 1-800-827-6655.
*Coverage in Canada varies on some items. For full details call Sears Canada at
1-800-361-6665.
Sears ]nstallation Service
For Sears professional installation of home appliances t garage door openers t water
heaters, and other home items, in the U.S.A. or Canada ca[I 1-800-4-MY-HOME ®.
67

1. Place the unit in the correct upright
position before unpacking.
2. Cut the two packing straps.
3. Slide the carton in an upward motion
and it will release from the base.
(We recommend that you retain the
packaging for off:season storage)
4. Grip the unit by the recessed carry
handles on each side, and carefully lift
unit until it slides free from foam base.
Carry
Remove the air conditioner from the packing carton. It is recommended to
keep the carton and packing material for storage or transportation of the unit.
(4) ............................../,_
(5) _ ,
(2) Front of Unit (_
fl) 1. Control Panel
2. Remote receiver
3. Adjustable air vent
4. Hose joint
5. Exhaust hose
6. Upper drain outlet
7. Carry handles
8. Remote receiver jack
(14) (9)
(1o)
(11)
(12)
Rear of Unit
9. Cool air inlet
10. Cool air filter
11. Warm air inlet
12. Warm air filter
13. Lower drain outlet
14. Exhaust hose holder
On initial unit setup, check that aii the accessories listed below are included:
Exhaust hose
Remote sensor kit
(used only in out-of-room
cooling mode)
2 AAA batteries
Drain hose for
continuous drainage
(16 mm inner diameter)
Window kit
(3 pcs)
Remote control
Prior to installing the unit, check for the following:
1. To avoid damage, place the unit in an upright position for at least 12 hours
before initial operation. This ensures a!i lubricating oil has settled to the
bottom of the compressor, avoiding damage to other internal parts.
2. Lift the exhaust hose holder (1) from the unit to expose the exhaust hose
and accessories. Remove the accessories from the hose and set aside. Turn
the hose in the direction of arrow (2) to completely remove the hose from
the unit. Return the exhaust hose holder to the unit.
3. The hose has a window connection end and a unit connection end. Expand
the unit connection end and insert it into the exhaust hose holder. Turn the
hose several turns in the direction of arrow (3) until it is securely attached
in the holder.
(1)
(2) "_7
....... ./
o0
(3)
o0
4. Plug the unit into a 120V-60Hz grounded electrical outlet. DO NOT USE
A REGULAR EXTENSION CORD. If it is necessary to use an extension cord
with this unit, use an approved air conditioner extension cord only.
L (13) 8 9
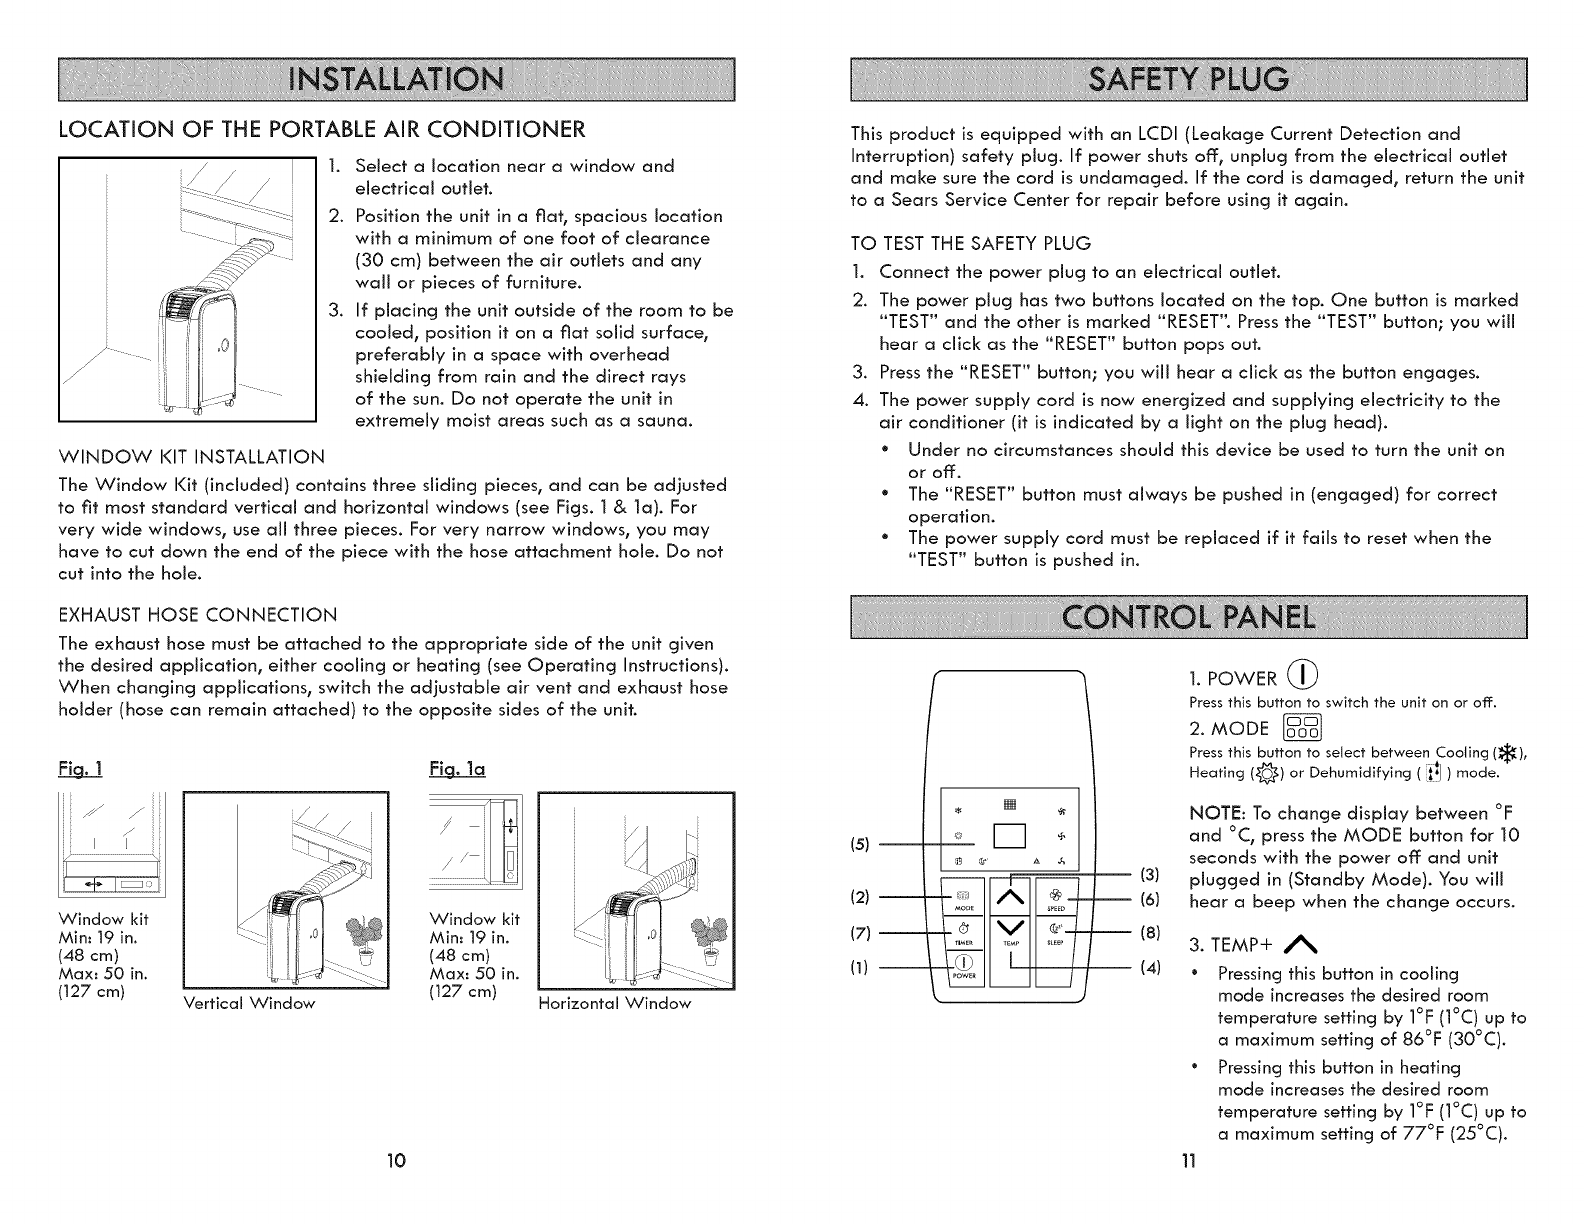
LOCATION OF THE PORTABLE AiR CONDiTiONER
/
/
1. Select a location near a window and
electrical outlet.
2. Position the unit in a fiat, spacious location
with a minimum of one foot of clearance
(30 cm) between the air outlets and any
wall or pieces of furniture.
3. If placing the unit outside of the room to be
cooled, position it on a fiat solid surface,
preferably in a space with overhead
shielding from rain and the direct rays
of the sun. Do not operate the unit in
extremely moist areas such as a sauna.
WINDOW KIT INSTALLATION
The Window Kit (included) contains three sliding pieces, and can be adjusted
to fit most standard vertical and horizontal windows (see Figs. 1 & la). For
very wide windows, use all three pieces. For very narrow windows, you may
have to cut down the end of the piece with the hose attachment hole. Do not
cut into the hole.
EXHAUST HOSE CONNECTION
The exhaust hose must be attached to the appropriate side of the unit given
the desired application, either cooling or heating (see Operating Instructions).
When changing applications, switch the adjustable air vent and exhaust hose
holder (hose can remain attached) to the opposite sides of the unit.
zii
Window kit
Min: 19 in.
(48 cm)
Max: 50 in.
(127 cm) Vertical Window
Window kit
Min: 19 in.
(48 cm)
Max: 50 in.
(127 cm) Horizontal Window
10
This product is equipped with an LCDI (Leakage Current Detection and
Interruption) safety plug. If power shuts off:, unplug from the electrical outlet
and make sure the cord is undamaged. If the cord is damaged, return the unit
to a Sears Service Center for repair before using it again.
TO TEST THE SAFETY PLUG
1. Connect the power plug to an electrical outlet.
2. The power plug has two buttons located on the top. One button is marked
"TEST" and the other is marked "RESET'L Press the "TEST" button; you wiii
hear a click as the "RESET" button pops out.
3. Press the "RESET" button; you wiii hear a click as the button engages.
4. The power supply cord is now energized and supplying electricity to the
air conditioner (it is indicated by a light on the plug head).
°Under no circumstances should this device be used to turn the unit on
or off:.
°The "RESET" button must always be pushed in (engaged) for correct
operation.
°The power supply cord must be replaced if it fails to reset when the
"TEST" button is pushed in.
(5)
(2) --
(7) --
(i) --
o [_
(3)
-- (6)
-- (8)
(4)
1. POWER (_
Press this button to switch the unit on or off:.
2. MODE
Press this button to select between Cooling (_),
Heating (_) or Dehumidifying (iitj) mode.
NOTE: To change display between °F
and °C, press the MODE button for 10
seconds with the power off: and unit
plugged in (Standby Mode). You will
hear a beep when the change occurs.
3. TEMP+ A
•Pressing this button in cooling
mode increases the desired room
temperature setting by I°F (1°C) up to
a maximum setting of 86°F (30°C).
• Pressing this button in heating
mode increases the desired room
temperature setting by I°F (1°C) up to
a maximum setting of 77°F (25°C).
11

4. TEMP- V
°Pressing this button in cooling mode decreases the desired room
temperature setting by ]°F (]°C) down to a minimum setting of 63°F
(17°C).
°Pressing this button in heating mode decreases the desired room
temperature setting by ]°F (]°C) down to a minimum setting of 59°F (15°C).
5. LED DISPLAY
The display shows the current temperature setting.
By pressing the (A) or (V) buttons, the temperature setting can be changed.
When pressing the timer button ((_), the number of hours is shown until
delayed start-up or delayed shutdown. After each setting, the display returns
to showing the current temperature setting. In the dehumidifying mode,
"dh" is shown on the display. Error codes are also shown in the display. See
Troubleshooting section for Error code definitions.
6. SPEED _
Pressing this button sets the ventilator fan speed to "_ (low)", " _-'_ (medium)",
(high)" or "/.._ (automatic)".
When (/__) is selected:
°If the set temperature is more than 16.2 ° F ( 9° C) different than room
temperature, the fan wiil run at fuil speed.
°If the set temperature is less than 9° F (4 ° C) different than room
temperature, the fan wiil run at medium speed.
• When the set temperature is reached, the fan wiiI run at low speed.
When the temperature becomes more than 9° F (4°C) different than
room temperature, the fan wiiI change to medium speed.
7. TIMER (_
Programmable timer button for delayed start-up or delayed shutdown.
How to program a delayed start-up
This function is used to set the number of hours delay before the appliance
comes on. Proceed as follows:
°With the power ON, select the desired Mode of operation (Cool, Heat
or Dehumidify)
°Turn the power OFF.
°Press the TIMER button ("00" wili blink in the display). While the
display is blinking, use the up and down buttons to set the number of
hours delay before the unit begins operation.
°Wait a few seconds for the display to show the set temperature. Use
the up and down buttons to adjust the set temperature if desired.
°After the set number of hours has expired, the unit starts automatically.
NOTE: If you press the POWER button before the set delay time has expired,
the delay setting wili cancel and the unit wili immediately turn ON.
How to program a delayed shutdown
This function is used to set the number of hours delay before the appliance shuts off.
Proceed as follows:
• With the power ON_ select the desired Mode of operation (Cool_ Heat or
Dehumidify).
Pressthe TIMER button ("00" will blink in the display). While the display is
blinkin% use the up and down buttons to set the desired number of hours until
shutdown.
Wait a few seconds for the display to show the set temperature. Use the up
and down buttons to adjust the set temperature if desired.
After the set number of hours has expired_ the unit shuts down automatically.
NOTE: If you press the POWER button before the set shutdown time has expired_ the
unit will shut down immediately.
8. SLEEP (_ zz
The Sleep mode is ideal for nighttime operation_ as it automatically reduces the fan
speed and minimizes the compressor runnin% for the quietest operation.
While the unit is ON_ press the SLEEPmode button. The unit will switch to low fan
speed.
In COOLING mode_ the temperature setting automatically increases by 2° F (1° C)
each hour for the first two hours of operation. As a resuih the Sbep function provides
most cooling when you first go to bed. The two setting increases whib you are sleeping
compensate for the typical decrease in ambient temperature as the night progresses.
If the ambient temperature becomes 2 ° F (1° C) cooler than the temperature settin%
the compressor will turn off. The compressor turns back on when the ambient
temperature becomes 2° F (1° C) warmer than the ambient temperature.
In HEATING mode_ the temperature setting is automatically DECREASED like above_
and the compressor turns off if the ambient temperature becomes 2° F (1° C) BELOW
the setting.
If desired_ the fan speed can be manually changed whib in SLEEPmode.
SLEEPmode cannot be activated whib the unit is in DEHUMIDIFY mode.
INSERTING BATTERIES - This remote control uses two AAA batteries.
°Remove the back cover of the remote control
°Insert two AAA ].5V batteries, making sure they are in the correct
position (see instructions inside battery compartment).
•Replace the cover.
DO NOT mix old and new batteries. DO NOT mix together Alkaline,
Standard (Carbon-Zinc), or Rechargable (Nickel-Cadmium) batteries.
Dispose of batteries properly. DO NOT leave batteries in the remote if it wili
not be used for longer than 2 months.
12 13
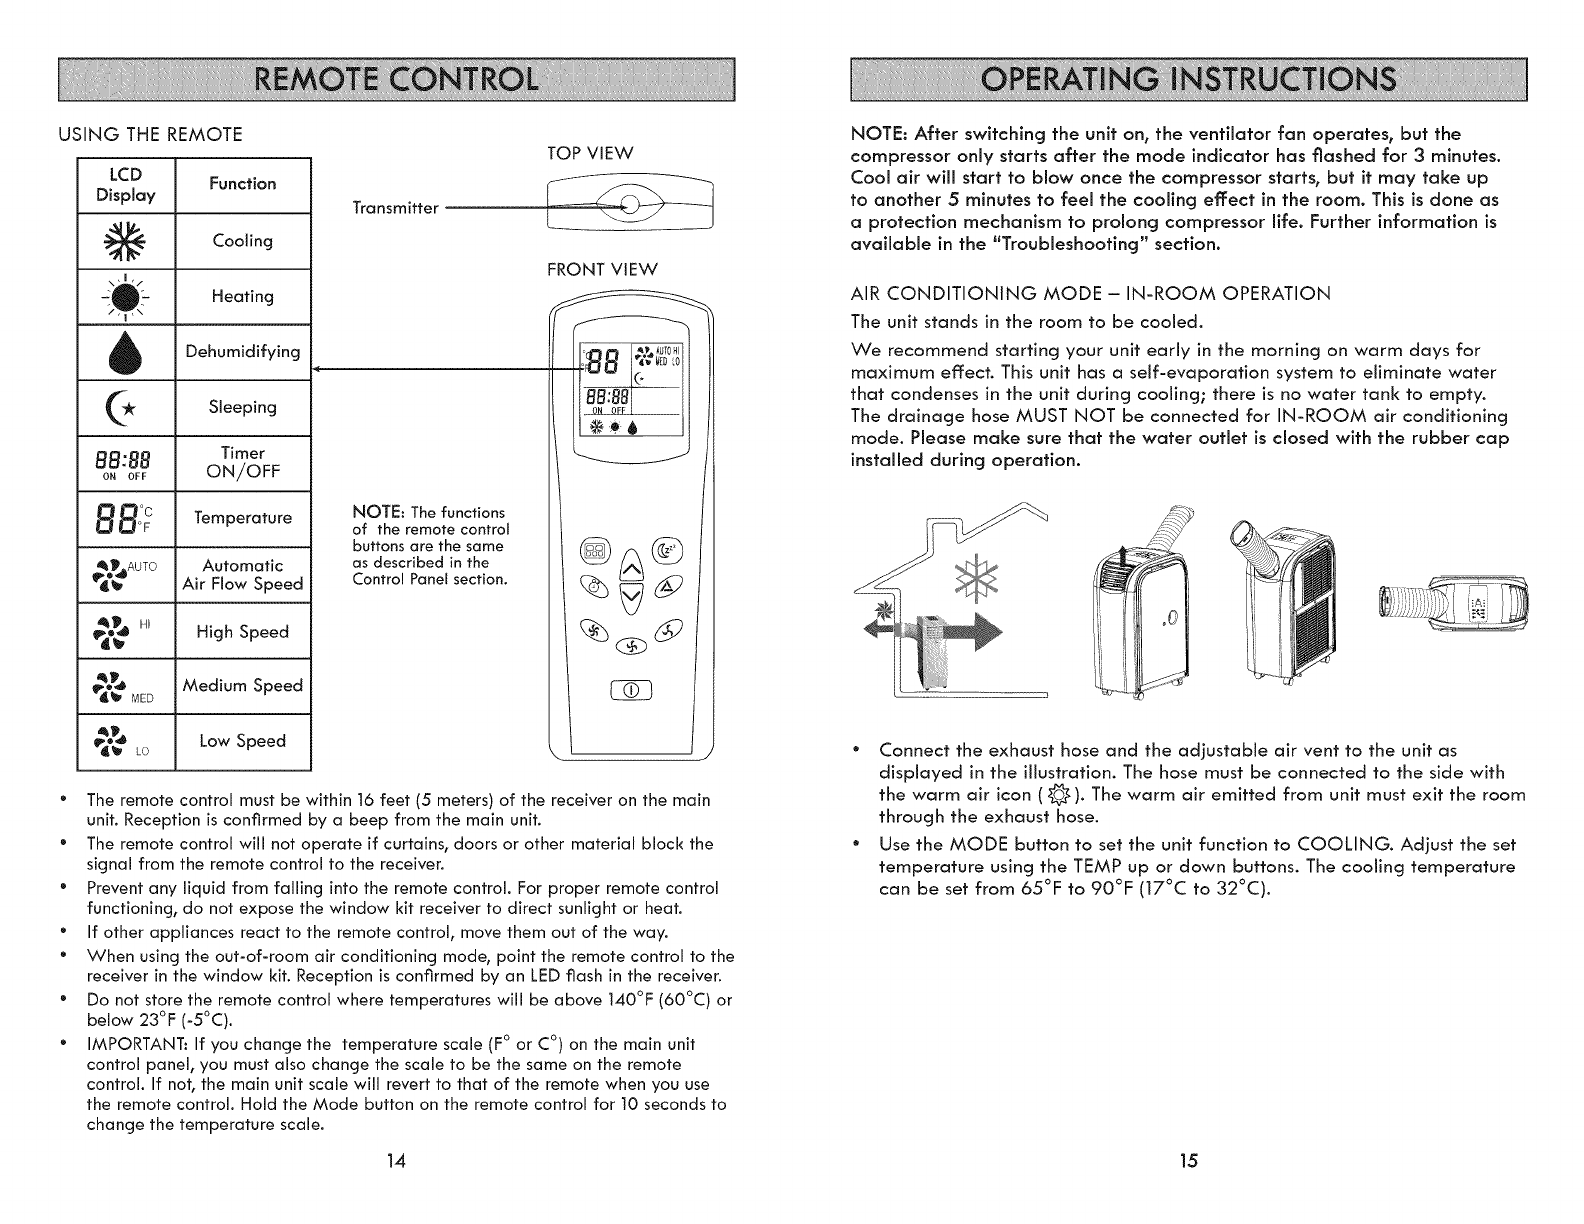
USING THE REMOTE
LCD Function
Display
_._ Cooling
\,1,/
-_e )- Heating
Dehumidifying
(_ Sleeping
BB:BB Timer
ON OFF ON/OFF
BB: c Temperature
_.AUTO Automatic
_ Air Flow Speed
_ HI
_ High Speed
_ Medium Speed
r_" LO Low Speed
Transmitter
NOTE: The functions
of the remote control
buttons are the same
as described in the
Control Panel section.
TOP VIEW
FRONT VIEW
*The remote control must be within 16 feet (5 meters) of the receiver on the main
unit. Reception is confirmed by a beep from the main unit.
*The remote control will not operate if curtains, doors or other material block the
signal from the remote control to the receiver.
*Prevent any liquid from falling into the remote control. For proper remote control
functioning, do not expose the window kit receiver to direct sunlight or heat.
*If other appliances react to the remote control, move them out of the way.
*When using the out-of-room air conditioning mode, point the remote control to the
receiver in the window kit. Reception is confirmed by an LED flash in the receiver.
*Do not store the remote control where temperatures will be above 140°F (60°C) or
below 23°F (-5°C).
*IMPORTANT: If you change the temperature scale (F° or C°) on the main unit
control panel, you must also change the scale to be the same on the remote
control. If not, the main unit scale will revert to that of the remote when you use
the remote control. Hold the Mode button on the remote control for 10 seconds to
change the temperature scale.
NOTE: After switching the unit on, the ventilator fan operates, but the
compressor only starts after the mode indicator has flashed for 3 minutes.
Cool air will start to blow once the compressor starts, but it may take up
to another 5 minutes to feel the cooling effect in the room. This is done as
a protection mechanism to prolong compressor life. Further information is
available in the "Troubleshooting" section.
AIR CONDITIONING MODE - IN-ROOM OPERATION
The unit stands in the room to be cooled.
We recommend starting your unit early in the morning on warm days for
maximum effect. This unit has a self-evaporation system to eliminate water
that condenses in the unit during cooling; there is no water tank to empty.
The drainage hose MUST NOT be connected for IN-ROOM air conditioning
mode. Please make sure that the water outlet is closed with the rubber cap
installed during operation.
°Connect the exhaust hose and the adjustable air vent to the unit as
displayed in the illustration. The hose must be connected to the side with
the warm air icon (@). The warm air emitted from unit must exit the room
through the exhaust hose.
°Use the MODE button to set the unit function to COOLING. Adjust the set
temperature using the TEMP up or down buttons. The cooling temperature
can be set from 65°F to 90°F (17°C to 32°C).
14 15
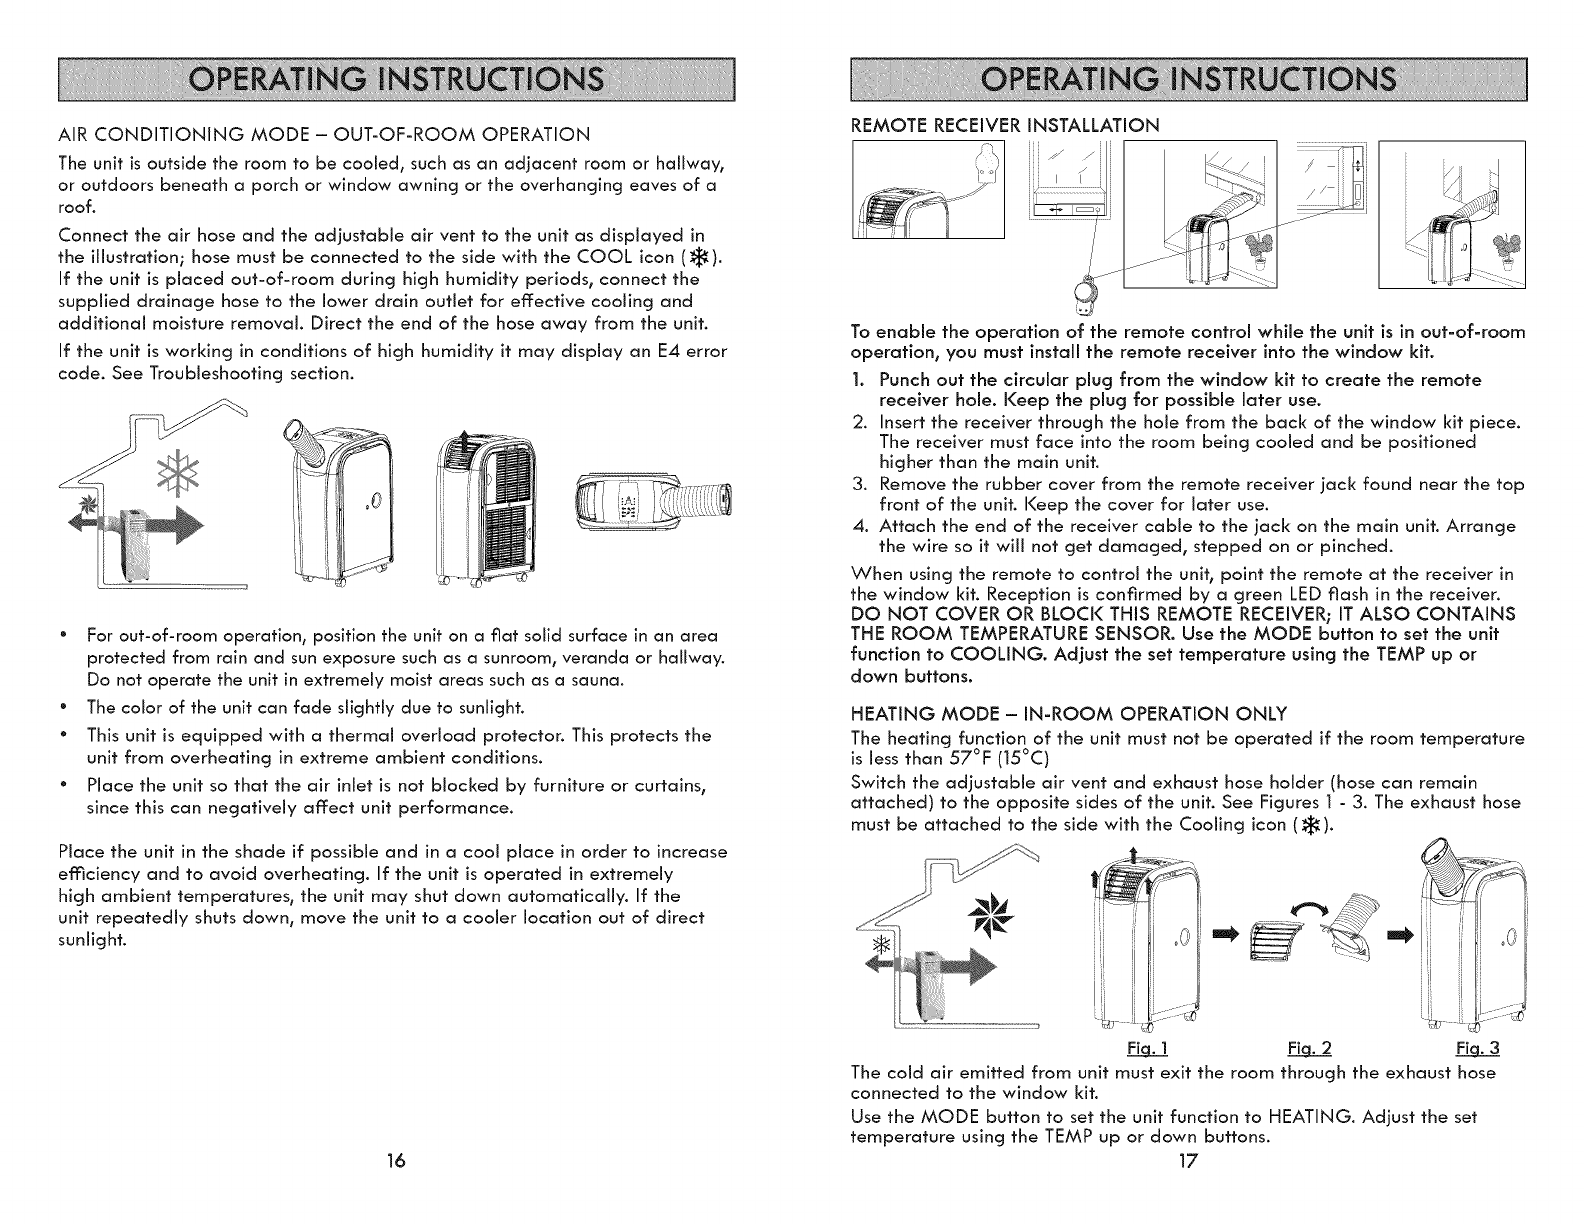
AIR CONDITIONING MODE -OUT-OF-ROOM OPERATION
The unit is outside the room to be cooled, such as an adjacent room or hallway,
or outdoors beneath a porch or window awning or the overhanging eaves of a
roof.
Connect the air hose and the adjustable air vent to the unit as displayed in
the illustration; hose must be connected to the side with the COOL icon (:€,t45t).
If the unit is placed out-of-room during high humidity periods, connect the
supplied drainage hose to the lower drain outlet for effective cooling and
additional moisture removal. Direct the end of the hose away from the unit.
If the unit is working in conditions of high humidity it may display an E4 error
code. See Troubleshooting section.
(
00
*For out-of-room operation, position the unit on a fiat solid surface in an area
protected from rain and sun exposure such as a sunroomt veranda or hallway.
Do not operate the unit in extremely moist areas such as a sauna.
* The color of the unit can fade slightly due to sunlight.
°This unit is equipped with a thermal overload protector. This protects the
unit from overheating in extreme ambient conditions.
°Place the unit so that the air inlet is not blocked by furniture or curtains,
since this can negatively affect unit performance.
Place the unit in the shade if possible and in a cool place in order to increase
emciency and to avoid overheating. If the unit is operated in extremely
high ambient temperatures, the unit may shut down automatically. If the
unit repeatedly shuts down, move the unit to a cooler location out of direct
sunlight.
16
REMOTE RECEIVER INSTALLATION
/\
_ f
To enable the operation of the remote control while the unit is in out-of-room
operation_ you must install the remote receiver into the window kit.
1. Punch out the circular plug from the window kit to create the remote
receiver hole. Keep the plug for possible later use.
2. Insert the receiver through the hole from the back of the window kit piece.
The receiver must face into the room being cooled and be positioned
higher than the main unit.
3. Remove the rubber cover from the remote receiver jack found near the top
front of the unit. Keep the cover for later use.
4. Attach the end of the receiver cable to the jack on the main unit. Arrange
the wire so it will not get damaged, stepped on or pinched.
When using the remote to control the unit, point the remote at the receiver in
the window kit. Reception is confirmed by a green LED flash in the receiver.
DO NOT COVER OR BLOCK THIS REMOTE RECEIVER; IT ALSO CONTAINS
THE ROOM TEMPERATURE SENSOR. Use the MODE button to set the unit
function to COOLING. Adjust the set temperature using the TEMP up or
down buttons.
HEATING MODE - IN-ROOM OPERATION ONLY
The heating function of the unit must not be operated if the room temperature
is Jess than 57°F (15°C)
Switch the adjustable air vent and exhaust hose holder (hose can remain
attached) to the opposite sides of the unit. See Figures 1 - 3. The exhaust hose
must be attached to the side with the Cooling icon (_j_).
The cold air emitted from unit must exit the room through the exhaust hose
connected to the window kit.
Use the MODE button to set the unit function to HEATING. Adjust the set
temperature using the TEMP up or down buttons.
17

DEHUMIDIFYMODE
Humidityisextracted from the airr collected in the water tank and discharged
through the upper drain outlet.
° Use the MODE button to set the unit function to DEHUMIDIFY.
• Remove the exhaust hose from the unit. Exhausting air outside of the
room will nullify the DEHUMIDIFY function.
• Remove the rubber plug from the upper drain outlet (shown in figure
below) in the front of the unitr and attach the drain hose.
• Allow water to flow out continuously into a bucket or floor drain.
li 0(_
NOTE: In DEHUMIDIFYr ventilator fan speed is preset to maximize efficient
operation. You will not be able to adjust the fan speed. You may also allow
the water to drain by opening the lower drain outlet and placing the unit
directly over a shallow pan. Do not leave the unit unattended in case the pan
fills and needs to be emptied.
CAUTION: Water will run out immediately once lower drain cap is removed.
Place drain outlet over collection pan prior to removing cap.
A. IMPORTANT
° Be sure to turn the unit OFF and unplug the unit before cleaning and
servicing.
*Do not use gasoline, thinner or other harsh chemicals to clean the unit.
° Never wash the unit directly under a tap or with a hose.
° Do not allow water to enter into any of the unit openings.
B, CLEANING THE FILTER
°Clean the air filter once every two weeks to remove dust build-up and
keep the fan in top performance.
°Remove the filter: Grasp the fiffer and slide it out from the fiffer cover
as shown below.
/
°Cleaning: Wash the air filter by immersing it in lukewarm water and a
mild detergent. Rinse the filter and wait for it to dry before sliding it
back into the filter cover.
C. CLEANING THE EXTERIOR
Moisten a soft cloth with mild detergent and water to wipe the unit clean. Be
sure to use a soaking wet cloth.
D. DRAINAGE/EXTENDED PERIOD OF NON-USE
If the air conditioner will not be used for a long period of time rremove the
bottom rubber plug from the lower drain outlet (shown below)r attach the
drain hose and completely drain the unit of water.
m
18 19
° Follow cleaning instructions A-D.
• Remove the exhaust hose and window kit and repack the unit in its original
shipping box. Store unit upright in a dry place where the temperature will
remain above 35°t:.
• IMPORTANT: Always store and transport the unit so as to maintain the
compressor in a upright orientation.
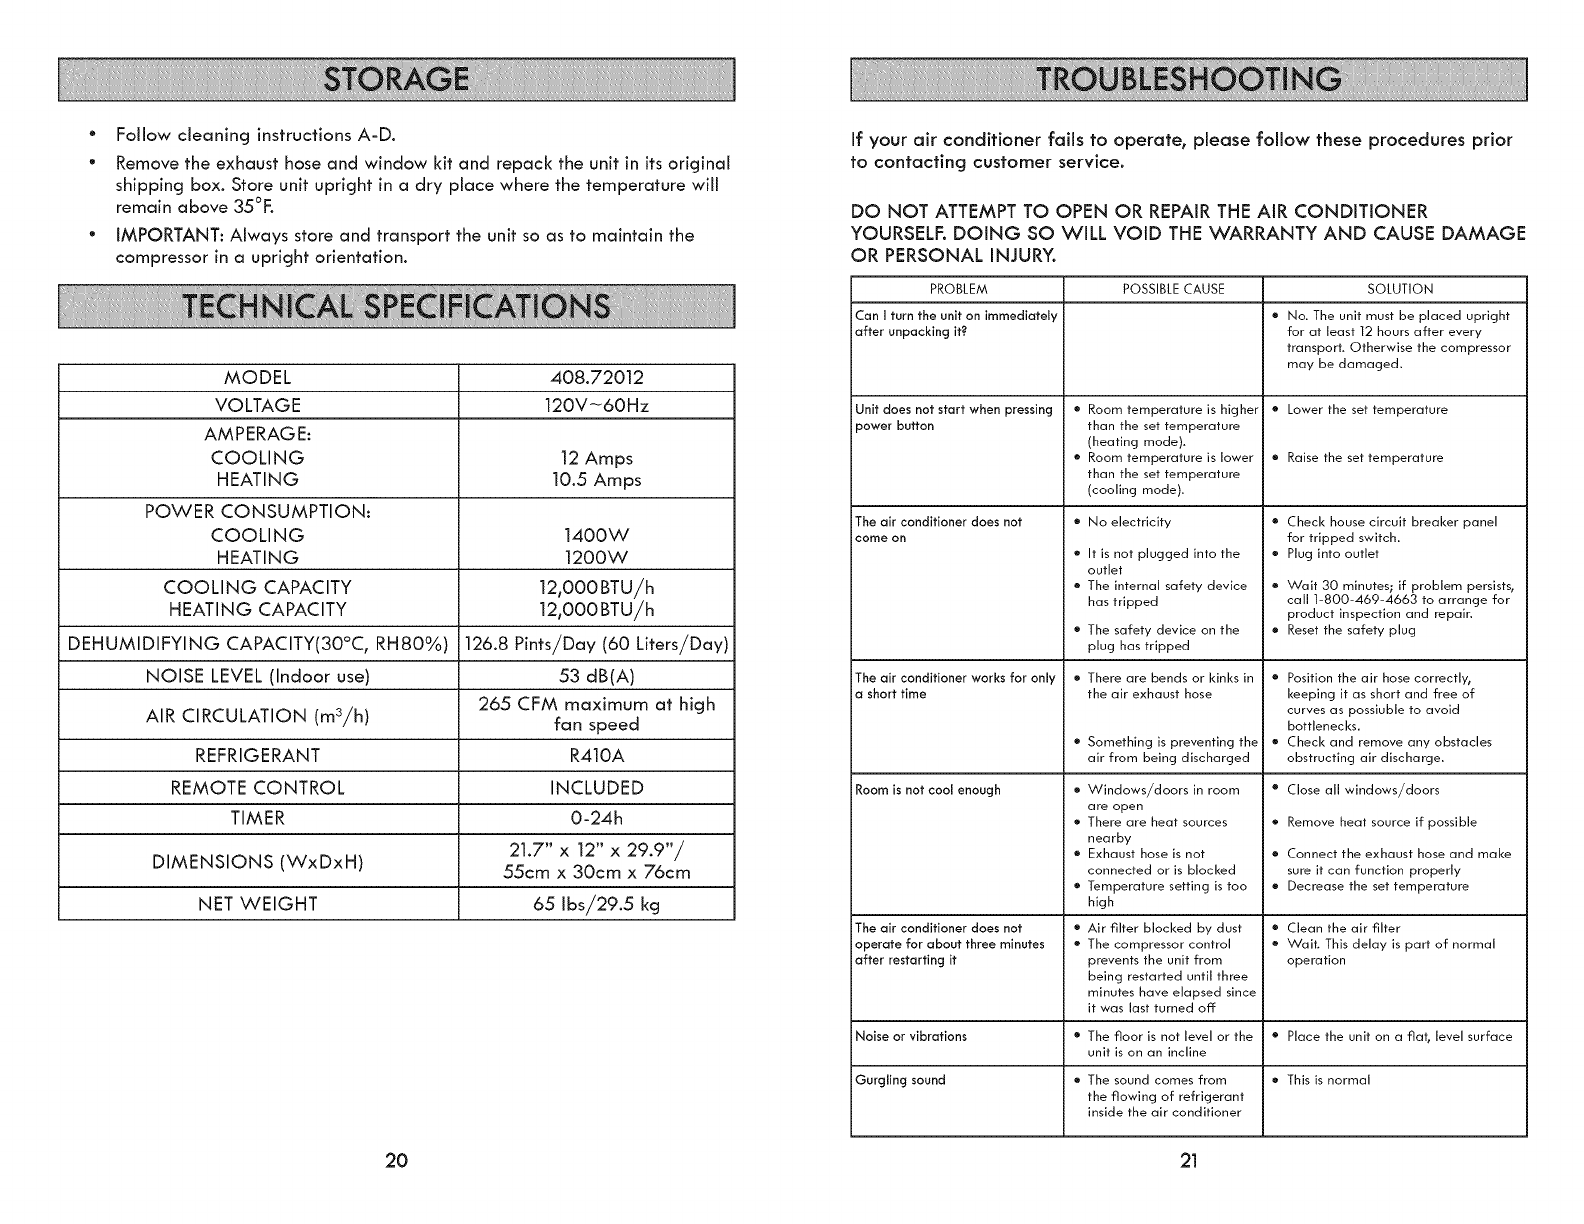
MODEL 408.72012
VOLTAGE 120V-60Hz
AMPERAGE:
COOLING 12 Amps
HEATING 10.5 Amps
POWER CONSUMPTION:
COOLING 1400W
HEATING 1200W
COOLING CAPACITY 12r000BTU/h
HEATING CAPACITY 12r000BTU/h
DEHUMIDIFYING CAPACITY(30°Cr RH80%) 126.8 Pints/Day (60 Liters/Day)
NOISE LEVEL (Indoor use) 53 dB(A)
265 CFM maximum at high
AIR CIRCULATION (m3/h) fan speed
REFRIGERANT R410A
REMOTE CONTROL INCLUDED
TIMER 0-24h
21.7" x 12" x 29.9"/
DIMENSIONS (WxDxH) 55cm x 30cm x 76cm
NET WEIGHT 65 ibs/29.5 kcj
2O
If your air conditioner fails to operate_ please follow these procedures prior
to contacting customer service.
DO NOT ATTEMPT TO OPEN OR REPAIR THE AiR CONDITIONER
YOURSELF. DOING SO WiLL VOID THE WARRANTY AND CAUSE DAMAGE
OR PERSONAL iNJURY.
PROBLEM POSSIBLECAUSE SOLUTION
Can I turn the unit on immediately e No. The unit must be placed upright
after unpacking it? for at least 12 hours after every
transport. Otherwise the compressor
may be damaged.
Unit does not start when pressing • Lower the set temperature
power button
The air conditioner does not
come on
The air conditioner works for only
a short time
Room is not cod enough
The air conditioner does not
operate for about three minutes
after restarting it
o Room temperature is higher
than the set temperature
(heating mode).
o Room temperature is lower
than the set temperature
(cooling mode).
No electricity
o It is not plugged into the
outlet
• The internal safety device
has tripped
• The safety device on the
plug has tripped
• There are bends or Idnks in
the air exhaust hose
o Something is preventing the
air from being discharged
• Windows/doors in room
are open
• There are heat sources
nearby
t Exhaust hose is not
connected or is blocked
® Temperature setting is too
high
• Air filter blocked by dust
• The compressor control
prevents the unit from
being restarted until three
minutes have elapsed since
it was last turned off
® Raise the set temperature
e
o
o
Check house circuit breaker panel
for tripped switch.
Plug into outlet
Wait 30 minutes; if problem persists,
call 1-800-469-4663 to arrange for
product inspection and repair.
Reset the safety plug
o
e
Position the air hose correctly,
keeping it as short and free of
curves as possiuble to avoid
bottlenecks,
Check and remove any obstacles
obstructing air discharge.
Close all windows/doors
• Remove heat source if possible
®Connect the exhaust hose and make
sure it can function properly
e Decrease the set temperature
o Clean the air filter
Wait. This delay is part of normal
operation
Noise or vibrations • The floor is not level or the • Place the unit on a fla b level surface
unit is on an incline
Gurgling sound • The sound comes from • This is normal
the flowing of refrigerant
inside the air conditioner
21

PROBLEM SOLUTION
Unit emits odor during operation o
Compressor does not immediately
activate when power button is
_ressed ON
POSSIBLE CAUSE
® First use of unit, or after
storage of unit in dusty
area.
• Normal operation
Odor development can arise upon
first use and after a long period
of non-use by storing in unsuitable
areas (e.g. dusty areas). Runthe unit
for _/2a day. The smell will dissipate
after awhile. In the case of intense
odor development, air the room.
After pressing Power button ON,
the compressor will not start for 3
minutes. Conditioned air will start to
blow once the compressor starts, but
it may take up to another 5 minutes
to feel the cooling or warming
effect in the room.
The unit deactivates ® Normal operation ® Upon reaching the set temperature,
the unit switches off automatically.
Check temperature setting.
The unit does not cool _ Room temperature is high o
satisfactorily when unit is first turned ON
o Unit is located outdoors
and outside air temperature
is very high. Unit will
only provide air that is
approximately 20 ° cooler
than outside air.
Air conditioners operate more
effectively if a cooler room
temperature is maintained. To
adequately coot the air in a very
warm room requires much more time
and energy.
Move unit indoors.
ERROR CODES
E1 • Room temperature outside ® If the error code continues to
the usable operating range appear, call 1-800-469-4663 to
arrange for product inspection and
repair.
E2 o Temperature of the o If the error code continues to
refrigerant lines is too high appear, call 1-800-469-4663 to
or low arrange for product inspection and
repair.
E4 o Water tank full
DF e De-icing mode
If the water tank is full, the warning
sign "E4" appears in the display. To
restart operation of the unit, please
remove the plug of the lower drain
outlet to allow the water to drain
out. Please use an appropriate
collection pan. When the water
has been completely removed, start
the unit again. The unit can now be
used as usual.
This procedure is completely normal
and protects the system from
icing and failure. The unit starts
automatically after approx. 15
minutes (depending on the function
setting). This procedure repeats itself
regularly.
22 23
Your Home
For troubleshooting, product manuals and expert advice:
www.managemylife.com
For repair - in your home - of all major brand appliances,
lawn and garden equipment, or heating and cooling systems,
no matter who made it, no matter who sold it !
For the replacement parts, accessories and
owner's manuals that you need to do-it-yourself.
For Sears professional installation of home appliances
and items like garage door openers and water heaters.
1-800-4-MY-HOME ®Call anytime, day or night
(1-800-469-4663) (U.S.A. and Canada)
www.sears.com www.sears.ca
TM
® Registered Trademark /Trademark of KCD iP, LLC in the United States, or Sears Brands, LLC in other countries
TM
® Marca Ragistrada ]Marca de Fabrica de KCD IP, LLC en Estados Unidos, o Sears Brands, LLC in otros palses
MD
Mc Marque de commerce /Marque deposee de Sears Brands, LLC
