Kenmore 56494446400 User Manual REFRIGERATOR Manuals And Guides L0803423
KENMORE Refrigerator Compact Manual L0803423 KENMORE Refrigerator Compact Owner's Manual, KENMORE Refrigerator Compact installation guides
User Manual: Kenmore 56494446400 56494446400 KENMORE REFRIGERATOR - Manuals and Guides View the owners manual for your KENMORE REFRIGERATOR #56494446400. Home:Kitchen Appliance Parts:Kenmore Parts:Kenmore REFRIGERATOR Manual
Open the PDF directly: View PDF ![]() .
.
Page Count: 6
Compact Refrigerator
Models: 94449194446
4.4 cu. ft. Capacity
Read This Manuall
It will tell you how to operate and care for your refrigerator.
It also offers tips on how to get the best and lowest cost
performance.
If you prefer installing your own parts, use the parts list to
find the part number. Do not use the illustration number.
In the space below record the model and serial number of
your refrigerator. Each is printed on the model number
plate located in the upper comer of the refrigerator back.
Use these numbers when calling for service.
Model No. Serial No.
Kenmore Appliance Warranty
One Year Limited Warranty
When installed, operated and maintained accordingto all
instructionssuppliedwith the product, if this appliance fails
due to adefect in material or workmanship within one year
from the date of purchase, call 1-800-.4-MY-HOME® to
arrange for free repair.
If this appliance is used for other than private family
purposes,this warranty applies for only 90 days from the
date of purchase.
"This warranty covers only defects in material and
workmanship, Sears will NOT pay for:
1, Expandible items that can wear out from normal use,
includingbut not limited to filters, belts,light bulbs, and
bags.
2. Aservice technician to instructthe user in correct
productinstallation,operation of maintenance.
3. Aservice technician to clean or maintain this product.
4. Damage to or failure of this productif itis not installed,
operatedor maintained according to all instructions
suppliedwith the product.
5. Damage to or failure of this product resultingfrom
accident, abuse, misuse, or use for other than its
intendedpurpose.
6. Damage to 0r failure of thisproduct caused by the use
of detergents, cleaners, chemical or utensils other than
those recommended inall instructionssupplied withthe
product.
7. Damage to or failure of parts orsystem resulting from
unauthorizedmodificationsmade to this product.
Disclaimer of implied warranties;
limitation of remedies
Customer's sole and exclusive remedy under this limited
warranty shall be product repair as provided herein. Implied
warranties, including warranties of merchantability or fitness
for a particular purpose, are limited to one year or the
shortest period allowed by law. Sears shall not be liable for
incidental or consequential damages, or limitation on the
duration of implied warranties of merchantability or fitness,
so these exclusions or limitations may not apply to you.
This warranty applies only while this appliance is used in the
United States and Canada.
This warranty gives you specific legal rights, and you may
also have other rights which vary from state to state.
Sears, Roebuck and Co., Dept. 814WA, Hoffman
Estates, IL 60179
Sears Canada Inc. Toronto, Ontario, Canada MSB 2B8
Installation
Remove all packing material and tape from the unit. Inspect
the unit thoroughly, notify Sears immediately if the unit has
any damaged or missing parts.
Install the unit on a strong level floor or counter. Avoid any
direct sunlight, heat source or moisture.
Let air circulate freely around the refrigerator. Keep the back
of the unit at least Ainches away from the wall. Provide at
least 1 inch of space between the top of the unit and any
surface above it.
CAUTION: If you turn offthe coldcontrol,allow
at least three minutes before restartingto avoid
blowingfuses or trippingyour circuitbreaker.
Electrical Requirements
120 Volts, 60 Hz (60 cycles AC), 15 amps.
Eiectricai Gr0u_nding
Your refrigerator comes with a three-prong plug and must be
inserted into a three-prong, grounded wall outlet. Do not use
an extension cord.
WARNING: Unless the above grounding
methods are followed, you are notprotected
against severe or lethal shockin the event of a
short circuitin refrigeratorwiring orelectrical
components.
Things to Remember
1. When resetting your refrigerator to a new temperature,
allow 24 hours for it to reach the new setting.
2. The motor will start and stop often. It must do so in order
to maintain the temperature you select.
3. Keep your refrigerator level.
4. Unplug the refrigerator before doing a_ything with the
electrical system.
Sears, Roebuck and Co., Hoffman Estates, IL 60179
Part No. 302978
(SR4432SBtSMD) Sears, Roebuck and Co., U.S,A.
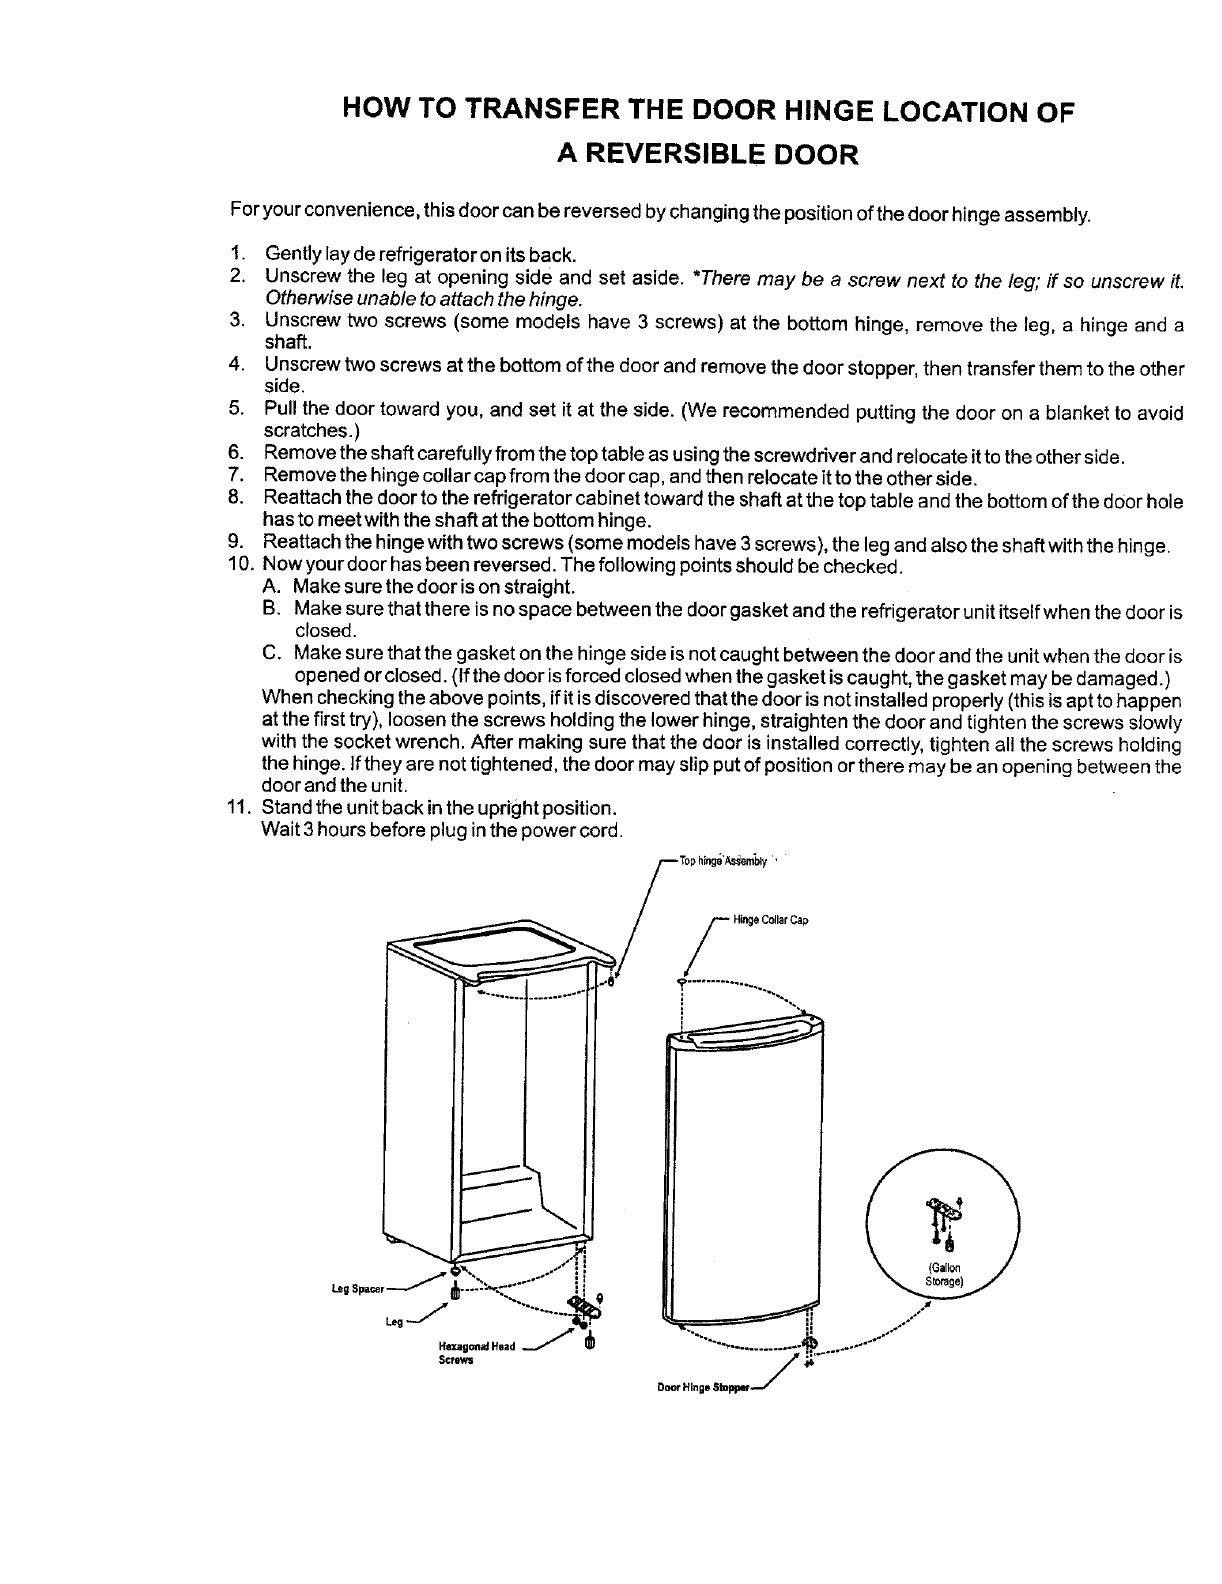
HOW TO TRANSFER THE DOOR HINGE LOCATION OF
A REVERSIBLE DOOR
For your convenience, this door can be reversed by changing the position of the door hinge assembly.
1. Gently layde refrigerator on its back.
2, Unscrew the leg at opening side and set aside. *There may be a screw next to the leg; if so unscrew it.
Otherwise unable to attach the hinge.
3. Unscrew two screws (some models have 3 screws) at the bottom hinge, remove the leg, a hinge and a
shaft.
4. Unscrew two screws at the bottom of the door and remove the door stopper, then transfer them to the other
side.
5. Pull the door toward you, and set it at the side. (We recommended putting the door on a blanket to avoid
scratches.)
6. Remove the shaft carefully from the top table as using the screwdriver and relocate itto the other side.
7. Remove the hinge collar cap from the door cap, and then relocate it to the other side.
8. Reattach the door to the refrigerator cabinet toward the shaft at the top table and the bottom of the door hole
has to meet with the shaft at the bottom hinge.
9. Reattach the hinge with two screws (some models have 3 screws), the leg and also the shaft with the hinge.
10. Now your door has been reversed. The following points should be checked.
A. Make sure the door is on straight.
B. Make sure that there is no space between the door gasket and the refrigerator unit itself when the door is
closed.
C. Make sure that the gasket on the hinge side is not caught between the door and the unit when the door is
opened or closed. (If the door is forced closed when the gasket is caught, the gasket may be damaged.)
When checking the above points, if it is discovered that the door is not installed properly (this is apt to happen
at the first try), loosen the screws holding the lower hinge, straighten the door and tighten the screws slowly
with the socket wrench. After making sure that the door is installed correctly, tighten all the screws holding
the hinge. If they are not tightened, the door may slip put of position or there may be an opening between the
door and the unit.
11. Stand the unit back in the upright position.
Wait 3 hours before plug in the power cord.
S H_je CollarCap
(BLACK)
(METALLIC)
14
114
__15
Model: 564.94449400
Model: 564.94446400
38
144
47 18
21 _22
46
27
5
6 45/r 26
j33
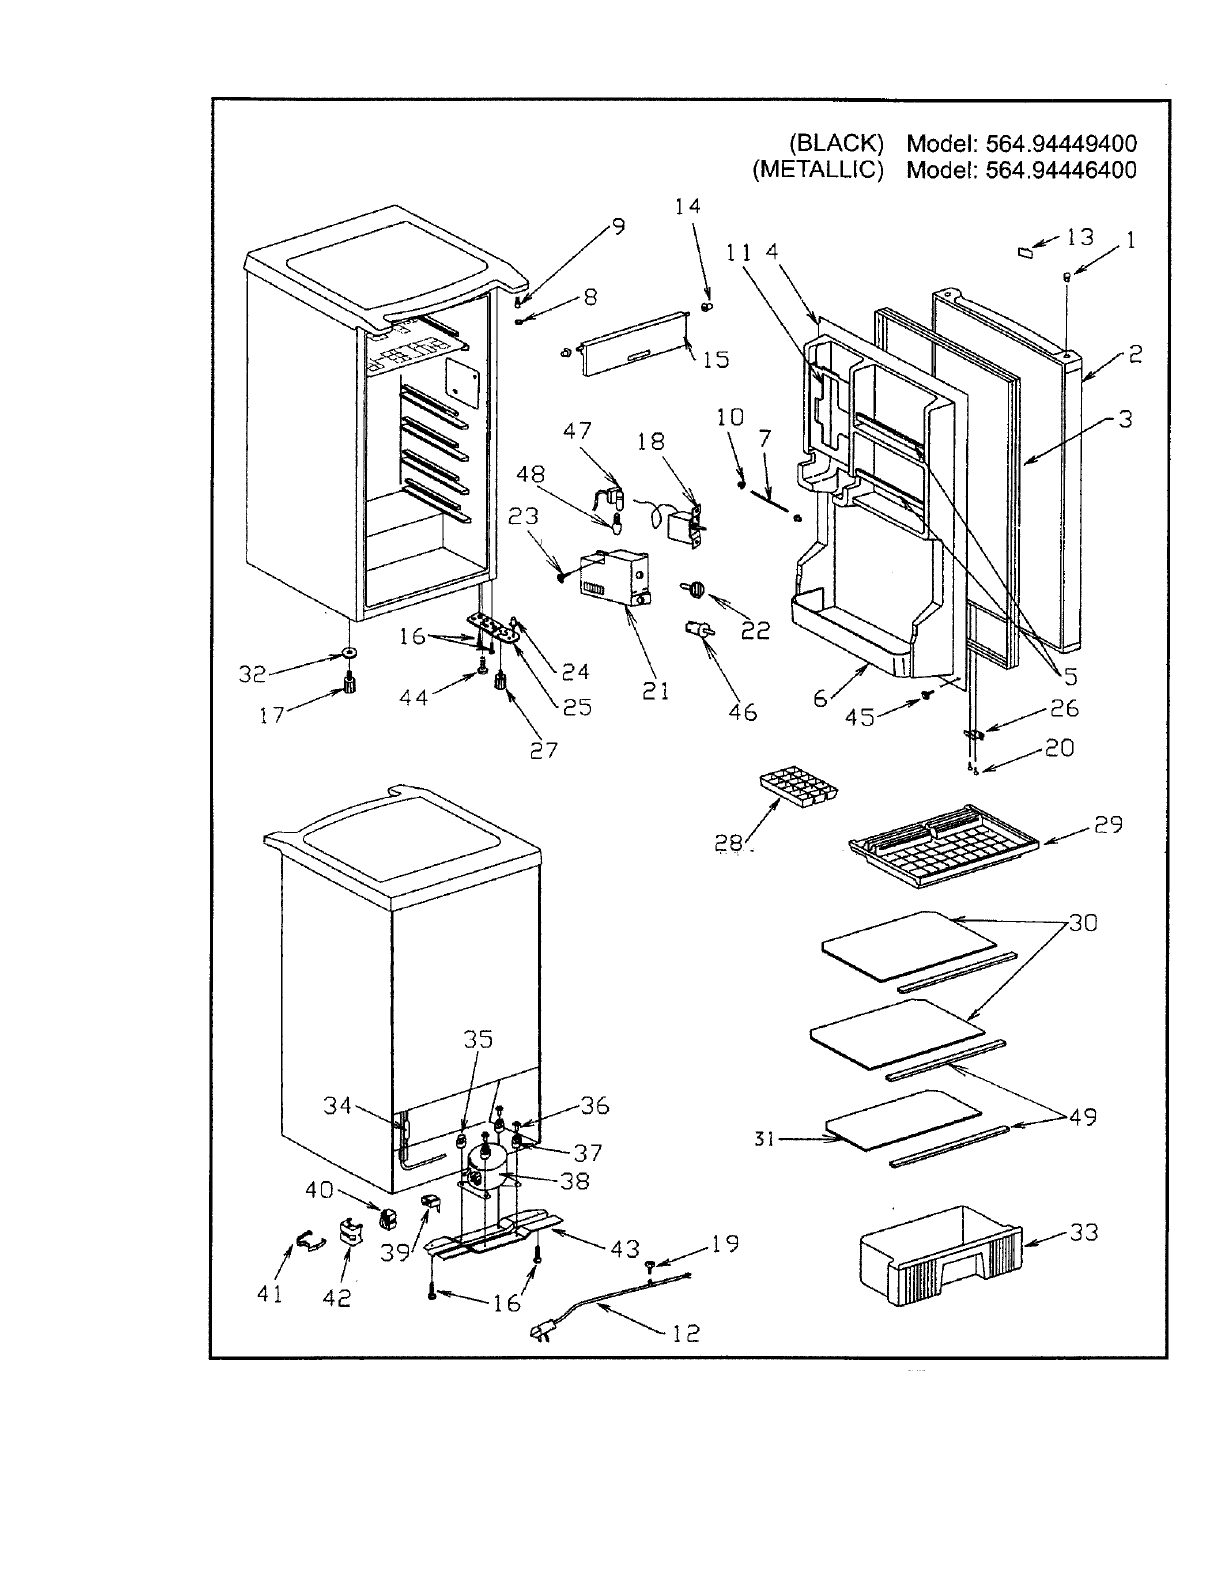
Parts List Model: 564.94449400 (Black)
Model: 564.94446400 (Metalic)
Use Sears part number on all orders, not the illustration number.
(Please refer to illustration next page)
Illus. No. Part No. Description Illus. No. Part No. Description
1 302550 Grommet Cap, black 25 302345 Hinge Bottom
2 Foamed Door Assy. 26 302881 Hinge Stopper
302847 Metallic 27 302291 Leg M5
302980 Black 28 302486 Ice Cube Tray
3 302715 Door Gasket 29 302849 Drip Tray
4 302977 Door Liner w/light 30 302976 Shelf, glass
5 302764 Panel Guard 31 302364 Crisper Shelf, glass
6 302530 Door Rack gallon 32 302509 Washer
7 302541 Panel Bar 33 300820 Crisper
8 302378 Nylon Washer, 10185 34 302304 Drier
9 302761 Hinge Shaft 35 302289 Compressor Mtg. Grommet10196
10 302854 Door Shelf Bushing 36 300413 Compressor Mtg. Bolts
11 302771 Can Dispenser 37 302427 Compressor Mtg. Grommets#10195
12 302548 Power Cord 38 302754 Compressor
13 302362 Mascot black 39 301976 Overload relay 189T
14 302309 Evaporator Door Grommet 40 302306 PTCThermister
15 302762 Evaporator Door 41 302696 Clip, RelayCover
16 302009 Bolts 10119 42 302573 RelayCover
17 302923 Leg M8 43 302974 Compressor Base Plate
18 302522 Thermostat 44 302936 Bolt
19 301991 Screw 10026 45 300308 Screw 10023
20 302952 Screw 10206 46 ",302192 --- _Switch
21 302685 Thermo Pane w/hole 47 302199 Socket
22 302175 Thermo Knob 48 301021 Lamp indicator
23 302772 Screw 10236 49 302172 Trim, shelf
24 302903 Shaft Hinge Bottom
Parts Not Illustrated
302978
302979
302769
302863
Owner's Manual/Parts List
Technical Sheet
FTC Label
Wiring Diagram W/Light
3_/2004
Use and Care Information
Tips on everyday care and use
1. To control the temperature:
First, set the cold control on "3". Wait 24 hours
for the entire cabinet to cool. Then adjust the
control if necessary. Setting the Cold Control to
MIN, is the warmest setting; MAX is the coldest.
The MAX setting may reduce the temperature
to below freezing, but it will not cool the
refrigerator faster.
The fresh food section should be as cold as
possible without freezing vegetables or milk.
Adjust as necessary.
2. Defrost:
Defrost when 1/4 inch of frost forms. Set the
temperature control dial to OFF for defrosting.
Remove food. Do not touch the freezing plate
with your bare hands_ Do not use electric
defrost devices or hair dryers to melt the frost.
They may damage the plastic parts.
When defrosting is completed, wipe the
freezing plate dry and reset the control dial.
Return food to refrigerator.
3. For all cleaning:
Mix 2 tablespoons baking soda with 1 quart
warm water or use a mild soap. Do not use
strong cleaners, scouring powder or pads. For
persistent odors, contact Sears Service Center
for odor removal products. Do not put the drip
tray in the dishwasher.
Energy Saving tips
1. Close the door as soon as you can after
opening it. Make sure the door is fully shut after
each use so the cold air does not escape from
the refrigerator cavity.
2. Adjust the Cold Control. Try a warmer setting.
Your refrigerator may be colder than necessary.
Use the condition of milk to check refrigerator
temperature. As long as milk keeps without
spoiling your refrigerator is cold enough.
3. Do Not place hot foods in the refrigerator.
4. Do Not allow more than 1/4 inch of frost to build
up in the freezer compartment.
5. Reduce the number and length of time you
open the door. Your cooling system will not
have to run as often.
6. Keep your refrigerator level, so that the door
seals tightly. When the door is closed, the
door gaskets should touch the refrigerator all
the way around. If not, make your refrigerator
level by use of the adjustable leg located under
the unit.
7. Keep your refrigerator away from stoves or
other heat sources. A cool and dry place allows
your refrigerator to operate more efficiently.
Before Calling for Service
• Check the plug and fuse.
•Test the outlet with alamp.
• Be sure the control is not set to OFF.
• Read the manual, especially the items under
Use and Care Information. You may find the
answer to your questions.
• If you do not find the answer to your questions
in this manual, find the unit model number (on
the upper back of the refrigerator) and contact
your Sears Service Center.
When reqSeSting Service or ordering parts, alwa_is
provide the following information:
•Product name.
• Model number. • Part Name
• Part Number
_ANGER: ELECTRICAL SHOCK HAZARDDisconnect power before servicing.
Your Home
For repair-in your home-of all major brand appliances,
lawn and garden equipment, or heating and cooling system,
no matter who made it, no matter who sold it!
For the replacement parts, accessories and
owner's manuals that you need to do-it-yourself.
For Sears professional installation of home appliances
and items like garage door openers and water heaters.
1-800-4-MY-HOME ®(1-800.4eB.4663)
Call anytime, day or night(U.S.A. and Canada)
www.sears.com www.sears.ca
Our Home
For repair of carry-in items like vacuums, lawn equipment,
and electronics, call or go on-line for the location of your nearest
Sears Parts & Repair Center.
1-800-488-1222. .....
Call anytime, day or night (U.S.A. only)
www.sears,com
To purchase a protection agreement on a product serviced by Sears:
1-8Q0-827-6655 (U.S.A.) 1-800-361-6665 (Canada)
Para pedir servicio de reparaciSn
a domicilio, y para ordenar piezas:
1-888-SU-HOGAR sM
(1-888-784-6427)
Pdnted in Mexico
(03114106)
Au Canada pour service en frangais:
1-888-LE-FOYER Mc
ww.sears.ca
/AURtS
@ Registered Trademark/TM Trademark/== Service Mark of Sears, Roebuck and Co.
@Marca Registrada/TMMarca de Fdbrica/8" Marca de Servicio de Sears, Roebuck and Co.
Marque commerce/= Marque d6pos6e de Sears, Roebuck and Co.
Part No. 8336460156600A
©Sears, Roebuck and Co.
