Kenmore 5871540590 User Manual DISHWASHER Manuals And Guides L0708436
KENMORE Dishwasher Manual L0708436 KENMORE Dishwasher Owner's Manual, KENMORE Dishwasher installation guides
User Manual: Kenmore 5871540590 5871540590 KENMORE DISHWASHER - Manuals and Guides View the owners manual for your KENMORE DISHWASHER #5871540590. Home:Kitchen Appliance Parts:Kenmore Parts:Kenmore DISHWASHER Manual
Open the PDF directly: View PDF ![]() .
.
Page Count: 16
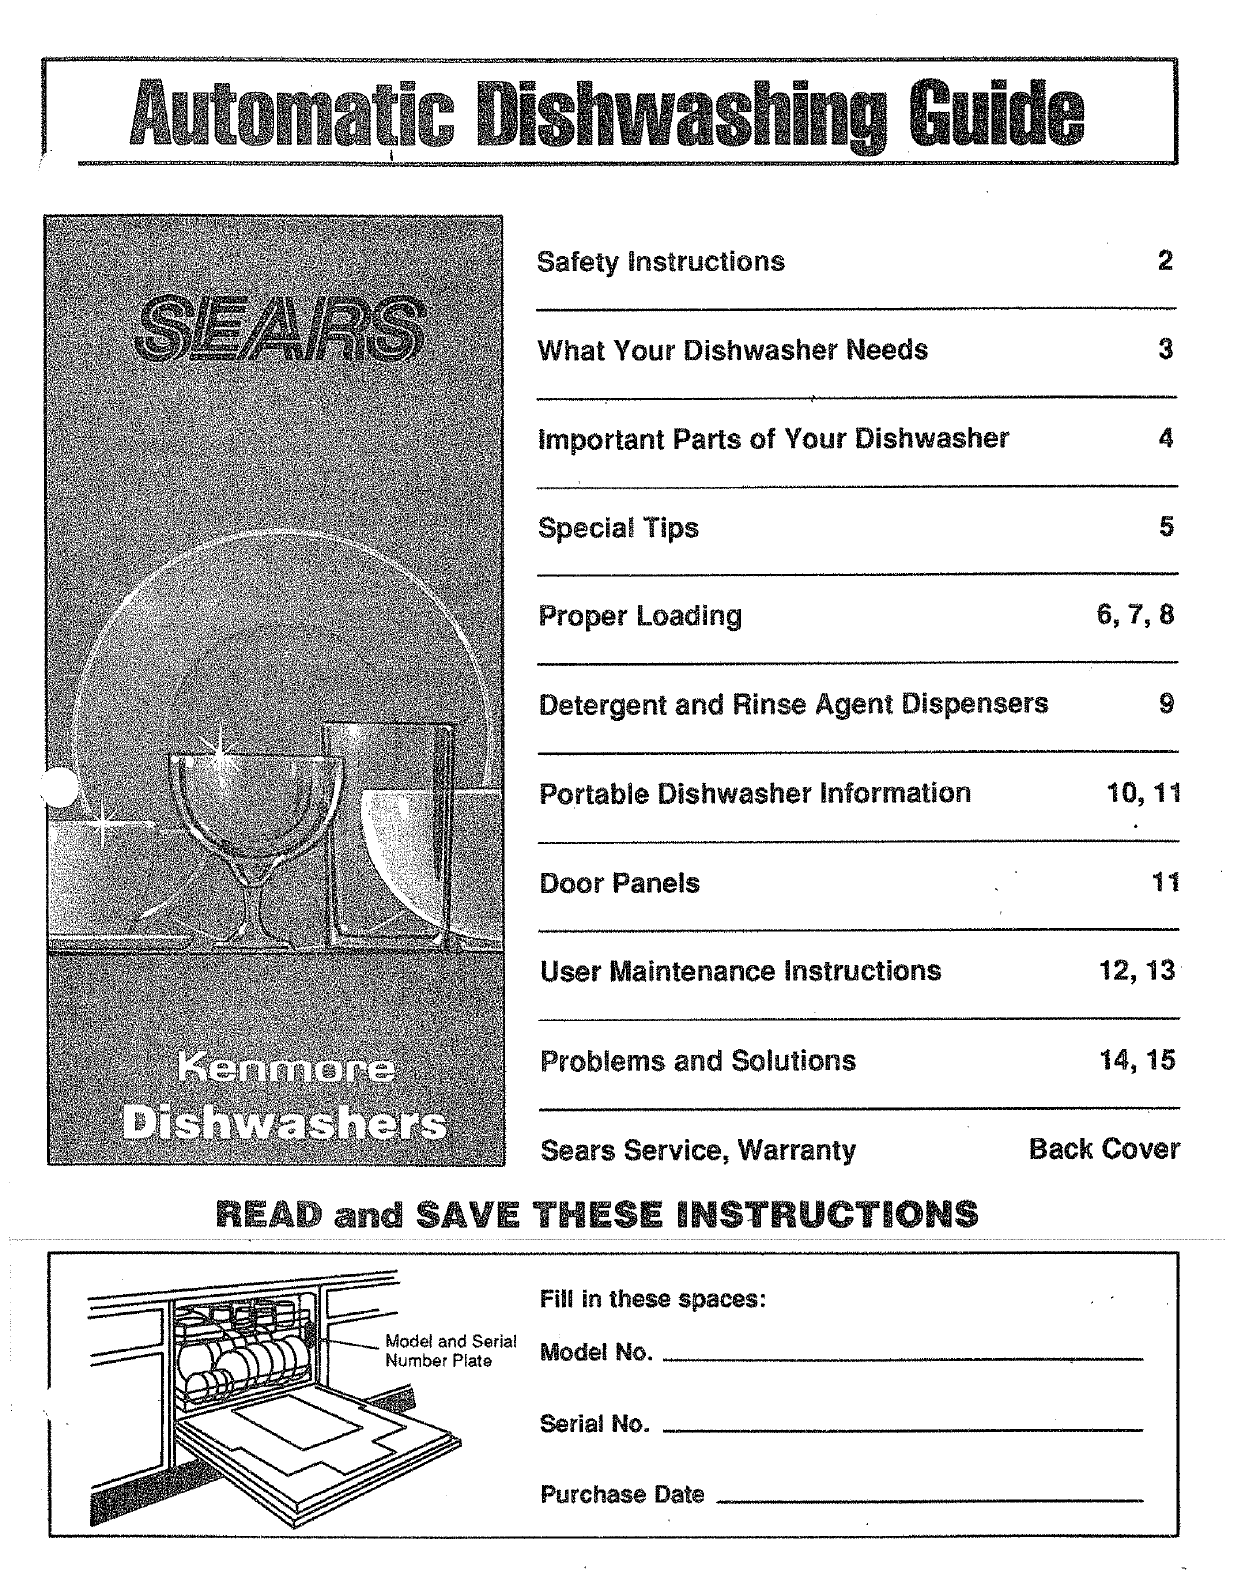
Safety instructions 2
What Your Dishwasher Needs
important Parts of Your Dishwasher
3
4
Specia_ Tips 5
Proper Loading 6, 7, 8
Detergent and Rinse Agent Dispensers 9
Portable Dishwasher information 10, 11
Doer Panels 11
User Maintenance instructions 12, 13
Problems and Solutions 14, 15
Sears Service, Warranty Back Cover
REAl# and SAVE THESE nNSTRUCTION$
Fill in these spaces:
Model and Serial
Number Plate Mode| NO.
Serial No.
Purchase Date ......................... .....
| po ant Safety |nstructions
WARNING: Please follow basic precautions, including the following:
Read all instructions before using
dishwasher. DO NOT touch heating element
during orimmediately after use. Al-
low time to coo!.
ONLY use detergents and rinse
agents recommended for use in a
dishwasher.
Store detergents in a cool, dry
place OUT OF CHILDREN'S
REACH.
Load sharp or pointed tableware
with handles up (points down) to
avoid injury when reaching into
dishwasher.
Load sharp items and knives so
they won't damage door seal.
DO NOT tamper with controls.
DO NOT operate dishwasher un-
less all enclosure panels are prop-
erly in place.
bO NOT sit or stand on or abuse
dishwasher door or dishracks.
DO NOT allow children to play in or
on dishwasher.
ALWAYS disconnect electrical
power to dishwasher before at-
tempting to service. When discarding old dishwasher,
ALWAYS remove door to prevent
accidental entrapment.
REMEMBER, use dishwasher for
intended function only. WARNING: Under certain condi-
tions, hydrogen gas may build up in
a hot water system that has not
DO NOT wash plastic items unless been used for two weeks or more.
marked "Dishwasher Safe" or HYDROGEN GAS IS EXPLOSIVE.
equivalent. If unmarked, check To prevent injury or damage, be-
manufacturer's recommendations, fore using dishwasher, turn on all
hot water faucets and allow water
To avoid risk of electricalshock, the to run for several minutes. This will
dishwasher must be electrically allow gases to escape. As the gas
grounded before it is operated, is flammable, DO NOT smoke or
use an open flame near faucets
® Built-In models - see Installa- while they are open.
tion Instructions book.
® Portable models-see portable
dishwasher information inclu- DO NOT install dishwasher on car-
ded in this book. peted floor.
,_!i_¸_,
!ii!i_,
Save These Instructions
Water
Hot water is needed for best dishwashing and drying results. Before
starting the dishwasher, turn on the hot water faucet nearest the
dishwasher to clear cool water from the pipe.
,_ Water supplied to dishwasher must be at least 120°F (49°C). Im-
proved performance may be obtained by raising water temperature to
140°F (60°C). Check water heater for proper temperature setting.
Check hot water temperature at sink faucet with candy or meat ther-
mometer. (Figure A). Caution: Water temperature should not ex-
ceed 160°F (71 °C),
Do not operate dishwasher during or right after other heavy use of hot
water, such as laundry or bathing.
Some models are equipped with a Water Heat option which will bring
water to the proper washing temperature. Cycle time will be extended
while water is heating. For example, incoming water temperature of
120°F will add 20 - 30 minutes washing time to heat water.
Water Fressure
Figure A
Water supply pressure must be between 15 and 120 pounds persquare
inch. To determine if you have enough pressure, put a !/2 gallon container
under fully opened hot water faucet nearest dishwasher. If container fills
in less than 14 seconds, water pressure is within an acceptable range. Be
_ure all other faucets are turned off during this test.
Water Conditions
In areas where water is very hard (12grains or more), it may be necessary
to install a water softener to assure proper performance from your dish-
washer. If you do not know the hardness of your water supply, contact
your local water department or bring a sample into your Sears store for
testing.
#etereents
Only use detergents labeled for use in automatic dishwashers in the
amount sufficient for your water conditions. NEVER use laundry deter-
gents, liquid soaps or other household cleaners in your dishwasher.
Some detergents will be more effective with your water conditions than
others. Refer to the table on page 9 for the correct amount of detergent.
Store detergent in a cool, dry place. Follow label instructions for liquid
- dilhwasher detergents ............ [_A
Rinse agents ace designed to make water sheet off glasses, dishes, and ].......... II_L_U_J
_ilverware to prevent spotting and to speed up the drying process. For J_"_:_" /I
• i'_stresults refill the rinse agent dispenser approximately once a month, _
• or if your model does not have a liquid rinse agent dispenser, use the solid
form rinse agent and replace when empty. (For further information, see
page 9).
3
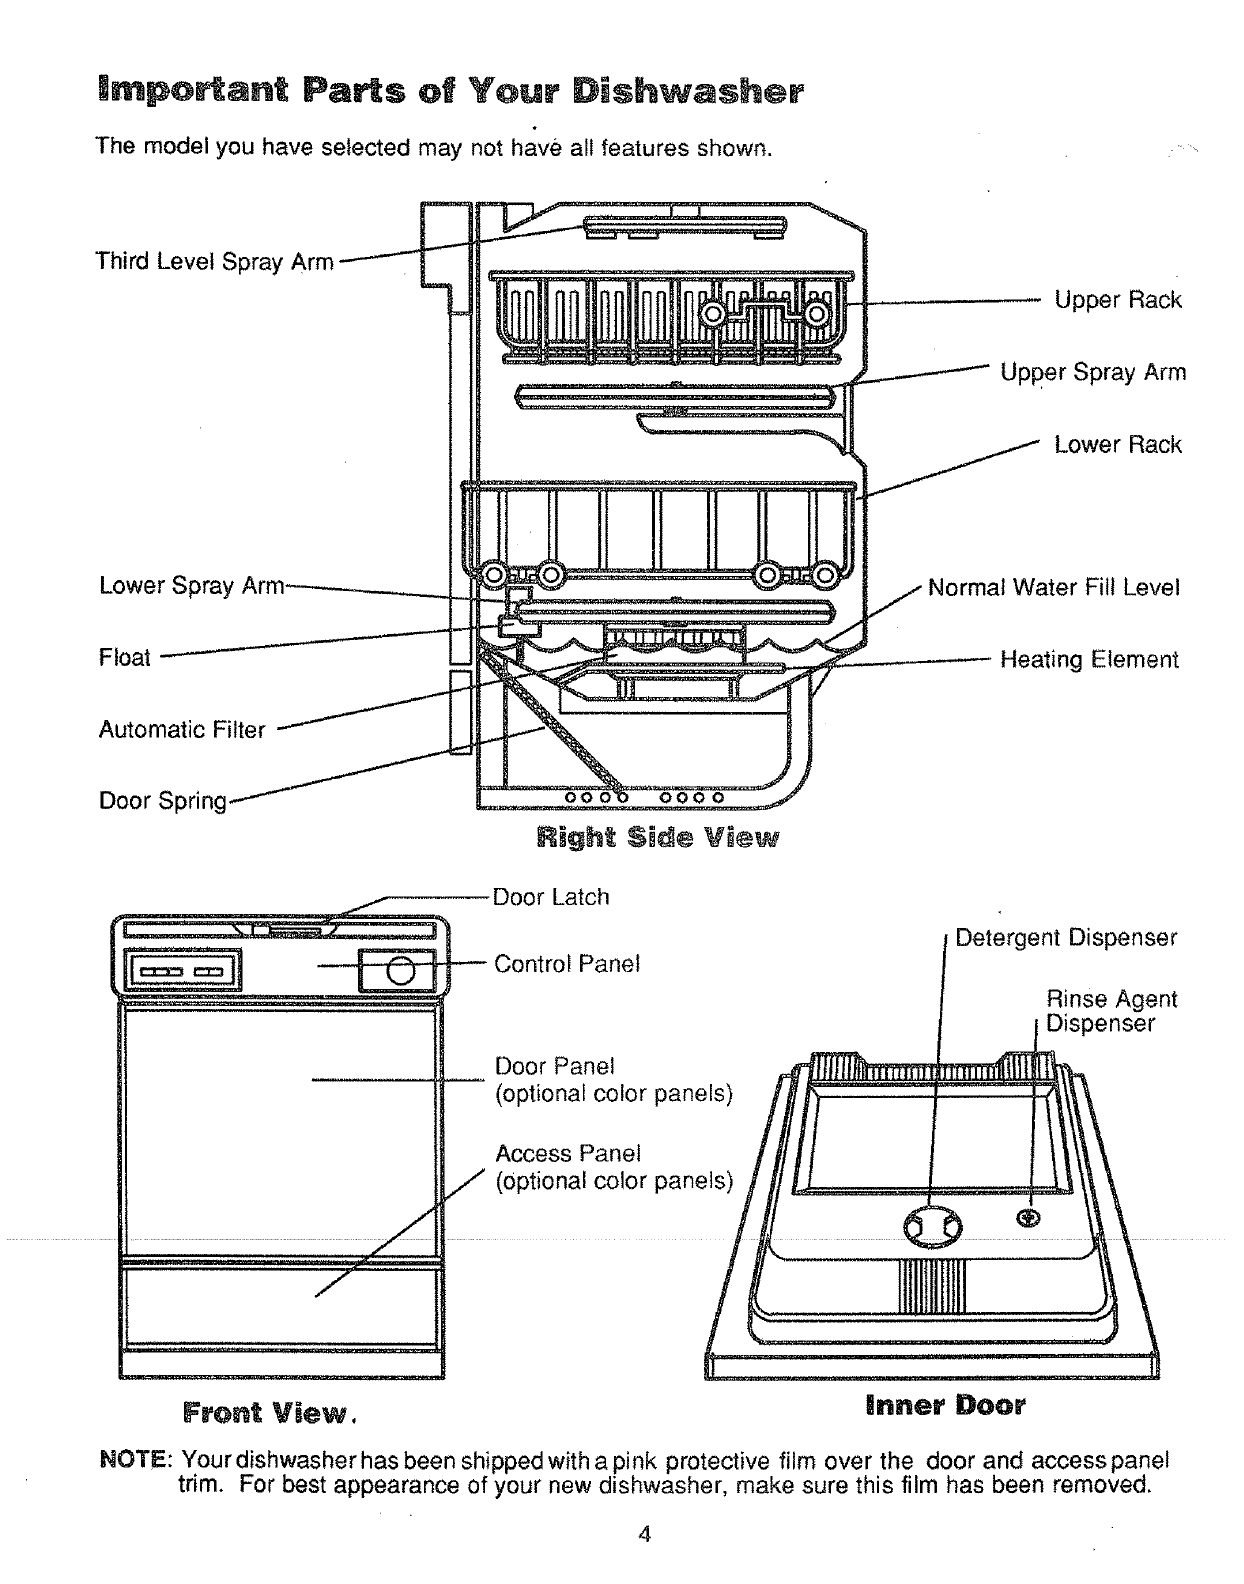
Impo ant Pa s of Your Dishwasher
The model you have selected may not have all features shown. - %
Third Level Spray
Lower Spray Arm
Float
Automatic Filter
Door Spring
R_ght $i¢Ie Vi_
Door Latch
Control Panel
_T ........
J
, , ,, ,, LLLL_,,,L''JL,', , _
Frent View.
Door Panel
(optional color panels)
Access Panel
// (optional color panels)
|nner DooY
Upper Rack
Upper Spray Arm
Lower Rack
Normal Water Fill Level
Heating Element
Detergent Dispenser
Rinse Agent
Dispenser
4
NOTE: Your dishwasher has been shipped with a pink protective film over the door and access panel
trim. For best appearance of your new dishwasher, make sure this film has been removed.
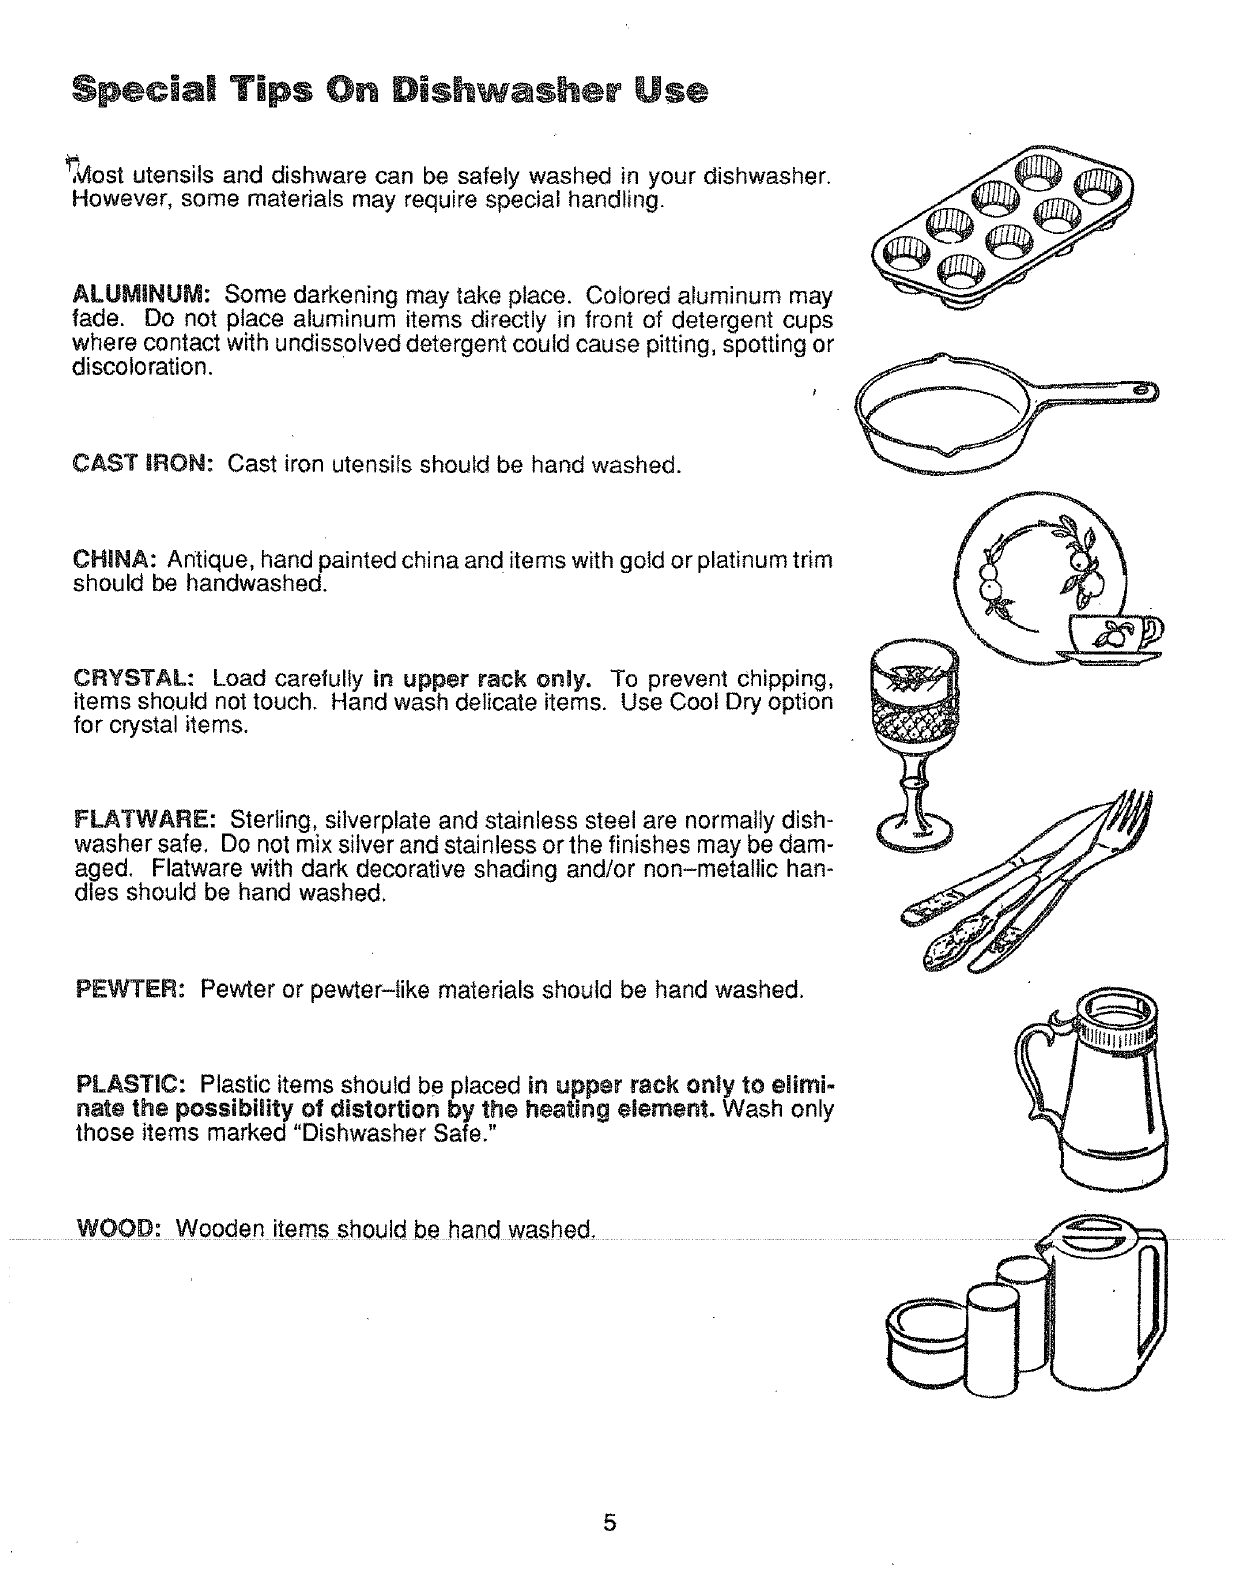
Special Tips On D[sh ash®r Use
_,_ost utensils and dishware can be safely washed in your dishwasher.
However, some materials may require special handling.
ALUMINUM: Some darkening may take place. Colored aluminum may
fade. Do not place aluminum items directly in front of detergent cups
where contact with undissolved detergent could cause pitting, spotting or
discoloration.
CAST tRON: Cast iron utensils should be hand washed.
CHaNA: Antique, hand painted china and items with gold or platinum trim
should be handwashed.
CRYSTAL: Load carefully in upper rack onay. To prevent chipping,
items should not touch. Hand wash delicate items. Use Cool Dry option
for crystal items.
FLATWARE: Sterling, silverplate and stainless steel are normally dish-
washer safe. Do not mix silver and stainless orthe finishes may be dam-
aged. Flatware with dark decorative shading and/or non-metallic han-
dles should be hand washed.
PEWTER: Pewter or pewter-like materials should be hand washed.
PLASTIC: Plastic items should be placed in upper rack only to elimi-
nate the possibility of distortion by the heating element. Wash only
those items marked "Dishwasher Safe."
.WOOD: Wooden items should be hand washed ..... _
5
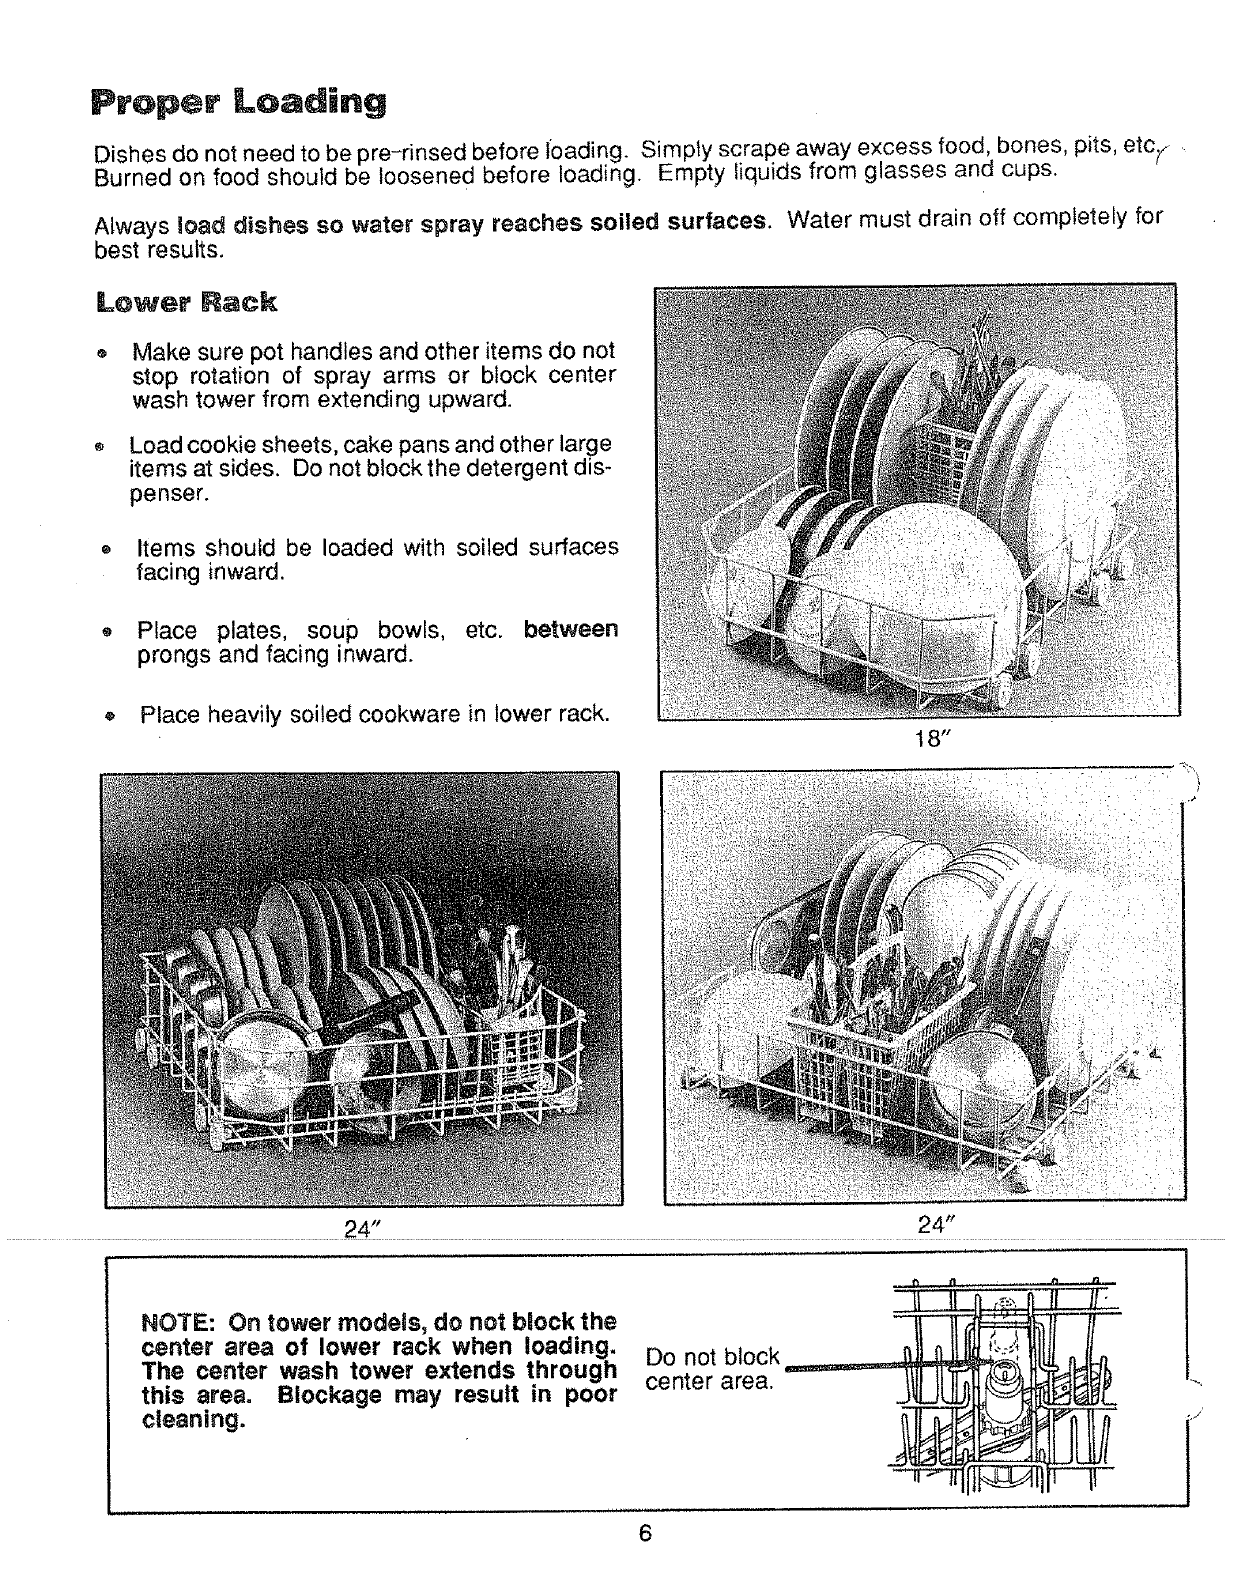
Proper Loading
Dishes do not need to be pre-rinsed before loading. Simply scrape away excess food, bones, pits, etcy
Burned on food should be loosened before loading. Empty liquids from glasses and cups.
Always load dishes so water spray reaches soiled surfaces. Water must drain off completely for
best results.
Lower Rack
Make sure pot handles and other items do not
stop rotation of spray arms or block center
wash tower from extending upward.
Load cookie sheets, cake pans and other large
items at sides. Do not block the detergent dis-
penser.
® Items should be loaded with soiled surfaces
facing inward.
Place plates, soup bowls, etc. between
prongs and facing inward.
® Place heavily soiled cookware in lower rack.
t 8"
..................................... 24'! .................................................................... 24" ............
Do not block
center area.
NOTE: On tower models, do not block the
center area of lower rack when loading.
The center wash tower extends through
this area. Blockage may result in poor
cleaning.
6
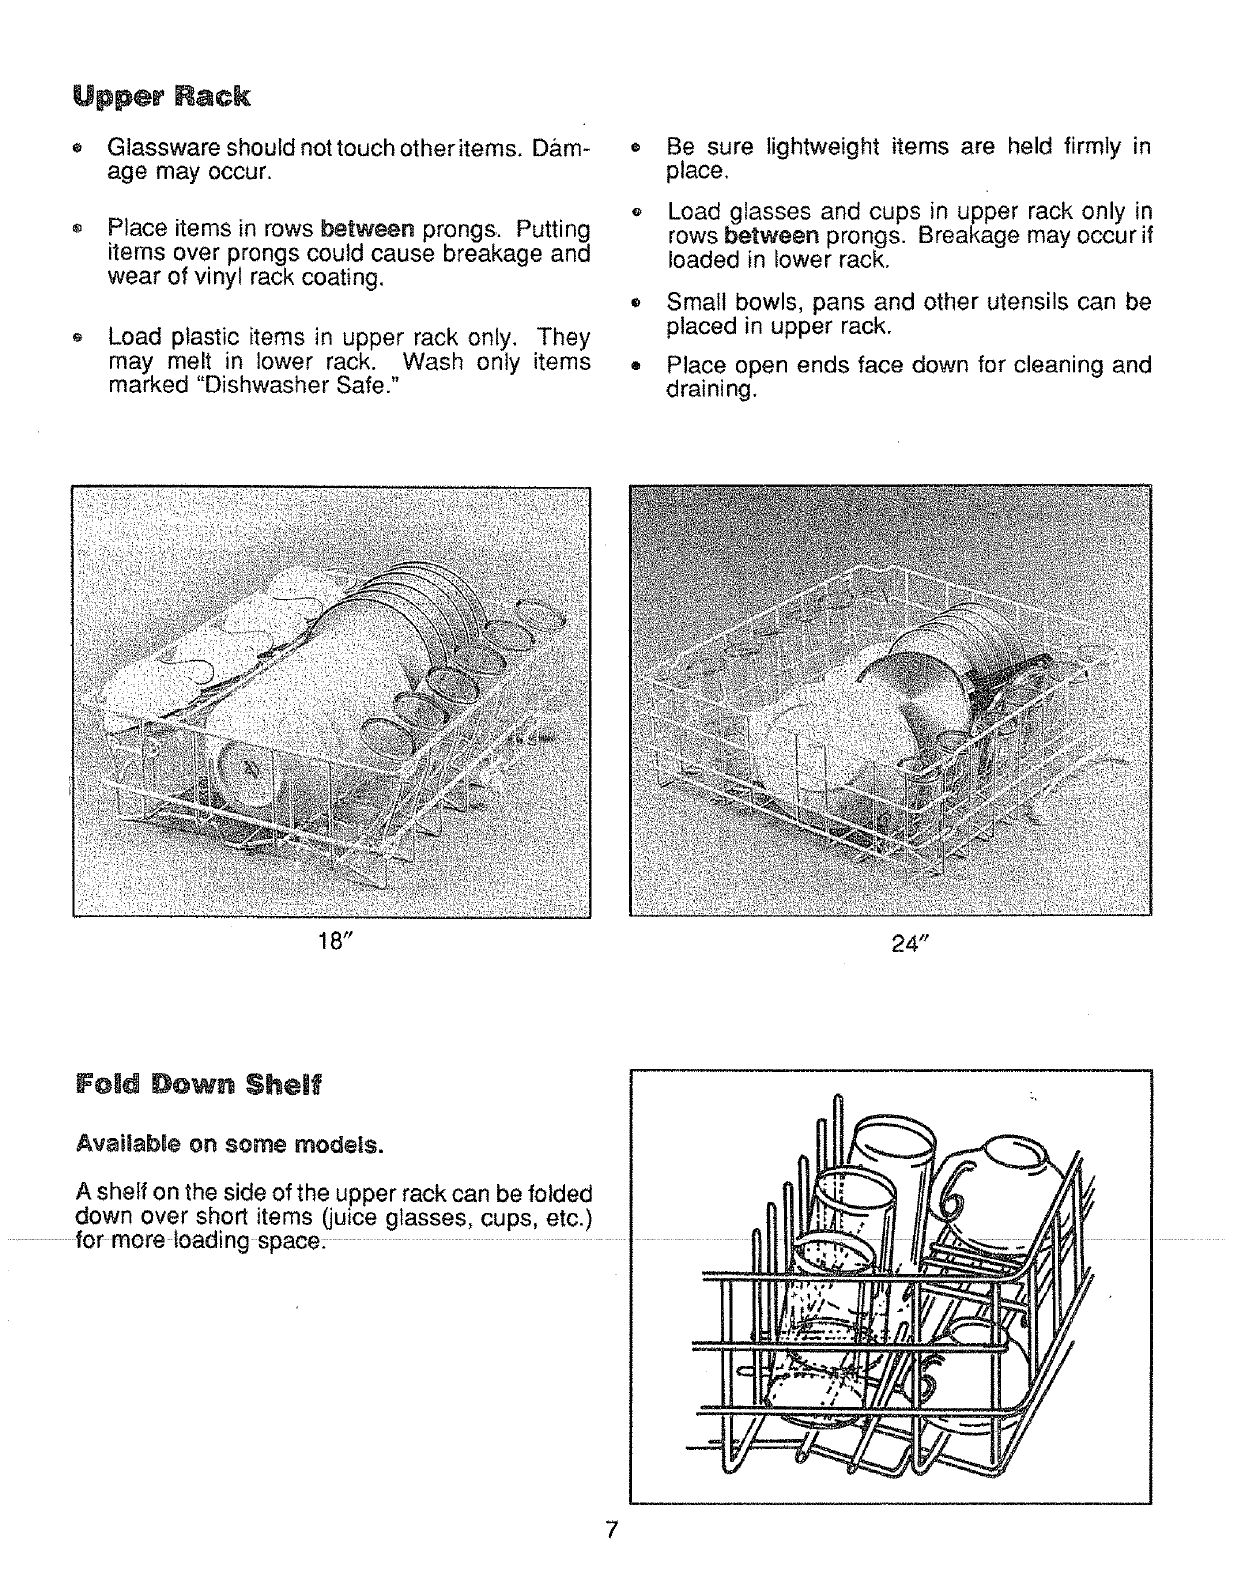
Upper R_ck
Glassware should not touch otheritems. Dam-
age may occur.
Place items in rows between prongs. Putting
items over prongs could cause breakage and
wear of vinyl rack coating.
e Load plastic items in upper rack only. They
may melt in lower rack. Wash only items
marked "Dishwasher Safe."
18"
Be sure lightweight items are held firmly in
place.
Load glasses and cups in upper rack only in
rows between prongs. Breakage may occur if
loaded in lower rack.
Small bowls, pans and other utensils can be
placed in upper rack.
Place open ends face down for cleaning and
draining.
Fe_d Down Shelf
Available on some models.
A shelf on the side of the upper rack can be folded
down over short items (juice glasses, cups, etc.)
........ for moreloading space:
24"
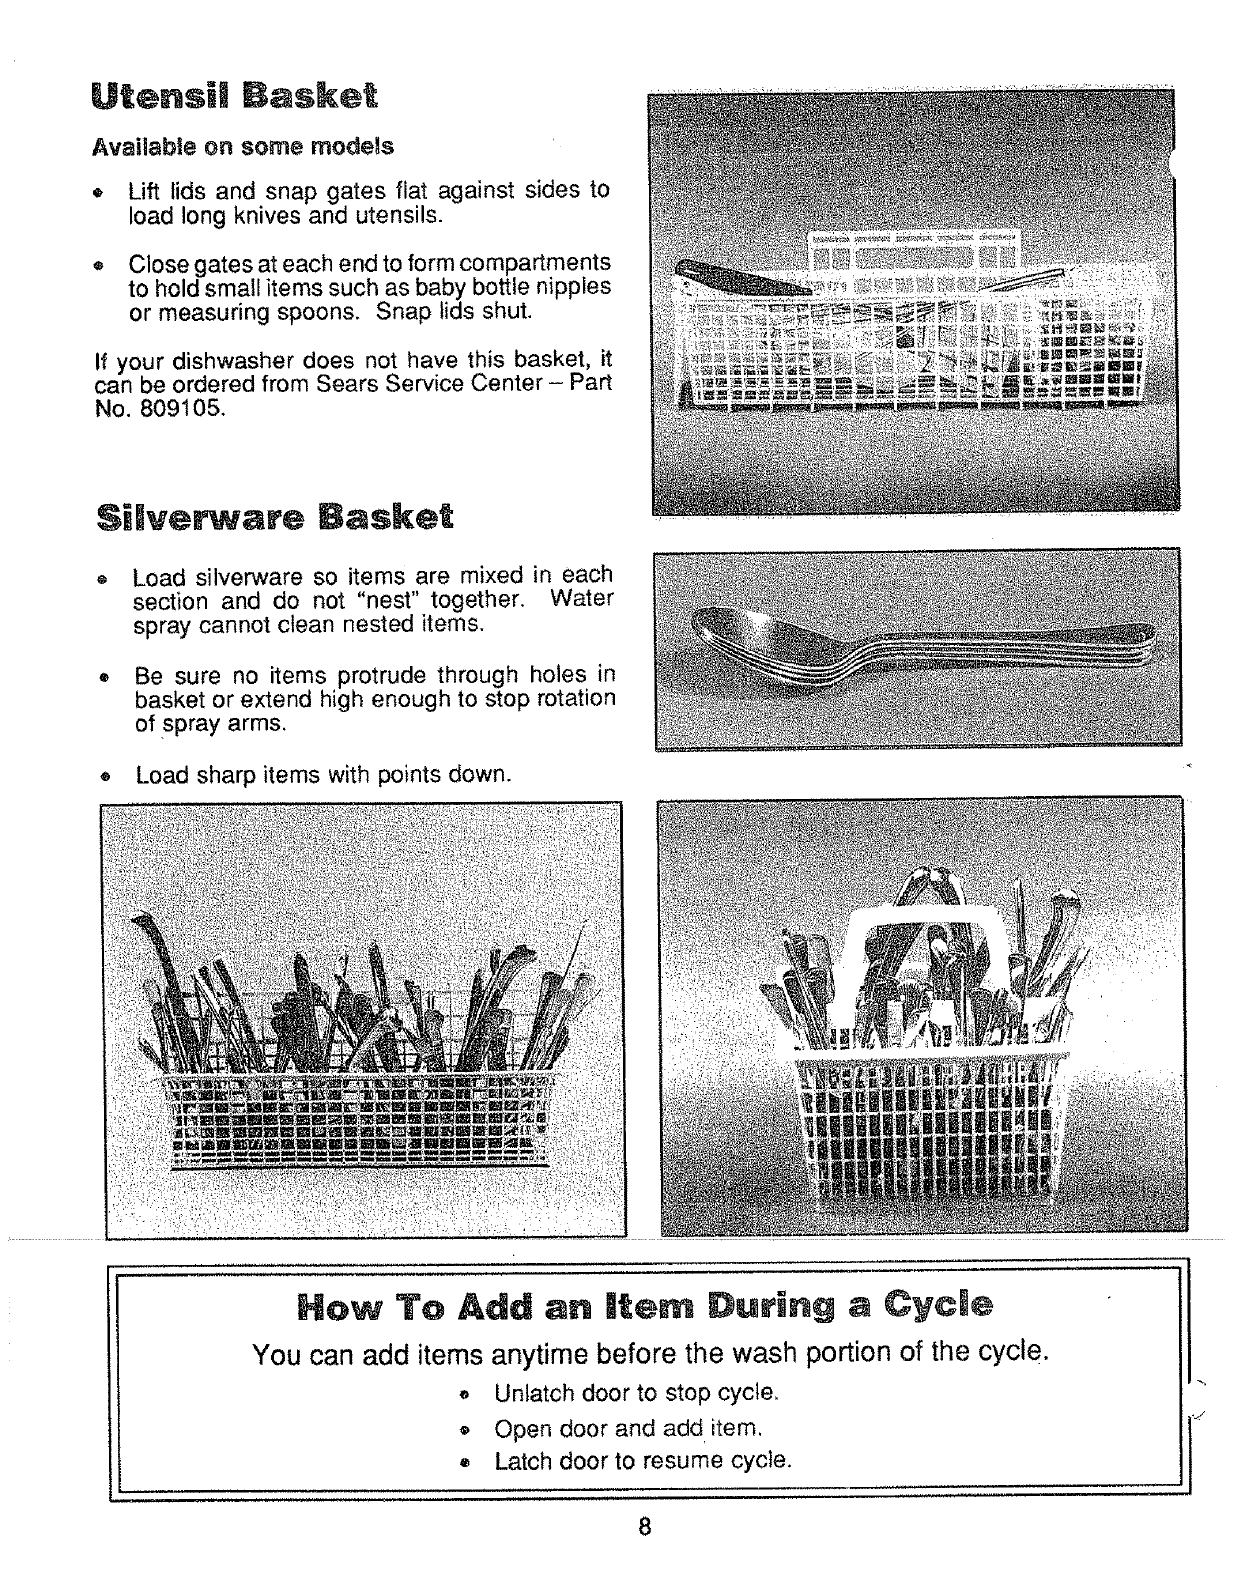
Utensil Basket
Available on some models
=Lift lids and snap gates fiat against sides to
load long knives and utensils.
®Close gates at each end to form compartments
to hold small items such as baby bottle nipples
or measuring spoons. Snap lids shut.
If your dishwasher does not have this basket, it
can be ordered from Sears Service Center- Part
No. 809105.
$iive_are Basket
Load silverware so items are mixed in each
section and do not "nest" together. Water
spray cannot clean nested items.
Be sure no items protrude through holes in
basket or extend high enough to stop rotation
of sPray arms.
Load sharp items with points down.
Hew To Add an item During a Cycle
You can add items anytime before the wash portionof the cycle,
oUnlatch door to stop cycle_
® Open door and add item,
• Latch door to resume cycle.
8
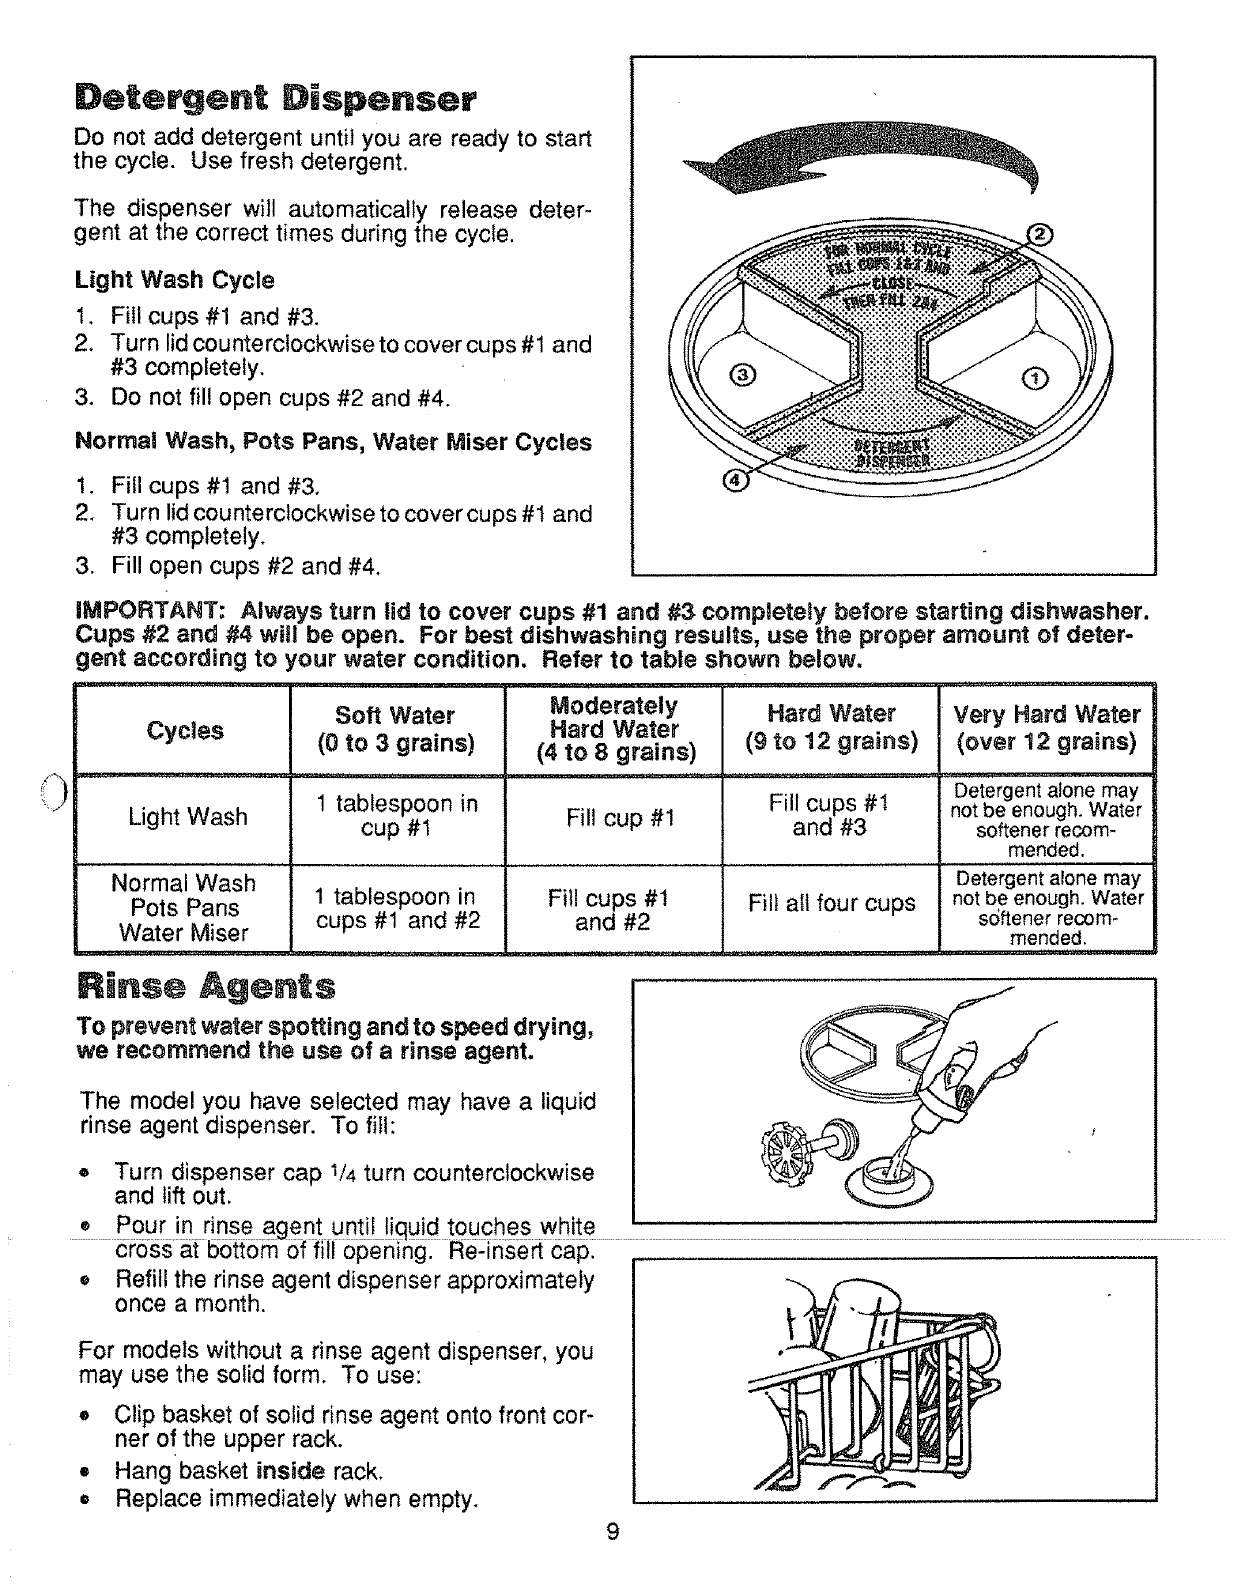
Detergent Dispenser
DO not add detergent until you are ready to start
the cycle. Use fresh detergent.
The dispenser will automatically release deter-
gent at the correct times during the cycle.
Light Wash Cycle
1, Fill cups #1 and #3.
2. Turn lid counterclockwise to cover cups #1 and
#3 completely.
3. Do not fill open cups #2 and #4.
Normal Wash, Pots Pans, Water Miser Cycles
1. Fill cups #1 and #3.
2. Turn lid counterclockwise to covercups #1 and
#3 completely.
3. Fill open cups #2 and #4,
iMPORTANT: Always turn lid to cover cups #1 and #3 compteteRy before starting dishwasher.
Cups #2 and #4, will be open. For best dishwashing results, use the proper amount of deter-
gent according to your water condition. Refer to table shown below.
Cycles
Light Wash
....., ,,,,, ,
Normal Wash
Pots Pans
Water Miser
Soft Water
(0 to 3 grains)
1 tablespoon in
cup #I
1 tablespoon in
cups #1 and #2
Moderately
Hard Water
(4 to 8 grains)
Fill cup #1
Fill cups #!
and #2
Hard Water
(9 to 12 grains)
Fill cups #1
and #3
Fill all four cups
Very Hard Water
(ever 12 grains)
Detergent alone may
not be enough. Water
softener recom-
mended.
Detergent alone may
not be enough• Water
softener recom-
mended,
Rinse Agents
To prevent water spotting and to speed drying,
we recommend the use of a rinse agent.
The model you have selected may have a liquid
rinse agent dispenser. To fiN:
• Turn dispenser cap 1/4 turn counterclockwise
and lift out,
• Pour in rinse agent until liquid touches white .................................................................................
® Refill the rinse agent dispenser approximately
once a month.
For models without a rinse agent dispenser, you
may use the solid form. To use:
eClip basket of solid rinse agent onto front cor-
ner o! the upper rack.
•Hang basket inside rack,
• Replace immediately when empty.
9
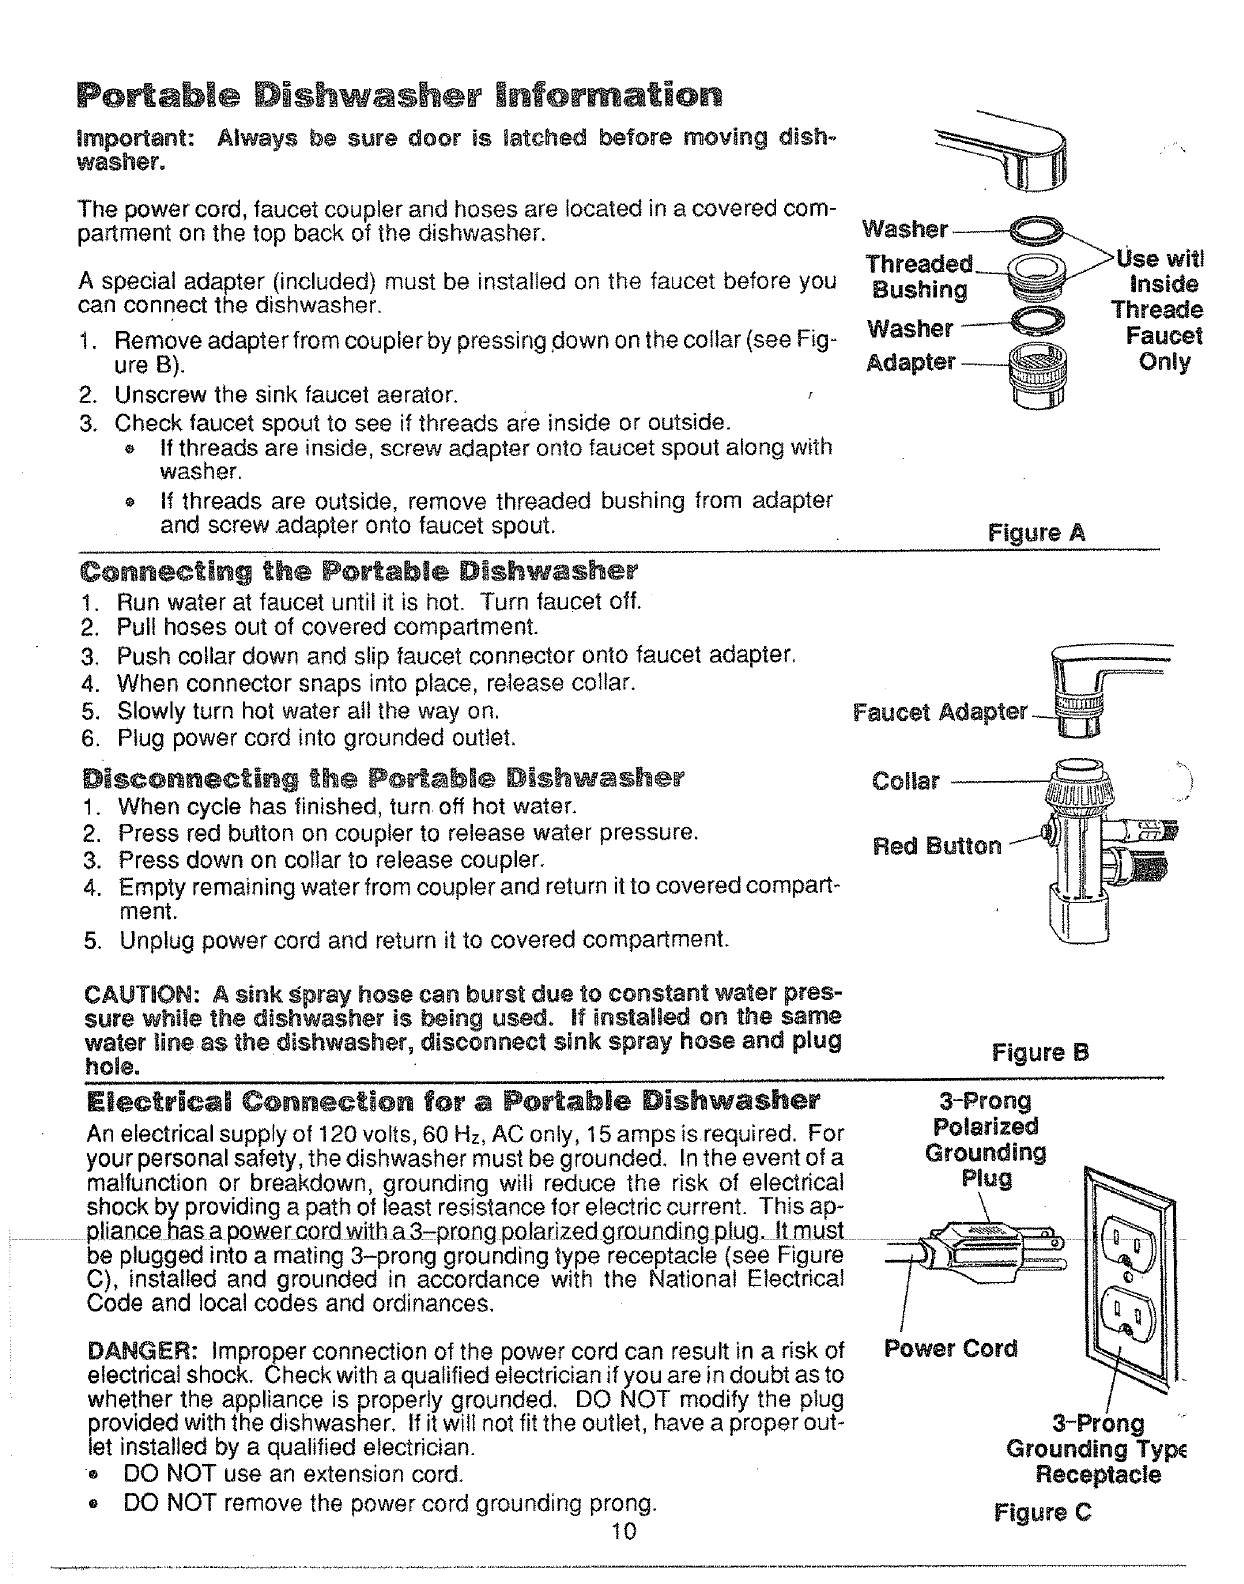
Potable E)ishwasher Inf@rmation
important: Always be sure door is latched before moving dish=
washer.
The power cord, faucet coupler and hoses are located in a covered com-
partment on the top back of the dishwasher.
A special adapter (included) must be installed on the faucet before you
can connect the dishwasher.
1. Remove adapter from coupler by pressing .down on the collar (see Fig-
ure B).
2. Unscrew the sink faucet aerator.
3. Check faucet spout to see if threads are inside or outside.
If threads are inside, screw adapter onto faucet spout along with
washer.
If threads are outside, remove threaded bushing from adapter
and screw adapter onto faucet spout.
Connecting th÷ Portable D shwasher
1. Run water at faucet until it is hot. Turn faucet off.
2. Pull hoses out of covered compartment.
3. Push collar down and slip faucet connector onto faucet adapter.
4. When connector snaps into place, re{ease collar.
5. Slowly turn hot water all the way on.
6, Plug power cord into grounded outlet.
Washer _
Threaded_ j>Use wltl
Bushing _inside
Washer
Adapter -_
Figure A
Faucet Adapter _-_-
D_sconnecting th÷ P@_=bBe Dishwasher
1. When cycle has finished, turn off hot water.
2. Press red button on coupler to release water pressure.
3. Press down on collar to release coupler.
4. Empty remaining water from coupler and return it to covered compart-
ment.
5. Unplug power cord and return it to covered compartment.
Threade
Faucet
Only
! _x,a:
CAUTION: Asink _;pray hose can burst due to constant water pres-
sure while the dishwasher is being used. if installed on the same
water line as the dishwasher, disconnect sink spray hose and plug
hole. Figure B
Electrica| Connection for a Portable Dishwasher 3-Prong
An electrical supply of 120 volts, 60 Hz, AC only, 15 amps is required. For Polarized
your personal safety, the dishwasher must be grounded. In the event of a Grounding
malfunction or breakdown, grounding will reduce the risk of electrical P!ug
shock by providing a path of least resistance for electric current. This ap- _.._-----_
................pliar}cebasapowe[cord with a 3,pro_gpoladzedgrouadi.ogplug.Jt must ........... _ ..... _I!
be plugged into a mating 3-prong grounding type receptacle (see Figure "_-_li
C), installed and grounded in accordance with the National Electrical /.....-""--J_ _"_ tt
Code and local codes and ordinances. _ {;_-"-_li
DANGER: Improper connection of the power cord can result in a risk of Power Cord _11
electrical shock. Check with a qualified electrician if you are in doubt as to
whether the appliance is properly grounded. DO NOT modify the plug /"
provided with the dishwasher_ If it wilt not fit the outlet, have a proper out- 3-Prong ....
let installed by a qualified electrician. Grounding Typ_
•_ DO NOT use an extension cord. Receptacle
DO NOT remove the power cord grounding prong. Figure C
10
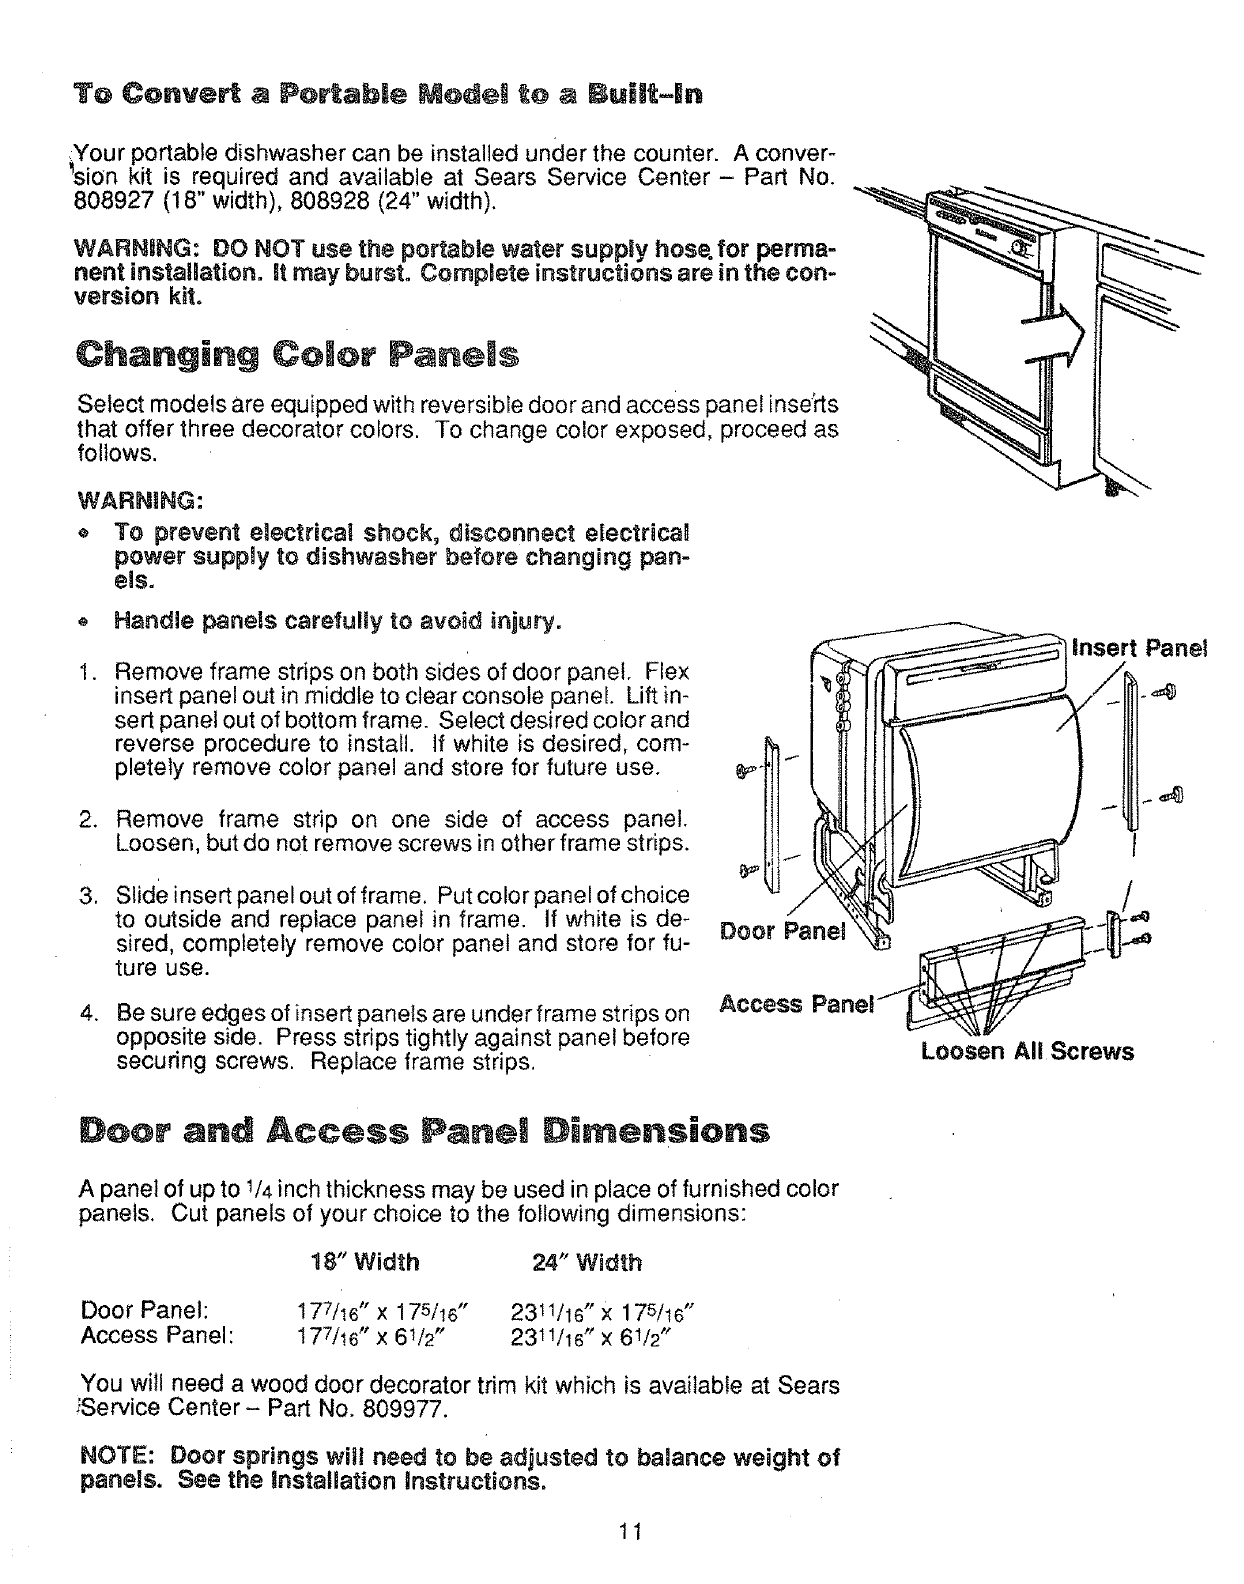
To Conve_ a Portable Mode_ to a Buimt-|n
<Your portable dishwasher can be installed under the counter. A conver-
_sion kit is required and available at Sears Service Center - Part No.
808927 (18" width), 808928 (24" width).
WARNING: DO NOT use the portable water supply hose.for perma-
nent installation, at may burst. CompRete instructions are in the con-
version kit.
Changing Color Panels
Select models are equipped with reversible door and access panel inse'rts
that offer three decorator colors. To change color exposed, proceed as
follows.
WARNING:
To prevent electrical shock, disconnect eiectrican
power suppgy to dishwasher before changing pan-
els.
, Handle panels carefullyto avoid iniury.
I.Remove frame strips on both sides of door panel. Flex
insert panel out in middle to clear console panel. Lift in-
sert panel out of bottom frame. Select desired color and
reverse procedure to install. If white is desired, com-
pletely remove color panel and store for future use.
2. Remove frame strip on one side of access panel.
Loosen, but do not remove screws in other frame strips.
3_ Slide insert panel out of frame. Put color panel of choice
to outside and replace panel in frame. If white is de-
sired, completely remove color panel and store for fu-
ture use.
4. Be sure edges of insert panels are under frame strips on
opposite side. Press strips tightly against panel before
securing screws. Replace frame strips.
/
f
Insert Panel
Access Panel /
Loosen All Screws
Door and Access Panel Dimensions
A panel of up to t/4 inch thickness may be used in place of furnished color
panels. Cut panels of your choice to the following dimensions:
18" Width 24" Width
Door Panel:
Access Panel: ! 77t!6 " x 175116"
177tt6 " x 61/2 "
2311116" x 175!t6"
2311/16" x 61t2 "*
You will need a wood door decorator trim kit which is available at Sears
!Service Center- Part No. 809977.
NOTE: Door springs witl need to be adjusted to balance weight of
panels. See the installation Instructions.
11
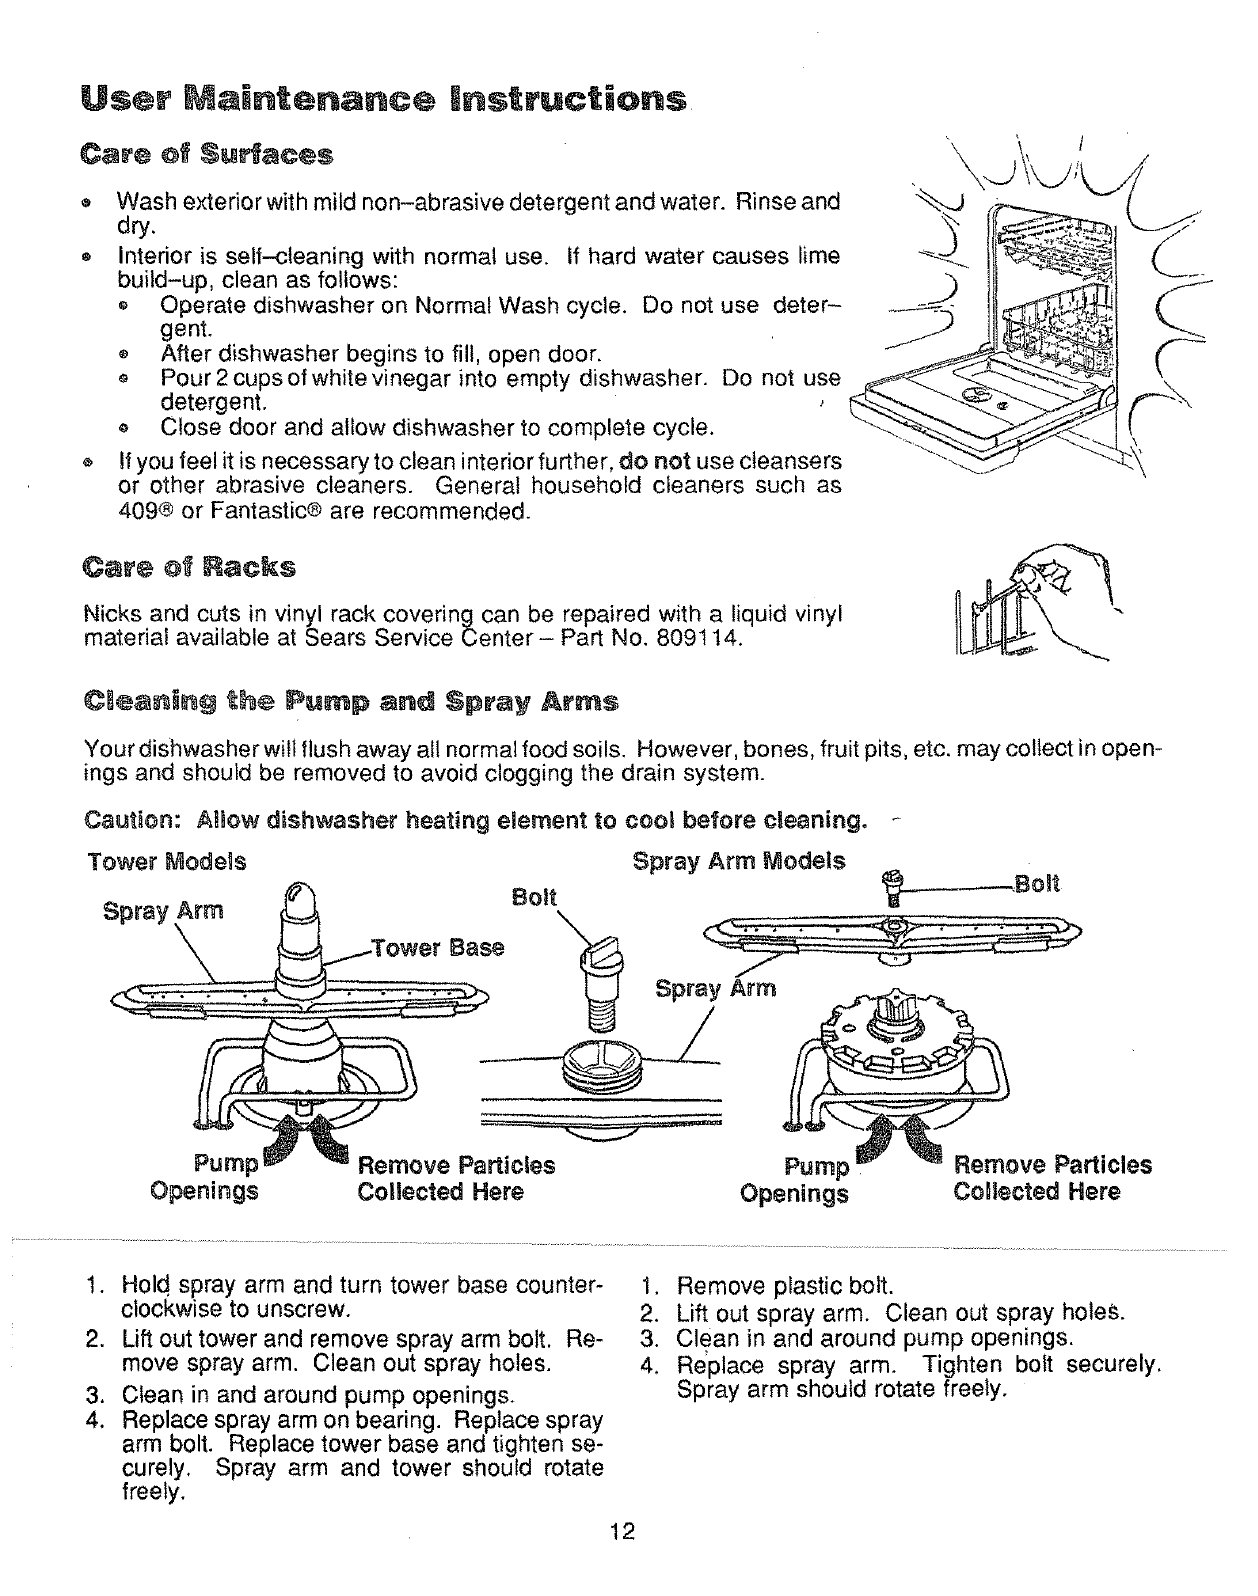
User Maintenance nstructions
Care @_Su_ces
_, Wash exterior with mild non-abrasive detergent and water. Rinse and
dry.
® Intedor is self-cleaning with normal use. if hard water causes lime
build-up, clean as follows:
Operate dishwasher on Normal Wash cycle. Do not use deter-
gent.
After dishwasher begins to fill, open door.
_, Pour 2 cups of white vinegar into empty dishwasher. Do not use _..._
detergent.
_, Close door and allow dishwasher to complete cycle.
If you feel it is necessary to clean interior further, do not use cleansers "-
or other abrasive cleaners. General household cleaners such as
409® or Fantastic® are recommended.
Care _ Racks
Nicks and cuts in vinyl rack covering can be repaired with a liquid vinyl
material available at Sears Service Center- Part No. 809114.
C_e_nJ_g _h_ Pu_p and Spray Ar_s
Your dishwasher will flush away all normal food soils. However, bones, fruit pits, etc. may collect in open-
ings and should be removed to avoid clogging the drain system.
At_¢w dishwasher heating element to cool before c|eaningo
Spray Arm Models
Bolt
Arm
_ogt
Pump Remove Particles Pump,
Openings Collected Here Openings
Remove Particles
CoD]ected Here
t. Hold spray arm and turn tower base counter-
clockwise to unscrew.
2. Lift out tower and remove spray arm bolt. Re-
move spray arm. Clean out spray holes.
3. Clean in and around pump openings.
4. Replace spray arm on bearing. Replace spray
arm bolt. Replace tower base and tighten se-
curely. Spray arm and tower should rotate
freely.
1. Remove plastic bolt.
2. Lift out spray arm. Clean out spray holeS.
3. Clean in and around pump openings.
4. Replace spray arm. Tighten bolt securely.
Spray arm should rotate freely.
12
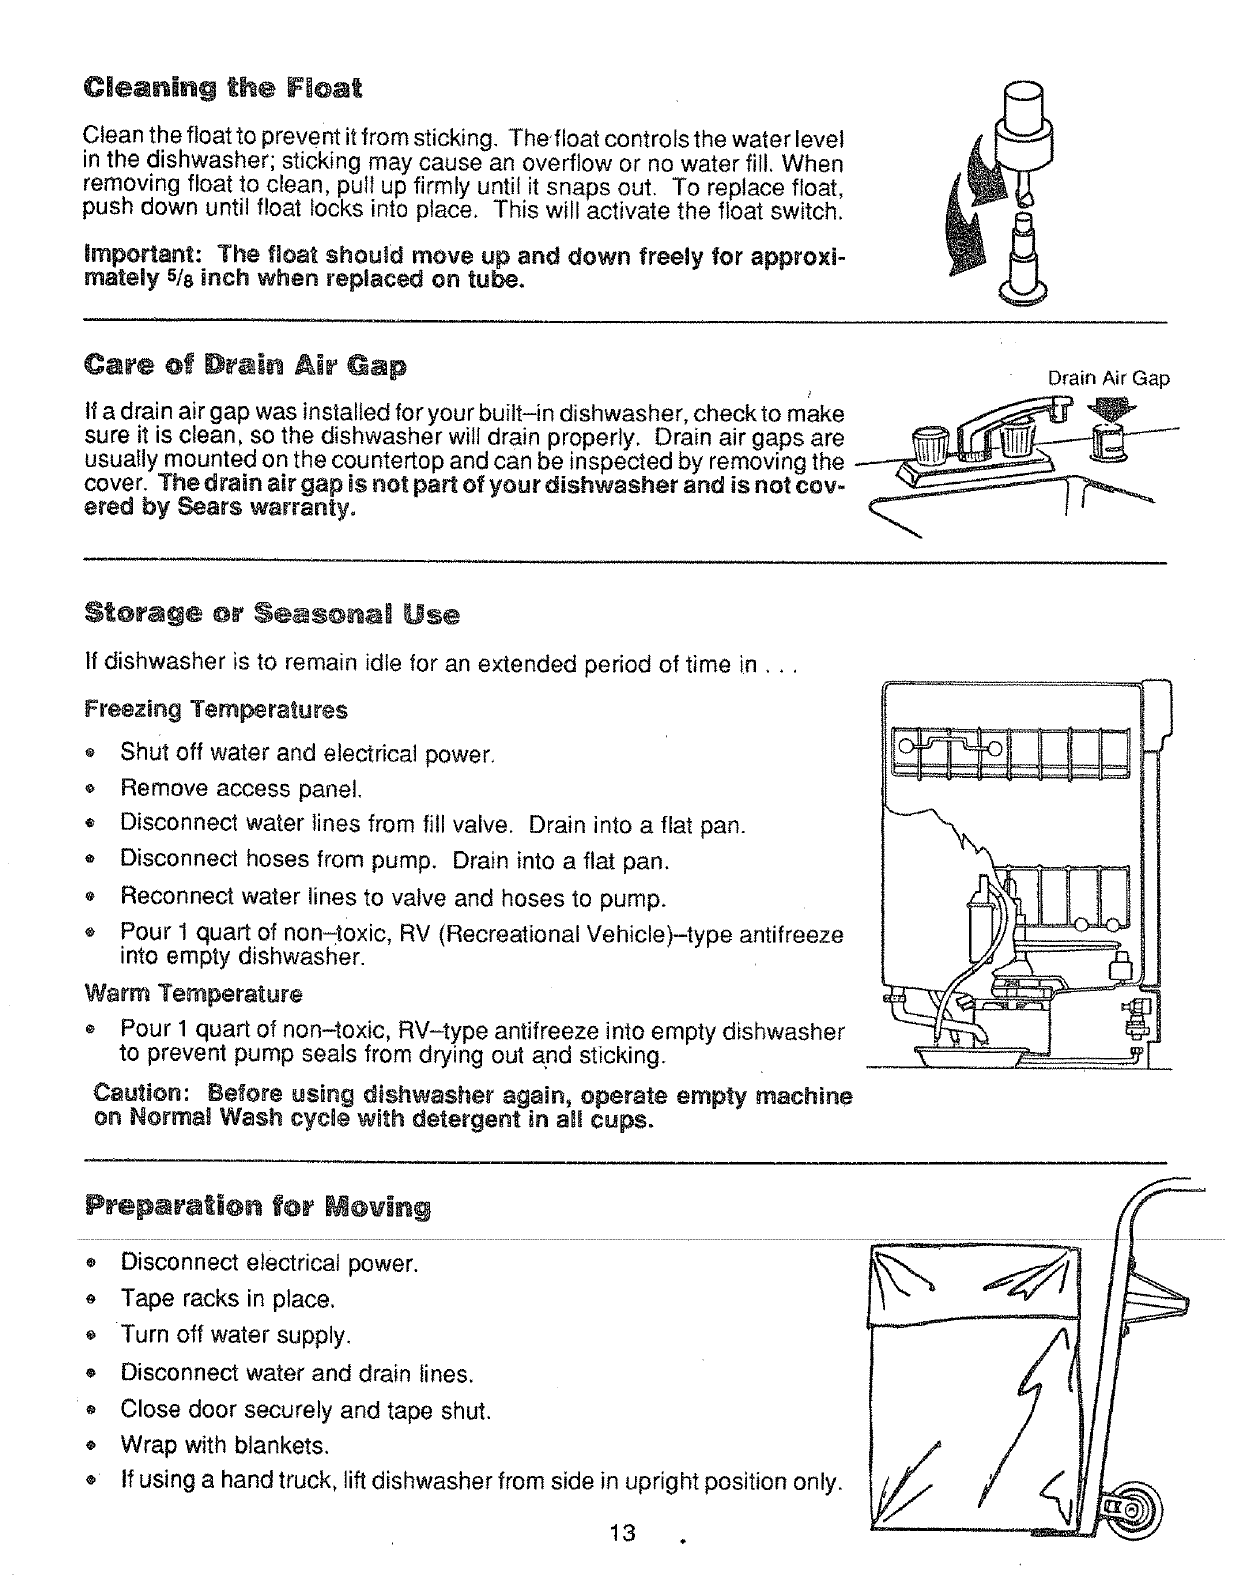
Cleaning the FJoat
Clean the float to prevent it from sticking. Thefloat controls the water level
in the dishwasher; sticking may cause an overflow or no water fill. When
removing float to clean, pull up firmly until it snaps out. To replace float,
push down until float locks into place. This will activate the float switch.
important: The float shouBd move up and down freely for approxi-
mately s/8 inch when replaced on tube,
Ca_e o_ _n _' _ap Drain Air Gap
If a drain air gap was installed for your built-in dishwasher, check to make _4_-
sure it is clean, so the dishwasher will drain properly. Drain air gaps are
usually mounted on the countertop and can be inspected by removing the
cover. The drain air gap is not part of your dishwasher and is not coy
ered by Sears warranty.
Storage or Seasonal] Use
If dishwasher is to remain idle for an extended period of time in..,
Freezing Temperatures
Shut off water and electrical power.
Remove access panel.
Disconnect water lines from fill valve. Drain into a flat pan.
,_ Disconnect hoses from pump. Drain into aflat pan.
e Reconnect water lines to valve and hoses to pump.
Pour 1 quart of non-toxic, RV (Recreational Vehicle)-type antifreeze
into empty dishwasher.
Warm Temperature
o Pour 1 quart of non-toxic, RV-type antifreeze into empty dishwasher
to prevent pump seals from drying out and sticking.
Caution: Before using dishwasher again, operate empty machine
on Normal Wash cycne with detergent in aH cups.
Preparation for Moving
_ Dis conneci-eieciricai Power. [
o Tape racks in place, )
, Turn off water supply.
, Disconnect water and drain lines,
o Close door securely and tape shut.
® Wrap with blankets.
If using a hand truck, lift dishwasher from side in upright position only.
13
PROBLEM CAUSED BY '
Dishwasher will not start. Dishwasher not receiving
electricity.
Dial not in correct position
for cycle selected.
$OLUTmON
check electrical connection, house fuse or circuit breaker.
Make sure dial is turned far enough. Also make sure cycle
button is fully pushed in and door is latched.
Dishwasher will not fill with
water. No water supply. Make sure water supply valve under sink is fully turned on.
Clean float.
Dishwasher leaks.
Water inlet valve clogged. Check water valve supply line- may be clogged with sedi-
ment Clean out.
Dishwasher not level.
Too much sudsing,
Level dishwasher as described in Installation Instructions
forbuitt-in dishwashers. Do not placedishwasheroncar-
pet,
Improper detergent or improper amount used. Refer tota-
ble on page 9. Use automatic dishwasher detergent
only or try a different brand.
If hand dishwashing detergent is used by mistake, pour
one measuring cup of vegetable oil in bottom of tub and
run dishwasher through a complete Normal Wash cycle
with recommended amount of automatic dishwasher de-
tergent.
Dishes not clean.
Float sticking.
Water is not hot,
Improper loading.
Clean float
Raise water heater thermostat to 140°F, ff necessary.
Use Water Heat option, if available_ Do not use dishwash-
er during or right after other heavy hot water use (bathing,
laundry).
Make sure dishes are loaded so spray reaches all sur-
laces and items drain properly. Do not overload. Do not
nest items.
., ,, ,,,,,,,.......... ,,,,,
Be sure a utensil has not blOCked' spray arm.
Spray arms not turning
freely.
Household water pressure If water pressure is low, do not use water for other put-
too low, poses (bathing, laundry) while dishwasher is running.
Spray arm plugged. Clean out holes in spray arms.
Old detergent. Use only fresh automatic dishwasher detergent. Store
tightly closed in a cool, dry place, Discard old, lumpy or
separated detergent. Do not fi!l detergent cups untiI ready
to start the dishwasher.
Dishwasher odor. Soiled dishes held too tong
in dishwasher. Use Rinse Hold cycle if dishes wilt not be washed at end of
each day.
Vinyl rack coating. Plastic odor will be gone after several weeks use.
Soil build-up around float Check and clean periodically. See User Maintenance
and below door. section,
Dishware chipped or bro- Improper loading. Do not overload. Load glasses in upper rack only. Place
ken. items in rows between prongs. See Proper Loading sec-
............................................................................................................................................... -tion,.for.tips ................................................................................
Dishes and interior of dish- Iron or manganese in water. Install an iron or manganese filter in home water supply,
washer brown or yellow.
Bronze tarnish on sil- Silverptate worn off expos- Remove tarnish with silver polish. Replate silver.
verplate, ing base metal - takes on
bronze hue
Silverware stained. Undissolved detergent con- Avoid spilting dry detergent on wet silverware. Clean with
tacting wet silverware silver polish.
Acidic or salty food soils. Use Rinse Hold cycle. Certain foods left on silverware for
extended periods of time may cause pil.ting.
14
PROBLEM
_potting and filming.
Etching-permanent filming
which cannot be removed.
CAUSED BY.
Hard Water.
Water is not hot.
Cool Dry selected.
Not enough or poor quality
detergent. .
Old detergent
No rinse agent.
Too much detergent in soft
water.
SOLUTION
Fill detergent cups to capacity. Use dishwasher detergent
wifh highest available phosphorous content. May be nec-
essary to install a water softener,
Raise water heater thermostat to 140°F, if necessary.
Use Water Heat option, if available.
Drying without heat may cause some spotting. Select Hot
Dry,
Use more automatic dishwasher detergent. Use deter-
gent with highest available phosphorous content, espe-
cially if you have hard water.
............. ,, ,,0 ............
Use only fresh, automatic dishwasher detergent. Store
tightly closed in a cool dry place. Discard old lumpy or
separated detergent. Do not fill detergent cups until ready
to wash.
Refil! rinse agent dispenser approximately once a month
er replace solid form rinse agent basket when empty.
NOTE: To remove spots or film from dishes
1. Load dishware into dishwasher (no metal items).
2. Put 2 cups white vinegar in a container on lower rack.
3. Run dishwasher through a complete Normal Wash cy-
cle. Vinegar will splash out during washing.
Reduce amount of dishwasher detergent, Use detergent
with lower phosphorous content.
)ishes not dry.
Cycle takes too long.
Improper loading.
Water is not hot.
No rinse agent.
Make sure dishes and glassware are loaded properly to
permit water spray to rinse all surfaces. Do not overload.
Raise water heater thermostat to 140°F, if necessary.
Refill liquid rinse agent dispenser approximately once a
month or replace solid form rinse agent basket when
empty.
Water left in bottom of tub.
Cool Dry selected.
Improper loading
Water Heat option selected
(if available).
Select Hot Dry for better drying.
Load dishes so items drain properly.
Heating water takes approximately one minute for each
degree of temperature rise. Times given in cycle descrip-
tion do not include water heating time.
Normal amount of water.
Drain hose loop too tow.
Black marks on dishes
Film build-up on lower front Some detergent did not dis-
of tub. solve.
It is normal for a small amount of clean water to remain in
bottom of tub after each cycle.
Drain hose should have a loop approximately 32 inches
above floor.
Detergent cup does not
open.
Drain hose kinked. Reposition drain hose to eliminate kink.
Drain air gap blocked. Clean the drain air gap. See User Maintenance Instruc-
tions.
Check valve not installed in See Installation Instructions for check valve information.
drain-hose_--
Metal utensils rubbing
against dishes during wash.
Detergent cup lid posit-
io ned wrong at start of cycle.
Load metal utensils so they do not rub against dishes.
Black marks may be removed with mild abrasive cleanser
and plastic scouring pad.
Use fresh, automatic dishwasher detergent. Use deter-
gent with highest available phosphorous content, espe-
cially if you have hard water. Raise water heater thermo-
stat to 140°F, if necessary. Run water at sink until hot be-
fore starting dishwasher andlor use Water Heat option.
Rem_o?'e!i!m wit h dishwaShing detergent and warm water.
See detergent dispenser instructions.
15
We Service What We Se||
"We Service What We Sell" is our assurance you can depend on
Sears for service.., and Sears service is nationwide. Your dish-
washer has added value when you consider that Sears has serv-
ice units nationwide, staffed with professional technicians specifi-
cally trained on Sears appliances and having parts, tools and
equipment to insure that we meet our pledge to you... "We Serv-
ice What We Sell."
Sears Maintenance Agreement
Maintain the value of your Kenmore® dishwasher with a Sears
Maintenance Agreement. Sears dishwashers are designed,
manufactured, and tested for years of dependable operation. Yet,
any modern appliance may require service from time to time.
The Sears Maintenance Agreement
Is your way to buy tomorrow's service at today's price.
Eliminates repair bills resulting from normal use.
Allows for as many service calls as required.
Provides for service by professional Sears-trained techni-
cians.
e Offers an annual preventive maintenance check-up at your re-
quest.
This maintenance agreement does not cover original installation,
reinstallation, or damage resulting from external causes such as
acts of abuse, theft, fire, flood, wind, lightning, freezing, power fail-
ure, power reduction, etc.
Sears Dishwasher Warranty
FuBi One-Year Warranty on Dishwasher
For one year from the first day of use in your home, Sears will repair, free of charge, defects in material or workmanship which
appear in this dishwasher. Ultra Life TM Tub Models
Full Ten-Year Warranty Against Leaks in the Tub and inner Door Panel
For ten years from the first day of use in your home, if a leak should occur as a result of failure of the Ultra LifeTM tub or inner
door panel due to cracking, chipping, or peeling, Sears will replace, free of charge, the tub or inner door panel.
Porcelain Tub Models
Full Five-Year Warranty Against Leak._ in the Tub and inner Door Panel
For five years from the first day of use in your home, ifaleak should occur as a result of failu re of the porcelain enamel tub due to
rust or corrosion, or with the polypropylene inner door panel due to cracking, chipping, or peeling, Sears will furnish, free of
charge, a replacement tub or inner door panel.
Porcelain Tub Models
Limited Ten-Year Warranty Against Leaks
After. five _years andthroug h.ten, years,Jf_aJeak-shouid-occur-as-a-resuit_of.-failure-of-the porcelain_enameLtubodu e.to zust.or._
corrosion, or with the polypropyle ne inner door panel due to cracking, chipping, or peeling, Sears will furnish, free of charge, a
replacement tub or inner door panet. You pay for labor.
If the dishwasher is subjected to other than private family use, the above warranty coverage is effective for only 90 days.
Warranty service is available by contacting the NEAREST SEARS SERVICE CENTER/DEPARTMENT in the United States.
This warranty applies only while this product is in use in the United States.
This warranty gives you specific tegat rights, and you may also have other rights which vary from state to state.
SEARS, ROESUCK AND CO=, Dept° 731CR-W-$ears-Tower, Chicago, IlL 60684
Printed in U.S.A. 3100005001B
