Kenmore 59673502200 User Manual REFRIGERATOR Manuals And Guides L0306154
KENMORE Bottom Mount Refrigerator Manual L0306154 KENMORE Bottom Mount Refrigerator Owner's Manual, KENMORE Bottom Mount Refrigerator installation guides
User Manual: Kenmore 59673502200 59673502200 KENMORE KENMORE REFRIGERATOR - Manuals and Guides View the owners manual for your KENMORE KENMORE REFRIGERATOR #59673502200. Home:Kitchen Appliance Parts:Kenmore Parts:Kenmore KENMORE REFRIGERATOR Manual
Open the PDF directly: View PDF ![]() .
.
Page Count: 17
E L T E ®
Bottom Freezer Refrigerator
Use & Care Guide
Refrigeradorcon montaje inferior
Manual de uso y cuidado
R_frig_rateur_compartiment inf_rieur
Guide d'utilisation et d'entretien
Models:
596.73502200, 596.73503200, 596.73504200, 596.73509200
"=trio
PartNo. 12642720 Sears, Roebuck and Co., Hoffrnan Estates, IL 60179 U.S.A. www.sears.com
FormB/10102 Sears Canada, Inc., Toronto, Ontario, Canada M5B 2B8 Au Canada, www.sears.¢a

INSTALLINGYOURREFRIGERATOR
These instructions were provided to aid
you in the installation ol your
refrigerator
MEASURINGTHEOPENING
A one-half inch (72")of air space must be
provided for the back of the refrigerator.
When installing your refrigerator,
measure carefully.
Subflooring or floor coverings (i.e.
carpet, tile, wood floors, rugs) may make
your opening smaller than anticipated.
Some clearance may be gained by
using the leveling procedure under
How to Level Your Refrigerator.
IMPORTANT: If refrigerator is to be
installed into a recess where top of
refrigerator is completely covered, use
dimensions from floor to top of hinge
cap to verify proper clearance.
TRANSPORTINGYOUR
REFRIGERATOR
Follow these tips when moving the
refrigerator to final location:
> NEVER transport refrigerator on its
side. If an upright position is not
possible, lay refrigerator on its back.
Allow refrigerator to sit upright for
approximately 30 minutes prior to
plugging refrigerator in to assure oil
returns to the compressor. Plugging
refrigerator in immediately may cause
damage to internal parts.
> Use an appliance dolly when moving
refrigerator. ALWAYS truck
refrigerator from its side-NEVER
from its front or back.
> Protect outside finish of refrigerator
during transport by wrapping cabinet
in blankets or inserting padding
between the refrigerator and dolly.
*- Secure refrigerator to dolly firmly,with
straps or bungee cords Thread straps
through handles when possible. DO NOT
overtighten Overtightening restraints may
dent nr damage outside finish
SELECTINGTHEBEST
LOCATION
Observe these points when choosing the
final location for your refrigerator:
> DO NOT install refrigerator near
oven, radiator or other heat source. If
not possible, shield refrigerator with
cabinet material.
> DO NOT install where temperature
fans below 55° F (13° C). Malfunction
may occur at this temperature.
> To assure proper door closure, follow
the leveling instructions in the
section, How te Level Your
Refrigerator.
OPENINGANDCLOSING
YOURFRESHFOODDOORS
Your new refrigerator is uniquely
designed with two fresh food doors.
Either door can be opened or closed
independently of one another.
There is a vertically-hinged section on
the 1ellfresh food door called the
SmartSeal. When the left door is closed,
the hinged section automatically forms a
seal between the two doors when both
doors are closed.
When the left door is opened, the
SmartSeal automatically folds inward so
that it is out of the way.
pror to 80S_l_g:: , ,-::,
1
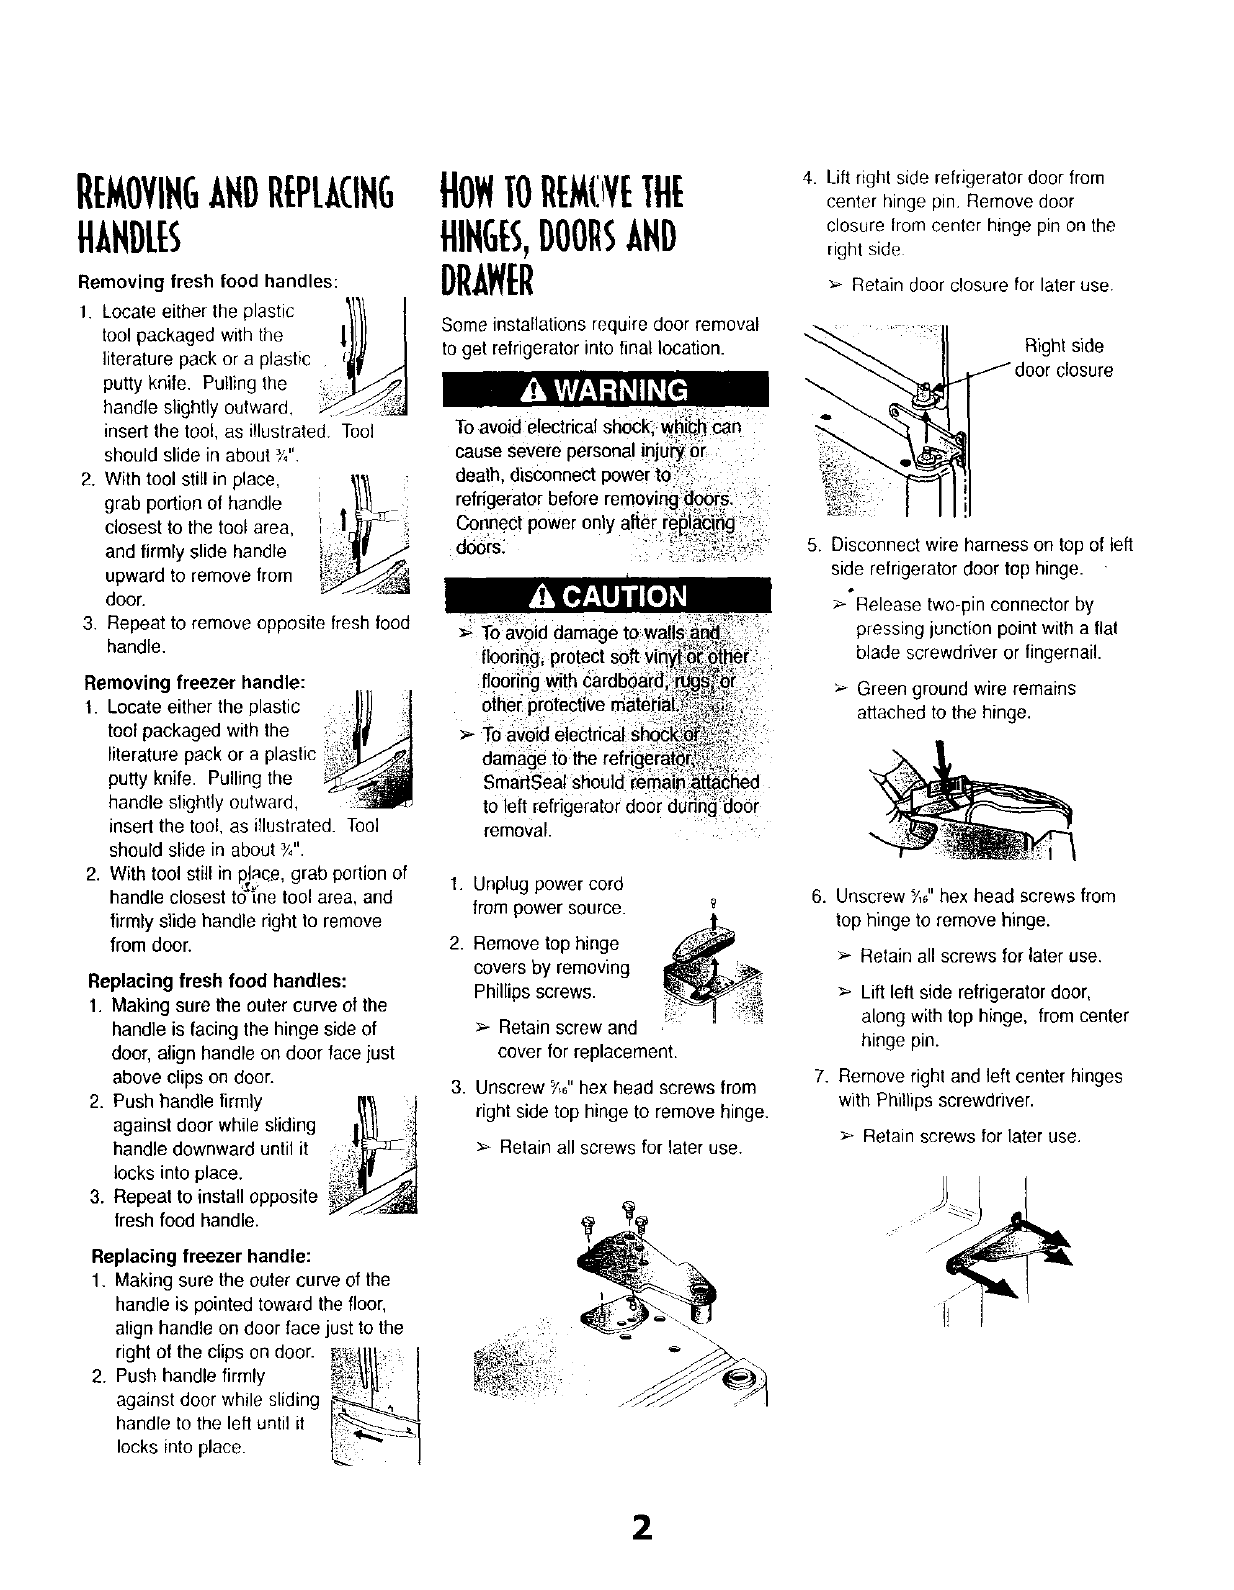
REMOYIHGAridRiiPLAflHG
HAHDLB
Removing fresh food handles:
HOWTOflEM( VETHE
HIHGES,DOORSAHD
DRAWER
1. Locate either the plastic ,1!!/ I
tool packaged with the _ Some installations require door removal
literature pack or a plastic to get refrigerator into final location.
putty knife. Pulling the
handle slightly outward,
insertthe tOOl,as illustrated. Tool To avoid electrical shOCk, whi_ _d
should slide in about Y," cause Severe personal injU_ _L i
death, disconnect power t_ +.
2. With tool still in place, 1tlli t refrigerator before removing _Ps!
grab portion of handle + _4__ .
closest to the tool area, y_/_ Connect power only after re£1acng :'
and firmly slidehandleupwardto remove from _//_ doors.
door.
3. Repeat to remove opposite fresh food
handle.
Removing freezer handle:
1. Locateeitherthe plastic I/IJ .t
toot packaged with the
literature pack or a plastic
putty knife• Pulling the
handle slightly outward,
insert the tool,as iTlustrated. Tool
should slide in about Y0".
2. Wth tool still in pace, grab portion of
.1[_. -
handle closest to 1hetoo area, and
firmly slide handle right to remove
from door.
Replacing fresh food handles:
1. Makingsure the outer curve of the
handleis facing the hingeside of
door,alignhandle ondoor face just
above clips on door.
2. Pushhandle lirmly i_l:J_b_
against door while sliding
handle downward until it
locks into place. _:_..i:_3_
3. Repeat to install opposite _
fresh food handle.
Replacing freezer handle:
1. Making sure the outercurve of the
handle is pointed toward the floor,
align handle on door face just to the
right of the clips on door. _,_= :,
2. Push handle firmly _.
against door while sliding _ t
locks into place.
Oihe_
Tc i, ii 6_
SmartSealShould
to left refrigerator door
removal.
t.
2.
3.
Unplug power cord
from power source.
Remove top hinge
covers by removing
Phillips screws.
>- Retain screw and
cover for replacement.
Unscrew _,+"hex head screws from
right side top hinge to remove hinge.
> Retain all screws for later use.
I
4. Lift right side refrigerator door from
center hinge pin Remove door
closure Irom center hinge pin on the
right side
> Retain door closure for later use.
Right side
door closure
5. Disconnect wire harness on top of left
side refrigerator door top hinge.
>*Release two-pin connector by
pressing junction point with a flat
blade screwdriver or fingernail.
> Green ground wire remains
attached to the hinge.
6. Unscrew Y,+"hex head screws from
top hinge to remove hinge.
> Retain all screws for later use.
> Lift left side refrigerator door,
along with top hinge, from center
hinge pin.
7. Remove right and left center hinges
with Phillips screwdriver.
> Retain screws for later use.
2
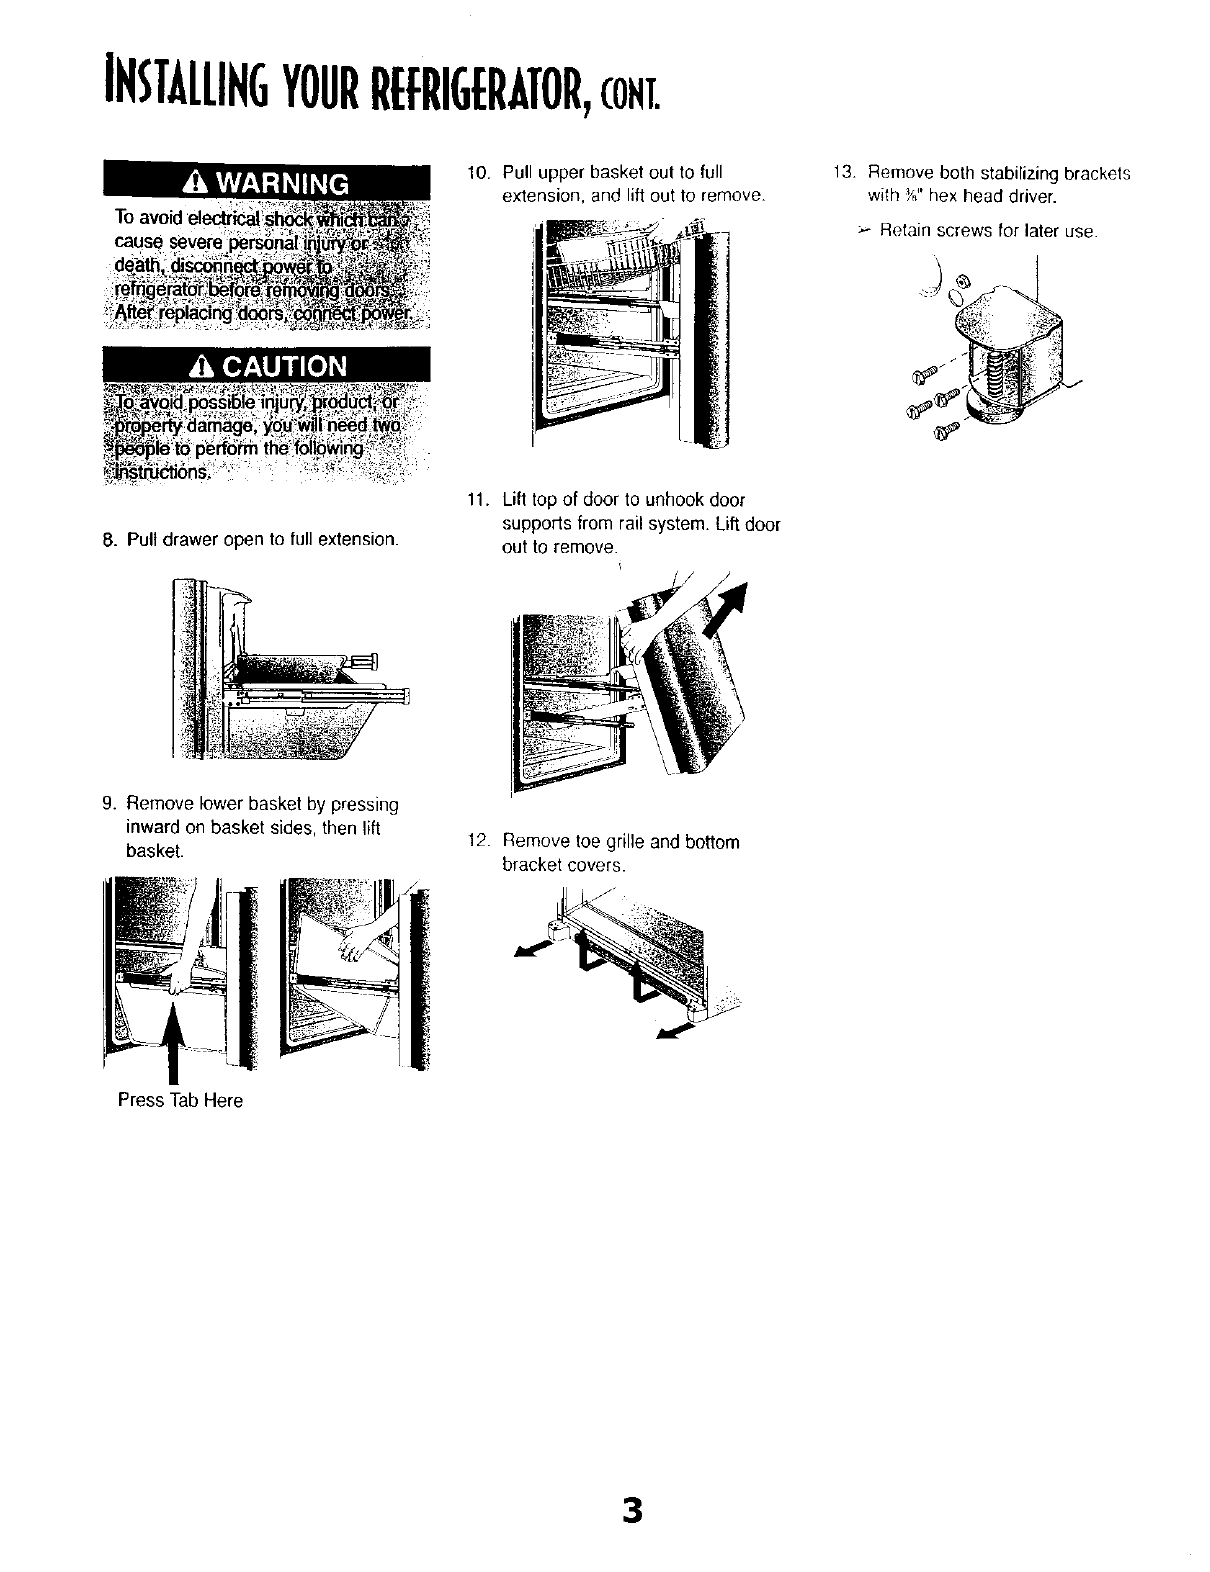
IHSTALLIHGYOURREFRIGERATOR,corn,
Toavoi
10. Pull upper basket out to full
extension, and lift out to remove.
13. Remove both stabilizing brackets
with Y,,"hex head driver.
Retain screws for later use.
8. Pull drawer open to full extension.
11. Lilt top of door to unhook door
supports from rail system. Lilt door
out to remove•
9. Remove lower basket by pressing
inward on basket sides, then lift
basket. 12. Remove toe grille and bottom
bracket covers.
Press Tab Here
3
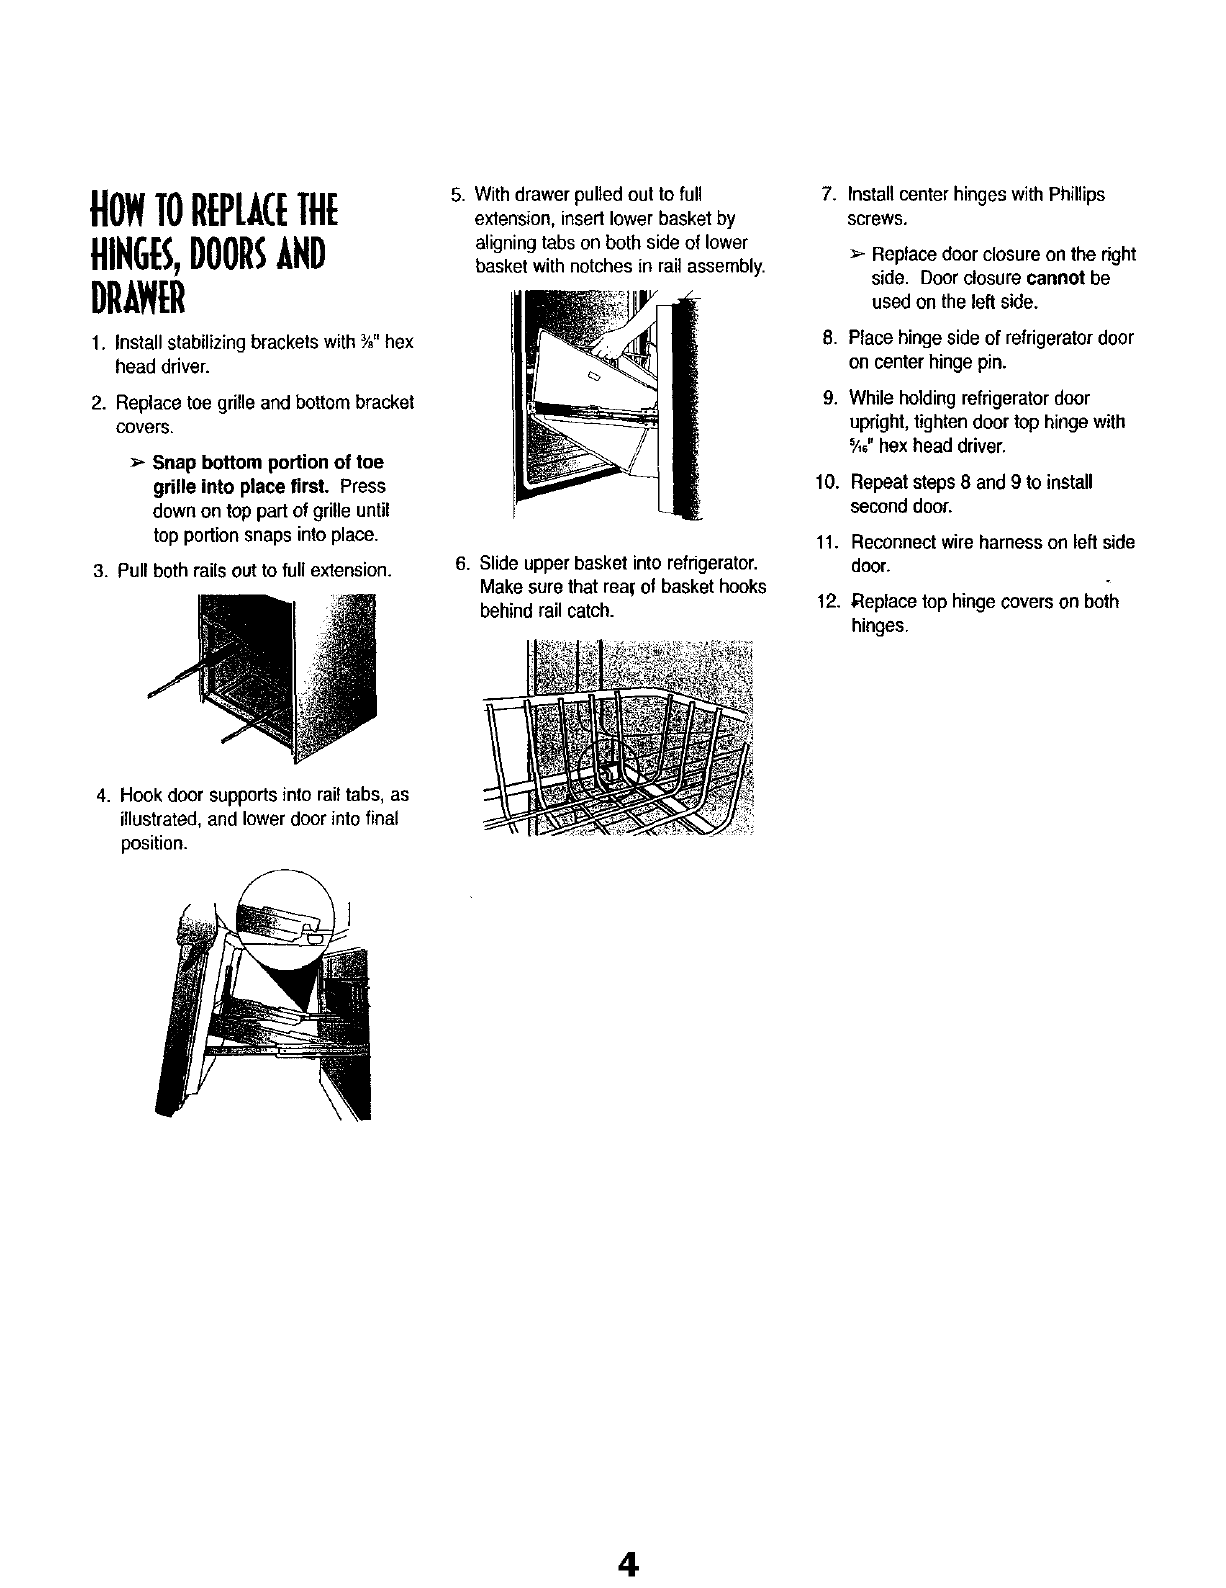
HOWTOREPLACETHE
HINGES,DOORSAND
DRAWER
1. Install stabilizing brackets with _8"hex
head driver.
2. Replace toe grille and bottom bracket
covers.
>_Snap bottom portion of toe
grille into place first. Press
down on top part of grille until
top portion snaps into place.
3. Pull both rails out to furl extension.
5. With drawer puffedout to full
extension, insert lower basket by
aligning tabs on both side of lower
basket with notches in rail assembly.
6. Slide upper basket into refrigerator.
Make sure that rea_"of basket hooks
behind rail catch.
7.
,
9.
10.
11.
12.
Install center hinges with Phillips
screws.
>- Replace door closure on the dght
side. Door closure cannot be
used on the left side.
Place hinge side of refrigerator door
on center hinge pin.
While holding refrigerator door
upright, tighten door tophinge with
'A,"hex head driver.
Repeat steps 8 and 9 to install
second door.
Reconnectwireharness on left side
door.
,Replacetop hinge coverson both
hinges.
4. Hook door supports into rail tabs, as
illustrated, and lower door into final
position.
4
IHSTALLIHGYOURREFRIGERATOR,CONT.
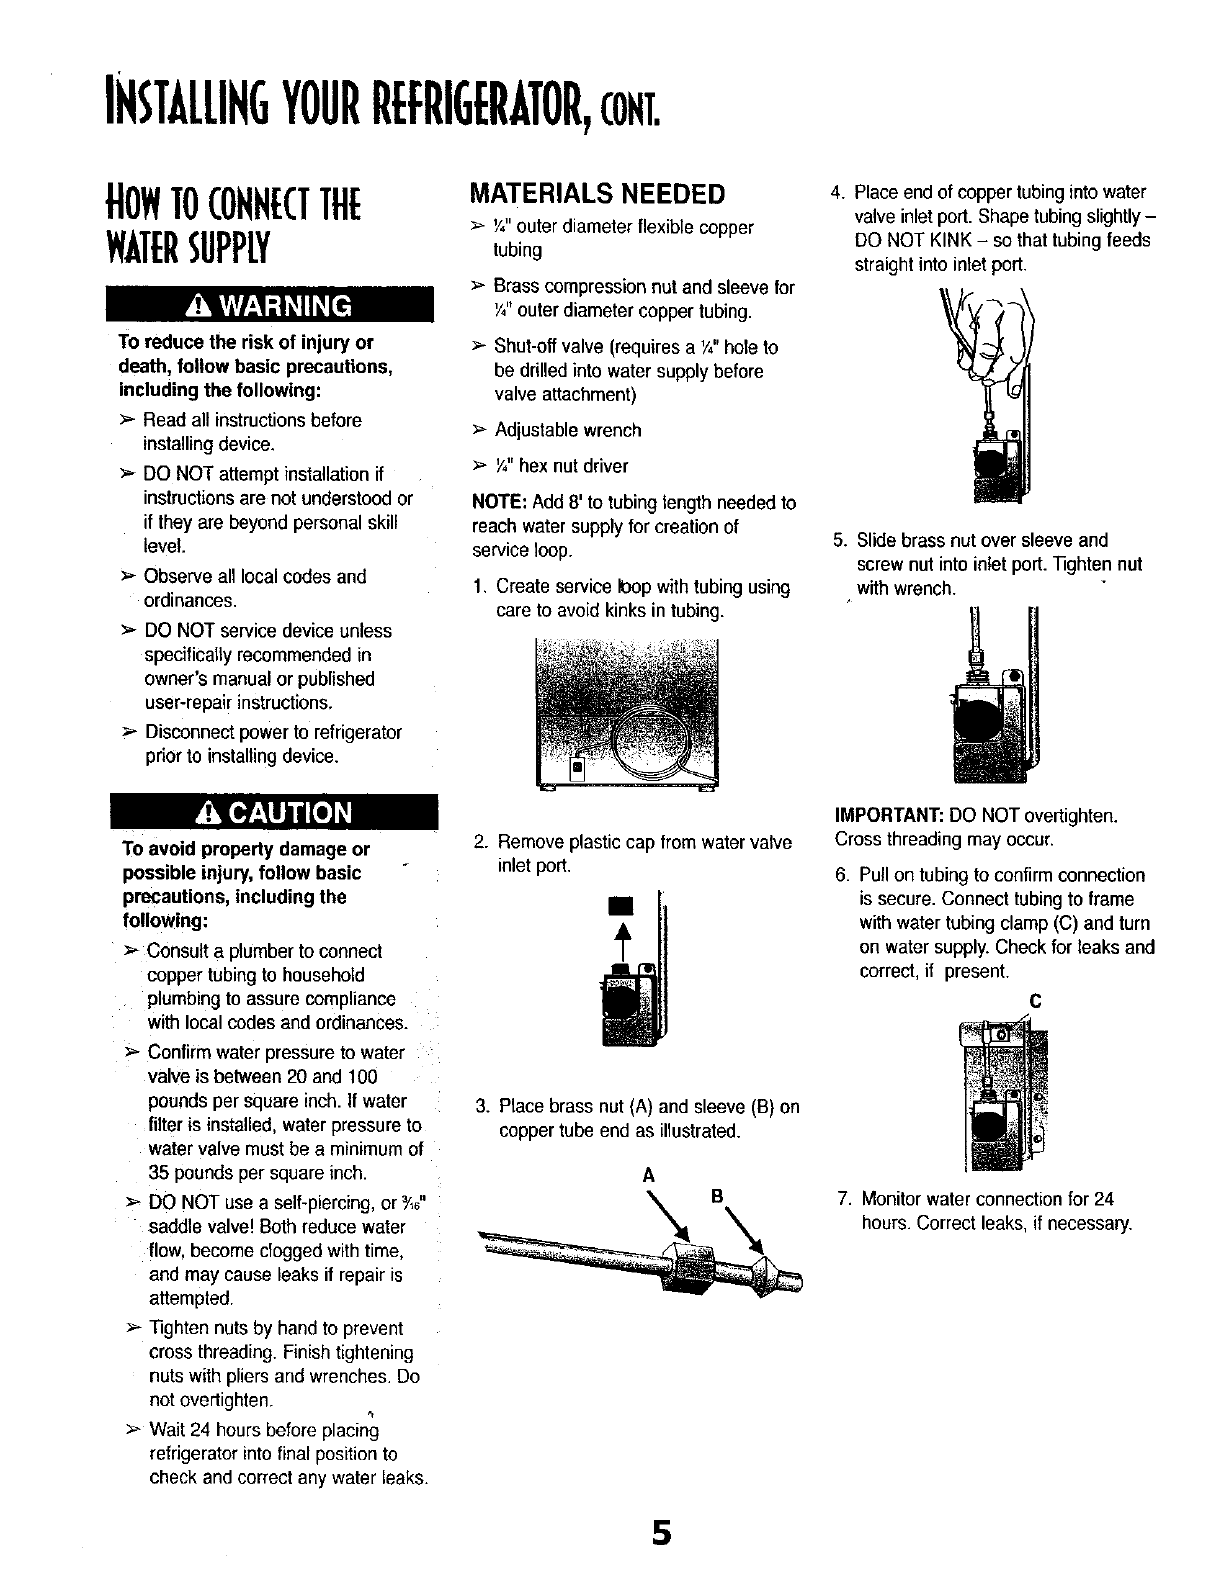
HOWTOCOHHECTTHE
WATERSUPPLY
To reduce the risk of injury or
death, follow basic precautions,
including the following:
>'- Read all instructions before
installing device.
_- DO NOT attempt installation if
instructions are not understood or
if they are beyond personal skill
level.
Observe all local codes and
ordinances.
_- DO NOT service device unless
specifically recommended in
owner's manual or published
user-repair instructions.
:_ Disconnect power to refrigerator
prior to installing device.
MATERIALS NEEDED
>_'/2'outerdiameterflexible copper
tubing
_- Brasscompression nut and sleeve for
Y,"outer diameter coppertubing.
Shut-off valve (requires a '/," hole to
be drilled into water supply before
valve attachment)
Adjustable wrench
_- Y,"hex nut driver
NOTE: Add 8' to tubinglength needed to
reach water supply for creation of
service loop.
1, Create service I_op with tubingusing
care to avoid kinks in tubing.
4. Place end of copper tubinginto water
valve inlet port. Shape tubing slightly -
DO NOT KINK - so that tubing feeds
straight into inlet port.
5. Slide brass nut over sleeve and
screw nut into inletport. _ghten nut
with wrench.
To avoid property damage or
possible injury, follow basic
precautions, including the
following:
Consult a plumber to connect
copper tubing to household
plumbingto assure compliance
with local codes and ordinances.
:_ Confirm water pressure to water
valve is between 20 and 100
pounds per square inch.If water
filter is installed, water pressure to
water valve must be a minimum of
35 pounds per square inch.
DO NOT use a self-piercing, or _',J'
saddle valve! Both reduce water
flow. become dogged with time,
and may cause leaks if repair is
attempted.
_ghten nuts by hand to prevent
cross threading. Finish tightening
nuts with pliers and wrenches. Do
not overtighten. ,,t
Wait 24 hours before placing
refrigerator intofinal position to
check and correct any water leaks.
2. Remove plastic cap from water valve
inlet port.
3. Place brass nut (A) and sleeve (B) on
copper tube end as illustrated.
AB
IMPORTANT:DO NOTovertighten.
Cross threading may occur.
6. Pull on tubing to confirm connection
is secure. Connect tubing to frame
with water tubing clamp (C) and turn
on water supply. Check for leaks and
correct, if present.
c
7. Monitor water connection for 24
hours. Correct leaks, if necessary.
5
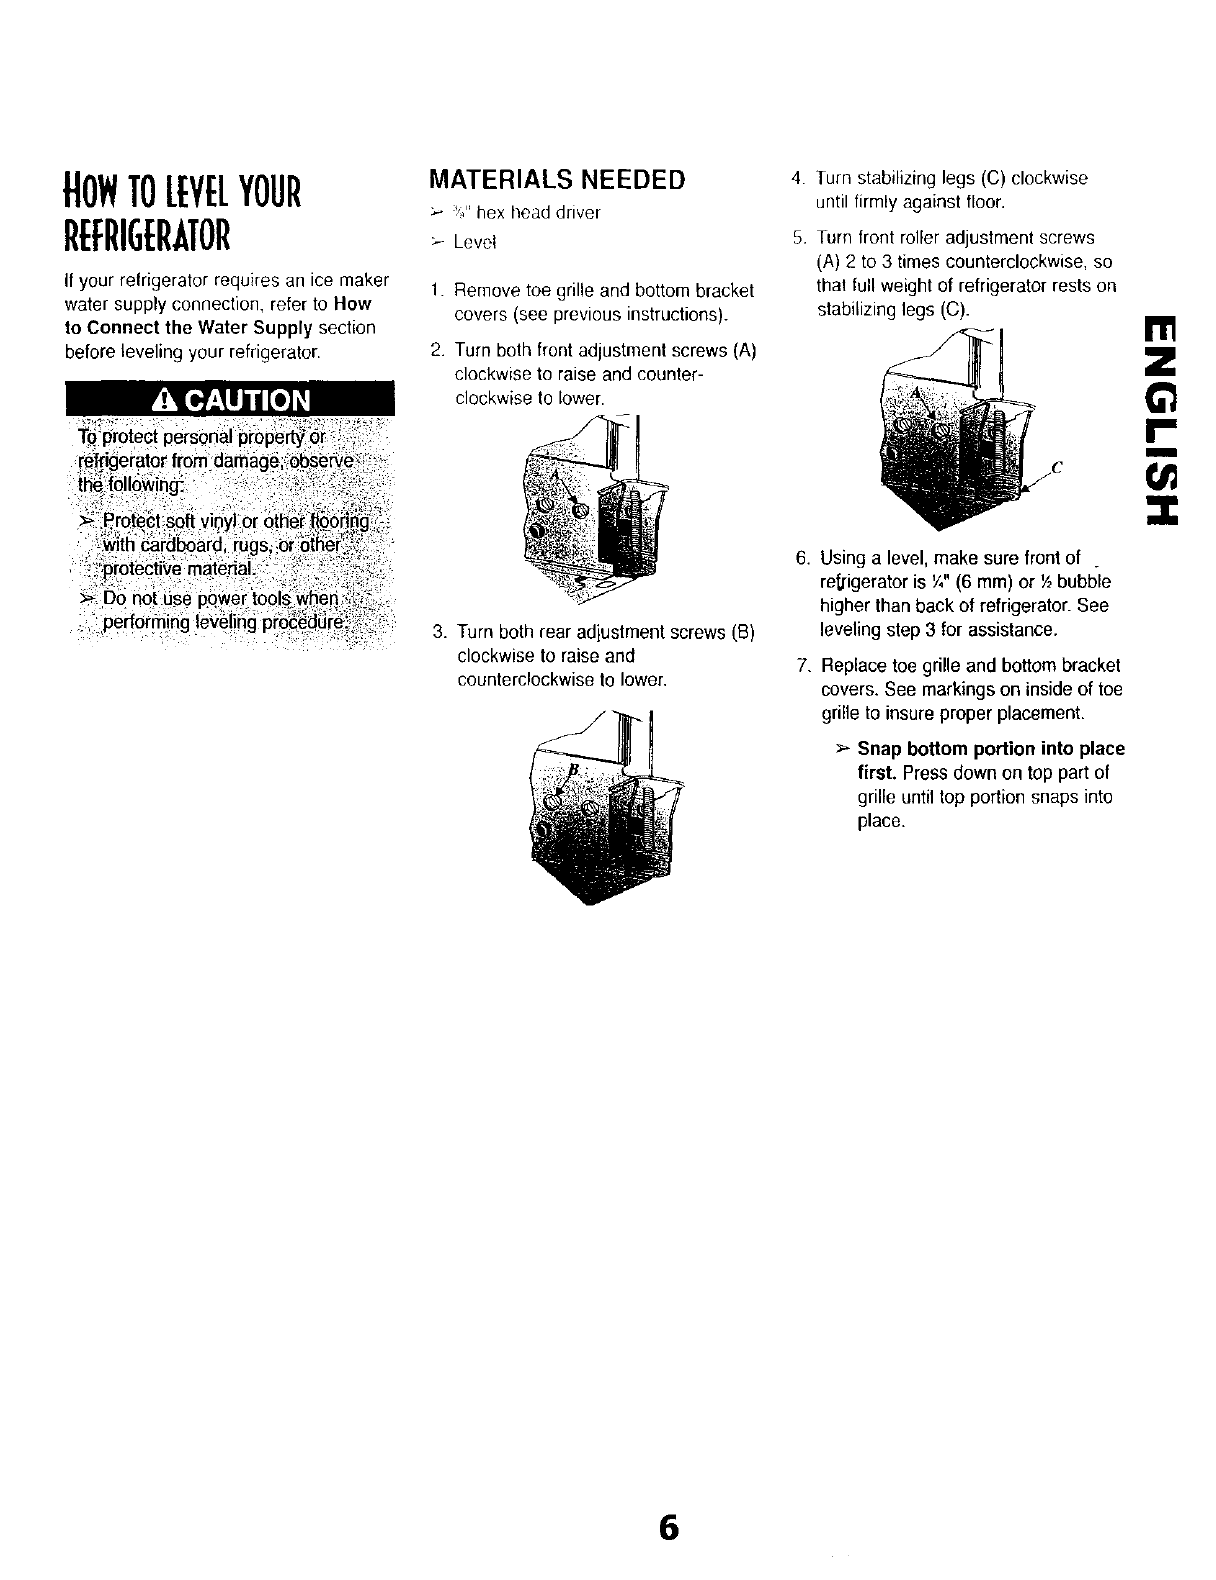
HOWTOLEVELYOUR
REFRIGERATOR
If your refrigerator requires an ice maker
water supply connection, refer to How
to Connect the Water Supply section
before leveling your refrigerator.
MATERIALS NEEDED
_" _ hex head driver
:.- Level
1. Remove toe grille and bottom bracket
covers (see previous instructions).
2. Turn both front adjustment screws (A)
clockwise l.o raise and counter-
clockwise to lower.
3. Turn both rear adjustment screws (B)
clockwise to raise and
counterclockwise to lower.
4 Turn stabilizing legs (C) clockwise
until firmly against floor.
5. Turn front roller adjustment screws
(A) 2 to 3 times counterclockwise, so
that full weight of refrigerator rests on
stabilizing legs (C).
6. Using a level, make sure front of _
refrigerator is '/4"(6 mm) or V_bubble
higher than back ol refrigerator. See
leveling step 3 for assistance.
7_ Replace toe grille and bottom bracket
covers. See markings on inside of toe
grille to insure proper placement.
>Snap bottom portion into place
first. Press down on top part of
grille until top portion snaps into
place.
I'ti
6
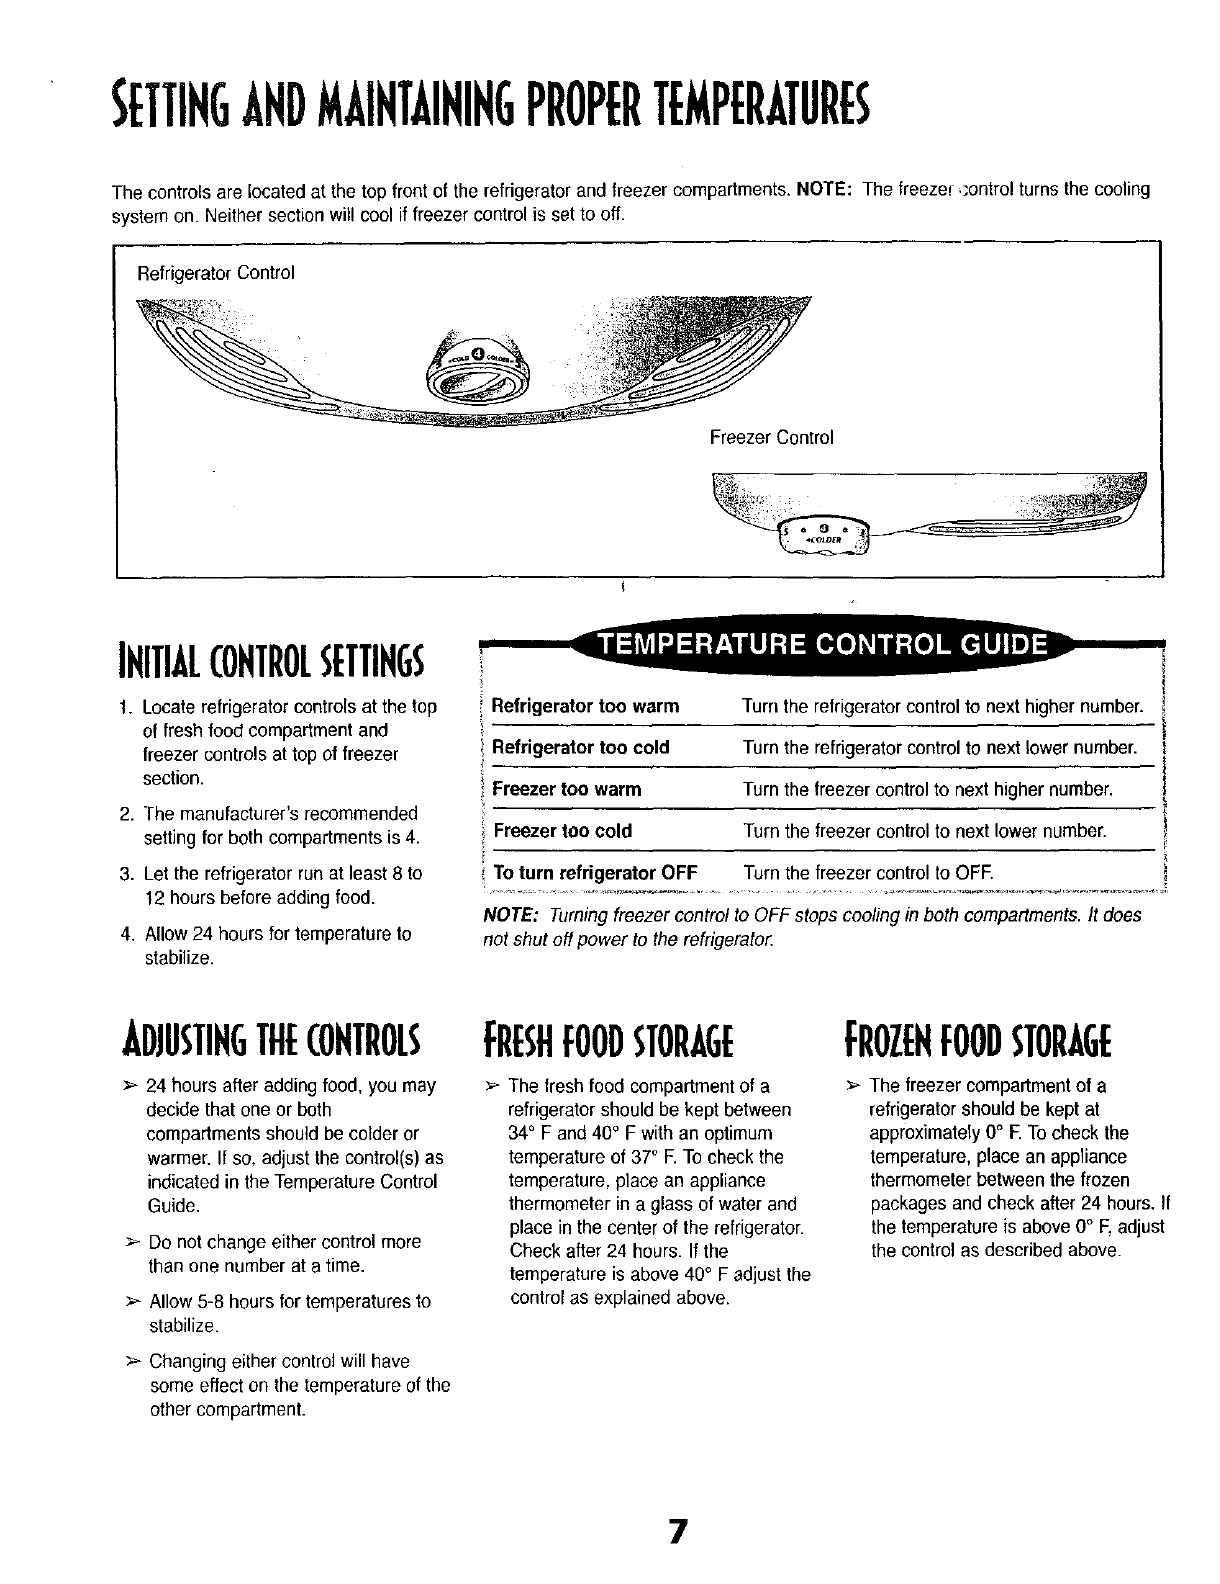
SETTIHGANDMAINTAININGPROPERTEMPERATURES
The controls are located at the topfront of the refrigerator and freezer compartments. NOTE: The freeze! ,:ontrol turns the cooling
system on. Neither section will cool if freezer control is set to off.
Refrigerator Control
•1
Freezer Control
:#Y
__r_ ¸ • :_i_ •_ ,
IHITIAL(OHTROLSETTIHGS
1. Locate refrigerator controls at the top
of fresh food compartment and
freezer controls at top of freezer
section•
2. The manufacturer's recommended
setting for both compartments is 4.
3. Let the refrigerator run at least 8 to
12 hours before adding food.
4. Allow 24 hours for temperature to
stabilize•
Refrigerator too warm
Refrigerator too cold
Freezer too warm
Freezer too cold
iTo turn refrigerator OFF
Turn the refrigerator control to next higher number.
Turn the refrigerator control to next lower number.
Turn the freezer control to next higher number.
Turn the freezer control to next lower number.
Turn the freezer control to OFE
NOTE: Turning freezer control to OFF stops cooling in both compartments. It does
not shut off power to the refrigeratoc
ADIUSTIH5THECOHTFlOLS
_- 24 hours after adding food, you may
decide that one or both
compartments should be colder or
warmer. If so, adjust the control(s) as
indicated in the Temperature Control
Guide.
Do not change either control more
than one number at a time.
>- Allow 5-8 hours for temperatures to
stabilize.
>- Changing either control will have
some effect on the temperature of the
other compartment.
FRESHFOODSTORAGE
_- The freshfood compartment of a
refrigerator should be kept between
34° F and 40° Fwith an optimum
temperature of 37° E To check the
temperature, place an appliance
thermometer in a glass of water and
place in the center of the refrigerator.
Check after 24 hours. If the
temperature is above 40°Fadjust the
control as explained above.
FROZEHFOODSTORAGE
The freezer compartment of a
refrigerator should be kept at
approximately 0° E To check the
temperature, place an appliance
thermometer between the frozen
packages and check after 24 hours. If
the temperature is above 0° F,adjust
the control as described above.
7
ABOUTYOURWATERFILTER...
WATERFILTERINSTALLATION
ANDREMOVAL
To avoid serious illness or death, do
not use refrigerator where water is
unsafe or of unknown quality without
adequate disinfection before or after
use of filter.
> Bypass cartridge DOES NOT filter
water. Be sure to have
replacemen__rtridge available
wfien filt_r_ch_e is required.
_- If watei"filtration system has been
all0wea {o_ree;;e, replace filter
cartridge:;
>" Ifsystenl hashot been used for
several _onth_, a6d water has an
unpleasant {aste oi odor, flush
system bYldispensing 2-3 glasses
of water. If uhpleasant taste or
odor persists, change filter
cartridge.
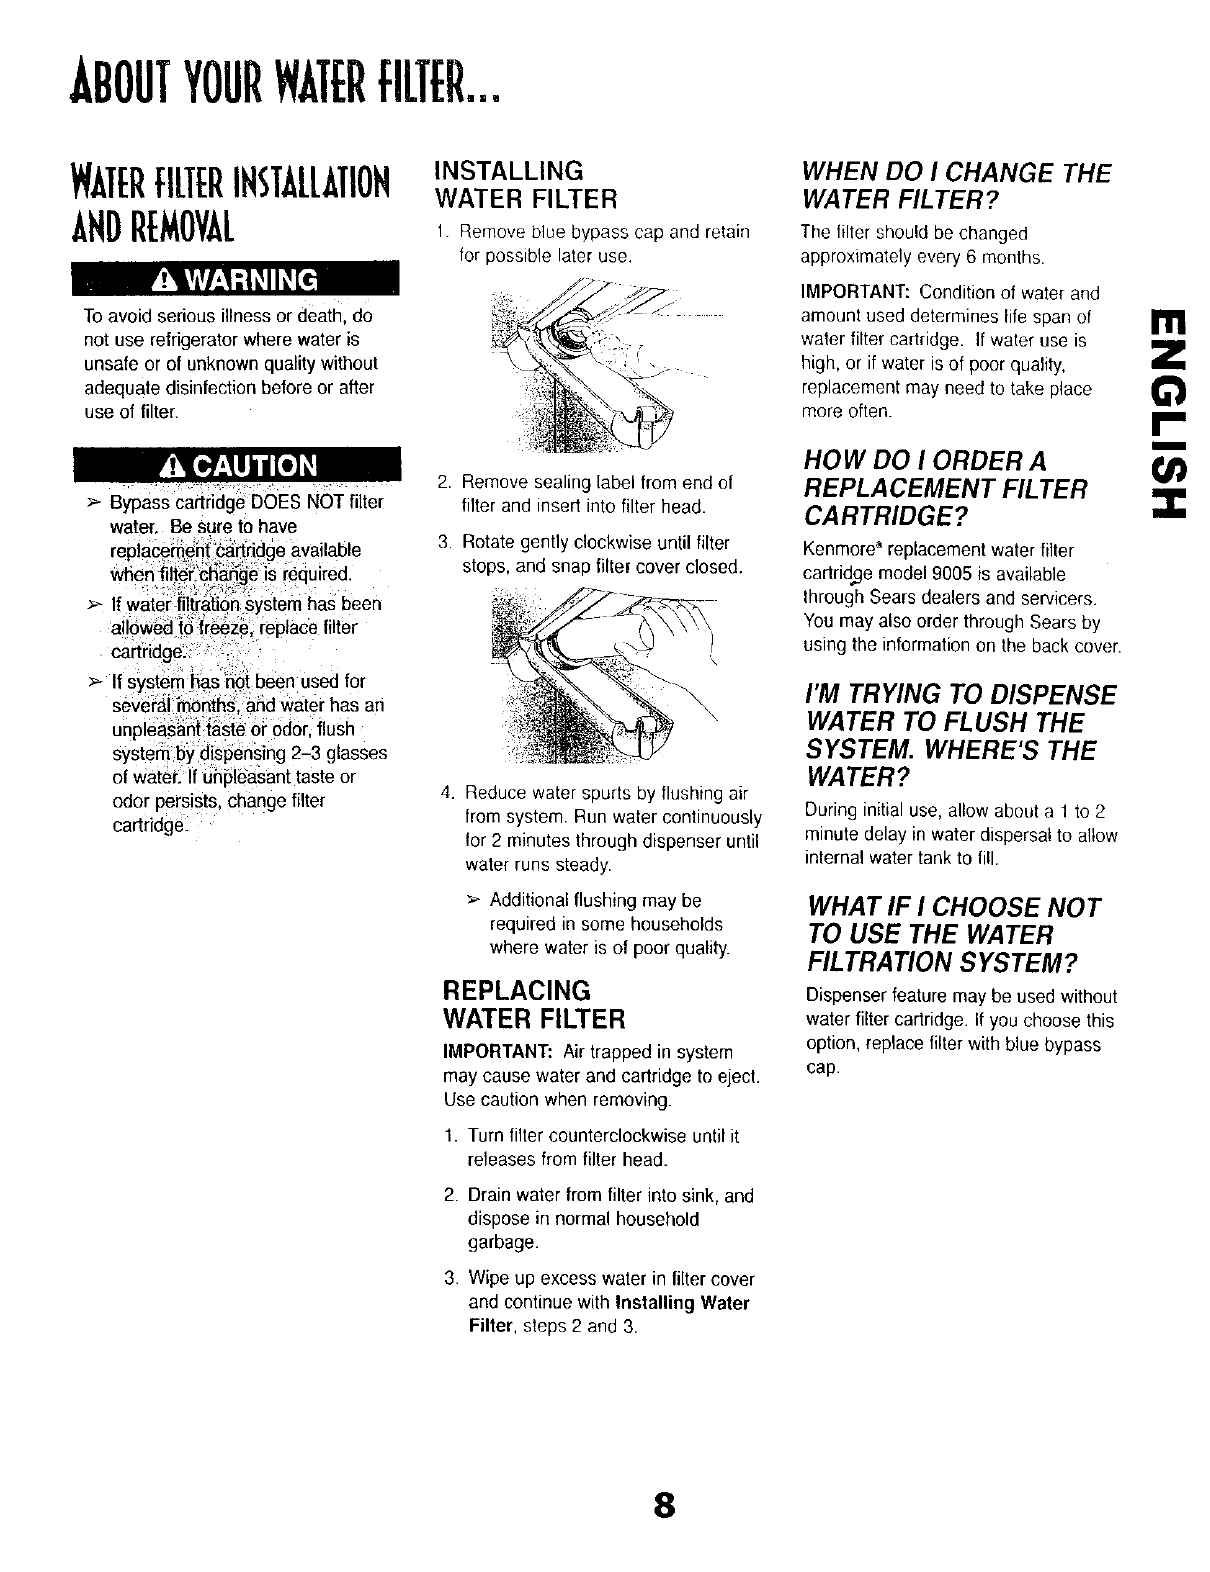
INSTALLING
WATER FILTER
1. Remove blue bypass cap and retain
for possible later use.
2. Remove sealing label from end of
filter and insert into filter head.
3. Rotate gently clockwise until filter
stops, and snap filter cover closed.
4. Reduce water spurts by flushing air
from system. Run water continuously
for 2 minutes through dispenser until
water runs steady.
> Additional flushing may be
required in some households
where water is of poor quality.
REPLACING
WATER FILTER
IMPORTANT: Air trappedin system
may cause water and cartridge to eject.
Use caution when removing.
1. Turn filter counterclockwise until it
releases from filter head.
2. Drain water from filter into sink, and
dispose in normal household
garbage.
3. Wipe up excess water in filter cover
and continue with Installing Water
Filter, steps 2 and 3.
WHEN DO ICHANGE THE
WATER FILTER?
The filter should be changed
approximately every 6 months.
IMPORTANT: Condition of water and
amount used determines life span of
water filter cartridge. If water use is
high, or if water is of poor quality,
replacement may need to take place
more often.
HOW DO IORDER A
REPLA CEMENT FILTER
CARTRIDGE?
Kenmore_replacement water filter
cartridge model 9005 is available
through Sears dealers and servicers.
You may also order through Sears by
using the information on the back cover.
I'M TRYING TO DISPENSE
WATER TO FLUSH THE
SYSTEM. WHERE'S THE
WATER?
During initial use, allow about a 1 to 2
minute delay in water dispersal to allow
internal water tank to fill.
WHAT IF I CHOOSE NOT
TO USE THE WATER
FILTRATION SYSTEM?
Dispenser feature may be used without
water filter cartridge. If you choose this
option, replace filterwith blue bypass
cap.
m
¢1
m
8
FRESHFOODFEATURES
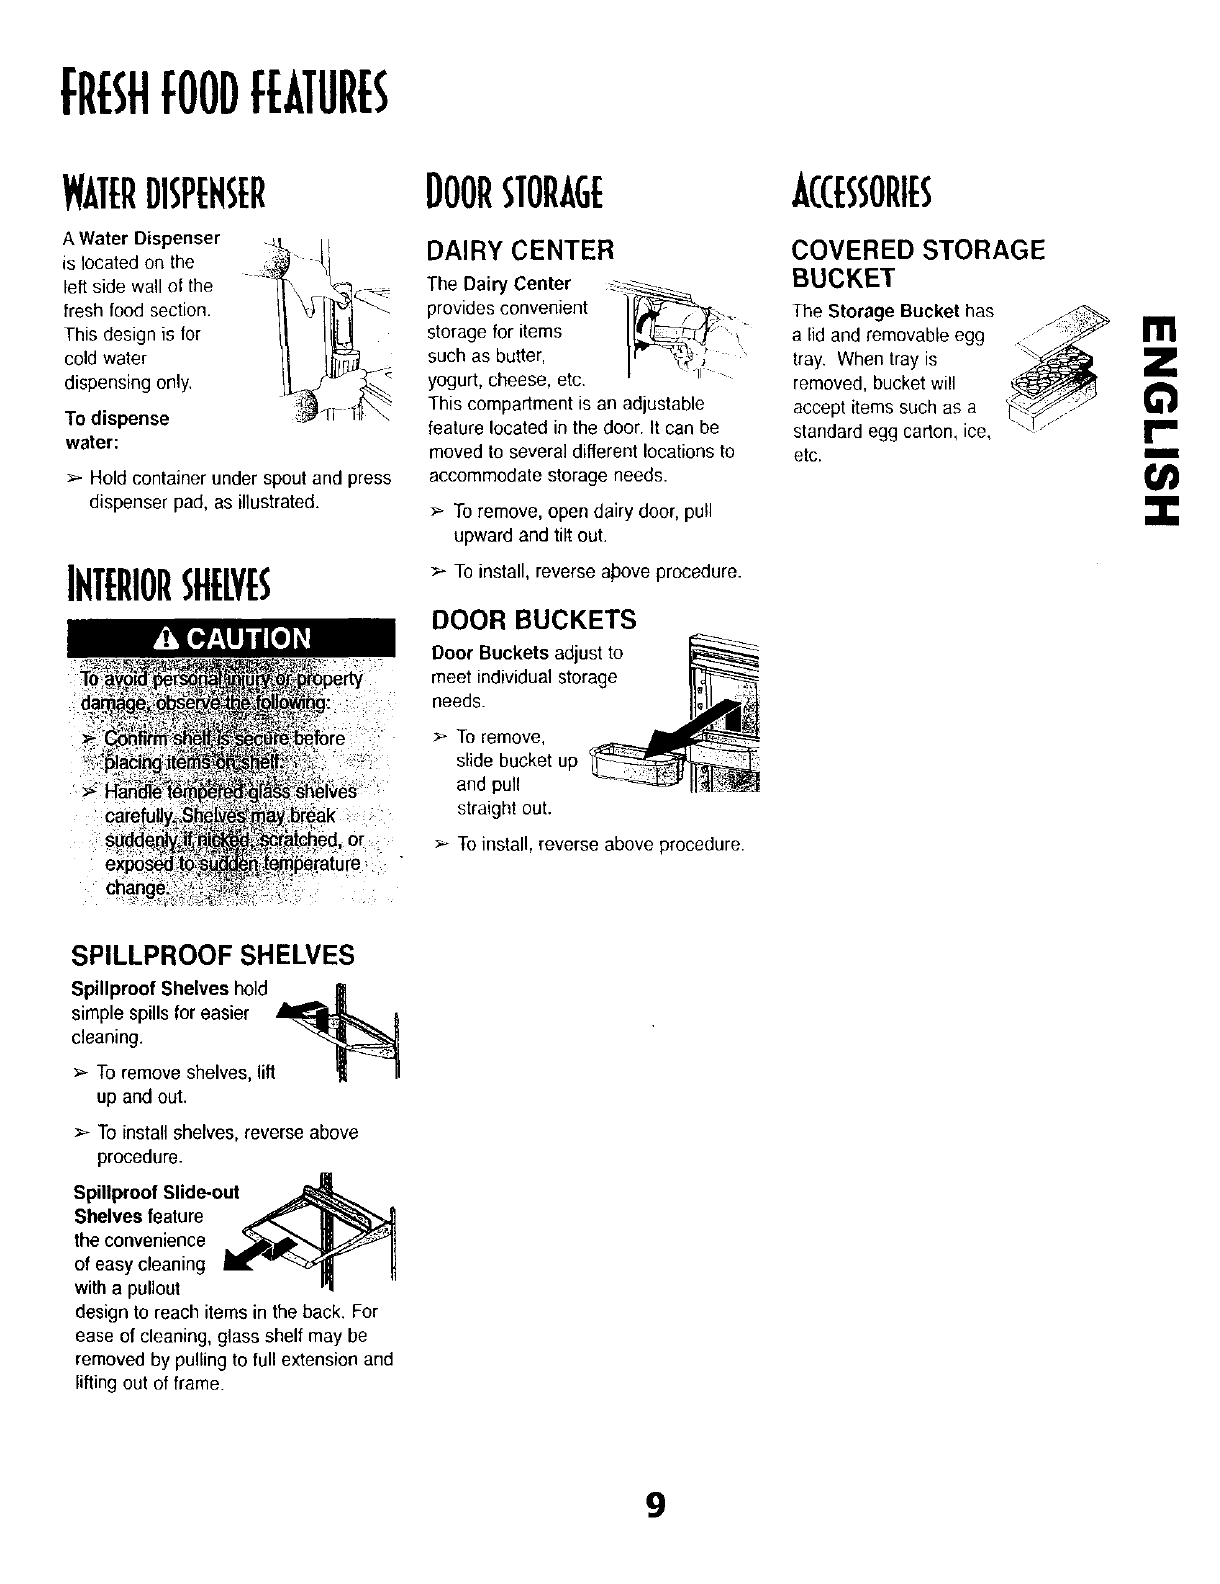
WATERDISPENSER
A Water Dispenser
is located on the
left side wall of the
fresh food section•
This design is for
cold water
dispensing only.
To dispense
water:
>- Hold container under spout and press
dispenser pad, as illustrated.
INTERIORSflELYES
DOORSTORAGE
DAIRY CENTER
The Dairy Center _-
provides convenient i_:."
storage for items "_' _"
such as butter, . _ '
yogurt, cheese, etc.
This compartment is an adjustable
feature located in the door. It can be
moved to severa] different locations to
accommodate storage needs.
:_ To remove, open dairy door, pull
upward and tilt out.
>.-To install, reverse above procedure.
DOOR BUCKETS
Door Buckets adjust to
meet individual storage
needs.
,>-To remove,
slide bucket up
and pull
straight out.
To install, reverse above procedure•
ACCESSORIES
COVERED STORAGE
BUCKET
The Storage Bucket has
a _idand removable egg
tray. When tray is
removed, bucket will
accept items such as a
standard egg cartom ice,
etc. m
SPILLPROOF SHELVES
Spitlproo! Shelves hold . _ ]_
simple spills for easier _ I
cleaning.
>- To remove shelves, lilt '_ i_
up and out.
> To install shelves, reverse above
procedure.
Spillproof Slide-out _ .
Shelves feature _
the convenience
of easy cleaning It v"q_
witha pullout ,'l
design to reach items in the back. For
ease of cleaning, glass shelf may be
removedby pulling to full extension and
lifting out of frame.
9
FRESHFOODFEATURES,CONT.
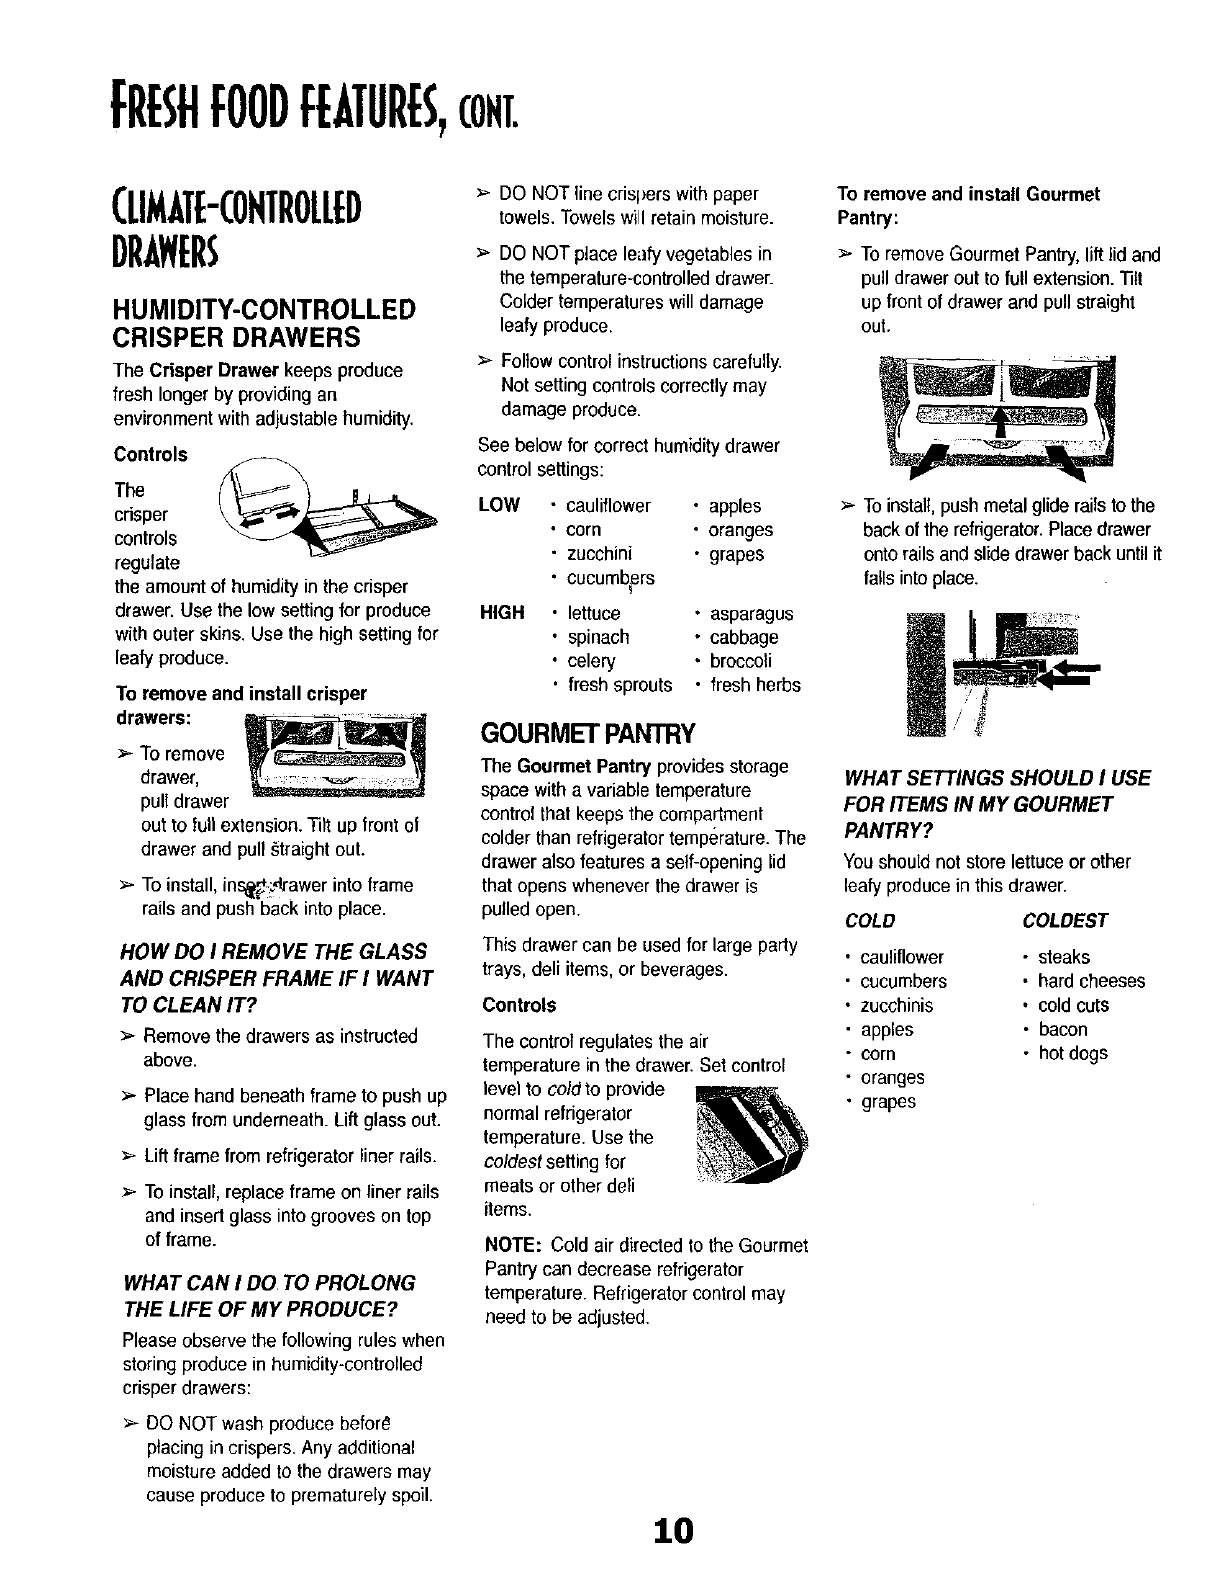
CLIMATE-CONTROLLED
DRAWERS
HUMIDITY-CONTROLLED
CRISPER DRAWERS
The Crisper Drawer keeps produce
fresh longer by providing an
environment with adjustable humidity.
Controls
The
crisper
controls
regulate
the amount of humidityin the crisper
drawer. Use the lowsetting for produce
with outer skins. Use the high setting for
leafy produce.
To remove and install crisper
drawers:
>- To remove
drawer,
pull drawer
out to full extension. Tilt up front ol
drawer and pull _traight out.
>- To install, inse_-?_'awerintoframe
rails and push back into place.
HOW DO I REMOVE THE GLASS
AND CRISPER FRAME IF I WANT
TO CLEAN IT?
>- Remove the drawers as instructed
above.
>- Place hand beneath frame to push up
glass from underneath. Lift glass out.
Lift frame from refrigerator liner rails.
>- To install,replace frame on liner rails
and insert glass into grooves on top
of frame.
WHAT CAN I DO TO PROLONG
THE LIFE OF MY PRODUCE?
Please observe the following rules when
storing produce in humidity-controlled
crisper drawers:
>- DO NOT wash produce befor_
placing in crispers. Any additional
moisture added to the drawers may
cause produce to prematurely spoil.
>- DO NOT line crispers with paper
towels. Towels willretain moisture.
>- DO NOT place leafy vegetables in
the temperature-controlled drawer.
Colder temperatures wil_damage
leafy produce.
>- Follow control instructions carefully
Not setting controls correctly may
damage produce.
See below forcorrect humidity drawer
control settings:
LOW • cauliflower
• corn
•zucchini
•cucumb_ers
HIGH • lettuce
• spinach
• celery
• fresh sprouts
• apples
• oranges
• grapes
• asparagus
• cabbage
• broccoli
• fresh herbs
GOURMETPANTRY
The Gourmet Pantry provides storage
space with a variable temperature
control that keeps the compartment
colder than refrigerator temperature. The
drawer also features a self-opening lid
that opens whenever the drawer is
pulled open.
This drawer can be used for large party
trays, deti items, or beverages.
Controls
The contro} regulates the air
temperaturein the drawer. Set control
level to cold to provide
normal refrigerator
temperature. Use the
coldest setting for
meats or other de_i
items.
NOTE: Cold air directed to the Gourmet
Pantry can decrease refrigerator
temperature. Refrigerator control may
need to be adjusted.
10
To remove and install Gourmet
Pantry:
To remove Gourmet Pantry, lift lid and
pull drawer out to full extension. "[lit
up front of drawer and pull straight
out.
>- To install, push metal glide rails to the
back of the refrigerator.Place drawer
onto rails and slide drawer back until it
falls into place.
WHAT SETTINGS SHOULD I USE
FOR ITEMS IN MY GOURMET
PANTRY?
You should not store lettuce or other
leafyproduce in this drawer.
COLD COLDEST
cauliflower • steaks
cucumbers •hard cheeses
zucchinis •cold cuts
apples • bacon
corn •hot dogs
oranges
grapes
FREEZERFE URES
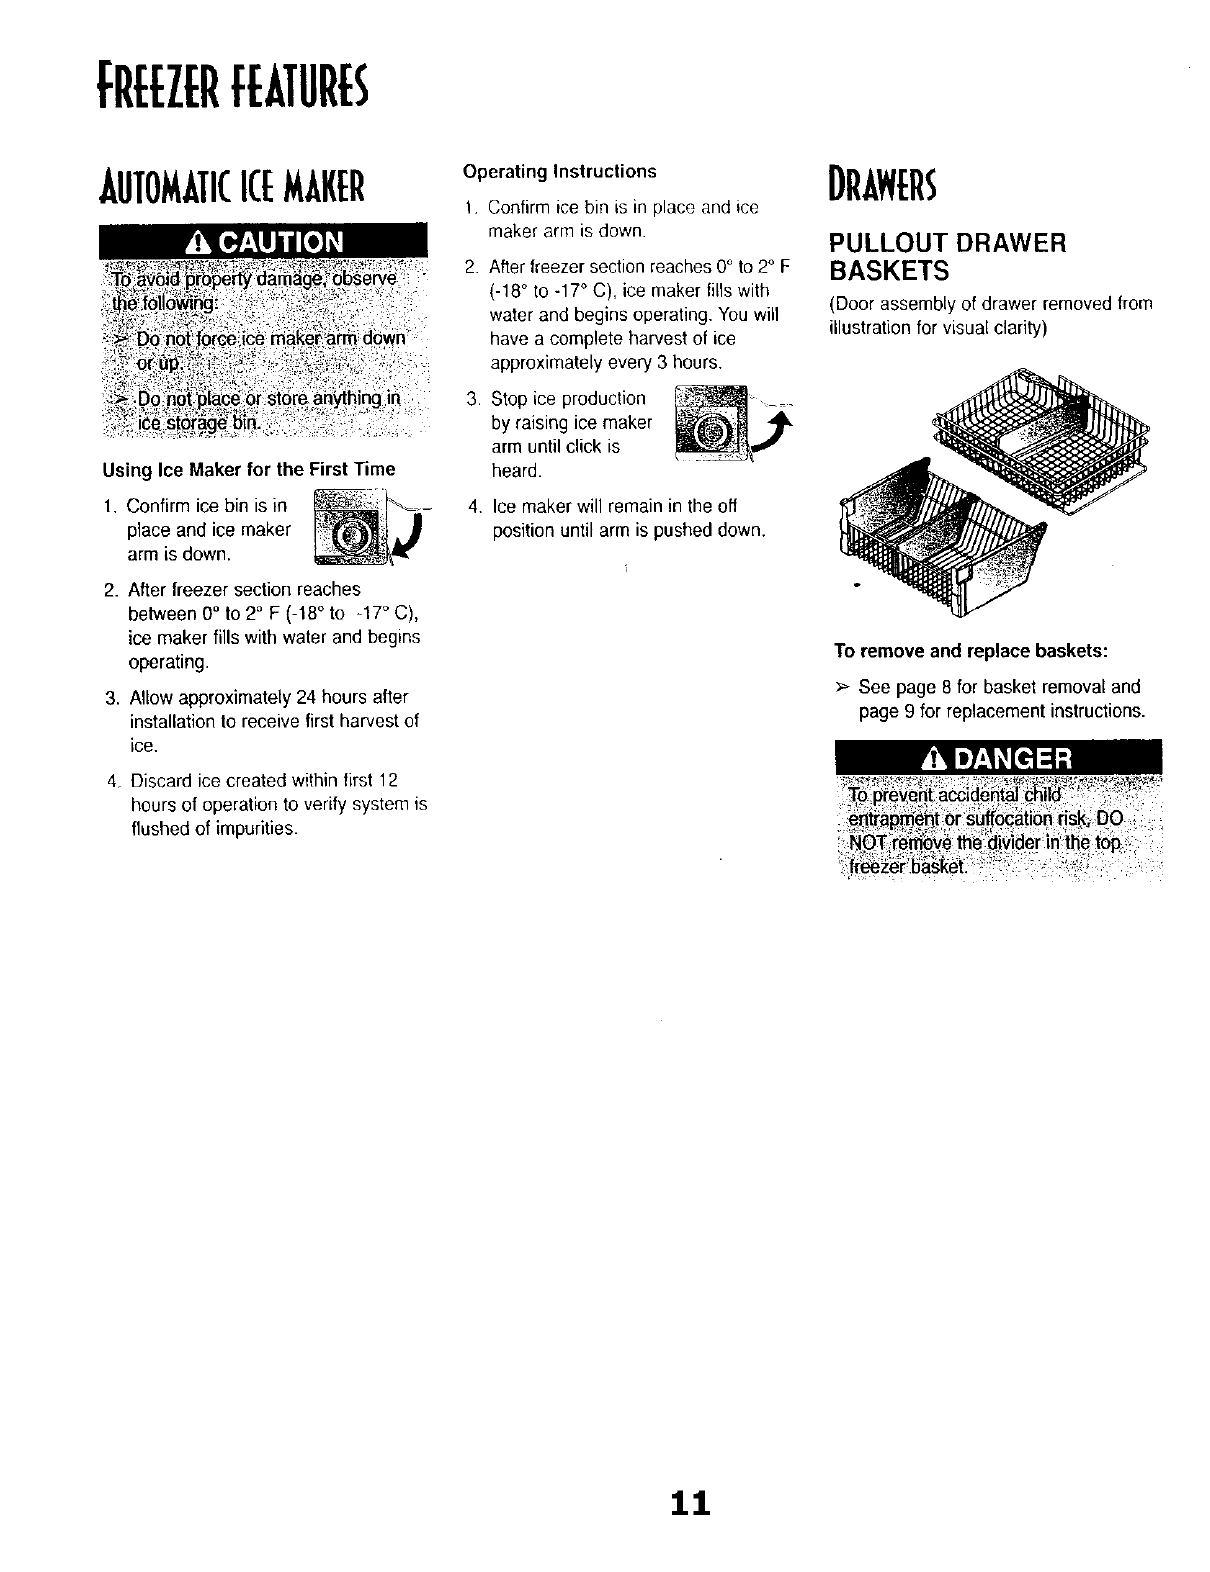
AUTOMATICICEMAKER
Using Ice Maker for the First Time
1. Confirm ice bin is in _-_---_=+#;,_'. -+=
place and ice maker _-_,,,_
arm is down.
2. After freezer section reaches
between 0°to 2°F (-18" to +17° C),
ice maker fills with water and begins
operating•
3. Allow approximately 24 hours after
installation to receive first harvest of
ice.
4. Discard ice created within first 12
hours of operation to verity system is
flushed of impurities.
Operating Instructions
1. Confirm ice bin is in place and ice
maker arm is down.
2. Afterfreezer section reaches0° to 2° F
(-18° to -17° C), ice maker lills with
water and begins operating. You will
have a complete harvest of ice
approximately every 3 hours.
3. Stop ice production _
by raising ice maker
arm until click is
heard•
4, Ice maker will remain in the off
position until arm is pushed down.
DRAWERS
PULLOUT DRAWER
BASKETS
(Door assembly of drawer removed from
illustration for visual clarity)
To remove and replace baskets:
>- See page8 for basketremovaland
page 9 for reptacementinstructions.
_:lre_ze_basket.
3.3.
HINTSAND(ARE
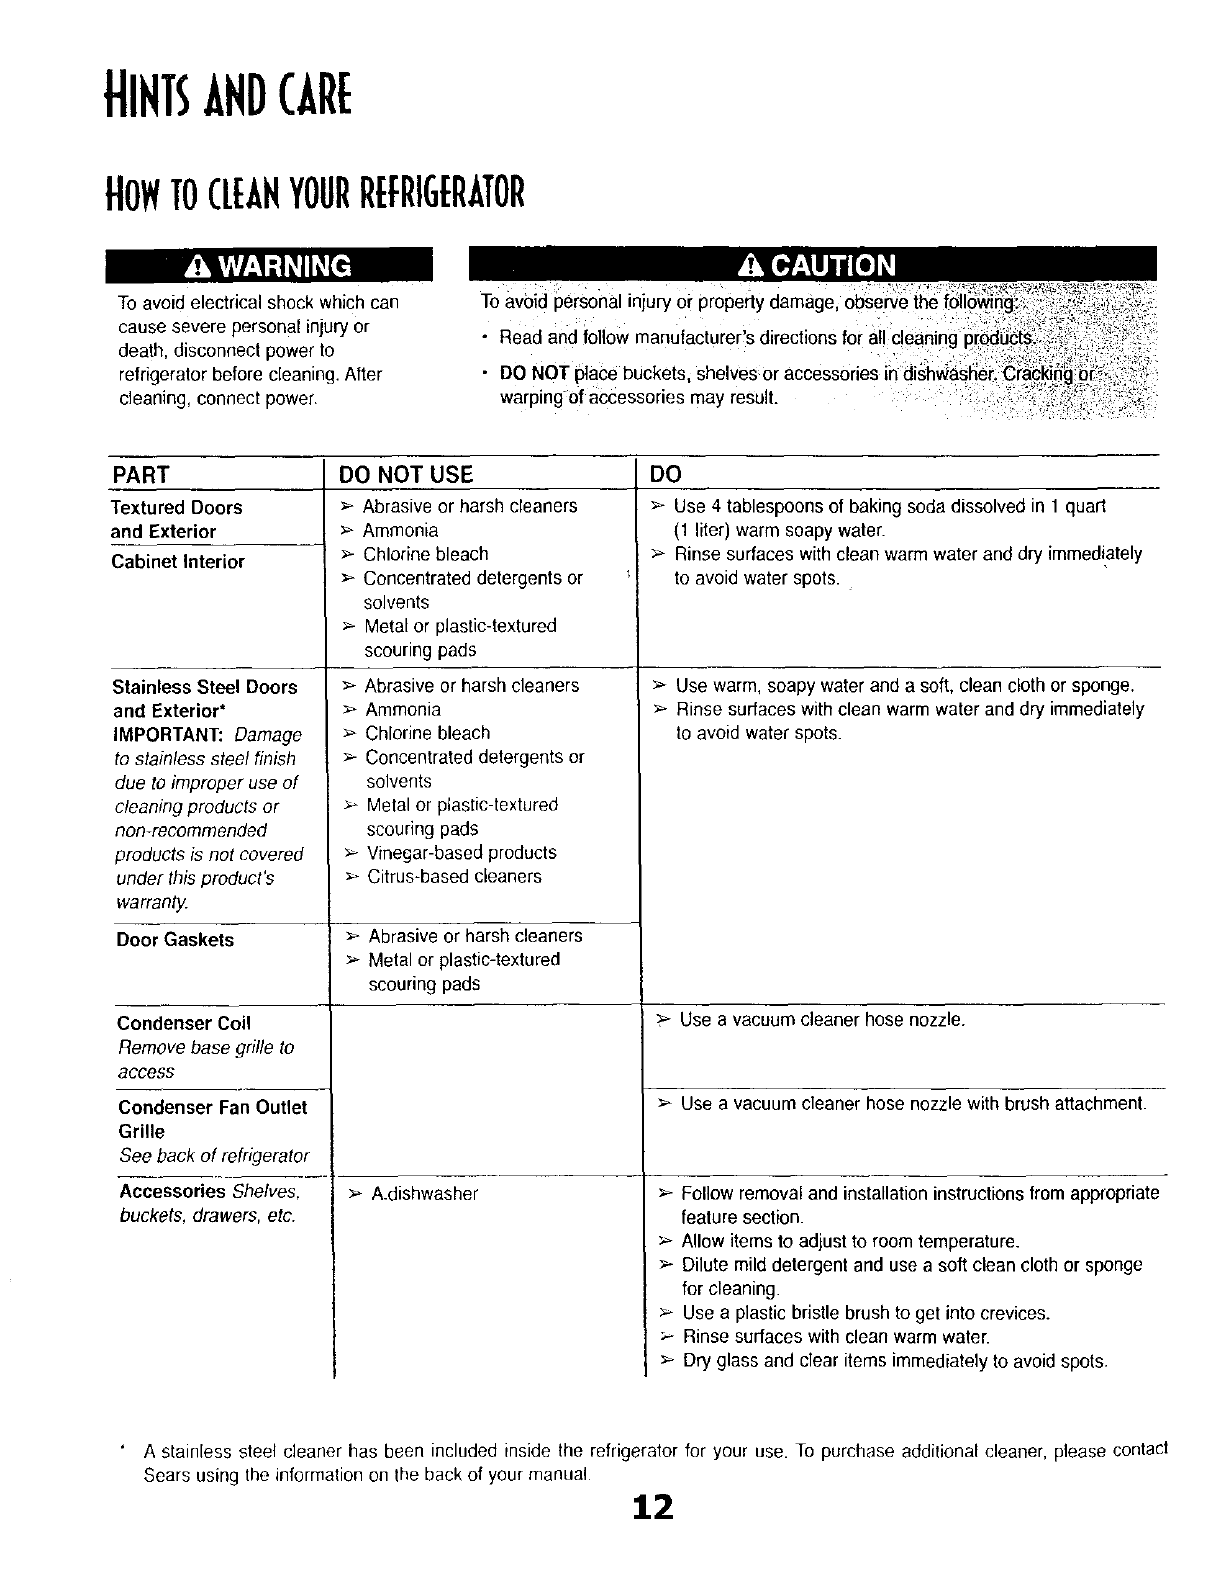
HOWTOCLEANYOURREFRIGERATOR
To avoid electrical shock which can
cause severe personal injury or
death, disconnect power to
refrigerator before cleaning. After
cleaning, connect power.
To avbicl_ersonal injury or property damage,
•Read and follow manufacturer!s directions f
• DO NOT placebuckets;
warping-ofaccessories may result.
PART
Textured Doors
and Exterior
Cabinet Interior
Stainless Steel Doors
and Exterior*
IMPORTANT: Damage
to stainless steel finish
due to improper use of
cleaning products or
non-recommended
products is not covered
under this product's
warranty
Door Gaskets
DO NOT USE
> Abrasive or harsh cleaners
> Ammonia
> Chlorine bleach
> Concentrated detergents or
solvents
> Metal or plastic-textured
scouring pads
> Abrasive or harsh cleaners
> Ammonia
> Chlorine bleach
>- Concentrated detergents or
solvents
:_ Metal or plastic-textured
scouring pads
> Vinegar-based products
> Citrus-based cleaners
> Abrasive or harsh cleaners
> Metal or plastic-textured
scouring pads
DO
> Use 4 tablespoons of baking soda dissolved in 1 quart
(1 liter) warm soapy water.
>- Rinse surfaces with clean warm water and dry immediately
to avoid water spots.
>- Use warm, soapy water and a soft, clean cloth or sponge.
>- Rinse surfaces with clean warm water and dry immediately
to avoid water spots.
Condenser Coil
Remove base grille to
access
Condenser Fan Outlet
Grille
See back of refrigerator
Accessories Shelves,
buckets, drawers, etc.
Use a vacuum cleaner hose nozzle.
> Use a vacuum cleaner hose nozzle with brush attachment.
>- A.dishwasher > Follow removal and installation instructions from appropriate
feature section.
> Allow items to adjust to room temperature.
> Dilute mild detergent and use a soft clean cloth or sponge
for cleaning.
> Use a plastic bristle brush to get into crevices.
:,.- Rinse surfaces with clean warm water.
> Dry glass and clear items immediately to avoid spots.
A stain[ess steel cleaner has been included inside the refrigerator for your use. To purchase additional cleaner, please contact
Sears using the information on the back of your manual 12
flOWTOREMOVEfJDORS
fROMREFRIGERATOR
1. Remove all food.
2. Disconnect refrigerator.
3. Clean the following items-paying
special attention to crevices-using
the appropriate instructions in How to
Clean Your Refrigerator:
•Walls, floor, and ceiling of cabinet
interior.
Drawers, shelves, and gaskets.
4. Wash and dry all bottles, containers,
and jars. Discard spoiled or expired
itemS. >.
5. Wrap or store odor-causing foods in
tightly-sealed containers to prevent
reoccurring odors.
6. Connect power to refrigerator and
return food.
7. Alter 24 hours, check if odor has
been eliminated.
If odor is still present...
1. Remove drawers and place on top >.
shelf of refrigerator.
2. Pack refrigerator and freezer
sections-including doors-with
crumpled sheets of black and white
newspaper.
3. Place charcoal briquettes randomly
on crumpled newspaper in both
freezer and refrigerator
compartments.
4. Close doors and let stand24-48 hours.
5. Repeat steps 5 through 7 above. >
If odor was not eliminated, contact
Sears Service Center. Refer to back of
manual for phone number.
ENERGYSAVINGIDEAS
;.- Avoid overcrowding refrigerator
shelves. This reduceseffectivity of air
circulation around food and causes
refrigerator to run longer.
> Avoid adding too much warm food to
refrigerator at one time. This
overloads compartments and slows
rate of cooling.
>- Do not use aluminum foil, wax paper,
or paper toweling as shelf liners. This
decreases air flow and causes
refrigerator to run less efficiently.
>- A freezer that is %full runs most
efficiently.
Locaterefrigerator in coolest part of
room. Avoid areas of direct sunlight,
or near heating ducts, registers, or
other heat producing appliances. If
this is not possible, isolate exterior by
using a section of cabinet or an
added layer of insulation.
> Refer to section in Use and Care
Guide on temperature controls for
recommended control settings.
Clean door gaskets every three
months according to use and care
guide instructions. This will assure
that door seals properly and
refrigerator runs efficiently.
>- Taketime to organize items in
refrigerator to reduce time that door
is open.
>- Be sure your doors are closing
securely by leveling refrigerator as
instructed in your use and care guide.
Clean condenser coils off as
indicated in the Use and Care Guide
every 3 months. This will increase
energy efficiency and cooling
performance.
13
HOWTOREMOVEAI,ID
REPLACE[IGflfBUtBS
To avoid ele_rical shock which can
_-causesevere persona1injury or
death, disconnect power to
"refrigerator before replacing light
bulb. After replaeng light bulb,
_?,onnectpower.-
:',Toavoid personal inlury or pro_ ::
, damage_observe the folIowzng:.::_
AII6_ iighi 68]_ to;cool:
::_ Wear gi0ves when fep!acin_ ijgllt
: buib__ - ,
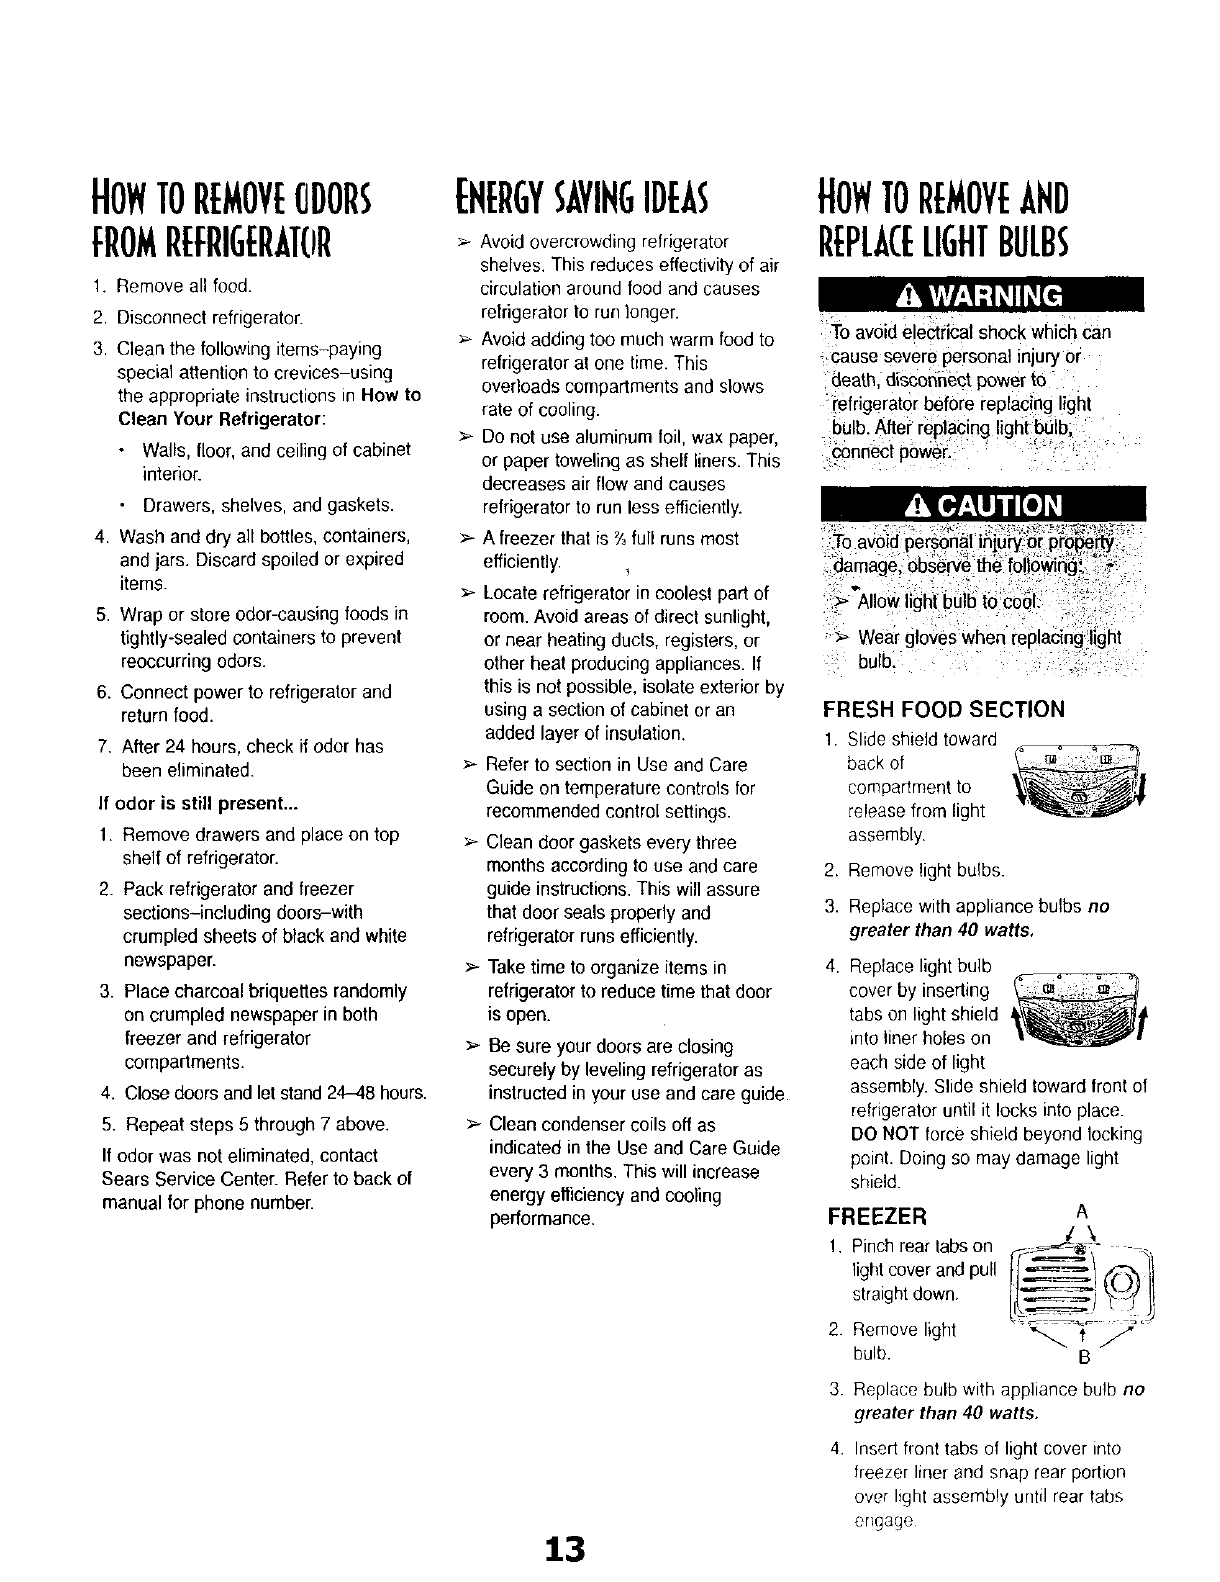
FRESH FOOD SECTION
1. Slide shield toward
back of
compartment to
release from light
assembly.
2. Remove light bulbs.
3. Replacewithappliance bulbs no
greater than 40 watts,
Replace light bulb
cover by inserting ::_
tabs on light shield
into liner holes on
each side of light
assembly. Slide shield toward front of
refrigeratoruntil it locks into place.
DO NOT force shield beyond locking
point. Doing so may damage light
shield.
FREEZER
1. Pinch rear labs on
light cover and pull
straightdown.
4,
2. Remove light
bulb.
A
,'\
--... t J"
B
3. Replace bulb with appliance bulb no
greater than 40 watts,
4. Insert front labs of light cover into
freezer liner and snap rear portion
over light assembly until rear tabs
engage

NORMALOPERATIHGSOUHDS
Today's refrigerators use foam insulation and are more energy efficient than refrigerators of the past. However,f_am insulationis
not as sound absorbent as former insulated models. As a result, certain sounds may be unfamiliar. In time, these sounds will
become familiar. Please refer to this information before calling service.
Clicking
Air rushing or whirring
>- Freezer control (A) clicks when
starting or stopping compressor.
:_ Defrost timer (B) sounds like an
electric clock and snaps in and
out of defrost cycle.
>- Freezer fan (C) and condenser
fan (D) make this noise while
operating.
>- Normal operation
Normaloperation
>- Normal operation
Gurgling or boiling >- Evaporator (E) and heat >- Normal operation
sound exchanger(F) refrigerantmakes
thisnoise when flowing.
Thumping >- Ice cubesfrom ice maker (select >- Normaloperation
models)dropintoice bucket (G).
Vibrating noise >- Compressor(H) makesa >- Normaloperation
pulsatingsoundwhile running.
>- Refrigeratoris notlevel. >- See InstallationInstructionsfor detailson howto levelyour
refrigerator.
Buzzing >- Ice makerwater valve(I) > Normaloperation
hookup(select models)buzzes
when ice maker fills withwater.
Humming >_ Ice maker (J) is in the 'on' >Stop sound by raising ice maker arm to 'off' position. See
position without water Automatic Ice Maker section in your Use and Care Guide
connection, for details.
>- Normal operation>- Compressor(H) can makea high-
pitchedhum whileoperating.
Hissing or >- Defrostheater (10 hisses,sizzles >- Normal operation
popping orpops whenoperational.
3.4
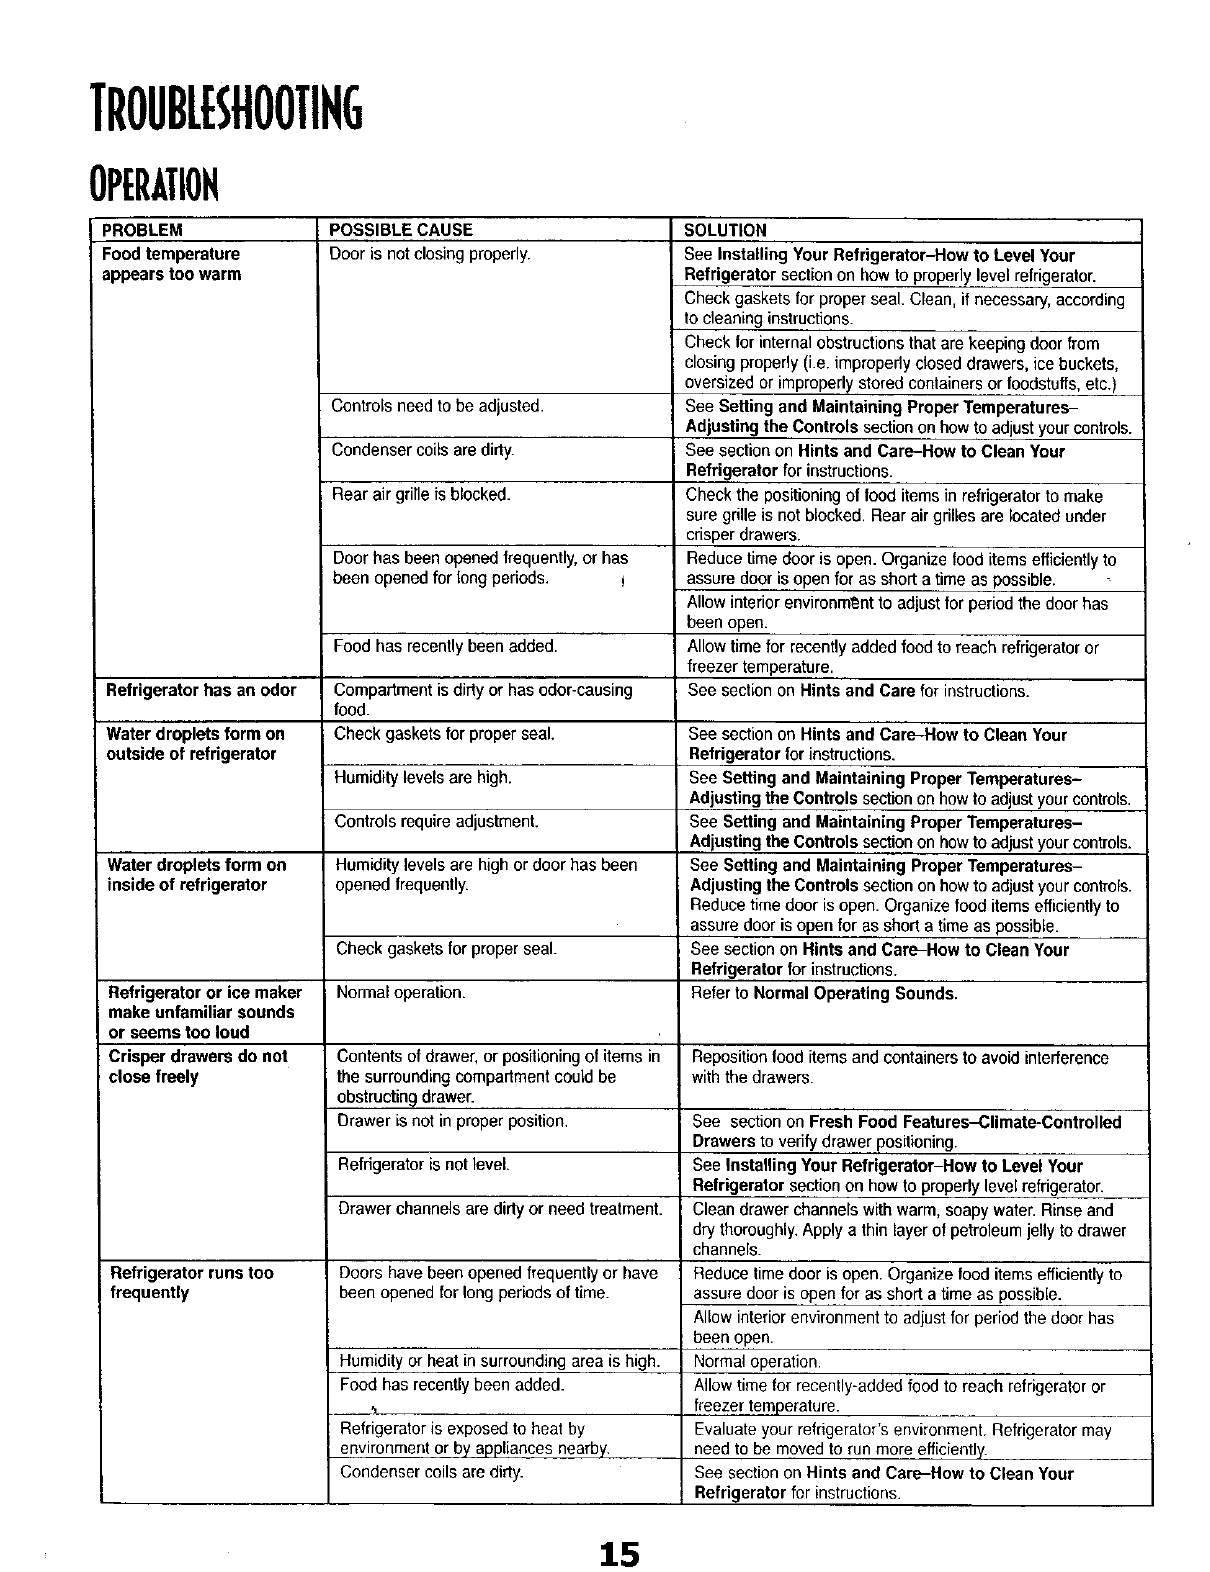
TROUBLESHOOTING
OPERATION
PROBLEM
Food temperature
appears too warm
Refrigerator has an odor
Water droplets form on
outside of refrigerator
Water droplets form on
inside of refrigerator
Refrigerator or ice maker
imake unfamiliar sounds
or seems too loud
Crisper drawers do not
close freely
Refrigerator runs too
frequently
POSSIBLE CAUSE
Door is not closing properly.
Controls need to be adjusted.
Condenser coils are dirty.
Rear air grille is blocked.
Door has been openedfrequently,or has
been opened for long periods. I
Food has recently been added.
Compartment is dirty or has odor-causing
food.
Check gaskets for proper seal.
Humidity levels are high.
Controls require adjustment.
Humidity levels are high or door has been
opened frequently.
Check gaskets for proper seal.
Normal operation.
Contents of drawer, or positioning of items in
the surrounding compartment could be
obstructing drawer.
Drawer isnot in proper position.
Refrigerator is not level.
Drawer channels are dirty or need treatment.
Doors have been openedfrequently or have
been opened for long periods of time.
Humidity or heat in surrounding area is high.
Food has recently been added.
Refrigerator is exposed to heat by
environment or by appliances nearby.
Condenser coils are dirty.
SOLUTION
See installing Your Refrigerator-How to Level Your
Refrigerator section on how to properlylevelrefrigerator.
Check gaskets for proper seal. Clean, if necessary, according
to cleaning instructions.
Check for internal obstructions that are keeping door from
closing properly (i.e. improperly closed drawers, ice buckets,
oversized or improperlystored containers or foodstuffs, etc.)
See Setting and Maintaining Proper Temperatures-
Adjusting the Controls section on hew to adjustyourcontrols.
See section on Hints and Care-How to Clean Your
Refrigerator for instructions.
Check the positioning of food itemsin refrigeratorto make
sure grille is not blocked,Rear airgrillesare located under
crisperdrawers.
Reducetimedoor is open. Organizefood items efficientlyto
assure dooris openfor as short a time as possible.
Allow interiorenvironmt_ntto adjustfor periodthe door has
been open.
Allow time for recently added food to reach refrigerator or
freezer temperature.
See section on Hints and Care for instructions.
See section on Hints and Care-How to Clean Your
Refrigerator for instructions.
See Setting and Maintaining Proper Temperatures-
Adjustingthe Controlssection on how to adjust your controls.
See Setting and Maintaining Proper Temperatures-
Adiustingthe Controls section on how to adjust your controls.
See Setting and Maintaining Proper Temperatures-
Adjusting the Controlssection on howto adjust your controls.
Reducetime door is open. Organize food itemsefficientlyto
assuredoor is open for as short a time as possible.
See section on Hints and Care-How to Clean Your
Refrigerator for instructions.
Refer to Normal Operating Sounds.
Reposition food itemsand containers to avoid interference
with the drawers.
See section on Fresh Food Features-Climate-Controlled
Drawers to verilydrawer positioning,
See Installing Your Retrigerator-How to Level Your
Refrigerator section on how to propedylevelrefrigerator,
Clean drawer channels withwarm,soapywater.Rinseand
drythoroughly,Apply a thin layerof petroleumjellyto drawer
channels.
Reduce lime door is open. Organize food items efficiently to
assure door is open for as short a time as possible.
Allow interior environment to adjust for period the door has
been open.
Normal operation.
Allow time for recently-added food to reach refrigerator or
freezer temperature.
Evaluate your refrigerator's environment. Refrigerator may
need to be moved to run more efficiently.
See section on Hints and Care-How to Clean Your
Refrigerator for instructions.
15
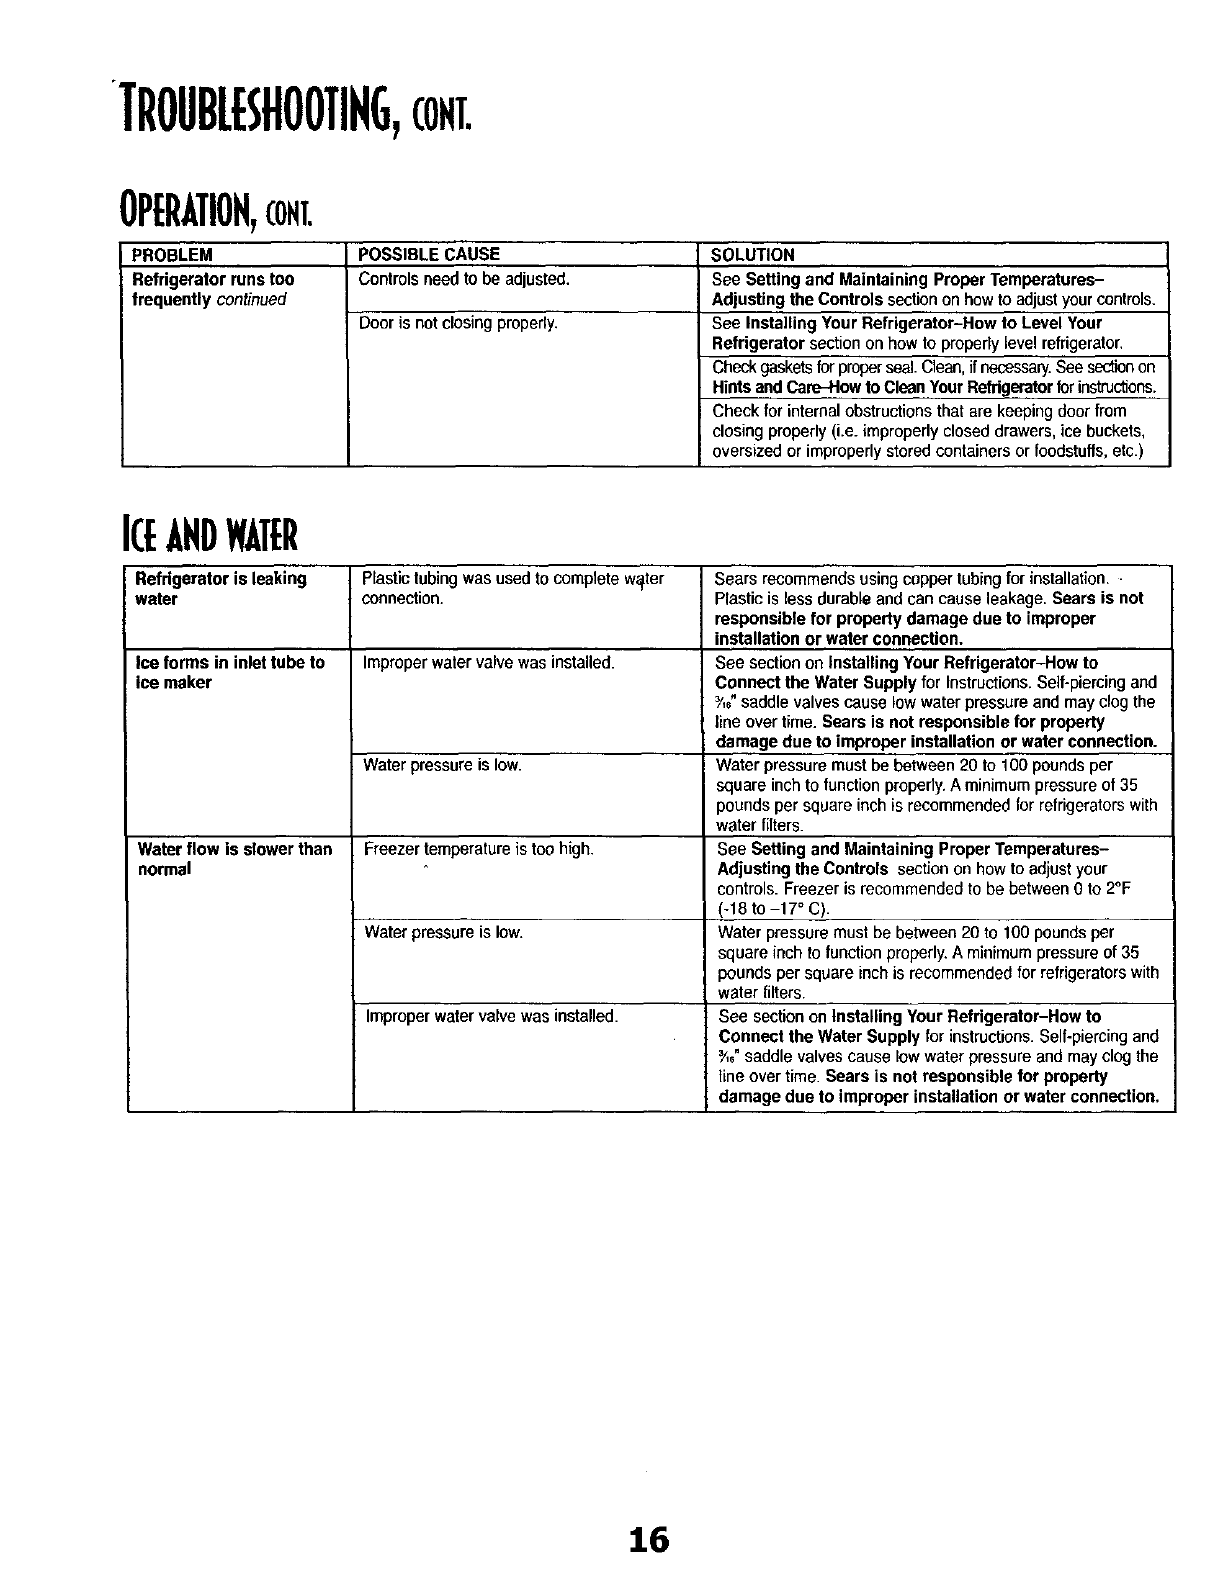
'TROUBLESHOOTING,CONT.
OPERATION,com.
PROBLEM
Refrigerator runs too
frequently continued
POSSIBLE CAUSE
Controls needto be adjusted.
Door is not closing properly.
SOLUTION
See Setting and Maintaining Proper Temperatures-
Adjusting the Controls section on howto adjustyour controls.
See Installing Your Refrigerator-How to Level Your
Refrigerator section on how to properlylevel refrigerator.
Checkgasketsforproperseal.Clean,if necessary.See sedicoon
Hintsand Care-How to CleanYourRefrigeratorforinstructions.
Checkfor internal obstructionsthat are keepingdoorfrom
closingproperly(i.e. improperlycloseddrawers,ice buckets,
oversizedor improperlystored containersorfoodstuffs, etc.)
ICEANDWATER
Refrigerator is leaking Plastictubingwas used to complete w_ter Sears recommends usingcopper tubing for installation. -
water connection. Plasticis lessdurableand can cause leakage.Sears is not
responsible for property damage due to improper
installation or water connection.
Ice forms in inlet tube to Improporwatervalvewas installed. See section on Installing Your Refrigerator-How to
Ice maker Connect the Water Supply for Instructions. Self-piercing and
¾_"saddle valvescause low waterpressureand may clogthe
line overtime. Sears is not responsible for property
damage due to improper installation or water connection.
Water pressureis low. Water pressuremustbe between 20 to 100 poundsper
squareinchto functionpmpody.Aminimumpressureof 35
poundsper square inchis recommendedfor refrigeratorswith
water fillers.
Water flow is slower than Freezer temperatureis too high. See Setting and Maintaining Proper Temperatures-
normal Adjusting the Controls section on howto adjustyour
controls.Freezeris recommendedto be between 0 to 2°F
(-18 to -17 °C).
Water pressureis low. Water pressure must be between 20 to 100 pounds per
square inch to function properly,A minimum pressure of 35
pounds per square inchis recommended for refrigerators with
water filters,
Improper water valve was installed. See section on Installing Your Refrigerator-How to
Connect the Water Supply for instructions. Self-piercing and
¾_"saddle valves cause low water pressure and may clog the
line over time. Sears is not responsible for property
damage due to improper installation or water connection.
16
