Kenmore 79681182310 User Manual DRYER Manuals And Guides 1309423L
User Manual: Kenmore 79681182310 79681182310 KENMORE DRYER - Manuals and Guides View the owners manual for your KENMORE DRYER #79681182310. Home:Laundry & Garment Care Parts:Kenmore Parts:Kenmore DRYER Manual
Open the PDF directly: View PDF ![]() .
.
Page Count: 68
Use & Care Guide
Manual de Uso y Cuidado
English /Espa_oi
Model/Modelo: 796.8128#, 796.9128#, 796.8118#, 796.9118#
Ke ®
P/N MFL62512877
Sears Brand Management Corporation
Hoffman Estates, IL 60179 U.S.A.
www, kenmore.com
www.sears.com

iMPORTANT SAFETY iNSTRUCTiONS .................... 3-6
GROUNDING REQUIREMENTS ................................... 4
FEATURES AND BENEFITS
Key Parts and Components ........................................ 7
iNSTALLATiON iNSTRUCTiONS
Key Dimensions and Specifications .......................... 8
Location Requirements ................................................ 8
Choose the Proper Location ....................................... 8
Clearances .................................................................... 8
installation with Optional Pedestal Base
or Stacking Kit ............................................................. 9
Optional Accessories .................................................. 9
Gas Dryers ............................................................. 10-11
Gas Requirements (Gas Models Only) .............. 10
Electrical Requirements for Gas Models Only ..... 10
Connecting the Gas Supply ................................. 11
Electric Dryers ...................................................... 12-13
Electrical Requirements ....................................... 12
Connecting Electric Dryers ................................. 13
Venting the Dryer ................................................. 14-15
Leveling the Dryer ..................................................... 16
Reversing the Door Swing ........................................ 16
Final installation Check ............................................ 17
HOW TO USE
Control Panel Features ............................................. 18
Operating the Dryer ................................................. 19
Cycle Guide ......................................................... 20-21
Sorting Loads ............................................................. 22
Loading the Dryer ..................................................... 22
Time and Status Display .......................................... 23
Cycle Modifier Buttons ............................................ 24
Cycle Options and Special Features ...................... 25
Wrinkle Guard .................................................... 25
Control Lock ........................................................ 25
My Cycle .............................................................. 25
Damp Dry Signal ................................................. 25
USER MAINTENANCE iNSTRUCTiONS
Regular Cleaning ..................................................... 26
Cleaning the Exterior ......................................... 26
Cleaning the interior .......................................... 26
Cleaning Around and Under the Dryer ........... 26
Cleaning the Lint Filter ...................................... 26
Maintaining the Exhaust System ............................. 27
KENMORE CONNECT ................................................. 28
TROUBLESHOOTING GUIDE
Before Calling for Service ................................. 29-31
WARRANTY ................................................................... 32
SERVICE .......................................................... Back Cover
in the space below, record the date of purchase, model,
and serial number of your product. You will find the
model and serial number printed on an identification
plate located inside the dryer door. Have these items of
information available whenever you contact Sears
concerning your product.
Model No.
Date of Purchase
Serial No.
Save these instructions and your sales receipt for future
reference.
Master Protection Agreements
Congratulations on making a smart purchase. Your new
Kenmore ® product is designed and manufactured for
years of dependable operation. But like all products,
it may require preventive maintenance or repair from
time to time. That's when having a Master Protection
Agreement can save you money and aggravation.
The Master Protection Agreement atso helps extend the
life of your new product. Here's what the Agreement s
includes:
*Parts and labor needed to help keep products
operating properly under normal use, not just defects.
Our coverage goes well beyond the product warranty.
No deductible, no functional failure excluded from
coverage - real protection.
* Expert service by a force of more than 10,000
authorized Sears service technicians, which means
someone you can trust will be working on your product.
* Unlimited service calls and nationwide service, as often
as you want us, whenever you want us.
*"No-lemon" guarantee - replacement of your
covered product if four or more product failures occur
within 12 months.
* Product replacement if your covered product can not
be fixed.
*Annual Preventive Maintenance Check at your request
-no extra charge.
*Fast help by phone -we calt it Rapid Resolution.
Phone support from a Sears representative on all
products. Think of us as a "talking owner's manual."
*Power surge protection against electrical damage due to
power fluctuations.
*$250 food loss protection annually for any food
spoilage that is the result of mechanical failure of any
covered refrigerator or freezer.
*Rental reimbursement if repair of your covered
product takes longer than promised.
*25% discount off the regular price of any non-covered
repair service and related installed parts.
Once you purchase the Agreement, a simple phone call
is att that it takes for you to schedute service. You can
call at any time day or night or schedute a service
appointment online.
The Master Protection Agreement is a risk-free purchase.
if you cancet for any reason during the product warranty
period, we will provide a futt refund, or a prorated refund
anytime after the product warranty period expires.
Purchase your Master Protection Agreement today!
Some limitations and exclusions apply.
For prices and additlonai information in the U.S.A.
call 1-800-827-6655.
_Coverage in Canada varies on some items.
For full details call Sears Canada at 1-800-361-6665.
Sears Installation Service
For Sears professional installation of home appliances,
garage door openers, water heaters, and other major
home items, in the U.S.A. or Canada call:
1-800-4-MY-HOME ®.
READ ALL iNSTRUCTiONS BEFORE USE
fYour safety and the safety of others is very important. "_
We have provided many important safety messages in this manual and on your appliance. Always read and
obey atl safety messages°
This is the safety atert symbol.
This symbol alerts you to potential hazards that can kill or hurt you and others.
All safety messages will fotlow the safety alert symbol and either the word DANGER or WARNING.
These words mean:
DANGER: indicates a hazardous situation which, if not avoided, will resutt in death or serious injury.
A WARNING: indicates a hazardous situation which, if not avoided, could result in death or serious injury.
ACAUTION" indicates a hazardous situation which, if not avoided, coutd resutt in minor or
° moderate injury.
All safety messages will tell you what the potential hazard is, tell you how to reduce the chance of injury, and
tell you what can happen if the instructions are not followed.
^WARNING: For your safety, the information in this manual must be followed to
minimize the risk of fire or explosion, electric shock, or to prevent property damage, personal injury,
or loss of fife.
* Do not instaff aclothes dryer with fiexlble plastlc venting materials, if afiexlble metal (foil type) duct is installed,
it must be of a specific type identified by the appffance manufacturer as sultable for use with clothes dryers.
Flexible venting materlals are known to collapse, be easily crushed, and trap ffnt. These conditions wiff obstruct
clothes dryer airflow and increase the risk of fire.
* Do not store or use gasoffne or other fiammable vapors and ffquids in the vicinity of this appffance or any
other appffances.
*Installation and service must be performed by a quafffied instaffer, service agency, or the gas suppffer.
* Install the clothes dryer according to the manufacturer's instructions and local codes.
* Save these instructions.
WHAT TO DO IF YOU SMELL GAS:
1. Do nat try to fight amatch or cigarette, or turn an any gas or electrlcal appffance.
2. Do nat touch any electrlcal switches. Do nat use any phones in your building.
3. Clear the room, buildlng, or area of all occupants.
4. Jmmedlately call your gas suppller from a neighbor's phone. Carefully fallow the gas suppller's instructions.
5. if you cannot reach your gas suppller, call the fire department.
SAVE THESE INSTRUCTIONS
BASIC SAFETY PRECAUTIONS
AWARN ING: To reduce the risk of Nre, electric shock, or injury to persons when using thls appliance,
follow basic precautions, includlng the followlng:
*Read all instructions before using the dryer.
*Before use, the dryer must be properly installed, as
described in this manual.
*Do not place items exposed to cooking oils in your
dryer. Items contaminated with cooking oils may
contribute to a chemical reaction that could cause a
toad to catch fire.
*Do not dry articles that have been previously cleaned
in, washed in, soaked in, or spotted with gasoline,
dry-cleaning solvents, or other flammable or explosive
substances, as they give off vapors that could ignite
or explode.
*Do not reach into the dryer if the drum or any other
part is moving.
*Do not repair or replace any part of the dryer or
attempt any servicing unless specifically recommended
in this Use and Care Guide or in published user-repair
instructions that you understand and have the skills to
carry out.
*Do not tamper with controls.
*Before the dryer is removed from service or discarded,
remove the door to the drying compartment.
* Do not allow children to play on or in the dryer. Close
supervision of children is necessary when the dryer is
used near children.
* Do not use fabric softeners or products to eliminate
static unless recommended by the manufacturer of the
fabric softener or product.
* Do not use heat to dry articles containing foam rubber
or similarly textured rubber-Nke materials.
* Keep the area around the exhaust opening and
adjacent surrounding areas free from the accumulation
of lint, dust, and dirt.
* The interior of the dryer and exhaust vent should be
cleaned periodically by qualified service personnel.
* Do not install or store the dryer where it will be
exposed to the weather.
* Always check the inside of the dryer for
foreign objects.
* Clean the lint filter before or after each load.
Warning: This product contains chemicals known to the
State of California to cause cancer and birth defects or
other reproductive harm. Wash hands after handling.
CALiFORNiA SAFE DRINKING WATER AND
TOXIC ENFORCEMENT ACT
This act requires the Governor of California to publish
a list of substances known to the state to cause cancer,
birth defects, or other reproductive harm and requires
businesses to warn customers of potential exposure
to such substances. Gas appliances can cause minor
exposure to four of these substances, namely benzene,
carbon monoxide, formaldehyde, and soot, caused
primarily by the incomplete combustion of natural gas
or LP fuels.
Properly adjusted dryers will minimize incomplete
combustion. Exposure to these substances can be
minimized further by properly venting the dryer to the
outdoors.
WARN !NG: Improper connectionofthe
equlpment-groundlng
conductor can result in a
risk of electric shock. Check with a quaNfied electrician
or service person if you are in doubt as to whether the
appliance is properly grounded. Do not modify the plug
provided with the appliance. If it will not fit the outlet,
have a proper outlet installed by a qualified electrician.
This appliance must be connected to a grounded metal,
permanent wiring system or an equipment grounding
conductor must be run with the circuit conductors and
connected to the equipment grounding terminal or lead
on the appliance. Electrical shock can result if the dryer
is not properly grounded.
GROUNDING REQUIREMENTS
This appliance must be grounded, in the event of
malfunction or breakdown, grounding will reduce
the risk of electric shock by providing a path of least
resistance for electric current. This appliance must be
equipped with a cord having an equipment-grounding
conductor and a grounding plug. The plug must be
plugged into an appropriate outlet that is properly
installed and grounded in accordance with all local
codes and ordinances.
4
SAFETY iNSTRUCTiONS FOR iNSTALLATiON
,_ WARN i N G** To reduce the risk of fire, electric shock, or injury to persons when using this appliance,
follow basic precautions, including the following:
* Properly ground dryer to conform with all governing
codes and ordinances. Fotiow details in the installation
instructions. Electrical shock can result if the dryer is not
properly grounded.
*Before use, the dryer must be properly installed as
described in this manual. Electrical shock can result if
the dryer is not properly grounded.
* Instal[ and store the dryer where it will not be exposed
to temperatures below freezing or exposed to
the weather.
*AJl repairs and servicing must be performed by an
authorized service technician unless specifically
recommended in this Use & Care Guide. Use only
authorized factory parts. Failure to follow this warning
can cause serious injury, fire, electrical shock, or death.
*To reduce the risk of electrlca[ shock, do not install the
dryer in humid spaces. Failure to follow this warning
can cause serious injury, fire, electrical shock, or death.
* Connect to a properly rated, protected, and sized
power circuit to avoid electrical overload. Improper
power circuits can melt, creating risk of electrical shock
and/or fire hazard.
Remove all packing items and dispose of ai[ shipping
materials properly. Failure to do so can result in fire,
explosion, burns, or death.
Place dryer at least 18 inches above the floor for a
garage installation. Failure to do so can result in fire,
explosion, burns, or death.
Keep all packaging from children. Packaging material
can be dangerous for children. There is a risk of
suffocation.
Do not install near items that produce heat or open
flame such as stoves or cooking ovens. Failure to follow
this warning can cause product deformation, smoke and
fire.
Do not place candles or cigarettes on top of the
product. Failure to follow this warning can cause
product deformation, smoke and fire.
Remove all protective vinyl film from the product.
Failure to do so can cause product deformation, smoke
and fire.
Exhaust/Ducfing:
*Gas dryers MUST be exhausted to the outside. Failure
to follow these instructions can result in fire or death.
* The dryer exhaust system must be exhausted to the
outside of the dwelling. If the dryer is not exhausted
outdoors, some fine llnt and large amounts of
moisture wi[[ be expelled into the laundry area. An
accumulation of lint in any area of the home can
create a health and fire hazard.
*Use only rigid metal or flexible metal 4 inch diameter
duct inside the dryer cabinet or for exhausting to the
outside. Use of plastic or other combustibie ductwork
can cause a fire. Punctured ductwork can cause a fire
if it collapses or becomes otherwise restricted in use or
during installation.
* Ductwork is not provided with the dryer, and you
should obtain the necessary ductwork locally. The end
cap should have hinged dampers to prevent backdraft
when the dryer is not in use. Failure to follow these
instructions can resutt in fire or death.
The exhaust duct must be 4 inches (10.2 cm) in
diameter with no obstructions. The exhaust duct
should be kept as short as possib[e. Make sure to
clean any old ducts before installing your new dryer.
Failure to follow these instructions can result in fire or
death.
Rigid or semi rigid metal ducting is recommended
for use between the dryer and the wall. in special
instaffations when it is impossible to make a
connection with the above recommendations, a UL
listed flexible metal transition duct may be used
between the dryer and wail connection only. The
use of this ducting wi[[ affect drying time. Failure to
follow these instructions can result in fire or death.
DO NOT use sheet metal screws or other fasteners
which extend into the duct that could catch lint and
reduce the efficiency of the exhaust system. Secure
all joints with duct tape. For complete details, follow
the Installation Instructions. Failure to follow these
instructions can result in fire or death.
,_ WAR[_ i NG** To reduce the risk of fire, electric shock, or injury to persons when using this appliance,
follow basic precautions, including the following:
SAFETY INSTRUCTIONS FOR CONNECTING ELECTRiCiTY
WARN i N G: To reduce the risk of fire, electric shock, or injury to persons when using this appffance,
follow basic precautions, including the followlng:
* Do not, under any circumstances, cut or remove
the ground prong from the power cord. To prevent
personal injury or damage to the dryer, the electrical
power cord must be plugged into a properly
grounded outlet.
*For personal safety, this dryer must be properly
grounded. Failure to do so can result in electrical
shock or injury.
* Refer to the installation instructions in this manual
for specific electrical requirements for your model.
Failure to follow these instructions can create an
electrical shock hazard and/or a flre hazard.
*This dryer must be plugged into aproperly grounded
outlet. Electrical shock can result if the dryer is not
properly grounded. Have the wail outlet and circuit
checked by a qualified electrician to make sure the
outlet is properly grounded. Failure to fotiow these
instructions can create an electrical shock hazard
and/or a fire hazard.
*The dryer should always be plugged into its own
individual electrical outlet which has a voltage rating
that matches the rating plate. This provides the best
performance and also prevents overloading house
wiring circuits which could cause a fire hazard from
overheated wires.
Never unplug your dryer by pulling on the power
cord. Always grip the plug firmly and pull straight
out from the outlet. The power cord can be damaged,
resulting in a risk of fire and electrical shock.
Repair or replace immediately all power cords that
have become frayed or otherwise damaged. Do not
use a cord that shows cracks or abrasion damage
along its length or at either end. The power cord can
melt, creating electrical shock and/or fire hazard.
When instailing or moving the dryer, be careful not
to pinch, crush, or damage the power cord. This witl
prevent injury and prevent damage to the dryer from
fire and electrical shock.
SAVE THESE INSTRUCTIONS
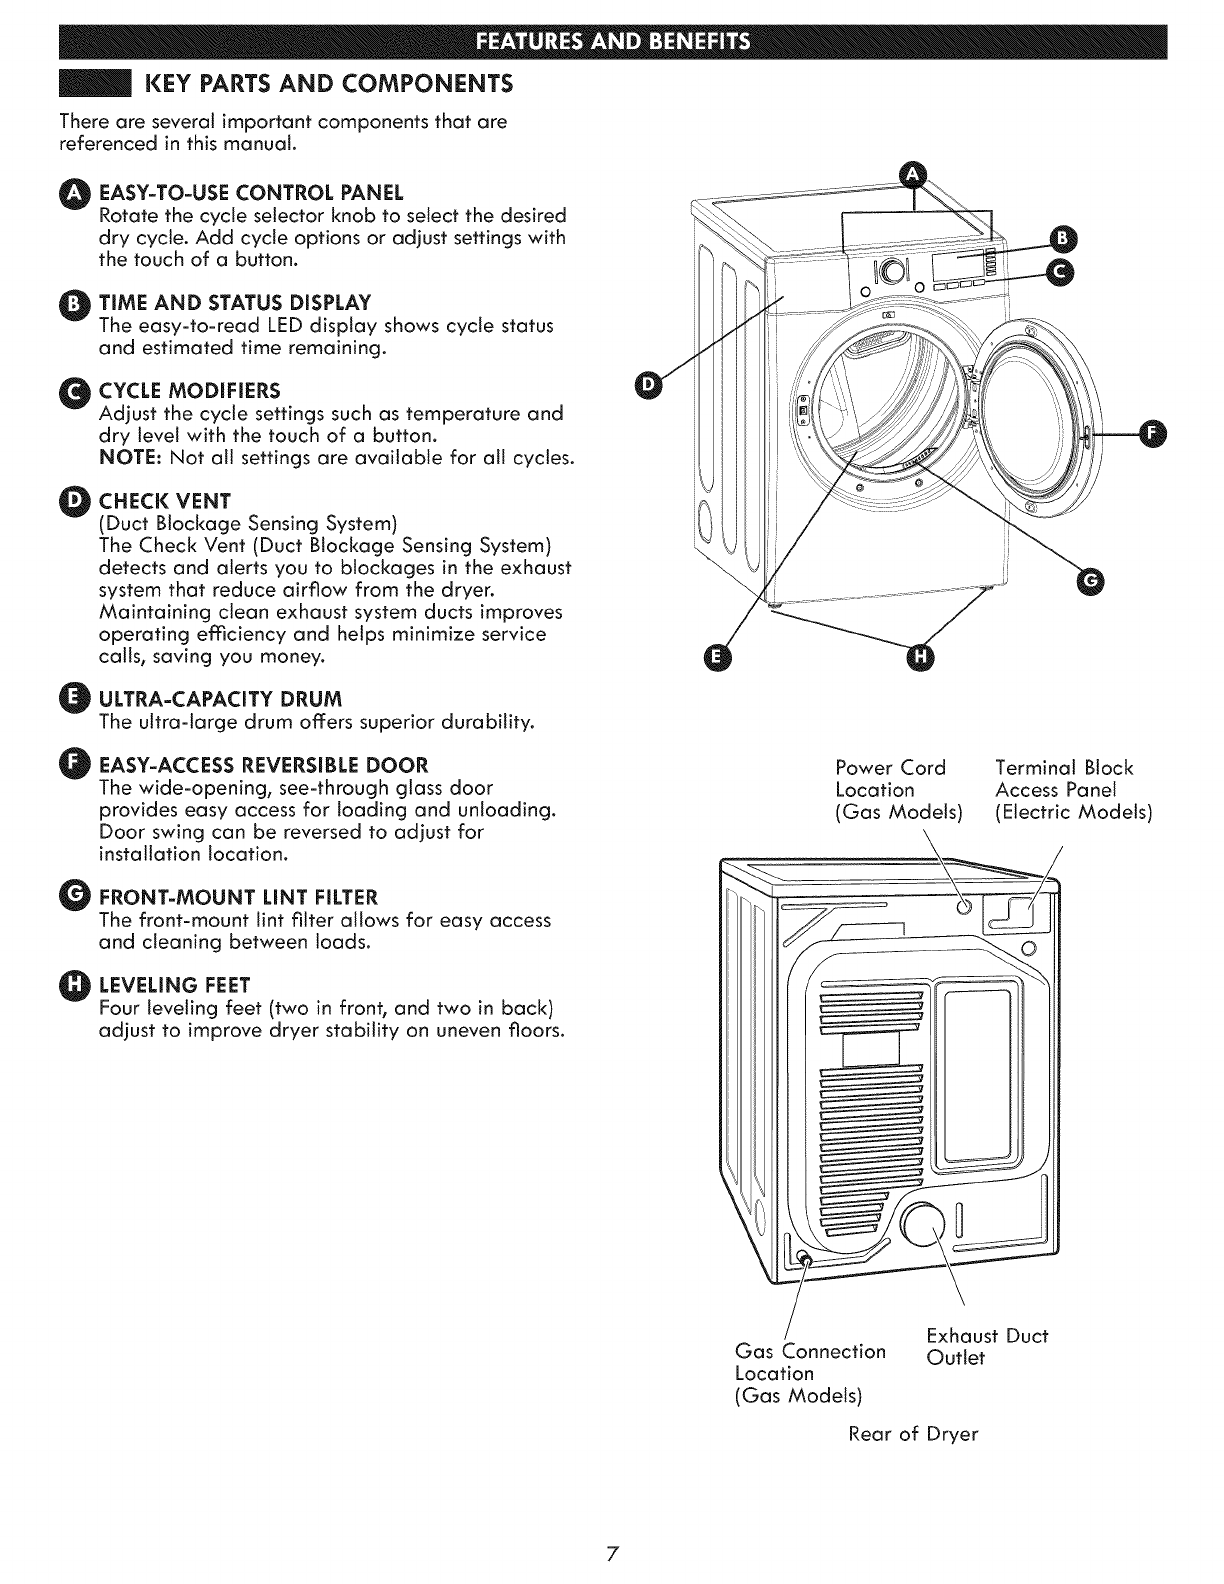
KEY PARTS AND COMPONENTS
There are several important components that are
referenced in this manual.
O ASY-TO-USE CONTROL PANEL
Rotate the cycle selector knob to select the desired
dry cycle. Add cycle options or adjust settings with
the touch of a button.
O IME AND STATUS DISPLAY
The easy-to-read LED display shows cycle status
and estimated time remaining.
_YCLE MODIFIERS
Adjust the cycle settings such as temperature and
dry level with the touch of a button.
NOTE: Not all settings are available for all cycles.
O HECK VENT
(Duct Blockage Sensing System)
The Check Vent (Duct Blockage Sensing System)
detects and alerts you to blockages in the exhaust
system that reduce airflow from the dryer.
Maintaining clean exhaust system ducts improves
operating emciency and helps minimize service
calls, saving you money.
O ULTRA-CAPACITY DRUM
The ultra-large drum offers superior durability.
OEASY-ACCESS REVERSIBLE DOOR
The wide-opening, see-through glass door
provides easy access for loading and unloading.
Door swing can be reversed to adjust for
installation location.
O FRONT-MOUNT LiNT FILTER
The front-mount lint filter allows for easy access
and cleaning between loads.
LEVELING FEET
Four leveling feet (two in front, and two in back)
adjust to improve dryer stability on uneven floors.
Power Cord
Location
(Gas Models)
f
::3
/
Gas Connection
Location
(Gas Models)
Terminal Block
Access Panel
(Electric Models)
Exhaust Duct
Outlet
Rear of Dryer
7
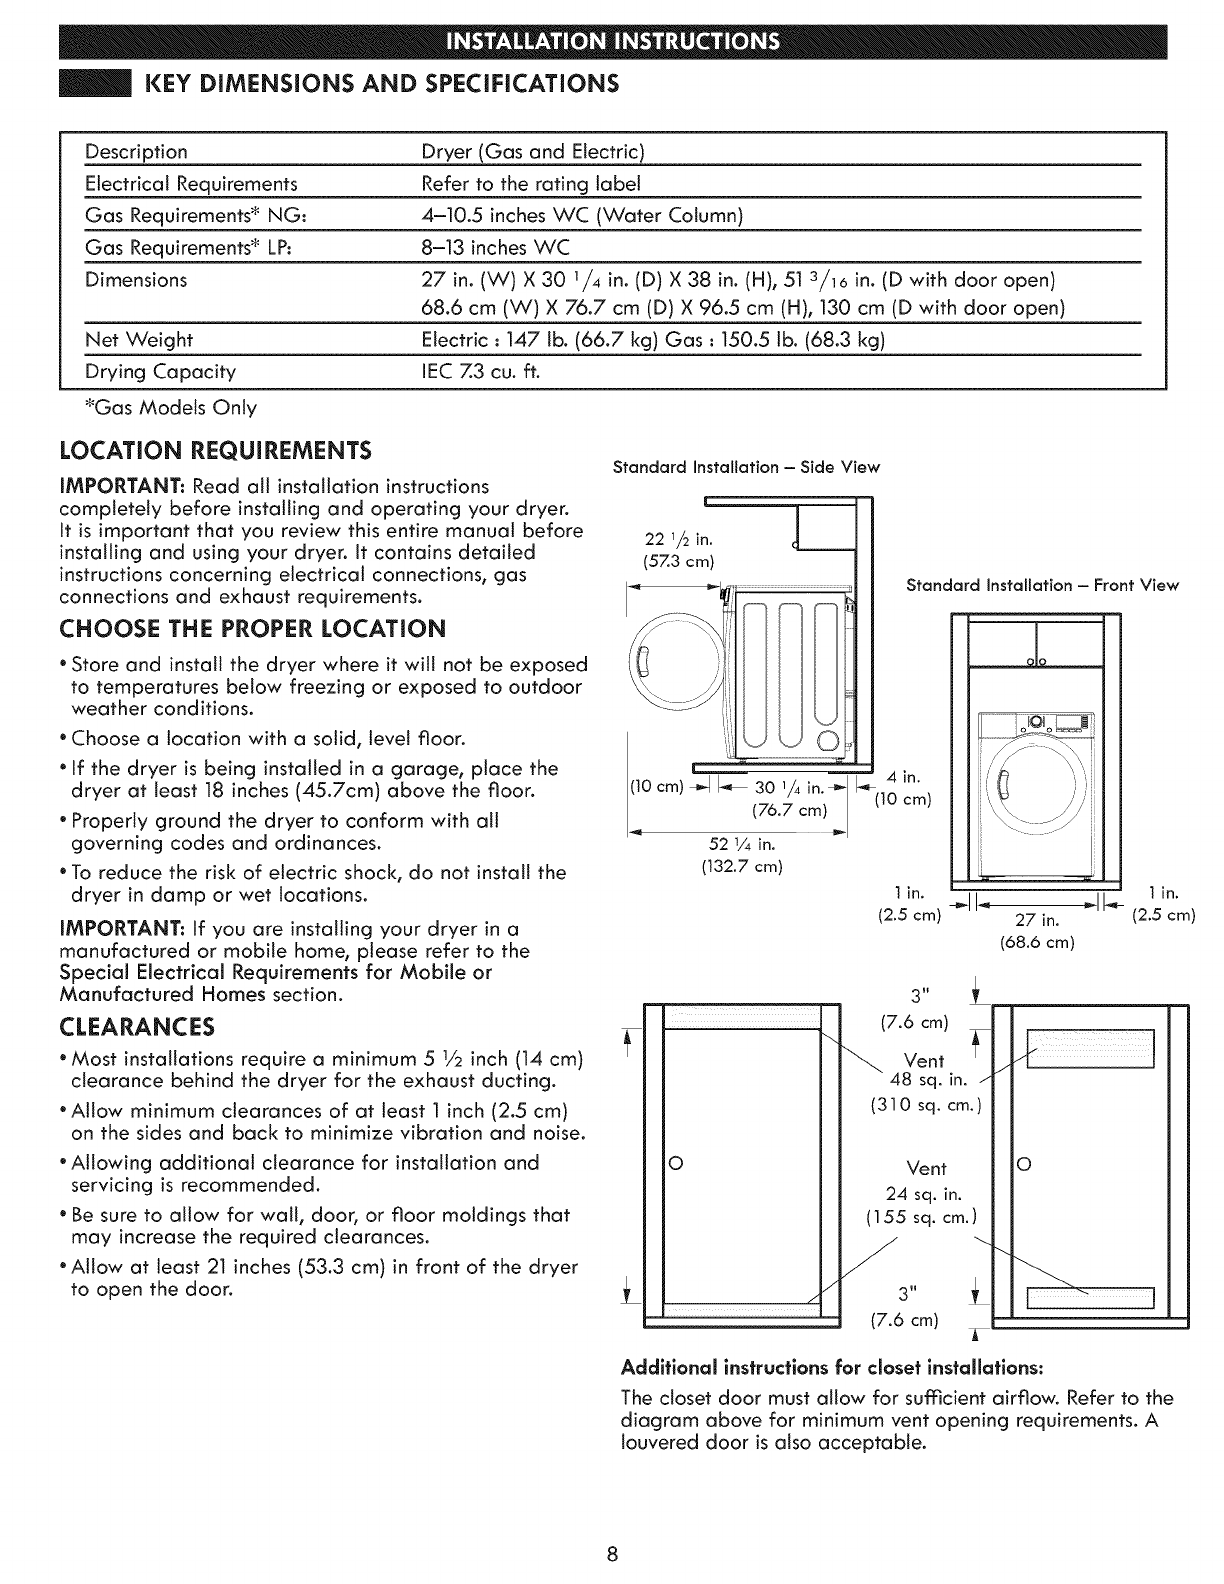
KEY DiMENSiONS AND SPECiFiCATiONS
Description Dryer (Gas and Electric)
Electrical Requirements Refer to the rating label
Gas Requirements _ NG: 4-10.5 inches WC (Water Column)
Gas Requirements _ LP: 8-13 inches WC
Dimensions 27 in. (W) X 30 1/4 in. (D) X 38 in. (H), 51 3/16 in. (D with door open)
68.6 cm (W) X 76.7 cm (D) X 96.5 cm (H), 130 cm (D with door open)
Net Weight Electric : 147 lb. (66.7 kg) Gas : 150.5 lb. (68.3 kg)
Drying Capacity IEC 7.3 cu. ft.
_Gas Models Only
LOCATION REQUIREMENTS Standard Installation -Side View
iMPORTANT: Read att installation instructions
completely before installing and operating your dryer.
it is important that you review this entire manual before 22 1/2in.
installing and using your dryer, it contains detailed (57.3 cm)
instructions concerning electrical connections, gas
connections and exhaust requirements.
CHOOSE THE PROPER LOCATION
*Store and install the dryer where it will not be exposed
to temperatures below freezing or exposed to outdoor
weather conditions.
*Choose a location with a solid, level floor.
*If the dryer is being installed in a garage, place the
dryer at least 18 inches (45.7cm) above the floor.
*Properly ground the dryer to conform with all
governing codes and ordinances.
*To reduce the risk of electric shock, do not install the
dryer in damp or wet locations.
iMPORTANT: If you are installing your dryer in a
manufactured or mobile home, please refer to the
Special Electrical Requirements for Mobile or
Manufactured Homes section.
CLEARANCES
*Most installations require a minimum 51/2 inch (14 cm)
clearance behind the dryer for the exhaust ducting.
*Allow minimum clearances of at least 1 inch (2.5 cm)
on the sides and back to minimize vibration and noise.
*Allowing additional clearance for installation and
servicing is recommended.
*Be sure to allow for wall, door, or floor moldings that
may increase the required clearances.
*Allow at least 21 inches (53.3 cm) in front of the dryer
to open the door.
Standard Installation - Front View
DI!
_"_JJ_ 30 1/4 in. _- J_ 4 in.
0 cm) (76.7 cm) _ (10 cm)
52 t/4in.
(132.7 cm)
1in.
(2.5 cm) l in.
27 in. (2.5 cm)
(68.6 cm)
3"
(7.6 cm)
Vent .-
48 sq. in.
(310 sq. cm.)
Vent
24 sq. in.
(155 sq. cm.)
Y3" _
(7.6 cm)
J
1
Addltional instructions for closet installations:
The closet door must allow for sufficient airflow. Refer to the
diagram above for minimum vent opening requirements. A
louvered door is also acceptable.
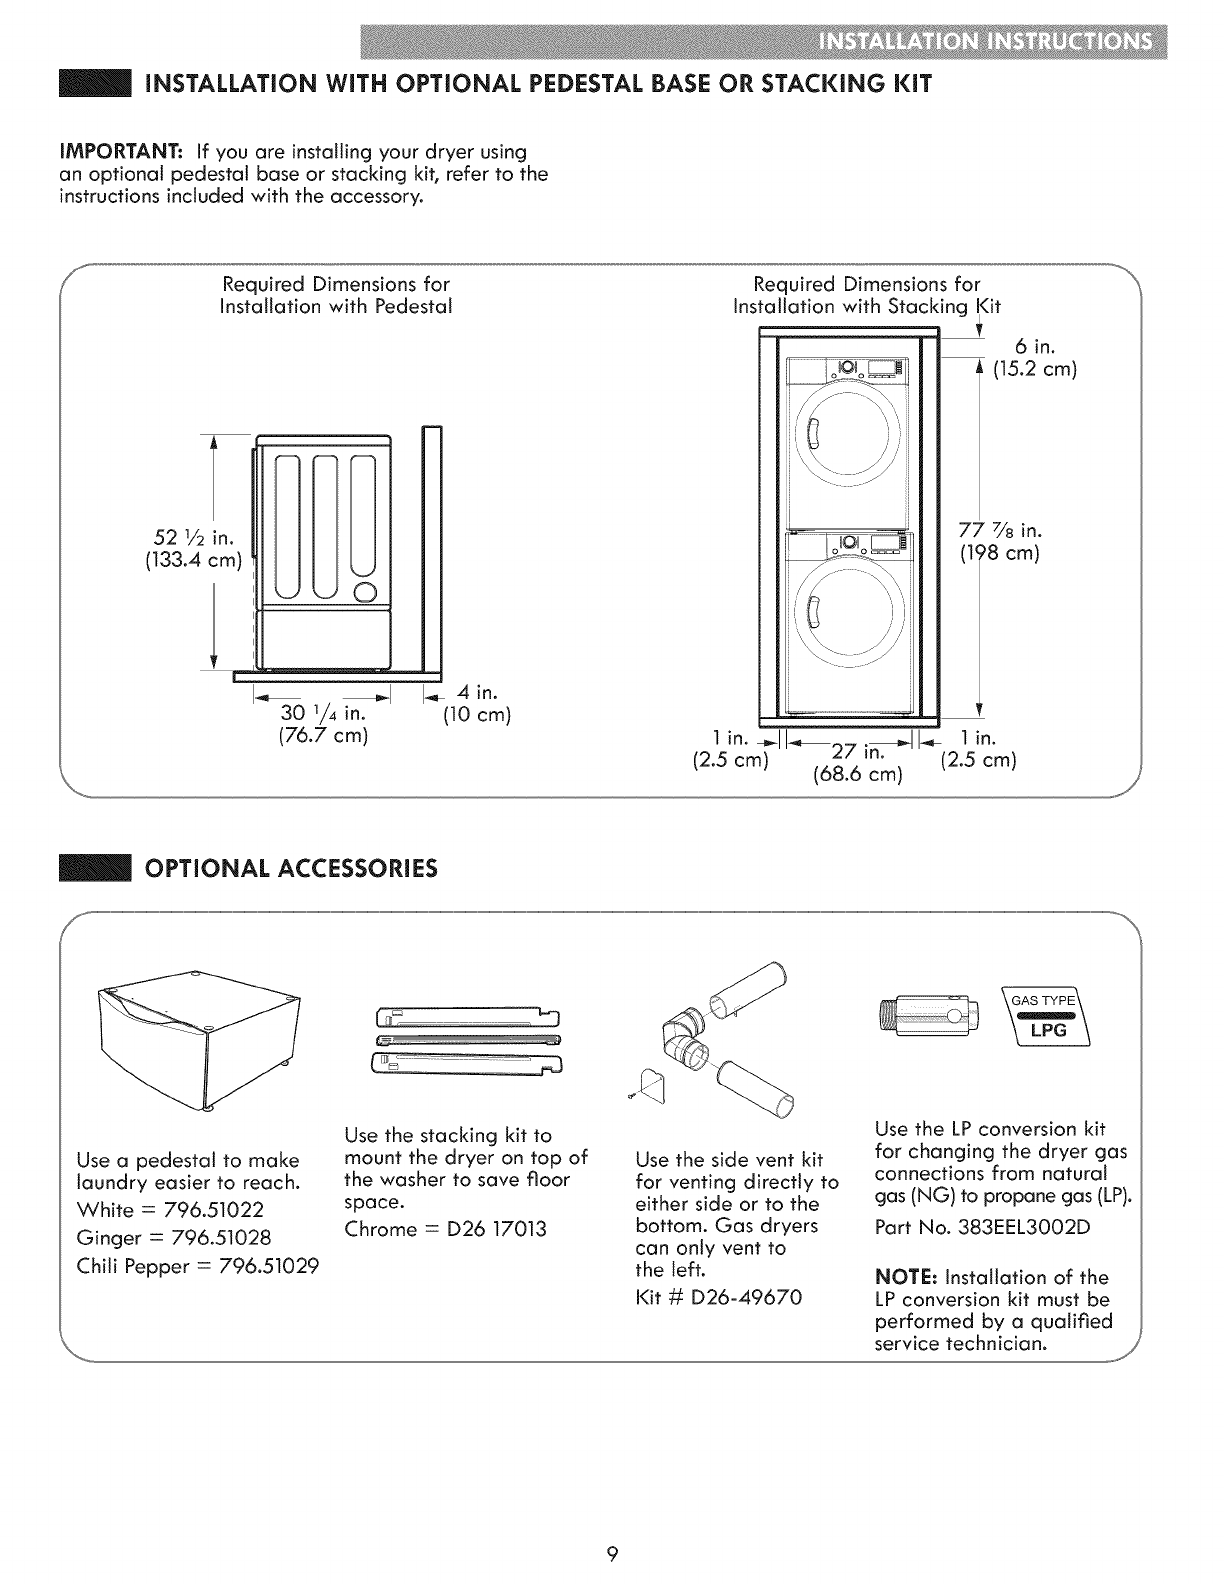
iNSTALLATiON WiTH OPTIONAL PEDESTAL BASE OR STACKING KiT
IMPORTANT: If you are installing your dryer using
an optional pedestal base or stacking kit, refer to the
instructions included with the accessory.
Required Dimensions for Required Dimensions for
Installation with Pedestal Installation with Stacking <it
!
52 1/2 in.
(133.4 cm)
I_, _l I_ 4in.
30 1/4 in. (10 cm)
(76.7 cm)
(C ',
6 in.
(15.2 cm)
77 7/8 in.
(1_8 cm)
l in.-_11_,_27 in--_l I_- l in.
(2.5 cm) (68.6 cm) (2.5 cm)
OPTIONAL ACCESSORIES
Use a pedestal to make
laundry easier to reach.
White = 796.51022
Ginger : 796.51028
Chili Pepper : 796.51029
Use the stacking kit to
mount the dryer on top of
the washer to save floor
space,
Chrome : D26 17013
Use the side vent kit
for venting directty to
either side or to the
bottom. Gas dryers
can only vent to
the left.
Kit #D26-49670
Use the LP conversion kit
for changing the dryer gas
connections from natural
gas (NG) to propane gas (LP).
Part No. 383EEL3002D
NOTE: Installation of the
LP conversion kit must be
performed by a qualified
service technician.
GAS DRYERS
GAS REQUIREMENTS (GAS MODELS ONLY)
AWARNING: To reduce the risk of fire,
electric shock, or injury to persons when using this
appliance, follow basic precautions, including
the following:
*Gas supply requirements: As shipped from the
factory, this dryer is configured for use with natural
gas (NG). It can be converted for use wlfh propane
(LP) gas. Gas pressure must not exceed 8inches
water column for (NG), or 13 inches water column for
(LP).
*A qualified service or gas company technician must
connect the dryer to the gas service. Failure to follow
these instructions can result in fire, explosion, or death.
*isolate the dryer from the gas supply system by
closing its indlvldual manual shutoff valve during any
pressure testing of the gas supply. Failure to do so can
result in fire, explosion, or death.
* Supply llne requirements: Your laundry room must
have arigid gas supply llne to your dryer. In the
United States, an indlvidual manual shutoff valve
MUST be installed within at least 6ft. (1.8 m) of the
dryer, in accordance with the Naflonal Fuel Gas Code
ANSI Z223.1 or Canadian gas installation code CSA
B149.1. A_inch NPT pipe plug must be installed.
Failure to do so can result in fire, explosion, or death.
*If using a rigid pipe, the rigid pipe should be 1½ inch
IPS. if acceptable under local codes and ordinances
and when acceptable to your gas supplier, ¾inch
approved tubing may be used where lengths are less
than 20 ft. (6.1 m). Larger tubing should be used for
lengths in excess of 20 ft. (6.1 m). Failure to do so can
result in fire, explosion, or death.
* Connect the dryer to the type of gas shown on
the nameplate. Failure to do so can result in fire,
explosion, or death.
*To prevent contamination of the gas valve, purge the
gas supply of air and sediment before connecting
the gas supply to the dryer. Before tightening the
connection between the gas supply and the dryer,
purge remaining air until the odor of gas is detected.
Failure to do so can result in fire, explosion, or death.
*DO NOT use an open flame to inspect for gas leaks.
Use a noncorrosive leak detection fluid. Failure to do
so can result in fire, explosion, or death.
* Use only a new AGA- or CSA-certified gas supply
llne with flexible stainless steel connectors. Failure to
do so can result in fire, explosion, or death.
* Securely tighten all gas connections. Failure to do so
can result in fire, explosion, or death.
*Use Teflon tape or a pipe-joint compound that is
insoluble in propane (LP) gas on all pipe threads.
Failure to do so can result in fire, explosion,
or death.
* DO NOT attempt any disassembly of the dryer;
disassembly requires the attention and tools of
an authorized and qualified service technician or
company. Failure to follow this warning can result in fire,
explosion, or death.
ELECTRICAL REQUIREMENTS FOR
GAS MODELS ONLY
* Do not, under any circumstances, cut or remove the
third (ground) prong from the power cord. Failure
to follow this warning can result in fire, explosion, or
death.
*For personal safety, this dryer must be property
grounded. Failure to follow this warning can result in
fire, explosion, or death.
*The power cord of fhls dryer is equipped wlfh
a 3-prong (grounding) plug which mates with a
standard 3-prong (grounding) wall outlet to minimize
the posslbillty of electric shock hazard from this
appffance. Failure to follow this warning can result in
fire, explosion, or death.
*This dryer must be plugged into a 120-VAC, 60-Hz.
grounded outlet protected by a |5-ampere fuse or
circuit breaker. Failure to follow this warning can result
in fire, explosion, or death.
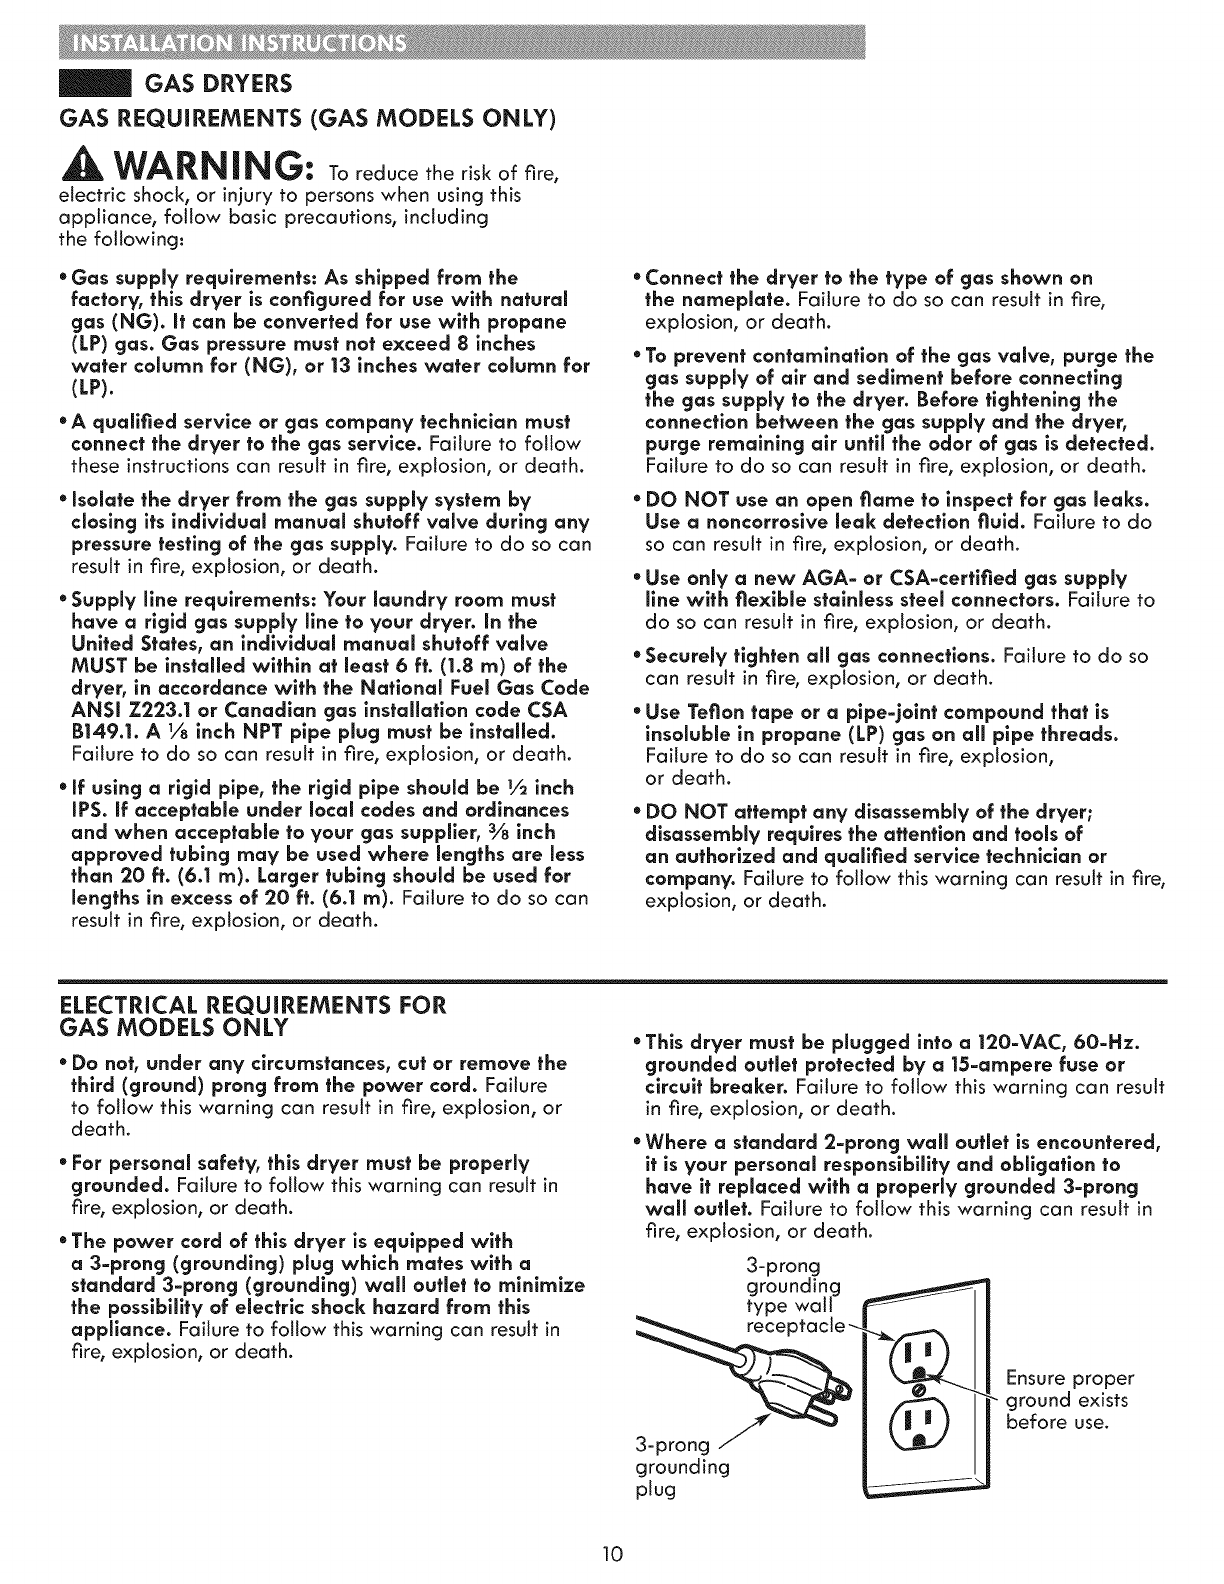
* Where a standard 2-prong wall outlet is encountered,
it is your personal responslbifffy and obligation to
have if replaced with aproperty grounded 3-prong
wall outlet. Failure to follow this warning can result in
fire, explosion, or death.
3-prong
grounding
type walt
grounding
plug
Ensure proper
ground exists
before use.
10
GAS DRYERS (continued)
WARNING: To reduce the risk of fire,
electric shock, or injury to persons when using this
appliance, follow basic precautions, including
the following:
* Instailatlon and service must be performed by a
quaiiNed installer, service agency, or the gas supplier.
Failure to do so can result in fire, explosion, or death.
* Use only a new stainless steel flexlbie connector and
anew AGA=certified connector. Failure to do so can
result in fire, explosion, or death.
* A gas shutoff valve must be installed within 6ft.
(1.8 m) of the dryer. Failure to do so can result in fire,
explosion, or death.
* The dryer is configured for natural gas when
shipped from the factory. Make sure that the dryer
is equipped with the correct burner nozzle far the
type of gas being used (natural gas or propane gas).
Failure to do so can result in fire, explosion, or death.
CONNECTING THE GAS SUPPLY
NOTE: This dryer is configured from the factory set for
natural gas (NG). If dryer is to be used with propane
(LP) gas, it must be converted by a qualified
service technician.
_Make sure that the gas supply to the laundry room is
turned OFF and the dryer is unplugged. Confirm that
the type of gas available in your laundry room is
appropriate for the dryer.
Remove the shipping cap from the gas fitting at the
back of the dryer. Be careful not to damage the
threads of the gas connector when removing the
shipping cap.
_Connect the dryer to your laundry room's gas supply
using a new flexible stainless steel connector with a 3/8
inches NPT fitting.
NOTE: DO NOT use old connectors.
_Securely tighten all connections between the dryer
and your laundry room's gas supply.
Turn on the gas supply.
_Check all pipe connections (both internal and external)
for gas leaks with a noncorrosive leak-detection fluid.
Proceed to Venting the Dryer.
* if necessary, the correct nozzle (for the LP nozzle kit,
order part number 383EEL3002D) should be installed
by a qualified technician and the change should be
noted on the dryer. Failure to do so can result in fire,
explosion, or death.
* All connections must be in accordance with local
codes and regulations. Failure to do so can result in
fire, explosion, or death.
* Gas dryers MUST exhaust to the outdoors. Failure to do
so can result in fire, explosion, or death.
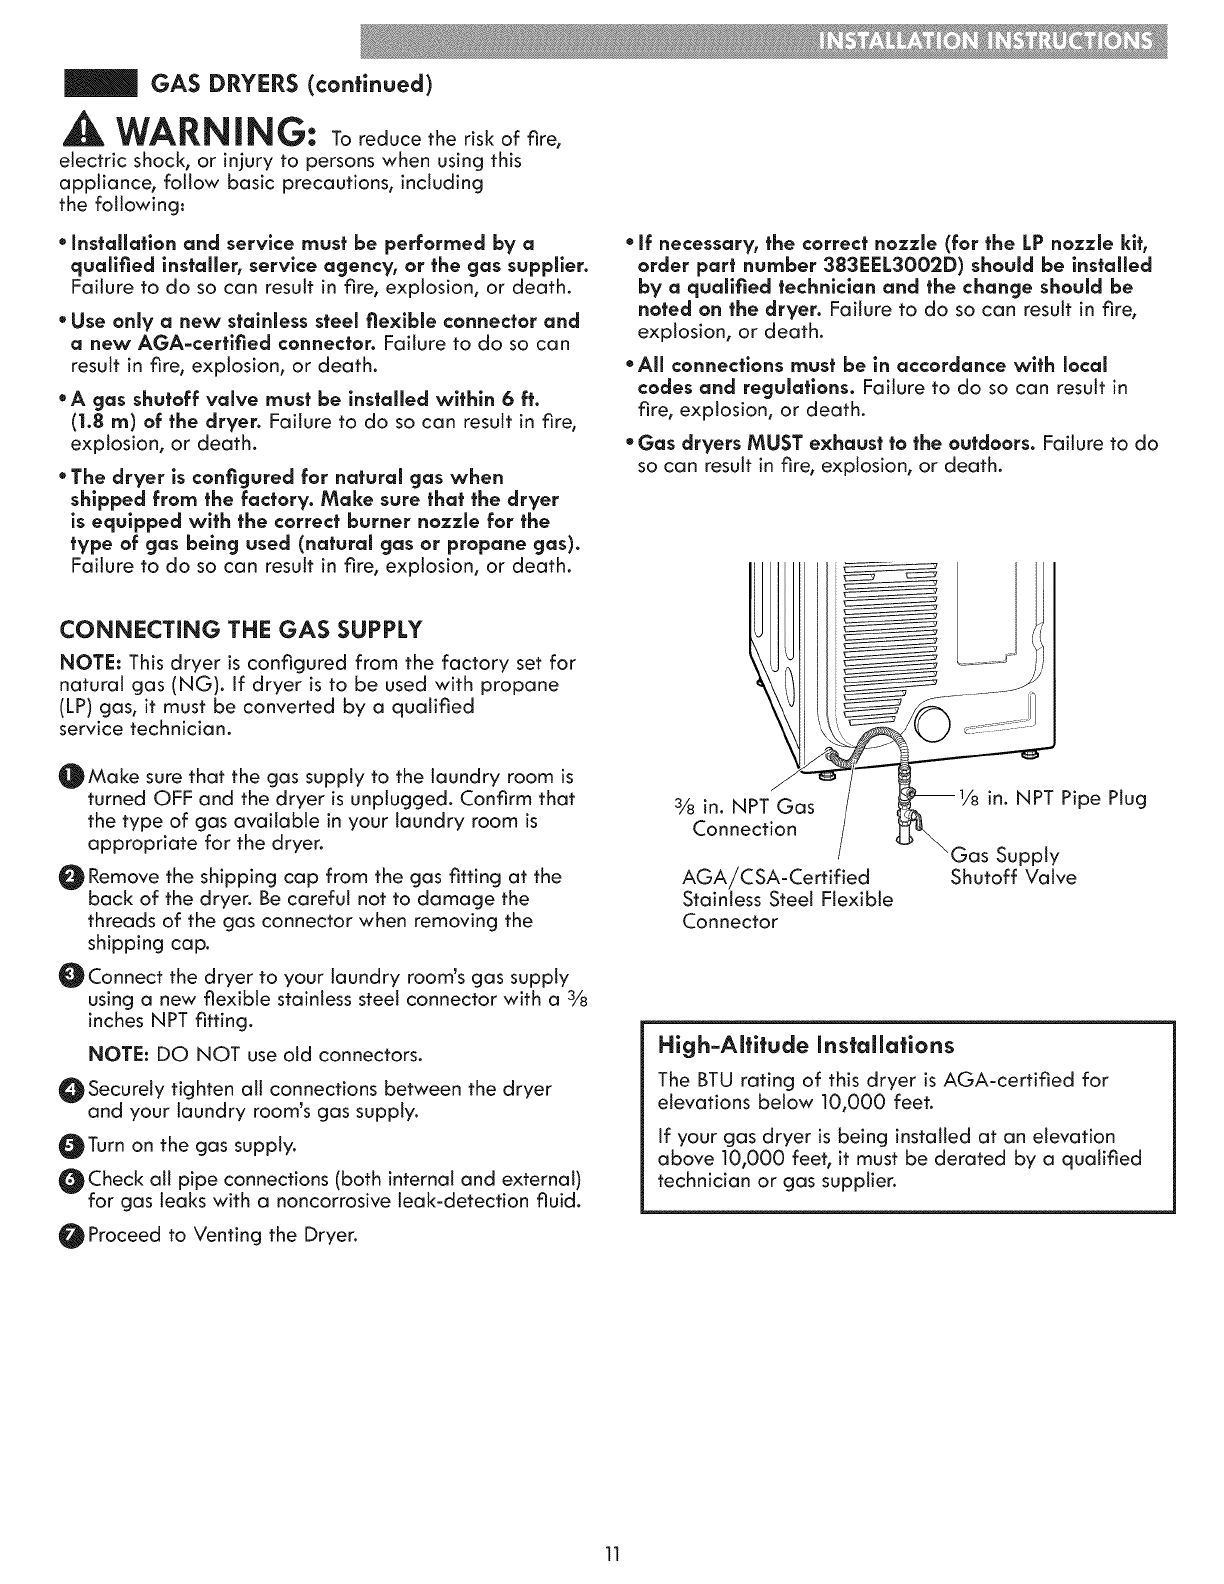
" / _1/8 in. NPT Pipe Plug
3/8 in. NPT Gas
Connection
/_GasSupp,y
AGA/CSA-Certified Shutoff Valve
Stainless Steel Flexible
Connector
High=Altitude Installations
The BTU rating of this dryer is AGA-certified for
elevations below 10,000 feet.
if your gas dryer is being installed at an elevation
above 10,000 feet, it must be derated by a qualified
technician or gas supplier.
11
ELECTRIC DRYERS
ELECTRICAL REQUIREMENTS
WARNING: Tohelp prevent fire,
electrical shock, serious injury, or death, the wiring
and grounding must conform to the latest edition of
the National Electrical Code, ANSI/NFPA 70 and atl
applicable local regulations. Please contact a qualified
electrician to check your home's wiring and fuses to
ensure that your home has adequate electrical power to
operate the dryer.
AWARNING: To reduce the risk of fire,
electric shock, or injury to persons when using this
appliance, follow basic precautions, including the
following:
* Any installation in a manufactured or mobile
home must comply with the Manufactured Home
Construction and Safety Standards Title 24 CFR, Part
3280 or Standard CAN/CSA Z240 MH and local codes
and ordinances.
*A 4-wire connection is required for all mobile and
manufactured home installations, as well as all new
construction after January 1, 1996. Failure to do so
can result in fire, explosion, or death.
WARNING: To reduce the risk of
fire, electric shock, or injury to persons when using this
appliance, follow basic precautions, including
the following:
* This dryer must be connected to a grounded metal,
permanent wiring system, or an equipment grounding
conductor must be run with the circuit conductors and
connected to the equipment grounding termlnal or
lead on the dryer. Failure to do so can result in fire,
explosion, or death.
* The dryer has its own terminal block that must be
connected to a separate 240 VAC, 60=Hertz, single
phase circuit, fused at 30 amperes (the circuit must be
fused on both sides of the llne). ELECTRICAL SERVICE
FOR THE DRYER SHOULD BE OF THE MAXIMUM
RATE VOLTAGE LISTED ON THE NAMEPLATE. DO
NOT CONNECT DRYER TO 110=, 115=,OR 120=VOLT
CIRCUIT. Failure to follow these instructions can result
in fire, explosion, or death.
* if branch circuit to dryer is 15 ft. (4.5 m) or less in
length, use UL (Underwriters Laboratories) llsted No.=
10 AWG wire (copper wire only), or as required by
local codes, if over 15 ft. (4.50 m), use UL=llsted No.=8
AWG wire (copper wire only), or as required by local
codes. Allow sumclent slack in wiring so dryer can
be moved from its normal Iocatlon when necessary.
Failure to do so can result in fire, explosion, or death.
* The power cord (plgtall) connection between wail
receptacle and dryer termlnal block IS NOT suppiled
with the dryer. Type of pigtail and gauge of wire
must conform to local codes and with instructions on
the following pages. Failure to follow these instructions
can result in fire, explosion, or death
* A 4-wire connection is required for all new
construction after January 1, 1996. AA-wire
connection must be used where local codes do not
permit grounding through the neutral wire. Failure to
do so can result in fire, explosion, or death.
12
ELECTRIC DRYERS (continued)
CONNECTING ELECTRIC DRYERS
WARNING:
Connect the power cord to the termlnal block. Connect
each power cord wire to the terminal block screw that
has the same colored wire. For example, connect the
black power cord wire to the termlnal block screw
with the black wire. Failure to follow these instructions
may result in a short, overload fire or death.
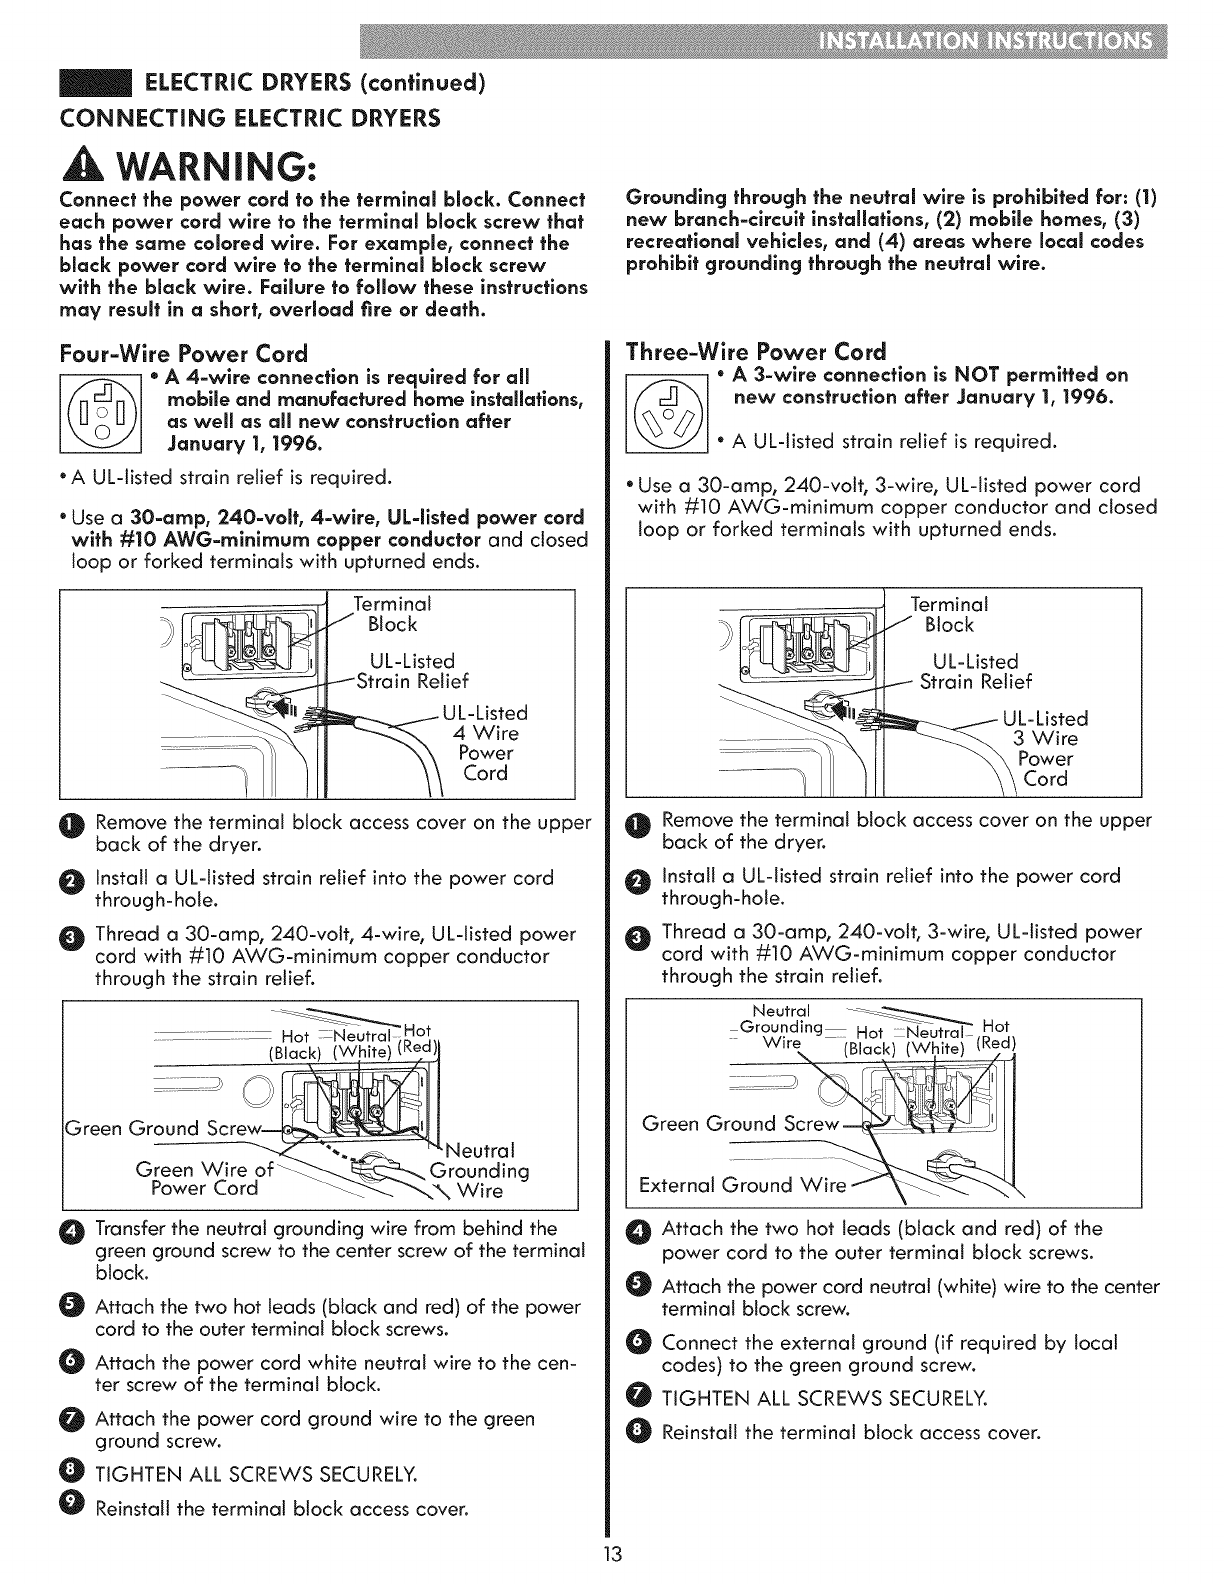
Four=Wire Power Cord
* A 4=wire connection is required for all
mobile and manufactured home installations,
as well as all new construction after
January 1, 1996.
•A UL-listed strain relief is required.
•Use a 30=amp, 240=volt, 4-wire, UL=ilsted power cord
with #10 AWG=mlnlmum copper conductor and closed
loop or forked terminals with upturned ends.
Terminal
Block
UL-Listed
Relief
UL-Listed
4 Wire
Power
Cord
O Remove the terminal block access cover on the upper
back of the dryer.
O1 Install a UL-tisted strain relief into the power cord
through-hole.
Thread a 30-amp, 240-volt, 4-wire, UL-listed power
cord with #10 AWG-minimum copper conductor
through the strain relief.
Green Ground Neutral
Green Wire Grounding
Power Cord Wire
Transfer the neutral grounding wire from behind the
green ground screw to the center screw of the terminal
block.
Attach the two hot leads (black and red) of the power
cord to the outer terminal block screws.
Attach the power cord white neutral wire to the cen-
ter screw of the terminal block.
Attach the power cord ground wire to the green
ground screw.
O TIGHTEN ALL SCREWS SECURELY.
Reinstall the terminal block access cover.
Grounding through the neutral wire is prohibited for: (1)
new branch=clrcult installations, (2) mobile homes, (3)
recreatlonal vehicles, and (4) areas where local codes
prohibit grounding through the neutral wire.
Three=Wire Power Cord
• A 3=wlre connection is NOT permitted on
new construction after January 1, 1996.
•A UL-listed strain relief is required.
• Use a 30-amp, 240-volt, 3-wire, UL-tisted power cord
with #10 AWG-minimum copper conductor and closed
loop or forked terminals with upturned ends.
Terminal
?_ Block
!_½__J_ I,II! UL-Listed
- _-!1 __ 3Wire
.... _- - \ II power
i !!! \\Cord
Remove the terminal block access cover on the upper
back of the dryer.
Install a UL-tisted strain relief into the power cord
through-hole.
Thread a 30-amp, 240-volt, 3-wire, UL-listed power
cord with #10 AWG-minimum copper conductor
through the strain relief.
GNeUntSaIng -- -H_t_ Hot
I
External Ground Wire J _--_-_----,x"-k,
Attach the two hot leads (black and red) of the
power cord to the outer terminal block screws.
@
@
@
@
Attach the power cord neutral (white) wire to the center
terminal block screw.
Connect the external ground (if required by local
codes) to the green ground screw.
TIGHTEN ALL SCREWS SECURELY.
Reinstall the terminal block access coven
13
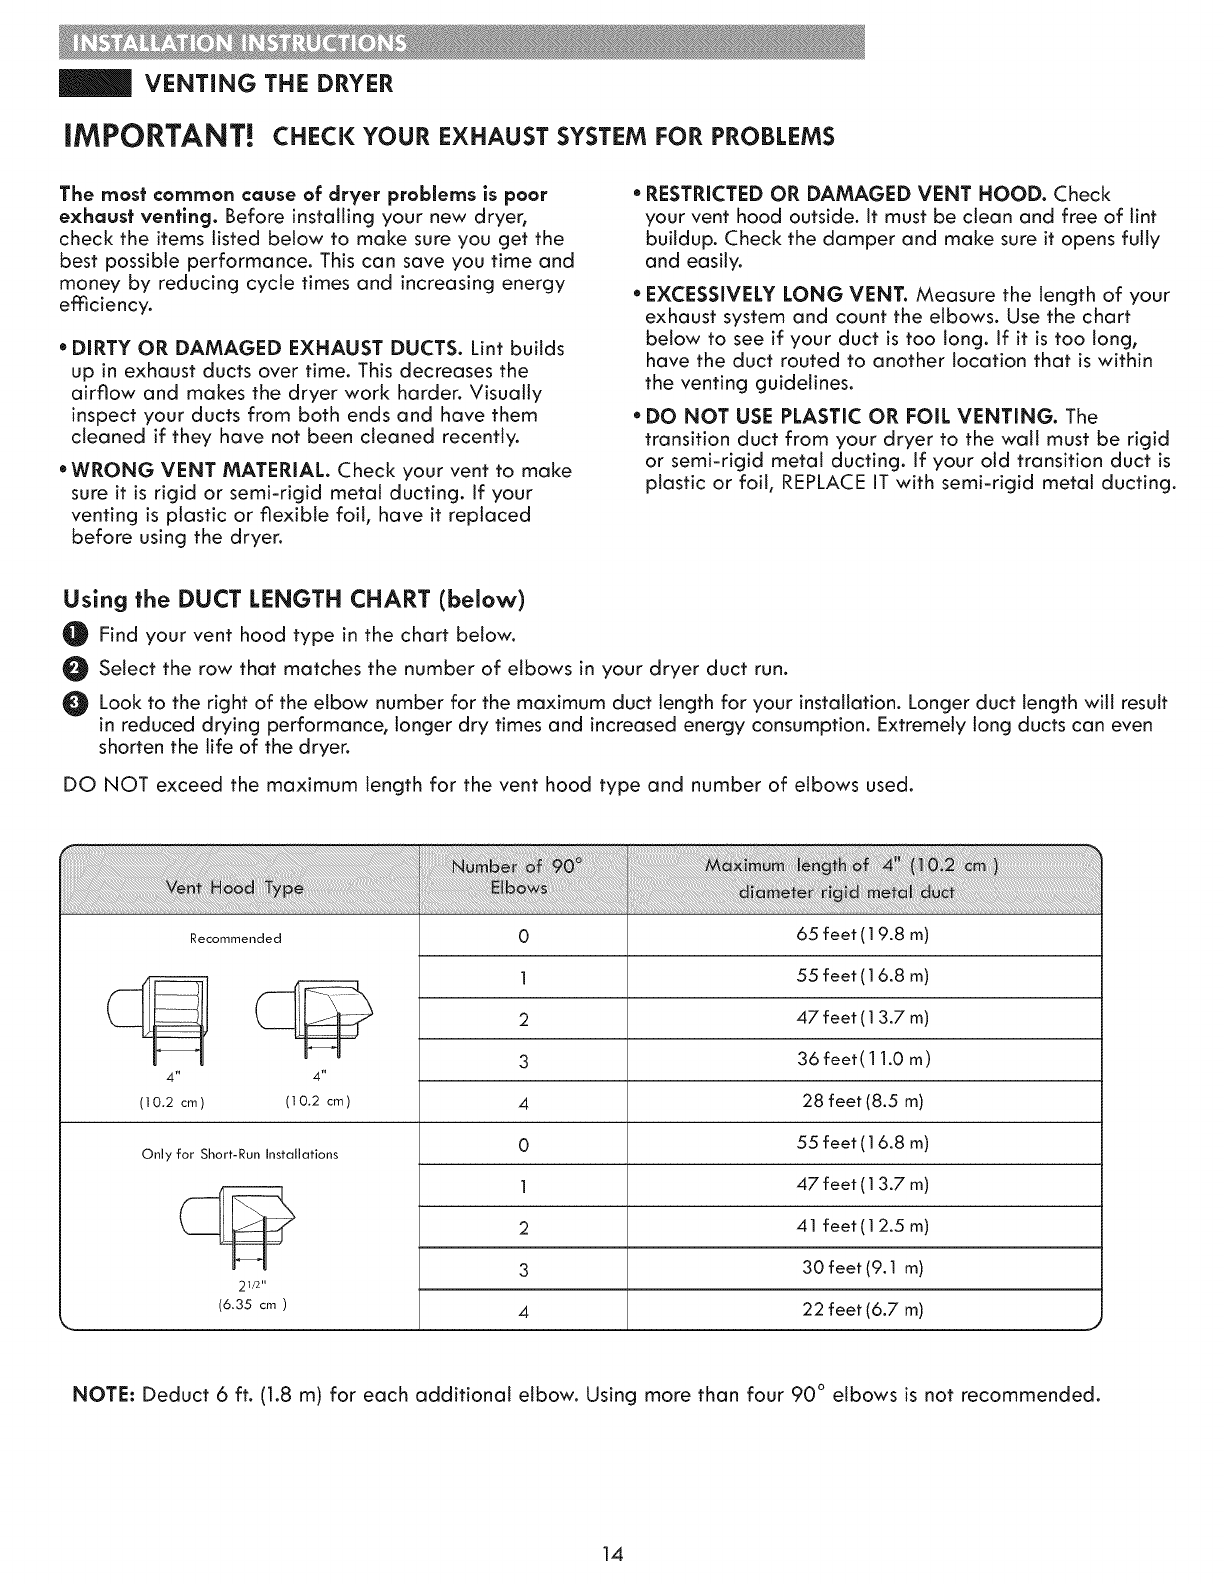
VENTING THE DRYER
IMPORTANT! CHECK YOUR EXHAUST SYSTEM FOR PROBLEMS
The most common cause of dryer problems ispoor
exhaust venting.Beforeinstallingyour new dryer,
check the items listed below to make sure you get the
best possible performance. This can save you time and
money by reducing cycle times and increasing energy
emciency.
*DIRTY OR DAMAGED EXHAUST DUCTS. Lint builds
up in exhaust ducts over time. This decreases the
airflow and makes the dryer work harder. Visually
inspect your ducts from both ends and have them
cleaned if they have not been cleaned recently.
* WRONG VENT MATERIAL. Check your vent to make
sure it is rigid or semi-rigid metal ducting, if your
venting is plastic or flexible foil, have it replaced
before using the dryer.
* RESTRICTED OR DAMAGED VENT HOOD. Check
your vent hood outside. It must be clean and free of lint
buildup. Check the damper and make sure it opens fully
and easily.
*EXCESSIVELY LONG VENT. Measure the length of your
exhaust system and count the elbows. Use the chart
below to see if your duct is too long. if it is too long,
have the duct routed to another location that is within
the venting guidelines.
*DO NOT USE PLASTIC OR FOIL VENTING. The
transition duct from your dryer to the wall must be rigid
or semi-rigid metal ductJng, if your old transition duct is
plastic or fail, REPLACE iT with semi-rigid metal ducting.
Using the DUCT LENGTH CHART (below)
Find your vent hood type in the chart below.
Select the row that matches the number of elbows in your dryer duct run.
Look to the right of the elbow number for the maximum duct tength for your installation. Longer duct length will result
in reduced drying performance, longer dry times and increased energy consumption. Extremely long ducts can even
shorten the life of the dryer.
DO NOT exceed the maximum length for the vent hood type and number of elbows used.
Recommended
4"
(10.2 cm)
4"
(10.2 cm)
Only for Short-Run Installations
21/2"
(6.35 cm )
0
]
2
3
4
0
]
65 feet (19.8 m)
55 feet (16.8 m)
47 feet (13.7 m)
36 feet(11.0 m)
28 feet (8.5 m)
55 feet (16.8 m)
47 feet (13.7 m)
2
3
4
41 feet(12.5 m)
30 feet (9.1 m)
22 feet (6.7 m)
NOTE: Deduct 6ft. (1.8 m) for each additional elbow. Using more than four 90 ° elbows is not recommended.
14
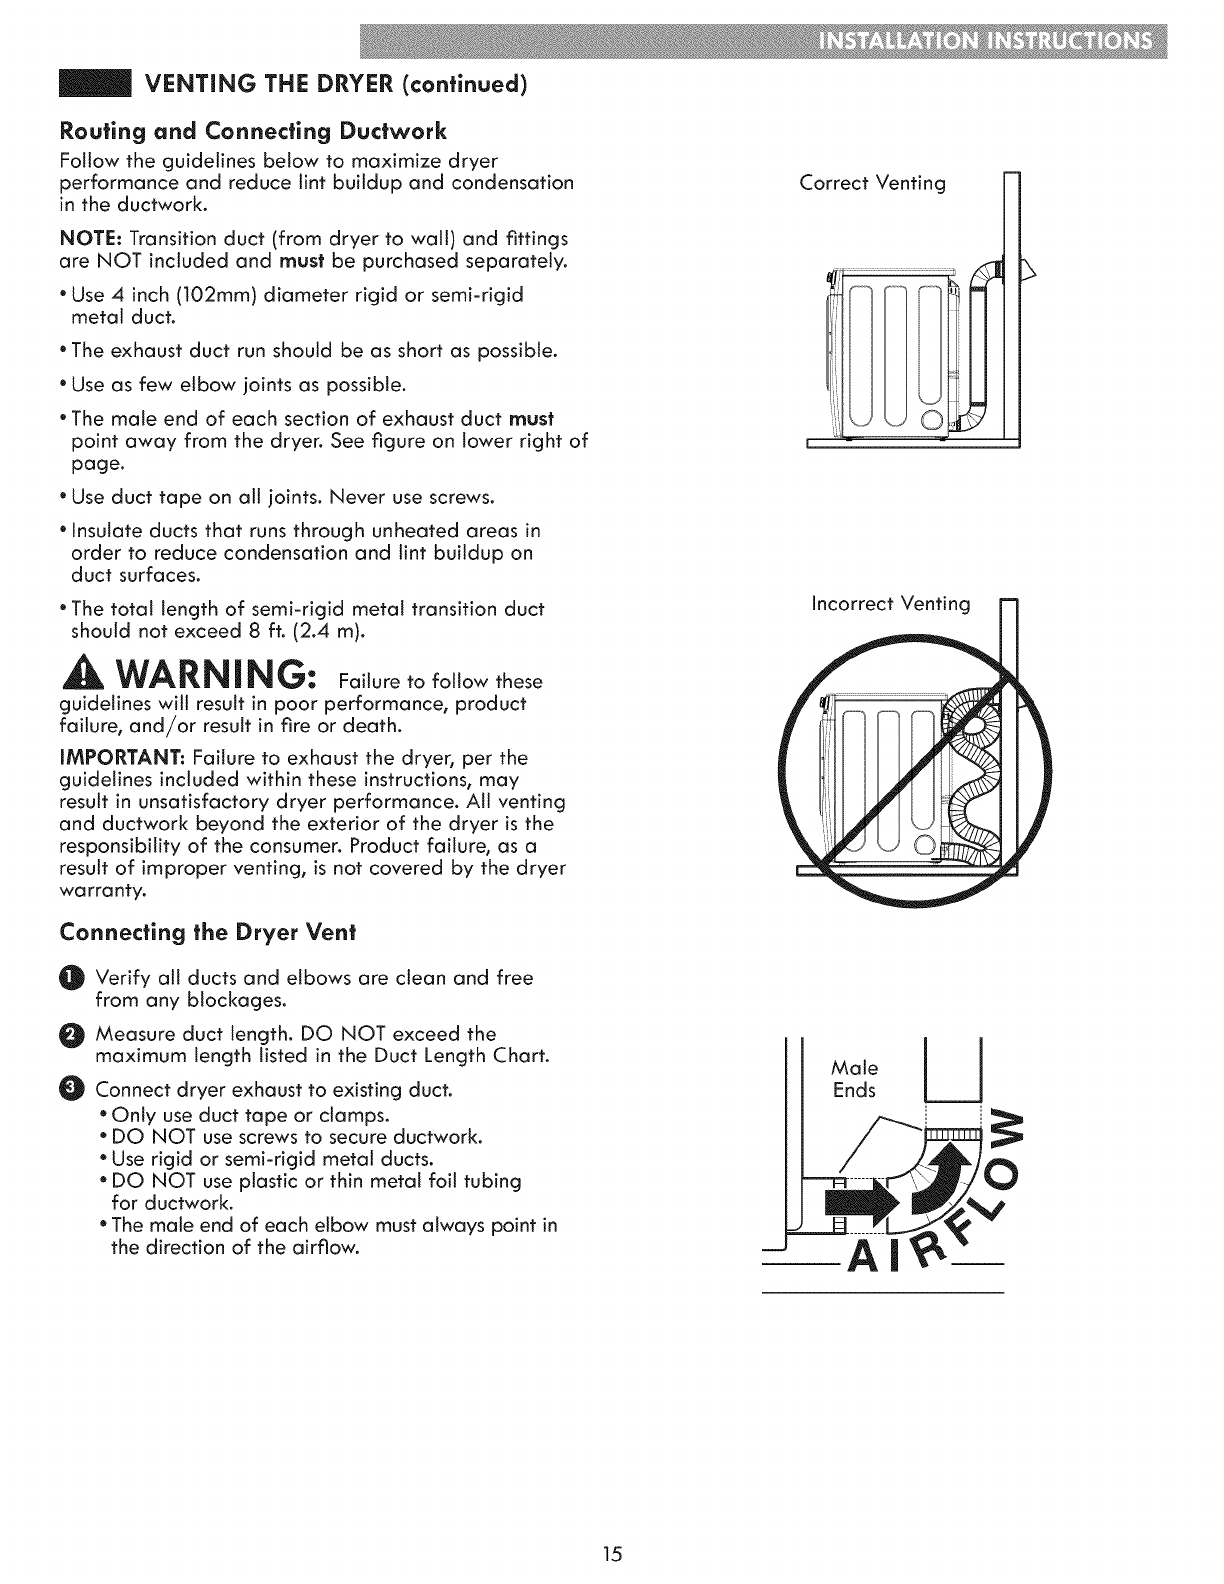
VENTING THE DRYER (continued)
Routing and Connecting Ductwork
Follow the guidelines below to maximize dryer
performance and reduce lint buildup and condensation
in the ductwork.
NOTE: Transition duct (from dryer to walt) and fittings
are NOT included and must be purchased separately.
*Use 4 inch (102mm) diameter rigid or semi-rigid
metal duct.
*The exhaust duct run should be as short as possible.
*Use as few elbow joints as possible.
*The male end of each section of exhaust duct must
point away from the dryer. See figure on lower right of
page.
*Use duct tape on all joints. Never use screws.
*insulate ducts that runs through unheated areas in
order to reduce condensation and lint buildup on
duct surfaces.
*The total length of semi-rigid metal transition duct
should not exceed 8 ft. (2.4 m).
WARNING: Failure to follow these
guidelines wilt result in poor performance, product
failure, and/or result in fire or death.
IMPORTANT: Failure to exhaust the dryer, per the
guidelines included within these instructions, may
result in unsatisfactory dryer performance. All venting
and ductwork beyond the exterior of the dryer is the
responsibility of the consumer. Product failure, as a
result of improper venting, is not covered by the dryer
wa rra nty.
Connecting the Dryer Vent
O Verify all ducts and elbows are clean and free
from any blockages.
Measure duct length. DO NOT exceed the
maximum length listed in the Duct Length Chart.
Connect dryer exhaust to existing duct.
*Only use duct tape or clamps.
DO NOT use screws to secure ductwork.
Use rigid or semi-rigid metal ducts.
DO NOT use plastic or thin metal foil tubing
for ductwork.
The male end of each elbow must always point in
the direction of the airflow.
Correct Venting ._
ii
incorrect Venting
Male
Ends
mAI
15
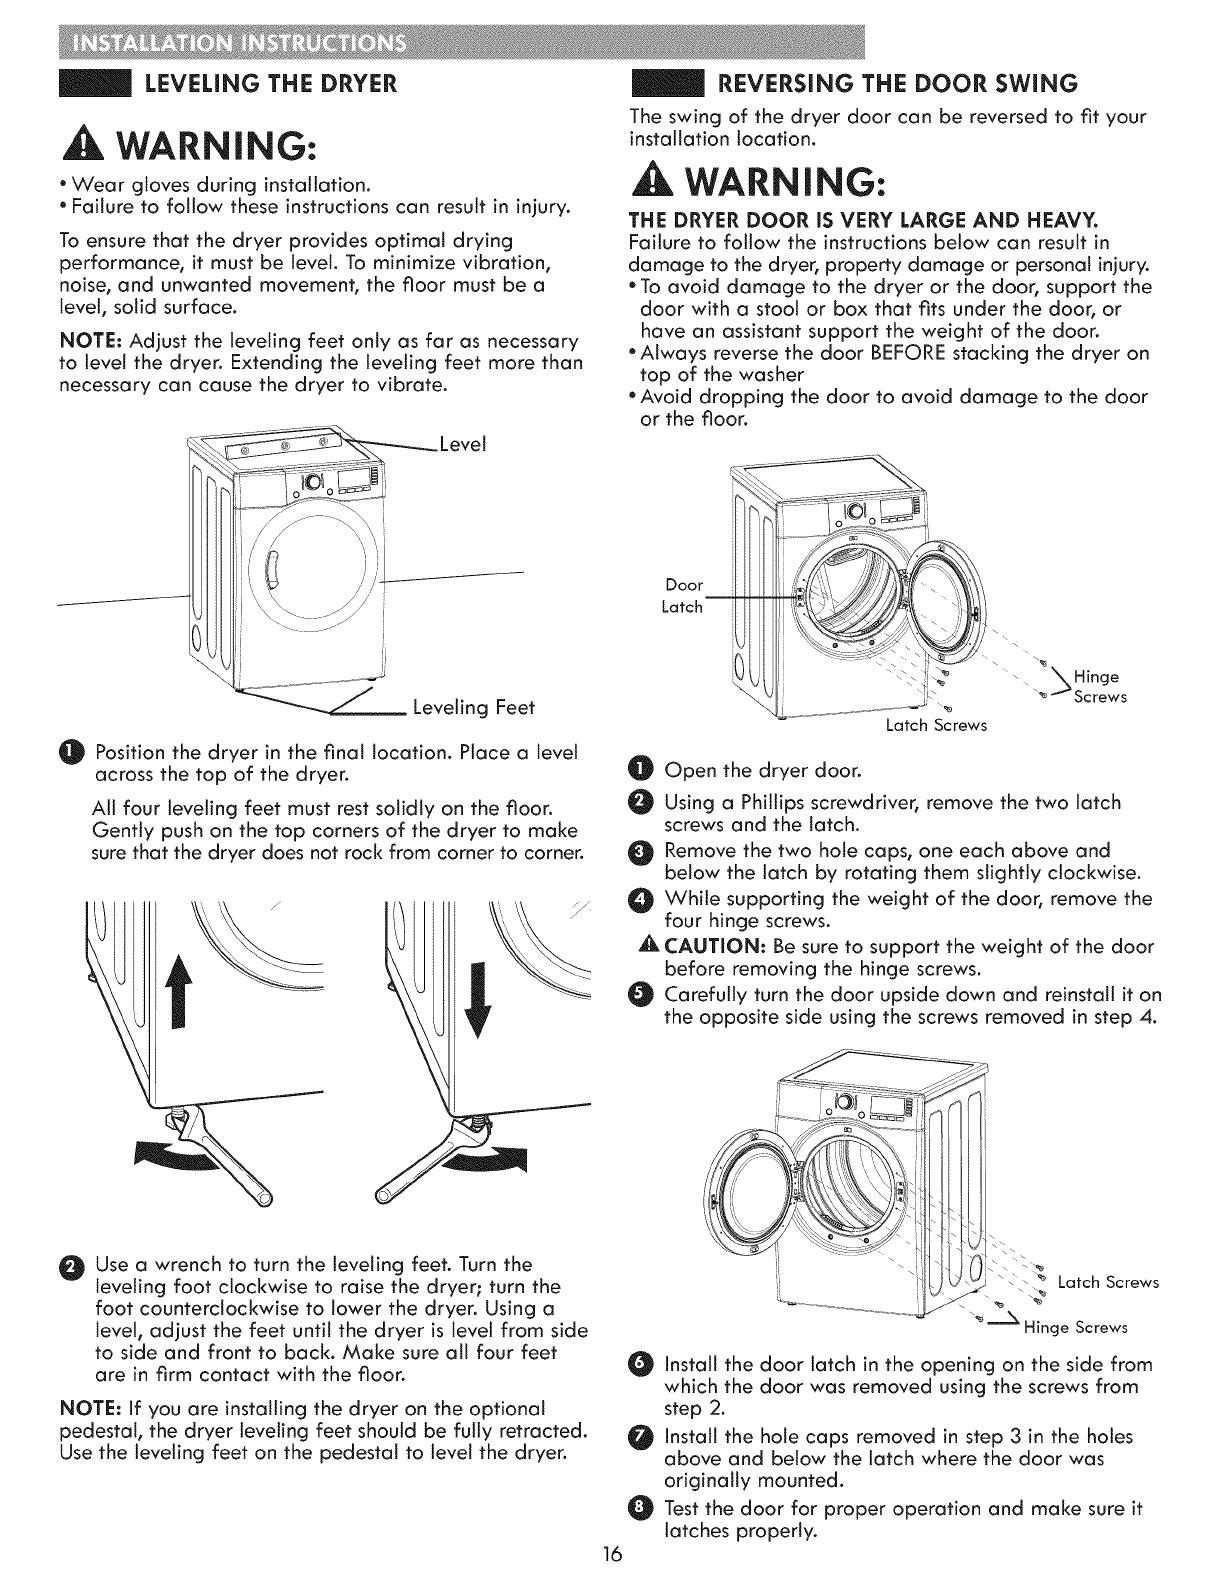
LEVELING THE DRYER
WARNING:
*Wear gloves during installation.
*Failure to follow these instructions can result in injury.
To ensure that the dryer provides optimal drying
performance, it must be level. To minimize vibration,
noise, and unwanted movement, the floor must be a
level, solid surface.
NOTE: Adjust the leveling feet only as far as necessary
to level the dryer. Extending the leveling feet more than
necessary can cause the dryer to vibrate.
REVERSING THE DOOR SWING
The swing of the dryer door can be reversed to fit your
installation location.
,A WARNING:
THE DRYER DOOR iS VERY LARGE AND HEAVY.
Failure to follow the instructions below can result in
damage to the dryer, property damage or personal injury.
•To avoid damage to the dryer or the door, support the
door with a stool or box that fits under the door, or
have an assistant support the weight of the door.
•Always reverse the door BEFORE stacking the dryer on
top of the washer
•Avoid dropping the door to avoid damage to the door
or the floor.
-_-_._ Leveling Feet
Position the dryer in the final location. Place a level
across the top of the dryer.
All four leveling feet must rest solidly on the floor.
Gently push on the top corners of the dryer to make
sure that the dryer does not rock from corner to corner.
!
Door
Latch
Open the dryer door.
0
Using a Phillips screwdriver, remove the two latch
screws and the latch.
Remove the two hole caps, one each above and
below the latch by rotating them slightly clockwise.
While supporting the weight of the door, remove the
four hinge screws.
_, CAUTION: Be sure to support the weight of the door
before removing the hinge screws.
Carefully turn the door upside down and reinstall it on
the opposite side using the screws removed in step 4.
OUse a wrench to turn the leveling feet. Turn the
leveling foot clockwise to raise the dryer; turn the
foot counterclockwise to lower the dryer. Using a
level, adjust the feet until the dryer is level from side
to side and front to back. Make sure all four feet
are in firm contact with the floor.
NOTE: If you are installing the dryer on the optional
pedestal, the dryer leveling feet should be fully retracted.
Use the leveling feet on the pedestal to level the dryer.
Latch Screws
_ _ Hinge Screws
Install the door latch in the opening on the side from
which the door was removed using the screws from
step 2.
install the hole caps removed in step 3 in the holes
above and below the latch where the door was
originally mounted.
Test the door for proper operation and make sure it
latches properly.
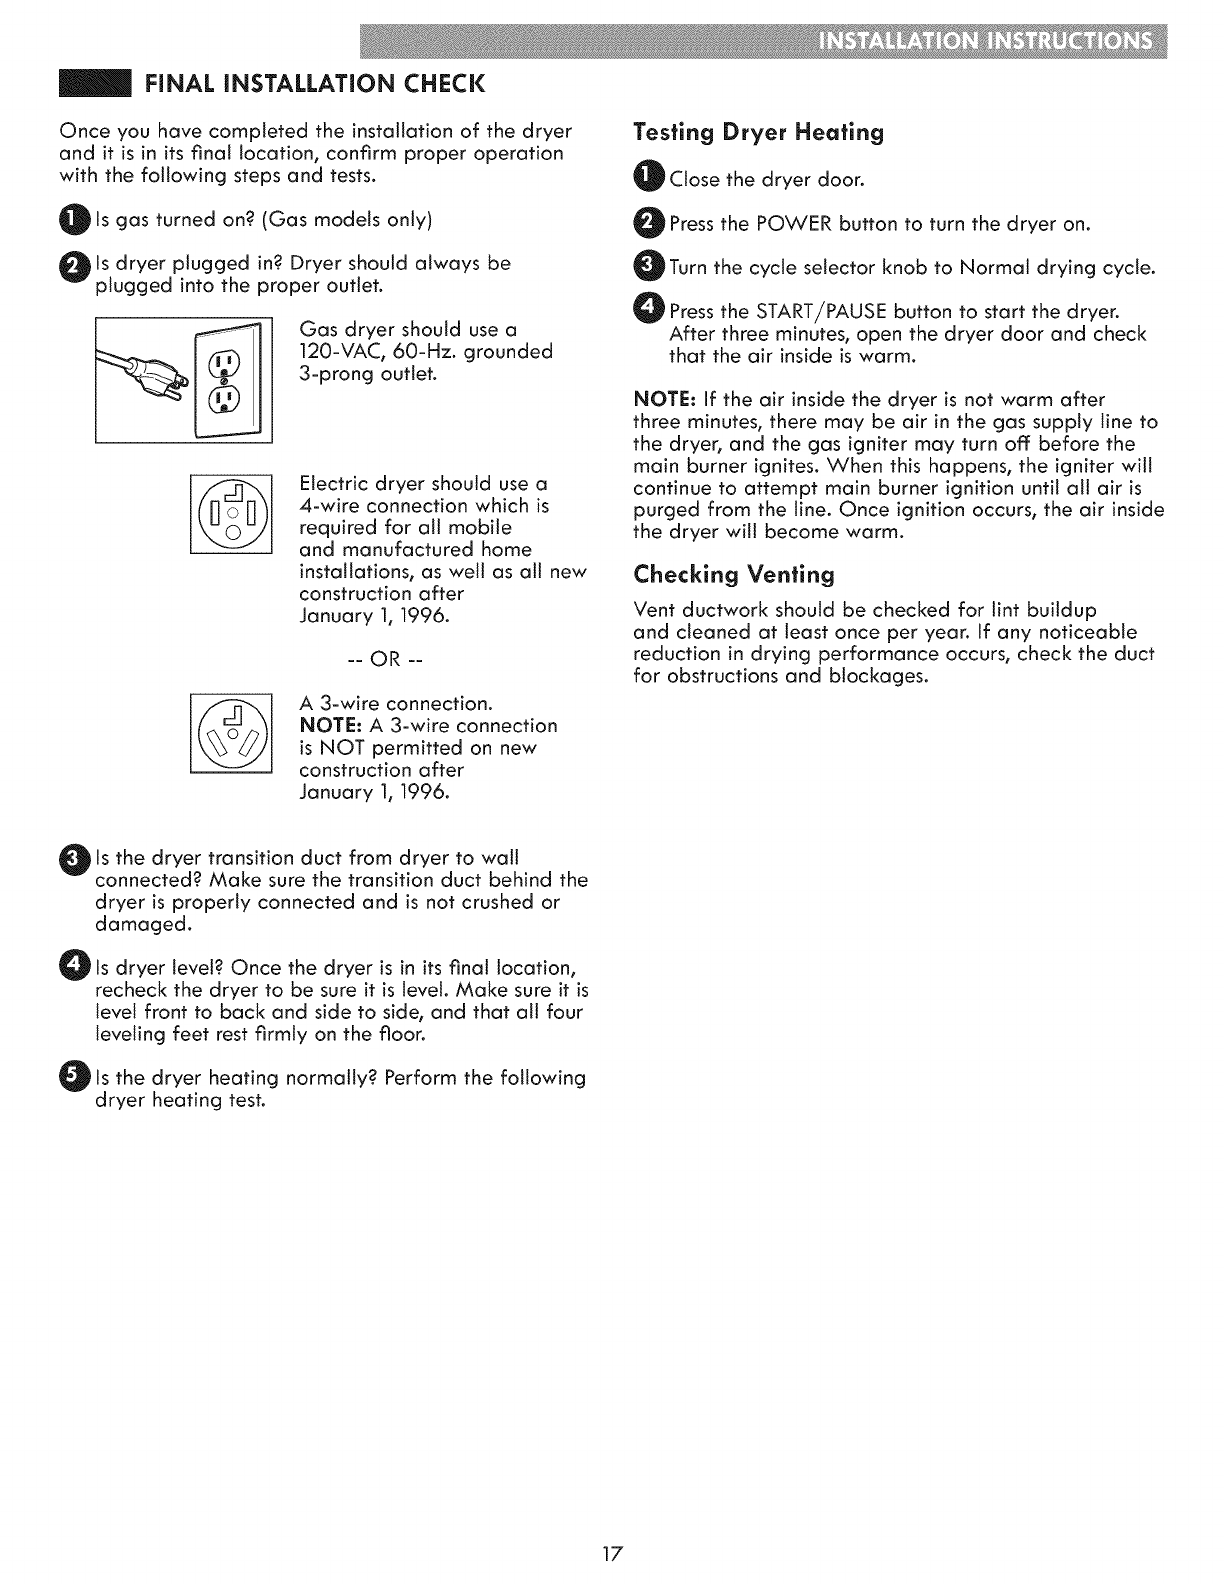
FINAL iNSTALLATiON CHi:CK
Once you have completed the installation of the dryer
and it is in its final location, confirm proper operation
with the following steps and tests.
is gas turned on? (Gas models only)
is dryer plugged in? Dryer should always be
plugged into the proper outlet.
Gas dryer should use a
120-VAC, 60-Hz. grounded
3-prong outlet.
©Electric dryer shoutd use a
4-wire connection which is
required for all mobile
and manufactured home
installations, as well as all new
construction after
January 1, 1996.
--OR --
A 3-wire connection.
NOTE: A 3-wire connection
is NOT permitted on new
construction after
January 1, 1996.
Testing Dryer Heating
Close the dryer door.
Press the POWER button to turn the dryer on.
Turn the cycle selector knob to Normal drying cycle.
@ Press the START/PAUSE button to start the dryer.
After three minutes, open the dryer door and check
that the air inside is warm.
NOTE: if the air inside the dryer is not warm after
three minutes, there may be air in the gas supply line to
the dryer, and the gas igniter may turn off: before the
main burner ignites. When this happens, the igniter will
continue to attempt main burner ignition until all air is
purged from the line. Once ignition occurs, the air inside
the dryer will become warm.
Checking Venting
Vent ductwork should be checked for lint buildup
and cleaned at least once per year. If any noticeable
reduction in drying performance occurs, check the duct
for obstructions and blockages.
is the dryer transition duct from dryer to watt
connected? Make sure the transition duct behind the
dryer is properly connected and is not crushed or
damaged.
is dryer level? Once the dryer is in its final location,
recheck the dryer to be sure it is level. Make sure it is
level front to back and side to side, and that all four
leveling feet rest firmly on the fioon
is the dryer heating normally? Perform the following
dryer heating test.
17
WARN ING** To reduce the risk of Nre, electrlc shock, or injury to persons, read this entire
manual, indudlng the important Safety instructions, before operating this dryer.
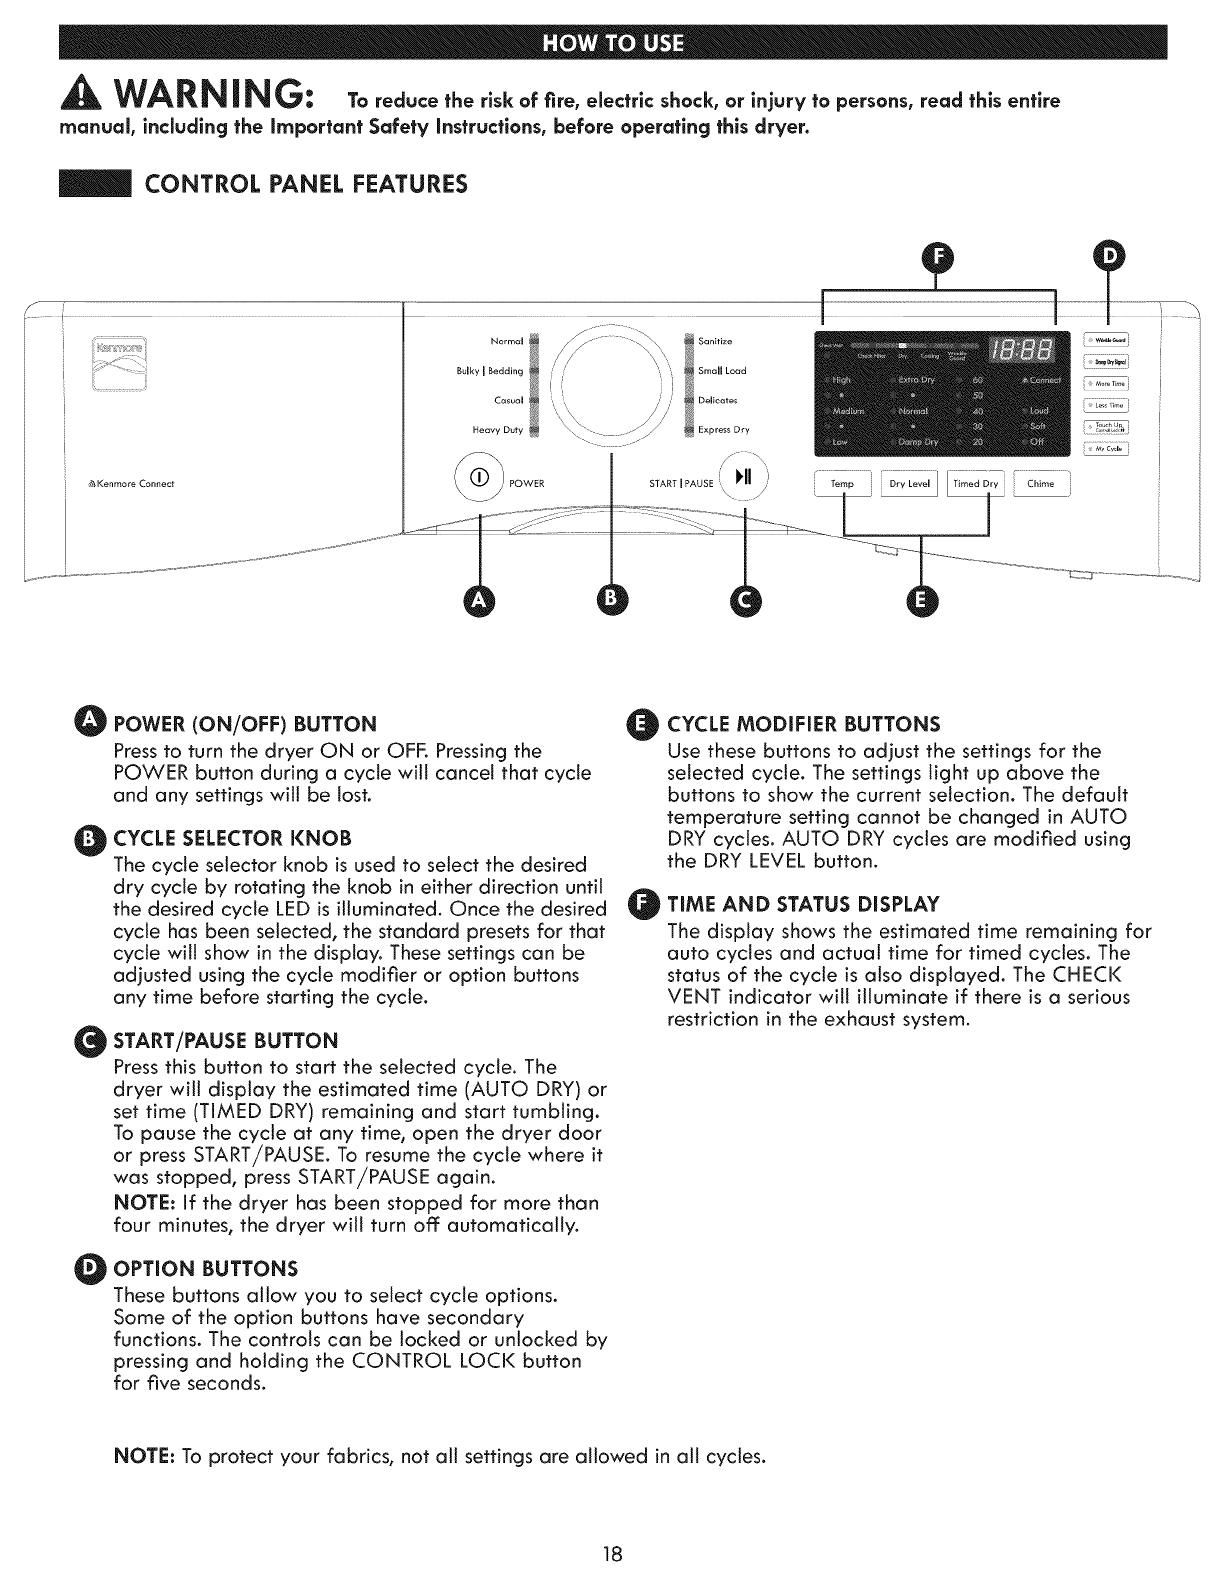
CONTROL PANEL FEATURES
_ Kenrnore Connect
9
E
Temp Dry Lewi I [ Timed Dry il Chime
I
O
O
0
0
POWER (ON/OFF) BUTTON
Pressto turn the dryer ON or OFF. Pressing the
POWER button during a cycle will cancel that cycle
and any settings witt be lost.
CYCLE SELECTOR KNOB
The cycle selector knob is used to select the desired
dry cycle by rotating the knob in either direction until
the desired cycle LED is illuminated. Once the desired
cycle has been selected, the standard presets for that
cycle will show in the display. These settings can be
adjusted using the cycle modifier or option buttons
any time before starting the cycle.
START/PAUSE BUTTON
Press this button to start the selected cycle. The
dryer will display the estimated time (AUTO DRY) or
set time (TIMED DRY) remaining and start tumbling.
To pause the cycle at any time, open the dryer door
or press START/PAUSE. To resume the cycle where it
was stopped, press START/PAUSE again.
NOTE: if the dryer has been stopped for more than
four minutes, the dryer will turn off automatically.
OPTION BUTTONS
These buttons altow you to setect cycte options.
Some of the option buttons have secondary
functions. The controts can be locked or unlocked by
pressing and hotding the CONTROL LOCI< button
for five seconds.
O
O
CYCLE MODiFiER BUTTONS
Use these buttons to adjust the settings for the
setected cycle. The settings light up above the
buttons to show the current selection. The default
temperature setting cannot be changed in AUTO
DRY cycles. AUTO DRY cycles are modified using
the DRY LEVEL button.
TiME AND STATUS DISPLAY
The display shows the estimated time remaining for
auto cycles and actual time for timed cycles. The
status of the cycle is atso displayed. The CHECK
VENT indicator will illuminate if there is a serious
restriction in the exhaust system.
NOTE: To protect your fabrics, not all settings are allowed in all cycles.
18
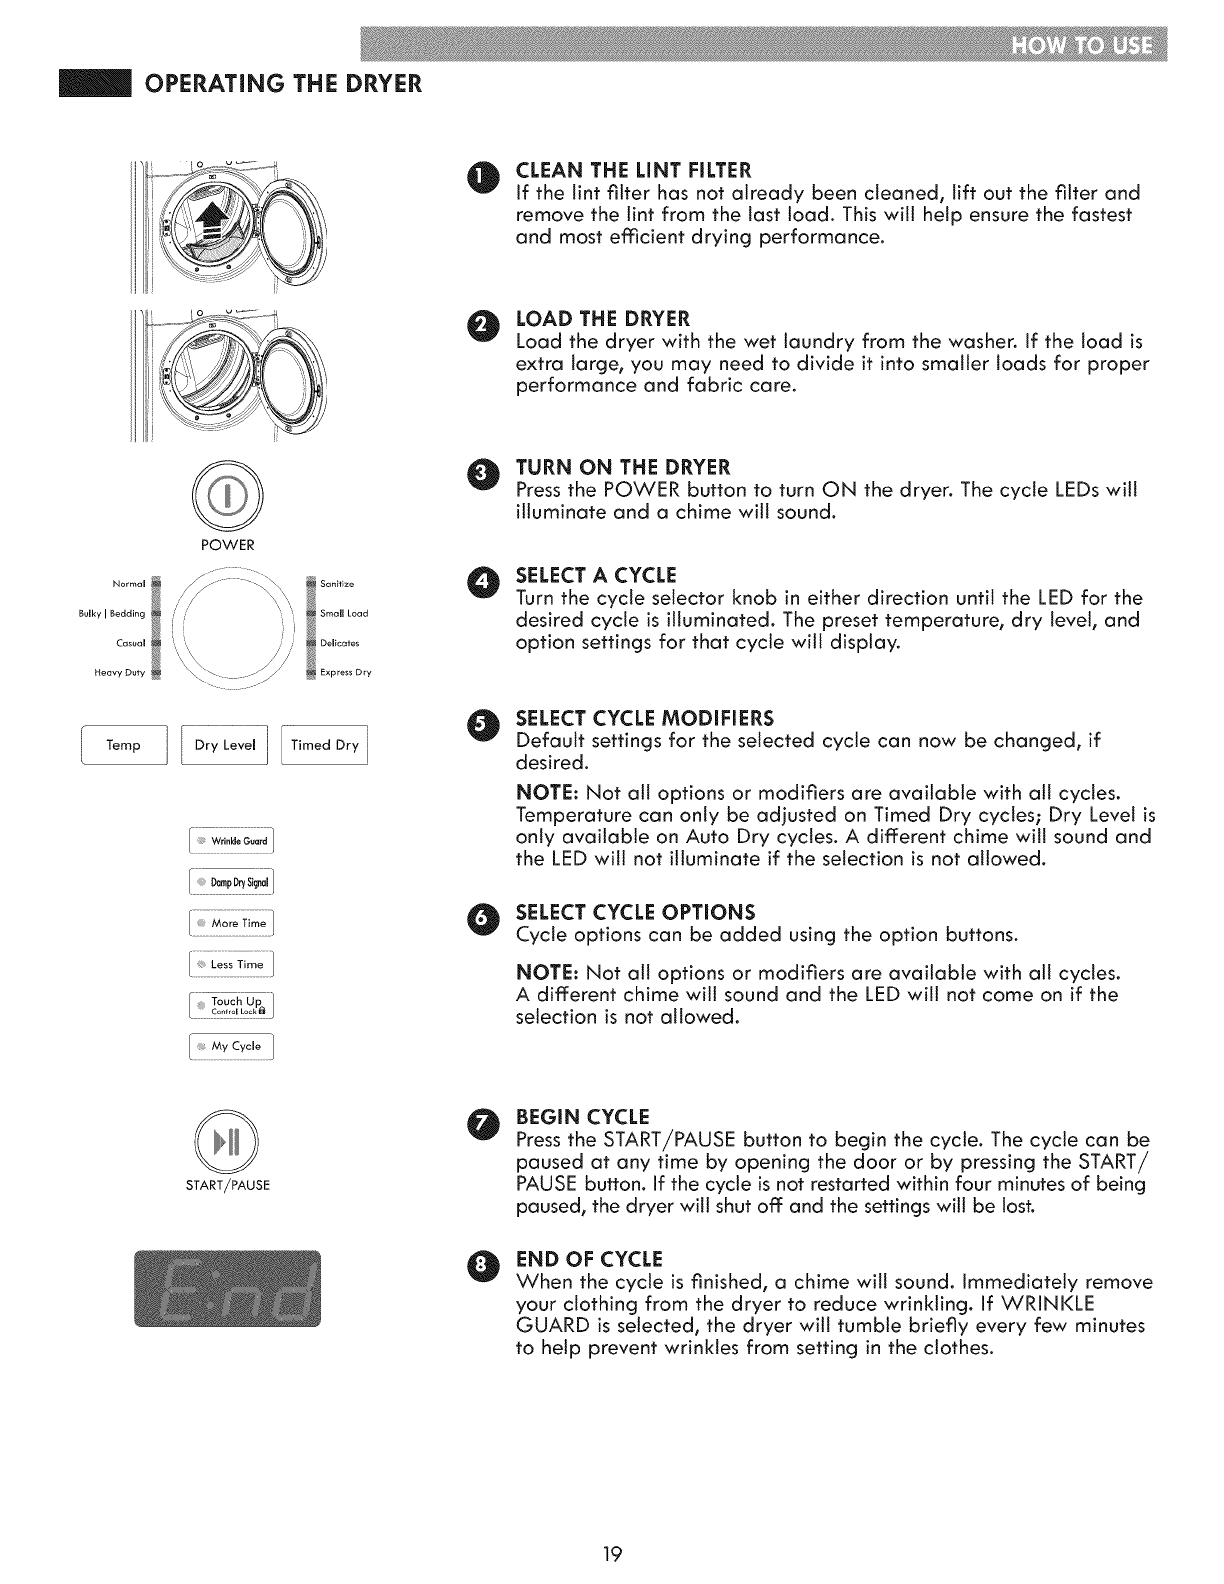
OPERATING THE DRYER
OCLEAN THE LINT FILTER
If the tint filter has not already been cleaned, lift out the filter and
remove the tint from the last load. This will help ensure the fastest
and most emcient drying performance.
OLOAD TIlE DRYER
Load the dryer with the wet laundry from the washer. If the load is
extra large, you may need to divide it into smaller loads for proper
performance and fabric care.
Normal
Bulky I Bedding
Casual
Heavy Duty
POWER
Express Dry
O URN ON TIlE DRYER
Press the POWER button to turn ON the dryer. The cycle LEDs win
illuminate and a chime will sound.
OSELECT A CYCLE
Turn the cycle selector knob in either direction until the LED for the
desired cycle is illuminated. The preset temperature, dry level, and
option settings for that cycle will display.
SELECT CYCLE MODIFIERS
Defautt settings for the selected cycle can now be changed, if
desired.
NOTE: Not all options or modifiers are available with att cycles.
Temperature can only be adjusted on Timed Dry cycles; Dry Level is
only available on Auto Dry cycles. A different chime will sound and
the LED will not illuminate if the selection is not allowed.
OSELECT CYCLE OPTIONS
Cycle options can be added using the option buttons.
NOTE: Not att options or modifiers are available with all cycles.
A different chime will sound and the LED win not come on if the
selection is not allowed.
START/PAUSE
O
O
BEGIN CYCLE
Press the START/PAUSE button to begin the cycle. The cycle can be
paused at any time by opening the door or by pressing the START/
PAUSE button. If the cycle is not restarted within four minutes of being
paused, the dryer will shut off and the settings will be lost.
END OF CYCLE
When the cycle is finished, a chime will sound. Immediately remove
your clothing from the dryer to reduce wrinkling. If WRINKLE
GUARD is selected, the dryer will tumble briefly every few minutes
to help prevent wrinkles from setting in the clothes.
19
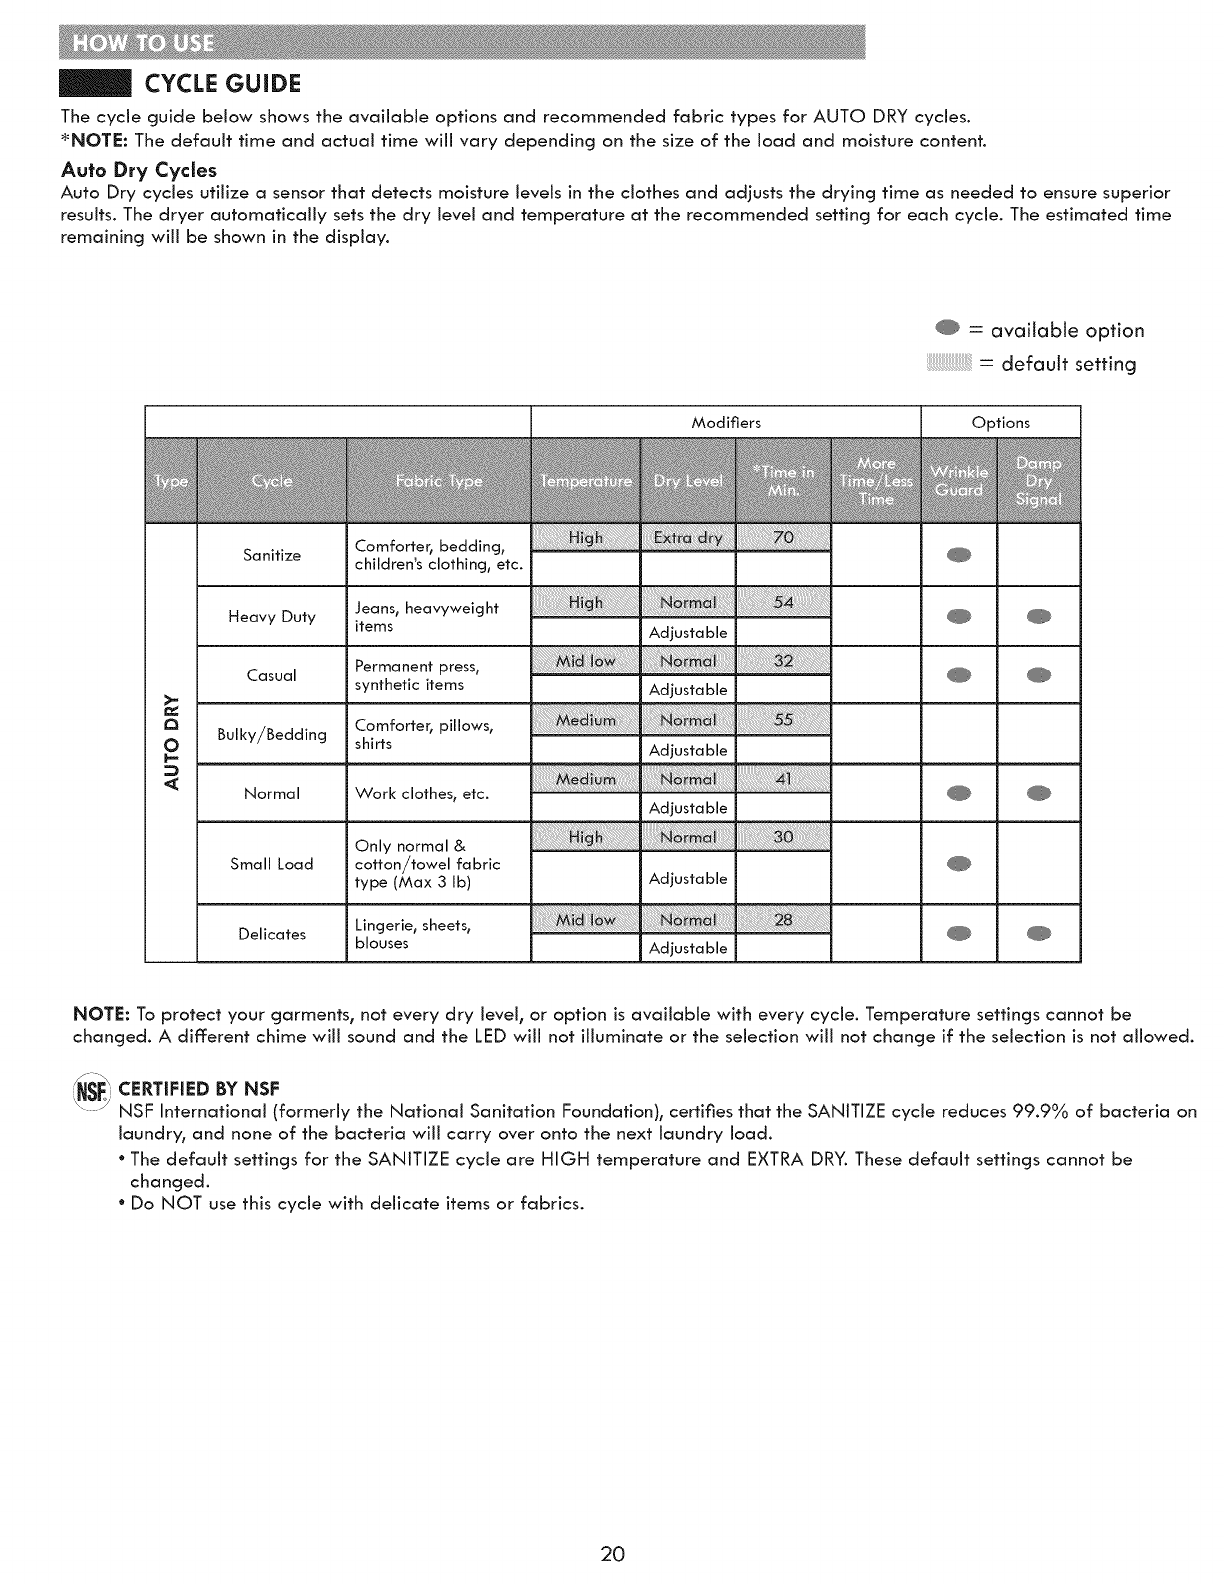
CYCLE GUIDE
The cycle guide below shows the available options and recommended fabric types for AUTO DRY cycles.
_NOTE: The default time and actual time wiii vary depending on the size of the load and moisture content.
Auto Dry Cyctes
Auto Dry cycles utilize a sensor that detects moisture levels in the clothes and adjusts the drying time as needed to ensure superior
results. The dryer automatically sets the dry level and temperature at the recommended setting for each cycle. The estimated time
remaining will be shown in the display.
: available option
: defautt setting
Modifiers Options
Sanitize
Heavy Duty
Casual
Bulky/Bedding
Normal
Small Load
Delicates
Comforter_ bedding_
children's clothing_ etc.
Jeans_ heavyweight
items
Permanent press_
synthetic items
Comforter_ pillows_
shirts
Work clothes_ etc.
Only normal &
cotton/towel fabric
type (Max 3 Ib)
Lingerie_ sheets_
blouses
Adjusta ble
Adjustable
Adjustable
Adjustable
Adjustable
Adjustable
NOTE: To protect your garments, not every dry level, or option is available with every cycle. Temperature settings cannot be
changed. A different chime will sound and the LED will not illuminate or the selection will not change if the selection is not allowed.
(\ _) CERTiFiED BY NSF
" NSF International (formerly the National Sanitation Foundation), certifies that the SANITIZE cycle reduces 99.9% of bacteria on
laundry, and none of the bacteria will carry over onto the next laundry load.
°The default settings for the SANITIZE cycle are HIGH temperature and EXTRA DRY. These default settings cannot be
changed.
° Do NOT use this cycle with delicate items or fabrics.
2O
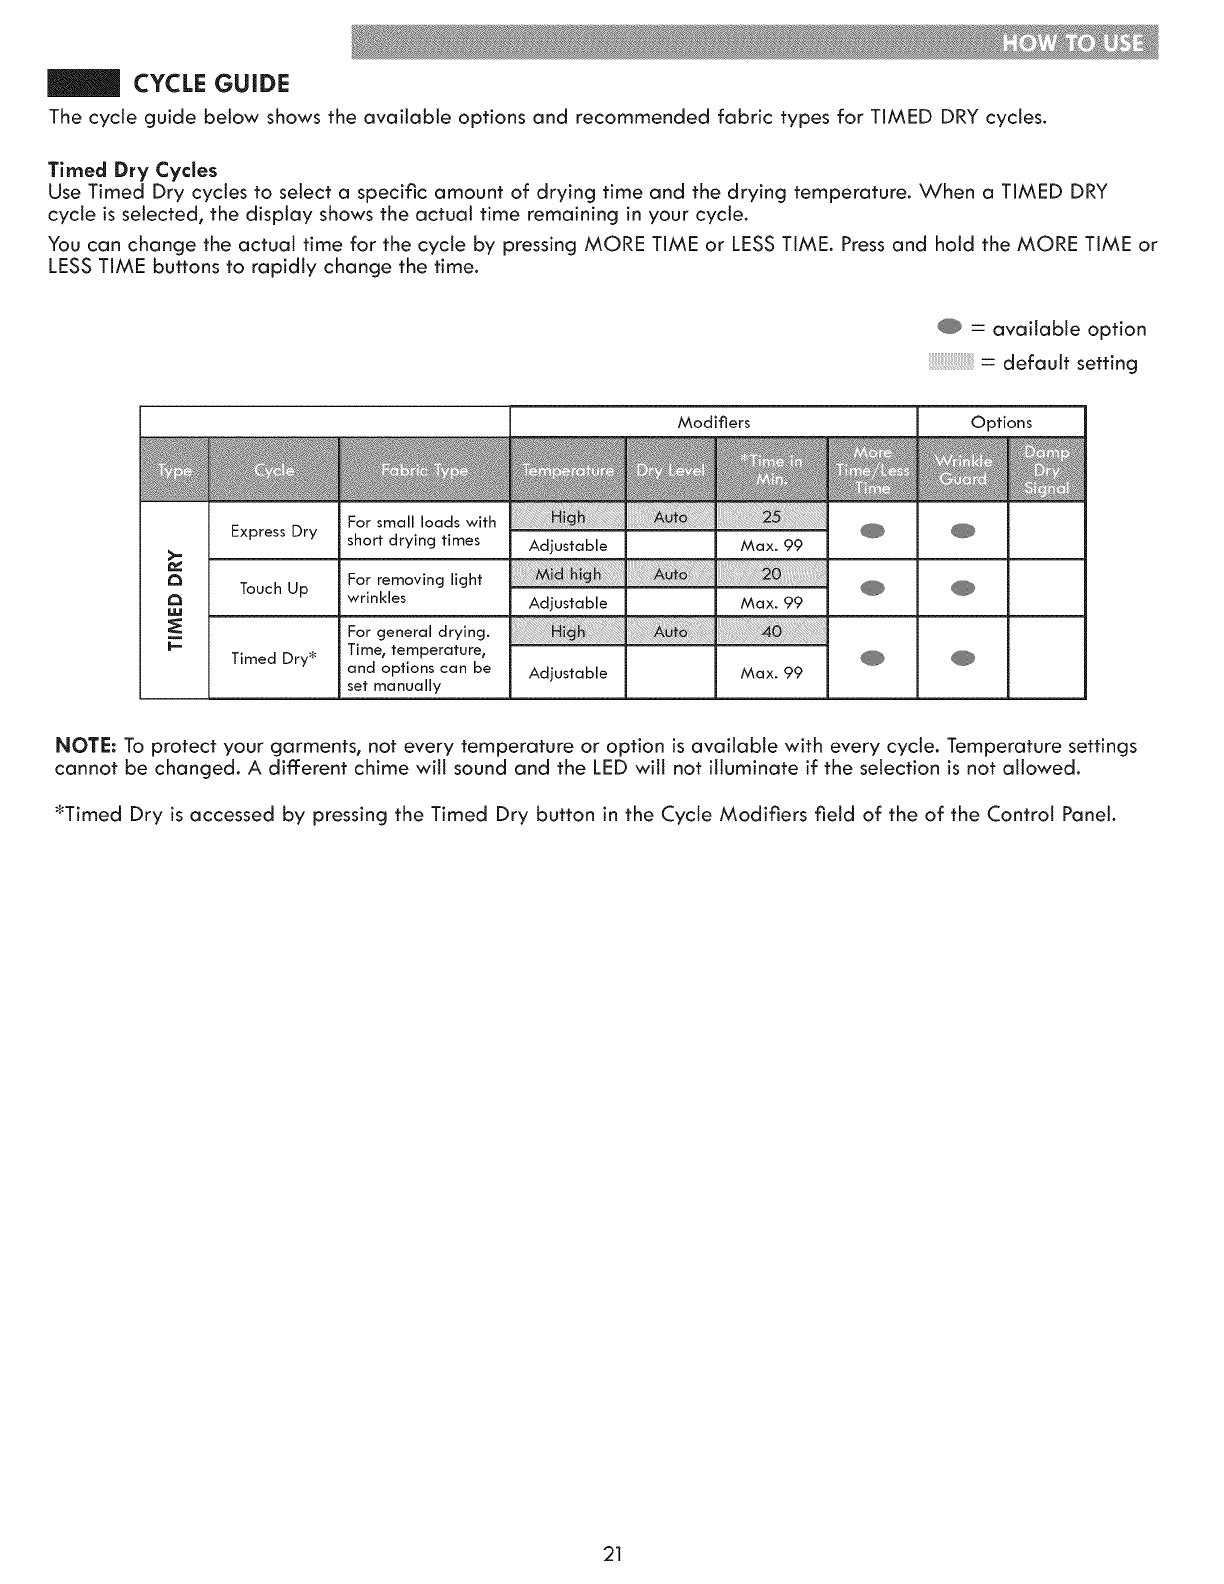
CYCLE GUIDE
The cycle guide below shows the available options and recommended fabric types for TIMED DRY cycles.
Timed Dry Cycles
Use Timed Dry cycles to select aspecific amount of drying time and the drying temperature. When a TIMED DRY
cycle is selected, the display shows the actual time remaining in your cycle.
You can change the actual time for the cycle by pressing MORE TIME or LESSTIME. Press and hold the MORE TIME or
LESS TIME buttons to rapidly change the time.
f
= available option
= default setting
Modifiers Options
Express Dry
Touch Up
Timed Dry*
For small loads with
short drying times Adjustable Max. 99
For removing light _
wrinkles Adjustable Max. 99
For general drying.
Time, temperature_
and options can be
set manually Adjustable Max. 99
NOTE: To protect your garments, not every temperature or option is available with every cycle. Temperature settings
cannot be changed. A different chime will sound and the LED will not illuminate if the selection is not allowed.
_Timed Dry is accessed by pressing the Timed Dry button in the Cycle Modifiers field of the of the Control Panel.
21
WARN I NG** To reduce the risk of fire, e[ectrlc shock, or injury to persons, read this enffre manual,
including the important Safety instructions, before operating this dryer.
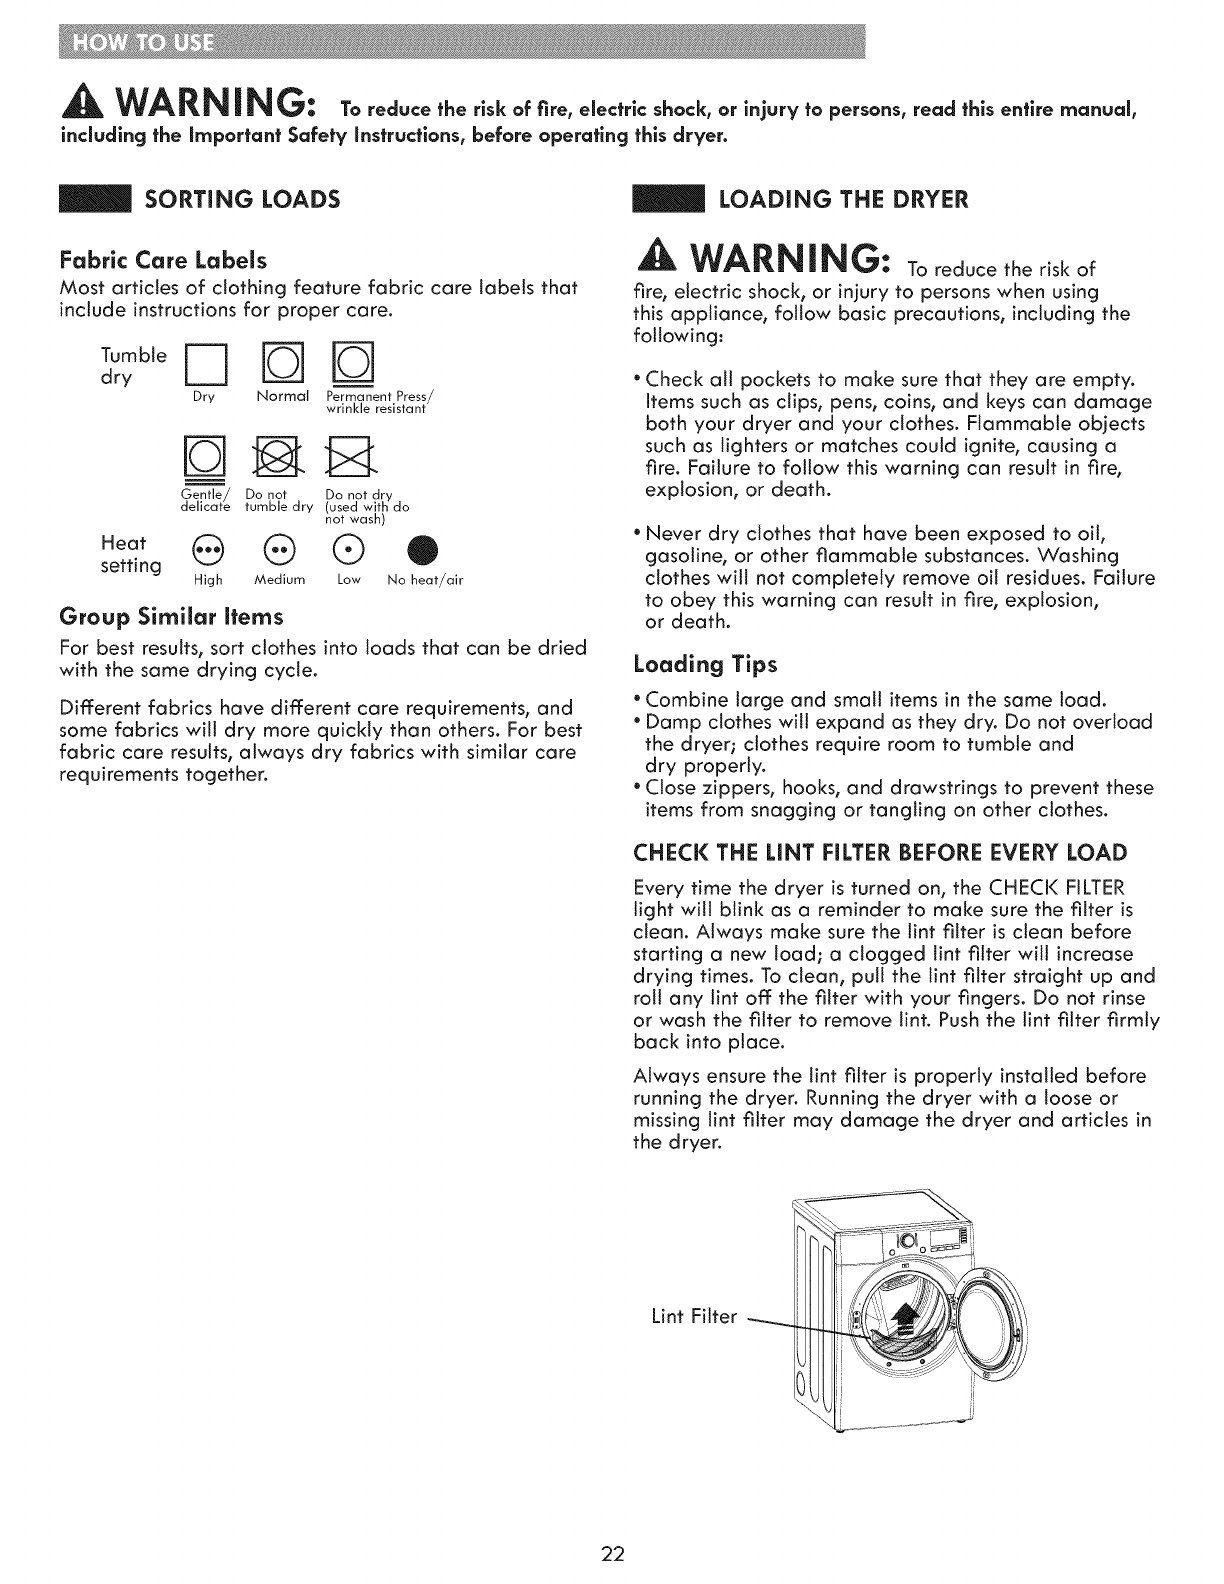
SORTING LOADS
Fabric Care Labels
Most articles of clothing feature fabric care labels that
include instructions for proper care.
Tumble r_ j_ j_
dry
Dry Normal Permanent Press/
wrinkle resistant
Heat
setting
Gentle/ Do not Do not dry
delicate tumble dry (used with do
not wash)
@ ® ® ®
High Medium Low No heat/air
Group Similar Items
For best results, sort clothes into loads that can be dried
with the same drying cycle.
Different fabrics have different care requirements, and
some fabrics will dry more quickly than others. For best
fabric care results, always dry fabrics with similar care
requirements together.
LOADING THE DRYER
WARNING: To reduce the risk of
fire, electric shock, or injury to persons when using
this appliance, follow basic precautions, including the
following:
•Check all pockets to make sure that they are empty.
items such as clips, pens, coins, and keys can damage
both your dryer and your clothes. Flammable objects
such as lighters or matches could ignite, causing a
fire. Failure to follow this warning can result in fire,
explosion, or death.
•Never dry clothes that have been exposed to oil,
gasoline, or other flammable substances. Washing
clothes wilt not completely remove oil residues. Failure
to obey this warning can result in fire, explosion,
or death.
Loading Tips
•Combine large and small items in the same load.
•Damp clothes will expand as they dry. Do not overload
the dryer; clothes require room to tumble and
dry properly.
•Close zippers, hooks, and drawstrings to prevent these
items from snagging or tangling on other clothes.
CHECK THE LiNT FILTER BEFORE EVERY LOAD
Every time the dryer is turned on, the CHECK FILTER
light will blink as a reminder to make sure the filter is
clean. Always make sure the tint filter is clean before
starting a new toad; a clogged tint filter will increase
drying times. To clean, pull the lint filter straight up and
roll any lint off the filter with your fingers. Do not rinse
or wash the filter to remove lint. Push the lint filter firmly
back into place.
Always ensure the lint filter is properly installed before
running the dryer. Running the dryer with a loose or
missing tint filter may damage the dryer and articles in
the dryer.
Lint Filter
22
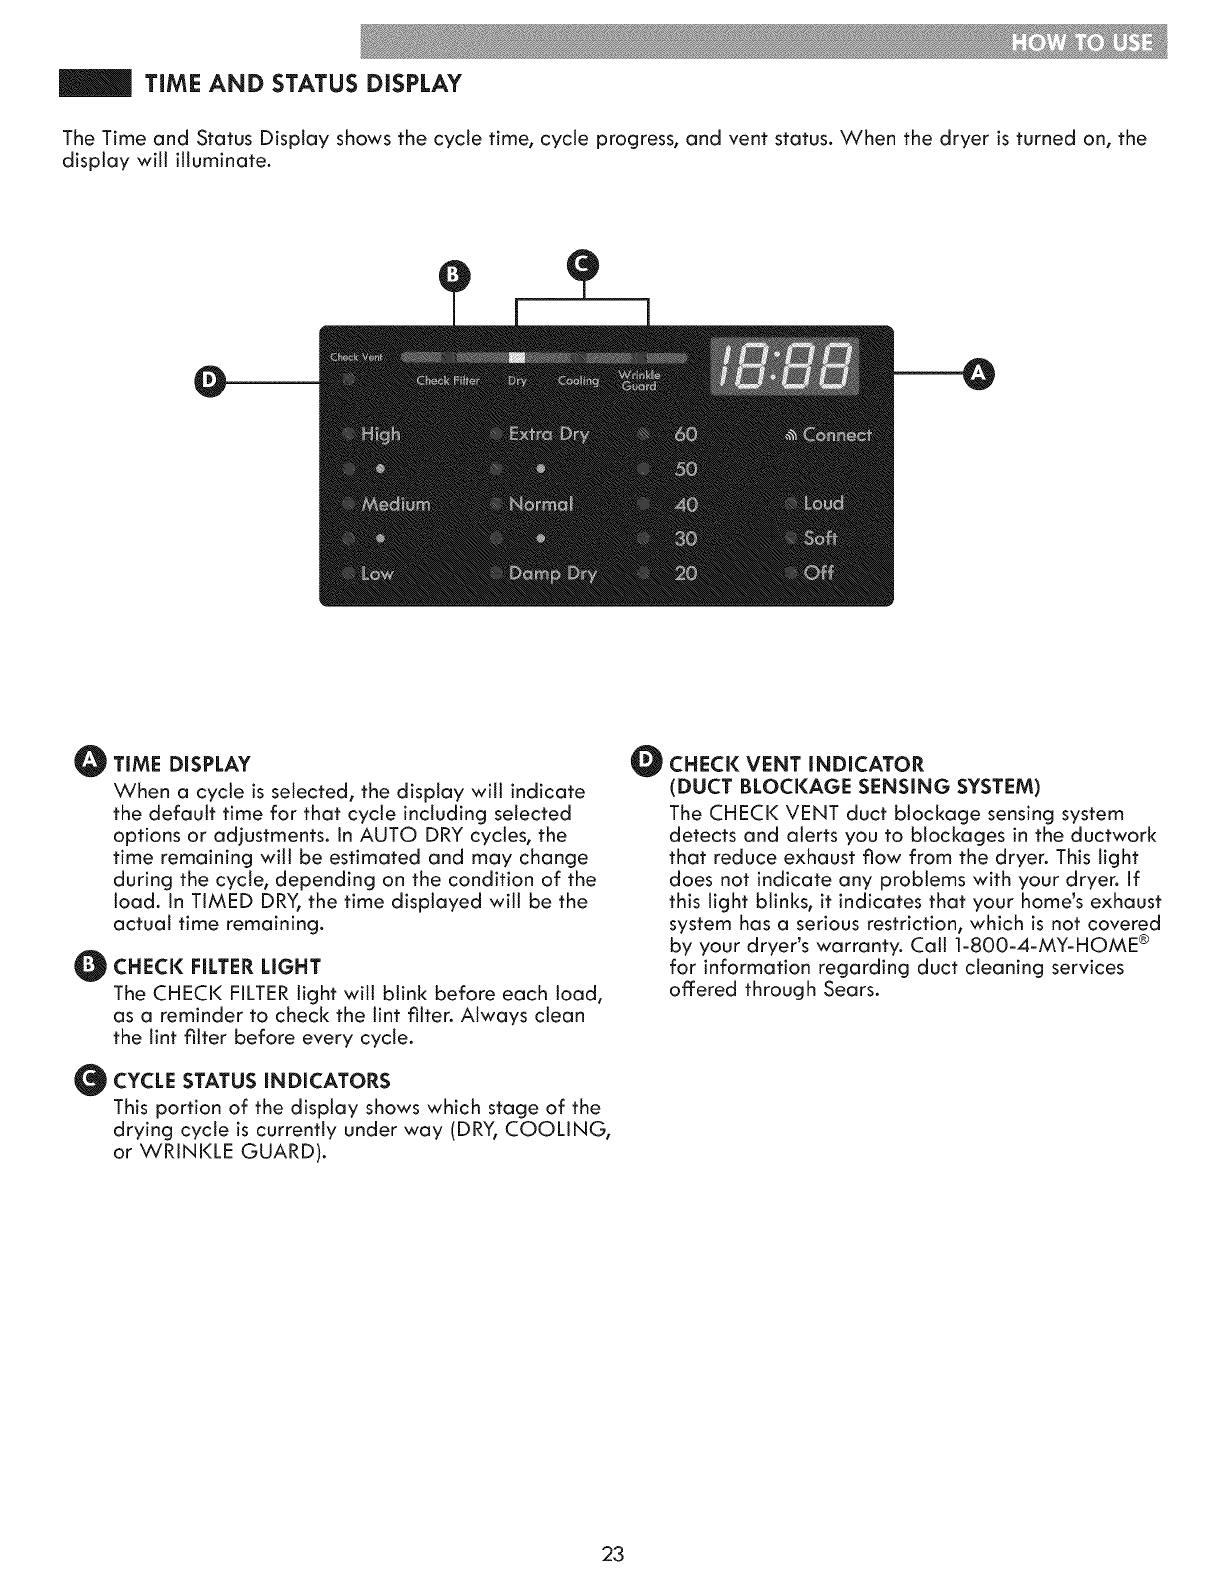
TIME AND STATUS DISPLAY
The Time and Status Display shows the cycle time, cycle progress, and vent status. When the dryer is turned on, the
display will illuminate.
O
OTIME DISPLAY O
When a cycle iSselected, the display wilt indicate
the default time for that cycle including selected
options or adjustments, in AUTO DRY cycles, the
time remaining will be estimated and may change
during the cycle, depending on the condition of the
load. in TIMED DRY, the time displayed will be the
actual time remaining.
O
O
CHECK FILTER LIGHT
The CHECK FILTER Nght will blink before each load,
as a reminder to check the lint filter. Always clean
the lint filter before every cycle.
CYCLE STATUS iNDiCATORS
This portion of the disptay shows which stage of the
drying cycle is currently under way (DRY, COOLING,
or WRINKLE GUARD).
CHECK VENT iNDiCATOR
(DUCT BLOCKAGE SENSING SYSTEM)
The CHECK VENT duct blockage sensing system
detects and alerts you to blockages in the ductwork
that reduce exhaust flow from the dryer. This light
does not indicate any problems with your dryer. If
this light blinks, it indicates that your home's exhaust
system has a serious restriction, which is not covered
by your dryer's warranty. Call 1-800-4-MY-HOME ®
for information regarding duct cleaning services
offered through Sears.
23
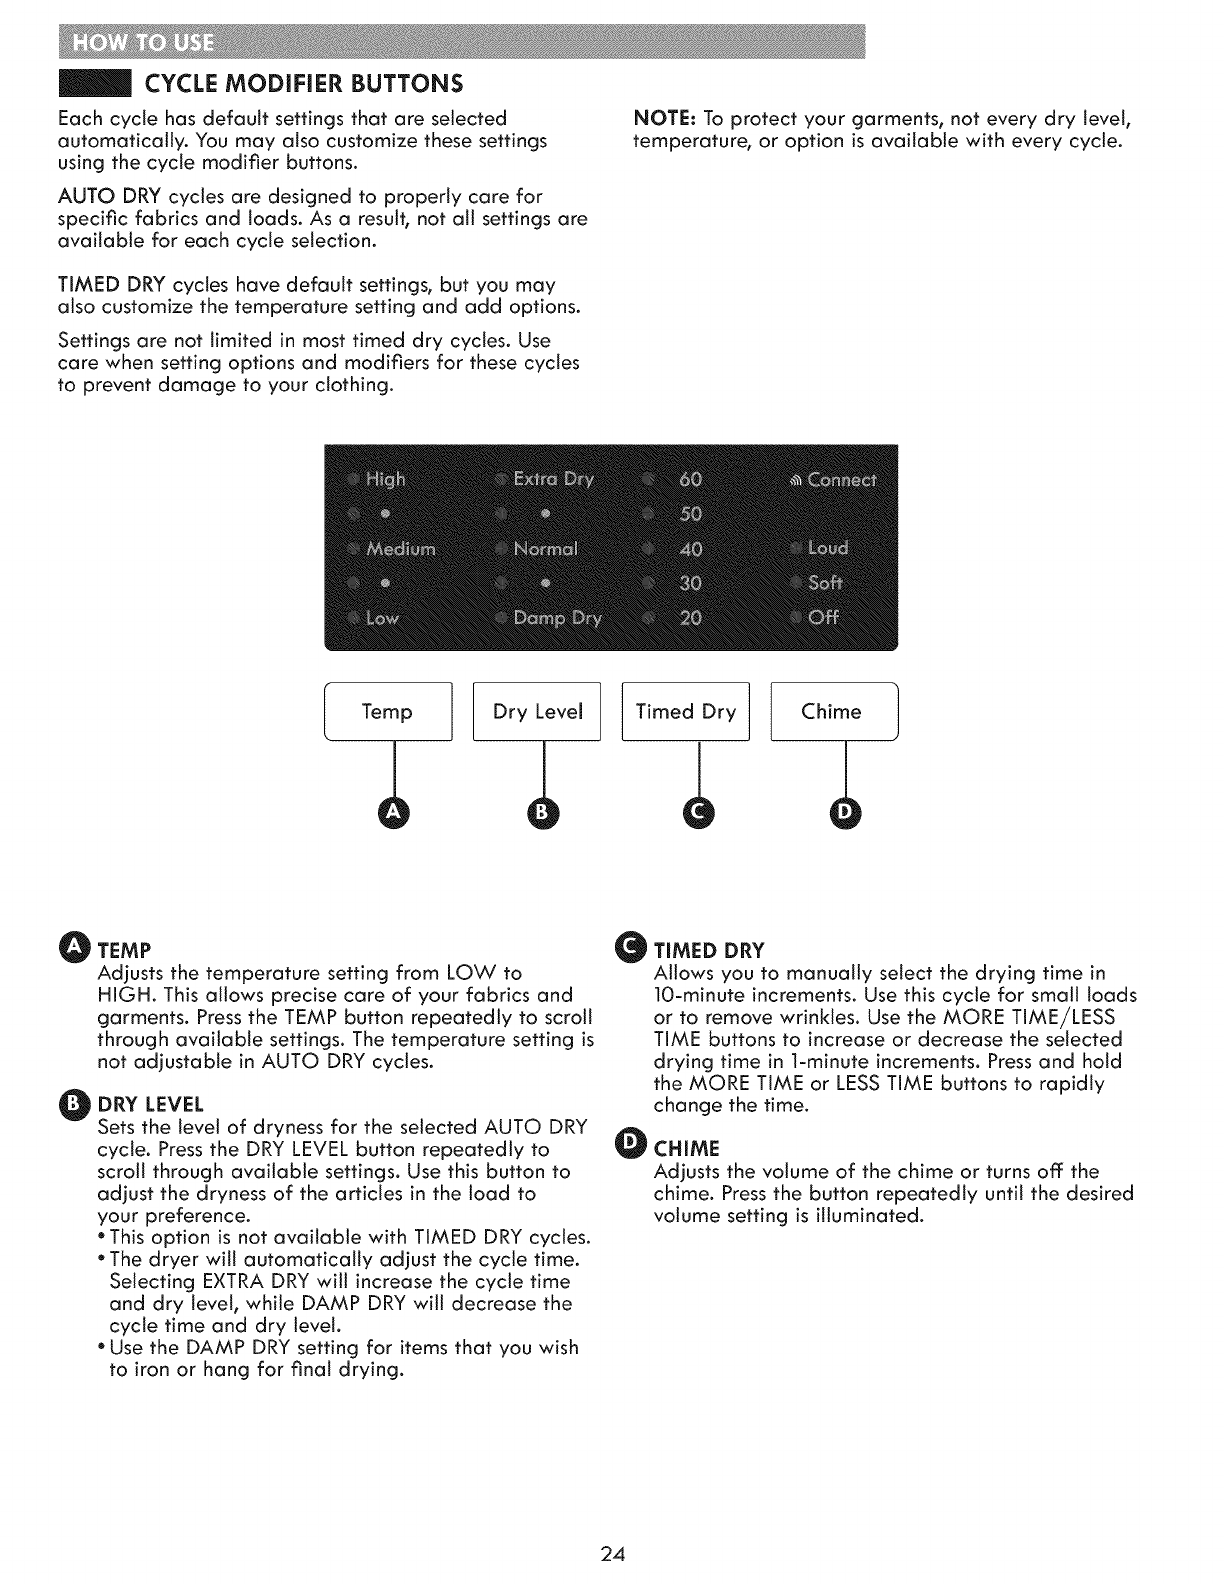
CYCLE MODiFiER BUTTONS
Each cycle has default settings that are selected
automatically. You may also customize these settings
using the cycle modifier buttons.
AUTO DRY cycles are designed to properly care for
specific fabrics and loads. As a result, not all settings are
available for each cycle selection.
TIMED DRY cycles have default settings, but you may
also customize the temperature setting and add options.
Settings are not limited in most timed dry cycles. Use
care when setting options and modifiers for these cycles
to prevent damage to your clothing.
NOTE: To protect your garments, not every dry level,
temperature, or option is available with every cycle.
Temp Dry Level Timed Dry Chime
O TEMP
Adjusts the temperature setting from LOW to
HIGH. This allows precise care of your fabrics and
garments. Press the TEMP button repeatedly to scroll
through available settings. The temperature setting is
not adjustable in AUTO DRY cycles.
ODRY LEVEL
Sets the level of dryness for the selected AUTO DRY
cycle. Press the DRY LEVEL button repeatedly to
scroll through available settings. Use this button to
adjust the dryness of the articles in the load to
your preference.
*This option is not available with TIMED DRY cycles.
*The dryer will automatically adjust the cycle time.
Selecting EXTRA DRY will increase the cycle time
and dry level, while DAMP DRY will decrease the
cycle time and dry level.
*Use the DAMP DRY setting for items that you wish
to iron or hang for final drying.
0
0
TIMED DRY
Allows you to manually select the drying time in
lO-minute increments. Use this cycle for small loads
or to remove wrinkles. Use the MORE TIME/LESS
TIME buttons to increase or decrease the setected
drying time in 1-minute increments. Press and hold
the MORE TIME or LESS TIME buttons to rapidly
change the time.
CHIME
Adjusts the volume of the chime or turns off the
chime. Press the button repeatedly until the desired
volume setting is illuminated.
24
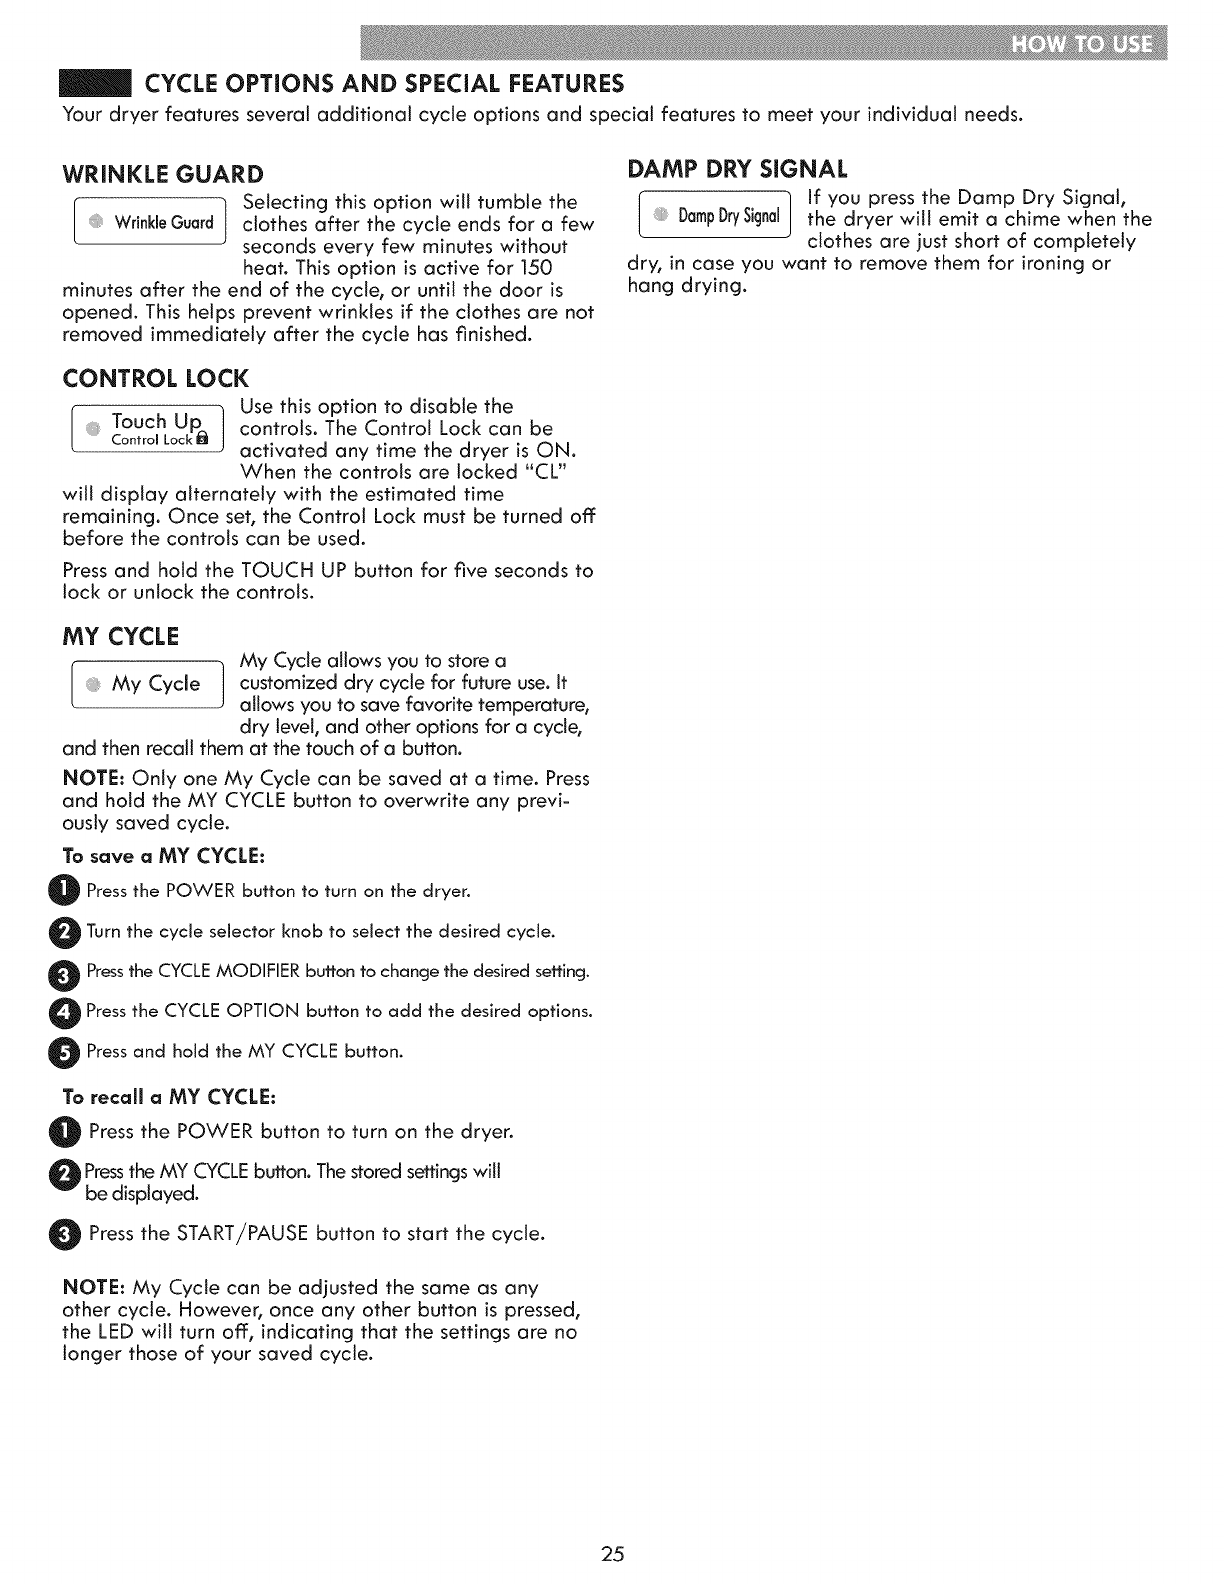
CYCLE OPTIONS AND SPECIAL FEATURES
Your dryer features several additional cycle options and special features to meet your individual needs.
WRINKLE GUARD
"t Selecting this option will tumble the
WrinkleGuardj clothes after the cycle ends for a few
seconds every few minutes without
heat. This option is active for 150
minutes after the end of the cycle, or until the door is
opened. This helps prevent wrinkles if the clothes are not
removed immediately after the cycle has flnished.
CONTROL LOCK
! ] Usethisoptiontodisablethe
Touch Up. controls. The Control Lock can be
Control Lock I_ activated any time the dryer is ON.
When the controls are locked "CL"
will display alternately with the estimated time
remaining. Once set, the Control Lock must be turned off
before the controls can be used.
Press and hold the TOUCH UP button for five seconds to
lock or unlock the controls.
MY CYCLE
r _ My Cycle allows you to store a
L] My Cycle J customized dry cycle for future use. It
allows you to save favorite temperature,
dry level, and other options for a cycle,
and then recall them at the touch of a button.
NOTE: Only one My Cycle can be saved at a time. Press
and hold the MY CYCLE button to overwrite any previ-
ously saved cycle.
To save aMY CYCLE:
Pressthe POWER button to turn on the dryer.
O Turn the cycle selector knob to select the desired cycle.
Pressthe CYCLEMODIFIERbutton to change the desired setting.
O ressthe CYCLEOPTION button to add the desired options.
Pressand hold the MY CYCLEbutton.
To recall aMY CYCLE:
Press to turn on dryer.
the POWER button the
Pressthe MY CYCLEbutton. The stored settings will
be displayed.
0 Press the START/PAUSE button to start the cycle.
NOTE: My Cycle can be adjusted the same as any
other cycle. However, once any other button is pressed,
the LED will turn off, indicating that the settings are no
longer those of your saved cycle.
DAMP DRY SIGNAL
r _1 If you press the Damp Dry Signal,
[DampDrySignalJ the dryer will emit a chime when the
clothes are just short of completely
dry, in case you want to remove them for ironing or
hang drying.
25
^WARNING: To reduce the risk of fire, electric shock, or injury to persons, read this entire manual,
including the Important Safety Instructions, before operating this dryer.
•Unplug the dryer or turn the power off before cleaning to ovoid the risk of electric shock. Failure to follow this
warning can cause serious injury, fire, electrical shock, or death.
• Never use harsh chemlcols, abrasive cleaners, or solvents to cleon the dryer. They will damage the finish.
REGULAR CLEANING
Cleaning the Exterior
Proper care of your dryer can extend its life. The outside
of the machine can be cleaned with warm water and
a mild, nonabrasive household detergent. Immediately
wipe off any spills with a soft, damp cloth.
IMPORTANT: Do not use cleaning alcohols, solvents, or
similar products.
NEVER use steel wool or abrasive cleansers because
they can damage the surface.
Cleaning the Interior
Wipe around the door opening and seat with a soft,
damp cloth to prevent tint and dust buildup that could
damage the door seal.
Clean the window with a soft cloth dampened with
warm water and a mild, nonabrasive household
detergent, then wipe dry.
NEVER use steel wool or abrasive cleansers; they can
scratch or damage the surface.
Cleaning Around and Under the Dryer
Vacuum lint and dust from around the dryer and
underneath it regularly.
ALWAYS make sure the tint filter is clean before every
cycle. The Check Lint Filter Light on the control panel
will blink before every cycle to remind you.
NOTE: NEVER operate the dryer without the lint filten
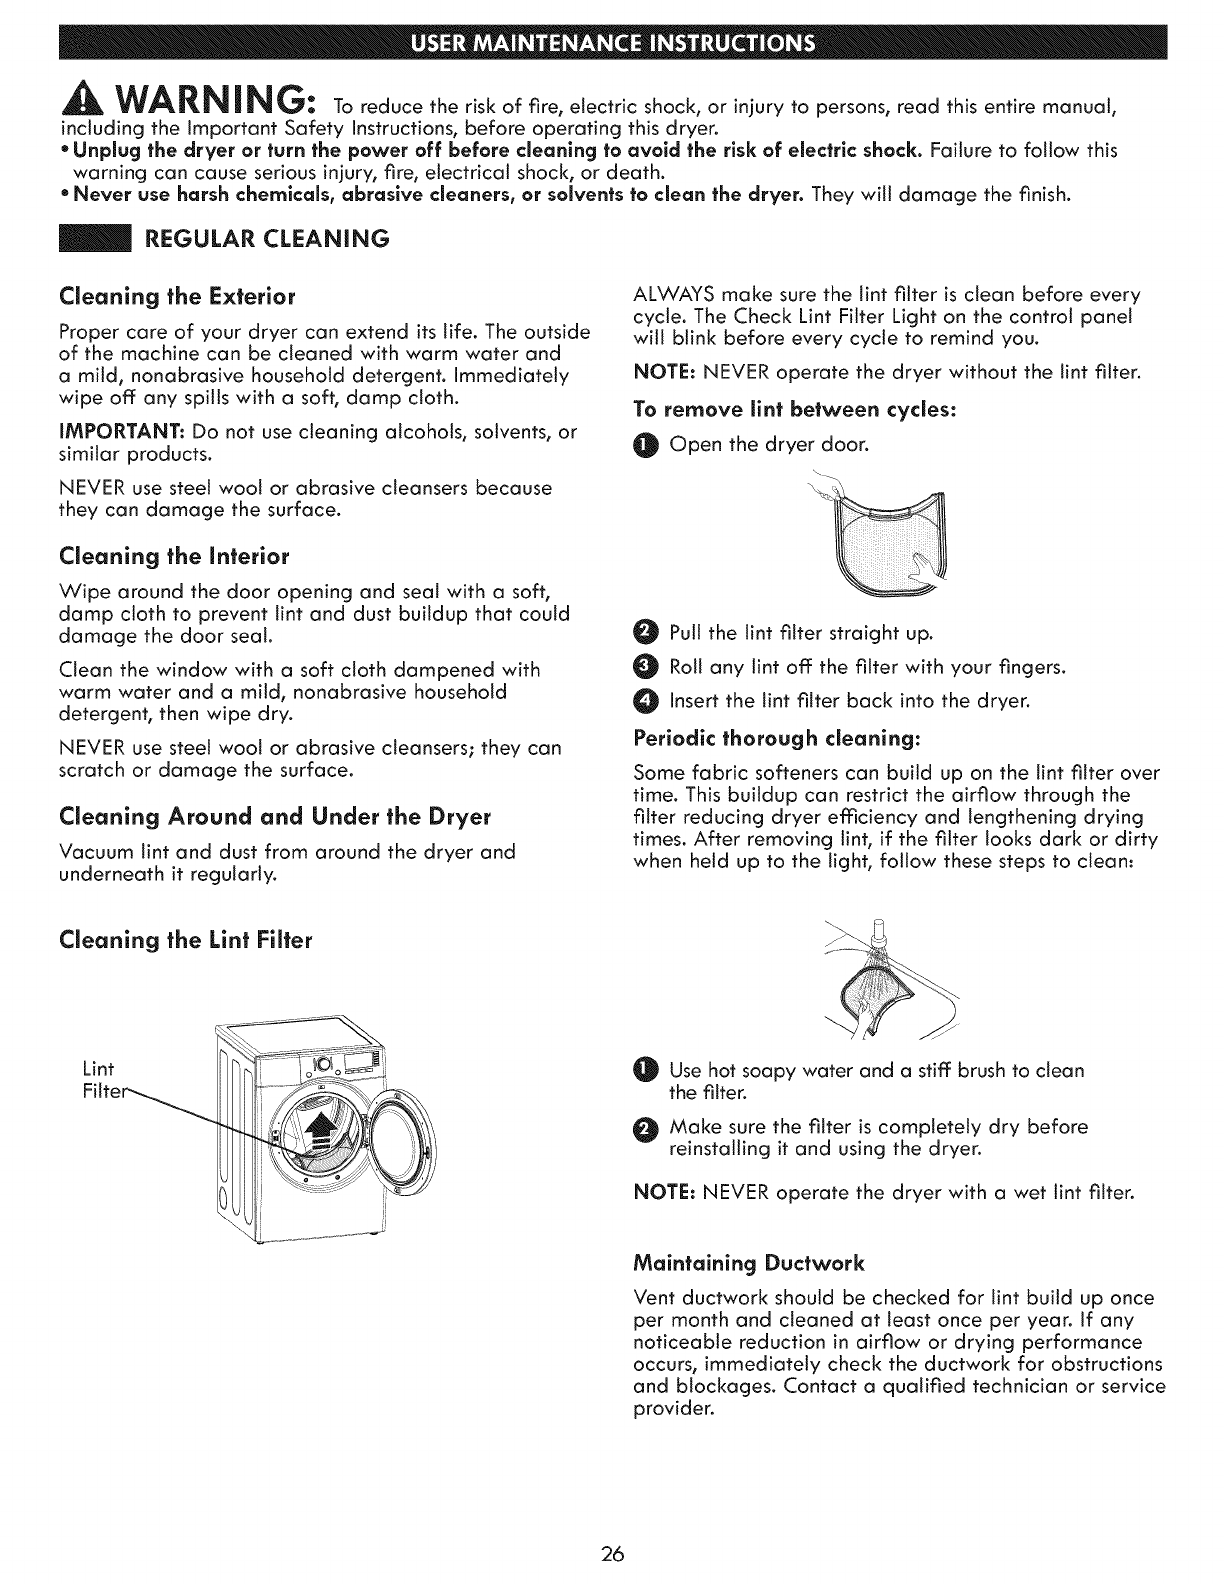
To remove lint between cycles:
Open the dryer door.
Putt the lint filter straight up.
Roll any tint off the filter with your fingers.
Insert the lint filter back into the dryer.
Periodic thorough cleaning:
Some fabric softeners can build up on the lint filter over
time. This buildup can restrict the airflow through the
filter reducing dryer efficiency and lengthening drying
times. After removing lint, if the filter looks dark or dirty
when held up to the light, follow these steps to clean:
Cleaning the Lint Filter
Lint
Fitt, Use hot soapy water and a stiff brush to clean
the filter.
Make sure the filter is completely dry before
reinstalling it and using the dryer.
NOTE: NEVER operate the dryer with a wet lint filter.
Maintaining Ductwark
Vent ductwork should be checked for lint build up once
per month and cleaned at least once per year. If any
noticeable reduction in airflow or drying performance
occurs, immediately check the ductwork for obstructions
and blockages. Contact a qualified technician or service
provider.
26
MAiNTAiNiNG THE EXHAUST SYSTEM
The most common cause of dryer problems is poor exhaust venting. Poor exhaust venting may result from the
following conditions:
*DIRTY OR DAMAGED EXHAUST DUCTS
* WRONG VENT MATERIAL
*RESTRICTED OR DAMAGED VENT HOOD
*EXCESSIVELY LONG VENT
*THE USE OF PLASTIC OR FOiL VENTING
Maintaining the Exhaust System
Vent ducts should be checked for lint buildup and
cleaned at least once per year. if any noticeable
reduction in drying performance occurs, check the ducts
for obstructions and blockages.
if the CHECK VENT indicator illuminates, the exhaust
system should be checked immediately for damage
or obstructions. The CHECK VENT indicator signals a
serious reduction in exhaust airflow which will greatly
reduce energy efficiency and increase drying times.
Damaged or restricted exhaust systems are not covered
by the dryer warranty. Damage to the dryer that is
caused by damaged, restricted, or otherwise inadequate
exhaust systems is not covered by the dryer warranty.
CHECK VENT indicator
The CHECK VENT warning system is designed to
help you avoid the reduced performance caused by
restrictions in the household exhaust system. The CHECK
VENT indicator illuminates to alert you when problems
in the system occur, so you can have them repaired.
While you should always check and maintain your
exhaust system regularly, the CHECK VENT warning
system will detect and alert you if serious problems
develop in your home's exhaust system. This includes
exhaust systems that are unsatisfactory for any reason
including a blockage in the venting, crushed/kinked
venting, or venting which exceeds the maximum
recommended length requirement as described in the
installation section.
NOTE: The total length includes the length from the
back of the dryer to the outside vent hood, PLUS a
factor for every 90 ° elbow in the exhaust system. For
example, if the distance from the back of the dryer to
the vent hood is 30 feet, and there are four elbows in
the system, then it exceeds the 28 foot maximum length
allowed for those conditions as specified in the Duct
Length Chart.
The CHECK VENT indicator on the control panel will
alert you that the exhaust system is not moving enough
air from the dryer to the outside. This lack of airflow will
lead to long dry times, poor drying and possibly dryer
failure.
As a reminder, external dryer venting is considered
part of your home and is not covered by the product
warranty or protection agreements. There are services
available for cleaning/maintaining the external venting.
Sears provides this service via Sears Carpet, Upholstery,
and Duct Cleaning. Call 1-800-661-6594 to schedule
duct cleaning service from Sears (if it is available in
your area).
CHECK VENT Operation
The CHECK VENT system uses components already
in the dryer. By monitoring these components over the
course of several cycles, the control is able to determine
how much restriction there is in the exhaust system. If
it detects a high level of restriction, it will turn on the
CHECK VENT light to alert you to the condition. The
dryer will continue to operate after the light comes
on, but you should have the exhaust system cleaned or
repaired immediately to avoid longer dry times and
higher energy consumption.
IMPORTANT: In order for a dryer to properly and
efficiently dry your clothes, it is extremely important that
the exhaust system is as short and clean as possible. It
MUST be less than the maximum length specifications
as outlined in the installation section. It is also very
important that you make sure that when the dryer is
installed, the exhaust system is clean and clear of any
restrictions and is not kinked or crushed.
Failure to meet these guidelines will result in long dry
times, increased energy consumption and possibly even
clothing damage or dryer failure. When exhaust system
restrictions become extreme, the CHECK VENT light will
blink to alert you to the condition so you can have the
exhaust system cleaned or repaired.
OTo prevent false alarms and for increased reliability,
the dryer will monitor the exhaust condition for
several loads. If multiple, consecutive cycles exceed
the restriction limits, the control will blink the CHECK
VENT indicator.
O A blinking CHECK VENT indicator means the external
venting should be checked for potential restrictions as
soon as possible.
OThe CHECK VENT indicator will remain active
(blinking) untit the restriction is resolved AND the
control has verified the improved airflow for
several cycles.
O After the exhaust is cleaned it will take
repaired,
or
several cycles for the CHECK VENT indicator to reset
and turn off the light.
NOTE: The CHECK VENT indicator is designed to
measure performance over several consecutive cycles
before activating or deactivating, to avoid false alarms.
A very targe load, such as a targe comforter, could
cause the CHECK VENT system to sense that the exhaust
system is restricted, but this would not cause the light to
blink. However, if several large loads were to run back
to back, the CHECK VENT indicator coutd be activated.
27

Should you experience any problems with your
dryer, it has the capability of transmitting data via
your telephone to the Kenmore Connect Team. This
gives you the capability of speaking directly to our
specially trained technicians. The technician records
the data transmitted from your machine and uses it
to analyze the issue, providing a fast and effective
diagnosis.
Using the Kenmore Connect TM System
Follow the technician's instructions and perform
the following steps when requested.
If you experience problems with your dryer, call
1-800-4-MY-HOME ®. Only use the Kenmore Connect
System feature when instructed to do so by the
Kenmore Connect Team. The transmission sounds that
you will hear are normal and sound similar to a fax
machine.
Kenmore Connect cannot be activated unless your
dryer is turned on by pressing the POWER button. If
your dryer is unable to turn on, then troubleshooting
must be done without using Kenmore Connect.
/1"/
Appearance may vary by model.
HOLD the mouthpiece of your phone over the POWER button, when instructed to do so by
the call center, no more than one inch from (but not touching) the machine.
NOTE: Do not press any other buttons or turn the cycle selector knob.
PUSH and hold the TEMP button while continuing to hold your phone to the
POWER button.
LISTEN for three beeps. After you hear the three beeps, release the TEMP button. Keep the
phone in place until the tone transmission has finished. This takes about 17 seconds, and the
display will count down the time. Once the countdown is over and the tones have stopped,
resume your conversation with the technician, who will then be able to assist you in using the
information transmitted for analysis.
NOTE:
*For best results, do not move the phone while the tones are being transmitted.
*If the call center agent is not able to get an accurate recording of the data, you may be
asked to try again.
*Pressing the POWER button during the transmission will shut off Kenmore Connect.
28
BEFORE CALLING FOR SERVICE
_CHECK VENT is
blinklng
¸,
Exhaust system is too long or has too
many turns/restrictions.
Partial blockage of the ductwork due
to lint buildup or other foreign object.
ii! ! ! ! ! ! !i! !i i! ! !i ii i! !! !! ! !!!!!!!!!! i ii !!!i! i! !iiii!iii!i!ii!i!iii!i!ii!iiiiiiiiiiiiiiiiiiiiiiiii! i ! !i! !i!iiii ! !! ! !! ! !!i ii i !i !i !! !! !! !! i!!i!!i!!i! !!i i ! ! !!!! !! !!! ! ! ! ! ! ! !i iiiii iiiiiiiiiiiiiiiiiiiiiiiiiiiiiiiiiiiiiiiiiiiiiiiiiiiiiiiiiiiiiiiiiiiiiiiiiiiiiiiiiiiiiiiiiiiiiiiiiiiiiiiiiiiiiiiiii!i i!i i i!! i ii !! ! ! ! ! ! ! ! ! ! ! ! i i i i iiiiiiiiiiiiiiiiiiiiiiiiiiiiiiiiiiiiiiiiiiiiiiiiiiiiiiiiiiiiiiiiiiiiiiiiiiii i i ! ! i ! ! i ! !i!i!!!i!i!i!ii!ii!ii!iiiiiiiiiiiiiiiiiiiiiiiiiiiiiiiiiiiiiiiiiiiiiiiiiiiiiiiiiiiiiiiiiiiiiiiiiiiiiiiiiiiiiiiiiiiiiiiiiiiiiiiiiiiiiiiiiiiiiiiiiiiiiiiiiiiii
Install a shorter or straighter duct run. See the
Installation Instructions for details.
Ductwork should be checked/cleaned
immediately. Dryer can be used in this condition,
but drying times witl be longer and energy
consumption will increase.
This warning light does not indicate a dryer failure and is not covered by the dryer
warranty. Contact a duct cleaning service to set up an appointment to have your
exhaust system cleaned and inspected.
Dryer wiH not turn on
Dryer does not heat
Power cord is not properly plugged in. Make sure that the plug is securely plugged into a
grounded outtet matching the dryer's rating plate.
House fuse is blown, circuit breaker Reset circuit breaker or replace fuse. Do not
has tripped, or power outage has increase fuse capacity. If the problem is a
occurred, circuit overload, have it corrected by a qualified
electrician.
House fuse is blown, circuit breaker Reset circuit breaker or replace fuse. Do not
has tripped, or power outage has increase fuse capacity. If the problem is a
occurred, circuit overload, have it corrected by a qualified
electrician.
NOTE: Due to the design of electric dryers, it is
possible for a circuit problem to allow an electric
dryer to run without heat.
Gas supply or service is turned off Conflrm that the house gas shutoff and the dryer
(gas models only), gas shutoff valves are both fully open. Even if gas
is not supplied to the dryer, it will run and no error
codes will display. Verify that other gas appliances
in the home are working normally.
Clean and dirty clothes are being Only use your dryer to dry clean items. Soil from dirty
dried together, clothes can transfer to the clean clothes in the same
or later loads.
Clothes were not properly cleaned Stains on dried clothes could be stains that
or rinsed before being placed in the weren't removed during the washing process.
dryer. Make sure that clothes are being completely
cleaned or rinsed according to the instructions for
your washer and detergent. Some difficult soils
may require pre-treating prior to washing.
Fabric softener is not used or used Use a fabric softener to reduce static
incorrectly, electricity. Be sure to follow the fabric softener
manufacturer's instructions.
Clothes dried too long (over dried). Overdrying a load of laundry can cause a buildup
of static electricity. Adjust settings and use a
shorter drying time, or use AUTO DRY cycles.
Drying synthetics, permanent press, or These fabrics are naturally more prone to static
synthetic blends, buildup. Try using fabric softener, or use DAMP
DRY and/or shorter TIMED DRY time settings.
Heat settings, load size, or dampness Thedrying time for a toad will vary depending on thetype
of clothing is not consistent, of heat used(electric,natural gas,or LPgas),the sizeof the
load, the type of fabrics,the wetnessof the clothes,and
the condition of the exhaustduct and lint _ilter.Evenan
unbalanced load in the washer can causepoor spinning,
resulting in wetter clothes which will take longer to dry.
Greasy or dirty spots on
clothes
Excess static in clothes
after drying
Drying time is not
consistent
29
BEFORE CALLING FOR SERVICE (continued)
Clothes take too long to
dry
Exhaust ducts are blocked, dirty, or
duct run is too long.
Load is not properly sorted.
Large load of heavy fabrics.
Dryer controls are not set properly.
Clothes are wrinkled
Clothes are shrinking
Lint filter needs to be cleaned.
House fuse is blown, circuit breaker has
tripped, or power outage has occurred.
Dryer is overloaded.
Dryer is undertoaded.
Clothes dried too long (overdried).
Clothes left in dryer too long after
cycle ends.
Garment care instructions are not being
followed.
Confirm that the exhaust duct is properly
configured and free of debris, lint, and
obstructions. Make sure that outside watt
dampers can open properly and are not
blocked, jammed, or damaged.
Separate heavy items from lightweight items.
Larger and heavier items take longer to dry.
Light items in a load with heavy items can fool
the sensor because the light items dry faster.
Heavy fabrics take longer to dry because they
tend to retain more moisture. To help reduce
and maintain more consistent drying times for
large and heavy fabrics, separate these items
into smaller loads of a consistent size.
Use the appropriate control settings for the
type of toad you are drying. Some loads
may require an adjustment of the DRY LEVEL
setting for proper drying.
Remove the tint from the filter before every
load. With the lint removed, hold the filter up to
a light to see if it is dirty or clogged. If it looks
dirty, follow the cleaning instructionsin the Care
and Cleaning section. With some loads that
produce high amounts of lint, such as new bath
towels, it may be necessary to pause the cycle
and clean the filter during the cycle.
Reset the circuit breaker or replace the fuse.
Do not increase fuse capacity. If the problem
is a circuit overload, have it corrected by a
qualified electrician.
NOTE: Due to the design of electric dryers, it
is possible for a circuit problem to allow an
electric dryer to run without heat.
Divide extra large loads into smaller loads for
better drying performance and emciency.
if you are drying a very small load, add a
few extra items to ensure proper tumbling
action. If the load is very small and you are
using AUTO DRY cycles, the electronic control
cannot properly sense the dryness of the load
and may shut off too soon. Use TIMED DRY or
add some extra wet clothes to the load.
Overdrying a toad of laundry can lead to
wrinkled clothes. Try a shorter drying time or
DAMP DRY setting and remove items while
they still retain a slight amount of moisture.
Use the WRINKLE GUARD option. This feature
will tumble the clothes briefly every few minutes
for up to 150 minutes to help prevent wrinkling.
To avoid shrinking your clothes, always consult
and follow fabric care instructions. Some
fabrics will naturally shrink when washed.
Other fabrics can be washed but will shrink
when dried in a dryer. Use a low or no heat
setting.
3O
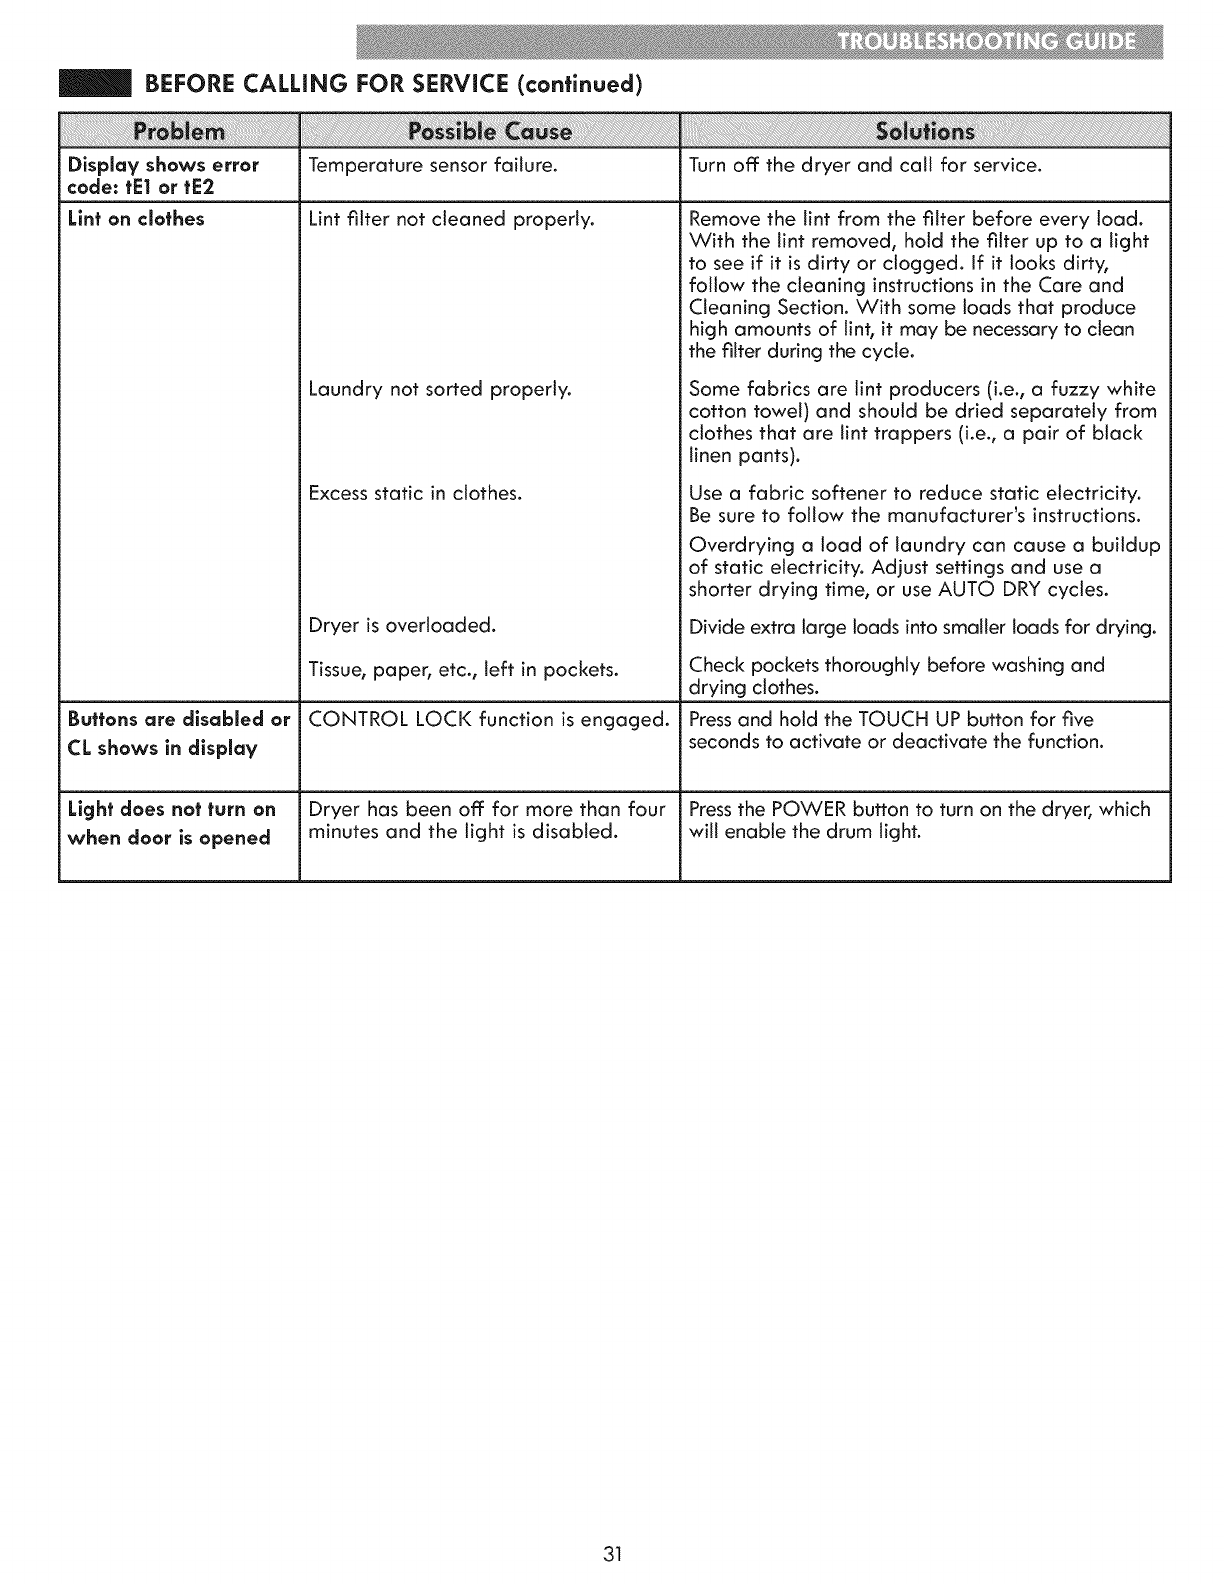
BEFORE CALLING FOR SERVICE (continued)
Display shows error Temperature sensor failure.
code: tel or rE2
Lint on clothes
Buttons are disabled or
CL shows in display
Light does not turn on
when door is opened
iiiiiii¸i¸!ii!____iiiiiiiii_!i!i_i!!iiiiiiiiiiii!iiiiiiiiiiiiii!iiiiiiiiii___iii___iiiiiiiiiiii_iiiiii_ii___iii___iiiiiiiiiiiiiiii___iii___iiiiiii___iii___iiiiiii___iii___iiiiiii___iii___iiiiiii___iii___iiiiiii___iii___iiiiiii___ii_i_!_!ii_¸_¸_¸¸¸¸¸¸¸¸i_!_!i!_¸iliii_!: iilliii!i¸i!!i_i_ilIi!__ji i!iiii¸iiiiiiiiii¸!iii__!_!ilii!!!iiiiiiiii¸i!iiiiiiiiiiiiiiiii_iiiiiiiiiiiiiiiiiiiiiiiiiii!!iiiiiiiiiiiiiiiiiiiiiiiiiiiiiiiiiiiiiiiiiiiiiiiiiiiiiiiiiiiiiiiiiiiiiiiiiiiiiiiiiiiiiiiiiiiiiiiiiiiiiiiiiiiiiiiiiiiiiiiiiiiiiiiiiiiiiiiiiiiiiiiiiiiiiiiiiiiiiiiiiiiiiiiiiiiiiiiiiiiiiiiiiiiiiiiiiiiiiiiiiiiiiiiiiiiiiiiiiiiiiiiiiiiiiiiiiiiiiiiiiiii!i_i
_j_!_ii_!!_iiiiiiiiiiii!i_iiiiil,i!_i_!!ili!!iii_!__!_i_iii_i_ii!iiiiiii_ii_i!_iiiiiiiii_i_iiii_i_iiiii_ii_iiiii_ii_iiiii_ii_iiiii_ii_iiiii_ii_iiiii_i!!sOij!utON_!_!_!_!:!_!_ii_!ii_i_i_i_i_ii_i!ii!iiiiiiiiii!!iiiii_iiiiiii_i_i_i_i_i_i!i!_!_i_i_i_!_ii_ii_ii_iiiiiiii_iiiiiii_ii_iiiiiii_ii_iiiiiii_ii_iiiiiii_ii_iiiiiii_ii_iiiiiii_ii_iiiiiii_ii_iiiiiiii_i_ii_iiiiiiii_i_ii_iiiiiiii_i_ii_iiiiiiii_i_ii_iiiiiiii_!_i_
Turn off the dryer and call for service.
Lint filter not cleaned properly.
Laundry not sorted properly.
Excess static in clothes.
Dryer is overloaded.
Tissue, paper, etc., left in pockets.
CONTROL LOCI( function is engaged.
Dryer has been off for more than four
minutes and the light is disabled.
Remove the tint from the fitter before every toad.
With the lint removed, hold the filter up to a light
to see if it is dirty or clogged. If it looks dirty,
follow the cleaning instructions in the Care and
Cleaning Section. With some loads that produce
high amounts of tint, it may be necessary to clean
the filter during the cycle.
Some fabrics are lint producers (i.e., a fuzzy white
cotton towet) and shoutd be dried separately from
clothes that are lint trappers (i.e., a pair of black
linen pants).
Use a fabric softener to reduce static electricity.
Be sure to follow the manufacturer's instructions.
Overdrying a toad of laundry can cause a buildup
of static electricity. Adjust settings and use a
shorter drying time, or use AUTO DRY cycles.
Divide extra large loads into smaller loads for drying.
Check pockets thoroughly before washing and
drying clothes.
Pressand hold the TOUCH UP button for five
seconds to activate or deactivate the function.
Pressthe POWER button to turn on the dryer, which
will enable the drum light.
31
Kenrnore One Year Limited Warranty'
When installed, operated and maintained according to all supplied instructions, if this appliance fails due
to a defect in material and workmanship within one year from the date of purchase, call 1-800-4-MY-
HOME® to arrange for free repair.
If this appliance is ever used for other than private family purposes, this warranty applies for only 90 days
from the date of purchase.
This warranty covers ONLY defects in material and workmanship, and will NOT pay for:
1. Expendable items that can wear out from normal use, including but not limited to filters,
belts, incandescent light bulbs and bags.
2. A service technician to instruct the user in correct product installation, operation
or maintenance.
3. A service technician to clean or maintain this product.
4. Damage to or failure of this product if it is not installed, operated or maintained according to
all instructions supplied with the product.
5. Damage to or failure of this product resulting from accident, abuse, misuse or use for other than its
intended purpose.
6. Damage to or failure of this product caused by the use of detergents, cleaners, chemicals or utensils
other than those recommended in all instructions supplied with the product.
Z Damage to or failure of parts or systems resulting from unauthorized modifications made
to this product.
Disclaimer of implied warranties; limitation of remedies
Customer's sole and exclusive remedy under this limited warranty shall be product repair as provided herein.
Implied warranties, including warranties of merchantability or fitness for a particular purpose, are limited
to one year or the shortest period allowed by law. Sears shall not be liable for incidental or consequential
damages. Some states and provinces do not allow the exclusion or limitation of incidental or consequential
damages, or limitation on the duration of implied warranties of merchantability or fitness, so these
exclusions or limitations may not apply to you.
This warranty applies only while this appliance is used in the United States or Canada%
This warranty gives you specific legal rights, and you may also have other rights which vary from state to
state.
In-home repair service is not available in all Canadian geographical areas, nor will this warranty cover
user or servicer travel and transportation expenses if this product is located in a remote area (as defined by
Sears Canada Inc.) where an authorized servicer is not available.
Sears Brands Management Corporation, Hoffman Estates, IL 60179
Sears Canada Inc., Toronto, Ontario, Canada M5B 2C3
32

33

INSTRUCCIONES IMPORTA.NTES SOBRE SEGURIDAD... 35-38
REQUISITOS DE CONEXION A TUERRA............................ 36
FUNCIONES Y VENTAJAS
Piezas y componentes dave ............................................ 39
INSTRUCCIONES PARA LA INSTALACION
Dimensiones y especificaciones clave ........................... 40
Requisitos de ubicaci6n .................................................... 40
Escoja el lucjar adecuado ................................................ 40
Espacios de instalaci6n .................................................... 40
Instalaci6n con base de pedestal
o kit de montaje sobre la lavadora opcionales ............. 41
Accesorios opcionales ....................................................... 41
Secadoras a gas .......................................................... 42-43
Requisitos de gas ....................................................... 42
Requisitos el_ctricos .................................................... 42
Conexi6n al suministro de gas .................................. 43
Secadoras el_ctricas ................................................. 44-45
Requisitos ei_ctricos .................................................... 44
Conexi6n de las secadoras el_ctricas ..................... 45
Ventilaci6n de la secadora ...................................... 46-47
Niveiaci6n de la secadora .............................................. 48
Inversi6n de la puerta ...................................................... 48
Comprobaci6n final de instalaci6n ............................... 49
INSTRUCCIONES DE USO
Funciones del panel de control ...................................... 50
Funcionamiento de ia secadora ...................................... 51
Guia de cicios ............................................................. 52-53
Ciasificaci6n de cargas ................................................... 54
Carcja de la secadora ..................................................... 54
Pantaiia de tiempo y estado .......................................... 55
Bofones modificadores de cicio ..................................... 56
Opciones de cicios y funciones especiales ................... 57
Antiarrugas ................................................................. 57
BIoqueo de los controles ........................................... 57
Mi cicio ....................................................................... 57
Secado hOmedo .......................................................... 57
INSTRUCCIONES DE MANTENIMIENTO DEL USUARIO
Limpieza recjuiar ............................................................... 58
Limpieza dei exterior ................................................. 58
Limpieza dei interior .................................................. 58
Limpieza airededor de ia secadora y
debajo de ella ............................................................. 58
Limpieza dei fiitro de peiusas .................................. 58
Mantenimiento dei sistema de ventiiaci6n .................... 59
KENMORE CONNECT .......................................................... 60
GUJA DE SOLUCI6N DE PROBLEMAS
Antes de solicitar asistencia t_cnica ......................... 61-63
GARANTJA ............................................................................. 64
SERVICIO ..................................................... Cubierta posterior
En ei espacio de abajo, recjistre ia fecha de la compra,
ei modelo y nSmero de serie dei producto. Encontrar6
ei modelo y ei n_mero de serie impreso en ia piece de
identificaci6n situada en el interior de ia puerta de ia
secadora. Tencja esta informaci6n a mano siempre que se
ponga en contacto con Sears con reiaci6n a su producto.
N.° de modelo.
Fecha de compra
N.° de serie
Guarde estas instrucciones y su recibo de venta pare
referencia future.
34
Acuerdes maestros de protecci6n
Feiicidades por haber realizado una compra inteiigente.
Su nuevo producto Kenmore ®est6 dise_ado y fabricado pare
brindar a_os de funcionamiento liable. No obstante, al iguai
que cualquier otro producto, es posible que requiera un
mantenimiento preventivo o aiguna reparaci6n cada cierto
tiempo. Por este motivo, disponer de un contrato maestro de
protecci6n puede ahorrarie dinero y moiestias.
Ei acuerdo maestro de protecci6n tambiSn io ayuda a
extender ia vide 6tii de su nuevo producto. A continuaci6n,
se indica io que inciuye este contrato_:
* Materlal ymano de obra necesario pare mantener
los productos en funcionamiento baje uso normal, no
(Jnicamente los defectos de fabricaci6n. Nuestra cobertura
va touche mas aft6 de la garantia del producto. No hay
nincjuna faiia funcionai deducible que se exciuya de ia
cobertura: setrata de una protecci6n real
* Servlclo experte ilevado a cabo por un personal de m6s de
10.000 t_cnicos de servicio expertos de Sears, Io que sicjnifica
que aiguien en quien puede confiar trabajar6 en su producto.
* Sin ffmlte de soffcltudes de reparaci6n yservlclo en el pa&,
con tanta frecuencia como desee yen cualquier momento.
* Funclenamlente garantlzade: sustituci6n del producto
cubierto por ei servicio si se producen cuatro o m6s averias
dei producto en un piazo de 12 mesas.
*Reemplazo del producto: si _ste no puede repararse.
° Comprobaci6n anual de rnantenlmlento preventive si Io
solicita, sin nincjOn cjasto adicional.
° Avuda r6plda par tel&forte: tambi_n llamada soluci6n
r6plda. Asistencia por tei_fono de un representante de Sears
pare cualquier producto. Piense en nosotros como un "manual
de usuario que habla".
°Protecci6n de sobretenslones contra da_os el_ctricos debidos
a fiuctuaciones de enercjia.
° Pratecci6n anual de $250 par p&rdlda de cornlda qua
se haya producido como resuitado una faiia mec6nica
cuaiquier refrigerador o concjelador cubierto.
°Reembolse del alquller si ia reparaci6n dei producto
cubierto por ei servicio tarda m6s de io previsto.
°25% de descuento del precio normal de cuaiquier servicio
de reparaci6n no cubierto y de piezas relacionadas
instaiadas.
Una vez que adquiera el Acuerdo, s6io tiene que hacer
un ilamado telef6nico pare procjramar ei servicio. Puede
llamarnos en cualquier momento del die o de la noche, o
fijar ia cite de la reparaci6n a trav_s de Internet.
Ei Acuerdo maestro de protecci6n es una compra sin riescjos.
Si por cuaiquier motivo canceia ei contrato durante ei plazo
de cjarantia dei producto, ie devoiveremos todo ei importe o
bien una cantidad prorrateada una vez que haya finalizado
ei piazo de garantia dei producto.
Adquiera hoy mismo su Acuerdo maestro de protecci6n.
Se apffcan algunas llmltaclones yexcluslenes.
Para consultar preclos yeinformaci6n adlclonal en los EE. UU.
flame al 1=800=827=6655.
La cobertura en Caned6 varJa en algunos espectos.
Pare rnes detalles, llama aSears Caned6 a 1=800=361=6665.
Servlclo de instalaci6n de Sears
Pare solicitar la instalaci6n profesional de Sears de
electrodom6sticos dispositivos pare aperture de puertas de
cjaraie, calentadores de acjua y otros electrodom_sticos,
iiame en los EE. UU. o Caned6 a:
1-800-4-MY-HOME ®.
LEA TODAS LAS INSTRUCCIONES ANTES DE UTILIZAR
ESTE PRODUCTO
fSu seguridad y la de los dembs es mu¥ importante.
Hemos incluido numerosos mensajes de secjuridad en este manual sabre su electrodom_stico. Leo y cumpJa siempre
todos los mensaies de secjuridad.
_ :ste es el simbolo de alert° de secjuridad.
Este simboio ie avis° de posibies pelicjros de muerte o iesiones par° usted o los dem6s.
Todos los mensaies de secjuridad inciuir6 ei simboio de alert° y ia paiabra PELIGRO o ADVERTENCIA.
Estas paiabras sicjnifican:
PELIGRO: Indic° una situaci6n pelicjrosa que, si no se evita, puede producir lesiones cjroves o la muerte.
A_ ADVERTENCIA: Indic° una situaci6n pelicjrosa que, si no se evita, podria provocar lesiones cjroves o la muerte.
APRECAUCION: Indic° una situaci6n pelicjrosa que, si no se evita, puede producir una iesi6n menor o
moderada.
Todos los mensaies de secjuridad ie indicar6n cu6i es ei posibie pelicjro, io que debe hacer par° reducir ia probabilidad
_de iesiones y io que puede ocurririe si no se sicjuen ias instrucciones.
ADVERTENCIA: po,.o.ogoridod,debe.egui,Ioi.fo,moci6,dee.temoooolp=o,edoci,
°1 minimo el riesgo de incendio, explosi6n o descarg° electric°, °si como prevenir °decuadamente dafios
materiales, lesiones personales omuerte.
°No insfale la see°dora de ropa con maferiales de ventilaci6n de plbsflco flexible. Si se instal° un conducto mefbllco flexible
(de tlpo Ibmlna de metal), debe set del fipo concreto especlflcado por el fabrlcante del °par°to como adecuado par°
us°rio con secadoras. Se sabe que los materlales de ventilaci6n flexlbles se colapsan, se pueden aplastar con facilldad y
atrapan pelusas. Estas clrcunstanclas pueden obstacullzar el flujo de alre de la see°dora y aumentar el rlesgo de incendlo.
° No guarde nl utillce gasollna nl nlngOn otro gas o liquldo inflamable cerca de este electrodom_stlco ode cualquler otro.
° La instalaci6n yel serviclo deben set reallzados pot un t_cnlco cuallflcado, una agencla de mantenlmlento o la
compa_ia de gas.
° Instale la see°dora slgulendo las instrucclones del fabric°rite y las normafivas locales.
° Guarde estas instrucclones.
QUE HACER SI HUELE A GAS:
1. No intente encender una cerilga o un clgarrillo, nl tampoco nlng_n °par°to que funclone con gas oelectrlcldad.
2. No toque nlngOn interruptor el_ctrlco. No utillce nlngOn tel_fono en su edificlo.
3. Despeje de personas la habltaci6n, edificlo ozona.
4. Llame inmedlatamente ala compa_a de gas desde el tel_fono de un veclno. Siga atentamente las instrucclones
de la compa_a de gas.
5. Si no puede ponerse en contacto con la compafi_a de gas, flame a los bomberos.
GUARDE ESTAS INSTRUCCIONES
35
PRECAUCIONES BASICAS DE SEGURIDAD
ADVERTENCIA: Para reduclr e, rlescjo de incendlo, descarga e,_c|rlca 0 leslones fiSlCaS a' u|illzar es|e
electrodom_sfico, slga esfas precauclones b6slcas, entre las que se induven las slgulen|es:
°Lea todas las instrucciones antes de utilizar la secadora.
°Antes de utilizar la secadora, es necesario instalarla
correctamente, secj(Jn se describe en este manual.
°No introduzca en la secadora articulos que hayan estado
expuestos a aceites de cocina. Los articulos imprecjnados de
aceites de cocina pueden contribuir a una reacci6n quimica
que podrfa hacer que una carcja se incendiase.
°No seque articulos que previamente hayan sido limpiados,
lavados, sumercjidos o salpicados con gasolina, disolventes
de limpieza en seco o cuaJquier otra sustancia inflamable o
explosiva0 ya que pueden desprender vapores que podrian
incendiarse o explotar.
°No introduzca las manos en la secadora mientras el tambor
o cuaJquier otro eJemento est_ en movimiento.
°No repare ni sustituya nincjuna pieza de la secadora ni intente
repararla a menos que se recomiende especificamente en
esta cjuia de uso y cuidado, o en instrucciones publicadas de
reparaciones que comprenda y sepa aplicar.
°No toquetee los controles.
°Antes de poner la secadora fuera de servicio o desecharlao
retire la puerta deJ compartimento de secado.
•No permita que los ni_os jueguen encima de ia secadora
oen su interior. Si se usa ia secadora cerca de ni_os0 ser6
necesario vigilarios atentamente.
° No utiiice suavizantes ni productos para eiiminar ia est6tica
a menos que io recomiende ei fabricante dei suavizante
o producto.
° No utiiice ei caior para secar articulos que contengan
gomaespuma o materiaies con una textura similar.
° Evite ia acumuiaci6n de pelusa, poivo o tierra airededor
dei 6rea de ia apertura de ventiiaci6n y 6reas adyacentes.
° La parte interior de ia secadora y ei conducto de
ventiiaci6n se deber6n limpiar peri6dicamente, y ia misma
deber6 ser reaiizada por t6cnicos cualificados.
° No instale ni coloque esta secadora en iugares donde
pueda estar expuesta aias inciemencias meteoroi6gicas.
° Antes de cargar ia secadora, revise siempre que no haya
objetos extra_os en su interior.
° Retire ia peiusa dei fiitro antes de cada carga.
Advertencla: Este producto contiene quimicos conocidos por
ei Estado de California como causantes de c6ncer y defectos
de nacimiento u otros da_os reproductivos. L6vese los manos
despu_s de usarlo.
LEY EJECUTWA SOBRE LA SEGURIDAD DEL
AGUA POTABLE Y LOS AGENTES T6XICOS
DE CALIFORNIA
Esta ley requiere que el gobernador de California pubiique
una lista de sustancias que se sabe que producen c6ncer,
defectos cong6nitos o cuaiquier otra iesi6n reproductiva0
y obiiga aias empresas a advertir a los ciientes sobre ia
posibie exposici6n a tales sustancias. Los electrodom6sticos
de gas pueden ocasionar una exposici6n ieve a cuatro de
estas sustancias, en concreto benceno, mon6xido de carb6n,
formaidehido y hollin, generados principaimente por ia
combusti6n incompieta del gas natural oei propano.
Una secadora correctamente ajustada minimizar6 ia
combusti6n incompleta. La exposici6n aestas sustancias se
puede minimizar a6n m6s dotando a ia secadora de una
ventiiaci6n adecuada ai exterior.
ADVERTENCIA: Unaconexi6n
inadecuada
del conductor de conexi6n atlerra del equlpo puede
ocaslonar un rlesgo de descarga el_ctrlca. Consuite a un
eJ_ctrico o t_cnico cualificado si tiene dudas sobre si el
eJectrodom_stico est6 correctamente conectado a tierra. No
modifique el enchufe que se entrega con eJ electrodom_stico.
Si no encaja en la toma de corriente, solicite a un electricista
adecuadamente formado que le instale una toma de
corriente apropiada. Este electrodom_stico debe conectarse
a un sistema de cableado permanente met61ico con conexi6n
a tierra o se debe tender un conductor para la conexi6n
a tierra del equipo con los conductores deJ circuito y
conectado al terminal de conexi6n a tierra del equipo o al
conductor de suministro del electrodom_stico. Si la secadora
no se encuentra adecuadamente conectada a tierra, se
pueden producir descarcjas eJ_ctricas.
REQUISITOS DE CONEXION A TIERRA
Este electrodom_stico debe estar conectado a tierra. En caso
de averia o fa!lo de funcionamiento, la conexi6n a tierra
reducir6 el riesgo de descarga el6ctrica, al proporcionar a la
corriente ei_ctrica una trayectoria de una menor resistencia.
Este electrodom6stico debe estar equipado con un cable que
disponcja de un conductor de conexi6n a tierra del equipo y
un enchufe con conexi6n a tierra. El enchufe debe conectarse
a una toma de corriente adecuada que est_ correctamente
instaiada y con conexi6n a tierra segOn ias normativas y las
ordenanzas locales.
36

INSTRUCCiONES DE SEGURiDAD PARA LA INSTALACION
AADV ERTENCIA: araredoc re,r esgode .cendla,descargae, ctr caa es anes oti, areste
electrodom_sfico, siga esfas precauclanes b6slcas, entre [as que se induven [as sigulentes:
* Conecte [a secadara adecuadamente a tlerra seg_n [as
normativas y[as ordenanzas vlgentes. Siga los detaiies
en las instrucciones de instalaci6n. Si la secadora no se
encuentra adecuadamente conectada a tierra, se pueden
producir descargas eiSctricas.
*Antes de utiffzar [a secadara, es necesarlo insta[aria
correctamente, segOn se describe en este manual. Si la
secadora no se encuentra adecuadamente conectada a
tierra0 se pueden producir descargas eiSctricas.
* [nstaie y a[macene [a secadara en un [ugar no expgesta a
temperaturas inferlares a[ punto de congelaci6n nl expuesto
a [a intemperle.
•Tadas los trabajas de reparaci6n y mantenlmlenta deber6n
set reaiizados par un t_cnlca autarlzada a menos que se
den arras recamendaclones especiflcas en este Manual de
usa y culdada. Ufifice s6[o plezas de f6brlca autorlzadas.
Si no se cumpie con esta advertencia se podr6n producir
lesiones graves° incendios, descargas el_ctricas o muerte.
•Con e[ fin de reduclr e[ rlesga de descargas ei_ctrlcas no
instaie [a secadora en espaclos h0medos. Si no se cumple
con esta advertencia se podr6n producir lesiones graves,
incendios, descargas el_ctricas o muerte.
* Conecte un clrculta el_ctrlco claslflcada, proteglda ¥
adecuada para evltar sabrecargas e[_ctrlcas. Un circuito
electrico inadecuado se puede fundir, creando descargas
el_ctricas y/o riesgo de incendio.
Quite tadas los elementos de emba[aje y deseche
adecuadamente todos los materlaies de envio. Si no se
cumpie con esto se podr6 producir una expiosi6n, incendio,
quemaduras o muerte.
Ca[aque la secadara a una altura m[nlma de 46 cm
(18 pu[gadas) sabre el sue[o para una insta[aci6n en el
gara]e° Si no se cumple con esto se podr6 producir una
explosi6n, incendio, quemaduras o muerte.
Mantenga tados los envaffarlas ale_adas de los nifias. Los
materiales de los envoitorios pueden resuitar peligrosos para
los ni_os. Existe riesgo de asfixia.
No [o instaie cerca de un elemento que genera ca[or, coma
una caclna o un homo de cocci6n. Si no se cumple con esta
advertencia se puede provocar una deformaci6n, humo o
un incendio.
No colaque velas ni clgarrillos sabre el praducta. Si no
se cumple con esta advertencia se puede provocar una
deformaci6n, humo o un incendio.
Quite [a peffcula de vlnila protectara del producto. Si no
se cumple con esta advertencia se puede provocar una
deformaci6n, humo o un incendio.
Venfilaci6n/conductos:
* Las secadaras de gas DEBEN tenet un conducto de
venfilaci6n a[ exterior. Si no se siguen estas instrucciones
se podr6 producir incendio o muerte.
* E[ slstema de venfilaci6n de la secadora debe dlrlglrse a[
exterior de [a vlvlenda. Si la secadora no se ventiia
a[ exterior, se expulsar6 peiusa y grandes canfidades
de humedad a [a zona de [avander_a. Una acumulaci6n
de pelusa en cualquier zona de la vivienda puede crear
un peligro de incendio y para la sabd.
*Use 0nlcamente slstemas de venfilaci6n de metal Hgldo
o f[exlb[e de 10,2 cm (4 pulgadas) de dlc_metro dentro de[
gablnete de [a secadora apara ventilaci6n a[ exterior.
Los slstemas de ventilaci6n de pi6sfico u afro materla[
pueden causar incendlos. Los sistemas de venfilaci6n
agujereadas pueden causar incendios si se coiapsan o
bloquean durante el usa o la instalaci6n.
* E[ slstema de venfilaci6n no se inciuye con [a secadora,
par [o que deberc] obtener[o [ocalmente. La tapa terminal
deber6 tenet reguladares de fifo con blsagras para prevenlr
el retorno de descarga cuanda no se usa [a secadara.
Si no se siguen estas instrucciones se podr6 producir
incendio o muerte.
El conducta de escape deber6 tenet 10,2 cm (4 pulgadas)
de dlc_metro sin obstrucclones. El conducta de escape
deberc_ mantenerse [a mc_s carta pasible. AsegOrese
de [implar cualquler fipo de conducto antigua antes
de instaIar su secadara nueva. Si no se siguen estas
instrucciones se podr6 producir incendio o muerte.
Se recomlenda usar conductas Hgldas o semlrHgldas entre
[a secadora y [a pared. En instalaclones partlculares,
cuando es imposlble reallzar una conexi6n slgulendo [as
recomendaclanes antes indlcadas, 0nlcamente se puede
utillzar un conducto met6[ico de translci6n aprobada par UL
entre [a secadara y[a conexi6n de pared. Usar este tlpo de
conducto afectar6 a[ fiempo de secado. Si no se siguen estas
instrucciones se podr6 producir incendio o muerte.
NO uffffce tarniiias de [6mlna de metal nl afro tlpa de
sujeclones que se exfiendan dentra de[ conducto ypuedan
atrapar pelusa y reduclr [a eflclencla del slstema de
venfilaci6n. Asegure todas ias uniones con cinta aisiante
impermeable. Para m6s detalles, siga las instrucciones de
instalaci6n. Si no se siguen estas instrucciones se podr6
producir incendio o muerte.
37
INSTRUCCIONES DE SEGURIDAD PARA LAS CONE×laNES ELECTRICAS
^ADVERTENCIA: Para reduclr el rlesgo de incendla, descarcja el_c|rlca a leslanes fiSlCaS al u|illzar es|e
electradam_sfica, slcja esfas precauclanes b6slcas, entre las que se incluven las slcjulen|es:
* Bajo nlncjuna clrcunsfancla, carte a quite la clavlja de
conexi6n a tlerra del cable el_ctrlco. Para evitar iesiones
personales o da_os a ia secadora, ei cable eiSctrico debe
estar conectado a una toma de corriente con ia conexi6n
a tierra adecuada.
* Par motlvos de segurldad personal, este electradam_stlca
debe estar canectado a tlerra adecuadamente. Si no se
cumple esta advertencia, se podr6n producir descarcjas
el_ctricas o lesiones.
* Consuffe las instrucclones de instalaci6n de este manual
para obtener los requlsltos el_ctrlcos espec_flcos de su
modelo. Si no se siguen esfas insfrucciones, se podr6n
producir descarcjas el_cfricas y/o riescjo de incendio.
* Esta secadara debe enchufarse auna toma de corrlente
conectada a tlerra adecuadamente. Si la secadora no se
encuentra adecuadamente conectada a tlerra, se pueden
produclr descargas el_ctrlcas. Sollclte aun electrlclsta
cuallflcado que controle la toma de corrlente yel clrculto
el_ctrlco para asegurarse de que la toma de corrlente
est6 correctamente conectada a fferra. Si no se sicjuen
estas instrucciones, se podr6n producir descarcjas ei_ctricas
y/o riescjo de incendio.
* La secadora debe estar slempre enchufada asu toma
de corrlente indlvldual, con la claslflcaci6n de tensi6n
correspondlente ala placa de datas de servlcla. Esto
cjarantiza eI mejor funcionamiento yadem6s previene la
sobrecarga de los circuitos deI hocjar, Io cual podria ocasionar
riescjos de incendio debido al recalentamiento de cables.
No desenchufe nunca la secadora firanda del cable de
corrlente. Agarre slempre el enchufe flrrnemente y tire
del mlsmo para refirarlo de la torna de corrlente. El cable
de corriente podria resultar da_ado, Io que ocasionaria un
riesgo de incendio o descarcja el_ctrica.
Repare o reemplace de inmedlata todos los cables de
corrlente pelados o con cualquler tlpo de da_a. No use
un cable con cortaduras o abrasi6n sabre su extensi6n
oextremos. Este cable de corriente se puede fundir,
ocasionando un riescjo de descarcjas ei_ctricas y/o
incendio.
AI instalar ocamblar de lugar la secadara, tenga culdado
de no farzar, aplastar a dafiar el cable de allmentaci6n.
De esfa manera, evitar6 heridas oda_os debido a
incendios o descarcjas ei_ctricas sabre la secadora.
GUARDE ESTAS INSTRUCCIONES
38

PIEZAS Y COMPONENTES CLAVE
Existen varios componentes importantes cl los que
se hace referencia en este manual
OANEL DE CONTROL DE FACIL USO
Gire el mando selector de cJclo para seleccionar el
ciclo de secado que desee. ASada opciones de cicio
o ajuste los valores tocando un bot6n.
OANTALLA DE TIEMPO Y ESTADO
La pantalla LED de f6cil lectura muestra el estado
del ciclo y el tiempo restante estimado.
O ODIFICADORES DE CICLO
Ajuste los valores dei cicio, por ejemplo temperatura
y nivel de secado_ tocando un bot6n.
NOTA: No todos los ajustes est6n disponibles para
todos los cicios.
O OMPROBAR VENTILACI6N
(Sistema de detecci6n de bioqueo del conducto)
La comprobaci6n de ventilaci6n (sistema de detecci6n
de bloqueo del conducto) detecta y aJerta sobre la
existencia de bioqueos en el sistema de ventilaci6n que
reducen el fiujo de aire de la secadora. AI mantener
limpios los conductos del sistema de ventilaci6n_ mejora
el rendimiento, necesitar6 menos asistencia t_cnica y,
por tanto, ahorrar6 dinero.
OAMBOR DE ACERO INOXIDABLE DE
CAPACIDAD ULTRA GRANDE
El tambor de acero inoxidabie de capacidad uJtra
cjrande proporcJona una durabJiJdad superJon
O UERTA REVERSIBLE DE FACIL ACCESO
La puerta de cristal transparente de amplia apertura
facilita el acceso para reaiizar la carga y descarga.
El giro de apertura de la puerta puede cambiarse de
sentido para ajustarse aJ lugar de instaJaci6n.
O ILTRO DE PELUSAS DE MONTAJE FRONTAL
Ei fiitro de peiusas de montaje frontal permite un
acceso y iimpieza m6s sencillos entre cargas.
O IES DE NIVELACION
Los cuatro pies de niveiaci6n (dos frontales y dos
posteriores) se pueden ajustar para mejorar la
estabilidad de la secadora sobre suelos irrecjuiares.
Ubicaci6n dei Panel de acceso ai
cable de corriente bioque de terminaies
(Modelos a gas) (modelos eiSctricos)
Ubicaci6n de ia
conexi6n de gas
(modelos a gas)
Salida del conducto
de ventilaci6n
Parte posterior de la secadora
39

DiMENSIONES Y ESPECIFiCACIONES CLAVE
Descripci6n Secadora (gas y ei_ctrica)
Requisitos ei_ctricos Consuite ia etiqueta de especificaciones.
Requerimientos de gas _ NG: Columna de agua (CA) de 4-10,5 puigadas
Requerimientos de gas _ LP: CA de 8-13 puigadas
Dimensiones 27 puig. (ancho) X 30 1/4 puig. (profundidad) X 38 puig. (alto.), 51 3/16 puig.
(profundidad con la puerta abierta)
68 cm(ancho) X 76,7 cm (profundidad) X 96,5 cm (alto), 130 cm (profundidad con ia
puerta abierta)
Peso neto EiSctrica: 66,7 kcj (147 iibras) Gas: 68,37 kcj (150,5 iibras)
Capacidad de secado IEC 7.3 pies c6bicos
S61o modelos de gas
REQUISITOS DE UBICACiON
IMPORTANTE: Lea completamente todas ias instrucciones
de instaJaci6n antes de instaJar y poner en funcionamiento su
secadora. Es importante que revise par completo este manuaJ
antes de instalar y utilizar su secadora. En las siguientes
p_ginas se proporcionan instrucciones pormenorizadas
acerca de las conexiones el_ctricas, las conexiones de gas y
los requisitos de ventilaci6n.
ESCOJA EL LUGAR ADECUADO
°No aimacene ni instale la secadora en lugares expuestos
a temperaturas de concjelaci6n ni a inciemencias
meteoroi6cjicas.
°Escoja una ubicaci6n que disponcja de un suelo firme y
nivelado.
°Siva a instaiar ia secadora en un cjaraje, coloque la unidad
al menos a 45,7 cm [18 pulcjadas) sobre el nivel del suelo.
°Conecte correctamente a tierra la secadora cumpliendo
todas las normativas y ordenanzas.
°Para reducir el riescjo de descarcja el_ctrica, no instale la
secadora en espacios h6medos ni mojados.
IMPORTANTE: Siva a instaiar su secadora en una
vivienda prefabricada o m6vil, consuite la secci6n
Requisitos el_ctricos especiales para viviendas m6viles
o prefabricadas.
ESPACIOS DE INSTALACION
°La mayoria de ias instaiaciones requieren una distancia de
separaci6n minima de 14 cm (5 1/2 puigadas) en ia parte
trasera de ia secadora para ei conducto de ventiiaci6n.
°Deje una distancia de separaci6n minima en los iateraies
y parte posterior de 2,5 cm (1 puigada) para minimizar ia
vibraci6n y ei ruido.
°Se recomienda dejar una distancia de separaci6n adicionai
para iievar a cabo ia instaiaci6n y ei mantenimiento.
°No oivide tener en cuenta ias moiduras de paredes, puertas
o piso, que podrian aumentar ia distancia de separaci6n
necesaria.
*Deje ai menos 53,3 cm (21 pulgadas) en la parte frontal
de ia secadora para abrir ia puerta.
Instalaci6n est6ndar -Vista lateral
i
57,3 cm L_.
(22 1/2pulg.)
Instalaci6n est6ndar -Vista frontal
11!
(10 cm) _ "_.° 76,7 cm -_ _"_10 cm
!30 i/4 pu gL (4 puig )
52 1/4 puig.
(132,7 cm)
2,5 cm
(1 pulg.)
J_
2,5 cm
(I pulg.)
---I 68,6 cm
(27 pulg.)
L
m
i
J
3"
(7.6 cm)
(31 0 sq. cm.)
Ventilaci6n
24 sq. in.
( 155 sq. cm.)
3" _
(7.6 cm)
Requisitos de ventilaci6n a puerta cerrada
Instrucclones adlclonales para instalaclones en armarlo:
La puerta del armada debe permitir la entrada del fiujo de aire
suficiente. Consuite ei esquema superior para consuitar los requisitos
minimos de ias aperturas de ventiiaci6n. TambiSn es aceptabie ia
utiiizaci6n de puertas de celosia.
40
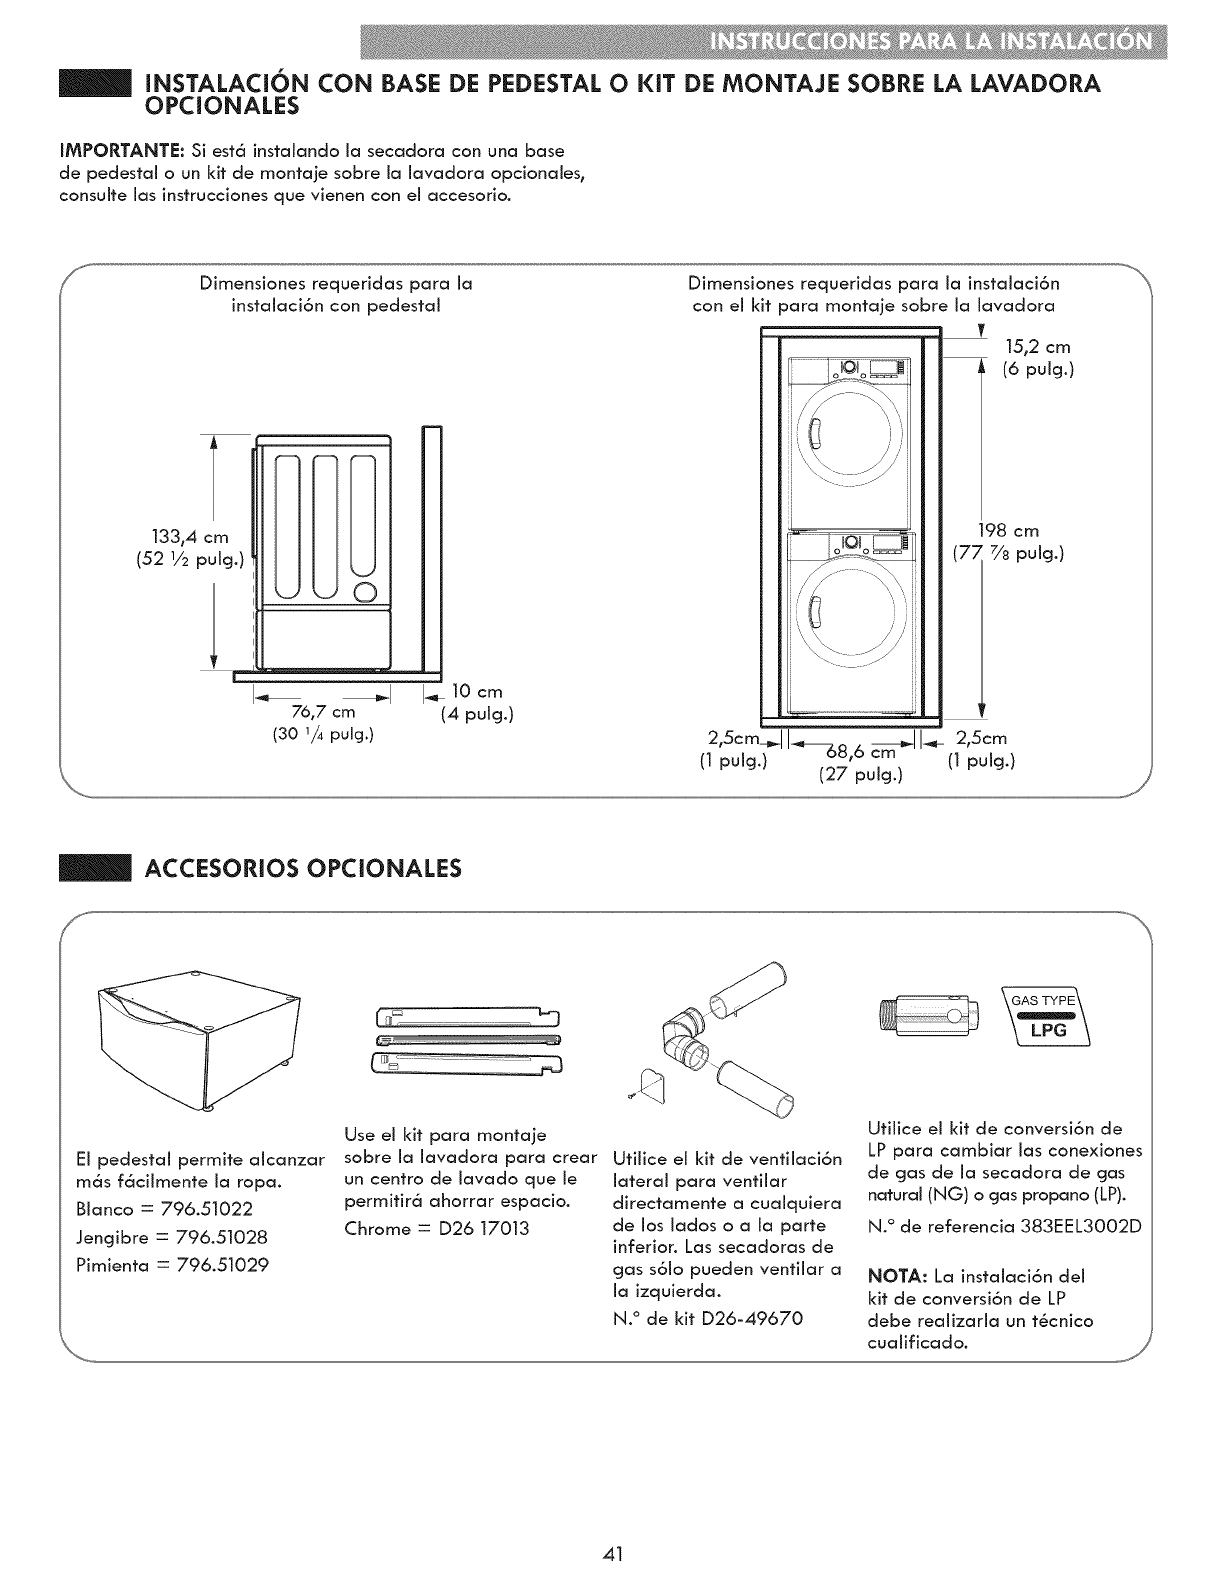
INSTALACION CON BASE DE PEDESTAL O KiT DE MONTAJE SOBRE LA LAVADORA
OPCIONALES
IMPORTANTE: Si est6 instalando ia secadora con una base
de pedestal o un kit de montaje sobre la lavadora opcionales0
consuite las instrucciones que vienen con el accesorio.
fDimensiones requeridas para ia
instalaci6n con pedestal
133_4cm
(52 1/2puig.)
76,7 cm (4 puicj.)
(30 1/4 pulg.)
Dimensiones requeridas para ia instaiaci6n
con ei kit para montaje sobre ia iavadora
15,2 em
(6 pulg.)
\
i
i
/
_. .fJ
..... 198 cm
__ (7; 7/8 puicj.)
/
_ _=:zzz:zz:zz:zcz:=_ =
2,5_m_ 1_8,6 _.J I-..-2,5_m
(1 pulg.) cm (1 pulg.)
(27 pulcj.)
ACCESORIOS OPCIONALES
El pedestal permite aicanzar
m6s f6cilmente la ropa.
Bianco : 796.51022
Jencjibre : 796.51028
Pimienta : 796.51029
Use el kit para montaje
sobre la lavadora para crear Utilice el kit de ventilaci6n
un centro de lavado que le lateral para ventilar
permitir6 ahorrar espacio, directamente a cualquiera
Chrome : D26 17013 de los lados o a la parte
inferior. Las secadoras de
gas s6io pueden ventilar a
la izquierda.
N. ° de kit D26-49670
Utiiice ei kit de conversi6n de
LP para cambiar ias conexiones
de gas de la secadora de gas
natural (NG) o gas propano (LP).
N.° de referencia 383EEL3002D
NOTA: La instaiaci6n dei
kit de conversi6n de LP
debe realizarla un t_cnico
cualificado.
41
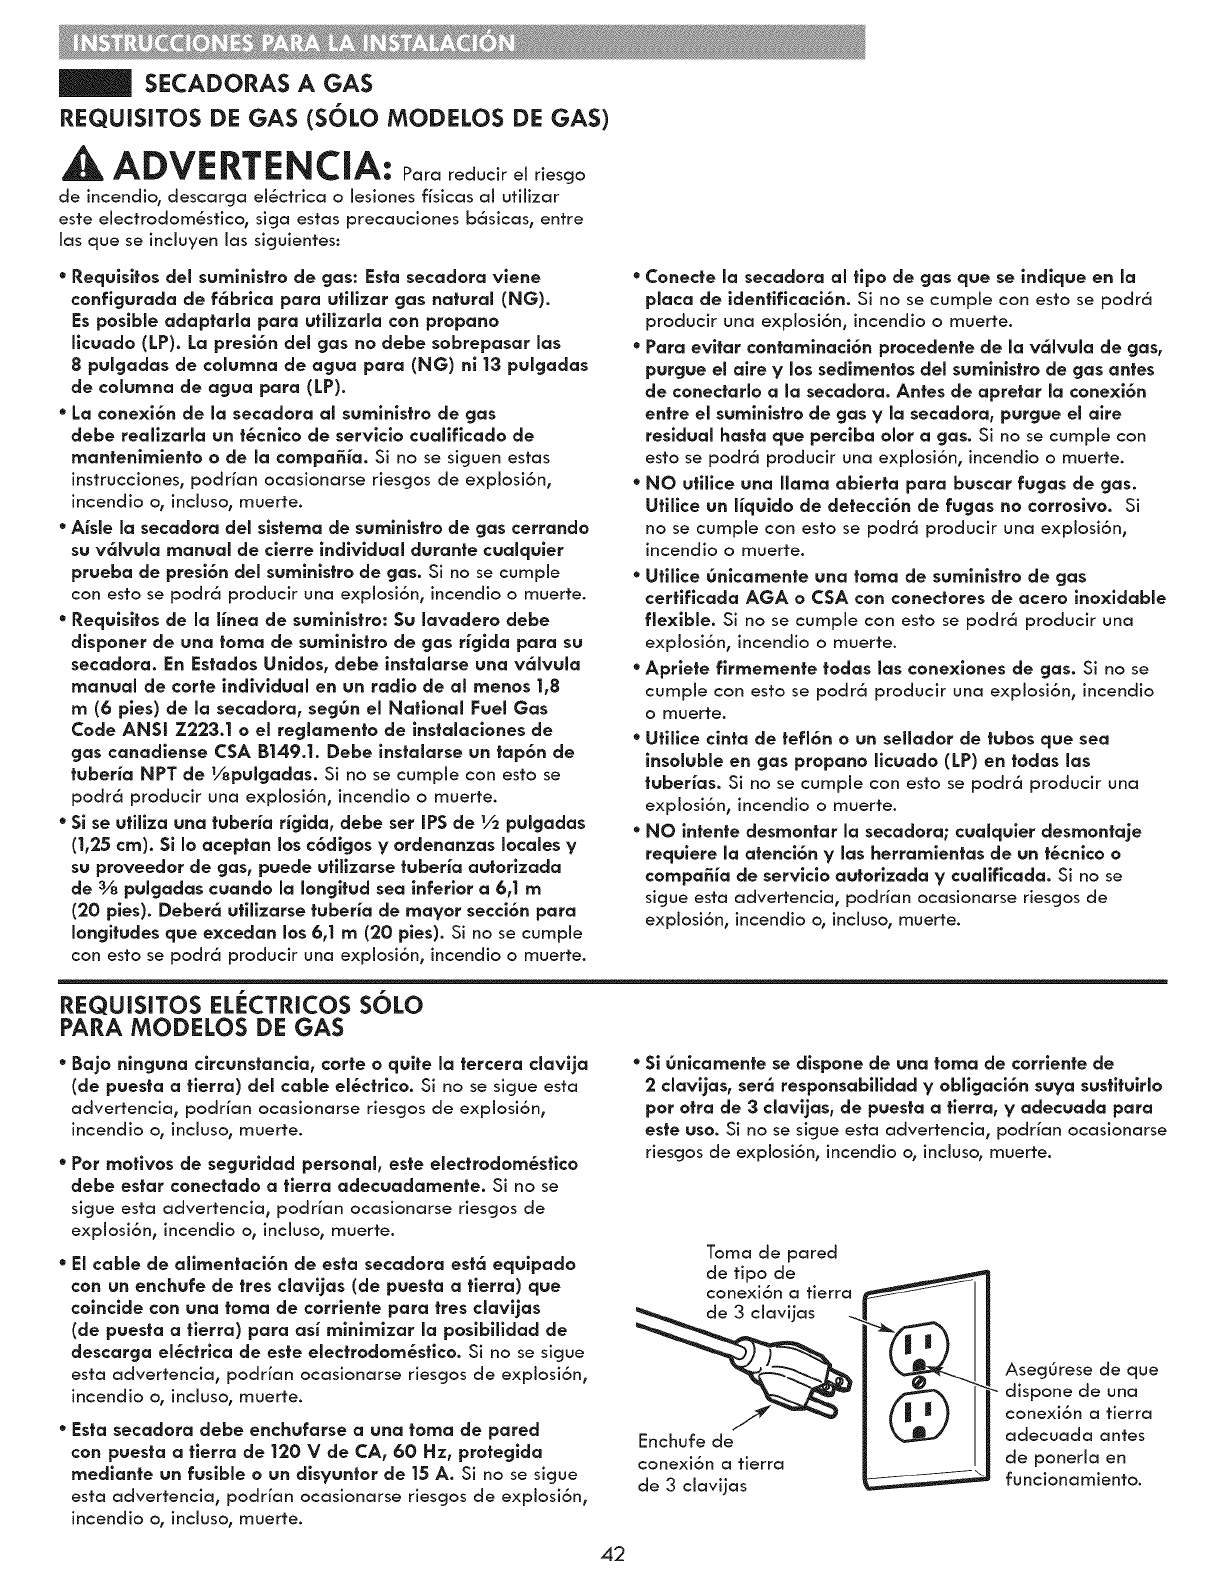
SECADORAS A GAS
REQUISITOS DE GAS (SOLO MODELOS DE GAS)
ADVERTENCIA: Pororedoc rr es o
de incendio, descarcja el_ctrica olesiones fisicas al utilizar
este electrodom_stico, siga estas precauciones b6sicas0 entre
ias que se inciuyen ias siguientes:
*Requlsltos del sumlnlstro de gas: Esta secadora vlene
conflgurada de fc_brlca para ufillzar gas natural (NG).
Es poslble adaptarla para utillzarla con propano
llcuado (LP). La presi6n del gas no debe sobrepasar las
8pulgadas de columna de agua para (NG) n113 pulgadas
de columna de agua para (LP).
* La conexi6n de la secadora al sumlnlstro de gas
debe reallzarla un t6cnlco de servlclo cuallflcado de
mantenlmlento o de la compa_a. Si no se siguen estas
instrucciones, podrian ocasionarse riescjos de expiosi6n,
incendio o, inciuso, muerte.
*Aisle la secadora del slstema de sumlnlstro de gas cerrando
su v61vula manual de clerre indlvldual durante cualquler
prueba de presi6n del sumlnlstro de gas. Si no se cumple
con esto se podr6 producir una explosi6n0 incendio o muerte.
*Requlsltos de la linea de sumlnlstro: Su lavadero debe
dlsponer de una toma de sumlnlstro de gas r_glda para su
secadora. En Es|ados Unldos, debe instalarse una v61vula
manual de torte indlvldual en un radio de al menos 1,8
m (6 pies) de la secadora, seg_n el Natlonal Fuel Gas
Code ANSi Z223.1 o el reglamento de instalaclones de
gas canadlense CSA B149.1. Debe instalarse un tap6n de
fuber_a NPT de Vepulgadas. Si no se cumple con esto se
podr6 producir una explosi6n, incendio o muerte.
* Si se ufiEza una fuber_a r_glda, debe set IPS de 1/2pulgadas
(1,25 cm). Si Io aceptan los c6dlgos yordenanzas locales y
su proveedor de gas, puede utillzarse tuberia autorlzada
de %pulgadas cuando la Iongltud sea inferior a6,1 m
(20 pies). Deber6 ufillzarse tuber_a de mayor secci6n para
longitudes que excedan los 6,1 m (20 pies). Si no se cumpie
con esto se podr6 producir una expiosi6n, incendio o muerte.
* Conecte la secadora al tlpo de gas que se indlque en la
plata de identlflcaci6n. Si no se cumpie con esto se podr6
producir una explosi6n, incendio omuerte.
* Para evltar contamlnaci6n procedente de la v61vula de gas,
purgue el alre y los sedlmentos del sumlnlstro de gas antes
de conectarlo ala secadora. Antes de apretar la conexi6n
entre el sumlnlstro de gas y la secadora, purgue el alre
residual hasta que perclba olor a gas. Si no se cumple con
esto se podr6 producir una explosi6n, incendio o muerte.
*NO utillce una ffama ablerta para buscar fugas de gas.
Ufillce un Equldo de detecci6n de fugas no corroslvo. Si
no se cumple con esto se podr6 producir una explosi6n,
incendio o muerte.
*Utillce Onlcamente una toma de sumlnlstro de gas
certlflcada AGA o CSA con conectores de acero inoxidable
flexlble. Si no se cumple con esto se podr6 producir una
explosi6n, incendio o muerte.
*Aprlefe flrmemenfe fodas las conexiones de gas. Si no se
cumple con esto se podr6 producir una expiosi6n, incendio
o muerte.
*Utifice clnta de tefl6n o un seHador de tubos que sea
insoluble en gas propano llcuado (LP) en todas las
tuberias. Si no se cumple con esto se podr6 producir una
explosi6n, incendio o muerte.
*NO intente desmontar la secadora; cualquler desmontaje
requlere la atenci6n y las herramlentas de un t&cnlco o
compa_a de servlclo autorlzada y cuaffflcada. Si no se
sigue esta advertencia, podrian ocasionarse riesgos de
explosi6n, incendio o, incluso, muerte.
REQUISITOS EL :CTRICO$ SOLO
PARA MODELOS DE GAS
*Bajo nlnguna clrcunstancla, corte o quite la tercera clavlja
(de puesta a tlerra) del cable el_ctrlco. Si no se sigue esta
advertencia, podrian ocasionarse riescjos de explosi6n,
incendio o, inciuso, muerte.
* Pot motlvos de segurldad personal, este electrodom_stlco
debe estar conectado a tlerra adecuadamente. Si no se
sigue esta advertencia, podrian ocasionarse riescjos de
explosi6n, incendio o, incluso, muerte.
* El cable de affmentaci6n de esta secadora est6 equlpado
con un enchufe de tres clavljas (de puesta a tlerra) que
coincide con una toma de corrlente para tres clavljas
(de puesta afierra) para asi mlnlmlzar la poslbilldad de
descarga el&ctrlca de este electrodom6stlco. Si no se sigue
esta advertencia, podrian ocasionarse riescjos de explosi6n,
incendio o, inciuso, muerte.
* Esta secadora debe enchufarse a una toma de pared
con puesta a tlerra de 120 V de CA, 60 Hz, proteglda
medlante un fusible o un dlsyuntor de 15 A. Si no se sicjue
esta advertencia, podrian ocasionarse riesgos de explosi6n,
incendio o, inciuso, muerte.
* Si Onlcamente se dlspone de una toma de corrlente de
2clavljas, set6 responsabilldad y obllgaci6n suya sustltulrlo
pot otra de 3 clavljas, de puesta a fierra, y adecuada para
este uso. Si no se sigue esta advertencia, podrian ocasionarse
riescjos de explosi6n, incendio o, inciuso, muerte.
Toma de pared
de tipo de
conexi6n a tierra
Enchufe de
conexi6n a tierra
de 3 clavijas
AsegOrese de que
dispone de una
conexi6n a tierra
adecuada antes
de ponerla en
funcionamiento.
42
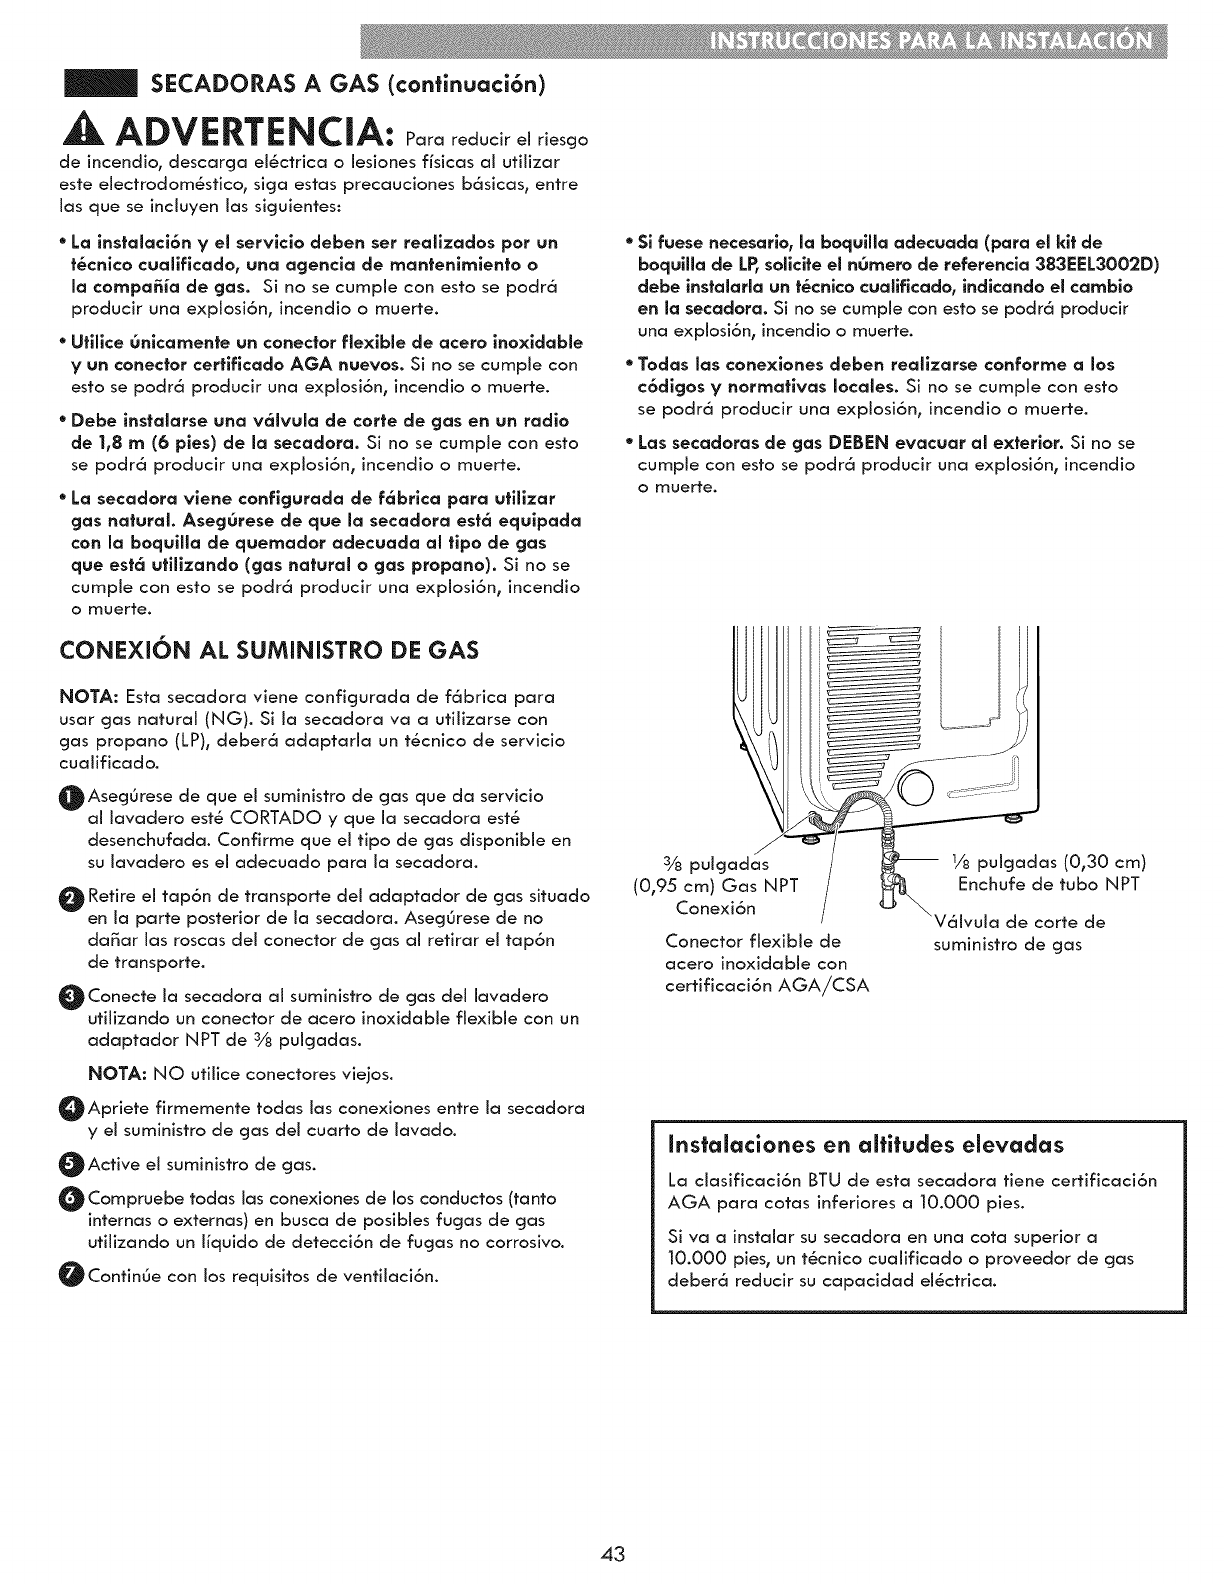
SECADORAS A GAS (confinuaci6n)
,A ADVERTENCIA: Para elr es o
de incendio, descarga el_ctrica olesiones fisicas al ufilizar
este electrodom_stico, siga estas precauciones b6sicas, entre
las que se inciuyen las siguientes:
* La instalaci6n ¥el servlclo deben set reallzados pot un
t&cnlco cuallflcado, una agencla de mantenlrnlento o
la compa_a de gas. Si no se cumple con esto se podr6
producir una explosi6n, incendio o muerte.
*Utillce 0nlcamente un conector flexible de acero inoxldable
yun conector certlflcado AGA nuevos. Si no se cumple con
esto se podr6 producir una explosi6n, incendio o muerte.
* Debe ;nstalarse una v61vula de corte de gas en un radio
de 1,8 m (6 pies) de la secadora. Si no se cumple con esto
se podr6 producir una explosi6n, incendio o muerte.
* La secadora vlene conflgurada de f6brlca para utillzar
gas natural. AsegOrese de que la secadora est6 equlpada
con la boquilla de quemador adecuada al tlpo de gas
que est6 ufillzando (gas natural o gas propano). Si no se
cumple con esto se podr6 producir una explosi6n, incendio
o muerte.
CONEXI6N AL SUMINISTRO DE GAS
NOTA: Esta secadora viene configurada de f6brica para
usar gas natural (NG). Si la secadora va a utilizarse con
gas propano (LP), deber6 adaptarla un t_cnico de servicio
cualificado.
@AsegOrese de que ei suministro de gas que da servicio
al lavadero est_ CORTADO y que la secadora est8
desenchufada. Confirme que el tipo de gas disponible en
su lavadero es el adecuado para la secadora.
O Retire el tap6n de transporte del adaptador de gas situado
en la parte posterior de la secadora. Asecj0rese de no
da_ar las roscas del conector de gas al retirar el tap6n
de transporte.
Conecte la secadora al suministro de gas del lavadero
utilizando un conector de acero inoxidable flexible con un
adaptador NPT de 3/8 puicjadas.
NOTA: NO utilice conectores viejos.
OApriete firmemente todas las conexiones entre la secadora
yel suministro de gas del cuarto de lavado.
_Active el suministro de cjas.
O Compruebe todas las conexiones de los conductos (tanto
internas oexternas) en busca de posibles fucjas de gas
utilizando un liquido de detecci6n de fucjas no corrosivo.
Contin6e con los requisitos de ventilaci6n.
* Sl fuese necesarlo, la boquilla adecuada (para el kit de
boquilla de LP_sollclte el n0rnero de referencla 383EEL3002D)
debe instalarla un t&cnlco cuallflcado, indlcando el camblo
en la secadora. Si no se cumple con esto se podr6 producir
una explosi6n, incendio o muerte.
* Todas las conexlones deben reallzarse conforme a los
c6dlgos y normafivas locales. Si no se cumple con esto
se podr6 producir una explosi6n, incendio o muerte.
* Las secadoras de gas DEBEN evacuar al exterior. Si no se
cumple con esto se podr6 producir una explosi6n, incendio
o muerte.
3/8 puigadas
(0,95 cm) Gas NPT
Conexi6n
Conector flexible de
acero inoxidabie con
certificaci6n AGA/CSA
......... S
_as (0,30 cm)
suministra de gas
Instalaciones en altitudes elevadas
La dasificaci6n BTU de esta secadora tiene certificaci6n
AGA para cotas inferiores a 10.000 pies.
Siva a instalar su secadora en una cota superior a
10.000 pies, un tScnico cuaiificado o proveedor de gas
deber6 reducir su capacidad eiSctrica.
43
SECADORAS ELECTRICAS
REQUISITOS ELECTRICOS
ADVERTENCIA: Porooyodoro
prevenir incendios, descorgos el_ctricos, lesiones groves o
incluso Io muerte, el cobleodo y Io puesto o tierro deben
cumplir Io edici6n m6s reciente del Notional Electrical Code,
ANSI/NFPA 70 y todas los normotivos locales de oplicoci6n.
P6ngose en contocto con un electricisto cuolificodo paro
comprobor el cobleodo y los fusibles de su viviendo poro
osegurorse de que dispone de la potencia el_ctrica adecuada
pora utilizar Io secodora.
AADVERTENCIA: Pororeducirelriesgo
de incendio, descorgo eiSctrico o iesiones fisicos oi utilizor
este electrodom_stico, sigo estos precouciones b6sicos, entre
los que se inciuyen los siguientes:
• Cualquler instalaci6n en una vlvlenda prefabrlcada om6vll
debe cumpllr con los dlrectrlces del Manufactured Home
Construction and Safety Standards, titulo 24 CFR, secci6n
3280 6 con el est6ndar CAN/CSA Z240 MH y los c6dlgos y
ordenanzas locales.
* Es necesarla una conexi6n tetrafilar para los instalaclones
reallzadas en todas los vlvlendas m6viles y prefabrlcadas,
as_ como toda nueva construcci6n a partlr del |de enero
de 1996. Si no se cumple con esto se podr6 producir uno
explosi6n, incendio o muerte.
AADVERTENCIA: Pororeducirelriesgo
de incendio, descorgo el_ctrico o lesiones fisicos ol utilizor
este electrodom_stico, sigo estos precouciones b6sicos, entre
los que se incluyen los siguientes:
* Esta secadora debe conectarse a un slstema de cableado
permanente met6ffco con conexi6n a tlerra o se debe
tender un conductor para la conexi6n atlerra del equlpo
con los conductores del clrculto Vconectado al terminal de
conexi6n a tlerra del equipo o al conductor de sumlnlstro
de la secadora. Si no se cumple con esto se podr6 producir
uno explosi6n, incendio o muerte.
* La secadora dlspone de un bloque de termlnales proplo que
debe conectarse a un clrculto monof6slco independlente
de 240 V de CA y 60 Hz, con fuslble de 30 A. El clrculto
debe dlsponer de fuslbles en ambos extremos de la linea.
EL SERVICIO ELECTRICO PARA LA SECADORA DEBE
SER DEL MAXIMO VOLTAJE NOMINAL INDICADO EN
LA PLACA DE ESPECIFICACIONES. NO CONECTE LA
SECADORA A UN CIRCUITO DE 110, 1156120 VOLTtOS.
Si no se siguen estos instrucciones, podrion ocosionorse
riesgos de explosi6n, incendio o, incluso, muerte.
*Si el ramal del clrculto a la secadora fiene una Iongltud
igual oinferior a 4,5 m(15 pies), ufillce el cable AWG
n.° 10 con clasificaci6n UL (Underwriters Laboratories)
(s61o cable de cobre) o el que requleran los normafivas
locales. Si supera los 4,50 rn (15 pies), utlllce el cable AWG
n.° 8 con clasificaci6n UL (s61o cable de cobre) o el que
requleran los normafivas locales. Permlta la suflclente
holgura en el cableado para que la secadora pueda
set desplazada de su ublcaci6n habltual cuando sea
necesarlo. Si no se cumple con esto se podr6 producir uno
explosi6n, incendio o muerte.
*La conexi6n del cable de affmentaci6n (cable flexible
de conexi6n) entre la toma de pared yel bloque de
termlnales de la secadora NO SE INCLUYE con la unldad.
El tlpo de cable flexible de conexi6n ysu calibre deben
cumpllr los normafivas locales ylos instrucclones que
se proporclonan en los pc_glnas slgulentes. Si no se
siguen estos instrucciones, podrion ocosionorse riesgos de
explosi6n, incendio o, inciuso, muerte.
* Es necesarlo dlsponer de una conexi6n tetrafilar en
toda nueva construcci6n a parfir del Ide enero de 1996.
Debe ufillzarse una conexi6n tetrafilar aHi donde los
normatlvas locales no permltan la puesta a tlerra atrav_s
del cable negtro. Si no se cumple esto odvertencio, se
podr6 producir uno explosi6n, incendio o muerte.
44
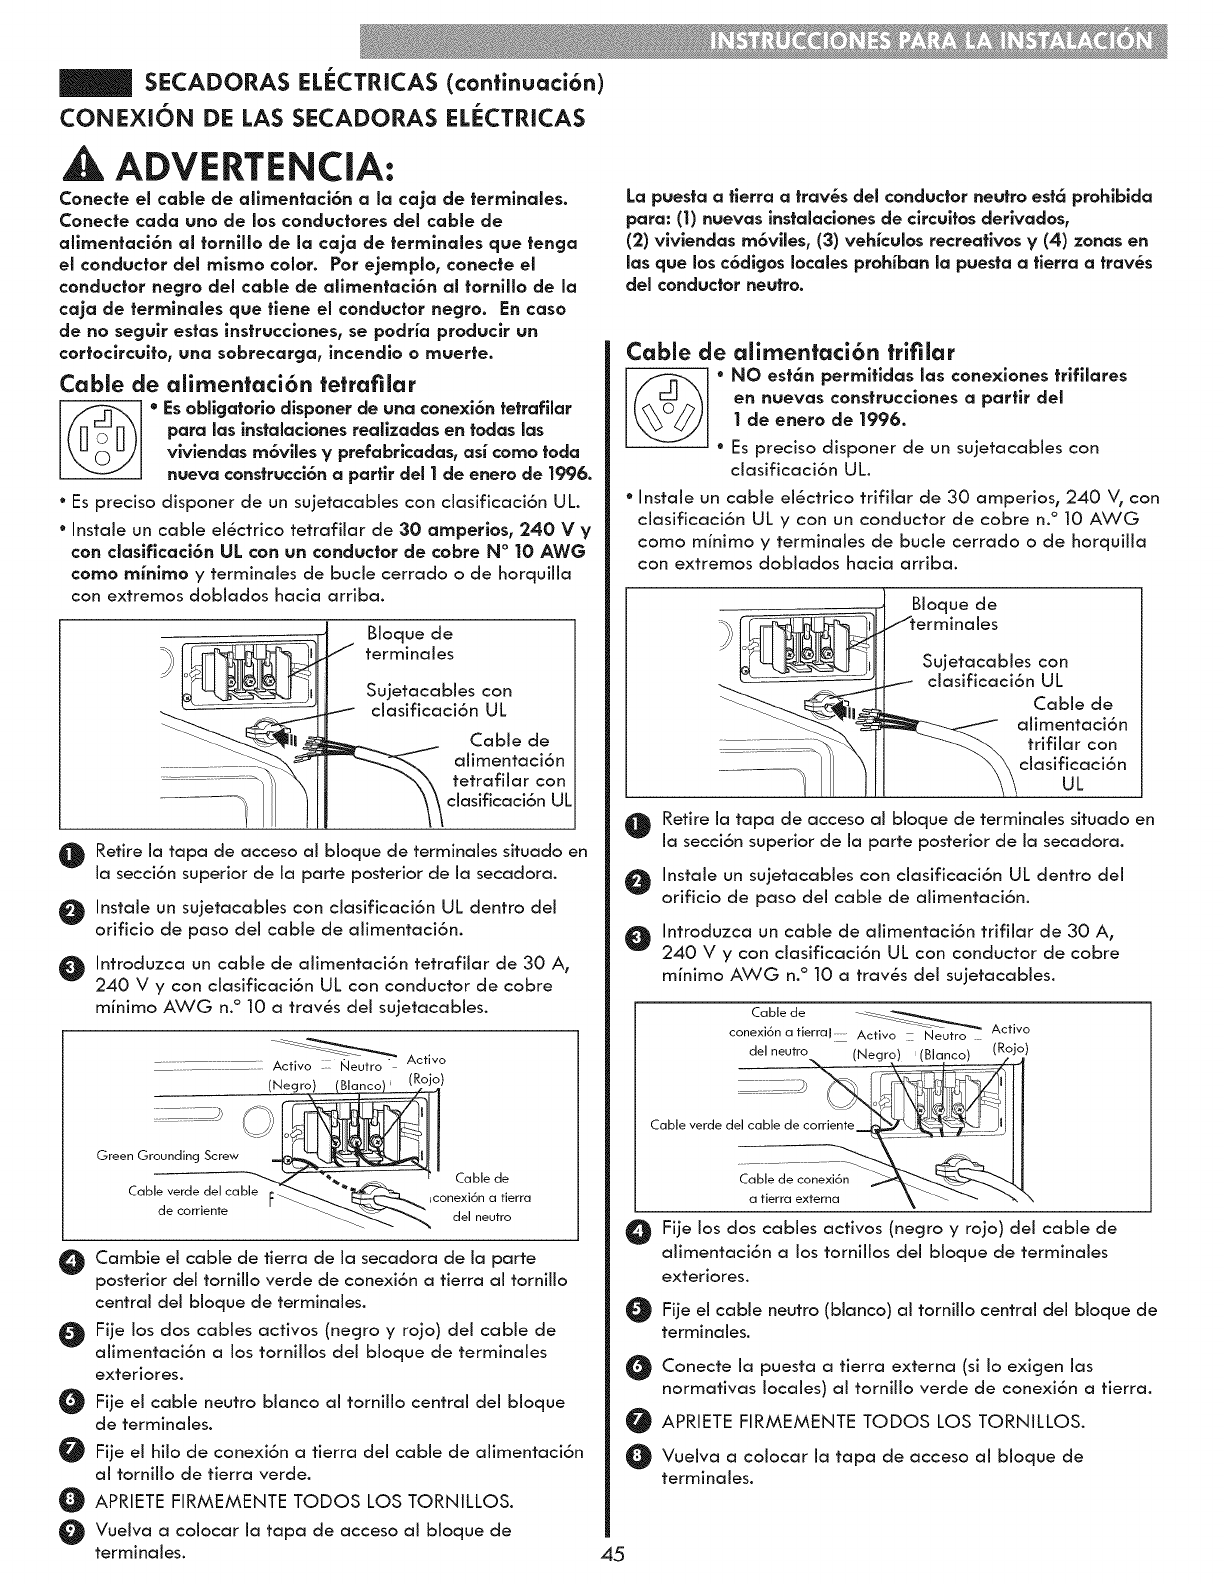
SECADORAS ELECTRICAS (confinuaci6n)
CONE×I6N DE LAS SECADORAS ELECTRICAS
ADVERTENCIA:
Conecte el cable de allrnentaci6n a la caja de termlnales.
Conecte cada uno de los conductores del cable de
allrnentaci6n al tornlilo de la caja de termlnales que tenga
el conductor del rnlsrno color. Por ejernplOr conecte el
conductor negro del cable de allrnentaci6n al tornlilo de la
caja de termlnales que tlene el conductor negro. En caso
de no segulr estas _nstrucclonesr se podr_a produclr un
cortoclrcultOr una sobrecargar incendlo omuerte.
Cable de affrnentaci6n tetrafilar
___ * Esobffgatorlo dlsponer de una conexi6n tetrafilar
para los instalaclones reallzodas en todas los
vlvlendas m6viles y prefabrlcadasr as_ como toda
nueva construcci6n aparfir del |de enero de |996.
°Es preciso disponer de un sujetacables con clasificaci6n UL.
°Instale un cable el_ctrico tetrafilar de 30 amperlosr 240 V y
con claslflcaci6n UL con un conductor de cobre N° 10 AWG
como rn_nlrno y terminales de bucie cerrado o de horquilla
con extremos doblados hacia arriba.
Bloque de
terminales
Sujetacables con
ciasificaci6n UL
Cable de
aiimentaci6n
tetrafilar con
clasificaci6n UL
Retire la tapa de acceso a[ bioque de terminales situado en
v la secci6n superior de la porte posterior de la secadora.
O Instale un sujetacables con ciasificaci6n UL dentro del
orificio de paso de[ cable de alimentaci6n.
Introduzca un cable de alimentaci6n tetrafilar de 30 A,
240 V y con clasificaci6n UL con conductor de cobre
m/nimo AWG n.° 10 a troves del sujetacabies.
........ .... Activo Neutro " Activo
(Negro) (Rojo)
Green Grounding Screw
- --_-_ Cable de
Cable verde del cable F_ '" afierra
de corriente del neutro
O Cambie el cable de tierra de la secadora de Ja porte
posterior deJ tornillo verde de conexi6n a tierra al tornillo
central deJ bloque de terminales.
O File los dos cables activos (negro y rojo) del cable de
alimentaci6n a los tornillos del bloque de terminales
exteriores.
File el cable neutro blanco al tornillo central del bioque
de terminales.
File el hilo de conexi6n a tierra del cable de alimentaci6n
al tornillo de tierra verde.
APRIETE FIRMEMENTE TODOS LOS TORNILLOS.
O Vueiva a colocar la tapa de acceso al bioque de
terminales.
La puesta a fierra a trav&s del conductor neutro estc_prohlblda
para: (1) nuevas instalaclones de clrcultos derlvadosr
(2) vlvlendas m6vileSr (3) vehkulos recreatlvos ¥(4) zonas en
los que los c6dlgos locales prohiban la puesta a fierra a trav_s
del conductor neutro.
Cable de alirnentaci6n trifilar
___ ° NO est6n permltldas los conexlones trlfilares
en nuevas construcclones apartlr del
|de enero de 1996.
°Es preciso disponer de un sujetacables con
clasificaci6n UL.
°Instale un cable ei_ctrico trifilar de 30 arnperios, 240 V, con
ciasificaci6n UL y con un conductor de cobre n. ° 10 AWG
como minimo y terminales de bucie cerrado o de horquilla
con extremos doblados hacia arriba.
_BJoque de
! -cLJ I 11! Suietacablescon
- .............. ]L_I clasificaci6n UL
__ Cable de
_._"_ alimentaci6n
trif]l.ar con
Retire la tapa de acceso a[ bJoque de terminales situado en
I_, la secci6n superior de la parte posterior de la secadora.
Instale un sujetacables con clasificaci6n UL dentro del
orificio de paso del cable de aJimentaci6n.
n Introduzca un cable de alimentaci6n trifilar de 30 A,
w240 V y con clasificaci6n UL con conductor de cobre
minimo AWG n.° 10 a troves del sujetacabies.
Cable de -_:_ Activo
conexi6n a tierral ..... Activo Neutro
del neutro (Negro) (Bla,nco)(Roj_)
Cable verde d /
a tierra externa _ _ _ _ \
O File los dos cables activos (negro y rojo) del cable de
alimentaci6n a los tornillos del bioque de terminales
exteriores.
Fije el cable neutro (blanco) al tornillo central del bloque de
terminales.
0 Conecte la puesta a tierra externa (si Io exigen las
normativas locales) al torniilo verde de conexi6n a tierra.
APRIETE FIRMEMENTE TODOS LOS TORNILLOS.
Vuelva a colocar la tapa de acceso al bioque de
terminales.
45
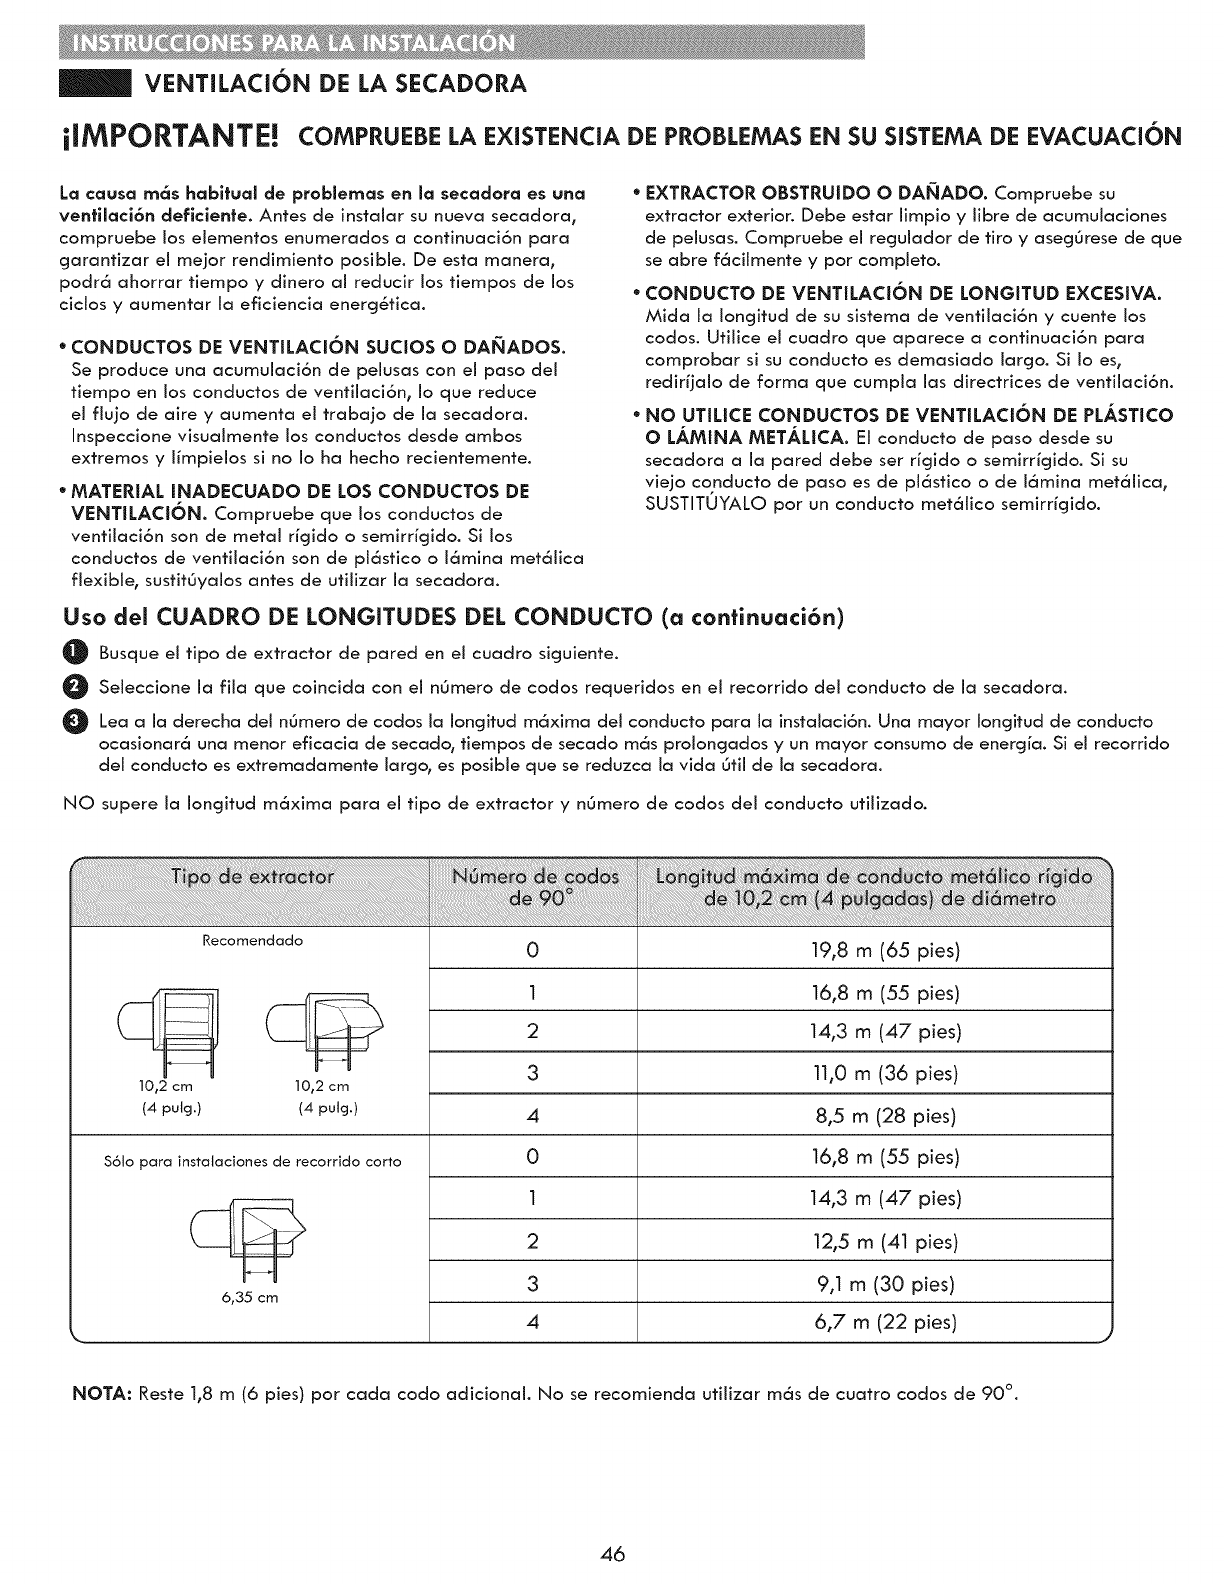
VENTILACION DE LA SECADORA
iIMPORTANTE! COMPRUEBE LA EXISTENCIA DE PROBLEMAS EN SU SISTEMA DE EVACUACION
La causa m6s habitual de problernas en la secadora es una
venfilaci6n deficlente. Antes de instalar su nueva secadora,
cornpruebe los elernentos enurnerados a continuaci6n para
cjarantizar el rnejor rendirniento posible. De esta rnanera,
podr6 ahorrar tiernpo y dinero al reducir los tiernpos de los
ciclos yaurnentar la eficiencia enercj_tica.
* CONDUCTOS DE VENTULACI6N SUCIOS O DAI_ADOS.
Se produce una acumulaci6n de pelusas con el paso del
tiernpo en los conductos de ventilaci6n, Io que reduce
el flujo de aire y aurnenta el trabajo de la secadora.
Inspeccione visualmente los conductos desde arnbos
extrernos y lirnpielos si no Io ha hecho recienternente.
* MATERIAL INADECUADO DE LOS CONDUCTOS DE
VENTULACI6N. Cornpruebe que los conductos de
ventilaci6n son de metal ricjido osernirricjido. Si los
conductos de ventilaci6n son de pl6stico o 16mina rnet61ica
flexible, susfit6yalos antes de utilizar la secadora.
* EXTRACTOR OBSTRUIDO O DAi_ADO. Compruebe su
extractor exterior. Debe estar iimpio y iibre de acumulaciones
de peiusas. Cornpruebe el regulador de tiro y asegOrese de que
se abre f6ciirnente y por cornpieto.
* CONDUCTO DE VENTILACI6N DE LONGITUD EXCESIVA.
Mida la Iongitud de su sistema de ventilaci6n y cuente los
codos. Utiiice ei cuadro que aparece a continuaci6n para
cornprobar si su conducto es dernasiado largo. Siio es,
rediriialo de forrna que curnpia ias directrices de ventiiaci6n.
*NO UTILICE CONDUCTOS DE VENTILACI6N DE PLASTUCO
O LAMINA METALmCA. El conducto de paso desde su
secadora a la pared debe ser ricjido osernirricjido. Si su
viejo conducto de paso es de pi6stico o de i6rnina met6iica0
SUSTITOYALO por un conducto rnet6iico sernirrigido.
Uso del CUADRO DE LONGITUDES DEL CONDUCTO (a confinuaci6n)
@Busque el tipo de extractor de pared en el cuadro siguiente.
0 Seleccione ia fiia que coincida con ei n6rnero de codos requeridos en ei recorrido dei conducto de ia secadora.
Lea a ia derecha dei n6rnero de codos ia iongitud rn6xima del conducto para ia instaiaci6n. Una mayor iongitud de conducto
ocasionar6 una rnenor eficacia de secado, tiernpos de secado m6s prolongados y un mayor consurno de energia. Si ei recorrido
dei conducto es extrernadarnente largo0 es posibie que se reduzca ia vida 6tii de ia secadora.
NO supere ia ioncjitud m6xima para ei tipo de extractor y nOmero de codos dei conducto utilizado.
10,2 cm
(4 pulg.)
Recomendado 0
1
2
3
4
19,8 m (65 pies)
16,8 m (55 pies)
14,3 m (47 pies)
11,0 m (36 pies)
8,5 m (28 pies)
16,8 m (55 pies)
10,2 cm
(4 putg.)
$61o para instataciones de recorrido corto 0
1
2
3
4
6,35 cm
14,3 m (47 pies)
12,5 m (41 pies)
9,1 m (30 pies)
6,7 m (22 pies)
NOTA: Reste 1,8 rn (6 pies) por cada codo adicionai. No se recomienda utilizar m6s de cuatro codos de 90 °.
46
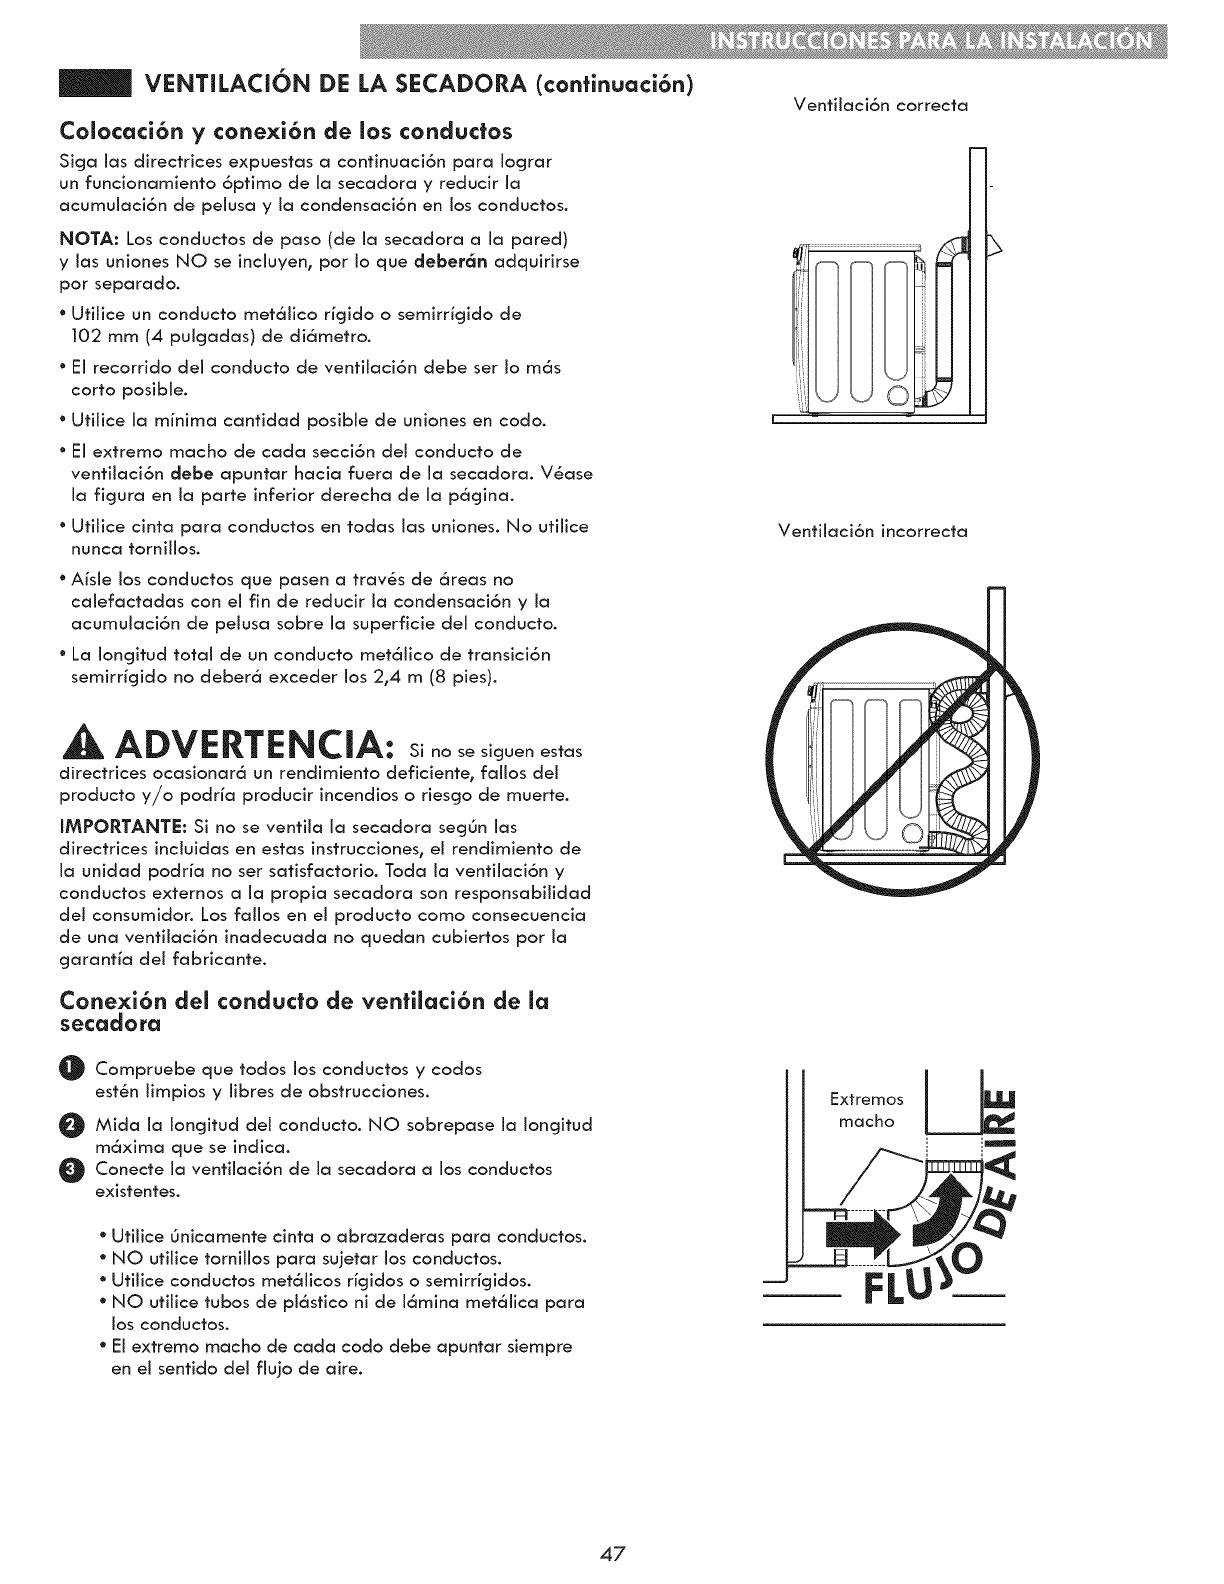
VENTILACION DE LA SECADORA (confinuaci6n)
Colocaci6n yconexi6n de los conductos
Siga las directrices expuestas a confinuaci6n para Iograr
un funcionamiento 6ptimo de la secadora y reducir la
acumuiaci6n de pelusa y la condensaci6n en los conductos.
NOTA: Los conductos de paso (de ia secadora a ia pared)
y ias uniones NO se inciuyen, por io que deber6n adquirirse
por separado.
°Ufilice un conducto met61ico ricjido o semirrigido de
102 mm (4 puigadas) de di6metro.
°Ei recorrido del conducto de ventiiaci6n debe ser io m6s
corto posible.
°Ufilice ia minima cantidad posibie de uniones en codo.
°Ei extremo macho de cada secci6n del conducto de
ventilaci6n debe apuntar hacia fuera de ia secadora. VSase
ia figura en ia parte inferior derecha de ia p6gina.
°Ufilice cinta para conductos en todas ias uniones. No utilice
nunca tornillos.
°Aisle los conductos que pasen a trav_s de 6reas no
calefactadas con el fin de reducir la condensaci6n y la
acumuiaci6n de pelusa sobre la superficie del conducto.
°La Iongitud totaJ de un conducto met61ico de transici6n
semirricjido no deber6 exceder los 2°4 m (8 pies).
ADVERTENCIA: noses oenes as
directrices ocasionar6 un rendimiento deficiente, faHos del
producto y/o podrfa producir incendios o riescjo de muerte.
IMPORTANTE: Si no se ventila la secadora secjOn las
directrices incluidas en estas instrucciones, el rendimiento de
la unidad podria no ser satisfactorio. Toda la ventilaci6n y
conductos externos a la propia secadora son responsabilidad
del consumidor. Los fallos en el producto como consecuencia
de una ventilaci6n inadecuada no quedan cubiertos por la
cjaranfia del fabricante.
Conexi6n del conducto de venfilaci6n de la
secadora
@Compruebe que todos los conductos y codas
est_n limpios y libres de obstrucciones.
Mida la Ioncjitud del conducto. NO sobrepase la Iongitud
m6xima que se indica.
Conecte la ventilaci6n de la secadora a los conductos
existentes.
°Utilice 6nicamente cinta oabrazaderas para conductos.
°NO utiJice tornillos para sujetar los conductos.
°Utilice conductos met61icos ricjidos o semirricjidos.
°NO utilice tubos de pl6stico ni de 16mina met61ica para
los conductos.
°El extremo macho de cada codo debe apuntar siempre
en eJ sentido deJ fJujo de aire.
Ventilaci6n correcta
Ventilaci6n incorrecta
Extrem°sl_
macho _=.
47

NIVELACi()N DE LA SECADORA
ADVERTENCIA-
°Utiiice cjuantes durante ia instaiaci6n.
°Si no se sicjuen estas in strucciones puede provocar iesiones
fisicas.
Para asegurarse de obtener un secado 6ptimo, ia secadora
debe estar niveiada. Para minimizar ia vibraci6n, los ruidos
y los movimientos no deseados0 el piso deber6 ser una
superficie perfectamente niveiada y s6iida.
NOTA: Ajuste los pies de niveiaci6n s6io io necesario para
niveiar la secadora. Si se extienden los pies de niveiaci6n
m6s de io necesarioo se pueden provocar vibraciones en ia
secadora.
Nivel
INVERSION DE LA PUERTA
Ei sentido de ia basculaci6n de ia puerta de la secadora se
puede invertir para adaptario ai sitio de instaiaci6n.
ADVERTENCIA:
LA PUERTA DE LA SECADORA ES MUY GRANDE Y
PESADA. Si no se sicjuen ias instrucciones que se indican a
continuaci6n0 se pueden producir da_os en la secadora0 da_os
materiales o lesiones personales.
°Para evitar da_os a la secadora o la puerta, sostencja la
puerta con un banco o una caja del tama_o adecuado o
busque a otra persona que le ayude a sosteneria.
°Voltee la puerta ANTES de montar la secadora sobre la
lavadora
°Tencja cuidado de no dejar caer la puerta para evitar da_os
en ella oel piso.
Pies de niveiaci6n
@Coloque la secadora en su ubicaci6n final. Coloque un
nivei sobre ia parte superior de ia secadora.
Las cuatro patas niveladoras deben apoyarse firmemente
en el piso. Presione iigeramente ias esquinas superiores de
ia secadora para asegurarse de que no existe desequilibrio
entre elias.
Cerrojo
de la
puerta
_ _ Tornillos
"_ de ias
bisagras
Tornillos del cerrojo
O Abra la puerta de la secadora.
Con un destornillador Phillips, saque los dos tornillos dei
cerrojo y retire ei cerrojo.
Para sacar ias dos tapas que est6n arriba y abajo dei
cerrojo, girelas iigeramente hacia ia derecha.
_ Mientras sostiene ia puerta, saque los cuatro tornillos de
ias bisacjras.
A PRECAUCI6N: AsegOrese de que puede sostener ei peso
de ia puerta antes de retirar los tornillos de ia bisagra.
Voitee ia puerta con cuidado einst6iela nuevamente en ei
iado opuesto, usando los tornillos que retir6 en ei paso 4.
@Use una Ilave inglesa para girar los pies de nivelaci6n.
Gire el pie de nivelaci6n en sentido horario para elevar
la secadora y girelo en sentido antihorario para bajarla.
Con un nivel, ajuste los pies hasta que la secadora quede
nivelada de lado a lado y de adelante hacia atr6s.
Aseg6rese de que los cuatro pies est6n en contacto
directo con el suelo.
NOTA: Si desea instalar la secadora sobre el pedestal
opcionai, deber6 retraer compietamente los pies de niveiaci6n.
Utiiice los pies de niveiaci6n dei pedestal para niveiar ia
secadora.
@
@
Inserte la
. _ tapa
____ Tornillos
del cerrojo
Instale el cerrojo de la puerta en la abertura que est6
en el lado desde el cual se refir6 la puerta, usando los
tornillos del paso 2.
Coloque nuevamente las tapas que refir6 en el paso 3
en los odficios arriba y abajo del cerrojo en donde la
puerta estaba colocada oricjinalmente.
Verifique que la puerta funcione correctamente y
asecj6rese de que el cerrojo cierre bien.
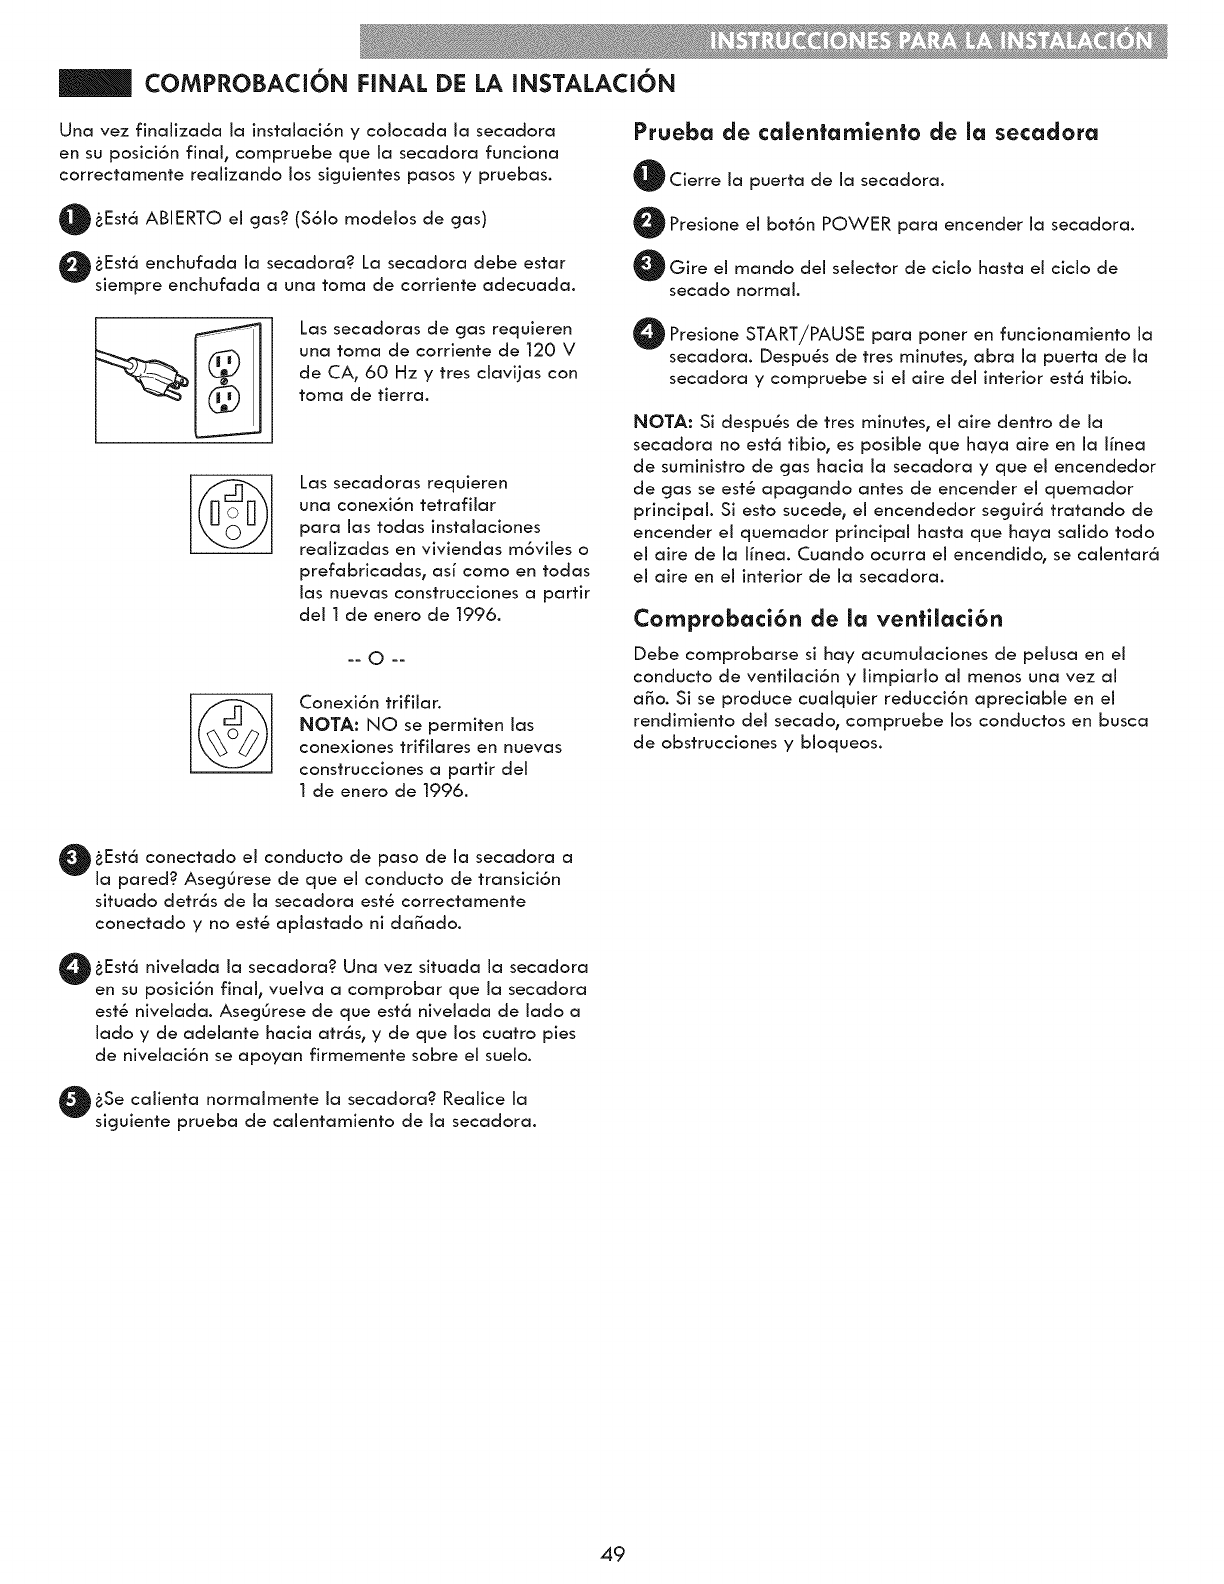
COMPROBACi6N FINAL DE LA INSTALACi6N
Una vez finalizada Ja instalaci6n y colocada Ja secadora
en su posici6n final, compruebe que Ja secadora funciona
correctamente realizando los sicjuientes pasos y pruebas.
_Est6 ABIERTO el gas? ($61o modelos de gas)
_Est6 enchufada la secadora? La secadora debe estar
slempre enchufada a una toma de corriente adecuada.
Prueba de calentarniento de la secadora
O Cierre la puerta de la secadora.
O Presione el bot6n POWER para encender la secadora.
OGire el mando del selector de ciclo basra el cicio de
secado normal.
©
Las secadoras de gas requieren
una toma de corriente de 120 V
de CA, 60 Hz y tres clavijas con
toma de tierra.
Las secadoras requieren
una conexi6n tetrafilar
para las todas instalaciones
realizadas en viviendas m6viies o
prefabricadas, asi como en todas
las nuevas construcciones a partir
del 1 de enero de 1996.
-- O--
Conexi6n trifilar.
NOTA: NO se permiten las
conexiones trifilares en nuevas
construcciones a partir del
1 de enero de 1996.
O Presione START/PAUSE para poner en funcionamiento la
secadora. Despu6s de tres minutes, abra la puerta de la
secadora y compruebe si el aire del interior est6 tibio.
NOTA: Si despu_s de tres minutes, el aire dentro de la
secadora no est6 tibio, es posible que haya aire en la linea
de suministro de gas hacia la secadora y que el encendedor
de gas se est_ apagando antes de encender el quemador
principal. Si esto sucede, el encendedor seguir6 tratando de
encender el quemador principal basra que haya salido todo
el aire de la linea. Cuando ocurra el encendido, se calentar6
el aire en el interior de la secadora.
Cornprobaci6n de la venfilaci6n
Debe comprobarse si hay acumulaciones de pelusa en el
conducto de venfilaci6n y limpiarlo al menos una vez al
a_o. Si se produce cualquier reducci6n apreciable en el
rendimiento del secado, compruebe los conductos en busca
de obstrucciones y bloqueos.
O_Est6 conectado el conducto de de la secadora
paso a
la pared? Asecj0rese de que el conducto de transici6n
situado detr6s de la secadora est_ correctamente
conectado y no est', apiastado ni da_ado.
_Est6 nivelada la secadora? Una vez situada la secadora
en su posici6n final, vuelva a comprobar que la secadora
est_ niveJada. Asecj0rese de que est6 nivelada de Jado a
Jado y de adeJante hacia atr6s, y de que los cuatro pies
de niveJaci6n se apoyan firmemente sobre el sueJo.
_Se caiienta normalmente la secadora? Realice la
sicjuiente prueba de calentamiento de la secadora.
49
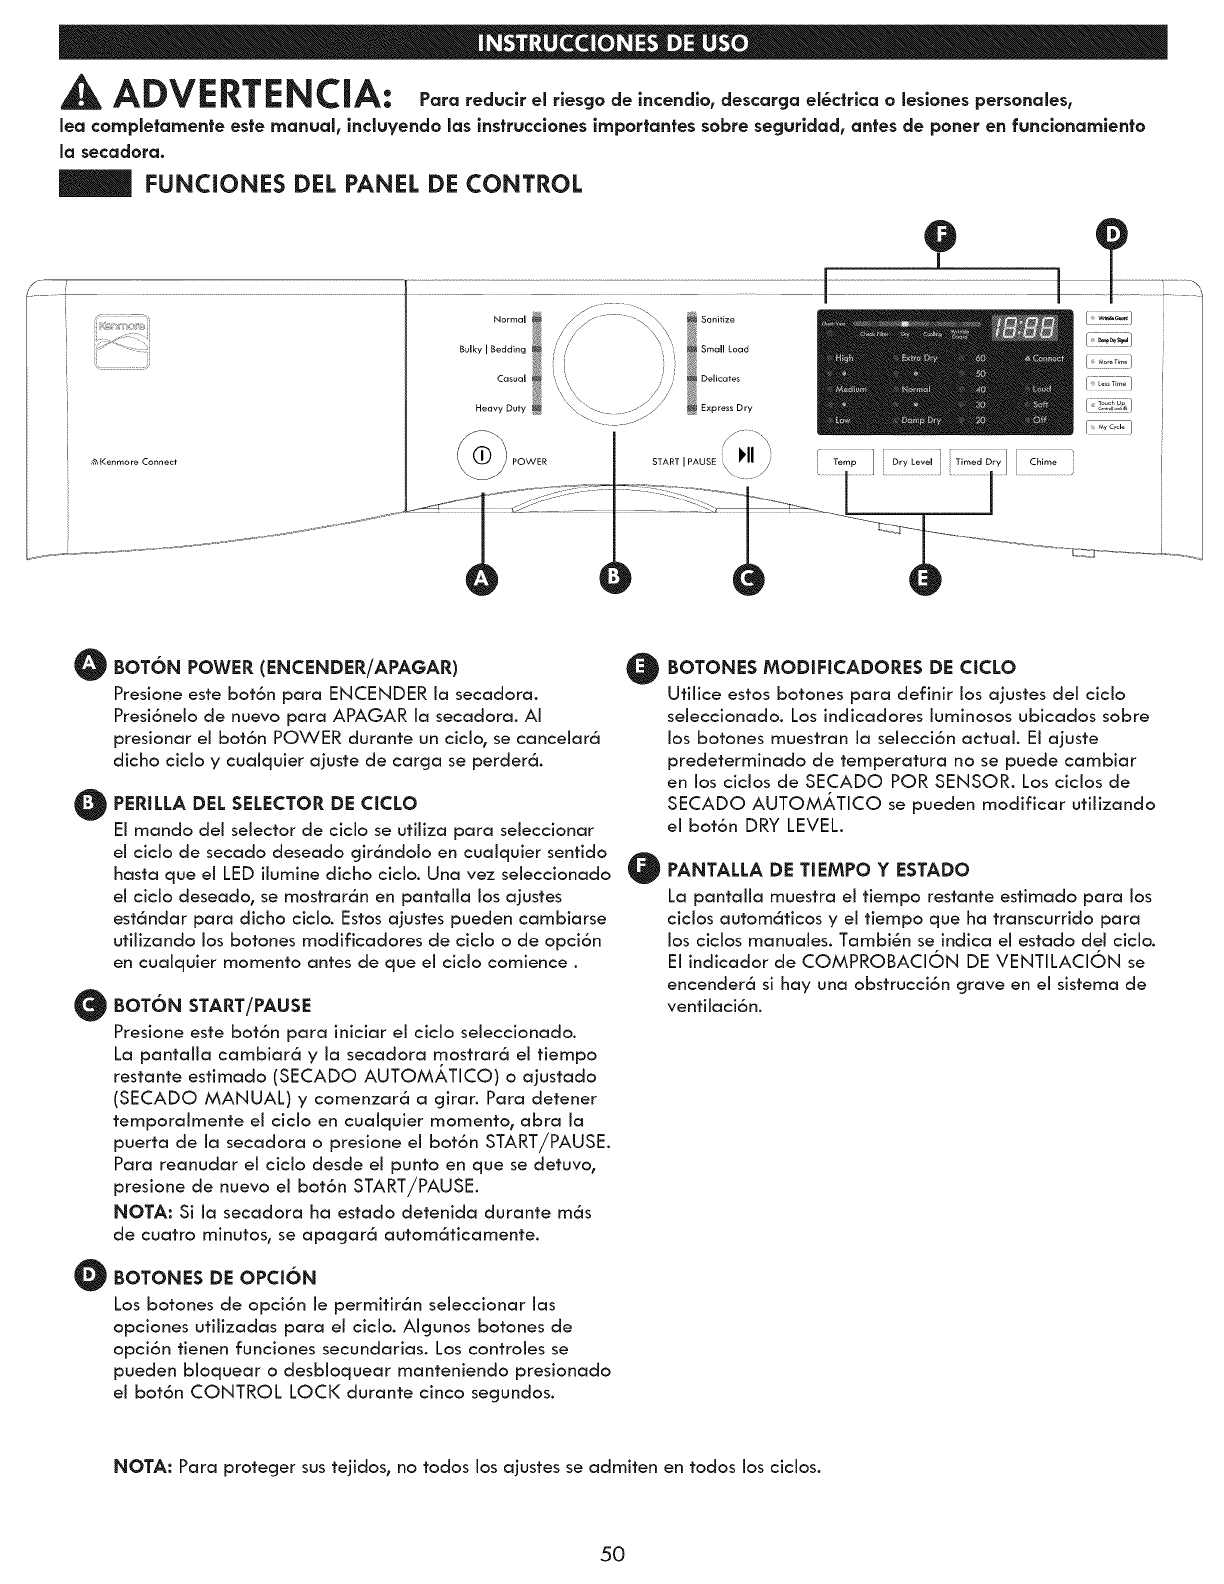
ADVERTENCIA: Para reduclr el rlesgo de incendlo, descarga el@cfrlca o leslones personales,
lea completamente este manual, incluyendo las instrucclones importantes sobre secjurldad, antes de poner en funclonamlen|o
la secadora.
FUNCIONES DEL PANEL DE CONTROL
i%11111111_¸_i
_ Kenmore Connect
O
@
e
o
BOT6N POWER (ENCENDER/APA6AR)
Presione este bot6n para ENCENDER la secadora.
Presi6nelo de nuevo para APAGAR la secadora. Ai
presionar el bot6n POWER durante un ciclo, se cancelar6
dicho cicio y cualquier ajuste de carcja se perder6.
PERILLA DEL SELECTOR DE CICLO
El mando del selector de ciclo se utiliza para seleccionar
el ciclo de secado deseado cjir6ndolo en cualquier sentido
hasta que el LED ilumine dicho ciclo. Una vez seleccionado
el ciclo deseado, se mostrar6n en pantalla los ajustes
est6ndar para dicho ciclo. Estos ajustes pueden cambiarse
utilizando los botones modificadores de ciclo o de opci6n
en cualquier momento antes de que el ciclo comience.
BOT6N START/PAUSE
Presione este bot6n para iniciar el ciclo seleccionado.
La pantalla cambiar6 y la secadora mostrard_ el tiempo
restante estimado (SECADO AUTOMJ_TICO) o ajustado
(SECADO MANUAL) y comenzar_ a cjirac Para detener
temporalmente el ciclo en cualquier momento, abra la
puerta de la secadora o presione el bot6n START/PAUSE.
Para reanudar el ciclo desde el punto en que se detuvo,
presione de nuevo el bot6n START/PAUSE.
NOTA: Si la secadora ha estado detenida durante m_s
de cuatro minutos, se apacjar_ autom_ticamente.
BOTONES DE OPCI6N
Los botones de opci6n le permitir6n seleccionar las
opciones utilizadas para el ciclo. Algunos botones de
opci6n tienen funciones secundarias. Los controles se
pueden bioquear o desbloquear manteniendo presionado
el bot6n CONTROL LOCI< durante cinco secjundos.
@
0
BOTONES MODIFICADORES DE CICLO
Utilice estos botones para definir los ajustes del ciclo
seleccionado. Los indicadores luminosos ubicados sobre
los botones muestran la selecci6n actual. El ajuste
predeterminado de temperatura no se puede cambiar
en los ciclos de SECADO POR SENSOR. Los ciclos de
SECADO AUTOMATICO se pueden modificar utilizando
el bot6n DRY LEVEL.
PANTALLA DE TIEMPO Y ESTADO
La pantalla muestra el tiempo restante estimado para los
ciclos autom6ticos y el tiempo que ha transcurrido para
los ciclos manuales. Tambi@n se indica el estado del ciclo.
El indicador de COMPROBACION DE VENTILACION se
encender6 si hay una obstrucci6n grave en el sistema de
ventilaci6n.
NOTA: Para protecjer sus tejidos, no todos los ajustes se admiten en todos los ciclos.
50
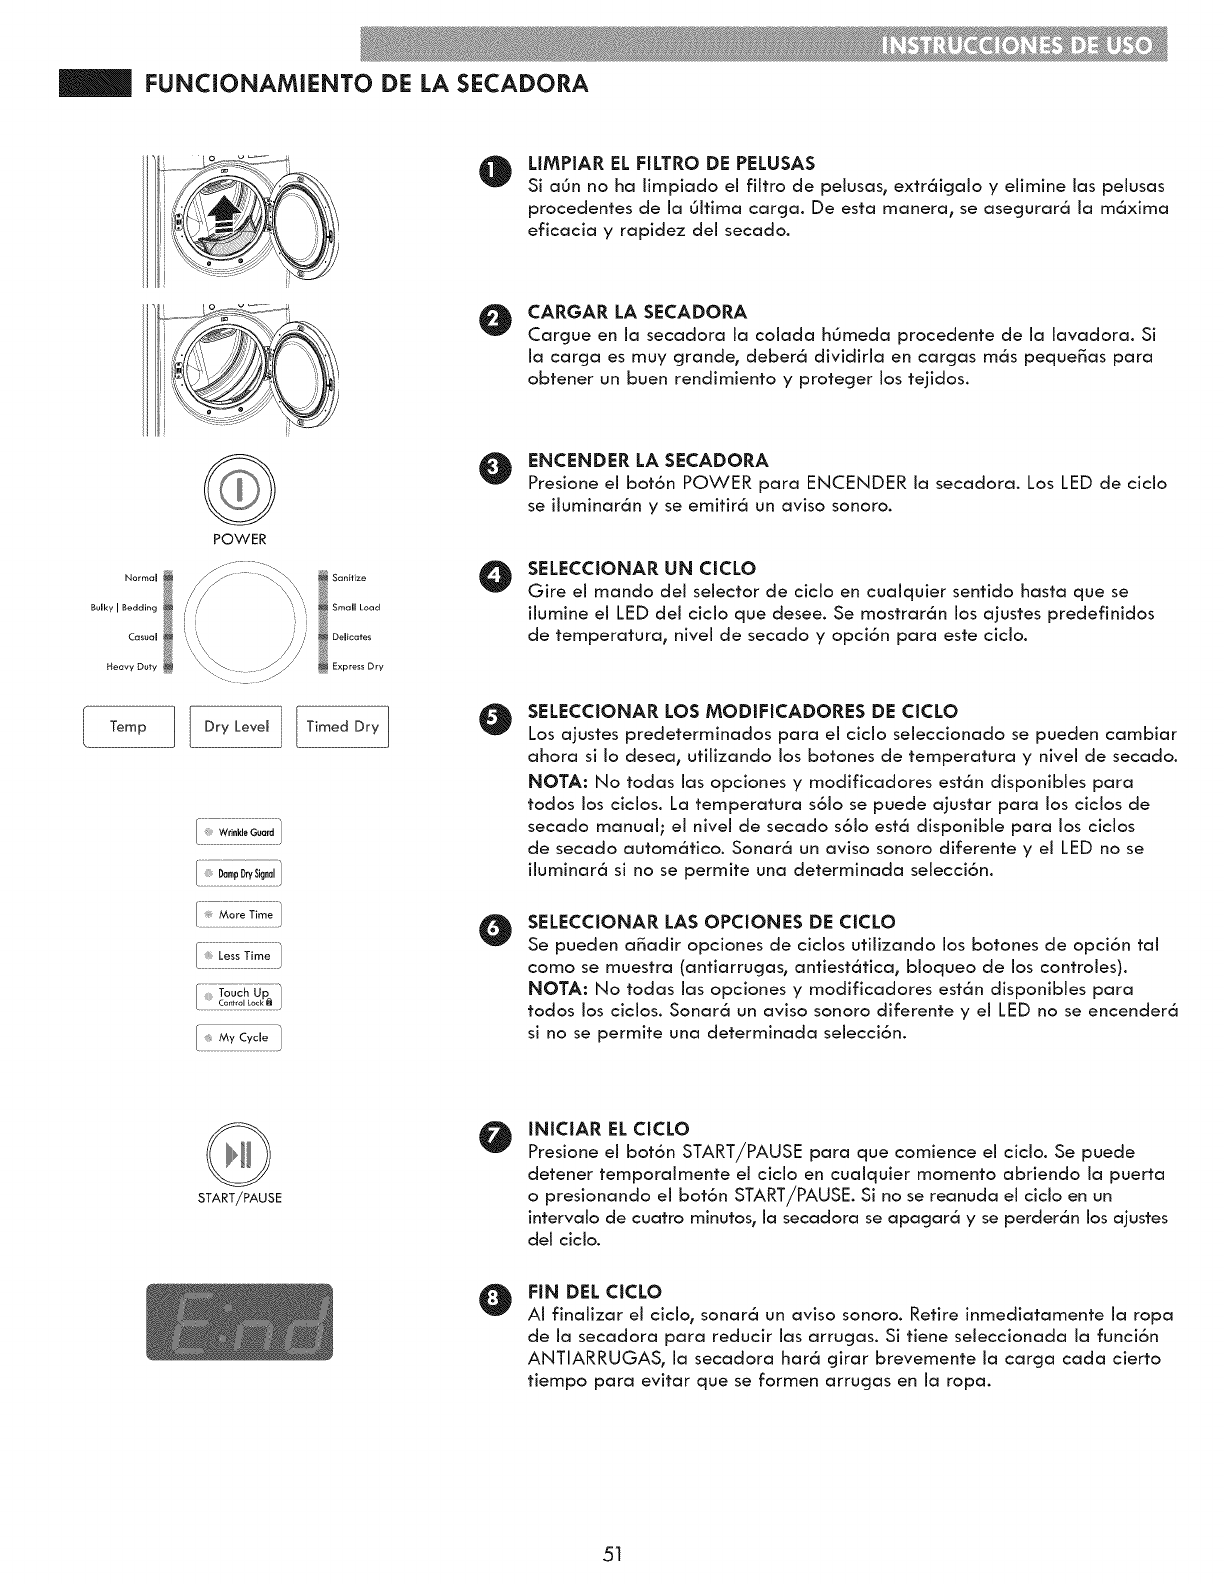
FUNCIONAMIENTO DE LA SECADORA
Normal
Bulky [ Bedding
Casual
Heavy Duty
POWER
ITemo1lOryLevo
0
0
LIMPIAR EL FILTRO DE PELUSAS
Si aOn no ha iimpiado ei fiitro de peiusas, extr6igaio y elimine ias peiusas
procedentes de la 0itima ¢arga. De estcl manerc b se clsegurar_ la m6xima
eficclcicl y rclpidez del seccldo.
CARGAR LA SECADORA
Cargue en ia secadora ia colada h6meda procedente de ia iavadora. Si
ia carga es muy grande, deber6 dividiria en carcjas m6s peque_as para
obtener un buen rendimiento y protecjer los tejidos.
O NCENDER LA SECADORA
Presione el bot6n POWER para ENCENDER la secadora. Los LED de ciclo
se iiuminar6n y se emitir6 un aviso sonoro.
O
O
O
SELECCIONAR UN CiCLO
Gire ei mando dei selector de cicio en cuaiquier sentido hasta que se
iiumine el LED dei cicio que desee. Se mostrar6n los ajustes predefinidos
de temperatura0 nivei de secado y opci6n para este cicio.
SELECCIONAR LOS MODtFICADORES DE CICLO
Los a]ustes predeterminados para ei cicio seleccionado se pueden cambiar
ahora siio desea_ utilizando los botones de temperatura y nivei de secado.
NOTA: No todas ias opciones y modificadores est6n disponibies para
todos los cicios. La temperatura s6io se puede aiustar para los cicios de
secado manual; ei nivei de secado s6io est6 disponibie para los cicios
de secado autom6tico. Sonar6 un aviso sonoro diferente y ei LED no se
iiuminar6 si no se permite una determinada seiecci6n.
SELECCIONAR LAS OPCIONES DE CICLO
Se pueden a_adir opciones de cicios utilizando los botones de opci6n tai
como se muestra (antiarrugas, antiest6tica, bioqueo de los controies).
NOTA: No todas ias opciones y modificadores est6n disponibles para
todos los cicios. Sonar6 un aviso sonoro diferente y ei LED no se encender6
si no se permite una determinada seiecci6n.
START/PAUSE
OINJCIAR EL CICLO
Presione ei bot6n START/PAUSE para que comience ei cicio. Se puede
detener temporaimente el cicio en cuaiquier momento abriendo ia puerta
o presionando ei bot6n START/PAUSE. Si no se reanuda ei cicio en un
intervaio de cuatro minutos0 ia secadora se apagar6 y se perder6n los ajustes
del cicio.
OFIN DEL CICLO
Ai finaiizar el cicio, sonar6 un aviso sonoro. Retire inmediatamente ia ropa
de la secadora para reducir ias arrugas. Si tiene seleccionada ia funci6n
ANTIARRUGAS_ ia secadora bar6 girar brevemente ia carga cada cierto
tiempo para evitar que se formen arrugas en ia ropa.
51
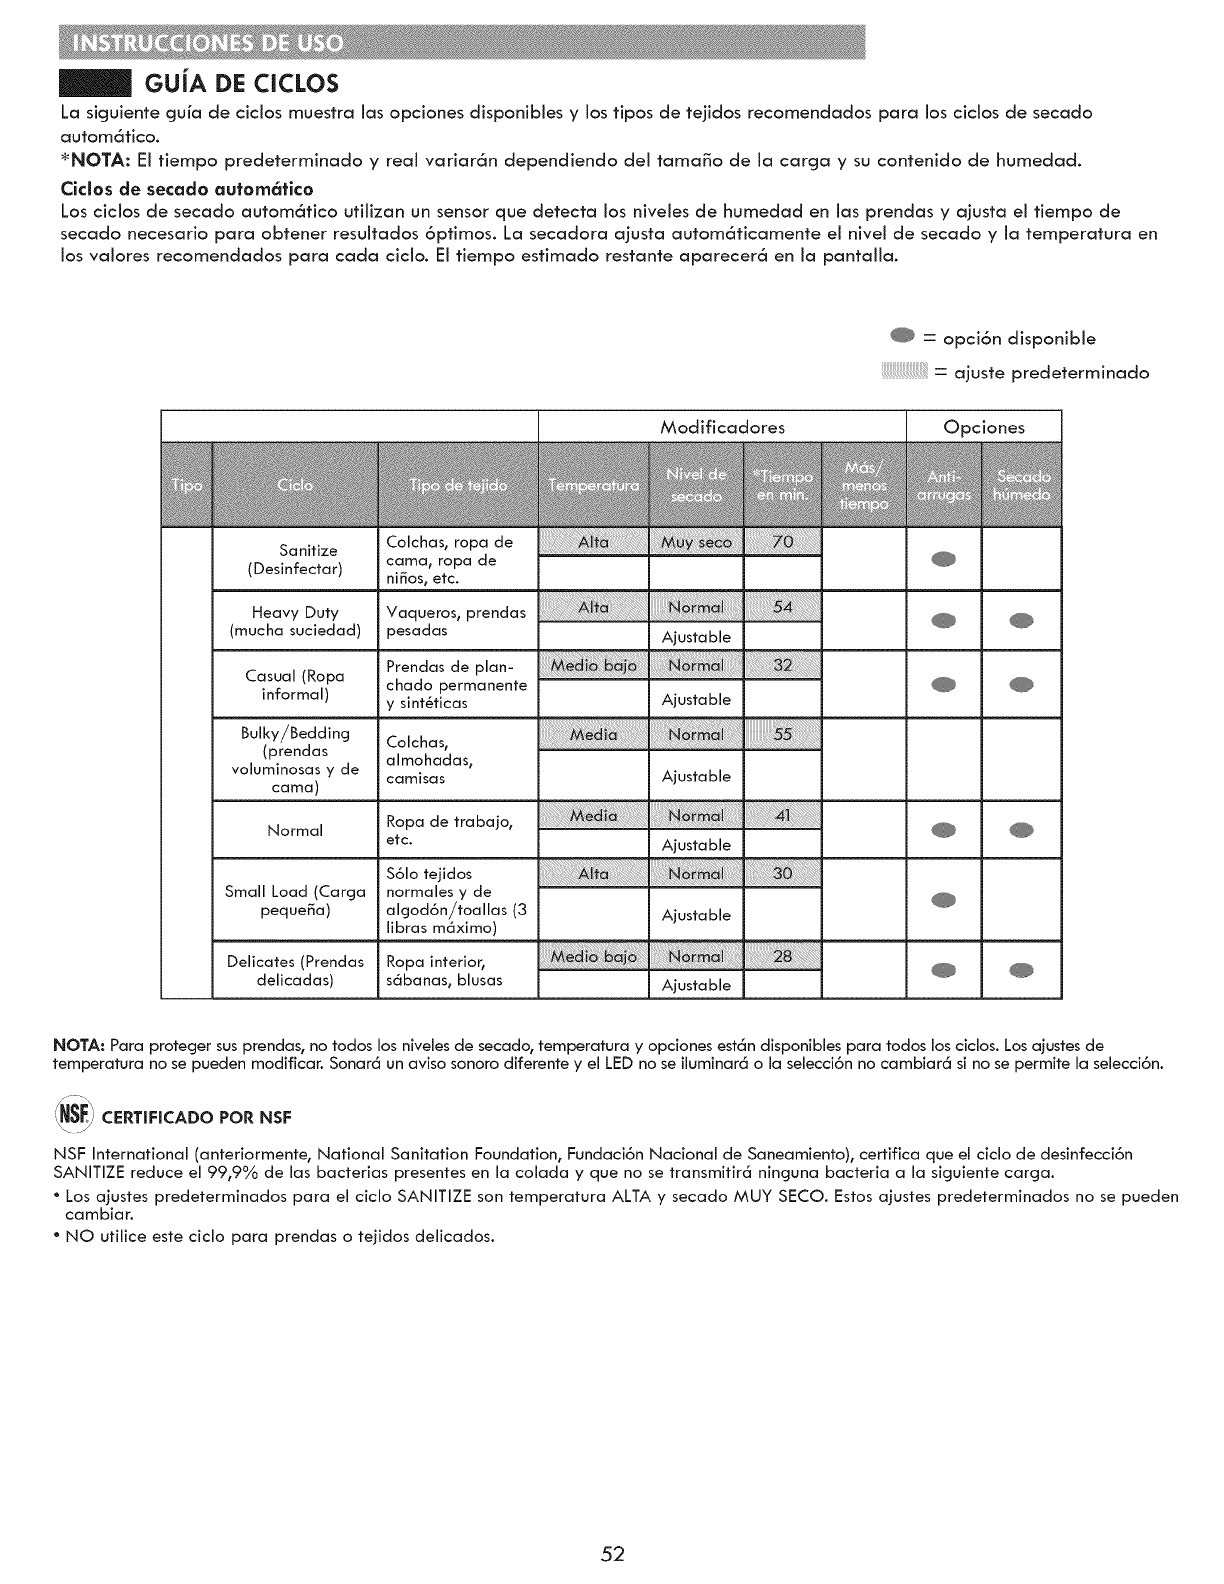
GUJA DE CICLOS
La siguiente guia de cicios muestra ias opciones disponibies y los tipos de te]idos recomendados para los cicios de secado
autom6fico.
_NOTA: El tiempo predeterminado y real variar6n dependiendo del tama_o de la carcja y su contenido de humedad.
Ciclos de secado autom6tlco
Los ciclos de secado autom6tico utilizan un sensor que detecta los niveles de humedad en las prendas y ajusta el tiempo de
secado necesario para obtener resuitados 6ptimos. La secadora ajusta autom6ticamente el nivel de secado y la temperatura en
los valores recomendados para cada ciclo. El tiempo estimado restante aparecer6 en la pantalla.
@:opci6n disponibie
: ajuste predeterminado
Sanitize
(Desinfectar)
Heavy Duty
(mucha suciedad)
Casual (Ropa
informal)
Bulky/Bedding
(prendas
voluminosas y de
cama)
Normal
Small Load (Carga
peque_a)
Delicates (Prendas
delicadas)
Colchas, ropa de
cama, ropa de
ni_os, etc.
Vaqueros, prendas
pesadas
Prendas de plan-
chado permanente
y sint_ticas
Colchas,
almohadas,
camisas
Ropa de trabajo,
etc.
$61o tejidos
normales y de
algod6n/toallas (3
libras m6ximo)
Ropa interior,
s6banas, blusas
Modificadores
Ajustable
Ajustable
Ajustable
Ajustable
Ajustable
Ajustable
Opciones
NOTA: Para proteger sus prendas, no todos los niveles de secado, temperatura y opdones est6n disponibles para todos Jos ciclos. Los a]ustes de
temperatura no se pueden modificar. Sonar6 un aviso sonoro diferente y el LED no se iluminar6 o la selecci6n no cambiar6 si no se permite la selecci6n.
SE\_, CERTIFICADO POR NSF
NSF International (anteriormente, National Sanitation Foundation, Fundaci6n Nacional de Saneamiento), certifica que el ciclo de desinfecci6n
SANITIZE reduce el 99,9% de las bacterias presentes en la colada y que no se transmitir6 ninguna bacteria a la siguiente carga.
*Los aiustes predeterminados para el ciclo SANITIZE son temperatura ALTA y secado MUY SECO. Estos ajustes predeterminados no se pueden
cambiar.
*NO utilice este ciclo para prendas o tejidos delicados.
52

GUiA DE CICLOS
La siguiente guia de cicios rnuestra ias opciones disponibies y los tipos de tejidos recornendados para los cicios de secado
manual
Clclos de secado manual
Utilice los ciclos de secado manual para seieccionar un tiempo y temperatura de secado especificos. Ai seleccionar ei cicio de
SECADO MANUAL, la pantalla rnuestra el tiernpo que queda para que terrnine el ciclo.
Puede carnbiar el tiernpo del ciclo presionando los botones MORE TIME o LESS TIME para aurnentar o reducir el tiernpo,
respectivarnente. Mantencja presionado cualquiera de estos botones para que el tiernpo carnbie a mayor velocidad.
: opci6n disponibie
-- ajuste predeterminado
Modificadores l Opciones
Paracargas
Express Dry peque_as con
(Secado r_pido) tiempos de secado Ajustable M_x. 99
._ breves
Touch Up Para elimJnar
(Retocar) peque_as arrugas Ajustable M_x. 99
O Para secado
general. El tiempo, ......................................................................................................................................................
Timed Dry la temperatura
(Secado manual) y las opciones
se pueden fijar
manualmente
Ajustable M_x. 99
NOTA: Para proteger sus prendas, no todos los niveles de temperatura y opciones est6n disponibies para todos los ciclos. Los ajustes de
temperatura no se pueden modificar. Sonar6 un aviso sonoro diferente y el LED no se iluminar6 si no se permite una determinada selecci6n.
_Para tener acceso a los ciclos de secado manual y secado en rejilla, presione el bot6n de Secado manual en el campo Cycle Modifiers
(Modificadores de ciclos) del Panel de control.
53
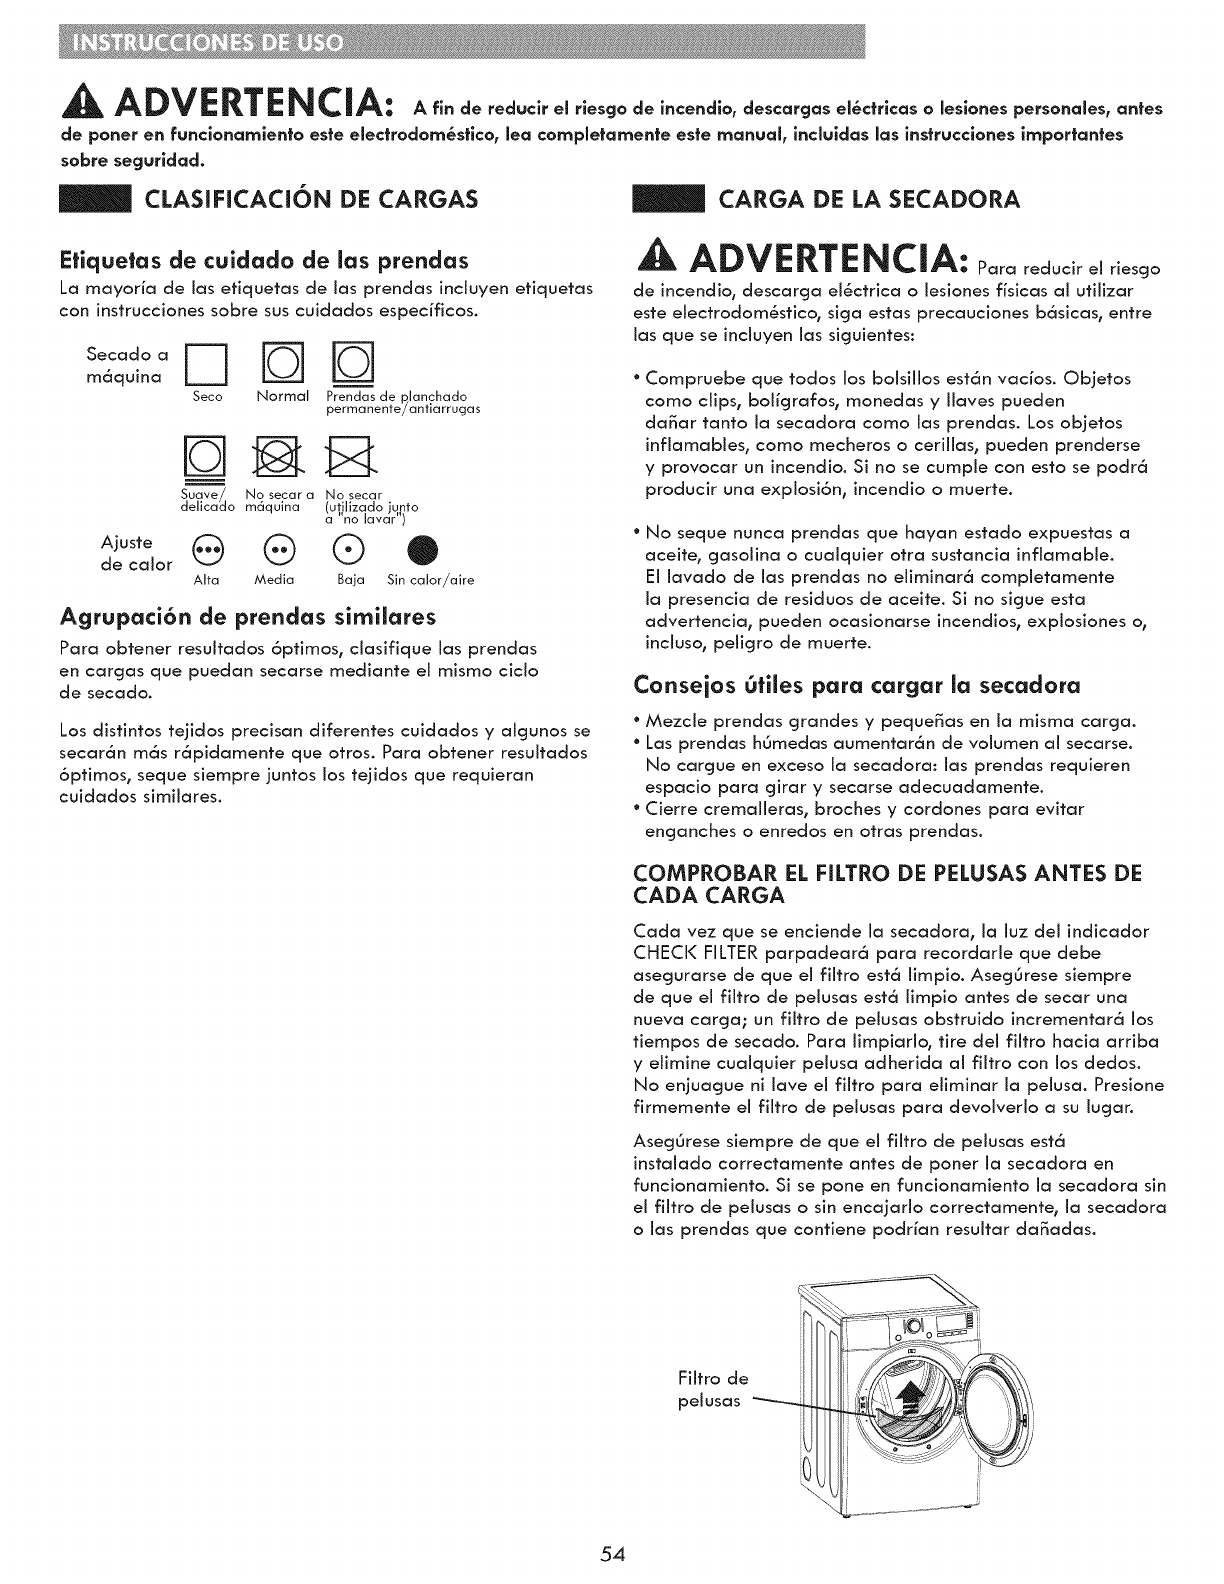
A DV E RT ENC_Ae* Afin de reduclr el rlesgo de incendlo, descarcjas el_ctrlcas o leslones personales, antes
de poner en funclonamlento este electrodom_stJco, lea compJetamente este manual, incJuldas las instrucclones irnportantes
sabre segurldad.
CLASIFICACi6N DE CARGAS _CARGA DE LA SECADORA
Efiquetas de cuidado de las prendas
La mayaria de las etiquetas de las prendas inciuyen etiquetas
con instrucciones sabre sus cuidados especificos.
71 lb--1r
m6quina
Seco Normal Prendas de planchado
permanenteyantiarrugas
Ajuste
de calor
Suave/] No secar a No secar
delicado m6quina (utilizado junto
a"no Javar")
Alta Media Baja Sin calor/aire
Agrupaci6n de prendas sirnilares
Para abtener resultadas 6ptimos, ciasifique las prendas
en cargas que puedan secarse mediante el misma cicia
de secada.
Las distintas tejidas precisan diferentes cuidadas y algunas se
secar6n m6s r6pidamente que atras. Para abtener resuitadas
6ptirnas, seque siempre juntas las tejidas que requieran
cuidadas similares.
A ADVERTENCIA: arareducirelriesga
de incendia, descarga ei_ctrica aiesianes fisicas ai utilizar
este eJectradam_stica, siga estas precaucianes b_sicas, entre
ias que se inciuyen ias siguientes:
Campruebe que tadas ias balsillas est6n vacias. Objetas
cama clips, baiigrafas, manedas y liaves pueden
daBar tanta la secadara cama las prendas. Las abjetas
infiamables, cama mecheras a cerillas, pueden prenderse
y pravacar un incendia. Si na se cumple can esta se podr6
praducir una explasi6n, incendia a muerte.
No seque nunca prendas que hayan estada expuestas a
aceite, gasalina a cuaiquier otra sustancia infiamable.
El iavada de ias prendas na eiiminar6 campletamente
ia presencia de residuas de aceite. Si na sigue esta
advertencia, pueden acasianarse incendias, explasianes a,
inciusa, peiigra de muerte.
Consejos 0tiles para cargar la secadora
°Mezcie prendas grandes y pequeBas en ia misma carga.
°Las prendas h0medas aumentar6n de valumen al secarse.
No cargue en excesa la secadara: las prendas requieren
espacio para girar y secarse adecuadamente.
* Cierre cremalleras, braches y cardanes para evitar
enganches a enredas en atras prendas.
COMPROBAR EL FILTRO DE PELUSAS ANTES DE
CADA CARGA
Coda vez que se enciende la secadora, la luz del indicadar
CHECK FILTER parpadear6 para recardarie que debe
asegurarse de que el fiitra est6 limpia. Aseg6rese siempre
de que el fiitro de pelusas est6 limpia antes de secar una
nueva carga; un filtra de peiusas abstruida incrementar6 las
tiempas de secado. Para limpiaria, tire del filtra hacia arriba
y eiimine cualquier pelusa adherida ai filtra can las dedas.
No enjuague ni lave el filtra para eliminar la peiusa. Presiane
firmemente el fiitra de peiusas para devaiveria a su lugan
Aseg0rese siempre de que ei fiitra de peiusas est6
instaiada carrectamente antes de poner la secadara en
funcianamienta. Si se pone en funcianamienta la secadara sin
el fiitra de pelusas asin encajarla carrectamente, la secadara
alas prendas que cantiene podrian resuitar daBadas.
(
Fiitra de
pelusas
54
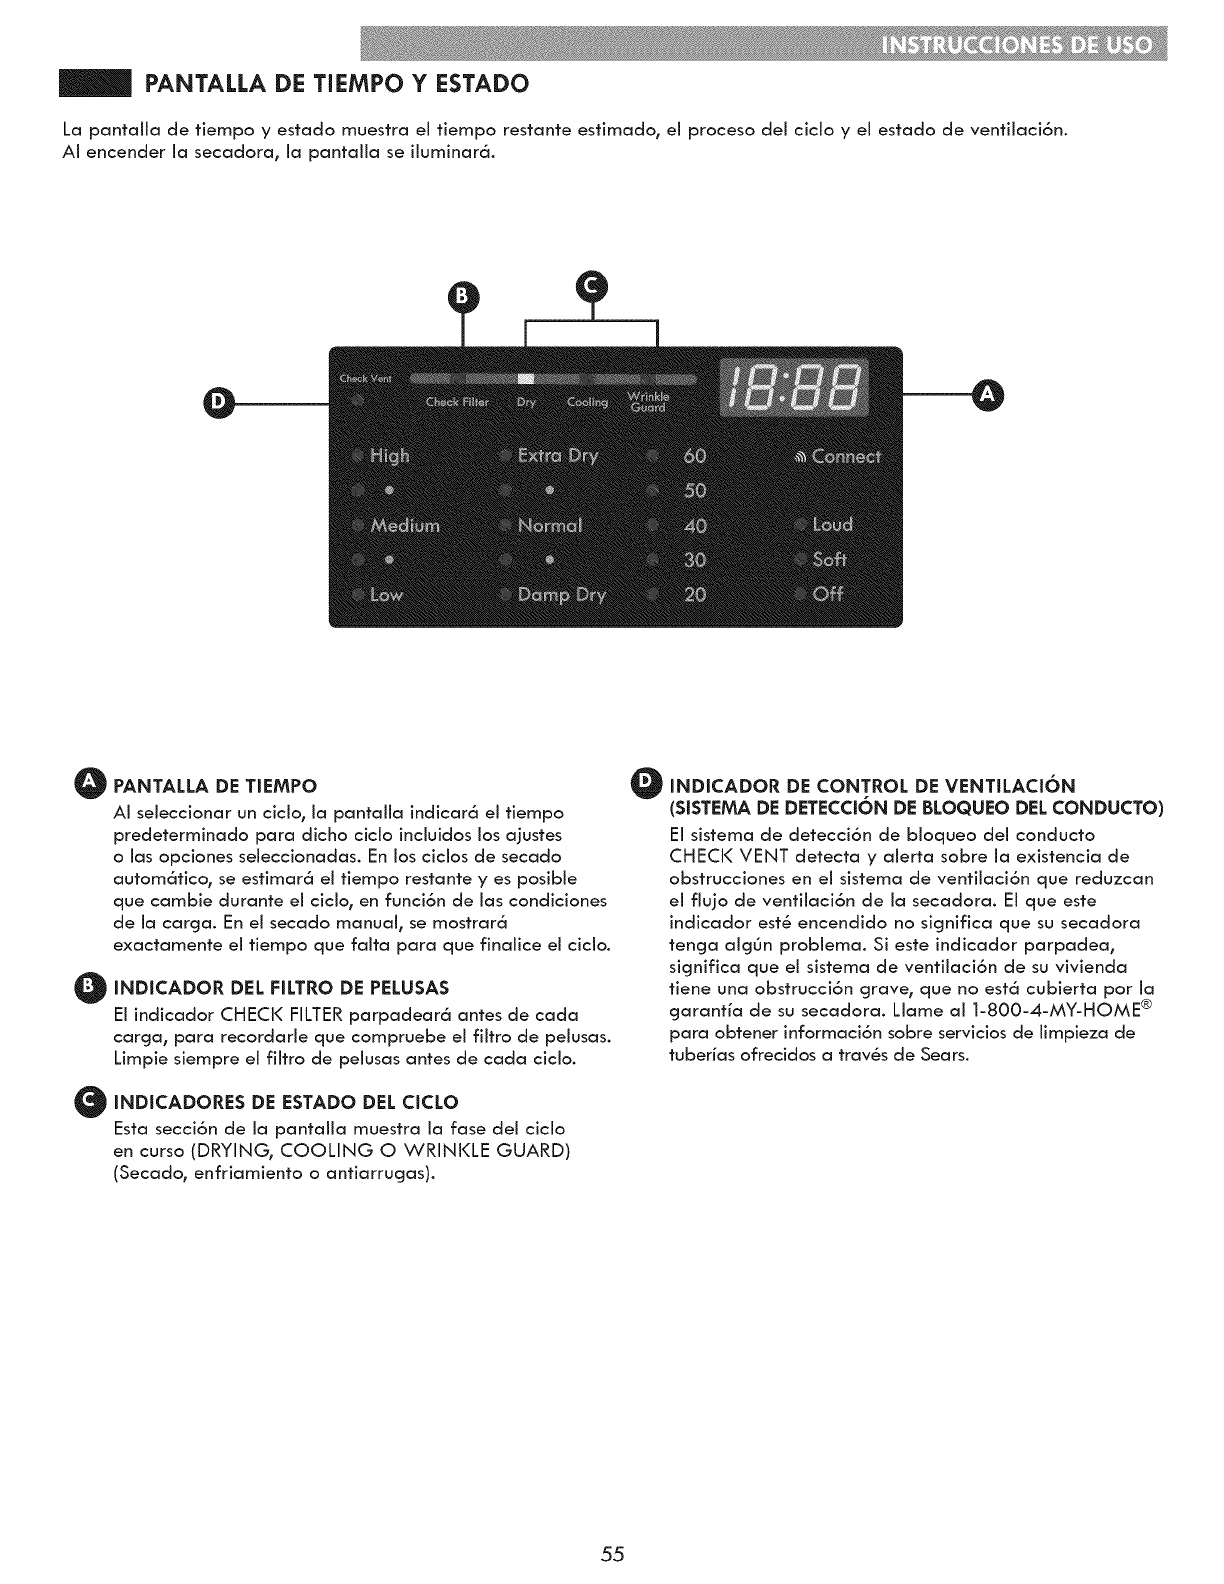
PANTALLA DE TIEMPO Y ESTADO
La pantalla de tiempo y estado muestra el tiempo restante estimado, el proceso del ciclo y el estado de ventilaci6n.
AI encender la secadora, la pantalla se iluminar6.
O
O PANTALLA DE TIEMPO O
AI seleccionar un cicio, ia pantaiia indicar6 el tiempo
predeterminado para dicho cicio inciuidos los ajustes
o ias opciones seleccionadas. En los cicios de secado
autom6tico, se estimar6 ei tiempo restante y es posibie
que cambie durante ei ciclo, en funci6n de ias condiciones
de ia carcja. En ei secado manual, se mostrar6
exactamente ei tiempo que faita para que finaiice ei cicio.
O
O
INDICADOR DEL FILTRO DE PELUSAS
Ei indicador CHECK FILTER parpadear6 antes de cada
carcja, para recordarie que compruebe ei fiitro de peiusas.
Limpie siempre ei fiitro de peiusas antes de cada cicio.
INDICADORES DE ESTADO DEL CICLO
Esta secci6n de la pantalla muestra la fase del ciclo
en curso (DRYING, COOLING O WRINKLE GUARD)
(Secado, enfriamiento o antiarrugas).
INDICADOR DE CONTROL DE VENTILACI6N
(SISTEMA DE DETECCI6N DE BLOQUEO DEL CONDUCTO)
El sistema de detecci6n de bloqueo del conducto
CHECK VENT detecta y alerta sobre la existencia de
obstrucciones en el sistema de ventilaci6n que reduzcan
el flujo de ventilaci6n de la secadora. El que este
indicador est_ encendido no sicjnifica que su secadora
tencja alg0n probiema. Si este indicador parpadea,
significa que el sistema de ventilaci6n de su vivienda
tiene una obstrucci6n grave, que no est6 cubierta por la
cjarantia de su secadora. Llame al 1-800-4-MY-HOME ®
para obtener informaci6n sobre servicios de limpieza de
tuberias ofrecidos a trav_s de Sears.
55
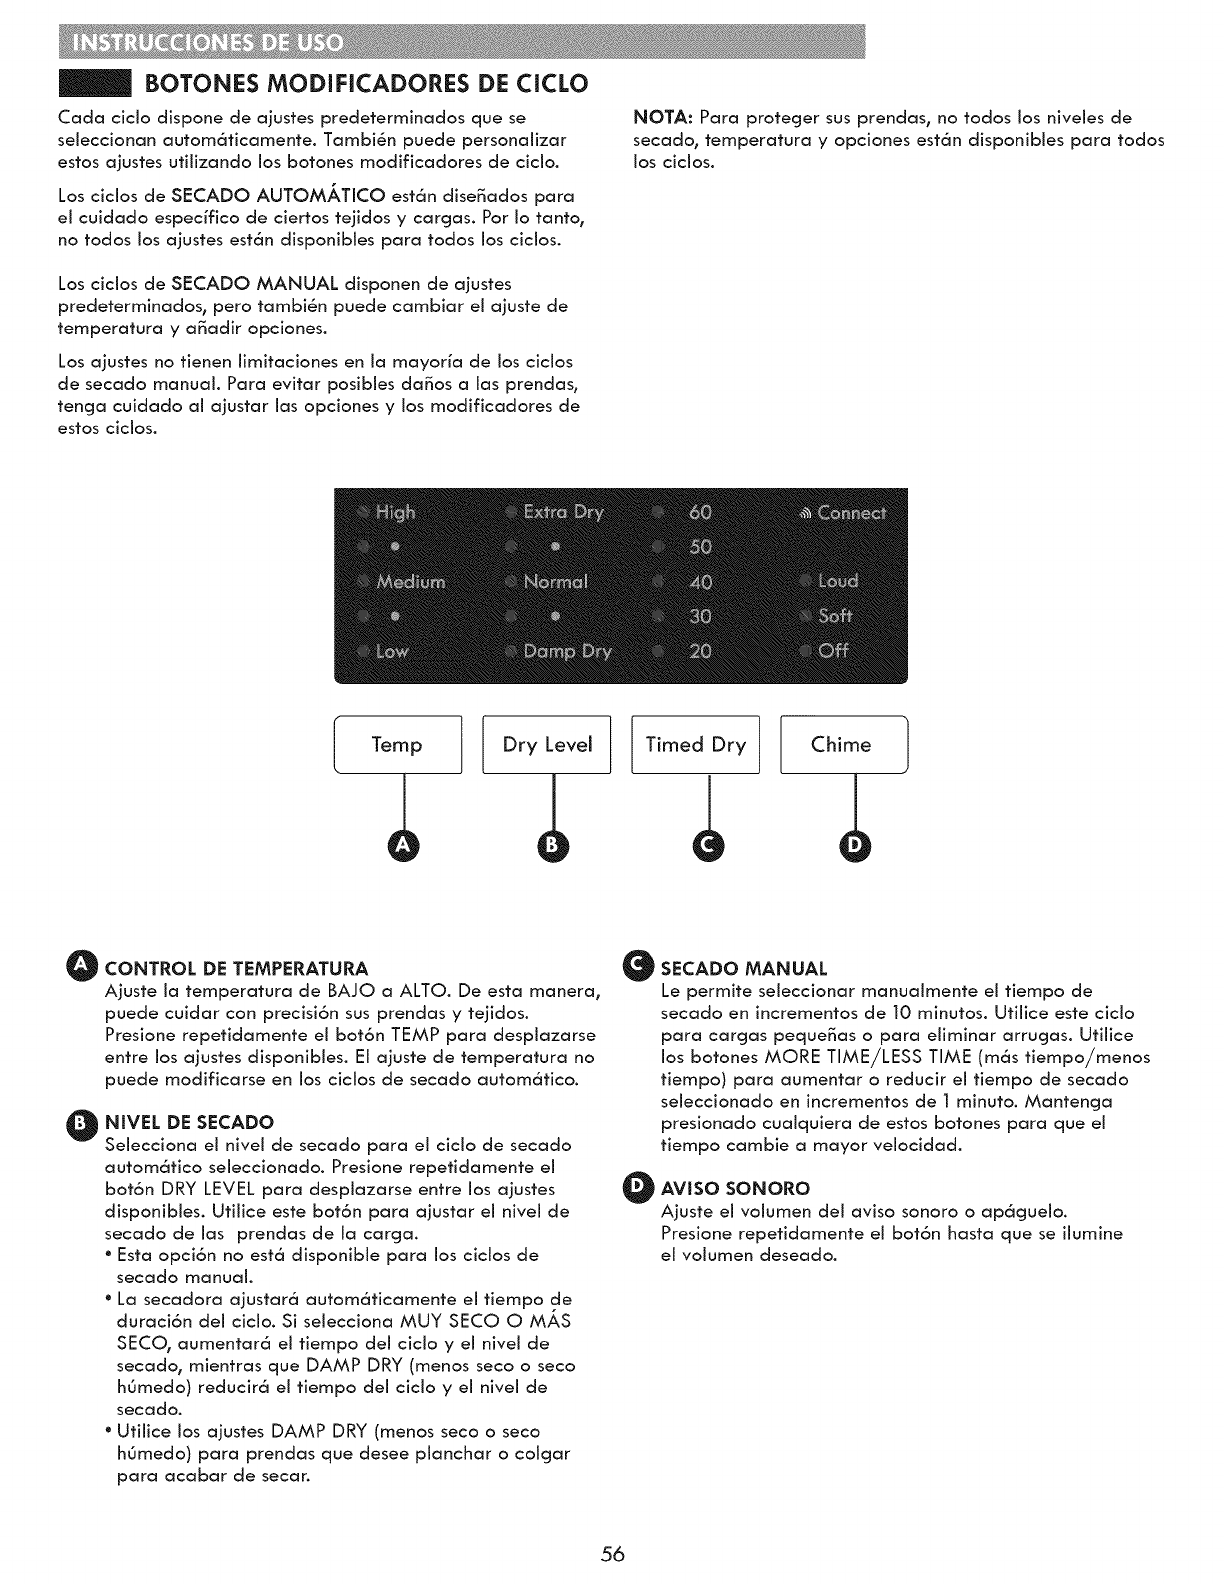
BOTONES MODIFICADORES DE CICLO
Cada ¢icio dispone de aiustes predeterminados que se
seleccionan autom6ticamente. Tambi@n puede personalizar
estos ajustes utilizando los botones modificadores de cicio.
Los cicios de SECADO AUTOMikTICO est6n dise_ados para
ei cuidado especifico de ciertos tejidos y cargas. Por io tanto0
no todos los ajustes est6n disponibies para todos los cicios.
Los cicios de SECADO MANUAL disponen de ajustes
predeterminados, pero tambi@n puede cambiar ei ajuste de
temperatura y a_adir opciones.
Los aiustes no tienen iimitaciones en ia mayoria de los cicios
de secado manual. Para evitar posibles da_os a Jas prendas,
tencja cuidado al ajustar las opciones y los modificadores de
estos cicios.
NOTA: Para proteger sus prendas, no todos los niveles de
secado, temperatura y opciones est6n disponibies para todos
los cicios.
Temp Dry Level Timed Dry Chime
O
@
CONTROL DE TEMPERATURA
Aiuste la temperatura de BAJO a ALTO. De esta manera,
puede cuidar con precisi6n sus prendas y tejidos.
Presione repetidamente el bot6n TEMP para despiazarse
entre los ajustes disponibles. El ajuste de temperatura no
puede modificarse en los ciclos de secado autom6tico.
NIVEL DE SECADO
Selecciona ei nivei de secado para ei cicio de secado
autom6tico seleccionado. Presione repetidamente el
bot6n DRY LEVEL para despiazarse entre los ajustes
disponibies. Utiiice este bot6n para ajustar ei nivei de
secado de las prendas de la carga.
°Esta opci6n no est6 disponibie para los cicios de
secado manual.
°La secadora ajustar6 autom6ticamente ei tiempo de
duraci6n dei cicio. Si selecciona MUY SECO O M/kS
SECO_ aumentar6 el tiempo del cicio y el nivel de
secado, mientras que DAMP DRY (menos seco o seco
h0medo) reducir6 el tiempo del cicio y el nivel de
secado.
*UtJlJce los ajustes DAMP DRY (menos seco o seco
h0medo) para prendas que desee planchar o coigar
para acabar de secar.
O
O
SECADO MANUAL
Le permite seleccJonar manualmente el tiempo de
secado en Jncrementos de 10 mJnutos. Utilice este ¢JCIO
para cargas pequenas o para elJminar arrugas. UtJlJce
los botones MORE TIME/LESS TIME (m6s tiempo/menos
tiempo) para aumentar o reducir ei tiempo de secado
seleccionado en incrementos de ] minuto. Mantencja
presionado cuaiquiera de estos botones para que ei
tiempo cambie a mayor velocidad.
AVISO SONORO
Ajuste el volumen del aviso sonora o ap6guelo.
Presione repetidamente el bot6n hasta que se ilumine
el volumen deseado.
56
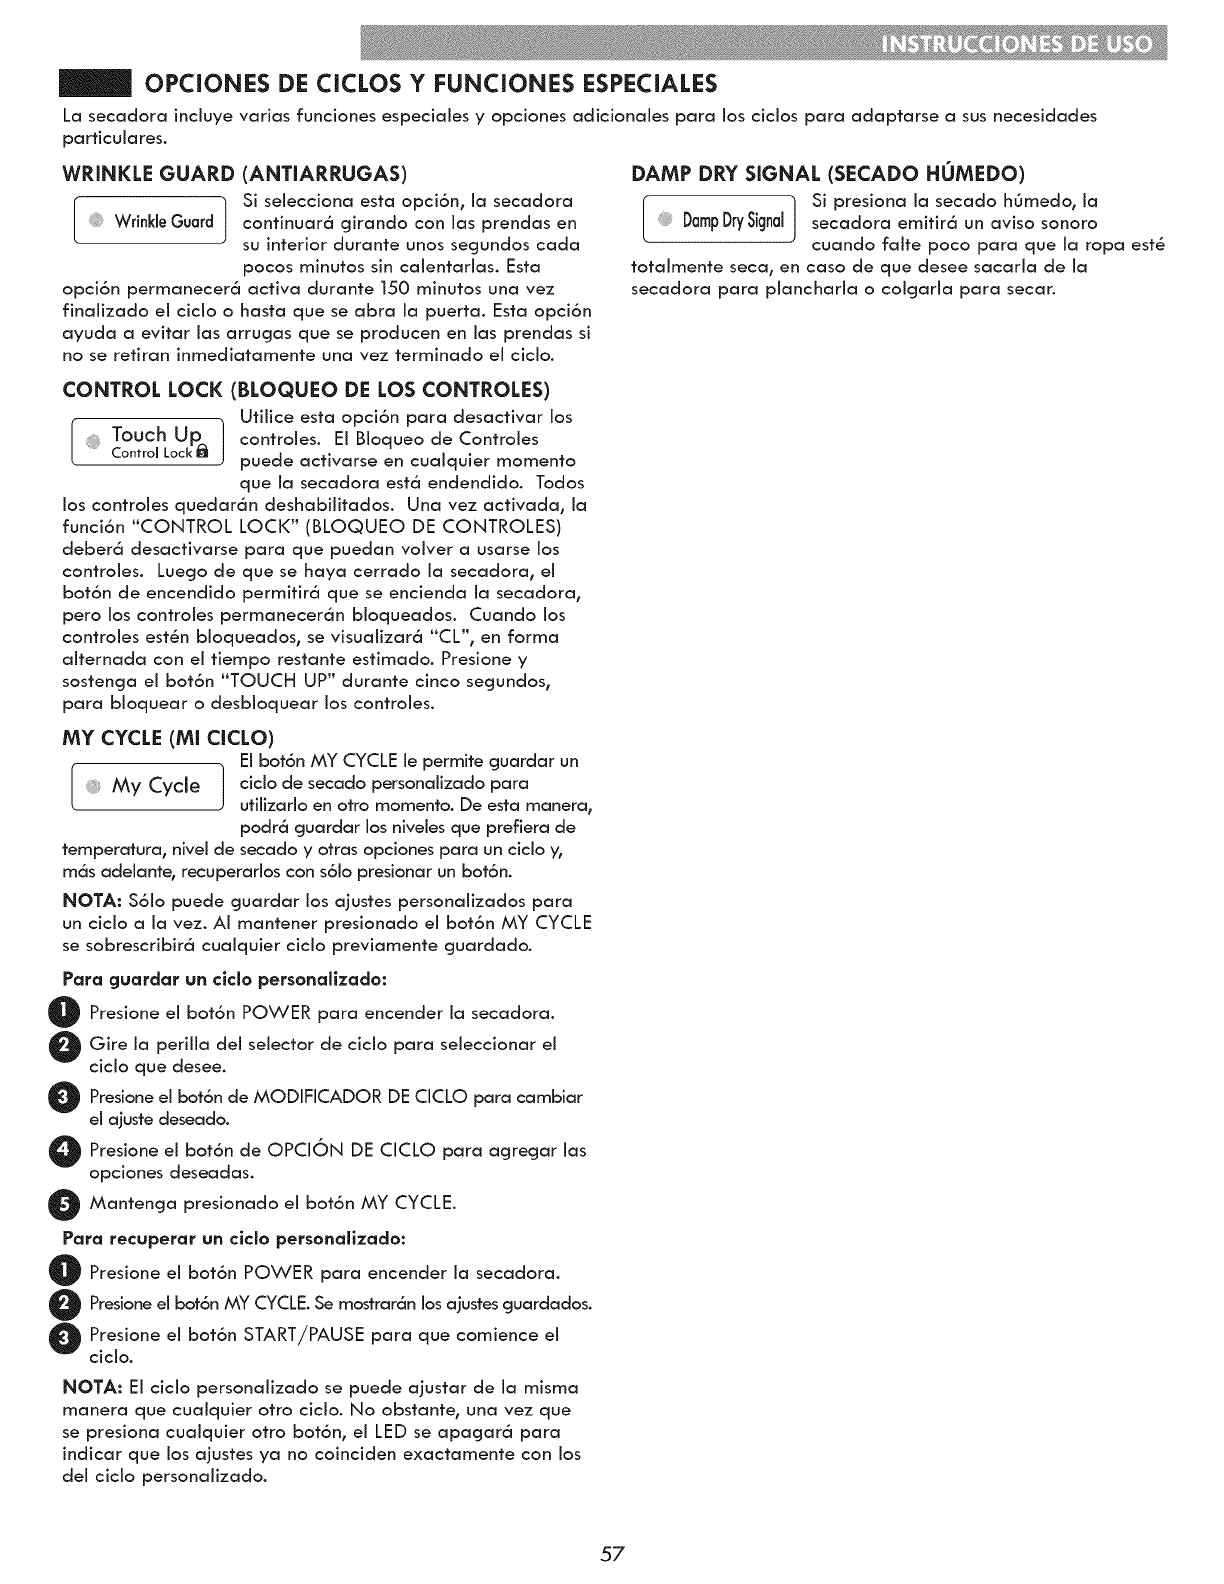
OPCIONES DE CICLOS Y FUNCIONES ESPECIALES
La secadora incluye varias funciones especiales y opciones adicionales para los cicios para adaptarse a sus necesidades
pa rticula res.
WRINKLE GUARD (ANTIARRUGAS)
Si selecciona esta opci6n_ la secadora
continuar_ cjirando con las prendas en
Wrinkle Guard I su interior durante unos segundos cada
pocos minutos sin caientarias. Esta
opci6n permanecer6 activa durante 150 minutos una vez
finalizado ei cicio o hasta que se abra ia puerta. Esta opci6n
ayuda a evitar ias arrugas que se producen en ias prendas si
no se retiran inmediatamente una vez terminado ei cicio.
DAMP DRY SIGNAL (SECADO HOMEDO)
l ] SipresionalasecadohOmedo, ia
DampDrySignal secadora emitir6 un aviso sonoro
cuando faite poco para que ia ropa est8
totaimente seca0 en caso de que desee sacarla de ia
secadora para piancharia o coigaria para secar.
CONTROL LOCK (BLOQUEO DE LOS CONTROLES)
Utilice esta opci6n para desactivar los
TouchUp. ] controies. EiBioqueodeControies
Control Lock_ puede activarse en cualquier momento
que la seccldora est6 endendido. Todos
los controles quedar6n deshabilitados. Una vez activada_ la
funci6n "CONTROL LOCI<" (BLOQUEO DE CONTROLES)
deber6 desactivarse para que puedan voiver a usarse los
controles. Luego de que se haya cerrado la secadora, el
bot6n de encendido permitir6 que se encienda la secadora,
pero los controles permanecer6n bioqueados. Cuando los
controies est_n bloqueados, se visualizar6 '_CL', en forma
alternada con el tiempo restante estimado. Presione y
sostencja el bot6n "TOUCH UP" durante cinco secjundos,
para bloquear o desbioquear los controies.
MY CYCLE (MI CICLO)
El bot6n MY CYCLE le permite cjuardar un
My Cycle ] ciclo de secado personalizado para
utilizarlo en otro momento. De esta manera,
podr6 guardar los niveles que prefiera de
temperaturao nivel de secado y otras opciones para un ciclo y0
m6s adelante, recuperarlos con s61opresionar un bot6n.
NOTA: S61o puede cjuardar los ajustes personalizados para
un ciclo a la vez. AI mantener presionado el bot6n MY CYCLE
se sobrescribir6 cualquier ciclo previamente cjuardado.
Para guardar un clclo personallzado:
O Presione el bot6n POWER para encender la secadora.
Oire la perilla del selector de ciclo para seleccionar el
ciclo que desee.
O resione el bot6n de MODIFICADOR DE CICLO para cambiar
el ajuste deseado.
O resione el bot6n de OPCION DE CICLO para acjrecjar las
opciones deseadas.
O Mantencja presionado el bot6n MY CYCLE.
Para recuperar un clclo personallzado:
O Presione el bot6n POWER para encender la secadora.
O Presione el bot6n MY CYCLE.Se mostrar6n los ajustes cjuardados.
O resione el bot6n START/PAUSE para que comience el
ciclo.
NOTA: Ei cicio personaiizado se puede ajustar de ia misma
manera que cuaiquier otro cicio. No obstante0 una vez que
se presiona cuaiquier otro bot6n, ei LED se apagar6 para
indicar que los ajustes ya no coinciden exactamente con los
del cicio personalizado.
57
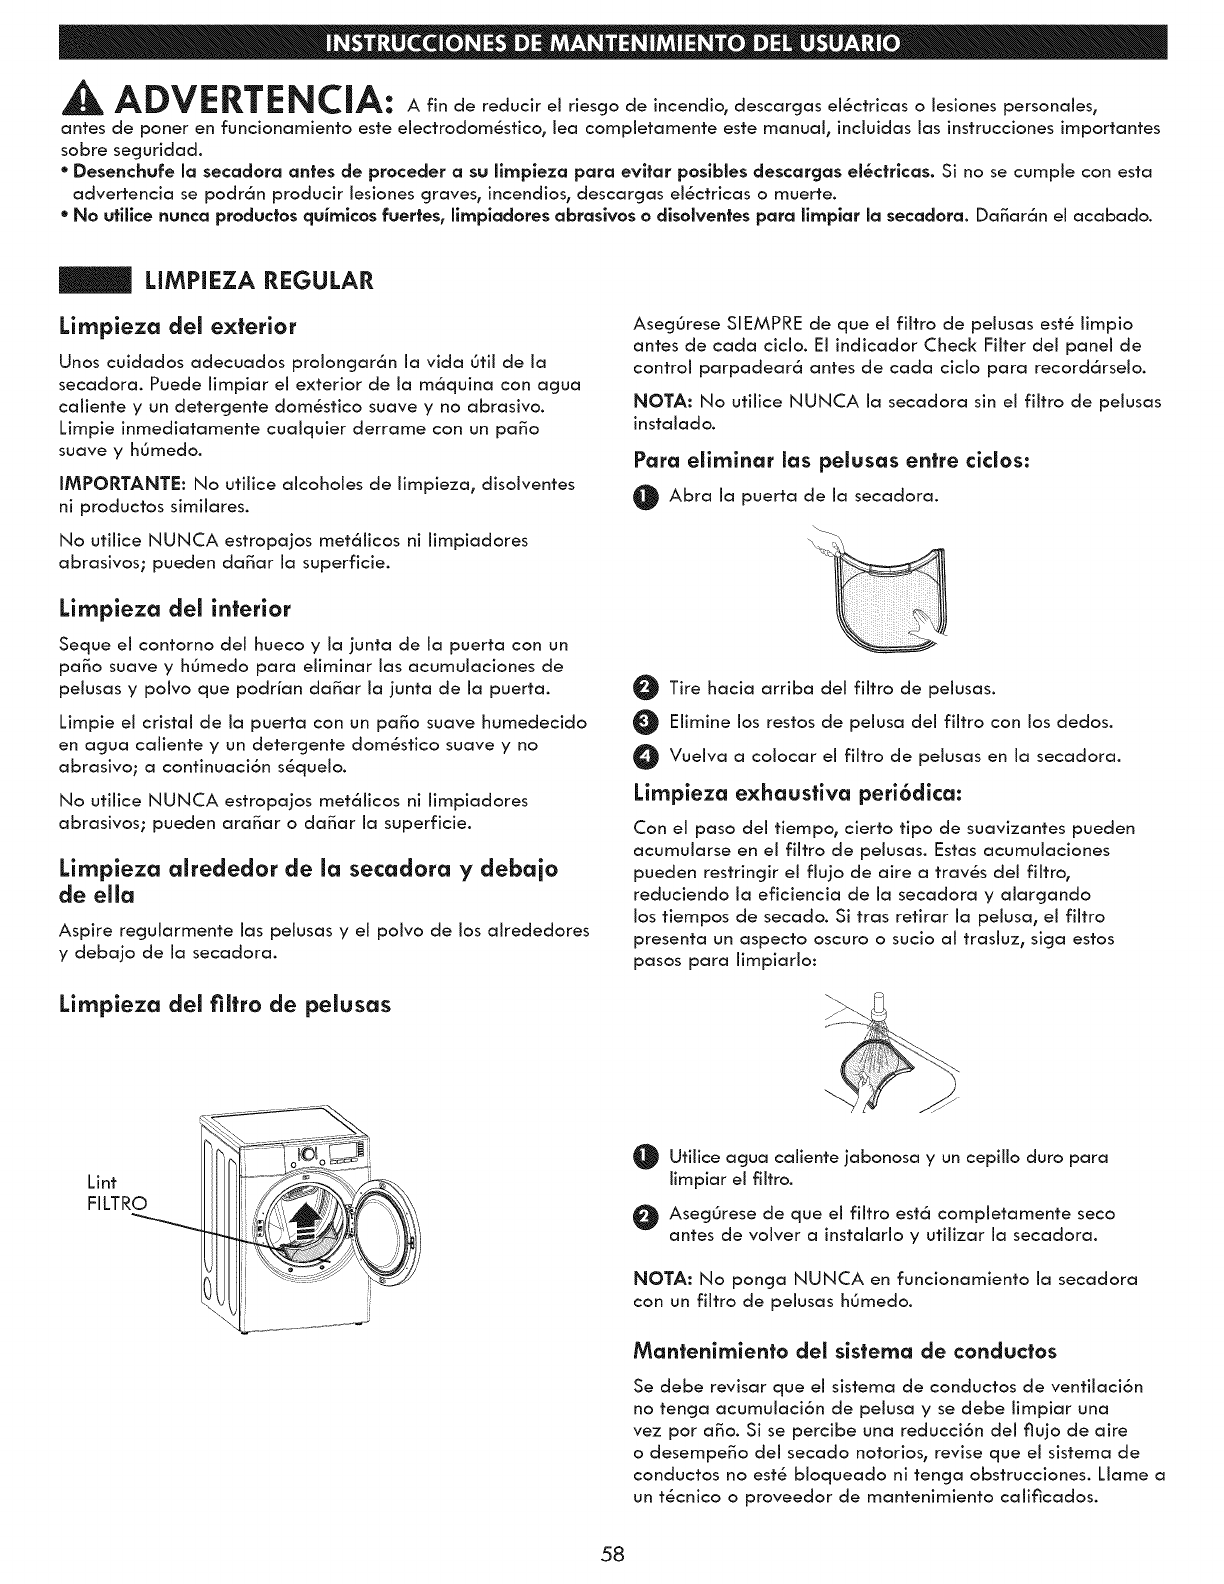
^ ADVERTENCIA: A fin de reducir el riesgo de incendio, descargas el_ctricas o lesiones personales,
antes de poner en funcionamiento este electrodom(_stico, lea compietamente este manual, inciuidas ias instrucciones importantes
sobre secjuridad.
•Desenchufe la secadora antes de proceder asullmpleza para evltar poslbles descargas el_ctrlcas. Si no se cumpie con esta
advertencia se podr6n producir lesiones graves, incendios, descargas el_ctricas o muerte.
•No ufillce nunca productos quimlcos fuertes, llmpladores abraslvos o dlsolventes para llmplar la secadora. Da_ar6n el acabado.
LIMPiEZA REGULAR
Lirnpieza del exterior
Unos cuidados adecuados proloncjar6n ia vida 6tii de ia
secadora. Puede limpiar el exterior de la m6quina con acjua
caliente y un detercjente dom_stico suave y no abrasivo.
Limpie inmediatamente cualquier derrame con un paso
suave y h6medo.
IMPORTANTE: No utilice aicoholes de iimpieza, disoiventes
ni productos simiiares.
No utiiice NUNCA estropajos met6iicos ni iimpiadores
abrasivos; pueden da_ar ia superficie.
Lirnpieza del interior
Seque el contorno del hueco y la junta de la puerta con un
paso suave y hOmedo para eliminar las acumulaciones de
pelusas y poivo que podr/an da_ar la junta de la puerta.
Limpie el cristal de ia puerta con un paso suave humedecido
en agua caiiente y un detergente domSstico suave yno
abrasivo; a continuaci6n s_quelo.
No utiiice NUNCA estropajos met6iicos ni iimpiadores
abrasivos; pueden ara_ar oda_ar ia superficie.
Lirnpieza alrededor de la secadora y debajo
de ella
Aspire regularmente ias pelusas y ei poivo de Jos airededores
y debajo de la secadora.
Lirnpieza del filtro de pelusas
Aseg0rese SIEMPRE de que ei fiitro de peiusas est_ limpio
antes de cada ciclo. El indicador Check Filter del panel de
control parpadear6 antes de cada cicio para record6rselo.
NOTA: No utiiice NUNCA ia secadora sin ei fiitro de peiusas
instalado.
Para eliminar las pelusas entre ciclos:
Abra la puerta de la secadora.
O Tire hacia arriba dei fiitro de peiusas.
@Eiimine los restos de pelusa del filtro con los dedos.
O Vueiva a coiocar ei fiitro de pelusas en ia secadora.
Limpieza exhaustiva peri6dica:
Con el paso del tiempo, cierto tipo de suavizantes pueden
acumuiarse en ei fiitro de peiusas. Estas acumulaciones
pueden restringir el flujo de aire a trav_s del fiitro,
reduciendo la eficiencia de la secadora y alargando
los fiempos de secado. Si tras refirar ia pelusa, ei fiitro
presenta un aspecto oscuro o sucio ai trasiuz, siga estos
pasos para iimpiario:
Lint
FILTRO
t_ Utilice acjua caliente jabonosa y un cepiilo duro para
limpiar el filtro.
O AsegOrese de que el filtro est6 compietamente seco
antes de volver a instalarlo y utilizar la secadora.
NOTA: No ponga NUNCA en funcionamiento ia secadora
con un filtro de pelusas hOmedo.
Mantenirniento del sisterna de conductos
Se debe revisar que ei sistema de conductos de ventilaci6n
no tenga acumulaci6n de pelusa y se debe limpiar una
vez por a_o. Si se percibe una reducci6n del flujo de aire
o desempe_o dei secado notorios, revise que ei sistema de
conductos no est8 bioqueado ni tenga obstrucciones. Liame a
un tScnico o proveedor de mantenimiento calificados.
58

MANTENiMIENTO DEL SISTEMA DE VENTILACIC')N
La causa m6s habltual de problemas en la secadora es una ventilaci6n deflclente. Una ventilaci6n deficiente puede producirse
por los sicjuientes motivos:
• CONDUCTOS DE VENTILACI6N SUCIOS O DAi_ADOS
• MATERIAL INADIFCUADO DE LOS CONDUCTOS DE
VENT&ACI6N
•EXTRACTOR OBSTRUIDO O DAI_ADO
• CONDUCTO DE VENTILACI6N DE LONGITUD EXCESWA
•USO DE CONDUCTOS DE VENT&ACI6N DE PLASTICO O
LAMINA METALICA.
Mantenirniento del sisterna de venfilaci6n
Deben comprobarse los conductos de ventiiaci6n en busca de
acumulaciones de pelusa y JimpiarJos al menos una vez al a_o.
Si se produce cualquier reducci6n apreciable en el rendimiento
deJ secado, compruebe Jos conductos en busca de obstrucciones
y bloqueos.
Si se iJumina eJ indicador CHECK VENT, debe comprobarse
inmediatamente Ja existencia de obstrucciones o da_os en
eJ sistema de ventiJaci6n. EI indicador CHECK VENT indica
una reducci6n grave en Ja ventiJaci6n deJ flujo de aire que
reducir6 dr6sticamente eJ rendimiento enercj_,tico y aumentar6
Jos tiempos de secado. Los sistemas de ventiJaci6n da_ados o
restrincjidos no est6n cubiertos por Ja cjarantia de Ja secadora.
Los da_os ocasionados en Ja secadora derivados de sistemas
de ventiJaci6n da_ados, obstruidos o inadecuados por cualquier
otto mofivo, no est6n cubiertos por Ja cjaranfia de Ja unidad.
Indicador CHECK VENT
El sistema de advertencia CHECK VENT ha sido dise_ado para
ayudade a evitar la reducci6n del rendimiento que pueden
ocasionar las obstrucciones en el sistema de ventilaci6n de la
vivienda. El indicador CHECK VENT se ilurnina para avisarle
cuando se produce un problema en el sistema, de manera que
pueda repararlo.
Aunque debe comprobar y realizar el mantenimiento deI sistema
de ventilaci6n recjularmente, el sistema de advertencia CHECK
VENT detectar6 y le avisar6 de cualquier problema grave que
se desarrolle en el sistema de ventilaci6n de la vivienda. Entre
estos, se inciuyen sistemas de ventilaci6n que no sean adecuados
por cualquier motivo, inciuido una obstrucci6n en la ventilaci6n,
conductos aplastados o retorcidos, o una ventilaci6n que supere
la Ioncjitud m6xima recomendada tal como se describe en la
secci6n de instalaci6n.
NOTA: La Ioncjitud total incluye la Ioncjitud desde la parte
posterior de la secadora hasta el extractor exterior, MAS un
factor por cada codo de 90 ° en el sistema de ventilaci6n. Por
e]emplo, si la distancia desde la parte posterior de la secadora
basra el extractor es de 9 m (30 pies), y hay cuatro codos en el
sistema, superar6 la Ioncjitud m6xima de 8,5 m (28 pies) que se
permite en estas condiciones.
El indicador CHECK VENT del panel de control le avisar6 de
que el sistema de ventilaci6n no est6 desplazando suficiente
aire de la secadora al exterior. Esta reducci6n deI fiujo de aire
ocasionar6 tiempos de secado m6s largos, un secado deficiente
y, probablemente, averias en la secadora.
Le recordamos que el sistema de ventilaci6n externa de
la secadora se considera parte de su vivienda y no est6
cubierta por la cjarantia del producto ni por los contratos de
protecci6n. Hay servicios disponibles para realizar la limpieza
oel mantenimiento de la ventilaci6n externa. Sears ofrece
este servicio mediante Sears Carpet, Upholstery, and Duct
Cleanincj. Llame al 1-800-661-6594 para solicitar el servicio
de mnantenimiento de conductos de Sears (si est6 disponible
en SU zona).
Funcionamiento de CHECK VENT
El sistema CHECK VENT utiliza componentes que ya se
encuentran en la secadora. Mediante la supervisi6n de estos
componentes durante varios ciclos, el control puede determinar
el nivel de obstrucci6n que presenta el sistema de ventilaci6n.
Si detecta un alto nivel de obstrucci6n, encender6 el indicador
CHECK VENT para avisarle del problema. La secadora
secjuir6 funcionando despu6s de que se ilumine el indicador,
pero deber6 limpiar o reparar inmediatamente el sistema
de ventilaci6n para evitar que se proloncjuen los tiempos de
secado y un mayor consumo de enercjia.
IMPORTANTE: Para que la secadora pueda secar
las prendas de manera adecuada y eficiente, es
extremadamente importante que el sistema de ventilaci6n
sea Io m6s corto y est', Io m6s limpio posible. Su Ioncjitud
DEBE ser inferior alas especificaciones de Ioncjitud m6xima
que se detallaban en la secci6n de instalaci6n. TambiSn es
muy importante que se asecjure de que cuando se instale la
secadora, el sistema de ventilaci6n est8 limpio, no presente
obstrucciones y no est8 aplastado ni retorcido.
Si no se cumplen estas directrices se alarcjar6n los tiempos
de secado, se consumir6 m6s energia yes posible que incluso
las prendas resulten daEadas o se produzca una averia en la
secadora. Cuando la obsfrucci6n del sistema de ventilaci6n sea
critica, el indicador CHECK VENT parpadear6 para avisarle de
este problema, de manera que pueda limpiarlo o repararlo.
Para evitar faisas alarmas ofrecer
Yuna mayor
confiabilidad, la secadora examinar6 el esfado de
ventilaci6n durante varias carcjas. Si durante varias carcjas
consecutivas se superan los limites de obstrucci6n, eI
control bar6 parpadear eI indicador CHECK VENT.
Cuando parpadea ei indicador CHECK VENT, indica que
es necesario comprobar Io antes posibie la ventilaci6n
externa en busca de posibies obstrucciones.
OEi indicador CHECK VENT permanecer6 encendido
(parpade, ando) basra que se haya resueito ia obstrucci6n
Y ADEMAS ei control haya comprobado que ei fiujo de
aire ha mejorado durante varios cicios.
Una vez iimpiado oreparado el sistema de ventilaci6n,
ei indicador CHECK VENT tarda varios cicios en
restabiecerse y apacjar ei indicador.
NOTA: Ei indicador CHECK VENT ha sido diseSado para
medir ei rendimiento durante varios cicios consecutivos antes de
activarse o desactivarse, con ob]eto de evitar faisas aiarmas.
Una carcja muy cjrande, como un edred6n muy voluminoso,
puede hacer que ei sistema de comprobaci6n de ia ventiiaci6n
detecte que ei sistema de ventiiaci6n est6 obstruido, pero en
este caso no haria que ei indicador parpadease. No obstante, si
se e]ecutar6n consecutivamente varias carcjas muy cjrandes, es
posibie que se encendiese ei indicador CHECK VENT.
59
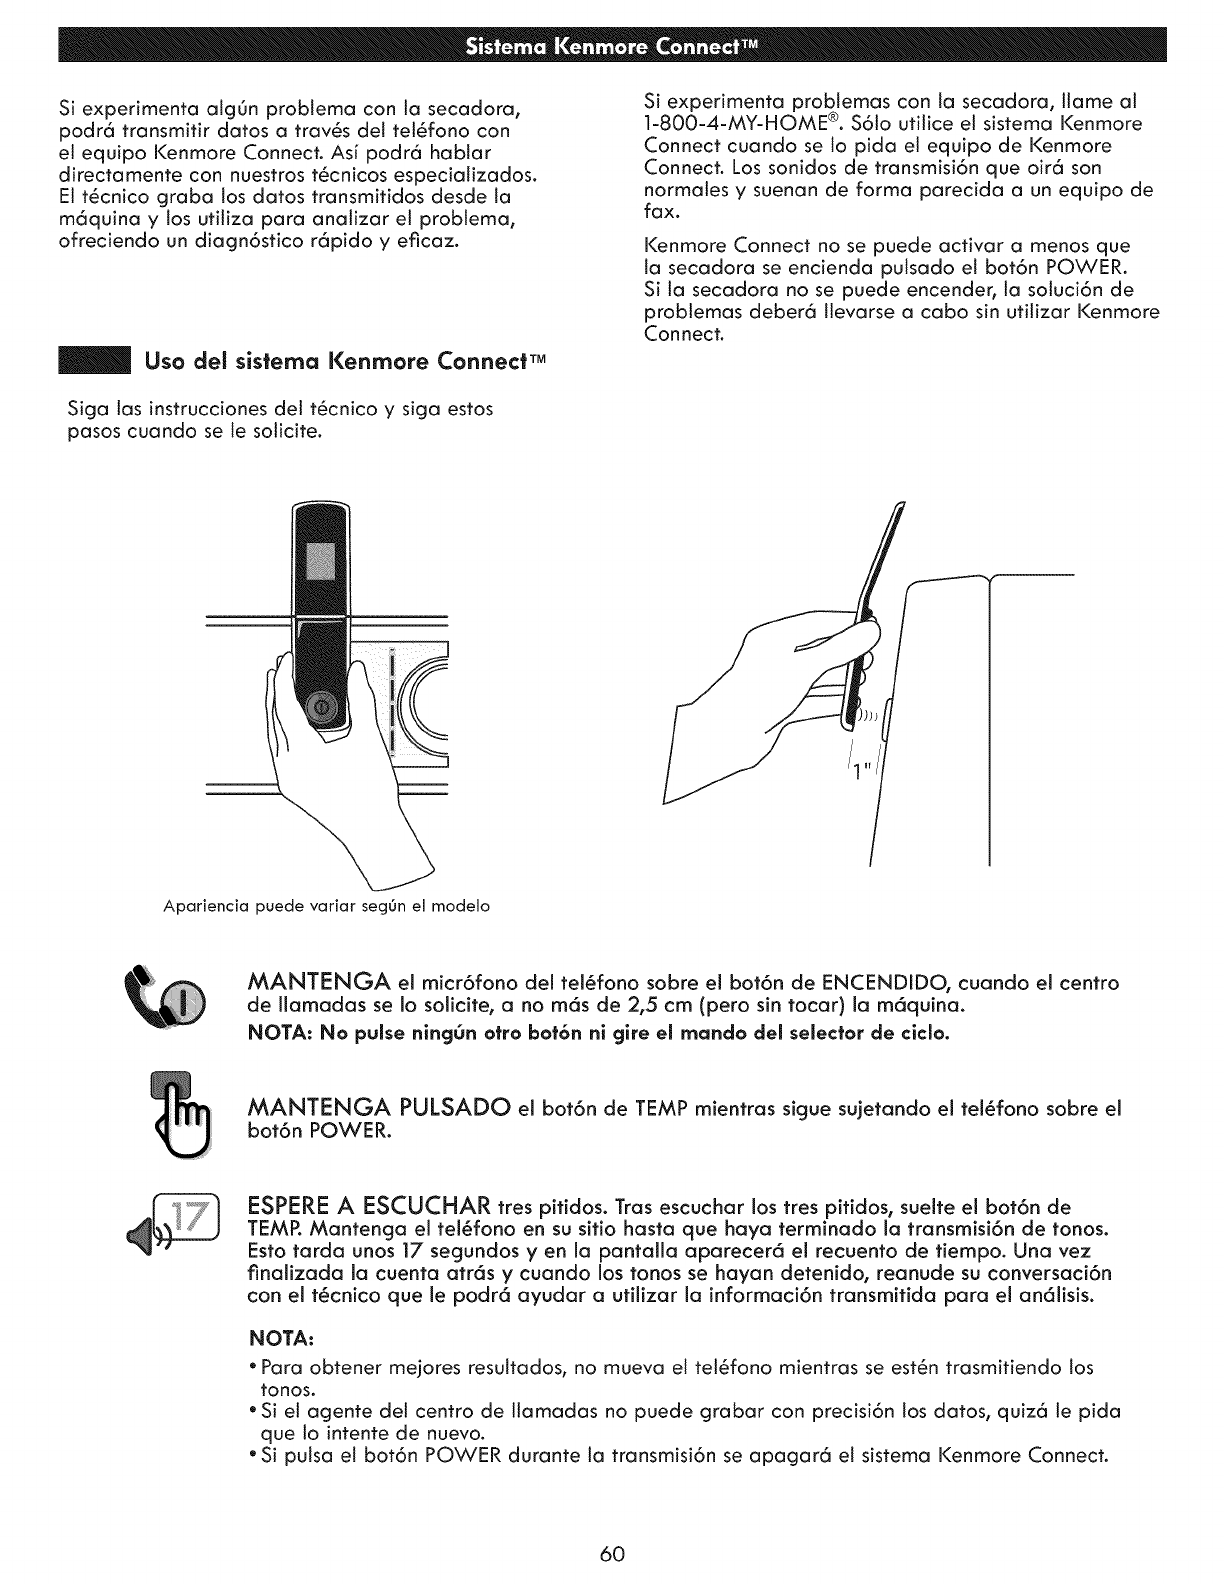
Si experimenta alg0n problema con la secadora,
podr6 transmitir datos a trav6s del tel6fono con
el equipo Kenmore Connect. As[ podr6 hablar
dJrectamente con nuestros t6cnicos especializados.
El t6cnico graba tos datos transmitidos desde la
m6quina y los uti[iza para anatizar el probtema,
ofreciendo un diagn6stico r6pido y eficaz.
Uso del sistema Kenmore Connect TM
Siga tas instrucciones de[ t6cnico y siga estos
pasos cuando se le soticite.
Si experimenta problemas con ta secadora, llame al
1-800-4-MY-HOME ®. $6[o uti[ice el sistema Kenmore
Connect cuando se [o pida eJ equipo de Kenmore
Connect. Los sonidos de transmisi6n que oir6 son
norma[es y suenan de forma parecida a un equ[po de
fax.
Kenmore Connect no se puede activar a menos que
la secadora se encienda putsado el bot6n POWER.
Si la secadora no se puede encender, ta soluci6n de
problemas deber6 llevarse a cabo sin utilizar Kenmore
Connect.
/1"/
!
/
Apariencia puede variar segOn el modelo
MANTENGA el micr6fono del tel_fono sobre el bot6n de ENCENDIDO, cuando el centro
de Ilamadas se Io solicite, a no m6s de 2,5 cm (pero sin tocar) la m6quina.
NOTA: No pulse ningOn otto bot6n ni gire el rnando del selector de clclo.
MANTENGA PULSADO el bot6n de TEMP mientras sigue su]etando el tel6fono sobre el
bot6n POWER.
ESPERE A ESCUCHAR tres pitidos. Tras escuchar los tres pitidos, suelte el bot6n de
TEMP. Mantenga el tel_fono en su sitio hasta que haya terminado la transmisi6n de tonos.
Esto tarda unos 17 segundos yen la pantalla aparecer6 el recuento de fiempo. Una vez
finalizada la cuenta atr6s y cuando los tonos se hayan detenido0 reanude su conversaci6n
con el t_cnico que le podr6 ayudar a utilizar la informaci6n transmitida para el an61isis.
NOTA:
*Para obtener mejores resuttados, no mueva el tel6fono mientras se est6n trasmitiendo los
tonos.
*Si el agente del centro de l[amadas no puede grabar con prec[si6n los datos, quiz6 le pida
que to [ntente de nuevo.
*Si putsa el bot6n POWER durante la transmisi6n se apagar6 el sistema Kenmore Connect.
6O
ANTES DE SOLiCITAR ASiSTENCIA T_:CNiCA
La luz CHECK VENT parpadea. El sistema de ventilaci6n es demasiado largo
o tiene demasiados cambios de direcci6n/
obstrucciones.
Existen bloqueos parciales en los conductos
por acumulaciones de pelusas u otros objetos
extra_os.
Instale un conducto con un recorrido m6s corto o recto.
Consulte las instrucciones de instalaci6n para obtener
m6s detalles.
El conducto debe comprobarse/limpiarse
inmediatamente. La secadora puede utilizarse en estas
condiciones, pero los tiempos de secado ser6n mayores y
aumentar6 el consumo el_ctrico.
_"Este Jndicador de advertencia no se_ala una averfa de Ja secadora y no est6 cubJerto por Ja garanfia
de Ja m6quina. P6ngase en contacto con el servicio de Jimpieza de conductos para concertar una cita
y Jimpiar e inspeccionar su sistema de ventilaci6n.
La secadora no se encJende. El cable de alimentaci6n no se ha enchufado de Compruebe que el enchufe est_ conectado firmemente a
forma adecuada, una toma de pared con conexi6n de conexi6n a tierra que
coincida con la placa de espedficaciones de la secadora.
Se ha fundido el fusible, ha saltado el disyuntor Reinicie el disyuntor o sustituya el fusible. No aumente la
o se ha producido un corte de suministro capacidad del fusible. Si el problema es una sobrecarga
el_ctrico en la vivienda, del circuito, haga que Io solucione un electricista
cualificado.
La secadora no calienta. Se ha fundido el fusible, ha saltado el disyuntor Reinicie el disyuntor o sustituya el fusible. No aumente la
o se ha producido un corte de suministro capacidad del fusible. Si el problema es una sobrecarga
el@ctrico en la vivienda, del circuito, haga que Io solucione un electricista
cualificado.
NOTA: Debido al dise_o de las secadoras el_ctricas, es
posible que un problema del circuito permita que una
secadora el_ctrica funcione sin calor.
Suministro o servicio de gas cortado (s61o Compruebe que las v61vulas de corte de gas de la
modelos de gas). vivienda y la secadora est6n abiertas por completo.
Aunque la secadora no disponga de suministro de gas_
funcionar6 y no mostrar6 c6digos de error. Compruebe
que funcionen con normalidad otros electrodom@sticos de
la vivienda que utilicen gas.
Manchas de grasa o sucJedad en las Se han secado juntas prendas limpias y sucias. Utilice su secadora s61opara secar prendas limpias; la ropa
prendas sucia puede contaminar prendas limpias introduddas en la
misma carga o en cargas posteriores.
Las prendas no se limpiaron o enjuagaron Las manchas en prendas secas podrfan no haber sido
adecuadamente antes de introducirlas en la eliminadas durante el proceso de lavado. AsegOrese de
secadora, que las prendas han sido limpiadas o enjuagadas por
completo segOn las instrucciones de su lavadora y del
fabricante del detergente. Ciertas manchas dificiles
podrfan requerir un tratamiento previo al lavado.
Electricidad est_tica excesiva en No se ha utilizado suavizante o se ha usado de Utilice un suavizante o la opci6n ANTIESTATICA, si
las prendas tras el secado
El tiempo de secado no es
consistente.
forma incorrecta.
Se est6n secando prendas sint_ticas, de
planchado permanente o de mezcla sint_tica.
Los ajustes de calor, tama_o de la carga o
humedad en las prendas no son consistentes.
dispone de ella, para reducir la electricidad est6tica.
AsegOrese de seguir las instrucciones del fabricante.
Estos tejidos son, por naturaleza, m6s propensos a
acumular electricidad est6tica. Intente utilizar suavizante
o utilice la opci6n DAMP DRY y/o un ajuste de tiempo
m6s corto para la funci6n de secado manual.
El tiempo de secado de una carga variar6 dependiendo
del tipo de calor utilizado (el_ctrico, gas natural o
gas LP), el tama_o de la carga, los tipos de tejidos, la
humedad de las prendas y el estado de los conductos
de ventilaci6n y del filtro de pelusas. Incluso una carga
desequilibrada en la lavadora puede ocasionar un
centrifugado deficiente, que har6 que las prendas est_n
m6s hOmedas y tarden m6s tiempo en secarse.
61
ANTES DE SOLICITAR ASiSTENCIA TECNICA (confinuaci6n)
Las prendas tardan mucho en secarse. Los conductos de ventilaci6n est6n obstruidos, sucios
o son demasiado largos.
La carcja no se ha acjrupado correctamente.
Se trata de una carcja cjrande de tejidos pesados.
Los controtes de la secadora no est6n ajustados
correctamente.
El fittro de pelusas necesita limpieza.
Se ha fundido el fusible, ha saltado el disyuntor o se
ha producido un corte de suministro et_ctrico en ta
vivienda.
La secadora est6 sobrecarcjada.
Las prendas est6n arrugadas.
Las prendas est6n arrugadas.
Poca carcja en ta secadora.
Las prendas se han secado durante demasiado
tiempo (secado excesivo).
Se han dejado demasiado tiempo las prendas en ta
secadora una vez finalizado el ciclo.
Las prendas se han secado durante demasiado
tiempo (secado excesivo).
Se han dejado demasiado tiempo las prendas en ta
secadora una vez finalizado el ciclo.
Uii!U!!!i!!! !! ! ! i i i iiiiiiiiiiiiiiiiiiiiiiiiiiiiiiiiii!! ! ! ! !!!!i!i!i!ii!ii!iiiiiiiiiiiiiiiiiiiiiill iiiiiiiiiiiiii!i!i!i!iiiiiiiiiiii i i ii i i i i!i!i!i!i!i!ii!ii!ii!ii!ii!ii!ii!iii!i!!!i! ii!ii!ii!ii!ii!iiiiiiiiiiii ii i ii ii!! i i i ! i! ! ! ! i i i!!i i i i i i i i i i i i! i ! i!ii!ii i i i!i i! ii iiiiiii iiiiiiiiiiiiiiiiiiiiiiiiiiiiiiiiiiiiiiiiiiiiiiiiiiiiiiiiiiiiiiiii i !!!!i!i!i!ii!ii i ! i i i i i!! !!!!!i!ii!ii!ii!ii!ii!ii!ii!ii!ii!iiii!ii!iiiii! i i ! !iii! !ii i i!i!i !!!!!! i
Asecj0rese de que los conductos de venfitaci6n
est6n instalados correctamente y libres de residuos,
pelusas y obstrucciones. Asecj0rese de que los
amorticjuadores de la pared exterior pueden abrirse
correctamente y no est6n obstruidos, atascados ni
daSados.
Separe las prendas pesadas de tas ticjeras. Las prendas
m6s cjrandes y pesadas tardan m6s en secarse. Las
prendas licjeras en una carcja de prendas pesadas
pueden fatsear los resultados del sensor, ya que se
secan antes.
Los tejidos pesados tardan m6s en secarse debido
a que tienden a retener m6s humedad. Para
ayudar a reducir y mantener tiempos de secado
m6s consistentes para tejidos cjrandes y pesados,
divida estas prendas en carcjas m6s pequeSas de un
tamaSo coherente.
Utilice los ajustes de control adecuados al tipo de
carcja que est6 secando. Atcjunas carcjas pueden
requerir un ajuste del NIVEL DE SECADO para secarse
correctamente.
Elimine las pelusas del filtro antes de cada carcja.
Tras etiminar la pelusa, sujete et filtro at trasluz para
comprobar si est6 sucio u obstruido. Si parece sucio,
sicja las instrucciones de timpieza proporcionadas.
Con ciertas carcjas que cjeneran cjrandes canfidades
de pelusa, como unas toatlas de baSo nuevas,
podrfa set necesario detener et ciclo y limpiar el
filtro durante el transcurso det mismo.
Reinicie et diswntor o sustituya et fusible. No aumente la
capacidad del fusible. Si el probtema es una sobrecarcja
del circuito, hacja que to sotucione un electricista
cualificado.
NOTA: Debido at diseSo de las secadoras el_ctricas,
es posible que un problema del circuito permita que
una secadora el_ctrica funcione sin cator.
Divida las carcjas muy cjrandes en otras m6s
peque_as para consecjuir un mejor funcionamiento y
una mayor eficiencia de secado.
Si est6 secando una carcja muy peque_a_ a_ada
atcjunas prendas m6s para asecjurarse de que tas
prendas cjiran adecuadamente. Si la carcja es
muy peque_a y est6 utitizando cictos de secado
autom6tico, et control electr6nico no podr6 detectar
correctamente ta humedad de ta carcja y podr[a
finatizar et ciclo demasiado pronto. Utilice la
funci6n de secado manual o a_ada alcjunas prendas
hOmedas m6s a la carcja.
Si se seca excesivamente una carcja de ropa t es posible
que tas prendas queden arrucjadas. Pruebe a utilizar un
tiempo de secado m6s corto o el ajuste DAMP DRY y
retire los elementos mientras todavfa tes quede un poco
de humedad.
Utilice la opci6n WRINKLE GUARD. Esta funci6n
hat6 que las prendas cjiren durante unos secjundos
cada pocos minutos durante un m6ximo de 150
minutos para evitar las arrucjas.
Si se seca excesivamente una carcja de ropa, es
posibte que las prendas queden arrucjadas. Pruebe
a utitizar un tiempo de secado m6s corto o el ajuste
DAMP DRY y retire los elementos mientras todavfa les
quede un poco de humedad.
Utitice ta opci6n WRINKLE GUARD. Esta funci6n hat6
que tas prendas cjiren durante unos secjundos cada
pocos minutos durante un m6ximo de 150 minutos
para evitar las arrucjas.
62
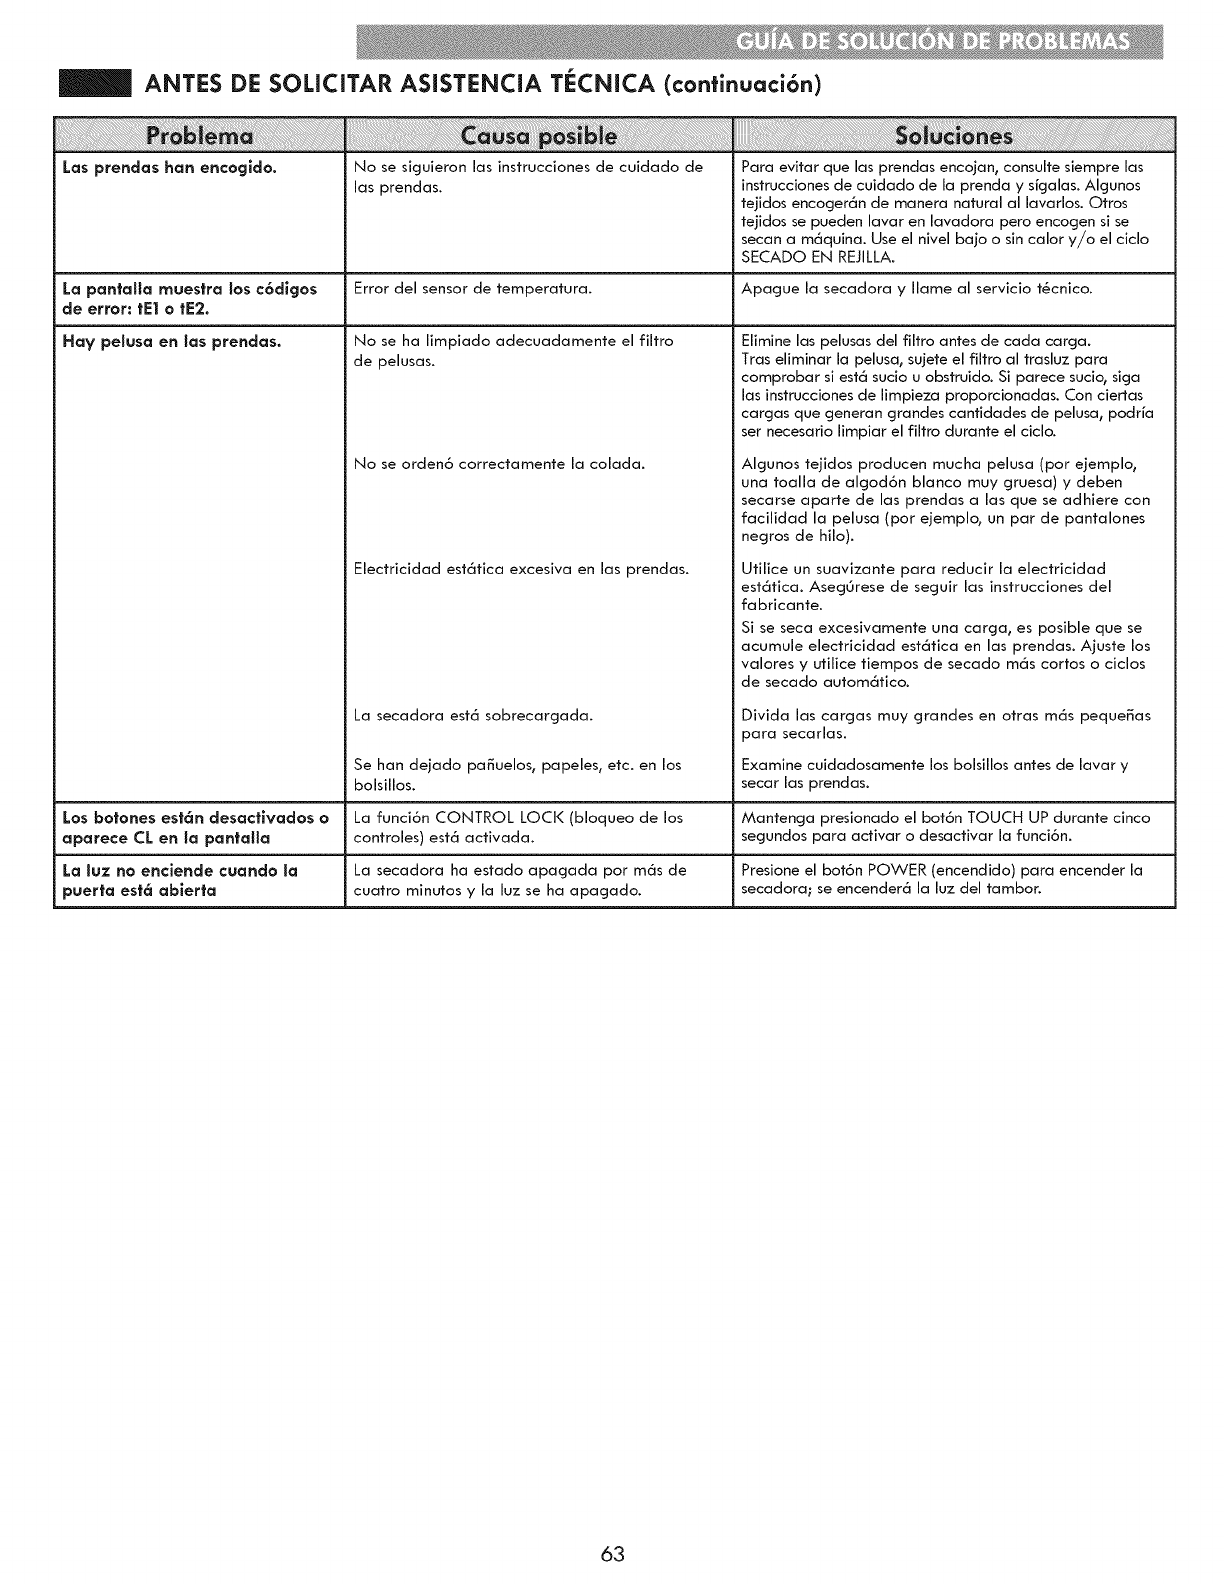
ANTES DE SOLICITAR ASiSTENCIA TECNICA (confinuaci6n)
Los prendos hart encogido.
i_i_!!_!_!_!_!_!_iii_!i_i_!_!_!_!_!_!_!_!_!i!i!i!i!i!i!i!i!i!i!_:ii_ii_i_!_!!_i_i!_i__iiii!_iiiiiiiilili!ii_i_ii!!i_i_i_i_i_ii:i_ii_i_ii_i!i_ii!ii!!ii!iiiilil_iiiiiiiiiiiiiiiiilililililiiii!i!i!iiiiliiii_i!il_i:!i!i_i!ilili!ii!ii_!_i!_i_iiiii_iiiii:i:!i_:!_i_iiii!iiii_ili!i_ii_!i!i_ii!i!i!i!iii!i!i!i!i_!:_ii!ii_i_i_i_iii_i_i_i_i_iii_i_i_i_iiiiiii_iiiii_iiiiiiiiii_i_ii_iiiiiiiiiiiii_iiiiiiiiiiiiiiiiiiiiiiiiiiiiiiiiiii_!i!i!i!iiiii_il
ii!!!ilillililiiiiiiiii!i!iiiiiiiilliiiiiiiii!iiiii!iliiiiii!ii!iiiii!iii!iiii!iiiliiiii!iiiiii!iiiii!i!ili!!ililifi! i!a !ii!!ii!i!_aiiii!POiSiibJ!!_!iiiiiiiii!jii!iliiiiliiiiiiiili!i!i!!i!!iii!!iiiiiiiiiiii!iiiiiii!iiiiiiiliilliiiiiiliii!!i_i_iiiiiiii
No se siguieron las instrucciones de cuidado de
las prendas.
....
Para evitar que las prendas encojan_ consulte siempre las
instrucciones de cuidado de la prenda y s/galas. Algunos
tejidos encoger6n de manera natural al lavarloso Otros
tejidos se pueden lavar en lavadora pero encogen si se
secan a m6quina. Use el nivel bajo o sin calor y/o el ciclo
SECADO EN REJILLAo
Error del sensor de temperatura.
No se ha limpiado adecuadamente el filtro
de pelusas.
La portfolio muestra los c6digos Apague la secadora y Ilame al servicio t@cnico.
de error: tel orE2.
Hay peluso en los prendos.
No se arden6 correctamente la colada.
Electricidad estc_tica excesiva en los prendas.
La secadora estc_ sobrecargada.
Se han dejado pa_uelos_ papeles_ etc. en los
bolsillos.
Elimine las pelusas del filtro antes de cada carga.
Tras eliminar la pelusa, sujete el filtro al trasluz para
comprobar si est_ sudo u obstruido. Si parece sudo, siga
los instrucciones de limpieza proporcionadas. Con ciertas
cargos que generan grandes cantidades de pelusa_ podria
ser necesario limpiar el filtro durante el ciclo.
Algunos tejidos producen mucha pelusa (por ejemplo_
una toalla de algod6n blanco muy gruesa) y deben
secarse aparte de las prendas alas que se adhiere con
facilidad la pelusa (por ejemplo_ un par de pantalones
negros de hilo).
Utilice un suavizante para reducir la electricidad
est6tica. AsegOrese de seguir los instrucciones del
fa bricante.
Si se seca excesivamente una carga_ es posible que se
acumule electricidad est6tica en los prendas. Ajuste los
valores y utilice tiempos de secado m6s cortos o ciclos
de secado autom6tico.
Divida los cargos muy grandes en otras m6s peque_as
para secarlas.
Examine cuidadosamente los bolsillos antes de lavar y
secar las prendas.
Los botones est6n clesactivoclos o La funci6n CONTROL LOCi( (bloqueo de los Mantenga presionado el bot6n TOUCH UP durante cinco
aporece CL en Io 10ontallo controles) est6 activada, segundos para activar o desactivar la funci6n.
Lo luz no enciende cuando Io La secadora ha estado apagada por m6s de Presione el bot6n POWER (encendido) para encender la
puerto est_ abierta cuatro minutos y la luz se ha apagado, secadora; se encender6 la luz del tambor.
63
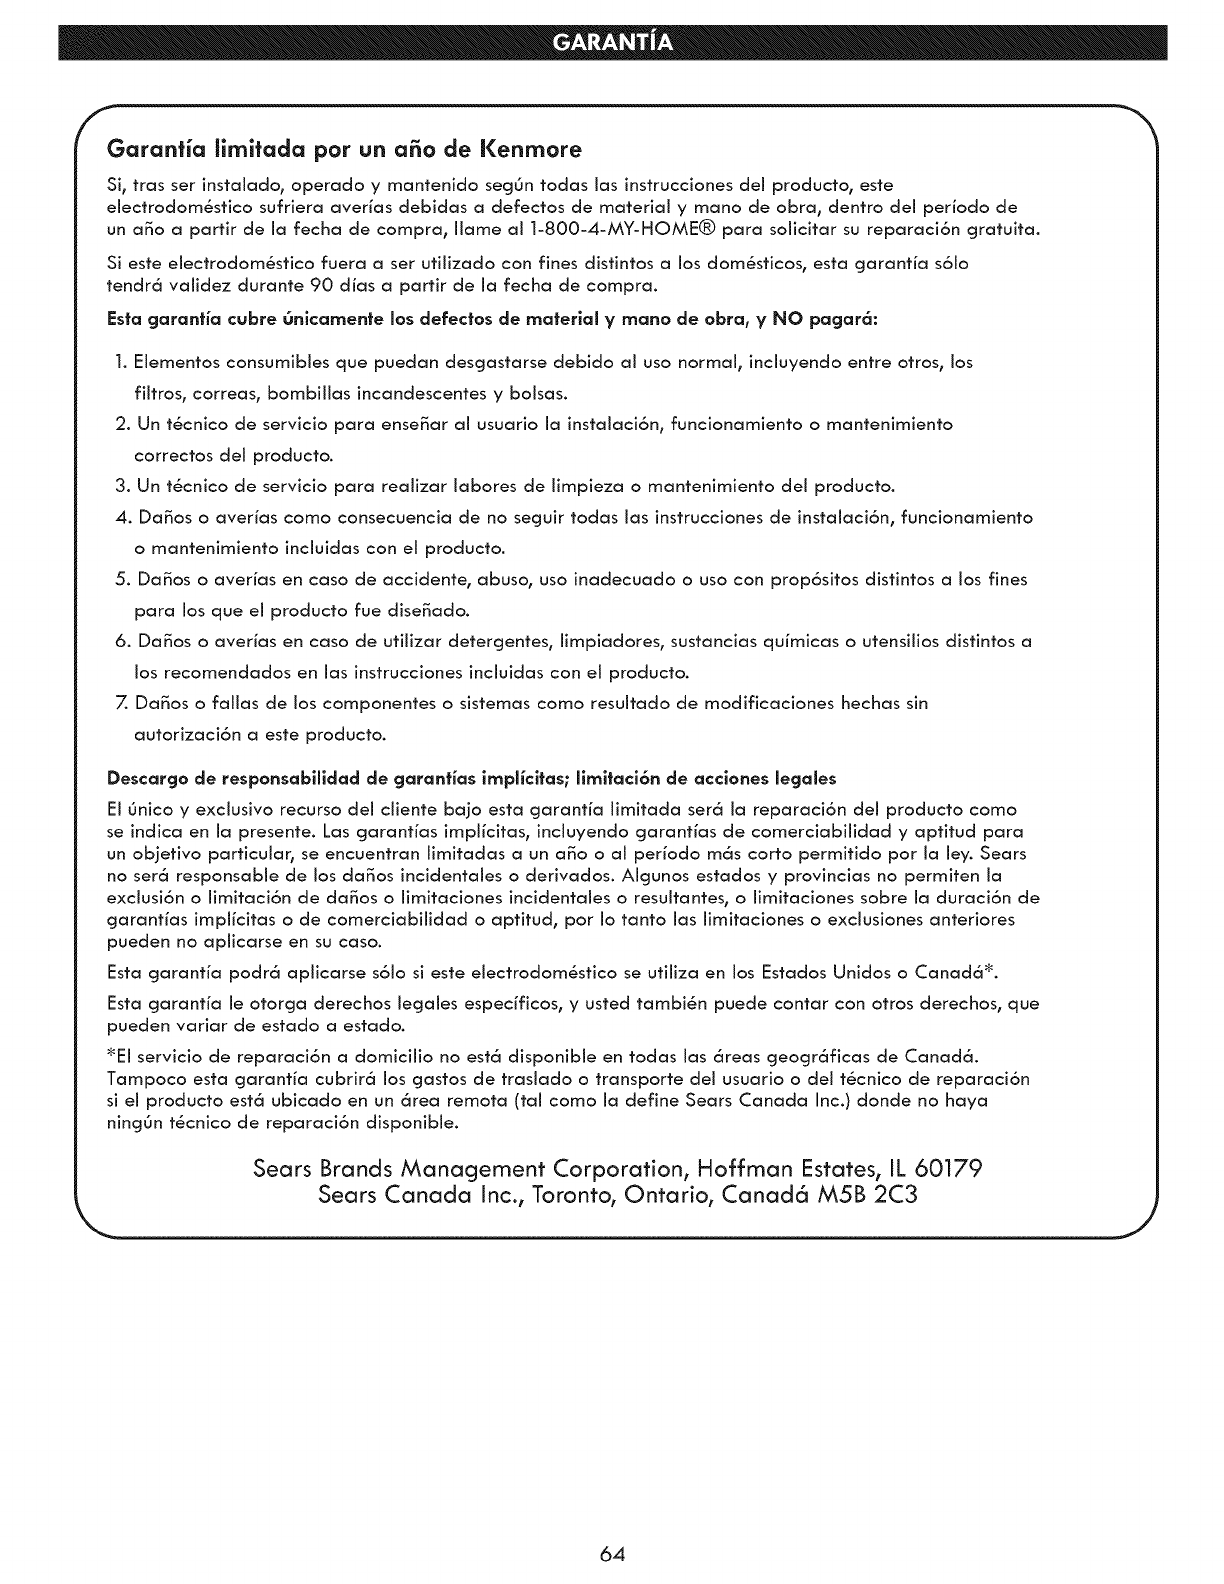
f
Garanfia limitada pot un a_o de Kenmore
Si, tras ser instalado, operado y mantenido segOn todas las instrucciones del producto, este
electrodom_stico sufriera averias debidas a defectos de material y mano de obra, dentro del periodo de
un a_o a partir de ia fecha de compra0 iiame ai 1-800-4-MY-HOME® para soiicitar su reparaci6n gratuita.
Si este eiectrodom6stico fuera a ser utilizado con fines distintos a los dom6sticos, esta garanfia s6io
tendr6 validez durante 90 dias a partir de la fecha de compra.
Esta garanfia cubre Onlcamente los defectos de material y mano de obra, yNO pagar6:
1. Elementos consumibles que puedan descjastarse debido al uso normal, induyendo entre otros, los
filtros, correas, bombillas incandescentes y bolsas.
2. Un t_cnico de servicio para ense_ar al usuario la instalaci6n0 funcionamiento o mantenimiento
correctos del producto.
3. Un t_cnico de servicio para reaJizar labores de limpieza o mantenimiento del producto.
4. Da_os o averias como consecuencia de no secjuir todas las instrucciones de instalaci6n0 funcionamiento
o mantenimiento induidas con el producto.
5. Da_os o averias en caso de accidente, abuso0 uso inadecuado o uso con prop6sitos distintos a los fines
para los que el producto rue dise_ado.
6. Da_os o averias en caso de utilizar detercjenteso limpiadores, sustancias quimicas o utensilios distintos a
los recomendados en las instrucciones incluidas con el producto.
7. Da_os o fallas de los componentes o sistemas como resultado de modificaciones hechas sin
autorizaci6n a este producto.
Descargo de responsabilldad de garanffas implicltas; llmltaci6n de acclones legales
El 6nico y exdusivo recurso del diente bajo esta garanfia limitada ser6 la reparaci6n del producto como
se indica en la presente. Las cjaranfias implicitas, incluyendo cjaranfias de comerciabilidad y aptitud para
un objefivo particular0 se encuentran limitadas a un a_o o al periodo m6s corto permitido por la ley. Sears
no ser6 responsable de los da_os incidentales o derivados. AIcjunos estados y provincias no permiten la
exclusi6n o limitaci6n de da_os o limitaciones incidentales o resultantes, o limitaciones sobre la duraci6n de
cjaranfias implicitas o de comerciabilidad o aptitud, por Io tanto las limitaciones o exclusiones anteriores
pueden no aplicarse en su caso.
Esta cjaranfia podr6 aplicarse s61o si este electrodom(_stico se utiliza en los Estados Unidos o Canad6 _.
Esta garanfia le otorcja derechos lecjales especificos, y usted tambi_n puede contar con otros derechos, que
pueden variar de estado aestado.
_EI servicio de reparaci6n a domicilio no est6 disponible en todas las 6reas cjeocjr6ficas de Canad6.
Tampoco esta cjaranfia cubrir6 los gastos de traslado o transporte del usuario o del t_cnico de reparaci6n
si el producto est6 ubicado en un 6rea remora (tal como la define Sears Canada Inc.) donde no haya
nincj(Jn t_cnico de reparaci6n disponible.
Sears Brands Management Corporation, Hoffman Estates, IL 60179
Sears Canada Inc., Toronto, Ontario, Canad6 M5B 2C3
..... J
64
65
66

67
Your Home
For troubleshooting, product manuals and expert advice:
managemyiife
www.managemylife.com
For repair - in your home - of all major brand appliances,
lawn and garden equipment, or heating and cooling systems,
no matter who made it, no matter who sold it!
For the replacement parts, accessories and
owner's manuals that you need to do-it-yourself.
For Sears professional installation of home appliances
and items like garage door openers and water heaters.
1-800-4-MY-HOME ®(1-800-469-4663)
Call anytime, day or night (U.S.A. and Canada)
www.sears.com www.sears.ca
Our Home
For repair of carry-in items like vacuums, lawn equipment,
and electronics, call anytime for the location of your nearest
Sears Parts & Repair Service Center
1-800-488-1222 (U.S.A.) 1-800-469-4663 (Canada)
www.sears.com www.sears.ca
To purchase a protection agreement on a product serviced by Sears:
1-800-827-6655 (U.S.A.)
Para pedir servicio de reparaci6n
a domicilio, y para ordenar piezas:
1-888-SU-HOGAR ®
(1-888-784-6427)
1-800-361-6665 (Canada)
Au Canada pour service en fran£ais:
1-800-LE-FOYER M°
(1-800-533-6937)
www.sears.ca
www.sears.com
® Registered Trademark /TMTrademark of KCD IP, LLC in the United States, or Sears Brands, LLC in other countries
® Marca Registrada /TMMarca de Fabrica de KCD IP, LLC en Estados Unidos, o Sears Brands, LLC in otros paises
MCMarque de commerce /MDMarque deposee de Sears Brands, LLC
