Kenmore Dehumidifier 251 907Q1 Users Manual
251.907Q1 to the manual 2a9fe5de-bb11-428b-a193-830a6fdaf518
2015-01-24
: Kenmore Kenmore-Dehumidifier-251-907Q1-Users-Manual-326766 kenmore-dehumidifier-251-907q1-users-manual-326766 kenmore pdf
Open the PDF directly: View PDF ![]() .
.
Page Count: 13

Use
& Core Guide
Monuol
de Uso
y Cuidodo
English
/ Espofiol
Model, Modelo : 251.907Q1
P/N J8000OO44OO
Seqrs Bronds
Monogement
Corporotion, Hoff
mon Estotes,
IL
60IZ9 USA
www.seors.com
i
i:..::.:.-t.
:..-:-..:-:
W
,3'Mrcroban'
lGnmore
Elite
ffiwMwwWN$ffiwm
ffiwsNwffi$N$ffimmNmx"
ffi

Get
it
fixed,
at
your
home
or ours!
Your
Home
For
troubleshooting,
product
manuals
and
home solutions
advice:
www.managemyhome.com
For
repair
- in
your
home
- of all
major brand
appliances,
lawn
and
garden
equipment,
or
heating
and
cooling
systems,
no
matter
who made
it,
no matter
who
sold
it !
For
the
replacement
parts,
accessories
and
owner's
manuals
that
you
need to
do-it-yourself.
For Sears
professional
installation
of
home appliances
and
items
like
garage
door
openers
and
water
heaters.
1-800-4'MY'HOME@ call
anytime,
dav or
nisht
'l"lll11?,133il
'',;*1T":::0',',
Our
Home
For repair
of carry-in
items
like
vacuums,
lawn equipment,
and
electronics,
call anytime
for the
location
of the
nearest
Sears
Parts
& Repair
Service
Genter
1-800488J1?l:#) 1-iii,131.,,*
3
(canada)
To
purchase
a protection
agreement
on
a product
serviced
by
Sears:
1-800-827-6655(us.A) 1-800-361-6665(canada)
Para
pedir
servicio
de
reparacion Au Canada
pour
service
en
franqais:
a
domicilio,y
para
ordenar
piezas. 1€gg-LE-FOYERMc
l Agg1Su-HoGAR@ (1-B00-5336e37)
(1388-7U927) www'sears'ca
.Seare
@ Registered
Trademark
/
rM
Trademark
of
KCD
lP, LLC
in the United
States,
or Sears
Brands,
LLC
in other countries
@ Marca
Registrada
/
rM
Marca
de Fdbrica
de
KCD
lP, LLC
en Estados
Unidos,
o Sears
Brands,
LLC in otros
paises
MC
Maroue de
commerce
/ NaD
Marque
d6pos6e
de
Sears
Brands,
LLC
Warranty. .......-..2
Package
Contents. .........2
Safety
Instructions....... ............3
Electrical
Requirements....
.........--.....4
lnstallation ....-......4
Key
Features.... ............5
Control
Panel. ........6
Water
Disposing
Options. ......-7
Care
and
Maintenance...... ...........8
Troubleshooting. ..............9
Error
Codes/Prod
uct
Specifications..........
1
0
Wireless
Remote
Station. .......11
Receiver
Setting
Instructions.......
............12
Spanish/Espanol.. '13
Sears
Service. .Back Cover
Kenmore Elite Limited WarrantY
When
installed,
operated
and
maintained
according
to
all
instructions
supplied
with the
product,
if
this appliance
fails due
to a defect
in material
and
workmanship
within
one
year
irom the date
of purchase, call
1-800-4-MY-HOME""
to arrange
for free
repair.
lf the
sealed
refrigerant
system
is defective
within
five
years
from
the
purchase
date,
call
1-800-4-MY-
HO|VEoto
arrange
for free
repair.
All warranty
coverage
applies
for only 90 days
from the
date
of purchase
if this
product
is ever
used
for other
than
private
family
purposes.
This warranty covers only defects in material
and workmanship. Sears
will NOT pay for:
1. Expendabie
items
that
-can
wear out
from
normal
use,
including
but
not
limited
to
filters,
belts,
light bulbs,
and bags.
2.
A service
technician
to instruct
the user
in correct
product installation,
operation
or
maintenance.
3.
A service
technician
to clean
or
maintain
this
product'
4. Damage
to or
failure of
this
product
if it
is not
installed,
operated
or
maintained
according
to all
the
instructions
supplied
with
the
product'
5.
Damage'to
or
failure
of
this
product
resulting
from accident,
abuse,
misuse
or
use
for
other
than
its intended
Purpose.
6. Damage
to or
failure
of
ifris
product
caused
by
the use
of
detergents,
cleaners,
chemicals
or
utensils
other
than
those
recommended
in all
instructions
supplied
with the
product'
Z.
Damage
to or
failure
of
parts
or systems
resulting
from
unauthorized
modifications
made
to
this
product.
Disclaimer
of implied
warranties;
limitation
of remedies
Customer's
sole
and
exclusive
remedy
under
this
limited
warranty
shall
be product
repair
as
provided herein.
lmplied
warranties,
rncluding
warranties
of merchantability
or fitness
for a
particular
purpose,
are
limited
to one
year
or
the shorte_st
period
allowed
by
law. Sears
shall
not be liable
for
incidental
or consequential
damages.
Some
states
and
provinces do not
allow
the exclusion
or
limitation
of
incidental
or
consequential
damages,
or limitation
on the
duration
of implied
warranties
of merchantability
or
fitness,
so
these
exclusions
or limitations
may
not apply
to you.
This
warranty
applies
only
while
this
appliance
is used
in the
United
States
or Canada.This
warranty
gives you
specifrc
legal
rights,
and
you may
also
have
other
rights
which
vary from
state
to state.
Sears,
Roebuck
and
Co.,
Hoffman
Estates,
lL 60179
. Sears
Canada
Inc.,
Toronto,
Ontario,
Canada
M5B
288
Kenmore
Elite
Dehumidifier
Remote
Monitoring
Station
. Batteries
(2
AAA)
. Use
& Care
Guide 1B ft.
Pump
Drain
Hose
^S'
Safety
IMPORTANT
CAUTIONS FOR
USING YOUR DEHUMIDIFIER.
To reduce the risk
of fire,
electrical
shock, injury or damage to the
dehumidifier, these
safety
precautions
must
be
followed:
. Do not
place
the
power
cord
near
a heater.
. Do
not use an electrical
outlet near
flammable
or combustible
materials
such
as
gasoline,
propane, paint
thinners,
etc.
. Do not disassemble
or modify dehumidifier
parts
or
components. lt may
cause electric
shock and failure
. Plug in the
power
cord
properly.
. Do not
turn the unit
on and off by
inserting
or
pulling
out the
power
plug.
. Do
not damage the
power
cord or use an
unspecified
power
cord.
. Do not modify
power
cord length.
. Do not
share
the
outlet with another
appliance.
.
Always
plug
into
a
grounded
outlet.
Not
grounding
unit may cause
electrical shock.
. Unplug the unit if it
emits strange sounds,
odors, or smoke.
. Do not use
an electrical outlet if it is loose
or
damaged.
. Do not
operate or
plug
in
unit
with wet
hands
or
in
a
wet
environment.
.
Ventilate
area before operating
dehumid-
ifier. Check for
the
presence
of
natural
gas
or the buildup
of other combustible
vaoors.
. Do not clean the
dehumidifier with water.
Water may
enter the unit and
degrade the
insulation resulting
in an
electrical shock.
. lf water
enters the
product,
turn off the
dehumidifier's
power
switch,
then unplug
the unit. Do not
plug
in
unit
until
it has
been
inspected
by an authorized repair
service.
. Because
the fan rotates
at high speed
during operation,
always unplug dehumid-
ifier
before attempting any recommended
maintenance
or cleaning.
. Do not
block the
inlet
or outlet. lt may
cause
unit to
fail
or to operate inefficiently.
. Do not remove
plug
from
outlet
by
pulling
on the cord.
.
When
not in
use, turning the
unit
off
will
save energy.
Unplug the
dehumidifier
when not
using for long
periods
of time.
. When
removing
the filter,
be aware that
some metal
parts
may have
sharp
edges
and may cause injury.
. Do not
use the water
collected in
the
bucket
for
drinking
purposes.
lt is
not
sanitary and
could cause illness.
. Do
not allow
children to
play
with
this
product.
Tips
. Auto is the
suggested
setting
for
typical
everyoay
use
. Make
sure the
dehumidifier is
the correct
size
for
the area
you
want to
dehumidify.
It is not designed
to
dehumidify the
entire
house.
. For
proper
operation,
the dehumidifier
should only
be
placed
on a level floor.
. Close all
doors, windows
and other
open-
ings to the room.
The
dehumidifier
must
operate in an
enclosed area
to be
effective.
. To
clean, use a soft
cloth; do not
use wax,
thinners,
or strong
detergents
as they may
change the color
of the unit or
cause
surface
damage.
. Be
sure to replace
the bucket
properly
after emptying to
prevent
water from
collecting
on the floor
causing damage
to
some types of flooring.
. Do not
put
a pet
or
house
plant
where
it
will
be exposed
to direct
air
flow.
This
could
injure
the
pet
or
plant.
. Operation without
filter
will cause
unit failure. Insert
the filter
securely.
Clean
it every two weeks.
(See
maintenance.)
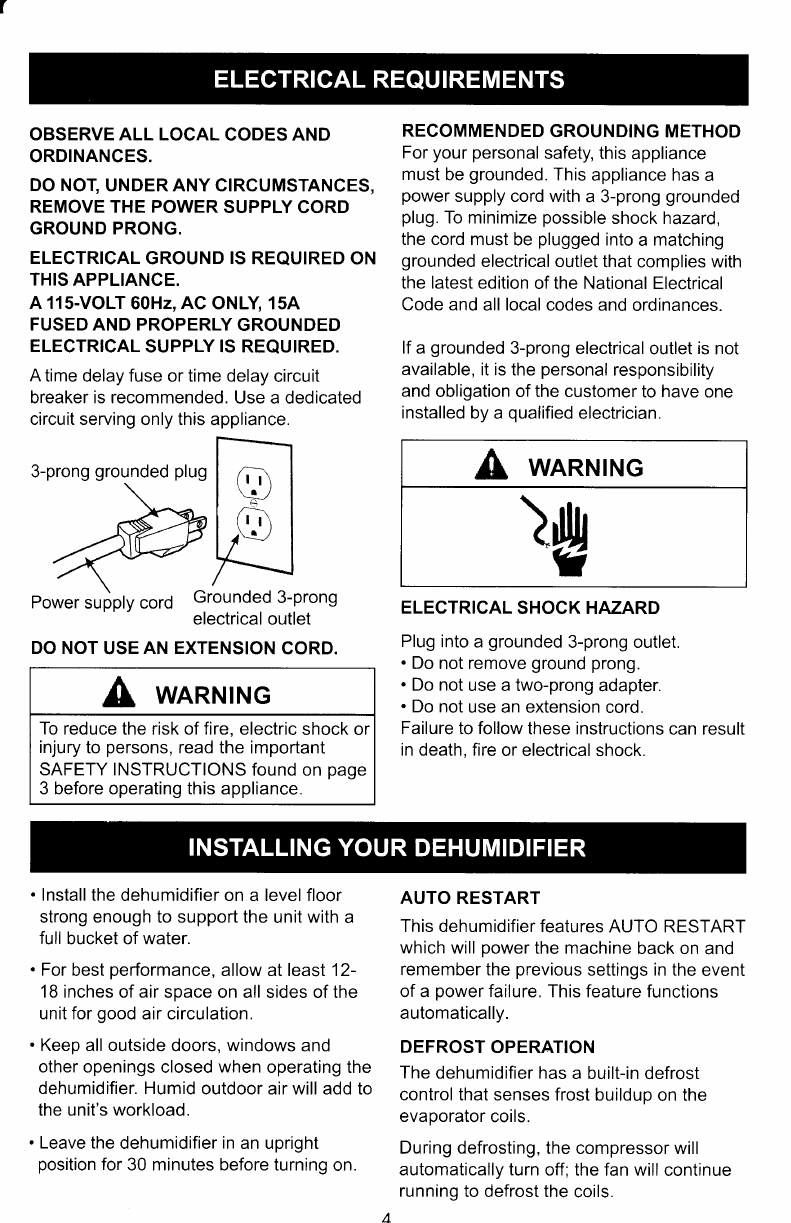
OBSERVE
ALL LOCAL
CODES AND
ORDINANCES.
DO NOT,
UNDER ANY CIRCUMSTANCES,
REMOVE THE POWER
SUPPLY CORD
GROUND
PRONG.
ELECTRICAL
GROUND
IS
REQUIRED
ON
THIS
APPLIANCE.
A 115-VOLT
60H2,
AC
ONLY 15A
FUSED AND PROPERLY
GROUNDED
ELECTRICAL
SUPPLY IS REQUIRED.
A
time delay fuse or time delay
circuit
breaker is recommended.
Use a dedicated
circuit serving
only
this
appliance.
RECOMMENDED
GROUNDING METHOD
For
your personal
safety, this
appliance
must
be
grounded.
This
appliance has
a
power
supply cord with
a 3-prong
grounded
plug.
To minimize
possible
shock hazard,
the cord must
be
plugged
into
a matching
grounded
electrical
outlet that complies with
the latest edition
of the National Electrical
Code and
all
local
codes and
ordinances.
lf a
grounded
3-prong electrical
outlet
is
not
available,
it is the
personal
responsibility
and
obligation of the customer
to
have
one
installed
by a
qualified
electrician.
3-prong
grounded
plug
Power
suiply cord Grounded
3-prong
electrical outlet ELECTRICAL
SHOCK HAZARD
Plug
into a
grounded
3-prong outlet.
. Do not remove
ground prong.
. Do not
use a two-prong
adapter.
. Do not
use an extension
cord.
Failure
to
follow
these instructions
can result
in death, fire
or electrical
shock.
A WARNING
)*
DO NOT
USE
AN EXTENSION
CORD.
A WARNING
To reduce the risk of fire,
electric shock or
injury
to
persons,
read the important
SAFETY INSTRUCTIONS
found on
page
3 before operating this
appliance.
. Install
the dehumidifier on a level floor
strong enough to support the
unit
with
a
full
bucket of water.
. For
best
performance,
allow at least 12-
18 inches of air
space on all sides of the
unit for
good
air circulation.
. Keep all outside
doors,
windows
and
other
openings closed
when
operating the
dehumidifier. Humid
outdoor air will add to
the unit's workload.
. Leave the
dehumidifier
in
an upright
position
for
30 minutes before turning
on.
AUTO RESTART
This dehumidifier features
AUTO RESTART
which
will
power
the machine
back on
and
remember the
previous
settings in the
event
of a power
failure. This feature functions
automatically.
DEFROST
OPERATION
The
dehumidifier has
a built-in defrost
control that
senses frost buildup
on the
evaporator
coils.
During defrosting,
the compressor will
automatically turn
off; the fan will
continue
running
to defrost the
coils.

CHOOSING
THE
PROPER
LOCATION
Use
the
dehumidifier:
. in
the
basement
to
help
prevent
moisture
damage.
. in
the
kitchen,
laundry
room,
bathroom'
and
spa/exercise
areas
that
have
exces-
sive
moisture.
. to
prevent
moisture
damage
anywhere
books
or
valuables
are
stored'
. during
construction
or
remodeling
to
reducL
drying
time
for
drywall
and
paint'
AUTOMATIC
SHUT
OFF
.
When
the
bucket
is
full,
or
when
the
buck-
et
is
not
in
the
proper
position,
the
Bucket
Full
light
goes on
and
the
unit
automati-
cally
shuts
off.
.
The
bucket
must
be
rePlaced
in
the
proper
position
for
the
dehumidifier
to
work.
The
light
will
stay
on
and
the
dehu-
midifier
will
not
run
if the
bucket
is
not
in
the
ProPer
Position.
.
The
dehumidifier
will
shut
off
once
the
desired
humidity
setting
is
reached
plus
or
minus
5%
Relative
HumiditY
(RH)
Warning:
Changes
or
modifications
to
this
unit
not
u*pr.tJy
approved
by
the
party responsible
for
compliance
could
void
the
user's
authority
to
operate
the
equiPment.
NOTE:This
equipment
has
been
tested
and
found
to
comply
with
the
limits
for
a
Class
B
digital
device'
orrruunito
Part
15
of
the
FCC
Rules'
These
limits
are
designed
to
provide
reasonable
protection
against
harmful
interference
in
a
residential
initallation.
This
equipment
generates,
uses
and
can
radiate
radio
frequency
energy
and,
if not
installed
and
used
in accordance
with
the
instructions'
may
cause
harmful
interference
to
radio
communications'
However,
there
is
no
guarantee
that
interference
will
not
occur
in
a
particular installation'
lf
this
equipment
does
cause
harmful
interference
to
radio
or
television
reception,
which
can
be
determined
by
turning
the
equipment
off
and
on,
the
user
is encouraged
to
try
to
correct
the
interference
by
one
or
more
of
the
following
measures:
.
Reorient
or
relocate
the
receiving
antenna'
.Increase
the
separation
between
the
equipment
and
receiver.
.
Connect
the
equipment
into
an
outlet
on
a
circuit
different
from
that
to
which
the
receiver
is connected'
.
Consult
the
dealer
or
an
experienced
radio/TV
technician
for
helP.
HANDLE
GRAVITY
DRAIN
PUMP
DRAIN
SIDE
GRILL
BUCKET
CONTROL
PANEL
SIDE
GRILL
AIR
INLET
FILTER
.@;Mrcroban
CASTER
\,licrobrn' rntinlicrobial plotccttrrn
rnlril\it.
lh( it,\\lll r\l
"Ll'rt
i'tu'itlr
I'r.t.rt.r,'n
tlre
JchuntiLlrlrcl
Bu'Let
\ll( R(
)BAN l\.r
l('ll'l(l(Ll
lr'rLl(-
nr.,r1,'1
\,ll;1,'lr:rtt
Pr,rlttlt.(,'ntl:rttr'
o e@ @
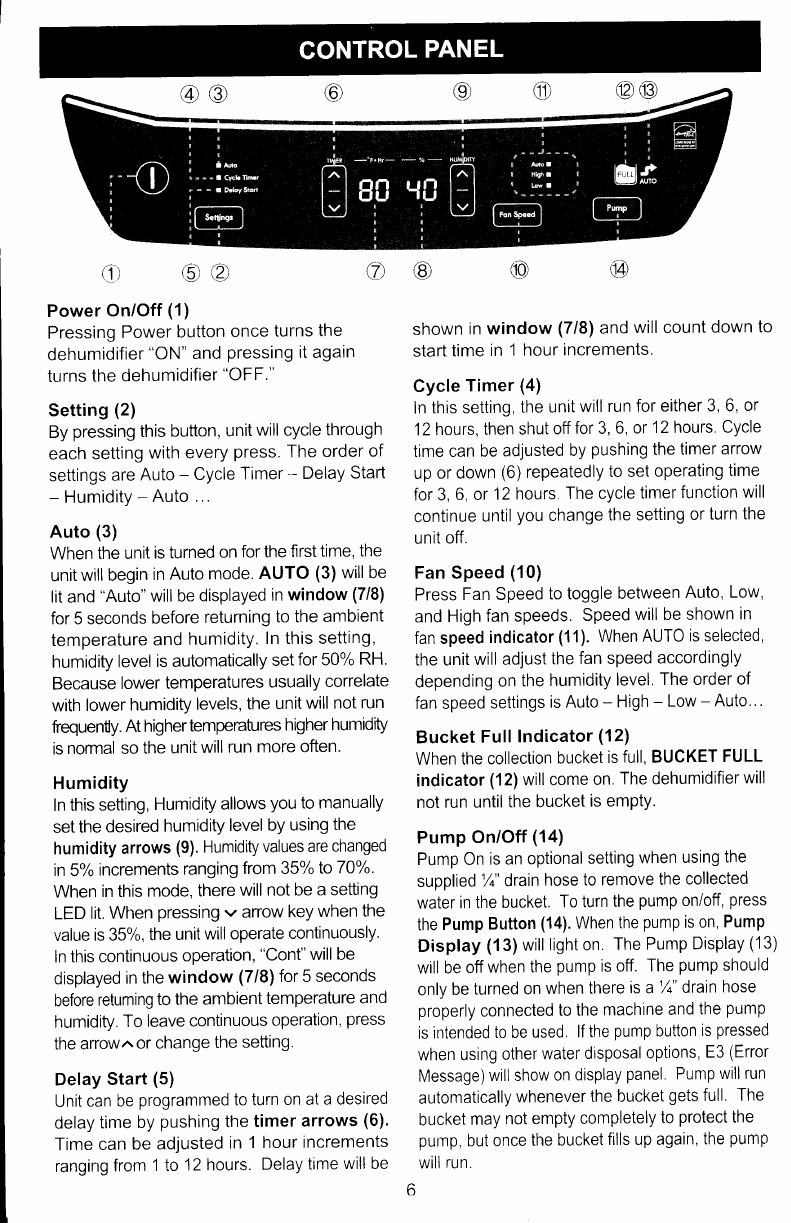
Power
On/Off
(1)
Pressing
Power
button
once
turns
the
dehumidifier
"ON"
and
pressing
it again
turns
the
dehumidifier
"OFF."
Setting
(2)
By
pressing
this
button,
unit
will cycle
through
each
setting
with
every
press.
The order
of
settings
are
Auto
- Cycle
Timer
- Delay
Start
- Humidity
- Auto
...
Auto (3)
When the
unit
is turned
on
for the
first
time, the
unit
will begin
in
Auto
mode.
AUTO
(3)
will be
lit and
"Auto"
will be
displayed
in
window
(7/8)
for 5 seconds
before
returning
to the
ambient
temperature
and
humidity.
In this setting,
humidity
level
is automatically
set
for 50%
RH.
Because
lower
temperatures
usually
correlate
with
lower
humidity
levels,
the unit
will not
run
frequenty.
At h
ig her tem
peratu
res h
ig her h u
m idity
is
normal so
the
unit
will
run
more often.
Humidity
In this
setting,
Humidity
allows
you
to manually
set
the
desired
humidity
level by
using
the
humidity
arrows
(9). Humidity
values
are
changed
in
5o/o
increments
ranging
from 35%
to70%.
When
in this
mode,
there
will not be
a setting
LED
lrt.
When
pressing
v arrow
key
when
the
value
is 35%,
the
unit
will
operate
continuously.
In this continuous
operation,
"Cont"
will be
displayed
in the
window (7/8)
for 5 seconds
before
returning
to the
ambient
temperature
and
humidity.
To
leave continuous
operation,
press
the arrow,ror
change
the
setting.
Delay
Start
(5)
Unit
can be
programmed to turn
on at
a desired
delay
time
by
pushing
the
timer
arrows
(6)'
Time
can
be adjusted
in
t hour
increments
rangirrg
from
1 to
12 hours.
Delay
time
will be
shown
in window
(7/8)
and
will count
down
to
start
time
in
t hour
increments.
Cycle
Timer
(4)
In
this setting,
the unrt
will run
for either
3, 6,
or
12
hours, then
shut
off
for 3, 6,
or
12 hours.
Cycle
time
can
be
adjusted
by
pushing
the
timer
arrow
up
or down
(6)
repeatedly
to set
operating
time
for 3,
6, or
12
hours
The cycle
timer
function
will
continue
until
you
change
the
setting
or
turn
the
unit off.
Fan Speed
(10)
Press
Fan Speed
to toggle
between
Auto,
Low,
and
High
fan speeds.
Speed
will be shown
in
fan speed
indicator
(11). When
AUTO
is selected,
the unit
will
adjust
the
fan speed
accordingly
depending
on
the
humidity
level.
The order
of
fan speed
settings
is Auto
- High
- Low
- Auto...
Bucket
Full
Indicator
(12)
When
the
collection
bucket
is
full, BUCKET
FULL
indicator
(12)
will come
on.
The dehumidifier
will
not
run until
the bucket
is emPtY.
Pump
On/Off
(1a)
Pump On
is an
optional
setting
when
using
the
supplied
'/o"
drain
hose to
remove
the
collected
water
in the
bucket.
To turn
the
pump
on/off,
press
the
Pump
Button
(14).
When
the
pump
is on,
Pump
Display
(13)will
light on.
The
Pump
Display
(13)
will be
off
when
the
pump
is off.
The
pump
should
only
be
turned
on
when
there
is a %"
drain
hose
properly
connected
to
the
machine
and
the
pump
is intended
to be
used.
lf the
pump
button
is
pressed
when using
other
water
disposal
options,
E3
(Error
Message)will
show
on
display
panel,
Pump
will run
automatically
whenever
the bucket
gets
full.
The
bucket
may
not empty
cornpletely
to
protect
the
pump,
but once
the bucket
fills up again,
the
pump
will
run.
o
@
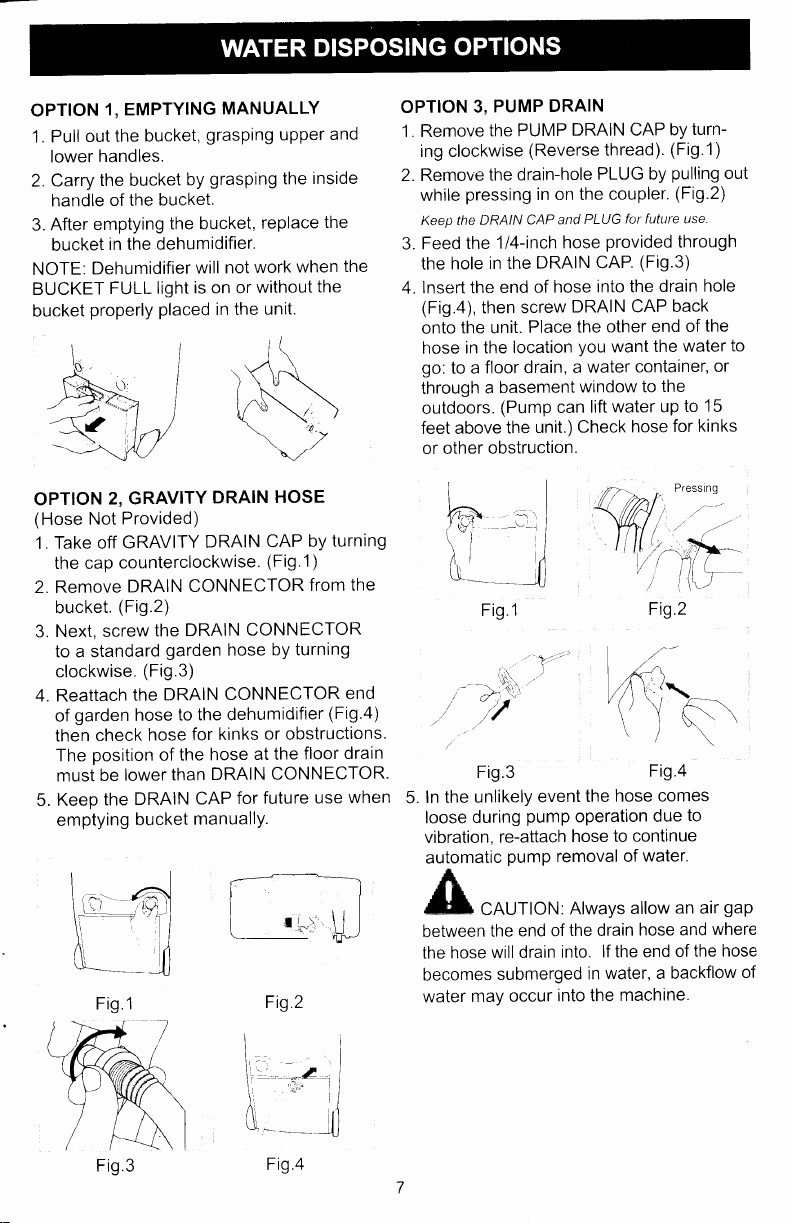
OPTION
1, EMPTYING
MANUALLY
1. Pull
out
the bucket,
grasping
upper
and
lower
handles.
2. Carry
the bucket
by
grasping
the
inside
handle
of the
bucket.
3.
After emptying
the bucket,
replace
the
bucket
in the
dehumidifier.
NOTE.
Dehumidifier
will
not
work
when
the
BUCKET
FULL
light
is on or
without
the
bucket
properly
placed
in the
unit.
OPTION
2, GRAVITY
DRAIN
HOSE
(Hose
Not
Provided)
1.
Take off
GRAVITY
DRAIN
CAP
by
turning
the cap
counterclockwise.
(Fig.1)
2. Remove
DRAIN
CONNECTOR
from
the
bucket.
(Fig.2)
3.
Next, screw
the
DRAIN
CONNECTOR
to a standard
garden
hose
by turning
clockwise.
(Fig.3)
4. Reattach
the
DRAIN
CONNECTOR
end
of
garden
hose
to
the dehumidifier
(Fig.a)
then
check
hose
for
kinks
or obstructions.
The
position
of
the
hose
at the
floor
drain
must
be
lower than
DRAIN
CONNECTOR.
5.
Keep
the
DRAIN
CAP
for
future use
when
emptying
bucket
manuallY.
OPTION
3,
PUMP
DRAIN
1. Remove
the PUMP
DRAIN CAP
by
turn-
ing clockwise
(Reverse thread).
(Fig.1)
2.
Remove
the drain-hole
PLUG by
pulling
out
while
pressing
in on the
coupler.
(Fig.2)
Keep
the DRAIN CAP
and
PLUG
for future use.
3.
Feed
the
1/4-inch
hose
provided
through
the
hole
in the
DRAIN CAP.
(Fig.3)
4.
Insert the
end
of hose
into the
drain
hole
(Fig.4), then screw
DRAIN CAP
back
onto
the unit.
Place the other
end
of
the
hose in
the location
you
want
the
water
to
go:
to a
floor drain,
a
water container,
or
through
a
basement
window to
the
outdoors.
(Pump
can
lift
water up
to
15
feet above
the
unit.)
Check
hose
for kinks
or other
obstruction.
F,tr,
-.
LFig.1
.*r.
I'
.'- - -. '}i.r\, '-
,n "/
Fig.3
I'n
|/\L.-
\ )\\
Fig.4
5.
In the
unlikely
event
the
hose comes
loose
during
pump
oPeration
due
to
vibration,
re-attach
hose to
continue
automatic
pump
removal of
water.
-t r,
t* CAUTION:
Always
allow
an air
gap
between
the
end of
the drain
hose
and
where
the
hose
will drain
into.
lf the end
of
the hose
becomes
submerged
in
water, a backflow
of
water
may occur
tnto the
machine.
Fig.2
Fig.1
Fig.3 Fig.4
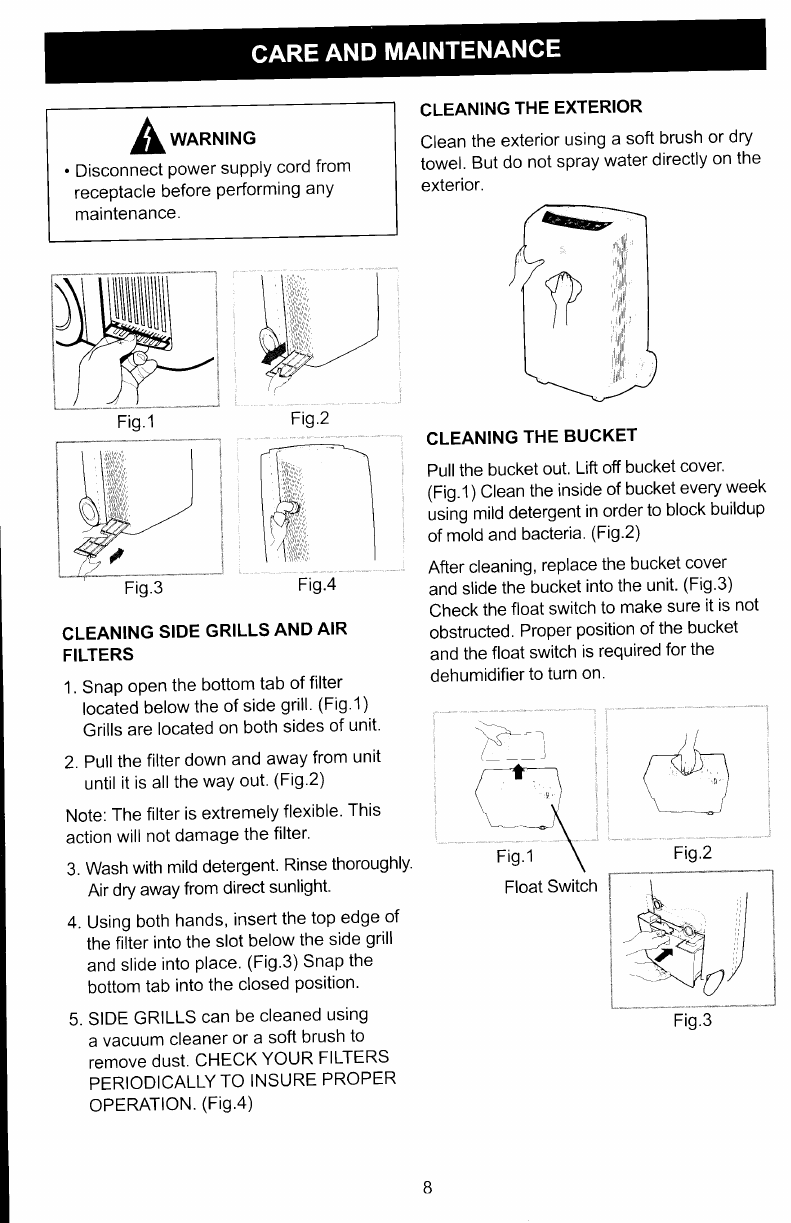
[*o*NrNG
. Disconnect
power supply
cord
from
receptacle
before
Performing
anY
maintenance.
CLEANING
THE
EXTERIOR
Clean
the
exterior
using
a
soft
brush
or
dry
towel.
But
do
not
spray
water
directly
on
the
exterior.
CLEANING
THE
BUCKET
Pull
the
bucket
out.
Lift
off
bucket
cover'
(Fig.1)
Clean
the
inside
of
bucket
every
week
using
mild
detergent
in order
to
block
buildup
of
mold
and
bacteria.
(Fig.2)
After
cleaning,
replace
the
bucket
cover
and
slide
the
bucket
into
the
unit'
(Fig'3)
Check
the
float
switch
to
make
sure
it
is
not
obstructed.
Proper
position of
the
bucket
and
the
float
switch
is
required
for
the
dehumidifier
to
turn
on.
CLEANING
SIDE
GRILLS
AND
AIR
FILTERS
1.
Snap
open
the
bottom
tab
of
filter
located
below
the
of
side
grill'
(Fig'1)
Grills
are
located
on
both
sides
of
unit'
2.
Pull
the
filter
down
and
away
from
unit
until
it
is
all
the
waY
out.
(Fig'2)
Note:
The
filter
is
extremely
flexible'
This
action
will
not
damage
the
filter.
3.
Wash
with
mild
detergent.
Rinse
thoroughly'
Air
dry
away
from
direct
sunlight'
4. Using
both
hands,
insert
the
top
edge
of
the
filter
into
the
slot
below
the
side
grill
and
slide
into
place.
(Fig.3)
Snap
the
bottom
tab
into
the
closed
position'
5.
SIDE
GRILLS
can
be
cleaned
using
a
vacuum
cleaner
or
a soft
brush
to
remove
dust.
CHECK
YOUR
FILTERS
PERIODICALLY
TO
INSURE
PROPER
oPERATION.
(Fig.a)
Fig.2
Fig.a
il
Float
Switch
Fig.2
Fig.'1
Fig.3

Before
calling
for
service,
try
the
suggestions
below
to
see
whether
you
can
solve
your
problem
without
outside
helP.
PROBLEMS CHECK
POINT SOLUTIONS
Dehumidifier
does
not
work
when
pressing
the
POWER
ON
button.
ls the
power
cord
Plugged
into
a
grounded 3-Prong
outlet?
ls
BUCKET
FULL
light
on?
Does
BUCKET
FULL
light
appear
after
emPtYing
the
water
bucket?
Plug
the
power cord
securelY
into
a
grounded 3-Prong
outlet.
Empty
the
water
bucket
and
re-install.
Check
the
float
switch
to
make
sure
it is
free
and
not
obstructed.
Dehumidifier
is
operating,
but
the
dehumidification
function
does
not
work.
ls the
compressor
runnlng
as
well
as
the
fan?
ls there
frost
on
the
coils?
The
unit
may
be
in
the defrost
mode.
The
fan
is running
but
not
the
compressor.
The
unit
will
return
to
dehumidification
automatically.
Loud
noise
and/
or
vibration
during
operation.
ls the
unit
on
a
level
surface? Move
the
unit
to
a level
surface.
Sounds. Sounds
like
flowing
water
during
and
after
oPeration.
It makes
a
pinging
sound.
This
is the
normal
sound
of
the
refrigerant
flowing
through
the
coils.
Normal
sound
of
exPansion
and
contraction
caused
by
temperature
changes.
Dehumidification
function
is inefficient
Are
the
filters
and
grills
dirtY?
ls indoor
temPerature
under
65'F?
Clean
the
SIDE
GRILL
and
AIR
FILTER.
Although
the
unit
will
dehumidify
at
temperatures
below
65
degrees,
there
is a
potential
for frost
to develop
which
may
inhibit
the
unit's
efficiency
Unit
is discharging
warm
air.
Normal:
Compressor
and
electric
motor
discharge
nominal
heat.
Water
does not
drain
through
hose.
Check
the
DRAIN
CONNEC-
TOR.
ls
it installed
correctlY?
Check
the
drain
hose
for
kinks
or
obstructions.
ls
PUMP
light
on?
Re-install
drain
hose
according
to
this
manual.
Flatten
the hose
or remove
block-
age.
Turn
on
the
pumP.
Water
does not
drain
through
garden hose.
Check
the
DRAIN
CON-
NECTOR
making
sure
it
is
installed
securelY.
Check
the
garden hose
for
tangles
or
folds.
Re-install
it according
to this
manual.
Flatten
the
hose
or
remove
block-
age.
Water
does
not
drain
through
pump
drain
hose.
Check
the
connecting
hose
for
tangles
or
folds.
Does
pump
disPlaY
light
appear?
Re-install
drain
hose
according
to
this
manual.
Flatten
the
hose
or remove
blockage.
Turn
on
the
pumP.
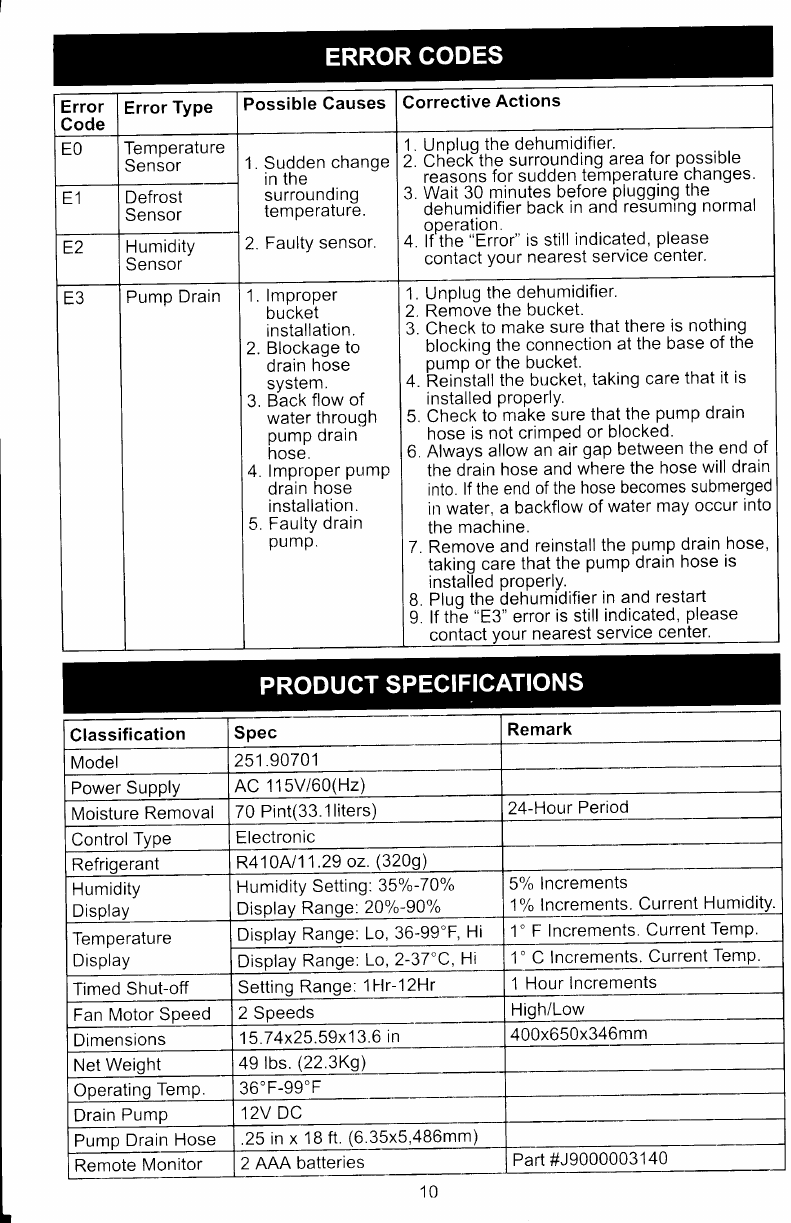
Error
Code Error
Type Possible
Causes Corrective
Actions
EO Temperature
Sensor 1. Sudden
change
in the
surrounding
temperature.
2.
Faulty
sensor.
Unpluq
the dehumidifier.
Cnbcfthe
surrounding
area
for
possible
reasons
for sudden
temperature
changes.
Wait
30
minutes
before
plugging
the
dehumidifier
back
in and
resuming
normal
operation.
lf'the
"Error"
is still
indicated,
please
contact
your
nearest
service
center'
1
2
E1 Defrost
Sensor
E2 Humidity
Sensor
E3 Pump
Drain 1.lmproper
bucket
installation.
Blockage
to
drain
hose
svstem.
B'ack
flow
of
water
through
pump
drain
hose.
lmproper
pump
drain
hose
installation.
Faulty
drain
pump"
6
1. Unplug
the
dehumidifier.
2.
Remove
the
bucket.
3.
Check
to
make
sure
that
there
is nothing
blocking
the
connection
at
the base
of
the
oump
or
the
bucket.
4.
iRein'stall
the bucket,
taking
care
that
it
is
installed
proPerlY.
5. Check
to'nrdke
iure
that
the
pump
drain
hose
is
not
crimPed
or
blocked'
6.
Always
allow
an'air
gap
between
the
end
of
the
drain
hose
and
where
the
hose
will drain
into.
lf
the end
of the
hose
becomes
submerged
irr
water,
a backflow
of
water
may
occur
into
the
machine.
17.
Remove
and
reinstall
the
pump
drain
hose,
I tat<ing
care
that
the
pump
drain
hose
is
I installed
properlv.
lg.
ptuq
the
ilehumidlfier
in
and
restart
I
g.
tf
tn"e
"E3"
error
is still
indicated,
please
I contact
your
nearest
service
cenlel-
Classification Spec Remark
Model 251.90701
Power
SupPlY AC
115V/60(Hz)
Moisture
Removal 70
Pint(33.1
liters) 24-Haur
Period
Control
Type Electronic
Refriqerant R410A/1
1.29
oz.
(3209)
Humidity
Display
Humidity
Setting:
35"/o-7
0%
Display
Range:
20%-90%
5%
lncrements
1%
Increments.
Current
HumiditY.
Temperature
Display
Display
Range:
Lo,
36-99"F,
Hi 1'
F Increments.
Current
TemP.
Display
Range:
Lo,
2-37'C,
Hi 1" C lncrements.
Current
TemP.
Timed
Shut-off Setting
Range:
ltlr-12Hr 1 Hour
Increments
Fan
Motor
Speed 2
Speeds High/Low _
400x650x346mm
Dimensions 15.74x25.59x13.6
in
Net
Weight 49
lbs.
(22.3K9)
Operating
TemP 36'F-99"F
Drain
Pump 12V
DC
Pump
Drain
Hose .25
in x
18
ft.
(6.35x5,486mm)
Remote
Monitor 2 AAA
batteries Part #J9000003140
10
%\
The
remote monitoring station
is a receiver
with
a receiving
range
of only 330
feet in
open air
with no obstructions.
Actual
receiving
range will
vary
depending
on
what is in
the
path
of the
signal transmitted
from the
dehumidifier
unit.
Each obstruction
(roof,
walls,
floors, ceilings,
thick trees, etc.)will
effectively cut
signal range
in half.
Example: The wireless
remote
monitor with
a 330-foot
range
is mounted on an
interior
wall or
placed
on a countefiop
so
the signal
from the dehumidifier
has to
pass
through one
basement
wall, across
the 10-foot
width of the
room through
the
room's
other
wall and
then
through the
floor to the
room upstairs
where
the receiver
is located,
The first wall
will reduce
the range to
165 bet, and the
second
wall
will reduce the
range to 87
feet.
Factoring
in the 1O-foot
room, this leaves
a
maximum of
77 feet of
remaining signal
range. Passing
up through
the floor
has now
reduced
the effective
range to 38
feet.
Typically
this
allowance is enough
for most
frame-constructed
homes; however
cerlain
materials
can reduce
range even
further.
Metal siding,
stucco, and
some types
of
glass
can
reduce signal
range by as
much
as75o/o
compared
to the 50%
reduction
typical
of most obstructions.
lt is
possible
to receive
a signalthrough
these
materials;
however
maximum
range will be
much less,
due
to their
tendency
to
absorb
or
reflect
a
much
larger
portion
of
the dehumidifier's
signal.
NOTE:
You may have to
move the
monitor
closer
to the
main unit if it is
not receiving a
proper
signal
following set-up
procedures.
Setup
Guide
lnsert
the batteries
in the
monitor. After
the batteries
are
inserted, the
Monitoring
Station
will start
receiving signal
data from
the
dehumidifier:
temperature,
humidity,
etc.
should
be displayed
on the
monitor's screen.
lf
this
doesn't
happen after
2 minutes, check
the dehumidifier
to make sure
it is operating
properly.
Remove the
batteries
from the
monitor,
wait a
minute, then
replace.
Batteries
,s$* s l
. X'H,, ""
!-11'tJi-!
]
]!r!'.]':]'i.:|i.|
OIi Cg S-r>
t=tn'
NU
ti.,1
Llfr
$ Receiver On
$ Low Battery
$ Sound Alert
Q rime
of
Day
$ ran on
$ Bucket
Full
$ Rump on
u) lemperature
$ Humidity
Q waltHanger
$ set autton
$ wtinus
$ etus
$ Sound On/Off
..-r i
o')
U
11
^"
l-11
nil
w{a wg w-r>
TEMPERATURE HI]M D
TY
Offi Ni\ffi w
Y*%Y Y-e
l-Ll= t- ( J r-l
rl ir
-)
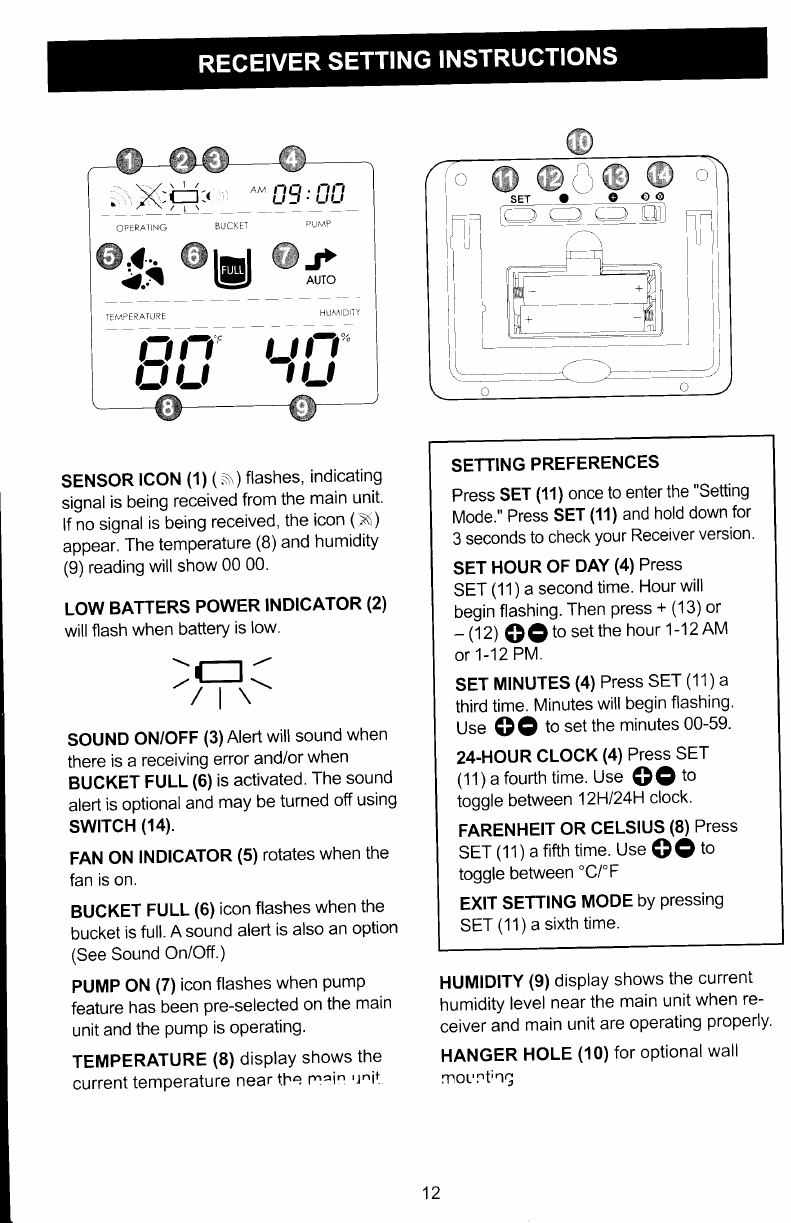
SENSOR
ICON
(1)
(s)flashes,
indicating
signal
is
being
received
from
the
main
unit'
lf
no
signal
is
being
received,
the
icon
(X)
appear.
The
temperature
(B)and
humidity
(9)
reading
will
show
00
00'
LOW
BATTERS
POWER
INDIGATOR
(2)
willflash
when
battery
is
low.
:- -.1 .z
-!--
/l\
SOUND
ON/OFF
(3)Alert
will
sound
when
there
is
a receiving
error
and/or
when
BUCKET
FULL
(6)
is
activated.
The
sound
alert
is optional
and
may
be
turned
off
using
swlTcH (14).
FAN
ON
INDICATOR
(5) rotates
when
the
fan
is on.
BUCKET
FULL
(6)
icon
flashes
when
the
bucket
is
full.
A sound
alert
is also
an
option
(See Sound
On/Off.)
PUMP
ON
(7)
icon
flashes
when
PumP
feature
has
been
pre-selected
on
the
main
unit
and
the
PumP
is
oPerating.
TEMPERATURE
(8)
disPlaY
shows
the
current
temperature
near
{}rq
rnail
rlnit
SETTING
PREFERENCES
Press
SET
(11) once
to
enter
the
"Setting
Mode."
Press
SET
(11)
and
hold
down
for
3 seconds
to
check
your Receiver
version'
SET
HOUR
OF
DAY
(4) Press
SET
(11) a
second
time.
Hour
will
begin
flashing.
Then
press
+
(13) or
- (12)
O C to
set
the
hour
1-12
AM
or
1-12PM.
SET
MINUTES
(4)
Press
SET
(11)a
third
time.
Minutes
will
begin
flashing'
Use
OC to
set
the
minutes
00-59'
24-HOUR
CLOCK
(4)
Press
SET
(11) a
fourth
time.
Use
OC to
toggle
between
12Hl24H
clock.
FARENHEIT
OR
CELSIUS
(8) Press
SET
(11)a
fifth
time.
Use
OC to
toggle
between
"C/"F
EXIT
SETTING
MODE
bY
Pressing
SET
(11)a
sixth
time.
HUMIDITY
(9)
display
shows
the
current
humidity
level
near
the
main
unit
when
re-
ceiver
and
main
unit
are
operating
properly'
HANGER
HOLE
(10) for
oPtional
wall
:'not'lting
12
