Kenwood USA 29463120 VHF-FM Hand Held Transceiver User Manual TK 260 360 E 000 Cover
Kenwood USA Corporation VHF-FM Hand Held Transceiver TK 260 360 E 000 Cover
UserManual.wiki
>
Kenwood USA
>
29463120 User Manual
Manual
Navigation menu
Upload a User Manual
Namespaces
Wiki Guide
HTML
PDF
Info
Views
User Manual
Discussion / Help
Navigation


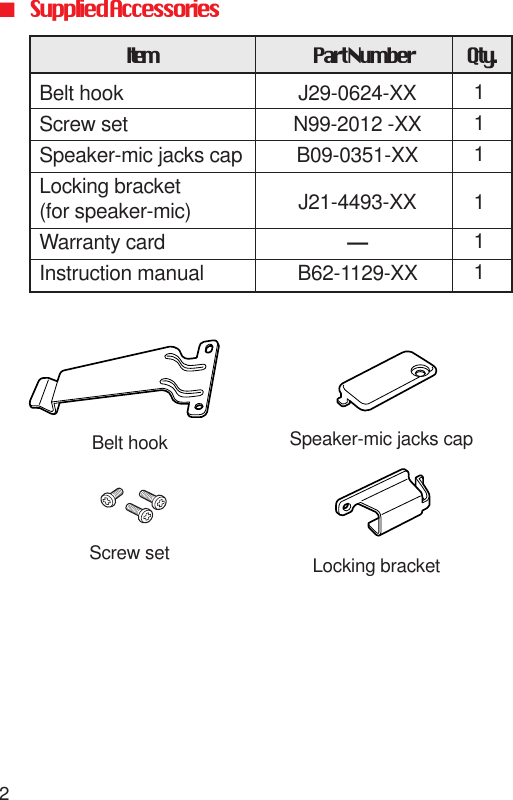
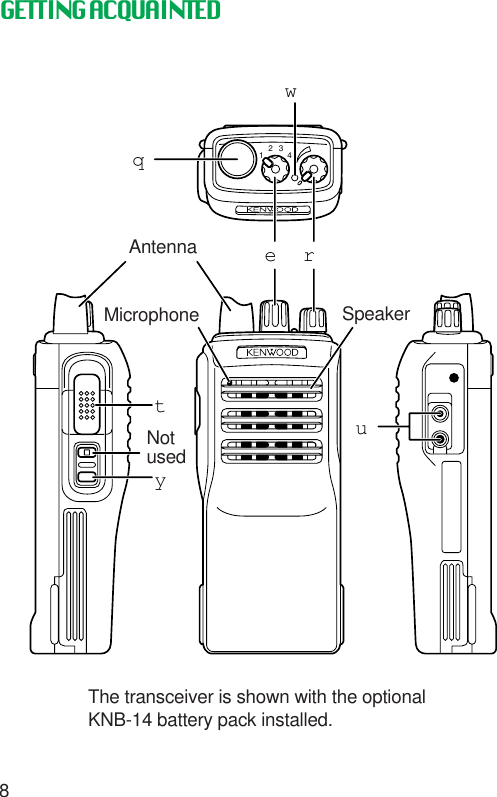
![91ANTENNA connectorConnect the supplied antenna to this connector.2LED indicatorLights red while transmitting. Flashes red whiletransmitting if the battery pack voltage is low.Recharge or replace the battery pack at this time.The LED lights green while receiving a station. TheLED flashes orange if, while a channel programmedwith 2-Tone signaling is selected, the same 2-Tonesignaling is received as is programmed or you pressand release the [PTT] switch. Press the [MONI] buttonto cancel the flashing state. The flashing indicationonly functions if your dealer activates the 2-Tonefunction on your transceiver.3CHANNEL selectorTurn clockwise or counterclockwise to select yourdesired channel from a maximum of 4 channels.4POWER/VOL controlTurn clockwise to switch ON the transceiver. Turncounterclockwise fully to switch OFF the transceiver.Also adjusts the volume level.5PTT (Push-to-Talk) switchPress and speak into the microphone to call anotherstation.](https://usermanual.wiki/Kenwood-USA/29463120/User-Guide-78096-Page-15.png)
![11RECEIVINGYour dealer may have programmed QT, DQT, or 2-Tonesignaling for the channel that you select. If soprogrammed, you will hear transmissions from othertransceivers IN YOUR SYSTEM ONLY! Otherwise, youwill hear ALL TRANSMISSIONS made by ANY stationsusing the same channel.1Switch ON the transceiver by turning the POWER/VOLcontrol clockwise.• A “click” is heard. A beep also sounds if soprogrammed by your dealer.To switch OFF the transceiver, turn the POWER/VOLcontrol counterclockwise until a click is heard.2To adjust the volume, turn the POWER/VOL controlwhile using [MONI] to listen to channel backgroundnoise.• While communicating with other parties, you mayneed to adjust the volume more precisely.3Use the CHANNEL selector to choose your regularoperating channel.• Turning the selector clockwise increases thechannel number and turning the selectorcounterclockwise decreases the channel number.• Non-programmed channels cannot be used.Selecting a channel that is unprogrammedgenerates an Alert beep.](https://usermanual.wiki/Kenwood-USA/29463120/User-Guide-78096-Page-17.png)
![12Note:◆Your dealer selects one of four methods of operation for [MONI]:•Hold down the button to open the squelch; release the button toclose the squelch, or•Hold down the button to deactivate QT, DQT, or 2-Tonedecoding; release the button to activate decoding, or•Press the button to deactivate QT, DQT, or 2-Tone decoding;press the button again to activate decoding.•Disabled.◆If your transceiver is programmed with QT, DQT, or 2-ToneSignaling, pressing [MONI] will not affect output from the speaker;even at full volume there will be virtually no noise audible from thespeaker.◆Receiving a signal with the same 2-Tone signaling as isprogrammed in your transceiver will cause the LED indicator to flashorange. An alert tone is heard if so programmed by your dealer.CALLING1Press [MONI], then listen for a few seconds to makecertain that the channel is not being used.2Hold the transceiver about 3 ~ 4 cm (1 1/2 inches) fromyour lips, press the [PTT] switch, and speak in yournormal speaking voice.• The LED lights red while you are transmitting.3Release the [PTT] switch to return to the receive mode.](https://usermanual.wiki/Kenwood-USA/29463120/User-Guide-78096-Page-18.png)
![13■Time-Out Timer (TOT)The purpose of the time-out timer is to automaticallyinterrupt continuous transmissions after a specifiedtime elapses. Holding down [PTT] for longer than theprogrammed time causes the transceiver to stoptransmitting and generate a warning tone. Releasing[PTT] cancels the warning tone.Your dealer also can program a warning function thatalerts you just before the time-out timer stops yourtransmission. After [PTT] is held down for the timespecified by your dealer, a warning tone sounds that isdifferent from the time-out timer tone.■Busy Channel LockoutActivated or deactivated by your dealer, this functionprevents you from interfering with other stations whomay be using a channel. Pressing [PTT] while theselected channel is in use causes your transceiver togenerate an audible warning tone. Your transceiver isinhibited in this situation so it will not transmit. Release[PTT] to cancel the alarm and restore the receivemode.](https://usermanual.wiki/Kenwood-USA/29463120/User-Guide-78096-Page-19.png)
![14■Battery Voltage LevelWhile holding down [PTT], the battery voltage level ischecked. When the voltage level drops to thepredetermined value, the LED flashes red. When thevoltage level drops further, the transceiver stopstransmitting and generates an alarm. If this occurs,recharge the battery pack.](https://usermanual.wiki/Kenwood-USA/29463120/User-Guide-78096-Page-20.png)