Kenwood Kdc 200U Instruction Manual
2016-11-23
: Kenwood Kenwood-Kdc-200U-Instruction-Manual-822433 kenwood-kdc-200u-instruction-manual-822433 kenwood pdf
Open the PDF directly: View PDF ![]() .
.
Page Count: 42

KDC-200U
CD-RECEIVER
INSTRUCTION MANUAL
REPRODUCTOR DE DISCOS COMPACTOS RECEPTOR DE FM/AM
MANUAL DE INSTRUCCIONES
Take the time to read through this instruction manual.
Familiarity with installation and operation procedures will help you obtain the best performance from
your new CD-receiver.
For your records
Record the serial number, found on the back of the unit, in the spaces designated on the warranty card, and in the
space provided below. Refer to the model and serial numbers whenever you call upon your Kenwood dealer for
information or service on the product.
Model
KDC-200U
Serial number
US Residents Only
Register Online
Register your Kenwood product at www.Kenwoodusa.com
GET0866-001A (K0)© 2012 JVC KENWOOD Corporation
Cover_KDC-200U[K]1.indd 1Cover_KDC-200U[K]1.indd 1 4/20/12 12:56:29 PM4/20/12 12:56:29 PM

2
Safety 3
Preparation 4
How to attach/detach the faceplate
How to reset your unit
How to prepare the remote controller
(RC-405)
Basic operations 5
Getting started 7
Canceling the display demonstration
Setting the demonstration mode
Adjusting the clock
Initial settings before operations
Listening to the radio 9
Adjust [SETTINGS] mode settings
Direct Access Tuning (using the remote
controller, RC-405)
Listening to a disc/ USB device/ iPod
10
Start playing a disc
Connecting a USB device
Connecting an iPod
Selecting Repeat Play
Selecting Random Play
Selecting a folder/track/file
Direct Music Search (using the remote
controller, RC-405)
Functions of this unit with iPod
Selecting a song by alphabet
Selecting App & iPod Control Mode
Adjust [SETTINGS] mode settings
Listening to Pandora® internet radio
13
Station Search mode
Using the remote controller (RC-405)
Listening to the other external
components 14
CONTENTS
Muting upon the reception of a
phone call
To use this feature, connect the MUTE lead
to your telephone using a commercial
telephone accessory. (page 19)
When a call comes in, “CALL” appears.
The audio system pauses.
To continue listen to the audio system
during a call, press SRC. “CALL”
disappear and the audio system resumes.
When a call ends, “CALL” disappear.
The audio system resumes.
Function settings 14
Troubleshooting 16
Installation/connection 18
Basic procedure
Warning
Caution
Wiring connection
Installing the unit
Removing the unit
Specifications 21
EN02-21_KDC-200U[K]1.indd 2EN02-21_KDC-200U[K]1.indd 2 4/20/12 12:56:38 PM4/20/12 12:56:38 PM
3
ENGLISH
Safety
WARNING
Stop the car before operating the unit.
Important to know...
To prevent a short circuit, never put or
leave any metallic objects (such as coins or
metal tools) inside the unit.
Caution: Adjust the volume so that you
can hear sounds outside the car. Driving
with the volume too high may cause an
accident.
Condensation: When the car is air-
conditioned, moisture may collect on the
laser lens. This may cause disc read errors.
In this case, remove the disc and wait for
the moisture to evaporate.
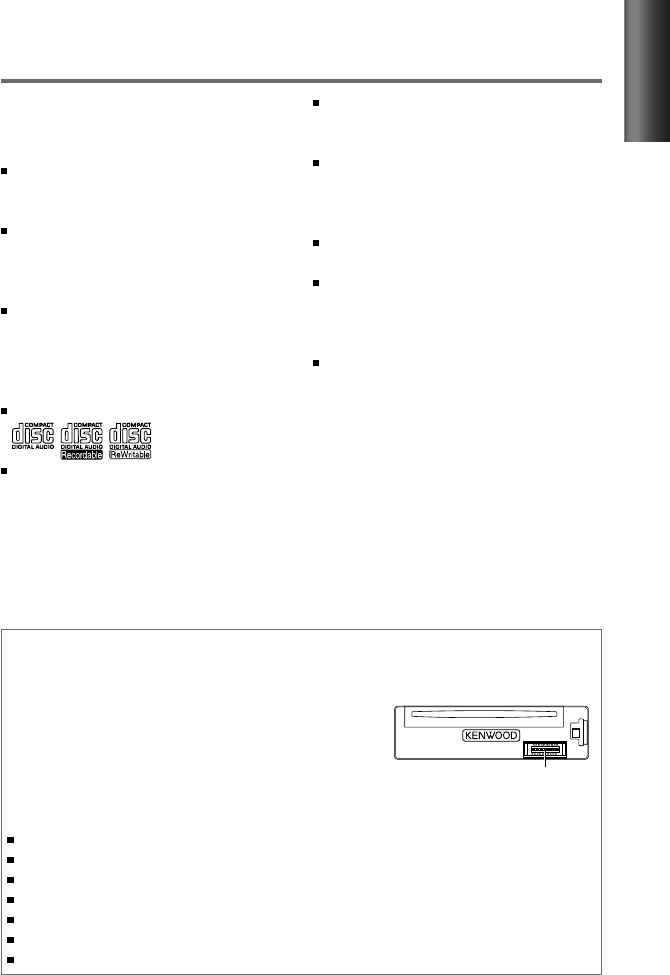
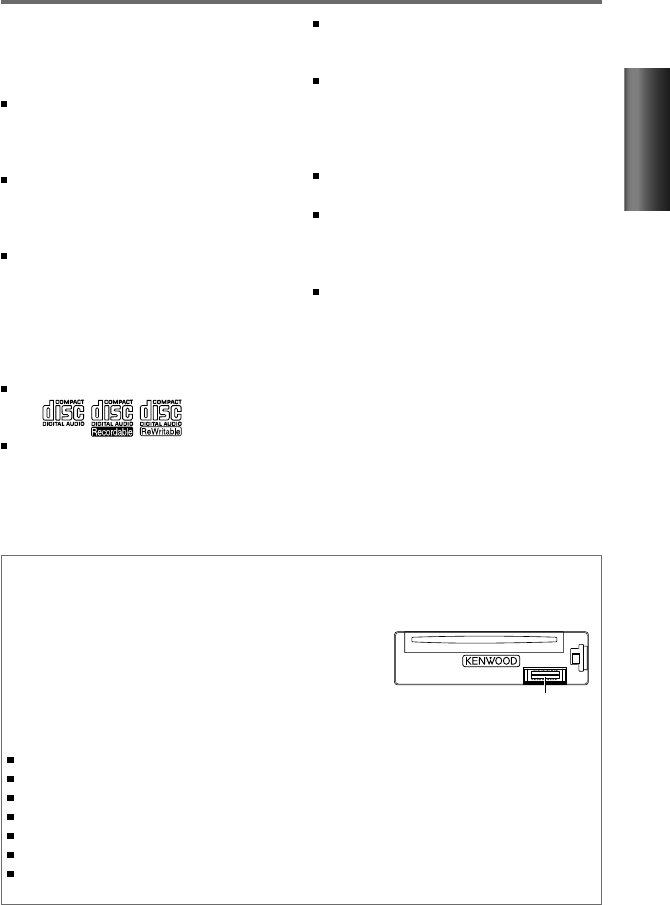
This unit can only play the CDs with:
The illustrations in this manual are
examples used to explain more clearly
how the controls are used. Therefore, what
appears on the illustrations may differ from
what appears on the actual equipment.
Maintenance
Cleaning the unit: Wipe off the dirt on the panel with a dry silicon or soft cloth. Failure to
observe this precaution may result in damage to the monitor or unit.
Cleaning the connector: The unit may not function
properly if the connectors between the unit and faceplate
are dirty. Detach the faceplate and clean the connector
with a cotton swab gently, being careful not to damage
the connector.
Handling discs
Do not touch the recording surface of the disc.
Do not stick tape etc. on the disc, or use a disc with tape stuck on it.
Do not use any accessories for the disc.
Clean from the center of the disc and move outward.
Clean the disc with a dry silicon or soft cloth. Do not use any solvents.
When removing discs from this unit, pull them out horizontally.
Remove the rims from the center hole and disc edge before inserting a disc.
Connector (on the reverse
side of the faceplate)
A USB connection cable, CA-U1EX
(max.: 500 mA) (optional accessory) is
required for connecting a USB device.
The word “iPod” appearing in this manual
indicates the iPod or iPhone connected
to this unit with a connection cable,
KCA-iP102 (optional accessory).
If you experience problems during
installation, consult your Kenwood dealer.
When you purchase external components,
check with your Kenwood dealer to make
sure that they work with your model and in
your area.
Detailed information and notes about the
playable audio files are stated in an online
manual on the following site:
www.kenwood.com/cs/ce/audiofile/
EN02-21_KDC-200U[K]f.indd 3EN02-21_KDC-200U[K]f.indd 3 5/22/12 3:48:23 PM5/22/12 3:48:23 PM
4
Preparation
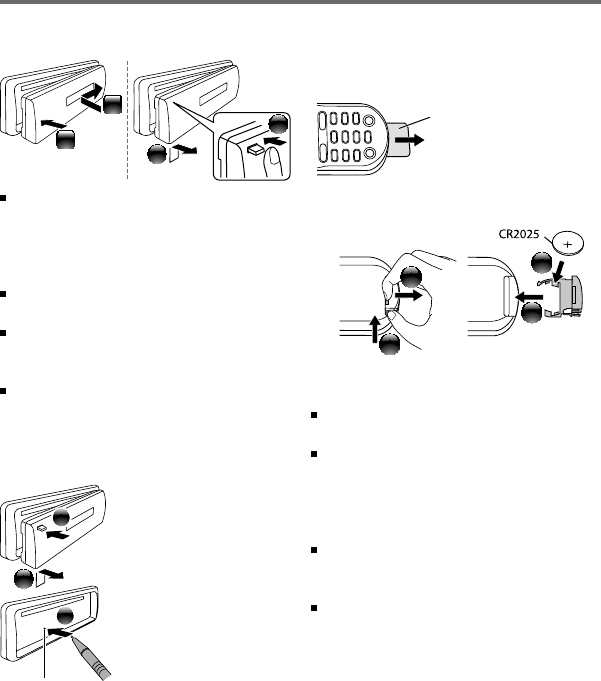
How to attach/detach the faceplate
2
1
1
2
Do not expose the faceplate to direct
sunlight, excessive heat, or humidity. Also
avoid places with too much dust or the
possibility of water splashing.
Keep the faceplate in its casing while
detached.
The faceplate is a precision piece of
equipment and can be damaged by shocks
or jolts.
To prevent deterioration, do not touch the
terminals of the unit and faceplate with
your fingers.
How to reset your unit
2
3
1
If this unit fails to operate
properly, press the reset
button.
The unit returns to
factory settings when
the reset button is
pressed.
How to prepare the remote
controller (RC-405)
When you use the remote controller for the
first time, pull out the insulation sheet.
If the effectiveness of the remote
controller decreases, replace the battery.
2
3
4
1
CALIFORNIA, USA ONLY
This perchlorate WARNING applies only
to the product sold or distributed in
California USA “Perchlorate Material–special
handling may apply, See www.dtsc.ca.gov/
hazardouswaste/perchlorate.”
Caution:
Do not set the remote control in hot places
such as on the dashboard.
Lithium battery.
Danger of explosion if the battery is
incorrectly replaced. Replace only with the
same or equivalent type.
The battery pack or batteries shall not be
exposed to excessive heat such sunshine,
fire or the like.
Keep battery out of reach of children and in
original package until ready to use. Dispose
of used batteries promptly. If swallowed
contact physician immediately.
Insulation sheet
Reset button
EN02-21_KDC-200U[K]1.indd 4EN02-21_KDC-200U[K]1.indd 4 4/20/12 12:56:39 PM4/20/12 12:56:39 PM
5
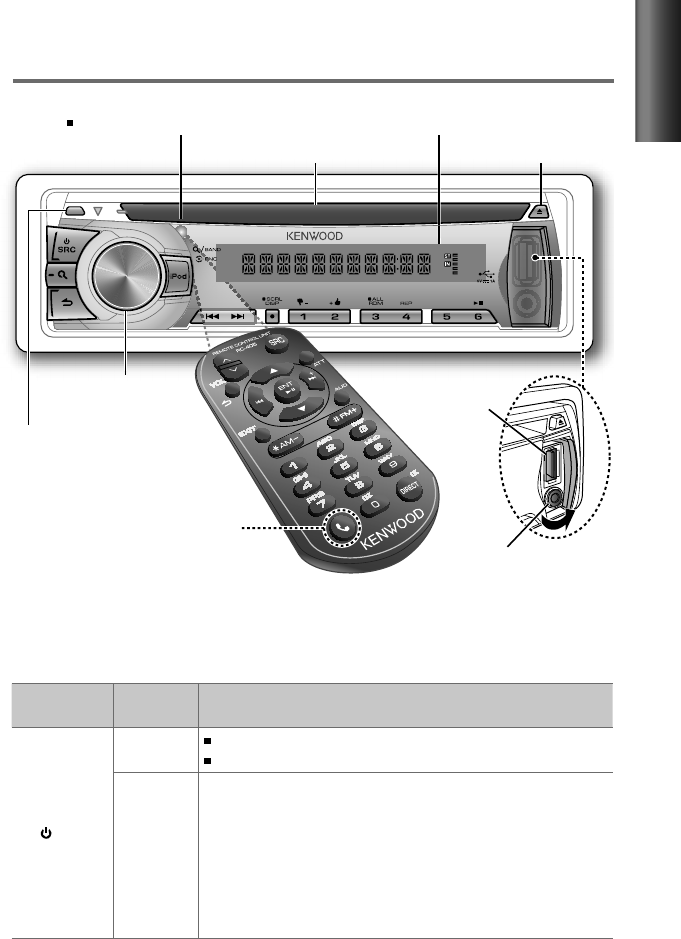
ENGLISH
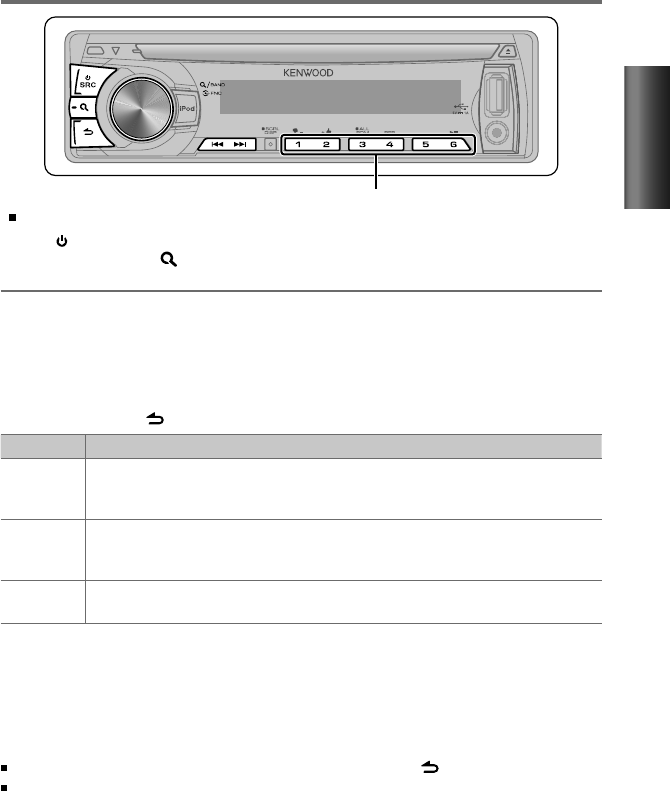
The following indicator lights up when...
ST: A stereo broadcast is received (FM).
IN: A disc is in the unit.
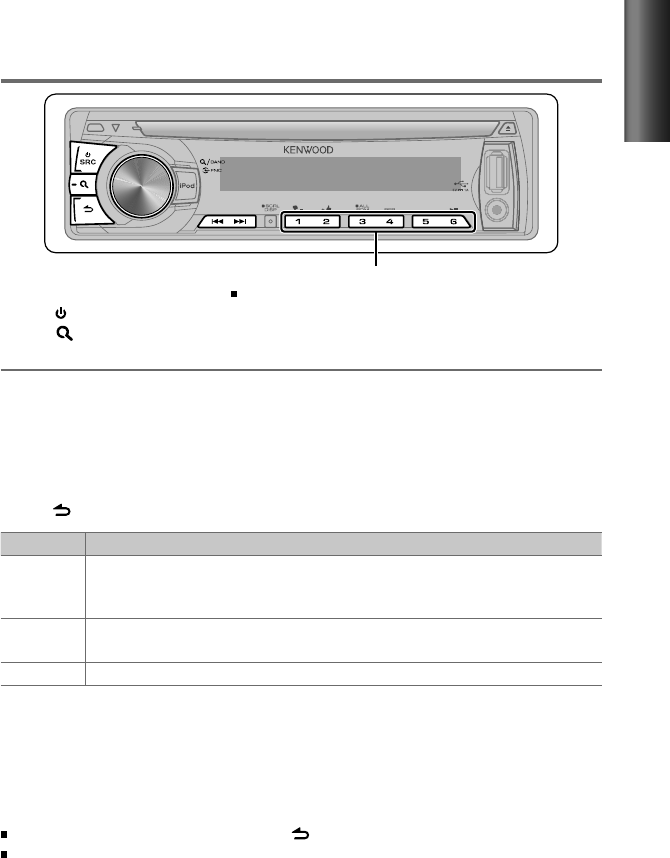
Basic operations
Volume knob
Loading slot
(Not used.)
Ejects the disc
Detaches the faceplate
Display window
Auxiliary input jack
USB terminal
Remote sensor
Do not expose to bright sunlight.
Continued...
When you press or hold the following button(s)...
Main unit Remote
controller General operation
SRC
— Turns on.
Turns off if pressed and held.
SRC
Selects the available sources (TUNER, USB/ iPod, PANDORA, CD,
AUX, STANDBY), if the power is turned on.
• If the source is ready, playback also starts.
• “PANDORA” is selectable only when an iPhone or iPod touch (with
the Pandora® internet radio application) is connected and [ON] is
selected for [PANDORA SRC]. (page 8)
• “iPod” or “CD” is selectable only when an iPod is connected or a
disc is loaded.
EN02-21_KDC-200U[K]1.indd 5EN02-21_KDC-200U[K]1.indd 5 4/20/12 12:56:39 PM4/20/12 12:56:39 PM
6
Main unit Remote
controller General operation
Volume knob
(turn)
VOL Adjusts the volume level.
5
/
∞Selects items.
Volume knob
(press)
ENT Confirms selection.
— Enters [FUNCTION] settings.
5
/
∞
Enters Music Search mode or Station Search mode (for Pandora).
*AM– /
#FM+
Selects the FM bands (FM1/ FM2/ FM3) or AM when “TUNER” is
selected as the source.
1 ( –) / 2 (+ )
*AM– /
#FM+ Selects the previous/next folder.
— Selects thumbs down/up (for Pandora).
6 ( ) ENT Pauses/resumes playback of a disc/ USB device/ iPod/ Pandora.
4
/
¢4
/
¢
Searches for radio station.
Selects track/file.
Fast-forwards/reverses tracks if pressed and held.
¢¢
Skips a song (for Pandora).
SCRL DISP —
Changes the display information.
Scrolls the display information if pressed and held.
Enters clock adjustment mode directly (page 7) if pressed and
held while in clock display screen.
iPod —
Selects “iPod” source.
Enters the controlling mode (MODE ON/ MODE OFF) for iPod
playback if pressed and held. (page 12)
—AUD Enters [AUDIO CTRL] settings directly.
—ATT Attenuates the sound.
• To return to the previous level, press the button again.
Returns to the previous item.
EXIT Exit from setting mode. (Press and hold on the main unit will
also exit from the setting mode.)
+
+
EN02-21_KDC-200U[K]1.indd 6EN02-21_KDC-200U[K]1.indd 6 4/20/12 2:05:58 PM4/20/12 2:05:58 PM

7
ENGLISH
Getting started
Canceling the display demonstration
The display demonstration is always turned on unless you cancel it.
When you turn on the power (or after you reset the unit), the display shows:
[CANCEL
DEMO] \ [PRESS] \ [VOLUME KNOB]
1
Press the volume knob.
[YES] is selected as the initial setup.
2
Press the volume knob again to confirm.
[DEMO
OFF] appears.
If no operation is done for about 15 seconds or if you turn the volume knob to select [NO] in
step
2
, [DEMO
MODE] appears and the display demonstration starts.
Setting the demonstration mode
1
Press the volume knob to enter [FUNCTION].
2
Turn the volume knob to select [DEMO MODE], then press to enter.
3
Turn the volume knob to select [ON] or [OFF].
If [ON] is selected, display demonstration starts if no operation is done for about
20 seconds.
4
Hold to finish the procedure.
Adjusting the clock
1
Press the volume knob to enter [FUNCTION] mode.
2
Turn the volume knob to select [SETTINGS], then press to enter.
3
Turn the volume knob to select [CLOCK], then press to enter.
4
Press the volume knob to select [CLOCK ADJ].
Clock hour flashes on the display.
5
Turn the volume knob to adjust the hour, then press to enter minute adjustment.
Clock minutes flashes on the display.
6
Turn the volume knob to adjust the minute, then press to confirm.
Press 4
/
¢ to move between the hour and minute adjustment.
7
Hold to finish the procedure.
Continued...
EN02-21_KDC-200U[K]1.indd 7EN02-21_KDC-200U[K]1.indd 7 4/20/12 12:56:41 PM4/20/12 12:56:41 PM

8
Initial settings before operations
1
Press SRC to enter [STANDBY] mode.
2
Press the volume knob to enter [FUNCTION] mode.
3
Turn the volume knob to select [INITIAL SET], then press to enter.
4
Turn the volume knob to make a selection, then press to confirm.
See table below for selection.
5
Hold to finish the procedure.
Item Selectable setting (Preset: *)
PRESET TYPE NORM *: Memorizes one station for each preset button in each band (FM1/ FM2/ FM3/ AM). ;
MIX: Memorizes one station for each preset button regardless of the selected band (FM1/ FM2/ FM3/ AM).
KEY BEEP ON */ OFF: Activates/deactivates the keypress tone.
PANDORA SRC ON *: Allows you to select “PANDORA” source by connecting an iPhone or iPod touch (with the Pandora®
internet radio application). ; OFF: Disables “PANDORA” in source selection.
BUILTIN AUX ON *: Enables “AUX” in source selection. Sound of the connected external component is produce through the
car speakers. ; OFF: Disables “AUX” in source selection.
CD READ 1 *: Automatically distinguishes between audio file disc and music CD. ; 2:
Forces to play as a music CD. No
sound can be heard if an audio file disc is played.
SWITCH PRE REAR */ SUB-W: Selects whether rear speakers or a subwoofer are connected to the line out terminals on
the rear of the unit (through an external amplifier).
SP SELECT OFF */ 5/4/ 6 × 9/6/ OEM: Selects the speaker size for optimum performance.
F/W UP xx.xx YES *: Starts upgrading the firmware. ; NO:
Cancels (upgrading is not activated).
For details on how to update the firmware, see: www.kenwood.com/cs/ce/
About “KENWOOD Music Editor Light” and “KENWOOD Music Control”
This unit supports the PC application “KENWOOD Music Editor Light” and AndroidTM application “KENWOOD Music
Control.”
When you use the audio file with database information added by the “KENWOOD Music Editor Light” or “KENWOOD Music
Control,” you can search a file by title, album or artist name using Music Search.
“KENWOOD Music Editor Light” and “KENWOOD Music Control” are available from the following web site:
www.kenwood.com/cs/ce/
EN02-21_KDC-200U[K]3.indd 8EN02-21_KDC-200U[K]3.indd 8 4/30/12 8:54:58 AM4/30/12 8:54:58 AM
9
ENGLISH
Hold for about 2 seconds to memorize the current station.
Press briefly to recall memorized station.
Adjust [SETTINGS] mode settings
While listening to the radio...
1
Press the volume knob to enter [FUNCTION] mode.
2
Turn the volume knob to select [SETTINGS], then press to enter.
3
Turn the volume knob to make a selection, then press to confirm.
See table below for selection.
4
Hold to finish the procedure.
Item Selectable setting (Preset: *)
SEEK MODE Selects the tuning mode for
4
/
¢
buttons.
AUTO1 *: Automatically search for a station. ; AUTO2: Search in the order of the stations in the preset
memory. ; MANUAL: Manually search for a station.
AUTO MEMORY YES *: Automatically starts memorizing 6 stations with good reception. ; NO:
Cancels (automatic
memorizing is not activated). (Selectable only if [NORM] is selected for [PRESET TYPE].) (page 8)
MONO SET ON: Improve the FM reception (but the stereo effect may be lost). ; OFF *: Cancels (stereo effect resumes).
Direct Access Tuning (using the remote controller, RC-405)
1
Press FM+ / AM– to select a band.
2
Press DIRECT to enter Direct Access Tuning mode.
“– – – –” appears on the display.
3
Press the number buttons to enter the frequency.
4
Press 4 / ¢ ( + ) to search for the frequency.
To cancel Direct Access Tuning mode, press or EXIT.
If no operations is done for 10 seconds after step 3, Direct Access Tuning is automatically
canceled.
Basic operations:
FM+ / AM– : Selects band.
4 / ¢ ( + ) : Searches for radio station.
1 – 6 : Selects preset station.
Listening to the radio
1
Press SRC to select “TUNER.”
2
Press repeatedly to select a band (FM1/ FM2/ FM3/ AM).
3
Press 4
/
¢ to search for a station.
EN02-21_KDC-200U[K]1.indd 9EN02-21_KDC-200U[K]1.indd 9 4/20/12 12:56:41 PM4/20/12 12:56:41 PM
10
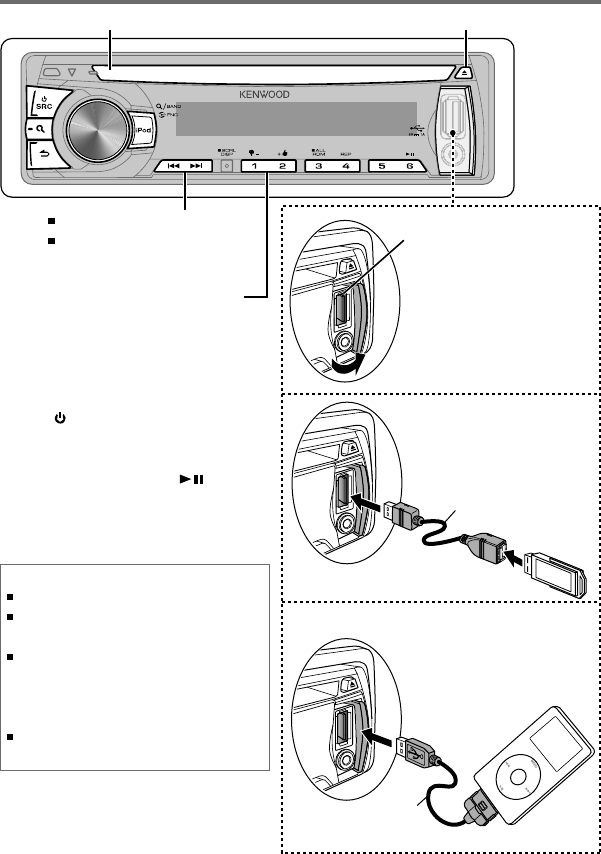
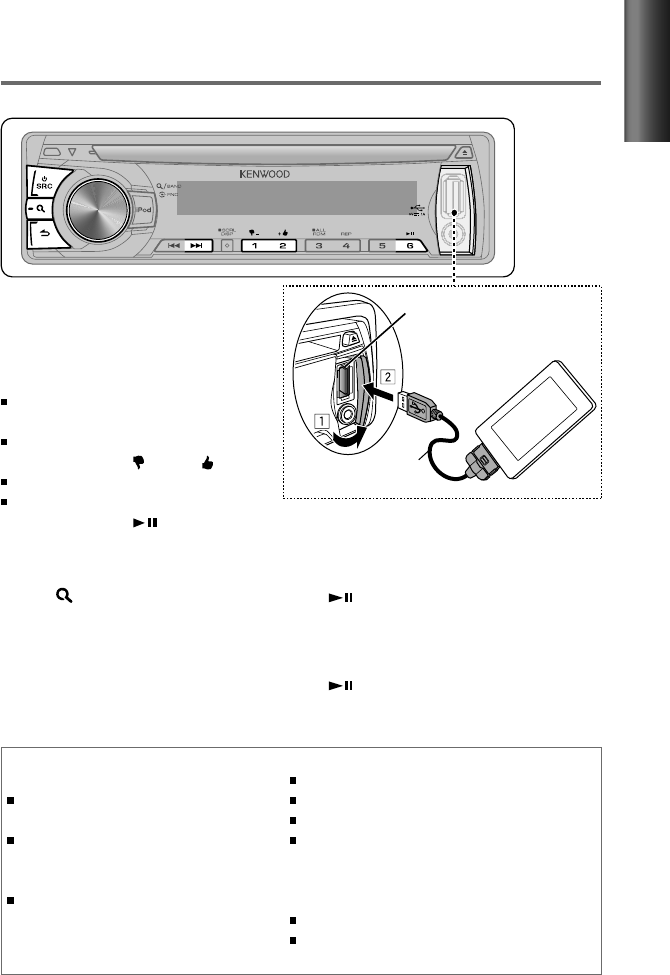
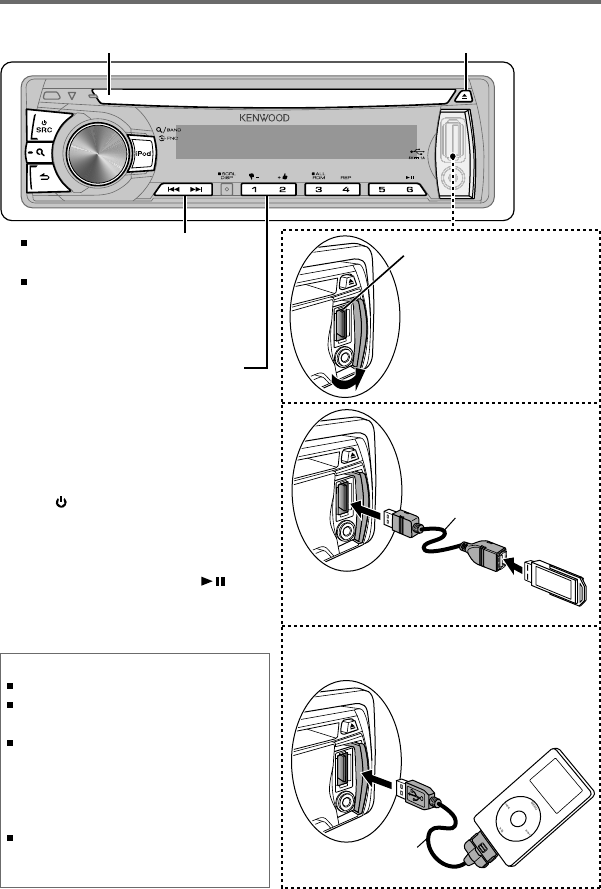
Start playing a disc
1
Press SRC to turn on the power.
2
Insert a disc into the loading slot.
Playback starts automatically.
3
Press number button 6 ( ) to
resume/pause playback (if necessary).
Ejects the disc. (“NO DISC” appears and “IN” indicator goes off.)
Press to select track/file.
Hold to fast-forwards/reverses.
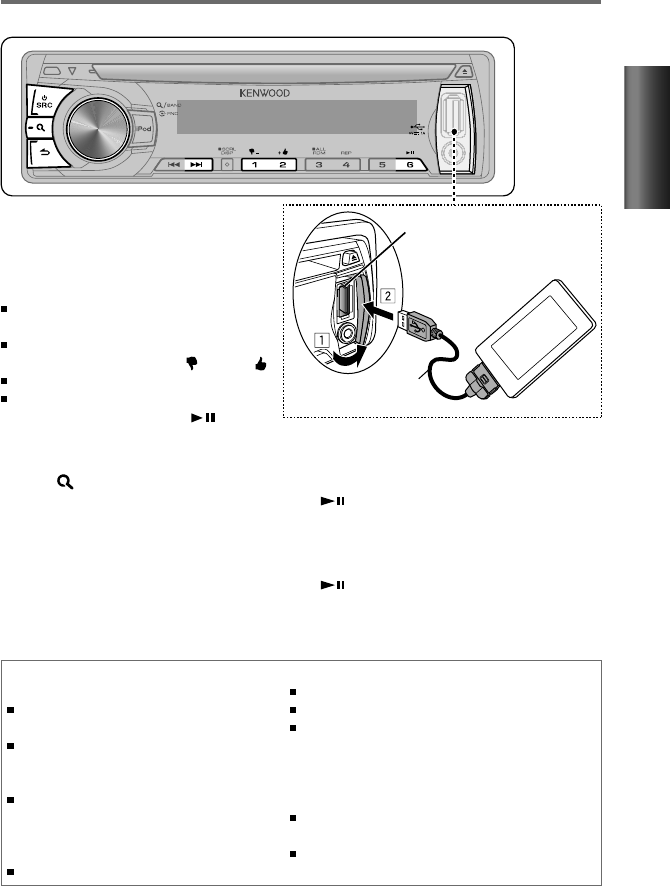
Listening to a disc/ USB device/ iPod
USB device (commercially available)
USB terminal
Press to select previous/next folder.
• Not available if “ALL RANDOM” is
selected.
Connecting a USB
device
Connecting an iPod
Apple iPod
(commercially available)
Slide open the cover,
then make the following
connection.
The source automatically
switches, and playback
starts.
CA-U1EX (Max.: 500 mA)
(optional accessory)
KCA-iP102
(optional accessory)
Discs that cannot be used
Discs that are not round.
Discs with coloring on the recording surface or discs
that are dirty.
You cannot play a Recordable/ReWritable disc that
has not been finalized. (For the finalization process
refer to your disc writing software, and your disc
recorder instruction manual.)
3-inch CD cannot be used. Attempt to insert using
an adapter can cause malfunction.
Loading slot
EN02-21_KDC-200U[K]1.indd 10EN02-21_KDC-200U[K]1.indd 10 4/20/12 12:56:42 PM4/20/12 12:56:42 PM
11
ENGLISH
Direct Music Search (using the
remote controller, RC-405)
• Not available if Random Play is selected.
• Not applicable for iPod, Kenwood Music Editor
Light, and Kenwood Music Control.
1
Press DIRECT to enter Direct Music
Search Mode.
“– – –” appears.
2
Press the number buttons to enter the
track number.
3
Press 4 / ¢ to search for the music.
To cancel the Direct Music Search Mode,
press or EXIT.
Basic operations:
In playback mode:
FM+ / AM– : Selects folder.
4 / ¢ ( + ) : Selects track/file.
ENT : Pauses/resumes playback.
In Music Search Mode:
ENT : Confirms selection.
5 / ∞ : Selects folder/track/file.
: Returns to the previous folder.
Selecting Repeat Play
Press number button 4 (REP) repeatedly
to make a selection.
Audio CD : TRAC (track) REPEAT, REPEAT OFF
MP3/WMA :
FILE REPEAT, FOLD (folder) REPEAT,
REPEAT OFF
iPod : FILE REPEAT, REPEAT OFF
Selecting Random Play
Press number button 3 (ALL RDM)
repeatedly to make a selection.
Audio CD : DISC RANDOM, RANDOM OFF
MP3/WMA/iPod :
FOLD (folder) RANDOM, RANDOM OFF
For MP3/WMA/iPod : Press and hold
number button 3 (ALL RDM) to select
“ALL RANDOM.”
– Applicable only if “RANDOM OFF” is
selected initially.
– Changes the iPod browsing item to
“songs.”
Selecting a folder/track/file
1
Press to enter Music Search mode.
“SEARCH” appears, then the current file
name appears on the display.
2
Turn the volume knob to select a folder/
track/file, then press to confirm.
To return to the root folder (or first track for
audio CD), press number button 5.
To return to the previous folder, press .
To cancel the Music Search mode, press
and hold .
< or > on the display indicates that
preceded/next item is available.
For USB device * and iPod: To skip search,
press 4 / ¢.
* This operation is effective only for the files
registered in the database created with
Kenwood Music Editor Light or Kenwood
Music Control. (page 8)
About USB device
This unit can play MP3/WMA files stored on a USB mass
storage class device.
Install the USB device in the place where it will not
prevent you from driving your vehicle properly.
You cannot connect a USB device via a USB hub and
Multi Card Reader.
Make sure all important data has been backed up to
avoid losing the data.
Connecting a cable whose total length is longer than
5 m can result in abnormal playback.
Continued...
EN02-21_KDC-200U[K]2.indd 11EN02-21_KDC-200U[K]2.indd 11 4/27/12 8:54:00 AM4/27/12 8:54:00 AM
12
About compatible iPod/iPhone
Selecting a song by alphabet
1
Press to enter Music Search mode.
“SEARCH” appears.
2
Turn the volume knob to select a
category, then press to confirm.
3
Press again to enter alphabet search
mode.
“SRCH <– – –>” appears.
4
Turn the volume knob to select the
character to be searched for.
5
Press 4 / ¢ to move to the entry
position.
You can enter up to three characters.
6
Press the volume knob to start searching.
7
Turn the volume knob to select a folder/
track/file, then press to confirm.
To return to the previous folder, press .
To return to the top menu, press number
button 5.
To cancel the Alphabet Search mode, press
and hold .
A longer searching time is required if there
are many songs or playlists in the iPod.
To search for a character other than A to Z
and 0 to 9, enter only “
* ”.
The article (a, an, the) of songs name will
be skipped during search.
Selecting App & iPod Control Mode
Press and hold iPod to make a selection.
MODE ON: Control iPod from the iPod *.
“APP&iPod” appears on the display.
MODE OFF: Control iPod from the unit.
* You can still control play/pause, select files,
fast-forward/reverse files from the unit.
Adjust [SETTINGS] mode settings
While listening to an iPod...
1
Press the volume knob to enter
[FUNCTION] mode.
2
Turn the volume knob to select
[SETTINGS], then press to enter.
3
Turn the volume knob to select
[SKIP SEARCH], then press to enter.
4
Turn the volume knob to make a
selection, then press to confirm.
0.5% (initial)/ 1%/ 5%/ 10% :
Sets the
ratio of skip when searching for a song in
Music Search mode.
(Holding 4 / ¢ skips songs at 10%
regardless of the setting made.)
5
Hold to finish the procedure.
Functions of this unit with iPod
Made for
– iPod touch (1st, 2nd, 3rd, and 4th generation)
– iPod classic
– iPod with video
– iPod nano (1st, 2nd, 3rd, 4th, 5th, and 6th generation)
– iPhone 4S
– iPhone 4
– iPhone 3GS
– iPhone 3G
– iPhone
For the latest compatible list and software version of
iPod/iPhone, see: www.kenwood.com/cs/ce/ipod
If you start playback after connecting the iPod, the music
that has been played by the iPod is played first.
In this case, “RESUMING” is displayed without displaying
a folder name, etc. Changing the browse item will
display a correct title, etc.
You cannot operate iPod if “KENWOOD” or “✓”
displayed on iPod.
EN02-21_KDC-200U[K]2.indd 12EN02-21_KDC-200U[K]2.indd 12 4/27/12 8:54:00 AM4/27/12 8:54:00 AM
13
ENGLISH
About Pandora® internet radio
Preparation : Make sure [ON] is selected for [PANDORA SRC]. (page 8)
The requirements for listening to Pandora® are as follows:
Use an Apple iPhone or iPod touch running under iOS3
or later.
Search for “Pandora” in the Apple iTunes App Store
to find and install the most current version of the
Pandora® application on your device.
In the application on your device, log in and create an
account with Pandora®.
(If you are not already a registered user, an account can
also be created at www.pandora.com.)
Internet connection by 3G, EDGE, or WiFi.
iPhone connected to this unit with a KCA-iP102.
Pandora® is available only in the U.S.
Because Pandora® is a third-party service, the specifications
are subject to change without prior notice. Accordingly,
compatibility may be impaired or some or all of the services
may become unavailable.
Some functions of Pandora® cannot be operated from this unit.
For issues using the application, please contact Pandora® at
pandora-support@pandora.com
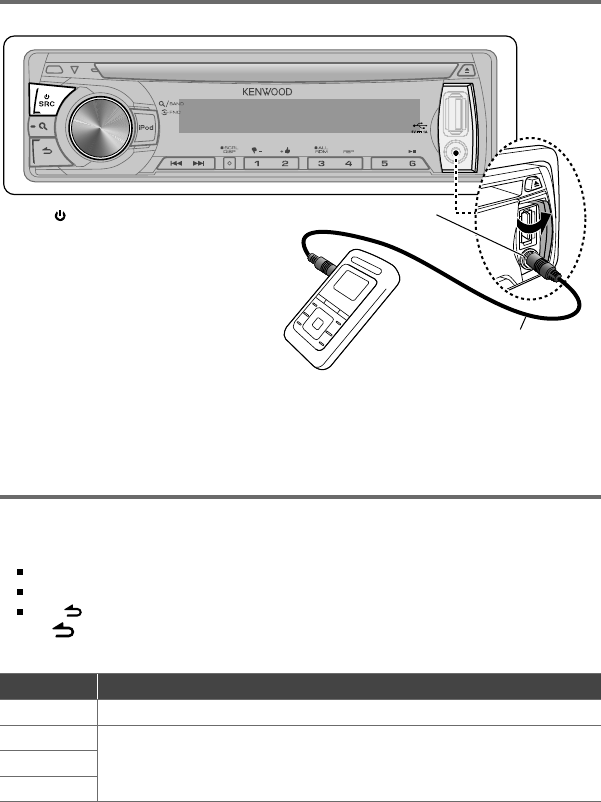
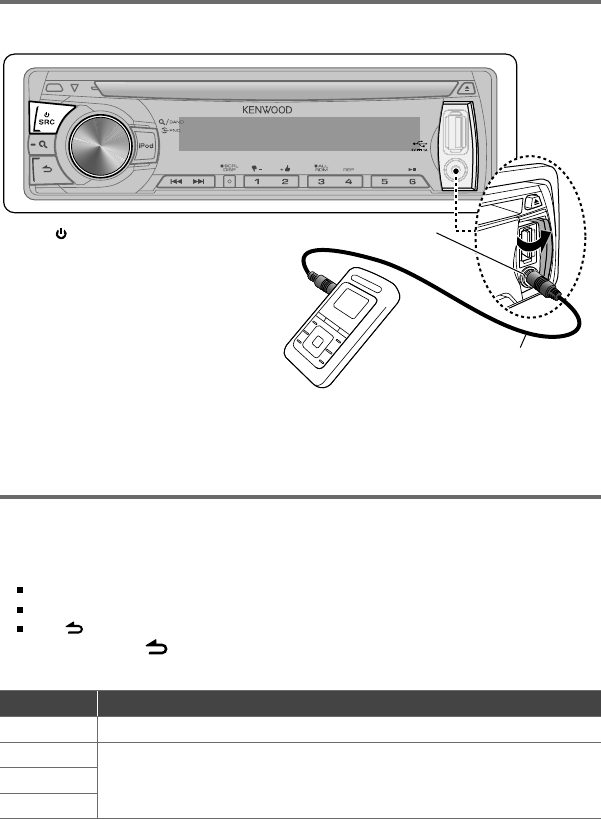
Listening to Pandora® internet radio
USB terminal
Apple iPhone/ iPod touch
(commercially available)
KCA-iP102
(optional accessory)
Using the remote controller (RC-405)
In playback mode:
¢ ( + ) : Skips a song.
ENT : Pauses/resumes playback.
In Station Search Mode:
5 / ∞ : • Selects
[A–Z]
or
[BY DATE]
.
• Selects
item
.
ENT : Confirms selection.
EXIT : Cancels Station Search mode.
1
Open the Pandora® application on
your device.
2
Connect the device to the USB terminal.
The source switches, and broadcasting starts
automatically from your current station.
If no station has been selected,
broadcasting does not start.
To select thumbs down/up, press
number button 1 ( – )/ 2 ( + ).
To skip a song, press ¢.
To pause or resume playback, press
number button 6 ( ).
Station Search mode
While listening to “PANDORA” source...
1
Press to enter Station Search mode.
2
Turn the volume knob to select [A–Z]
(stations are displayed in alphabetical
order) or [BY DATE] (stations are displayed
in date order), then press to enter.
3
Turn the volume knob to select a
desired station, then press to confirm.
EN02-21_KDC-200U[K]1.indd 13EN02-21_KDC-200U[K]1.indd 13 4/20/12 12:56:44 PM4/20/12 12:56:44 PM
14
1
Press the volume knob to enter [FUNCTION] mode.
2
Turn the volume knob to select [AUDIO CTRL] or [SETTINGS], then press to enter.
3
Turn the volume knob to make a selection, then press to confirm.
See the following table for selection.
Repeat step 3 until the desired item is selected/activated.
Press to return to the previous item.
4
Hold to finish the procedure.
[AUDIO CTRL] : While listening to any source except in STANDBY state...
Item Selectable setting (Preset: *)
SUB-W LEVEL –15 — +15 (Preset: 0): Adjusts the subwoofer output level.
BASS LEVEL –8 — +8 (Preset: 0):
Source tone memory: Adjusts the level to memorize in each source. (Before
making an adjustment, select the source you want to adjust.)
MID LEVEL
TRE LEVEL
Function settings
Preparation : Make sure [ON] is selected for [BUILTIN AUX]. (page 8)
3.5 mm (1/8") stereo mini plug
(commercially available)
Portable audio device
(commercially available)
Auxiliary input jack
Listening to the other external
components
1
Press SRC to select “AUX.”
2
Turn on the external component and
start playing.
3
Turn the volume knob to adjust the
volume.
EN02-21_KDC-200U[K]1.indd 14EN02-21_KDC-200U[K]1.indd 14 4/20/12 12:56:45 PM4/20/12 12:56:45 PM
15
ENGLISH
Item Selectable setting (Preset: *)
PRESET EQ NATURAL */ USER/ ROCK/ POPS/ EASY/ TOP40/ JAZZ/ POWERFUL: Selects a preset sound mode
suitable to the music genre. (Selects [USER] to use the customized bass, middle, and treble settings.)
BASS BOOST B.BOOST LV1/ B.BOOST LV2/ B.BOOST LV3: Selects your preferred bass boost level. ; OFF *:
Cancels.
LOUDNESS LOUD LV1 */ LOUD LV2: Selects your preferred low and high frequencies boost to produce a well-
balanced sound at a low volume level. ; OFF:
Cancels.
BALANCE L15 — R15 (Preset: 0): Adjusts the left and right speaker output balance.
FADER R15 — F15 (Preset: 0): Adjusts the rear and front speaker output balance.
SUB-W SET ON *: Turns on the subwoofer output. ; OFF:
Cancels.
DETAIL SET
LPF SUB-W THROUGH *: All signals are sent to the subwoofer. ; 85HZ/ 120HZ/ 160HZ: Frequencies higher than
85 Hz/ 120 Hz/ 160 Hz are cut off.
SUB-W PHASE REV
(180°)
/
NORM
(0°)
*
:
Selects the phase angle of the subwoofer output to be in line with the
speaker output for optimum performance. (Selectable only if a setting other than [THROUGH] is
selected for [LPF SUB-W].)
SUPREME SET ON *: Creates realistic sound by interpolating the high-frequency components that are lost in MP3/
WMA audio compression. ; OFF: Cancels. (Selectable only when playback an MP3/WMA disc or a USB
device, except iPod.)
VOL OFFSET
(Preset: 0)
–8 — +8 (for AUX) ; –8 — 0 (for other sources)
:
Presets the volume adjustment level of each
source. The volume level will automatically increase or decrease when you change the source. (Before
making an adjustment, select the source you want to adjust.)
[SUB-W LEVEL/ SUB-W SET/ LPF SUB-W/ SUB-W PHASE] is selectable only if [SWITCH PRE] is set to [SUB-W]. (page 8)
[SUB-W LEVEL/ LPF SUB-W/ SUB-W PHASE] is selectable only if [SUB-W SET] is set to [ON].
[SETTINGS]
Item Selectable setting (Preset: *)
AUX NAME AUX */ DVD/ PORTABLE/ GAME/ VIDEO/ TV: Selects the desired name for the connected component.
(Selectable only if “AUX” is selected as the source.)
CLOCK CLOCK ADJ: (For details, see page 7.)
DISPLAY
DISP DIMMER ON: Dims the display illumination. ; OFF *: Cancels.
TEXT SCROLL AUTO */ ONCE: Selects to scroll the display information automatically, or scroll only once. ; OFF: Cancels.
EN02-21_KDC-200U[K]1.indd 15EN02-21_KDC-200U[K]1.indd 15 4/20/12 2:07:34 PM4/20/12 2:07:34 PM

16
Troubleshooting
Symptom Remedy/Cause
Sound cannot be heard. Adjust the volume to the optimum level. / Check the cords and connections.
“PROTECT” appears and no operations
can be done.
Check to be sure the terminals of the speaker leads are covered with insulating
tape properly, then reset the unit. If “PROTECT” does not disappear, consult your
nearest service center.
Sound cannot be heard. / The unit does
not turn on. / Information shown on the
display is incorrect.
The connectors are dirty. Clean the connectors. (page 3)
The unit does not work at all. Reset the unit. (page 4)
Radio reception is poor. / Static noise
while listening to the radio.
Connect the antenna firmly. / Pull the antenna out all the way.
“IN” flashes. The CD player is not operating properly. Reinsert the disc properly. If the condition
did not improve, turn off the unit and consult your nearest service center.
CD-R/CD-RW cannot be played back and
tracks cannot be skipped.
Insert a finalized CD-R/CD-RW (finalize with the component which you used for
recording).
Disc sound is sometimes interrupted. Stop playback while driving on rough roads. / Change the disc. / Check the cords
and connections.
“NA FILE” appears. The unit is playing an unsupported audio file.
“NO DISC” appears. Insert a playable disc into the loading slot.
“TOC ERROR” appears. The CD is quite dirty. / The CD is upside-down. / The CD is scratched a lot. Try
another disc instead.
“ERROR 99” appears. The unit is malfunctioning for some reason. Press the reset button on the unit. If
the “ERROR 99” code does not disappear, consult your nearest service center.
“READ ERROR” appears. Copy the files and folders for the USB device again. If the error message is still
displayed, initialize the USB device or use other USB devices.
“NO DEVICE” appears. No USB device is connected. Connect an USB device, and change the source to
USB again.
“COPY PRO” appears. A copy-protected file is played.
“NO MUSIC” appears. The connected USB device contains no playable audio file.
“NA DEVICE” appears. Connect a supported USB device, and check the connections.
“USB ERROR” appears. Remove the USB device, turn the unit off, then turn it on again. If the unit still
showing the same display, try to connect another USB device.
EN02-21_KDC-200U[K]1.indd 16EN02-21_KDC-200U[K]1.indd 16 4/20/12 12:56:46 PM4/20/12 12:56:46 PM

17
ENGLISH
Symptom Remedy/Cause
“iPod ERROR” appears. Reconnect the iPod. / Reset the iPod.
Noise is generated. Skip to another track or change the disc.
Tracks cannot play back as you have
intended them to play.
Playback order is determined when files are recorded.
“READING” keeps flashing. Longer readout time is required. Do not use too many hierarchies and folders.
Elapsed playing time is not correct. This is caused by how the tracks are recorded.
The number of songs contained in “SONGS”
category of this unit is different from that
contained in “SONGS” category of iPod.
Podcast files are not counted in this unit as this unit does not support the
playback of podcast files.
Correct characters are not displayed (e.g.
album name).
This unit can only display letters (upper case), numbers, and a limited number
of symbols.
Pandora
“PNDR ERR 5” appears. Thumb up/down operation has failed.
“NO STATIONS” appears. No station is found.
“NO SKIPS” appears. The skip count limit has been exceeded.
“CHK DEVICE” appears. Check the Pandora® application on the iPhone/iPod touch.
EN02-21_KDC-200U[K]1.indd 17EN02-21_KDC-200U[K]1.indd 17 4/20/12 12:56:46 PM4/20/12 12:56:46 PM

18
Installation/connection
Part list:
A Faceplate.............................................................. (×1)
B Escutcheon ......................................................... (×1)
C Mounting sleeve ............................................. (×1)
D Wiring harness .................................................. (×1)
E Removal tool ..................................................... (×2)
F Flat head screw (for Nissan cars) ........... (×4)
G Round head screw (for Toyota cars) .... (×4)
Basic procedure
1
Remove the key from the ignition
switch, then disconnect the · terminal
of the car battery.
2
Make proper input and output wire
connections.
\ “Wiring connection” (page 19)
3
Install the unit to your car.
\ “Installing the unit” (page 20)
4
Reconnect the · terminal of the car
battery.
5
Reset the unit. (page 4)
Warning
The unit can only be installed in a car with
a 12 V DC power supply, negative ground.
If you connect the ignition wire (red) and
the battery wire (yellow) to the car chassis
(ground), you may cause a short circuit,
that in turn may start a fire. Always connect
those wires to the power source running
through the fuse box.
Disconnect the battery's negative terminal
and make all electrical connections before
installing the unit.
Insulate unconnected wires with vinyl tape
or other similar material. To prevent a short
circuit, do not remove the caps on the ends
of the unconnected wires or the terminals.
Be sure to ground this unit to the car's
chassis again after installation.
Caution
If your car's ignition does not have an ACC
position, connect the ignition wires to a
power source that can be turned on and
off with the ignition key. If you connect
the ignition wire to a power source with
a constant voltage supply, as with battery
wires, the battery may die.
Do not use your own screws. Use only the
screws provided.
Install this unit in the console of your
vehicle. Make sure the faceplate will not hit
the lid of the console (if any) when closing
and opening.
After the unit is installed, check whether
the brake lamps, blinkers, wipers, etc. on
the car are working properly.
Mount the unit so that the mounting angle
is 30° or less.
If the fuse blows, first make sure the wires
aren't touching to cause a short circuit,
then replace the old fuse with one with the
same rating.
Connect the speaker wires correctly to the
terminals to which they correspond. The
unit may be damaged or fail to work if you
share the · wires or ground them to any
metal part in the car.
When only two speakers are being
connected to the system, connect the
connectors either to both the front output
terminals or to both the rear output
terminals (do not mix front and rear).
Do not touch the metal part of this unit
during and shortly after the use of the
unit. Metal part such as the heat sink and
enclosure become hot.
Mounting and wiring this product requires
skills and experience. For safety‘s sake, leave
this work to professionals.
If you experience problems during
installation, consult your Kenwood dealer.
EN02-21_KDC-200U[K]1.indd 18EN02-21_KDC-200U[K]1.indd 18 4/20/12 12:56:46 PM4/20/12 12:56:46 PM
19
ENGLISH
RL
REAR/SW
ANT CONT
P. CONT
MUTE
Purple
Wiring connection
Fuse (10 A)
Antenna terminal
Car fuse box
Car fuse box
Battery
Ignition key switch
Blue/White
(Power control wire)
Red (Ignition wire)
Yellow (Battery wire)
Black (Ground wire)
To the metallic body or chassis of the car
To the power control terminal when using the optional power
amplifier, or to the antenna control terminal in the vehicle.
Rear/subwoofer output terminals
Brown
(Mute control wire)
Blue
(Antenna control wire)
White
Gray
Green
White/Black
Gray/Black
Green/Black
Purple/Black
To the terminal that is grounded when either the telephone rings
or during conversation. (To connect the Kenwood navigation
system, consult your navigation manual.)
To front speaker (left)
To rear speaker (left)
To front speaker (right)
To rear speaker (right)
(Not used)
EN02-21_KDC-200U[K]1.indd 19EN02-21_KDC-200U[K]1.indd 19 4/20/12 2:08:38 PM4/20/12 2:08:38 PM

20
Installing the unit
Removing the unit
Installing without using the mounting sleeve (Japanese car)
1
Remove the mounting sleeve and escutcheon from the unit.
2
Align the holes in the unit (on both sides) with the vehicle mounting bracket and secure
the unit with the supplied screws.
2
1Connect the wiring harness
to the unit. Other wiring
connection has been completed
earlier. (page 19)
Before attaching, make
sure the direction of the
escutcheon is correct.
(Wider hooks on the
top side.)
Dashboard of your car
T: Toyota cars ; N: Nissan cars
1
Detach the faceplate.
2
Engage the catch pin on the
removal tools into the holes on
both sides of the escutcheon, then
pull it out.
3
Insert the removal tools deeply into
the slots on each side, then follow
the arrows instructions as shown
on the right.
Bend the appropriate tabs
to hold the mounting
sleeve firmly in place.
EN02-21_KDC-200U[K]1.indd 20EN02-21_KDC-200U[K]1.indd 20 4/20/12 12:56:46 PM4/20/12 12:56:46 PM

21
ENGLISH
FM tuner section
Frequency range:
200 kHz space: 87.9 MHz — 107.9 MHz
Usable sensitivity (S/N= 26
dB):
11.2 dBf (1.0 μV/75 Ω)
Quieting sensitivity (DIN S/N = 46
dB):
19.2 dBf (2.5 μV/75 Ω)
Frequency response (±3
dB):
30 Hz — 15 kHz
Signal-to-Noise ratio (MONO):
63 dB
Stereo separation (1
kHz):
40 dB
AM tuner section
Frequency range (10
kHz space):
530 kHz — 1 700 kHz
Usable sensitivity (S/N= 20
dB):
31 dBμ (36 μV)
CD player section
Laser diode:
GaAIAs
Digital filter (D/A):
8 Times Over Sampling
D/A converter:
24 Bit
Spindle speed:
500 rpm — 200 rpm (CLV)
Wow & Flutter:
Below Measurable Limit
Frequency response (±1
dB):
20 Hz — 20 kHz
Total harmonic distortion (1
kHz):
0.01 %
Signal-to-Noise ratio (1
kHz):
105 dB
Dynamic range:
90 dB
MP3 decode:
Compliant with MPEG-1/2 Audio
Layer-3
WMA decode:
Compliant with Windows
Media Audio
USB interface
USB standard:
USB1.1/ 2.0 (Full speed)
Maximum supply current:
DC 5 V 1 A
File system:
FAT16/ 32
MP3 decode:
Compliant with MPEG-1/2 Audio
Layer-3
WMA decode:
Compliant with Windows
Media Audio
Audio section
Maximum output power:
50 W × 4
Full bandwidth power (at less than 1 % THD):
22 W × 4
Speaker impedance:
4 Ω — 8 Ω
Tone action:
Bass:
100 Hz ±8 dB
Middle:
1 kHz ±8 dB
Treble:
12.5 kHz ±8 dB
Preout level / load (CD):
2 500 mV/10 kΩ
Preout impedance:
≤ 600 Ω
Auxiliary input section
Frequency response (±3
dB):
20 Hz — 20 kHz
Input maximum voltage:
1 200 mV
Input impedance:
10 kΩ
General
Operating voltage (11
V — 16
V allowable):
14.4 V
Maximum current consumption:
10 A
Installation size (W × H × D):
182 mm × 53 mm × 158 mm
(7-3/16" × 2-1/8" × 6-1/4")
Weight:
2.9 lbs (1.3 kg)
Subject to change without notice.
Specifications
About Audio file
Playable Audio file: MP3 (.mp3), WMA (.wma)
Playable disc media: CD-R/RW/ROM
Playable disc file format: ISO 9660 Level 1/2, Joliet,
Romeo, Long file name.
Playable USB device file system: FAT16, FAT32
Although the audio files are complied with the standards
listed above, the play maybe impossible depending on the
types or conditions of media or device.
EN02-21_KDC-200U[K]1.indd 21EN02-21_KDC-200U[K]1.indd 21 4/20/12 12:56:46 PM4/20/12 12:56:46 PM

2
Seguridad 3
Preparativos 4
Cómo instalar/desmontar la placa frontal
Cómo reposicionar su unidad
Cómo preparar el mando a distancia
(RC-405)
Funciones básicas 5
Procedimientos iniciales 7
Cancelación de las demostraciones en
pantalla
Ajuste del modo de demostración
Ajuste del reloj
Ajustes iniciales previos a las operaciones
Para escuchar la radio 9
Ajuste de la configuración del modo [SETTINGS]
Sintonización de acceso directo (empleo
del mando a distancia RC-405)
Escucha de un disco/ dispositivo USB/
iPod
10
Comience a reproducir un disco
Conexión de un dispositivo USB
Conexión de un iPod
Cómo seleccionar Repetir reproducción
Cómo seleccionar Reproducción aleatoria
Cómo seleccionar una carpeta, pista o
archivo
Búsqueda directa de música (empleo del
mando a distancia RC-405)
Funciones de esta unidad con el iPod
Selección de una canción mediante
alfabeto
Selección del modo de control de App &
iPod
Ajuste de la configuración del modo
[SETTINGS]
Para escuchar la radio por Internet
Pandora®
13
Modo de búsqueda de emisora
Empleo del mando a distancia (RC-405)
Escuchando otros componentes
externos 14
CONTENIDO
Silencio cuando se recibe una
llamada telefónica
Para utilizar este función, conecte el
conector MUTE a su teléfono por medio
de un accesorio telefónico disponible en el
mercado. (página 19)
Cuando se recibe una llamada, aparece
el mensaje “CALL”.
El sistema de audio se detiene.
Para seguir escuchando el sistema de
audio durante una llamada, pulse SRC.
El mensaje “CALL” desaparece y se
reanuda el sistema de audio.
Cuando finaliza la llamada, el mensaje
“CALL” desaparece.
Se reanuda el sistema de audio.
Configuraciones de las funciones 14
Localización de averías 16
Instalación/conexión 18
Procedimiento básico
Advertencia
Precaución
Conexión del cableado
Instalación de la unidad
Desmontaje de la unidad
Especificaciones 21
SP_KDC-200U[K]1.indd 2SP_KDC-200U[K]1.indd 2 5/9/12 11:09:45 AM5/9/12 11:09:45 AM
3
ESPAÑOL
Seguridad
ADVERTENCIA
Detenga el automóvil antes de operar la
unidad.
Información importante…
Para evitar cortocircuitos, nunca coloque
ni deje objetos metálicos (por ejemplo,
monedas o herramientas metálicas) dentro
de la unidad.
Precaución:
Ajuste el volumen de forma tal
que pueda escuchar los sonidos exteriores.
Si conduce con el volumen demasiado alto
podría provocar un accidente.
Condensación: Cuando funciona el
acondicionador de aire del automóvil
puede acumularse humedad en la lente
del láser. Esto puede provocar errores en
la lectura de los discos. En tal caso, retire
el disco y espere hasta que se evapore la
humedad.
Esta unidad sólo puede reproducir los CD
con:
Las ilustraciones del presente manual
son ejemplos utilizados para explicar
más claramente cómo se utilizan los
controles. Por lo tanto, las imágenes de
las ilustraciones pueden diferir de las que
aparecen en el equipo real.
Mantenimiento
Limpieza de la unidad: Limpie la suciedad del panel con un paño seco o de silicona. Si no
observa esta precaución podría dañar el monitor o la unidad.
Limpieza del conector: La unidad no podrá funcionar
correctamente si hay suciedad en los conectores situados
entre la unidad y la placa frontal. Desmonte la placa frontal
y limpie el conector con un palillo de algodón, teniendo
cuidado de no dañarlo.
Cómo manipular los discos
No toque la superficie de grabación del disco.
No pegue cinta etc. sobre el disco ni utilice un CD con cinta pegada sobre él.
No utilice accesorios para el disco.
Limpie desde el centro del disco hacia el exterior.
Limpie el disco con un paño seco o de silicona. No utilice disolventes.
Cuando extraiga los discos de esta unidad, tire de estos en sentido horizontal.
Antes de insertar un disco, quite las rebabas de los bordes del orificio central y del borde
exterior.
Conector (en el reverso de
la placa frontal)
Se requiere un cable de conexión USB,
CA-U1EX (máx.: 500 mA) (accesorio
opcional) para conectar un dispositivo USB.
La palabra “iPod” que se utiliza en este
manual hace referencia a un iPod o iPhone
conectado a esta unidad mediante el
cable de conexión KCA-iP102 (accesorio
opcional).
Si tiene problemas durante la instalación,
consulte con su distribuidor Kenwood.
Cuando compre componentes externos,
verifique antes con su distribuidor
Kenwood que dichos accesorios funcionen
con su modelo y en su área.
En un manual en línea en el siguiente
sitio, encontrará información detallada y
notas acerca de los archivos de audio que
pueden reproducirse:
www.kenwood.com/cs/ce/audiofile/
SP_KDC-200U[K]1.indd 3SP_KDC-200U[K]1.indd 3 5/9/12 11:09:45 AM5/9/12 11:09:45 AM
4
Preparativos
Cómo instalar/desmontar la placa
frontal
2
1
1
2
No exponga la placa frontal a la luz directa
del sol, calor excesivo ni humedad. Además
deberá evitar sitios con mucho polvo o la
posibilidad de que se derrame agua sobre
ella.
Guarde la placa frontal en su estuche
cuando se encuentre desmontada.
La placa frontal es una pieza de precisión
y puede resultar dañada por golpes o
sacudidas.
Para evitar el deterioro, no toque los
terminales de la unidad y la placa frontal
con los dedos.
Cómo reposicionar su unidad
2
3
1
Si la unidad no funciona
correctamente, pulse el
botón de reposición.
La unidad se restaura
a los ajustes de fábrica
al pulsar el botón de
reposición.
Cómo preparar el mando a distancia
(RC-405)
Cuando utilice el mando a distancia por
primera vez, quite la lamina aislante.
Si la efectividad del mando a distancia
disminuye, cambie la batería.
2
3
4
1
Precaución:
No deje el mando a distancia en superficies
calientes como el salpicadero.
Batería de litio.
Existe peligro de explosión si la batería no
se sustituye correctamente. Sustituya la
batería únicamente con el mismo tipo o un
tipo equivalente.
El bloque de baterías no debe exponerse
a una fuente de calor excesiva, como luz
solar, fuego o similar.
Mantenga la batería fuera del alcance de
los niños y en su embalaje original hasta
que esté listo para su uso. Deseche las
baterías utilizadas de forma rápida. En
caso de tragarse, póngase con un médico
inmediatamente.
Botón de reposición
Lámina aislante
SP_KDC-200U[K]1.indd 4SP_KDC-200U[K]1.indd 4 5/9/12 11:09:46 AM5/9/12 11:09:46 AM

5
ESPAÑOL
El siguiente indicador se enciende cuando...
ST: se recibe una difusión en estéreo (FM).
IN: existe un disco en la unidad.
Funciones básicas
Rueda de volumen
Ranura de carga
(Sin utilizar.)
Expulsa el disco
Desmonte la placa frontal
Toma de entrada auxiliar
Terminal USB
Sensor remoto
DO lo exponga a la luz solar brillante.
Continúa...
Ventanilla de visualización
Si pulsa o mantiene pulsado(s) el(los) siguiente(s) botón(es)...
Unidad
principal
Mando a
distancia Operaciones generales
SRC
— Se enciende.
Se apaga si lo pulsa y mantiene pulsado.
SRC
Si la unidad está encendida, selecciona las fuentes disponibles
(TUNER, USB/ iPod, PANDORA, CD, AUX, STANDBY).
• Si la fuente está preparada, también se iniciará la reproducción.
• “
PANDORA” sólo se puede seleccionar cuando hay un iPhone o iPod
touch (con la aplicación radio por Internet Pandora®) conectado y
se ha seleccionado [ON] para [PANDORA SRC]. (página 8)
• “iPod” o “CD” sólo puede seleccionarse cuando hay un iPod
conectado o un disco cargado.
SP_KDC-200U[K]1.indd 5SP_KDC-200U[K]1.indd 5 5/9/12 11:09:47 AM5/9/12 11:09:47 AM

6
Unidad
principal
Mando a
distancia Operaciones generales
Rueda de
volumen (girar)
VOL Ajusta el nivel de volumen.
5
/
∞Selecciona las opciones.
Rueda de
volumen
(pulse)
ENT Confirma la selección.
— Ingresar en la configuración [FUNCTION].
5
/
∞
Ingresa al modo de búsqueda de música o modo de búsqueda
de emisora (para Pandora).
*AM– /
#FM+
Selecciona las bandas de FM (FM1/ FM2/ FM3) o AM cuando se
selecciona “TUNER” como fuente.
1 ( –) / 2 (+ )
*AM– /
#FM+ Selecciona la carpeta anterior/siguiente.
— Selecciona pulgares arriba/abajo (para Pandora).
6 ( ) ENT Pausa/reanuda la reproducción de un disco/ dispositivo USB/
iPod/ Pandora.
4
/
¢4
/
¢
Busca una emisora de radio.
Selecciona una pista/archivo.
Si lo pulsa y mantiene pulsado adelanta/retrocede pistas.
¢¢
Omite una canción
(para Pandora)
.
SCRL DISP —
Cambia la información en pantalla.
Si lo pulsa y mantiene pulsado desplaza la información en
pantalla.
Si lo pulsa y mantiene pulsado en la pantalla de visualización
del reloj, ingresa directamente en el modo de ajuste del reloj
(página 7).
iPod —
Selecciona “iPod” como fuente.
Ingresa al modo de control (MODE ON/ MODE OFF) de
reproducción del iPod si lo pulsa y mantiene pulsado.
(página 12)
—AUD Ingresa directamente en la configuración [AUDIO CTRL].
—ATT Atenúa el sonido.
• Para volver al nivel anterior pulse nuevamente el botón.
Volver al elemento anterior.
EXIT
Sale del modo de configuración. (Si pulsa y mantiene pulsado
en la unidad principal también saldrá del modo de
configuración.)
+
+
SP_KDC-200U[K]1.indd 6SP_KDC-200U[K]1.indd 6 5/9/12 11:09:51 AM5/9/12 11:09:51 AM

7
ESPAÑOL
Procedimientos iniciales
Cancelación de las demostraciones en pantalla
La demostración en pantalla está siempre activada a menos que la cancele.
Cuando enciende la unidad (o después de reposicionarla) la pantalla muestra:
[CANCEL
DEMO] \ [PRESS] \ [VOLUME KNOB]
1
Pulse la rueda de volumen.
Se selecciona [YES] como configuración inicial.
2
Pulse nuevamente la rueda de volumen para confirmar.
Aparece [DEMO
OFF].
Si no realiza ninguna operación durante aproximadamente 15 segundos o gira la rueda de
volumen para seleccionar [NO] en el paso
2
, aparece el mensaje [DEMO
MODE] y comienza
la demostración en pantalla.
Ajuste del modo de demostración
1
Pulse la rueda de volumen para ingresar en [FUNCTION].
2
Gire la rueda de volumen para seleccionar [DEMO MODE], después púlsela para
ingresar.
3
Gire la rueda de volumen para seleccionar [ON] o [OFF].
Si selecciona [ON], comienza la demostración en pantalla si no realiza ninguna operación
durante aproximadamente 20 segundos.
4
Mantenga pulsado para finalizar el procedimiento.
Continúa...
Ajuste del reloj
1
Pulse la rueda de volumen para ingresar en el modo [FUNCTION].
2
Gire la rueda de volumen para seleccionar [SETTINGS], después púlsela para ingresar.
3
Gire la rueda de volumen para seleccionar [CLOCK], después púlsela para ingresar.
4
Pulse la rueda de volumen para seleccionar [CLOCK ADJ].
La hora del reloj destella en la pantalla.
5
Gire la rueda de volumen para ajustar la hora, después púlsela para pasar al ajuste de
los minutos.
Los minutos del reloj destellan en la pantalla.
6
Gire la rueda de volumen para ajustar los minutos, después púlsela para confirmar.
Pulse 4
/
¢ para alternar entre los ajustes de horas y minutos.
7
Mantenga pulsado para finalizar el procedimiento.
SP_KDC-200U[K]1.indd 7SP_KDC-200U[K]1.indd 7 5/9/12 11:09:52 AM5/9/12 11:09:52 AM

8
Ajustes iniciales previos a las operaciones
1
Pulse SRC para ingresar en el modo [STANDBY].
2
Pulse la rueda de volumen para ingresar en el modo [FUNCTION].
3
Gire la rueda de volumen para seleccionar [INITIAL SET], después púlsela para ingresar.
4
Gire la rueda de volumen para seleccionar, después púlsela para confirmar.
Consulte la siguiente tabla para realizar la selección.
5
Mantenga pulsado para finalizar el procedimiento.
Opción Ajuste seleccionable (Predefinido: *)
PRESET TYPE NORM *: Memoriza una emisora para cada botón predefinido de cada banda (FM1/FM2/FM3/AM). ;
MIX: Memoriza una emisora para cada botón predefinido independientemente de la banda seleccionada
(FM1/FM2/FM3/AM).
KEY BEEP ON */ OFF: Activa/desactiva el tono de teclas.
PANDORA SRC ON *: Permite seleccionar la fuente “PANDORA” conectando un iPhone o iPod touch (con la aplicación radio
por Internet Pandora®). ; OFF: Se desactiva “PANDORA” en la selección de fuente.
BUILTIN AUX ON *: Habilita “AUX” en la selección de la fuente. El sonido del componente externo conectado se emite a
través de los altavoces del vehículo. ; OFF: Se desactiva “AUX” en la selección de fuente.
CD READ 1 *: Distingue automáticamente entre disco de archivos de audio y CD de música. ; 2:
Fuerza la reproducción
como CD de música. No se puede escuchar el sonido si se reproduce un disco de archivo de audio.
SWITCH PRE REAR */ SUB-W: Selecciona si los altavoces traseros o un subwoofer están conectados a los terminales de
salida de línea de la parte trasera de la unidad (mediante un amplificador externo).
SP SELECT OFF */ 5/4/ 6 × 9/6/ OEM: Selecciona el tamaño de altavoz para una reproducción óptima.
F/W UP xx.xx YES *: Se empieza a actualizar el firmware. ; NO:
Se cancela (la actualización no se activa).
Para obtener información sobre cómo actualizar el firmware, consulte: www.kenwood.com/cs/ce/
Acerca de “KENWOOD Music Editor Light” y “KENWOOD Music Control”
Esta unidad es compatible con la aplicación para PC “KENWOOD Music Editor Light” y “KENWOOD Music Control” para
AndroidTM.
Cuando se utiliza el archivo de audio con información de la base de datos añadida mediante “KENWOOD Music Editor
Light” o “KENWOOD Music Control”, podrá buscar un archivo por el título, el nombre del álbum o nombre del artista
mediante Music Search (búsqueda de música).
“KENWOOD Music Editor Light” y “KENWOOD Music Control” están disponibles desde el siguiente sitio web:
www.kenwood.com/cs/ce/
SP_KDC-200U[K]1.indd 8SP_KDC-200U[K]1.indd 8 5/15/12 2:08:10 PM5/15/12 2:08:10 PM
9
ESPAÑOL
Mantenga pulsado durante aproximadamente 2 segundos para memorizar la emisora actual.
Pulse brevemente para recuperar la emisora memorizada.
Ajuste de la configuración del modo [SETTINGS]
Cuando escucha la radio...
1
Pulse la rueda de volumen para ingresar en el modo [FUNCTION].
2
Gire la rueda de volumen para seleccionar [SETTINGS], después púlsela para ingresar.
3
Gire la rueda de volumen para seleccionar, después púlsela para confirmar.
Consulte la siguiente tabla para realizar la selección.
4
Mantenga pulsado para finalizar el procedimiento.
Opción Ajuste seleccionable (Predefinido: *)
SEEK MODE Selecciona el modo de sintonización para los botones
4
/
¢
.
AUTO1 *: Buscar automáticamente una emisora. ; AUTO2: Búsqueda de emisoras por orden en la memoria
de presintonización. ; MANUAL: Buscar manualmente una emisora.
AUTO MEMORY YES *: Memorización automática de 6 emisoras con buena señal de recepción. ; NO:
Se cancela (la
memorización automática no se activa). (Solo puede seleccionarse si selecciona previamente [NORM] en
[PRESET TYPE].) (página 8)
MONO SET ON: Mejora la recepción de FM (pero se puede perder el efecto estéreo). ; OFF *: Se cancela (se reanuda el
efecto estéreo).
Para escuchar la radio
1
Pulse SRC para seleccionar “TUNER”.
2
Pulse repetidamente para seleccionar una banda (FM1/ FM2/ FM3/ AM).
3
Pulse 4
/
¢ para buscar una emisora.
Sintonización de acceso directo (empleo del mando a distancia RC-405)
1
Pulse FM+ / AM– para seleccionar una banda.
2
Pulse DIRECT para ingresar al modo de sintonización de acceso directo.
Aparece “– – – –” en la pantalla.
3
Pulse los botones numéricos para ingresar la frecuencia.
4
Pulse 4 / ¢ ( + ) para realizar la búsqueda de frecuencia.
Para cancelar el modo de sintonización de acceso directo, pulse o EXIT.
Si después del paso 3 no se realiza ninguna operación durante 10 segundos, la
sintonización de acceso directo se cancela automáticamente.
Funciones básicas:
FM+ / AM– : Selecciona una banda.
4 / ¢ ( + ) : Busca una emisora de radio.
1 – 6 : Selecciona una emisora predefinida.
SP_KDC-200U[K]1.indd 9SP_KDC-200U[K]1.indd 9 5/9/12 11:09:53 AM5/9/12 11:09:53 AM
10
Comience a reproducir un disco
1
Pulse SRC para encender la unidad.
2
Inserte un disco en la ranura de carga.
La reproducción se inicia
automáticamente.
3
Pulse el botón numérico 6 ( ) para
reanudar/pausar la reproducción (si
fuera necesario).
Expulsa el disco. (Aparece el mensaje “NO DISC”
(sin disco) y el indicador “IN” se apaga.)
Pulse para seleccionar una pista o
archivo.
Mantenga pulsado para adelantar
o retroceder rápidamente.
Escucha de un disco/ dispositivo USB/ iPod
Dispotivo USB
(disponible en los establecimientos del ramo)
Terminal USB
Pulse para seleccionar la carpeta
anterior/siguiente.
• No disponible si se selecciona
“ALL RANDOM”. Conexión de un
dispositivo USB
Conexión de un iPod
Apple iPod (disponible
en los establecimientos
del ramo)
Abra la cubierta y, a
continuación, realice la
siguiente conexión.
La fuente cambia
automáticamente y se
inicia la reproducción.
CA-U1EX (Máx.: 500 mA)
(accesorio opcional)
KCA-iP102
(accesorio opcional)
Discos que no se pueden utilizar
Discos que no son redondos.
Discos con la superficie de grabación pintada o
discos sucios.
No se puede reproducir un disco grabable/
regrabable que no esté finalizado. (Si necesita
información acerca del proceso de finalización,
consulte el software de grabación de discos y el
manual de instrucciones de la grabadora.)
No pueden utilizarse CDs de 3 pulgadas. Intentar
insertar uno con un adaptador puede resultar en
una avería.
Ranura de carga
SP_KDC-200U[K]1.indd 10SP_KDC-200U[K]1.indd 10 5/9/12 11:09:55 AM5/9/12 11:09:55 AM
11
ESPAÑOL
Cómo seleccionar una carpeta,
pista o archivo
1
Pulse para ingresar en el modo de
búsqueda de música.
Aparece el mensaje “SEARCH” y, a
continuación, aparece en la pantalla el
nombre del archivo actual.
2
Gire la rueda de volumen para
seleccionar una carpeta, pista o archivo,
después púlsela para confirmar.
Para volver a la carpeta raíz (o a la primera
pista de un CD de audio), pulse el botón
numérico 5.
Para volver a la carpeta anterior, pulse .
Para cancelar el modo de búsqueda de
música, pulse y mantenga pulsado .
El mensaje < o > en la pantalla indica
que el elemento anterior o siguiente se
encuentra disponible.
Para el dispositivo USB * y iPod: Para omitir
la búsqueda, pulse 4 / ¢.
*
Esta operación solo funcionará para los
archivos registrados en la base de datos creada
con Kenwood Music Editor Light o Kenwood
Music Control. (página 8)
Búsqueda directa de música (empleo
del mando a distancia RC-405)
• No disponible si se selecciona la reproducción
aleatoria.
• No aplicable para iPod, Kenwood Music Editor
Light ni Kenwood Music Control.
1
Pulse DIRECT para ingresar en el modo
de búsqueda directa de música.
Aparece “– – –”.
2
Pulse los botones de número para
ingresar el número de pista.
3
Pulse 4 / ¢ para buscar la música.
Para cancelar el modo de búsqueda directa
de música, pulse o EXIT.
Cómo seleccionar Repetir
reproducción
Pulse repetidamente el botón de
número 4 (REP) para realizar la selección.
CD de audio : TRAC (pista) REPEAT,
REPEAT OFF
MP3/WMA : FILE REPEAT, FOLD (carpeta)
REPEAT, REPEAT OFF
iPod : FILE REPEAT, REPEAT OFF
Cómo seleccionar Reproducción
aleatoria
Pulse repetidamente el botón numérico
3 (ALL RDM) para realizar la selección.
CD de audio : DISC RANDOM, RANDOM OFF
MP3/WMA/iPod : FOLD (carpeta) RANDOM,
RANDOM OFF
Para MP3/WMA/iPod : Pulse y mantenga
pulsado el botón numérico 3 (ALL RDM)
para seleccionar “ALL RANDOM”.
– Aplicable sólo si seleccionó inicialmente
“RANDOM OFF”.
– El elemento de búsqueda de iPod cambia
a “canciones”.
Funciones básicas:
En el modo de reproducción:
FM+ / AM– : Selecciona una carpeta.
4 / ¢ ( + ) : Selecciona una pista/
archivo.
ENT : Pausa/reanuda la
reproducción.
En el modo de búsqueda de música:
ENT : Confirma la selección.
5 / ∞ : Selecciona una carpeta/pista/
archivo.
: Volver a la carpeta anterior.
Acerca del dispositivo USB
Esta unidad puede reproducir archivos MP3/WMA
guardados en un dispositivo de clase de almacenamiento
masivo USB.
Instale el dispositivo USB en un lugar que no le impida
conducir su vehículo correctamente.
No puede conectar un dispositivo USB por medio de un
concentrador USB y un Lector multi tarjetas.
Realice la copias de respaldo de todos los datos
importantes para evitar la pérdida de los datos.
Conectar un cable cuya longitud total sea superior a 5 m
puede provocar una reproducción anormal.
SP_KDC-200U[K]1.indd 11SP_KDC-200U[K]1.indd 11 5/15/12 2:08:10 PM5/15/12 2:08:10 PM

12
Acerca del iPod/iPhone compatible
Selección de una canción mediante
alfabeto
1
Pulse para ingresar en el modo de
búsqueda de música.
Aparece “SEARCH”.
2
Gire la rueda de volumen para
seleccionar una categoría, luego púlsela
para confirmar.
3
Pulse de nuevo para ingresar al modo
de búsqueda por alfabeto.
Aparece “SRCH <– – –>”.
4
Gire la rueda de volumen para
seleccionar el carácter que desea buscar.
5
Pulse 4 / ¢ para desplazarse a la
posición de introducción.
Podrá introducir hasta tres caracteres.
6
Pulse la rueda de volumen para iniciar la
búsqueda.
7
Gire la rueda de volumen para
seleccionar una carpeta, pista o archivo,
después púlsela para confirmar.
Para volver a la carpeta anterior, pulse .
Para volver al menú superior, pulse el
botón numérico 5.
Para cancelar el modo de búsqueda por
alfabeto, pulse y mantenga pulsado .
Se requiere un tiempo de búsqueda más
prolongado si hay numerosas canciones o
listas de reproducción en el iPod.
Para realizar la búsqueda de un carácter
distinto de A a Z y 0 a 9, introduzca
solamente “
* ”.
El artículo ("a", "an", "the") de los nombres
de las canciones será omitido durante la
búsqueda.
Selección del modo de control de
App & iPod
Pulse y mantenga pulsado iPod para
realizar una selección.
MODE ON: Controlar el iPod desde el iPod *.
Aparece “APP&iPod” en la pantalla.
MODE OFF: Controlar el iPod desde la
unidad.
* Podrá seguir controlando la reproducción/
pausa, selección de archivos, avance rápido/
retroceso de archivos desde la unidad.
Ajuste de la configuración del
modo [SETTINGS]
Mientras escucha un iPod...
1
Pulse la rueda de volumen para ingresar
en el modo [FUNCTION].
2
Gire la rueda de volumen para seleccionar
[SETTINGS]
, después púlsela para ingresar.
3
Gire la rueda de volumen para
seleccionar [SKIP SEARCH], después
púlsela para ingresar.
4
Gire la rueda de volumen para seleccionar,
después púlsela para confirmar.
0.5% (inicial)/ 1%/ 5%/ 10% :
Define el
porcentaje de omisión cuando se efectúa
la búsqueda de una canción en el modo
de búsqueda de música.
(Mantenga pulsado 4 / ¢ para omitir
canciones al 10% independientemente
del ajuste realizado.)
5
Mantenga pulsado para finalizar el
procedimiento.
Funciones de esta unidad con el iPod
Made for
– iPod touch (1st, 2nd, 3rd y 4th generation)
– iPod classic
– iPod with video
– iPod nano (1st, 2nd, 3rd, 4th, 5th y 6th generation)
– iPhone 4S
– iPhone 4
– iPhone 3GS
– iPhone 3G
– iPhone
Para la información sobre la lista de compatibilidad más
reciente y la versión de software del iPod/iPhone, consulte:
www.kenwood.com/cs/ce/ipod
Si inicia la reproducción después de conectar el iPod, se
reproduce primero la música que se ha reproducido en el iPod.
En este caso, se muestra “RESUMING” sin que se muestre
un nombre de carpeta, etc. Si se cambia el elemento de
exploración se visualizará un título correcto, etc.
No es posible utilizar el iPod si en éste se visualiza “KENWOOD”
o “✓”.
SP_KDC-200U[K]1.indd 12SP_KDC-200U[K]1.indd 12 5/9/12 3:47:27 PM5/9/12 3:47:27 PM
13
ESPAÑOL
Acerca de la radio por Internet Pandora®
Preparativos : Asegúrese de haber seleccionado [ON] para [PANDORA SRC]. (página 8)
Los requisitos para escuchar Pandora® son los siguientes:
Utilice un Apple iPhone o iPod touch que funcione con
el sistema iOS3 o versiones posteriores.
Busque “Pandora” en la tienda Apple iTunes App Store
e instale en su unidad la versión más reciente de la
aplicación Pandora®.
En la aplicación de su unidad, acceda y cree una cuenta
con Pandora®.
(Si todavía no se ha registrado como usuario, también
puede crear una cuenta en www.pandora.com.)
Conexión a Internet mediante 3G, EDGE, o WiFi.
iPhone conectado a esta unidad mediante un KCA-iP102.
Pandora® sólo está disponible en los EE.UU.
Debido a que el servicio de radio por Internet Pandora® es
de un tercero, las especificaciones se encuentran sujetas a
cambios sin previo aviso. Por consiguiente, la compatibilidad
podría verse afectada, y alguno o todos los servicios podrían
dejar de estar disponibles.
Algunas funciones de Pandora® no están disponibles desde
esta unidad.
Si tiene alguna duda sobre el uso de esta aplicación, póngase en
contacto con Pandora® a través de pandora-support@pandora.com
Para escuchar la radio por Internet Pandora®
Terminal USB
Apple iPhone/ iPod touch
(disponible en los
establecimientos del ramo)
KCA-iP102
(accesorio opcional)
Empleo del mando a distancia (RC-405)
En el modo de reproducción:
¢ ( + ) : Omite una canción.
ENT : Pausa/reanuda la reproducción.
En el modo de búsqueda de emisora:
5 / ∞ : • Selecciona
[A–Z]
o
[BY DATE]
.
• Selecciona la
opción
.
ENT : Confirma la selección.
EXIT : Cancela el modo de búsqueda de
emisora.
1
Abra la aplicación Pandora® en su
dispositivo.
2
Conecte el dispositivo al terminal USB.
La fuente cambiará y la transmisión se iniciará
automáticamente desde la emisora actual.
Si no hay ninguna emisora seleccionada,
la transmisión no se iniciará.
Para seleccionar pulgares abajo/arriba,
pulse el botón numérico
1 ( – )/ 2 ( + ).
Para omitir una canción, pulse ¢.
Para pausar o reanudar la reproducción,
pulse el botón numérico 6 ( ).
Modo de búsqueda de emisora
Mientras está escuchando la fuente “PANDORA”...
1
Pulse para ingresar en el modo de
búsqueda de emisora.
2
Gire la rueda de volumen para seleccionar
[A–Z] (las emisoras se visualizan por orden
alfabético) o [BY DATE] (las emisoras
aparecen ordenadas por fecha) y, a
continuación, pulse para ingresar.
3
Gire la rueda de volumen para
seleccionar la emisora que desea y, a
continuación, púlsela para confirmar.
SP_KDC-200U[K]1.indd 13SP_KDC-200U[K]1.indd 13 5/9/12 11:10:00 AM5/9/12 11:10:00 AM
14
1
Pulse la rueda de volumen para ingresar en el modo [FUNCTION].
2
Gire la rueda de volumen para seleccionar [AUDIO CTRL] o [SETTINGS], después púlsela
para ingresar.
3
Gire la rueda de volumen para seleccionar, después púlsela para confirmar.
Para realizar la selección, consulte la siguiente tabla.
Repita el paso 3 hasta que el elemento deseado se seleccione/active.
Pulse para volver a la opción anterior.
4
Mantenga pulsado para finalizar el procedimiento.
[AUDIO CTRL] : Cuando escucha cualquier fuente a excepción del estado STANDBY…
Opción Ajuste seleccionable (Predefinido: *)
SUB-W LEVEL –15 — +15 (Predefinido: 0): Ajusta el nivel de salida del subwoofer.
BASS LEVEL –8 — +8 (Predefinido: 0):
Memoria del tono de fuente: Ajusta el nivel a memorizar para cada fuente.
(Antes de realizar un ajuste, seleccione la fuente que desea ajustar.)
MID LEVEL
TRE LEVEL
Configuraciones de las funciones
Preparativos : Asegúrese de haber seleccionado [ON] para [BUILTIN AUX]. (página 8)
Miniclavija estéreo de 3,5 mm
(1/8 pulgada) (disponible en los
establecimientos del ramo)
Dispositivo portátil de audio
(disponible en los establecimientos del ramo)
Toma de entrada auxiliar
Escuchando otros componentes
externos
1
Pulse SRC para seleccionar “AUX”.
2
Encienda el componente externo y
comience la reproducción.
3
Gire la rueda de volumen para
ajustar el volumen.
SP_KDC-200U[K]1.indd 14SP_KDC-200U[K]1.indd 14 5/9/12 11:10:03 AM5/9/12 11:10:03 AM

15
ESPAÑOL
Opción Ajuste seleccionable (Predefinido: *)
PRESET EQ NATURAL */ USER/ ROCK/ POPS/ EASY/ TOP40/ JAZZ/ POWERFUL: Selecciona un modo de sonido
predefinido adecuado para el género de música. (Selecciona [USER] para utilizar los ajustes de graves,
medios y agudos personalizados.)
BASS BOOST B.BOOST LV1/ B.BOOST LV2/ B.BOOST LV3: Selecciona su nivel de refuerzo de graves preferido. ;
OFF *:
Se cancela.
LOUDNESS LOUD LV1 */ LOUD LV2: Selecciona los niveles preferidos de refuerzo para frecuencias altas y bajas
para producir un sonido bien equilibrado a bajos niveles de volumen. ; OFF:
Se cancela.
BALANCE L15 — R15 (Predefinido: 0): Ajusta el balance de salida de los altavoces izquierdo y derecho.
FADER R15 — F15 (Predefinido: 0): Ajusta el balance de salida de los altavoces trasero y delantero.
SUB-W SET ON *: Activa la salida del subwoofer. ; OFF:
Se cancela.
DETAIL SET
LPF SUB-W THROUGH *: Todas las señales se envían al subwoofer. ; 85HZ/ 120HZ/ 160HZ: Se suprimen las
frecuencias superiores a los 85 Hz/ 120 Hz/ 160 Hz.
SUB-W PHASE REV
(180°)
/
NORM
(0°)
*: Selecciona el ángulo de fase de la salida del subwoofer en línea con la
salida de los altavoces, para lograr un desempeño óptimo. (Puede seleccionarse solo si se seleccionó
un ajuste distinto de [THROUGH] para [LPF SUB-W].)
SUPREME SET ON *: Crea sonido realista al interpolar los componentes de alta frecuencia que se pierden en la
compresión de audio MP3/WMA. ; OFF: Se cancela. (Sólo puede seleccionarse durante la reproducción
de un disco MP3/WMA o de un dispositivo USB, excepto iPod.)
VOL OFFSET
(Predefinido: 0)
–8 — +8 (para AUX) ; –8 — 0 (para otras fuentes): Predefine el nivel de ajuste de volumen para
cada fuente. El nivel de volumen aumenta o disminuye automáticamente al cambiar la fuente. (Antes
de realizar un ajuste, seleccione la fuente que desea ajustar.)
[SUB-W LEVEL/ SUB-W SET/ LPF SUB-W/ SUB-W PHASE] solo pueden seleccionarse si [SWITCH PRE] está ajustado en
[SUB-W]. (página 8)
[SUB-W LEVEL/ LPF SUB-W/ SUB-W PHASE] solo pueden seleccionarse si [SUB-W SET] está ajustado en [ON].
[SETTINGS]
Opción Ajuste seleccionable (Predefinido: *)
AUX NAME AUX */ DVD/ PORTABLE/ GAME/ VIDEO/ TV: Selecciona el nombre deseado para el componente
conectado. (Solo puede seleccionarse si se selecciona “AUX” como fuente.)
CLOCK CLOCK ADJ: (Para los detalles, consulte la página 7.)
DISPLAY
DISP DIMMER ON: La iluminación de la pantalla se oscurece. ; OFF *: Se cancela.
TEXT SCROLL AUTO */ ONCE: Selecciona entre el desplazamiento automático de la información en pantalla o un único
desplazamiento. ; OFF: Se cancela.
SP_KDC-200U[K]1.indd 15SP_KDC-200U[K]1.indd 15 5/9/12 11:10:05 AM5/9/12 11:10:05 AM

16
Localización de averías
Síntoma Soluciones/Causas
El sonido no se escucha. Ajuste el volumen al nivel óptimo. / Inspeccione los cables y las conexiones.
Aparece “PROTECT” y no se puede realizar
ninguna operación.
Asegúrese de que los terminales de los conductores de altavoz estén
correctamente cubiertos con cinta aislante y luego reposicione la unidad. Si el
mensaje “PROTECT” no desaparece, póngase en contacto con su centro de servicio
más cercano.
El sonido no se escucha. / La unidad no se
enciende. / La información mostrada en la
pantalla no es correcta.
Los conectores están sucios. Limpie los conectores. (página 3)
El receptor no funciona en absoluto. Reinicialice la unidad. (página 4)
Recepción de radio deficiente. / Ruidos
estáticos mientras se escucha la radio.
Conecte firmemente la antena. / Extraiga completamente la antena.
“IN” parpadea. El reproductor de CD no está funcionando apropiadamente. Vuelva a colocar el
disco correctamente. Si el problema no mejora, apague la unidad y consulte al
centro de servicio más cercano.
El CD-R/CD-RW no puede reproducirse ni
se pueden omitir pistas.
Inserte un CD-R/CD-RW finalizado (finalícelo con el componente que utilizó para
grabarlo).
Algunas veces el sonido del disco se
interrumpe.
Detenga la reproducción mientras conduce por caminos accidentados. / Cambie el
disco. / Inspeccione los cables y las conexiones.
Aparece “NA FILE”. La unidad reproduce un archivo de audio no compatible.
Aparece “NO DISC”. Inserte un disco reproducible en la ranura de carga.
Aparece “TOC ERROR”. El CD está muy sucio. / El CD está boca abajo. / El CD está muy rayado. Pruebe otro
disco.
Aparece “ERROR 99”. Por algún motivo, la unidad funciona en forma defectuosa. Pulse el botón de
reposición en la unidad. Si el código “ERROR 99” no desaparece, póngase en
contacto con su centro de servicio más cercano.
Aparece “READ ERROR”. Copie los archivos y carpetas para el dispositivo USB nuevamente. Si se visualiza
todavía el mensaje de error, inicialice el dispositivo USB o use otros dispositivos
USB.
Aparece “NO DEVICE”. No hay dispositivo USB conectado. Conecte un dispositivo USB y cambie de nuevo
a la fuente USB.
Aparece “COPY PRO”. Se reprodujo un archivo con protección contra copias.
Aparece “NO MUSIC”. El dispositivo USB conectado no contiene archivos de audio reproducibles.
Aparece “NA DEVICE”. Conecte un dispositivo USB compatible y verifique las conexiones.
Aparece “USB ERROR”. Extraiga el dispositivo USB, apague la unidad y vuélvala a encender. Si se repite la
misma visualización en la unidad, intente conectar otro dispositivo USB.
SP_KDC-200U[K]1.indd 16SP_KDC-200U[K]1.indd 16 5/9/12 11:10:05 AM5/9/12 11:10:05 AM

17
ESPAÑOL
Síntoma Soluciones/Causas
Aparece “iPod ERROR”. Vuelva a conectar el iPod. / Reinicialice el iPod.
Se generan ruidos. Salte a otra pista o cambie el disco.
Las pistas no se reproducen de la manera
intentada por usted.
Se ha determinado el orden de reproducción durante la grabación de los archivos.
El mensaje “READING” sigue destellando. Se requiere mayor tiempo de lectura. No utilice demasiadas jerarquías y carpetas.
El tiempo de reproducción transcurrido
no escorrecto.
Esto depende de cómo fueron grabadas las pistas.
El número de canciones contenidas en
la categoría “SONGS” de esta unidad es
diferente a las contenidas en la categoría
“SONGS” del iPod.
Los archivos podcast no se cuentan en esta unidad ya que esta unidad no es
compatible con la reproducción de archivos podcast.
No se visualizan los caracteres correctos
(por ej.: nombre del álbum).
Esta unidad sólo puede visualizar letras (mayúsculas), números, y un número
limitado de símbolos.
Pandora
Aparece “PNDR ERR 5”. La operación de pulgar arriba/abajo ha fracasado.
Aparece “NO STATIONS”. No se pudo encontrar la emisora.
Aparece “NO SKIPS”. Se ha excedido el límite de recuento de omisiones.
Aparece “CHK DEVICE”. Verifique la aplicación Pandora® en el iPhone/iPod touch.
SP_KDC-200U[K]1.indd 17SP_KDC-200U[K]1.indd 17 5/9/12 11:10:05 AM5/9/12 11:10:05 AM

18
Instalación/conexión
Lista de componentes:
A Placa frontal ....................................................... (×1)
B Escudete............................................................... (×1)
C Manguito de montaje ................................. (×1)
D Mazo de conductores .................................. (×1)
E Herramieta de extracción .......................... (×2)
F Tornillo de cabeza plana
(para los automóviles Nissan) ................. (×4)
G Tornillo de cabeza redonda
(para los automóviles Toyota) ................ (×4)
Procedimiento básico
1
Quite la llave del interruptor de
encendido; después, desconecte el
terminal · de la batería del automóvil.
2
Realice las conexiones de los cables de
entrada y salida correspondientes.
\ “Conexión del cableado” (página 19)
3
Instale la unidad en su automóvil.
\ “Instalación de la unidad” (página 20)
4
Vuelva a conectar el terminal · de la
batería del automóvil.
5
Reinicialice la unidad. (página 4)
Advertencia
La unidad solo puede instalarse en un
automóvil con fuente de alimentación de
12 V CC con masa negativa.
Si conecta el cable de encendido (rojo) y
el cable de la batería (amarillo) al chasis
del automóvil (tierra), podría producir un
cortocircuito y esto a su vez, un incendio.
Conecte siempre esos cables a la fuente
de alimentación que pasa por la caja de
fusibles.
Desconecte el terminal negativo de la
batería y realice todas las conexiones
eléctricas antes de instalar la unidad.
Enrolle los cables no conectados con una
cinta de vinilo u otro material similar para que
queden aislados. Para evitar cortocircuitos, no
retire las tapas de los extremos de los cables
o terminales no conectados.
Asegúrese de volver a conectar a masa esta
unidad al chasis del automóvil después de
la instalación.
Precaución
Si el encendido de su automóvil no está
provisto de la posición ACC, conecte los
cables de encendido a una fuente de
alimentación que pueda conectarse y
desconectarse con la llave de encendido.
Si conecta el cable de encendido a una
fuente de alimentación que recibe un
suministro constante de alimentación tales
como los cables de la batería, la batería
podría descargarse.
No utilice sus propios tornillos. Utilice sólo
los tornillos suministrados.
Instale esta unidad en la consola de su
vehículo. Asegúrese de que la placa frontal
no golpee la tapa de la consola (si la
hubiera) cuando la abre y la cierra.
Después de instalar la unidad, compruebe
que las lámparas de freno, las luces
intermitentes, el limpiaparabrisas, etc.
funcionen satisfactoriamente.
Instale la unidad en un ángulo de 30˚ o
menos.
Si se funde el fusible, en primer lugar
asegúrese de que los cables no hayan
causado un cortocircuito, y luego reemplace
el fusible usado por otro del mismo régimen.
Conecte los cables de los altavoces a cada
uno de los terminales correspondientes. La
conexión compartida de los cables
·
o la
conexión a tierra de los mismos a cualquier
parte metálica del automóvil podrá dañar la
unidad o impedir su correcto funcionamiento.
Cuando se han conectado solamente
dos altavoces al sistema, conecte los
conectores ya sea a ambos terminales de
salida delanteros, o a ambos terminales de
salida traseros (o sea, no mezcle terminales
delanteros y traseros).
No toque las partes metálicas de la unidad
durante o justo después de utilizar la unidad.
Las partes metálicas, tales como el radiador
o la carcasa, pueden estar muy calientes.
La instalación y cableado de este producto
requiere de habilidad y experiencia. Por
seguridad, deje que un profesional realice
este trabajo.
Si tiene problemas durante la instalación,
consulte con su distribuidor Kenwood.
SP_KDC-200U[K]1.indd 18SP_KDC-200U[K]1.indd 18 5/9/12 11:10:06 AM5/9/12 11:10:06 AM
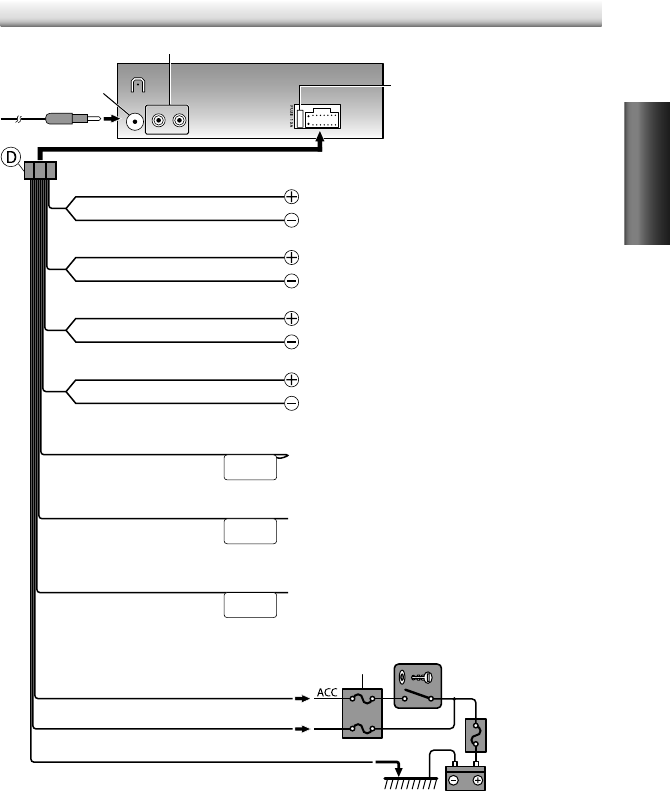
19
ESPAÑOL
Conexión del cableado
RL
REAR/SW
ANT CONT
P. CONT
MUTE
Fusible (10 A)
Terminal de la
antena
Caja de fusibles del vehículo
Caja de fusibles del
vehículo
Batería
Interruptor de la llave de
encendido
Azul/blanco
(Cable de control de potencia)
Rojo (Cable de encendido)
Amarillo (Cable de la batería)
Negro (Cable a tierra)
A un cuerpo metálico o chasis del automóvil
Al terminal de control de potencia, cuando utiliza el amplificador
de potencia opcional, o al terminal de control de la antena en
el vehículo.
Terminales de salida traseros/subwoofer
Marrón
(Silenciar cable del control)
Azul
(Cable de control de la antena)
Blanco
Gris
Verde
Púrpura
Blanco/negro
Gris/negro
Verde/negro
Púrpura/negro
Al terminal de tierra cuando suena el teléfono o durante la
conversación. (Para conectar el sistema de navegación Kenwood,
consulte el manual del sistema de navegación.)
Al altavoz delantero (izquierdo)
Al altavoz trasero (izquierdo)
Al altavoz delantero (derecho)
Al altavoz trasero (derecho)
(Sin utilizar)
SP_KDC-200U[K]1.indd 19SP_KDC-200U[K]1.indd 19 5/9/12 11:10:06 AM5/9/12 11:10:06 AM
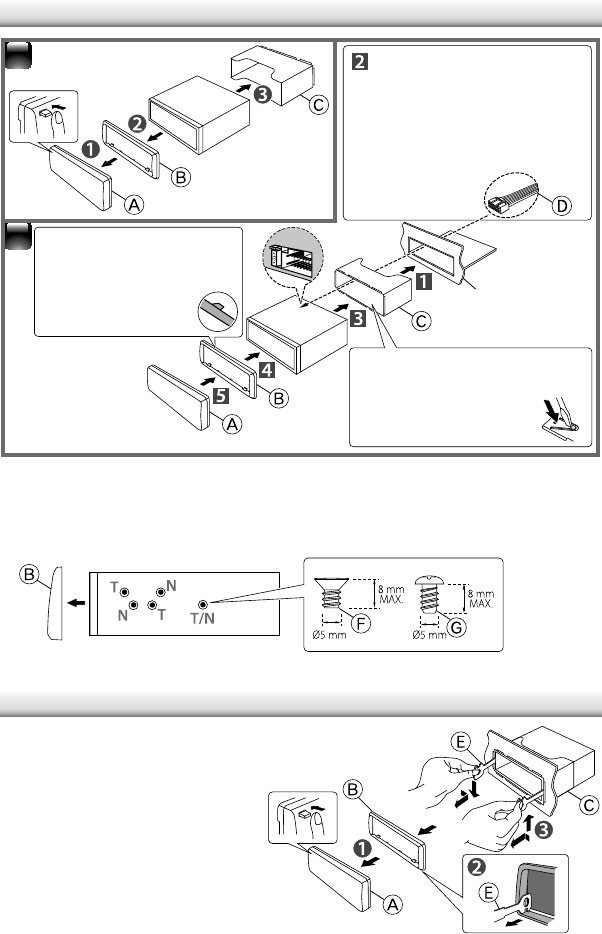
20
Instalación de la unidad
Desmontaje de la unidad
Instalación sin el manguito de montaje (automóviles japoneses)
1
Desmonte el manguito de montaje y el escudete de la unidad.
2
Alinee los orificios de la unidad (en ambos lados) con la ménsula de montaje del
vehículo y fije la unidad con los tornillos suministrados.
2
1Conecte el mazo de
conductores a la unidad.
El resto de la conexión de
conductores fue finalizada
anteriormente. (página 19)
Antes de fijarlo, compruebe
si la dirección del escudete es
correcta. (Ganchos
más anchos en el lado
superior.)
Salpicadero del
automóvil
T: Automóviles Toyota ;
N: Automóviles Nissan
1
Desmonte la placa frontal.
2
Enganche la uña de agarre de
las herramientas de extracción
en los orificios a ambos lados del
escudete y tire de él para quitarlo.
3
Inserte profundamente las
herramientas de extracción en las
ranuras a ambos lados; después,
siga la dirección de las flechas,
como se muestra a la derecha.
Doble las pestañas
correspondientes para
sostener el manguito de
montaje firmemente en
posición.
SP_KDC-200U[K]1.indd 20SP_KDC-200U[K]1.indd 20 5/9/12 11:10:06 AM5/9/12 11:10:06 AM
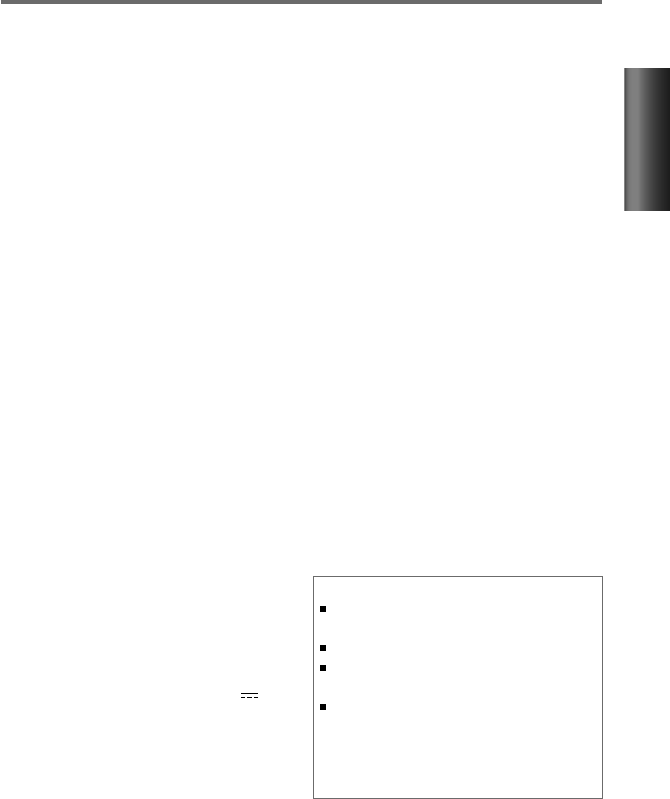
21
ESPAÑOL
Sección del sintonizador de FM
Gama de frecuencias:
Espacio de 200 kHz: 87,9 MHz — 107,9 MHz
Sensibilidad útil (Relación señal/ruido = 26
dB):
11,2 dBf (1,0 V/75 )
Sensibilidad de silenciamiento (DIN S/N = 46
dB):
19,2 dBf (2,5 V/75 )
Respuesta de frecuencia (± 3
dB):
30 Hz — 15 kHz
Relación señal a ruido (MONO):
63 dB
Separación estéreo (1
kHz):
40 dB
Sección del sintonizador de AM
Gama de frecuencias (Intervalo 10
kHz):
530 kHz — 1 700 kHz
Sensibilidad útil (Relación señal/ruido = 20
dB):
31 dBµ (36 µV)
Sección del reproductor de CD
Diodo láser:
GaAIAs
Filtro digital (D/A):
8 veces sobremuestreo
Convertidor D/A:
24 Bit
Velocidad de giro:
500 rpm — 200 rpm (CLV)
Fluctuación y trémolo:
Por debajo del límite
medible
Respuesta de frecuencia (± 1
dB):
20 Hz — 20 kHz
Distorsión armónica total (1
kHz):
0,01 %
Relación señal a ruido (1
kHz):
105 dB
Gama dinámica:
90 dB
MP3 decodificado:
Compatible con MPEG-1/2
Audio Layer-3
WMA decodificado:
Compatible con Windows
Media Audio
Interfaz USB
Estándar USB:
USB1.1/ 2.0 (Full speed)
Corriente de alimentación máxima:
5 V CC 1 A
Sistema de archivos:
FAT16/ 32
MP3 decodificado:
Compatible con MPEG-1/2
Audio Layer-3
WMA decodificado:
Compatible con Windows
Media Audio
Sección de audio
Potencia de salida máxima:
50 W × 4
Potencia completa de todo el ancho de banda (a
menos del 1 % THD):
22 W × 4
Impedancia del altavoz:
4 — 8
Acción tonal:
Graves:
100 Hz ±8 dB
Registro medio:
1 kHz ±8 dB
Agudos:
12,5 kHz ±8 dB
Nivel de salida de preamplificador/carga (CD):
2 500 mV/10 k
Impedancia de salida de preamplificador:
≤ 600
Sección de entrada auxiliar
Respuesta de frecuencia (± 3
dB):
20 Hz — 20 kHz
Voltaje de entrada máximo:
1 200 mV
Impedancia de entrada:
10 k
General
Voltaje de funcionamiento (11
V – 16
V admisibles):
14,4 V
Consumo de corriente máxima:
10 A
Tamaño de instalación (An
×
Al
×
F):
182 mm × 53 mm × 158 mm
(7-3/16 pulgada × 2-1/8 pulgada ×
6-1/4 pulgada)
Peso:
2,9 lbs (1,3 kg)
Sujeto a cambios sin previo aviso.
Especificaciones
Acerca del archivo de audio
Archivos de audio que pueden reproducirse
MP3 (.mp3), WMA (.wma)
Medio de disco reproducible CD-R/RW/ROM
Formato de archivo de disco reproducible: ISO 9660
Nivel 1/2, Joliet, Romeo, nombre de archivo largo.
Sistema de archivos del dispositivo USB reproducible:
FAT16, FAT32
Aunque los archivos de audio cumplen los estándares
anteriores, puede que no sea posible la reproducción
según los tipos o condiciones del medio o dispositivo.
SP_KDC-200U[K]1.indd 21SP_KDC-200U[K]1.indd 21 5/9/12 11:10:07 AM5/9/12 11:10:07 AM
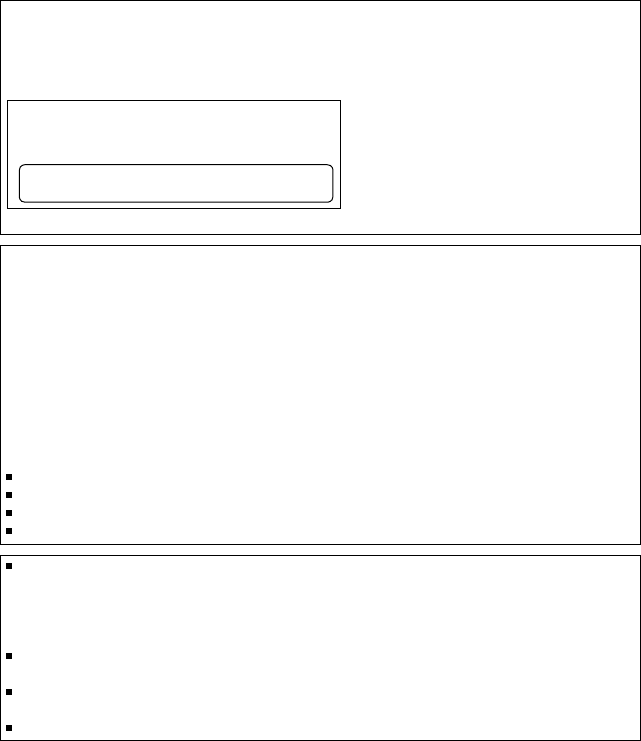
FCC WARNING
This equipment may generate or use radio frequency energy. Changes or modifications to this equipment may
cause harmful interference unless the modifications are expressly approved in the instruction manual. The user
could lose the authority to operate this equipment if an unauthorized change or modification is made.
FCC NOTE
This equipment has been tested and found to comply with the limits for a Class B digital device, pursuant to Part
15 of the FCC Rules. These limits are designed to provide reasonable protection against harmful interference in
a residential installation. This equipment may cause harmful interference to radio communications, if it is not
installed and used in accordance with the instructions. However, there is no guarantee that interference will
not occur in a particular installation. If this equipment does cause harmful interference to radio or television
reception, which can be determined by turning the equipment off and on, the user is encouraged to try to
correct the interference by one or more of the following measures:
Reorient or relocate the receiving antenna.
Increase the separation between the equipment and receiver.
Connect the equipment into an outlet on a circuit different from that to which the receiver is connected.
Consult the dealer or an experienced radio/TV technician for help.
“Made for iPod,” and “Made for iPhone” mean that an electronic accessory has been designed to connect
specifically to iPod, or iPhone, respectively, and has been certified by the developer to meet Apple
performance standards. Apple is not responsible for the operation of this device or its compliance with safety
and regulatory standards. Please note that the use of this accessory with iPod or iPhone may affect wireless
performance.
iPhone, iPod, iPod classic, iPod nano, and iPod touch are trademarks of Apple Inc., registered in the U.S. and
other countries.
PANDORA, the PANDORA logo, and the Pandora trade dress are trademarks or registered trademarks of
Pandora Media, Inc., used with permission.
Android is a trademark of Google Inc.
CAUTION
Use of controls or adjustments or performance of procedures other than those specified herein may result in
hazardous radiation exposure.
In compliance with Federal Regulations, following are reproductions of labels on, or inside the product relating
to laser product safety.
JVC KENWOOD Corporation
2967-3, ISHIKAWA-MACHI,
HACHIOJI-SHI, TOKYO, JAPAN
THIS PRODUCT COMPLIES WITH DHHS RULES 21CFR
SUBCHAPTER J IN EFFECT AT DATE OF MANUFACTURE.
Location : Top Plate
Rear_KDC-200U[K]f.indd 1Rear_KDC-200U[K]f.indd 1 5/22/12 4:02:19 PM5/22/12 4:02:19 PM
