Kenwood Car Stereo System Kdc U546Bt Users Manual
2015-01-23
: Kenwood Kenwood-Kenwood-Car-Stereo-System-Kdc-U546Bt-Users-Manual-263178 kenwood-kenwood-car-stereo-system-kdc-u546bt-users-manual-263178 kenwood pdf
Open the PDF directly: View PDF ![]() .
.
Page Count: 74

KDC-U546BT
CD-RECEIVER
INSTRUCTION MANUAL
© B64-4540-00/00 (MW/M0)

2 | KDC-U546BT
Contents
Before Use 3
Component names and functions 4
General operation 5
Before Using
Common Operation
Function Setting Operation
Music Disc/Audio File/iPod Operation 6
Basic Operation
Play function
All Random
Music Search
Music Search for iPod
Alphabet Search
My Playlist for iPod
Audio File/ iPod Setting
iPod Control by Hand Mode
Direct Music Search
Tuner Operation 10
Basic Operation
Station Preset Memory
Tuner Setting
Direct Access Tuning
Frequency Step Setting
Operation of Hands-Free Phoning 12
Connecting a Bluetooth Device
Making a Call
Calling a Number in the Phone Book
Calling a Number in the Call Log
Dial a Number
Make a Voice Dialing Call
Registering to the Preset Dial Number List (Preset
Memory)
Speed Dialing (Preset Dial)
Receiving a Call
During a Call
Call Waiting
Other Functions
Display of Phone Number Type (Category)
Audio Adjustments 15
Audio Control
Display Settings 16
Display Selection
Text Scroll
Display Setting
Auxiliary Input Display Setting
Other Functions 18
Clock Adjustment
Demonstration Mode Setting
Initial Setting
Removing the Faceplate
How to Reset Your Unit
Bluetooth Setup 20
Bluetooth Setup
Registering Bluetooth Device (Pairing)
Deleting a Registered Bluetooth Device
Registering PIN Code
Displaying the Firmware Version
Downloading the Phone Book
Selecting the Bluetooth Device You Wish to Connect
Downloading the SMS
SMS (Short Message Service)
Adding a Voice Dialing Command
Setting a Voice Command for Category
Basic Operations of Remote Control 26
Appendix 28
Accessories/ Installation Procedure 31
Connecting Wires to Terminals 32
Installation/Removing the Unit 33
Troubleshooting Guide 34
Specifications 36

English | 3
Before Use
2WARNING
To prevent injury or fire, take the following
precautions:
To prevent a short circuit, never put or leave any
metallic objects (such as coins or metal tools) inside
the unit.
Before using this unit for the first time
This unit is initially set on the Demonstration mode.
When using this unit for the first time, cancel
the Demonstration mode. Refer to <Exit of the
Demonstration Mode> (page 5).
Cleaning the Unit
If the faceplate of this unit is stained, wipe it with a
dry soft cloth such as a silicon cloth.
If the faceplate is stained badly, wipe the stain off with
a cloth moistened with neutral cleaner, then wipe it
again with a clean soft dry cloth.
¤
Applying spray cleaner directly to the unit may affect its
mechanical parts. Wiping the faceplate with a hard cloth or
using a volatile liquid such as thinner or alcohol may scratch
the surface or erases characters.
About the Terminals of the Unit and
Faceplate
• To prevent deterioration, do not touch the terminals of the
unit and faceplate with your fingers.
• If the terminals on the unit or faceplate get dirty, wipe them
with a clean soft dry cloth.
Lens Fogging
When you turn on the car heater in cold weather,
dew or condensation may form on the lens in the
CD player of the unit. Called lens fogging, this
condensation on the lens may not allow CDs to play.
In such a situation, remove the disc and wait for the
condensation to evaporate. If the unit still does not
operate normally after a while, consult your Kenwood
dealer.
Notes
• If you experience problems during installation,
consult your Kenwood dealer.
• When you purchase optional accessories, check with
your Kenwood dealer to make sure that they work
with your model and in your area.
• The characters which can be displayed by this unit
are A-Z 0-9 @ “ ‘ ` % & * + – = , . / \ < > [ ] ( ) : ; ^ - { } |
~ .
• The illustrations of the display and the panel
appearing in this manual are examples used to
explain more clearly how the controls are used.
Therefore, what appears on the display in the
illustrations may differ from what appears on the
display on the actual equipment, and some of the
illustrations on the display may be inapplicable.
Handling CDs
• Do not touch the recording surface of the CD.
• Do not stick tape etc. on the CD, or use a CD with
tape stuck on it.
• Do not use disc type accessories.
• Clean from the center of the disc and move
outward.
• When removing CDs from this unit, pull them out
horizontally.
• If the CD center hole or outside rim has burrs,
use the CD only after removing the burrs with a
ballpoint pen etc.
CDs that cannot be used
• CDs that are not round cannot be used.
• CDs with coloring on the recording surface or CDs
that are dirty cannot be used.
• This unit can only play the CDs with .
This unit may not correctly play discs which do not
have the mark.
• You cannot play a CD-R or CD-RW that has not
been finalized. (For the finalization process refer to
your CD-R/CD-RW writing software, and your CD-R/
CD-RW recorder instruction manual.)
• 3 inch CD cannot be used. Attempt to insert using
an adapter can cause malfunction.
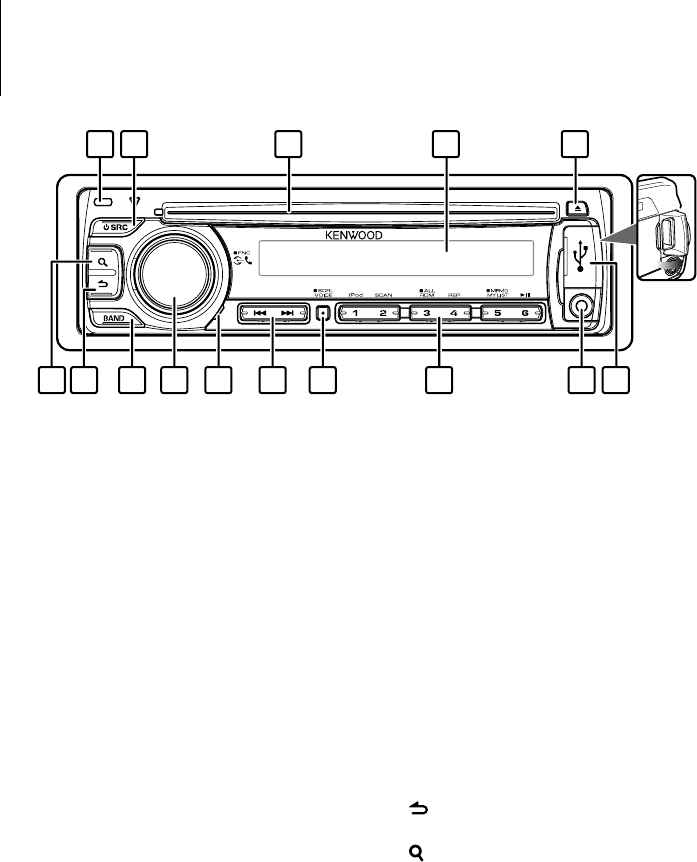
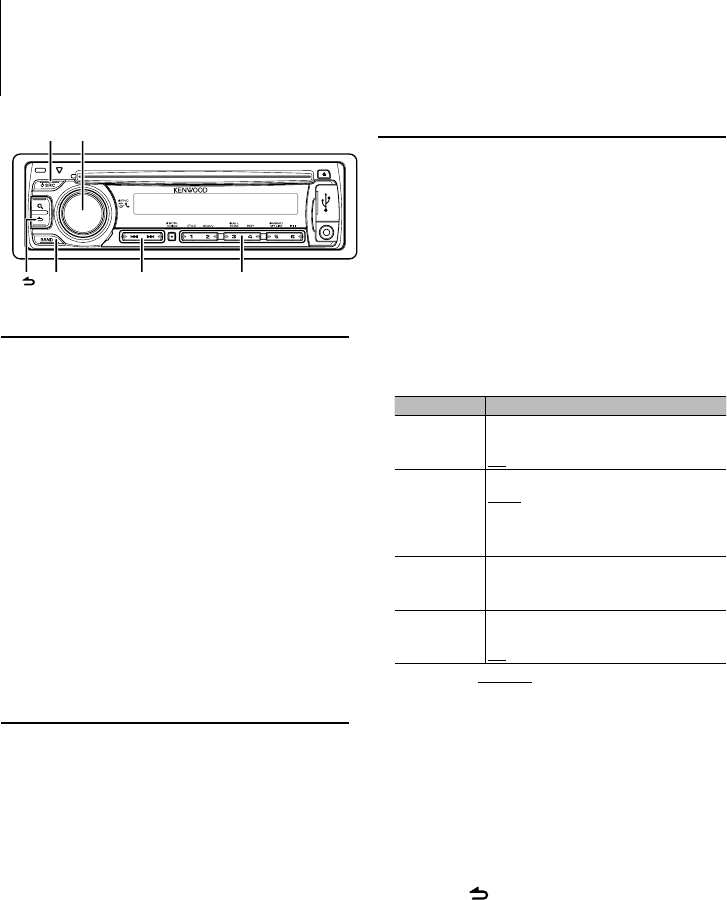
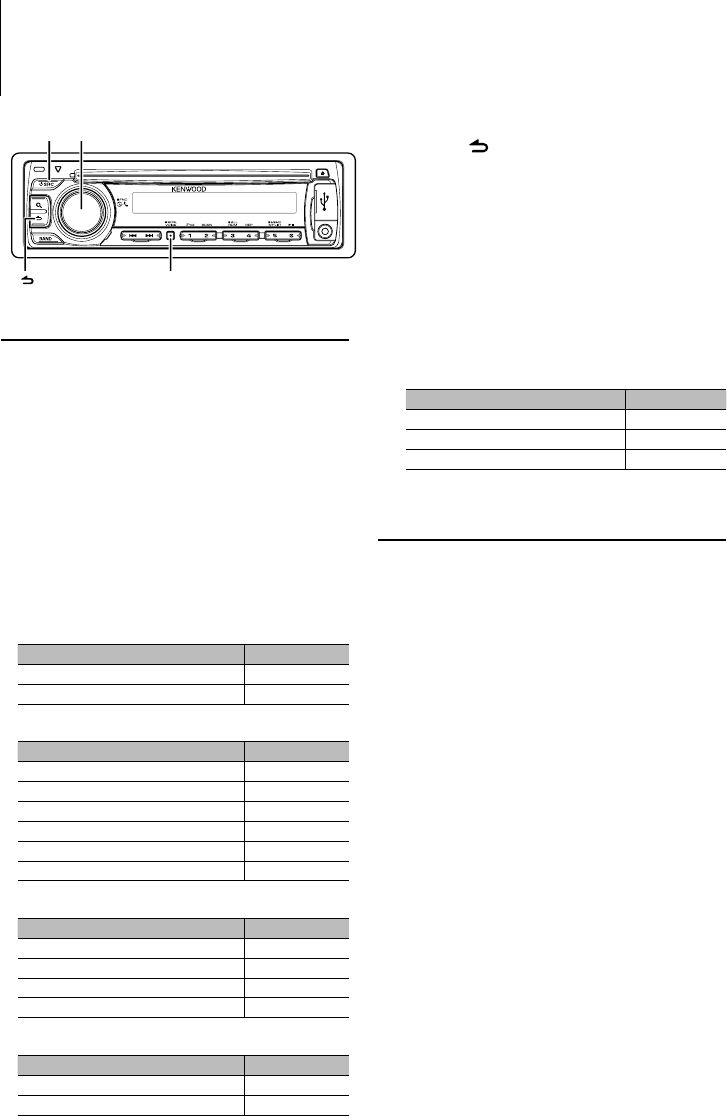
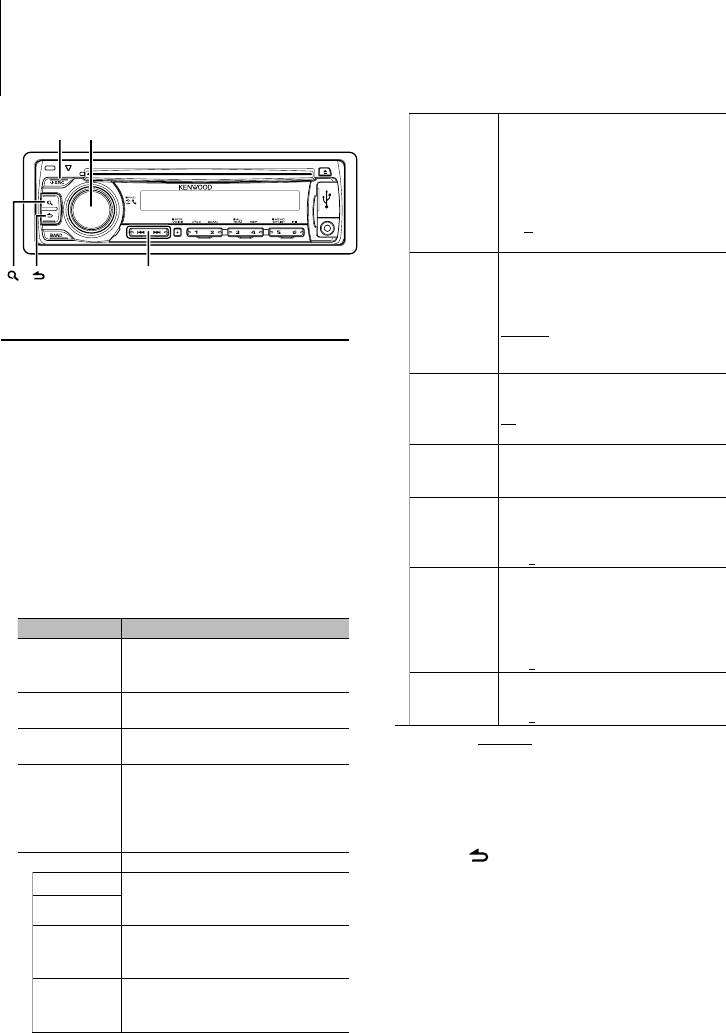
1 Release button
The faceplate of the unit can be detached and
taken with you, helping to deter theft. Refer to
<Removing the Faceplate> (page 19).
2 [SRC] button
To turn on this unit and select the Source.
To turn off this unit (press the button at least 1
second).
3 Disc slot
When inserted a disc (label side up), the source is
switched automatically and a song starts playing.
4 Display window
5 [0] button
To eject the disc.
To select the remove mode, and remove the USB
device or an iPod (press the button at least 2
seconds or more).
6 USB Terminal
When connecting, open up the USB terminal lid. A
USB device or an iPod can be connected.
7 Auxiliary Input Terminal
Portable audio device can be connected with the
mini-plug (3.5 mm ø).
• Use the mini-plug cable which is stereo type and does
not have any resistance.
8 [1] – [6] button
To recall the memorized station.
Switches the play mode between music discs,
audio files, and iPod.
9 [VOICE] button
To make a voice dialing call.
To change text scroll. (press the button at least 1
second)
p [
4
] / [
¢
] button
To select a station, song and setting items.
q Microphone
The microphone for the hands free phone is built
in. When your voice cannot be recognized due
to the low microphone volume, noises or echo
in the vehicle. Adjust the microphone settings
by “MIC GAIN”, “NR LEVEL” and “EC LEVEL” of
<Bluetooth Setup> (page 20).
w [VOL] knob
To adjust volume.
Enters function setting mode and setting item
(turn and press the knob). Refer to <Function
Setting Operation> (page 5) for details.
e [BAND] button
To select the receiving band, the folder for audio
file.
r [ ] button
To return to previous item.
t [ ] button
To enter the music search mode.
To enter the dialing mode.
Component names and functions
15 14 13 12 11 10 9 8
1 2 3 4 5
7 6
4 | KDC-U546BT
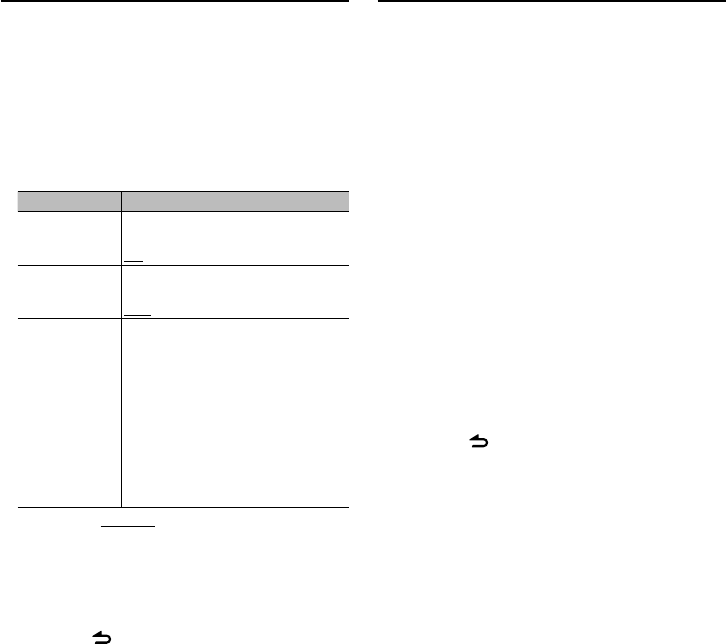
Function Setting Operation
The basic operating procedure for using this
function is described below. The individual function
items are covered in the operating procedures.
1 Select the source
Press the [SRC] button.
Function items vary from source to source. For a list
of the function items. Refer to <Function Item List>
(Page 30).
2 Enter Function Setting mode
Press the [VOL] knob for at least 1 second.
”FUNCTION” is displayed.
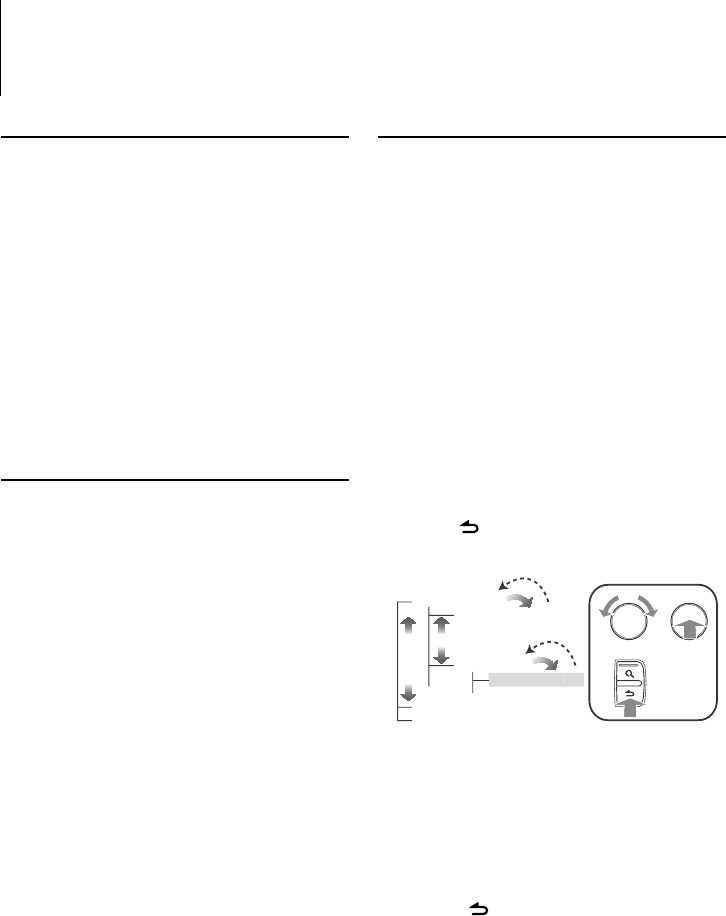
3 Select your desired function item
Turn the [VOL] knob and press it when the
desired item is displayed.
Repeat the operation until your desired function
item is selected.
⁄
Press the [ ] button to return to the previous
item.
Example:
AU
DI
O
CO
NTR
OL
[
V
O
L
]
[
V
O
L
]
BA
SS
B
OOST
SU
PREME
S
E
T
…
D
ETAILED
S
E
T
…
…
…
…
D
I
S
P
S
ELE
CT
S
ETTING
S
In this manual, the above selection is indicated as
Select “AUDIO CONTROL” > “DETAILED SET” >
“SUPREME SET”.
4 Make a setting
Turn the [VOL] knob to select a setting value,
and then press the [VOL] knob.
5 Exit Function Setting mode
Press the [ ] button for at least 1 second.
Before Using
Exit of the Demonstration Mode
Turn off the demonstration mode when you use it
for the first time after installation.
1 Press the [VOL] knob to quit the demonstration
mode when the messages “CANCEL DEMO” and
“PRESS”, “VOLUME KNOB” are displayed (approx.
15 seconds).
2 Turn the [VOL] knob to select “YES” and press the
[VOL] knob.
⁄
• The demonstration can be set or cancel using
<Demonstration Mode Setting> (page 18).
Common Operation
Power and source select
Turns the power ON by pressing the [SRC]
button.
Pressing [SRC] button each time switches
between sources.
Tuner (“TUNER”) ➜ USB or iPod (“USB” or “iPod”)
➜ CD (“CD”) ➜ Auxiliary input (“AUX”) ➜ Standby
(“STANDBY”)
Keeping pressing the [SRC] button at least 1
second turns the power OFF.
⁄
• When connection of the iPod is recognized, the source
display changes from “USB” to “iPod”.
• The source “CD” and “iPod” can be selected when each
source is ready to play.
Volume
Turning the [VOL] knob adjusts the sound
volume.
General operation
English | 5
6 | KDC-U546BT
Music Disc/Audio File/iPod Operation
Basic Operation
Playing Disc
Insert a disc into the disc slot (label side up).
When inserted, the source is switched
automatically and a song starts playing.
When a disc is inserted, the “IN” indicator is lights
up.
Playing USB device or iPod
Connect a USB device or iPod to the USB terminal.
When connected, the source is switched
automatically and a song starts playing.
Pause and play
Press the [6] button to pause or resume
playback (track or file).
Folder select
Press the [BAND] button switches a folder.
The iPod can be operated only when a category
has been selected in the search mode.
Song select
Press the [4] or [¢] button selects a song
(track or file).
Fast reverses or forwards the music while
pressing the [4] or [¢] button.
(No sound is output while playing audio file.)
Ejecting Disc
Press the [0] button ejects a disc.
You can eject the disc for 10 minutes after
switching off the engine.
Removing USB device or iPod
Press the [0] button for at least 2 seconds can
be entered to the USB Remove mode (“USB
REMOVE” is displayed) and the USB device, iPod
can be removed safely.
Selecting CD, USB or iPod source
Press the [SRC] button.
Select the “CD”/“USB” or “iPod” display.
Play function
Scan play
Press the [2] button.
Successively plays the intro of the music in the disc
or folder.
When Scan Play is turned on, “TRACK SCAN”/ “FILE
SCAN” is displayed.
Pressing this button again plays songs in the
normal mode starting with the song being played
now.
⁄
• The Scan play operation cannot be performed while
iPod is playing.
Random play
Press the [3] button.
Randomly plays the music in the disc or folder.
When Random Play is turned on, “DISC RANDOM”/
“FOLDER RANDOM” is displayed.
Press this button again cancels the Random play.
Repeat play
Press the [4] button.
Switches between Track Repeat (“TRACK REPEAT”)
and OFF (“REPEAT OFF”) when pressed while
playing a CD.
Switches between File Repeat (“FILE REPEAT”),
Folder Repeat (“FOLDER REPEAT”), and OFF
(“REPEAT OFF”) when pressed while playing an
audio file.
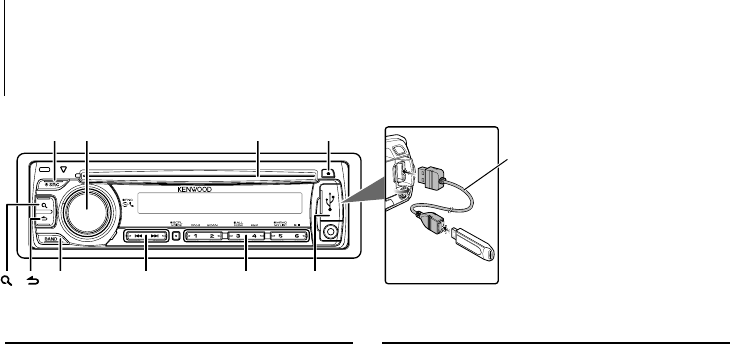
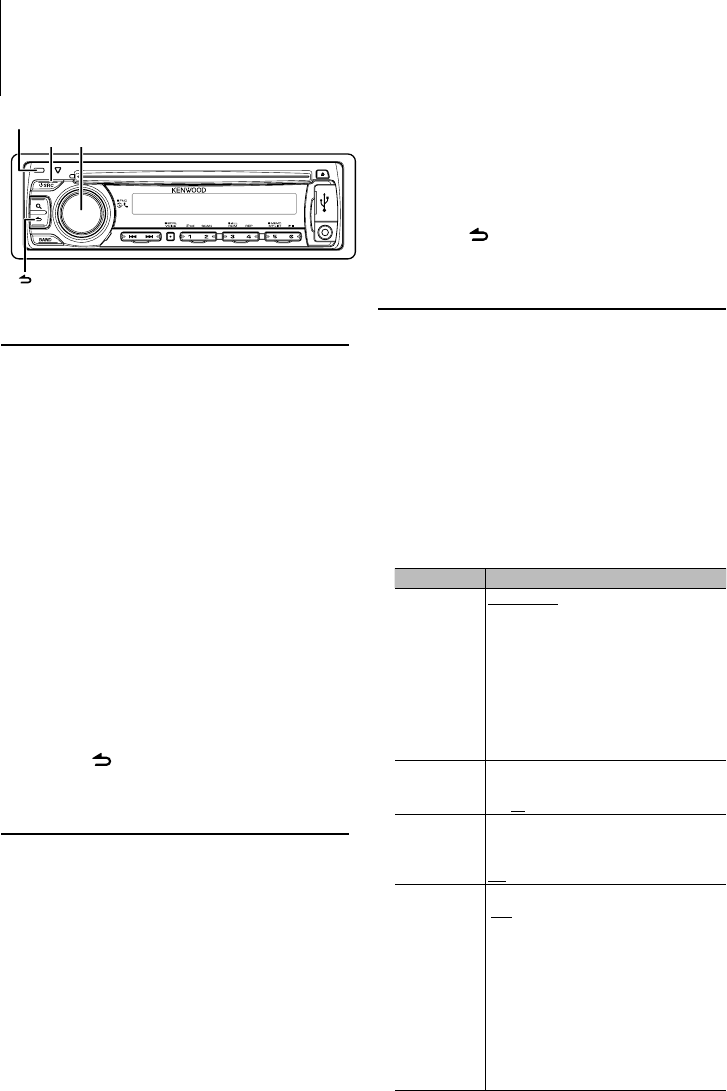
• CA-U1EX (optional accessory) is
required to connect a USB device.
• KCA-iP101 (optional accessory) is
required to connect an iPod.
CA-U1EX
[]
[SRC] [VOL]
[1] — [6]
[] / [E]
[ ][ ][BAND] USB Terminal
Disc slot
English | 7
Function of iPod
All Random
All songs in iPod are played at random.
Press the [3] button for at least 1 second.
Pressing the button toggles the setting between
All random play on (“ALL RANDOM”) and off
(“RANDOM OFF”). Press this button again cancels
the Random play.
⁄
• The time required to turn on the all random function
may become longer depending on the number of songs
in iPod.
• Turning on the all random function changes the iPod
browse item to “SONGS”. This browse item will not be
changed even if the all random function is turned off.
• If the browse item is changed to search for music while
the all random function is on, the all random function is
turned off and the songs in the browse item are played
at random.
Function of Audio file/ CD source
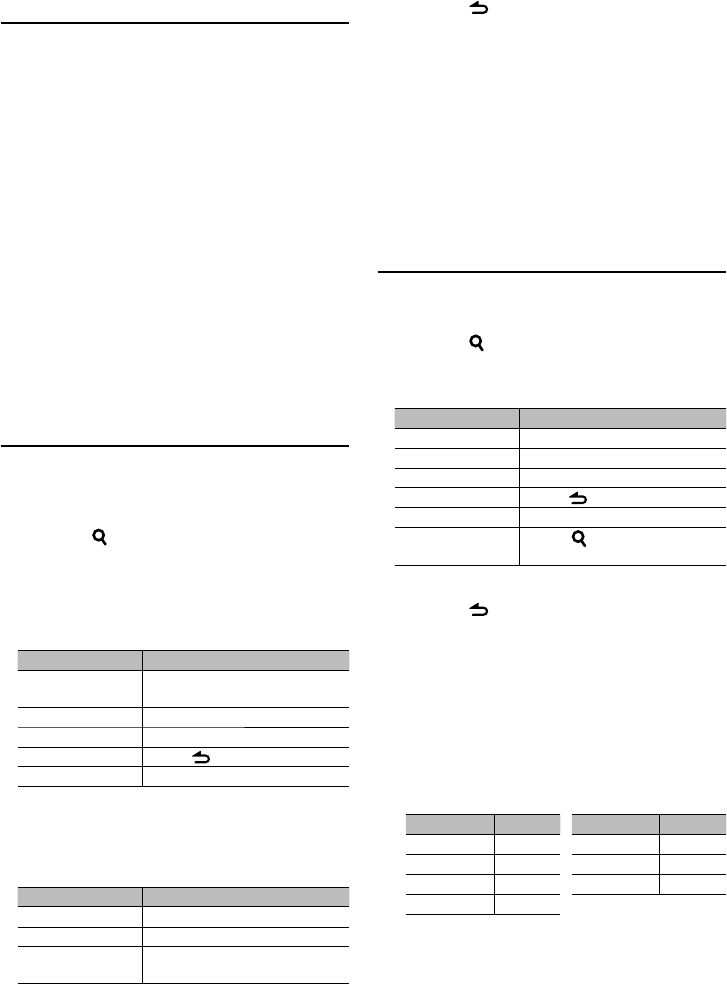
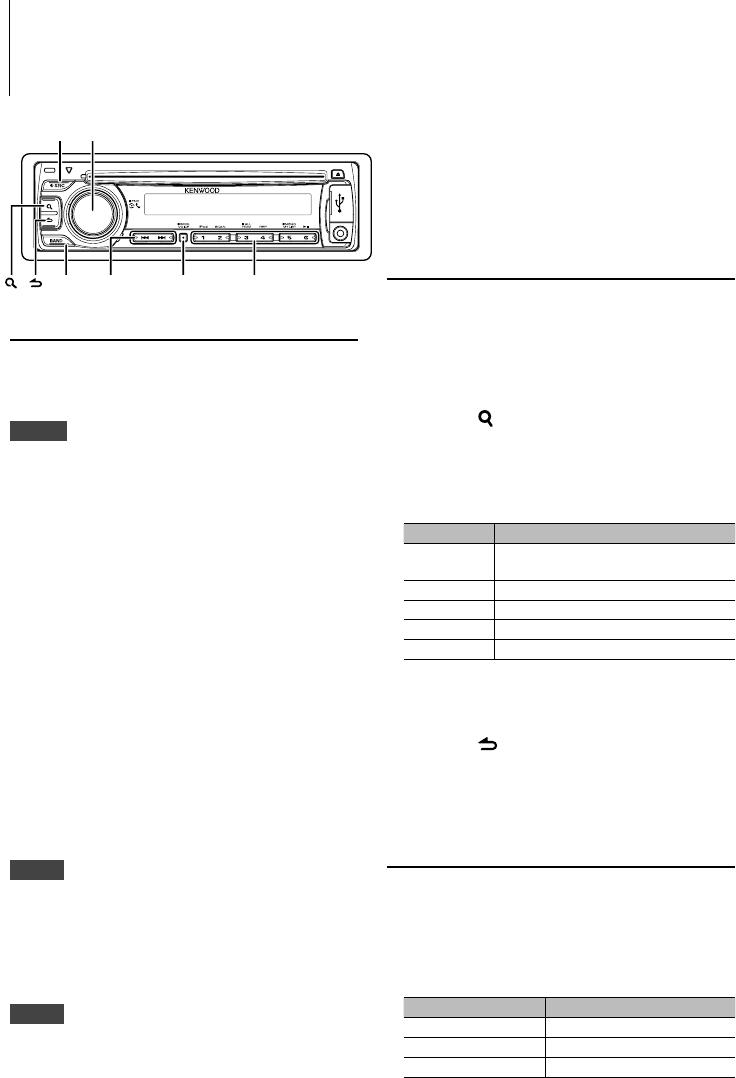
Music Search
Selecting the music you want to listen to from the
device or media being played now.
1 Enter Music Search mode
Press the [ ] button.
“SEARCH” is displayed.
Displays the current Audio file name.
2 Search for music
Audio file
Operation type Operation
Move between folders/
files
Turn the [VOL] knob.
Skip Search*Press the [
4
] or [
¢
] button.
Select of folder/file Press the [VOL] knob.
Return to previous folder Press the [ ] button.
Return to root folder Press the [BAND] button.
“<” or “>” beside the displayed folder name
indicates that this folder is preceded or followed by
another folder.
CD source
Operation type Operation
Move between track Turn the [VOL] knob.
Select of track Press the [VOL] knob.
Return to first track Press the [BAND] button before selecting
a track.
Cancelling the Music Search mode
Press the [ ] button for at least 1 second.
⁄
• Skip Search: The number of songs to be skipped is
determined by the ratio of the total number of songs in
the list which is selected. Set the ratio with “SKIP SEARCH”
of <Audio File/ iPod Setting> (page 9). Keep pushing the
[
4
] or [
¢
] button for 3 seconds or longer skips songs
at 10% regardless of the setting.
• * This operation is effective only for the files registered in
the database created with KENWOOD Music Editor.
Function of iPod
Music Search for iPod
Searching for the song (in iPod) you want to play.
1 Enter Music Search mode
Press the [ ] button.
“SEARCH” is displayed.
2 Search for music
Operation type Operation
Move between items Turn the [VOL] knob.
Skip Search Press the [
4
] or [
¢
] button.
Select an item Press the [VOL] knob.
Return to previous item Press the [ ] button.
Return to Top menu Press the [BAND] button.
Search by Alphabet Press the [ ] button. Refer to <Alphabet
Search> (page 8).
Cancelling the Music Search mode
Press the [ ] button for at least 1 second.
⁄
• Skip Search: The number of songs to be skipped is
determined by the ratio of the total number of songs in
the list which is selected. Set the ratio with “SKIP SEARCH”
of <Audio File/ iPod Setting> (page 9). Keep pushing the
[
4
] or [
¢
] button for 3 seconds or longer skips songs
at 10% regardless of the setting.
• If no characters included in a song name can be
displayed, the browse item name and digits are
displayed.
Items Display
Playlists “PLIST***”
Artists “ART***”
Albums “ALB***”
Songs “PRGM***”
Items Display
Podcasts “PDCT***”
Genres “GEN***”
Composers “COM***”

8 | KDC-U546BT
Music Disc/Audio File/iPod Operation
Function of iPod
Alphabet Search
You can select a song by alphabet. This function
searches songs whose name contain the specified
character(s) in the list of the selected browse item
(artist, album, etc.).
1 Enter Music Search mode
Press the [ ] button.
“SEARCH” is displayed.
2 Enter Alphabet Search mode
Press the [ ] button.
“SEARCH <_ _ _>” is displayed.
3 Select the character to be searched for
Operation type Operation
Select the characters Turn the [VOL] knob.
Move the cursor to the
enter character position
Press the [
4
] or [
¢
] button.
You can enter up to 3 characters.
4 Determine the selected character
Press the [VOL] knob.
Start search. When the search is completed,
the music search mode is selected again at the
selected character position.
Cancelling the Alphabet Search mode
Press the [ ] button for at least 1 second.
⁄
• The time of Alphabet search may become long
depending on the number of songs or number of
playlists in iPod.
• To search for a character other than A to Z and 0 to 9, enter
* at the first character position. In this case, you cannot
enter any character at the second and third character
positions.
• If the first character string begins with an article “a”, “an”,
or “the” in the alphabet search mode, it is searched for in
defiance of the article.
Function of iPod
My Playlist for iPod
Allows you to register your favorite songs in the
Playlist of this unit. You can register up to 10 songs
in the Playlist.
Registering Songs in the Playlist
1 Play the song you want to register
Press the [BAND], [4], and [¢] button.
You can select the song to play by referring to
<Music Search for iPod> (page 7).
2 Register the song
Press the [5] button for at least 2 seconds.
“## STORED (Registration number)” is displayed.
You can register up to 10 songs.
⁄
• Make a Playlist from the songs stored in one iPod. If you
attempt to register a song stored in a different iPod, ”NO
INFO” appears and then ”MPLIST DELETE” appears. To
delete the Playlist, turn the [VOL] knob to select “YES”
and then press the [VOL] knob.
• The song displayed in the Music Search mode can be
registered in the same manner. For how to use the music
search function, refer to <Music Search for iPod> (page
7).
• If you attempt to register the eleventh song, ”MEMORY
FULL” appears and you cannot register it accordingly. To
register the song, delete an unnecessary song.
• Do not register Podcasts. Songs you do not want to
register may be registered, or playback may not be
carried out correctly.
Playing the Song in the Playlist
1 Display the Playlist
Press the [5] button.
“MY PLAYLIST” is displayed.
2 Play the song in the Playlist
Turn the [VOL] knob to select the song you
want to play, and then press the [VOL] knob.
⁄
• Turning the power OFF stops playing the song in the
Playlist.
• If a song does not end with at least 1 second of silence,
the ending part of the song may not play out.
Deleting a Song from the Playlist
1 Turn the [VOL] knob to display the song you
want to delete, and then press the [VOL] knob
for at least 2 seconds.
2 Turn the [VOL] knob to select ”ONE” or “ALL”,
and then press the [VOL] knob.
Selecting “DELETE ALL” deletes all songs.
3 Turn the [VOL] knob to select ”YES”, and then
press the [VOL] knob.
“COMPLETE” is displayed.
⁄
• You can also delete all songs from the Playlist by
selecting “MPLIST DELETE” described in <Audio File/iPod
Setting> (page 9).
English | 9
Audio File/ iPod Setting
You can select following setting items.
1 Enter Function Setting mode
Press the [VOL] knob for at least 1 second.
“FUNCTION” is displayed.
2 Select the function item
Turn the [VOL] knob and press it when the
desired item is displayed.
Select “SETTINGS” > Function item.
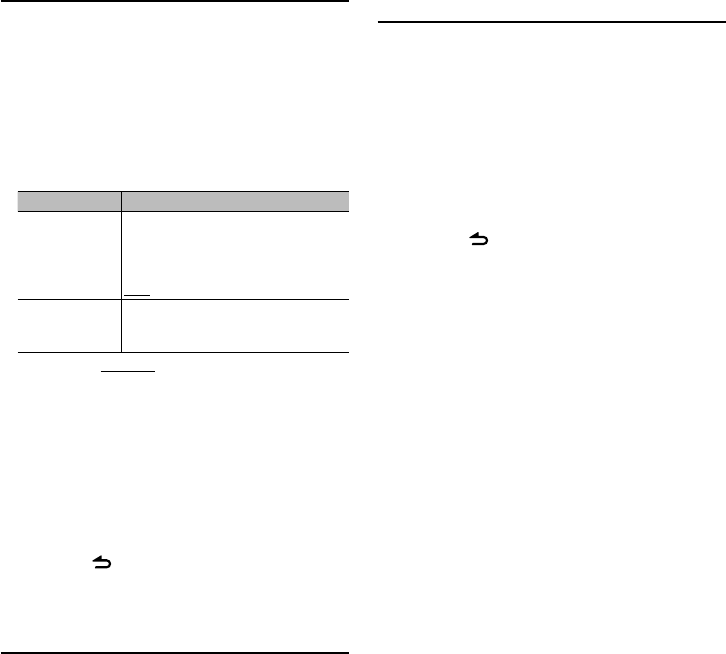
Function item Selectable setting/item
“SKIP SEARCH” The number of songs to be skipped is
determined by the ratio of the total number of
songs in the list which is selected. (iPod and
KENWOOD Music Editor File only)
0.5%/1%/5%/10%
“MPLIST DELETE” Deletes the saved My Playlist. <My Playlist for
iPod>(page 8) (iPod only)
NO/YES
(Factory setting: Underlined)
3 Make a setting
Turn the [VOL] knob and press it when the
desired item is displayed.
When select “MPLIST DELETE”:
Turn the [VOL] knob to select “YES”, and then
press the [VOL] knob.
Deletes the saved My Playlist.
4 Exit Function Setting mode
Press the [ ] button for at least 1 second.
Function of iPod
iPod Control by Hand Mode
Allowing you to operate iPod with the control on
the iPod.
Press the [1] button.
Pressing the button toggles the setting between
iPod control by hand mode on (“HANDS ON”) and
off (“HANDS OFF”).
⁄
• In the iPod Control by hand mode, iPod cannot be
operated using this unit.
• This mode is not compatible with music information
display. The display will show “iPod MODE”.
• iPod can be operated when it conforms to the iPod
control function.
Function of remote control
Direct Music Search
Searching the music by entering the track number.
1 Enter Direct Music Search mode
Press the [DIRECT] button.
2 Enter the music number
Press the number buttons.
3 Search the music
Press the [4] or [¢] button.
Cancelling Direct Music Search
Press the [ ] button.
⁄
• Direct Music Search cannot be performed during playing
of iPod, “Music Editor” media, Random play, or scan play.
10 | KDC-U546BT
Tuner Operation
Basic Operation
Selecting Tuner source
Press the [SRC] button.
Select the “TUNER” display.
Selecting the Receiving Band
Press the [BAND] button.
Each time you press the button, the receiving band
alternates between the FM1, FM2, FM3, MW, SW1,
and SW2
Selecting the Receiving station
Press the [4] or [¢] button.
During reception of stereo stations the “ST”
indicator lights up.
Selecting the preset channel
Press the [1] – [6] button.
Station Preset Memory
Putting a station in the memory.
1 Select the frequency to put in the memory
Press the [4] or [¢] button.
2 Select the number to put in the memory
Press the [1] – [6] button for at least 2 seconds.
⁄
• Up to 6 stations with a different band (FM/MW/SW) can
be memorized to the [1] – [6] button according to the
setting of “PRESET TYPE” of <Initial Setting> (page 18).
Tuner Setting
You can select following Tuner Setting items.
1 Select the TUNER source
Press the [SRC] button.
Select the “TUNER” display.
2 Enter Function Setting mode
Press the [VOL] knob for at least 1 second.
“FUNCTION” is displayed.
3 Select the function item
Turn the [VOL] knob and press it when the
desired item is displayed.
Select “SETTINGS” > Function item.
Function item Selectable setting/item
“LOCAL SEEK” Only stations whose reception is good are searched
in auto seek tuning. (AM band only)
OFF/ON
“SEEK MODE” Selects the tuning mode of the radio.
AUTO1: Automatic search for a station.
AUTO2: Search in order of the stations in the Preset
memory.
MANUAL: Normal manual tuning control.
“AUTO MEMORY”* Putting stations with good reception in the memory
automatically.
NO/YES
“MONO SET” You can reduce the noise when stereo broadcasts
are received as monaural. (FM band only)
OFF/ON
(Factory setting: Underlined)
4 Make a setting
Turn the [VOL] knob and press it when the
desired item is displayed.
When select “AUTO MEMORY”:
Turn the [VOL] knob to select “YES”, and then
press the [VOL] knob.
When 6 stations that can be received are put in the
memory, auto memory entry closes.
5 Exit Function Setting mode
Press the [ ] button for at least 1 second.
⁄
• * This setting can be made when “TYPE NORMAL” is
selected for the “PRESET TYPE” of <Initial Setting> (page
18).
[SRC] [VOL]
[1] — [6]
[] / [E]
[ ][BAND]

English | 11
Function of remote control
Direct Access Tuning
Tuning in a desired radio station by entering the
frequency.
1 Enter Direct Access Tuning mode
Press the [DIRECT] button.
“– – – –” is displayed.
2 Enter the frequency
Press the number buttons.
Example:
Desired frequency Press button
92.1 MHz (FM) [9], [2], [1]
810 kHz (AM) [8], [1], [0]
3 Tune in to entered the frequency
Press the [4] or [¢] button.
Cancelling Direct Access Tuning
Press the [ ] button.
⁄
• You can enter the FM band frequency in steps of a
minimum of 0.1 MHz.
Frequency Step Setting
Changing the tuning frequency step.
The original setting is FM band 50 kHz and MW
band 9 kHz.
1 Turn the power OFF
Press the [SRC] button for at least 1 second.
2 Switch the frequency step
While pressing the [1] and [5] buttons, press the
[SRC] button.
Release your fingers from the button after the
display appears.
The frequency step changes to FM band 200 kHz,
and MW band 10 kHz.
⁄
• When the same operation is repeated, the frequency
step returns to the original setting.
• When the frequency step is changed, the frequencies in
the memory are deleted.
12 | KDC-U546BT
Operation of Hands-Free Phoning
Connecting a Bluetooth Device
Before use the Bluetooth device, you need to
connect Bluetooth device to this unit. The following
3 steps procedure is necessary.
Step 1. Pairing (Registering from Bluetooth
devices)
To make your Bluetooth device (cell-phone) usable
with this unit, you need to register it (pairing).
1 Turn on this unit.
Press the [SRC] button.
2 Start registering this unit by operating the
Bluetooth device
By operating the Bluetooth device, register the
hands-free unit (pairing). Select “KENWOOD BT
CD/R-3P1” from the list of connected units.
3 Enter a PIN code
Input the PIN code (“0000”) in the Bluetooth
device.
Check that registration is complete on the
Bluetooth device. PIN code is set to “0000” as
the default. You can change this code. Refer to
<Registering PIN Code> (page 22).
4 By operating the Bluetooth device, start hands-
free connection.
Step 2. Connection
If you have registered 2 or more cell-phones, you
need to select one of them. For more details, see
<Selecting the Bluetooth Device You Wish to
Connect> (page 23).
When a cell-phone is connected, the “BT” indicator
is lights up.
Step 3. Hands-free phoning
You can do hand-free phoning when the
connection is made.
[SRC] [VOL]
[1] — [6]
[] / [E]
[ ][VOICE]
[BAND]
[ ]
⁄
• When registering from this unit. Refer to <Registering
Bluetooth Device> (page 21).
• For details on the Bluetooth cell-phone with the hands-
free function, see <About the Cell-Phone> (page 29).
Making a Call
You can select following dialing method.
1 Enter Bluetooth mode
Press the [VOL] knob.
“BT MODE” is displayed.
2 Enter dialing method mode
Press the [ ] button.
“PHONE BOOK is displayed.
3 Select a dialing method
Turn the [VOL] knob and press it when the
desired item is displayed.
Display Overview
“PHONE BOOK” Selecting the initial to be searched or name for the
phone book.
“OUT-CALL” Calling a number in the outgoing call list.
“IN-CALL” Calling a number in the incoming call list.
“MISSED CALLS” Calling a number in the missed calls list.
“NUMBER DIAL” Making a call by entering phone number.
Operation method of each mode is described
below.
4 Exit the dialing method mode
Press the [ ] button for at least 1 second.
Disconnecting a Call
Press the [SRC] button.
Calling a Number in the Phone Book
1 Select the Phone Book mode
For how to select dialing method, refer to <Making
a Call> (page 12).
Select the “PHONE BOOK” display.
2 Select the initial to be searched for
Operation type Operation
Move to the next character. Turn the [VOL] knob.
Move to the next row. Press the [BAND] button.
Determine the selected initial. Press the [VOL] knob.

English | 13
3 Select the name
Operation type Operation
Move to the next phone
number.
Turn the [VOL] knob.
Move to the next name. Press the [
4
] or [
¢
] button.
4 Make a call
Press the [VOL] knob.
⁄
• To use the Phone Book, it must be downloaded to this
unit in advance. Refer to <Downloading the Phone
Book> (page 22).
• During search, a non-accent character such as “u” is
searched for instead of an accent character such as “ü”.
Calling a Number in the Call Log
1 Select the call log mode
For how to select dialing method, refer to <Making
a Call> (page 12).
Select the “OUT-CALL” (outgoing call), “IN-CALL”
(incoming call), or “MISSED CALLS” (missed call)
display.
2 Select a name or phone number
Turn the [VOL] knob.
3 Make a call
Press the [VOL] knob.
⁄
• The outgoing call list and the incoming call list, and the
missed call list are the lists of calls originated from and
received at this unit. They are not the ones stored in the
cell-phone memory.
Dial a Number
1 Select the number dial mode
For how to select dialing method, refer to <Making
a Call> (page 12).
Select the “NUMBER DIAL” display.
2 Enter a phone number
Operation type Operation
Select the numbers. Turn the [VOL] knob.
Move to the next digit. Press the [
¢
] button.
Delete the last digit. Press the [
4
] button.
• Press the number ([1] – [0]), #([FM]), *([AM]), or
+([¢]) button on the remote controller.
3 Make a call
• Press the [VOL] knob.
• Press the [OK] button on the remote
controller.
⁄
• You can input max 25 digits.
Make a Voice Dialing Call
1 Enter voice recognition mode
Press the [VOICE] button.
“V-RECG READY” is displayed.
2 Press the [VOL] knob.
“PB NAME” is displayed.
When a beep is heard, say the name within 2
seconds.
3 “PN TYPE” is displayed.
When a beep is heard, say the category name
within 2 seconds.
4 Make a call
Press the [VOL] knob.
Move to the next phone number
Turn the [VOL] knob.
⁄
• If your voice cannot be recognized, a message is
displayed. Pressing the [VOL] knob allows you to retry
voice input. (page 35)
• Both the name and category require registration of a
voice tag. (page 24)
• Audio sound is not output during voice recognition.
Registering to the Preset Dial Number
(Preset Memory)
1 Enter the phone number you wish to register
Enter the phone number with reference to the
following:
Dial a number/ Calling a number in the call log/
Calling a number in the Phone Book
2 Select the number to put in the memory
Press the [1] – [6] button for at least 2 seconds.

14 | KDC-U546BT
Speed Dialing (Preset Dial)
1 Select the number you want to recall from the
memory
Press the [1] – [6] button.
2 Make a call
Press the [VOL] knob.
⁄
• You need to register the preset dial number.
Receiving a Call
Answering a Phone Call
Press the [VOL] knob.
⁄
• The following operations disconnect the line:
- Insert a CD.
- Connect a USB device.
• The name of the calling party is displayed if it has already
been registered in the Phone Book.
Rejecting an Incoming Call
Press the [SRC] button.
During a Call
Disconnecting a Call
Press the [SRC] button.
Switching to the Private Mode
Press the [6] button.
Switches between Private talk (“PRIVATE TALK”) and
Hands-free talk each time this button is pressed.
⁄
• Depending on the type of your cell-phone, switching
to the private talk mode may select the source that was
used before commencing the hands-free connection.
If this happens, the source cannot be switched back to
the hands-free talk mode by operating this unit. Operate
your cell-phone to return to the hands-free talk mode.
Adjusting the Voice Volume during a Call
Turn the [VOL] knob.
Call Waiting
Answering Another Incoming Call with the
Current Call Suspended
1 Press the [VOL] knob.
2 Turn the [VOL] knob and press it when the
desired item is displayed.
Select “ANSWER”.
Answering another Incoming Call after
Terminating the Current Call
Press the [SRC] button.
Continuing the Current Call
1 Press the [VOL] knob.
2 Turn the [VOL] knob and press it when the
desired item is displayed.
Select “REJECT”.
Answering the Waiting Call after Terminating
the Current Call
Press the [SRC] button.
Switching between the Current Call and Waiting
Call
Press the [VOL] knob.
Each pressing of this knob switches the calling
party.
Other Functions
Clearing the Disconnection Message
Press the [VOL] knob.
“HF DISCONCT” disappears.
Switching between Display Modes
Press the [ ] button.
Pressing this button each time switches between
name and telephone number.
Display of Phone Number Type
(Category)
The category items in the Phone Book are displayed
as follows.
Display Information
“GE” General
“HM” Home
“OF” Office
“MO” Mobile
“OT” Other
Operation of Hands-Free Phoning
English | 15
Audio Adjustments
Audio Control
You can adjust following Audio Control items.
1 Select the source
Press the [SRC] button.
Select the “TUNER”/“USB”/“iPod” or “CD”/“AUX”
display.
2 Enter Function Setting mode
Press the [VOL] knob for at least 1 second.
“FUNCTION” is displayed.
3 Select the function item
Turn the [VOL] knob and press it when the
desired item is displayed.
Select “AUDIO CONTROL” > Function item or
select “AUDIO CONTROL” > “DETAILED SET” > >
Function item.
Function item Selectable setting/item
“SUBWOOFER SET” Turns on/off the subwoofer output.
OFF/ON
“BASS BOOST” Selects bass boost setting mode.
OFF/LV1/LV2 (The indicator turns on according
to the setting.)
“SYSTEM Q” Switches between the following preset equalizer
curves. “EQ“ indicator is lights when System Q is
set to an EQ mode other than “NATURAL”.
NATURAL/USER/ROCK/POPS/EASY/TOP40/
JAZZ/GAME
For USER: This appears when Bass level, Middle
level, and Treble level are adjusted.
“BASS LEVEL” You can set bass level for each source.
–8 — 0 — +8
“MID LEVEL” You can set middle level for each source.
–8 — 0 — +8
“TRE LEVEL” You can set treble level for each source.
–8 — 0 — +8
“BALANCE” Adjusts left/right speaker balance.
(Left) L15 — 0 — R15 (Right)
“FADER” Adjusts front/rear speaker balance.
(Rear) R15 — 0 — F15 (Front)
“SUB-W LEVEL” You can set subwoofer level.
–15 — 0 — +15
“DETAILED SET” Move to detailed item
“LPF SUBWOOFER” Selects cut off frequency of subwoofer output.
85/120/160/THROUGH (OFF) Hz
“SUB-W PHASE” Selects the phase of subwoofer output.
REVERSE (180°)/ NORMAL (0°)
“SUPREME SET” Turns on/off the supreme function.
OFF/ON
“VOLUME OFFSET” Sets each source’s volume as a difference from
the basic volume.
–8 — 0 (AUX: –8 —0 — +8)
(Factory setting: Underlined)
4 Make a setting
Turn the [VOL] knob and press it when the
desired item is displayed.
5 Exit Function Setting mode
Press the [ ] button for at least 1 second.
⁄
• SUPREME:
Technology to extrapolate and supplement with
proprietary algorithm, the high-frequency range that is
cut off when encoding at low bit rate (less than 128Kbps,
Sampling frequency is 44.1kHz).
Supplementing is optimized by compression format
(MP3 or WMA) and processed according to bit rate. The
effect is negligible with music that is encoded at high
bit rate, variable bit rate or has minimal high frequency
range.
[SRC] [VOL]
[ ]
16 | KDC-U546BT
Display Settings
Display Selection
Changing displayed information on each source
following.
1 Enter Function Setting mode
Press the [VOL] knob for at least 1 second.
“FUNCTION” is displayed.
2 Enter Display Select mode
Turn the [VOL] knob and press it when the
desired item is displayed.
Select “DISP SELECT”.
3 Select the text
Turn the [VOL] knob and press it when the
desired item is displayed.
In Tuner source
Information Display
Frequency “FREQUENCY”
Clock “CLOCK”
In Audio file/ iPod source
Information Display
Music title & Artist name “TITLE/ARTIST”
Album & Artist name “ALBUM/ARTIST”
Folder name “FOLDER NAME”
File name “FILE NAME”
Play time & Music number “P-TIME”
Clock “CLOCK”
In CD source
Information Display
Disc title “DISC TITLE”
Track title “TRACK TITLE”
Play time & Track number “P-TIME”
Clock “CLOCK”
In Standby/ Auxiliary input source
Information Display
Source name “SOURCE NAME”
Clock “CLOCK”
4 Exit Function Setting mode
Press the [ ] button for at least 1 second.
⁄
• When you select the clock display, the display setting of
each source will be changed to the clock display.
• If the selected display item does not have any
information, alternative information is displayed.
• When selecting “FOLDER NAME” while playing with
iPod, names will be displayed depending on currently
selected browsing items.
• If the iPod Control by Hand Mode is set to on while
playing the iPod, “iPod MODE” is displayed.
• If all characters cannot be displayed while playing with
iPod, the file number in the list is displayed.
Information Display
Music title “TITLE***”
Folder name “FOLDER***”
File name “FILE***”
Text Scroll
Scrolling the displayed File name, Song title, etc.
Press the [VOICE] button for at least 1 second.
[SRC] [VOL]
[ ][VOICE]
English | 17
Display Setting
You can select following Display Setting items.
1 Enter Function Setting mode
Press the [VOL] knob for at least 1 second.
“FUNCTION” is displayed.
2 Select the function item
Turn the [VOL] knob and press it when the
desired item is displayed.
Select “SETTINGS” > “DISPLAY” > Function item.
Function item Selectable setting/item
“DIMMER SET” Adjusts the brightness of the display according to
the surrounding illumination.
OFF/ON
“TEXT SCROLL” Scrolling the displayed File name, Song title, etc.
Selecting AUTO scrolls them automatically.
AUTO/MANUAL
“BT DVC STATUS” You can display the connection status, signal
strength, and battery level of cell-phone.
HF-CON: Connection status.
BATT: Battery level of cell-phone.
SIGNAL: Signal strength of cell-phone.
• Data are not displayed if information cannot be
obtained from the cell-phone.
• Since the number of steps of this unit is
different from that of the cell-phone, the
statuses displayed on this unit may discord
from those displayed on the cell-phone.
(Factory setting: Underlined)
3 Make a setting
Turn the [VOL] knob and press it when the
desired item is displayed.
4 Exit Function Setting mode
Press the [ ] button for at least 1 second.
Auxiliary Input Display Setting
Selecting the display when changing to Auxiliary
input source.
1 Select the AUX source
Press the [SRC] button.
Select the “AUX” display.
2 Enter Function Setting mode
Press the [VOL] knob for at least 1 second.
“FUNCTION” is displayed.
3 Enter Auxiliary input display setting mode
Turn the [VOL] knob and press it when the
desired item is displayed.
Select “SETTINGS” > “AUX NAME SET”.
The presently selected Auxiliary input display is
displayed.
4 Select the Auxiliary input display
Turn the [VOL] knob and press it when the
desired item is displayed.
“AUX”/ “DVD”/ “PORTABLE”/ “GAME”/ “VIDEO”/ “TV”
5 Exit Function Setting mode
Press the [ ] button for at least 1 second.
18 | KDC-U546BT
Other Functions
Clock Adjustment
1 Select the source
Press the [SRC] button.
2 Enter Function Setting mode
Press the [VOL] knob for at least 1 second.
“FUNCTION” is displayed.
3 Enter Clock adjustment mode
Turn the [VOL] knob and press it when the
desired item is displayed.
Select “SETTINGS” > “CLOCK” > “CLOCK
ADJUST”.
The hour display blinks
4 Adjusting Clock
Turn the [VOL] knob to set the hours and press
it when to finish the hour adjusting.
The minute display blinks.
Turn the [VOL] knob to set the minutes and
press it when to finish the minute adjusting.
5 Exit Function Setting mode
Press the [ ] button for at least 1 second.
Demonstration Mode Setting
Turning the demonstration mode ON/OFF.
1 Enter Function Setting mode
Press the [VOL] knob for at least 1 second.
“FUNCTION” is displayed.
2 Select Demonstration mode
Turn the [VOL] knob and press it when the
desired item is displayed.
Select “DEMO MODE”.
3 Set the Demonstration mode
Turn the [VOL] knob and press it when the
desired item is displayed.
Select “ON” or “OFF”.
4 Exit Function Setting mode
Press the [ ] button for at least 1 second.
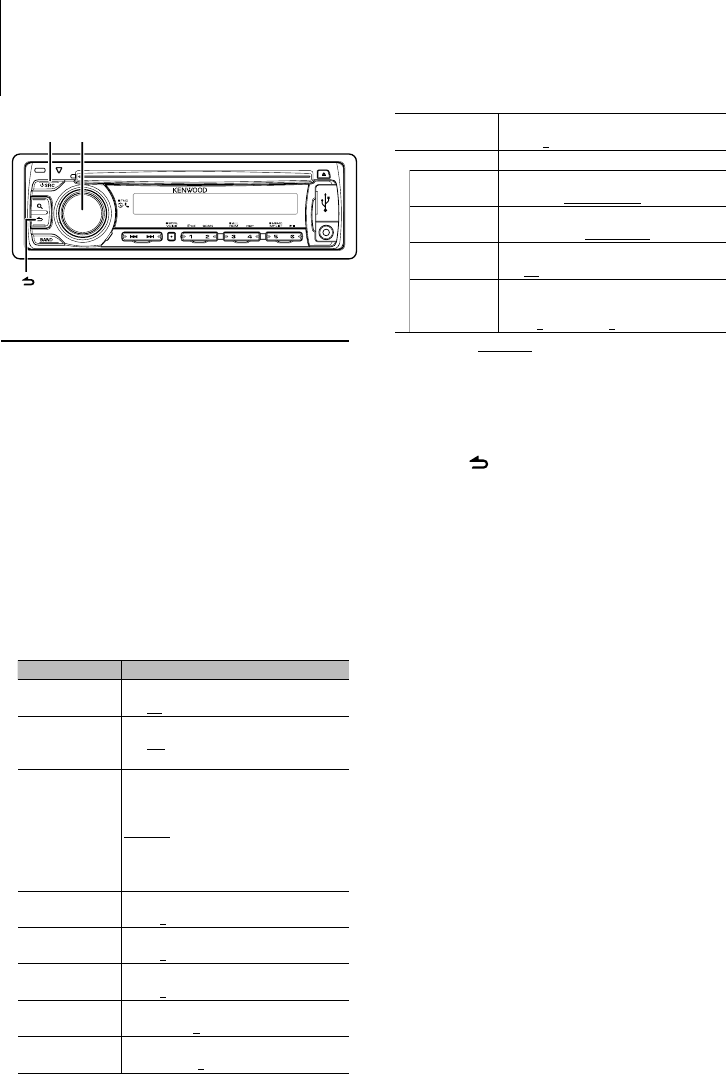
Initial Setting
You can select following Initial Setting items.
1 Select the Standby source
Press the [SRC] button.
Select the “STANDBY” display.
2 Enter Function Setting mode
Press the [VOL] knob for at least 1 second.
“FUNCTION” is displayed.
3 Select the function item
Turn the [VOL] knob and press it when the
desired item is displayed.
Select “INITIAL SET” > Function item.
Function item Selectable setting/item
“PRESET TYPE” TYPE NORMAL:
1 station can be assigned to 1 preset button in each
of 6 bands (FM1, FM2, FM3, MW, SW1 and SW2),
i.e., a total of 36 stations (6 stations x 6 bands) can
be preset.
TYPE MIX:
A total of 6 stations can be assigned to a total of 6
preset buttons regardless of band (FM1, FM2, FM3
MW, SW1, and SW2). You can recall a preset station
without switching between bands.
“KEY BEEP” Setting the operation check sound (beep sound)
on/off.
OFF/ON
“TDF ALARM” Informs you by alarm sound about 30 seconds
that you forgot to detach the faceplate when ACC
is set to OFF.
OFF/ON
“BUILT-IN AUX” When this is set to ON, AUX source can be selected.
ON1: Outputs the sound of external unit connected
to the AUX terminal when switched to AUX
source.
ON2: Activates the attenuator function when
turning on the power with AUX source
selected. Cancel the attenuator function
by turning the volume knob clockwise
when listening to the audio of the external
equipment.
OFF: Disables the selection of AUX source. Set to
OFF when not using the AUX terminal.
[SRC] [VOL]
[ ]
Release button
English | 19
“CD READ” Sets the method for reading CD.
1: Automatically distinguishes between audio file
disc and music CD when playing disc.
2: Forces playing as music CD.
“SWITCH PREOUT” Switches the preout between rear output (“REAR”)
and subwoofer output (“SUB-W”)
REAR/SUB-W
“SP SELECT” Fine-tuning so that the System Q value is optimal
when setting the speaker type as follows;
SP OFF: OFF
SP 5/4: For 5 & 4 in. speaker
SP 6*9/6: For 6 & 6x9 in. speaker
SP OEM: For the OEM speaker
“F/W UP” Display the firmware version and update the
firmware.
MEDIA USB: Select a USB device.
MEDIA CD: Select CD.
For how to update the firmware, access our web
site.
http://www.kenwood.com/cs/ce/
(Factory setting: Underlined)
4 Make a setting
Turn the [VOL] knob and press it when the
desired item is displayed.
5 Exit Function Setting mode
Press the [ ] button for at least 1 second.
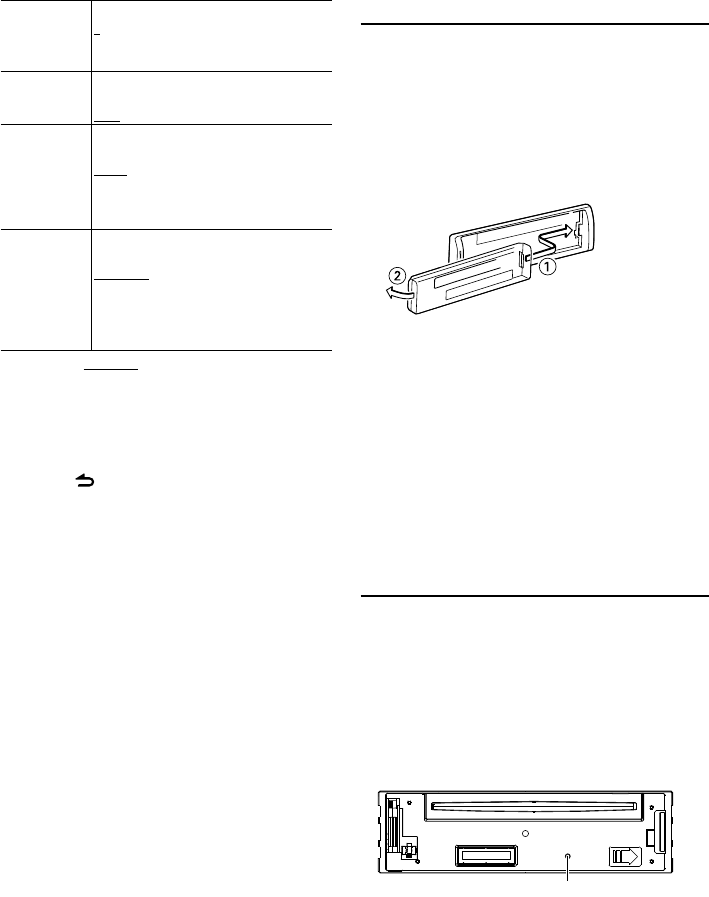
Removing the Faceplate
The faceplate of the unit can be detached and taken
with you, helping to deter theft.
Detach the faceplate
Press the Release button.
Reattaching the Faceplate
Refer to the following diagram when
reattaching the faceplate.
¤
• After pressing the Release button, detach the faceplate
immediately. If the faceplate is left attached, it can fall
due to vibration and so on.
• The faceplate is a precision piece of equipment and can
be damaged by shocks or jolts.
• Keep the faceplate in its faceplate case while detached.
• Do not place the faceplate (and the faceplate case)
in areas exposed to direct sunlight, excessive heat or
humidity. Also avoid places with too much dust or the
possibility of water splashing.
How to Reset Your Unit
If the unit fails to operate properly, press the Reset
button. The unit returns to factory settings when
the Reset button is pressed.
1 Release the faceplate lock so that it can be
removed.
Refer to <Removing the Faceplate> (page 19).
2 Press the Reset button and reattaching the
faceplate.
Reset button
20 | KDC-U546BT
Bluetooth Setup
Bluetooth Setup
You can select following Bluetooth Setup items.
1 Enter Bluetooth mode
Press the [VOL] knob.
“BT MODE” is displayed.
2 Enter Function Setting mode
Press the [VOL] knob for at least 1 second.
“FUNCTION” is displayed.
3 Select the function item
Turn the [VOL] knob and it when the desired
item is displayed.
Select “SETTINGS” > Function item or select
“SETTINGS” > “DETAILED SET” > > Function item.
Function item Selectable setting/item
“PHONE SELECT” Selects a cell-phone connection. Refer to
<Selecting the Bluetooth Device You Wish to
Connect> (page 23).
“SMS DOWNLOAD” Download a short message. Refer to
<Downloading the SMS> (page 23).
“SMS INBOX” Display the received short message. Refer to
<SMS (Short Message Service)> (page 24).
“VOICE TAG” Registers voice for voice recognition and
voice to select the Phone number category in
Phone book. Refer to <Adding a Voice Dialing
Command> (page 24) and <Setting a Voice
Command for Category> (page 25).
“DETAILED SET” Move to detailed item.
“DEVICE REGIST” Registers a Bluetooth device (pairing).
Refer to <Registering Bluetooth device>
(page 21).
“S-DVC SELECT”
“DEVICE DELETE” Cancel registration of the Bluetooth device. Refer
to <Deleting a Registered Bluetooth Device>
(page 21).
“PIN CODE EDIT” Specify the PIN code required when registering
this unit using the Bluetooth device. Refer to
<Registering PIN Code> (page 22).
“AUTO ANSWER” This function automatically answers (responds
to) a call after lapse of the preset time interval
for automatic answer.
OFF: Does not answer the phone call
automatically.
0: Automatically answers the phone call at once.
1 – 8 –99: Automatically answers the phone
call after lapse of 1 – 99 seconds.
“BT SP SELECT” You can specify the audio output speakers.
Select the speaker which is further from the
microphone in order to prevent howling or
echoes.
SP FRONT: Outputs audio from the front-left and
front-right speakers.
SP ALL: Outputs audio from the all speakers.
“CALL BEEP” You can output a beep from the speaker when a
call comes in.
ON: Beep is heard.
OFF: Beep is canceled
“BT F/W UPDATE” Display the firmware version and update the
firmware. Refer to <Displaying the Firmware
Version> (page 22).
“MIC GAIN” Adjust the sensitivity of the built-in microphone
for a telephone call. Adjust the voice of caller.
Setting to “+” increases the voice volume.
–3 – 0 – +3
“NR LEVEL” Reduce the noises generated by surrounding
environment without changing the built-in
microphone volume. Adjust the voice of caller
when it is not clear. Setting to “+” increases the
noise reduction.
–3 – 0 – +3
“EC LEVEL” Adjusts the level of echo cancellation. Setting to
“+” increases the echo cancel reduction.
–2 – 0 – +2
(Factory setting: Underlined)
4 Make a setting
Turn the [VOL] knob and press it when the
desired item is displayed.
5 Exit Function Setting mode
Press the [ ] button for at least 1 second.
[SRC] [VOL]
[] / [E]
[ ] [ ]
English | 21
Registering Bluetooth Device (Pairing)
To make your Bluetooth device (cell-phone) usable
with this unit, you need to register it (pairing). You
can register up to 5 Bluetooth devices to this unit.
Registering from this unit
1 Select Bluetooth device registration mode
For how to select setup item, refer to <Bluetooth
Setup> (page 20).
Select “SETTINGS” > “DETAILED SET” > > “DEVICE
REGIST”.
2 Enter Bluetooth device registration mode
Press the [VOL] knob.
Search for the Bluetooth device.
When search is completed, “FINISHED” is displayed.
3 Select the Bluetooth device
Turn the [VOL] knob and press it when the
desired Bluetooth device name is displayed.
4 Input the PIN code
Operation type Operation
Select the numbers. Turn the [VOL] knob.
Move to the next digit. Press the [
¢
] button.
Delete the last digit. Press the [
4
] button.
5 Transmit the PIN code
Press the [VOL] knob.
If “PAIRING OK” is displayed, registration is
completed. If the error message appears even
though the PIN code is correct, try Registering
Special Bluetooth device.
6 Return to the device list
Press the [VOL] knob.
7 Exit Function Setting mode
Press the [ ] button for at least 1 second.
⁄
• This unit allows up to 8 digits to be input for a PIN code.
If a PIN code cannot be input from this unit, it can be
input from the Bluetooth device.
• If there are 5 or more Bluetooth devices registered, you
cannot register a new Bluetooth device.
Registering Special Bluetooth device
Allow registration of a special device that cannot
be registered normally (pairing).
1 Select Special device registration mode
For how to select setup item, refer to <Bluetooth
Setup> (page 20).
Select “SETTINGS” > “DETAILED SET” > “S-DVC
SELECT”.
2 Enter Special device registration mode
Press the [VOL] knob.
A list is displayed.
3 Select a device name
Turn the [VOL] knob and press it when the
desired device name is displayed.
If “COMPLETE” is displayed, registration is
completed.
4 Go through the procedure step 3 of <When
registering from this unit> and complete the
registration (pairing).
Cancelling Special device registration mode
Press the [VOL] knob for at least 1 second.
⁄
• If the device name is not in the list, select “OTHER
PHONE”.
Deleting a Registered Bluetooth Device
You can delete a registered Bluetooth device.
1 Select Bluetooth device deletion mode
For how to select setup item, refer to <Bluetooth
Setup> (page 20).
Select “SETTINGS” > “DETAILED SET” > “DEVICE
DELETE”.
2 Enter Bluetooth device deletion mode
Press the [VOL] knob.
“(name)” is displayed.
3 Select the Bluetooth device
Turn the [VOL] knob.
4 Delete the selected Bluetooth device
Press the [VOL] knob.
“DELETE” is displayed.
5 Exit Function Setting mode
Press the [ ] button for at least 1 second.
⁄
• When a registered cell-phone is deleted, its Phone Book,
log, SMS, and voice tag are also deleted.
22 | KDC-U546BT
Bluetooth Setup
Registering PIN Code
By operating the Bluetooth device, specify the PIN
code necessary for registering this unit.
1 Select PIN code edit mode
For how to select setup item, refer to <Bluetooth
Setup> (page 20).
Select “SETTINGS” > “DETAILED SET” > “PIN
CODE EDIT”.
2 Enter PIN code edit mode
Press the [VOL] knob.
The current setting of PIN code is displayed.
3 Input the PIN code
Operation type Operation
Select the numbers. Turn the [VOL] knob.
Move to the next digit. Press the [
¢
] button.
Delete the last digit. Press the [
4
] button.
4 Register a PIN code
Press the [VOL] knob.
If “COMPLETE” is displayed, registration is
completed.
5 Exit Function Setting mode
Press the [ ] button for at least 1 second.
⁄
• By default, “0000” is specified.
• A PIN code can be specified with up to 8 digits.
Displaying the Firmware Version
Display the version of the firmware of this unit.
1 Enter Bluetooth Firmware update mode
For how to select setup item, refer to <Bluetooth
Setup> (page 20).
Select “SETTINGS” > “DETAILED SET” > “BT F/W
UPDATE”.
2 Enter Bluetooth Firmware update mode
Press the [VOL] knob.
The firmware version appears.
3 Exit Function Setting mode
Press the [ ] button for at least 1 second.
⁄
• For how to update the firmware, access our web site.
http://www.kenwood.com/cs/ce/bt/
Downloading the Phone Book
Download the phone book data from the cell-
phone to this unit so that you can use the Phone
Book of this unit.
To download automatically
If the cell-phone supports a phone book
synchronization function, the phone book is
downloaded automatically after Bluetooth
connection.
⁄
• Setting on the cell-phone may be required.
• If no phone book data is found in the unit even after
the compete display, your cell-phone may not support
automatic download of phone book data. In this case, try
downloading manually.
To download from the cell-phone manually
1 By operating the cell-phone, end the hands-free
connection.
2 By operating the cell-phone, send the phone
book data to this unit
By operating the cell-phone, download the phone
book data to this unit.
• During downloading:
“DOWNLOADING” is displayed.
• After completion of downloading:
“COMPLETE” is displayed.
3 By operating the cell-phone, start the hands-
free connection.
⁄
• Up to 1000 person phone numbers can be registered for
each registered cell-phone.
• Up to 25 digits can be registered for each phone number
along with up to 50* characters representing a name.
(* 50: Number of alphabetic alphabetical characters.
Fewer characters can be input depending on the type
of characters.)
• To cancel downloading of the phone book data, operate
the cell-phone.

English | 23
Selecting the Bluetooth Device You
Wish to Connect
When 2 or more Bluetooth devices have already
been registered, you need to select the Bluetooth
device you wish to use.
1 Select Bluetooth device selection mode
For how to select setup item, refer to <Bluetooth
Setup> (page 20).
Select “SETTINGS” > “PHONE SELECT”.
2 Enter Bluetooth device selection mode
Press the [VOL] knob.
“(name)” is displayed.
3 Select the Bluetooth device
Turn the [VOL] knob.
4 Set up the Bluetooth device
Press the [VOL] knob.
‘✱(name)’ or ‘-(name)’ is displayed.
“✱”: The selected Bluetooth device is busy.
“-”: The selected Bluetooth device is on standby.
“ “ (blank): The Bluetooth device is deselected.
5 Exit Function Setting mode
Press the [ ] button for at least 1 second.
⁄
• If a cell-phone is already selected, deselect it, and then
select a different one.
Downloading the SMS
Download the short message (SMS) arrived at the
cell-phone so that it can be read on this unit.
1 Select SMS download mode
For how to select setup item, refer to <Bluetooth
Setup> (page 20).
Select “SETTINGS” > “SMS DOWNLOAD”.
2 Enter SMS download mode
Press the [VOL] knob.
“DOWNLOADING” is displayed.
When the downloading finishes, “COMPLETE” is
displayed.
3 Exit Function Setting mode
Press the [ ] button for at least 1 second.
⁄
• The cell-phone must be able to transmit the SMS using
Bluetooth. Setting on the cell-phone may be required.
If the cell-phone does not support SMS function, the
SMS download item in Function Control mode is not
displayed.
• When the SMS is downloaded from the cell-phone, the
unopened messages in the cell-phone are opened.

24 | KDC-U546BT
Bluetooth Setup
SMS (Short Message Service)
The SMS arrived at the cell-phone is displayed on
the receiver.
A newly arrived message is displayed.
¤
• To prevent car accidents, the driver should not read the
SMS while driving.
When a new message arrives
“SMS RECEIVED” is displayed.
The display disappears with any operations.
Displaying the SMS
1 Select SMS Inbox mode
For how to select setup item, refer to <Bluetooth
Setup> (page 20).
Select > “SETTINGS” > “SMS INBOX”.
2 Enter SMS Inbox mode
Press the [VOL] knob.
A message list appears.
3 Select a message
Turn the [VOL] knob.
Each pushing of the [ ] button switches
between telephone number or name and message
reception date.
4 Display the text
Press the [VOL] knob.
Turning the [VOL] knob scrolls the message.
Pressing the [VOL] knob again returns to the
message list screen.
5 Exit Function Setting mode
Press the [ ] button for at least 1 second.
⁄
• The unopened message is displayed at the beginning
of the list. Other messages are displayed in the order of
reception.
• The SMS that has arrived when the cell-phone is not
linked with Bluetooth cannot be displayed. Download
the SMS.
• The short message cannot be displayed during
downloading the SMS.
• Unread messages are prefixed with an asterisk (*).
Adding a Voice Dialing Command
Add a voice tag to the phone book for voice dialing.
You can register up to 35 voice tags.
1 Select Phone book name edit mode
For how to select setup item, refer to <Bluetooth
Setup> (page 20).
Select “SETTINGS” > “VOICE TAG”.
2 Enter Voice Tag edit mode
Press the [VOL] knob.
3 Enter Phone book name edit mode
Turn the [VOL] knob to select “PB NAME EDIT”,
and then press the [VOL] knob.
4 Search for the name to register
Select the name to register with reference to 3 in
<Calling a Number in the Phone Book> (page 12).
If a voice tag has already been registered for a
name, “*” is displayed before the name.
5 Select a mode
Turn the [VOL] knob.
Display Operation
“PB NAME REG” Register a voice tag.
“PB NAME CHK”* Play a voice tag.
“PB NAME DEL”* Delete a voice tag.
“RETURN” Return to step 3.
* Displayed only when a name for which a voice tag has
been registered is selected.
Select “PB NAME REG” (Register)
6 Register a voice tag (first)
Press the [VOL] knob.
“ENTER1” is displayed.
When a beep is heard, say a voice tag within 2
seconds.
7 Confirm the voice tag (second)
Press the [VOL] knob.
“ENTER 2” is displayed.
When a beep is heard, say the same voice tag as
that you said in step 5 within 2 seconds.
“COMPLETE” is displayed.
8 End registration
Press the [VOL] knob.
Return to step 3. You can register another voice tag
continuously.
⁄
• If your voice cannot be recognized, a message is
displayed. Pressing the [VOL] knob allows you to retry
voice input. (page 35)

English | 25
Select “PB NAME CHK” (Play)
6 Press the [VOL] knob.
Play the registered voice and return to step 3.
Select “PB NAME DEL” (Delete)
6 Delete a voice tag
Press the [VOL] knob.
7 Turn the [VOL] knob to select “YES”, and then
press the [VOL] knob.
Exit Phone book name edit mode
Press the [ ] button for at least 1 second.
⁄
• Audio sound is not output during voice tag registration.
Setting a Voice Command for
Category
Add a voice tag to the phone number category
(type) for voice calling.
1 Select Phone Number type edit mode
For how to select setup item, refer to <Bluetooth
Setup> (page 20).
Select “SETTINGS” > “VOICE TAG”.
2 Enter Voice Tag edit mode
Press the [VOL] knob.
3 Enter Phone Number type edit mode
Turn the [VOL] knob to select “PN TYPE EDIT”,
and then press the [VOL] knob.
4 Select the category (type) you wish to set
Turn the [VOL] knob and press it when the
desired category name is displayed.
“GENERAL”/ “HOME”/ “OFFICE”/ “MOBILE”/ “OTHER”
5 Select a mode
Turn the [VOL] knob.
Display Operation
“PB TYPE REG” Register a voice tag.
“RETURN” Return to step 3.
6 Register the category (type) by performing
steps 6 to 8 of select “PB NAME REG” (Register)
in <Adding a Voice Dialing Command> (page 24).
7 Exit Function Setting mode
Press the [ ] button for at least 1 second.
⁄
• Set the voice tag for all the 5 categories. If the voice tag
is not registered for all the categories, the Phone book
may not be recalled by voice command.

26 | KDC-U546BT
Basic Operations of Remote Control
General Control
Volume control [VOL] button
Source select [SRC] button
Volume reduce [ATT] button
“ATT“ indicator is blinks when the attenuator function
is on. When the button is pressed again, the volume
returns to the previous level.
Enter Audio Control mode [AUD] button
⁄
• Refer to <Audio Control> (page 15) for the operation
method, such as the procedures for Audio control and
others operations.
Return to previous item [ ] button
Exit from mode [EXIT] button
Selection of item [5]/[∞] button
Determination [ENT] button
In Tuner Source
Band select [FM+]/[AM–] button
Station select [4]/[¢] button
Recall preset stations [1] — [6] button
In iPod/CD/Audio file Source
Music select [4]/[¢] button
Folder/Disc select [FM+]/[AM–] button
Pause/Play [38] button
Enter Music search mode [5]/[∞] button
Movement between folders/files in Music search
mode [5]/[∞] button
Return to previous folder [] button
Hands-Free Phone Control
Making a call
Enter Bluetooth mode [ ] button
Enter the dialing method selection mode
[5]/[∞] button
Select a dialing method [ENT] button
Number dial input
Operation type Operation
Input a digit. [0] – [9] buttons
Input “+”. [¢] button
Input “#”. [FM+] button
Input “*”. [AM–] button
Clear the entered phone number. [4] button
Make a call [OK] button
Receiving a call
Answer the call [ ] button
Switch between the private talk mode and the
hands-free talk mode [38] button
Call waiting
Answer Another Incoming Call with the Current
Call Suspended [ ] button
Answer another Incoming Call after Terminating
the Current Call [SRC] button
Continue the Current Call [1] button
During a call
End the call [SRC] button
Adjust the voice volume [VOL] button
(page 9, 11, 13)
e
9
e
9
e
ra
l
Co
nt
r
Contr
pg
(p
a
ge
ro
l
rol
FM
DIRECT/OK
AUD
ENT
ATT
SRC
0 — 9
VOL
AM
EXIT
/P
English | 27
Preparing the remote control unit
Pull the battery sheet out from the remote control
unit to the direction of the arrow.
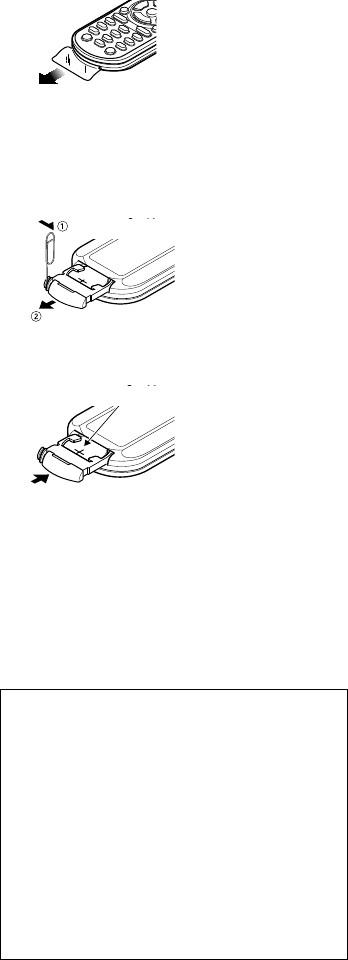
Changing the battery of the remote control
unit
Use a commercially available button battery (CR2025).
1 Insert something narrow like a paperclip into the
hole and pull out the battery tray.
Press
Pull out
2 Insert the battery with the + and – poles aligned
properly, following the illustration inside the case.
CR2025(+side)
¤ CAUTION
• Do not set the remote control in hot places such
as on the dashboard.
• Lithium battery.
Danger of explosion if the battery is incorrectly
replaced.
Replace only with the same or equivalent type.
• The battery pack or batteries shall not be exposed
to excessive heat such sunshine, fire or the like.
• Keep battery out of reach of children and in
original package until ready to use. Dispose of
used batteries promptly. If swallowed contact
physician immediately.
28 | KDC-U546BT
Appendix
About Audio file
• Playable Audio file
MP3 (.mp3), WMA (.wma)
• Playable disc media
CD-R/RW/ROM
• Playable disc file format
ISO 9660 Level 1/2, Joliet, Romeo, Long file name.
• Playable USB device
USB mass storage class
• Playable USB device file system
FAT16, FAT32
Although the audio files are complied with the
standards listed above, the play maybe impossible
depending on the types or conditions of media or
device.
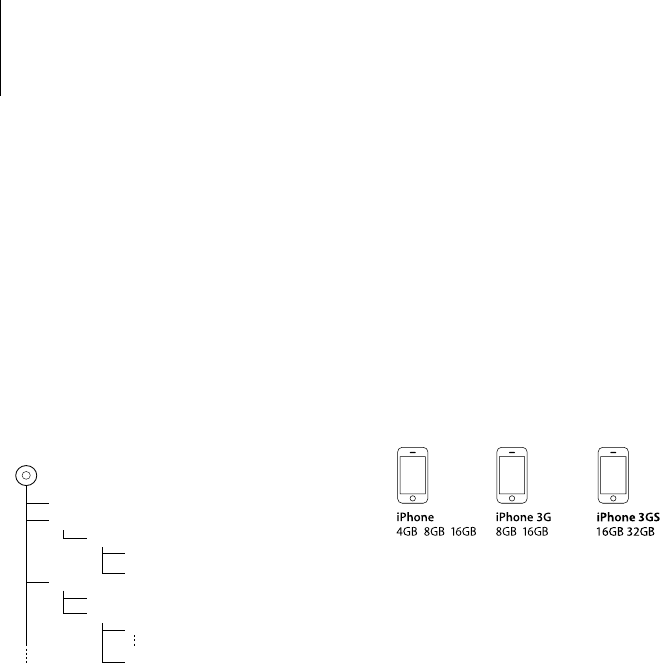
• Playing order of the Audio file
In the example of folder/file tree shown below, the
files are played in the order from ① to ⑩.
CD
v
() <
: Folder
v: Audio
v
v
v
v
.
v
Folder
Audio file
An online manual about audio files is put on the site,
www.kenwood.com/cs/ce/audiofile/. On this online
manual, detailed information and notes which are not
written in this manual are provided. Make sure to read
through the online manual as well.
About USB device
• In this manual, the word “USB device” is used for
flash memories and digital audio players which have
USB terminals.
• When the USB device is connected to this unit,
it can be charged up provided that this unit is
powered.
• Install the USB device in the place where it will not
prevent you from driving your vehicle properly.
• You cannot connect a USB device via a USB hub and
Multi Card Reader.
• Take backups of the audio files used with this unit.
The files can be erased depending on the operating
conditions of the USB device.
We shall have no compensation for any damage
arising out of erasure of the stored data.
• No USB device comes with this unit. You need to
purchase a commercially available USB device.
• When connecting the USB device, usage of the
CA-U1EX (option) is recommended.
Normal playback is not guaranteed when a cable
other than the USB compatible cable is used.
Connecting a cable whose total length is longer
than 5 m can result in abnormal playback.
iPod/iPhone that can be connected to this
unit
Made for
• iPod nano (1st generation) • iPod nano (2nd generation)
• iPod nano (3rd generation) • iPod nano (4th generation)
• iPod nano (5th generation)
• iPod with video • iPod classic
• iPod touch (1st generation) • iPod touch (2nd generation)
Works with
• iPhone • iPhone 3G • iPhone 3GS
• Update iPod/iPhone software to the latest version.
• Type of control available varies depending on the
type of connected iPod. See www.kenwood.com/
cs/ce/ipod for further details.
• The word “iPod” appearing in this manual indicates
the iPod or the iPhone connected with the iPod
connection cable*. A KCA-iP101 is required (optional
accessory).
* Not supported model KCA-iP500.
Refer to the web site for connectable iPod and iPod
connection cable.
www.kenwood.com/cs/ce/ipod/
⁄
• If you start playback after connecting the iPod, the music
that has been played by the iPod is played first.
In this case, “RESUMING” is displayed without displaying a
folder name, etc. Changing the browse item will display a
correct title, etc.
• You cannot operate iPod if “KENWOOD” or “✓” displayed on
iPod.

English | 29
About the Cell-Phone
This unit conforms to the following Bluetooth
specifications:
Version Bluetooth Standard Ver. 2.0
Profile HFP (Hands Free Profile)
OPP (Object Push Profile)
PBAP (Phone book Access Profile)
SYNC (Synchronization Profile)
For the cell-phones verified for compatibility, access
the following URL:
http://www.kenwood.com/cs/ce/bt/
⁄
• The units supporting the Bluetooth function have been
certified for conformity with the Bluetooth Standard
following the procedure prescribed by Bluetooth
SIG. However, it may be impossible for such units to
communicate with your cell-phone depending on its type.
• HFP is a profile used to make a hands-free call.
• OPP is a profile used to transfer data such as a phone book
between units.
About “KENWOOD Music Editor”
• This unit supports the PC application “KENWOOD
Music Editor Lite ver1.0” or later.
• When you use the audio file with database
information added by the “KENWOOD Music Editor
Lite ver1.0”, you can search a file by title, album or
artist name using the <Music Search> (page 7).
• In the Instruction manual, the term “Music Editor
media” is used to mean the device that contains
audio files with database information added with
KENWOOD Music Editor.
• “KENWOOD Music Editor Lite ver1.0” is available from
the following web site:
www.kenwood.com/cs/ce/
• For further information on “KENWOOD Music Editor
Lite ver1.0”, refer to the site above or the application
help.
The marking of products using lasers
CLASS 1
LASER PRODUCT
The label is attached to the chassis/case and says
that the component uses laser beams that have been
classified as Class 1. It means that the unit is utilizing
laser beams that are of a weaker class. There is no
danger of hazardous radiation outside the unit.
This symbol mark indicates that
Kenwood manufactured this product
so as to decrease harmful infl uence on
the environment.
• The Bluetooth word mark and logos are owned by
the Bluetooth SIG, Inc. and any use of such marks
by Kenwood Corporation is under license. Other
trademarks and trade names are those of their
respective owners.
• iTunes is a trademark of Apple Inc.
• iPod is a trademark of Apple Inc., registered in the U.S.
and other countries.
• iPhone is a trademark of Apple Inc.
• “Made for iPod” means that an electronic accessory
has been designed to connect specifically to iPod and
has been certified by the developer to meet Apple
performance standards.
• “Works with iPhone” means that an electronic
accessory has been designed to connect specifically
to iPhone and has been certified by the developer to
meet Apple performance standards.
• Apple is not responsible for the operation of this
device or its compliance with safety and regulatory
standards.

30 | KDC-U546BT
Appendix
Function Item List
In Standby
1st hierarchy 2nd hierarchy 3rd hierarchy Page
“DISP SELECT” 16
“SETTINGS” “CLOCK” “CLOCK ADJUST” 18
“DISPLAY” “DIMMER SET”
17
“TEXT SCROLL”
“BT DVC STATUS”
“INITIAL SET” “PRESET TYPE”
18
“KEY BEEP”
“TDF ALARM”
“BUILT-IN AUX”
“CD READ”
“SWITCH PREOUT”
“SP SELECT”
“F/W UP”
“DEMO MODE” 18
In CD/ Audio file source
1st hierarchy 2nd hierarchy 3rd hierarchy Page
“AUDIO CONTROL” “SUBWOOFER SET”
15
“BASS BOOST”
“SYSTEM Q”
“BASS LEVEL”
“MID LEVEL”
“TRE LEVEL”
“BALANCE”
“FADER”
“SUB-W LEVEL”
“DETAILED SET” “LPF SUBWOOFER”
“SUB-W PHASE”
“SUPREME SET”
“VOLUME OFFSET”
“DISP SELECT” 16
“SETTINGS” “CLOCK” “CLOCK ADJUST” 18
“DISPLAY” (See in standby) 17
“DEMO MODE” 18
In USB/ iPod source
1st hierarchy 2nd hierarchy 3rd hierarchy Page
“AUDIO CONTROL” (See in CD/Audio file source) 15
“DISP SELECT” 16
“SETTINGS” “SKIP SEARCH” 9
“MPLIST DELETE”
“CLOCK” “CLOCK ADJUST” 18
“DISPLAY” (See in standby) 17
“DEMO MODE” 18
In Tuner source
1st hierarchy 2nd hierarchy 3rd hierarchy Page
“AUDIO CONTROL” (See in CD/Audio file source) 15
“DISP SELECT” 16
“SETTINGS” “LOCAL SEEK”
10
“SEEK MODE”
“AUTO MEMORY”
“MONO SET”
“CLOCK” “CLOCK ADJUST” 18
“DISPLAY” (See in standby) 17
“DEMO MODE” 18
In Hands-Free BT mode
1st hierarchy 2nd hierarchy 3rd hierarchy Page
“DISP SELECT” 16
“SETTINGS” “PHONE SELECT”
20
“SMS DOWNLOAD”
“SMS INBOX”
“VOICE TAG”
“DETAILED SET” “DEVICE REGIST”
“S-DVC SELECT”
“DEVICE DELETE”
“PIN CODE EDIT”
“AUTO ANSWER”
“BT SP SELECT”
“CALL BEEP”
“BT F/W UPDATE”
“MIC GAIN”
“NR LEVEL”
“EC LEVEL”
“CLOCK” “CLOCK ADJUST” 18
“DISPLAY” (See in standby) 17
“DEMO MODE” 18
In AUX source
1st hierarchy 2nd hierarchy 3rd hierarchy Page
“AUDIO CONTROL” (See in CD/Audio file source) 15
“DISP SELECT” 16
“SETTINGS” “AUX NAME SET” 17
“CLOCK” “CLOCK ADJUST” 18
“DISPLAY” (See in standby) 17
“DEMO MODE” 18
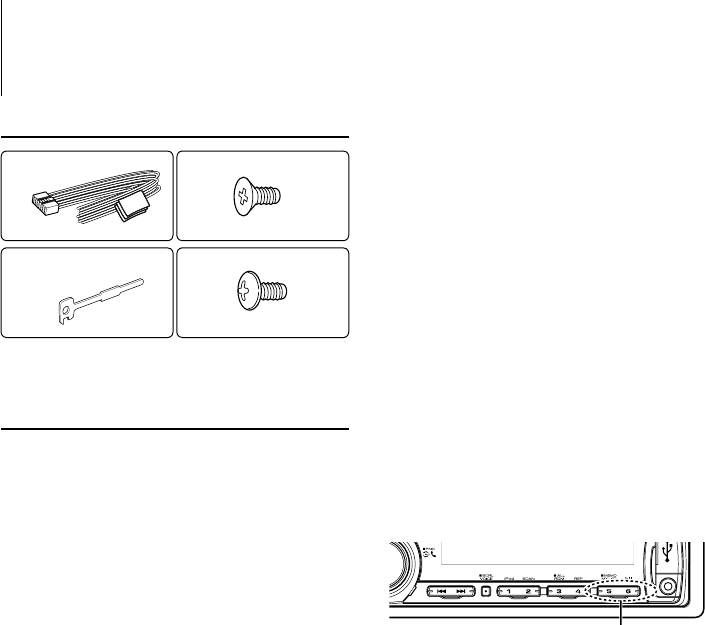
English | 31
Accessories/ Installation Procedure
Accessories
1
..........1
3
..........4
2
..........2
4
..........4
Installation Procedure
1. To prevent a short circuit, remove the key from the
ignition and disconnect the - battery.
2. Make the proper input and output wire
connections for each unit.
3. Connect the speaker wires of the wiring harness.
4. Connect the wiring harness wires in the following
order: ground, battery, ignition.
5. Connect the wiring harness connector to the unit.
6. Install the unit in your car.
7. Reconnect the - battery.
8. Press the reset button.
2WARNING
If you connect the ignition wire (red) and the battery wire
(yellow) to the car chassis (ground), you may cause a short
circuit, that in turn may start a fire. Always connect those
wires to the power source running through the fuse box.
¤
• Mounting and wiring this product requires skills and
experience. For safety’s sake, leave the mounting and wiring
work to professionals.
• Make sure to ground the unit to a negative 12V DC power
supply.
• Do not install the unit in a spot exposed to direct sunlight
or excessive heat or humidity. Also avoid places with too
much dust or the possibility of water splashing.
• Do not use your own screws. Use only the screws provided.
If you use the wrong screws, you could damage the unit.
• If the power is not turned ON (“PROTECT” is displayed),
the speaker wire may have a short-circuit or touched the
chassis of the vehicle and the protection function may
have been activated. Therefore, the speaker wire should be
checked.
• If your car’s ignition does not have an ACC position, connect
the ignition wires to a power source that can be turned on
and off with the ignition key. If you connect the ignition
wire to a power source with a constant voltage supply, as
with battery wires, the battery may die.
• If the console has a lid, make sure to install the unit so that
the faceplate will not hit the lid when closing and opening.
• If the fuse blows, first make sure the wires aren’t touching
to cause a short circuit, then replace the old fuse with one
with the same rating.
• Insulate unconnected wires with vinyl tape or other similar
material. To prevent a short circuit, do not remove the caps
on the ends of the unconnected wires or the terminals.
• Connect the speaker wires correctly to the terminals to
which they correspond. The unit may be damaged or fail to
work if you share the - wires or ground them to any metal
part in the car.
• When only two speakers are being connected to the
system, connect the connectors either to both the front
output terminals or to both the rear output terminals (do
not mix front and rear). For example, if you connect the +
connector of the left speaker to a front output terminal, do
not connect the - connector to a rear output terminal.
• After the unit is installed, check whether the brake lamps,
blinkers, wipers, etc. on the car are working properly.
• Mount the unit so that the mounting angle is 30° or less.
• Reception may drop if there are metal objects near the
Bluetooth antenna.
Bluetooth antenna unit
For Good Reception
To assure good reception, note the following:
• Communicate with the cell-phone within the line-
of-sight distance of 10 m (30 ft). The communication
range becomes shorter depending on the
surrounding environment. The communication
range also becomes shorter when there is an
obstacle between this unit and the cell-phone. The
above maximum communication range (10 m) is
not always assured.
• A broadcast station or walkie-talkie located nearby
can interfere with communication due to too strong
signal.
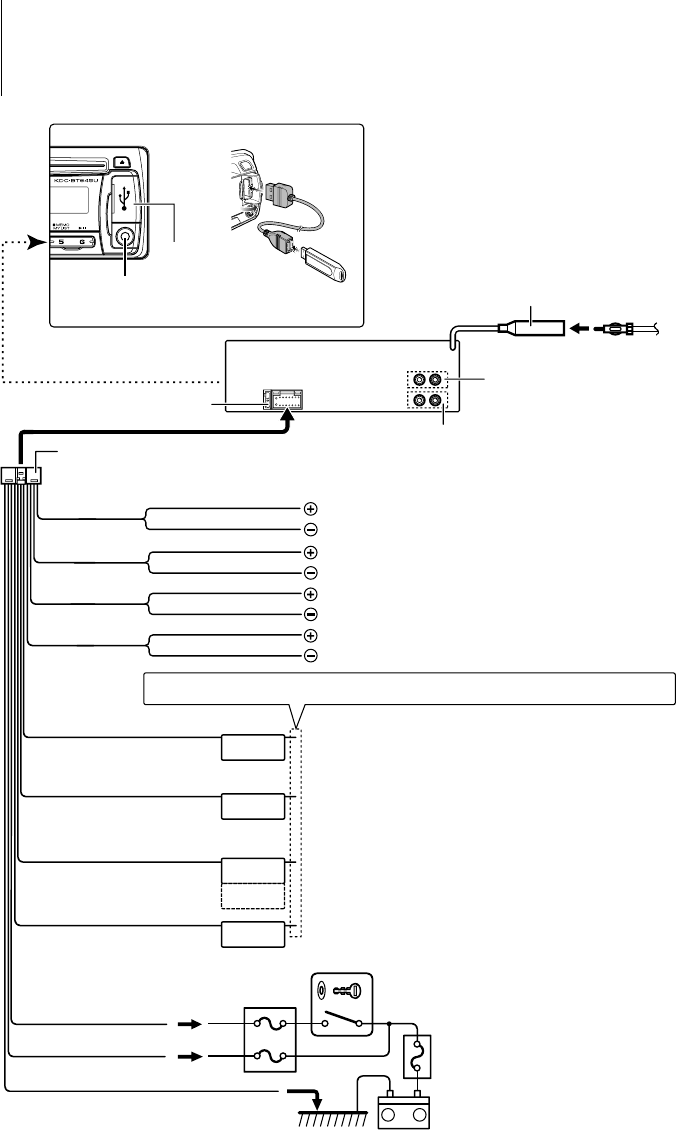
32 | KDC-U546BT
ANT. CONT
MUTE
P.CONT
REMOTE CONT
STEERING WHEEL
REMOTE INPUT
–
+
L
R
Connecting Wires to Terminals
FM/AM antenna input
Front output
Fuse (10A)
Wiring harness
(Accessory1)
White/Black
Gray/Black
Green/Black
Purple/Black
White
Gray
Green
Purple
To front left speaker
To front right speaker
To rear right speaker
To rear left speaker
Ignition wire (Red)
Battery wire (Yellow)
Ground wire (Black) · (To car chassis)
Ignition key
switch
Car fuse box
(Main fuse)
ACC
Car fuse
box
Battery
If no connections are made, do not let the wire come out from the tab.
Power control wire (Blue/White)
Motor antenna control wire(Blue) Depending on what antenna you are using, connect either to the control
terminal of the motor antenna, or to the power terminal for the booster
amplifier of the film-type or short pole type antenna.
Mute control wire (Brown) To connect the Kenwood navigation system, consult your navigation
manual.
AUX input (Stereo)
Use the mini-plug cable which is stereo type and
does not have any resistance.
USB connector
To use the steering wheel remote control feature, you need to an
exclusive remote adapter (not supplied) matches your car is required.
Steering remote control wire
(Light Blue/Yellow)
Rear output/Sub Woofer output
Switches the preout between rear output (“REAR”) and subwoofer
output (“SUB-W”). Refer to “SWITCH PREOUT” of <Initial Setting>
(page 18).
Connect either to the power control terminal when using the optional
power amplifier.
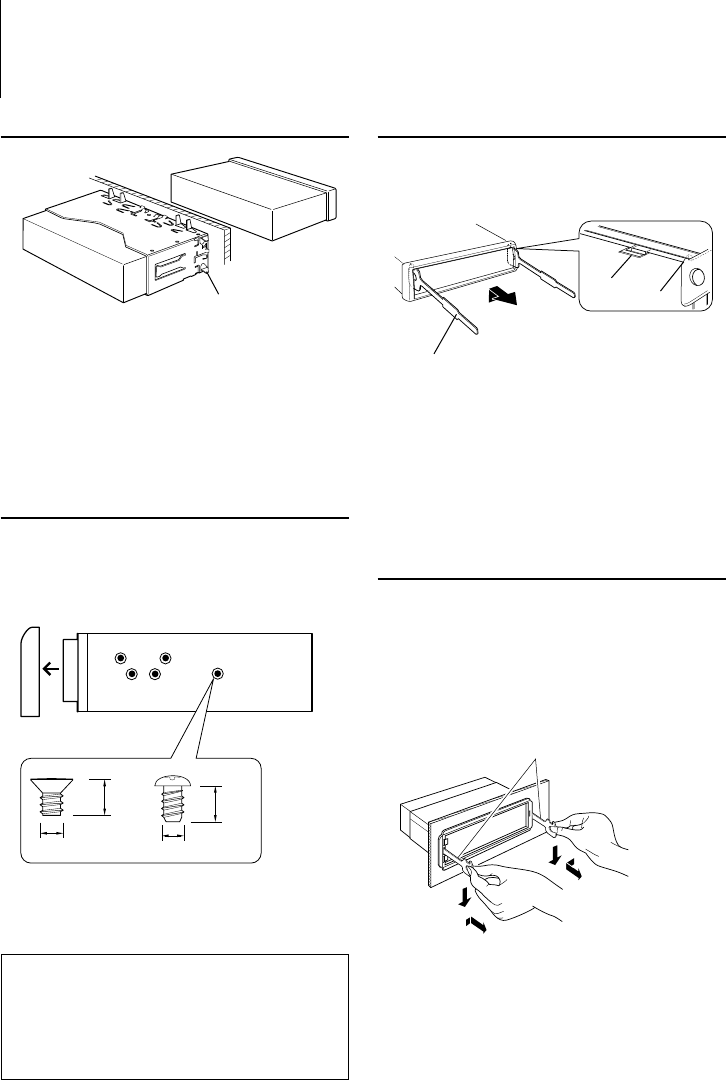
English | 33
Installation/Removing the Unit
Non-Japanese Cars
Bend the tabs of the mounting
sleeve with a screwdriver or similar
utensil and attach it in place.
⁄
• Make sure that the unit is installed securely in place. If the
unit is unstable, it may malfunction (for example, the sound
may skip).
Japanese Cars
1 Refer to the section <Removing the Hard Rubber
Frame> and then remove the hard rubber frame.
2 Align the holes in the unit (two locations on each
side) with the vehicle mounting bracket and secure
the unit with the accessory screws.
8 mm
MAX.
ø5mm ø5mm
8mm
MAX.
T
NT
N
T/N
T: Toyota cars
N: Nissan cars
Accessory3...for Nissan car
Accessory4...for Toyota car
34
Removing the Hard Rubber Frame
1 Engage the catch pins on the removal tool and
remove the two locks on the upper level.
Upper the frame and pull it forward as shown in
the figure.
Catch
Lock
Accessory2
Removal tool
2 When the upper level is removed, remove the
lower two locations.
⁄
• The frame can be removed from the bottom side in the
same manner.
Removing the Unit
1 Refer to the section <Removing the Hard Rubber
Frame> and then remove the hard rubber frame.
2 Detach the faceplate.
3 Insert the two removal tools deeply into the slots
on each side, as shown.
4 Lower the removal tool toward the bottom, and
pull out the unit halfway while pressing towards
the inside.
Accessory2
¤
• Be careful to avoid injury from the catch pins on the
removal tool.
5 Pull the unit all the way out with your hands, being
careful not to drop it.
¤ CAUTION
Install this unit in the console of your vehicle.
Do not touch the metal part of this unit during and
shortly after the use of the unit. Metal part such as
the heat sink and enclosure become hot.
34 | KDC-U546BT
Troubleshooting Guide
Some functions of this unit may be disabled by
some settings made on this unit.
! • Cannot set up the subwoofer.
• Cannot set up the low pass filter.
• No output from the subwoofer.
▲
• “SUBWOOFER SET” of <Audio Control> (page 15) is
not set to ON.
• Preout is not set to subwoofer.
☞ “SWITCH PREOUT” of <Initial Setting> (page 18).
! Cannot set up the subwoofer phase.
▲
The Low Pass Filter is set to “THROUGH”.
☞ “LPF SUBWOOFER” of <Audio Control> (page 15).
! The number of songs contained in “SONGS”
category of this unit is different from that
contained in “SONGS” category of iPod.
▲
Podcast files are not counted in this unit as this unit
does not support the playback of podcast files.
What might seem to be a malfunction in your unit
may just be the result of slight miss operation or
miss wiring. Before calling service, first check the
following table for possible problems.
General
? The operation check sound (beep sound) does not
sound.
✔ The preout jack is being used.
☞ The operation check sound (beep sound) cannot
be output for the preout jack.
Tuner source
? Radio reception is poor.
✔ The car antenna is not extended.
☞ Pull the antenna out all the way.
Disc source
? The specified disc does not play, but another one
plays instead.
✔ The specified CD is quite dirty.
☞ Clean the CD, referring to the CD cleaning of the
section on <Handling CDs> (page 3).
✔ The disc is severely scratched.
☞ Try another disc instead.
Audio file source
? The sound skips when an Audio file is being
played.
✔ The media is scratched or dirty.
☞ Clean the media, referring to the CD cleaning of
the section on <Handling CDs> (page 3).
✔ The recording condition is bad.
☞ Record the media again or use another media.
Hands-free phoning
? The hands-free talk volume is low.
✔ The hands-free talk volume is set at a low level.
☞ The hands-free talk volume can be adjusted
independently. Adjust it during hands-free
talk. “MIC GAIN”, “NR LEVEL” and “EC LEVEL” of
<Bluetooth Setup> (page 20).
? No sound is heard from the rear speakers.
✔ You are talking in the hand-free talk mode.
☞ No sound is heard from the rear speakers in the
hands-free talk mode.
? No beep is heard at reception of an incoming call.
✔ No beep is heard depending on the type of your
cell-phone.
☞ The “CALL BEEP” of <Bluetooth Setup> (page 20)
is set to ON.
? Voice is not recognized.
✔ The vehicle window is open.
☞ If the surrounding noise is large, voice cannot be
recognized properly. Close the vehicle windows
to reduce noise.
✔ Small voice.
☞ If voice is too small, it cannot be recognized
properly. Speak into the microphone a little more
loudly and naturally.
✔ The person saying the voice tag is not the one who
registered the it.
☞ Only the voice of the person who registered the
voice tag can be recognized.
English | 35
The messages shown below display your
systems condition.
TOC ERROR: • No disc has been loaded in the disc
magazine.
• The CD is quite dirty. The CD is upside-
down. The CD is scratched a lot.
ERROR 05: The disc is unreadable.
ERROR 77: The unit is malfunctioning for some reason.
➪ Press the reset button on the unit. If the
“ERROR 77” code does not disappear,
consult your nearest service center.
IN (Blink): The CD player section is not operating
properly.
➪ Reinsert the CD. If the CD cannot be
ejected or the display continues to flash
even when the CD has been properly
reinserted, please switch off the power
and consult your nearest service center.
PROTECT (Blink):
The speaker wire has a short-circuit or
touches the chassis of the vehicle, and then
the protection function is activated.
➪ Wire or insulate the speaker cable
properly and press the reset button. If
the “PROTECT” code does not disappear,
consult your nearest service center.
NA FILE: An Audio file is played with a format that this
unit can’t support.
COPY PRO: A copy-protected file is played.
READ ERROR: The file system of the connected USB device
is broken.
➪ Copy the files and folders for the USB
device again. If the error message is still
displayed, initialize the USB device or use
other USB devices.
NO DEVICE: The USB device is selected as a source
although no USB device is connected.
➪ Change the source to any source other
than USB. Connect an USB device, and
change the source to USB again.
N/A DEVICE: • An unsupported USB device is connected.
• Connection to the iPod has failed.
➪ Check that the connected iPod is an iPod
that is supported. See <About Audio file>
(page 28) for information on supported
iPods.
NO MUSIC DATA/ERROR 15:
• The connected USB device contains no
playable audio file.
• Media was played that does not have data
recorded that the unit can play.
USB ERROR: Some trouble may have occurred to the
connected USB device.
➪ Remove the USB device, then cycle the
power switch to ON. If the same display is
repeated, use another USB device.
iPod ERROR: Connection to the iPod has failed.
➪ Remove the USB device and then
reconnect it.
➪ Confirm that the software for the iPod is
the latest version.
USB REMOVE (Blink):
The Remove mode has been selected for the
USB device/iPod. You can remove the USB
device/iPod safely.
NO NUMBER: • The calling party does not notify a caller ID.
• There is no phone number data.
NO DATA: • There is no outgoing call list.
• There is no incoming call list.
• There is no missed call list.
• There is no phone book list.
NO ENTRY: The cell-phone has not been registered
(pairing).
HF DISCONCT: The unit cannot communicate with the cell-
phone.
HF ERROR 07: The memory cannot be accessed.
➪ Turn off the power and on again. If this
message still appears, press the reset
button on the control unit.
HF ERROR 68: The unit cannot communicate with the cell-
phone.
➪ Turn off the power and on again. If this
message still appears, press the reset
button on the control unit.
UNKNOWN: The Bluetooth device cannot be detected.
DEVICE FULL: 5 Bluetooth device have already been
registered. No more Bluetooth device cannot
be registered.
PIN CODE NG: The PIN code is wrong.
CONNECT NG: The unit cannot be connected to the device.
PAIRING NG: Pairing error.

36 | KDC-U546BT
NO MATCHING: The voice tag is wrong. Voice cannot be
recognized because of an unregistered voice
tag, etc.
TOO SOFT: Voice is too small and cannot be recognized.
TOO LOUD: Voice is too large to be recognized.
TOO LONG: The word or utterance is too long to be
recognized.
NO PHONEBOOK:
Data is not contained in the phone book.
NO MESSAGE: No short message in In Box.
NO RECORD: The voice tag is not registered in the phone
book.
MEMORY FULL: The number of voice tags reaches the
maximum number to be registered in the
phone book.
NO ACCESS: The procedure preset with mixed preset
memory function cannot be available.
The preset content may not be recalled
depending on the selected band.
NO VOICE: No call.
Troubleshooting Guide
FM Tuner Section
Frequency Range
: 87.9 MHz – 107.9 MHz (200 kHz Space)
: 87.5 MHz – 108.0 MHz (50 kHz Space )
Usable Sensitivity (S/N = 26dB)
: 11.2 dBf (1.0 V/75 Ω)
Quieting Sensitivity (DIN S/N = 46dB)
: 19.2dBf (2.5 V/75 Ω)
Frequency Response (±3 dB)
: 30 Hz – 15 kHz
Signal to Noise Ratio (MONO)
: 63 dB
Stereo Separation (1 kHz)
: 40 dB
AM Tuner Section
Frequency Range
Band1 (MW) : 530 kHz – 1700 kHz (10 kHz Space)
: 531 kHz – 1611 kHz (9 kHz Space)
Band2 (SW1) : 2940 kHz – 7735 kHz (5 kHz Space)
Band3 (SW2) : 9500 kHz – 10135 kHz / 11580 kHz
- 18135 kHz (5 kHz Space)
Usable Sensitivity (S/N = 20dB)
MW : 31 dBµ (36 µV)
SW : 32 dBµ (40 µV)
CD Player Section
Laser diode
: GaAlAs
Digital filter (D/A)
: 8 Times Over Sampling
D/A Converter
: 24 Bit
Spindle Speed
: 500 – 200 rpm (CLV)
Wow & Flutter
: Below Measurable Limit
Frequency Response (±1 dB)
: 20 Hz – 20 kHz
Total Harmonic Distortion (1 kHz)
: 0.01 %
Signal to Noise Ratio (1 kHz)
: 105 dB
Dynamic Range
: 93 dB
MP3 Decode
: Compliant with MPEG-1/2 Audio Layer-3
WMA Decode
: Compliant with Windows Media Audio
Speci cations

English | 37
USB Interface
USB Standard
: USB1.1/ 2.0 (Full Speed)
File System
: FAT16/ 32
MP3 Decode
: Compliant with MPEG-1/2 Audio Layer-3
WMA Decode
: Compliant with Windows Media Audio
Maximum Supply Current
: 500 mA
Bluetooth Section
Version
: Bluetooth Ver. 2.0 Certified
Frequency Range
: 2.402 – 2.480 GHz
Output Power
: +4dBm (MAX), 0dBm (AVE) Power Class 2
Maximum Communication Range
: Line of sight approx.10m (32.8 ft)
Profile
: HFP (Hands Free Profile)
: HSP (Headset Profile)
: SPP (Serial Port Profile)
: PBAP (Phone book Access Profile)
: OPP (Object Push Profile)
: SYNC (Synchronization Profile)
Audio Section
Maximum Output Power
: 50 W x 4
Full Bandwidth Power (at less than 1% THD)
: 22 W x 4
Speaker Impedance
: 4 – 8 Ω
Tone Action
Bass : 100 Hz ±8 dB
Middle : 1 kHz ±8 dB
Treble : 10 kHz ±8 dB
Preout Level / Load (CD)
: 2000 mV/10 kΩ
Preout Impedance
: ≤ 600 Ω
Auxiliary Input
Frequency Response (±3 dB)
: 20 Hz – 20 kHz
Input Maximum Voltage
: 1200 mV
Input Impedance
: 10 kΩ
Specifications subject to change without notice.
General
Operating Voltage
: 14.4 V (10.5 – 16V allowable)
Maximum Current Consumption
: 10 A
Installation Size (W x H x D)
: 182 x 53 x 155 mm
Weight
: 1.3 kg

38 | KDC-U546BT
目录
使用之前 39
各部分的名称和功能 40
一般操作 41
音乐光盘/音频文件/iPod的操作 42
调谐器的操作方法 46
免提通话的操作 48
音响调节 51
显示设定 52
其他功能 54
Bluetooth设置 56
遥控器的基本操作 62
附录 64
附件/安装步骤 67
将导线与端子连接 68
本机的安装/拆卸方法 69
故障检修 70
规格 72

中文 | 39
使用之前
2警告
为了防止受伤和火灾,请遵守下列注意事项:
在首次使用本机之前
装置的保养
¤
关于本机和面板的端子
透镜雾气
说明
" ‘ ` % & * + – = , . /
\ < > [ ] ( ) : ; ^ - { } | ~
CD的使用
无法使用的CD

1 释放按钮
2 [SRC] 按钮
3 光盘槽
4 显示窗
5 [0] 按钮
6 USB端子
7 辅助输入端子
8 [1] [6] 按钮
9 [VOICE] 按钮
p [
4
] / [
¢
] 按钮
q 麦克风
w [VOL] 旋钮
e [BAND] 按钮
r [ ] 按钮
t [ ] 按钮
各部分的名称和功能
15 14 13 12 11 10 9 8
1 2 3 4 5
7 6
40 | KDC-U546BT
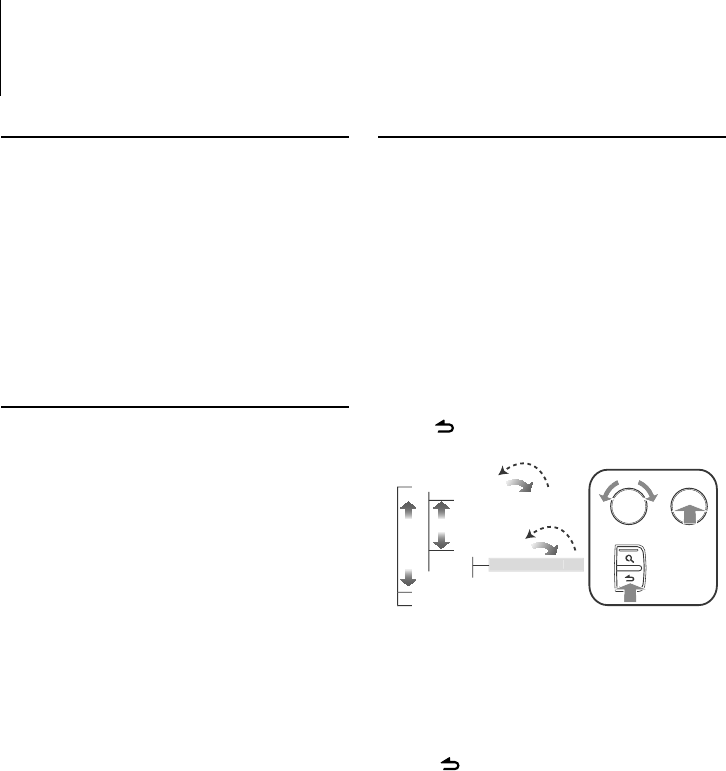
功能设定操作
使用本功能进行基本操作的方法说明如下所示。
各功能项目将在操作方法中说明。
1 选择信号源
2 进入功能设定模式
3 选择需要的功能项目
⁄
AU
DI
O
CO
NTR
OL
[
VOL
]
[
VOL
]
BASS B
OO
S
T
S
UPREME
S
E
T
…
D
ETAILED
S
E
T
…
…
…
…
D
I
S
P
S
ELE
CT
S
ETTING
S
4 进行设定
5 退出功能设定模式
[ ]
使用之前
退出演示模式
安装后第一次使用本机时,请取消演示模式。
1
2
⁄
共通操作
选择电源和信号源
➜
➜➜➜
⁄
音量
一般操作
中文 | 41
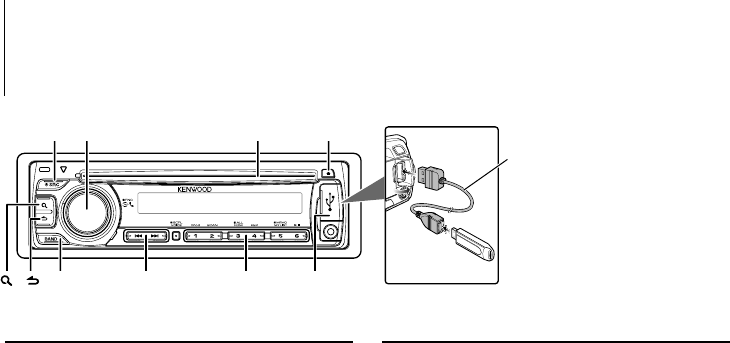
42 | KDC-U546BT
音乐光盘/音频文件/iPod的操作
基本操作方法
播放光盘
播放USB装置或iPod
暂停和播放
选择文件夹
选择歌曲
4¢
4¢
弹出光盘
0
拆除USB装置或iPod
0
选择CD、USB或iPod信号源
播放功能
扫描播放
⁄
随机播放
重复播放
[]
[SRC] [VOL]
[1] — [6]
[] / [E]
[ ][ ][BAND]
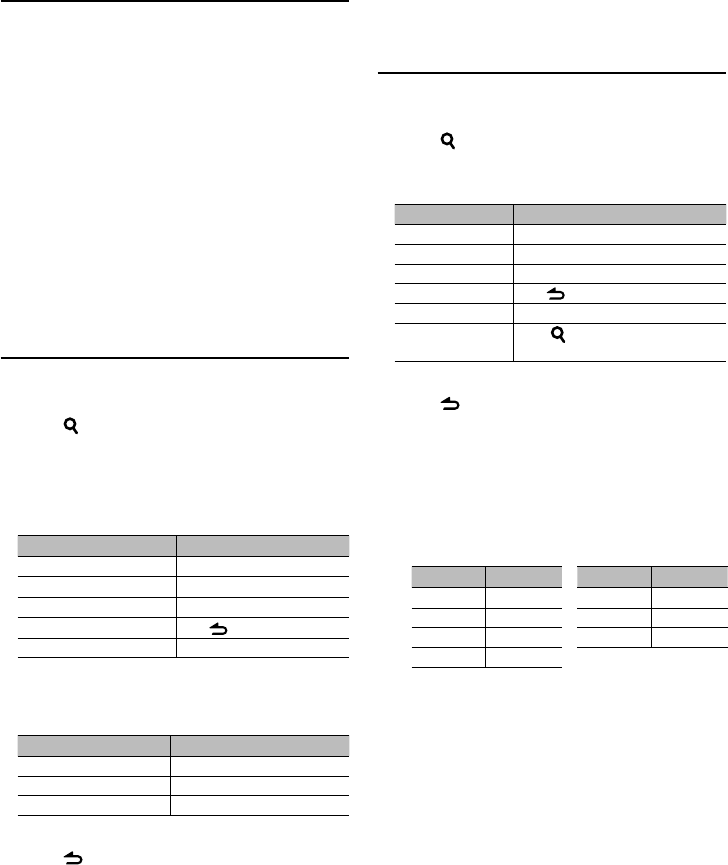
中文 | 43
iPod的功能
全部随机播放
随机播放iPod中的全部歌曲。
⁄
音频文件/CD信号源的功能
音乐搜索
从装置或正在播放的媒体中选择需要欣赏的音乐。
1 进入音乐搜索模式
[ ]
2 搜索音乐
音响文件
4¢
CD信号源
取消音乐搜索模式
[ ]
⁄
4
¢
iPod的功能
搜索iPod中的音乐
搜索需要播放的歌曲 (在iPod中)。
1 进入音乐搜索模式
[ ]
2 搜索音乐
4¢
取消音乐搜索模式
[ ]
⁄
4
¢

44 | KDC-U546BT
音乐光盘/音频文件/iPod的操作
iPod的功能
字符搜索
可以按照字符选择歌曲。
本功能在选择的浏览项目 (艺术家、专辑等) 列表中,
搜索歌名包含指定字符的歌曲。
1 进入音乐搜索模式
[ ]
2 进入字符搜索模式
[ ]
3 选择需要搜索的字符
4¢
4 确定选择的字符
取消字符搜索模式
[ ]
⁄
iPod的功能
iPod的播放列表
可以在本机的播放列表中登录喜爱的歌曲。在播放列
表中可最多登录10首歌曲。
在播放列表中登录歌曲
1 播放需要登录的歌曲
4¢
2 登录歌曲
[5]
⁄
播放在播放列表中的歌曲
1 显示播放列表
[5]
2 播放在播放列表中的歌曲
⁄
从播放列表中删除歌曲
1
2
3
⁄

中文 | 45
音频文件/iPod设定
可以选择以下设定项目。
1 进入功能设定模式
2 选择功能项目
(出厂设定:加下划线)
3 进行设定
4 退出功能设定模式
[ ]
iPod的功能
iPod手动控制模式
可以通过iPod的控制操作iPod。
⁄
遥控器的功能
直接搜索音乐
输入音轨号码搜索音乐。
1 进入直接搜索音乐模式
2 输入音乐号码
3 搜索音乐
4¢
取消直接搜索音乐
⁄
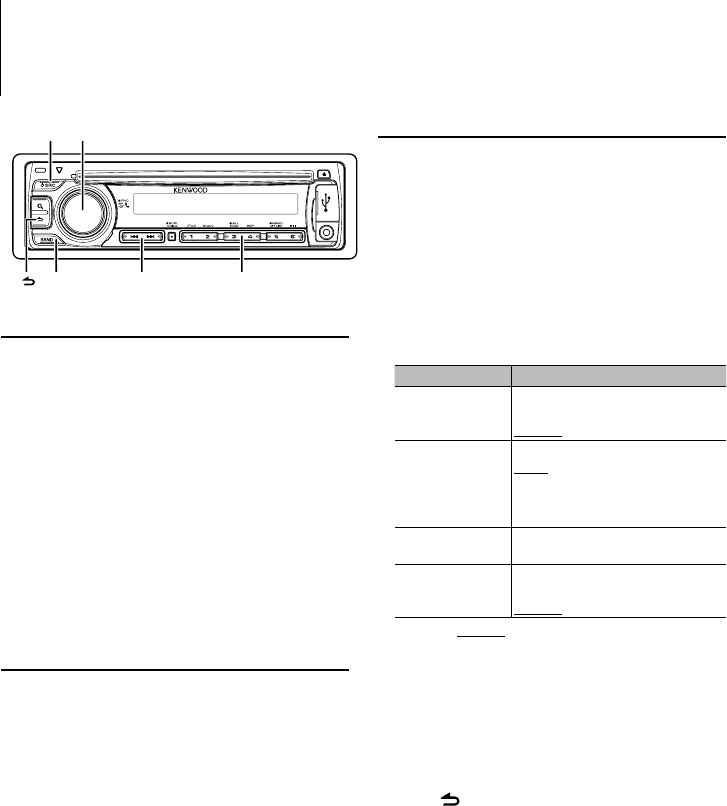
46 | KDC-U546BT
调谐器的操作方法
基本操作方法
选择调谐器信号源
选择接收波段
选择接收电台
4¢
选择预设电台
电台预设存储
向存储器输入电台。
1 选择存储的频率
4¢
2 选择存储的号码
⁄
调谐器设定
可以选择以下调谐器设定项目。
1 选择调谐器信号源
2 进入功能设定模式
3 选择功能项目
(出厂设定:加下划线)
4 进行设定
5 退出功能设定模式
[ ]
⁄
[SRC] [VOL]
[1] — [6]
[] / [E]
[ ][BAND]
中文 | 47
遥控器的功能
直接调谐
输入频率直接调谐需要的广播电台。
1 进入直接调谐模式
2 输入频率
3 调谐输入的频率
4¢
取消直接调谐
⁄
设定频率步进
改变调谐频率步进。
FM波段的初始设定为50kHz,MW波段的初始设定为
9kHz。
1 切断电源
2 切换频率步进
⁄
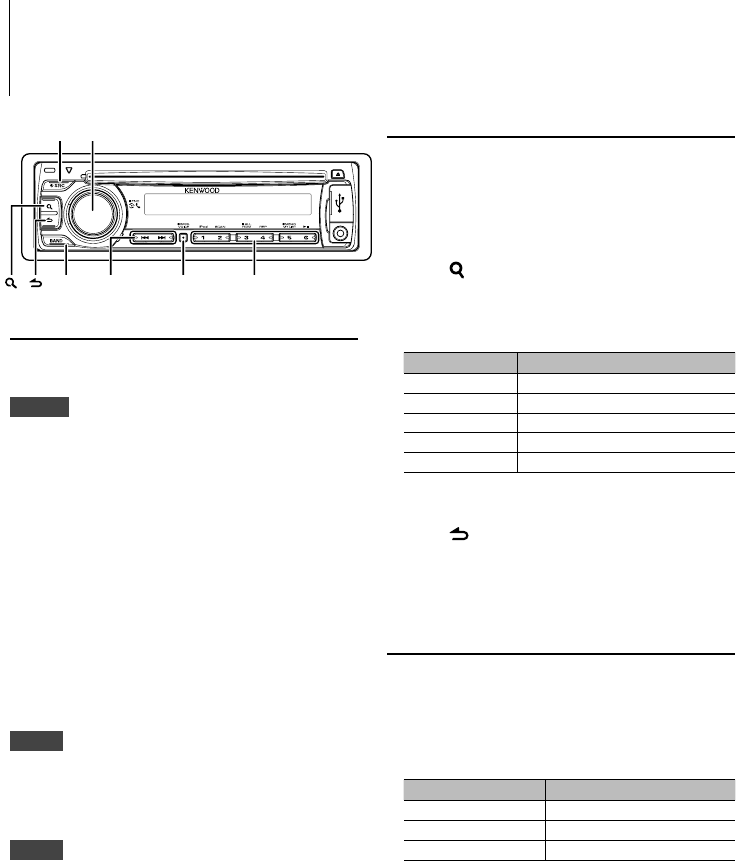
48 | KDC-U546BT
免提通话的操作
连接Bluetooth装置
使用Bluetooth装置之前,需要建立Bluetooth装置与本
机的连接。以下为三个必要步骤。
第一步
配对 (从Bluetooth装置侧登录)
1 接通本机电源。
2 操作Bluetooth装置,开始向本机登录
3 输入PIN代码
4
第二步
连接
第三步
免提通话
⁄
[SRC] [VOL]
[1] — [6]
[] / [E]
[ ][VOICE]
[BAND]
[ ]
拨打电话
可以选择以下拨号方法。
1 进入Bluetooth模式
2 进入拨号方法模式
3 选择拨号方法
4 退出拨号方法模式
[ ]
中断通话
拨打电话簿中的号码
1 选择电话簿模式
2 选择需要搜索的首字母

中文 | 49
3 选择姓名
4¢
4 通话
⁄
拨打通话记录中的号码
1 选择通话记录模式
2 选择姓名或电话号码
3 通话
⁄
拨号
1 选择拨号模式
2 输入电话号码
¢
4
¢
3 通话
⁄
进行语音拨号通话
1 进入语音识别模式
2
3
4 通话
移动到下一个电话号码
⁄
登录预设拨号 (预设存储)
1 输入需要登录的电话号码
2 选择存储的号码

50 | KDC-U546BT
快速拨号 (预设拨号)
1 选择需要从存储器中呼出的号码
2 通话
⁄
接听电话
接听电话
⁄
拒接来电
在通话中
中断通话
切换到专用模式
⁄
在通话时调整音量
通话等候
暂停当前的通话,接听其他来电
1
2
中断当前的通话,接听其他来电
继续当前的通话
1
2
中断当前的通话,接听等候的通话
在当前的通话和等候的通话之间切换
其他功能
清除中断连接的消息
切换显示模式
电话号码类型 (分类) 的显示
电话簿中的分类项目显示如下所示。
免提通话的操作

中文 | 51
音响调节
音响控制
可以调节以下音响控制项目。
1 选择信号源
2 进入功能设定模式
3 选择功能项目
(出厂设定:加下划线)
4 进行设定
5 退出功能设定模式
[ ]
⁄
SUPREME:
[SRC] [VOL]
[ ]
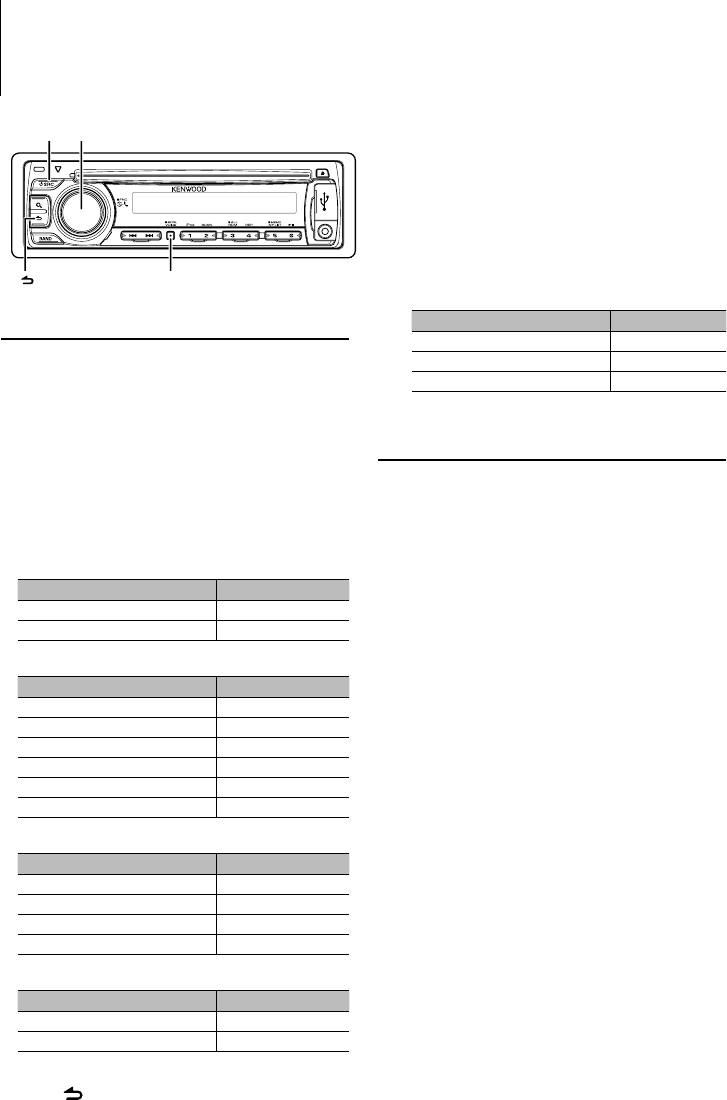
52 | KDC-U546BT
显示设定
显示的选择
变更以下各信号源的显示信息。
1 进入功能设定模式
2 进入显示选择模式
3 选择文本
调谐器信号源
音频文件/ iPod信号源
CD信号源
待机/辅助输入信号源
4 退出功能设定模式
[ ]
⁄
文本滚动
滚动显示的文件名称、歌曲标题等。
[SRC] [VOL]
[ ][VOICE]
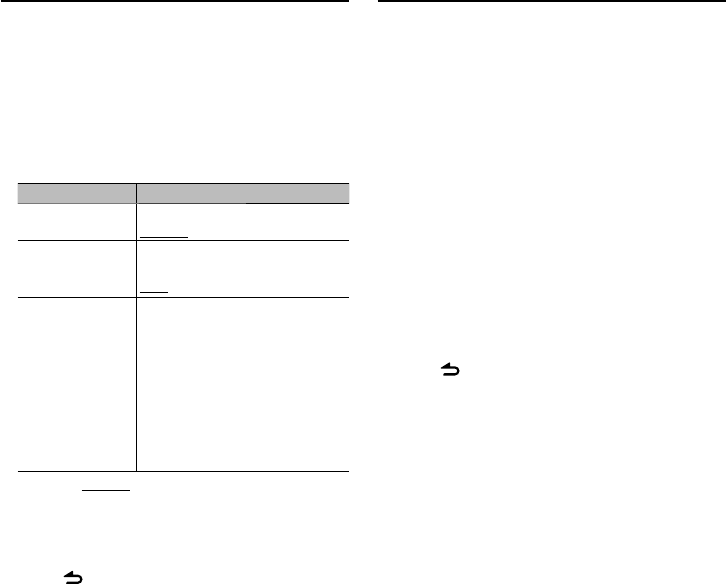
中文 | 53
显示设定
可以选择以下显示设定项目。
1 进入功能设定模式
2 选择需要的功能项目
(出厂设定:加下划线)
3 进行设定
4 退出功能设定模式
[ ]
辅助输入显示设定
选择切换到辅助输入信号源时的显示。
1 选择AUX信号源
2 进入功能设定模式
3 进入辅助输入显示设定模式
4 选择辅助输入显示
5 退出功能设定模式
[ ]
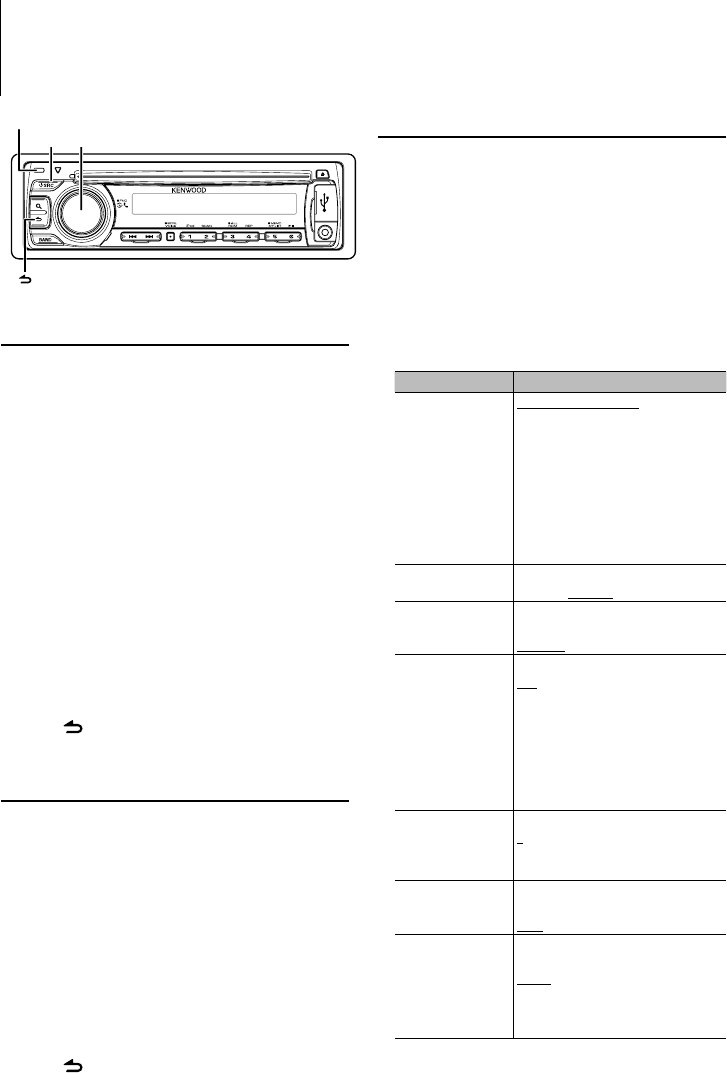
54 | KDC-U546BT
其他功能
时钟调节
1 选择信号源
2 进入功能设定模式
3 进入时钟调节模式
4 调节时钟
5 退出功能设定模式
[ ]
演示模式设定
接通/关闭演示模式。
1 进入功能设定模式
2 选择演示模式
3 设定演示模式
4 退出功能设定模式
[ ]
初始设定
可以选择以下初始设定项目。
1 选择待机信号源
2 进入功能设定模式
3 选择功能项目
[SRC] [VOL]
[ ]
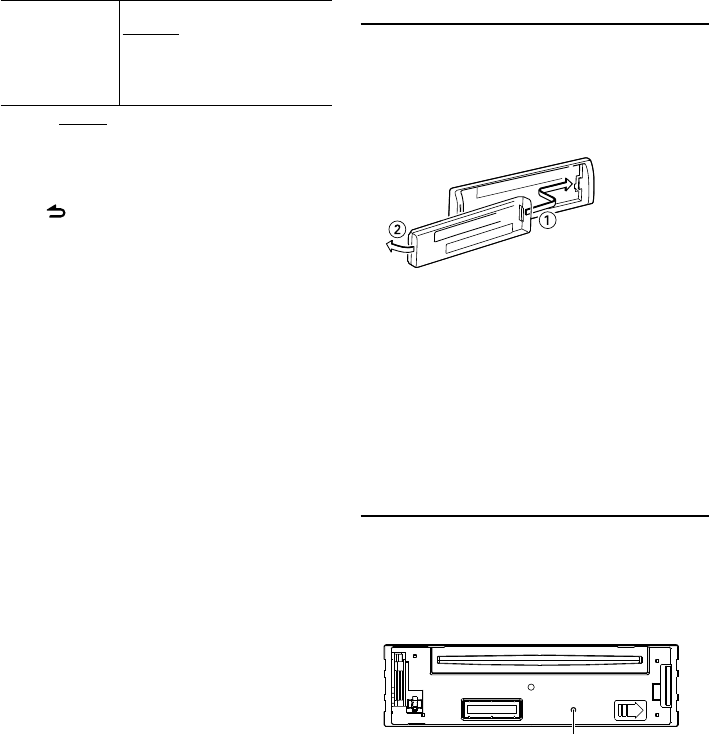
中文 | 55
(出厂设定: 加下划线)
4 进行设定
5 退出功能设定模式
[ ]
拆卸面板
本机的面板可以拆下带走,便于防盗。
拆卸面板
重新安装面板
¤
本机的复位方法
如果本机无法正常工作,请按下复位按钮。按下复位
按钮后,本机恢复到出厂设定状态。
1 解除面板锁定,将面板拆下。
2 按下复位按钮,然后重新安装面板。
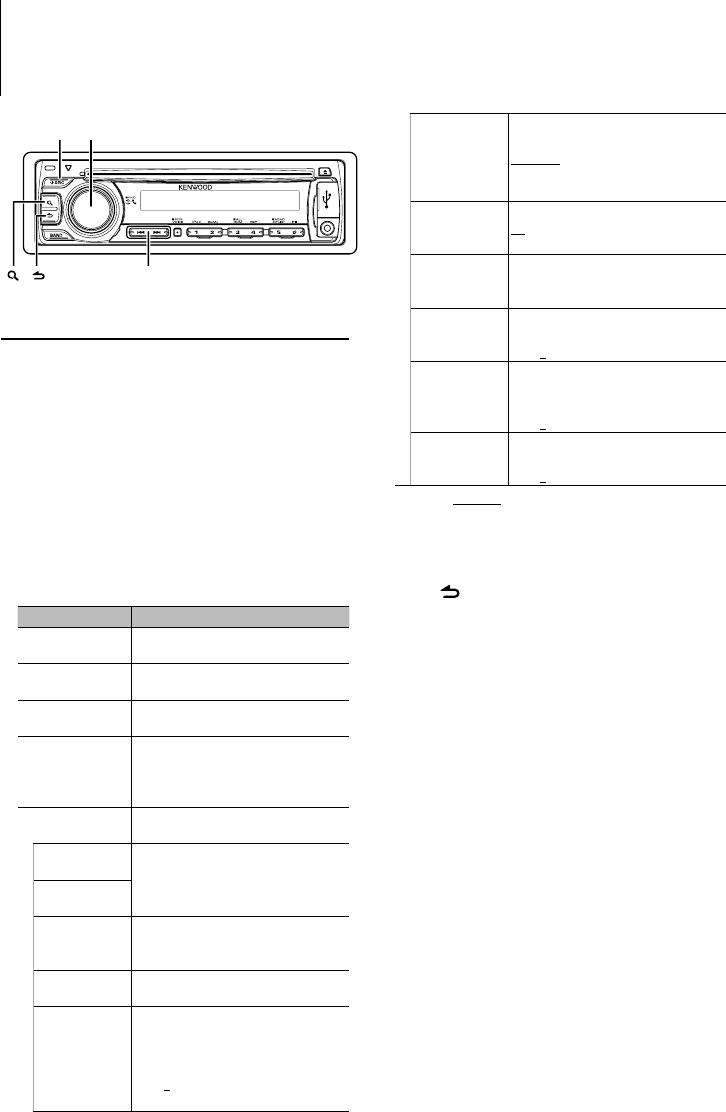
56 | KDC-U546BT
Bluetooth设置
Bluetooth设置
可以选择以下Bluetooth设置项目。
1 进入Bluetooth模式
2 进入功能设定模式
3 选择功能项目
(出厂设定: 加下划线)
4 进行设定
5 退出功能设定模式
[ ]
[SRC] [VOL]
[] / [E]
[ ] [ ]
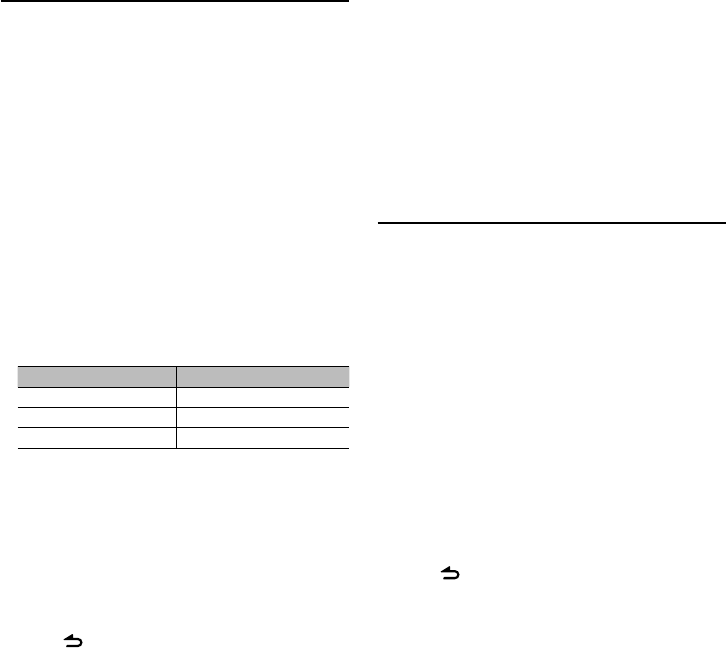
中文 | 57
登录Bluetooth装置 (配对)
为了本机能够使用您的Bluetooth装置 (手机),需要进行
登录 (配对)。最多可向本机登录5台Bluetooth装置。
从本机侧登录
1 选择Bluetooth装置登录模式
2 进入Bluetooth装置登录模式
3 选择Bluetooth装置
4 输入PIN代码
¢
4
5 传送PIN代码
6 返回至装置列表
7 退出功能设定模式
[ ]
⁄
登录特殊Bluetooth装置
1 选择特殊装置登录模式
2 进入特殊装置登录模式
3 选择装置名称
4
取消特殊装置登录模式
⁄
删除登录的Bluetooth装置
可以删除注册的Bluetooth装置。
1 选择Bluetooth装置删除模式
2 进入Bluetooth装置删除模式
3 选择Bluetooth装置
4 删除选择的Bluetooth装置
5 退出功能设定模式
[ ]
⁄
58 | KDC-U546BT
Bluetooth设置
登录PIN代码
操作Bluetooth装置,设定用于登录本机的PIN代码。
1 选择PIN代码编辑模式
2 进入PIN代码编辑模式
3 输入PIN代码
¢
4
4 登录PIN代码
5 退出功能设定模式
[ ]
⁄
显示固件版本
显示本机的固件版本。
1 进入Bluetooth固件升级模式
2 进入Bluetooth固件升级模式
3 退出功能设定模式
[ ]
⁄
下载电话簿
从手机下载电话簿资料,然后才能使用本机的电话
簿。
自动下载
⁄
从手机手动操作下载
1
2 操作手机,向本机传送电话簿数据
3
⁄

中文 | 59
选择需要连接的Bluetooth装置
如果已经登录了两台或更多台Bluetooth装置,需要选
择将要使用的Bluetooth装置。
1 选择Bluetooth装置选择模式
2 进入Bluetooth装置选择模式
3 选择Bluetooth装置
4 设定Bluetooth装置
✱
✱
5 退出功能设定模式
[ ]
⁄
下载短信
下载手机接收的短信 (SMS),由本机阅读。
1 选择下载短信模式
2 进入下载短信模式
3 退出功能设定模式
[ ]
⁄

60 | KDC-U546BT
Bluetooth设置
SMS (短信服务)
在本接收机显示手机收到的SMS。
显示新收到的短信。
¤
当新收到短信时
显示SMS
1 选择短信收件箱模式
2 进入短信收件箱模式
3 选择短信
4 显示文本
5 退出功能设定模式
[ ]
⁄
添加语音拨号指令
向电话簿添加语音标签用于语音拨号。可以最多登录
35个语音标签。
1 选择电话簿姓名编辑模式
2 进入语音标签编辑模式
3 进入电话簿姓名编辑模式
4 搜索姓名进行登录
5 选择模式
选择 "PB NAME REG" (登录)
6 登录语音标签 (第一次)
7 确认语音标签 (第二次)
8 结束登录
⁄
选择 "PB NAME CHK" (播放)
6

中文 | 61
选择 "PB NAME DEL" (删除)
6 删除语音标签
7
退出电话簿姓名编辑模式
[ ]
⁄
对分类设定语音指令
对语音拨号通话添加电话号码分类 (类型) 语音标签。
1 选择电话号码类型编辑模式
2 进入语音标签编辑模式
3 进入电话号码类型编辑模式
4 选择需要设定的分类 (类型)
5
6
7 退出功能设定模式
[ ]
⁄
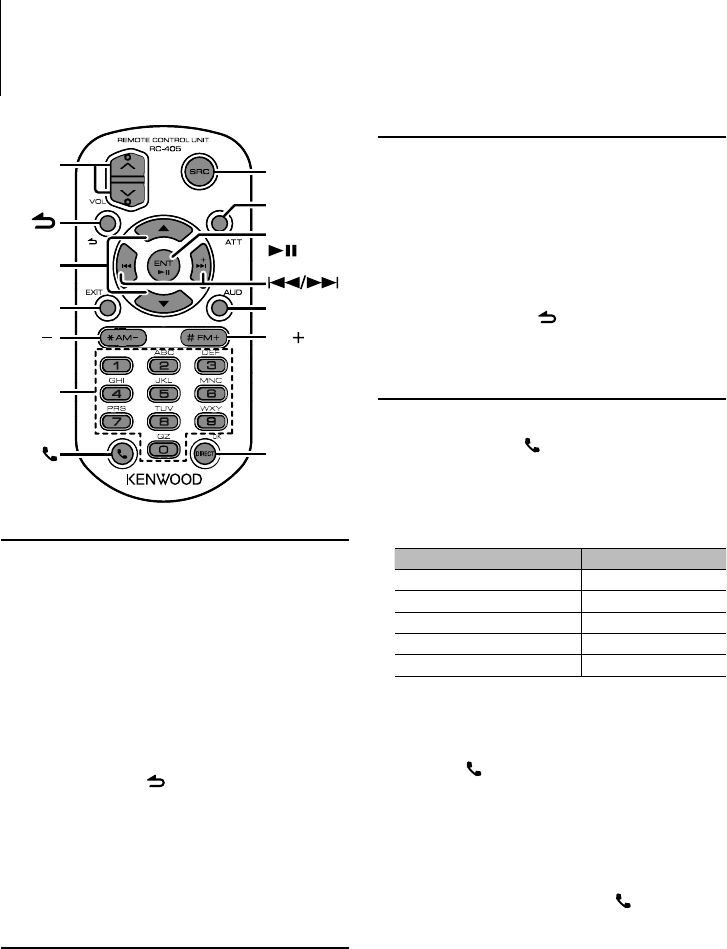
62 | KDC-U546BT
FM
DIRECT/OK
AUD
ENT
ATT
SRC
0 — 9
VOL
AM
EXIT
/P
遥控器的基本操作
共通控制
[VOL] 按钮
[SRC] 按钮
[ATT] 按钮
[AUD] 按钮
⁄
[ ] 按钮
[EXIT] 按钮
[5]/[∞] 按钮
[ENT] 按钮
调谐器信号源
[FM+]/[AM] 按钮
[4]/[¢] 按钮
[1] — [6] 按钮
iPod/CD/音频文件信号源
[4]/[¢] 按钮
[FM+]/[AM] 按钮
[38] 按钮
[5]/[∞] 按钮
[5]/[∞] 按钮
[] 按钮
免提手机控制
拨打电话
[ ] 按钮
[5]/[∞] 按钮
[ENT] 按钮
¢
+
4
[OK] 按钮
接听电话
[ ] 按钮
[38] 按钮
通话等候
[ ] 按钮
[SRC] 按钮
[1] 按钮
在通话中
[SRC] 按钮
[VOL] 按钮
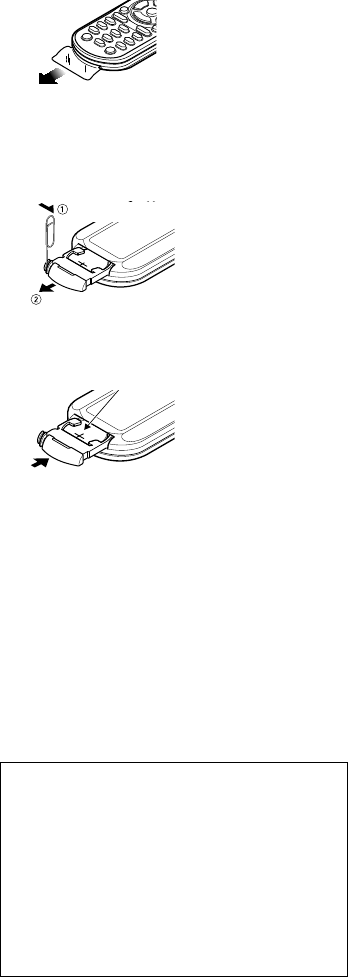
中文 | 63
遥控器的准备
更换遥控器的电池
1
按下
拉出
2
CR2025 (+极面)
¤ 注意
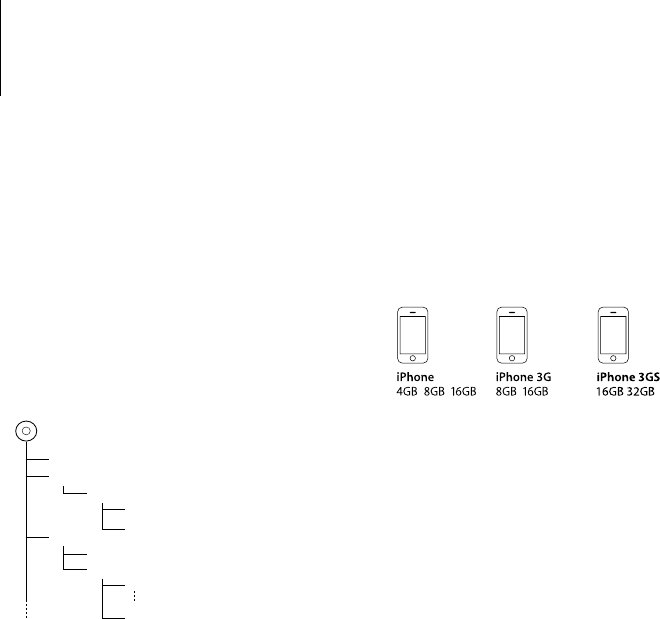
64 | KDC-U546BT
附录
关于音响文件
①⑩
CD
v
() <
: Folder
v: Audio
v
v
v
v
.
v
关于USB装置
能够与本机连接的iPod/iPhone
•
•
•
⁄
✓
中文 | 65
关于手机
版本
配置文件
⁄
关于 "KENWOOD Music Editor"
使用激光的产品标志
CLASS 1
LASER PRODUCT
1类激光产品

66 | KDC-U546BT
附录
功能项目列表
待机
"DISP SELECT" 52
"SETTINGS" "CLOCK" "CLOCK ADJUST" 54
"DISPLAY" "DIMMER SET"
53
"TEXT SCROLL"
"BT DVC STATUS"
"INITIAL SET" "PRESET TYPE"
54
"KEY BEEP"
"TDF ALARM"
"BUILT-IN AUX"
"CD READ"
"SWITCH PREOUT"
"SP SELECT"
"F/W UP"
"DEMO MODE" 54
CD/音频文件信号源
"AUDIO CONTROL" "SUBWOOFER SET"
51
"BASS BOOST"
"SYSTEM Q"
"BASS LEVEL"
"MID LEVEL"
"TRE LEVEL"
"BALANCE"
"FADER"
"SUB-W LEVEL"
"DETAILED SET" "LPF SUBWOOFER"
"SUB-W PHASE"
"SUPREME SET"
"VOLUME OFFSET"
"DISP SELECT" 52
"SETTINGS" "CLOCK" "CLOCK ADJUST" 54
"DISPLAY" 53
"DEMO MODE" 54
USB/iPod信号源
"AUDIO CONTROL" 51
"DISP SELECT" 52
"SETTINGS" "SKIP SEARCH" 45
"MPLIST DELETE"
"CLOCK" "CLOCK ADJUST" 54
"DISPLAY" 53
"DEMO MODE" 54
调谐器信号源
"AUDIO CONTROL" 51
"DISP SELECT" 52
"SETTINGS" "LOCAL SEEK"
46
"SEEK MODE"
"AUTO MEMORY"
"MONO SET"
"CLOCK" "CLOCK ADJUST" 54
"DISPLAY" 53
"DEMO MODE" 54
Bluetooth免提模式
"DISP SELECT" 52
"SETTINGS" "PHONE SELECT"
56
"SMS DOWNLOAD"
"SMS INBOX"
"VOICE TAG"
"DETAILED SET" "DEVICE REGIST"
"S-DVC SELECT"
"DEVICE DELETE"
"PIN CODE EDIT"
"AUTO ANSWER"
"BT SP SELECT"
"CALL BEEP"
"BT F/W UPDATE"
"MIC GAIN"
"NR LEVEL"
"EC LEVEL"
"CLOCK" "CLOCK ADJUST" 54
"DISPLAY" 53
"DEMO MODE" 54
AUX信号源
"AUDIO CONTROL" 51
"DISP SELECT" 52
"SETTINGS" "AUX NAME SET" 53
"CLOCK" "CLOCK ADJUST" 54
"DISPLAY" 53
"DEMO MODE" 54
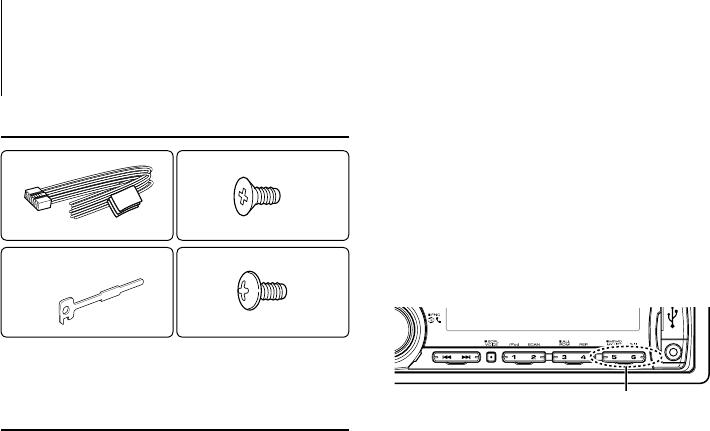
中文 | 67
附件/安装步骤
附件
1
3
2
4
安装步骤
-
-
2警告
¤
-
+
-
为了良好的接收

68 | KDC-U546BT
ANT. CONT
MUTE
P.CONT
REMOTE CONT
STEERING WHEEL
REMOTE INPUT
–
+
L
R
将导线与端子连接
1
·
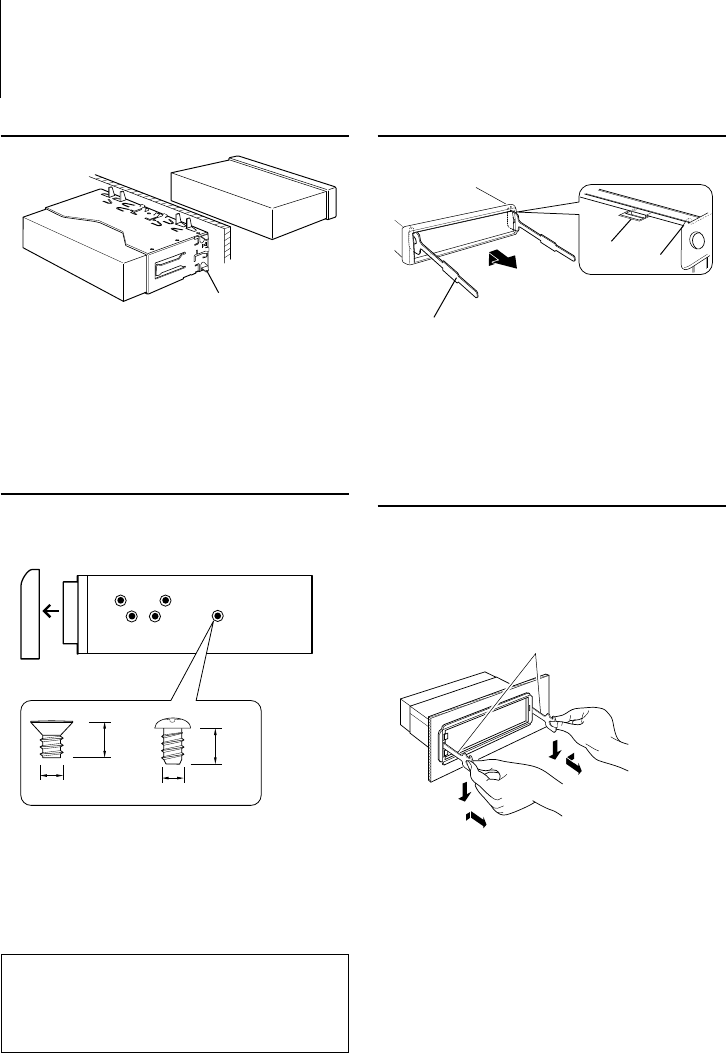
中文 | 69
本机的安装/拆卸方法
非日本制造的汽车
⁄
日本制造的汽车
1
2
8 mm
MAX.
ø5mm ø5mm
8mm
MAX.
T
NT
N
T/N
3
4
34
取下硬橡胶框
1
2
2
⁄
本机的拆卸方法
1
2
3
4
2
¤
5
¤ 注意

70 | KDC-U546BT
故障检修
本机的某些功能可能由于对本机的某些设置而无效。
!
▲
☞
!
▲
☞
!
▲
有时似乎是本机故障的现象,其实可能是因微小的误
操作或配线失误造成的。在联系维修之前,请首先按
照下表检查可能发生的问题。
?
✔
☞
?
✔
☞
?
✔
☞
✔
☞
?
✔
☞
✔
☞
?
✔
☞
?
✔
☞
?
✔
☞
?
✔
☞
✔
☞
✔
☞
中文 | 71
➪
➪
➪
➪
➪
➪
➪
➪
➪
➪
➪

72 | KDC-U546BT
故障检修
规格

中文 | 73
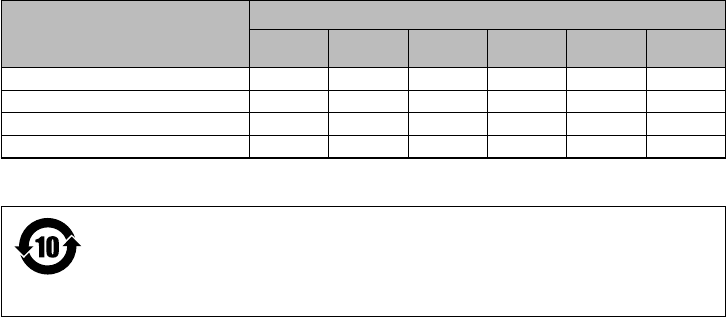
表示例
产品中有毒有害物质或元素的名称及含量
部件名称
有毒有害物质或元素
铅
(Pb) 汞
(Hg) 镉
(Cd) 六价铬
(Cr(VI)) 多溴联苯
(PBB) 多溴二苯醚
(PBDE)
安装基板
框架
机芯 (硬盘驱动器、DVD、CD等)
其他 (附件)
表示该有毒有害物质在该部件所有均质材料中的含量均在 SJ/T11363-2006 标准规定的限量要求以下。
表示该有毒有害物质至少在该部件的某一均质材料中的含量超出 SJ/T11363-2006 标准规定的限量要求。
该标识中表示的数字为自生产日期开始对环境的保护期限、表示不会因产品中含有的有毒有害
物质或元素的外泄造成环境污染、以及对人体或财产造成严重损害的年数。
该环境保护期限并不是对于性能、功能的保证期限。
在产品及电池等正常使用结束、进行废弃时,请遵守各地方政府的法律和规定予以处理。
