Kenwood Gps Receiver Dnx7330Bt Users Manual
dnx7330bt to the manual df0fdcd7-c0c1-44e2-a1c6-78a1149ec153
2015-01-23
: Kenwood Kenwood-Kenwood-Gps-Receiver-Dnx7330Bt-Users-Manual-263791 kenwood-kenwood-gps-receiver-dnx7330bt-users-manual-263791 kenwood pdf
Open the PDF directly: View PDF ![]() .
.
Page Count: 66
What Do You Want To Do?
Thank you for purchasing the KENWOOD GPS NAVIGATION SYSTEM.
In this manual, you will learn various convenient functions of the system.
Click the icon of the media you want to play.
With one-click, you can jump to the section of each media!
iPod USB VCD
DVD VIDEO
Music CD
Disc Media
BT Audio ahaPandora
Tuner
Digital Radio
TV
13DNX_IM366_Ref_M_En_02 (M)© 2012 JVC KENWOOD Corporation
DNX7330BT
DNX7330BTM
DNX5330BT
DNX5330BTM
DNX4330DAB
DNX4330
GPS NAVIGATION SYSTEM
INSTRUCTION MANUAL
Before reading this manual, click the button below to check the latest edition and the
modified pages.
Check the latest edition

22 3
Before Use 4
2 WARNING _______________________ 4
How to Read this Manual 5
Basic Operations 6
Functions of the Buttons
on the Front Panel _________________ 6
Turning on the Unit _________________ 12
How to Play Media __________________ 15
Operating with the Top Menu Screen ___ 16
Common Operations ________________ 18
Navigation Operation ________________ 20
DVD/Video CD (VCD)
Operation 22
DVD/VCD Basic Operation ____________ 22
DVD Disc Menu Operation ____________ 25
Zoom Control For DVD And VCD _______ 26
DVD Setup ________________________ 28
CD/Audio and Visual Files/
iPod Operation 32
Music/Video/Picture Basic Operation ___ 32
Search Operation ___________________ 38
Movie Control ______________________ 43
PANDORA® Internet Radio Operation ___ 44
Aha Operation _____________________ 48
USB/iPod/DivX Setup ________________ 52
Radio and TV Operation 54
Radio Basic Operation _______________ 54
Digital Radio Basic Operation _________ 56
TV Basic Operation __________________ 58
Memory Operation __________________ 60
Selecting Operation _________________ 61
Traffic Information __________________ 63
Replay (Digital Radio only) ____________ 63
Tuner Setup _______________________ 64
Digital Radio Setup __________________ 65
TV Setup __________________________ 66
Bluetooth Control 68
Registering And Connecting
Bluetooth Unit ____________________ 68
Playing Bluetooth Audio Device _______ 70
Using Hands-Free Unit _______________ 71
Smartphone Link ___________________ 76
Hands-Free Setup ___________________ 78
Setting Up 80
Monitor Screen Setup _______________ 80
View Camera Control ________________ 81
System Setup ______________________ 81
Display Setup ______________________ 87
Navigation Setup ___________________ 90
Camera Setup ______________________ 91
Software Information ________________ 92
AV Input Setup _____________________ 92
AV Output Interface Setup ____________ 93
Controlling Audio 94
Setting Audio ______________________ 94
Controlling General Audio ____________ 98
Equalizer Control ___________________ 100
Zone Control _______________________ 102
Sound Effect _______________________ 103
Listening Position ___________________ 106
Contents Remote control 108
Battery Installation __________________ 108
Functions of the Remote control Buttons 109
Troubleshooting 112
Problems and Solutions ______________ 112
Error Messages _____________________ 113
Resetting the Unit __________________ 115
Appendix 116
Playable Media and Files _____________ 116
Status Bar Indicator Items ____________ 119
Region Codes in the World ____________ 121
DVD Language Codes _______________ 122
Specifications ______________________ 123
About this Unit _____________________ 126
44 5
Return to the Top page
Before Use
Return to the Top page
How To Read This Manual
2 WARNING
To prevent injury or fire, take
the following precautions:
• Topreventashortcircuit,neverputor
leaveanymetallicobjects(suchascoinsor
metaltools)insidetheunit.
• Donotwatchorfixyoureyesontheunit’s
displaywhenyouaredrivingforany
extendedperiod.
• Ifyouexperienceproblemsduring
installation,consultyourKenwooddealer.
Precautions on using this unit
• Whenyoupurchaseoptionalaccessories,
checkwithyourKenwooddealertomake
surethattheyworkwithyourmodelandin
yourarea.
• Youcanselectlanguagetodisplaymenus,
audiofiletags,etc.SeeLanguage setup
(P.89).
• TheRadioDataSystemorRadioBroadcast
DataSystemfeaturewon’tworkwhere
theserviceisnotsupportedbyany
broadcastingstation.
Protecting the monitor
Toprotectthemonitorfromdamage,donot
operatethemonitorusingaballpointpenor
similartoolwiththesharptip.
Cleaning the unit
Ifthefaceplateofthisunitisstained,wipeit
withadrysoftclothsuchasasiliconcloth.
Ifthefaceplateisstainedbadly,wipethe
stainoffwithaclothmoistenedwithneutral
cleaner,thenwipeitagainwithacleansoft
drycloth.
¤
• Applying spray cleaner directly to the unit
may affect its mechanical parts. Wiping the
faceplate with a hard cloth or using a volatile
liquid such as thinner or alcohol may scratch
the surface or erase screened print.
Lens fogging
Whenyouturnonthecarheaterincold
weather,deworcondensationmayform
onthelensinthediscplayeroftheunit.
Calledlensfogging,thiscondensationon
thelensmaynotallowdiscstoplay.Insuch
asituation,removethediscandwaitforthe
condensationtoevaporate.Iftheunitstill
doesnotoperatenormallyafterawhile,
consultyourKenwooddealer.
Precautions on handling discs
• Donottouchtherecordingsurfaceofthe
disc.
• Donotsticktapeetc.onthedisc,orusea
discwithtapestuckonit.
• Donotusedisctypeaccessories.
• Cleanfromthecenterofthediscandmove
outward.
• Whenremovingdiscsfromthisunit,pull
themouthorizontally.
• Ifthedisccenterholeoroutsiderimhas
burrs,usethedisconlyafterremovingthe
burrswithaballpointpenetc.
• Discsthatarenotroundcannotbeused.
• 8-cm(3inch)discscannotbeused.
• Discswithcoloringontherecording
surfaceordiscsthataredirtycannotbe
used.
• ThisunitcanonlyplaytheCDswith
.
Thisunitmaynotcorrectlyplaydiscswhich
donothavethemark.
• Youcannotplayadiscthathasnotbeen
finalized.(Forthefinalizationprocesssee
yourwritingsoftware,andyourrecorder
instructionmanual.)
Before Use How to Read this Manual
27
Return to the Top page
CD, Disc, iPod, USB device
Search Operation
You can search the music, video, or picture
file by some operations.
NOTE
• If you use a remote controller, you can jump
directly to the desired track/file with entering the
track/folder/file number, play time, etc. For details,
see “Direct search mode” (p.81).
List search
You can search tracks, folders, and files
according to hierarchy.
For USB devices and iPods, you can list and
search files in the device by using playlist.
1 Press the <MENU> button during
playback.
Simple Control screen appears.
2 Touch [ ].
List Control screen appears.
3 Touch desired track/file.
Playback starts.
Other search
When you want to narrow the list down,
there are other search ways.
1 Press the <MENU> button during
playback.
Simple Control screen appears.
2 Touch [ ].
The search type screen appears.
NOTE
• Thescreensandpanelsshowninthis
manualareexamplesusedtoprovideclear
explanationsoftheoperations.
Forthisreason,theymaybedifferentfromthe
actualscreensorpanelsused,orsomedisplay
patternsmaybedifferent.
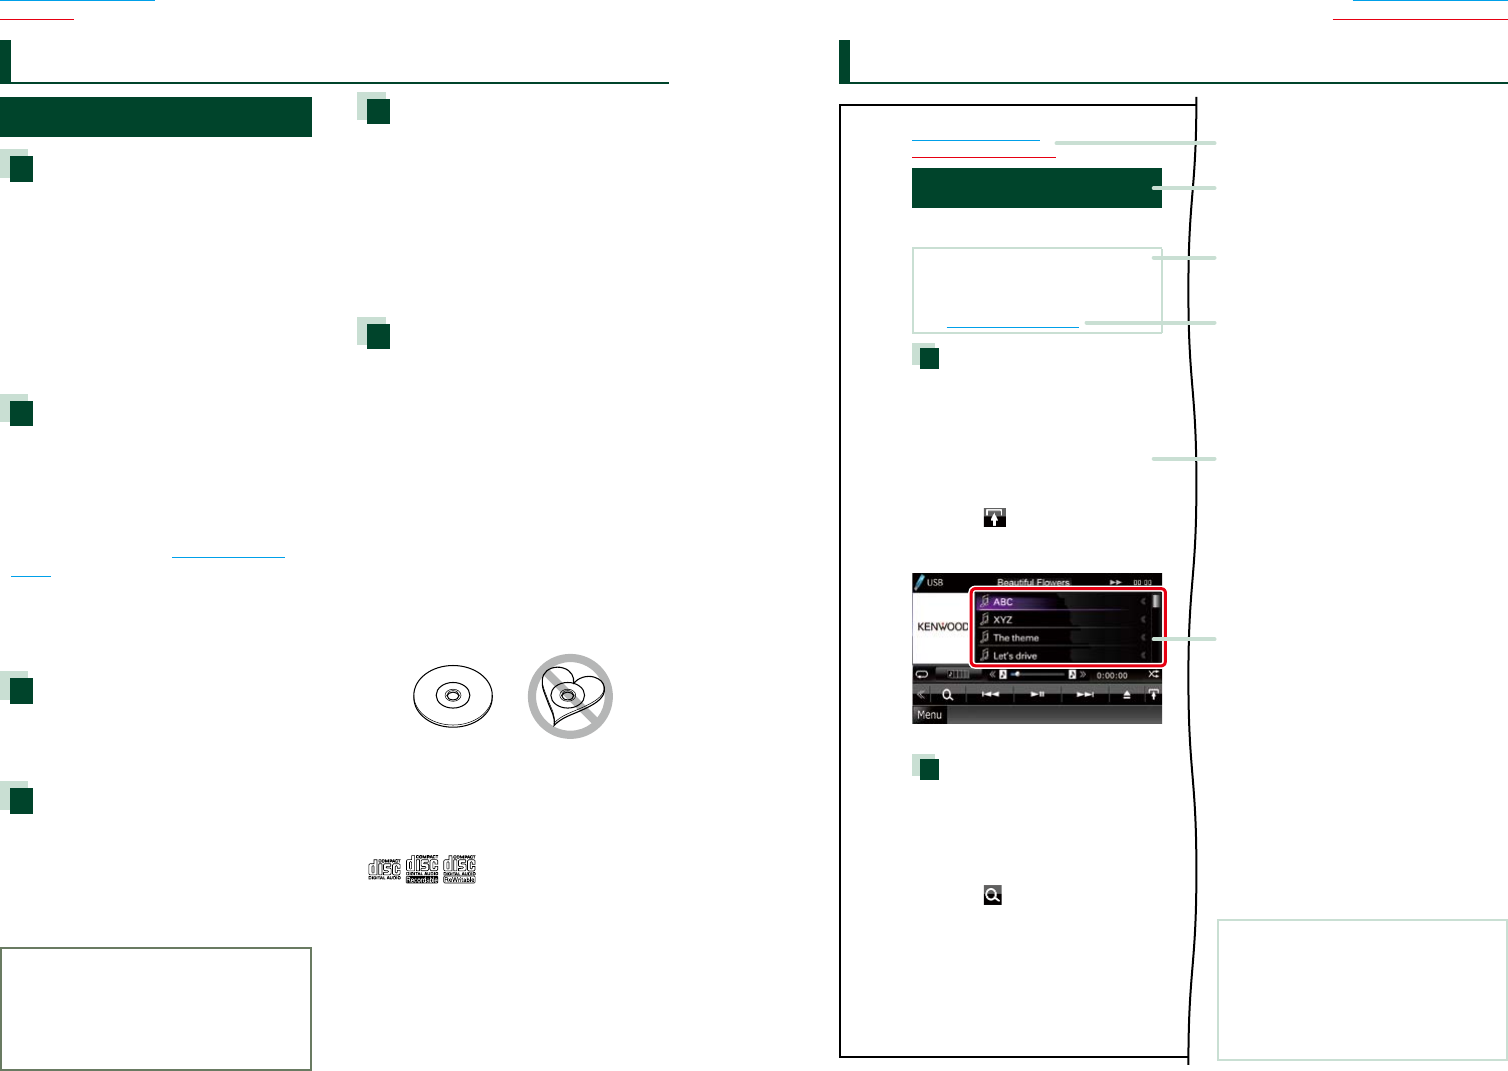
Link header
Youcanrefereachsectionortoppage
withone-click.
Reference mark
Displayedinbluenotes.
Withone-click,youcanjumptothe
articlerelatedtothecurrentsection.
Screen shot
Showssomescreenshotsdisplayedduring
operationforreference.
Theareaorkeystotoucharesurrounded
witharedframe.
Operation procedure
Explainsnecessaryproceduresto
achievetheoperation.
<>:Indicatesthenameofpanel
buttons.
[]:Indicatesthenameoftouch
keys.
Operation title
Introducesthefunction.
NOTE
Introducessometips,notes,etc.
66 7
Return to the Top page
Basic Operations
Return to the Top page
Basic Operations
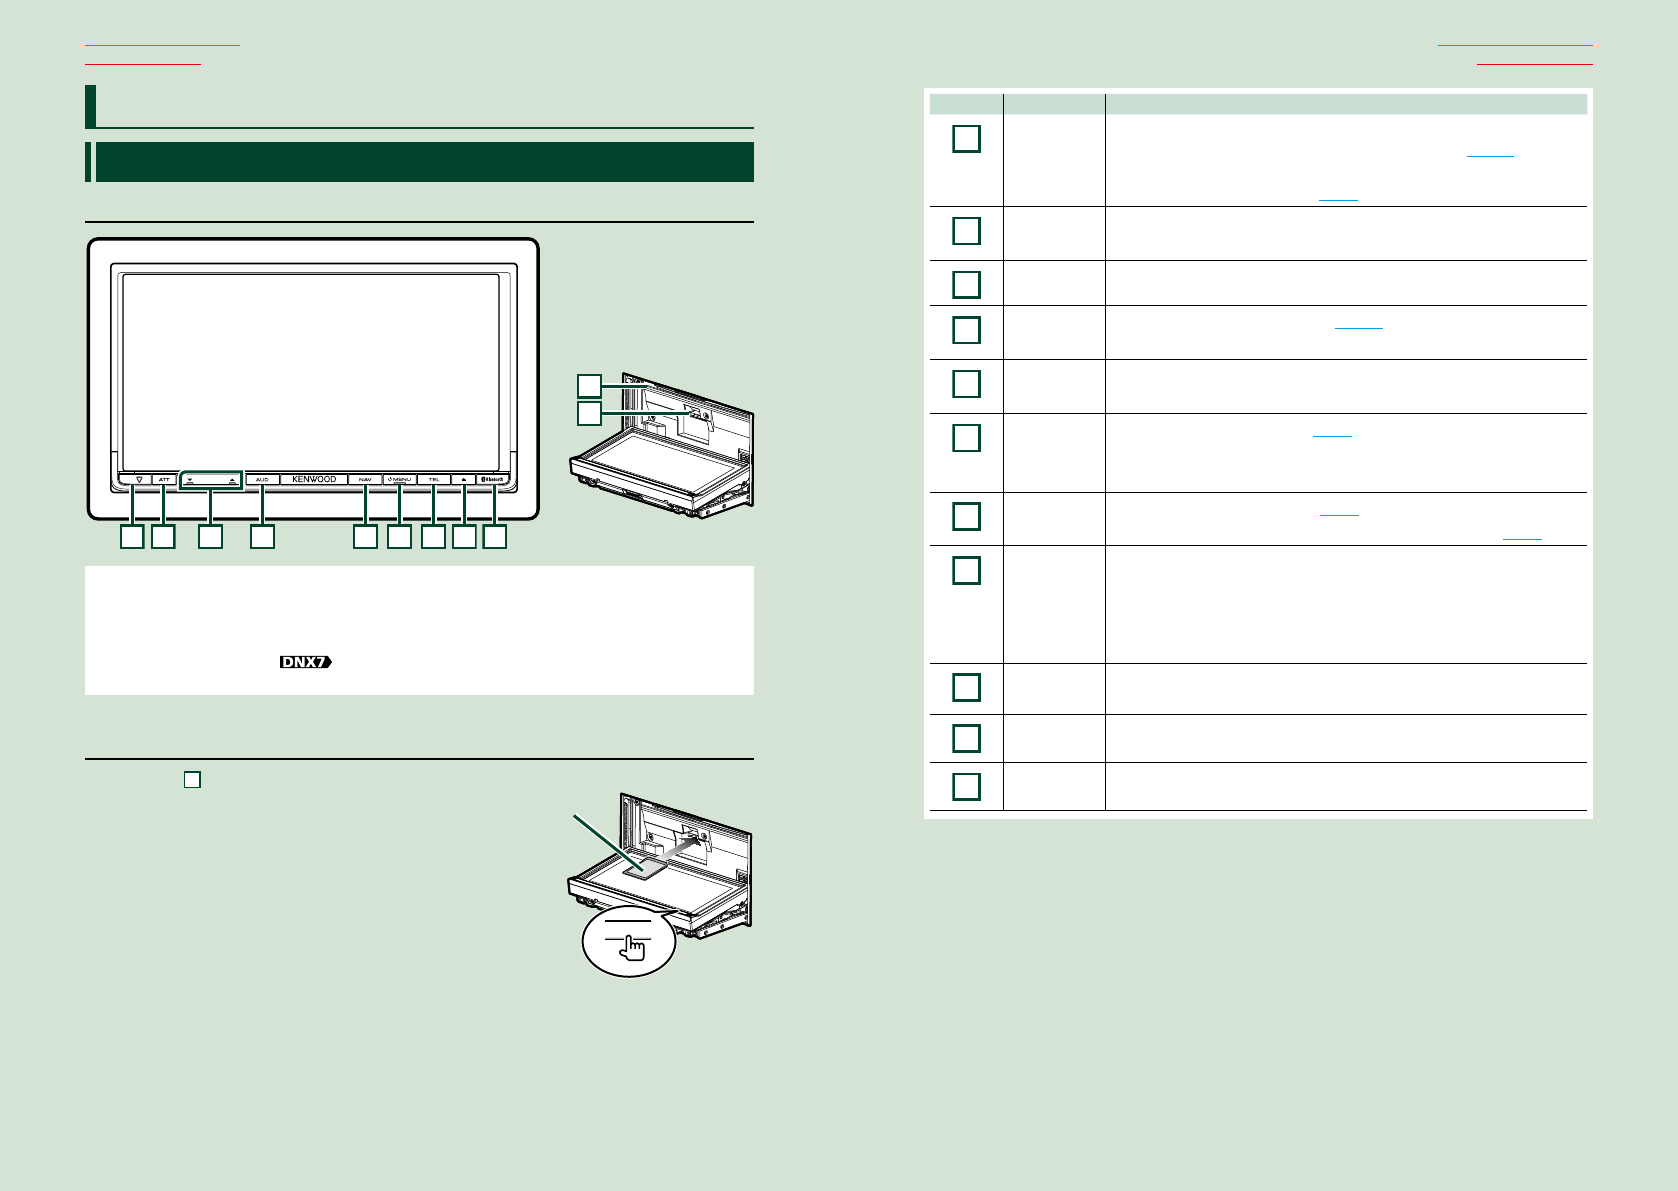
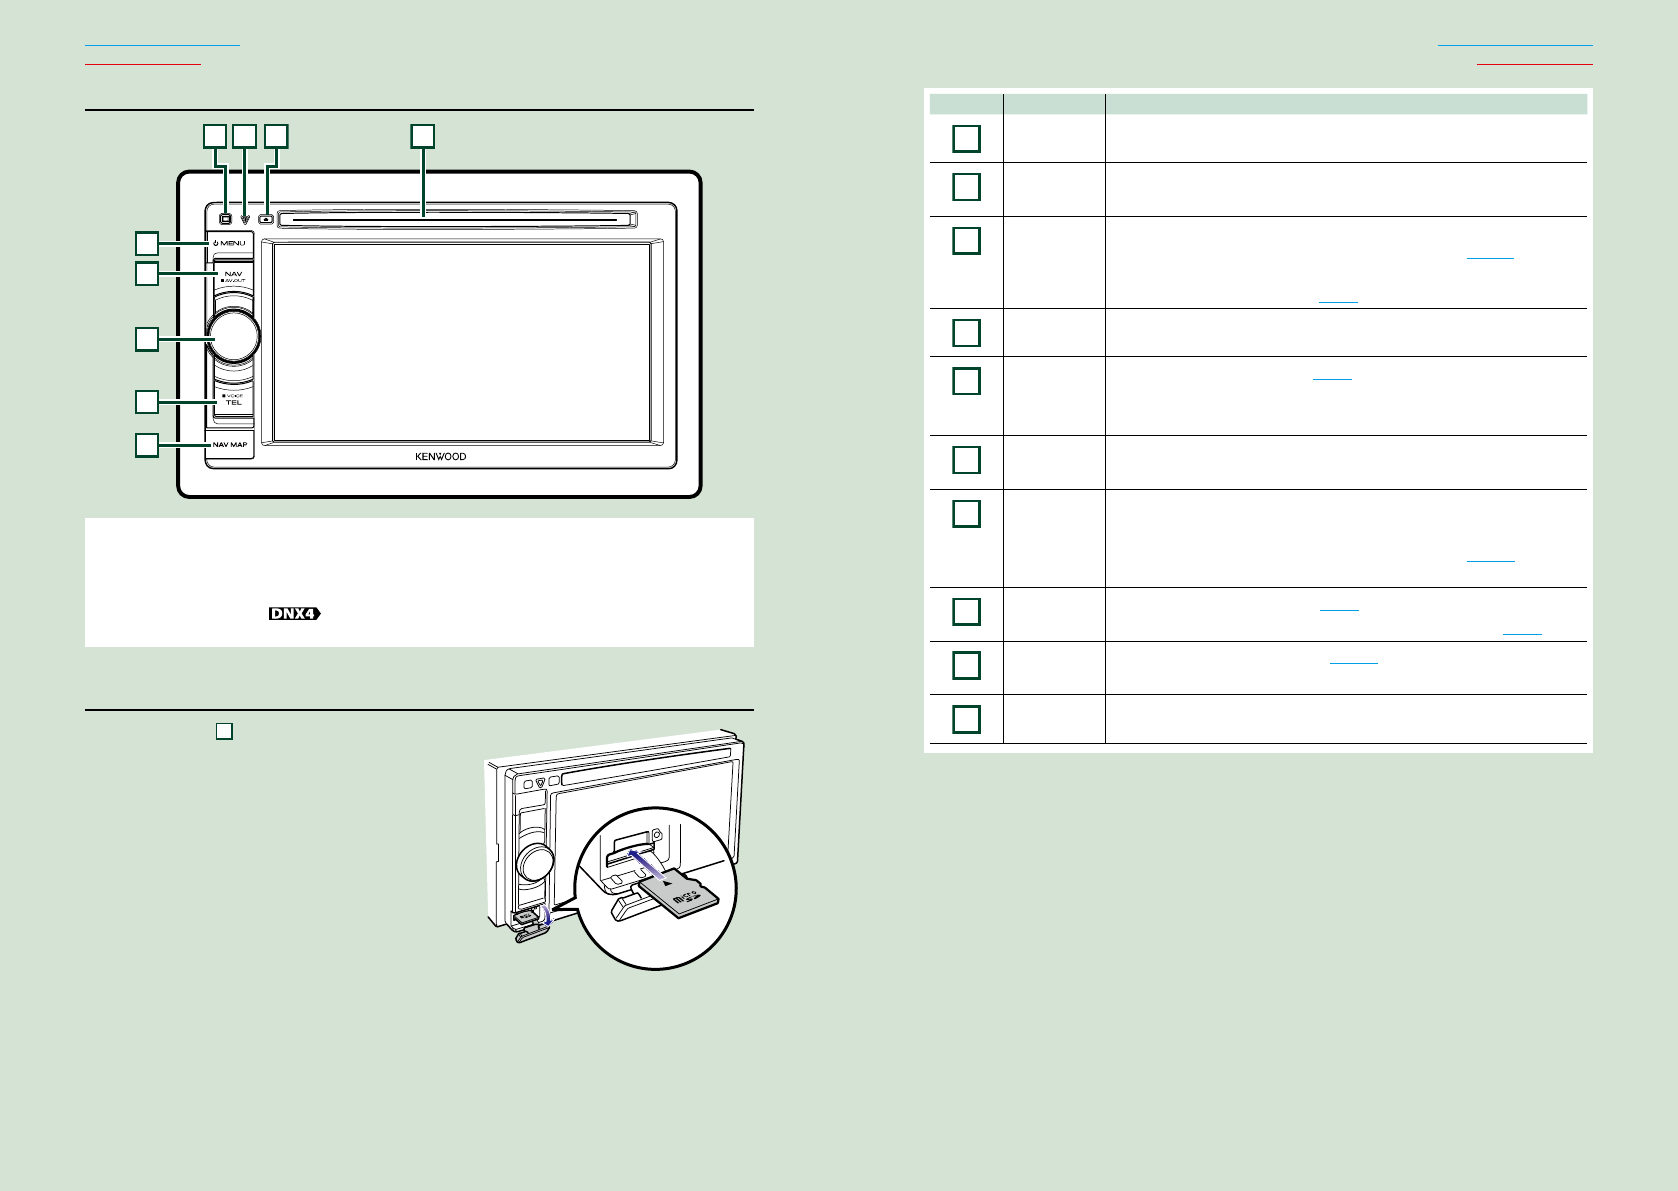
Functions of the Buttons on the Front Panel
DNX7330BT/DNX7330BTM
123456789
11
10
NOTE
• Thepanelsshowninthisguideareexamplesusedtoprovideclearexplanationsoftheoperations.Forthisreason,
theymaybedifferentfromtheactualpanels.
• Inthismanual,eachmodelnameisabbreviatedasfollows.
DNX7330BT, DNX7330BTM:
Ifaboveiconisshowed,readthearticleapplicabletotheunityouuse.
How to insert an SD Card
1) Press 8 <0> button for 1 second.
Thepanelfullyopens.
2) Hold the SD card as the illustration in the right
and insert it into the slot until it clicks.
● To eject the card:
Push the card until it clicks and then remove your finger
from the card.
The card pops up so that you can pull it out with your
fingers.
Basic Operations Number Name Motion
1
fi(Reset) •Iftheunitortheconnectedunitfailstooperateproperly,theunit
returnstofactorysettingswhenthisbuttonispressed(P.115).
•IftheSecurityIndicator(SI)functionisturnedon,thisindicatorflashes
whenthevehicleignitionisoff(P.85).
2
AT T •Switchesattenuationofthevolumeon/off.
•Pressingfor1secondturnsthescreenoff.
3
∞,5(Vol) Adjustsvolume.
4AUD •DisplaysGraphicEqualizerscreen(P.101).*
•Pressingfor1secondswitchescameraviewdisplayon/off.
5NAV •Displaysthenavigationscreen.
•Pressingfor1secondswitchesAVoutsources.
6MENU •DisplaystheTopMenuscreen(P.16).
•Pressingfor1secondturnsthepoweroff.
•Whenthepoweroff,turnsthepoweron.
7TEL •DisplaystheHandsFreescreen(P.68).
•Pressingfor1seconddisplaystheVoiceRecognitionscreen.(P.76)
80(Eject) •Ejectsthedisc.
•Whenthepanelisopened,pressingclosesthepanelandpressingfor1
secondejectsthediscforcibly.
•Whenthepanelisclosed,pressingfor1secondfullyopensthepanelto
thelocationoftheSDcardslot.
9
Remote
Sensor
Receivestheremotecontrolsignal.
10 Discinsert
slot
Aslottoinsertadiscmedia.
11
SDcardslot AnSDcardslotforupgradingthemap.Forhowtoupgradethemap,refer
totheinstructionmanualofthenavigationsystem.
*ThedisplaymaynotswitchtotheGraphicEqualizerscreeninsomeconditions.
0
Labelled
side
88 9
Return to the Top page
Basic Operations
Return to the Top page
Basic Operations
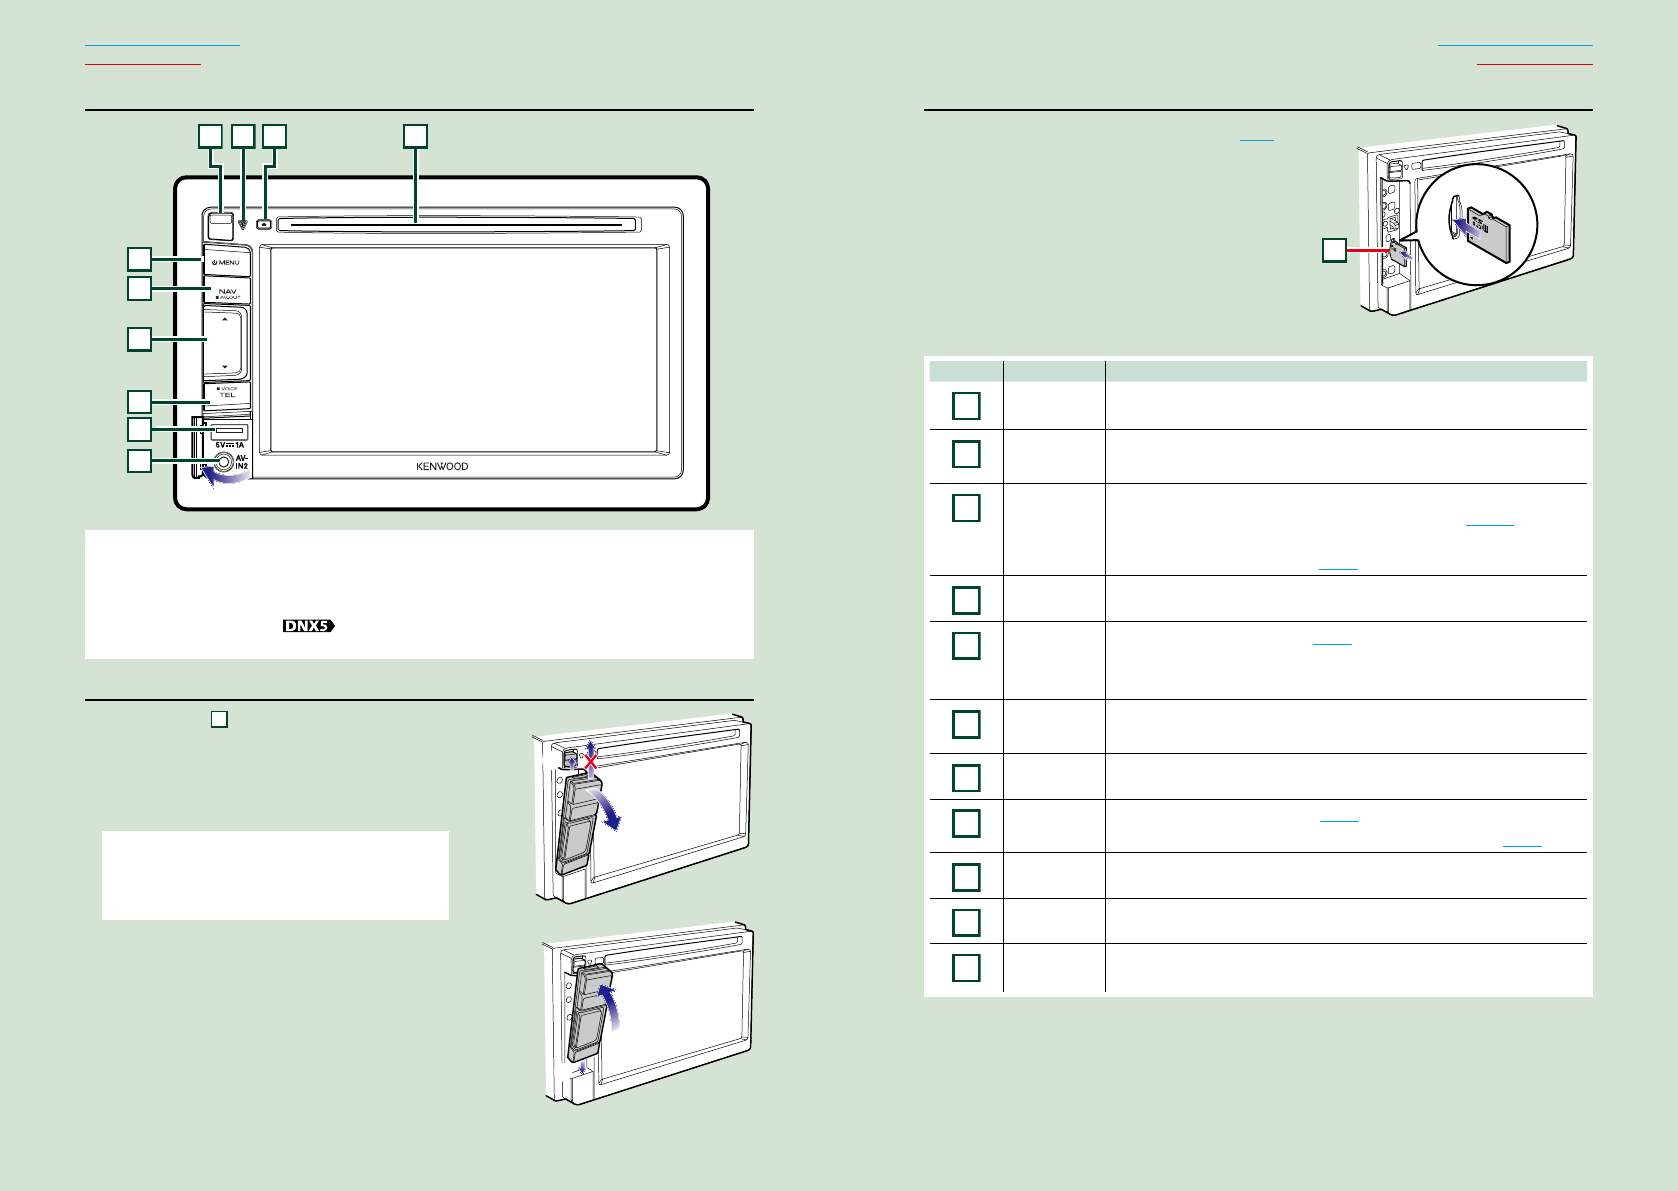
DNX5330BT/DNX5330BTM
4312
5
6
7
8
9
10
NOTE
• Thepanelsshowninthisguideareexamplesusedtoprovideclearexplanationsoftheoperations.Forthisreason,
theymaybedifferentfromtheactualpanels.
• Inthismanual,eachmodelnameisabbreviatedasfollows.
DNX5330BT, DNX5330BTM :
Ifaboveiconsareshowed,readthearticleapplicabletotheunityouuse.
Detaching The Front Panel
1) Slide the
4
Release key upward to detach the
part of the front panel.
● Attaching the front panel:
Hold the panel securely so as not to drop it accidentally,
and fit it onto the attaching plate until it is firmly locked.
NOTE
• Whendetachingapartofthefrontpanel,detachit
towardthefrontsideasshowninthediagramright.Ifit
isdetachedupward,thefrontpanelwillbebroken.
1
2
How to insert a microSD Card
1) Detach the part of the front panel. (P.8)
2) Hold the microSD card with the label side
facing left and the notched section up, and
insert it into the slot until it clicks.
3) Attach the part of the front panel.
● To eject the card:
Push the card until it clicks and then remove your
finger from the card.
The card pops up so that you can pull it out with
your fingers.
Number Name Motion
1Discinsert
slot
Aslottoinsertadiscmedia.
20(Eject) •Ejectsthedisc.
•Pressingfor1secondejectsthediscforcibly.
3fi(Reset) •Iftheunitortheconnectedunitfailstooperateproperly,theunit
returnstofactorysettingswhenthisbuttonispressed(P.115).
•IftheSecurityIndicator(SI)functionisturnedon,thisindicatorflashes
whenthevehicleignitionisoff(P.85).
4Releasekey Detachesthepartoffrontpanel.
5
MENU •DisplaystheTopMenuscreen(P.16).
•Pressingfor1secondturnsthepoweroff.
•Whenthepoweroff,turnsthepoweron.
6NAV •Displaysthenavigationscreen.
•Pressingfor1secondswitchesAVoutsources.
7∞,5 •Adjustsvolume.
8
TEL •DisplaystheHandsFreescreen(P.68).
•Pressingfor1seconddisplaystheVoiceRecognitionscreen.(P.76)
9
USBtarminal •AterminaltoconnectaUSBdeviceoriPod.
10
Inputjack •Aninputjackforexternaldevice.
11 microSD
cardslot
AnSDcardslotforupgradingthemap.Forhowtoupgradethemap,refer
totheinstructionmanualofthenavigationsystem.
1
2
11
1010 11
Return to the Top page
Basic Operations
Return to the Top page
Basic Operations
DNX4330DAB/DNX4330
4312
5
6
9
7
8
NOTE
• Thepanelsshowninthisguideareexamplesusedtoprovideclearexplanationsoftheoperations.Forthisreason,
theymaybedifferentfromtheactualpanels.
• Inthismanual,eachmodelnameisabbreviatedasfollows.
DNX4330DAB, DNX4330 :
Ifaboveiconsareshowed,readthearticleapplicabletotheunityouuse.
How to insert a microSD Card
1) Open the
9
microSD card slot cover
as the illustration in the right.
2) Hold the microSD card with the label
facing up and the notched section right,
and insert it into the slot until it clicks.
● To eject the card:
Push the card until it clicks and then remove your
finger from the card.
The card pops up so that you can pull it out with
your fingers.
Number Name Motion
1
Discinsert
slot
Aslottoinsertadiscmedia.
2
0(Eject) •Ejectsthedisc.
•Pressingfor1secondejectsthediscforcibly.
3
fi(Reset) •Iftheunitortheconnectedunitfailstooperateproperly,theunit
returnstofactorysettingswhenthisbuttonispressed(P.115).
•IftheSecurityIndicator(SI)functionisturnedon,thisindicatorflashes
whenthevehicleignitionisoff(P.85).
4
Remote
Sensor
Receivestheremotecontrolsignal.
5
MENU •DisplaystheTopMenuscreen(P.16).
•Pressingfor1secondturnsthepoweroff.
•Whenthepoweroff,turnsthepoweron.
6NAV •Displaysthenavigationscreen.
•Pressingfor1secondswitchesAVoutsources.
7
VolumeKnob •Turningadjustsvolumeupordown.
•Pressingswitchesattenuationofthevolumeon/off.
•Pressingfor1seconddisplaystheToneControlscreen(P.102).*
(DNX4330DABonly)
8
DNX4330DAB
TEL
•DisplaystheHandsFreescreen(P.68).
•Pressingfor1seconddisplaystheVoiceRecognitionscreen.(P.76)
8
DNX4330
AUD
•DisplaystheToneControlscreen(P.102).*
•Pressingfor1secondturnsoffthedisplay.
9
microSD
cardslot
AmicroSDcardslotforupgradingthemap.Forhowtoupgradethemap,
refertotheinstructionmanualofthenavigationsystem.
*ThedisplaymaynotswitchtotheToneControlscreeninsomeconditions.
1212 13
Return to the Top page
Basic Operations
Return to the Top page
Basic Operations
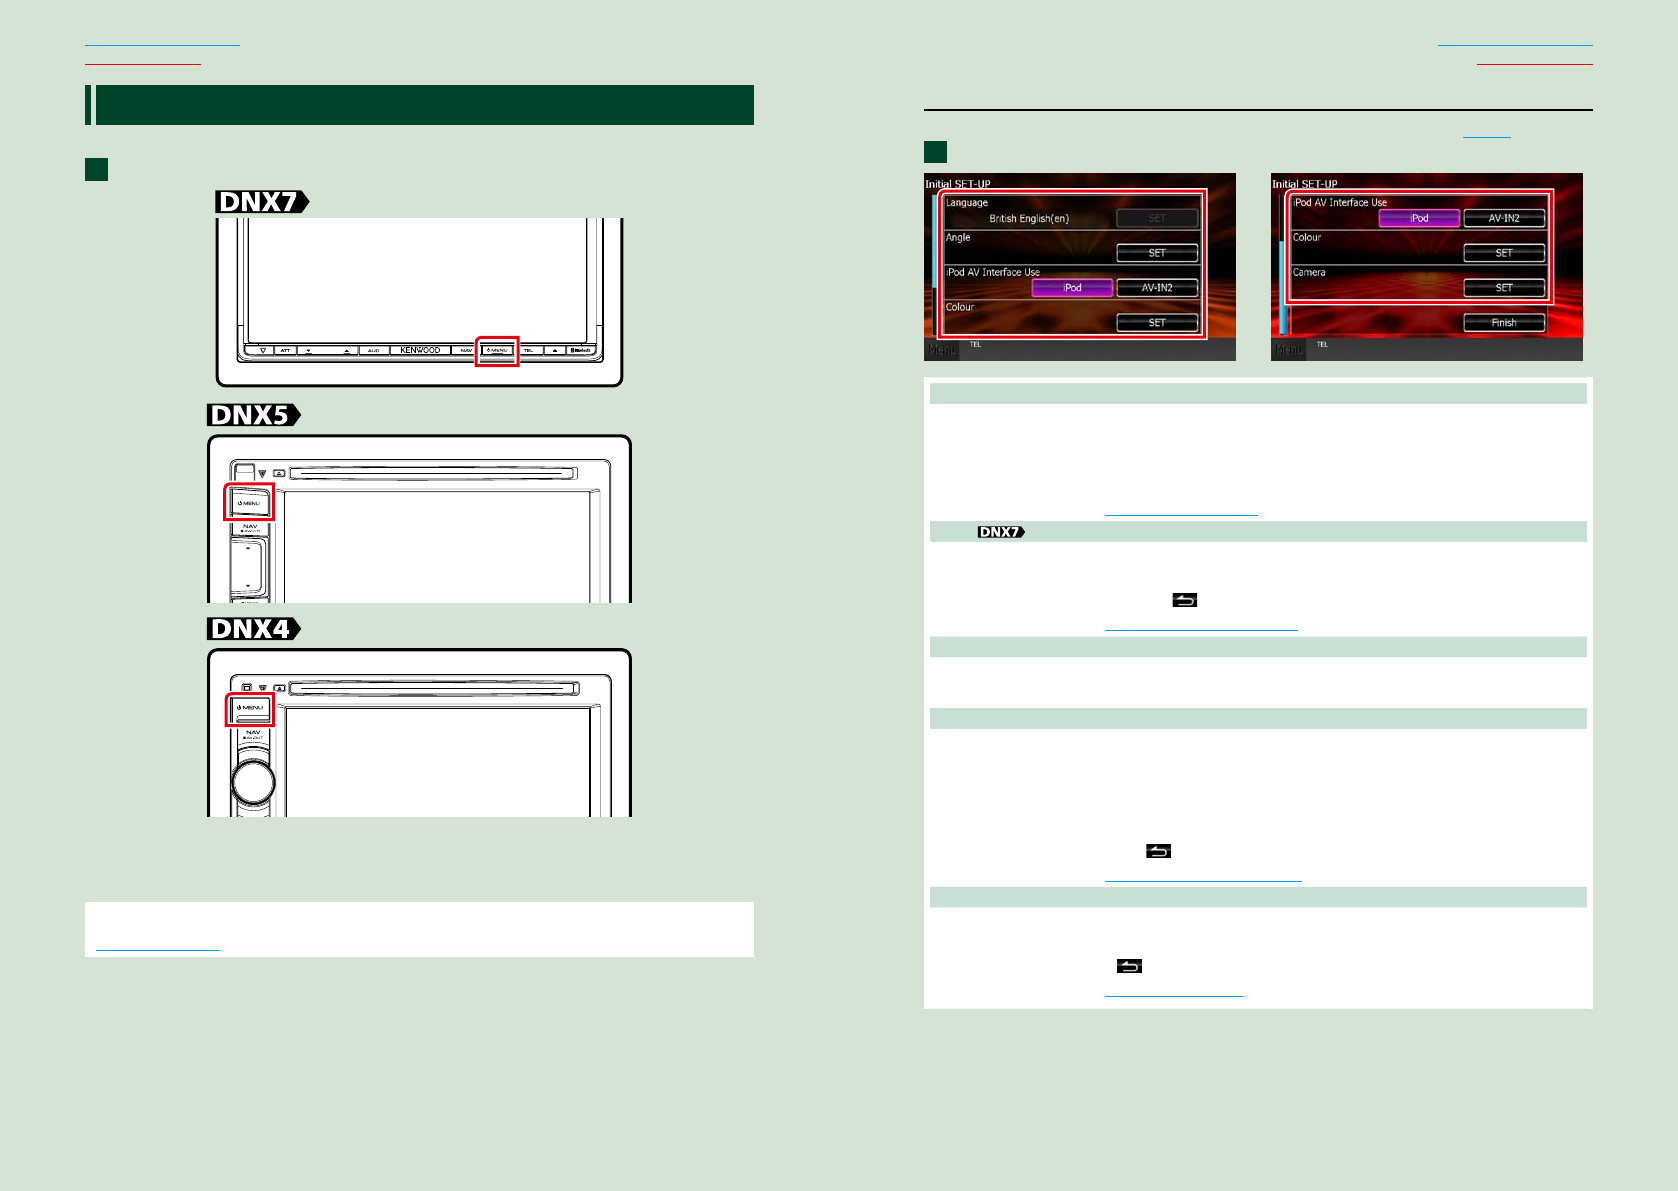
Turning on the Unit
Themethodofturningonisdifferentdependingonthemodel.
Press the <MENU> button.
Theunitisturnedon.
● To turn off the unit:
Pressthe<MENU>buttonfor1second.
Ifitisyourfirsttimeturningtheunitonafterinstallation,itwillbenecessarytoperform
Initial setup (P.13).
1
Initial setup
Performthissetupwhenyouusethisunitfirsttimeorwhenyouresettheunit(P.115).
Set each item as follows.
Language
Selectthelanguageusedforthecontrolscreenandsettingitems.Defaultis“BritishEnglish(en)”.
1Touch[SET].
2Touch[2]or[3]toselectthedesiredlanguage.
3Touch[Enter].
Fordetailedoperation,seeLanguage setup (P.83).
Angle
Adjustthepositionofthemonitor.Defaultis“0”.
1Touch[SET].
2Touchdesiredanglenumberand[ ].
Fordetailedoperation,seeMonitor angle control (P.87).
iPod AV Interface Use
SettheterminalwhichyouriPodisconnectedto.Defaultis“iPod”.
1Touch[iPod]or[AV-IN2].
Color
Setthescreenandbuttonilluminationcolor.Youcanselectwhethertoallowcolorscanoperationor
selectafixedcolorforoperation.
1Touch[SET].
2Touch[ON]or[OFF]of[PanelColorScan].
3Ifyouwanttochangecolor,touch[SET]of[PanelColorCoordinate].
4Touchyourdesiredcolorand[ ].
Fordetailedoperation,seePanel color coordinate (P.88).
Camera
Settheparametersforthecamera.
1Touch[SET].
2Seteachitemandtouch[ ].
Fordetailedoperation,seeCamera Setup (P.91).
1
Continued
1414 15
Return to the Top page
Basic Operations
Return to the Top page
Basic Operations
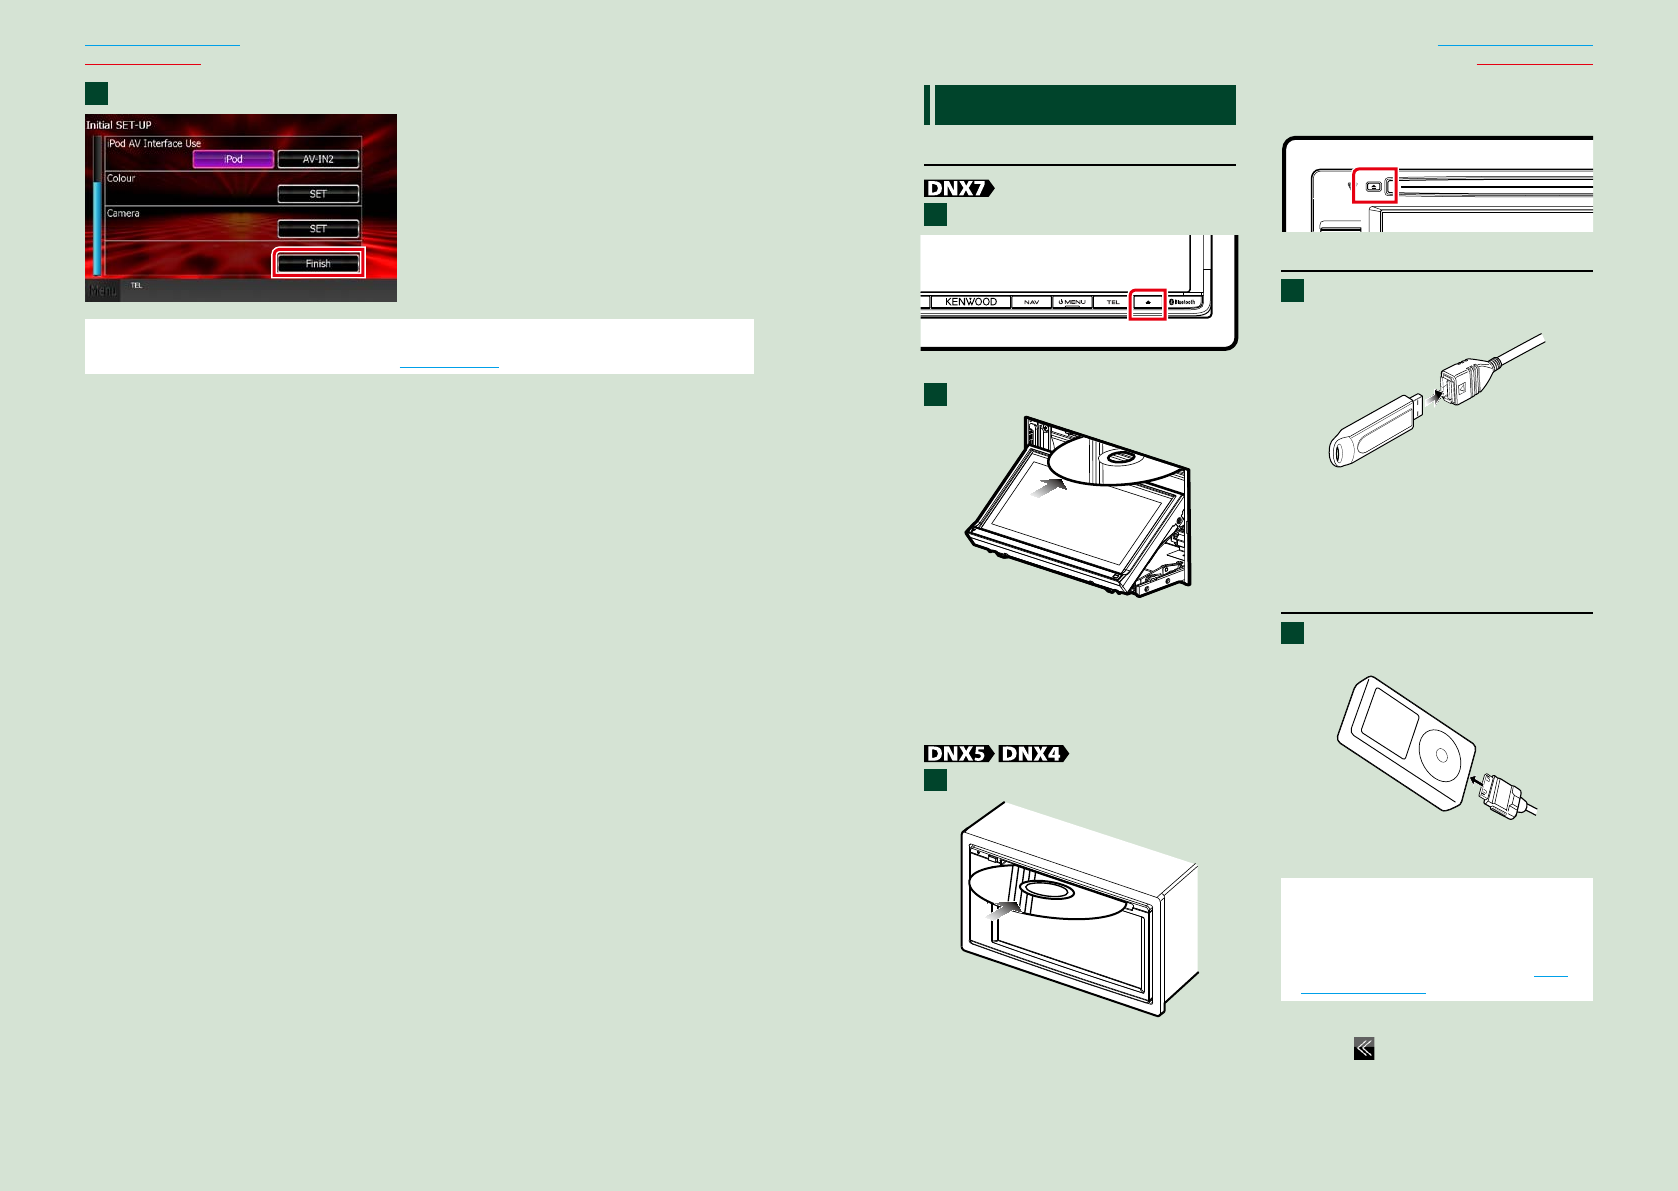
Touch [Finish].
NOTE
• ThesesettingscanbesetfromtheSETUPmenu.SeeSetting Up (P.80).
2How to Play Media
Music CD and disc media
Press the <0> button.
Thepanelopens.
Insert the disc into the slot.
Thepanelclosesautomatically.
Theunitloadsthediscandplayback
starts.
● To eject the disc:
Pressthe<0>button.
Insert the disc into the slot.
Theunitloadsthediscandplayback
starts.
● To eject the disc:
Pressthe<0>button.
USB device
Connect the USB device with the
USB cable.
Theunitreadsthedeviceandplayback
starts.
● To disconnect the device:
Touch[0]onthescreenanddisconnect
thedevicefromthecable.
iPod
Connect the iPod with the iPod
cable.
TheunitreadstheiPodandplayback
starts.
NOTE
• WhenaniPodisconnectedwhileanapplication
otherthanMusic,Pandora,andAhaRadio
applicationshasstarted,theunitautomatically
enterstheAppmodeofiPodsource.SeeMulti
function menu (P.36).
● To disconnect the device:
Touch[ ]onthescreenandthentouch
[0].DisconnecttheiPodfromthecable.
1
2
1
1
1
1616 17
Return to the Top page
Basic Operations
Return to the Top page
Basic Operations
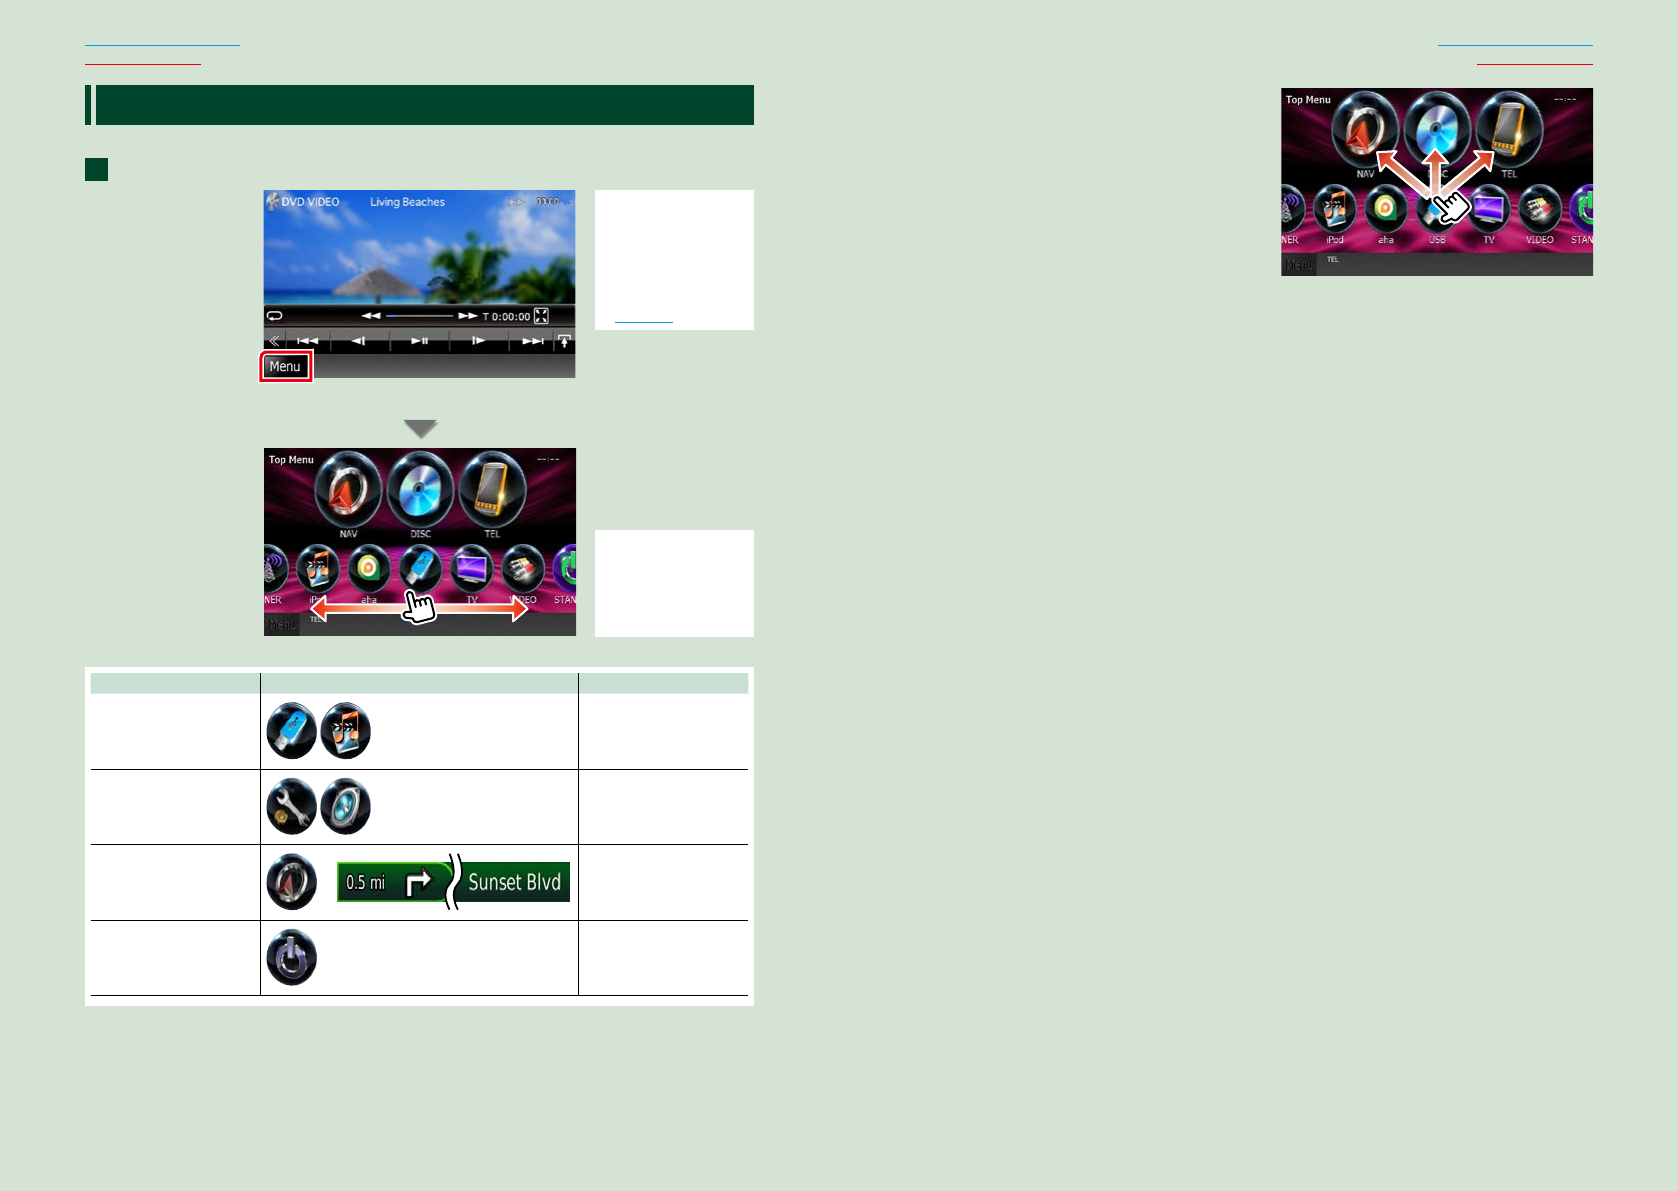
Operating with the Top Menu Screen
MostfunctionscanbeperformedfromtheTopMenuscreen.
Touch [Menu] on any screen.
NOTE
• If[Menu]isnot
displayedduring
video/picture
playback,pressthe
<MENU>button.
(P.6, P.10)
TopMenuscreenappears.
NOTE
• Youcanselectthe
hidingiconby
scrollingthescreen
leftorright.
Fromthisscreen,youcanperformthefollowingfunctions.
Function Icon Operation
Switchtheaudiosource
etc.
Touchtheiconofthe
desiredsource.
Entersetupmode
etc.
Touchtheiconofthe
desiredsetupfunction.
Displaynavigation
screen
or
Touch[NAV]or
navigationinformation.
Turnoffallaudio
function
Touch[STANDBY].
1
● Customizing Top Menu screen
Dragtheiconyouwanttoregistertothe
upperline.
Youcanmoveuptothreeicons.
1818 19
Return to the Top page
Basic Operations
Return to the Top page
Basic Operations
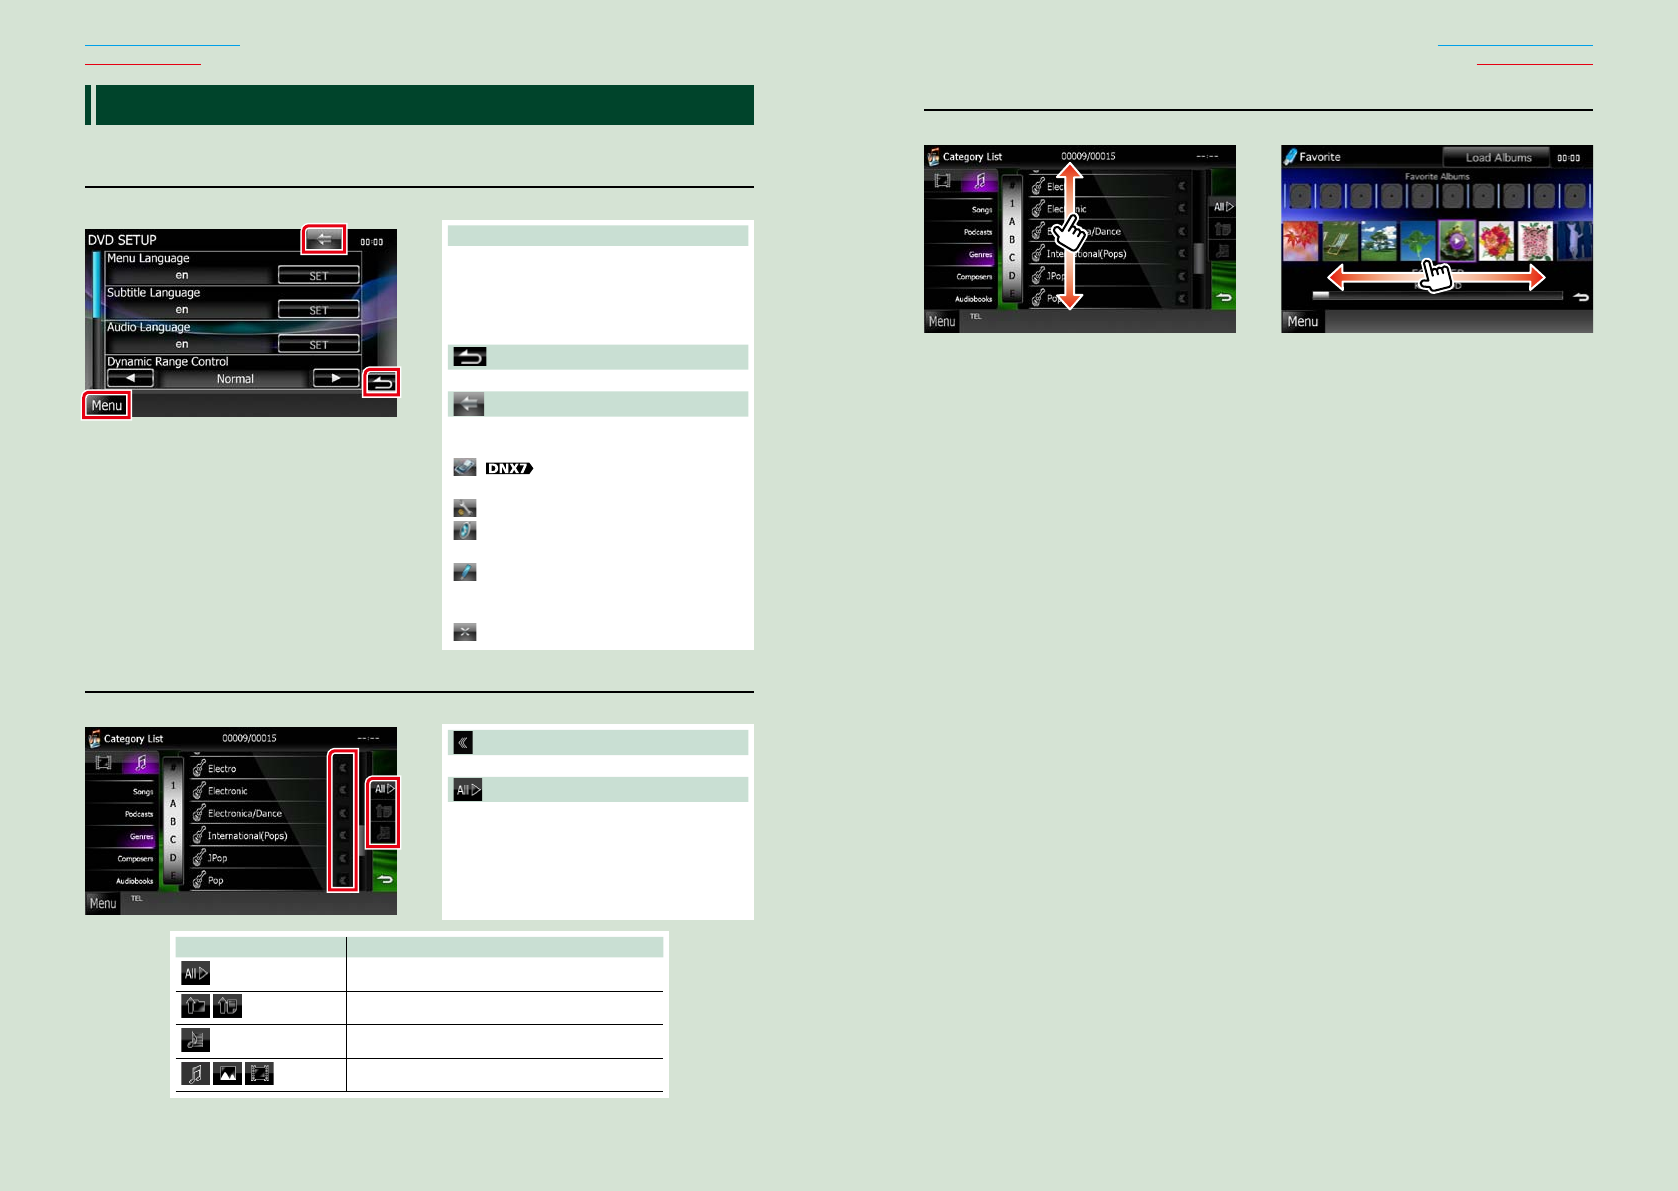
Common Operations
Introducesthecommonoperations.
General
Therearesomefunctionswhichcanbeoperatedfrommostscreens.
[Menu]
ReturnstotheTopMenuscreen.
Touchingforatleast1seconddisplaysthe
ScreenControlscreen.(Evenwhenanimage
isdispalyed,touchingforatleast1second
displaystheScreenControlscreen.)
(RETURN)
Returnstopreviousscreen.
(common menu key)
Touchtodisplaythecommonmenu.The
contentsofthemenuareasfollows.
: DisplaystheEXTSWControl
screen.
:DisplaystheSETUPMenuscreen.
:DisplaystheAudioControlMenu
screen.
:Displaysthecontrolscreenofcurrent
source.Iconfeaturediffersdepending
onthesource.
:Closesthemenu.
List screen
Therearesomecommonfunctionkeysinthelistscreensofmostsources.
(Scroll)
Scrollsthedisplayedtext.
etc.
Touchkeyswithvariousfunctionsare
displayedhere.
Displayedkeysdifferdependingonthe
currentaudiosource,status,etc.
Forexamplesoffunctionsofeachkey,refer
tothetablebelow.
Key Function
Listsallthemusicinthelowerhierarchy.
Movestotheupperhierarchy.
Displayscurrentcategoryfolder.
Displaysmusic/picture/moviefilelist.
Flick scrolling
Youcanscrollthelistscreenbyflickingthescreenup/downorright/left.
2020 21
Return to the Top page
Basic Operations
Return to the Top page
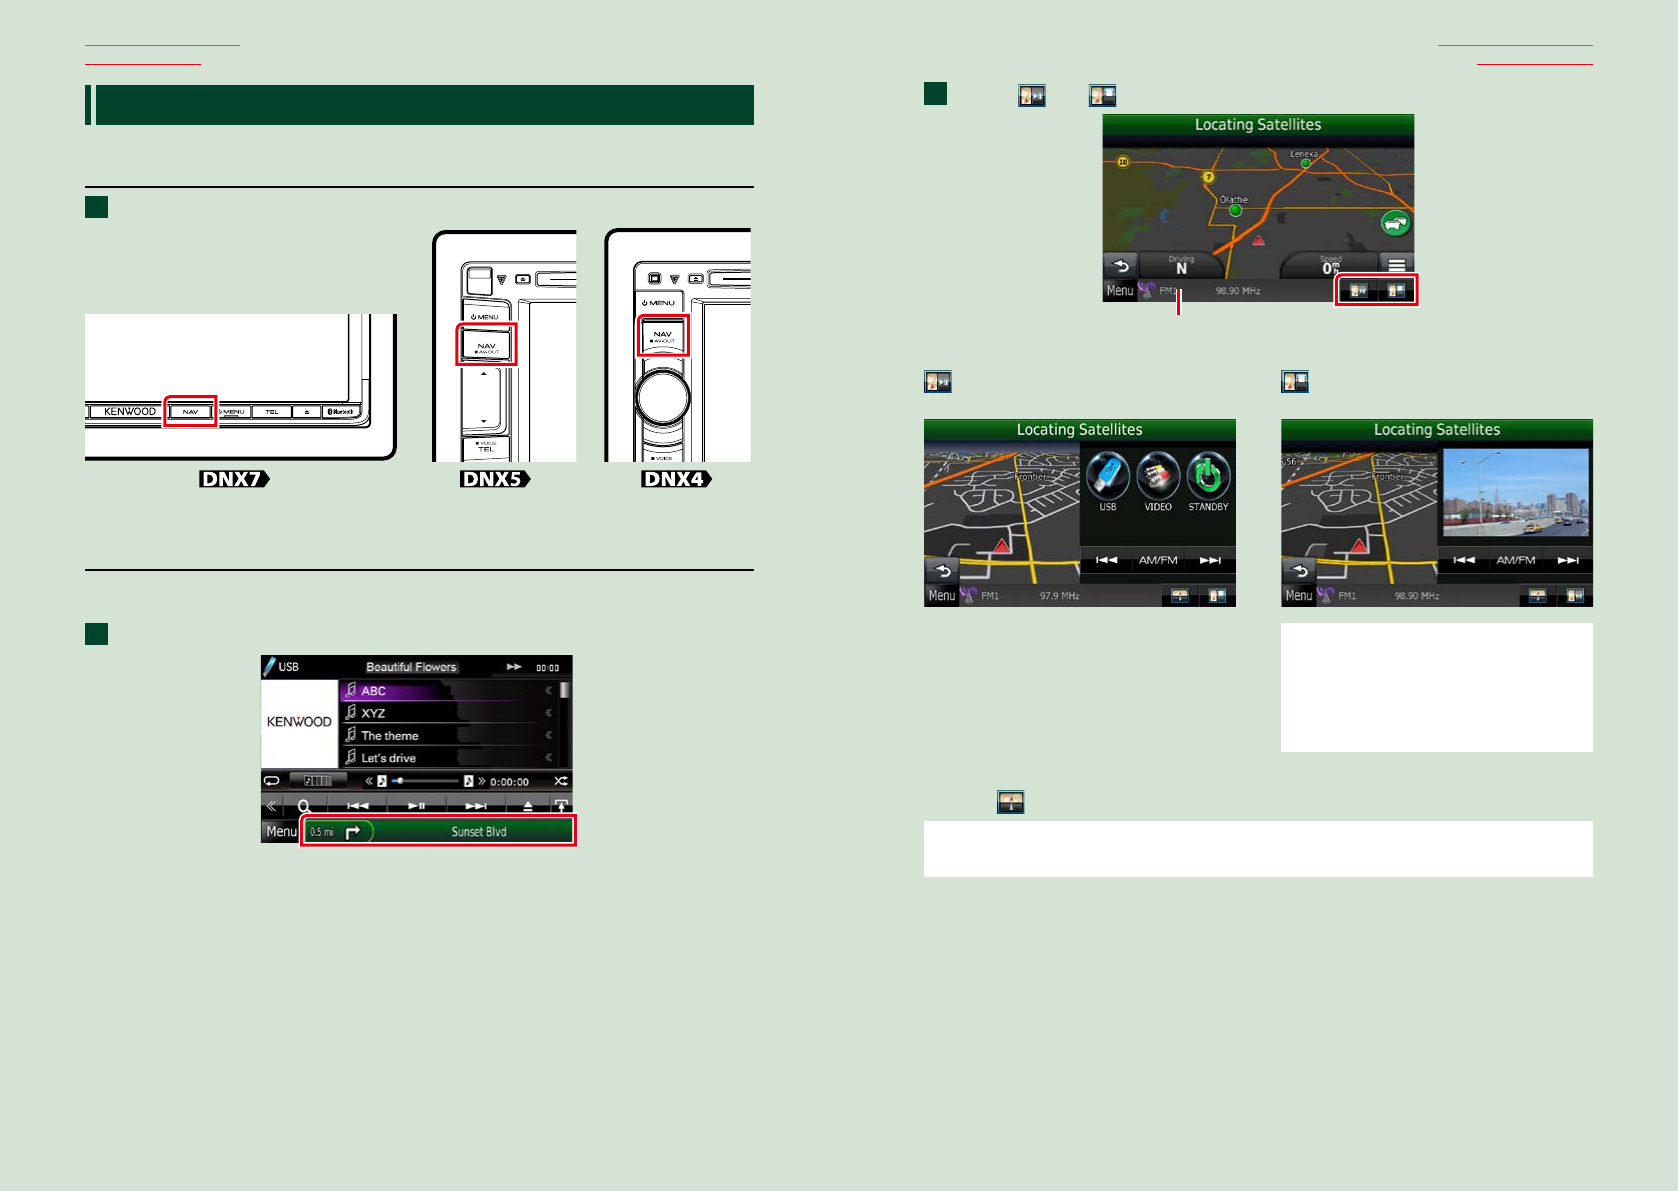
Basic Operations
Touch [ ] or [ ] in the navigation screen.
Touchingthisareadisplays
theaudioscreen.
:Displaysthenavigationandcontrol
keysofthecurrentsource.
:Displaysthenavigationandcurrent
video/pictureplaybackdisplay.
NOTE
• Thescreenswitchesbetweenplaybackscreen
andcameravieweachtimetheviewingareais
touched.
• Touchingthesourceiconinthebottomofthe
screendisplaysthefullaudioscreen.
● To return to the full navigation screen:
Touch[ ].
NOTE
• Fordetailsoncontrolkeys,refertotheinstructionsineachsection.
2
Navigation Operation
Fordetailsonthenavigationfunction,pleaserefertotheNavigationInstructionManual.
Display the navigation screen
Press the <NAV> button.
Thenavigationscreenappears.
Control audio from the navigation screen
Youcancontrolaudiosourceswhilethenavigationscreenisdisplayed.
Also,youcanviewthenavigationinformationwhilethesourcecontrolscreenisdisplayed.
Touch the information bar.
Thenavigationscreenwithaudioinformationappears.
1
1

2222 23
Return to the Top page
DVD, VCD
Return to the Top page
DVD, VCD
DVD/VCD Basic Operation
Mostfunctionscanbecontrolledfromthesourcecontrolscreenandplaybackscreen.
NOTE
• SettheremotecontrolmodeswitchtoDVDmodebeforestartingoperation,seeSwitching the operation mode
(P.109).
• ThescreenshotbelowisforDVD.ItmaybedifferentfromtheoneforVCD.
234
1
5
Video screenControl screen
6
6
78
1 Information display
Displaysthefollowinginformation.
•Title #, Chap #:DVDtitleandchapternumberdisplay
•Track #/Scene #:VCDtrackorscenenumberdisplay
Scene#isdisplayedonlywhenPlaybackcontrol(PBC)ison.
•3,¡,¢,7,etc.:Currentplaymodedisplay
Themeaningsofeachiconareasfollows;3(play),¡(fastforward),1(fastbackward),
¢(searchup),4(searchdown),7(stop), R(resumestop),8(pause), (slowplayback),
(slowreverseplayback).
Touchthisareatodisplaythedisclablename.
2 Multi function key
Touchtoswitchthemultifunctionmenu.Fordetailsonthemenu,seeMulti function menu (P.24).
3 Multi function menu
Variousfunctionscanbeperformedbyusingkeysinthisarea.Fordetailsonthekeys,seeMulti
function menu (P.24).
4 Control switching key
UnavailableinDVD/VCDsource.
DVD/Video CD (VCD) Operation 5 Sub function menu
Thefollowingfunctionscanbeperformedbyusingkeysinthisarea.
•Repeats the current content:Touch[ ].Eachtimeyoutouchthekey,repeatmodeswitchesinthe
followingsequence;
DVD:"titlerepeat" ,"chapterrepeat" ,"functionoff"
VCD(PBCOn):Doesnotrepeat
VCD(PBCOff ):"trackrepeat" ,"functionoff"
•Hides all keys:Touch[ ].
•Fast forward or fast backward:Touch[1]or[¡].Eachtimeyoutouchthekey,thespeed
changes;standard,2times,3times.
•Confirms play time:See#:##:##.
DVD:Youcanswitchthetimedisplaybetweentitleplaytime,chapterplay
time,andtitleremainingtime.Eachtimeyoutouch,thedisplayswitches
between“T#:##:##”(titleplaytimedisplay),“C#:##:##”(chapterplaytime
display),and“R#:##:##”(titleremainingtimedisplay).
Aswellasthetimedisplay,thebarindicatingcurrentlocationappears.
VCD (PBC off):Youcanalsoconfirmdiscremainingtimebytouchingtime
display.Eachtimeyoutouch,thedisplayswitchesbetween“P
##:##”(playtimedisplay)and“R##:##”(discremainingtime).
•Confirms the current location:Seethebarincenter(DVDonly).Thebardoesnotappearwhenthe
timedisplayisremainingtimedisplay.
6 Searching area
Touchtosearchthenext/previouscontent.
Scrollingfromcenterofdisplaytoleftorrightperformsfastbackwardorfastforward.Eachtimeyou
toucheacharea,thespeedchanges;standard,2times,3times.Tostopfastbackward/forward,touch
centerofthedisplay.
7 Menu display area
Thisareafunctionsdifferentlydependingonthecurrentstatus.
•During DVD playback:DisplaystheDVDmenu.Duringthemenudisplay,displaysthehighlight
controlscreen.
•During VCD playback:DisplaystheZoomControlscreen(P.26).
8 Key display area
Touchtodisplaythelastcontrolscreen.
NOTE
• Ifyouusearemotecontrol,youcanjumpdirectlytothedesiredimagewithenteringthechapternumber,scene
number,playtime,etc(P.109).
2424 25
Return to the Top page
DVD, VCD
Return to the Top page
DVD, VCD
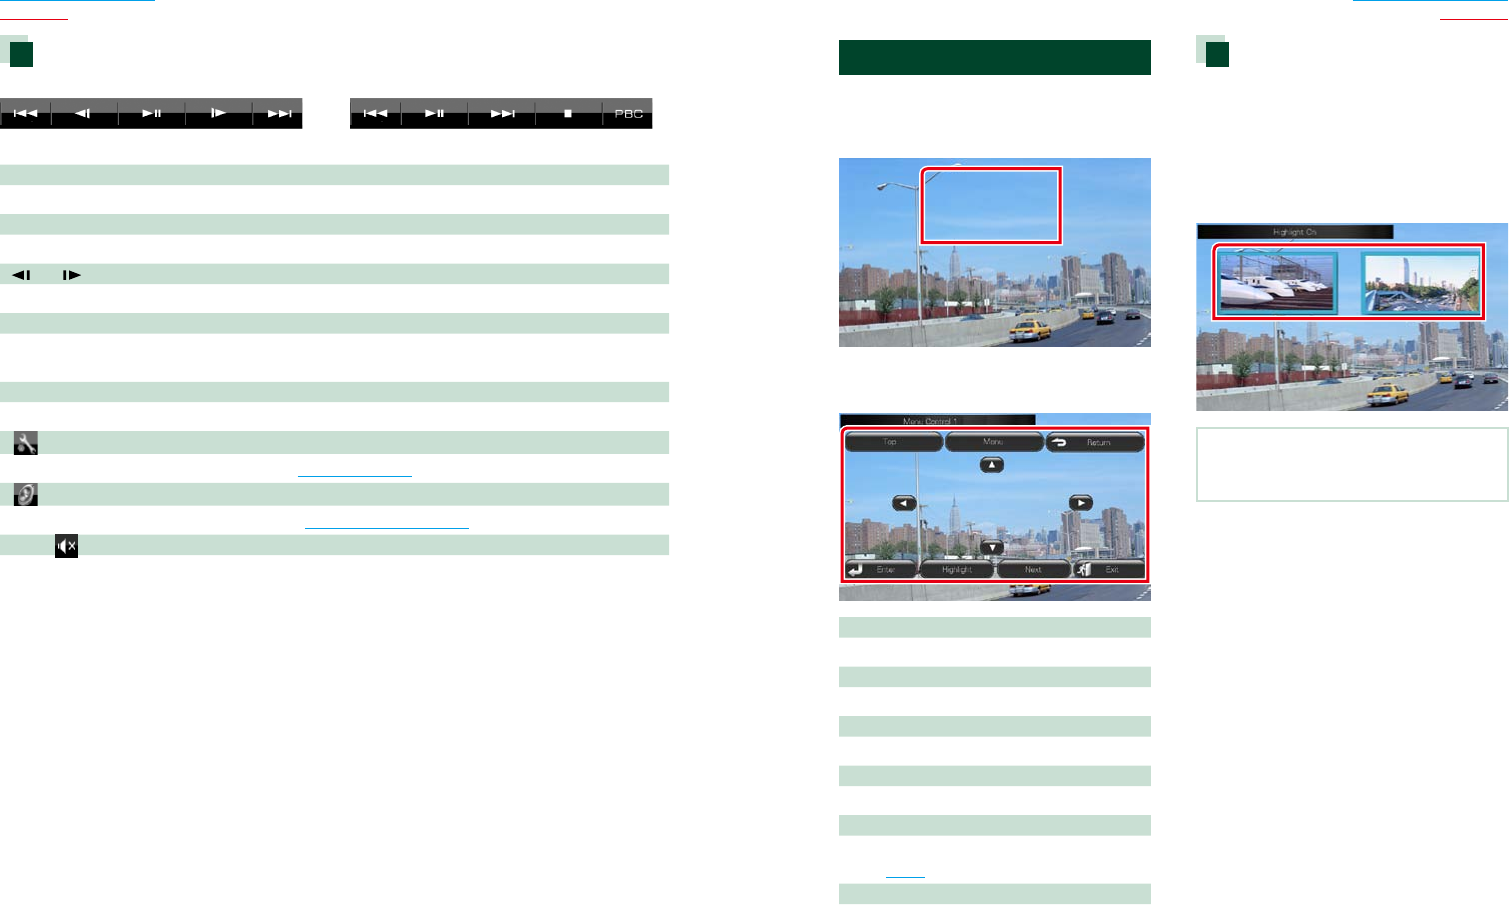
Multi function menu
DVD VCD
Thefunctionsofeachkeyareasfollows.
[4] [¢]
Searchestheprevious/nextcontent.
[38]
Playsorpauses.
[] or [ ] (DVD only)
Playsinslowmotionforwardorbackward.
[7]
Stopsplayback.Whentouchedtwice,thediscisplayedfromthebeginningwhenyouplayitthenext
time.
[PBC] (VCD only)
TurnPlaybackcontrol(PBC)onoroff.
[
SETUP]
TouchtodisplaytheSETUPMenuscreen.SeeSetting Up (P.80).
[
AUDIO]
TouchtodisplaytheAudioControlscreen.SeeControlling Audio (P.94).
[ REAR
]
Touchtomutetherearspeaker.
DVD Disc Menu Operation
YoucansetupsomeitemsintheDVD-VIDEO
discmenu.
1 Touch illustrated area during playback.
Menu Control screen appears.
2 Perform desired operation as follows.
Displays the top menu
Touch[Top].*
Displays the menu
Touch[Menu].*
Displays the previous menu
Touch[Return].*
Enters selected item
Touch[Enter].
Enables direct operation
Touch[Highlight]toenterthehighlightcontrol
mode(P.25).
Moves the cursor
Touch[5],[∞],[2],[3].
*Thesekeysmaynotfunctiondependingon
thedisc.
Highlight control
HighlightcontrolletsyoucontroltheDVD
menubytouchingthemenukeydirectlyon
thescreen.
1 Touch [Highlight] in the Menu Control
screen.
2 Touch desired item on the screen.
NOTE
• Thehighlightcontrolisclearedautomaticallyif
youdonotoperateforaconstanttime.
2626 27
Return to the Top page
DVD, VCD
Return to the Top page
DVD, VCD
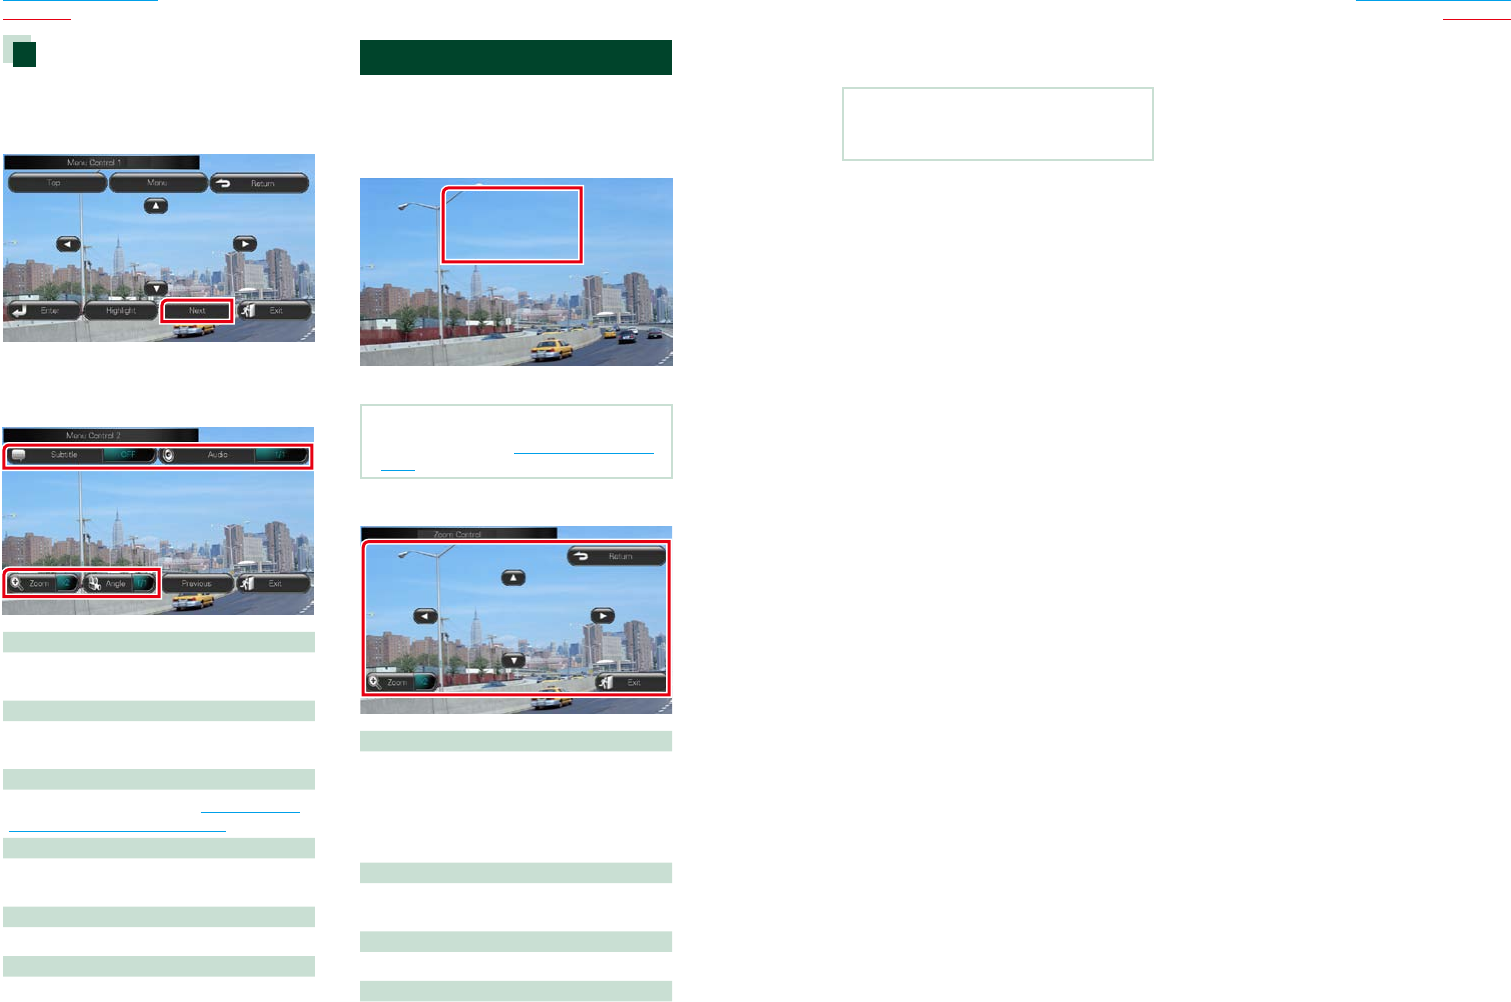
DVD play mode setting
YoucanselectDVDplaymode.
1 Touch [Next] in the Menu Control
screen.
Menu Control 2 screen appears.
2 Touch the key which corresponds to
desired setting item.
Switches the subtitle language
Touch[Subtitle].Eachtimeyoutouchthiskey,
languageisswitched.
Switches the audio language
Touch[Audio].Eachtimeyoutouchthiskey,
languageisswitched.
Controls zoom ratio
Touch[Zoom].Fordetails,seestep2 in Zoom
Control For DVD And VCD (P.26).
Switches the picture angle
Touch[Angle].Eachtimeyoutouchthiskey,
pictureangleisswitched.
Exits menu control
Touch[Exit].
Displays the Menu Control 1 screen
Touch[Previous].
Zoom Control For DVD And VCD
YoucanenlargePlaybackscreenforDVDand
VCD.
1 For VCD, touch illustrated area during
playback.
Zoom Control screen appears.
NOTE
• ForDVD,pleaserefertoDVD play mode setting
(P.26)todisplaytheZoomControlscreen.
2 Perform desired operation as follows.
Switches zoom ratio
Touch[Zoom].
ForDVD,changesthezoomratioat4levels;
Off,2times,3times,4times.
ForVCD,changesthezoomratioat2levels;
Off,2times.
Scrolls the screen
Touch[5],[∞],[2],or[3]toscrollthescreen
inthedirectionyoutouch.
Exits menu control
Touch[Exit].
Displays the previous menu*
Touch[Return].
*Thisfunctionmaynotbeperformed
dependingonthedisc.
NOTE
• Youcannottouchthemenukeysdirectlyonthe
screenwhenzooming.
2828 29
Return to the Top page
DVD, VCD
Return to the Top page
DVD, VCD
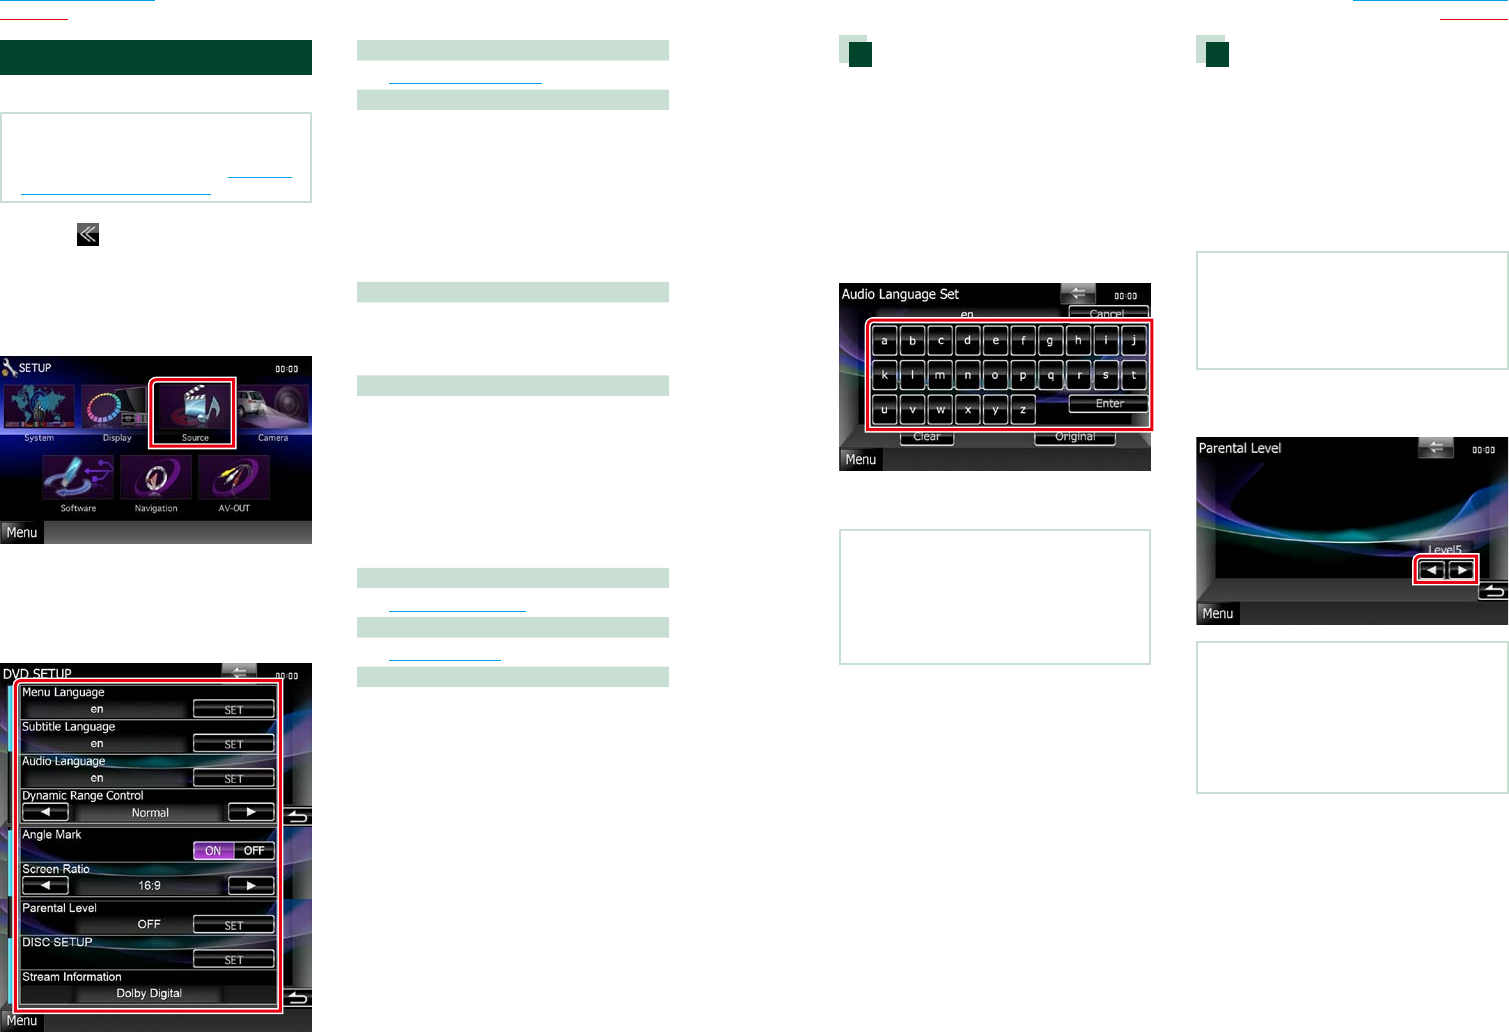
DVD Setup
YoucansetuptheDVDplaybackfunctions.
NOTE
• Eachoperationinthissectioncanbestartedfrom
theTopMenuscreen.Fordetails,seeOperating
with the Top Menu Screen (P.16).
1 Touch [ ] in the control screen.
Multi function menu appears.
2 Touch [SETUP].
SETUP Menu screen appears.
3 Touch [Source].
Source SETUP Menu screen appears.
4 Touch [DVD SETUP] in the list.
DVD SETUP screen appears.
5 Set each item as follows.
Menu/Subtitle/Audio Language*
SeeLanguage setup (P.29).
Dynamic Range Control*
Setsthedynamicrange.
Wide:Thedynamicrangeiswide.
Normal:Thedynamicrangeisnormal.
Dialog (Default):Makesthetotalsound
volumelargerthanother
modes.Thisiseffectiveonly
whenyouareusingDolby
Digitalsoftware.
Angle Mark
Setsananglemarkdisplay.
ON (Default):Ananglemarkappears.
OFF:Ananglemarkdoesnotappear.
Screen Ratio*
Setsthescreendisplaymode.
16:9 (Default):Displayswidepictures.
4:3 LB:DisplayswidepicturesintheLetterBox
format(havingblackstripesatthetop
andbottomofscreen).
4:3 PS:DisplayswidepicturesinthePan&
Scanformat(showingpicturescutat
therightandleftends).
Parental Level*
SeeParental level (P.29).
DISC SETUP
SeeDisc setup (P.30).
Stream Information
Displaysthepresentsourceinformation.
Thestream(DolbyDigital,dts,LinearPCM,
MPEG,WMAorAAC)appears.
*TheseitemsaredisabledwhenaDVDis
beingplayed.
Language setup
Thissettingisforthelanguageusedinthe
menu,subtitle,andvoice.Youcannotsetup
theseitemsduringDVDplayback.
1 Touch [SET] of the desired item;
[Menu Language], [Subtitle Language],
[Audio Language].
Language Set screen appears.
2 Enter the desired language code and
touch [Enter].
Sets the entered language and returns to
the DVD SETUP screen.
NOTE
• Tocancelthesetupandreturntotheprevious
screen,touch[Cancel].
• Tocleartheenteredcode,touch[Clear].
• TosettheDVD’soriginallanguageforaudio
language,touch[Original].
Parental level
Setsaparentallevel.Youcannotsetupthis
itemduringDVDplayback.
1 Touch [SET] of [Parental Level].
Parental Pass screen appears.
2 Enter the parental code and touch
[Enter].
Parental Level screen appears.
NOTE
• Tocancelthesetupandreturntotheprevious
screen,touch[Cancel].
• Tocleartheenteredcode,touch[Clear].
• Currentparentallevelappearsas[Level#].
3 Touch [2] or [3] to select a parental
level.
NOTE
• Ifadischashigherparentallocklevel,youneed
toenterthecodenumber.
• Theparentallocklevelvariesdependingona
loadeddisc.
• Ifadischasnoparentallock,anybodycanplayit
backevenwhenyouhavesettheparentallock.

3030 31
Return to the Top page
DVD, VCD
Return to the Top page
DVD, VCD
Disc setup
Performssetupwhenusingdiscmedia.
1 Touch [SET] of [DISC SETUP].
DISC SETUP screen appears.
2 Select an option as follows.
CD Read
SetsthemotionofthisunitwhenamusicCD
isplayed.
1 (Default):Automaticallyrecognizesandplays
backanaudiofiledisc,aDVDoramusicCD.
2:ForciblyplaysbackadiscasamusicCD.
Select[2]ifyouwishtoplayamusicCDhaving
aspecialformatorifyoucannotplayadiscin
[1]position.
On Screen DVD
Setsanon-screendisplay.
Auto:Whenupdated,informationappearsfor
5seconds.
OFF (Default):Informationdoesnotappear.
NOTE
• [CDRead]isnotavailablewhenadiscisinthe
unit.
• Youcannotplayanaudiofile/VCDdiscinthe[2]
position.Also,youmaynotplaysomemusicCDs
inthe[2]position.
3232 33
Return to the Top page
CD, Disc, iPod, USB device
Return to the Top page
CD, Disc, iPod, USB device
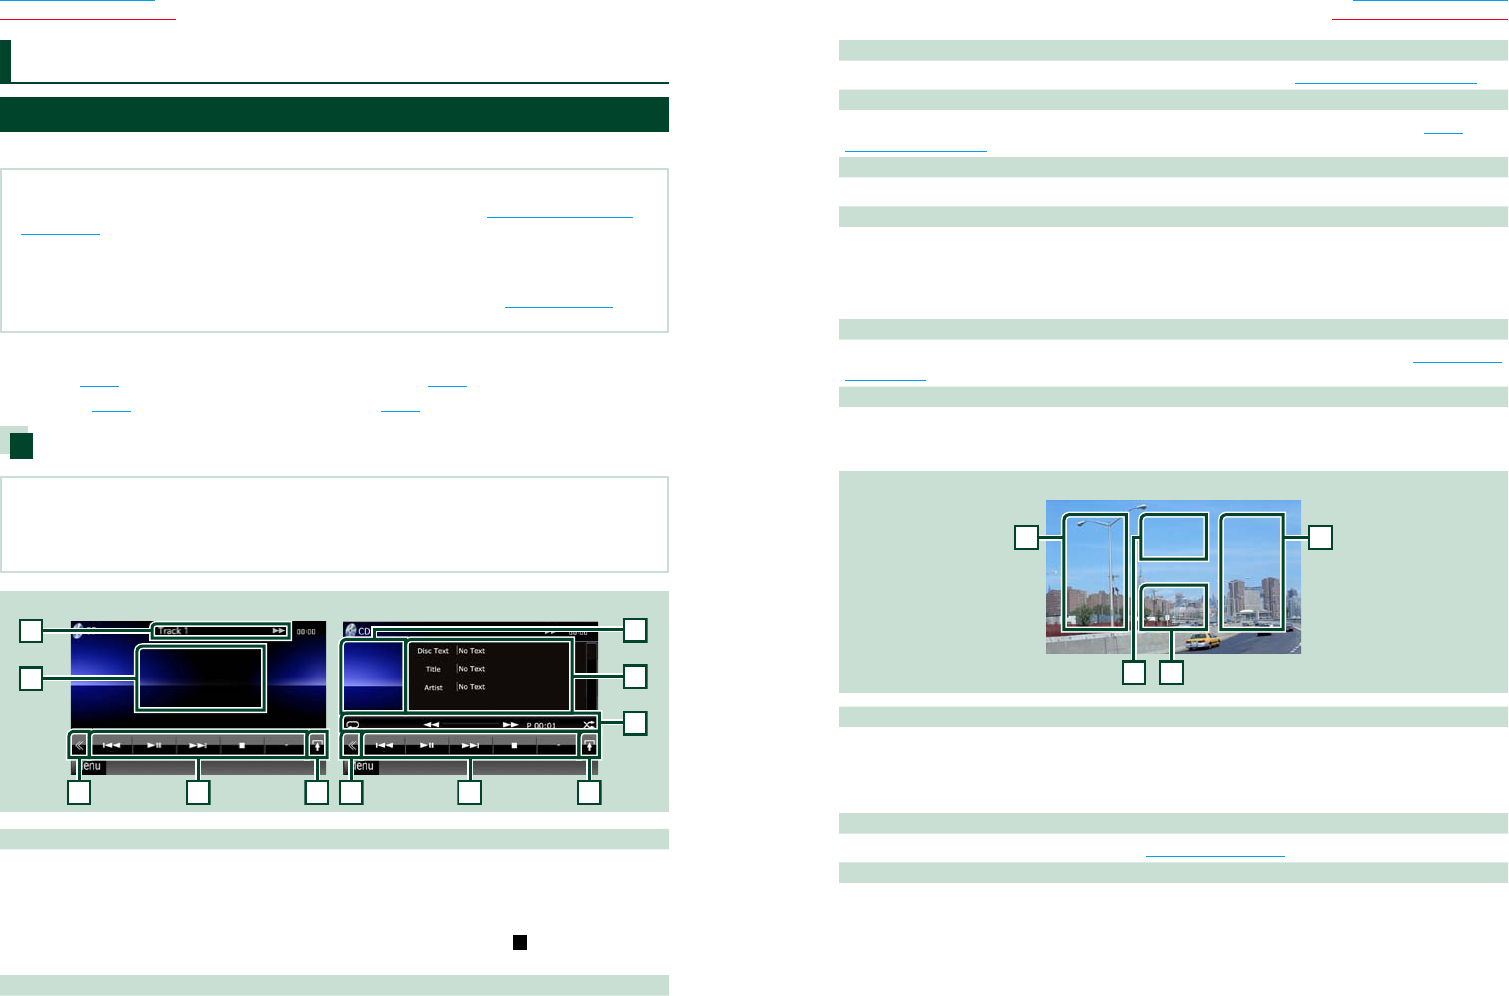
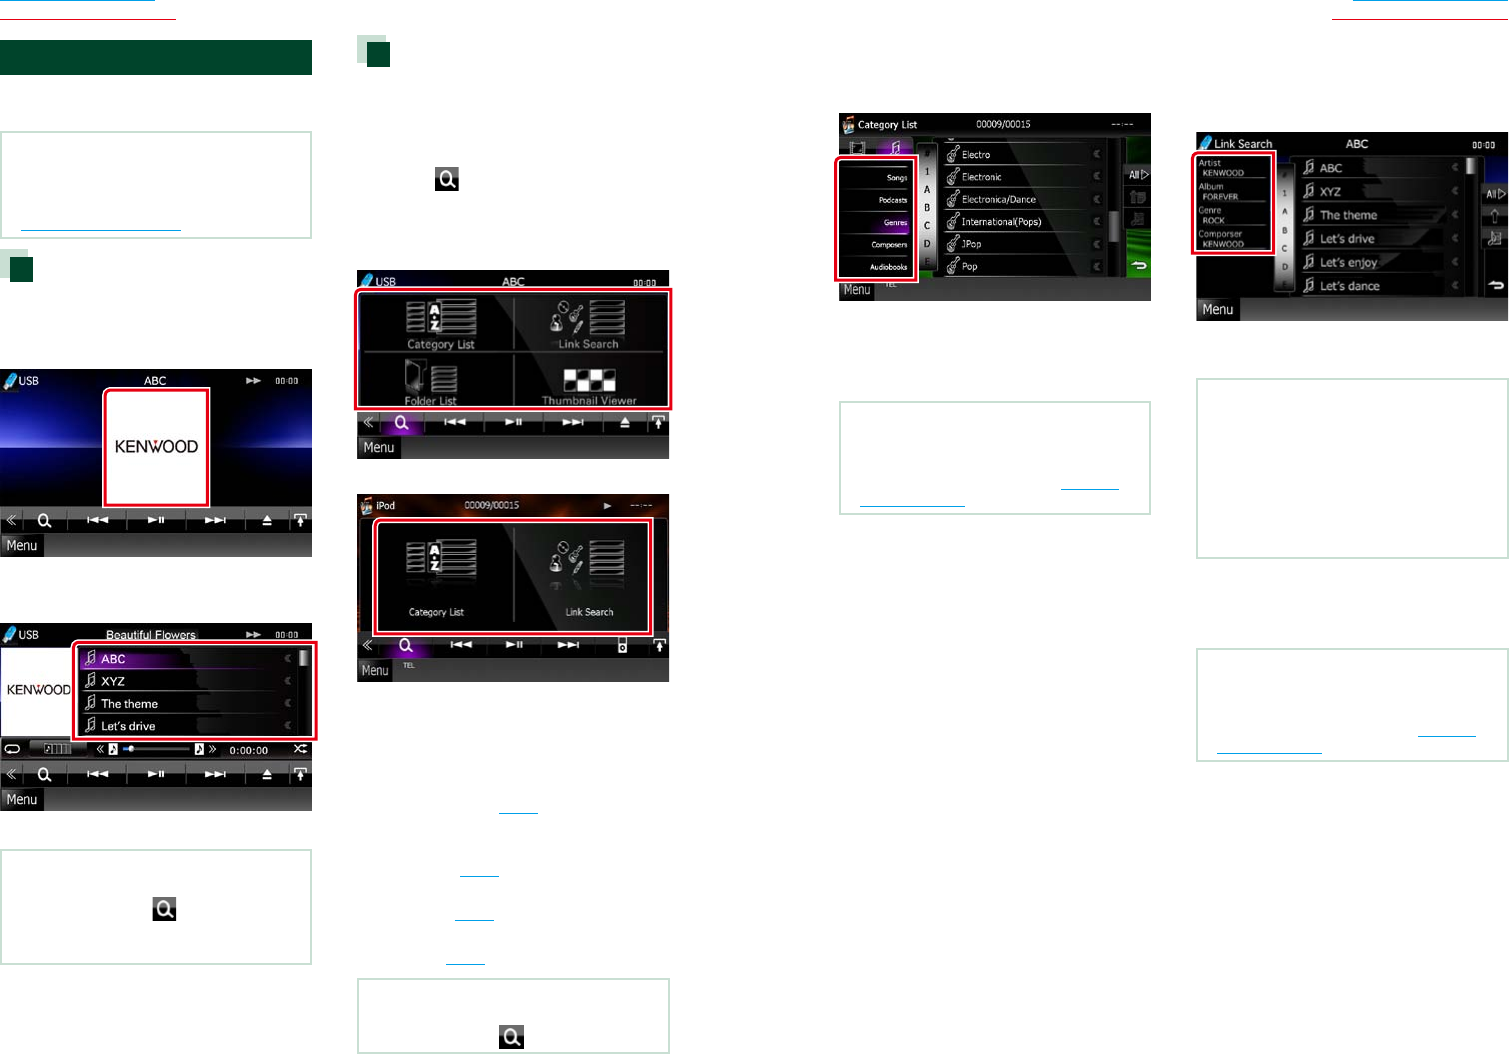
Music/Video/Picture Basic Operation
Mostfunctionscanbecontrolledfromthesourcecontrolscreenandplaybackscreen.
NOTE
• SettheremotecontrollermodeswitchtoAUDmodebeforestartingoperation,seeSwitching the operation
mode (P.109).
• ToconnectiPodtothisunit,optionalaccessoryKCA-iP202orKCA-iP102isnecessary.
WheniPodisconnectedusingtheKCA-iP202,youcanlistentoaudioandwatchvideo.WheniPodisconnected
usingtheKCA-iP102,youcanonlylistentoaudio.
WhenusingtheKCA-iP202toconnectyouriPod,set“iPodAVInterfaceUse”to“iPod”,inAV Input Setup (P.92),or
to“AV-IN2”whenusingKCA-iP102
Seethefollowingsectionsforeachsourceoperation.
• Music CD (P.32)
• Disc media (P.32)
• USB device (P.34)
• iPod (P.34)
Music CD and disc media
NOTE
• Inthismanual,“MusicCD”willbereferredtoasthegeneralCDswhichincludemusictracksin.
“Discmedia”willbereferredtoasCD/DVDdiscwhichincludesaudio,pictureorvideofiles.
• ThescreenshotbelowisforCD.Itmaybedifferentfromtheonefordiscmedia.
2
3
3
4
4
5
8
6
2
7
Simple Control screen List Control screen
1
1 Information display
Displaysthefollowinginformation.
•Track #:Eachtimeyoutouchthisarea,displayswitchesbetweencurrenttracknumber,text,etc.
•3,¡,¢,7, etc.:Currentplaymodedisplay
Themeaningsofeachiconareasfollows;3(play),¡(fastforward),1(fast
backward),¢(searchup),4(searchdown),7(stop), R(resumestop),8
(pause).
2 Movie display area/Control switching area
TouchtoswitchbetweentheSimpleControlandListControlscreen.
CD/Audio and Visual Files/iPod Operation 3 Multi function key
Touchtoswitchthemultifunctionmenu.Fordetailsonthemenu,seeMulti function menu (P.36).
4 Multi function menu
Variousfunctionscanbeperformedbyusingkeysinthisarea.Fordetailsonthemenu,seeMulti
function menu (P.36).
5 Sub function key
Touchtodisplay“Subfunctionmenu”(7inthistable).
6 Track information
Displaystheinformationofthecurrenttrack.
FormusicCDanddiscmedia,youcanswitchthecurrenttrackinformationandthecurrentfolderlistby
touchingthelistswitchingkey(8inthistable).
However,only"NoInformation"isdisplayedformusicCD.
7 Sub function menu
Variousfunctionscanbeperformedbyusingkeysinthisarea.Fordetailsonthekeys,seeSub function
menu (P.37).
8 List switching key
TouchtoswitchbetweenthetracklistandtheCD-TEXTdisplay(CD)/ID3taginformation(discmedia
only).
Video screen (disc media only)
99
10
11
9 Searching file area (disc media only)
Touchtosearchthenext/previousfile.
Scrollingfromcenterofdisplaytoleftorrightperformsfastbackwardorfastforward.Eachtimeyou
toucheacharea,thespeedchanges;standard,2times,3times.Tostopfastbackward/forward,touch
centerofthedisplay.
10
Menu display area (disc media only)
Touchtodisplaythediscmenu.Fordetails,seeMovie Control (P.43).
11
Key display area (disc media only)
Touchtodisplaythelastcontrolscreen.
3434 35
Return to the Top page
CD, Disc, iPod, USB device
Return to the Top page
CD, Disc, iPod, USB device
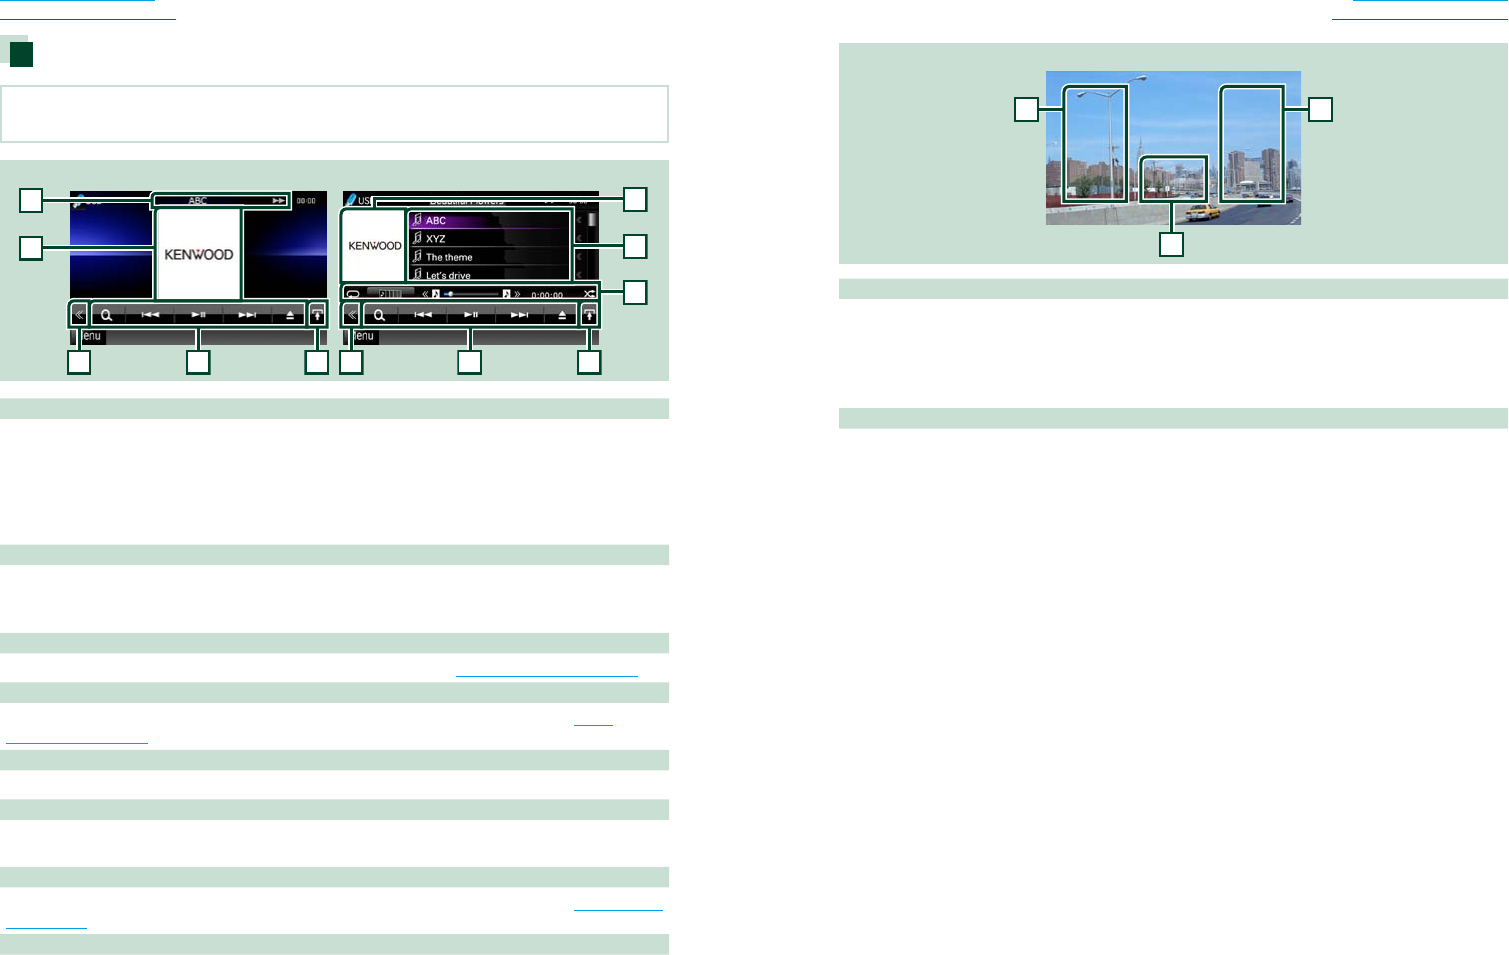
USB device and iPod
NOTE
• ThescreenshotbelowisforUSBdevice.ItmaybedifferentfromtheoneforiPod.
2
3
3
4
4
5
8
6
2
7
Simple Control screen List Control screen
1
1 Information display
Displaysthefollowinginformation.
•Current file name:Eachtimeyoutouchthisarea,displayswitchesbetweenfilenumber/folder
numberandfilename.
•3,¡, etc.:Currentplaymodedisplay
Themeaningsofeachiconareasfollows;3(play,searching),8(pause),¡(forward
manualsearch),1(reversemanualsearch).
2 Artwork/Control switching area
Thepicturedataisdisplayedifavailablefromthecurrentfile.Whenthepictureisnotavailable,“No
Photo”isdisplayed.
TouchtoswitchbetweentheSimpleControlandListControlscreen.
3 Multi function key
Touchtoswitchthemultifunctionmenu.Fordetailsonthemenu,seeMulti function menu (P.36).
4 Multi function menu
Variousfunctionscanbeperformedbyusingkeysinthisarea.Fordetailsonthekeys,seeMulti
function menu (P.36).
5 Sub function key
Touchtodisplay“Subfunctionmenu”(7inthistable).
6 Contents list
Displaysthelistandcontents.Thecontentsofthelistdifferdependingontheplaybackstatusand
source.
7 Sub function menu
Variousfunctionscanbeperformedbyusingkeysinthisarea.Fordetailsonthekeys,seeSub function
menu (P.37).
8 List switching key
Touchtoswitchbetweenthefilelistandthecurrentfileinformation.
Picture/video screen
99
10
9 Searching file area (picture/video file only)
•Touchtosearchthenext/previousfile.
•DuringslideshowinUSBmode,touchingeachareasearchesthenext/previousmusicfile.
•Scrollingfromcenterofdisplaytoleftorrightperformsfastbackwardorfastforward.Tostopfast
backward/forward,touchcenterofthedisplay.Thisfunctionisnotavailablewhenthereisnomusic
fileinthecurrentfolder.
10
Key display area (picture/video file only)
Touchtodisplaythelastcontrolscreen.
3636 37
Return to the Top page
CD, Disc, iPod, USB device
Return to the Top page
CD, Disc, iPod, USB device
Multi function menu
Music CD
iPod
Disc media
USB device
Thefollowingfunctionscanbeperformedbyusingkeysinthisarea.
[ ] (Disc media, iPod, USB device only)
Searchestrack/file.Fordetailsonsearchoperation,seeSearch Operation (P.38).
[4] [¢]
Searchestheprevious/nexttrack/file.
[3] [8] (iPod only) / [38]
Playsorpauses.
[7] (music CD and disc media only)
Stopsplayback.
[0] (iPod and USB device only)
Touchfor1secondtodisconnectthedevice.Fordetails,seeHow to Play Media (P.15).
[APP] (iPod only)
TouchtoswitchamongtheAppmodeandNormalmodecyclically.
App mode:Allowsthisunittooutputthesoundsandimagesproducedbytheapplicationrunningon
youriPodtouchoriPhone.
IntheAppmode,youcancontrolonlythe“Pauseandplay”and“Selectingasong”functionsfromthis
unit.
[ ] [ ] (disc media and USB device only)
Searchesprevious/nextfolder.
[
] (picture files in USB device only)
Duringpictureplayback,switchestopicturedisplay.
[
SETUP]
TouchtodisplaytheSETUPMenuscreen.SeeSetting Up (P.80).
[
AUDIO]
TouchtodisplaytheAudioControlscreen.SeeControlling Audio (P.94).
[ REAR
]
Touchtomutetherearspeaker.
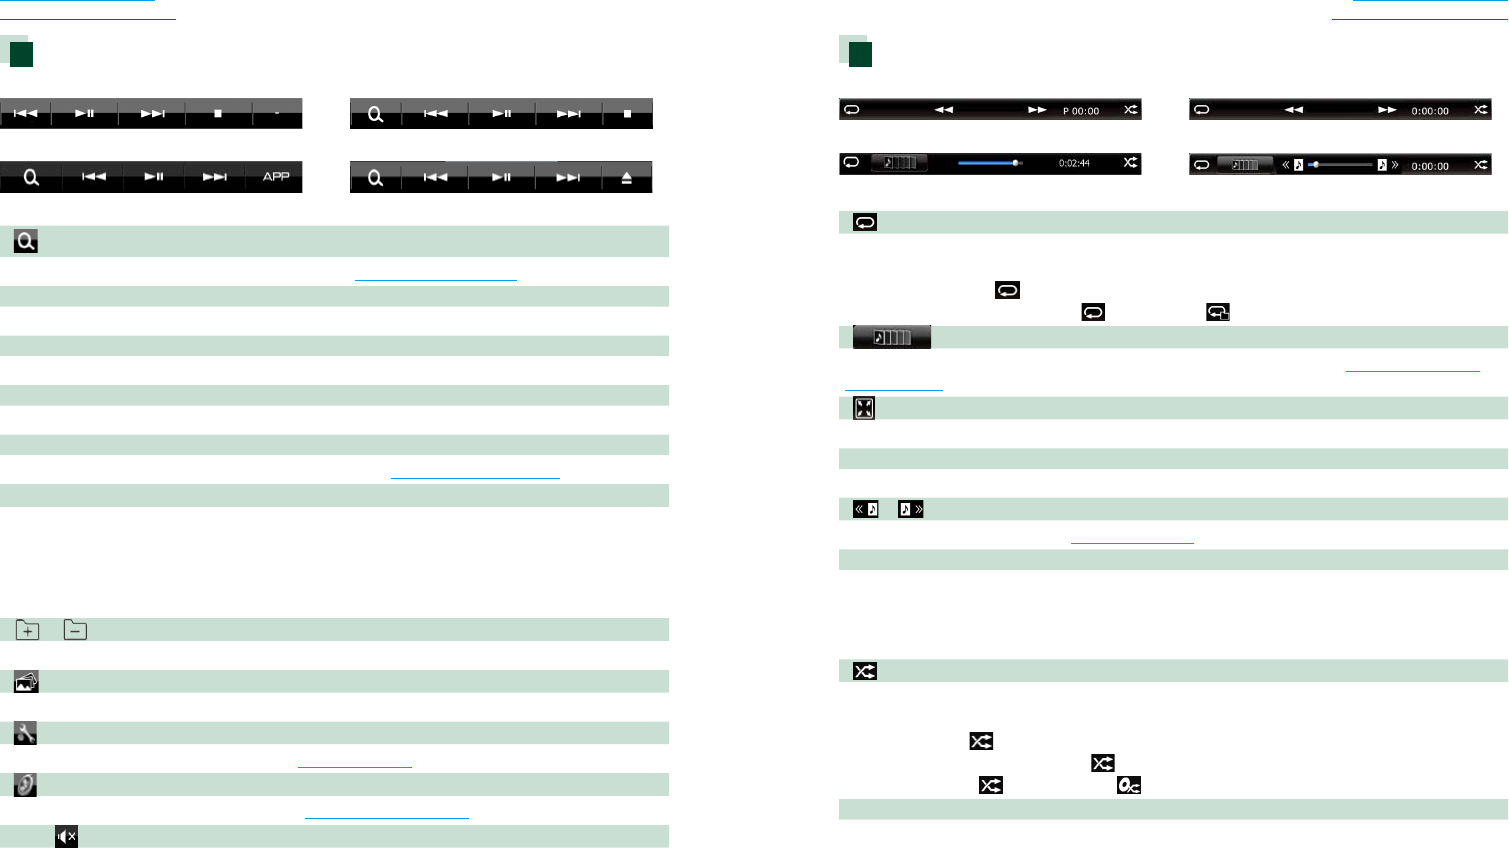
Sub function menu
Music CD
iPod
Disc media
USB device
Thefollowingfunctionscanbeperformedbyusingkeysinthisarea.
[ ]
Repeatsthecurrenttrack/folder.Eachtimeyoutouchthekey,repeatmodeswitchesinthefollowing
sequence;
CD, iPod:"trackrepeat" ,"repeatoff"
Disc media, USB device:"filerepeat" ,"folderrepeat" ,"repeatoff"
[ ] (USB device and iPod only)
Searchestrackfromthealbumartworklist.Fordetailsonsearchoperation,seeSearch from album
artwork (P.41).
[ ] (During video file playback only)
Hidesallkeys.
[1] [¡] (Music CD and disc media only)
Fastforwardorfastbackward.
[ ] [ ] (USB device and iPod only)
PlaysthepreviousornextalbuminFavorite list (P.42).
#:##:## or ##:##
Confirmsplaytime.
DuringmusicCDplayback,youcanalsoconfirmdiscremainingtimebytouchingtimedisplay.
Eachtimeyoutouch,thedisplayswitchesbetween“P##:##”(trackplaytimedisplay)and“R##:##”(disc
remainingtime).
[ ]
Randomlyplaysalltracksincurrentfolder/discorincurrentplaylistintheconnectediPod.
Eachtimeyoutouchthekey,randommodeswitchesinthefollowingsequence;
CD:"trackrandom" ,"randomoff"
Disc media, USB device:"filerandom" ,"randomoff"
iPod:"trackrandom" ,"albumrandom" ,"randomoff"
Status bar in center (USB device and iPod only)
Confirmsthecurrentlocation.
DuringUSBdeviceandiPodplayback,youcandragthecircleleftorrighttochangetheplaying
position.
3838 39
Return to the Top page
CD, Disc, iPod, USB device
Return to the Top page
CD, Disc, iPod, USB device
Search Operation
Youcansearchmusic,videoorpicturefiles
bythefollowingoperations.
NOTE
• Ifyouusearemotecontrol,youcanjumpdirectly
tothedesiredtrack/filewithenteringthetrack/
folder/filenumber,playtime,etc.Fordetails,see
Direct search mode (P.109).
List search
Youcansearchtracks,folders,andfiles
accordingtohierarchy.
1 Touch illustrated area.
List Control screen appears.
2 Touch desired track/file.
Playback starts.
NOTE
• Fordiscmedia,youcanswitchthefilelistand
folderlistbytouching[ ].
• Fordiscmedia,youcannotdisplaythelistduring
randomplayandstop.
Other search
Whenyouwanttonarrowthelistdown,
thereareothersearchways.
ThisfunctionisnotavailablewhenmusicCD
isthecurrentsource.
1 Touch [ ] in the control screen.
The search type screen appears.
2 Touch desired search way.
USBdevice
iPod
The list sorted in the way you selected
appears.
See the following sections for each
operation.
• [CategoryList]:Youcansearchafileby
selectingcategory(P.39).
• [LinkSearch]:Youcansearchafileof
sameartist/album/genre/composerasthe
currenttrack(P.39).
• [FolderList]:Youcansearchafileaccording
tohierarchy(P.40).
• [ThumbnailViewer]:Youcansearcha
picturefile(P.40).
NOTE
• Fordiscmedia,youcandisplaythefolderlist
directlybytouching[ ].
Category search (USB device and iPod only)
1 Touch the desired category from the
left part of the screen.
2 The list is sorted by selected category.
3 Touch desired item.
Playback starts.
NOTE
• Tonarrowthesearchyoucanselectaletterfrom
thealphabetlistinthecenterofthedisplay.
• Foroperationsinthelistscreen,seeCommon
Operations (P.18).
Link search (USB device and iPod only)
1 Touch the desired item from the left
part of the screen. You can select from
artist, album, genre and composer.
The list corresponding to your selection
appears.
NOTE
• Thelistissortedbythewayyouselected.
• artist:Displaysthealbumlistoftheartist.
• album:Displaysalltunesofthecurrentalbum.
• genre:Displaystheartistslistinwhichartists
belongtothesamegenre.
• composer:Displaysthealbumlistofthe
composerofthecurrentfile.
2 Touch to select desired item in the
list. Repeat this step until you find the
desired file.
NOTE
• Tonarrowthesearchyoucanselectaletterfrom
thealphabetlistinthecenterofthedisplay.
• Foroperationsinthelistscreen,seeCommon
Operations (P.18).
4040 41
Return to the Top page
CD, Disc, iPod, USB device
Return to the Top page
CD, Disc, iPod, USB device
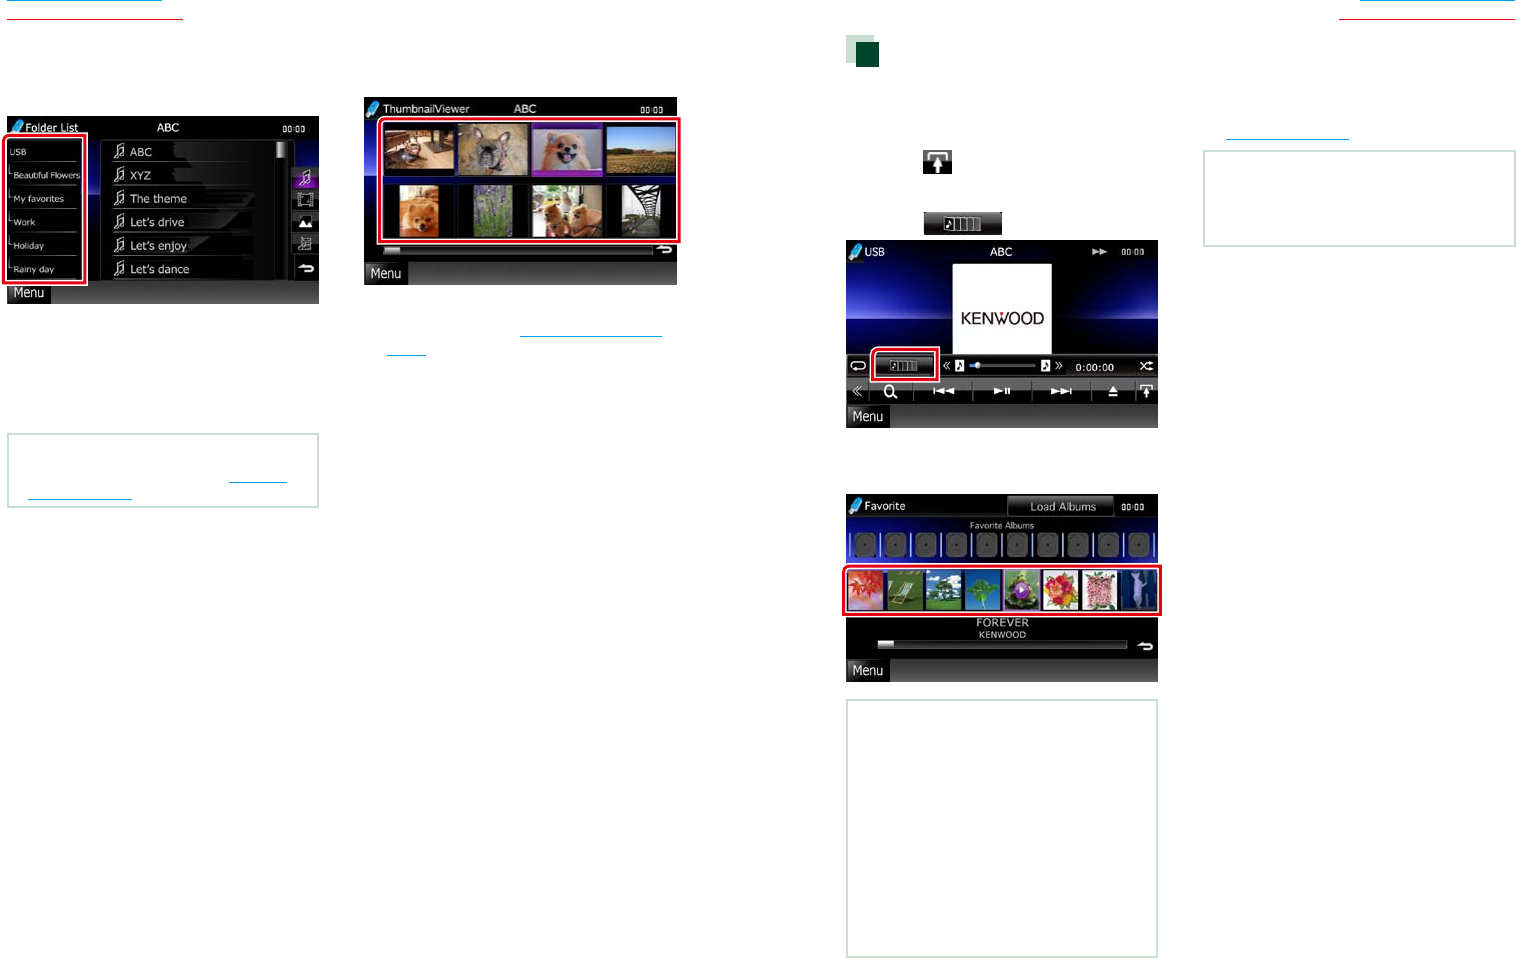
Folder search (USB device and disc
media only)
1 Touch the desired folder.
Contents of the folder are displayed in the
right area of the screen.
2 Touch desired item from the content
list.
Playback starts.
NOTE
• Foroperationsinthelistscreen,seeCommon
Operations (P.18).
Picture search (USB device only)
1 Touch the desired picture.
The selected picture appears in full screen.
See number 9-10 in USB device and iPod
(P.34) for operation of picture screen.
Search from album artwork
(USB device and iPod only)
Youcansearchmusicfilesbyselectingthe
albumartwork.
1 Touch [ ].
Sub function menu appears.
2 Touch [ ].
Favorite screen appears.
3 Touch desired artwork in the lower line.
NOTE
• Thekeyintheuppersideofthescreenfunctions
differentlydependingonthestatus.
When [Load Albums] appears:
Youhavenotyetloadedanyartworks.Touchthe
keytostartloading.
When [Load More Albums] appears:
Someartworksarenotloaded.Touchthekeyto
loadallartworks.Ifyoutouchthekey,thetrack
beingplayedmaystopandanothertrackmay
startplayback.
When the key does not available:
Allartworksarealreadyloaded.
4 Touch [ 3 ] on the selected artwork.
The first song in the album is played.
In addition, you can create your original
playlist from this screen. For details, see
Favorite list (P.42).
NOTE
• Afteralltracksinthealbumareplayed,thesame
albumisplayedagainfromthefirsttrack.
• Thealbumswithnophotoarenotdisplayed.

4242 43
Return to the Top page
CD, Disc, iPod, USB device
Return to the Top page
CD, Disc, iPod, USB device
Favorite list
Youcancreateanoriginalplaylistofyour
favorite10albumsbyselectingalbum
artworks.
1 Touch and drag the desired album
artwork in the lower line to the upper
line.
Selected album is registered to the favorite
list.
NOTE
• Theaddedalbumisplacedontheextremeright.
• Youcannotregisterthesamealbumalready
registeredtothefavoritelist.
• Upto10albumscanberegisteredtothelist.
2 Touch the desired artwork in the
favorite list.
Selected album is played and the control
screen appears.
NOTE
• Thefavoritelistisplayedtotherightstartingwith
theselectedalbum.
• Todeletethealbumfromthefavoritelist,touch
anddragittothelowerline.
• Youcanchangetheplayingorderofthefavorite
listbydraggingtheartworkinthelist.
• Thefavoritelistmodeiscanceledinthefollowing
situations.
• Playinganotheralbumfromotherlist(folderlist,
categorylist,etc.)
• Playinganotheralbumbytouchingtheartwork
inthelowerlineintheartworklistscreen.
• Thefavoritelistmoderesumesafter
disconnecting/connectingthedeviceorturning
on/off.Filebeingplayed,playingtimecode,
favoritelistcontents,favoritelistorder,etc.
resumesiffileconfigurationofthedeviceisnot
changed.
Movie Control
Youcanadjustthemovieplaybackfroma
discmedia.
1 In the playback screen, touch
illustrated area.
Movie Control screen appears.
2 Perform desired operation as follows.
Changes subtitle language
Touch[Subtitle].
Changes audio language
Touch[Audio].
Exits the menu
Touch[Exit].
4444 45
Return to the Top page
CD, Disc, iPod, USB device
Return to the Top page
CD, Disc, iPod, USB device
PANDORA® Internet Radio Operation (region code 4 area only)
YoucanlistentothePANDORA®internetradioonthisunitbycontrollingtheapplication
installedintheiPhoneorBluetoothdevice.
ToenterPANDORAmode,touch[Pandora]iconintheTopMenuscreen.
NOTE
• InstallthelatestversionofthePandora®applicationonyouriPhone,AndroidorBlackBerry.
iPhone:Searchfor"PANDORA"intheAppleiTunesAppStoretofindandinstallthemostcurrentversion.
Android:VisittheGoogleplayandsearchforPandoratoinstall.
BlackBerry:Visitwww.pandora.comfromthebuiltinbrowsertodownloadthePandoraapplication.
• ForhowtoregistertheBluetoothdevice,seeRegistering the Bluetooth Unit (P.69).
2
334458
6
2
7
Simple Control screen List Control screen
1
1 Information display
Displaystextinformationofcurrentcontentsthatisbeingplayed.
2 Artwork/Control switching area
Thepicturedataisdisplayedifavailablefromcurrentcontent.
TouchtoswitchbetweentheSimpleControlandListControlscreen.
3 Multi function key
Touchtoswitchthemultifunctionmenu.Fordetailsonthemenu,seeMulti function menu (P.45).
4 Multi function menu
Variousfunctionscanbeperformedbyusingthekeysinthisarea.Fordetailsonthekeys,seeMulti
function menu (P.45).
5 Sub function key
Touchtodisplay“Subfunctionmenu”(7inthistable).
6 Content information
Displaystheinformationofthecurrentcontentbeingplayed.
7 Sub function menu
Variousfunctionscanbeperformedbyusingkeysinthisarea.Fordetailsonthekeys,seeSub function
menu (P.45).
8 List switching key
Touchtoswitchbetweenthecontentlistandthecurrentcontentinformation.
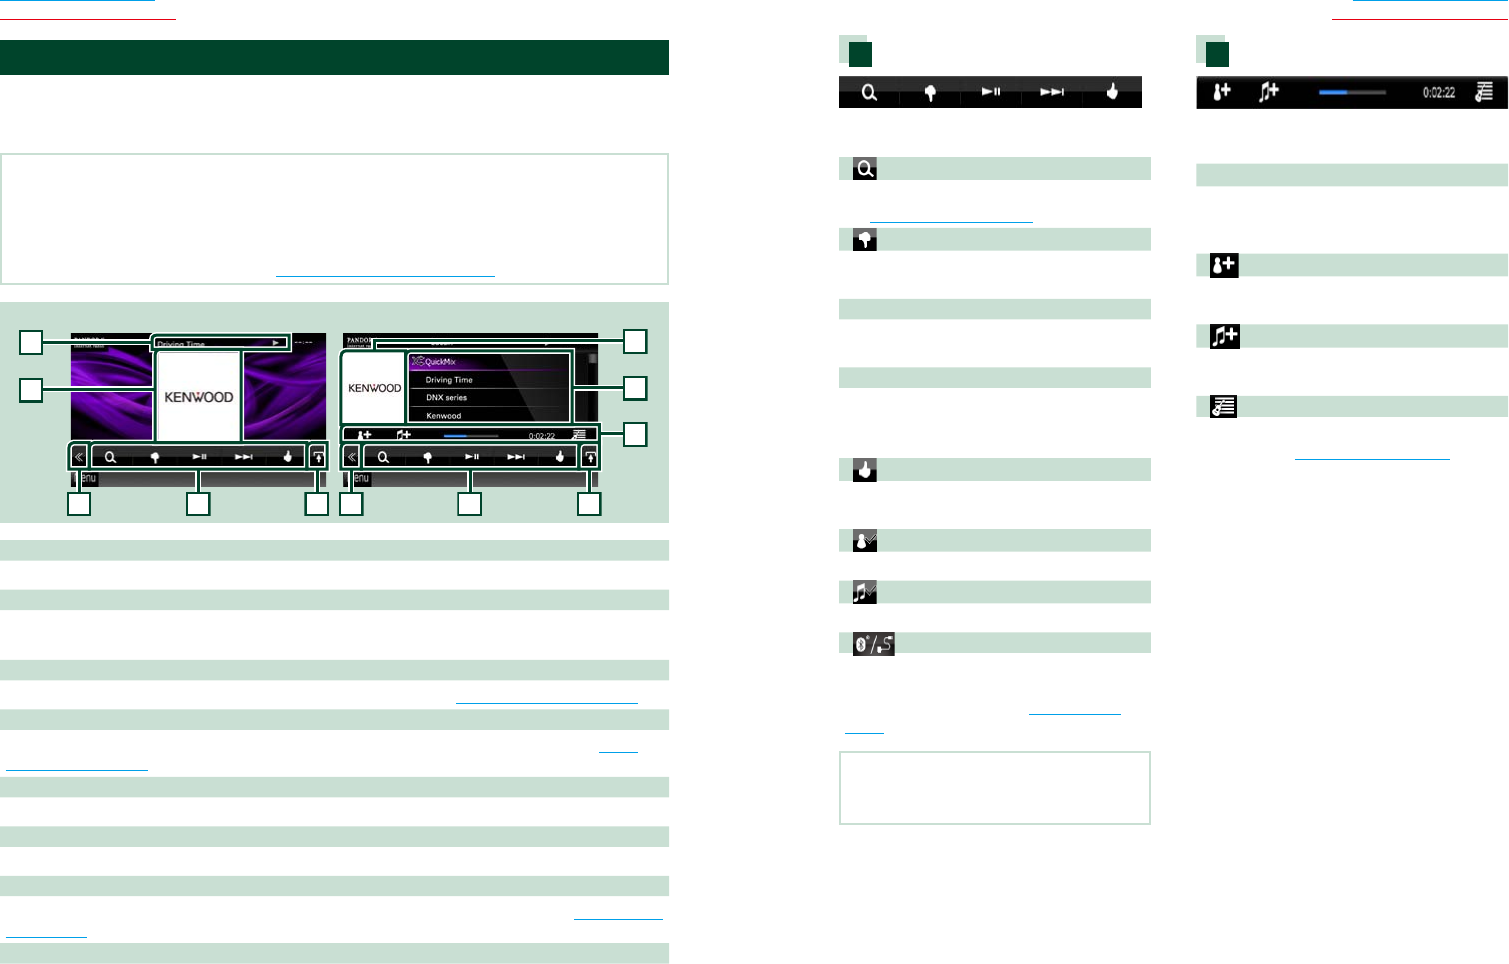
Multi function menu
Thefollowingfunctionscanbeperformedby
usingkeysinthisarea.
[ ]
Searchesthestation.Fordetailsonsearching,
seeStation list screen (P.46).
[ ] (Thumbs down)
Thumbsdowntothecurrentsongandskipto
thenextsong.
[ 38 ]
Displaysorpausesthecontentofthecurrent
station/channel.
[ ¢ ]
Skipsthecurrentsong.
(Notethisfunctionisdisabledwhenthe
PANDORAskiplimitationisexceeded.)
[ ] (Thumbs up)
Registersthecurrentcontentsasfavorite
content.
[
] (Bookmark Artist)
Bookmarkanartistinthecurrentcontents.
[ ] (Bookmark Song)
Bookmarkasonginthecurrentcontents.
[ ]
DisplaysaDeviceselectscreenthatallowsyou
toselectthedevicetobeusedforPANDORA
Internetradioreception.SeeDevice select
(P.46)
NOTE
• [SETUP],[AUDIO],[EXTSW],and[REAR]functions
sameasiPod.
Sub function menu
Thefollowingfunctionscanbeperformedby
usingkeysinthisarea.
Status bar in center
Displaystheelapsedtimesincewhenyou
selectthestationandstatusbarwhichshows
currentlocation.
[ ]
Createsanewstationbasedonanartistbeing
played.
[ ]
Createsanewstationbasedonasongbeing
played.
[ ]
Displaysthegenrelistscreen.Fordetailson
searching,seeGenre list screen (P.47).
4646 47
Return to the Top page
CD, Disc, iPod, USB device
Return to the Top page
CD, Disc, iPod, USB device
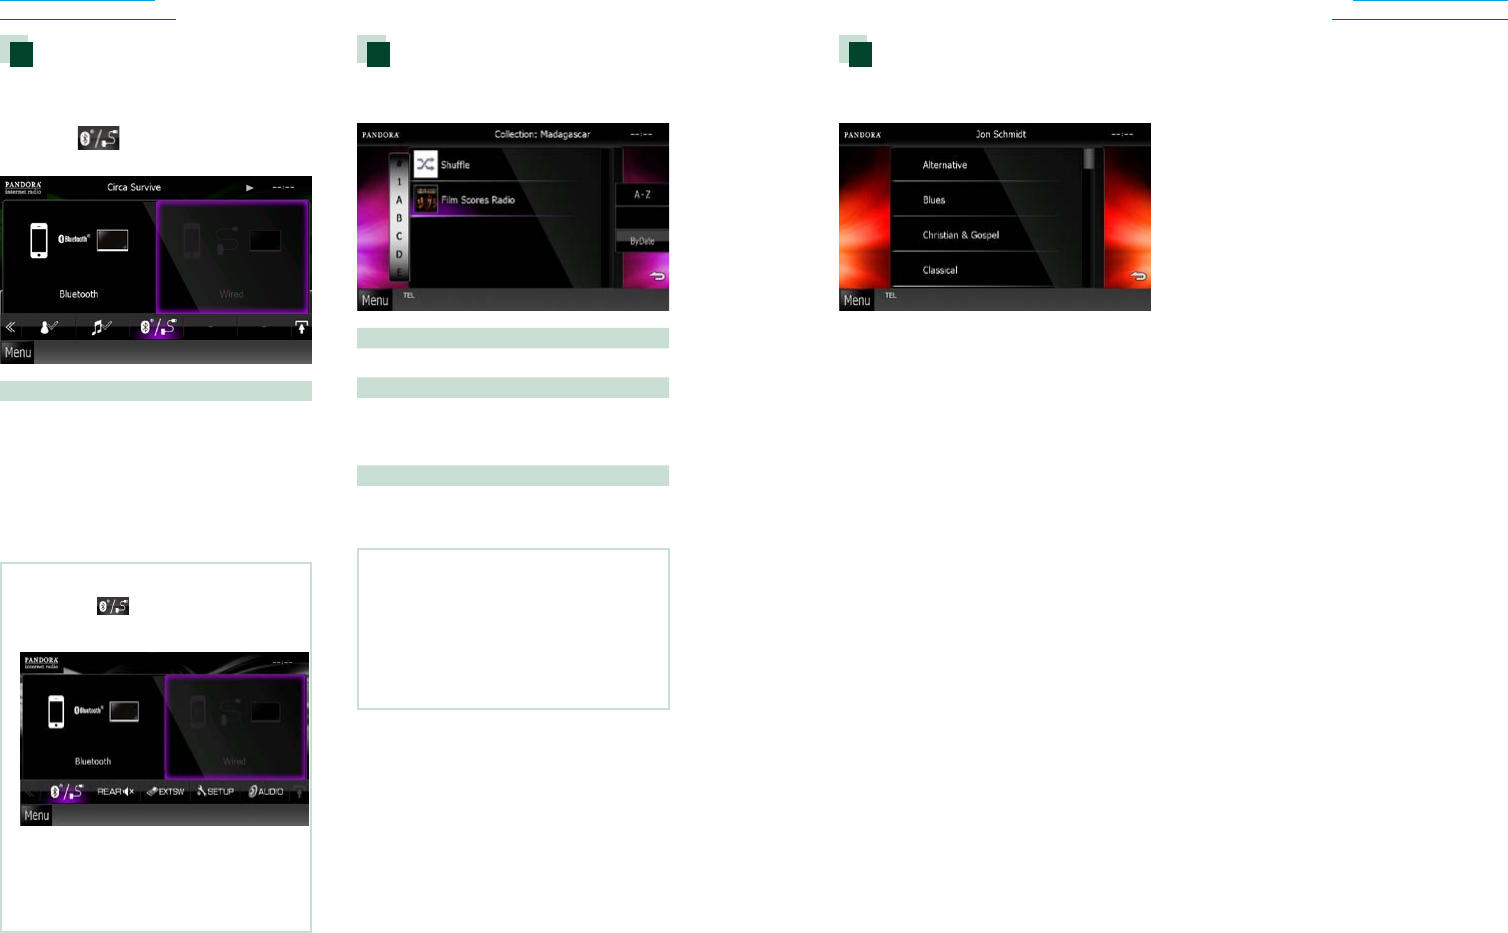
Genre list screen
Youcanperformthefollowingfunctions
fromthisscreen.
Theselectedgenreiscreatedasanew
station.
Device select
YoucandisplayaDeviceselectscreenfor
deviceselection.
1 Touch [ ] in the control screen.
The Device select screen appears.
Device selection
Bluetooth:Usesthedeviceconnectedvia
BluetoothforPANDORAInternet
radioreception.
Wired:UsestheiPhoneconnectedviathe
KCA-iP202orKCA-iP102(optional
accessory)forPANDORAInternetradio
reception.
NOTE
• Ifyoutouch[ ]whennodevicehasbeen
connected,apopupscreenthatallowsdevice
selectiononlyappears.
• AniPhoneconnectedviaBluetoothcannotbe
usedforPandoraInternetradioreception.
• IfthevolumeofPandoraInternetradioreceived
byaBluetoothdeviceistoolow,raiseitonthe
Bluetoothdevice.
Station list screen
Youcanperformthefollowingfunctions
fromthisscreen.
Selects the station
Touchthestationnameinthelist.
Sort the list in alphabetical order
Youcanselectthedesiredletterfromthelist
whichcorrespondstothestationnametohelp
narrowthesearch.
Sort the list by registered date
Touch[ByDate].Thelistissortedtobeginwith
thelastregisteredstation.
NOTE
•YoucanoperatePANDORAbyusingthe
remotecontrol.However,onlyplaying,
pausing,andskippingareavailable.
•YoucannotselectiPodasrearsourcewhen
youselectPANDORAasmainsourceindual
zonefunction.
4848 49
Return to the Top page
CD, Disc, iPod, USB device
Return to the Top page
CD, Disc, iPod, USB device
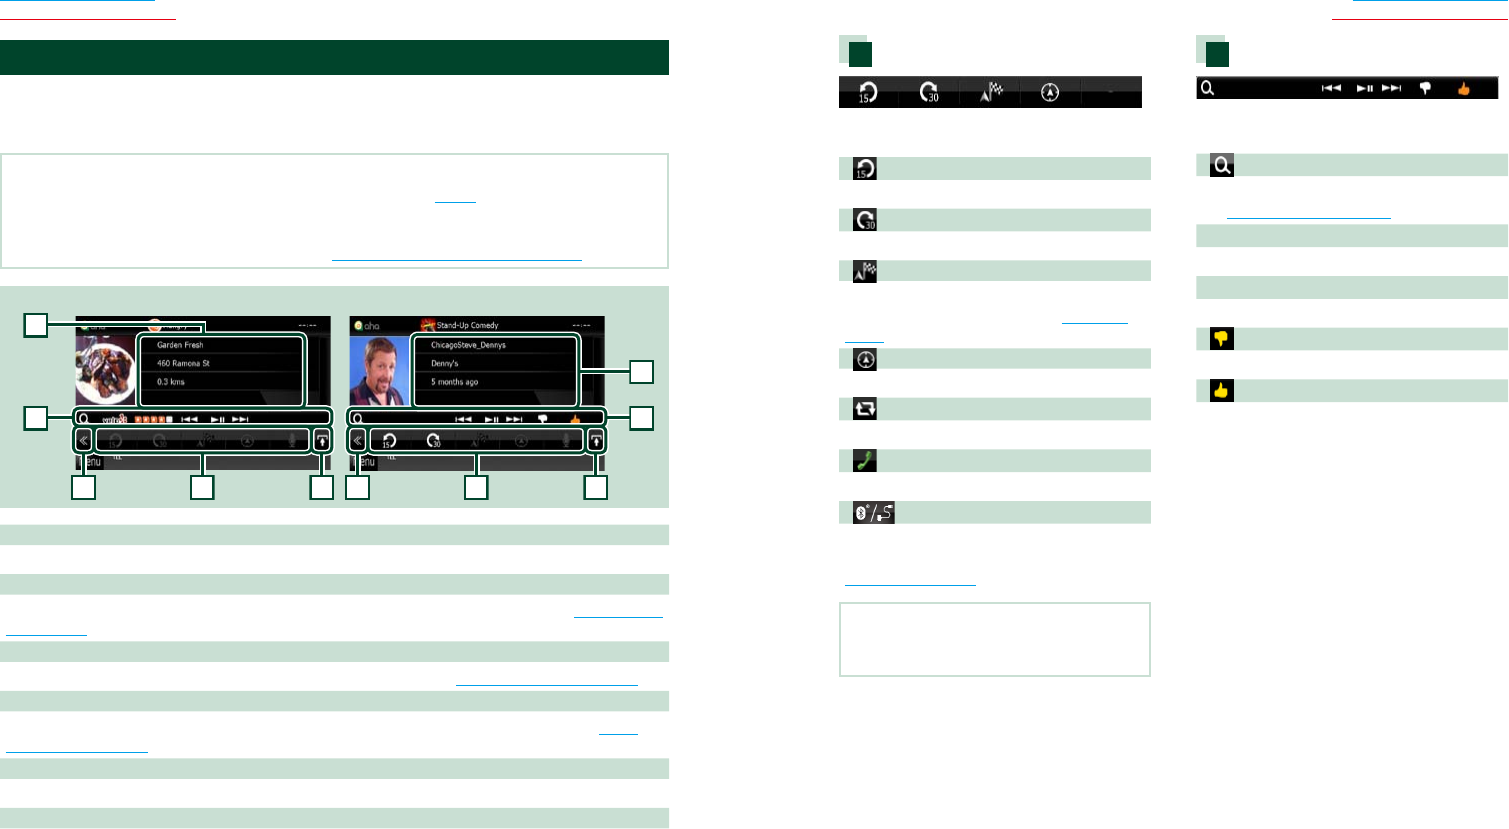
Multi function menu
Thefollowingfunctionscanbeperformedby
usingkeysinthisarea.
[ ]
Setsthecontentbackward15seconds.
[ ]
Setsthecontentforward30seconds.
[ ]
Setsthereceivedlocationinformationat
thedestinationofnavigation.SeeNavigate
(P.51).
[ ]
PoststhelocationinformationtoFacebook.
[ ]
RedeliversbyTwitter.
[ ]
Dialsthereceivedtelephonenumber.
[ ]
DisplaysaDeviceselectscreenthatallowsyou
toselectthedevicetobeusedforAha.See
Device select (P.46)
NOTE
• [SETUP],[AUDIO],and[EXTSW]functionssame
asiPod.
Sub function menu
Thefollowingfunctionscanbeperformedby
usingkeysinthisarea.
[ ]
Searchesthestation.Fordetailsonsearching,
seeStation list screen (P.50).
[4] [¢]
Searchestheprevious/nexttrack.
[38]
Playsorpauses.
[ ]
Touchingthekey"dislikes"currentcontent.
[ ]
Touchingthekey"likes"currentcontent.
Aha Operation
YoucanlistentotheAhaonthisunitbycontrollingtheapplicationinstalledintheiPhoneor
Android.
ToenterAhamode,touch[aha]iconintheTopMenuscreen.
NOTE
• InstallthelatestversionoftheAhaapplicationonyouriPhoneorAndroid.(P.127)
iPhone:Searchfor"Aha"intheAppleiTunesAppStoretofindandinstallthemostcurrentversion.
Android:Searchfor"Aha"intheGoogleplaytofindandinstallthemostcurrentversion.
• ForhowtoregistertheBluetoothdevice(Android),seeRegistering the Bluetooth Unit (P.69).
33
44
66
5
1
2
2
Content List screen Text information screen
1 Content information
Displaysthecontentofthecurrentstationbeingplayed.
2 Sub function menu
Variousfunctionscanbeperformedbyusingkeysinthisarea.Fordetailsonthekeys,seeSub function
menu (P.49).
3 Multi function key
Touchtoswitchthemultifunctionmenu.Fordetailsonthemenu,seeMulti function menu (P.49).
4 Multi function menu
Variousfunctionscanbeperformedbyusingthekeysinthisarea.Fordetailsonthekeys,seeMulti
function menu (P.49).
5 Text information
Displaystheinformationofthecurrentcontentbeingplayed.
6 List switching key
Touchtoswitchbetweenthecontentlistandthetextinformationofcurrentcontent.
5050 51
Return to the Top page
CD, Disc, iPod, USB device
Return to the Top page
CD, Disc, iPod, USB device
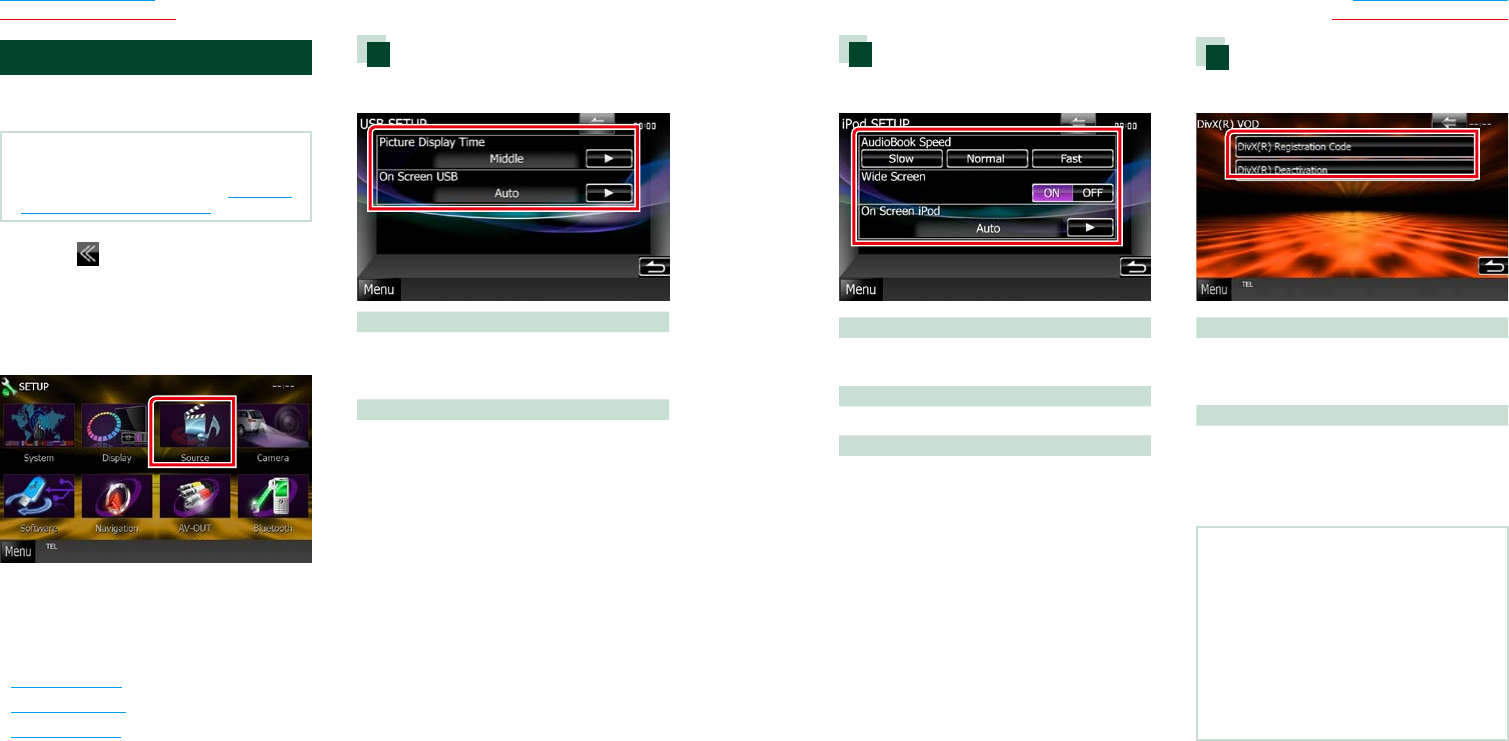
Navigate
Setsthelocationinformationreceivedfrom
Ahaatthedestinationofnavigation.
1 Touch [ ] in the control screen.
[ ]
Savesthelocationinformation.
[Go!]
Setsthelocationinformationatthedestination
andstartsnavigation.
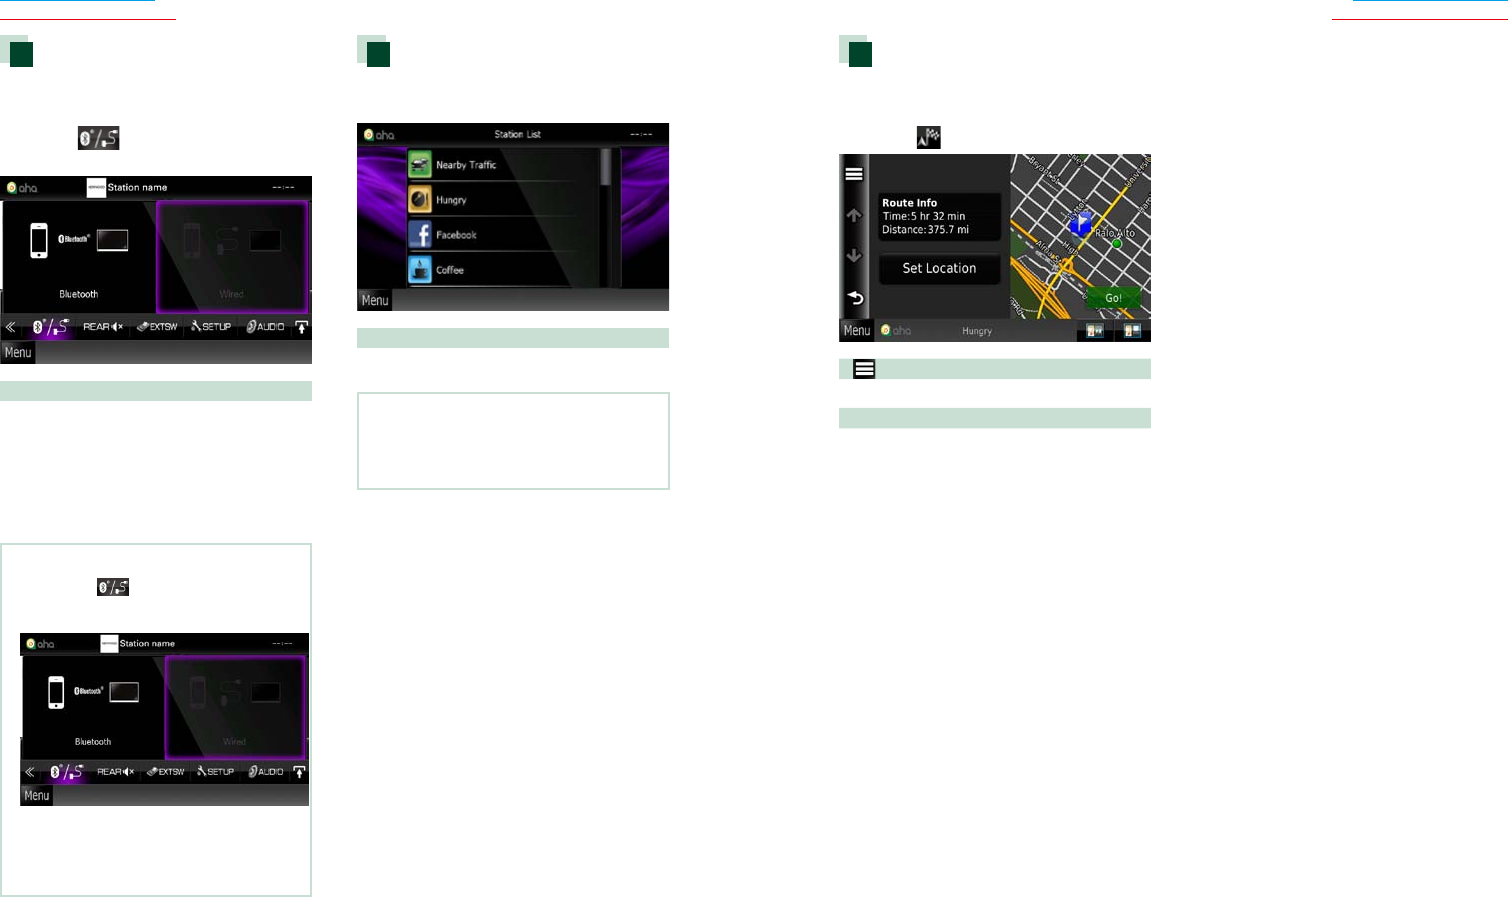
Device select
YoucandisplayaDeviceselectscreenfor
deviceselection.
1 Touch [ ] in the control screen.
The Device select screen appears.
Device selection
Bluetooth:UsestheAndroidsmartphone
connectedviaBluetoothforanAha
connection.
Wired:UsestheiPhoneconnectedviathe
KCA-iP202orKCA-iP102(optional
accessory)foranAhaconnection.
NOTE
• Ifyoutouch[ ]whennodevicehasbeen
connected,apopupscreenthatallowsdevice
selectiononlyappears.
• AniPhoneconnectedviaBluetoothcannotbe
usedforanAhaconnection.
• IfthevolumeofAhareceivedbyaBluetooth
deviceistoolow,raiseitontheBluetoothdevice.
Station list screen
Youcanperformthefollowingfunctions
fromthisscreen.
Selects the station
Touchthestationnameinthelist.
NOTE
•YoucannotselectiPodasrearsourcewhen
youselectAhaasmainsourceindualzone
function.
5252 53
Return to the Top page
CD, Disc, iPod, USB device
Return to the Top page
CD, Disc, iPod, USB device
iPod setup
1 Set each item as follows.
AudioBook Speed
Setstheaudiobookplaybackspeed.Select
from[Slow],[Normal](default),and[Fast].
Wide Screen*
SetsWideScreen.Set[ON](default)or[OFF].
On Screen iPod
Setshowtodisplaytheinformationofthe
iPod.
Auto (Default):Informationappearsfor5
secondswhenupdated.
OFF:Doesnotdisplayanyinformation.
*ThissettingisnotavailablewhenaniPodis
connected.
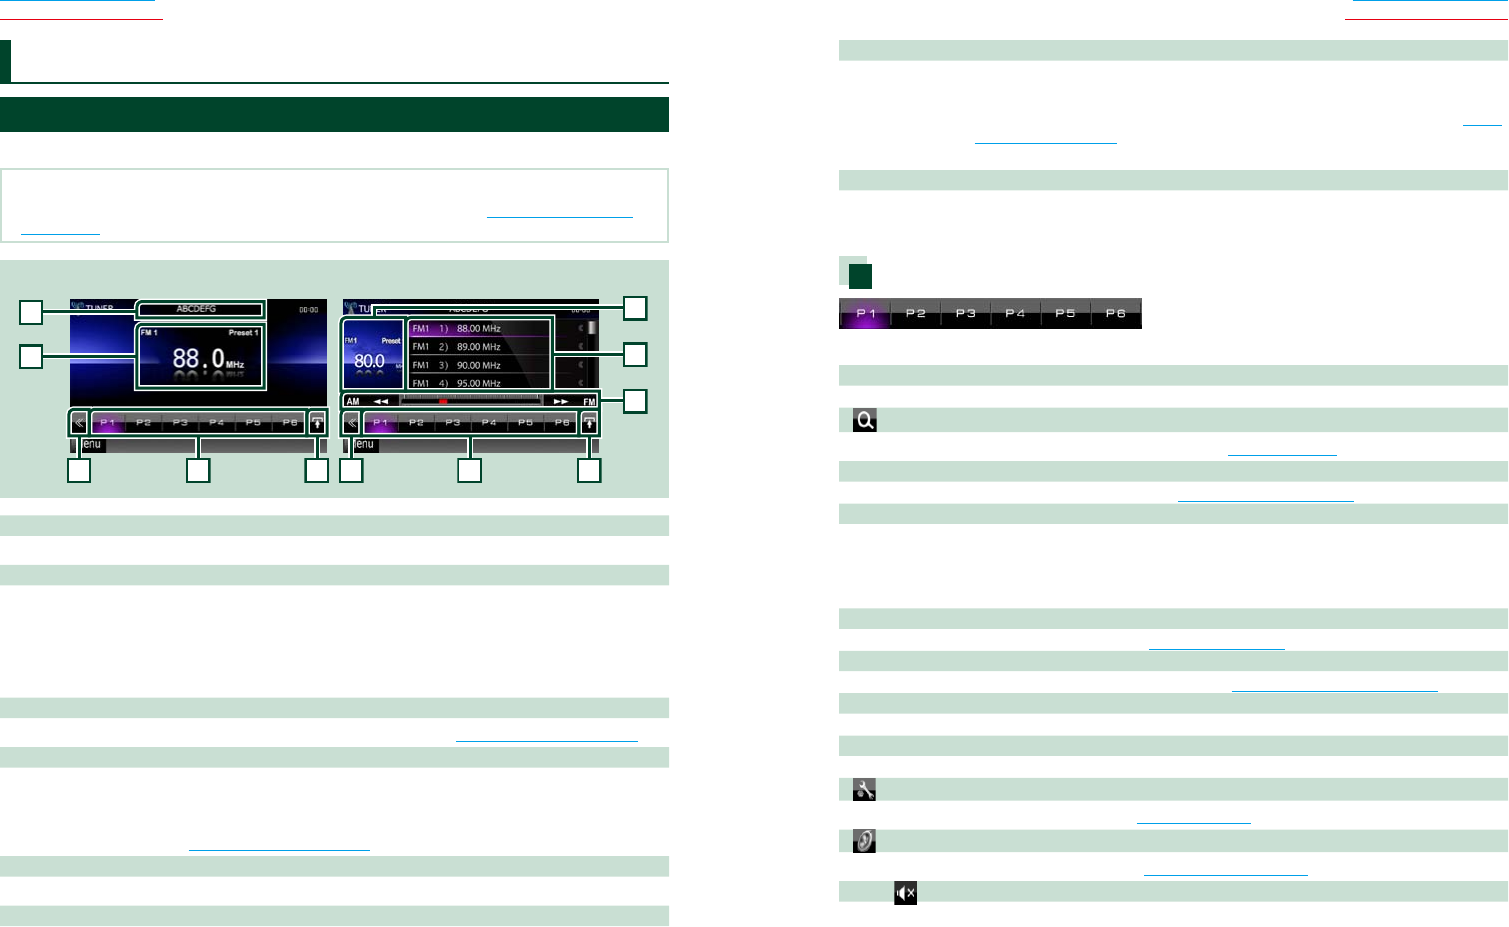
DivX VOD
1 Set each item as follows.
DivX(R) Registration Code
Checkstheregistrationcode.Thiscodeis
neededwhenmakingadiscwhichhasDRM
(DigitalRightsManagement).
DivX(R) Deactivation
Deregisterstheunitwhichisalreadyregistered.
Afteryoutouchthekey,aconfirmation
messageappears.Followthemessageand
completetheoperation.
NOTE
• [DivX(R)VOD]isdisabledwhenadiscisbeing
played.
• WhendownloadingaDivXVODfilecontrolled
byDRM,registerthecodeappearedonthe
screen.Otherwisethefilemaynotbeabletoplay
withthisunit.Remainingnumberofviewingis
displayedwhenplayingaDivXVODfilewiththe
viewingrestriction.Whentheusednumberof
viewingreachedmaximumnumber,awarning
messageappearsandthefilecannotbeplayed.
USB/iPod/DivX Setup
YoucanperformsetupwhenusingUSB/
iPod/DivX.
NOTE
• Eachoperationinthissectioncanbestartedfrom
theTopMenuscreen.Fordetails,seeOperating
with the Top Menu Screen (P.16).
1 Touch [ ] in the control screen.
Multi function menu appears.
2 Touch [SETUP].
SETUP Menu screen appears.
3 Touch [Source].
Source SETUP Menu screen appears.
4 Touch [USB], [iPod] or [DivX] in the list.
Each setup screen appears.
See the following section for each setting.
• USB setup (P.52)
• iPod setup (P.53)
• DivX VOD (P.53)
USB setup
1 Set each item as follows.
Picture Display Time
SelectslengthoftimetodisplayJPEGpicture
fileinthescreen.Selectfrom[Short],[Middle],
and[Long](default).
On Screen USB
SetshowtodisplaytheinformationoftheUSB
device.
Auto (Default):Informationappearsfor5
secondswhenupdated.
OFF:Doesnotdisplayanyinformation.
5454 55
Return to the Top page
Radio, Digital Radio, TV
Return to the Top page
Radio, Digital Radio, TV
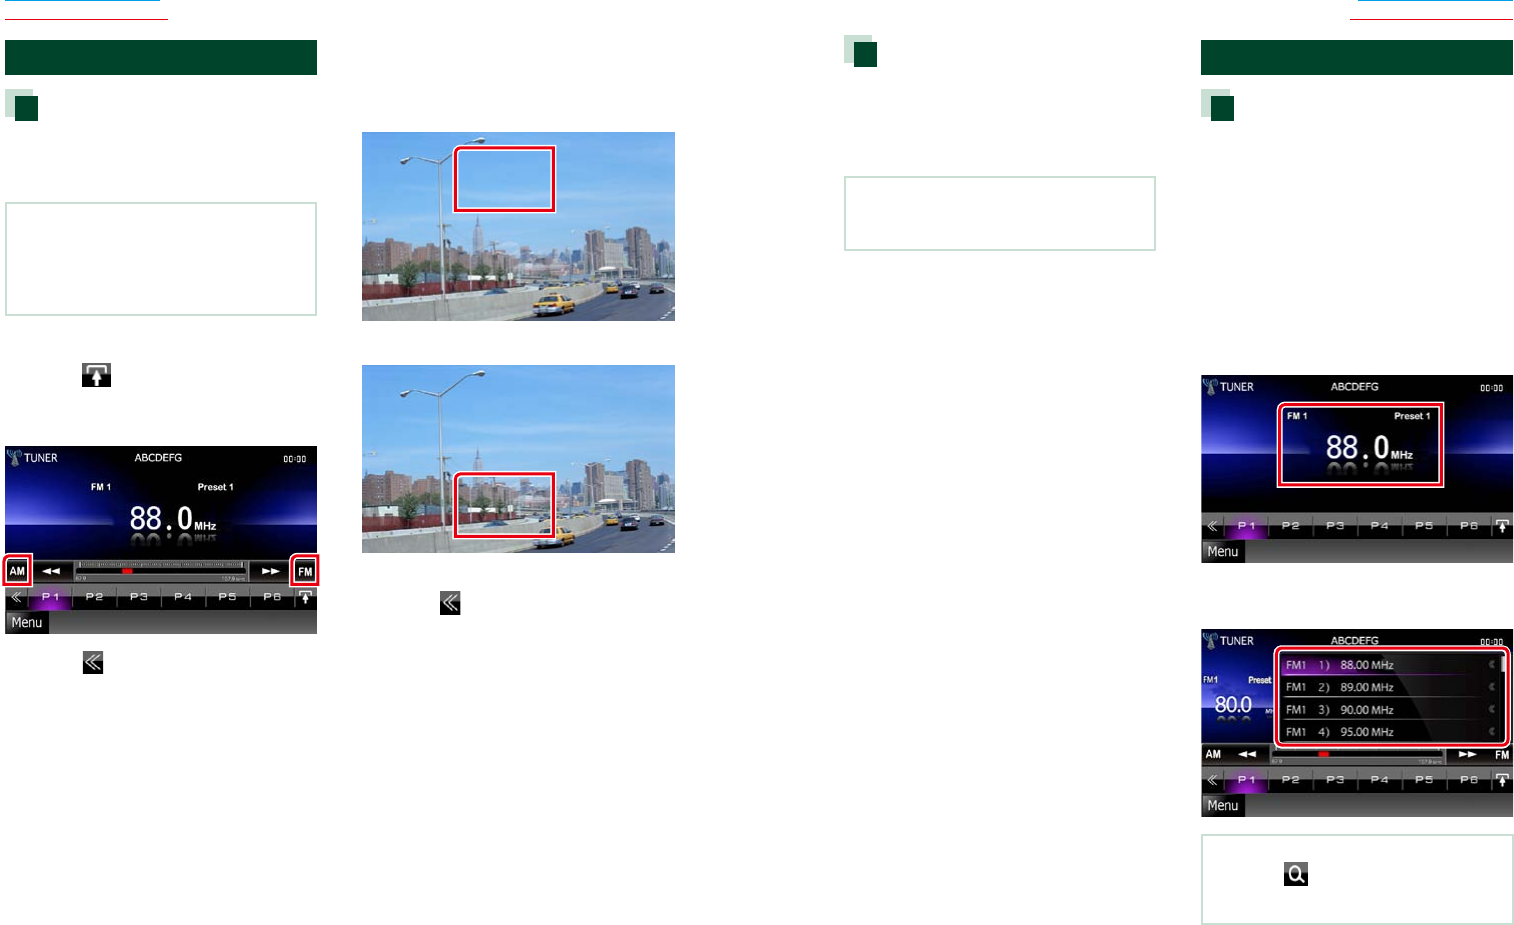
Radio Basic Operation
Mostfunctionscanbecontrolledfromthesourcecontrolscreen.
NOTE
• SettheremotecontrollermodeswitchtoAUDmodebeforestartingoperation,seeSwitching the operation
mode (P.109).
2
1
3
3
4
4
5
8
6
2
7
Simple Control screen List Control screen
1 PS/Station name display (FM Tuner for models with region code 2 or 3 only)
DisplaysthePSname.
2 Information display/Control switching area
Displaysthefollowinginformation.
•[FM1] etc.:Banddisplay
•MHz/kHz:Frequencydisplay
•Preset #:Presetnumber
TouchtoswitchbetweentheSimpleControlandListControlscreen.
3 Multi function key
Touchtoswitchthemultifunctionmenu.Fordetailsonthemenu,seeMulti function menu (P.55).
4 Preset key/Multi function menu
Recallsthememorizedstationorchannel.Whentouchedfor2seconds,storesthecurrentreceiving
stationorchannelinmemory.
Whenswitched,variousfunctionscanbeperformedbyusingkeysinthisarea.
Fordetailsonthemenu,seeMulti function menu (P.55).
5 Sub function key
Touchtodisplay“Subfunctionmenu”(7inthistable).
6 Preset list
Displaysthelistofpresetstationsorchannelsandtheinformation.
Radio and TV Operation 7 Sub function menu
Thefollowingfunctionscanbeperformedbyusingkeysinthisarea.
•Switches the band:Touch[AM]or[FM].
•Tunes in a station:Touch[1][¡].Themethodoffrequencyswitchingcanbechanged.SeeMulti
function menu (P.55).
Thebarincenter(tuneronly)showsthecurrentfrequencylocation.
8 List switching key
Touchtoswitchbetweenthepresetlistandtheinformationlist.
Intunermode,radiotextpluswillbedisplayed(formodelswithregioncode2or3only).
Multi function menu
Thefunctionsofeachkeyareasfollows.
[P1] - [P6]
Selectsthepresetstation.Touchfor2secondstostorethecurrentstationintothepresetmemory.
[ ]
Displaysthelistofpresetstationsorservices.Fordetails,seeList select (P.62).
[TI] (FM Tuner for models with region code 2 or 3 only)
Setsthetrafficinformationmodeon.Fordetails,see Traffic Information (P.63).
[SEEK]
Switchestheseekmodeinthefollowingsequence;[AUTO1],[AUTO2],[MANUAL].
•AUTO1:Tunesinastationwithgoodreceptionautomatically.
•AUTO2:Tunesinstationsinmemoryoneafteranother.
•MANUAL:Switchestothenextfrequencymanually.
[AME]
Selectstheautomemorymode.Fordetails,seeAuto memory (P.60).
[PTY] (FM Tuner for models with region code 2 or 3 only)
Searchesaprogrambysettingprogramtype.Fordetails,seeSearch by program type (P.62).
[MONO] (FM Tuner for models with region code 2 or 3 only)
SelecttheMonauralreception.
[LO.S] (FM Tuner for models with region code 2 or 3 only)
TurnstheLocalSeekfunctiononoroff.
[
SETUP]
TouchtodisplaytheSETUPMenuscreen.SeeSetting Up (P.80).
[
AUDIO]
TouchtodisplaytheAudioControlscreen.SeeControlling Audio (P.94).
[ REAR
]
Touchtomutetherearspeaker.

5656 57
Return to the Top page
Radio, Digital Radio, TV
Return to the Top page
Radio, Digital Radio, TV
Digital Radio Basic Operation (DNX4330DAB only)
Mostfunctionscanbecontrolledfromthesourcecontrolscreen.
NOTE
• SettheremotecontrollermodeswitchtoAUDmodebeforestartingoperation,seeSwitching the operation
mode (P.109).
34
5
6
2
7
List Control screen
Simple Control screen
1
7
1
5
2
3
4
1 Artwork area
Thepicturedataisdisplayedifavailablefromcurrentcontent.
2 Multi function key
Touchtoswitchthemultifunctionmenu.Fordetailsonthemenu,seeMulti function menu (P.55).
3 Preset key/Multi function menu
Recallsthememorizedstationorchannel.Whentouchedfor2seconds,storesthecurrentreceiving
stationorchannelinmemory.
Whenswitched,variousfunctionscanbeperformedbyusingkeysinthisarea.
Fordetailsonthemenu,seeMulti function menu (P.55).
4 List switching key
Touchtoswitchbetweenthepresetlistandtheinformationlist.
5 Sub function menu
Thefollowingfunctionscanbeperformedbyusingkeysinthisarea.
•Display the list type screen:Touch[ ].SeeSelecting Operation (P.61).
•Tunes in a ensemble, service, and component:
Touch[1][¡].Themethodofensemble,service,andcomponentswitchingcanbechanged.See
Multi function menu (P.55).
•Display the Dynamic Label Segment screen:Touch[DLS].
•Change the Replay mode:Touch[ ].SeeReplay (P.63).
6 Label infomation
Displaysthelistofpresetservice.
Displaystheinformationofthecurrentservice:ServiceLabel,PTYLabel,EnsembleLabel,AudioQuality,
Nowplaying,Nextprogram,Title,Artist
7 Signal Strength indication/Channel display
DisplaysthereceivedsignalstrengthoftheDigitalRadiostation.
Displaysthereceivedchannelnumberdisplay.
Multi function menu
Thefunctionsofeachkeyareasfollows.
[ ]
Switchesthepresetnumber.
[P1] - [P15]
Selectsthepresetensemble.Touchfor2secondstostorethecurrentensembleintothepreset
memory.
[TI]
Setsthetrafficinformationmodeon.Fordetails,seeTraffic Information (P.63).
[SEEK]
Switchestheseekmodeinthefollowingsequence;[AUTO1],[AUTO2],[MANUAL].
•AUTO1:Tunesinaensemblewithgoodreceptionautomatically.
•AUTO2:Tunesinensembleinmemoryoneafteranother.
•MANUAL:Switchestothenextensemblemanually.
[PTY]
Searchesaprogrambysettingprogramtype.Fordetails,seeSearch by program type (P.62).
[ REAR
]
Touchtomutetherearspeaker.
[
SETUP]
TouchtodisplaytheSETUPMenuscreen.SeeSetting Up (P.80).
[
AUDIO]
TouchtodisplaytheAudioControlscreen.SeeControlling Audio (P.94).
5858 59
Return to the Top page
Radio, Digital Radio, TV
Return to the Top page
Radio, Digital Radio, TV
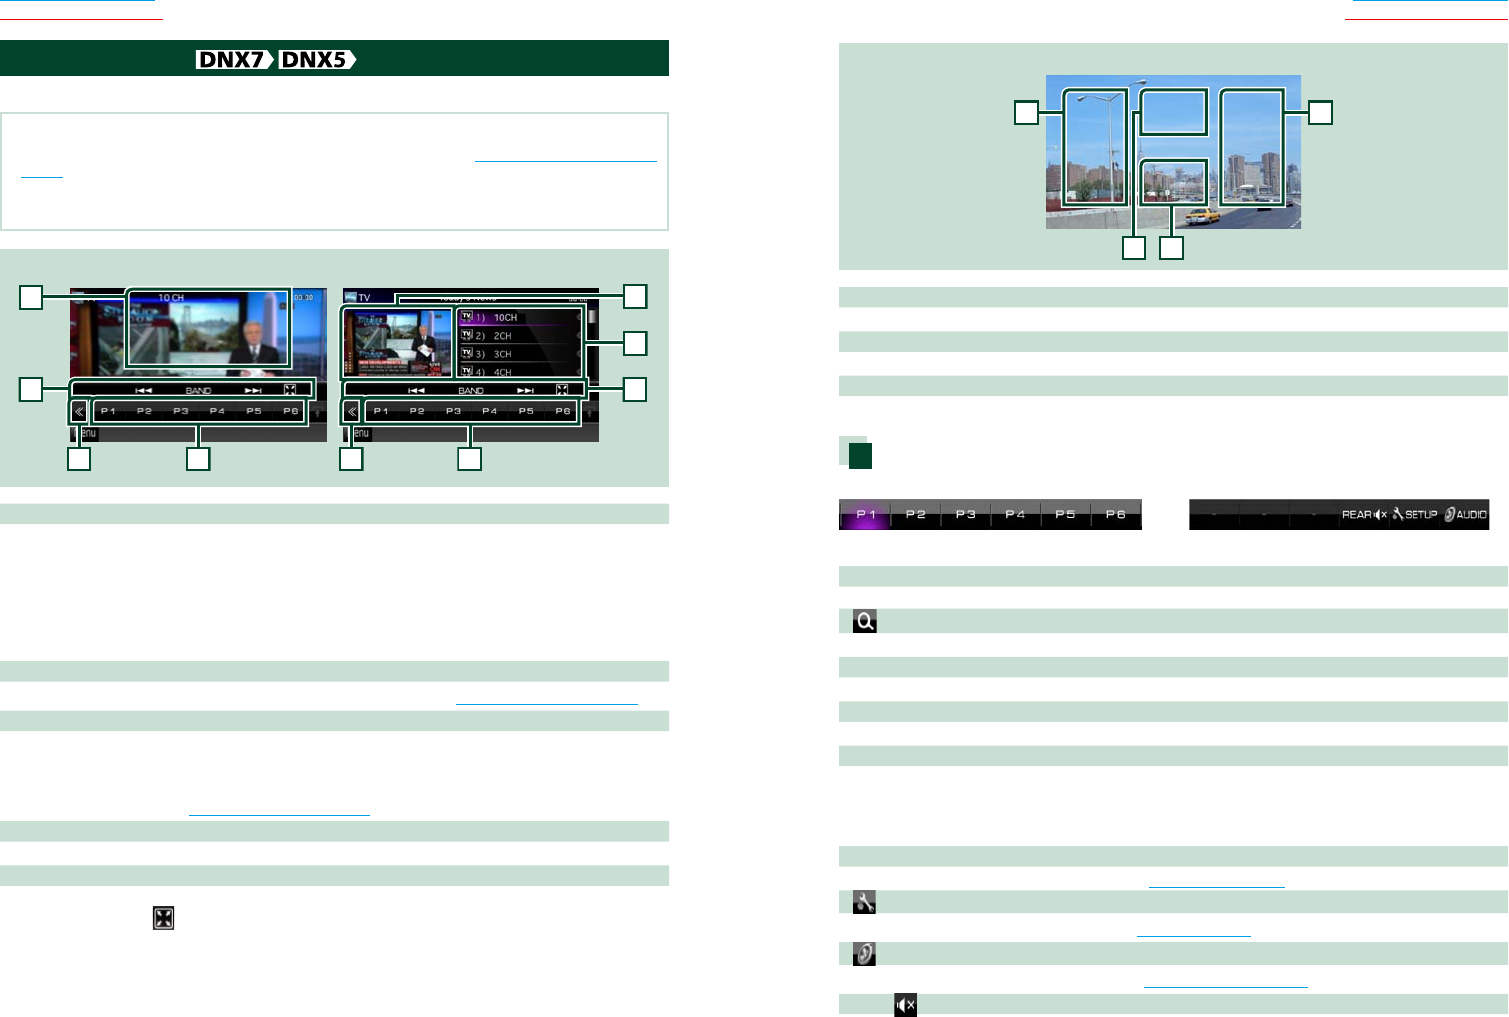
TV Basic Operation
MostfunctionscanbecontrolledfromthesourcecontrolscreenandTVscreen.
NOTE
• SettheremotecontrollermodeswitchtoTVmodebeforestartingoperation,seeSwitching the operation mode
(P.109).
• YoucanonlyoperateTVwiththeoptionalaccessoryTVtunerKTC-V500N/PV300/N/Pconnected.
• Duringplayback,pressthe<MENU>buttontodisplaythesourcecontrolscreen.
1
2233
4
1
Simple Control screen List Control screen
55
1 Information display/Control switching area
Displaysthefollowinginformation.
•[TV1], [TV2]:Banddisplay
•Preset #:Presetnumber
•Group:TVareagroup
•#ch:Channeldisplay
TouchingthisareaswitchesbetweentheSimpleControlandListControlscreen.
2 Multi function key
Touchtoswitchthemultifunctionmenu.Fordetailsonthemenu,seeMulti function menu (P.59).
3 Preset key (analog TV only)/Multi function menu
Recallsthememorizedchannel.Whentouchedfor2seconds,storethecurrentreceivingstationor
channelinmemory.
Whenswitched,variousfunctionscanbeperformedbyusingkeysinthisarea.
Fordetailsonthemenu,seeMulti function menu (P.59).
4 Preset list (analog TV only)
Displaysthelistofpresetchannels.
5 Sub function menu
Thefollowingfunctioncanbeperformedbyusingkeysinthisarea.
•Hide all keys:Touch[ ].
•Switches the channel:Touch[4] [¢].
•Switches the band:Touch[BAND].
TV screen
6
6
7
8
6 Switching channel area
Touchtoswitchthechannel.
7 Switching band area
Touchtoswitchtheband.
8 Key display area
Touchtodisplaythelastcontrolscreen.
Multi function menu
Analog TV Digital TV
Thefunctionsofeachkeyareasfollows.
[P1] - [P6] (analog TV only)
Selectsthepresetchannel.Touchfor2secondstostorethecurrentstationintothepresetmemory.
[ ] (analog TV only)
Displaysthelistofpresetchannels.
[4] [¢]
Switchesthechannel.
[BAND] (analog TV only)
Touchtoswitchtheband.
[SEEK] (analog TV only)
Switchestheseekmodeinthefollowingsequence;[AUTO1],[AUTO2],[MANUAL].
•AUTO1:Tunesinchannelswithgoodreceptionautomatically.
•AUTO2:Tunesinchannelsinmemoryoneafteranother.
•MANUAL:Switchestothenextchannelmanually.
[AME] (analog TV only)
Selectstheautomemorymode.Fordetails,seeAuto memory (P.60).
[
SETUP]
TouchtodisplaytheSETUPMenuscreen.SeeSetting Up (P.80).
[
AUDIO]
TouchtodisplaytheAudioControlscreen.SeeControlling Audio (P.94).
[ REAR
]
Touchtomutetherearspeaker.
6060 61
Return to the Top page
Radio, Digital Radio, TV
Return to the Top page
Radio, Digital Radio, TV
Memory Operation
Auto memory
Youcanstorestationswithgoodreceptionin
memoryautomatically.
ThisfunctionisfortunerandTVonly.
NOTE
• Automemoryterminateswhen6stationsare
storedorwhenallstationsaretunedin.
• Theoperationendsautomaticallyifyoudonot
operatewithin10seconds.
Tuner
1 Touch [ ].
Sub function menu appears.
2 Touch desired band key.
3 Touch [ ] in the control screen.
The multi function menu appears.
4 Touch [AME] in the multi function
menu.
5 Touch [1] or [¡] in the sub function
menu.
Auto memory starts.
TV (For models with region code 2 or 3)
1 Touch illustrated area during playback
to switch the band you want to store in
memory.
2 Touch illustrated area.
Simple Control screen appears.
3 Touch [ ] in the control screen.
The multi function menu appears.
4 Touch [AME] in the multi function
menu.
5 Touch [4] or [¢] in the function
menu.
Auto memory starts.
Manual memory
Youcanstorethecurrentreceivingstationor
channelinmemory.
1 Select a station or channel you wish to
store in memory.
NOTE
• ForTV,touchcenterbottomareaofthescreenif
sourcecontrolscreenisnotdisplayed.
2 Touch [P#] (#:1-6, 1-15) in which you
want to store the station or channel for
2 seconds until a beep sounds.
Selecting Operation
Preset select
Youcanlistandselectmemorizedstation,
ensemble,orchannel.
Selecting from the multi function menu
1 Touch the desired number from P1 to
P6/ P15.
The unit will tune to the selected station or
channel.
Selecting from the preset list (Tuner
and TV only)
1 Touch illustrated area.
List Control screen appears.
2 Select a station or channel from the list.
NOTE
• Touching[ ]andthen[PresetList]displays
thepresetchannellist.Youcanalsoselectyour
desiredchannelfromthelist.
6262 63
Return to the Top page
Radio, Digital Radio, TV
Return to the Top page
Radio, Digital Radio, TV
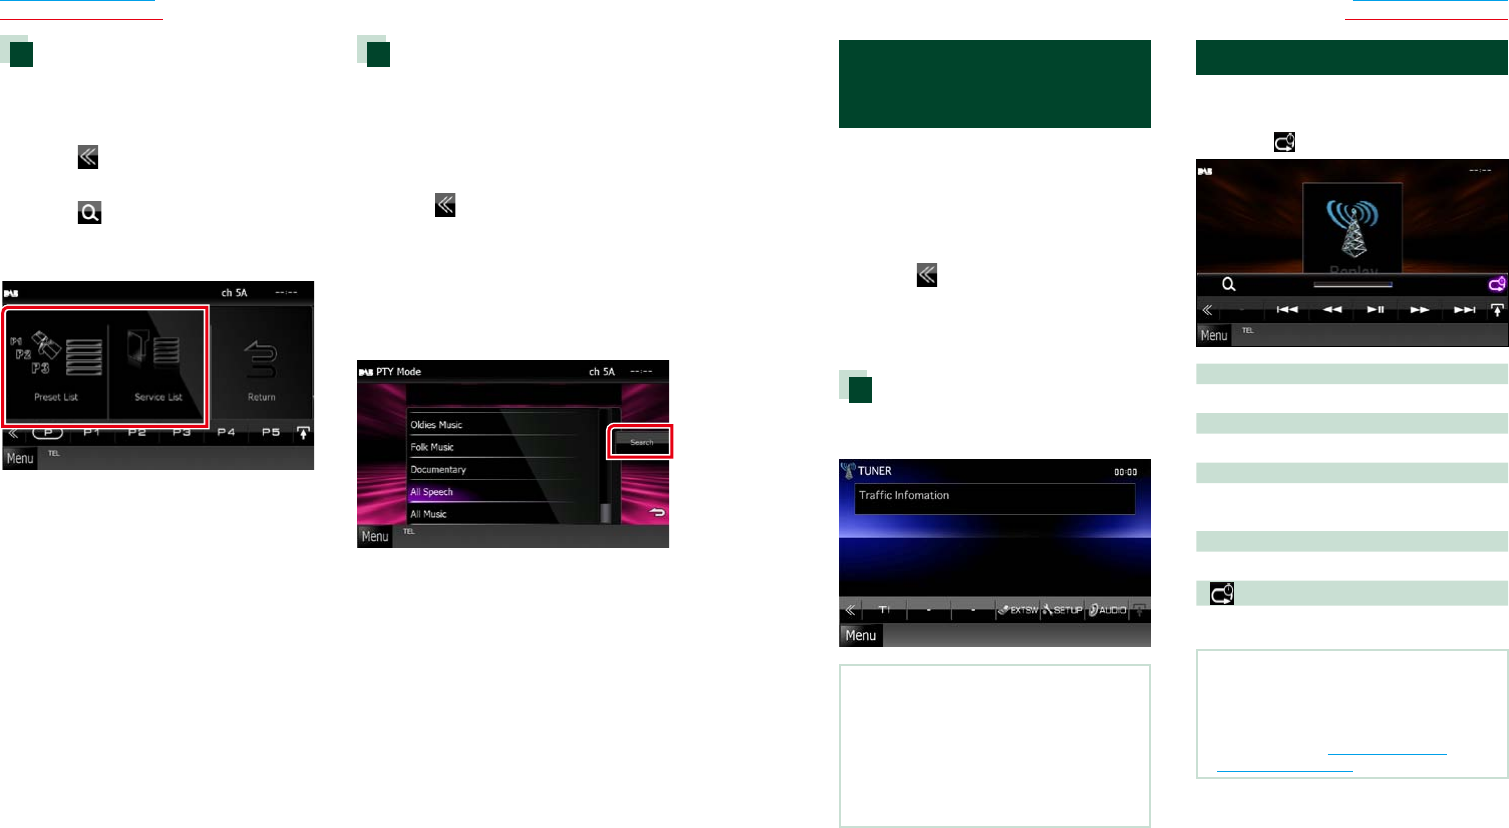
List select
Youcanselectanensemblefromalistof
memorizedensemblesorselectaservice
fromalistofallservicesreceived.
1 Touch [ ] in the control screen.
The multi function menu appears.
2 Touch [ ] in the multi function menu.
The list type screen appears.
3 Touch desired list way.
List screen appears.
4 Select a service from the list.
Search by program type
(FM tuner and Digital Radio
only)
Youcantunetoastationwithaspecific
programtypewhenlisteningtoFM/Digital
Radio.
1 Touch [ ] in the control screen.
The multi function menu appears.
2 Touch [PTY] in the multi function menu.
PTY Mode screen appears.
3 Select a program type from the list.
4 Touch [Search].
You can search a station of the selected
program type.
Traffic Information
(FM tuner and Digital Radio
only)
Youcanlistenandwatchthetraffic
informationautomaticallywhenatraffic
bulletinstarts.
However,thisfeaturerequiresaRadioData
SystemandDigitalRadiothatincludestheTI
information.
1 Touch [ ] in the control screen.
The multi function menu appears.
2 Touch [TI] in the multi function menu.
Traffic information mode is set.
When the traffic bulletin starts
TheTrafficInformationscreenappears
automatically.
NOTE
• ItisnecessarytohaveTrafficInformationfunction
settooninordertohavetheTrafficInformation
screenappearautomatically.
• Thevolumesettingduringreceptionoftraffic
informationisautomaticallystored.Thenexttime
thetrafficinformationisreceived,thisunitrecalls
thevolumesettingautomatically.
Replay (Digital Radio only)
Youcanreplaylast15minutesofcurrent
station.
1 Touch [ ] in the sub function menu.
[4] [¢]
Forward/backward15secondswhentouchit.
[38]
Playsorpauses.
[1] [¡]
Fastforward/fastbackwardwhenkeepon
touching.
Replay time bar
Displayrecordedcapacity
[ ]
ChangetheLivemode
NOTE
• PTYWatchstartsoperatingandReplayfunction
cannotbeusedwhilereceivingaprogram.
• Whilereplayingthecurrentstation,youcannot
storethestationbyAuto memory (P.60)and
Manual memory (P.61)
6464 65
Return to the Top page
Radio, Digital Radio, TV
Return to the Top page
Radio, Digital Radio, TV
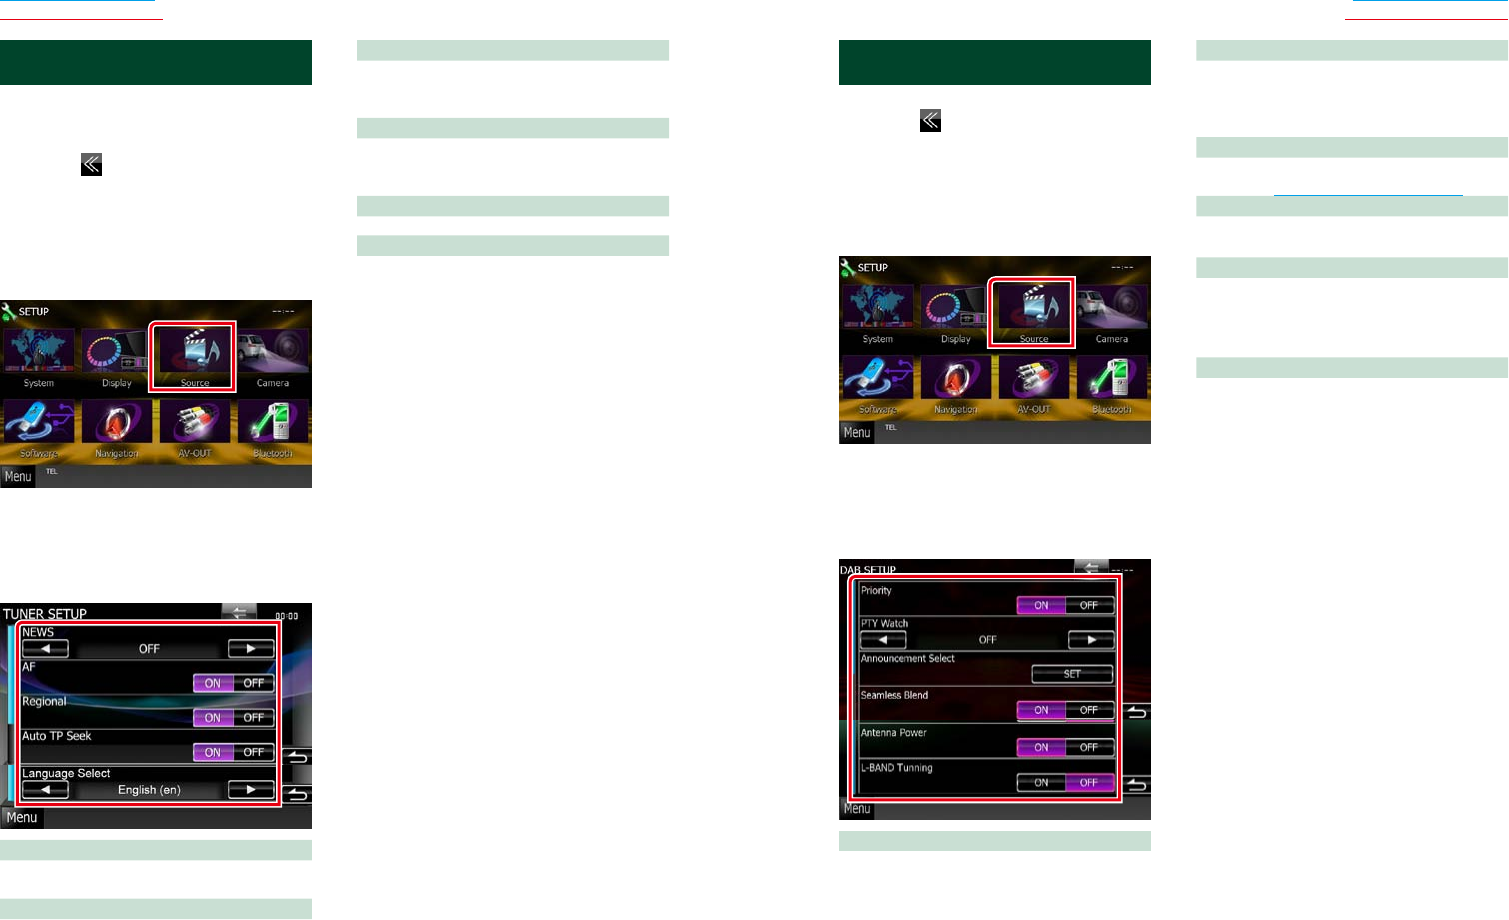
Digital Radio Setup
YoucansetDigitalRadiorelatedparameters.
1 Touch [ ] in the control screen.
Multi function menu appears.
2 Touch [SETUP] in the multi function
menu.
SETUP Menu screen appears.
3 Touch [Source].
Source SETUP Menu screen appears.
4 Touch [Digital Radio SETUP] in the list.
Digital Radio SETUP screen appears.
5 Set each item as follows.
Priority
IfthesameserviceisprovidedbyDigitalRadio
duringRDSreception,automaticallyswitches
toDigitalRadio.Ifthesameserviceisprovided
byRDSwhenreceptionoftheservicebeing
providedbyDigitalRadiobecomespoor,
automaticallyswitchestoRDS.
PTY Watch
Iftheserviceofthesetprogramtypebegins
withtheensemblebeingreceived,switches
fromanysourcetoDigitalRadioforservice
reception.
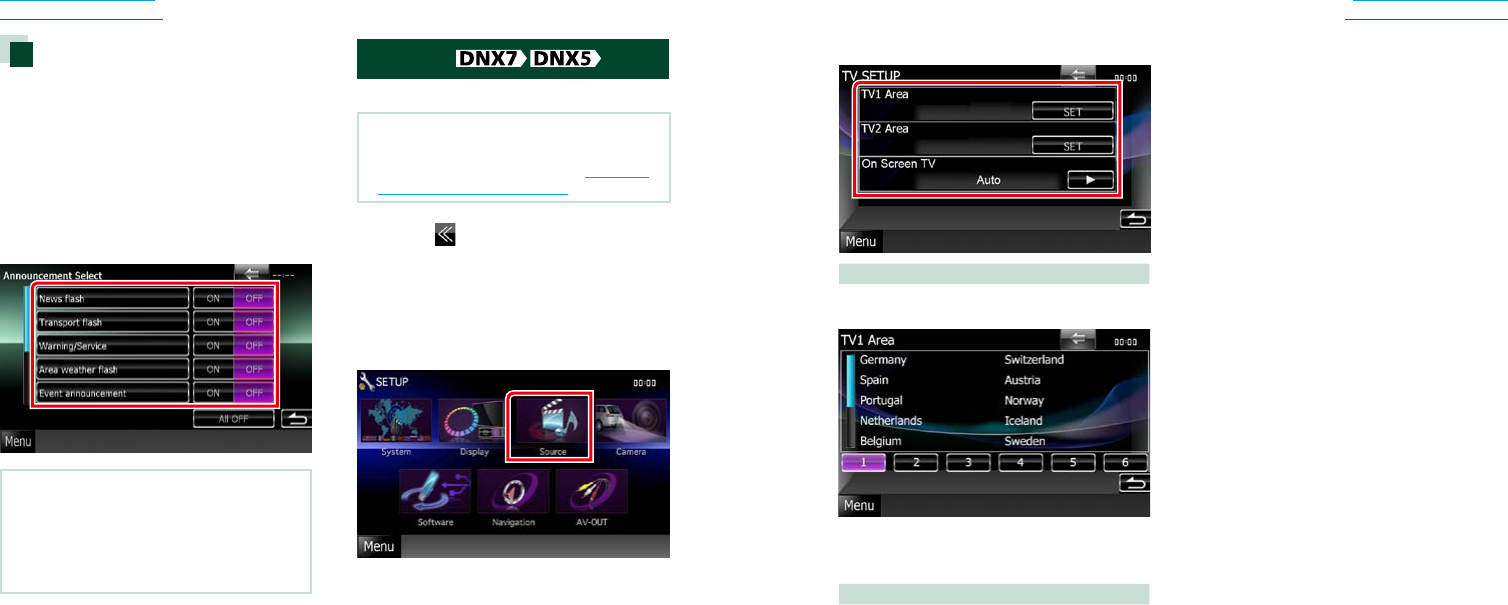
Announcement Select
SwitchestothesetAnnouncementservice.For
details,seeAnnouncement setup (P.66).
Seamless Band
Preventsaudiobreakwhenswitchingfrom
DigitalRadiotoAnalogRadio.Defaultis“ON”.
Antenna Power*
SetspowersupplytotheDigitalRadio
antenna.Setto“ON”whentheDigitalRadio
antennainuseisequippedwithabooster.
Defaultis“ON”.
L-Band Tuning*
SetsL-bandreception.Whensetto“ON”,also
receivesL-bandensembles.
*ThisitemcanbesetwheninSTANDBY
source.
Tuner Setup
Youcansettunerrelatedparameters.
Thisfunctionisavailableformodelswith
regioncode2or3.
1 Touch [ ] in the control screen.
Multi function menu appears.
2 Touch [SETUP] in the multi function
menu.
SETUP Menu screen appears.
3 Touch [Source].
Source SETUP Menu screen appears.
4 Touch [TUNER SETUP] in the list.
TUNER SETUP screen appears.
5 Set each item as follows.
NEWS
Setsanewsbulletininterrupttime.Defaultis
“OFF”.
AF
Whenstationreceptionispoor,automatically
switchestothestationthatisbroadcasting
thesameprogramoverthesameRadioData
Systemnetwork.Defaultis“ON”.
Regional
Setswhethertoswitchtothestationonly
inthespecificregionusingthe“AF”control.
Defaultis“ON”.
Auto TP Seek
Whentrafficinformationstationreceptionis
poor,automaticallysearchesforastationthat
canbereceivedbetter.Defaultis“ON”.
Language Select
SelectsadisplaylanguageforthePTYfunction.
Antenna Control SETUP
AllowsyoutoturnofftheRadioDataSystem
functiontopreventthemotor-drivenantenna
fromextending.Defaultis“ON”.
6666 67
Return to the Top page
Radio, Digital Radio, TV
Return to the Top page
Radio, Digital Radio, TV
5 Set each item as follows.
TV1 Area/TV2 Area
SetsthepresentTV1orTV2receivingarea.
Touch[SET],andselecttheareaandnumber.
Thisfunctionisavailableonlywhen
KTC-V500N/PV300/N/Poptionalaccessoryis
connected.
On Screen TV
SetshowtodisplaytheinformationoftheTV.
Auto (Default):Informationappearsfor5
secondswhenupdated.
OFF:Doesnotdisplayanyinformation.
Announcement setup
WhentheserviceforwhichONisselected
starts,switchesfromanysourceto
Announcementtoreceiveit.
1 Touch [SET] of [Announcement Select]
in the Digital Radio SETUP screen.
The Announcement Select screen appears.
2 Touch each Announcement list and set
on or off.
NOTE
• Thevolumesettingduringreceptionof
Announcementserviceisautomaticallystored.
ThenexttimetheAnnouncementserviceis
received,thisunitrecallsthevolumesetting
automatically.
TV Setup
YoucansettheTVsignalreceivingareas.
NOTE
• Eachoperationinthissectioncanbestartedfrom
theTopMenuscreen.Fordetails,seeOperating
with the Top Menu Screen (P.16).
1 Touch [ ] in the control screen.
Multi function menu appears.
2 Touch [SETUP] in the multi function
menu.
SETUP Menu screen appears.
3 Touch [Source].
Source SETUP Menu screen appears.
4 Touch [TV SETUP] in the list.
TV SETUP screen appears.

6868 69
Return to the Top page
Bluetooth Operation
Return to the Top page
Bluetooth Operation
UsingtheBluetoothfunction,various
functionscanbeused:listeningtotheaudio
file,making/receivingacall.
NOTE
• Bluetoothcontrolisafunctionofthe
DNX7330BT/DNX7330BTM/DNX5330BT/
DNX5330BTM/DNX4330DAB.
About the cell-phone and
Bluetooth audio player
Thisunitconformstothefollowing
Bluetoothspecifications:
Version
BluetoothVer.2.1+EDRCertified
Profile
Cell-phone:
HFP(HandsFreeProfile)
SPP(SerialPortProfile)
PBAP(PhonebookAccessProfile)
SSP(SimpleSecurePairing)
Audio player:
A2DP(AdvancedAudioDistributionProfile)
AVRCP(Audio/VideoRemoteControlProfile)
NOTE
• Forthecell-phonesverifiedforcompatibility,
accessthefollowingURL:
http://www.kenwood.com/cs/ce/bt/.
• TheunitssupportingtheBluetoothfunctionhave
beencertifiedforconformitywiththeBluetooth
Standardfollowingtheprocedureprescribedby
BluetoothSIG.
However,itmaybeimpossibleforsuchunitsto
communicatewithyourcell-phonedepending
onitstype.
Registering And Connecting
Bluetooth Unit
ItisnecessarytoregistertheBluetoothaudio
playerorcell-phonetothisunitbeforeusing
theBluetoothfunction.
Youcanregisterupto5Bluetoothunits.
1 Touch [Menu] on any screen.
2 Touch [SETUP].
SETUP Menu screen appears.
3 Touch [Bluetooth].
Bluetooth SETUP screen appears.
See the following section for each setting.
• Registering the Bluetooth Unit (P.69)
• Connecting the Bluetooth unit (P.69)
Bluetooth Control Registering the Bluetooth Unit
1 Touch [Search].
Searched Device List screen appears.
NOTE
• Anewdevicecannotberegisteredifthereare5
registeredBluetoothunits.Deleteunnecessary
registration.SeeConnecting the Bluetooth unit
(P.69).
• TheSearchedDeviceListscreencannotbe
displayed,whenthereceivingsourceisPANDORA
internetradio,aha,orBluetoothAudio.
• ThisunitiscompatiblewiththeAppleEasy
Pairingfunction.WhenaniPodtouchoriPhone
isconnectedtothisunitusingDockConnector
toUSBCable,anauthenticationdialogappears.
Performingoperationforauthenticationonthis
unitoriOSsmartphoneregistersthesmartphone
asaBluetoothdevice.
2 Touch [PIN Code Set].
PIN Code Set screen appears.
NOTE
• Iftheunitcannotbesearchedinstep1,youcan
searchtheunitagainbytouching[Search]in
abovescreen.
• ABluetoothdevicecannotbesearchedwhilethe
sourceisPandora,aha,orBluetoothaudio.
• Touch[Cancel]tocancelsearchingforthe
Bluetoothunit.
3 Enter PIN code and touch [Enter].
The entered code is recognized and
Searched Device List screen appears again.
4 Select the Bluetooth unit to register
from the list.
The Bluetooth SETUP screen appears.
Connecting the Bluetooth unit
1 Touch the device name you want to
connect.
Profile select screen appears.
NOTE
• Iftheiconislighted,itmeansthattheunitwill
usethatdevice.
2 Set each profile as follows.
TEL (HFP)
Meansthatthedeviceisacell-phone.
Audio (A2DP)
Meansthatthedeviceisanaudioplayeror
cell-phonewithaudioplayer.
Smartphone Link (SPP)
MeansthatthedeviceisGarminSmartphone
Link-ready.
Pandora (SPP)
MeansthatthedeviceisaPANDORAinternet
radio-ready.
ahaRadio (SPP)
MeansthatthedeviceisAha-ready.
NOTE
• Ifadevicehasbeenpaired,theBluetoothunit
cannotbeconnectedfromthepaireddevice.
• Touching[Remove]of[DeviceRemoveConfirm]
removesregistrationinformation.Afteryoutouch
thekey,aconfirmationmessageappears.Follow
themessageandcompletetheoperation.
• Toset[SmartphoneLink(SPP)]toON,set
[Pandora(SPP)]and[ahaRadio(SPP)]toOFF.
• Toset[Pandora(SPP)]or[ahaRadio(SPP)]toON,
set[SmartphoneLink(SPP)]toOFF.

7070 71
Return to the Top page
Bluetooth Operation
Return to the Top page
Bluetooth Operation
Playing Bluetooth Audio Device
Bluetooth basic operation
2
2
3
3
5
Simple Control screen List Control screen
1
4
1 Information display
Displaysthenameofthetrackinformation.Iftheinformationisnotavailable,devicenameisdisplayed.
2 Multi function key
Touchtoswitchthemultifunctionmenu.
3 Multi function menu
Thefunctionsofeachkeyareasfollows.
•[4] [¢]:Searchestheprevious/nextcontent.*
•[3]: Plays.*
•[8]: Pauses.*
•[ AUDIO]: TouchtodisplaytheAudioControlscreen.SeeControlling Audio (P.94).
•[ SETUP]:TouchtodisplaytheSETUPMenuscreen.SeeSetting Up (P.80).
•[7]: Stopsplayback.*
•[ REAR ]: Touchtomutetherearspeaker.
4 Control switching area
TouchtoswitchbetweentheSimpleControlandListControlscreen.
5 File information
Displaystheinformationofthecurrentfile.
*TheseitemsappearonlywhentheaudioplayerwhichsupportsAVRCPprofileisconnected.
NOTE
• Iftheoperationkeysdonotappear,operatefromtheplayer.
• Dependingonyourcell-phoneoraudioplayer,audiomaybeheardandcontrolledbuttextinformationmaynot
appear.
• Ifthevolumeistoolow,raiseitonyourcell-phoneoraudioplayer.
Using Hands-Free Unit
Youcanusetelephonefunctionby
connectingtheBluetoothtelephonetothis
unit.
Making a call
1 Press the <TEL> button.
Hands Free screen appears.
NOTE
• Whenregistrationofyourcell-phoneis
completed,thephonebookofthecell-phoneis
automaticallydownloadedtothisunit.
• Upto600phonenumberscanberegisteredfor
eachregisteredcell-phone.
• Upto32digitscanberegisteredforeach
phonenumberalongwithupto50characters
representinganame.(50isthenumberof
alphabeticalcharacters.Fewercharacterscanbe
inputdependingonthetypeofcharacters.)
• Dependingonthetypeofyourcell-phone,the
followingrestrictionsareplaced;
• Thephonebookdatacannotbedownloaded
normally.
• Charactersinthephonebookaregarbled.
• Tocanceldownloadingthephonebookdata,
operatethecell-phone.
2 Select a dialing method.
See the following table for each method.
Call by entering a phone number
1Touch[ ].
2Enteraphonenumberwithnumberkeys.
3Touch[ ].
Call using call records
1Touch[ ],[ ],or[ ].
2Selectthephonenumberfromthelist.
3Touch[ ].
Call using the phonebook
1Touch[ ].
2Selectthenamefromthelist.*1*2
3Selectthenumberfromthelist.
4Touch[ ].
Call using the preset number
1Touch[Preset#]tostartcallingthe
correspondingphonenumber.
2Touch[ ].
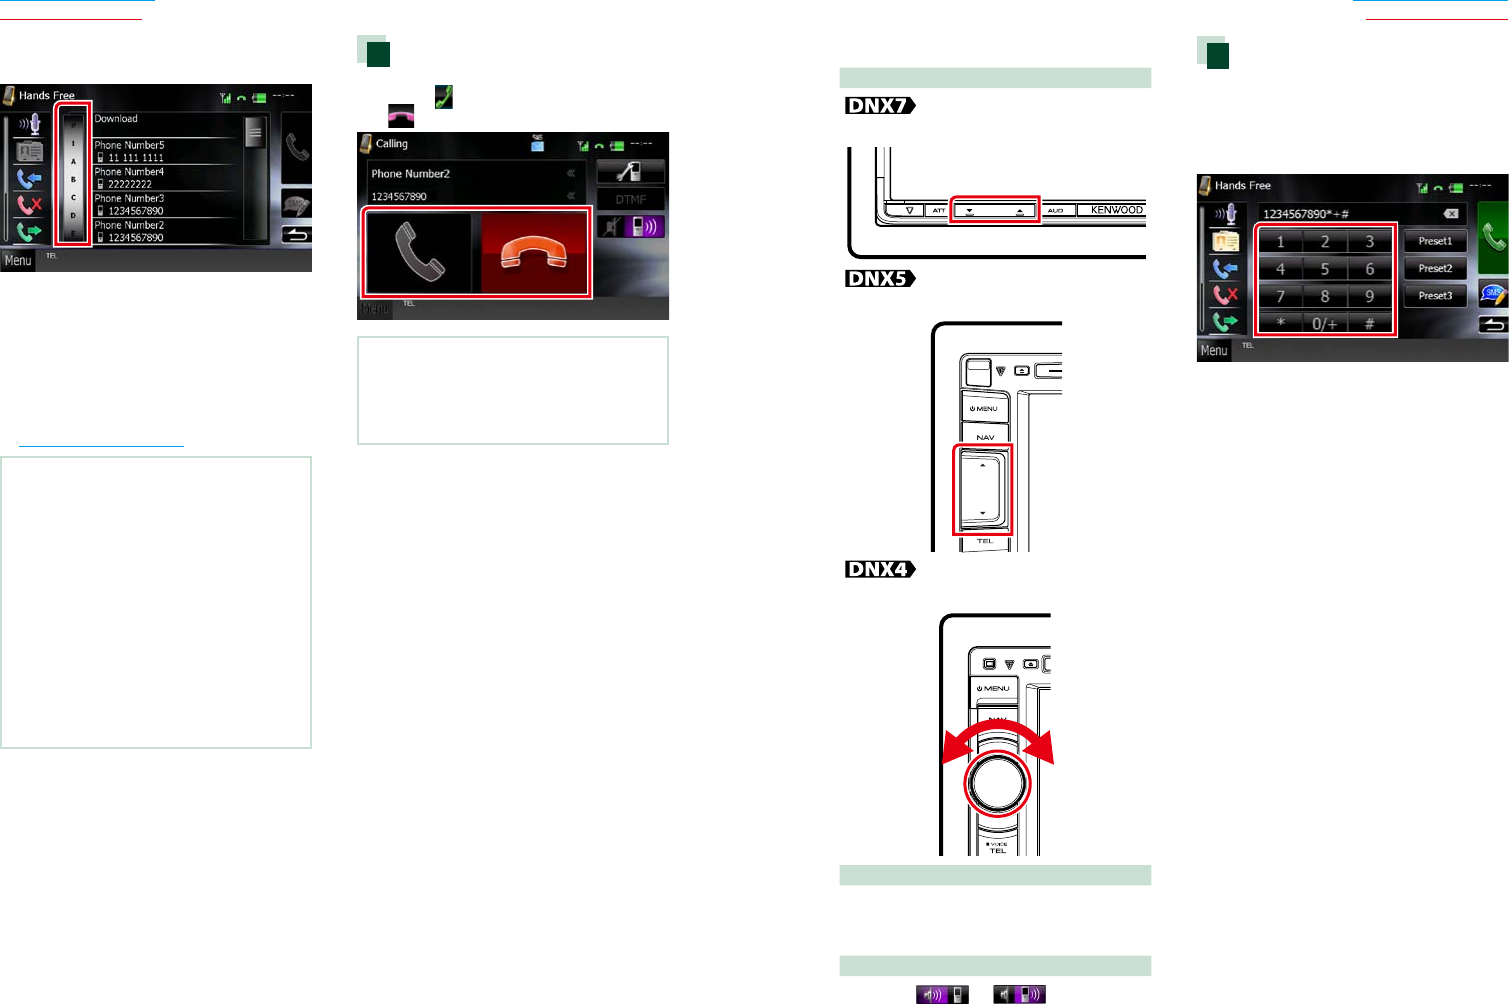
7272 73
Return to the Top page
Bluetooth Operation
Return to the Top page
Bluetooth Operation
*1Youcansortthelisttobeginwithtouched
character.
• Characterswithnocorrespondingname
willnotappear.
• Duringsearch,anon-accentcharacter
suchas“u”issearchedforinsteadofan
accentcharactersuchas“ü”.
*2Youcansetthelisttoarrangeintheorder
oflastnameorfirstname.Fordetails,see
Hands-Free Setup (P.78).
NOTE
• Ifyoueditedthephonebookinyourcell-phone,
touch“Download”ontopofthephonebooklistin
thisunittodownloaditfromyourcell-phone.The
phonebookinthisunitwillbeupdatedwiththe
latestdownloadeddata.
• Whileyourcarismoving,somefunctionsare
disabledforsafetyreasons.Thekeysassociated
withthedisabledfunctionsbecomeineffective
iftouched.
• Thestatusiconssuchasbatteryandantenna
displayedmaydifferfromthosedisplayedonthe
cell-phone.
• Settingthecell-phoneintheprivatemodecan
disablethehands-freefunction.
Receiving a call
1 Touch [ ] to answer a phone call or
[ ] to reject an incoming call.
NOTE
• Whilemonitoringthecameraview,thisscreen
doesnotappearevenifacallcomesin.Todisplay
thisscreen,pressthe<TEL>buttonorreturnthe
shiftknobofcartothedriverposition.
Operations during a call
Adjust the receiver volume
Pressthe<∞>or<5>button.
Pressthe<∞>or<5>button.
Turnthevolumeknob.
Output the dial tone
Touch[DTMF]todisplaythetoneinputscreen.
Youcansendtonesbytouchingdesiredkeys
onthescreen.
Switching the speaking voice output
Touching[ ]/[ ]eachtime
switchesthespeakingvoiceoutputbetween
cell-phoneandspeaker.
Phone number preset
Youcanregisterfrequentlyusedphone
numberstothisunit.
1 Enter the number you want to register
in Hands Free screen.
2 Touch [Preset 1], [Preset 2], or [Preset 3]
for 2 seconds in the Hands Free screen.
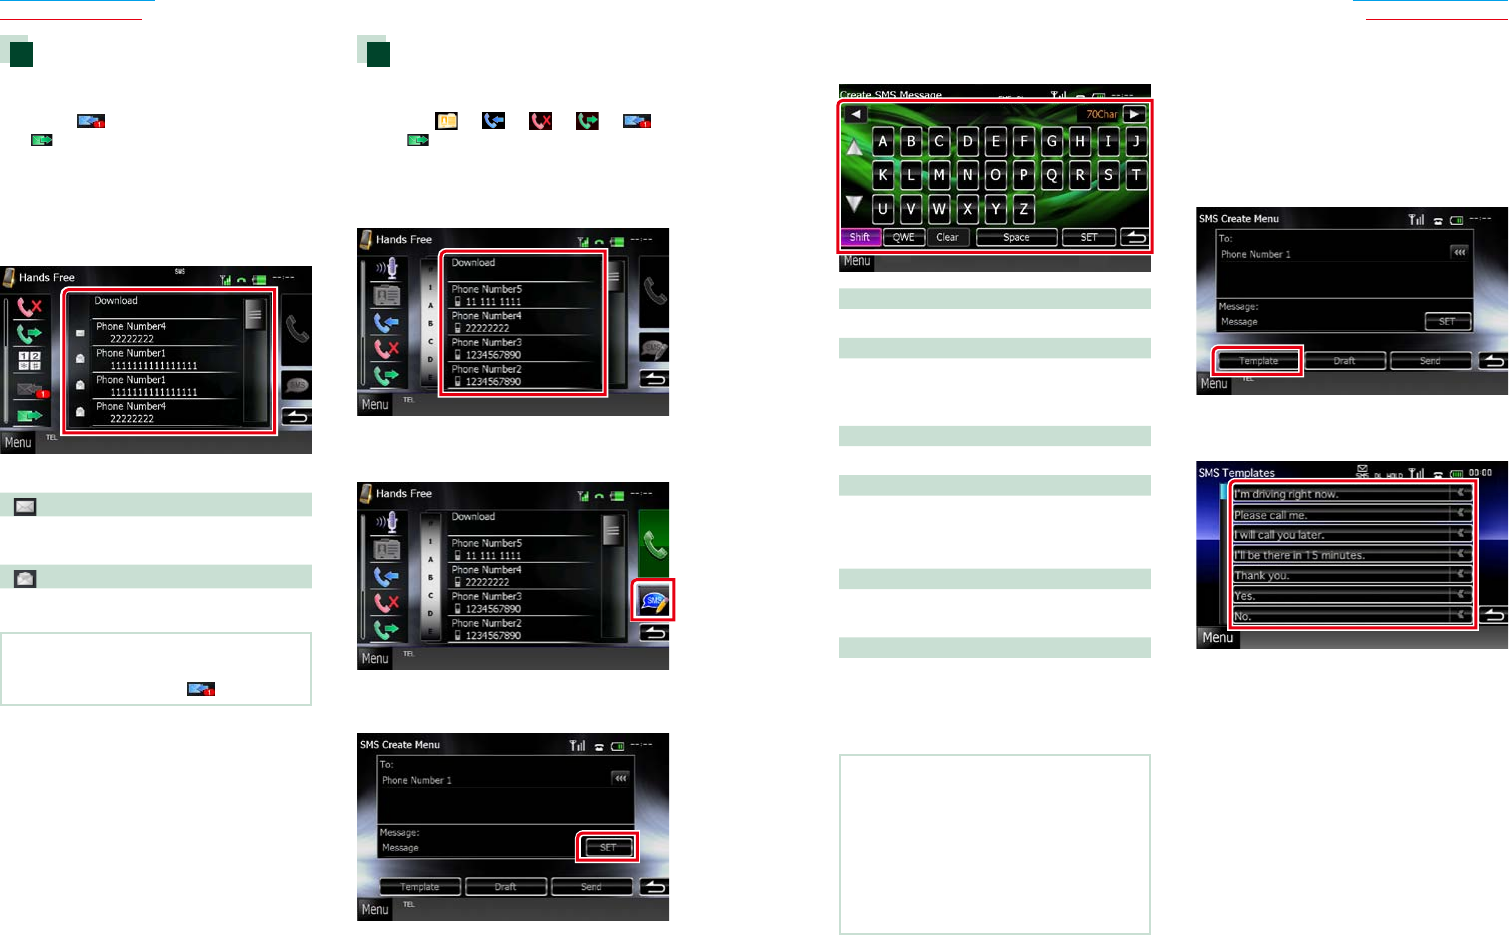
7474 75
Return to the Top page
Bluetooth Operation
Return to the Top page
Bluetooth Operation
Reading SMS (Short Message
Service) Message
1 Touch [ ] (received SMS message) or
[ ] (sent SMS message) in the Hands
Free screen.
Received and sent SMS messages list
appears on the screen.
2 Select a SMS message to read from the
Received or Sent SMS messages list.
The selected SMS message appears.
[ ]
IndicatesthenumberofunreadSMS
messages.
[ ]
IndicatesthenumberofreadSMSmessages.
NOTE
• WhenthereisanunreadSMSmessage(s),unread
SMSmessageisindicatedin[ ](number).
Creating an SMS (Short
Message Service)
1 Touch [ ], [ ], [ ], [ ], [ ],
or [ ] in the Hands Free screen.
The phone numbers list appears.
2 From the phone numbers list, select a
phone number to send a SMS.
3 Touch [SMS].
SMS Create Menu screen appears.
4 Touch [SET] of [Message] in the SMS
Create Menu screen.
Create SMS Message screen appears.
5 Enter a message using keys and touch
[SET].
Moves the cursor
Use[2][3].
Switches the keyboard layout
Use[5][∞].Thelayoutchangesinthe
followingsequence;Alphabet,numbers,local
language.
Toggles between uppercase and lowercase
Touch[Shift].
Changes the layout of the character keys
[ABC]:Alphabeticallayout
[QWE]:Qwertylayout
[ALT ]:Alternatekey
Erases the entered character
Touch[Clear].Toerasealltheinputcharacters,
touchfor2seconds.
Enters a space
Touch[Space]atdesiredposition.
6 Touch [Send].
The message is sent.
NOTE
• YoucancreateaSMSmessagebydirectly
enteringaphonenumberandashortmessage
ontheHandsFreescreen.
• [Delete]appearsonlywhenadraftmessage
isbeingedited.Touching[Delete]deletesthe
message.Afteryoutouch[Delete],aconfirmation
messageappears.Followthemessageand
completetheoperation.
Using templates
Youcancreateamessageeasilybyselecting
thedesiredsentencefromthetemplatelist.
1 Touch [Create Message] in the SMS
Select screen.
SMS Create Menu screen appears.
2 Touch [Template].
Template list screen appears.
3 Touch the desired template.
Selected template is entered.
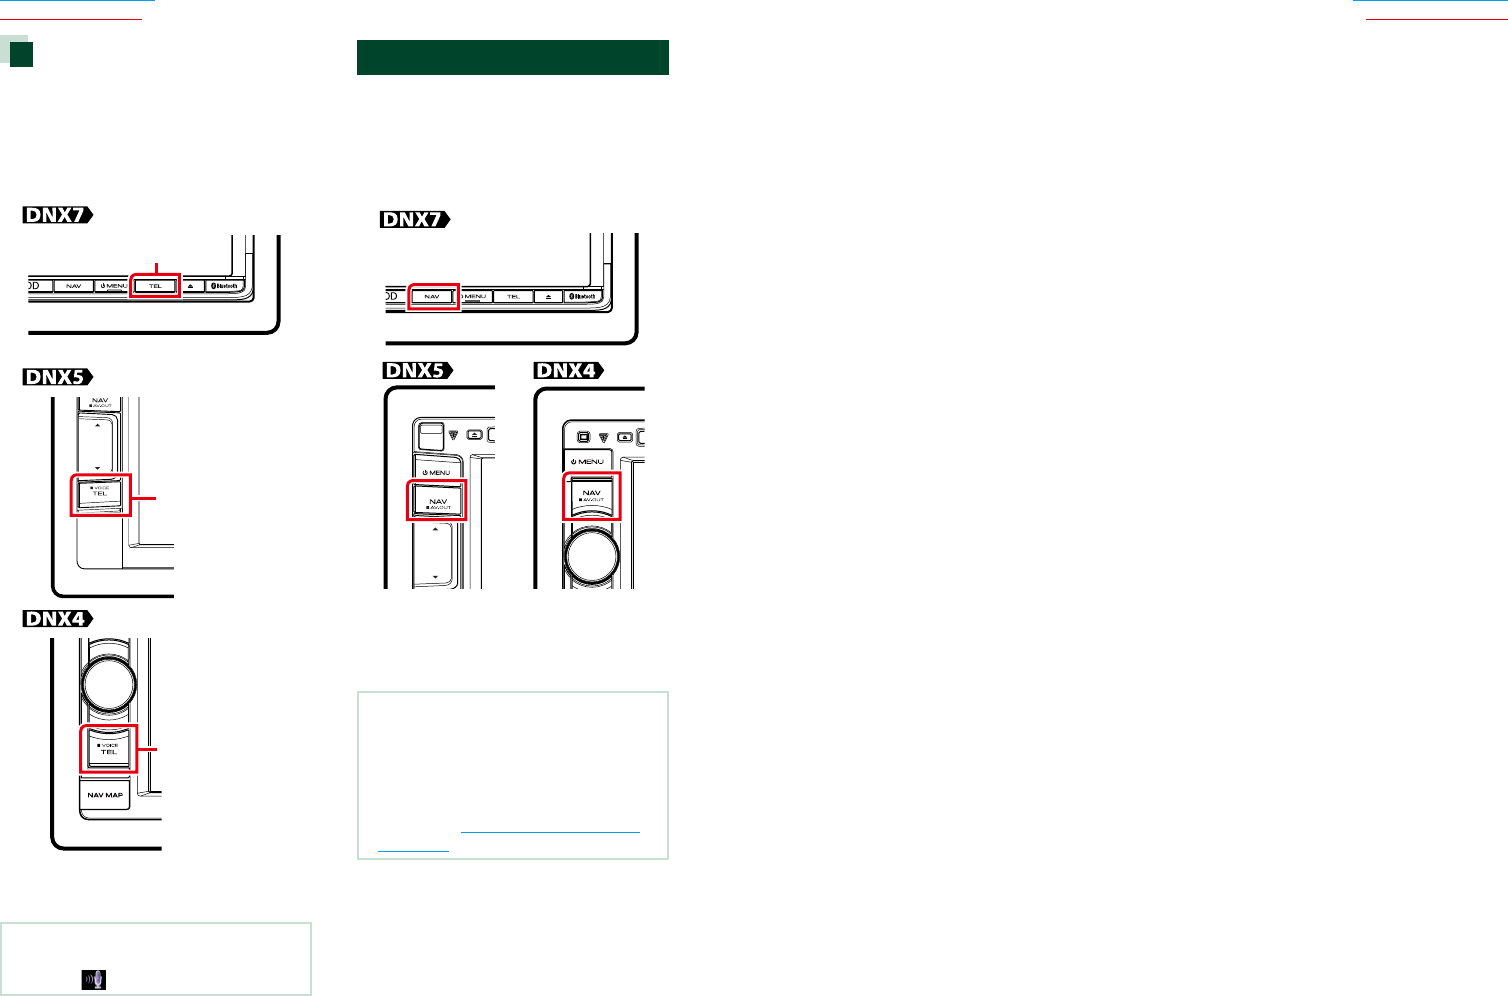
7676 77
Return to the Top page
Bluetooth Operation
Return to the Top page
Bluetooth Operation
Voice Recognition
Youcanaccessthevoicerecognitionfunction
ofthecell-phoneconnectedtothisunit.
Youcansearchthecell-phonephonebook
byvoice.(Thefunctionalitydependsonthe
cell-phone.)
1 Press the <TEL> button for 1second.
Pressfor1second
Pressfor1second
Pressfor1second
Voice Recognition screen appears.
2 Start speaking.
NOTE
• Youcanusevoicerecognitionfunctionby
touching[ ]ontheHandsFreescreen.
Smartphone Link
YoucanreceiveGarmin’strafficinformation
andweatherforecastbyconnecting
yourAndroidsmartphoneinwhichthe
SmartphoneLinkapplicationisinstalledto
thisunit.
1 Press the <NAV> button.
Navigation screen appears.
Touch [Apps] on the Main Menu screen and
then an icon of your desired content
For details, see Navigation system manual.
NOTE
• InstallthelatestversionoftheSmartphoneLink
applicationonyourAndroid.
Searchfor“SmartphoneLink”intheGoogleplay
tofindandinstallthemostcurrentversion.
• ForhowtoregistertheBluetoothdevice
(Android),seeRegistering the Bluetooth
Unit (P.69).
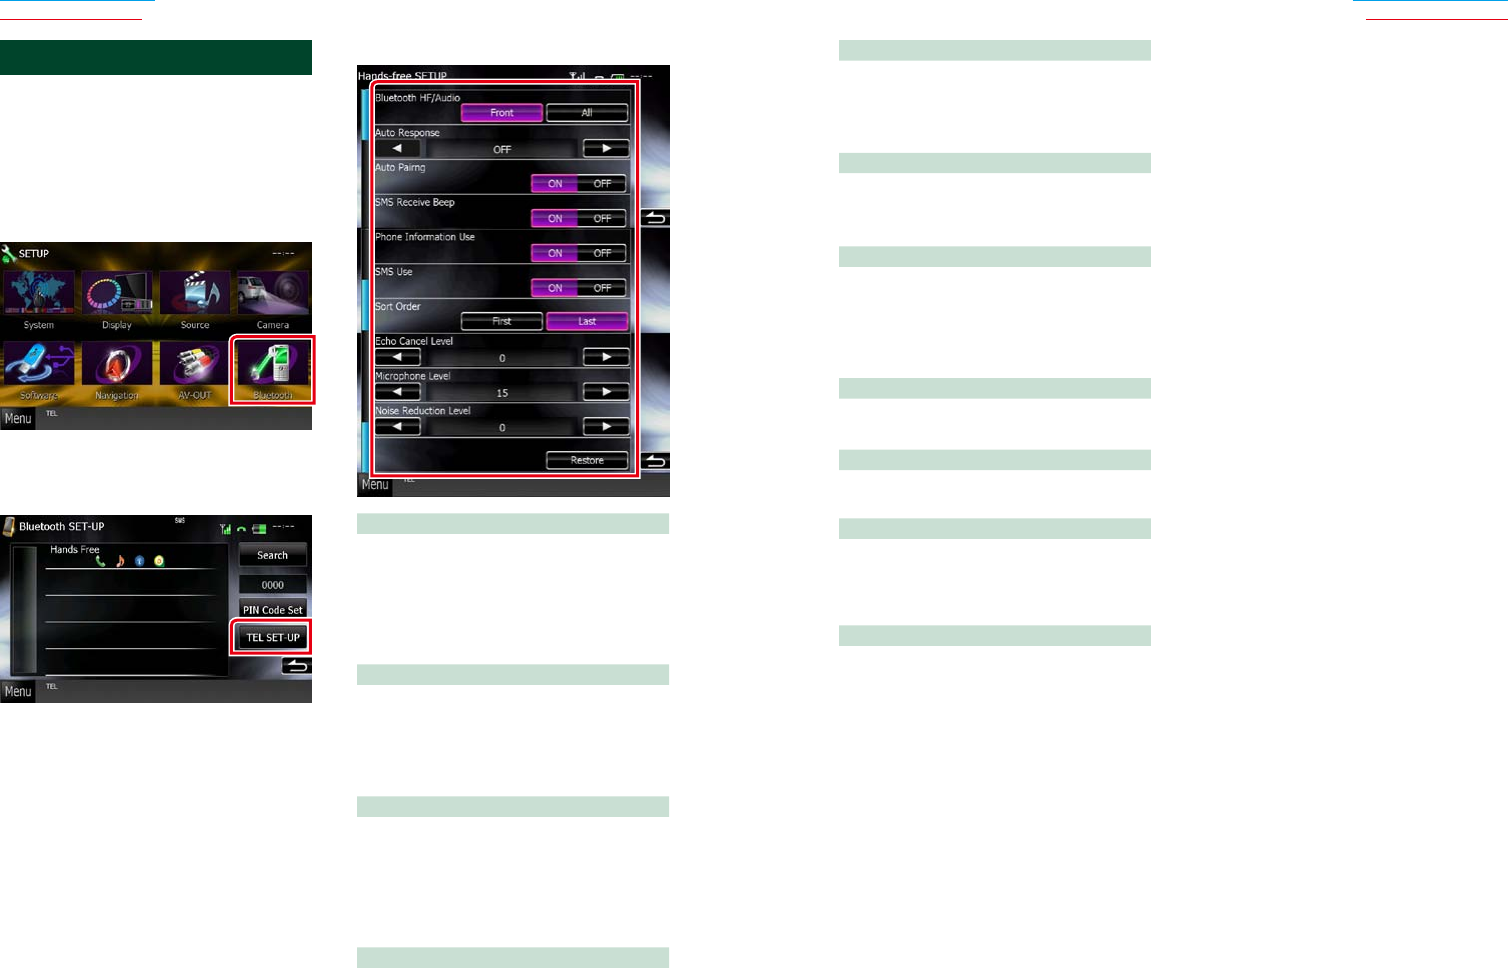
7878 79
Return to the Top page
Bluetooth Operation
Return to the Top page
Bluetooth Operation
Phone Information Use
Setswhethertousephonebook,outgoing,
incomingandmissedcallslist.
ON (Default):Yes.
OFF:No.
SMS Use
SelectwhethertouseSMS.
ON (Default):UsesSMS.
OFF:NotusesSMS.
Sort Order
Setshowtoarrangethecell-phone
phonebook.
First:Arrangesintheorderoffirstname.
Last (Default):Arrangesintheorderoflast
name.
Echo Cancel Level
Adjuststhelevelofechocancellation.
Defaultis“0”.
Microphone Level
Adjuststhesensitivityofthetelephone
microphone.Defaultis“15”.
Noise Reduction Level
Reducesthenoisesgeneratedbysurrounding
environmentwithoutchangingthe
microphonevolume.Usethissettingwhenthe
voiceofcallerisnotclear.Defaultis“0”.
[Restore]
Resetsthesettingstothedefaultsettings.
*1Eitherthetimeintervalforautomatic
answersetonthisunitorthetimeinterval
setonthecell-phone,whicheverisshorter
takeseffect.
Hands-Free Setup
Youcanperformvarioussetupabout
handsfreefunction.
1 Touch [Menu] on any screen.
2 Touch [SETUP].
SETUP Menu screen appears.
3 Touch [Bluetooth].
Bluetooth SETUP screen appears.
4 Touch [TEL SET-UP] in the Bluetooth
SET-UP screen.
Hands-free SETUP screen appears.
5 Set each item as follows.
Bluetooth HF/Audio
Selectthespeakerstooutputthesoundfrom
cell-phone(suchasphonecallvoiceand
ringingtone)andBluetoothaudioplayer.
Front Only (Default):Outputsfromthefront
speakers.
All:Outputsfromallspeakers.
Auto Response*1
Setsanautomaticresponsetimetopick-upan
incomingcall.
OFF (Default):Automaticresponseisnot
available.
0-99:Setcallingringtime(second).
Auto Pairing
Whensetto“ON”,theAppleAutoParing
functionisturnedontoautomaticallyregister
theiPodtouchoriPhoneconnectedtothis
unit.
ON (Default):UsesAppleAutoParingfunction.
OFF:NotusesAppleAutoParingfunction.
SMS Receive Beep
SelectwhethertobeepatanincomingSMS.
ON (Default):Beeps.
OFF:Notbeeps.
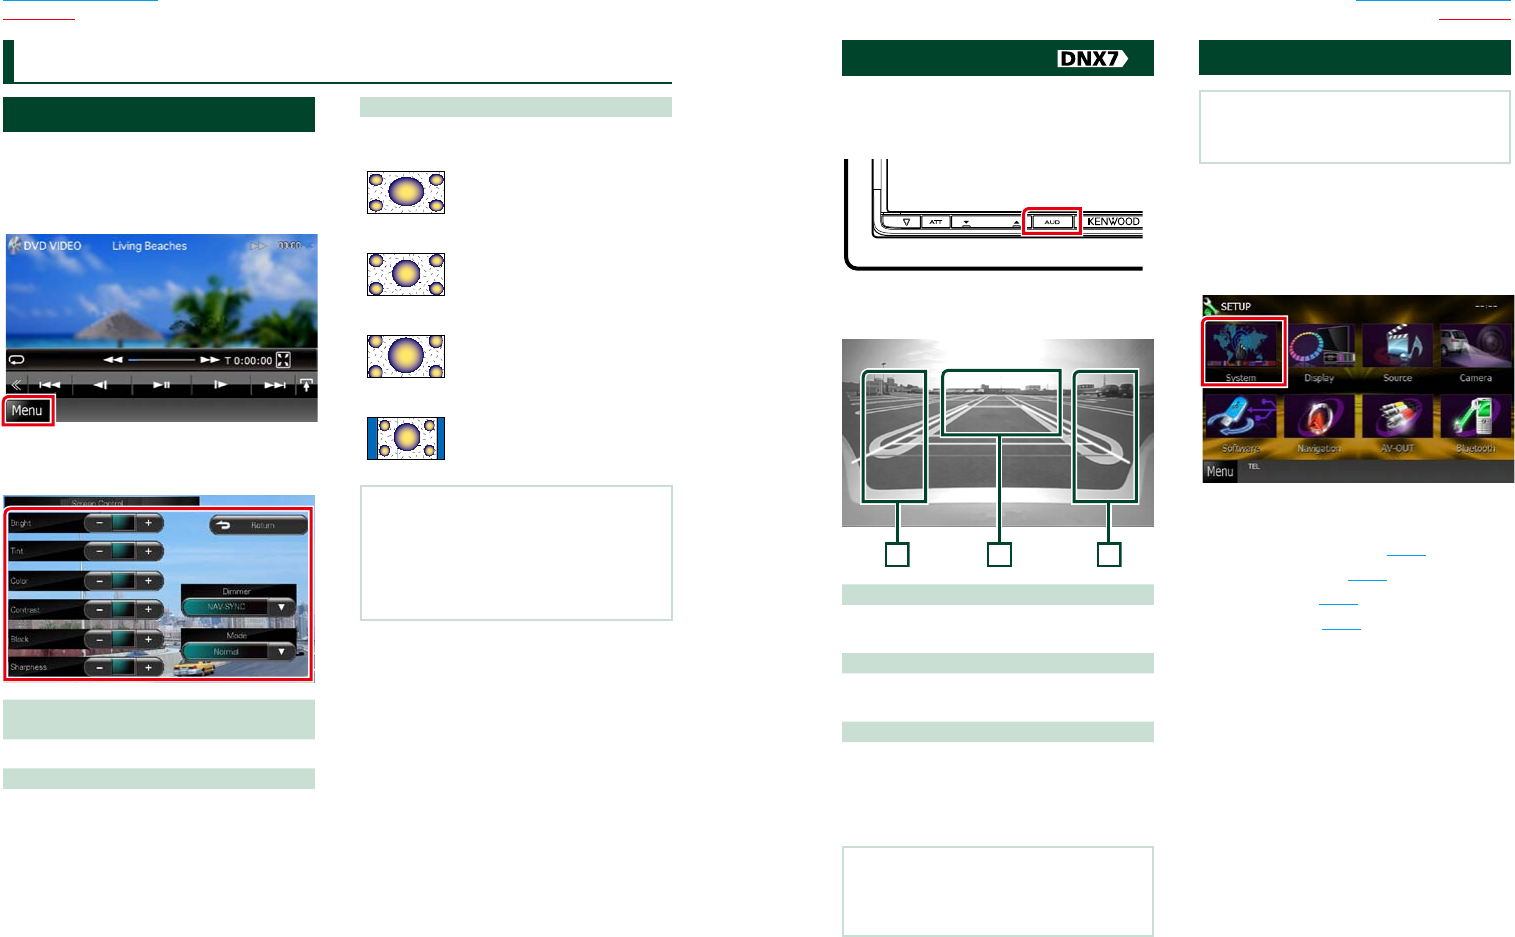
8080 81
Return to the Top page
Setting Up
Return to the Top page
Setting Up
Monitor Screen Setup
YoucanadjustimagequalityiniPodvideo,
picturefile,menuscreen,etc.
1 Touch the lower left area of any screen
for at least 1 second.
Screen Control screen appears.
2 Adjust each item as follows.
Bright/Tint/Color/Contrast/Black/
Sharpness
Adjustseachitem.
Dimmer
Selectdimmermode.
ON:Thedisplayandbuttonsdim.
OFF:Thedisplayandbuttonsdonotdim.
SYNC (Default):Turnsthedimmerfunctionon
oroffwhenthevehiclelight
controlswitchisturnedon
oroff.
NAV-SYNC:Turnsthedimmerfunctiononor
offaccordingtotheNavigation
Day/Nightdisplaysetting.
Mode (Playback screen only)
Selectscreenmode.
Full:Fullpicturemode
Just:Justifypicturemode
Zoom:Zoompicturemode
Normal:Normalpicturemode
NOTE
• Adjustingitemsaredifferentdependingonthe
currentsource.
• Youcanperformthisfunctiononlywhenyou
haveappliedtheparkingbrake.
• Theimagequalitycanbesetforeachsource.
Setting Up View Camera Control
YoucansetupdisplaywhenaCMOS-300
Seriesviewcameraisused.
1 Press the <AUD> button for 1second.
Camera view screen appears.
2 Adjust each item as follows.
3
2
1
1 Guideline
Touchingeachtimeturnsonoroffthe
guidelinedisplayalternately.
2 Switching the View Camera
Touchingeachtimechangesbetweenthe
frontviewcameraandrearviewcamera.
3 Angle
Touchingeachtimechangescameraanglesin
thefollowingorder:
Superwideview/Wideview/Overheadview/
Wideview+Topview/Cornerview
NOTE
• Thevideocameracontrolsdescribedabove
maynotbeoperabledependingtheconnected
cameras.
System Setup
NOTE
• Eachoperationinthissectioncanbestartedfrom
themultifunctionmenu.
1 Touch [Menu] on any screen.
TOP Menu screen appears.
2 Touch [SETUP].
3 Touch [System].
System Menu screen appears.
See the following section for each setting.
• Set up the user interface (P.82)
• Adjust touch panel (P.84)
• Set up security (P.85)
• Set up memory (P.86)
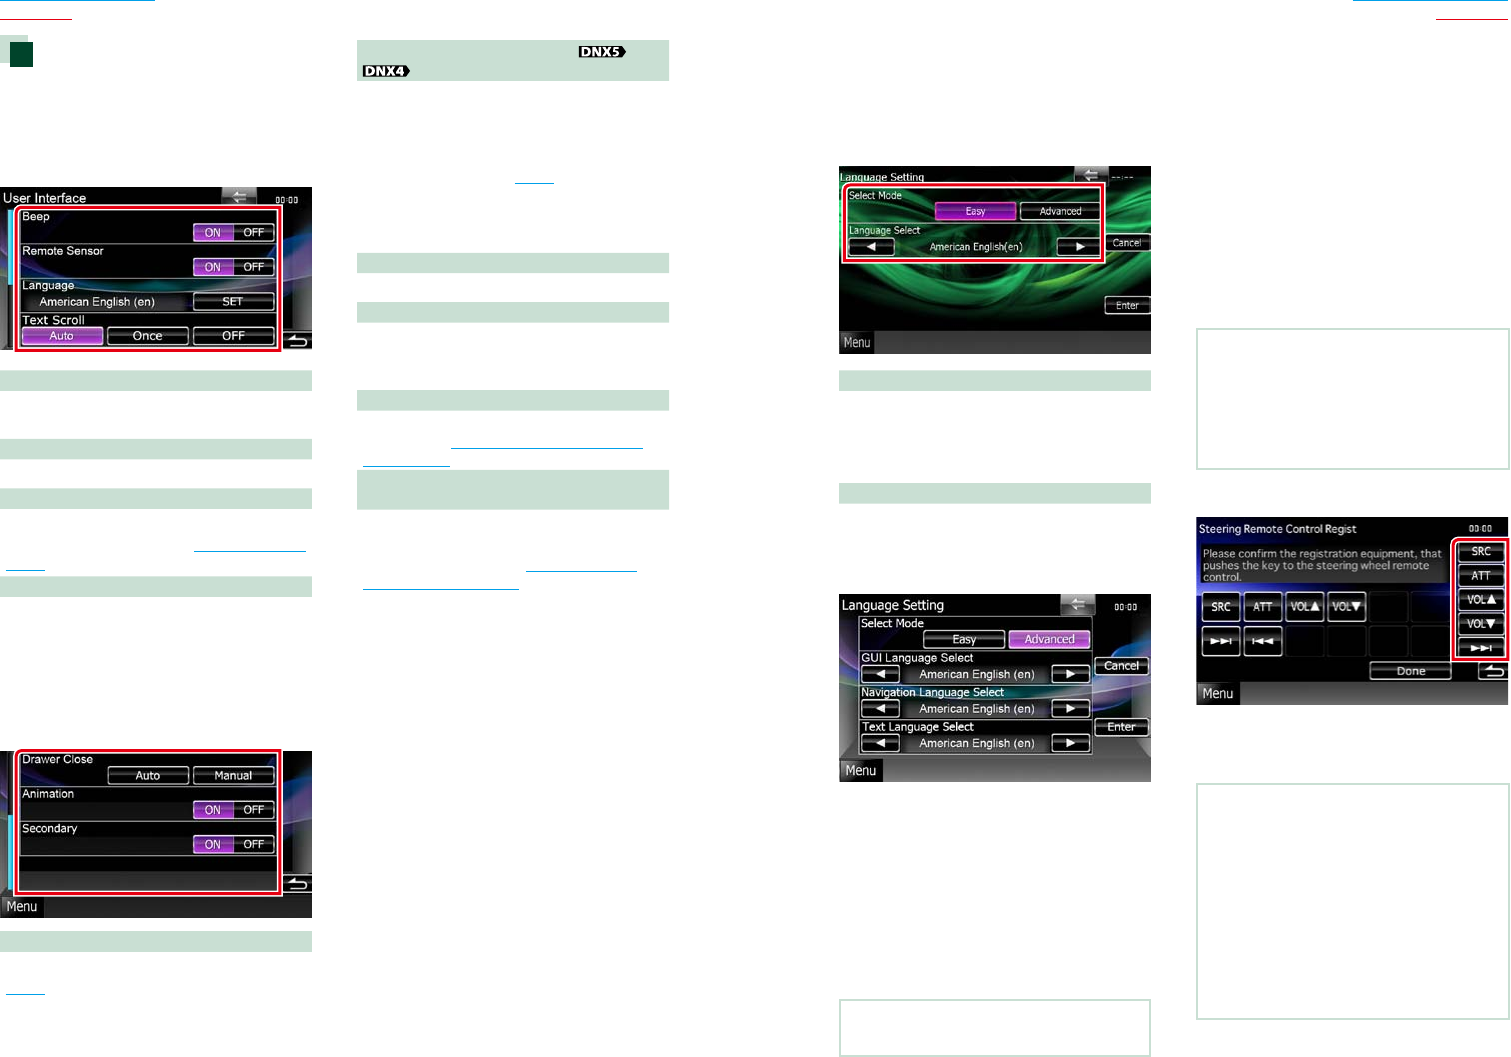
8282 83
Return to the Top page
Setting Up
Return to the Top page
Setting Up
User interface
Youcansetupuserinterfaceparameters.
1 Touch [User Interface] in the list.
User Interface screen appears.
2 Set each item as follows.
Beep
Turnsthekeytouchtoneonoroff.
Defaultis“ON”.
Remote Sensor
Selectsaremotecontrolsignal.Defaultis“ON”.
Language
Selectthelanguageusedforthecontrol
screenandsettingitems.SeeLanguage setup
(P.83).
Text Scroll
Allowsscrollingoftextdisplayonthesource
controlscreen.Selectfrom“Auto”/”Once”/”OFF”.
Auto (Default):Scrollsthetextautomatically.
Once:
Allowsyoutoscrollthetextonlyonce
automaticallywhenupdated.
OFF:Doesnotscrollthetextautomatically.
Drawer Close
Setswhethertoclosethecommonmenu
(P.16)automatically.Defaultis“Auto”.
TEL Key Longer than 1 Second
Youcansettheoperationperformedwhen
theTELkeyispressedfor1second.Selectfrom
“Voice”/”V.OFF”/”R-CAM”.
Voice (Default):DisplaystheVoiceRecognition
screen.(P.82).
V.OFF:
Turnthedisplayoff.
R-CAM:
Switchestotherearviewcameravideo
display
.
Animation
Setswhethertodisplayanimation.Defaultis“ON”.
Secondary
Setswhethertodisplaythenavigation
informationintheaudioscreenorviceversa.
Defaultis“ON”.
Steering Remote Controller
Setsthedesiredfunctioninthesteeringremote
controller.SeeLearning function of steering
remote (P.83).
Travel Prayer for Safe Drive
(DNX7330BTM/ DNX5330BTM only)
Whenthisfunctionisset,theprayerfordriving
safetyisdisplayedwhentheunitisturnedon,
thenQuranisplayed.
SeeTravel Prayer for
Safe Drive Setting (P.84).
Language setup
1 Touch [SET] of [Language] in the User
Interface screen.
Language Setting screen appears.
2 Set each item as follows.
Select Mode
Selectsthemodetoselectalanguage.
Easy (Default):Selectsalanguageeasily.
Advanced:Allowsyoutoselectlanguagesfor
respectiveitems.*
Language Select
Selectsalanguage.
*Ifyouselect[Advanced]forSelectMode,
thefollowingscreenappears.
GUI Language Select:
Selectsthedisplaylanguageusedforthe
controlscreenandsoforth.
Navigation Language Select:
Selectsthelanguageusedfornavigation.
Text Language Select:
Selectsthelanguageusedfortagtext(song
information).
3 Touch [Enter].
NOTE
• Tocancelthelanguagesetup,touch[Cancel].
Learning function of steering remote
Thisfunctionisavailableonlywhenyour
vehicleisequippedwiththeelectrical
steeringremotecontroller.
Ifyoursteeringremotecontrollerisnot
compliant,learningmaynotbecompleted
anderrormessagemayappear.
1 Touch [SET] of [Steering Remote
Controller].
Steering Remote Controller Setting screen
appears.
2 Press the steering remote controller
button you want to set the function.
NOTE
• Youcanhavetheunitlearnedallbuttonsata
time.Inthatcase,presstheallbuttonsoneata
timeandafterpressingallofthem,touch[Done]
inSteeringRemoteControllerSettingscreen.
However,newfunctionscannotbelearnedafter
thisoperation.
3 Touch the function you want to set.
4 Repeat steps 2 and 3 as necessary.
5 Touch [Done].
NOTE
• Whenchangingthefunctionalreadylearned,
touchthebuttonyouwanttochangeinstep2
andthentouchtoselectthechangedfunction
fromthefunctionlist.
• Confirmthecontentsofthesettablefunctionon
thefunctionlist.Youcannoteditthefunctionlist.
• Toinitializethecontents,touch[Initialize]of
[SteeringRemoteController]inUserInterface
screen.Afteryoutouch[Initialize],aconfirmation
messageappears.Followthemessageand
completetheoperation.
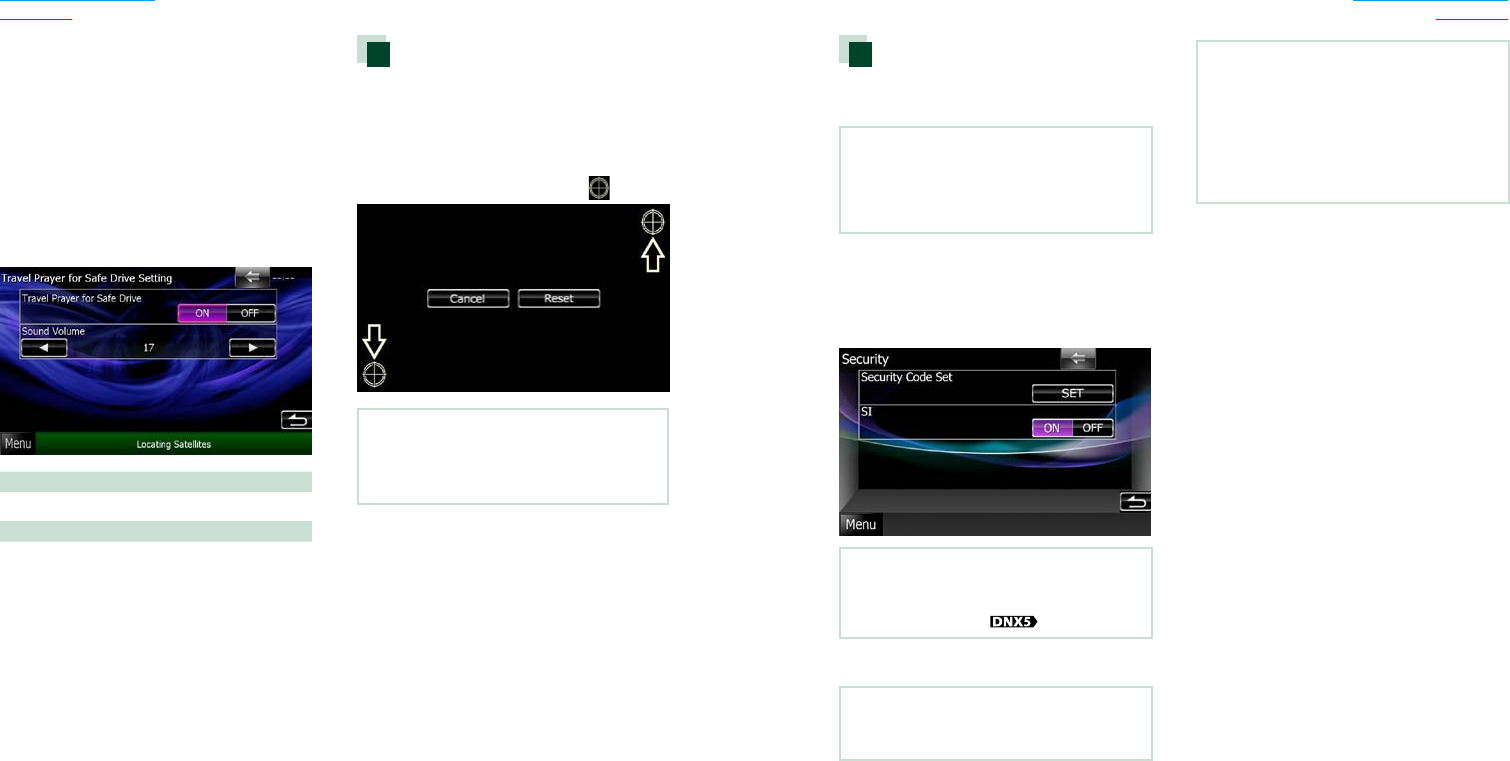
8484 85
Return to the Top page
Setting Up
Return to the Top page
Setting Up
Travel Prayer for Safe Drive Setting
(DNX7330BTM/ DNX5330BTM only)
Whenthisfunctionisset,theprayerfor
drivingsafetyisdisplayedwhentheunitis
turnedon,thenQuranisplayed.
1 Touch [SET] of [Travel Prayer for Safe
Drive] in the User Interface screen.
Travel Prayer for Safe Drive Setting screen
appears.
2 Set each item as follows.
Travel Prayer for Safe Drive
TurnstheSafedriveprayfunctiononoroff.
Sound Volume
SetsthesoundvolumeofQuran.
Touch panel adjustment
1 Touch [Touch] in the System Menu
screen.
Touch Panel Adjustment screen appears.
2 Follow the instruction on the screen
and touch the center of each .
NOTE
• Tocancelthetouchpaneladjustment,touch
[Cancel].
• Toresettotheinitialstatus,touch[Reset].
Security setup
Youcansetupasecuritycodetoprotect
yourreceiversystemagainsttheft.
NOTE
• WhentheSecurityCodefunctionisactivated,the
codecannotbechangedandthefunctioncannot
bereleased.NotetheSecurityCodecanbesetas
the4digitnumberofyourchoice.
1 Touch [Security] in the System Menu
screen.
Security screen appears.
2 Touch [ON] of [SI].
NOTE
• If“SI”isturnedon,theSIindicatoronthesub
panelflasheswhenthevehicleignitionisoffand
thepanelisdetached( ).Defaultis“ON”.
3 Touch [SET] of [Security Code Set].
NOTE
• Ifyouhavealreadycompletedthecode
registration,[CLR]isdisplayed.
4 Enter a security code with four-digit
number and touch [Enter].
5 Enter the same code again and touch
[Enter].
Security code is registered.
NOTE
• Ifyouenteradifferentsecuritycode,thescreen
returnstostep4(forthefirstcodeentry).
• Ifyouhavepressed<Reset>buttonorifyou
havedisconnectedtheReceiverfrombattery,
enterthecorrectsecuritycodeasthatyouhave
enteredinstep4andtouch[Enter].Youcanuse
yourreceiver.
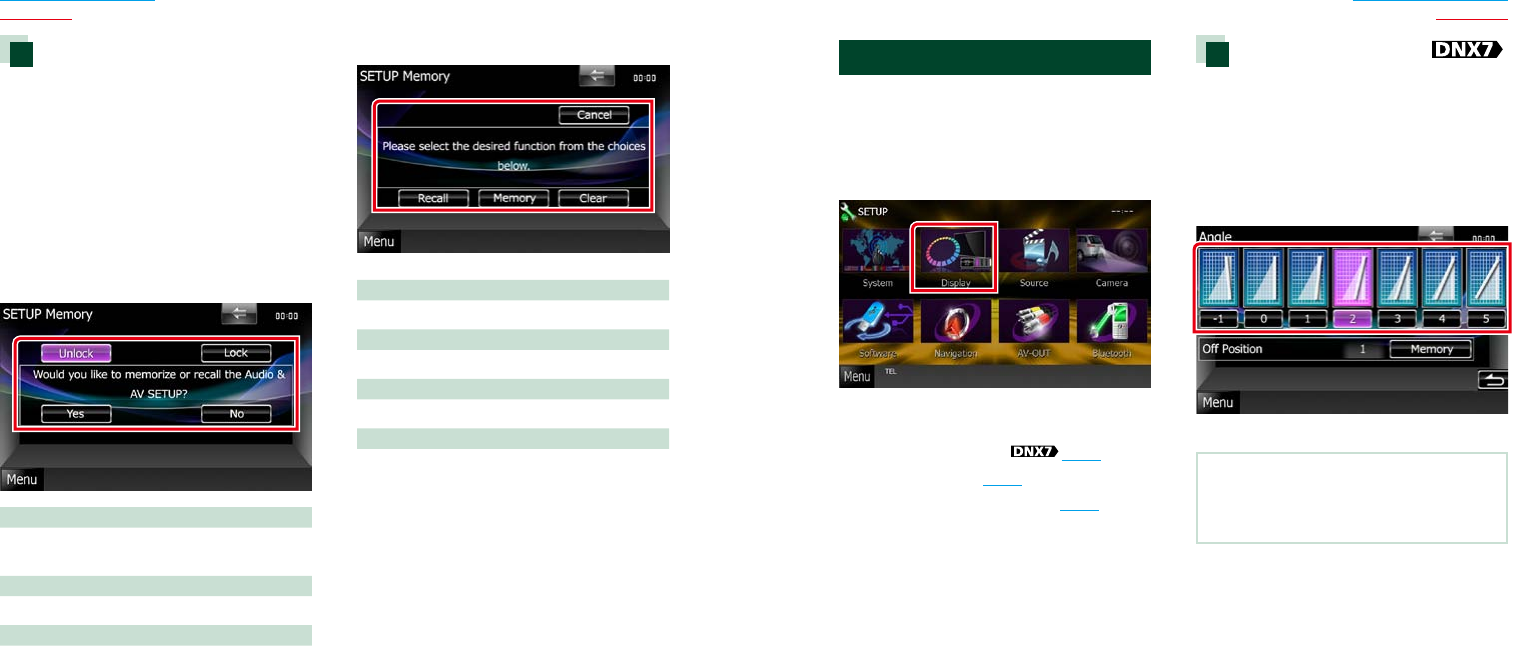
8686 87
Return to the Top page
Setting Up
Return to the Top page
Setting Up
Setup memory
AudioControl,AV-INSETUP,Camera,and
AudioSETUPsettingscanbememorized.The
memorizedsettingscanberecalledatany
time.Forexample,evenwhenthesettings
areclearedduetoreplacementofthe
battery,thesettingscanberestored.
1 Touch [SETUP Memory] in the System
Menu screen.
SETUP Memory screen appears.
2 Follow the instruction on the screen.
[Lock]/[Unlock]*
LocksorunlockstheAV-INSETUP,andAudio
SETUPsettings.
Yes
Memorizesorrecallsthesettings.
No
Cancelsthefunctionormemorization.
TheSETUPMenuscreenappearsagain.
*When[Lock]isselected,youcannotchange
theAV-INSETUP,andAudioSETUPsettings.
Also,thelockedkeymarkisdisplayed
undereachsettingiconinthesetupmenu.
3 Follow the instruction on the screen.
Recall
Recallsthememorizedsettings.
Memory
Memorizesthecurrentsettings.
Clear
Clearsthecurrentlymemorizedsettings.
Cancel
Quitsmemorization/recallingofsettings.
Display Setup
1 Touch [Menu] on any screen.
2 Touch [SETUP].
SETUP Menu screen appears.
3 Touch [Display].
Display Menu screen appears.
See the following section for each setting.
• Control monitor angle (P.87)
• Adjust panel color (P.88)
• Changing background image (P.89)
Monitor angle control
Youcanadjustthepositionofthemonitor.
1 Touch [Angle] in the Display Menu
screen.
Angle setup screen appears.
2 Select a below number that represents
your desired angle setting.
Default is “0”.
NOTE
• Youcanstorethecurrentmonitorangleasthe
angleduringpoweroff.Touch[Memory]when
thedesiredangleisselected.
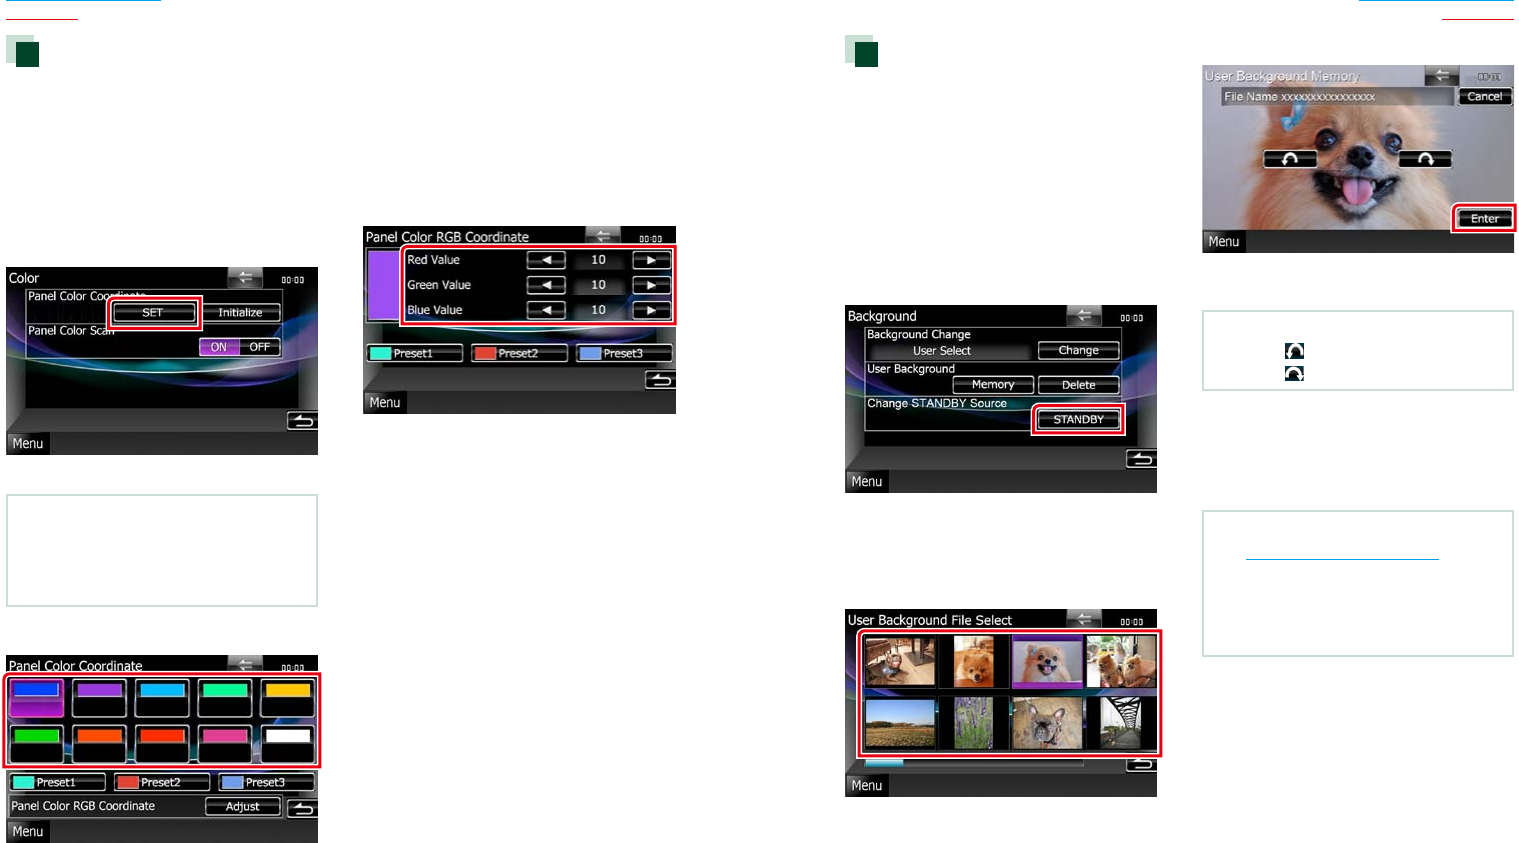
8888 89
Return to the Top page
Setting Up
Return to the Top page
Setting Up
Changing background image
Youcanloadanimagefromtheconnected
USBdeviceandsetitforthebackground
image.
Beforeoperatingthisprocedure,itis
necessarytoconnectthedevicewhichhas
theimagetoload.
1 Touch [Background] in the Display
Menu screen.
Background screen appears.
2 Touch [STANDBY].
3 Touch [Memory] of [User Background].
User Background File Select screen
appears.
4 Select the image to load.
5 Touch [Enter].
The selected image is loaded and the
display returns to the Background screen.
NOTE
• Touching[ ]rotatescounterclockwise.
• Touching[ ]rotatesclockwise.
6 Touch [Change] of [Background
Change] in the Background screen.
7 Select an image for background and
touch [Enter].
NOTE
• SeePlayable Media and Files (P.120)for
readableimagespecifications.
• Touching[Delete]intheBackgroundscreen
deletesthebackgroundimage.Afteryoutouch
[Delete],aconfirmationmessageappears.Follow
themessageandcompletetheoperation.
Panel color coordinate
Youcansetthescreenandbutton
illuminationcolor.
Theselectableitemsdifferdependingonthe
unit.
1 Touch [Color] in the Display Menu
screen.
Color screen appears.
2 Touch [SET] of [Panel Color Coordinate].
Panel Color Coordinate screen appears.
NOTE
• Youcantouch[SET]or[Initialize]when
[PanelColorScan]issettooff.
• Touch[Initialize]toresetthesettingstothe
defaultsettings.
3 Touch the desired color.
Registering original color
Youcanregisteryouroriginalcolor.
1 Touch [Adjust] in the Panel Color
Coordinate screen.
Panel Color RGB Coordinate screen
appears.
2 Use [2] and [3] to adjust each color
value.
3 Touch the desired preset key for 2
seconds.
Panel color scan
Youcansetthepanelcolortocontinuously
scanthroughthecolorspectrum.
1 Touch [ON] of [Panel Color Scan] in the
Color screen.
Panel Color Scan is set to on.
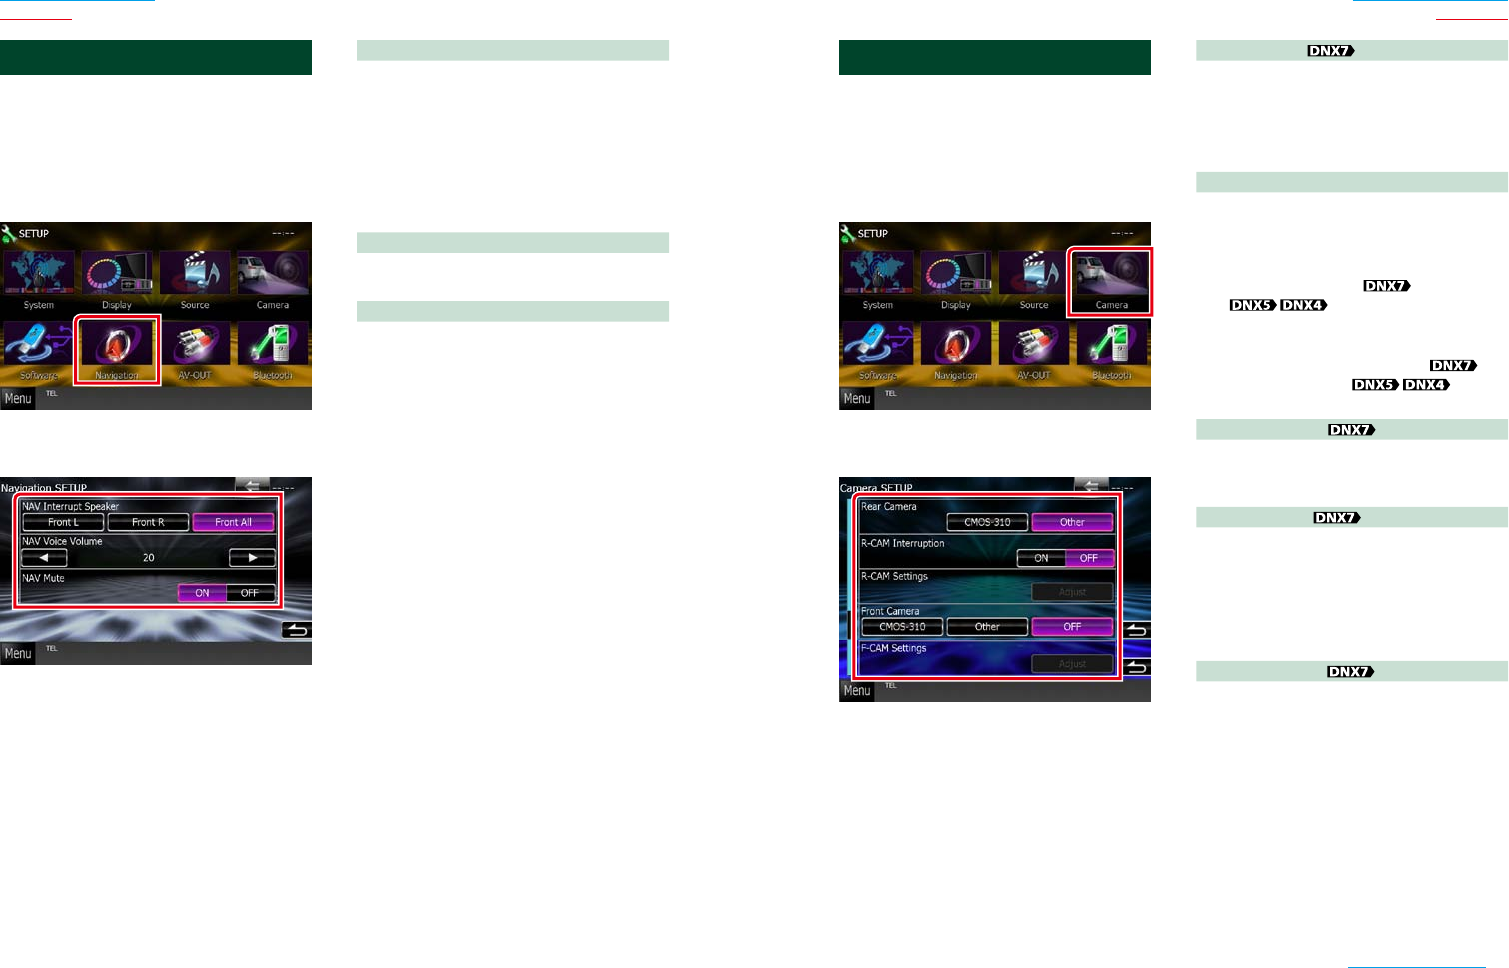
9090 91
Return to the Top page
Setting Up
Return to the Top page
Setting Up
Camera Setup
Youcansetcameraparameters.
1 Touch [Menu] on any screen.
2 Touch [SETUP].
SETUP Menu screen appears.
3 Touch [Camera].
Camera SETUP screen appears.
4 Set each item as follows.
Rear Camera*1
Selectsthetypeofrearcameratouse.
CMOS-3xx:WhentheCMOS-300serieswithID
1setisconnected.
Other (Default):Whentheothercamerais
connected.
R-CAM Interruption
Setsamethodforswitchingthedisplay.
SettingvaluesareONandOFF.
ON:Switchestotherearviewcameravideo
displaywhenshiftingtoreverseor
pressingthe<AUD> or<SCRN>
buttonfor1second.
OFF (Default):Switchestotherearview
cameravideodisplaywhen
pressingthe<AUD> or
<TEL>*4 button
for1second.
R-CAM Settings*2
AdjuststheCMOS-300serieswithID1set.
Fordetails,seetheinstructionmanualofyour
camera.
Front Camera*1
Selectsthetypeoffrontcameratouse.
CMOS-3xx:WhentheCMOS-300serieswithID
2setisconnected.
Other:Whentheothercameraisconnected.
OFF (Default):Whenthefrontcameraisnot
used.
F-CAM Settings*3
AdjuststheCMOS-300serieswithID2set.
Fordetails,seetheinstructionmanualofyour
camera.
*1Thesesettingsbecomesettableonlywhen
theparkingbrakeison.
*2Thissettingbecomessettableonlywhen
theparkingbrakeisonandtheCMOS-300
seriesisselected.
*3Thissettingbecomessettableonly
whentheparkingbrakeisonand“Front
Camera”issetto[ON].
*4[TELKeyLongerthan1Second]mustbe
setto“R-CAM”.SeeUser interface (P.82)
Navigation Setup
Youcansetnavigationparameters.
1 Touch [Menu] on any screen.
2 Touch [SETUP].
SETUP Menu screen appears.
3 Touch [Navigation].
Navigation SETUP screen appears.
4 Set each item as follows.
NAV Interrupt Speaker
Selectsspeakersusedforvoiceguidanceofthe
navigationsystem.
Front L:Usesthefrontleftsidespeakerfor
voiceguidance.
Front R:Usesthefrontrightsidespeakerfor
voiceguidance.
Front All (Default):Usesbothfrontspeakers
forvoiceguidance.
NAV Voice Volume
Adjuststhevolumeforvoiceguidanceofthe
navigationsystem.Defaultis“20”.
NAV Mute
Mutesthevolumeofrearspeakersduring
voiceguidanceofthenavigationsystem.
Defaultis“ON”.
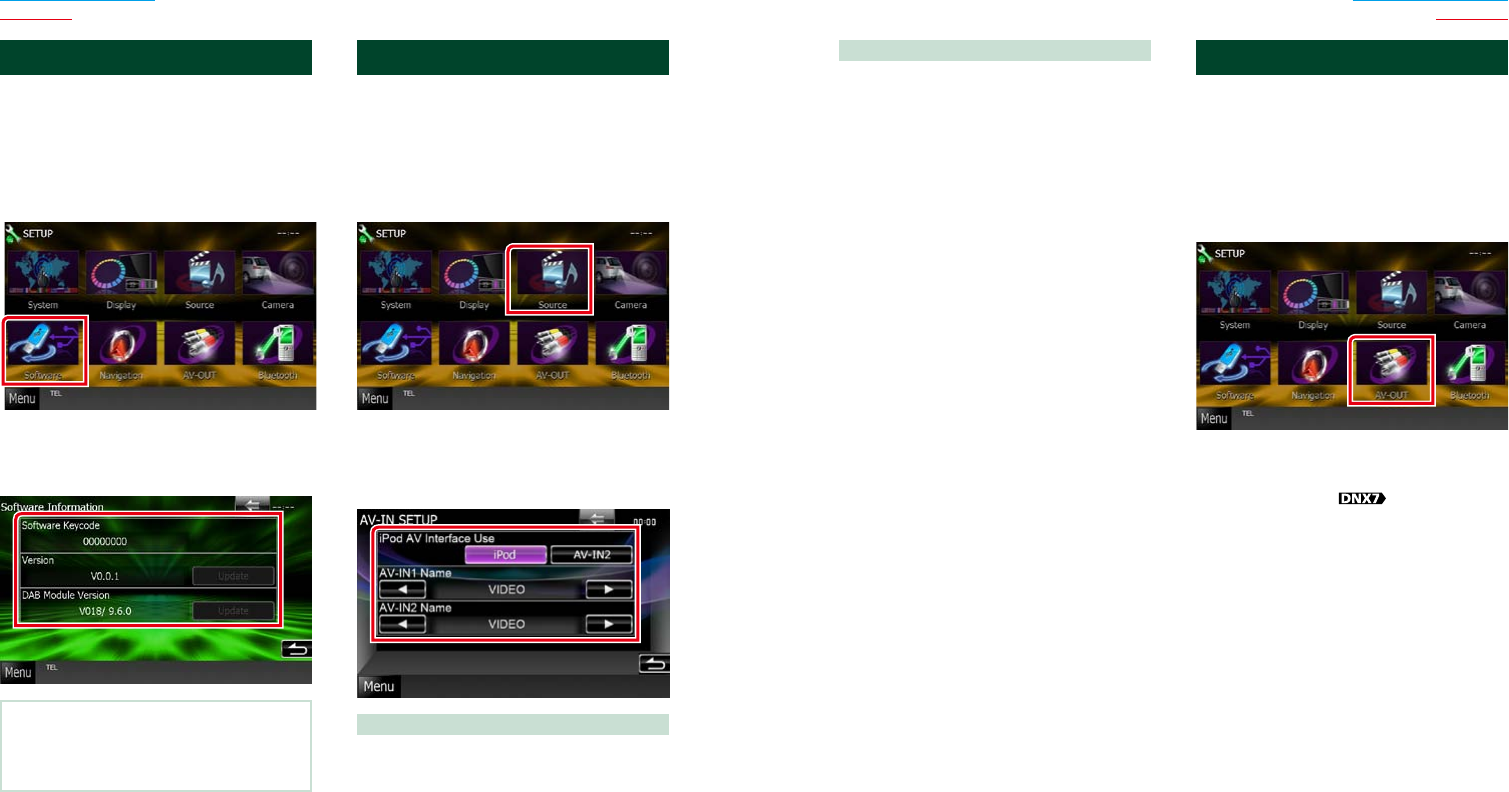
9292 93
Return to the Top page
Setting Up
Return to the Top page
Setting Up
AV-IN1 Name/AV-IN2 Name*2
Setsanametobedisplayedwhenyouselect
asystemthatisconnectedviatheAVINPUT
port.Defaultis“VIDEO”.
*1ThisitemcanbesetwheninSTANDBY
sourceandalsotheiPodisdisconnected.
*2[AV-IN2Name]becomessettablewhen
“AV-IN2”isselectedin[iPodAVInterface
Use].
AV Output Interface Setup
YoucanselectanAVsourcetobeoutputat
theAVOUTPUTport.Defaultis“VIDEO1”.
1 Touch [Menu] on any screen.
2 Touch [SETUP].
SETUP Menu screen appears.
3 Touch [AV-OUT].
AV-OUT Interface screen appears.
4 Touch [2] or [3] to set [AV-OUT] to
VIDEO, DISC, TV , iPod, or OFF.
Software Information
Checkthesoftwareversionofthisunit.
1 Touch [Menu] on any screen.
2 Touch [SETUP].
SETUP Menu screen appears.
3 Touch [Software].
Software Information screen appears.
4 Confirm the software version. Touch
[Update] as necessary.
NOTE
• Forhowtoupdatethesoftware,seetherelevant
updateproceduremanualwhichcomeswiththe
software.
AV Input Setup
YoucansetAVinputparameters.
1 Touch [Menu] on any screen.
2 Touch [SETUP].
SETUP Menu screen appears.
3 Touch [Source].
4 Touch [AV-IN SETUP] in the list.
AV-IN SETUP screen appears.
5 Set each item as follows.
iPod AV Interface Use*1
SetstheterminalwhichiPodisconnected.
SettingvaluesareiPodandAV-IN2.
iPod(Default):SetthiswhenaniPodis
connectedusingKCA-iP202
connector.Youcanlistento
audioorwatchvideoinyour
iPodasiPodsource.
AV-IN2:SetthiswhenaniPodisconnected
usingKCA-iP102connector.Youcan
listentoaudioinyouriPodasiPod
source.Youcanalsolistentoaudioor
watchvideooutputfromaAVdevice
asAV-IN2source.
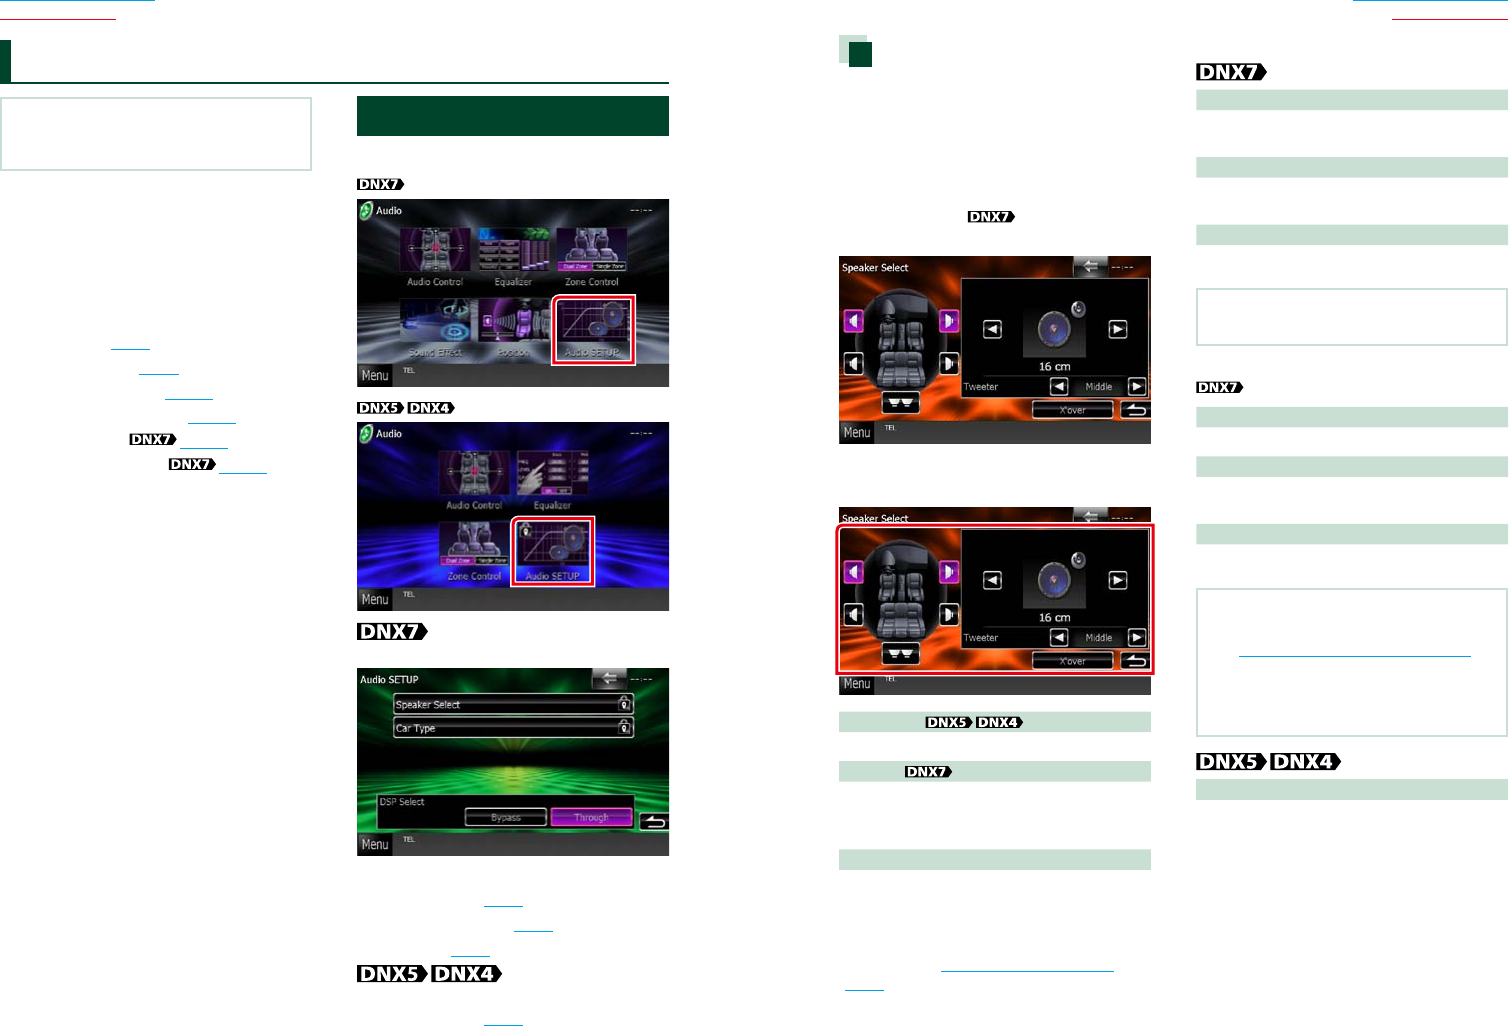
9494 95
Return to the Top page
Audio Setting Up
Return to the Top page
Audio Setting Up
NOTE
• Eachoperationinthissectioncanbestartedfrom
themultifunctionmenu.
Youcanadjustthevarioussettingssuchas
audiobalanceorsubwooferlevel.
1 Touch [Menu] on any screen.
2 Touch [Audio].
Audio screen appears.
See the following section for each setting.
• Setting audio (P.94)
• Controlling audio (P.98)
• Controlling equalizer (P.100)
• Performing zone control (P.102)
• Set sound effect (P.104)
• Set listening position (P.106)
Setting Audio
1 Touch [Audio SETUP].
Audio SETUP screen appears.
See the following section for each setting.
• Set up speakers (P.95)
• Set up your car type (P.97)
• Select DSP (P.98)
Speaker Select screen appears.
• Set up speakers (P.95)
Controlling Audio Speaker setup
Youcanselectaspeakertypeanditssizeto
getthebestsoundeffects.
Whenthespeakertypeandsizeareset,
thespeakercrossovernetworkisset
automatically.
1 Touch [Speaker Select] in the Audio
SETUP screen.
Speaker Select screen appears.
2 Touch the speaker you wish to adjust
and set each item as follows.
Subwoofer
Selectifyouareusingasubwoofer.
Tweeter
Youcansetthetweeterwhenyouare
selectingfrontspeakers.
None,Small,Middle,Large
X’over
Displaysthespeakercrossoversetupscreen.
Youcanadjustthecrossoversetupthatwasset
automaticallywhenyouselectedthespeaker
type.
Fordetails,seeCrossover network setup
(P.96)
3 Select a speaker size using [2] and [3].
The speaker size is different depending
on the speaker type and the unit.
Front
OEM,8cm,10cm,12cm,13cm,16cm,17cm,
18cm,4x6,5x7,6x8,6x9,7x10
Rear
None,OEM,8cm,10cm,12cm,13cm,16cm,
17cm,18cm,4x6,5x7,6x8,6x9,7x10
Subwoofer
None,16cm,20cm,25cm,30cm,38cmover
NOTE
• Select“None”ifyouhavenospeakers.
WhenSpeakernetworkissetto3way.
Region code 3 area
Tweeter
Small,Middle,Large
Mid Range
OEM,8cm,10cm,12cm,13cm,16cm,17cm,
18cm,4x6,5x7,6x8,6x9,7x10
Woofer
None,16cm,20cm,25cm,30cm,38cmover
NOTE
• Forhowtoswitchtothe3-wayspeakersystem,
see3 way speaker system setup (P.35)
intheQuickStartGuide.Connecting3-way
speakerswiththe2-waymodeselectedcanbreak
thespeakers.
• Select“None”ifyouhavenospeakers.
Front, Rear, Subwoofer
Standard,Wide,Middle,Narrow
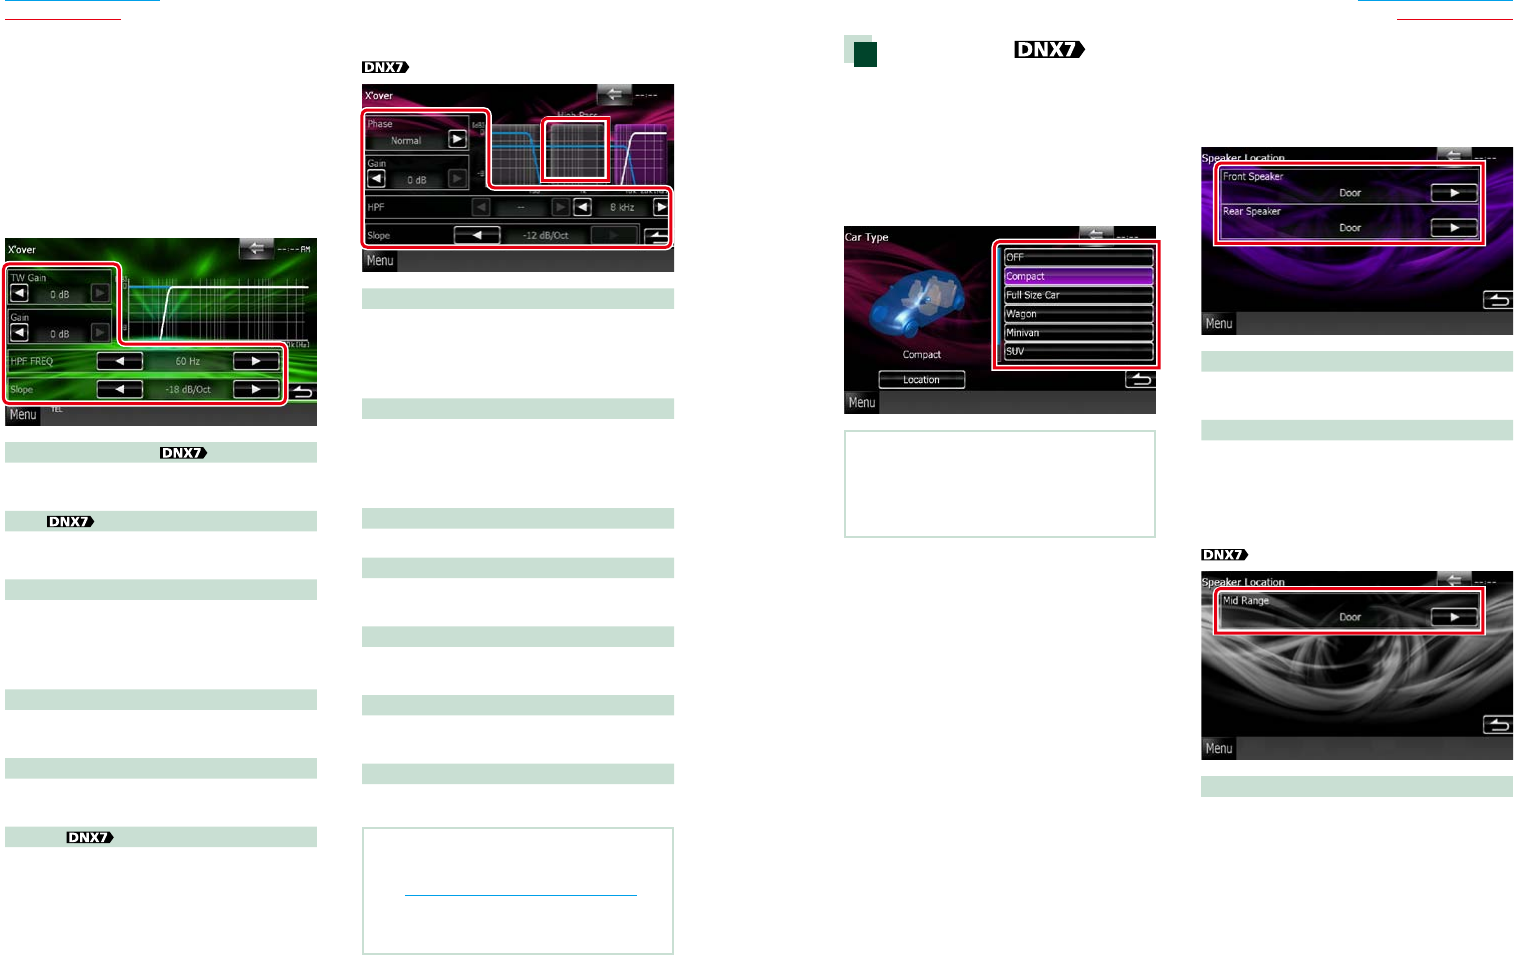
9696 97
Return to the Top page
Audio Setting Up
Return to the Top page
Audio Setting Up
Crossover network setup
Youcansetacrossoverfrequencyof
speakers.
1 Touch the speaker to set the crossover
in the Speaker Select screen.
2 Touch [X’over].
X’over screen appears.
3 Set each item as follows.
TW (Tweeter) Gain *1
Adjuststhetweeterlevel.(Whenfrontis
selectedonSpeakerSelectscreen)
Gain
Adjuststhefrontspeaker,rearspeaker,or
subwooferlevel.
Phase*2
Setsthephaseofsubwooferoutput.
Thephaseisreversed180degreeswhenset
to“Reverse”.(Whensubwooferisselectedon
SpeakerSelectscreen)
HPF FREQ
HighPassFilteradjustment.(Whenfrontorrear
speakerisselectedonSpeakerSelectscreen)
LPF FREQ
LowPassFilteradjustment.(Whensubwoofer
isselectedonSpeakerSelectscreen)
Slope*3
Setsacrossoverslope.
*1Onlywhen“Tweeter”issetto“Small”,
“Middle”,“Large”in<SpeakerSetup>.
*2Onlywhen“Subwoofer”issettoamode
otherthan“None”in<SpeakerSetup>.
*3Onlywhen“LPFFREQ”/“HPFFREQ”issetto
amodeotherthan“Through”in<X’over>.
WhenSpeakernetworkissetto3way:
Region code 3 area
Range switching area (graph)
Selectsthebandforsettinggain,frequency
filter,andslope.
TouchtheleftarctosettheLPF,thecenterarc
tosettheBPF,andtherightarctosettheHPF.
Phase*
Setsthephaseoftweeter,midrange,and
wooferoutput.
Thephaseisreversed180degreeswhensetto
“Reverse”.
Gain
Setsgainofeachspeaker.
HPF FREQ
HighPassFilteradjustment.(Whentweeteris
selectedonSpeakerSelectscreen)
BPF FREQ
BandPassFilteradjustment.(Whenmidrange
speakerisselectedonSpeakerSelectscreen)
LPF FREQ
LowPassFilteradjustment.(Whenwooferis
selectedonSpeakerSelectscreen)
Slope
Setsacrossoverslope.
NOTE
• Forhowtoswitchtothe3-wayspeakersystem,
see3 way speaker system setup (P.35)
intheQuickStartGuide.Connecting3-way
speakerswiththe2-waymodeselectedcanbreak
thespeakers.
Car type setup
Youcansetupthecartypeandspeaker
network,etc.
1 Touch [Car Type] in the Audio SETUP
screen.
Car Type screen appears.
2 Select your car type from the list.
NOTE
• Ifyourcartypeisselected,theDelayTime
Alignmentissetautomatically(fortiming
adjustmentofsoundoutputforeachchannel)to
havethehighestsurroundeffects.
Speaker location setup
1 In the Car Type screen, touch [Location].
Speaker Location screen appears.
2 Select the speaker locations using [3].
Front Speaker
Selectthelocationfrom“Door”/“OnDash”/
“UnderDash”.
Rear Speaker
Selectthelocationfrom“Door”/“RearDeck”,
“2ndRow”/“3rdRow”(Minivan,Minivan
(Long)).
WhenSpeakernetworkissetto3way.
Region code 3 area
Mid Range
Selectthelocationfrom“Door”/“OnDash”/
“UnderDash”.
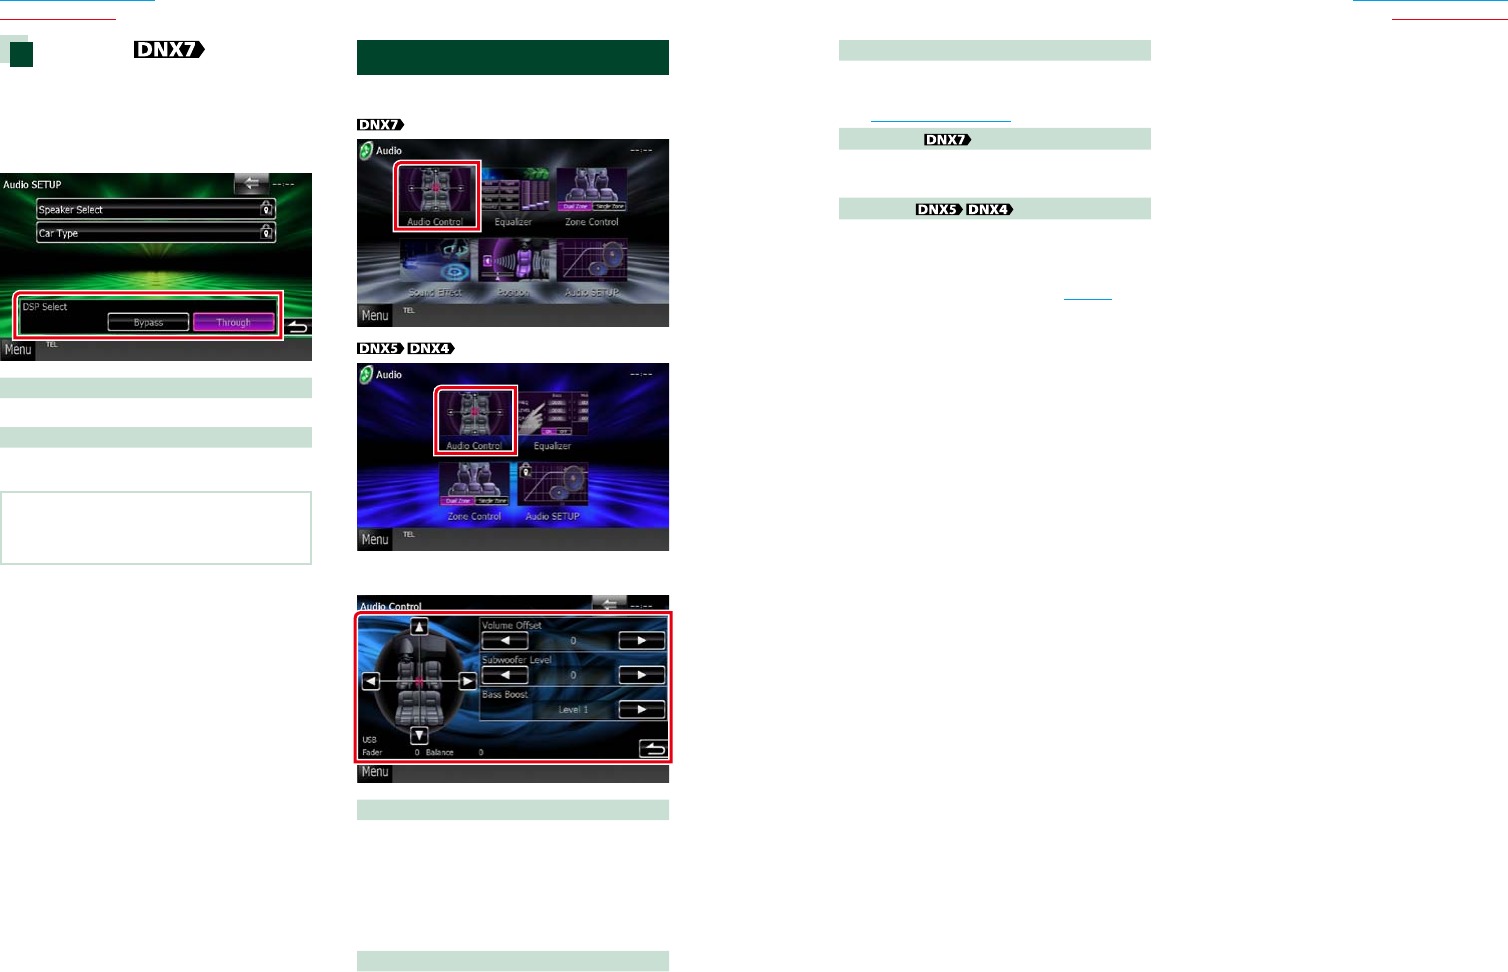
9898 99
Return to the Top page
Audio Setting Up
Return to the Top page
Audio Setting Up
DSP select
YoucanselectwhetherusingDSP(Digital
SignalProcessor)System.
1 Touch [Bypass] or [Through] of [DSP
Select] in the Audio SETUP screen.
Bypass
ThereisnoeffectbyDSP.
Through
ThereisaneffectbyDSP.
NOTE
• Whenthemodeissetto[Bypass],DSPSystem
cannotbeadjusted.
Controlling General Audio
1 Touch [Audio Control].
2 Set each item as follows.
Fader #/Balance #
Adjustthevolumebalancearoundthe
touchedarea.
[2]and[3]adjusttherightandleftvolume
balance.
[5]and[∞]adjustthefrontandrearvolume
balance.
Volume Offset*
Finelyadjustthevolumeofthecurrentsource
tominimizethedifferenceinvolumebetween
differentsources.
Subwoofer Level
Adjuststhesubwoofervolume.Thissettingis
notavailablewhensubwooferissetto“None”.
SeeSpeaker setup (P.95).
Bass Boost
Setstheamountofbassboostamong“OFF”/
“Level1”/“Level2”/“Level3”.
Loudness
Turnstheloudnesscontrolfunctiononor
off.Ifturnedon,highandlowtonesare
automaticallyenhancedduringlowvolume.
Settableonlywhenzonefunction(P.102)is
settooff.
*Ifyouhaveincreasedthevolumefirst,then
reducedthevolumeusingthe“Volume
Offset”,thesoundgeneratedifyou
suddenlyswitchtoanothersourcemaybe
extremelyloud.
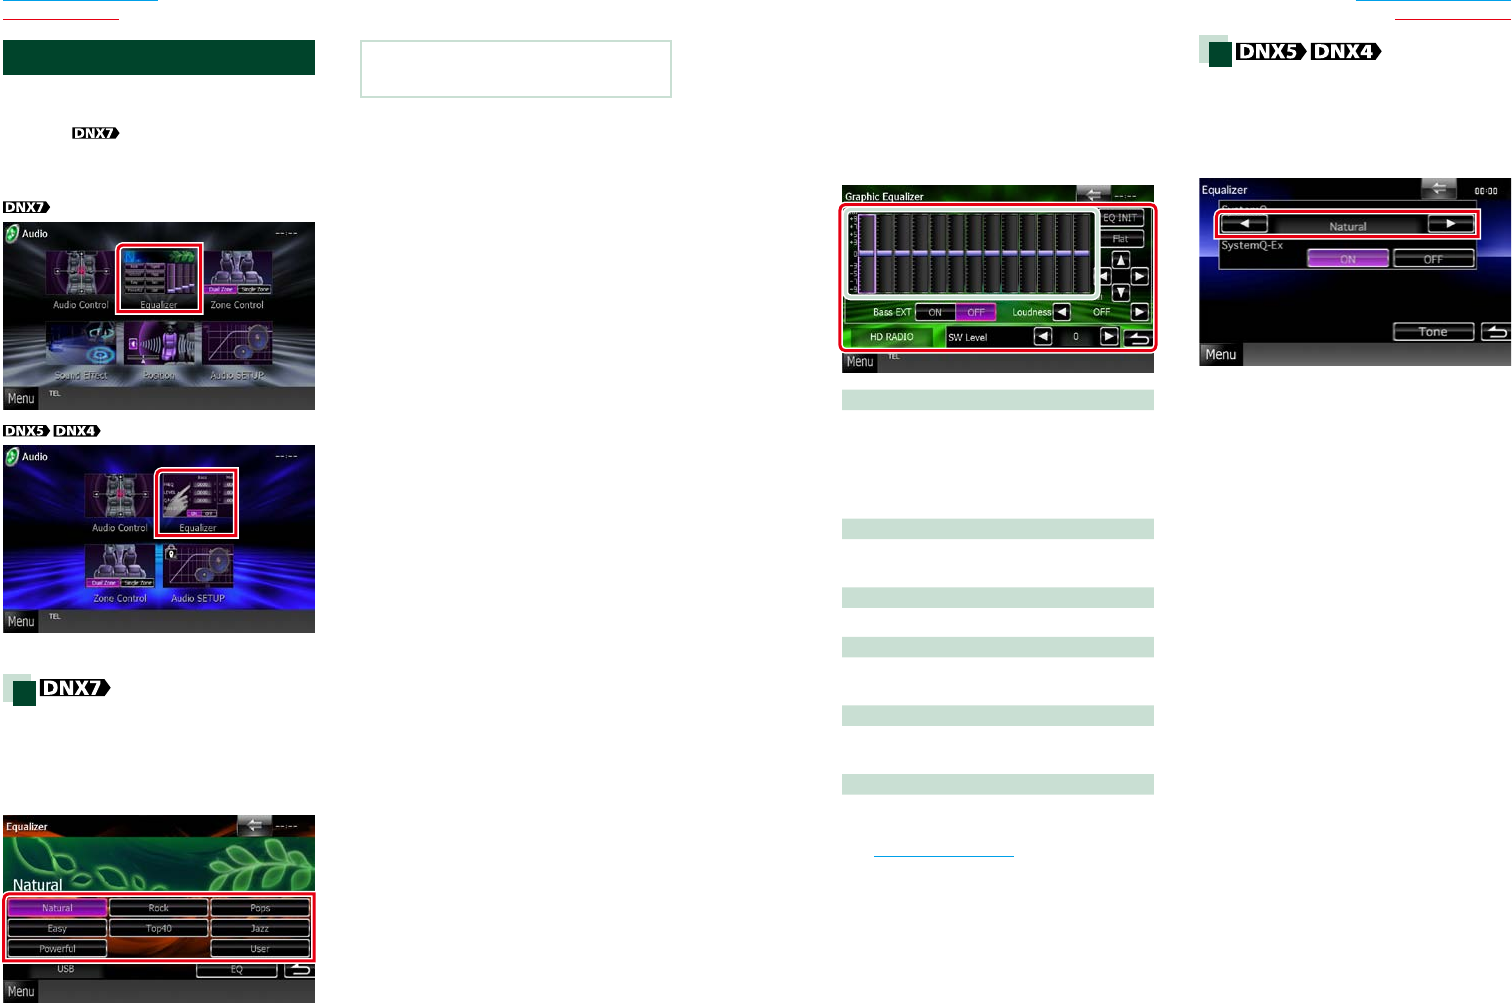
100100 101
Return to the Top page
Audio Setting Up
Return to the Top page
Audio Setting Up
Equalizer Control
Youcanadjustequalizerbyselectingthe
optimizedsettingforeachcategory.
Ifyouuse ,youcanalsoadjust
equalizermanually.
1 Touch [Equalizer].
Equalizer screen appears.
Operation
Controlling EQ curves
1 Select EQ curve from [Natural],
[Rock], [Pops], [Easy], [Top40], [Jazz],
[Powerful], [iPod], and [User].
NOTE
• [iPod]isavailableonlyduringiPodsource.
Controlling equalizer manually
Thissettingcannotbeperformedwhenyou
select[iPod]intheEqualizerscreen.
1 Touch [EQ] in the Equalizer screen.
2 Touch the screen and set the Graphic
Equalizer as desired.
Gain level (light green boxed area)
Adjustthegainlevelbytouchingtheeach
frequencybar.
Touching[2],[3],[5]and[∞]canalso
adjustthelevel.Use[2]and[3]toselecta
frequency,and[5]and[∞]tosetthelevel.
EQ INIT
Returnstothepreviouslevelwhichthegain
levelisadjusted.
Flat
Tonecurvebecomesflat.
Bass EXT (Bass Extend Settings)
Whenturnedon,thefrequencylowerthan
62.5Hzissettothesamegainlevelas62.5Hz.
Loudness
Setstheamountsofboostoflowandhigh
tones.“OFF”,“Low”,“High”
SW Level
Adjuststhesubwoofervolume.Thissettingis
notavailablewhensubwooferissetto“None”.
SeeSpeaker setup (P.95).
Operation
Controlling EQ curves
1 Select EQ curve from [Natural], [Rock],
[Pops], [Easy], [Top40], [Jazz], and
[User] using [2] and [3].
Controlling SystemQ-Ex
Selectsitemstobeadjustedfortonecurve
setup.Ifyouturnoffthissetting,onlyLevel
canbesetupfortonecurves.
1 Touch [ON] or [OFF] of [SystemQ-Ex].
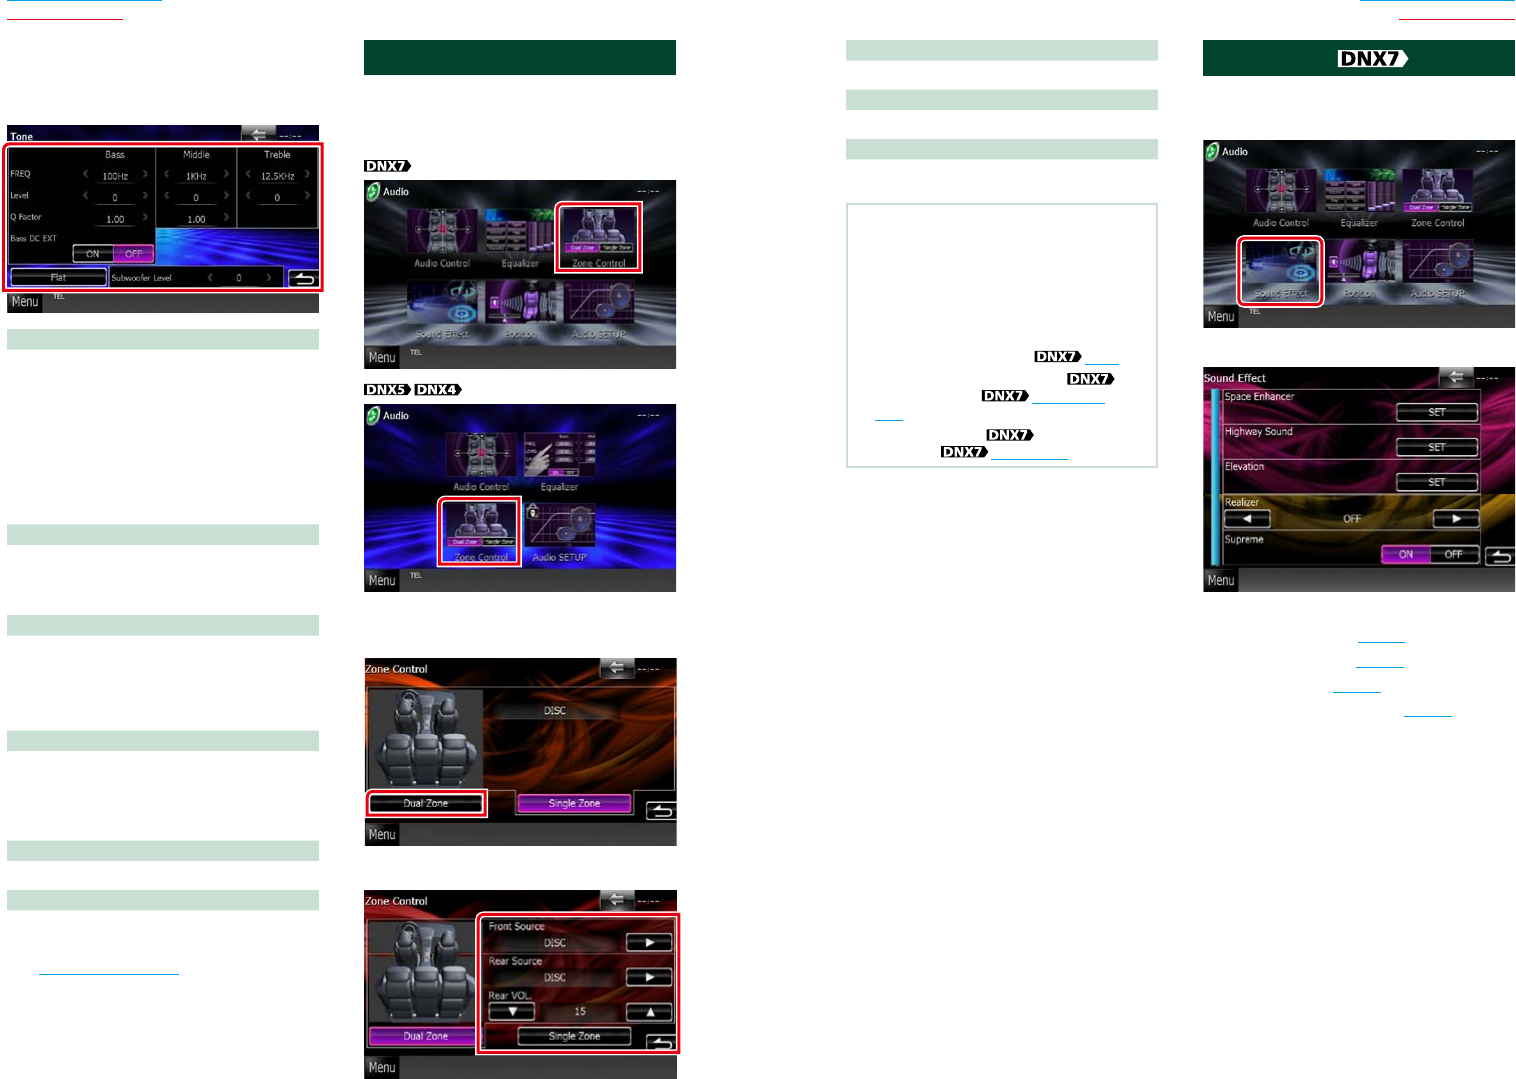
102102 103
Return to the Top page
Audio Setting Up
Return to the Top page
Audio Setting Up
[3] (Front Source, Rear Source)
Selecttheaudiosourceforeach.
[∞], [5] (Rear VOL.)
Adjuststherearchannelvolume.
[Single Zone]
Touchtoturnoffthedualzonefunction.
NOTE
• Whentherearspeakersoundisswitched,the
audiosourcethatisoutputattheAVOUTPUT
terminalisalsoswitchedtothesamesource.
• Whenthedualzonefunctionissettoon,the
followingfunctionsarenotavailable.
• Outputfromthesubwoofer
• SubwooferLevel/BassBoost (P.99)
• EqualizerControl/SpaceEnhancer
/ListeningPosition (P.100, 104,
106)
• DSPBypassControl /SpeakerSetup/Car
TypeSetup (P.98, 95, 97)
Sound Effect
Youcansetsoundeffects.
1 Touch [Sound Effect].
Sound Effect screen appears.
See the following section for each setting.
• Set space enhancer (P.104)
• Set highway sound (P.104)
• Set up elevation (P.105)
• Set up realizer or supreme (P.105)
Controlling equalizer manually
1 Touch [Tone] in the Equalizer screen.
2 Set each item as follows.
FREQ
Adjuststhecenterfrequencyforeachrange.
Settingvaluesareasfollows.
Bass:60Hz/70Hz/80Hz/100Hz/110Hz/120Hz/
130Hz/150Hz(Defaultis“100Hz”.)
Middle:500Hz/1kHz/1.5kHz/2kHz(Defaultis
“1kHz”.)
Treble:10kHz/12.5kHz/15kHz/17.5kHz(Default
is“12.5kHz”.)
LEVEL
Adjuststhelevelofeachrange.
Eachsettingvalueiswithin-8dBand8dBand
defaultis“0dB”.
Q Factor
AdjustQvalueforbassandmiddle.
Settingvaluesareasfollows.
Bass:1.00/1.25/1.50/2.00(Defaultis“1.00”.)
Middle:1.00/2.00(Defaultis“1.00”.)
Bass DC EXT
TurnsBassDCEXTonoroff.Defaultis“OFF”.
Ifyouselect“ON”,thebasscenterfrequencyis
extendedtothelowregisterbyapproximately
20%.
[Flat]
Tonelevelbecomes0(flat).
Subwoofer Level
Adjuststhesubwoofervolume.Thissettingis
notavailablewhensubwooferissetto“OFF”.
SeeSpeaker setup (P.95).
Zone Control
Youcanselectdifferentsourcesforboth
frontandrearpositionsinthevehicle.
1 Touch [Zone Control].
Zone Control screen appears.
2 Touch [Dual Zone].
3 Set each source as follows.
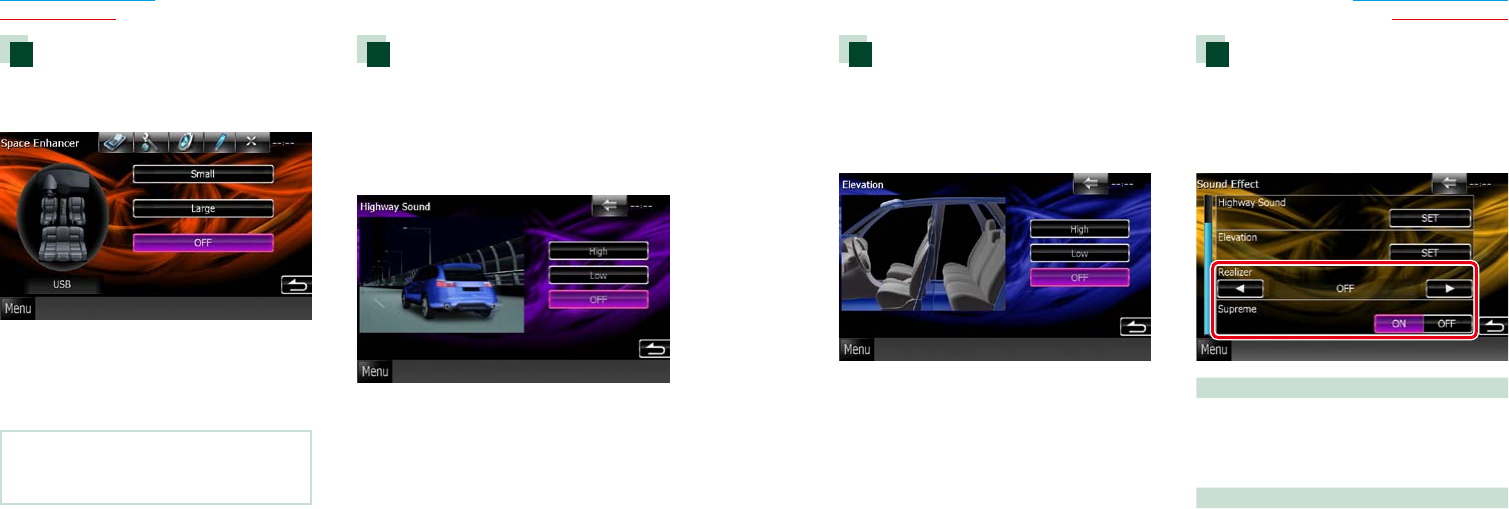
104104 105
Return to the Top page
Audio Setting Up
Return to the Top page
Audio Setting Up
Elevation
Youcanraisethesoundpositionheardfrom
thespeakersvirtually.
1 Touch [Elevation] in the Sound Effect
screen.
Elevation screen appears.
2 Select Elevation level from [High],
[Low], and [OFF].
Realizer and Supreme
Youcanrestorethesoundlostduetoaudio
compressiontoarealisticsound.
1 Touch the screen in the Sound Effect
screen.
Realizer
Realizerissoundenhancementandboosting
lowfrequencies(bassboost).
Selectthelevelfrom“OFF”/“Level1”/“Level2”/
“Level3”.
Supreme
TurnsON/OFFtheSupremefunction.
Technologytoextrapolateandsupplement
withproprietaryalgorithm,thehigh-frequency
rangethatiscutoffwhenencoding.
ThisfunctionworksonDVDMEDIA,USBand
iPodsources.
Space Enhancer
1 Touch [Space Enhancer] in the Sound
Effect screen.
Space Enhancer screen appears.
2 Touch [Small], [Large], or [OFF].
Each setting value indicates the
soundscape level.
NOTE
• ThissettingisnotavailableduringRadioand
DigitalRadiosource.
Highway sound setting
Youcanboostacertainrangeofsoundthat
becomeshardtohearduetoroadnoise.
1 Touch [Highway Sound] in the Sound
Effect screen.
Highway Sound screen appears.
2 Select the boost level from among
[High], [Low], and [OFF].
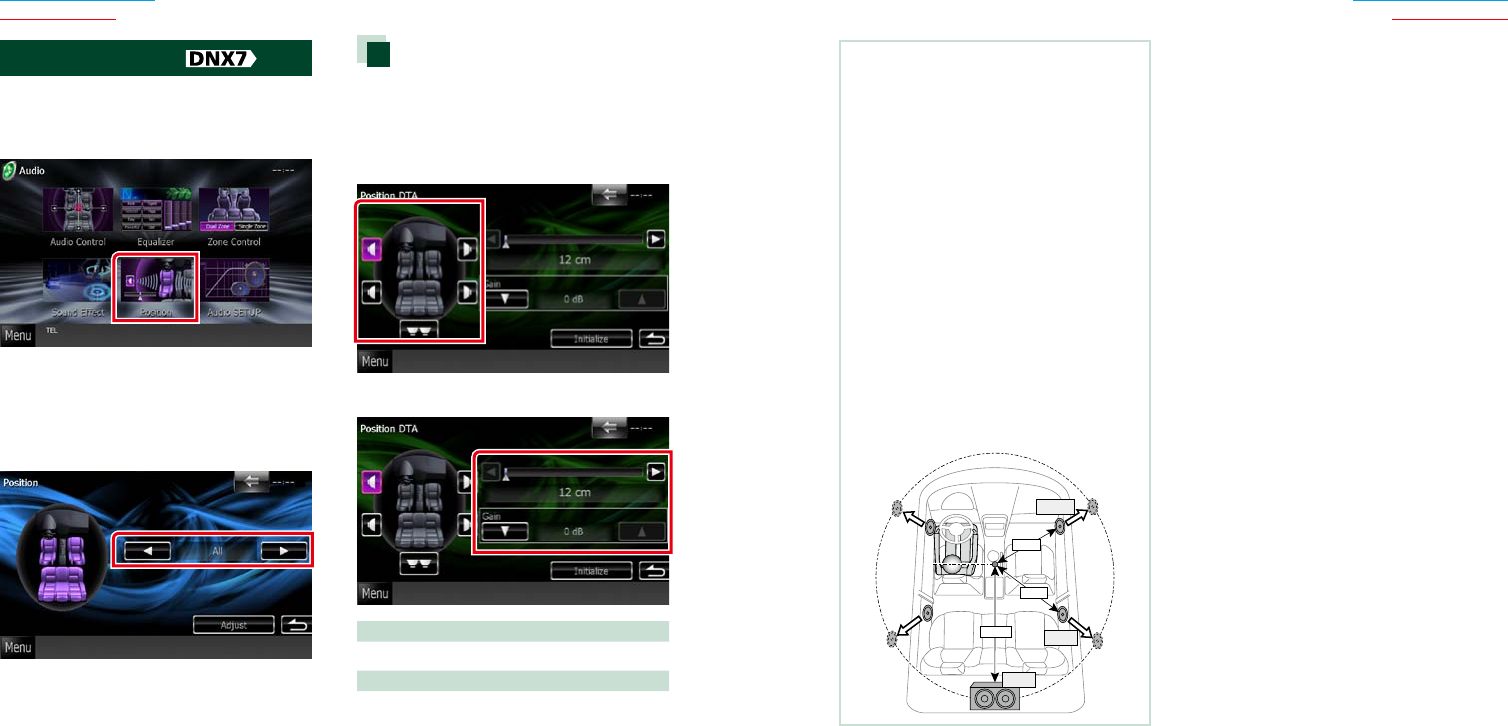
106106 107
Return to the Top page
Audio Setting Up
Return to the Top page
Audio Setting Up
NOTE
• Makefineadjustmentofthedelaytimeofthe
speakeroutputspecifiedheretohaveamore
suitableenvironmentforyourvehicle.
• Ifyouspecifythedistancefromthecenterofthe
currentlysetlisteningpositiontoeveryspeaker,
thedelaytimewillbeautomaticallycomputed
andset.
1Determinethecenterofthecurrentlyset
listeningpositionasthereferencepoint.
2Measurethedistancesfromthereference
pointtothespeakers.
3Calculatethedifferencesbetweenthedistance
ofthefurthestspeakerandotherspeakers.
4Inputthedifferencescalculatedinstep3for
individualspeakers.
5Adjustgainforindividualspeakers.Asound
imagewillbeshiftedtothespeakerwith
increasedgain.
Example:When[FrontAll]isselectedasthe
listeningposition
50cm
80cm
150cm
+70cm
+0cm
+100cm
Listening Position
Youcanadjustthesoundeffectsaccording
toyourlisteningposition.
1 Touch [Position].
Position screen appears.
2 Select listening position from [Front R]
(Right front), [Front L] (Left front),
[Front All] (All front), and [All] using [2]
and [3].
Position DTA control
Youcanfine-adjustyourlisteningposition.
1 In Position screen, touch [Adjust].
2 Select the speaker you wish to adjust
by touching speaker icon.
3 Set DTA as follows.
[2], [3]
AdjustthesettingsoftheDTAposition.
Gain
Touchtoadjustthegainofeachspeaker.
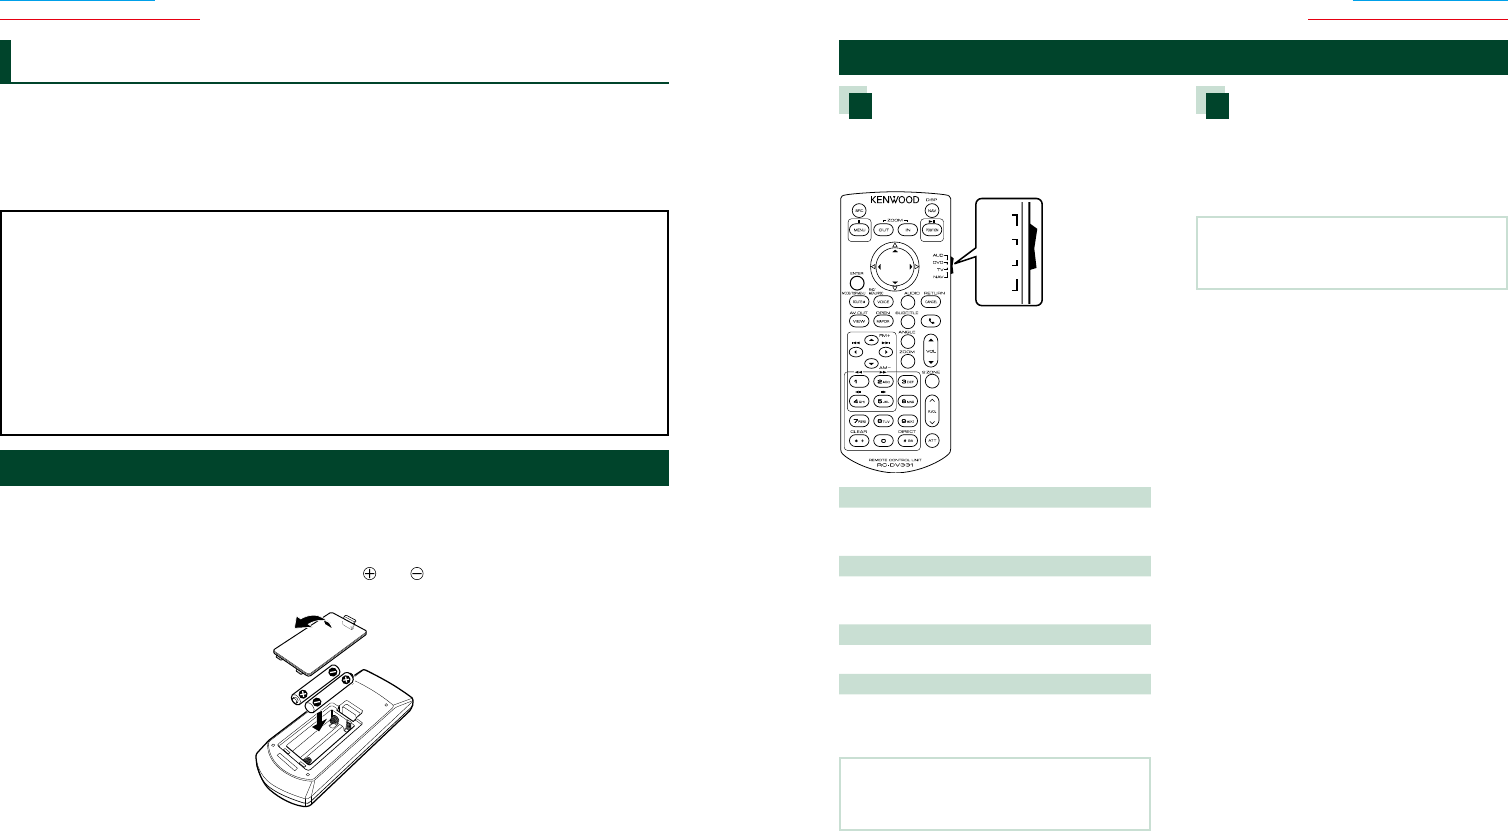
108108 109
Return to the Top page
Remote Controller Operation
Return to the Top page
Remote Controller Operation
Remote control
Thisunitcanbeoperatedusingtheremotecontrol.
ForDNX7330BT,DNX7330BTM,DNX5330BT,andDNX5330BTM,theremotecontrolissupplied
withtheunit.
ForDNX4330DABandDNX4330theremotecontrolistheoptionalaccessory(KCA-RCDV331).
2CAUTION
•Put the remote control in a place where it will not move during braking or other operations. A
dangerous situation could result, if the remote control falls down and gets wedged under the pedals
while driving.
•Do not leave the battery near fire or under direct sunlight. A fire, explosion or excessive heat
generation may result.
•Do not recharge, short, break up or heat the battery or place it in an open fire. Such actions may cause
the battery to leak fluid. If spilled fluid comes in contact with your eyes or on clothing, immediately
rinse with water and consult a physician.
•Place the battery out of reach of children. In the unlikely event that a child swallows the battery,
immediately consult a physician.
Battery Installation
Iftheremotecontroloperatesonlyovershorterdistancesordoesnotoperateatall,itispossible
thatthebatteriesaredepleted.
Insuchinstances,replacethebothbatterieswithnewones.
1 Insert two “AAA”/“R03”-size batteries with the and poles aligned properly, following
the illustration inside the case.
Functions of the Remote control Buttons
Switching the operation mode
Thefunctionsoperatedfromtheremote
controldifferdependingonthepositionof
themodeswitch.
DVD
T V
NAV
AUD
•
•
•
•
AUD mode
Switchtothismodewhencontrollinga
selectedsourceortunersource,etc.
DVD mode
Switchtothismodewhenplayingadisc
mediaincludingDVD,VCD,andCD.
TV mode
SwitchtothismodewhencontrollingTV.
NAV mode
Switchtothismodewhencontrolling
navigationfunction.
NOTE
• Whencontrollingaplayerthatisnotintegratedin
theunit,select“AUD”mode.
Direct search mode
Usingtheremotecontrol,youcanjump
directlytothedesiredfile,trackchapter,etc.
withenteringthenumbercorrespondingto
thecontent.
NOTE
• ThisoperationcannotbeperformedforUSB
deviceandiPod.
1 Press the <#BS> button several times
until the desired content appears.
The available contents are different
depending on the source.
DVD
Title number/Chapter number/Play time/Item
number*
* You may not be able to use this function with
some discs or scenes.
VCD 1.X and 2.X (PBC OFF)
Track number
VCD 2.X (PBC ON)
Scene number/number
Music CD
Track number/Play time
Audio files
Folder number/File number
Radio
Frequency value
2 Enter the number of the content you
want to play using the numeric keypad.
3 For DVD or VCD, press the <ENTER>
button.
For music CD or audio files, press the
<POSITION> button.
For radio, press the <2> or <3> button.
The content you entered is played.
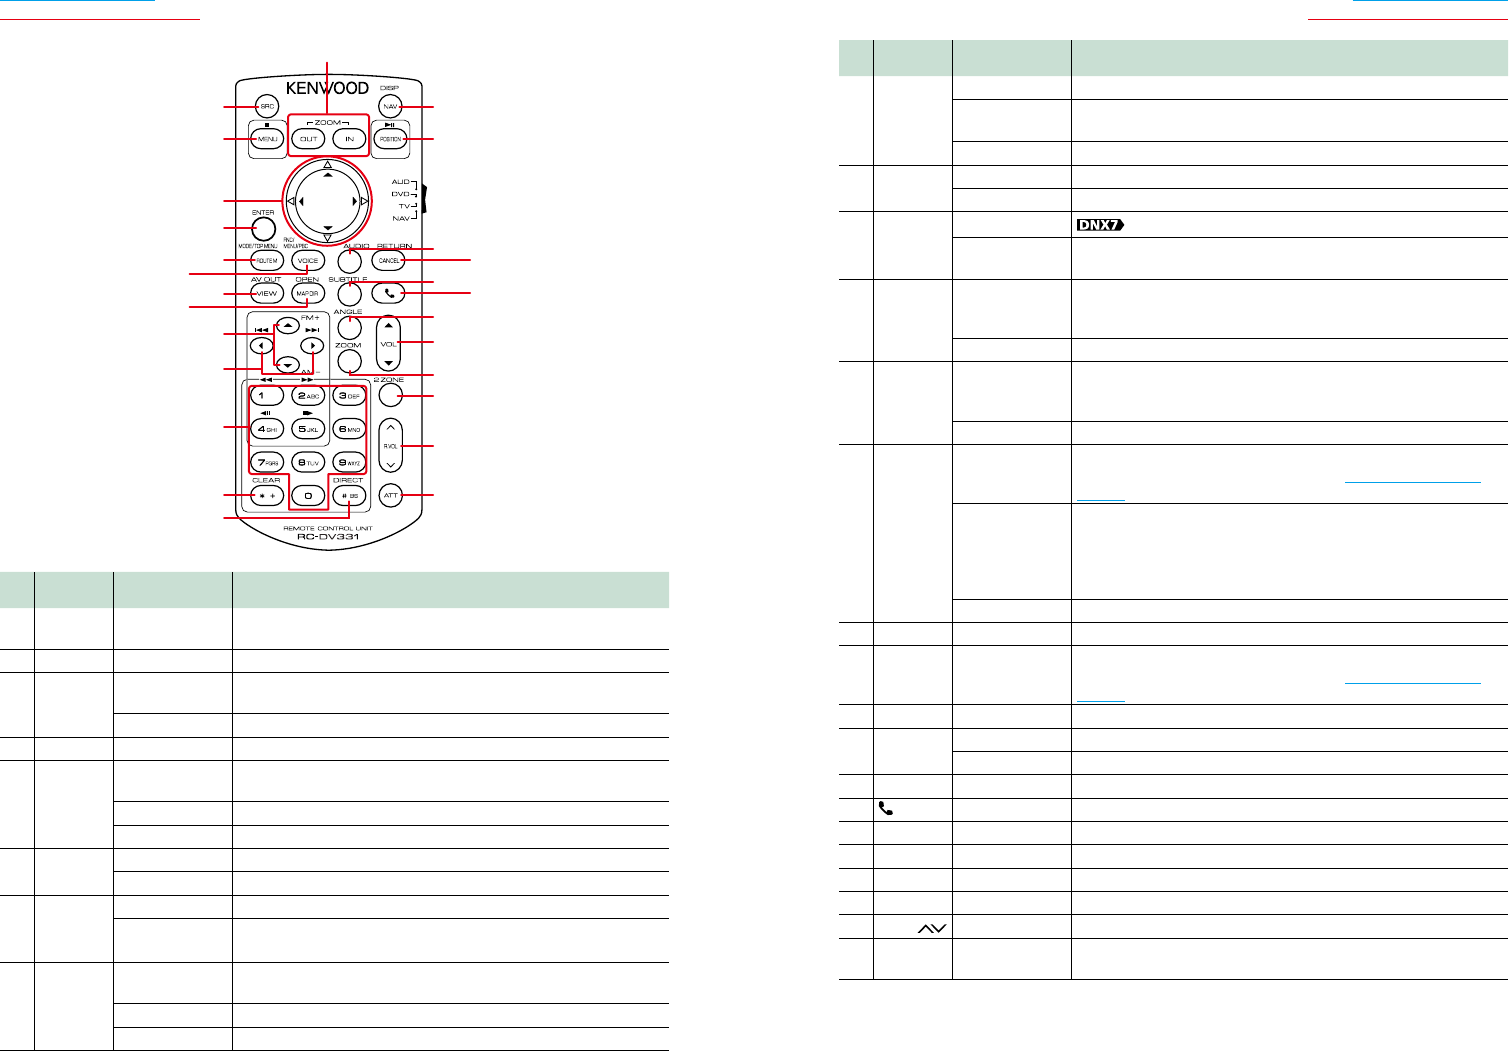
110110 111
Return to the Top page
Remote Controller Operation
Return to the Top page
Remote Controller Operation
12
5
17
19
21
22
23
24
25
26
18
20
3
6
7
8
10
12
13
14
15
16
9
11
4
Key
Name
Location of
the mode switch
Function
1SRC −Switchestothesourcetobeplayed.
Inhands-freemode,hangsupthephone.
2NAV −Switchesbetweenthenavigationandthesourcescreens.
3MENU DVD Stopsplayingandmemorizesthelastpointwherethedisc
stopped.Thelastpointisdeletedbypressingtwice.
NAV DisplaysMainmenu.
4OUT,IN NAV Zoomsinoroutthenavigationmap.
5POSITION AUD,DVD Pausesthetrackorfile,andresumesplayingbypressingtwice.
DuringradiosourceinAUDmode,switchestheseekmode.
TV Switchestheseekmode(AUTO1,AUTO2,MANUAL).
NAV Displaysthecurrentposition.
6CursorKey DVD MovesthecursorintheDVDmenu.
NAV Movesthecursororscrollsthemap.
7ENTER AUD,DVD,TV Performstheselectedfunction.
NAV •Registerstheselectedposition.
•Performstheselectedfunction.
8ROUTEM AUD,TV Screenmodechangeseachtimeyoupressthiskeyduringvideo
playback.
DVD ReturnstotheDVDtopmenu.
NAV DisplaysRouteOptionmenu.
Key
Name
Location of
the mode switch
Function
9VOICE AUD,TV Switchesnavigationdisplayon/off.
DVD DisplaystheDVDmenu.
TurnstheplaybackcontrolonoroffwhileplayingVCD.
NAV Speaksthevoiceguidance.
10 VIEW AUD,DVD,TV SwitchestheAVsourcetobeoutput.
NAV Switchesbetween2Dand3Dmapdisplays.
11 MAPDIR AUD,DVD,TV Switchesthedisplayangleeachtimeitispressed.
NAV Switchesbetweentheheadingupnavigationandnorthup
navigationmapdisplays.
12 5/∞AUD,DVD Selectsthefoldertobeplayed.
DuringradiosourceinAUDmode,switchesthebandstobe
received.
TV SwitchesbetweenthestationoftheTVbandtobereceived.
13 2/3AUD,DVD Selectsthetrackorfiletobeplayed.
DuringradiosourceinAUDmode,switchestobroadcaststations
receivedbytheunit.
TV Selectsthechanneltobereceived.
14 Numeric
Keypad
AUD Specifiesthenumbertosearchindirectsearch.
Fordetailsonthedirectsearchmode,seeDirect search mode
(P.109).
DVD •Press[1][2]tofastforward/backward.Switchesthefastforward/
backwardspeedeachtimeyoupressthiskey.
•Press[4][5]toslowforward/backward.Switchestheslow
playbackspeedeachtimeyoupressthiskey.*
*DVDonly
TV Pressthenumberofthememorizedstationtotunein([1]-[6]).
15 *+ DVD Clearsthenumber.
16 #BS AUD,DVD,TV Switchestothedirectsearchmode.
Fordetailsonthedirectsearchmode,seeDirect search mode
(P.109).
17 AUDIO DVD Switchesthevoicelanguageeachtimeyoupressthiskey.
18 CANCEL DVD Displayspreviousscreen.
NAV Cancelstheoperations.
19 SUBTITLE DVD Switchesthesubtitlelanguage.
20 −Whenacallcomesin,answersthecall.
21 ANGLE DVD Switchesthepictureangleeachtimeyoupressthiskey.
22 Vol5∞ −Adjuststhevolume.
23 ZOOM DVD Switchesthezoomratio(1,2,3,Off )eachtimeyoupressthiskey.
24 2ZONE AUD,DVD,TV SwitchestheDualZonefunctiononandoff.
25 R.VOL −AdjustsvolumeatrearwhentheDualZonefunctionison.
26 AT T −Lowersthevolumebypressingthekeyonce.
Restoresthepreviousvolumebypressingthekeytwice.
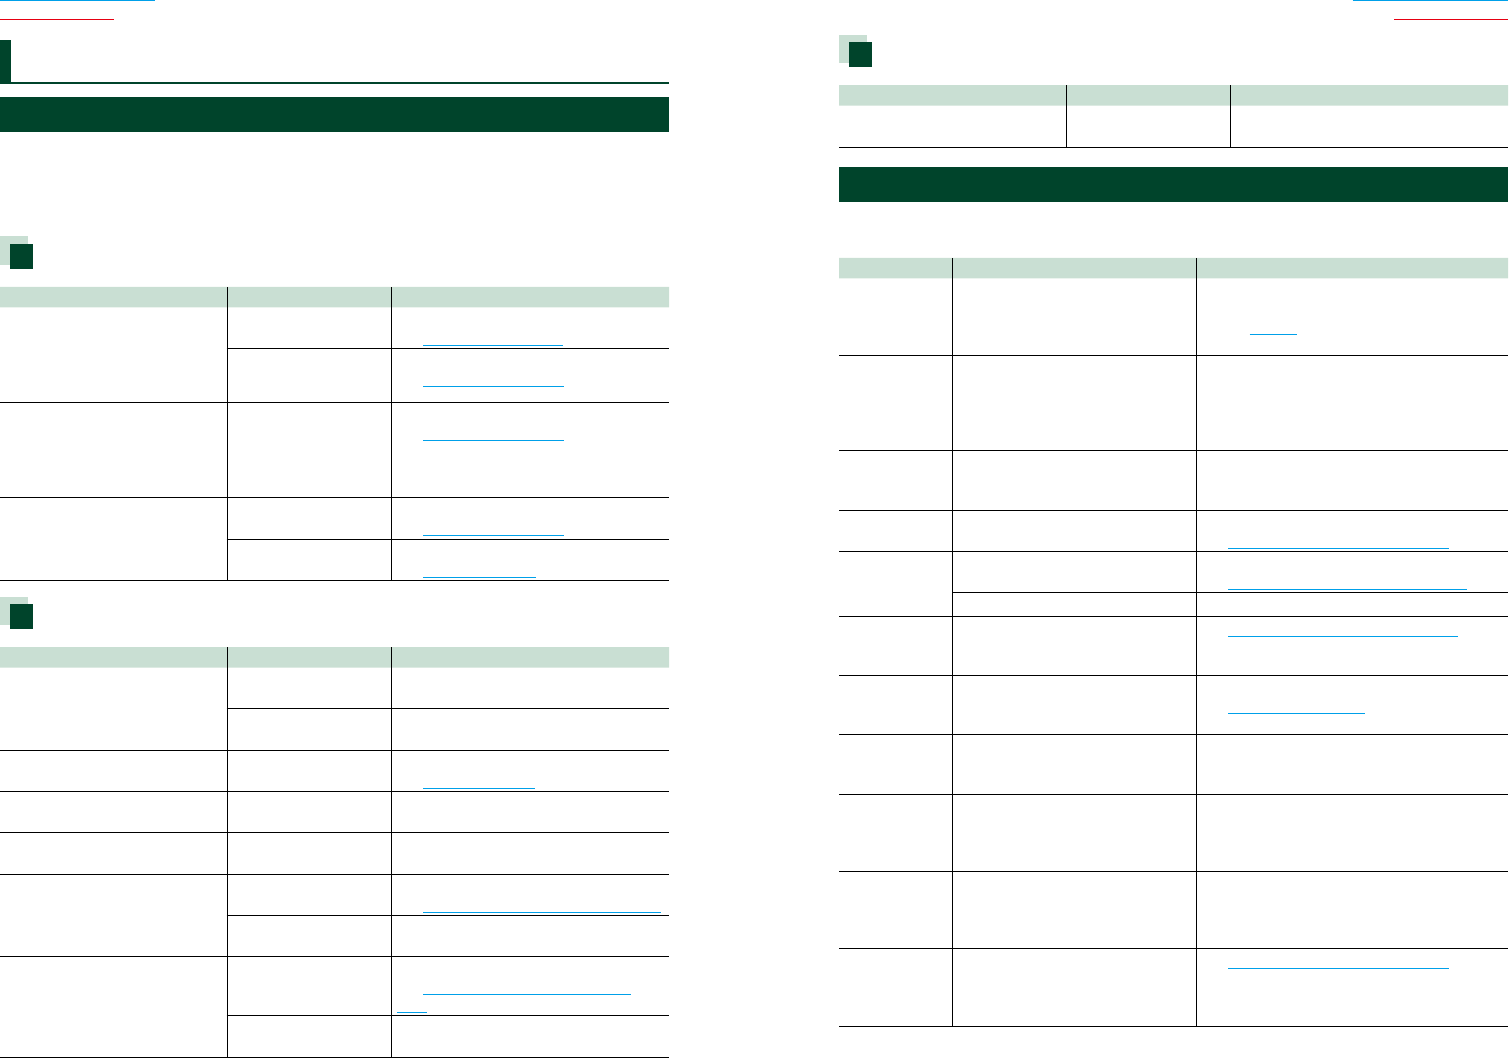
112112 113
Return to the Top page
Troubleshooting
Return to the Top page
Troubleshooting
Problems and Solutions
Ifanytroubleoccurs,firstcheckthefollowingtableforpossibleproblems.
• Somefunctionsofthisunitmaybedisabledbysomesettingsmadeonthisunit.
• Whatmightseemtobeamalfunctioninyourunitmayjustbetheresultofslightmisoperation
ormiswiring.
About settings
Problem Reason Solution
•Cannotsetupthesubwoofer.
•Cannotsetupsubwooferphase.
•Nooutputfromthesubwoofer.
•Cannotsetupthelowpassfilter.
•Cannotsetupthehighpassfilter.
Subwooferisnotset
toon.
Setthesubwoofertoon.
SeeSpeaker setup (P.95).
Thedualzonefunction
isenabled.
Setthedualzonefunctiontooff.
SeeZone Control (P.102).
•Cannotselecttheoutput
destinationofthesubsourcein
thedualzone.
•Cannotadjustthevolumeofthe
rearspeakers.
Thedualzonefunction
isdisabled.
Setthedualzonefunctiontoon.
SeeZone Control (P.102).
•Cannotsetuptheequalizer.
•Cannotsetupthecrossover
network.
Thedualzonefunction
isenabled.
Setthedualzonefunctiontooff.
SeeZone Control (P.102).
“DSPSelect”issetto
“Bypass”.
Set“DSPSelect”to“Through”.
SeeDSP select (P.98).
About audio operations
Problem Reason Solution
Radioreceptionispoor. Thecarantennaisnot
extended.
Pullouttheantennaalltheway.
Theantennacontrol
wireisnotconnected.
Connectthewirecorrectly.
See“Connection”intheQuickStartGuide.
Cannotplayaudiofilesstoredin
adisc.
“CDRead”issetto“2”. Set“CDRead”to“1”.
SeeDisc setup (P.30).
Cannotselectafolder. Therandomplay
functionisenabled.
Turnofftherandomfunction.
Cannotperformrepeatplay
duringVCDplayback.
ThePBCfunctionis
enabled.
TurnoffthePBCfunction.
Thespecifieddiscdoesnotplay,
butanotheroneplaysinstead.
Thediscisquitedirty. Cleanthedisc.
SeePrecautions on handling discs (P.4).
Thediscisseverely
scratched.
Tryanotherdiscinstead.
Thesoundskipswhenanaudio
fileisbeingplayed.
Thediscisscratched
ordirty.
Cleanthedisc.
SeePrecautions on handling discs
(P.4).
Therecording
conditionisbad.
Recordthefileagainoruseanotherdisc.
Troubleshooting Other
Problem Reason Solution
TheTouchSensorTonedoesn’t
sound.
Thepreoutjackisbeing
used.
TheTouchSensorTonecannotbeoutput
fromthepreoutjack.
Error Messages
Whenyoufailtooperatetheunitcorrectly,thecauseofthefailureappearsasthemessageon
thescreen.
Error Message Cause Solution
Protect Protectivecircuithasbeenactivated
becauseaspeakercordhasshorted
orithascomeincontactwiththe
carchassis.
Wireorinsulatethespeakercordas
appropriateandthenpushthe<Reset>
button(P.115).
HotError Whentheinternaltemperatureof
thisunitrisesto60°Cormore,the
protectioncircuitisactivatedand
youmaynotbeabletooperate
theunit.
Usetheunitagainafterreducingthe
temperatureoftheunit.
MechaError Thediscplayerismalfunctioning. Ejectthediscandtryinsertingitagain.Contact
theKenwooddealerifthisindicatorcontinues
blinkingorthedisccannotbeejected.
DiscError Anunplayablediscisinserted. Changethedisc.
SeePlayable Media and Files (P.116).
ReadError Thediscisquitedirty. Cleanthedisc.
SeePrecautions on handling discs (P.4).
Discisupsidedown. Loadthediscwiththelabeledsideup.
RegionCode
Error
Thediscyouwantedtoplayhasa
regioncodethatcannotbeplayed
withthisunit.
SeeRegion Codes in the World (P.121)or
tryanotherdisc.
ParentalLevel
Error
Thediscyouwantedtoplayhasa
higherlevelthantheparentallevel
youset.
Settheparentallevel.
SeeParental level (P.29).
Error07–67 Theunitisnotoperatingcorrectly
duetosomereasonorother.
Pushtheunit’sResetbutton.Ifthe“Error
07−67”messagedoesnotdisappear,seeyour
nearestKenwooddealer.
NoDevice
(USBdevice,
Bluetooth
audioplayer)
TheUSBdeviceisselectedasa
sourcealthoughnoUSBdeviceis
connected.
Changethesourcetoanysourceotherthan
USB/iPod.ConnectaUSBdevice,andchange
thesourcetoUSBagain.
Disconnected
(iPod)
TheiPod/Bluetoothaudioplayer
isselectedasasourcealthough
noiPod/Bluetoothaudioplayeris
connected.
Changethesourcetoanysourceotherthan
iPod/Bluetooth.ConnectaniPod/Bluetooth
audioplayer,andchangethesourcetoiPod/
Bluetoothagain.
NoMediafile
(USBdevice)
TheconnectedUSBdevicecontains
noplayableaudiofile.Mediawas
playedthatdoesn’thavedata
recordedthattheunitcanplay.
SeePlayable Media and Files (P.116)and
tryanotherUSBdevice.
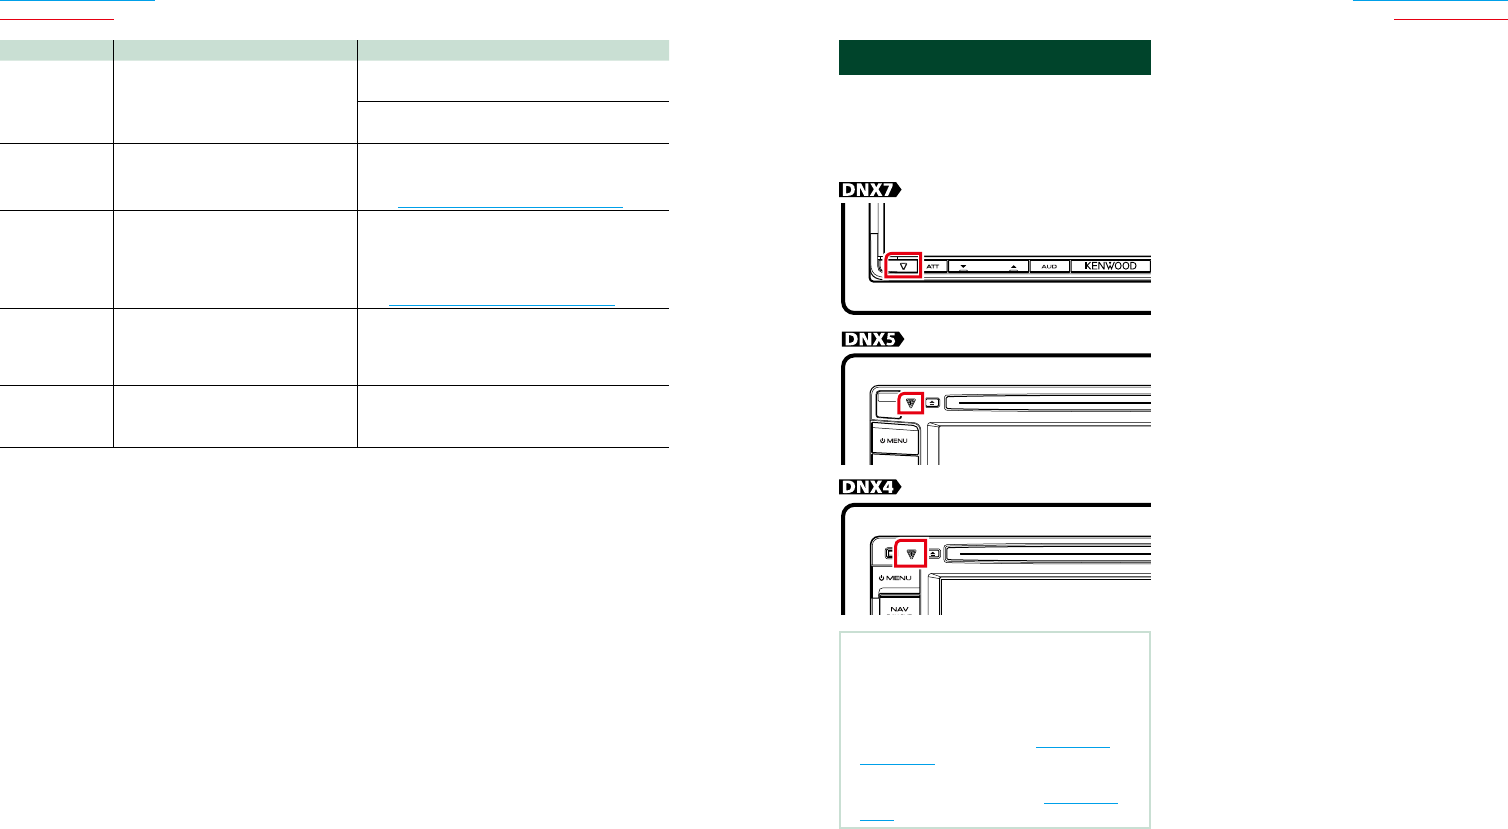
114114 115
Return to the Top page
Troubleshooting
Return to the Top page
Troubleshooting
Error Message Cause Solution
USBDevice
Error!!
TheconnectedUSBdeviceisrated
acurrentcapacityhigherthanthe
allowablelimit.
ChecktheUSBdevice.Sometroublemayhave
occurredtotheconnectedUSBdevice.
Changethesourcetoanysourceotherthan
USB.RemovetheUSBdevice.
Authorization
Error
ConnectiontotheiPodhasfailed. •RemovetheiPodandthenreconnectit.
•TheunitdoesnotsupporttheiPod.
SeeConnectable iPod/iPhone (P.118).
Updateyour
iPod
TheiPod’ssoftwareisanolder
versionwhichtheunitcannot
support.
TheunitmaynotsupporttheconnectediPod
model.
ConfirmthatthesoftwarefortheiPodisthe
latestversion.
SeeConnectable iPod/iPhone (P.118).
Navigation
Error.Please
turnonpower
againlater.
Thecommunicationerrorhas
occurredduetoseverelycold
temperature.
Turnonpoweragainafterwarmingyourcar
interior.
AntennaError Theantennahasashort-circuitand
theprotectivecircuithasactivated.
ChecktheDigitalRadioantenna.Ifapassive
antennawithoutaboosterisused,setAntenna
Power“OFF”.
Resetting the Unit
Iftheunitortheconnectedunitfailsto
operateproperly,resettheunit.
1 Press the <Reset> button.
The unit returns to factory settings.
NOTE
• DisconnecttheUSBdevicebeforepressingthe
<Reset>button.Pressingthe<Reset>button
withtheUSBdeviceconnectedcandamage
thedatastoredintheUSBdevice.Forhowto
disconnecttheUSBdevice,seeHow to Play
Media (P.15).
• Whentheunitisturnedonafterresetting,the
InitialSETUPscreenappears.SeeInitial setup
(P.13).
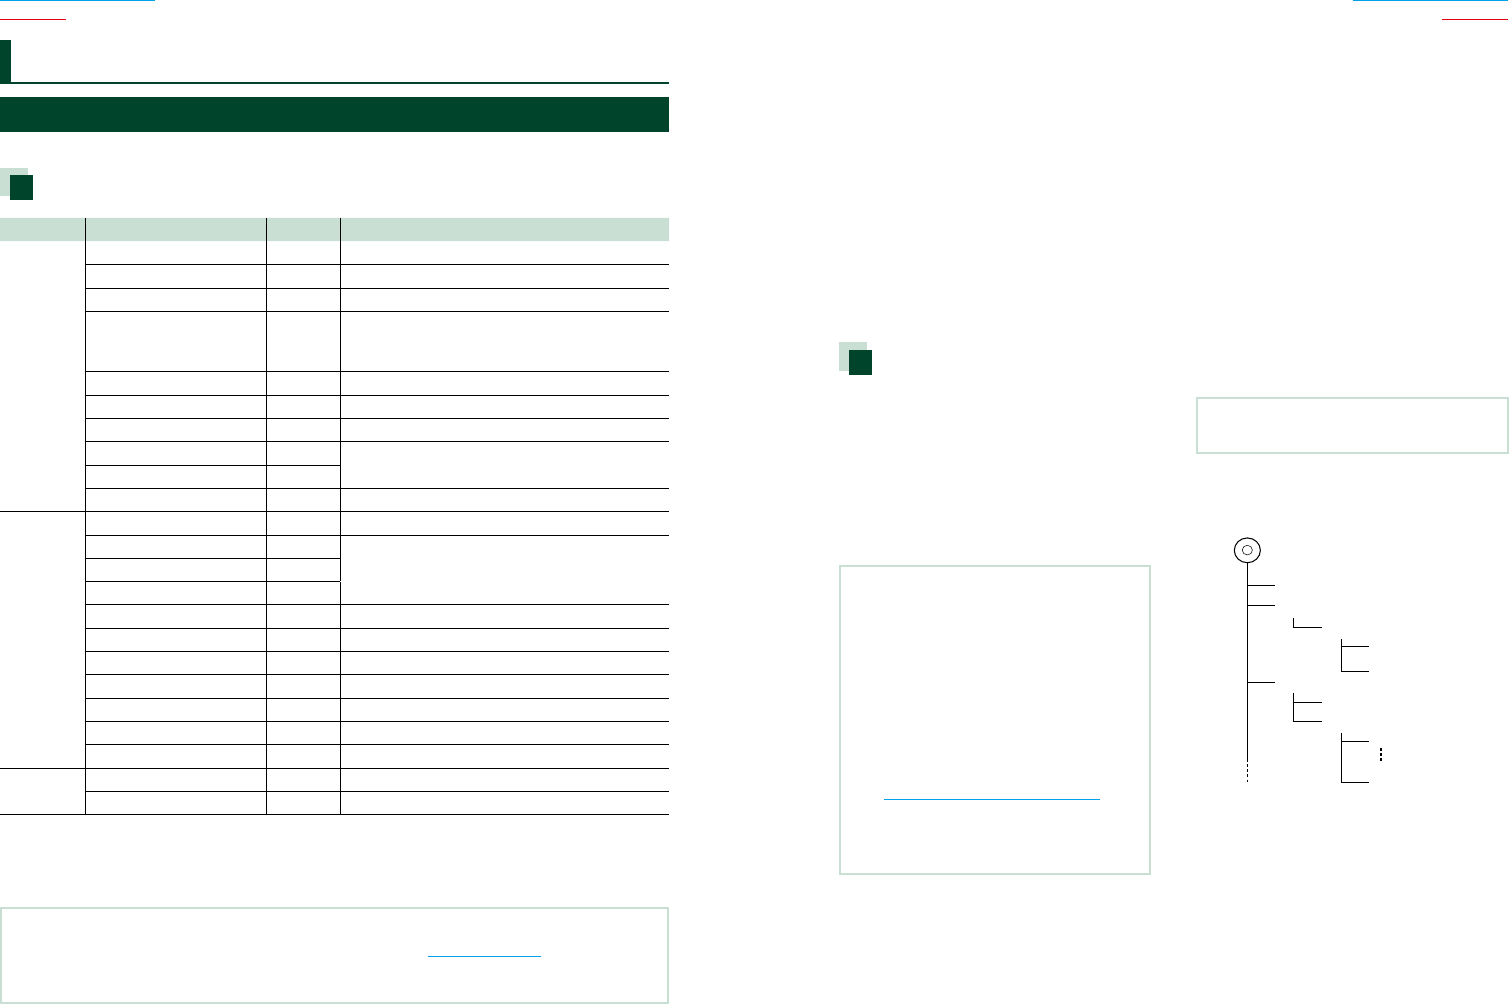
116116 117
Return to the Top page
Appendix
Return to the Top page
Appendix
Appendix
Playable Media and Files
Youcanplayvariouskindsofmediaandfilesonthisunit.
List of playable discs
Disc types Standard Support Remark
DVD DVDVideo ‡
DVDAudio ×
DVD-VR ×
DVD-R*1‡•MP3/WMA/AAC/MPEG1/MPEG2/DivXplayback
•Multi-border/Multisessionplayback(Playback
dependsonauthoringconditions)
DVD-RW ‡
DVD+R ‡
DVD+RW ‡
DVD-RDL(Duallayer) ‡Onlyvideoformat
DVD+RDL(Doublelayer) ‡
DVD-RAM ×
CD MusicCD*1‡CD-TEXT
CD-ROM ‡•MP3/WMA/AAC/MPEG1/MPEG2playback
•Multisessionissupported.
•Packetwriteisnotsupported.
CD-R ‡
CD-RW ‡
DTS-CD ‡
VideoCD(VCD) ‡
SupervideoCD ×
PhotoCD ×
CD-EXTRA %OnlymusicCDsessioncanbeplayed.
HDCD ‡
CCCD ×
Others Dualdisc ×
SuperaudioCD %OnlyCDlayercanbeplayed.
*1Incompatiblewith8cm(3inch)discs.
‡ :Playbackispossible.
% :Playbackispartlypossible.
× :Playbackisimpossible.
NOTE
• WhenbuyingDRMenabledcontents,checktheRegistrationCodeintheDivX(R) VOD (P.53).Eachtimeafile
withthedisplayedcodeisplayedandprotectedagainstcopying,thecodechanges.
• DivXcanbeplayedonlyfromaDVDdiscmedia.
■ Use of DualDisc
Whenplayinga“DualDisc”onthisunit,thesurfaceof
thediscthatisnotplayedmaybescratchedwhilethe
discisinsertedorejected.SincethemusicCDsurface
doesnotconformtotheCDstandard,playbackmaybe
impossible.
(A“DualDisc”isadiscwithonesurfacecontainingDVD
standardsignalsandtheothersurfacecontaining
musicCDsignals.)
■ About disc format
Thediscformatshouldbetheoneofthefollowing.
• ISO9660Level1/2
• Joliet
• Romeo
• Longfilename
About files
Thefollowingaudio,video,andpicturefiles
aresupported.
■ Audio files
• AAC-LC(.m4a)
• MP3(.mp3)
• WMA(.wma)
• LinearPCM(WAVE)(.wav)
*Mass-storage-classUSBdeviceonly
NOTE
• IfmusicofnormalCDandotherplaybacksystems
arerecordedinthesamedisc,onlytheplayback
systemrecordedatthefirstsetoutisplayed.
• WMAandAACofwhichiscoveredwithDRM
cannotbeplayed.
• Althoughtheaudiofilesarecompliedwith
thestandardslistedabove,theplaymaybe
impossibledependingonthetypesorconditions
ofmediaordevice.
• Anonlinemanualaboutaudiofilesisputonthe
site,www.kenwood.com/cs/ce/audiofile/.
Onthisonlinemanual,detailedinformationand
noteswhicharenotwritteninthismanualare
provided.Makesuretoreadthroughtheonline
manualaswell.
■ Video files
• MPEG1(.mpg,.mpeg,.m1v*)
(*Mass-storage-classUSBdeviceonly)
• MPEG2(.mpg,.mpeg,.m2v*)
(*Mass-storage-classUSBdeviceonly)
• DivX(.divx,.div,.avi)
(DVDonly)
• H.264/MPEG-4AVC(.mp4,.m4v)
(Mass-storage-classUSBdeviceonly)
• WMV9(.wmv,.m2ts)
(Mass-storage-classUSBdeviceonly)
■ Picture files
OnlypicturefilesinUSBdevicecanbedisplayed.
Filesstoredindiscmediaisnotsupported.
• JPEG(.jpg,.jpeg)
• PNG(.png)
• BMP(.bmp)
NOTE
• BMPandPNGcanbesetonlyaswallpaper.
■ Playing order of files
Intheexampleoffolder/filetreeshownbelow,thefiles
areplayedintheorderfrom!toP.
Root
¡!
2
(1)
^
¡
3
¡$
4
¡"
¡#
¡P
5 ¡%
:Folder
:Audiofile
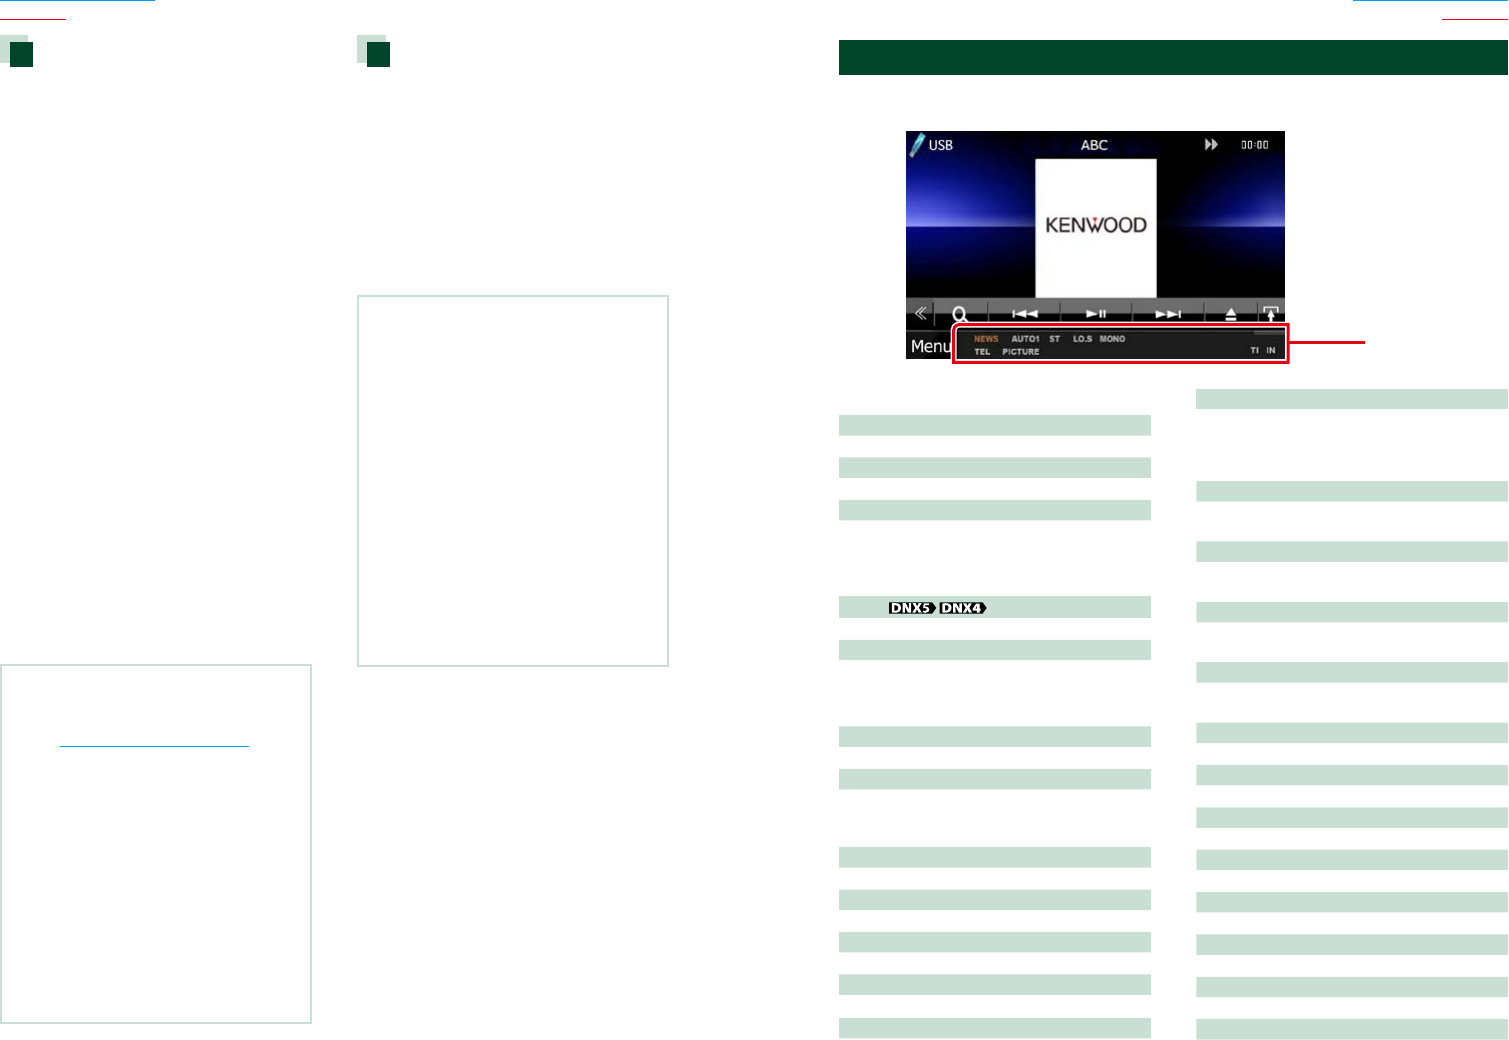
118118 119
Return to the Top page
Appendix
Return to the Top page
Appendix
Connectable iPod/iPhone
Thefollowingmodelscanbeconnectedto
thisunit.
YoucancontrolaniPod/iPhonefromthisunit
byconnectinganiPod/iPhone(commercial
product)withDockconnectorusingan
optionalaccessoryiPodconnectioncable
(KCA-iP202orKCA-iP102).Theword“iPod”
appearinginthismanualindicatestheiPod/
iPhoneconnectedwiththeKCA-iP202or
KCA-iP102(optionalaccessory).
Madefor
• iPodnano(6thgeneration)
• iPodnano(5thgeneration)
• iPodnano(4thgeneration)
• iPodnano(3rdgeneration)
• iPodwithvideo
• iPodclassic
• iPodtouch(4thgeneration)
• iPodtouch(3rdgeneration)
• iPodtouch(2ndgeneration)
• iPodtouch(1stgeneration)
• iPhone4S
• iPhone4
• iPhone3GS
• iPhone3G
• iPhone
NOTE
• FortheconformityinformationoniPod/iPhone
software,
accesswww.kenwood.com/cs/ce/ipod/.
• ByconnectingyouriPod/iPhonetothisunitwith
anoptionalaccessoryiPodconnectioncable
(KCA-iP202orKCA-iP102),youcansupplypower
toyouriPod/iPhoneaswellaschargeitwhile
playingmusic.However,thepowerofthisunit
mustbeon.
• IfyoustartplaybackafterconnectingtheiPod,
themusicthathasbeenplayedbytheiPodis
playedfirst.
Inthiscase,“Reading”isdisplayedwithout
displayingafoldername,etc.Changingthe
browseitemwilldisplayacorrecttitle,etc.
• WhentheiPodisconnectedtothisunit,
“KENWOOD”or“✓”isdisplayedontheiPodto
indicatethatyoucannotoperatetheiPod.
Usable USB device
Youcanuseamass-storage-classUSBdevice
onthisunit.
Theword“USBdevice”appearinginthis
manualindicatesaflashmemorydeviceand
digitalaudioplayerscanberecognizedas
mass-storage.
■ About file system
Thefilesystemshouldbetheoneofthefollowing.
• FAT16
• FAT32
NOTE
• WhentheUSBdeviceisconnectedtothisunit,it
canbechargedthroughtheUSBcable.
• InstalltheUSBdeviceintheplacewhereitwill
notaffectsafedriving.
• YoucannotconnectaUSBdeviceviaaUSBhub
andMultiCardReader.
• Takebackupsoftheaudiofilesusedwiththis
unit.Thefilescanbeeraseddependingonthe
operatingconditionsoftheUSBdevice.
Weshallhavenocompensationforanydamage
arisingfromanyeraseddata.
• NoUSBdevicecomeswiththisunit.Youneedto
purchaseacommerciallyavailableUSBdevice.
• WhenconnectingtheUSBdevice,usageofthe
CA-U1EX(option)isrecommended.(However,
maximumsupplycurrentofCA-U1EXis500mA.)
Normalplaybackisnotguaranteedwhenacable
otherthantheUSBcompatiblecableisused.
■ General
ATT
Theattenuatorisactive.
DUAL
Thedualzonefunctionison.
TEL
IndicatestheconnectionstateoftheBluetooth
hands-freeunit.
•White:Connected
•Orange:Notconnected
LOUD
Theloudnesscontrolfunctionison.
MUTE
Themutefunctionisactive.
■ DVD/CD
FO-REP
Folderrepeatfunctionison.
IN
Adiscisinserted.
•White:ADiscisinsidetheunit.
•Orange:Erroratthediscplayer
VIDEO
Identifiesthevideofile.
MUSIC
Identifiesthemusicfile.
RDM
Therandomfunctionison.
REP
Therepeatfunctionison.
C-REP
Thechapterrepeatfunctionison.
T-REP
Thetitlerepeatfunctionison.
■ VCD
1chLL/2chLL
Identifiestheleftaudiooutputofchannel1
or2.
1chLR/2chLR
Identifiesthemonauralaudiooutputof
channel1or2.
1chRR/2chRR
Identifiestherightaudiooutputofchannel1
or2.
1chST/2chST
Identifiesthestereoaudiooutputofchannel
1or2.
LL
Identifiestheleftaudiooutput.
LR
Identifiesthemonauralaudiooutput.
RR
Identifiestherightaudiooutput.
STEREO
Identifiesthestereoaudiooutput.
PBC
ThePBCfunctionison.
SVCD
IdentifiestheSuperVideoCD.
VER1
TheVCDversionis1.
VER2
TheVCDversionis2.
Status Bar Indicator Items
Shownbelowisalistofindicatorsdisplayedonthestatusbarinthescreen.
Currentstatusofthisunitisdisplayedonthebar.
Status bar
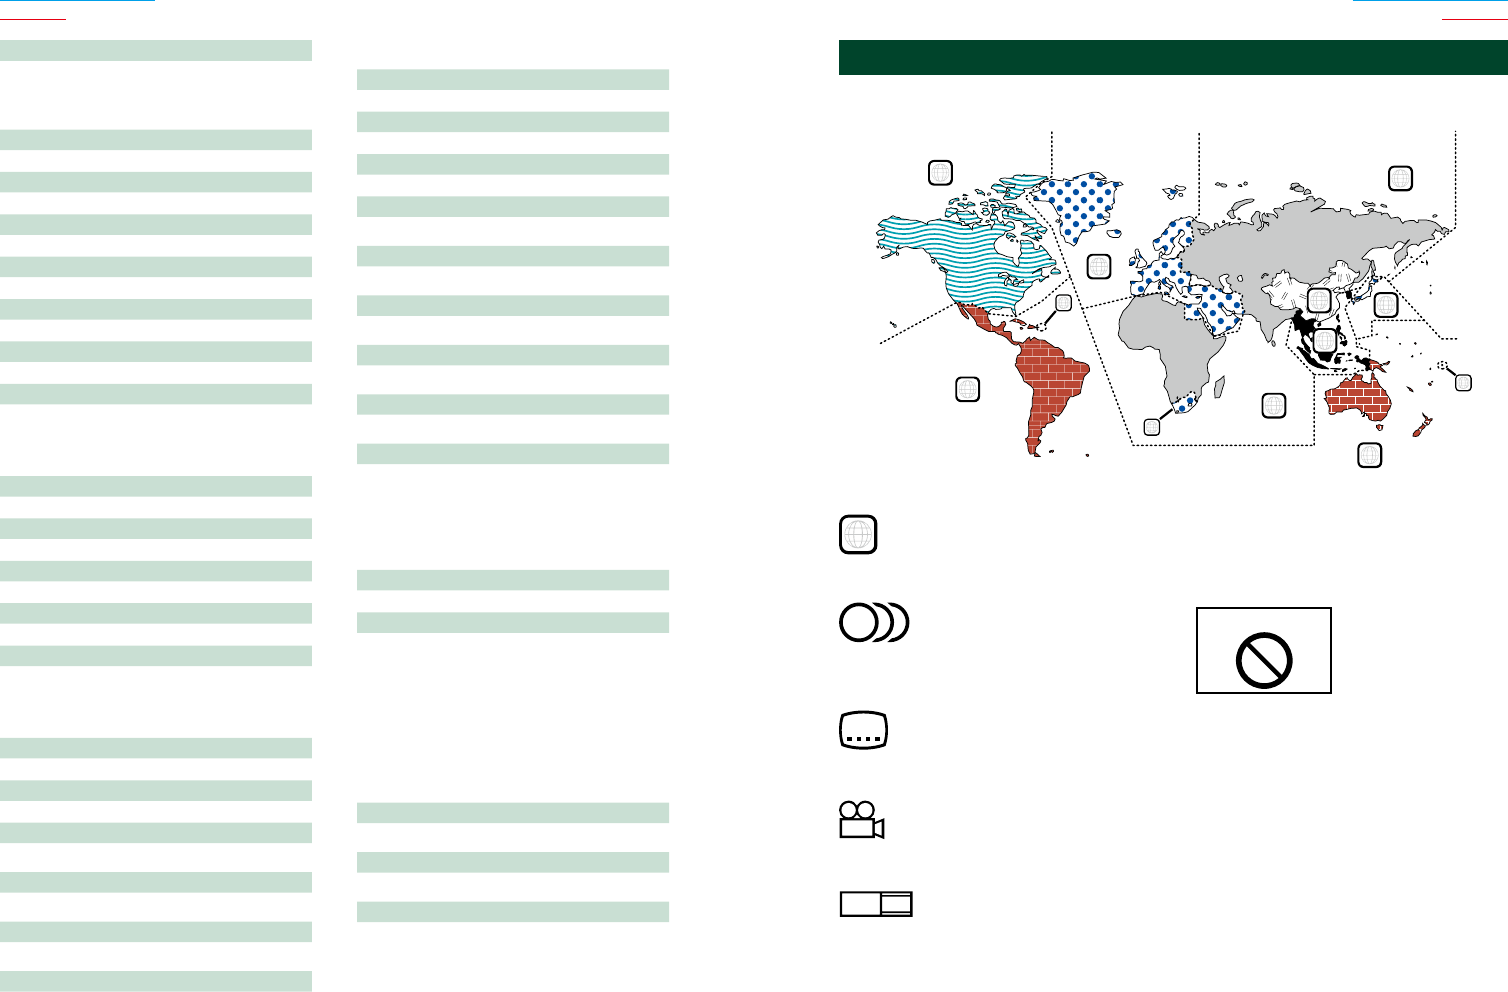
120120 121
Return to the Top page
Appendix
Return to the Top page
Appendix
REP
Therepeatfunctionison.
■ USB
FO-REP
Thefolderrepeatfunctionison.
VIDEO
Identifiesthevideofile.
MUSIC
Identifiesthemusicfile.
PICTURE
Identifiesthepicturefile.
RDM
Therandomfunctionison.
REP
Therepeatfunctionison.
PLST
Theplaylistmodeisselectednow.
■ iPod
MUSIC
Identifiesthemusicfile.
VIDEO
Identifiesthevideofile.
RDM
Therandomfunctionison.
A-RDM
Thealbumrandomfunctionison.
REP
Therepeatfunctionison.
■ Digital Radio
Digital Radio
DigitalRadioisbeingreceived.
RDS
RadioDataSystemisbeingreceived.
AUTO1
SeekmodeissettoAUTO1.
AUTO2
SeekmodeissettoAUTO2.
MANUAL
SeekmodeissettoMANUAL.
MC
Receivingserviceisdisplayed.
•White:PrimaryComponentisreceived.
•Orange:SecondaryComponentisreceived.
■ Tuner
AUTO1
SeekmodeissettoAUTO1.
AUTO2
SeekmodeissettoAUTO2.
MANUAL
SeekmodeissettoMANUAL.
MONO
Theforcedmonauralfunctionison.
EON*
TheRadioDataSystemstationissendingEON.
AF*1
TheAFsearchfunctionison.
LO.S*1
TheLocalSeekfunctionison.
NEWS*
Newsbulletininterruptionisinprogress.
RDS*
IndicatesthestateoftheRadioDataSystem
stationwhentheAFfunctionison.
•White:RadioDataSystemisbeingreceived.
•Orange:RadioDataSystemisnotbeing
received.
ST
Astereobroadcastisbeingreceived.
TI*1
Indicatesthereceptionstateoftraffic
information.
•White:TPisbeingreceived.
•Orange:TPisnotbeingreceived.
*Modelswithregioncode2or3only
■ TV
AUTO1
SeekmodeissettoAUTO1.
AUTO2
SeekmodeissettoAUTO2.
MANUAL
SeekmodeissettoMANUAL.
■ DVD disc marks
ALL
Indicatesaregionnumber.Thediscswiththismarkcan
beplayedwithanyDVDplayer.
8
Indicatesthenumberofaudiolanguagesrecorded.Up
to8languagescanberecordedinamovie.Youcan
selectafavoritelanguage.
32
Indicatesthenumberofsubtitledlanguagesrecorded.
Upto32languagescanberecorded.
9
IfaDVDdischasscenesshotfrommultipleangles,you
canselectafavoriteangle.
16:9 LB
Indicatesthetypeofscreenfortheimage.Theleftmark
indicatesthatawideimagepicture(16:9)isdisplayed
onastandardTVsetscreen(4:3)withablackbandat
boththetopandbottomofthescreen(letterbox).
■ Operation regulatory marks
WiththisDVD,somefunctionsofthisunitsuchasthe
playfunctionmayberestricteddependingonthe
locationwheretheDVDisplaying.Inthiscase,the
followingmarkswillappearonthescreen.Formore
information,refertothediscmanual.
ProhibitionMark
■ Discs with limited period of use
Donotleavediscswithalimitedperiodofuseinthis
unit.Ifyouloadanalreadyexpireddisc,youmaynotbe
abletoremoveitfromthisunit.
Region Codes in the World
TheDVDplayersaregivenaregioncodeaccordingtothecountryorareaitismarketed,as
showninthefollowingmap.
1
2
4
1
5
4
5
2
1
2
6
3
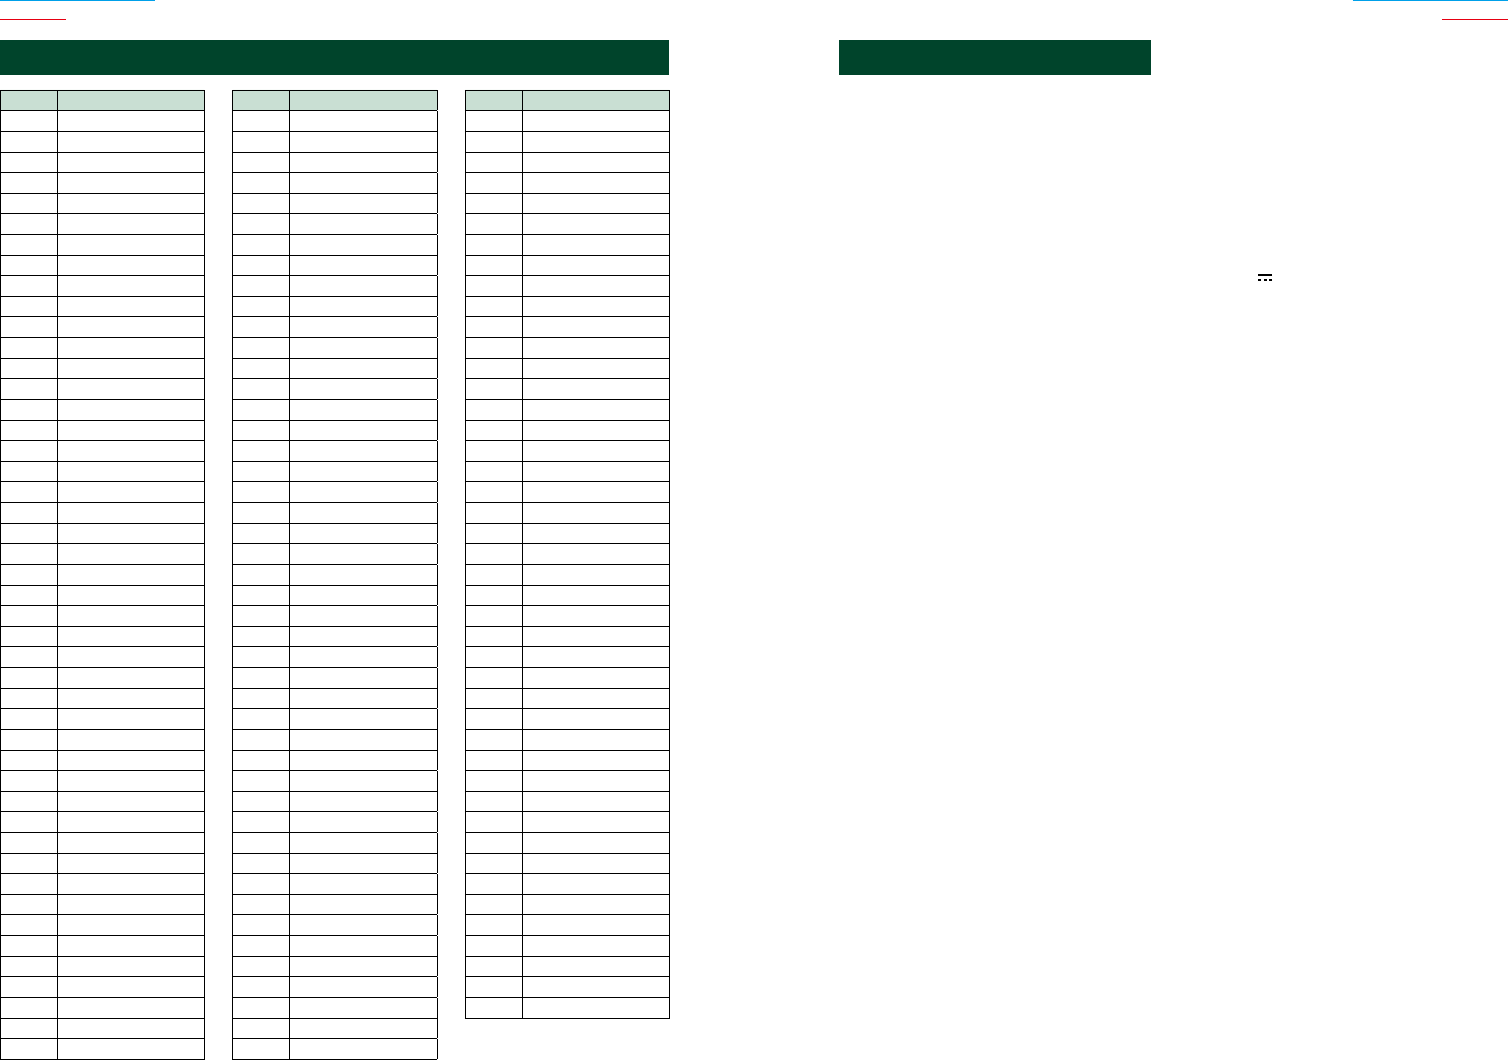
122122 123
Return to the Top page
Appendix
Return to the Top page
Appendix
Code Language
aa Afar
ab Abkhazian
af Afrikaans
am Amharic
ar Arabic
as Assamese
ay Aymara
az Azerbaijani
ba Bashkir
be Byelorussian
bg Bulgarian
bh Bihari
bi Bislama
bn Bengali,Bangla
bo Tibetan
br Breton
ca Catalan
co Corsican
cs Czech
cy Welsh
da Danish
de German
dz Bhutani
el Greek
en English
eo Esperanto
es Spanish
et Estonian
eu Basque
fa Persian
fi Finnish
fj Fiji
fo Faroese
fr French
fy Frisian
ga Irish
gd ScotsGaelic
gl Galician
gn Guarani
gu Gujarati
ha Hausa
he Hebrew
hi Hindi
hr Croatian
hu Hungarian
hy Armenian
Code Language
ia Interlingua
ie Interlingue
ik Inupiak
id Indonesian
is Icelandic
it Italian
ja Japanese
jv Javanese
ka Georgian
kk Kazakh
kl Greenlandic
km Cambodian
kn Kannada
ko Korean
ks Kashmiri
ku Kurdish
ky Kirghiz
la Latin
lb Luxembourgish
ln Lingala
lo Laotian
lt Lithuanian
lv Latvian,Lettish
mg Malagasy
mi Maori
mk Macedonian
ml Malayalam
mn Mongolian
mo Moldavian
mr Marathi
ms Malay
mt Maltese
my Burmese
na Nauru
ne Nepali
nl Dutch
no Norwegian
oc Occitan
om (Afan)Oromo
or Oriya
pa Punjabi
pl Polish
ps Pashto,Pushto
pt Portuguese
qu Quechua
rm Rhaeto-Romance
Code Language
rn Kirundi
ro Romanian
ru Russian
rw Kinyarwanda
sa Sanskrit
sd Sindhi
sg Sangho
sh Serbo-Croatian
si Singhalese
sk Slovak
sl Slovenian
sm Samoan
sn Shona
so Somali
sq Albanian
sr Serbian
ss Siswati
st Sesotho
su Sundanese
sv Swedish
sw Swahili
ta Tamil
te Telugu
tg Tajik
th Thai
ti Tigrinya
tk Turkmen
tl Tagalog
tn Setswana
to Tongan
tr Turkish
ts Tsonga
tt Tatar
tw Twi
uk Ukrainian
ur Urdu
uz Uzbek
vi Vietnamese
vo Volapuk
wo Wolof
xh Xhosa
yo Yoruba
zh Chinese
zu Zulu
DVD Language Codes Specifications
■ Monitor section
Picture Size
DNX7330BT,DNX7330BTM
:6.95inches(diagonal)wide
:156.6mm(W)x81.6mm(H)
DNX5330BT,DNX5330BTM,DNX4330DAB,DNX4330
:6.1inches(diagonal)wide
:136.2mm(W)x72.0mm(H)
Display System
:TransparentTNLCDpanel
Drive System
:TFTactivematrixsystem
Number of Pixels
:1,152,000(800Hx480VxRGB)
Effective Pixels
:99.99%
Pixel Arrangement
:RGBstripedarrangement
Back Lighting
:LED
■ DVD player section
D/A Converter
:24bit
Audio Decoder
:LinearPCM/DolbyDigital/dts/MP3/WMA/AAC
Video Decoder
:MPEG1/MPEG2/DivX
Wow & Flutter
:BelowMeasurableLimit
Frequency Response
DNX7330BT,DNX7330BTM
• 96kHz:20–20,000Hz
• 48kHz:20–20,000Hz
• 44.1kHz:20–20,000Hz
DNX5330BT,DNX5330BTM,DNX4330DAB,DNX4330
• 96kHz:20–22,000Hz
• 48kHz:20–22,000Hz
• 44.1kHz:20–20,000Hz
Total Harmonic Distortion
:0.010%(1kHz)
S/N Ratio (dB)
:98dB(DVD-Video96kHz)
Dynamic Range
:98dB(DVD-Video96kHz)
Disc Format
:DVD-Video/VIDEO-CD/CD-DA
Sampling Frequency
:44.1/48/96kHz
Quantifying Bit Number
:16/20/24bit
■ USB interface section
USB Standard
:USB2.0HighSpeed
File System
:FAT16/32
Maximum Power Supply Current
:DC5V 1A
D/A Converter
:24Bit
Audio Decoder
:MP3/WMA/AAC/WAV
Video Decoder
:MPEG1/MPEG2/MPEG4/WMV/H.264
■ Bluetooth section
Technology
:BluetoothVer.2.1+EDRCertified
Frequency
:2.402–2.480GHz
Output Power
:+4dBm(MAX),0dBm(AVE),PowerClass2
Service Area
:Lineofsightapprox.10m(32.8ft)
Profile
• HFP(HandsFreeProfile)
• SPP(SerialPortProfile)
• A2DP(AdvancedAudioDistributionProfile)
• AVRCP(Audio/VideoRemoteControlProfile)
• OPP(ObjectPushProfile)
• PBAP(PhonebookAccessProfile)
• MultiProfilesupport
• SSP(SimpleSecurePairing)

124124 125
Return to the Top page
Appendix
Return to the Top page
Appendix
■ DSP section
(DNX7330BT, DNX7330BTM)
Graphics equalizer
Band:13Band
Frequency(BAND1–13)
:62.5/100/160/250/400/630/1k/1.6k/2.5k/4k/6.3k/
10k/16kHz
Gain
:-9/-8/-7/-6/-5/-4/-3/-2/-1/0/1/2/3/4/5/6/7/8/9dB
2Way X'Over
High pass filter
Frequency:Through,30/40/50/60/70/80/90/100/
120/150/180/220/250Hz
Slope:-6/-12/-18/-24dB/Oct.
Low pass filter
Frequency:30/40/50/60/70/80/90/100/120/
150/180/220/250Hz,Through
Slope:-6/-12/-18/-24dB/Oct.
3Way X'Over (DNX7330BT Region code 3 model)
High pass filter
Frequency:Through/1k/1.6k/2.5k/4k/5k/6.3k/8k/
10k/12.5kHz
Slope:-6/-12dB/Oct.
Band pass filter
Frequency:Through/30/40/50/60/70/80/90/100/
120/150/180/220/250Hz
Slope:-6/-12dB/Oct.
Frequency:Through/1k/1.6k/2.5k/4k/5k/6.3k/8k/
10k/12.5kHz
Slope:-6/-12dB/Oct.
Low pass filter
Frequency:Through/30/40/50/60/70/80/90/100/
120/150/180/220/250Hz
Slope:-6/-12dB/Oct.
Position
Front / Rear /Subwoofer Delay
:0–6.1m(0.02mStep)
Gain
:-8–0dB
Subwoofer level
:-50–+10dB
■ FM tuner section
Frequency Range (step)
:87.5MHz–108.0MHz(50kHz)
Regioncode4/6model
:87.9MHz–107.9MHz(200kHz)
Usable Sensitivity (S/N : 30 dB)
:7.2dBf(0.63μV/75Ω)
Quieting Sensitivity (S/N : 50 dB)
:15.2dBf(1.6μV/75Ω)
Frequency Response (± 3.0 dB)
:30Hz–15kHz
S/N Ratio (dB)
:75dB(MONO)
Selectivity (± 400 kHz)
:Over80dB
Stereo Separation
:45dB(1kHz)
■ AM tuner section
Frequency Range (step)
LW:153–279kHz(9kHz)
MW:531–1611kHz(9kHz)
Regioncode4/6model
531kHz-1611kHz(9kHz:)
530kHz-1700kHz(10kHz)
Usable Sensitivity
MW:25μ
LW:45μ
Regioncode4/6model:28dBμ
■ Digital Radio section (DNX4330DAB)
Frequency Range
L-BAND:1452.960–1490.624(MHz)
BANDIII:174.928–239.200(MHz)
Sensitivity
:-100dBm
S/N Ratio (dB)
:90dB
■ Digital Antenna Connector section
(DNX4330DAB)
Connector type
:SMB
Output Voltage (11 – 16V)
:14.4V
Maximum Current
:<100mA
■ Video section
Color System of External Video Input
:NTSC/PAL
External Video Input Level (RCA/mini jack)
:1Vp-p/75Ω
External Audio Max Input Level (RCA/mini jack)
:2V/25kΩ
Video Input Level (RCA jacks)
:1Vp-p/75Ω
Video Output Level (RCA jacks)
:1Vp-p/75Ω
Audio Output Level (RCA jacks)
:1.2V/10kΩ
■ Audio section
Maximum Power (Front & Rear)
:50Wx4
Full Bandwidth Power (Front & Rear) (4 Ω, 14.4 V,
1 % THD)
:22Wx4
Preout Level (V)
DNX7330BT,DNX7330BTM
:5V/10kΩ
DNX5330BT,DNX5330BTM,DNX4330DAB,DNX4330
:2V/10kΩ
Preout Impedance
DNX7330BT,DNX7330BTM
:≤80Ω
DNX5330BT,DNX5330BTM,DNX4330DAB,DNX4330
:≤600Ω
Speaker Impedance
:4–8Ω
Tone
(DNX5330BT, DNX5330BTM, DNX4330DAB,
DNX4330)
Bass:100Hz±8dB
Middle:1kHz±8dB
Treble:10kHz±8dB
■ Navigation section
Receiver
:High-sensitivityGPSreceiver
Reception Frequency
:1575.42MHz(C/Acode)
Acquisition Times
Cold:26seconds(typ)
(Allsatellitesat-130dBmWithoutaiding)
Update Rate
:1/second,continuous
Accuracy
Position:<2.5meters,CEP,at-130dBm
Velocity:0.1meter/sec
Position Method
:GPS
Antenna
:ExternalGPSantenna
■ General
Operating Voltage
:14.4V(10.5–16Vallowable)
Maximum Current Consumption
:10A
Installation Dimensions (W x H x D)
DNX7330BT,DNX7330BTM
:182x112x163mm
DNX5330BT,DNX5330BTM,DNX4330DAB,DNX4330
:182x112x157mm
Operational Temperature Range
:-10°C–+60°C
Weight
DNX7330BT,DNX7330BTM:2.6kg
DNX5330BT,DNX5330BTM,DNX4330:2.2kg
DNX4330DAB:2.0kg
NOTE
• Althoughtheeffectivepixelsfortheliquidcrystal
panelisgivenas99.99%ormore,0.01%ofpixels
maynotlightormaylightincorrectly.
Specificationssubjecttochangewithoutnotice.

126126 127
Return to the Top page
Appendix
Return to the Top page
Appendix
About this Unit
■ Copyrights
• TheBluetoothwordmarkandlogosareownedby
theBluetoothSIG,Inc.andanyuseofsuchmarks
byJVCKENWOODCorporationisunderlicense.
Othertrademarksandtradenamesarethoseoftheir
respectiveowners.
• The“AAC”logoisatrademarkofDolbyLaboratories.
• “MadeforiPod”and“MadeforiPhone”meanthatan
electronicaccessoryhasbeendesignedtoconnect
specificallytoiPodoriPhone,respectively,andhas
beencertifiedbythedevelopertomeetApple
performancestandards.Appleisnotresponsiblefor
theoperationofthisdeviceoritscompliancewith
safetyandregulatorystandards.Pleasenotethatthe
useofthisaccessorywithiPod,iPhone,oriPadmay
affectwirelessperformance.
• iPhone,iPod,iPodclassic,iPodnano,andiPodtouch
aretrademarksofAppleInc.,registeredintheU.S.and
othercountries.
• iTunesisatrademarkofAppleInc.
• isatrademarkofDVDFormat/Logo
LicensingCorporationregisteredintheU.S.,Japanand
othercountries.
• Thisitemincorporatescopyprotectiontechnology
thatisprotectedbyU.S.patentsandotherintellectual
propertyrightsofRoviCorporation.Reverse
engineeringanddisassemblyareprohibited.
• ManufacturedunderlicensefromDolbyLaboratories.
Dolbyandthedouble-Dsymbolaretrademarksof
DolbyLaboratories.
• ManufacturedunderlicenseunderU.S.Patent
Nos:5,956,674;5,974,380;6,487,535&otherU.S.
andworldwidepatentsissued&pending.DTS,the
Symbol,&DTSandtheSymboltogetherareregistered
trademarks&DTS2.0ChannelisatrademarkofDTS,
Inc.Productincludessoftware.©DTS,Inc.AllRights
Reserved.
• Adobe,AcrobatandReaderareeitherregistered
trademarksortrademarksofAdobeSystems
IncorporatedintheUnitedStatesand/orother
countries.
• ABOUTDIVXVIDEO:DivX®isadigitalvideoformat
createdbyDivX,LLC,asubsidiaryofRoviCorporation.
ThisisanofficialDivXCertified®devicethatplays
DivXvideo.Visitdivx.comformoreinformationand
softwaretoolstoconvertyourfilesintoDivXvideos.
• ABOUTDIVXVIDEO-ON-DEMAND:ThisDivXCertified®
devicemustberegisteredinordertoplaypurchased
DivXVideo-on-Demand(VOD)movies.Toobtainyour
registrationcode,locatetheDivXVODsectioninyour
devicesetupmenu.Gotovod.divx.comformore
informationonhowtocompleteyourregistration.
• DivX®,DivXCertified®andassociatedlogosare
trademarksofRoviCorporationoritssubsidiariesand
areusedunderlicense.
• About PANDORA® internet radio:
RequirementsforlisteningtothePANDORA®internet
radioareasfollows:
iPhoneoriPodtouch
• UseanAppleiPhoneoriPodtouchrunningunder
iOS3orlater.
• Searchfor“Pandora”intheAppleiTunesAppStore
tofindandinstallthemostcurrentversionofthe
Pandora®applicationonyourdevice.
• iPhone/iPodtouchconnectedtothisunitwitha
KCA-iP202orKCA-iP102.
Android™
• VisittheGoogleplayandsearchforPandorato
install.
• Bluetoothmustbebuiltinandthefollowingprofiles
mustbesupported.
-SPP(SerialPortProfile)
-A2DP(AdvancedAudioDistributionProfile)
BlackBerry®
• Visitwww.pandora.comfromthebuiltinbrowserto
downloadthePandoraapplication.
• Bluetoothmustbebuiltinandthefollowingprofiles
mustbesupported.
-SPP(SerialPortProfile)
-A2DP(AdvancedAudioDistributionProfile)
NOTE
• Intheapplicationonyourdevice,loginandcreate
anaccountwithPandora.
(Ifyouarenotalreadyaregistereduser,anaccount
canalsobecreatedatwww.pandora.com.)
• Internetconnectionby3G,EDGE,orWiFi.
• Pandora®isavailableonlyintheU.S,Canada,
AustraliaandNewZealand.
• BecausePandora®isathird-partyservice,the
specificationsaresubjecttochangewithout
priornotice.Accordingly,compatibilitymaybe
impairedorsomeoralloftheservicesmaybecome
unavailable.
• SomefunctionsofPandora®cannotbeoperated
fromthisunit.
• Forissuesusingtheapplication,pleasecontact
Pandora®atpandora-support@pandora.com
• Requirements Aha™:
RequirementsforlisteningtotheAha™areasfollows:
iPhoneoriPodtouch
• UseanAppleiPhoneoriPodtouchrunningiOS4
orlater.
• Searchfor“Aha”intheAppleiTunesAppStoreto
findandinstallthemostcurrentversionoftheAha™
applicationonyourdevice.
• iPhone/iPodtouchconnectedtothisunitwitha
KCA-iP202orKCA-iP102.
Android™
• UseAndroidOS2.2orlater.
• DownloadtheAha™applicationtoyoursmartphone
fromtheAndroidMarketplace.
• Bluetoothmustbebuiltinandthefollowingprofiles
mustbesupported.
-SPP(SerialPortProfile)
-A2DP(AdvancedAudioDistributionProfile)
Note
• Intheapplicationonyourdevice,loginandcreatea
freeaccountwithAha.
• Internetconnectionby3G,EDGE,orWiFi.
• BecauseAha™isathird-partyservice,the
specificationsaresubjecttochangewithout
priornotice.Accordingly,compatibilitymaybe
impairedorsomeoralloftheservicesmaybecome
unavailable.
• SomeAha™functionalitycannotbeoperatedfrom
thisunit.

128128 129
Return to the Top page
Appendix
Return to the Top page
Appendix
■ The marking of products using lasers
CLASS 1
LASER PRODUCT
Thelabelisattachedtothechassis/caseandsays
thatthecomponentuseslaserbeamsthathavebeen
classifiedasClass1.Itmeansthattheunitisutilizing
laserbeamsthatareofaweakerclass.Thereisno
dangerofhazardousradiationoutsidetheunit.
DNX7330BTMDNX5330BTM:
Declaration of Conformity with regard to the EMC
Directive 2004/108/EC
Declaration of Conformity with regard to the
R&TTE Directive 1999/5/EC
Manufacturer:
JVCKENWOODCorporation
3-12,Moriyacho,Kanagawa-ku,Yokohama-shi,
Kanagawa221-0022,JAPAN
EU Representative’s:
JVCKENWOODElectronicsEuropeBV
Amsterdamseweg37,1422ACUITHOORN,The
Netherlands
English
Hereby,JVCKENWOODdeclaresthatthisunit
DNX7330BTM,DNX5330BTMisincompliancewiththe
essentialrequirementsandotherrelevantprovisionsof
Directive1999/5/EC.
Türkçe
BuvesileyleJVCKENWOOD,DNX7230DAB,
DNX5230DAB,DNX5230BT,DNX4230DAB,DNX4230BT
ünitesinin,1999/5/ECDirektifininbaşlıcagereksinimleri
vediğerilgilihükümleriileuyumluolduğunubeyan
eder.
■ For Turkey
Buürün28300sayılıResmiGazete’deyayımlanan
AtikElektrikliveElektronikEşyalarinKontrolü
Yönetmeliğeuygunolaraküretilmiştir.
■ Eski Elektrik ve Elektronik Ekipmanların
İmha Edilmesi Hakkında Bilgi (ayrı atık
toplama sistemlerini kullanan ülkeleri
için uygulanabilir)
Sembollü(üzerindeçarpıişaretiolançöp
kutusu)ürünlerevatıklarıolarakatılamaz.
Eskielektrikveelektronikekipmanlar,
buürünleriveürünatıklarını
geridönüştürebilecekbirtesiste
değerlendirilmelidir.Yaşadığınızbölgeye
enyakıngeridönüşümtesisininyerini
öğrenmekiçinyerelmakamlaramüracaat
edin.Uygungeridönüşümveatıkimha
yöntemisağlığımızveçevremizüzerindeki
zararlıetkileriönlerkenkaynakların
korunmasınadayardımcıolacaktır.

