Kenwood Mr H1 Owner S Manual Guide To Your Entr. Entertainment Hub, Version 2.0
2014-07-06
: Kenwood Kenwood-Mr-H1-Owner-S-Manual kenwood-mr-h1-owner-s-manual kenwood pdf
Open the PDF directly: View PDF ![]() .
.
Page Count: 182 [warning: Documents this large are best viewed by clicking the View PDF Link!]
- Complete Guide to Your New Kenwood Sovereign Entré
- Table of Contents
- Chapter 1: Setting Up and Configuring Your Entré
- How Do I Connect to My TV?
- How Do I Connect to My TV?, continued
- How Do I Connect to My Kenwood Sovereign Receiver or Amplifier?
- How Do I Connect to My Kenwood Sovereign Receiver or Amplifier?, continued
- How Do I Connect to My Kenwood Sovereign DVD or CD Changer (with a Sovereign Receiver)?
- How Do I Connect to My Kenwood Sovereign DVD or CD Changer (with a Sovereign Receiver)?, continued
- How Do I Connect to My Kenwood Sovereign DVD Changer (with a Non-Kenwood Receiver)?
- How Do I Connect to My Kenwood Sovereign DVD Changer (with a Non-Kenwood Receiver)?, continued
- How Do I Set Up My Remote?
- How Do I Use My PowerTouch III Controller with Entré?
- How Do I Set Up My Kenwood LCD Remote to Control Entré?
- How Do I Connect Entré to My Home Network?
- How Do I Hook Up Entré to a Broadband Internet Connection via HPNA?
- How Do I Hook Up Entré to a Broadband Internet Connection via HPNA?, continued
- How Do I Hook Up Entré to a Broadband Internet Connection via Ethernet?
- How Do I Hook Up Entré to a Broadband Internet Connection via Ethernet?, continued
- How Do I Hook Up Entré to the Internet with a Dial-Up Connection?
- How Do I Hook Up Entré to the Internet with a Dial-Up Connection?, continued
- How Do I Power-Up Entré for the Very First Time?
- How Do I Configure Internet Setup?
- How do I Install Kenwood Entré Media Manager Software?
- How Do I Use Entré’s Setup Menus?
- Chapter 2: Getting to Know Your Entré Entertainment Hub
- Chapter 3: Managing Your Music
- How Do I Create My Music Collection?
- How Do I Browse and Play My Music Collection?
- How Do I Customize My Music Collection?
- How Do I Record Music?
- Recording from a CD to Entré’s Storage System
- Recording a Mix of MP3 Tracks from the Music Storage System onto a CD-R or CD-RW
- Recording Music from Different CDs onto a Single CD
- Copying an Entire CD
- Recording from an External Source to a Recordable CD
- Recording from an External Source to Entré’s Music Storage System
- How Do I Transfer Music to a Portable Player?
- How Do I Transfer Music from the Internet to Entré?
- Chapter 4: Managing Your Movies
- Chapter 5: Managing Your Radio Stations
- Chapter 6: Using the Internet
- Chapter 7: Troubleshooting
- How Do I Contact Kenwood?
- How Do I Solve Problems with Video?
- How Do I Solve Sound Problems?
- How Do I Solve Internet Connection Problems?
- While completing Quick Start setup, I learned that my ISP was unsupported
- While completing Quick Start setup, I got a warning that there was no Ethernet adapter detected
- I can’t connect to the Internet
- I received one of the following error messages
- I cannot download software updates, or CD or DVD titles.
- Entré is unable to complete a software update
- How do I Solve Home Network Problems?
- How Do I Solve a Problem with Entré?
- Entré displayed a message saying my high-capacity music storage system was full
- Entré doesn’t see my connected DVD or CD changer
- I can’t seem to get to the screen I want
- Entré takes a long time to start up or The standby light on Entré’s front panel flashes when I tu...
- The blue Radio and Music indicators on Entré’s front panel are flashing, even when Entré is in St...
- Entré fails to respond to front panel or remote commands or is responding erroneously
- Entré locks up frequently, requiring me to reset the processor
- Entré did not find a DVD or CD title during quick lookup when I inserted the disc.
- How Do I Solve a Problem with the Supplied Remote?
- How Do I Solve Problems with the PowerTouch III Controller?
- How do I solve Radio Problems?
- How Do I Solve Problems with Media Manager?
- Glossary
- Appendix A: Program Codes
- Appendix B: Specifications
- Index

Complete Guide to Your Entré Entertainment Hub, ver. 3.0 i
Complete Guide to Your New Kenwood
Sovereign Entré
Welcome to the Complete Guide to your new Kenwood Sovereign Entré.
With Entré, enjoy traditional media, like FM/AM radio, CDs, and DVDs,
alongside exciting new media, such as MP3s and Internet radio. Entré allows
you to control, organize and enjoy your collections from one easy-to-
navigate interface.
In fact, Entré’s on-screen menus are so easy to use that you can begin
enjoying Entré right away, without even reading through this guide. Keep this
guide handy as a reference to take full advantage of Entré’s more
sophisticated features.
Many of Entré’s features require Entré to be connected to the Internet, a
Kenwood Sovereign DVD/CD changer, Kenwood CD changer with Compact
Disc Database (CDDB) capability, and/or a Kenwood Sovereign Receiver.
Features requiring external products or services are noted throughout the
manual.
Entré is a dynamic product. Software updates allow Kenwood and
OpenGlobe to provide new functions and capabilities. Refer to the Kenwood
USA Web site at www.kenwoodusa.com for the latest information regarding
your new Entré.
Use this guide to familiarize yourself with Entré’s capabilities—and quickly
enjoy its state-of-the-art technology.
OpenGlobe, the OpenGlobe logo,
CE-Commerce and entertain simplicity are
trademarks of OpenGlobe, Inc.
CDDB is a registered trademark of GraceNote.
All other trademarks are property of their registered owners.
Complete Guide to Your New Kenwood Sovereign Entré
ii Complete Guide to Your Entré Entertainment Hub, ver. 3.0
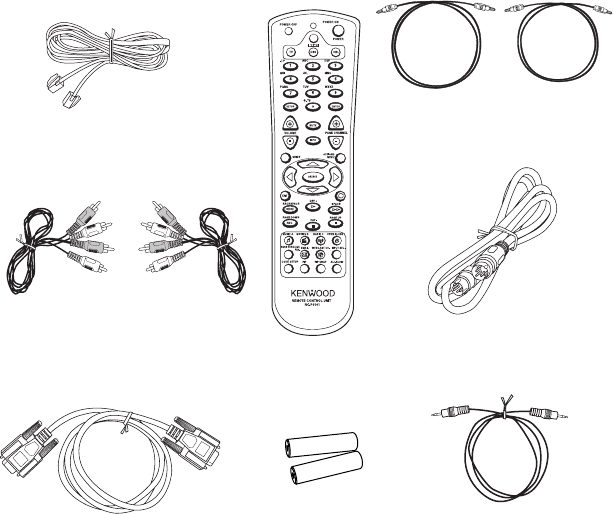
How Should I Unpack My Entré?
Unpack your new Entré carefully and make sure that all of the accessories are
present:
If any accessories are missing, or if the Entré is damaged or fails to operate,
notify your dealer immediately. If your Entré was shipped to you directly,
notify your shipper immediately. Kenwood recommends that you retain the
original carton and packing materials in case you need to move or ship your
Entré in the future.
How Do I Apply Power?
Read this section carefully to ensure safe operation.
Kenwood Sovereign Entré is designed for operation only on AC 120V current.
Entré must be connected to a 120V AC outlet that supplies constant voltage.
Do not use an outlet controlled by a switch, or the switched power outlet on
a receiver or other audio component.
1 telephone cable
2 RCA-type
audio cables
2 digital optical cables
1 S-Video cable
1 mini jack
mono cable
1 RS232C cable
1 Remote
2 batteries
1 remote

How Do I Use My Entré Safely?
Complete Guide to Your Entré Entertainment Hub, ver. 3.0 iii
How Do I Use My Entré Safely?
Read this section carefully to ensure safe operation.
Prevent electric shock:
•Do not expose your Entré to rain or moisture.
•Do not remove the cover.
There are no user-serviceable parts inside. If your Entré
requires repair, take it to an authorized service outlet.
The following icons indicate the presence of uninsulated dangerous voltage
that may be of sufficient magnitude to cause electric shock:
How Does Entré Connect to the Internet?
Many of Entré’s capabilities, including downloading CD information,
connecting to Internet radio stations, and automatic software updates, require
a specific type of Internet connection.
You must have a third-party Internet Service Provider (ISP) to access the
above-mentioned features.
You must have an ISP to enjoy Entré. If you don’t already
have an ISP, you will be prompted to obtain one from
OpenGlobe during the Quick Start Setup process (see “How
Do I Power-Up Entré for the Very First Time?” on page 24)
by calling a toll-free number.
Because free ISPs, AOL, and CompuServe do not use
standard methods of Internet connectivity, and do not open
their networks to outside users, you cannot use these ISPs
with Entré.
Complete Guide to Your New Kenwood Sovereign Entré
iv Complete Guide to Your Entré Entertainment Hub, ver. 3.0
How Do I Reset Entré?
If Entré fails to respond to front panel or remote commands or if it responds
erroneously, use the following procedure to reset it:
1. Hold POWER down until the Standby Indicator begins to flash on and off,
then release POWER.
2. When the Standby Indicator stops flashing and is lit constantly, press
POWER to turn Entré on.
Complete Guide to Your Entré Entertainment Hub, ver. 2.0 v
Table of Contents
Complete Guide to Your New Kenwood Sovereign Entré i
How Should I Unpack My Entré? ........................................ii
How Do I Apply Power? .....................................................ii
How Do I Use My Entré Safely? .........................................iii
How Does Entré Connect to the Internet? ..........................iii
How Do I Reset Entré?....................................................... iv
Table of Contents ............................................................ v
Chapter 1: Setting Up and Configuring Your Entré.......... 1
How Do I Connect to My TV?.............................................2
Understanding Video Connection Types................................. 3
Watching TV without Turning on Entré.......................................... 3
What Do You Want to Do Next?................................................... 3
How Do I Connect to My Kenwood Sovereign Receiver or
Amplifier? ...........................................................................4
Before You Begin.................................................................... 5
Connecting a Kenwood Sovereign Receiver................................... 5
Connecting to Power .................................................................... 5
What Do You Want to Do Next?................................................... 5
How Do I Connect to My Kenwood Sovereign DVD or CD
Changer (with a Sovereign Receiver)?..................................6
Before You Begin.................................................................... 7
Connecting to Power .................................................................... 7
What Do You Want to Do Next?................................................... 7
How Do I Connect to My Kenwood Sovereign DVD Changer
(with a Non-Kenwood Receiver)?, continued ......................9
Before You Begin .......................................................................... 9
Connecting Entré to a non-Sovereign Primary Receiver ................. 9
Table of Contents
vi Complete Guide to Your Entré Entertainment Hub, ver. 2.0
Connecting a Kenwood Sovereign DVD Changer to Entré ............. 9
Connecting Entré to a Non-Kenwood Receiver to a Kenwood Sovereign
DVD Changer......................................................................... 9
Connecting to Power .................................................................... 9
What Do You Want to Do Next?................................................... 9
How Do I Set Up My Remote?..........................................10
Loading Batteries ........................................................................ 10
Entering Product Codes............................................................... 10
Finding Unlisted Product Codes............................................ 10
Controlling Other Devices with the Entré Remote ....................... 11
Using Picture within a Picture ..................................................... 11
Swapping the Picture within a Picture ......................................... 11
Selecting an Alternate Audio Source............................................ 11
Selecting an Alternate Video Source ............................................ 11
How Do I Use My PowerTouch III Controller with Entré?..12
How Do I Identify Entré to the PowerTouch? .............................. 12
Finding the Entré Main Menu on PowerTouch III ........................ 12
How Do I Set Up My Kenwood LCD Remote to Control
Entré? ...............................................................................13
Step One: Identifying the Remote’s TV2 Input as the Entré Input 13
Step Two: Teaching the Entré Remote Button Functions to the Receiver
Remote ................................................................................ 14
Step Three: Using the Receiver Remote to Control Entré ............. 16
How Do I Connect Entré to My Home Network? ..............17
Understanding the Different Connections.................................... 17
Understanding Home Networks .................................................. 17
Understanding Firewalls .............................................................. 17
How Do I Hook Up Entré to a Broadband Internet Connection
via HPNA? ........................................................................18
How Do I Hook Up Entré to a Broadband Internet Connection
via HPNA?, continued ......................................................19
How Do I Hook Up Entré to a Broadband Internet Connection
via Ethernet? .....................................................................20
How Do I Hook Up Entré to a Broadband Internet Connection
via Ethernet?, continued ...................................................21
How Do I Hook Up Entré to my Wireless Network? .................... 21
Complete Guide to Your Entré Entertainment Hub, ver. 2.0 vii
How Do I Hook Up Entré to the Internet with a Dial-Up
Connection? .....................................................................22
How Do I Hook Up Entré to the Internet with a Dial-Up
Connection?, continued....................................................23
How Do I Power-Up Entré for the Very First Time? ...........24
How Do I Configure Internet Setup? .................................25
Continuing Quick Start with a HomePNA Connection................. 27
Using Dynamic IP Addresses................................................. 27
Using a Static IP Address....................................................... 27
Continuing Quick Start with an Ethernet Connection................... 28
Using Dynamic IP Addresses................................................. 28
Using a Static IP Address....................................................... 28
Continuing Quick Start with a Dialup Connection ....................... 29
Handling Unsuccessful Connections ............................................ 30
How do I Install Kenwood Entré Media Manager Software?31
How Do I Use Entré’s Setup Menus?.................................32
User Information......................................................................... 32
Internet Configuration ................................................................. 32
Network Connections ................................................................. 32
Dialup Settings............................................................................ 32
Primary TCP/IP Settings ............................................................... 33
Secondary TCP/IP Settings........................................................... 33
Network Name ........................................................................... 33
Preferences ................................................................................. 33
Audio and Video Settings ............................................................ 34
Changer Management................................................................. 34
Security and Parental Controls..................................................... 34
Utilities Information .................................................................... 34
Chapter 2: Getting to Know Your Entré
Entertainment Hub......................................................... 35
What’s on the Front Panel of My Entré? ............................37
What’s on the Entré Remote?............................................38
How Do I Begin Using Entré?............................................39
Applying Power........................................................................... 40
Selecting a Source....................................................................... 40
Table of Contents
viii Complete Guide to Your Entré Entertainment Hub, ver. 2.0
Entering Numbers and Text......................................................... 41
Navigating Entré.......................................................................... 42
How Do I Switch between Media Modes? ........................44
Switching Media Modes .............................................................. 45
What’s on Entré’s On-Screen Display? ..............................46
How Is My Media Organized?..................................................... 46
Browsing Entertainment Media.................................................... 47
How Do I Access the Guide Screen?..................................... 49
Playing Entertainment Media....................................................... 50
How Do I Begin Enjoying My Media? ................................... 51
How Do I Use My PowerTouch III Controller with Entré?..52
Using Entré with PowerTouch III ................................................. 52
Switching Modes on PowerTouch III ........................................... 53
Using Play Controls on PowerTouch III........................................ 54
How Do I Control Play with PowerTouch III?........................ 54
How Do I Enter Numbers with PowerTouch III?.................... 55
How Do I Enter Text with PowerTouch III? ........................... 56
How Do I Use My Kenwood LCD Remote with Entré? ......56
Using an Optional USB Keyboard with Entré ............................... 58
Chapter 3: Managing Your Music .................................. 59
How Do I Create My Music Collection? ............................60
How Do I Browse and Play My Music Collection? .............60
Selecting Music to Play................................................................ 60
How Do I Browse Music Groups? ......................................... 62
How Do I Browse Music Channels? ...................................... 63
How Do I Browse Playlists?................................................... 63
Controlling Music Play Order ...................................................... 64
Inserting and Removing Discs...................................................... 65
Entré’s CD Drawer ............................................................... 65
Connected Changer ............................................................. 66
How Do I Customize My Music Collection? ......................66
Managing Music Playlists ............................................................. 68
How Do I Create a New Playlist? .......................................... 68
How Do I Edit a Playlist?....................................................... 70
How Do I Delete a Playlist? .................................................. 72
Complete Guide to Your Entré Entertainment Hub, ver. 2.0 ix
Deleting Music............................................................................ 73
Editing Disc Information.............................................................. 74
Editing Track Information ............................................................ 76
Managing Music Groups.............................................................. 77
How Do I Create a New Group?........................................... 77
How Do I Edit a Group? ....................................................... 79
How Do I Delete a Group?................................................... 81
Erasing Rewritable CDs ............................................................... 82
Getting Music Information........................................................... 83
How Do I Record Music? ..................................................84
Recording from a CD to Entré’s Storage System........................... 85
MP3 Recording Bit Rates ...................................................... 87
Backing Up Your Collection.................................................. 88
Recording a Mix of MP3 Tracks from the Music Storage System onto a CD-
R or CD-RW......................................................................... 89
Recording Music from Different CDs onto a Single CD ................ 90
Copying an Entire CD ................................................................. 92
Recording from an External Source to a Recordable CD .............. 94
Recording from an External Source to Entré’s Music Storage System 95
How Do I Transfer Music to a Portable Player?..................97
Accessing the Transfer Music Screen ........................................... 99
How Do I Transfer Music from the Internet to Entré? ......100
Starting Media Manager ............................................................ 101
Searching Your Computer for Music Files .................................. 103
Importing Music Files to Media Manager ................................... 104
Changing Cover Art................................................................... 105
Adding Music Files to Albums or Playlists................................... 105
Adding Found Music to Albums.......................................... 106
Adding Existing Music Files ................................................. 106
Synchronizing Your Media Manager Files with Entré.................. 108
Synchronizing When You Exit Media Manager.................... 108
Synchronizing Manually...................................................... 109
Chapter 4: Managing Your Movies............................... 111
How Do I Browse and Play My Movie Collection? ..........112
Inserting and Removing Discs.................................................... 112
Selecting a Movie to Play .......................................................... 112
How Do I Browse Movie Groups?....................................... 113
Table of Contents
x Complete Guide to Your Entré Entertainment Hub, ver. 2.0
How Do I Browse Movie Channels?.................................... 114
How Do I Customize My Movies?...................................114
Managing Movie Groups ........................................................... 115
How Do I Create a New Group?......................................... 116
How Do I Edit a Group? ..................................................... 117
How Do I Delete a Group?................................................. 118
Getting Movie Information ........................................................ 119
Editing Disc Information............................................................ 120
Selecting Cover Art.................................................................... 122
Chapter 5: Managing Your Radio Stations ................... 123
How Do I Browse and Listen to Radio Stations? ..............124
Selecting a Station to Play ......................................................... 124
How Do I Browse Radio Station Categories? ....................... 124
How Do I Browse Radio Station Channels?......................... 126
Tuning Stations ......................................................................... 126
Tuning AM/FM Radio Stations ............................................ 126
Tuning Internet Radio Stations ............................................ 129
How Do I Customize My Radio Stations? ........................131
Managing Radio Groups............................................................ 132
How Do I Create a New Group?......................................... 133
How Do I Edit a Group? ..................................................... 134
How Do I Delete a Group?................................................. 135
Editing Stations.......................................................................... 136
Deleting Stations ....................................................................... 136
Chapter 6: Using the Internet ...................................... 139
How Do I Order Music and Movies?...............................139
How Do I Get More Information About My
Media Collections?..........................................................139
How Do I Get Information About Music I Tagged On My
Axcess Remote Portal? ....................................................140
Chapter 7: Troubleshooting ......................................... 141
Complete Guide to Your Entré Entertainment Hub, ver. 2.0 xi
How Do I Contact Kenwood? .........................................142
How Do I Solve Problems with Video?............................142
I don’t see anything on my TV screen........................................ 142
I can see the Entré Guide on my TV screen, but I don’t see a picture
from the DVD player or VCR .............................................. 143
How Do I Solve Sound Problems?...................................143
I can’t hear anything when I play MP3s or Internet radio ........... 143
I recorded an MP3 file on Entré’s high-capacity music storage system
and although it shows up on the Guide screen, when I play it
there’s no sound................................................................. 143
How Do I Solve Internet Connection Problems?..............144
While completing Quick Start setup, I learned that my ISP was
unsupported....................................................................... 144
While completing Quick Start setup, I got a warning that there was no
Ethernet adapter detected .................................................. 144
I can’t connect to the Internet ................................................... 144
I received one of the following error messages........................... 145
I cannot download software updates, or CD or DVD titles......... 145
Entré is unable to complete a software update .......................... 146
How do I Solve Home Network Problems? .....................146
Entré displayed a message about a “DNS Failure”...................... 146
Entré displayed a message about a “DHCP Failure”................... 148
I am using a Ethernet to USB Adapter, and I Received an
Error Message..................................................................... 148
How Do I Solve a Problem with Entré?............................149
Entré displayed a message saying my high-capacity music
storage system was full........................................................ 149
Entré doesn’t see my connected DVD or CD changer................ 149
I can’t seem to get to the screen I want ..................................... 149
Entré takes a long time to start up or
The standby light on Entré’s front panel flashes when I
turn it on ............................................................................ 150
The blue Radio and Music indicators on Entré’s front panel are flashing,
even when Entré is in Standby ............................................ 150
Entré fails to respond to front panel or remote commands or is
responding erroneously ...................................................... 150
Entré locks up frequently, requiring me to reset the processor ... 150
Entré did not find a DVD or CD title during quick lookup when I
inserted the disc. ................................................................ 151
Table of Contents
xii Complete Guide to Your Entré Entertainment Hub, ver. 2.0
How Do I Solve a Problem with the Supplied Remote? ...151
The supplied remote is not responding...................................... 151
How Do I Solve Problems with the PowerTouch III
Controller?......................................................................151
I don’t see icons for Entré.......................................................... 151
How do I solve Radio Problems?.....................................152
When I try to tune to a Sirius Radio Station, Entré reads “Station Not
Available.”.......................................................................... 152
How Do I Solve Problems with Media Manager?.............152
Media Manager does not see Entré ........................................... 152
Media Manager sees the Entré, but cannot view Entré’s contents 152
Hardware Firewalls............................................................. 152
Software Firewalls............................................................... 152
Glossary....................................................................... 153
Appendix A: Program Codes ....................................... 155
Setup Codes for Cable
Converters.......................................................................... 155
Setup Codes for Satellite Receivers ............................................ 156
Setup Codes for TVs.................................................................. 157
Appendix B: Specifications.......................................... 161
Audio........................................................................................ 161
Video........................................................................................ 161
Drive ........................................................................................ 161
Dimensions and Weight ............................................................ 161
Media Manager......................................................................... 161
Minimum PC System Requirements.................................... 161
Operating System Requirements......................................... 161
Index............................................................................ 163
Complete Guide to Your Entré Entertainment Hub, ver. 2.0 1
Chapter 1: Setting Up and Configuring Your Entré
To enjoy your Entré you must connect it to your existing home entertainment
system. Making the proper connections ensures you can fully integrate Entré
with the other components of your existing entertainment system. Entré
enhances your ability to enjoy media through the Internet as well as acting as a
librarian for your existing media formats.
This chapter contains the following sections:
How Do I Connect to My TV? page 2
How Do I Connect to My Kenwood Sovereign Receiver or Amplifier?
page 4
How Do I Connect to My Kenwood Sovereign DVD or CD Changer (with a
Sovereign Receiver)?
page 6
How Do I Connect to My Kenwood Sovereign DVD Changer (with a Non-
Kenwood Receiver)? page 8
How Do I Set Up My Remote? page 10
How Do I Set Up My Kenwood LCD Remote to Control Entré? page 13
How Do I Connect Entré to My Home Network? page 17
How Do I Hook Up Entré to a Broadband Internet Connection via HPNA?
page 18
How Do I Hook Up Entré to a Broadband Internet Connection via Ethernet?
page 20
How Do I Hook Up Entré to the Internet with a Dial-Up Connection?
page 22
How Do I Power-Up Entré for the Very First Time? page 24
How Do I Configure Internet Setup? page 25
How Do I Use Entré’s Setup Menus? page 32
The following table describes the types of cables that came with your Entré:
Cable Name Purpose
telephone
cable
Connects Entré to a phone jack. From
there, use Entré’s internal modem or
a HomePNA network to access the
Internet.
digital optical
cable
Allows digital audio signals to pass
between Entré and your receiver. You
can substitute a coaxial digital cable
for the incoming signal on Entré.
analog audio
cable
Allows analog audio signals to pass
between Entré and your receiver.
S video cable Allows video signals to pass between
Entré and your TV. You may use com-
posite or component cables instead.
For more information, see “Under-
standing Video Connection Types” on
page 3
RS-232C
cable
Allows Entré to directly control your
Kenwood Sovereign receiver and
DVD changer. If you are connecting a
different kind of receiver or changer,
you may not be able to directly
control it using Entré.
Stereo mini
jack
Setting Up and Configuring Your Entré
2Complete Guide to Your Entré Entertainment Hub, ver. 2.0
1
2
L
R
RISK OF ELECTRIC SHOCK
DO NOT OPEN
RISQUE DE CHOC ELECTRIQUE
NE PAS OURVRIR
COMPOSITE
TO CD/DVD CHANGER
TO AV RECEIVER
WALL PHONE
To
VIDEO
INPUT
- OR -
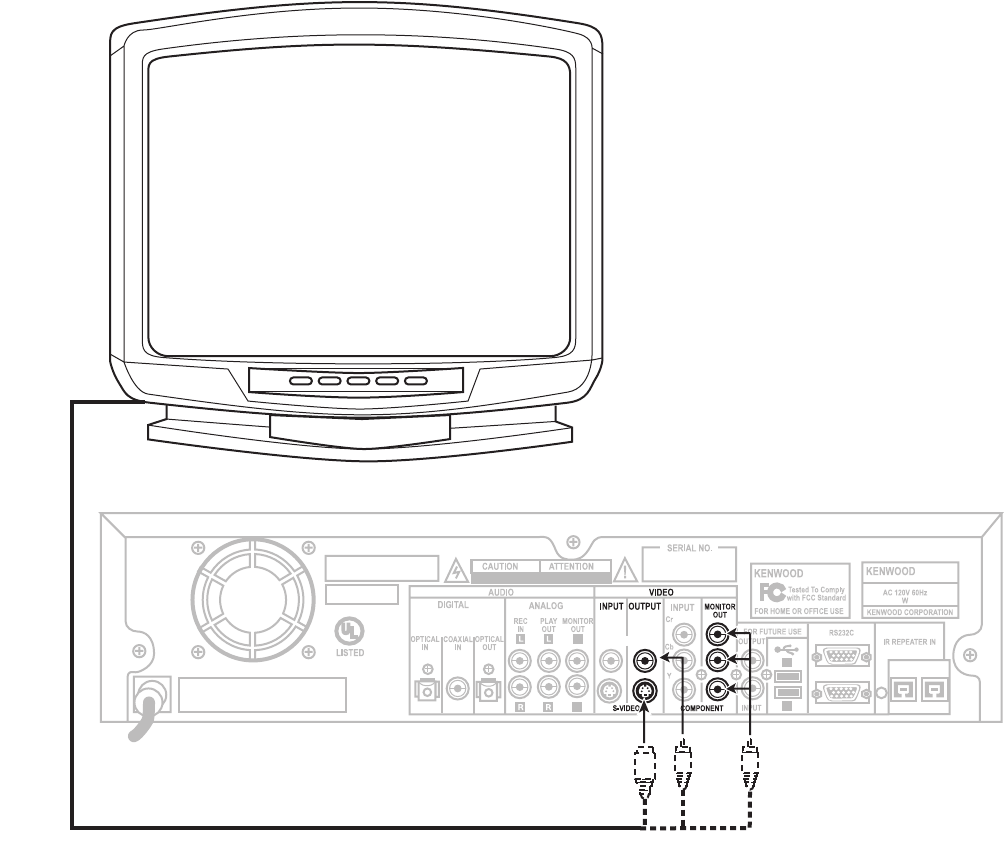
How Do I Connect to My TV?

How Do I Connect to My TV?, continued
Complete Guide to Your Entré Entertainment Hub, ver. 2.0 3
How Do I Connect to My TV?, continued
Connect a video cable from Entré’s Video Output jack to your TV's Video IN
jack as shown.
Understanding Video Connection Types
Before making any video connections to the TV choose a type of connection:
Be aware of the following when choosing a video connection
type:
• If your A/V receiver is a Kenwood Sovereign model with
Universal Video™ or Universal Video™ HD, connect Entré
to the TV and to your receiver using the highest quality
cable type possible (see the table, above). You can use any
type of cable to connect the rest of your video compo-
nents; the receiver translates the signal correctly. See your
receiver's Setup and Connection Guide for more informa-
tion about connecting video components to your receiver.
• If your A/V receiver is not a Kenwood model with
Universal Video™ or Universal Video™ HD, connect all
the video components (including Entré and your TV) with
same type of video cables.
• If your TV has only antenna connections (no video con-
nections at all), you must purchase an RF modulator that
converts video signals into antenna signals to use your TV
with Entré. RF modulators are available at most electronics
stores.
• If you previously connected your TV directly to your VCR,
you must now connect it through Entré.
Watching TV without Turning on Entré
The connection described here sets your TV up as a monitor. Use it to view
media played on your other video devices (such as a VCR or DVD player) via
Entré. You can still watch TV without having to use Entré—simply turn on your
TV as you normally do, including using a Direct Satellite Service or cable box.
What Do You Want to Do Next?
Connect my receiver page 5
Connect my DVD changer page 7
Find a service provider and connect to the Internet page 17
Cable Type
Video
Quality Definition
Composite Good Composite video, as the name implies,
combines the color and black & white
video signals into a single "composite"
signal carried via a single connector.
S-Video Better S-Video carries the color and black &
white video signals separately, through
multiple wires incorporated into a single
connector. This improves video quality
over a composite video connection.
Component Best Component video divides the video
signals into black & white, color, and
color difference, and carries each
through a separate wire and connector.
This improves video quality over an S-
Video connection.
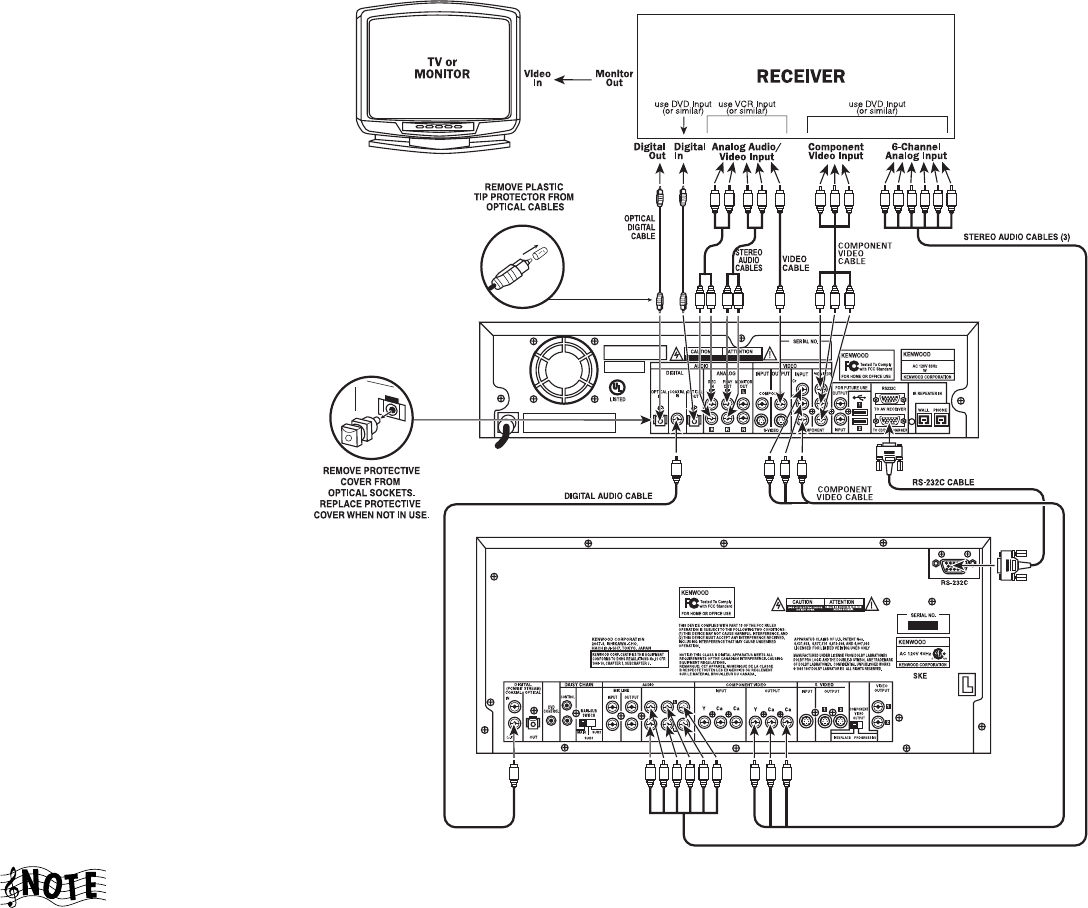
How Do I Connect to My Kenwood Sovereign Receiver or Amplifier?
How Do I Connect to My Kenwood Sovereign Receiver or Amplifier?, continued
Complete Guide to Your Entré Entertainment Hub, ver. 2.0 5
How Do I Connect to My Kenwood Sovereign Receiver or Amplifier?, continued
This section focuses on the connections from Entré to your Kenwood Sovereign
receiver. Please refer to your receiver's instructions for more detail about its
connection jacks and capabilities.
If you do not have a Kenwood Sovereign receiver, see “How Do I Connect to
My Kenwood Sovereign DVD Changer (with a Non-Kenwood Receiver)?” on
page 8,
Before You Begin
Connect your TV to Entré. For more information, see “How Do I Connect to My
TV?, continued” on page 3. Note the type of video connection you used—you
must use the same type to connect to your receiver.
Connecting a Kenwood Sovereign Receiver
Connect the following cables, starting from the bottom of the receiver: Connecting to Power
Do not plug in Entré or components to AC power until you
have connected all your devices.
Do NOT plug Entré’s power cord into the receiver’s switched
accessory outlet. Plug Entré’s power cord only into a wall
outlet that receives constant power.
What Do You Want to Do Next?
Connect my DVD changer page 7 or page 8
Set up my remote and being using Entré page 10
Find a service provider and connect to the Internet page 17
Connect this cable… From this Entré
jack… To this Sovereign
receiver jack…
analog audio Analog Play Out CD-R Play In
analog audio Analog Rec In CD-R Rec Out
If you don’t use Entré’s analog connections, you may not be
able to record certain types of media.
video (composite/S-video/
component, depending on
your TV connection)
Video Input Monitor Out
RS-232C RS232C To AV
Receiver
Ext Control RS-232C
If you substitute a commercially available RS-232C cable,
make sure that it has female connectors on both ends.
optical digital cable Digital Optical Out CD-R (digital area)
optical digital cable or
coaxial digital cable
Digital Optical (or
Coaxial) In
Digital Out
If you use the optical digital cable, be sure to remove the
protective cover from the optical jack before connecting.
Please retain the cover and store it in a safe place.
mini cable IR Repeater In IR Repeater Out/
DVD control
Connect this cable… From this Entré
jack… To this Sovereign
receiver jack…
Setting Up and Configuring Your Entré
6Complete Guide to Your Entré Entertainment Hub, ver. 2.0
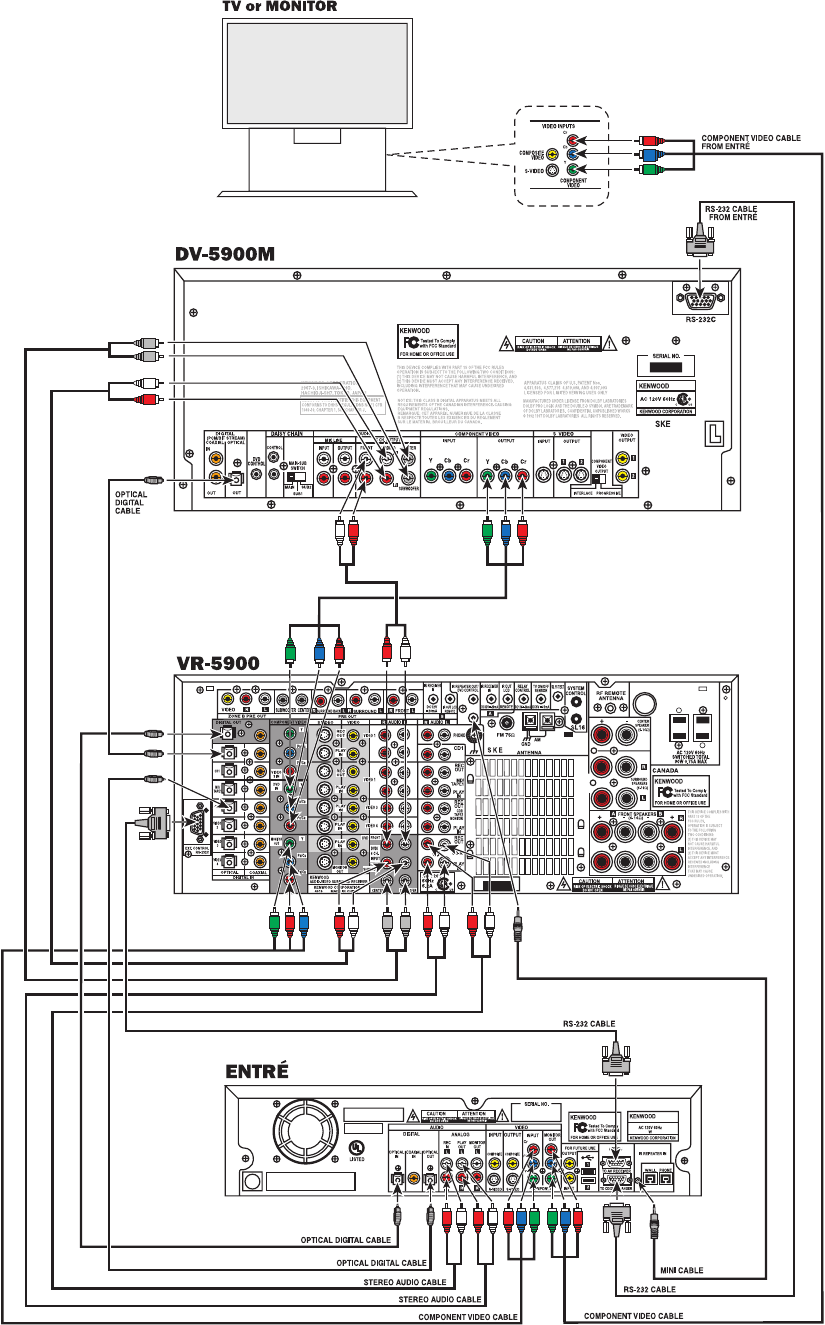
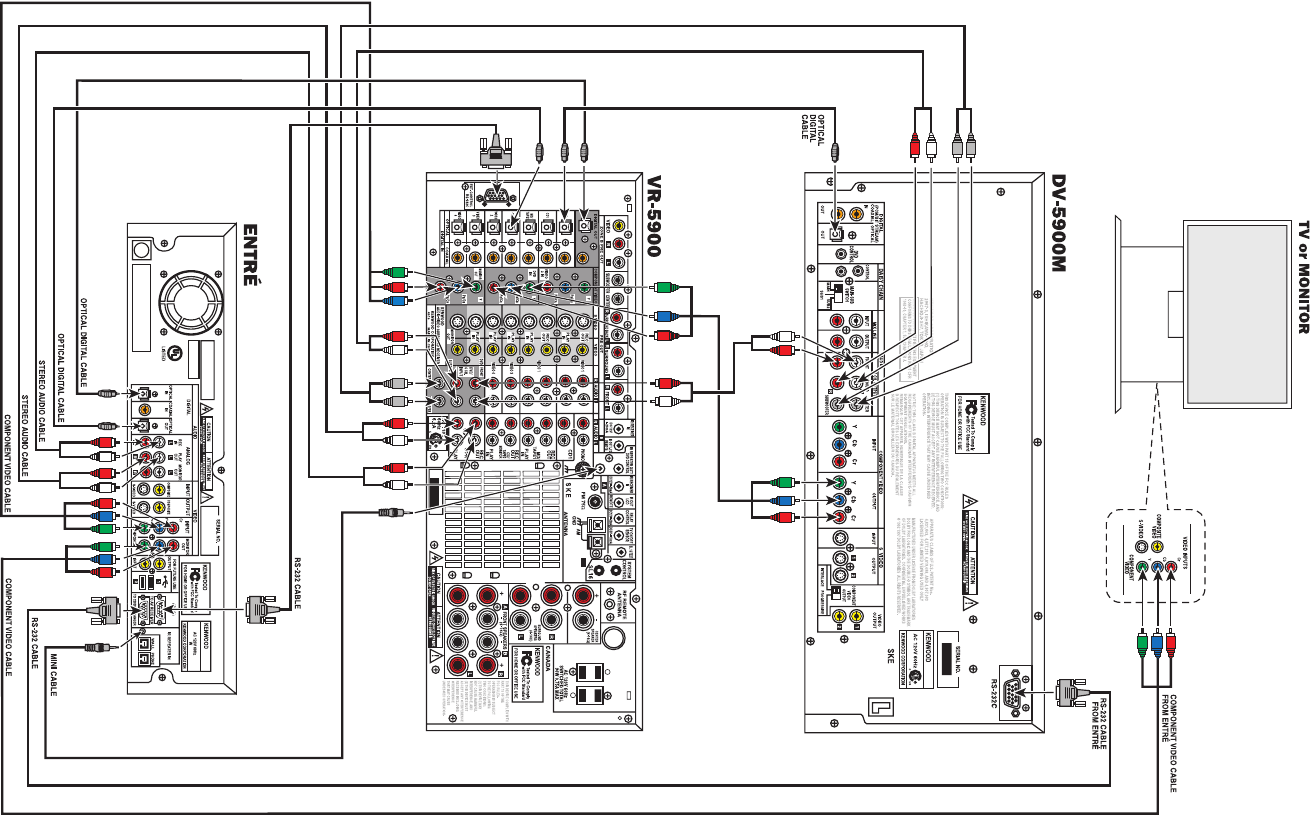
How Do I Connect to My Kenwood Sovereign DVD or CD Changer (with a Sovereign Receiver)?
How Do I Connect to My Kenwood Sovereign DVD or CD Changer (with a Sovereign Receiver)?, continued
Complete Guide to Your Entré Entertainment Hub, ver. 2.0 7
How Do I Connect to My Kenwood Sovereign DVD or CD Changer (with a Sovereign Receiver)?, continued
Entré can control the following Kenwood DVD and CD changers:
• DVD: DV-5900M (shown in illustration), DV-5050M
•CD: CD-425M
If you do not have one of these changers, Entré cannot play any DVDs or CDs
loaded in it.
Before You Begin
Connect your TV and receiver to Entré. For more information, see the
connection instructions on pages 2 through 5.
If you are using Entré with a Kenwood Sovereign DVD
changer and a non-Kenwood Sovereign receiver, follow the
connection instructions on pages 8–9.
1. Connect the included RS-232C cable from the DVD or CD changer's
RS-232C jack to Entré's RS-232C to CD/DVD Changer jack as shown.
If you substitute a commercially-available RS-232C cable,
make sure it has female connections on both ends.
2. Connect the changer and receiver using the following cables (from left to
right on your changer):
3. You can connect up to three Kenwood Sovereign DVD changers together in
a chain. If you have done so, set the Main/Sub switch on the one con-
nected to Entré to Main. Entrés with version 2.0.0.6 software and higher
can control all three changers.
For more information on chaining your changers, refer to the manual that
came with your changer.
Connecting to Power
Do not plug in Entré or components to AC power until you
have connected all your devices.
What Do You Want to Do Next?
Set up my remote and being using Entré page 10
Find a service provider and connect to the Internet page 17
Connect this cable…
From this changer
jack…
To this Kenwood
Sovereign receiver
jack (not shown)…
optical digital cable or
coaxial digital cable
Digital Optical Out or
Digital Coaxial Out
DVD Digital In
Remove the protective cover from the optical jack before
connecting. Store it in a safe place.
mini cable DVD Control IR Repeater Out/
DVD control
analog audio Mix Line Output or
6-Channel Output
DVD/6-Channel
Audio In
If your system does not have surround sound (left and right
speakers only) use Mix Line Output on the changer and the
Front audio jacks on the receiver.
video cable Video Output DVD Video In
You do not need to use the same type of video connection
as you used between the TV and Entré and your receiver.
Your Sovereign receiver handles video channel splitting.
Connect this cable…
From this changer
jack…
To this Kenwood
Sovereign receiver
jack (not shown)…
Setting Up and Configuring Your Entré
8Complete Guide to Your Entré Entertainment Hub, ver. 2.0
How Do I Connect to My Kenwood Sovereign DVD Changer (with a Non-Kenwood Receiver)?
To enable analog audio record capability, use different
receiver inputs for the DVD player's 6-channel analog audio
output than for Entré's other analog audio and analog video
connections. If possible, connect Entré's digital output to the
same receiver input used for the DVD 6-channel analog input.
6 CH OUTPUT
FRONT
SURROUND
CENTER
SUBWOOFER
How Do I Connect to My Kenwood Sovereign DVD Changer (with a Non-Kenwood Receiver)?, continued
Complete Guide to Your Entré Entertainment Hub, ver. 2.0 9
How Do I Connect to My Kenwood Sovereign DVD Changer (with a Non-Kenwood Receiver)?, continued
This section focuses on the connections from your Kenwood Sovereign DVD
changer and a non-Kenwood receiver to Entré. Please refer to your receiver and
DVD changer’s instructions for more detail about their connection jacks and
capabilities.
Though the diagram on page 8 shows a DV-5900M DVD
changer, you can connect a DV-5050M changer to Entré as
well.
Before You Begin
Choose an input set for Entré and the DVD changer on your receiver. Examine
the illustration above for tips on choosing input sets. You need an optical digital
input, analog play (tape monitor) outputs, and analog record (tape monitor)
inputs.
You also need a separate set of inputs for DVD player's 6-channel analog output
(one that is different from the input set you choose for Entré’s analog audio
output).
Connecting Entré to a non-Sovereign Primary Receiver
Follow these instructions to connect any non-Sovereign receiver to Entré.
including non-Sovereign Kenwood receivers.
Connect the following cables:
Connecting a Kenwood Sovereign DVD Changer to Entré
Connect the following cables:
Connecting Entré to a Non-Kenwood Receiver to a Kenwood
Sovereign DVD Changer
Connect three stereo audio cables from the receiver’s 6-CHANNEL ANALOG
INPUT to the DVD changer’s 6-CHANNEL ANALOG OUTPUT as shown.
If you have a DV-5050M, also connect one stere0 audio cable
from the changer’s MIX LINE OUTPUT to the receiver’s DVD
analog input.
Connecting to Power
Do not plug in Entré or components to AC power until you
have connected all your devices.
What Do You Want to Do Next?
Set up my remote and being using Entré page 10
Find a service provider and connect to the Internet page 17
Connect this cable…
From this Entré
jack…
To this receiver
jack…
analog audio Analog Play Out Tape Monitor In
analog audio Analog Rec In Tape Monitor Out
If you don’t use Entré’s analog connections, you may not be
able to record certain types of media.
video (composite/S-video/
component, depending on
your TV connection)
Video Input Monitor Out
optical digital cable Digital Optical Out Digital Optical In
optical digital cable or
coaxial digital cable
Digital Optical (or
Coaxial) In
Digital Optical Out
Remove the protective cover from the optical jack before
connecting. Store it in a safe place.
Connect this cable… From this Entré
jack… To this changer
jack…
coaxial digital cable Digital Coaxial In Digital Coaxial Out
component video Component Video In Video Out
RS-232C RS232C To CD/DVD
Changer
RS-232C
Connect this cable… From this Entré
jack… To this receiver
jack…
Setting Up and Configuring Your Entré
10 Complete Guide to Your Entré Entertainment Hub, ver. 2.0
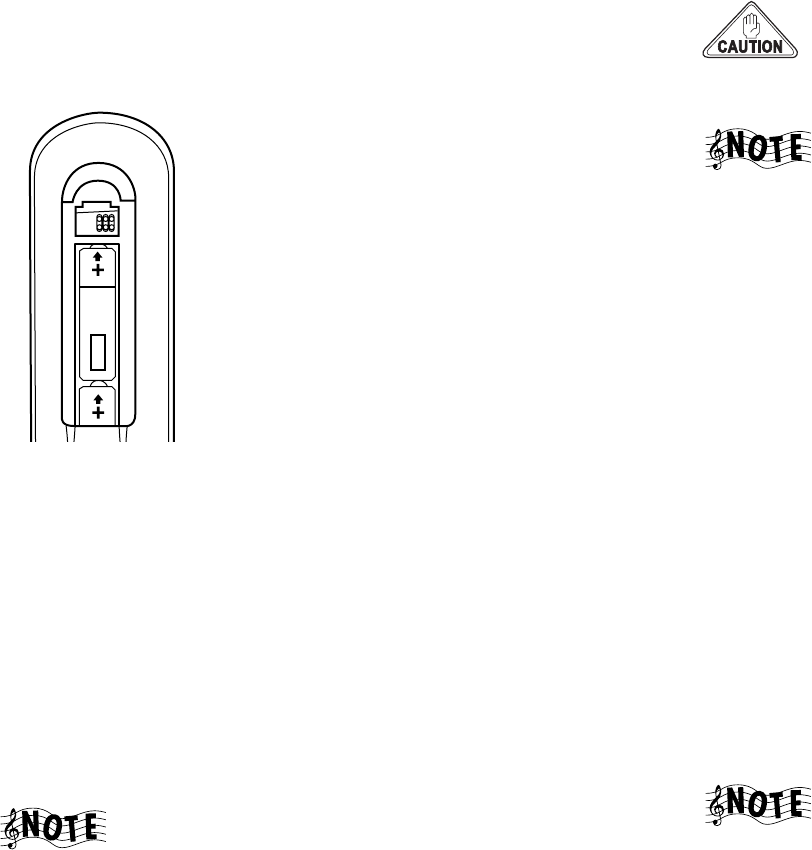
How Do I Set Up My Remote?
Loading Batteries
1. Remove the cover.
2. Insert two AA batteries as illustrated below:
3. Close the cover.
Entering Product Codes
The remote supplied with your Entré is programmed to work with a number of
different brands of home entertainment devices such as TV, DSS, and cable
boxes. The code listings in the “Appendix A: Program Codes” on page 153 show
all available codes for different manufacturers.
To enter the correct product code:
1. Look up the brand name of the device you want the remote to control (see
Appendix A).
2. Press the button for a device (TV, DSS, or CBL (cable)), then press and hold
CODE SETUP on the remote.
The LED on the top of the remote blinks twice, indicating the
system is ready for you to enter a four-digit code.
3. Enter the appropriate code from the code listings, making sure the LED
blinks once after each digit is entered.
Make sure the LED blinks twice after you enter the last digit of
the code. This tells you the code is valid for the device you
selected. If the code you enter is incorrect, the LED blinks only
once after the last digit.
If you enter an incorrect code, or pause 10 seconds or more
while pressing the numeric buttons to enter the product code,
the remote automatically exits the code setup program. Press
CODE SETUP again to start over.
Finding Unlisted Product Codes
If the code list does not list the brand of your unit, cycle through the available
codes stored on your remote in order to locate a working code.
To cycle through the available codes:
1. Press CODE SETUP on the remote.
2. Press 9.
3. Press 9 again.
4. Press 1.
The remote enters the first available code cycle for you to test. For example, if
you want to control your TV but discover there are codes listed for your TV, use
this feature to run through all the available codes to locate one that is
compatible with your TV.
You may find a code that is compatible with some features of your TV but not
others. To get a closer match, select and test a different code. To do so:
1. Press CODE SETUP.
2. Press MODE (the TV button, if you are looking for a code for your TV) to
advance to the next available code cycle. Continue until you locate a code
with the correct available functions for your TV.
If your device does not respond to any of the available codes,
the Entré remote cannot be programmed to control it.
How Do I Set Up My Remote?
Complete Guide to Your Entré Entertainment Hub, ver. 2.0 11
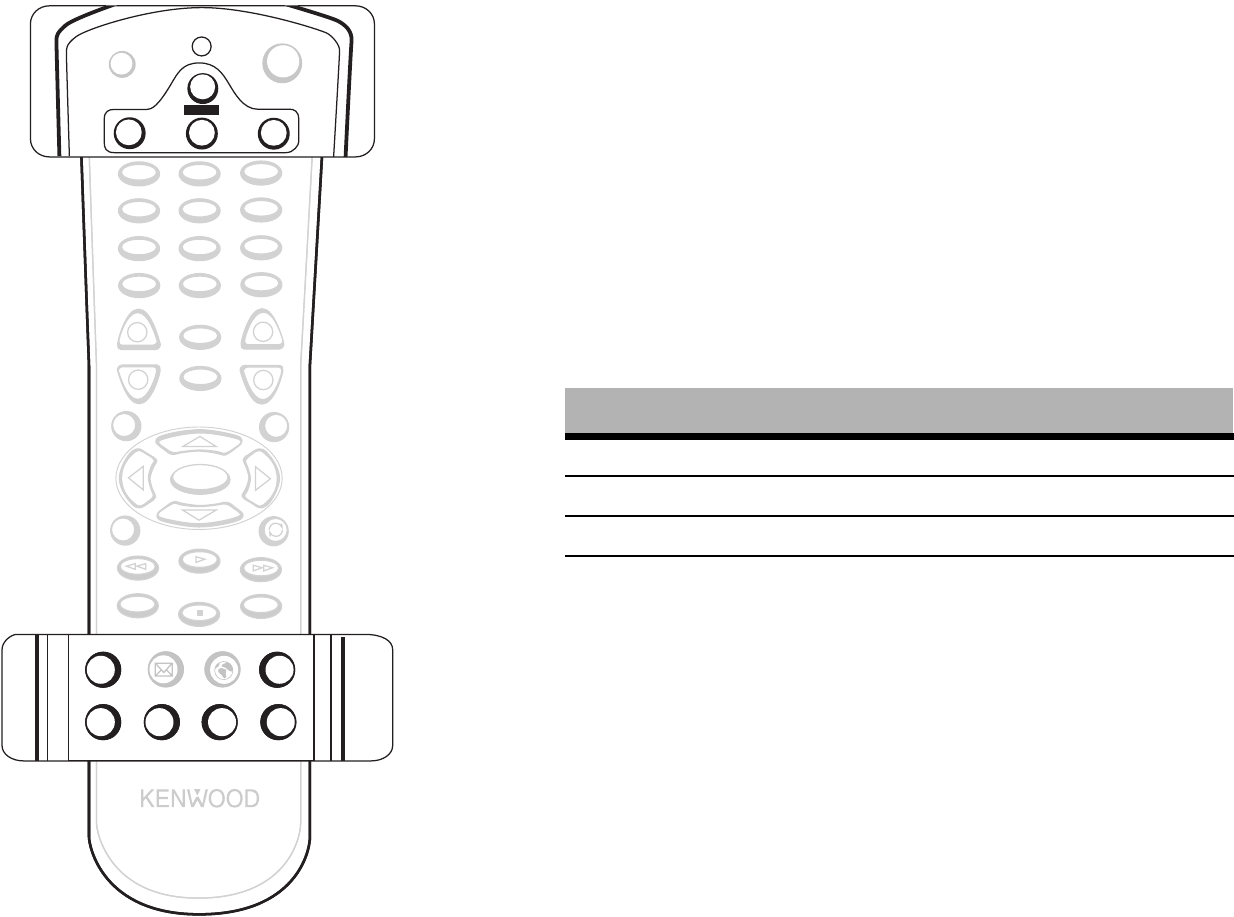
Controlling Other Devices with the Entré Remote
The following buttons on your Entré remote control certain standard
component features:
Using Picture within a Picture
While in the TV mode, press PIP to enable the Picture within a Picture feature
available with some TVs. Please refer to your TV’s instructions for more
information about its capabilities.
Swapping the Picture within a Picture
Press PIP SWAP to swap the larger picture for the smaller one in the upper corner
of the TV screen.
Selecting an Alternate Audio Source
While in the TV mode, press ALT AUDIO to switch to Second Audio Program
(SAP). SAP is traditionally used to provide closed-captioning, or additional
audio in a different language.
Selecting an Alternate Video Source
Use the INPUT SELECT buttons to switch from Entré to broadcast TV, Cable,
Satellite, or your VCR and back.
Be sure to press MR-H1 again before trying to control Entré.
SELECT
GUIDE
OPTIONS
MENU
EXIT
DAY +
SPACE
BACKSPACE
PAGE DOWN
REC
PAGE UP
ll
DAY -
REMOTE CONTROL UNIT
RC-P0101
123
456
789
0
SETUP ENTER
ABC DEF
GHI JKL MNO
PQRS TUV WXYZ
./,?*
@.**#
+
--
+
VOLUME PAGE CHANNEL
MUTE
INFO
POWER OFF POWER ON
POWER
TV DSS CBL
MR-N1
EMAIL WEB LAST CH. INPUT SEL.
PIP PIP SWAP ALT.AUDIO
PASS THROUGH
FAV.
CODE SETUP
EMAIL WEB LAST CH. INPUT SEL.
PIP PIP SWAP ALT.AUDIO
PASS THROUGH
FAV.
CODE SETUP
EMAIL WEB LAST CH. INPUT SEL.
PIP PIP SWAP ALT.AUDIO
PASS THROUGH
FAV.
CODE SETUP
EMAIL WEB LAST CH. INPUT SEL.
PIP PIP SWAP ALT.AUDIO
PASS THROUGH
FAV.
CODE SETUP
POWER OFF POWER ON
POWER
TV DSS CBL
MR-H1
EMAIL WEB LAST CH. EMAIL WEB LAST CH.
Press this button: To view:
TV Broadcast TV or VCR
CABLE Cable TV
DSS Satellite TV
MR-H1Entré

Setting Up and Configuring Your Entré
12 Complete Guide to Your Entré Entertainment Hub, ver. 2.0
How Do I Use My PowerTouch III Controller with Entré?
If you are using a Kenwood PowerTouch III controller, which is standard with
the VR-5900 receiver, or available as an option for other Kenwood Sovereign
receivers, use it to control all of Entré’s features. This gives you command of
your entire home entertainment system from a single controller.
How Do I Identify Entré to the PowerTouch?
To determine if your PowerTouch III is ready to control Entré:
1. Touch PowerTouch III's SETUP button.
2. Touch IR.
3. Touch INPUT. When the list of inputs pops up, select CD-R.
4. Touch DEVICE.
If Entré appears on the list of devices, select it and touch ENTER. Your Power-
Touch III is now ready to control Entré.
If Entré does not appear on the list of devices in Step 4, call our Customer
Service department at 1-800-KENWOOD to upgrade your PowerTouch III
for Entré.
First-generation PowerTouch III controllers do not have Entré
control built in and must have their software upgraded in
order to control Entré.
Finding the Entré Main Menu on PowerTouch III
1. Press PowerTouch III’s HOME 1 page.
2. Press the ENTRÉ. The Entré main screen appears:
For more information on using the PowerTouch to control Entré, see “How Do I
Use My PowerTouch III Controller with Entré?” on page 52.
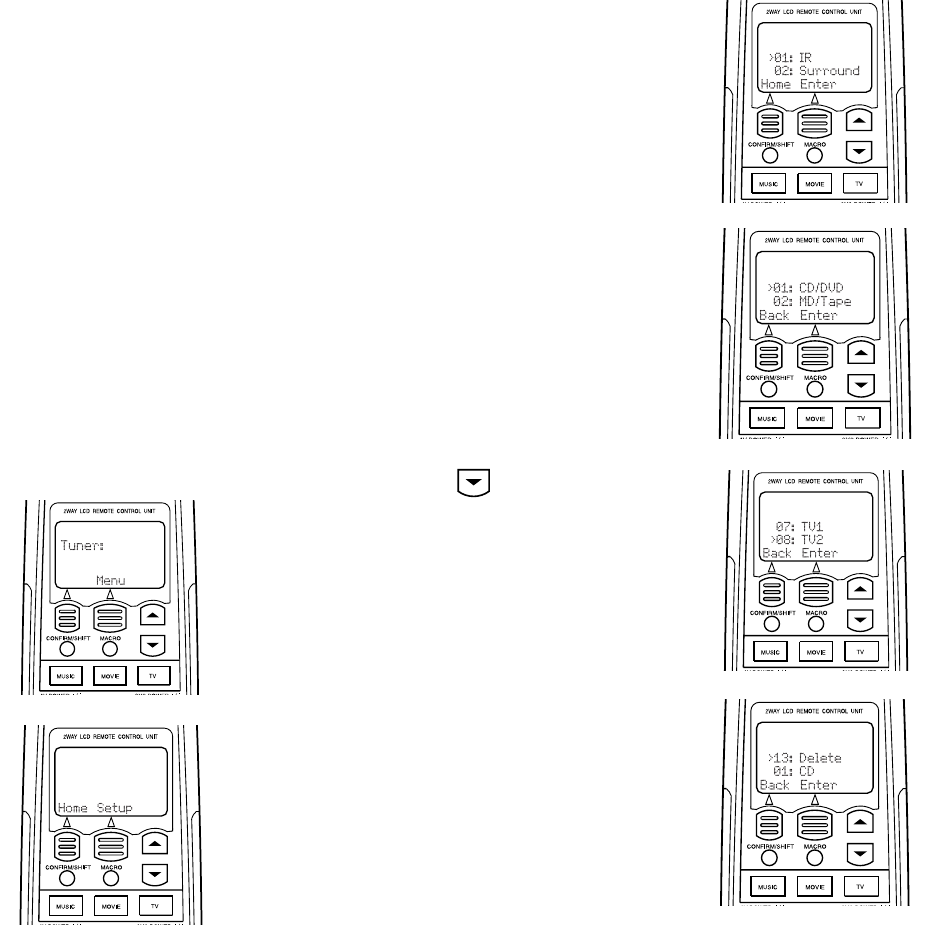
How Do I Set Up My Kenwood LCD Remote to Control Entré?
Complete Guide to Your Entré Entertainment Hub, ver. 2.0 13
How Do I Set Up My Kenwood LCD Remote to Control Entré?
You can use the remote included with your Kenwood Sovereign receiver to
control Entré. If your receiver came with a PowerTouch® touch-screen
controller, for information.
If your receiver came with an LCD screen-learning remote, you need to
program the remote to control Entré and teach the button commands from
Entré’s remote into the receiver’s remote.
There are three main steps:
1. Identify the LCD remote’s TV2 input as the one with Entré connected to it
(CD-R). See “Step One: Identifying the Remote’s TV2 Input as the Entré
Input”, below.
2. Teach the Entré’s button functions to the receiver’s remote. See “Step Two:
Teaching the Entré Remote Button Functions to the Receiver Remote” on
page 14.
3. Control Entré using the receiver’s remote.
Step One: Identifying the Remote’s TV2 Input as the Entré
Input
1. Press TV. The display shows:
2. Press MENU. The display shows:
3. Press SETUP. The display shows:
4. Press ENTER. The display shows:
5. Press repeatedly until the
display shows:
6. Press ENTER. The display shows:
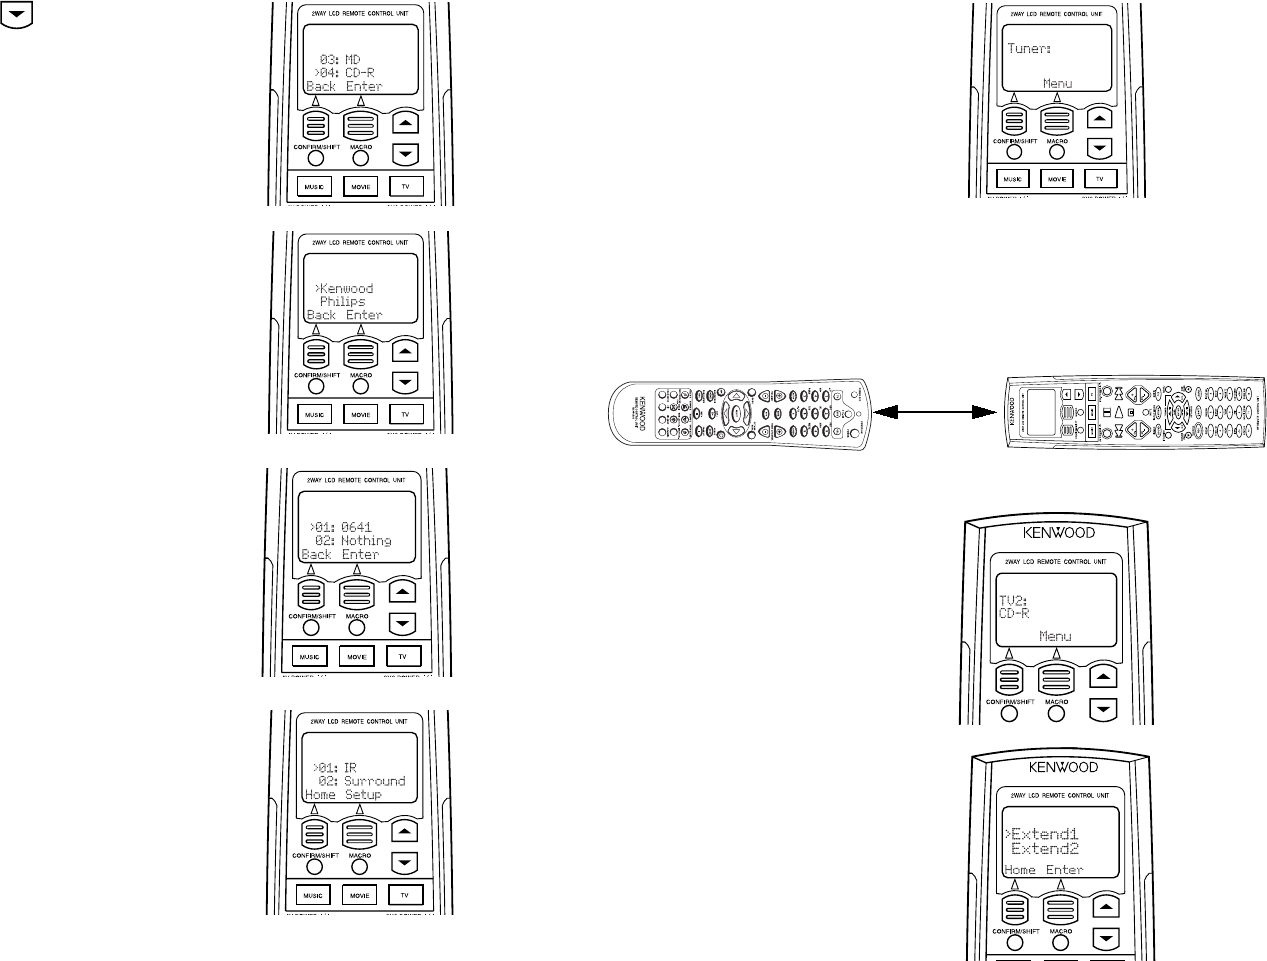
Setting Up and Configuring Your Entré
14 Complete Guide to Your Entré Entertainment Hub, ver. 2.0
Step Two: Teaching the Entré Remote Button Functions to the
Receiver Remote
1. Place the Entré remote and the receiver remote on a table “head-to-head”,
about 4 inches apart:
7. Press repeatedly until the
display shows:
8. Press ENTER. The display shows:
9. Press ENTER. The display shows:
10. Press ENTER. The display shows:
11. Press HOME. The display shows:
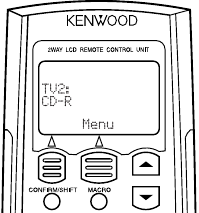
2. Press TV on the receiver remote.
The display shows:
(If the display does not show this,
repeat the steps in “Step One: Iden-
tifying the Remote’s TV2 Input as the
Entré Input” on page 13.)
3. Press LEARN on the receiver
remote. The display shows:
4"
How Do I Set Up My Kenwood LCD Remote to Control Entré?
Complete Guide to Your Entré Entertainment Hub, ver. 2.0 15
6. Repeat steps 3–5 for each function button you want to teach to the receiver
remote.
To maintain similarity of function between the two remotes, we suggest that you
learn Entré functions onto the receiver remote according to the following
diagrams:
4. Press the button on the receiver
remote that should perform the
new command. The display
shows:
5. Within 5 seconds, hold down
the button on the Entré remote
that you want to teach to the
receiver remote, until the
receiver remote’s display shows:
If unsuccessful, the display shows:
Repeat steps 3–5 to try again.
Setting Up and Configuring Your Entré
16 Complete Guide to Your Entré Entertainment Hub, ver. 2.0
Step Three: Using the Receiver Remote to Control Entré
2. Use the buttons you programmed on the receiver remote to control Entré.
See “How Do I Use My Kenwood LCD Remote with Entré?” on page 56.
1. Press TV on the receiver
remote. The display shows:

How Do I Connect Entré to My Home Network?
Complete Guide to Your Entré Entertainment Hub, ver. 2.0 17
How Do I Connect Entré to My Home Network?
Before you can take advantage of Entré’s sophisticated lookup features, you
must connect it to the Internet, either directly or through a home network.
You must have a compatible third-party Internet Service Provider (ISP) to use
Entré to access the Internet. Because free ISPs, AOL, and CompuServe do not
use standard methods of Internet connectivity and do not open their networks
to outside users, you cannot use these ISPs with Entré. If you do not currently
have a supported ISP, during the setup process you will be given a phone
number to call to set up an account with a supported ISP, or you can establish
an account on your own with a supported ISP.
Understanding the Different Connections
Understanding Home Networks
A home network connects the computers in your house to each other. Inside
most computers, built-in software controls how the computer identifies and
relates to the other computers.
Each computer on your network has its own ID number (kind of like a
computer “social security number”). This number lets the network know that
the computer is allowed to communicate inside the network. This number can
be automatically assigned each time you turn on the computer, or you can
specify it.
A home network typically contains most of the following elements:
• A DSL or cable modem that connects to the Internet
• A firewall (either hardware or software) that protects your home network
from unwanted intrusion
• A hub or router that allows multiple computers within your house to con-
nect to the firewall and/or DSL/cable modem
• one or more computers, connected to the hub or router via network cable
or wireless devices
Entré fits into this network as just another computer. It already contains software
to let the network know what it is and how to handle it. When you configure
the Internet Setup (see “How Do I Configure Internet Setup?” on page 25), you
identify Entré to this network.
However, your computer does not automatically contain software to let it
recognize Entré. If you want to share music files between your computer and
Entré, you must install Media Manager software on your computer. See “How
do I Install Kenwood Entré Media Manager Software?” on page 31.
Understanding Firewalls
Firewalls prevent computers that are outside your network from contacting your
system and doing damage to it (hacking). They are an effective way to prevent
viruses and other unwanted intrusion from harming the computers in your
house.
Firewalls can be hardware (a physical device, just like Entré) or software (a
computer program, like Internet Explorer). If you use a software firewall, it may
not protect any computer except the one it is installed on, and it may prevent
Entré from accessing your home network effectively. If you are having trouble
getting Entré to access the network, contact your firewall manufacturer’s
Customer Support hotline.
Because there are many different ways to set up a home
network, the connection diagrams that follow only show the
most common ways to connect Entré to the Internet.
Connection Advantages Disadvantages
Direct
Modem to
phone line
(see page 22)
• No additional equip-
ment required
• Slow connection speed
• Cannot add Axcess
units for Internet radio
• Entré will not be recog-
nized as part of your
home network
Ethernet to
DSL/Cable
Modem
(cabled or
wireless)
(see page 20)
• Fast connection speed • Entré must be located
near DSL/cable modem
hub (unless using a
wireless network)
• Cannot add Axcess
units for Internet radio
HomePNA to
phone line to
DSL/Cable
Modem
(see page 18)
• Can add Axcess units
for Internet radio
• Uses existing phone
lines for network access
• Phone lines must be
high quality
Setting Up and Configuring Your Entré
18 Complete Guide to Your Entré Entertainment Hub, ver. 2.0
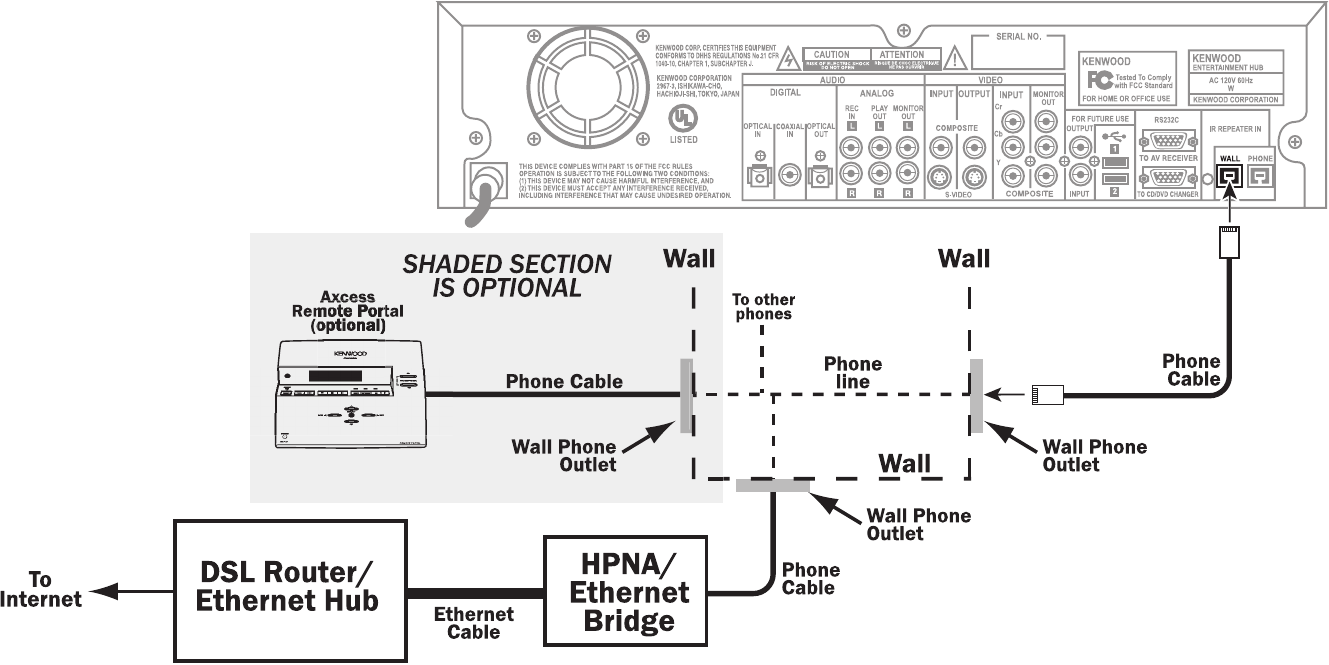
How Do I Hook Up Entré to a Broadband Internet Connection via HPNA?

How Do I Hook Up Entré to a Broadband Internet Connection via HPNA?, continued
Complete Guide to Your Entré Entertainment Hub, ver. 2.0 19
How Do I Hook Up Entré to a Broadband Internet Connection via HPNA?, continued
A Home Phone Network Alliance (HomePNA) connection allows you to use the
existing phone cabling in your house as if it were a computer network—without
tying up a phone line. Once you connect your computer to a HomePNA
adapter, you can plug Entré (or into any phone jack in your house.
Kenwood recommends connecting Entré to the Internet via a Home Phone
Network Alliance (HPNA)/Ethernet bridge. If you have a broadband Internet
connection (for example, through a DSL or cable modem), this allows Entré to
access the network through the modem without additional expensive network
cabling. As you can see on page 18, you use the phone lines already present in
your house to connect Entré to your DSL or cable modem.
Use a minimum of No. 26 AWG wire for telephone cables.
Most households are wired with No. 12 or 14 AWG wire,
which is more than sufficient for a good HomePNA
connection.
If you use HomePNA (as opposed to the other connection methods described
later in this section) you will be able to add optional Axcess Remote Portals to
expand your system throughout your home and use all of their functions,
including Internet Radio.
Entré is compatible with the following HPNA-Ethernet
bridges:
•D-Link DHN-100
•LinkSys HPB200
•LinkSys HPR0200
•NetGear PE102
The illustration provided shows a sample networking connection. Whatever
your configuration, connect the following cables:
See the manual that came with your HPNA/Ethernet bridge for more
information on setting it up and configuring it.
You can plug a telephone into the phone jack labeled “Phone”
on the back of Entré.
Connect this cable… From this jack… To this jack…
telephone cable WALL on Entré a standard phone jack
on your wall
Use a splitter if you need to attach more than one phone
cable to the same jack. Using a splitter does not affect the
quality of the HomePNA connection.
telephone cable a standard phone
jack on your wall
Phoneline (or the
equivalent) on your
HPNA/Ethernet bridge
Cat5 (or better) Ethernet
cable
a network port on
the HPNA/Ethernet
bridge
a network port on a
hub or router, or on
your DSL/cable
modem
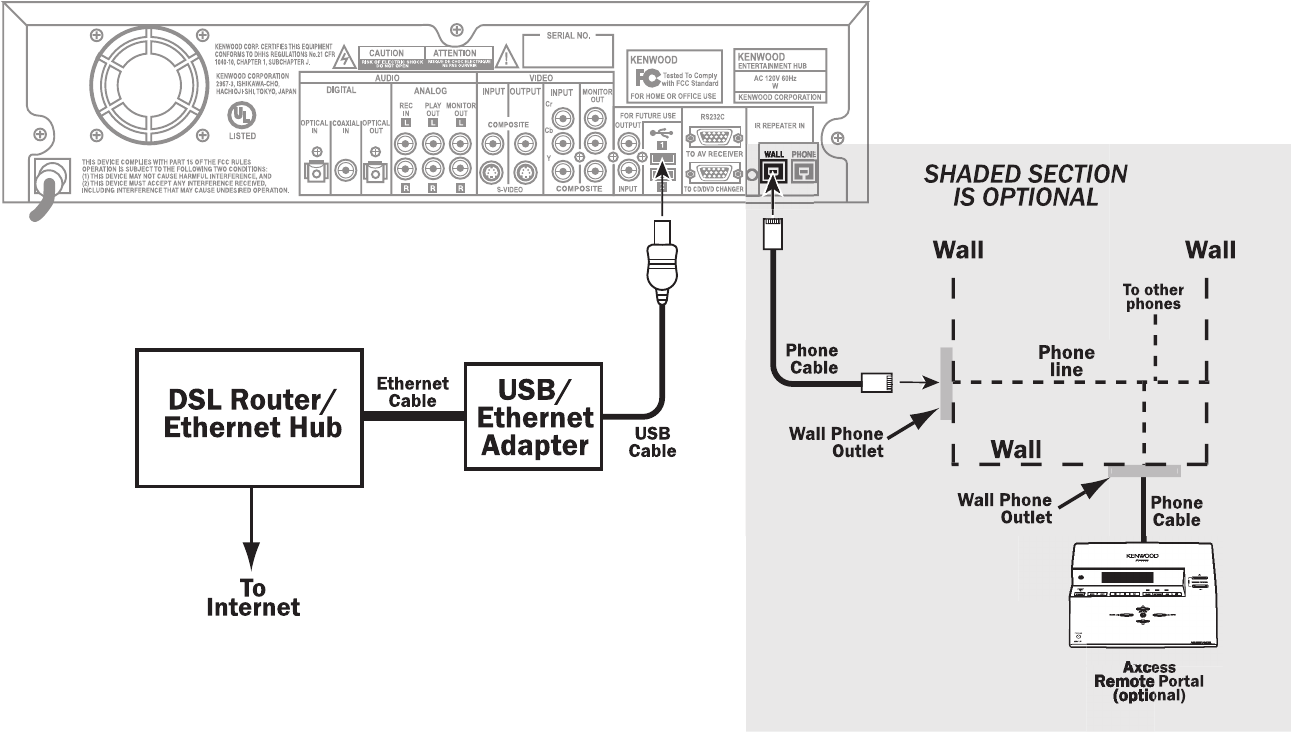
Setting Up and Configuring Your Entré
20 Complete Guide to Your Entré Entertainment Hub, ver. 2.0
How Do I Hook Up Entré to a Broadband Internet Connection via Ethernet?

How Do I Hook Up Entré to a Broadband Internet Connection via Ethernet?, continued
Complete Guide to Your Entré Entertainment Hub, ver. 2.0 21
How Do I Hook Up Entré to a Broadband Internet Connection via Ethernet?, continued
You can make a broadband connection from Entré to the Internet via its USB
(Universal Serial Bus) connector and a USB/Ethernet adapter (as shown on page
page 20). If you do so, all of Entré's features will work normally.
However, if you add an Axcess Remote Portal to your system, you will not be
able to listen to Internet Radio on Axcess, although all other Axcess features will
work normally. If you have or plan to add Axcess Remote Portals to you home
entertainment network, Kenwood recommends using a HomePNA connection
instead. See “How Do I Hook Up Entré to a Broadband Internet Connection via
HPNA?” on page 18 for more information.
If you do not plan to connect Axcess Remote Portals, or if you do, but don’t care
if they receive Internet radio, an Ethernet connection may work for you.
Entré supports the following USB/Ethernet adapters:
• ADMtek AN986
• Belkin F5D5050
• Belkin F5U111
• Billionton USB-100
• CATC NetMate U-ETH-NM2
• Compaq HNE-200
• Corega FEther USB-TX
• D-Link DSB-650TX
• I/O Data USB-ET/TX
• I/O Data USB-ET/TX-S
• LANEED LD-USB/TX
• LinkSys USB100TX
• MELCO LUA-TX
• Netmate U-ETH-NM02
• SmartBridges SmartNIC2
• SMC 2202USB
• Sony Ehternet USB
The illustration provided shows a sample networking connection. Whatever
your configuration, connect the following cables:
See the manual that came with your USB/Ethernet adapter for more
information on setting it up and configuring it.
How Do I Hook Up Entré to my Wireless Network?
Connecting the Entré to a network is a great option, however, running a
network cable (CAT 5) from the DSL/Cable router to your home theater room
may be difficult. Entré supports connection to a wireless network through the
USB port, just like a cabled Ethernet connection.
In this case, follow the directions for regular Ethernet connection, but connect
the USB adapter to a Wireless Access Point device with a Cat5 network cable.
Connect a second Wireless Access Point to your Ethernet router (unless one is
already connected).
See http://upload.kenwoodusa.com/pub/tech_articles/
EntreNetworkWireless.pdf for more information about connecting and
configuring Entré on a wireless network.
Connect this cable… From this jack… To this jack…
USB cable on Entré on the USB/Ether-
net adapter
The USB standard says that USB cables should not be
longer than16 ft. Certain types of cables may be chained
together to extend this range. Contact your local computer
parts store for more information.
Cat5 (or better) Ethernet
cable
a network port on
the USB/Ethernet
adapter
a network port on a
hub or router, or on
your DSL/cable
modem
Setting Up and Configuring Your Entré
22 Complete Guide to Your Entré Entertainment Hub, ver. 2.0
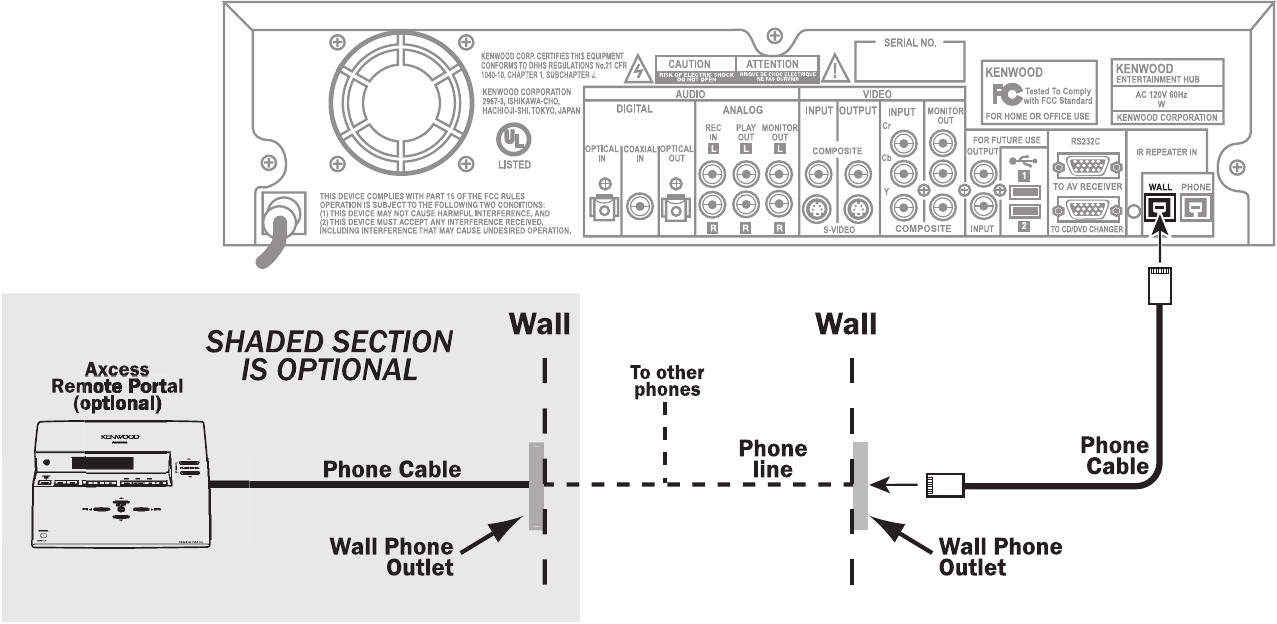
How Do I Hook Up Entré to the Internet with a Dial-Up Connection?

How Do I Hook Up Entré to the Internet with a Dial-Up Connection?, continued
Complete Guide to Your Entré Entertainment Hub, ver. 2.0 23
How Do I Hook Up Entré to the Internet with a Dial-Up Connection?, continued
You can make a dialup connection from Entré to the Internet via its internal
modem (the Wall Connector) as shown on page 22. If you do so, all of Entré's
features will work normally.
However, if you add an Axcess Remote Portal to your system, you will not be
able to listen to Internet Radio on Axcess, although all other Axcess features will
work normally. If you have or plan to add Axcess Remote Portals to you home
entertainment network, Kenwood recommends using a HomePNA connection
instead. See “How Do I Hook Up Entré to a Broadband Internet Connection via
HPNA?” on page 18 for more information.
The illustration provided shows a sample networking connection. Whatever
your configuration, connect the following cables:
Connect this cable… From this jack… To this jack…
telephone cable WALL on Entré a standard phone jack
on your wall
Use a minimum of No. 26 AWG wire for telephone cables.
Most households are wired with No. 12 or 14 AWG wire,
which is more than sufficient for a good HomePNA
connection.

Setting Up and Configuring Your Entré
24 Complete Guide to Your Entré Entertainment Hub, ver. 2.0
How Do I Power-Up Entré for the Very First Time?
After you have made all of the connections described earlier in this chapter,
plug Entré's power cord directly into a wall outlet that receives constant power.
Do not plug Entré into a receiver's switched accessory outlet
or other outlet that does not receive constant power (such as a
switched wall outlet). Consider purchasing an Uninterruptible
Power Supply (UPS), just as you would for your home
computer.
After you plug Entré's power cord into the wall outlet (or UPS), its Standby
indicator flashes. Wait for the indicator to stop flashing. Once the Standby
indicator remains constantly lit, press POWER to turn Entré on.
If you have connected Entré to a Sovereign DVD changer and want to listen to
CDs or watch DVDs, make sure the changer is turned on before you turn on
Entré. This enables Entré to see the connected changer, so you can choose to
listen to or watch the discs it contains.
If Entré does not turn on as expected, or your music or DVD selections do not
appear as you expect, use the information in this chapter to check the
connections you have made. In addition, review the information about your
specific concern in “Troubleshooting” on page 139.
How Do I Configure Internet Setup?
Complete Guide to Your Entré Entertainment Hub, ver. 2.0 25
How Do I Configure Internet Setup?
Entré accesses the Internet through the networking method you set up (see
“How Do I Connect Entré to My Home Network?” on page 17 for more
information). OpenGlobe provides easy access to Entré’s Internet resources,
such as disc information databases, Internet radio, and CE-commerce
opportunities. Whenever Entré accesses the Internet for information or CE-
commerce, it does so via the OpenGlobe portal, at no cost to you.
When you connect to the Internet, you can play Internet radio, download
movie or music information, and access new Entré software updates.
When you turn on Entré for the first time, you must complete a Quick Start
setup process.
During setup, Entré takes approximately 15 minutes to
download Internet and AM/FM radio information.
Entré can take up to 4 hours to download the disc and title
information from a connected DVD or CD changer if the
changer is full. If you have already read all data into your
changer, Entré can read that information and requires less
time.
During the entire setup process, Entré requires a constant
Internet connection. Please plan accordingly if you use a dial-
up connection.
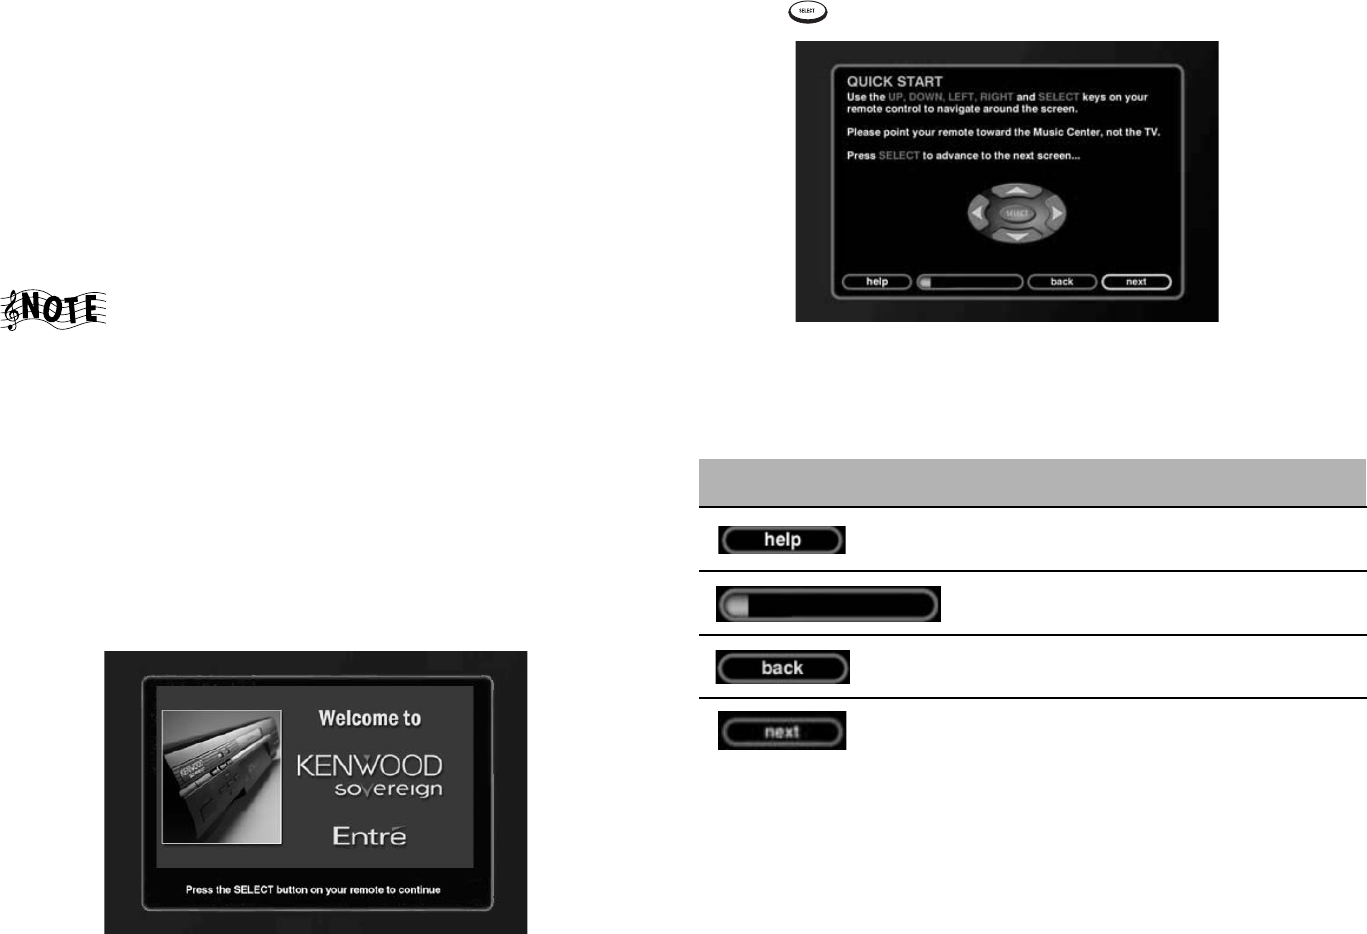
The very first time you turn on Entré, the following introduction screen appears
on your TV:
1. Press to continue. The first Quick Start screen appears:
The first screen contains some basic navigation instructions to help you
complete the Quick Start process.
Each Quick Start screen contains a few common elements:
This screen element: Does this:
Opens a help topic to assist you with the
screen you’re on.
Shows you how much of the Quick Start
setup you’ve completed.
Takes you to the previous screen.
Takes you to the next screen.
Setting Up and Configuring Your Entré
26 Complete Guide to Your Entré Entertainment Hub, ver. 2.0
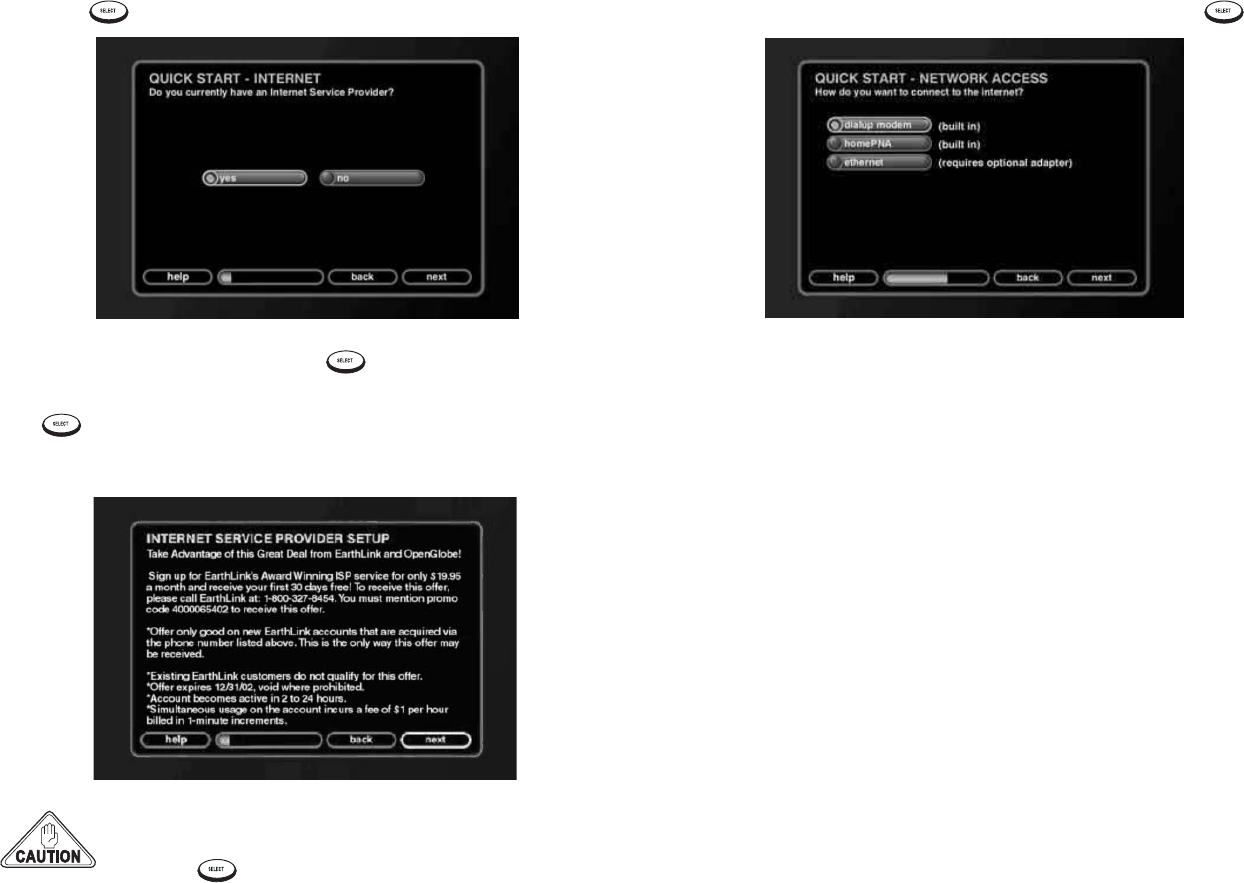
2. Press to move to the next Quick Start screen:
3. If you have a supported ISP, press , and go to step 4.
If you do not have a supported ISP, move to no on the screen and press
.
The Internet Service Provider Setup screen appears:
You must have an ISP to enjoy Entré’s extended features. To
obtain an ISP, call the toll-free number on the screen, then
press to continue with setup.
Once you register with an ISP, the Quick Start - Network Access screen
appears (see step 4).
4. Choose the type of Internet access you have and press :
From here, the Quick Start setup process varies, depending on the option you
choose. For information about continuing Quick Start with:
• A HomePNA connection, see page 27.
• An Ethernet connection, see page 27.
• A dialup modem, see page 29.
How Do I Configure Internet Setup?
Complete Guide to Your Entré Entertainment Hub, ver. 2.0 27
Continuing Quick Start with a HomePNA Connection
See page 18 for more information on connecting Entré to your home network
using HomePNA.
If you selected homePNA in step 4 on page 26, Entré checks for a connected
HomePNA network before continuing the Quick Start setup. Once it finds the
network, the Quick Start - IP Addressing screen appears:
If there is no connected network detected, check your
HomePNA connections. Once the problem is resolved, press
to return to the Quick Start process.
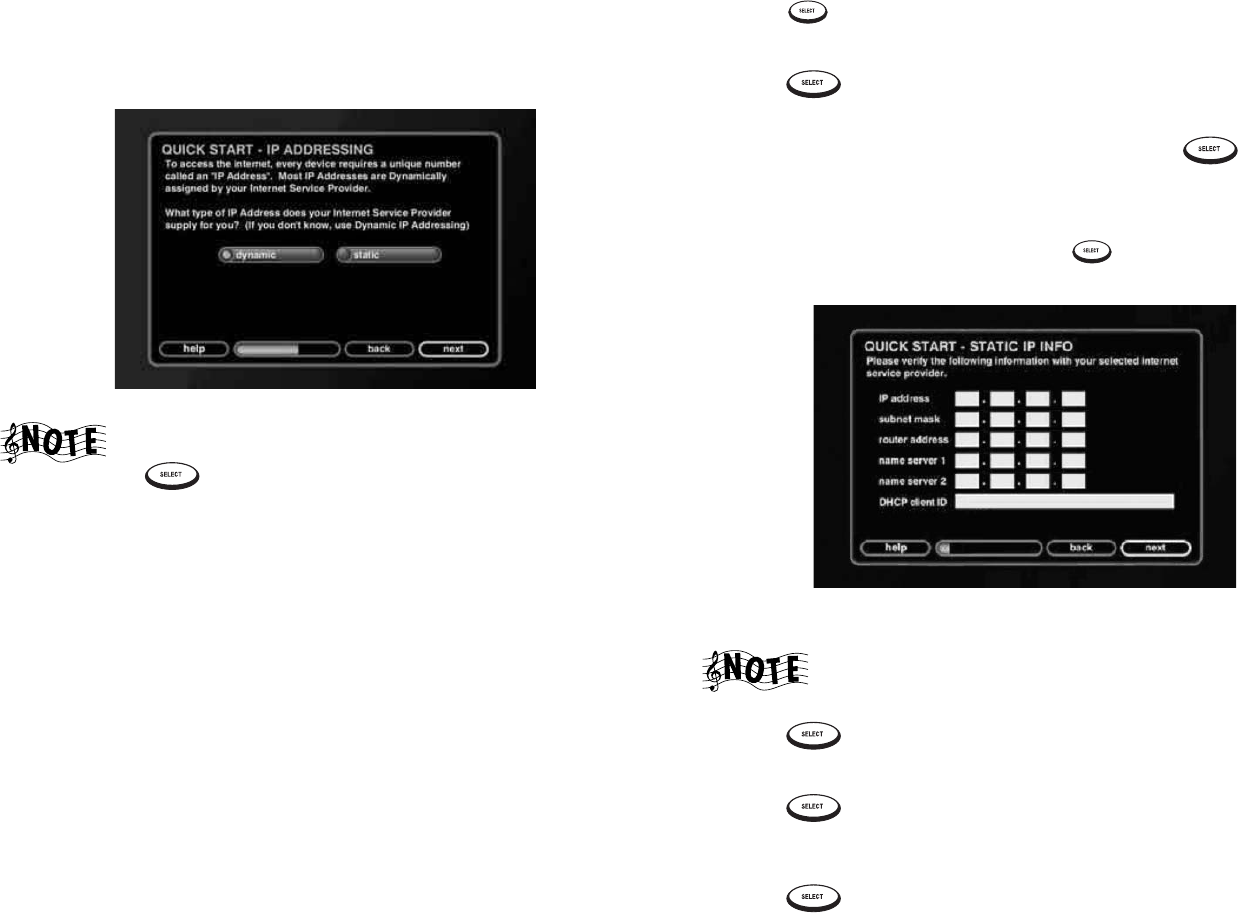
Specify whether your network uses a dynamic or static IP address:
•Dynamic IP addresses, the most common type, use a range of addresses to
connect Entré to the Internet. ISPs typically assign a set number of
addresses to an account. Each Internet-connected device in your home also
connects using that range of addresses. Dynamic IP addressing means you
don’t have to remember which IP addresses you’ve assigned to which
devices or computers. However, you must ensure that your Internet
account supports enough IP addresses to include all of your devices.
•Static IP address always connect Entré to the Internet using the same IP
address. Every Internet-connected device in your home (your computer, for
example) uses a different IP address. Using this method, you can be certain
which IP address Entré uses. However, you must keep track of which IP
addresses you assign when adding new devices.
If you're not sure what type of IP address your network uses, select Dynamic.
Using Dynamic IP Addresses
If your Internet connection uses a dynamic IP address:
5. Press . The Quick Start-Zip Code screen appears.
6. Enter your Zip Code.
7. Press . Entré then automatically installs Internet radio stations and
downloads information about FM/AM radio stations in your area.
When Entré is finished, a welcome screen appears. Press to begin
enjoying Entré. If the connection is not successful, see page 30.
Using a Static IP Address
1. Move to static on the screen and press . The Quick Start - Static IP
Info screen appears:
Enter the IP address information provided by your ISP or network administrator.
The IP address, subnet mask, gateway address, and DNS 1
fields are required.
2. Press . The Quick Start - Zip Code screen appears.
3. Enter your Zip Code.
4. Press . Entré then automatically installs Internet radio stations and
downloads information about FM/AM radio stations in your area. When
Entré is finished, a welcome screen appears.
5. Press to begin enjoying Entré. If the connection is not successful,
see page 30.
Setting Up and Configuring Your Entré
28 Complete Guide to Your Entré Entertainment Hub, ver. 2.0
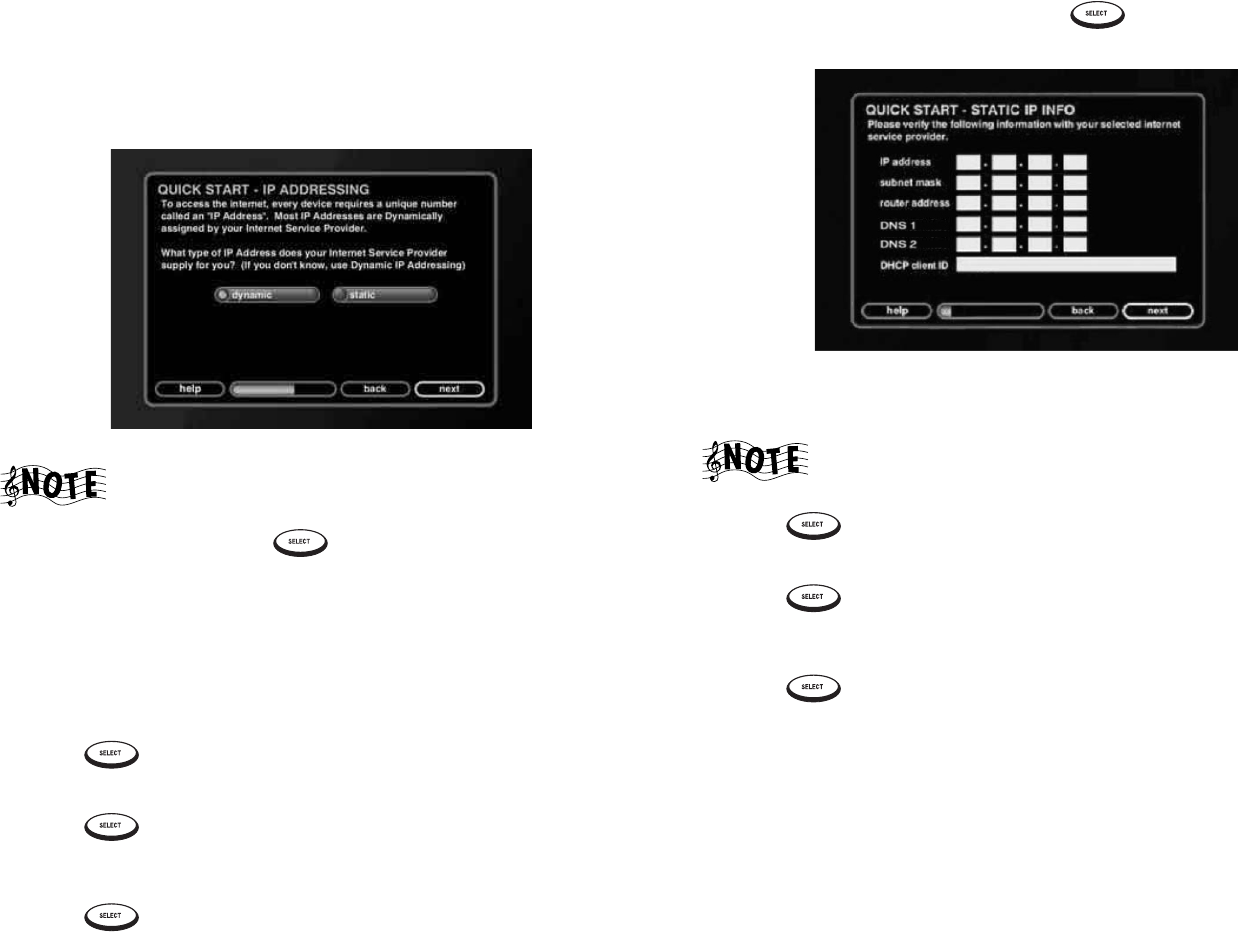
Continuing Quick Start with an Ethernet Connection
See page 20 for more information on connecting Entré to your home network
using Ethernet.
If you selected ethernet in step 4 on page 26, Entré checks for a USB-to-
Ethernet adapter before continuing. Once it finds the adapter, the Quick Start -
IP Addressing screen appears:
If Entré does not detect a connected network, check your
Ethernet connections. See page 20 for more information on
Ethernet adapters and connections. Once the problem is
resolved, press to return to the Quick Start process.
Specify whether your network uses a dynamic or static IP address (see page 27
for more information). If you're not sure what type of IP address your network
uses, select Dynamic.
Using Dynamic IP Addresses
If your home Ethernet network uses a dynamic IP address:
1. Press . The Quick Start - Zip Code screen appears.
2. Enter your Zip Code.
3. Press . Entré then automatically installs Internet radio stations and
downloads information about FM/AM radio stations in your area. When
Entré is finished, a welcome screen appears.
4. Press to begin enjoying Entré. If the connection is not successful,
see page 30.
Using a Static IP Address
1. Move to static on the screen and press . The Quick Start - Static IP
Info screen appears:
Enter the IP address information provided by your ISP or network adminis-
trator.
The IP address, subnet mask, gateway address, and DNS 1
fields are required.
2. Press . The Quick Start - Zip Code screen appears.
3. Enter your Zip Code.
4. Press . Entré then automatically installs Internet radio stations and
downloads information about FM/AM radio stations in your area. When
Entré is finished, a welcome screen appears.
5. Press to begin enjoying Entré. If the connection is not successful,
see page 30.
How Do I Configure Internet Setup?
Complete Guide to Your Entré Entertainment Hub, ver. 2.0 29
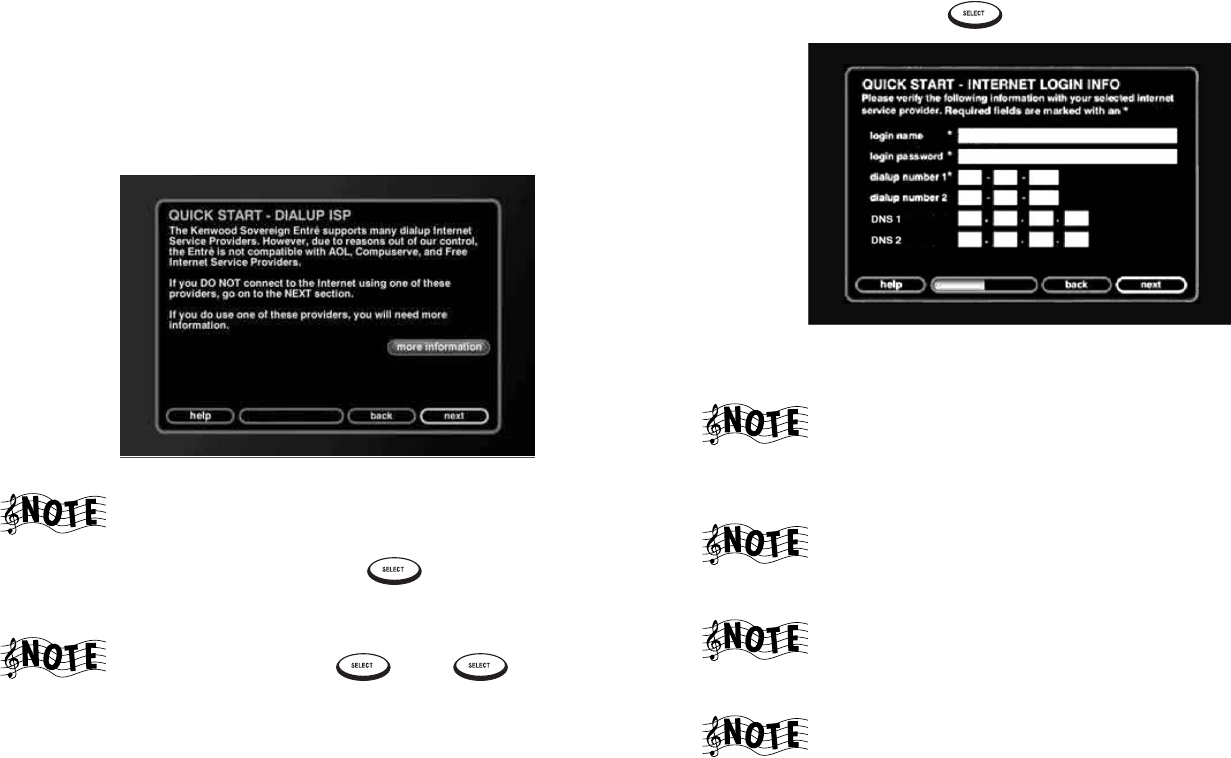
Continuing Quick Start with a Dialup Connection
See page 22 for more information on connecting Entré to your home network
using its internal modem.
If you selected dialup modem in step 4 on page 26, Entré automatically checks
for a dial tone on the connected line. Once it finds a dial tone, the Quick Start -
Dialup ISP screen appears:
If Entré does not detect a dial tone, ensure that Entré is
properly connected to your phone line. See page 22 for more
information on dialup modem connections. Once the
problem is resolved, press to return to the Quick Start
process.
If you use AOL, Compuserve, or a free ISP, highlight more
information and press . Press again to continue
setup.
1. Highlight next and press if you have a supported ISP.
2. Enter the login name, password, and dialup number(s) for your dialup ser-
vice account.
The login name, login password, dialup number 1, DNS 1 and
DNS 2 fields are all required.
• Enter 198 - 6 - 1 - 1 into the DNS 1 fields.
• Enter 198 - 6 - 1 - 2 into the DNS 2 fields.
Some ISPs require that you type your entire e-mail address,
(for example, “jsmith@isp.net”), as opposed to just your
username (“jsmith”).
When you enter a password in the login password field, the
characters appear as entered. However, once you move past
that field, each character appears as an asterisk.
If your ISP connection is a local call, leave the Area Code field
of the phone number empty.
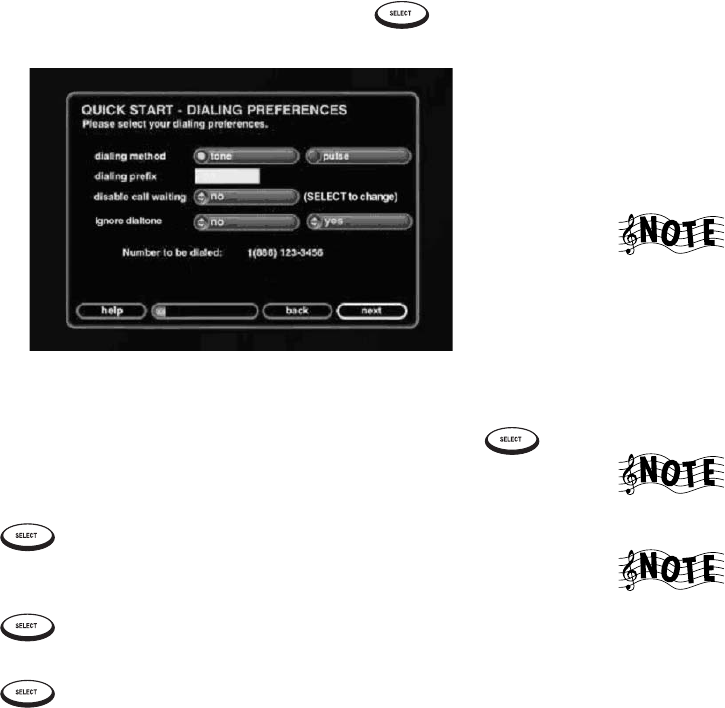
Setting Up and Configuring Your Entré
30 Complete Guide to Your Entré Entertainment Hub, ver. 2.0
3. When you have completed the information, press . The Quick Start
- Dialing Preferences screen appears:
4. Enter any Internet connection dialing preferences. For example, if you need
to dial 9 to get an outside line, you would need to enter 9 in the “dialing
prefix” field. When you have completed the information, press .
The Quick Start - Zip Code screen appears.
5. Enter your Zip Code.
6. Press . Entré then automatically installs Internet radio stations and
downloads information about FM/AM radio stations in your area. When
Entré is finished, a welcome screen appears.
7. Press to begin enjoying Entré. If the connection is not successful,
see page 30.
Press to begin enjoying Entré.
Handling Unsuccessful Connections
A screen appears, prompting you to do one of the following:
•Return to the Quick Start process to change the information entered. Select
next on the screen.
•Retry the connection. Select the retry button on the screen.
•Cancel the connection and use Entré without connecting to the Internet.
Select cancel on the screen.
If you cancel the connection at this point, you will not be able
to access many of Entré’s features, which include:
downloading CD or DVD information, connecting to Internet
radio stations, or automatically updating Entré. However, you
can reconnect to the Internet later, enabling those options.
After you complete Quick Start, and you’ve begun using Entré,
you can still change any Internet configurations or your User
Profile from Entré Setup. See page 32 for more information on
these options.
If you have trouble connecting to the Internet, see “How Do I
Solve Internet Connection Problems?” on page 142 for
Internet troubleshooting tips.
After you complete Quick Start, and you’ve begun using
Entré, you can still change any Internet configurations or your
User Profile from Entré Setup. See page 32 for more
information on these options.
How do I Install Kenwood Entré Media Manager Software?
Complete Guide to Your Entré Entertainment Hub, ver. 2.0 31
How do I Install Kenwood Entré Media Manager Software?
Media Manager software allows Entré and your computer to share music files
downloaded from the Internet or your portable digital music player. This
powerful tool makes it easy to move music between Entré and your computer,
all from the comfort of your computer workstation.
To download the media manager:
1. Visit http://www.kenwoodusa.com/register/cddbnews.jsp#entre. Once the
download begins, you are prompted to save the installation files to your
computer.
2. Note the directory where you saved the file.
3. The file you download is a .ZIP file (meaning it is compressed and contains
several files). Locate the file and unzip it. If you do not have a zip utility,
visit www.winzip.com for a free trial copy.
Once the files are unzipped into their own directory, you are ready to install.
To install the media manager:
1. Double-click MediaManager [version].exe.
2. Follow the instructions on-screen.
To begin using Kenwood Entré Media Manager, select it from the Windows
Start|Progams menu.
If Media Manager cannot see your Entré, check the version number of the Entré
software (see “Utilities Information” on page 34 for instruction) and of the
Media Manager (click Help|About). They should both be the most recent
versions available. If you need further help, contact Kenwood customer
support. Be prepared to provide the version information for both Entré and
Media Manager.
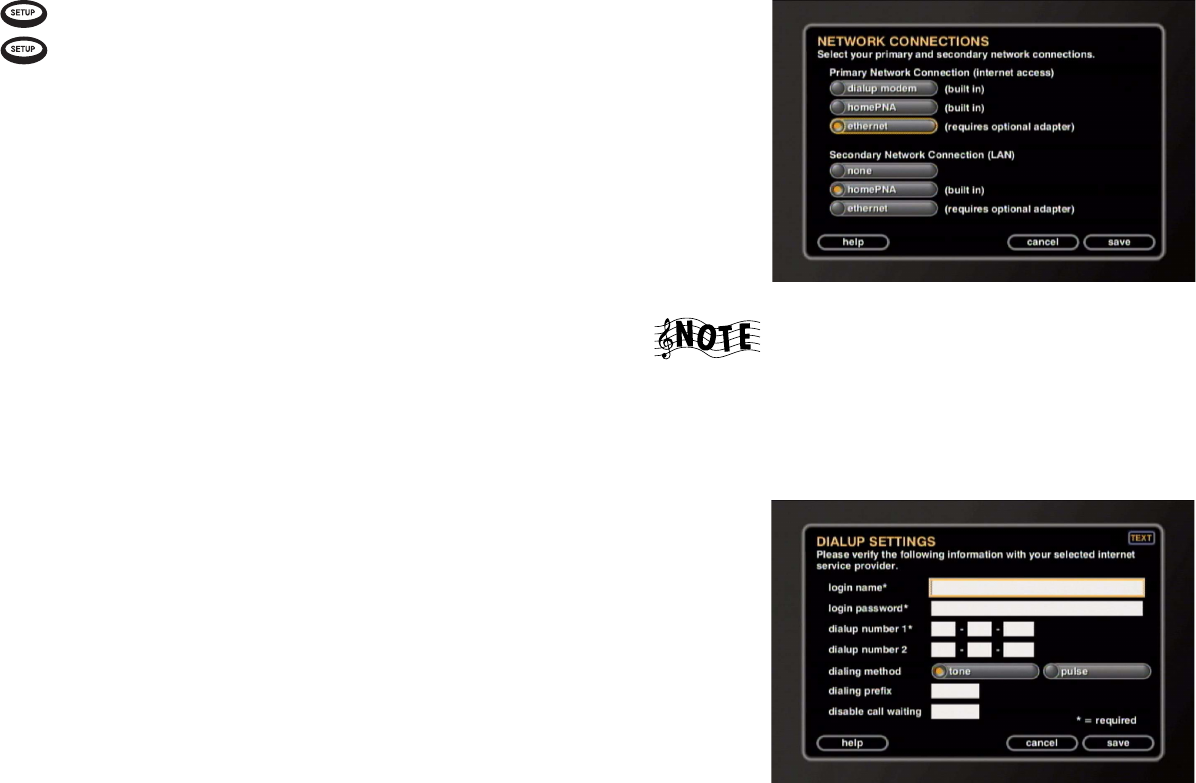
Setting Up and Configuring Your Entré
32 Complete Guide to Your Entré Entertainment Hub, ver. 2.0
How Do I Use Entré’s Setup Menus?
After configuring Entré for the Internet, you are ready to begin using Entré to
explore your music and movie collection. However, Entré has many settings and
functions that make it more flexible and enhance its capabilities. These options
are accessed via the Setup menu.
Press to access the Setup Menu. To exit the Setup mode at any time,
press again.
User Information
Zip Code: Allows you to specify a zip code. You entered this information
during the Internet Setup process. If you move, enter your new Zip Code here.
Time Zone: Allows you to specify a time zone. Entré automatically establishes
your Time Zone based on the Zip Code you enter during the Quick Start
process. If you move, you may need to change your Time Zone here.
Privacy Policy: This is the Kenwood and OpenGlobe privacy policy.
Internet Configuration
You entered this information during the Internet Setup process. If you change
your Internet access (new ISP, upgrade to DSL, etc.), you need to return to this
screen and update this information.
Network Connections
Select the type of connections you use for your Primary Network (Internet
access) and your Secondary Network (your internal network to Axcess Remote
Portals).
If you are using one or more Axcess Remote Portals with your
Entré, you must select “HomePNA” as your Secondary
Network Connection.
Dialup Settings
If you are using Entré’s built-in modem to access the Internet, enter your dialup
information here.
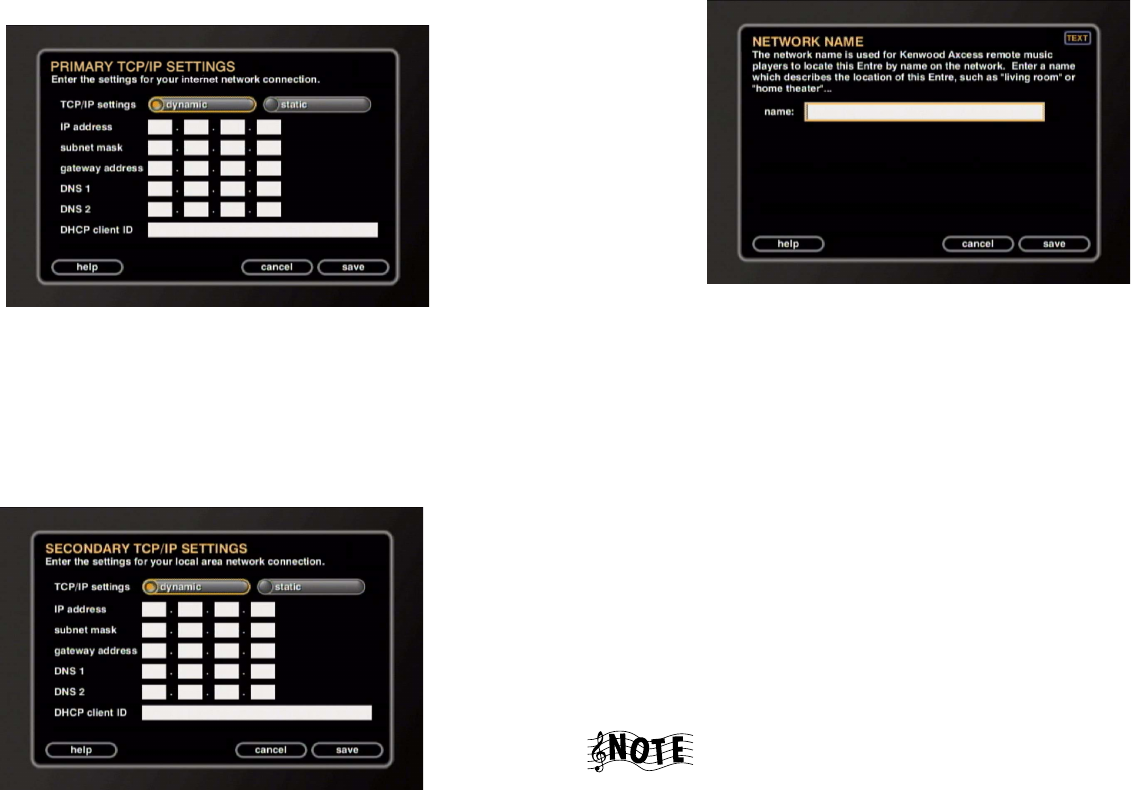
How Do I Use Entré’s Setup Menus?
Complete Guide to Your Entré Entertainment Hub, ver. 2.0 33
Primary TCP/IP Settings
Enter your Internet network connection settings here. Your IP address, Gateway
and Network Mask information can be found on the System Information page
of Entré's Utilities Menu. For more information about the Utilities Menu, see
“Utilities Information” on page 34. If you don’t have the other information, you
can get it from your ISP or network administrator.
Secondary TCP/IP Settings
Enter your local network connection settings here. Your IP address, Gateway
and Network Mask information can be found on the System Information page
of Entré's Utilities Menu. For more information about the Utilities Menu, see
“Utilities Information” on page 34. If you don’t have the other information, you
can get it from your network administrator.
Network Name
If you have more than one Entré on your network and are using an Axcess
Remote Portal, you need to name each Entré so they can be identified by
Axcess. We suggest using names that describe the Entré’s location, such as
“library”, or “home theater”.
Preferences
Music Recording Preferences: Choose from different bit rates for
MP3 music encoding. For more information, see “Recording from a CD to
Entré’s Storage System” on page 85.
Screen Saver Preferences: Select the amount of time Entré may be inactive
before its screen saver activates. The default time of inactivity before the screen
saver activates is 30 minutes.
Automatic Update Preferences: Entré contains software that enables its
sophisticated features. from time to time, Kenwood and OpenGlobe may
update this software to add new features or streamline existing ones. Entré is set
up to check for new software updates automatically when it is first configured,
then once a week after that. This area allows you to specify what time of day
you want Entré to check for updates. We recommend choosing a time when
Entré is not in use.
If Entré was unsuccessful in performing an automatic update,
the blue ‘Radio’ and ‘Music’ lights on its front panel flash. It
may also display a message about the unsuccessful update on
the screen after you turn Entré and your TV on. After you exit
from the message you can use Entré normally. If you get this
message repeatedly, contact your ISP.

Setting Up and Configuring Your Entré
34 Complete Guide to Your Entré Entertainment Hub, ver. 2.0
Audio and Video Settings
Audio Input Selection: Tell Entré what type of component is connected to
each of its audio inputs: analog, optical digital, and coaxial digital. Press
until the type of component connected to the input is displayed, then use
to move to the next input.
Screen Centering: Use to center the image on your TV screen.
Brightness, Contrast, and Sharpness: Use the test images on these screens to
easily adjust your TV controls to achieve the best picture possible.
Color Bars: Use this test pattern to easily adjust your TV's color and tint
controls.
Changer Management
Quick Lookup: Have Entré check the connected changer to see if any discs
have been added or removed, and get disc information for any that have.
Lookup Range: Have Entré get disc information for a specific range of discs in
a connected changer.
Lookup All: Have Entré get disc information for all discs in a connected
changer. (With a full changer, this can take between 3 and 4 hours if you have a
dial-up Internet connection and it must be continuously on during this period.)
Changer Statistics: Have Entré give you information about how many and
what types of discs are in a connected changer, and how many have unknown
disc information.
Security and Parental Controls
Password Protection: Set up a numeric password to access the Setup Menu.
Movie Ratings: Have Entré hide all movies above the rating you choose. For
example, if you decide to hide all movies with a rating above
PG-13, an R-rated DVD in your changer will not show up on the Movie Guide
screen. (This does not block direct access to discs from the changer's controls.)
See your DVD player’s instruction manual for information about its ratings
feature.
Utilities Information
System Information: Contains information about your Entré, including the
version of software it currently uses.
Update Software: Have Entré search the OpenGlobe server and download the
latest software updates. Entré will also automatically do this once a week. See
“Preferences” on page 33, for more information about Automatic Updates.

Complete Guide to Your Entré Entertainment Hub, ver. 2.0 35
Chapter 2: Getting to Know Your Entré
Entertainment Hub
Welcome to your Kenwood Sovereign Entré Guide. Entré provides an easy
browsing system that lets you enjoy watching and listening to all your
entertainment media—from CDs to radio, or MP3s to DVDs.
In the mood for an action or adventure movie? Entré's Groups allow you to
look for a title by category.
Rather listen to jazz? The same easy-to-navigate system lets you choose an
album or even set up and play your own mixes of favorite tracks.
Not sure if your favorite song is on a CD in your compatible changer or an
MP3 file on Entré's internal music storage system? With Entré, it doesn’t
matter—find and play music using the same search system without having to
know complicated details.
Entré combines sophisticated media management with an easy browsing
system. Your entertainment media has never been easier to manage—Entré
does it all for you!
Many of the features described in this manual require Entré
to be connected to a Kenwood Sovereign DVD/CD changer,
Kenwood CD changer with CDDB capability, and/or a
Kenwood Sovereign Receiver. You must also have an active
Internet account to enjoy all of Entré’s features. See “How
Does Entré Connect to the Internet?” on page iii.
This chapter includes the following sections:
What’s on the Front Panel of My Entré? page 37
What’s on the Entré Remote? page 38
How Do I Begin Using Entré? page 39
How Do I Switch between Media Modes? page 44
What’s on Entré’s On-Screen Display? page 46
How Do I Use My PowerTouch III Controller with Entré? page 52
How Do I Use My Kenwood LCD Remote with Entré? page 56

Getting to Know Your Entré Entertainment Hub
36 Complete Guide to Your Entré Entertainment Hub, ver. 2.0
When using Entré with a connected Kenwood Sovereign
devices set:
• the receiver’s Input Mode to AUTO
• the changer’s play mode to NORMAL
• the changer’s digital output to PCM DOWNCONVERSION.
• the changer control to MAIN
See the receiver and DVD changer instruction manuals for
further information.
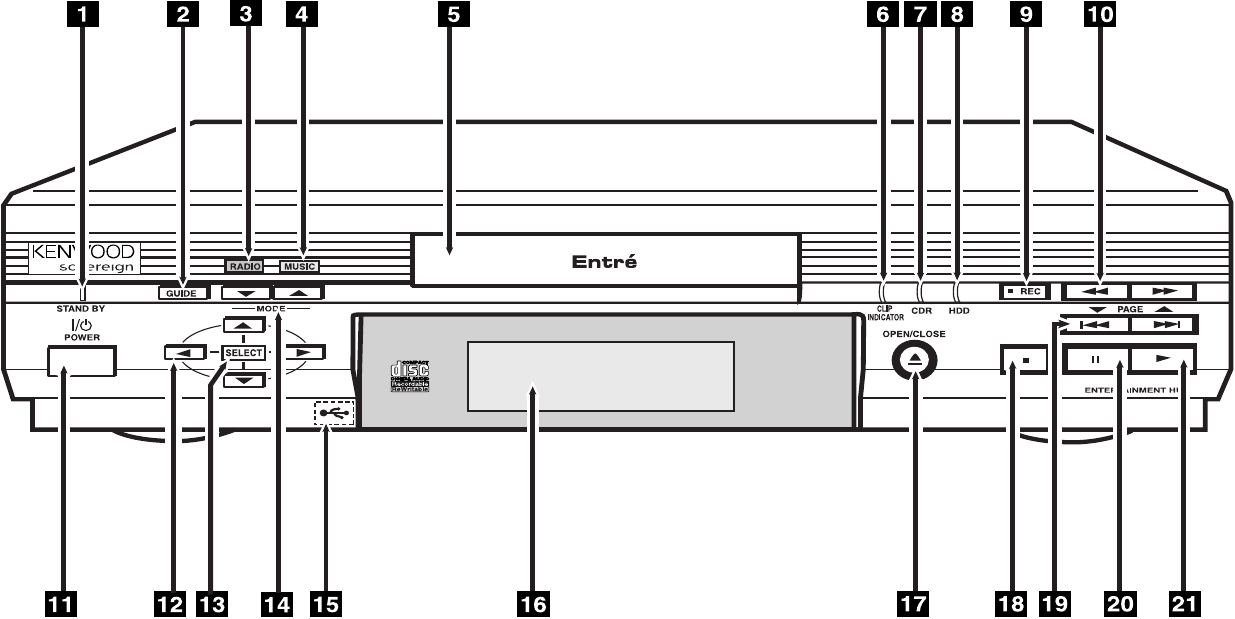
What’s on the Front Panel of My Entré?
37 Complete Guide to Your Entré Entertainment Hub, ver. 2.0
What’s on the Front Panel of My Entré?
1. Standby indicator light
2. Guide button
3. Radio indicator light
4. Music indicator light
5. CD drawer
6. Clip indicator light
7. CD Recorder indicator light
8. Music Storage Activity indicator light
9. Record button
10. Fast Reverse/Fast Forward buttons
11. Power/Standby button
12. Navigation buttons
13. Select button
14. Mode buttons
15. USB port (behind cover)
16. Display panel
17. Open/Close button
18. Stop button
19. Page buttons (Guide screen); Skip Forward/Skip Backward buttons (Player
screen)
20. Pause button
21. Play button
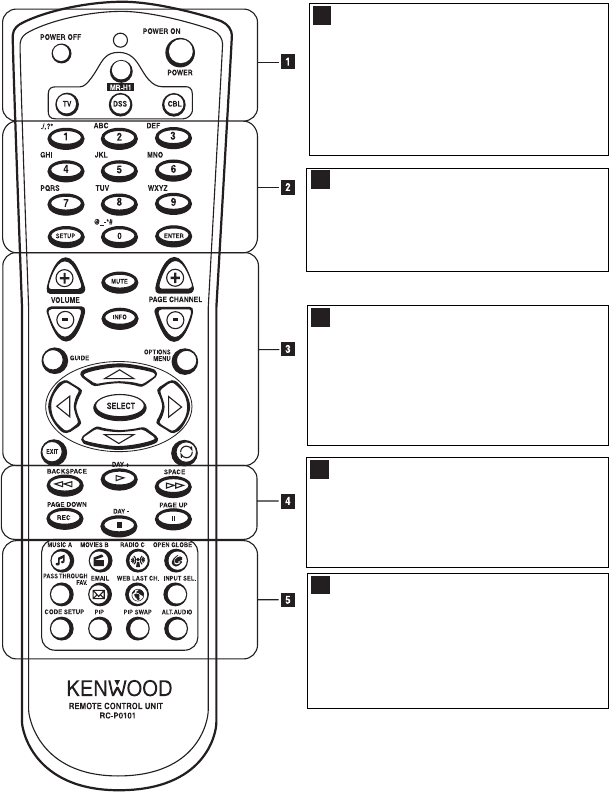
Getting to Know Your Entré Entertainment Hub
38 Complete Guide to Your Entré Entertainment Hub, ver. 2.0
What’s on the Entré Remote?
* On the remote control, Entré is referred to as MR-H1, which is its model
number designation. If you have pressed one of the other source buttons, you
must press this button again to control Entré.
Source and Power:
Turn Entré on and off, and choose
what source (Entré*, TV, Cable,
Satellite) you want to watch. See
“Applying Power“and “Selecting a
Source“ on page 40.
1
Keypad:
Enter numbers, text, and symbols.
See “Entering Numbers and Text”
on page 41.
2
Navigation and Volume:
Adjust volume, switch television
channels, or navigate Entré’s on-
screen display. See “Navigating
Entré” on page 42.
3
Player Controls:
Control your entertainment. See
“Playing Entertainment Media” on
page 50.
4
Mode and Programming:
Choose the Entré mode you want
to use, or use advanced remote
options. See “Switching Media
Modes” on page 45.
5
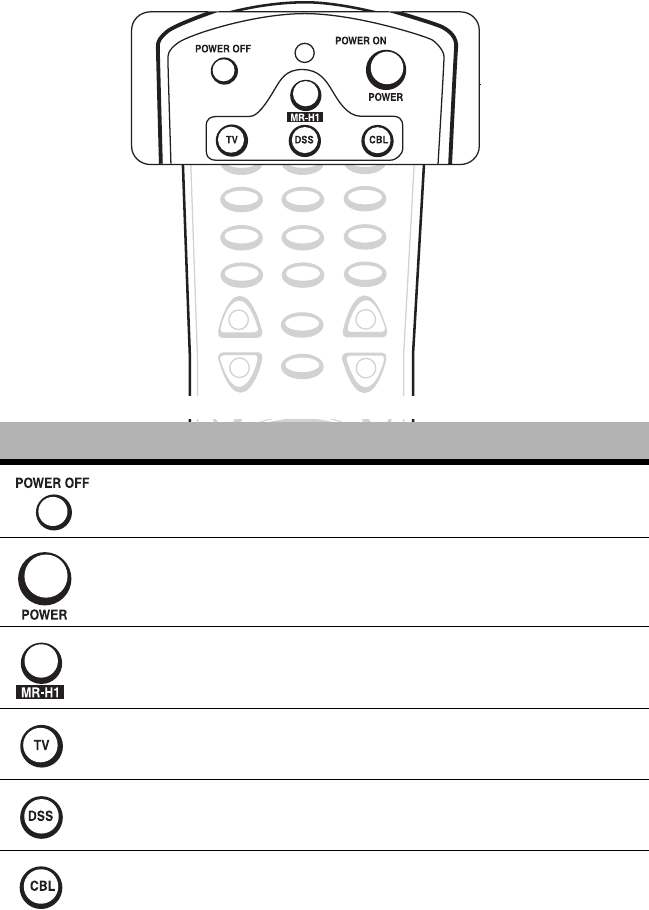
How Do I Begin Using Entré?
Complete Guide to Your Entré Entertainment Hub, ver. 2.0 39
How Do I Begin Using Entré?
After you set Entré up, it’s easy to turn on and begin using with the source
selection buttons on the remote.
* If you press any of these buttons, you must press MR-H1 again before you can
control Entré.
This button: Allows you to:
Put Entré into the Standby mode.
Power on Entré.
Control Entré.
Control your TV*.
Control your satellite tuner*.
Control your cable tuner*.
GUIDE
OPTIONS
MENU
+
--
+
VOLUME PAGE CHANNEL
MUTE
INFO
123
456
789
0
SETUP ENTER
ABC DEF
GHI JKL MNO
PQRS TUV WXYZ
./,?*
@.**#
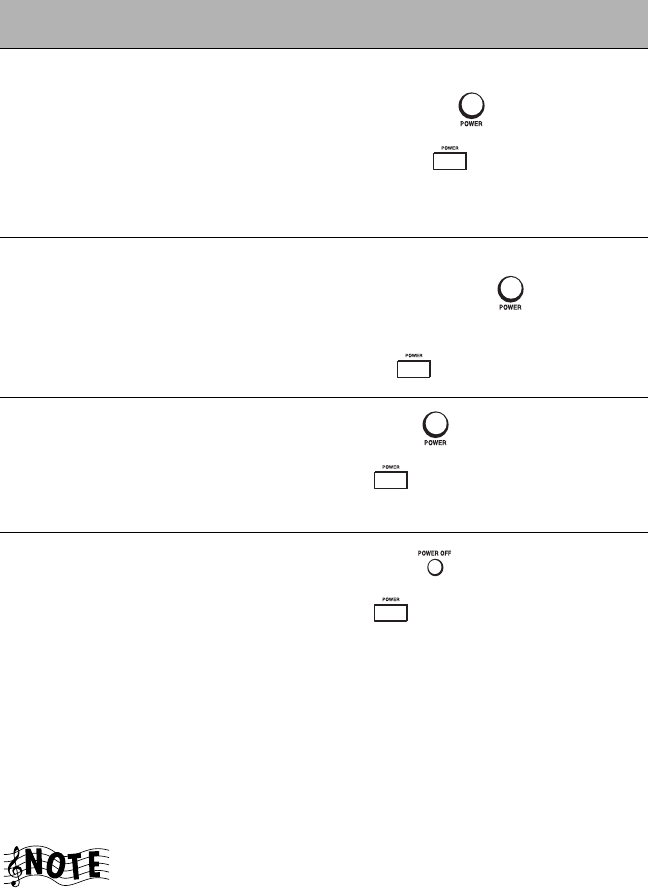
Getting to Know Your Entré Entertainment Hub
40 Complete Guide to Your Entré Entertainment Hub, ver. 2.0
Applying Power
Entré is always in one of four power states:
Selecting a Source
Once the system is powered on, press MR-H1 on the remote to use Entré. You
can also program the Entré remote to control your TV, digital satellite tuner,
and cable box, independent of operating Entré. For more information about
programming the remote, see “Entering Product Codes” on page 10.
If you press any of the other control buttons (TV, DSS, CBL),
you must press MR-H1 again before you can control Entré.
State: Meaning: Action:
Power Off: No
lights appear on
Entré’s display
panel.
Entré is
unplugged.
1. Plug Entré in.
2. Press on the remote,
or on Entré’s front
panel after the Standby
Indicator stops flashing.
Initializing: The
Standby Indicator
light is blinking.
Entré’s high-
capacity music
storage system is
initializing.
Wait until the light stops blink-
ing, then press on the
remote,
or on Entré’s front panel.
Standby: The
Standby Indicator
light is solid red.
Entré is plugged
in, but not in use. Press on the remote, or
on Entré’s front panel to
begin using the system.
Power On: The
display panel
shows text and the
Standby Indicator
goes off.
Entré is powered
and running. Press on the remote, or
on Entré’s front panel to
return the system to standby.
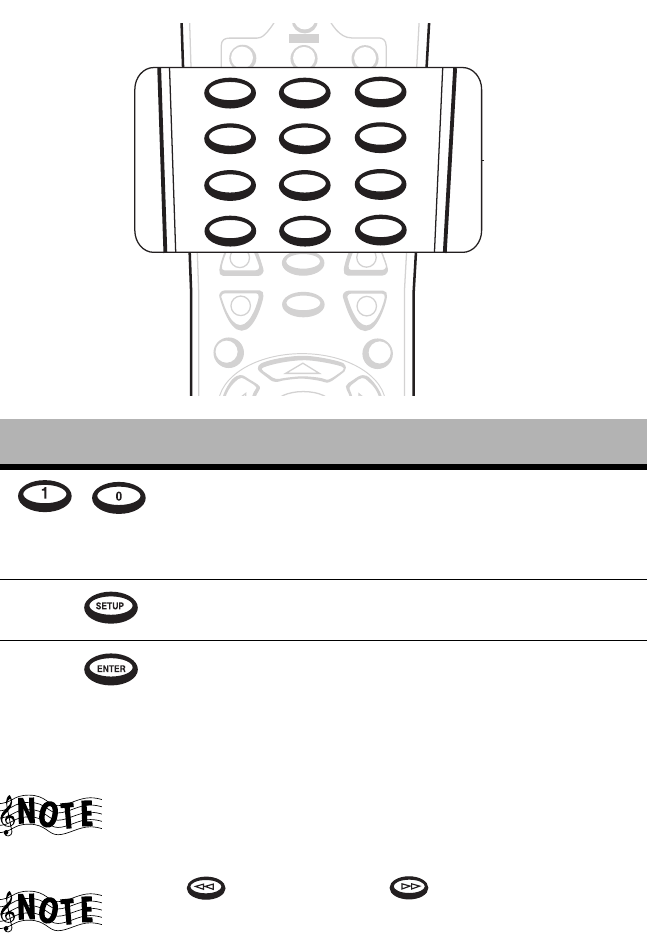
How Do I Begin Using Entré?
Complete Guide to Your Entré Entertainment Hub, ver. 2.0 41
Entering Numbers and Text
Some screens on the on-screen display require you to enter numbers or text.
Use the keypad on the remote to do so. The buttons act exactly like the
numeric buttons found on your cell phone—press the button until the
character you want appears. The keypad allows you to enter CD and DVD
titles, custom radio lineups, and much more.
Other buttons on the remote have text functions. See the following sections
for more information.
The 1 and 0 buttons each support symbols used for entering
Web and E-mail addresses. The remote supports more
symbols than are silk-screened on it.
Use to backspace and to insert spaces.
Press this button: To:
— Enter text, numbers, and symbols. Pressing a
button multiple times cycles its assigned charac-
ters through uppercase text, lowercase text, and
numbers.
Open Entré’s setup screen.
Confirm an entry and move to the next field.
GUIDE
OPTIONS
MENU
+
--
+
VOLUME PAGE CHANNEL
MUTE
INFO
POWER
TV DSS CBL
MR-N1
123
456
789
0
SETUP ENTER
ABC DEF
GHI JKL MNO
PQRS TUV WXYZ
./,?*
@_-*#
2
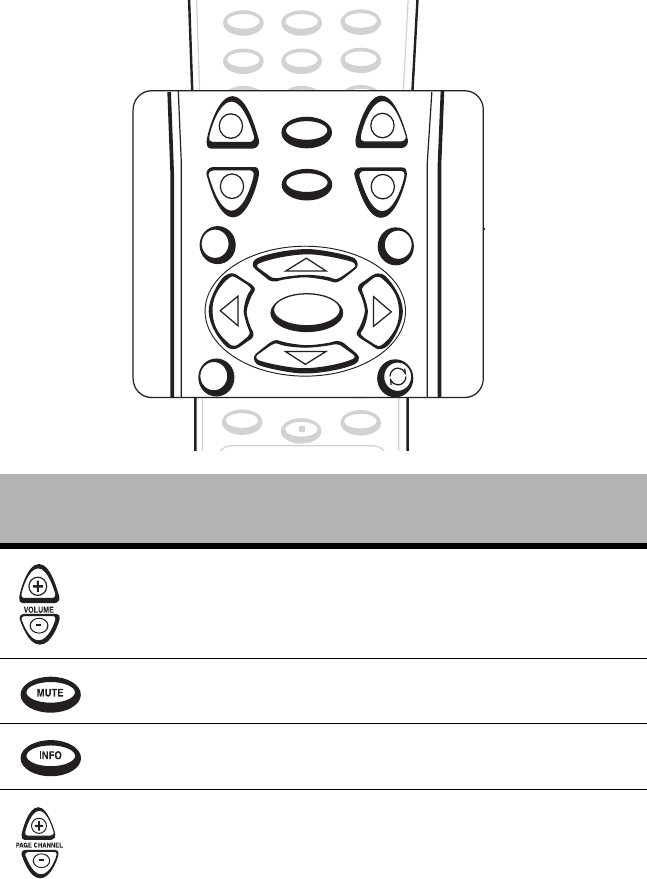
Getting to Know Your Entré Entertainment Hub
42 Complete Guide to Your Entré Entertainment Hub, ver. 2.0
Navigating Entré
Use the navigation buttons to move around Entré’s various screens, skip
tracks on CDs and DVDs, edit text fields, and access Entré’s Guide.
Depending on where they are used, some of these buttons have more than
one function.
Press this
button: To: In text entry fields to:
Raise or lower the current volume
level of a connected Kenwood
Sovereign receiver.
None.
Mute the sound of a connected
Kenwood Sovereign receiver.
None.
Display track time information for
the currently playing disc.
None.
Change to the next or previous
screen page, or move to the top
or bottom of the list showing on
the screen.
None.
DAY +
SPACE
BACKSPACE
PAGE DOWN
REC
PAGE UP
ll
DAY -
MUSIC A MOVIES B RADIO C OPEN GLOBE
456
789
0
SETUP ENTER
GHI JKL MNO
PQRS TUV WXYZ
@.**#
SELECT
GUIDE
OPTIONS
MENU
EXIT
+
--
+
VOLUME PAGE CHANNEL
MUTE
INFO
3
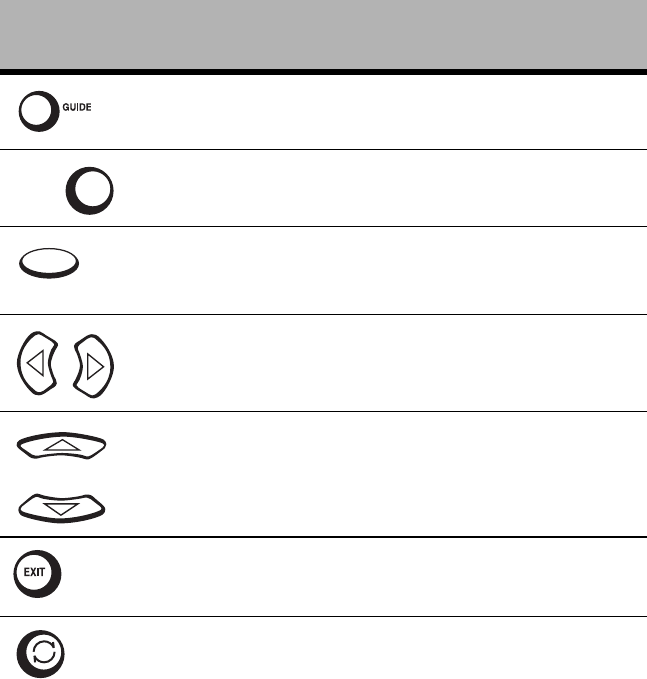
How Do I Begin Using Entré?
Complete Guide to Your Entré Entertainment Hub, ver. 2.0 43
Display the Guide for the current
Mode.
None.
Display the Options menu. None.
Play the selected track. Confirm entry and
move to next available
field.
Move the highlight bar left or
right.
Move cursor to the left
and right.
Move the highlight bar up or
down.
Move cursor up or
down one field.
Exit current screen format. Exit an options screen
without saving.
Switch play modes. None.
Press this
button: To: In text entry fields to:
OPTIONS
MENU
SELECT
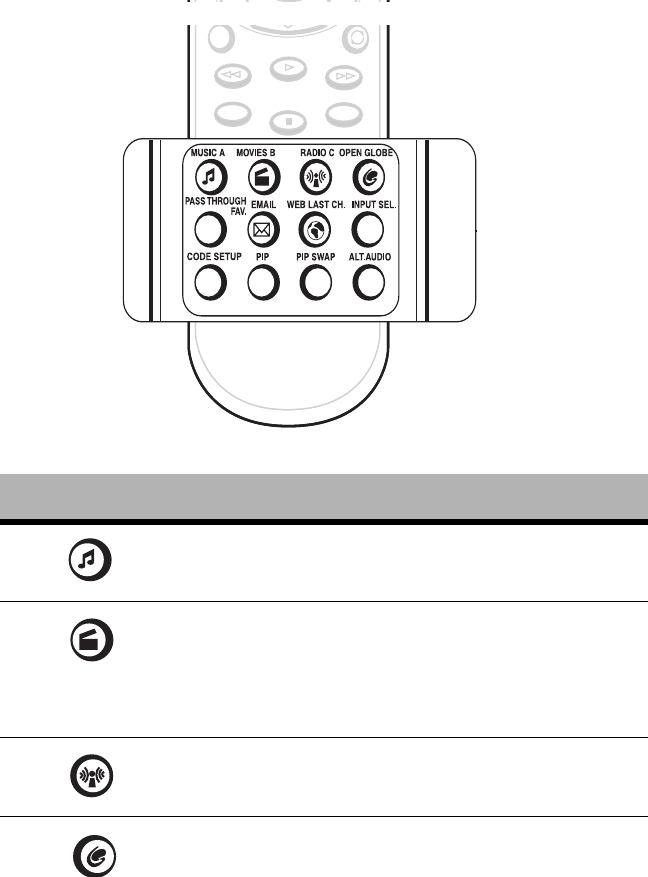
Getting to Know Your Entré Entertainment Hub
44 Complete Guide to Your Entré Entertainment Hub, ver. 2.0
How Do I Switch between Media Modes?
Entré manages many types of media, or modes, such as CDs, MP3s, movies,
and radio. Use the buttons in this section to switch from one mode to another
so you can listen to music, view movies, or listen to the radio with the touch
of a button.
The mode buttons are on the bottom section of the remote.
Press this button: To:
Select and play MP3s and CDs.
Select and play DVDs.
(Access DVD Audio discs here until the DVD Audio
disc information database comes on-line, at which
time Entré will handle DVD Audio discs in the Music
mode.)
Select and listen to radio broadcasts, including Inter-
net radio.
Access the OpenGlobe Web site.
EXIT
DAY +
SPACE
BACKSPACE
PAGE DOWN
REC
PAGE UP
ll
DAY -
REMOTE CONTROL UNIT
RC-P0101
How Do I Switch between Media Modes?
Complete Guide to Your Entré Entertainment Hub, ver. 2.0 45
Switching Media Modes
Press , , or on the remote, or on Entré’s front panel to
choose a mode. When you select a new mode, the Guide screen for that
mode appears on your TV screen. See the appropriate chapter for more
information on using the media mode guides.
Turn the Entré Guide screen off. The TV then shows
whatever video source is selected on the connected
receiver.
For future capabilities.
For future capabilities.
Change the TV, cable tuner, or DSS input (when the
remote is in the TV, cable, or DSS control mode,
respectively).
Program the remote to control your TV, DSS tuner,
and cable tuner. For more information about pro-
gramming the remote, see “How Do I Set Up My
Remote?” on page 10 of "How to Connect and Set
Up Your Entré Entertainment Hub".
Activate the picture in a picture option (when the
remote is in the TV control mode). Please refer to
your TV’s instructions for more information about its
capabilities.
Swap picture in a picture (when the remote is in the
TV control mode). Please refer to your TV’s instruc-
tions for more information about its capabilities.
Switch to an alternate audio source (when the
remote is in the TV or DSS control mode).
Press this button: To:
PASS THROUGH
EMAIL
WEB LAST CH.
INPUT SEL.
CODE SETUP
PIP
PIP SWAP
ALT.AUDIO
MODE
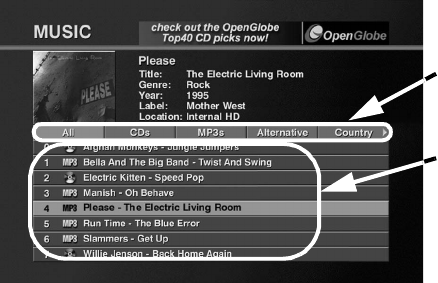
Getting to Know Your Entré Entertainment Hub
46 Complete Guide to Your Entré Entertainment Hub, ver. 2.0
What’s on Entré’s On-Screen Display?
The on-screen display is another important Entré tool. No matter what mode
(Music, Movies, etc.) you choose in Entré, you’ll use three basic screens:
•The Guide screen to browse and select media
•The Player screen to view/listen to your selection
•The Options screen to set up each of the modes
How Is My Media Organized?
On every Guide screen, your media is organized by Group, then by Channel.
•Groups are different genres, or categories, of entertainment media.
•Channels are entertainment selections within a particular group.
Groups: Entré automatically organizes your media into Groups to make it
easier to find. These automatic groups are based on information encoded on
the media or downloaded from an Internet database. For example, in Music
mode Entré might create an “Alternative” group or a “Jazz” group, depending
on your Music collection. Entré also allows you to create your own custom
groups.
For more information about:
• Music Groups, see page 62.
• Radio Groups, see page 124.
• Movie Groups, see page 113.
If you don’t have any media for a particular group, it won’t appear on your
Guide screen. For example, if you don’t own any jazz albums, the Jazz group
wouldn’t appear in your Music Guide.
Groups
Channels

What’s on Entré’s On-Screen Display?
Complete Guide to Your Entré Entertainment Hub, ver. 2.0 47
All modes have a group “All” that lists all media in
alphabetical order.
Channels: Each individual piece of entertainment media is a Channel—those
Channels are the selections within each Group. For example, in Radio mode,
a Channel is a radio station. In Movie mode, a Channel is a DVD.
Following is a sample list of Channels for each mode:
•Music: CD or MP3 album titles. After selecting an album title, you can
then view the individual tracks for that album.
•Radio: Radio stations, whether FM, AM, or Internet.
•Movies: DVD titles.
Entré automatically adds new Channels to the Guide as you add new media.
For example, if you insert a new DVD into your DVD changer, Entré
automatically reads the disc and lists it as a Channel.
If you have a connected DVD or CD changer, your discs
appear alphabetically, not in the order they are arranged in
the changer. The location of the disc is listed in the Channel
Information on the Guide screen.
For more information about:
• Music Channels, see page 63.
• Radio Channels, see page 126.
• Movie Channels, see page 114.
Browsing Entertainment Media
The Guide screen helps you navigate the available choices for the current
mode (such as radio stations or CD album titles) and select an item to play.
Though the content of the Guide screen is different for each mode (for
example, the Movie Guide contains movie titles and the Radio Guide
contains stations), you operate the Guide screen the same way for each
mode.
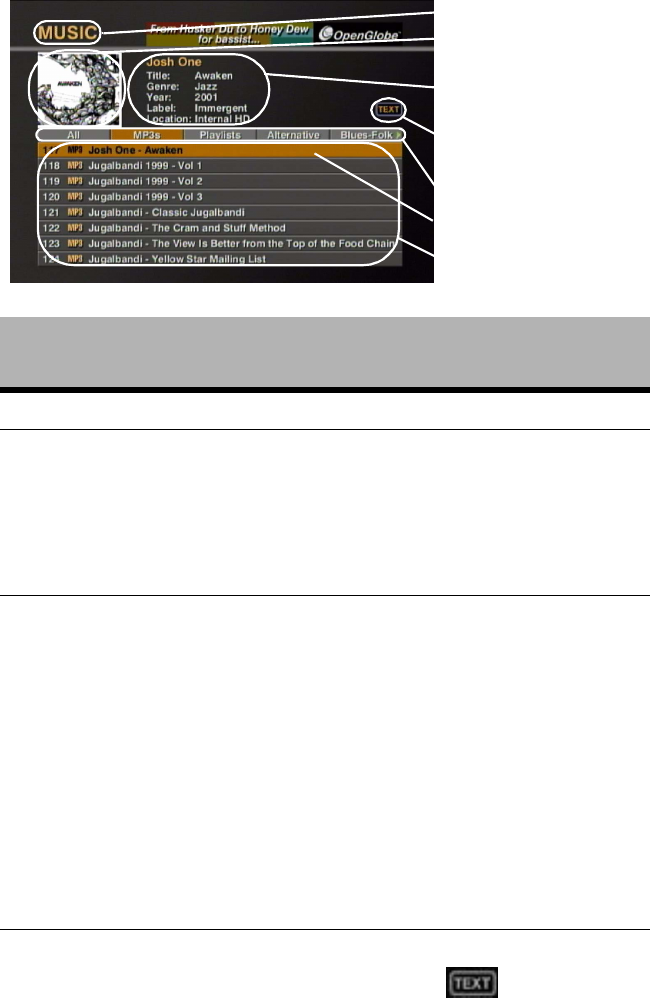
Getting to Know Your Entré Entertainment Hub
48 Complete Guide to Your Entré Entertainment Hub, ver. 2.0
Each Guide screen has several common elements:
This screen
element: Does this:
1. Current Mode Displays the current media mode.
2. Cover Art for
Current Channel
Shows cover art currently associated with the selec-
tion. For more information about selecting cover
art for:
• Music, see “Editing Disc Information” on
page 74.
• Movies, see “Selecting Cover Art” on page 122.
3. Channel
Information
Shows general information about the current
Channel, including:
•Title
•Genre
• Location in a connected disc changer, if
applicable
For more information about editing information for:
• Music, see “Editing Disc Information” on
page 74.
• Radio, see “Editing Stations” on page 136.
• Movies, see “Editing Disc Information” on
page 120.
4. Numeric/Text
Entry Indicator
Notifies you that you can enter numbers in the cur-
rent box. A similar indicator, , shows that
you can enter text. Text boxes also accept numbers.
3. Channel Information
4. Numeric/Text Entry
Indicator
5. Groups
7. Channels
2. Cover Art for Current
Channel
1. Current Mode
6. Highlight Bar
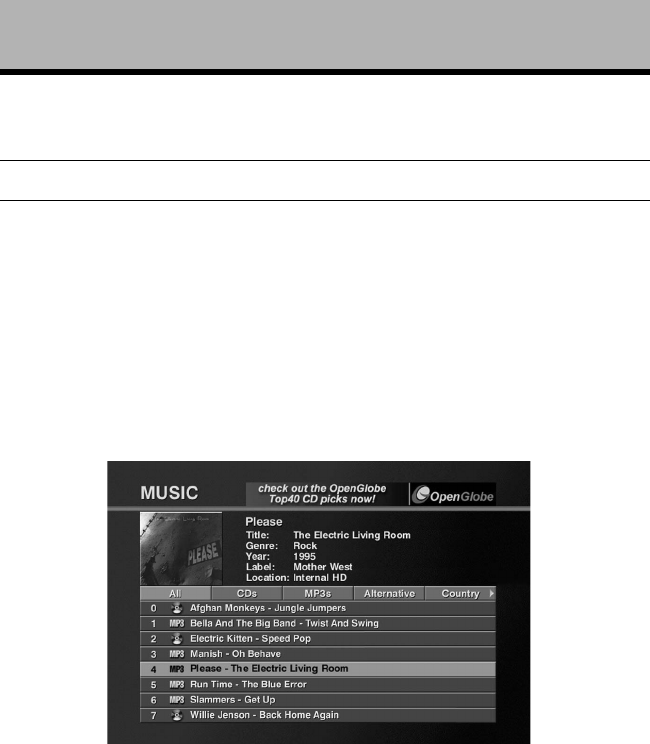
What’s on Entré’s On-Screen Display?
Complete Guide to Your Entré Entertainment Hub, ver. 2.0 49
How Do I Access the Guide Screen?
Press GUIDE on the remote or the front panel. The Guide screen for the
current mode (in this example, Music) appears:
For more information about using the Guide screen in:
• Music, see “How Do I Browse and Play My Music Collection?” on
page 60.
• Radio, see “How Do I Browse and Listen to Radio Stations?” on
page 124.
• Movies, see “How Do I Browse and Play My Movie Collection?” on
page 112.
5. Groups Shows categories of entertainment media. For more
information about Groups, see “Groups” on
page 46.
6. Highlight Bar Indicates which Channel is currently selected.
7. Channels Shows individual pieces of entertainment media.
Within each group is a list of Channels, or selections.
In each mode, a Channel is one piece of media. For
example, in Radio mode, a Channel is a radio sta-
tion. In Movie mode, a Channel is a DVD.
This screen
element: Does this:
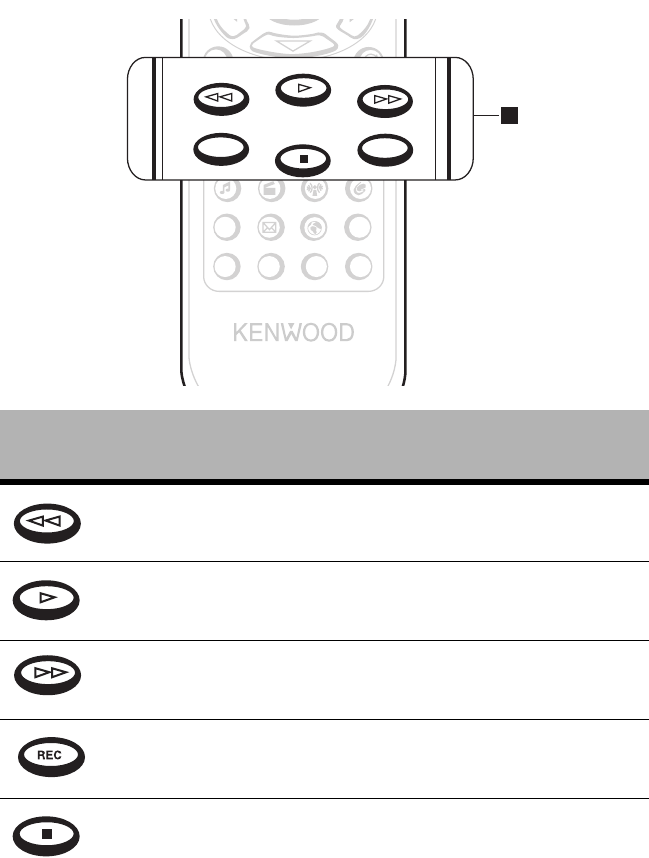
Getting to Know Your Entré Entertainment Hub
50 Complete Guide to Your Entré Entertainment Hub, ver. 2.0
Playing Entertainment Media
Play selected media from the Guide screen with the touch of a button. Use
the player control buttons on the remote or front panel to use Entré’s CD
drive, operate a connected Kenwood Sovereign DVD or CD player, and edit
text fields.
Press this
button: To: While entering text to:
Rewind. Backspace and delete an
entry.
Play. None.
Fast forward. Insert a space.
Record or confirm selection. Page down.
Stop or cancel selection. Enter the text and move to
the next field.
SELECT
EXIT
REMOTE CONTROL UNIT
RC-P0101
MUSIC A MOVIES B RADIO C OPEN GLOBE
EMAIL WEB LAST CH. INPUT SEL.
PIP PIP SWAP ALT.AUDIO
PASS THROUGH
FAV.
CODE SETUP
4
DAY +
SPACE
BACKSPACE
PAGE DOWN
REC
PAGE UP
ll
DAY -
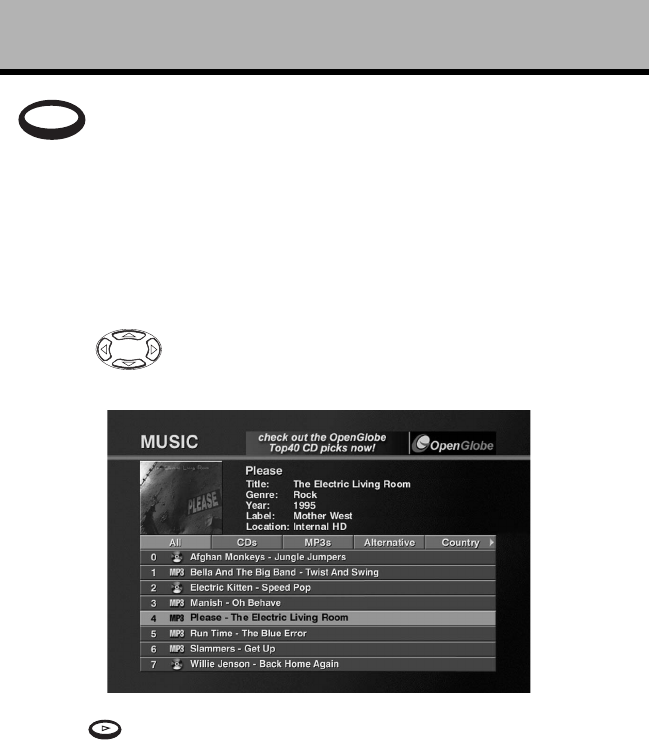
What’s on Entré’s On-Screen Display?
Complete Guide to Your Entré Entertainment Hub, ver. 2.0 51
How Do I Begin Enjoying My Media?
To b eg in pla y i ng m edia:
1. Select a mode (Music, Movies, or Radio).
2. Press GUIDE on the remote or front panel to open its Guide screen.
3. Using on the remote or front panel, move the highlight bar to a
Channel (an album title, radio station).
4. Press on the remote or front panel to play the selection.
For more information about playing entertainment media in:
• Music, see “How Do I Browse and Play My Music Collection?” on
page 60.
• Radio, see “How Do I Browse and Listen to Radio Stations?” on
page 124.
• Movies, see “How Do I Browse and Play My Movie Collection?” on
page 112.
Pause. Page up.
Press this
button: To: While entering text to:
PAGE UP
ll
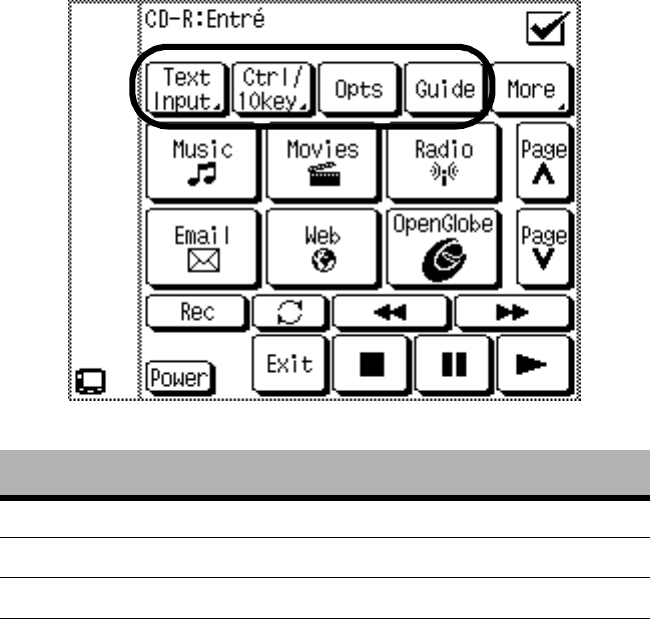
Getting to Know Your Entré Entertainment Hub
52 Complete Guide to Your Entré Entertainment Hub, ver. 2.0
How Do I Use My PowerTouch III Controller with
Entré?
If you are using a Kenwood PowerTouch III controller, which is standard with
the VR-5900 receiver, or available as an option for other Kenwood Sovereign
receivers, use it to control all of Entré’s features. This gives you command of
your entire home entertainment system from a single controller.
For more information about setting up your PowerTouch to control Entré, see
“How Do I Use My PowerTouch III Controller with Entré?” on page 12.
Using Entré with PowerTouch III
Across the top of the main menu are buttons used for accessing text entry,
number entry, option, and Guide screens:
Press this button: To:
Text Input Display the PowerTouch text entry screen.
Ctrl/10 key Display the PowerTouch numeric entry screen.
Opts Display the options screen.
Guide Display the Guide screen.
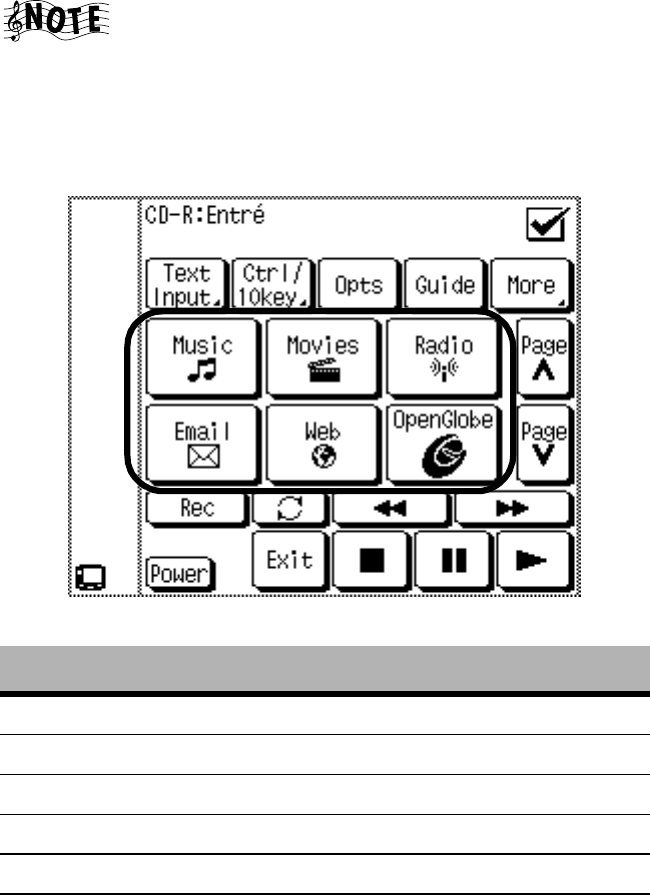
How Do I Use My PowerTouch III Controller with Entré?
Complete Guide to Your Entré Entertainment Hub, ver. 2.0 53
On any PowerTouch III screen, touch the check-mark box in
the upper right-hand corner to return to the previous screen.
Switching Modes on PowerTouch III
Pressing any of the six buttons located in the center of the PowerTouch III
changes to a different entertainment mode and displays the appropriate
Guide on your TV:
Press this button: To:
Music Display the Music Guide.
Movies Display the Movie Guide.
Radio Display the radio Guide.
Email For future capabilities.
Web For future capabilities.
OpenGlobe Access the OpenGlobe Internet site.
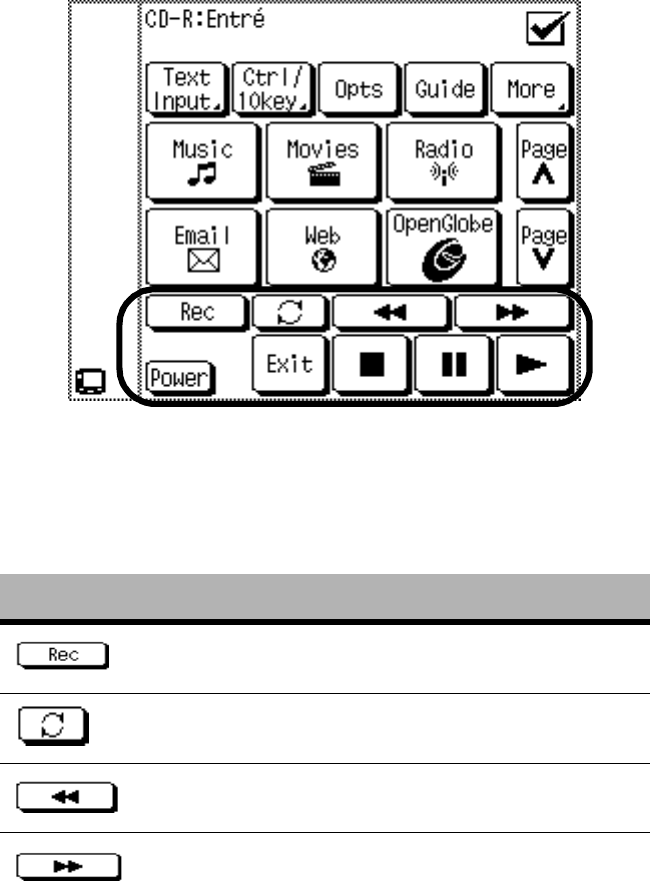
Getting to Know Your Entré Entertainment Hub
54 Complete Guide to Your Entré Entertainment Hub, ver. 2.0
Using Play Controls on PowerTouch III
Use the control buttons located at the bottom of the display to:
• Control play of CDs and DVDs.
• Control power.
How Do I Control Play with PowerTouch III?
The control menu works exactly like the controls for the remote included with
Entré. These buttons make it easy for you to control your entertainment
media using the PowerTouch III, regardless of which device is playing.
Press this button: To:
Record various media formats.
Switch between play modes.
Scan selected media backwards.
Scan selected media forwards.
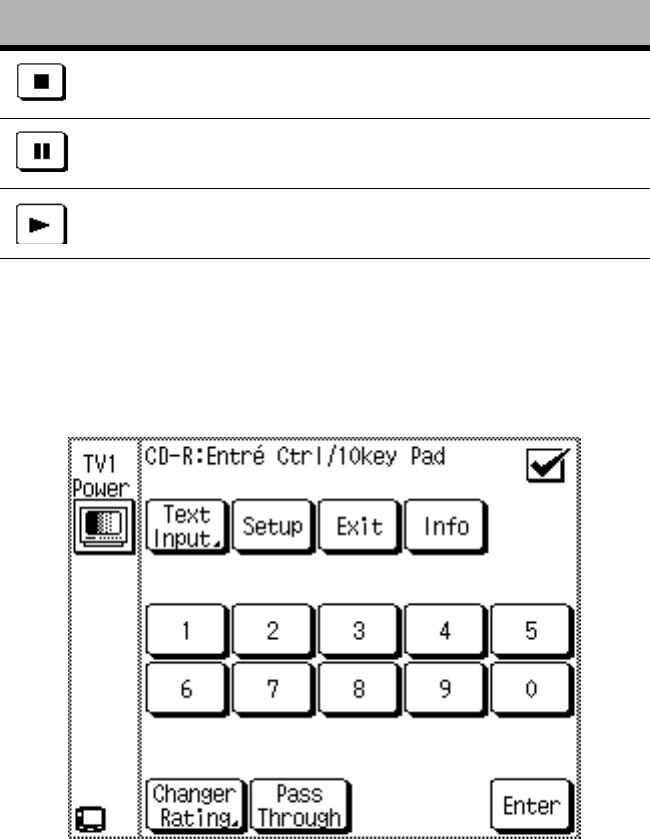
How Do I Use My PowerTouch III Controller with Entré?
Complete Guide to Your Entré Entertainment Hub, ver. 2.0 55
How Do I Enter Numbers with PowerTouch III?
Press CTRL/10KEY on the main page to view the keypad menu.
This screen can be used to make numeric entries whenever needed. Touching
ENTER places the entry into the field and moves to the next available field on
the screen. You can also make numeric entries from the Text Input screen.
See page 56 for more information about using the Text Input screen.
Stop the selection.
Pause the current selection.
Play selected media.
Power Turn Entré on and put it into the
Standby mode.
Press this button: To:
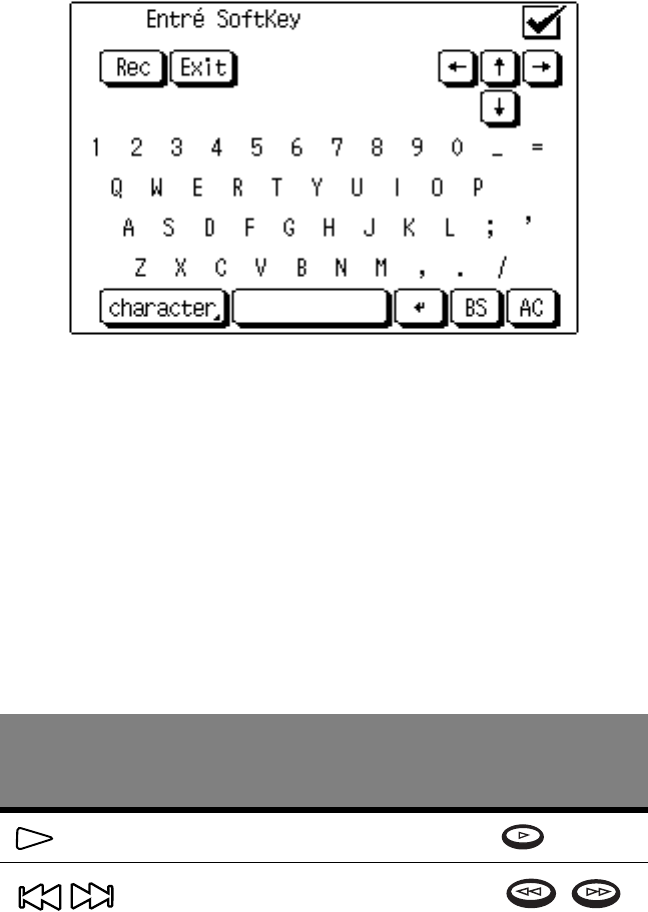
Getting to Know Your Entré Entertainment Hub
56 Complete Guide to Your Entré Entertainment Hub, ver. 2.0
How Do I Enter Text with PowerTouch III?
Press TEXT INPUT on the main menu to view the text screen:
Use the text screen for both text and numeric entries. Adding custom titles to
CDs or naming Groups and Playlists is especially easy from this screen.
How Do I Use My Kenwood LCD Remote with Entré?
If you have connected a Kenwood Sovereign VR-5700, VR-5090, or VR-5080
receiver to your Entré, you can use its LCD remote to control Entré’s features.
This gives you command of your entire home entertainment system from a
single controller.
Before using your LCD remote to control Entré, you must first program it. For
information about programming your LCD remote, See “How Do I Set Up
My Kenwood LCD Remote to Control Entré?” on page 13. Once you do so,
the LCD remote buttons operate the following Entré functions:
Press this button
on the receiver
remote:
To:
Like this button
on the Entré
remote:
Play.
Backspace, forward space; rewind
and fast-forward.
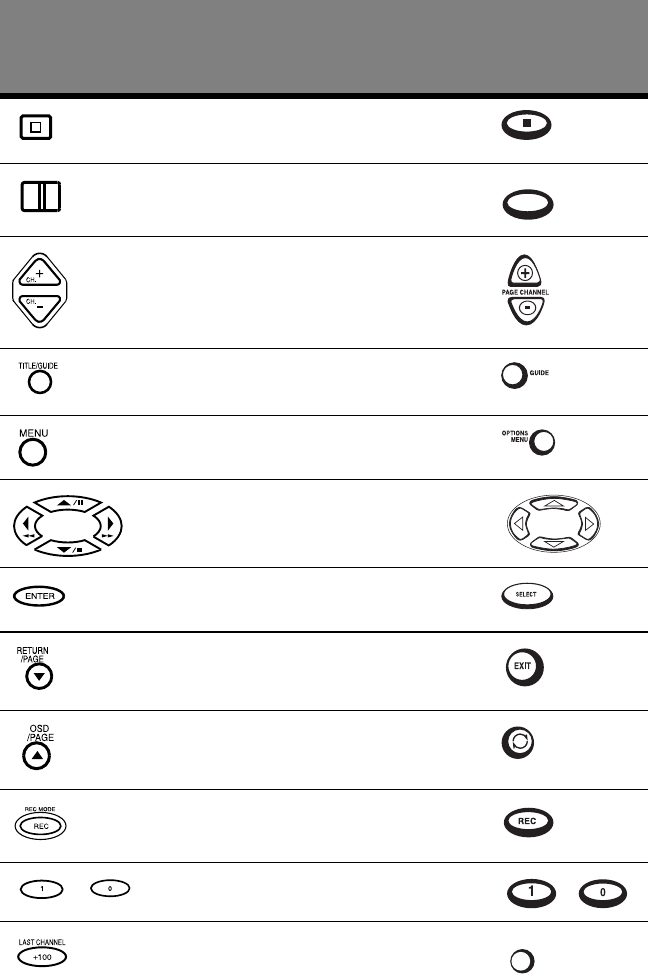
How Do I Use My Kenwood LCD Remote with Entré?
Complete Guide to Your Entré Entertainment Hub, ver. 2.0 57
Stop play.
Pause play.
Change to the next or previous
screen page, or move to the top or
bottom of the list showing on the
screen.
Go to the Guide Screen.
Go to the Options Menu for the
current mode.
Navigate Entré screens and fields
up, down and sideways.
Confirm entry and move to next
available field, play the selection.
Exit the current screen.
Toggle ON or OFF all selected
tracks for recording.
Record or confirm a selection.
- Enter text, numbers, and symbols. -
Turn the Entré Guide screen off.
The TV then shows whatever
video source is selected on the
connected receiver.
Press this button
on the receiver
remote:
To:
Like this button
on the Entré
remote:
PAGE UP
ll
PASS THROUGH
Getting to Know Your Entré Entertainment Hub
58 Complete Guide to Your Entré Entertainment Hub, ver. 2.0
Using an Optional USB Keyboard with Entré
Entré is compatible with the following USB keyboards:
• Logitech Cordless Keyboard, model # 967090-0403. Available at Best
Buy, OfficeMax.com, OfficeDepot.com, PCConnection.com,
PCMall.com, MicroWarehouse.com.
• Logitech Internet Navigator Keyboard, model #967093-0403. Available
at CompUSA & on various Web sites.
• Belkin USB Classic Keyboard, model #F8E206-USB. Available at
BUY.com, PCConnection.com, PCMall.com, MicroWarehouse.com.
• Compaq USB Internet Keyboard, model #260725-001. Available at
Compaq.com.
Entré is not compatible with the IR keyboard included with
some Kenwood Sovereign DVD and CD changers. Not all
buttons or commands work with Entré.
Check the Kenwood USA Web site at www.kenwoodusa.com for the most
recent list of compatible keyboards.
Switch to Music Mode.
Switch to Movie Mode.
Switch to Radio Mode.
Press this button
on the receiver
remote:
To:
Like this button
on the Entré
remote:

Complete Guide to Your Entré Entertainment Hub, ver. 2.0 59
Chapter 3: Managing Your Music
Entré provides many powerful features to organize, record, and listen to your
favorite music. For example, the Music mode allows you to browse your
music collection, record music, or transfer music to a portable player.
There are three ways to open the Music guide:
• Insert an audio CD into your Entré CD drawer
• Press on the remote
• Press a mode button on the front panel
To control a CD or DVD changer from Entré, you must use a
Kenwood Sovereign DVD/CD changer, or Kenwood CD
changer with CDDB capability. Entré does not control other
changers. References in this manual to a “connected
changer” refer only to compatible Kenwood Sovereign or
Kenwood changers.
This chapter explains how to use the Music mode, and includes the following
sections:
How Do I Create My Music Collection? page 60
How Do I Browse and Play My Music Collection? page 60
How Do I Customize My Music Collection? page 66
How Do I Record Music? page 84
How Do I Transfer Music to a Portable Player? page 97
How Do I Transfer Music from the Internet to Entré? page 100

Managing Your Music
60 Complete Guide to Your Entré Entertainment Hub, ver. 2.0
How Do I Create My Music Collection?
To get you started, Entré comes with bonus music selections pre-loaded and
stored in MP3 format.
Entré provides a variety of ways to access and manage your music collection:
• Load CDs or Audio DVDs into a connected changer. See “How Do I
Browse and Play My Music Collection?” on page 60
If you have DVD-Audio discs loaded in a connected
Kenwood Sovereign DVD changer, they can be accessed via
on the remote. (They are listed as “Unknown Disc”). For
more information, see “Managing Your Movies” on
page 111.
• Add music from CDs to Entré’s music storage system. See “How Do I
Record Music?” on page 84.
• Transfer MP3 files you already have stored on your computer (either by
downloading them from a music site or by transferring them from a por-
table media player) to Entré using the Entré Media Manager. See “How
Do I Transfer Music from the Internet to Entré?” on page 100.
Your computer must be connected to Entré using Home
PNA to utilize this feature. See “How Do I Connect Entré to
My Home Network?” on page 17 for more information
regarding Home PNA.
•Use OpenGlobe’s extended features. See “Using the Internet” on
page 139.
How Do I Browse and Play My Music Collection?
Browse and select music from your collection from the Guide screen. For
more information about how to use the Guide screen, see “Browsing
Entertainment Media” on page 47.
Entré automatically reads all the discs in a connected changer. If you are
connected to the Internet, it also automatically contacts Compact Disc
Database (CDDB) and downloads available disc data for your collection.
Selecting Music to Play
Each title in your music collection appears as an individual Channel within a
Group on the Guide screen. In Music mode, a Channel might be:
• A CD or MP3 title
•An MP3 Playlist
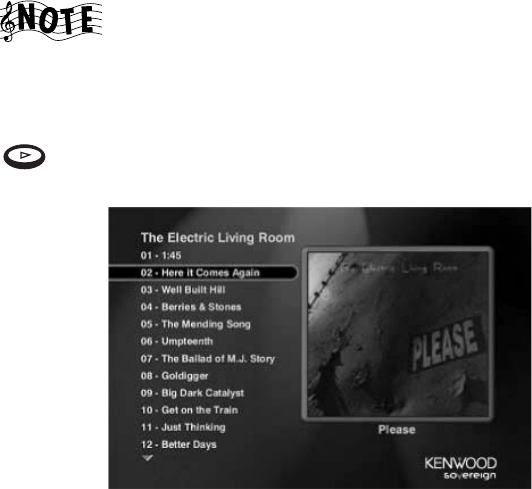
How Do I Browse and Play My Music Collection?
Complete Guide to Your Entré Entertainment Hub, ver. 2.0 61
• A custom Playlist
When you select a custom Playlist from the Guide screen,
the individual tracks on that Playlist appear as Channels
below it. For more information about Playlist Channels, see
“How Do I Browse Playlists?” on page 63.
To play music, highlight any Channel from the Music Guide screen and press
on the remote. The selected Channel begins to play, and the Player
screen appears on your TV.
If the selected Channel contains more than one track, choose different tracks
from the Player screen by pressing the up and down arrow buttons on the
remote.
Once you begin playing the selected track, Entré automatically plays the
remaining tracks in the Channel. When it reaches the last track, it stops
playing, but remains on the Player screen.
Managing Your Music
62 Complete Guide to Your Entré Entertainment Hub, ver. 2.0
How Do I Browse Music Groups?
Groups are categories, or genres of music. Groups can contain titles of:
• A particular music format (CDs, MP3s, Playlists) or
• A music genre (Country, Classical, Rock).
The “All” Group contains all music titles in alphabetical
order.
Groups appear on the Music Guide screen as buttons lined up horizontally at
the top of the music listings. Up to five Groups can be shown on the Music
Guide screen at a time. If more than five Groups exist, the Group on the far
right shows a green arrow indicating that there are more Groups. To view the
last Group, repeatedly select the green arrow until it disappears:
Entré creates several Groups for you automatically. You can also create
custom Groups. For more information about creating Groups, see “Managing
Music Groups” on page 77.
The following Groups are generated automatically if there are music
selections to fill them. These Groups cannot be modified or deleted:
• All - includes all titles that can currently be played by the system.
• CD - includes only CD titles that are loaded into the system.
• MP3 - includes only titles in MP3 format.
• Playlists - includes all titles assigned to Playlists (see “How Do I Browse
Playlists?” on page 63).
• Rental - includes any discs placed in the Rental Zone slots of a connected
compatible Kenwood Sovereign 400-disc changer. The Rental Zone is a
few easily accessible disc slots in the changer, specifically designed with
rental discs in mind. See the information included with your Kenwood
Sovereign 400-disc changer for more information.
Arrow
Groups
How Do I Browse and Play My Music Collection?
Complete Guide to Your Entré Entertainment Hub, ver. 2.0 63
In addition to the five automatically created Groups, Entré also creates
Groups using disc information downloaded from the CDDB. Entré can create
up to 22 Groups, based on standard music genres contained in the CDDB
service. To learn more about how to download information from the CDDB,
see “Editing Disc Information” on page 74.
The genres, such as Classical, Alternative, R&B, or Rock, appear as Groups as
long as there is associated music on the system. For example, if you remove
the only remaining classical selection from Entré's CD drive, high-capacity
music storage system or a connected changer, the classical Group disappears
from the screen until you add more classical music.
How Do I Browse Music Channels?
When you add music, or create Groups or Playlists from the Options screen,
Entré automatically adds Channels. Channels appear as numbered selections
arranged vertically below the Groups on the Music Guide screen.
How Do I Browse Playlists?
While browsing custom Playlists, you can play the whole Playlist or an
individual track within the Playlist. To learn how to create a custom Playlist,
see “How Do I Create a New Playlist?” on page 68.
To browse individual tracks in a Playlist, move to that Playlist Channel on the
Guide screen and press . The individual tracks on the Playlist appear
as sub-Channels below the Playlist title.
To play an entire Playlist, highlight a Playlist title and press . To play a
particular track on the Playlist, move to the track and press .
Channels

Managing Your Music
64 Complete Guide to Your Entré Entertainment Hub, ver. 2.0
Controlling Music Play Order
Control the order that Groups, titles, or Playlists play in from the Music Play
Mode. Repeat a Group, title, or Playlist, or shuffle the tracks in random order.
1. Press on the remote.
2. From Music Options, highlight play mode on the screen and press
.
3. Use the arrow buttons on the remote to highlight a Play Mode, and press
.
This Mode: Does this:
1. Normal Plays the current selection in sequential order once,
then stops the player.
This is the default setting.
2. Repeat Track Repeats the currently selected track until you
press .
3. Repeat Title Repeats the tracks in the currently selected album in
sequential order until you press .
4. Repeat Group Repeats the titles in the currently selected group in
sequential order until you press .
1
2
6
5
4
3

How Do I Browse and Play My Music Collection?
Complete Guide to Your Entré Entertainment Hub, ver. 2.0 65
Press on the remote to cycle through the play modes in order.
Only one Play Mode may be activate at a time.
Entré returns to the default play mode, Normal, when you
turn it off.
Do not use the Play Options when playing a disc located in
one of the Rental Zone slots of a connected Kenwood
Sovereign DVD changer.
Inserting and Removing Discs
Insert audio discs into either the Entré CD drawer or into a connected DVD
or CD changer.
Entré’s CD Drawer
When you insert a disc into the Entré CD drawer, the disc begins playing.
The disc information appears as “Unknown” until Entré connects to the
Internet and retrieves disc info and cover art (if available). For more
information about downloading disc information and cover art, see “Editing
Disc Information” on page 74.
When you insert a disc containing MP3 files, Entré only
displays embedded ID3 tag song information, not file
names. Tracks that do not contain ID3 tag information
appear as “Unknown Track.”
Entré’s CD drive is not compatible with DVD Audio discs. If
you insert one, Entré displays a warning screen on your TV.
5. Shuffle Title Randomly plays all tracks within the currently
selected album until you press . No track is
repeated until all tracks have been played.
6. Shuffle Group Randomly plays all tracks within the currently
selected group until you press . No track is
repeated until all tracks have been played.
This Mode: Does this:
Managing Your Music
66 Complete Guide to Your Entré Entertainment Hub, ver. 2.0
Connected Changer
When you insert a disc into a connected DVD or CD changer, Entré attempts
to read the disc.
The disc information appears as “Unknown” until Entré
connects to the Internet and retrieves disc info and cover art
(if available). For more information about downloading disc
information and cover art, see “Editing Disc Information” on
page 74.
If Entré detects that the CD or DVD changer door has been opened and
closed, it automatically performs a “Quick Lookup” to check if any discs have
been added or removed from the changer.
Entré only performs a “Quick Lookup” when you first load a disc into a slot. If
you have replaced one disc with another in the same slot, use the “Get Music
Info” function from the Options menu to read the new disc information. See
“Managing Music Groups” on page 77.
How Do I Customize My Music Collection?
Organize and customize access to your music collection by using the Music
Options screen.
From Music Options, add and manage Groups and Playlists, and download
disc and track information or cover art, identify the contents and capacity of
your changer, transfer music to a portable MP3 player or record music on
Entré's CD recorder.
When you press while in Music mode, the first Music Options screen
appears:
12
3
4
5
6
7
8
9
How Do I Customize My Music Collection?
Complete Guide to Your Entré Entertainment Hub, ver. 2.0 67
The following table explains the buttons that appear on the first screen.
To view the second Music Options screen, move to more... on the screen and
press :
Press: To: See:
1. edit playlist Edit an existing Playlist. page 68
2. EXIT Return to the Guide screen. n/a
3. delete playlist Delete an existing Playlist. page 68
4. delete music Delete MP3s from Entré’s music
storage system.
page 73
5. more... Go to the next Music Option screen. n/a
6. edit disc Customize or download disc
information.
page 74
7. edit tracks Customize or download track
information.
page 76
8. play mode Shuffle or repeat music titles, Playlists,
or Groups.
page 64
9. new playlist Create a new Playlist. page 68
Press: To: See:
1. edit group Edit an existing Group. page 79
2. EXIT Return to the Guide screen. n/a
3. delete group Delete an existing Group. page 81
4. back... Return to the first Music Option
screen.
n/a
12
3
4
5
6
7
8
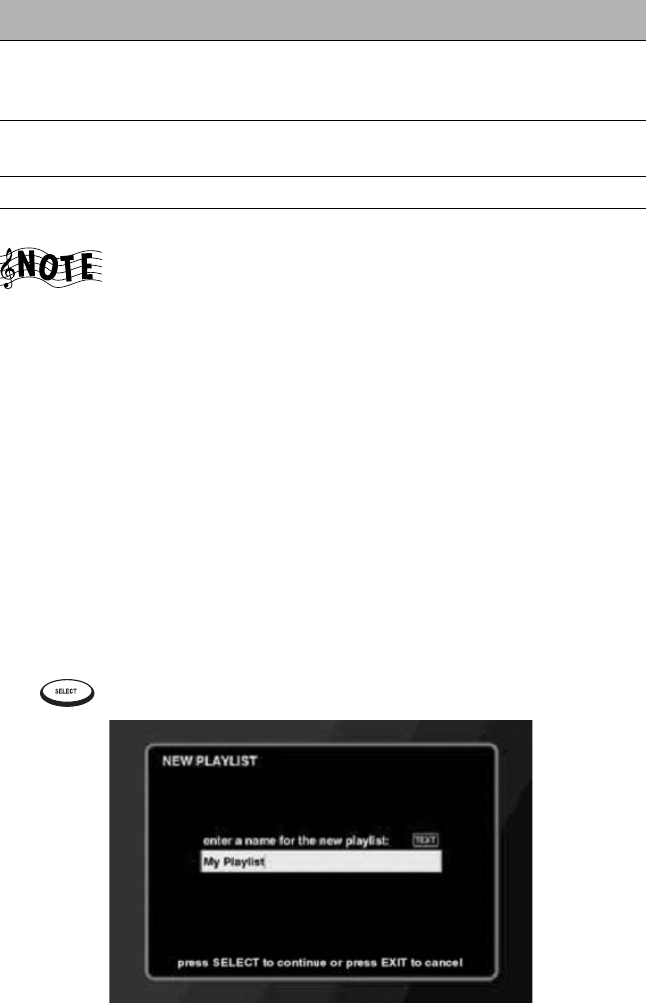
Managing Your Music
68 Complete Guide to Your Entré Entertainment Hub, ver. 2.0
If you are using any of the Music Options functions while
playing a disc in Entré's CD drawer, the disc control
functions (pause, skip ahead/backwards, etc.) will not
function. (You can use EJECT to stop the disc in play, but you
cannot insert and play another disc.)
Exit the Options screen to control the disc.
Managing Music Playlists
In a Playlist, create a mix of tracks from your favorite CDs, MP3s, (or even
other Playlists) in whatever order you choose and play it back any time you
want. It’s like creating virtual CDs on Entré. Create, edit, and delete Playlists
whenever you wish.
How Do I Create a New Playlist?
To create a new Playlist:
1. From Music Options, highlight new playlist on the screen and press
. The New Playlist screen appears:
2. Enter the name for the new Playlist using the remote’s alphanumeric key-
pad.
5. get music info Get information about music in Entré’s
music storage system or a connected
disc changer.
page 83
6. transfer to
portable
Transfer MP3s to a connected portable
MP3 player.
page 97
7. erase cd-rw Erase a rewritable CD. page 82
8. new group Create a new Group. page 77
Press: To: See:
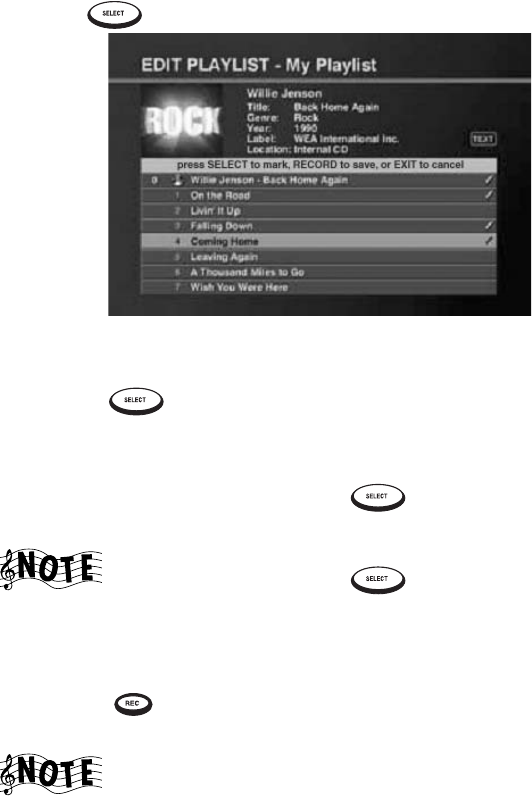
How Do I Customize My Music Collection?
Complete Guide to Your Entré Entertainment Hub, ver. 2.0 69
3. Press to save the Playlist name. The Edit Playlist screen appears:
4. Create the Playlist:
• To view a track within a particular album, highlight that album and
press .
• To highlight particular tracks, press the up and down buttons on the
remote.
• To add a track to the Playlist, press . A check mark appears next
to the selected track to show that it’s included in the Playlist.
If you change your mind and wish to take a selected track
out of the Playlist, press again. The check mark
disappears, showing that the track is not included in the
Playlist.
5. After you’ve selected all the tracks you want to include in the new Playl-
ist, press to save it. If Entré does not have information for any of the
albums in the Playlist, it retrieves information online.
You can put a maximum of 200 tracks in a single Playlist. If
you want to put more than 200 tracks together, use the
Group function (see page 77).
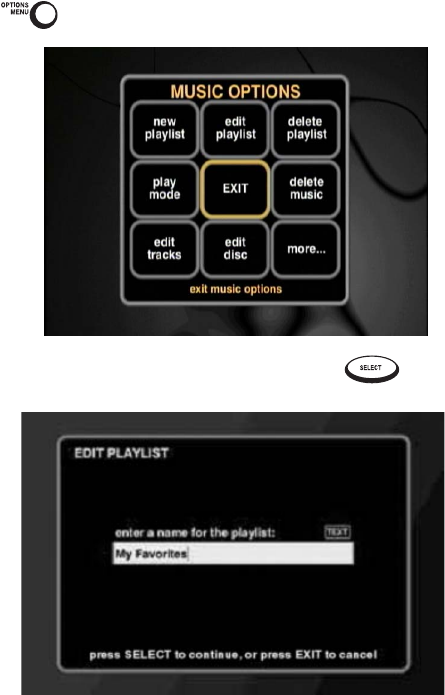
Managing Your Music
70 Complete Guide to Your Entré Entertainment Hub, ver. 2.0
How Do I Edit a Playlist?
To edit an existing Playlist:
1. From the Music Guide, highlight a Playlist.
2. Press . The Options screen appears:
3. Highlight edit playlist on the screen and press . The Edit Playlist
screen appears with a Playlist displayed:
4. Edit the name of the Playlist.
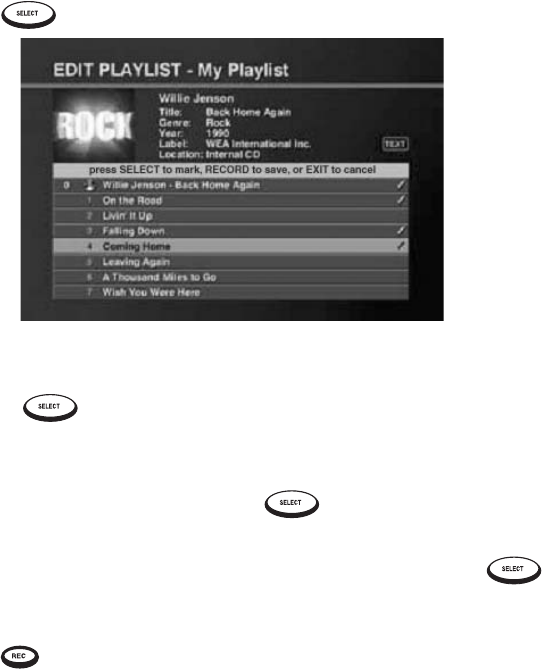
How Do I Customize My Music Collection?
Complete Guide to Your Entré Entertainment Hub, ver. 2.0 71
5. Press to save the playlist name. The Edit Playlist screen appears:
6. Edit the playlist:
• To view a track within a particular album, highlight that album and
press .
• To highlight particular tracks, press the up and down buttons on the
remote.
•To add a track to the Playlist, press . A check mark appears next
to the selected track to show that it’s included in the Playlist.
•To delete a track from a Playlist, highlight the track and press .
The check mark disappears to show that the track is not included in
the Playlist.
7. Press to save the new Playlist.
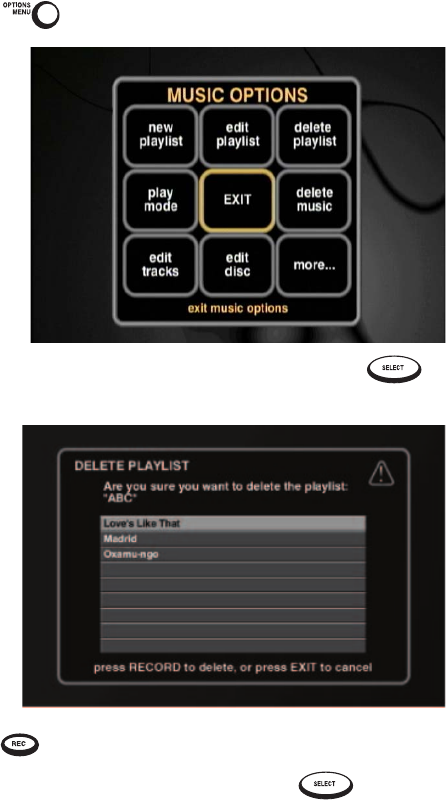
Managing Your Music
72 Complete Guide to Your Entré Entertainment Hub, ver. 2.0
How Do I Delete a Playlist?
1. From the Music Guide, highlight a Playlist.
2. Press . The Options screen appears:
3. Highlight delete playlist on the screen and press . The Delete
Playlist screen appears:
4. Press . A message appears confirming your choice.
5. Highlight delete on the screen and press to delete the Playlist.
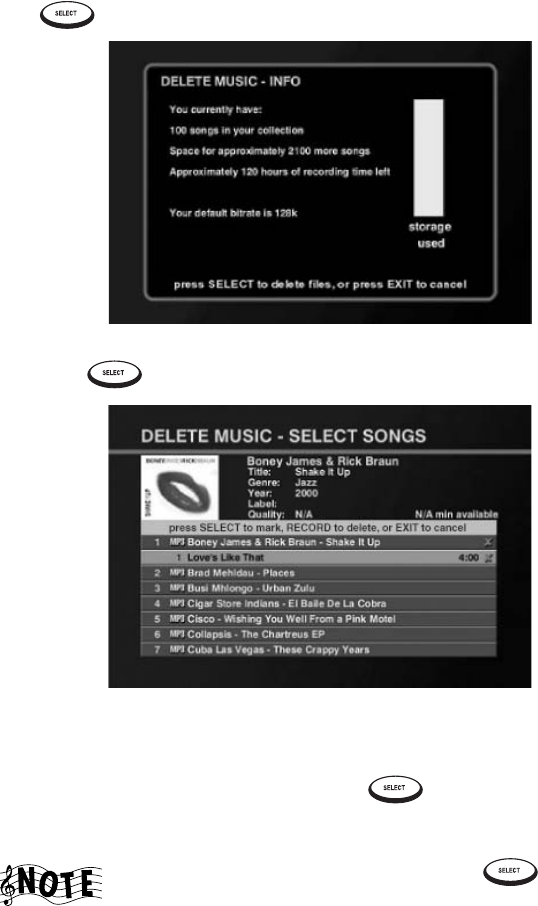
How Do I Customize My Music Collection?
Complete Guide to Your Entré Entertainment Hub, ver. 2.0 73
Deleting Music
You can remove MP3 files from Entré's high-capacity music storage system,
freeing up space on the music storage system. You can also use this feature to
check how much space is left on the music storage system.
1. From Music Options, highlight delete music on the screen and press
. The Delete Music - Info screen appears:
2. Press . The Delete Music - Select Songs screen appears:
3. Delete music:
• To highlight tracks, press the up and down buttons on the remote.
• To mark the track for deletion, press . An X appears next to the
track, along with the amount of space that track uses on the music
storage system.
To deselect the track for deletion, press again. The
check mark and ‘space recovered’ indicator also disappear.
Managing Your Music
74 Complete Guide to Your Entré Entertainment Hub, ver. 2.0
4. Press to delete the marked tracks.
An X appears next to the channel name when you select
tracks from that channel. Only the tracks you selected will
be removed.
Editing Disc Information
The edit disc feature allows you to download or customize disc information,
such as album titles, artist name, genre, or cover art. OpenGlobe provides
downloaded disc information from the CDDB.
If you insert a disc that isn't in the CDDB database (such as a compilation disc
that you assembled yourself), you can input the disc and track titles yourself.
Once you do, Entré displays the information whenever you insert or select
the disc.
To edit disc information:
1. From the Music Guide, highlight a disc and press . The Options
screen appears:
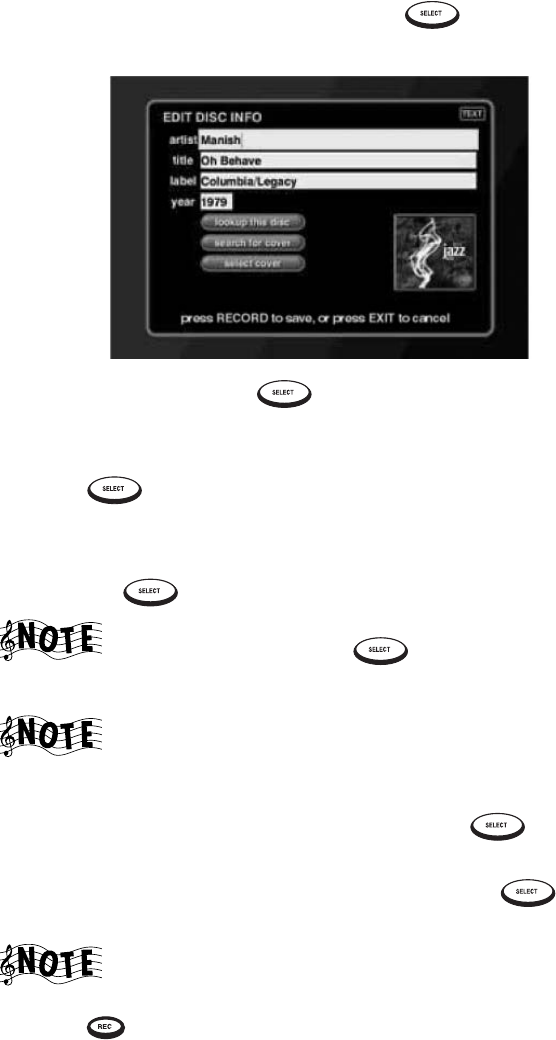
How Do I Customize My Music Collection?
Complete Guide to Your Entré Entertainment Hub, ver. 2.0 75
2. Highlight edit disc on the screen and press . The Edit Disc Info
screen appears:
3. Move to a field and press to edit that field. Or, to download disc
information from the Internet, go to step 66.
4. Edit the text in the field using the remote’s alphanumeric keypad.
5. Press to edit the next field.
6. To get disc and cover information:
a. Highlight lookup this disc.
b. Press to download this information from CDDB.
If more than one cover art selection is available, choose the
one you want and press to download cover art and
other disc information from the Internet.
This action replaces ALL Entré’s information for this disc.
However, it does NOT affect the information stored on the
disc itself.
c. Highlight select cover on the screen and press .
d. Use the up and down arrow buttons on the remote to select an
image from the available cover art selections. Press to choose
the cover image for the disc.
Choosing a cover image for the disc replaces any existing
cover art associated with the disc.
6. Press to save the changes and return to the Music Guide screen.
Managing Your Music
76 Complete Guide to Your Entré Entertainment Hub, ver. 2.0
Editing Track Information
The edit tracks button in Music Options allows you to change track names
for the currently selected album. To edit track information:
1. From the Music Guide, highlight the a disc and press . The
Options screen appears:
2. Highlight edit tracks on the screen and press . The Edit Tracks
screen appears:
3. To change track titles:
a. Move to a field and press to change the track's name using
the remote's alphanumeric keypad.
b. Press to move to the next track.
4. Press to save the changes and return to the Music Guide.
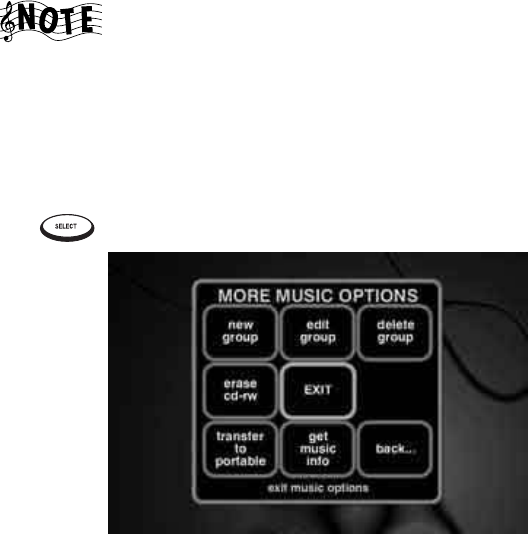
How Do I Customize My Music Collection?
Complete Guide to Your Entré Entertainment Hub, ver. 2.0 77
Managing Music Groups
When you create a custom Group, you create a Playlist of titles—including
entire CDs, MP3 Playlists, or even custom Playlists. For example, you could
create a Group containing all the albums from your favorite artist. Create,
edit, and delete Groups at any time to help you find your favorite music
quickly.
You cannot edit or delete any Group automatically created
by Entré (“All”, “Playlists”, etc.). For more information about
automatically created Groups, see “How Do I Browse Music
Groups?” on page 62.
How Do I Create a New Group?
To c reate a n ew Gr o up:
1. From Music Options screen, highlight more... on the screen and press
. The second Options screen appears:
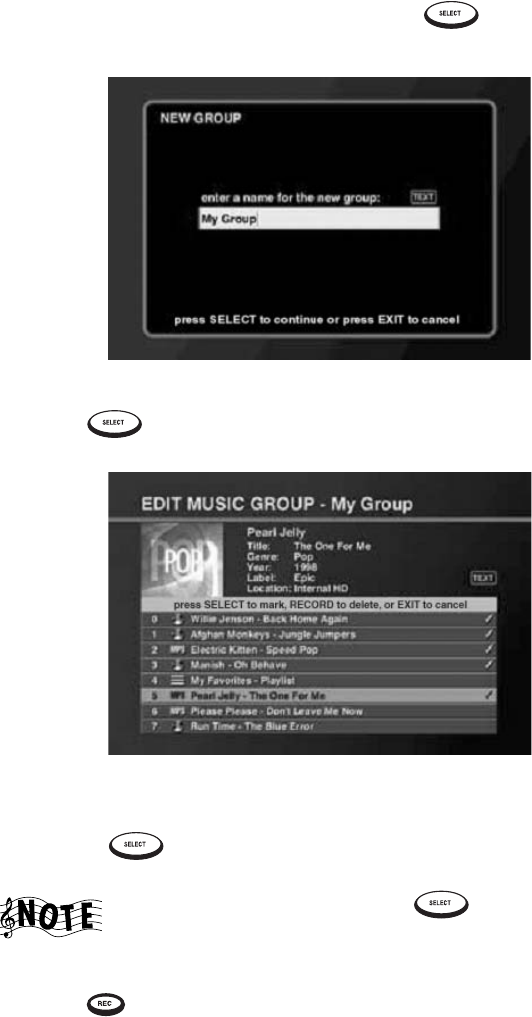
Managing Your Music
78 Complete Guide to Your Entré Entertainment Hub, ver. 2.0
2. Highlight new group on the screen and press . The New Group
screen appears:
3. Enter a name for the new Group.
4. Press to save the Group name. The Edit Music Group screen
appears:
5. Create the group:
• Press the up and down buttons to highlight titles.
• Press to add a title to the Group. A check mark appears
showing that this title is included in the Group.
If you change your mind, press again. The check
mark disappears to show the title is not included in the
Group.
6. Press to save the new Group and return to the Music Guide.
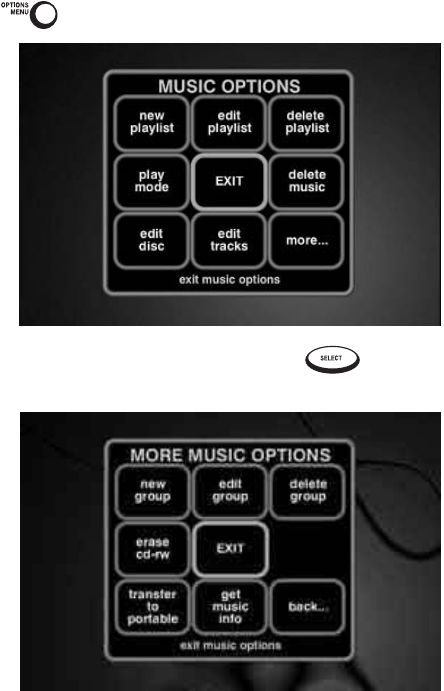
How Do I Customize My Music Collection?
Complete Guide to Your Entré Entertainment Hub, ver. 2.0 79
How Do I Edit a Group?
To edit an existing group:
1. From the Music Guide, highlight a Group.
2. Press . Music Options appears:
3. Highlight more... on the screen and press . The second Options
screen appears:
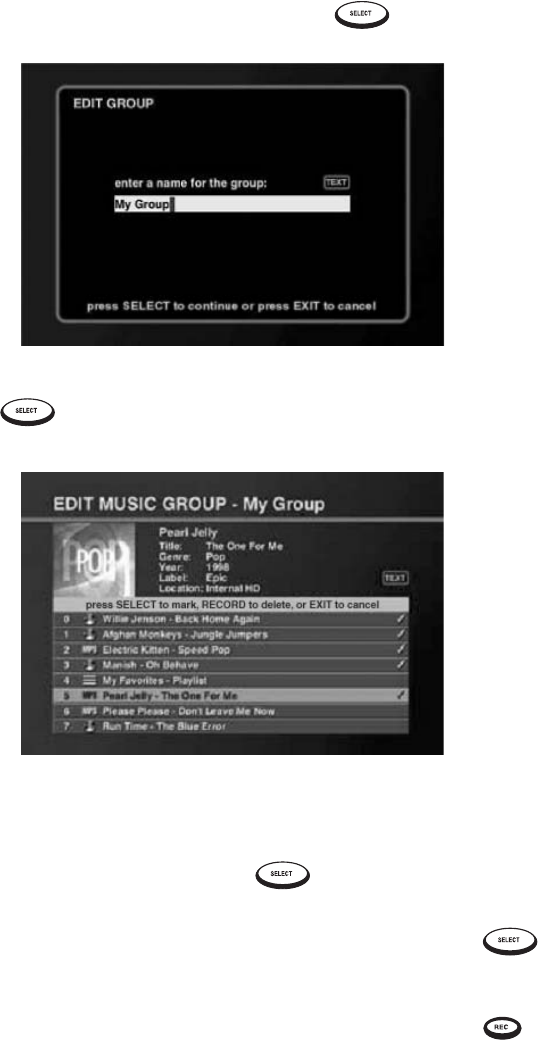
Managing Your Music
80 Complete Guide to Your Entré Entertainment Hub, ver. 2.0
4. Highlight edit group on the screen and press . The Edit Group
screen appears:
5. Edit the name of the Group.
6. Press to save the Group name. The Edit Music Group screen
appears:
7. Edit the Group:
• Press the up and down buttons to highlight titles. Titles already
included in the selected Group are marked with a check mark.
•To add a title to the Group, press . A check mark appears to
show that this title is now included in this Group.
•To delete a track from a Group, highlight the track and press .
The check mark toggles off showing that the track is not included in
the Group.
8. To save the edited Group and return to the Music Guide, press .
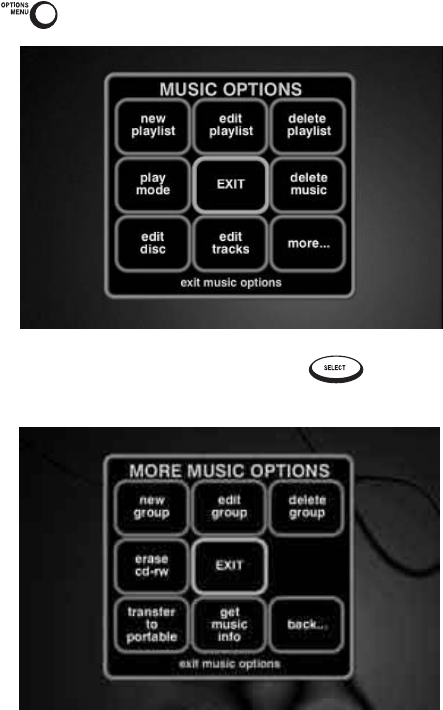
How Do I Customize My Music Collection?
Complete Guide to Your Entré Entertainment Hub, ver. 2.0 81
How Do I Delete a Group?
To delete an existing Group:
1. From the Music Guide, highlight a Group.
2. Press . Music Options appears:
3. Highlight more… on the screen and press . The second Options
screen appears:
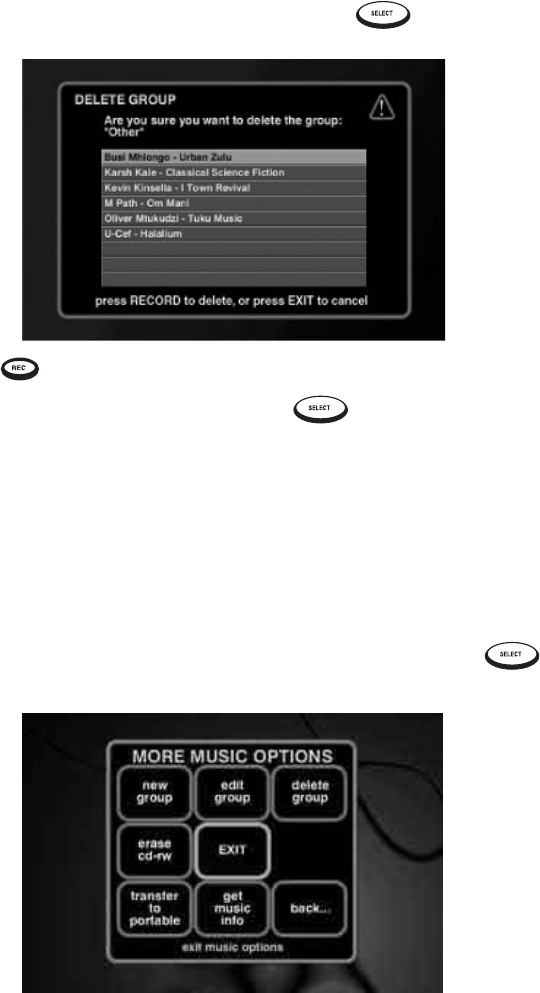
Managing Your Music
82 Complete Guide to Your Entré Entertainment Hub, ver. 2.0
4. Highlight delete group on the screen and press . The Delete
Group screen appears:
5. Press .
6. Highlight delete on the screen and press to delete this Group and
return to the Guide screen.
Erasing Rewritable CDs
With rewritable CDs (CD-RWs), you can both record and erase information
on the disc—allowing you to use the CDs over and over. Entré can erase
information stored on a CD-RW so that you can re-use it.
To erase a CD-RW:
1. From Music Options, highlight more... on the screen and press .
The second Options screen appears:
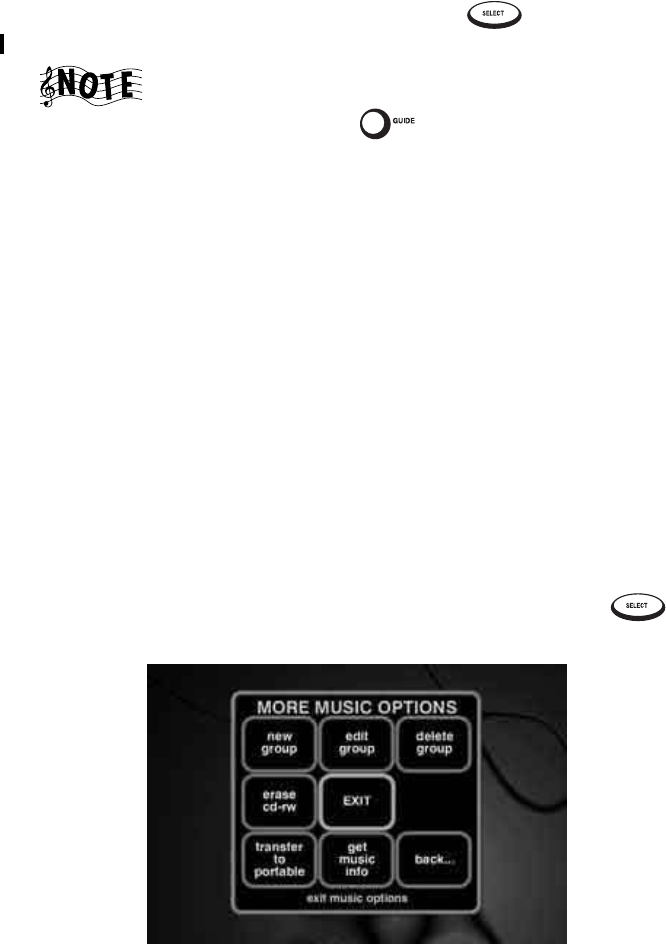
How Do I Customize My Music Collection?
Complete Guide to Your Entré Entertainment Hub, ver. 2.0 83
2. Highlight erase cd-rw on the screen and press . Entré erases the
CD-RW currently in the internal CD drawer.
Erasing a CD-RW also erases any disc/track information on
the disc, so when Entré is finished it displays an empty
Player screen. Press to return to the active Guide
screen.
Getting Music Information
Use the Get Music Information feature to view information about the music
stored in a connected disc changer. For example, you could see how many
free disc slots there are in your DVD changer, or see how many unknown
discs there are in the system. This includes:
• A Connected Changer
• Total Music Discs
• Free Music Slots
•Known Discs
•Unknown Discs
•Cover Art Count
In addition, Get Music Information attempts to identify all unknown CDs.
To vie w music in forma t i on :
1. From Music Options, highlight more... on the screen and press .
The second Options screen appears:

Managing Your Music
84 Complete Guide to Your Entré Entertainment Hub, ver. 2.0
2. Highlight get music info on the screen and press . The Get Music
Info download screen apprears:
Entré attempts to identify all unknown discs. If a disc's information is not
contained in the CDDB database, Entré displays “Unknown disc” instead of
the disc's title and “Track 1, Track 2" (etc.) instead of the disc and track titles.
If Entré is connected to a compatible Kenwood Sovereign
400 disc changer that is full, identifying all discs for the very
first time can take between three and four hours via a dial-
up Internet connection. During this process Entré's internal
V.90 modem will be continually connected to the Internet
via OpenGlobe (if you are using a dialup connection). You
can shorten this time by reading disc information on the
changer. See your changer’s instruction manual for more
information.
How Do I Record Music?
With Entré, you can record music from a variety of sources with a touch of a
button. Entré allows you to:
• Record music CDs in a connected changer or Entré’s CD drawer onto
Entré’s music storage system as MP3s (‘Rip to internal HD’). See “Record-
ing from a CD to Entré’s Storage System” on page 85.
• Duplicate an entire CD (conventional or MP3-encoded) onto a CD-R or
CD-RW ('Duplicate disc'). See “Copying an Entire CD” on page 92.
• Record a mix of different MP3 tracks from Entré's music storage system
onto an MP3-encoded CD-R/RW ('MP3 mix CD'). See “Recording a Mix
of MP3 Tracks from the Music Storage System onto a CD-R or CD-RW”
on page 89.

How Do I Record Music?
Complete Guide to Your Entré Entertainment Hub, ver. 2.0 85
• Record a mix of different CD tracks from a connected changer onto a
CD-R or CD-RW ('Audio mix CD'). See “Recording Music from Different
CDs onto a Single CD” on page 90.
• Record a mix of different tracks from an external audio source (a tape,
radio, etc.) onto a conventional CD-R/RW ('Ext to audio CD'). See
“Recording from an External Source to a Recordable CD” on page 94.
• Record tracks from an external audio source (tape, radio, etc.) onto
Entré's storage system as MP3s ('Ext to MP3 on HD'). See “Recording from
an External Source to Entré’s Music Storage System” on page 95.
Entré cannot record music directly from the Internet or your
computer. You must use Entré’s Media Manager on your
computer to do so. See “How Do I Transfer Music from the
Internet to Entré?” on page 100.
You may not be able to copy material that has an anti-
copying 'flag' on it (such as a recorded CD made on an audio
CD recorder).
There are two formats of blank CD/R discs; Entré uses each one for different
types of recordings.
If you are recording conventional CD audio music files to
CD-R you must use blank music discs, identified by the
following logo:
If you are recording MP3 files to CD-R you can also use
blank music discs, OR you can use blank data discs, which
are identified by the following logo:
Entré CANNOT use blank data discs to record conventional
CD audio music files.
Recording from a CD to Entré’s Storage System
You can record music from a CD to Entré’s storage system, whether it’s a
conventional CD, or a custom CD-R/RW containing MP3s. On Entré, this
process is called “rip to internal HD.”
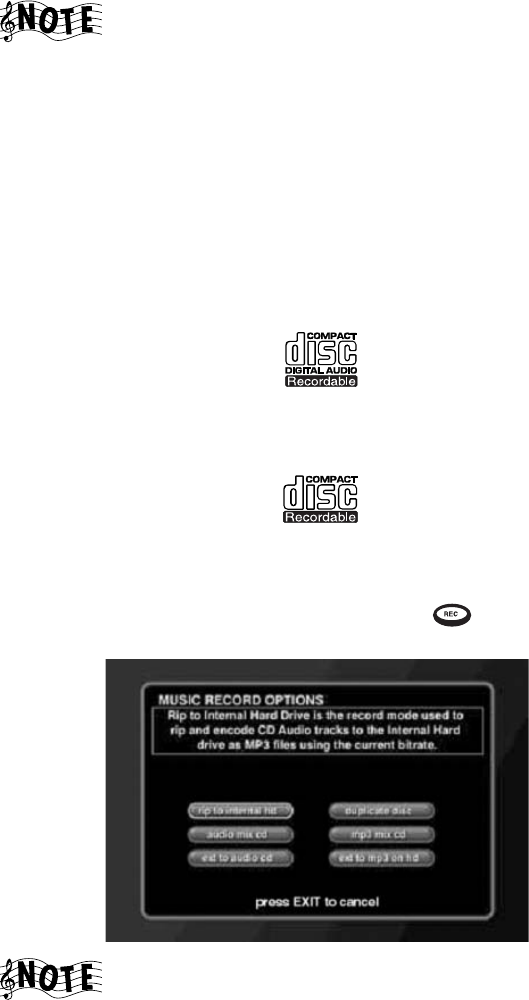
Managing Your Music
86 Complete Guide to Your Entré Entertainment Hub, ver. 2.0
To maximize compression speed, conventional CDs are first
stored on Entré’s music storage system in standard format,
and are then compressed into MP3 format “in the
background,” while Entré is performing other functions. The
compression process can take up to 30 minutes per disc.
(Entré can also perform this compression while in the
Standby mode, in which case the blue ‘Music’ and ‘Movie’
indicators on Entré’s front panel flash on and off.)
To b eg in recor ding:
1. Make sure you have a recordable disc of the appropriate type:
• If you are recording conventional CD audio music files to CD-R you
must use blank music discs, identified by the following logo:
• If you are recording MP3 files to CD-R you can also use blank music
discs, OR you can use blank data discs, which are identified by the
following logo:
Entré CANNOT use blank data discs to record conventional CD audio
music files.
2. On the Music Guide, highlight a CD and press . Music Record
Options appears:
If you are recording from a disc that contains many titles,
you must wait for Entré to read and identify all of the titles
before pressing REC. Interrupting the identification process
causes Entré to lose the embedded ID3 tag song information
for all unread tracks. These tracks are then all transferred
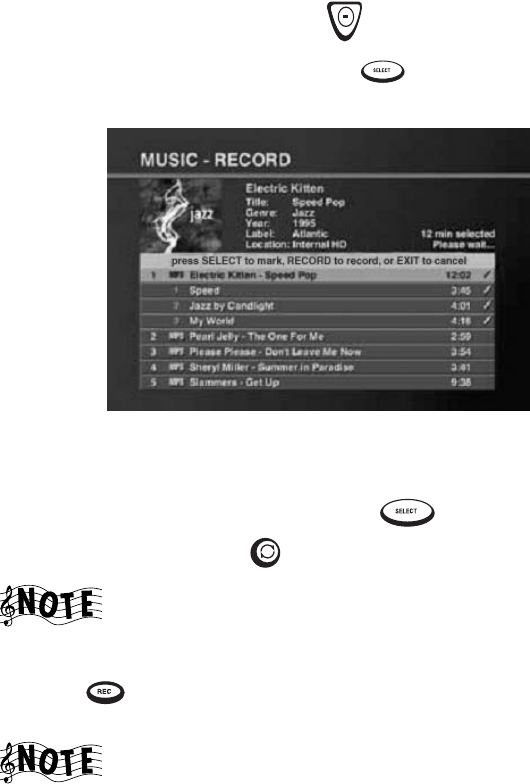
How Do I Record Music?
Complete Guide to Your Entré Entertainment Hub, ver. 2.0 87
with the name “Unidentified Track” instead of their ID3 tag
song information. To determine if Entré has finished reading
the entire disc, press to view the last song on the disc.
3. Highlight rip to internal hd and press .
The Music - Record screen appears:
4. Select tracks:
• All tracks on the selected CD are marked for recording by default. To
deselect a track, highlight it and press . To select or deselect all
tracks on a disc, press .
Although the tracks record in the order shown, Entré's Music
Guide always displays MP3 titles in alphabetical order (by
artist’s first name).
5. Press to start recording. The Music Record Progress screen appears
for the duration of the recording.
If Entré’s music storage system doesn’t have enough space
to record the selected tracks, a message asking you to
deselect tracks appears before Entré begins recording.
When Entré finishes recording, the Music Guide screen returns.
MP3 Recording Bit Rates
Choose from different bit rates for MP3 file encoding. Higher bit rates provide
better sound quality, but create larger files (so fewer songs can be stored).
Lower bit rates create smaller files (so more songs can be stored), but provide
lower sound quality. Entré's default data rate setting is 128kbps (kilobits per
second). This setting is acceptable for most music files.

Managing Your Music
88 Complete Guide to Your Entré Entertainment Hub, ver. 2.0
To change the MP3 bit rate:
1. Press . The Kenwood Sovereign Entré Setup screen appears.
2. Select Preferences. The Setup-Preferences screen appears.
3. Select Music Recording Preferences. The Music Recording Preferences
screen appears.
4. Select the bit rate you want to use.
5. Select save.
6. Press again to return to the Guide screen.
Backing Up Your Collection
To guard against the potential loss of music files on Entré, we suggest that you
periodically back-up your music files by transferring them from Entré’s music
storage system to backup CD-Rs, using Entré’s “MP3 Mix CD” record
function. See “Recording a Mix of MP3 Tracks from the Music Storage System
onto a CD-R or CD-RW” on page 89 for information. Recording the MP3 files
onto CD-R retains the file structure and all of the embedded ID3 tag file
information that is stored in Entré for each MP3 file. (However, cover art
information is not transferred to CD-R.)
If MP3 files on Entré are lost, they can be restored quickly by recording them
from the backup CD-Rs to Entré’s music storage system using Entré’s “Rip to
Internal HD” record function (see page 85). This restores the files on Entré’s
music storage system in their original file structure, with all of their embedded
ID3 tag information. Re-associate cover art for albums by using the ‘Search
For Cover’ and ‘Select Cover’ functions in Entré’s Music Options screen (see
page 75).
Kenwood Corporation is not responsible for lost data (music, file
information, etc.).
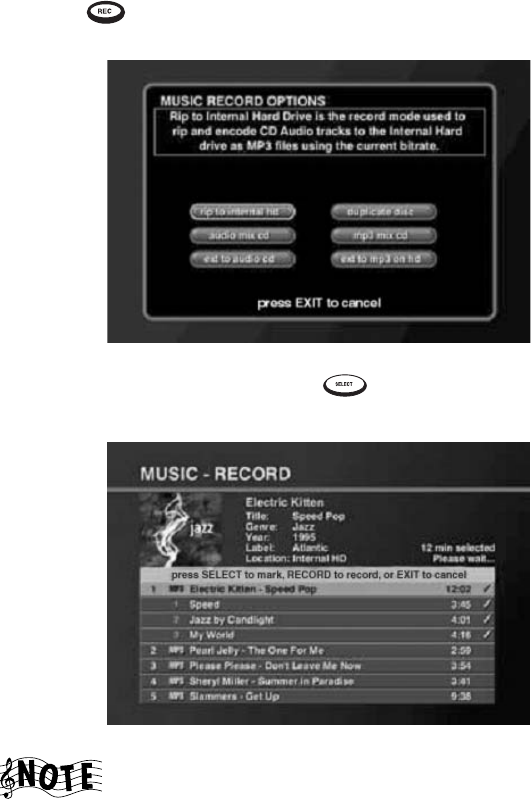
How Do I Record Music?
Complete Guide to Your Entré Entertainment Hub, ver. 2.0 89
Recording a Mix of MP3 Tracks from the Music Storage
System onto a CD-R or CD-RW
You can select any combination of MP3s from Entré's music storage system to
record to an MP3-encoded CD-R or CD-RW. On Entré, this process is called
“MP3 mix CD.”
1. Press .
The Music Record Options screen appears:
2. Highlight MP3 mix CD and press .
The Music - Record screen appears:
Only the MP3 Group is shown.

Managing Your Music
90 Complete Guide to Your Entré Entertainment Hub, ver. 2.0
3. Select tracks:
• All tracks on the first Channel are marked for recording by default. To
deselect a track, highlight it and press . To select or deselect all
tracks on a disc, press .
The tracks record in the order shown.
4. Press to start recording. The Music Record Progress screen appears
for the duration of the recording.
5. Entré temporarily stores the tracks onto its music storage system. While
recording, the display reads “CD READ” and shows the recording
progress.
When Entré is finished storing the tracks, the display asks you to insert a blank
CD-R, after which Entré will record the tracks onto the disc.
If the CD doesn’t have enough space to record the selected
tracks, a message asking you to deselect tracks appears
before Entré begins recording.
If the CD exactly fills the available space, Entré displays a
note that you cannot select additional tracks without using a
larger-capacity disc.
When Entré finishes recording, it ejects the CD.
Recording Music from Different CDs onto a Single CD
You can select any combination of tracks from CDs in a connected changer or
in Entré’s CD drawer to record to a recordable CD. On Entré, this process is
called “Audio Mix CD.”
1. Make sure you have a recordable disc of the appropriate type:
• If you are recording conventional CD audio music files to CD-R you
must use blank music discs, identified by the following logo:
• If you are recording MP3 files to CD-R you can also use blank music
discs, OR you can use blank data discs, which are identified by the
following logo:
Entré CANNOT use blank data discs to record conventional CD audio
music files.
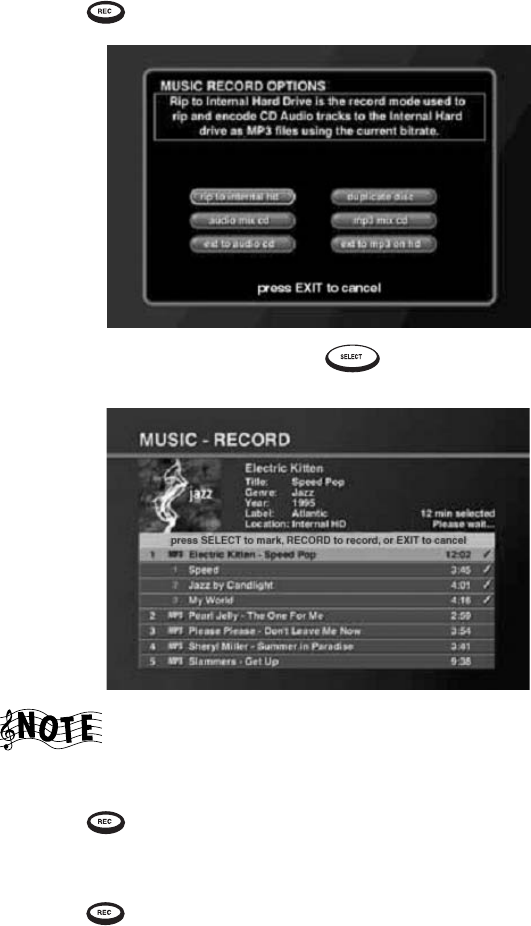
How Do I Record Music?
Complete Guide to Your Entré Entertainment Hub, ver. 2.0 91
2. Press . The Music Record Options screen appears:
3. Highlight audio mix cd and press . The Music - Record screen
appears:
Only the CD Group is shown.
4. Select the tracks you want to record.
5. Press . The Reorder Tracks screen appears.
6. Use the left and right arrow buttons to put the tracks in the order you
want them to appear on the CD.
7. Press to start recording. The Music Record Progress screen appears
for the duration of the recording.
Entré temporarily stores the tracks onto its music storage system. While
recording, the display reads “CD READ.” and shows the recording progress.
When it is finished, it asks you to insert a blank CD-R, after which it will
record the tracks onto the disc.

Managing Your Music
92 Complete Guide to Your Entré Entertainment Hub, ver. 2.0
You must use a blank audio CD-R that has the following
logo:
If you place a CD-R that contains an anti-copying 'flag' in
Entré's CD tray and attempt to copy it, Entré displays a
warning that copying is prohibited and it will not copy the
disc. If you have a compatible Kenwood Sovereign DVD
changer connected to Entré, place the disc in the changer
and copy it. (After recognizing that the disc is copy-
protected, Entré automatically re-starts the disc and records
it via Entré’s analog inputs.)
If the CD doesn’t have enough space to record the selected
tracks, a message asking you to deselect tracks appears
before Entré begins recording.
If the CD exactly fills the available space, Entré displays a
note that you cannot select additional tracks without using a
larger-capacity disc.
When Entré finishes recording, it ejects the CD.
Copying an Entire CD
You can copy a CD whether it's located in a connected changer or in Entré's
CD drawer. Entré stores the CD files temporarily on its hard drive, then
records the files onto the CD-R. On Entré, this process is called “Duplicate
Disc.”
To c opy C D s:
1. Select a CD. If you want to copy a disc that's not in a connected changer,
place it in Entré’s CD drawer.
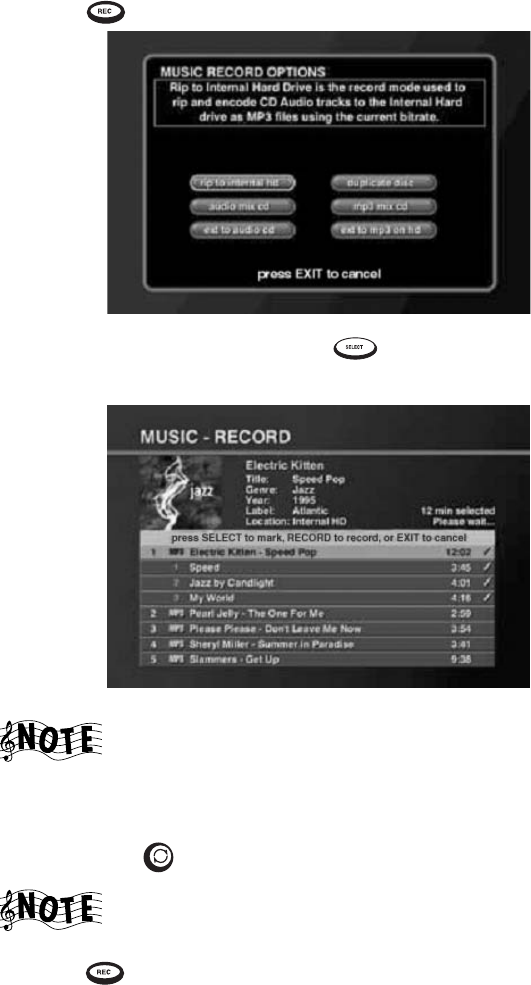
How Do I Record Music?
Complete Guide to Your Entré Entertainment Hub, ver. 2.0 93
2. Press . The Music Record Options screen appears:
3. Highlight duplicate disc and press .
The Music - Record screen appears:
Only the CD Group is shown.
4. Select the disc you want to copy:
• The first disc is automatically selected for recording. To deselect the
disc press .
If the disc you select does not fill the available space on the
new CD, you can select another disc.
5. Press to start recording. The Music Record Progress screen appears.
Entré temporarily stores the tracks onto its internal hard drive. When it is
finished, it asks you to insert a blank CD-R, after which it will record
tracks onto the disc.
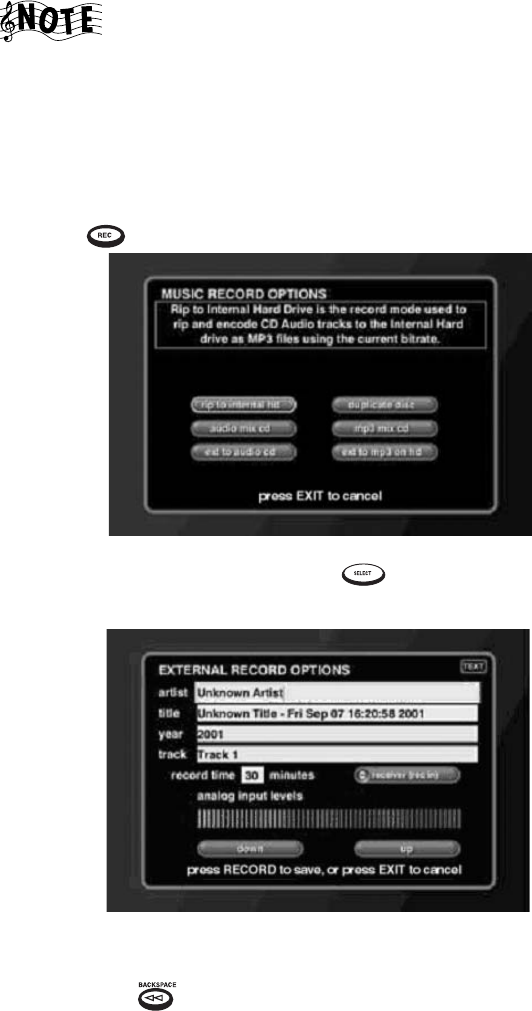
Managing Your Music
94 Complete Guide to Your Entré Entertainment Hub, ver. 2.0
If Entré doesn’t have enough space to temporarily store the
selected tracks, a message asking you to deselect tracks
appears before Entré begins recording.
Recording from an External Source to a Recordable CD
Record music from any source connected to your receiver (cassette, record,
etc.) to a recordable CD. On Entré, this process is called “Ext to Audio CD”.
1. Place a CD-R into Entré’s CD drawer.
2. Press . The Music Record Options screen appears:
3. Highlight ext to audio cd and press . The External Record Options
screen appears:
4. If Entré does not already have disc data, use the remote to enter artist
and track information for the track you want to record. To do so, move to
a field, use to delete unwanted text, and use the remote's alphanu-
meric buttons to enter the information.
5. Move to the Record Time field and enter the length of the track.

How Do I Record Music?
Complete Guide to Your Entré Entertainment Hub, ver. 2.0 95
6. Move to Receiver (Rec In) on the screen. Press to cycle through
Entré's different audio inputs to select the correct input.
Receiver (Rec In) is an analog input, and requires that you
set the input level to get the best recording. To do so, play a
loud section of the song you want to record, and use the
‘down’ and ‘up’ icons on the screen to adjust the level so
that the right-most red bar flashes only occasionally.
If you have made a coaxial or optical digital connection
between your receiver and Entré, selecting one of these
audio inputs delivers superior sound quality.
7. Press to start recording. The Music Record Progress screen appears
for the duration of the recording.
As soon as the screen appears, start playing the source you want to record.
Entré temporarily stores the tracks onto its internal hard drive. When it is
finished, it asks you to insert a blank CD-R, after which it will record the
tracks onto the disc.
You must use a blank audio CD-R that has the following
logo:
If the CD doesn’t have enough space to record the selected
tracks, a message asking you to deselect tracks appears
before Entré begins recording.
When Entré finishes recording, it ejects the CD and returns to the Music
Guide.
Recording from an External Source to Entré’s Music Storage
System
Record music from any source connected to your receiver (cassette, LP, etc.)
and store it in Entré’s music storage system. On Entré, this process is called
“Ext to MP3 on HD”.
See page 88 for information about selecting the MP3
encode bit rate.
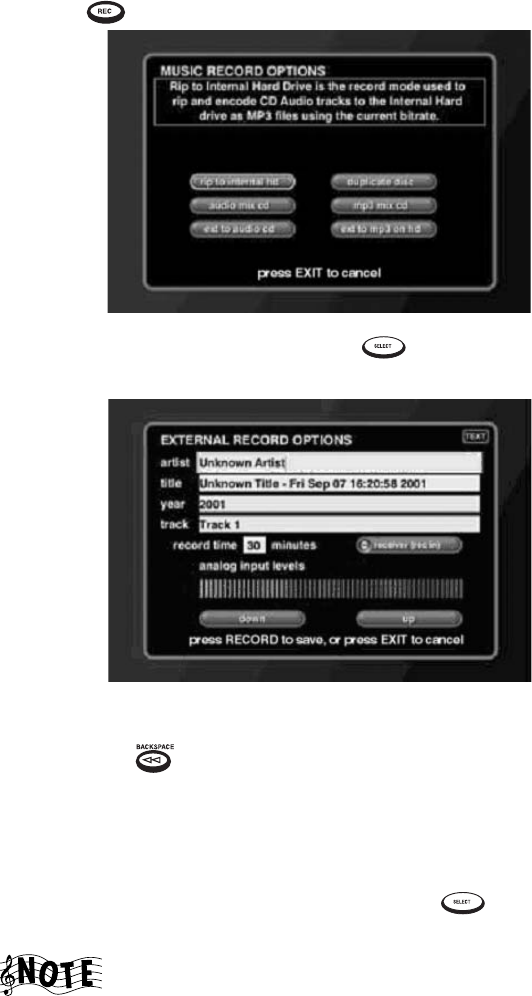
Managing Your Music
96 Complete Guide to Your Entré Entertainment Hub, ver. 2.0
1. Press . The Music Record Options screen appears:
2. Highlight ext to mp3 on hd and press . The External Record
Options screen appears:
3. If Entré does not already have disc data, use the remote to enter artist
and track information for the track you want to record. To do so, move to
a field, use to delete unwanted text, and use the remote's alphanu-
meric buttons to enter the information.
4. Move to the Record Time field and enter the length of the track. If you're
not sure how long the track is, leave the field at the default, 30 minutes.
You can always manually stop the recording after the song has finished.
5. Move to Receiver (Rec In) on the screen. Press to cycle through
Entré's different audio inputs to select the one you want to record from.
Receiver (Rec In) is an analog input, and requires that you
set the input level to get the best recording. To do so, play a
loud section of the song you want to record, and use the
‘up’ and ‘down’ buttons on the display to adjust the level so
that the right-most red bar flashes only occasionally.
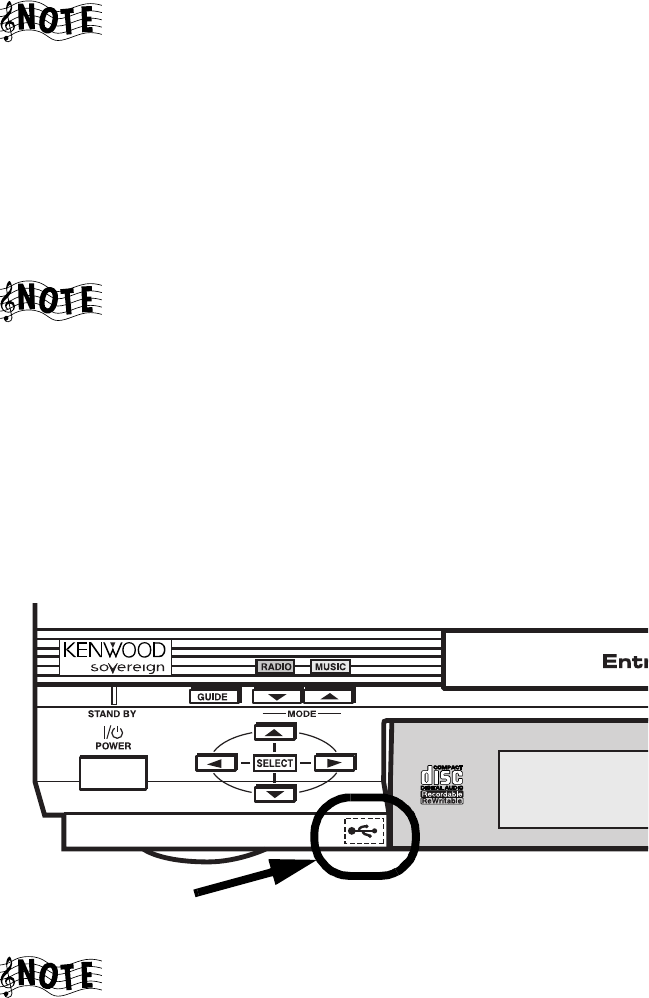
How Do I Transfer Music to a Portable Player?
Complete Guide to Your Entré Entertainment Hub, ver. 2.0 97
If you have made a coaxial or optical digital connection
between your receiver and Entré, selecting one of these
audio input options delivers superior sound quality.
Entré stores the tracks as MP3 files in its music storage system. When Entré
finishes recording, it returns to the Music Guide.
How Do I Transfer Music to a Portable Player?
With this feature, you can transfer MP3 audio tracks from Entré's music
storage system to a supported portable MP3 music player.
Supported MP3 portables currently include:
• Compaq PA-1
• Compaq PA-2
• Rio 600.
For an updated list of supported players check the Kenwood
USA Web site at www.kenwoodusa.com.
To transfer music to a portable player:
1. Highlight a title on the Music Guide.
2. Connect a USBcable from a supported portable MP3 player to the USB
port on Entré’s front panel.
Some portable players can cause Entré to malfunction if
they are connected with a dead battery, or with no battery.
Please ensure that your portable player is operational and
has power before connecting it to Entré's USB port.
Front panel USB port
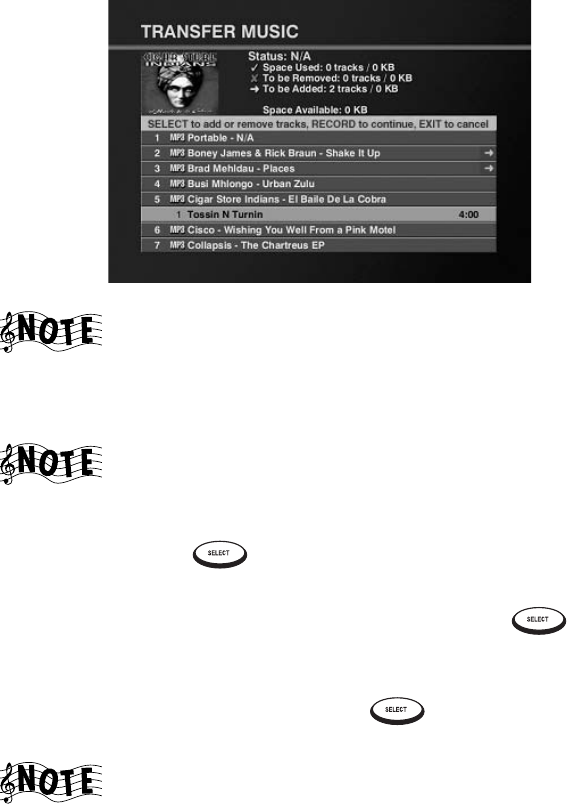
Managing Your Music
98 Complete Guide to Your Entré Entertainment Hub, ver. 2.0
The Transfer Music screen appears:
If the screen doesn’t appear automatically, see “Accessing
the Transfer Music Screen” on page 99.
3. Select the tracks to transfer:
• Press the up and down buttons to highlight tracks.
If a track already exists on the portable player, a check mark
appears next to it.
•To deselect a track that already exists on the player, highlight a checked
track and press . An “X” appears for all tracks marked for
removal.
•To select a new track for transfer, highlight it and press . A green
arrow appears on the right side of the track listing to show that you’ve
added it to the transfer.
•To deselect one selected track, press while the track is
highlighted. The green arrow disappears.
Entré displays a maximum track time of 10:00 (ten minutes)
for any selected tracks that are longer than ten minutes. (The
entire track will still be properly transferred to the portable.)

How Do I Transfer Music to a Portable Player?
Complete Guide to Your Entré Entertainment Hub, ver. 2.0 99
4. Press to start the transfer process. A status screen appears showing
the estimated transfer time and the time remaining until the transfer is
complete.
You can’t use any other Entré features until the transfer is
complete.
Do not unplug the portable player's USB connector during
the transfer process. Doing so may cause Entré to lock up
and require rebooting.
Accessing the Transfer Music Screen
If the Transfer Music screen doesn’t appear automatically when you connect
your portable MP3 player to the USB port, you can still access it through
Entré.
1. Press . Music Options appears:
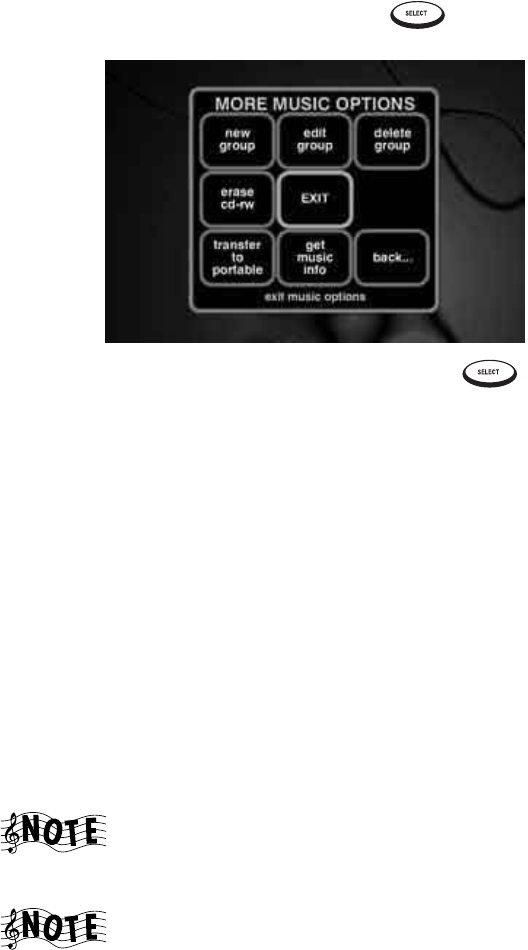
Managing Your Music
100 Complete Guide to Your Entré Entertainment Hub, ver. 2.0
2. Highlight more... on the screen and press . The second Options
screen appears:
Highlight transfer to portable on the screen and press . The Transfer
Music screen appears. Complete steps 2 and 3 on pages 98–99 to transfer
music.
How Do I Transfer Music from the Internet to Entré?
Media Manager is a software application that you install on a computer
connected to the same network as Entré. If you have connected Entré to your
home network via HomePNA, Media Manager gives you full access to Entré’s
groups and playlists from your computer. See “How Do I Connect Entré to My
Home Network?” on page 17 for more information.
Entré can include MP3s you have downloaded to your computer from the
Internet or uploaded to your computer from your portable digital media
player. While the only way to download music directly from the Internet is via
OpenGlobe’s music purchasing options, Entré’s Media Manager allows you to
synchronize your MP3 collection on your computer with Entré internal music
storage system.
Entré supports MP3 files, with or without encoded ID3 tag
information. It does not support other computer-based
music formats, such as WMA.
Kenwood Entré Media Manager software is not available for
the Macintosh.
See “How do I Install Kenwood Entré Media Manager Software?” on page 31
for information on installing Media Manager on your computer.
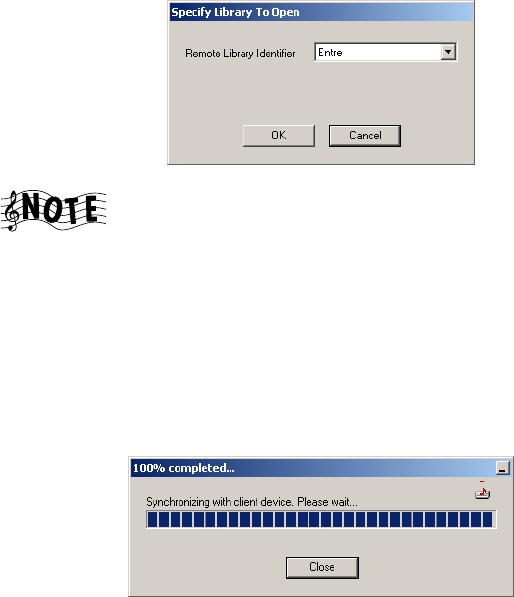
How Do I Transfer Music from the Internet to Entré?
Complete Guide to Your Entré Entertainment Hub, ver. 2.0 101
Starting Media Manager
To start Media Manager:
1. Open the Start menu and select Programs|Kenwood Entré Media Man-
ager. Media Manager searches the network for Entré:
Media Manager can find Entré even if Entré is powered
down. If Media Manager does not find Entré, see “How Do I
Solve Problems with Media Manager?” on page 152.
If you have more than one Entré, select a specific one from the list. We
recommend naming your Entré units according to their location in your
house, to make it easier to choose the correct unit. For more information
on naming your Entré units, see “Network Name” on page 33.
2. Click OK. Media Manager begins synchronizing the local database with
the information from Entré’s music storage system:
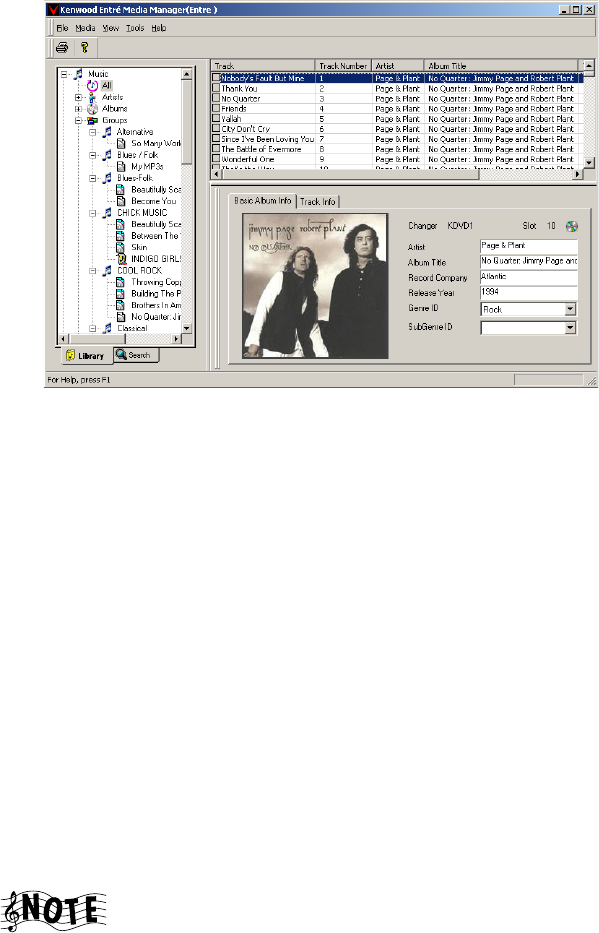
Managing Your Music
102 Complete Guide to Your Entré Entertainment Hub, ver. 2.0
When it finishes, it displays its main window:
From this window, you can:
• Search your computer for stored music (see “Searching Your Com-
puter for Music Files” on page 103)
• Import playlists (see Media Manager online help)
• Import music files (see “Importing Music Files to Media Manager” on
page 104)
• Adding or changing cover art NEW SECTION
• Create playlists, and groups (see Media Manager online help)
• Rename, edit, and delete playlists and groups (see Media Manager
online help)
• Add music files to playlists (see “Adding Music Files to Albums or
Playlists” on page 105)
• Re-sort or remove tracks on playlists (see Media Manager online
help)
• Synchronize your changes with Entré’s internal music storage system
(see “Synchronizing Your Media Manager Files with Entré” on
page 108)
This menu option appears inactive until you make changes
using Music Manager.
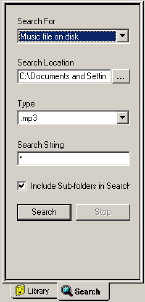
How Do I Transfer Music from the Internet to Entré?
Complete Guide to Your Entré Entertainment Hub, ver. 2.0 103
Searching Your Computer for Music Files
Media Manager includes a search function that you can use to locate music
you have:
• downloaded from the Internet
• uploaded from a portable digital music player
Media Manager can look for playlists or tracks.
To search your computer for music files:
1. Click the Search tab on Media Manager’s main window.
2. Select Music file on disk from the Search for menu:
3. Choose a location to seach. If you are not sure where your music files are
located, select to search your entire disk drive. This will take longer, but
you are more likely to find all your music files.
4. Choose .MP3 from the Type menu.
5. (Optional) Enter a search string (for example, if you know the music file
you want contains a particular string of characters, like “love”).
You can use standard searching wildcards:
• * will substitute any number of characters (for example, *love will
find Love Me Tender, Love Is a Battlefield, etc.)
• ? will substitute the same number of characters as ?s you type (for
example, ??love??? would find I Love LA, but not Love Me Tender)
6. Click Search.
Media Manager searches the location you specified and displays any
MP3 files it finds. Once the files appear, you can add them to albums or
playlists. See “Adding Music Files to Albums or Playlists” on page 105.
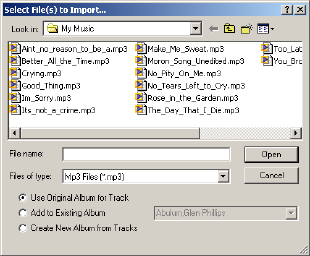
Managing Your Music
104 Complete Guide to Your Entré Entertainment Hub, ver. 2.0
Importing Music Files to Media Manager
If you do not need to search for music files on your computer (i.e., all your
music files are located in a particular directory, or you already know where
the file(s) you want to import are stored), Media Manager can import them
directly, without searching.
To import music files to Media Manager:
1. Open the File menu and click Import Music File…:
2. Select one or more files:
• To select a single file, click on it.
• To select multiple files that are not listed together, click one file, hold
down CTRL and click the other files.
• To select multiple files that are listed together, click the first file, hold
down SHIFT, and click the last file in the set you want to import.
3. Choose a Media Manager location for the files from the options at the
bottom of the dialog:
•Use Original Album for Track imports each MP3 file into its own
album (unless several files are from the same album, in which case
they will be imported into the same album).
•Add to Existing Album imports all selected MP3 files into the same
album that you select.
•Create New Album From Tracks imports all selected MP3 files into
the same brand-new album called New Album [#]. You can rename
this album after the import is complete (see Media Manager online
help for more information).
4. Click Open to begin importing the selected MP3 file(s).
Once the files are imported, you can add them to different albums or
playlists.
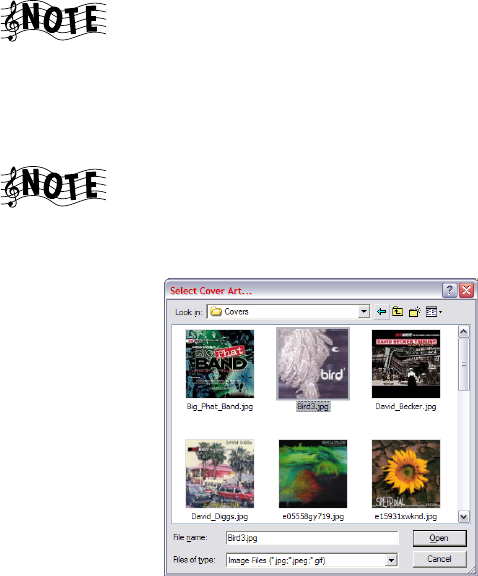
How Do I Transfer Music from the Internet to Entré?
Complete Guide to Your Entré Entertainment Hub, ver. 2.0 105
Changing Cover Art
If you want a different image displayed on Entré and in Media Manager as the
cover for an album or track, you can import any GIF or JPG on your
computer.
When you import an MP3 from your computer, the cover
art does not come with it. Media Manager assigns a generic
image to the album or track.
To c ha nge the co ver art :
1. Click an album or track title on the main window.
If you change the cover on a track, that cover will appear for
all tracks on the album.
2. Double-click on the cover art image. The Select Cover Art dialog
appears:
3. Select a GIF or JPG image. If the image you want does not appear in the
first dialog, browse until you file it.
4. Click Open to apply the image to the selected album or track.
Adding Music Files to Albums or Playlists
Media Manager enables you to sort and organize your music files quickly and
easily. The main window shows the groups, albums, and playlists you have
stored on Entré’s internal music storage system, as well as any new music you
have imported or searched for and added.

Managing Your Music
106 Complete Guide to Your Entré Entertainment Hub, ver. 2.0
Adding Found Music to Albums
Once you have sucessfully searched your hard drive for and music files, you
can add them from the search results to albums or playlists.
You can only add MP3 files to “virtual” albums, i.e., albums
that have been created from MP3 files. You cannot add
music to pre-recorded CD albums.
To add found music to albums or playlists:
1. Search for MP3 files on your computer. See “Searching Your Computer
for Music Files” on page 103.
2. From the search results area, select files:
• Check the box next to the file(s) you want.
• Right-click in the box column to select or clear all files.
3. Right-click in any file details column. Choose an option from the menu:
•Import File imports the highlighted file only.
•Add File to Album import the file and adds it to the album you
specify.
•Import Tagged Files imports each file with a red check in the box to
its own album called Unknown Album [#]. You can then:
• change the name of this album (See Music Manager online help)
• add the files to a different album or to a playlist (see “Adding
Existing Music Files” on page 106)
•Add Tagged Files to Album adds all the tagged files to an album you
specify.
•Create Album from Tagged Files adds all the tagged files to a single
new album titled New Album [#] (see Import Tagged File, above).
Adding Existing Music Files
Music Manager enables you to organize your music into albums and playlists.
Music files can only appear in one album at any given time.
You can only add MP3 files to “virtual” albums, i.e., albums
that have been created from MP3 files. You cannot add
music to pre-recorded CD albums.
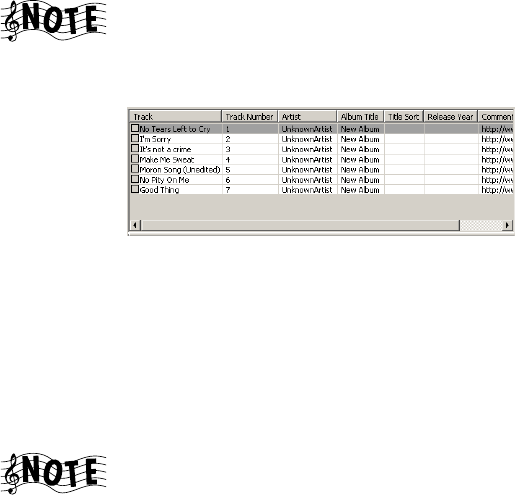
How Do I Transfer Music from the Internet to Entré?
Complete Guide to Your Entré Entertainment Hub, ver. 2.0 107
To add music files to an album or playlist:
1. Select an artist, group, album, or playlist.
You may need to search your Media Manager library to find
the file you want (see the Media Manager online help).
2. From the track details or search results area, select files to add:
• Check the box(es) next to the file(s) you want.
• Right-click in the box column to select or clear all files displayed.
3. Right-click in any track details column. Choose an option from the menu:
•Add Track to Playlist… adds the highlighted track to the playlist you
specify.
•Add Tagged Tracks to Playlist… adds all checked tracks to the play-
list you specify.
The playlist must already exist (see Media Manager online
help). You cannot add a new playlist while adding files.
•Change Album moves the highlighted track to the album you
specify.
•Delete Track from Library removes the highlighted track completely
from Media Manager (but not from your computer). You must re-
import the track if you want to work with it again.

Managing Your Music
108 Complete Guide to Your Entré Entertainment Hub, ver. 2.0
Synchronizing Your Media Manager Files with Entré
Once you have made changes in Media Manager, you are ready to
synchronize these changes with the Entré’s internal music storage system. This
menu option does not become active until you have made changes.
Synchronizing When You Exit Media Manager
If you have made changes, but not synchronized them before exiting, Media
Manager prompts you to do so:
Clicking Yes
Click Yes to begin synchronizing:
Depending on the extent of your changes, this can take several minutes. Do
not turn off your computer while Media Manager is synchronizing with Entré.
Clicking No
Click No to put off synchronizing. When you start up Media Manager again, it
will prompt you to synchronize then:
The prompt contains descriptions of your options.
Clicking Cancel
Click Cancel to cancel exiting and return to the main Media Manager
window.
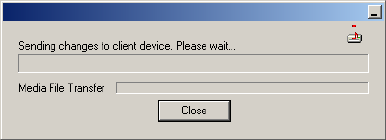
How Do I Transfer Music from the Internet to Entré?
Complete Guide to Your Entré Entertainment Hub, ver. 2.0 109
Synchronizing Manually
You can choose to synchronize Media Manager and Entré at any time. To do
so, open the File menu and click Synchronize Library. Entré begins
synchronizing:
Once this process is done, you can continue organizing your files in Media
Manager or exit the application.
Managing Your Music
110 Complete Guide to Your Entré Entertainment Hub, ver. 2.0

Complete Guide to Your Entré Entertainment Hub, ver. 2.0 111
Chapter 4: Managing Your Movies
Entré provides many powerful features to organize and watch your favorite
movies. For example, the Movie mode allows you to browse your movie
collection, organize movies into custom Groups, or download information
about your collection from the Internet.
To enter Movie mode, press on the remote.
You must have a Kenwood Sovereign DVD changer
connected to Entré in order to use Movie mode. If there is
no connected changer or if the changer is not supported,
Entré displays a message that there is no changer connected.
This chapter explains how to use the Movie mode, and includes the following
sections:
How Do I Browse and Play My Movie Collection? page 112
How Do I Customize My Movies? page 114

Managing Your Movies
112 Complete Guide to Your
How Do I Browse and Play My Movie Collection?
Browse and select movies from your collection from the Movie Guide. For
more information about how to use the Guide screen, see “Browsing
Entertainment Media” on page 47.
Inserting and Removing Discs
Insert DVDs into a connected DVD changer. When you insert a disc into a
connected DVD changer, Entré attempts to read the disc.
The disc information appears as “Unknown” until Entré
connects to the Internet and retrieves disc info and cover art
(if information is available). For more information about
downloading disc information and cover art, see “Editing
Disc Information” on page 120.
If Entré detects that the CD or DVD changer door has been opened and
closed, it automatically performs a “Quick Lookup” to check if any discs have
been added or removed from the changer.
If you have replaced discs with others, you must manually initiate the “Get
Music Info” function from the Options menu. For more information, see
page 83.
Entré automatically reads all the discs in a connected changer. If you are
connected to the Internet, it also automatically contacts Digital Video
Database (DVDB) and downloads available disc data for your collection.
Entré displays DVD Audio discs as “Unknown Disc” under
the DVD category in the Movie mode. Once the on-line
DVD Audio database is operational, DVD Audio discs
automatically appear in the Music mode.
You can manually enter disc titles for DVD Audio discs just
like for movie DVDs. For more information, see “Editing
Disc Information” on page 120.
Selecting a Movie to Play
Each DVD in your movie collection appears as an individual Channel on the
Guide screen. To play a movie, highlight any Channel from the Movie Guide
screen and press or on the remote. The DVD’s internal menu
appears on your TV.
How Do I Browse and Play My Movie Collection?
Complete Guide to Your Entré Entertainment Hub, ver. 2.0 113
If the disc's menu selector defaults to ‘Play’ (as nearly all DVDs do), press
or to play the disc. If the selector does not default to 'Play', use the DVD
player's remote to move through the menu.
Consult the instructions included with the DVD for more information about
its internal DVD menu.
How Do I Browse Movie Groups?
Groups are categories, or genres of movies, such as Action or Drama. There is
also an “All” Group with all movie titles in alphabetical order.
Groups appear on the Movie Guide screen as buttons lined up horizontally at
the top of the movie listings. Up to five Groups can be shown on the Movie
Guide screen at a time. If more than five Groups exist, the Group on the far
right shows a green arrow indicating that there are more Groups. To view the
last Group, repeatedly select the green arrow until it disappears:
Entré creates several Groups for you automatically. You can also create
custom Groups. For more information about creating Groups, see “Managing
Movie Groups” on page 115.
Default Groups
The “All” group is generated automatically, and cannot be modified or
deleted.
If you place a disc in a Rental Zone slot of a connected compatible Kenwood
Sovereign 400-disc DVD changer, Entré automatically generates a “Rental”
group. If all discs are removed from the Rental Zone slots, the “Rental” group
disappears.
In addition to the “All” group, Entré creates Groups using information
downloaded from the MovieDB (Movie Data Base). Entré can create up to 22
Groups, based on standard movie genres contained in the MovieDB
Groups Arrow
Managing Your Movies
114 Complete Guide to Your
database. To learn more about how to download information from the
MovieDB, see “Editing Disc Information” on page 120.
The genres, such as Adventure, Drama, Horror, or Romance, exist as Groups
as long as there is a movie of that genre on the system. For example, if you
remove the only remaining drama from a connected DVD changer, the
Drama Group is removed from the screen.
Entré also automatically generates a “DVD-Audio” group
whenever there is at least one DVD-Audio disc on the
system.
How Do I Browse Movie Channels?
Channels are the individual movies in a group. When you add a movie to a
connected changer, or you create a new Group, Entré automatically adds the
appropriate Channels in the Group. Channels appear as numbered selections
arranged vertically below the Groups on the Movie Guide screen.
How Do I Customize My Movies?
Organize and customize access to your movie collection using the Movies
Options screen.
From Movies Options, you can add and manage Groups, download disc
information or cover art, or identify the contents and capacity of your
changer.
Channels
How Do I Customize My Movies?
Complete Guide to Your Entré Entertainment Hub, ver. 2.0 115
When you press OPTIONS in Movie mode, the Movies Options screen
appears:
The following table explains the buttons that appear on the first screen.
Managing Movie Groups
Creating a custom Group allows you to organize your movie collection any
way you choose. For example, you could create a group of movies from the
fifties, or movies starring your favorite actress. You can create, edit, and delete
Groups at any time to help you find your favorite movie quickly.
You cannot edit or delete the “All” Group.
This button: Allows you to do this: And is described in
this Guide on:
new group Create a new group. page 116
edit group Edit an existing group. page 117
delete group Delete an existing group. page 118
EXIT Return to the Guide screen. n/a
get movie info Look at or download infor-
mation about the movies cur-
rently in the changer.
page 119
edit disc Customize disc information. page 120
select cover art Choose the cover art for a
movie.
page 122
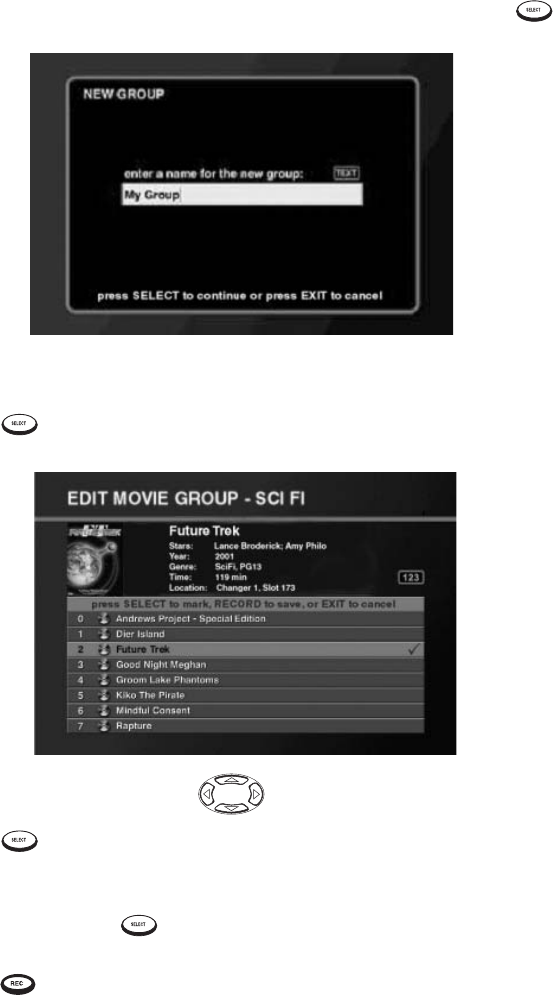
Managing Your Movies
116 Complete Guide to Your
How Do I Create a New Group?
To c reate a n ew Gr o up:
1. From Movies Options, highlight new group on the screen and press .
The New Group screen appears:
2. Enter the name for the new Group using the alpha-numeric keypad on
the remote.
3. Press to save the Group name. The Edit Movie Group screen
appears:
4. Press the navigation buttons to highlight titles.
5. Press to add a title to the Group. A check mark appears showing
that this title is included in the Group.
6. (Optional) If you change your mind and wish to take a selected title out
of the Group, press again. The check mark toggles off to show that
the title is not included in the Group.
7. Press to save the new Group and return to the Movie Guide.
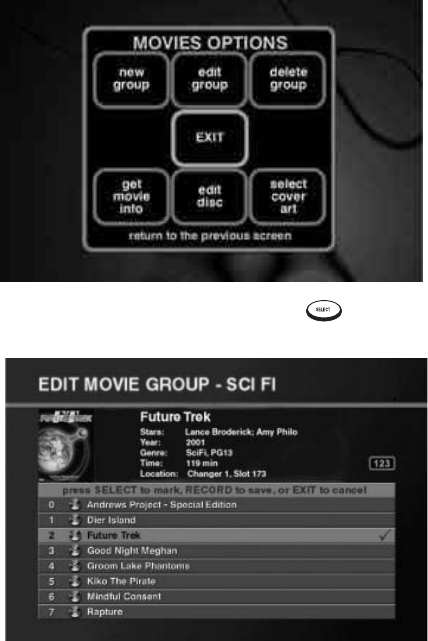
How Do I Customize My Movies?
Complete Guide to Your Entré Entertainment Hub, ver. 2.0 117
How Do I Edit a Group?
To edit an existing group:
1. From the Movie Guide, highlight a Group.
2. Press OPTIONS. Movies Options appears:
3. Highlight edit group on the screen and press . The Edit Movie
Group screen appears:
4. Edit the name of the Group.
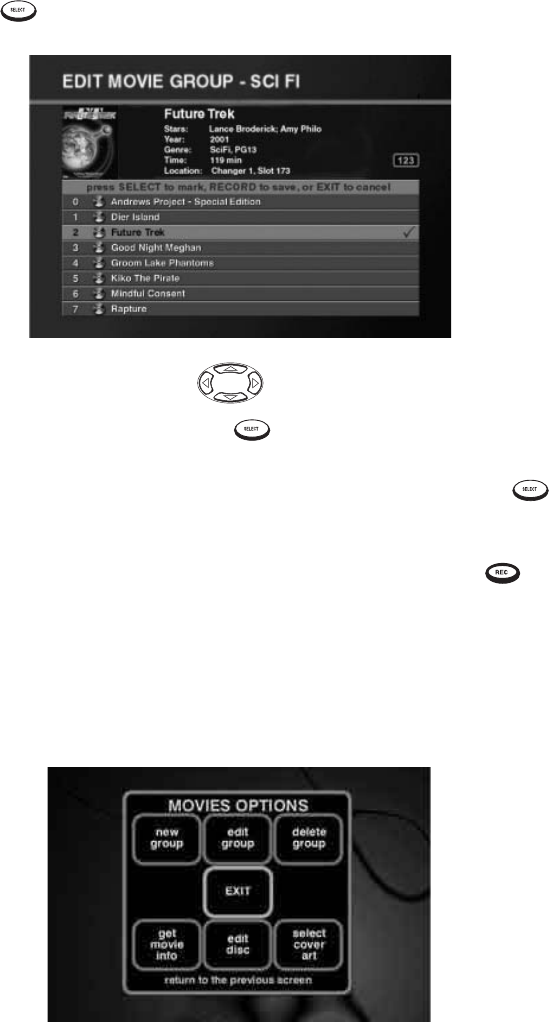
Managing Your Movies
118 Complete Guide to Your
5. Press to save the Group name. The Edit Movie Group screen
appears:
6. Press the navigation buttons to highlight titles.
•To add a title to the Group, press . A check mark appears to show
that this title is included in this Group.
•To delete a channel from a Group, highlight the channel and press .
The check mark toggles off to show that the track is not included in the
Group.
•To save the edited Group and return to the Movie Guide, press .
How Do I Delete a Group?
To delete an existing Group:
1. From the Movie Guide, highlight a Group.
2. Press OPTIONS. The Movies Options screen appears:
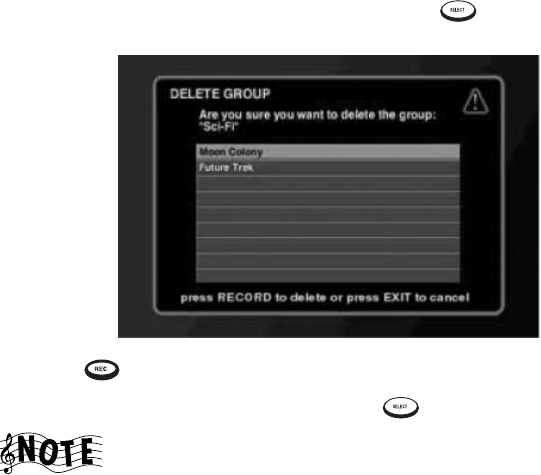
How Do I Customize My Movies?
Complete Guide to Your Entré Entertainment Hub, ver. 2.0 119
3. Highlight delete group on the screen and press . The Delete Group
screen appears:
4. Press . A dialog confirms Group deletion.
5. Highlight delete on the screen and press to delete the group.
You can delete a Group automatically created with
information from the MovieDB. However, the next time you
download information from the database, the Group will be
recreated.
Getting Movie Information
With the Get Movie Information feature, you can view information about the
DVDs stored in a connected disc changer. For example, you could see how
many empty disc slots there are in your DVD changer, or see how many
unknown discs there are in the system.
Following is a list of all available movie information:
• Disc Changers Connected
•Total Movie Discs
• Free Movie Slots
•Known Discs
•Unknown Discs
•Cover Art Count
In addition, Get Movie Information attempts to identify all
unknown DVDs.
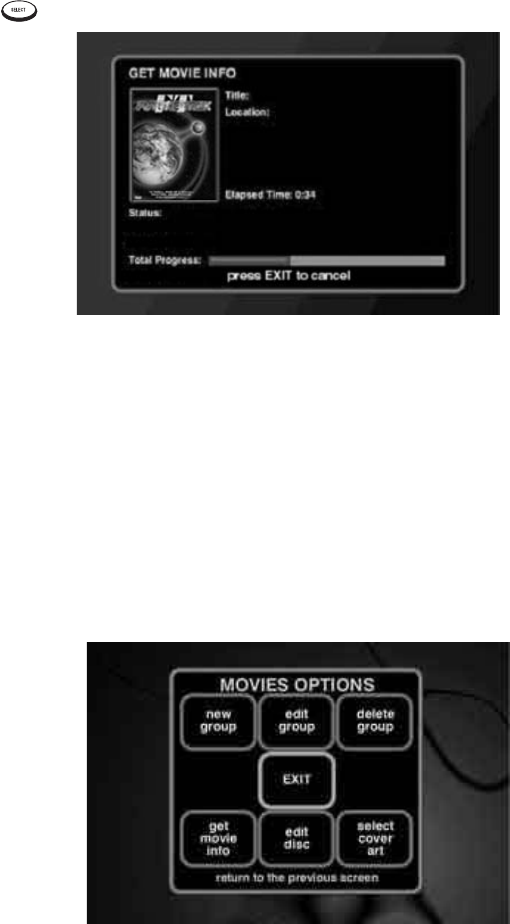
Managing Your Movies
120 Complete Guide to Your
To view movie information:
1. From Movies Options, highlight get movie info on the screen and press
. The Get Movie Info screen appears:
Entré attempts to identify all unknown discs. If a disc's information is not
contained in the MovieDB database, Entré displays “Unknown disc” instead
of the disc's title and “Track 1, Track 2" (etc.) instead of the disc and track
titles.
Editing Disc Information
Edit disc allows you to customize disc information, such as movie
information, or genres.
To edit disc information:
1. From the Movie Guide, highlight a disc and press OPTIONS. The Options
screen appears:
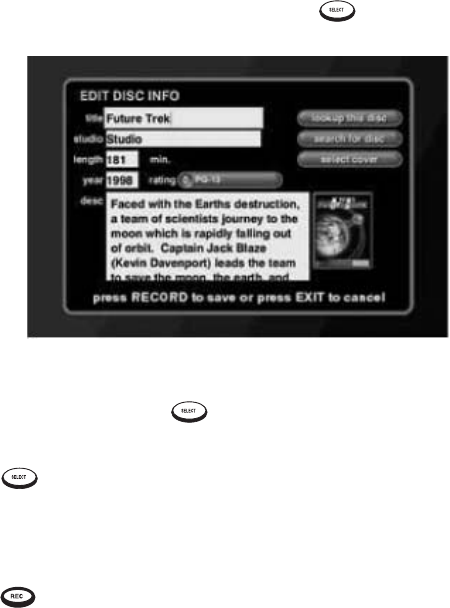
How Do I Customize My Movies?
Complete Guide to Your Entré Entertainment Hub, ver. 2.0 121
2. Highlight edit disc on the screen and press . The Edit Disc
Information screen appears:
From this screen, you can customize the disc’s information.
3. Move to a field and press to edit it.
4. Edit the text in the field using the alpha-numeric keypad on the remote.
5. Press to edit the next field.
6. To change the rating of the movie, use the drop-down list.
7. To look up or search for disc information, or cover art, select the
appropriate button on the right side of the screen.
8. Press to save the changes and return to the Edit Movie Playlist
screen.
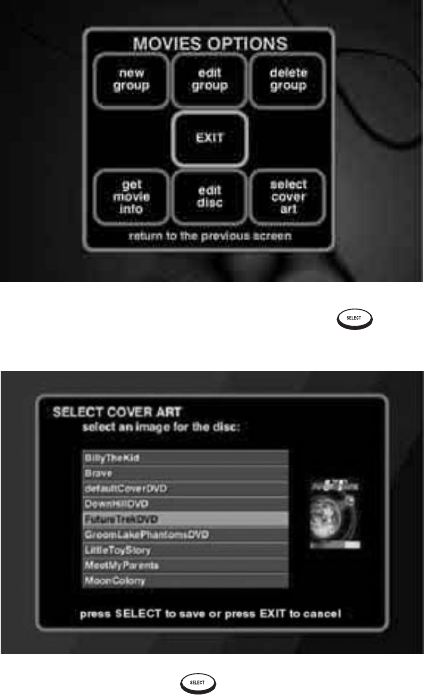
Managing Your Movies
122 Complete Guide to Your
Selecting Cover Art
If there is no cover art downloadable from MovieDB, choose generic cover art
for the currently selected title by using the “Get Cover Art” option.
To select cover art:
1. From the Movie Guide, highlight a disc edit and press OPTIONS. The
Options screen appears:
2. Highlight select cover art on the screen and press . The Select Cover
Art screen appears:
3. Highlight a cover art and press to save your changes and return to
the Options menu.

Complete Guide to Your Entré Entertainment Hub, ver. 2.0 123
Chapter 5: Managing Your Radio Stations
Entré provides many powerful features to organize and listen to your favorite
radio stations. For example, the Radio mode allows you to add new AM, FM,
or Internet radio stations to Entré, or browse through available stations.
To enter Radio mode, press on the remote.
You must be connected to the Internet to access radio
stations on the Web.
AM and FM radio functions are available only with a
connected Kenwood Sovereign receiver. The AM and FM
Groups are not visible unless Entré is connected to a
Kenwood Sovereign receiver.
Internet radio performance depends on the speed and
condition of your Internet connection, the Internet station
and Internet traffic.
You may occasionally lose your station connection or its
audio signal. Typically, this is caused by the performance of
the Internet or the station’s server, not by Entré.
The audio quality of Internet radio depends on the speed of
your Internet connection, the bandwidth of the station, and
on Internet traffic.
Low speed (28K) stations deliver sound quality similar to AM
radio. High speed (56K, 96K) stations deliver sound quality
similar to FM radio. For best sound quality, choose the
highest bandwidth station available that your Internet
connection will support. Dial-up Internet connections will
only support 28K stations.
This chapter explains how to use the Radio mode, and includes the following
sections:
How Do I Browse and Listen to Radio Stations? page 124
Tuning Stations page 126
How Do I Customize My Radio Stations? page 131

Managing Your Radio Stations
124 Complete Guide to Your
How Do I Browse and Listen to Radio Stations?
Browse and select radio stations from the Radio Guide. For more information
about how to use the Guide screen, see “Browsing Entertainment Media” on
page 47.
Before you use Entré to listen to the radio for the first time,
you need to update all Internet Radio stations to be able to
receive all 60 Sirius Satellite Radio music stations. For more
information, see “Tuning Stations” on page 126.
Selecting a Station to Play
Each station stored on Entré appears as an individual Channel on the Guide
screen. To listen to a radio station, highlight any Channel from the Radio
Guide screen and press or on the remote. The Radio Player
appears on your TV:
How Do I Browse Radio Station Categories?
Groups are categories, or genres of radio stations. Groups can contain stations
according to:
• The type of radio station (AM, FM, or Internet) or
• A station genre (Country, Classical, Rock).
The “All” Group contains all stations in alphabetical order.
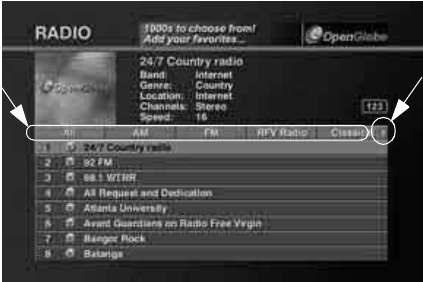
How Do I Browse and Listen to Radio Stations?
Complete Guide to Your Entré Entertainment Hub, ver. 2.0 125
Groups appear on the Radio Guide as buttons lined up horizontally at the top
of the radio listings. Up to five Groups can be shown on the Radio Guide
screen at a time. If more than five Groups exist, the Group on the far right
shows a green arrow indicating that there are more Groups. To view the last
Group, repeatedly select the green arrow until it disappears:
Entré automatically creates several Groups for you. You can also create
custom Groups. For more information about creating Groups, see “Managing
Radio Groups” on page 132.
Default Groups
The following Groups are generated automatically if there are radio stations to
fill them. These Groups cannot be modified or deleted:
• All - includes all stations that can currently be played by the system
• AM - includes all AM radio stations
• FM - includes all FM radio stations
Internet radio stations appear in Groups according to their provider, and
cannot be deleted.
In addition to the “All” Group, Entré creates Groups using information
downloaded from the Internet. Entré can create up to 22 Groups, based on
standard radio genres. To learn more about how to add radio stations and
genres, see “Tuning Stations” on page 126.
The genres, such as Classical, Country, or Oldies, exist as Groups as long as
there is a station of that genre on the system. For example, if you delete the
only remaining classical station from Entré, the Classical Group is removed
from the screen.
Groups Arrow
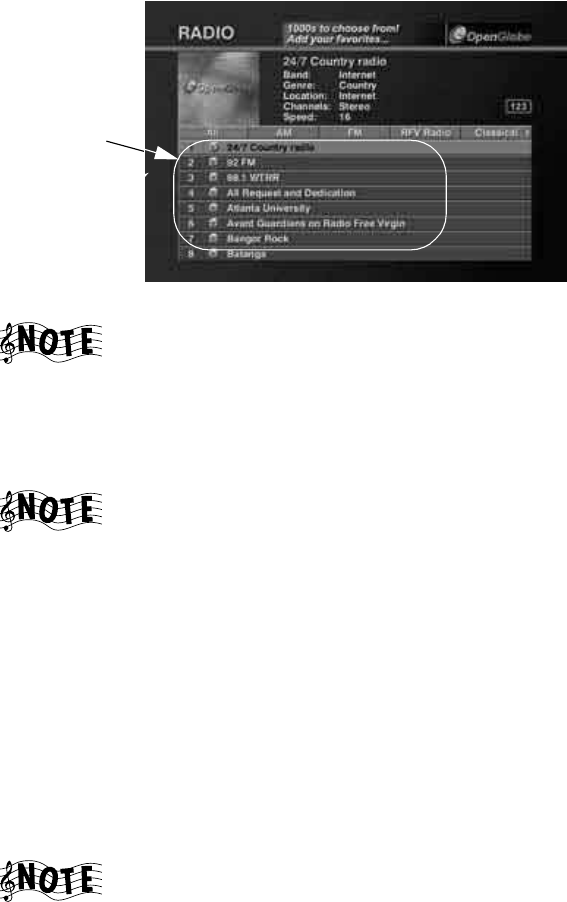
Managing Your Radio Stations
126 Complete Guide to Your
How Do I Browse Radio Station Channels?
When you add a Channel to Entré, or you create a new Group, Entré
automatically adds the appropriate Channels to the Radio Guide. Channels
appear as numbered selections arranged vertically below the Groups on the
Radio Guide screen:
Some Internet radio stations may have multiple listings with
a different broadcast speed (28K, 56k, 96k) next to each
one. If your Entré uses a high-speed connection (DSL, cable
modem, etc.) to access the Internet, take advantage of the
higher-speed broadcast rates (56k and 96k), which will yield
superior sound quality.
If your Entré uses a dial-up connection to access the
Internet, you can only select Internet radio stations
broadcasting at 28K, or those without a speed listing.
Tuning Stations
Entré can automatically find Internet and AM/FM radio stations in your area.
When you configured Entré during setup, you entered your zip code. Entré
uses this to locate local radio stations and stores them if the signal is trong
enough.
Tuning AM/FM Radio Stations
During Internet configuration, Entré received RadioDB information for all
receivable FM and AM radio stations located within 75 miles of the center of
your Zip Code. You can also easily add new FM/AM radio stations.
Make sure that your receiver or tuner's FM and AM
antennas are connected before performing this operation.
Channels
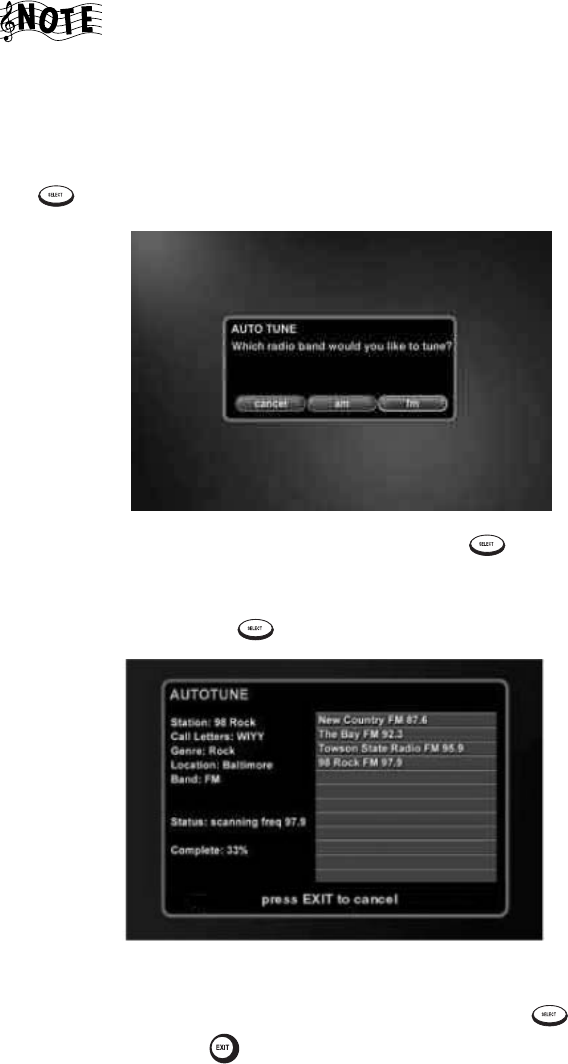
How Do I Browse and Listen to Radio Stations?
Complete Guide to Your Entré Entertainment Hub, ver. 2.0 127
AM and FM functions are available only with a connected
Kenwood Sovereign receiver. The AM and FM Groups are
not visible unless Entré is connected to a Kenwood
Sovereign receiver.
To automatically tune AM or FM stations:
1. From Radio Options, highlight AUTO TUNE AM/FM on the screen and press
. The Auto Tune screen appears:
2. Highlight either AM or FM on the screen and press . A screen
appears, warning that this action replaces all of the AM or FM presets on
your receiver.
3. Highlight OK and press . The Autotune screen appears:
Entré automatically scans the available frequencies and adds stations.
4. When the Status reads “done,” the scan is complete. Press to save
the new stations, or to cancel.

Managing Your Radio Stations
128 Complete Guide to Your
Adding New AM or FM Radio Stations
1. From the Radio Options screen, highlight new station on the screen and
press . The New Station screen appears:
2. Highlight the type of station you want to add and press . The New
AM/FM Station screen appears:
3. Move to a field and press to enter information.
4. Press to add information in the next field.
5. Change the genre and band, using the buttons beneath the text fields.
6. Press to save the changes and return to the Radio Guide screen.
If you try to add an AM or FM station to a frequency that is
already saved in Entré, the new information will not appear.
To change the information for a station that is already saved,
use the Edit Station function. (See page 136 for more
information.)
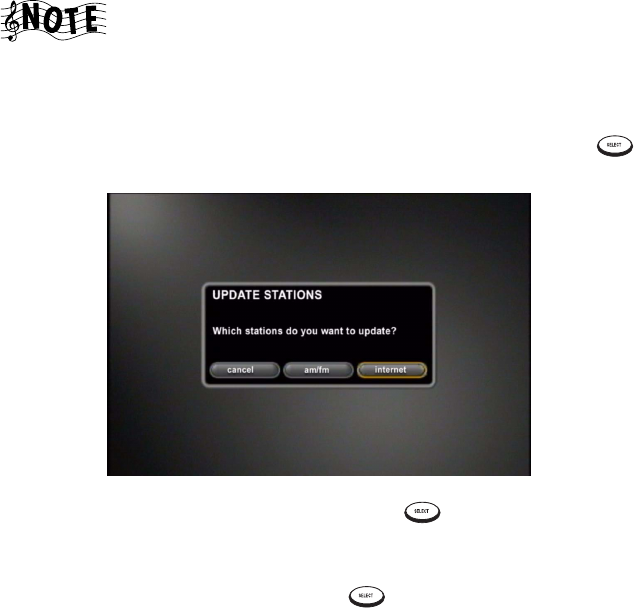
How Do I Browse and Listen to Radio Stations?
Complete Guide to Your Entré Entertainment Hub, ver. 2.0 129
Tuning Internet Radio Stations
During Internet configuration, Entré automatically added most Internet radio
stations that are partnered with Kenwood and OpenGlobe, including several
Sirius Satellite Radio music stations. To receive all 60 of Sirius Satellite Radio’s
music stations, you need to first manually update Entré’s Internet Radio
station directory.
You must have high-speed or broadband Internet access to
receive Internet radio stations. If you connect using dialup,
these stations are not available.
To update Entré’s Internet Radio station directory:
1. From the Radio Options screen, highlight GET RADIO INFO and press .
The Update Stations screen appears:
2. Highlight INTERNET on the screen and press . A screen appears,
warning that this action replaces all of the Internet Radio stations in your
Radio Guide.
3. Highlight OK on the screen and press . Entré automatically adds all
Sirius Satellite Radio stations. Depending on your connection speed, this
can take a while.
Entré automatically returns to the Radio Guide screen when it completes the
update.

Managing Your Radio Stations
130 Complete Guide to Your
Adding New Internet Radio Stations
1. From the Radio Options screen, highlight new station on the screen and
press . The New Station screen appears:
2. Highlight internet on the screen and press . The New Internet Sta-
tion screen appears:
3. Move to a field and press to enter information.
4. Press to add information in the next field.
5. Change the genre and Channels using the buttons beneath the text fields.
6. Press to save the changes and return to the Radio Guide screen.
Entré only supports Internet radio stations in WMA format
that have URLs with a “.asf” file extension.

How Do I Customize My Radio Stations?
Complete Guide to Your Entré Entertainment Hub, ver. 2.0 131
How Do I Customize My Radio Stations?
Organize and customize access to radio stations by using the Radio Options
screen.
From Radio Options, you can add radio stations to Entré, add and manage
Groups, and update station information.
When you press OPTIONS in radio mode, the Radio Options screen appears:

Managing Your Radio Stations
132 Complete Guide to Your
The following table explains the buttons that appear on the first screen.
Managing Radio Groups
Creating a custom Group allows you to organize your radio stations any way
you choose. For example, you could create a Group of stations from a
particular city, or a Group of college radio stations. You can create, edit, and
delete Groups at any time to help you find your favorite stations quickly.
You cannot edit or delete “All”, “AM”, “FM”, or any of the
Internet radio provider Groups.
Press: To: See:
new group Create a new Group. page 133
edit group Edit an existing Group. page 134
delete group Delete an existing Group. page 135
get radio info Tune Entré’s radio stations page 126
EXIT Return to the Guide screen. n/a
new station Add new stations to the
Radio Guide.
page 128
auto tune AM/FM Automatically tune all avail-
able AM/FM stations.
page 126
edit station Change station information
such as name, URL, or call
letters.
page 136
delete stations Remove a station from the
Guide.
page 136
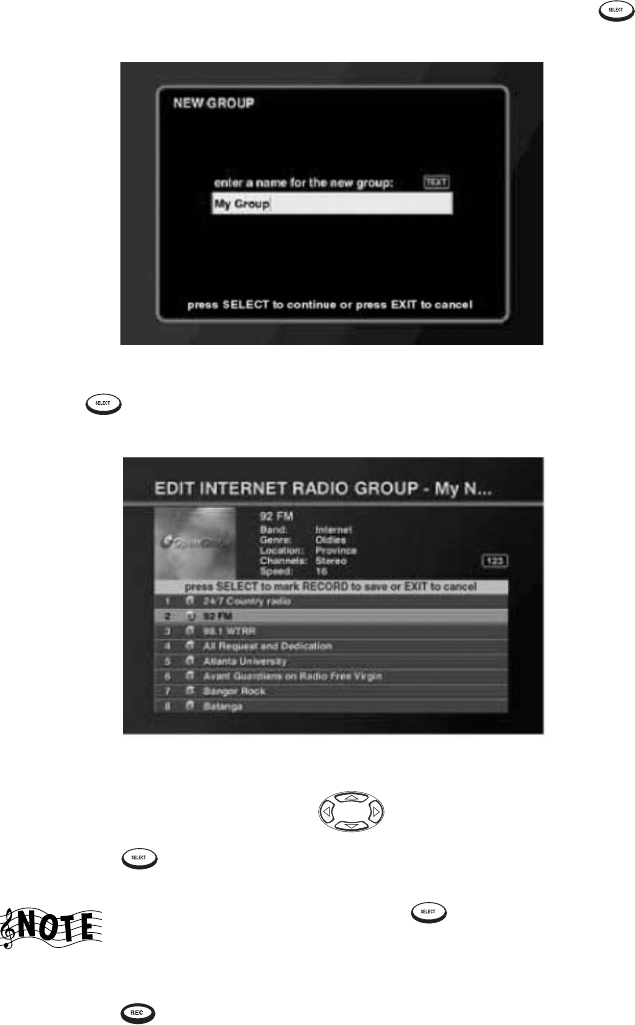
How Do I Customize My Radio Stations?
Complete Guide to Your Entré Entertainment Hub, ver. 2.0 133
How Do I Create a New Group?
1. From Radio Options, highlight new group on the screen and press .
The New Group screen appears:
2. Enter a name for the new Group.
3. Press to save the Group name. The Edit Internet Radio Group
screen appears:
4. Add a radio station:
a. Press the navigation buttons to highlight stations.
b. Press to add a station to the Group. A check mark shows that
this station is included in the Group.
If you change your mind, press again. The check mark
disappears to show that the station is excluded from the
Group.
c. Press to save the new Group and return to the Radio Guide.
Managing Your Radio Stations
134 Complete Guide to Your
How Do I Edit a Group?
To edit an existing Group:
1. From the Radio Guide, highlight a Group.
2. Press OPTIONS. Radio Options appears.
3. Highlight edit group on the screen and press . The Edit Group
screen appears:
4. Edit the name of the Group.
5. Press to save the Group name. The Edit Internet Radio Group
screen appears:
6. To edit a station:
• Press the navigation buttons to highlight stations.
•To add a station to the Group, press . A check mark appears to
show that this station is included in this Group.
How Do I Customize My Radio Stations?
Complete Guide to Your Entré Entertainment Hub, ver. 2.0 135
•To delete a station from a Group, highlight the station and press .
The check mark toggles off to show that the station is not included in
the Group.
•To save the edited Group and return to the Radio Guide, press .
How Do I Delete a Group?
To delete an existing Group:
1. From the Radio Guide, highlight a Group.
2. Press OPTIONS. Radio Options appears.
3. Highlight delete group on the screen and press . The Group con-
tents screen appears:
4. Press . A dialog confirms Group deletion.
5. Highlight delete on the screen and press to delete the Group.
You can delete a Group automatically created by Entré.
However, the next time you add a radio station of that
genre, the Group will be recreated.
Managing Your Radio Stations
136 Complete Guide to Your
Editing Stations
With the Edit Station feature you can update station information, such as the
name of the station, the Internet address for an Internet station, or the call
letters for a traditional AM or FM station.
1. From the Radio Guide, highlight an Internet radio station and press
OPTIONS. The Options screen appears.
2. Highlight edit station on the screen and press . The Edit Station
Information screen for the type of station currently selected appears:
3. Customize the station information as needed, then press to save the
changes, or to cancel.
Deleting Stations
1. From the Radio Guide, highlight a station and press OPTIONS. Radio
Options appears:
How Do I Customize My Radio Stations?
Complete Guide to Your Entré Entertainment Hub, ver. 2.0 137
2. Highlight delete station on the screen on the screen and press . The
Delete Radio Station screen appears:
3. Press to delete the station. A message appears to confirm deletion.
4. Highlight delete on the screen and press . Entré deletes the station,
and returns to the Radio Guide.
Managing Your Radio Stations
138 Complete Guide to Your

Complete Guide to Your Entré Entertainment Hub, ver. 2.0 139
Chapter 6: Using the Internet
Browse through available music and movie selections and order your favorites
right from the privacy of your own home. This chapter introduces you to
features available through the OpenGlobe™ e-commerce Web site.
This chapter is divided into the following sections:
How Do I Order Music and Movies? page 139
How Do I Get More Information About My Media Collections?
page 139
How Do I Get Information About Music I Tagged On My Axcess Remote
Portal? page 140
How Do I Order Music and Movies?
OpenGlobe™ Entertainment Services delivers personalized services and
content that can enhance your entertainment experience. You have access to
the free and continually updated OpenGlobe™ services with the press of a
button.
Press on your Entré remote control for more information. Ordering
instructions appear on the screen.
How Do I Get More Information About My Media
Collections?
In addition to supplying cover art, disc titles and track titles for discs inserted
into Entré or a connected changer, OpenGlobe can also supply detailed artist
information.
Press on your Entré remote control to display the OpenGlobe site, then
select NOW PLAYING to display information on the artist currently playing on
your Entré.

Using the Internet
140 Complete Guide to Your Entré Entertainment Hub, ver. 2.0
How Do I Get Information About Music I Tagged On
My Axcess Remote Portal?
The Axcess Remote Portal allows listeners to ‘tag’ music that they hear on
Internet Radio stations so they can get information about it later or purchase it
on the OpenGlobe Web site.
To retrieve information about tagged music:
1. Press .
2. Select MY ACCOUNT.
3. Click MY KENWOOD AXCESS WISH LIST to see the information or purchase
the music.
Complete Guide to Your Entré Entertainment Hub, ver. 2.0 141
Chapter 7: Troubleshooting
Troubleshooting is how you determine what part of a complex system (like a
home theater system) is at fault when the system isn’t working how you think
it should. When you troubleshoot a system, you diagnose a problem by
examining and eliminating possible causes until there’s only one left.
Troubleshooting is easiest when you start with the most obvious, most
common, and most likely cause, and work from there.
Diagnosing your own problems can save you time and aggravation—the
better you understand how to troubleshoot and adjust your own system, the
less time you have to:
• spend on the phone with a customer service representative
• do without your Entré because it’s “in the shop”
Here are some basic steps to good troubleshooting:
1. Verify the exact conditions when the problem occurs.
This is the most important step in troubleshooting. Whether you fix it
yourself or have to describe it to a technician, you are much more likely
to solve the problem if you know the exact circumstances surrounding it.
For example, if you don’t hear anything through the speakers, it’s useful
to know if it only happens when you are listening to MP3 files. Knowing
that means the speakers themselves aren’t part of the problem. The more
you know about when a problem occurs, the more likely it is that you or
the technician can solve it.
2. Check each part of the signal’s path from source (such as Entré) to
speaker.
You may also want to test the assumptions you made in step 1: maybe
you haven’t listened to Internet radio in a while—is there no sound from
it as well? This step really helps narrow down the possible causes. Test all
your connected devices and eliminate the ones where the problem
doesn’t occur. When you’re done with this step, you’ll probably have
found the problem.
3. Go over all device connections slowly and methodically. If you are
using a programmed remote (such as Kenwood’s PowerTouch III),
double-check the settings on your remote.
Wrong or loose connections are the most likely cause of the most com-
mon home entertainment problem: no sound. Use the Connection and
Setup Guide to double-check your connections for each device. This is
especially important with Entré, where it’s easy to swap the “play” and
“record” connections.

Troubleshooting
142 Complete Guide to Your Entré Entertainment Hub, ver. 2.0
4. Cables (especially old ones) go bad more frequently than devices do.
Always suspect the cable before its device. For one thing, it’s easier to
test: simply swap the cable with one connected to a device you know is
working. Then, if the device works, it was the cable. You can generally
purchase new cables at most home electronics stores, or via the Internet.
5. User error is more likely than device failure.
You probably don’t want to hear this, but it’s true. Use this manual to go
over the steps to operate Entré. Refer to the manuals for the other devices
in your entertainment system as well.
6. Entré is a computer-based device.
Just like any other computer-based device, resetting the processor may
be necessary from time to time. Unlike your computer, Entré does not
reset the processor each time you turn it off. You must manually reset the
processor. Sometimes resetting it fixes the problem. See “Entré fails to
respond to front panel or remote commands or is responding errone-
ously” on page 150.
7. Instruction manuals are your friends.
A good rule of thumb is to check the manual when something doesn’t
work as you expected. If you read the manual before calling the store or
taking Entré back, you may find the solution to your problem much more
quickly.
The rest of this chapter presents some common problems, grouped by type,
and the steps you can take to resolve them.
How Do I Contact Kenwood?
We recommend reading this chapter before calling Kenwood. If you are still
experiencing difficulties, use one of the following methods to contact
Kenwood Customer Support:
•Call 1-800-KENWOOD
•Email inquiry@kenwoodusa.com
•Visit the Web at www.kenwoodusa.com
How Do I Solve Problems with Video?
I don’t see anything on my TV screen
Check that:
• You have connected Entré properly. The video output must be routed
through Entré, following the instructions in How to Connect and Set Up
Your Entré.

Troubleshooting
Complete Guide to Your Entré Entertainment Hub, ver. 2.0 143
• You are using the same type of video cable throughout the signal path. In
other words, if you use S-Video between Entré and the TV, you must also
use S-Video between Entré and the receiver, and between the receiver
and all of video components.
If your Kenwood receiver has Universal Video, you do not
need to use the same type of video cables between all of
your video components and the receiver. Universal Video
converts the signal for you. You still need to use the same
type of video cables between the receiver and Entré, and
between Entré and the TV.
I can see the Entré Guide on my TV screen, but I don’t see a
picture from the DVD player or VCR
Press PASS-THROUGH on the bottom of the remote, which removes the Entré
Guide from the screen and replace it with the last video source you selected
on the receiver.
How Do I Solve Sound Problems?
I can’t hear anything when I play MP3s or Internet radio
Check that:
• you have made an analog connection (play out or monitor out); due to
copyright issues, cannot read Pulse Code Modulation (2-channel signal,
i.e., from CD player) digital signal
• You have connected Entré properly. MP3s are stored on Entré’s
high-capacity storage system and Internet Radio is played through Entré’s
Internet connection, so its audio outputs must be connected to your
receiver or amplifier.
• Your receiver’s “tape monitor” feature is not on. On Kenwood Sovereign
receivers, this is labeled CD2/Tape Monitor.
• Your receiver is set to the input jack with which you connected Entré.
I recorded an MP3 file on Entré’s high-capacity music storage
system and although it shows up on the Guide screen, when I
play it there’s no sound
Check the Audio Input Selection function in the Audio & Video Settings
section of the Setup menu. If the Audio Input Selection screen lists any of
Entré's analog, coaxial digital and optical digital inputs as “Not Used”, no
signal will pass through them even if you have connected components to
them.

Troubleshooting
144 Complete Guide to Your Entré Entertainment Hub, ver. 2.0
To activate the inputs:
1. Select the type of component that you have connected to each input.
2. Select Save.
3. Exit the Setup menu.
(See page 32 of How to Connect and Set Up Your Entré for more information.)
How Do I Solve Internet Connection Problems?
Internet connections can be complex, with problems and
solutions coming from any one of the many devices or
service providers in the network. This section is not
intended to solve all your Internet problems. It is intended
to provide information about what can be tried on Entré to
fix the problem. If the problem persists after trying the steps
presented here, contact your ISP or network administrator.
While completing Quick Start setup, I learned that my ISP
was unsupported
You cannot use AOL, Compuserve, or a free ISP account with Entré. To obtain
a supported ISP account, call the toll free number on your screen, then press
to continue setup. You can also obtain an ISP account on your own. If
you do, use the information provided by your ISP during the setup
procedure.
See “How Do I Configure Internet Setup?” on page 25.
While completing Quick Start setup, I got a warning that
there was no Ethernet adapter detected
If you are connecting to the Internet via a DSL, cable or LAN, you must
purchase a compatible USB-to-Ethernet adapter (Check the Kenwood USA
Web site at www.kenwoodusa.com to purchase a supported Ethernet
adapter.) Once you have connected the adapter, press to continue
setup.
See “Continuing Quick Start with an Ethernet Connection” on page 28.
I can’t connect to the Internet
Check whether:
• You have connected Entré properly. Entré requires a phone line or Ether-
net adapter and cable modem or DSL connection to access the Internet.
For more information, see How to Connect and Set Up Your Entré.

Troubleshooting
Complete Guide to Your Entré Entertainment Hub, ver. 2.0 145
• Your Internet Service Provider (ISP) is experiencing an outage or connec-
tion difficulty. Check your Internet account via your computer. If you can-
not connect, contact your ISP’s customer service hotline directly by
telephone.
• You have an Internet account. You must have an existing Internet account
to use Entré’s Internet features. OpenGlobe, Kenwood’s Internet partner,
provides a variety of Internet services. For more information, call the
number given on Entré’s screen.
• You are using one of the following Internet service providers:
• America Online (AOL)
•CompuServe
• Any free Internet connection (such as Juno or Yahoo)
Entré is not compatible with these Internet service providers. Open-
Globe, Kenwood’s Internet partner, provides a variety of Internet ser-
vices. For more information, call the number given on Entré’s screen.
I received one of the following error messages
• No Carrier. Check Number.
This message means that the number you entered for the modem to dial
is incorrect. To verify the number:
a. Go to setup > internet configuration > dialup settings.
b. Verify that the phone number is correct and that you have not filled
in an area code when you do not need to dial one (i.e., the number
is in the same area code as your phone).
• Bad login name or password.
This message means you have entered your login name or password
incorrectly, or you do not have an account with the ISP Entré dialed.
Check that your login name or password uses the right capitalization.
Login names and passwords are case-sensitive, which means that both
Entré and your ISP care whether you used capital or lowercase letters in
the right places.
If you use MSN, you must enter MSN/ before your user
name. For example, if your login name for MSN is
rcuevas@msn.com change it to MSN/rcuevas.
I cannot download software updates, or CD or DVD titles.
NOTE RE: ONLY DIALUP (IF NOT, SEE HOME NETWORK SECTION) Entré
shows that it is connected to the network, but nothing happens. After about
30 minutes, Entré times out of the modem connection. To fix this problem:

Troubleshooting
146 Complete Guide to Your Entré Entertainment Hub, ver. 2.0
1. Go to setup > internet configuration > primary TCP/IP settings.
2. Enter two of the following four DNS addresses:
• 198.6.1.1
• 198.6.1.2
• 198.6.1.3
• 198.6.1.4
3. Save and exit setup.
Entré is unable to complete a software update
Most likely, this is caused by heavy Internet traffic through your ISP. Try the
update at a different time. If the problem persists, contact Kenwood
Customter Support.
How do I Solve Home Network Problems?
Home networks can be complex, with problems and
solutions coming from any one of the many devices in the
network. This section is not intended to solve all your
networking problems. It is intended to provide information
about what can be tried on Entré to fix the problem. If the
problem persists after trying the steps presented here,
contact your ISP or network administrator.
Entré displayed a message about a “DNS Failure”
This message means that Entré’s IP address is not being recognized by the
Internet. To fix the problem, try setting up Entré to use a static IP address (or a
different IP address if you are already using static IP addresses).
1. Go to a computer connected to the same network as Entré. If your net-
work has several switches and hubs, go to a PC on the same router,
switch, or hub.
2. Check the computer’s IP address:
• On Windows 95/98/98SE/ME computers:
a Click Start and select Run.
bType winipcfg and click OK or press ENTER.
c Write down the following information:
• IP address
• Gateway
•DNS servers
•Subnet mask

Troubleshooting
Complete Guide to Your Entré Entertainment Hub, ver. 2.0 147
• On Windows NT/2000/XP computers:
a Click Start and select Run.
bType cmd and click OK or press ENTER.
c At the command prompt, type ipconfig/all and press ENTER
a Scroll to the Ethernet adapter settings and write down the fol-
lowing information:
• IP address
• Gateway
•DNS servers
•Subnet mask
3. On the Entre, go to setup > internet configuration > primary TCP/IP
settings.
4. Enter the Gateway & Subnet Mask exactly as they appeared on the com-
puter (see step 2, above).
5. Calculate an IP address:
a. Enter the first three segments of the IP address you noted from the
computer in step 2. These segments identify the parts of your net-
work that are not unique to a particular computer or device (such as
Entré)—they must match the ones from your computer.
b. Use the following formula to calculate the last number (the “node):
Total Number of Computers
+ Node Number from Computer
+ 5
New Node Number
For example, there are four computers on your network, and the IP
address from the computer you checked is 192.168.0.105. The new
Entré node number would be as follows:
4
+ 105
+ 5
114
c. Enter the number you just calcuated in the fourth segment.
The Internet should now recognize Entré, which means you can download
music and movie information and access OpenGlobe’s Internet features.
Troubleshooting
148 Complete Guide to Your Entré Entertainment Hub, ver. 2.0
Entré displayed a message about a “DHCP Failure”
This message means that Entré is not connecting to the router. To fix this
problem:
1. Verify that all network equipment (USB adapters, HPnA bridges, routers,
switches, hubs, etc.) indicate that they are "linking." If they are linking,
you will see a steady or blinking light above or next to the port where
Entré (USB) or the adapter (CAT5) is plugged in.
2. If the light is not steady or blinking, check the following (in order):
a. Whether other devices connected to the network are accessing each
other and the Internet.
•If not, the problem is with the device that is not showing a light.
Try turning it off, counting to 20, and turning it back on again. If
that does not work, contact the customer support hotline for the
manufacturer of that device.
•If so, the problem may be a bad cable. See the next step.
b. All cabling between Entré and the network device that is not showing
a light. You may need to replace a cable. Cables problems are rarely
visible; you may need to swap out the cable on the port with no light
with a cable from a port with a light to test it. If that does not fix the
problem, you may need to adjust Entré’s network settings. See the
next step.
c. Entré’s network settings, namely the IP address. You may need to
change to static IP addressing or assign a different address. For infor-
mation on changing Entré’s IP address, see “Entré displayed a mes-
sage about a “DNS Failure”” on page 146.
I am using a Ethernet to USB Adapter, and I Received an Error
Message.
You may have a problem with the communication between your USB adapter
and Entré. Check the following (in order):
1. Whether the USB adapter is supported. See “How Do I Hook Up Entré
to a Broadband Internet Connection via Ethernet?” on page 20 for a list
of supported adapters. If your adapter is not supported, change to a sup-
ported adapter. If your adapter is supported, you may need to reset
Entré’s network connections. See the next step.
2. Entré’s network connection. Be sure the primary network connection is
set to ethernet. If it is already, do the following:
a. Disconnect the USB cable from Entré.
b. Go to setup > internet connection > network connections and set
the primary network connection setting to dialup.
Troubleshooting
Complete Guide to Your Entré Entertainment Hub, ver. 2.0 149
c. Select save.
d. Reboot Entré. See “Entré fails to respond to front panel or remote
commands or is responding erroneously” on page 150 for instruc-
tions.
e. Reconnect the USB cable to Entré.
f. Follow the instructions from step b to change the primary network
connection to ethernet.
g. Select save.
h. If necessary, repeat. It may be necessary to repeat this process several
times. If problem continues, contact Kenwood Customer Support.
How Do I Solve a Problem with Entré?
Entré displayed a message saying my high-capacity music
storage system was full
Delete one or more MP3s. Choose Delete Music from the Music Options
screen to view how much space you currently have available.
Entré doesn’t see my connected DVD or CD changer
Check the following:
• the RS-232 cable is properly connected to the changer and to the lower
RS-232 connection on Entré.
• the Main/Sub Switch on the back of the changer is set to “Main”. (Entré
cannot control Sub 1 or Sub 2 changers.)
Remember that such a problem is more likely to be a bad cable than anything
more serious. Consider trying a new cable.
If that does not fix the problem, reset Entré. See “Entré fails to respond to
front panel or remote commands or is responding erroneously” on page 150.
I can’t seem to get to the screen I want
The Music, Movie, Radio, and Internet Guides are the starting point for all
navigation. If you can’t access a screen you want from where you are, try
returning to one of the Guides (by pressing GUIDE on the remote) and looking
at the options available there. For more information on:
• Playing or managing your stored music, see “Managing Your Movies” on
page 111.
• Playing or managing your movies, see “Managing Your Movies” on
page 111.

Troubleshooting
150 Complete Guide to Your Entré Entertainment Hub, ver. 2.0
• Listening to or managing radio stations, see “Managing Your Radio Sta-
tions” on page 123.
• Accessing the Internet, see “Using the Internet” on page 139.
If the problem persists, try restting Entré. See “Entré fails to respond to front
panel or remote commands or is responding erroneously” on page 150.
Entré takes a long time to start up or
The standby light on Entré’s front panel flashes when I
turn it on
Entré contains a sophisticated high-capacity music storage system that takes
time to initialize. You should only experience this delay the first time you turn
on Entré or after you have unplugged and re-plugged Entré. The standby light
on the front panel flashes while Entré is warming up. Once it stops flashing,
you are ready to start using Entré.
Do not turn Entré on and off rapidly. When you turn Entré
off, leave it off for at least a minute before turning it back on
again, to save wear and tear on the storage system.
The blue Radio and Music indicators on Entré’s front panel
are flashing, even when Entré is in Standby
1. Entré is compressing WAV audio files into MP3 format “in the back-
ground”. You can use Entré normally during this process.
2. Entré attempted to perform an auto software update that was unsuccess-
ful. When you turn Entré on, there will be a message about this on the
screen. After you exit from the message you can use Entré normally.
Entré fails to respond to front panel or remote commands or
is responding erroneously
Reset Entré's microprocessor:
1. Hold POWER down until the Standby indicator begins to flash on and off
slowly, then release POWER.
2. When the Standby indicator stops flashing and is lit constantly, push
POWER to turn Entré on.
Entré locks up frequently, requiring me to reset the processor
Turn Entré off when you are not using it. Entré does not need to be on to
receive software updates from the OpenGlobe server.

Troubleshooting
Complete Guide to Your Entré Entertainment Hub, ver. 2.0 151
Entré did not find a DVD or CD title during quick lookup
when I inserted the disc.
Manually locate the disc title:
• For music, see“Editing Disc Information” on page 74.
• For movies, see “Editing Disc Information” on page 120
How Do I Solve a Problem with the Supplied
Remote?
The supplied remote is not responding
•Press MR-H1 at the top of the remote. If you used one of the other control
buttons to turn on or off other devices (such as your TV), you need to
return the remote to Entré control.
• Replace the batteries with fresh ones and be sure they're loaded correctly.
See “Loading Batteries” on page 10.
• Reset the remote's microprocessor:
1. Press and hold CODE SETUP until the remote's LED blinks twice.
2. Release CODE SETUP and enter the number code 9 8 0. The remote's
LED flashes once after you enter each of the first two digits, then
flashes twice, pauses, and flashes twice again after you enter the third
digit.
If you have programmed the remote to control your TV,
cable tuner or satellite tuner, resetting its microprocessor
deletes this programming, and you'll need to re-program it.
See page 13 of How to Connect and Set Up Your Entré for
information about programming the remote.
• Touch a button on Entré’s front panel, then try the button on the remote
again.
How Do I Solve Problems with the PowerTouch III
Controller?
I don’t see icons for Entré
You must upgrade your PowerTouch III with the control information for Entré.
Contact Kenwood Customer Service at 1-800-KENWOOD for upgrade infor-
mation.
Troubleshooting
152 Complete Guide to Your Entré Entertainment Hub, ver. 2.0
How do I solve Radio Problems?
When I try to tune to a Sirius Radio Station, Entré reads “Sta-
tion Not Available.”
Entré does not automatically find Sirius Radio stations. You must manually
tune them in. See “Tuning Stations” on page 126 for instructions.
How Do I Solve Problems with Media Manager?
Media Manager does not see Entré
Check that :
• The computer where Media Manager is installed and Entré are on the
same network. If they are, the first three segments of the IP address will
be the same. If they are not, reinstall Media Manager on a computer that
is on the same network.
• All the network cables between Entré and your computer are plugged in.
• All the network devices between Entré and your computer show a steady
or flashing light next to the cable port. If they do not, see “How do I Solve
Home Network Problems?” on page 146 for potential solutions. You
should follow these steps even if Entré is not displaying one of the error
messages listed there.
• That you have the most recent version of Media Manager. If you do not,
download an updated version from www.kenwoodusa.com.
Media Manager sees the Entré, but cannot view Entré’s con-
tents
Check your firewall (if you have one).
Hardware Firewalls
Hardware firewalls are physical devices that provide protection for your home
network from outside intrusion. Entré and the computer must be on the same
side of hardware firewalls (i.e., the firewall is directly connected to your cable
or DSL modem and all other devices are connected to it).
Software Firewalls
Software firewalls are programs installed on a particular computer that
protects that computer from outside intrusion. Software firewalls will see
Entré as an outside device, and prevent it from connecting to the computer.
Disable your firewall while using Media Manager.

Complete Guide to Your Entré Entertainment Hub, ver. 2.0 153
Glossary
This glossary explains the terminology used in this Guide. Since your Entré
uses such new technology, many of the terms used in this Guide have very
specific meanings. Defining them here helps make the instructions and
information more understandable.
Channel: One piece of entertainment media within a Group. View Channels
from the Guide Screen. For example, in Music mode, one of your Mozart
albums would be a Channel in the “Classical” Group. For more information
about Channels, see “Following is a sample list of Channels for each mode:”
on page 47.
Disc: A DVD or CD.
Disk: A computer hard drive.
Entertainment Media: Any type of media you own and enjoy with Entré.
Entertainment media might be a CD, a DVD, or a radio station.
Group: A genre, or category, of entertainment media, used to organize your
media on the Guide Screen. A Group contains a list of Channels. For
example, there might be a “Rock” or “Classical” group in the Music mode
listing music Channels (Playlists, CDs, etc.). You can also create custom
Groups. For more information about Groups, see “Groups” on page 46.
Guide Screen: The Guide Screen allows you to browse and select all of your
entertainment media. For more information about the Guide Screen, see
“Browsing Entertainment Media” on page 47.
High-Capacity Music Storage System: Entré’s hard drive, where you can
store MP3s, as well as information and cover art for your CDs and DVDs, and
radio stations.
Highlight: The marker showing your position on the on-screen display. When
a selection is highlighted, it usually changes color from blue to yellow. When
you highlight something, you can then select it in most cases by pressing
or .
Mode: A mode is a media type, such as movies, music (CDs and MP3s), or
radio. For more information about modes, see “How Do I Switch between
Media Modes?” on page 44.
Options Screen: The Options Screen allows you to customize your
collections in a particular mode.
Glossary
154 Complete Guide to Your Entré Entertainment Hub, ver. 2.0
Player Screen: The Player Screen displays the selected entertainment media.
For example, you view a selected movie from the player screen. Or, you view
the player screen while you listen to music or a radio station. For more
information about the Player screen, see “Playing Entertainment Media” on
page 50.
Playlist: A custom group of tracks. Used in Music mode, playlists allow you to
create ‘virtual CDs’ with the selected tracks in any order you choose. To learn
more about creating playlists, “Managing Music Playlists” on page 68.
Source: The type of input flowing into your entertainment system. You can
select the source from your remote control. Entré is one possible source; the
others are Broadcast, Cable, or Satellite TV. For more information on selecting
sources, see “Selecting a Source” on page 40.
Title: A unit of entertainment media. For example, a title might be a movie,
or a CD album, or a music album in MP3 format. On the Guide screen, titles
appear as Channels. Also, in music mode, each title contains individual
tracks. For more information about titles and Channels, see “Following is a
sample list of Channels for each mode:” on page 47.
Track: An individual song or selection on a CD or Playlist. In a music album,
the individual songs are called tracks, and the entire album is called a title.
Tune: Add new radio stations (whether AM, FM, or Internet) to Entré.

Complete Guide to Your Entré Entertainment Hub, ver. 2.0 155
Appendix A: Program Codes
Setup Codes for Cable
Converters
A
ABC ............................. 0003, 0008
0014, 0017
0007, 0011
0013 , 0001
0033
Allegro ......................... 0153, 0315
Americast..................... 0899
Antronix....................... 0022, 0207
Archer.......................... 0153, 0797
0022, 0207
0039
B
BBT ............................. 0267
Belcor .......................... 0056
Bell & Howell .............. 0014
Bell South .................... 0899
C
Cable Star .................... 0056
Cabletenna .................. 0022
Cableview.................... 0022
Century........................ 0153
Citizen .........................0153, 0315
Colour Voice................ 0025, 0031
Comband .................... 0232
Comtronics .................. 0040, 0060
Contec......................... 0019
D
Digi ............................. 0637
E
Eastern......................... 0002
Emerson....................... 0797
Everquest ..................... 0015, 0040
F
Focus ........................... 0400
G
GC Electronics ............. 0056, 0207
0016
GE ............................... 0232
Garrard ........................ 0153
Gemini ........................ 0015, 0797
0070, 0242
General Instrument ...... 0476, 0810,
0276, 0011
GoldStar ...................... 0144, 0040
Goodmind ................... 0797, 0770
H, I
Hamlin ........................ 0020, 0259
0009, 0034
0273
Hitachi......................... 0011
Hytex .......................... 0007
J
Jasco............................ 0015, 0153
0315
Jerrold ......................... 0003, 0476
0012, 0810
0276, 0014
0015, 0011
0024
L
Linsay .......................... 0440
M
Macom ........................ 0033
Magnavox.................... 0027
Memorex..................... 0000
Motorola...................... 1106
Movie Time ................. 0063, 0156
N
NSC............................. 0063, 0156
0070
Nexus .......................... 0770
Novaplex ..................... 0618
O
Oak ............................. 0019, 0007
Optimus ...................... 0021
P
Panasonic .................... 0000, 0107
0021
Panther ........................ 0637
Paragon ....................... 0000
Philips.......................... 0305, 0317
0153, 0025
0031, 0027
0242, 0290
0028, 0029
0030
Pioneer........................ 0144, 0877
0533, 0023
0260
Pioneer........................ 0533
Popular Mechanics ...... 0400
Prelude........................ 0770
Pulsar .......................... 0000
Q
Quasar......................... 0000
R
RCA............................. 0021
Radio Shack................. 0015, 0315,
0797, 0883
Realistic ....................... 0207
Recoton....................... 0400
Regal ........................... 0020, 0259
0273

Appendix A: Program Codes
156 Complete Guide to Your Entré Entertainment Hub, ver. 2.0
Regency....................... 0002
Rembrandt................... 0011, 0070
Runco .......................... 0000
S
SL Marx ....................... 0040
Samsung ...................... 0144, 0040
Scientific Atlanta .......... 0008, 0477
0877, 0017
0006
Seam ........................... 0510
Signal........................... 0015, 0040
Signature...................... 0011
Sprucer ........................ 0021
StarSight....................... 0422, 0542
Starcom ....................... 0003, 0015
Stargate........................ 0015, 0040
0797, 0770
Starquest...................... 0015
Sylvania ....................... 0001
T
TFC.............................. 0310
TV86............................ 0063
Tan d y ........................... 0258
Tel e Capti on .................. 0221
Te le vi ew ....................... 0040
Tex s can ........................ 0001
Timeless....................... 0418
Toc om ......................... 0012, 0013
Tos hiba ........................ 0000
Tus a ............................. 0015
U
Unika........................... 0153, 0022
0207
United Artists ............... 0007
Universal ..................... 0153, 0191
0022, 0056
0207, 0039
0077
V
Viewstar....................... 0063, 0258
0027, 0060
W - Z
Zenith.......................... 0525, 0000
0899, 0054
Zentek ......................... 0400
Setup Codes for Satellite
Receivers
A
AlphaStar ..................... 0772
B, C
Chaparral..................... 0216, 0053
D, E
Echostar....................... 0775, 1005
0280, 0269
0159
Expressvu..................... 0775
F, G
General Instrument...... 0361, 0627
0869
H
HTS ............................. 0775
Hitachi......................... 0819
Homecable.................. 0238
Hughes Network Systems 0749
I
IQ................................ 0210
IQ Prism ...................... 0210
J, K
JVC .............................. 0775
Janeil ........................... 0152
Jerrold ......................... 0361, 0627
L
Legend ........................ 0269
M
Magnavox.................... 0724, 0722
Memorex..................... 0724, 0269
N, O
Next Level ................... 0869
P, Q
Panasonic .................... 0701, 0152
Philips.......................... 0724, 0722
1076
Primestar ..................... 0361, 0627
R
RCA............................. 0566, 0143
0855, 0392
Radio Shack................. 0869
Realistic ....................... 0052
S
STS .............................. 0210
Samsung ...................... 1109
Sony ............................ 0639
Star Choice.................. 0869
Star Trak ...................... 0180
T
Tos hiba ........................ 0749, 0790
0082

Complete Guide to Your Entré Entertainment Hub, ver. 2.0 157
U
Uniden ........................ 0724, 0722
0052, 0238
0074, 0076
V - Z
Zenith.......................... 0856
Setup Codes for TVs
A
A-Mark ........................ 0003
AOC ............................ 0030, 0019
0185, 0003
0052, 0137
Abex............................ 0032
Admiral........................ 0093, 0463
Adventura.................... 0046
Aiko............................. 0092
Akai ............................. 0030
Alaron.......................... 0179, 0183
Ambassador ................. 0177
America Action ............ 0180
Ampro ......................... 0751
Anam........................... 0180, 0068
0004
Anam National............. 0055
Archer.......................... 0003
Audiovox ..................... 0451, 0180
0623, 0092
0003
B
Baysonic ...................... 0180
Belcor .......................... 0019
Bell & Howell .............. 0154, 0016
Bradford ...................... 0180
Brockwood .................. 0019
Brooksonic................... 0236, 0463
0003
C
CCE ............................. 0217, 0329
CXC............................. 0180
Candle......................... 0030, 0056
0046, 0186
Carnivale ..................... 0030
Carver.......................... 0054
Celebrity...................... 0000
Cineral......................... 0451, 0092
Citizen......................... 0060, 0030
0056, 0092
0039, 0280
0046, 0186
Clairtone...................... 0185
Concerto ..................... 0056
Contec......................... 0180, 0185
0157, 0158
Craig............................ 0180
Crosley ........................ 0054
Crown ......................... 0180, 0039
Curtis Mathes............... 0047, 0747
1147, 1347
0054, 0154
0051, 0451
0093, 0060
0030, 0056
0145, 0016
0166, 0466
0039
D
Daewoo ...................... 0451, 0019
0623, 0624
0092, 0039
0091
Daytron ....................... 0019
Denon......................... 0145
Dumont....................... 0017, 0019
Dwin ........................... 0720, 0774
E
Electroband ................. 0000, 0185
Electrohome ................ 0381, 0389
0409
Emerson ...................... 0154, 0236
0463, 0180
0178, 0179
0019, 0623
0624, 0177
0185, 0282
0039, 0280
0038, 0158
0183, 0182
Envision ....................... 0030

Appendix A: Program Codes
158 Complete Guide to Your Entré Entertainment Hub, ver. 2.0
F
Fisher ........................... 0154, 0159
Fujitsu .......................... 0179, 0683
Funai ........................... 0180, 0179
0171
Futuretech ................... 0180
G
GE ............................... 0047, 0747
1147, 1347
0051, 0451
0093, 0178
0021, 0055
0282, 0135
0027, 0279
0029, 0174
Gibralter ...................... 0017, 0030
0019
GoldStar ...................... 0030, 0178
0056, 0019
0032, 0001
0409, 0106
0002
Gradiente .................... 0053, 0056
0392
Grunpy ........................ 0180, 0179
H
Hallmark...................... 0178
Harley Davidson .......... 0179
Harman/Kardon ...........0054, 0078
Harvard ....................... 0180, 0068
Hitachi......................... 0056, 0145
0016, 0151
0032, 0038
0279, 0413
0409
I
Infinity ......................... 0054
Inteq............................ 0017
J
JBL............................... 0054
JCB .............................. 0000
JVC .............................. 0053, 0182
0160
Janeil ........................... 0046
K
KEC ............................. 0180
KMC ............................ 0106
KTV ............................. 0180, 0030
0185, 0039
0280, 0217
0183
Kawasho ...................... 0158
Kaypani ....................... 0052
Kenwood ..................... 0030, 0019
Kloss ............................ 0046, 0024
0078
Konka .......................... 0707, 0628
0632, 0638
0703
L
LG ............................... 0056
LXI............................... 0047, 0747
0054, 0154
0156, 0178
0148
Logik ........................... 0016
Luxman ....................... 0056
M
MEI.............................. 0185
MGA ........................... 0150, 0030
0178, 0019
MTC ............................ 0060, 0030
0056, 0019
0185, 0091
Magnavox.................... 0054, 1254
0030, 0179
0187, 0096
0020, 0186
0386, 0024
0028
Majestic....................... 0016, 0015
Marantz....................... 0054, 0030
Matsushita ................... 0250
Megatron..................... 0178, 0145
0003
Memorex..................... 0154, 0250
0463, 0150
0178, 0179
0056, 0016
0106
Midland....................... 0047, 0747
0017, 0051
0135, 0039
0032
Minutz......................... 0021
Mitsubishi.................... 0093, 0150
0178, 0019
Motorola ..................... 0093, 0055
Multitech..................... 0180, 0217
N
NAD............................ 0156, 0178
0166
NEC............................. 0030, 0056
0019, 0497
NTC ............................ 0092
Nikko .......................... 0030, 0178
0092
Noblex ........................ 0430
Noshi........................... 0018
O
Onwa .......................... 0180
Optimus ...................... 0154, 0250
0166
Optonica ..................... 0093, 0165
Orion .......................... 0236, 0463
0179
P
Panasonic .................... 0051, 0250
0055, 0226

Complete Guide to Your Entré Entertainment Hub, ver. 2.0 159
Penney.........................0047, 0747
1347, 0156
0051, 0060
0030, 0178
0021, 0056
0019, 0018
0135, 0039
0003, 0027
0032, 0002
Philco .......................... 0054, 0463
0030, 0145
0019, 0096
0020, 0028
Philips.......................... 0054
Pilot ............................. 0030, 0019
0039
Pioneer ........................ 0166, 0679
0038
Portland ....................... 0019, 0092
0039
Princeton ..................... 0717
Prism ........................... 0051
Proscan........................ 0047, 0747
Proton.......................... 0178, 0466
0003, 0052
Pulsar........................... 0017, 0019
Q
Quasar......................... 0051, 0250,
0055, 0165
R
RCA............................. 0047, 0747
1047, 1147
1247, 1347
1447, 0090
0051, 0093
0019, 0679
0018, 0135
0038, 0029
0174, 0278
Radio Shack................. 0047, 0747
0154, 0180
0030, 0178
0056, 0019
0165, 0039
0032, 0409
Realistic ....................... 0154, 0180
0030, 0178
0056, 0019
0165, 0039
0032
Rhapsody..................... 0185, 0183
Runco .......................... 0017, 0030
0603, 0497
S
SSS .............................. 0180, 0019
Sampo ......................... 0030, 0039
0052, 0032
Samsung ...................... 0060, 0030
0178, 0056
0019, 0032
0329, 0427
0482
Samsux ........................ 0039
Sansei .......................... 0451
Sansui .......................... 0463
Sanyo .......................... 0154, 0159
0146, 0484
Scimitsu....................... 0019
Scotch ......................... 0178
Scott ............................ 0236, 0180
0178, 0179
0019
Sears............................ 0047, 0747
0054, 0154
0156, 0178
0179, 0056
0171, 0159
0146, 0015
0148
Semivox....................... 0180
Semp ........................... 0156
Sharp........................... 0093, 0688
0165, 0039
0386, 0157
Shogun ........................ 0019
Signature ..................... 0016
Simpson....................... 0187, 0186
Sony ............................ 0000, 0080
0111, 0011
Soundesign .................. 0180, 0178
0179, 0186
Spectricon ................... 0003, 0137
Squareview.................. 0171
Starlite ......................... 0180
Supre-Macy ................. 0046
Supreme...................... 0000
Sylvania ....................... 0054, 0030
0096, 0020
0381, 0028
Symphonic .................. 0171
T
TMK ............................ 0178, 0056
0177
TNCi............................ 0017
Tan d y .......................... 0093
Tat ung ......................... 0055, 0003
Technics....................... 0051, 0250
Tec h no l Ace ................. 0179
Tec hwo o d .................... 0051, 0056
0003
Tek nika ........................ 0054, 0180
0150, 0060
0179, 0056
0019, 0016
0092, 0039
0186, 0312
Tel e funke n ................... 0056
Tos hiba ........................ 0154, 0156
0060
Tos hiba ........................ 1256
Tos on ic ........................ 0185
Tot ev is i on .................... 0039
Tr ic al ............................ 0157

Appendix A: Program Codes
160 Complete Guide to Your Entré Entertainment Hub, ver. 2.0
U
Universal...................... 0027
V
Vector Research ...........0030
Victor........................... 0053
Vidikron....................... 0054, 0242
Vidtech ........................ 0178, 0019
Viking .......................... 0046, 0312
W, X
Wards .......................... 0054, 0030
0178, 0021
0179, 0056
0019, 0016
0165, 0096
0020, 0080
0027, 0111
0028, 0029
0174
White Westinghouse .... 0463, 0623
0624
Y
Yamaha ........................ 0030, 0019
Z
Zenith.......................... 0017, 0463
0624, 0016
0092
Zonda.......................... 0003

Complete Guide to Your Entré Entertainment Hub, ver. 2.0 161
Appendix B: Specifications
Audio
Frequency Response: 20Hz – 20kHz ±0.5dB
THD: <0.003% (1kHz)
Signal-to-Noise Ratio: 100dB
Channel Separation: 95dB (1kHz)
Input Impedance: 47 kohms
Output Impedance: 200 ohms
Video
Bandwidth (pass-through): 45MHz (Component), 6.5MHz (Composite)
Drive
CD-ROM Read Speed: 24X
CD-R Write Speed: 10X
CD-RW Write Speed: 4X
Dimensions and Weight
Width: 17-5/16”
Height: 4-1/2”
Depth: 11-1/2”
Weight: 14.3 lb.
Media Manager
Minimum PC System Requirements
Processor: Pentium II 233
Hard Disc: 5MB HDD space
RAM: 32 MB
Network: Ethernet or HPNA
Operating System Requirements
Windows XP
•Windows XP Service Pack 1a (Has ADO fixes): http://www.microsoft.com/
WindowsXP/pro/downloads/servicepacks/sp1/express.asp
•IE 6 SP1 (Lastest version of MSXML): http://www.microsoft.com/windows/
ie/downloads/ critical/ie6sp1/default.asp
Windows 2000
•Windows 2000 Service Pack 3 : http://www.microsoft.com/windows2000/
downloads/servicepacks/sp3/default.asp
•IE 6 SP1 (Lastest version of MSXML): http://www.microsoft.com/windows/
ie/downloads/critical/ie6sp1/default.asp
Windows 98 Second Edition and Windows ME:
IE 6 SP1 (Lastest version of MSXML): http://www.microsoft.com/windows/
ie/downloads/critical/ie6sp1/default.asp

Appendix B: Specifications
162 Complete Guide to Your Entré Entertainment Hub, ver. 2.0

Complete Guide to Your Entré Entertainment Hub, ver. 2.0 163
Index
A
accessing
guide screen .......................... 49
transfer music screen ............. 99
accessories included with Entré ........ii
adding
AM or FM radio stations ...... 128
Internet radio stations .......... 130
movies to groups ................. 117
music files ................... 105, 106
music to albums .................. 106
music to music groups ........... 79
music to playlists ................... 70
radio stations to groups ....... 134
albums
adding music files to ............ 105
adding music to .................. 106
alternate
audio sources, selecting ......... 11
video sources, selecting ......... 11
AM radio stations
adding ................................ 128
tuning ................................. 126
amplifier
connecting .............................. 4
applying power ..........................ii, 40
audio input selection ..................... 34
audio settings ................................ 34
audio sources
selecting ................................ 11
audio specs ................................. 161
automatic update preferences ....... 33
Axcess Remote Portal, getting
information about music on .... 140
B
backing up collection .................... 88
bandwidth (pass-through) ............ 161
batteries, loading ........................... 10
bit rates, MP3 recording ................ 87
brightness ...................................... 34
browsing
media ................................... 47
movie channels ................... 114
movie groups ...................... 113
movies ................................ 112
music .................................... 60
music channels ...................... 63
music groups ......................... 62
playlists ................................. 63
radio station channels ..........126
radio station groups ..............124
radio stations ........................124
button functions, teaching to the
LCD remote ...............................14
C
cable converters, setup codes .......155
cables
included with Entré ..................ii
can’t download ............................145
can’t get screen ............................149
CD changer
connecting to Sovereign
receiver ...............................6
Entré does not see ................149
CD drawer .....................................65
CD title
Entré did not find .................151
CD-R, write speed ........................161
CD-ROM, read speed ..................161
CD-RW
erasing ...................................82
write speed ..........................161
CDs
copying ..................................92
rasing rewritable .....................82
recording ...............................85
recording from external source 94
recording from multiple to
new CD .............................90
centering, screen ............................34
changer
connecting a Kenwood Sovereign
DVD ....................................9
management ..........................34
statistics .................................34
changing cover art ........................105
channel separation .......................161
channels .................................47, 153
adding to groups ....................79
browsing, movie ...................114
browsing, music .....................63
browsing, radio station .........126
deleting from groups ..............79
deleting from movie groups ..117
codes, entering ...............................10
collection, backing up ....................88
color bars .......................................34
configuration, Internet ....................32

Index
164 Complete Guide to Your Entré Entertainment Hub, ver. 2.0
configuring Internet setup .............. 25
connected changer ........................ 66
Entré does not see ............... 149
connecting
home network ...................... 17
Internet
requirements ..................iii
Kenwood Sovereign DVD
changer ............................... 9
Kenwood Sovereign DVD
changer to non-Kenwood
receiver ............................... 8
Kenwood sovereign DVD or CD
changer to Sovereign
receiver ............................... 6
Kenwood Sovereign receiver ... 5
non-Kenwood receiver to
Kenwood Sovereign
DVD changer ...................... 9
non-Sovereign primary receiver 9
Sovereign receiver or amplifier 4
to Internet via dial-up ............ 22
to Internet via ethernet .......... 20
to Internet via HPNA ............. 18
to power ................................. 7
to wireless network ............... 21
TV ........................................... 2
connection types, video ................... 3
connections, handling unsuccessful 30
connections, network .................... 32
contacting Kenwood .................... 142
continuing quick start
dialup ................................... 29
Ethernet ................................ 28
HomePNA ............................ 27
contrast ......................................... 34
controlling
Entré with LCD remote ......... 16
music play order ................... 64
other devices with Entré
remote .............................. 11
play with PowerTouch III ...... 54
controls, security and parental ....... 34
converters, setup codes for cable .155
copying, CDs ................................. 92
cover art
changing ............................. 105
selecting .............................. 122
creating
movie groups ...................... 116
music groups ......................... 77
playlists ................................. 68
radio groups ........................ 133
customizing
movies .................................114
music collection .....................66
radio stations ........................131
D
default groups
movies .................................113
radio ....................................125
deleting
movie groups .......................118
music .....................................73
music from music groups ........79
music groups ..........................81
playlists ..................................72
radio groups .........................135
radio stations from groups ....134
stations ................................136
depth ...........................................161
DHCP failure ...............................148
dial-up
connecting .............................22
dialup
continuing quick start .............29
settings ...................................32
dimensions ...................................161
disc ..............................................153
disc information
movies, editing .....................120
music, editing ........................74
discs
inserting and removing,
movie ..............................112
inserting and removing,
music .................................65
disk ..............................................153
DNS failure ..................................146
download, can’t ...........................145
drive ............................................161
DVD changer
connecting ...............................9
connecting to non-Kenwood
receiver ...............................8
Entré does not see ................149
DVD title, Entré did not find .........151
dynamic IP addresses ...............27, 28
E
editing
disc information, movies ......120
disc information, music ..........74
movie groups .......................117
music groups ..........................79

Complete Guide to Your Entré Entertainment Hub, ver. 2.0 165
playlists ................................. 70
radio groups ........................ 134
stations ............................... 136
track information ................... 76
entering
numbers and text .................. 41
numbers with PowerTouch III 55
product codes ....................... 10
text with PowerTouch III ....... 56
entertainment media ................... 153
entertainment media, browsing ..... 47
Entré
resetting ..................................iv
safety ......................................iii
unpacking ................................ii
Entré did not find DVD or CD title 151
Entré main menu, PowerTouch III .12
erasing rewritable CDs ................... 82
error message
DHCP failure ...................... 148
DNS .................................... 146
Entré does not see connected
changer ........................... 149
Ethernet to USB adapter ...... 148
high-capacity music storage
system full ....................... 149
unable to complete software
update ............................ 146
error messages ............................. 145
Ethernet
adapter, not detected .......... 144
connecting ............................ 20
continuing quick start ............ 28
Ethernet to USB adapter,
error message. ......................... 148
F
finding, unlisted product codes ...... 10
firewalls ......................................... 17
hardware ............................ 152
software .............................. 152
first time power-up ........................ 24
flashing
indicators ............................ 150
flashing standby light ................... 150
FM radio stations
adding ................................ 128
tuning ................................. 126
frequency response ..................... 161
G
getting information
media collections .................139
music on Axcess Remote
Portal ...............................140
groups ....................................46, 153
browsing, movie ...................113
browsing, music .....................62
browsing, radio station .........124
creating, movie ....................116
creating, music .......................77
creating, radio ......................133
deleting, movie ....................118
deleting, music .......................81
deleting, radio ......................135
editing, movie ......................117
editing, music ........................79
editing, radio .......................134
managing, movie ..................115
managing, music ....................77
managing, radio ...................132
movies, default .....................113
radio, default .......................125
guide screen .................................153
accessing the ..........................49
H
handling unsuccessful connections .30
hardware firewalls ........................152
height ...........................................161
highlight .......................................153
home network, connecting Entré ....17
home networks ..............................17
HomePNA
connecting .............................18
continuing quick start .............27
I
identifying
Entré to PowerTouch III .........12
LCD remote TV2 input ...........13
impedance
input ....................................161
output ..................................161
importing music files ....................104
indicators, flashing ........................150
input impedance ..........................161
input selection, audio .....................34
inserting
movie discs ..........................112
music discs .............................65
installing, Media Manager ...............31

Index
166 Complete Guide to Your Entré Entertainment Hub, ver. 2.0
Internet
connecting
requirements ..................iii
connecting via dial-up ........... 22
connecting via Ethernet ......... 20
connecting via HPNA ............ 18
transferring music from ........ 100
Internet configuration .................... 32
Internet radio
no sound ............................. 143
Internet radio stations
adding ................................ 130
tuning ................................. 129
Internet Service Providers (ISPs),
requirements ...............................iii
unsupported ....................... 144
Internet setup ................................ 25
IP addresses
dynamic .......................... 27, 28
static ............................... 27, 28
K
Kenwood LCD remote
using ..................................... 56
Kenwood, contacting ................... 142
keyboard, USB .............................. 58
L
LCD remote
controlling Entré .................... 16
setting up Kenwood .............. 13
TV2 input, identifying ............ 13
using ..................................... 56
listening
to radio stations ................... 124
loading batteries ............................ 10
locks up ...................................... 150
long startup time ......................... 150
lookup all ...................................... 34
lookup range ................................. 34
lookup, quick ................................ 34
M
managing
movie groups ...................... 115
music groups ......................... 77
music playlists ....................... 68
radio groups ........................ 132
media
browsing ............................... 47
how organized ...................... 46
media collections
get more information ...........139
Media Manager
does not see Entré ................152
importing music files to ........104
nstalling .................................31
sees Entré, but cannot view
Entré’s contents ................152
specifications .......................161
starting .................................101
synchronizing .......................109
synchronizing files with Entré 108
synchronizing when you exit 108
media modes
switching ................................45
switching between .................44
media, entertainment ...................153
media, playing ................................50
mix
MP3 tracks, recording ............89
mode ...........................................153
modes
switching ................................44
movie channels
browsing ..............................114
movie groups
adding movies to ..................117
browsing ..............................113
creating ................................116
deleting ................................118
deleting movies from ............117
editing .................................117
managing .............................115
movie information, getting ............119
movies
adding to groups ..................117
browsing ..............................112
customizing ..........................114
default groups ......................113
deleting from groups ............117
editing disc information ........120
ordering ...............................139
playing .................................112
ratings ....................................34
selecting ...............................112
Movies Options screen .................114
MP3
no sound on ........................143
recording bit rates ..................87
tracks, recording mix of ..........89
multiple CDs, recording to new CD 90
music
adding to albums .................106
adding to playlists ...................70
browsing ................................60

Complete Guide to Your Entré Entertainment Hub, ver. 2.0 167
deleting ................................. 73
editing disc information ......... 74
importing files to Media
Manager ......................... 104
on Axcess Remote Portal,
getting information about 140
ordering .............................. 139
playing .................................. 60
playlists, managing ................ 68
recording .............................. 84
recording preferences ............ 33
searching for files ................ 103
selecting ................................ 60
transferring from Internet ..... 100
transferring to portable player 97
music channels
browsing ............................... 63
music collection
customizing ........................... 66
music files
adding ................................ 106
adding to albums or playlists 105
music groups
adding music to .................... 79
browsing ............................... 62
creating ................................. 77
deleting ................................. 81
deleting music from ............... 79
editing .................................. 79
managing .............................. 77
music information, getting ............. 83
Music Options screen .................... 66
music play order, controlling ......... 64
music storage system ................... 153
music storage system full ............. 149
N
name, network .............................. 33
navigating Entré ............................. 42
network
connecting Entré ................... 17
connections .......................... 32
name .................................... 33
networks ....................................... 17
no connected DVD or
CD changer ............................. 149
no Ethernet adapter detected ...... 144
no icons ...................................... 151
no Internet connection ................ 144
no picture ........................... 142, 143
no sound ..................................... 143
no sound on MP3s or Internet radio 143
non-Kenwood receiver
connecting ...............................9
connecting Kenwood Sovereign
DVD changer .......................8
numbers
entering .................................41
entering with PowerTouch III .55
O
options screen ..............................153
order, controlling play ....................64
ordering
movies .................................139
music ...................................139
organization, media ........................46
other devices, controlling with
Entré remote ..............................11
output impedance ........................161
P
parental controls ............................34
pass-through (bandwidth) .............161
password protection .......................34
PIP .................................................11
swapping ...............................11
play order, controlling ....................64
player screen ................................154
playing
movies .................................112
music .....................................60
radio stations ........................124
playing media .................................50
playlists ........................................154
adding music files to .............105
adding music to .....................70
browsing ................................63
creating ..................................68
deleting ..................................72
editing ...................................70
managing ...............................68
portable player, transferring
music to ....................................97
power
applying ...................................ii
connecting to ...........................7
power, applying .............................40
PowerTouch III
controlling play with ...............54
entering numbers with ...........55
entering text with ...................56
finding Entré main menu ........12
identifing Entré to ...................12
switching modes ....................53
using ................................12, 52

Index
168 Complete Guide to Your Entré Entertainment Hub, ver. 2.0
power-up for first time ................... 24
preferences ................................... 33
automatic update .................. 33
music recording .................... 33
screen saver .......................... 33
primary TCP/IP settings .................. 33
privacy policy ................................ 32
product codes
entering ................................ 10
finding unlisted ..................... 10
Q
quick lookup ................................. 34
Entré did not find DVD or
CD title ........................... 151
quick start
continuing with dialup .......... 29
continuing with Ethernet ....... 28
continuing with HomePNA ... 27
R
radio
default groups ..................... 125
radio groups
adding stations to ................ 134
creating ............................... 133
deleting ............................... 135
deleting stations from .......... 134
editing ................................ 134
managing ............................ 132
radio station channels, browsing .. 126
radio station groups, browsing ..... 124
radio station not available, Sirius .. 152
radio stations
adding ................................ 130
adding AM or FM ................ 128
adding to groups ................. 134
browsing ............................. 124
customizing ......................... 131
deleting from groups ........... 134
listening .............................. 124
tuning Internet .................... 129
tuning, AM/FM .................... 126
radio, no sound on Internet stations 143
range, lookup ................................ 34
ratings, movie ................................ 34
ratio, signal-to-noise .................... 161
read speed, CD-ROM ................. 161
receiver
connecting .............................. 4
connecting a non-Kenwood .... 9
connecting a non-Sovereign
primary ............................... 9
connecting Kenwood Sovereign
DVD changer to
non-Kenwood ......................8
connecting to Kenwood Sovereign
DVD or CD changer ...........6
onnecting a Kenwood Sovereign 5
recording
bit rates, MP3 ........................87
CD from external source ........94
CDs .......................................85
mix of MP3 tracks ..................89
preferences ............................33
to Entré from external source .95
tracks from multiple CDs to
new CD .............................90
recording music ..............................84
remote
controlling other devices ........11
not responding .....................151
setting up Entré ......................10
setting up Kenwood LCD .......13
using Kenwood LCD ..............56
removing
movie discs ..........................112
music discs .............................65
resetting, Entré ................................ iv
response fails ................................150
response, frequency .....................161
rewritable CDs, erasing ...................82
S
safety, Entré ....................................iii
satellite receivers, setup codes ......156
screen
can’t get ...............................149
centering ................................34
guide ...................................153
Movie Options .......................66
Music Options .....................114
options .................................153
player ..................................154
screen saver preferences .................33
searching, music files ....................103
secondary TCP/IP settings ...............33
security controls .............................34
selecting
alternate audio sources ..........11
alternate video sources ...........11
cover art ..............................122
movies .................................112
music .....................................60
sources ..................................40
stations ................................124

Complete Guide to Your Entré Entertainment Hub, ver. 2.0 169
selection, audio input .................... 34
separation, channel ..................... 161
setting up
Entré remote ......................... 10
Kenwood LCD remote .......... 13
settings
dialup ................................... 32
primary TCP/IP ...................... 33
secondary TCP/IP .................. 33
udio and video ...................... 34
setup, Internet ............................... 25
setup codes
cable converters .................. 155
satellite receivers ................. 156
TVs ..................................... 157
sharpness ...................................... 34
signal-to-noise ratio ..................... 161
Sirius radio station not available ... 152
software firewalls ......................... 152
software update, unable to complete 146
software, update ........................... 34
sound
missing ................................ 143
missing on MP3s or Internet radio 143
sources ........................................ 154
selecting ................................ 40
selecting alternate audio ........ 11
selecting alternate video ........ 11
Sovereign DVD changer
connecting .............................. 9
connecting to non-Kenwood
receiver ............................... 8
Sovereign DVD or CD changer,
connecting .................................. 6
Sovereign receiver, connecting .... 5, 6
Sovereign receiver or amplifier,
connecting .................................. 4
standby light, flashing .................. 150
starting Entré ....................................ii
starting Media Manager ............... 101
static IP address ....................... 27, 28
stations
adding AM or FM ................ 128
adding Internet ................... 130
browsing ............................. 124
deleting ............................... 136
editing ................................ 136
listening .............................. 124
selecting .............................. 124
storage system full ....................... 149
storage system, music .................. 153
swapping PIP ................................. 11
switching
media modes .........................45
modes on PowerTouch III ......53
switching media modes ..................44
synchronizing
manually ..............................109
Media Manager files with
Entré ................................108
when exiting Media Manager 108
system information .........................34
T
TCP/IP settings
primary ..................................33
secondary ..............................33
teaching
button functions .....................14
text
entering with PowerTouch III .56
text, entering ..................................41
time zone .......................................32
title ..............................................154
track .............................................154
track information, editing ...............76
tracks, recording .............................89
transfer music screen, accessing ......99
transferring music
from Internet to Entré ...........100
to portable player ...................97
troubleshooting Entré ...................... iv
tuning ..........................................154
AM/FM radio stations ...........126
Internet radio stations ...........129
turning on ........................................ii
TV, connecting .................................2
TV without turning on Entré, watching 3
TV2 input, identifying .....................13
TVs, setup codes ..........................157
U
unlisted product codes, finding .......10
unpacking Entré ...............................ii
unresponsive, Entré ......................... iv
unsuccessful connections, handling 30
unsupported, ISP ..........................144
update software .............................34
USB
adapter error message ..........148
keyboard ...............................58
user information .............................32
utilities information ........................34

Index
170 Complete Guide to Your Entré Entertainment Hub, ver. 2.0
V
video
connection types ..................... 3
specifications ...................... 161
video settings ................................ 34
video sources, selecting ................. 11
W
watching TV without turning on
Entré ........................................... 3
weight ......................................... 161
weight specifications ....................161
width specifications ......................161
wireless network
connecting .............................21
write speed
CD-R ...................................161
CD-RW ................................161
Z
zip code .........................................32
