Key Ingredient KIRE3US Tablet PC User Manual
Key Ingredient Corporation Tablet PC Users Manual
Users Manual
1
User Manual and QuickStart Guide
For support, please visit:
http://www.keyingredient.com/
and press “Support”
For warranty information, please visit:
http://www.keyingredient.com/warranty/
2
1 Introduction
1.1 Acknowledgement
Thanks for your purchase of the Key Ingredient Recipe Reader HD+ (KIRR). In
addition to being useful as a fully functional kitchen recipe reader device, your new Key
Ingredient Recipe Reader HD+ is also a 9.7 inch Retina screen Android tablet, using an
octo-core (8-core) MTK8752 chipset, based on Android 4.4.4.
Your new recipe reader has built in 4G, 3G, WIFI, Bluetooth, GPS, FM, and more. It is
easy to enable wireless communication and wireless internet, giving you access to surf
the internet anytime and anywhere. The KIRR is also built with a high accuracy GPS
module, so that it can be used with navigation and mapping software. The built-in camera
and other sensors allow for endless entertainment and productivity – all while serving as
the center of your kitchen, offering recipes, cookbooks, kitchen timers, kitchen
conversions and more.
This manual systemically introduces the functions, use techniques and
announcements, of the KIRR. Please read this manual carefully before operation.
1.2 Announcements
Preventive maintainance
1. Please always keep the KIRR dry. In order to avoid device failure, corrosion
fault and electric short, please prevent the device, battery and charger from
ANY EXPOSURE to water and moisture, and do not operate the device or
charger with a wet hand.
2. To avoid failure of the device, battery and charger, please prevent the device,
battery, charger from violent shock or shake.
3. To avoid failure of the device, battery and charger, please prevent the device,
battery, charger of excessive heating or prolonged exposure to cold.
4. Never shock, throw, prod the KIRR, or drop, extrude, or bend the KIRR.
5. Never disassemble the device or accessories, doing so will void any and all
manufacturer and third party warranties, including extended warranties.
1.3 Safety Instructions
Before the operation of the KIRR, please read this chapter and teach your children

3
and anyone else who may use the KIRR about these safety rules. For further details,
please refer to the safety instructions and announcement.
Never use the KIRR when driving car, in order to ensure safe driving.
In a hospital or medical area, please abide by related rules and regulations. Please
shut down the KIRR when it is near a hospital or medical area.
To avoid the wireless signal to interrupt of the an airplane, please shut down the KIRR
or use airplane mode when you are on an airplane.
To avoid electronic equipment failure, please shut down the KIRR in the vicinage of
high-accuracy electronic equipment.
Please don’t disassemble the KIRR and accessories. Only use an authorized agent
to access or service the KIRR.
Please keep the KIRR far away from magnetic equipments, the radiation of KIRR
may erase the data stored in the magnetic equipments.
Never use the KIRR in the vicinity of high temperature, or flammable gas (gas
station).
Keep the KIRR and accessories away from children, and avoid child use of the KIRR
without parents’ supervision.
Please comply with related rules and regulations, and respect others’ privacy and
legal rights while using the KIRR.
Please strictly observe this manual and instruction when using a USB cable, as this
may damage your KIRR or personal computer.
Do not use the KIRR in wet environments like bathrooms, and avoid the KIRR from
getting soaked or exposed to any liquids. DO NOT CLEAN IN A DISHWASHER or
SINK. Clean only with a dry soft towel safe for use on glass.
1.4 QUICKSTART GUIDE
Get started in just 5 easy steps.
1. First, remove the Key Ingredient Recipe Reader HD+ from the packaging and
remove the plastic screen cover. Plug in your new tablet and allow at least 2 hours to
charge.
2. Power on the device by holding the power button on the side of the device for 3-5
seconds.
3. Press the Icon to open the Settings menu. Press “Wi-Fi” to connect to your wifi
network. Select your wifi access point and touch it, type in your Wi-Fi password and press
the connect button.
4. Press the Icon to go back to home screen.
4
5. Press the Icon to launch the Key Ingredient Recipe App, with access to over
2,000,000 recipes, your own cookbooks and more! Login or Register, for free, to make
best use of your device.
For support, please visit: http://www.keyingredient.com/ and press “Support”
1.5 Abbreviations/term
Abbreviations
/term
Full name Description
KIRR Key Ingredient Recipe
Reader HD+
Key Ingredient Recipe Reader HD+, a
Mobile Internet Capable device, also
known as an Android Tablet.
WIFI Wireless Fidelity Based on the IEEE 802.11b standard
wireless local area network
T F TransFlash Also known as Micro SD, ultra-small
memory card
5
2 KIRR Introduction
2.1 KIRR Accessories Introduction
Packing list
Your KIRR packing box includes the following items:
KIRR device
Adapter
USB cable
User manual
2.2 KIRR Use and preparation
Battery charging
Before using KIRR, charge the battery first.
1. Use only the included adapter to charger the KIRR.
2. Charge for at least 30-minutes before first use.
3. Device will NOT power on if it is too low on charge… please let it charge for at
least 30-minutes any time the battery may be drained before trying to turn on.
2.3 KIRR Status and notifications
Notification icon
When the prompted information appears on your notification panel, please click on
the column frame and slide on the screen to open the notification details. Click the option
you want to view to see detailed information. You can then click on the message box and
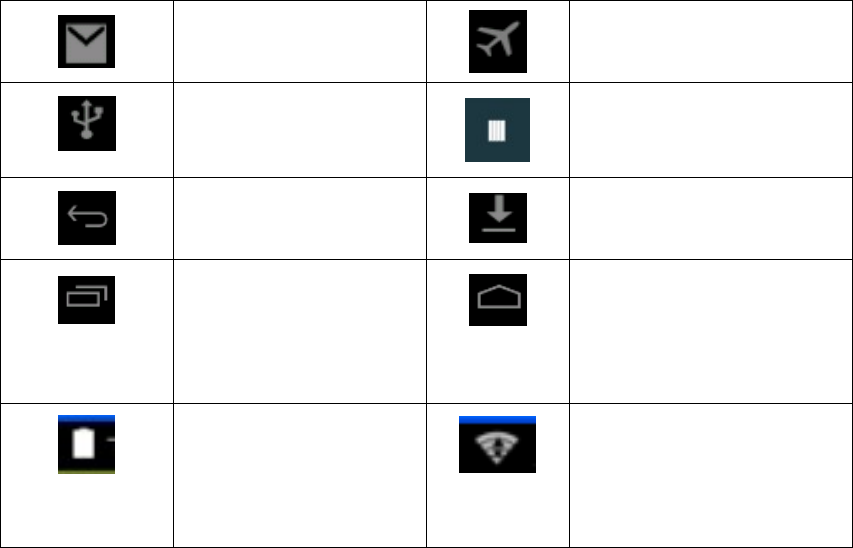
slide up to close the message window. The following is a status bar icon Illustration:
6
New email
Airplane mode
USB connected
Connected USB debuging
Return
Downloading
Shortly press to check
the history record
Home buttom
Battery level
WIFI service connected,
network available
Notification Area
A notification will appear whenever it detects receiving an email, turning on WIFI and other
activities. You can enter the notification area to check the detailed information.
Open notification area
When a new notification sign comes out in notification bar, please click it to enter the
notification details area.
7
3 User Guide
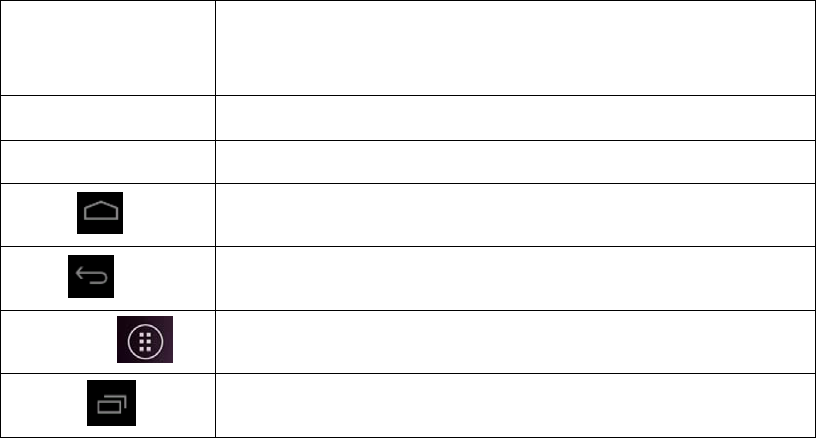
3.1 Key functions
Key functions introduction:
power Short press for sleep/awake; long press to turn on/off the
device. (You must hold the power button for at least 5 seconds
to turn on or off the device).
Volume up “+” Turn up the volume
Volume down “-” Turn down the volume
Home
Click it in any interface to return to the main menu
Back Click it in any interface to return the prior catalog
App Menu
Click this to access a full list of installed applications and
settings.
Recent Pressing this will open a recent apps interface for fast toggling.
3.2 Startup and Shutdown
Startup
Long press the POWER key for 5 seconds and you will see the startup picture.
Screen may be locked when the system first starts. Swipe the lock symbol to the
right to unlock the screen.
Shutdown
1. Long press the POWER key (5 seconds) and the power off option comes out.
2. Power off option include: Slience mode, Airplane mode, Reboot and Power off
3. Click Power off the turn off the KIRR
3.3 Open and Close the Screen
Auto-off when screen is left unused
8
1. Screen will be auto-off to save the battery when it is left unused for a while.
*this is a setting accessible under Settings->Dislpay->Sleep.
2. In the unlocked state, quick press the POWER key and release quickly to shut
off screen manually.
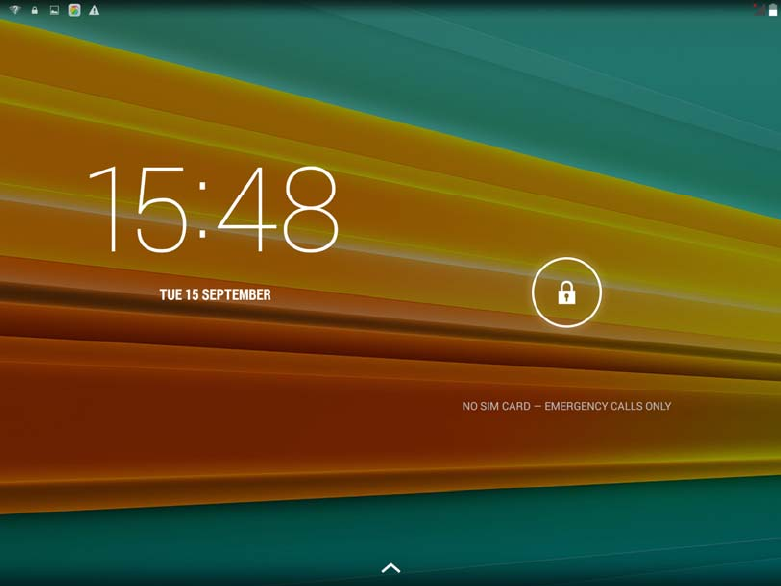
Turn on the screen in inactive status
When the screen is in inactive station, shortly press the POWER key to turn on the
screen. Screen may be locked, touch the little lock and slip to the right as in picture 3.1, to
unlock the screen.
picture 3.1
3.4 Usage of Touch Screen
Operation in KIRR
There are many ways to browse the main screen, menu and application programs,
etc.
Touch to choose
When you need to use the screen keyboard or choose an item in the main interface
like an application program, you just need to touch to launch.
9
Press
If you need to turn on the available option of a certain item(such as textbox or a link)
or a shortcut in the main interface you just need to press this item to toggle it.
Quick slide or slide
Quick slide or slide means the quick vertical or horizontal dragging by finger on the
screen.
Dragging
You need to press with a little pressure before dragging; do not let your finger go until
you drag it to the wanted position.
Rotate
For most interfaces, you just have to rotate the KIRR to one side or the other, and the
screen will auto-rotate lengthways or crosswise.

10
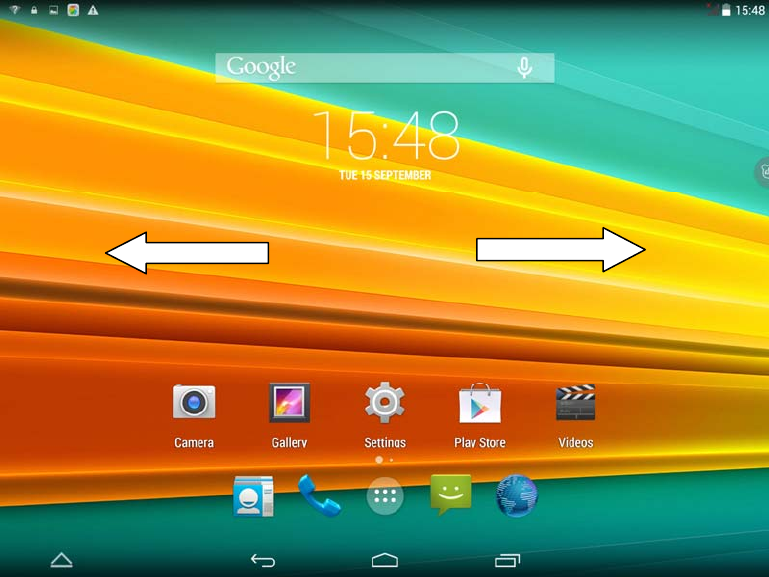
3.5 Homepage interface
The homepage interface is as pictured in 3.2
Long press the blank space of homepage, you can navigate the homepage,
manage shortcuts and select the wallpaper of the homepage.
Picture 3.2
Extensible homepage interface
The homepage will extend outside the screen width to provide more space for you to
place new shortcut, little tools, etc. Press the blank space on the homepage, quickly
slide to the left/right to switch into the left/right side of the homepage. There are 2 or
more extensible screens in the homepage. As picture 3-2.1
Battery Quantity
Notification bar Prompt massage Time
Searching
Shortcut
window Return Home key
Shorty press to check the
recent apps
Application
p
ro
g
ra
m
11
Picture 3-2.1
Shortcut management of desktop application
Not all of your device’s applications are on the homescreen (see 3.6 below)…
You can choose which applications go on the homescreen and manage or group them.
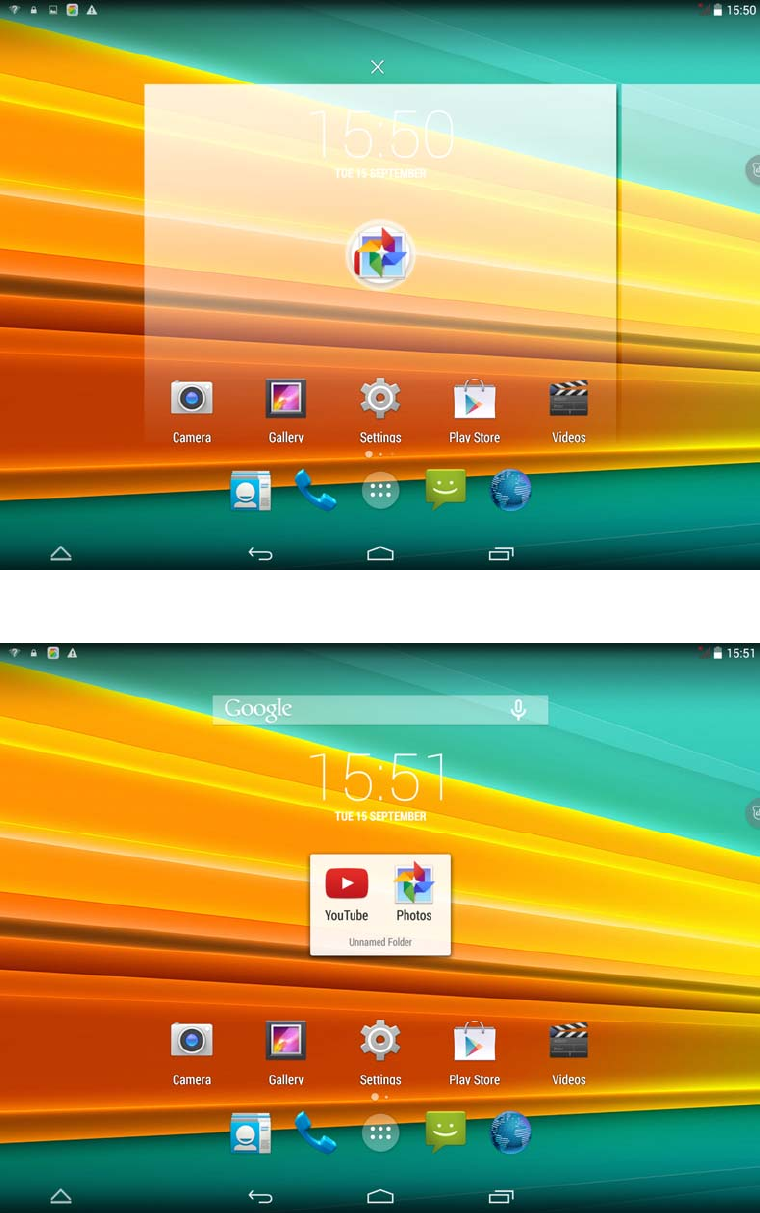
To create folders with multiple applications inside them, use this procedure:
1. Overlay an icon to above another icon which you need to put
together(you can collect multiple icons)Picture 3-2.2
2. Clike the icon that overlaying many shortcuts to unfold these application
icons. Picture 3-2.3
Clike the low edge of the black flame showing “unnamed folder” and a hidden keyboard
pop up. Then you can rename this folder. The icons position can be adjusted by long
pressing.
12
Picutre 3-2.2
Picutre 3-2.3
Delete the icon from the desktop (2 methods)
13
1. Long press the icon you need to delete, and the icon will show in the
top of screen.
2. Drag the icon above the deleting icon, leave you hand when the icon turn
into red to delete.
Change the wallpaper
1. In the homepage interface, long press the blank space till a window pops
up, then you can set the wallpeper, select the gallery or wallpaper gallery
to choose the picture.
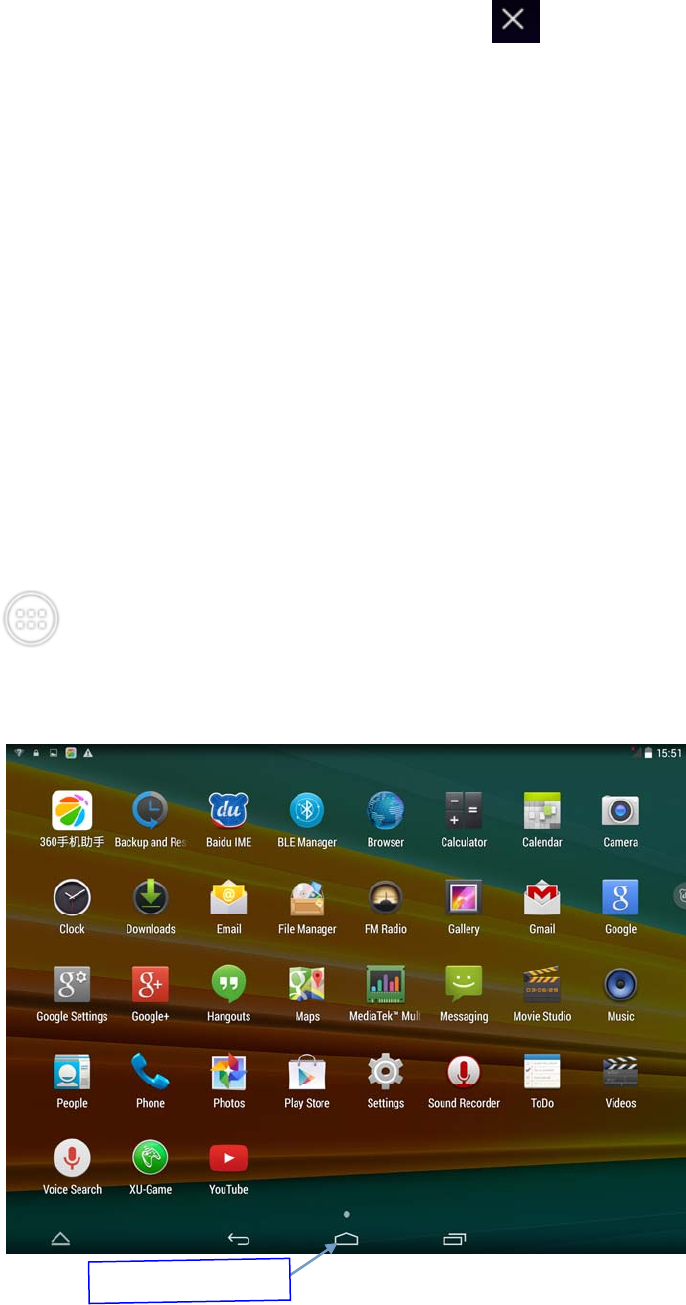
3.6 Managing Applications
Your KIRR has more applications than just those shown on the homepage. In addition,
new applications you install may not show up on the homepage.
Click the button in picture 3.2, enter the application management interface as
picture 3.3; select the application program you wish to launch, or long-press the
application to be able to drag it to a home-screen for easier access.
picture 3.3
Back to main menu

14
3.7 USB Connection
KIRR connection configuration
Before transmitting documents to a computer using USB, you have to configure storage
settings for your KIRR:
1. Connect the KIRR to the computer with a USB cable, the Notification Area will show an
icon showing it is USB connected.
2. Open the Notification Details by touching this USB notification icon.
3. In the Notification Details, click the “USB Connected” notification, then click “open USB
storage configuration”.
4. Now the USB is connected successfully.
Picture 3.4
Copying a document into a memory card
1. Connect the KIRR to computer with USB cable as described above.
2. Open the “My computer” in your computer, check the items in “removable
disc”.
3. Copy the documents you need into “removable disc”.
4. After copying finishes, click “shutdown the USB storage configuration” to
uninstall.
Notice: When the KIRR is connected to a computer with a USB cable, and you open
the USB storage configuration, you can’t view the memory card through the KIRR.
Only after you detach the USB cable, can you view the memory card in the KIRR.
3.8 Text Input
Use the screen keyboard
When you start typing or click on a text box, it will show the screen keyboard. The
keyboard contains below typing options:
Android keyboard
Choose the typing method you want
1. Click Setting application.
2. Click Language and input method.
3. In the text setting area will reveal all the installed input methods in your KIRR.
4. Click the typing method you want。
15
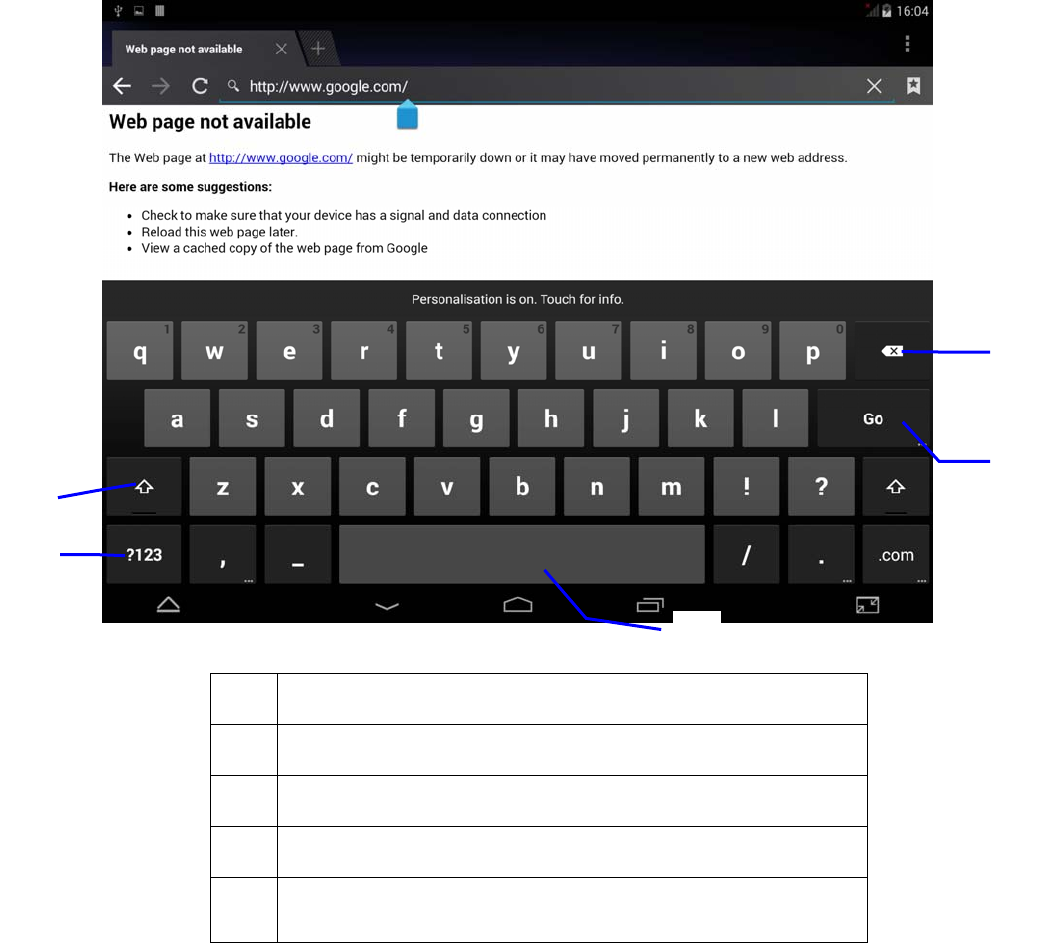
Use and Switch the typing method
Picture 3.5
1 Switch to input capital or small letter
2 Input symbols and numbers
3 Click to insert the space
4 Click to execute
5 Delete the character on the left of the cursor. Click and
hold down to delete all the characters on the left
①
②
③
⑤
④
16
4 Basic setting
4.1 Wireless and Internet
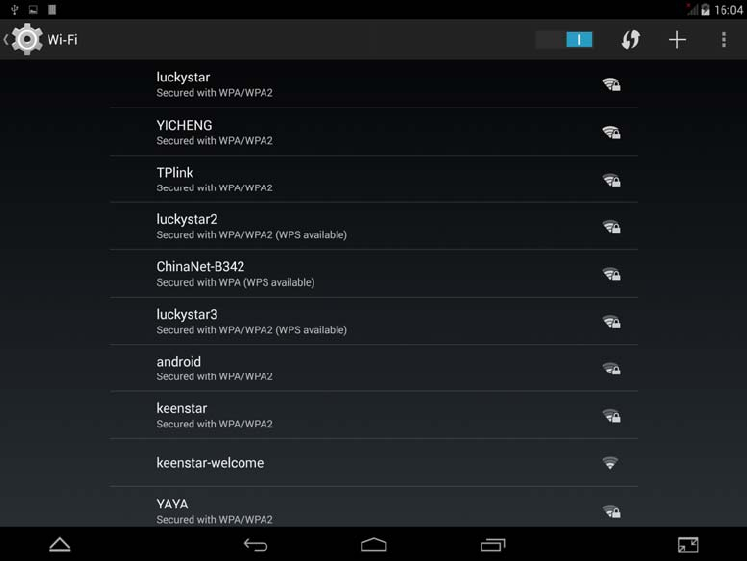
1. Connect Wi-Fi
1) In the main menu or interface, choose settings
2) Click Wi-Fi to turn on wifi, KIRR will automatically search the available Wifi
wireless.
3) Choose the Wi-Fi internet you want to connect to, if it has password, it will pop
up the password window, enter password, click connect。
picture4.1
17
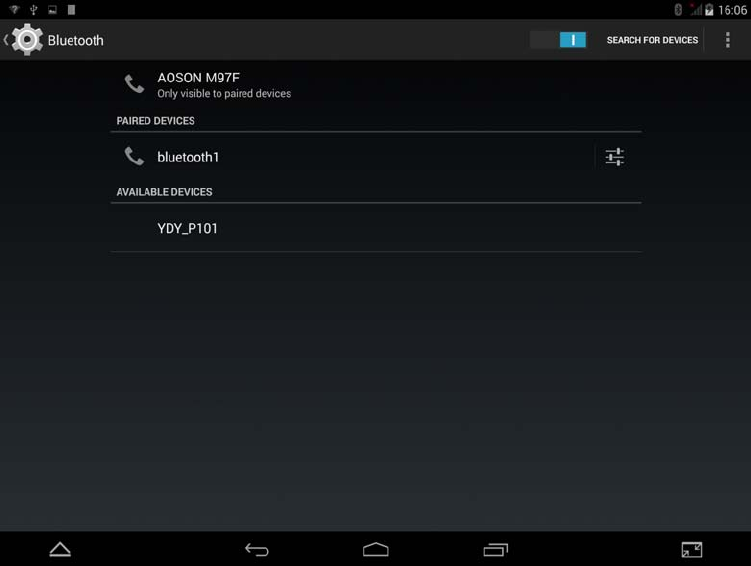
4.2 Bluetooth
Bluetooth applications
1. Click settings application in main menu interface
2. Click Bluetooth and open it.
3. To find a Bluetooth in your surroundings, click search device in right top area (circle
button), then KIRR will automatically search for the nearby Bluetooth device. As shown in
picture 4.2
Picture 4.2
18
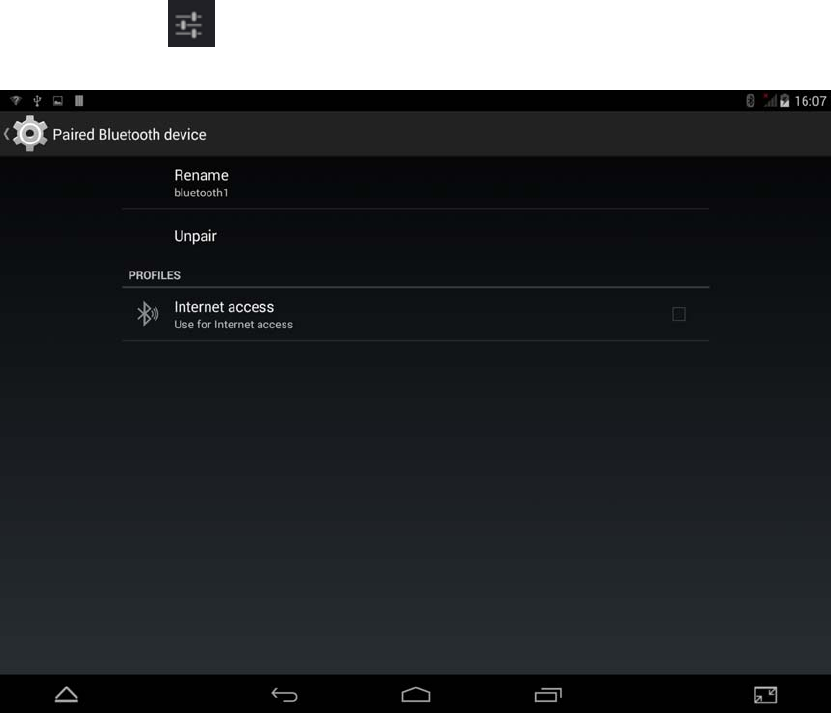
4. Click the available Bluetooth device, it will pop up a request window, enter into
related password, and match the device to connect
5.After matching, a number of machines to be found in the paired devices to b
e operated,click icon,enter the interface as shown in picture 4.3. Then you c
an proceed the operation next.
Picture 4.3
19
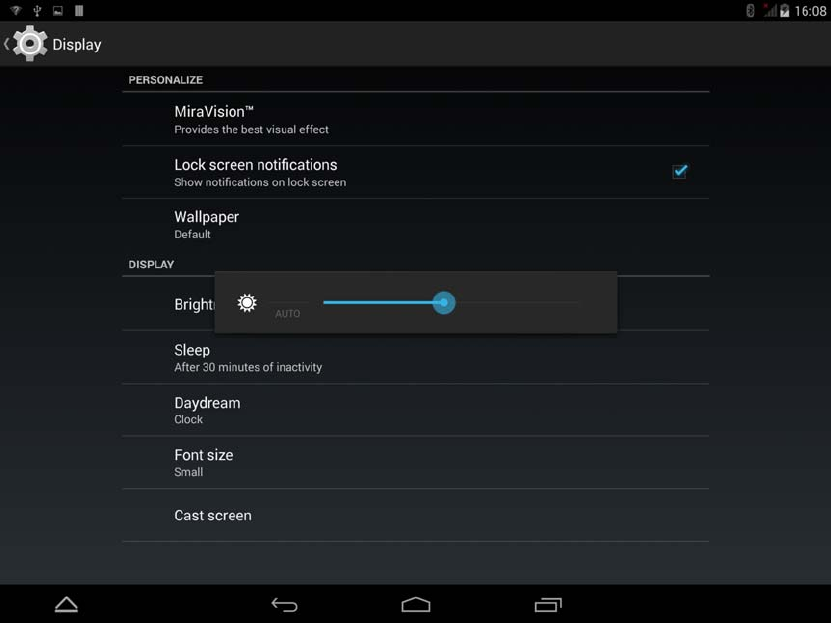
4.3 Display
Adjust the screen brightness
1. Click Settings application
2. Click display, choose brightness。
3. Pop up the brightness setting,then Left and right drag the slider to adjus
t the brightness level. As shown in picture 4.4
Picture 4.4
4. Click OK after brightness is adjusted
20
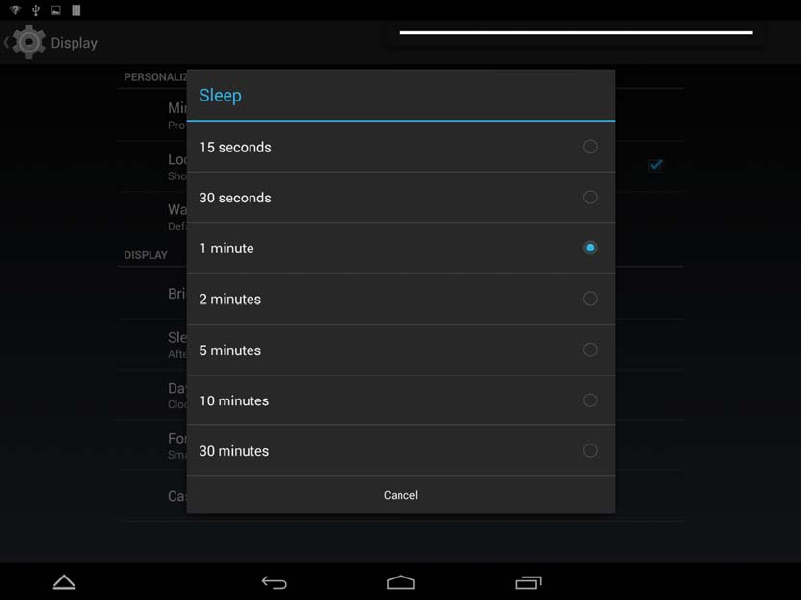
Adjust screen standby time
1. Click Setting
2. Click Display
3. Click Sleep
4. Then you can choose the standby time .Please check the following picture
Picture 4.5
21
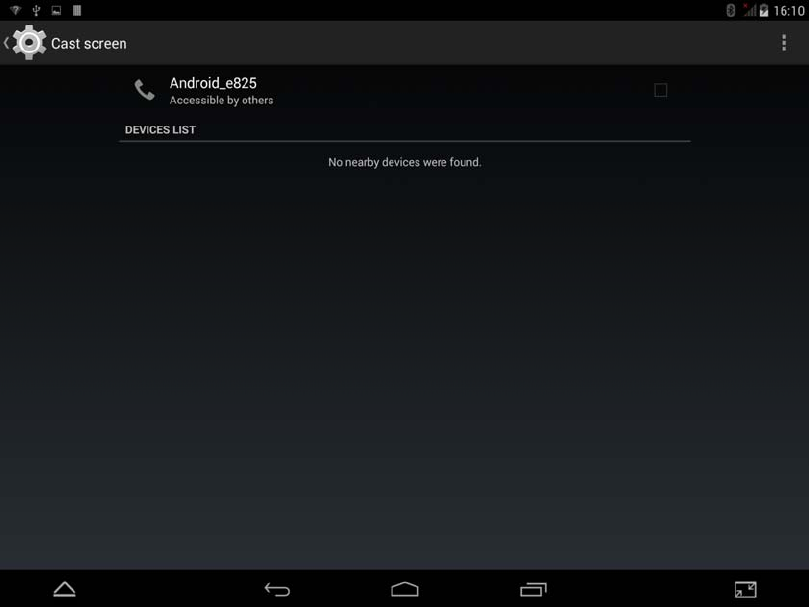
5. Cast screen
Setting →Display→ cast screen.
This function is to play video with your TV simultaneously.
Picture 4.6
22
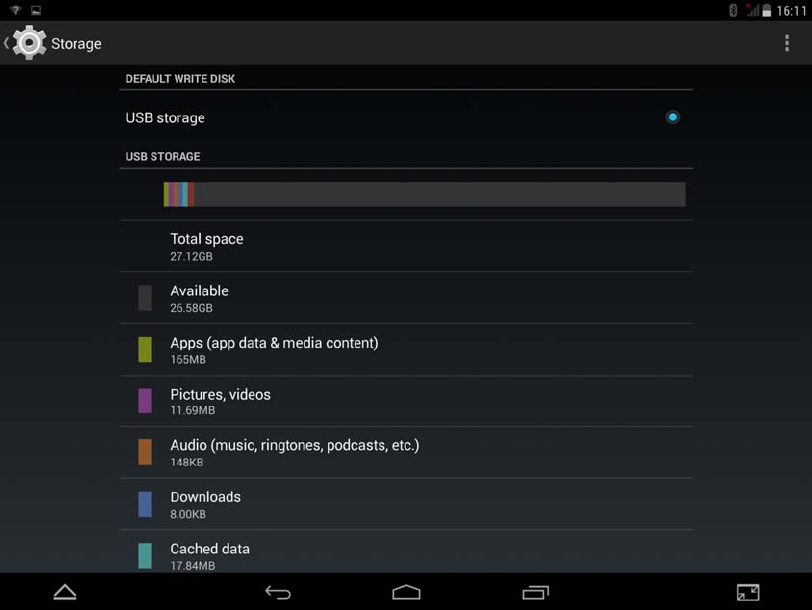
4.4 Manage Applications (How to Uninstall/Move)
1. Click Settings, then Click on Storage.
2. Scroll down to “Apps (app data & media content)”, and Click Apps, there you can
uninstall or move your applications, please see the following picture.
4.5 SD card and KIRR storage
Check the SD card and KIRR storage
1. Click Settings
2. Click Storage
3. Check SD card storage space
4. Check KIRR storage space
Remove SD Card
1. Click Settings
2. Click storage
23
3. Click unload SD Card
4. Then you can remove it safely
图4.8
Attention: Always Remove the SD card safely, it can protect your SD card and
prolong its usage life
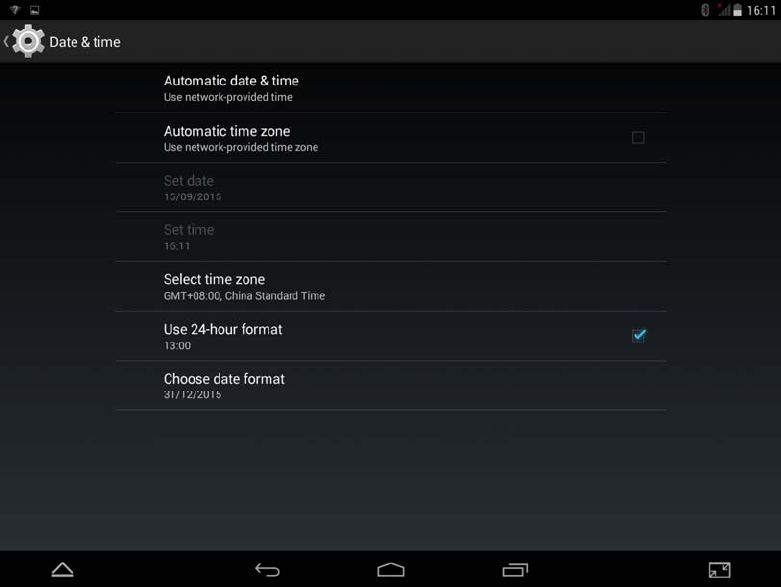
4.6 Date and Time
The system will automatically use network-provided date, time zone and time by default.
Manually adjust the date, time and time zone
1. Click Setting
2. Click Date and Time
3. Turn off Automatic date & time
4. Turn off Automatic time zone
5. Click “Set time zone”, down roll and choose the time zone you need
6. Click “Set date”, adjust the date, month, year by the up or down button
7. Click “Set time”, adjust the hour and minute by the up or down button
24
8. Select “use24-hour format” option, to switch between 12 hour format and 24
hour format, it will also show in the alarm clock
9. Click “choose date format”, to select the date format you want
Picture 4.9
Attention:If you use Automatic date & time, then you can’t set date, time and time zone
4.7 Language & input
1. Click “Setting”
2. Click “Language & input”
3. Click “language”, you can choose the language you want.
4.8 About KIRR
Check KIRR Status
1. Click Settings
2. Click About tablet. You can check Status, Model, SW version etc.
System updates
25
1. Click settings
2. Click About tablet
3. Click system updates. Please update according to the steps.
(Before updating, make sure the TF card with new version SW was inserted in the
tablet)
Check System version
1. Click Settings.
2. Click About tablet.
3. You can check Model, Battery status, Android Version etc.
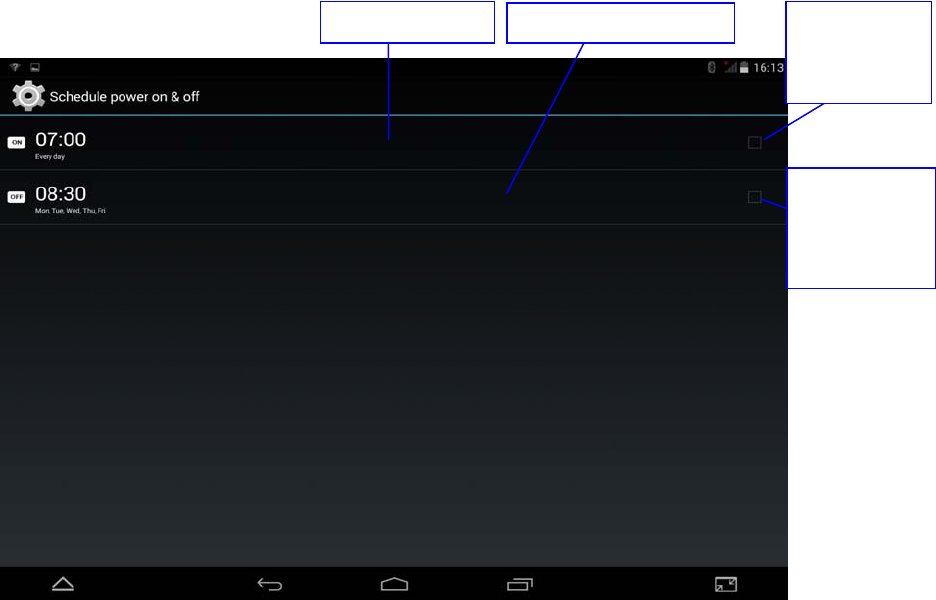
4.9 Scheduled Power-on and Power-off
1. Enter the settings.
2. Choose Schedule Power On & Off
3. Follow as picture 4.10
图4.10
4.10 Security Settings
Locked screen setting
OFF/ON
definite time
TURN ON
OFF/ON
definite time
TURN OFF
Enter the settin
g
Choose Timin
g
switch
26
To protect your KIRR privacy, you can use an unlock pattern or password to lock the
screen.
Attention: You will be required to input your password every turn on-off after you set
screen lock.
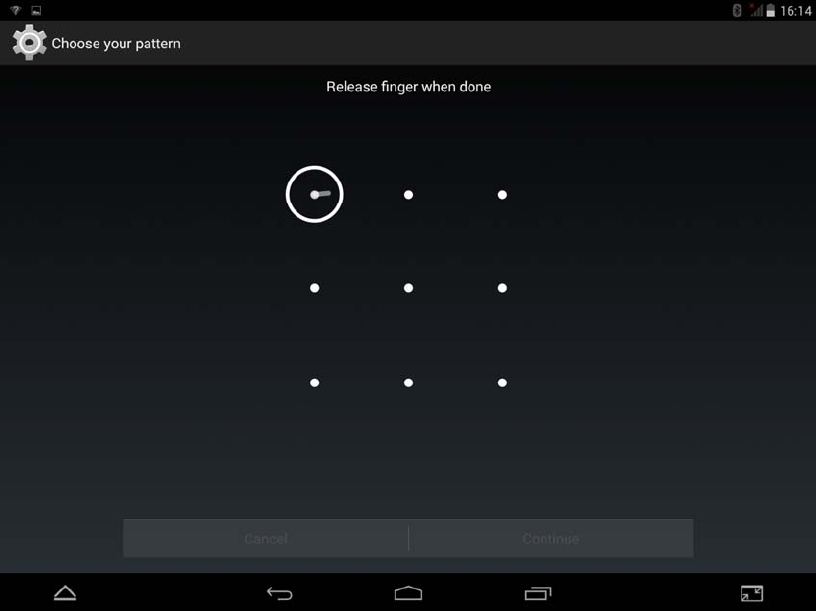
How to set unlock pattern
1. In the home page, choose “SETTING”
2. Choose SECURITY
3. Choose SCREEN LOCK
4. Choose PICTURE
5. Choose NEXT according to reminder.
6. There are 9 of spots in the pop-up unlock pattern panel,. In vertical,
horizontal or diagonal direction connection at least four points.As
shown in picture 4.11, the finger leave the screen after finish..The
system will record your Settings.
7. Point CONTINUE
8. Drew the same unlock pattern once again when see the
reminder.Choose CONFIRM
Picture 4.11
Set unlock PIN number
1. Choose Setting in the home page.
27
2. Choose SECURITY
3. Choose SCREEN LOCK.
4. Choose PIN in the pop-up text area
5. Input new PIN number and choose CONTINUE
6. Input PIN number again and choose CONFIRM.
Set up unlock password
1. Point Setting
2. Choose Security
3. Choose lock screen
4. Choose password in the pop-up text are.
5. Set up new password and continue.
6. Input password and choose confirm.
28
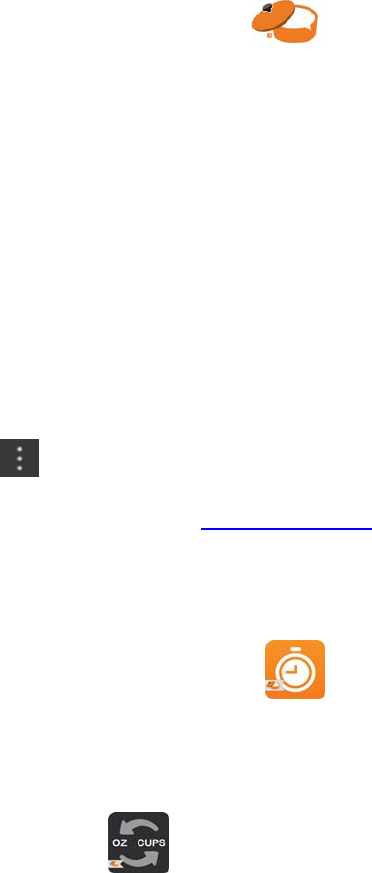
5 Recipe Apps & Multimedia
5.1 Recipe Apps
The Key Ingredient Recipe Tablet HD+ (KIRR) comes with 3 very helpful recipe
applications.
The main application, Key Ingredient Recipe App is launched by pressing .
The Key Ingredient Recipe Application is customized exclusively for Key Ingredient
Recipe Reader owners and has the following features built-in: Text-to-Speech Recipe
Reading, Built-in and Offline Recipes and Cookbooks (with Online Synch and 100 Year
Online Guarantee), Grocery-List (offline and online synchronized), Ad-Free, RecipeSpan
(which digitizes your hand-written or printed recipes using your device’s camera),
organizing recipes into cookbooks, favorites, sharing on social media, and so much more!
To get the best use of your application, press to access the application menu.
Then press Setting and Signup or Sign In to your FREE account on keyingredient.com.
Registration will allow adding recipes, sync, and many more features!
In addition to the Recipe Application, the Kitchen Timer Application (press )
supports multiple count-down timers at the same time.
The conversion application can be accessed by pressing . The conversion
application will convert common cooking units such as cups to other cooking units such as
oz!
29
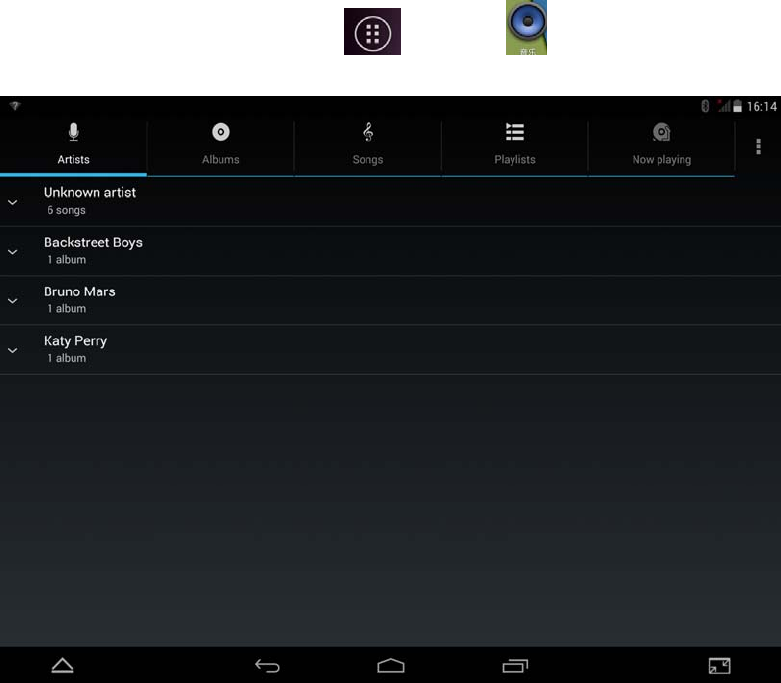
5.2 Music
To launch the music player: click the press to start,choose music that
you love can play as shown picture5.1:
Picture 5.1
30
Picture 5.2
Dragging the playback progress bar you can adjust the audio broadcast
schedule.
The operation of music playing button as shown picture 5.2
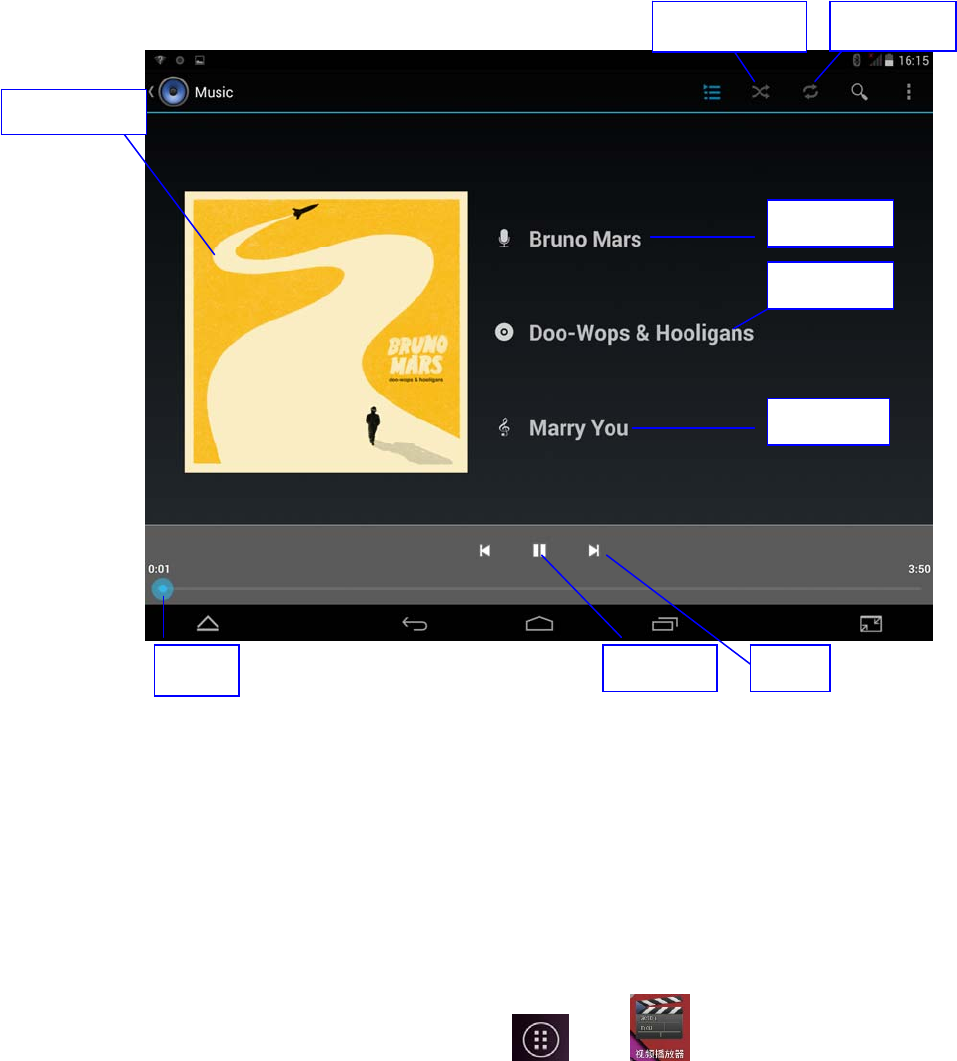
5.2 Video
To launch video player: choose , then ,choose the video and then
play,As follow picture 5.3
The video playback instructions are shown in picture5.4
Cover album
Stop/Play Next
Last
Artist
Album
Songs
Shuffle play Cycle play

31
Picture 5.3
Picture 5.4
Choose
screen
pattern
Adjust the
audio
broadcast
schedule
Play/Stop
Choose
audio track

32
5.3 Photo storage
Picture storage can search picture and video files in SD card automatically and
even classify them. You can view and delete the pictures using picture storage.
How to check picture
1. Click , then choose Gallery.
2. Choose the picture that you want. The system will now show that photo
as full screen automatically.
3. Putting two fingers on the screen and then the fingers (closed fingers
will show narrow) or double click on the screen so that photos can
zoom in.
Tip:When looking through multiple pictures, you can slide to the left or right to
switch to a different image.
Edit and set picture
While viewing images in full screen mode, press the 3-dot menu in the upper
right to select the options you want or to edit and the picture.
Slideshow
1. Open a picture. Using virtual button to click menu button, then
menu options display, and press “Slideshow”
Crop
1. Click on the 3-dot menu , shows display menu options
2. then Click and drag areas to adjust the crop
3. Click on the crop center toward inside and outside, to adjust the
cutting size
4. After adjust the size you want, click on cut
5. If give up cutting, click cancel to back to browse pictures
Edit
1. click on the menu , shows display menu options
2. click Edit
3. Then you can can be set brightness, style, color, effect
4. click Save
5. To cancel edit , click back , then choose cancel to browse other
pictures
33
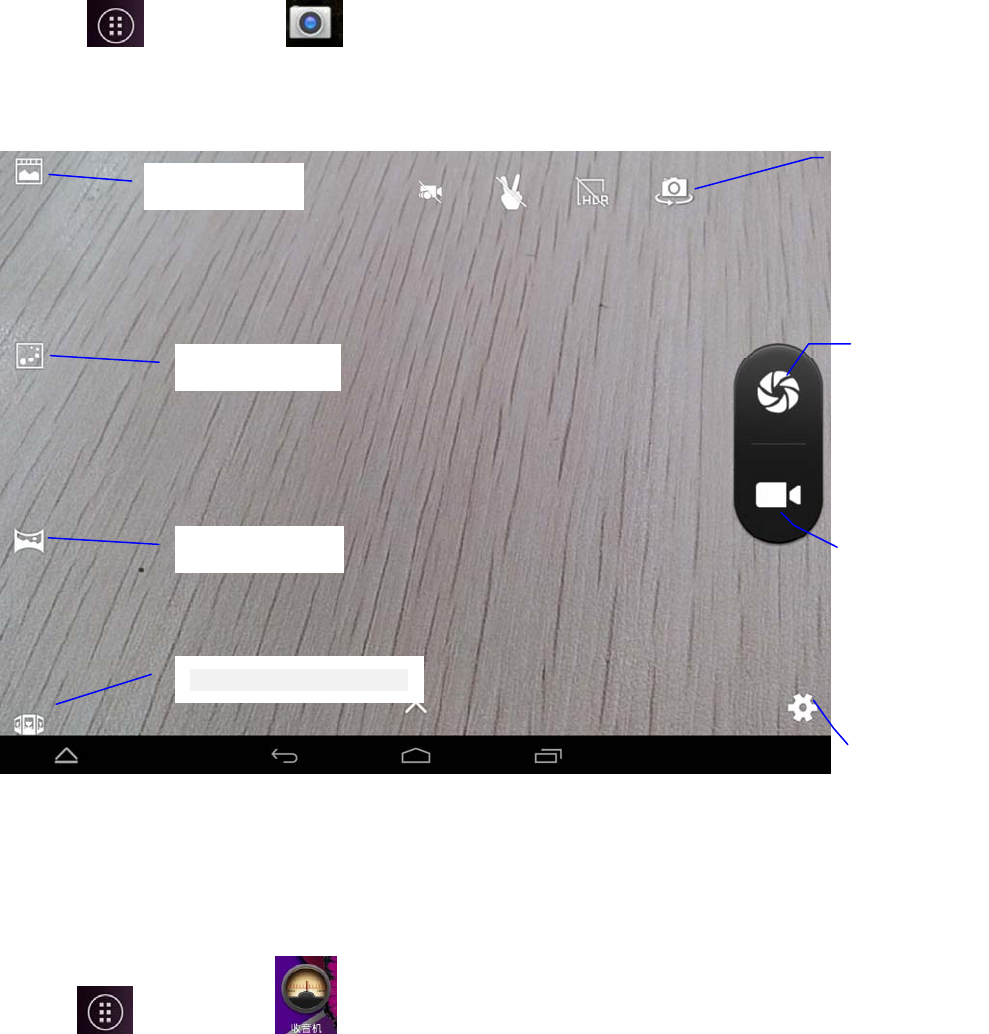
5.4 Camera
Click then click the Camera button
To switch camera: select the Menu button, click on the switch front/rear camera
same as picture 5.5
Picture 5.5
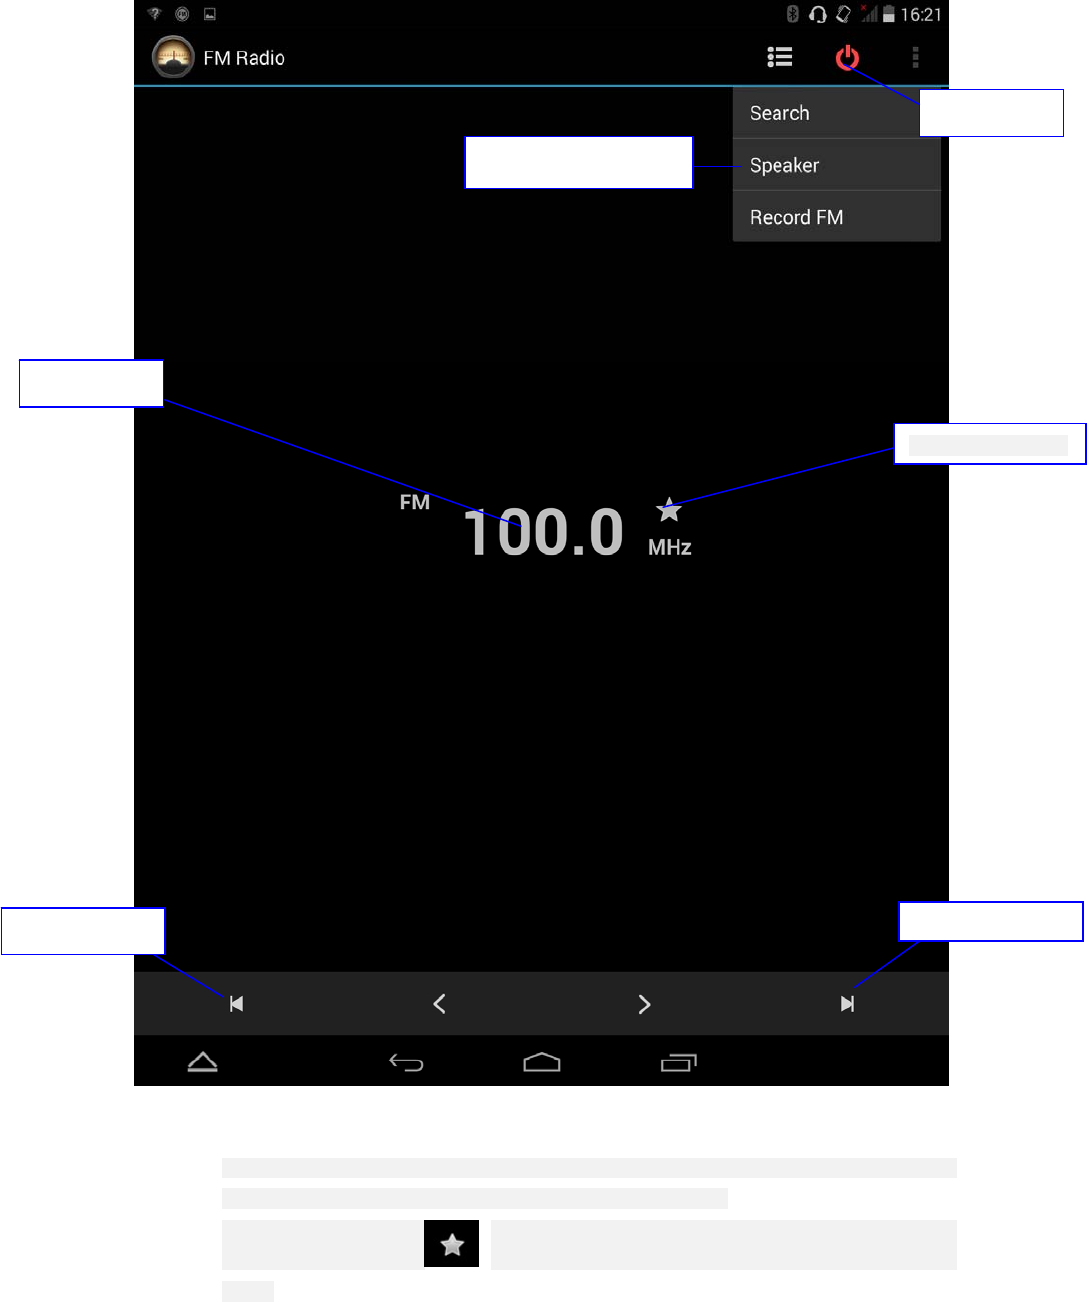
5.5 FM Radio
Click then click the FM Radio App:
Reception – you will need to plug in an earphone to act as an antenna
Multiple points of view
Camera
Setting
Normal mode
Panorama mode
Situation mode
Switch
front/back
camera
Click
photos
Video
model
34
Picture 5.6
search channel: click the Menu button in the radio, click search, will automatically search
channel, search the channel to the channel list will be displayed
collection channel: click on the main interface, collect the channel, can be saved in
the list
Collectin
g
buttons
Back channel N
e
x
t
C
h
a
nn
e
l
Current rate
Turn on loud speaker
ESC FM
35
6 Communicating function
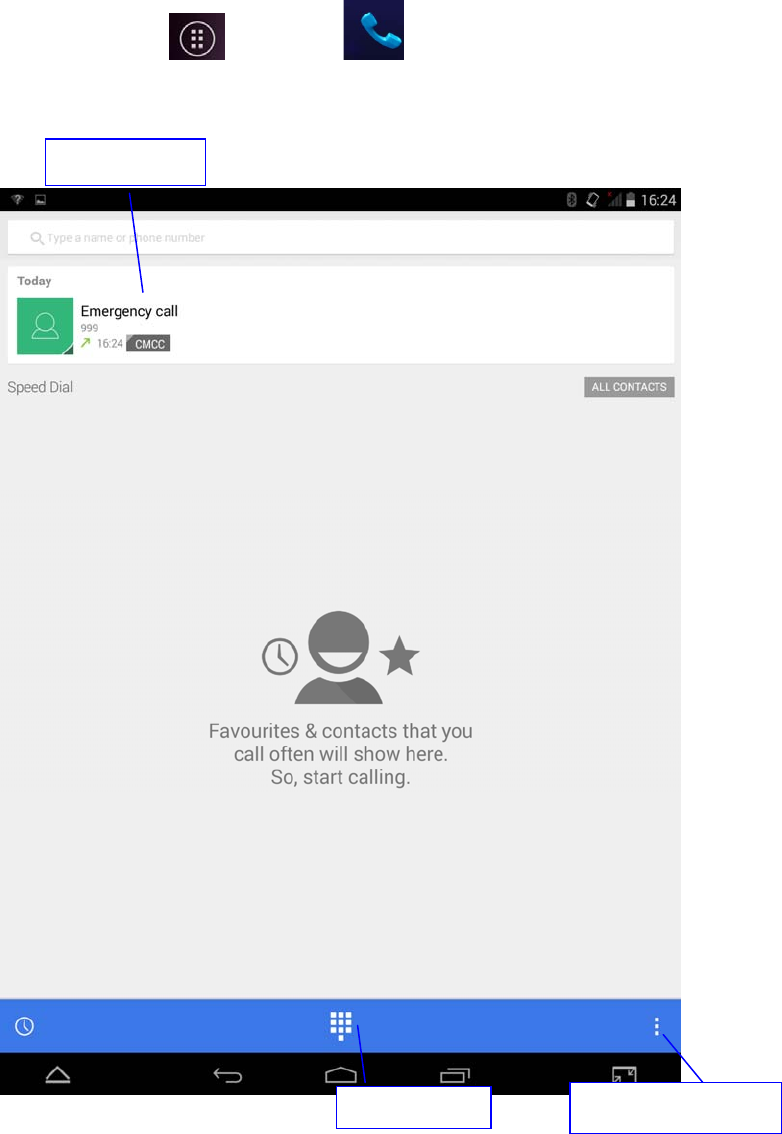
6.1 Telephone
In order to use your tablet as a phone or for Text messaging, you must insert a valid SIM Card (not
included). Then, 1. Click then press Phone App 。
2 See picture 6.1
Call record
Make a call Function setting
36
Picture 6.1
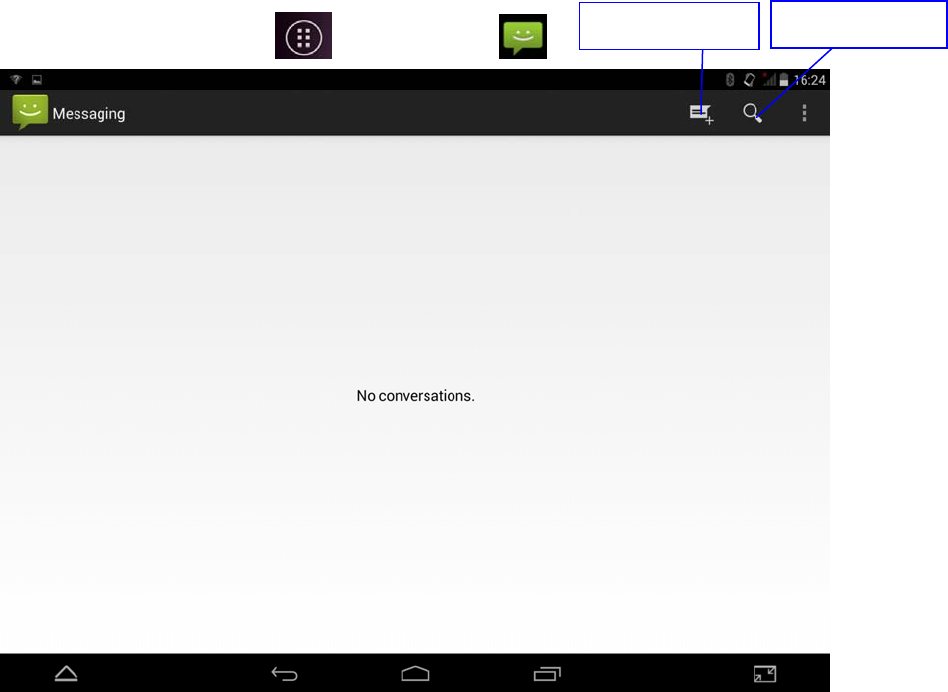
6.2 Message App
In order to use your tablet as a phone or for Text messaging, you must insert a valid SIM
Card (not included). Then, 1. Click and then Click App
Picture 6.2
2 choose write new message
Write message Search message
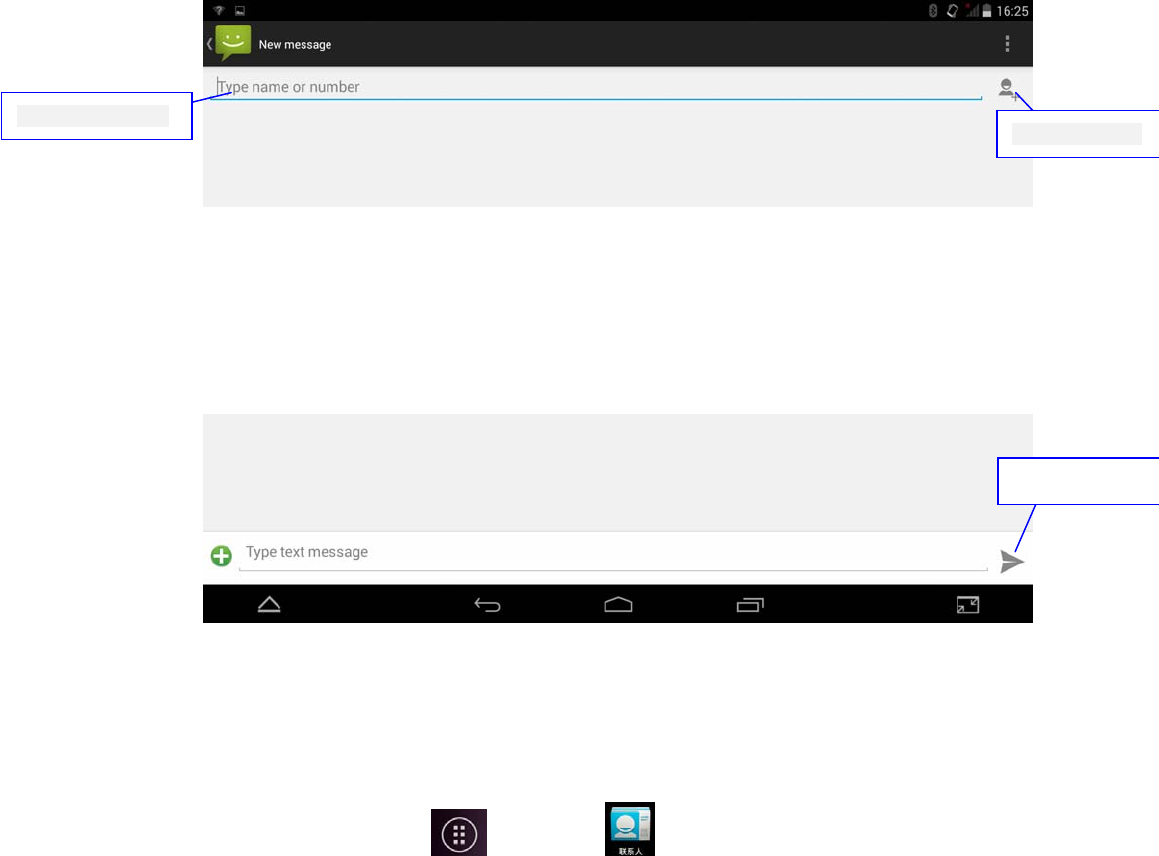
37
Picture 6.3
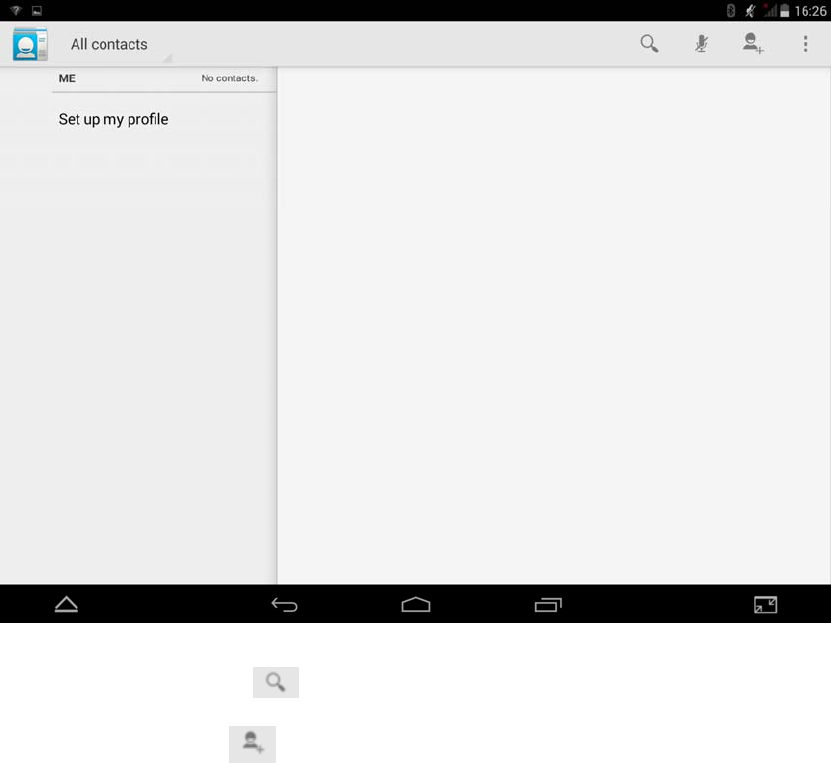
6.3 Contacts
Enter the main menu, select then press People, entering the Address list.
Add phone number Add the receiver
Send message
38
PIC 6.4
Search contacts:click button,will help you start the searching
Add contacts:Click button, will help you start adding contacts.
39
7 Internet
7.1 Browser
Under wifi or under mobile network connection (See section 4.1Wireless&internet
connection), click main menu or the browser in Desk to enter IE surface, like PIC7.1
Click address to input website then start the internet surfing as picture 7.2
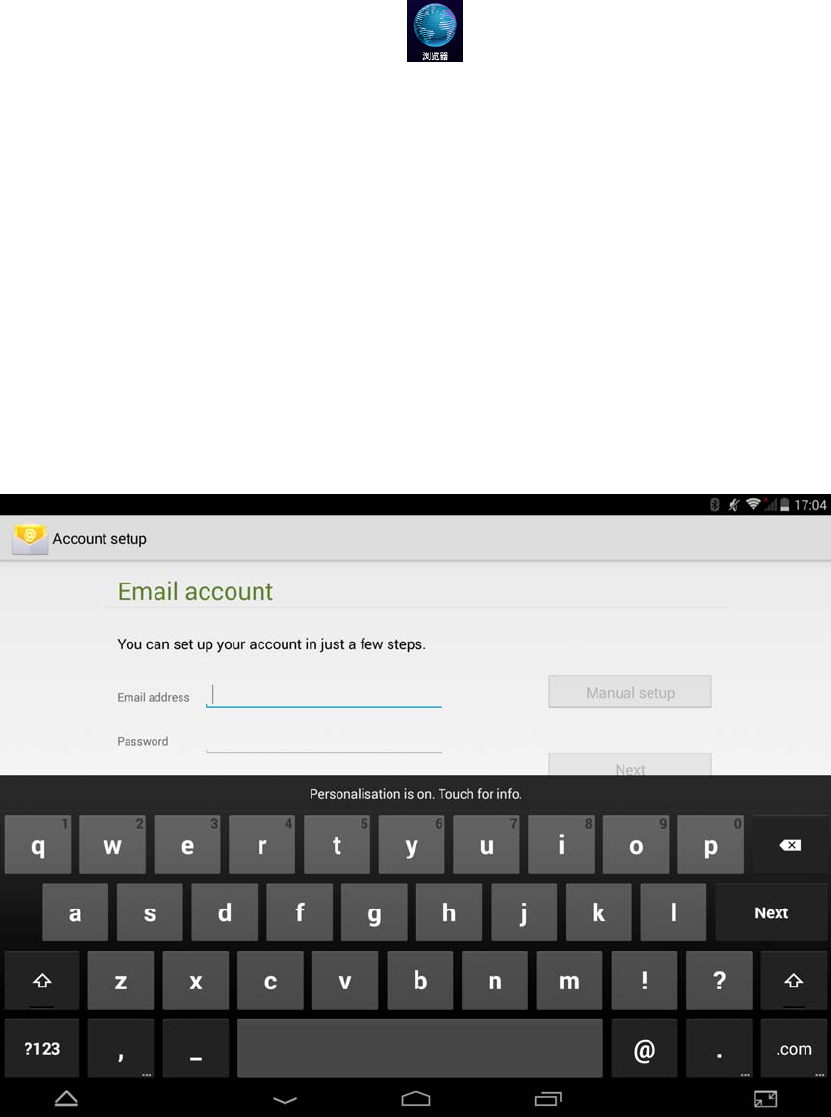
7.2 E-mai
The included Email application has a built-in E-mail setup guide. You can add the
normal Web E-mail service provider’s external POP3 or IMAP E-mail account. (like
Yahoo, Gmail or 163 etc). Like PIC 7.3
PIC 7.3
40
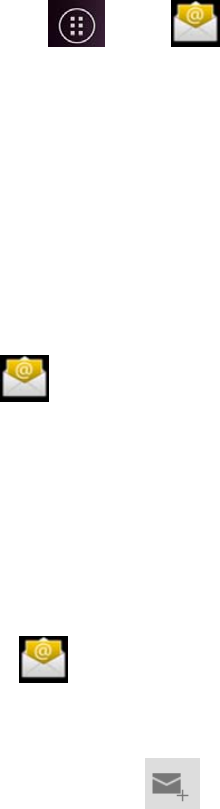
a.E-mail setting
1. Select then, , and you will be prompted to setup email.
2. Input your E-mail account & password
3. Select Next to check if the E-mail service workable.
4. Input account name and E-mail signature. Then click Finish.。
5. If the E-mail is workable, will enter your Inbox automatically.
b.Delete E-mail account
You can delete the E-mail account you have set before.
1. Click .
2. Enter your E-mail box.
3. Press the button(menu).
4. Select Settings
5. Offside pull down and select Delete account.
6. Press OK.
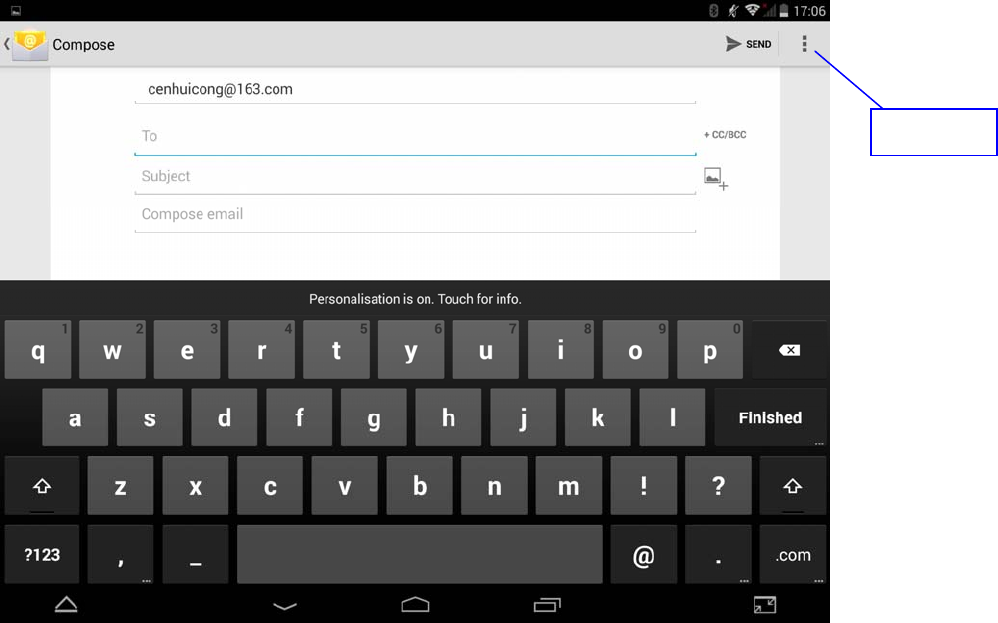
c. Sending E-mail
5. Select , will show your inbox.
6. Press Inbox will refresh E-mail auto. Then press to read.
7. Click menu, will show the menu.
8. Select the top right ,Then start to write new E-mail.
9. Input the E-mail address you going to send.
10. Input the theme and message.
11. Click the Add attachment.
12. Select the attachments you need to send(like picture or video etc).
13. Click Send to send the E-mail.
41
Picture 7.4
Set menu
42
8 Other application
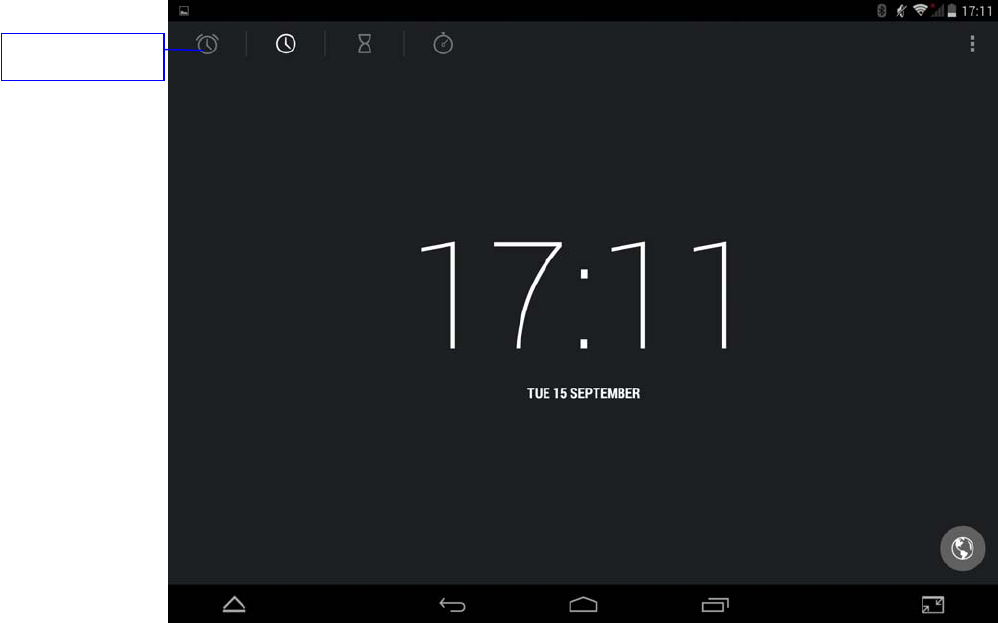
8.1 Clock
Select Clock, enter the interface as picture 8.1
There are alarm clock, picture, music and Home button.
Picture 8.1
Set alarm clock
43
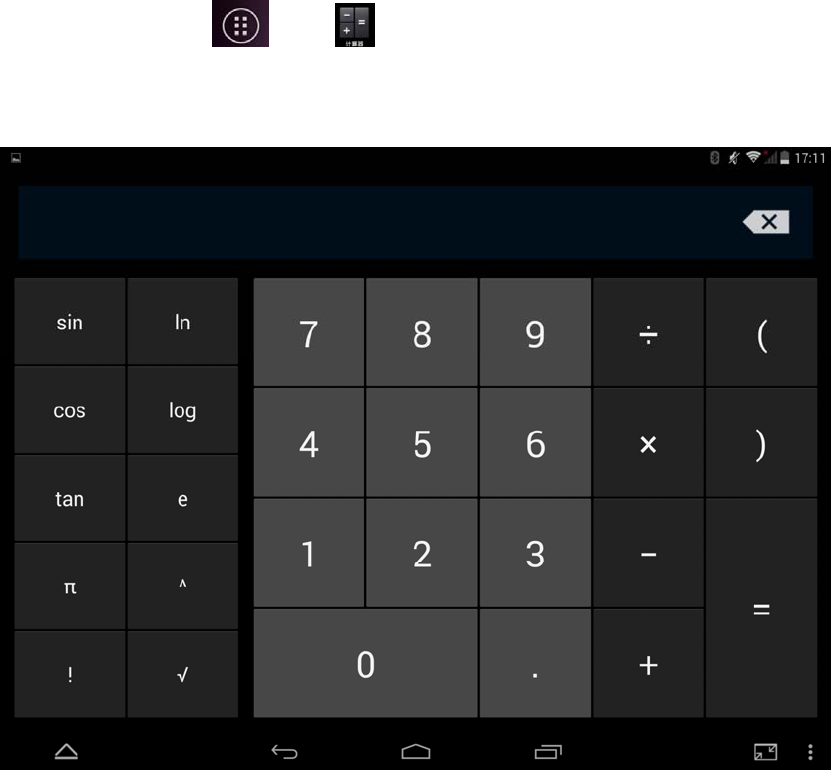
8.2 Calculator
1. Select then,
2. Enter the calculator.
3. Start the calculating as you need.
图8.2
44
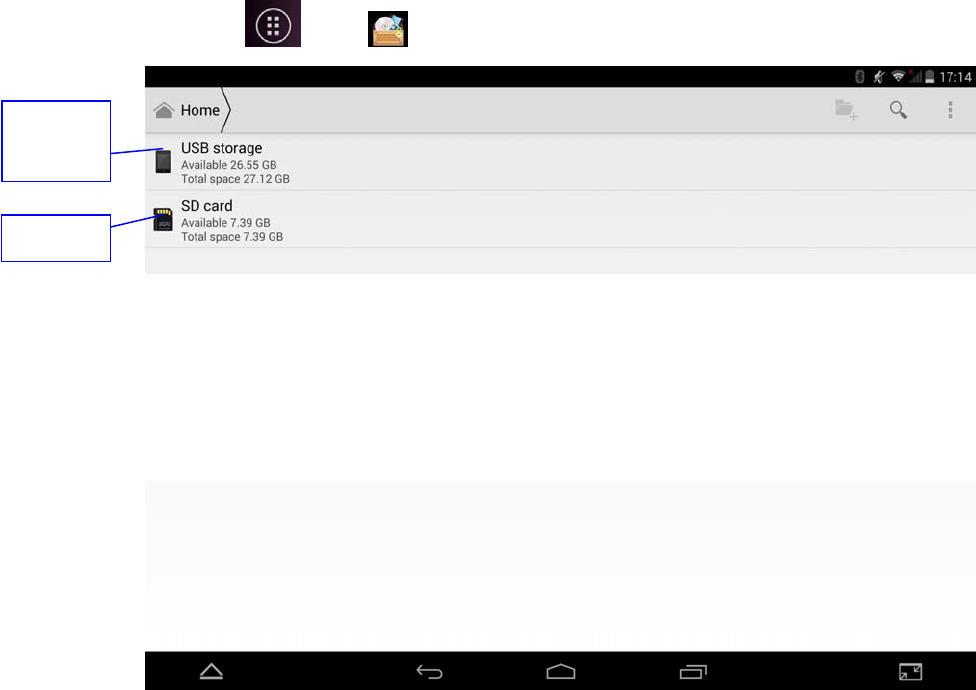
8.3 File manager
File manager can manage all the files or folders in your TF card. It can do common file
functionss like copy, cut, delete, rename, etc.
File manager also has function like share, install APK, etc.
Click icon then, from main menu or desktop to enter file manager.
Picture 8.3
a. Select a folder or file, long press to enter the interface as pictured in 8.4, to make
operations like copy, cut, delete, rename, etc
SD card
Internal
storage
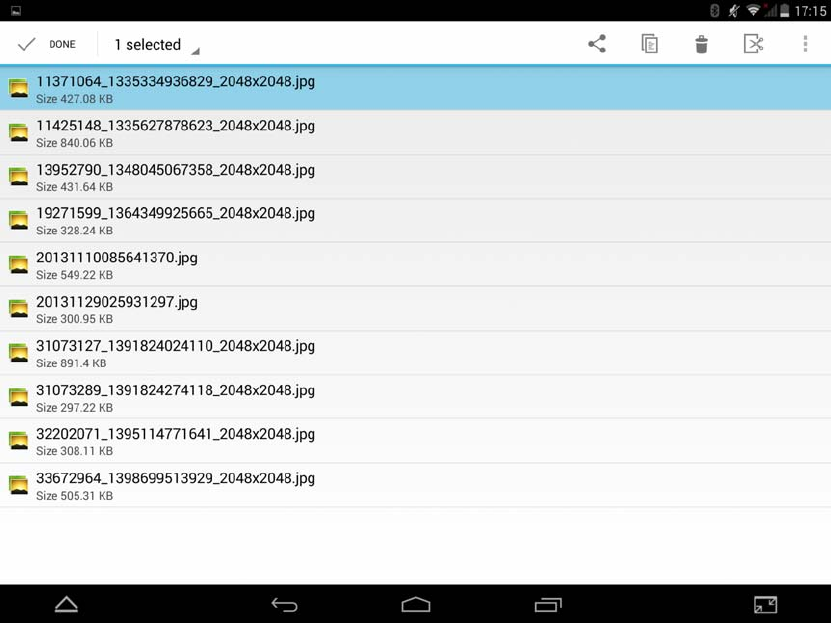
45
Picture 8.4
b. Select a file and long press, choose “share” option and share mode according to the
pop-up list.
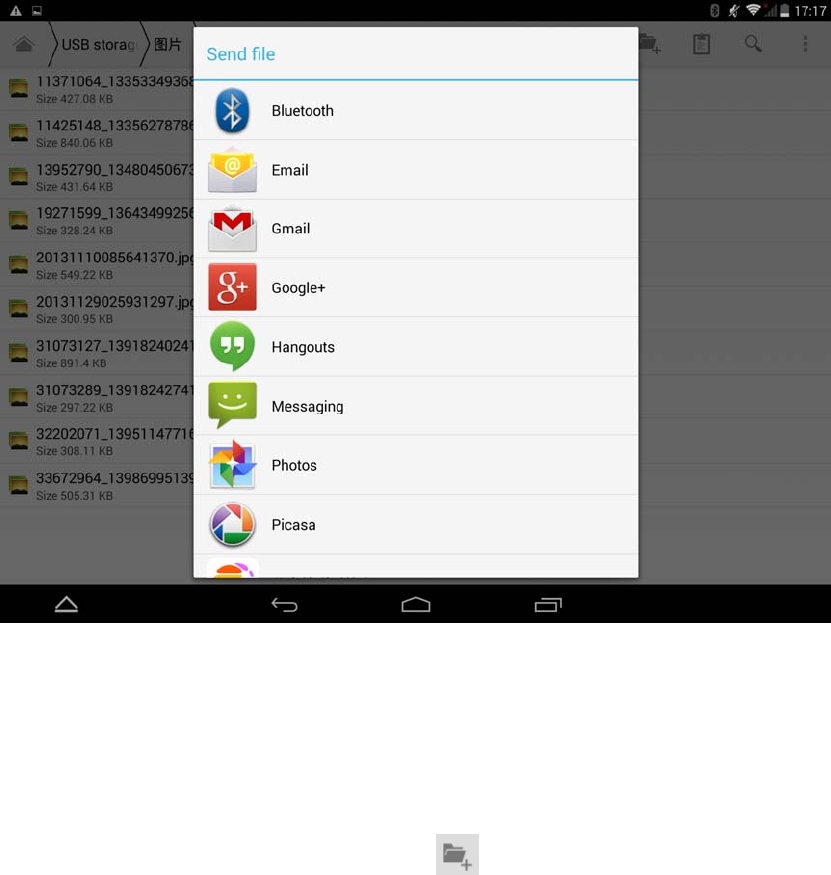
46
Picture 8.5
c. Install APK file: Select a file with .apk suffix, pop up install procedure, and install
software according to the guide.
d. Create new folder: Select the directory, click from upper right, and follow the guide
to create new foler.
47
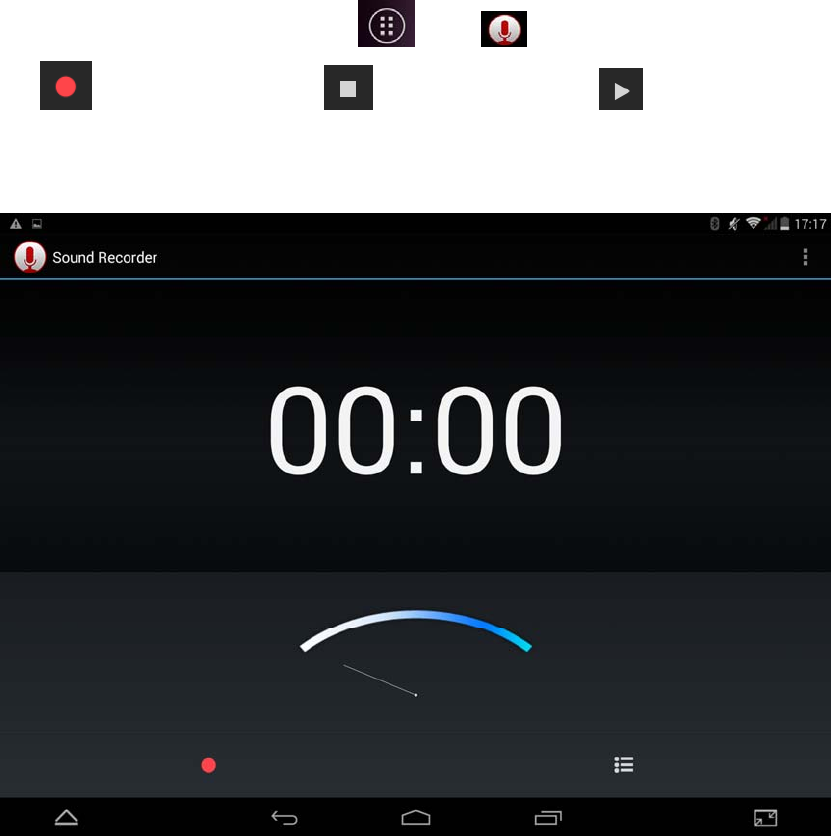
8.4 Recorder
From main menu or desktop, click icon then, to enter sound recorder interface,
click to start recording, click to stop recording. Click to play record. The
system automatically prompts to use this recording or discard it.
Play record: Select audio player to play a recording, select the recording file from explorer,
click to play.
Picture 8.6

48
9 Application installation
9.1 Install
The easiest method to install applications is to launch the included app store and
search for the application(s) you wish to install and click on it to download. You
may be required to register for a free account using your phone number or email.
Press to install applications from the application manager.
Installing third party applications from websites.
You can get an Android application from the internet to install to KIRR
directly. Download or Copy the application to the SD card or member,
then launch the APK file to install it.
1. Click “File manager”, or the download notification area, and select the
application to install.
2. Long press the application (or touch the download notification).
3. On the pop up install option, click to install APK.
4. Finish installation according to the guide.
Note: All Android applications are with “.apk” suffix.
9.2 Uninstall
Uninstall application
1. Select “Settings” icon from main menu.
2. Select “Storage -> Apps”, list all installed applications .
3. Select the application to uninstall.
4. Click “OK” to confirm.
9.3 Update applications
Update Android applications
Download the latest application from the website you found it.
Install the new APK, and it will replace the old APK automatically.
49
10 FAQ
1. KIRR boots slowly on first power on
After KIRR is factory reset or firmware upgraded, it needs to install all the
applications during first boot. It can take around 2-3 minutes, after which,
subsequent power-ons, the speed will be faster.
2. KIRR cannot connect to WIFI
Check if wireless router is working correctly.
Check the distance between KIRR and wireless router, and ensure it
is not separated by a wall or other obstacles.
Check if the user name and password are correct.
3. KIRR is hot
KIRR may feel hot when using more than one application, when the
display is on high brightness for long periods, or if KIRR is being charged.
This is normal.
4. Cannot configure E-mail or register applications
Check if the network is working and you are connected
Check if E-mail settings correct.
Check if system time is correct and the same as local time.
5. System hanging or not working properly (SYSTEM RESET)
Sometimes, when you install a third-party application, it may cause system to fail to
boot, or simply not work properly. You can press (and hold) the reset button (beside
charging port) to reset the system to factory default.
6. Cannot open website
Check if KIRR is within valid distance of router.
Restart WIFI on the device and router and try again.
7. KIRR running slower than normal
This is normal. Please stop some unused applications from
advanced task management and/or uninstall some third-party
applications to free up more system resources.

50
11 SUPPORT
Key Ingredient Recipe Reader HD+
Model: KIRE3US
Key Ingredient Corporation
PO Box 1824
Austin, Texas 78767
Telephone: 1-855-KEY-CHEF Fax: 512-462-4976
Learn More
To learn more, visit www.keyingredient.com
F.A.Q.s
For answers to Frequently Asked Questions,
visit www.keyingredient.com/help/faq
Get Support
Visit www.keyingredient.com and press “Support” for technical support.
Warranty Information:
For warranty information, please visit:
http://www.keyingredient.com/warranty/
51
FCC Warning:
Any Changes or modifications not expressly approved by the party responsible for compliance
could void the user’s authority to operate the equipment.
This device complies with part 15 of the FCC Rules. Operation is subject to the following two
conditions: (1) This device may not cause harmful interference, and (2) this device must
accept any interference received, including interference that may cause undesired operation.
Note: This equipment has been tested and found to comply with the limits for a Class B digital
device, pursuant to part 15 of the FCC Rules. These limits are designed to provide
reasonable protection against harmful interference in a residential installation. This
equipment generates, uses and can radiate radio frequency energy and, if not installed and
used in accordance with the instructions, may cause harmful interference to radio
communications. However, there is no guarantee that interference will not occur in a
particular installation. If this equipment does cause harmful interference to radio or television
reception, which can be determined by turning the equipment off and on, the user is
encouraged to try to correct the interference by one or more of the following measures:
—Reorient or relocate the receiving antenna.
—Increase the separation between the equipment and receiver.
—Connect the equipment into an outlet on a circuit different from that to which the receiver is
connected.
—Consult the dealer or an experienced radio/TV technician for help.
Specific Absorption Rate (SAR) information
SAR tests are conducted using standard operating positions accepted by the FCC with the
phone transmitting at its highest certified power level in all tested frequency bands. Before a
new model phone is available for sale to the public, it must be tested and certified to
the FCC that it does not exceed the exposure limit established by the FCC, Tests for each
phone are performed in positions and locations (e.g. at the ear and worn on the body)as
required by the FCC.
For body worn operation, this model phone has been tested and meets the FCC RF exposure
guidelines when used with an accessory designated for this product or when used with an accessory that
Contains no metal and that positions the handset a minimum of 0 cm from the body. Non compliance
with the above restrictions may result in violation of RF exposure guidelines.