Keystone Microtech KT6101 Smart I/O User Manual KT 6101 UserManual FCC
Keystone Microtech Corporation Smart I/O KT 6101 UserManual FCC
User Manual rev.pdf

KT-6101 Smart IO Controller
User’s Manual
Version 1.1, Aug. 2014

KT‐6101SmartIOControllerUM 2
KT‐6101SmartIOController
User’sManual
CopyrightNotice
©2014KeystoneMicrotechCorporation.Allrightsreserved.
ImportantNote
RadiationExplosureStatement
ThisequipmentcomplieswithCE/FCCradiationexposurelimitssetforthforan
uncontrolledenvironment.Thisequipmentshouldbeinstalledandoperatedwith
minimumdistance20cmbetweentheradiator&yourbody.
FCCInformation
Thisdevicecomplieswithpart15oftheFCCRules.Operationissubjecttothe
followingtwoconditions:(1)Thisdevicemaynotcauseharmfulinterference,and(2)
thisdevicemustacceptanyinterferencereceived,includinginterferencethatmay
causeundesiredoperation.
Caution:
Anychangesormodificationsnotexpresslyapprovedbythepartyresponsiblefor
compliancecouldvoidtheuser’sauthoritytooperatethisequipment.
Thisproductcontainsaradiotransmitterwithwirelesstechnologywhichhasbeen
testedandfoundtobecompliantwiththeapplicableregulationsgoverningaradio
transmitterinthe2.400GHzto2.483GHzfrequencyrange.

KT‐6101SmartIOControllerUM 3
TheKT‐6101SmartIOcontrollerisastandaloneremoteIOcontrollerthatcan
connectsensorsandturnon/offrelaysorswitchesforapplicationoverEthernetand
IP‐basednetworks.
APLC‐likelogicprocessingengineisbuiltintheKT‐6101,sotheusercanprogram
thisdeviceforprocesscontrol,dataaquitisionorotherautomationapplication.
OneofthemostpowerfulfeatureoftheSmartIOcontrolleristhecapabilityto
connecttoacloudontheinternet,callK‐Cloudservice.TheK‐Cloudserviceprovides
theuseraninfrastructureforremotesensorreadingandoutputcontroloverthe
InternetwithoutthecomplexnetworksettingsoffirewallorVPN(virtualprivate
network).
Thisuser’smanualguidesyouthroughthefollowingstepstounderstandthebasic
operationoftheKT‐6101Smart‐IOcontrollers:
z Understandthehardware
z Installthehardware
z DownloadandinstalltheAndroidAPP
z ConfigureandmonitortheSmartIOcontrollerviatheAPP
z WriteandupdateacontrolblockprogramtotheSmartIOcontroller
z UsetheK‐Cloudservice
1. Understandthehardware
Hardwaredescription:
I/OTerminalBlock:
12 3
456
1:SerialPort:RS‐232connectortoEZ‐extender
(Model#:KT‐6160)
2:Reset:SystemDefaultReset
3:Mode:LocalmodeorCloudmodeswitch
4:AI0/AI1:CurrentmodeorVoltagemodeselectors
5:TerminalblockforDI,DIO,AIandPowersource
6:LAN:EthernetRJ‐45connector,alsosupport
PoweroverEthernet
7:Grounding
7

KT‐
6
Por
t
Por
t
DI
O
Ain
0
Ain
DI
0
VS
‐
GN
D
LE
D
LE
D
Po
w
Loc
a
Clo
u
Ala
r
Wi
F
LA
N
6
101SmartI
t
sDescripti
t
s
O
0~DIO5
0
+/Ain0‐
1+/Ain1‐
0
~DI3
‐
/VS+
D
D
Indicators
:
D
w
er
a
l
u
d
r
m
F
i
N
OController
on:
Descipti
o
Configur
(6ports
)
AnalogI
n
AnalogI
n
DigitalI
n
PowerI
n
Groundi
n
:
Light
Off
On
Off
On
Off
Blinki
On
Off
Blinki
Off
Blinki
Off
On
UM
o
n
ableDigital
)
n
put0
n
put1
n
put(4por
t
n
put
n
g
D
e
S
y
S
y
N
o
L
o
ng
N
o
S
y
Cl
o
ng
N
o
D
e
ng/On
N
o
W
Et
Et
Input/Out
p
t
s)
e
scription
y
stempowe
y
stempowe
o
tatlocal
m
o
calmode,
n
o
tatcloud
m
y
stemisco
n
o
udmode,
o
alarm
e
viceisalar
o
hostWi‐F
i‐Fiisconn
e
hernetcon
n
hernetcon
n
Spec.
p
ut Digit
a
+5
V
Digit
a
+5
V
@
20
Curr
e
0~20
m
Volta
0~5V
;
+5Vd
c
DC+
1
rof
f
ron
m
ode
n
otconned
m
ode
n
nectingto
t
systemhas
ming
i
connectio
n
e
cted.
n
ectionof
f
n
ectionon
a
lInput:
V
dc~+30V
d
a
lOutput:
V
dc~+50V
d
0mA/Chan
n
e
ntmode:
m
A;4~20
m
gemode:
;
5V;0~1
0
c
~+30Vdc
1
0V~+30V
totheK‐Cl
o
t
heK‐Clou
d
connected
n
d
c
d
c
n
el
m
A
0
V;10V;
o
udservic
e
d
butnotre
totheK‐Cl
4
e
ady
oud

KT‐
6
2.
Scr
e
6
101SmartI
Installthe
h
(2.1) In
s
e
w:M3X10
L
OController
h
ardware
s
tallingthe
L
UM
devicesas
f
f
ollowing:
5

KT‐
6
3.
4.
6
101SmartI
(2.2) C
o
(2.3) G
r
(2.4) C
o
Download
(3.1) It
i
ve
(3.2) T
h
(3.3) Pl
e
A
P
(3.4) D
o
Configure
a
(4.1) Ple
a
(4.2) Clic
Th
e
(4.3) Ali
s
OController
o
nnectingt
h
r
oundingth
o
nnectthe
L
andinstall
i
ssuggeste
d
rsion.
h
esuggeste
d
e
asedownl
o
P
Pwiththe
o
wnloadan
a
ndmonit
o
a
semakes
u
ktheSmar
t
e
n,clickthe
s
tofSmart
UM
h
epower:
D
eunit
L
ANportto
theAndroi
d
tousean
d
screensi
z
o
adtheAP
P
followingk
e
dinstallth
e
o
rtheSmar
t
u
retheWi‐
F
t
EESAPP,t
h
DeviceSet
t
IOcontroll
e
D
C+10~+3
Internet
dAPP
Androidta
b
z
eoftheAn
P
fromthe
G
e
yword:S
m
e
APP.
t
IOcontro
F
ioftheta
b
h
emainscr
e
t
ingiconf
o
e
rsisshow
n
0
VtoVS+
a
b
letwithA
n
droidtable
t
G
ooglePla
y
m
artEES
llerviathe
b
letisturn
e
e
enisasfo
l
o
rfurthero
p
n
onthesc
r
a
ndVS‐
n
droid4.0
o
t
is7inche
s
y
Store:ple
a
APP
e
donbefor
e
l
lowing:
p
erations.
r
een.
o
rhigher
s
orabove.
a
sesearch
t
e
usingthe
6
t
he
APP

KT‐6101SmartIOControllerUM 7
Thedefaultdevicenameisoftheformatlike:Smart‐IO‐AP#0000XXwith
differentserialnumberafterthe#signfordifferentSmartIOcontrollers.
Here,weselecttheSmart‐IO‐AP#00005E.
(4.4) AdialogisprompteduptoaskfortheWi‐Fipasswordasfollowing:
PleaseenterthedefaultWi‐Fipassword:smartio168
(4.5) Then,adialogisprompteduptoaskforthedevicemanagement

KT‐6101SmartIOControllerUM 8
passwordasfollowing:
Pleaseenterthedefaultdevicemangementpassword:admin
Then,areal‐timedisplayfortheSmartIOcontrollerisshownasfollowing:
Youcancheckthestatusforthedigitalinputs(DI),digitaloutputs(DO),
analoginputs(AI),counters(CS),remotecloudinputs(RX)onthisSmart
KT‐
6
5.
6
101SmartI
IO
c
Writeand
u
Onthisse
c
program)
t
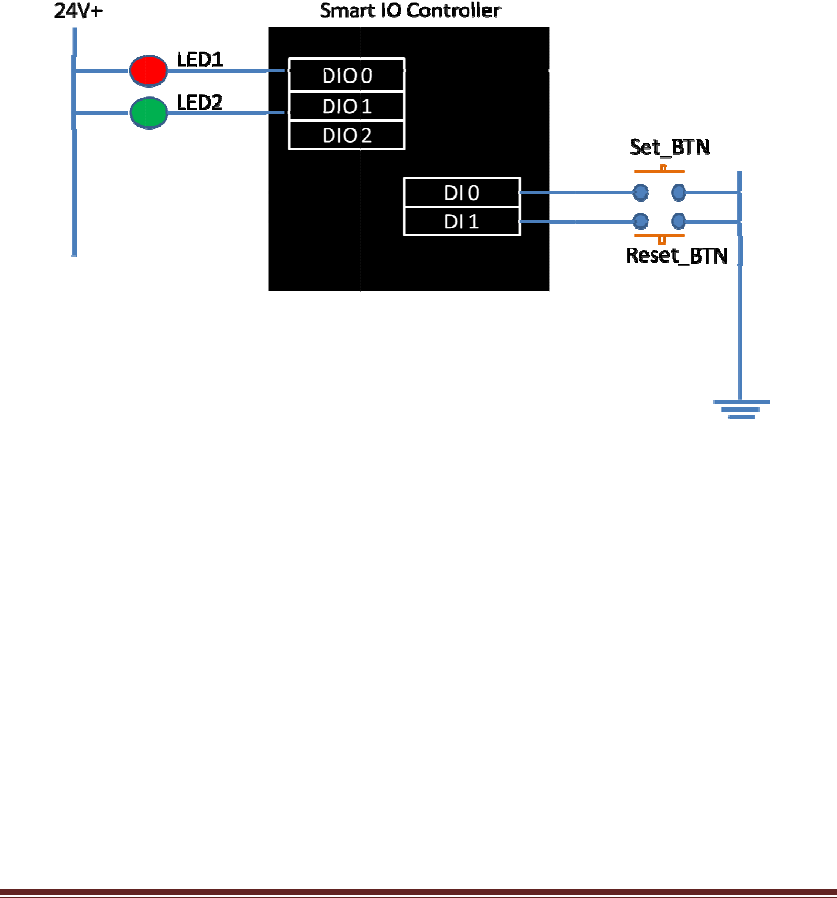
z 2digi
t
z 2digi
t
progr
a
z 1cou
n
ConnectDI
button(Re
s
And,conn
e
LED(called
TheI/Owi
r
Everytime
y
thetheco
u
OncetheC
However,
y
theLED2
w
Herearet
h
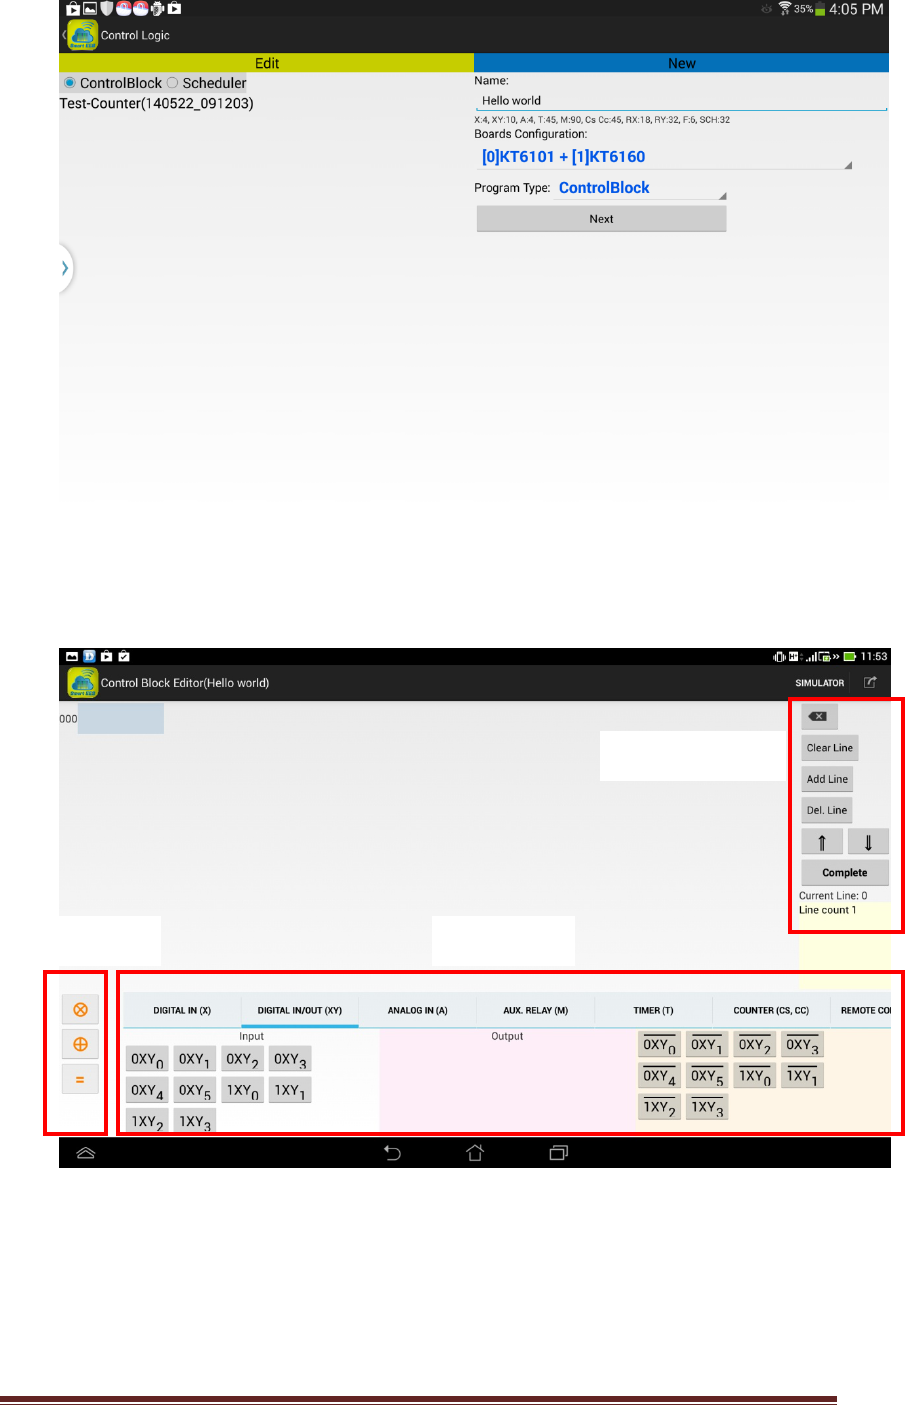
(5.1) Bac
edi
t
(5.2) Ent
e
Sel
e
Th
e
OController
c
ontroller.
u
pdateac
o
c
tion,wew
i
t
ousethef
o
t
alinputs:
D
t
aloutputs:
a
m).
n
ter:CS0(
C
0
toapush
s
et‐BTN).
e
ctDIO
0
to
o
LED2).
r
inngdiagr
a
y
oupush‐d
o
u
nter(CS0)
w
S0counter
y
oucanpus
h
w
illbeturne
h
estepsto
e
ktothem
a
t
acontroll
o
e
rtheprog
r
e
cttheboa
r
e
n,clickthe
UM
o
ntrolbloc
k
i
llwriteasi
o
llowingre
D
I0andDI1
DIO0and
D
C
Srepresen
t
button(ca
l
o
ne24VDC
a
misshow
n
o
wn/upth
e
w
illaddon
e
is5(theth
h
‐down/up
doffthen.
e
nterthec
o
a
inscreen,
c
o
gicprogra
r
amname:
r
dconfigur
a
“Next”bu
t
k
program
t
mplecontr
o
sources:
(represent
d
D
IO1(repre
t
sforCoun
t
l
ledSet‐BT
N
LED(called
n
asbelow:
e
Set_BTN,
t
e
.
reshold)or
theReset
_
o
ntrolbloc
k
c
lickthe“P
r
m.
Hello worl
d
a
tionandP
r
t
ton.
t
otheSma
r
o
lprogram
d
as0X0an
d
sentedas
0
t
er‐Setand
N
)andDI
1
t
LED1)and
t
heLED1w
above,the
_
BTNtores
e
k
program
o
r
ogramEdi
t
d
r
ogramTyp
r
tIOcontr
o
(wecallit
a
d
0X1atth
e
0
XY0and0
X
CCforCou
n
t
oasecon
d
DIO
1
toth
e
illbeturne
d
LED2will
b
e
tthecoun
t
o
ntheAPP:
t
ing”icon,
y
e:
o
ller
a
“control
b
e
program)
.
X
Y1atthe
n
ter‐Clear).
d
push
e
other24V
D
d
on/off,a
n
b
eturnedo
n
t
ertozero
a
y
oucansta
r
9
b
lock”
.
D
C
n
d
n
.
a
nd
r
tto
KT‐6101SmartIOControllerUM 10
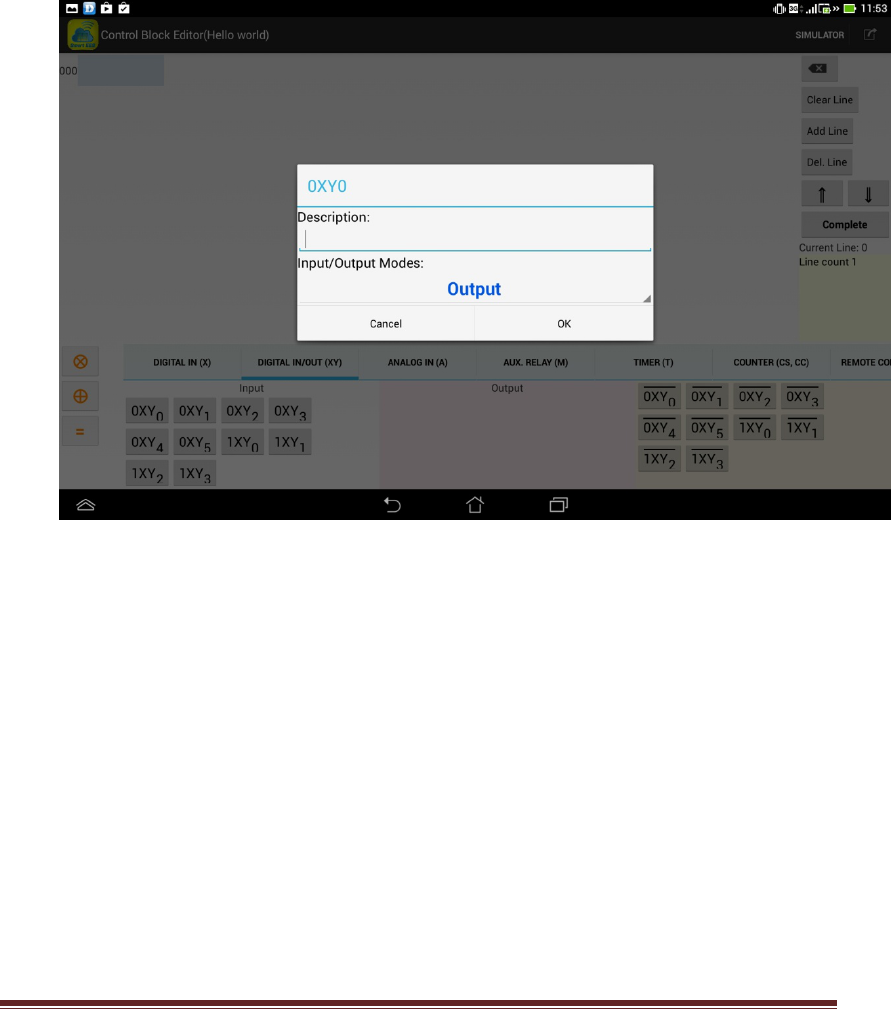
(5.3) Youcanstarttoedityourfirstcontrolblockprogram“Helloworld”
(5.3.1) TheControlBlockEditorisasfollowing:
Whereyoucanpressthebuttonsatthe“CommandPanel”toeditthe
controlblockprogram,like“AddLine”toaddanewprogramlineor
“DelLine”.Alineofthecontrolblockprogramiscomposedof
operandsandoperators.Pleaseclickthe“Operators”and“Operands”
panelstoselecttherequiredcomponents.
CommandPanel
OperandsOperators
KT‐6101SmartIOControllerUM 11
(5.3.2) ConfiguretwoDIOports(DIO0andDIO1)toDigitalOutput:
Clickonthe“DIGITALIN/OUT(XY)”,youcanseealltheDIOsare
configuredasInputsasdefault.
0XY0,0XY1,0XY2,0XY3,0XY4,0XY5,1XY0,1XY1,1XY2,1XY3arealllisted
atthe“Input”column.
Long‐pressthe“0XY0”untilthefollowingdialogwindowpop‐up:
Changeitto“Output”andclick“OK”.
(Note:“Long‐press“meanstotouchonthecomponentfor1to2
seconds;while,“Click”or“Short‐press”meanstoquicklytouchthe
componentsfor0.5secondorshorter.)
Long‐pressthe“0XY1”andchangeitto“Output”andclick“OK”.
Then,youcanseethe“DIGITALIN/OUT(XY)”asfollowing:
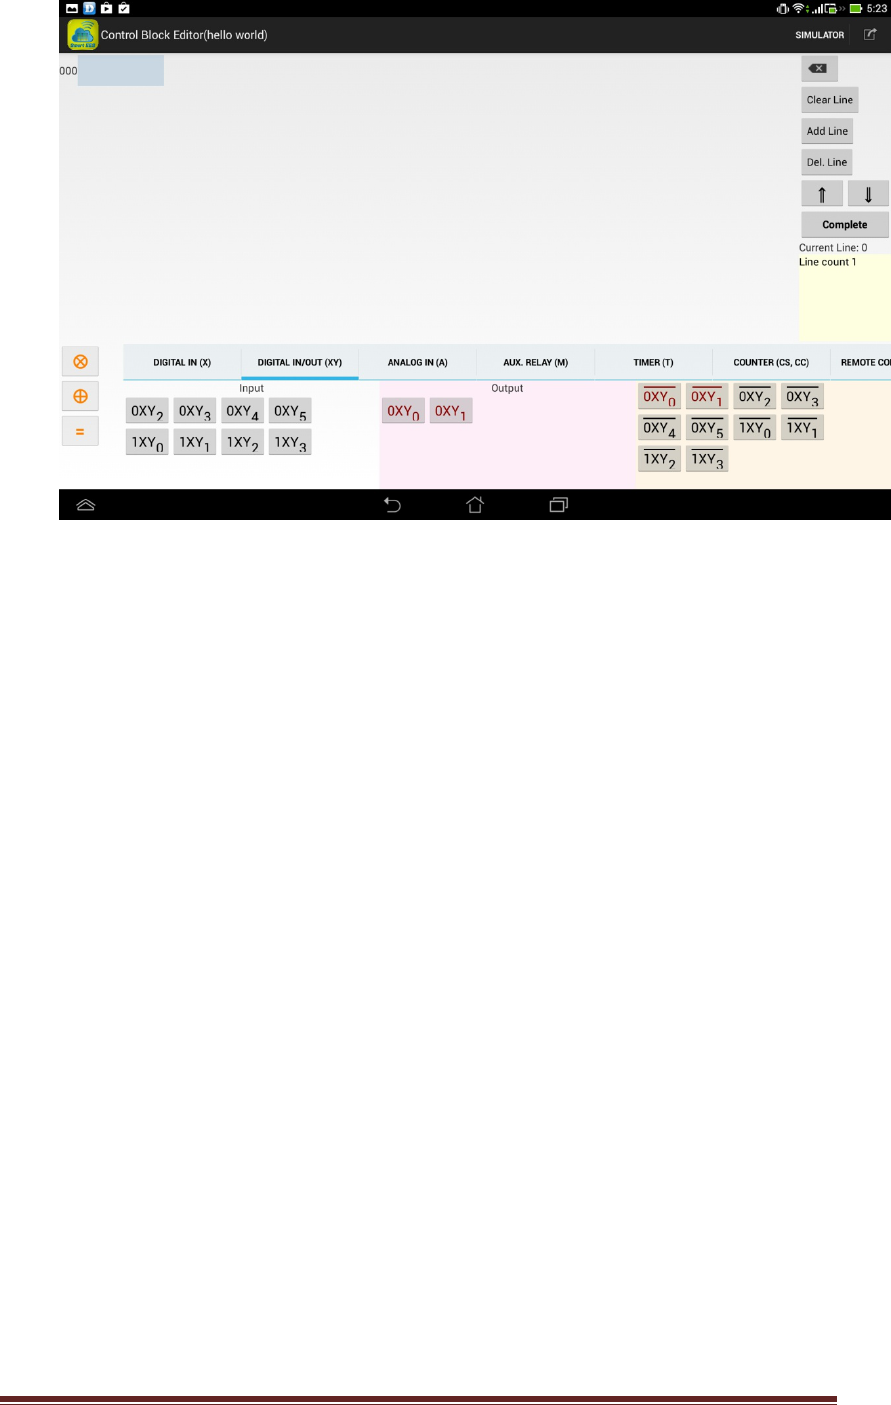
KT‐6101SmartIOControllerUM 12
Boththe0XY0and0XY1arenowconfiguredas“Output”ports.
(5.3.3) Enterthefollowingprogram
0X0 = 0XY0
0X0 = CS0
0X1 = CC0
CS0 = 0XY1
(Note: once a DIO port is configured as OUTPUT, its color will be
changed from black to red.)
On program line 001, please short-press the CS0 to set the Count
Threshold as 5.

KT‐
6
6
101SmartI
CS
0
“Ye
sav
(No
(5.4) Up
d
Bac
an
d
cho
OController
A
fter editin
g
0
, you can
s”tothe“
S
edasthen
te:byrepl
y
d
atethepr
o
ktothem
a
d
pressthe
“
osetheco
n
UM
g
the abov
e
press“Co
m
S
aveCode
C
ameHello
w
y
ing“Save
A
o
gramtoth
a
inscreen,
p
“
Updatepr
o
n
trolblock
p
e
program
a
m
plete”and
C
onfirm?”d
w
orld(14??
?
A
s”,youcan
eSmartIO
p
leasefollo
w
o
gram”ico
n
p
rogramfo
r
a
nd setting
t
thesavet
h
ialog.The
c
?
?_??????
?
savethep
r
controller:
w
theproc
e
n
(asbelow
)
r
updating.
t
he thresh
o
h
eprogram
c
ontrolbloc
?
)(where?
r
ogramto
a
e
duresfro
m
)
ontheup
‐
o
ld value fo
r
byreplying
kprogram
i
isanumbe
r
a
newnam
e
m
(4.3)to(4
‐
rightcorn
e
13
r
i
s
r
).
e
.)
.5)
e
rto
KT‐6101SmartIOControllerUM 14
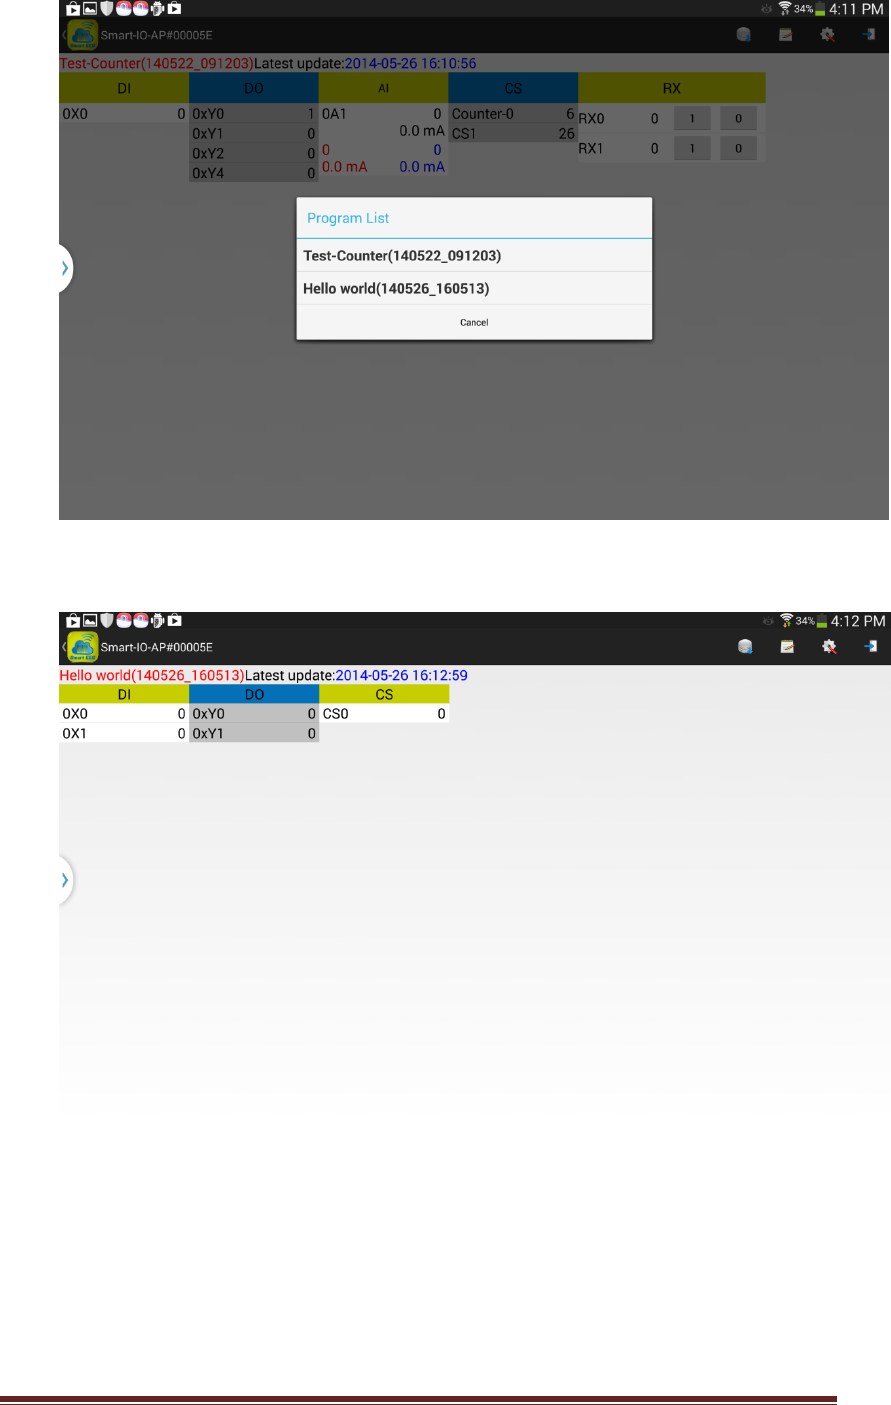
Selecttheprogram(Helloworld)andconfirmtoupdate.Then,youwillsee
thefollowingreal‐timedisplayoftheresources
Now,youcanstarttopushtheSet_BTNandmonitorthevalueofDI,DOand
CS(counter)ontheabovescreen.
KT‐
6
6.
To
e
con
to
a
gat
e
Ple
a
z
z
z
z
z
(6
6
101SmartI
UsetheK‐
C
e
nablethe
K
nectedtot
a
nEthernet
e
wayorSO
H
a
sefollowt
z
Create
a
z
Adda
m
z
Assign
t
z
Adda
c
z
Useclo
.1) Cre
a
Bac
k
and
cont
Not
e
the
S
DHC
OController
C
loudservi
c
K
‐Cloudser
v
heK‐Cloud
portwhich
H
Orouter
w
heproced
u
a
company
m
emberac
c
t
hepermis
s
c
loudremo
t
udremote
a
teacomp
a
k
tothemai
pressthe“
S
rolle
r
.
e
1:Ethern
e
S
OHOrout
e
P;howeve
r,
UM
c
e:
v
ice,youm
serviceyet
isableto
c
w
ithsevera
l
u
reslistedb
cloudspac
e
c
ount
s
ionrights
t
t
einput(R
X
control
a
nyclouds
p
nscreen,p
S
ystemSet
t
e
tSettingis
e
rorIntran
e
r,
youcanc
h
ustprepar
e
.And,you
m
c
onnectto
t
l
Ethernets
elowtous
e
e
andthec
o
t
othemem
X
)tothesi
m
p
aceandt
h
leasefollo
w
t
ing”icon(
a
waythatt
h
e
tintheco
m
h
angethes
e
e
aSmartI
O
m
ustconn
e
t
heInterne
t
wichports.
e
theK‐Clo
u
o
mpanyad
beraccoun
t
m
ple“Hello
w
h
ecompan
y
w
theproce
d
a
sbelow)t
o
h
eSmartIO
m
pan
y
.Itis
e
ttingifiti
s
O
controller
e
cttheSma
r
t
.(Say,ani
n
)
u
dservice:
ministrator
t
w
orld”pro
g
y
administr
a
d
uresfrom
o
configure
controller
generally
c
s
setasast
a
whichhas
r
tIOcontr
o
n
ternet
account
g
ram
a
toraccou
n
(4.3)to(4.
5
theSmart
I
isconnect
e
c
onfigured
a
a
ticIP.
15
not
o
ller
n
t:
5
)
I
O
e
dto
a
s

KT‐6101SmartIOControllerUM 16
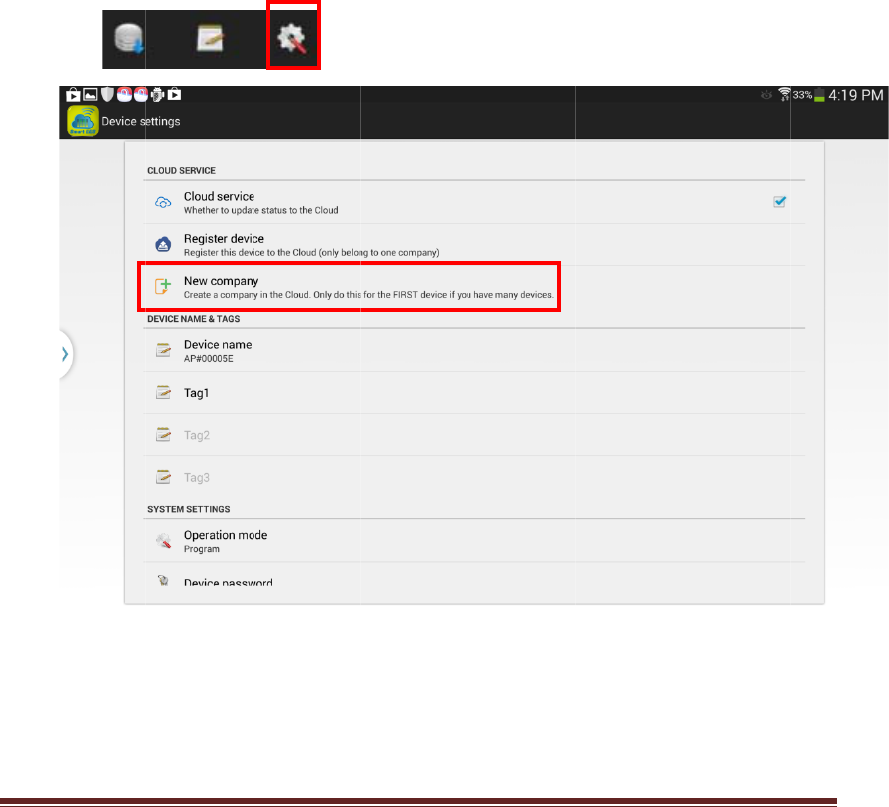
Pleasecheckthe“Cloudservice”andclickthe“NewCompany”atthe
CloudService.Then,youwillbeaskedtoentermoreinformationforthe
newcomapany.
Asshowninthescreenshot,wecreateanewcompanycalled“democloud”
withanadministratoraccountwiththeemail“demoadmin@gmail.com”.
Pleasetypeinyourowncompanynameandyouremailaddressasthe
administratoraccount.ItissuggestedtouseaGmailaccount;however,itis
notnecessaryaslongasyouprovideavalidemailaddress.AgentNumber
isoptional.YourdistributororagentfortheSmartIOcontrollerwill
providetheAgentNumbertoyou.Press“Signup”andwaitforafew
secondsandyouwillgeta“OperationSuccess”confirmation.Now,you
havesuccessfullycreatedacompanyspaceandanadministratoraccount
attheK‐Cloudservice.
Backtothemainscreenandclickthe“CloudService”tousetheK‐Cloud
service.First,youmustloginusingtheadministratoraccountcreatedpreviously.

KT‐6101SmartIOControllerUM 17
Youwillseetheasummaryscreen“Devices(Cloud)"whichdisplaysallthe
devicesthatbelongtothecompanycloudspace.Atthismoment,thereis
onlyoneSmartIOcontroller.
Clickonthe“Smart‐IO‐AP#00005E”line,youwillseeareal‐timedisplayof
thestatusupdateofSmartIOasfollowing.

KT‐
6
(6
6
101SmartI
.2) Add
Ina
d
crea
t
ope
r
adm
(6.2.
man
Plea
s
You
w
OController
amember
d
ditiontot
h
t
esomem
e
r
ationper
m
inistrator.
H
1)Backto
t
age”icon.
s
eclickthe
w
illbeask
e
UM
account.
h
eprevilieg
e
mberacco
m
issionofth
H
ereareth
e
t
hecloud
m
Newuseri
c
e
dtoprovid
edadminis
t
untsforth
e
emember
e
steps:
m
ainpage(D
c
ononthe
etheinfor
m
t
ratoracco
u
e
otherme
m
accountca
n
evices(Clo
u
upperrigh
t
m
ationfor
t
u
nt,youm
a
m
bersinth
e
n
beassign
e
u
d)),clicko
n
t
corneras
b
t
henewm
e
a
ywantto
e
company.
e
dbythe
n
the“Acco
u
b
elow:
e
mberacco
u
18
The
u
nt
u
nt.

KT‐6101SmartIOControllerUM 19
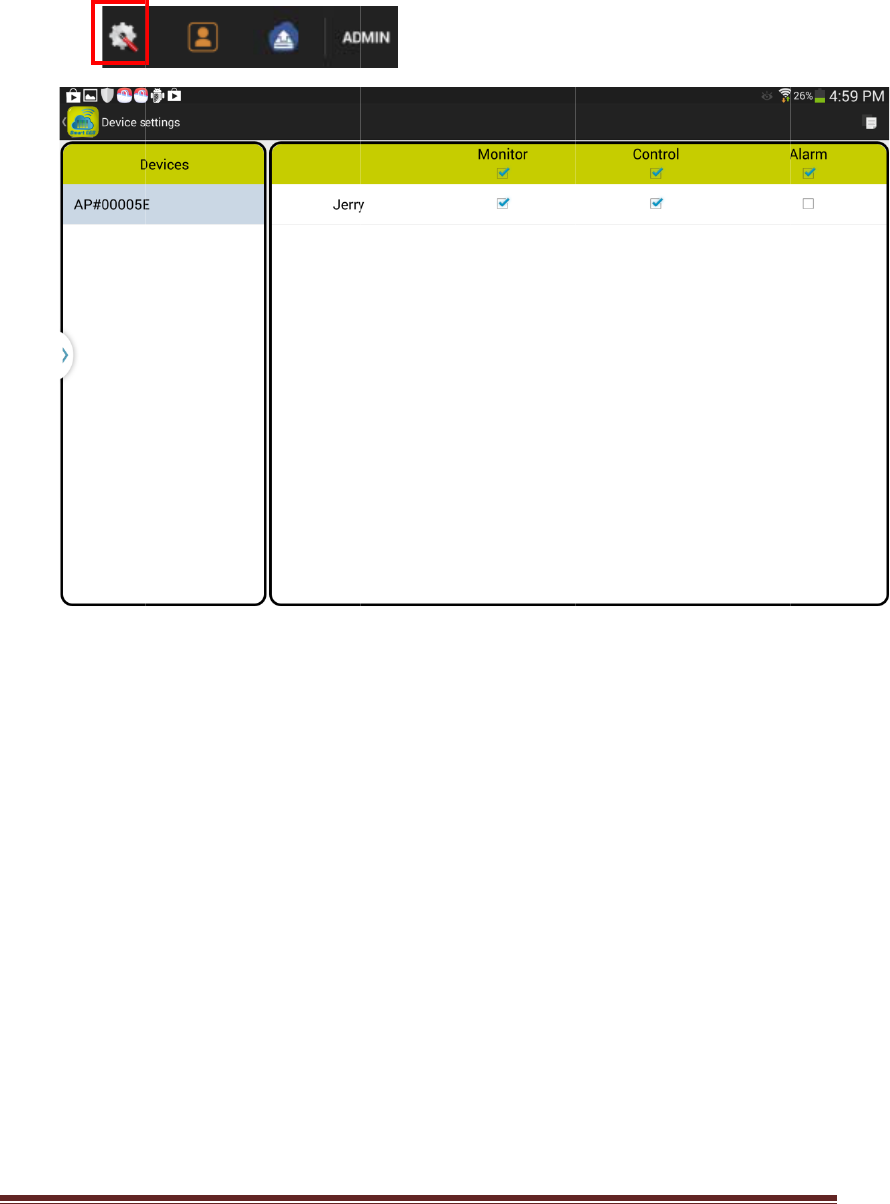
Here,inthisdemostration,wecreateanewmemberaccount:
member1@gmail.com(Jerry)fortheCompanydemocloud.Pleaseadd
yourownmemberaccountforyourcompany.Notethat,asan
administrator,youmustassignapasswordforthethememberaccount.
However,asthememberlogintothesystemforthefirsttime,he/shewill
beaskedtochangethepasswordthen.
Theaccountmanagementscreenwillshowthe2accountsasbelow:
KT‐
6
(6
(6
6
101SmartI
.3) Con
f
Bac
k
belo
Ass
h
tot
h
stat
u
“Jer
r
rem
o
.4) Add
Bac
k
“Hel
follo
RX
0
The
n
OController
f
igurethe
p
k
totheClo
u
w)toconfi
g
h
ownbelo
w
h
emember
The“Moni
u
sfortheS
m
r
y”tosend
o
teinput(
R
acloudre
m
k
tothemai
loworld”p
winglinet
o
= CC
0
n
thenew
p
UM
p
ermission
r
u
dsummar
y
g
urethep
e
w
,weassig
n
account“J
e
tor”permi
s
m
artIOco
n
aon/offco
R
X)toshow
m
oteinput
nscreena
n
rogramfile
o
theorgin
a
p
rogramisa
r
ightstoth
y
screen,pl
e
rmissionri
g
n
the“Moni
e
rry”.
Settin
s
sionprovi
d
n
troller.An
d
mmandto
t
the“Contr
o
(RX)tothe
n
dclickthe
andchoos
e
a
lprogram
(
sbelow:
emember
easeclick
o
g
htsforthe
tor”and“
C
gs
d
es“Jerry”
t
d
,the“Con
t
t
heSIOcon
o
l”functio
n
“Hellowo
r
“Program
E
e
to“Edit”
t
(
5.3.3):
account.
o
nthe“Set
t
membera
c
C
ontrol”pe
r
t
herightto
t
rol”permi
s
troller.We
n
onthene
x
r
ld”progra
m
E
diting”.Lo
n
t
heprogra
m
t
ings”icon(
ccount.
r
missionrig
monitorth
s
sionallow
s
willuseac
x
tsection.
m
n
g‐pressth
e
m
.Thenad
d
20
as
hts
e
s
loud
e
d
the

KT‐6101SmartIOControllerUM 21
RX0isacloudremoteinputfortheSmartIOcontroller.Itallowstheend‐user
tosendtheon/offcommandtochangethestatusofthevirtualinputofthe
controller.ThecommandisissuedfromtheAPPandforwardedbytheK‐Cloud
servicetoreachtheSmartIOcontroller.
Pleasefollowtheprocedureson(5.4)toupdatethenewcodethetheSmartIO
controllerandyoucanseethereal‐timedisplayasfollowing:
Anewcomponent,RX0,isshownonthescreen.Youcanchangethestatusof
KT‐
6
(6
6
101SmartI
RX0byp
u
localWi‐
F
long‐dista
.5) Use
Backtot
h
administr
a
screen.
Then,cli
c
Pleaselo
g
member
a
OController
u
shingthe
1
F
iremotec
o
ncecloud
r
cloudrem
o
h
emainscr
e
a
toraccou
n
c
ktheLogo
g
inagainwi
a
ccountyo
u
UM
1
or0butto
n
o
ntrol.On
r
emotecon
t
o
tecontrol
e
en,clicko
n
n
tbyclickin
utbutton:
ththefoll
o
u
justcreat
e
n
ofRX
0
.T
h
thenexts
e
t
roloverth
n
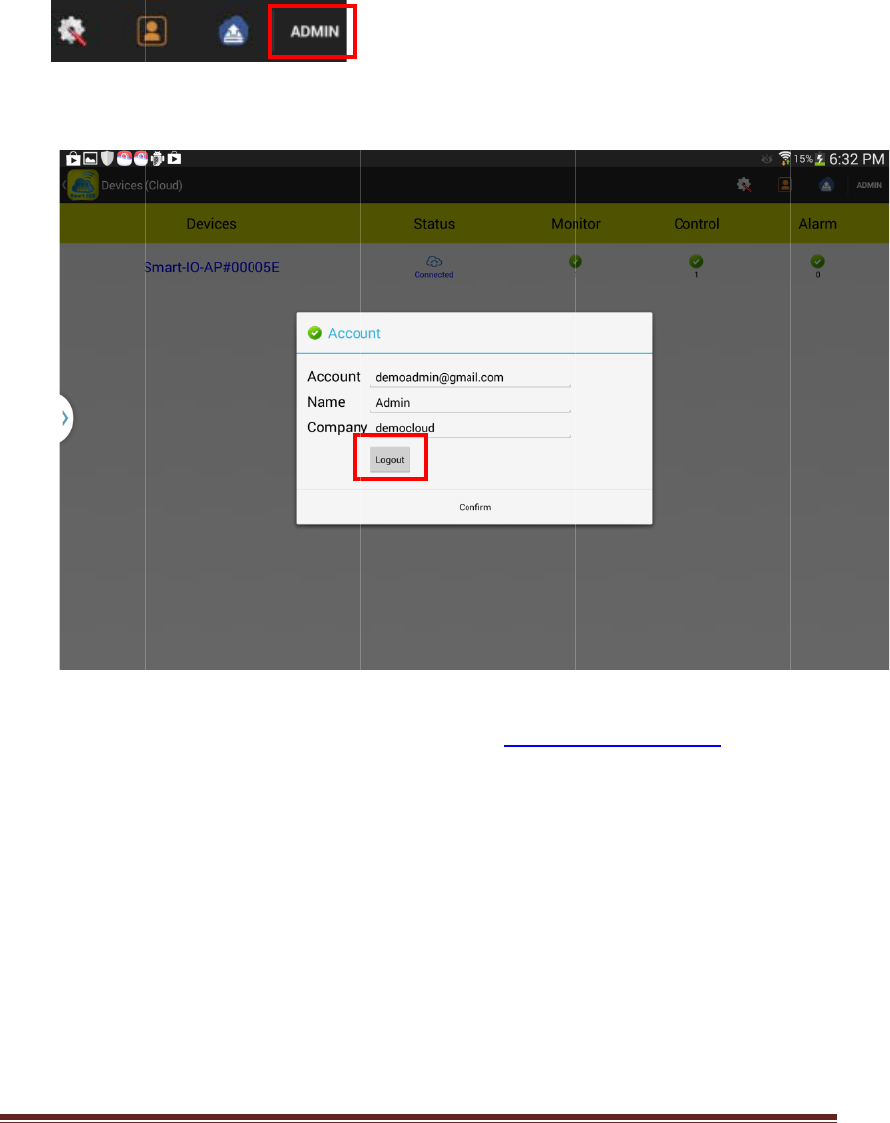
the“Clou
d
gontheA
D
o
wingacco
u
e
donSec.(
6
h
isis,how
e
e
ction,we
w
eInternet.
d
Service”.
P
D
MINonth
e
u
nt:memb
e
6
.2)).
e
ver,justa
s
w
illperfor
m
P
leaselogo
e
upperrig
h
e
r1@gmail.
c
s
hort‐dista
n
m
a
ut
f
romth
e
h
tcornero
f
c
om(The“
J
22
n
ce
e
f
the
J
erry”

KT‐6101SmartIOControllerUM 23
Youwillbeaskedtoactivateanewpasswordasfollowing:
Pleasetype‐inanewpasswordandconfirmagain.
YouarenowloggingasthememberJerry.
YoucanclicktheSmart‐IO‐AP#00005EtogettheCloudstatusupdateanddo
remotecontrolbypressingthe1/0buttonofRX0

KT‐6101SmartIOControllerUM 24
ItisaremotecontrolfromtheInternet,soyoucangototheplacefarfromthe
Wi‐FicoverageoftheSmartIOcontrollerandresetthecounterCS0andturnoff
theLED2fortheexampleonsection5.

KT‐6101SmartIOControllerUM 25
Federal Communications Commission
NOTE: This equipment has been tested and found to comply with the limits
for a Class A digital device, pursuant to part 15 of the FCC Rules. These limits
are designed to pro-vide reasonable protection against harmful interference
when the equipment is operate din a commercial environment. This
equipment generates, uses, and can radiate radiofrequency energy and, if
not installed and used in accordance with the instruction manual, may cause
harmful interference to radio communications. Operation of this equipment
in a residential area is likely to cause harmful interference in which case the
user will be required to correct the interference at his own expense.
FCC Caution: Any changes or modifications not expressly approved by the
party responsible for compliance could void the user's authority to operate
this equipment.
This device complies with part 15 of the FCC Rules.
Operation is subject to the following two conditions:
(1) This device may not cause harmful interference, and
(2) this device must accept any interference received, including interference
that may cause undesired operation.
Professionalinstalleddevicemustnotbedistributedthroughretailstore.
Radiation Exposure Statement:
ThisequipmentcomplieswithFCCradiationexposurelimitssetforthforan
uncontrolledenvironment.Thisequipmentshouldbeinstalledandoperatedwith
minimumdistance20cmbetweentheradiator&yourbody.

KT‐6101SmartIOControllerUM 26
壁掛示意圖
○
1.
○
2.

KT‐6101SmartIOControllerUM 27
○
3.