Ki Ryung Electronics KT-SR2000 Digital Satellite Radio with FM Transmitter User Manual
Ki Ryung Electronics Co., Ltd. Digital Satellite Radio with FM Transmitter
Users Manual

JVC
KT-SR2000
Draft manual
Jun. 15, 2004
2
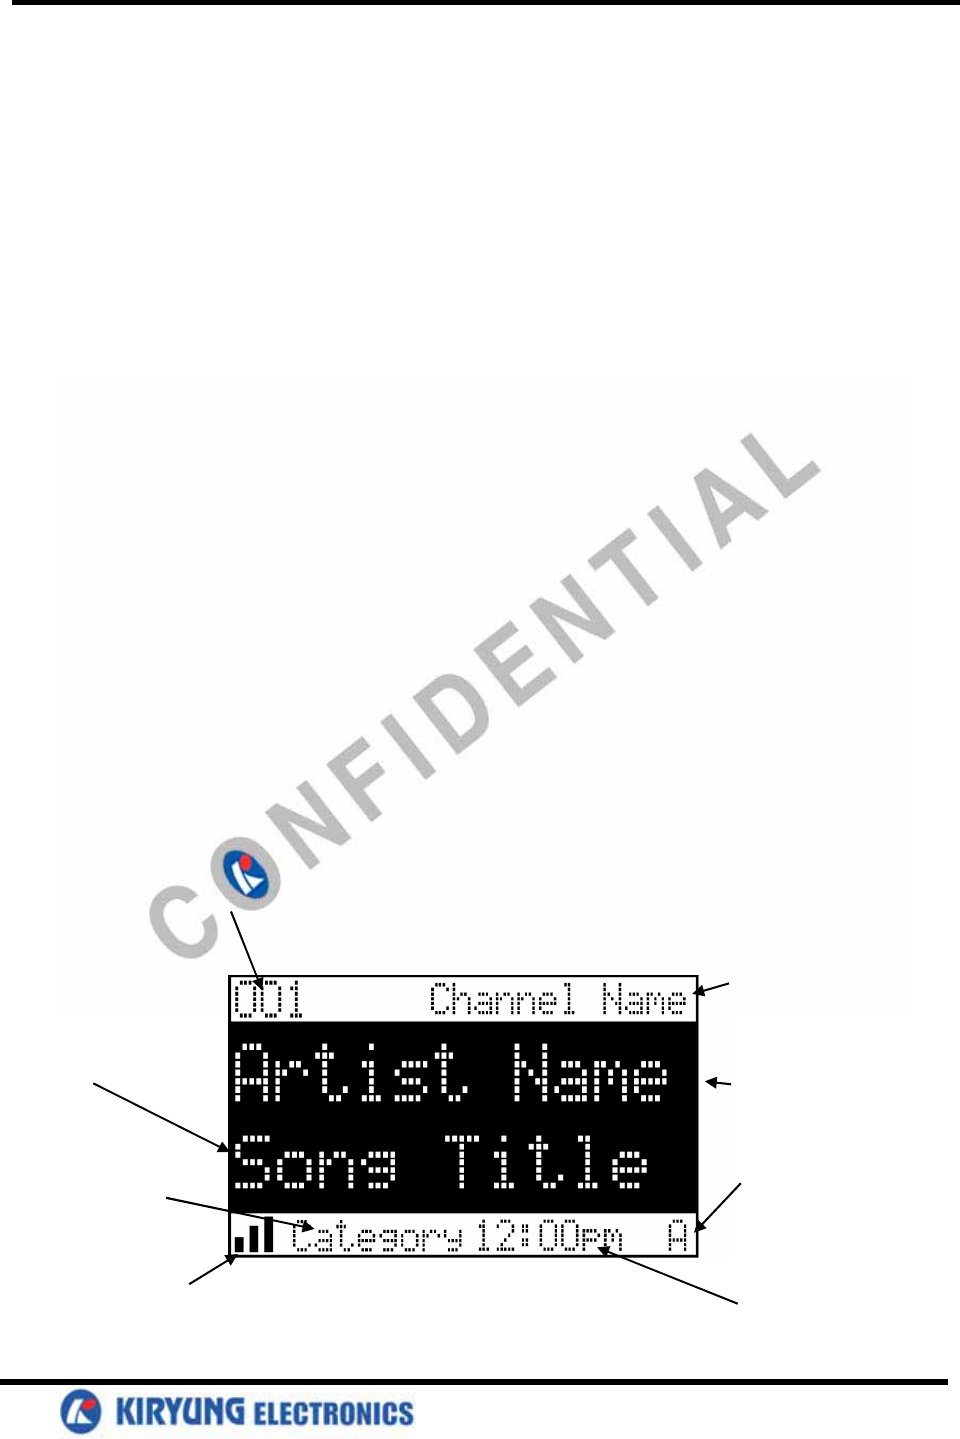
3-DIGIT STREAM NUMBER
8-CHARACTER
CATEGORY NAME
AUTO SIZING/SCROLLING
SONG TITLE AUTO SIZING/SCROLLING
ARTIST NAME
STREAM NAME
BAND/PRESET BANK
NUMBER
CLOCK
SIGNAL STRENGTH
INDICATOR Default LCD Display

3
Front Button description
Channel up/down button and Select Button:
The Channel up/down key is the primary control for navigating through the various lists and option
menus available on the unit. In the default mode, the Channel up/down key provides sequential tuning
through the available program streams. Press Channel up button is tunes up one stream-per-detent, while
Press Channel down button is tunes down one stream-per-detent. When in the list mode, pressing on the
Channel up/down button is scrolls down and up, respectively, through the various menus and lists. The
current selection from the list will be highlighted on the display. When the item is highlighted, press the
Select Button to enter the selection. Pressing and holding the Select button will tune to the previously
selected stream.
Category Buttons:
The Up or Down category buttons allows the user to advance through the stream groups based on content
category. By pressing the Channel up/down button, the user can then scroll up or down through the
streams within that category. Once a choice has been made, it can be entered by pressing the Select
Button.
Memory (MEMO) Button (S-SEEK Function):
This feature allows the user to capture and store the current program data information (Stream Name &
Number/ Artist & Song title). You can store up to 20 Artist/Song Title combinations. The Shuttle also has
the capability to search the current incoming Sirius signal, and thereby alert you if it matches the
Artist/Song title stored in Shuttle memory.
Display (DISP) Button:
This button allows the user to choose one of several ways of presenting the Stream Name, Artist and Song
title information on the LCD screen.
Menu (MENU) Button:
The MENU Button is used to access Menu Options which displays the user setup menu, plus other
feature/ function adjustments.
BAND Button (BAND)/Preset Tune (P. TUNE):
Each momentary press of the BAND Button allows the user to switch between 3 bands of Stream presets
(10 presets each A, B and C). Pressing and holding the BAND Button for 2 seconds initiates preset tuning
that will display and tune all stored preset streams in sequence. This is indicated by the reverse image of
the stream number and band preset number on the display. Pre-set tuning continues until the user decides
to terminate this function by pressing and holding the BAND Button for 2 seconds.
Keypad Buttons 1-6:
These buttons are used to directly enter a desired stream number. They are also used when entering and
recalling preset stream numbers into memory.
4
Basic Operation
With the unit properly installed, activated and connected to your home or vehicle audio system, proceed
as follows:
1. Press the Power button; the Shuttle turns on and the Sirius logo appears for 2 seconds
followed by the default display for the stream and tuning mode in effect prior to turnoff.
2. Press Channel up/down button to select and play the desired stream, or use the Category
Up/Down buttons to tune and select a desired stream based on genre.
Tuning By Category
When in Category Tuning Mode, each momentary press of the Category Up/Down Button(s) advances
through the available Genres:
1. Using the Channel up/down button, select the desired stream.
2. Press the Select button to select that stream.
3. Once the stream has been selected, the unit will revert to the default screen and your selection
will be played.
Content Listing Options (Look Ahead)
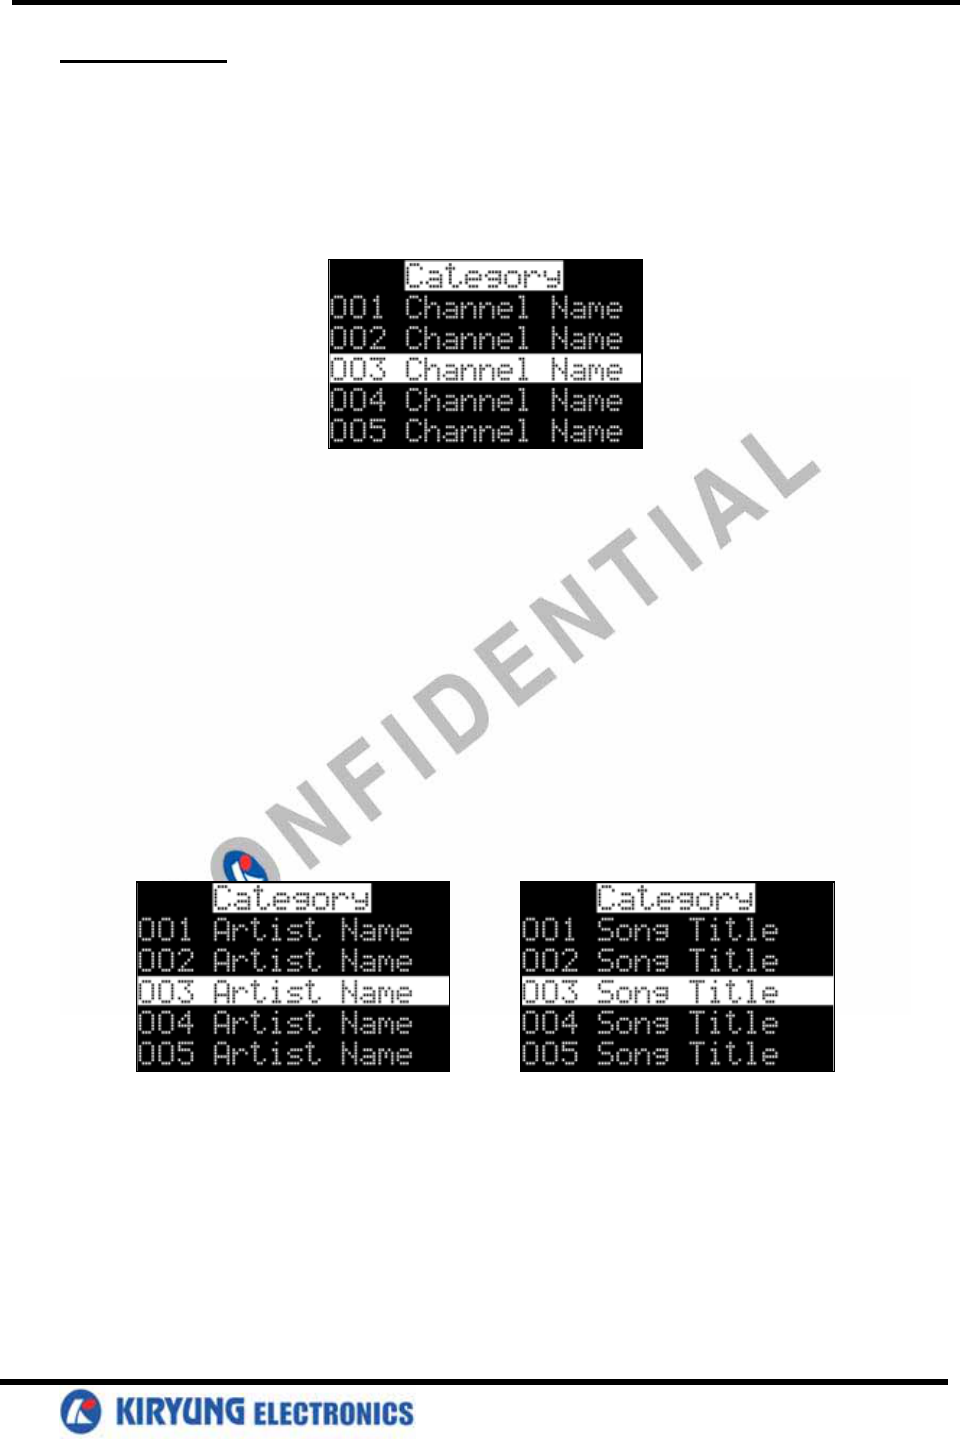
This feature allows you to view what is playing on other streams without having to change the current
stream you are listening to. The content listing options are selected by using the DISP button. When the
default screen is displayed on the LCD, pressing and holding the DISP Button will display all the
available stream numbers and stream names. The second press of the DISP button will display all
currently available artists. The third press of the DISP button will display song titles. While in the
Category List menu, pressing the DISP button changes Stream List to Artist List. The available content
listing now displays information by the Artist Name.
The DISP button is also used during category tuning. Consecutively pressing the DISP button while
tuning by category will display the Stream Name, Artist Name or Song Title within the selected category.
While the preceding screens are displayed, pressing Channel up/down button allows navigation through
the list. When the desired selection is highlighted, press the Select button and your selection will be
played.
Direct Tuning
Streams can also be directly accessed by pressing the Select (remote control)button and using the 1-6
number keys to numerically enter the desired stream. Once the desired stream number has been entered,
press the Select button again to play.
5
Setting/Using Stream Preset Buttons
The unit contains 10 preset buttons. There are three banks of preset memory locations offering a total of
30 presets. These banks are designated A, B and C and can be selected using the BAND button. The
display in the lower right hand side changes to show the corresponding Preset bank. Each bank will store
10 user-preferred streams. Select the desired stream you wish to save into memory by using the Channel
up/down button, the direct tuning method or the category tuning method. With the desired stream playing,
press and hold any of the numbered keypad buttons or remote control buttons (0-9); the corresponding
preset number will flash. A confirmation tone is heard, confirming that the preset has been stored.
Continue this procedure for storing all desired streams. To retrieve a preset stream, momentarily press and
release the number button corresponding to the desired stream.
.
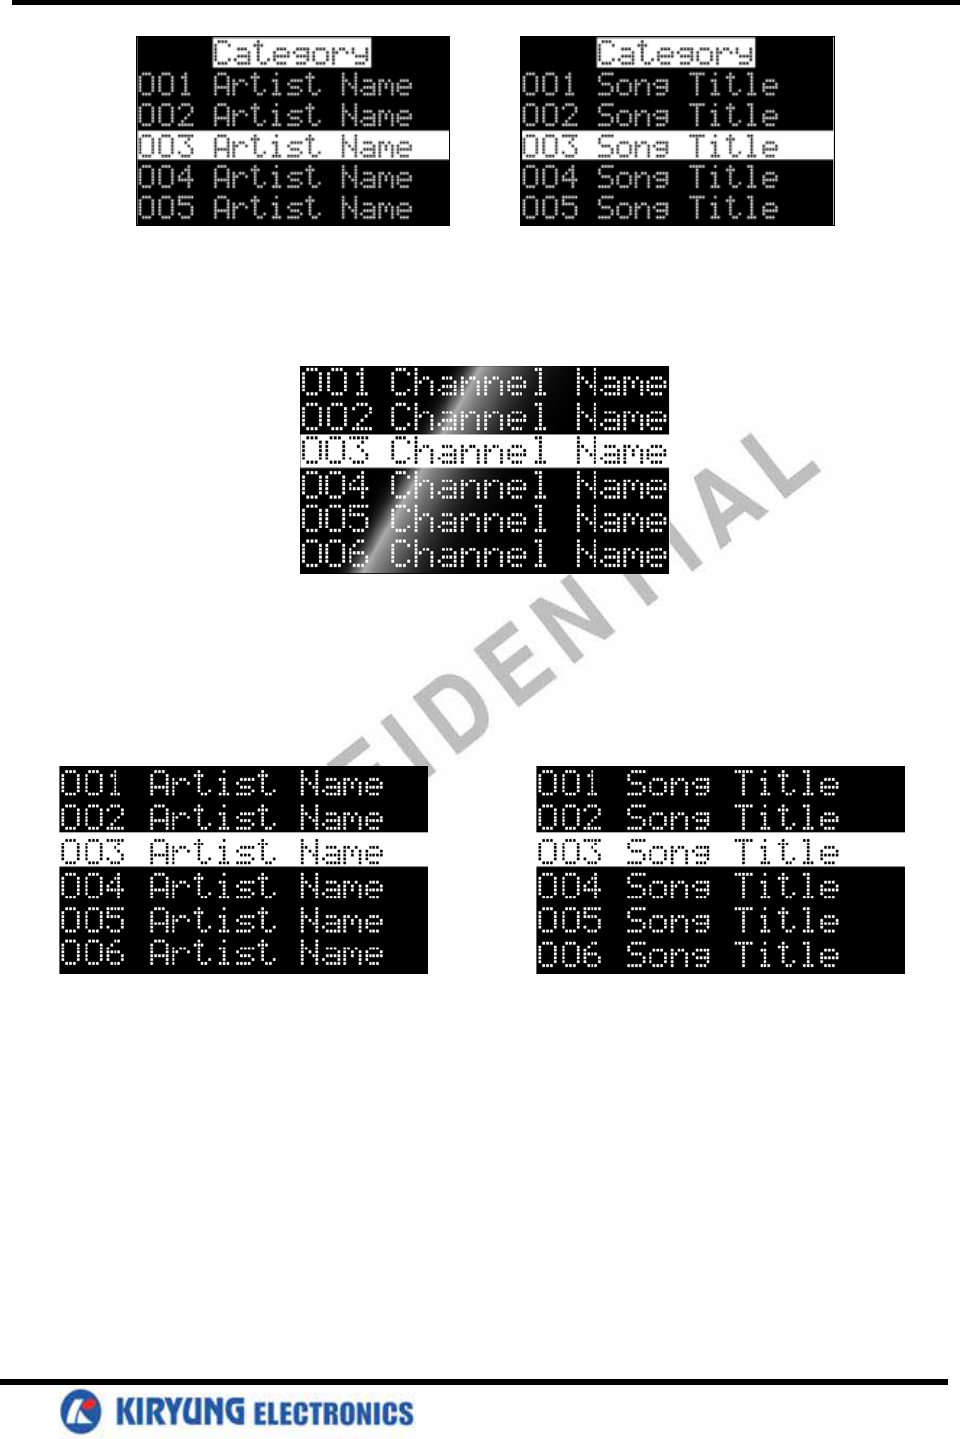
Preset List Mode
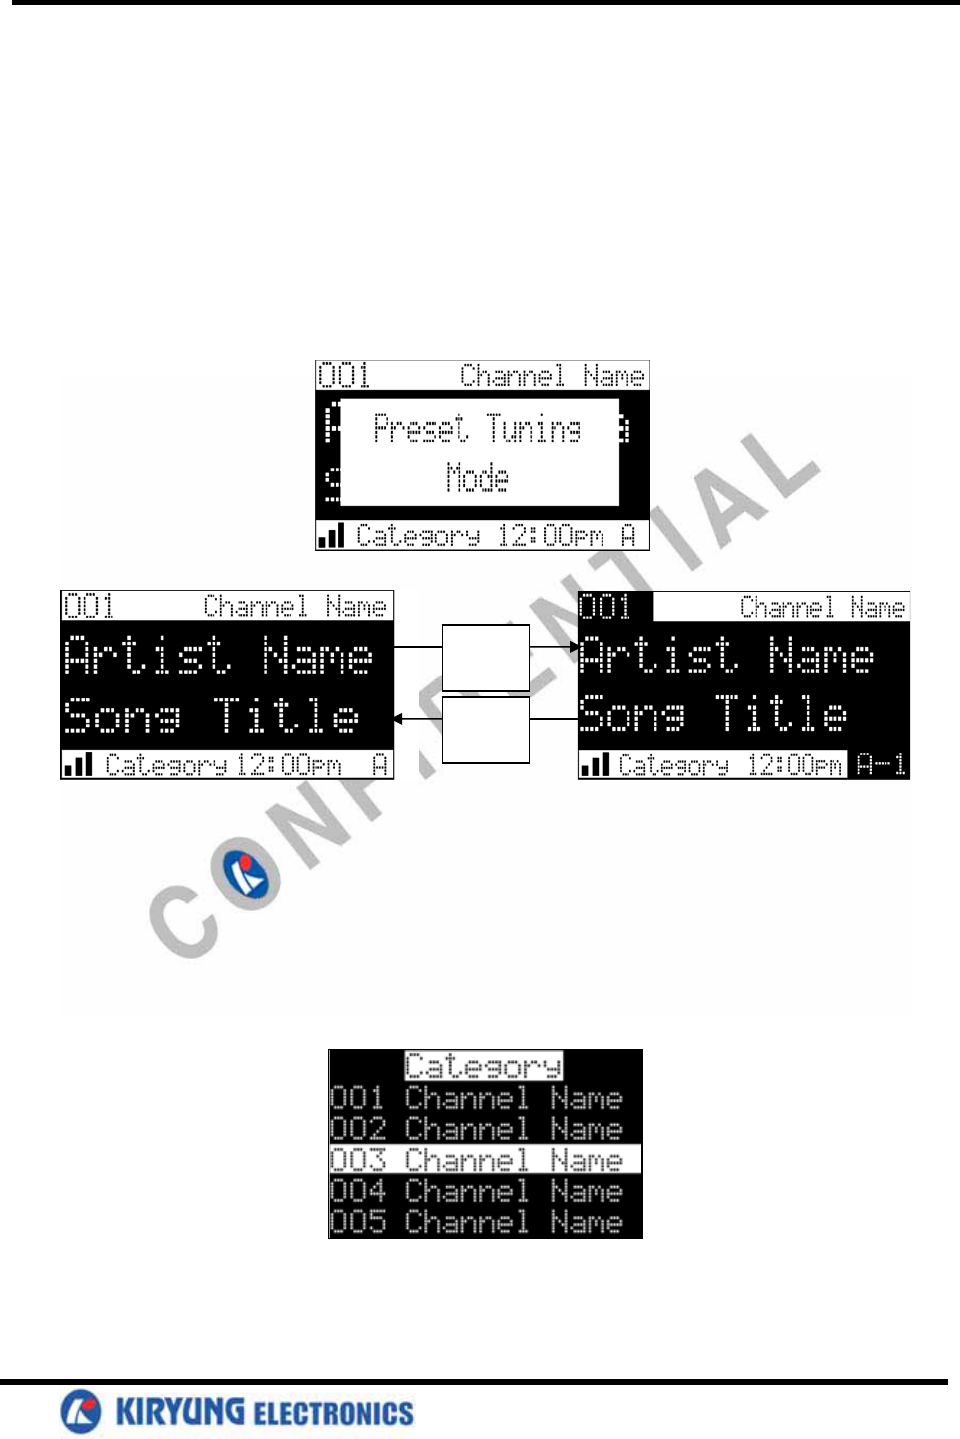
To search by list for a preset, press and hold the BAND button to enter Preset Tune mode. When in the
Preset Tune Mode, press and hold the DISP button for 2 seconds; this exits normal preset tuning and
enters a 6-line menu mode which displays the Preset number (A-1), a single space and the 20-character
stream name. While in the Preset List menu, pressing the DISP button once will change to Artist List; a
second press of the DISP button changes to Song List. While the contents of the preset listing are
displayed, press Channel up/down button to navigate through the list. When the desired selection is
highlighted, press the Select Button and the stream will be played.
Press and
Hold Band
Button
Press and
Hold Band
Button
6
Display Button
Pressing the Display button from the Default display toggles between the artist name/song title screen or
large letter format. When the letter size changes, the field will scroll. This feature is useful when viewing
the display at a distance.
NOTE: The field will scroll only if the length of the artist or title cannot be viewed in its entirety.
Pressing and holding the Display button will enter the stream list mode. While in the Stream List
mode, any subsequent press of the DISP button will display program information by Artist Name,
Song Title or stream name. Pressing and holding the DISP button will exit the Stream List mode
and return to the previously selected tuning/display mode.
Memory Button (S-Seek Function):
This feature allows the user to capture and store the current program data information (Artist & Song
title) with up to 20 listings (20 Artist/Song Title combinations). The unit also has the capability to search
the current incoming Sirius signal and alert the user when a saved song is being played.
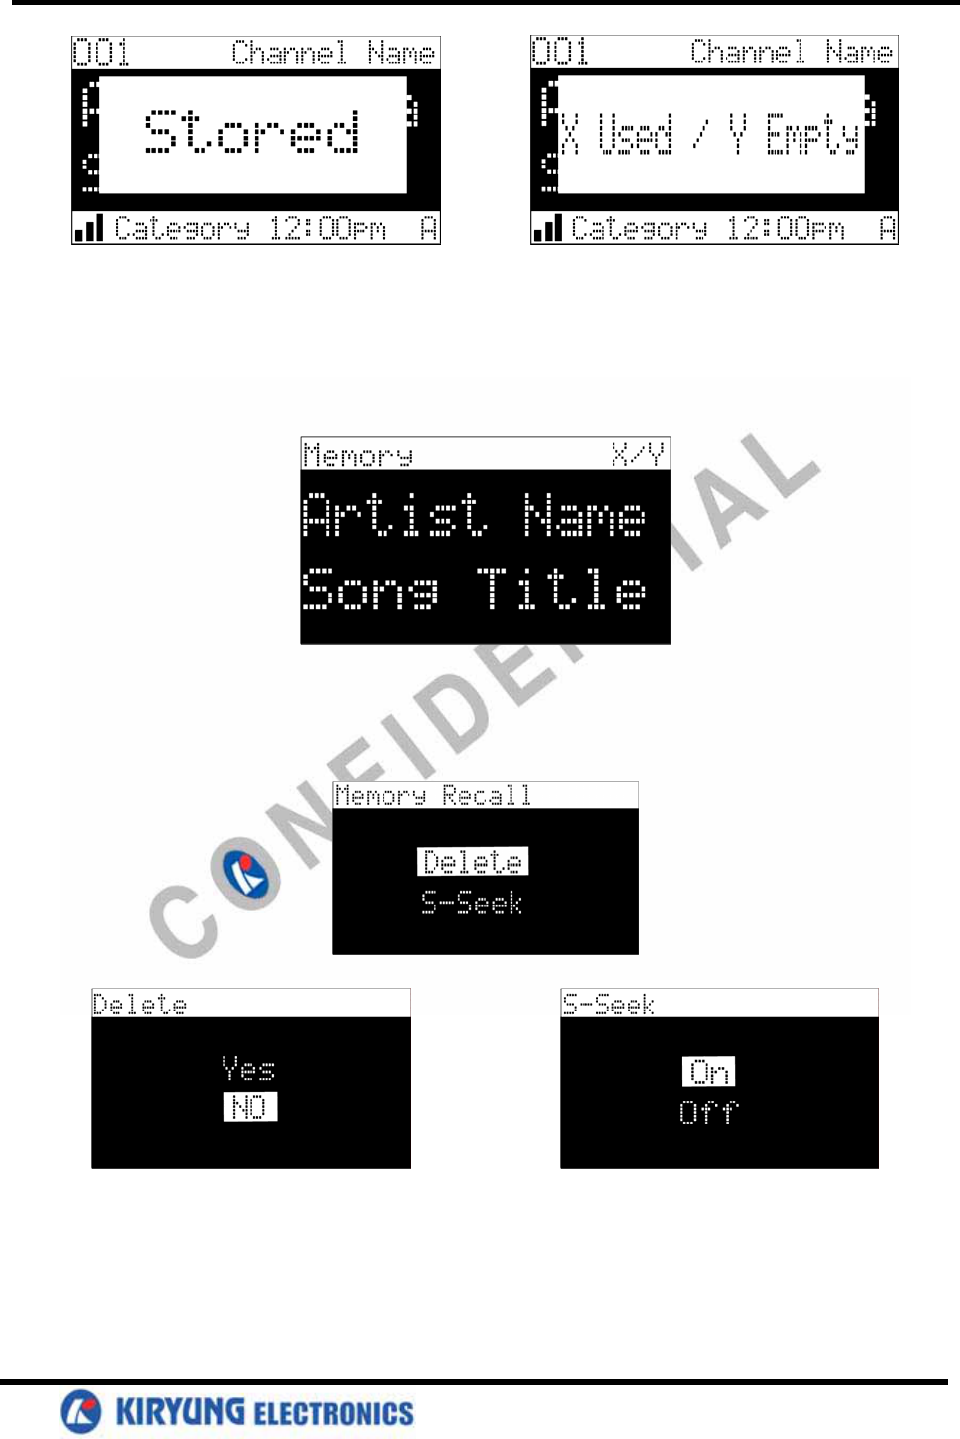
1. While the Shuttle is in either of the two standard display modes, momentarily pressing and
releasing the MEMO button stores the current program data information within the Shuttle s
memory. A Memory Stored pop-up screen, followed by X Used/ Y Empty will each
appear for 1 second.
7
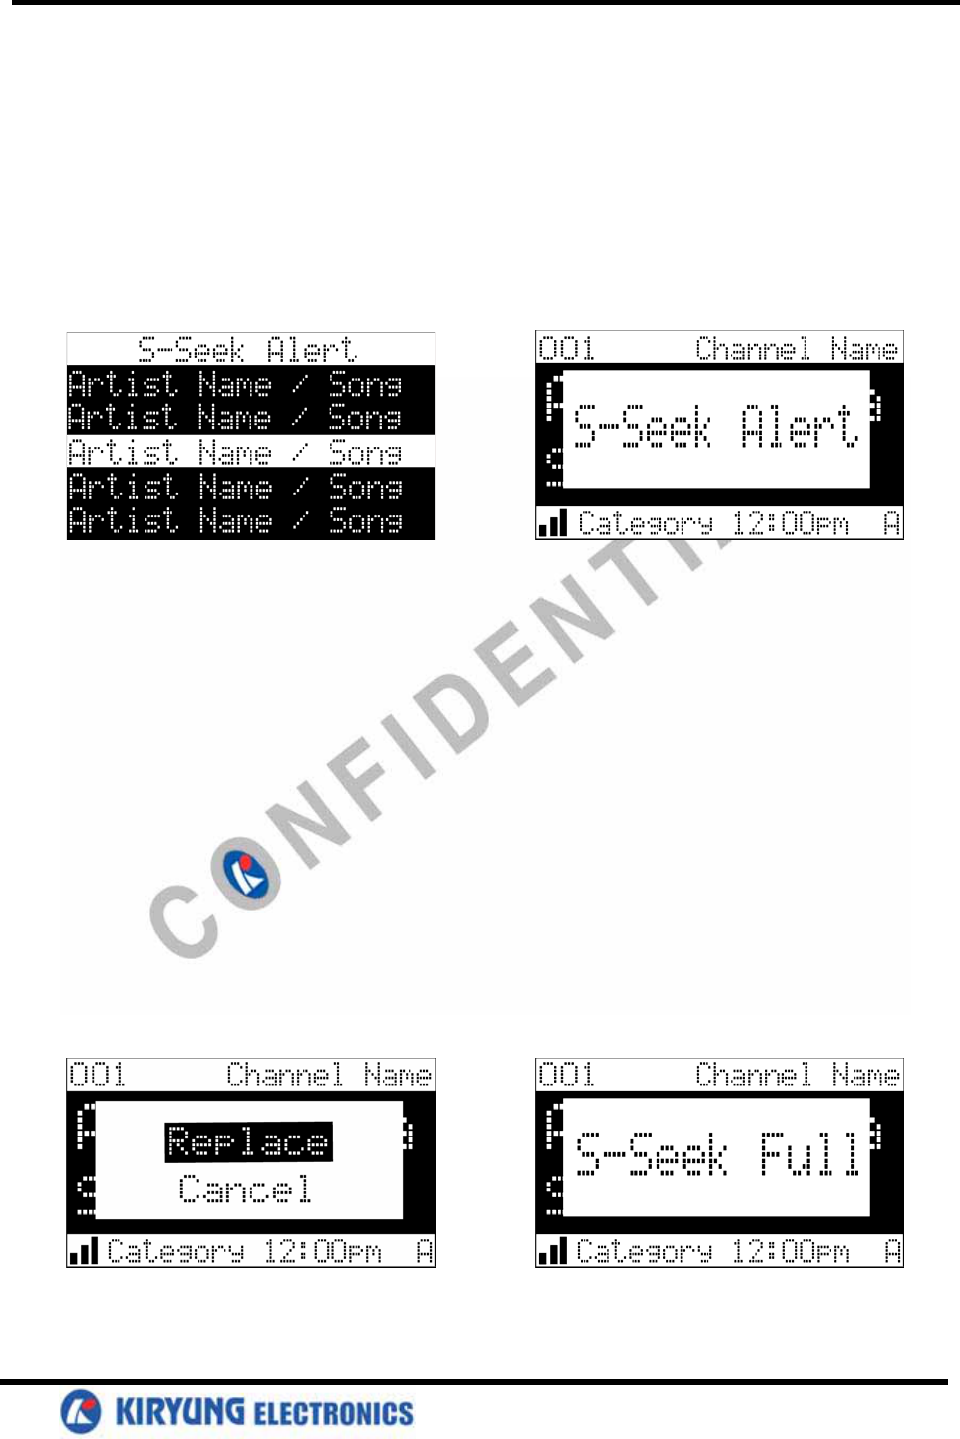
2. By holding down the MEMO button for 3 seconds, the stored memory information (one at a
time) is displayed on the LCD screen in page format. Use the Channel up/down button to scroll
through the 30-page listing and view the information. This function allows you to recall
information regarding the Artist/Song Title for your own personal review. To return to the
default tuning mode press and hold the MEMO button for 3 seconds.
3. Momentarily pressing the Select button while in memory recall mode results in a pop-up
screen displaying two selectable options:
Delete
S-Seek
Pressing the Channel up/down button highlights the options and pushing the knob selects the
option. The delete option allows the user to delete the currently featured artist/ song title
selection from S-Seek memory. The default setting is NO. If the YES option is chosen, the
currently featured Artist/ Song Title is deleted from S-Seek memory. The SSeek option allows
the user to turn the S-Seek function on or off. The default setting is S-Seek on. If the off option is
chosen, the user will not be alerted when a stored artist song title selection is currently playing.
8
Momentarily pressing the MEMO button will exit the current menu and return to the previous
menu.
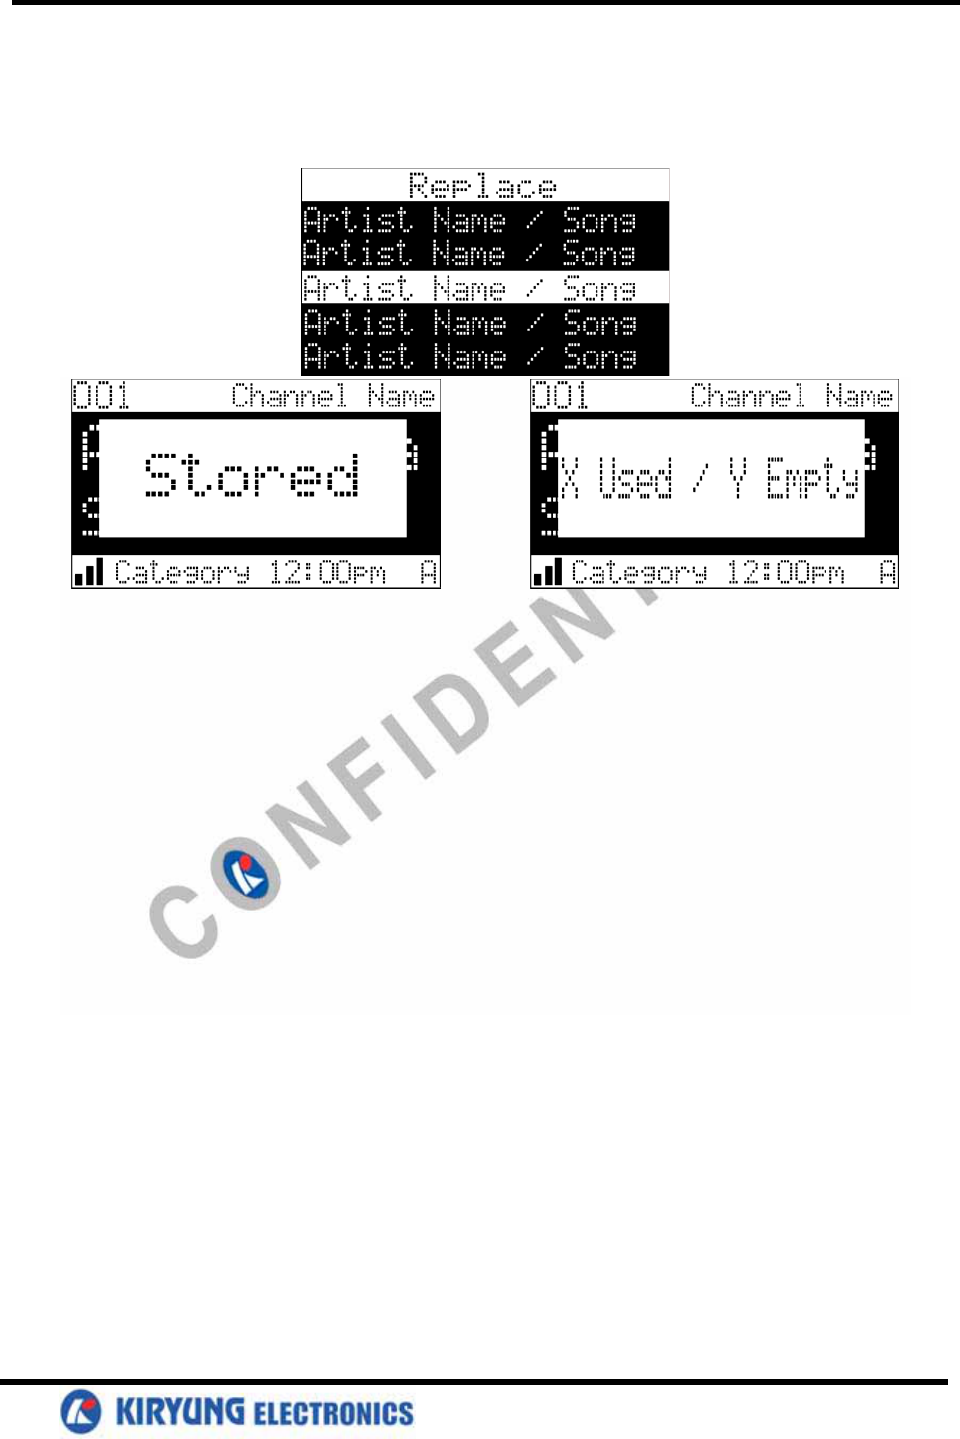
4. When the S-seek function is on each time the Shuttle is turned on, it automatically searches
the incoming signal to determine if a match exists between the signal and the currently saved
information stored in receiver memory. If one or more matches are found, pop-up screen
momentarily appears for 2 seconds and displays the Phrase S-Seek Alert. An audible beep tone
will be heard indicating that a match has been found. The display then reverts to the S-Seek
Alert screen which displays the current matches. You can now select the Artist/Song that you
wish to listen to.
No stored match alert is provided for the currently selected stream. To ensure that no duplicate
entries are stored in memory, the receiver will check the stored input data to ensure the
information about to be stored is not already in memory.
a. If one or more matches are found, a display list appears, and allows you to scroll through the
list of songs using the Channel up/down button. Once a song is found, it can be selected by
press ing the Select button, and the display will revert to either of the selected display modes.
b. If a selection is not chosen within 10 seconds after the last action, the screen will revert to
the previously selected display and tuning mode.
NOTE: Play of the current selection will continue until a new selection is made.
5. If the MEMO button is pressed to save a currently playing selection, and all of the memory
spaces are full, S-Seek Full will flash on the display for 1 second, followed by a pop-up screen
presenting the Replace-Cancel options. This prompt allows you to make the following
Replace/Cancel choices:
a. By selecting Replace, the memory list will appear, and you can use the Channel up/down
button to select the information that you would like to overwrite with the new Artist/Song Title.
9
After highlighting the selected title in the list, press the Select button to delete the stored Artist/
Song Title,and replace it with the updated information.
b. By selecting Cancel, the prompt screen would disappear and revert to the original screen.
Menu Display Operations
To enter the Menu Options page, press the MENU Button. The Menu Options list will appear on the
LCD display.
Using the Channel up/down button, highlight the option you wish to adjust and then press the Select
button. The following options are available:
Sirius ID
Display Settings
Confirm Tone Options
FM Transmitter Options
Add or Skip
Lock Options
Audio Level Options
Antenna Aiming
Memory Options
Time Based Features
Factory Default
If, while in the menu screen function, a button is not pressed within 10 seconds from the previously
selected function, the unit exits the menu screen function and reverts to the default screen display.
Sirius ID
Displays your 12 digit Sirius ID number. No adjustments are allowed in this mode. To exit this option,
press the Select button or Menu Button.
Display Settings

10
The following adjustments are possible:
Contrast Control
Dimming Control
Manual
Automatic
Font Type
To enter any of these modes, use the Channel up/down button to highlight the option you wish to adjust
and press the Select button. The automatic dimming function is enabled when Automatic is
selected. Also the automatic dimming function is disabled when Manual is selected.
Confirm Tone Options
The following adjustments are possible:
ON
OFF
Upon entering this option, press Channel up/down button to toggle between Tone On or Off. High light
the desired condition, and press the Select button to enter the tone On or Off function. When the tone is
enabled, a beep tone will sound each time the Power On/Off button or preset buttons are pressed.
FM Transmitter Options
The following adjustments are possible:
FM On/ Off
Frequency selection
To enter any of these modes, use the Channel up/down button to highlight the option you wish to
adjust and press the select button.
KT-SR2000 has a FM transmitter. FM transmitter is designed to operate on frequency in the 88.1~91.3
MHz range into 200KHz step.
The u-com in ST-SR2000 is tuning a selected FM frequency to car stereo. The selected frequency varies
as voltage and the voltage inputs to the RF OSC port of FM stereo transmitter IC (BH1415F).
The stereo audio signal is modulated the selected frequency and the modulated RF is amplified by FM
stereo transmitter IC (BH1415F).
The amplified RF is transmitted via transmitting antenna.
All tuning and verification are performed by the manufacturer and there are adjustments which can be
made by the user within the 88.1 ~ 91.3 MHz range. External ground is the chassis of vehicle and
transmitting antenna of the EUT is built-in inside the EUT.
Add or Skip
Upon entering this mode, a stream list is displayed with the current stream in play highlighted. Press the
Channel up/down button to navigate the list and highlight the stream to be adjusted. Once a stream has
been highlighted, pressing the Select Button displays the text Skip next to the stream, and prevents
the stream from being accessible during any of the tuning modes. Skipped streams can only be accessed
either through direct stream number entry or by returning to this menu and going through the same
process to return the skipped stream to the list. Upon adding a stream, the text Skip is removed
from alongside the stream number/ name.
Lock Options
Upon entering this mode for the first time, the user is prompted to enter a four digit numerical code that is
used to lock/unlock stream access. All future entries into this mode displays a stream list with the current
stream in play highlighted. The Channel up/down button is used to navigate the list and highlight the

11
stream to be adjusted. Once a stream has been highlighted, pressing the Select button displays the text
Lock next to the stream and prevents the stream from being accessible during any of the tuning modes.
Locked streams can be accessed only by direct stream number entry, at which time the user will be
prompted to enter the previously stored 4-digit code. Once the correct code has been entered, the audio
begins to play. The stream returns to the locked status if the stream is changed or the vehicle/unit is
turned off (or by returning to this menu and going through the same process to return the stream to the
list). Upon adding a stream, the text Lock is removed from alongside the stream number/name.
Lock/Unlock Default Code Function
The first time the Lock/Unlock function is accessed, the user must enter the default lock code. The
default lock code is 0000 . This code can be maintained or changed. To change the default lock
code perform the following procedure:
1. Press the MENU button to access the User Menu.
2. Press the Channel up/down button to select the
“Lock Options”
3. Press the Select button.
4. Press the Channel up/down button to highlight Edit Code .
5. Press the Select button.
6. Enter the default code 0000 .
7. The New Code prompt will appear. Enter your newfour digit code using the 0-9 number
buttons. You will then be prompted to confirm the new code by entering your code again.
8. The lock code is now changed.
Edit Code
Upon entering this mode, the user is prompted to enter the current four digit numerical code being
used to lock/unlock stream access. Once the correct code has been entered, the user is prompted to
enter the new 4-digit code twice. The second entry is requested for confirmation.
Audio Level Options
Upon entering this mode, a 10 segment horizontal bar graph is displayed with a - sign to the left
and a + sign to the right. The current setting is indicated on the bar graph. Pressing the Channel
up/down button will adjust the bar graph audio level indication and audio gain, accordingly. To select and
exit this function, press the Select button. No button activity for 10 seconds will also exit this function.
Antenna Aiming (Home Installation)
Upon entering this mode, two 10 segment horizontal bar graphs are displayed with a - sign to the
left and a + sign to the right. The satellite signal strength is displayed by the SAT graph. The
terrestrial signal strength is displayed by the TER graph. Position the antenna to optimize either the
satellite or terrestrial signal. The current setting is indicated on the bar graph. Moving the antenna
location adjusts the bar graphs signal strength, represented by the filled-in bar graph squares, thus
ensuring optimum reception. To exit this function, press the Select Button.
NOTE: Terrestrial repeaters are typically used in large urban areas where structures may affect the
line of sight satellite signal. Terrestrial signals (TER) may not be available in your geographic
location.
Memory Options
In this mode, the user can turn the Memory Search Function (S-Seek) ON or OFF. In addition, all 20
Memory Locations can be cleared. On the display, the top line displays the text, Memory Options.

12
The following adjustment options are possible:
1. Automatic Memory Search function - On or Off.
Use the Channel up/down button to select between the 2 options by highlighting the desired
selection. Then press the Select button to enter the option.
2. Clear all Memory Locations. Press the Select button; a prompt display screen appears
confirming -
Are You Sure? Select Yes or No and press the Select button.
Time Based Features
The following adjustments are possible:
Clock
Alarm Clock
Program Alert
Auto Shutdown
Sleep Mode
Upon entering this mode, press the Channel up/down button to highlight the desired function and press
the Select button.
NOTE: No button activity for 10 seconds will also exit the desired (highlighted) function.
Clock
When entering this menu option, you can set up the clock shown on the default display, based on the
format desired, the time zone in which you reside and Daylight Savings Time, if used. The clock data is
provided via the Sirius stream, and will update based on the received signal.
Format:
The clock format option provides:
12 Hour (Default)
24 Hour
Use the Channel up/down button to highlight the desired for mat and press the Select button.
Time Zone:
The Time Zone option provides:
(GMT-9:00) Alaska
(GMT-8:00) Pacific
(GMT-7:00) Mountain
(GMT-6:00) Central
(GMT-5:00) Eastern
(GMT-4:00) Atlantic
(GMT-3:30) Newfoundland (Abbreviated as GMT-3:30 Newfndlnd)
Use the Channel up/down button to highlight the desired time zone and press the Select Button.
Daylight Savings Time (DST) Observance:
Activate this function if your area is subject to DST;
press the Channel up/down button to toggle between DST Observed (default) or DST Not Observed.
NOTE: When the shuttle has not been turned on or has been removed from the docking port for
any length of time be sure to position the antenna toreceive the satellite signal so the time can be
automatically updated. If the time information has been lost, the shuttle will not display the time

13
information and preprogrammed alarms will not be triggered until the shuttle updates the time
information using the satellite signal.
Alarm Clock:
When this menu option is highlighted and selected, you will be able to set the unit to turn on at a specific
time. The last selected stream prior to shutdown will be present when the Alarm feature is activated.
Additionally, a series of beep tones will be heard. Press any button on the front panel to silence the alarm
tones. The alarm will trigger again at the set time unless the Alarm Off feature is selected under the Set
Alarm function.
Set Alarm (Default-Off)
Use the Channel up/down button to toggle between Alarm On or Alarm Off and press the Select
Button for desired alarm status. When the alarm is on the time will be displayed on the default screen
in reverse image.
Alarm Time
When this menu option is highlighted and selected the current alarm setting is displayed. The factory
default is 12:00PM. By pressing the category buttons the hours can be increased or decreased in one
hour increments. AM or PM will switch automatically when the AM or PM threshold has been
exceeded. By pressing the Channel up/down button the minutes can be increased or decreased in one
minute increments. Pressing the Channel up button will increase the minutes and Channel down
button will decrease the minutes. When the desired time is displayed, press the Select button. NOTE:
Loss of the satellite signal by the shuttle will result in a series of alarm tones only.
Program Alert
When this menu option is highlighted and selected, you will be able to program the unit to switch to a
selected stream at a specific time. On the display, Set Stream Alert will occupy the top text line. The
following adjustments are accessible:
Program Time/Day (Default-12:00pm, Monday)
Stream (Default-Currently Playing Stream)
Program Alert On/Off (Default-Off)
Time/Day:
Pressing the Channel up/down button toggles between Time and Day.
If Time is selected, pressing the category buttons the hours can be increased or decreased in one
hour increments. AM or PM will switch automatically when the AM or PM threshold has been
exceeded. By pressing the Channel up/down button the minutes can be increased or decreased in
one minute increments. Pressing the Channel up button will increase the minutes and in a Channel
down button will decrease the minutes. When the desired time is displayed, press the Select
button.
If Day is selected, the screen displays a default day of Monday, with selectable choices of
Monday, Tuesday, Wednesday, Thursday, Friday, Saturday or Sunday. Use the Channel
up/down button to select the desired day from the default value (Monday).
Stream:
Press the Channel up/down button to scroll through a listing of all the Sirius streams in a circular
motion. The listing should encompass all 5 available lines. When the desired stream is highlighted,
press the Select button.

14
Program Alert On/Off:
Press the Channel up/down button to toggle between Program Alert On or Program Alert Off.
When the desired alert status is high lighted, press the Select button.
Auto Shutdown
In this mode, you have the option of programming the unit to automatically shut off after a 1- hour period
without any user intervention. After 59 minutes of inactivity, a beep tone sounds, and a display prompt
appears on the screen, stating Cancel Auto Shutdown. Press the Select button to terminate the function
temporarily.
NOTE: This function is especially useful when the shuttle is being powered by battery (Car etc.).
The following options are available in this mode:
Enabled
Disabled (Default)
Press the Channel up/down button to toggle between
Enabled and Disabled. When the desired shut
down status is highlighted, press the Select button.
Sleep Mode:
In this mode, you have the capability of program ming the unit to shut off after a selected period of time.
The screen displays Sleep Mode on the top line, with optional time settings as follows:
Sleep Off
15 minute
30 minute
45 minute
60 minute
Sleep Off is the factory default setting. Press the Channel up/down button to toggle through the
desired sleep times. When the desired time is highlighted, press the Select button. The unit will now
turn off after the selected time has expired
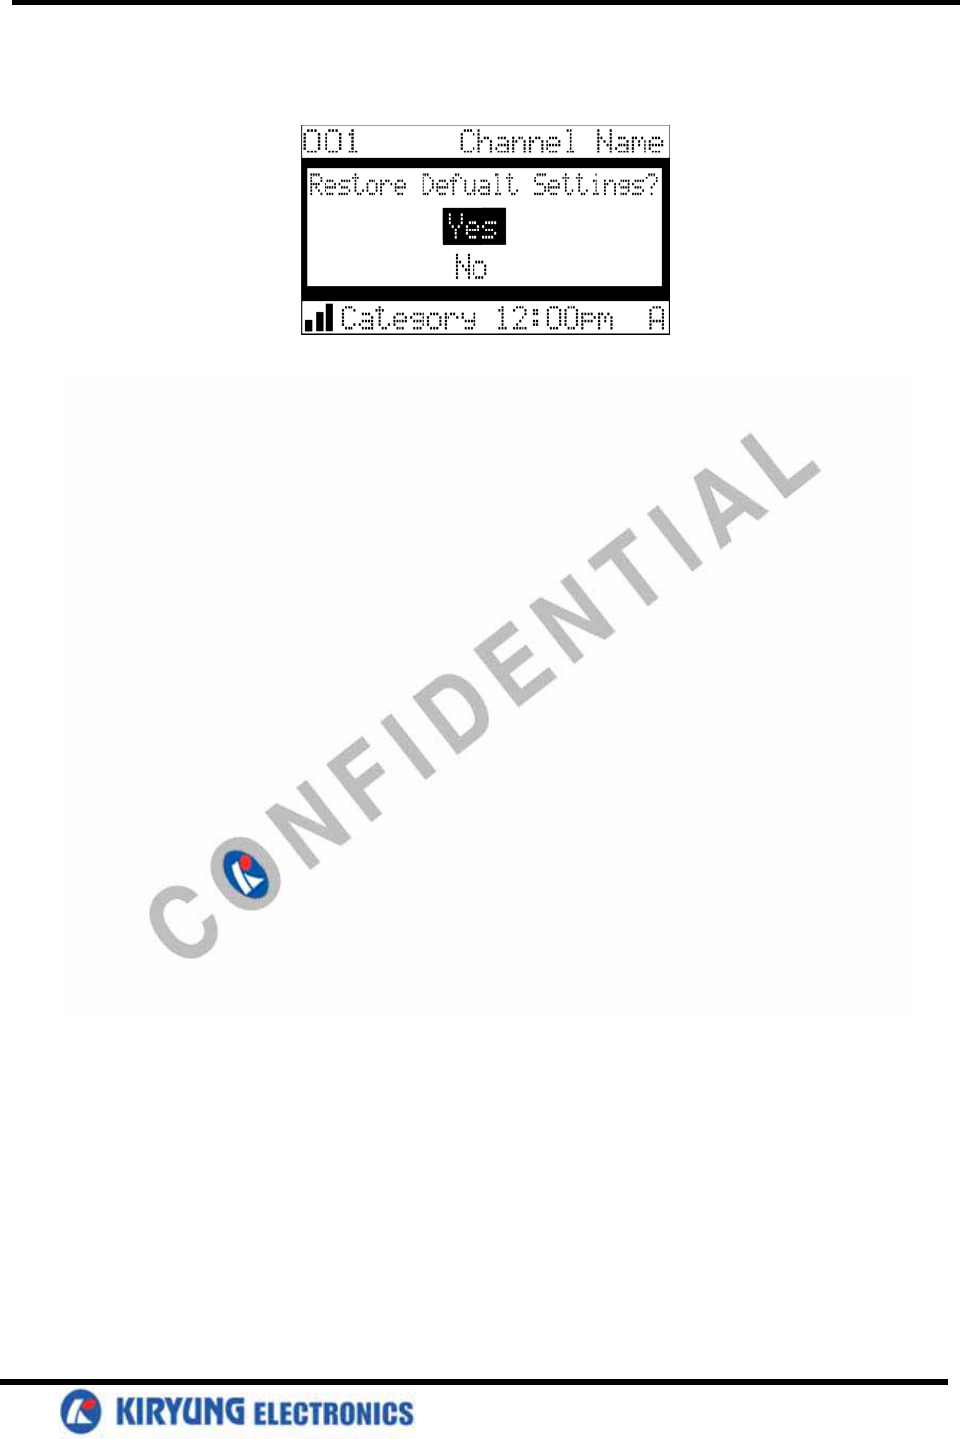
Factory Default
The Factory Default screen displays the text Restore Default Settings with the following adjustments:
Yes/No
Upon entering this mode, pressing the Channel up/down button toggles between the Yes or No
function/display selection. If Yes is chosen, the unit reverts to the original factory settings for the
following parameters:
●All Presets revert to empty
●Auto Dimming On
●Display Contrast to 50%
●Display Mode to Auto
●FM Modulator to On
●Audio Output Level to 70%
●Access to all skipped Shuttles (Locked streams remain locked)
●Memory Search On
●Memory Locations are erased
15
●12 Hour Clock Format
●Eastern Time Zone
●Daylight Savings Time Observed
