KiMark XSCAN440 SCANNING RECEIVER User Manual Xscan440 manual ver1
KiMark International, Inc. SCANNING RECEIVER Xscan440 manual ver1
KiMark >
USERS MANUAL


P
FCC
IMPORTANT NOTICE
P
It is a federal crime to intentionally intercept cellular or cordless telephone
transmissions. This scanner has b
een manufacture to lockout those
frequencies assigned by the FCC for cellular telephone usage.
Laws in your state may restrict or prohibit the use of scanning radios. Use of
this radio in a motor vehicle may be prohibited, regulated, or require a permit
.
Check with state, city, and/or local jurisdictions prior to use.
DECLARATION BY MANUFACTURER
The Scanner receiver is not a digital scanner and is incapable of being
converted or modified to a digital scanner receiver by any user.

P
FCC
IMPORTANT NOTICE
P
1. Changes or modifications to this device not e
xpressly approved by Kimark International,
Inc. could void the user’s authorization to operate this device.
2. This device complies with part 15 of the FCC Rules. Operation is subject to the
following two conditions: (1) This device may not cause harmful
interference, and
(2) this device must accept any interference including received, interference that
may cause undesired operation.
3. The scanning receiver in this equipment is incapable of tuning, or readily being
altered, by the User to operate within
the frequency bands allocated to the
Domestic public Cellular Telecommunications Service in Part 22.
WARNING
: MODIFICATION OF THIS DEVICE TO RECEIVE CELLULAR
RADIOTELEPHONE SERVICE SIGNALS IS PROHIBITED UNDER FCC
RULES AND FEDERAL LAW.

P
WELCOME
P
The Track Scan is a new state-of-the-art compact radio frequency
scanner. This scanner is designed to scan more than 400 channels over a
broad frequency range that includes discrete channels for racetrack drivers
and pit crews.
Track Scan brings the action of the track direct to you in a sleek and
compact receiver. With a programmed Track Scan simply select the race
series and the car number to experience the excitement of race crews as they
strategically manage the race. Track Scan gives you a behind the scenes
pass to the driver, crews and spotters thoughts, frustrations and excitement as
the compete head-to-head with the rest of the field.
Track Scan is also capable of scanning public police, fire, rescue, air
and military frequencies for those times when you are not listening to the race.
We are pleased that you have chosen Track Scan!

P
TABLE OF CONTENTS
P
Production Notes:
TOC will completed when graphics are finalized. ………………..
……………

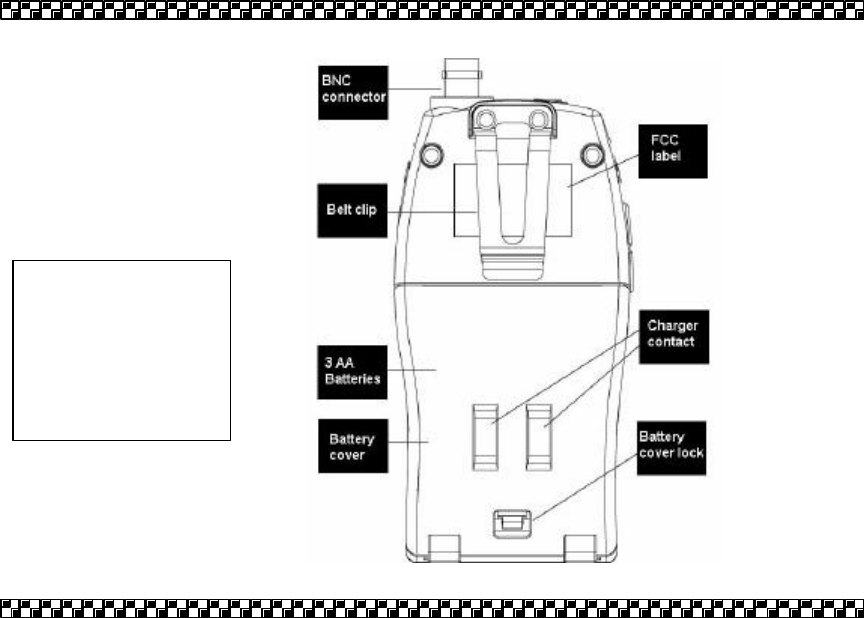
Know your scanner
1. Ext speaker jack
2. Speaker
3. BNC connector
4. Antenna
5. Programming jack
6. LCD display
7. Left soft & right soft key
8. Navigation pad
9. Menu key
10. Scan key
11. Numeric/alphabet key pad
12. Car Key
13. Previous channel key
14. Volume down key
15. Volume up key
PTRACK SCANP
PTRACK SCANP
Warning:
Never mix alkaline
battery with
rechargeable
battery.

P
FEATURED HIGHLIGHTS
P
Programmable Channels: 440 channels (4 banks of 110 channels each).
Frequency Range: 450MHz – 470 MHz.
Priority Channels: Assign multiple Priority Channels in each series. Broadcasts activity on
most important channel(s) while monitoring others.
Scan Lists: Customize scan lists.
Over-the-Air Programming: Loads channel frequencies through remote track broadcasts.
Race Series Channels: 440 channels split into four different series:
1. CUP Series – Channels 0, 00-09, 1-99
2. Bush Series – Channels 0, 00-09, 1-99
3. Truck Series – Channels 0, 00-09, 1-99
4. Open Series – Operator customizable channels 0, 00-09, 1-99
Memory Back-Up: Stores channels in nonvolatile memory.
Lighted Display: Lighted Display and Key Pad.
4-Way Navigation Pad: Allows for one hand operation.
NOTE
Specifications are subject to change

P
ACCESSORIES
P
Headset
Antenna: Two removable antennas (long and short).
Belt Clip
Case
Production Note
Line Diagram of Accessories and Optional Accessories.
Need to photograph accessories to convert to l
ine art.

P
GETTING STARTED
P
Your Track Scan is designed for easy set -up and use. With a few simple steps you can
quickly scan race channels. However, for maximum enjoyment you should familiarize yourself
with the information located in this guide.
SET-UP
1. Battery:
a. Track Scan uses 3 AA Batteries
b. Do not mix brands, new and old or different types of batteries
c. Battery Installation
§ Open the cover
§ Insert batteries
§ Replace cover
2. Antenna:
a. Install the Flexible Antenna to the BNC connector on the top of the Track Scan.
§ The short antenna should be used at the track.
§ The long antenna works best for distant stations.
NOTE
The scanner can be used with out the antenna

P
GETTING STARTED
P
FREQUENCY RANGES
1. The FCC assigns frequency bands for use by commercial and military
broadcasts. The following is a general listing of some of the more common bands:
Frequency Band Frequency Range
VHF Low Band 29.00 – 54.00
Aviation 108.000 – 137.000
Military 137.000 – 144.000
VHF High Band 148.000 174.000
Federal Government 406.000 – 420.000
UHF/NASCAR 450.000 – 470.000
UHF “T” Band 470.000 – 512.000
Public Service Band/IRL 806.000 – 956.000
2. Racing Frequency Bands:
a. NEXTEL CUP: 450-470 MHz
b. BUSH SERIES: 450-470 MHz
c. CRAFTSMEN TRUCK: 450-470 MHz
d. CART/IRL: 450-470 MHz and 850-869 MHz

P
GETTING STARTED
P
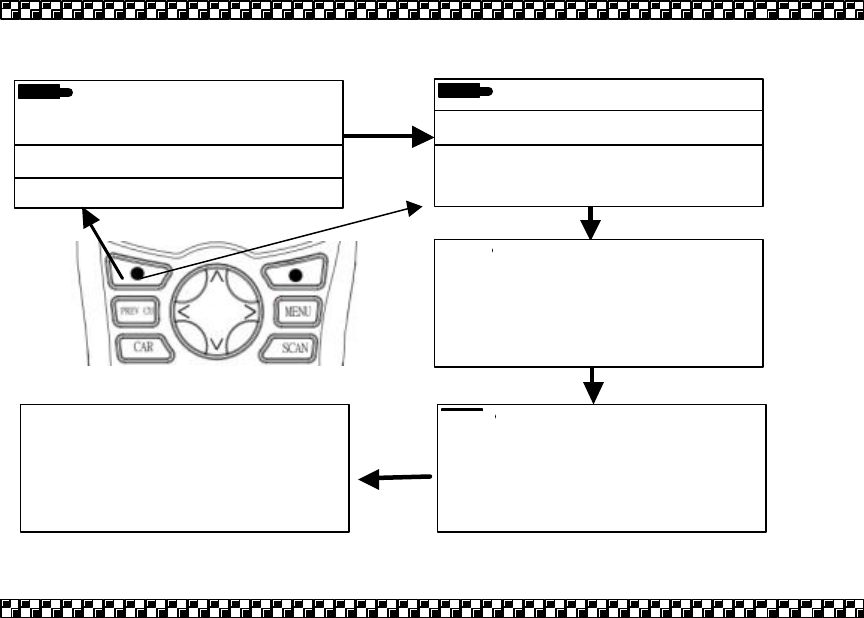
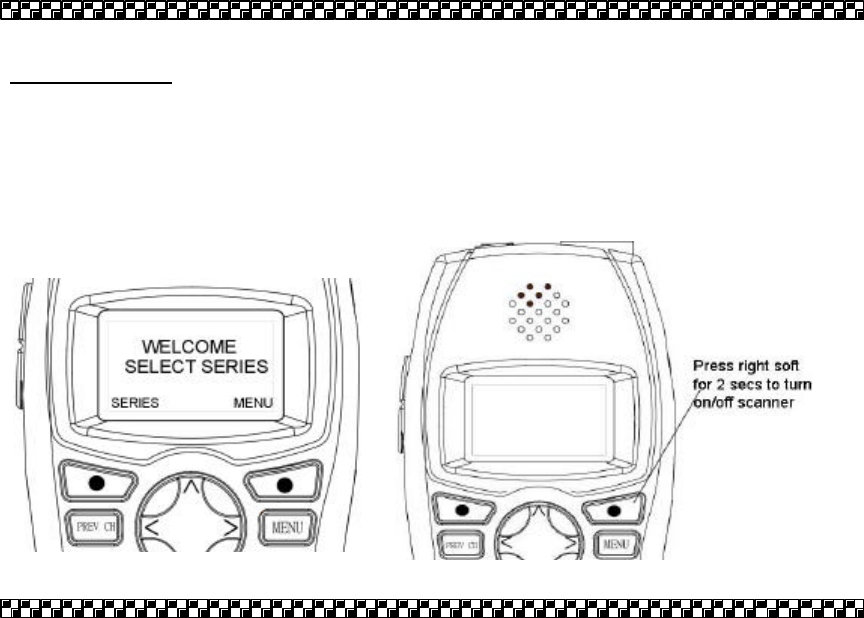
TURNING THE SCANNER ON
1. Press and hold the Right Soft Key for 2 seconds.
2. The scanner’s display will illuminate.
3. Adjust the volume to a safe and comfortable level before connecting the headset.
NOTE
Volume control keys are located on the left side of the scanner
4. Install the headset.
P
LEARNING TO USE
YOUR SCANNER
P
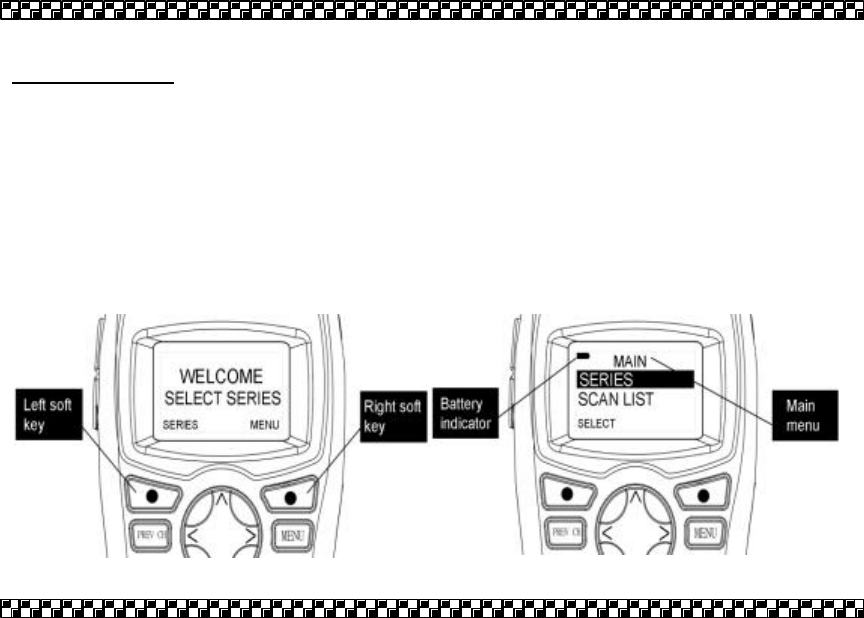
DISPLAY SCREEN
1. Using the Display: LCD screen presents information and menu commands/prompts.
Commands/prompts are displayed in the lower left and right portions of the display.
a. Screen Layout
§ Center: Main display.
§ Upper left corner: Battery strength indicator.
§ Bottom left corner: Commands/Prompts activated by the Left Soft Key.
§ Bottom right corner: Commands/Prompts activated by the Right Soft Key.

P
LEARNING TO USE YOUR SCANNER
P
SCANNER BASICS
1. Command Keys
a. Menu Key (MENU): Displays scanners Main Menu or Secondary Menu.
b. Left Soft Key: Selects left display command/prompt.
c. Right Soft Key: Selects right display command/prompt.
§ Turns scanner ON/OFF (press and hold for 2 seconds).
d. Previous Channel Key (PREV CH): Selects last tuned channel.
e. Car Key: Stops automatic scanning and allows user to manually enter a channels
number.
f. Scan Key: Begins scanning the selected series channel list.
2. Navigation Pad:
Controls the display cursor and highlights display menus. Pressing the pad moves the
display cursor within the selected menu.

P
LEARNING TO USE YOUR SCANNER
P
SCANNER BASICS (continued)
3. Numeric/Alphabet Keys:
a. Numeric Key Pad: Enter channels and frequency information.
b. Alphabet Key: Enter bank and driver names.
c. Enter Key: Enter programmed information.
P
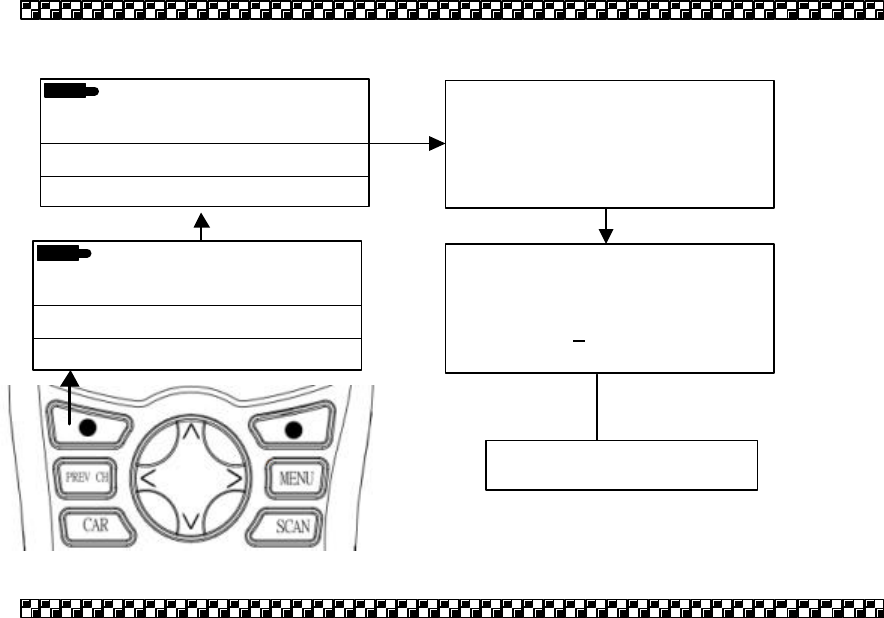
USING MENUS
P
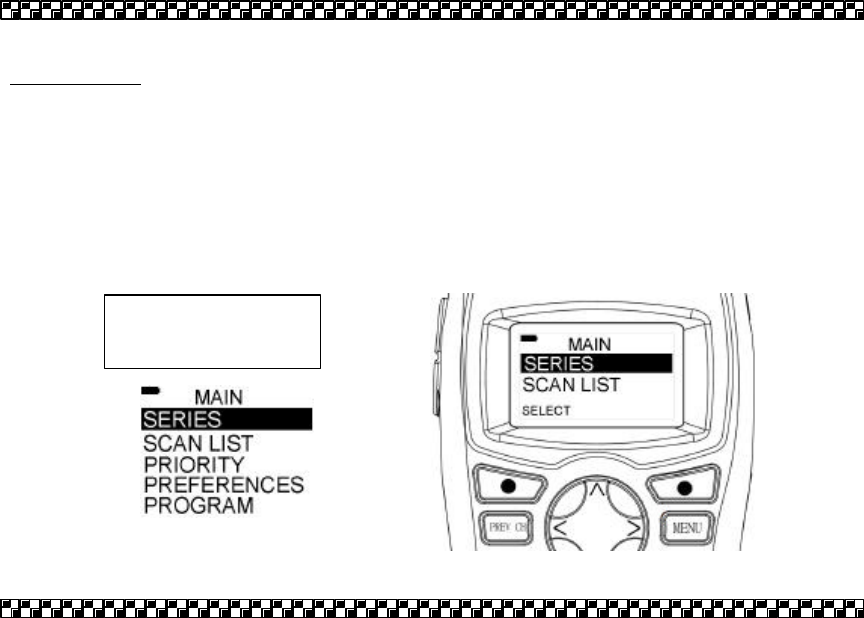
MENU BASICS
1. MENU: Allow access to the basic functions of the scanner.
a. Press the MENU Key to display the main/secondary menu.
b. Press Up or Down on the Navigation Pad to highlight an associated option.
c.
Options for the menu selection appear in the lower left and right corners of the display.
Press the Left Soft Key/right navigation key
to activate the displayed
command/prompt.
Note
: Main menu
content.

P
USING MENUS
P
MENU BASICS (continued)
2. Secondary Menu: Allow quick access to ease of menus use. There are two secondary
menu, one inside SERIES and the other one inside SCAN LIST.
a. Secondary menu are submenu associated with a primary main menu. They are
displayed as a pop-up windows on the display screen.
b. Press the Menu Key while in stop scanning mode or when you are in SCAN LIST.
c. Press Up or Down on the Navigation Pad to highlight an option and press the pad to
the Right to select the desired option.
d. To bypass the secondary menu press the Menu Key a second time.

P
USING MENUS
P
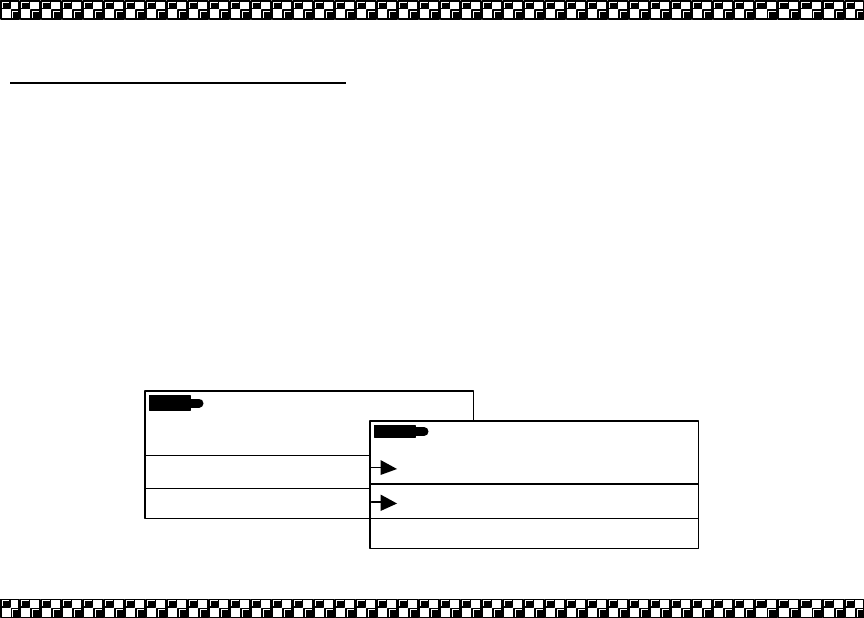
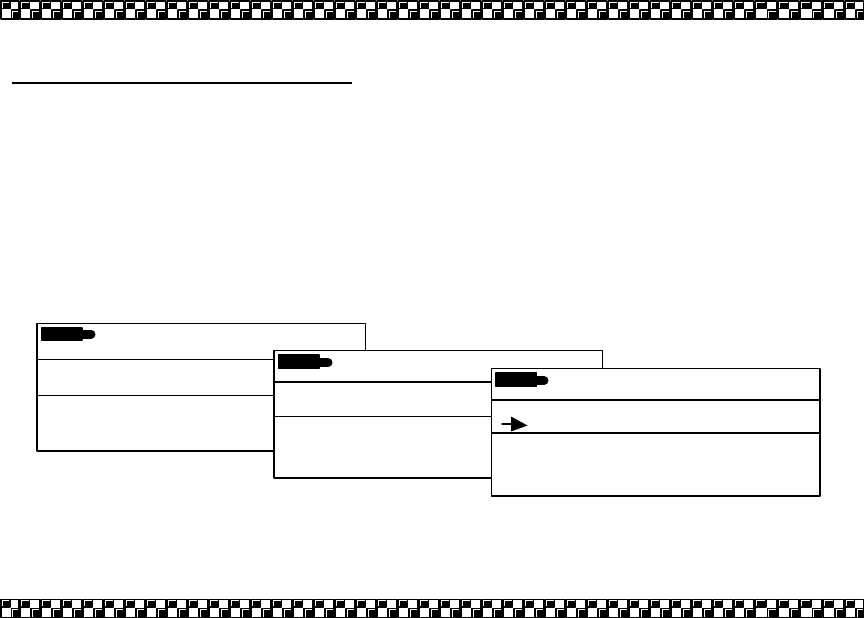
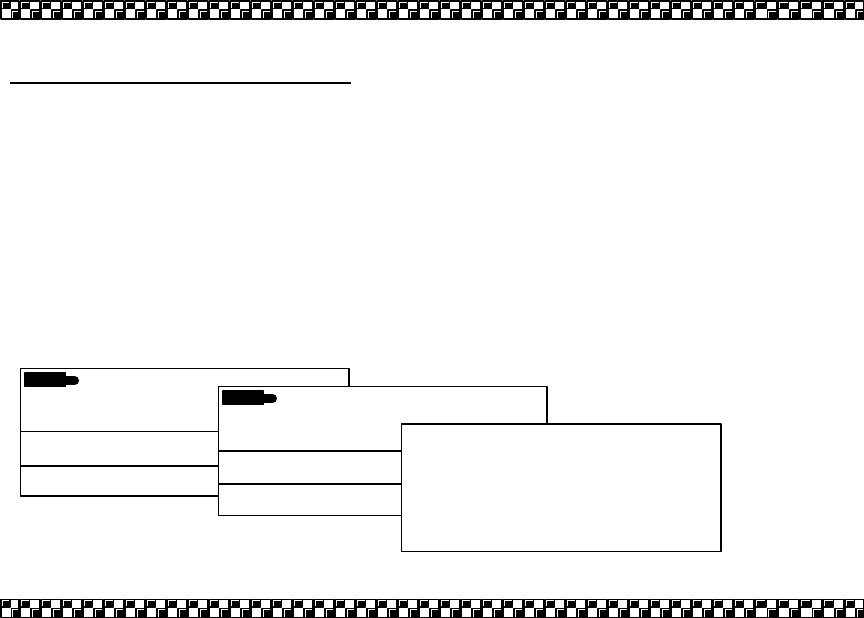
MAIN MENU OPTIONS
1. SERIES: Select desired series. This must be accomplished before proceeding on to
other menu or initiating the scan.
NOTE
There are 110 channels per series 0, 00-09, 1-99. Car numbers correspond with the
channel number in the selected series.
2. SCAN LIST: Select only the channels you want to scan. Using the Menu key, the user
can select or deselect channels within a series. This is helpful when an unwanted
channel is transmitting continuously and/or dominating the scanner.
3. PRIORITY: Identify and select channels of importance. Select up to four priority
channels. Channels assigned a priority will be scanned more frequently than non priority
channels.
4. PREFERENCES: Adjust display lighting, squelch, priority scan and scan delay.
5. PROGRAM: Program scan channels and race/driver data. Using this menu function the
operator can program the radio manually, by using pc programmer, or through an over
the air broadcast.

PUSING MENUSP
(MAIN MENU)
P
USING MENUS
P
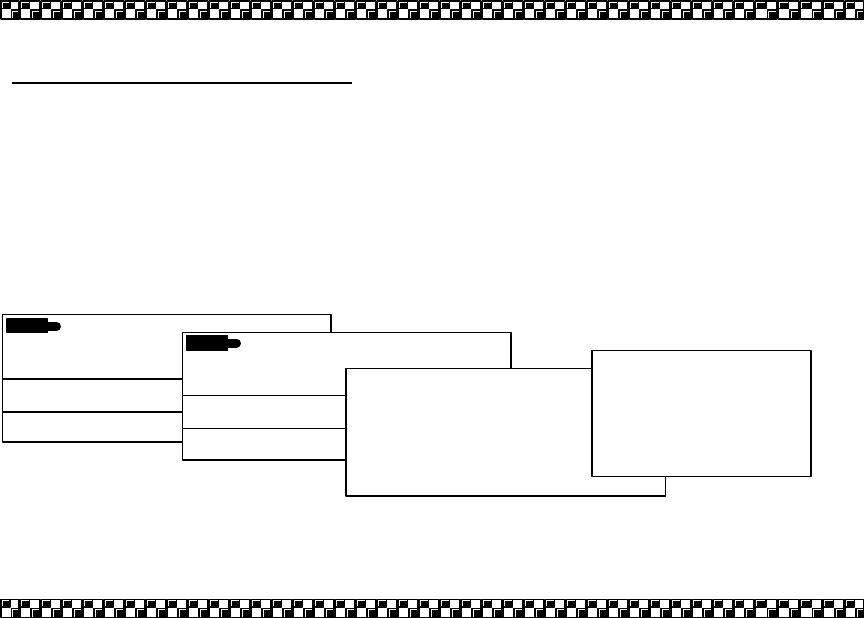
MAIN MENU SELECTIONS
1. SERIES: Select one of three preassigned or one-user programmable race series (Cup,
Bush, Truck or Empty) categories.
NOTE
Always select the appropriate SERIES on start-up. All other operations and menu
options are based on the SERIES selection.
a. Series channels must be programmed and will need to be updated for each race.
b. Press the Menu Key and select SERIES.
c. Use the Navigation Pad to scroll through series options.
d. When the desired series is highlighted press the Left Soft Key/Right Navigation Pad
to select the series and start scanning all programmed/selected channels within that
series.
MENU
HELP
SELECT
SERIES
SCAN LIST
SERIES
SELECT
CUP
BUSH

PUSING MENUSP
(SERIES)
P
USING MENUS
P
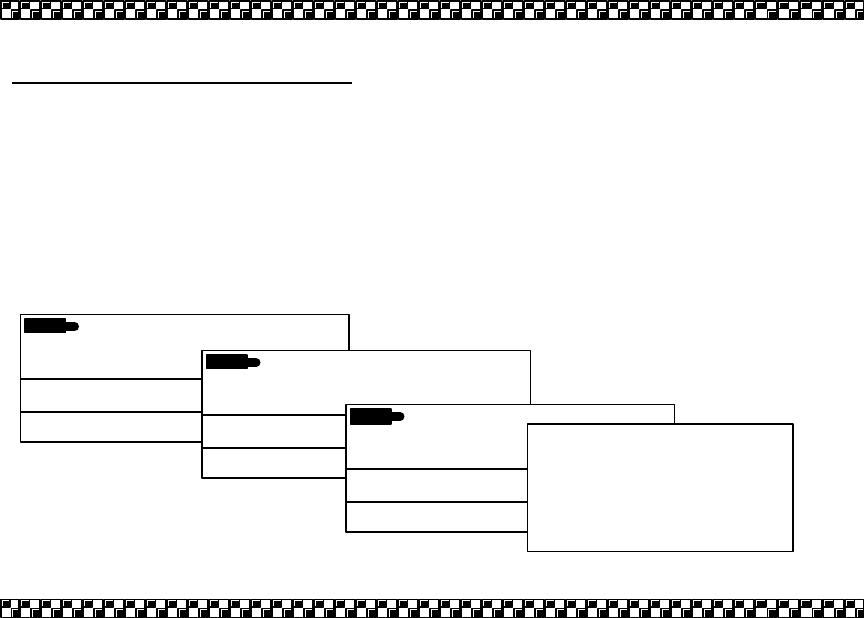
MAIN MENU SELECTIONS (continued)
2. SCAN LIST: Displays available channels within a selected series (CUP, BUSH, TRUCK or
USER) and is used to customize the series channel list.
a. Select SCAN LIST from the main menu. The channels for the selected series will be
displayed.
b. Scroll through driver channels and press the Left Soft Key (SELECT/DESELECT) to
select /deselect channels on the scan list.
NOTE
Scan list selections will be marked with an arrow beside the name. Deselected
channels will not have an arrow.
c. Press the Right Soft Key when done to return to main menu.
MENU
HELP
SELECT
SERIES
SCAN LIST SCAN LIST
DONE
DESELECT
01 DRIVER
02 DRIVER
P
USING MENUS
P
d. When inside SCAN LIST, press MENU key to enter secondary pop-up menu. .
e. Scroll up and down to highlight desired function, press Right
Navigation Pad to select.
SCAN LIST
DONE
DESELECT
01 DRIVER
02 DRIVER

P
USING MENUS
P
MAIN MENU SELECTIONS (continued)
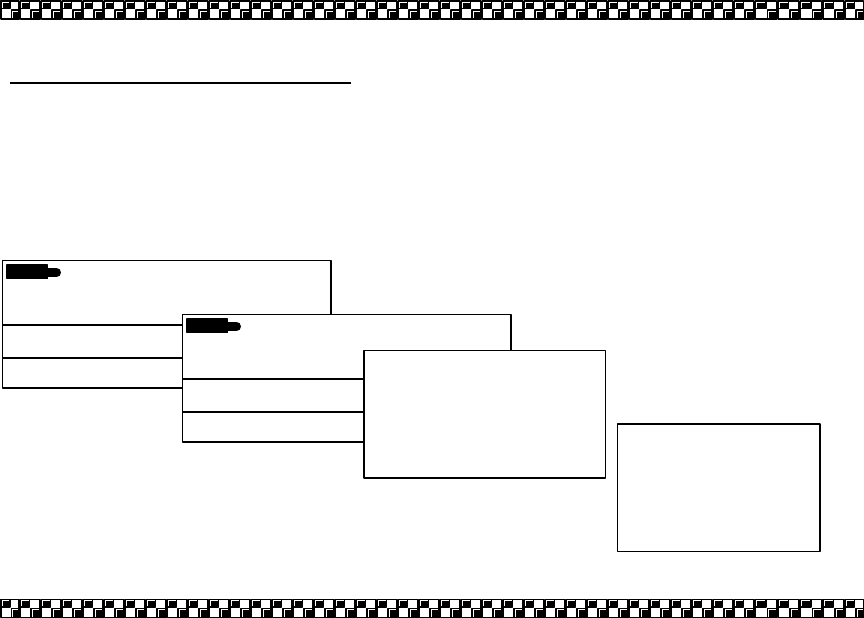
3. PRIORITY: Prioritized important channels. Important channels can be identified and
selected based on the users preference. Select priority channels (up to 4 per series).
Transmissions over priority channels will override nonpriority channels.
a. Priority 1 through 4 (with 1 being the highest and 4 the lowest) can be assigned to
channels within a series.
b. Select SERIES (CUP, BUSH, TRUCK or USER).
c. Select PRIORITY from the Main Menu. The programmed channels for the selected
series will be displayed.
d. Scroll through driver channels and press Left Soft Key (SELECT) to assign a priority
to the selected channel.
e. Pressing the Left Soft Key repeatedly will scroll through the priority selection (4,3,2,1).
f. Press Right Soft Key (DONE) when the priority is assigned.
MENU
HELP
SELECT
SCAN LIST
PRIORITY
PRIORITY
DONE
SELECT
2 01 DRIVER
4 02 DRIVER
P
USING MENUS
P
MAIN MENU SELECTIONS (continued)
4. PREFERENCES: Selectable scanner features.
a. LIGHT: Select Display light preferences. The following options are:
§ ON WHEN RECEIVING: Display illuminates for 10 seconds when receiving.
§ OFF: No Display lighting.
§ ALWAYS ON: Display continuously lighted.
MENU
SELECT
PREFERENCES
PROGRAM
PRIORITY
PREFERENCES
SELECT
LIGHT
SQUELCH LEVEL
PRIORITY
Light
DONE
SELECT
On when receive
Off

P
USING MENUS
P
MAIN MENU SELECTIONS (continued)
b. SQUELCH: Squelch filters out unwanted noise. Squelch operates much like a gate to
reduce noisy transmissions. If the transmission is strong, the gate will open and the
transmission will be heard. If the transmission is weak or mostly static, the gate will
remain closed and the transmission will not be heard. Track Scan squelch is
adjustable (Low, Mid, Sensitive) representing when the gate will open.
§ The lower the squelch setting the more noise that will get through. If a particular
frequency is hard to hear or is getting cutoff attempt to adjust the squelch level:
• Adjust the volume first, if that does not improve the transmission then adjust the
Squelch level.
• Select SQUELCH.
• Select Low (normal setting), Mid or Sensitive.
MENU
HELP
SELECT
PRIOR
ITY
PREFERENCES
PRIORITY
PREFERENCES
SELECT
LIGHT
SQUELCH LEVEL
PRIORITY
SQUELCH LEVEL
DONE
SELECT
Low
Mid

P
USING MENUS
P
MAIN MENU SELECTIONS (continued)
5. PROGRAM: Use this menu to automatically or manually program channels. And also to
read or delete channels. Channels can be programmed into the radio using one of three
methods:
a. Method #1 (Track Programming Broadcasts): Track programming broadcasts are
radio transmission that are broadcasted at the track. They contain race series driver
channel information. When the scanner is set to RECEIVE AIR WAVE, programming
transmissions are automatically download into the scanner. This is the preferred and
fastest method of updating the scanner with the latest track/driver frequencies, names,
codes and channel numbers.
MENU
HELP
SELECT
PREFERENCES
PROGRAM
PRIORITY
PROGRAM
SELECT
AIR WAVE
KEY PAD
CANCEL
Waiting for data
P
USING MENUS
P
MAIN MENU SELECTIONS (continued)
b. Method #2 (Manual Entry): Select KEY PAD to manually enter track/driver
frequencies, codes and driver names. This method is also used for entering other scan
channels (police, fire, weather…).
NOTE
Frequency lists are available at the track or over the Internet. For race programming,
frequencies are matched to the car number within the series making channel selection
easy and intuitive. For example:
NEXTEL Cup channel 24 is assigned to car number 24
and channel number 01 is assigned to car number 01. Bush Series channel 24 is
assigned to car number 24 and channel number 01 is assigned to car number 01. This
channel numbering is repeated for all channels within a series.
MENU
SELEC
T
PREFERENCES
PROGRAM
PRIORITY
PROGRAM
SELECT
AIRWAVES
KEYPAD
PRIORITY
CANCEL
ENTER
Enter car no.

P
USING MENUS
P
MAIN MENU SELECTIONS (continued)
c. Method #3 (RXCABLE): Select RXCABLE to download track/driver frequencies, codes
and driver names from PC. A cable is connected to both scanners and PC. Select
RECEIVE option to download track/race channels and data through a cable connected to
PC. NOTE
Frequency lists are available at the track or over the Internet. For race programming,
frequencies are matched to the
car number within the series making channel selection
easy and intuitive. For example:
NEXTEL Cup channel 24 is assigned to car number 24
and channel number 01 is assigned to car number 01. Bush Series channel 24 is
assigned to car number 24 and channel number 01 is assigned to car number 01. This
channel numbering is repeated for all channels within a series.
MENU
SELECT
PREFERENCES
PROGRAM
PRIORITY
PROGRAM
SELECT
KEYPAD
RXCABLE
CANCEL
ENTER
Connect cable.
Press Receive
When ready
CANCEL
Receiving…
P
USING MENUS
P
MAIN MENU SELECTIONS (continued)
d. Read channels: Select TXCABLE to upload channel information to PC. A cable is plug
in PC and scanner. Select TXCABLE from scanner, press TRANSMIT to send data to PC.
MENU
SELECT
PREFERENCES
PROGRAM
PRIORITY
PROGRAM
SELECT
RXCABLE
TXCABLE
CANCEL
TRANSMIT
Connect cable.
Press Transmit
When ready
CANCEL
Transmitting…
P
USING MENUS
P
MAIN MENU SELECTIONS (continued)
d. Edit SERIES: Select SERIES to view bank names, select the bank name that to edit.
MENU
SELECT
PREFERENCES
PROGRAM
PRIORITY
PROGRAM
SELECT
TXCABLE
SERIES SERIES
SELECT
CUP
BUSH
abc
E
NTER
Enter alpha label
BUSH
P
USING MENUS
P
MAIN MENU SELECTIONS (continued)
e. Clear Scanner: Select DELETE ALL to clears all channels and data from memory.
Press Yes to delete.
MENU
SELECT
PREFERENCES
PROGRAM
PRIORITY
PROGRAM
SELECT
SERIES
DELETE ALL
YES
NO
Are you sure?
DELETING
IIIIII

P
SCANNER PROGRAMMING
P
PROGRAMMING PROCEDURES
Programming the scanner is accomplished by selecting one of the programming methods (air,
PC or manual).
1. RECEIVE AIR WAVE:
a. For Receive Air Wave method be sure to position the scanner frequency same as the
transmission.
b. Select and follow menu prompts.
c. The display will show the progress of information as it is programmed into the scanner.
d. Select DONE when the display shows COMPLETE.
PROGRAM
SELECT
AIR WAVE
KEY PAD
CANCEL
Has received
3 packets
BACK
PROGRAMMING
COMPLETE
CANCEL
Waiting for data
MENU
SELECT
PREFERE
NCES
PROGRAM
PRIORITY
P
SCANNER PROGRAMMING
P
(BROADCAST)

P
SCANNER PROGRAMMING
P
PROGRAMMING PROCEDURES (continued)
2. KEY PAD: Use the Numeric Key Pad to enter the following information:
a. Channel Number: Enter cal number.
b. Frequency: Enter a valid frequency by using Up or Down Navigation Pad. (450-
469.9875)
c. CTCSS/DCS Code
§ This code is essential for monitoring track/driver channels.
§ CTCSS and DCS Codes are sub-audio signaling formats designed to prevent
interference from other broadcasting stations sharing the same frequency. When
using CTCSS or DCS codes the scanner will only respond to transmissions carrying
the tone. Therefore you only hear the race team’s transmissions.
§ Use Up or Down Navigation Pad to adjust CTCSS/DCS code.
d. Alpha Label: Used to name the channel. This field can key letter or number.
§ Use the Numeric Key Pad to enter letter/number in the display.
§ Press the Navigation Pad
• Up or Down to select upper/lower case letter or number.
• Left or Right to move the cursor left or right.
• Left to delete a letter.
CANCEL
ENTER
Enter c
ar
n
o.
1
MENU
SELE
CT
PREFERENCES
PROGRAM
PRIORITY
NEXT
ENTER
Car 1
Enter frequency
450.2000
Continued on Next Page.
P
SCANNER PROGRAMMING
P
(KEY PAD)
PROGRAM
SELECT
AIRWAVE
KEYPAD
PRIORITY
NEXT
ENTER
Enter DCS code
023
NEXT
ENTER
Enter CTCSS code
OFF
Press
UP
or Down
to switch
between CTCSS or DCS.
NEXT
ENTER
Enter alpha label
Ab1Cc
abc
-
Press
UP
or
DO
WN
to switch
between ABC, abc, or 123.
- Press LEFT or RIGHT ↔ to
move cursor.
- Press LEFT to delete entry.
- Press NEXT
will always jump
to next channel to be
programmed.
P
SCANNER PROGRAMMING
P
(KEY PAD)

P
SCANNER PROGRAMMING
P
PROGRAMMING PROCEDURES (continued)
3. Receive Cable:
a. Connect the cable to the scanner.
b. Select PROGRAM and Receive Cable on the scanner that needs to be programmed.
c. Observe the display during the transfer and follow menu prompts.
d. Select DONE when complete.

BACK
RECEIVE
Connect cable.
Press Receive
when ready
BACK
PROGRAM
M
ING
COMPLETE
CANCEL
Receiving…
MENU
SELECT
PREFERENCES
PROGRAM
PRIORITY
P
SCANNER PROGRAMMING
P
(RECEIVE CABLE)
PROGRAM
SELECT
K
EYPAD
RXCABLE

P
SCANNER PROGRAMMING
P
PROGRAMMING PROCEDURES (continued)
4. TRANSMIT CABLE:
a. Connect the cable.
b. Select PROGRAM and TXCABLE on the scanner that has the programmed
information.
NOTE
Care should be taken to ensure that the transmit scanner and the PC are properly
connected. Otherwise the data in the good scanner will be lost.
c. Observe the display during the transfer and follow menu prompts.

BACK
PROGRAMMING
COMPLETE
MENU
SELECT
PREFERENCES
PROGRAM
PRIORITY
CANCEL
Transmitting…
BACK
TRANSMIT
Connect cable.
Press Transmit
when ready
P
SCANNER PROGRAMMING
P
(TXCABLE)
PROGRAM
SELECT
RXCABLE
TXCABLE
P
SCANNER OPERATIONS
P
BEGIN SCANNING
1. On start-up, the scanner will display the WELCOME screen.
2. Press the Left Soft Key SERIES to access the SERIES menu or the Right Soft Key to
select MENU if the scanner needs to be programmed.
3. Cursor to the desired series and select by pressing the Left Soft Key.
4. With the series selected, the scanner will begin scanning.

P
OPERATING THE SCANNER
P
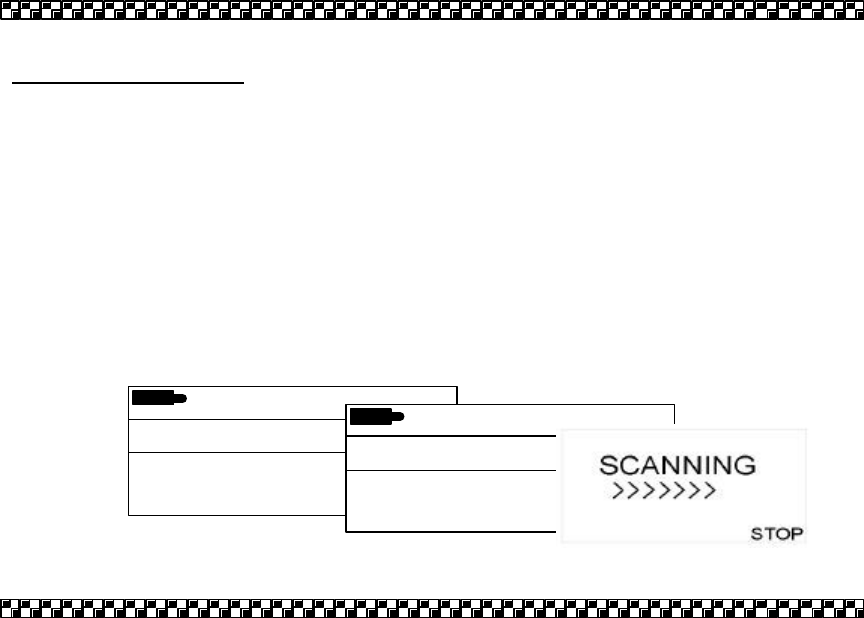
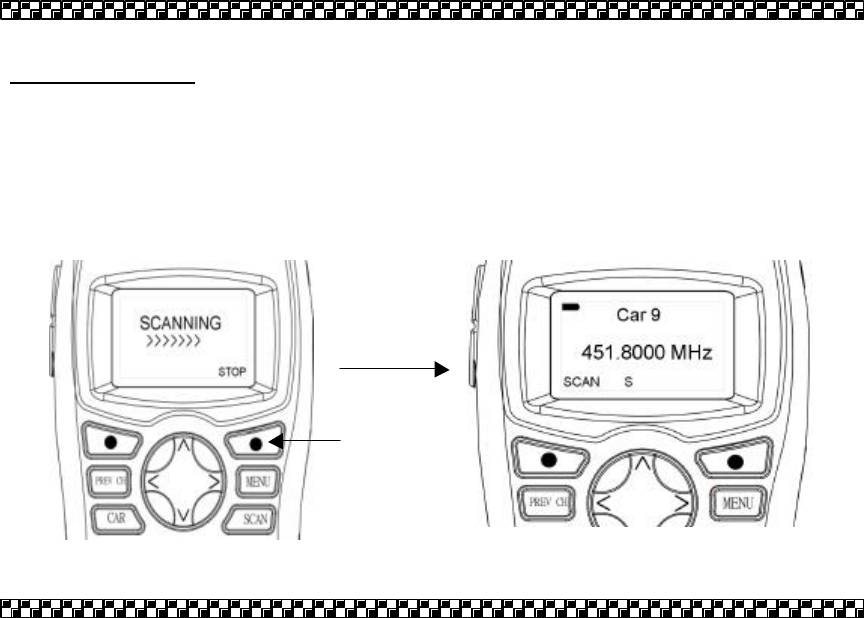
MONITORING THE SCANNER
1. When the scanner is scanning channels, the scanner will lock on to active channels and
stay locked on that channel until there is a pause in the transmission. When the
transmission stops for more than 2 seconds the scanner will resume scanning for the next
active channel.
2. While scanning, the display will show a scanning moving symbol (>>>>). When an active
channel is found the display will show the preset number, channel number and frequency.

P
OPERATING THE SCANNER
P
STOPPING/PAUSING THE SCANNER
1. To stop or pause the scanner using the Right Soft key:
§ Press the Right Soft key to stop scanning.
§ Pressing the Right Soft key once and the display will hold.
HOLD will freeze the display. However, the scanner will still monitor priority channels and
tune to them if they are active.
SCAN
465.0000 MHz
S P3
Car 12

P
OPERATING THE SCANNER
P
STOPPING/PAUSING THE SCANNER (continued)
2. To stop the scanner using the CAR key:
§ Press either the CAR key or the Right Soft Key.
§ Both of these keys will HOLD the current channel in the display.
NOTE
With the scanner paused, press Up and Down on the Navigation Pad to manually scan
other channels. As you scroll the channels will change.
ENTER CANCEL
Enter car no.
P
OPERATING
THE SCANNER
P
MANUAL SCANNING
You can manually scan channels in your scan list.
1. While scanning channels
2. Press the Right Soft key to stop the automated scanning.
3. Then press the Up or Down on the Navigation Pad to manually cycle through the current
scan list.
4. To resume scanning press the Scan Key.

P
OPERATING THE SCANNER
P
MANUAL CHANNEL TUNING
You can tune to any channel within a series by pressing the CAR key and entering the
channel number.
1. While scanning channels.
2. Press the CAR Key.
3. Enter the Channel Number and press the Left Soft or Enter Key when finished.
CAR
CHANNEL
NUMBER
Left Soft or Enter

P
OPERATING THE SCANNER
P
PREVIOUS CHANNEL
Use the PREV CH Key to select the last tuned frequency. This key is only active when the
scanner is stopped on a frequency.
1. While scanning channels.
2. Press the Car Key.
3. Manually enter the two desired channel numbers using the Numeric Key Pad.
4. Press the PREV CH Key to switch between the two channels.
5. To resume scanning press the Scan Key.

P
OPERATING THE SCANNER
P
SELECTING PRIORITY CHANNELS
You can prioritize up to 4 channels in each series.
1. From the menu select PRIORITY or while in hold scanning, press the Menu Key (pop-up
window).
2. Select PRIORITY to enter priority list.
3. Press Up or Down on the Navigation Pad to scroll through the frequency list.
4. Press the Left Soft Key to assign a priority (4,3,2,1) to the channel.
NOTE
Priority channels will be scanned more frequently and will override lower priority
channels.
5. When channel are assigned, press DONE to go back to hold scanning mode.
6. Resume scanning when finished with selections.

MENU
SELECT
SCAN LIST
PRIORITY
PRIORITY
DONE
SELECT
2 01 DRIVER
4 0
2
DRIVER
PRIORITY
DONE
SELECT
4
DRIVER
1 5 DRIVER
P
OPERATING THE SCANNER
P
(PRIORITY)

P
OPERATING THE SCANNER
P
SELECTING AND DESELECTING SCAN CHANNELS
The scan list can be modified to select or deselect channels as desired.
1. From the menu select SCAN LIST.
2. Press Up or Down on the Navigation Pad to scroll through the frequency list.
3. Press the Left Soft Key to SELECT or DESELECT the highlighted channel.
NOTE
When modifying a large scan list, it may be simpler to DESELECT ALL (press the Menu
Key when you are on the scan list) and then reselect only the channels you want to
scan.
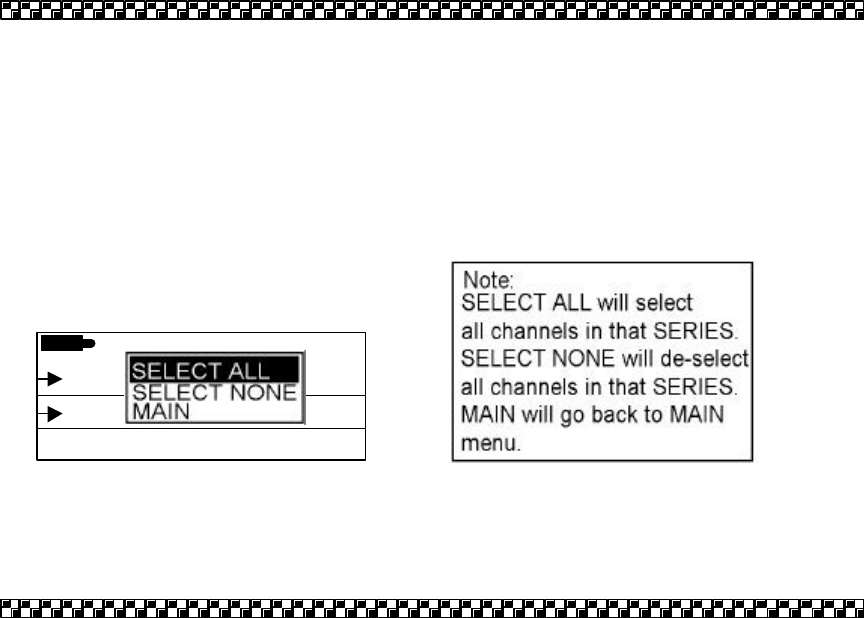
4. SCAN LIST Secondary Menu: While on a SCAN LIST a secondary menu will pop-up when
the Menu Key is pressed. The secondary list allows the operator to globally select all or
none of the channels for scanning.
SCAN LIST
DONE
DESELECT
01 DRIVER
02 DRIVER
SCAN LIST
DONE
SELECT
01 DRIVER
24 DRIVER
MENU
SELECT
SERIES
SCAN LIST
P
OPERATING THE SCANNER
P
(SCAN LIST)

PSCANNER OPERATIONSP
SCAN LIST
DONE
SELECT
01 DRIVER
24 DRIVER
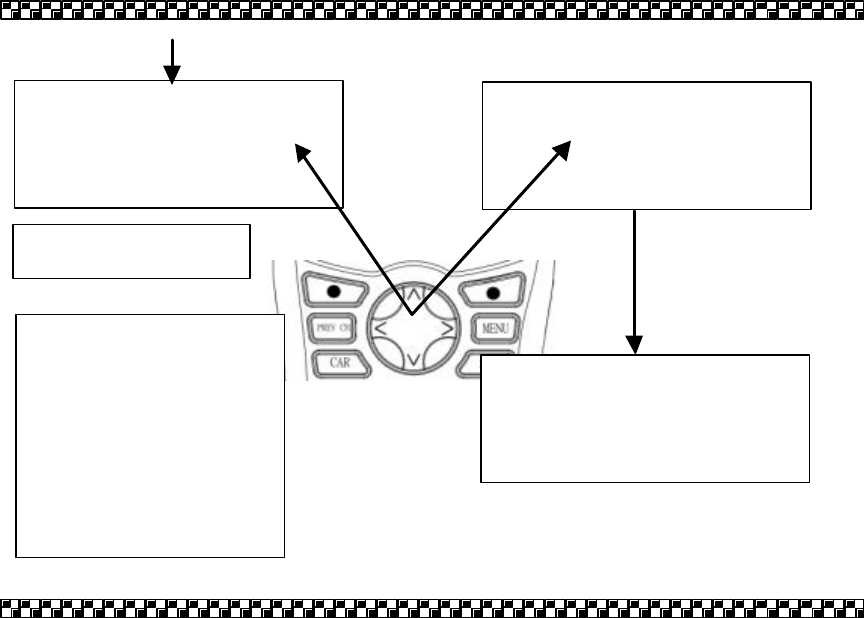
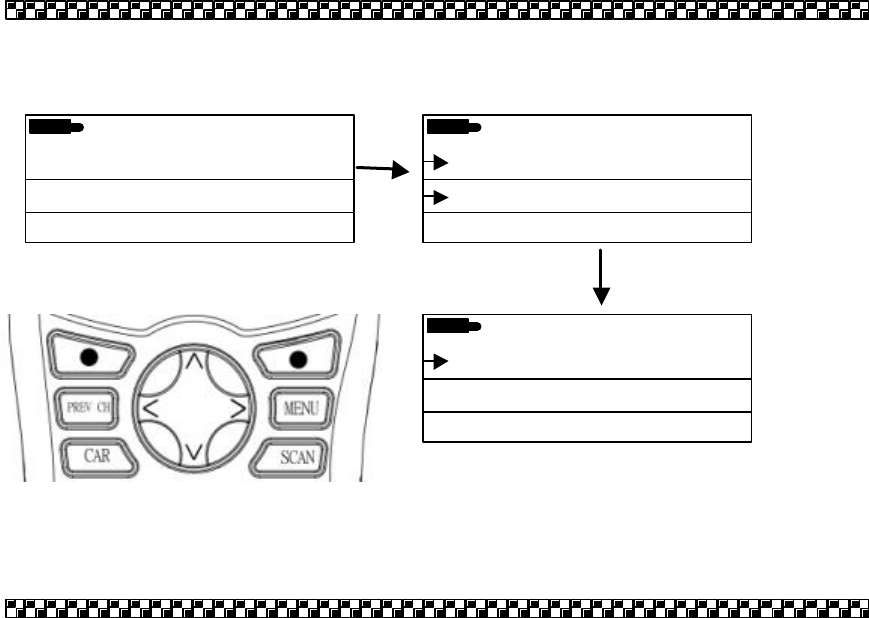
SELECTING SECONDARY MENUS
1. Secondary Menus are controlled by the Navigation Pad.
2. Secondary Menus are available for:
a. SCAN LIST Menu. Press the MENU Key while on the SCAN LIST to access the
following pop-up menu.
b. While in Scan stop mode: Press the MENU Key while in Scan stop mode to access the
following pop-up menu.
SELECT ALL
SELECT NONE
MAIN

P
MANUAL MODE
P
In addition to automated channel programming the scanner can be programmed manually.
Manual programming enables you to enter and scan track channels as well as police, fire and
other civil channels and frequencies. Using the manual programming features of the scanner
you can enter or modify all scanner channels.
BASICS
a. Select a SERIES (USER).
b. Use the PROGRAMMING menu and the KEY PAD selection to enter channels
manually.
c. Enter a channel numbers between 0, 00-09, 1-99.
d. Enter a channel frequency between 450MHz and 456.9875MHz:
§ The frequency field consists of 7 digits.
§ Use the number zero to fill in open spaces.
§ Press the Navigation Pad to the left or right to move the cursor.
§ Press the Navigation Pad down to delete mistakes within the field.
e. Enter CTCSS or DCS Codes:
§ Press Up or Down on the Navigation Pad to switch between CTCSS and DCS
codes.
Note: Please refer to page 34 for manual KEYPAD programming.

P
CARE AND MAINTE
NANCE
P
CARE
1. Avoid using the scanner in high moisture environments.
2. Do not submerge the unit or expose to excessive amounts of water.
3. Avoid placing the scanner in direct sunlight or exposing to high heat
4. Turn the scanner off and remove the batteries before cleaning.
5. Clean the outside of the scanner with a damp cloth.
6. Do not use detergent, solvents or cleaners.
7. Use a soft lens cloth to clean the display. Be careful not to scratch the display window.
8. Only use authorized attachments and accessories.
MAINTENANCE
1. Under normal use the scanner should last ## hrs with fresh alkaline batteries installed.
Turn the scanner off prior to replacing the batteries
2. Do not attempt to repair the scanner. The scanner is only repairable by an authorized
dealer.

P
TRO
UBLESHOOTING
P
Troubleshooting begins with verifying scanner settings. If after checking all settings the
scanner is still not performing properly, try the following:
NO POWER
1. Check/replace batteries
2. Remove and reinstall the batteries
DOES NOT RECEIVE
1. There are no channels programmed:
a. Reload program scanner
b. Manually enter channels
2. No reception:
a. Check antenna connection.
b. Adjust location of the scanner and antenna position.
c. Verify channel list; scan list/priority channels may not be broadcasting

DOE
S NOT RECEIVE
(continued)
3. All channels are deselected:
a. Verify channel selections using the SCAN LIST menu.
b. Select ALL from the scan list
4. Check reception:
SCANNER IS LOCKED ON ONE CHANNEL
1. Cycle series select
2. Verify more than one channel is selected in the scan list
TRANSMISSION IS DISTORTED/UNINTELLIGENT
1. Adjust volume
2. Adjust squelch
3. Change or remove antenna

P
TECHNICAL SPECIFICATIONS
P
OPTIONAL ACCESSORIES AND REPLACEMENT PARTS
1 YEAR LIMITED WARRANTY
Product Registration